1. Введение
Привет! Итак, вам нравится идея агентов — маленьких помощников, которые могут сделать за вас всё, не требуя от вас никаких усилий, верно? Отлично! Но давайте будем реалистами, одного агента не всегда достаточно, особенно когда речь идёт о более крупных и сложных проектах. Вам, вероятно, понадобится целая команда! Вот тут-то и пригодятся многоагентные системы.
Агенты, работающие на основе LLM-модулей, обеспечивают невероятную гибкость по сравнению со старым методом жесткого программирования. Но, как всегда, у них есть свои сложные задачи. И именно их мы и рассмотрим на этом мастер-классе!
Вот чему вы научитесь – воспринимайте это как повышение уровня ваших агентских навыков:
Создание вашего первого агента с помощью LangGraph : Мы на практике разберемся, как создать собственного агента, используя LangGraph, популярный фреймворк. Вы научитесь создавать инструменты, подключающиеся к базам данных, использовать новейший API Gemini 2 для поиска в интернете, а также оптимизировать запросы и ответы, чтобы ваш агент мог взаимодействовать не только с LLM, но и с существующими сервисами. Мы также покажем вам, как работает вызов функций.
Управление работой агентов по вашему усмотрению : мы рассмотрим различные способы управления работой ваших агентов, от простых прямых маршрутов до более сложных многопутевых сценариев. Представьте это как управление потоком вашей команды агентов.
Многоагентные системы : Вы узнаете, как настроить систему, в которой ваши агенты смогут сотрудничать и совместно выполнять задачи — и все это благодаря событийно-ориентированной архитектуре.
Свобода LLM : Используйте лучшее для решения задачи: Мы не ограничиваемся одной программой LLM! Вы узнаете, как использовать несколько программ LLM, назначая им разные роли для повышения эффективности решения проблем с помощью интересных «моделей мышления».
Динамический контент? Нет проблем! Представьте, что ваш агент создает динамический контент, специально адаптированный для каждого пользователя, в режиме реального времени. Мы покажем вам, как это сделать!
Переход в облако с Google Cloud : забудьте о простом моделировании в блокноте. Мы покажем вам, как спроектировать и развернуть вашу многоагентную систему в Google Cloud, чтобы она была готова к работе в реальном мире!
Этот проект станет хорошим примером того, как можно использовать все обсуждавшиеся нами методы.
2. Архитектура
Работа учителем или в сфере образования может быть очень благодарной, но давайте посмотрим правде в глаза: объем работы, особенно вся подготовительная работа, может быть очень сложным! Кроме того, часто не хватает персонала, а репетиторство может быть дорогим. Именно поэтому мы предлагаем помощника учителя на базе искусственного интеллекта. Этот инструмент может облегчить нагрузку на педагогов и помочь преодолеть дефицит кадров и отсутствие доступного репетиторства.
Наш ИИ-помощник для преподавателей может создавать подробные планы уроков, увлекательные викторины, простые для восприятия аудиозаписи с обзорами и персонализированные задания. Это позволяет учителям сосредоточиться на том, что у них получается лучше всего: налаживании контакта со студентами и помощи им в том, чтобы полюбить учебу.
Система состоит из двух сайтов: один предназначен для учителей, чтобы создавать планы уроков на предстоящие недели,
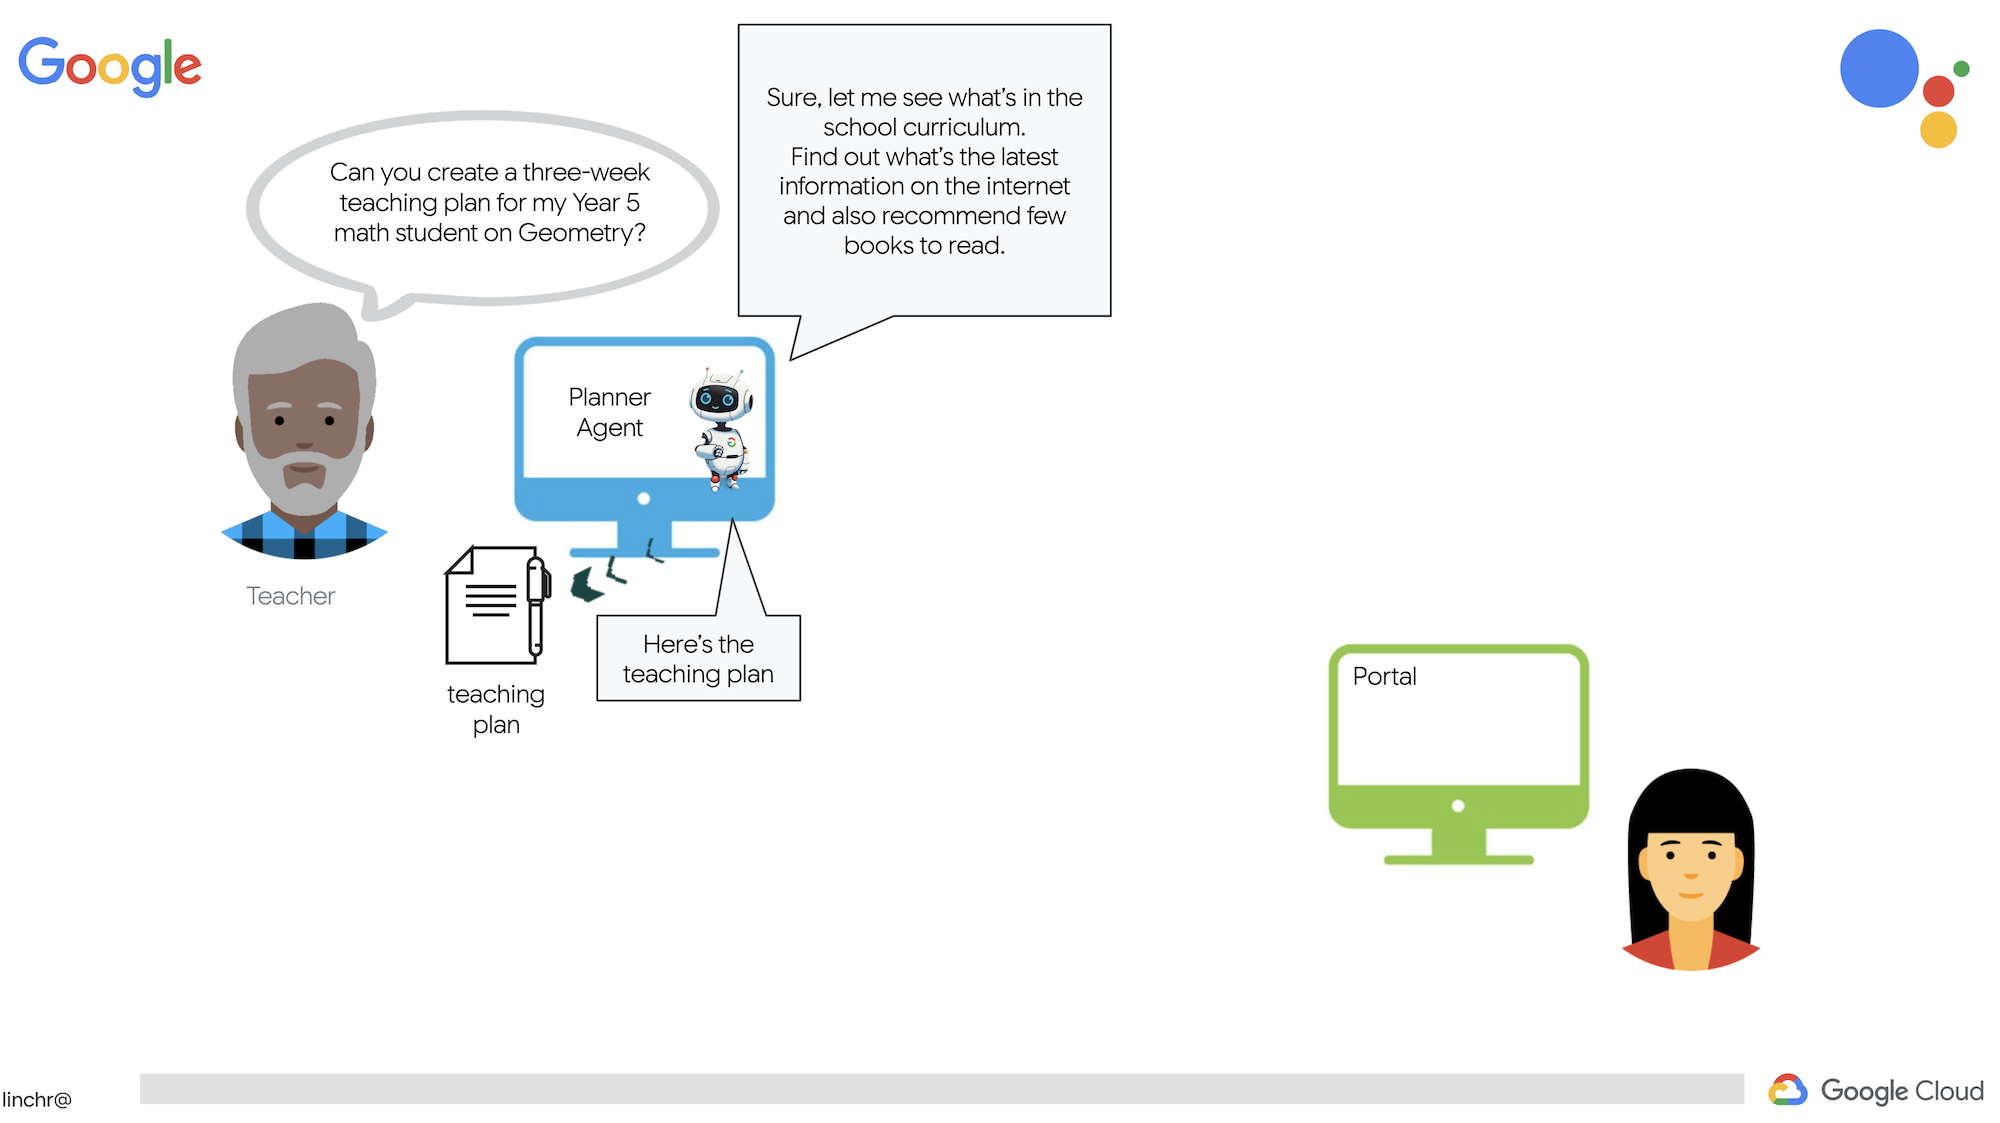
а также отдельный раздел для доступа студентов к викторинам, аудиозаписям и заданиям. 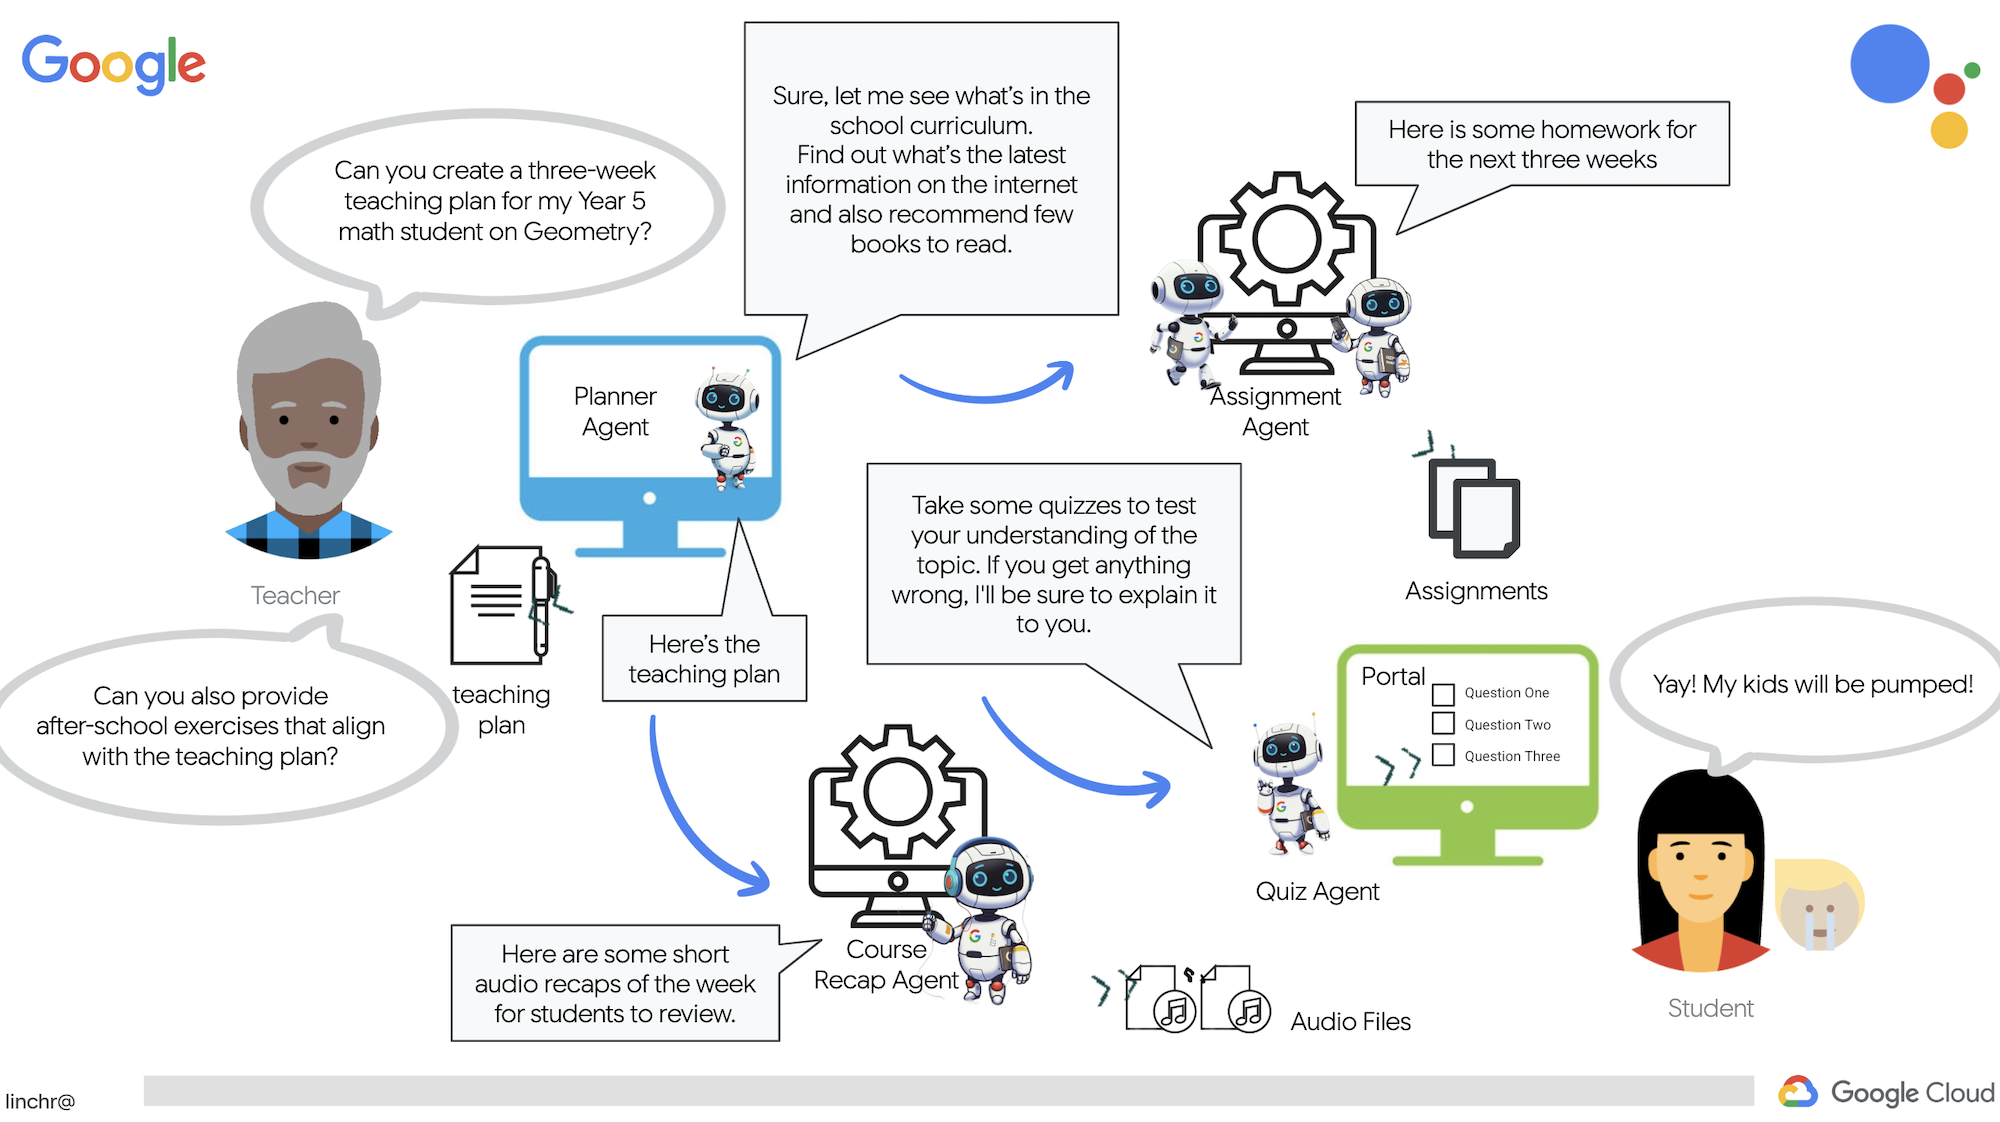
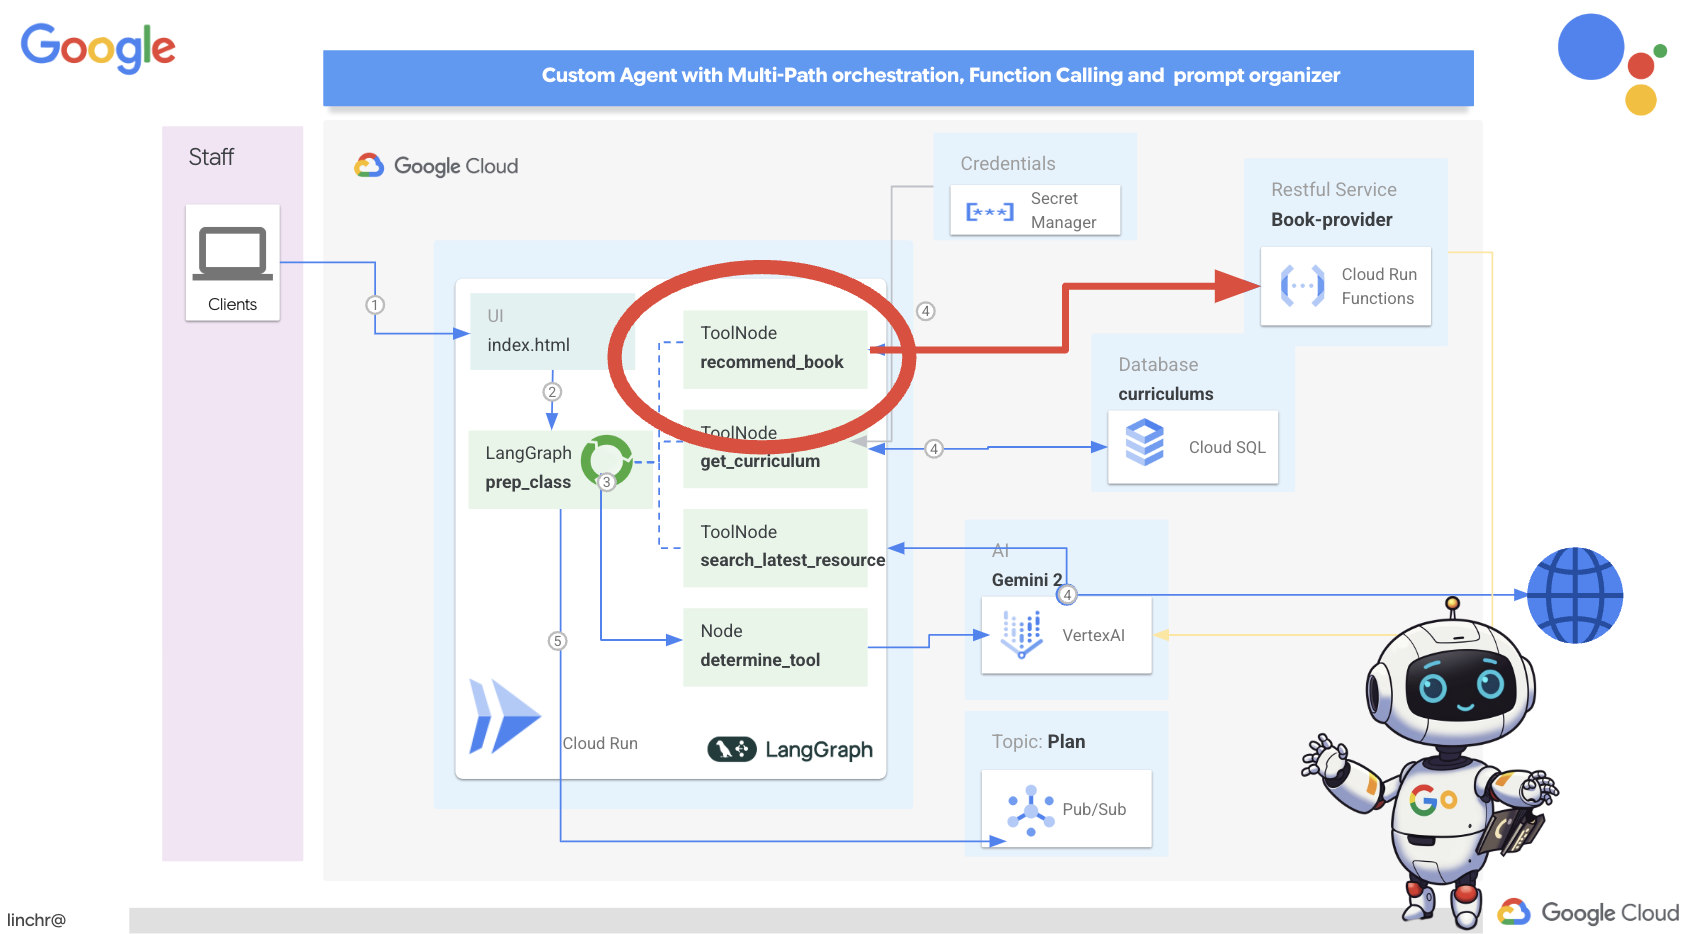
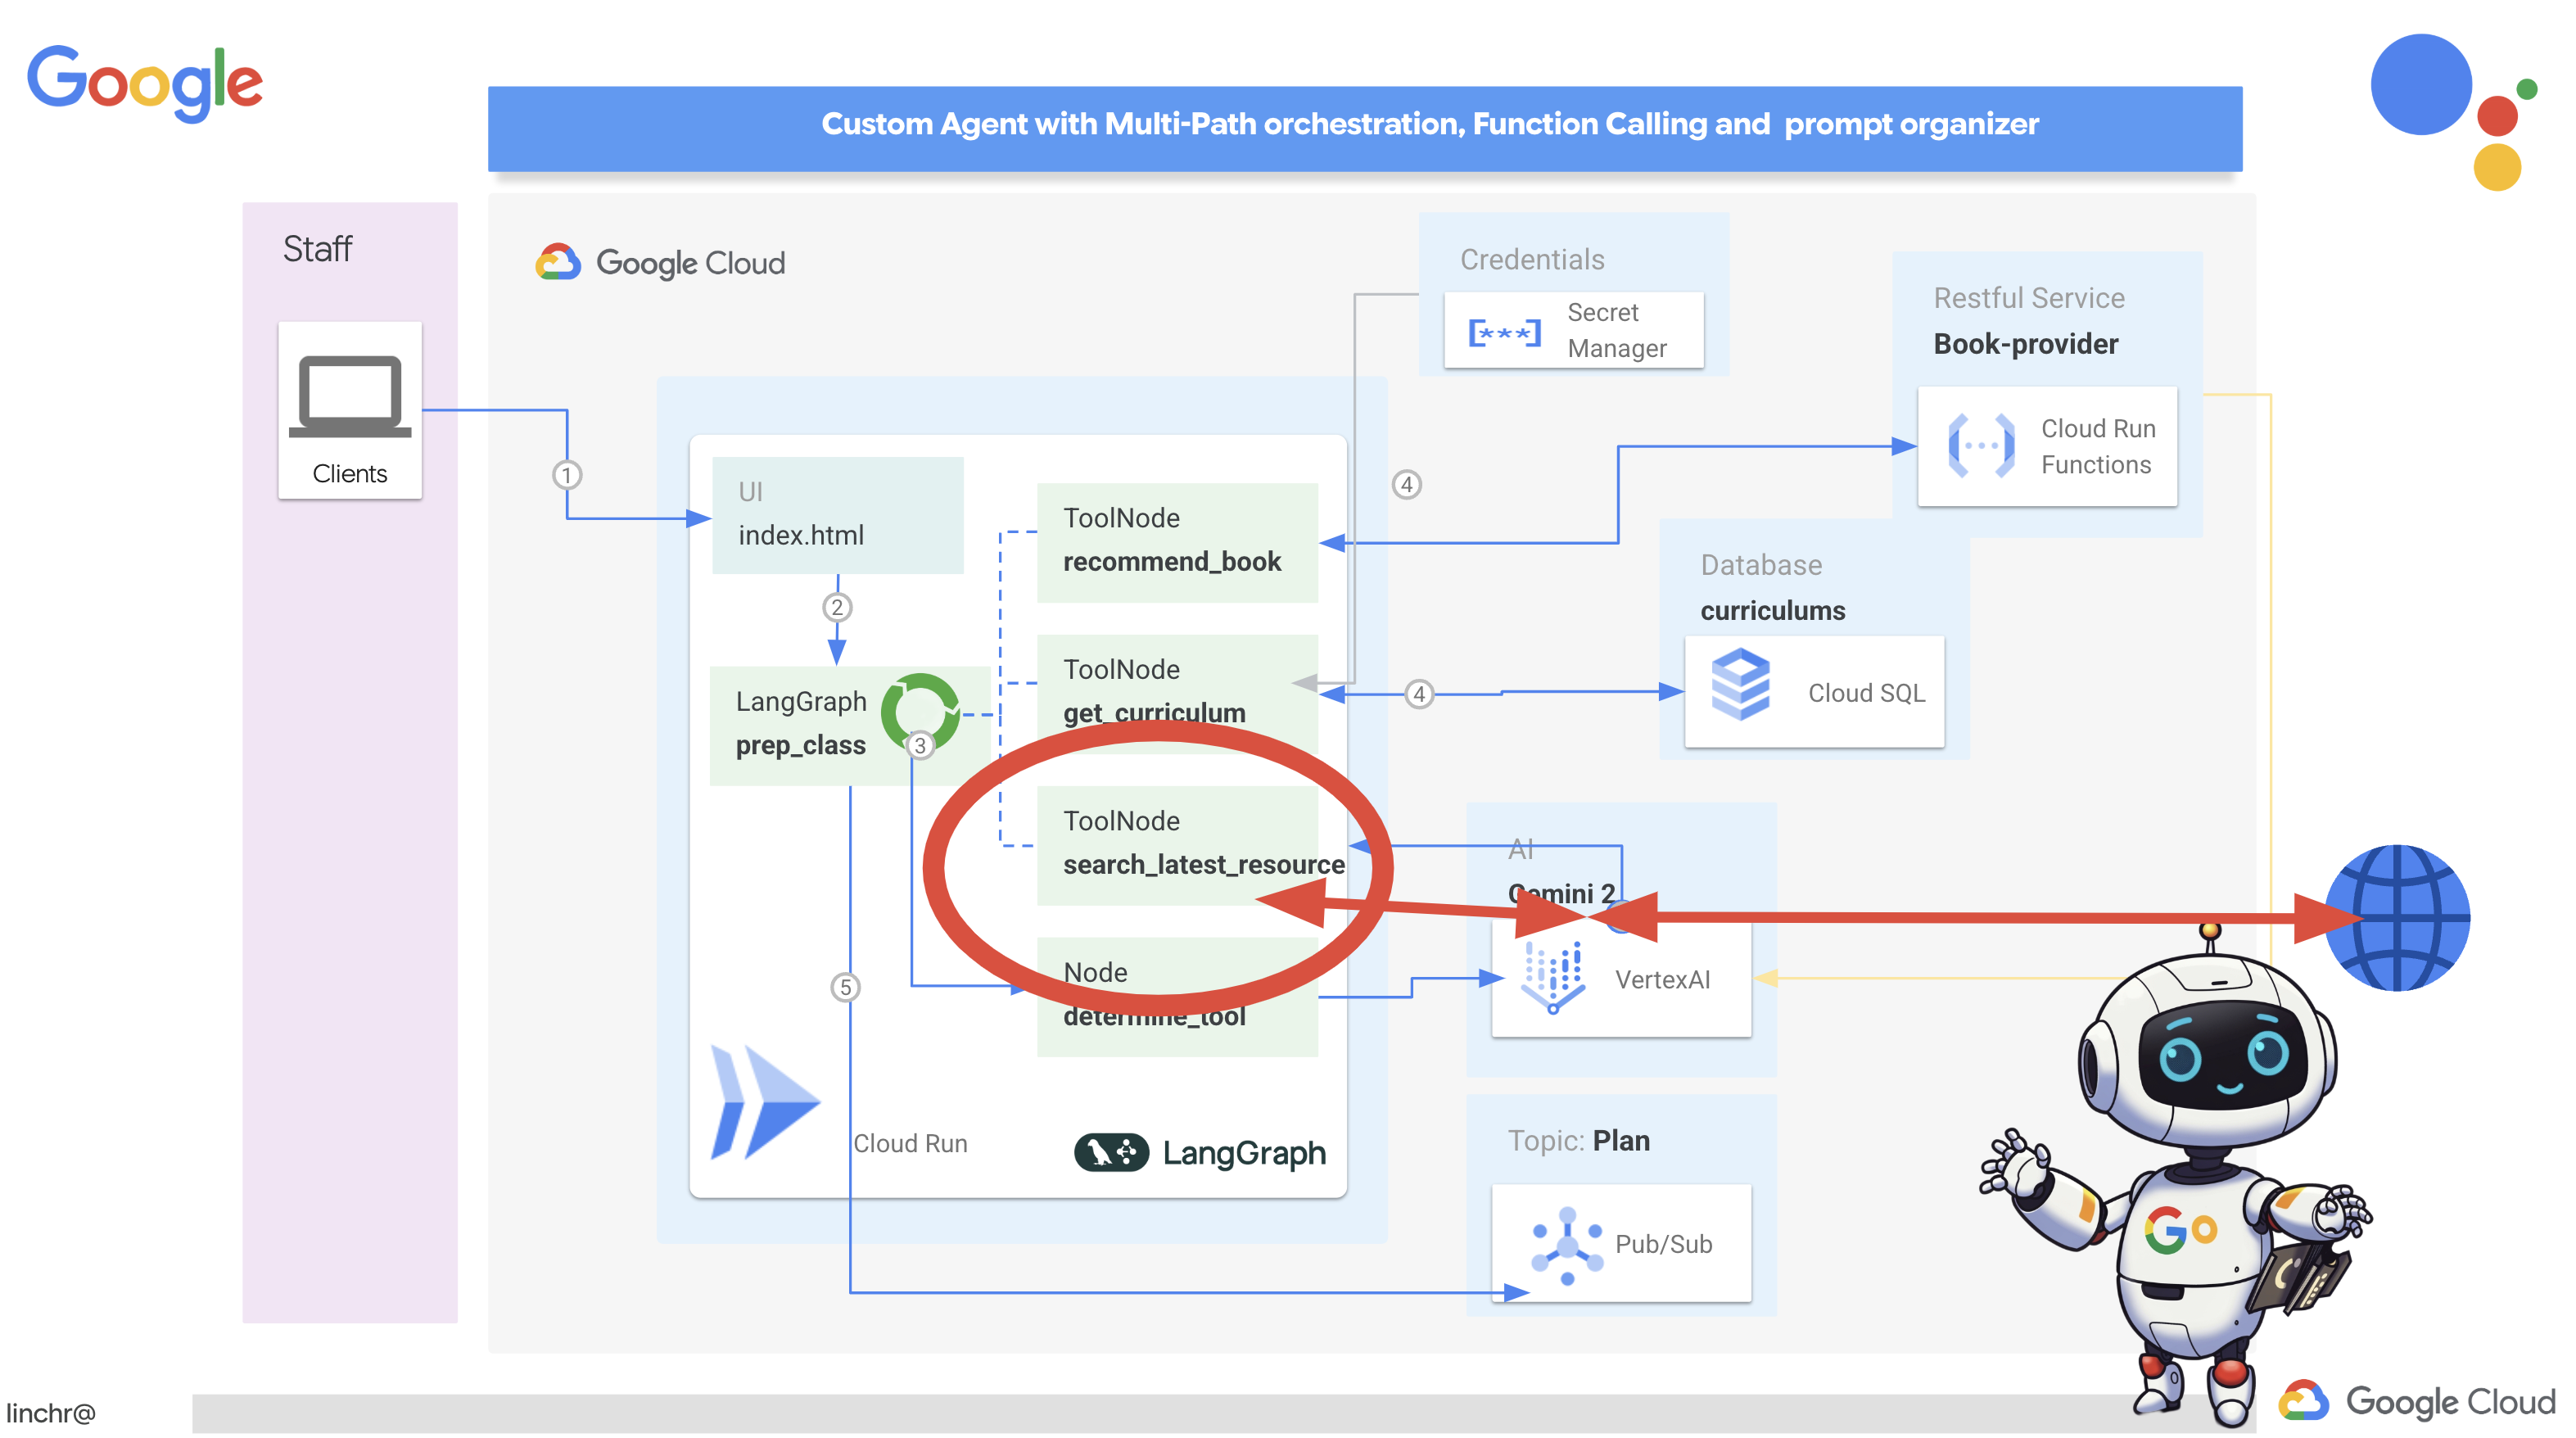
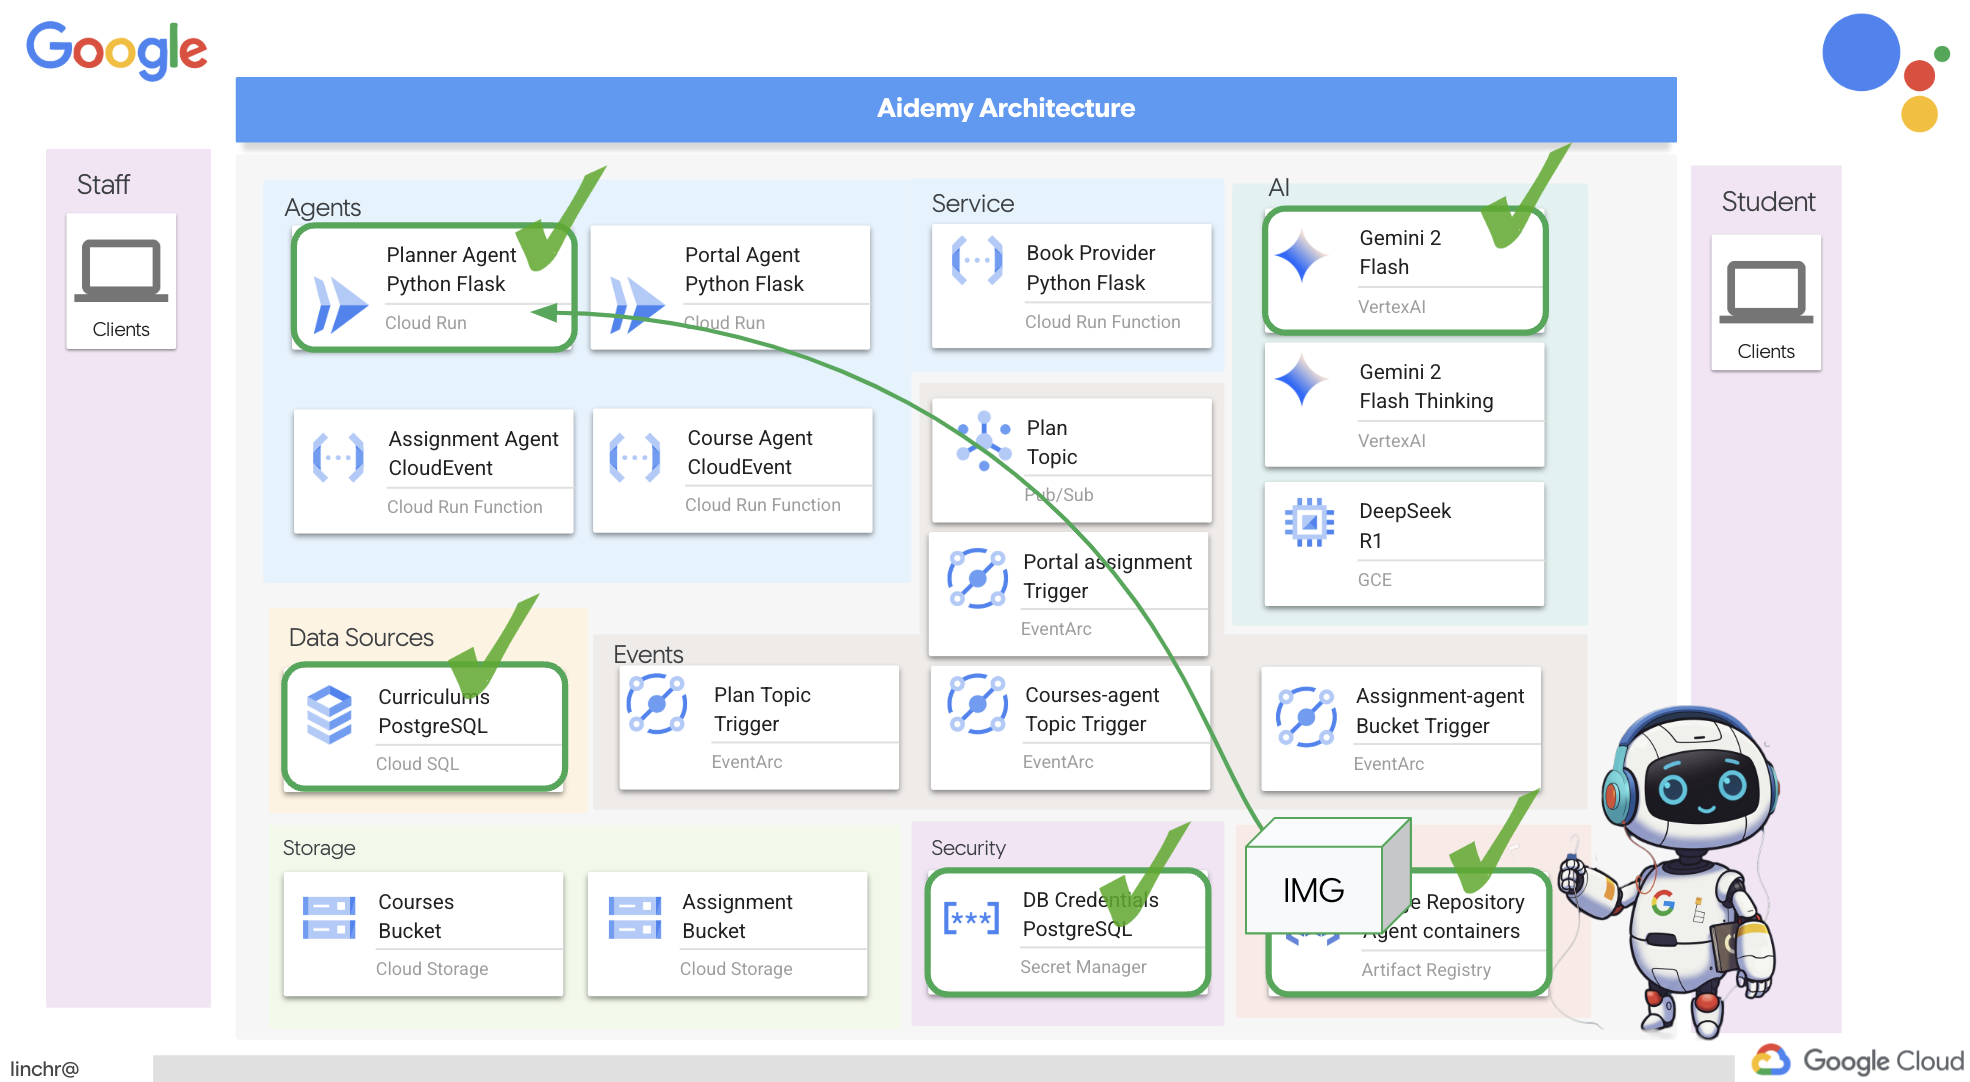
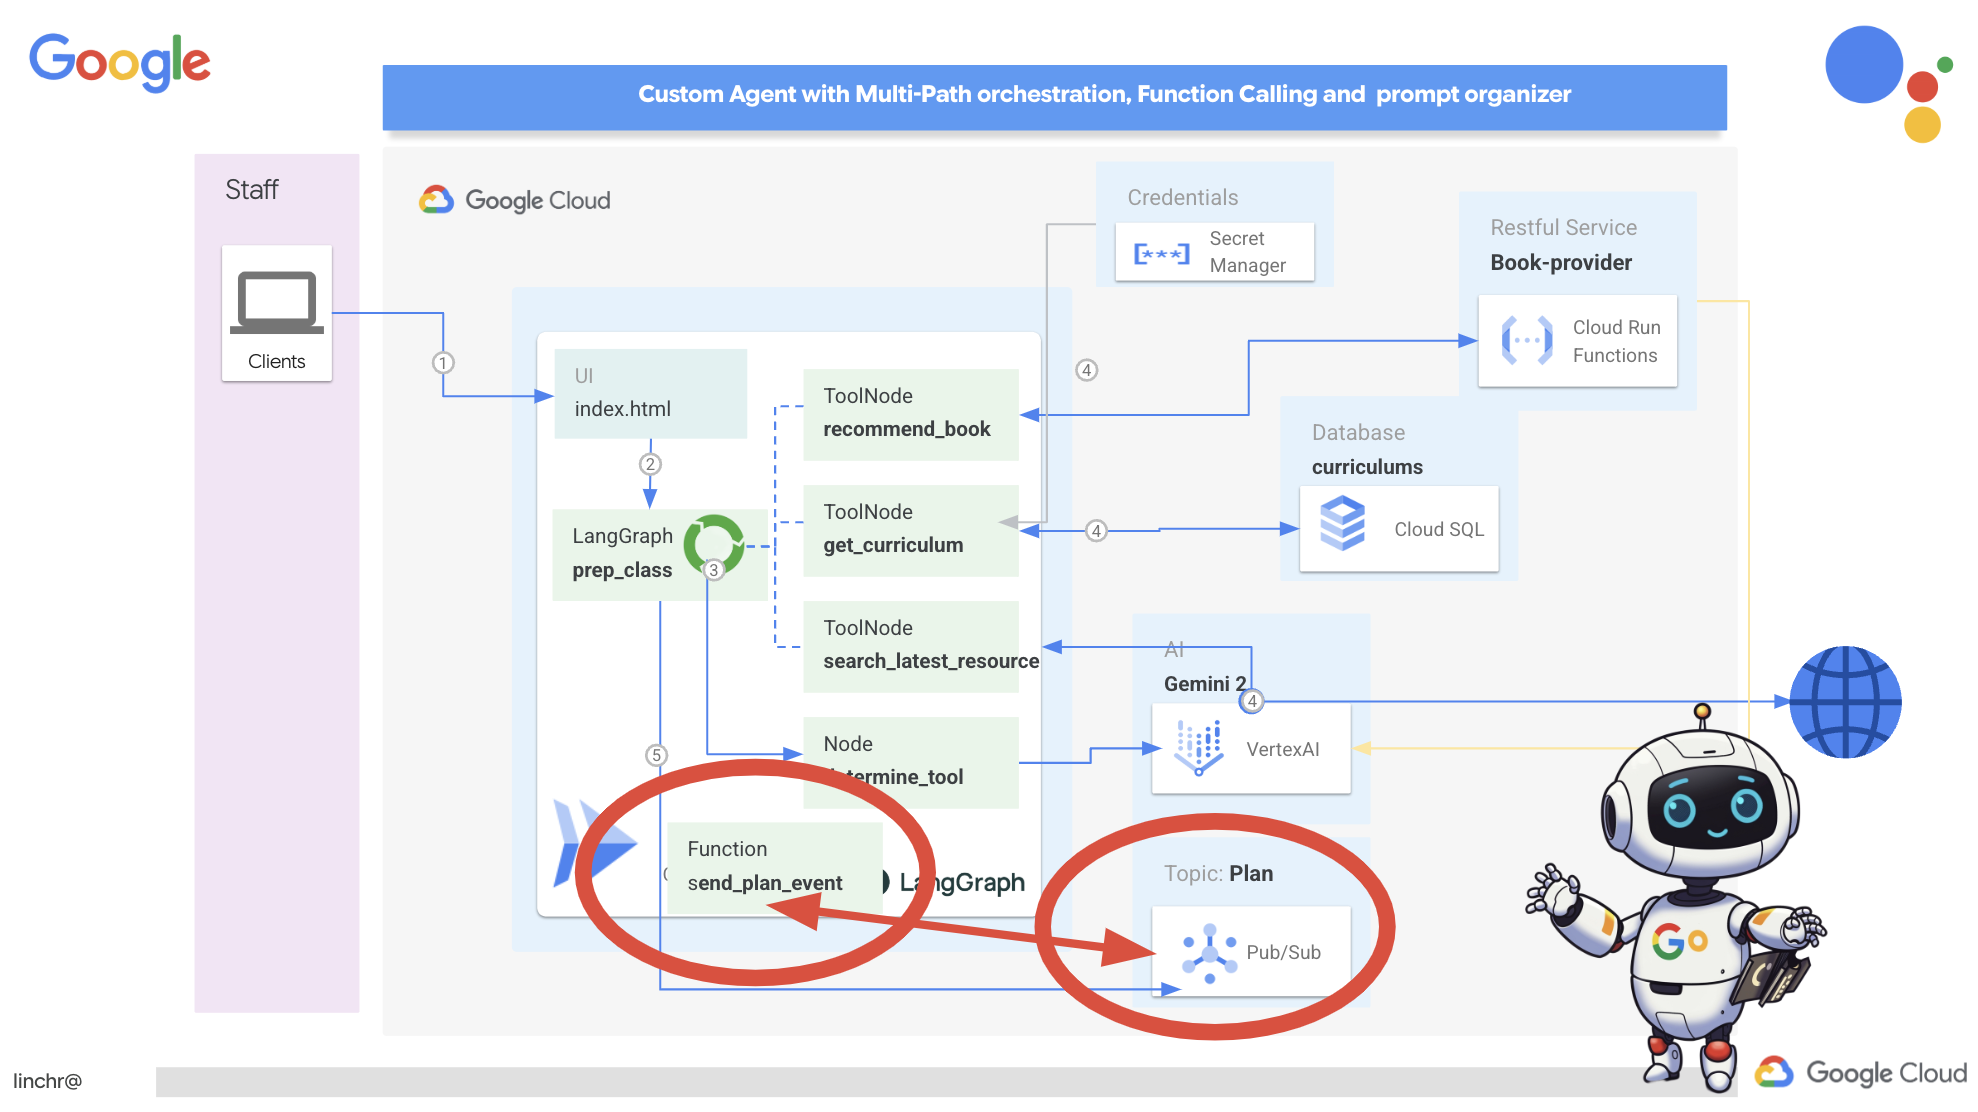
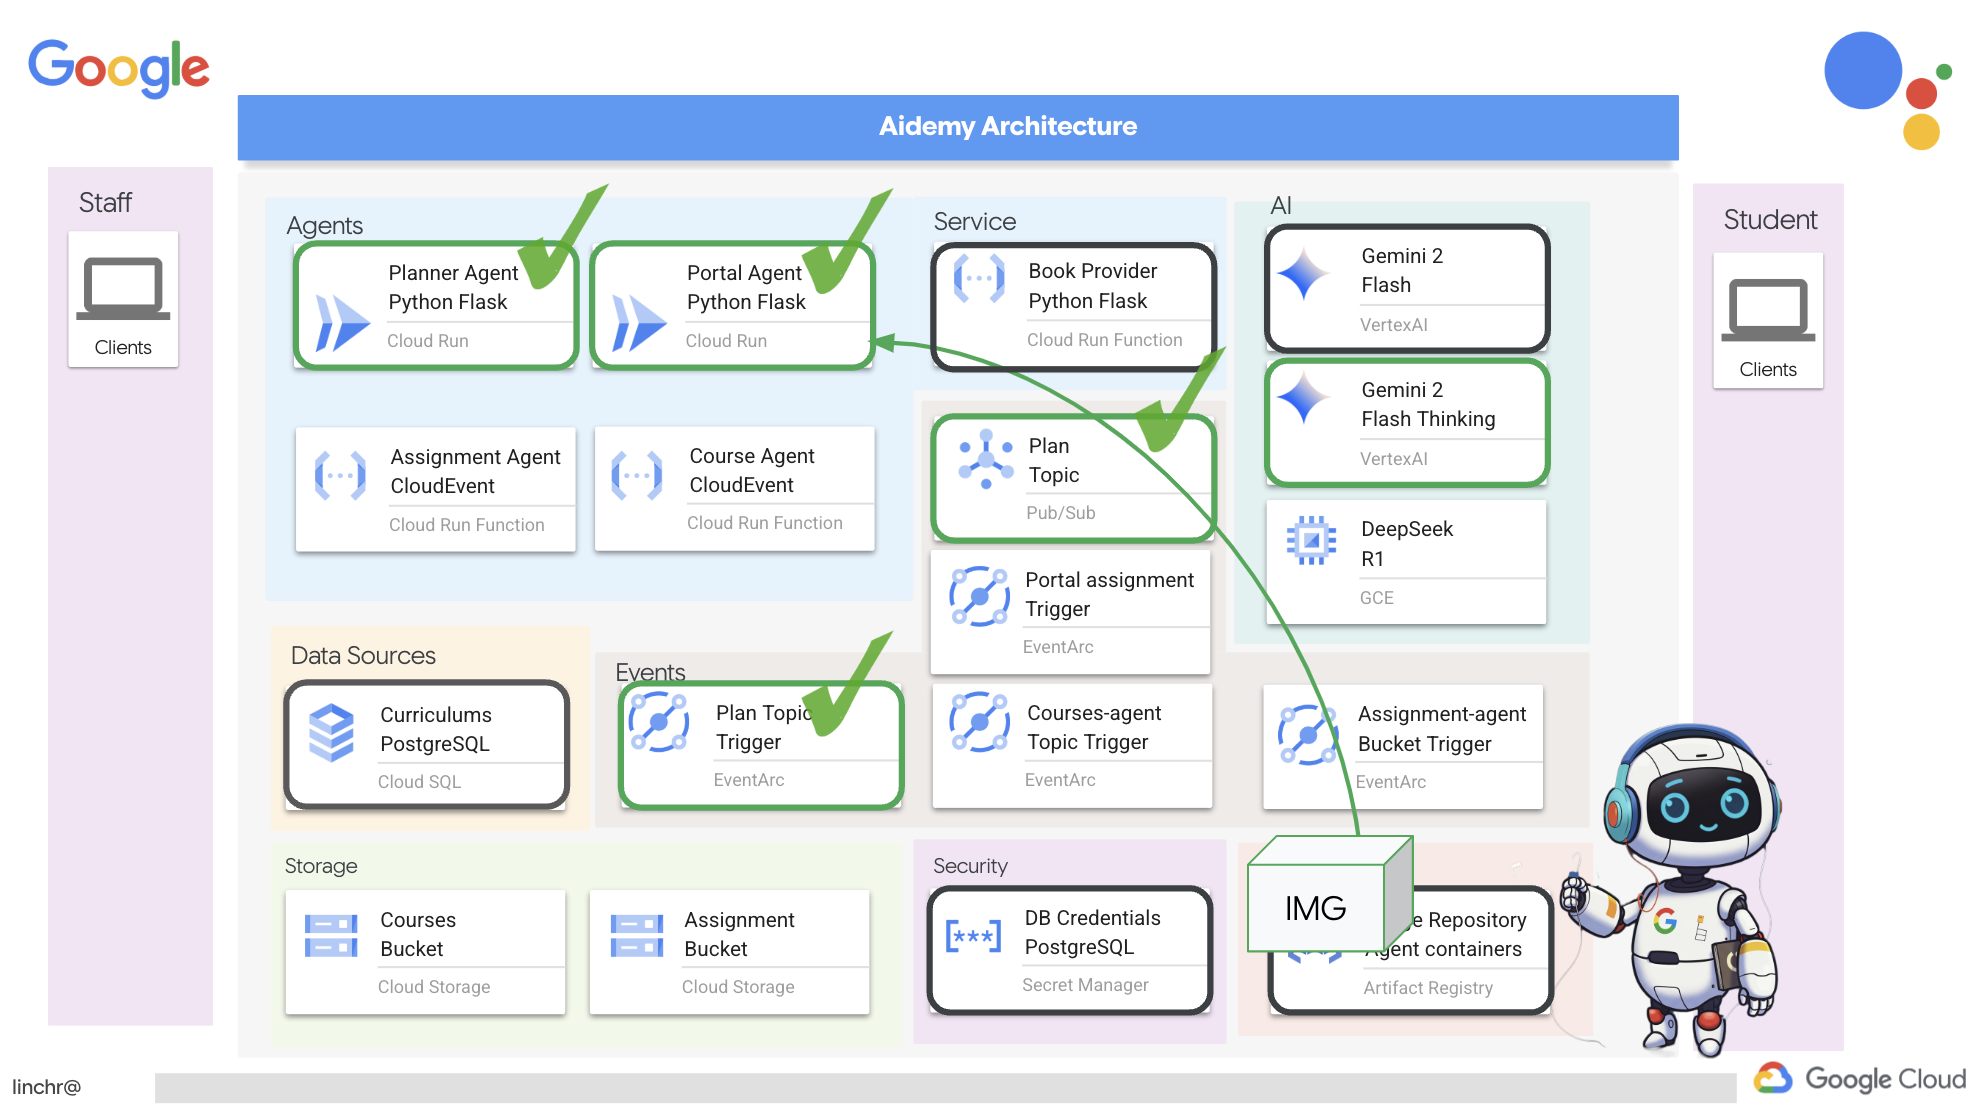
Итак, давайте рассмотрим архитектуру, лежащую в основе нашего помощника преподавателя Aidemy. Как видите, мы разделили её на несколько ключевых компонентов, которые работают вместе, чтобы обеспечить эту функцию.
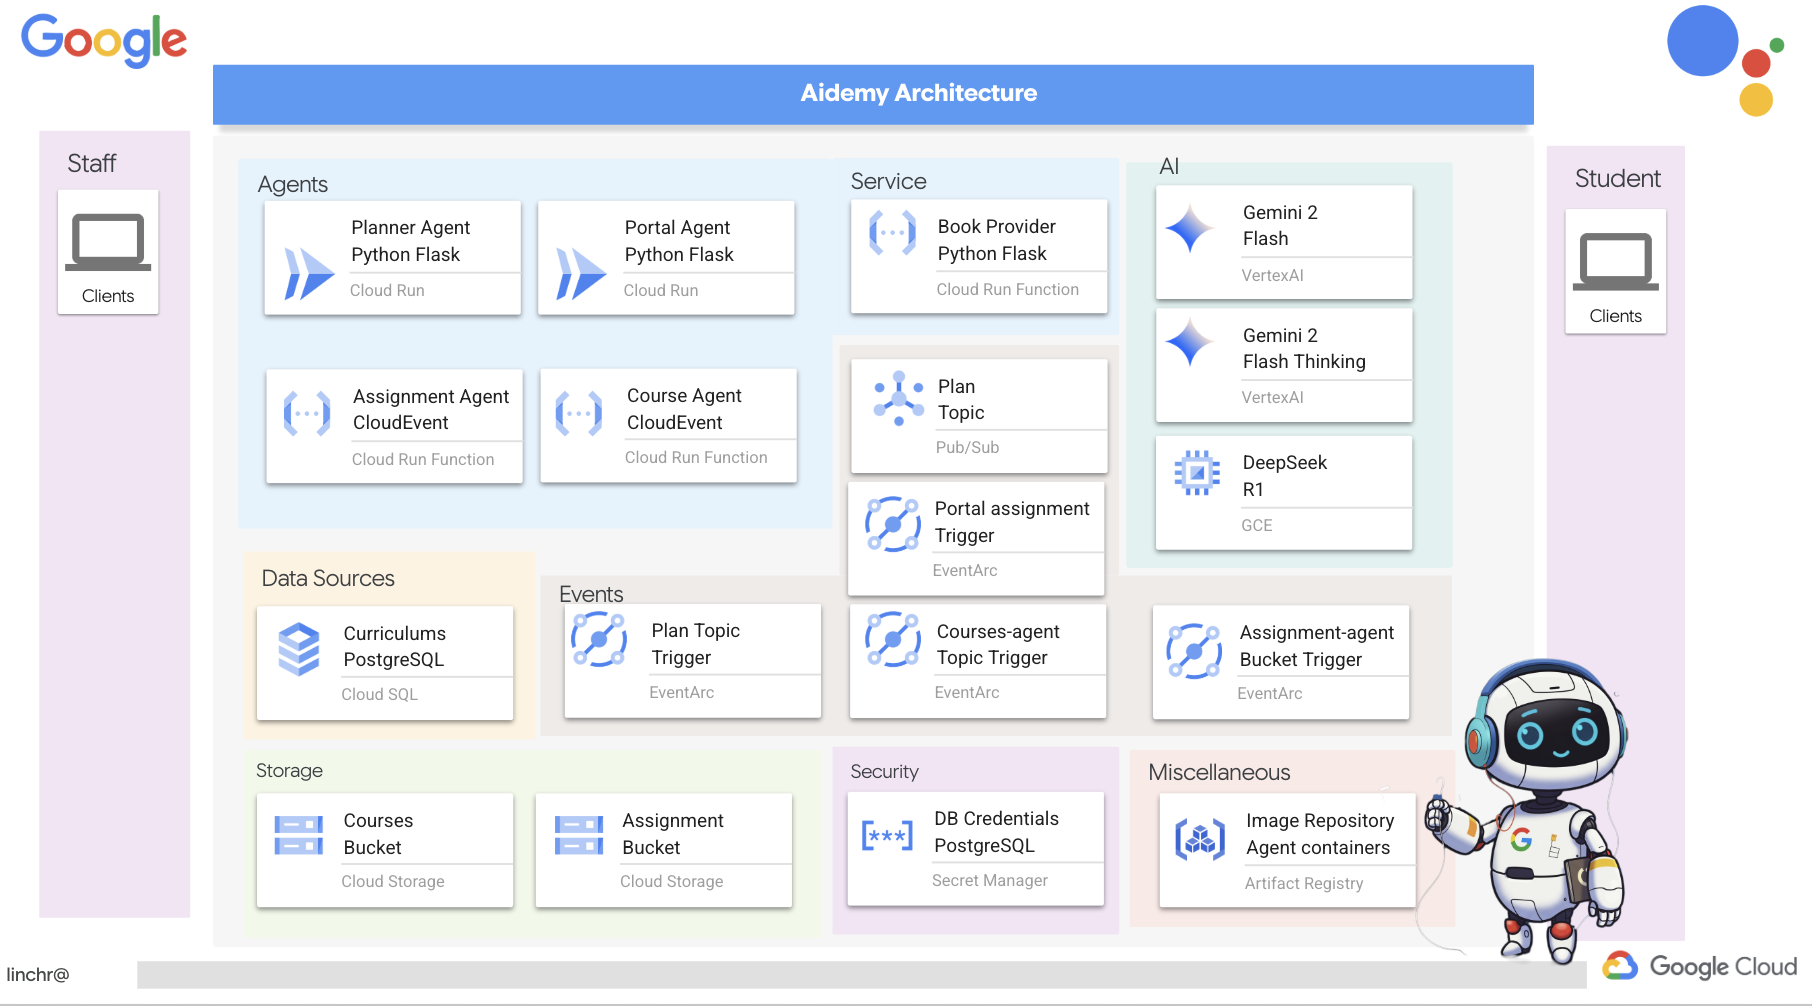
Ключевые архитектурные элементы и технологии :
Платформа Google Cloud (GCP) : является центральным элементом всей системы:
- Vertex AI: получает доступ к программам магистратуры в области прикладного ИИ (LLM) от Google Gemini.
- Cloud Run: Бессерверная платформа для развертывания контейнеризированных агентов и функций.
- Cloud SQL: база данных PostgreSQL для хранения данных об учебных программах.
- Pub/Sub и Eventarc: Основа архитектуры, управляемой событиями, обеспечивающая асинхронную связь между компонентами.
- Облачное хранилище: хранит аудиозаписи и файлы с заданиями.
- Secret Manager: Обеспечивает безопасное управление учетными данными базы данных.
- Реестр артефактов: хранит образы Docker для агентов.
- Compute Engine: Развертывание собственной системы LLM вместо использования решений сторонних поставщиков.
LLM : «мозг» системы:
- Модели Google Gemini (Gemini x Pro, Gemini x Flash, Gemini x Flash Thinking) используются для планирования уроков, создания контента, динамического HTML-кода, объяснения вопросов викторин и объединения заданий.
- DeepSeek: Используется для специализированной задачи создания заданий для самостоятельного изучения.
LangChain и LangGraph : фреймворки для разработки приложений для обучения на магистрах права.
- Облегчает создание сложных многоагентных рабочих процессов.
- Обеспечивает интеллектуальную координацию работы инструментов (вызовы API, запросы к базам данных, веб-поиск).
- Реализует событийно-ориентированную архитектуру для обеспечения масштабируемости и гибкости системы.
По сути, наша архитектура сочетает в себе возможности программ LLM со структурированными данными и событийной коммуникацией, и всё это работает на платформе Google Cloud. Это позволяет нам создавать масштабируемый, надежный и эффективный ассистент преподавателя.
3. Прежде чем начать
В консоли Google Cloud на странице выбора проекта выберите или создайте проект Google Cloud. Убедитесь, что для вашего проекта Cloud включена оплата. Узнайте, как проверить, включена ли оплата для проекта .
Включите функцию Gemini Code Assist в IDE Cloud Shell.
👉 В консоли Google Cloud перейдите в раздел «Инструменты Gemini Code Assist» и бесплатно активируйте Gemini Code Assist, согласившись с условиями использования.
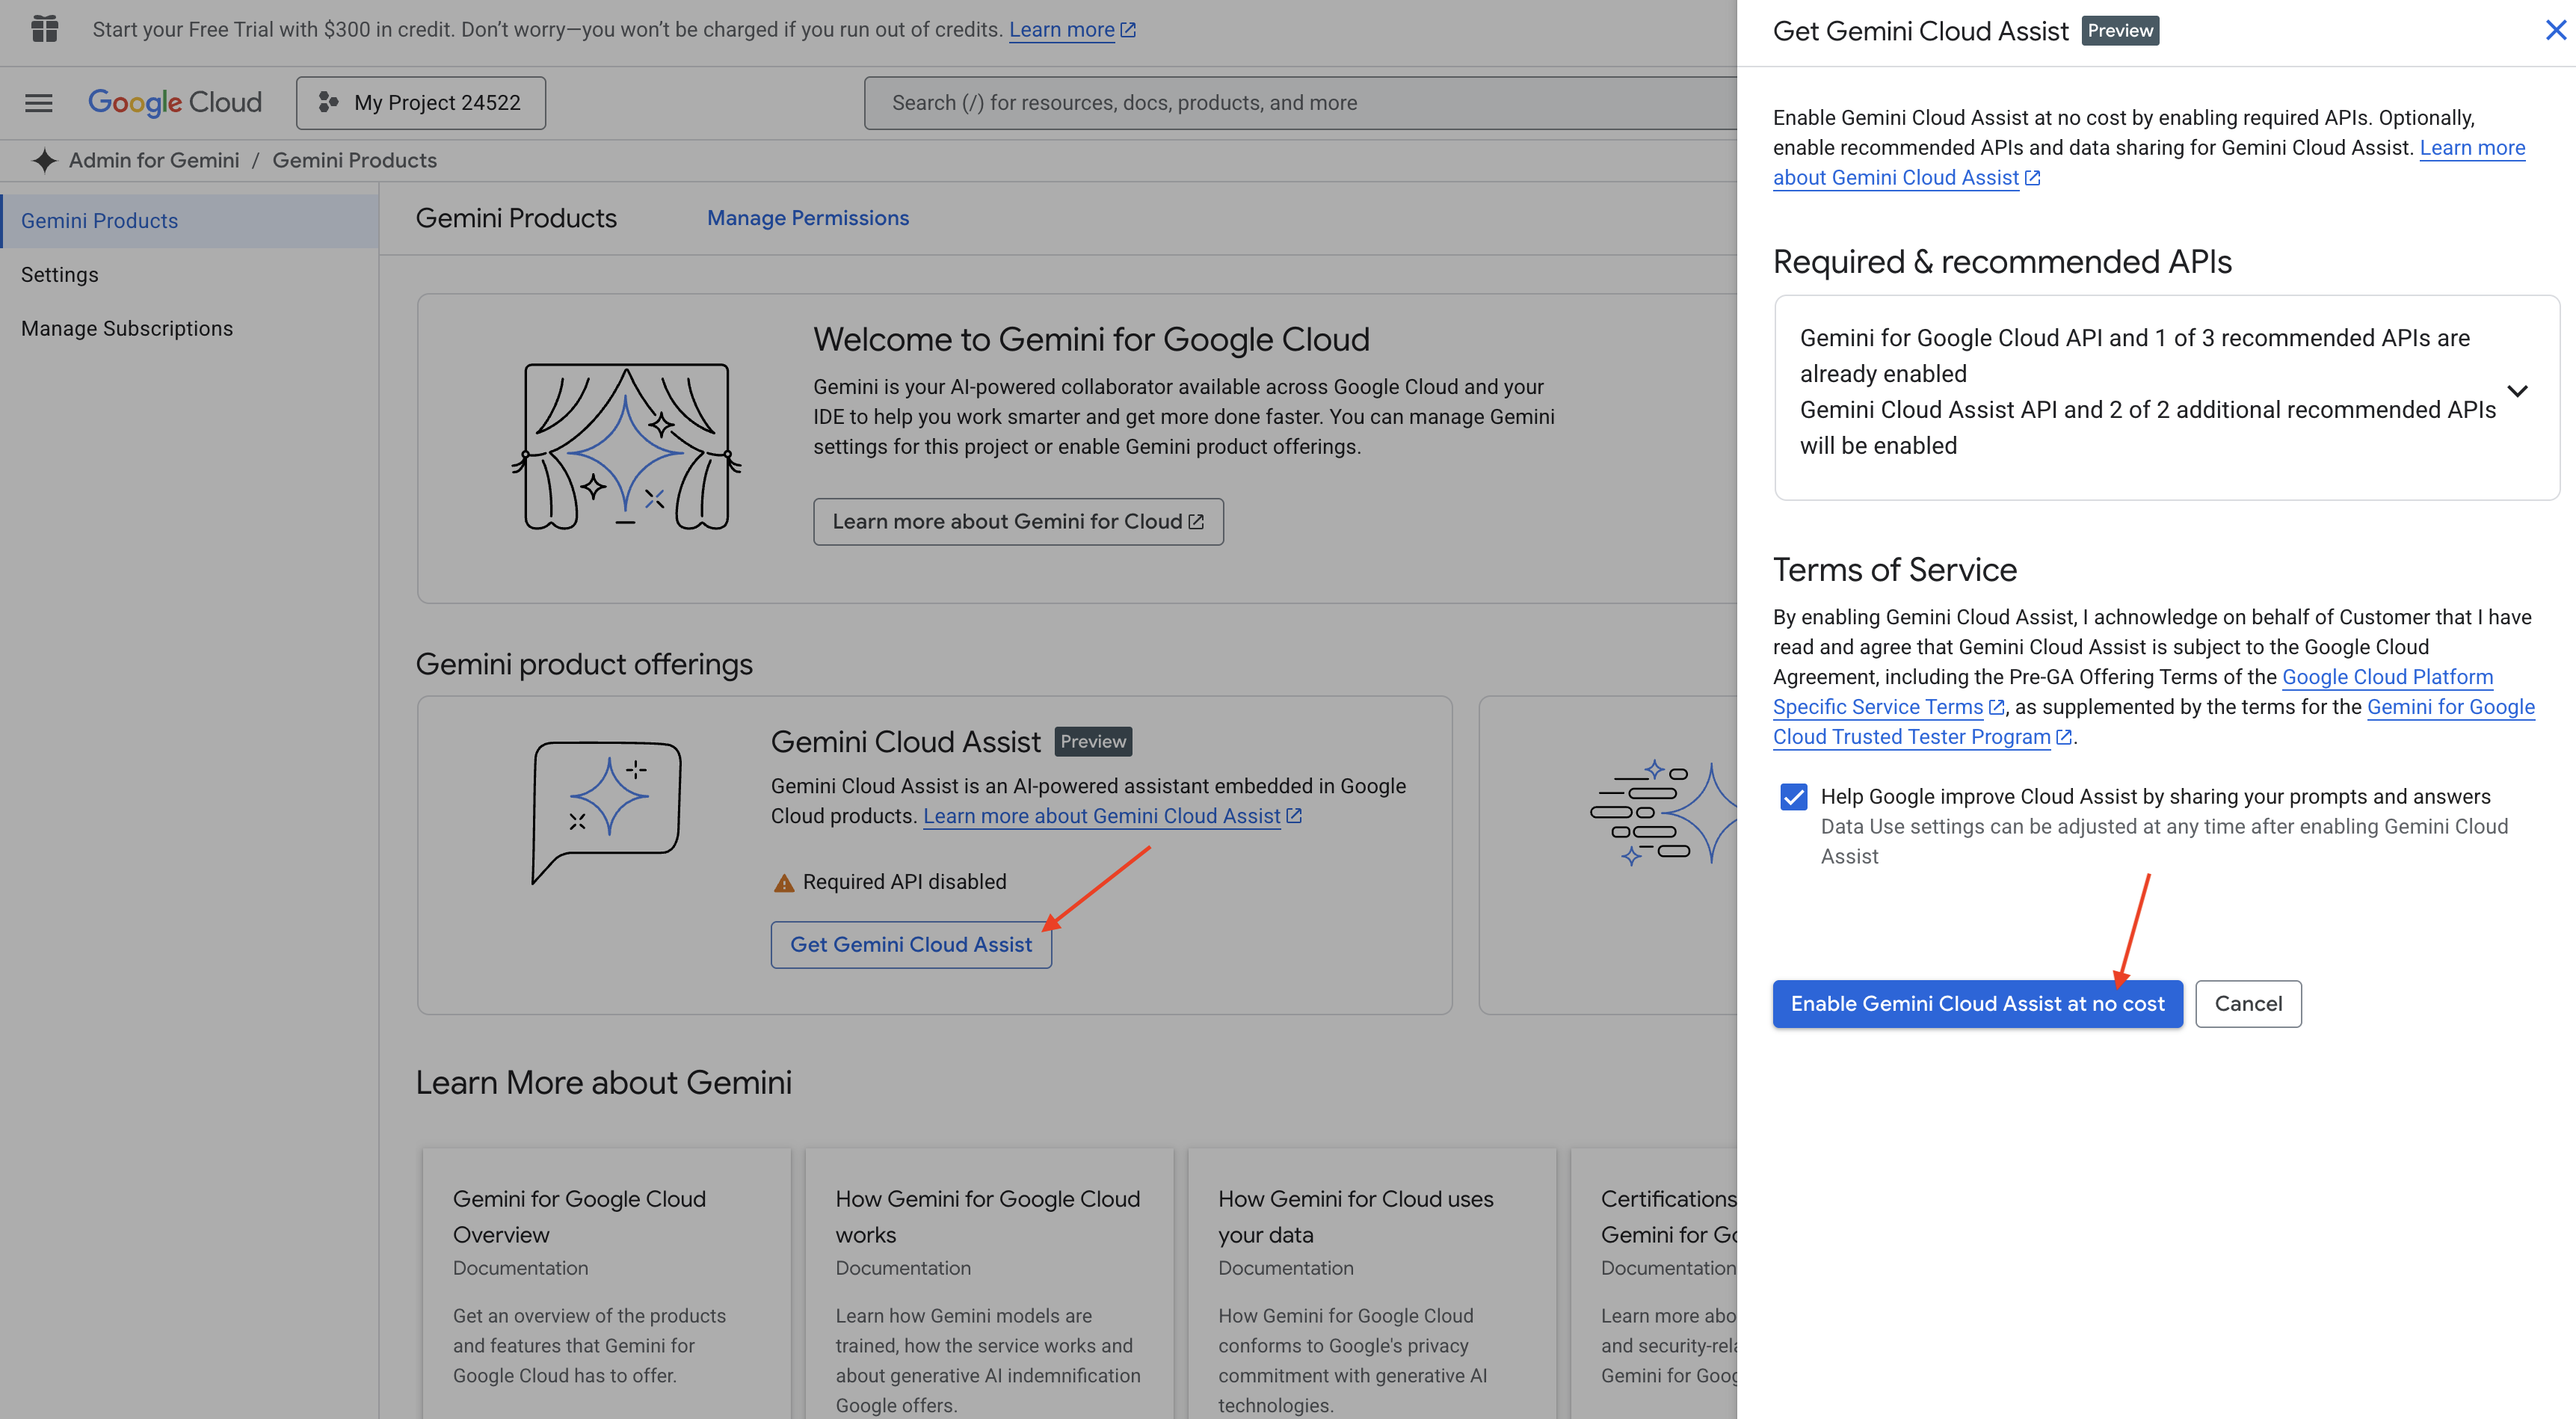
Проигнорируйте настройку прав доступа и покиньте эту страницу.
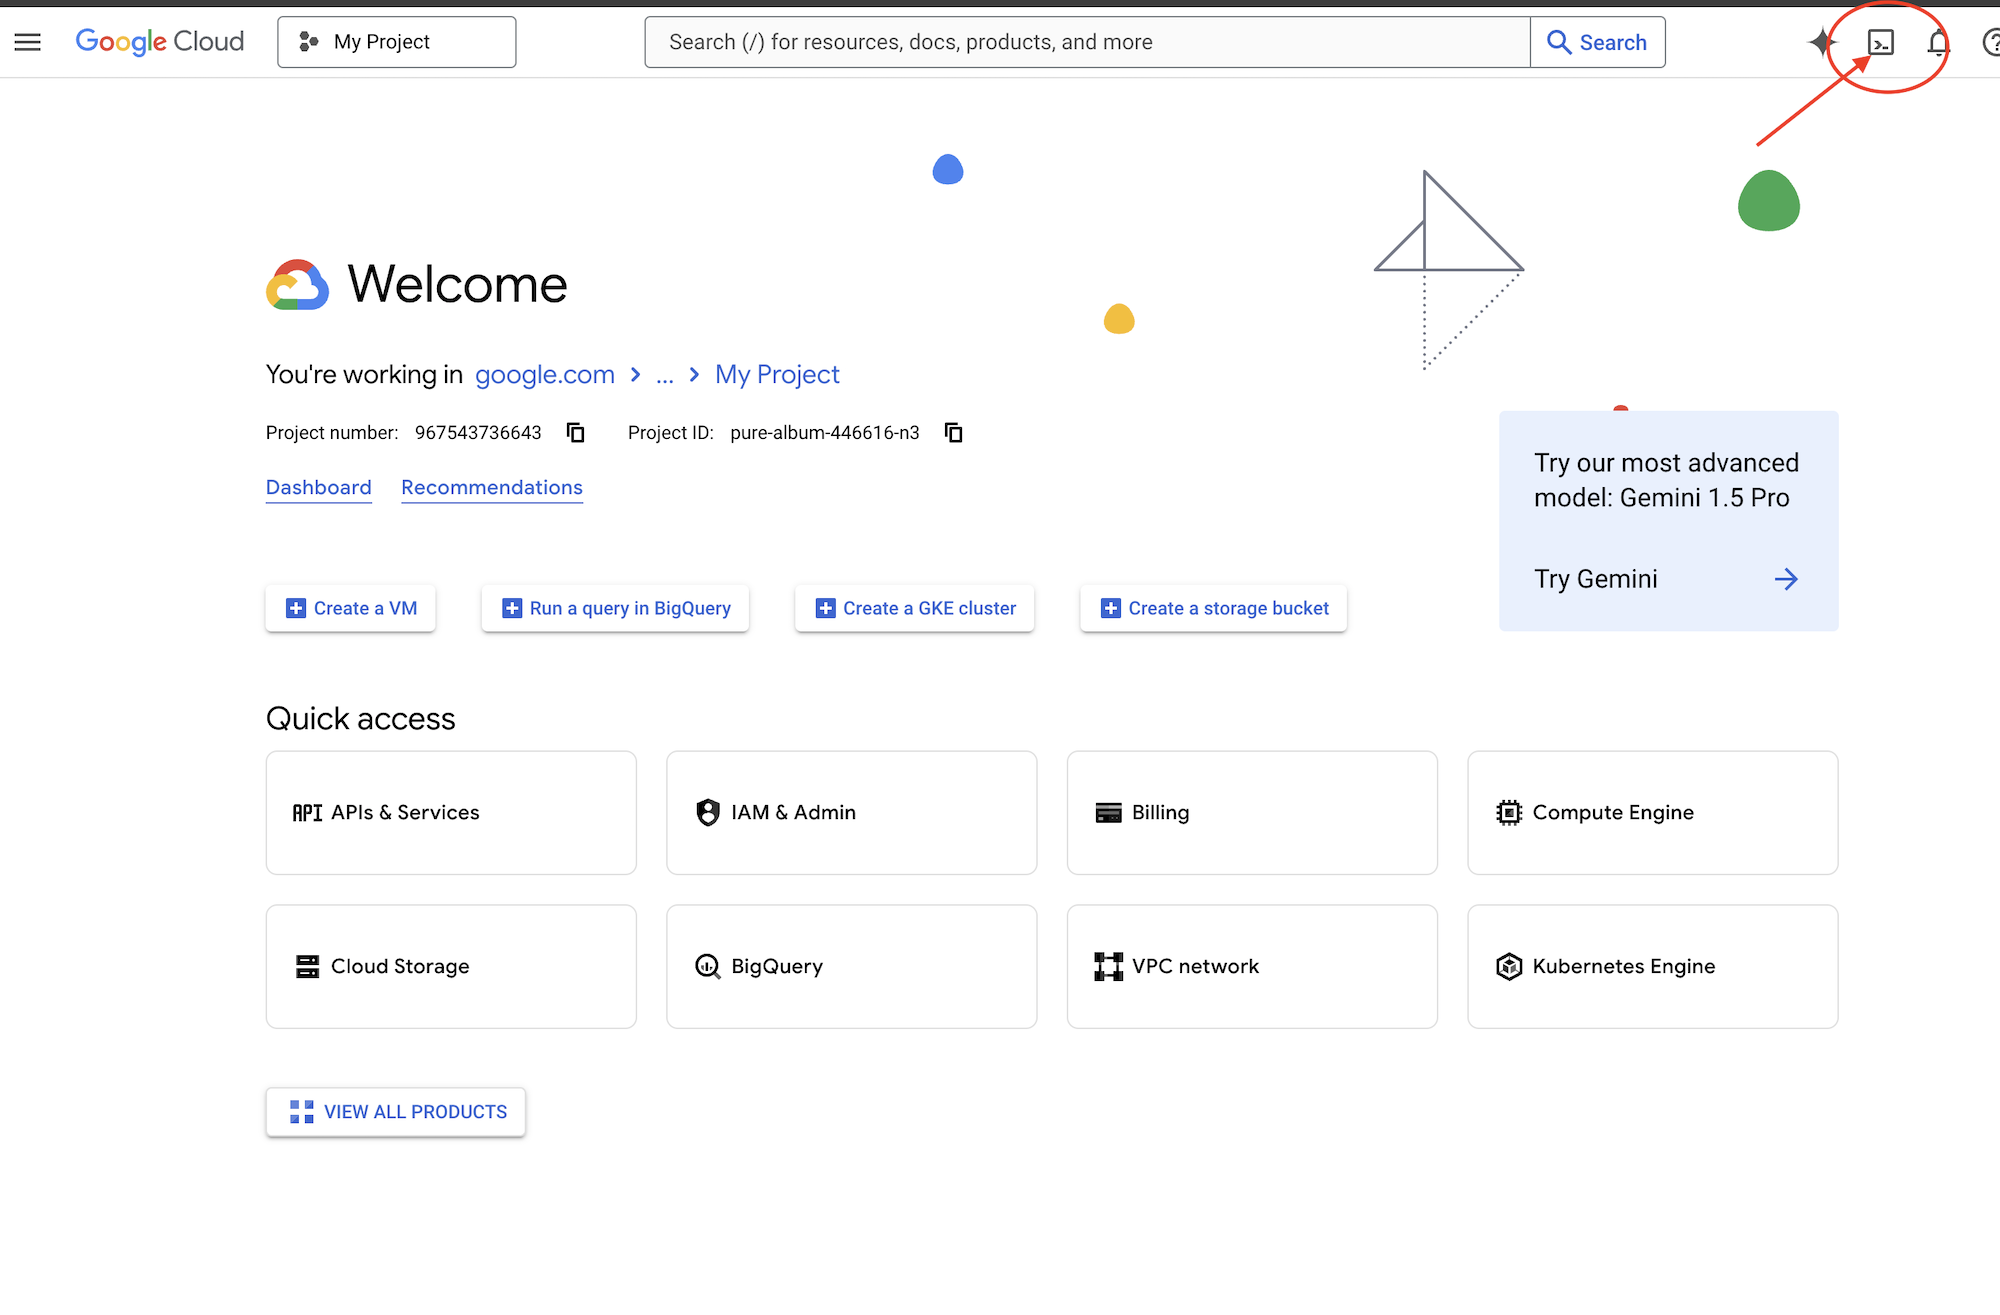
Работа над редактором Cloud Shell
👉Нажмите «Активировать Cloud Shell» в верхней части консоли Google Cloud (это значок терминала в верхней части панели Cloud Shell), затем нажмите кнопку «Открыть редактор » (она выглядит как открытая папка с карандашом). Это откроет редактор кода Cloud Shell в окне. Слева вы увидите файловый менеджер.
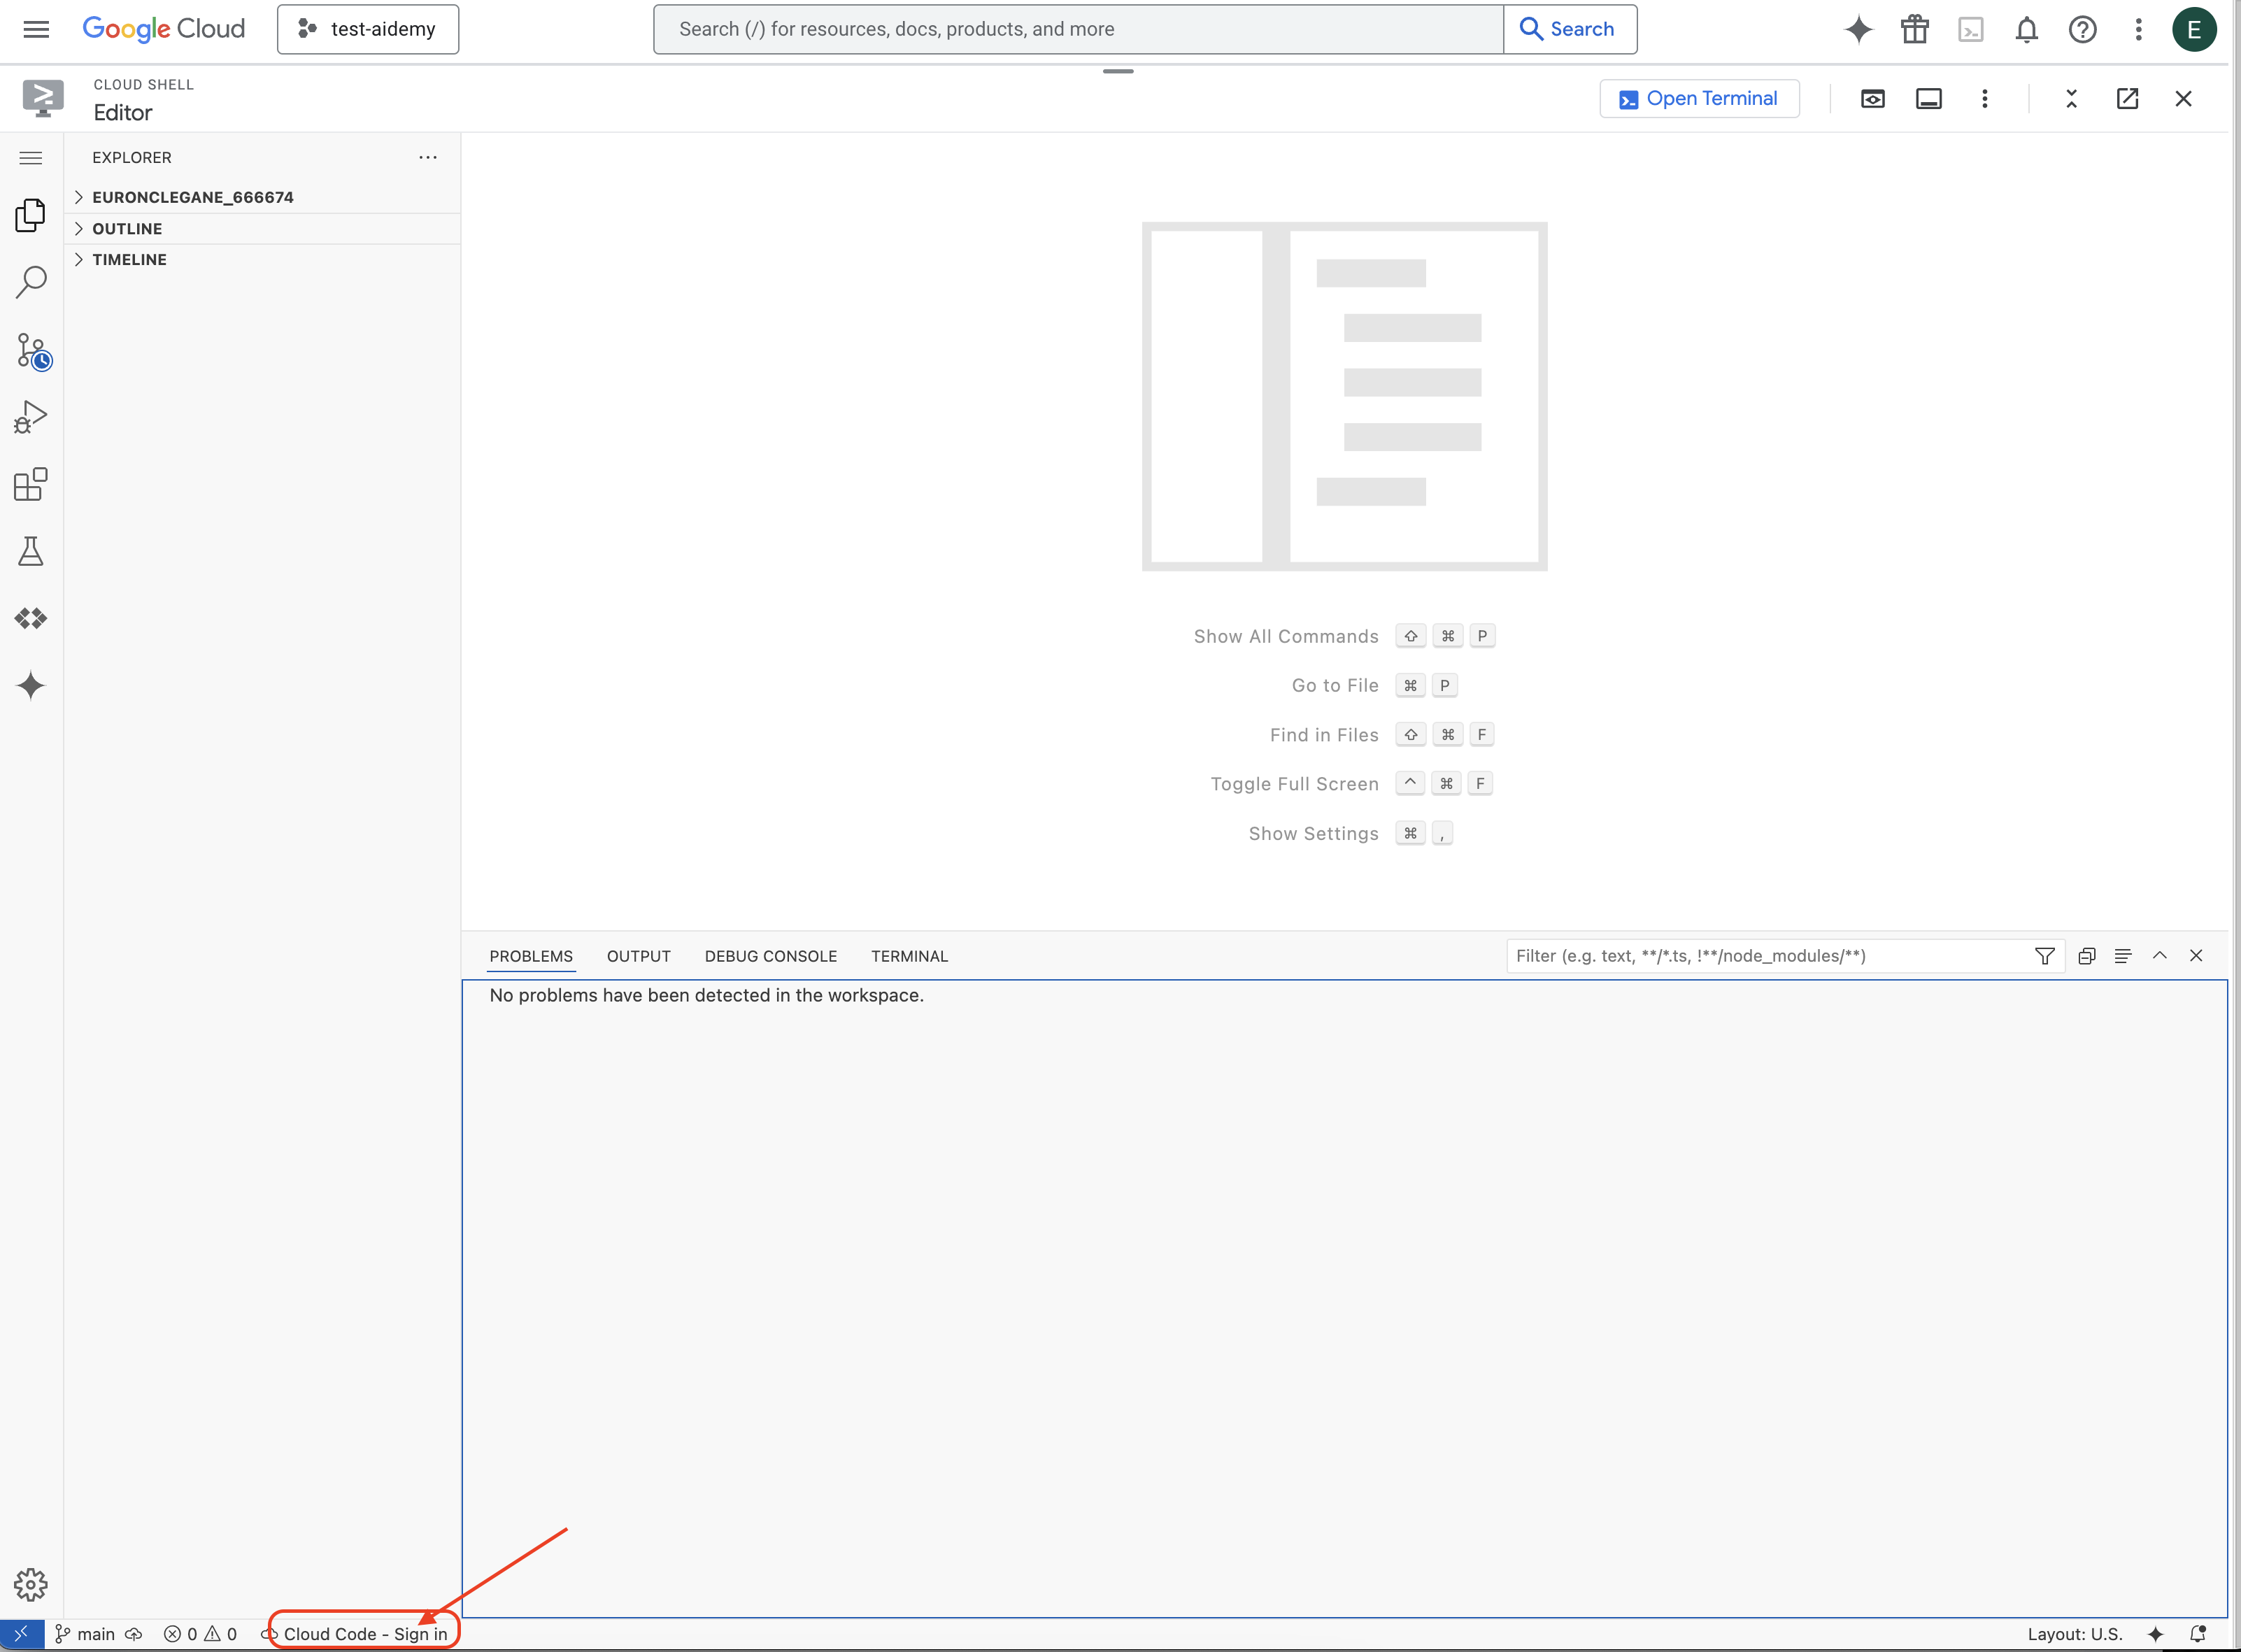
👉Нажмите на кнопку « Вход в Cloud Code» в нижней строке состояния, как показано на рисунке. Авторизуйте плагин в соответствии с инструкциями. Если в строке состояния отображается «Cloud Code — нет проекта », выберите его, затем в раскрывающемся списке «Выберите проект Google Cloud» выберите конкретный проект Google Cloud из списка созданных вами проектов.
👉Откройте терминал в облачной IDE, 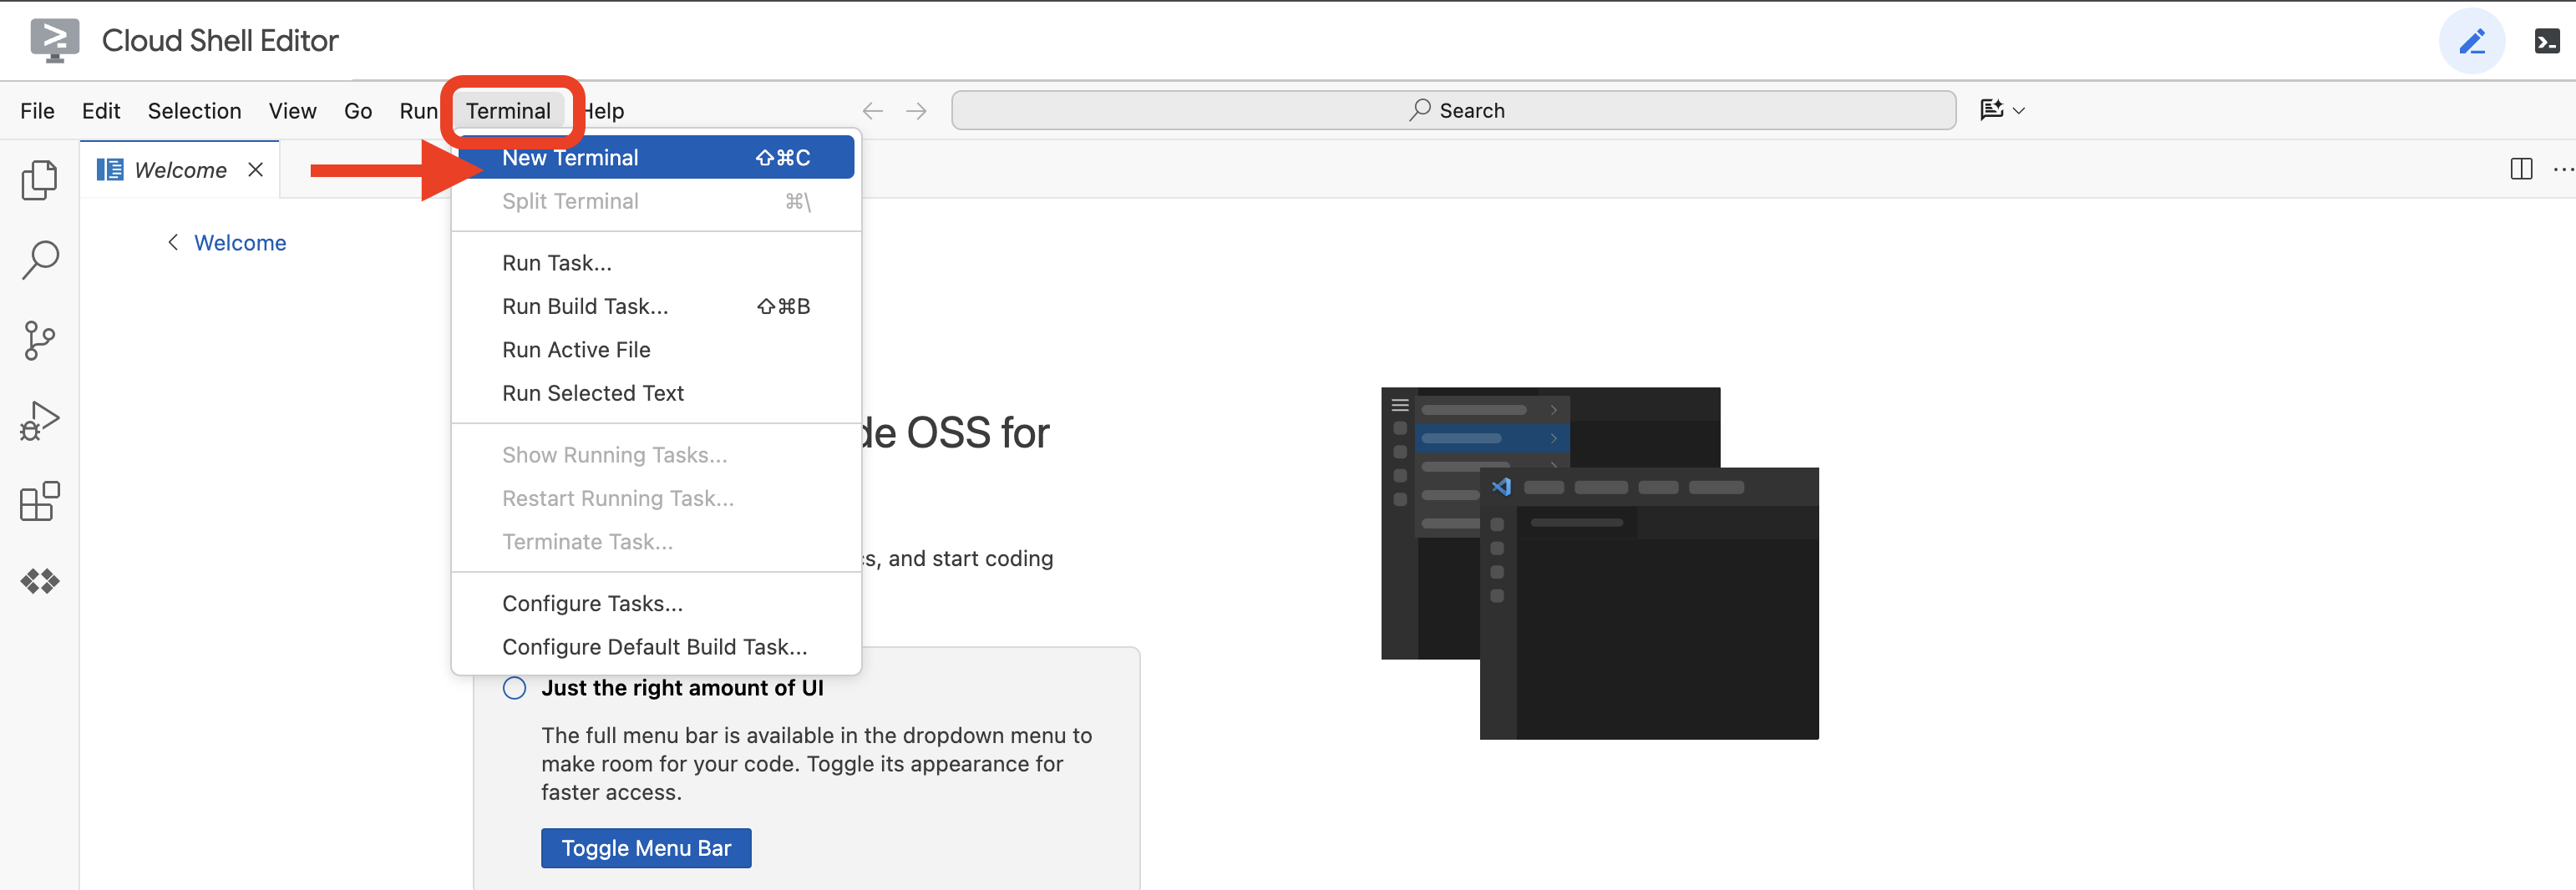 или
или 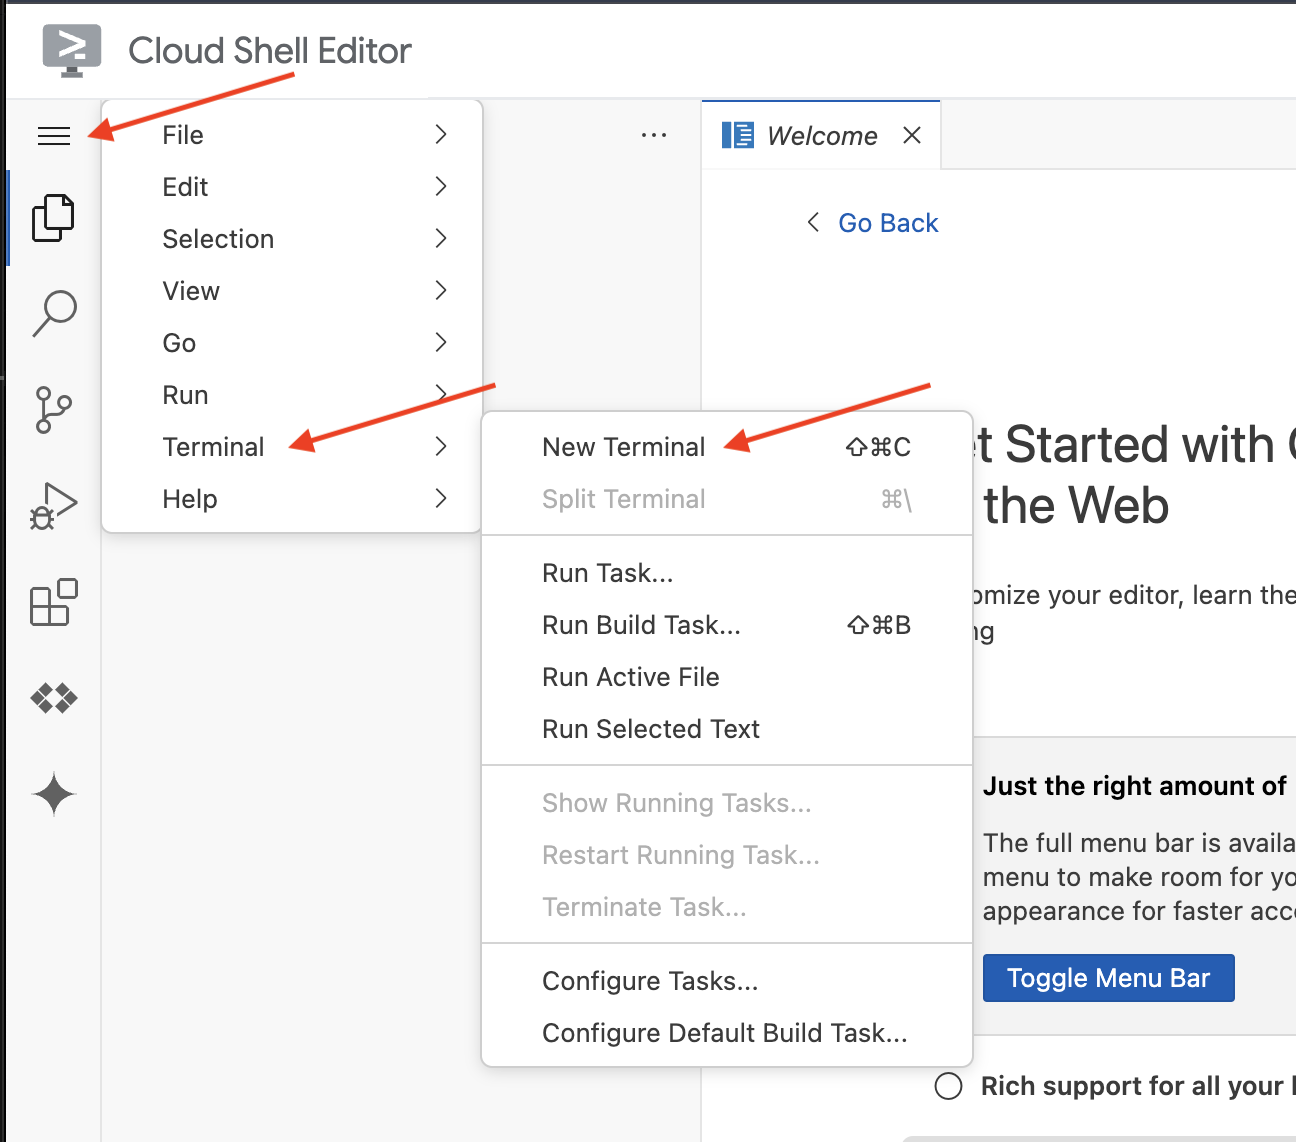
👉В терминале убедитесь, что вы уже авторизованы и что проект настроен на ваш идентификатор проекта, используя следующую команду:
gcloud auth list
👉И при запуске обязательно замените <YOUR_PROJECT_ID> на идентификатор вашего проекта:
echo <YOUR_PROJECT_ID> > ~/project_id.txt
gcloud config set project $(cat ~/project_id.txt)
👉Выполните следующую команду, чтобы включить необходимые API Google Cloud:
gcloud services enable compute.googleapis.com  \
                        storage.googleapis.com  \
                        run.googleapis.com  \
                        artifactregistry.googleapis.com  \
                        aiplatform.googleapis.com \
                        eventarc.googleapis.com \
                        sqladmin.googleapis.com \
                        secretmanager.googleapis.com \
                        cloudbuild.googleapis.com \
                        cloudresourcemanager.googleapis.com \
                        cloudfunctions.googleapis.com \
                        cloudaicompanion.googleapis.com
Это может занять пару минут.
Настройка разрешений
👉Настройте права доступа для учетной записи службы. В терминале выполните команду:
gcloud config set project $(cat ~/project_id.txt)
export PROJECT_ID=$(gcloud config get project)
export SERVICE_ACCOUNT_NAME=$(gcloud compute project-info describe --format="value(defaultServiceAccount)")

echo "Here's your SERVICE_ACCOUNT_NAME $SERVICE_ACCOUNT_NAME"
👉 Предоставьте права доступа. В терминале выполните команду:
#Cloud Storage (Read/Write):
gcloud projects add-iam-policy-binding $PROJECT_ID \
  --member="serviceAccount:$SERVICE_ACCOUNT_NAME" \
  --role="roles/storage.objectAdmin"

#Pub/Sub (Publish/Receive):
gcloud projects add-iam-policy-binding $PROJECT_ID \
  --member="serviceAccount:$SERVICE_ACCOUNT_NAME" \
  --role="roles/pubsub.publisher"

gcloud projects add-iam-policy-binding $PROJECT_ID \
  --member="serviceAccount:$SERVICE_ACCOUNT_NAME" \
  --role="roles/pubsub.subscriber"


#Cloud SQL (Read/Write):
gcloud projects add-iam-policy-binding $PROJECT_ID \
  --member="serviceAccount:$SERVICE_ACCOUNT_NAME" \
  --role="roles/cloudsql.editor"


#Eventarc (Receive Events):
gcloud projects add-iam-policy-binding $PROJECT_ID \
  --member="serviceAccount:$SERVICE_ACCOUNT_NAME" \
  --role="roles/iam.serviceAccountTokenCreator"

gcloud projects add-iam-policy-binding $PROJECT_ID \
  --member="serviceAccount:$SERVICE_ACCOUNT_NAME" \
  --role="roles/eventarc.eventReceiver"

#Vertex AI (User):
gcloud projects add-iam-policy-binding $PROJECT_ID \
  --member="serviceAccount:$SERVICE_ACCOUNT_NAME" \
  --role="roles/aiplatform.user"

#Secret Manager (Read):
gcloud projects add-iam-policy-binding $PROJECT_ID \
  --member="serviceAccount:$SERVICE_ACCOUNT_NAME" \
  --role="roles/secretmanager.secretAccessor"
👉Проверьте результат в консоли IAM 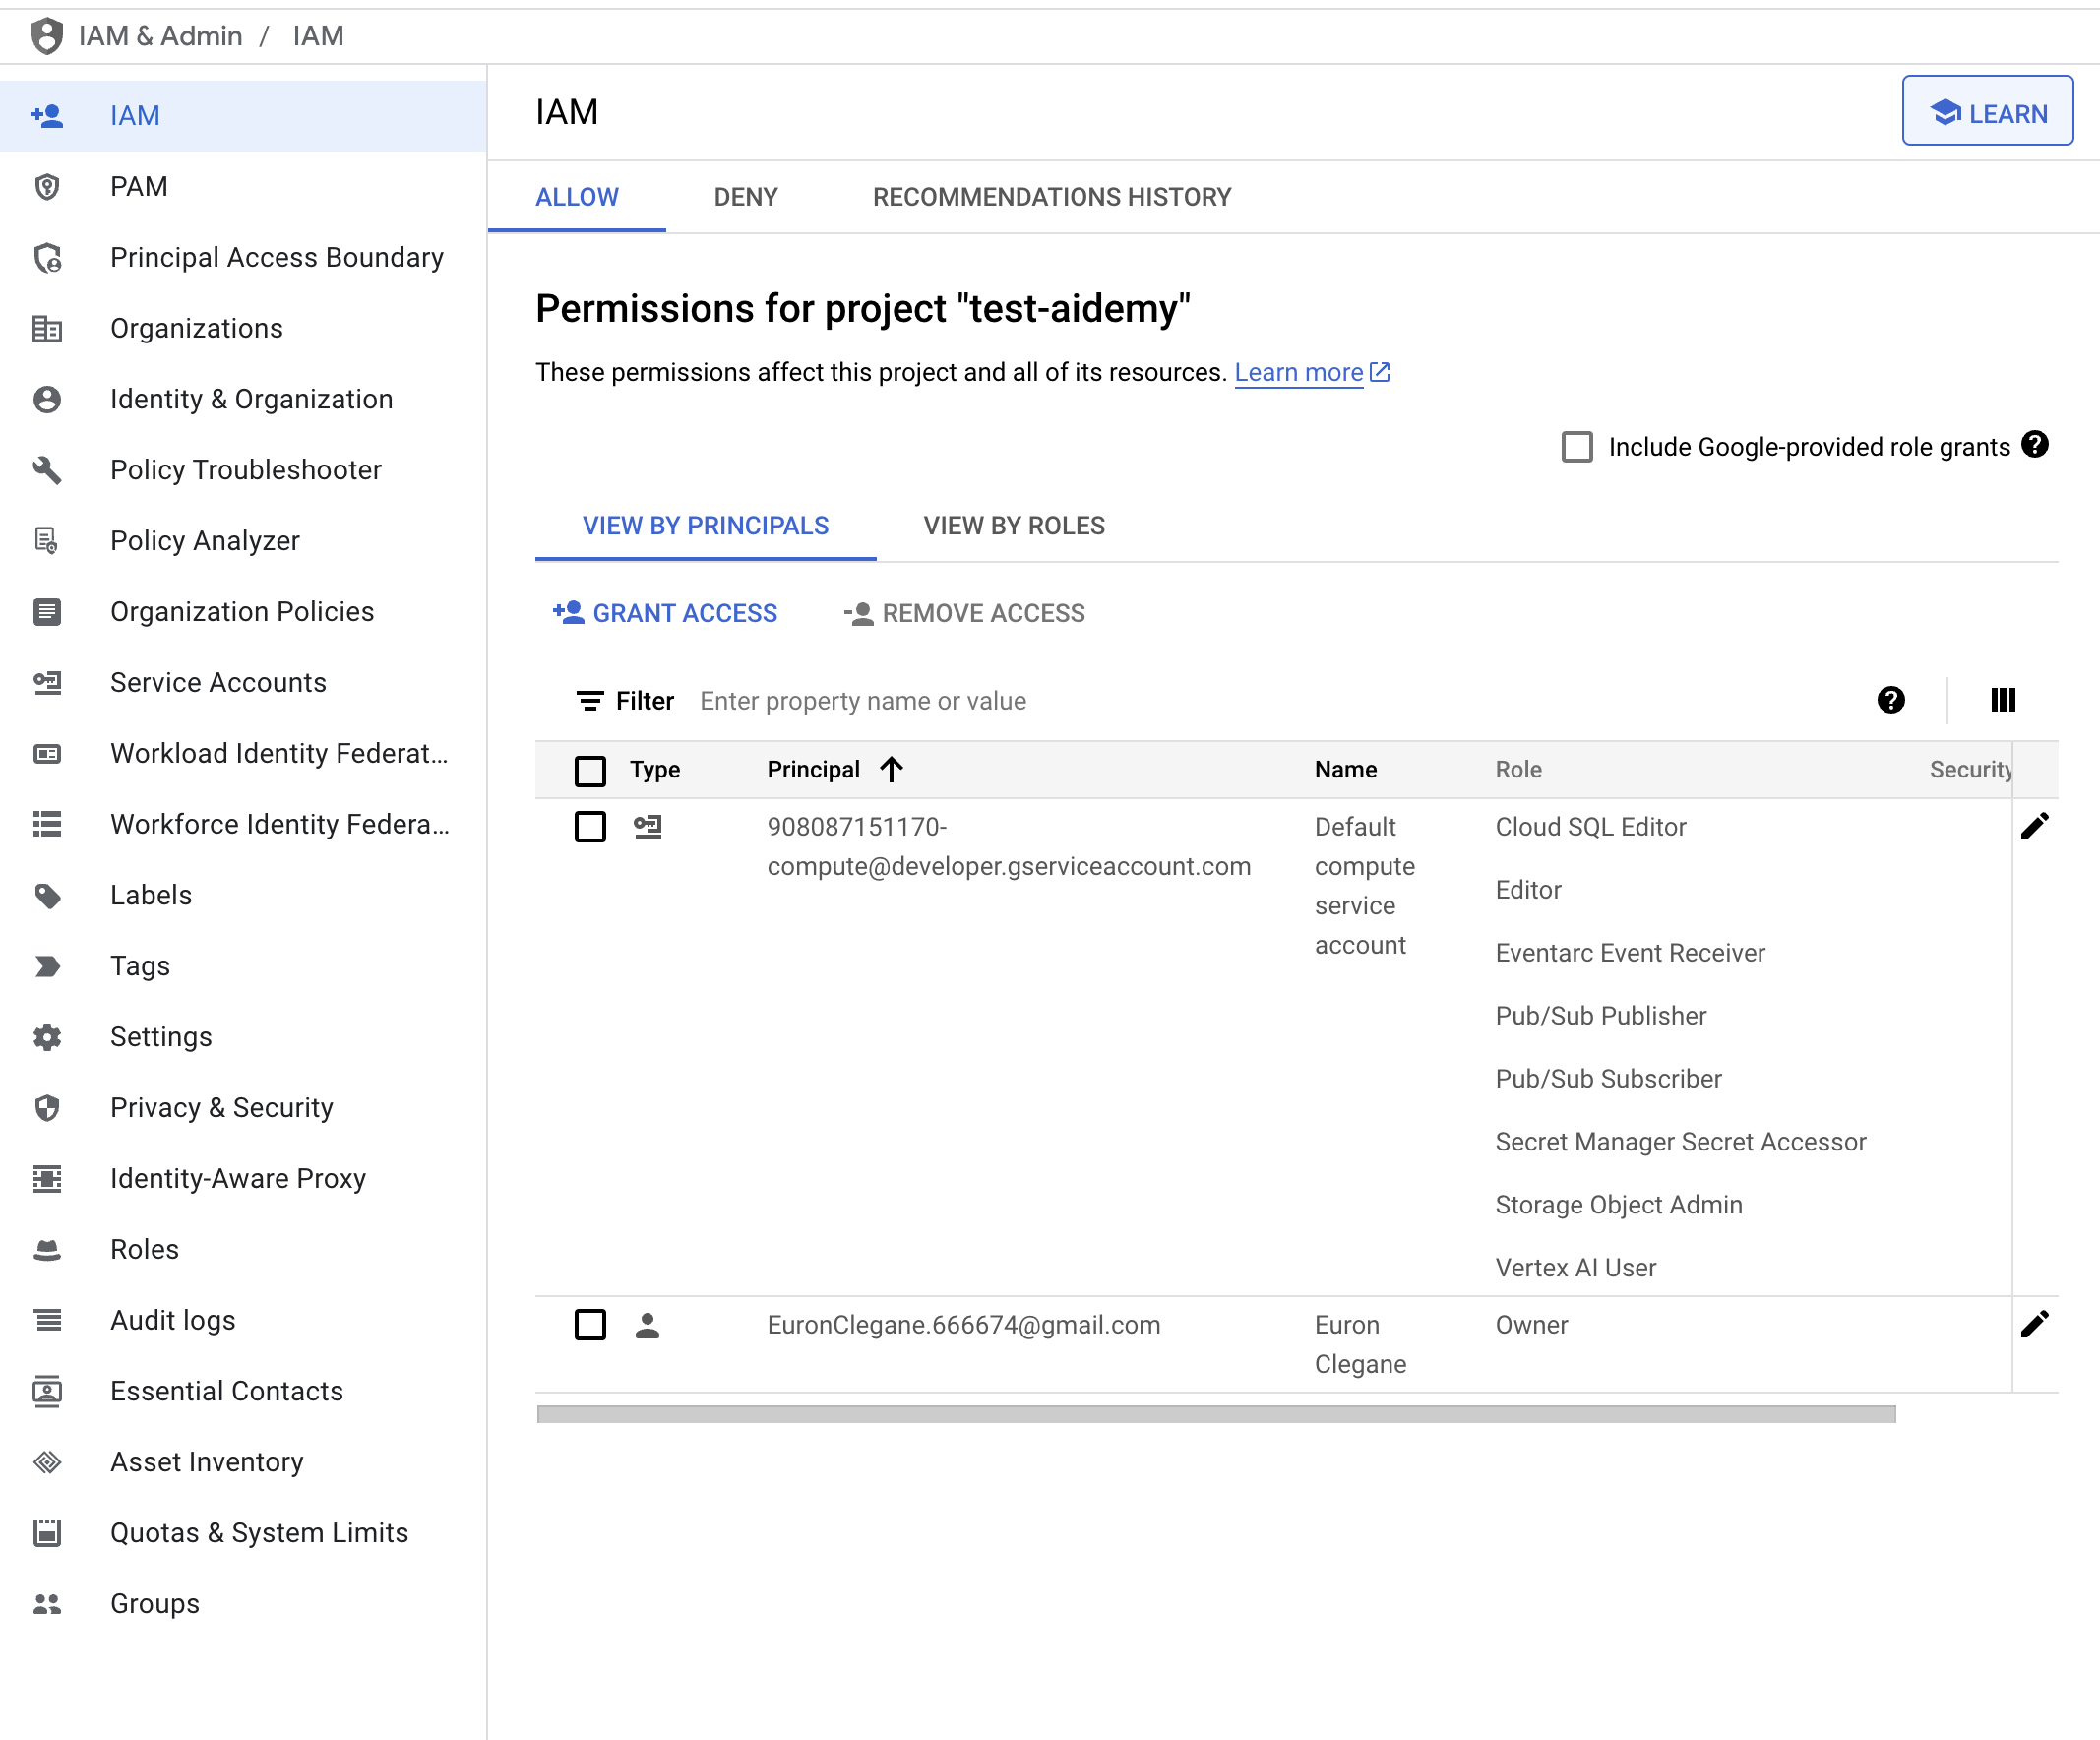
👉Выполните следующие команды в терминале, чтобы создать экземпляр Cloud SQL с именем aidemy . Он понадобится нам позже, но поскольку этот процесс может занять некоторое время, мы сделаем это сейчас.
gcloud sql instances create aidemy \
    --database-version=POSTGRES_14 \
    --cpu=2 \
    --memory=4GB \
    --region=us-central1 \
    --root-password=1234qwer \
    --storage-size=10GB \
    --storage-auto-increase
4. Создание первого агента
Прежде чем углубляться в сложные многоагентные системы, нам необходимо создать фундаментальный строительный блок: единого функционального агента. В этом разделе мы сделаем первые шаги, создав простого агента-«поставщика книг». Агент-поставщик книг принимает категорию в качестве входных данных и использует Gemini LLM для генерации JSON-представления книги в этой категории. Затем он предоставляет эти рекомендации по книгам в качестве конечной точки REST API.
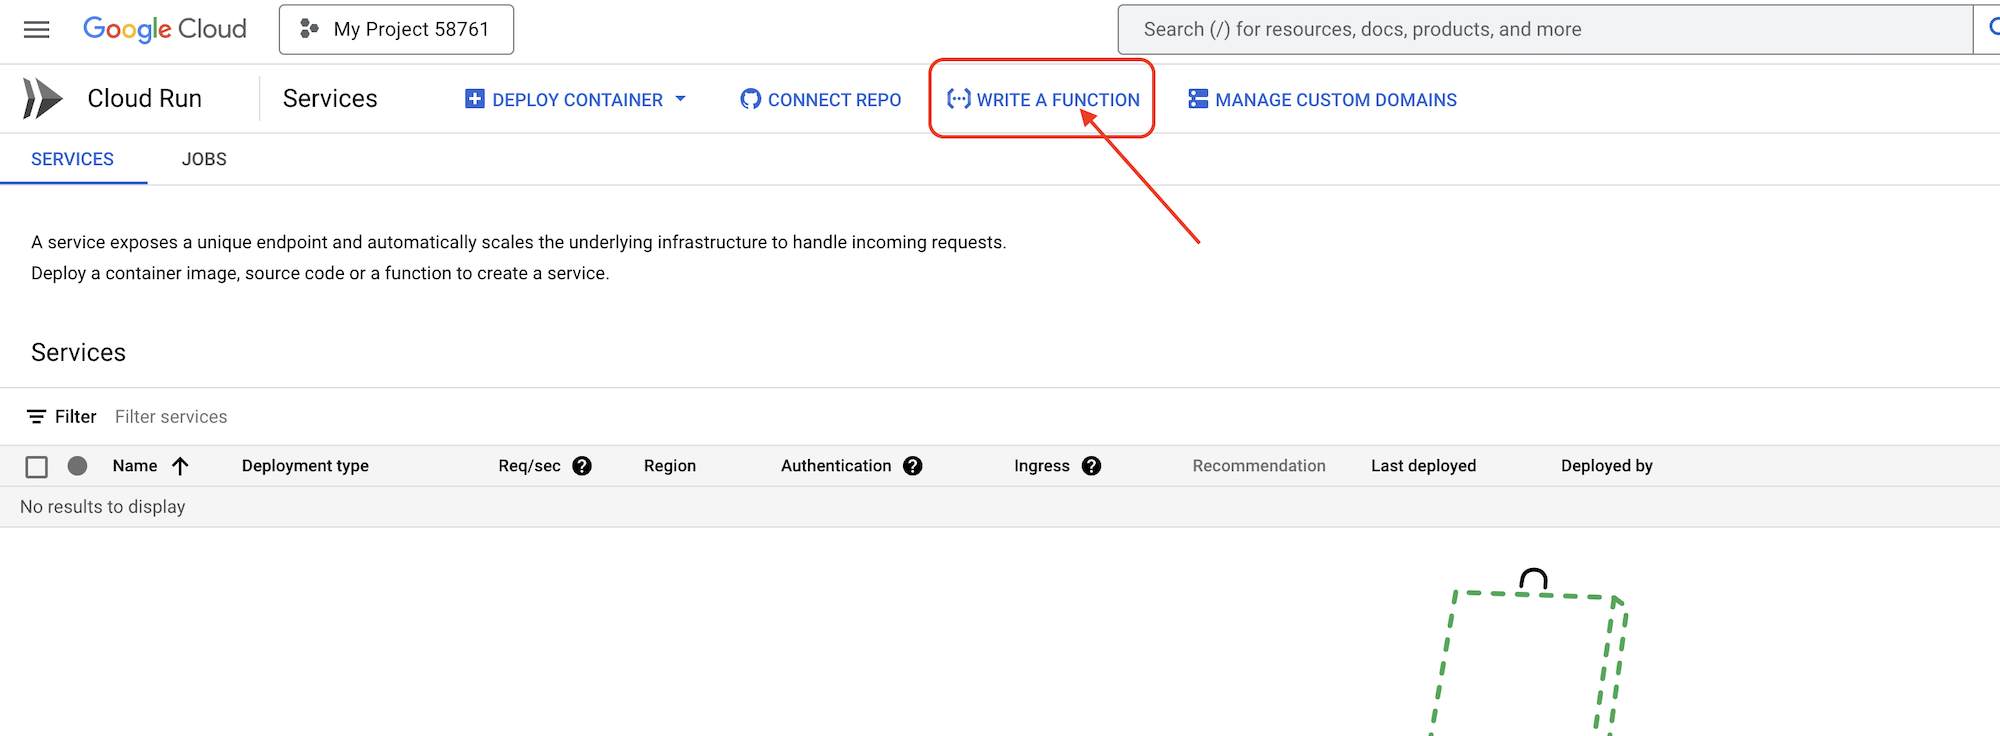
👉В новой вкладке браузера откройте консоль Google Cloud в веб-браузере. В меню навигации (☰) перейдите в раздел «Cloud Run». Нажмите кнопку «+ ... НАПИСАТЬ ФУНКЦИЮ».
👉Далее мы настроим основные параметры функции Cloud Run:
- Название сервиса:
book-provider - Регион:
us-central1 - Среда выполнения:
Python 3.12 - Аутентификация:
Allow unauthenticated invocations.
👉Оставьте остальные настройки по умолчанию и нажмите «Создать» . Это переведет вас в редактор исходного кода.
Вы увидите предварительно заполненные файлы main.py и requirements.txt .
Файл main.py будет содержать бизнес-логику функции, а requirements.txt — список необходимых пакетов.
👉Теперь мы готовы писать код! Но прежде чем приступить, давайте посмотрим, сможет ли Gemini Code Assist помочь нам на старте. Вернитесь в редактор Cloud Shell , нажмите на значок Gemini Code Assist вверху, это должно открыть чат Gemini Code Assist.
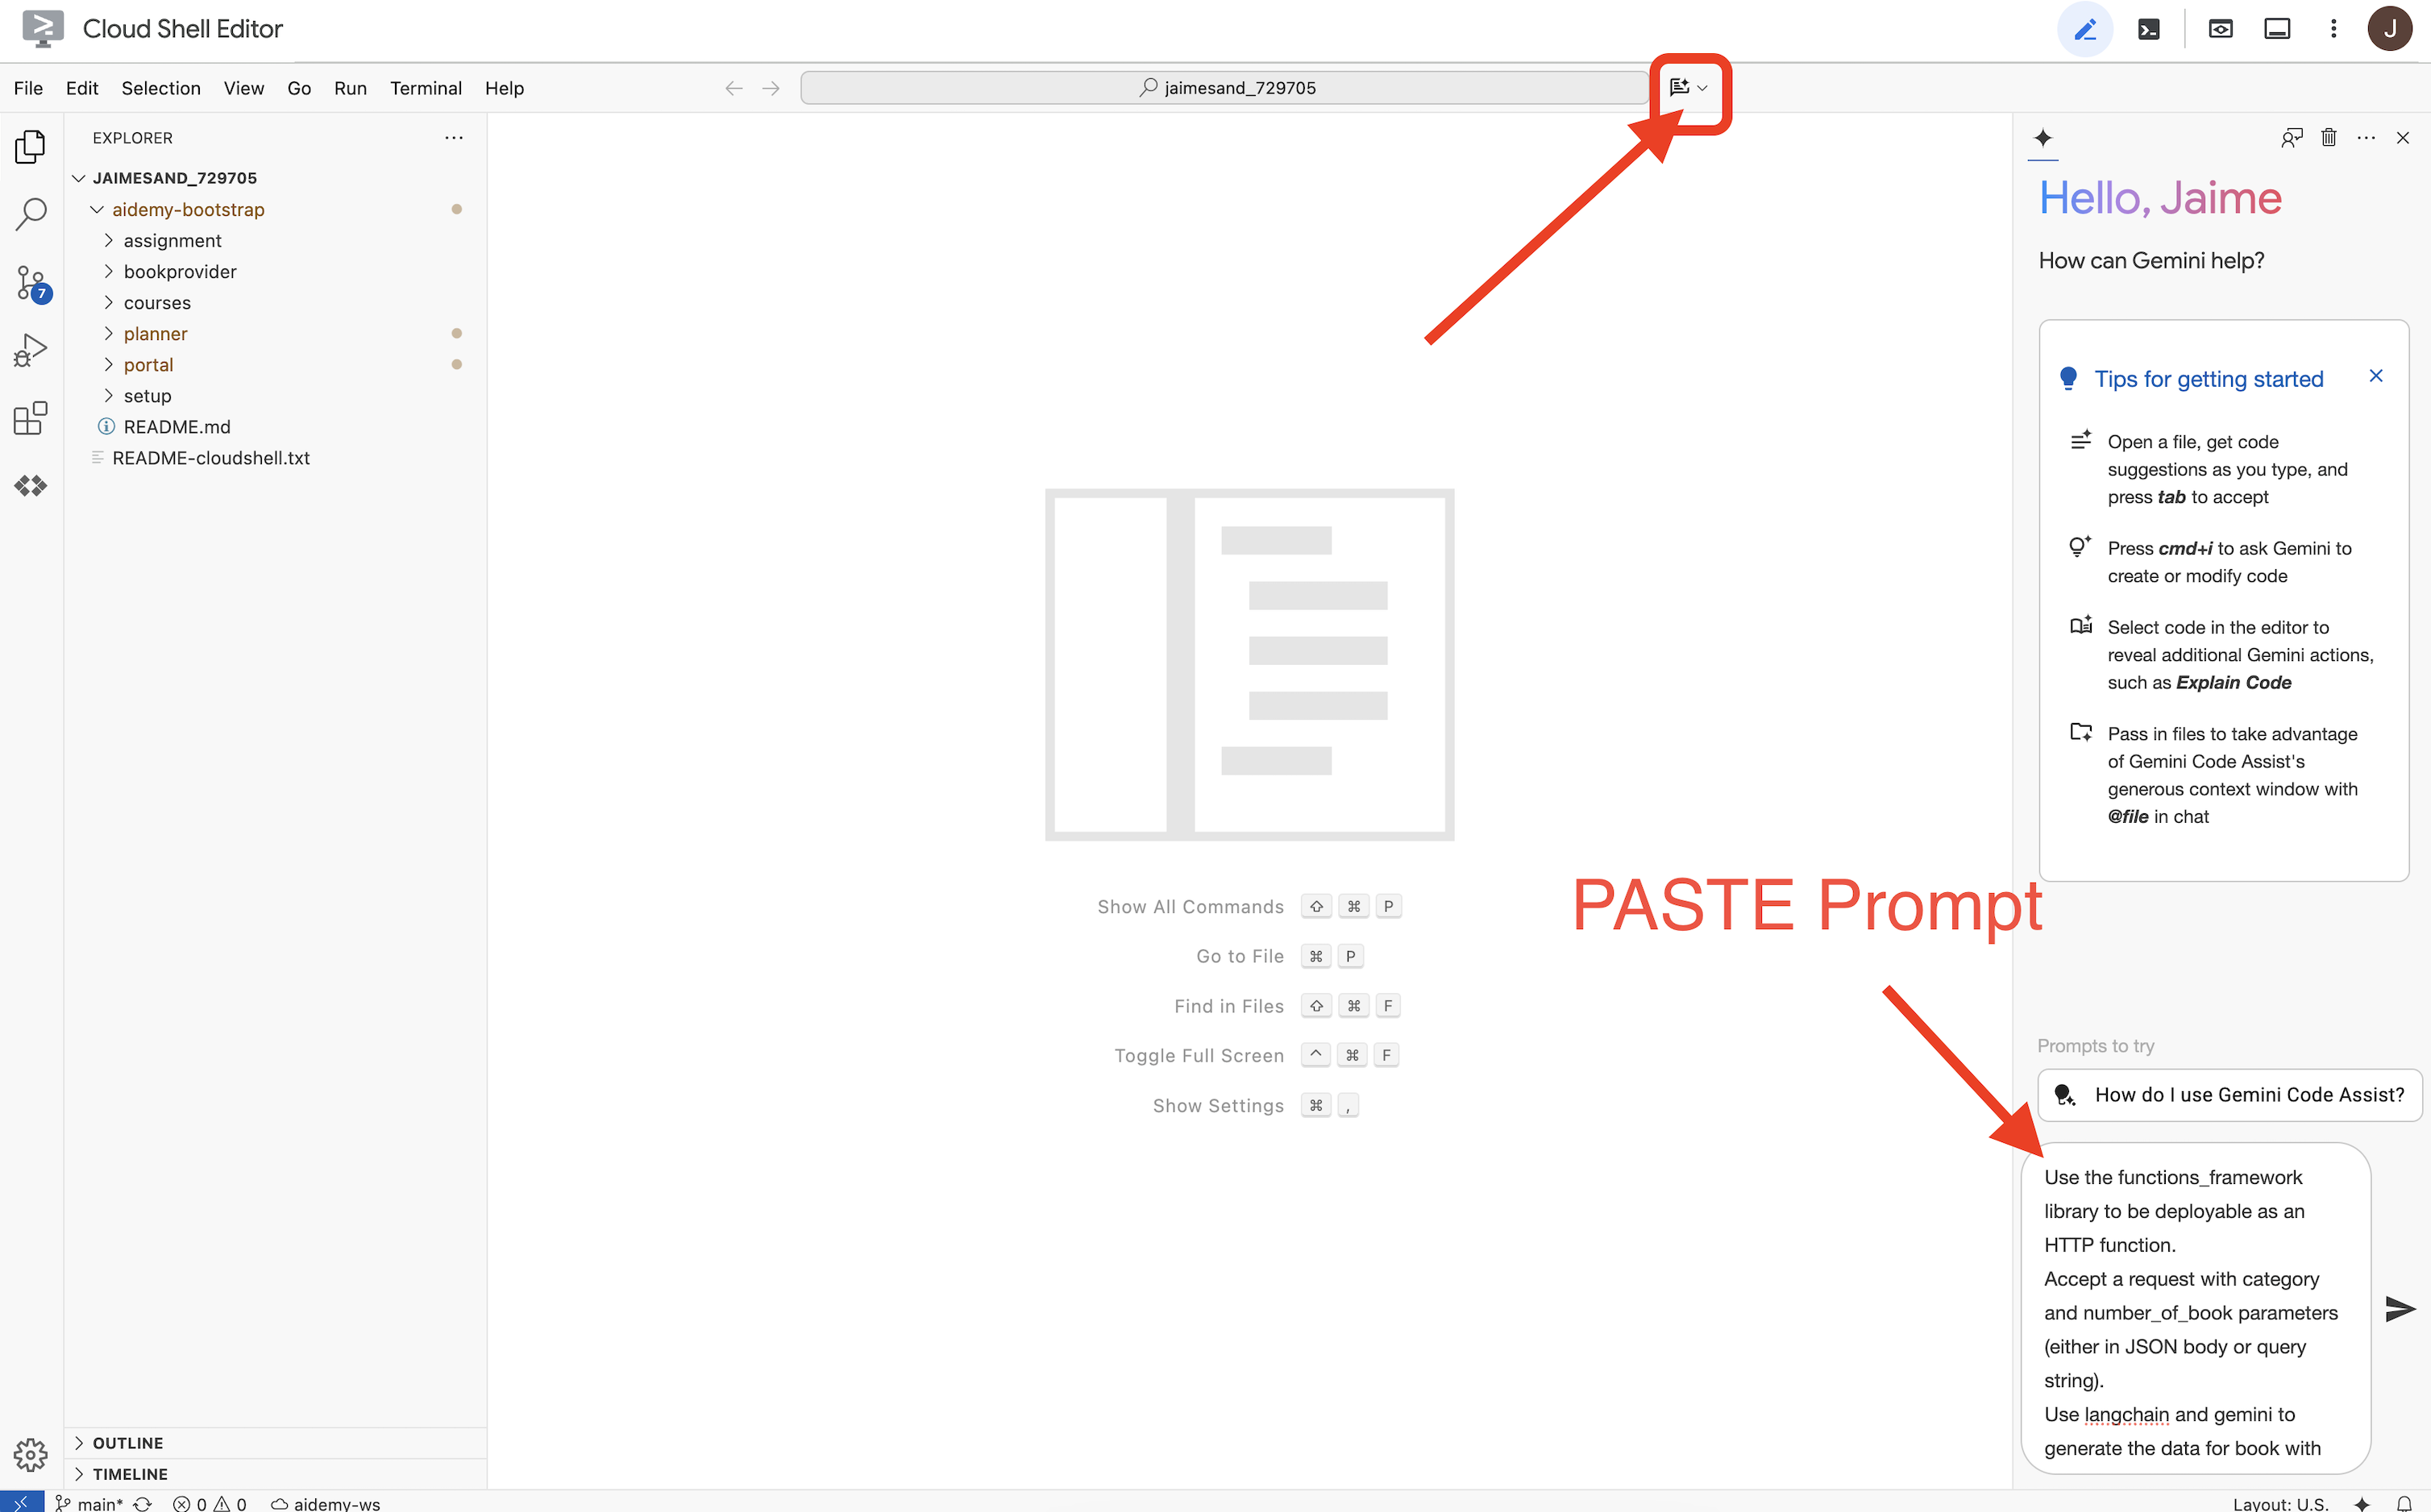
👉 Вставьте следующий запрос в поле для запроса:
Use the functions_framework library to be deployable as an HTTP function.
Accept a request with category and number_of_book parameters (either in JSON body or query string).
Use langchain and gemini to generate the data for book with fields bookname, author, publisher, publishing_date.
Use pydantic to define a Book model with the fields: bookname (string, description: "Name of the book"), author (string, description: "Name of the author"), publisher (string, description: "Name of the publisher"), and publishing_date (string, description: "Date of publishing").
Use langchain and gemini model to generate book data. the output should follow the format defined in Book model.

The logic should use JsonOutputParser from langchain to enforce output format defined in Book Model.
Have a function get_recommended_books(category) that internally uses langchain and gemini to return a single book object.
The main function, exposed as the Cloud Function, should call get_recommended_books() multiple times (based on number_of_book) and return a JSON list of the generated book objects.
Handle the case where category or number_of_book are missing by returning an error JSON response with a 400 status code.
return a JSON string representing the recommended books. use os library to retrieve GOOGLE_CLOUD_PROJECT env var. Use ChatVertexAI from langchain for the LLM call
Затем Code Assist сгенерирует возможное решение, предоставив как исходный код, так и файл зависимостей requirements.txt. (НЕ ИСПОЛЬЗУЙТЕ ЭТОТ КОД)
Мы рекомендуем сравнить сгенерированный Code Assist код с проверенным, правильным решением, представленным ниже. Это позволит оценить эффективность инструмента и выявить любые потенциальные несоответствия. Хотя LLM-ы никогда не следует слепо доверять, Code Assist может быть отличным инструментом для быстрого прототипирования и генерации начальных структур кода, и его следует использовать для хорошего старта.
Поскольку это мастер-класс, мы будем использовать проверенный код, представленный ниже. Однако вы можете поэкспериментировать с кодом, сгенерированным Code Assist, в удобное для вас время, чтобы глубже понять его возможности и ограничения.
👉Вернитесь в редактор исходного кода функции Cloud Run (в другой вкладке браузера). Аккуратно замените существующее содержимое файла main.py приведенным ниже кодом:
import functions_framework
import json
from flask import Flask, jsonify, request
from langchain_google_vertexai import ChatVertexAI
from langchain_core.output_parsers import JsonOutputParser
from langchain_core.prompts import PromptTemplate
from pydantic import BaseModel, Field
import os

class Book(BaseModel):
    bookname: str = Field(description="Name of the book")
    author: str = Field(description="Name of the author")
    publisher: str = Field(description="Name of the publisher")
    publishing_date: str = Field(description="Date of publishing")


project_id = os.environ.get("GOOGLE_CLOUD_PROJECT")

llm = ChatVertexAI(model_name="gemini-2.0-flash-lite-001")

def get_recommended_books(category):
    """
    A simple book recommendation function.

    Args:
        category (str): category

    Returns:
        str: A JSON string representing the recommended books.
    """
    parser = JsonOutputParser(pydantic_object=Book)
    question = f"Generate a random made up book on {category} with bookname, author and publisher and publishing_date"

    prompt = PromptTemplate(
        template="Answer the user query.\n{format_instructions}\n{query}\n",
        input_variables=["query"],
        partial_variables={"format_instructions": parser.get_format_instructions()},
    )

    chain = prompt | llm | parser
    response = chain.invoke({"query": question})

    return  json.dumps(response)


@functions_framework.http
def recommended(request):
    request_json = request.get_json(silent=True) # Get JSON data
    if request_json and 'category' in request_json and 'number_of_book' in request_json:
        category = request_json['category']
        number_of_book = int(request_json['number_of_book'])
    elif request.args and 'category' in request.args and 'number_of_book' in request.args:
        category = request.args.get('category')
        number_of_book = int(request.args.get('number_of_book'))

    else:
        return jsonify({'error': 'Missing category or number_of_book parameters'}), 400


    recommendations_list = []
    for i in range(number_of_book):
        book_dict = json.loads(get_recommended_books(category))
        print(f"book_dict=======>{book_dict}")

        recommendations_list.append(book_dict)


    return jsonify(recommendations_list)
👉Замените содержимое файла requirements.txt следующим:
functions-framework==3.*
google-genai==1.0.0
flask==3.1.0
jsonify==0.5
langchain_google_vertexai==2.0.13
langchain_core==0.3.34
pydantic==2.10.5
👉Мы установим точку входа функции : recommended
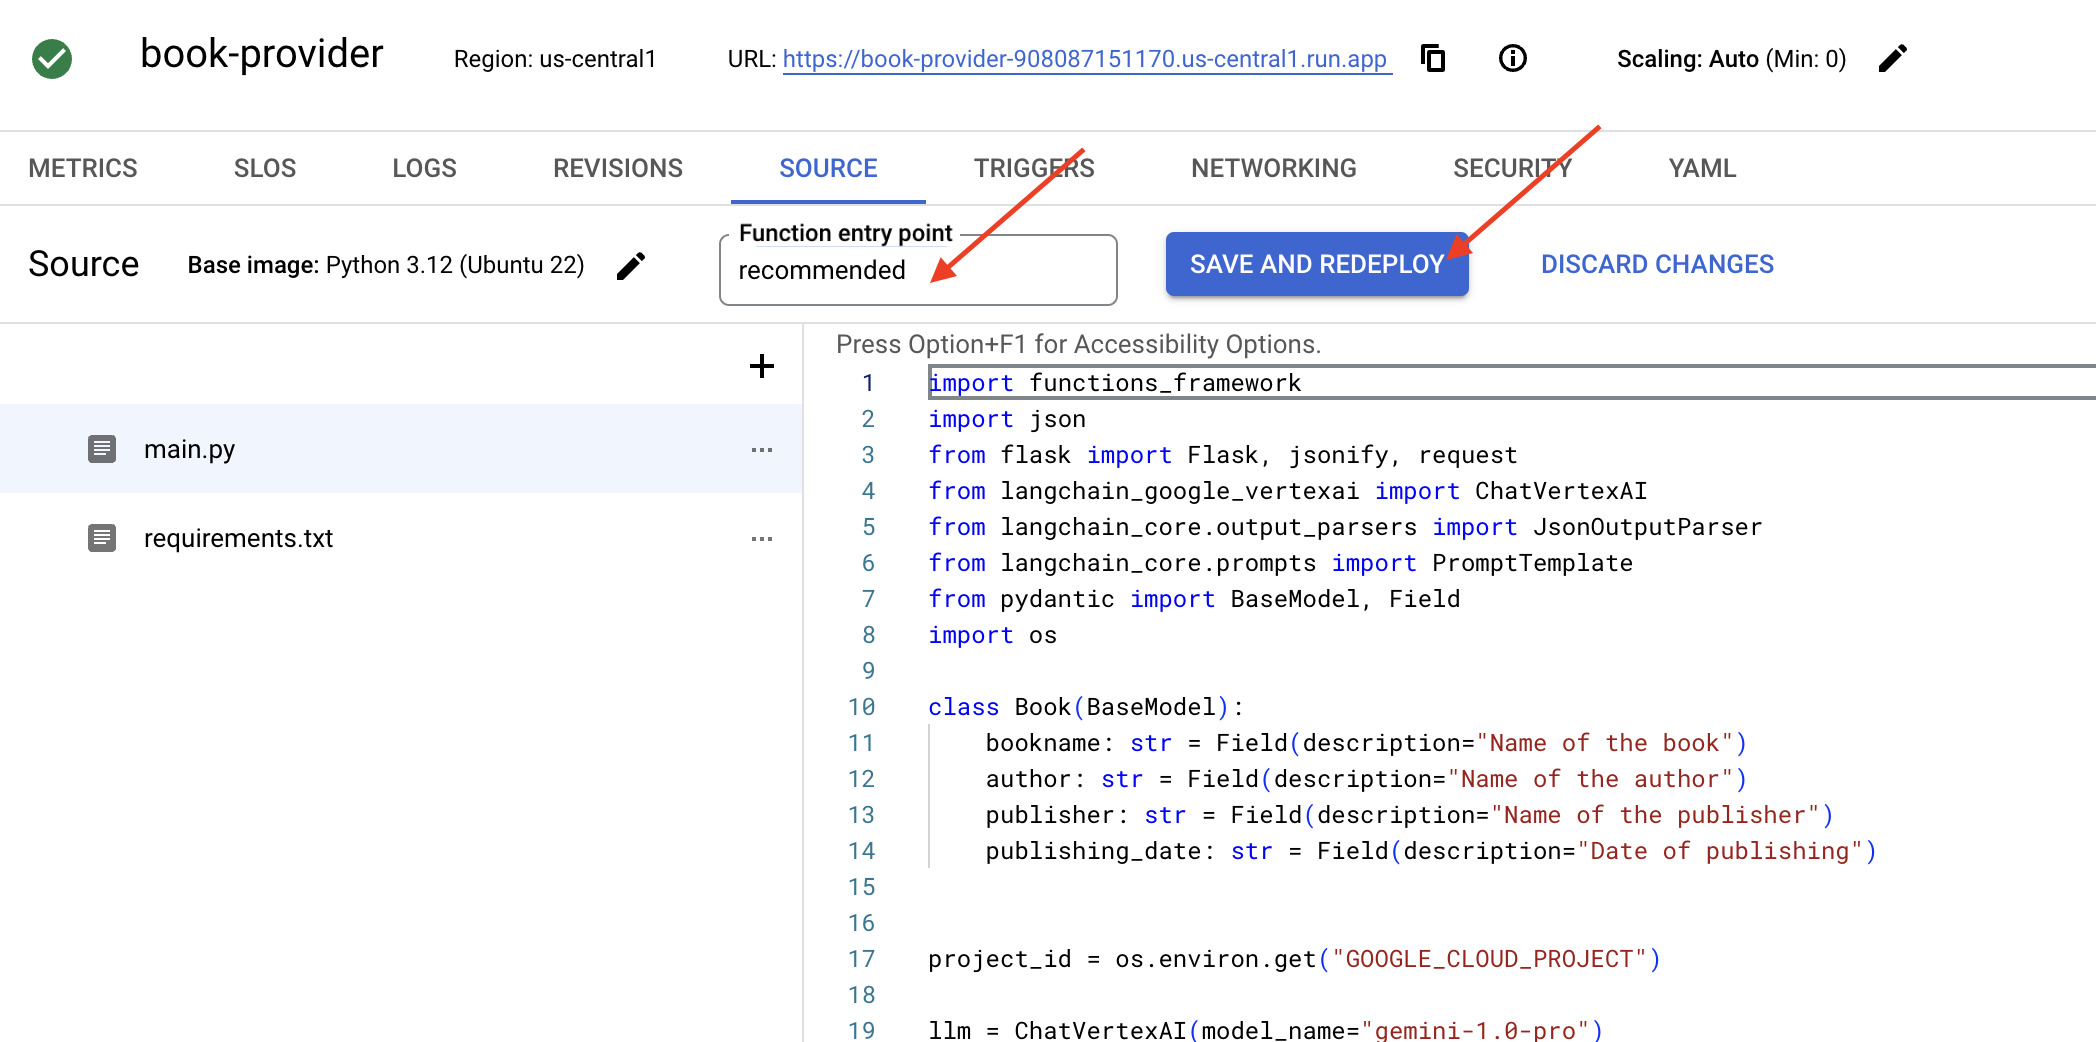
👉Нажмите «СОХРАНИТЬ И РАЗВЕРНУТЬ» (или «СОХРАНИТЬ И ПОВТОРНО РАЗВЕРНУТЬ »), чтобы развернуть функцию. Дождитесь завершения процесса развертывания. В облачной консоли отобразится статус. Это может занять несколько минут.
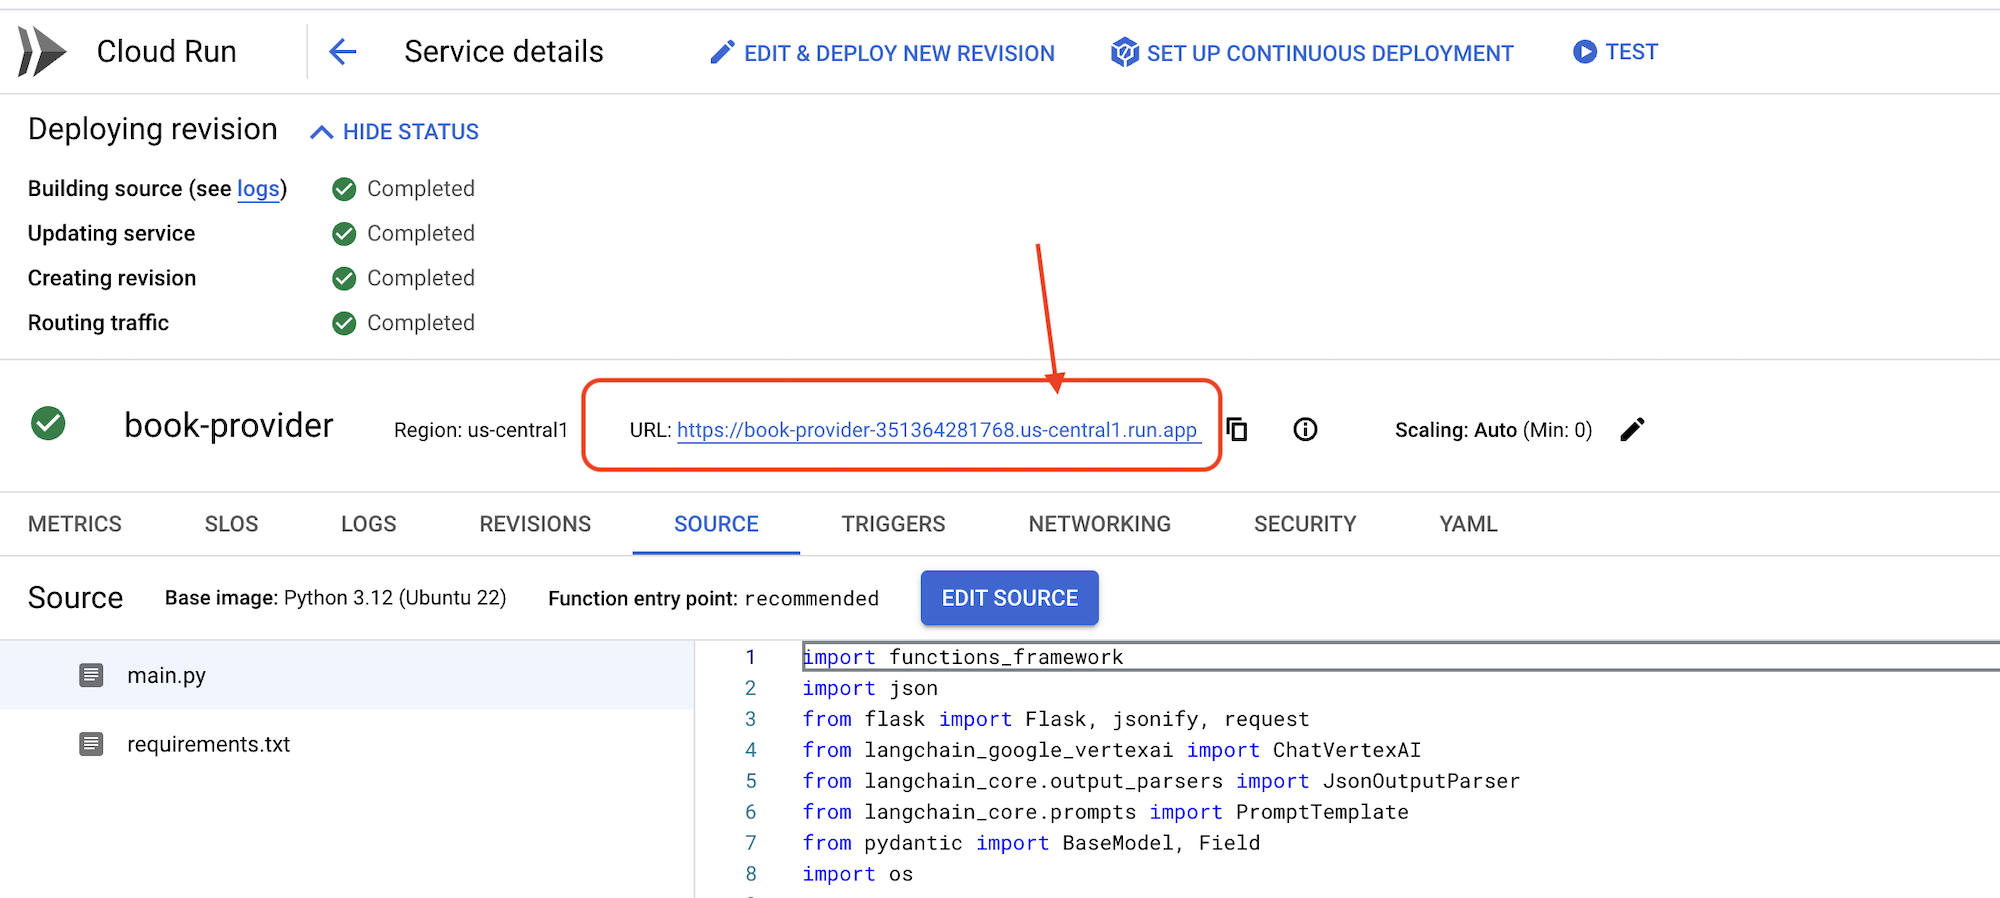 👉После развертывания вернитесь в редактор облачной оболочки и в терминале выполните следующую команду:
gcloud config set project $(cat ~/project_id.txt)
export PROJECT_ID=$(gcloud config get project)
export BOOK_PROVIDER_URL=$(gcloud run services describe book-provider --region=us-central1 --project=$PROJECT_ID --format="value(status.url)")

curl -X POST -H "Content-Type: application/json" -d '{"category": "Science Fiction", "number_of_book": 2}' $BOOK_PROVIDER_URL
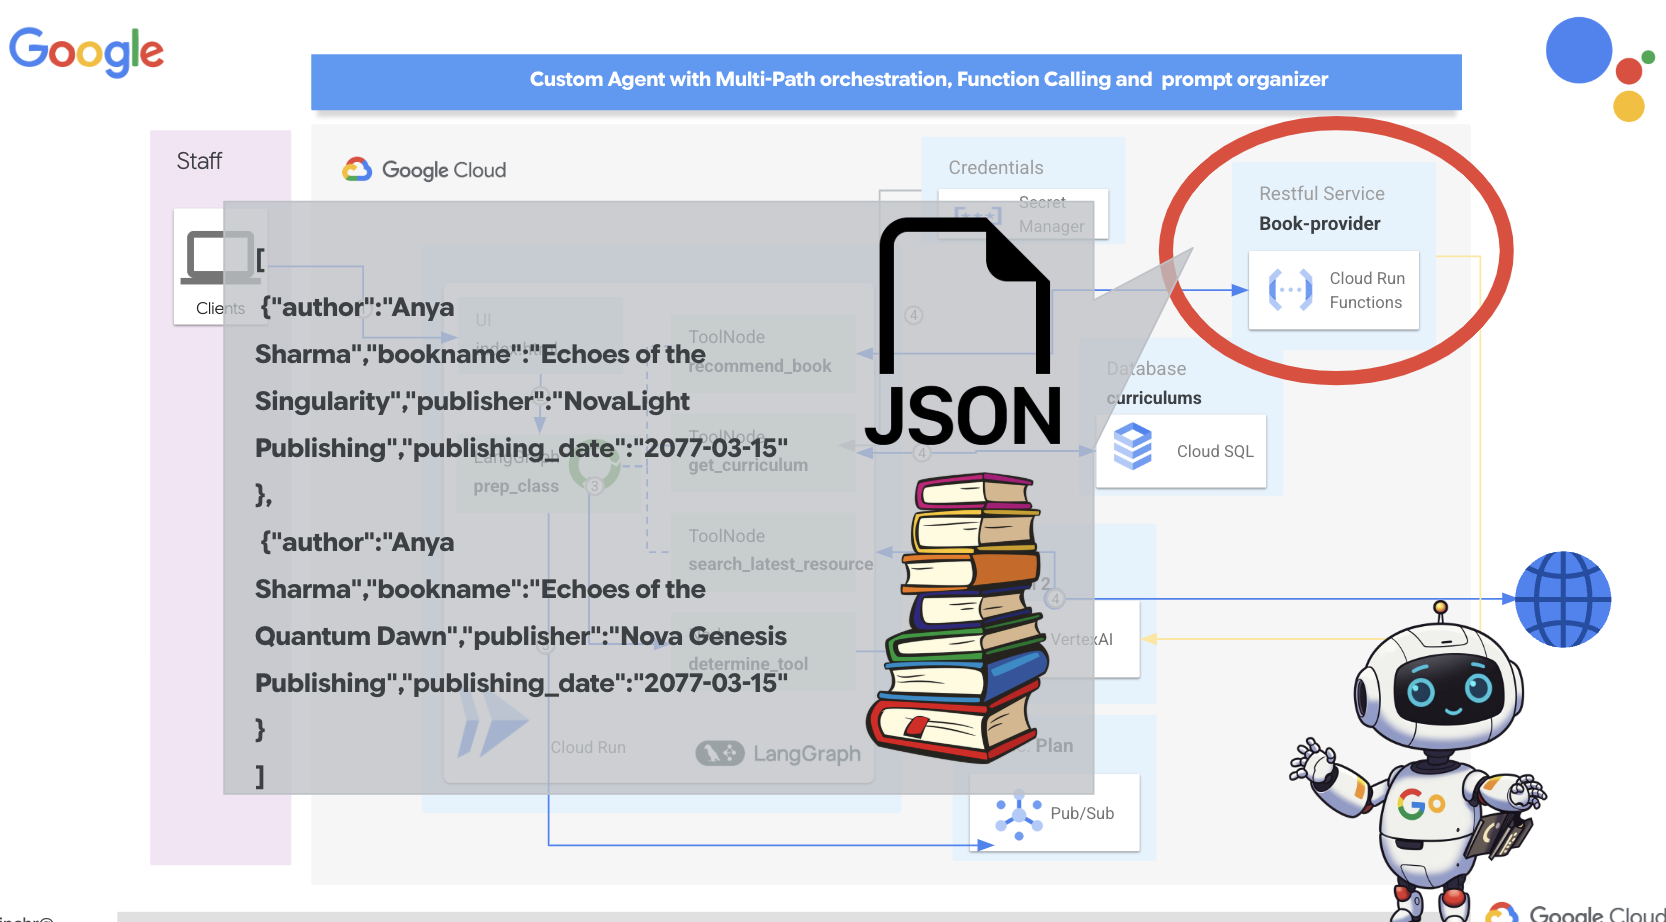
Должно отображаться информация о книгах в формате JSON.
[
  {"author":"Anya Sharma","bookname":"Echoes of the Singularity","publisher":"NovaLight Publishing","publishing_date":"2077-03-15"},
  {"author":"Anya Sharma","bookname":"Echoes of the Quantum Dawn","publisher":"Nova Genesis Publishing","publishing_date":"2077-03-15"}
]
Поздравляем! Вы успешно развернули функцию Cloud Run. Это одна из служб, которую мы будем интегрировать при разработке нашего агента Aidemy.
5. Разработка инструментов: подключение агентов к RESTful-сервису и данным.
Давайте загрузим шаблон проекта Bootstrap, убедитесь, что вы находитесь в редакторе Cloud Shell. В терминале выполните следующую команду:
git clone https://github.com/weimeilin79/aidemy-bootstrap.git
После выполнения этой команды в вашей среде Cloud Shell будет создана новая папка с именем aidemy-bootstrap .
В панели проводника редактора Cloud Shell (обычно слева) вы должны увидеть папку, созданную при клонировании репозитория Git aidemy-bootstrap . Откройте корневую папку вашего проекта в проводнике. Внутри неё вы найдёте подпапку planner , откройте и её. 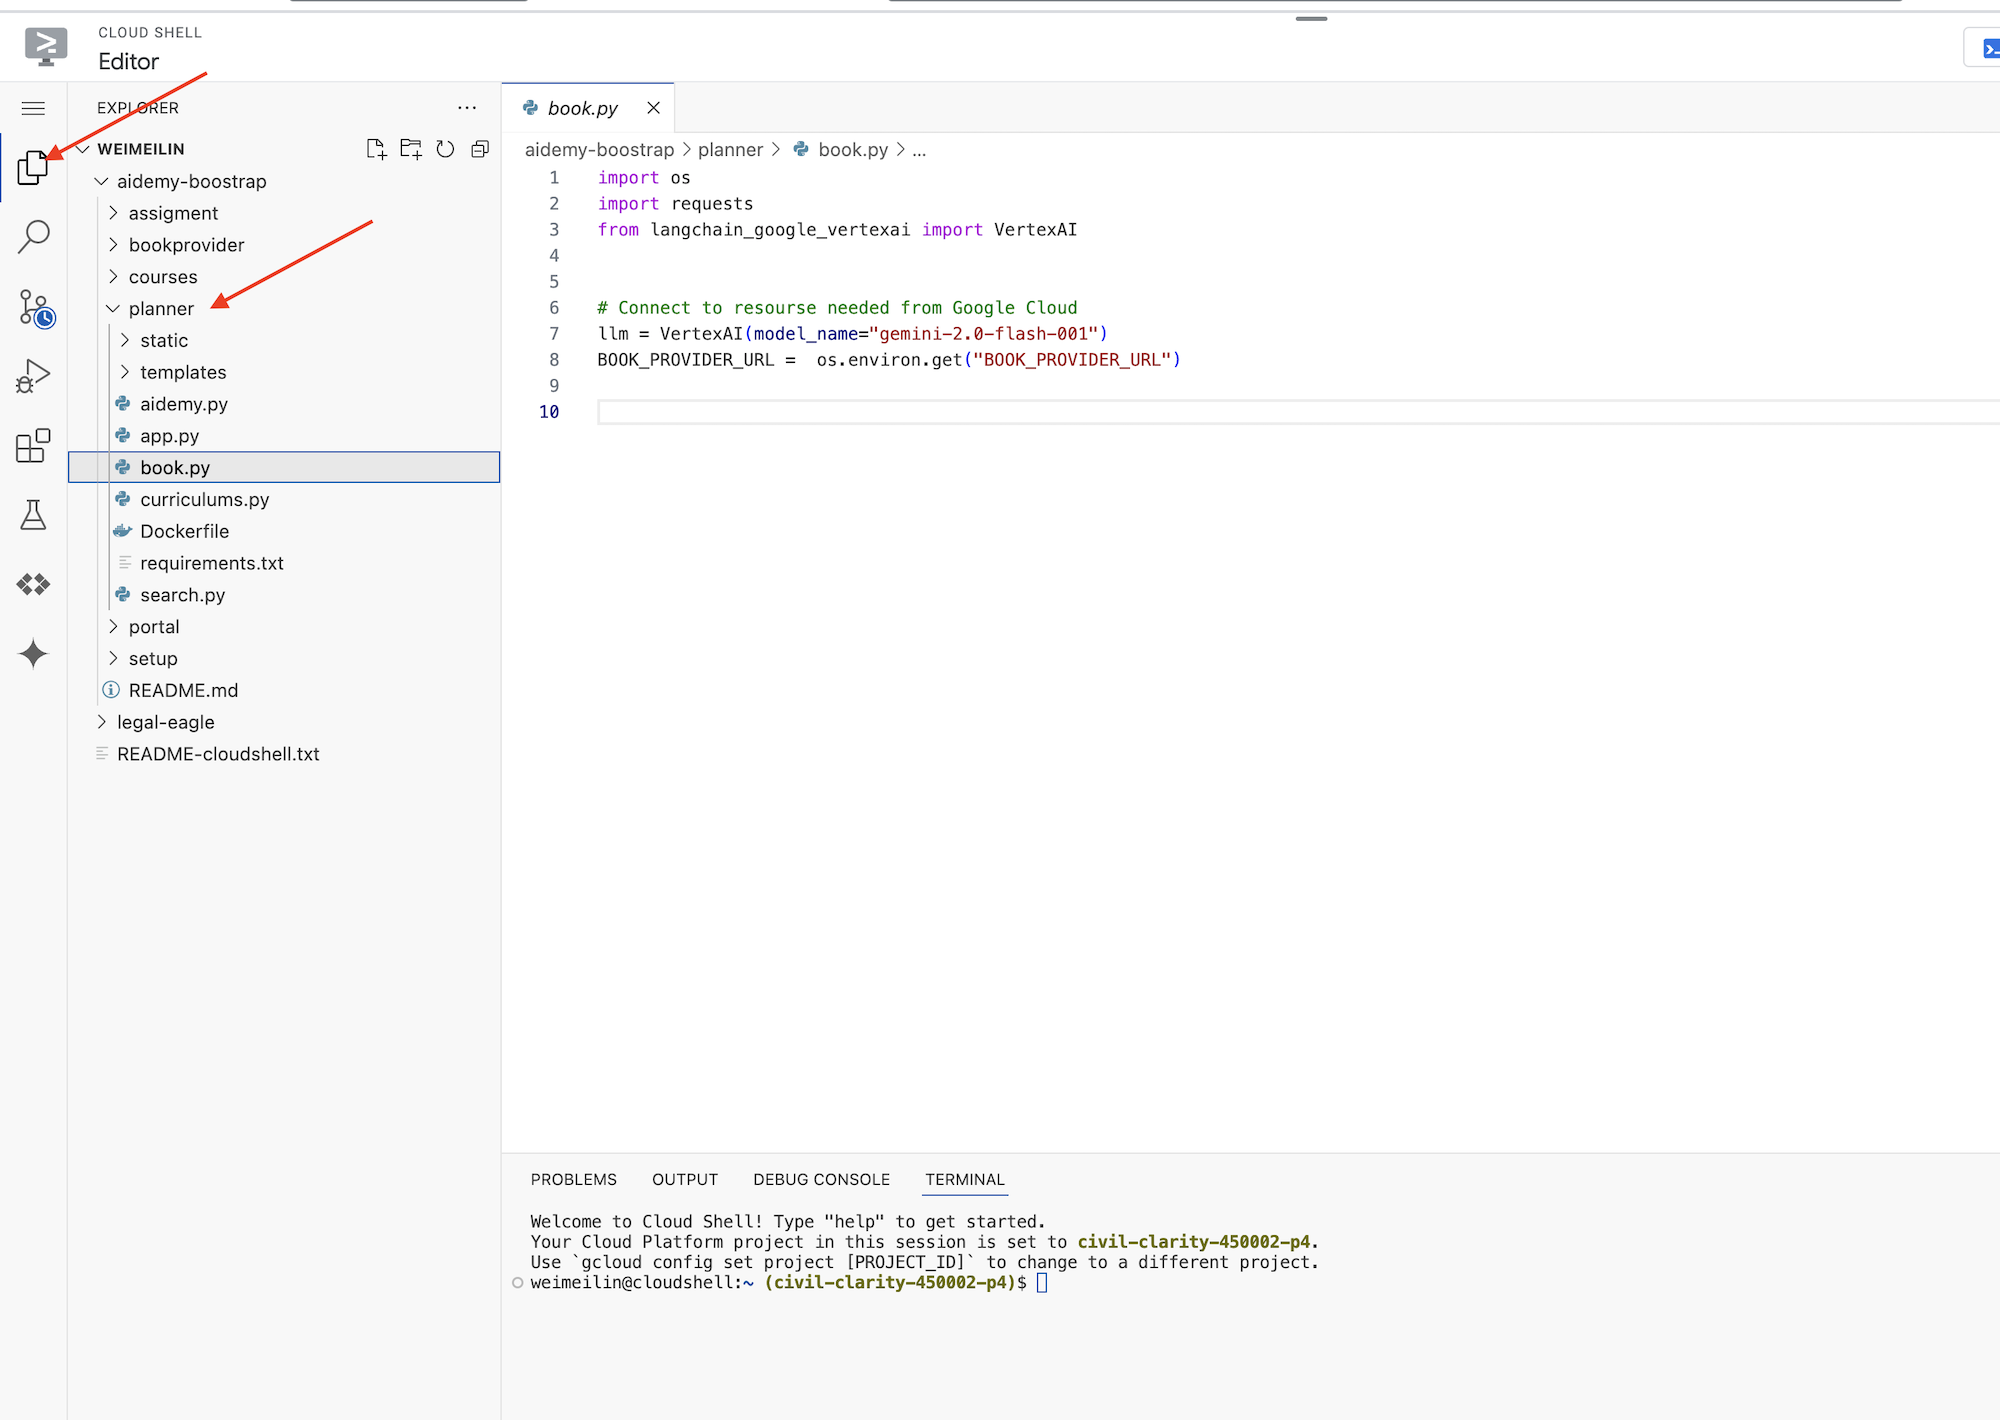
Давайте начнём создавать инструменты, которые наши агенты будут использовать, чтобы стать по-настоящему полезными. Как вы знаете, специалисты с магистерской степенью отлично умеют рассуждать и генерировать тексты, но им необходим доступ к внешним ресурсам для выполнения реальных задач и предоставления точной, актуальной информации. Представьте эти инструменты как «швейцарский армейский нож» агента, позволяющий ему взаимодействовать с окружающим миром.
При создании агента легко впасть в жёсткое кодирование множества деталей. Это создаёт агента, лишённого гибкости. Вместо этого, создавая и используя инструменты, агент получает доступ к внешней логике или системам, что даёт ему преимущества как LLM, так и традиционного программирования.
В этом разделе мы заложим основу для агента-планировщика, которого учителя будут использовать для создания планов уроков. Прежде чем агент начнет создавать план, мы хотим установить границы, предоставив более подробную информацию о предмете и теме. Мы создадим три инструмента:
- Вызов RESTful API: взаимодействие с уже существующим API для получения данных.
- Запрос к базе данных: Извлечение структурированных данных из базы данных Cloud SQL.
- Поиск Google: доступ к информации в режиме реального времени из интернета.
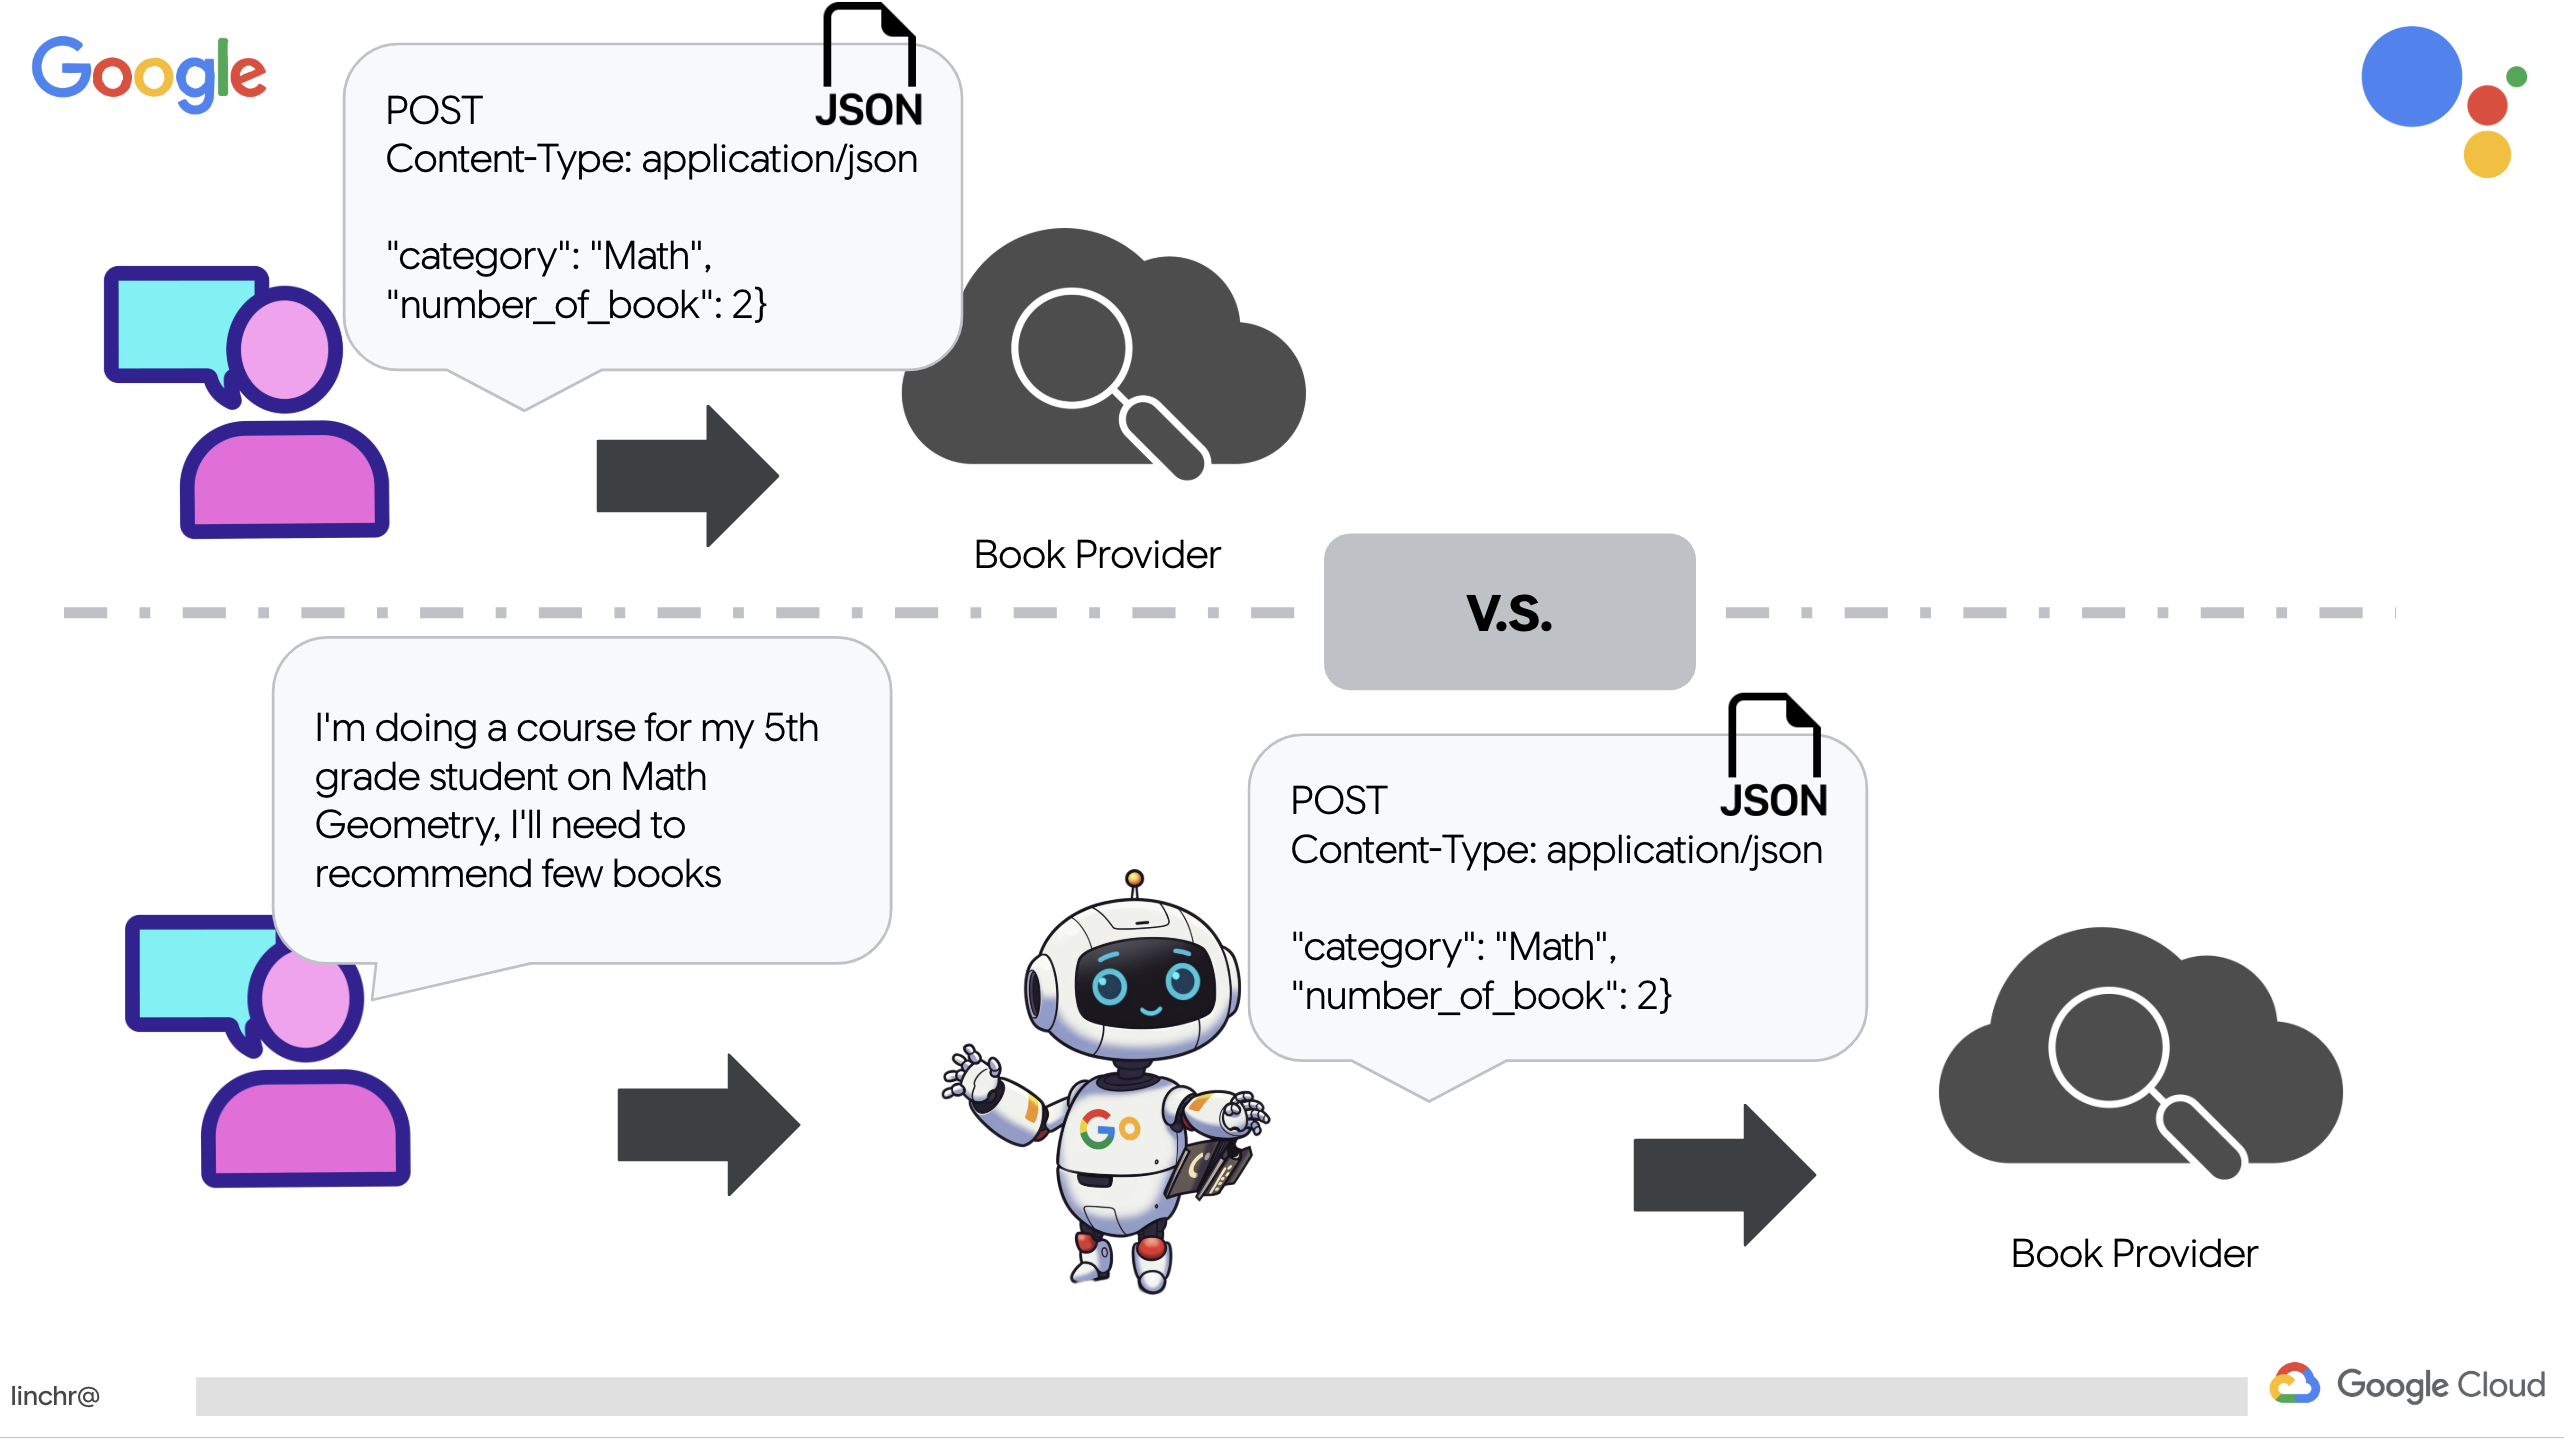
Получение рекомендаций по книгам из API
Для начала давайте создадим инструмент, который получает рекомендации по книгам из API поставщика книг, развернутого в предыдущем разделе. Это демонстрирует, как агент может использовать существующие сервисы.
В редакторе Cloud Shell откройте проект aidemy-bootstrap , который вы клонировали в предыдущем разделе.
👉Отредактируйте файл book.py в папке planner и вставьте следующий код в конец файла :
def recommend_book(query: str):
    """
    Get a list of recommended book from an API endpoint

    Args:
        query: User's request string
    """

    region = get_next_region();
    llm = VertexAI(model_name="gemini-1.5-pro", location=region)

    query = f"""The user is trying to plan a education course, you are the teaching assistant. Help define the category of what the user requested to teach, respond the categroy with no more than two word.

    user request:   {query}
    """
    print(f"-------->{query}")
    response = llm.invoke(query)
    print(f"CATEGORY RESPONSE------------>: {response}")

    # call this using python and parse the json back to dict
    category = response.strip()

    headers = {"Content-Type": "application/json"}
    data = {"category": category, "number_of_book": 2}

    books = requests.post(BOOK_PROVIDER_URL, headers=headers, json=data)

    return books.text

if __name__ == "__main__":
    print(recommend_book("I'm doing a course for my 5th grade student on Math Geometry, I'll need to recommend few books come up with a teach plan, few quizes and also a homework assignment."))
Объяснение:
- recommend_book(query: str) : Эта функция принимает в качестве входных данных запрос пользователя.
- Взаимодействие с LLM : Здесь используется LLM для извлечения категории из запроса. Это демонстрирует, как можно использовать LLM для создания параметров для инструментов.
- Вызов API : Он отправляет POST-запрос к API поставщика книг, передавая категорию и желаемое количество книг.
👉Чтобы протестировать эту новую функцию, установите переменную окружения и выполните команду:
gcloud config set project $(cat ~/project_id.txt)
export PROJECT_ID=$(gcloud config get project)
cd ~/aidemy-bootstrap/planner/
export BOOK_PROVIDER_URL=$(gcloud run services describe book-provider --region=us-central1 --project=$PROJECT_ID --format="value(status.url)")
👉Установите зависимости и запустите код, чтобы убедиться в его работоспособности:
cd ~/aidemy-bootstrap/planner/
python -m venv env
source env/bin/activate
gcloud config set project $(cat ~/project_id.txt)
export PROJECT_ID=$(gcloud config get project)
pip install -r requirements.txt
python book.py
Вы должны увидеть JSON-строку, содержащую рекомендации по книгам, полученные из API поставщика книг. Результаты генерируются случайным образом. Ваши книги могут отличаться, но вы должны получить две рекомендации по книгам в формате JSON.
[{"author":"Anya Sharma","bookname":"Echoes of the Singularity","publisher":"NovaLight Publishing","publishing_date":"2077-03-15"},{"author":"Anya Sharma","bookname":"Echoes of the Quantum Dawn","publisher":"Nova Genesis Publishing","publishing_date":"2077-03-15"}]
Если вы видите это, значит, первый инструмент работает правильно!
Вместо того чтобы явно создавать вызов RESTful API с конкретными параметрами, мы используем естественный язык («Я прохожу курс...»). Затем агент интеллектуально извлекает необходимые параметры (например, категорию) с помощью обработки естественного языка, демонстрируя, как агент использует понимание естественного языка для взаимодействия с API.
👉 Удалите следующий тестовый код из book.py
if __name__ == "__main__":
    print(recommend_book("I'm doing a course for my 5th grade student on Math Geometry, I'll need to recommend few books come up with a teach plan, few quizes and also a homework assignment."))
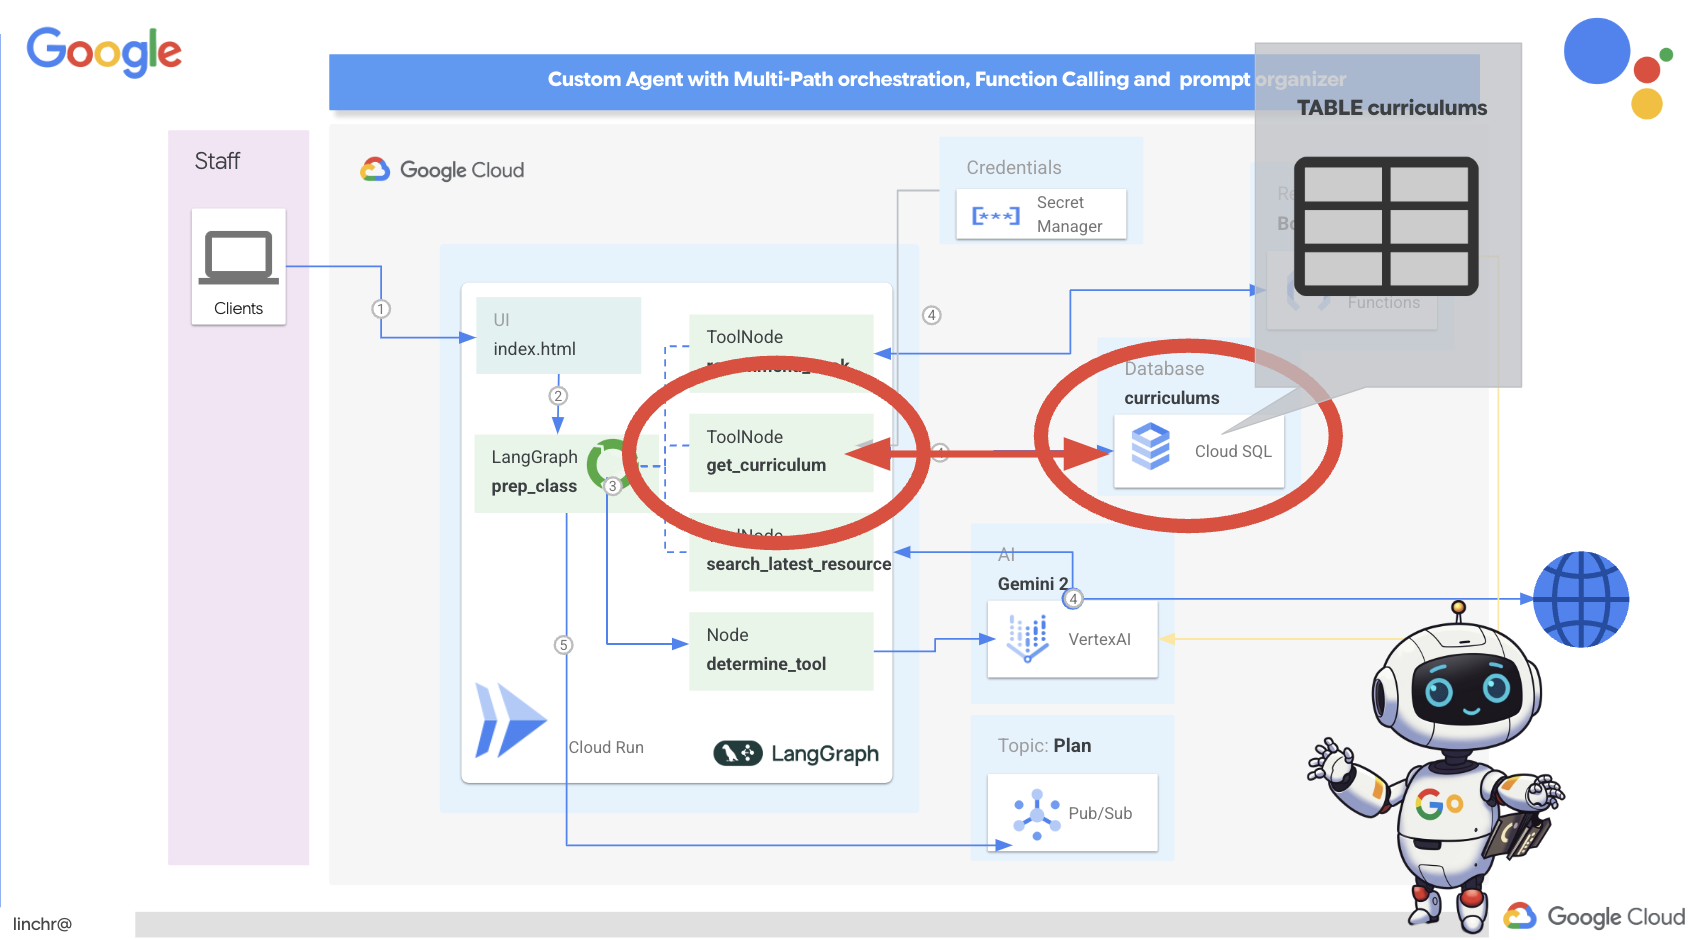
Получение данных об учебной программе из базы данных
Далее мы создадим инструмент, который будет извлекать структурированные данные об учебной программе из базы данных Cloud SQL PostgreSQL. Это позволит агенту получить доступ к надежному источнику информации для планирования уроков.
Помните созданный вами на предыдущем шаге экземпляр aidemy Cloud SQL? Вот где он будет использоваться.
👉 В терминале выполните следующую команду, чтобы создать базу данных с именем aidemy-db в новом экземпляре.
gcloud sql databases create aidemy-db \
    --instance=aidemy
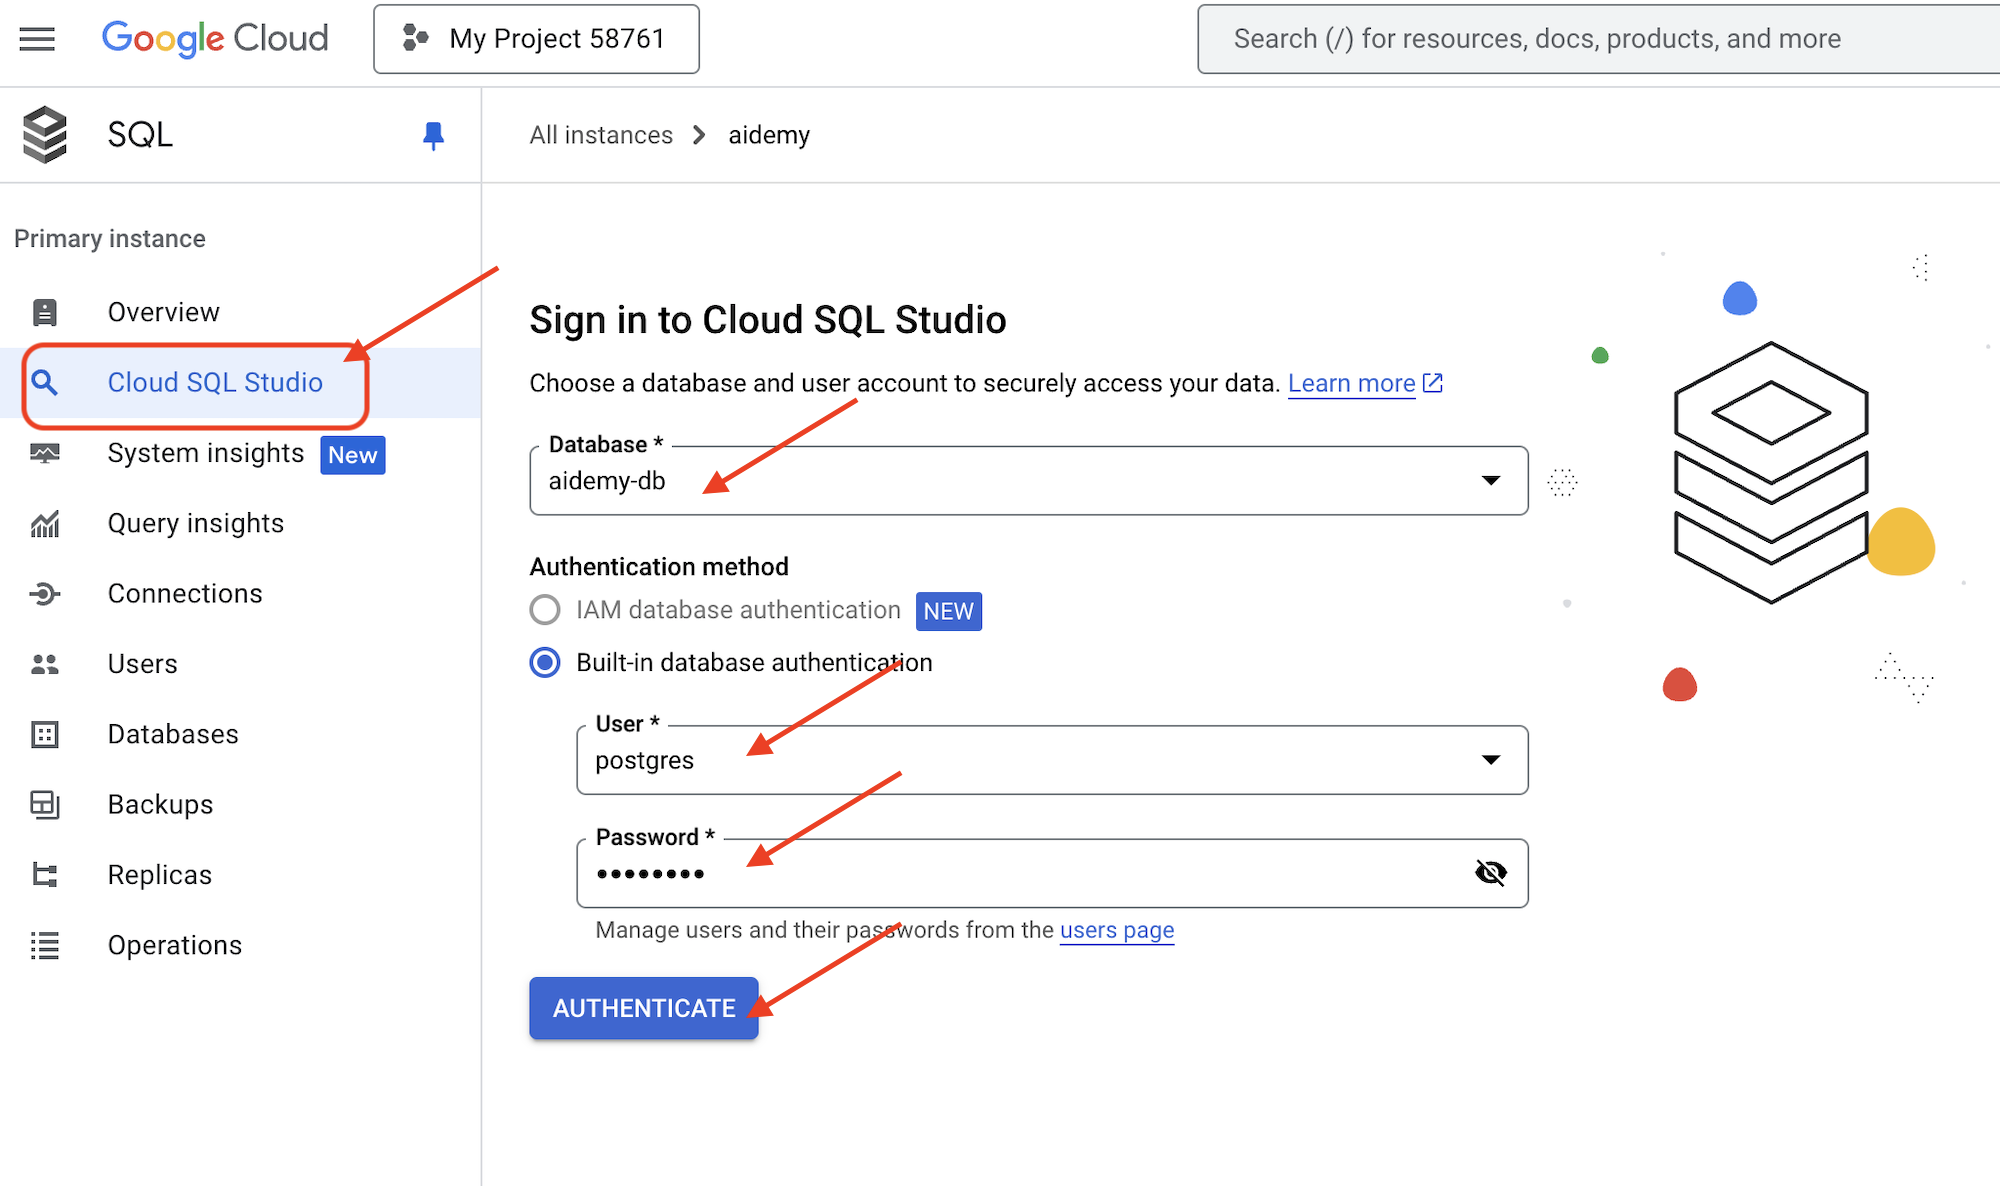
Давайте проверим экземпляр в Cloud SQL в консоли Google Cloud. Вы должны увидеть в списке экземпляр Cloud SQL с именем aidemy .
👉 Щелкните по имени экземпляра, чтобы просмотреть его подробные сведения. 👉 На странице с подробными сведениями об экземпляре Cloud SQL щелкните Cloud SQL Studio в левом навигационном меню. Откроется новая вкладка.
Выберите aidemy-db в качестве базы данных. Введите postgres в качестве пользователя и 1234qwer в качестве пароля .
Нажмите «Аутентифицировать»
👉В редакторе запросов SQL Studio перейдите на вкладку «Редактор 1» и вставьте следующий SQL-код:
CREATE TABLE curriculums (
    id SERIAL PRIMARY KEY,
    year INT,
    subject VARCHAR(255),
    description TEXT
);

-- Inserting detailed curriculum data for different school years and subjects
INSERT INTO curriculums (year, subject, description) VALUES
-- Year 5
(5, 'Mathematics', 'Introduction to fractions, decimals, and percentages, along with foundational geometry and problem-solving techniques.'),
(5, 'English', 'Developing reading comprehension, creative writing, and basic grammar, with a focus on storytelling and poetry.'),
(5, 'Science', 'Exploring basic physics, chemistry, and biology concepts, including forces, materials, and ecosystems.'),
(5, 'Computer Science', 'Basic coding concepts using block-based programming and an introduction to digital literacy.'),

-- Year 6
(6, 'Mathematics', 'Expanding on fractions, ratios, algebraic thinking, and problem-solving strategies.'),
(6, 'English', 'Introduction to persuasive writing, character analysis, and deeper comprehension of literary texts.'),
(6, 'Science', 'Forces and motion, the human body, and introductory chemical reactions with hands-on experiments.'),
(6, 'Computer Science', 'Introduction to algorithms, logical reasoning, and basic text-based programming (Python, Scratch).'),

-- Year 7
(7, 'Mathematics', 'Algebraic expressions, geometry, and introduction to statistics and probability.'),
(7, 'English', 'Analytical reading of classic and modern literature, essay writing, and advanced grammar skills.'),
(7, 'Science', 'Introduction to cells and organisms, chemical reactions, and energy transfer in physics.'),
(7, 'Computer Science', 'Building on programming skills with Python, introduction to web development, and cyber safety.');
Этот SQL-код создает таблицу с именем curriculums и вставляет в нее некоторые примерные данные.
👉 Нажмите «Выполнить» , чтобы запустить SQL-код. Вы должны увидеть сообщение с подтверждением успешного выполнения запросов.
👉 Разверните проводник, найдите только что созданную таблицу curriculums и нажмите «Запрос» . Откроется новая вкладка редактора с сгенерированным для вас SQL-запросом.
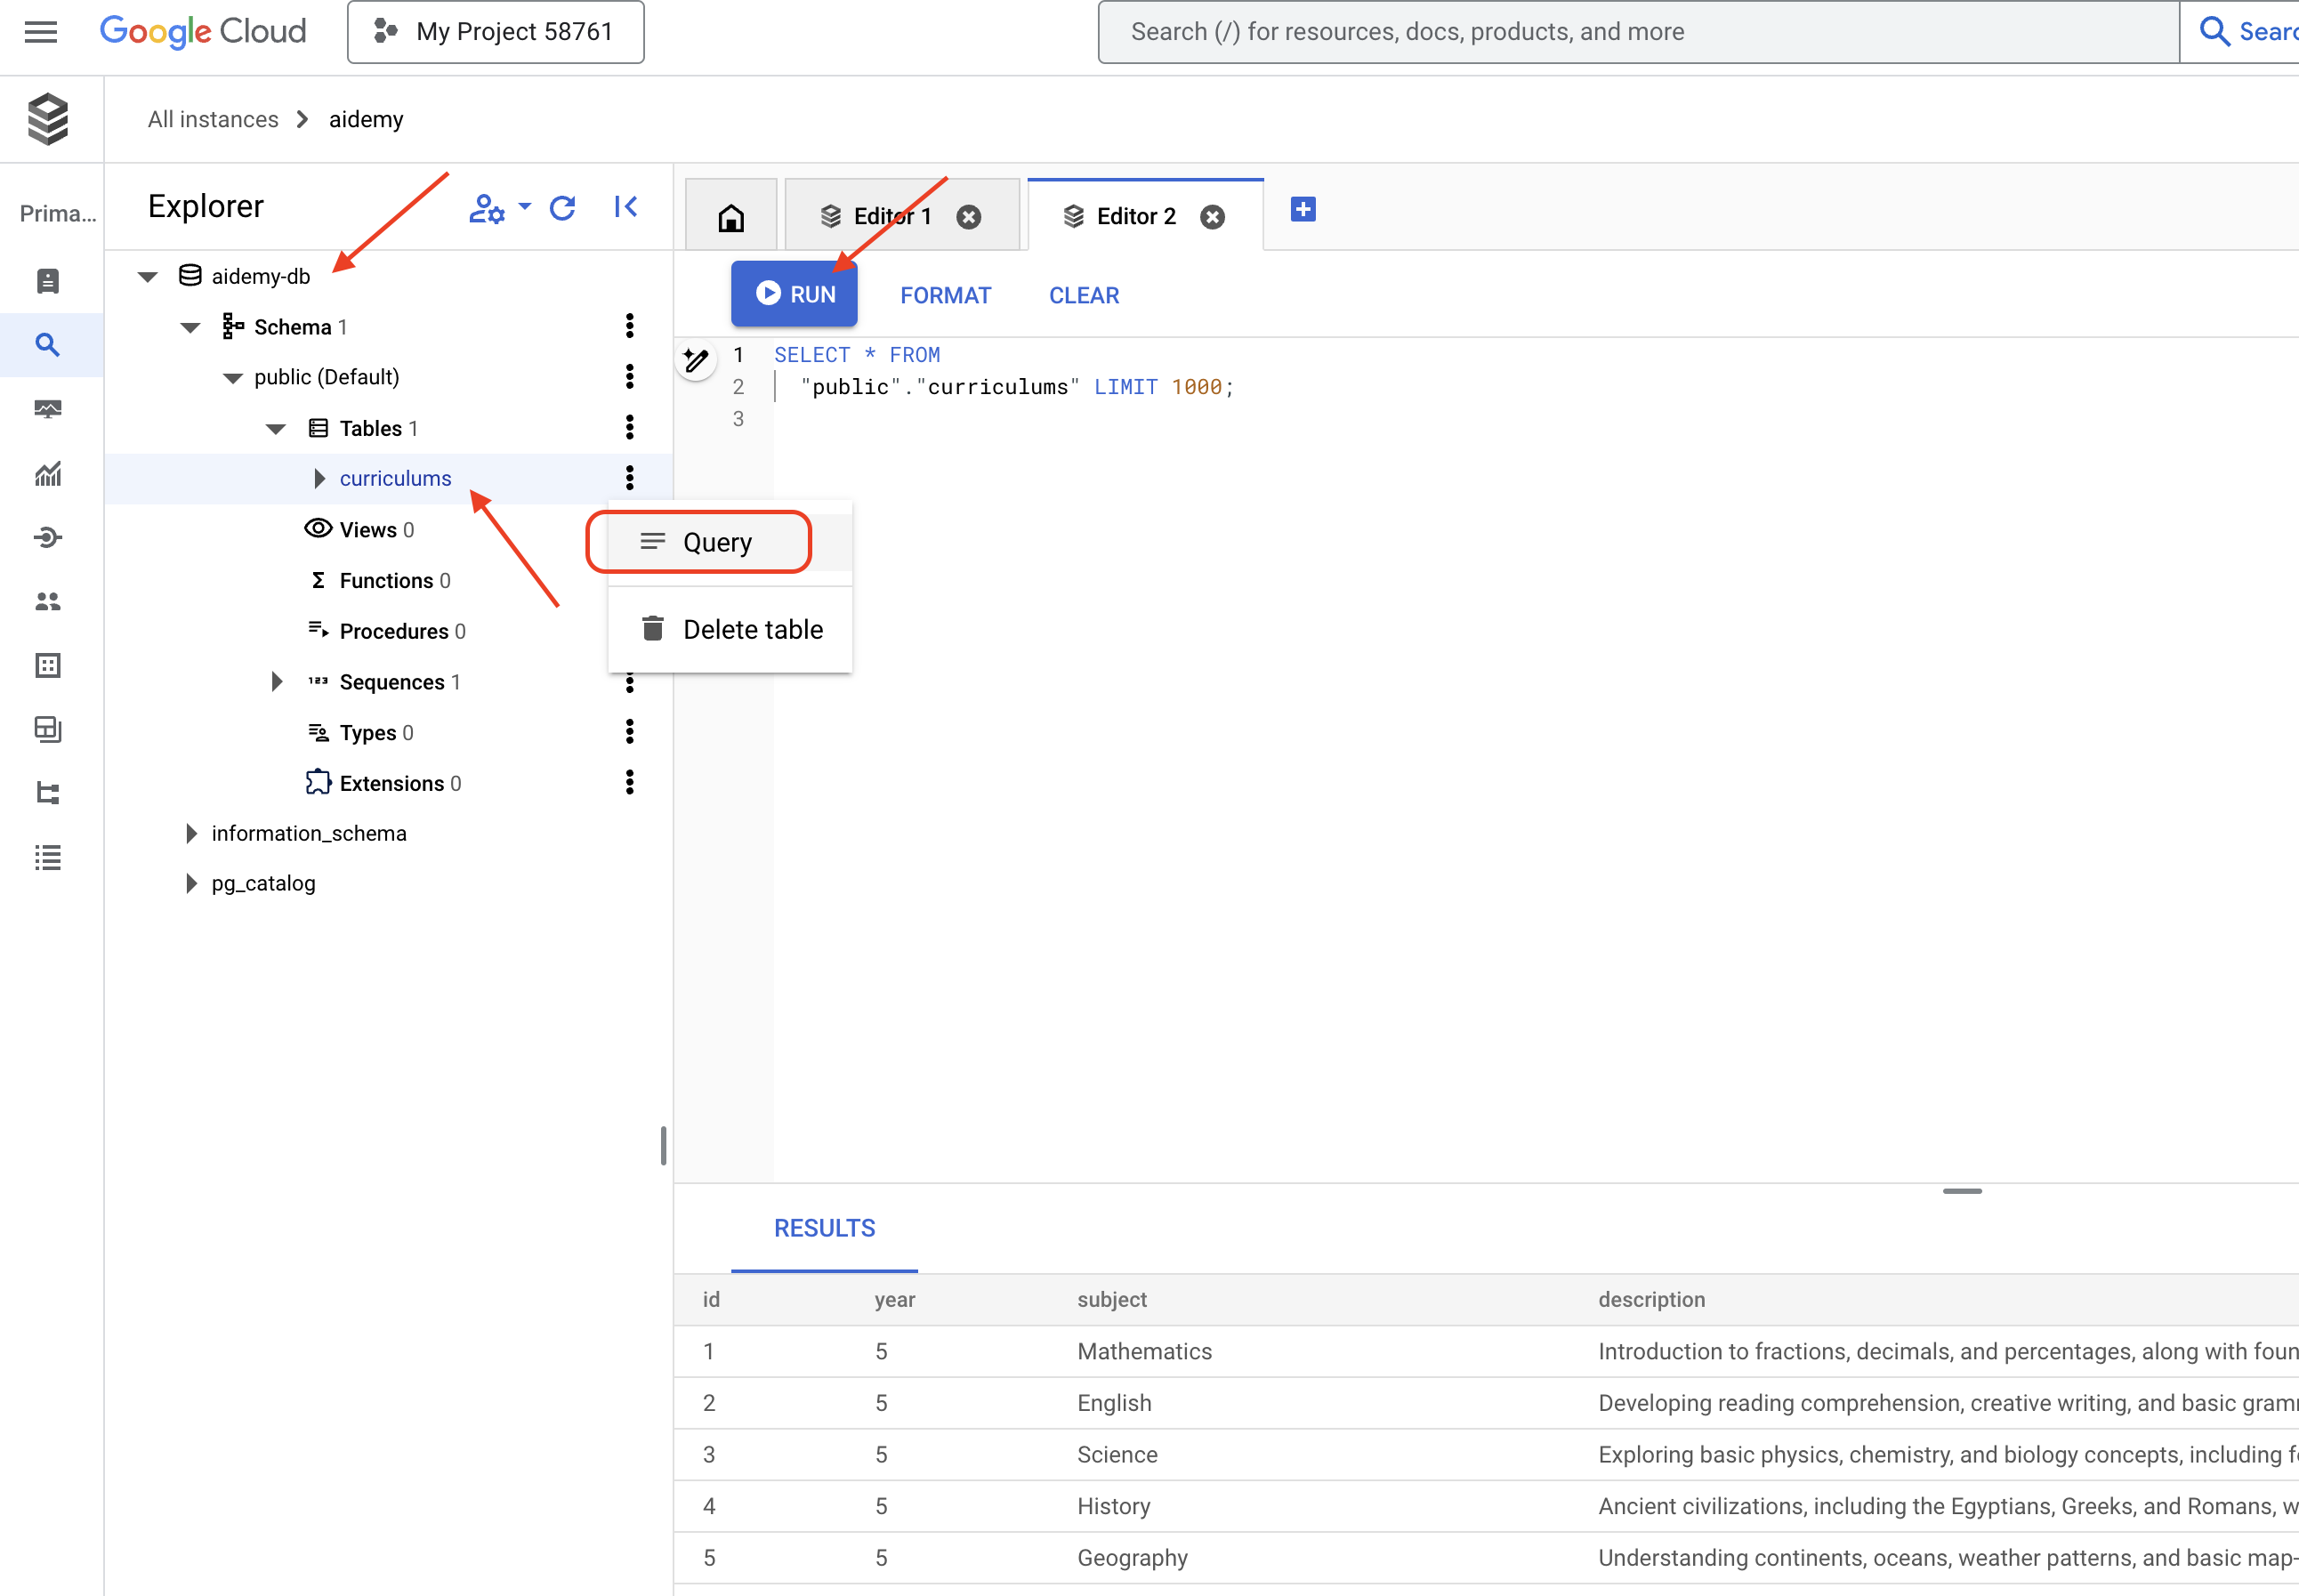
SELECT * FROM
  "public"."curriculums" LIMIT 1000;
👉Нажмите «Выполнить» .
В таблице результатов должны отобразиться строки данных, которые вы вставили на предыдущем шаге, что подтвердит правильность создания таблицы и данных.
Теперь, когда вы успешно создали базу данных с заполненными примерами учебных планов, мы разработаем инструмент для их извлечения.
👉В облачном редакторе кода отредактируйте файл curriculums.py в папке aidemy-bootstrap и вставьте следующий код в конец файла :
def connect_with_connector() -> sqlalchemy.engine.base.Engine:

    db_user = os.environ["DB_USER"]
    db_pass = os.environ["DB_PASS"]
    db_name = os.environ["DB_NAME"]

    print(f"--------------------------->db_user: {db_user!r}")
    print(f"--------------------------->db_pass: {db_pass!r}")
    print(f"--------------------------->db_name: {db_name!r}")

    connector = Connector()

    pool = sqlalchemy.create_engine(
        "postgresql+pg8000://",
        creator=lambda: connector.connect(
            instance_connection_name,
            "pg8000",
            user=db_user,
            password=db_pass,
            db=db_name,
        ),
        pool_size=2,
        max_overflow=2,
        pool_timeout=30,  # 30 seconds
        pool_recycle=1800,  # 30 minutes
    )
    return pool

def get_curriculum(year: int, subject: str):
    """
    Get school curriculum

    Args:
        subject: User's request subject string
        year: User's request year int
    """
    try:
        stmt = sqlalchemy.text(
            "SELECT description FROM curriculums WHERE year = :year AND subject = :subject"
        )

        with db.connect() as conn:
            result = conn.execute(stmt, parameters={"year": year, "subject": subject})
            row = result.fetchone()
        if row:
            return row[0]
        else:
            return None

    except Exception as e:
        print(e)
        return None

db = connect_with_connector()
Объяснение:
- Переменные среды : Код получает учетные данные базы данных и информацию о подключении из переменных среды (подробнее об этом ниже).
- connect_with_connector() : Эта функция использует Cloud SQL Connector для установления защищенного соединения с базой данных.
- Функция `get_curriculum(year: int, subject: str) ` принимает в качестве входных данных год и предмет, выполняет запрос к таблице учебных программ и возвращает соответствующее описание учебной программы.
👉Прежде чем запустить код, необходимо установить некоторые переменные окружения. В терминале выполните следующую команду:
gcloud config set project $(cat ~/project_id.txt)
export PROJECT_ID=$(gcloud config get project)
export INSTANCE_NAME="aidemy"
export REGION="us-central1"
export DB_USER="postgres"
export DB_PASS="1234qwer"
export DB_NAME="aidemy-db"
👉Для проверки добавьте следующий код в конец файла curriculums.py :
if __name__ == "__main__":
    print(get_curriculum(6, "Mathematics"))
👉Запустите код:
cd ~/aidemy-bootstrap/planner/
source env/bin/activate
python curriculums.py
На консоли должно отобразиться описание учебной программы по математике для 6-го класса.
Expanding on fractions, ratios, algebraic thinking, and problem-solving strategies.
Если вы видите описание учебной программы, значит, инструмент работы с базой данных работает корректно! Если скрипт всё ещё запущен, остановите его, нажав Ctrl+C .
👉 Удалите следующий тестовый код из файла curriculums.py
if __name__ == "__main__":
    print(get_curriculum(6, "Mathematics"))
👉Выйдите из виртуальной среды, в терминале выполните:
deactivate
6. Инструменты для создания: доступ к информации в режиме реального времени через Интернет.
Наконец, мы создадим инструмент, который будет использовать интеграцию Gemini 2 и Google Search для доступа к информации в режиме реального времени из интернета. Это поможет агенту оставаться в курсе событий и предоставлять релевантные результаты.
Интеграция Gemini 2 с API поиска Google расширяет возможности агентов, предоставляя более точные и контекстно релевантные результаты поиска. Это позволяет агентам получать доступ к актуальной информации и основывать свои ответы на реальных данных, сводя к минимуму ошибки. Улучшенная интеграция API также способствует более естественным запросам, позволяя агентам формулировать сложные и детализированные поисковые запросы.
Эта функция принимает на вход поисковый запрос, учебный план, предмет и год обучения и использует API Gemini и инструмент поиска Google для извлечения релевантной информации из интернета. Если присмотреться, то окажется, что она использует SDK Google Generative AI для вызова функций без применения каких-либо других фреймворков.
👉Отредактируйте search.py в папке aidemy-bootstrap и вставьте следующий код в конец файла :
model_id = "gemini-2.0-flash-001"

google_search_tool = Tool(
    google_search = GoogleSearch()
)

def search_latest_resource(search_text: str, curriculum: str, subject: str, year: int):
    """
    Get latest information from the internet

    Args:
        search_text: User's request category   string
        subject: "User's request subject" string
        year: "User's request year"  integer
    """
    search_text = "%s in the context of year %d and subject %s with following curriculum detail %s " % (search_text, year, subject, curriculum)
    region = get_next_region()
    client = genai.Client(vertexai=True, project=PROJECT_ID, location=region)
    print(f"search_latest_resource text-----> {search_text}")
    response = client.models.generate_content(
        model=model_id,
        contents=search_text,
        config=GenerateContentConfig(
            tools=[google_search_tool],
            response_modalities=["TEXT"],
        )
    )
    print(f"search_latest_resource response-----> {response}")
    return response

if __name__ == "__main__":
  response = search_latest_resource("What are the syllabus for Year 6 Mathematics?", "Expanding on fractions, ratios, algebraic thinking, and problem-solving strategies.", "Mathematics", 6)
  for each in response.candidates[0].content.parts:
    print(each.text)
Объяснение:
- Определение инструмента - google_search_tool : Оборачивание объекта GoogleSearch в инструмент.
- search_latest_resource(search_text: str, subject: str, year: int) : Эта функция принимает в качестве входных данных поисковый запрос, тему и год и использует API Gemini для выполнения поиска в Google.
- GenerateContentConfig : Указывает, что у объекта есть доступ к инструменту GoogleSearch.
Модель Gemini внутренне анализирует поисковый текст и определяет, может ли она ответить на вопрос напрямую или ей необходимо использовать инструмент GoogleSearch. Это критически важный шаг в процессе рассуждений LLM. Модель обучена распознавать ситуации, когда необходимы внешние инструменты. Если модель решает использовать инструмент GoogleSearch, фактическое обращение к нему обрабатывается SDK Google Generative AI. SDK принимает решение модели и сгенерированные ею параметры и отправляет их в API поиска Google. Эта часть скрыта от пользователя в коде.
Затем модель Gemini интегрирует результаты поиска в свой ответ. Она может использовать эту информацию для ответа на вопрос пользователя, создания сводки или выполнения какой-либо другой задачи.
👉Для проверки запустите код:
cd ~/aidemy-bootstrap/planner/
gcloud config set project $(cat ~/project_id.txt)
export PROJECT_ID=$(gcloud config get project)
source env/bin/activate
python search.py
Вы должны увидеть ответ от API поиска Gemini, содержащий результаты поиска, относящиеся к «Учебной программе по математике для 5 класса». Точный результат будет зависеть от результатов поиска, но это будет объект JSON с информацией о поисковом запросе.
Если вы видите результаты поиска, значит, инструмент поиска Google работает корректно! Если скрипт всё ещё запущен, остановите его, нажав Ctrl+C .
👉И удалите последнюю часть кода.
if __name__ == "__main__":
  response = search_latest_resource("What are the syllabus for Year 6 Mathematics?", "Expanding on fractions, ratios, algebraic thinking, and problem-solving strategies.", "Mathematics", 6)
  for each in response.candidates[0].content.parts:
    print(each.text)
👉Выйдите из виртуальной среды в терминале, выполнив команду:
deactivate
Поздравляем! Вы создали три мощных инструмента для своего агента-планировщика: API-коннектор, коннектор к базе данных и инструмент поиска Google. Эти инструменты позволят агенту получить доступ к информации и возможностям, необходимым для создания эффективных учебных планов.
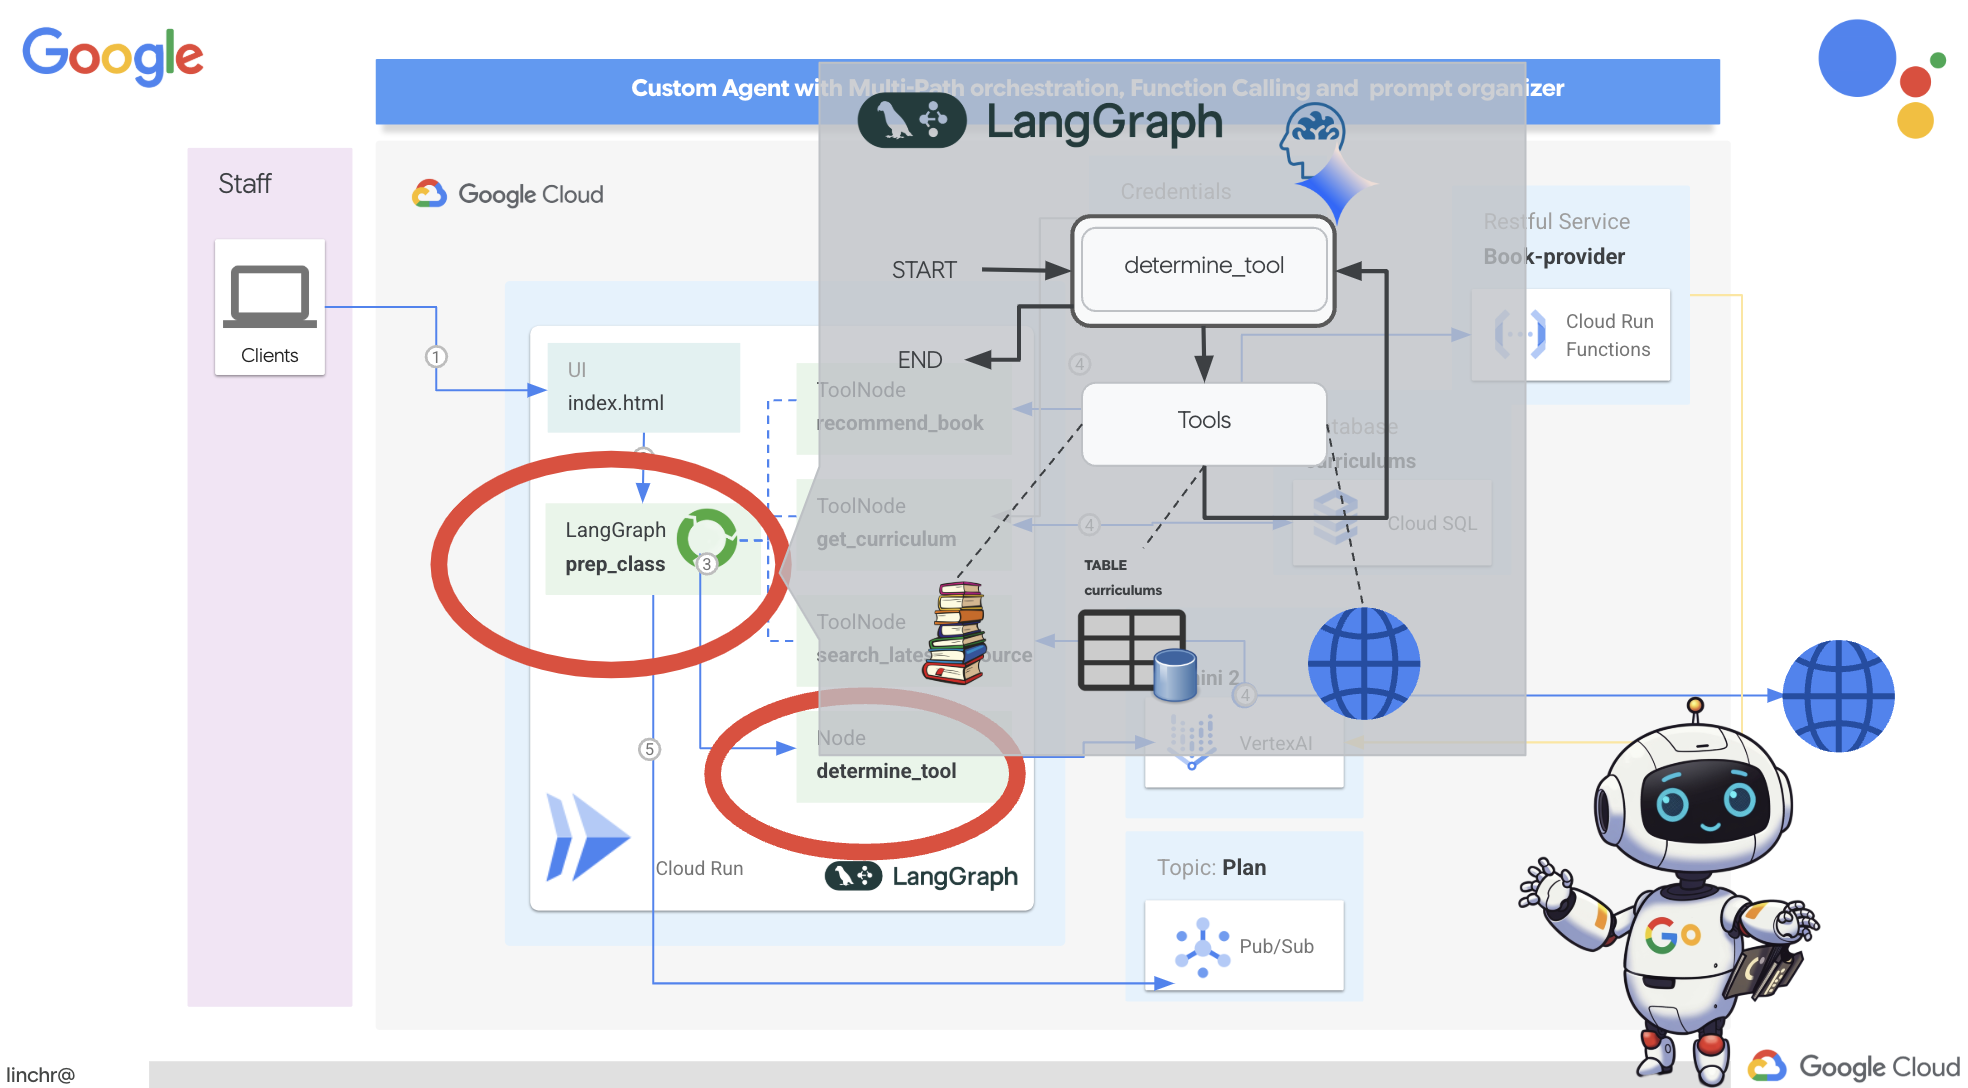
7. Организация работы с LangGraph
Теперь, когда мы создали свои индивидуальные инструменты, пришло время объединить их с помощью LangGraph. Это позволит нам создать более сложный агент-«планировщик», который сможет интеллектуально решать, какие инструменты использовать и когда, в зависимости от запроса пользователя.
LangGraph — это библиотека Python, разработанная для упрощения создания многопользовательских приложений с сохранением состояния, использующих большие языковые модели (LLM). Рассматривайте её как фреймворк для организации сложных диалогов и рабочих процессов с участием LLM, инструментов и других агентов.
Ключевые понятия:
- Структура графа: LangGraph представляет логику вашего приложения в виде ориентированного графа. Каждый узел графа представляет собой шаг в процессе (например, вызов LLM, вызов инструмента, проверка условия). Ребра определяют поток выполнения между узлами.
- Состояние: LangGraph управляет состоянием вашего приложения по мере его перемещения по графу. Это состояние может включать такие переменные, как ввод пользователя, результаты вызовов инструментов, промежуточные выходные данные от LLM-модулей и любую другую информацию, которую необходимо сохранить между шагами.
- Узлы: Каждый узел представляет собой вычисление или взаимодействие. Они могут быть:
- Узлы инструментов: Использование инструмента (например, выполнение веб-поиска, запрос к базе данных).
- Функциональные узлы: Выполнение функции Python.
- Ребра: соединяют узлы, определяя поток выполнения. Они могут быть:
- Прямые ребра: простой, безусловный поток от одного узла к другому.
- Условные ребра: Поток событий зависит от результата выполнения условного узла.
Для реализации оркестровки мы будем использовать LangGraph. Давайте отредактируем файл aidemy.py в папке aidemy-bootstrap чтобы определить нашу логику LangGraph.
👉 Добавьте следующий код в конец
aidemy.py :
tools = [get_curriculum, search_latest_resource, recommend_book]

def determine_tool(state: MessagesState):
    llm = ChatVertexAI(model_name="gemini-2.0-flash-001", location=get_next_region())
    sys_msg = SystemMessage(
                    content=(
                        f"""You are a helpful teaching assistant that helps gather all needed information.
                            Your ultimate goal is to create a detailed 3-week teaching plan.
                            You have access to tools that help you gather information.
                            Based on the user request, decide which tool(s) are needed.

                        """
                    )
                )

    llm_with_tools = llm.bind_tools(tools)
    return {"messages": llm_with_tools.invoke([sys_msg] + state["messages"])}
Эта функция отвечает за получение текущего состояния разговора, передачу системного сообщения модулю LLM, а затем запрашивает у модуля LLM генерацию ответа. Модуль LLM может либо ответить непосредственно пользователю, либо выбрать один из доступных инструментов.
tools : Этот список представляет собой набор инструментов, доступных агенту. Он содержит три функции инструментов, которые мы определили на предыдущих шагах: get_curriculum , search_latest_resource и recommend_book . llm.bind_tools(tools) : Эта функция «привязывает» список инструментов к объекту llm. Привязка инструментов сообщает LLM о доступности этих инструментов и предоставляет LLM информацию о том, как их использовать (например, названия инструментов, принимаемые ими параметры и их функции).
Для реализации оркестровки мы будем использовать LangGraph.
👉 Добавьте следующий код в конец
aidemy.py :
def prep_class(prep_needs):

    builder = StateGraph(MessagesState)
    builder.add_node("determine_tool", determine_tool)
    builder.add_node("tools", ToolNode(tools))

    builder.add_edge(START, "determine_tool")
    builder.add_conditional_edges("determine_tool",tools_condition)
    builder.add_edge("tools", "determine_tool")


    memory = MemorySaver()
    graph = builder.compile(checkpointer=memory)

    config = {"configurable": {"thread_id": "1"}}
    messages = graph.invoke({"messages": prep_needs},config)
    print(messages)
    for m in messages['messages']:
        m.pretty_print()
    teaching_plan_result = messages["messages"][-1].content


    return teaching_plan_result

if __name__ == "__main__":
  prep_class("I'm doing a course for  year 5 on subject Mathematics in Geometry, , get school curriculum, and come up with few books recommendation plus  search latest resources on the internet base on the curriculum outcome. And come up with a 3 week teaching plan")
Объяснение:
-
StateGraph(MessagesState): Создает объектStateGraph.StateGraph— это ключевое понятие в LangGraph. Он представляет рабочий процесс вашего агента в виде графа, где каждый узел графа представляет собой шаг в процессе. Представьте это как определение плана того, как агент будет рассуждать и действовать. - Условное ребро: Аргумент
tools_condition, исходящий из узла"determine_tool", скорее всего, представляет собой функцию, определяющую, по какому ребру следовать, исходя из результата функцииdetermine_tool. Условные ребра позволяют графу разветвляться в зависимости от решения LLM о том, какой инструмент использовать (или отвечать ли пользователю напрямую). Именно здесь вступает в игру "интеллект" агента — он может динамически адаптировать свое поведение в зависимости от ситуации. - Цикл: Добавляет ребро в граф, соединяющее узел
"tools"с узлом"determine_tool". Это создает цикл в графе, позволяя агенту многократно использовать инструменты, пока он не соберет достаточно информации для выполнения задачи и предоставления удовлетворительного ответа. Этот цикл имеет решающее значение для сложных задач, требующих многоэтапного рассуждения и сбора информации.
Теперь давайте протестируем нашего агента-планировщика, чтобы посмотреть, как он координирует работу различных инструментов.
Этот код запустит функцию prep_class с определенным пользовательским вводом, имитируя запрос на создание учебного плана по геометрии для 5-го класса, используя учебную программу, рекомендации по учебникам и новейшие интернет-ресурсы.
👉 Если вы закрыли терминал или переменные окружения больше не установлены, повторно выполните следующие команды в терминале.
export BOOK_PROVIDER_URL=$(gcloud run services describe book-provider --region=us-central1 --project=$PROJECT_ID --format="value(status.url)")
gcloud config set project $(cat ~/project_id.txt)
export PROJECT_ID=$(gcloud config get project)
export INSTANCE_NAME="aidemy"
export REGION="us-central1"
export DB_USER="postgres"
export DB_PASS="1234qwer"
export DB_NAME="aidemy-db"
👉Запустите код:
cd ~/aidemy-bootstrap/planner/
source env/bin/activate
pip install -r requirements.txt
python aidemy.py
Просмотрите лог в терминале. Вы должны увидеть подтверждение того, что агент задействует все три инструмента (получение учебной программы, получение рекомендаций по книгам и поиск последних ресурсов) перед предоставлением окончательного плана обучения. Это демонстрирует, что оркестрация LangGraph работает корректно, и агент разумно использует все доступные инструменты для выполнения запроса пользователя.
================================ Human Message =================================

I'm doing a course for  year 5 on subject Mathematics in Geometry, , get school curriculum, and come up with few books recommendation plus  search latest resources on the internet base on the curriculum outcome. And come up with a 3 week teaching plan
================================== Ai Message ==================================
Tool Calls:
  get_curriculum (xxx)
 Call ID: xxx
  Args:
    year: 5.0
    subject: Mathematics
================================= Tool Message =================================
Name: get_curriculum

Introduction to fractions, decimals, and percentages, along with foundational geometry and problem-solving techniques.
================================== Ai Message ==================================
Tool Calls:
  search_latest_resource (xxxx)
 Call ID: xxxx
  Args:
    year: 5.0
    search_text: Geometry
    curriculum: {"content": "Introduction to fractions, decimals, and percentages, along with foundational geometry and problem-solving techniques."}
    subject: Mathematics
================================= Tool Message =================================
Name: search_latest_resource

candidates=[Candidate(content=Content(parts=[Part(.....) automatic_function_calling_history=[] parsed=None
================================== Ai Message ==================================
Tool Calls:
  recommend_book (93b48189-4d69-4c09-a3bd-4e60cdc5f1c6)
 Call ID: 93b48189-4d69-4c09-a3bd-4e60cdc5f1c6
  Args:
    query: Mathematics Geometry Year 5
================================= Tool Message =================================
Name: recommend_book

[{.....}]

================================== Ai Message ==================================

Based on the curriculum outcome, here is a 3-week teaching plan for year 5 Mathematics Geometry:

**Week 1: Introduction to Shapes and Properties**
.........
Если скрипт все еще запущен, остановите его, нажав Ctrl+C .
👉 (ЭТОТ ШАГ НЕОБЯЗАТЕЛЕН) замените тестовый код другим приглашением командной строки, для вызова которого потребуются другие инструменты.
if __name__ == "__main__":
  prep_class("I'm doing a course for year 5 on subject Mathematics in Geometry, search latest resources on the internet base on the subject. And come up with a 3 week teaching plan")
👉 Если вы закрыли терминал или переменные окружения больше не установлены, повторно выполните следующие команды.
gcloud config set project $(cat ~/project_id.txt)
export BOOK_PROVIDER_URL=$(gcloud run services describe book-provider --region=us-central1 --project=$PROJECT_ID --format="value(status.url)")
export PROJECT_ID=$(gcloud config get project)
export INSTANCE_NAME="aidemy"
export REGION="us-central1"
export DB_USER="postgres"
export DB_PASS="1234qwer"
export DB_NAME="aidemy-db"
👉 (ЭТОТ ШАГ НЕОБЯЗАТЕЛЕН, выполняйте его ТОЛЬКО ЕСЛИ вы выполнили предыдущий шаг) Запустите код еще раз:
cd ~/aidemy-bootstrap/planner/
source env/bin/activate
python aidemy.py
Что вы заметили на этот раз? Какие инструменты вызвал агент? Вы должны увидеть, что на этот раз агент вызывает только инструмент search_latest_resource. Это потому, что в подсказке не указано, что ему нужны два других инструмента, и наш LLM достаточно умён, чтобы не вызывать другие инструменты.
================================ Human Message =================================

I'm doing a course for  year 5 on subject Mathematics in Geometry, search latest resources on the internet base on the subject. And come up with a 3 week teaching plan
================================== Ai Message ==================================
Tool Calls:
  get_curriculum (xxx)
 Call ID: xxx
  Args:
    year: 5.0
    subject: Mathematics
================================= Tool Message =================================
Name: get_curriculum

Introduction to fractions, decimals, and percentages, along with foundational geometry and problem-solving techniques.
================================== Ai Message ==================================
Tool Calls:
  search_latest_resource (xxx)
 Call ID: xxxx
  Args:
    year: 5.0
    subject: Mathematics
    curriculum: {"content": "Introduction to fractions, decimals, and percentages, along with foundational geometry and problem-solving techniques."}
    search_text: Geometry
================================= Tool Message =================================
Name: search_latest_resource

candidates=[Candidate(content=Content(parts=[Part(.......token_count=40, total_token_count=772) automatic_function_calling_history=[] parsed=None
================================== Ai Message ==================================

Based on the information provided, a 3-week teaching plan for Year 5 Mathematics focusing on Geometry could look like this:

**Week 1:  Introducing 2D Shapes**
........
* Use visuals, manipulatives, and real-world examples to make the learning experience engaging and relevant.
Остановите выполнение скрипта, нажав Ctrl+C .
👉 (НЕ ПРОПУСКАЙТЕ ЭТОТ ШАГ!) Удалите тестовый код, чтобы ваш файл aidemy.py оставался чистым:
if __name__ == "__main__":
  prep_class("I'm doing a course for  year 5 on subject Mathematics in Geometry, search latest resources on the internet base on the subject. And come up with a 3 week teaching plan")
Теперь, когда логика работы нашего агента определена, давайте запустим веб-приложение Flask. Оно предоставит преподавателям привычный интерфейс на основе форм для взаимодействия с агентом. Хотя взаимодействие с чат-ботом распространено в программах магистратуры, мы выбираем традиционный интерфейс отправки форм, поскольку он может быть более интуитивно понятным для многих преподавателей.
👉 Если вы закрыли терминал или переменные окружения больше не установлены, повторно выполните следующие команды.
export BOOK_PROVIDER_URL=$(gcloud run services describe book-provider --region=us-central1 --project=$PROJECT_ID --format="value(status.url)")
gcloud config set project $(cat ~/project_id.txt)
export PROJECT_ID=$(gcloud config get project)
export INSTANCE_NAME="aidemy"
export REGION="us-central1"
export DB_USER="postgres"
export DB_PASS="1234qwer"
export DB_NAME="aidemy-db"
👉 Теперь запустите веб-интерфейс.
cd ~/aidemy-bootstrap/planner/
source env/bin/activate
python app.py
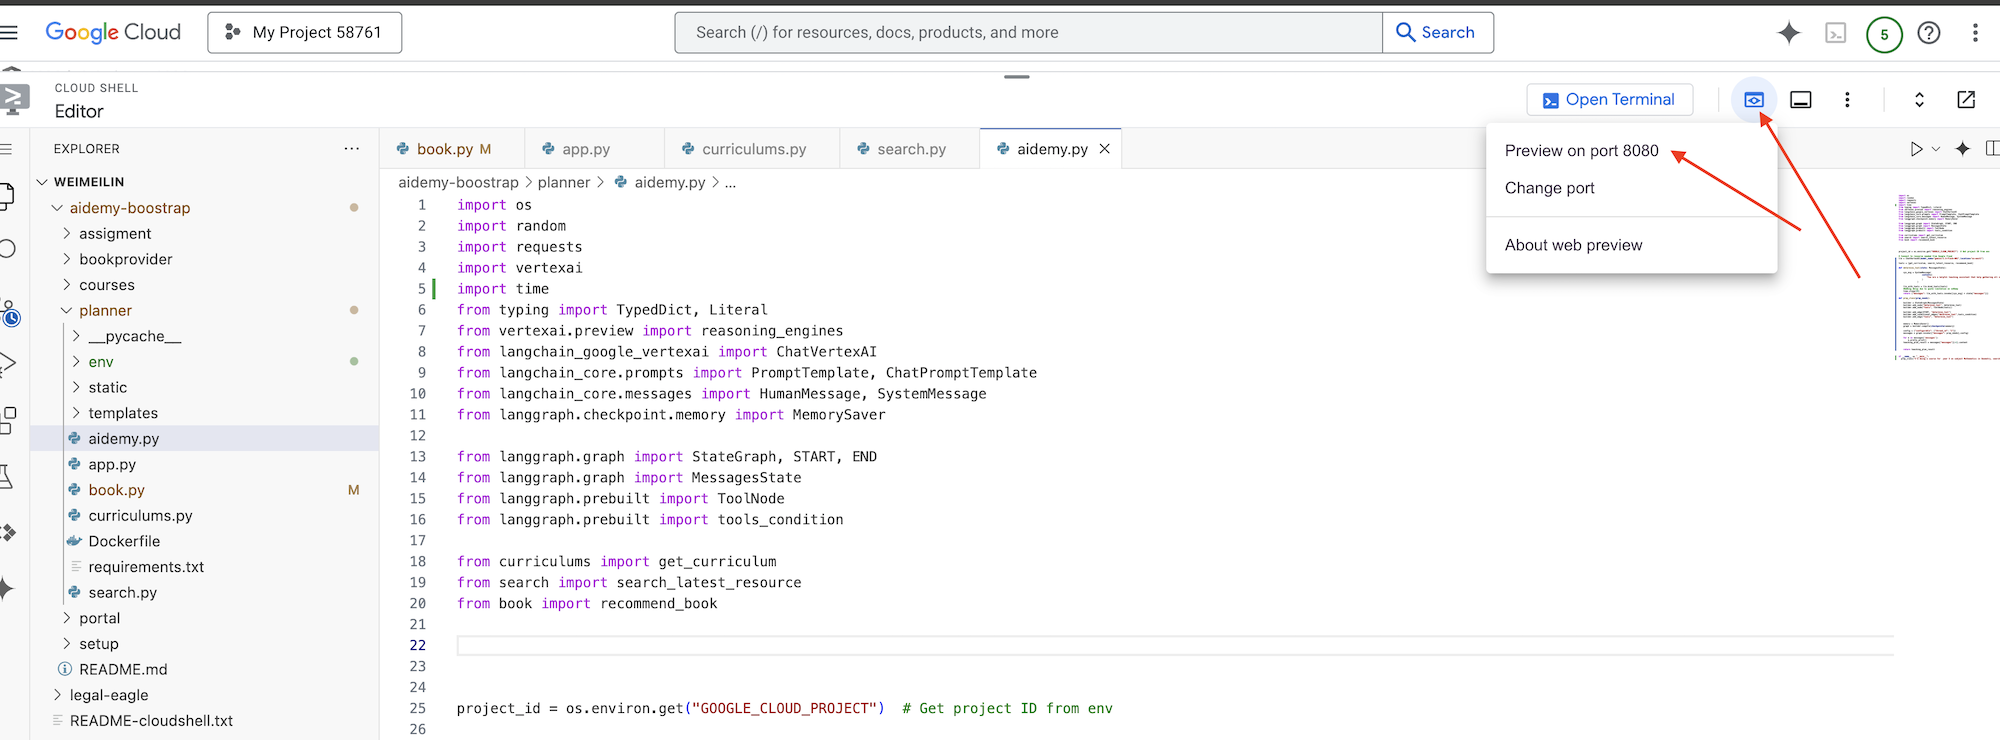
Обратите внимание на сообщения о запуске в выводе терминала Cloud Shell. Flask обычно выводит сообщения, указывающие на то, что он запущен и на каком порту.
Running on http://127.0.0.1:8080
Running on http://127.0.0.1:8080
The application needs to keep running to serve requests.
👉 В меню «Предварительный просмотр веб-страницы» в правом верхнем углу выберите «Предварительный просмотр на порту 8080» . Cloud Shell откроет новую вкладку или окно браузера с предварительным просмотром вашего приложения.
В интерфейсе приложения выберите 5 в качестве года обучения, выберите предмет Mathematics и введите Geometry в поле «Запрос на дополнение».
👉 Если вы покинули пользовательский интерфейс приложения, вернитесь назад, и вы увидите сгенерированный результат.
👉 В терминале остановите выполнение скрипта, нажав Ctrl+C .
👉 В терминале выйдите из виртуальной среды:
deactivate
8. Развертывание агента планировщика в облаке.
Соберите и загрузите образ в реестр.
Пора развернуть это в облаке.
👉 В терминале создайте репозиторий артефактов для хранения образа Docker, который мы собираемся собрать.
gcloud artifacts repositories create agent-repository \
    --repository-format=docker \
    --location=us-central1 \
    --description="My agent repository"
Вы должны увидеть сообщение «Создан репозиторий [agent-repository]».
👉 Выполните следующую команду для сборки образа Docker.
cd ~/aidemy-bootstrap/planner/
gcloud config set project $(cat ~/project_id.txt)
export PROJECT_ID=$(gcloud config get project)
docker build -t gcr.io/${PROJECT_ID}/aidemy-planner .
👉 Нам нужно изменить тег изображения, чтобы оно размещалось в реестре артефактов (Artifact Registry) вместо GCR, и загрузить помеченное изображение в реестр артефактов:
gcloud config set project $(cat ~/project_id.txt)
export PROJECT_ID=$(gcloud config get project)
docker tag gcr.io/${PROJECT_ID}/aidemy-planner us-central1-docker.pkg.dev/${PROJECT_ID}/agent-repository/aidemy-planner
docker push us-central1-docker.pkg.dev/${PROJECT_ID}/agent-repository/aidemy-planner
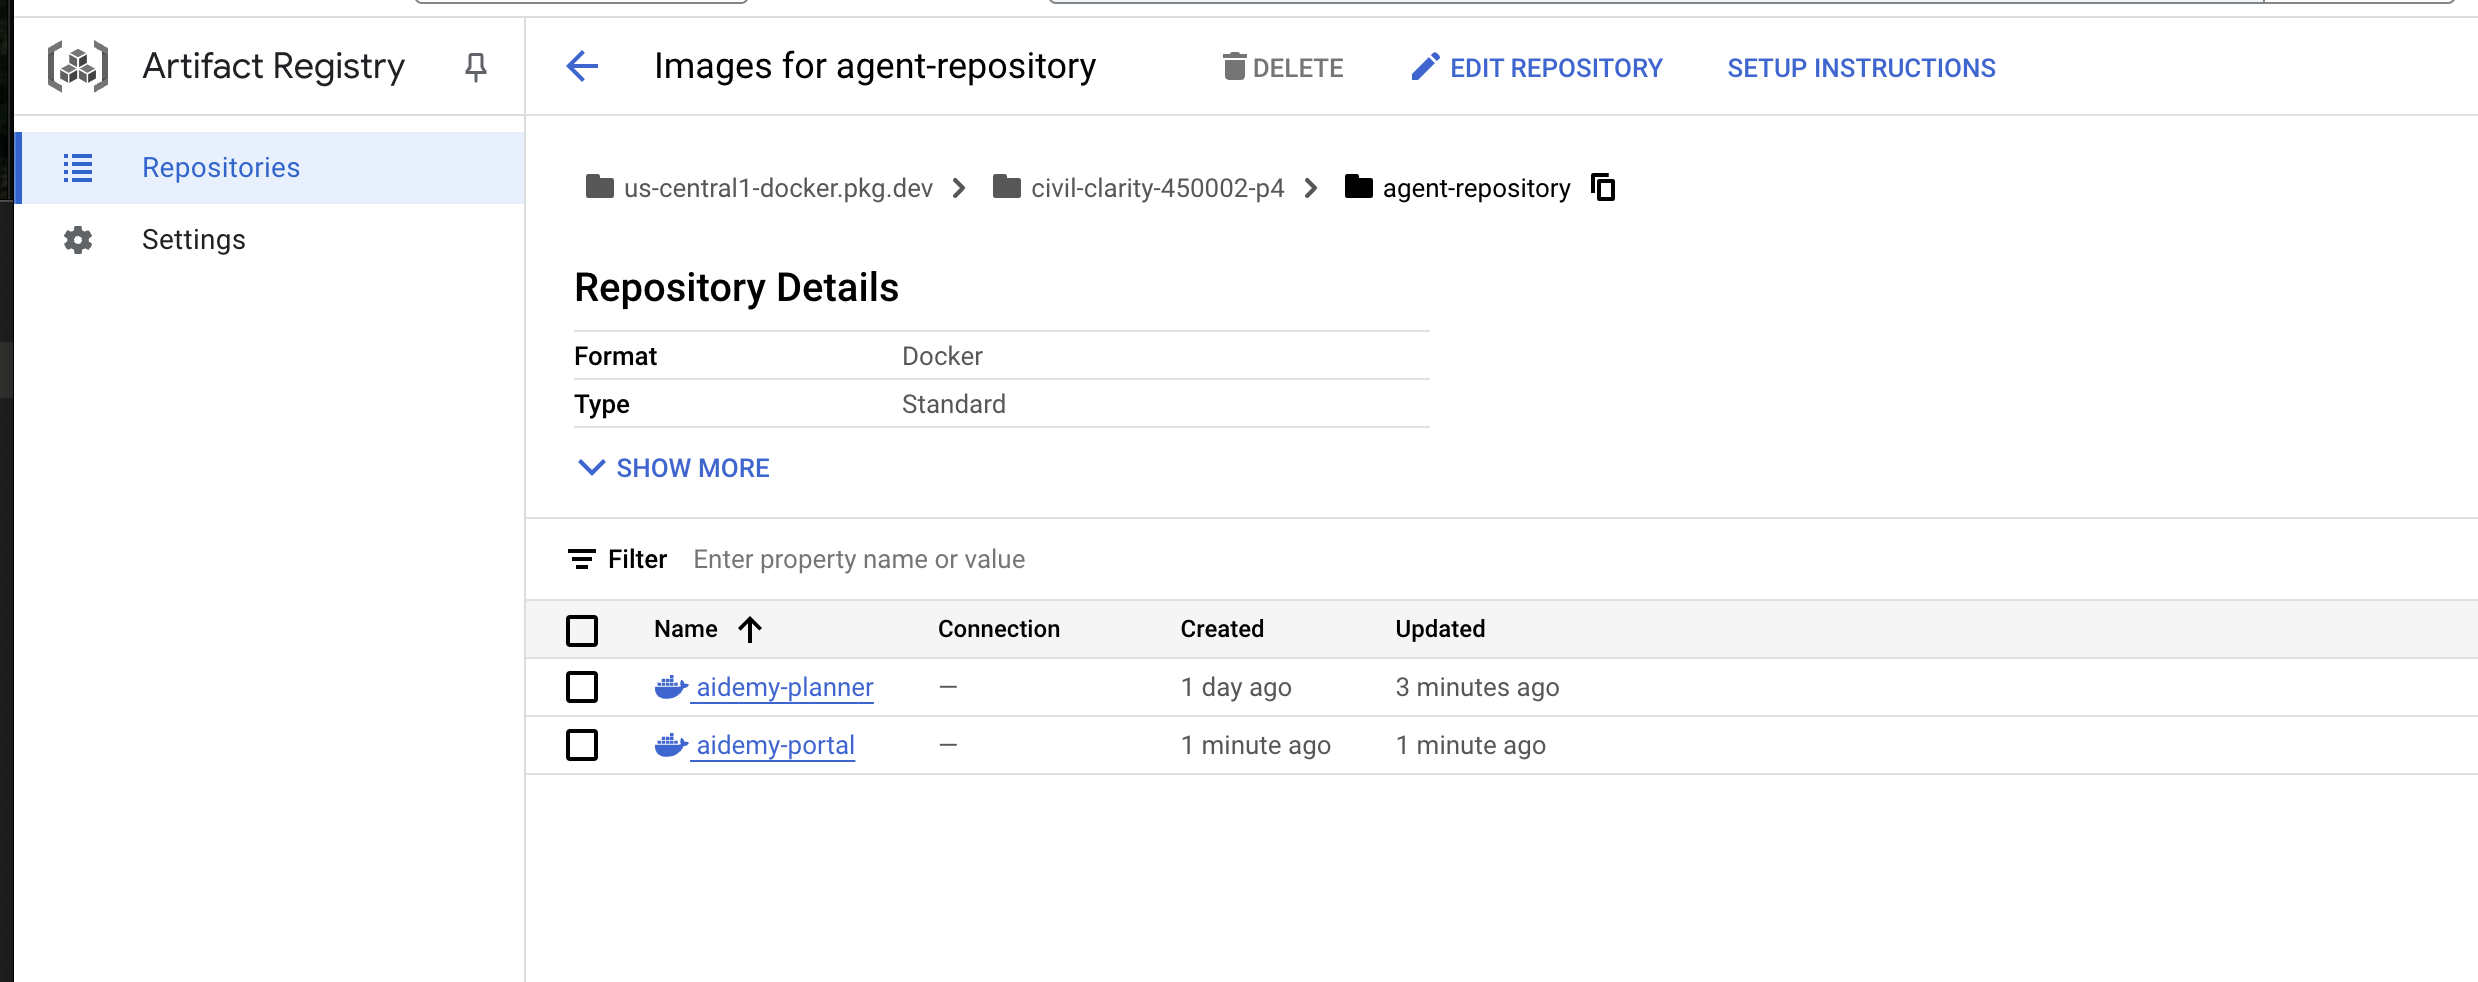
После завершения процесса отправки вы можете убедиться, что образ успешно сохранен в реестре артефактов.
👉 Перейдите в Реестр артефактов в консоли Google Cloud. Образ aidemy-planner вы найдете в репозитории agent-repository . 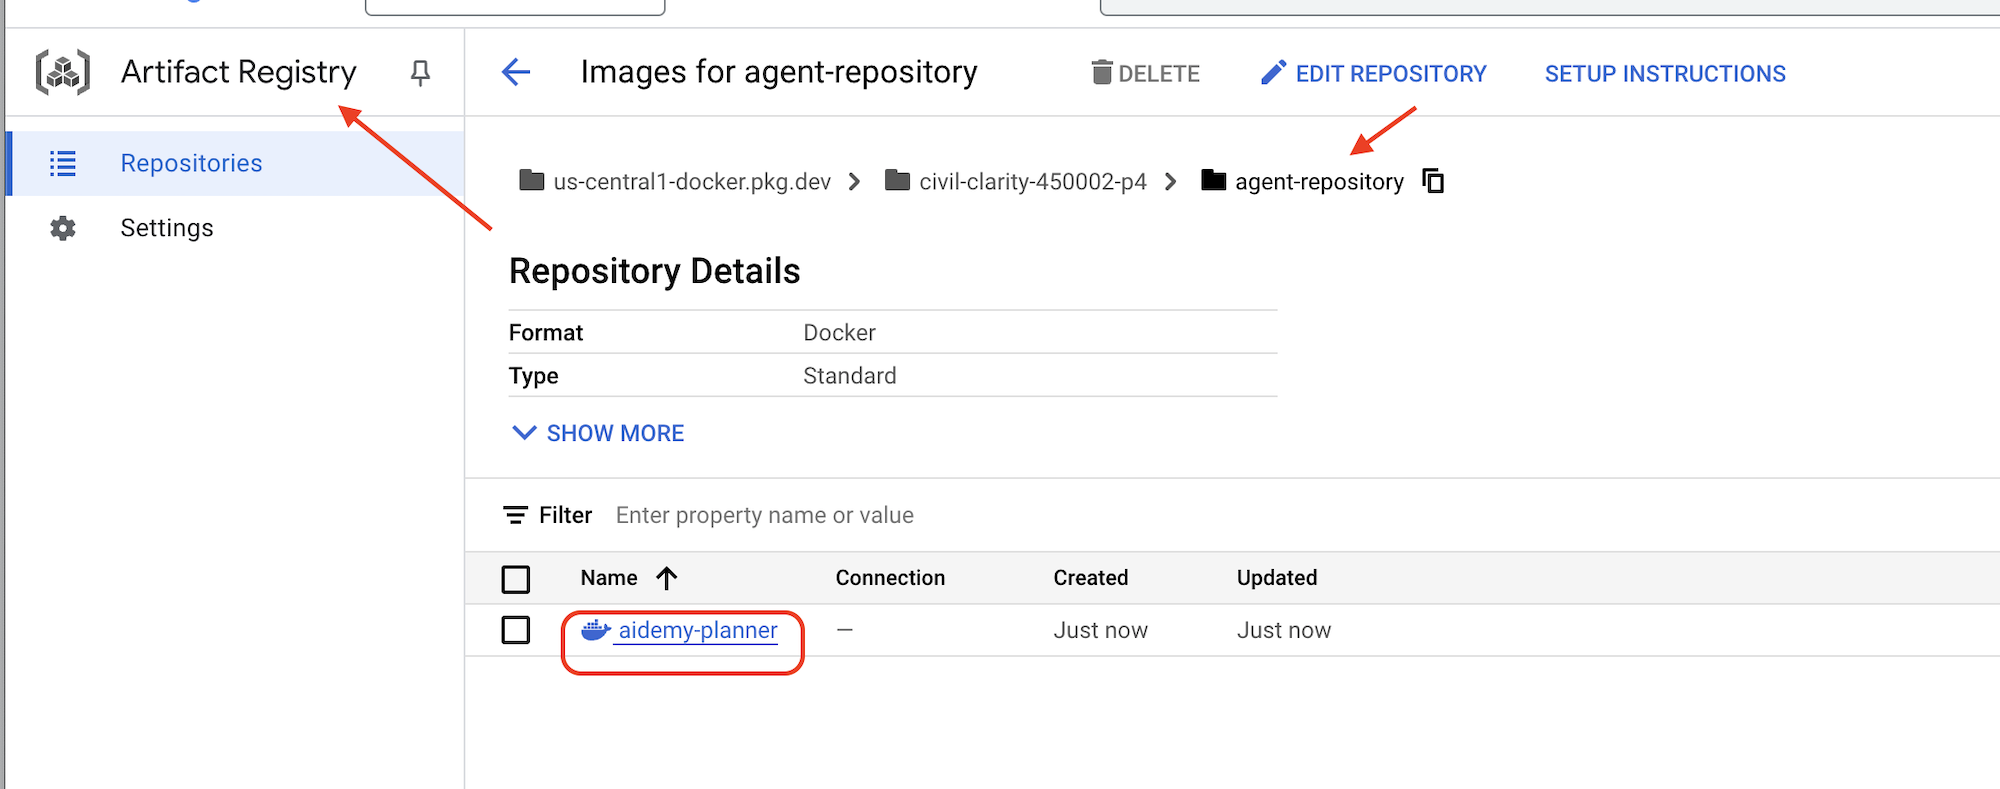
Защита учетных данных базы данных с помощью Secret Manager
Для безопасного управления учетными данными базы данных и доступа к ним мы будем использовать Google Cloud Secret Manager. Это предотвратит жесткое кодирование конфиденциальной информации в коде нашего приложения и повысит уровень безопасности.
Мы создадим отдельные секретные ключи для имени пользователя, пароля и имени базы данных. Такой подход позволит нам управлять каждым учетным данными независимо.
👉 В терминале выполните следующую команду:
gcloud secrets create db-user
printf "postgres" | gcloud secrets versions add db-user --data-file=-

gcloud secrets create db-pass
printf "1234qwer" | gcloud secrets versions add db-pass --data-file=-

gcloud secrets create db-name
printf "aidemy-db" | gcloud secrets versions add db-name --data-file=-
Использование Secret Manager — важный шаг для обеспечения безопасности вашего приложения и предотвращения случайного раскрытия конфиденциальных учетных данных. Это соответствует передовым методам обеспечения безопасности при развертывании в облаке.
Развертывание в облаке. Запуск.
Cloud Run — это полностью управляемая бессерверная платформа, позволяющая быстро и легко развертывать контейнеризированные приложения. Она абстрагирует управление инфраструктурой, позволяя вам сосредоточиться на написании и развертывании кода. Мы будем развертывать наш планировщик как сервис Cloud Run.
👉В консоли Google Cloud перейдите в раздел " Cloud Run ". Нажмите на кнопку "РАЗВЕРНУТЬ КОНТЕЙНЕР " и выберите "СЕРВИС" . Настройте свой сервис Cloud Run:
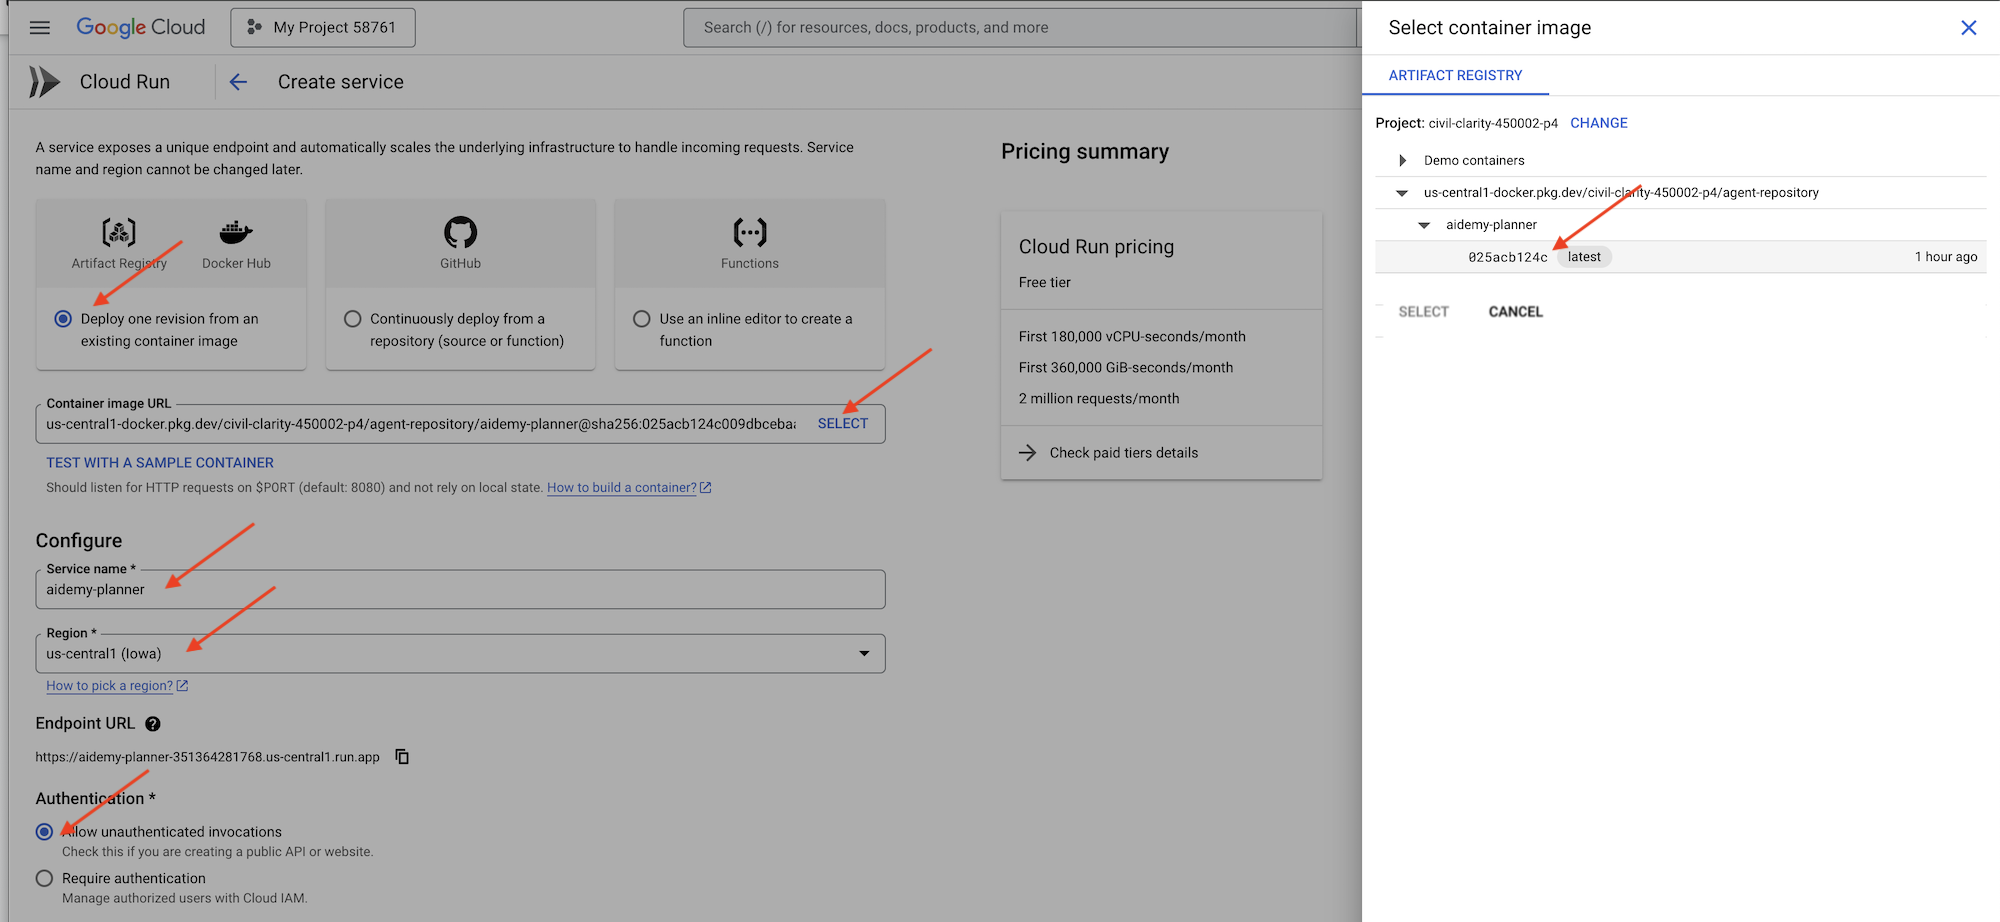
- Образ контейнера : нажмите «Выбрать» в поле URL. Найдите URL-адрес образа, который вы загрузили в реестр артефактов (например, us-central1-docker.pkg.dev/YOUR_PROJECT_ID/agent-repository/aidemy-planner/YOUR_IMG).
- Название сервиса :
aidemy-planner - Регион : Выберите регион
us-central1. - Аутентификация : Для целей этого семинара вы можете разрешить «Разрешить вызовы без аутентификации». В производственной среде, скорее всего, вам потребуется ограничить доступ.
- Разверните раздел «Контейнеры», «Тома», «Сеть», «Безопасность» и установите следующие параметры на вкладке «Контейнеры» : (:
- Вкладка «Настройки»:
- Ресурсы
- Память: 2 ГБ
- Ресурсы
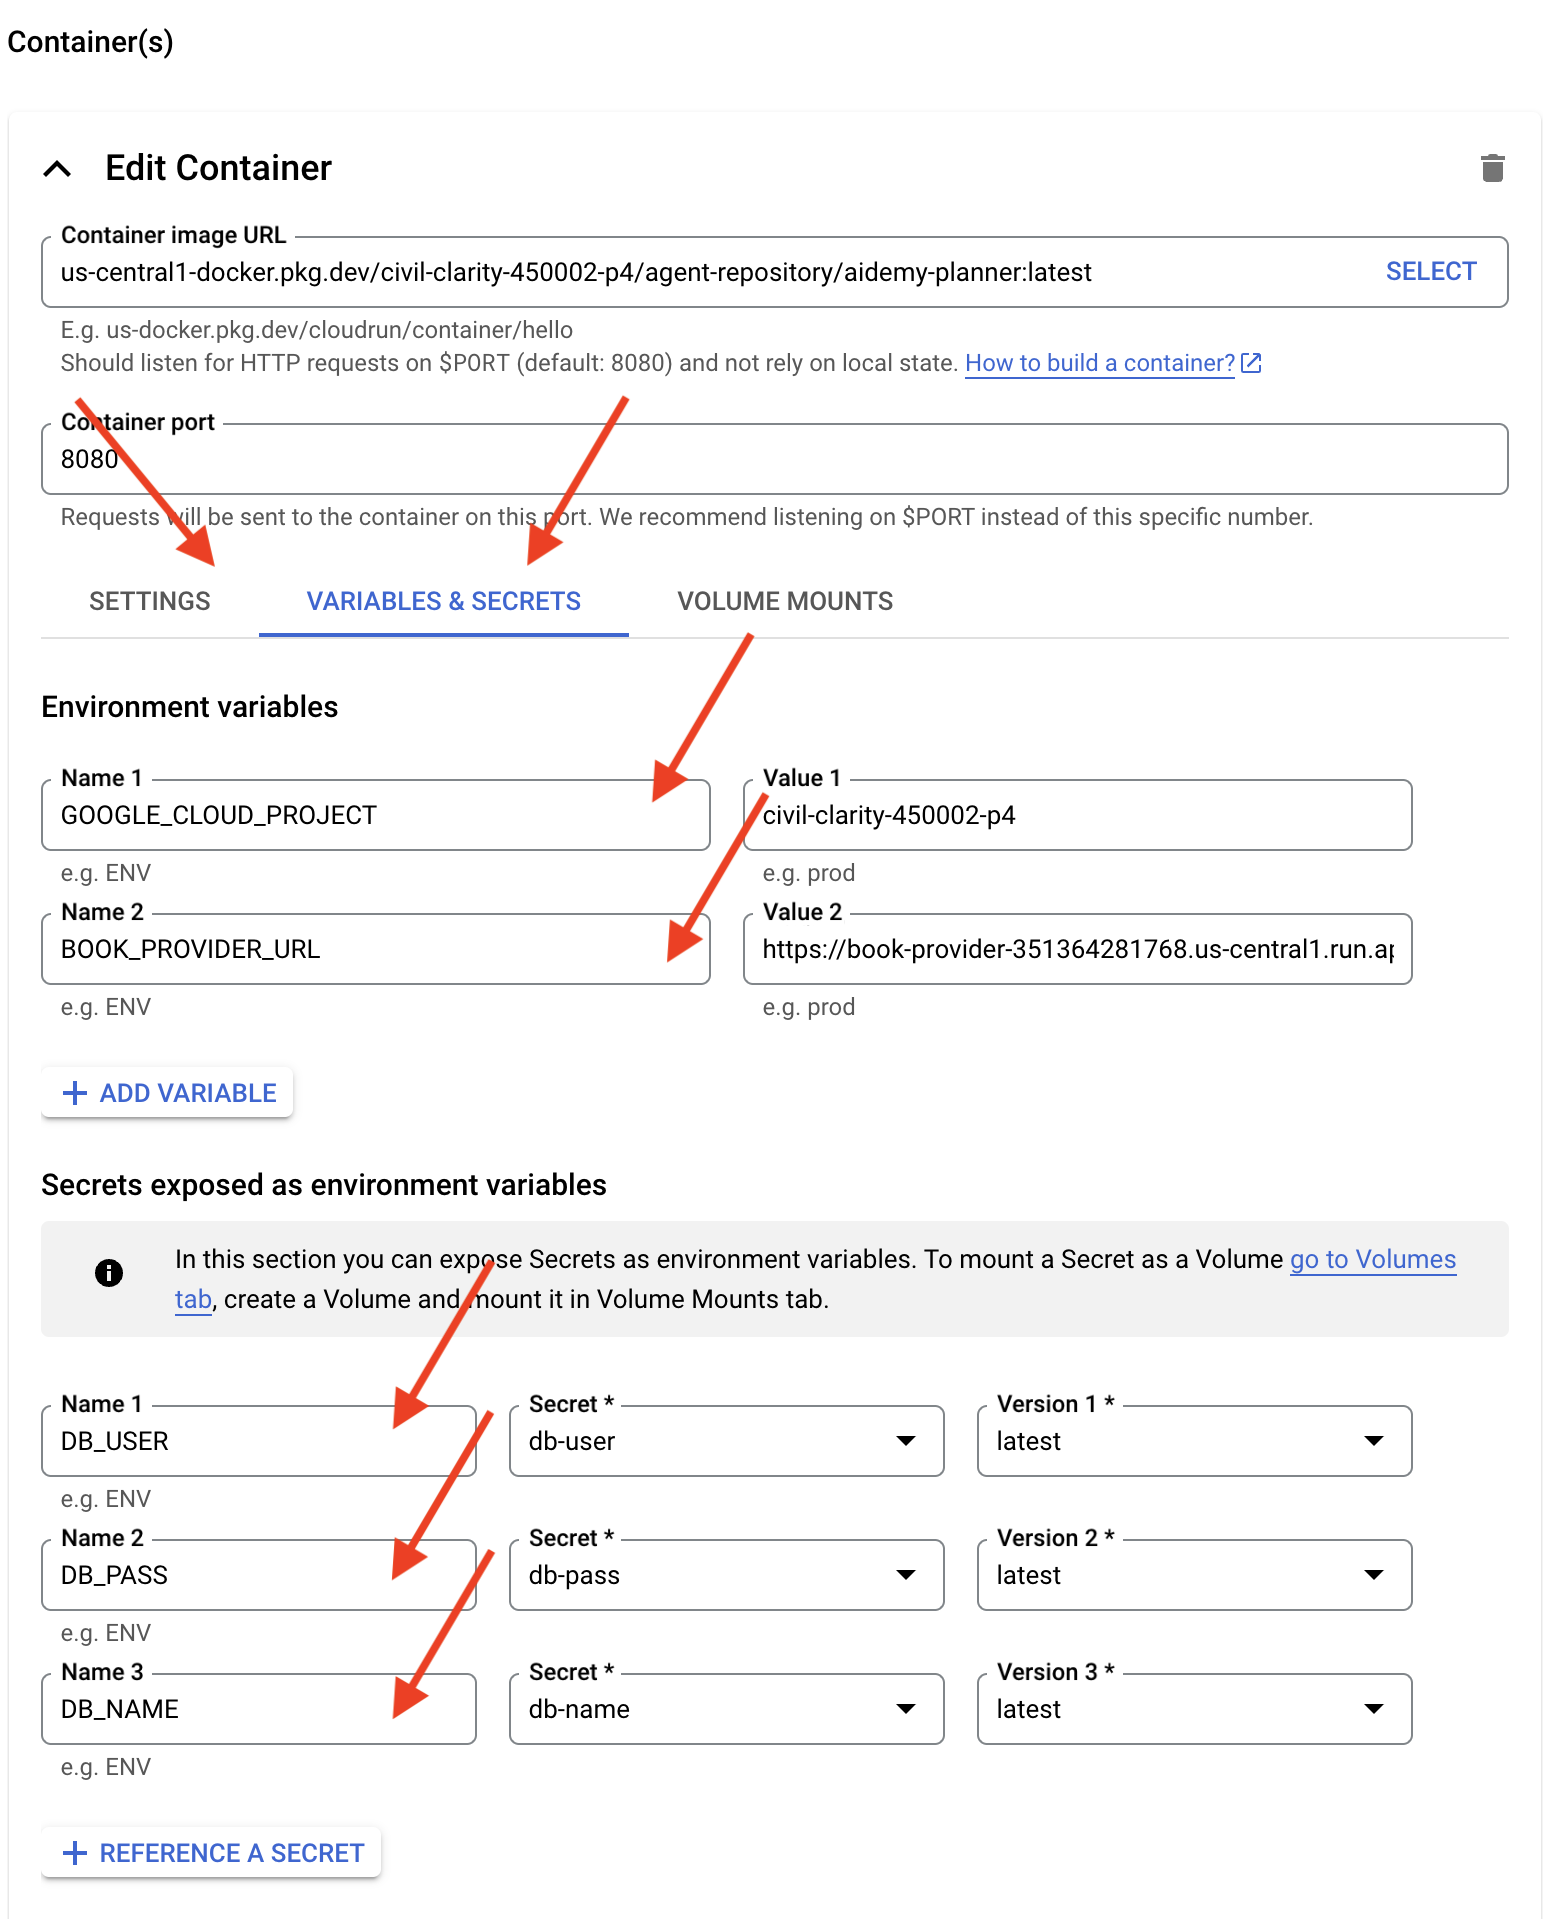
- Вкладка «Переменные и секреты»:
- Для добавления переменных среды нажмите кнопку «+ Добавить переменную» :
- Добавьте имя:
GOOGLE_CLOUD_PROJECTи значение: <ВАШ_ИДЕНТИФИКАТОР_ПРОЕКТА> - Добавьте имя:
BOOK_PROVIDER_URLи установите значение равным URL-адресу вашей функции поставщика книг, который можно определить с помощью следующей команды в терминале:gcloud config set project $(cat ~/project_id.txt) gcloud run services describe book-provider \ --region=us-central1 \ --project=$PROJECT_ID \ --format="value(status.url)"
- Добавьте имя:
- В разделе « Секреты, отображаемые в виде переменных среды» добавьте следующие секреты, нажав кнопку « + Указать в качестве секрета» :
- Добавить имя:
DB_USER, секрет: selectdb-userи версию:latest - Добавить имя:
DB_PASS, секрет: selectdb-passи версию:latest - Добавить имя:
DB_NAME, секрет: selectdb-nameи версию:latest
- Добавить имя:
- Для добавления переменных среды нажмите кнопку «+ Добавить переменную» :
- Вкладка «Настройки»:
Остальные значения оставьте по умолчанию.
👉 Нажмите СОЗДАТЬ .
Cloud Run развернет ваш сервис.
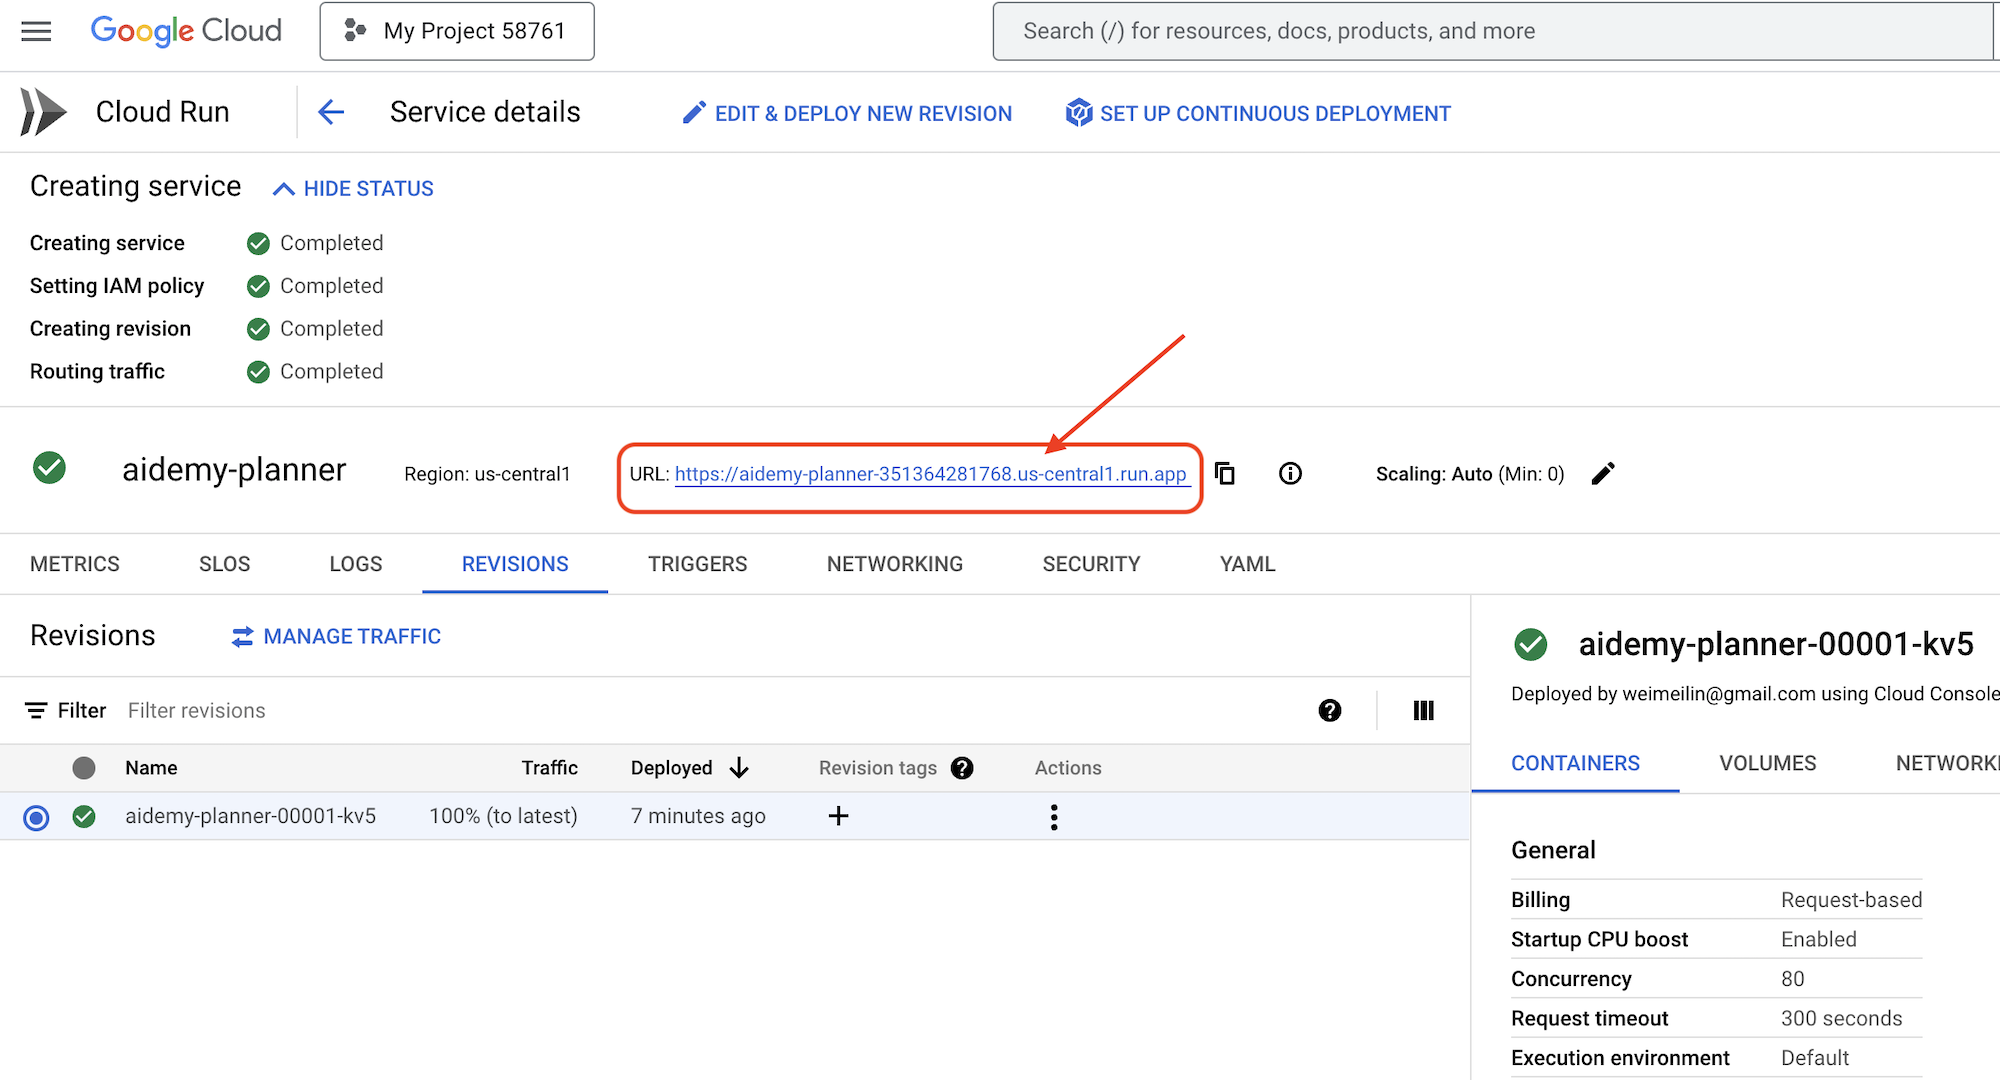
Once deployed, if you are not already on the detail page, click on the service name to go to its detail page. You can find the deployed URL available on the top.
👉 In the application interface, select 7 for the Year, choose Mathematics as the subject, and enter Algebra in the Add-on Request field.
👉 Click Generate Plan . This will provide the agent with the necessary context to generate a tailored lesson plan.
Congratulations! You've successfully created a teaching plan using our powerful AI agent. This demonstrates the potential of agents to significantly reduce workload and streamline tasks, ultimately improving efficiency and making life easier for educators.
9. Multi-agent systems
Now that we've successfully implemented the teaching plan creation tool, let's shift our focus to building the student portal. This portal will provide students with access to quizzes, audio recaps, and assignments related to their coursework. Given the scope of this functionality, we'll leverage the power of multi-agent systems to create a modular and scalable solution.
As we discussed earlier, instead of relying on a single agent to handle everything, a multi-agent system allows us to break down the workload into smaller, specialized tasks, each handled by a dedicated agent. This approach offers several key advantages:
Modularity and Maintainability : Instead of creating a single agent that does everything, build smaller, specialized agents with well-defined responsibilities. This modularity makes the system easier to understand, maintain, and debug. When a problem arises, you can isolate it to a specific agent, rather than having to sift through a massive codebase.
Scalability : Scaling a single, complex agent can be a bottleneck. With a multi-agent system, you can scale individual agents based on their specific needs. For example, if one agent is handling a high volume of requests, you can easily spin up more instances of that agent without affecting the rest of the system.
Team Specialization : Think of it like this: you wouldn't ask one engineer to build an entire application from scratch. Instead, you assemble a team of specialists, each with expertise in a particular area. Similarly, a multi-agent system allows you to leverage the strengths of different LLMs and tools, assigning them to agents that are best suited for specific tasks.
Parallel Development : Different teams can work on different agents concurrently, speeding up the development process. Since agents are independent, changes to one agent are less likely to impact other agents.
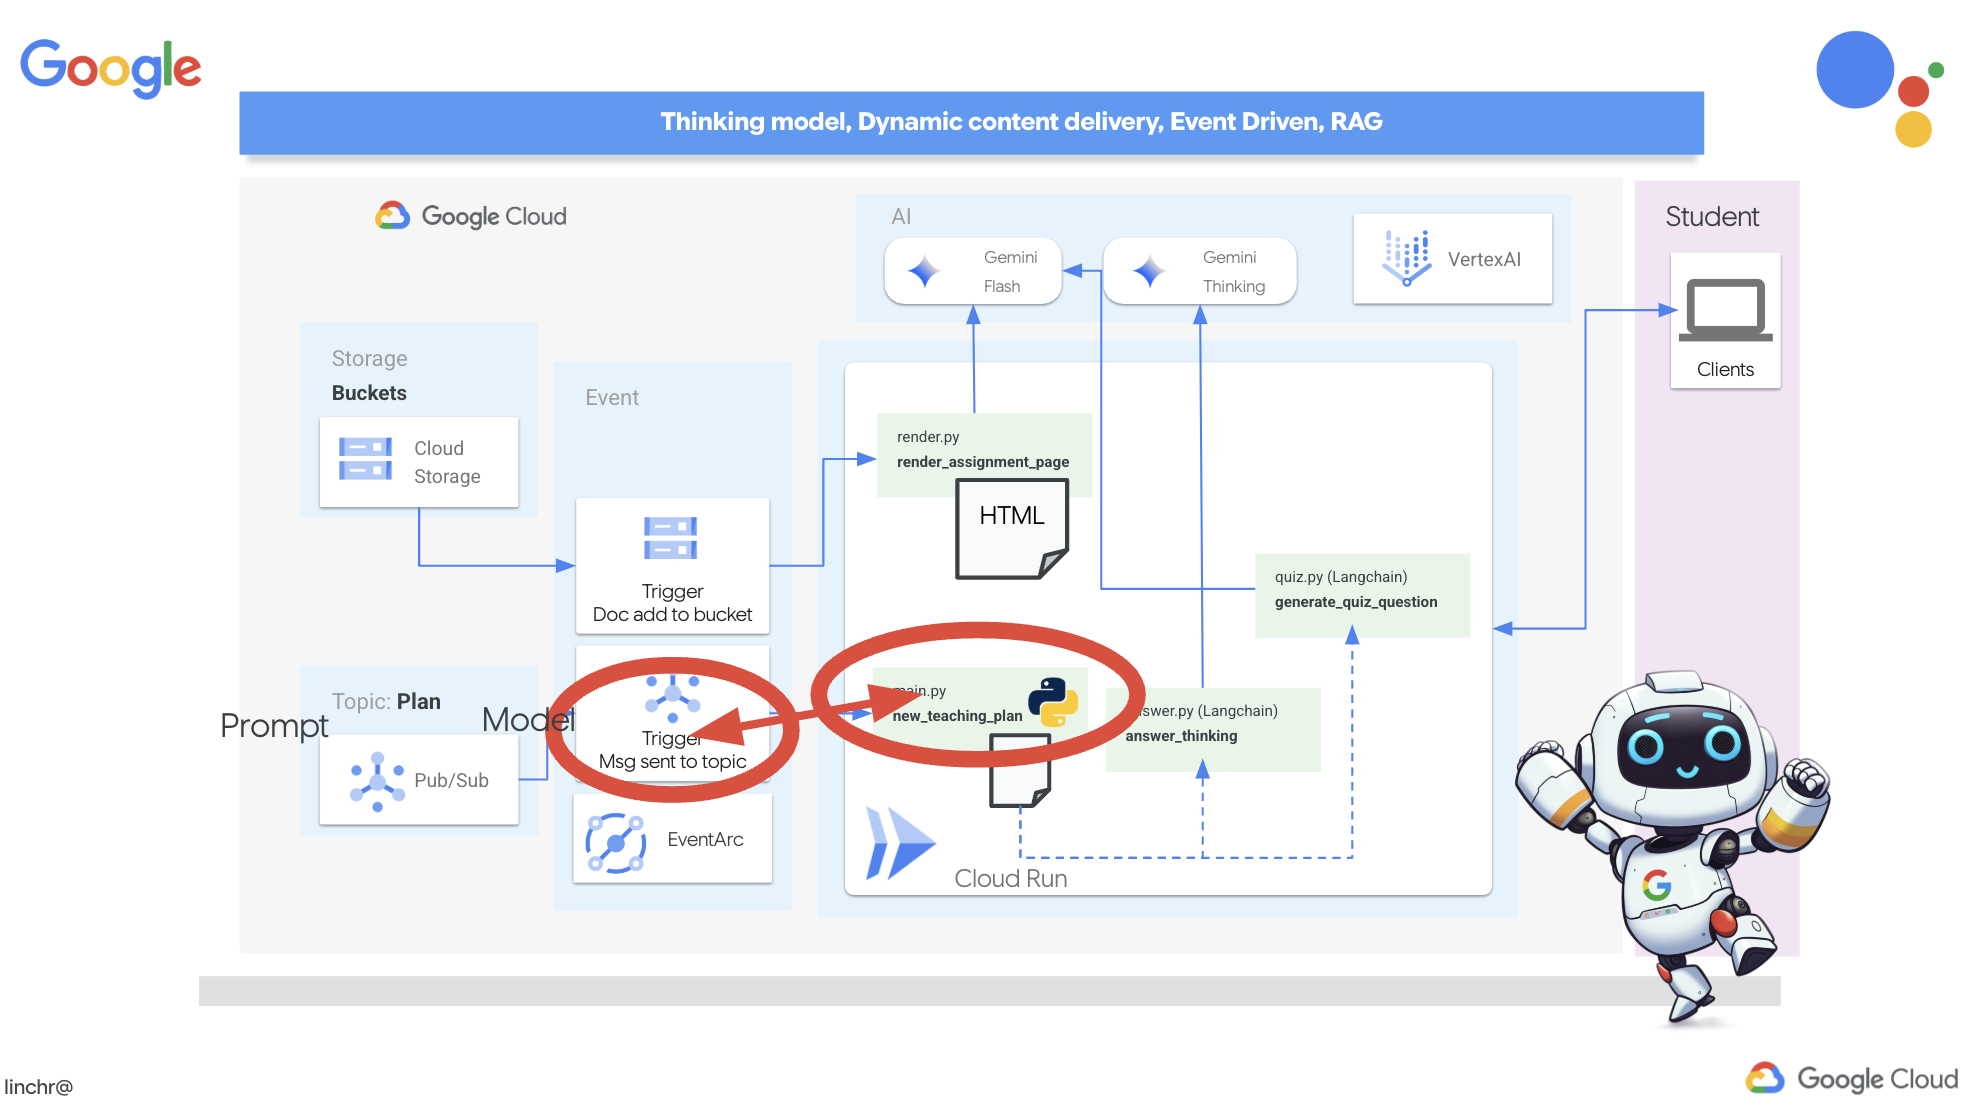
Архитектура, управляемая событиями
To enable effective communication and coordination between these agents, we'll employ an event-driven architecture. This means that agents will react to "events" happening within the system.
Agents subscribe to specific event types (eg, "teaching plan generated," "assignment created"). When an event occurs, the relevant agents are notified and can react accordingly. This decoupling promotes flexibility, scalability, and real-time responsiveness.
Now, to kick things off, we need a way to broadcast these events. To do this, we will set up a Pub/Sub topic. Let's start by creating a topic called plan .
👉 Go to Google Cloud Console pub/sub .
👉 Click on the Create Topic button.
👉 Configure the Topic with ID/name plan and uncheck Add a default subscription , leave rest as default and click Create .
The Pub/Sub page will refresh, and you should now see your newly created topic listed in the table. 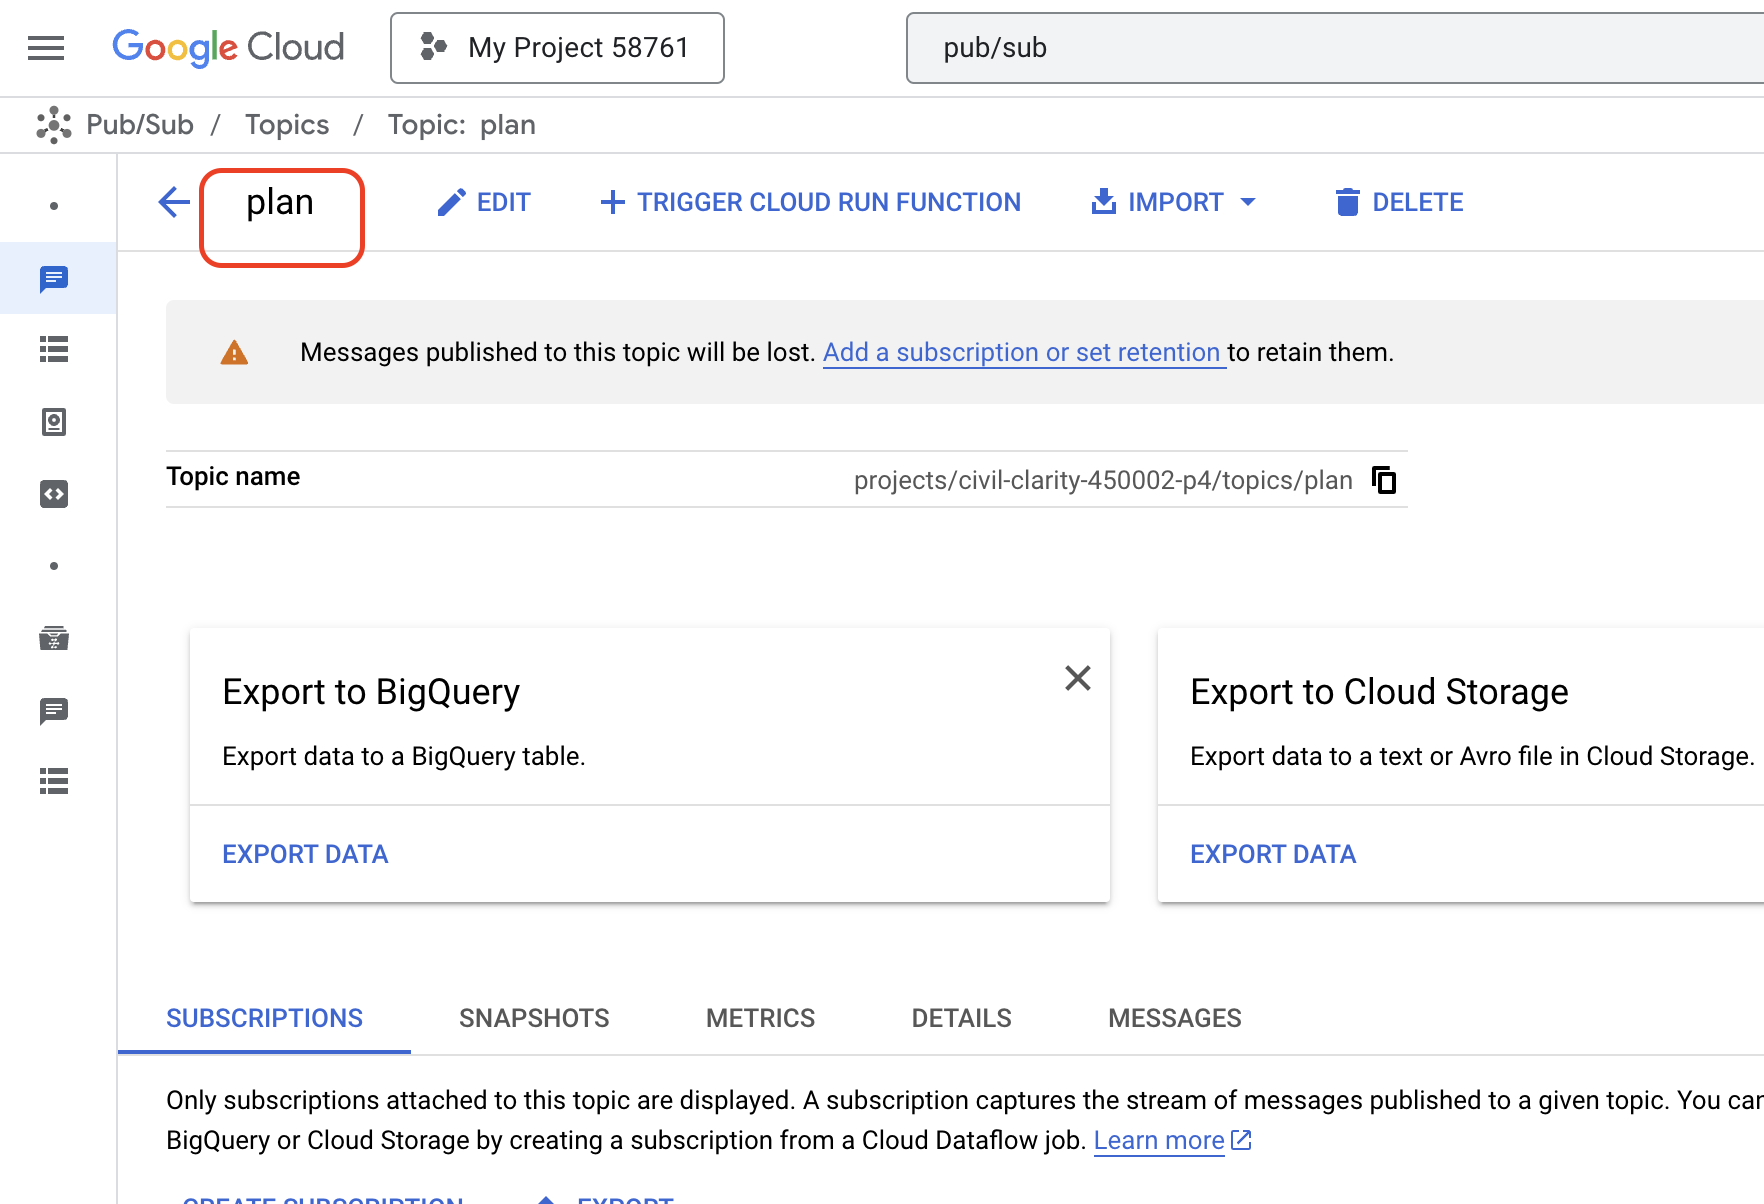
Now, let's integrate the Pub/Sub event publishing functionality into our planner agent. We'll add a new tool that sends a "plan" event to the Pub/Sub topic we just created. This event will signal to other agents in the system (like those in the student portal) that a new teaching plan is available.
👉Go back to the Cloud Code Editor and open the app.py file located in the planner folder. We will be adding a function that publishes the event. Replace :
##ADD SEND PLAN EVENT FUNCTION HERE
with the following code
def send_plan_event(teaching_plan:str):
    """
    Send the teaching event to the topic called plan

    Args:
        teaching_plan: teaching plan
    """
    publisher = pubsub_v1.PublisherClient()
    print(f"-------------> Sending event to topic plan: {teaching_plan}")
    topic_path = publisher.topic_path(PROJECT_ID, "plan")

    message_data = {"teaching_plan": teaching_plan}
    data = json.dumps(message_data).encode("utf-8")

    future = publisher.publish(topic_path, data)

    return f"Published message ID: {future.result()}"
- send_plan_event : This function takes the generated teaching plan as input, creates a Pub/Sub publisher client, constructs the topic path, converts the teaching plan into a JSON string, and publishes the message to the topic.
In the same app.py file
👉Update the prompt to instruct the agent to send the teaching plan event to the Pub/Sub topic after generating the teaching plan. * Replace
### ADD send_plan_event CALL
with the following :
send_plan_event(teaching_plan)
By adding the send_plan_event tool and modifying the prompt, we've enabled our planner agent to publish events to Pub/Sub, allowing other components of our system to react to the creation of new teaching plans. We will now have a functional multi-agent system in the following sections.
10. Empowering Students with On-Demand Quizzes
Imagine a learning environment where students have access to an endless supply of quizzes tailored to their specific learning plans. These quizzes provide immediate feedback, including answers and explanations, fostering a deeper understanding of the material. This is the potential we aim to unlock with our AI-powered quiz portal.
To bring this vision to life, we'll build a quiz generation component that can create multiple-choice questions based on the content of the teaching plan.
👉 In the Cloud Code Editor's Explorer pane, navigate to the portal folder. Open the quiz.py file copy and paste the following code to the end of the file .
def generate_quiz_question(file_name: str, difficulty: str, region:str ):
    """Generates a single multiple-choice quiz question using the LLM.

    ```json
    {
      "question": "The question itself",
      "options": ["Option A", "Option B", "Option C", "Option D"],
      "answer": "The correct answer letter (A, B, C, or D)"
    }
    ```
    """

    print(f"region: {region}")
    # Connect to resourse needed from Google Cloud
    llm = VertexAI(model_name="gemini-2.5-flash-preview-04-17", location=region)


    plan=None
    #load the file using file_name and read content into string call plan
    with open(file_name, 'r') as f:
        plan = f.read()

    parser = JsonOutputParser(pydantic_object=QuizQuestion)


    instruction = f"You'll provide one question with difficulty level of {difficulty}, 4 options as multiple choices and provide the anwsers, the quiz needs to be related to the teaching plan {plan}"

    prompt = PromptTemplate(
        template="Generates a single multiple-choice quiz question\n {format_instructions}\n  {instruction}\n",
        input_variables=["instruction"],
        partial_variables={"format_instructions": parser.get_format_instructions()},
    )

    chain = prompt | llm | parser
    response = chain.invoke({"instruction": instruction})

    print(f"{response}")
    return  response
In the agent it creates a JSON output parser that's specifically designed to understand and structure the LLM's output. It uses the QuizQuestion model we defined earlier to ensure the parsed output conforms to the correct format (question, options, and answer).
👉 In your terminal , Execute the following commands to set up a virtual environment, install dependencies, and start the agent:
gcloud config set project $(cat ~/project_id.txt)
cd ~/aidemy-bootstrap/portal/
python -m venv env
source env/bin/activate
pip install -r requirements.txt
python app.py
👉 From the "Web preview" menu in the top right corner, choose Preview on port 8080 . Cloud Shell will open a new browser tab or window with the web preview of your application.
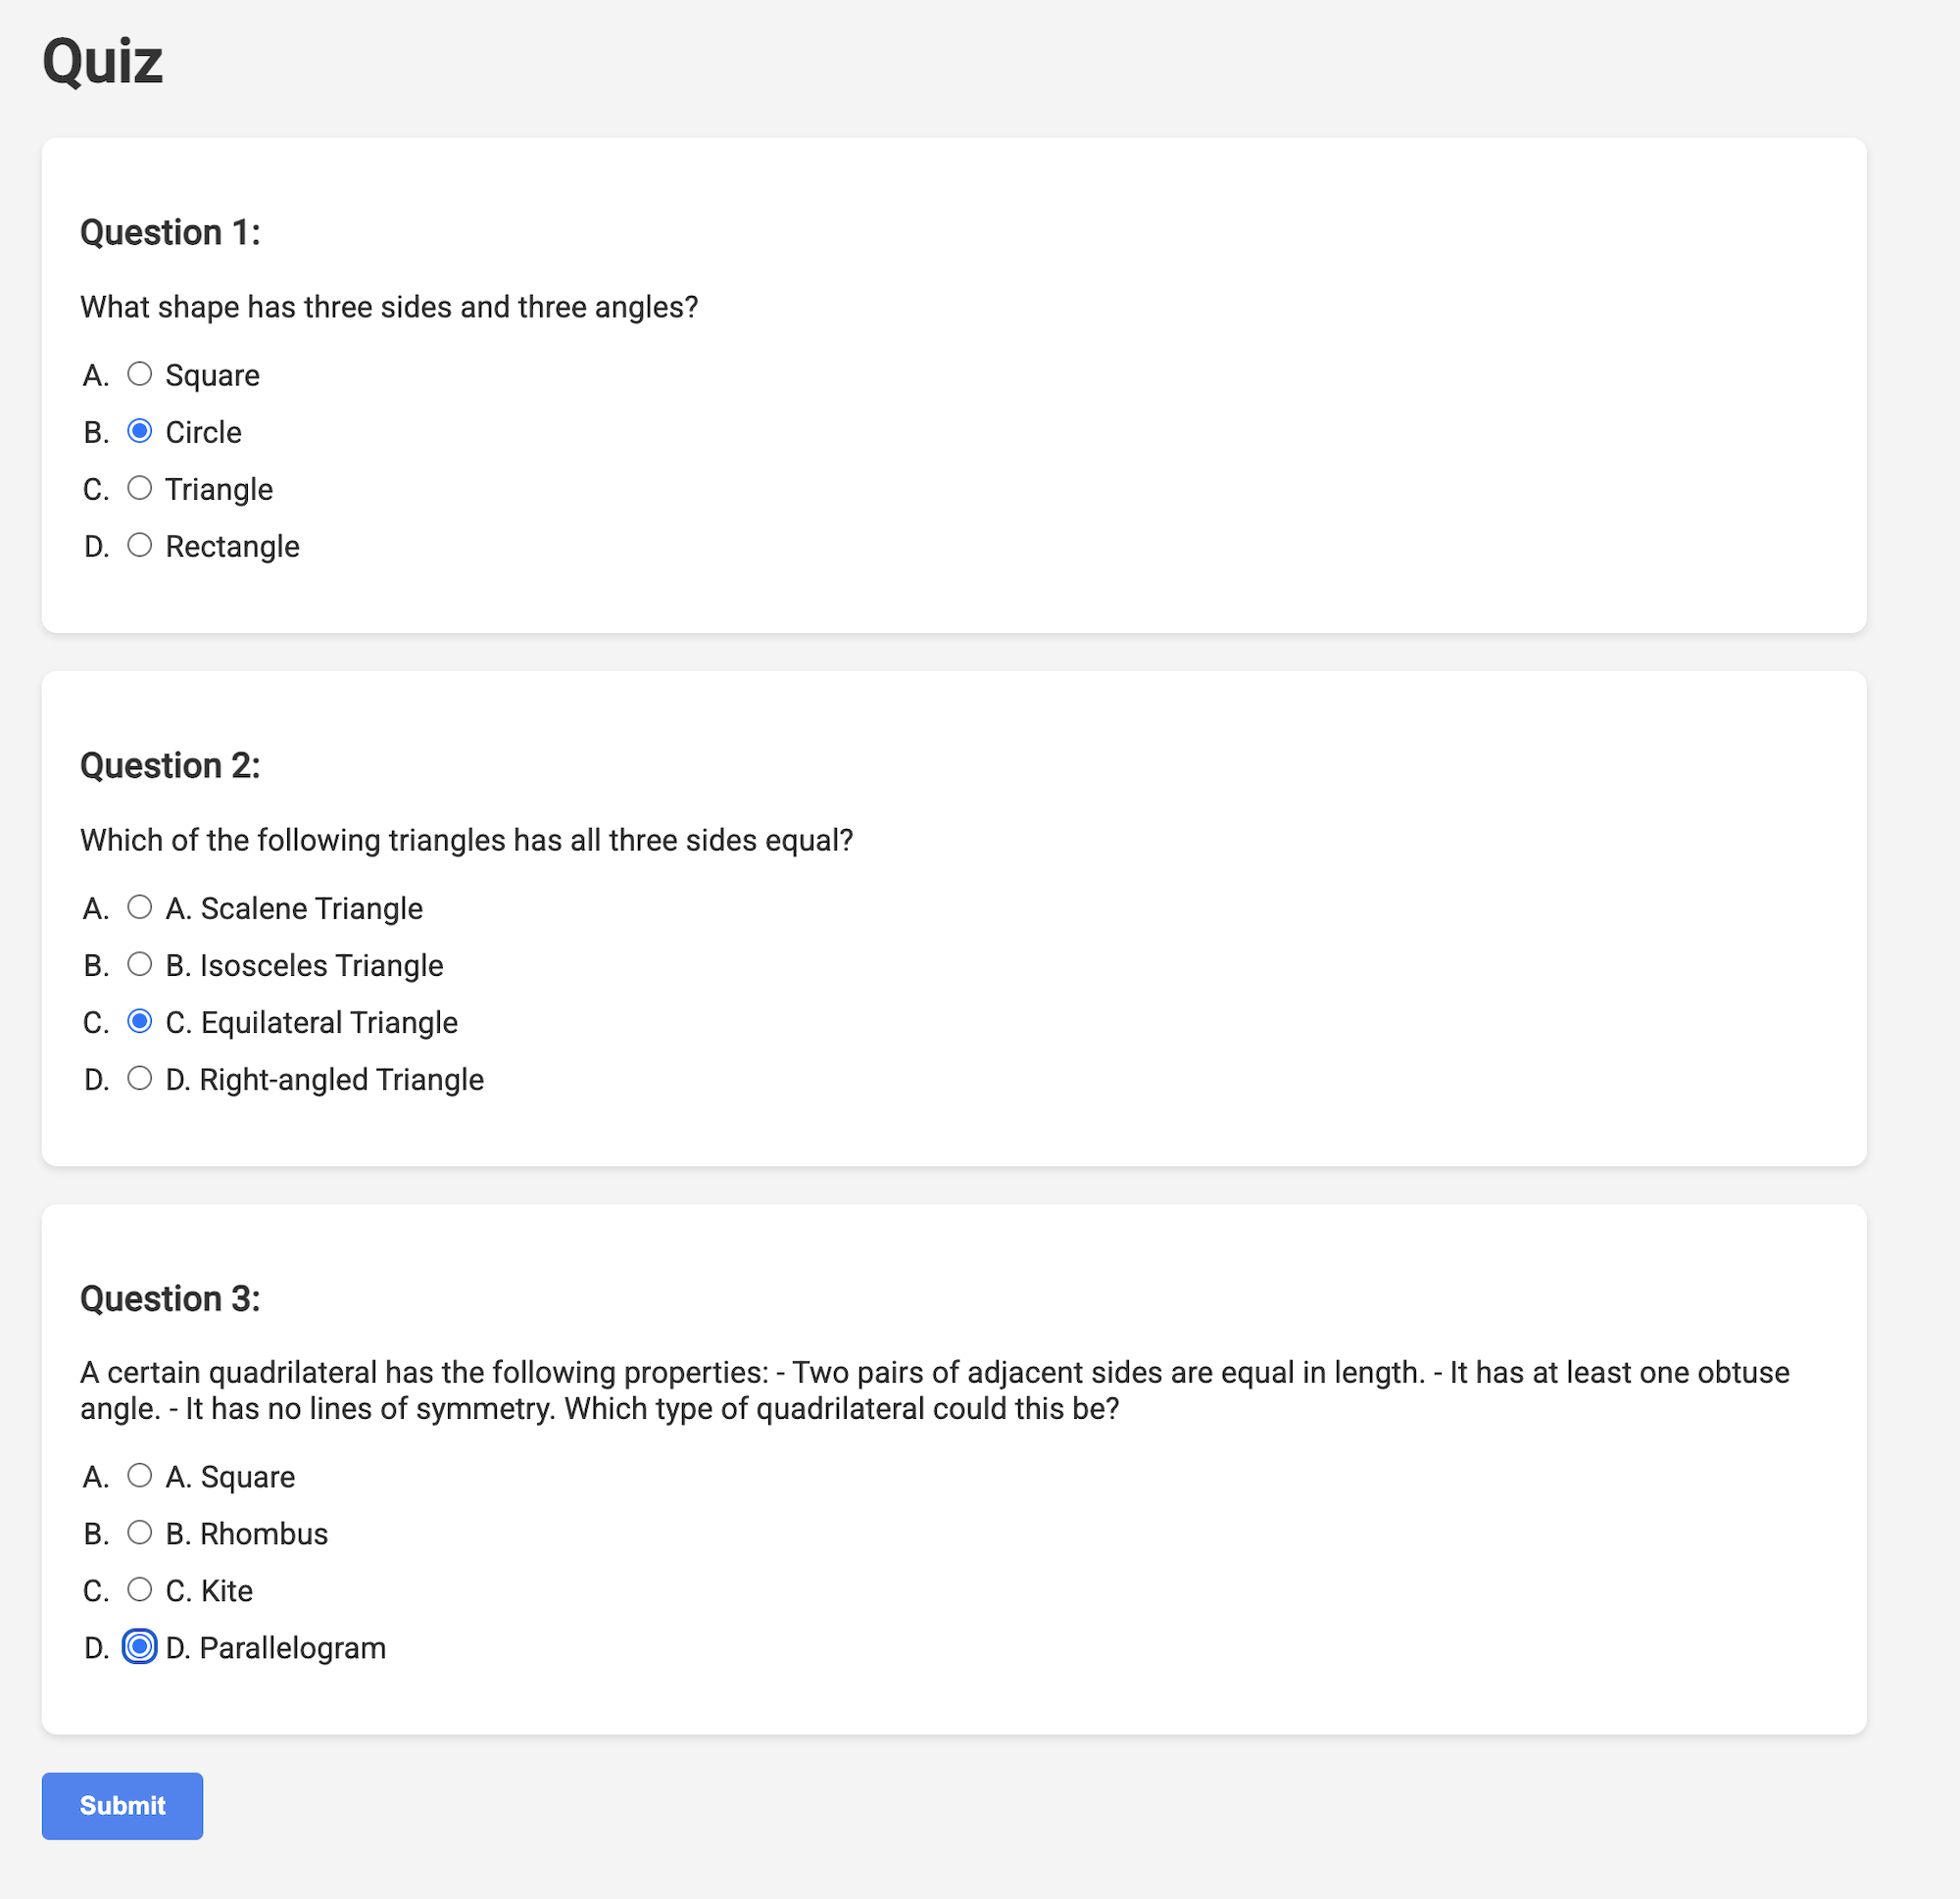
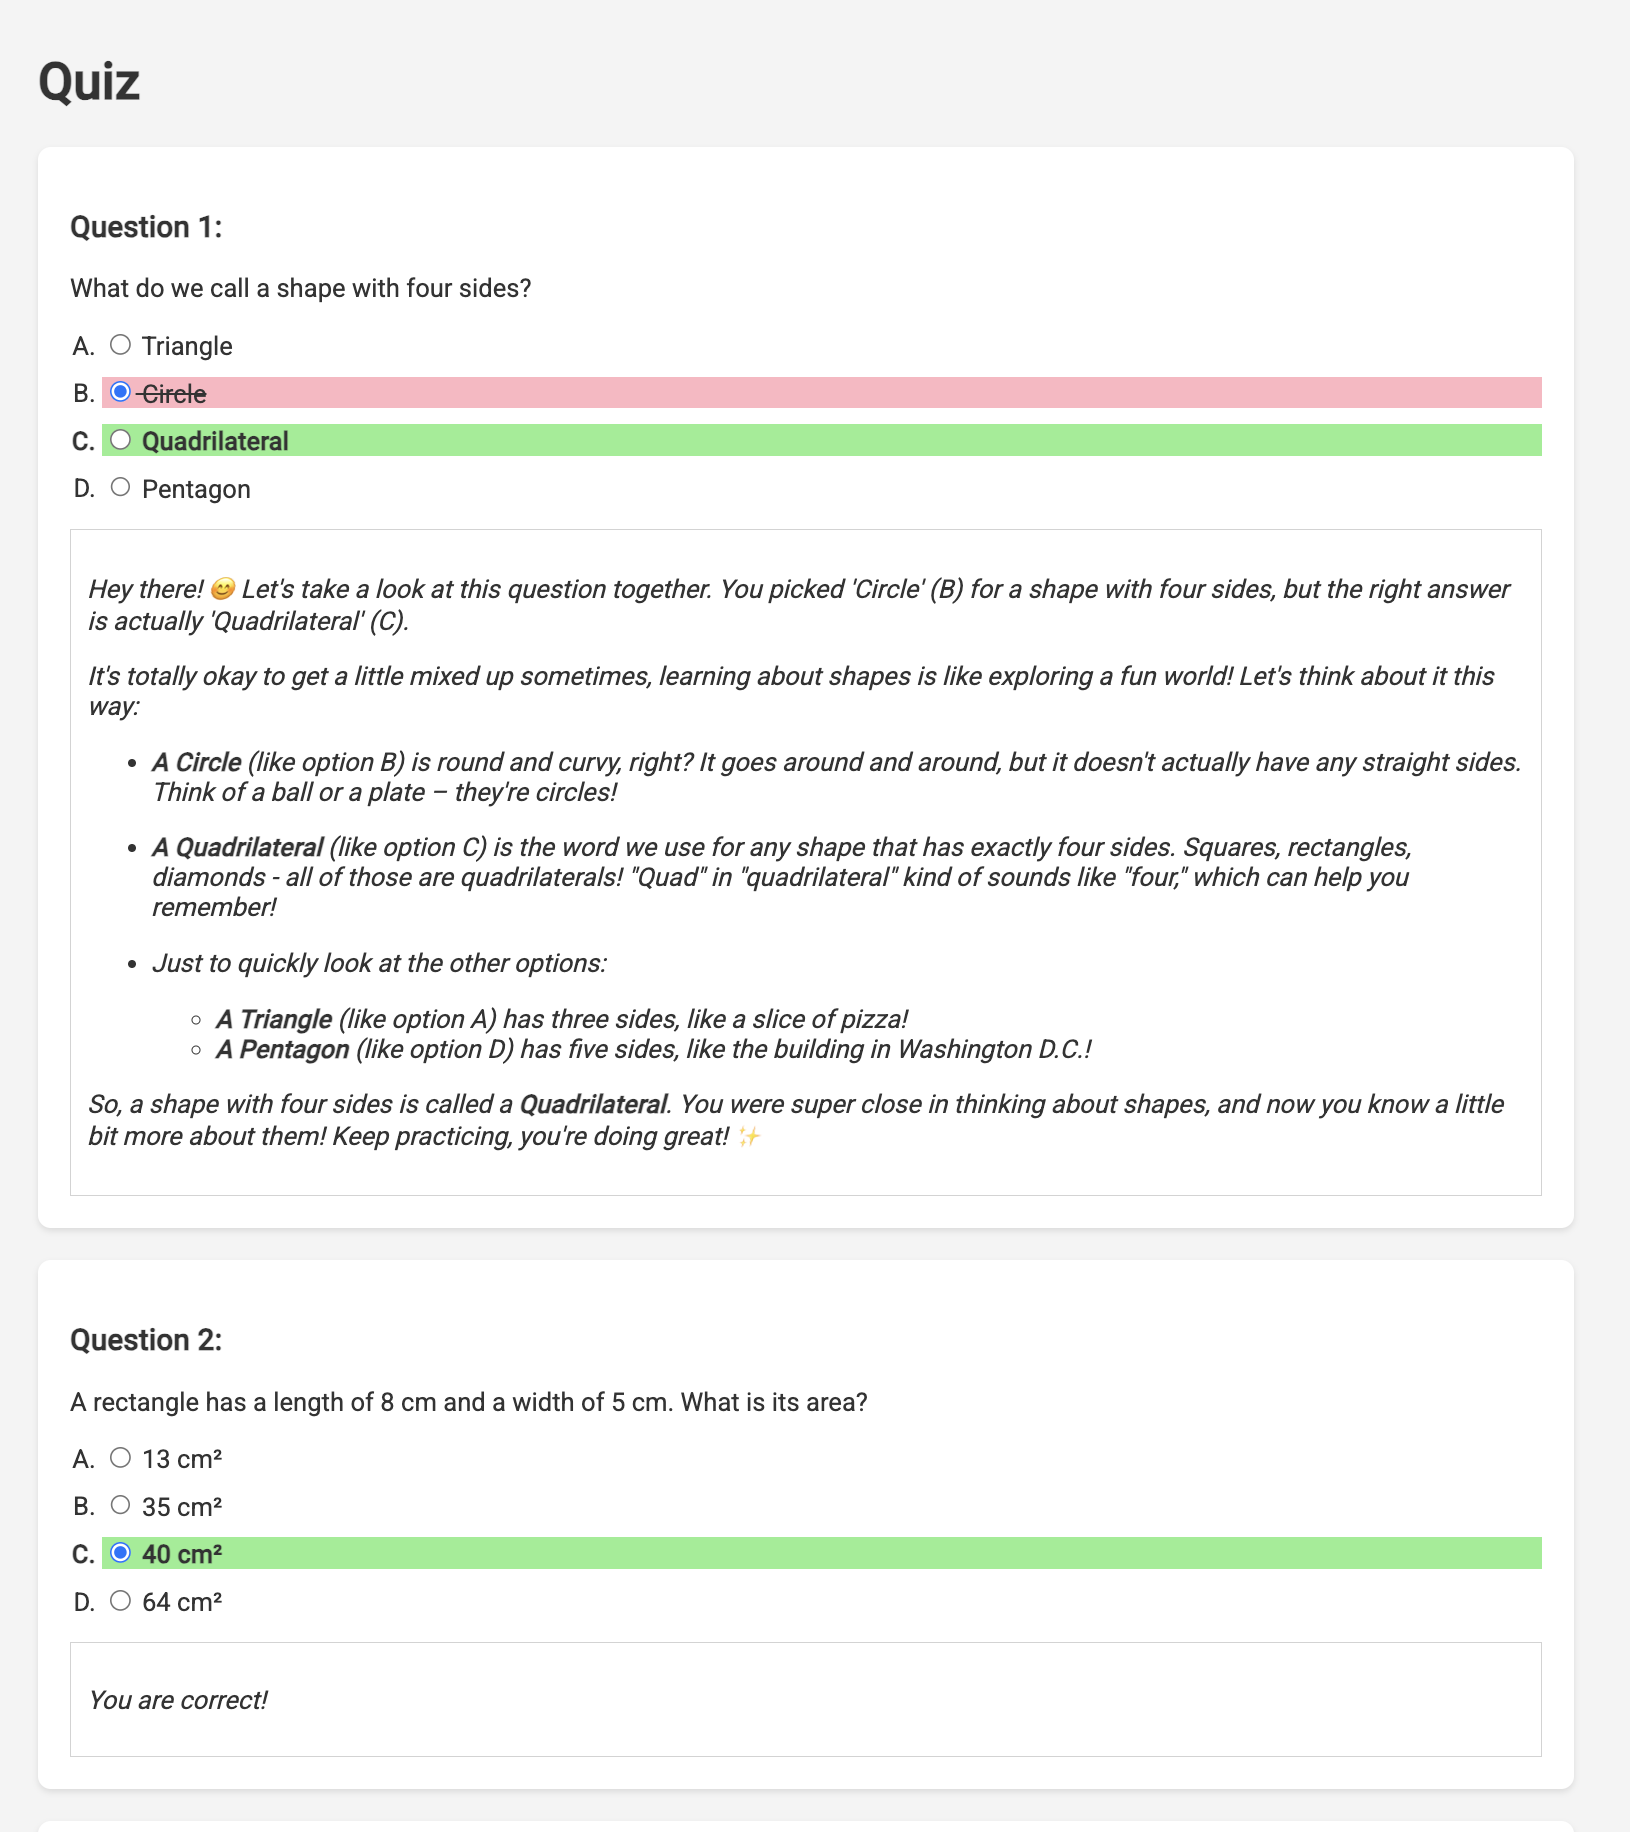
👉 In the web application, Click on the "Quizzes" link, either in the top navigation bar or from the card on the index page. You should see three randomly generated quizzes displayed for the student. These quizzes are based on the teaching plan and demonstrate the power of our AI-powered quiz generation system.
👉To stop the locally running process, press Ctrl+C in the terminal.
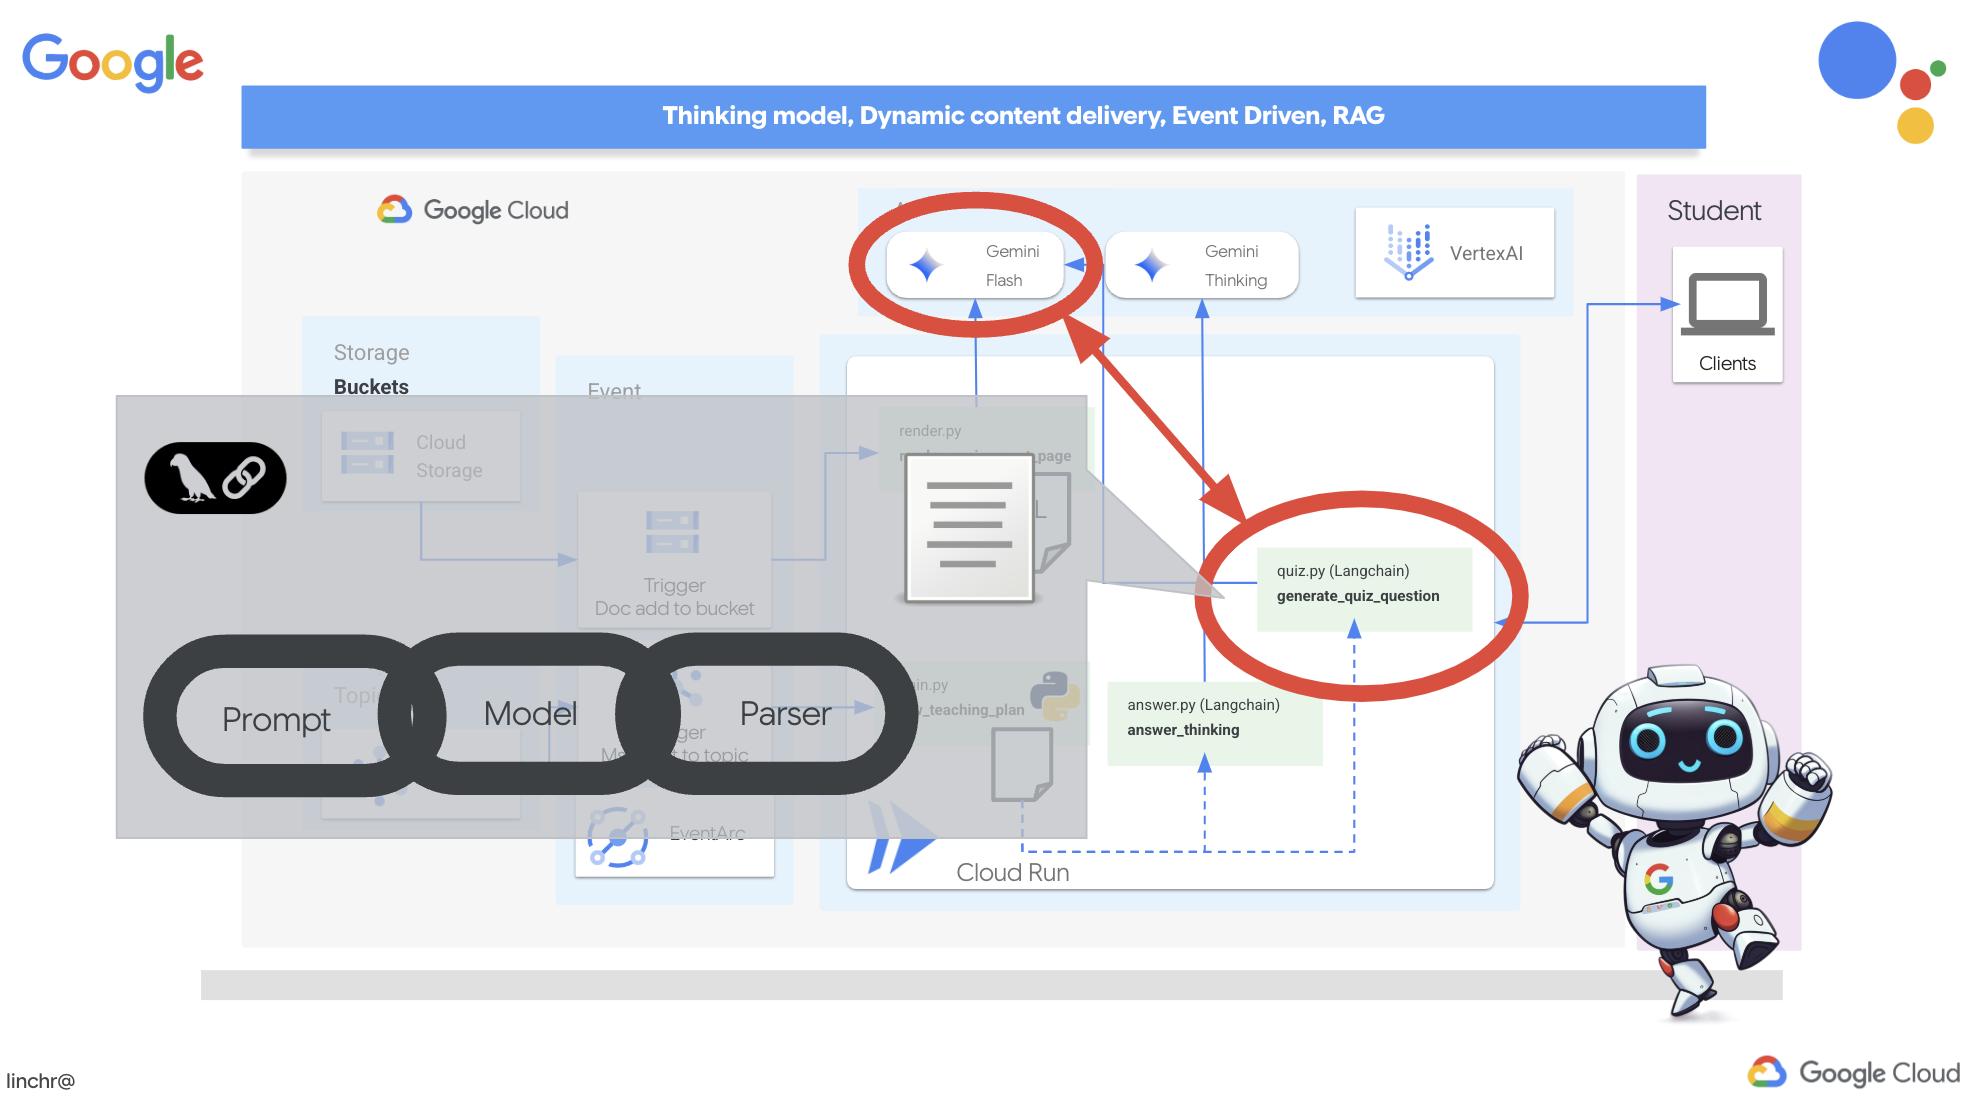
Близнецы 2. Мышление для объяснений.
Okay, so we've got quizzes, which is a great start! But what if students get something wrong? That's where the real learning happens, right? If we can explain why their answer was off and how to get to the correct one, they're way more likely to remember it. Plus, it helps clear up any confusion and boost their confidence.
That's why we're going to bring in the big guns: Gemini 2's "thinking" model! Think of it like giving the AI a little extra time to think things through before explaining. It lets it give more detailed and better feedback.
We want to see if it can help students by assisting, answering and explaining in detail. To test it out, we'll start with a notoriously tricky subject, Calculus.

👉First, head over to the Cloud Code Editor, in answer.py inside the portal folder. Replace the following function code
def answer_thinking(question, options, user_response, answer, region):
    return ""
with following code snippet :
def answer_thinking(question, options, user_response, answer, region):
    try:
        llm = VertexAI(model_name="gemini-2.0-flash-001",location=region)

        input_msg = HumanMessage(content=[f"Here the question{question}, here are the available options {options}, this student's answer {user_response}, whereas the correct answer is {answer}"])
        prompt_template = ChatPromptTemplate.from_messages(
            [
                SystemMessage(
                    content=(
                        "You are a helpful teacher trying to teach the student on question, you were given the question and a set of multiple choices "
                        "what's the correct answer. use friendly tone"
                    )
                ),
                input_msg,
            ]
        )

        prompt = prompt_template.format()

        response = llm.invoke(prompt)
        print(f"response: {response}")

        return response
    except Exception as e:
        print(f"Error sending message to chatbot: {e}") # Log this error too!
        return f"Unable to process your request at this time. Due to the following reason: {str(e)}"


if __name__ == "__main__":
    question = "Evaluate the limit: lim (x→0) [(sin(5x) - 5x) / x^3]"
    options = ["A) -125/6", "B) -5/3 ", "C) -25/3", "D) -5/6"]
    user_response = "B"
    answer = "A"
    region = "us-central1"
    result = answer_thinking(question, options, user_response, answer, region)
This is a very simple langchain app where it Initializes the Gemini 2 Flash model, where we are instructing it to act as a helpful teacher and provide explanations
👉Execute the following command in the terminal:
gcloud config set project $(cat ~/project_id.txt)
cd ~/aidemy-bootstrap/portal/
source env/bin/activate
python answer.py
You should see output similar to the example provided in the original instructions. The current model may not provide as through explanation.
Okay, I see the question and the choices. The question is to evaluate the limit:

lim (x→0) [(sin(5x) - 5x) / x^3]

You chose option B, which is -5/3, but the correct answer is A, which is -125/6.

It looks like you might have missed a step or made a small error in your calculations. This type of limit often involves using L'Hôpital's Rule or Taylor series expansion. Since we have the form 0/0, L'Hôpital's Rule is a good way to go! You need to apply it multiple times. Alternatively, you can use the Taylor series expansion of sin(x) which is:
sin(x) = x - x^3/3! + x^5/5! - ...
So, sin(5x) = 5x - (5x)^3/3! + (5x)^5/5! - ...
Then,  (sin(5x) - 5x) = - (5x)^3/3! + (5x)^5/5! - ...
Finally, (sin(5x) - 5x) / x^3 = - 5^3/3! + (5^5 * x^2)/5! - ...
Taking the limit as x approaches 0, we get -125/6.

Keep practicing, you'll get there!
👉 In the answer.py file, replace the
model_name from gemini-2.0-flash-001 to gemini-2.0-flash-thinking-exp-01-21 in the answer_thinking function.
This changes the LLM to a different one that does better with reasoning. This will help the model generate better explanations.
👉 Run the answer.py script again to test the new thinking model:
gcloud config set project $(cat ~/project_id.txt)
cd ~/aidemy-bootstrap/portal/
source env/bin/activate
python answer.py
Here is an example of the response from the thinking model that is much more thorough and detailed, providing a step-by-step explanation of how to solve the calculus problem. This highlights the power of "thinking" models in generating high-quality explanations. You should see output similar to this:
Hey there! Let's take a look at this limit problem together. You were asked to evaluate:

lim (x→0) [(sin(5x) - 5x) / x^3]

and you picked option B, -5/3, but the correct answer is actually A, -125/6. Let's figure out why!

It's a tricky one because if we directly substitute x=0, we get (sin(0) - 0) / 0^3 = (0 - 0) / 0 = 0/0, which is an indeterminate form. This tells us we need to use a more advanced technique like L'Hopital's Rule or Taylor series expansion.

Let's use the Taylor series expansion for sin(y) around y=0. Do you remember it?  It looks like this:

sin(y) = y - y^3/3! + y^5/5! - ...
where 3! (3 factorial) is 3 × 2 × 1 = 6, 5! is 5 × 4 × 3 × 2 × 1 = 120, and so on.

In our problem, we have sin(5x), so we can substitute y = 5x into the Taylor series:

sin(5x) = (5x) - (5x)^3/3! + (5x)^5/5! - ...
sin(5x) = 5x - (125x^3)/6 + (3125x^5)/120 - ...

Now let's plug this back into our limit expression:

[(sin(5x) - 5x) / x^3] =  [ (5x - (125x^3)/6 + (3125x^5)/120 - ...) - 5x ] / x^3
Notice that the '5x' and '-5x' cancel out!  So we are left with:
= [ - (125x^3)/6 + (3125x^5)/120 - ... ] / x^3
Now, we can divide every term in the numerator by x^3:
= -125/6 + (3125x^2)/120 - ...

Finally, let's take the limit as x approaches 0.  As x gets closer and closer to zero, terms with x^2 and higher powers will become very, very small and approach zero.  So, we are left with:
lim (x→0) [ -125/6 + (3125x^2)/120 - ... ] = -125/6

Therefore, the correct answer is indeed **A) -125/6**.

It seems like your answer B, -5/3, might have come from perhaps missing a factor somewhere during calculation or maybe using an incorrect simplification. Double-check your steps when you were trying to solve it!

Don't worry, these limit problems can be a bit tricky sometimes! Keep practicing and you'll get the hang of it.  Let me know if you want to go through another similar example or if you have any more questions! 😊


Now that we have confirmed it works, let's use the portal.
👉 REMOVE the following test code from answer.py :
if __name__ == "__main__":
    question = "Evaluate the limit: lim (x→0) [(sin(5x) - 5x) / x^3]"
    options = ["A) -125/6", "B) -5/3 ", "C) -25/3", "D) -5/6"]
    user_response = "B"
    answer = "A"
    region = "us-central1"
    result = answer_thinking(question, options, user_response, answer, region)
👉Execute the following commands in the terminal to set up a virtual environment, install dependencies, and start the agent:
gcloud config set project $(cat ~/project_id.txt)
cd ~/aidemy-bootstrap/portal/
source env/bin/activate
python app.py
👉 From the "Web preview" menu in the top right corner, choose Preview on port 8080 . Cloud Shell will open a new browser tab or window with the web preview of your application.
👉 In the web application, Click on the "Quizzes" link, either in the top navigation bar or from the card on the index page.
👉 Answer all the quizzes and make sure at least get one answer wrong and then click Submit .
Rather than staring blankly while waiting for the response, switch over to the Cloud Editor's terminal. You can observe the progress and any output or error messages generated by your function in the emulator's terminal. 😁
👉 In your terminal, stop the locally running process by pressing Ctrl+C in the terminal.
11. OPTIONAL: Orchestrating the Agents with Eventarc
So far, the student portal has been generating quizzes based on a default set of teaching plans. That's helpful, but it means our planner agent and portal's quiz agent aren't really talking to each other. Remember how we added that feature where the planner agent publishes its newly generated teaching plans to a Pub/Sub topic? Now it's time to connect that to our portal agent!
We want the portal to automatically update its quiz content whenever a new teaching plan is generated. To do that, we'll create an endpoint in the portal that can receive these new plans.
👉 In the Cloud Code Editor's Explorer pane , navigate to the portal folder.
👉 Open the app.py file for editing. REPLACE ## REPLACE ME! NEW TEACHING PLAN line with the following code:
@app.route('/new_teaching_plan', methods=['POST'])
def new_teaching_plan():
    try:

        # Get data from Pub/Sub message delivered via Eventarc
        envelope = request.get_json()
        if not envelope:
            return jsonify({'error': 'No Pub/Sub message received'}), 400

        if not isinstance(envelope, dict) or 'message' not in envelope:
            return jsonify({'error': 'Invalid Pub/Sub message format'}), 400

        pubsub_message = envelope['message']
        print(f"data: {pubsub_message['data']}")

        data = pubsub_message['data']
        data_str = base64.b64decode(data).decode('utf-8')
        data = json.loads(data_str)

        teaching_plan = data['teaching_plan']

        print(f"File content: {teaching_plan}")

        with open("teaching_plan.txt", "w") as f:
            f.write(teaching_plan)

        print(f"Teaching plan saved to local file: teaching_plan.txt")

        return jsonify({'message': 'File processed successfully'})


    except Exception as e:
        print(f"Error processing file: {e}")
        return jsonify({'error': 'Error processing file'}), 500
Rebuilding and Deploying to Cloud Run
You'll need to update and redeploy both our planner and portal agents to Cloud Run. This ensures they have the latest code and are configured to communicate via events.
👉First we'll rebuild and push the planner agent image, back in the terminal run:
cd ~/aidemy-bootstrap/planner/
gcloud config set project $(cat ~/project_id.txt)
export PROJECT_ID=$(gcloud config get project)
docker build -t gcr.io/${PROJECT_ID}/aidemy-planner .
export PROJECT_ID=$(gcloud config get project)
docker tag gcr.io/${PROJECT_ID}/aidemy-planner us-central1-docker.pkg.dev/${PROJECT_ID}/agent-repository/aidemy-planner
docker push us-central1-docker.pkg.dev/${PROJECT_ID}/agent-repository/aidemy-planner
👉We'll do the same, build and push the portal agent image:
cd ~/aidemy-bootstrap/portal/
gcloud config set project $(cat ~/project_id.txt)
export PROJECT_ID=$(gcloud config get project)
docker build -t gcr.io/${PROJECT_ID}/aidemy-portal .
export PROJECT_ID=$(gcloud config get project)
docker tag gcr.io/${PROJECT_ID}/aidemy-portal us-central1-docker.pkg.dev/${PROJECT_ID}/agent-repository/aidemy-portal
docker push us-central1-docker.pkg.dev/${PROJECT_ID}/agent-repository/aidemy-portal
👉 Navigate to Artifact Registry , you should see both the aidemy-planner and aidemy-portal container images listed under the agent-repository .
👉Back in the terminal, run this to update the Cloud Run image for the planner agent:
gcloud config set project $(cat ~/project_id.txt)
export PROJECT_ID=$(gcloud config get project)
gcloud run services update aidemy-planner \
    --region=us-central1 \
    --image=us-central1-docker.pkg.dev/${PROJECT_ID}/agent-repository/aidemy-planner:latest
You should see output similar to this:
OK Deploying... Done.
  OK Creating Revision...
  OK Routing traffic...
Done.
Service [aidemy-planner] revision [aidemy-planner-xxxxx] has been deployed and is serving 100 percent of traffic.
Service URL: https://aidemy-planner-xxx.us-central1.run.app
Make note of the Service URL; this is the link to your deployed planner agent. If you need to later determine the planner agent Service URL, use this command:
gcloud config set project $(cat ~/project_id.txt)
export PROJECT_ID=$(gcloud config get project)
gcloud run services describe aidemy-planner \
    --region=us-central1 \
    --format 'value(status.url)'
👉Run this to create the Cloud Run instance for the portal agent
gcloud config set project $(cat ~/project_id.txt)
export PROJECT_ID=$(gcloud config get project)
gcloud run deploy aidemy-portal \
  --image=us-central1-docker.pkg.dev/${PROJECT_ID}/agent-repository/aidemy-portal:latest \
  --region=us-central1 \
  --platform=managed \
  --allow-unauthenticated \
  --memory=2Gi \
  --cpu=2 \
  --set-env-vars=GOOGLE_CLOUD_PROJECT=${PROJECT_ID}
You should see output similar to this:
Deploying container to Cloud Run service [aidemy-portal] in project [xxxx] region [us-central1]
OK Deploying new service... Done.
  OK Creating Revision...
  OK Routing traffic...
  OK Setting IAM Policy...
Done.
Service [aidemy-portal] revision [aidemy-portal-xxxx] has been deployed and is serving 100 percent of traffic.
Service URL: https://aidemy-portal-xxxx.us-central1.run.app
Make note of the Service URL; this is the link to your deployed student portal. If you need to later determine the student portal Service URL, use this command:
gcloud config set project $(cat ~/project_id.txt)
export PROJECT_ID=$(gcloud config get project)
gcloud run services describe aidemy-portal \
    --region=us-central1 \
    --format 'value(status.url)'
Creating the Eventarc Trigger
But here's the big question: how does this endpoint get notified when there's a fresh plan waiting in the Pub/Sub topic? That's where Eventarc swoops in to save the day!
Eventarc acts as a bridge, listening for specific events (like a new message arriving in our Pub/Sub topic) and automatically triggering actions in response. In our case, it will detect when a new teaching plan is published and then send a signal to our portal's endpoint, letting it know that it's time to update.
With Eventarc handling the event-driven communication, we can seamlessly connect our planner agent and portal agent, creating a truly dynamic and responsive learning system. It's like having a smart messenger that automatically delivers the latest lesson plans to the right place!
👉In the console head to the Eventarc .
👉Click the "+ CREATE TRIGGER" button.
Configure the Trigger (Basics):
- Trigger name:
plan-topic-trigger - Trigger type: Google sources
- Event provider: Cloud Pub/Sub
- Event type:
google.cloud.pubsub.topic.v1.messagePublished - Cloud Pub/Sub Topic: select
projects/PROJECT_ID/topics/plan - Region:
us-central1. - Service account:
- GRANT the service account with role
roles/iam.serviceAccountTokenCreator - Use the default value: Default compute service account
- GRANT the service account with role
- Event destination: Cloud Run
- Cloud Run service:
aidemy-portal - Ignore error message: Permission denied on 'locations/me-central2' (or it may not exist).
- Service URL path:
/new_teaching_plan
👉 Click "Create".
The Eventarc Triggers page will refresh, and you should now see your newly created trigger listed in the table.
Now, access the planner agent using its Service URL to request a new teaching plan.
👉 Run this in the terminal to determine the planner agent Service URL:
gcloud config set project $(cat ~/project_id.txt)
export PROJECT_ID=$(gcloud config get project)
gcloud run services list --platform=managed --region=us-central1 --format='value(URL)' | grep planner
👉 Navigate to the URL that was output and this time try Year 5 , Subject Science , and Add-on Request atoms .
Then, wait a minute or two, again this delay has been introduced due to billing limitation of this lab, under normal condition, there shouldn't be a delay.
Finally, access the student portal using its Service URL.
Run this in the terminal to determine the student portal agent Service URL:
gcloud config set project $(cat ~/project_id.txt)
export PROJECT_ID=$(gcloud config get project)
gcloud run services list --platform=managed --region=us-central1 --format='value(URL)' | grep portal
You should see that the quizzes have been updated and now align with the new teaching plan you just generated! This demonstrates the successful integration of Eventarc in the Aidemy system!

Congratulations! You've successfully built a multi-agent system on Google Cloud, leveraging event-driven architecture for enhanced scalability and flexibility! You've laid a solid foundation, but there's even more to explore. To delve deeper into the real benefits of this architecture, discover the power of Gemini 2's multimodal Live API, and learn how to implement single-path orchestration with LangGraph, feel free to continue on to the next two chapters.
12. OPTIONAL: Audio Recaps with Gemini
Gemini can understand and process information from various sources, like text, images, and even audio, opening up a whole new range of possibilities for learning and content creation. Gemini's ability to "see," "hear," and "read" truly unlocks creative and engaging user experiences.
Beyond just creating visuals or text, another important step in learning is effective summarization and recap. Think about it: how often do you remember a catchy song lyric more easily than something you read in a textbook? Sound can be incredibly memorable! That's why we're going to leverage Gemini's multimodal capabilities to generate audio recaps of our teaching plans. This will provide students with a convenient and engaging way to review material, potentially boosting retention and comprehension through the power of auditory learning.
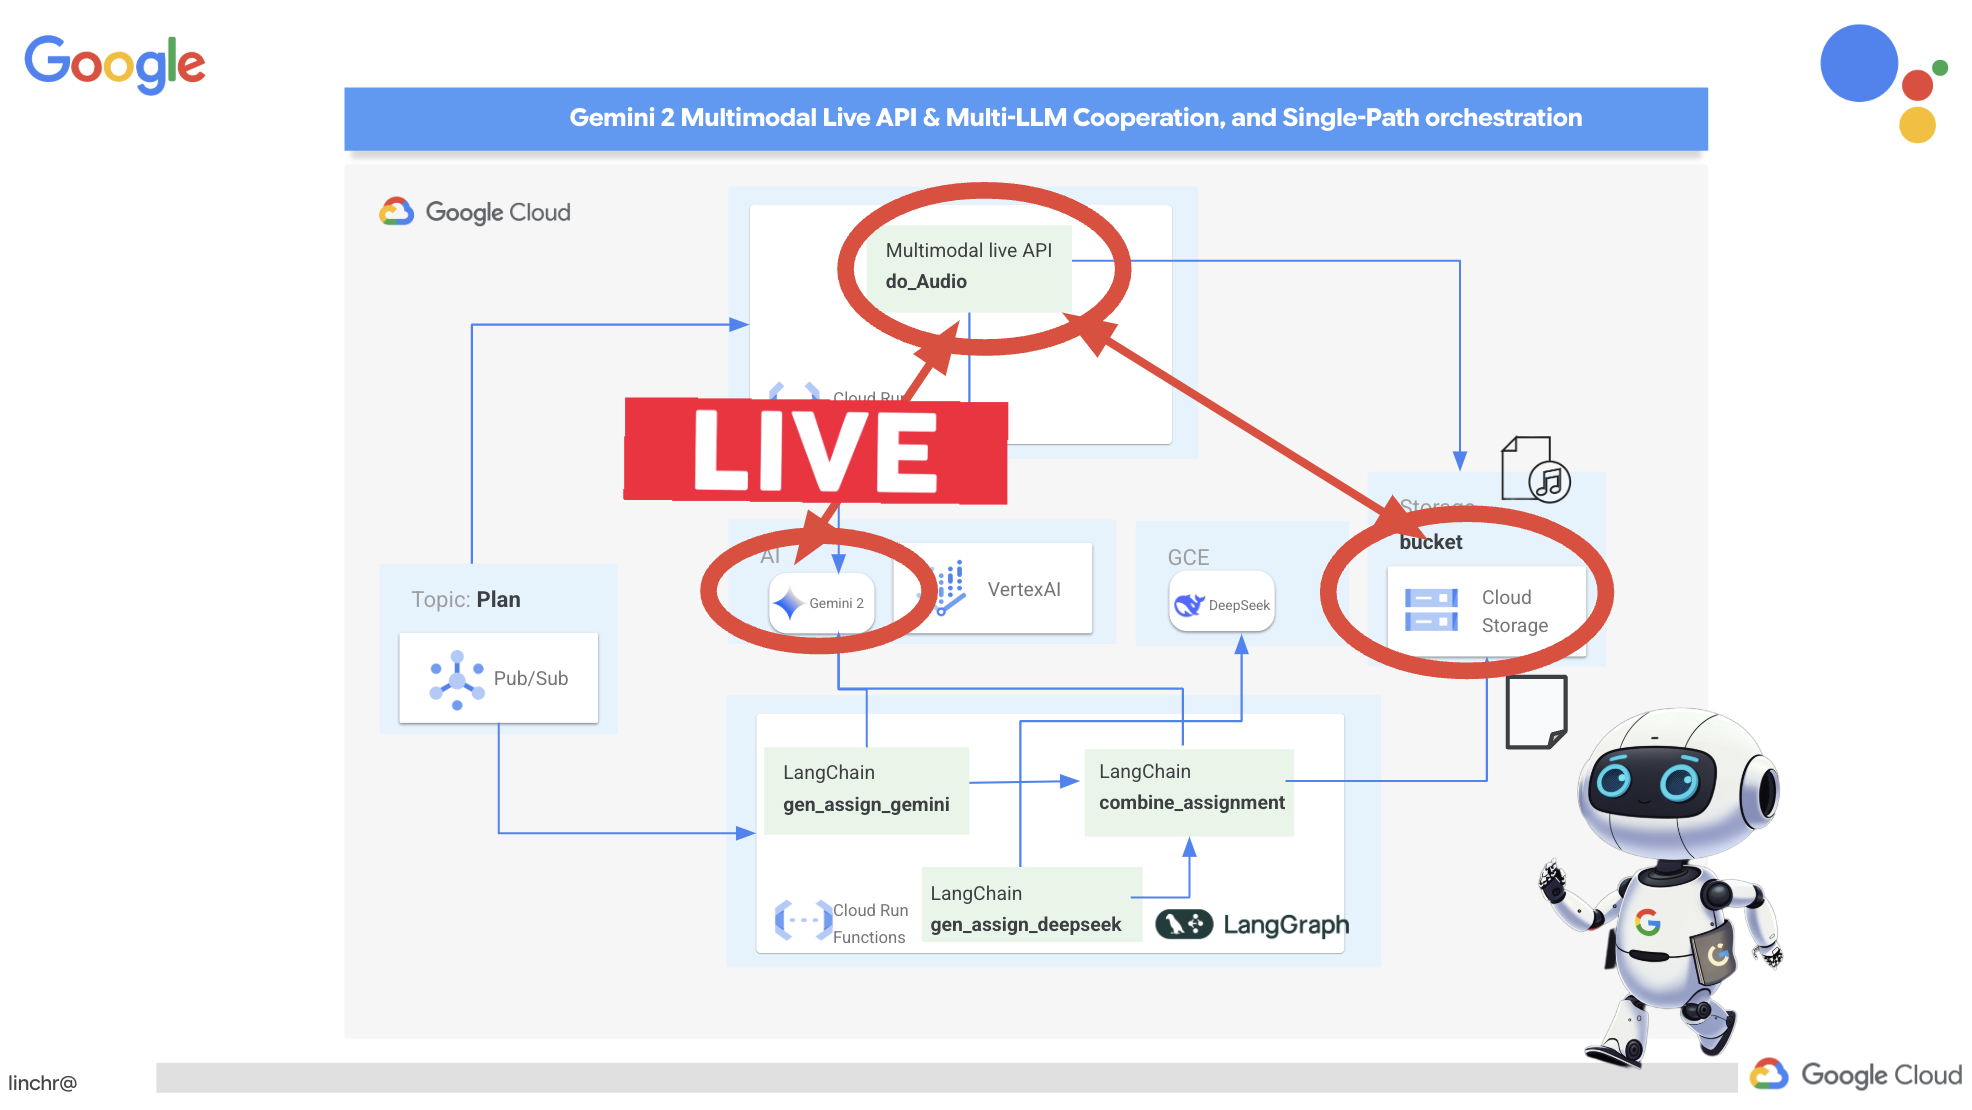
We need a place to store the generated audio files. Cloud Storage provides a scalable and reliable solution.
👉Head to the Storage in the console. Click on "Buckets" in the left-hand menu. Click on the "+ CREATE" button at the top.
👉Configure your new bucket:
- bucket name:
aidemy-recap-UNIQUE_NAME.- IMPORTANT : Ensure you define a unique bucket name that begins with
aidemy-recap-. This unique prefix is crucial for avoiding naming conflicts when creating your Cloud Storage bucket.
- IMPORTANT : Ensure you define a unique bucket name that begins with
- region:
us-central1. - Storage class: "Standard". Standard is suitable for frequently accessed data.
- Access control: Leave the default "Uniform" access control selected. This provides consistent, bucket-level access control.
- Advanced options: For this workshop, the default settings are usually sufficient.
Click the CREATE button to create your bucket.
- You may see a pop up about public access prevention. Leave the "Enforce public access prevention on this bucket" box checked and click
Confirm.
You will now see your newly created bucket in the Buckets list. Remember your bucket name, you'll need it later.
👉In the Cloud Code Editor's terminal, run the following commands to grant the service account access to the bucket:
gcloud config set project $(cat ~/project_id.txt)
export PROJECT_ID=$(gcloud config get project)
export COURSE_BUCKET_NAME=$(gcloud storage buckets list --format="value(name)" | grep aidemy-recap)
export SERVICE_ACCOUNT_NAME=$(gcloud compute project-info describe --format="value(defaultServiceAccount)")
gcloud storage buckets add-iam-policy-binding gs://$COURSE_BUCKET_NAME \
    --member "serviceAccount:$SERVICE_ACCOUNT_NAME" \
    --role "roles/storage.objectViewer"

gcloud storage buckets add-iam-policy-binding gs://$COURSE_BUCKET_NAME \
    --member "serviceAccount:$SERVICE_ACCOUNT_NAME" \
    --role "roles/storage.objectCreator"
👉In the Cloud Code Editor, open audio.py inside the courses folder. Paste the following code to the end of the file:
config = LiveConnectConfig(
    response_modalities=["AUDIO"],
    speech_config=SpeechConfig(
        voice_config=VoiceConfig(
            prebuilt_voice_config=PrebuiltVoiceConfig(
                voice_name="Charon",
            )
        )
    ),
)

async def process_weeks(teaching_plan: str):
    region = "us-east5" #To workaround onRamp quota limits
    client = genai.Client(vertexai=True, project=PROJECT_ID, location=region)

    clientAudio = genai.Client(vertexai=True, project=PROJECT_ID, location="us-central1")
    async with clientAudio.aio.live.connect(
        model=MODEL_ID,
        config=config,
    ) as session:
        for week in range(1, 4):
            response = client.models.generate_content(
                model="gemini-2.0-flash-001",
                contents=f"Given the following teaching plan: {teaching_plan}, Extrace content plan for week {week}. And return just the plan, nothingh else  " # Clarified prompt
            )

            prompt = f"""
                Assume you are the instructor.
                Prepare a concise and engaging recap of the key concepts and topics covered.
                This recap should be suitable for generating a short audio summary for students.
                Focus on the most important learnings and takeaways, and frame it as a direct address to the students.
                Avoid overly formal language and aim for a conversational tone, tell a few jokes.

                Teaching plan: {response.text} """
            print(f"prompt --->{prompt}")

            await session.send(input=prompt, end_of_turn=True)
            with open(f"temp_audio_week_{week}.raw", "wb") as temp_file:
                async for message in session.receive():
                    if message.server_content.model_turn:
                        for part in message.server_content.model_turn.parts:
                            if part.inline_data:
                                temp_file.write(part.inline_data.data)

            data, samplerate = sf.read(f"temp_audio_week_{week}.raw", channels=1, samplerate=24000, subtype='PCM_16', format='RAW')
            sf.write(f"course-week-{week}.wav", data, samplerate)

            storage_client = storage.Client()
            bucket = storage_client.bucket(BUCKET_NAME)
            blob = bucket.blob(f"course-week-{week}.wav")  # Or give it a more descriptive name
            blob.upload_from_filename(f"course-week-{week}.wav")
            print(f"Audio saved to GCS: gs://{BUCKET_NAME}/course-week-{week}.wav")
    await session.close()


def breakup_sessions(teaching_plan: str):
    asyncio.run(process_weeks(teaching_plan))
- Streaming Connection : First, a persistent connection is established with the Live API endpoint. Unlike a standard API call where you send a request and get a response, this connection remains open for a continuous exchange of data.
- Configuration Multimodal : Use configuration to specifying what type of output you want (in this case, audio), and you can even specify what parameters you'd like to use (eg, voice selection, audio encoding)
- Asynchronous Processing : This API works asynchronously, meaning it doesn't block the main thread while waiting for the audio generation to complete. By processing data in real-time and sending the output in chunks, it provides a near-instantaneous experience.
Now, the key question is: when should this audio generation process run? Ideally, we want the audio recaps to be available as soon as a new teaching plan is created. Since we've already implemented an event-driven architecture by publishing the teaching plan to a Pub/Sub topic, we can simply subscribe to that topic.
However, we don't generate new teaching plans very often. It wouldn't be efficient to have an agent constantly running and waiting for new plans. That's why it makes perfect sense to deploy this audio generation logic as a Cloud Run Function.
By deploying it as a function, it remains dormant until a new message is published to the Pub/Sub topic. When that happens, it automatically triggers the function, which generates the audio recaps and stores them in our bucket.
👉Under the courses folder in main.py file, this file defines the Cloud Run Function that will be triggered when a new teaching plan is available. It receives the plan and initiates the audio recap generation. Add the following code snippet to the end of the file.
@functions_framework.cloud_event
def process_teaching_plan(cloud_event):
    print(f"CloudEvent received: {cloud_event.data}")
    time.sleep(60)
    try:
        if isinstance(cloud_event.data.get('message', {}).get('data'), str):  # Check for base64 encoding
            data = json.loads(base64.b64decode(cloud_event.data['message']['data']).decode('utf-8'))
            teaching_plan = data.get('teaching_plan') # Get the teaching plan
        elif 'teaching_plan' in cloud_event.data: # No base64
            teaching_plan = cloud_event.data["teaching_plan"]
        else:
            raise KeyError("teaching_plan not found") # Handle error explicitly

        #Load the teaching_plan as string and from cloud event, call audio breakup_sessions
        breakup_sessions(teaching_plan)

        return "Teaching plan processed successfully", 200

    except (json.JSONDecodeError, AttributeError, KeyError) as e:
        print(f"Error decoding CloudEvent data: {e} - Data: {cloud_event.data}")
        return "Error processing event", 500

    except Exception as e:
        print(f"Error processing teaching plan: {e}")
        return "Error processing teaching plan", 500
@functions_framework.cloud_event : This decorator marks the function as a Cloud Run Function that will be triggered by CloudEvents.
Тестирование локально
👉We'll run this in a virtual environment and install the necessary Python libraries for the Cloud Run function.
cd ~/aidemy-bootstrap/courses
gcloud config set project $(cat ~/project_id.txt)
export PROJECT_ID=$(gcloud config get project)
export COURSE_BUCKET_NAME=$(gcloud storage buckets list --format="value(name)" | grep aidemy-recap)
python -m venv env
source env/bin/activate
pip install -r requirements.txt
👉The Cloud Run Function emulator allows us to test our function locally before deploying it to Google Cloud. Start a local emulator by running:
functions-framework --target process_teaching_plan --signature-type=cloudevent --source main.py
👉While the emulator is running, you can send test CloudEvents to the emulator to simulate a new teaching plan being published. In a new terminal:

👉Run:
  curl -X POST \
  http://localhost:8080/ \
  -H "Content-Type: application/json" \
  -H "ce-id: event-id-01" \
  -H "ce-source: planner-agent" \
  -H "ce-specversion: 1.0" \
  -H "ce-type: google.cloud.pubsub.topic.v1.messagePublished" \
  -d '{
    "message": {
      "data": "eyJ0ZWFjaGluZ19wbGFuIjogIldlZWsgMTogMkQgU2hhcGVzIGFuZCBBbmdsZXMgLSBEYXkgMTogUmV2aWV3IG9mIGJhc2ljIDJEIHNoYXBlcyAoc3F1YXJlcywgcmVjdGFuZ2xlcywgdHJpYW5nbGVzLCBjaXJjbGVzKS4gRGF5IDI6IEV4cGxvcmluZyBkaWZmZXJlbnQgdHlwZXMgb2YgdHJpYW5nbGVzIChlcXVpbGF0ZXJhbCwgaXNvc2NlbGVzLCBzY2FsZW5lLCByaWdodC1hbmdsZWQpLiBEYXkgMzogRXhwbG9yaW5nIHF1YWRyaWxhdGVyYWxzIChzcXVhcmUsIHJlY3RhbmdsZSwgcGFyYWxsZWxvZ3JhbSwgcmhvbWJ1cywgdHJhcGV6aXVtKS4gRGF5IDQ6IEludHJvZHVjdGlvbiB0byBhbmdsZXM6IHJpZ2h0IGFuZ2xlcywgYWN1dGUgYW5nbGVzLCBhbmQgb2J0dXNlIGFuZ2xlcy4gRGF5IDU6IE1lYXN1cmluZyBhbmdsZXMgdXNpbmcgYSBwcm90cmFjdG9yLiBXZWVrIDI6IDNEIFNoYXBlcyBhbmQgU3ltbWV0cnkgLSBEYXkgNjogSW50cm9kdWN0aW9uIHRvIDNEIHNoYXBlczogY3ViZXMsIGN1Ym9pZHMsIHNwaGVyZXMsIGN5bGluZGVycywgY29uZXMsIGFuZCBweXJhbWlkcy4gRGF5IDc6IERlc2NyaWJpbmcgM0Qgc2hhcGVzIHVzaW5nIGZhY2VzLCBlZGdlcywgYW5kIHZlcnRpY2VzLiBEYXkgODogUmVsYXRpbmcgMkQgc2hhcGVzIHRvIDNEIHNoYXBlcy4gRGF5IDk6IElkZW50aWZ5aW5nIGxpbmVzIG9mIHN5bW1ldHJ5IGluIDJEIHNoYXBlcy4gRGF5IDEwOiBDb21wbGV0aW5nIHN5bW1ldHJpY2FsIGZpZ3VyZXMuIFdlZWsgMzogUG9zaXRpb24sIERpcmVjdGlvbiwgYW5kIFByb2JsZW0gU29sdmluZyAtIERheSAxMTogRGVzY3JpYmluZyBwb3NpdGlvbiB1c2luZyBjb29yZGluYXRlcyBpbiB0aGUgZmlyc3QgcXVhZHJhbnQuIERheSAxMjogUGxvdHRpbmcgY29vcmRpbmF0ZXMgdG8gZHJhdyBzaGFwZXMuIERheSAxMzogVW5kZXJzdGFuZGluZyB0cmFuc2xhdGlvbiAoc2xpZGluZyBhIHNoYXBlKS4gRGF5IDE0OiBVbmRlcnN0YW5kaW5nIHJlZmxlY3Rpb24gKGZsaXBwaW5nIGEgc2hhcGUpLiBEYXkgMTU6IFByb2JsZW0tc29sdmluZyBhY3Rpdml0aWVzIGludm9sdmluZyBwZXJpbWV0ZXIsIGFyZWEsIGFuZCBtaXNzaW5nIGFuZ2xlcy4ifQ=="
    }
  }'
Rather than staring blankly while waiting for the response, switch over to the other Cloud Shell terminal. You can observe the progress and any output or error messages generated by your function in the emulator's terminal. 😁
Back in the 2nd terminal you should see it should returned OK .
👉You'll verify Data in bucket, go to Cloud Storage and select the "Bucket" tab and then the aidemy-recap-UNIQUE_NAME
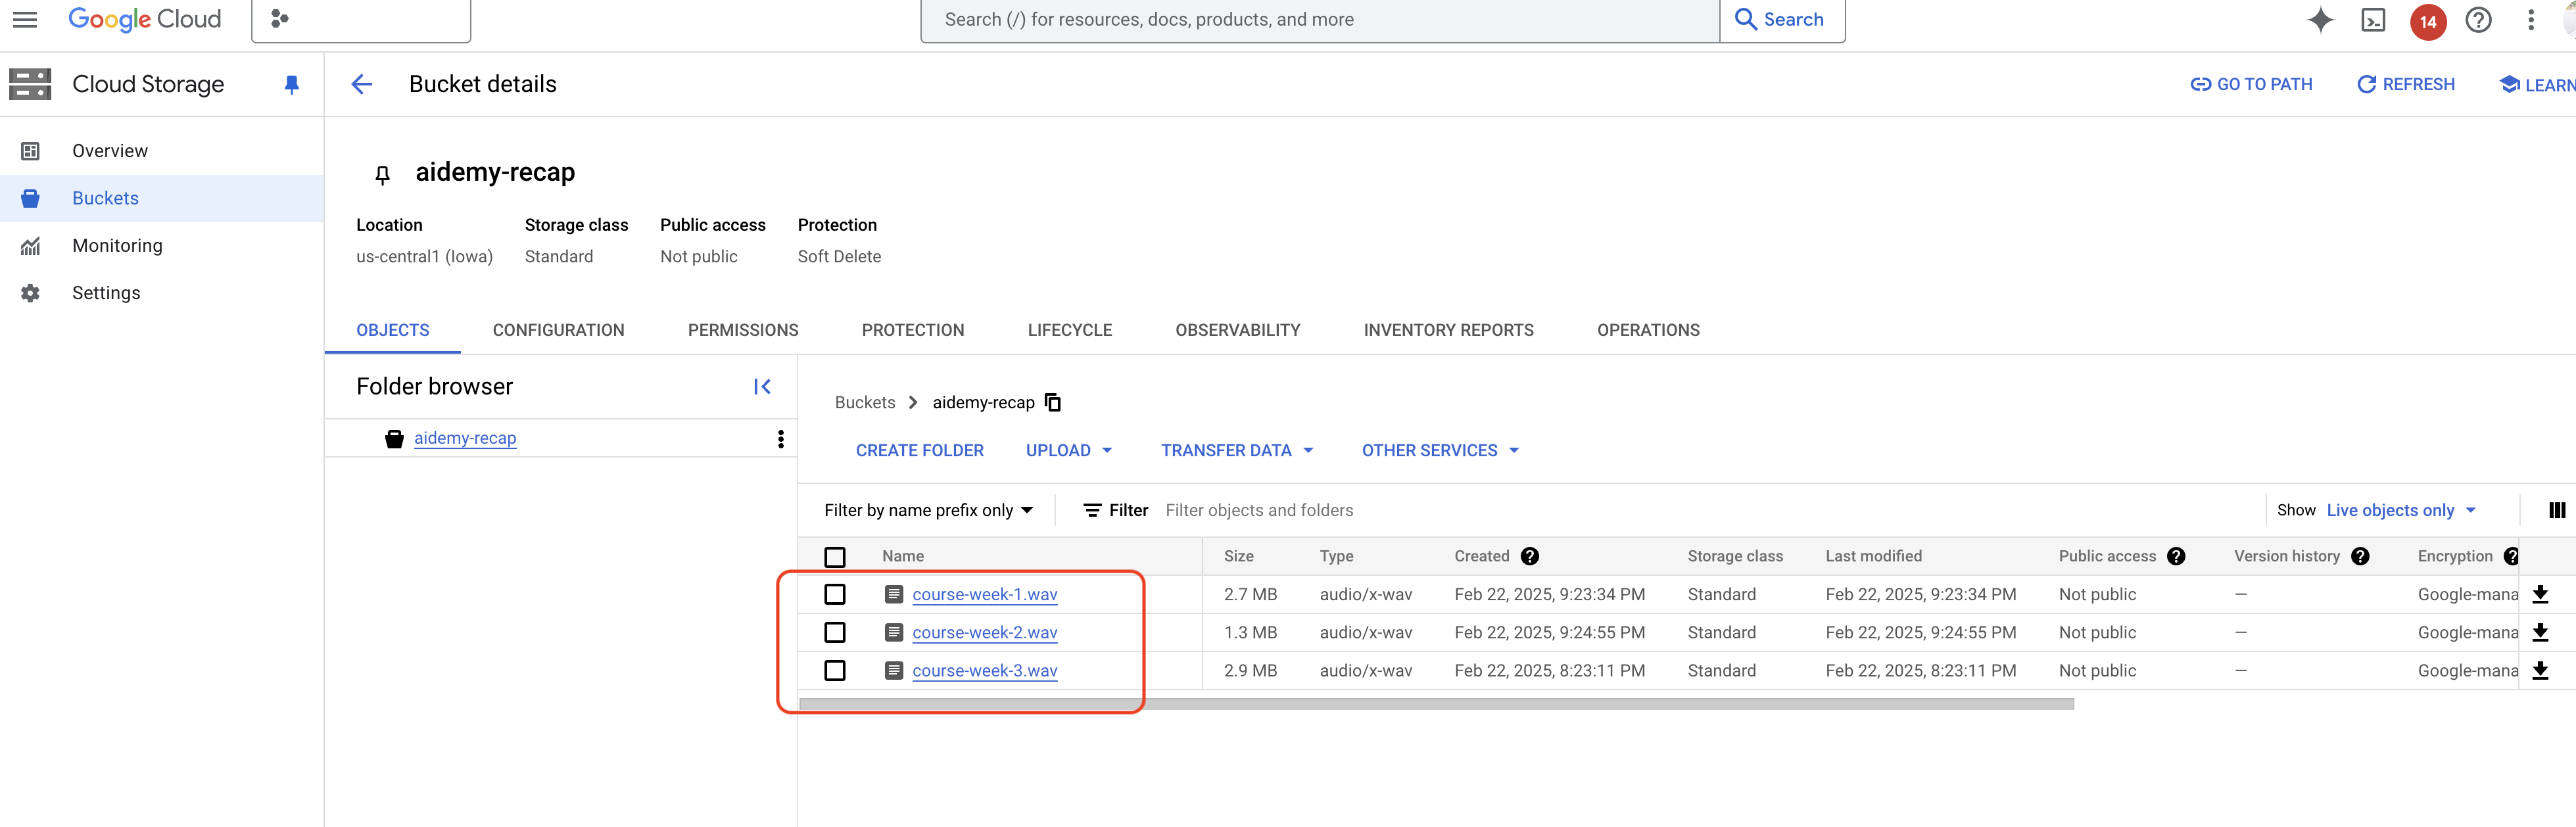
👉In the terminal running the emulator, type ctrl+c to exit. And close the second terminal. And close the second terminal. and run deactivate to exit the virtual environment.
deactivate
Deploying to Google Cloud
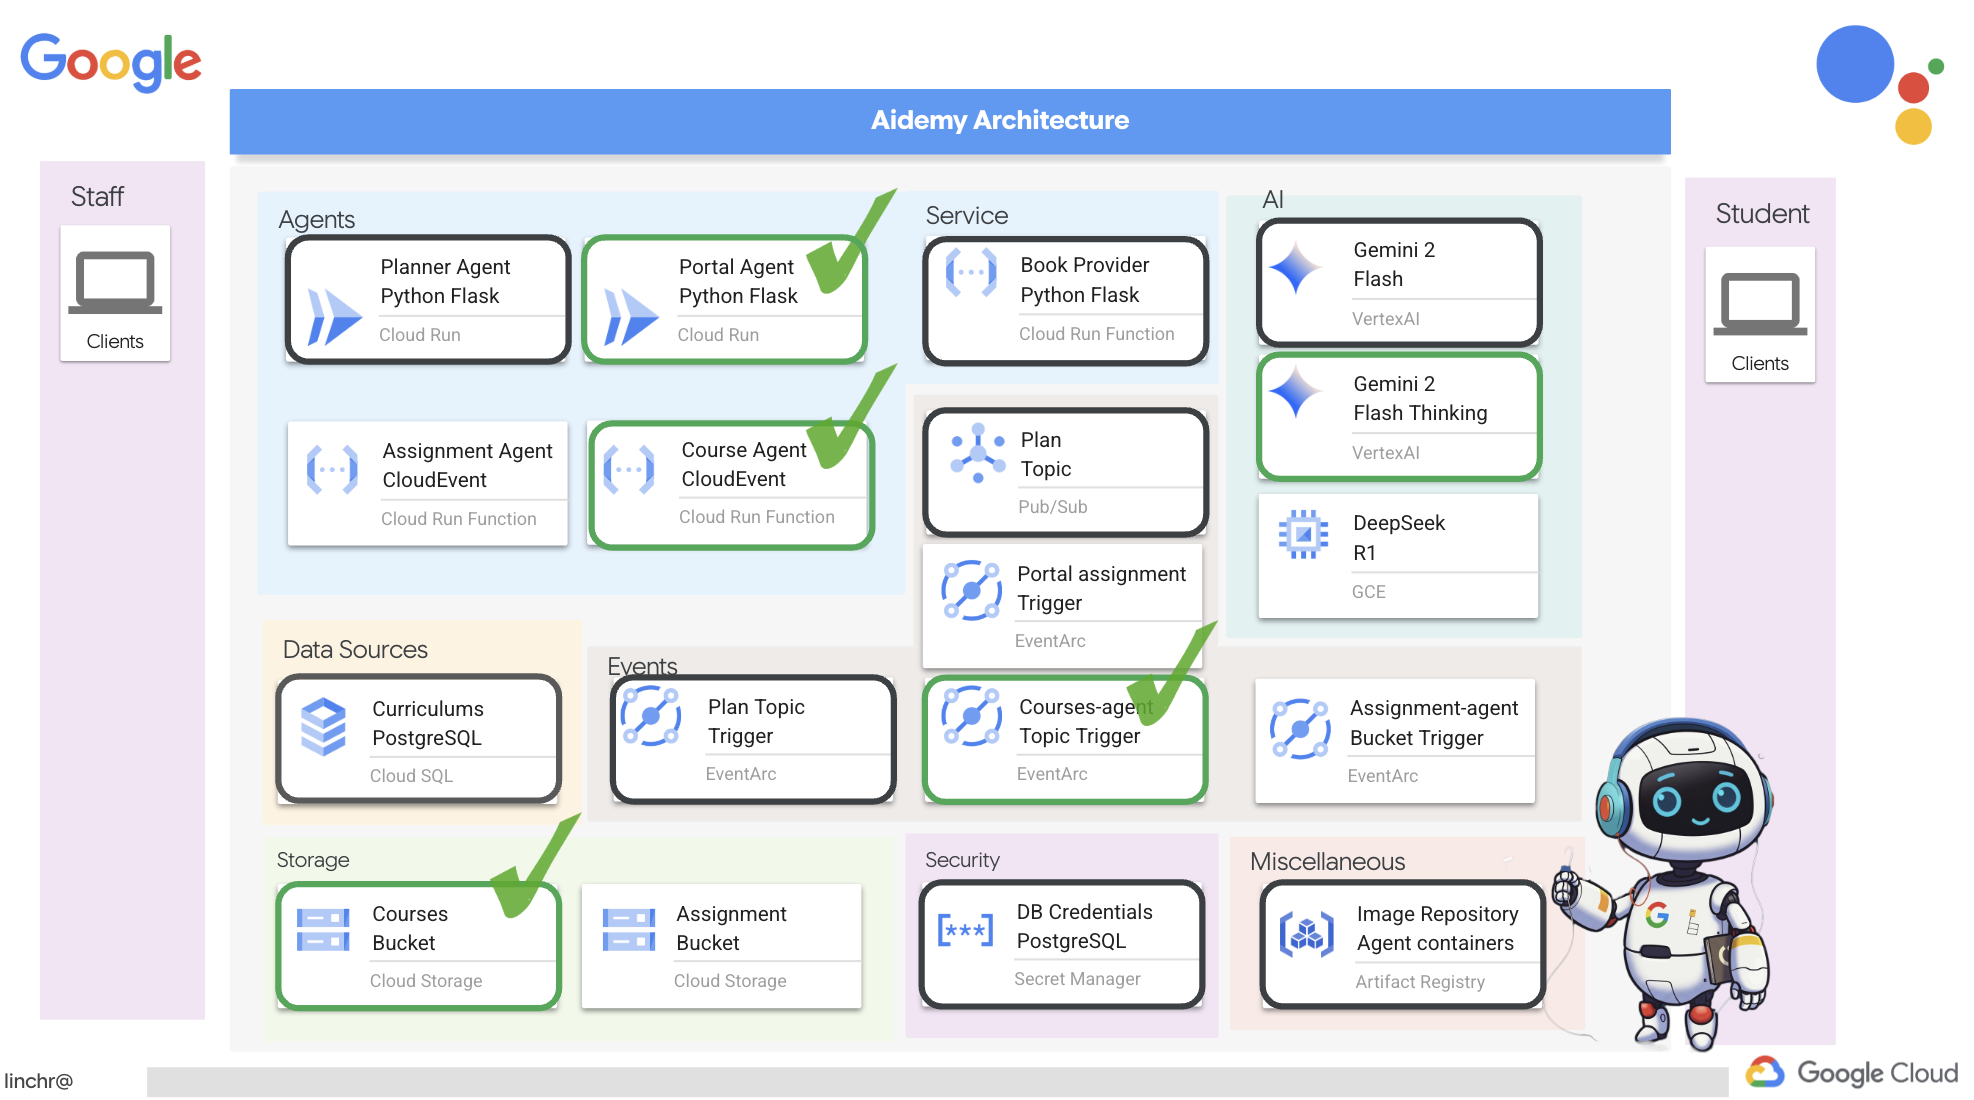 👉After testing locally, it's time to deploy the course agent to Google Cloud. In the terminal, run these commands:
cd ~/aidemy-bootstrap/courses
gcloud config set project $(cat ~/project_id.txt)
export PROJECT_ID=$(gcloud config get project)
export COURSE_BUCKET_NAME=$(gcloud storage buckets list --format="value(name)" | grep aidemy-recap)
gcloud functions deploy courses-agent \
  --region=us-central1 \
  --gen2 \
  --source=. \
  --runtime=python312 \
  --trigger-topic=plan \
  --entry-point=process_teaching_plan \
  --set-env-vars=GOOGLE_CLOUD_PROJECT=${PROJECT_ID},COURSE_BUCKET_NAME=$COURSE_BUCKET_NAME
Verify deployment by going Cloud Run in the Google Cloud Console.You should see a new service named courses-agent listed.

To check the trigger configuration, click on the courses-agent service to view its details. Go to the "TRIGGERS" tab.
You should see a trigger configured to listen for messages published to the plan topic.
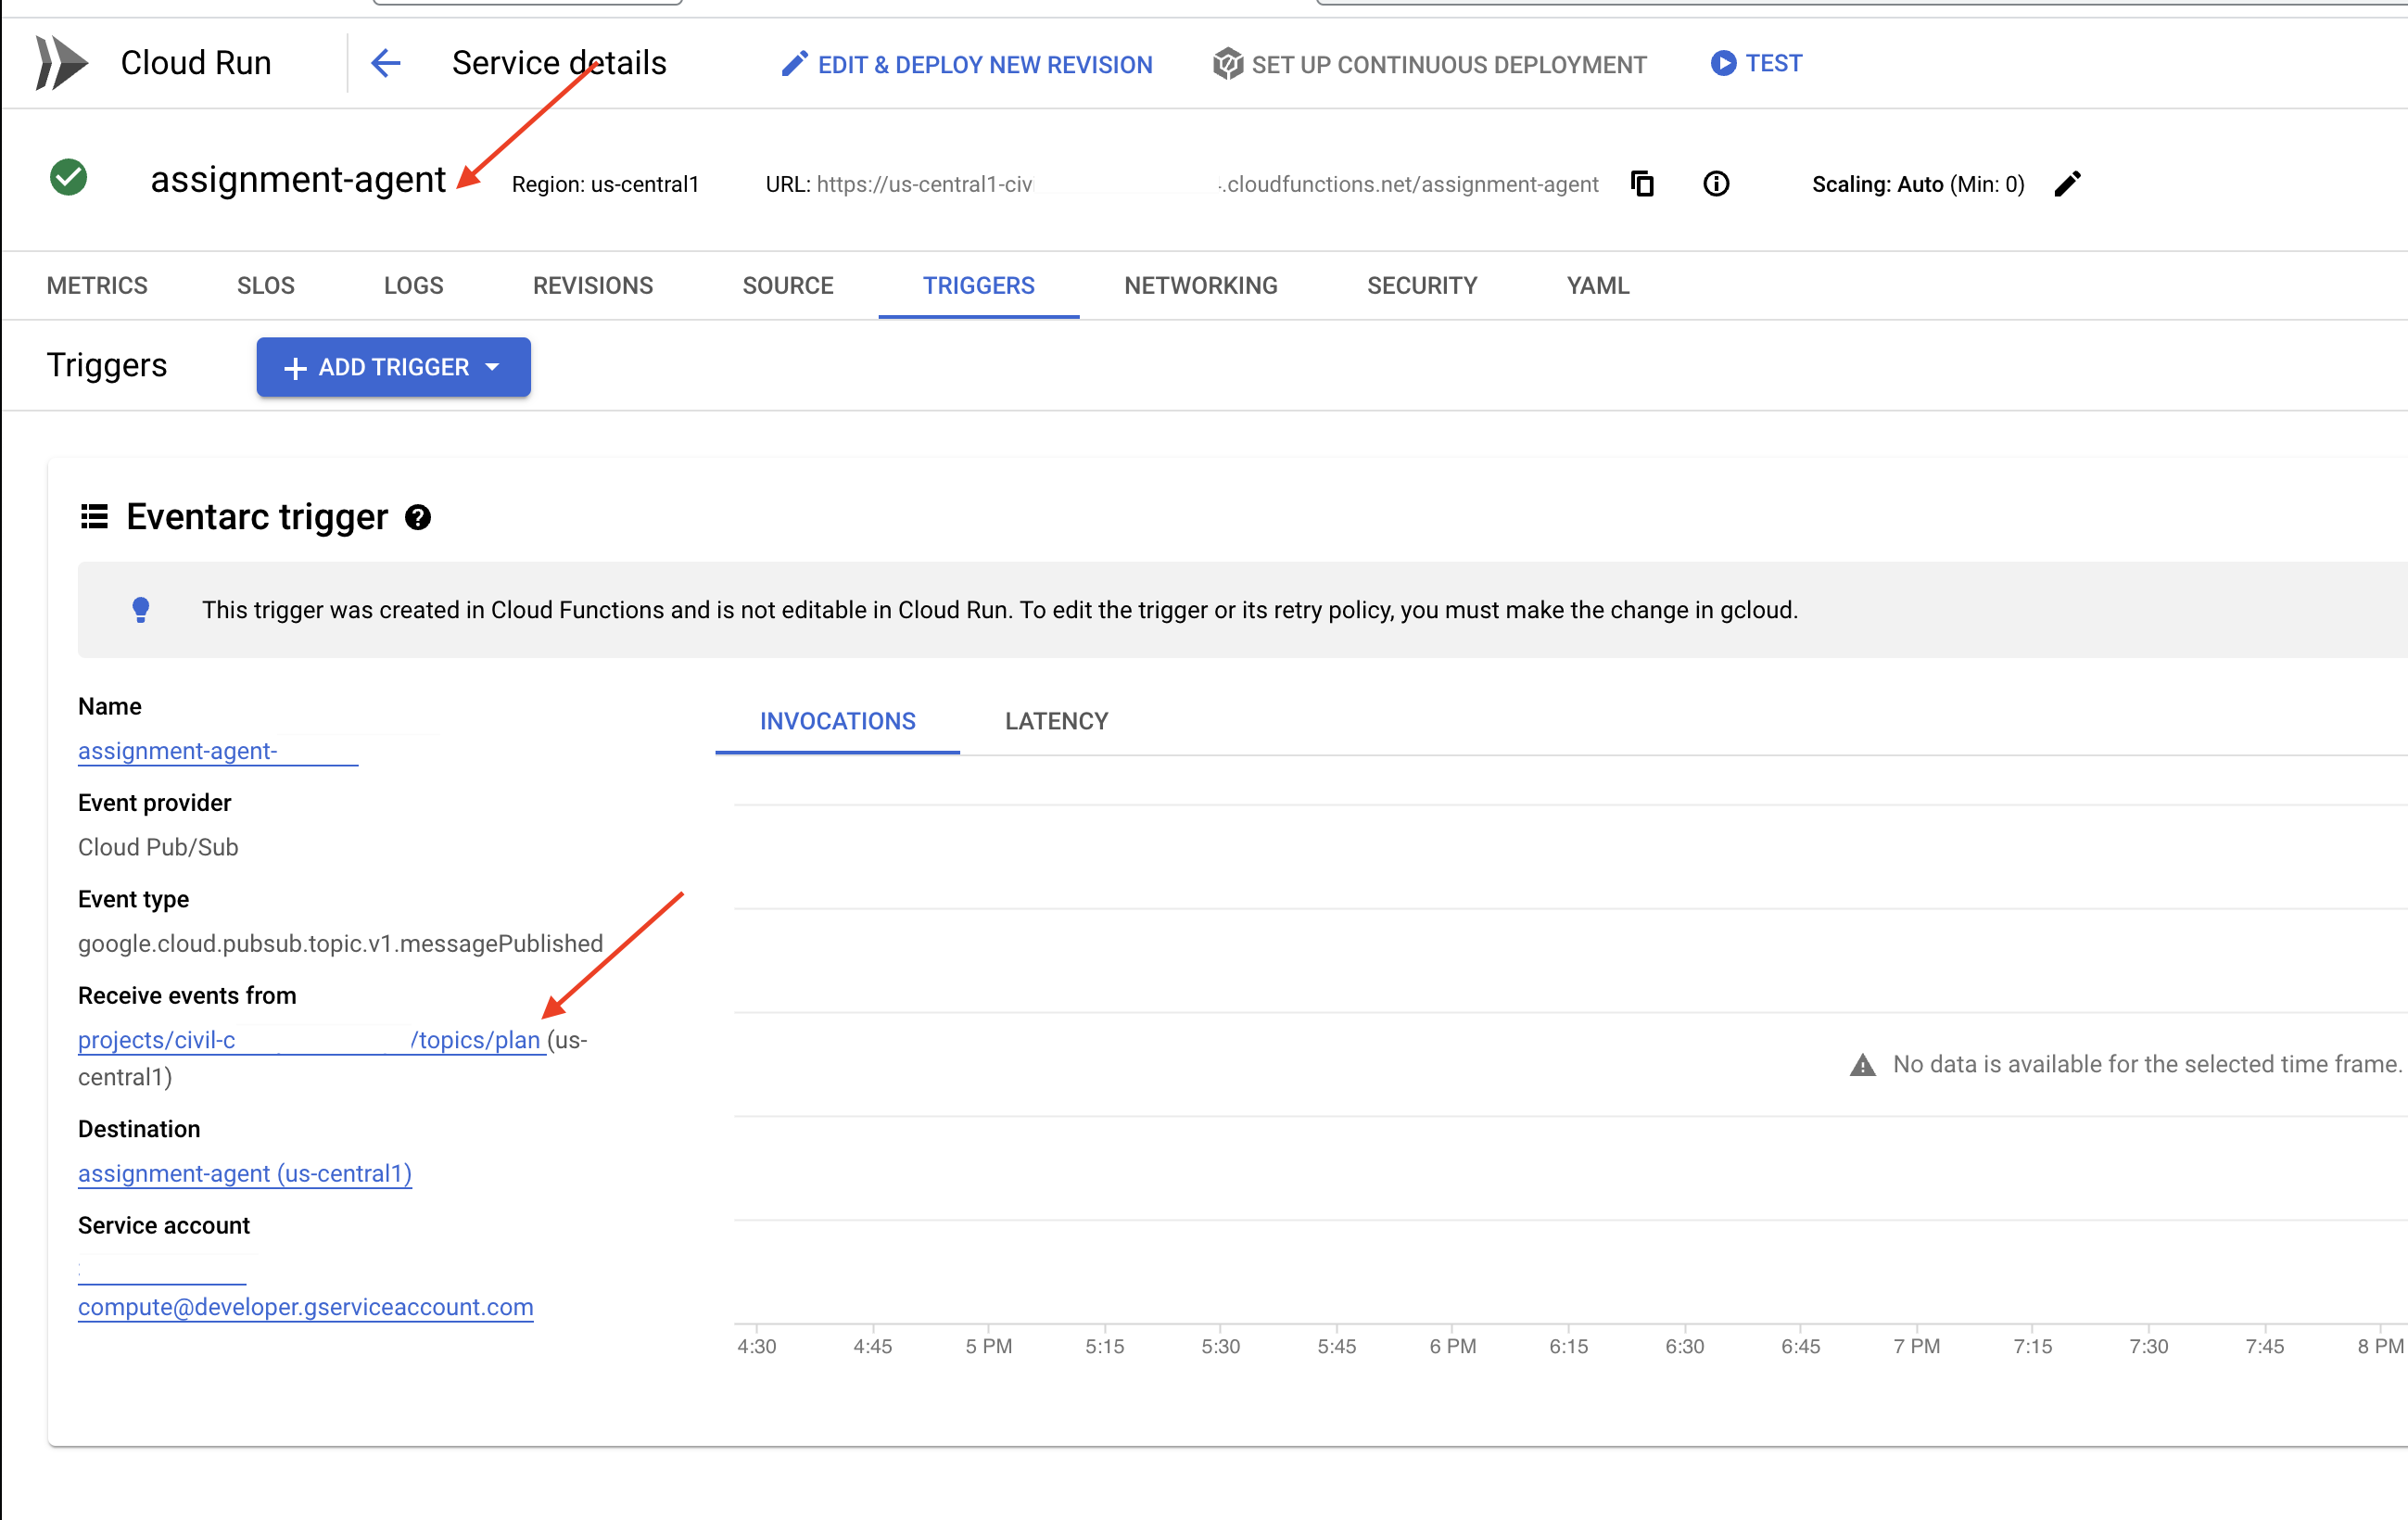
Finally, let's see it running end to end.
👉We need to configure the portal agent so it knows where to find the generated audio files. In the terminal, run:
export COURSE_BUCKET_NAME=$(gcloud storage buckets list --format="value(name)" | grep aidemy-recap)
gcloud config set project $(cat ~/project_id.txt)
export PROJECT_ID=$(gcloud config get project)
gcloud run services update aidemy-portal \
    --region=us-central1 \
    --set-env-vars=GOOGLE_CLOUD_PROJECT=${PROJECT_ID},COURSE_BUCKET_NAME=$COURSE_BUCKET_NAME
👉Try generating a new teaching plan using the planner agent web page. It might take a few minutes to start, don't be alarmed, it's a serverless service.
To access the planner agent, get its Service URL by running this in the terminal:
gcloud run services list \
    --platform=managed \
    --region=us-central1 \
    --format='value(URL)' | grep planner
After generating the new plan, wait 2-3 minutes for the audio to be generated, again this will take a few more minutes due to billing limitation with this lab account.
You can monitor whether the courses-agent function has received the teaching plan by checking the function's "TRIGGERS" tab. Refresh the page periodically; you should eventually see that the function has been invoked. If the function hasn't been invoked after more than 2 minutes, you can try generating the teaching plan again. However, avoid generating plans repeatedly in quick succession, as each generated plan will be sequentially consumed and processed by the agent, potentially creating a backlog.
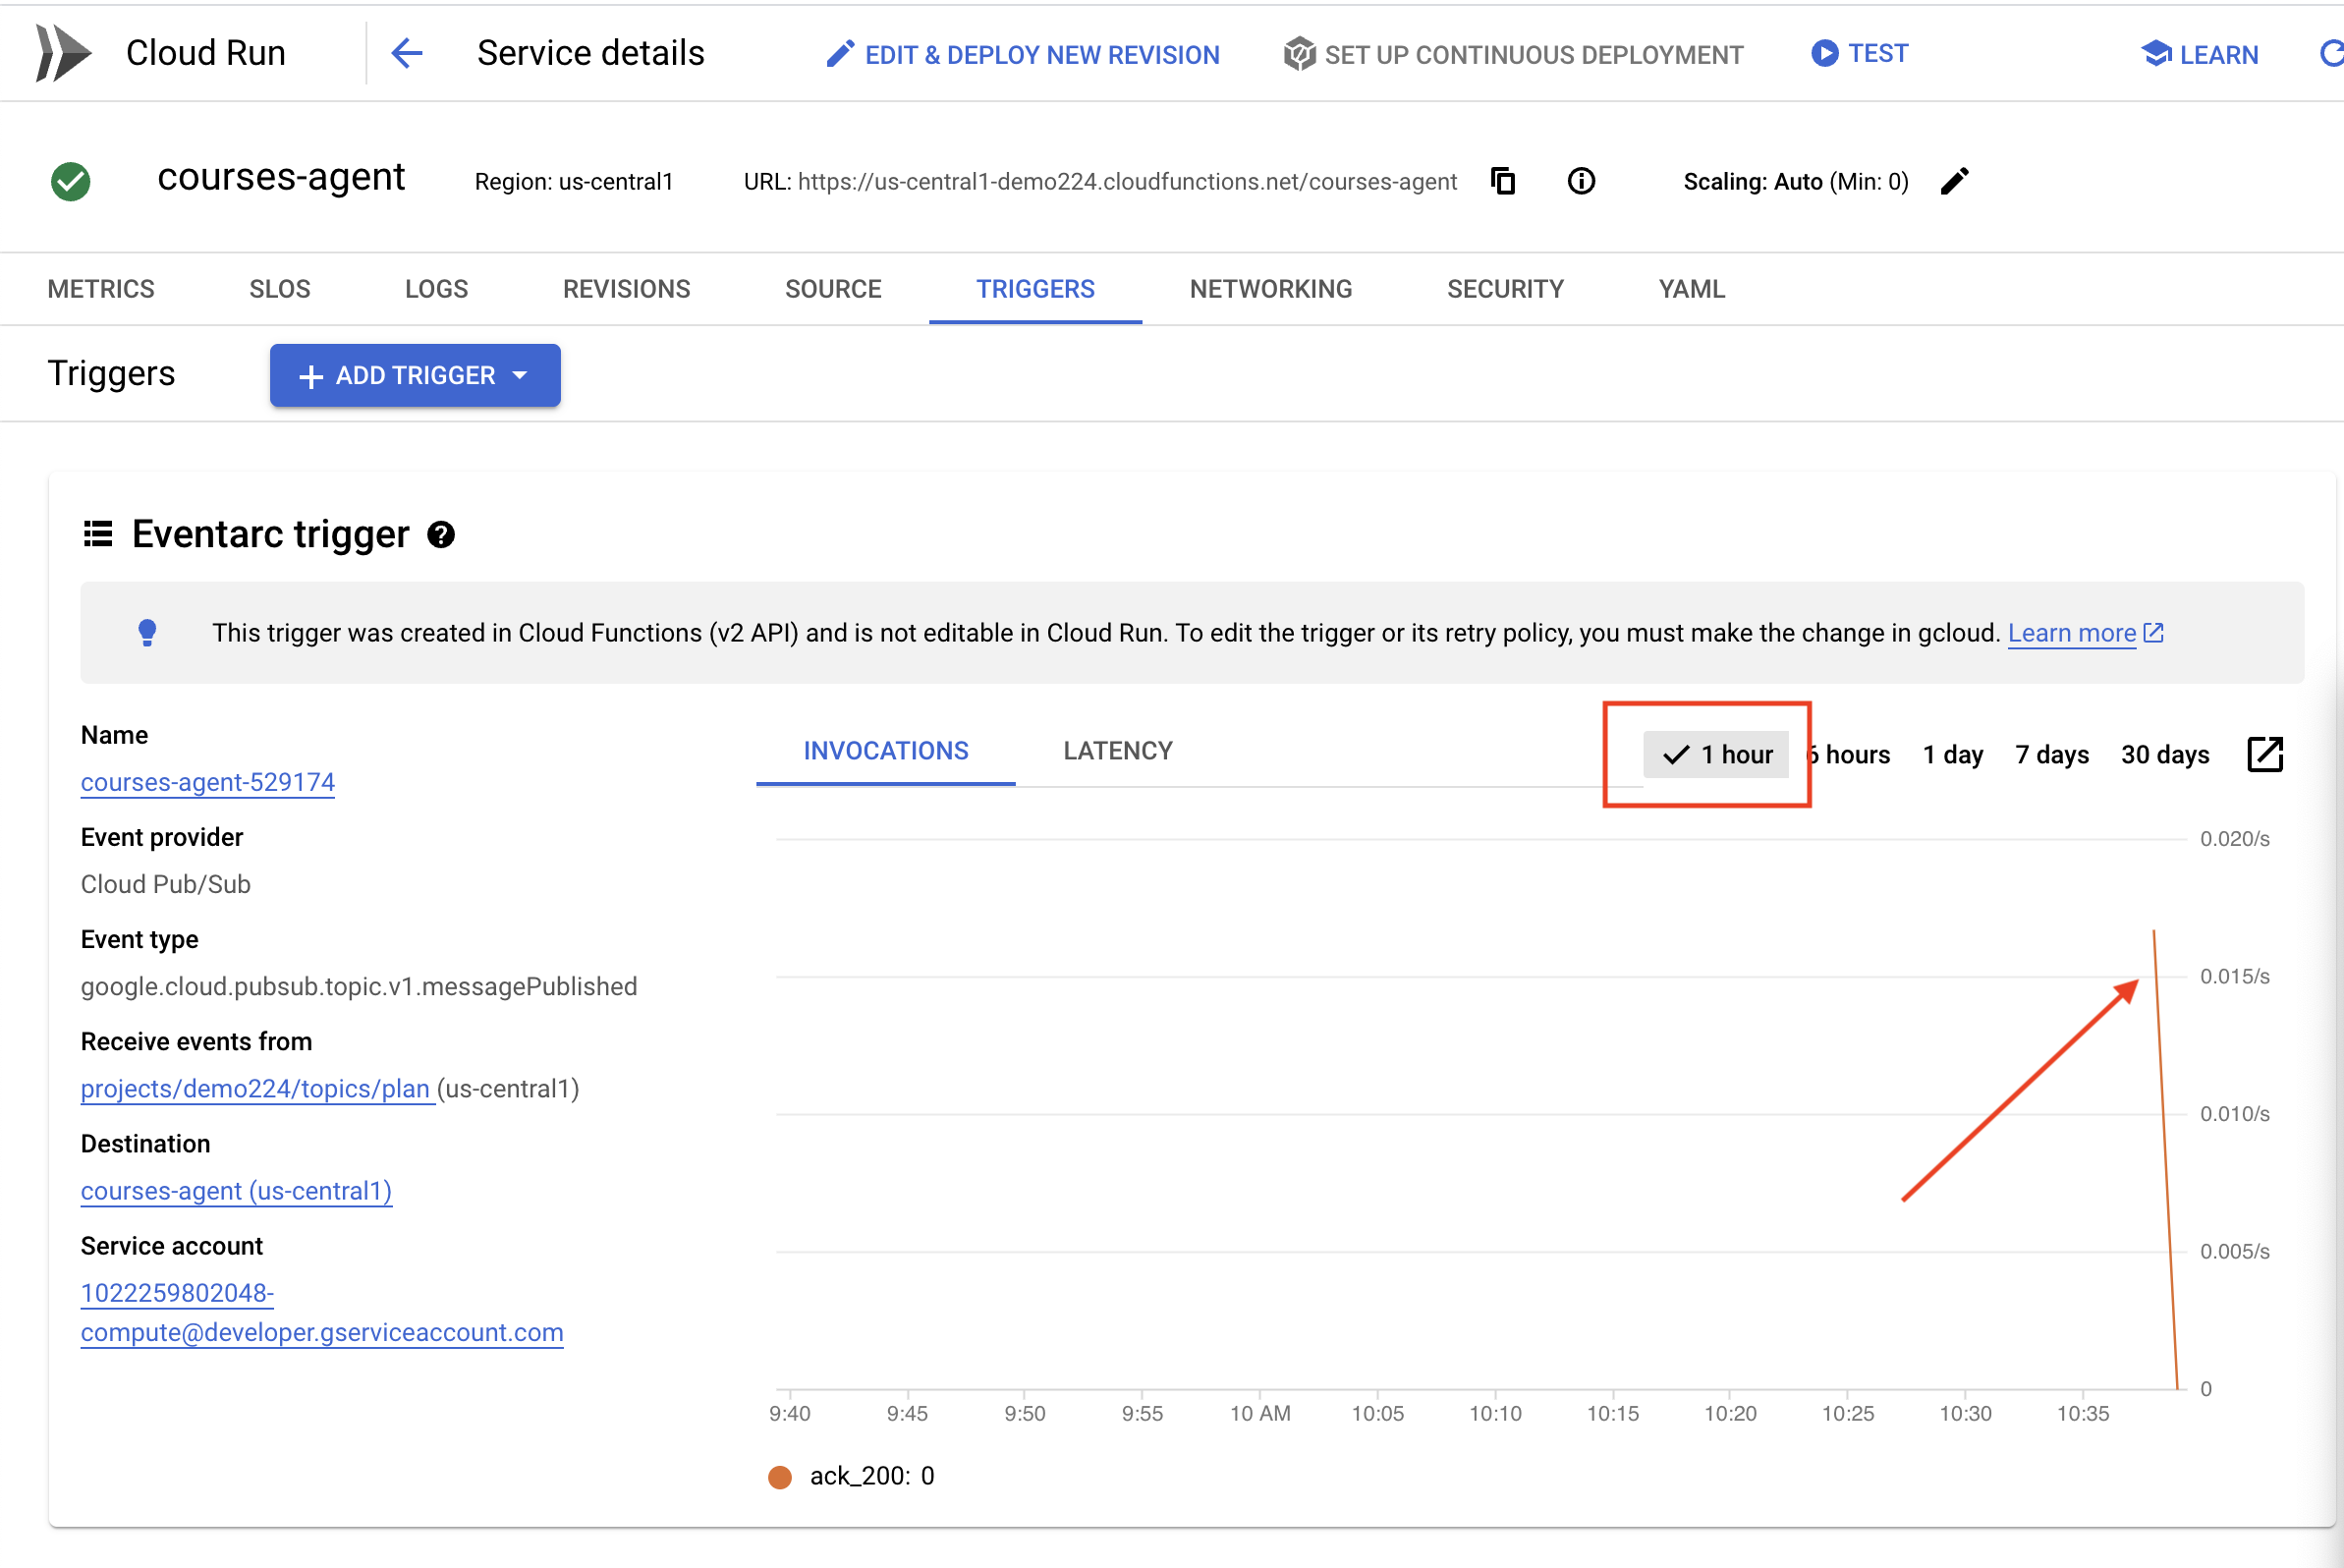
👉Visit the portal and click on "Courses". You should see three cards, each displaying an audio recap. To find the URL of your portal agent:
gcloud run services list \
    --platform=managed \
    --region=us-central1 \
    --format='value(URL)' | grep portal
Click "play" on each course to ensure the audio recaps are aligned with the teaching plan you just generated! 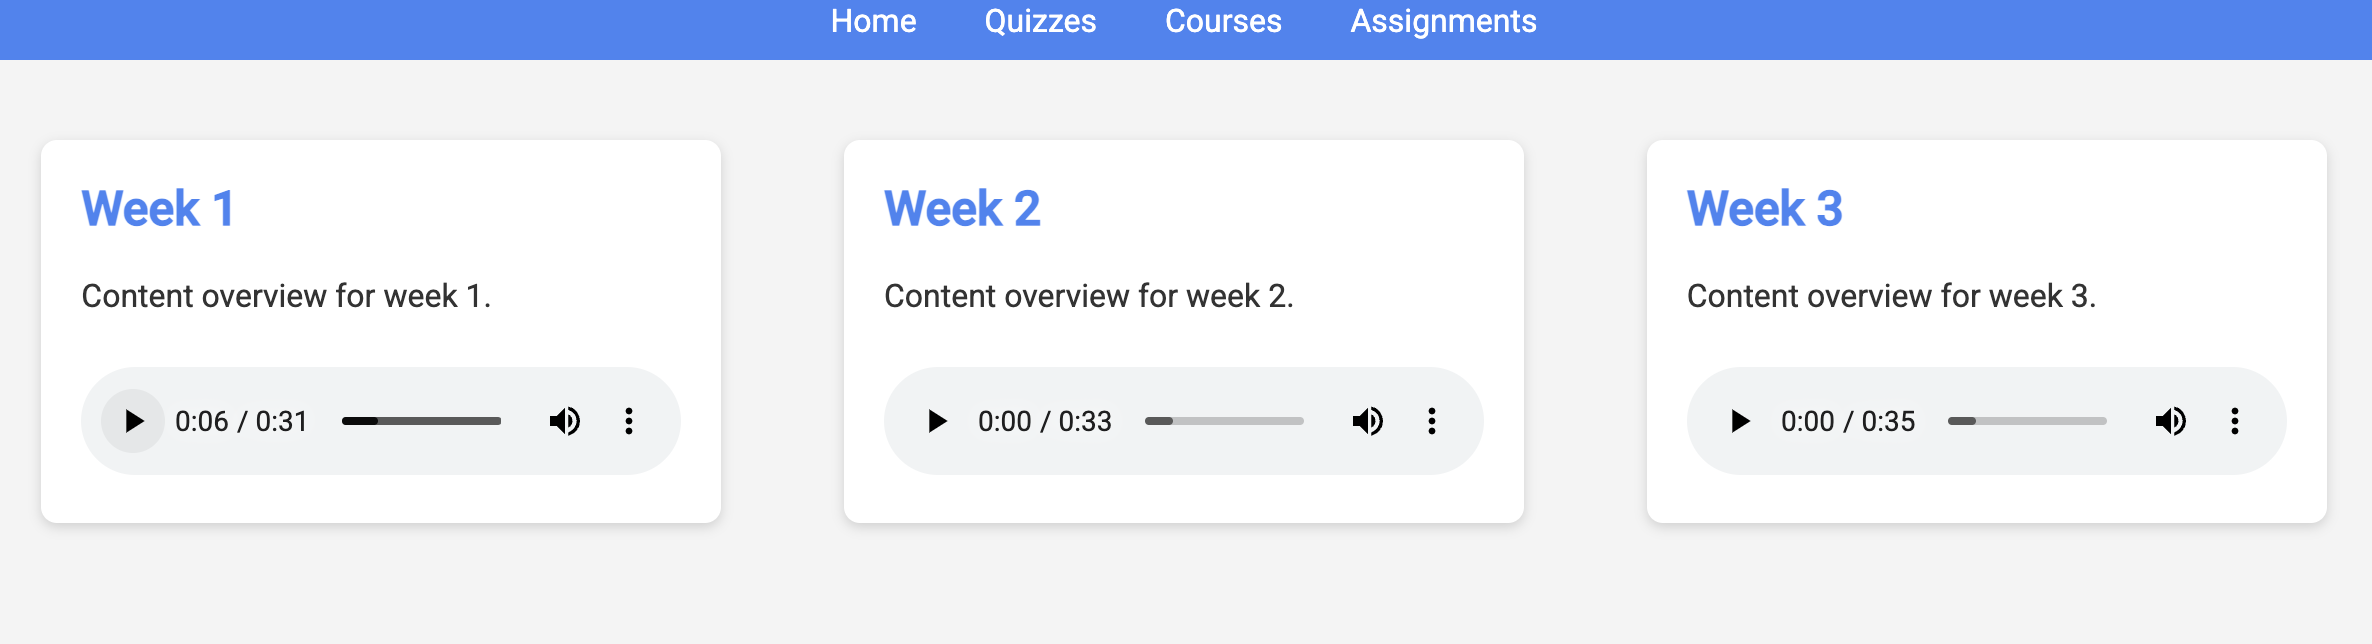
Exit the virtual environment.
deactivate
13. OPTIONAL: Role-Based collaboration with Gemini and DeepSeek
Having multiple perspectives is invaluable, especially when crafting engaging and thoughtful assignments. We'll now build a multi-agent system that leverages two different models with distinct roles, to generate assignments: one promotes collaboration, and the other encourages self-study. We'll use a "single-shot" architecture, where the workflow follows a fixed route.
Gemini Assignment Generator
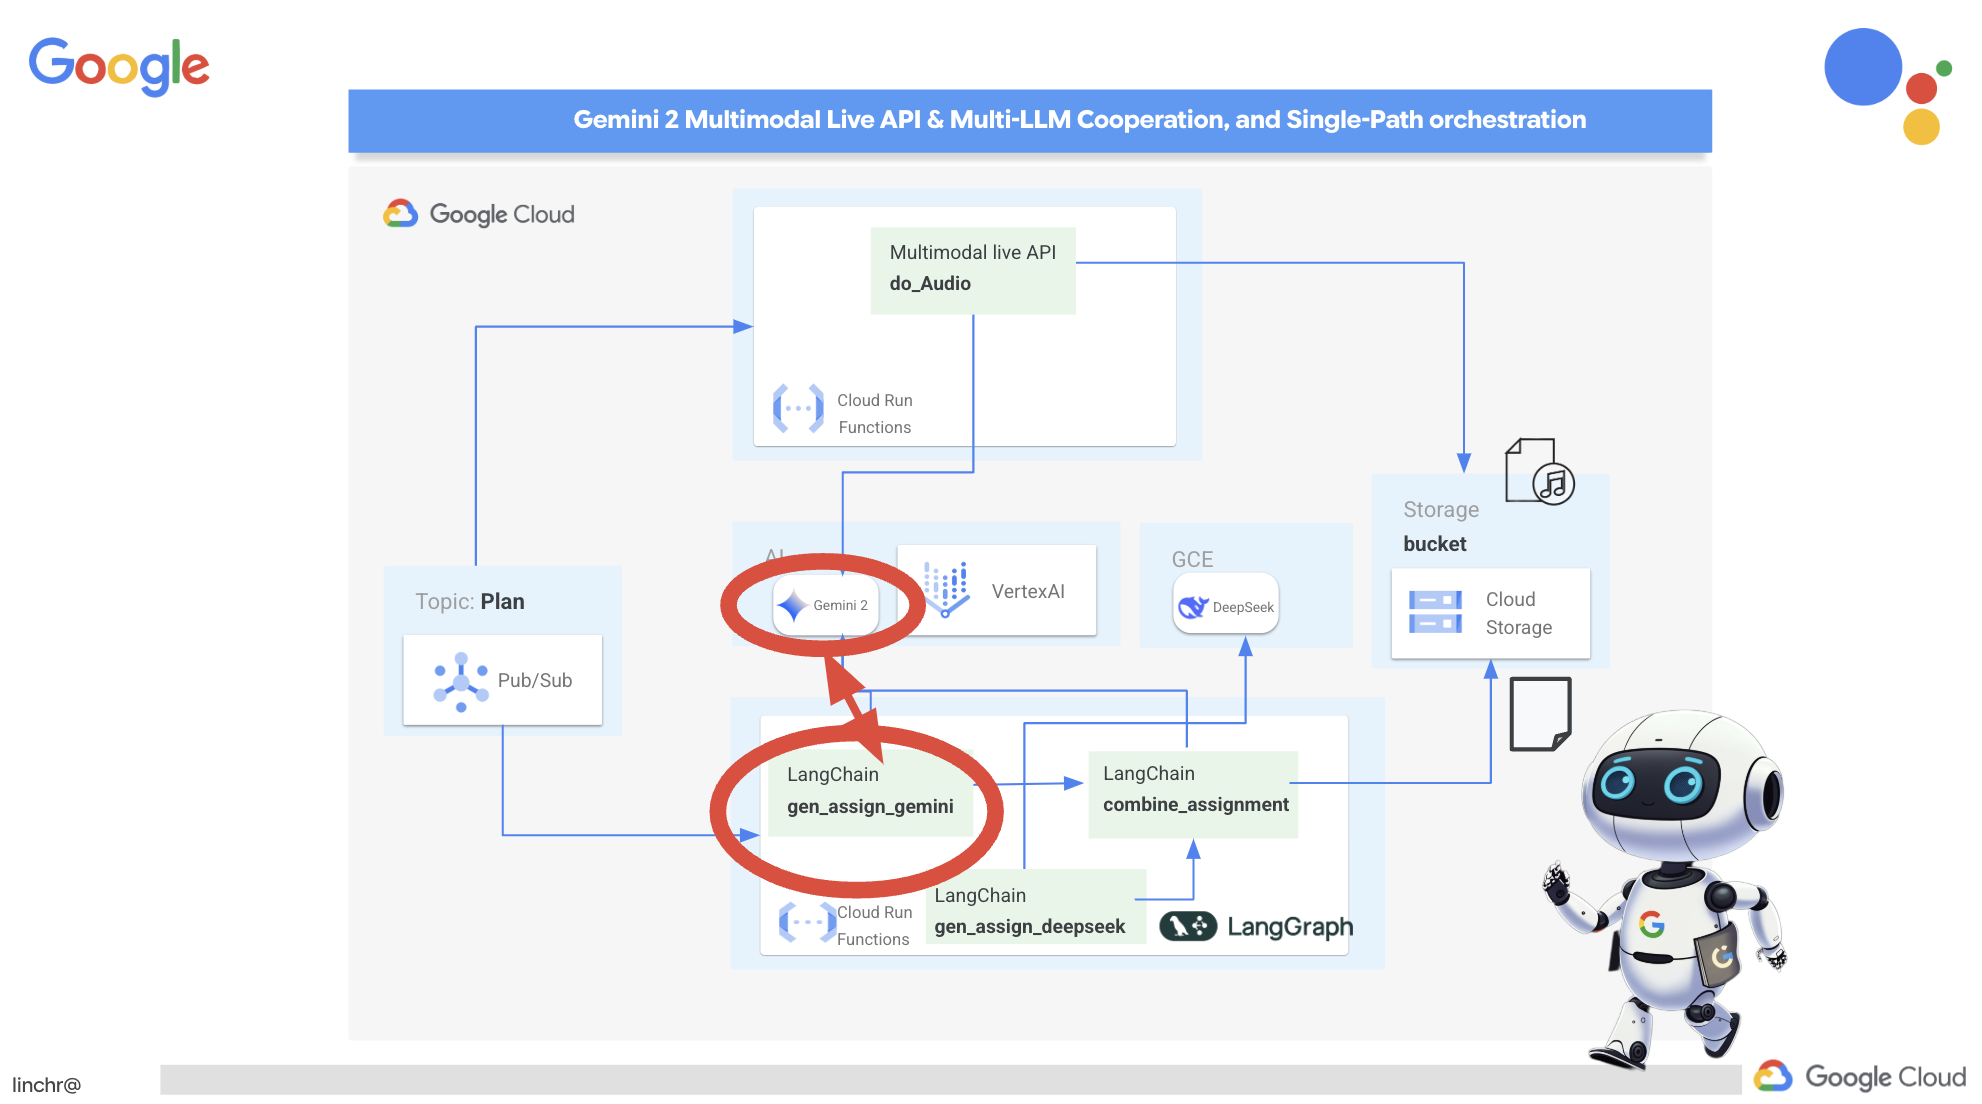 We'll start by setting up the Gemini function to generate assignments with a collaborative emphasis. Edit the
 gemini.py file located in the assignment folder.
👉Paste the following code to the end of the gemini.py file:
def gen_assignment_gemini(state):
    region=get_next_region()
    client = genai.Client(vertexai=True, project=PROJECT_ID, location=region)
    print(f"---------------gen_assignment_gemini")
    response = client.models.generate_content(
        model=MODEL_ID, contents=f"""
        You are an instructor

        Develop engaging and practical assignments for each week, ensuring they align with the teaching plan's objectives and progressively build upon each other.

        For each week, provide the following:

        * **Week [Number]:** A descriptive title for the assignment (e.g., "Data Exploration Project," "Model Building Exercise").
        * **Learning Objectives Assessed:** List the specific learning objectives from the teaching plan that this assignment assesses.
        * **Description:** A detailed description of the task, including any specific requirements or constraints.  Provide examples or scenarios if applicable.
        * **Deliverables:** Specify what students need to submit (e.g., code, report, presentation).
        * **Estimated Time Commitment:**  The approximate time students should dedicate to completing the assignment.
        * **Assessment Criteria:** Briefly outline how the assignment will be graded (e.g., correctness, completeness, clarity, creativity).

        The assignments should be a mix of individual and collaborative work where appropriate.  Consider different learning styles and provide opportunities for students to apply their knowledge creatively.

        Based on this teaching plan: {state["teaching_plan"]}
        """
    )

    print(f"---------------gen_assignment_gemini answer {response.text}")

    state["model_one_assignment"] = response.text

    return state


import unittest

class TestGenAssignmentGemini(unittest.TestCase):
    def test_gen_assignment_gemini(self):
        test_teaching_plan = "Week 1: 2D Shapes and Angles - Day 1: Review of basic 2D shapes (squares, rectangles, triangles, circles). Day 2: Exploring different types of triangles (equilateral, isosceles, scalene, right-angled). Day 3: Exploring quadrilaterals (square, rectangle, parallelogram, rhombus, trapezium). Day 4: Introduction to angles: right angles, acute angles, and obtuse angles. Day 5: Measuring angles using a protractor. Week 2: 3D Shapes and Symmetry - Day 6: Introduction to 3D shapes: cubes, cuboids, spheres, cylinders, cones, and pyramids. Day 7: Describing 3D shapes using faces, edges, and vertices. Day 8: Relating 2D shapes to 3D shapes. Day 9: Identifying lines of symmetry in 2D shapes. Day 10: Completing symmetrical figures. Week 3: Position, Direction, and Problem Solving - Day 11: Describing position using coordinates in the first quadrant. Day 12: Plotting coordinates to draw shapes. Day 13: Understanding translation (sliding a shape). Day 14: Understanding reflection (flipping a shape). Day 15: Problem-solving activities involving perimeter, area, and missing angles."

        initial_state = {"teaching_plan": test_teaching_plan, "model_one_assignment": "", "model_two_assigmodel_one_assignmentnment": "", "final_assignment": ""}

        updated_state = gen_assignment_gemini(initial_state)

        self.assertIn("model_one_assignment", updated_state)
        self.assertIsNotNone(updated_state["model_one_assignment"])
        self.assertIsInstance(updated_state["model_one_assignment"], str)
        self.assertGreater(len(updated_state["model_one_assignment"]), 0)
        print(updated_state["model_one_assignment"])


if __name__ == '__main__':
    unittest.main()
It uses the Gemini model to generate assignments.
We are ready to test the Gemini Agent.
👉Run these commands in the terminal to setup the environment:
cd ~/aidemy-bootstrap/assignment
gcloud config set project $(cat ~/project_id.txt)
export PROJECT_ID=$(gcloud config get project)
python -m venv env
source env/bin/activate
pip install -r requirements.txt
👉You can run to test it:
python gemini.py
You should see an assignment that has more group work in the output. The assert test at the end will also output the results.
Here are some engaging and practical assignments for each week, designed to build progressively upon the teaching plan's objectives:

**Week 1: Exploring the World of 2D Shapes**

* **Learning Objectives Assessed:**
    * Identify and name basic 2D shapes (squares, rectangles, triangles, circles).
    * .....

* **Description:**
    * **Shape Scavenger Hunt:** Students will go on a scavenger hunt in their homes or neighborhoods, taking pictures of objects that represent different 2D shapes. They will then create a presentation or poster showcasing their findings, classifying each shape and labeling its properties (e.g., number of sides, angles, etc.).
    * **Triangle Trivia:** Students will research and create a short quiz or presentation about different types of triangles, focusing on their properties and real-world examples.
    * **Angle Exploration:** Students will use a protractor to measure various angles in their surroundings, such as corners of furniture, windows, or doors. They will record their measurements and create a chart categorizing the angles as right, acute, or obtuse.
....

**Week 2: Delving into the World of 3D Shapes and Symmetry**

* **Learning Objectives Assessed:**
    * Identify and name basic 3D shapes.
    * ....

* **Description:**
    * **3D Shape Construction:** Students will work in groups to build 3D shapes using construction paper, cardboard, or other materials. They will then create a presentation showcasing their creations, describing the number of faces, edges, and vertices for each shape.
    * **Symmetry Exploration:** Students will investigate the concept of symmetry by creating a visual representation of various symmetrical objects (e.g., butterflies, leaves, snowflakes) using drawing or digital tools. They will identify the lines of symmetry and explain their findings.
    * **Symmetry Puzzles:** Students will be given a half-image of a symmetrical figure and will be asked to complete the other half, demonstrating their understanding of symmetry. This can be done through drawing, cut-out activities, or digital tools.

**Week 3: Navigating Position, Direction, and Problem Solving**

* **Learning Objectives Assessed:**
    * Describe position using coordinates in the first quadrant.
    * ....

* **Description:**
    * **Coordinate Maze:** Students will create a maze using coordinates on a grid paper. They will then provide directions for navigating the maze using a combination of coordinate movements and translation/reflection instructions.
    * **Shape Transformations:** Students will draw shapes on a grid paper and then apply transformations such as translation and reflection, recording the new coordinates of the transformed shapes.
    * **Geometry Challenge:** Students will solve real-world problems involving perimeter, area, and angles. For example, they could be asked to calculate the perimeter of a room, the area of a garden, or the missing angle in a triangle.
....
Stop with ctl+c , and to clean up the test code. REMOVE the following code from gemini.py
import unittest

class TestGenAssignmentGemini(unittest.TestCase):
    def test_gen_assignment_gemini(self):
        test_teaching_plan = "Week 1: 2D Shapes and Angles - Day 1: Review of basic 2D shapes (squares, rectangles, triangles, circles). Day 2: Exploring different types of triangles (equilateral, isosceles, scalene, right-angled). Day 3: Exploring quadrilaterals (square, rectangle, parallelogram, rhombus, trapezium). Day 4: Introduction to angles: right angles, acute angles, and obtuse angles. Day 5: Measuring angles using a protractor. Week 2: 3D Shapes and Symmetry - Day 6: Introduction to 3D shapes: cubes, cuboids, spheres, cylinders, cones, and pyramids. Day 7: Describing 3D shapes using faces, edges, and vertices. Day 8: Relating 2D shapes to 3D shapes. Day 9: Identifying lines of symmetry in 2D shapes. Day 10: Completing symmetrical figures. Week 3: Position, Direction, and Problem Solving - Day 11: Describing position using coordinates in the first quadrant. Day 12: Plotting coordinates to draw shapes. Day 13: Understanding translation (sliding a shape). Day 14: Understanding reflection (flipping a shape). Day 15: Problem-solving activities involving perimeter, area, and missing angles."

        initial_state = {"teaching_plan": test_teaching_plan, "model_one_assignment": "", "model_two_assigmodel_one_assignmentnment": "", "final_assignment": ""}

        updated_state = gen_assignment_gemini(initial_state)

        self.assertIn("model_one_assignment", updated_state)
        self.assertIsNotNone(updated_state["model_one_assignment"])
        self.assertIsInstance(updated_state["model_one_assignment"], str)
        self.assertGreater(len(updated_state["model_one_assignment"]), 0)
        print(updated_state["model_one_assignment"])


if __name__ == '__main__':
    unittest.main()
Configure the DeepSeek Assignment Generator
While cloud-based AI platforms are convenient, self-hosting LLMs can be crucial for protecting data privacy and ensuring data sovereignty. We'll deploy the smallest DeepSeek model (1.5B parameters) on a Cloud Compute Engine instance. There are other ways like hosting it on Google's Vertex AI platform or hosting it on your GKE instance, but since this is just a workshop on AI agents, and I don't want to keep you here forever, let's just use the most simplest way. But if you are interested and want to dig into other options, take a look at deepseek-vertexai.py file under assignment folder, where it provides an sample code of how to interact with models deployed on VertexAI.
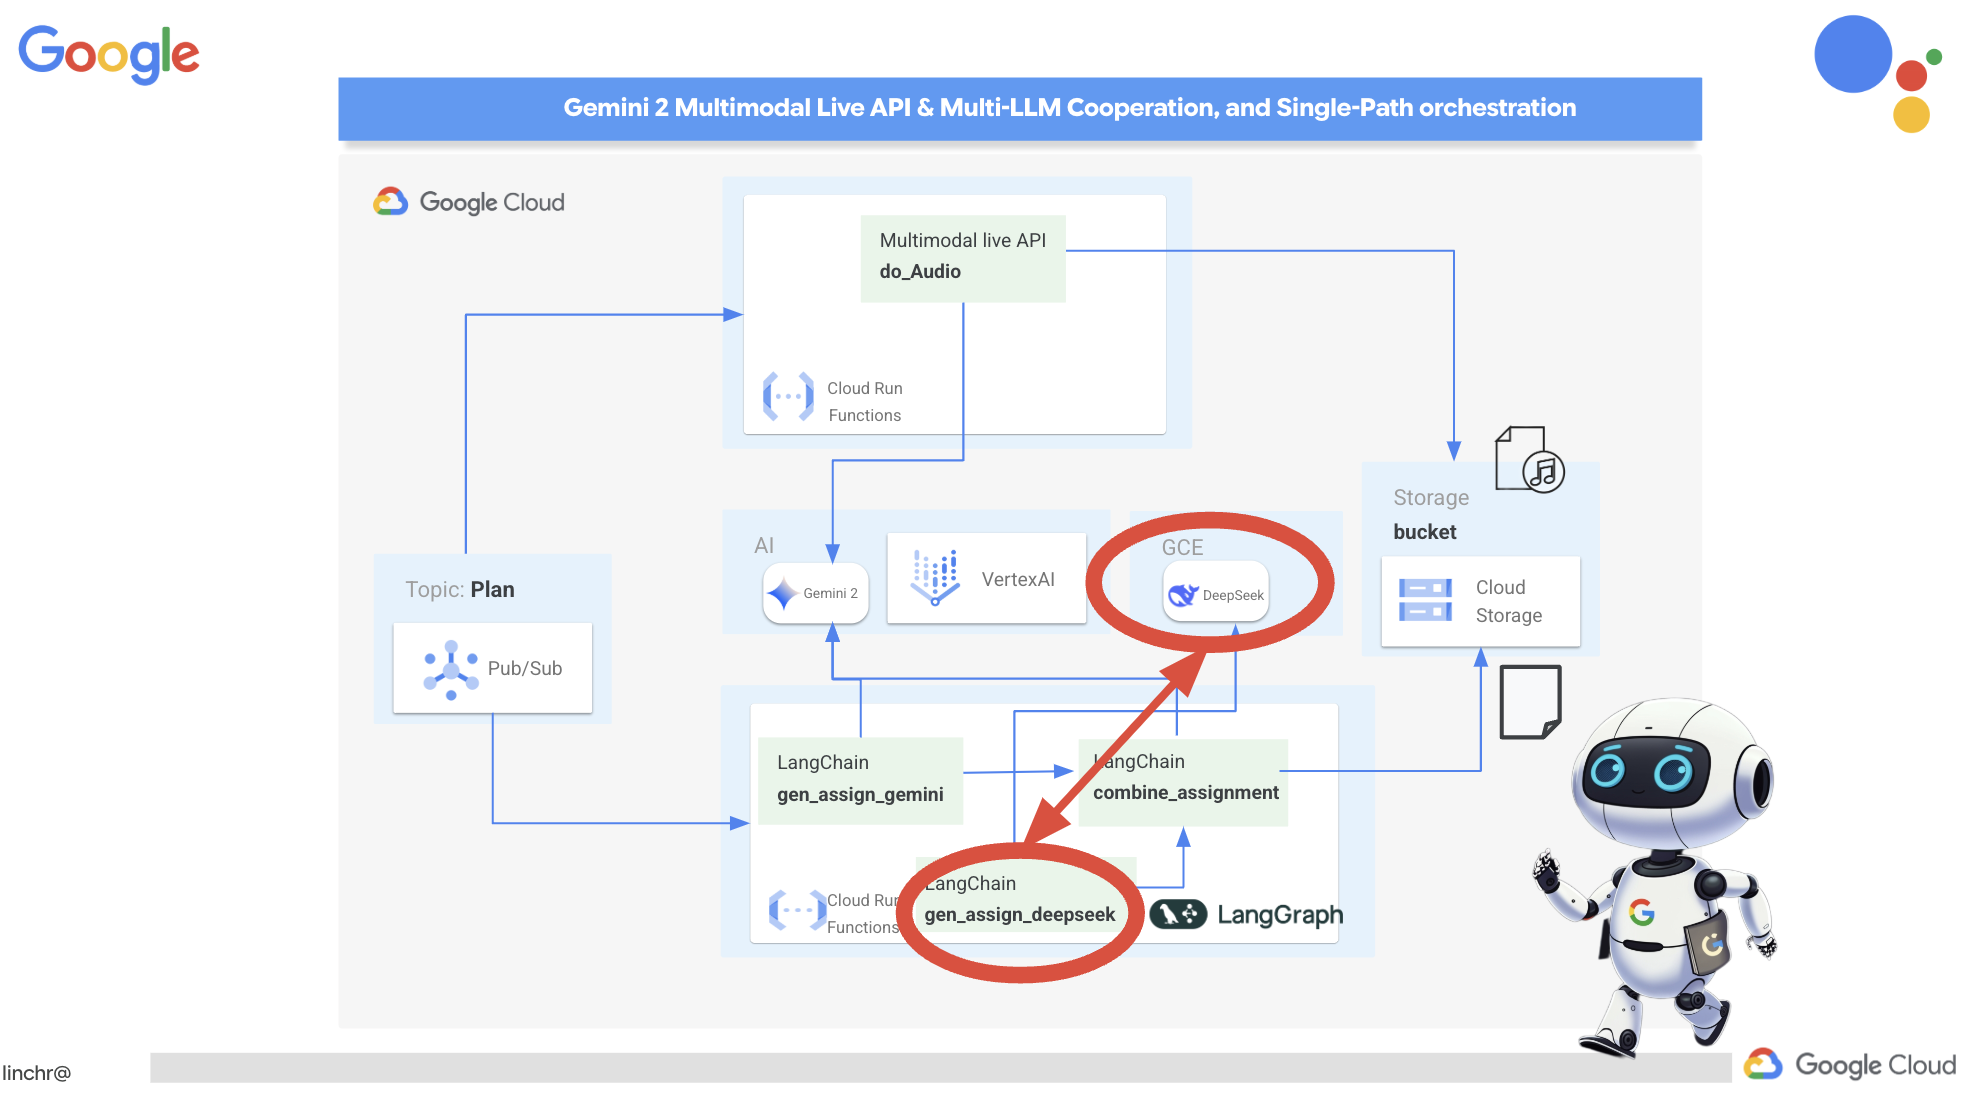
👉Run this command in the terminal to create a self-hosted LLM platform Ollama:
cd ~/aidemy-bootstrap/assignment
gcloud config set project $(cat ~/project_id.txt)
gcloud compute instances create ollama-instance \
    --image-family=ubuntu-2204-lts \
    --image-project=ubuntu-os-cloud \
    --machine-type=e2-standard-4 \
    --zone=us-central1-a \
    --metadata-from-file startup-script=startup.sh \
    --boot-disk-size=50GB \
    --tags=ollama \
    --scopes=https://www.googleapis.com/auth/cloud-platform
To verify the Compute Engine instance is running:
Navigate to Compute Engine > "VM instances" in the Google Cloud Console. You should see the ollama-instance listed with a green check mark indicating that it's running. If you can't see it, make sure the zone is us-central1. If it's not, you may need to search for it.
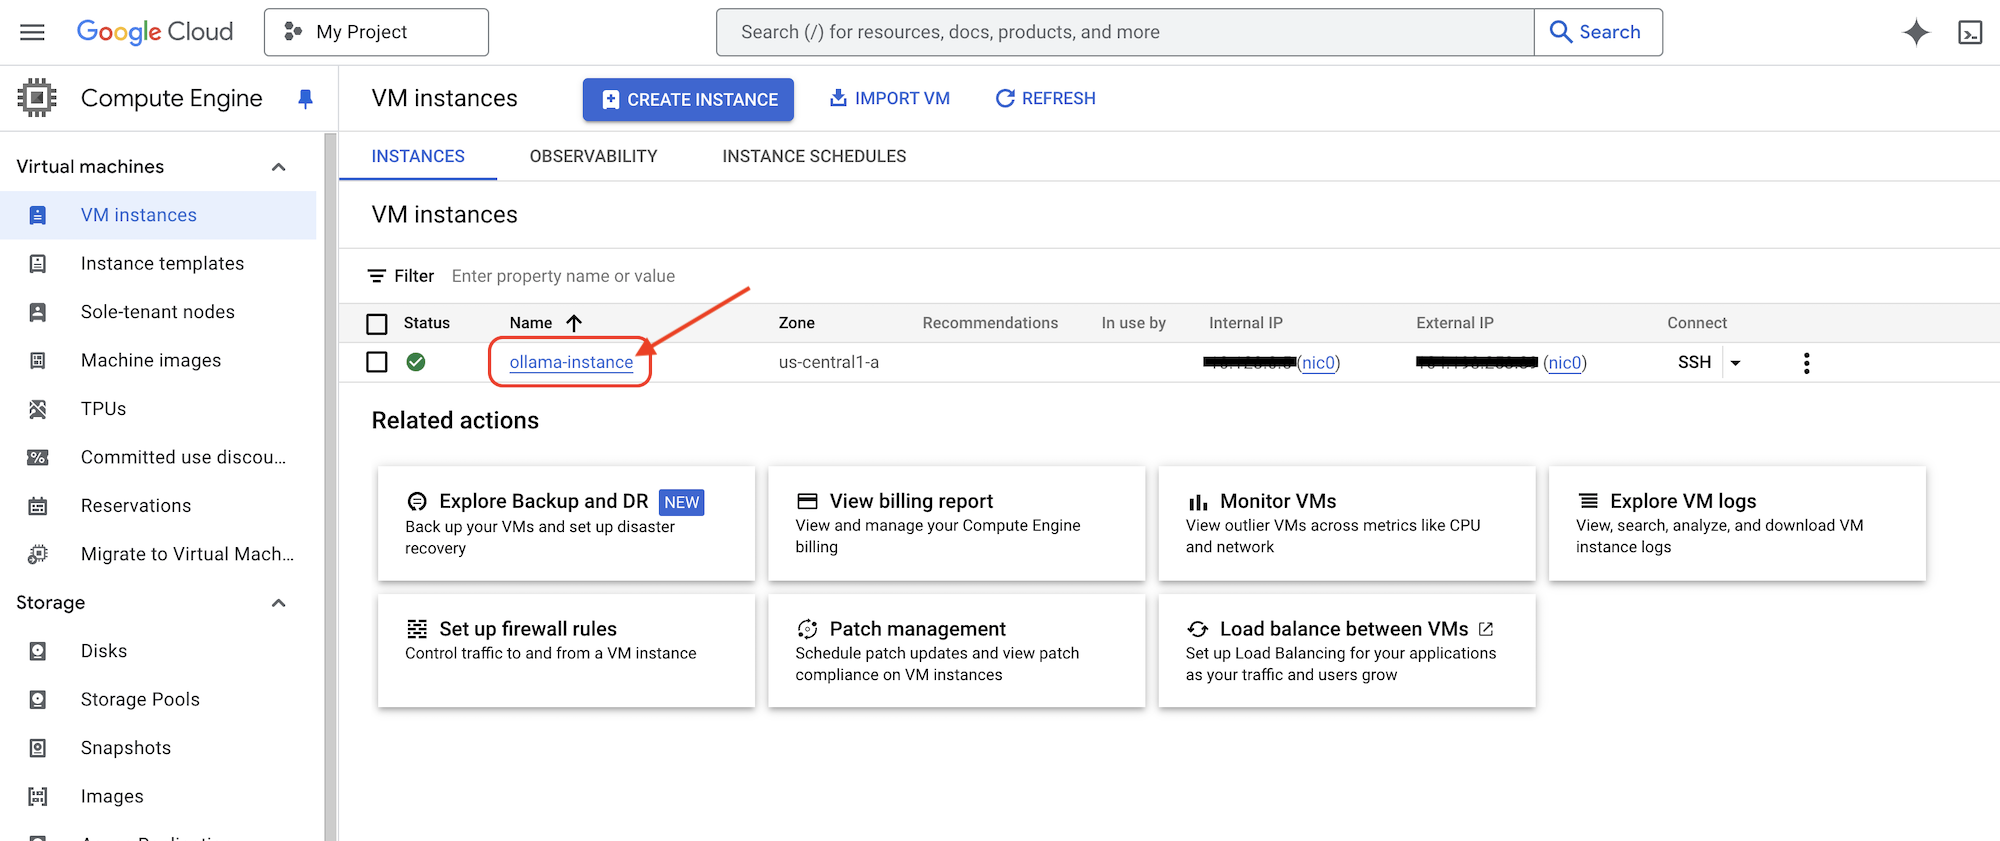
👉We'll install the smallest DeepSeek model and test it, back in the Cloud Shell Editor, in a New terminal, run following command to ssh into the GCE instance.
gcloud compute ssh ollama-instance --zone=us-central1-a
Upon establishing the SSH connection, you may be prompted with the following:
"Do you want to continue (Y/n)?"
Simply type Y (case-insensitive) and press Enter to proceed.
Next, you might be asked to create a passphrase for the SSH key. If you prefer not to use a passphrase, just press Enter twice to accept the default (no passphrase).
👉Now you are in the virutal machine, pull the smallest DeepSeek R1 model, and test if it works?
ollama pull deepseek-r1:1.5b
ollama run deepseek-r1:1.5b "who are you?"
👉Exit the GCE instance enter following in the ssh terminal:
exit
👉Next, setup the network policy, so other services can access the LLM, please limit the access to the instance if you want to do this for production, either implement security login for the service or restrict IP access. Run:
gcloud compute firewall-rules create allow-ollama-11434 \
    --allow=tcp:11434 \
    --target-tags=ollama \
    --description="Allow access to Ollama on port 11434"
👉To verify if your firewall policy is working correctly, try running:
export OLLAMA_HOST=http://$(gcloud compute instances describe ollama-instance --zone=us-central1-a --format='value(networkInterfaces[0].accessConfigs[0].natIP)'):11434
curl -X POST "${OLLAMA_HOST}/api/generate" \
     -H "Content-Type: application/json" \
     -d '{
          "prompt": "Hello, what are you?",
          "model": "deepseek-r1:1.5b",
          "stream": false
        }'
Next, we'll work on the Deepseek function in the assignment agent to generate assignments with individual work emphasis.
👉Edit deepseek.py under assignment folder add following snippet to the end:
def gen_assignment_deepseek(state):
    print(f"---------------gen_assignment_deepseek")

    template = """
        You are an instructor who favor student to focus on individual work.

        Develop engaging and practical assignments for each week, ensuring they align with the teaching plan's objectives and progressively build upon each other.

        For each week, provide the following:

        * **Week [Number]:** A descriptive title for the assignment (e.g., "Data Exploration Project," "Model Building Exercise").
        * **Learning Objectives Assessed:** List the specific learning objectives from the teaching plan that this assignment assesses.
        * **Description:** A detailed description of the task, including any specific requirements or constraints.  Provide examples or scenarios if applicable.
        * **Deliverables:** Specify what students need to submit (e.g., code, report, presentation).
        * **Estimated Time Commitment:**  The approximate time students should dedicate to completing the assignment.
        * **Assessment Criteria:** Briefly outline how the assignment will be graded (e.g., correctness, completeness, clarity, creativity).

        The assignments should be a mix of individual and collaborative work where appropriate.  Consider different learning styles and provide opportunities for students to apply their knowledge creatively.

        Based on this teaching plan: {teaching_plan}
        """


    prompt = ChatPromptTemplate.from_template(template)

    model = OllamaLLM(model="deepseek-r1:1.5b",
                   base_url=OLLAMA_HOST)

    chain = prompt | model


    response = chain.invoke({"teaching_plan":state["teaching_plan"]})
    state["model_two_assignment"] = response

    return state

import unittest

class TestGenAssignmentDeepseek(unittest.TestCase):
    def test_gen_assignment_deepseek(self):
        test_teaching_plan = "Week 1: 2D Shapes and Angles - Day 1: Review of basic 2D shapes (squares, rectangles, triangles, circles). Day 2: Exploring different types of triangles (equilateral, isosceles, scalene, right-angled). Day 3: Exploring quadrilaterals (square, rectangle, parallelogram, rhombus, trapezium). Day 4: Introduction to angles: right angles, acute angles, and obtuse angles. Day 5: Measuring angles using a protractor. Week 2: 3D Shapes and Symmetry - Day 6: Introduction to 3D shapes: cubes, cuboids, spheres, cylinders, cones, and pyramids. Day 7: Describing 3D shapes using faces, edges, and vertices. Day 8: Relating 2D shapes to 3D shapes. Day 9: Identifying lines of symmetry in 2D shapes. Day 10: Completing symmetrical figures. Week 3: Position, Direction, and Problem Solving - Day 11: Describing position using coordinates in the first quadrant. Day 12: Plotting coordinates to draw shapes. Day 13: Understanding translation (sliding a shape). Day 14: Understanding reflection (flipping a shape). Day 15: Problem-solving activities involving perimeter, area, and missing angles."

        initial_state = {"teaching_plan": test_teaching_plan, "model_one_assignment": "", "model_two_assignment": "", "final_assignment": ""}

        updated_state = gen_assignment_deepseek(initial_state)

        self.assertIn("model_two_assignment", updated_state)
        self.assertIsNotNone(updated_state["model_two_assignment"])
        self.assertIsInstance(updated_state["model_two_assignment"], str)
        self.assertGreater(len(updated_state["model_two_assignment"]), 0)
        print(updated_state["model_two_assignment"])


if __name__ == '__main__':
    unittest.main()
👉let's test it by running:
cd ~/aidemy-bootstrap/assignment
source env/bin/activate
gcloud config set project $(cat ~/project_id.txt)
export PROJECT_ID=$(gcloud config get project)
export OLLAMA_HOST=http://$(gcloud compute instances describe ollama-instance --zone=us-central1-a --format='value(networkInterfaces[0].accessConfigs[0].natIP)'):11434
python deepseek.py
You should see an assignment that has more self study work.
**Assignment Plan for Each Week**

---

### **Week 1: 2D Shapes and Angles**
- **Week Title:** "Exploring 2D Shapes"
Assign students to research and present on various 2D shapes. Include a project where they create models using straws and tape for triangles, draw quadrilaterals with specific measurements, and compare their properties.

### **Week 2: 3D Shapes and Symmetry**
Assign students to create models or nets for cubes and cuboids. They will also predict how folding these nets form the 3D shapes. Include a project where they identify symmetrical properties using mirrors or folding techniques.

### **Week 3: Position, Direction, and Problem Solving**

Assign students to use mirrors or folding techniques for reflections. Include activities where they measure angles, use a protractor, solve problems involving perimeter/area, and create symmetrical designs.
....
👉Stop the ctl+c , and to clean up the test code. REMOVE the following code from deepseek.py
import unittest

class TestGenAssignmentDeepseek(unittest.TestCase):
    def test_gen_assignment_deepseek(self):
        test_teaching_plan = "Week 1: 2D Shapes and Angles - Day 1: Review of basic 2D shapes (squares, rectangles, triangles, circles). Day 2: Exploring different types of triangles (equilateral, isosceles, scalene, right-angled). Day 3: Exploring quadrilaterals (square, rectangle, parallelogram, rhombus, trapezium). Day 4: Introduction to angles: right angles, acute angles, and obtuse angles. Day 5: Measuring angles using a protractor. Week 2: 3D Shapes and Symmetry - Day 6: Introduction to 3D shapes: cubes, cuboids, spheres, cylinders, cones, and pyramids. Day 7: Describing 3D shapes using faces, edges, and vertices. Day 8: Relating 2D shapes to 3D shapes. Day 9: Identifying lines of symmetry in 2D shapes. Day 10: Completing symmetrical figures. Week 3: Position, Direction, and Problem Solving - Day 11: Describing position using coordinates in the first quadrant. Day 12: Plotting coordinates to draw shapes. Day 13: Understanding translation (sliding a shape). Day 14: Understanding reflection (flipping a shape). Day 15: Problem-solving activities involving perimeter, area, and missing angles."

        initial_state = {"teaching_plan": test_teaching_plan, "model_one_assignment": "", "model_two_assignment": "", "final_assignment": ""}

        updated_state = gen_assignment_deepseek(initial_state)

        self.assertIn("model_two_assignment", updated_state)
        self.assertIsNotNone(updated_state["model_two_assignment"])
        self.assertIsInstance(updated_state["model_two_assignment"], str)
        self.assertGreater(len(updated_state["model_two_assignment"]), 0)
        print(updated_state["model_two_assignment"])


if __name__ == '__main__':
    unittest.main()
Now, we'll use the same gemini model to combine both assignments into a new one. Edit the gemini.py file located in the assignment folder.
👉Paste the following code to the end of the gemini.py file:
def combine_assignments(state):
    print(f"---------------combine_assignments ")
    region=get_next_region()
    client = genai.Client(vertexai=True, project=PROJECT_ID, location=region)
    response = client.models.generate_content(
        model=MODEL_ID, contents=f"""
        Look at all the proposed assignment so far {state["model_one_assignment"]} and {state["model_two_assignment"]}, combine them and come up with a final assignment for student.
        """
    )

    state["final_assignment"] = response.text

    return state
To combine the strengths of both models, we'll orchestrate a defined workflow using LangGraph. This workflow consists of three steps: first, the Gemini model generates an assignment focused on collaboration; second, the DeepSeek model generates an assignment emphasizing individual work; finally, Gemini synthesizes these two assignments into a single, comprehensive assignment. Because we predefine the sequence of steps without LLM decision-making, this constitutes a single-path, user-defined orchestration.
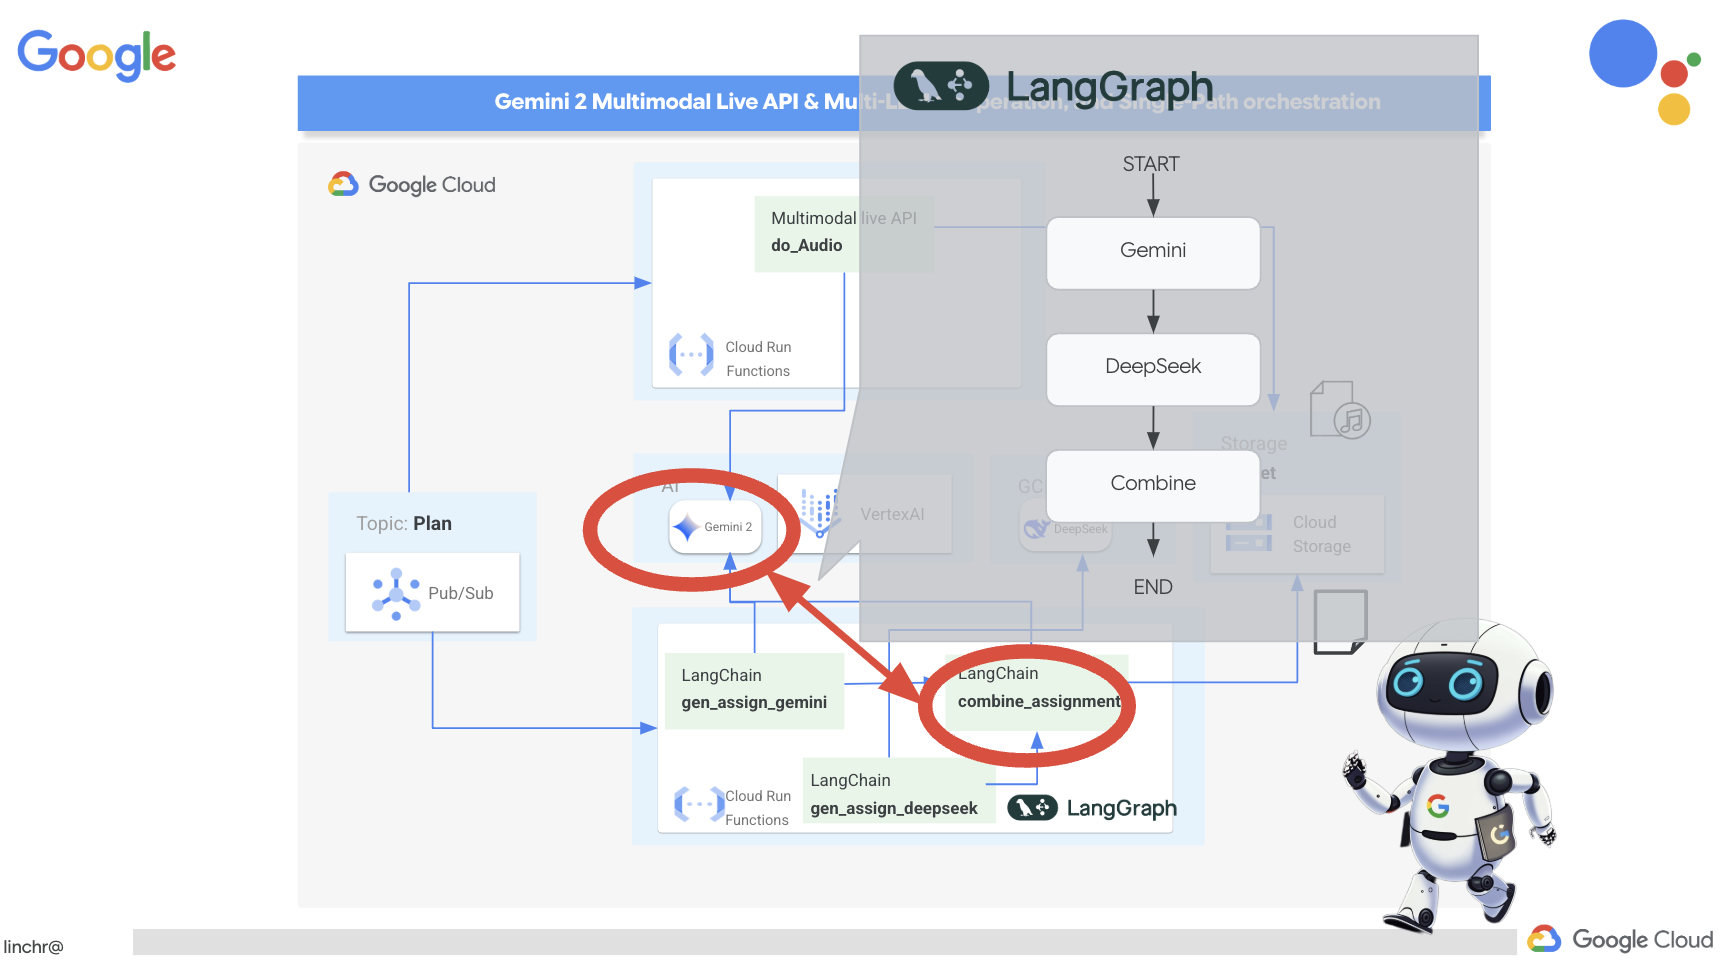
👉Paste the following code to the end of the main.py file under assignment folder:
def create_assignment(teaching_plan: str):
    print(f"create_assignment---->{teaching_plan}")
    builder = StateGraph(State)
    builder.add_node("gen_assignment_gemini", gen_assignment_gemini)
    builder.add_node("gen_assignment_deepseek", gen_assignment_deepseek)
    builder.add_node("combine_assignments", combine_assignments)

    builder.add_edge(START, "gen_assignment_gemini")
    builder.add_edge("gen_assignment_gemini", "gen_assignment_deepseek")
    builder.add_edge("gen_assignment_deepseek", "combine_assignments")
    builder.add_edge("combine_assignments", END)

    graph = builder.compile()
    state = graph.invoke({"teaching_plan": teaching_plan})

    return state["final_assignment"]


import unittest

class TestCreateAssignment(unittest.TestCase):
    def test_create_assignment(self):
        test_teaching_plan = "Week 1: 2D Shapes and Angles - Day 1: Review of basic 2D shapes (squares, rectangles, triangles, circles). Day 2: Exploring different types of triangles (equilateral, isosceles, scalene, right-angled). Day 3: Exploring quadrilaterals (square, rectangle, parallelogram, rhombus, trapezium). Day 4: Introduction to angles: right angles, acute angles, and obtuse angles. Day 5: Measuring angles using a protractor. Week 2: 3D Shapes and Symmetry - Day 6: Introduction to 3D shapes: cubes, cuboids, spheres, cylinders, cones, and pyramids. Day 7: Describing 3D shapes using faces, edges, and vertices. Day 8: Relating 2D shapes to 3D shapes. Day 9: Identifying lines of symmetry in 2D shapes. Day 10: Completing symmetrical figures. Week 3: Position, Direction, and Problem Solving - Day 11: Describing position using coordinates in the first quadrant. Day 12: Plotting coordinates to draw shapes. Day 13: Understanding translation (sliding a shape). Day 14: Understanding reflection (flipping a shape). Day 15: Problem-solving activities involving perimeter, area, and missing angles."
        initial_state = {"teaching_plan": test_teaching_plan, "model_one_assignment": "", "model_two_assignment": "", "final_assignment": ""}
        updated_state = create_assignment(initial_state)

        print(updated_state)


if __name__ == '__main__':
    unittest.main()
👉To initially test the create_assignment function and confirm that the workflow combining Gemini and DeepSeek is functional, run the following command:
cd ~/aidemy-bootstrap/assignment
source env/bin/activate
pip install -r requirements.txt
python main.py
You should see something that combine both models with their individual perspective for student study and also for student group works.
**Tasks:**

1. **Clue Collection:** Gather all the clues left by the thieves. These clues will include:
    * Descriptions of shapes and their properties (angles, sides, etc.)
    * Coordinate grids with hidden messages
    * Geometric puzzles requiring transformation (translation, reflection, rotation)
    * Challenges involving area, perimeter, and angle calculations

2. **Clue Analysis:** Decipher each clue using your geometric knowledge. This will involve:
    * Identifying the shape and its properties
    * Plotting coordinates and interpreting patterns on the grid
    * Solving geometric puzzles by applying transformations
    * Calculating area, perimeter, and missing angles

3. **Case Report:** Create a comprehensive case report outlining your findings. This report should include:
    * A detailed explanation of each clue and its solution
    * Sketches and diagrams to support your explanations
    * A step-by-step account of how you followed the clues to locate the artifact
    * A final conclusion about the thieves and their motives
👉Stop the ctl+c , and to clean up the test code. REMOVE the following code from main.py
import unittest

class TestCreateAssignment(unittest.TestCase):
    def test_create_assignment(self):
        test_teaching_plan = "Week 1: 2D Shapes and Angles - Day 1: Review of basic 2D shapes (squares, rectangles, triangles, circles). Day 2: Exploring different types of triangles (equilateral, isosceles, scalene, right-angled). Day 3: Exploring quadrilaterals (square, rectangle, parallelogram, rhombus, trapezium). Day 4: Introduction to angles: right angles, acute angles, and obtuse angles. Day 5: Measuring angles using a protractor. Week 2: 3D Shapes and Symmetry - Day 6: Introduction to 3D shapes: cubes, cuboids, spheres, cylinders, cones, and pyramids. Day 7: Describing 3D shapes using faces, edges, and vertices. Day 8: Relating 2D shapes to 3D shapes. Day 9: Identifying lines of symmetry in 2D shapes. Day 10: Completing symmetrical figures. Week 3: Position, Direction, and Problem Solving - Day 11: Describing position using coordinates in the first quadrant. Day 12: Plotting coordinates to draw shapes. Day 13: Understanding translation (sliding a shape). Day 14: Understanding reflection (flipping a shape). Day 15: Problem-solving activities involving perimeter, area, and missing angles."
        initial_state = {"teaching_plan": test_teaching_plan, "model_one_assignment": "", "model_two_assignment": "", "final_assignment": ""}
        updated_state = create_assignment(initial_state)

        print(updated_state)


if __name__ == '__main__':
    unittest.main()
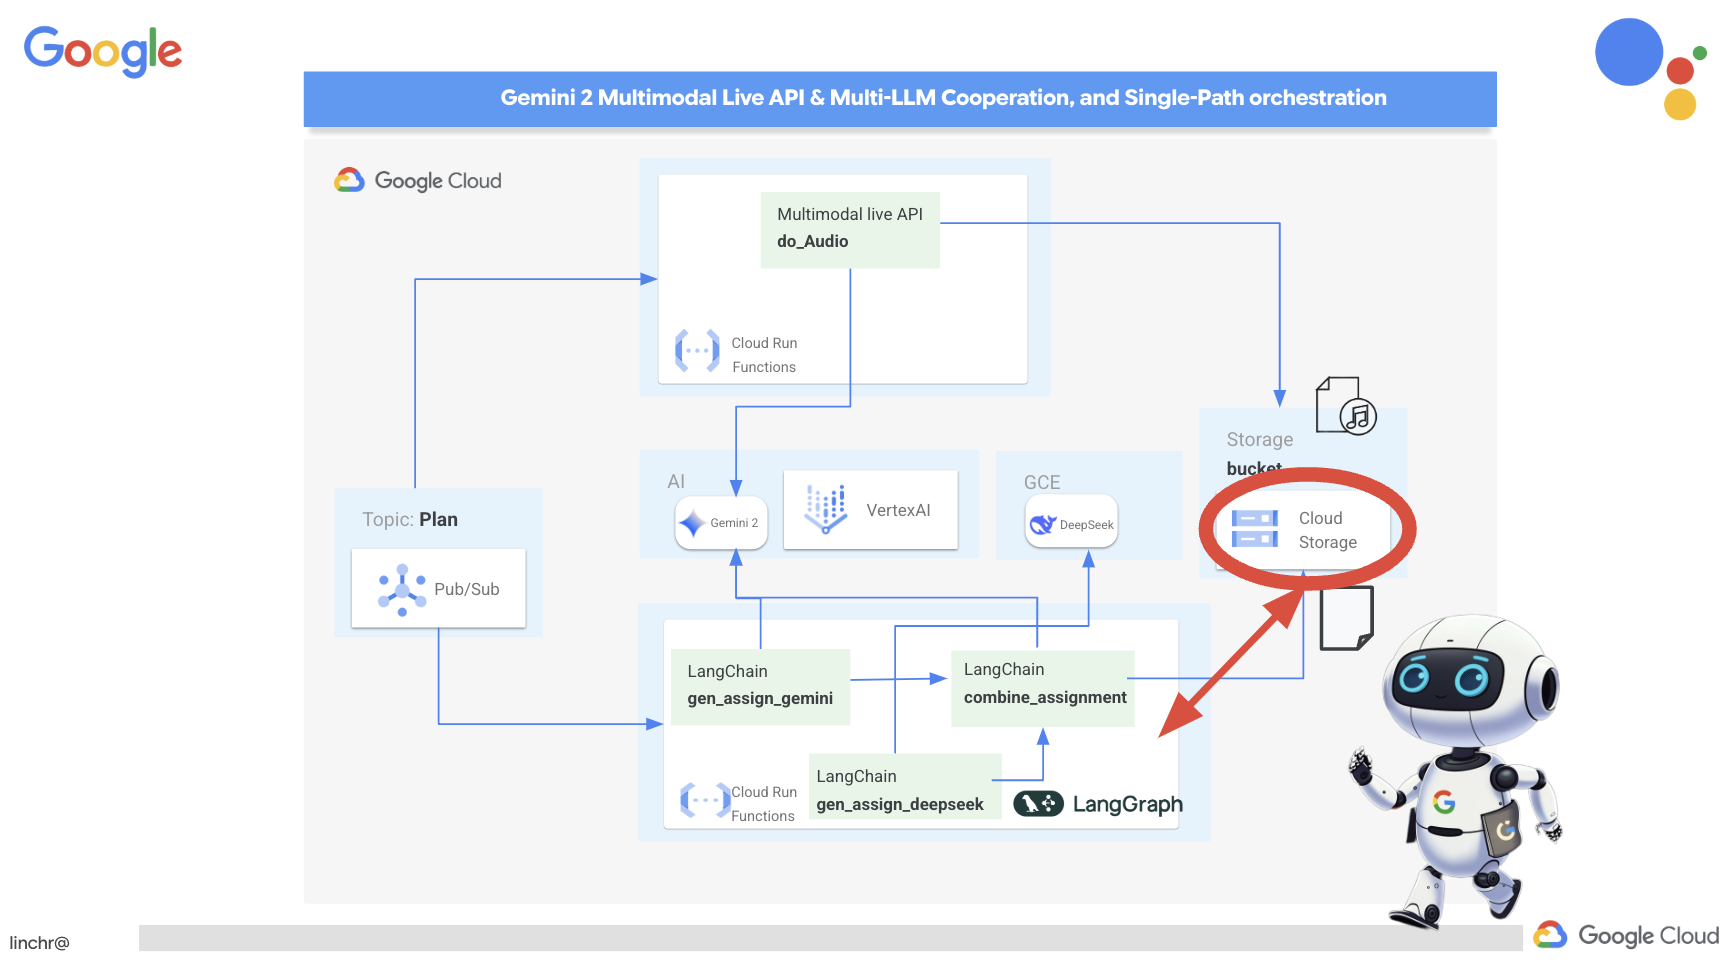
To make the assignment generation process automatic and responsive to new teaching plans, we'll leverage the existing event-driven architecture. The following code defines a Cloud Run Function (generate_assignment) that will be triggered whenever a new teaching plan is published to the Pub/Sub topic ' plan '.
👉Add the following code to the end of main.py in the assignment folder:
@functions_framework.cloud_event
def generate_assignment(cloud_event):
    print(f"CloudEvent received: {cloud_event.data}")

    try:
        if isinstance(cloud_event.data.get('message', {}).get('data'), str):
            data = json.loads(base64.b64decode(cloud_event.data['message']['data']).decode('utf-8'))
            teaching_plan = data.get('teaching_plan')
        elif 'teaching_plan' in cloud_event.data:
            teaching_plan = cloud_event.data["teaching_plan"]
        else:
            raise KeyError("teaching_plan not found")

        assignment = create_assignment(teaching_plan)

        print(f"Assignment---->{assignment}")

        #Store the return assignment into bucket as a text file
        storage_client = storage.Client()
        bucket = storage_client.bucket(ASSIGNMENT_BUCKET)
        file_name = f"assignment-{random.randint(1, 1000)}.txt"
        blob = bucket.blob(file_name)
        blob.upload_from_string(assignment)

        return f"Assignment generated and stored in {ASSIGNMENT_BUCKET}/{file_name}", 200

    except (json.JSONDecodeError, AttributeError, KeyError) as e:
        print(f"Error decoding CloudEvent data: {e} - Data: {cloud_event.data}")
        return "Error processing event", 500

    except Exception as e:
        print(f"Error generate assignment: {e}")
        return "Error generate assignment", 500
Тестирование локально
Before deploying to Google Cloud, it's good practice to test the Cloud Run Function locally. This allows for faster iteration and easier debugging.
First, create a Cloud Storage bucket to store the generated assignment files and grant the service account access to the bucket. Run the following commands in the terminal:
👉 IMPORTANT : Ensure you define a unique ASSIGNMENT_BUCKET name that begins with " aidemy-assignment- ". This unique name is crucial for avoiding naming conflicts when creating your Cloud Storage bucket. (Replace <YOUR_NAME> with any random word)
export ASSIGNMENT_BUCKET=aidemy-assignment-<YOUR_NAME> #Name must be unqiue
👉And run:
gcloud config set project $(cat ~/project_id.txt)
export PROJECT_ID=$(gcloud config get project)
export SERVICE_ACCOUNT_NAME=$(gcloud compute project-info describe --format="value(defaultServiceAccount)")
gsutil mb -p $PROJECT_ID -l us-central1 gs://$ASSIGNMENT_BUCKET

gcloud storage buckets add-iam-policy-binding gs://$ASSIGNMENT_BUCKET \
    --member "serviceAccount:$SERVICE_ACCOUNT_NAME" \
    --role "roles/storage.objectViewer"

gcloud storage buckets add-iam-policy-binding gs://$ASSIGNMENT_BUCKET \
    --member "serviceAccount:$SERVICE_ACCOUNT_NAME" \
    --role "roles/storage.objectCreator"
👉Now, start the Cloud Run Function emulator:
cd ~/aidemy-bootstrap/assignment
functions-framework \
    --target generate_assignment \
    --signature-type=cloudevent \
    --source main.py
👉While the emulator is running in one terminal, open a second terminal in the Cloud Shell. In this second terminal, send a test CloudEvent to the emulator to simulate a new teaching plan being published:
  curl -X POST \
  http://localhost:8080/ \
  -H "Content-Type: application/json" \
  -H "ce-id: event-id-01" \
  -H "ce-source: planner-agent" \
  -H "ce-specversion: 1.0" \
  -H "ce-type: google.cloud.pubsub.topic.v1.messagePublished" \
  -d '{
    "message": {
      "data": "eyJ0ZWFjaGluZ19wbGFuIjogIldlZWsgMTogMkQgU2hhcGVzIGFuZCBBbmdsZXMgLSBEYXkgMTogUmV2aWV3IG9mIGJhc2ljIDJEIHNoYXBlcyAoc3F1YXJlcywgcmVjdGFuZ2xlcywgdHJpYW5nbGVzLCBjaXJjbGVzKS4gRGF5IDI6IEV4cGxvcmluZyBkaWZmZXJlbnQgdHlwZXMgb2YgdHJpYW5nbGVzIChlcXVpbGF0ZXJhbCwgaXNvc2NlbGVzLCBzY2FsZW5lLCByaWdodC1hbmdsZWQpLiBEYXkgMzogRXhwbG9yaW5nIHF1YWRyaWxhdGVyYWxzIChzcXVhcmUsIHJlY3RhbmdsZSwgcGFyYWxsZWxvZ3JhbSwgcmhvbWJ1cywgdHJhcGV6aXVtKS4gRGF5IDQ6IEludHJvZHVjdGlvbiB0byBhbmdsZXM6IHJpZ2h0IGFuZ2xlcywgYWN1dGUgYW5nbGVzLCBhbmQgb2J0dXNlIGFuZ2xlcy4gRGF5IDU6IE1lYXN1cmluZyBhbmdsZXMgdXNpbmcgYSBwcm90cmFjdG9yLiBXZWVrIDI6IDNEIFNoYXBlcyBhbmQgU3ltbWV0cnkgLSBEYXkgNjogSW50cm9kdWN0aW9uIHRvIDNEIHNoYXBlczogY3ViZXMsIGN1Ym9pZHMsIHNwaGVyZXMsIGN5bGluZGVycywgY29uZXMsIGFuZCBweXJhbWlkcy4gRGF5IDc6IERlc2NyaWJpbmcgM0Qgc2hhcGVzIHVzaW5nIGZhY2VzLCBlZGdlcywgYW5kIHZlcnRpY2VzLiBEYXkgODogUmVsYXRpbmcgMkQgc2hhcGVzIHRvIDNEIHNoYXBlcy4gRGF5IDk6IElkZW50aWZ5aW5nIGxpbmVzIG9mIHN5bW1ldHJ5IGluIDJEIHNoYXBlcy4gRGF5IDEwOiBDb21wbGV0aW5nIHN5bW1ldHJpY2FsIGZpZ3VyZXMuIFdlZWsgMzogUG9zaXRpb24sIERpcmVjdGlvbiwgYW5kIFByb2JsZW0gU29sdmluZyAtIERheSAxMTogRGVzY3JpYmluZyBwb3NpdGlvbiB1c2luZyBjb29yZGluYXRlcyBpbiB0aGUgZmlyc3QgcXVhZHJhbnQuIERheSAxMjogUGxvdHRpbmcgY29vcmRpbmF0ZXMgdG8gZHJhdyBzaGFwZXMuIERheSAxMzogVW5kZXJzdGFuZGluZyB0cmFuc2xhdGlvbiAoc2xpZGluZyBhIHNoYXBlKS4gRGF5IDE0OiBVbmRlcnN0YW5kaW5nIHJlZmxlY3Rpb24gKGZsaXBwaW5nIGEgc2hhcGUpLiBEYXkgMTU6IFByb2JsZW0tc29sdmluZyBhY3Rpdml0aWVzIGludm9sdmluZyBwZXJpbWV0ZXIsIGFyZWEsIGFuZCBtaXNzaW5nIGFuZ2xlcy4ifQ=="
    }
  }'
Rather than staring blankly while waiting for the response, switch over to the other Cloud Shell terminal. You can observe the progress and any output or error messages generated by your function in the emulator's terminal. 😁
The curl command should print "OK" (without a newline, so "OK" may appear on the same line your terminal shell prompt).
To confirm that the assignment was successfully generated and stored, go to the Google Cloud Console and navigate to Storage > "Cloud Storage". Select the aidemy-assignment bucket you created. You should see a text file named assignment-{random number}.txt in the bucket. Click on the file to download it and verify its contents. This verifies that a new file contains new assignment just generated.
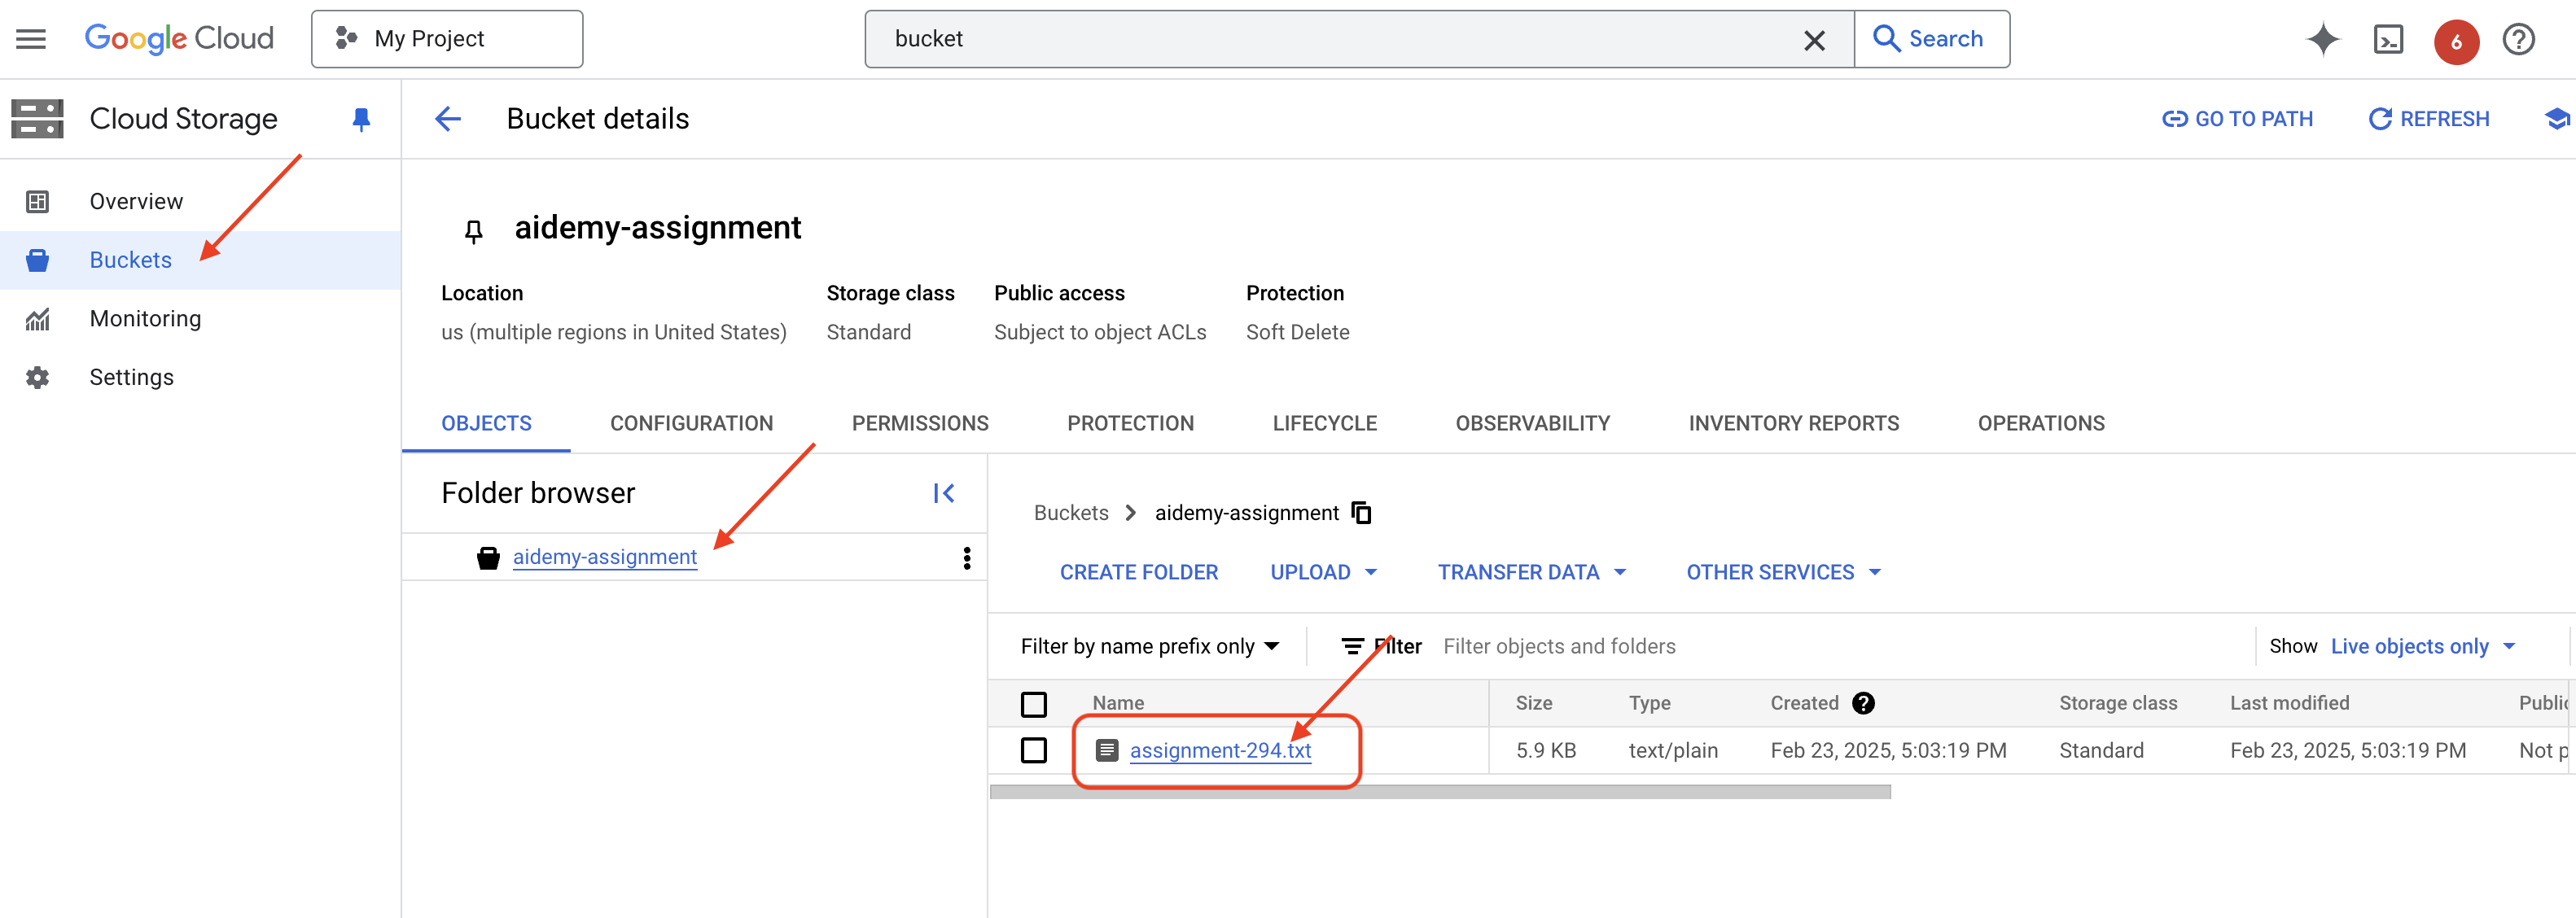
👉In the terminal running the emulator, type ctrl+c to exit. And close the second terminal. 👉Also, in the terminal running the emulator, exit the virtual environment.
deactivate
👉Next, we'll deploy the assignment agent to the cloud
cd ~/aidemy-bootstrap/assignment
export ASSIGNMENT_BUCKET=$(gcloud storage buckets list --format="value(name)" | grep aidemy-assignment)
export OLLAMA_HOST=http://$(gcloud compute instances describe ollama-instance --zone=us-central1-a --format='value(networkInterfaces[0].accessConfigs[0].natIP)'):11434
gcloud config set project $(cat ~/project_id.txt)
export PROJECT_ID=$(gcloud config get project)
gcloud functions deploy assignment-agent \
 --gen2 \
 --timeout=540 \
 --memory=2Gi \
 --cpu=1 \
 --set-env-vars="ASSIGNMENT_BUCKET=${ASSIGNMENT_BUCKET}" \
 --set-env-vars=GOOGLE_CLOUD_PROJECT=${GOOGLE_CLOUD_PROJECT} \
 --set-env-vars=OLLAMA_HOST=${OLLAMA_HOST} \
 --region=us-central1 \
 --runtime=python312 \
 --source=. \
 --entry-point=generate_assignment \
 --trigger-topic=plan
Verify deployment by going to Google Cloud Console, navigate to Cloud Run. You should see a new service named courses-agent listed. 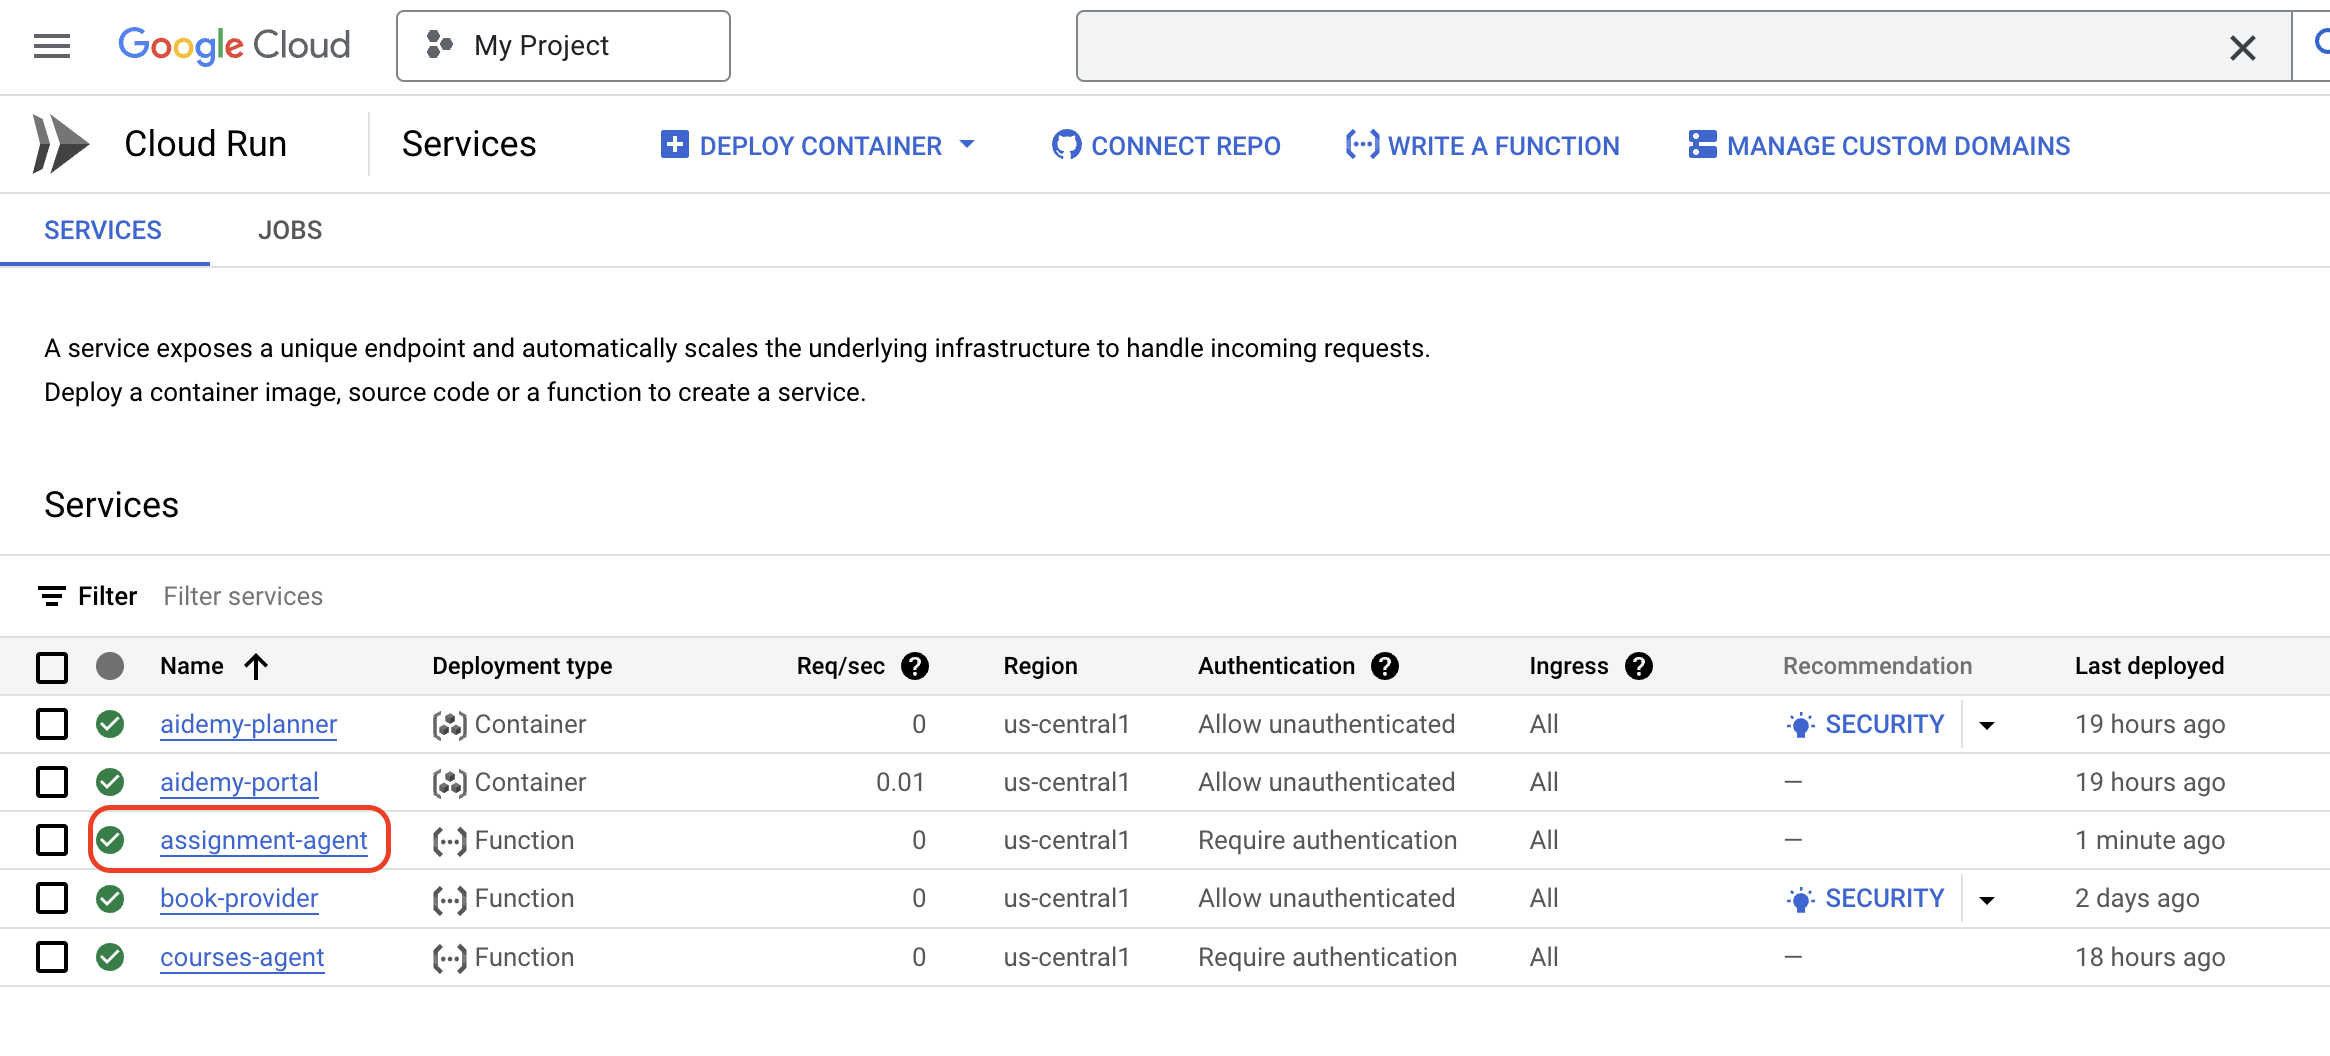
With the assignment generation workflow now implemented and tested and deployed, we can move on to the next step: making these assignments accessible within the student portal.
14. OPTIONAL: Role-Based collaboration with Gemini and DeepSeek - Contd.
Динамическая генерация веб-сайтов
To enhance the student portal and make it more engaging, we'll implement dynamic HTML generation for assignment pages. The goal is to automatically update the portal with a fresh, visually appealing design whenever a new assignment is generated. This leverages the LLM's coding capabilities to create a more dynamic and interesting user experience.
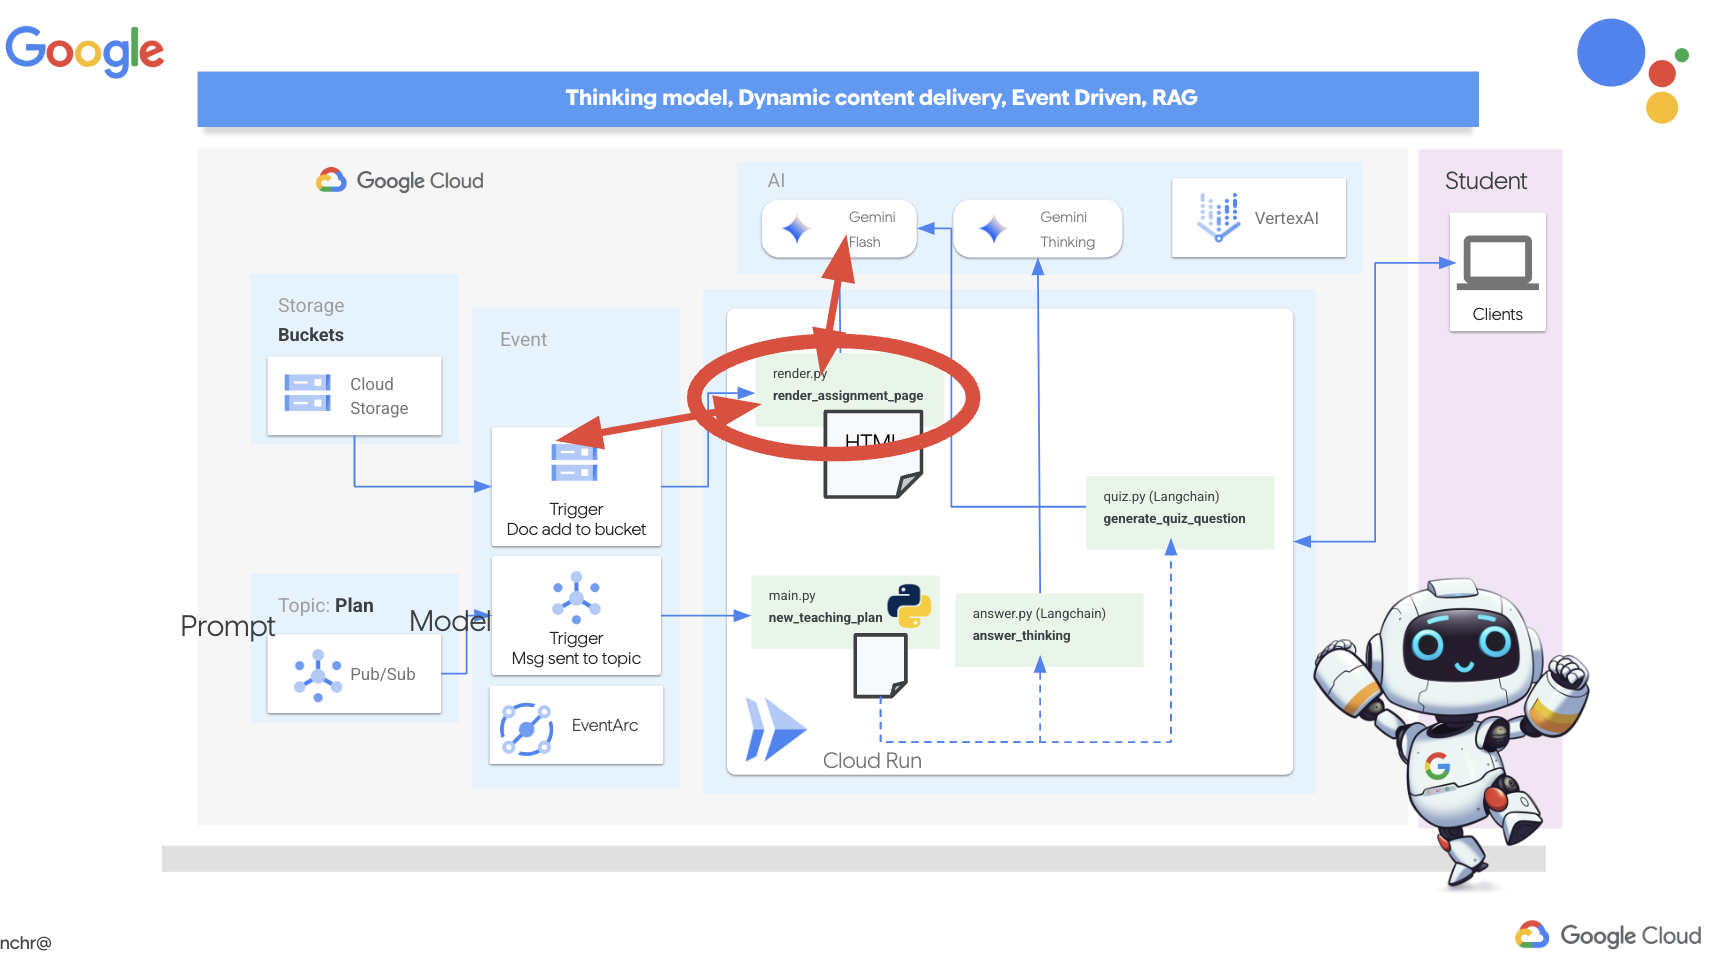
👉In Cloud Shell Editor, edit the render.py file within the portal folder, replace
def render_assignment_page():
    return ""
with following code snippet:
def render_assignment_page(assignment: str):
    try:
        region=get_next_region()
        llm = VertexAI(model_name="gemini-2.0-flash-001", location=region)
        input_msg = HumanMessage(content=[f"Here the assignment {assignment}"])
        prompt_template = ChatPromptTemplate.from_messages(
            [
                SystemMessage(
                    content=(
                        """
                        As a frontend developer, create HTML to display a student assignment with a creative look and feel. Include the following navigation bar at the top:
                        ```
                        <nav>
                            <a href="/">Home</a>
                            <a href="/quiz">Quizzes</a>
                            <a href="/courses">Courses</a>
                            <a href="/assignment">Assignments</a>
                        </nav>
                        ```
                        Also include these links in the <head> section:
                        ```
                        <link rel="stylesheet" href="{{ url_for('static', filename='style.css') }}">
                        <link rel="preconnect" href="https://fonts.googleapis.com">
                        <link rel="preconnect" href="https://fonts.gstatic.com" crossorigin>
                        <link href="https://fonts.googleapis.com/css2?family=Roboto:wght@400;500&display=swap" rel="stylesheet">

                        ```
                        Do not apply inline styles to the navigation bar.
                        The HTML should display the full assignment content. In its CSS, be creative with the rainbow colors and aesthetic.
                        Make it creative and pretty
                        The assignment content should be well-structured and easy to read.
                        respond with JUST the html file
                        """
                    )
                ),
                input_msg,
            ]
        )

        prompt = prompt_template.format()

        response = llm.invoke(prompt)

        response = response.replace("```html", "")
        response = response.replace("```", "")
        with open("templates/assignment.html", "w") as f:
            f.write(response)


        print(f"response: {response}")

        return response
    except Exception as e:
        print(f"Error sending message to chatbot: {e}") # Log this error too!
        return f"Unable to process your request at this time. Due to the following reason: {str(e)}"
It uses the Gemini model to dynamically generate HTML for the assignment. It takes the assignment content as input and uses a prompt to instruct Gemini to create a visually appealing HTML page with a creative style.
Next, we'll create an endpoint that will be triggered whenever a new document is added to the assignment bucket:
👉Within the portal folder, edit the app.py file and REPLACE the ## REPLACE ME! RENDER ASSIGNMENT line with following code:
@app.route('/render_assignment', methods=['POST'])
def render_assignment():
    try:
        data = request.get_json()
        file_name = data.get('name')
        bucket_name = data.get('bucket')

        if not file_name or not bucket_name:
            return jsonify({'error': 'Missing file name or bucket name'}), 400

        storage_client = storage.Client()
        bucket = storage_client.bucket(bucket_name)
        blob = bucket.blob(file_name)
        content = blob.download_as_text()

        print(f"File content: {content}")

        render_assignment_page(content)

        return jsonify({'message': 'Assignment rendered successfully'})

    except Exception as e:
        print(f"Error processing file: {e}")
        return jsonify({'error': 'Error processing file'}), 500
When triggered, it retrieves the file name and bucket name from the request data, downloads the assignment content from Cloud Storage, and calls the render_assignment_page function to generate the HTML.
👉We'll go ahead and run it locally:
cd ~/aidemy-bootstrap/portal
source env/bin/activate
python app.py
👉From the "Web preview" menu at the top of the Cloud Shell window, select "Preview on port 8080". This will open your application in a new browser tab. Navigate to the Assignment link in the navigation bar. You should see a blank page at this point, which is expected behavior since we haven't yet established the communication bridge between the assignment agent and the portal to dynamically populate the content.
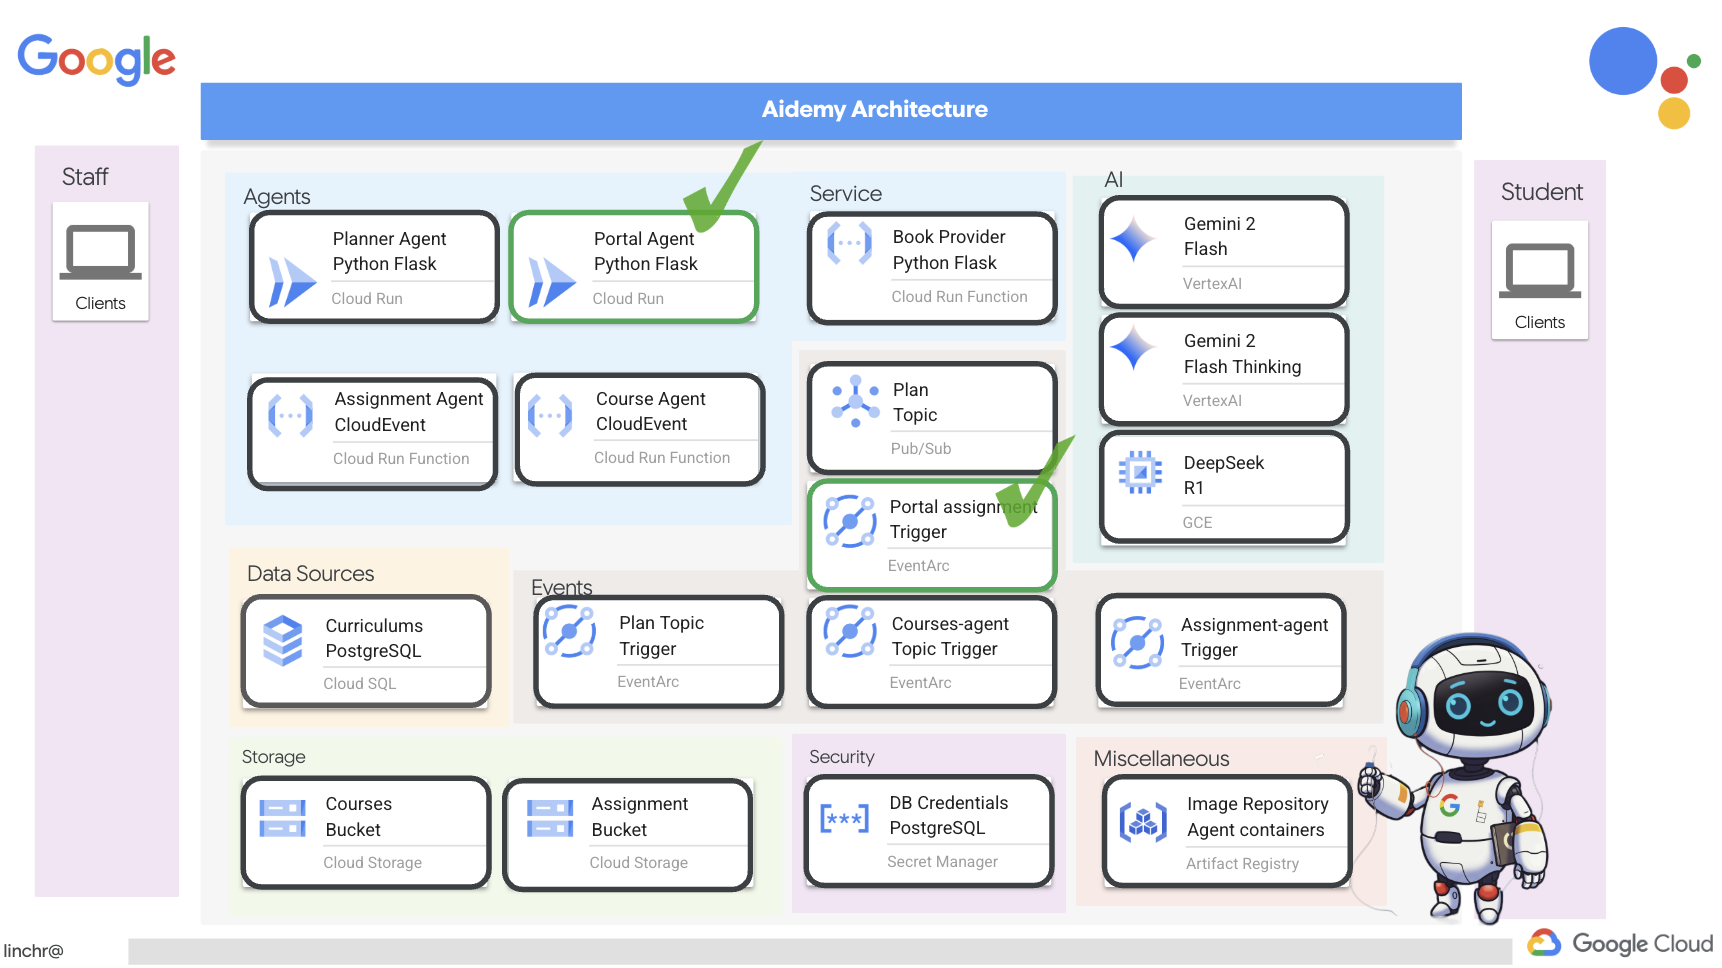
o ahead and stop the script by pressing Ctrl+C .
👉To incorporate these changes and deploy the updated code, rebuild and push the portal agent image:
cd ~/aidemy-bootstrap/portal/
gcloud config set project $(cat ~/project_id.txt)
export PROJECT_ID=$(gcloud config get project)
docker build -t gcr.io/${PROJECT_ID}/aidemy-portal .
docker tag gcr.io/${PROJECT_ID}/aidemy-portal us-central1-docker.pkg.dev/${PROJECT_ID}/agent-repository/aidemy-portal
docker push us-central1-docker.pkg.dev/${PROJECT_ID}/agent-repository/aidemy-portal
👉After pushing the new image, redeploy the Cloud Run service. Run the following script to force the Cloud Run update:
gcloud config set project $(cat ~/project_id.txt)
export PROJECT_ID=$(gcloud config get project)
export COURSE_BUCKET_NAME=$(gcloud storage buckets list --format="value(name)" | grep aidemy-recap)
gcloud run services update aidemy-portal \
    --region=us-central1 \
    --set-env-vars=GOOGLE_CLOUD_PROJECT=${PROJECT_ID},COURSE_BUCKET_NAME=$COURSE_BUCKET_NAME
👉Now, we'll deploy an Eventarc trigger that listens for any new object created (finalized) in the assignment bucket. This trigger will automatically invoke the /render_assignment endpoint on the portal service when a new assignment file is created.
gcloud config set project $(cat ~/project_id.txt)
export PROJECT_ID=$(gcloud config get project)
gcloud projects add-iam-policy-binding $PROJECT_ID \
  --member="serviceAccount:$(gcloud storage service-agent --project $PROJECT_ID)" \
  --role="roles/pubsub.publisher"
export SERVICE_ACCOUNT_NAME=$(gcloud compute project-info describe --format="value(defaultServiceAccount)")
gcloud eventarc triggers create portal-assignment-trigger \
--location=us-central1 \
--service-account=$SERVICE_ACCOUNT_NAME \
--destination-run-service=aidemy-portal \
--destination-run-region=us-central1 \
--destination-run-path="/render_assignment" \
--event-filters="bucket=$ASSIGNMENT_BUCKET" \
--event-filters="type=google.cloud.storage.object.v1.finalized"
To verify that the trigger was created successfully, navigate to the Eventarc Triggers page in the Google Cloud Console. You should see portal-assignment-trigger listed in the table. Click on the trigger name to view its details. 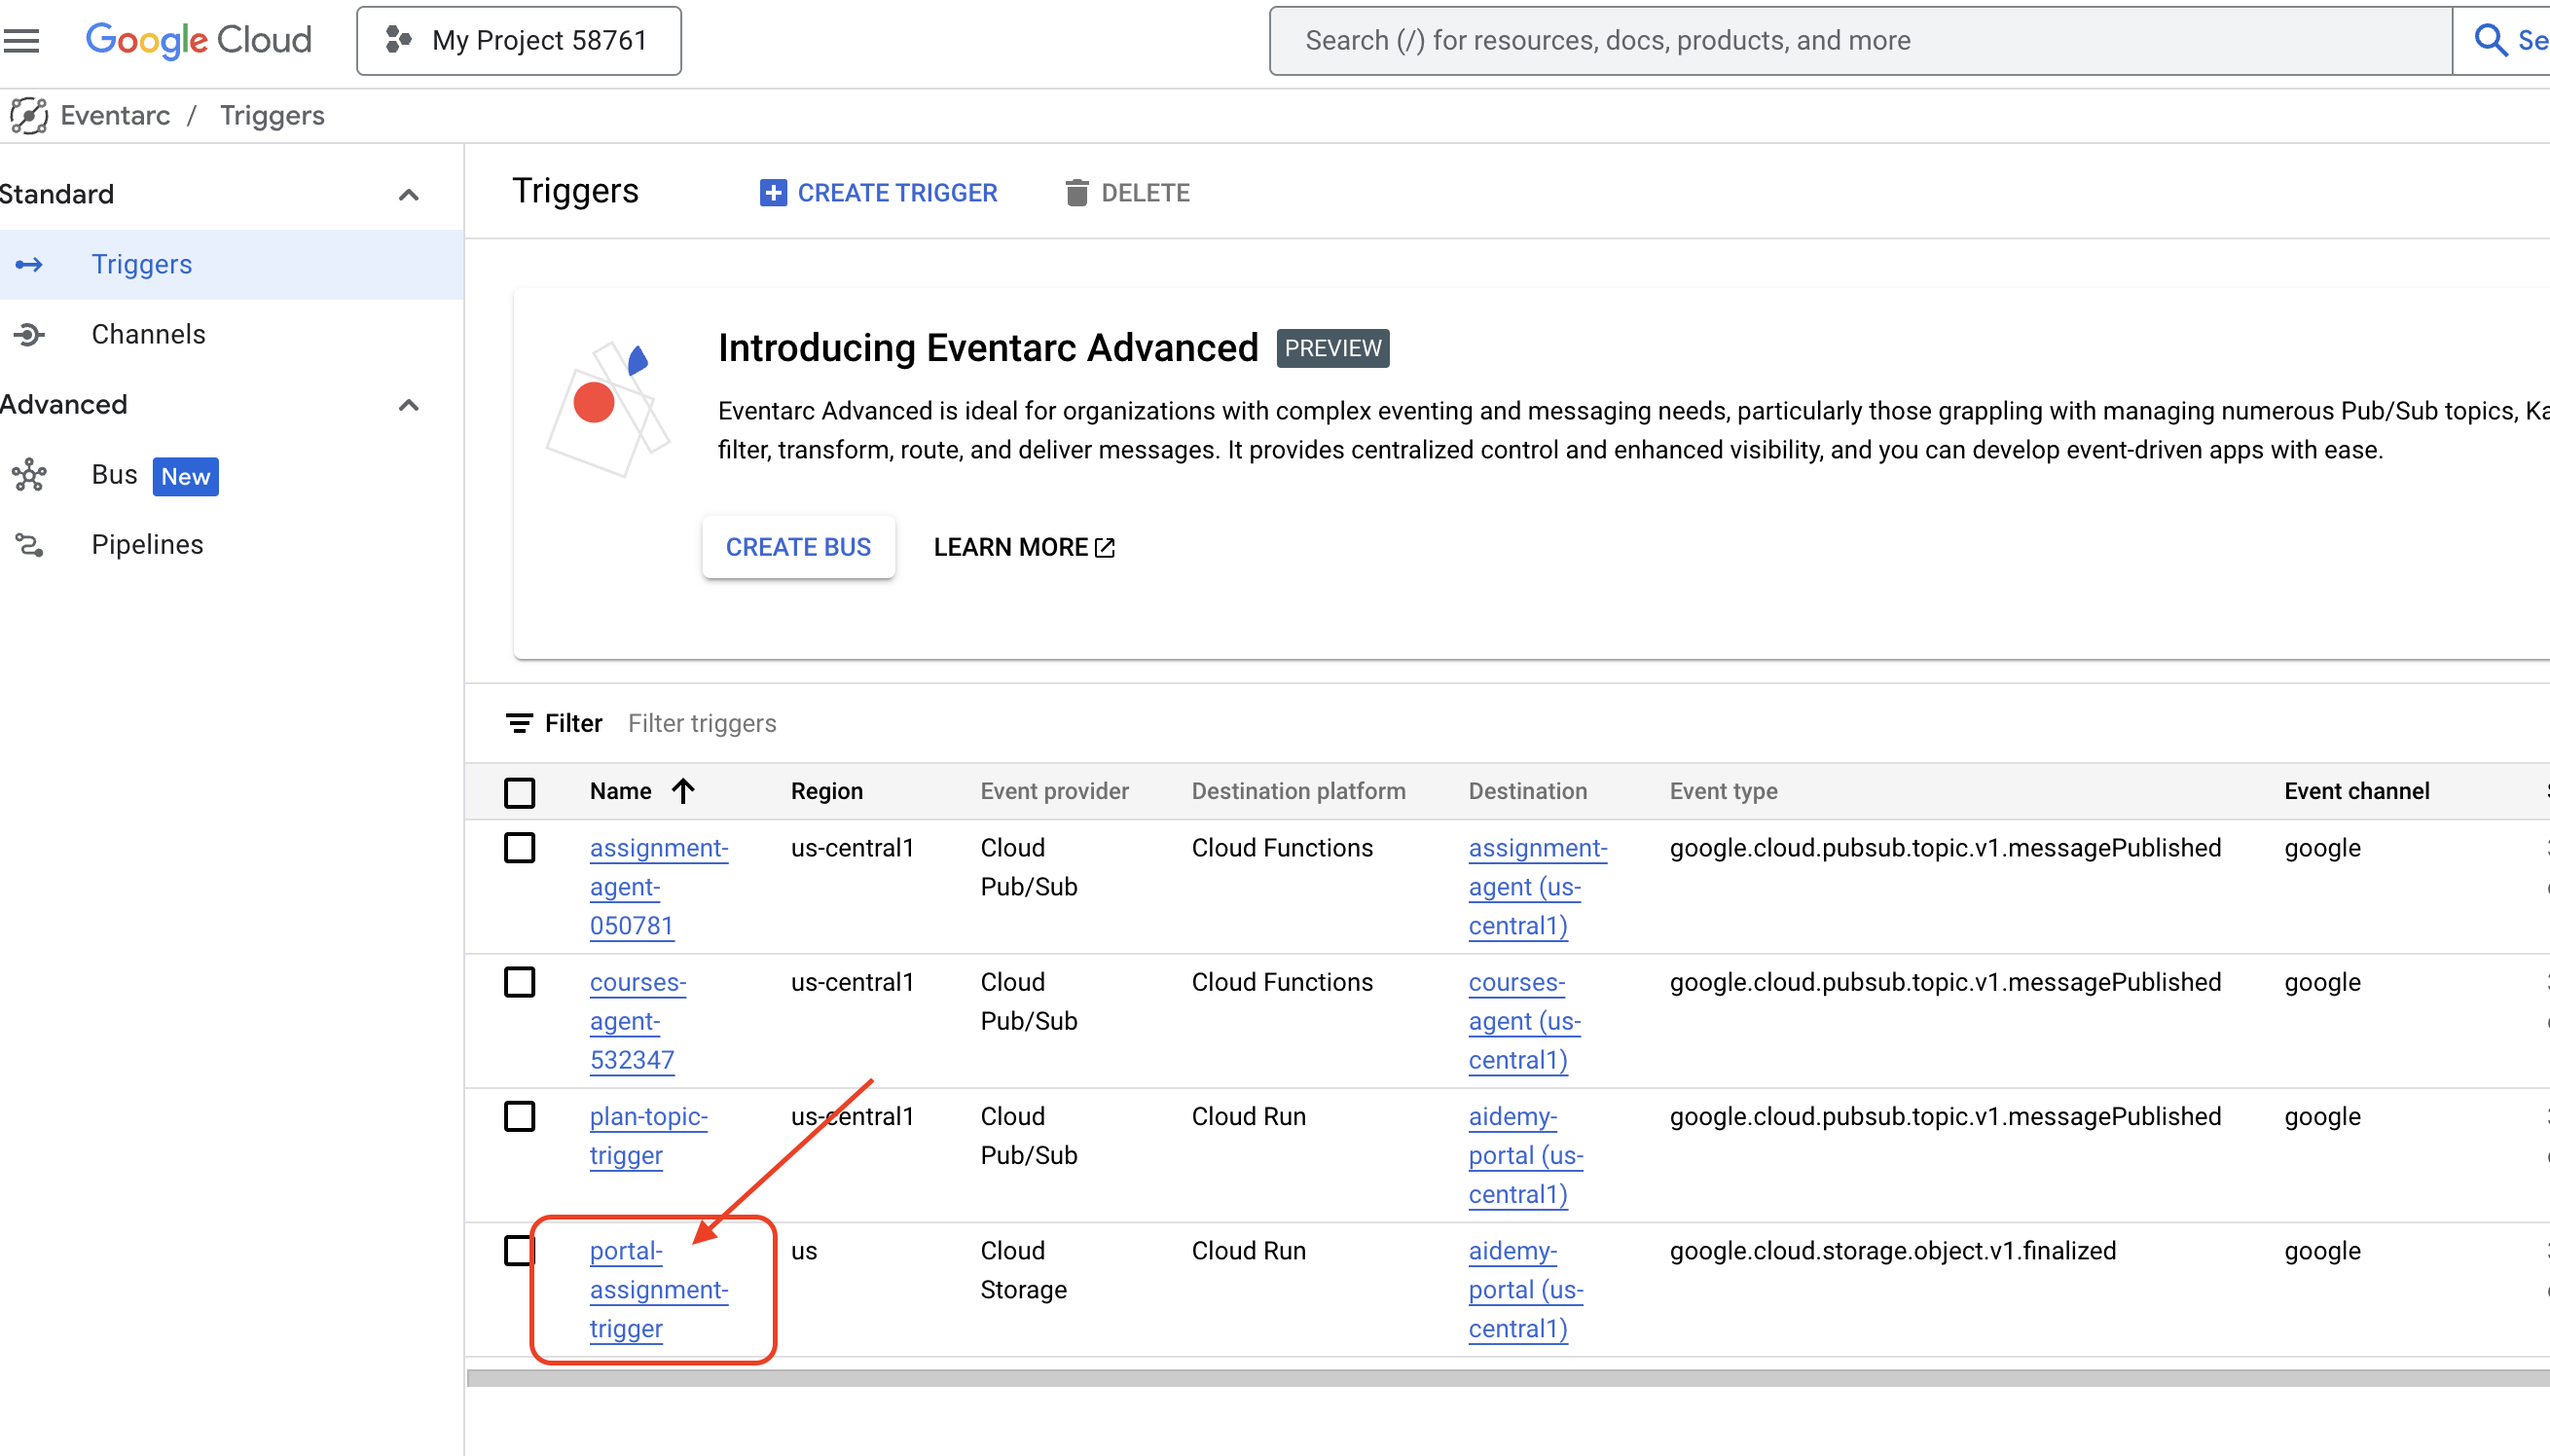
It may take up to 2-3 minutes for the new trigger to become active.
To see the dynamic assignment generation in action, run the following command to find the URL of your planner agent (if you don't have it handy):
gcloud run services list --platform=managed --region=us-central1 --format='value(URL)' | grep planner
Find the URL of your portal agent:
gcloud run services list --platform=managed --region=us-central1 --format='value(URL)' | grep portal
In the planner agent, generate a new teaching plan.
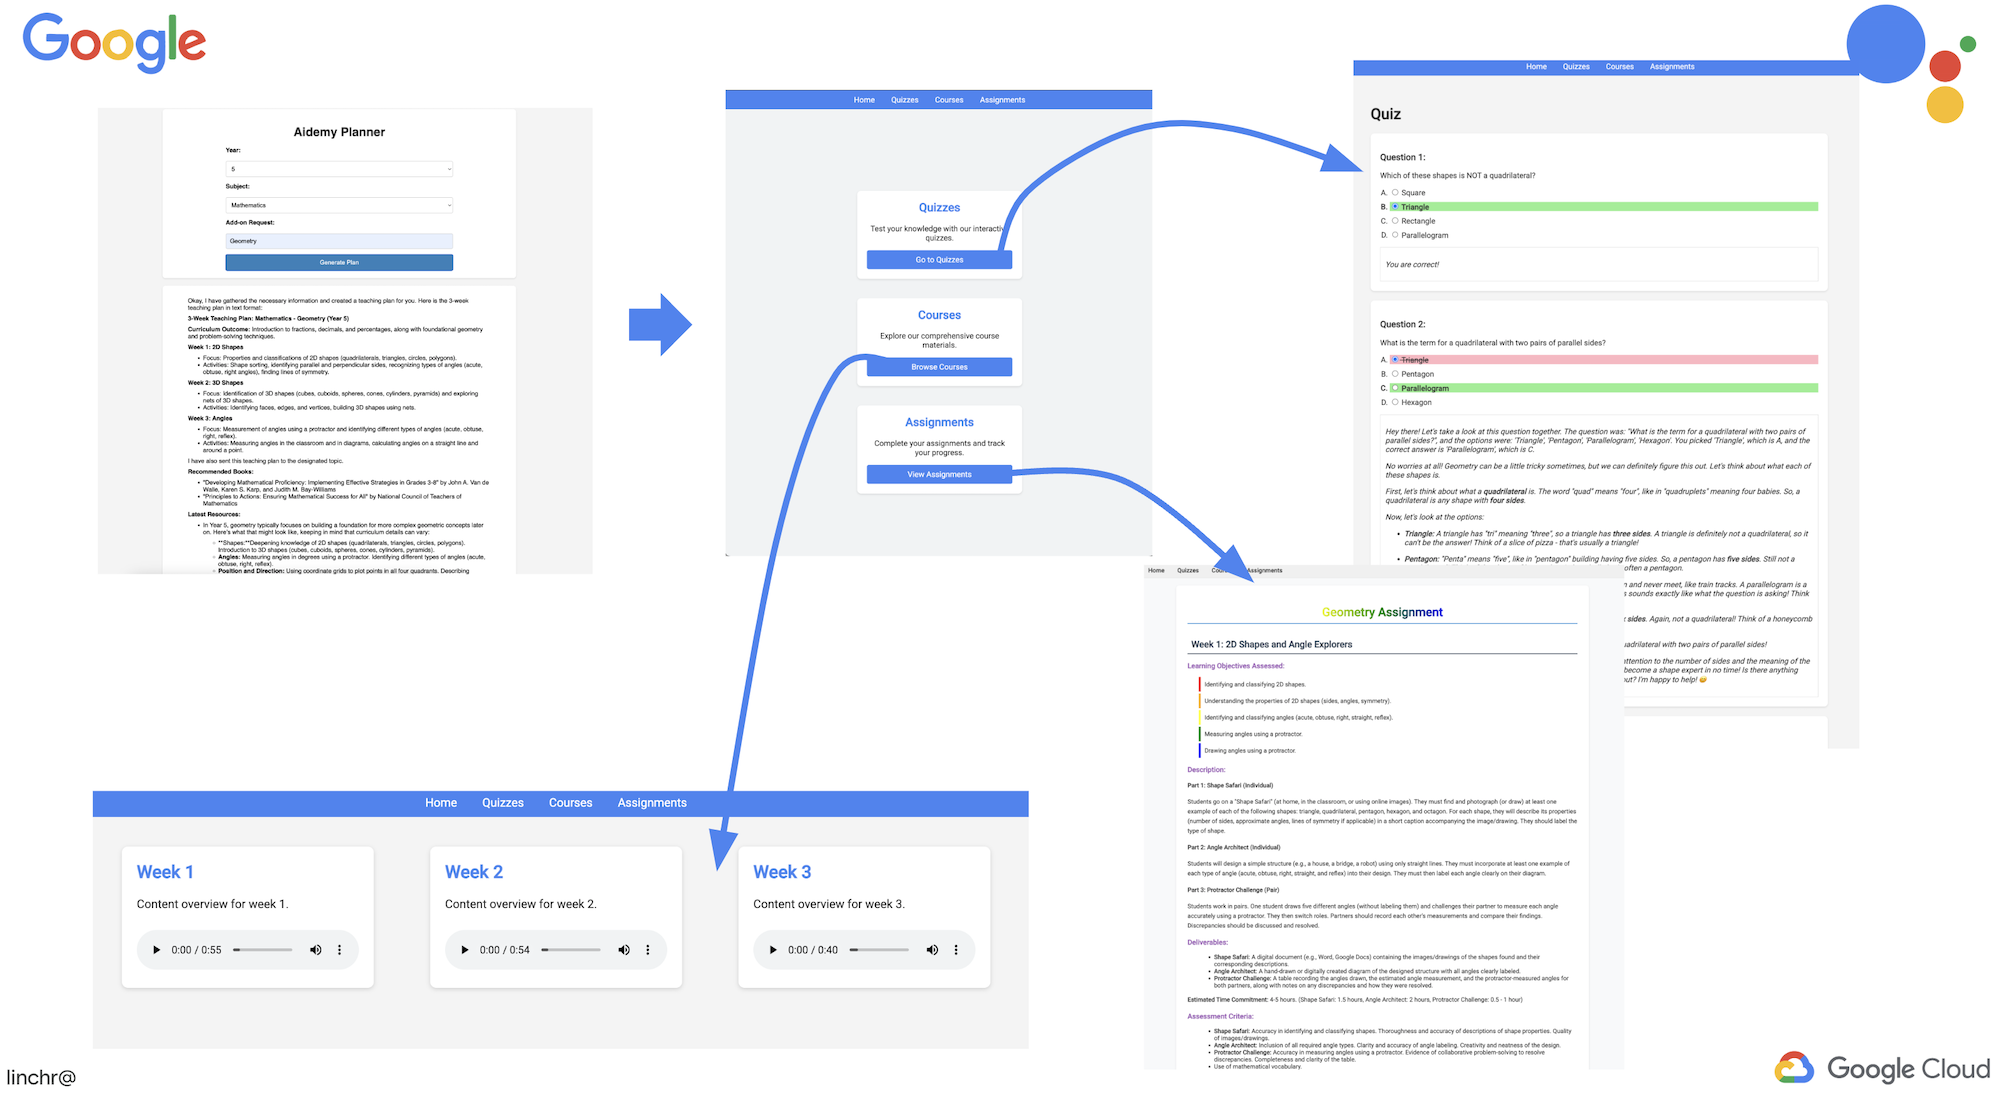
After a few minutes (to allow for the audio generation, assignment generation, and HTML rendering to complete), navigate to the student portal.
👉Click on the "Assignment" link in the navigation bar. You should see a newly created assignment with a dynamically generated HTML. Each time a teaching plan is generated it should be a dynamic assignment.
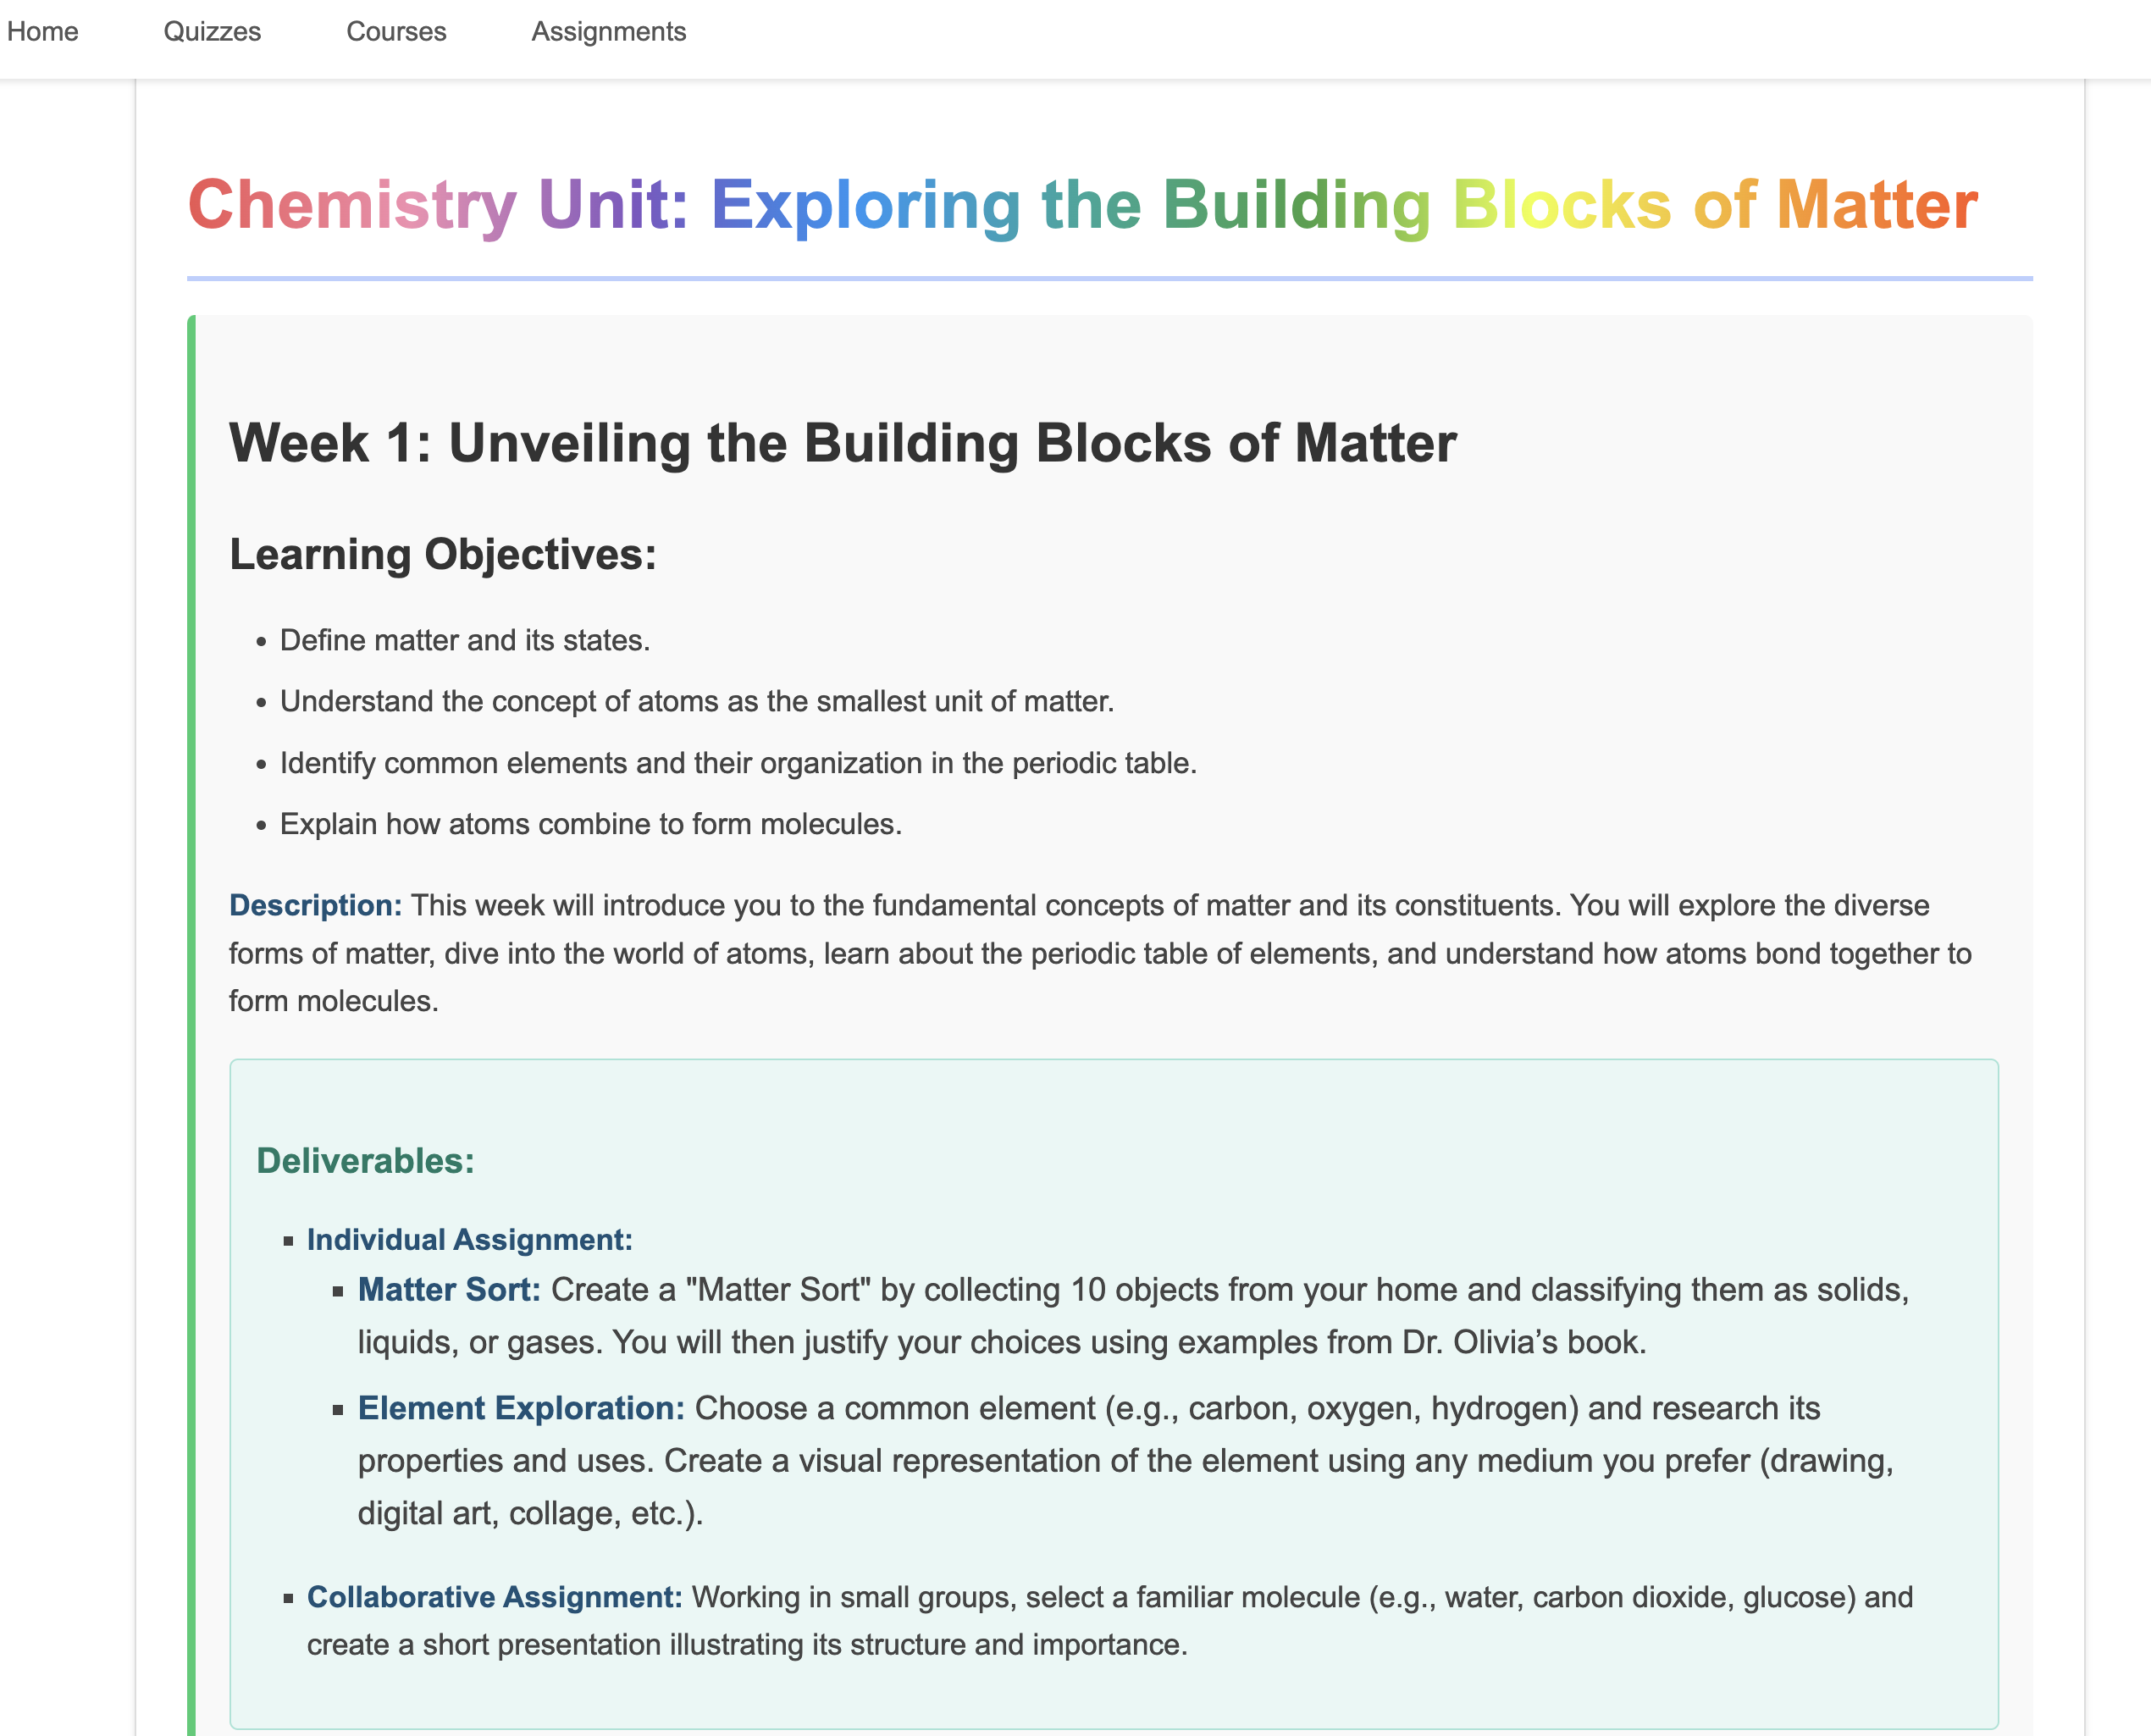
Congratulations on completing the Aidemy multi-agent system ! You've gained practical experience and valuable insights into:
- The benefits of multi-agent systems, including modularity, scalability, specialization, and simplified maintenance.
- The importance of event-driven architectures for building responsive and loosely coupled applications.
- The strategic use of LLMs, matching the right model to the task and integrating them with tools for real-world impact.
- Cloud-native development practices using Google Cloud services to create scalable and reliable solutions.
- The importance of considering data privacy and self-hosting models as an alternative to vendor solutions.
You now have a solid foundation for building sophisticated AI-powered applications on Google Cloud!
15. Challenges and Next Steps
Congratulations on building the Aidemy multi-agent system! You've laid a strong foundation for AI-powered education. Now, let's consider some challenges and potential future enhancements to further expand its capabilities and address real-world needs:
Interactive Learning with Live Q&A:
- Challenge: Can you leverage Gemini 2's Live API to create a real-time Q&A feature for students? Imagine a virtual classroom where students can ask questions and receive immediate, AI-powered responses.
Automated Assignment Submission and Grading:
- Challenge: Design and implement a system that allows students to submit assignments digitally and have them automatically graded by AI, with a mechanism to detect and prevent plagiarism. This challenge presents a great opportunity to explore Retrieval Augmented Generation (RAG) to enhance the accuracy and reliability of the grading and plagiarism detection processes.

16. Clean up
Now that we've built and explored our Aidemy multi-agent system, it's time to clean up our Google Cloud environment.
👉Delete Cloud Run services
gcloud run services delete aidemy-planner --region=us-central1 --quiet
gcloud run services delete aidemy-portal --region=us-central1 --quiet
gcloud run services delete courses-agent --region=us-central1 --quiet
gcloud run services delete book-provider --region=us-central1 --quiet
gcloud run services delete assignment-agent --region=us-central1 --quiet
👉Delete Eventarc trigger
gcloud eventarc triggers delete portal-assignment-trigger --location=us --quiet
gcloud eventarc triggers delete plan-topic-trigger --location=us-central1 --quiet
gcloud eventarc triggers delete portal-assignment-trigger --location=us-central1 --quiet
ASSIGNMENT_AGENT_TRIGGER=$(gcloud eventarc triggers list --project="$PROJECT_ID" --location=us-central1 --filter="name:assignment-agent" --format="value(name)")
COURSES_AGENT_TRIGGER=$(gcloud eventarc triggers list --project="$PROJECT_ID" --location=us-central1 --filter="name:courses-agent" --format="value(name)")
gcloud eventarc triggers delete $ASSIGNMENT_AGENT_TRIGGER --location=us-central1 --quiet
gcloud eventarc triggers delete $COURSES_AGENT_TRIGGER --location=us-central1 --quiet
👉Delete Pub/Sub topic
gcloud pubsub topics delete plan --project="$PROJECT_ID" --quiet
👉Delete Cloud SQL instance
gcloud sql instances delete aidemy --quiet
👉Delete Artifact Registry repository
gcloud artifacts repositories delete agent-repository --location=us-central1 --quiet
👉Delete Secret Manager secrets
gcloud secrets delete db-user --quiet
gcloud secrets delete db-pass --quiet
gcloud secrets delete db-name --quiet
👉Delete Compute Engine instance (if created for Deepseek)
gcloud compute instances delete ollama-instance --zone=us-central1-a --quiet
👉Delete the firewall rule for Deepseek instance
gcloud compute firewall-rules delete allow-ollama-11434 --quiet
👉Delete Cloud Storage buckets
export COURSE_BUCKET_NAME=$(gcloud storage buckets list --format="value(name)" | grep aidemy-recap)
export ASSIGNMENT_BUCKET=$(gcloud storage buckets list --format="value(name)" | grep aidemy-assignment)
gsutil rm -r gs://$COURSE_BUCKET_NAME
gsutil rm -r gs://$ASSIGNMENT_BUCKET