۱. مقدمه
سلام! خب، شما به ایدهی عاملها علاقهمند شدید - دستیاران کوچکی که میتوانند کارها را برای شما انجام دهند بدون اینکه حتی انگشتتان را تکان دهید، درست است؟ عالی! اما بیایید واقعبین باشیم، یک عامل همیشه کافی نیست، مخصوصاً وقتی که با پروژههای بزرگتر و پیچیدهتری سر و کار دارید. احتمالاً به یک تیم کامل از آنها نیاز خواهید داشت! اینجاست که سیستمهای چندعاملی وارد عمل میشوند.
عاملها، وقتی توسط LLMها پشتیبانی میشوند، در مقایسه با کدنویسی سخت قدیمی، انعطافپذیری فوقالعادهای به شما میدهند. اما، و همیشه یک اما وجود دارد، آنها با مجموعهای از چالشهای دشوار خود همراه هستند. و این دقیقاً همان چیزی است که ما در این کارگاه به آن خواهیم پرداخت!
این چیزی است که میتوانید انتظار یادگیری آن را داشته باشید - آن را به عنوان ارتقای سطح بازی خود در زمینهی نمایندگی در نظر بگیرید:
ساخت اولین عامل خود با LangGraph : ما با استفاده از LangGraph، یک چارچوب محبوب، دست به کار میشویم و عامل خود را میسازیم. شما یاد خواهید گرفت که چگونه ابزارهایی ایجاد کنید که به پایگاههای داده متصل میشوند، از آخرین API Gemini 2 برای جستجوی اینترنتی استفاده کنید و اعلانها و پاسخها را بهینه کنید، به طوری که عامل شما بتواند نه تنها با LLMها، بلکه با سرویسهای موجود نیز تعامل داشته باشد. ما همچنین به شما نشان خواهیم داد که فراخوانی تابع چگونه کار میکند.
هماهنگسازی اپراتورها، به روش شما : ما روشهای مختلفی را برای هماهنگسازی اپراتورها، از مسیرهای مستقیم ساده گرفته تا سناریوهای پیچیدهتر چندمسیره، بررسی خواهیم کرد. آن را به عنوان هدایت جریان تیم اپراتور خود در نظر بگیرید.
سیستمهای چندعاملی : شما یاد خواهید گرفت که چگونه سیستمی راهاندازی کنید که در آن عوامل شما بتوانند با هم همکاری کنند و کارها را با هم انجام دهند - همه اینها به لطف یک معماری مبتنی بر رویداد.
آزادی LLM : از بهترینها برای شغل استفاده کنید: ما فقط به یک LLM وابسته نیستیم! خواهید دید که چگونه از چندین LLM استفاده کنید و با اختصاص نقشهای مختلف به آنها، قدرت حل مسئله را با استفاده از «مدلهای تفکر» جالب افزایش دهید.
محتوای پویا؟ مشکلی نیست!: تصور کنید که نماینده شما محتوای پویایی را ایجاد میکند که به طور خاص برای هر کاربر، به صورت بلادرنگ (real-time) تنظیم شده است. ما به شما نشان خواهیم داد که چگونه این کار را انجام دهید!
بردن آن به فضای ابری با گوگل کلود : بازی کردن با دفترچه یادداشت را فراموش کنید. ما به شما نشان خواهیم داد که چگونه سیستم چندعاملی خود را در گوگل کلود معماری و مستقر کنید تا برای دنیای واقعی آماده باشد!
این پروژه نمونه خوبی از نحوه استفاده از تمام تکنیکهایی است که در مورد آنها صحبت کردیم.
۲. معماری
معلم بودن یا کار در آموزش و پرورش میتواند بسیار ارزشمند باشد، اما بیایید با آن روبرو شویم، حجم کار، به خصوص تمام کارهای مقدماتی، میتواند چالش برانگیز باشد! به علاوه، اغلب کارکنان کافی وجود ندارد و تدریس خصوصی میتواند گران باشد. به همین دلیل است که ما یک دستیار آموزشی مبتنی بر هوش مصنوعی را پیشنهاد میکنیم. این ابزار میتواند بار معلمان را سبکتر کند و به پر کردن شکاف ناشی از کمبود کارکنان و عدم وجود تدریس خصوصی مقرون به صرفه کمک کند.
دستیار آموزشی هوش مصنوعی ما میتواند برنامههای درسی دقیق، آزمونهای سرگرمکننده، خلاصههای صوتی آسان و تکالیف شخصیسازیشده را ارائه دهد. این به معلمان اجازه میدهد تا روی کاری که در آن بهترین هستند تمرکز کنند: ارتباط با دانشآموزان و کمک به آنها برای عاشق شدن به یادگیری.
این سیستم دو سایت دارد: یکی برای معلمان تا برنامههای درسی هفتههای آینده را ایجاد کنند،

و یکی برای دانشآموزان تا به آزمونها، خلاصههای صوتی و تکالیف دسترسی داشته باشند. 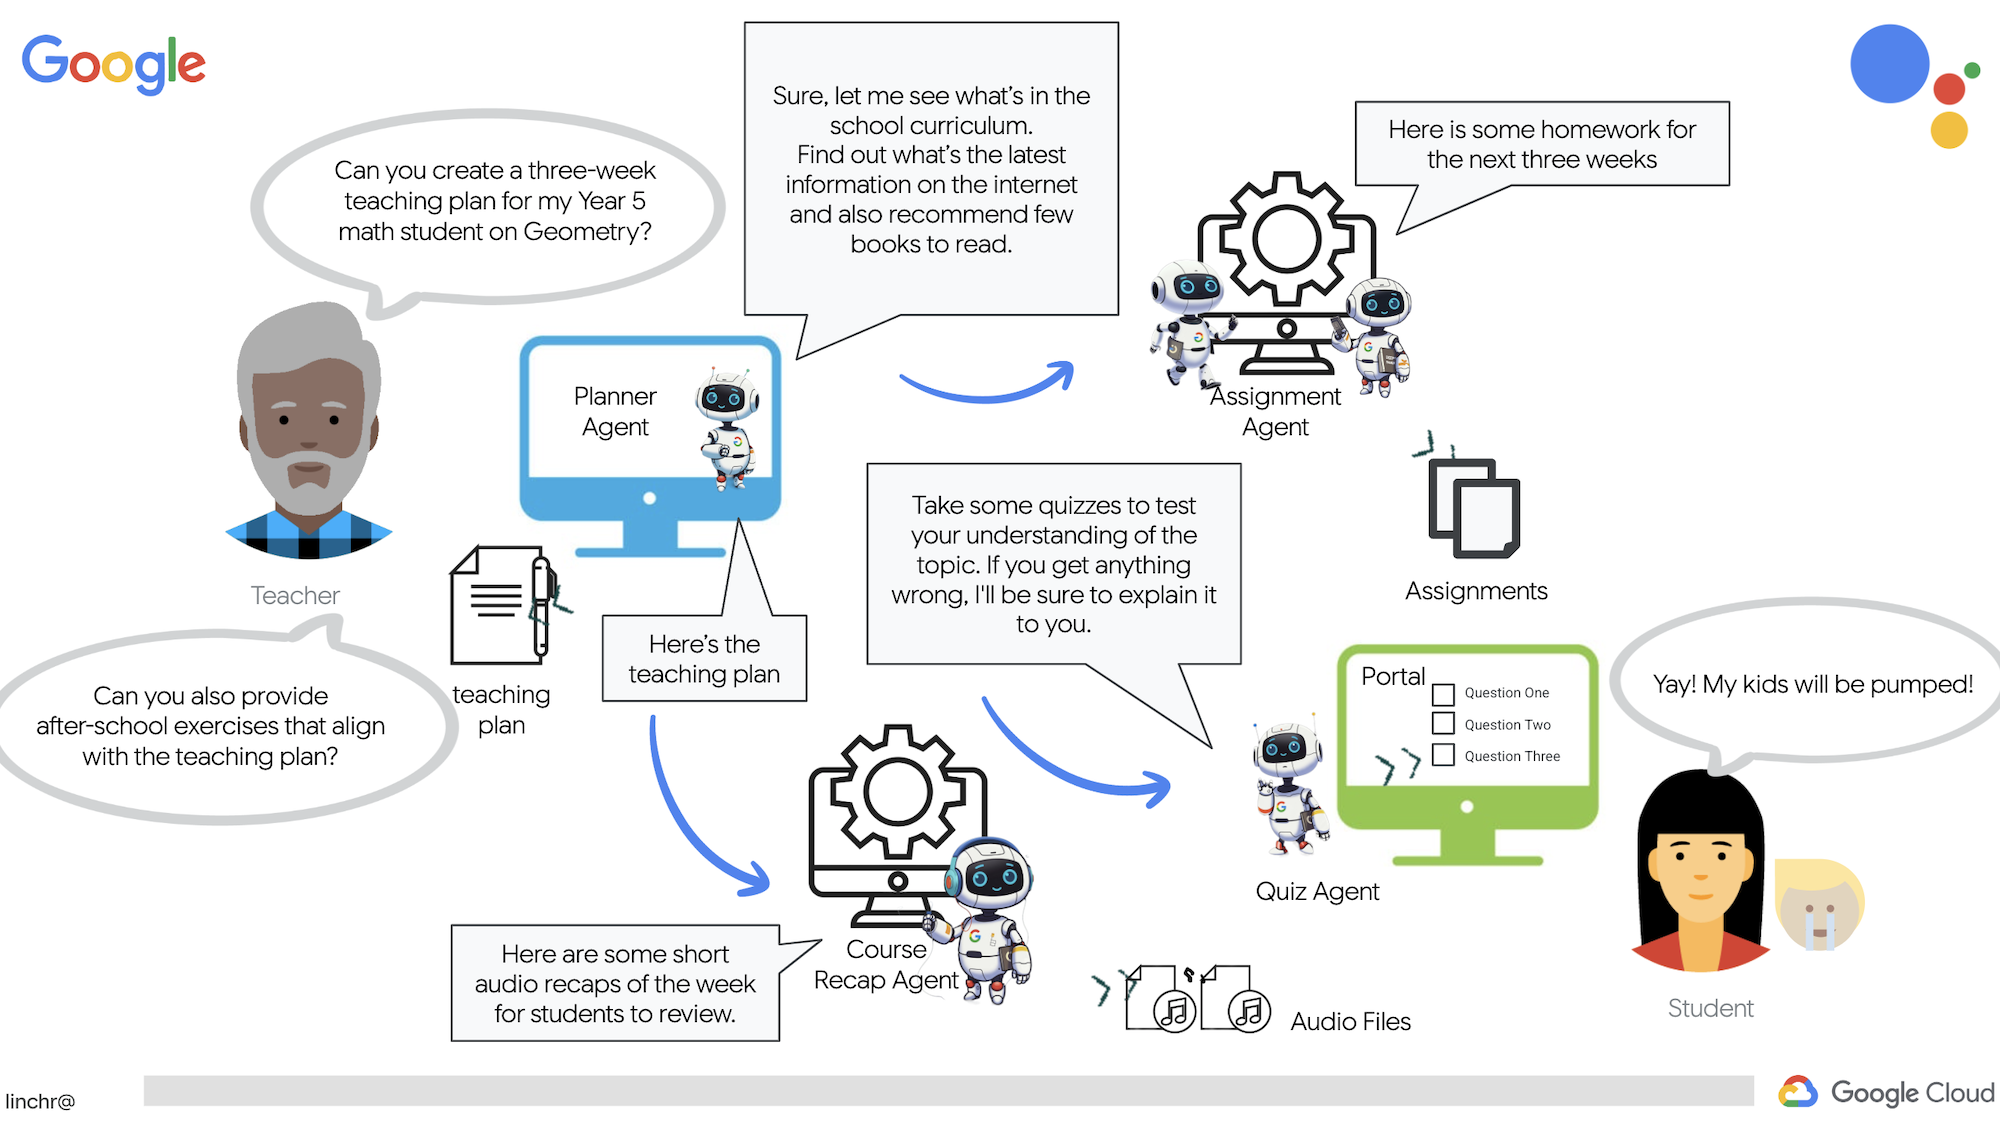
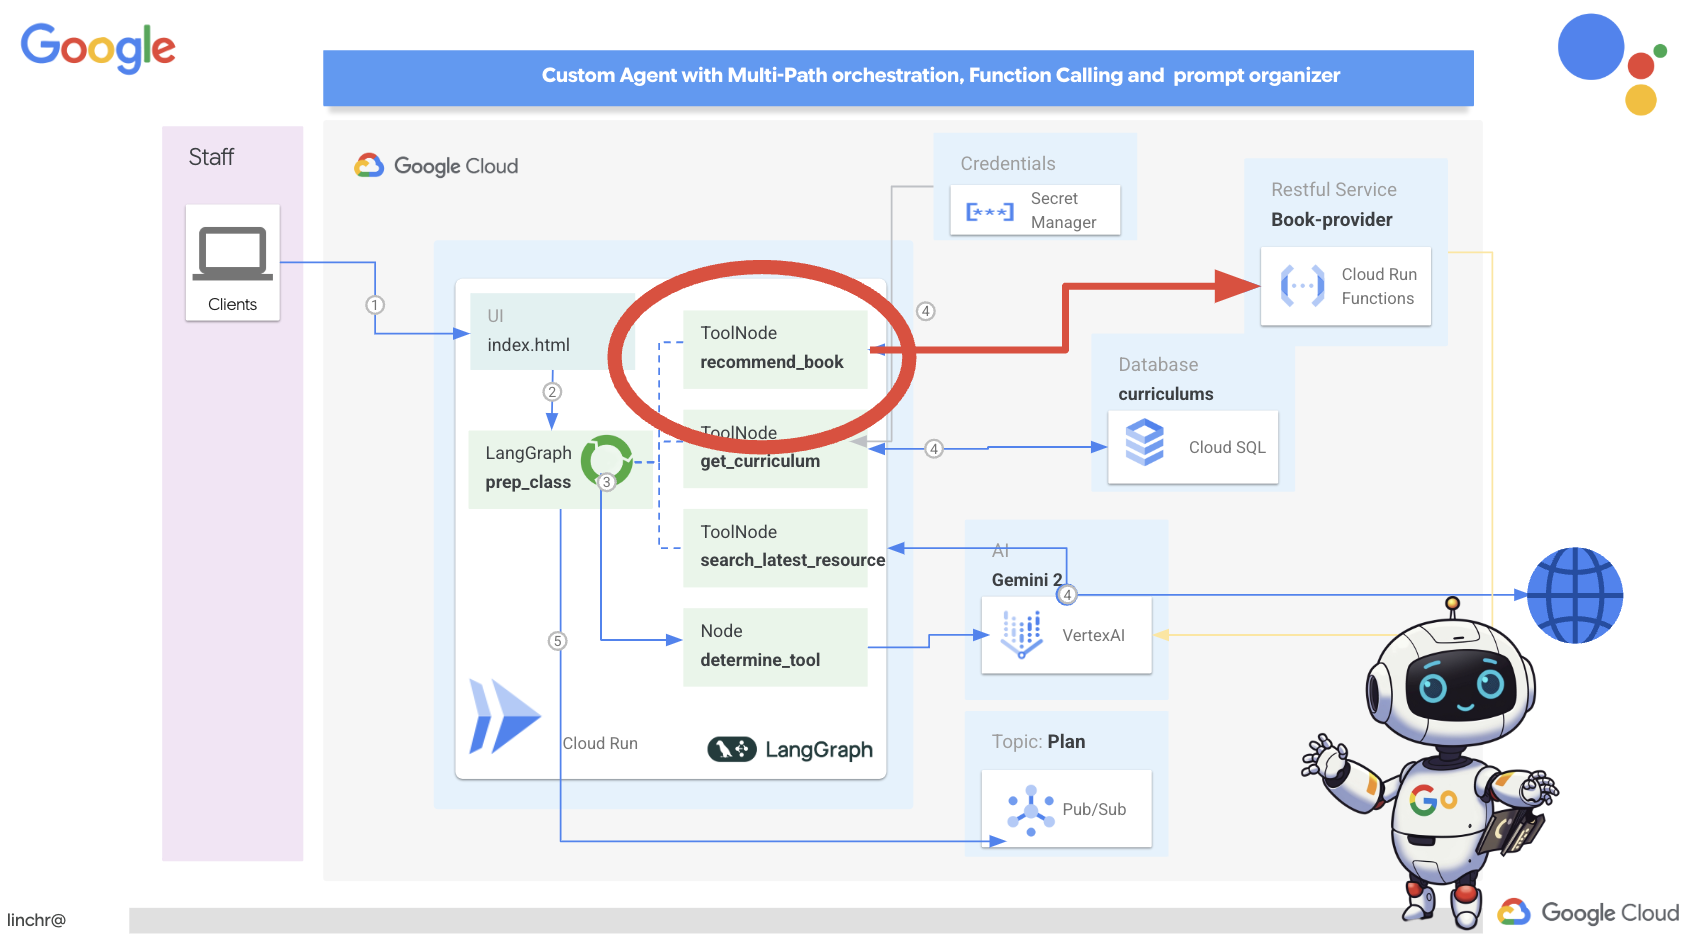
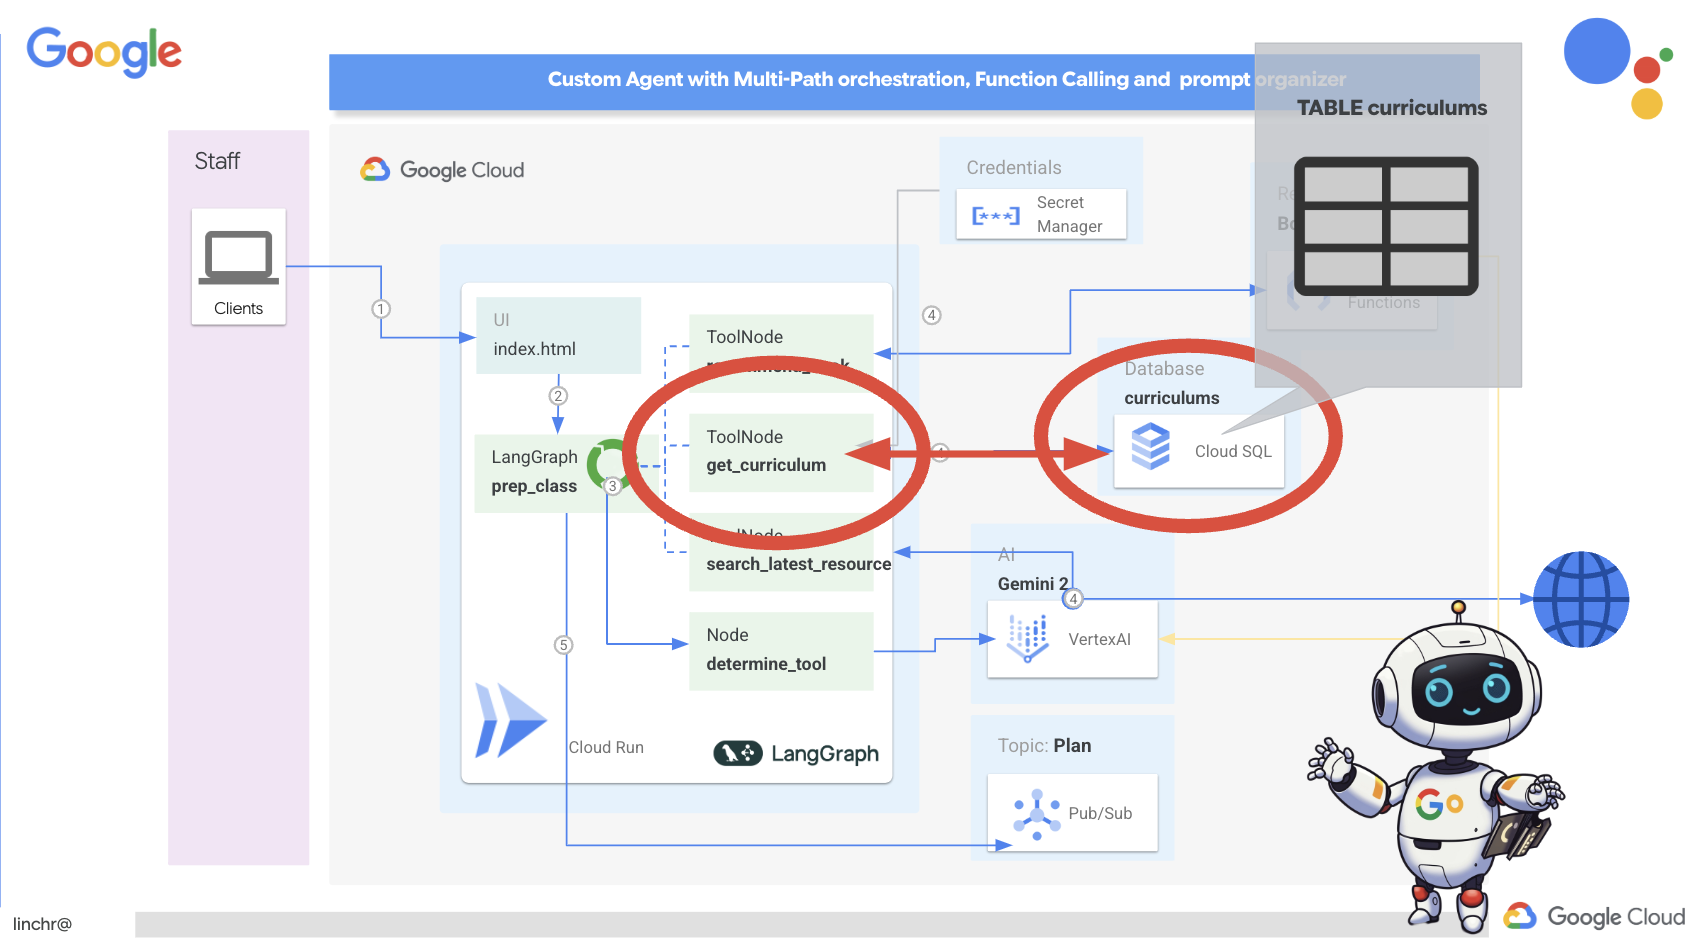
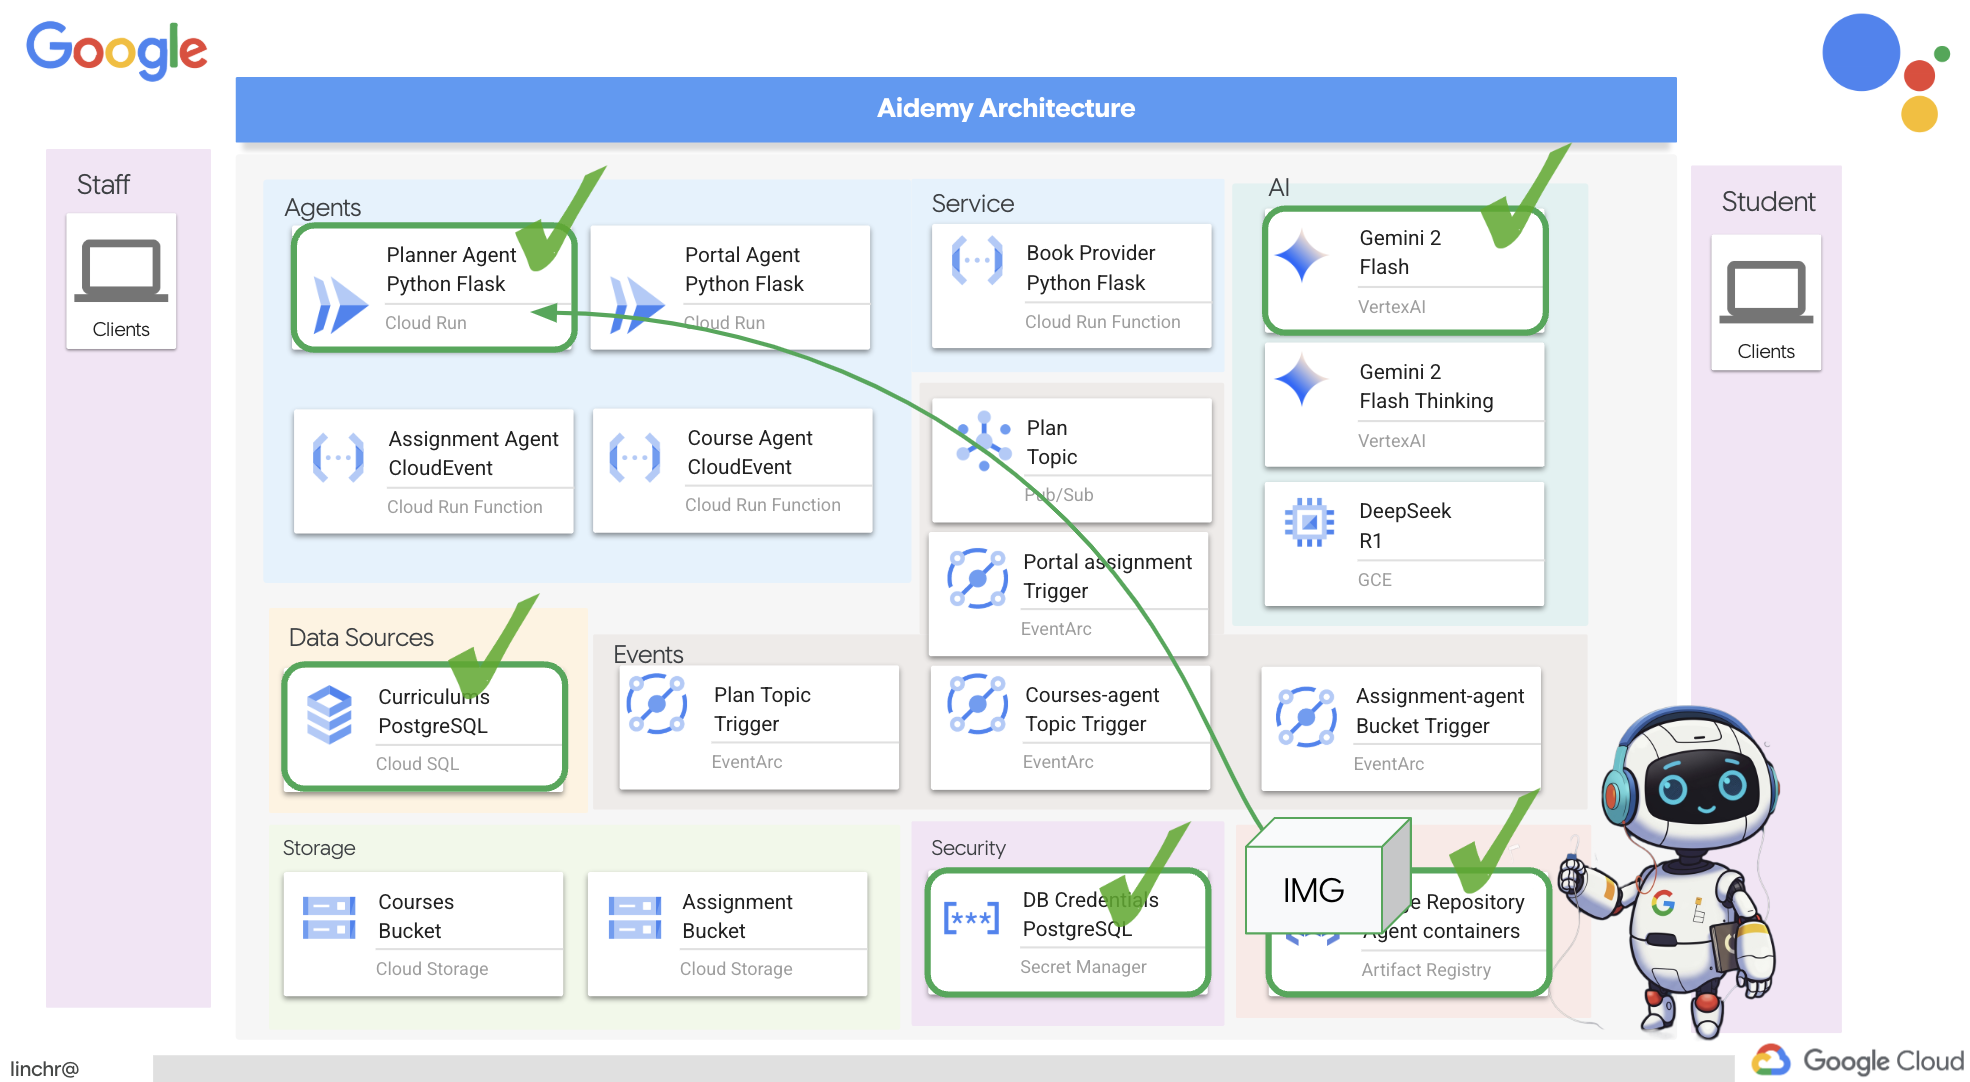
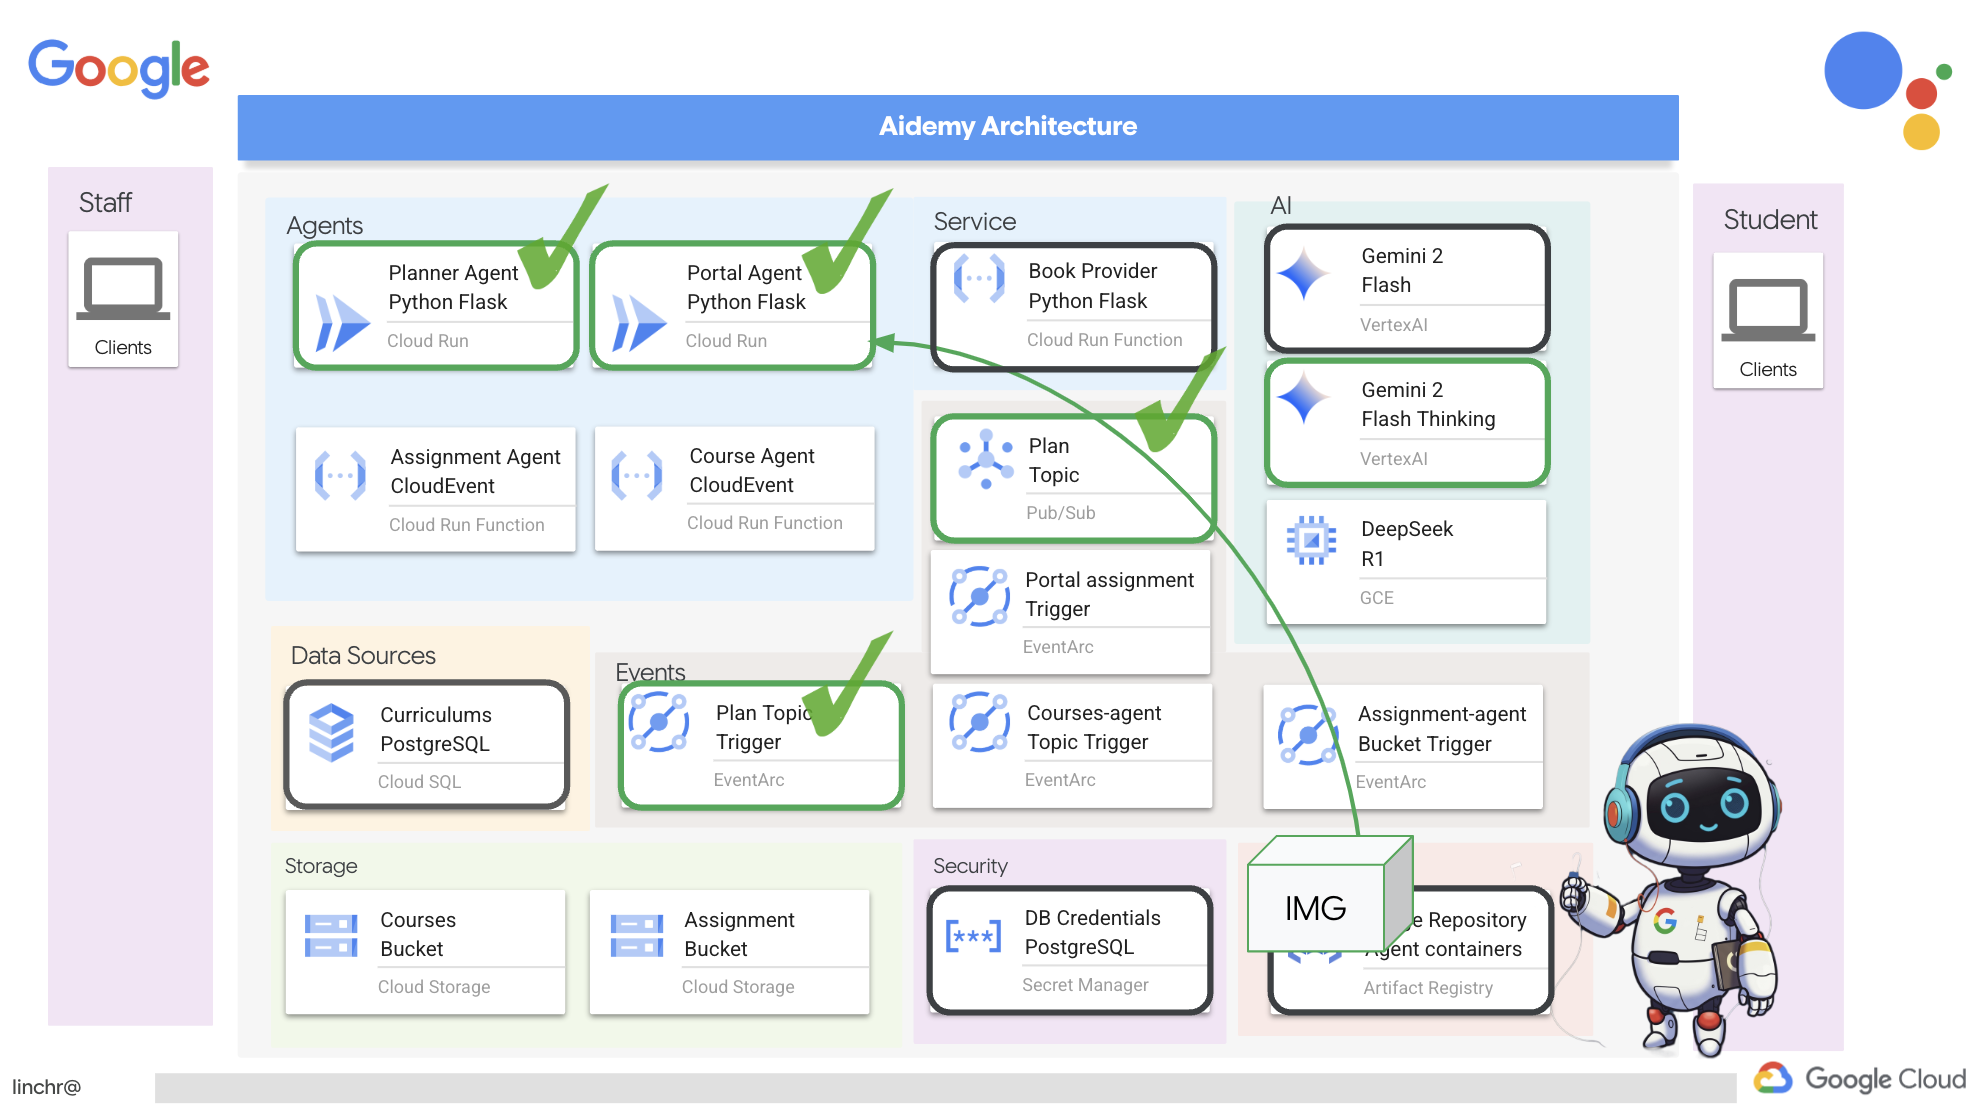
بسیار خب، بیایید معماری دستیار آموزشیمان، ایدمی، را بررسی کنیم. همانطور که میبینید، آن را به چندین جزء کلیدی تقسیم کردهایم که همگی با هم کار میکنند تا این اتفاق بیفتد.
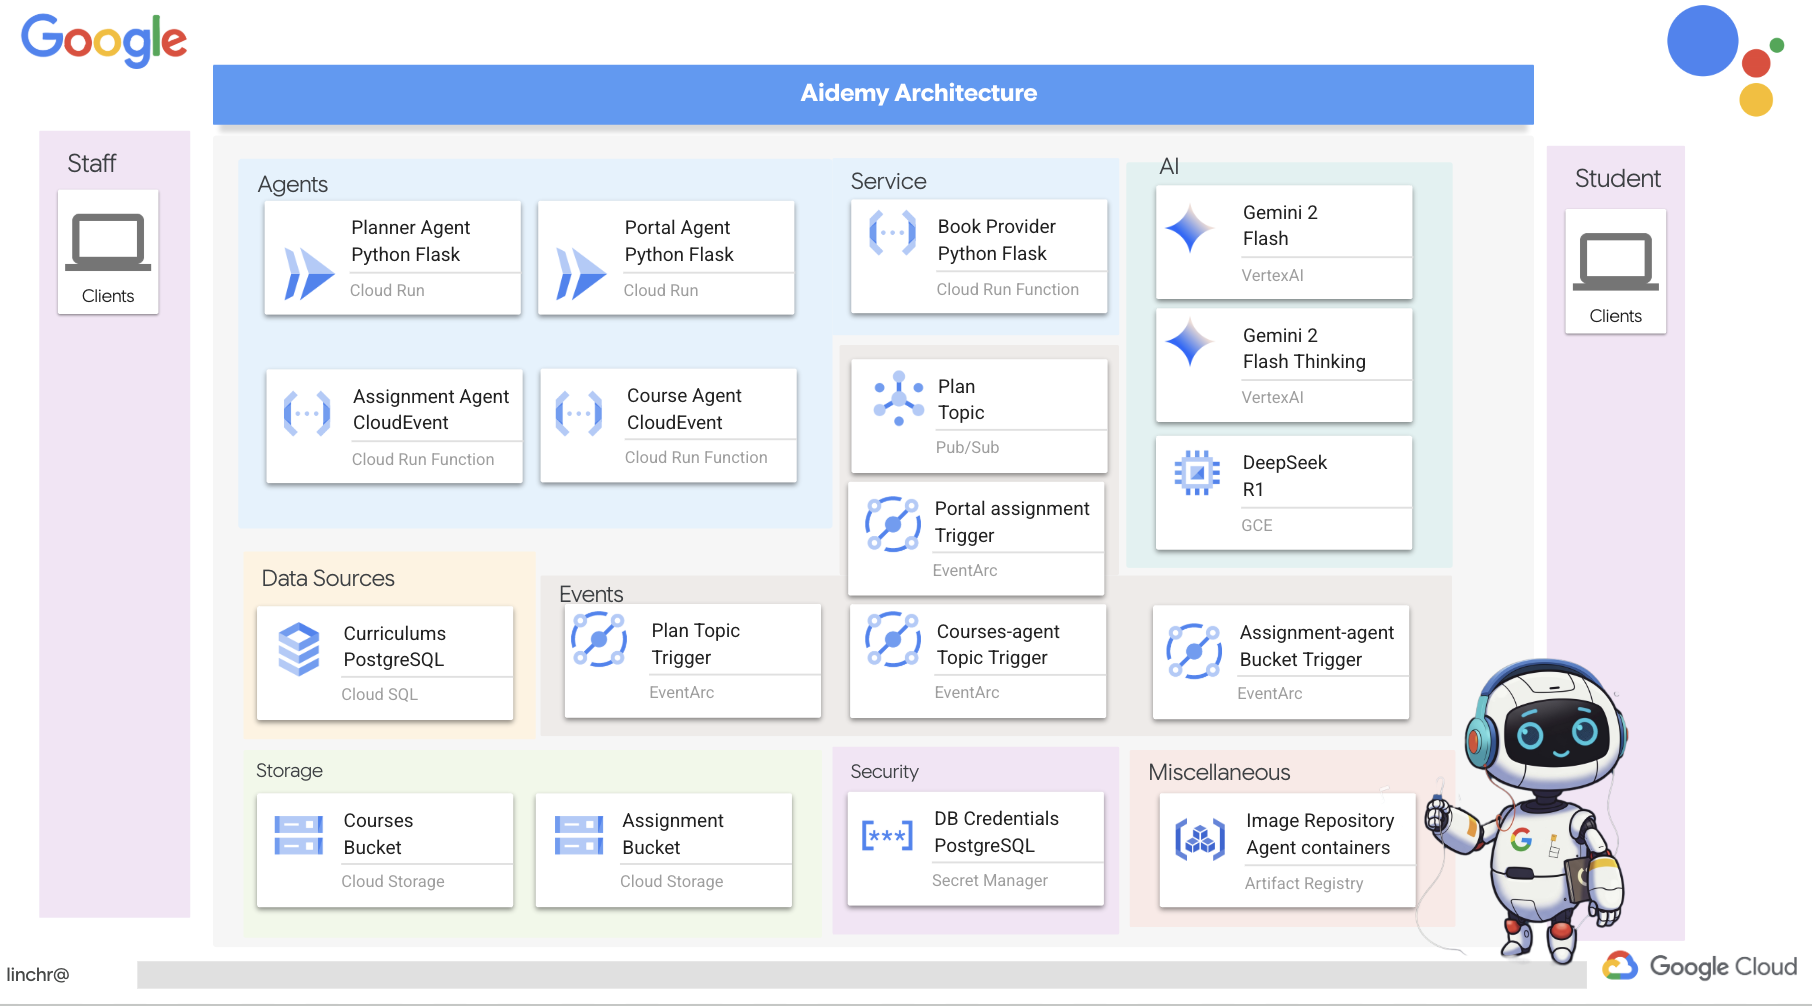
عناصر و فناوریهای کلیدی معماری :
پلتفرم ابری گوگل (GCP) : مرکزی برای کل سیستم:
- هوش مصنوعی ورتکس: به دورههای آموزشی Gemini LLM گوگل دسترسی دارد.
- Cloud Run: پلتفرم بدون سرور برای استقرار عاملها و توابع کانتینری.
- Cloud SQL: پایگاه داده PostgreSQL برای دادههای برنامه درسی.
- Pub/Sub و Eventarc: پایه و اساس معماری رویداد محور، که امکان ارتباط ناهمزمان بین اجزا را فراهم میکند.
- فضای ذخیرهسازی ابری: خلاصههای صوتی و فایلهای تکالیف را ذخیره میکند.
- مدیر مخفی: اعتبارنامههای پایگاه داده را به طور ایمن مدیریت میکند.
- رجیستری مصنوعات: تصاویر داکر را برای عاملها ذخیره میکند.
- موتور محاسبه: برای استقرار LLM خود میزبان به جای تکیه بر راهحلهای فروشندگان
LLM ها : "مغز" سیستم:
- مدلهای Gemini گوگل: (Gemini x Pro، Gemini x Flash، Gemini x Flash Thinking) برای برنامهریزی درسی، تولید محتوا، ایجاد HTML پویا، توضیح آزمون و ترکیب تکالیف استفاده میشوند.
- DeepSeek: برای کار تخصصی تولید تکالیف خودآموزی مورد استفاده قرار میگیرد.
LangChain و LangGraph : چارچوبهایی برای توسعه برنامههای کاربردی LLM
- ایجاد گردشهای کاری پیچیده چندعاملی را تسهیل میکند.
- امکان هماهنگی هوشمند ابزارها (فراخوانیهای API، پرسوجوهای پایگاه داده، جستجوهای وب) را فراهم میکند.
- معماری رویدادمحور را برای مقیاسپذیری و انعطافپذیری سیستم پیادهسازی میکند.
در اصل، معماری ما قدرت LLMها را با دادههای ساختاریافته و ارتباطات رویدادمحور ترکیب میکند که همگی بر روی Google Cloud اجرا میشوند. این به ما امکان میدهد یک دستیار آموزشی مقیاسپذیر، قابل اعتماد و مؤثر بسازیم.
۳. قبل از شروع
در کنسول گوگل کلود ، در صفحه انتخاب پروژه، یک پروژه گوگل کلود را انتخاب یا ایجاد کنید. مطمئن شوید که صورتحساب برای پروژه ابری شما فعال است. یاد بگیرید که چگونه بررسی کنید که آیا صورتحساب در یک پروژه فعال است یا خیر .
فعال کردن دستیار کد Gemini در Cloud Shell IDE
👉 در کنسول گوگل کلود، به ابزارهای کمکی کد جمینی بروید، با موافقت با شرایط و ضوابط، دستیار کد جمینی را بدون هیچ هزینهای فعال کنید.
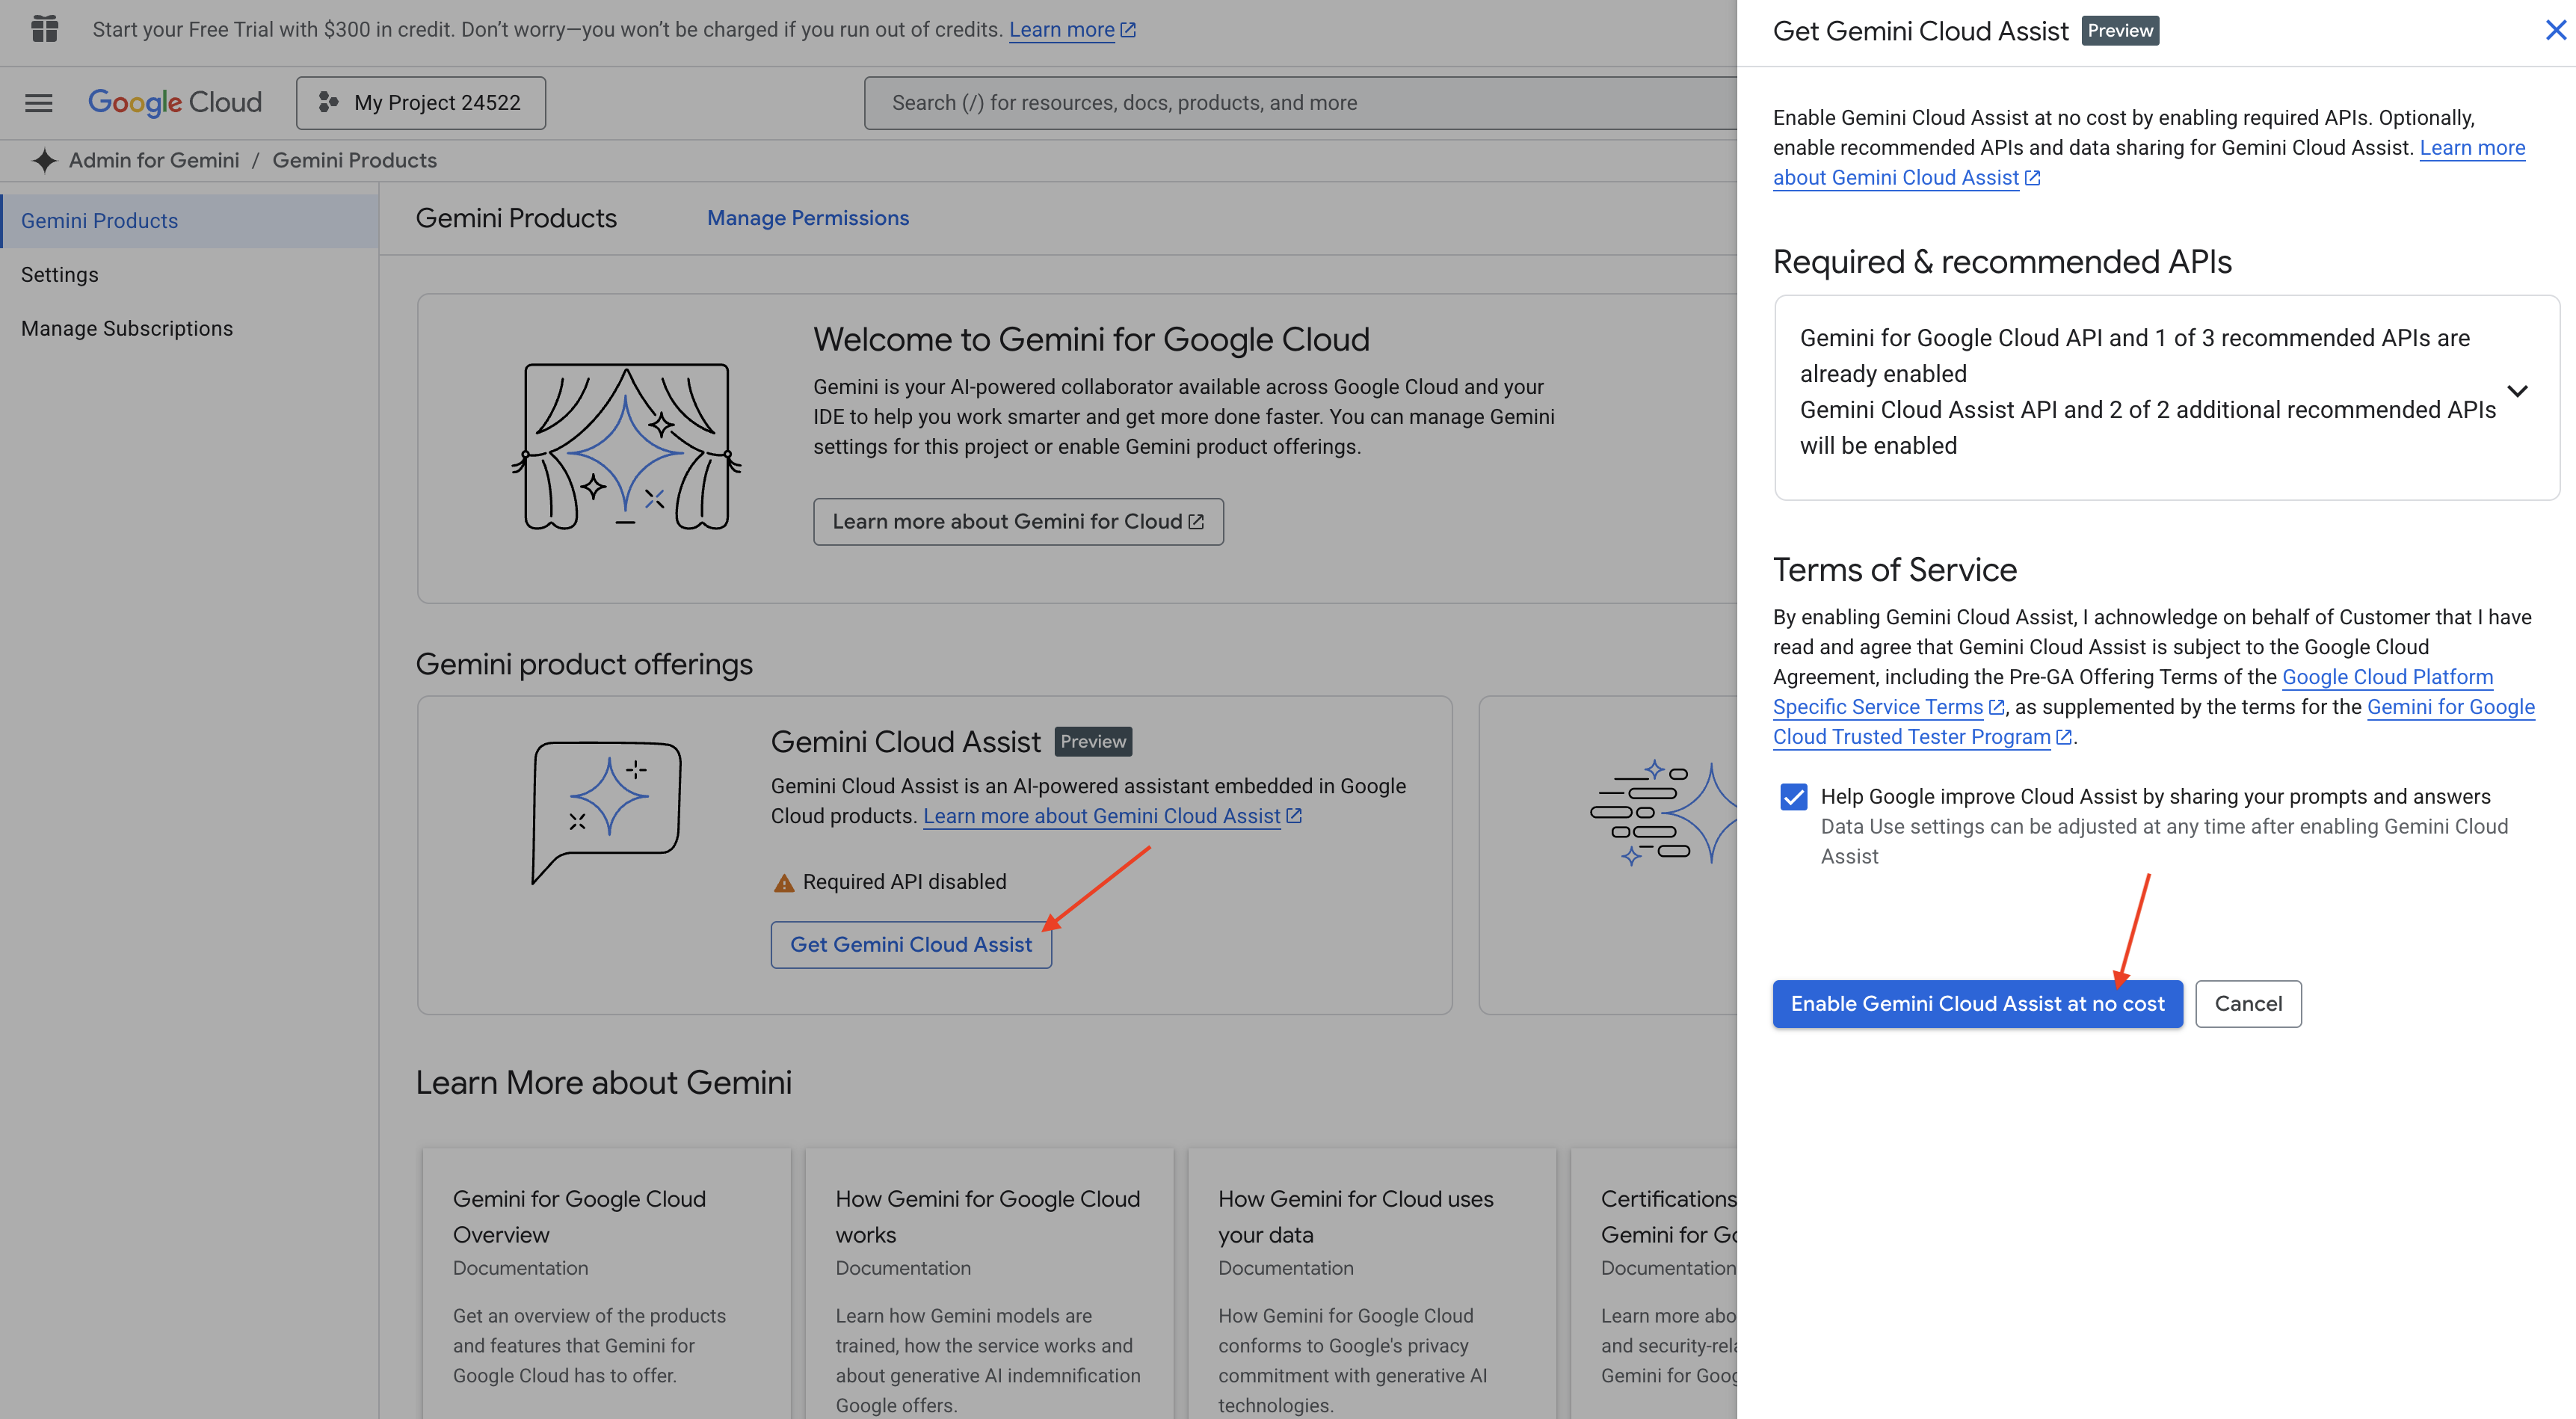
تنظیمات مجوز را نادیده بگیرید، از این صفحه خارج شوید.
کار روی ویرایشگر Cloud Shell
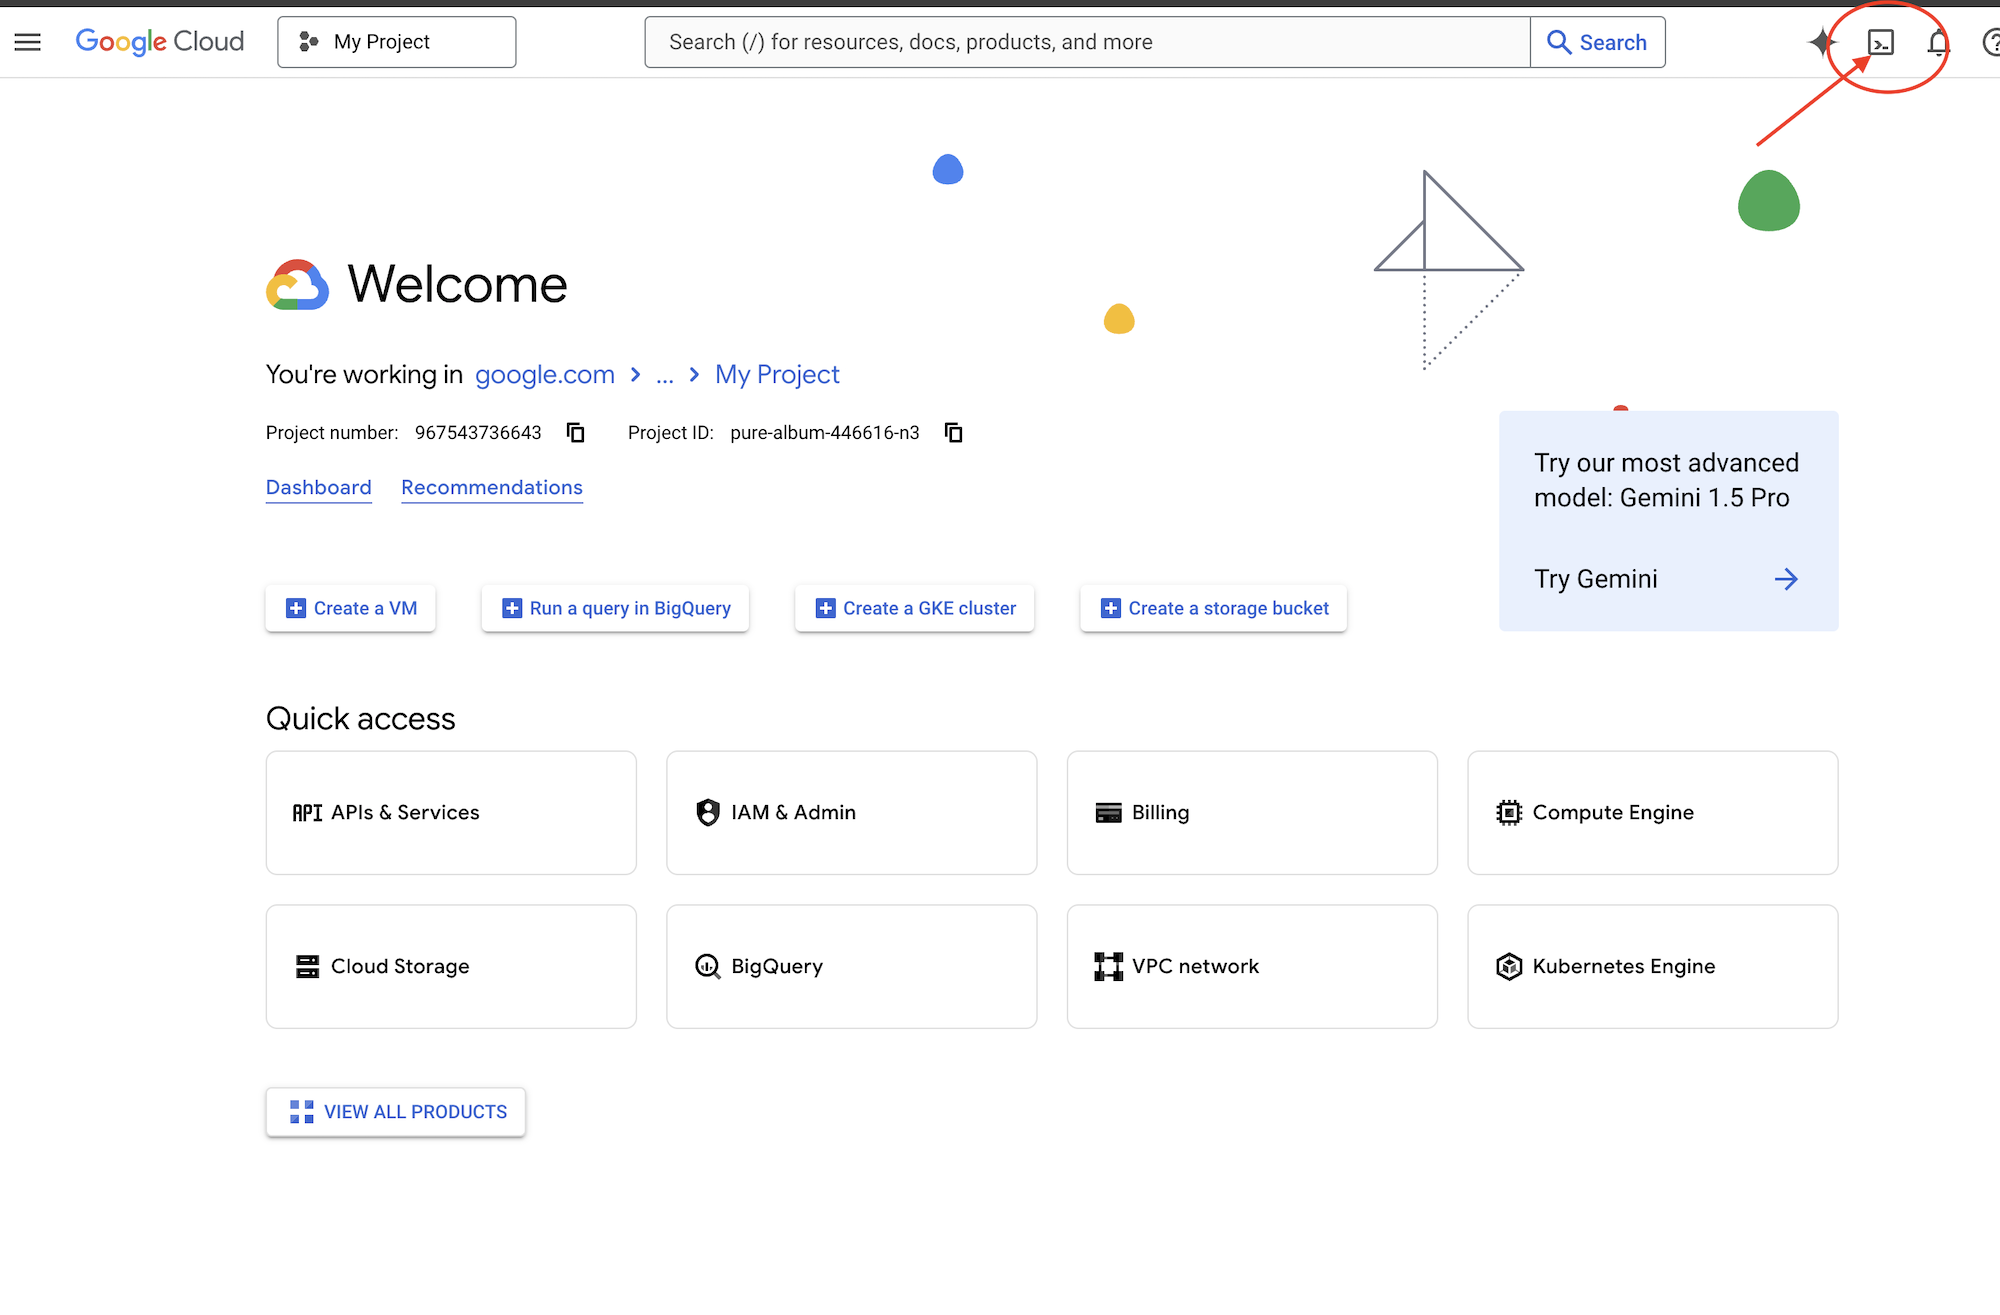
👉 روی گزینهی «فعال کردن پوستهی ابری» در بالای کنسول گوگل کلود کلیک کنید (این آیکون به شکل ترمینال در بالای پنل پوستهی ابری است)، روی دکمهی «باز کردن ویرایشگر » کلیک کنید (شبیه یک پوشهی باز با مداد است). با این کار ویرایشگر کد پوستهی ابری در پنجره باز میشود. یک فایل اکسپلورر در سمت چپ خواهید دید.
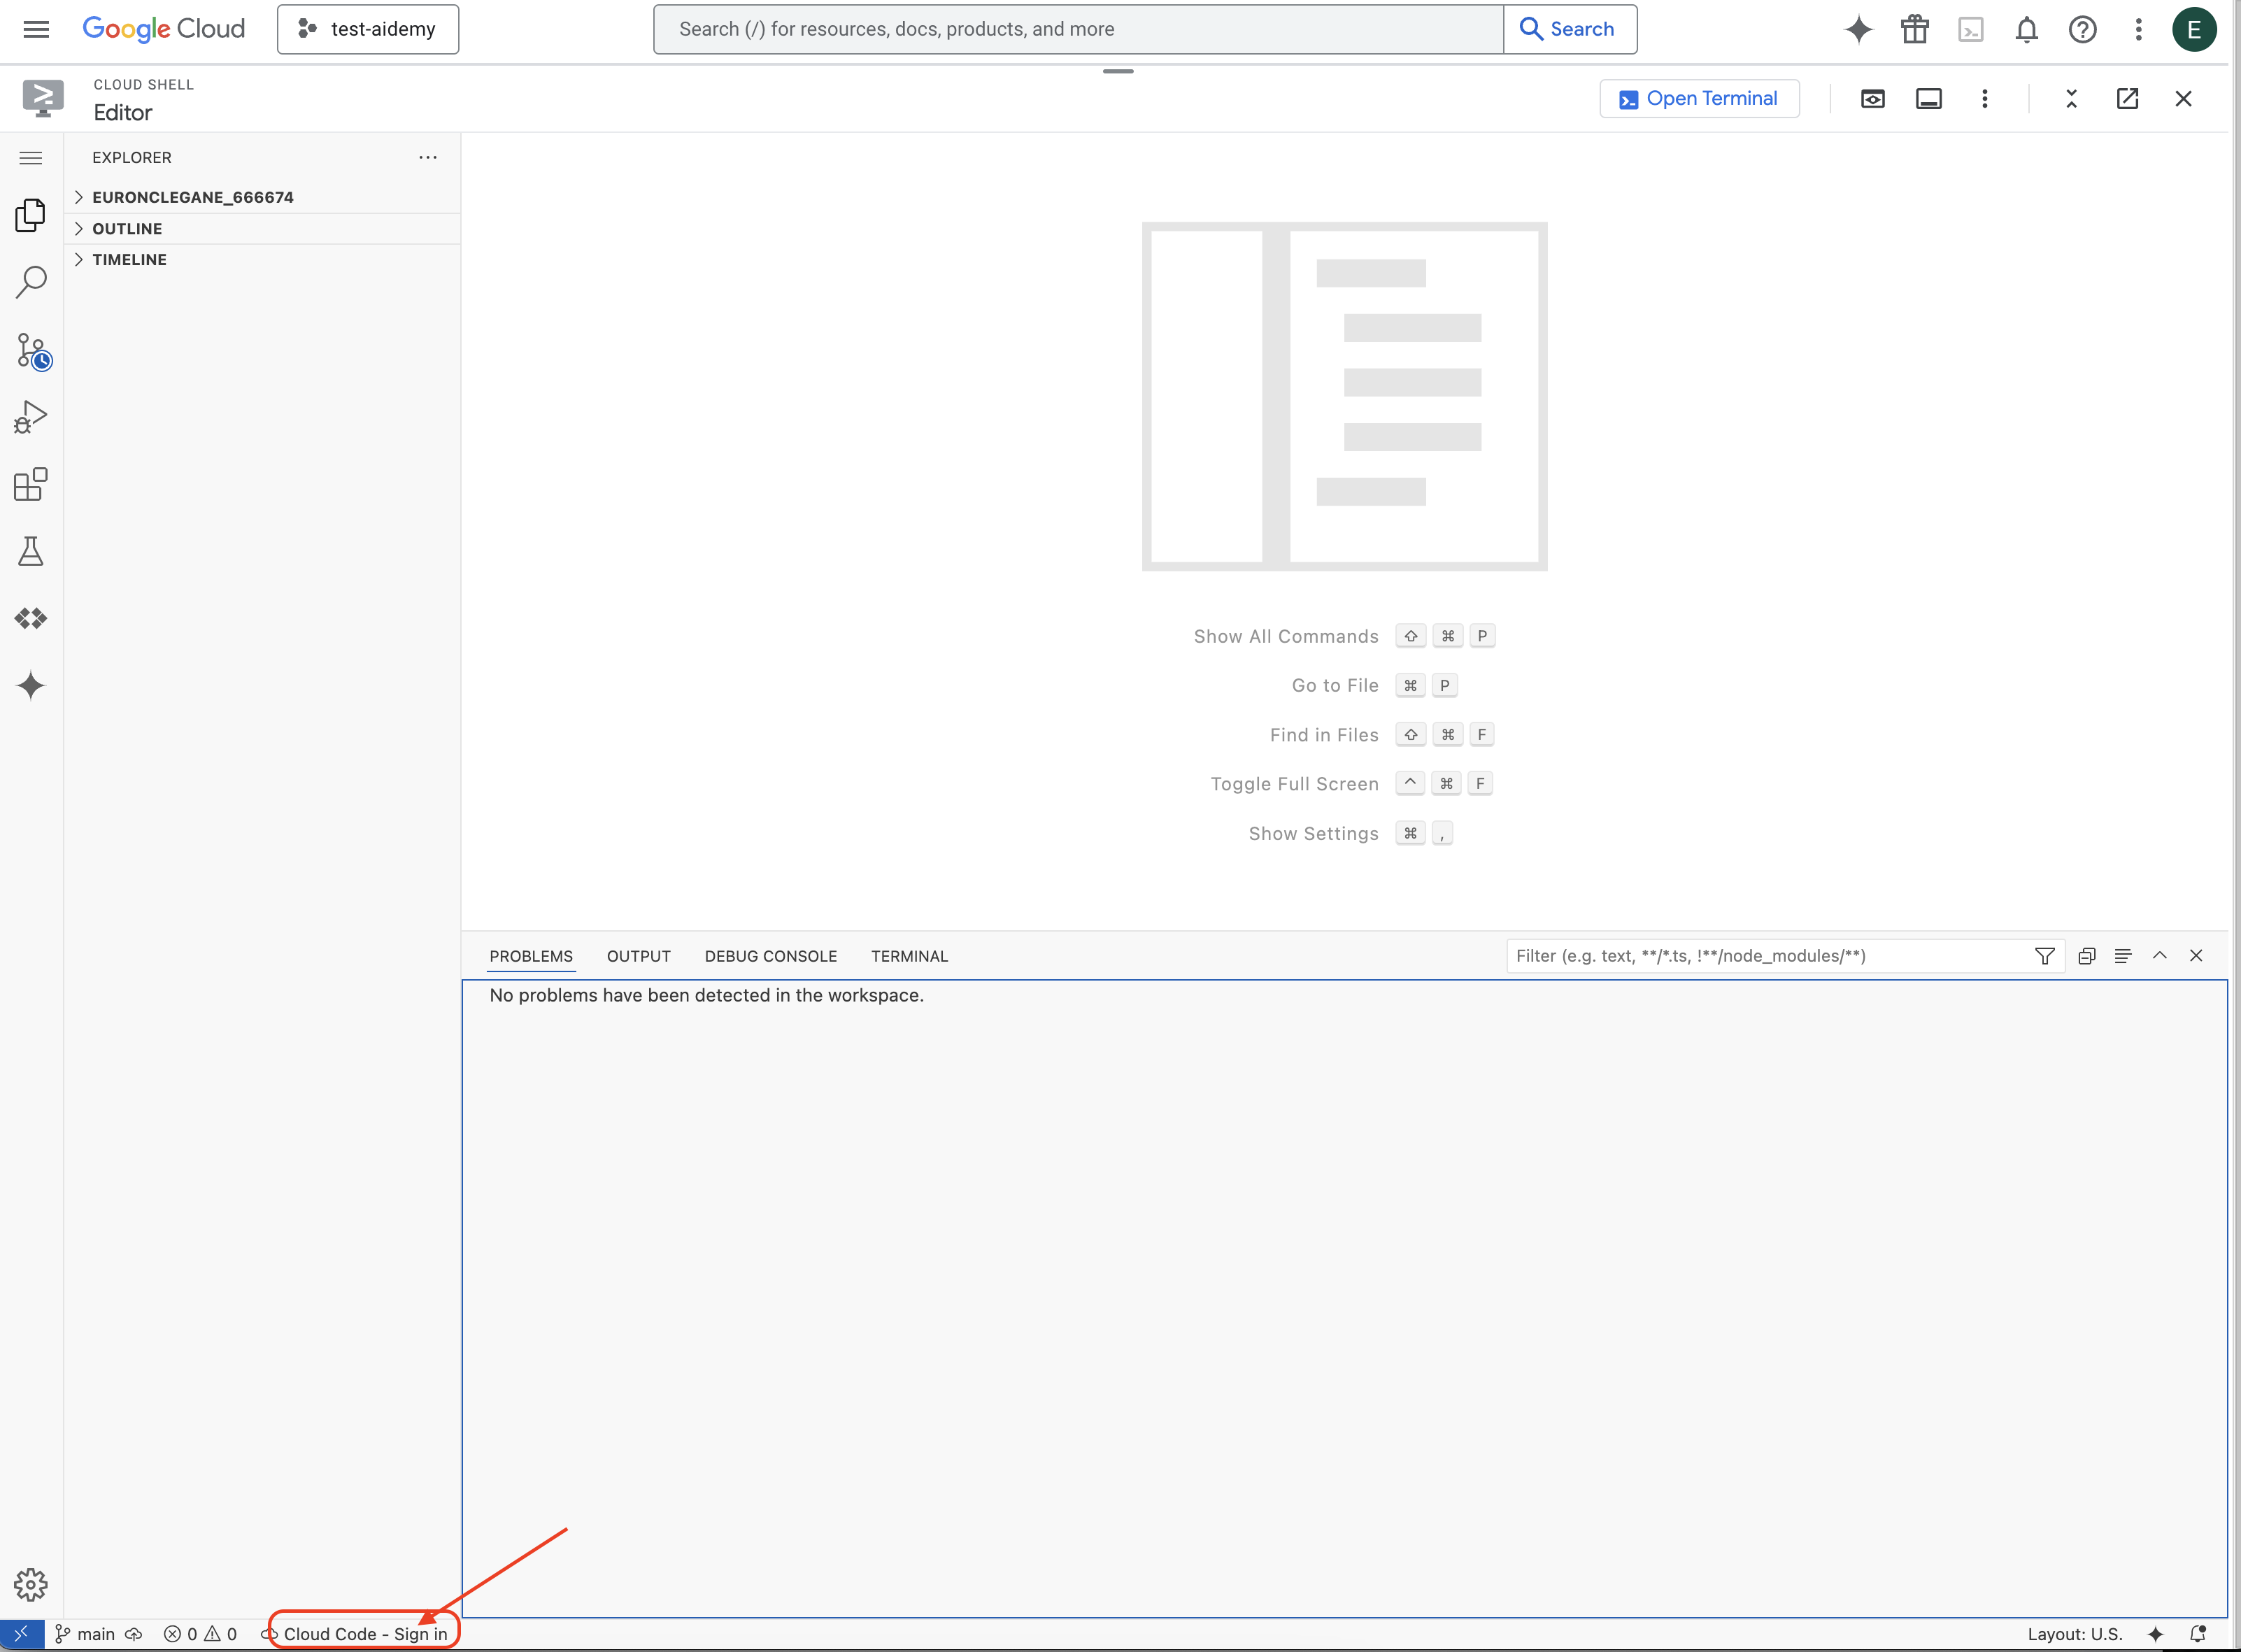
👉 مطابق شکل، روی دکمه ورود به سیستم Cloud Code در نوار وضعیت پایین کلیک کنید. افزونه را طبق دستورالعمل تأیید کنید. اگر عبارت Cloud Code - no project را در نوار وضعیت مشاهده کردید، آن را انتخاب کنید، سپس در منوی کشویی «Select a Google Cloud Project» آن را انتخاب کنید و سپس پروژه Google Cloud خاص را از لیست پروژههایی که ایجاد کردهاید، انتخاب کنید.
👉 ترمینال را در محیط توسعه ابری (cloud IDE) باز کنید، 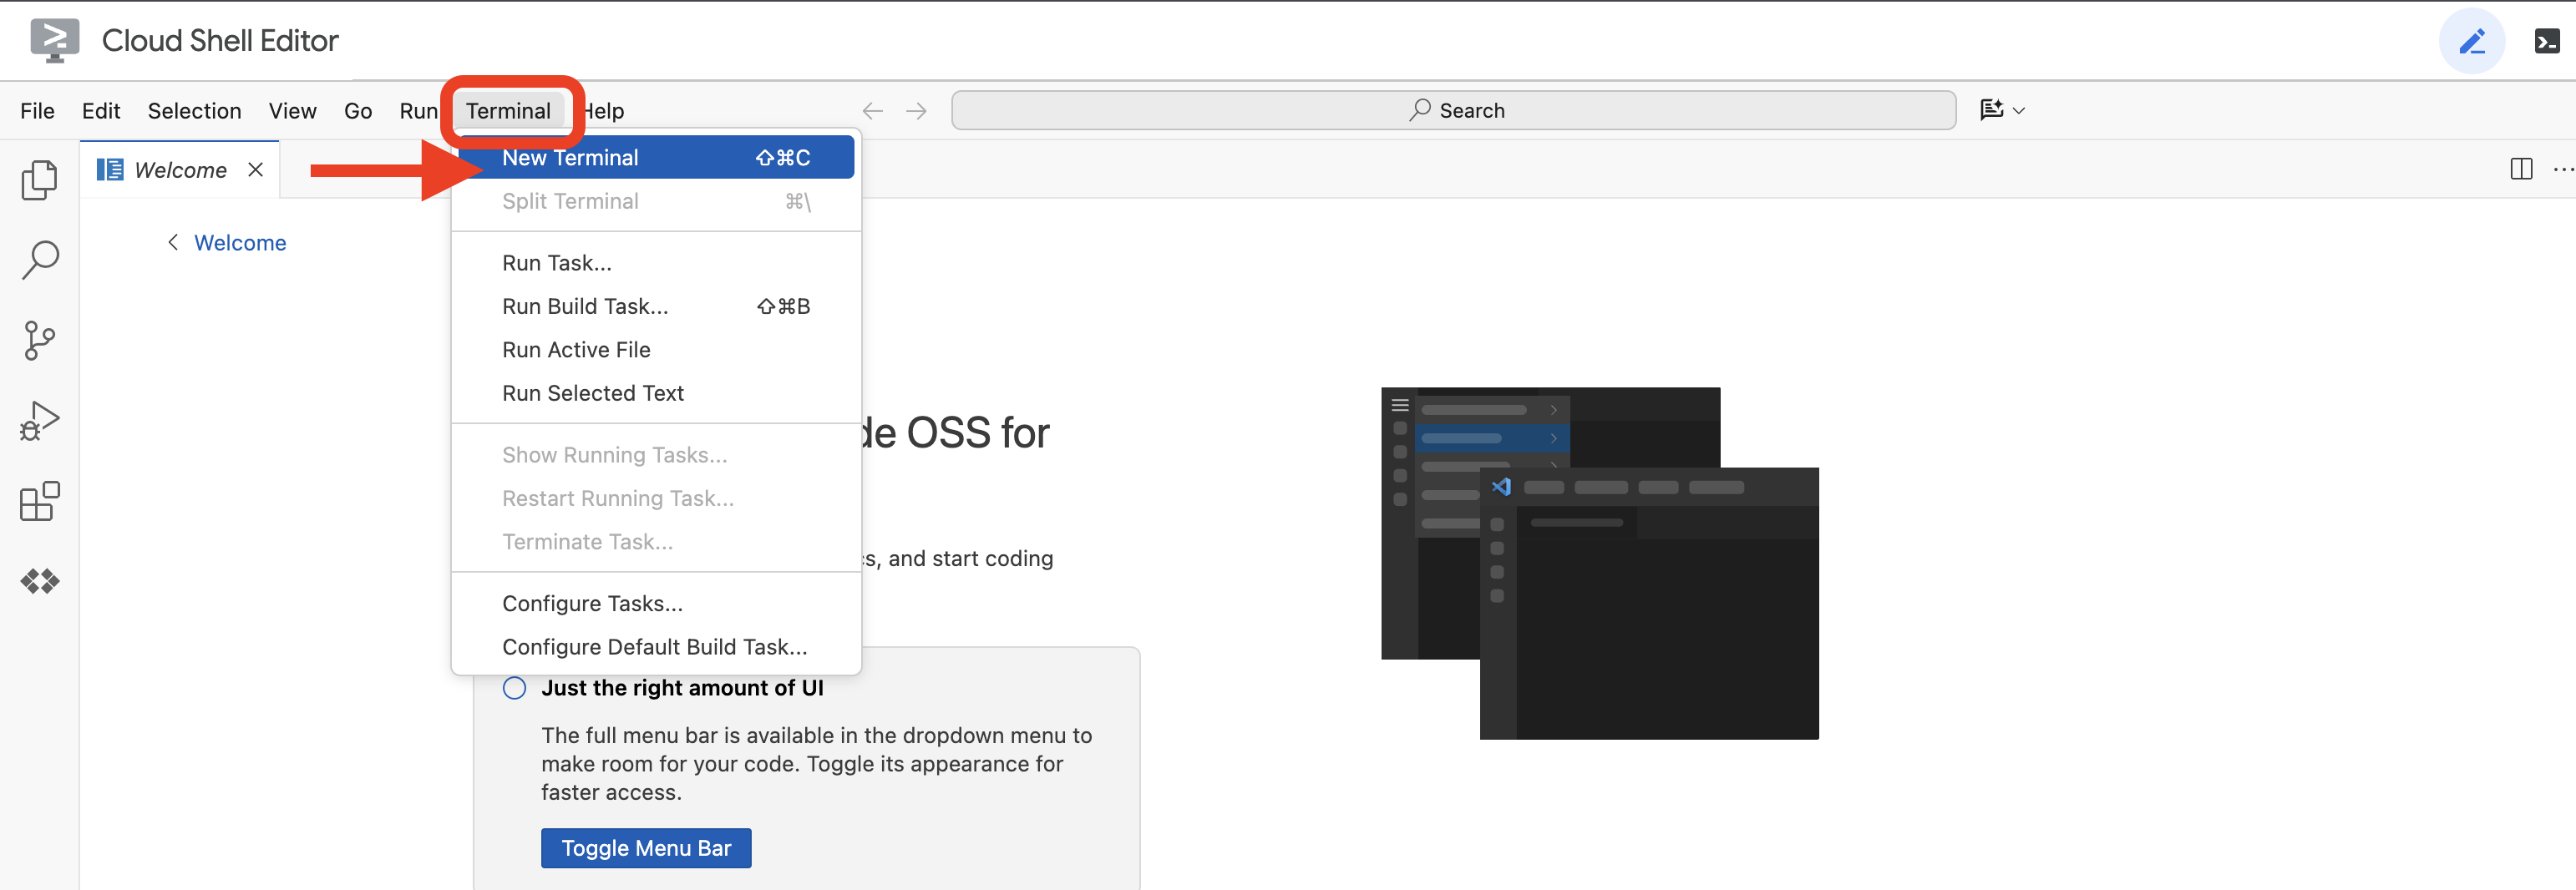 یا
یا 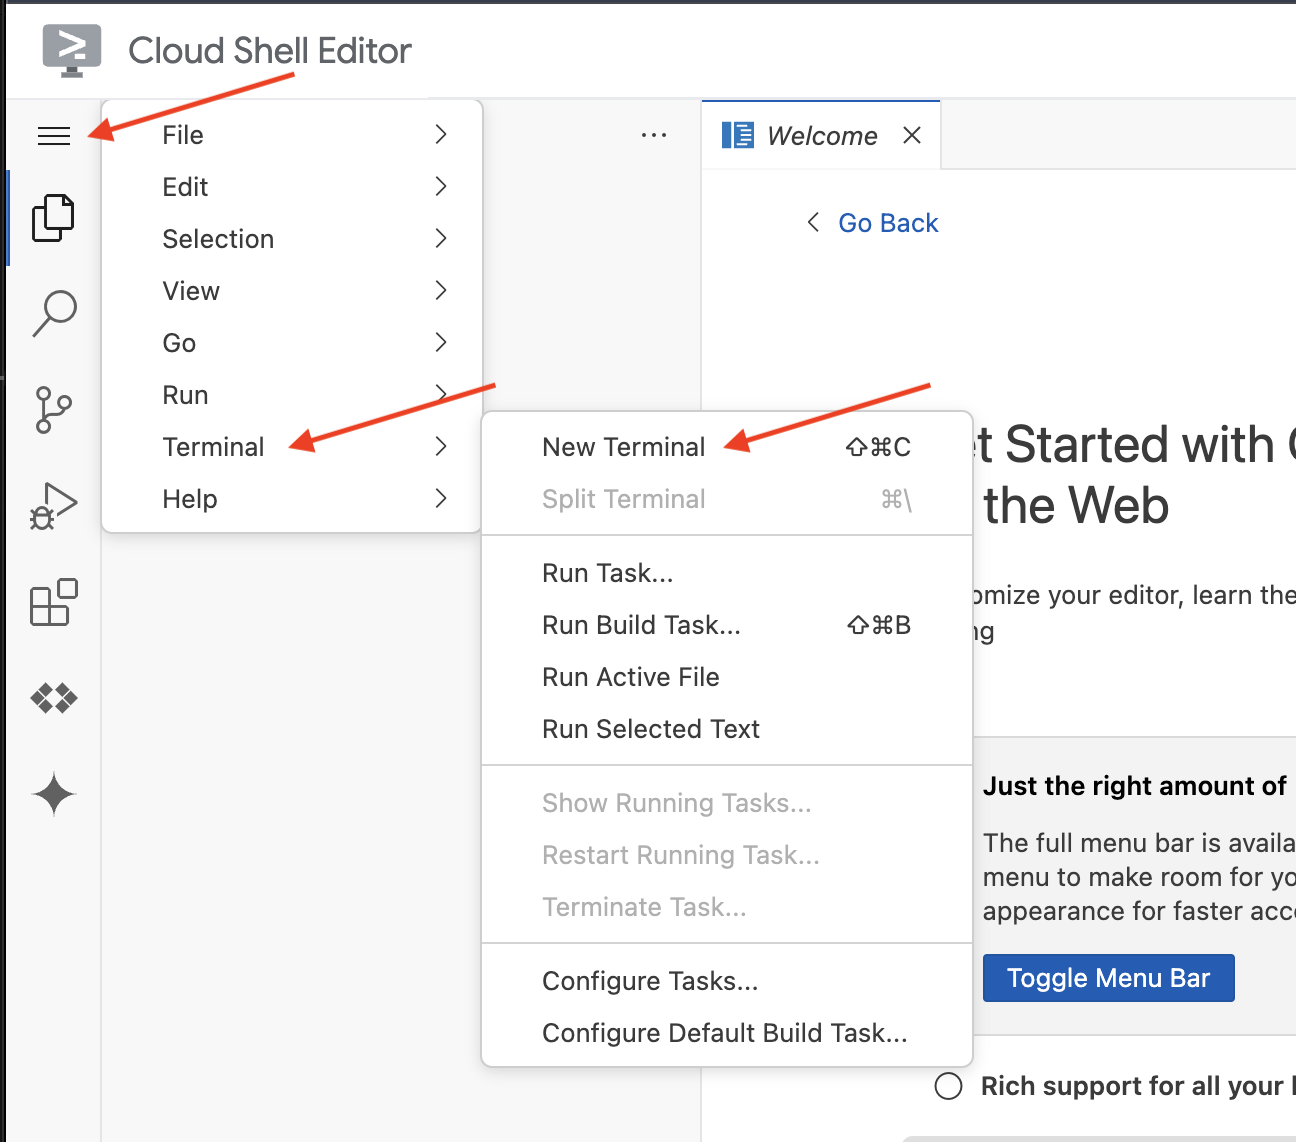
👉 در ترمینال، با استفاده از دستور زیر تأیید کنید که از قبل احراز هویت شدهاید و پروژه روی شناسه پروژه شما تنظیم شده است:
gcloud auth list
👉 و در هنگام اجرا، مطمئن شوید که <YOUR_PROJECT_ID> را با شناسه پروژه خود جایگزین میکنید:
echo <YOUR_PROJECT_ID> > ~/project_id.txt
gcloud config set project $(cat ~/project_id.txt)
👉 دستور زیر را برای فعال کردن API های لازم Google Cloud اجرا کنید:
gcloud services enable compute.googleapis.com  \
                        storage.googleapis.com  \
                        run.googleapis.com  \
                        artifactregistry.googleapis.com  \
                        aiplatform.googleapis.com \
                        eventarc.googleapis.com \
                        sqladmin.googleapis.com \
                        secretmanager.googleapis.com \
                        cloudbuild.googleapis.com \
                        cloudresourcemanager.googleapis.com \
                        cloudfunctions.googleapis.com \
                        cloudaicompanion.googleapis.com
این ممکنه یکی دو دقیقه طول بکشه..
تنظیم مجوز
👉 تنظیم مجوز حساب سرویس. در ترمینال، دستور زیر را اجرا کنید:
gcloud config set project $(cat ~/project_id.txt)
export PROJECT_ID=$(gcloud config get project)
export SERVICE_ACCOUNT_NAME=$(gcloud compute project-info describe --format="value(defaultServiceAccount)")

echo "Here's your SERVICE_ACCOUNT_NAME $SERVICE_ACCOUNT_NAME"
👉 اعطای مجوزها. در ترمینال، دستور زیر را اجرا کنید:
#Cloud Storage (Read/Write):
gcloud projects add-iam-policy-binding $PROJECT_ID \
  --member="serviceAccount:$SERVICE_ACCOUNT_NAME" \
  --role="roles/storage.objectAdmin"

#Pub/Sub (Publish/Receive):
gcloud projects add-iam-policy-binding $PROJECT_ID \
  --member="serviceAccount:$SERVICE_ACCOUNT_NAME" \
  --role="roles/pubsub.publisher"

gcloud projects add-iam-policy-binding $PROJECT_ID \
  --member="serviceAccount:$SERVICE_ACCOUNT_NAME" \
  --role="roles/pubsub.subscriber"


#Cloud SQL (Read/Write):
gcloud projects add-iam-policy-binding $PROJECT_ID \
  --member="serviceAccount:$SERVICE_ACCOUNT_NAME" \
  --role="roles/cloudsql.editor"


#Eventarc (Receive Events):
gcloud projects add-iam-policy-binding $PROJECT_ID \
  --member="serviceAccount:$SERVICE_ACCOUNT_NAME" \
  --role="roles/iam.serviceAccountTokenCreator"

gcloud projects add-iam-policy-binding $PROJECT_ID \
  --member="serviceAccount:$SERVICE_ACCOUNT_NAME" \
  --role="roles/eventarc.eventReceiver"

#Vertex AI (User):
gcloud projects add-iam-policy-binding $PROJECT_ID \
  --member="serviceAccount:$SERVICE_ACCOUNT_NAME" \
  --role="roles/aiplatform.user"

#Secret Manager (Read):
gcloud projects add-iam-policy-binding $PROJECT_ID \
  --member="serviceAccount:$SERVICE_ACCOUNT_NAME" \
  --role="roles/secretmanager.secretAccessor"
👉 نتیجه را در کنسول IAM خود اعتبارسنجی کنید 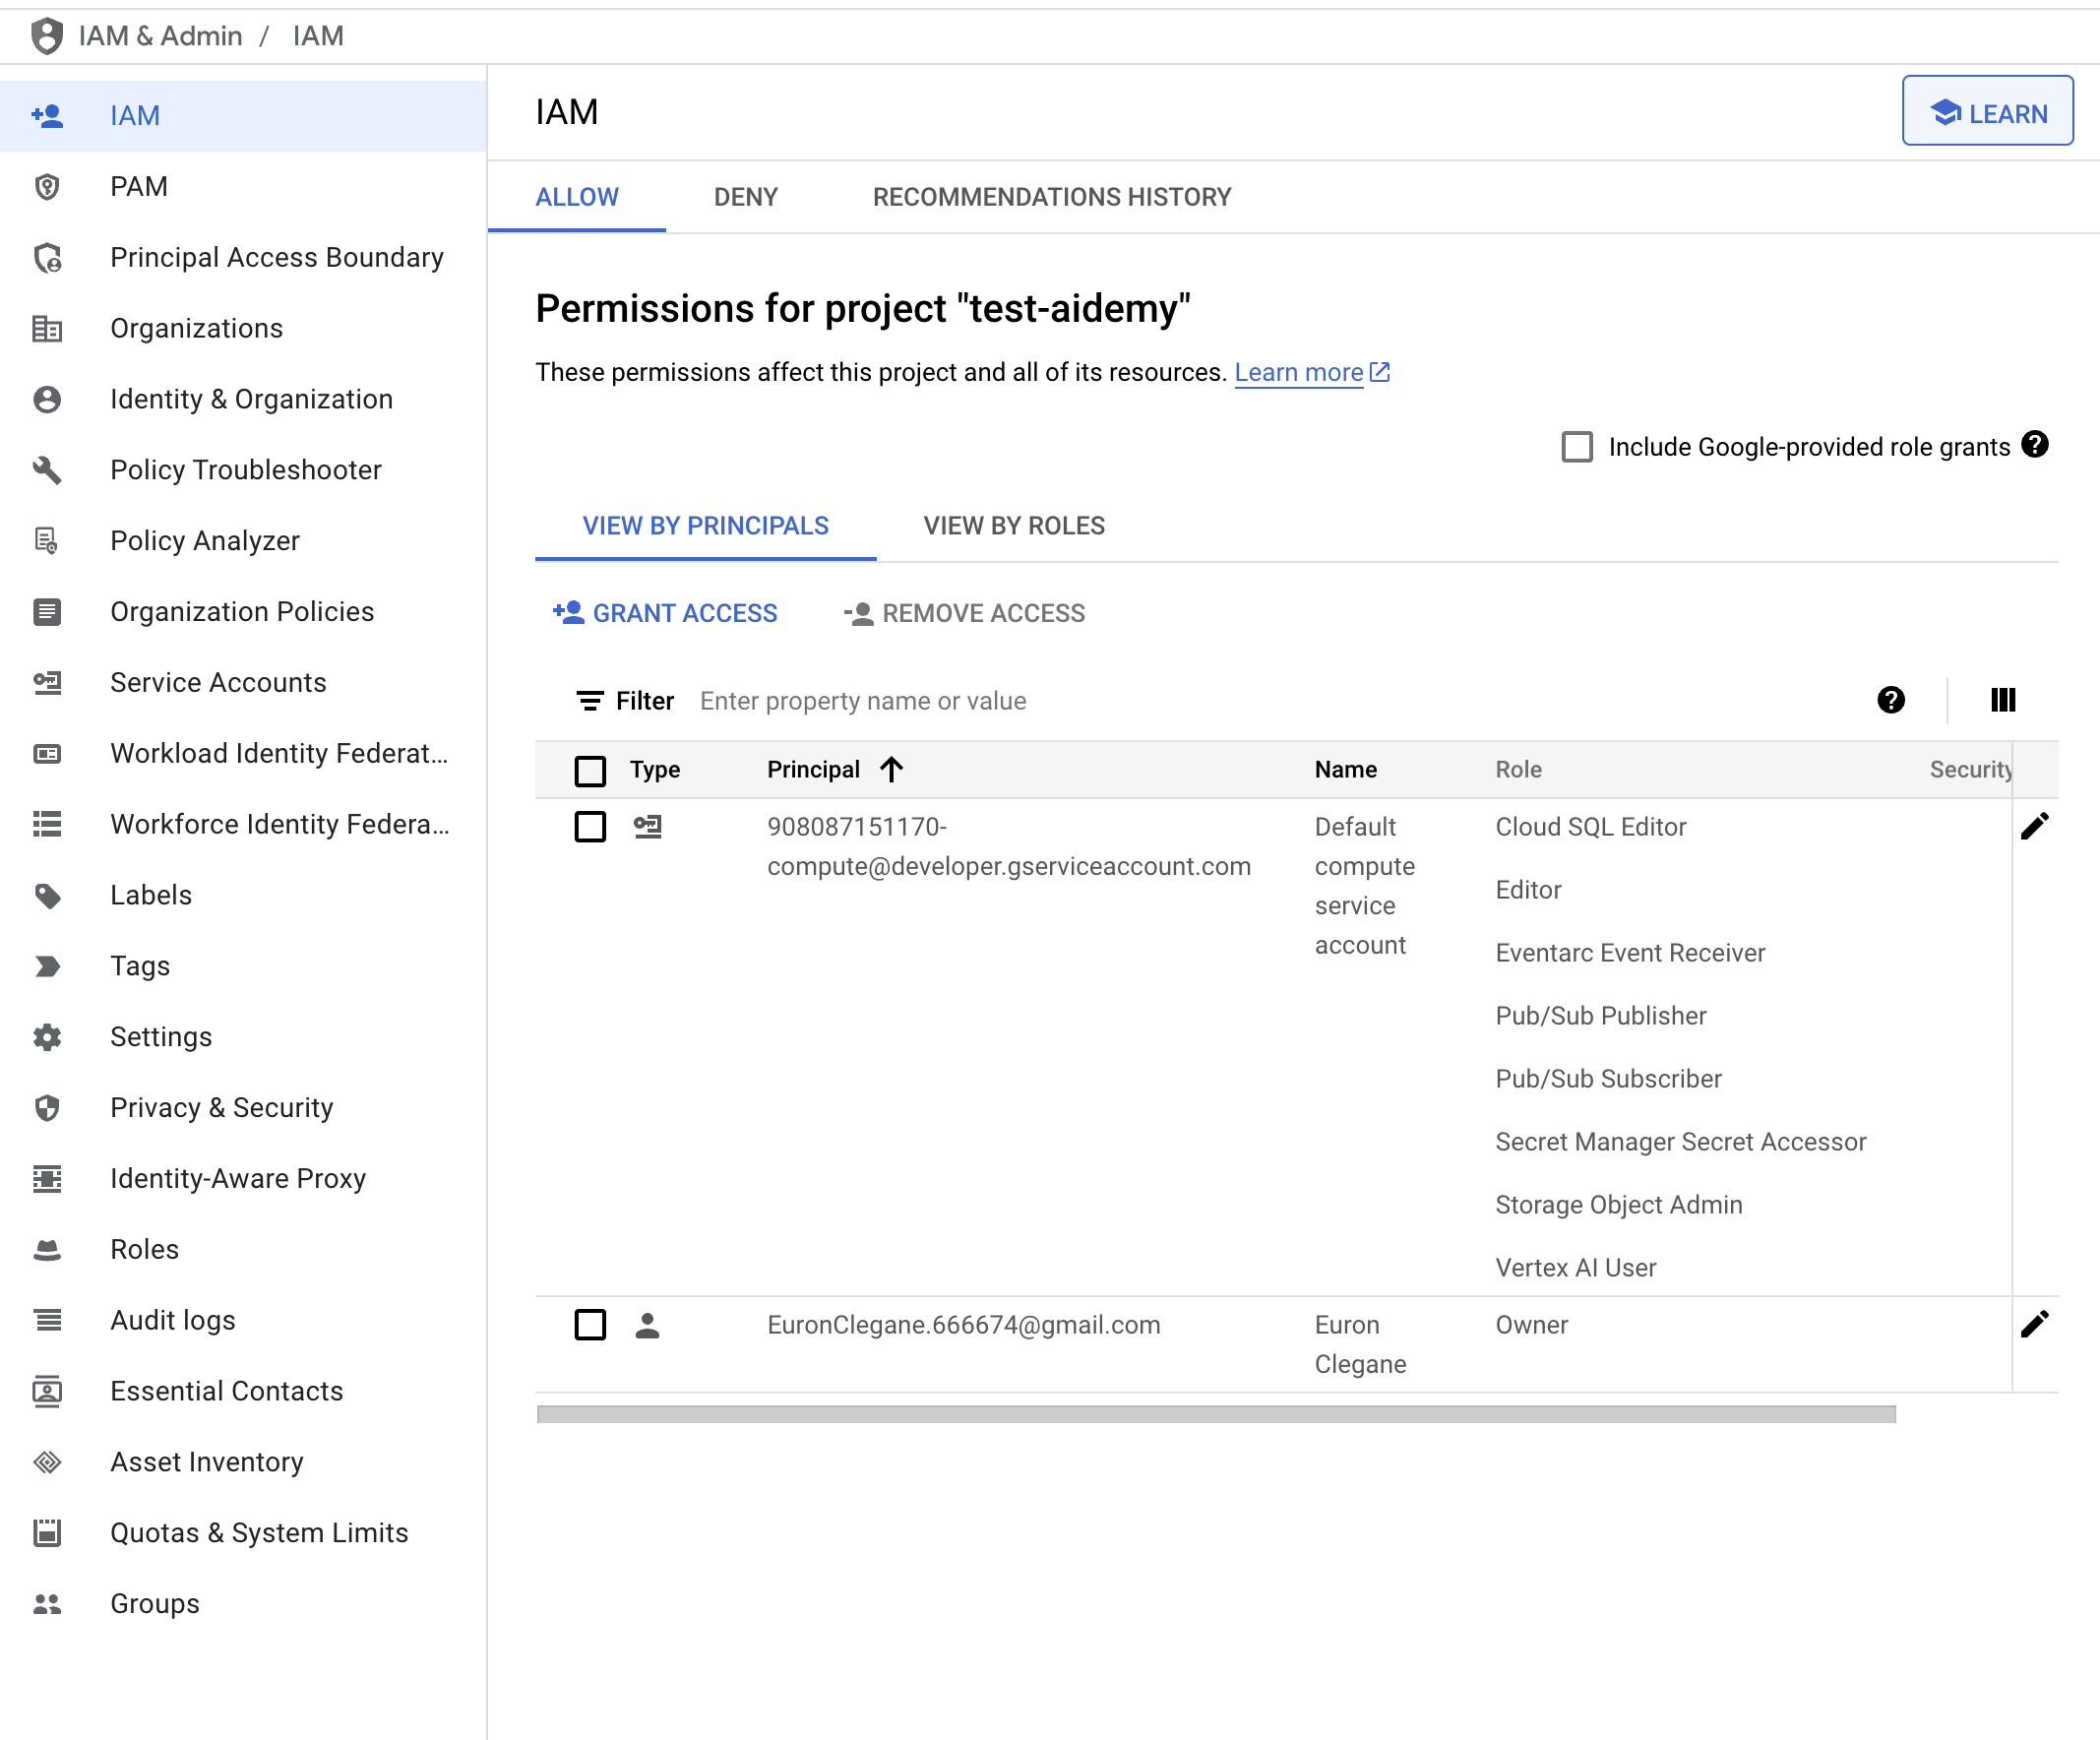
👉 دستورات زیر را در ترمینال اجرا کنید تا یک نمونه Cloud SQL با نام aidemy ایجاد شود. بعداً به آن نیاز خواهیم داشت، اما از آنجایی که این فرآیند ممکن است کمی طول بکشد، اکنون آن را انجام میدهیم.
gcloud sql instances create aidemy \
    --database-version=POSTGRES_14 \
    --cpu=2 \
    --memory=4GB \
    --region=us-central1 \
    --root-password=1234qwer \
    --storage-size=10GB \
    --storage-auto-increase
۴. ساخت اولین عامل
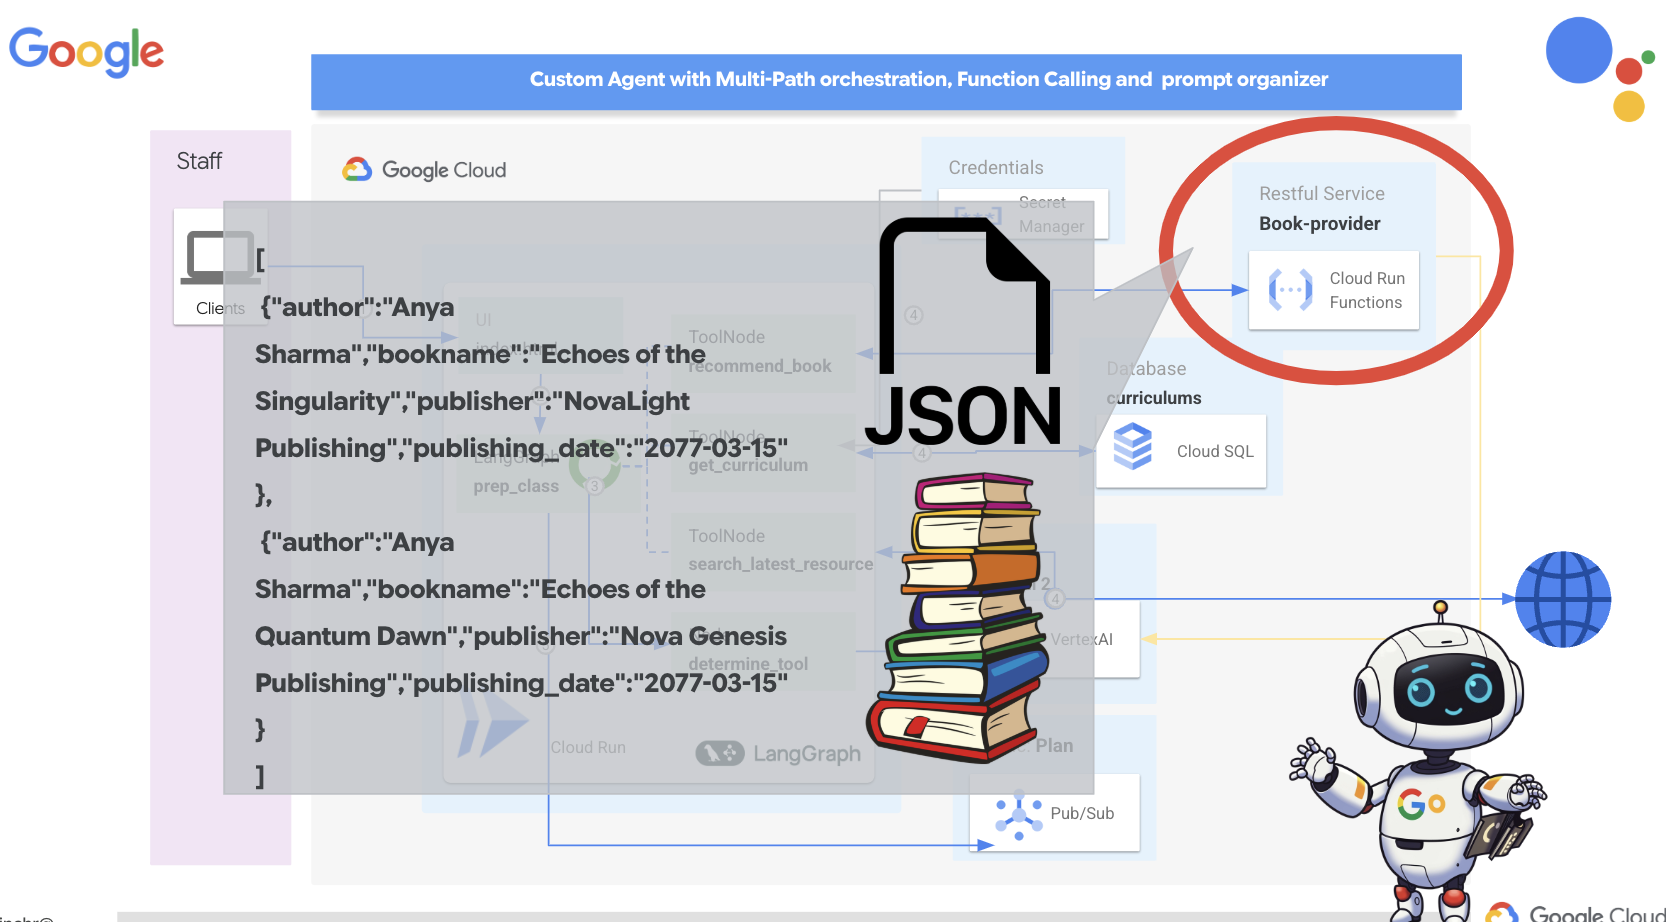
قبل از اینکه به سیستمهای پیچیده چندعاملی بپردازیم، باید یک بلوک سازنده اساسی ایجاد کنیم: یک عامل واحد و کاربردی. در این بخش، اولین گامهای خود را با ایجاد یک عامل ساده "ارائهدهنده کتاب" برمیداریم. عامل ارائهدهنده کتاب یک دسته را به عنوان ورودی میگیرد و از یک Gemini LLM برای تولید یک کتاب با نمایش JSON در آن دسته استفاده میکند. سپس این توصیههای کتاب را به عنوان یک نقطه پایانی REST API ارائه میدهد.
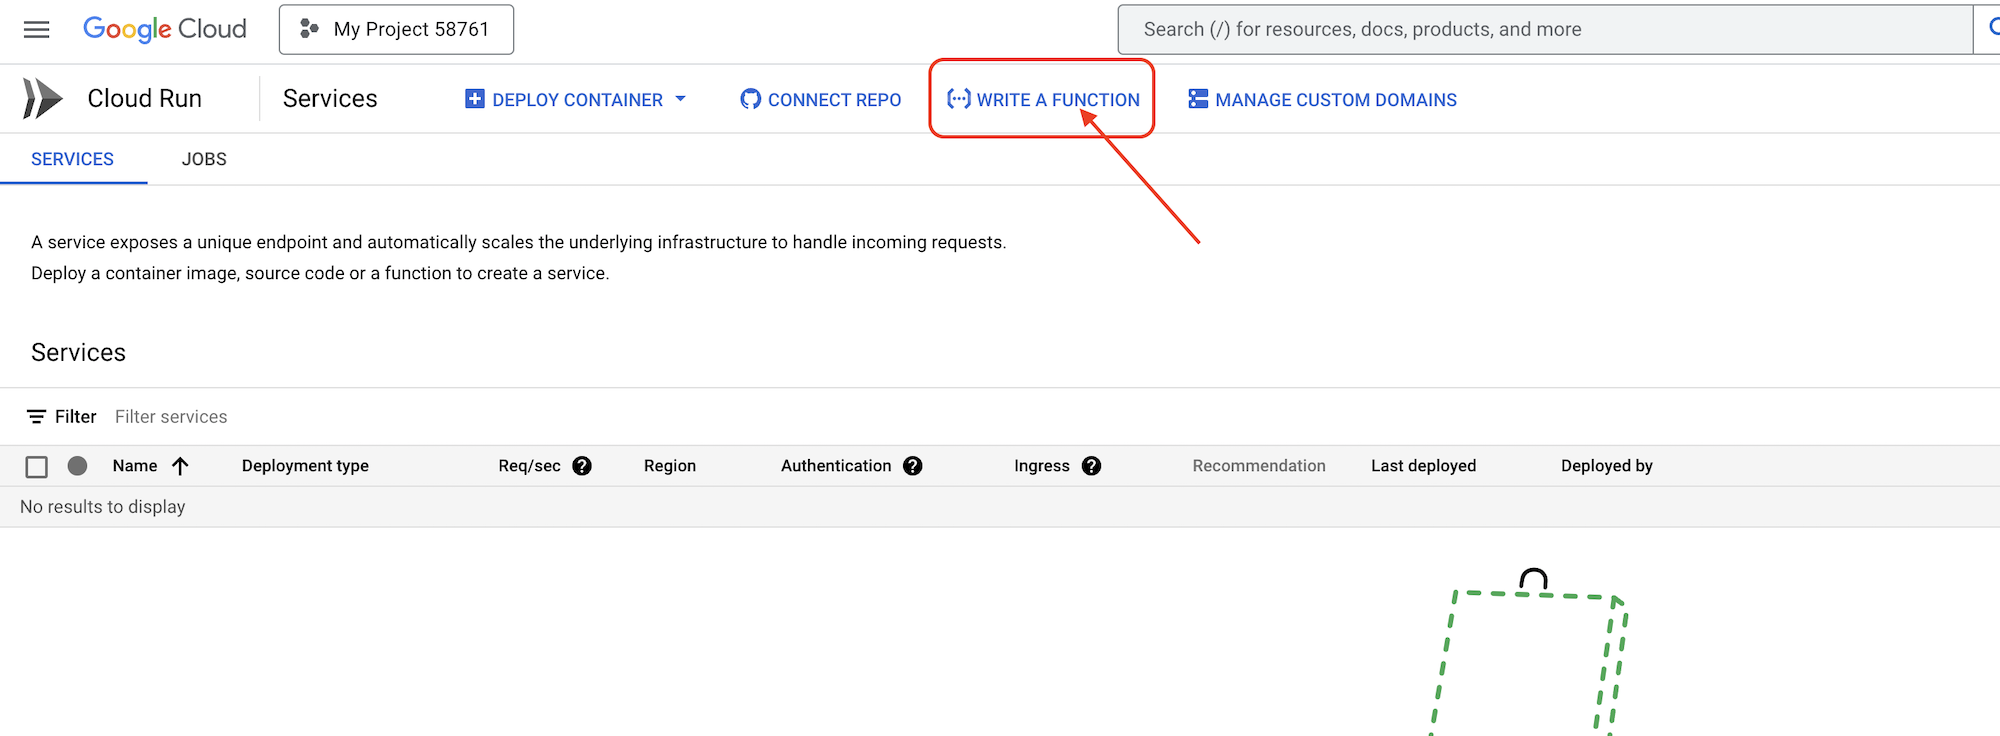
👉 در یک برگه مرورگر دیگر، کنسول ابری گوگل را در مرورگر وب خود باز کنید. در منوی پیمایش (☰)، به «اجرای ابری» بروید. روی دکمه «+ ... نوشتن یک تابع» کلیک کنید.
👉 در مرحله بعد تنظیمات اولیه تابع Cloud Run را پیکربندی خواهیم کرد:
- نام خدمات:
book-provider - منطقه:
us-central1 - زمان اجرا:
Python 3.12 - احراز هویت:
Allow unauthenticated invocationsفعال شوند.
👉 سایر تنظیمات را به صورت پیشفرض رها کنید و روی «ایجاد» کلیک کنید. این کار شما را به ویرایشگر کد منبع میبرد.
فایلهای main.py و requirements.txt از پیش پر شده را مشاهده خواهید کرد.
main.py شامل منطق تجاری تابع و requirements.txt شامل بستههای مورد نیاز خواهد بود.
👉 حالا آمادهایم که کمی کد بنویسیم! اما قبل از شروع، ببینیم آیا Gemini Code Assist میتواند شروع خوبی برای ما باشد یا نه. به ویرایشگر Cloud Shell برگردید ، روی آیکون Gemini Code Assist که در بالا قرار دارد کلیک کنید، باید چت Gemini Code Assist باز شود.
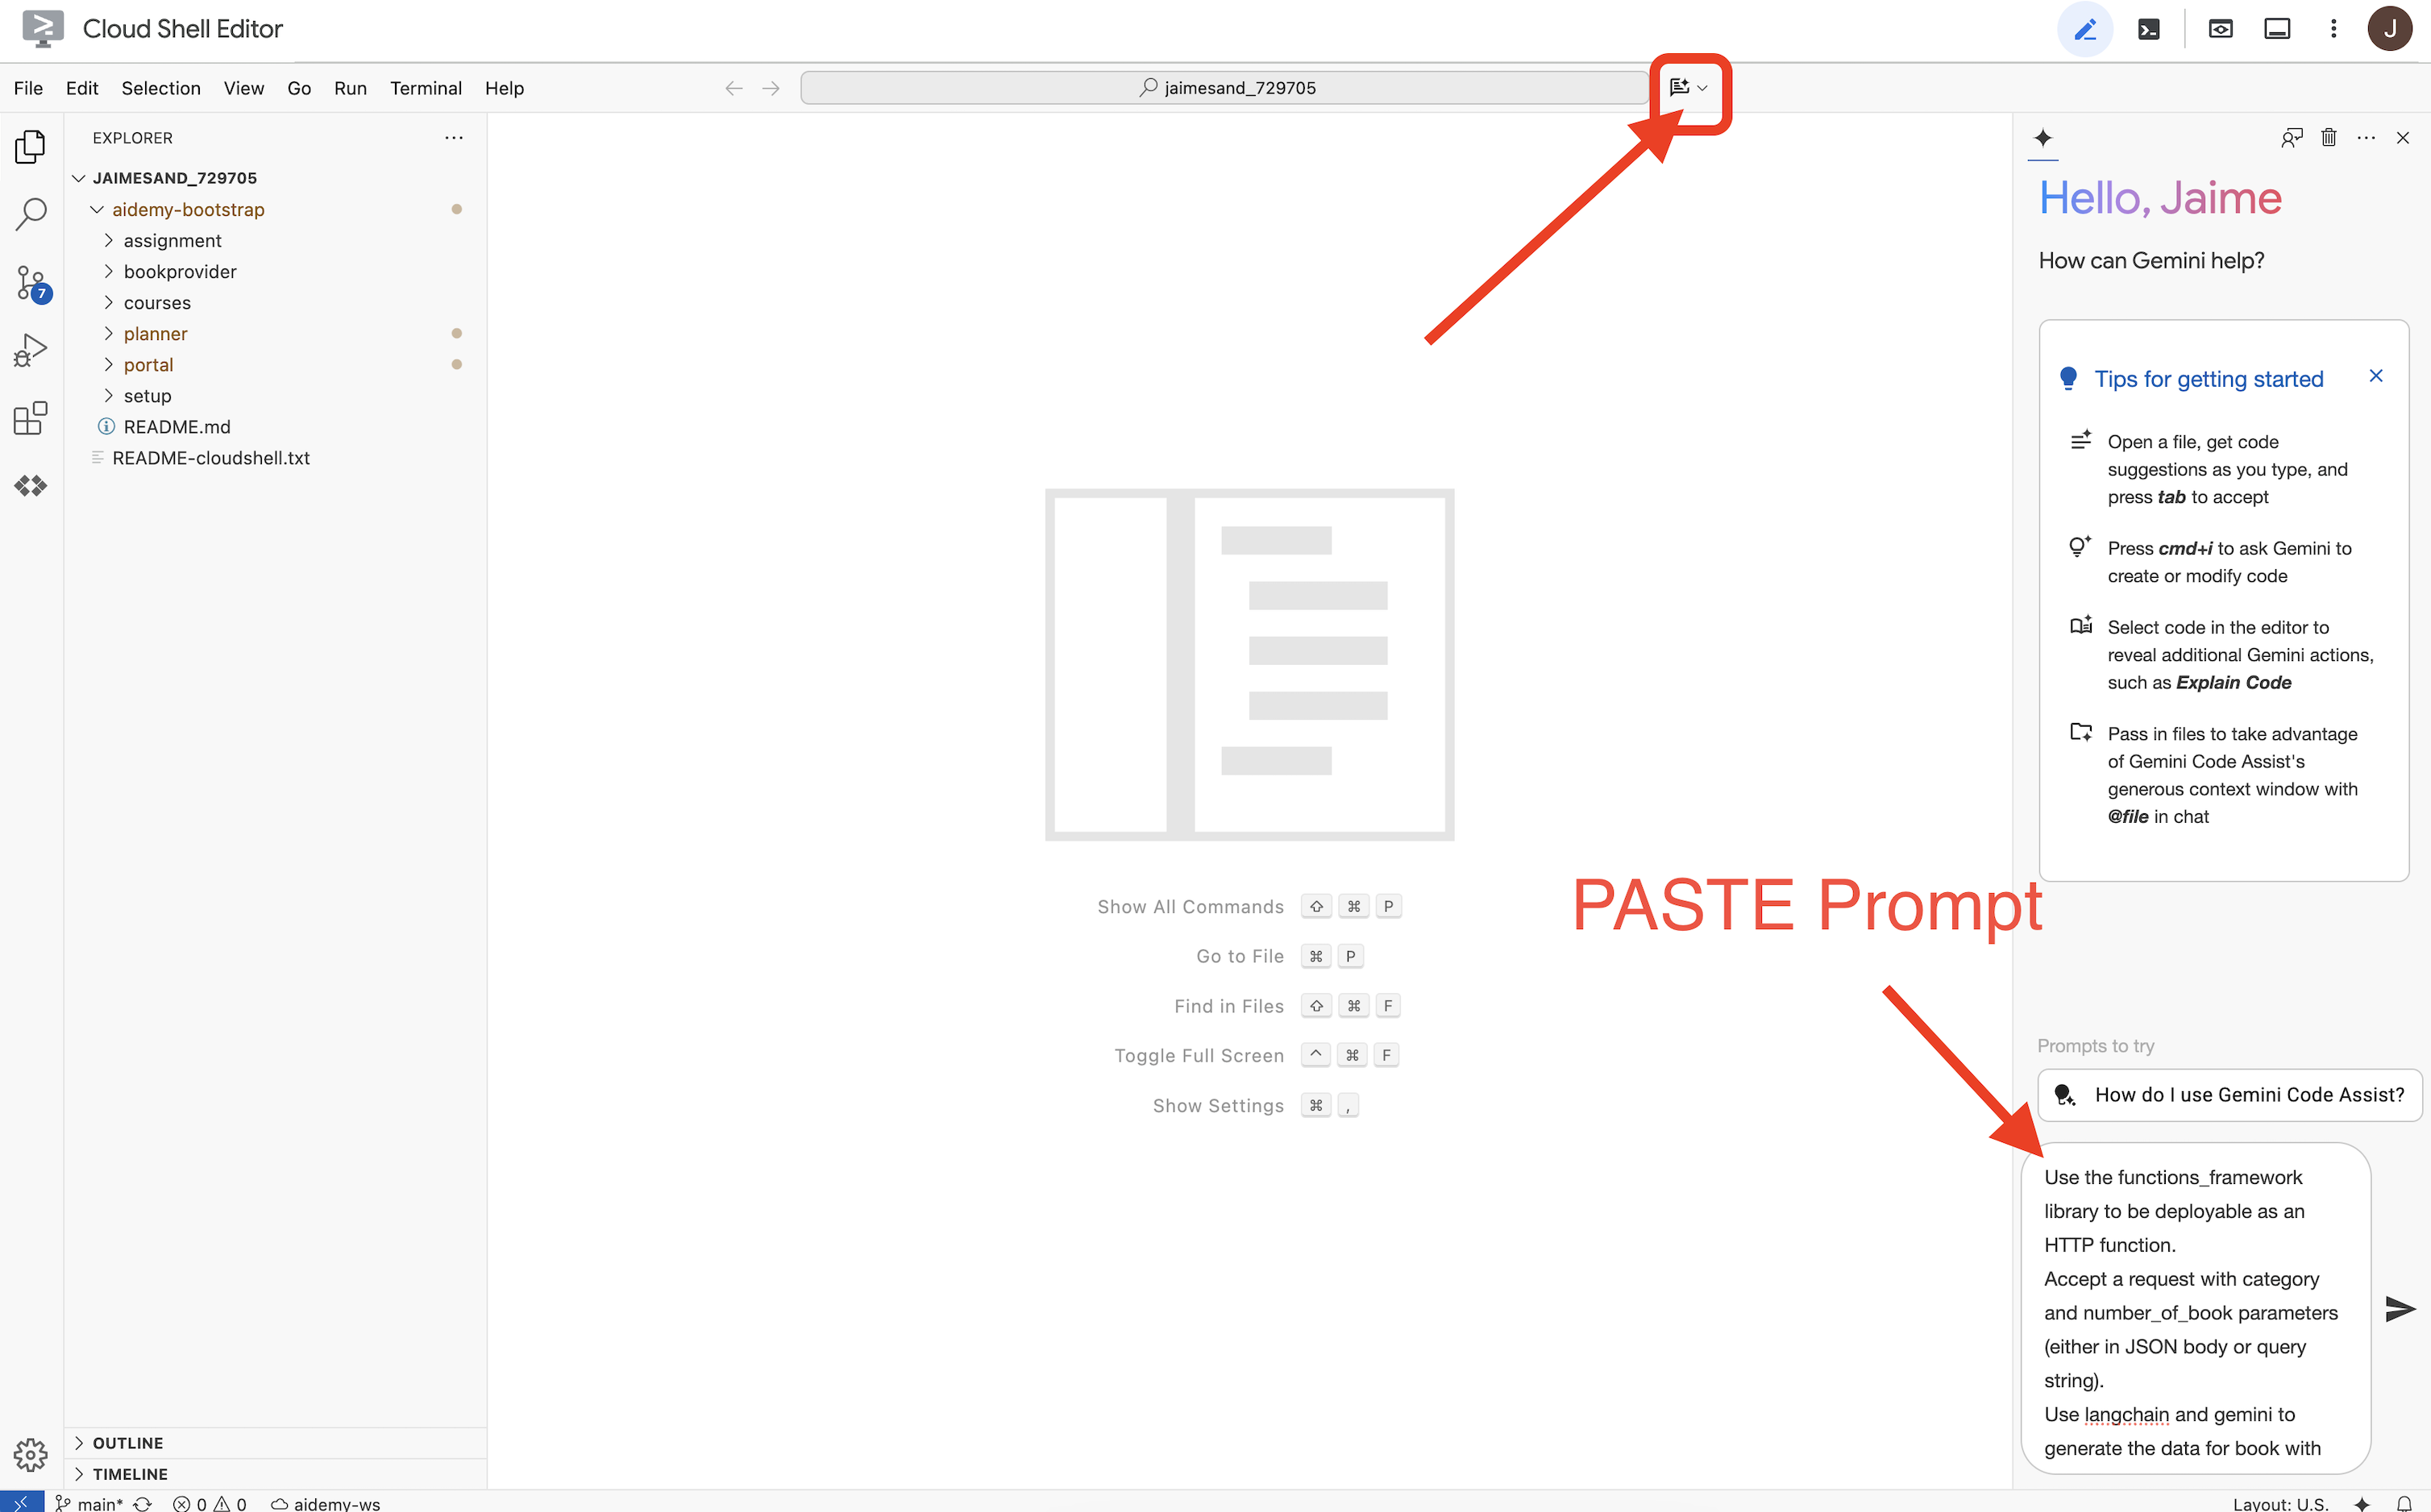
👉 درخواست زیر را در کادر اعلان وارد کنید:
Use the functions_framework library to be deployable as an HTTP function.
Accept a request with category and number_of_book parameters (either in JSON body or query string).
Use langchain and gemini to generate the data for book with fields bookname, author, publisher, publishing_date.
Use pydantic to define a Book model with the fields: bookname (string, description: "Name of the book"), author (string, description: "Name of the author"), publisher (string, description: "Name of the publisher"), and publishing_date (string, description: "Date of publishing").
Use langchain and gemini model to generate book data. the output should follow the format defined in Book model.

The logic should use JsonOutputParser from langchain to enforce output format defined in Book Model.
Have a function get_recommended_books(category) that internally uses langchain and gemini to return a single book object.
The main function, exposed as the Cloud Function, should call get_recommended_books() multiple times (based on number_of_book) and return a JSON list of the generated book objects.
Handle the case where category or number_of_book are missing by returning an error JSON response with a 400 status code.
return a JSON string representing the recommended books. use os library to retrieve GOOGLE_CLOUD_PROJECT env var. Use ChatVertexAI from langchain for the LLM call
سپس Code Assist یک راهحل بالقوه ایجاد میکند و هم کد منبع و هم فایل وابستگی requirements.txt را ارائه میدهد. (از این کد استفاده نکنید)
ما شما را تشویق میکنیم که کد تولید شده توسط Code Assist را با راهحل آزمایششده و صحیح ارائه شده در زیر مقایسه کنید. این به شما امکان میدهد تا اثربخشی ابزار را ارزیابی کرده و هرگونه اختلاف احتمالی را شناسایی کنید. در حالی که هرگز نباید کورکورانه به LLMها اعتماد کرد، Code Assist میتواند ابزاری عالی برای نمونهسازی سریع و تولید ساختارهای اولیه کد باشد و باید برای شروع خوب استفاده شود.
از آنجایی که این یک کارگاه آموزشی است، ما با کد تأیید شده ارائه شده در زیر پیش خواهیم رفت. با این حال، میتوانید در زمان خودتان با کد تولید شده توسط Code Assist آزمایش کنید تا درک عمیقتری از قابلیتها و محدودیتهای آن به دست آورید.
👉 به ویرایشگر کد منبع تابع Cloud Run (در تب دیگر مرورگر) برگردید. محتوای موجود main.py را با کد ارائه شده در زیر با دقت جایگزین کنید:
import functions_framework
import json
from flask import Flask, jsonify, request
from langchain_google_vertexai import ChatVertexAI
from langchain_core.output_parsers import JsonOutputParser
from langchain_core.prompts import PromptTemplate
from pydantic import BaseModel, Field
import os

class Book(BaseModel):
    bookname: str = Field(description="Name of the book")
    author: str = Field(description="Name of the author")
    publisher: str = Field(description="Name of the publisher")
    publishing_date: str = Field(description="Date of publishing")


project_id = os.environ.get("GOOGLE_CLOUD_PROJECT")

llm = ChatVertexAI(model_name="gemini-2.0-flash-lite-001")

def get_recommended_books(category):
    """
    A simple book recommendation function.

    Args:
        category (str): category

    Returns:
        str: A JSON string representing the recommended books.
    """
    parser = JsonOutputParser(pydantic_object=Book)
    question = f"Generate a random made up book on {category} with bookname, author and publisher and publishing_date"

    prompt = PromptTemplate(
        template="Answer the user query.\n{format_instructions}\n{query}\n",
        input_variables=["query"],
        partial_variables={"format_instructions": parser.get_format_instructions()},
    )

    chain = prompt | llm | parser
    response = chain.invoke({"query": question})

    return  json.dumps(response)


@functions_framework.http
def recommended(request):
    request_json = request.get_json(silent=True) # Get JSON data
    if request_json and 'category' in request_json and 'number_of_book' in request_json:
        category = request_json['category']
        number_of_book = int(request_json['number_of_book'])
    elif request.args and 'category' in request.args and 'number_of_book' in request.args:
        category = request.args.get('category')
        number_of_book = int(request.args.get('number_of_book'))

    else:
        return jsonify({'error': 'Missing category or number_of_book parameters'}), 400


    recommendations_list = []
    for i in range(number_of_book):
        book_dict = json.loads(get_recommended_books(category))
        print(f"book_dict=======>{book_dict}")

        recommendations_list.append(book_dict)


    return jsonify(recommendations_list)
👉 محتویات requirements.txt را با موارد زیر جایگزین کنید:
functions-framework==3.*
google-genai==1.0.0
flask==3.1.0
jsonify==0.5
langchain_google_vertexai==2.0.13
langchain_core==0.3.34
pydantic==2.10.5
👉 نقطه ورود تابع را تنظیم میکنیم: recommended
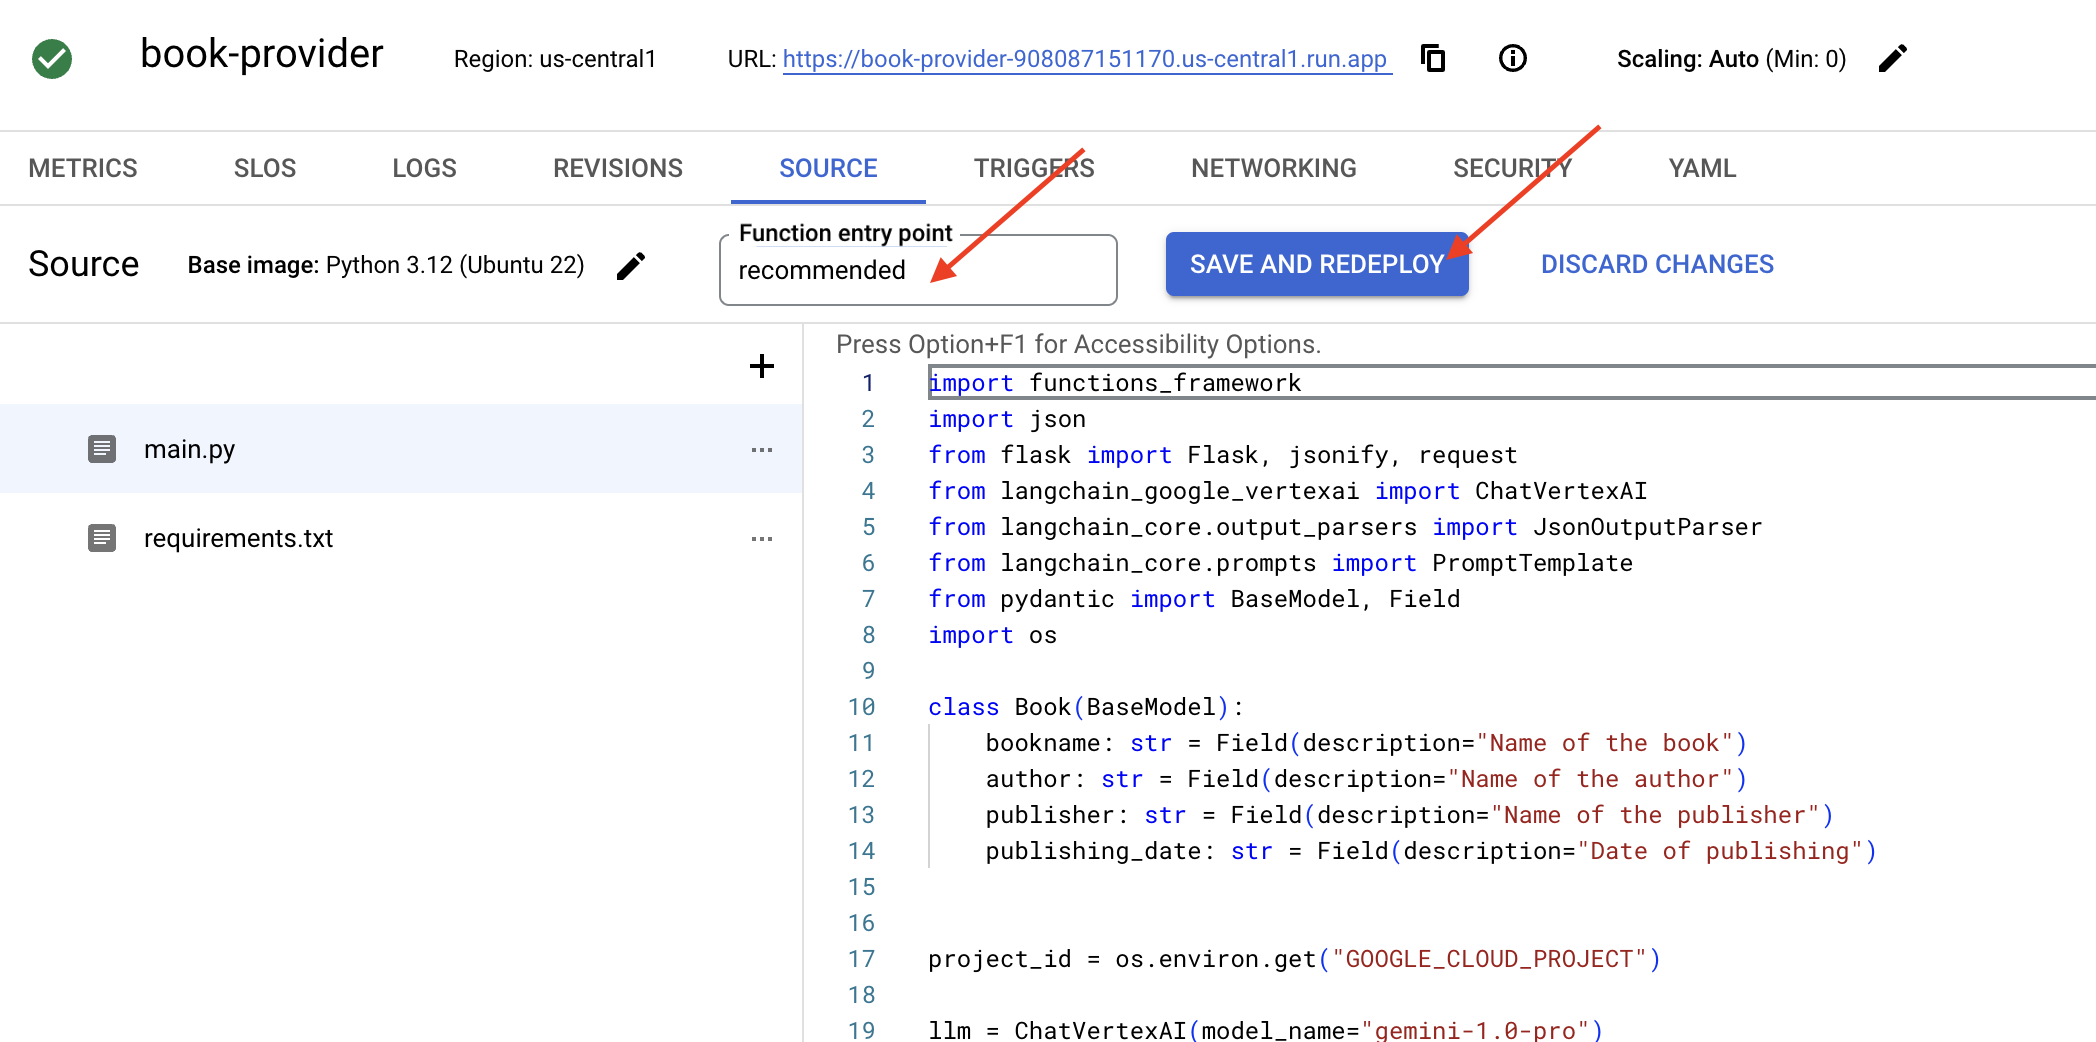
👉 برای استقرار تابع ، روی ذخیره و استقرار (یا ذخیره و استقرار مجدد ) کلیک کنید. منتظر بمانید تا فرآیند استقرار کامل شود. کنسول ابری وضعیت را نمایش میدهد. این ممکن است چند دقیقه طول بکشد.
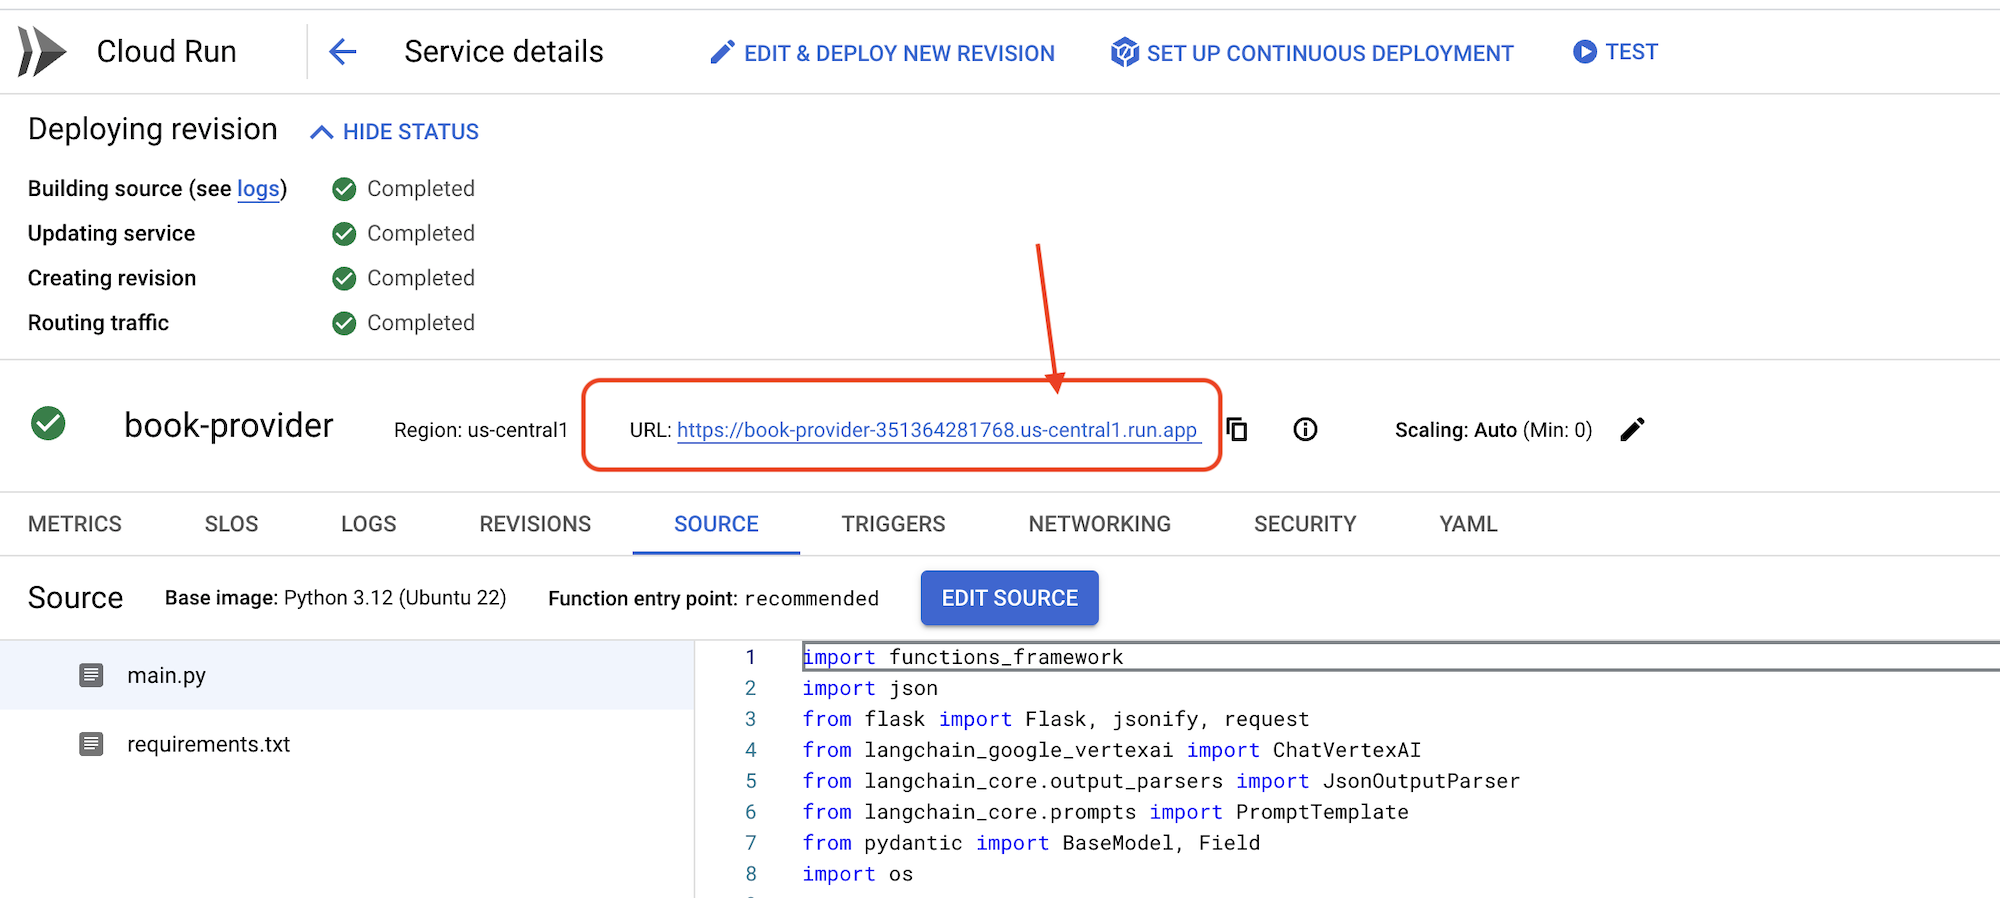 👉 پس از استقرار، به ویرایشگر پوسته ابری برگردید و در ترمینال دستور زیر را اجرا کنید:
gcloud config set project $(cat ~/project_id.txt)
export PROJECT_ID=$(gcloud config get project)
export BOOK_PROVIDER_URL=$(gcloud run services describe book-provider --region=us-central1 --project=$PROJECT_ID --format="value(status.url)")

curl -X POST -H "Content-Type: application/json" -d '{"category": "Science Fiction", "number_of_book": 2}' $BOOK_PROVIDER_URL
باید دادههای مربوط به کتاب را در قالب JSON نشان دهد.
[
  {"author":"Anya Sharma","bookname":"Echoes of the Singularity","publisher":"NovaLight Publishing","publishing_date":"2077-03-15"},
  {"author":"Anya Sharma","bookname":"Echoes of the Quantum Dawn","publisher":"Nova Genesis Publishing","publishing_date":"2077-03-15"}
]
تبریک! شما با موفقیت یک تابع Cloud Run را مستقر کردید. این یکی از سرویسهایی است که ما هنگام توسعه عامل Aidemy خود ادغام خواهیم کرد.
۵. ساخت ابزارها: اتصال عاملها به سرویس و دادههای RESTFUL
بیایید ادامه دهیم و پروژه Bootstrap Skeleton را دانلود کنیم، مطمئن شوید که در ویرایشگر Cloud Shell هستید. در ترمینال، دستور زیر را اجرا کنید:
git clone https://github.com/weimeilin79/aidemy-bootstrap.git
پس از اجرای این دستور، یک پوشه جدید با نام aidemy-bootstrap در محیط Cloud Shell شما ایجاد خواهد شد.
در پنجره اکسپلورر ویرایشگر Cloud Shell (معمولاً در سمت چپ)، اکنون باید پوشهای را که هنگام کلون کردن مخزن Git aidemy-bootstrap ایجاد شده است، ببینید. پوشه ریشه پروژه خود را در اکسپلورر باز کنید. یک زیرپوشه planner درون آن خواهید یافت، آن را نیز باز کنید. 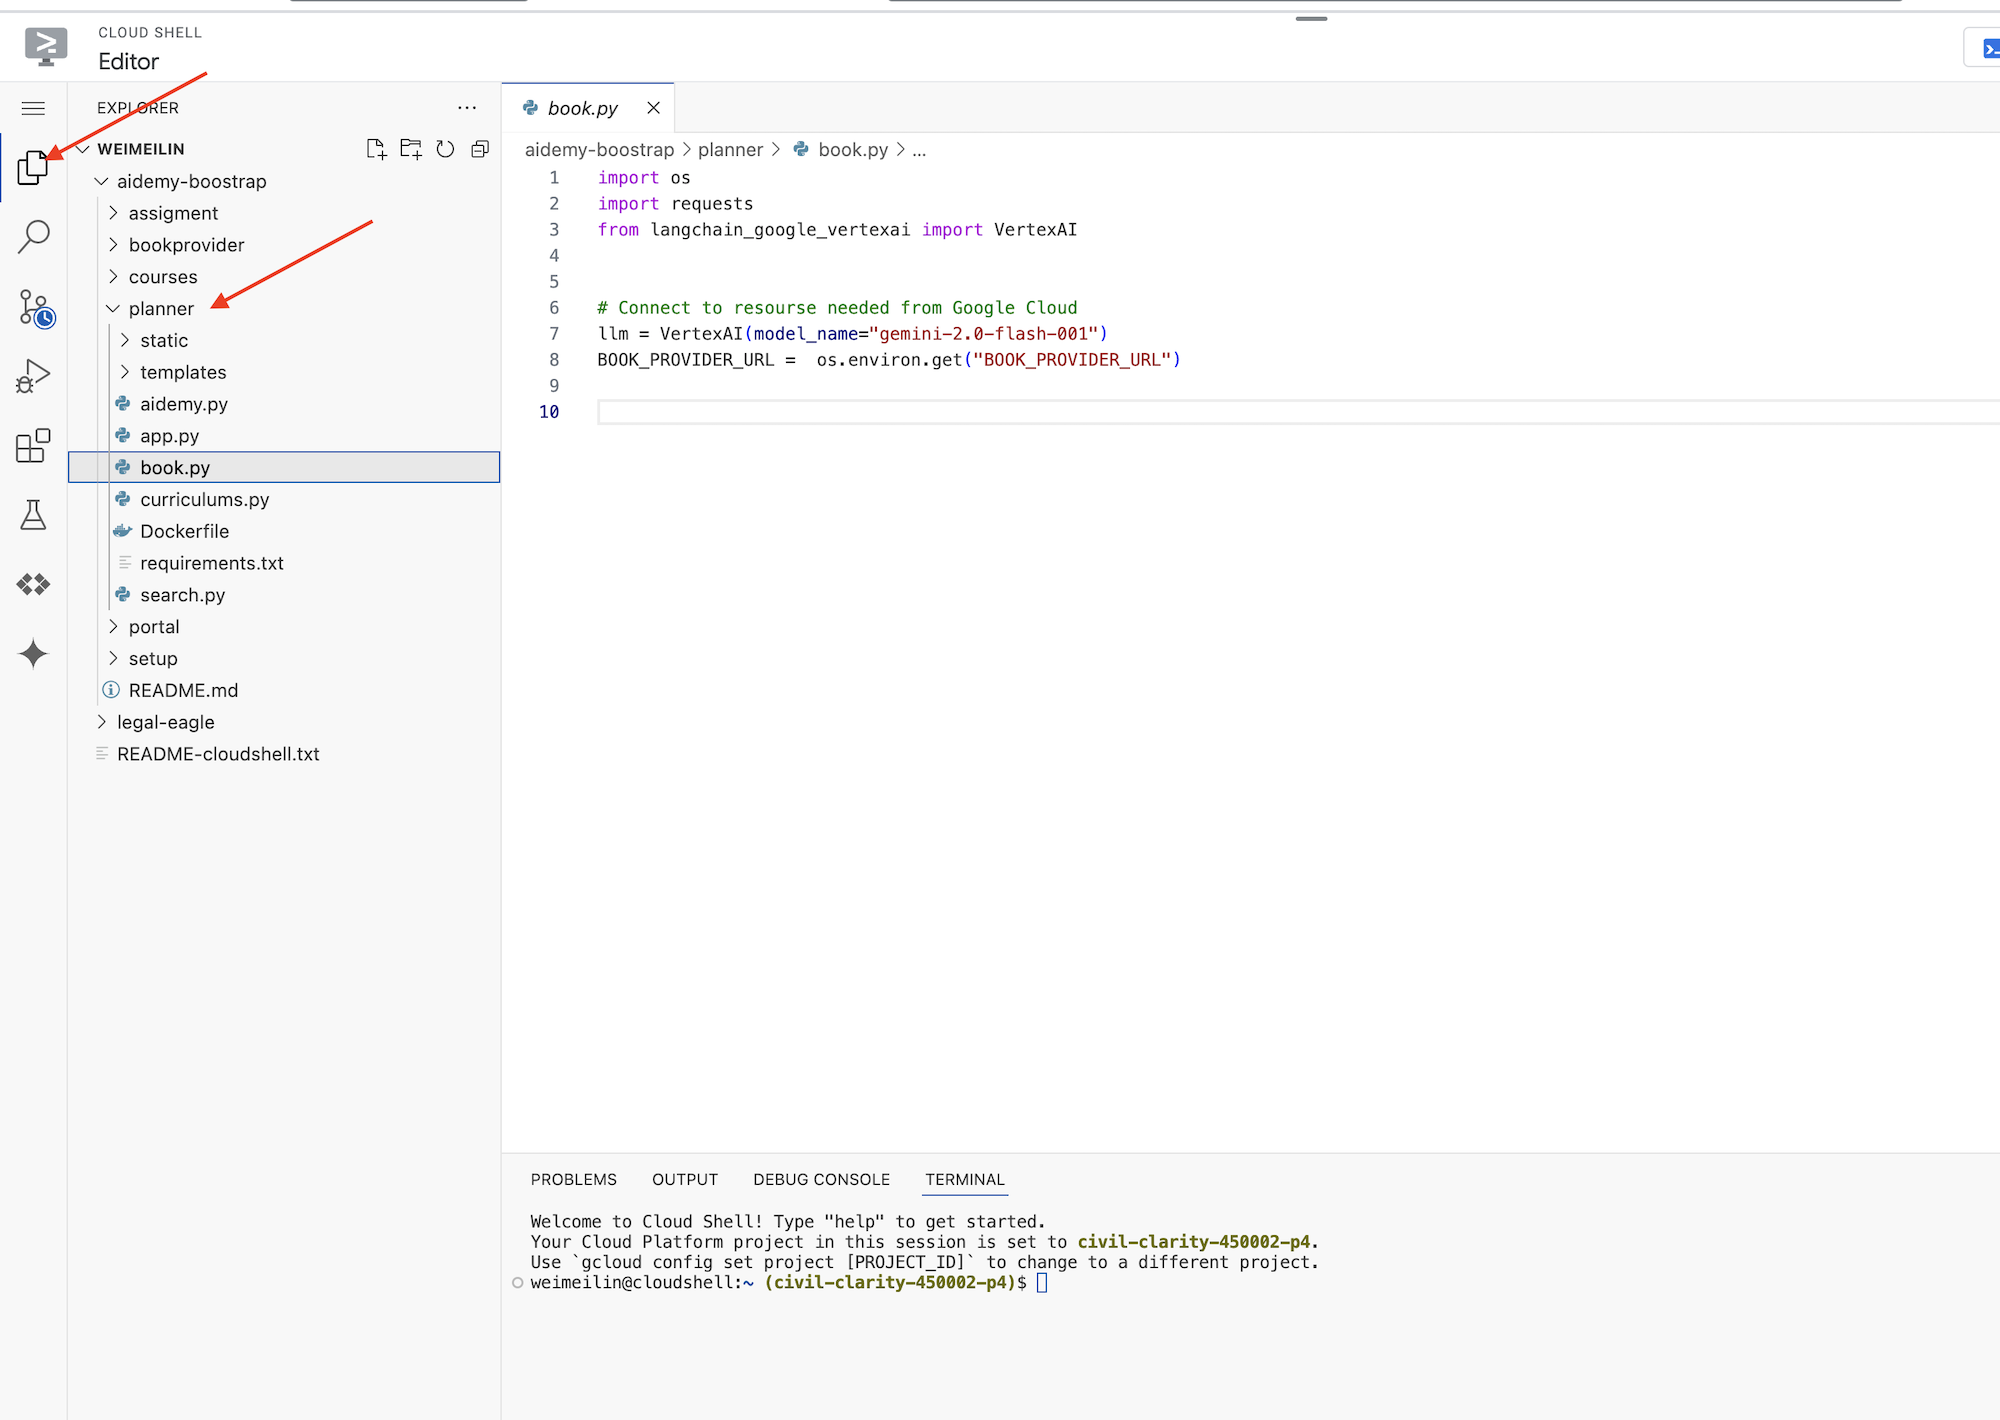
بیایید شروع به ساخت ابزارهایی کنیم که ماموران ما برای مفید واقع شدن از آنها استفاده خواهند کرد. همانطور که میدانید، LLMها در استدلال و تولید متن عالی هستند، اما برای انجام وظایف دنیای واقعی و ارائه اطلاعات دقیق و بهروز، به منابع خارجی نیاز دارند. این ابزارها را به عنوان "چاقوی ارتش سوئیس" مامور در نظر بگیرید که به آن توانایی تعامل با جهان را میدهد.
هنگام ساخت یک عامل، به راحتی میتوان درگیر کدنویسیهای پیچیده و زیاد شد. این باعث میشود عاملی ایجاد شود که انعطافپذیر نباشد. در عوض، با ایجاد و استفاده از ابزارها، عامل به منطق یا سیستمهای خارجی دسترسی پیدا میکند که مزایای هر دو زبان برنامهنویسی LLM و برنامهنویسی سنتی را به آن میدهد.
در این بخش، پایه و اساس عامل برنامهریز را ایجاد خواهیم کرد که معلمان از آن برای تولید طرح درس استفاده خواهند کرد. قبل از اینکه عامل شروع به تولید طرح کند، میخواهیم با ارائه جزئیات بیشتر در مورد موضوع و عنوان، مرزهایی را تعیین کنیم. ما سه ابزار خواهیم ساخت:
- فراخوانی Restful API: تعامل با یک API از پیش موجود برای بازیابی دادهها.
- پرس و جوی پایگاه داده: دریافت دادههای ساختاریافته از یک پایگاه داده SQL ابری.
- جستجوی گوگل: دسترسی به اطلاعات بلادرنگ از وب.
دریافت توصیههای کتاب از یک API
ابتدا، بیایید ابزاری ایجاد کنیم که توصیههای کتاب را از API ارائه دهنده کتاب که در بخش قبلی مستقر کردیم، بازیابی کند. این نشان میدهد که چگونه یک عامل میتواند از سرویسهای موجود استفاده کند.
در ویرایشگر پوسته ابری، پروژه aidemy-bootstrap را که در بخش قبل کلون کردهاید، باز کنید.
👉 فایل book.py را در پوشه planner ویرایش کنید و کد زیر را در انتهای فایل قرار دهید :
def recommend_book(query: str):
    """
    Get a list of recommended book from an API endpoint

    Args:
        query: User's request string
    """

    region = get_next_region();
    llm = VertexAI(model_name="gemini-1.5-pro", location=region)

    query = f"""The user is trying to plan a education course, you are the teaching assistant. Help define the category of what the user requested to teach, respond the categroy with no more than two word.

    user request:   {query}
    """
    print(f"-------->{query}")
    response = llm.invoke(query)
    print(f"CATEGORY RESPONSE------------>: {response}")

    # call this using python and parse the json back to dict
    category = response.strip()

    headers = {"Content-Type": "application/json"}
    data = {"category": category, "number_of_book": 2}

    books = requests.post(BOOK_PROVIDER_URL, headers=headers, json=data)

    return books.text

if __name__ == "__main__":
    print(recommend_book("I'm doing a course for my 5th grade student on Math Geometry, I'll need to recommend few books come up with a teach plan, few quizes and also a homework assignment."))
توضیح:
- recommend_book(query: str) : این تابع، کوئری کاربر را به عنوان ورودی دریافت میکند.
- تعامل LLM : از LLM برای استخراج دستهبندی از پرسوجو استفاده میکند. این نشان میدهد که چگونه میتوانید از LLM برای ایجاد پارامترهای ابزارها استفاده کنید.
- فراخوانی API : یک درخواست POST به API ارائه دهنده کتاب ارسال میکند و دسته و تعداد کتابهای مورد نظر را ارسال میکند.
برای آزمایش این تابع جدید، متغیر محیطی را تنظیم کنید و دستور زیر را اجرا کنید:
gcloud config set project $(cat ~/project_id.txt)
export PROJECT_ID=$(gcloud config get project)
cd ~/aidemy-bootstrap/planner/
export BOOK_PROVIDER_URL=$(gcloud run services describe book-provider --region=us-central1 --project=$PROJECT_ID --format="value(status.url)")
👉 وابستگیها را نصب کنید و کد را اجرا کنید تا مطمئن شوید که کار میکند، دستور زیر را اجرا کنید:
cd ~/aidemy-bootstrap/planner/
python -m venv env
source env/bin/activate
gcloud config set project $(cat ~/project_id.txt)
export PROJECT_ID=$(gcloud config get project)
pip install -r requirements.txt
python book.py
شما باید یک رشته JSON حاوی توصیههای کتاب که از API ارائه دهنده کتاب بازیابی شده است را ببینید. نتایج به صورت تصادفی تولید میشوند. ممکن است کتابهای شما یکسان نباشند، اما باید دو توصیه کتاب در قالب JSON دریافت کنید.
[{"author":"Anya Sharma","bookname":"Echoes of the Singularity","publisher":"NovaLight Publishing","publishing_date":"2077-03-15"},{"author":"Anya Sharma","bookname":"Echoes of the Quantum Dawn","publisher":"Nova Genesis Publishing","publishing_date":"2077-03-15"}]
اگر این را میبینید، ابزار اول به درستی کار میکند!
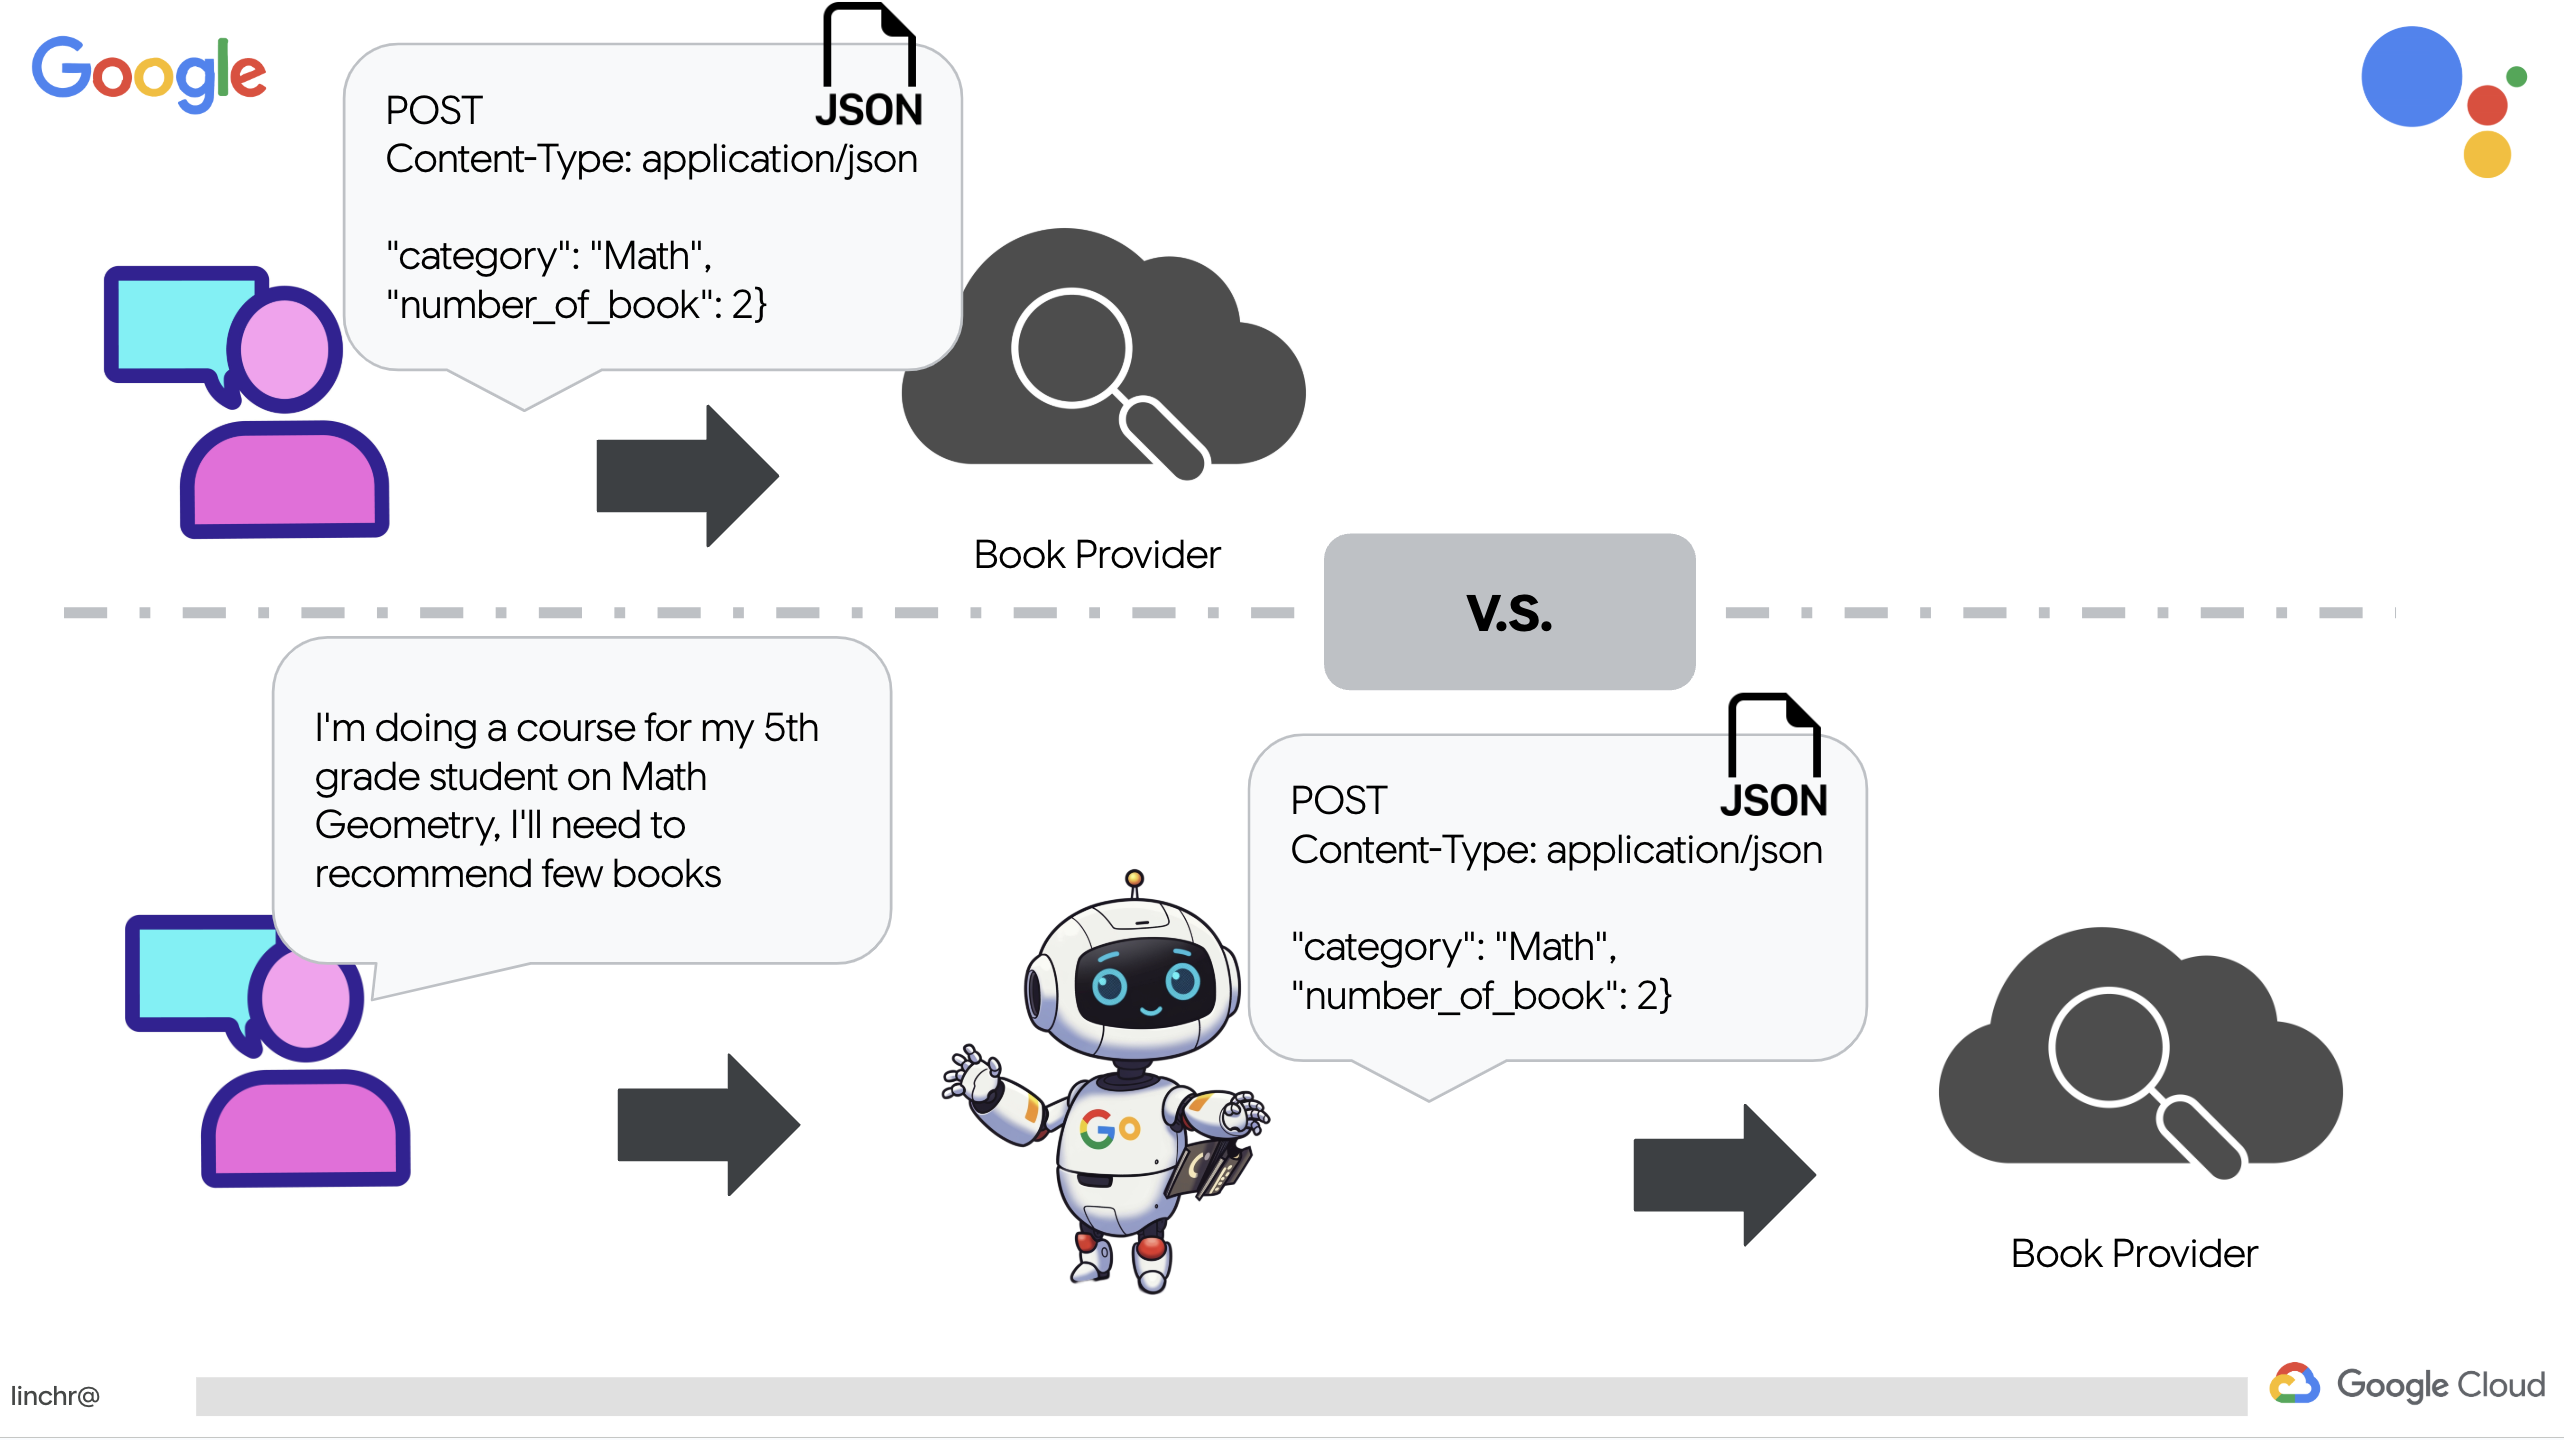
به جای اینکه صریحاً یک فراخوانی RESTful API با پارامترهای خاص ایجاد کنیم، از زبان طبیعی استفاده میکنیم ("من در حال انجام یک دوره هستم..."). سپس عامل به طور هوشمندانه پارامترهای لازم (مانند دسته بندی) را با استفاده از NLP استخراج میکند و نشان میدهد که چگونه عامل از درک زبان طبیعی برای تعامل با API استفاده میکند.
👉 کد تست زیر را از book.py حذف کنید .
if __name__ == "__main__":
    print(recommend_book("I'm doing a course for my 5th grade student on Math Geometry, I'll need to recommend few books come up with a teach plan, few quizes and also a homework assignment."))
دریافت دادههای برنامه درسی از پایگاه داده
در مرحله بعد، ابزاری خواهیم ساخت که دادههای ساختاریافته برنامه درسی را از پایگاه داده Cloud SQL PostgreSQL دریافت میکند. این به عامل اجازه میدهد تا به منبع اطلاعاتی قابل اعتمادی برای برنامهریزی درسی دسترسی داشته باشد.
نمونهی aidemy Cloud SQL که در مرحلهی قبل ایجاد کردید را به خاطر دارید؟ اینجا جایی است که از آن استفاده خواهد شد.
👉 در ترمینال، دستور زیر را اجرا کنید تا یک پایگاه داده با نام aidemy-db در نمونه جدید ایجاد شود.
gcloud sql databases create aidemy-db \
    --instance=aidemy
بیایید نمونه موجود در Cloud SQL را در کنسول Google Cloud تأیید کنیم، باید یک نمونه Cloud SQL با نام aidemy را در فهرست مشاهده کنید.
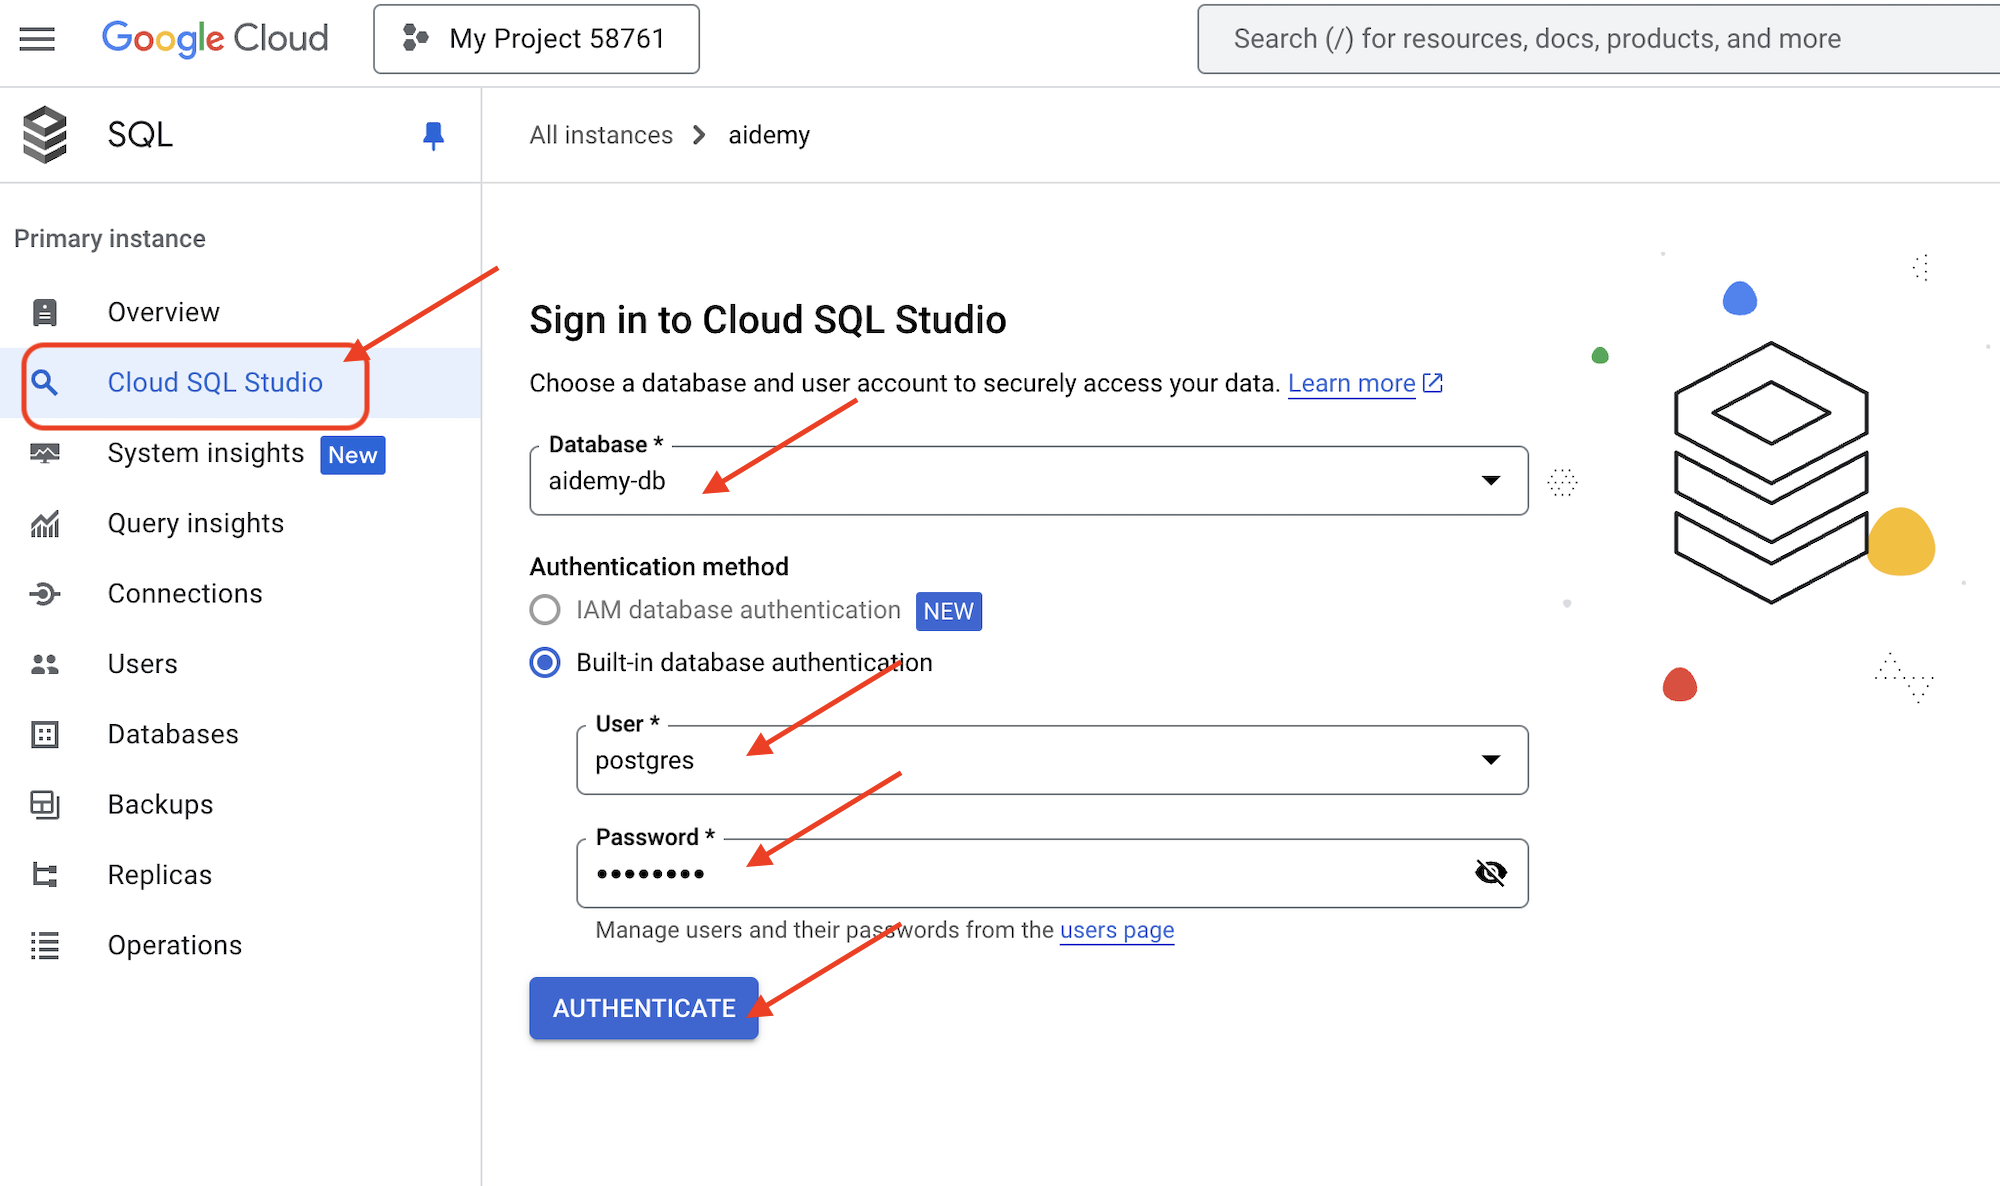
👉 برای مشاهده جزئیات هر نمونه، روی نام آن کلیک کنید. 👉 در صفحه جزئیات نمونه Cloud SQL، در منوی ناوبری سمت چپ روی Cloud SQL Studio کلیک کنید. با این کار یک برگه جدید باز میشود.
به عنوان پایگاه داده، aidemy-db انتخاب کنید. postgres به عنوان نام کاربری و 1234qwer به عنوان رمز عبور وارد کنید.
روی تأیید اعتبار کلیک کنید
👉 در ویرایشگر کوئری SQL Studio، به برگه Editor 1 بروید و کد SQL زیر را جایگذاری کنید:
CREATE TABLE curriculums (
    id SERIAL PRIMARY KEY,
    year INT,
    subject VARCHAR(255),
    description TEXT
);

-- Inserting detailed curriculum data for different school years and subjects
INSERT INTO curriculums (year, subject, description) VALUES
-- Year 5
(5, 'Mathematics', 'Introduction to fractions, decimals, and percentages, along with foundational geometry and problem-solving techniques.'),
(5, 'English', 'Developing reading comprehension, creative writing, and basic grammar, with a focus on storytelling and poetry.'),
(5, 'Science', 'Exploring basic physics, chemistry, and biology concepts, including forces, materials, and ecosystems.'),
(5, 'Computer Science', 'Basic coding concepts using block-based programming and an introduction to digital literacy.'),

-- Year 6
(6, 'Mathematics', 'Expanding on fractions, ratios, algebraic thinking, and problem-solving strategies.'),
(6, 'English', 'Introduction to persuasive writing, character analysis, and deeper comprehension of literary texts.'),
(6, 'Science', 'Forces and motion, the human body, and introductory chemical reactions with hands-on experiments.'),
(6, 'Computer Science', 'Introduction to algorithms, logical reasoning, and basic text-based programming (Python, Scratch).'),

-- Year 7
(7, 'Mathematics', 'Algebraic expressions, geometry, and introduction to statistics and probability.'),
(7, 'English', 'Analytical reading of classic and modern literature, essay writing, and advanced grammar skills.'),
(7, 'Science', 'Introduction to cells and organisms, chemical reactions, and energy transfer in physics.'),
(7, 'Computer Science', 'Building on programming skills with Python, introduction to web development, and cyber safety.');
این کد SQL یک جدول به نام curriculums ایجاد میکند و برخی دادههای نمونه را در آن وارد میکند.
👉 برای اجرای کد SQL روی Run کلیک کنید. باید یک پیام تأیید مشاهده کنید که نشان میدهد دستورات با موفقیت اجرا شدهاند.
👉 پنجره اکسپلورر را باز کنید، جدولهای curriculums تازه ایجاد شده را پیدا کنید و روی کوئری کلیک کنید. این کار باید یک تب ویرایشگر جدید با SQL تولید شده برای شما باز کند.
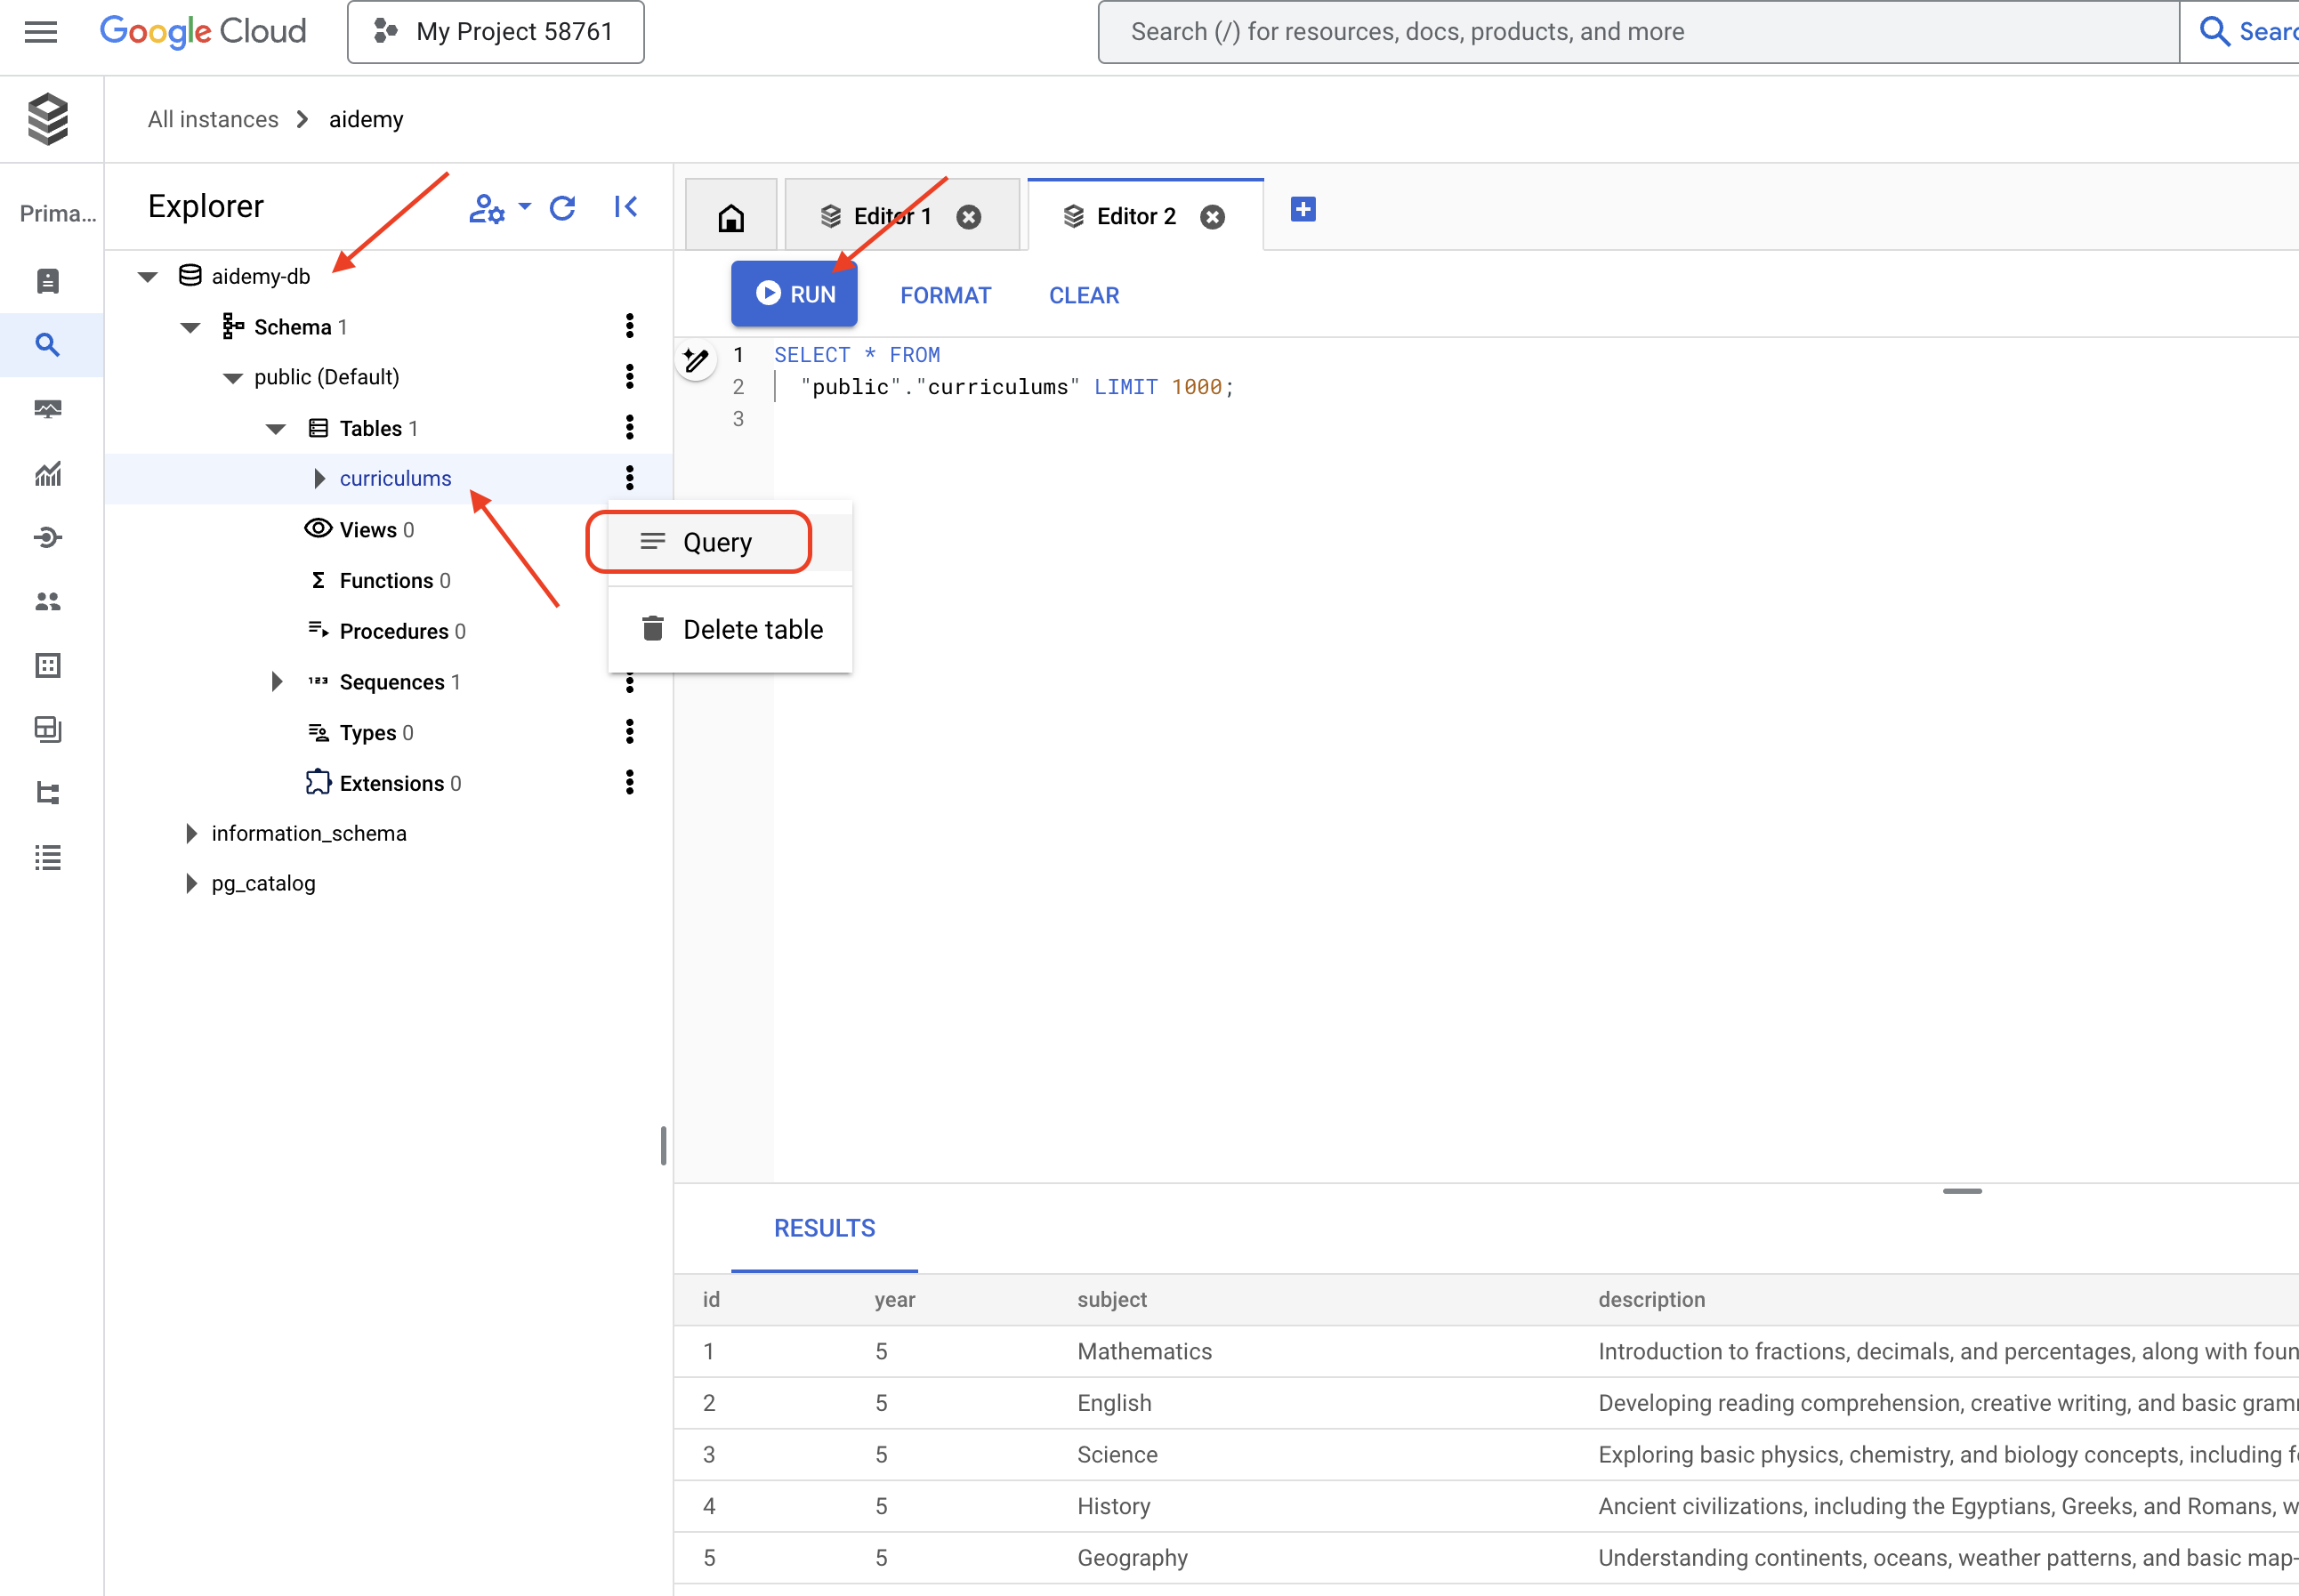
SELECT * FROM
  "public"."curriculums" LIMIT 1000;
👉 روی اجرا کلیک کنید.
جدول نتایج باید ردیفهای دادههایی را که در مرحله قبل وارد کردهاید، نمایش دهد و تأیید کند که جدول و دادهها به درستی ایجاد شدهاند.
اکنون که با موفقیت یک پایگاه داده با دادههای نمونه برنامه درسی ایجاد کردهاید، ابزاری برای بازیابی آن خواهیم ساخت.
👉 در ویرایشگر کد ابری، فایل curriculums.py را در پوشه aidemy-bootstrap ویرایش کنید و کد زیر را در انتهای فایل قرار دهید :
def connect_with_connector() -> sqlalchemy.engine.base.Engine:

    db_user = os.environ["DB_USER"]
    db_pass = os.environ["DB_PASS"]
    db_name = os.environ["DB_NAME"]

    print(f"--------------------------->db_user: {db_user!r}")
    print(f"--------------------------->db_pass: {db_pass!r}")
    print(f"--------------------------->db_name: {db_name!r}")

    connector = Connector()

    pool = sqlalchemy.create_engine(
        "postgresql+pg8000://",
        creator=lambda: connector.connect(
            instance_connection_name,
            "pg8000",
            user=db_user,
            password=db_pass,
            db=db_name,
        ),
        pool_size=2,
        max_overflow=2,
        pool_timeout=30,  # 30 seconds
        pool_recycle=1800,  # 30 minutes
    )
    return pool

def get_curriculum(year: int, subject: str):
    """
    Get school curriculum

    Args:
        subject: User's request subject string
        year: User's request year int
    """
    try:
        stmt = sqlalchemy.text(
            "SELECT description FROM curriculums WHERE year = :year AND subject = :subject"
        )

        with db.connect() as conn:
            result = conn.execute(stmt, parameters={"year": year, "subject": subject})
            row = result.fetchone()
        if row:
            return row[0]
        else:
            return None

    except Exception as e:
        print(e)
        return None

db = connect_with_connector()
توضیح:
- متغیرهای محیطی : این کد، اطلاعات مربوط به اعتبارنامههای پایگاه داده و اتصال را از متغیرهای محیطی بازیابی میکند (در ادامه بیشتر در این مورد توضیح داده خواهد شد).
- connect_with_connector() : این تابع از رابط Cloud SQL برای ایجاد یک اتصال امن به پایگاه داده استفاده میکند.
- تابع get_curriculum(year: int, subject: str) : این تابع سال و موضوع را به عنوان ورودی میگیرد، جدول curriculums را جستجو میکند و توضیحات مربوط به curriculum را برمیگرداند.
قبل از اینکه بتوانیم کد را اجرا کنیم، باید برخی از متغیرهای محیطی را تنظیم کنیم، برای این کار در ترمینال دستور زیر را اجرا کنید:
gcloud config set project $(cat ~/project_id.txt)
export PROJECT_ID=$(gcloud config get project)
export INSTANCE_NAME="aidemy"
export REGION="us-central1"
export DB_USER="postgres"
export DB_PASS="1234qwer"
export DB_NAME="aidemy-db"
👉 برای آزمایش، کد زیر را به انتهای curriculums.py اضافه کنید:
if __name__ == "__main__":
    print(get_curriculum(6, "Mathematics"))
👉 کد را اجرا کنید:
cd ~/aidemy-bootstrap/planner/
source env/bin/activate
python curriculums.py
شما باید شرح برنامه درسی ریاضی کلاس ششم را که در کنسول چاپ شده است، ببینید.
Expanding on fractions, ratios, algebraic thinking, and problem-solving strategies.
اگر توضیحات برنامه درسی را میبینید، ابزار پایگاه داده به درستی کار میکند! اگر اسکریپت هنوز در حال اجرا است، با فشردن Ctrl+C آن را متوقف کنید.
👉 کد تست زیر را از curriculums.py حذف کنید .
if __name__ == "__main__":
    print(get_curriculum(6, "Mathematics"))
👉 از محیط مجازی خارج شوید، در ترمینال دستور زیر را اجرا کنید:
deactivate
۶. ابزارهای ساخت: دسترسی به اطلاعات بلادرنگ از طریق وب
در نهایت، ابزاری خواهیم ساخت که از ادغام Gemini 2 و جستجوی گوگل برای دسترسی به اطلاعات بلادرنگ از وب استفاده میکند. این به اپراتور کمک میکند تا بهروز بماند و نتایج مرتبط ارائه دهد.
ادغام Gemini 2 با API جستجوی گوگل، با ارائه نتایج جستجوی دقیقتر و مرتبطتر با متن، قابلیتهای عامل را افزایش میدهد. این امر به عاملها اجازه میدهد تا به اطلاعات بهروز دسترسی داشته باشند و پاسخهای خود را بر اساس دادههای دنیای واقعی ارائه دهند و توهمات را به حداقل برسانند. ادغام بهبود یافته API همچنین پرسوجوهای زبان طبیعی بیشتری را تسهیل میکند و عاملها را قادر میسازد تا درخواستهای جستجوی پیچیده و ظریف را تدوین کنند.
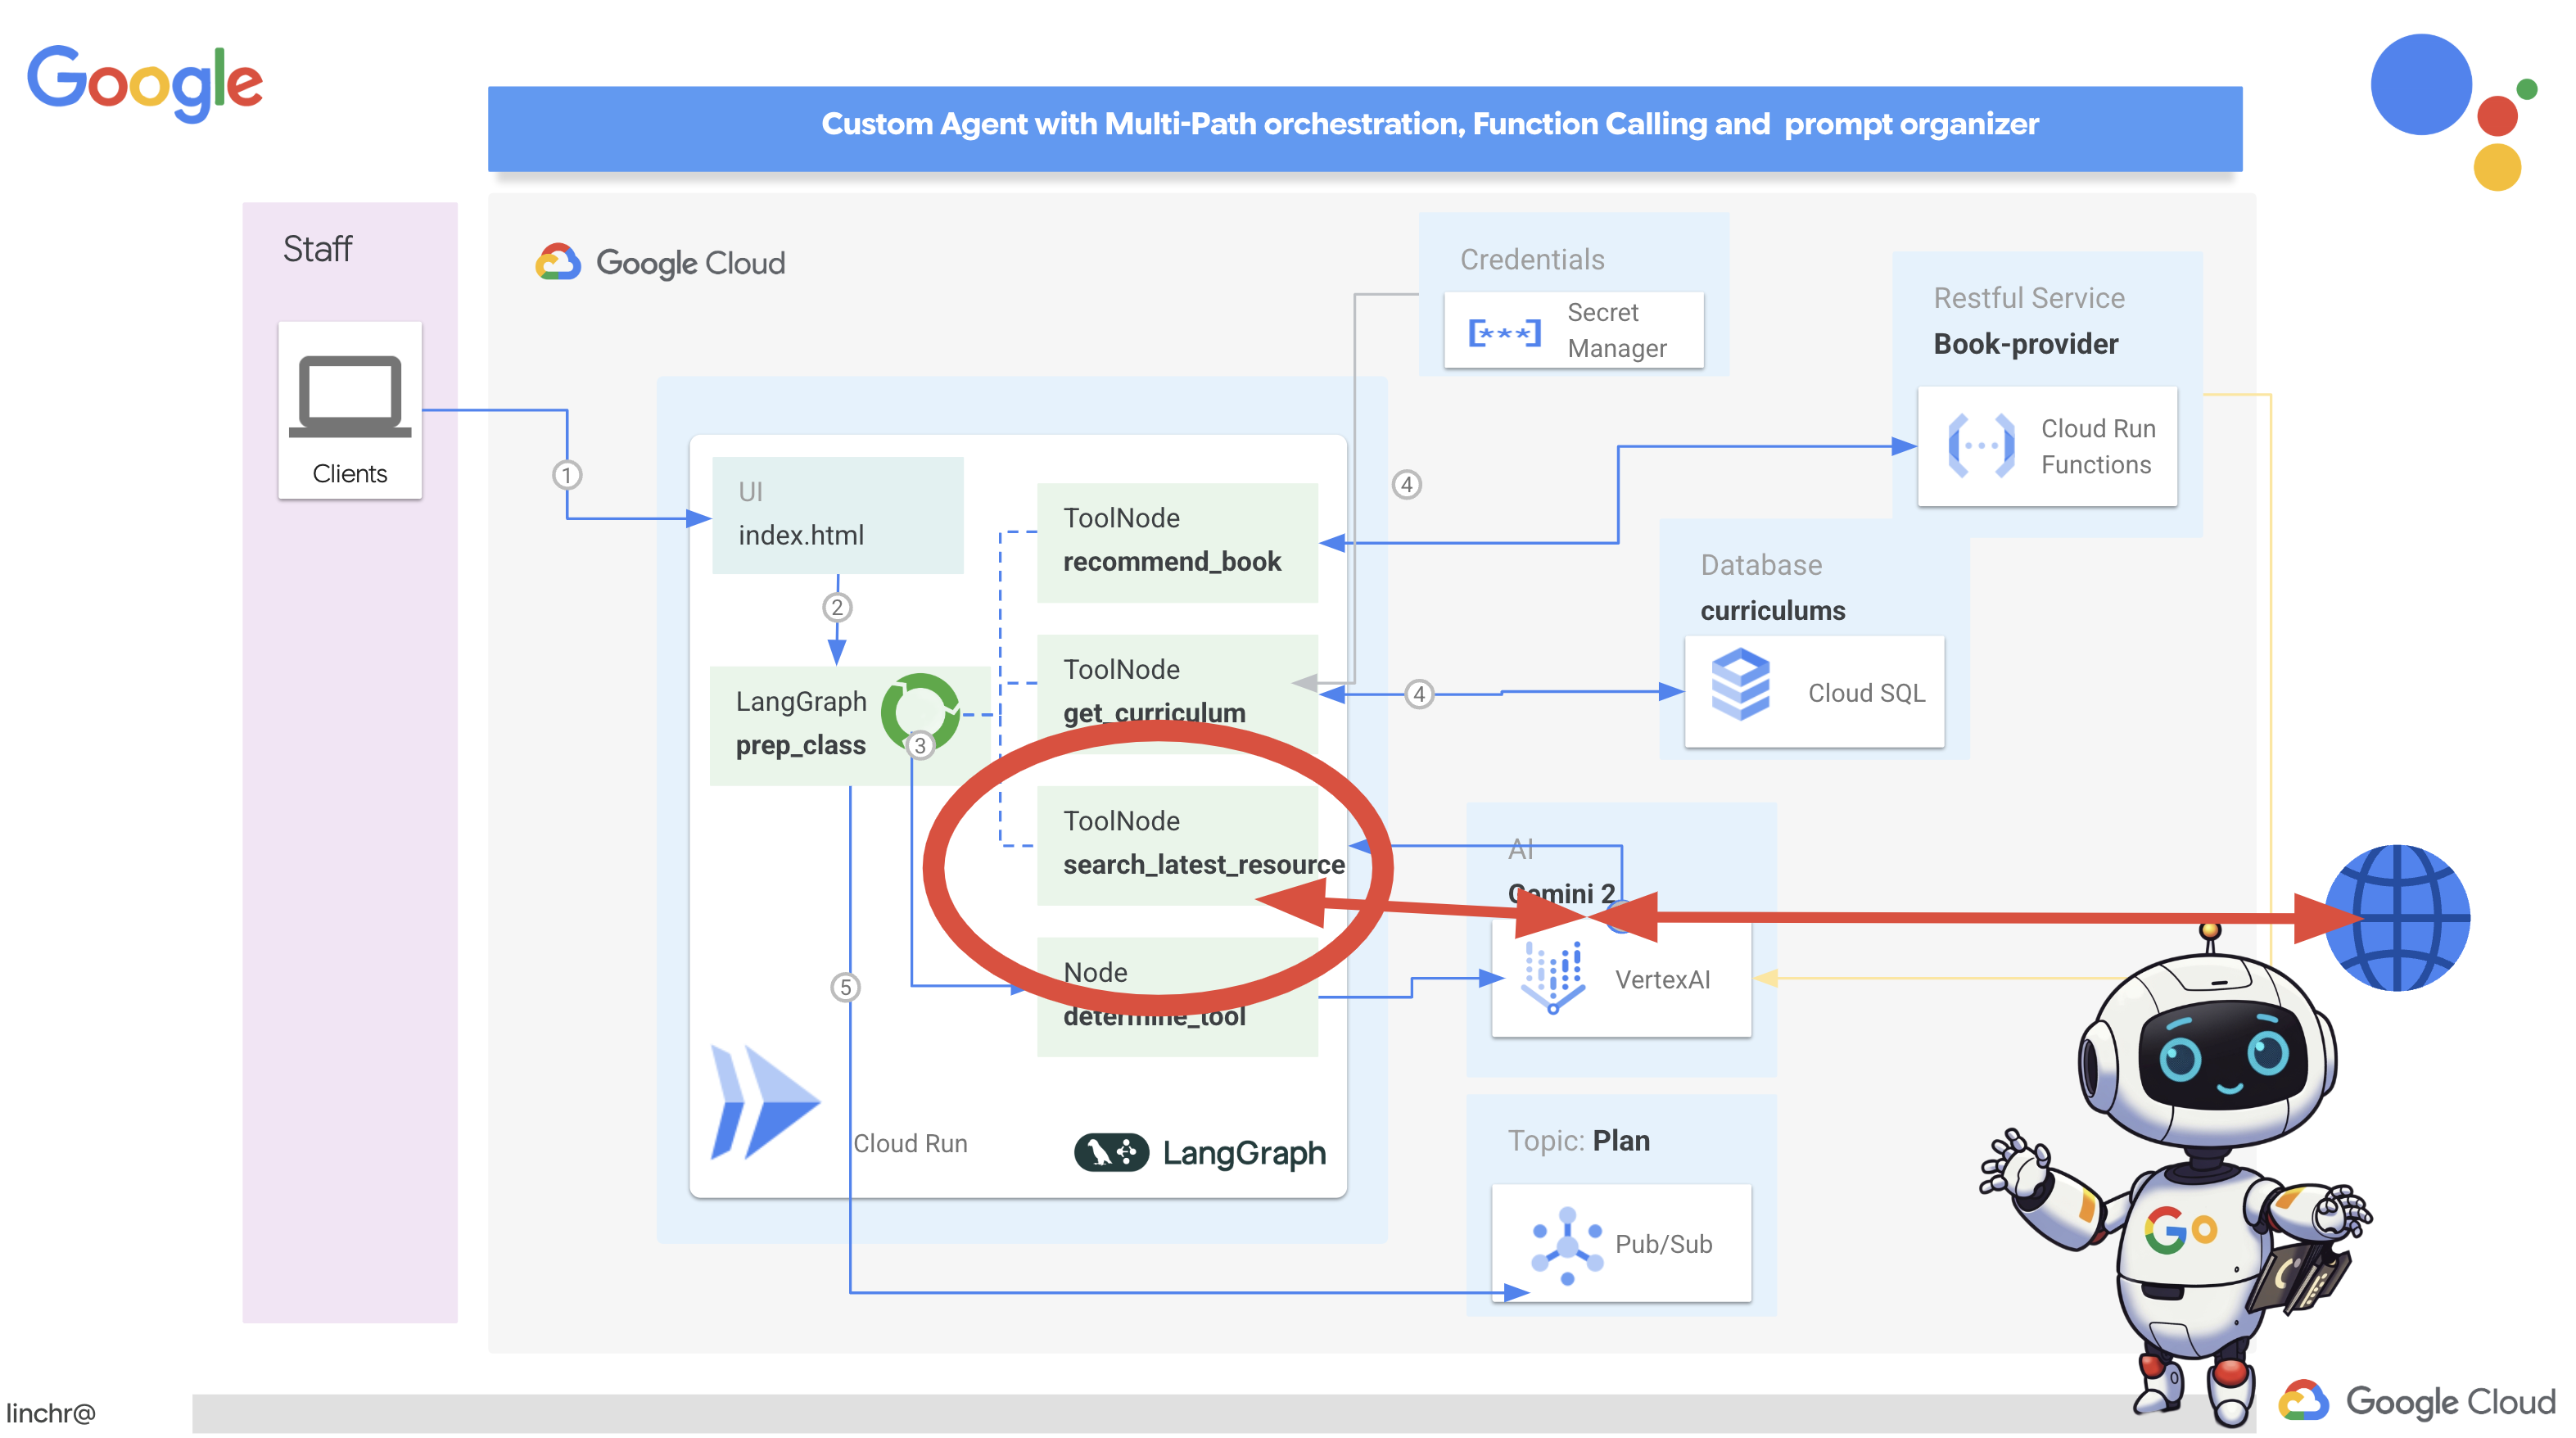
این تابع یک عبارت جستجو، برنامه درسی، موضوع و سال تحصیلی را به عنوان ورودی دریافت میکند و از رابط برنامهنویسی Gemini و ابزار جستجوی گوگل برای بازیابی اطلاعات مرتبط از اینترنت استفاده میکند. اگر دقت کنید، از کیت توسعه نرمافزاری هوش مصنوعی Generative گوگل برای فراخوانی تابع بدون استفاده از هیچ چارچوب دیگری استفاده میکند.
👉 search.py در پوشه aidemy-bootstrap ویرایش کنید و کد زیر را در انتهای فایل قرار دهید :
model_id = "gemini-2.0-flash-001"

google_search_tool = Tool(
    google_search = GoogleSearch()
)

def search_latest_resource(search_text: str, curriculum: str, subject: str, year: int):
    """
    Get latest information from the internet

    Args:
        search_text: User's request category   string
        subject: "User's request subject" string
        year: "User's request year"  integer
    """
    search_text = "%s in the context of year %d and subject %s with following curriculum detail %s " % (search_text, year, subject, curriculum)
    region = get_next_region()
    client = genai.Client(vertexai=True, project=PROJECT_ID, location=region)
    print(f"search_latest_resource text-----> {search_text}")
    response = client.models.generate_content(
        model=model_id,
        contents=search_text,
        config=GenerateContentConfig(
            tools=[google_search_tool],
            response_modalities=["TEXT"],
        )
    )
    print(f"search_latest_resource response-----> {response}")
    return response

if __name__ == "__main__":
  response = search_latest_resource("What are the syllabus for Year 6 Mathematics?", "Expanding on fractions, ratios, algebraic thinking, and problem-solving strategies.", "Mathematics", 6)
  for each in response.candidates[0].content.parts:
    print(each.text)
توضیح:
- تعریف ابزار - google_search_tool : قرار دادن شیء GoogleSearch درون یک ابزار
- search_latest_resource(search_text: str, subject: str, year: int) : این تابع یک عبارت جستجو، موضوع و سال را به عنوان ورودی میگیرد و از API Gemini برای انجام جستجوی گوگل استفاده میکند.
- GenerateContentConfig : تعریف میکند که به ابزار GoogleSearch دسترسی دارد.
مدل Gemini متن جستجو (search_text) را به صورت داخلی تجزیه و تحلیل میکند و تعیین میکند که آیا میتواند مستقیماً به سوال پاسخ دهد یا نیاز به استفاده از ابزار GoogleSearch دارد. این یک مرحله حیاتی است که در فرآیند استدلال LLM اتفاق میافتد. این مدل آموزش دیده است تا موقعیتهایی را که در آنها به ابزارهای خارجی نیاز است، تشخیص دهد. اگر مدل تصمیم به استفاده از ابزار GoogleSearch بگیرد، Google Generative AI SDK فراخوانی واقعی را انجام میدهد. SDK تصمیم مدل و پارامترهای تولید شده توسط آن را دریافت کرده و آنها را به Google Search API ارسال میکند. این بخش در کد از دید کاربر پنهان است.
سپس مدل Gemini نتایج جستجو را در پاسخ خود ادغام میکند. میتواند از این اطلاعات برای پاسخ به سوال کاربر، تولید خلاصه یا انجام برخی کارهای دیگر استفاده کند.
👉برای آزمایش، کد را اجرا کنید:
cd ~/aidemy-bootstrap/planner/
gcloud config set project $(cat ~/project_id.txt)
export PROJECT_ID=$(gcloud config get project)
source env/bin/activate
python search.py
شما باید پاسخ Gemini Search API را که حاوی نتایج جستجوی مربوط به "Syllabus for Year 5 Mathematics" است، مشاهده کنید. خروجی دقیق به نتایج جستجو بستگی دارد، اما یک شیء JSON با اطلاعاتی در مورد جستجو خواهد بود.
اگر نتایج جستجو را مشاهده کردید، ابزار جستجوی گوگل به درستی کار میکند! اگر اسکریپت هنوز در حال اجرا است، با فشردن Ctrl+C آن را متوقف کنید.
👉 و آخرین بخش کد را حذف کنید .
if __name__ == "__main__":
  response = search_latest_resource("What are the syllabus for Year 6 Mathematics?", "Expanding on fractions, ratios, algebraic thinking, and problem-solving strategies.", "Mathematics", 6)
  for each in response.candidates[0].content.parts:
    print(each.text)
👉 از محیط مجازی خارج شوید، در ترمینال دستور زیر را اجرا کنید:
deactivate
تبریک! شما اکنون سه ابزار قدرتمند برای عامل برنامهریز خود ساختهاید: یک رابط API، یک رابط پایگاه داده و یک ابزار جستجوی گوگل. این ابزارها عامل را قادر میسازند تا به اطلاعات و قابلیتهای مورد نیاز برای ایجاد برنامههای آموزشی مؤثر دسترسی پیدا کند.
۷. هماهنگسازی با LangGraph
حالا که ابزارهای تکی خودمان را ساختهایم، وقت آن رسیده که آنها را با استفاده از LangGraph هماهنگ کنیم. این به ما امکان میدهد یک عامل «برنامهریز» پیچیدهتر ایجاد کنیم که میتواند هوشمندانه تصمیم بگیرد از کدام ابزارها و چه زمانی، بر اساس درخواست کاربر، استفاده کند.
LangGraph یک کتابخانه پایتون است که برای آسانتر کردن ساخت برنامههای چندعاملی و دارای وضعیت با استفاده از مدلهای زبان بزرگ (LLM) طراحی شده است. آن را به عنوان چارچوبی برای هماهنگسازی مکالمات و گردشهای کاری پیچیده شامل LLMها، ابزارها و سایر عاملها در نظر بگیرید.
مفاهیم کلیدی:
- ساختار گراف: LangGraph منطق برنامه شما را به صورت یک گراف جهتدار نشان میدهد. هر گره در گراف، یک مرحله از فرآیند را نشان میدهد (مثلاً فراخوانی یک LLM، فراخوانی یک ابزار، بررسی شرطی). لبهها جریان اجرا بین گرهها را تعریف میکنند.
- وضعیت: LangGraph وضعیت برنامه شما را در حین حرکت در نمودار مدیریت میکند. این وضعیت میتواند شامل متغیرهایی مانند ورودی کاربر، نتایج فراخوانی ابزارها، خروجیهای میانی از LLMها و هرگونه اطلاعات دیگری باشد که باید بین مراحل حفظ شود.
- گرهها: هر گره نشاندهنده یک محاسبه یا تعامل است. آنها میتوانند:
- گرههای ابزار: استفاده از یک ابزار (مثلاً انجام جستجوی وب، پرسوجو در پایگاه داده)
- گرههای تابع: یک تابع پایتون را اجرا میکنند.
- لبهها: گرهها را به هم متصل میکنند و جریان اجرا را تعریف میکنند. آنها میتوانند:
- لبههای مستقیم: یک جریان ساده و بدون قید و شرط از یک گره به گره دیگر.
- یالهای شرطی: جریان به نتیجه یک گره شرطی بستگی دارد.
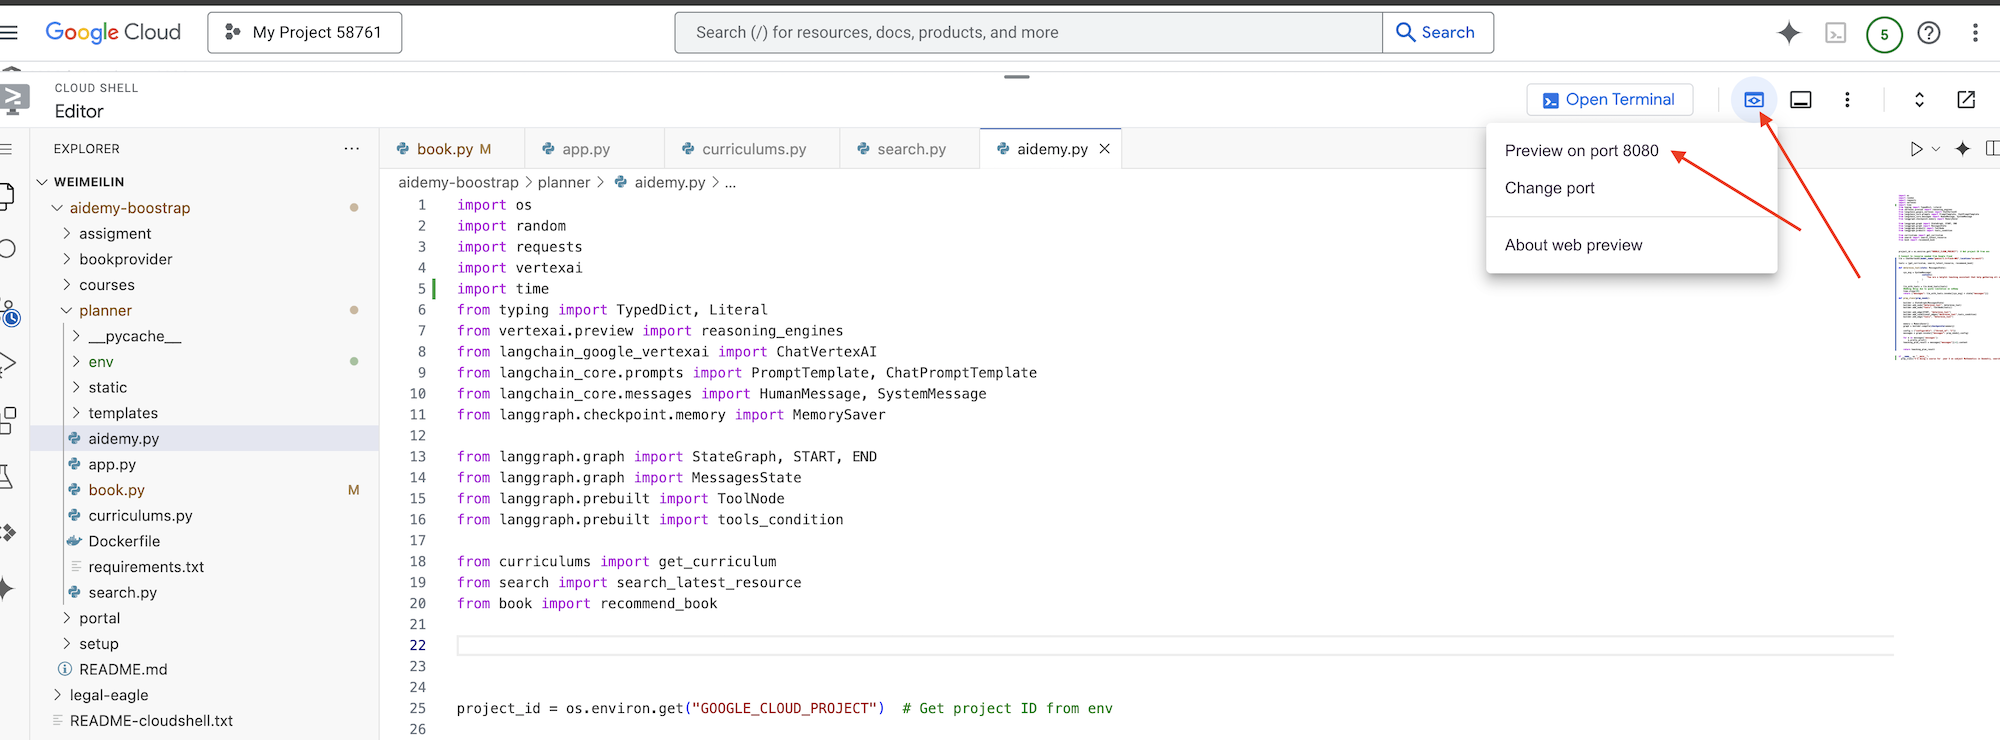
ما از LangGraph برای پیادهسازی ارکستراسیون استفاده خواهیم کرد. بیایید فایل aidemy.py را در پوشه aidemy-bootstrap ویرایش کنیم تا منطق LangGraph خود را تعریف کنیم.
👉 کد زیر را به انتهای اضافه کنید
aidemy.py :
tools = [get_curriculum, search_latest_resource, recommend_book]

def determine_tool(state: MessagesState):
    llm = ChatVertexAI(model_name="gemini-2.0-flash-001", location=get_next_region())
    sys_msg = SystemMessage(
                    content=(
                        f"""You are a helpful teaching assistant that helps gather all needed information.
                            Your ultimate goal is to create a detailed 3-week teaching plan.
                            You have access to tools that help you gather information.
                            Based on the user request, decide which tool(s) are needed.

                        """
                    )
                )

    llm_with_tools = llm.bind_tools(tools)
    return {"messages": llm_with_tools.invoke([sys_msg] + state["messages"])}
این تابع مسئول دریافت وضعیت فعلی مکالمه، ارائه یک پیام سیستمی به LLM و سپس درخواست از LLM برای تولید پاسخ است. LLM میتواند یا مستقیماً به کاربر پاسخ دهد یا از یکی از ابزارهای موجود استفاده کند.
tools : این لیست مجموعهای از ابزارهایی را نشان میدهد که عامل در اختیار دارد. این لیست شامل سه تابع ابزار است که در مراحل قبلی تعریف کردیم: get_curriculum ، search_latest_resource و recommend_book . llm.bind_tools(tools) : این تابع لیست ابزارها را به شیء llm "متصل" میکند. اتصال ابزارها به LLM میگوید که این ابزارها در دسترس هستند و اطلاعاتی در مورد نحوه استفاده از آنها (مثلاً نام ابزارها، پارامترهایی که میپذیرند و کاری که انجام میدهند) در اختیار LLM قرار میدهد.
ما از LangGraph برای پیادهسازی هماهنگی استفاده خواهیم کرد.
👉 کد زیر را به انتهای اضافه کنید
aidemy.py :
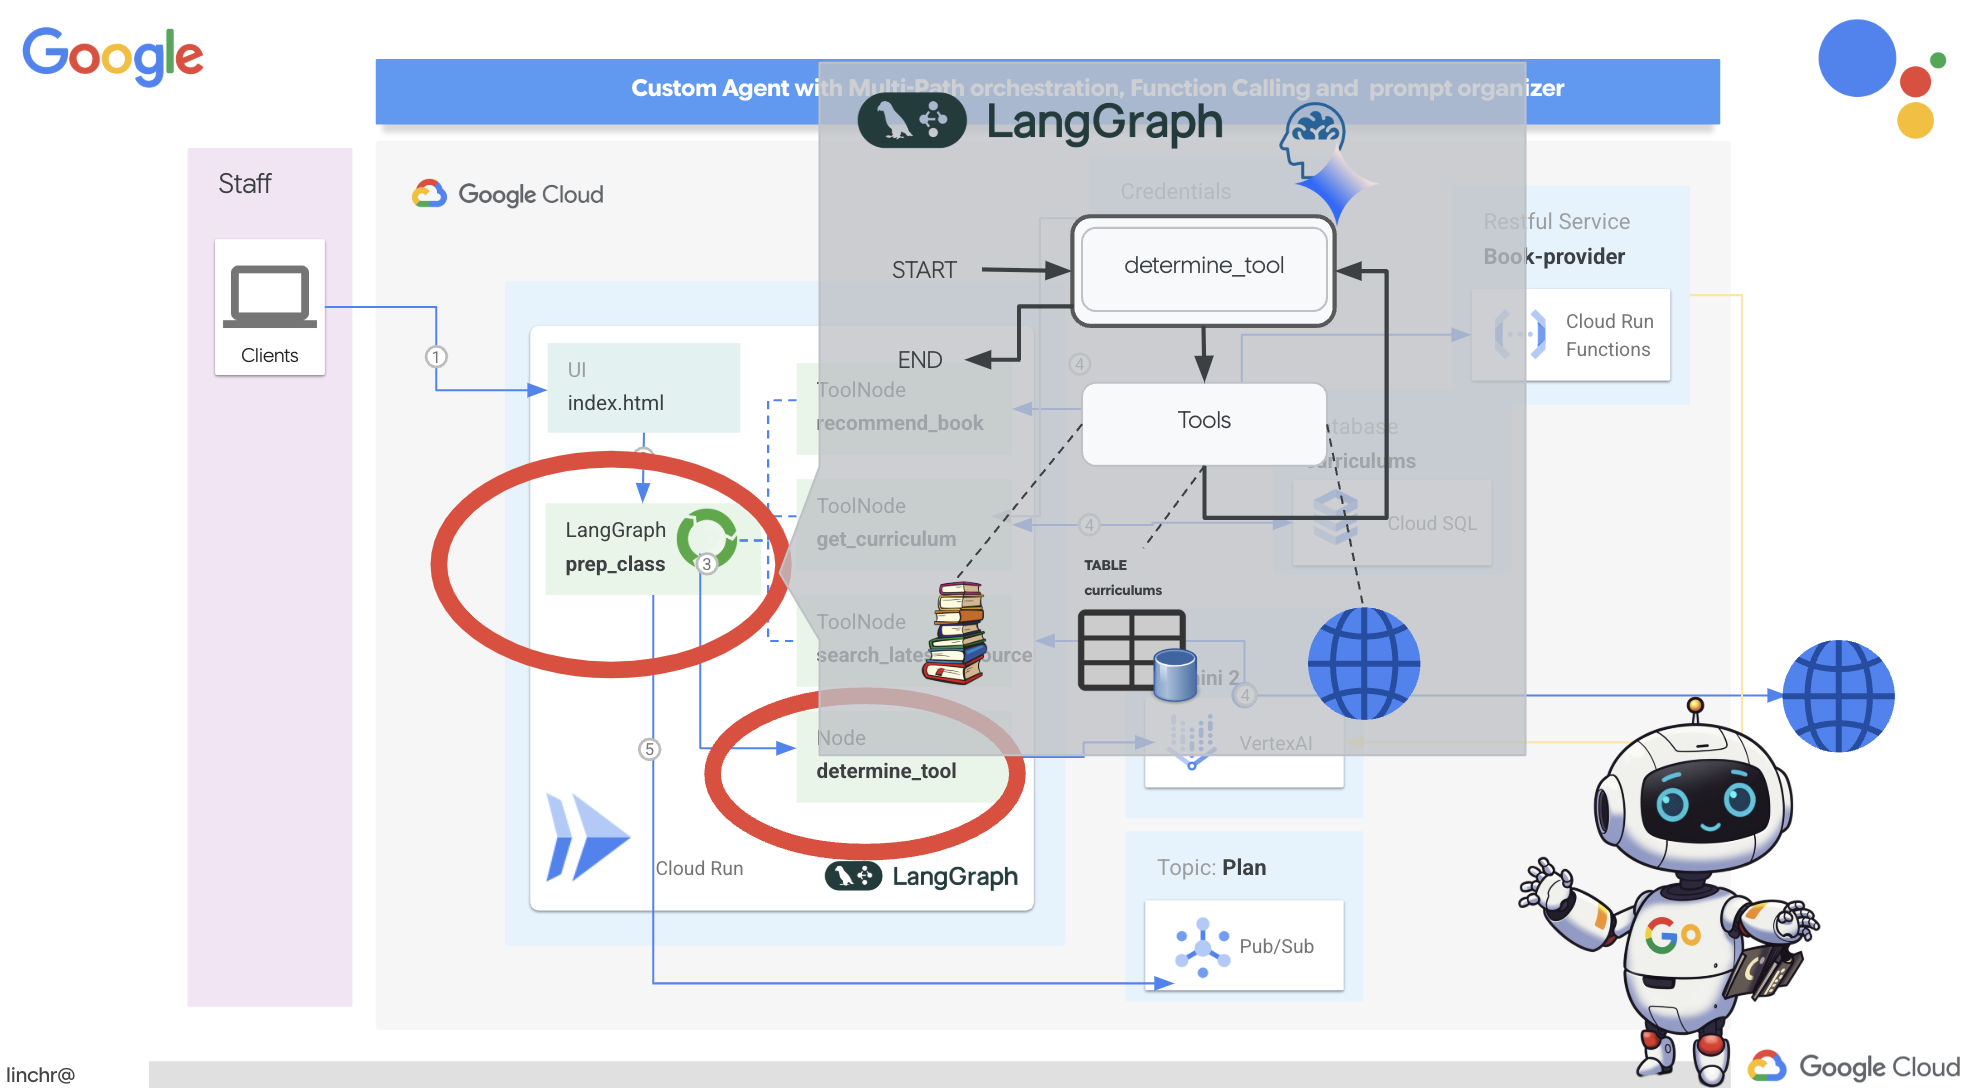
def prep_class(prep_needs):

    builder = StateGraph(MessagesState)
    builder.add_node("determine_tool", determine_tool)
    builder.add_node("tools", ToolNode(tools))

    builder.add_edge(START, "determine_tool")
    builder.add_conditional_edges("determine_tool",tools_condition)
    builder.add_edge("tools", "determine_tool")


    memory = MemorySaver()
    graph = builder.compile(checkpointer=memory)

    config = {"configurable": {"thread_id": "1"}}
    messages = graph.invoke({"messages": prep_needs},config)
    print(messages)
    for m in messages['messages']:
        m.pretty_print()
    teaching_plan_result = messages["messages"][-1].content


    return teaching_plan_result

if __name__ == "__main__":
  prep_class("I'm doing a course for  year 5 on subject Mathematics in Geometry, , get school curriculum, and come up with few books recommendation plus  search latest resources on the internet base on the curriculum outcome. And come up with a 3 week teaching plan")
توضیح:
-
StateGraph(MessagesState): یک شیءStateGraphایجاد میکند.StateGraphیک مفهوم اصلی در LangGraph است. این مفهوم، گردش کار عامل شما را به صورت یک گراف نشان میدهد که در آن هر گره در گراف، یک مرحله از فرآیند را نشان میدهد. آن را به عنوان تعریف طرح اولیه برای نحوه استدلال و عمل عامل در نظر بگیرید. - لبه شرطی: آرگومان
tools_conditionکه از گره"determine_tool"سرچشمه میگیرد، احتمالاً تابعی است که بر اساس خروجی تابعdetermine_toolتعیین میکند کدام لبه باید دنبال شود. لبههای شرطی به گراف اجازه میدهند تا بر اساس تصمیم LLM در مورد اینکه از کدام ابزار استفاده کند (یا اینکه آیا مستقیماً به کاربر پاسخ دهد یا خیر)، شاخه شاخه شود. اینجاست که "هوش" عامل وارد عمل میشود - میتواند به صورت پویا رفتار خود را بر اساس موقعیت تطبیق دهد. - حلقه: یک یال به گراف اضافه میکند که گره
"tools"را به گره"determine_tool"متصل میکند. این یک حلقه در گراف ایجاد میکند و به عامل اجازه میدهد تا زمانی که اطلاعات کافی برای تکمیل وظیفه و ارائه پاسخ رضایتبخش جمعآوری کند، بارها و بارها از ابزارها استفاده کند. این حلقه برای وظایف پیچیدهای که نیاز به مراحل متعدد استدلال و جمعآوری اطلاعات دارند، بسیار مهم است.
حال، بیایید عامل برنامهریز خود را آزمایش کنیم تا ببینیم چگونه ابزارهای مختلف را هماهنگ میکند.
این کد تابع prep_class را با یک ورودی خاص از کاربر اجرا میکند و درخواستی را برای ایجاد یک طرح تدریس برای درس هندسه ریاضی کلاس پنجم، با استفاده از برنامه درسی، توصیههای کتاب و جدیدترین منابع اینترنتی شبیهسازی میکند.
👉 در ترمینال خود، اگر آن را بستهاید یا متغیرهای محیطی دیگر تنظیم نشدهاند، دستورات زیر را دوباره اجرا کنید
export BOOK_PROVIDER_URL=$(gcloud run services describe book-provider --region=us-central1 --project=$PROJECT_ID --format="value(status.url)")
gcloud config set project $(cat ~/project_id.txt)
export PROJECT_ID=$(gcloud config get project)
export INSTANCE_NAME="aidemy"
export REGION="us-central1"
export DB_USER="postgres"
export DB_PASS="1234qwer"
export DB_NAME="aidemy-db"
👉 کد را اجرا کنید:
cd ~/aidemy-bootstrap/planner/
source env/bin/activate
pip install -r requirements.txt
python aidemy.py
به گزارش ترمینال توجه کنید. باید قبل از ارائه طرح تدریس نهایی، شواهدی مبنی بر فراخوانی هر سه ابزار (دریافت برنامه درسی مدرسه، دریافت توصیههای کتاب و جستجوی جدیدترین منابع) توسط عامل مشاهده کنید. این نشان میدهد که هماهنگی LangGraph به درستی کار میکند و عامل به طور هوشمندانه از تمام ابزارهای موجود برای انجام درخواست کاربر استفاده میکند.
================================ Human Message =================================

I'm doing a course for  year 5 on subject Mathematics in Geometry, , get school curriculum, and come up with few books recommendation plus  search latest resources on the internet base on the curriculum outcome. And come up with a 3 week teaching plan
================================== Ai Message ==================================
Tool Calls:
  get_curriculum (xxx)
 Call ID: xxx
  Args:
    year: 5.0
    subject: Mathematics
================================= Tool Message =================================
Name: get_curriculum

Introduction to fractions, decimals, and percentages, along with foundational geometry and problem-solving techniques.
================================== Ai Message ==================================
Tool Calls:
  search_latest_resource (xxxx)
 Call ID: xxxx
  Args:
    year: 5.0
    search_text: Geometry
    curriculum: {"content": "Introduction to fractions, decimals, and percentages, along with foundational geometry and problem-solving techniques."}
    subject: Mathematics
================================= Tool Message =================================
Name: search_latest_resource

candidates=[Candidate(content=Content(parts=[Part(.....) automatic_function_calling_history=[] parsed=None
================================== Ai Message ==================================
Tool Calls:
  recommend_book (93b48189-4d69-4c09-a3bd-4e60cdc5f1c6)
 Call ID: 93b48189-4d69-4c09-a3bd-4e60cdc5f1c6
  Args:
    query: Mathematics Geometry Year 5
================================= Tool Message =================================
Name: recommend_book

[{.....}]

================================== Ai Message ==================================

Based on the curriculum outcome, here is a 3-week teaching plan for year 5 Mathematics Geometry:

**Week 1: Introduction to Shapes and Properties**
.........
اگر اسکریپت هنوز در حال اجرا است، با فشردن Ctrl+C آن را متوقف کنید.
👉 (این مرحله اختیاری است) کد آزمایشی را با یک اعلان متفاوت جایگزین کنید، که نیاز به فراخوانی ابزارهای متفاوتی دارد.
if __name__ == "__main__":
  prep_class("I'm doing a course for year 5 on subject Mathematics in Geometry, search latest resources on the internet base on the subject. And come up with a 3 week teaching plan")
👉 اگر ترمینال خود را بستهاید یا متغیرهای محیطی دیگر تنظیم نشدهاند، دستورات زیر را دوباره اجرا کنید
gcloud config set project $(cat ~/project_id.txt)
export BOOK_PROVIDER_URL=$(gcloud run services describe book-provider --region=us-central1 --project=$PROJECT_ID --format="value(status.url)")
export PROJECT_ID=$(gcloud config get project)
export INSTANCE_NAME="aidemy"
export REGION="us-central1"
export DB_USER="postgres"
export DB_PASS="1234qwer"
export DB_NAME="aidemy-db"
👉 (این مرحله اختیاری است، فقط در صورتی که مرحله قبل را اجرا کردهاید، این کار را انجام دهید) کد را دوباره اجرا کنید:
cd ~/aidemy-bootstrap/planner/
source env/bin/activate
python aidemy.py
این بار متوجه چه چیزی شدید؟ عامل کدام ابزارها را فراخوانی کرد؟ باید ببینید که عامل این بار فقط ابزار search_latest_resource را فراخوانی میکند. دلیل این امر این است که اعلان مشخص نمیکند که به دو ابزار دیگر نیاز دارد و LLM ما به اندازه کافی هوشمند است که ابزارهای دیگر را فراخوانی نکند.
================================ Human Message =================================

I'm doing a course for  year 5 on subject Mathematics in Geometry, search latest resources on the internet base on the subject. And come up with a 3 week teaching plan
================================== Ai Message ==================================
Tool Calls:
  get_curriculum (xxx)
 Call ID: xxx
  Args:
    year: 5.0
    subject: Mathematics
================================= Tool Message =================================
Name: get_curriculum

Introduction to fractions, decimals, and percentages, along with foundational geometry and problem-solving techniques.
================================== Ai Message ==================================
Tool Calls:
  search_latest_resource (xxx)
 Call ID: xxxx
  Args:
    year: 5.0
    subject: Mathematics
    curriculum: {"content": "Introduction to fractions, decimals, and percentages, along with foundational geometry and problem-solving techniques."}
    search_text: Geometry
================================= Tool Message =================================
Name: search_latest_resource

candidates=[Candidate(content=Content(parts=[Part(.......token_count=40, total_token_count=772) automatic_function_calling_history=[] parsed=None
================================== Ai Message ==================================

Based on the information provided, a 3-week teaching plan for Year 5 Mathematics focusing on Geometry could look like this:

**Week 1:  Introducing 2D Shapes**
........
* Use visuals, manipulatives, and real-world examples to make the learning experience engaging and relevant.
با فشردن Ctrl+C اسکریپت را متوقف کنید.
👉 (این مرحله را نادیده نگیرید!) کد تست را حذف کنید تا فایل aidemy.py شما تمیز بماند:
if __name__ == "__main__":
  prep_class("I'm doing a course for  year 5 on subject Mathematics in Geometry, search latest resources on the internet base on the subject. And come up with a 3 week teaching plan")
حالا که منطق عامل ما تعریف شده است، بیایید برنامه وب Flask را راهاندازی کنیم. این یک رابط کاربری مبتنی بر فرم آشنا برای معلمان فراهم میکند تا با عامل تعامل داشته باشند. در حالی که تعاملات چتبات با LLMها رایج است، ما رابط کاربری ارسال فرم سنتی را انتخاب میکنیم، زیرا ممکن است برای بسیاری از مربیان شهودیتر باشد.
👉 اگر ترمینال خود را بستهاید یا متغیرهای محیطی دیگر تنظیم نشدهاند، دستورات زیر را دوباره اجرا کنید
export BOOK_PROVIDER_URL=$(gcloud run services describe book-provider --region=us-central1 --project=$PROJECT_ID --format="value(status.url)")
gcloud config set project $(cat ~/project_id.txt)
export PROJECT_ID=$(gcloud config get project)
export INSTANCE_NAME="aidemy"
export REGION="us-central1"
export DB_USER="postgres"
export DB_PASS="1234qwer"
export DB_NAME="aidemy-db"
👉 اکنون، رابط کاربری وب را اجرا کنید.
cd ~/aidemy-bootstrap/planner/
source env/bin/activate
python app.py
به دنبال پیامهای راهاندازی در خروجی ترمینال Cloud Shell باشید. Flask معمولاً پیامهایی را چاپ میکند که نشان میدهد در حال اجرا است و روی چه پورتی.
Running on http://127.0.0.1:8080
Running on http://127.0.0.1:8080
The application needs to keep running to serve requests.
👉 از منوی «پیشنمایش وب» در گوشه بالا سمت راست، پیشنمایش روی پورت ۸۰۸۰ را انتخاب کنید. Cloud Shell یک برگه یا پنجره مرورگر جدید با پیشنمایش وب برنامه شما باز میکند.
در رابط برنامه، برای سال، 5 را انتخاب کنید، رشته Mathematics را انتخاب کنید و در قسمت درخواست افزونه، Geometry را تایپ کنید.
👉 اگر از رابط کاربری برنامه خارج شدید، به عقب برگردید و باید خروجی تولید شده را ببینید.
👉 در ترمینال خود، با فشردن Ctrl+C اسکریپت را متوقف کنید.
👉 در ترمینال خود، از محیط مجازی خارج شوید:
deactivate
۸. استقرار عامل برنامهریز در فضای ابری
ساخت و ارسال تصویر به رجیستری
وقت آن است که این را به فضای ابری منتقل کنیم.
👉 در ترمینال ، یک مخزن مصنوعات ایجاد کنید تا ایمیج داکری که قرار است بسازیم را در آن ذخیره کنید.
gcloud artifacts repositories create agent-repository \
    --repository-format=docker \
    --location=us-central1 \
    --description="My agent repository"
شما باید مخزن ایجاد شده [agent-repository] را ببینید.
👉 دستور زیر را برای ساخت ایمیج داکر اجرا کنید.
cd ~/aidemy-bootstrap/planner/
gcloud config set project $(cat ~/project_id.txt)
export PROJECT_ID=$(gcloud config get project)
docker build -t gcr.io/${PROJECT_ID}/aidemy-planner .
👉 باید تصویر را دوباره برچسبگذاری کنیم تا به جای GCR در Artifact Registry میزبانی شود و تصویر برچسبگذاری شده را به Artifact Registry منتقل کنیم:
gcloud config set project $(cat ~/project_id.txt)
export PROJECT_ID=$(gcloud config get project)
docker tag gcr.io/${PROJECT_ID}/aidemy-planner us-central1-docker.pkg.dev/${PROJECT_ID}/agent-repository/aidemy-planner
docker push us-central1-docker.pkg.dev/${PROJECT_ID}/agent-repository/aidemy-planner
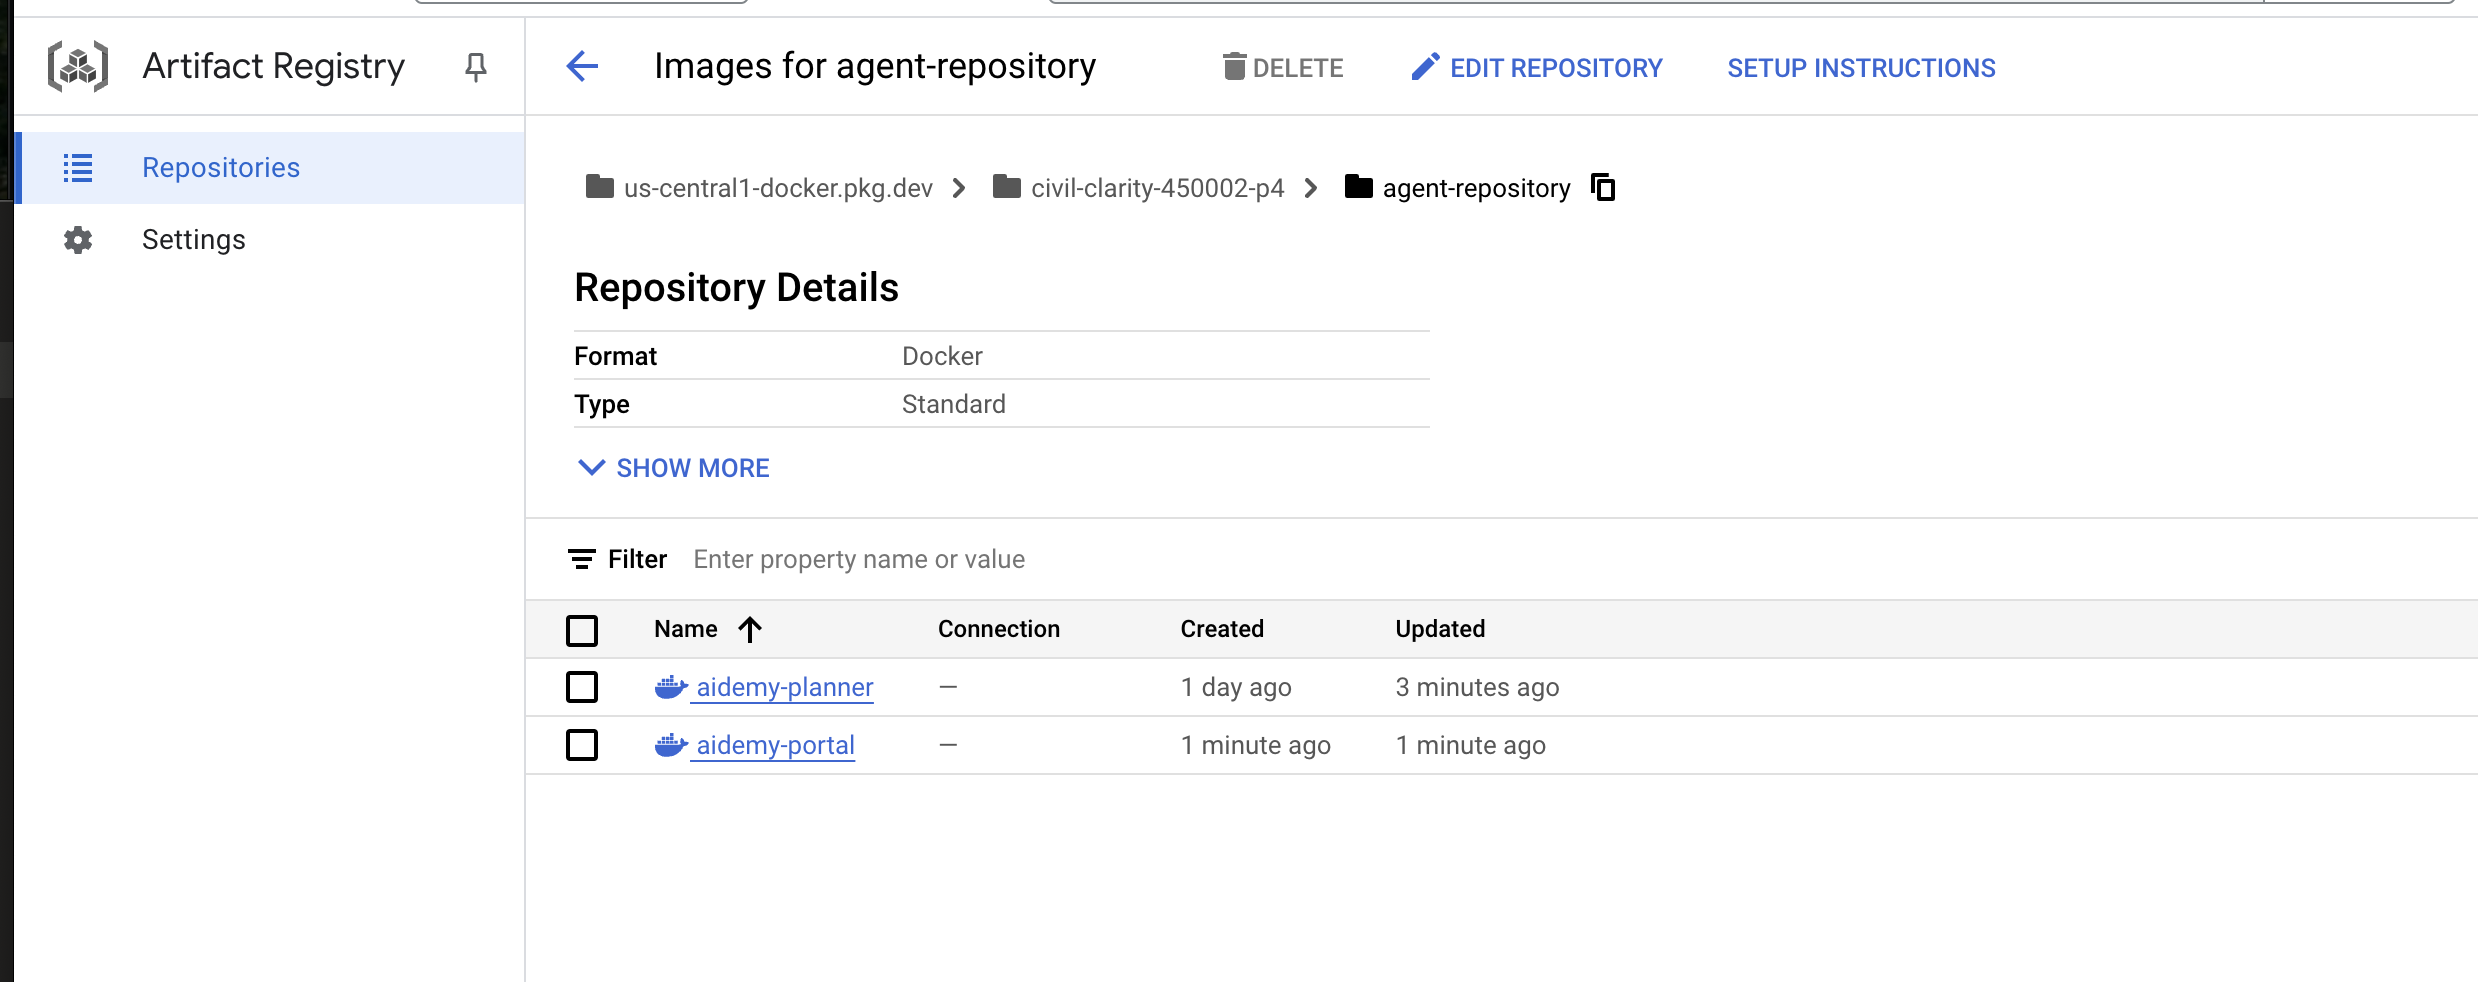
پس از اتمام عملیات، میتوانید تأیید کنید که تصویر با موفقیت در Artifact Registry ذخیره شده است.
👉 به بخش Artifact Registry در کنسول Google Cloud بروید. باید تصویر aidemy-planner را در مخزن agent-repository پیدا کنید. 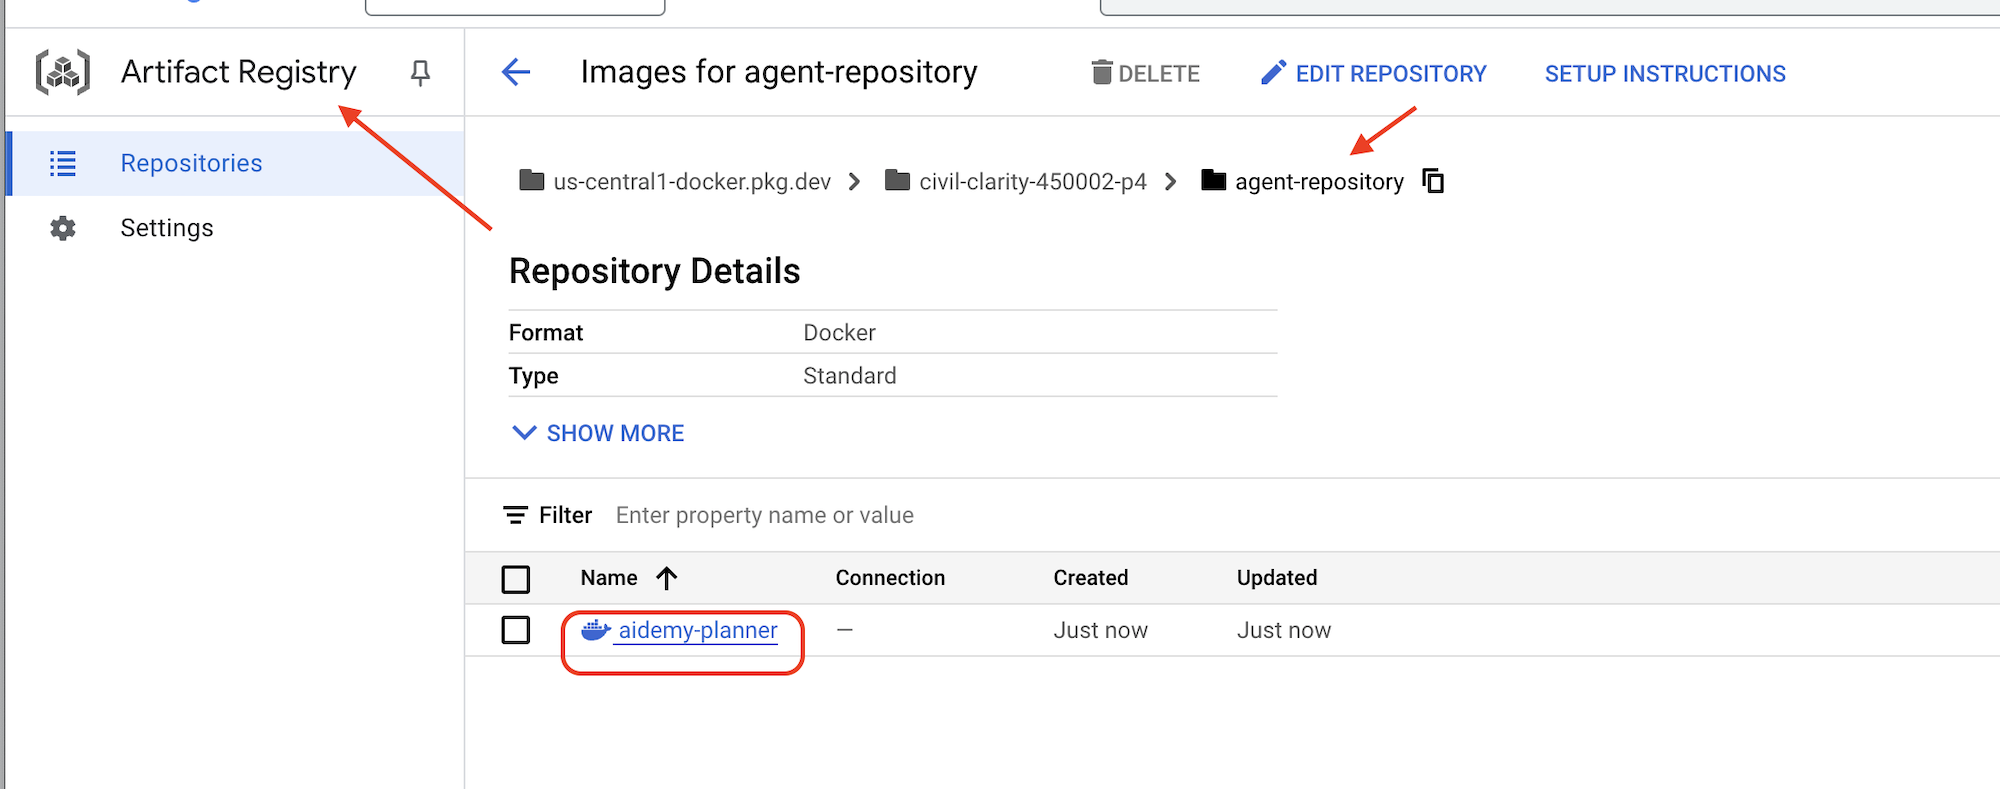
ایمنسازی اعتبارنامههای پایگاه داده با Secret Manager
برای مدیریت و دسترسی ایمن به اعتبارنامههای پایگاه داده، از Google Cloud Secret Manager استفاده خواهیم کرد. این امر از کدگذاری سخت اطلاعات حساس در کد برنامه ما جلوگیری کرده و امنیت را افزایش میدهد.
ما برای نام کاربری، رمز عبور و نام پایگاه داده، رمزهای جداگانه ایجاد خواهیم کرد. این رویکرد به ما امکان میدهد هر اعتبارنامه را بهطور مستقل مدیریت کنیم.
👉 در ترمینال دستور زیر را اجرا کنید:
gcloud secrets create db-user
printf "postgres" | gcloud secrets versions add db-user --data-file=-

gcloud secrets create db-pass
printf "1234qwer" | gcloud secrets versions add db-pass --data-file=-

gcloud secrets create db-name
printf "aidemy-db" | gcloud secrets versions add db-name --data-file=-
استفاده از Secret Manager گامی مهم در ایمنسازی برنامه شما و جلوگیری از افشای تصادفی اطلاعات حساس است. این ابزار از بهترین شیوههای امنیتی برای استقرارهای ابری پیروی میکند.
استقرار در Cloud Run
Cloud Run یک پلتفرم کاملاً مدیریتشده بدون سرور است که به شما امکان میدهد برنامههای کانتینر شده را به سرعت و به راحتی مستقر کنید. این پلتفرم مدیریت زیرساخت را حذف میکند و به شما امکان میدهد روی نوشتن و استقرار کد خود تمرکز کنید. ما برنامهریز خود را به عنوان یک سرویس Cloud Run مستقر خواهیم کرد.
👉 در کنسول گوگل کلود، به « Cloud Run » بروید. روی DEPLOY CONTAINER کلیک کنید و SERVICE را انتخاب کنید. سرویس Cloud Run خود را پیکربندی کنید:
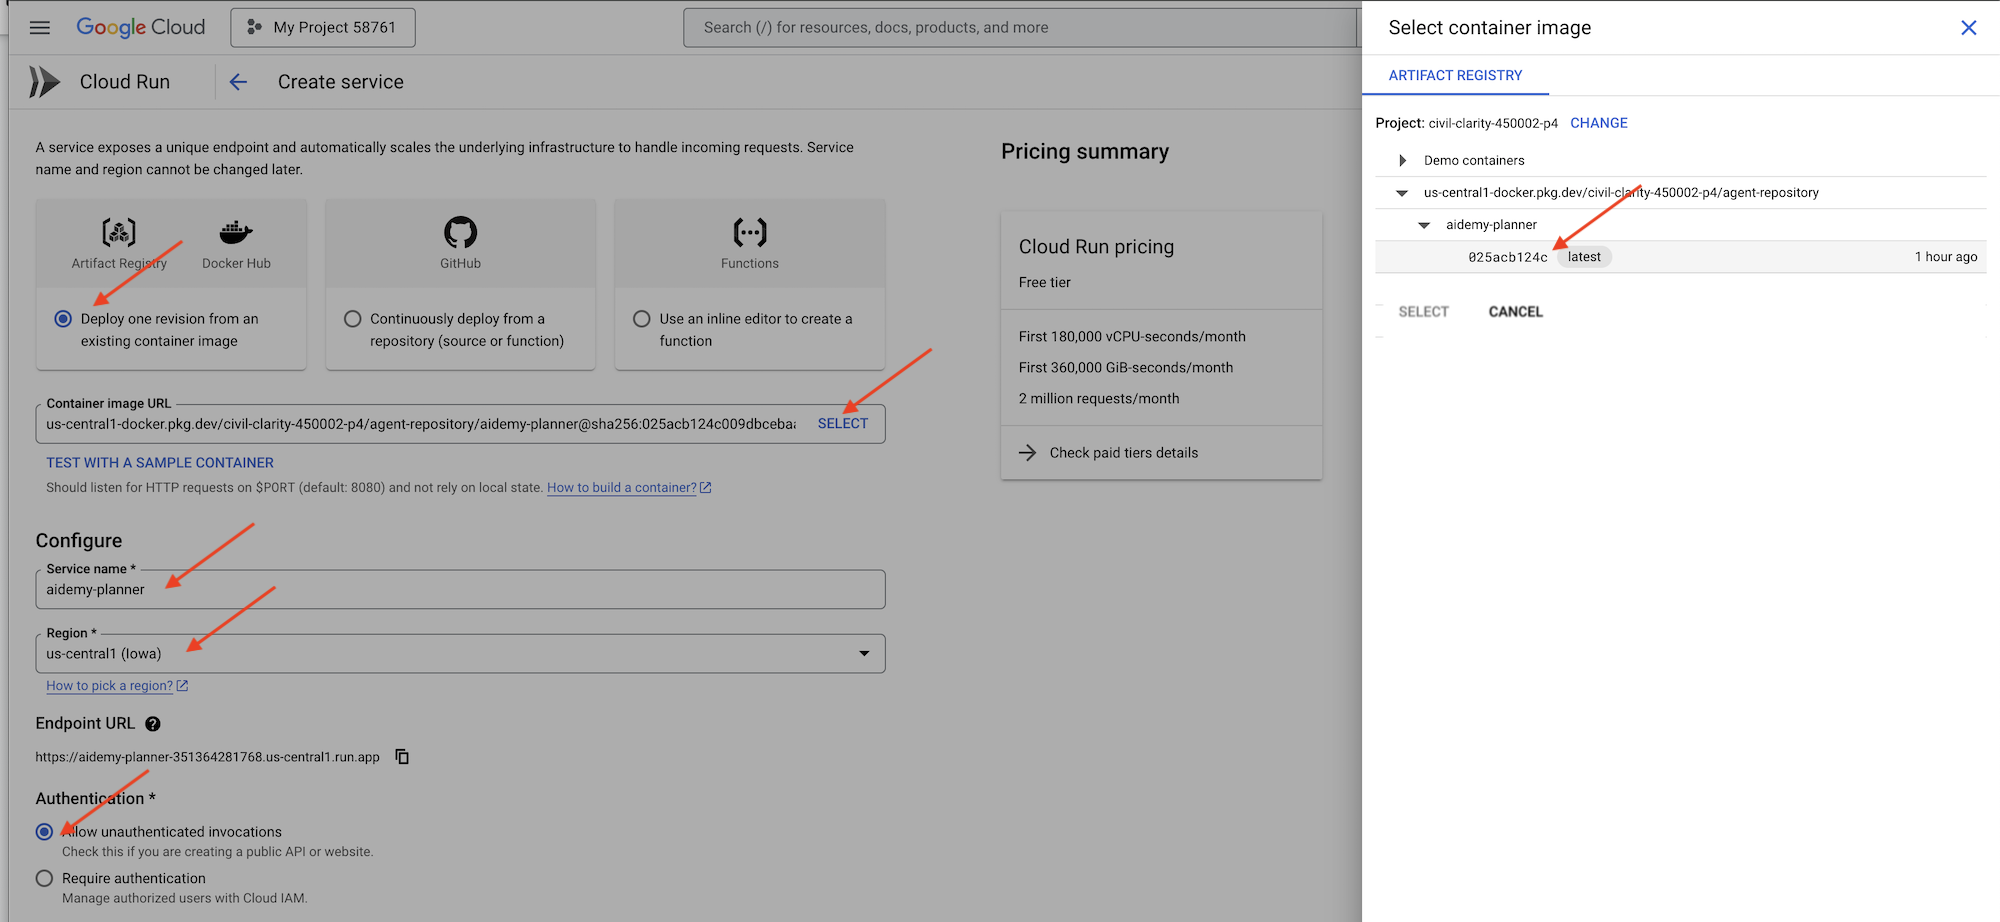
- تصویر کانتینر : در فیلد URL روی «انتخاب» کلیک کنید. URL تصویری را که به Artifact Registry ارسال کردهاید (مثلاً us-central1-docker.pkg.dev/YOUR_PROJECT_ID/agent-repository/aidemy-planner/YOUR_IMG) پیدا کنید.
- نام خدمات :
aidemy-planner - منطقه : منطقه
us-central1را انتخاب کنید. - احراز هویت : برای اهداف این کارگاه، میتوانید «اجازه دادن به فراخوانیهای احراز هویت نشده» را فعال کنید. برای محیط عملیاتی، احتمالاً میخواهید دسترسی را محدود کنید.
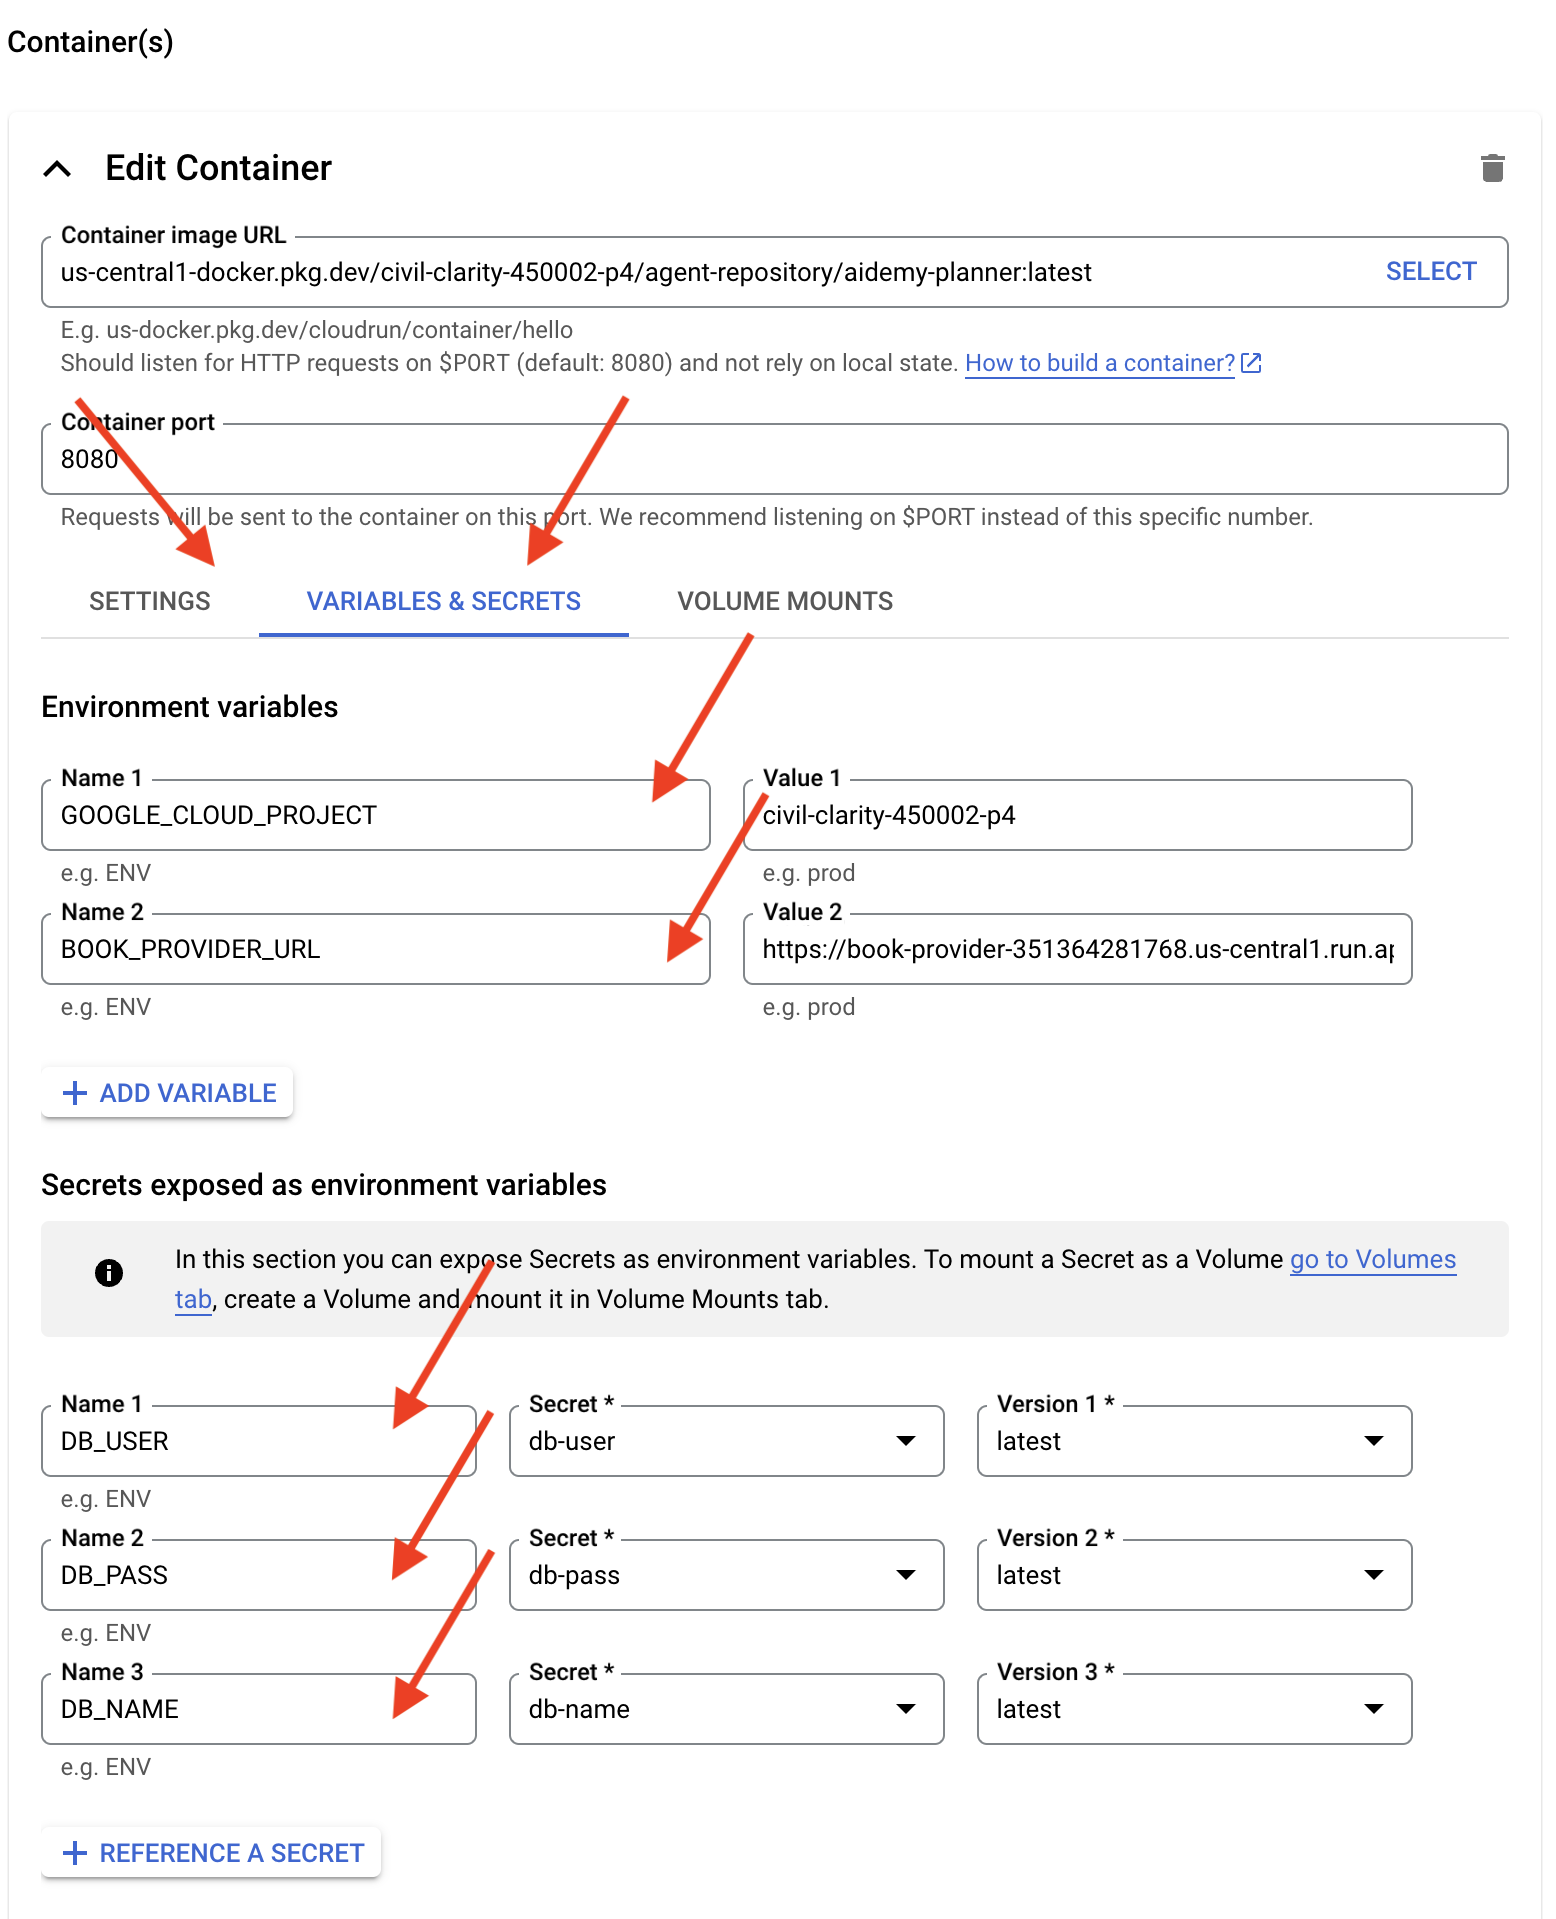
- بخش Container(s)، Volumes، Networking، Security را باز کنید و موارد زیر را در زیر تب Container(s) تنظیم کنید (:
- برگه تنظیمات:
- منابع
- حافظه: ۲ گیگابایت
- منابع
- تب متغیرها و اسرار:
- متغیرهای محیطی، متغیرهای زیر را با کلیک روی دکمه + افزودن متغیر اضافه کنید:
- نام را اضافه کنید:
GOOGLE_CLOUD_PROJECTو مقدار را <YOUR_PROJECT_ID> قرار دهید. - نام
BOOK_PROVIDER_URLرا اضافه کنید و مقدار آن را برابر با URL تابع book-provider خود قرار دهید، که میتوانید با استفاده از دستور زیر در ترمینال آن را تعیین کنید:gcloud config set project $(cat ~/project_id.txt) gcloud run services describe book-provider \ --region=us-central1 \ --project=$PROJECT_ID \ --format="value(status.url)"
- نام را اضافه کنید:
- در بخش «رازهایی که به عنوان متغیرهای محیطی افشا میشوند» ، با کلیک روی دکمه «+ مرجع به عنوان یک راز»، رازهای زیر را اضافه کنید:
- نام را اضافه کنید:
DB_USER، رمز را انتخاب کنید:db-userو نسخه را اضافه کنید:latest - نام را اضافه کنید:
DB_PASS، راز: انتخابdb-passو نسخه:latest - نام را اضافه کنید:
DB_NAME، راز:db-nameانتخاب کنید و نسخه را:latest
- نام را اضافه کنید:
- متغیرهای محیطی، متغیرهای زیر را با کلیک روی دکمه + افزودن متغیر اضافه کنید:
- برگه تنظیمات:
مقادیر دیگر را به صورت پیشفرض باقی بگذارید.
👉 روی ایجاد کلیک کنید.
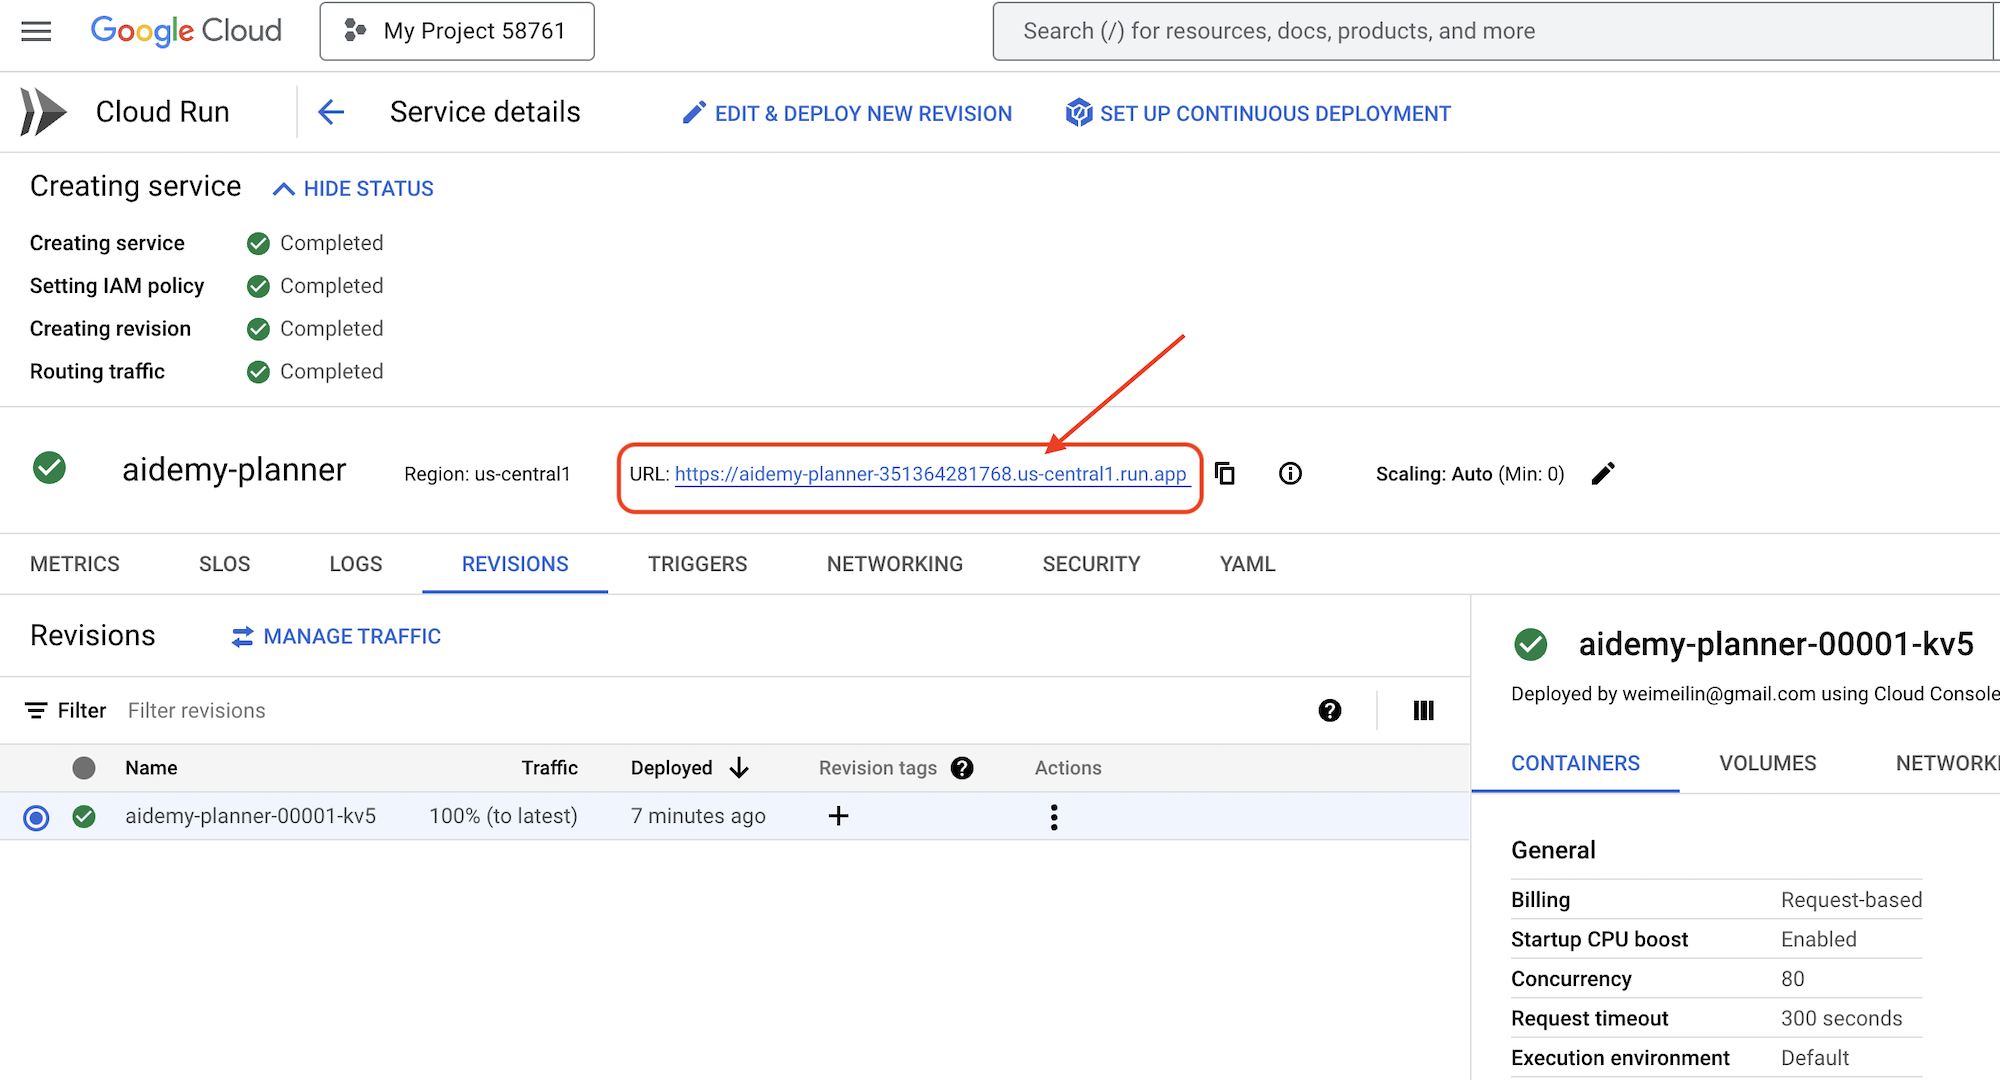
Cloud Run سرویس شما را مستقر خواهد کرد.
Once deployed, if you are not already on the detail page, click on the service name to go to its detail page. You can find the deployed URL available on the top.
👉 In the application interface, select 7 for the Year, choose Mathematics as the subject, and enter Algebra in the Add-on Request field.
👉 Click Generate Plan . This will provide the agent with the necessary context to generate a tailored lesson plan.
Congratulations! You've successfully created a teaching plan using our powerful AI agent. This demonstrates the potential of agents to significantly reduce workload and streamline tasks, ultimately improving efficiency and making life easier for educators.
9. Multi-agent systems
Now that we've successfully implemented the teaching plan creation tool, let's shift our focus to building the student portal. This portal will provide students with access to quizzes, audio recaps, and assignments related to their coursework. Given the scope of this functionality, we'll leverage the power of multi-agent systems to create a modular and scalable solution.
As we discussed earlier, instead of relying on a single agent to handle everything, a multi-agent system allows us to break down the workload into smaller, specialized tasks, each handled by a dedicated agent. This approach offers several key advantages:
Modularity and Maintainability : Instead of creating a single agent that does everything, build smaller, specialized agents with well-defined responsibilities. This modularity makes the system easier to understand, maintain, and debug. When a problem arises, you can isolate it to a specific agent, rather than having to sift through a massive codebase.
Scalability : Scaling a single, complex agent can be a bottleneck. With a multi-agent system, you can scale individual agents based on their specific needs. For example, if one agent is handling a high volume of requests, you can easily spin up more instances of that agent without affecting the rest of the system.
Team Specialization : Think of it like this: you wouldn't ask one engineer to build an entire application from scratch. Instead, you assemble a team of specialists, each with expertise in a particular area. Similarly, a multi-agent system allows you to leverage the strengths of different LLMs and tools, assigning them to agents that are best suited for specific tasks.
Parallel Development : Different teams can work on different agents concurrently, speeding up the development process. Since agents are independent, changes to one agent are less likely to impact other agents.
Event Driven Architecture
To enable effective communication and coordination between these agents, we'll employ an event-driven architecture. This means that agents will react to "events" happening within the system.
Agents subscribe to specific event types (eg, "teaching plan generated," "assignment created"). When an event occurs, the relevant agents are notified and can react accordingly. This decoupling promotes flexibility, scalability, and real-time responsiveness.

Now, to kick things off, we need a way to broadcast these events. To do this, we will set up a Pub/Sub topic. Let's start by creating a topic called plan .
👉 Go to Google Cloud Console pub/sub .
👉 Click on the Create Topic button.
👉 Configure the Topic with ID/name plan and uncheck Add a default subscription , leave rest as default and click Create .
The Pub/Sub page will refresh, and you should now see your newly created topic listed in the table. 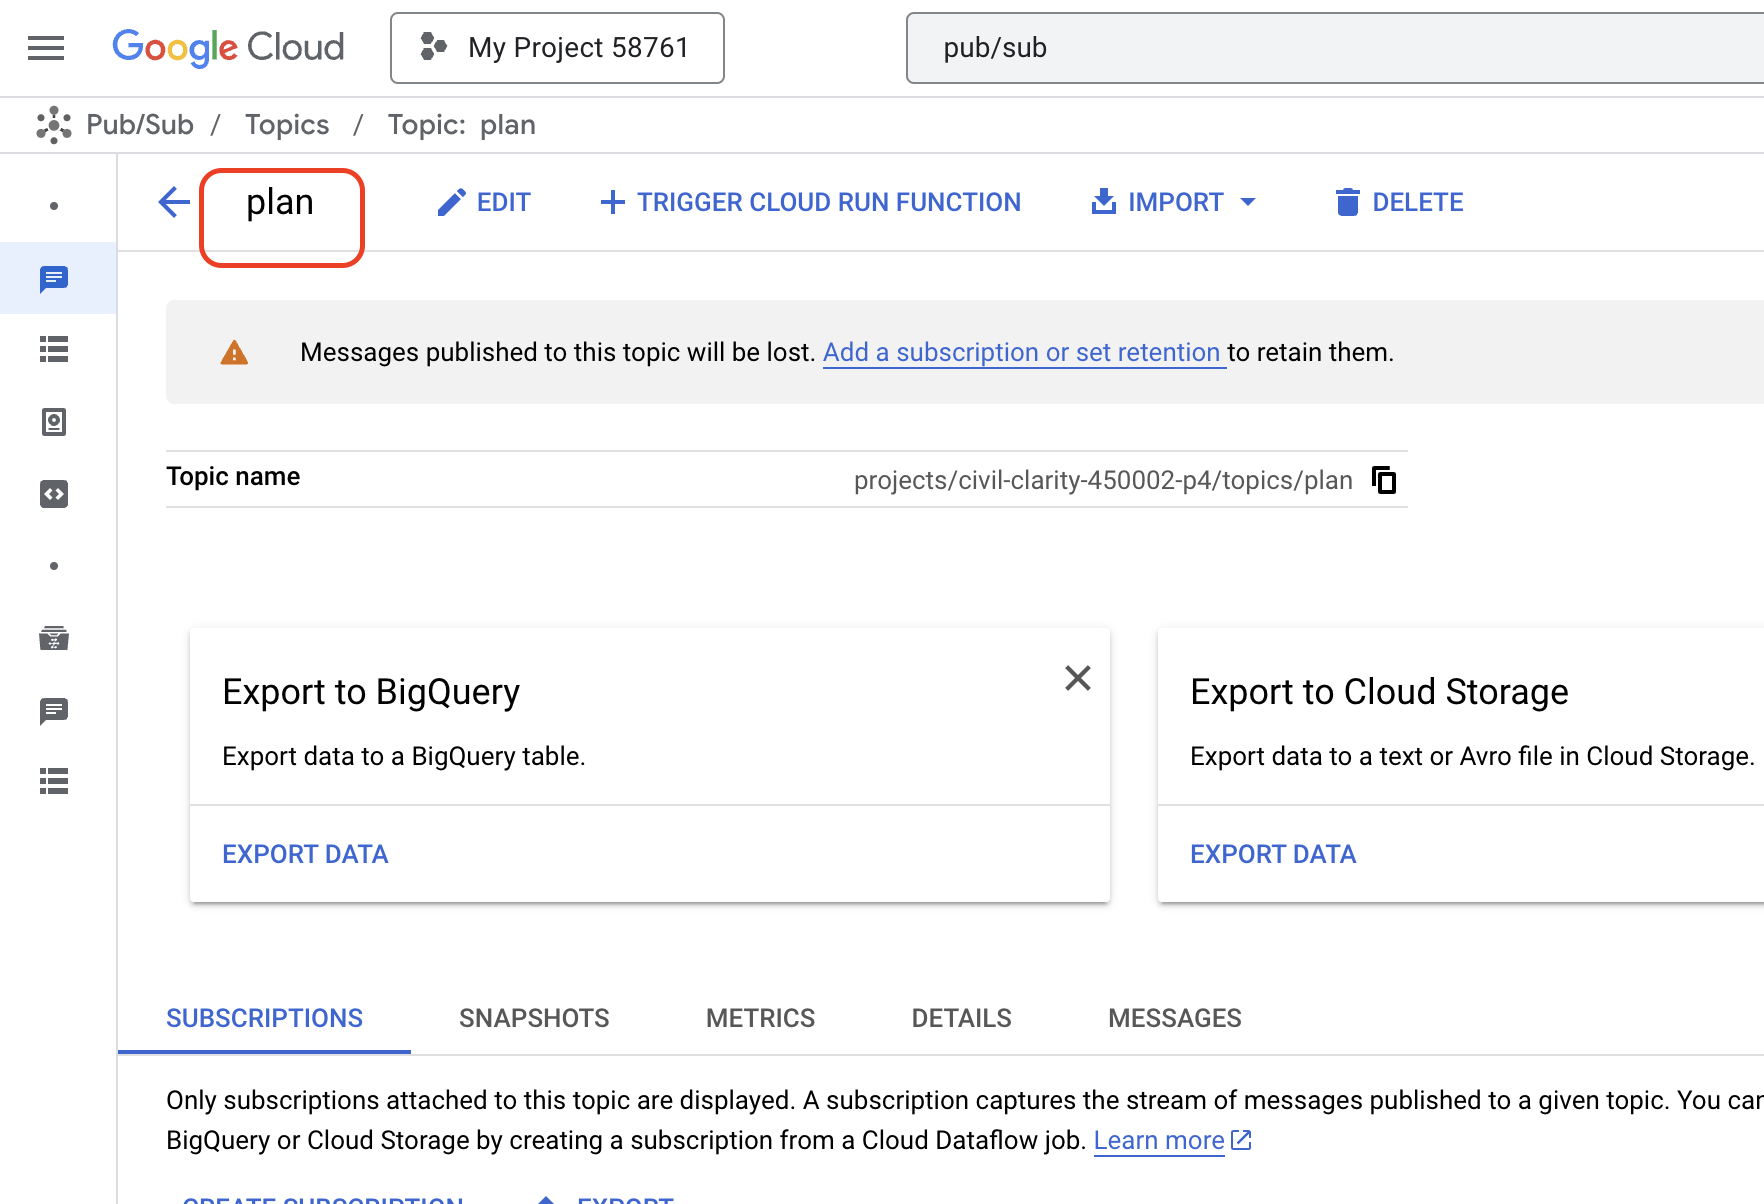
Now, let's integrate the Pub/Sub event publishing functionality into our planner agent. We'll add a new tool that sends a "plan" event to the Pub/Sub topic we just created. This event will signal to other agents in the system (like those in the student portal) that a new teaching plan is available.
👉Go back to the Cloud Code Editor and open the app.py file located in the planner folder. We will be adding a function that publishes the event. Replace :
##ADD SEND PLAN EVENT FUNCTION HERE
with the following code
def send_plan_event(teaching_plan:str):
    """
    Send the teaching event to the topic called plan

    Args:
        teaching_plan: teaching plan
    """
    publisher = pubsub_v1.PublisherClient()
    print(f"-------------> Sending event to topic plan: {teaching_plan}")
    topic_path = publisher.topic_path(PROJECT_ID, "plan")

    message_data = {"teaching_plan": teaching_plan}
    data = json.dumps(message_data).encode("utf-8")

    future = publisher.publish(topic_path, data)

    return f"Published message ID: {future.result()}"
- send_plan_event : This function takes the generated teaching plan as input, creates a Pub/Sub publisher client, constructs the topic path, converts the teaching plan into a JSON string, and publishes the message to the topic.
In the same app.py file
👉Update the prompt to instruct the agent to send the teaching plan event to the Pub/Sub topic after generating the teaching plan. * Replace
### ADD send_plan_event CALL
with the following :
send_plan_event(teaching_plan)
By adding the send_plan_event tool and modifying the prompt, we've enabled our planner agent to publish events to Pub/Sub, allowing other components of our system to react to the creation of new teaching plans. We will now have a functional multi-agent system in the following sections.
10. Empowering Students with On-Demand Quizzes
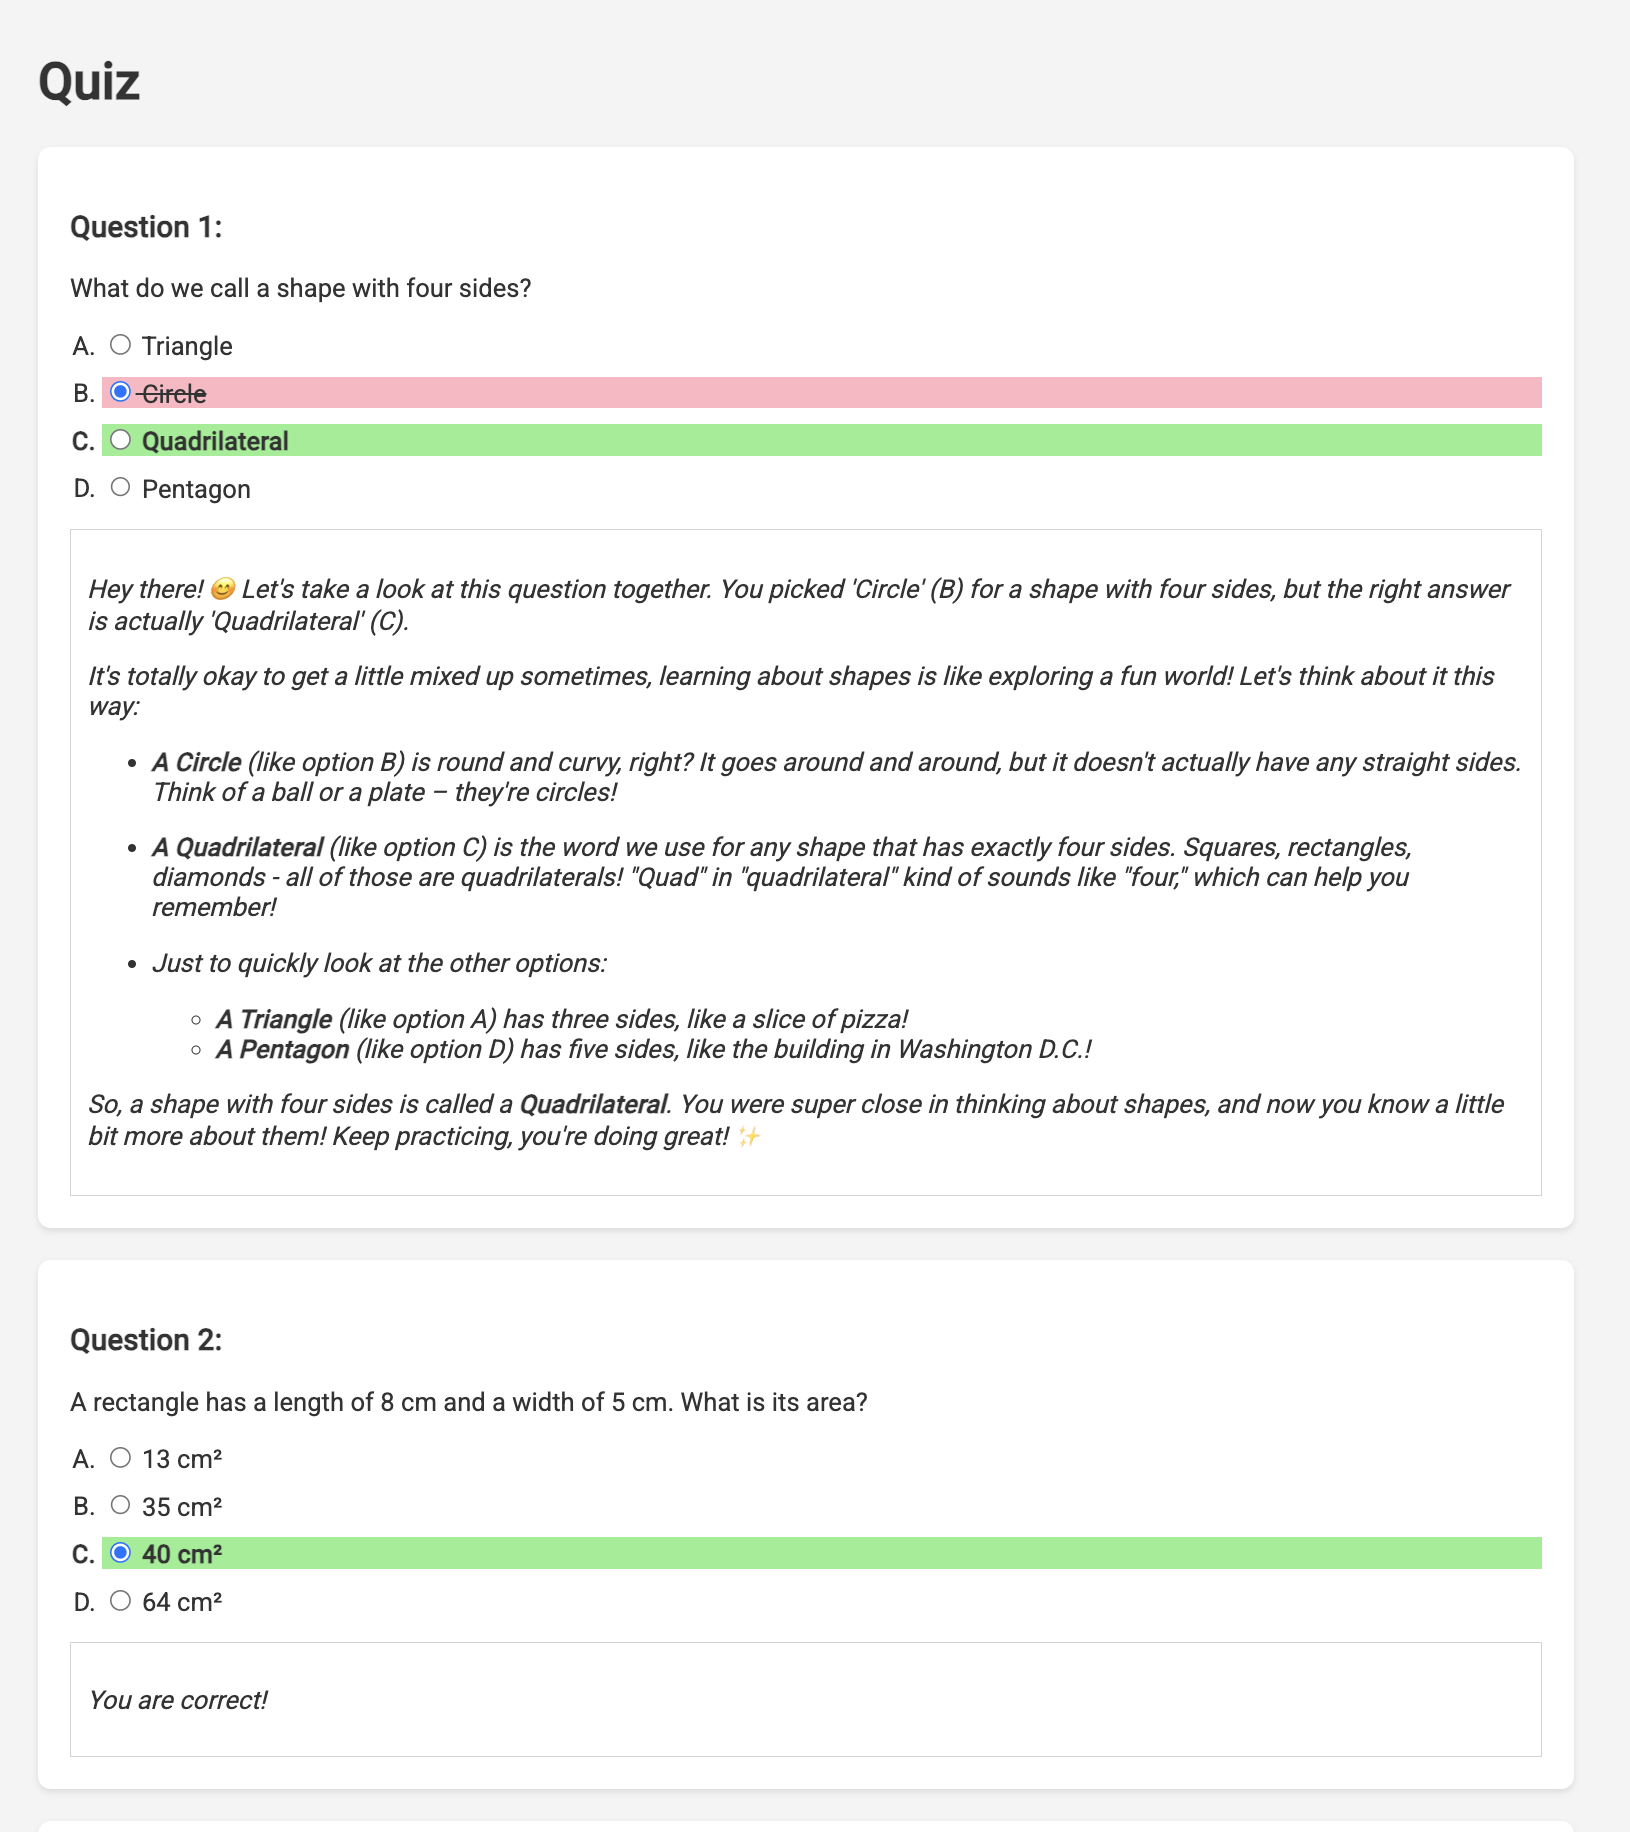
Imagine a learning environment where students have access to an endless supply of quizzes tailored to their specific learning plans. These quizzes provide immediate feedback, including answers and explanations, fostering a deeper understanding of the material. This is the potential we aim to unlock with our AI-powered quiz portal.
To bring this vision to life, we'll build a quiz generation component that can create multiple-choice questions based on the content of the teaching plan.
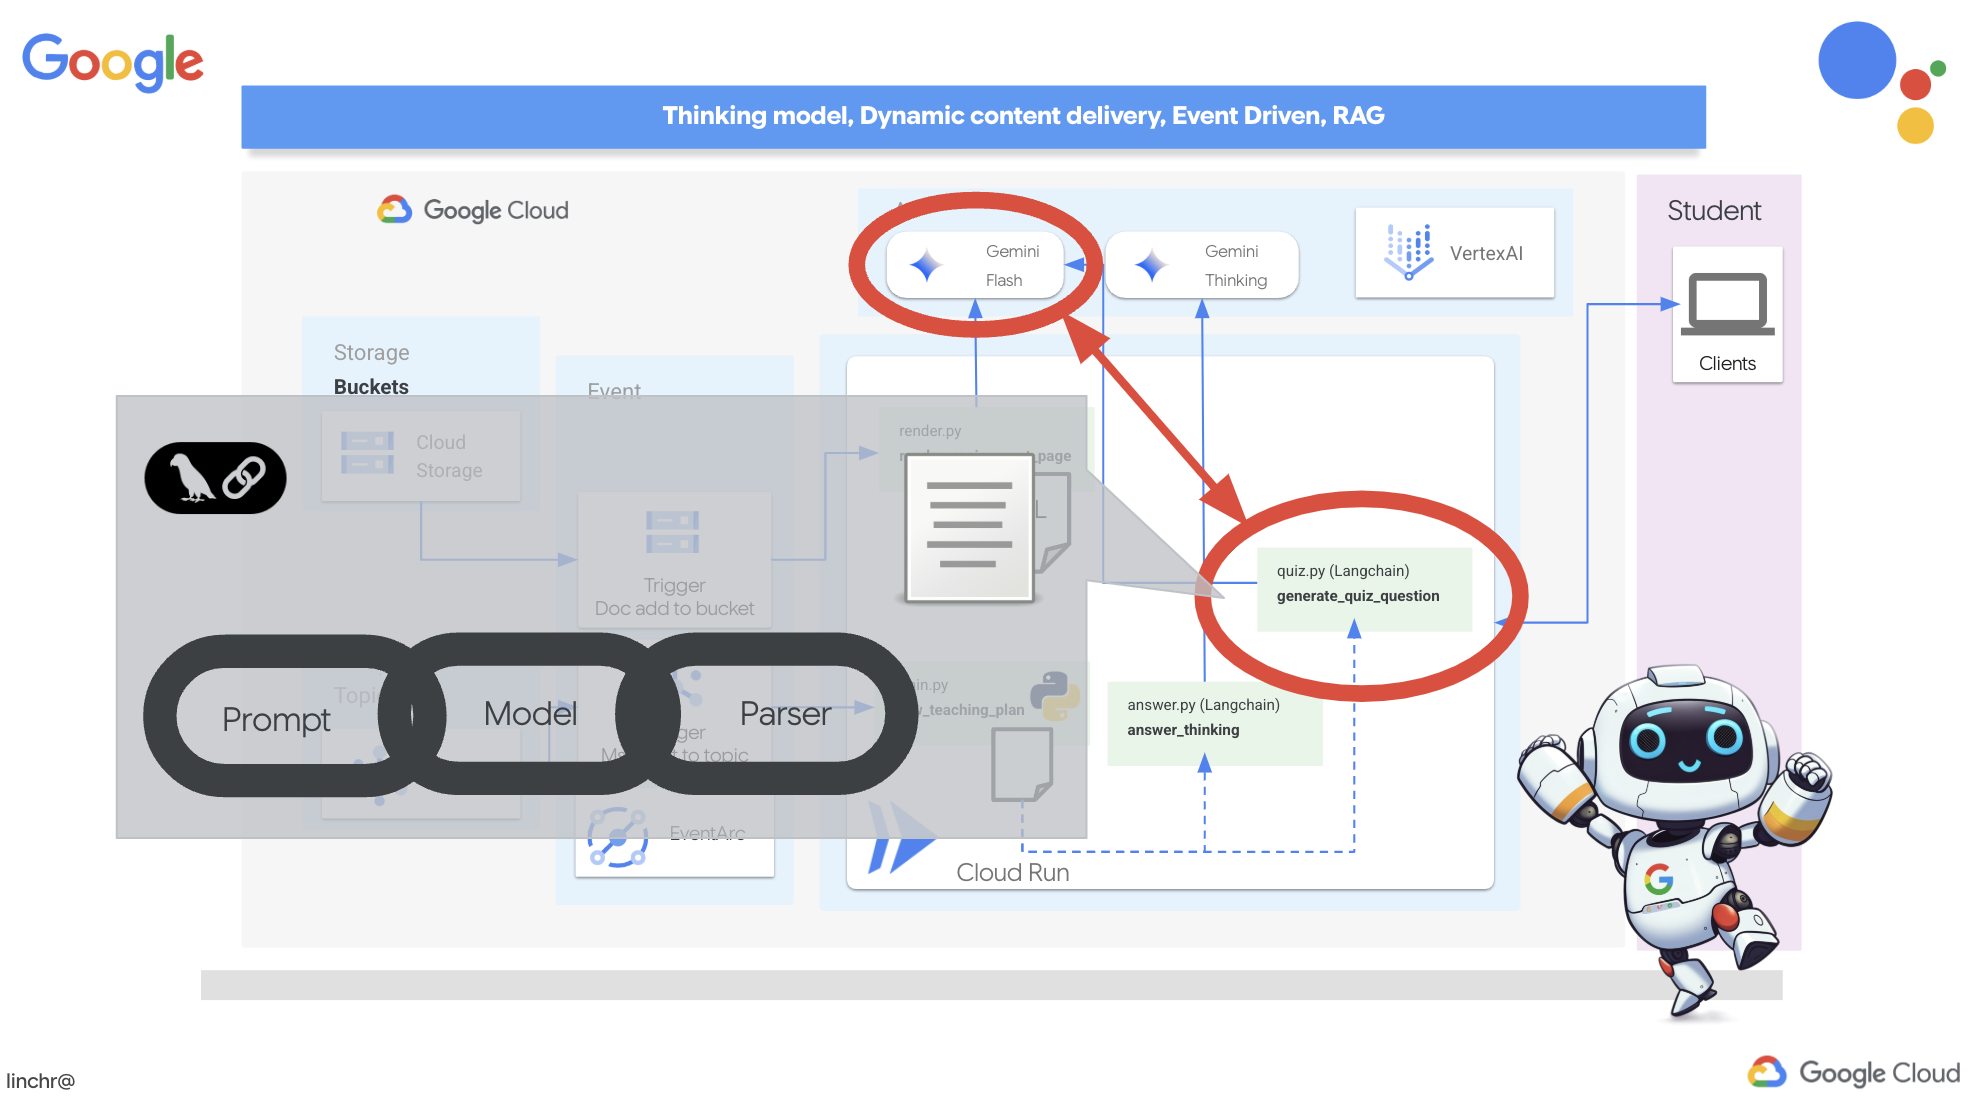
👉 In the Cloud Code Editor's Explorer pane, navigate to the portal folder. Open the quiz.py file copy and paste the following code to the end of the file .
def generate_quiz_question(file_name: str, difficulty: str, region:str ):
    """Generates a single multiple-choice quiz question using the LLM.

    ```json
    {
      "question": "The question itself",
      "options": ["Option A", "Option B", "Option C", "Option D"],
      "answer": "The correct answer letter (A, B, C, or D)"
    }
    ```
    """

    print(f"region: {region}")
    # Connect to resourse needed from Google Cloud
    llm = VertexAI(model_name="gemini-2.5-flash-preview-04-17", location=region)


    plan=None
    #load the file using file_name and read content into string call plan
    with open(file_name, 'r') as f:
        plan = f.read()

    parser = JsonOutputParser(pydantic_object=QuizQuestion)


    instruction = f"You'll provide one question with difficulty level of {difficulty}, 4 options as multiple choices and provide the anwsers, the quiz needs to be related to the teaching plan {plan}"

    prompt = PromptTemplate(
        template="Generates a single multiple-choice quiz question\n {format_instructions}\n  {instruction}\n",
        input_variables=["instruction"],
        partial_variables={"format_instructions": parser.get_format_instructions()},
    )

    chain = prompt | llm | parser
    response = chain.invoke({"instruction": instruction})

    print(f"{response}")
    return  response
In the agent it creates a JSON output parser that's specifically designed to understand and structure the LLM's output. It uses the QuizQuestion model we defined earlier to ensure the parsed output conforms to the correct format (question, options, and answer).
👉 In your terminal , Execute the following commands to set up a virtual environment, install dependencies, and start the agent:
gcloud config set project $(cat ~/project_id.txt)
cd ~/aidemy-bootstrap/portal/
python -m venv env
source env/bin/activate
pip install -r requirements.txt
python app.py
👉 From the "Web preview" menu in the top right corner, choose Preview on port 8080 . Cloud Shell will open a new browser tab or window with the web preview of your application.
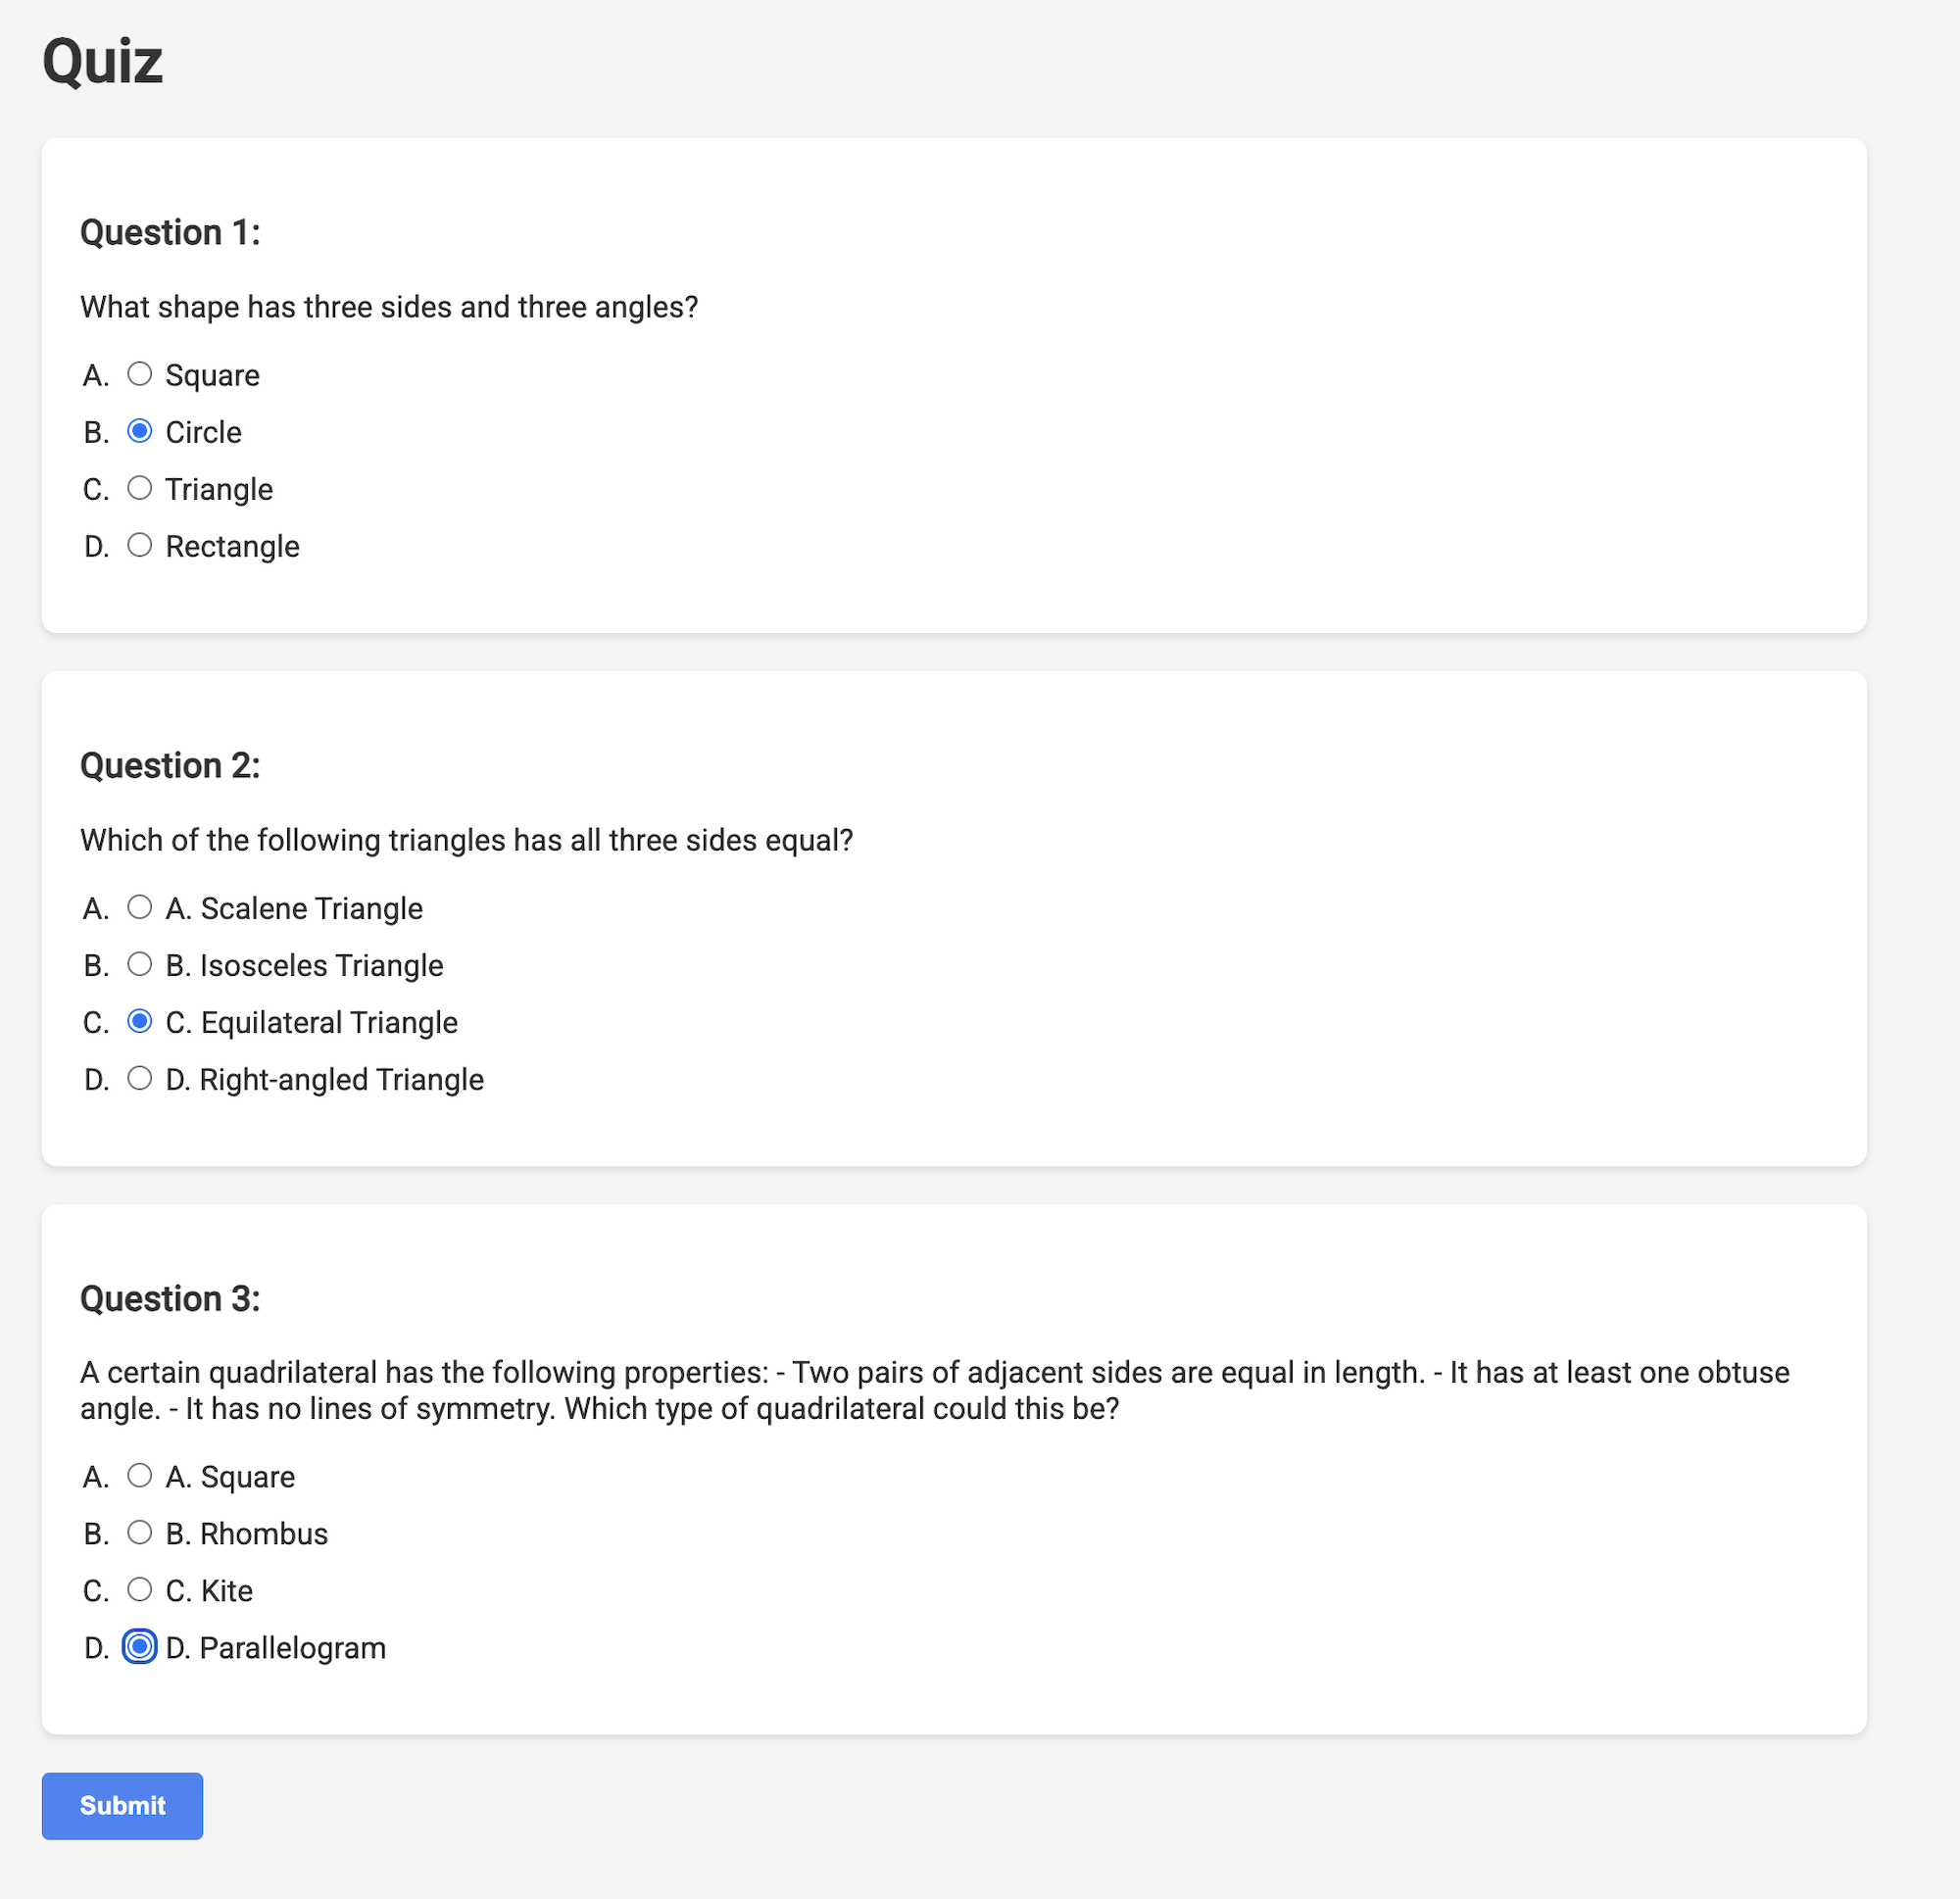
👉 In the web application, Click on the "Quizzes" link, either in the top navigation bar or from the card on the index page. You should see three randomly generated quizzes displayed for the student. These quizzes are based on the teaching plan and demonstrate the power of our AI-powered quiz generation system.
👉To stop the locally running process, press Ctrl+C in the terminal.
Gemini 2 Thinking for Explanations
Okay, so we've got quizzes, which is a great start! But what if students get something wrong? That's where the real learning happens, right? If we can explain why their answer was off and how to get to the correct one, they're way more likely to remember it. Plus, it helps clear up any confusion and boost their confidence.
That's why we're going to bring in the big guns: Gemini 2's "thinking" model! Think of it like giving the AI a little extra time to think things through before explaining. It lets it give more detailed and better feedback.
We want to see if it can help students by assisting, answering and explaining in detail. To test it out, we'll start with a notoriously tricky subject, Calculus.
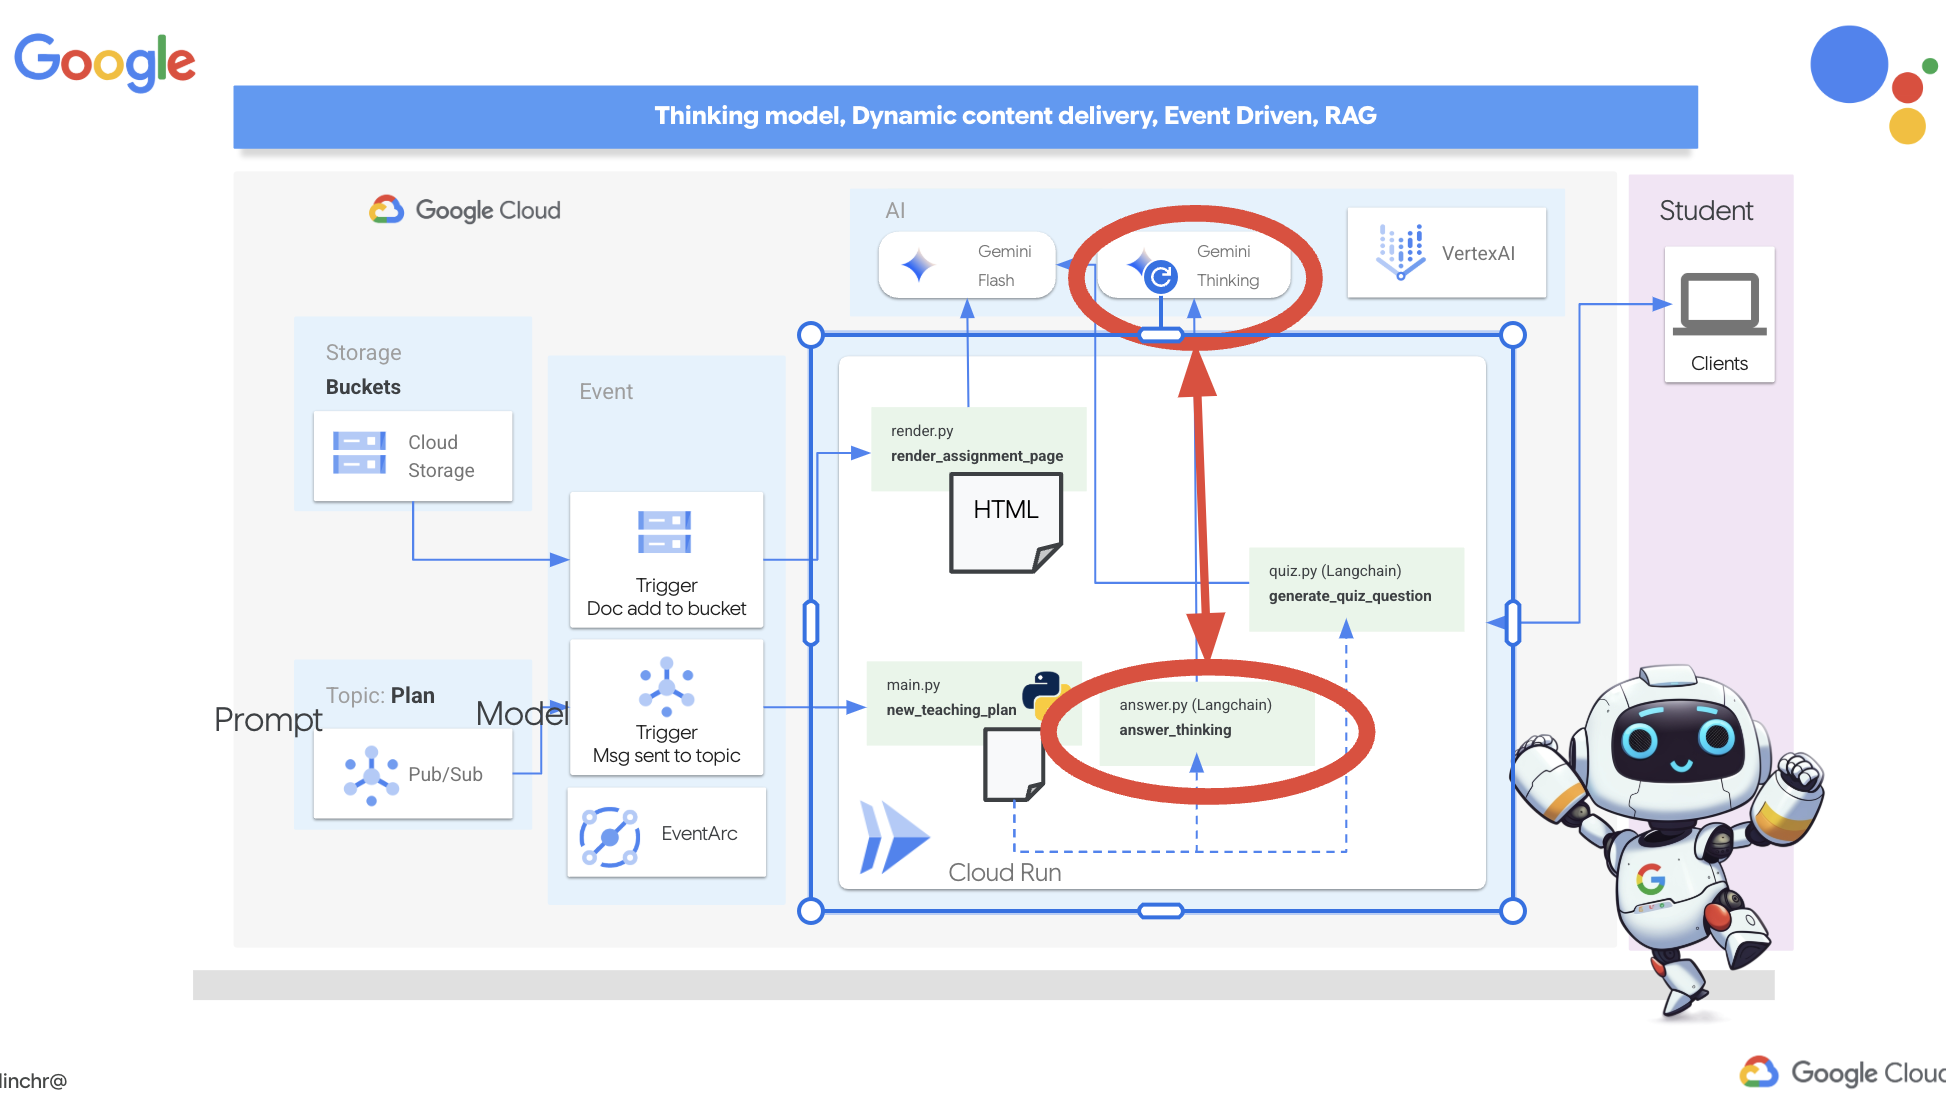
👉First, head over to the Cloud Code Editor, in answer.py inside the portal folder. Replace the following function code
def answer_thinking(question, options, user_response, answer, region):
    return ""
with following code snippet :
def answer_thinking(question, options, user_response, answer, region):
    try:
        llm = VertexAI(model_name="gemini-2.0-flash-001",location=region)

        input_msg = HumanMessage(content=[f"Here the question{question}, here are the available options {options}, this student's answer {user_response}, whereas the correct answer is {answer}"])
        prompt_template = ChatPromptTemplate.from_messages(
            [
                SystemMessage(
                    content=(
                        "You are a helpful teacher trying to teach the student on question, you were given the question and a set of multiple choices "
                        "what's the correct answer. use friendly tone"
                    )
                ),
                input_msg,
            ]
        )

        prompt = prompt_template.format()

        response = llm.invoke(prompt)
        print(f"response: {response}")

        return response
    except Exception as e:
        print(f"Error sending message to chatbot: {e}") # Log this error too!
        return f"Unable to process your request at this time. Due to the following reason: {str(e)}"


if __name__ == "__main__":
    question = "Evaluate the limit: lim (x→0) [(sin(5x) - 5x) / x^3]"
    options = ["A) -125/6", "B) -5/3 ", "C) -25/3", "D) -5/6"]
    user_response = "B"
    answer = "A"
    region = "us-central1"
    result = answer_thinking(question, options, user_response, answer, region)
This is a very simple langchain app where it Initializes the Gemini 2 Flash model, where we are instructing it to act as a helpful teacher and provide explanations
👉Execute the following command in the terminal:
gcloud config set project $(cat ~/project_id.txt)
cd ~/aidemy-bootstrap/portal/
source env/bin/activate
python answer.py
You should see output similar to the example provided in the original instructions. The current model may not provide as through explanation.
Okay, I see the question and the choices. The question is to evaluate the limit:

lim (x→0) [(sin(5x) - 5x) / x^3]

You chose option B, which is -5/3, but the correct answer is A, which is -125/6.

It looks like you might have missed a step or made a small error in your calculations. This type of limit often involves using L'Hôpital's Rule or Taylor series expansion. Since we have the form 0/0, L'Hôpital's Rule is a good way to go! You need to apply it multiple times. Alternatively, you can use the Taylor series expansion of sin(x) which is:
sin(x) = x - x^3/3! + x^5/5! - ...
So, sin(5x) = 5x - (5x)^3/3! + (5x)^5/5! - ...
Then,  (sin(5x) - 5x) = - (5x)^3/3! + (5x)^5/5! - ...
Finally, (sin(5x) - 5x) / x^3 = - 5^3/3! + (5^5 * x^2)/5! - ...
Taking the limit as x approaches 0, we get -125/6.

Keep practicing, you'll get there!
👉 In the answer.py file, replace the
model_name from gemini-2.0-flash-001 to gemini-2.0-flash-thinking-exp-01-21 in the answer_thinking function.
This changes the LLM to a different one that does better with reasoning. This will help the model generate better explanations.
👉 Run the answer.py script again to test the new thinking model:
gcloud config set project $(cat ~/project_id.txt)
cd ~/aidemy-bootstrap/portal/
source env/bin/activate
python answer.py
Here is an example of the response from the thinking model that is much more thorough and detailed, providing a step-by-step explanation of how to solve the calculus problem. This highlights the power of "thinking" models in generating high-quality explanations. You should see output similar to this:
Hey there! Let's take a look at this limit problem together. You were asked to evaluate:

lim (x→0) [(sin(5x) - 5x) / x^3]

and you picked option B, -5/3, but the correct answer is actually A, -125/6. Let's figure out why!

It's a tricky one because if we directly substitute x=0, we get (sin(0) - 0) / 0^3 = (0 - 0) / 0 = 0/0, which is an indeterminate form. This tells us we need to use a more advanced technique like L'Hopital's Rule or Taylor series expansion.

Let's use the Taylor series expansion for sin(y) around y=0. Do you remember it?  It looks like this:

sin(y) = y - y^3/3! + y^5/5! - ...
where 3! (3 factorial) is 3 × 2 × 1 = 6, 5! is 5 × 4 × 3 × 2 × 1 = 120, and so on.

In our problem, we have sin(5x), so we can substitute y = 5x into the Taylor series:

sin(5x) = (5x) - (5x)^3/3! + (5x)^5/5! - ...
sin(5x) = 5x - (125x^3)/6 + (3125x^5)/120 - ...

Now let's plug this back into our limit expression:

[(sin(5x) - 5x) / x^3] =  [ (5x - (125x^3)/6 + (3125x^5)/120 - ...) - 5x ] / x^3
Notice that the '5x' and '-5x' cancel out!  So we are left with:
= [ - (125x^3)/6 + (3125x^5)/120 - ... ] / x^3
Now, we can divide every term in the numerator by x^3:
= -125/6 + (3125x^2)/120 - ...

Finally, let's take the limit as x approaches 0.  As x gets closer and closer to zero, terms with x^2 and higher powers will become very, very small and approach zero.  So, we are left with:
lim (x→0) [ -125/6 + (3125x^2)/120 - ... ] = -125/6

Therefore, the correct answer is indeed **A) -125/6**.

It seems like your answer B, -5/3, might have come from perhaps missing a factor somewhere during calculation or maybe using an incorrect simplification. Double-check your steps when you were trying to solve it!

Don't worry, these limit problems can be a bit tricky sometimes! Keep practicing and you'll get the hang of it.  Let me know if you want to go through another similar example or if you have any more questions! 😊


Now that we have confirmed it works, let's use the portal.
👉 REMOVE the following test code from answer.py :
if __name__ == "__main__":
    question = "Evaluate the limit: lim (x→0) [(sin(5x) - 5x) / x^3]"
    options = ["A) -125/6", "B) -5/3 ", "C) -25/3", "D) -5/6"]
    user_response = "B"
    answer = "A"
    region = "us-central1"
    result = answer_thinking(question, options, user_response, answer, region)
👉Execute the following commands in the terminal to set up a virtual environment, install dependencies, and start the agent:
gcloud config set project $(cat ~/project_id.txt)
cd ~/aidemy-bootstrap/portal/
source env/bin/activate
python app.py
👉 From the "Web preview" menu in the top right corner, choose Preview on port 8080 . Cloud Shell will open a new browser tab or window with the web preview of your application.
👉 In the web application, Click on the "Quizzes" link, either in the top navigation bar or from the card on the index page.
👉 Answer all the quizzes and make sure at least get one answer wrong and then click Submit .
Rather than staring blankly while waiting for the response, switch over to the Cloud Editor's terminal. You can observe the progress and any output or error messages generated by your function in the emulator's terminal. 😁
👉 In your terminal, stop the locally running process by pressing Ctrl+C in the terminal.
11. OPTIONAL: Orchestrating the Agents with Eventarc
So far, the student portal has been generating quizzes based on a default set of teaching plans. That's helpful, but it means our planner agent and portal's quiz agent aren't really talking to each other. Remember how we added that feature where the planner agent publishes its newly generated teaching plans to a Pub/Sub topic? Now it's time to connect that to our portal agent!

We want the portal to automatically update its quiz content whenever a new teaching plan is generated. To do that, we'll create an endpoint in the portal that can receive these new plans.
👉 In the Cloud Code Editor's Explorer pane , navigate to the portal folder.
👉 Open the app.py file for editing. REPLACE ## REPLACE ME! NEW TEACHING PLAN line with the following code:
@app.route('/new_teaching_plan', methods=['POST'])
def new_teaching_plan():
    try:

        # Get data from Pub/Sub message delivered via Eventarc
        envelope = request.get_json()
        if not envelope:
            return jsonify({'error': 'No Pub/Sub message received'}), 400

        if not isinstance(envelope, dict) or 'message' not in envelope:
            return jsonify({'error': 'Invalid Pub/Sub message format'}), 400

        pubsub_message = envelope['message']
        print(f"data: {pubsub_message['data']}")

        data = pubsub_message['data']
        data_str = base64.b64decode(data).decode('utf-8')
        data = json.loads(data_str)

        teaching_plan = data['teaching_plan']

        print(f"File content: {teaching_plan}")

        with open("teaching_plan.txt", "w") as f:
            f.write(teaching_plan)

        print(f"Teaching plan saved to local file: teaching_plan.txt")

        return jsonify({'message': 'File processed successfully'})


    except Exception as e:
        print(f"Error processing file: {e}")
        return jsonify({'error': 'Error processing file'}), 500
Rebuilding and Deploying to Cloud Run
You'll need to update and redeploy both our planner and portal agents to Cloud Run. This ensures they have the latest code and are configured to communicate via events.
👉First we'll rebuild and push the planner agent image, back in the terminal run:
cd ~/aidemy-bootstrap/planner/
gcloud config set project $(cat ~/project_id.txt)
export PROJECT_ID=$(gcloud config get project)
docker build -t gcr.io/${PROJECT_ID}/aidemy-planner .
export PROJECT_ID=$(gcloud config get project)
docker tag gcr.io/${PROJECT_ID}/aidemy-planner us-central1-docker.pkg.dev/${PROJECT_ID}/agent-repository/aidemy-planner
docker push us-central1-docker.pkg.dev/${PROJECT_ID}/agent-repository/aidemy-planner
👉We'll do the same, build and push the portal agent image:
cd ~/aidemy-bootstrap/portal/
gcloud config set project $(cat ~/project_id.txt)
export PROJECT_ID=$(gcloud config get project)
docker build -t gcr.io/${PROJECT_ID}/aidemy-portal .
export PROJECT_ID=$(gcloud config get project)
docker tag gcr.io/${PROJECT_ID}/aidemy-portal us-central1-docker.pkg.dev/${PROJECT_ID}/agent-repository/aidemy-portal
docker push us-central1-docker.pkg.dev/${PROJECT_ID}/agent-repository/aidemy-portal
👉 Navigate to Artifact Registry , you should see both the aidemy-planner and aidemy-portal container images listed under the agent-repository .
👉Back in the terminal, run this to update the Cloud Run image for the planner agent:
gcloud config set project $(cat ~/project_id.txt)
export PROJECT_ID=$(gcloud config get project)
gcloud run services update aidemy-planner \
    --region=us-central1 \
    --image=us-central1-docker.pkg.dev/${PROJECT_ID}/agent-repository/aidemy-planner:latest
You should see output similar to this:
OK Deploying... Done.
  OK Creating Revision...
  OK Routing traffic...
Done.
Service [aidemy-planner] revision [aidemy-planner-xxxxx] has been deployed and is serving 100 percent of traffic.
Service URL: https://aidemy-planner-xxx.us-central1.run.app
Make note of the Service URL; this is the link to your deployed planner agent. If you need to later determine the planner agent Service URL, use this command:
gcloud config set project $(cat ~/project_id.txt)
export PROJECT_ID=$(gcloud config get project)
gcloud run services describe aidemy-planner \
    --region=us-central1 \
    --format 'value(status.url)'
👉Run this to create the Cloud Run instance for the portal agent
gcloud config set project $(cat ~/project_id.txt)
export PROJECT_ID=$(gcloud config get project)
gcloud run deploy aidemy-portal \
  --image=us-central1-docker.pkg.dev/${PROJECT_ID}/agent-repository/aidemy-portal:latest \
  --region=us-central1 \
  --platform=managed \
  --allow-unauthenticated \
  --memory=2Gi \
  --cpu=2 \
  --set-env-vars=GOOGLE_CLOUD_PROJECT=${PROJECT_ID}
You should see output similar to this:
Deploying container to Cloud Run service [aidemy-portal] in project [xxxx] region [us-central1]
OK Deploying new service... Done.
  OK Creating Revision...
  OK Routing traffic...
  OK Setting IAM Policy...
Done.
Service [aidemy-portal] revision [aidemy-portal-xxxx] has been deployed and is serving 100 percent of traffic.
Service URL: https://aidemy-portal-xxxx.us-central1.run.app
Make note of the Service URL; this is the link to your deployed student portal. If you need to later determine the student portal Service URL, use this command:
gcloud config set project $(cat ~/project_id.txt)
export PROJECT_ID=$(gcloud config get project)
gcloud run services describe aidemy-portal \
    --region=us-central1 \
    --format 'value(status.url)'
Creating the Eventarc Trigger
But here's the big question: how does this endpoint get notified when there's a fresh plan waiting in the Pub/Sub topic? That's where Eventarc swoops in to save the day!
Eventarc acts as a bridge, listening for specific events (like a new message arriving in our Pub/Sub topic) and automatically triggering actions in response. In our case, it will detect when a new teaching plan is published and then send a signal to our portal's endpoint, letting it know that it's time to update.
With Eventarc handling the event-driven communication, we can seamlessly connect our planner agent and portal agent, creating a truly dynamic and responsive learning system. It's like having a smart messenger that automatically delivers the latest lesson plans to the right place!
👉In the console head to the Eventarc .
👉Click the "+ CREATE TRIGGER" button.
Configure the Trigger (Basics):
- Trigger name:
plan-topic-trigger - Trigger type: Google sources
- Event provider: Cloud Pub/Sub
- Event type:
google.cloud.pubsub.topic.v1.messagePublished - Cloud Pub/Sub Topic: select
projects/PROJECT_ID/topics/plan - Region:
us-central1. - Service account:
- GRANT the service account with role
roles/iam.serviceAccountTokenCreator - Use the default value: Default compute service account
- GRANT the service account with role
- Event destination: Cloud Run
- Cloud Run service:
aidemy-portal - Ignore error message: Permission denied on 'locations/me-central2' (or it may not exist).
- Service URL path:
/new_teaching_plan
👉 Click "Create".
The Eventarc Triggers page will refresh, and you should now see your newly created trigger listed in the table.
Now, access the planner agent using its Service URL to request a new teaching plan.
👉 Run this in the terminal to determine the planner agent Service URL:
gcloud config set project $(cat ~/project_id.txt)
export PROJECT_ID=$(gcloud config get project)
gcloud run services list --platform=managed --region=us-central1 --format='value(URL)' | grep planner
👉 Navigate to the URL that was output and this time try Year 5 , Subject Science , and Add-on Request atoms .
Then, wait a minute or two, again this delay has been introduced due to billing limitation of this lab, under normal condition, there shouldn't be a delay.
Finally, access the student portal using its Service URL.
Run this in the terminal to determine the student portal agent Service URL:
gcloud config set project $(cat ~/project_id.txt)
export PROJECT_ID=$(gcloud config get project)
gcloud run services list --platform=managed --region=us-central1 --format='value(URL)' | grep portal
You should see that the quizzes have been updated and now align with the new teaching plan you just generated! This demonstrates the successful integration of Eventarc in the Aidemy system!

Congratulations! You've successfully built a multi-agent system on Google Cloud, leveraging event-driven architecture for enhanced scalability and flexibility! You've laid a solid foundation, but there's even more to explore. To delve deeper into the real benefits of this architecture, discover the power of Gemini 2's multimodal Live API, and learn how to implement single-path orchestration with LangGraph, feel free to continue on to the next two chapters.
12. OPTIONAL: Audio Recaps with Gemini
Gemini can understand and process information from various sources, like text, images, and even audio, opening up a whole new range of possibilities for learning and content creation. Gemini's ability to "see," "hear," and "read" truly unlocks creative and engaging user experiences.
Beyond just creating visuals or text, another important step in learning is effective summarization and recap. Think about it: how often do you remember a catchy song lyric more easily than something you read in a textbook? Sound can be incredibly memorable! That's why we're going to leverage Gemini's multimodal capabilities to generate audio recaps of our teaching plans. This will provide students with a convenient and engaging way to review material, potentially boosting retention and comprehension through the power of auditory learning.
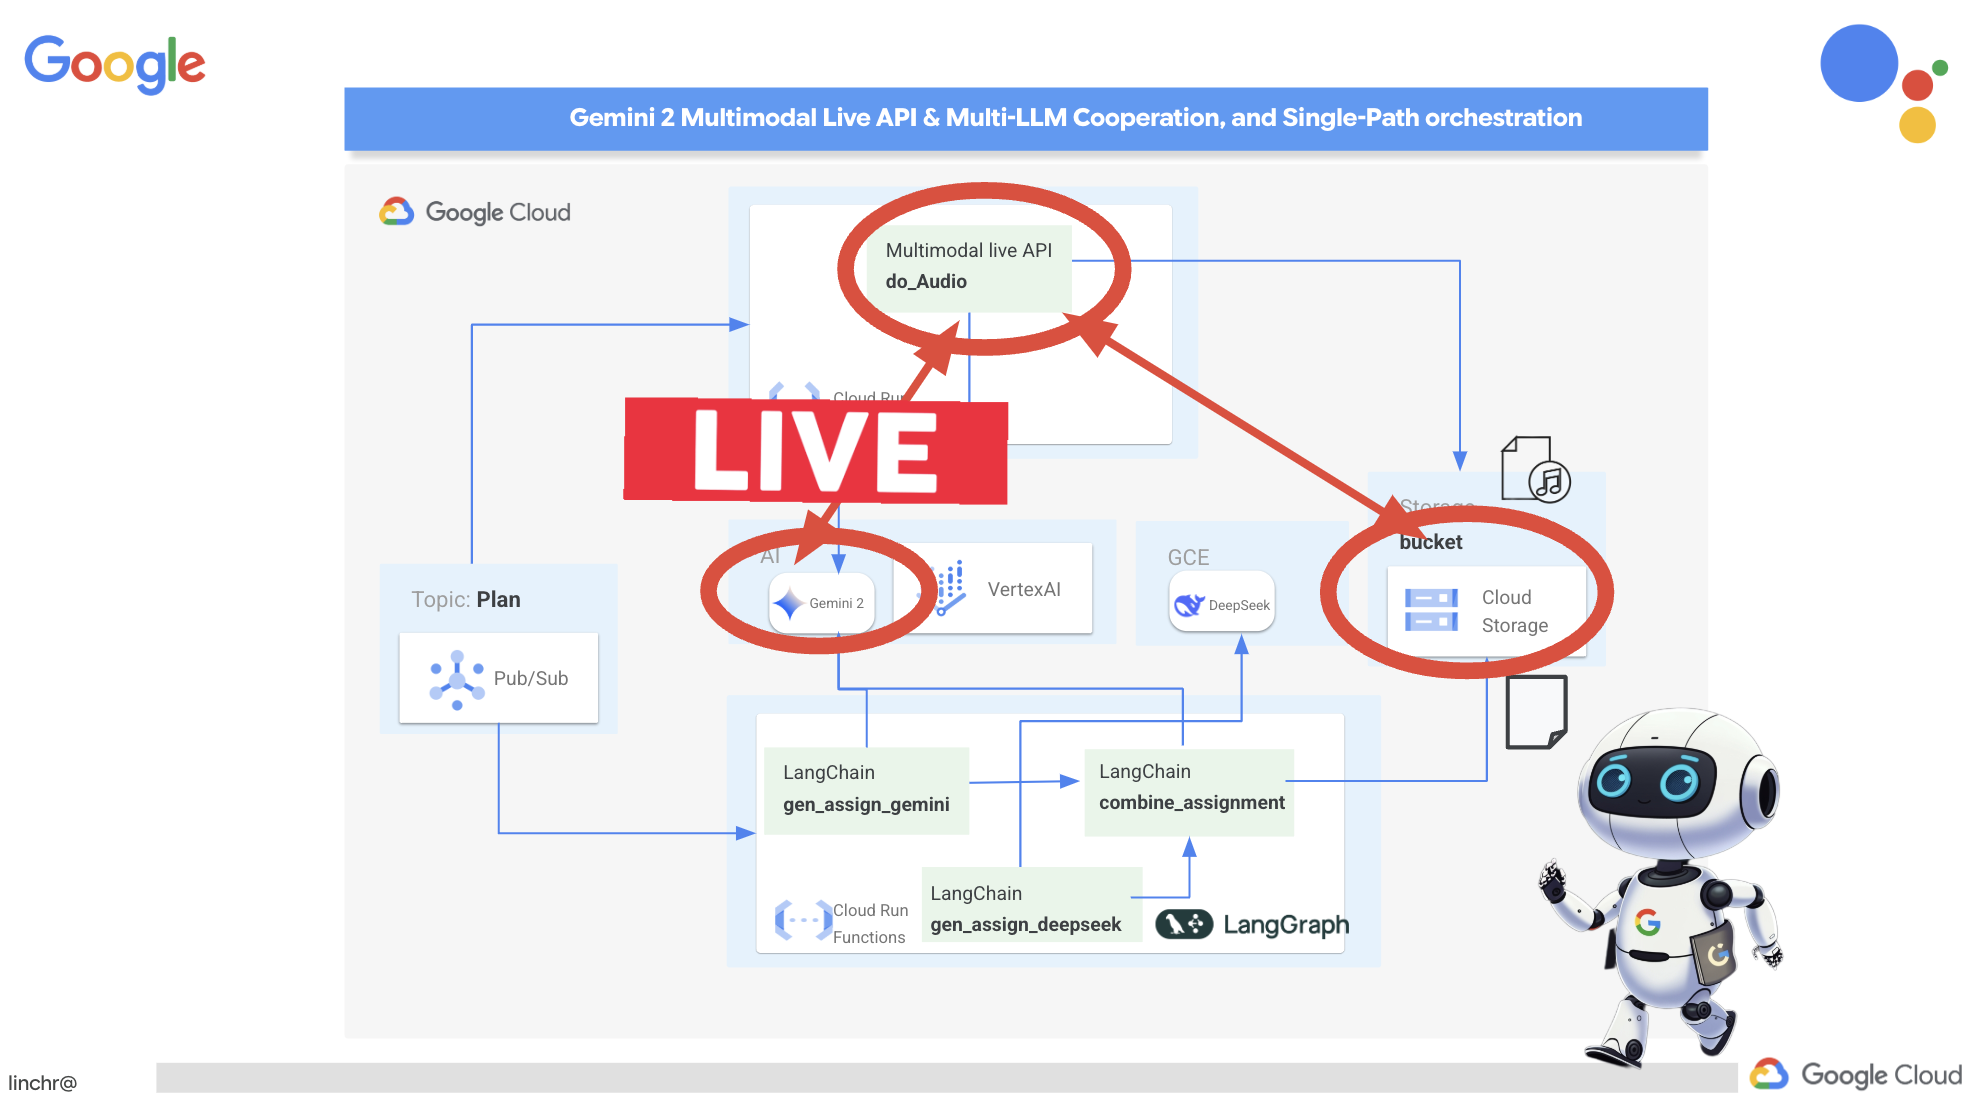
We need a place to store the generated audio files. Cloud Storage provides a scalable and reliable solution.
👉Head to the Storage in the console. Click on "Buckets" in the left-hand menu. Click on the "+ CREATE" button at the top.
👉Configure your new bucket:
- bucket name:
aidemy-recap-UNIQUE_NAME.- IMPORTANT : Ensure you define a unique bucket name that begins with
aidemy-recap-. This unique prefix is crucial for avoiding naming conflicts when creating your Cloud Storage bucket.
- IMPORTANT : Ensure you define a unique bucket name that begins with
- region:
us-central1. - Storage class: "Standard". Standard is suitable for frequently accessed data.
- Access control: Leave the default "Uniform" access control selected. This provides consistent, bucket-level access control.
- Advanced options: For this workshop, the default settings are usually sufficient.
Click the CREATE button to create your bucket.
- You may see a pop up about public access prevention. Leave the "Enforce public access prevention on this bucket" box checked and click
Confirm.
You will now see your newly created bucket in the Buckets list. Remember your bucket name, you'll need it later.
👉In the Cloud Code Editor's terminal, run the following commands to grant the service account access to the bucket:
gcloud config set project $(cat ~/project_id.txt)
export PROJECT_ID=$(gcloud config get project)
export COURSE_BUCKET_NAME=$(gcloud storage buckets list --format="value(name)" | grep aidemy-recap)
export SERVICE_ACCOUNT_NAME=$(gcloud compute project-info describe --format="value(defaultServiceAccount)")
gcloud storage buckets add-iam-policy-binding gs://$COURSE_BUCKET_NAME \
    --member "serviceAccount:$SERVICE_ACCOUNT_NAME" \
    --role "roles/storage.objectViewer"

gcloud storage buckets add-iam-policy-binding gs://$COURSE_BUCKET_NAME \
    --member "serviceAccount:$SERVICE_ACCOUNT_NAME" \
    --role "roles/storage.objectCreator"
👉In the Cloud Code Editor, open audio.py inside the courses folder. Paste the following code to the end of the file:
config = LiveConnectConfig(
    response_modalities=["AUDIO"],
    speech_config=SpeechConfig(
        voice_config=VoiceConfig(
            prebuilt_voice_config=PrebuiltVoiceConfig(
                voice_name="Charon",
            )
        )
    ),
)

async def process_weeks(teaching_plan: str):
    region = "us-east5" #To workaround onRamp quota limits
    client = genai.Client(vertexai=True, project=PROJECT_ID, location=region)

    clientAudio = genai.Client(vertexai=True, project=PROJECT_ID, location="us-central1")
    async with clientAudio.aio.live.connect(
        model=MODEL_ID,
        config=config,
    ) as session:
        for week in range(1, 4):
            response = client.models.generate_content(
                model="gemini-2.0-flash-001",
                contents=f"Given the following teaching plan: {teaching_plan}, Extrace content plan for week {week}. And return just the plan, nothingh else  " # Clarified prompt
            )

            prompt = f"""
                Assume you are the instructor.
                Prepare a concise and engaging recap of the key concepts and topics covered.
                This recap should be suitable for generating a short audio summary for students.
                Focus on the most important learnings and takeaways, and frame it as a direct address to the students.
                Avoid overly formal language and aim for a conversational tone, tell a few jokes.

                Teaching plan: {response.text} """
            print(f"prompt --->{prompt}")

            await session.send(input=prompt, end_of_turn=True)
            with open(f"temp_audio_week_{week}.raw", "wb") as temp_file:
                async for message in session.receive():
                    if message.server_content.model_turn:
                        for part in message.server_content.model_turn.parts:
                            if part.inline_data:
                                temp_file.write(part.inline_data.data)

            data, samplerate = sf.read(f"temp_audio_week_{week}.raw", channels=1, samplerate=24000, subtype='PCM_16', format='RAW')
            sf.write(f"course-week-{week}.wav", data, samplerate)

            storage_client = storage.Client()
            bucket = storage_client.bucket(BUCKET_NAME)
            blob = bucket.blob(f"course-week-{week}.wav")  # Or give it a more descriptive name
            blob.upload_from_filename(f"course-week-{week}.wav")
            print(f"Audio saved to GCS: gs://{BUCKET_NAME}/course-week-{week}.wav")
    await session.close()


def breakup_sessions(teaching_plan: str):
    asyncio.run(process_weeks(teaching_plan))
- Streaming Connection : First, a persistent connection is established with the Live API endpoint. Unlike a standard API call where you send a request and get a response, this connection remains open for a continuous exchange of data.
- Configuration Multimodal : Use configuration to specifying what type of output you want (in this case, audio), and you can even specify what parameters you'd like to use (eg, voice selection, audio encoding)
- Asynchronous Processing : This API works asynchronously, meaning it doesn't block the main thread while waiting for the audio generation to complete. By processing data in real-time and sending the output in chunks, it provides a near-instantaneous experience.
Now, the key question is: when should this audio generation process run? Ideally, we want the audio recaps to be available as soon as a new teaching plan is created. Since we've already implemented an event-driven architecture by publishing the teaching plan to a Pub/Sub topic, we can simply subscribe to that topic.
However, we don't generate new teaching plans very often. It wouldn't be efficient to have an agent constantly running and waiting for new plans. That's why it makes perfect sense to deploy this audio generation logic as a Cloud Run Function.
By deploying it as a function, it remains dormant until a new message is published to the Pub/Sub topic. When that happens, it automatically triggers the function, which generates the audio recaps and stores them in our bucket.
👉Under the courses folder in main.py file, this file defines the Cloud Run Function that will be triggered when a new teaching plan is available. It receives the plan and initiates the audio recap generation. Add the following code snippet to the end of the file.
@functions_framework.cloud_event
def process_teaching_plan(cloud_event):
    print(f"CloudEvent received: {cloud_event.data}")
    time.sleep(60)
    try:
        if isinstance(cloud_event.data.get('message', {}).get('data'), str):  # Check for base64 encoding
            data = json.loads(base64.b64decode(cloud_event.data['message']['data']).decode('utf-8'))
            teaching_plan = data.get('teaching_plan') # Get the teaching plan
        elif 'teaching_plan' in cloud_event.data: # No base64
            teaching_plan = cloud_event.data["teaching_plan"]
        else:
            raise KeyError("teaching_plan not found") # Handle error explicitly

        #Load the teaching_plan as string and from cloud event, call audio breakup_sessions
        breakup_sessions(teaching_plan)

        return "Teaching plan processed successfully", 200

    except (json.JSONDecodeError, AttributeError, KeyError) as e:
        print(f"Error decoding CloudEvent data: {e} - Data: {cloud_event.data}")
        return "Error processing event", 500

    except Exception as e:
        print(f"Error processing teaching plan: {e}")
        return "Error processing teaching plan", 500
@functions_framework.cloud_event : This decorator marks the function as a Cloud Run Function that will be triggered by CloudEvents.
Testing locally
👉We'll run this in a virtual environment and install the necessary Python libraries for the Cloud Run function.
cd ~/aidemy-bootstrap/courses
gcloud config set project $(cat ~/project_id.txt)
export PROJECT_ID=$(gcloud config get project)
export COURSE_BUCKET_NAME=$(gcloud storage buckets list --format="value(name)" | grep aidemy-recap)
python -m venv env
source env/bin/activate
pip install -r requirements.txt
👉The Cloud Run Function emulator allows us to test our function locally before deploying it to Google Cloud. Start a local emulator by running:
functions-framework --target process_teaching_plan --signature-type=cloudevent --source main.py
👉While the emulator is running, you can send test CloudEvents to the emulator to simulate a new teaching plan being published. In a new terminal:

👉Run:
  curl -X POST \
  http://localhost:8080/ \
  -H "Content-Type: application/json" \
  -H "ce-id: event-id-01" \
  -H "ce-source: planner-agent" \
  -H "ce-specversion: 1.0" \
  -H "ce-type: google.cloud.pubsub.topic.v1.messagePublished" \
  -d '{
    "message": {
      "data": "eyJ0ZWFjaGluZ19wbGFuIjogIldlZWsgMTogMkQgU2hhcGVzIGFuZCBBbmdsZXMgLSBEYXkgMTogUmV2aWV3IG9mIGJhc2ljIDJEIHNoYXBlcyAoc3F1YXJlcywgcmVjdGFuZ2xlcywgdHJpYW5nbGVzLCBjaXJjbGVzKS4gRGF5IDI6IEV4cGxvcmluZyBkaWZmZXJlbnQgdHlwZXMgb2YgdHJpYW5nbGVzIChlcXVpbGF0ZXJhbCwgaXNvc2NlbGVzLCBzY2FsZW5lLCByaWdodC1hbmdsZWQpLiBEYXkgMzogRXhwbG9yaW5nIHF1YWRyaWxhdGVyYWxzIChzcXVhcmUsIHJlY3RhbmdsZSwgcGFyYWxsZWxvZ3JhbSwgcmhvbWJ1cywgdHJhcGV6aXVtKS4gRGF5IDQ6IEludHJvZHVjdGlvbiB0byBhbmdsZXM6IHJpZ2h0IGFuZ2xlcywgYWN1dGUgYW5nbGVzLCBhbmQgb2J0dXNlIGFuZ2xlcy4gRGF5IDU6IE1lYXN1cmluZyBhbmdsZXMgdXNpbmcgYSBwcm90cmFjdG9yLiBXZWVrIDI6IDNEIFNoYXBlcyBhbmQgU3ltbWV0cnkgLSBEYXkgNjogSW50cm9kdWN0aW9uIHRvIDNEIHNoYXBlczogY3ViZXMsIGN1Ym9pZHMsIHNwaGVyZXMsIGN5bGluZGVycywgY29uZXMsIGFuZCBweXJhbWlkcy4gRGF5IDc6IERlc2NyaWJpbmcgM0Qgc2hhcGVzIHVzaW5nIGZhY2VzLCBlZGdlcywgYW5kIHZlcnRpY2VzLiBEYXkgODogUmVsYXRpbmcgMkQgc2hhcGVzIHRvIDNEIHNoYXBlcy4gRGF5IDk6IElkZW50aWZ5aW5nIGxpbmVzIG9mIHN5bW1ldHJ5IGluIDJEIHNoYXBlcy4gRGF5IDEwOiBDb21wbGV0aW5nIHN5bW1ldHJpY2FsIGZpZ3VyZXMuIFdlZWsgMzogUG9zaXRpb24sIERpcmVjdGlvbiwgYW5kIFByb2JsZW0gU29sdmluZyAtIERheSAxMTogRGVzY3JpYmluZyBwb3NpdGlvbiB1c2luZyBjb29yZGluYXRlcyBpbiB0aGUgZmlyc3QgcXVhZHJhbnQuIERheSAxMjogUGxvdHRpbmcgY29vcmRpbmF0ZXMgdG8gZHJhdyBzaGFwZXMuIERheSAxMzogVW5kZXJzdGFuZGluZyB0cmFuc2xhdGlvbiAoc2xpZGluZyBhIHNoYXBlKS4gRGF5IDE0OiBVbmRlcnN0YW5kaW5nIHJlZmxlY3Rpb24gKGZsaXBwaW5nIGEgc2hhcGUpLiBEYXkgMTU6IFByb2JsZW0tc29sdmluZyBhY3Rpdml0aWVzIGludm9sdmluZyBwZXJpbWV0ZXIsIGFyZWEsIGFuZCBtaXNzaW5nIGFuZ2xlcy4ifQ=="
    }
  }'
Rather than staring blankly while waiting for the response, switch over to the other Cloud Shell terminal. You can observe the progress and any output or error messages generated by your function in the emulator's terminal. 😁
Back in the 2nd terminal you should see it should returned OK .
👉You'll verify Data in bucket, go to Cloud Storage and select the "Bucket" tab and then the aidemy-recap-UNIQUE_NAME

👉In the terminal running the emulator, type ctrl+c to exit. And close the second terminal. And close the second terminal. and run deactivate to exit the virtual environment.
deactivate
Deploying to Google Cloud
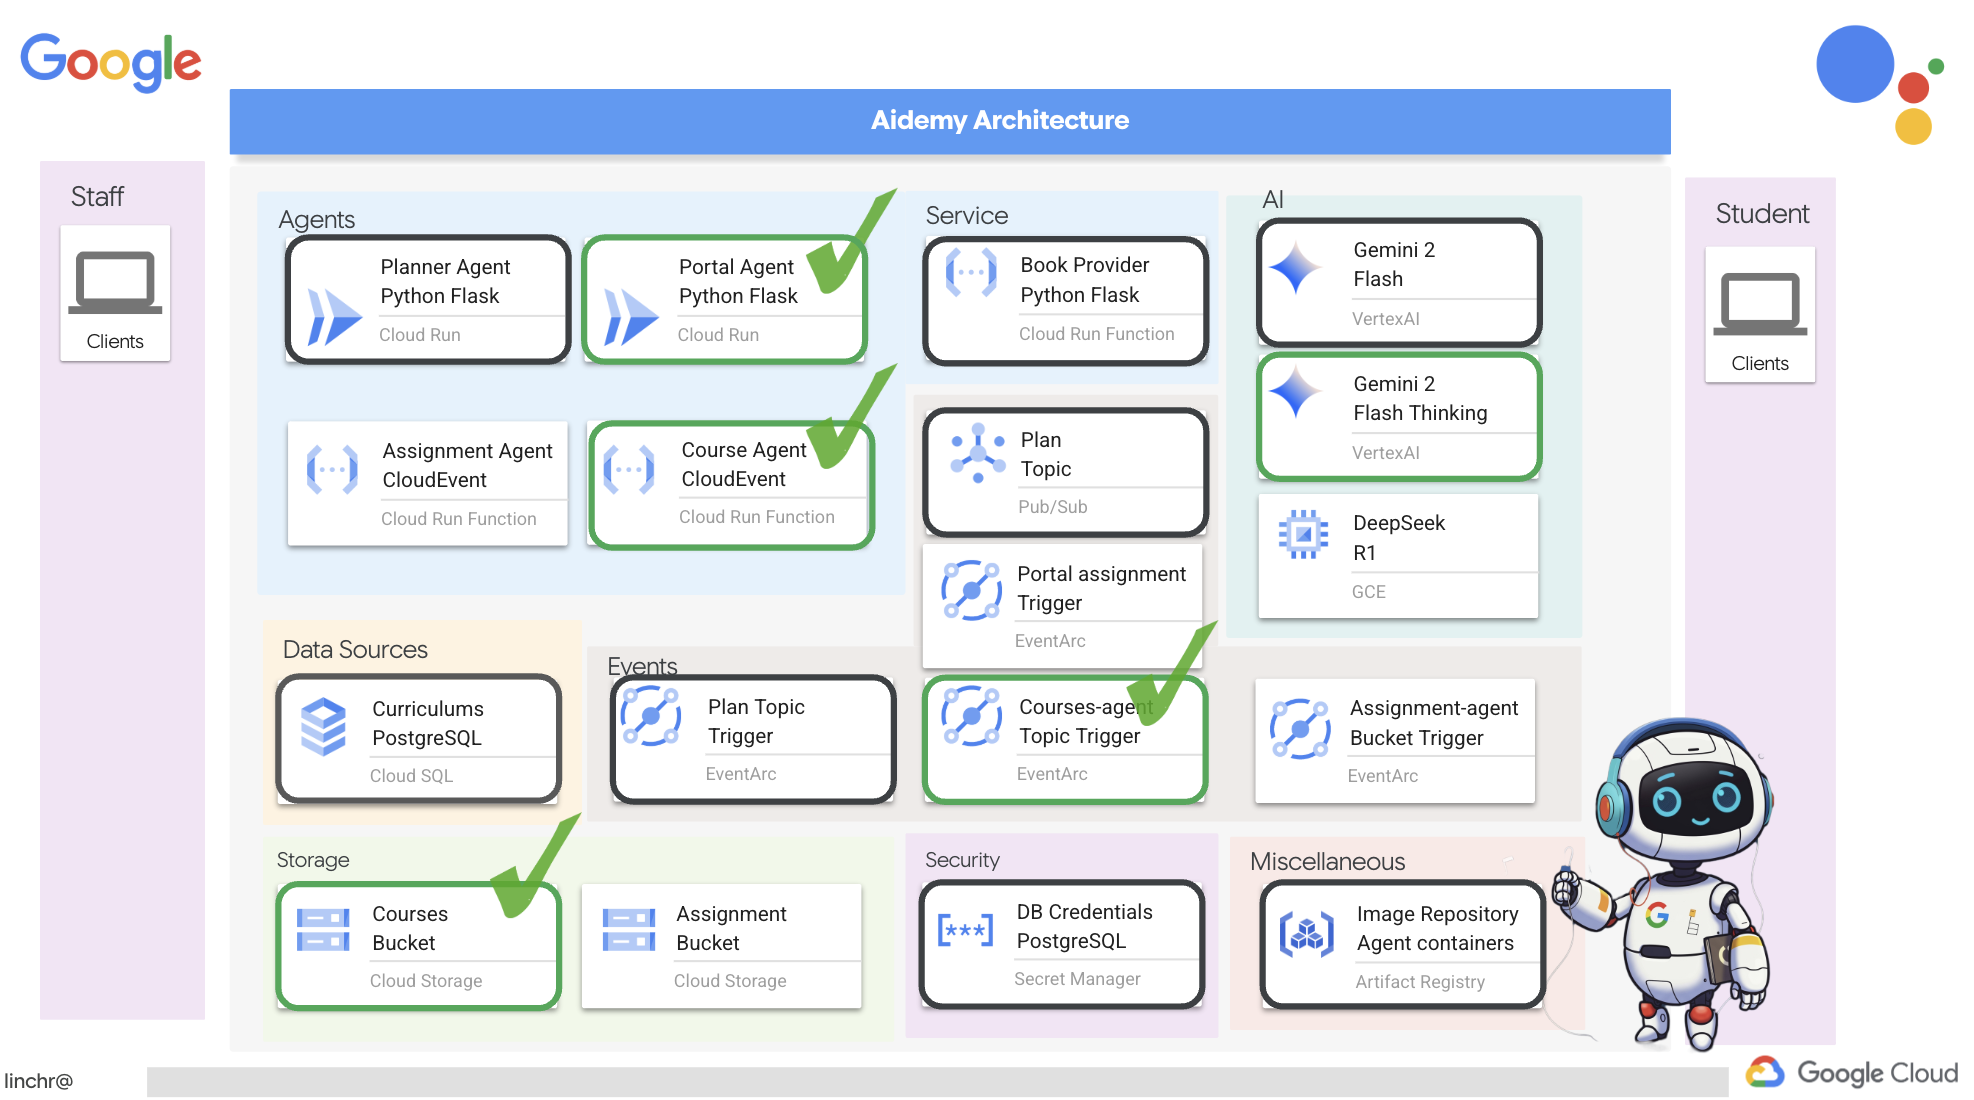 👉After testing locally, it's time to deploy the course agent to Google Cloud. In the terminal, run these commands:
cd ~/aidemy-bootstrap/courses
gcloud config set project $(cat ~/project_id.txt)
export PROJECT_ID=$(gcloud config get project)
export COURSE_BUCKET_NAME=$(gcloud storage buckets list --format="value(name)" | grep aidemy-recap)
gcloud functions deploy courses-agent \
  --region=us-central1 \
  --gen2 \
  --source=. \
  --runtime=python312 \
  --trigger-topic=plan \
  --entry-point=process_teaching_plan \
  --set-env-vars=GOOGLE_CLOUD_PROJECT=${PROJECT_ID},COURSE_BUCKET_NAME=$COURSE_BUCKET_NAME
Verify deployment by going Cloud Run in the Google Cloud Console.You should see a new service named courses-agent listed.
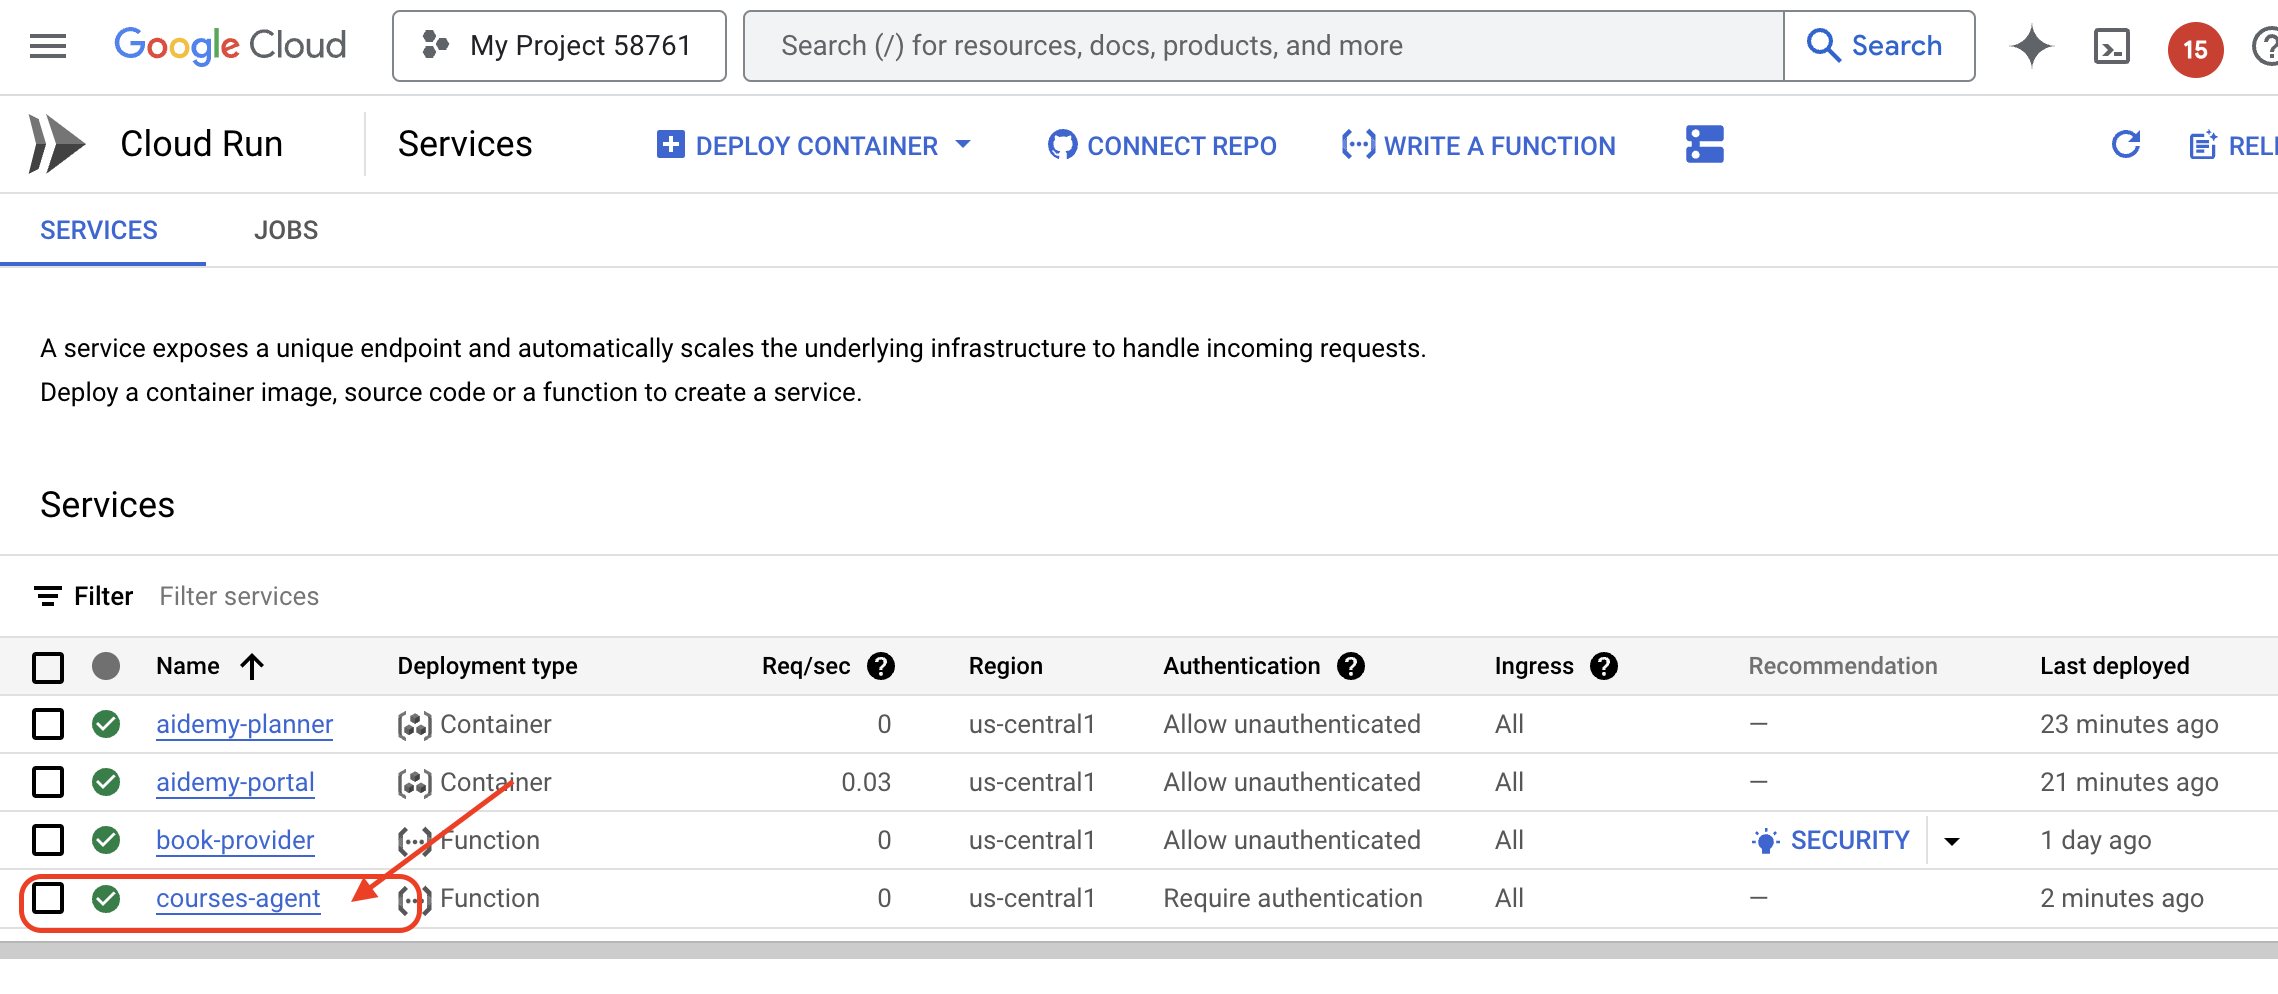
To check the trigger configuration, click on the courses-agent service to view its details. Go to the "TRIGGERS" tab.
You should see a trigger configured to listen for messages published to the plan topic.

Finally, let's see it running end to end.
👉We need to configure the portal agent so it knows where to find the generated audio files. In the terminal, run:
export COURSE_BUCKET_NAME=$(gcloud storage buckets list --format="value(name)" | grep aidemy-recap)
gcloud config set project $(cat ~/project_id.txt)
export PROJECT_ID=$(gcloud config get project)
gcloud run services update aidemy-portal \
    --region=us-central1 \
    --set-env-vars=GOOGLE_CLOUD_PROJECT=${PROJECT_ID},COURSE_BUCKET_NAME=$COURSE_BUCKET_NAME
👉Try generating a new teaching plan using the planner agent web page. It might take a few minutes to start, don't be alarmed, it's a serverless service.
To access the planner agent, get its Service URL by running this in the terminal:
gcloud run services list \
    --platform=managed \
    --region=us-central1 \
    --format='value(URL)' | grep planner
After generating the new plan, wait 2-3 minutes for the audio to be generated, again this will take a few more minutes due to billing limitation with this lab account.
You can monitor whether the courses-agent function has received the teaching plan by checking the function's "TRIGGERS" tab. Refresh the page periodically; you should eventually see that the function has been invoked. If the function hasn't been invoked after more than 2 minutes, you can try generating the teaching plan again. However, avoid generating plans repeatedly in quick succession, as each generated plan will be sequentially consumed and processed by the agent, potentially creating a backlog.
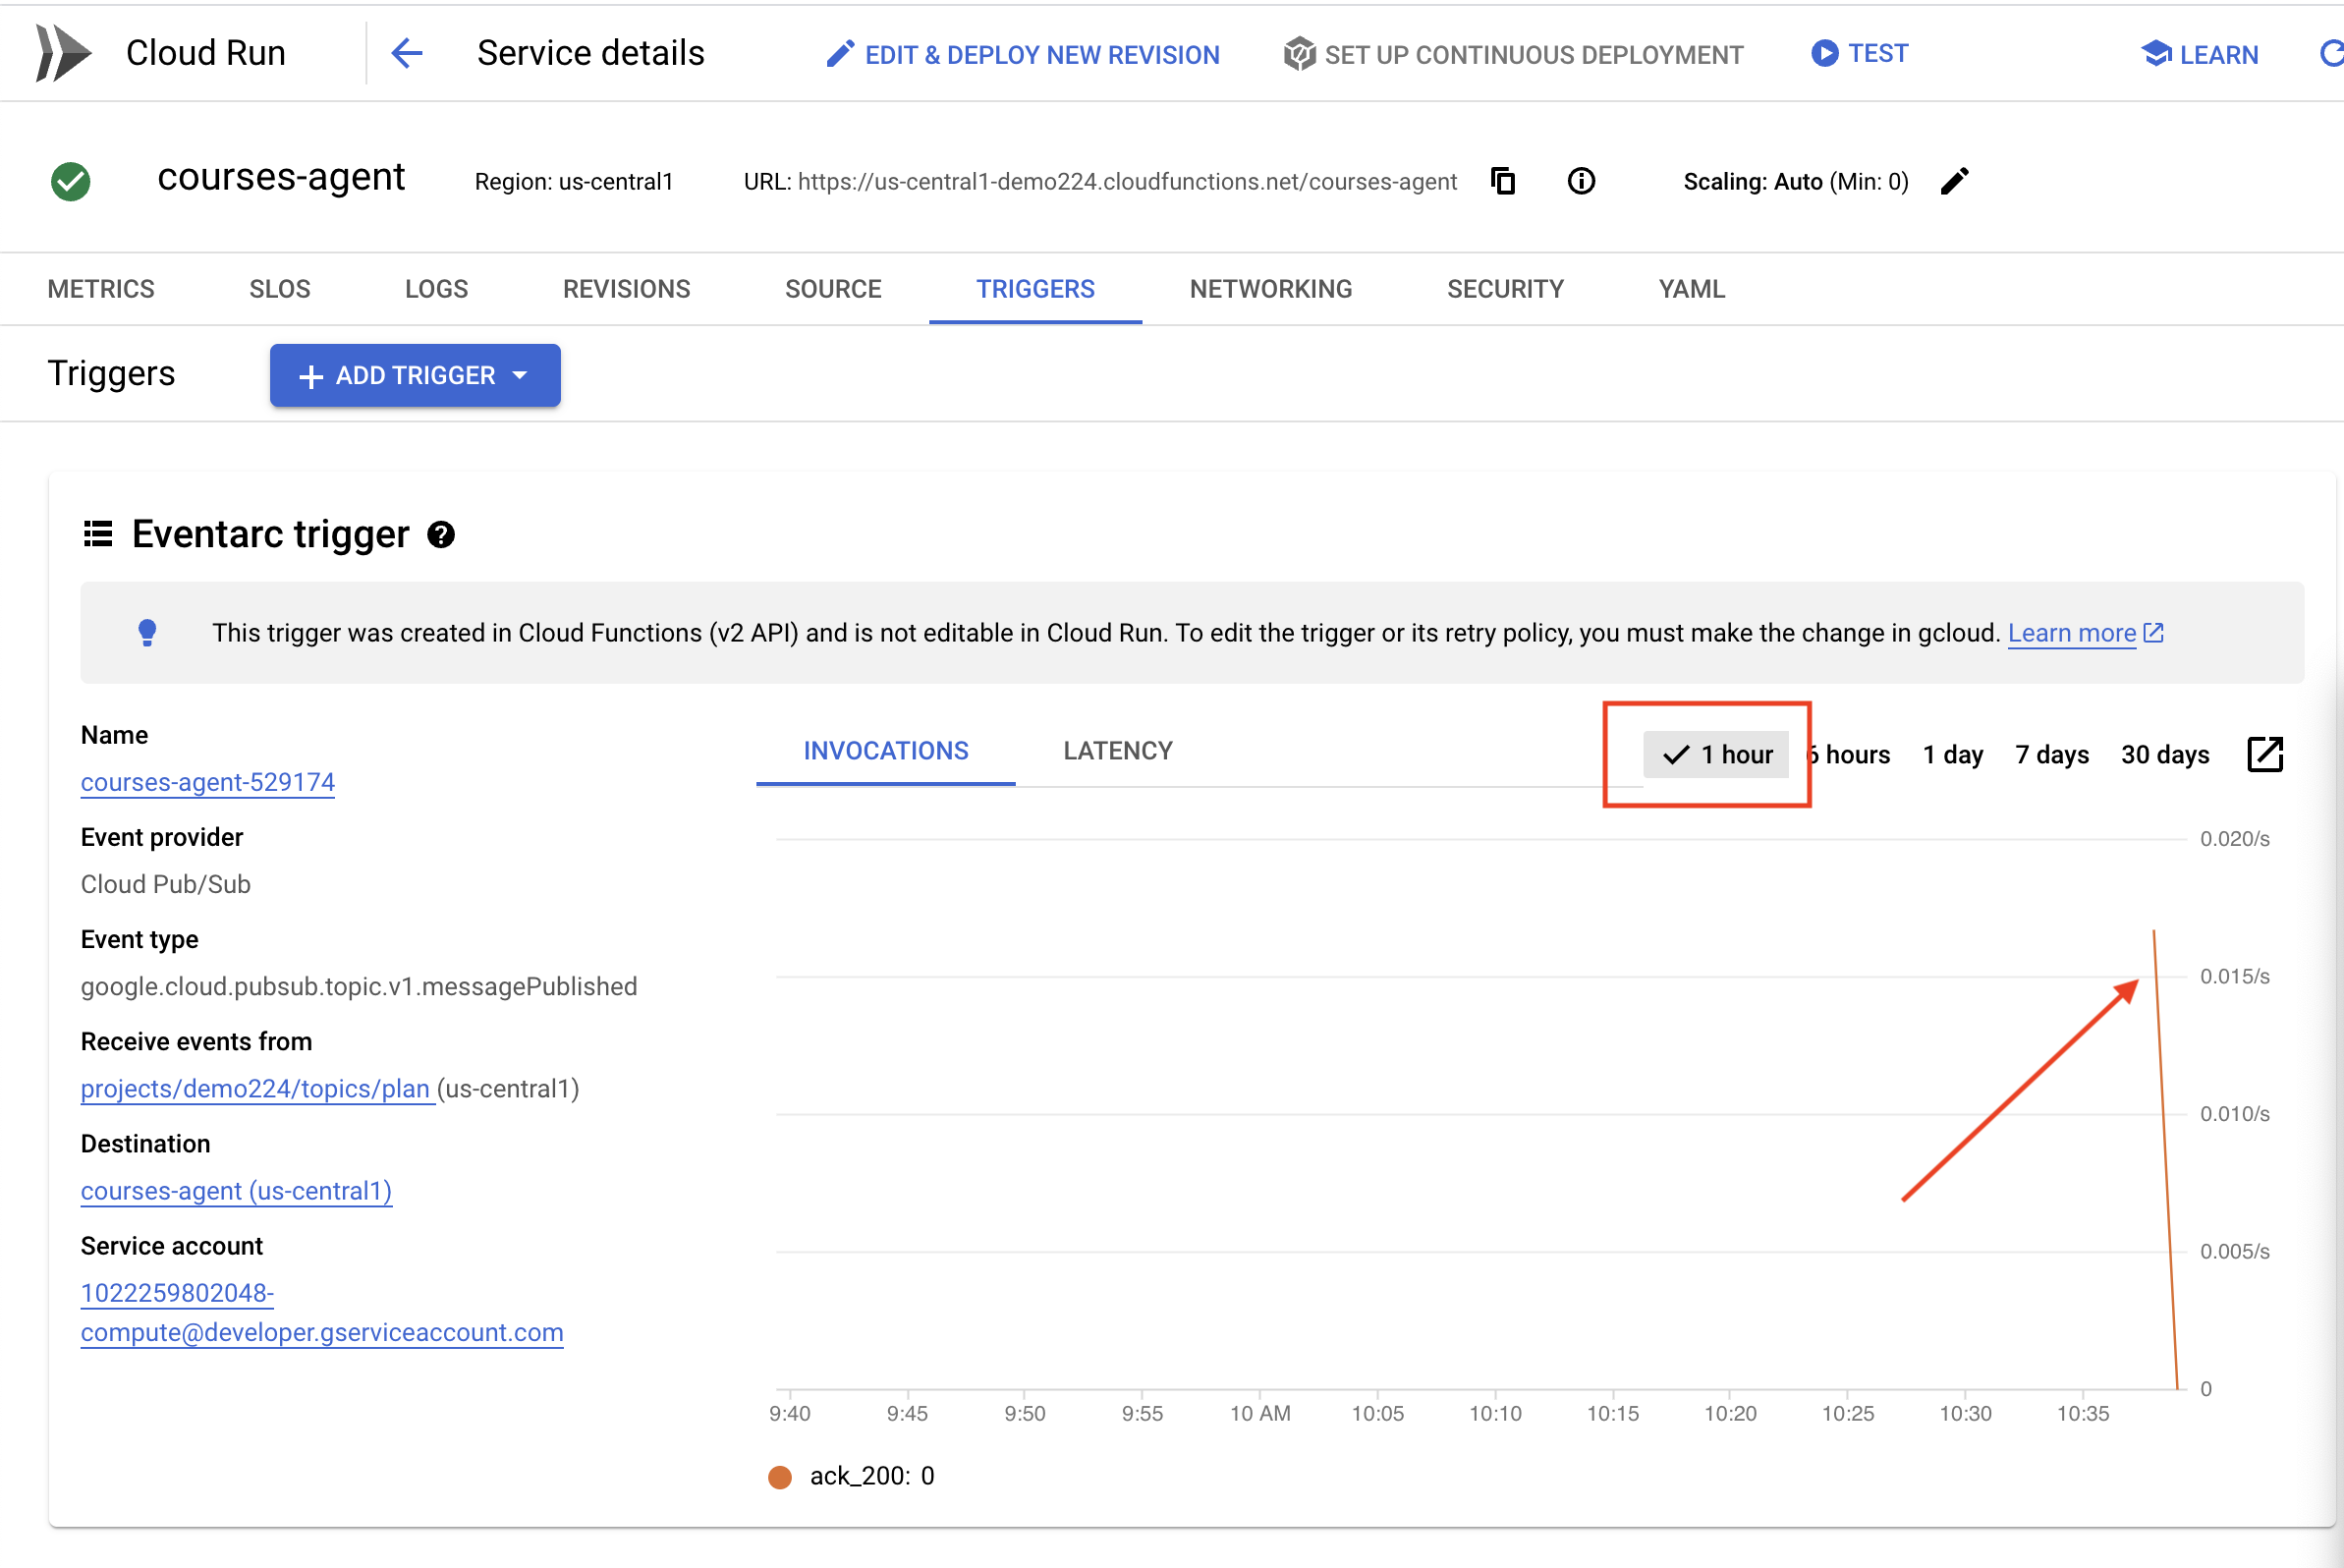
👉Visit the portal and click on "Courses". You should see three cards, each displaying an audio recap. To find the URL of your portal agent:
gcloud run services list \
    --platform=managed \
    --region=us-central1 \
    --format='value(URL)' | grep portal
Click "play" on each course to ensure the audio recaps are aligned with the teaching plan you just generated! 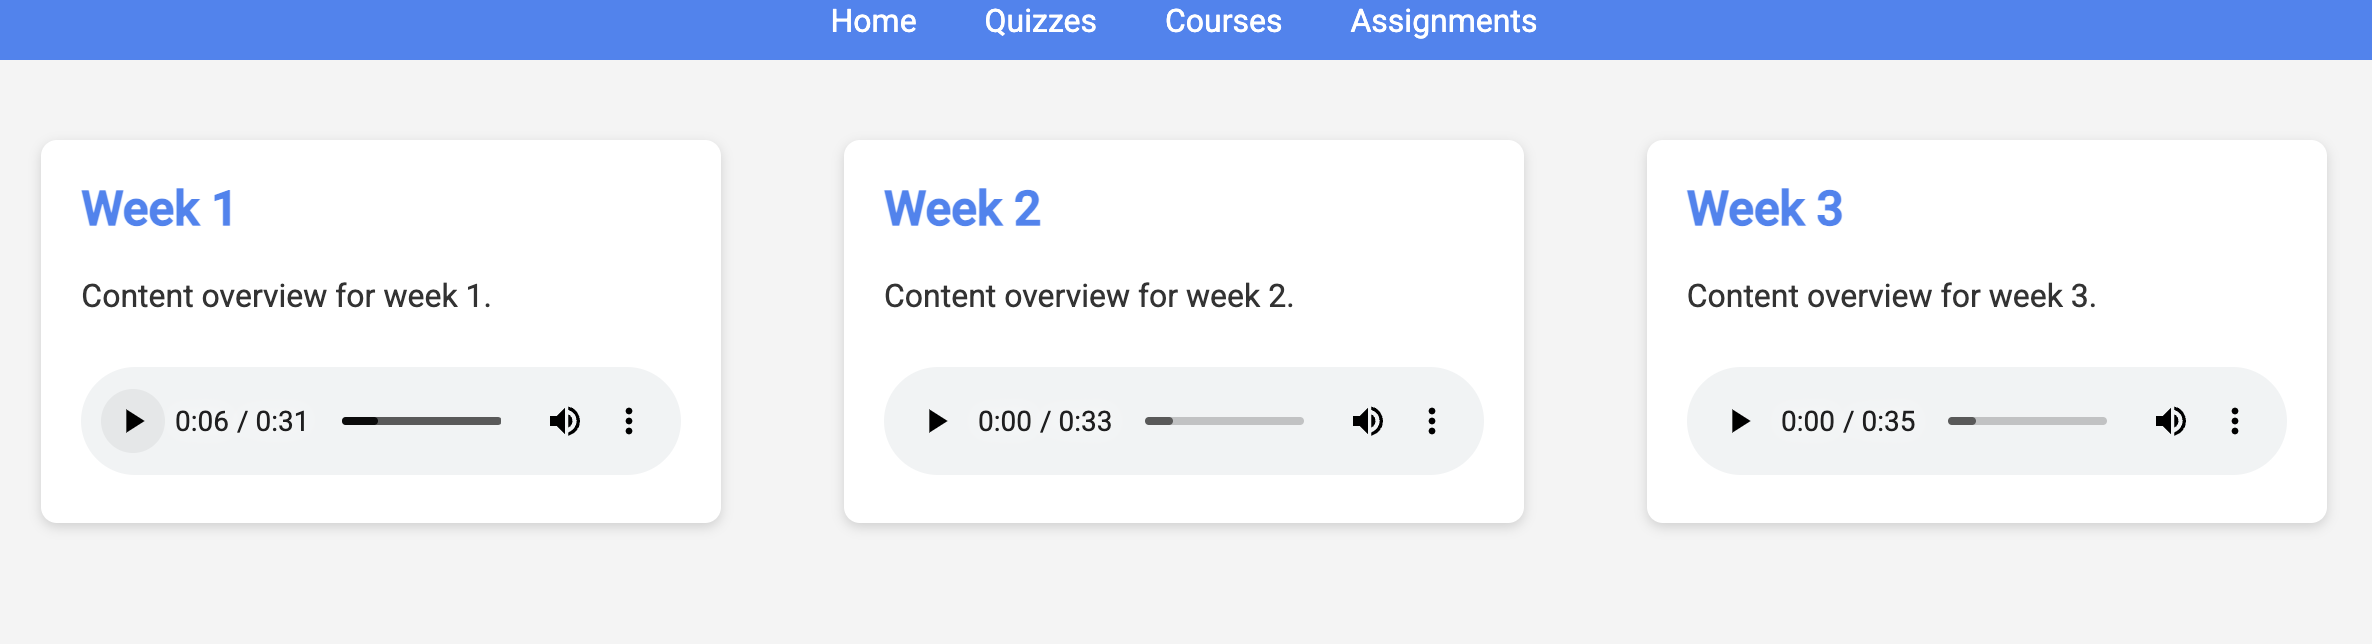
Exit the virtual environment.
deactivate
13. OPTIONAL: Role-Based collaboration with Gemini and DeepSeek
Having multiple perspectives is invaluable, especially when crafting engaging and thoughtful assignments. We'll now build a multi-agent system that leverages two different models with distinct roles, to generate assignments: one promotes collaboration, and the other encourages self-study. We'll use a "single-shot" architecture, where the workflow follows a fixed route.
Gemini Assignment Generator
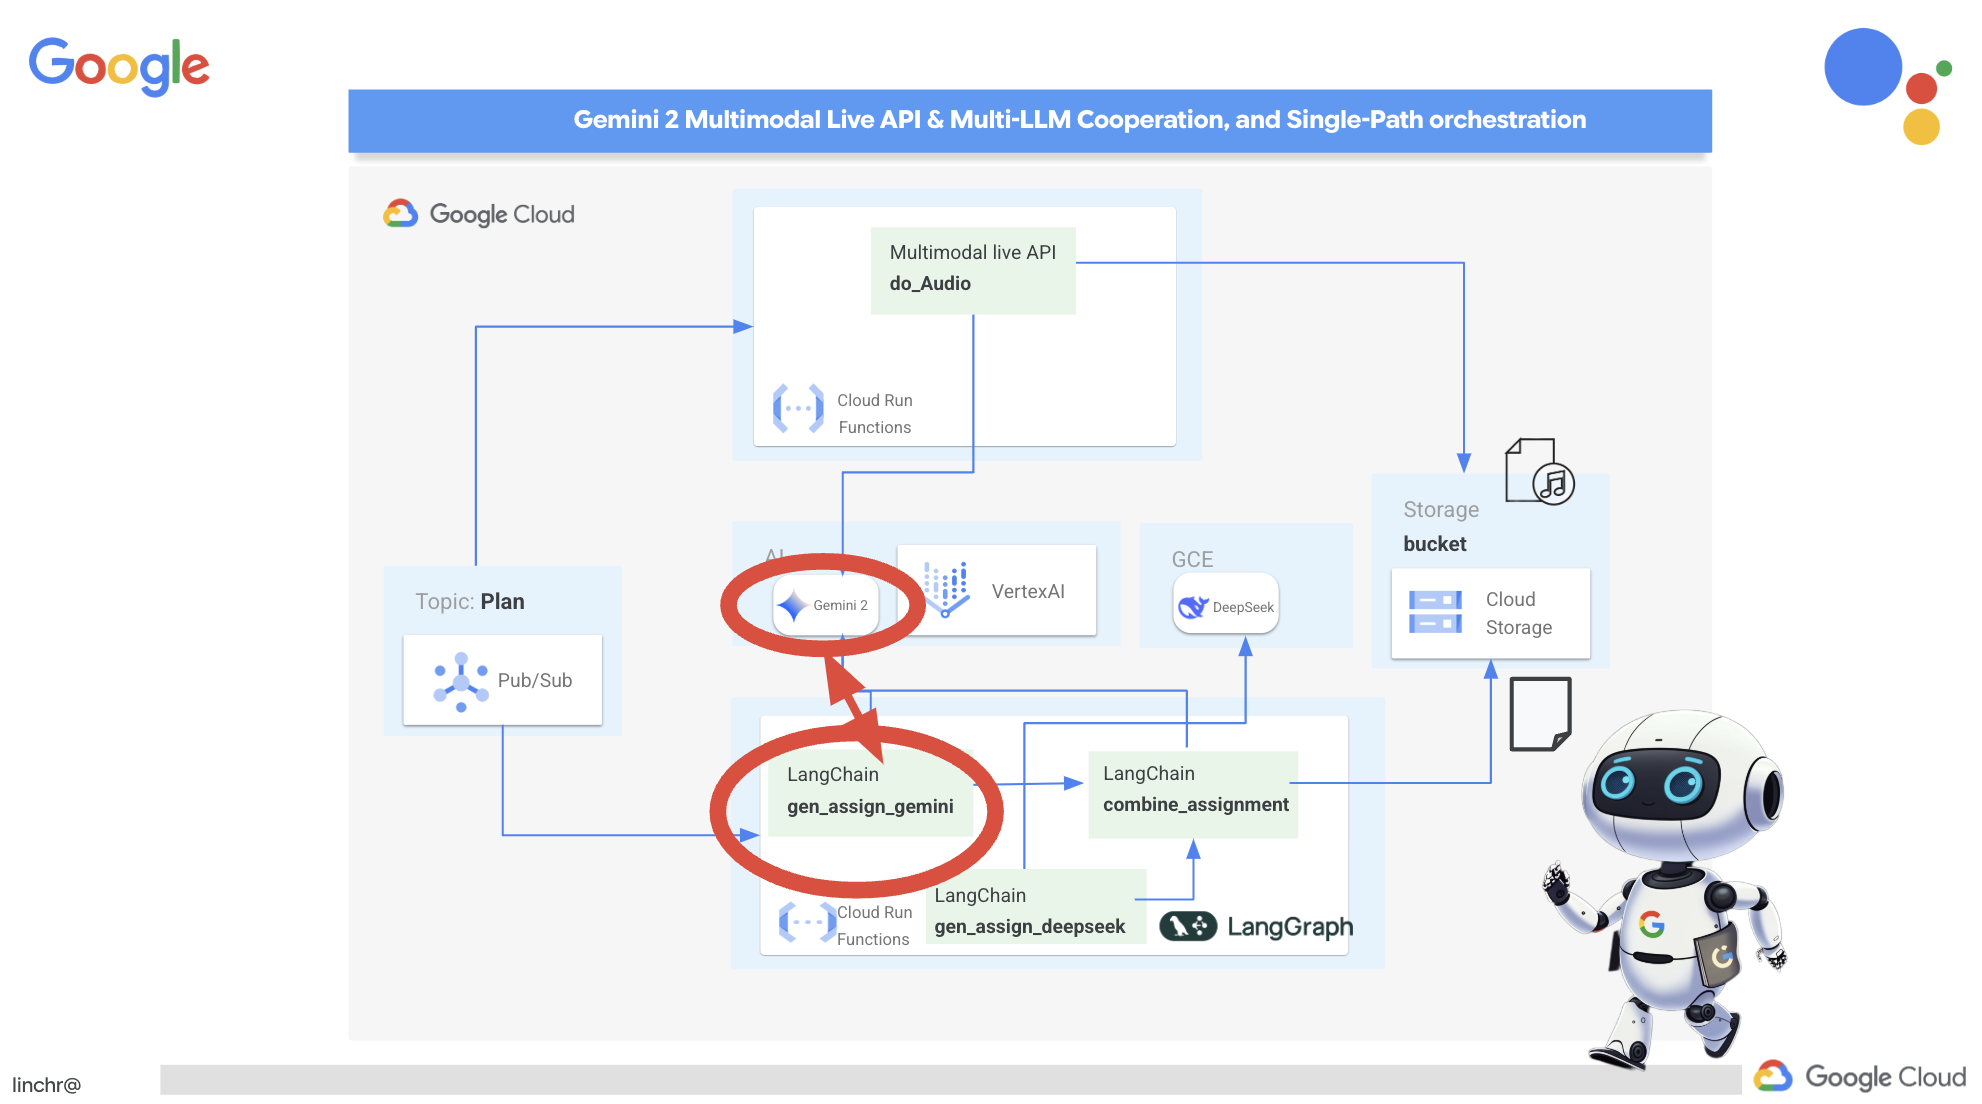 We'll start by setting up the Gemini function to generate assignments with a collaborative emphasis. Edit the
 gemini.py file located in the assignment folder.
👉Paste the following code to the end of the gemini.py file:
def gen_assignment_gemini(state):
    region=get_next_region()
    client = genai.Client(vertexai=True, project=PROJECT_ID, location=region)
    print(f"---------------gen_assignment_gemini")
    response = client.models.generate_content(
        model=MODEL_ID, contents=f"""
        You are an instructor

        Develop engaging and practical assignments for each week, ensuring they align with the teaching plan's objectives and progressively build upon each other.

        For each week, provide the following:

        * **Week [Number]:** A descriptive title for the assignment (e.g., "Data Exploration Project," "Model Building Exercise").
        * **Learning Objectives Assessed:** List the specific learning objectives from the teaching plan that this assignment assesses.
        * **Description:** A detailed description of the task, including any specific requirements or constraints.  Provide examples or scenarios if applicable.
        * **Deliverables:** Specify what students need to submit (e.g., code, report, presentation).
        * **Estimated Time Commitment:**  The approximate time students should dedicate to completing the assignment.
        * **Assessment Criteria:** Briefly outline how the assignment will be graded (e.g., correctness, completeness, clarity, creativity).

        The assignments should be a mix of individual and collaborative work where appropriate.  Consider different learning styles and provide opportunities for students to apply their knowledge creatively.

        Based on this teaching plan: {state["teaching_plan"]}
        """
    )

    print(f"---------------gen_assignment_gemini answer {response.text}")

    state["model_one_assignment"] = response.text

    return state


import unittest

class TestGenAssignmentGemini(unittest.TestCase):
    def test_gen_assignment_gemini(self):
        test_teaching_plan = "Week 1: 2D Shapes and Angles - Day 1: Review of basic 2D shapes (squares, rectangles, triangles, circles). Day 2: Exploring different types of triangles (equilateral, isosceles, scalene, right-angled). Day 3: Exploring quadrilaterals (square, rectangle, parallelogram, rhombus, trapezium). Day 4: Introduction to angles: right angles, acute angles, and obtuse angles. Day 5: Measuring angles using a protractor. Week 2: 3D Shapes and Symmetry - Day 6: Introduction to 3D shapes: cubes, cuboids, spheres, cylinders, cones, and pyramids. Day 7: Describing 3D shapes using faces, edges, and vertices. Day 8: Relating 2D shapes to 3D shapes. Day 9: Identifying lines of symmetry in 2D shapes. Day 10: Completing symmetrical figures. Week 3: Position, Direction, and Problem Solving - Day 11: Describing position using coordinates in the first quadrant. Day 12: Plotting coordinates to draw shapes. Day 13: Understanding translation (sliding a shape). Day 14: Understanding reflection (flipping a shape). Day 15: Problem-solving activities involving perimeter, area, and missing angles."

        initial_state = {"teaching_plan": test_teaching_plan, "model_one_assignment": "", "model_two_assigmodel_one_assignmentnment": "", "final_assignment": ""}

        updated_state = gen_assignment_gemini(initial_state)

        self.assertIn("model_one_assignment", updated_state)
        self.assertIsNotNone(updated_state["model_one_assignment"])
        self.assertIsInstance(updated_state["model_one_assignment"], str)
        self.assertGreater(len(updated_state["model_one_assignment"]), 0)
        print(updated_state["model_one_assignment"])


if __name__ == '__main__':
    unittest.main()
It uses the Gemini model to generate assignments.
We are ready to test the Gemini Agent.
👉Run these commands in the terminal to setup the environment:
cd ~/aidemy-bootstrap/assignment
gcloud config set project $(cat ~/project_id.txt)
export PROJECT_ID=$(gcloud config get project)
python -m venv env
source env/bin/activate
pip install -r requirements.txt
👉You can run to test it:
python gemini.py
You should see an assignment that has more group work in the output. The assert test at the end will also output the results.
Here are some engaging and practical assignments for each week, designed to build progressively upon the teaching plan's objectives:

**Week 1: Exploring the World of 2D Shapes**

* **Learning Objectives Assessed:**
    * Identify and name basic 2D shapes (squares, rectangles, triangles, circles).
    * .....

* **Description:**
    * **Shape Scavenger Hunt:** Students will go on a scavenger hunt in their homes or neighborhoods, taking pictures of objects that represent different 2D shapes. They will then create a presentation or poster showcasing their findings, classifying each shape and labeling its properties (e.g., number of sides, angles, etc.).
    * **Triangle Trivia:** Students will research and create a short quiz or presentation about different types of triangles, focusing on their properties and real-world examples.
    * **Angle Exploration:** Students will use a protractor to measure various angles in their surroundings, such as corners of furniture, windows, or doors. They will record their measurements and create a chart categorizing the angles as right, acute, or obtuse.
....

**Week 2: Delving into the World of 3D Shapes and Symmetry**

* **Learning Objectives Assessed:**
    * Identify and name basic 3D shapes.
    * ....

* **Description:**
    * **3D Shape Construction:** Students will work in groups to build 3D shapes using construction paper, cardboard, or other materials. They will then create a presentation showcasing their creations, describing the number of faces, edges, and vertices for each shape.
    * **Symmetry Exploration:** Students will investigate the concept of symmetry by creating a visual representation of various symmetrical objects (e.g., butterflies, leaves, snowflakes) using drawing or digital tools. They will identify the lines of symmetry and explain their findings.
    * **Symmetry Puzzles:** Students will be given a half-image of a symmetrical figure and will be asked to complete the other half, demonstrating their understanding of symmetry. This can be done through drawing, cut-out activities, or digital tools.

**Week 3: Navigating Position, Direction, and Problem Solving**

* **Learning Objectives Assessed:**
    * Describe position using coordinates in the first quadrant.
    * ....

* **Description:**
    * **Coordinate Maze:** Students will create a maze using coordinates on a grid paper. They will then provide directions for navigating the maze using a combination of coordinate movements and translation/reflection instructions.
    * **Shape Transformations:** Students will draw shapes on a grid paper and then apply transformations such as translation and reflection, recording the new coordinates of the transformed shapes.
    * **Geometry Challenge:** Students will solve real-world problems involving perimeter, area, and angles. For example, they could be asked to calculate the perimeter of a room, the area of a garden, or the missing angle in a triangle.
....
Stop with ctl+c , and to clean up the test code. REMOVE the following code from gemini.py
import unittest

class TestGenAssignmentGemini(unittest.TestCase):
    def test_gen_assignment_gemini(self):
        test_teaching_plan = "Week 1: 2D Shapes and Angles - Day 1: Review of basic 2D shapes (squares, rectangles, triangles, circles). Day 2: Exploring different types of triangles (equilateral, isosceles, scalene, right-angled). Day 3: Exploring quadrilaterals (square, rectangle, parallelogram, rhombus, trapezium). Day 4: Introduction to angles: right angles, acute angles, and obtuse angles. Day 5: Measuring angles using a protractor. Week 2: 3D Shapes and Symmetry - Day 6: Introduction to 3D shapes: cubes, cuboids, spheres, cylinders, cones, and pyramids. Day 7: Describing 3D shapes using faces, edges, and vertices. Day 8: Relating 2D shapes to 3D shapes. Day 9: Identifying lines of symmetry in 2D shapes. Day 10: Completing symmetrical figures. Week 3: Position, Direction, and Problem Solving - Day 11: Describing position using coordinates in the first quadrant. Day 12: Plotting coordinates to draw shapes. Day 13: Understanding translation (sliding a shape). Day 14: Understanding reflection (flipping a shape). Day 15: Problem-solving activities involving perimeter, area, and missing angles."

        initial_state = {"teaching_plan": test_teaching_plan, "model_one_assignment": "", "model_two_assigmodel_one_assignmentnment": "", "final_assignment": ""}

        updated_state = gen_assignment_gemini(initial_state)

        self.assertIn("model_one_assignment", updated_state)
        self.assertIsNotNone(updated_state["model_one_assignment"])
        self.assertIsInstance(updated_state["model_one_assignment"], str)
        self.assertGreater(len(updated_state["model_one_assignment"]), 0)
        print(updated_state["model_one_assignment"])


if __name__ == '__main__':
    unittest.main()
Configure the DeepSeek Assignment Generator
While cloud-based AI platforms are convenient, self-hosting LLMs can be crucial for protecting data privacy and ensuring data sovereignty. We'll deploy the smallest DeepSeek model (1.5B parameters) on a Cloud Compute Engine instance. There are other ways like hosting it on Google's Vertex AI platform or hosting it on your GKE instance, but since this is just a workshop on AI agents, and I don't want to keep you here forever, let's just use the most simplest way. But if you are interested and want to dig into other options, take a look at deepseek-vertexai.py file under assignment folder, where it provides an sample code of how to interact with models deployed on VertexAI.
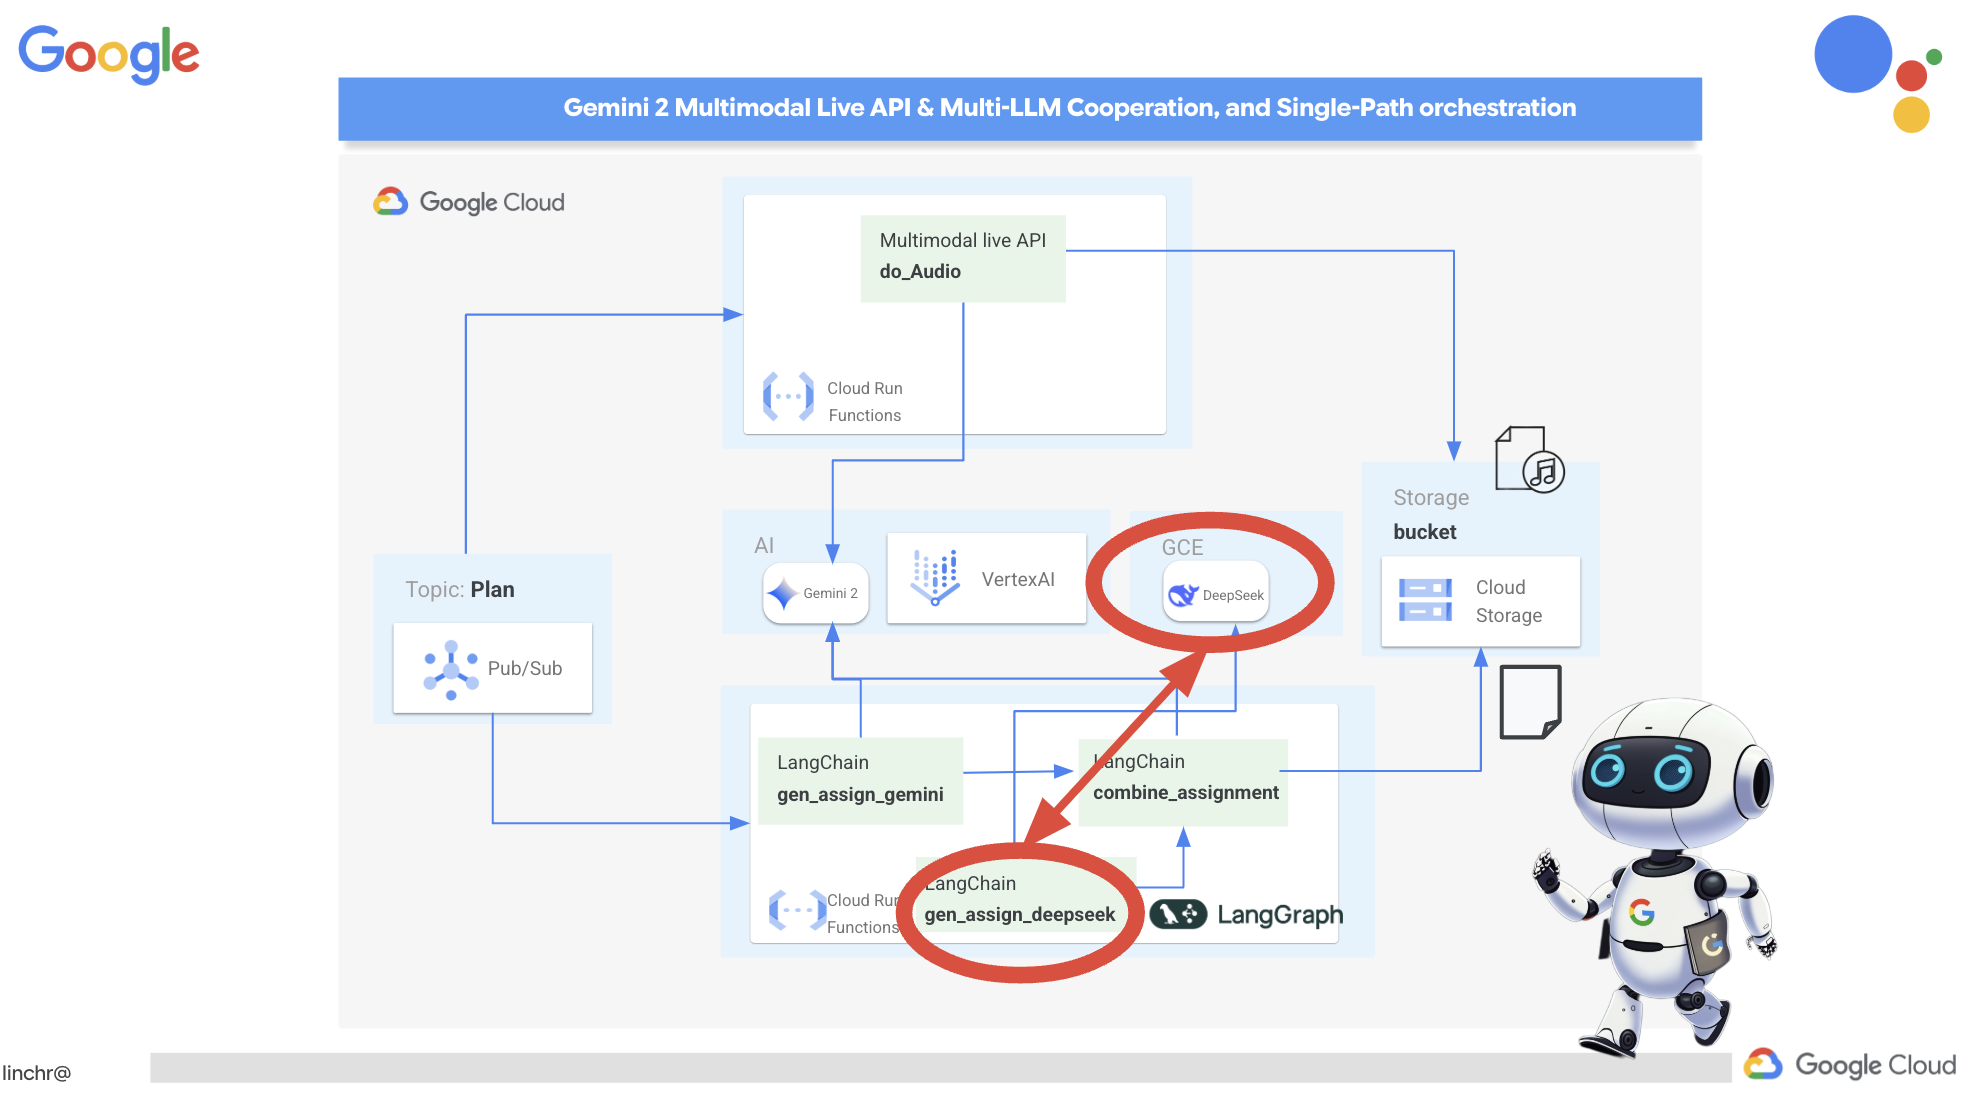
👉Run this command in the terminal to create a self-hosted LLM platform Ollama:
cd ~/aidemy-bootstrap/assignment
gcloud config set project $(cat ~/project_id.txt)
gcloud compute instances create ollama-instance \
    --image-family=ubuntu-2204-lts \
    --image-project=ubuntu-os-cloud \
    --machine-type=e2-standard-4 \
    --zone=us-central1-a \
    --metadata-from-file startup-script=startup.sh \
    --boot-disk-size=50GB \
    --tags=ollama \
    --scopes=https://www.googleapis.com/auth/cloud-platform
To verify the Compute Engine instance is running:
Navigate to Compute Engine > "VM instances" in the Google Cloud Console. You should see the ollama-instance listed with a green check mark indicating that it's running. If you can't see it, make sure the zone is us-central1. If it's not, you may need to search for it.
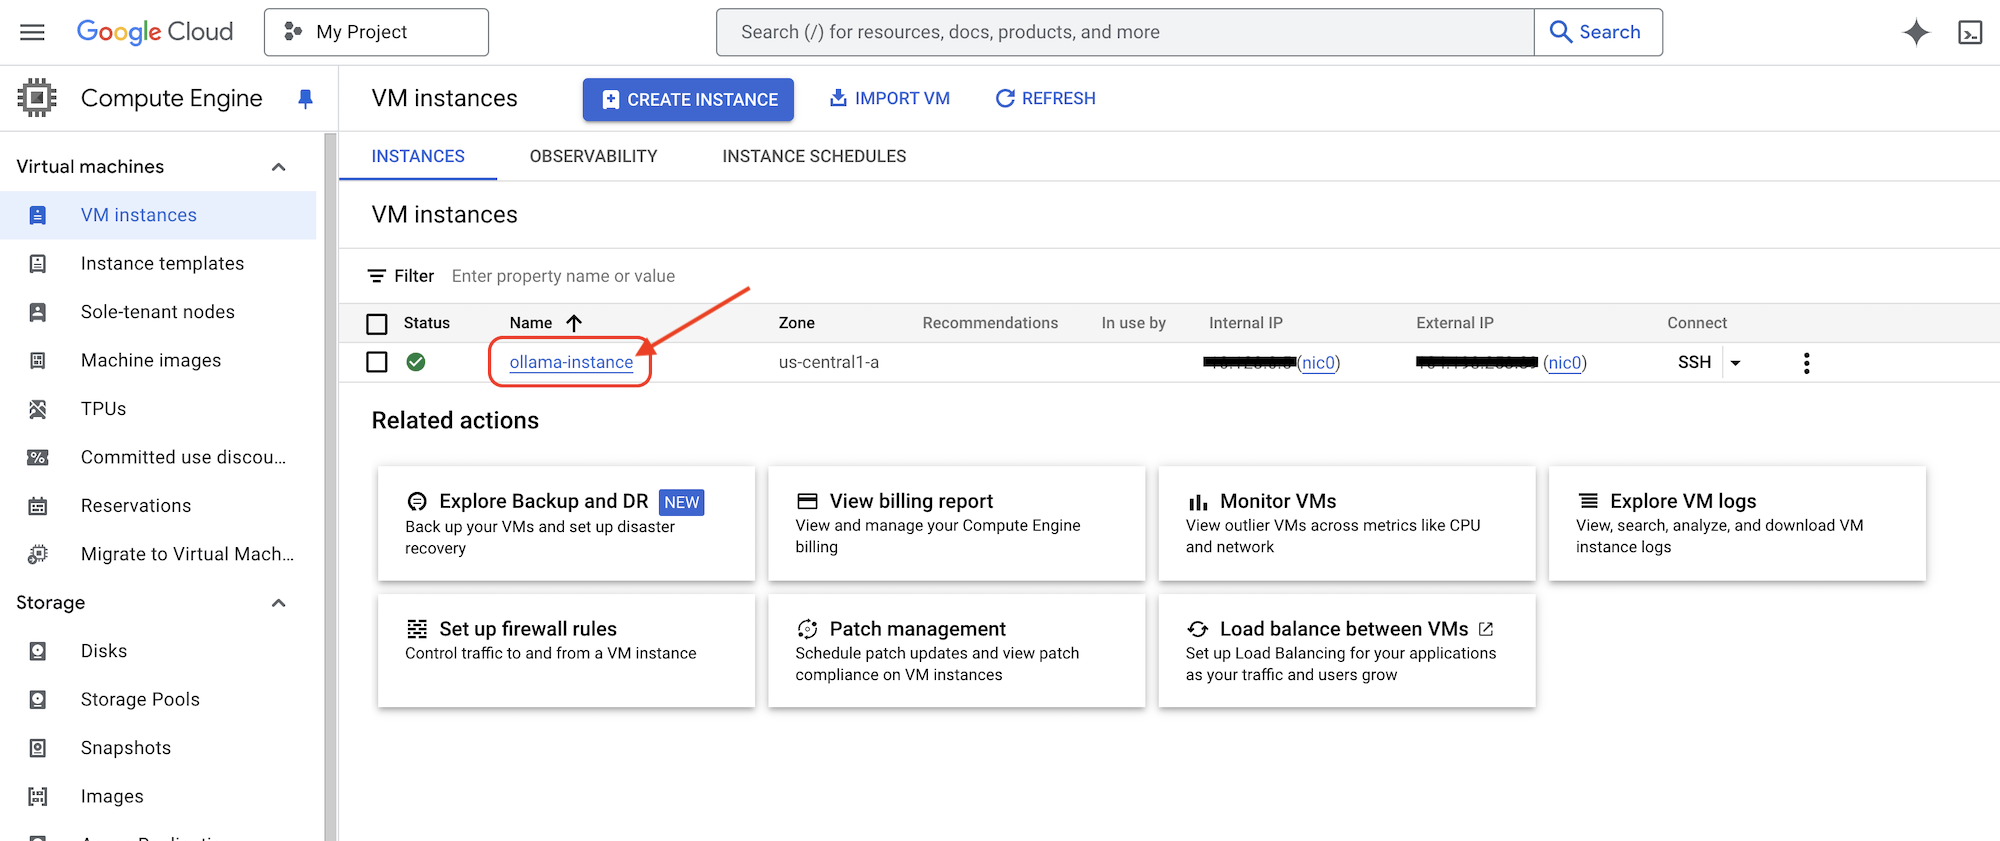
👉We'll install the smallest DeepSeek model and test it, back in the Cloud Shell Editor, in a New terminal, run following command to ssh into the GCE instance.
gcloud compute ssh ollama-instance --zone=us-central1-a
Upon establishing the SSH connection, you may be prompted with the following:
"Do you want to continue (Y/n)?"
Simply type Y (case-insensitive) and press Enter to proceed.
Next, you might be asked to create a passphrase for the SSH key. If you prefer not to use a passphrase, just press Enter twice to accept the default (no passphrase).
👉Now you are in the virutal machine, pull the smallest DeepSeek R1 model, and test if it works?
ollama pull deepseek-r1:1.5b
ollama run deepseek-r1:1.5b "who are you?"
👉Exit the GCE instance enter following in the ssh terminal:
exit
👉Next, setup the network policy, so other services can access the LLM, please limit the access to the instance if you want to do this for production, either implement security login for the service or restrict IP access. Run:
gcloud compute firewall-rules create allow-ollama-11434 \
    --allow=tcp:11434 \
    --target-tags=ollama \
    --description="Allow access to Ollama on port 11434"
👉To verify if your firewall policy is working correctly, try running:
export OLLAMA_HOST=http://$(gcloud compute instances describe ollama-instance --zone=us-central1-a --format='value(networkInterfaces[0].accessConfigs[0].natIP)'):11434
curl -X POST "${OLLAMA_HOST}/api/generate" \
     -H "Content-Type: application/json" \
     -d '{
          "prompt": "Hello, what are you?",
          "model": "deepseek-r1:1.5b",
          "stream": false
        }'
Next, we'll work on the Deepseek function in the assignment agent to generate assignments with individual work emphasis.
👉Edit deepseek.py under assignment folder add following snippet to the end:
def gen_assignment_deepseek(state):
    print(f"---------------gen_assignment_deepseek")

    template = """
        You are an instructor who favor student to focus on individual work.

        Develop engaging and practical assignments for each week, ensuring they align with the teaching plan's objectives and progressively build upon each other.

        For each week, provide the following:

        * **Week [Number]:** A descriptive title for the assignment (e.g., "Data Exploration Project," "Model Building Exercise").
        * **Learning Objectives Assessed:** List the specific learning objectives from the teaching plan that this assignment assesses.
        * **Description:** A detailed description of the task, including any specific requirements or constraints.  Provide examples or scenarios if applicable.
        * **Deliverables:** Specify what students need to submit (e.g., code, report, presentation).
        * **Estimated Time Commitment:**  The approximate time students should dedicate to completing the assignment.
        * **Assessment Criteria:** Briefly outline how the assignment will be graded (e.g., correctness, completeness, clarity, creativity).

        The assignments should be a mix of individual and collaborative work where appropriate.  Consider different learning styles and provide opportunities for students to apply their knowledge creatively.

        Based on this teaching plan: {teaching_plan}
        """


    prompt = ChatPromptTemplate.from_template(template)

    model = OllamaLLM(model="deepseek-r1:1.5b",
                   base_url=OLLAMA_HOST)

    chain = prompt | model


    response = chain.invoke({"teaching_plan":state["teaching_plan"]})
    state["model_two_assignment"] = response

    return state

import unittest

class TestGenAssignmentDeepseek(unittest.TestCase):
    def test_gen_assignment_deepseek(self):
        test_teaching_plan = "Week 1: 2D Shapes and Angles - Day 1: Review of basic 2D shapes (squares, rectangles, triangles, circles). Day 2: Exploring different types of triangles (equilateral, isosceles, scalene, right-angled). Day 3: Exploring quadrilaterals (square, rectangle, parallelogram, rhombus, trapezium). Day 4: Introduction to angles: right angles, acute angles, and obtuse angles. Day 5: Measuring angles using a protractor. Week 2: 3D Shapes and Symmetry - Day 6: Introduction to 3D shapes: cubes, cuboids, spheres, cylinders, cones, and pyramids. Day 7: Describing 3D shapes using faces, edges, and vertices. Day 8: Relating 2D shapes to 3D shapes. Day 9: Identifying lines of symmetry in 2D shapes. Day 10: Completing symmetrical figures. Week 3: Position, Direction, and Problem Solving - Day 11: Describing position using coordinates in the first quadrant. Day 12: Plotting coordinates to draw shapes. Day 13: Understanding translation (sliding a shape). Day 14: Understanding reflection (flipping a shape). Day 15: Problem-solving activities involving perimeter, area, and missing angles."

        initial_state = {"teaching_plan": test_teaching_plan, "model_one_assignment": "", "model_two_assignment": "", "final_assignment": ""}

        updated_state = gen_assignment_deepseek(initial_state)

        self.assertIn("model_two_assignment", updated_state)
        self.assertIsNotNone(updated_state["model_two_assignment"])
        self.assertIsInstance(updated_state["model_two_assignment"], str)
        self.assertGreater(len(updated_state["model_two_assignment"]), 0)
        print(updated_state["model_two_assignment"])


if __name__ == '__main__':
    unittest.main()
👉let's test it by running:
cd ~/aidemy-bootstrap/assignment
source env/bin/activate
gcloud config set project $(cat ~/project_id.txt)
export PROJECT_ID=$(gcloud config get project)
export OLLAMA_HOST=http://$(gcloud compute instances describe ollama-instance --zone=us-central1-a --format='value(networkInterfaces[0].accessConfigs[0].natIP)'):11434
python deepseek.py
You should see an assignment that has more self study work.
**Assignment Plan for Each Week**

---

### **Week 1: 2D Shapes and Angles**
- **Week Title:** "Exploring 2D Shapes"
Assign students to research and present on various 2D shapes. Include a project where they create models using straws and tape for triangles, draw quadrilaterals with specific measurements, and compare their properties.

### **Week 2: 3D Shapes and Symmetry**
Assign students to create models or nets for cubes and cuboids. They will also predict how folding these nets form the 3D shapes. Include a project where they identify symmetrical properties using mirrors or folding techniques.

### **Week 3: Position, Direction, and Problem Solving**

Assign students to use mirrors or folding techniques for reflections. Include activities where they measure angles, use a protractor, solve problems involving perimeter/area, and create symmetrical designs.
....
👉Stop the ctl+c , and to clean up the test code. REMOVE the following code from deepseek.py
import unittest

class TestGenAssignmentDeepseek(unittest.TestCase):
    def test_gen_assignment_deepseek(self):
        test_teaching_plan = "Week 1: 2D Shapes and Angles - Day 1: Review of basic 2D shapes (squares, rectangles, triangles, circles). Day 2: Exploring different types of triangles (equilateral, isosceles, scalene, right-angled). Day 3: Exploring quadrilaterals (square, rectangle, parallelogram, rhombus, trapezium). Day 4: Introduction to angles: right angles, acute angles, and obtuse angles. Day 5: Measuring angles using a protractor. Week 2: 3D Shapes and Symmetry - Day 6: Introduction to 3D shapes: cubes, cuboids, spheres, cylinders, cones, and pyramids. Day 7: Describing 3D shapes using faces, edges, and vertices. Day 8: Relating 2D shapes to 3D shapes. Day 9: Identifying lines of symmetry in 2D shapes. Day 10: Completing symmetrical figures. Week 3: Position, Direction, and Problem Solving - Day 11: Describing position using coordinates in the first quadrant. Day 12: Plotting coordinates to draw shapes. Day 13: Understanding translation (sliding a shape). Day 14: Understanding reflection (flipping a shape). Day 15: Problem-solving activities involving perimeter, area, and missing angles."

        initial_state = {"teaching_plan": test_teaching_plan, "model_one_assignment": "", "model_two_assignment": "", "final_assignment": ""}

        updated_state = gen_assignment_deepseek(initial_state)

        self.assertIn("model_two_assignment", updated_state)
        self.assertIsNotNone(updated_state["model_two_assignment"])
        self.assertIsInstance(updated_state["model_two_assignment"], str)
        self.assertGreater(len(updated_state["model_two_assignment"]), 0)
        print(updated_state["model_two_assignment"])


if __name__ == '__main__':
    unittest.main()
Now, we'll use the same gemini model to combine both assignments into a new one. Edit the gemini.py file located in the assignment folder.
👉Paste the following code to the end of the gemini.py file:
def combine_assignments(state):
    print(f"---------------combine_assignments ")
    region=get_next_region()
    client = genai.Client(vertexai=True, project=PROJECT_ID, location=region)
    response = client.models.generate_content(
        model=MODEL_ID, contents=f"""
        Look at all the proposed assignment so far {state["model_one_assignment"]} and {state["model_two_assignment"]}, combine them and come up with a final assignment for student.
        """
    )

    state["final_assignment"] = response.text

    return state
To combine the strengths of both models, we'll orchestrate a defined workflow using LangGraph. This workflow consists of three steps: first, the Gemini model generates an assignment focused on collaboration; second, the DeepSeek model generates an assignment emphasizing individual work; finally, Gemini synthesizes these two assignments into a single, comprehensive assignment. Because we predefine the sequence of steps without LLM decision-making, this constitutes a single-path, user-defined orchestration.
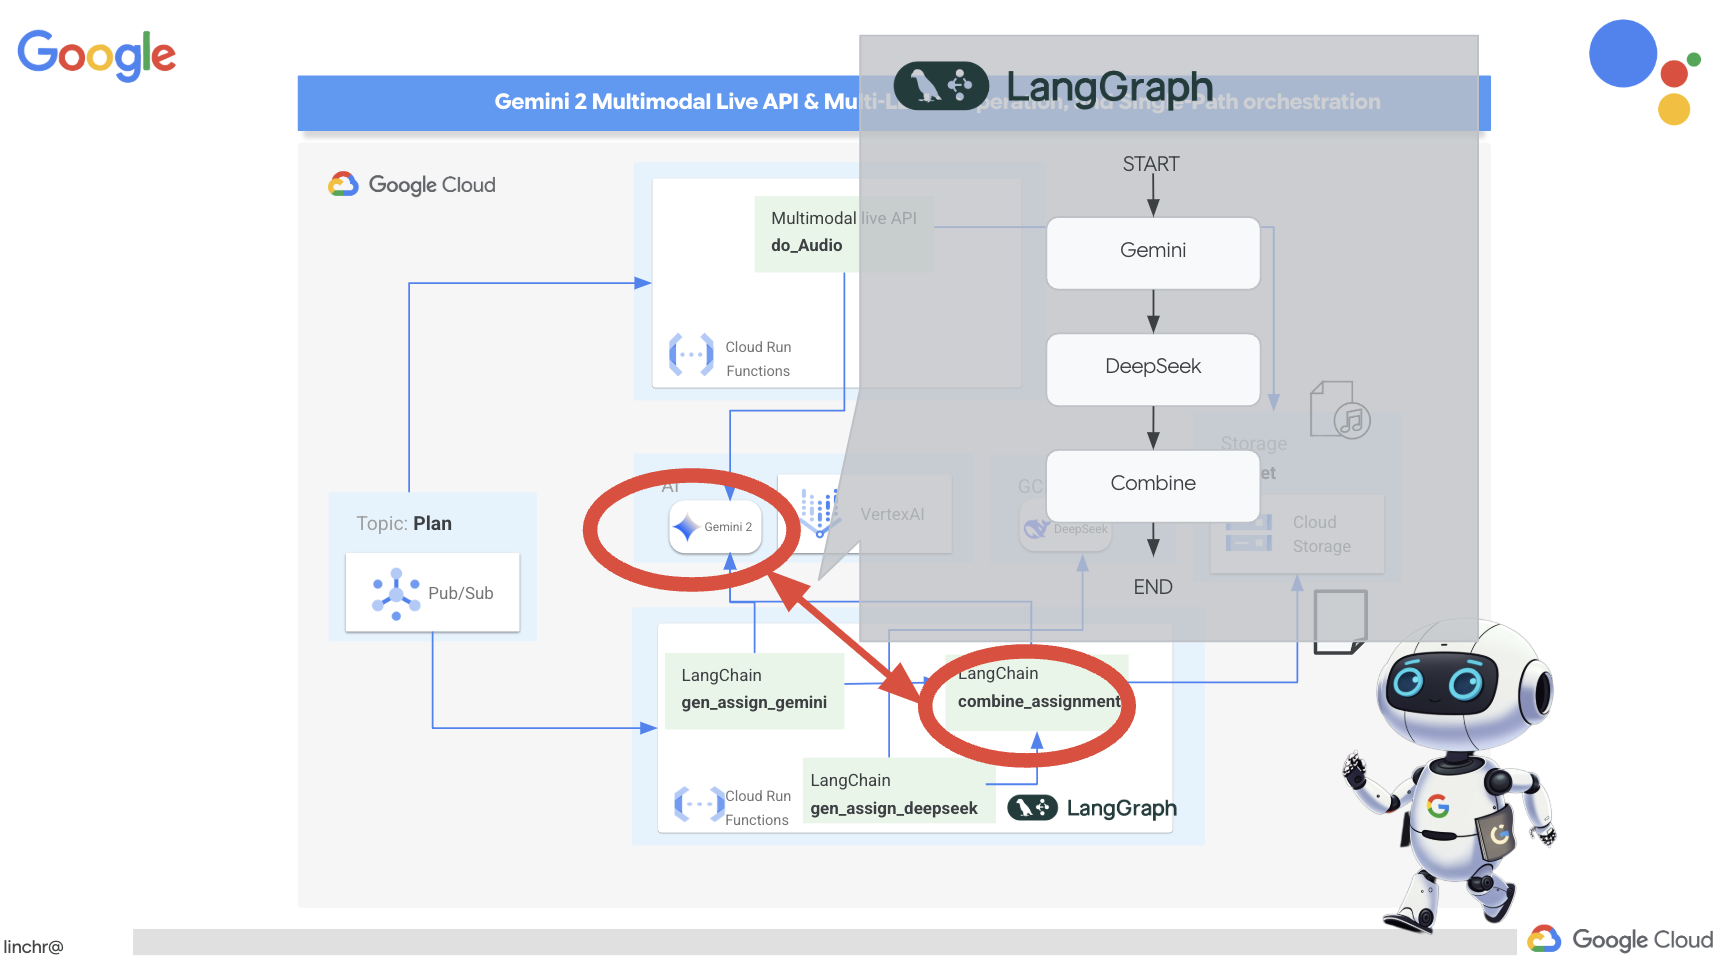
👉Paste the following code to the end of the main.py file under assignment folder:
def create_assignment(teaching_plan: str):
    print(f"create_assignment---->{teaching_plan}")
    builder = StateGraph(State)
    builder.add_node("gen_assignment_gemini", gen_assignment_gemini)
    builder.add_node("gen_assignment_deepseek", gen_assignment_deepseek)
    builder.add_node("combine_assignments", combine_assignments)

    builder.add_edge(START, "gen_assignment_gemini")
    builder.add_edge("gen_assignment_gemini", "gen_assignment_deepseek")
    builder.add_edge("gen_assignment_deepseek", "combine_assignments")
    builder.add_edge("combine_assignments", END)

    graph = builder.compile()
    state = graph.invoke({"teaching_plan": teaching_plan})

    return state["final_assignment"]


import unittest

class TestCreateAssignment(unittest.TestCase):
    def test_create_assignment(self):
        test_teaching_plan = "Week 1: 2D Shapes and Angles - Day 1: Review of basic 2D shapes (squares, rectangles, triangles, circles). Day 2: Exploring different types of triangles (equilateral, isosceles, scalene, right-angled). Day 3: Exploring quadrilaterals (square, rectangle, parallelogram, rhombus, trapezium). Day 4: Introduction to angles: right angles, acute angles, and obtuse angles. Day 5: Measuring angles using a protractor. Week 2: 3D Shapes and Symmetry - Day 6: Introduction to 3D shapes: cubes, cuboids, spheres, cylinders, cones, and pyramids. Day 7: Describing 3D shapes using faces, edges, and vertices. Day 8: Relating 2D shapes to 3D shapes. Day 9: Identifying lines of symmetry in 2D shapes. Day 10: Completing symmetrical figures. Week 3: Position, Direction, and Problem Solving - Day 11: Describing position using coordinates in the first quadrant. Day 12: Plotting coordinates to draw shapes. Day 13: Understanding translation (sliding a shape). Day 14: Understanding reflection (flipping a shape). Day 15: Problem-solving activities involving perimeter, area, and missing angles."
        initial_state = {"teaching_plan": test_teaching_plan, "model_one_assignment": "", "model_two_assignment": "", "final_assignment": ""}
        updated_state = create_assignment(initial_state)

        print(updated_state)


if __name__ == '__main__':
    unittest.main()
👉To initially test the create_assignment function and confirm that the workflow combining Gemini and DeepSeek is functional, run the following command:
cd ~/aidemy-bootstrap/assignment
source env/bin/activate
pip install -r requirements.txt
python main.py
You should see something that combine both models with their individual perspective for student study and also for student group works.
**Tasks:**

1. **Clue Collection:** Gather all the clues left by the thieves. These clues will include:
    * Descriptions of shapes and their properties (angles, sides, etc.)
    * Coordinate grids with hidden messages
    * Geometric puzzles requiring transformation (translation, reflection, rotation)
    * Challenges involving area, perimeter, and angle calculations

2. **Clue Analysis:** Decipher each clue using your geometric knowledge. This will involve:
    * Identifying the shape and its properties
    * Plotting coordinates and interpreting patterns on the grid
    * Solving geometric puzzles by applying transformations
    * Calculating area, perimeter, and missing angles

3. **Case Report:** Create a comprehensive case report outlining your findings. This report should include:
    * A detailed explanation of each clue and its solution
    * Sketches and diagrams to support your explanations
    * A step-by-step account of how you followed the clues to locate the artifact
    * A final conclusion about the thieves and their motives
👉Stop the ctl+c , and to clean up the test code. REMOVE the following code from main.py
import unittest

class TestCreateAssignment(unittest.TestCase):
    def test_create_assignment(self):
        test_teaching_plan = "Week 1: 2D Shapes and Angles - Day 1: Review of basic 2D shapes (squares, rectangles, triangles, circles). Day 2: Exploring different types of triangles (equilateral, isosceles, scalene, right-angled). Day 3: Exploring quadrilaterals (square, rectangle, parallelogram, rhombus, trapezium). Day 4: Introduction to angles: right angles, acute angles, and obtuse angles. Day 5: Measuring angles using a protractor. Week 2: 3D Shapes and Symmetry - Day 6: Introduction to 3D shapes: cubes, cuboids, spheres, cylinders, cones, and pyramids. Day 7: Describing 3D shapes using faces, edges, and vertices. Day 8: Relating 2D shapes to 3D shapes. Day 9: Identifying lines of symmetry in 2D shapes. Day 10: Completing symmetrical figures. Week 3: Position, Direction, and Problem Solving - Day 11: Describing position using coordinates in the first quadrant. Day 12: Plotting coordinates to draw shapes. Day 13: Understanding translation (sliding a shape). Day 14: Understanding reflection (flipping a shape). Day 15: Problem-solving activities involving perimeter, area, and missing angles."
        initial_state = {"teaching_plan": test_teaching_plan, "model_one_assignment": "", "model_two_assignment": "", "final_assignment": ""}
        updated_state = create_assignment(initial_state)

        print(updated_state)


if __name__ == '__main__':
    unittest.main()

To make the assignment generation process automatic and responsive to new teaching plans, we'll leverage the existing event-driven architecture. The following code defines a Cloud Run Function (generate_assignment) that will be triggered whenever a new teaching plan is published to the Pub/Sub topic ' plan '.
👉Add the following code to the end of main.py in the assignment folder:
@functions_framework.cloud_event
def generate_assignment(cloud_event):
    print(f"CloudEvent received: {cloud_event.data}")

    try:
        if isinstance(cloud_event.data.get('message', {}).get('data'), str):
            data = json.loads(base64.b64decode(cloud_event.data['message']['data']).decode('utf-8'))
            teaching_plan = data.get('teaching_plan')
        elif 'teaching_plan' in cloud_event.data:
            teaching_plan = cloud_event.data["teaching_plan"]
        else:
            raise KeyError("teaching_plan not found")

        assignment = create_assignment(teaching_plan)

        print(f"Assignment---->{assignment}")

        #Store the return assignment into bucket as a text file
        storage_client = storage.Client()
        bucket = storage_client.bucket(ASSIGNMENT_BUCKET)
        file_name = f"assignment-{random.randint(1, 1000)}.txt"
        blob = bucket.blob(file_name)
        blob.upload_from_string(assignment)

        return f"Assignment generated and stored in {ASSIGNMENT_BUCKET}/{file_name}", 200

    except (json.JSONDecodeError, AttributeError, KeyError) as e:
        print(f"Error decoding CloudEvent data: {e} - Data: {cloud_event.data}")
        return "Error processing event", 500

    except Exception as e:
        print(f"Error generate assignment: {e}")
        return "Error generate assignment", 500
Testing locally
Before deploying to Google Cloud, it's good practice to test the Cloud Run Function locally. This allows for faster iteration and easier debugging.
First, create a Cloud Storage bucket to store the generated assignment files and grant the service account access to the bucket. Run the following commands in the terminal:
👉 IMPORTANT : Ensure you define a unique ASSIGNMENT_BUCKET name that begins with " aidemy-assignment- ". This unique name is crucial for avoiding naming conflicts when creating your Cloud Storage bucket. (Replace <YOUR_NAME> with any random word)
export ASSIGNMENT_BUCKET=aidemy-assignment-<YOUR_NAME> #Name must be unqiue
👉And run:
gcloud config set project $(cat ~/project_id.txt)
export PROJECT_ID=$(gcloud config get project)
export SERVICE_ACCOUNT_NAME=$(gcloud compute project-info describe --format="value(defaultServiceAccount)")
gsutil mb -p $PROJECT_ID -l us-central1 gs://$ASSIGNMENT_BUCKET

gcloud storage buckets add-iam-policy-binding gs://$ASSIGNMENT_BUCKET \
    --member "serviceAccount:$SERVICE_ACCOUNT_NAME" \
    --role "roles/storage.objectViewer"

gcloud storage buckets add-iam-policy-binding gs://$ASSIGNMENT_BUCKET \
    --member "serviceAccount:$SERVICE_ACCOUNT_NAME" \
    --role "roles/storage.objectCreator"
👉Now, start the Cloud Run Function emulator:
cd ~/aidemy-bootstrap/assignment
functions-framework \
    --target generate_assignment \
    --signature-type=cloudevent \
    --source main.py
👉While the emulator is running in one terminal, open a second terminal in the Cloud Shell. In this second terminal, send a test CloudEvent to the emulator to simulate a new teaching plan being published:
  curl -X POST \
  http://localhost:8080/ \
  -H "Content-Type: application/json" \
  -H "ce-id: event-id-01" \
  -H "ce-source: planner-agent" \
  -H "ce-specversion: 1.0" \
  -H "ce-type: google.cloud.pubsub.topic.v1.messagePublished" \
  -d '{
    "message": {
      "data": "eyJ0ZWFjaGluZ19wbGFuIjogIldlZWsgMTogMkQgU2hhcGVzIGFuZCBBbmdsZXMgLSBEYXkgMTogUmV2aWV3IG9mIGJhc2ljIDJEIHNoYXBlcyAoc3F1YXJlcywgcmVjdGFuZ2xlcywgdHJpYW5nbGVzLCBjaXJjbGVzKS4gRGF5IDI6IEV4cGxvcmluZyBkaWZmZXJlbnQgdHlwZXMgb2YgdHJpYW5nbGVzIChlcXVpbGF0ZXJhbCwgaXNvc2NlbGVzLCBzY2FsZW5lLCByaWdodC1hbmdsZWQpLiBEYXkgMzogRXhwbG9yaW5nIHF1YWRyaWxhdGVyYWxzIChzcXVhcmUsIHJlY3RhbmdsZSwgcGFyYWxsZWxvZ3JhbSwgcmhvbWJ1cywgdHJhcGV6aXVtKS4gRGF5IDQ6IEludHJvZHVjdGlvbiB0byBhbmdsZXM6IHJpZ2h0IGFuZ2xlcywgYWN1dGUgYW5nbGVzLCBhbmQgb2J0dXNlIGFuZ2xlcy4gRGF5IDU6IE1lYXN1cmluZyBhbmdsZXMgdXNpbmcgYSBwcm90cmFjdG9yLiBXZWVrIDI6IDNEIFNoYXBlcyBhbmQgU3ltbWV0cnkgLSBEYXkgNjogSW50cm9kdWN0aW9uIHRvIDNEIHNoYXBlczogY3ViZXMsIGN1Ym9pZHMsIHNwaGVyZXMsIGN5bGluZGVycywgY29uZXMsIGFuZCBweXJhbWlkcy4gRGF5IDc6IERlc2NyaWJpbmcgM0Qgc2hhcGVzIHVzaW5nIGZhY2VzLCBlZGdlcywgYW5kIHZlcnRpY2VzLiBEYXkgODogUmVsYXRpbmcgMkQgc2hhcGVzIHRvIDNEIHNoYXBlcy4gRGF5IDk6IElkZW50aWZ5aW5nIGxpbmVzIG9mIHN5bW1ldHJ5IGluIDJEIHNoYXBlcy4gRGF5IDEwOiBDb21wbGV0aW5nIHN5bW1ldHJpY2FsIGZpZ3VyZXMuIFdlZWsgMzogUG9zaXRpb24sIERpcmVjdGlvbiwgYW5kIFByb2JsZW0gU29sdmluZyAtIERheSAxMTogRGVzY3JpYmluZyBwb3NpdGlvbiB1c2luZyBjb29yZGluYXRlcyBpbiB0aGUgZmlyc3QgcXVhZHJhbnQuIERheSAxMjogUGxvdHRpbmcgY29vcmRpbmF0ZXMgdG8gZHJhdyBzaGFwZXMuIERheSAxMzogVW5kZXJzdGFuZGluZyB0cmFuc2xhdGlvbiAoc2xpZGluZyBhIHNoYXBlKS4gRGF5IDE0OiBVbmRlcnN0YW5kaW5nIHJlZmxlY3Rpb24gKGZsaXBwaW5nIGEgc2hhcGUpLiBEYXkgMTU6IFByb2JsZW0tc29sdmluZyBhY3Rpdml0aWVzIGludm9sdmluZyBwZXJpbWV0ZXIsIGFyZWEsIGFuZCBtaXNzaW5nIGFuZ2xlcy4ifQ=="
    }
  }'
Rather than staring blankly while waiting for the response, switch over to the other Cloud Shell terminal. You can observe the progress and any output or error messages generated by your function in the emulator's terminal. 😁
The curl command should print "OK" (without a newline, so "OK" may appear on the same line your terminal shell prompt).
To confirm that the assignment was successfully generated and stored, go to the Google Cloud Console and navigate to Storage > "Cloud Storage". Select the aidemy-assignment bucket you created. You should see a text file named assignment-{random number}.txt in the bucket. Click on the file to download it and verify its contents. This verifies that a new file contains new assignment just generated.
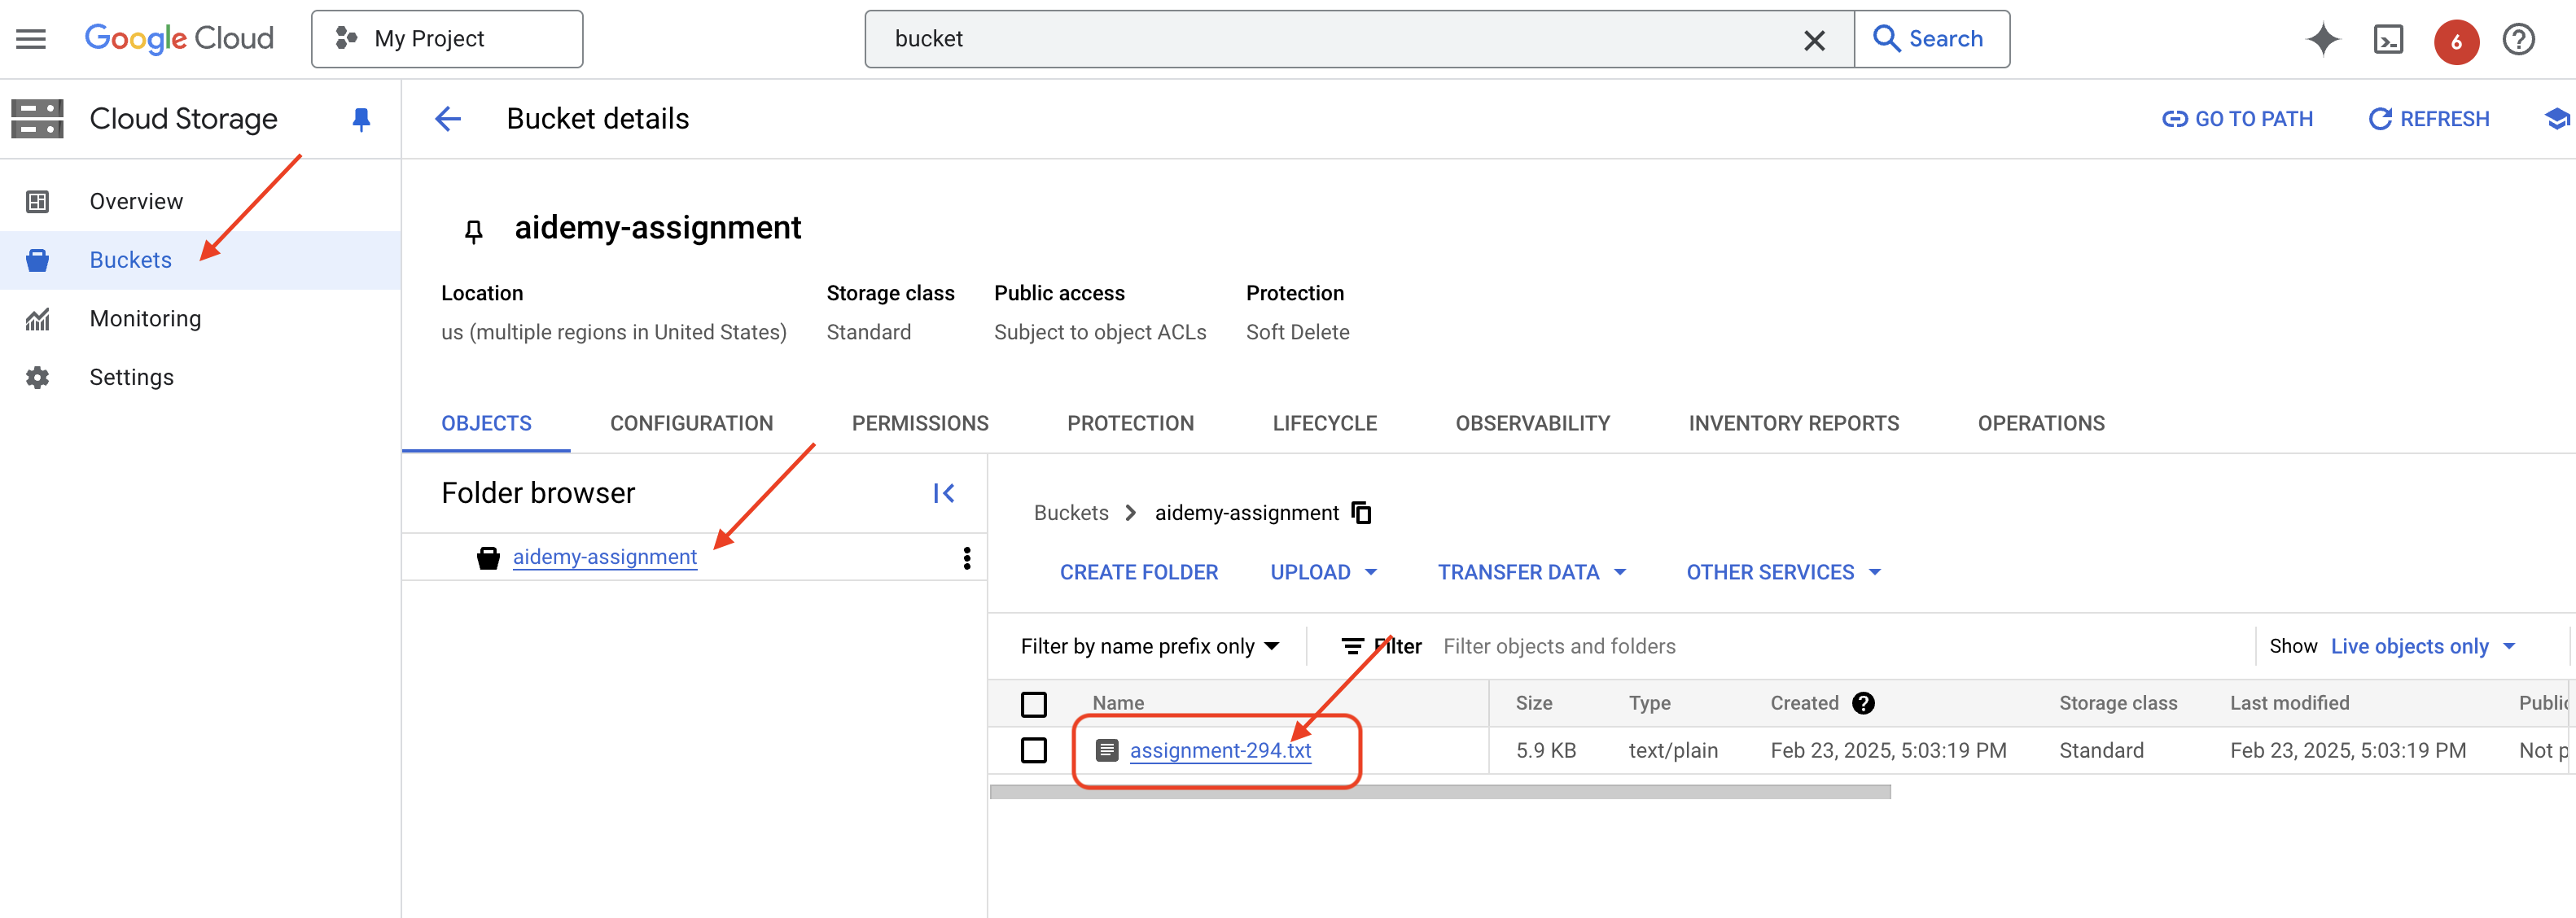
👉In the terminal running the emulator, type ctrl+c to exit. And close the second terminal. 👉Also, in the terminal running the emulator, exit the virtual environment.
deactivate
👉Next, we'll deploy the assignment agent to the cloud
cd ~/aidemy-bootstrap/assignment
export ASSIGNMENT_BUCKET=$(gcloud storage buckets list --format="value(name)" | grep aidemy-assignment)
export OLLAMA_HOST=http://$(gcloud compute instances describe ollama-instance --zone=us-central1-a --format='value(networkInterfaces[0].accessConfigs[0].natIP)'):11434
gcloud config set project $(cat ~/project_id.txt)
export PROJECT_ID=$(gcloud config get project)
gcloud functions deploy assignment-agent \
 --gen2 \
 --timeout=540 \
 --memory=2Gi \
 --cpu=1 \
 --set-env-vars="ASSIGNMENT_BUCKET=${ASSIGNMENT_BUCKET}" \
 --set-env-vars=GOOGLE_CLOUD_PROJECT=${GOOGLE_CLOUD_PROJECT} \
 --set-env-vars=OLLAMA_HOST=${OLLAMA_HOST} \
 --region=us-central1 \
 --runtime=python312 \
 --source=. \
 --entry-point=generate_assignment \
 --trigger-topic=plan
Verify deployment by going to Google Cloud Console, navigate to Cloud Run. You should see a new service named courses-agent listed. 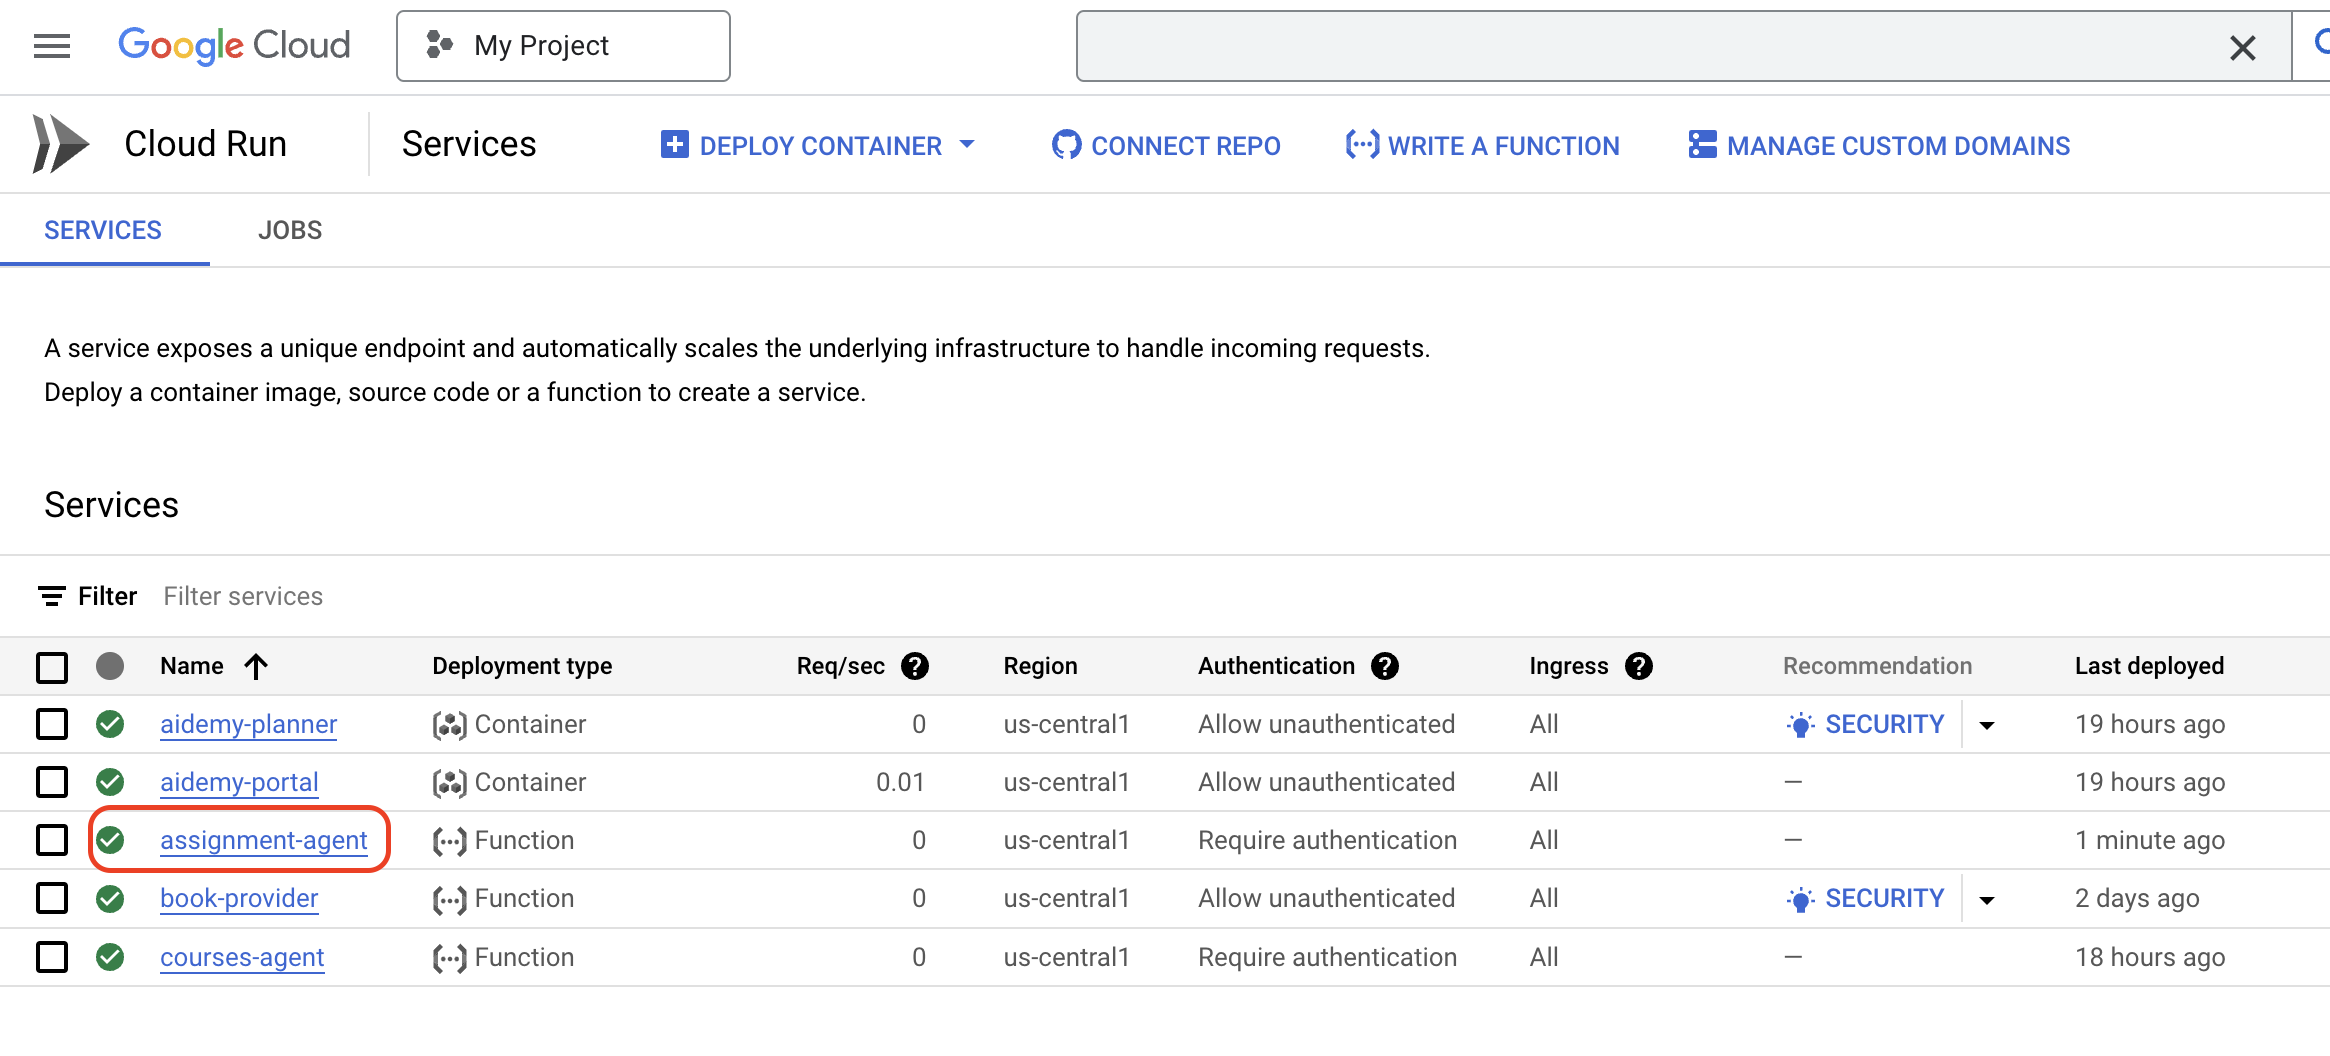
With the assignment generation workflow now implemented and tested and deployed, we can move on to the next step: making these assignments accessible within the student portal.
14. OPTIONAL: Role-Based collaboration with Gemini and DeepSeek - Contd.
Dynamic website generation
To enhance the student portal and make it more engaging, we'll implement dynamic HTML generation for assignment pages. The goal is to automatically update the portal with a fresh, visually appealing design whenever a new assignment is generated. This leverages the LLM's coding capabilities to create a more dynamic and interesting user experience.
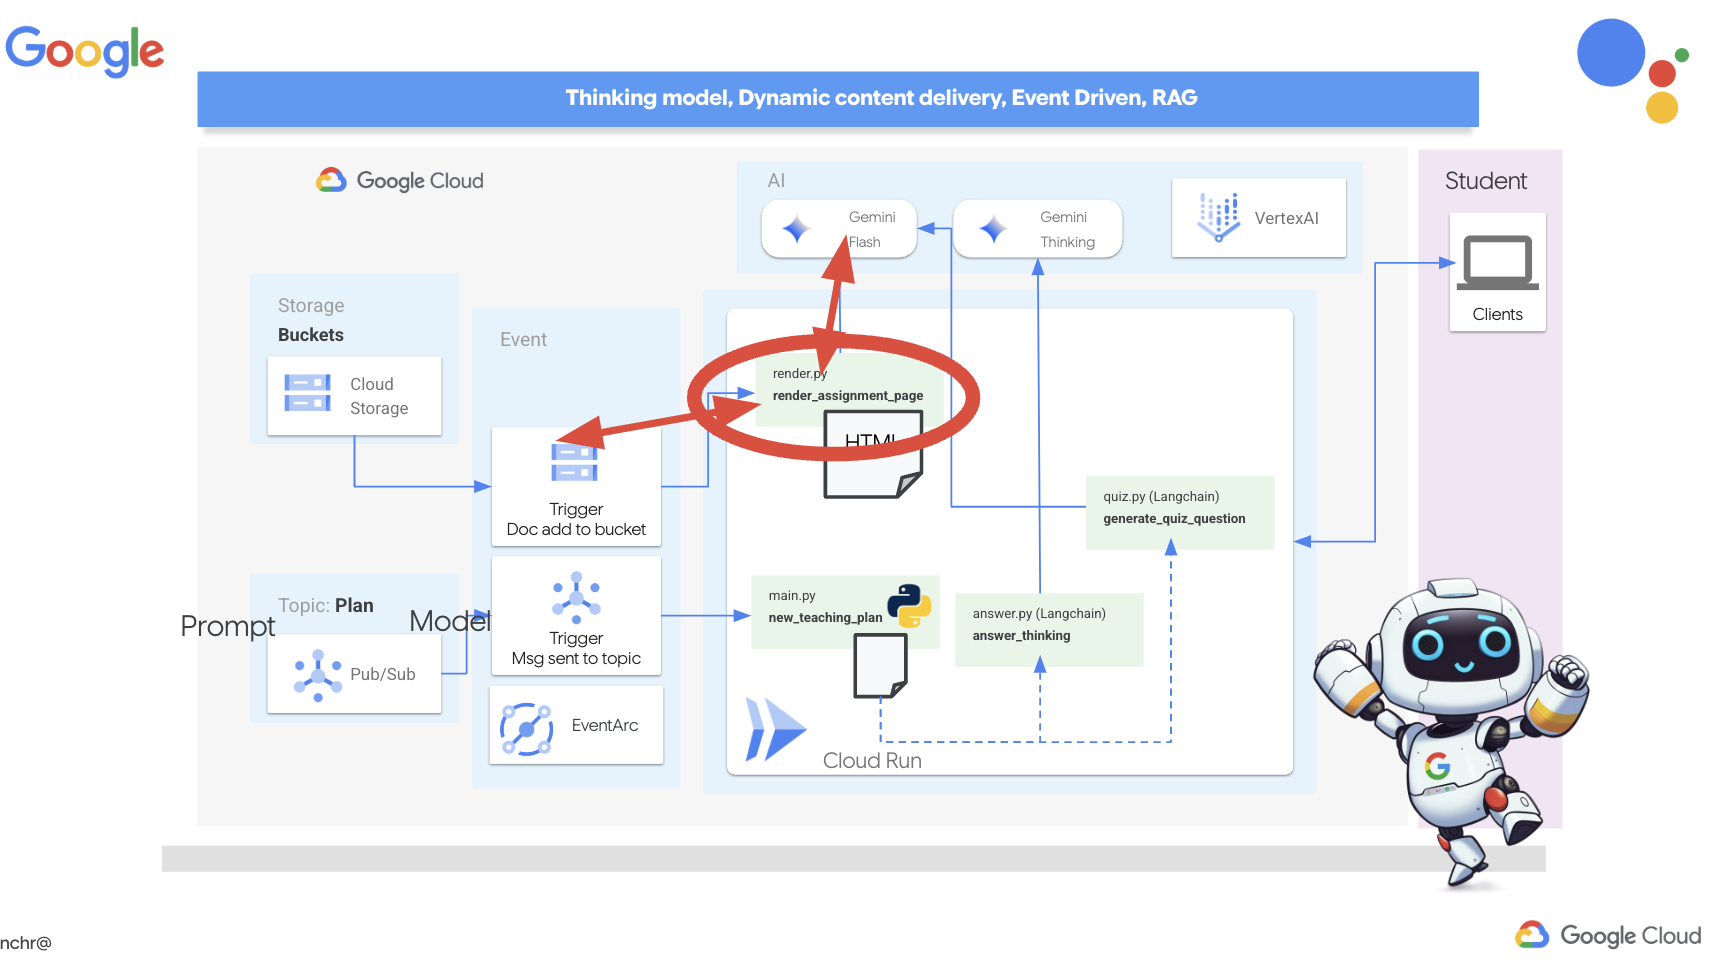
👉In Cloud Shell Editor, edit the render.py file within the portal folder, replace
def render_assignment_page():
    return ""
with following code snippet:
def render_assignment_page(assignment: str):
    try:
        region=get_next_region()
        llm = VertexAI(model_name="gemini-2.0-flash-001", location=region)
        input_msg = HumanMessage(content=[f"Here the assignment {assignment}"])
        prompt_template = ChatPromptTemplate.from_messages(
            [
                SystemMessage(
                    content=(
                        """
                        As a frontend developer, create HTML to display a student assignment with a creative look and feel. Include the following navigation bar at the top:
                        ```
                        <nav>
                            <a href="/">Home</a>
                            <a href="/quiz">Quizzes</a>
                            <a href="/courses">Courses</a>
                            <a href="/assignment">Assignments</a>
                        </nav>
                        ```
                        Also include these links in the <head> section:
                        ```
                        <link rel="stylesheet" href="{{ url_for('static', filename='style.css') }}">
                        <link rel="preconnect" href="https://fonts.googleapis.com">
                        <link rel="preconnect" href="https://fonts.gstatic.com" crossorigin>
                        <link href="https://fonts.googleapis.com/css2?family=Roboto:wght@400;500&display=swap" rel="stylesheet">

                        ```
                        Do not apply inline styles to the navigation bar.
                        The HTML should display the full assignment content. In its CSS, be creative with the rainbow colors and aesthetic.
                        Make it creative and pretty
                        The assignment content should be well-structured and easy to read.
                        respond with JUST the html file
                        """
                    )
                ),
                input_msg,
            ]
        )

        prompt = prompt_template.format()

        response = llm.invoke(prompt)

        response = response.replace("```html", "")
        response = response.replace("```", "")
        with open("templates/assignment.html", "w") as f:
            f.write(response)


        print(f"response: {response}")

        return response
    except Exception as e:
        print(f"Error sending message to chatbot: {e}") # Log this error too!
        return f"Unable to process your request at this time. Due to the following reason: {str(e)}"
It uses the Gemini model to dynamically generate HTML for the assignment. It takes the assignment content as input and uses a prompt to instruct Gemini to create a visually appealing HTML page with a creative style.
Next, we'll create an endpoint that will be triggered whenever a new document is added to the assignment bucket:
👉Within the portal folder, edit the app.py file and REPLACE the ## REPLACE ME! RENDER ASSIGNMENT line with following code:
@app.route('/render_assignment', methods=['POST'])
def render_assignment():
    try:
        data = request.get_json()
        file_name = data.get('name')
        bucket_name = data.get('bucket')

        if not file_name or not bucket_name:
            return jsonify({'error': 'Missing file name or bucket name'}), 400

        storage_client = storage.Client()
        bucket = storage_client.bucket(bucket_name)
        blob = bucket.blob(file_name)
        content = blob.download_as_text()

        print(f"File content: {content}")

        render_assignment_page(content)

        return jsonify({'message': 'Assignment rendered successfully'})

    except Exception as e:
        print(f"Error processing file: {e}")
        return jsonify({'error': 'Error processing file'}), 500
When triggered, it retrieves the file name and bucket name from the request data, downloads the assignment content from Cloud Storage, and calls the render_assignment_page function to generate the HTML.
👉We'll go ahead and run it locally:
cd ~/aidemy-bootstrap/portal
source env/bin/activate
python app.py
👉From the "Web preview" menu at the top of the Cloud Shell window, select "Preview on port 8080". This will open your application in a new browser tab. Navigate to the Assignment link in the navigation bar. You should see a blank page at this point, which is expected behavior since we haven't yet established the communication bridge between the assignment agent and the portal to dynamically populate the content.
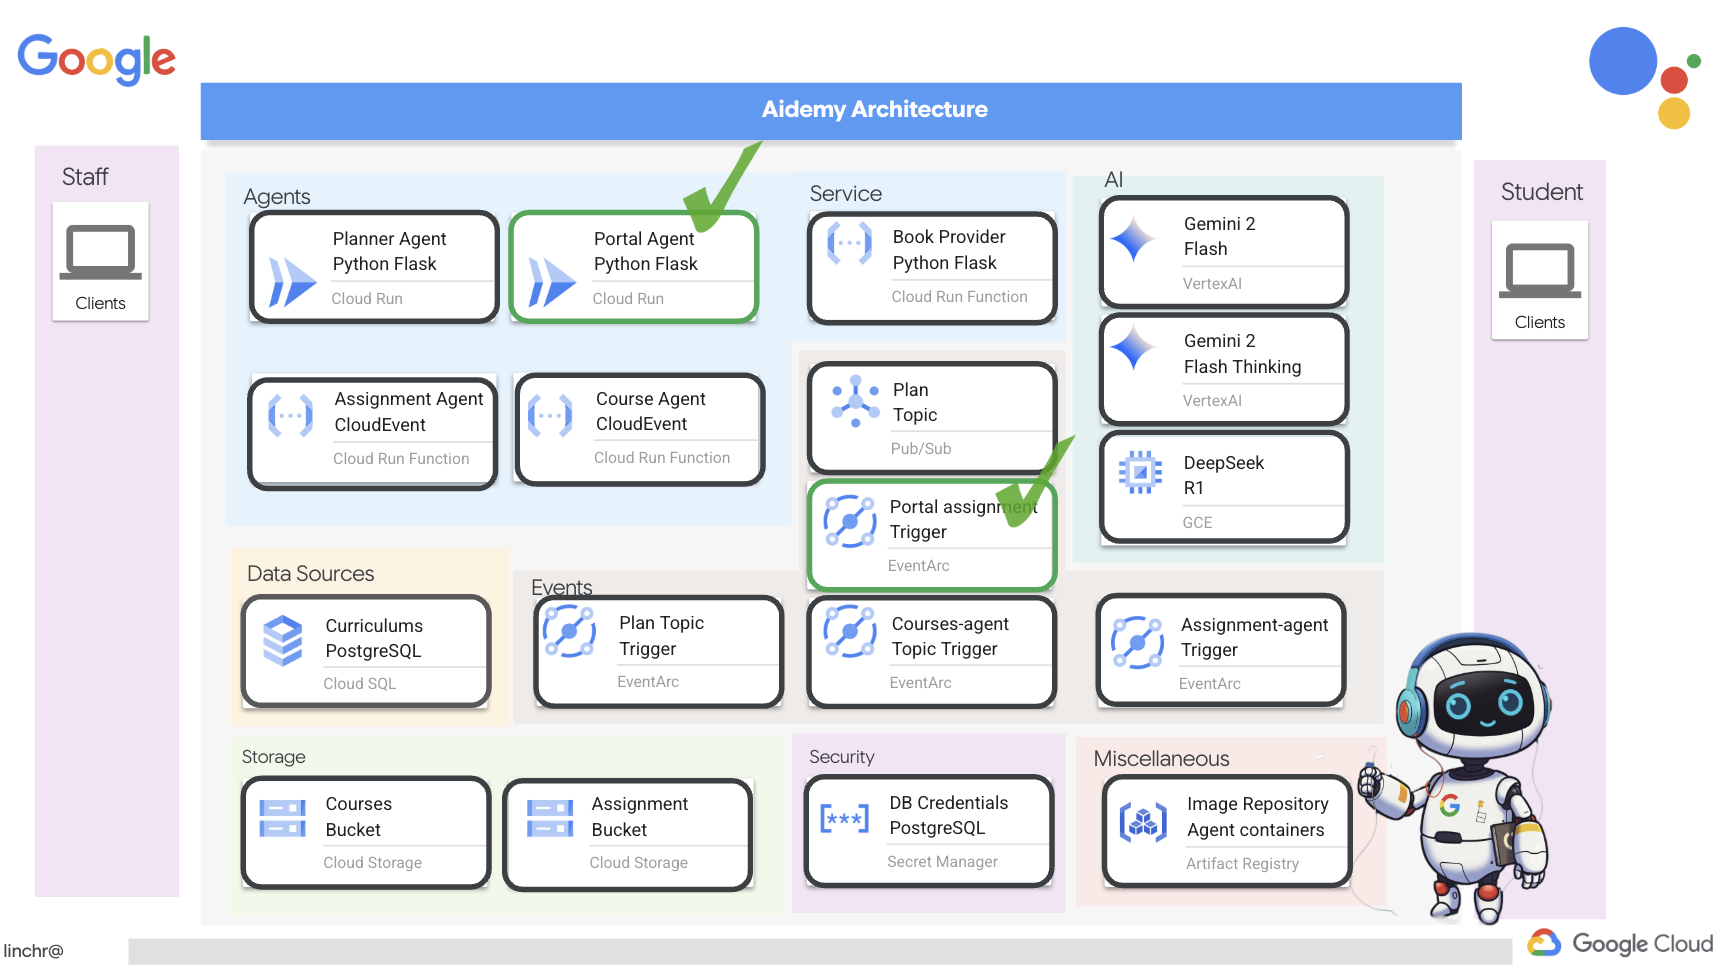
o ahead and stop the script by pressing Ctrl+C .
👉To incorporate these changes and deploy the updated code, rebuild and push the portal agent image:
cd ~/aidemy-bootstrap/portal/
gcloud config set project $(cat ~/project_id.txt)
export PROJECT_ID=$(gcloud config get project)
docker build -t gcr.io/${PROJECT_ID}/aidemy-portal .
docker tag gcr.io/${PROJECT_ID}/aidemy-portal us-central1-docker.pkg.dev/${PROJECT_ID}/agent-repository/aidemy-portal
docker push us-central1-docker.pkg.dev/${PROJECT_ID}/agent-repository/aidemy-portal
👉After pushing the new image, redeploy the Cloud Run service. Run the following script to force the Cloud Run update:
gcloud config set project $(cat ~/project_id.txt)
export PROJECT_ID=$(gcloud config get project)
export COURSE_BUCKET_NAME=$(gcloud storage buckets list --format="value(name)" | grep aidemy-recap)
gcloud run services update aidemy-portal \
    --region=us-central1 \
    --set-env-vars=GOOGLE_CLOUD_PROJECT=${PROJECT_ID},COURSE_BUCKET_NAME=$COURSE_BUCKET_NAME
👉Now, we'll deploy an Eventarc trigger that listens for any new object created (finalized) in the assignment bucket. This trigger will automatically invoke the /render_assignment endpoint on the portal service when a new assignment file is created.
gcloud config set project $(cat ~/project_id.txt)
export PROJECT_ID=$(gcloud config get project)
gcloud projects add-iam-policy-binding $PROJECT_ID \
  --member="serviceAccount:$(gcloud storage service-agent --project $PROJECT_ID)" \
  --role="roles/pubsub.publisher"
export SERVICE_ACCOUNT_NAME=$(gcloud compute project-info describe --format="value(defaultServiceAccount)")
gcloud eventarc triggers create portal-assignment-trigger \
--location=us-central1 \
--service-account=$SERVICE_ACCOUNT_NAME \
--destination-run-service=aidemy-portal \
--destination-run-region=us-central1 \
--destination-run-path="/render_assignment" \
--event-filters="bucket=$ASSIGNMENT_BUCKET" \
--event-filters="type=google.cloud.storage.object.v1.finalized"
To verify that the trigger was created successfully, navigate to the Eventarc Triggers page in the Google Cloud Console. You should see portal-assignment-trigger listed in the table. Click on the trigger name to view its details. 
It may take up to 2-3 minutes for the new trigger to become active.
To see the dynamic assignment generation in action, run the following command to find the URL of your planner agent (if you don't have it handy):
gcloud run services list --platform=managed --region=us-central1 --format='value(URL)' | grep planner
Find the URL of your portal agent:
gcloud run services list --platform=managed --region=us-central1 --format='value(URL)' | grep portal
In the planner agent, generate a new teaching plan.
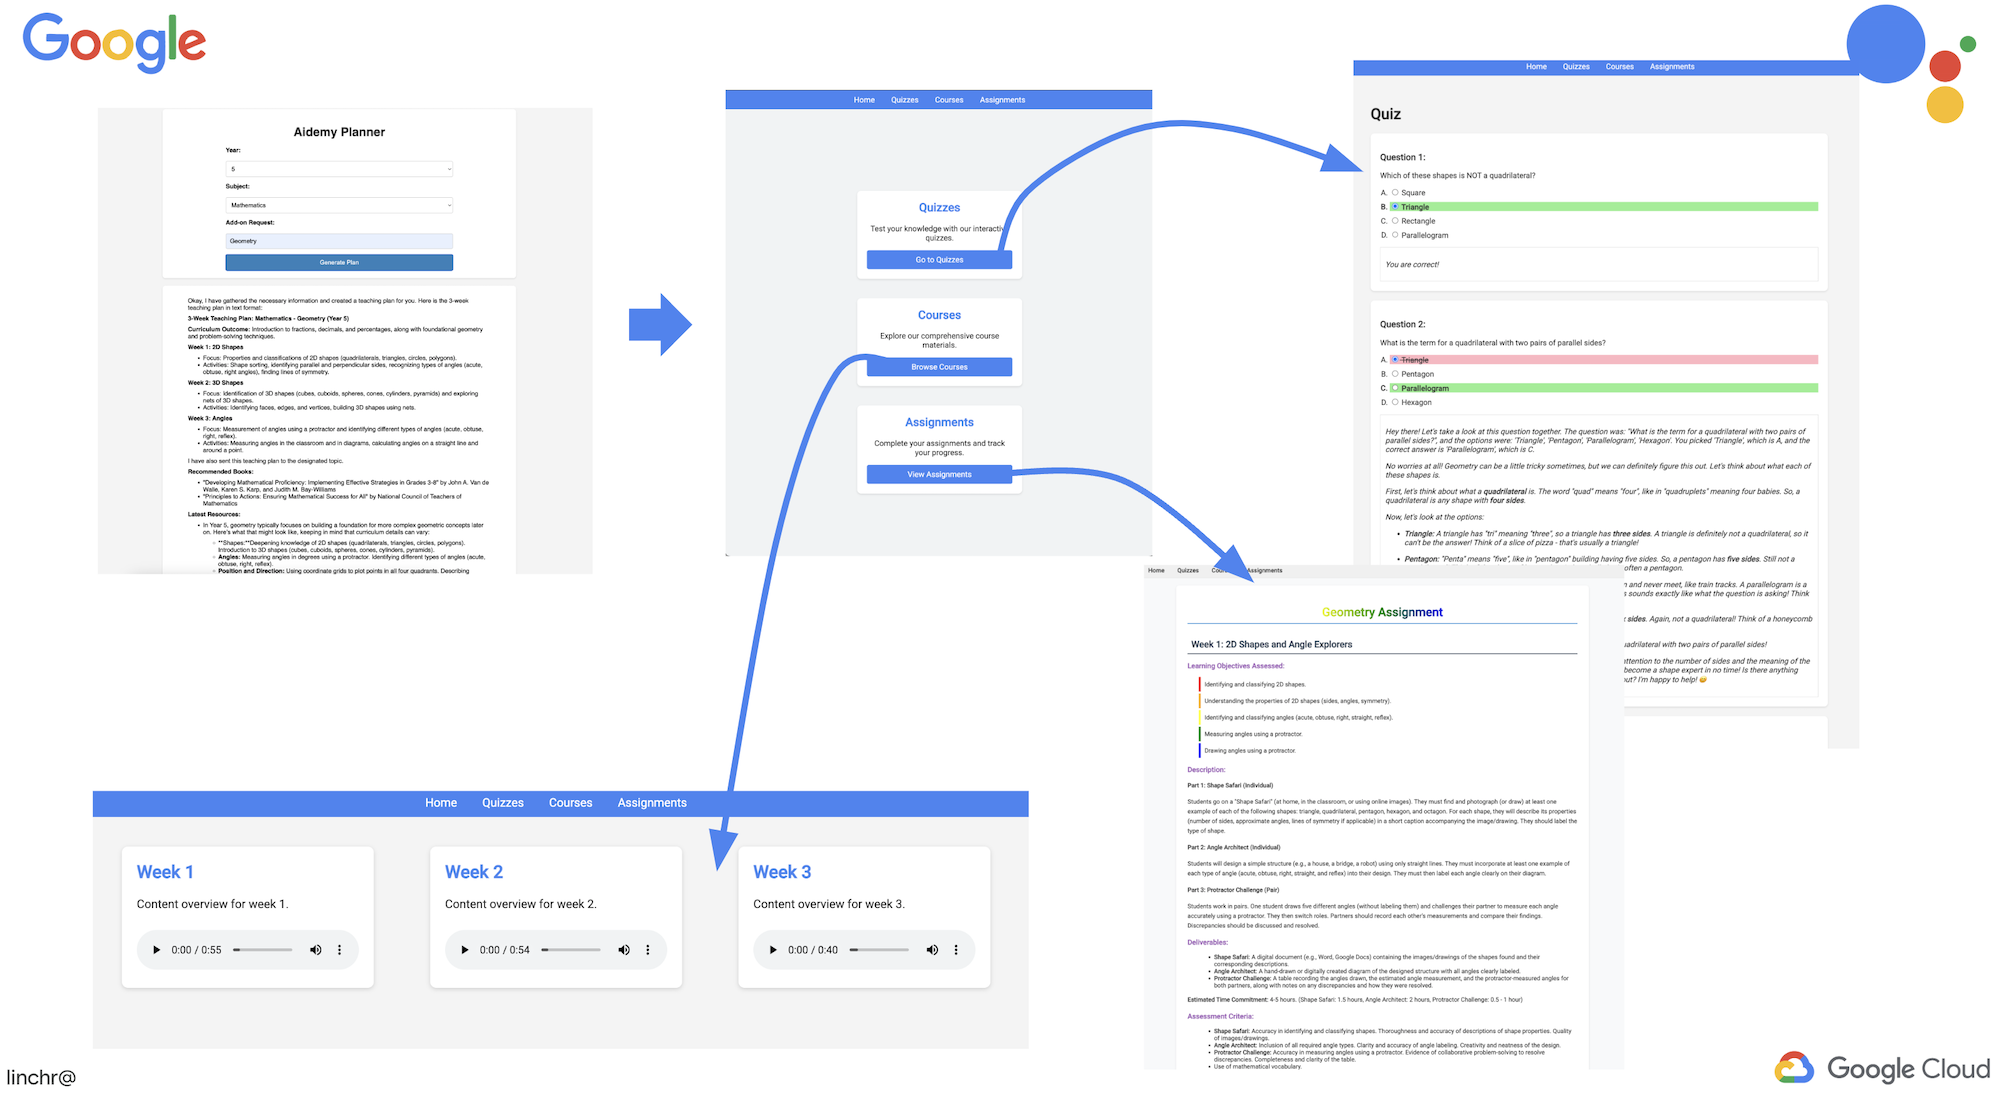
After a few minutes (to allow for the audio generation, assignment generation, and HTML rendering to complete), navigate to the student portal.
👉Click on the "Assignment" link in the navigation bar. You should see a newly created assignment with a dynamically generated HTML. Each time a teaching plan is generated it should be a dynamic assignment.
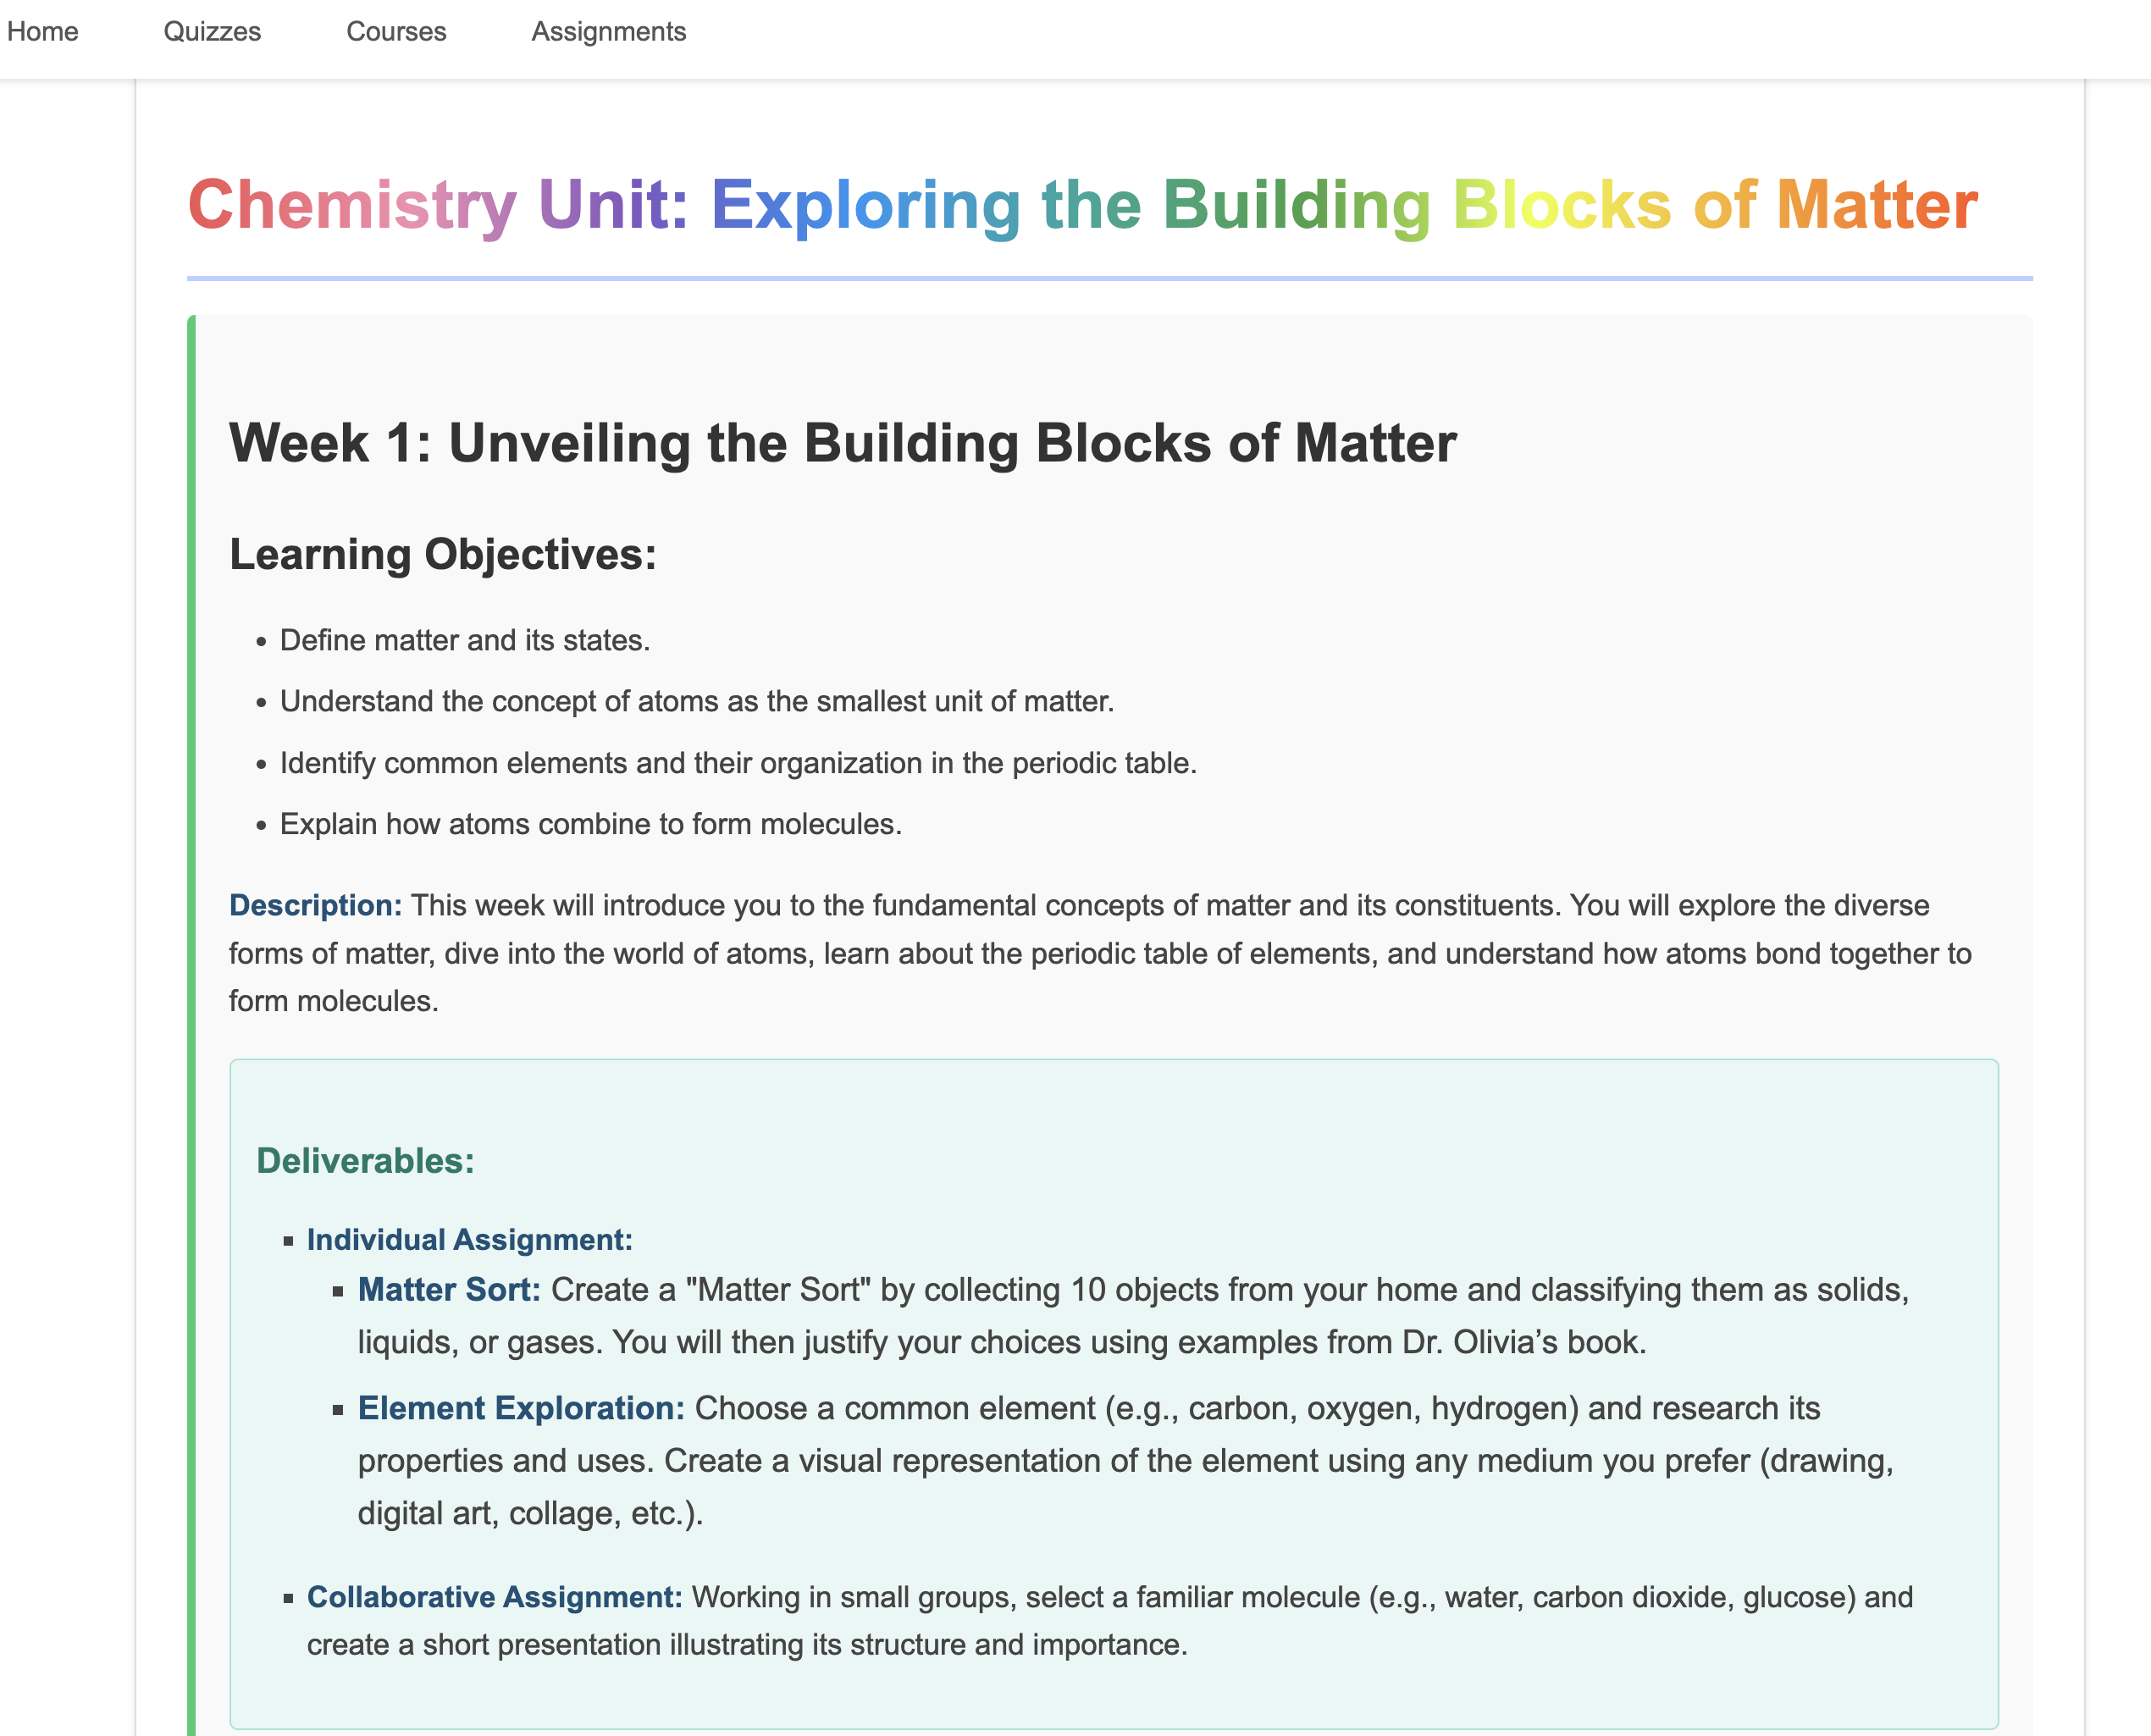
Congratulations on completing the Aidemy multi-agent system ! You've gained practical experience and valuable insights into:
- The benefits of multi-agent systems, including modularity, scalability, specialization, and simplified maintenance.
- The importance of event-driven architectures for building responsive and loosely coupled applications.
- The strategic use of LLMs, matching the right model to the task and integrating them with tools for real-world impact.
- Cloud-native development practices using Google Cloud services to create scalable and reliable solutions.
- The importance of considering data privacy and self-hosting models as an alternative to vendor solutions.
You now have a solid foundation for building sophisticated AI-powered applications on Google Cloud!
15. Challenges and Next Steps
Congratulations on building the Aidemy multi-agent system! You've laid a strong foundation for AI-powered education. Now, let's consider some challenges and potential future enhancements to further expand its capabilities and address real-world needs:
Interactive Learning with Live Q&A:
- Challenge: Can you leverage Gemini 2's Live API to create a real-time Q&A feature for students? Imagine a virtual classroom where students can ask questions and receive immediate, AI-powered responses.
Automated Assignment Submission and Grading:
- Challenge: Design and implement a system that allows students to submit assignments digitally and have them automatically graded by AI, with a mechanism to detect and prevent plagiarism. This challenge presents a great opportunity to explore Retrieval Augmented Generation (RAG) to enhance the accuracy and reliability of the grading and plagiarism detection processes.

16. Clean up
Now that we've built and explored our Aidemy multi-agent system, it's time to clean up our Google Cloud environment.
👉Delete Cloud Run services
gcloud run services delete aidemy-planner --region=us-central1 --quiet
gcloud run services delete aidemy-portal --region=us-central1 --quiet
gcloud run services delete courses-agent --region=us-central1 --quiet
gcloud run services delete book-provider --region=us-central1 --quiet
gcloud run services delete assignment-agent --region=us-central1 --quiet
👉Delete Eventarc trigger
gcloud eventarc triggers delete portal-assignment-trigger --location=us --quiet
gcloud eventarc triggers delete plan-topic-trigger --location=us-central1 --quiet
gcloud eventarc triggers delete portal-assignment-trigger --location=us-central1 --quiet
ASSIGNMENT_AGENT_TRIGGER=$(gcloud eventarc triggers list --project="$PROJECT_ID" --location=us-central1 --filter="name:assignment-agent" --format="value(name)")
COURSES_AGENT_TRIGGER=$(gcloud eventarc triggers list --project="$PROJECT_ID" --location=us-central1 --filter="name:courses-agent" --format="value(name)")
gcloud eventarc triggers delete $ASSIGNMENT_AGENT_TRIGGER --location=us-central1 --quiet
gcloud eventarc triggers delete $COURSES_AGENT_TRIGGER --location=us-central1 --quiet
👉Delete Pub/Sub topic
gcloud pubsub topics delete plan --project="$PROJECT_ID" --quiet
👉Delete Cloud SQL instance
gcloud sql instances delete aidemy --quiet
👉Delete Artifact Registry repository
gcloud artifacts repositories delete agent-repository --location=us-central1 --quiet
👉Delete Secret Manager secrets
gcloud secrets delete db-user --quiet
gcloud secrets delete db-pass --quiet
gcloud secrets delete db-name --quiet
👉Delete Compute Engine instance (if created for Deepseek)
gcloud compute instances delete ollama-instance --zone=us-central1-a --quiet
👉Delete the firewall rule for Deepseek instance
gcloud compute firewall-rules delete allow-ollama-11434 --quiet
👉Delete Cloud Storage buckets
export COURSE_BUCKET_NAME=$(gcloud storage buckets list --format="value(name)" | grep aidemy-recap)
export ASSIGNMENT_BUCKET=$(gcloud storage buckets list --format="value(name)" | grep aidemy-assignment)
gsutil rm -r gs://$COURSE_BUCKET_NAME
gsutil rm -r gs://$ASSIGNMENT_BUCKET