
1. Introduction
In this codelab you will learn how to use AlloyDB AI by combining vector search with Vertex AI embeddings. This lab is part of a lab collection dedicated to AlloyDB AI features. You can read more on the AlloyDB AI page in documentation.
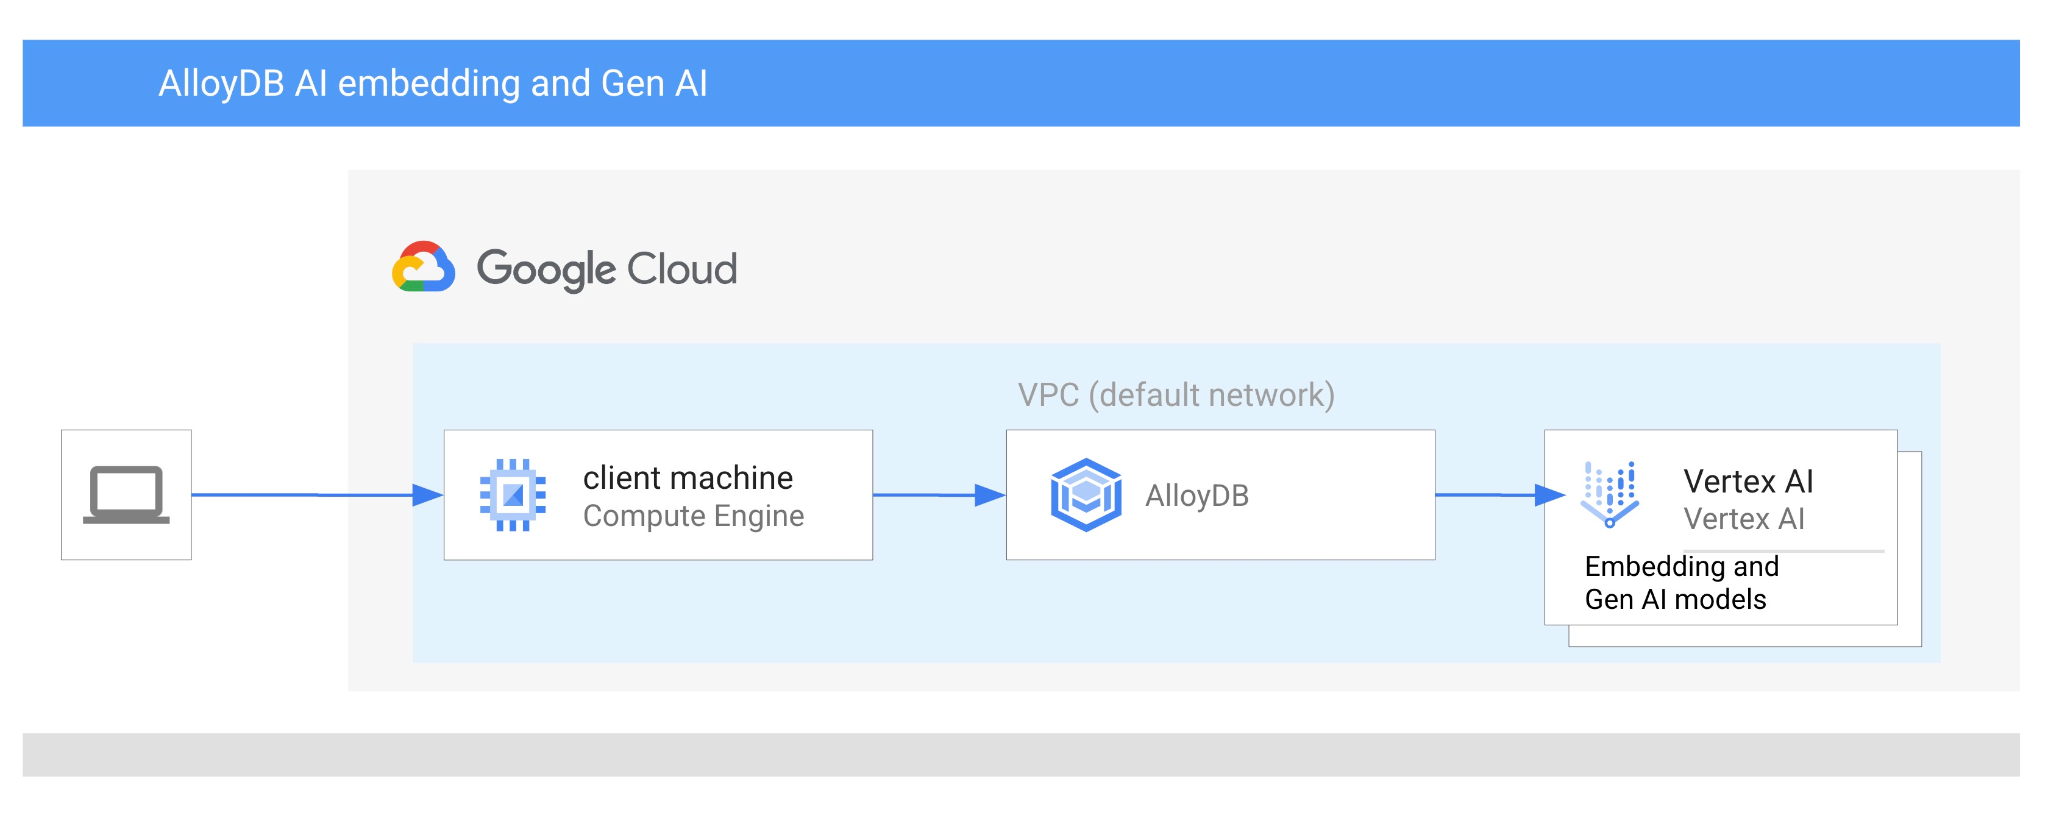
Prerequisites
- A basic understanding of Google Cloud, console
- Basic skills with the command-line interface and Cloud Shell
What you'll learn
- How to deploy AlloyDB cluster and primary instance
- How to connect to the AlloyDB from Google Compute Engine VM
- How to create database and enable AlloyDB AI
- How to load data to the database
- How to use AlloyDB Studio
- How to use Gemini Enterprise Agent Platform embedding model in AlloyDB
- How to use Gemini Enterprise Agent Platform Studio
- How to enrich the result using Gemini Enterprise Agent Platform generative model
- How to improve performance using vector index
What you'll need
- A Google Cloud Account and Google Cloud Project
- A web browser such as Chrome
2. Setup and Requirements
Project Setup
- Sign-in to the Google Cloud Console. If you don't already have a Gmail or Google Workspace account, you must create one.
Use a personal account instead of a work or school account.
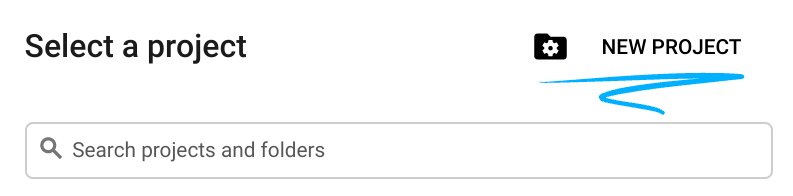
- Create a new project or reuse an existing one. To create a new project in the Google Cloud console, in the header, click the Select a project button which will open a popup window.

In the Select a project window push the button New Project which will open a dialog box for the new project.
In the dialog box put your preferable Project name and choose the location.
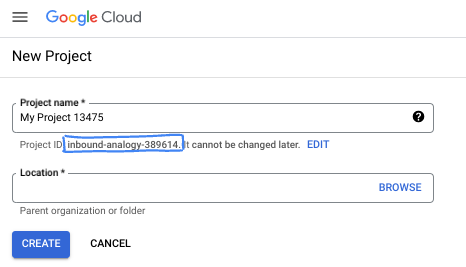
- The Project name is the display name for this project's participants. The project name isn't used by Google APIs, and it can be changed at any time.
- The Project ID is unique across all Google Cloud projects and is immutable (it can't be changed after it has been set). The Google Cloud console automatically generates a unique ID, but you can customize it. If you don't like the generated ID, you can generate another random one or provide your own to check its availability. In most codelabs, you'll need to reference your project ID, which is typically identified with the placeholder PROJECT_ID.
- For your information, there is a third value, a Project Number, which some APIs use. Learn more about all three of these values in the documentation.
Enable Billing
Set up a personal billing account
If you set up billing using Google Cloud credits, you can skip this step.
To set up a personal billing account, go here to enable billing in the Cloud Console.
Some Notes:
- Completing this lab should cost less than $3 USD in Cloud resources.
- You can follow the steps at the end of this lab to delete resources to avoid further charges.
- New users are eligible for the $300 USD Free Trial.
Start Cloud Shell
While Google Cloud can be operated remotely from your laptop, in this codelab you will be using Google Cloud Shell, a command line environment running in the Cloud.
From the Google Cloud Console, click the Cloud Shell icon on the top right toolbar:

Alternatively you can press G then S. This sequence will activate Cloud Shell if you are within the Google Cloud Console or use this link.
It should only take a few moments to provision and connect to the environment. When it is finished, you should see something like this:

This virtual machine is loaded with all the development tools you'll need. It offers a persistent 5GB home directory, and runs on Google Cloud, greatly enhancing network performance and authentication. All of your work in this codelab can be done within a browser. You do not need to install anything.
3. Before you begin
Enable API
Output:
To use AlloyDB, Compute Engine, Networking services, and Gemini Enterprise Agent Platform, you need to enable their respective APIs in your Google Cloud project.
Enabling the APIs
Inside Cloud Shell in the terminal, make sure that your project ID is setup:
gcloud config set project [YOUR-PROJECT-ID]
Set environment variable PROJECT_ID:
PROJECT_ID=$(gcloud config get-value project)
Enable all necessary APIs:
gcloud services enable alloydb.googleapis.com \
                       compute.googleapis.com \
                       cloudresourcemanager.googleapis.com \
                       servicenetworking.googleapis.com \
                       aiplatform.googleapis.com
Expected output
student@cloudshell:~ (test-project-001-402417)$ gcloud config set project test-project-001-402417
Updated property [core/project].
student@cloudshell:~ (test-project-001-402417)$ PROJECT_ID=$(gcloud config get-value project)
Your active configuration is: [cloudshell-14650]
student@cloudshell:~ (test-project-001-402417)$
student@cloudshell:~ (test-project-001-402417)$ gcloud services enable alloydb.googleapis.com \
                       compute.googleapis.com \
                       cloudresourcemanager.googleapis.com \
                       servicenetworking.googleapis.com \
                       aiplatform.googleapis.com
Operation "operations/acat.p2-4470404856-1f44ebd8-894e-4356-bea7-b84165a57442" finished successfully.
You can read about each enabled API in the documentation.
4. Deploy AlloyDB
Before creating an AlloyDB cluster, allocate an available private IP range in your VPC. to be used by the future AlloyDB instance. If you don't have it then you need to create it, assign it to be used by internal Google services and after that you will be able to create the cluster and instance.
Create private IP range
You need to configure Private Service Access configuration in our VPC for AlloyDB. The assumption here is that you have the "default" VPC network in the project and it is going to be used for all actions.
Create the private IP range:
gcloud compute addresses create psa-range \
    --global \
    --purpose=VPC_PEERING \
    --prefix-length=24 \
    --description="VPC private service access" \
    --network=default
Create private connection using the allocated IP range:
gcloud services vpc-peerings connect \
    --service=servicenetworking.googleapis.com \
    --ranges=psa-range \
    --network=default
Expected console output:
student@cloudshell:~ (test-project-402417)$ gcloud compute addresses create psa-range \
    --global \
    --purpose=VPC_PEERING \
    --prefix-length=24 \
    --description="VPC private service access" \
    --network=default
Created [https://www.googleapis.com/compute/v1/projects/test-project-402417/global/addresses/psa-range].

student@cloudshell:~ (test-project-402417)$ gcloud services vpc-peerings connect \
    --service=servicenetworking.googleapis.com \
    --ranges=psa-range \
    --network=default
Operation "operations/pssn.p24-4470404856-595e209f-19b7-4669-8a71-cbd45de8ba66" finished successfully.

student@cloudshell:~ (test-project-402417)$
Create AlloyDB Cluster
Create an AlloyDB cluster in the us-central1 region
Define password for the postgres user. You can define your own password or use a random function to generate one
export PGPASSWORD=`openssl rand -hex 16`
Expected console output:
student@cloudshell:~ (test-project-402417)$ export PGPASSWORD=`openssl rand -hex 12`
Note the PostgreSQL password for future use:
echo $PGPASSWORD
You will need that password in the future to connect to the instance as the postgres user. Save this password to use in subsequent steps.
Expected console output:
student@cloudshell:~ (test-project-402417)$ echo $PGPASSWORD
bbefbfde7601985b0dee5723 (Note: Yours will be different!)
Create a Free Trial Cluster
If you haven't been using AlloyDB before you can create a free trial cluster:
Set environment variables for the region and cluster name:
export REGION=us-central1
export ADBCLUSTER=alloydb-aip-01
Run command to create the cluster:
gcloud alloydb clusters create $ADBCLUSTER \
    --password=$PGPASSWORD \
    --network=default \
    --region=$REGION \
    --subscription-type=TRIAL
Expected console output:
export REGION=us-central1
export ADBCLUSTER=alloydb-aip-01
gcloud alloydb clusters create $ADBCLUSTER \
    --password=$PGPASSWORD \
    --network=default \
    --region=$REGION \
    --subscription-type=TRIAL
Operation ID: operation-1697655441138-6080235852277-9e7f04f5-2012fce4
Creating cluster...done.
Create an AlloyDB primary instance for your cluster in the same cloud shell session. If you are disconnected you will need to define the region and cluster name environment variables again.
gcloud alloydb instances create $ADBCLUSTER-pr \
    --instance-type=PRIMARY \
    --cpu-count=8 \
    --region=$REGION \
    --cluster=$ADBCLUSTER
Expected console output:
student@cloudshell:~ (test-project-402417)$ gcloud alloydb instances create $ADBCLUSTER-pr \
    --instance-type=PRIMARY \
    --cpu-count=8 \
    --region=$REGION \
    --availability-type ZONAL \
    --cluster=$ADBCLUSTER
Operation ID: operation-1697659203545-6080315c6e8ee-391805db-25852721
Creating instance...done.
Create AlloyDB Standard Cluster
If it is not your first AlloyDB cluster in the project proceed with creation of a standard cluster. If you have already created a free trial cluster, skip this step.
Set environment variables for the region and cluster name:
export REGION=us-central1
export ADBCLUSTER=alloydb-aip-01
Run command to create the cluster:
gcloud alloydb clusters create $ADBCLUSTER \
    --password=$PGPASSWORD \
    --network=default \
    --region=$REGION
Expected console output:
export REGION=us-central1
export ADBCLUSTER=alloydb-aip-01
gcloud alloydb clusters create $ADBCLUSTER \
    --password=$PGPASSWORD \
    --network=default \
    --region=$REGION
Operation ID: operation-1697655441138-6080235852277-9e7f04f5-2012fce4
Creating cluster...done.
Create an AlloyDB primary instance for your cluster in the same cloud shell session. If you are disconnected you will need to define the region and cluster name environment variables again.
gcloud alloydb instances create $ADBCLUSTER-pr \
    --instance-type=PRIMARY \
    --cpu-count=2 \
    --region=$REGION \
    --cluster=$ADBCLUSTER
Expected console output:
student@cloudshell:~ (test-project-402417)$ gcloud alloydb instances create $ADBCLUSTER-pr \
    --instance-type=PRIMARY \
    --cpu-count=2 \
    --region=$REGION \
    --availability-type ZONAL \
    --cluster=$ADBCLUSTER
Operation ID: operation-1697659203545-6080315c6e8ee-391805db-25852721
Creating instance...done.
5. Connect to AlloyDB
AlloyDB is deployed using a private-only connection, so you need a Compute Engine VM with PostgreSQL client installed to work with the database.
Deploy GCE VM
Create a GCE VM in the same region and VPC as the AlloyDB cluster.
In Cloud Shell execute:
export ZONE=us-central1-a
gcloud compute instances create instance-1 \
    --zone=$ZONE \
    --create-disk=auto-delete=yes,boot=yes,image=projects/debian-cloud/global/images/$(gcloud compute images list --filter="family=debian-13 AND family!=debian-13-arm64" --format="value(name)") \
    --scopes=https://www.googleapis.com/auth/cloud-platform
Expected console output:
student@cloudshell:~ (test-project-402417)$ export ZONE=us-central1-a
gcloud compute instances create instance-1 \
    --zone=$ZONE \
    --create-disk=auto-delete=yes,boot=yes,image=projects/debian-cloud/global/images/$(gcloud compute images list --filter="family=debian-13 AND family!=debian-13-arm64" --format="value(name)") \
    --scopes=https://www.googleapis.com/auth/cloud-platform

Created [https://www.googleapis.com/compute/v1/projects/test-project-402417/zones/us-central1-a/instances/instance-1].
NAME: instance-1
ZONE: us-central1-a
MACHINE_TYPE: n1-standard-1
PREEMPTIBLE:
INTERNAL_IP: 10.128.0.2
EXTERNAL_IP: 34.71.192.233
STATUS: RUNNING
Install Postgres Client
Install the PostgreSQL client software on the deployed VM
Connect to the VM:
gcloud compute ssh instance-1 --zone=us-central1-a
Expected console output:
student@cloudshell:~ (test-project-402417)$ gcloud compute ssh instance-1 --zone=us-central1-a
Updating project ssh metadata...working..Updated [https://www.googleapis.com/compute/v1/projects/test-project-402417].
Updating project ssh metadata...done.
Waiting for SSH key to propagate.
Warning: Permanently added 'compute.5110295539541121102' (ECDSA) to the list of known hosts.
Linux instance-1 6.12.101+deb13-cloud-amd64 #1 SMP PREEMPT_DYNAMIC Debian 6.12.101-1 (2026-08-05) x86_64

The programs included with the Debian GNU/Linux system are free software;
the exact distribution terms for each program are described in the
individual files in /usr/share/doc/*/copyright.

Debian GNU/Linux comes with ABSOLUTELY NO WARRANTY, to the extent
permitted by applicable law.
student@instance-1:~$
Install the software running command inside the VM:
sudo apt-get update
sudo apt-get install --yes postgresql-client
Expected console output:
student@instance-1:~$ sudo apt-get update
sudo apt-get install --yes postgresql-client
Get:1 file:/etc/apt/mirrors/debian.list Mirrorlist [30 B]
Get:2 file:/etc/apt/mirrors/debian-security.list Mirrorlist [39 B]
Hit:3 https://deb.debian.org/debian trixie InRelease
Get:4 https://deb.debian.org/debian trixie-updates InRelease [47.3 kB]
Get:5 https://deb.debian.org/debian trixie-backports InRelease [54.0 kB]
Get:6 https://deb.debian.org/debian-security trixie-security InRelease [43.4 kB]
Hit:10 https://packages.cloud.google.com/apt google-compute-engine-trixie-stable InRelease
...redacted...
update-alternatives: using /usr/share/postgresql/17/man/man1/psql.1.gz to provide /usr/share/man/man1/psql.1.gz (psql.1.gz) in auto mode
Setting up postgresql-client (17+278) ...
Processing triggers for man-db (2.13.1-1) ...
Processing triggers for libc-bin (2.41-12+deb13u3) ...
Connect to the Instance
Connect to the primary instance from the VM using psql.
In the same Cloud Shell tab with the opened SSH session to your instance-1 VM.
Use the noted AlloyDB password (PGPASSWORD) value and the AlloyDB cluster id to connect to AlloyDB from the GCE VM:
export PGPASSWORD=<Noted password>
export PROJECT_ID=$(gcloud config get-value project)
export REGION=us-central1
export ADBCLUSTER=alloydb-aip-01
export INSTANCE_IP=$(gcloud alloydb instances describe $ADBCLUSTER-pr --cluster=$ADBCLUSTER --region=$REGION --format="value(ipAddress)")
psql "host=$INSTANCE_IP user=postgres sslmode=require"
Expected console output:
student@instance-1:~$ export PGPASSWORD=CQhOi5OygD4ps6ty
student@instance-1:~$ export PROJECT_ID=$(gcloud config get-value project)
export REGION=us-central1
export ADBCLUSTER=alloydb-aip-01
export INSTANCE_IP=$(gcloud alloydb instances describe $ADBCLUSTER-pr --cluster=$ADBCLUSTER --region=$REGION --format="value(ipAddress)")
psql "host=$INSTANCE_IP user=postgres sslmode=require"
psql (17.10 (Debian 17.10-0+deb13u1), server 17.9)
SSL connection (protocol: TLSv1.3, cipher: TLS_AES_256_GCM_SHA384, compression: off, ALPN: postgresql)
Type "help" for help.

postgres=>
Close the psql session:
exit
6. Prepare Database
Create a database, enable Agent Platform AI integration, create database objects, and import data.
Grant Necessary Permissions to AlloyDB
Add Gemini Enterprise Agent Platform permissions to the AlloyDB service agent.
Open another Cloud Shell tab using the sign "+" at the top.
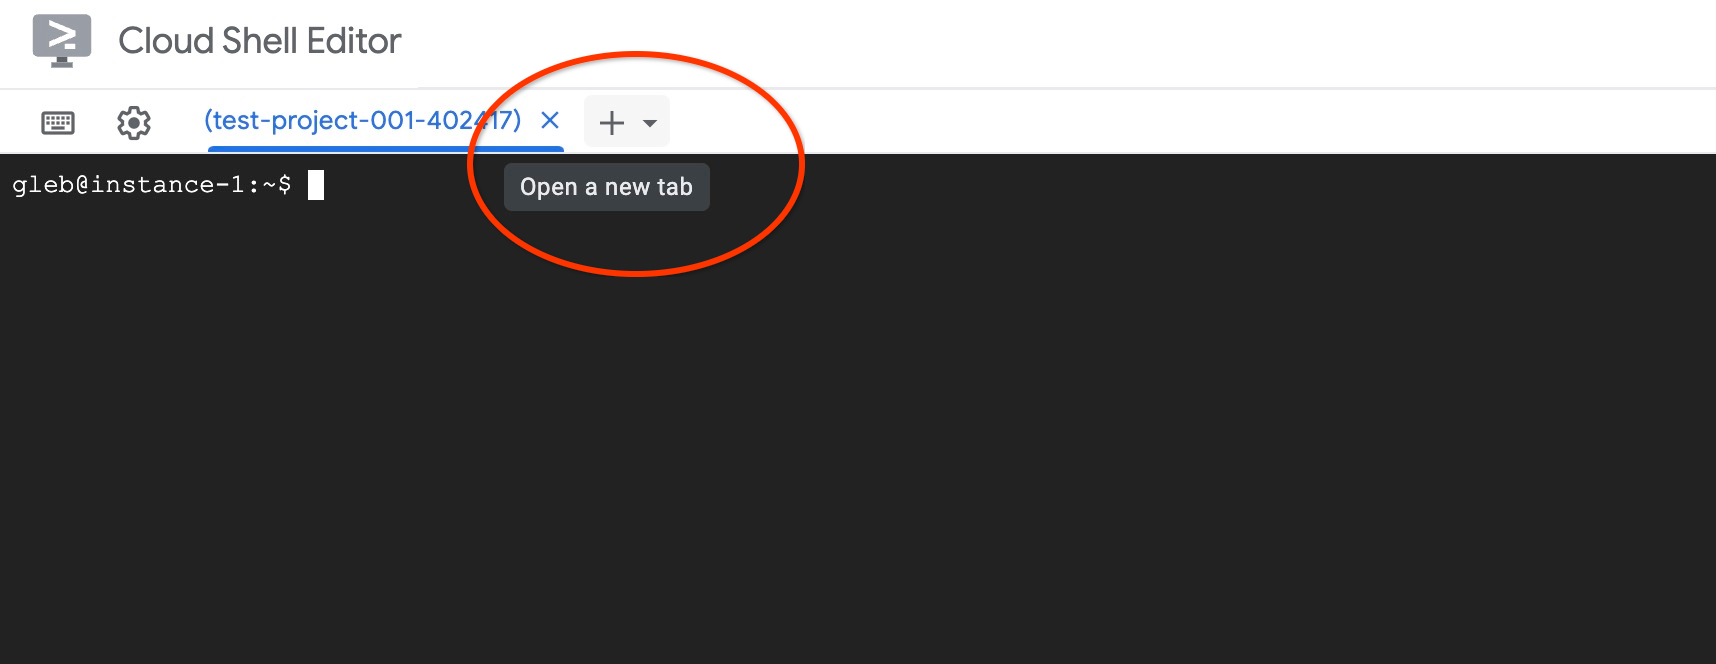
In the new cloud shell tab execute:
PROJECT_ID=$(gcloud config get-value project)
gcloud projects add-iam-policy-binding $PROJECT_ID \
  --member="serviceAccount:service-$(gcloud projects describe $PROJECT_ID --format="value(projectNumber)")@gcp-sa-alloydb.iam.gserviceaccount.com" \
  --role="roles/aiplatform.user"
Expected console output:
student@cloudshell:~ (test-project-001-402417)$ PROJECT_ID=$(gcloud config get-value project)
Your active configuration is: [cloudshell-11039]
student@cloudshell:~ (test-project-001-402417)$ gcloud projects add-iam-policy-binding $PROJECT_ID \
  --member="serviceAccount:service-$(gcloud projects describe $PROJECT_ID --format="value(projectNumber)")@gcp-sa-alloydb.iam.gserviceaccount.com" \
  --role="roles/aiplatform.user"
Updated IAM policy for project [test-project-001-402417].
bindings:
- members:
  - serviceAccount:service-4470404856@gcp-sa-alloydb.iam.gserviceaccount.com
  role: roles/aiplatform.user
- members:
...
etag: BwYIEbe_Z3U=
version: 1
Close the tab by either execution command "exit" in the tab:
exit
Create Database
Create database quickstart.
In the GCE VM session execute:
Create database:
psql "host=$INSTANCE_IP user=postgres" -c "CREATE DATABASE quickstart_db"
Expected console output:
student@instance-1:~$ psql "host=$INSTANCE_IP user=postgres" -c "CREATE DATABASE quickstart_db"
CREATE DATABASE
student@instance-1:~$
Enable Vertex AI Integration
Enable Vertex AI integration and the pgvector extensions in the database.
In the GCE VM execute:
psql "host=$INSTANCE_IP user=postgres dbname=quickstart_db" -c "CREATE EXTENSION IF NOT EXISTS google_ml_integration CASCADE"
psql "host=$INSTANCE_IP user=postgres dbname=quickstart_db" -c "CREATE EXTENSION IF NOT EXISTS vector"
Expected console output:
student@instance-1:~$ psql "host=$INSTANCE_IP user=postgres dbname=quickstart_db" -c "CREATE EXTENSION IF NOT EXISTS google_ml_integration CASCADE"
psql "host=$INSTANCE_IP user=postgres dbname=quickstart_db" -c "CREATE EXTENSION IF NOT EXISTS vector"
CREATE EXTENSION
CREATE EXTENSION
student@instance-1:~$
Import Data
Download the prepared data and import it into the new database.
In the GCE VM execute:
gcloud storage cat gs://cloud-training/gcc/gcc-tech-004/cymbal_demo_schema.sql |psql "host=$INSTANCE_IP user=postgres dbname=quickstart_db"
gcloud storage cat gs://cloud-training/gcc/gcc-tech-004/cymbal_products.csv |psql "host=$INSTANCE_IP user=postgres dbname=quickstart_db" -c "\copy cymbal_products from stdin csv header"
gcloud storage cat gs://cloud-training/gcc/gcc-tech-004/cymbal_inventory.csv |psql "host=$INSTANCE_IP user=postgres dbname=quickstart_db" -c "\copy cymbal_inventory from stdin csv header"
gcloud storage cat gs://cloud-training/gcc/gcc-tech-004/cymbal_stores.csv |psql "host=$INSTANCE_IP user=postgres dbname=quickstart_db" -c "\copy cymbal_stores from stdin csv header"
Expected console output:
student@instance-1:~$ gsutil cat gs://cloud-training/gcc/gcc-tech-004/cymbal_demo_schema.sql |psql "host=$INSTANCE_IP user=postgres dbname=quickstart_db"
SET
SET
SET
SET
SET
 set_config
------------

(1 row)
SET
SET
SET
SET
SET
SET
CREATE TABLE
ALTER TABLE
CREATE TABLE
ALTER TABLE
CREATE TABLE
ALTER TABLE
CREATE TABLE
ALTER TABLE
CREATE SEQUENCE
ALTER TABLE
ALTER SEQUENCE
ALTER TABLE
ALTER TABLE
ALTER TABLE
student@instance-1:~$ gsutil cat gs://cloud-training/gcc/gcc-tech-004/cymbal_products.csv |psql "host=$INSTANCE_IP user=postgres dbname=quickstart_db" -c "\copy cymbal_products from stdin csv header"
COPY 941
student@instance-1:~$ gsutil cat gs://cloud-training/gcc/gcc-tech-004/cymbal_inventory.csv |psql "host=$INSTANCE_IP user=postgres dbname=quickstart_db" -c "\copy cymbal_inventory from stdin csv header"
COPY 263861
student@instance-1:~$ gsutil cat gs://cloud-training/gcc/gcc-tech-004/cymbal_stores.csv |psql "host=$INSTANCE_IP user=postgres dbname=quickstart_db" -c "\copy cymbal_stores from stdin csv header"
COPY 4654
student@instance-1:~$
7. Calculate embeddings
After importing the data you have the product data in the cymbal_products table, inventory showing the number of available products in each store in the cymbal_inventory table, and list of the stores in the cymbal_stores table. You need to calculate the vector data based on descriptions for the products and you can use functions like google_ml.embedding for that. Read more about the used technology in the documentation.
It is easy to generate embeddings for a few rows but how to make it efficient if we have thousands? This section explains how to generate and manage embeddings for large tables. Read more about different options and techniques in the guide.
Enable Fast Embedding Generation
Connect to the database using psql from your VM using the AlloyDB instance IP and postgres password:
psql "host=$INSTANCE_IP user=postgres dbname=quickstart_db"
Verify the version of the google_ml_integration extension.
SELECT extversion FROM pg_extension WHERE extname = 'google_ml_integration';
The version should be 1.5.2 or higher. Here is example of the output:
quickstart_db=> SELECT extversion FROM pg_extension WHERE extname = 'google_ml_integration';
 extversion
------------
 1.6
(1 row)
The default version should be 1.6 or higher but if your instance shows an older version it probably needs to be updated. Check if maintenance was disabled for the instance.
Verify that the google_ml_integration.enable_faster_embedding_generation database flag is set to on. In the same psql session check the value for the flag:
show google_ml_integration.enable_faster_embedding_generation;
If the flag is in correct position then the expected output looks like this:
quickstart_db=> show google_ml_integration.enable_faster_embedding_generation;
 google_ml_integration.enable_faster_embedding_generation
----------------------------------------------------------
 on
(1 row)
If the flag value shows "off" then you need to update the instance. Do it using the web console or gcloud command as it is described in the documentation.
Exit from psql session:
exit;
To update the flag using gcloud, run:
export PROJECT_ID=$(gcloud config get-value project)
export REGION=us-central1
export ADBCLUSTER=alloydb-aip-01
gcloud beta alloydb instances update $ADBCLUSTER-pr \
   --database-flags google_ml_integration.enable_faster_embedding_generation=on \
   --region=$REGION \
   --cluster=$ADBCLUSTER \
   --project=$PROJECT_ID \
   --update-mode=FORCE_APPLY
It can take a few minutes but eventually the flag value should be switched to "on". After that you can proceed with the next steps.
Create embedding column
Connect to the database using psql and create a virtual column with the vector data type to be used by the embedding function in the cymbal_products table.
psql "host=$INSTANCE_IP user=postgres dbname=quickstart_db"
In the psql session after connecting to the database execute:
ALTER TABLE cymbal_products ADD COLUMN embedding vector(768);
The command creates a virtual column for future embeddings.
Expected console output:
quickstart_db=> ALTER TABLE cymbal_products ADD COLUMN embedding vector(768);
ALTER TABLE
quickstart_db=>
Generate embeddings in batches of 50 rows. In the same psql session execute:
Enable timing to measure how much time it will take:
\timing
Run the command:
CALL ai.initialize_embeddings(
    model_id => 'text-embedding-005',
    table_name => 'cymbal_products',
    content_column => 'product_description',
    embedding_column => 'embedding',
    batch_size => 50
);
And the console output shown less than 2 seconds for the embedding generation:
quickstart_db=> CALL ai.initialize_embeddings(
    model_id => 'text-embedding-005',
    table_name => 'cymbal_products',
    content_column => 'product_description',
    embedding_column => 'embedding',
    batch_size => 50
);
NOTICE:  Initialize embedding completed successfully for table cymbal_products
CALL
Time: 1458.704 ms (00:01.459)
quickstart_db=>
You can experiment with different batch sizes and see if it changes the time for the execution.
By default the embeddings are not refreshed if the corresponding product_description column is getting updated or an entire new row is inserted. But you can do it by setting parameter incremental_refresh_mode.
Create a column "product_embeddings" and make it automatically updatable:
ALTER TABLE cymbal_products ADD COLUMN product_embedding vector(768);
CALL ai.initialize_embeddings(
    model_id => 'text-embedding-005',
    table_name => 'cymbal_products',
    content_column => 'product_description',
    embedding_column => 'product_embedding',
    batch_size => 50,
    incremental_refresh_mode => 'transactional'
);
Insert a new row to the table.
INSERT INTO "cymbal_products" ("uniq_id", "crawl_timestamp", "product_url", "product_name", "product_description", "list_price", "sale_price", "brand", "item_number", "gtin", "package_size", "category", "postal_code", "available", "product_embedding", "embedding") VALUES ('fd604542e04b470f9e6348e640cff794', NOW(), 'https://example.com/new_product', 'New Cymbal Product', 'This is a new cymbal product description.', 199.99, 149.99, 'Example Brand', 'EB123', '1234567890', 'Single', 'Cymbals', '12345', TRUE, NULL, NULL);
Query the table to compare two embedding columns:
SELECT uniq_id,embedding, (product_embedding::real[])[1:5] as product_embedding FROM cymbal_products WHERE uniq_id='fd604542e04b470f9e6348e640cff794';
The output shows that product_embedding is automatically populated while embedding remains empty:
quickstart_db=> SELECT uniq_id,embedding, (product_embedding::real[])[1:5] as product_embedding  FROM cymbal_products WHERE uniq_id='fd604542e04b470f9e6348e640cff794';
             uniq_id              | embedding |                       product_embedding
----------------------------------+-----------+---------------------------------------------------------------
 fd604542e04b470f9e6348e640cff794 |           | {0.015003494,-0.005349732,-0.059790313,-0.0087091,-0.0271452}
(1 row)

Time: 3.295 ms
8. Run Similarity Search
Run a similarity search based on the generated vector embeddings using AlloyDB AI.
The SQL query can be executed from the same psql command line interface or, as alternative, from AlloyDB Studio. Any multirow and complex output work better in the AlloyDB Studio.
Connect to AlloyDB Studio
To open AlloyDB Studio, perform the following steps:
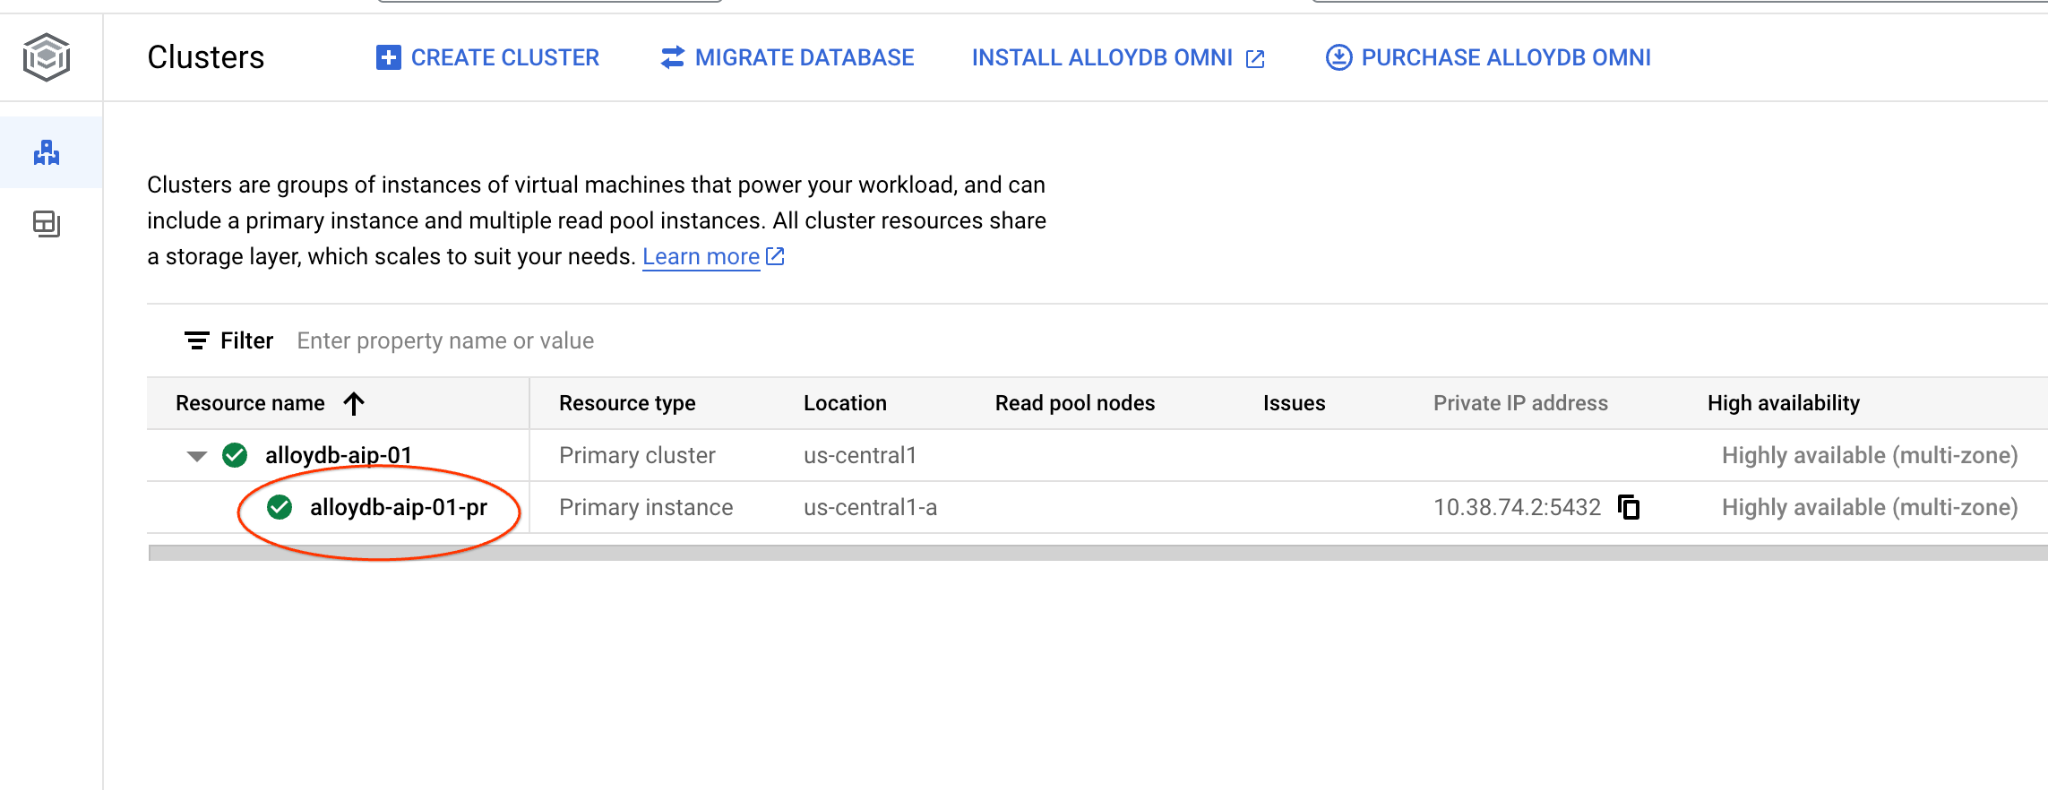
- In the Google Cloud console, go to the Clusters page for AlloyDB for PostgreSQL.
- Select your primary instance to open its web interface.
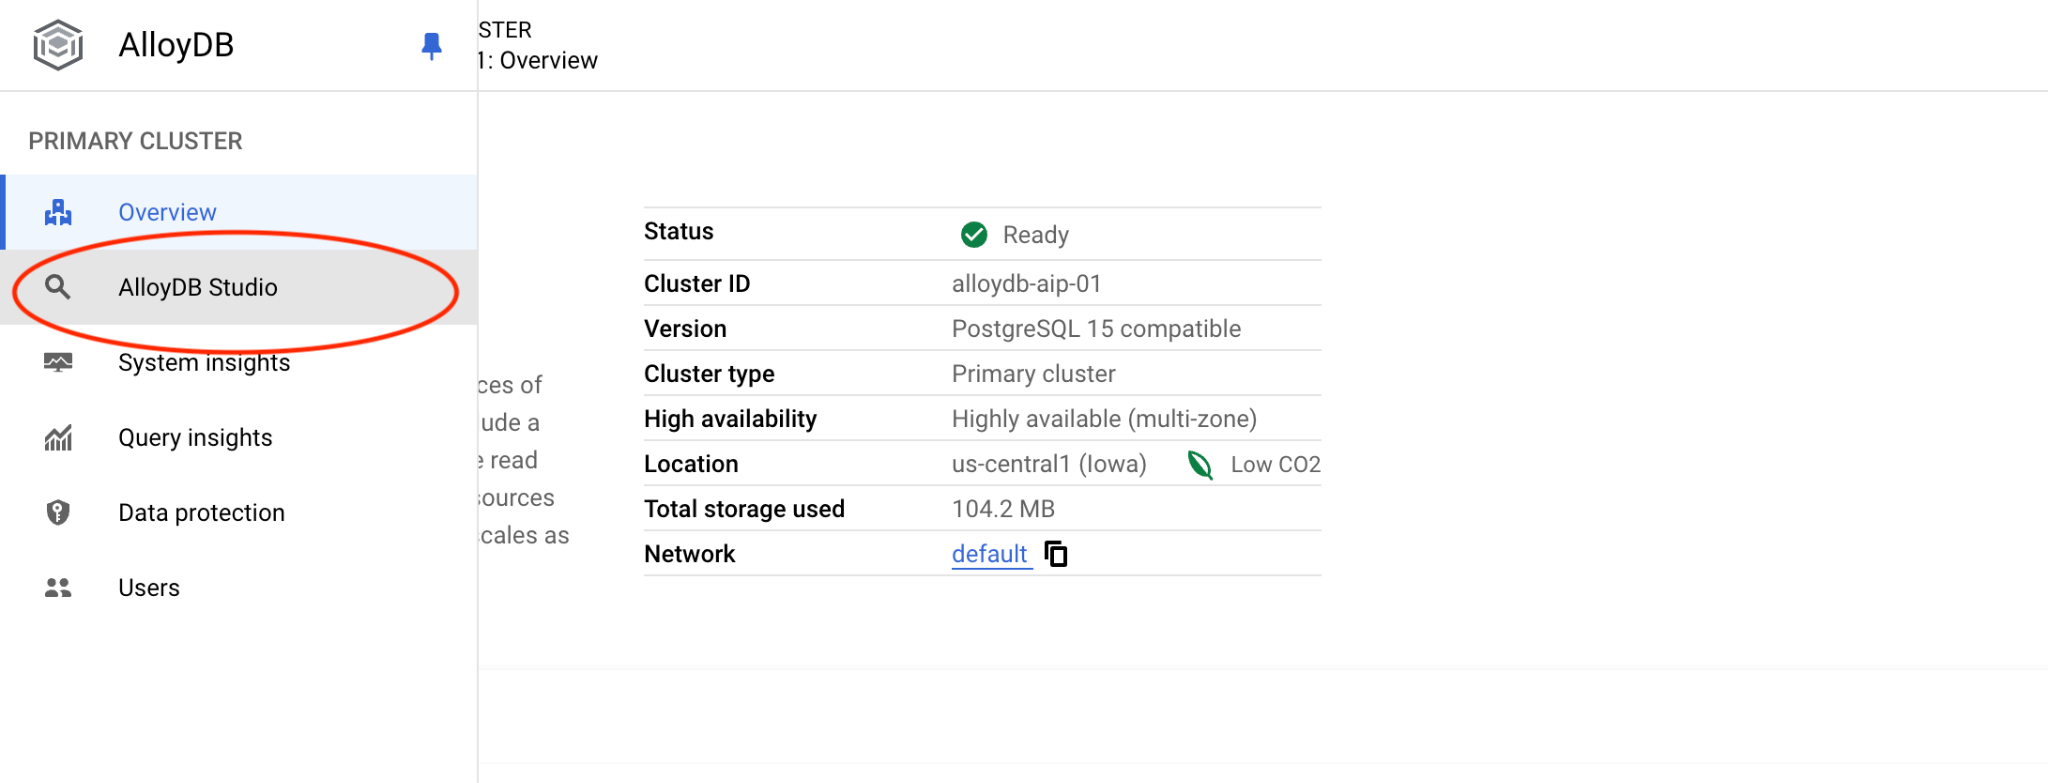
 3. Then click on AlloyDB Studio on the left:
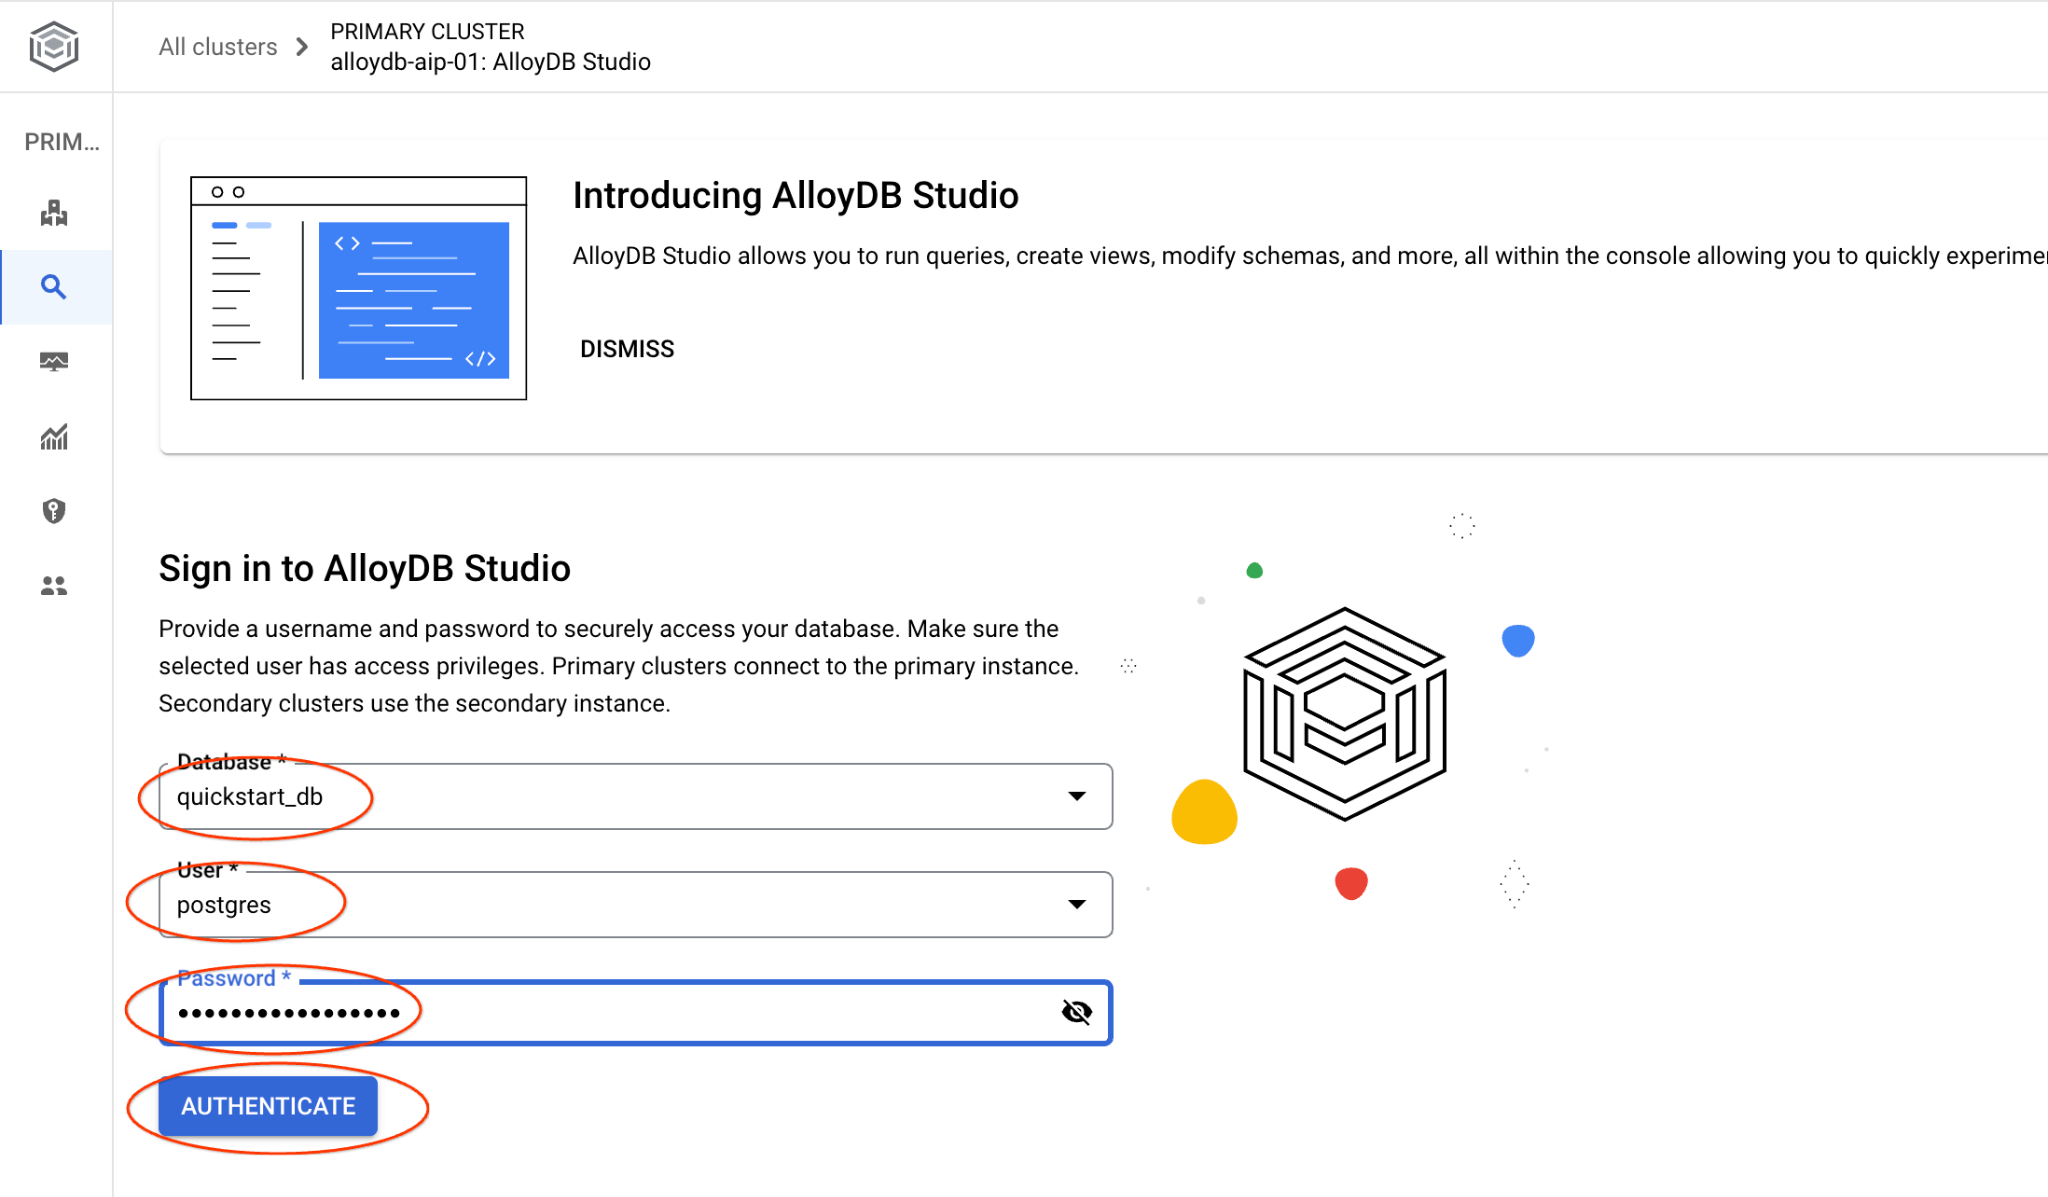
- Select the
quickstart_dbdatabase, user postgres, provide the noted password, and click Authenticate.
This action opens the AlloyDB Studio interface.
- Select the Untitled Query tab to open the SQL editor.
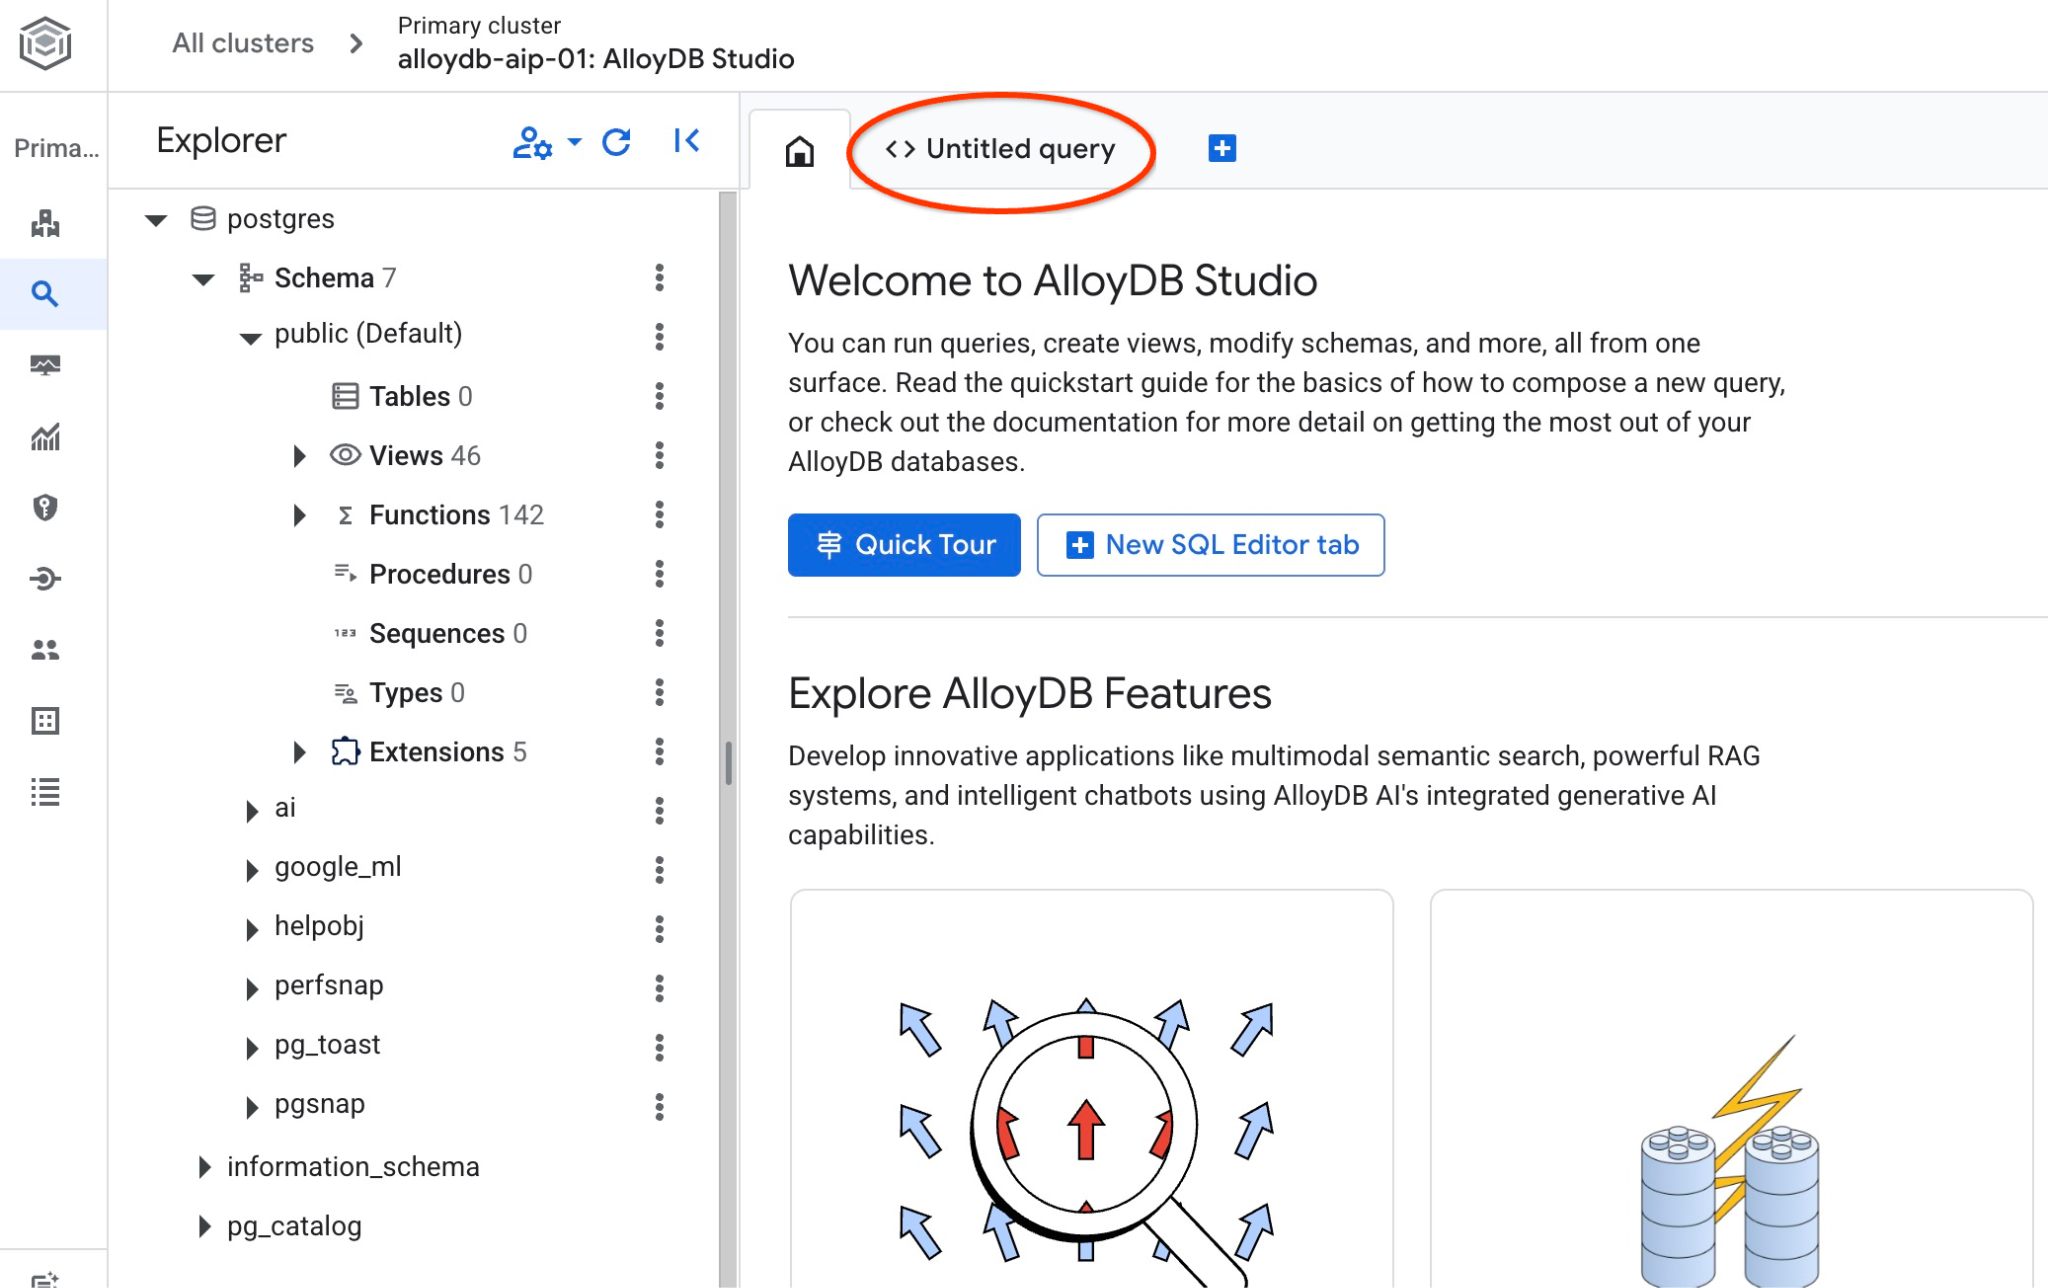
This opens an editor where you can run SQL commands, as shown in the following image:
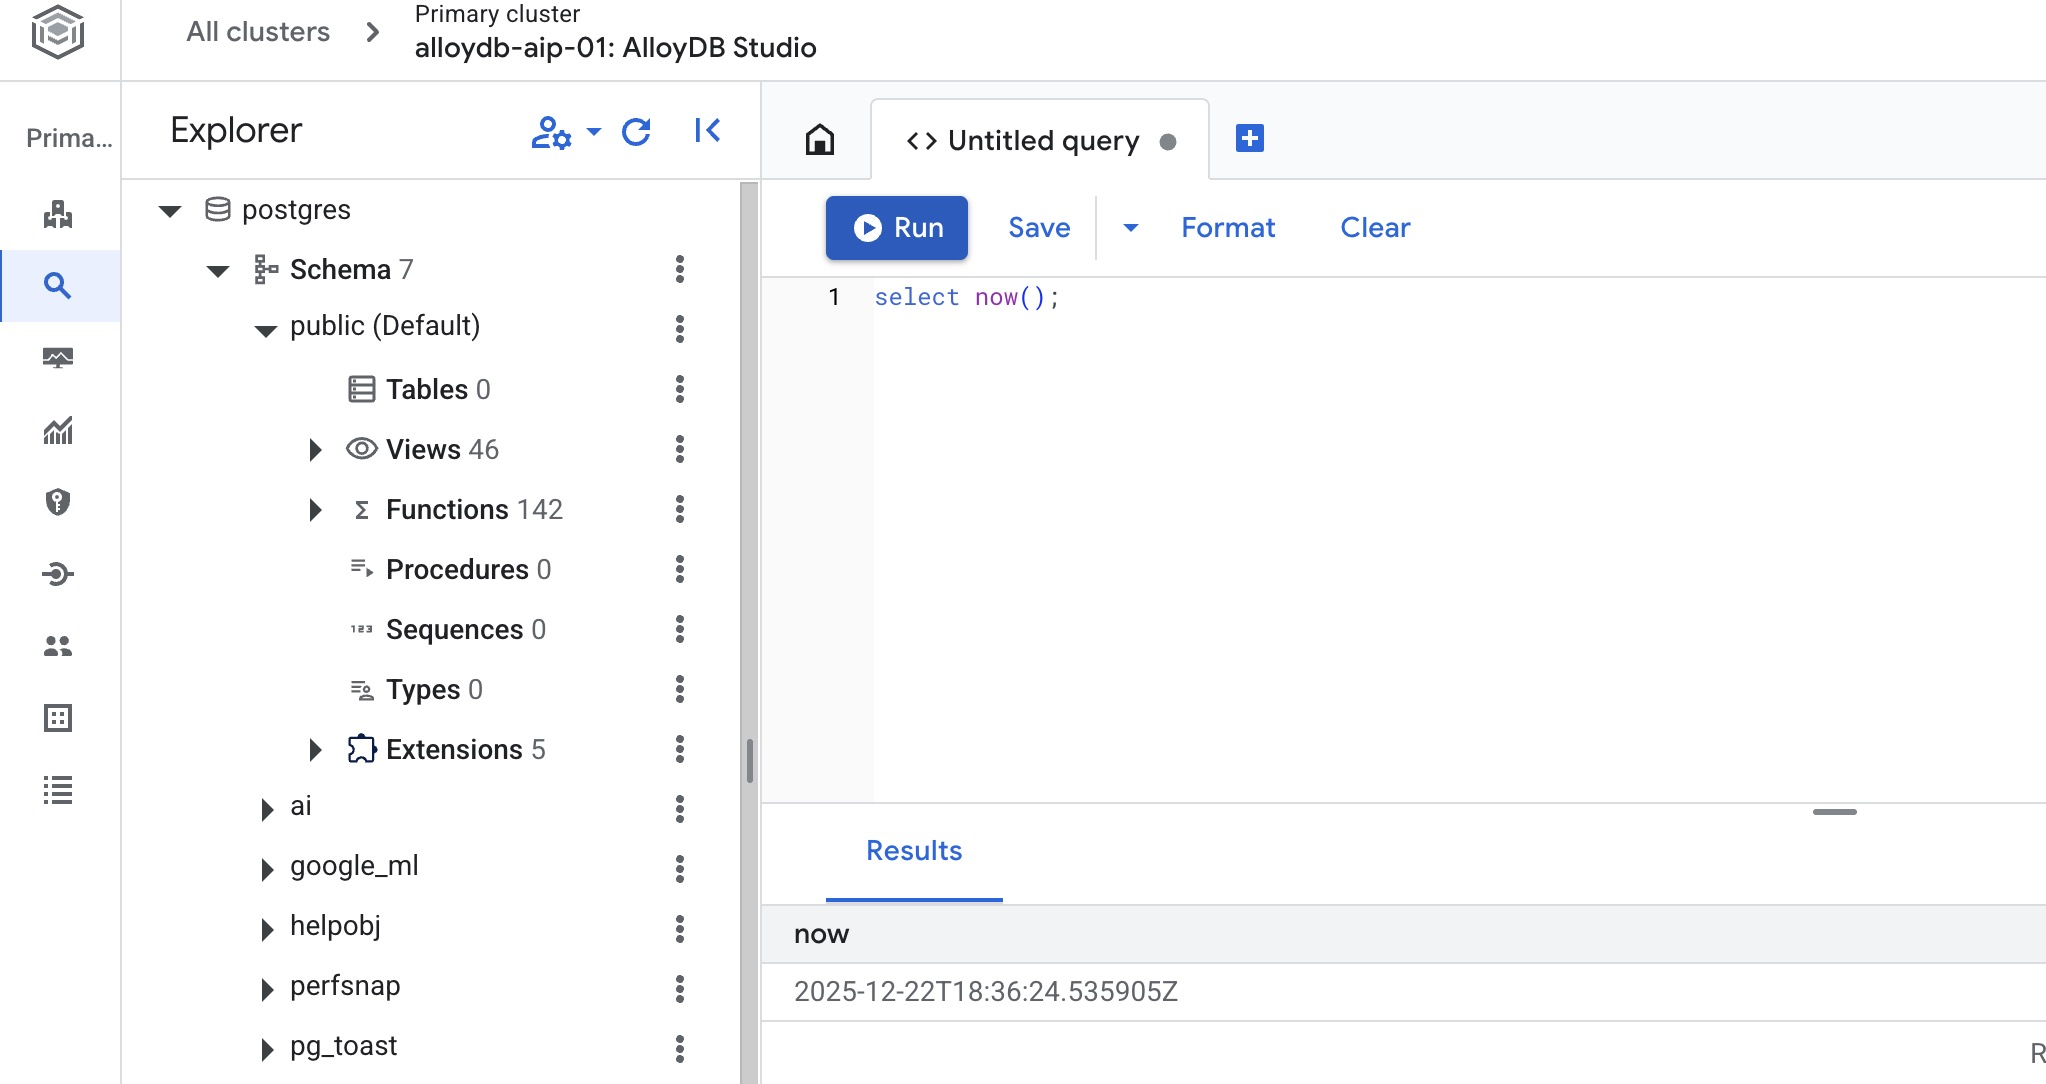
If you prefer to use command line psql then follow the alternative route and connect to the database from your VM SSH session as it has been described in the previous chapters.
Run Similarity Search
Run a query to get a list of available products most closely related to a client's request. The search phrase passed to the embedding model on Gemini Enterprise Agent Platform (the same we used to generate embeddings for our products) to get the vector value for "What kind of fruit trees grow well here?"
Run the query:
SELECT
        cp.product_name,
        left(cp.product_description,80) as description,
        cp.sale_price,
        cs.zip_code,
        (cp.embedding <=> embedding('text-embedding-005','What kind of fruit trees grow well here?')::vector) as distance
FROM
        cymbal_products cp
JOIN cymbal_inventory ci on
        ci.uniq_id=cp.uniq_id
JOIN cymbal_stores cs on
        cs.store_id=ci.store_id
        AND ci.inventory>0
        AND cs.store_id = 1583
ORDER BY
        distance ASC
LIMIT 10;
And here is the expected output:
quickstart_db=> SELECT
        cp.product_name,
        left(cp.product_description,80) as description,
        cp.sale_price,
        cs.zip_code,
        (cp.embedding <=> embedding('text-embedding-005','What kind of fruit trees grow well here?')::vector) as distance
FROM
        cymbal_products cp
JOIN cymbal_inventory ci on
        ci.uniq_id=cp.uniq_id
JOIN cymbal_stores cs on
        cs.store_id=ci.store_id
        AND ci.inventory>0
        AND cs.store_id = 1583
ORDER BY
        distance ASC
LIMIT 10;
      product_name       |                                   description                                    | sale_price | zip_code |      distance
-------------------------+----------------------------------------------------------------------------------+------------+----------+---------------------
 Cherry Tree             | This is a beautiful cherry tree that will produce delicious cherries. It is an d |      75.00 |    93230 | 0.43922018972266397
 Meyer Lemon Tree        | Meyer Lemon trees are California's favorite lemon tree! Grow your own lemons by  |         34 |    93230 |  0.4685112926118228
 Toyon                   | This is a beautiful toyon tree that can grow to be over 20 feet tall. It is an e |      10.00 |    93230 |  0.4835677149651668
 California Lilac        | This is a beautiful lilac tree that can grow to be over 10 feet tall. It is an d |       5.00 |    93230 |  0.4947204525907498
 California Peppertree   | This is a beautiful peppertree that can grow to be over 30 feet tall. It is an e |      25.00 |    93230 |  0.5054166905547247
 California Black Walnut | This is a beautiful walnut tree that can grow to be over 80 feet tall. It is a d |     100.00 |    93230 |  0.5084219510932597
 California Sycamore     | This is a beautiful sycamore tree that can grow to be over 100 feet tall. It is  |     300.00 |    93230 |  0.5140519790508755
 Coast Live Oak          | This is a beautiful oak tree that can grow to be over 100 feet tall. It is an ev |     500.00 |    93230 |  0.5143126438081371
 Fremont Cottonwood      | This is a beautiful cottonwood tree that can grow to be over 100 feet tall. It i |     200.00 |    93230 |  0.5174774727252058
 Madrone                 | This is a beautiful madrona tree that can grow to be over 80 feet tall. It is an |      50.00 |    93230 |  0.5227400803389093
You get 10 products with descriptions semantically close to the search phrase ordered by the distance with the most similar at the top.
9. Improve Response
You can improve the response to a client application using the result of the query and prepare a meaningful output using the supplied query results as part of the prompt to a foundation generative language model.
To achieve that you generate a JSON with the top results from the vector search, then use that generated JSON as addition to a prompt to a Gen AI model in Agent Platform to create a meaningful output. The first step generates the JSON, then it is tested in the Agent Platform Studio and the last step incorporates all into one SQL statement which can be used in an application.
Generate output in JSON format
Modify the query to generate the output in JSON format and return only one row to pass to Agent Platform
Run the query:
WITH trees as (
SELECT
        cp.product_name,
        left(cp.product_description,80) as description,
        cp.sale_price,
        cs.zip_code,
        cp.uniq_id as product_id
FROM
        cymbal_products cp
JOIN cymbal_inventory ci on
        ci.uniq_id=cp.uniq_id
JOIN cymbal_stores cs on
        cs.store_id=ci.store_id
        AND ci.inventory>0
        AND cs.store_id = 1583
ORDER BY
        (cp.embedding <=> embedding('text-embedding-005','What kind of fruit trees grow well here?')::vector) ASC
LIMIT 1)
SELECT json_agg(trees) FROM trees;
The JSON in the output:
[{"product_name":"Cherry Tree","description":"This is a beautiful cherry tree that will produce delicious cherries. It is an d","sale_price":75.00,"zip_code":93230,"product_id":"d536e9e823296a2eba198e52dd23e712"}]
Run the prompt in Agent Studio
Use the generated JSON to supply it as a part of the prompt to generative AI model in Agent Studio.
Open Agent Studio in the Google Cloud console.
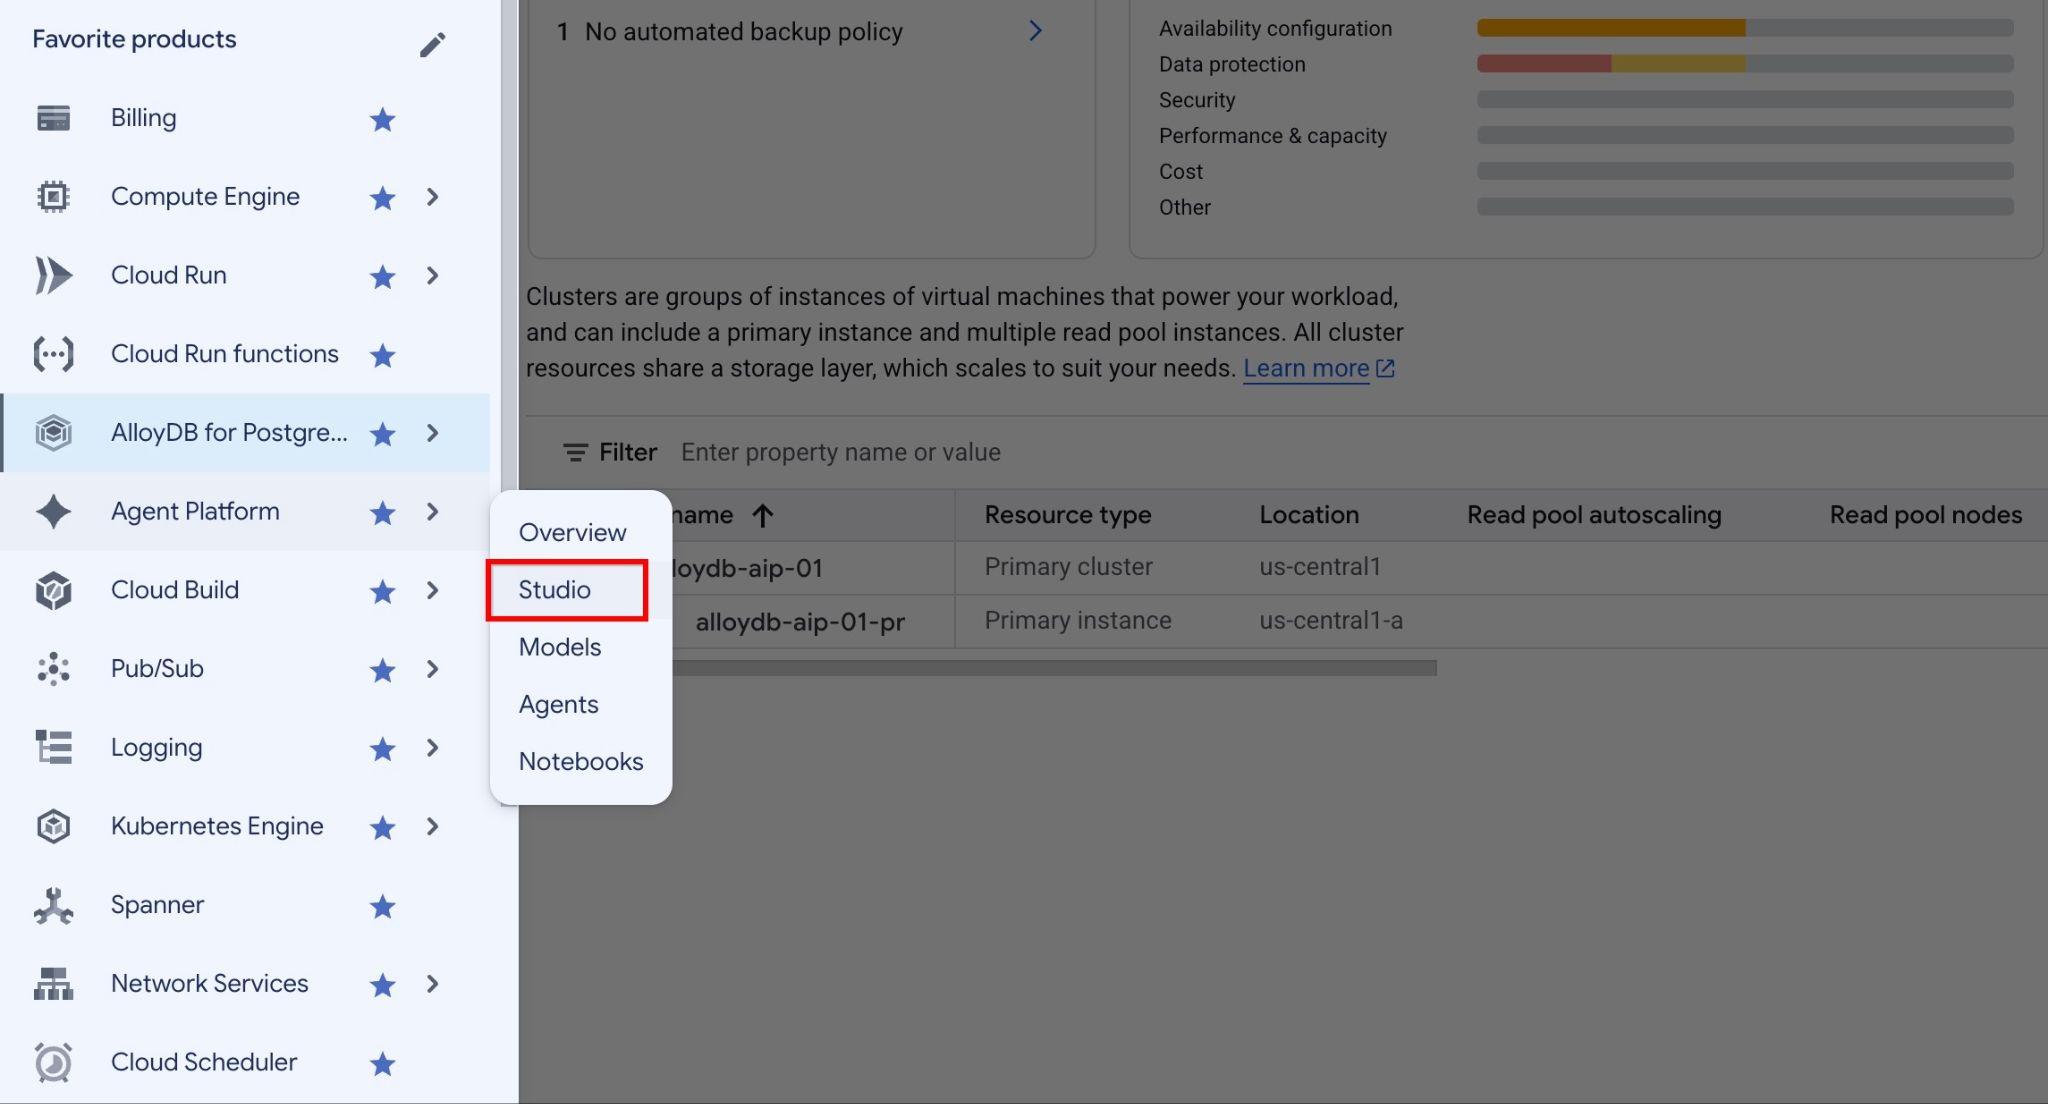
Write your prompt in the interface:
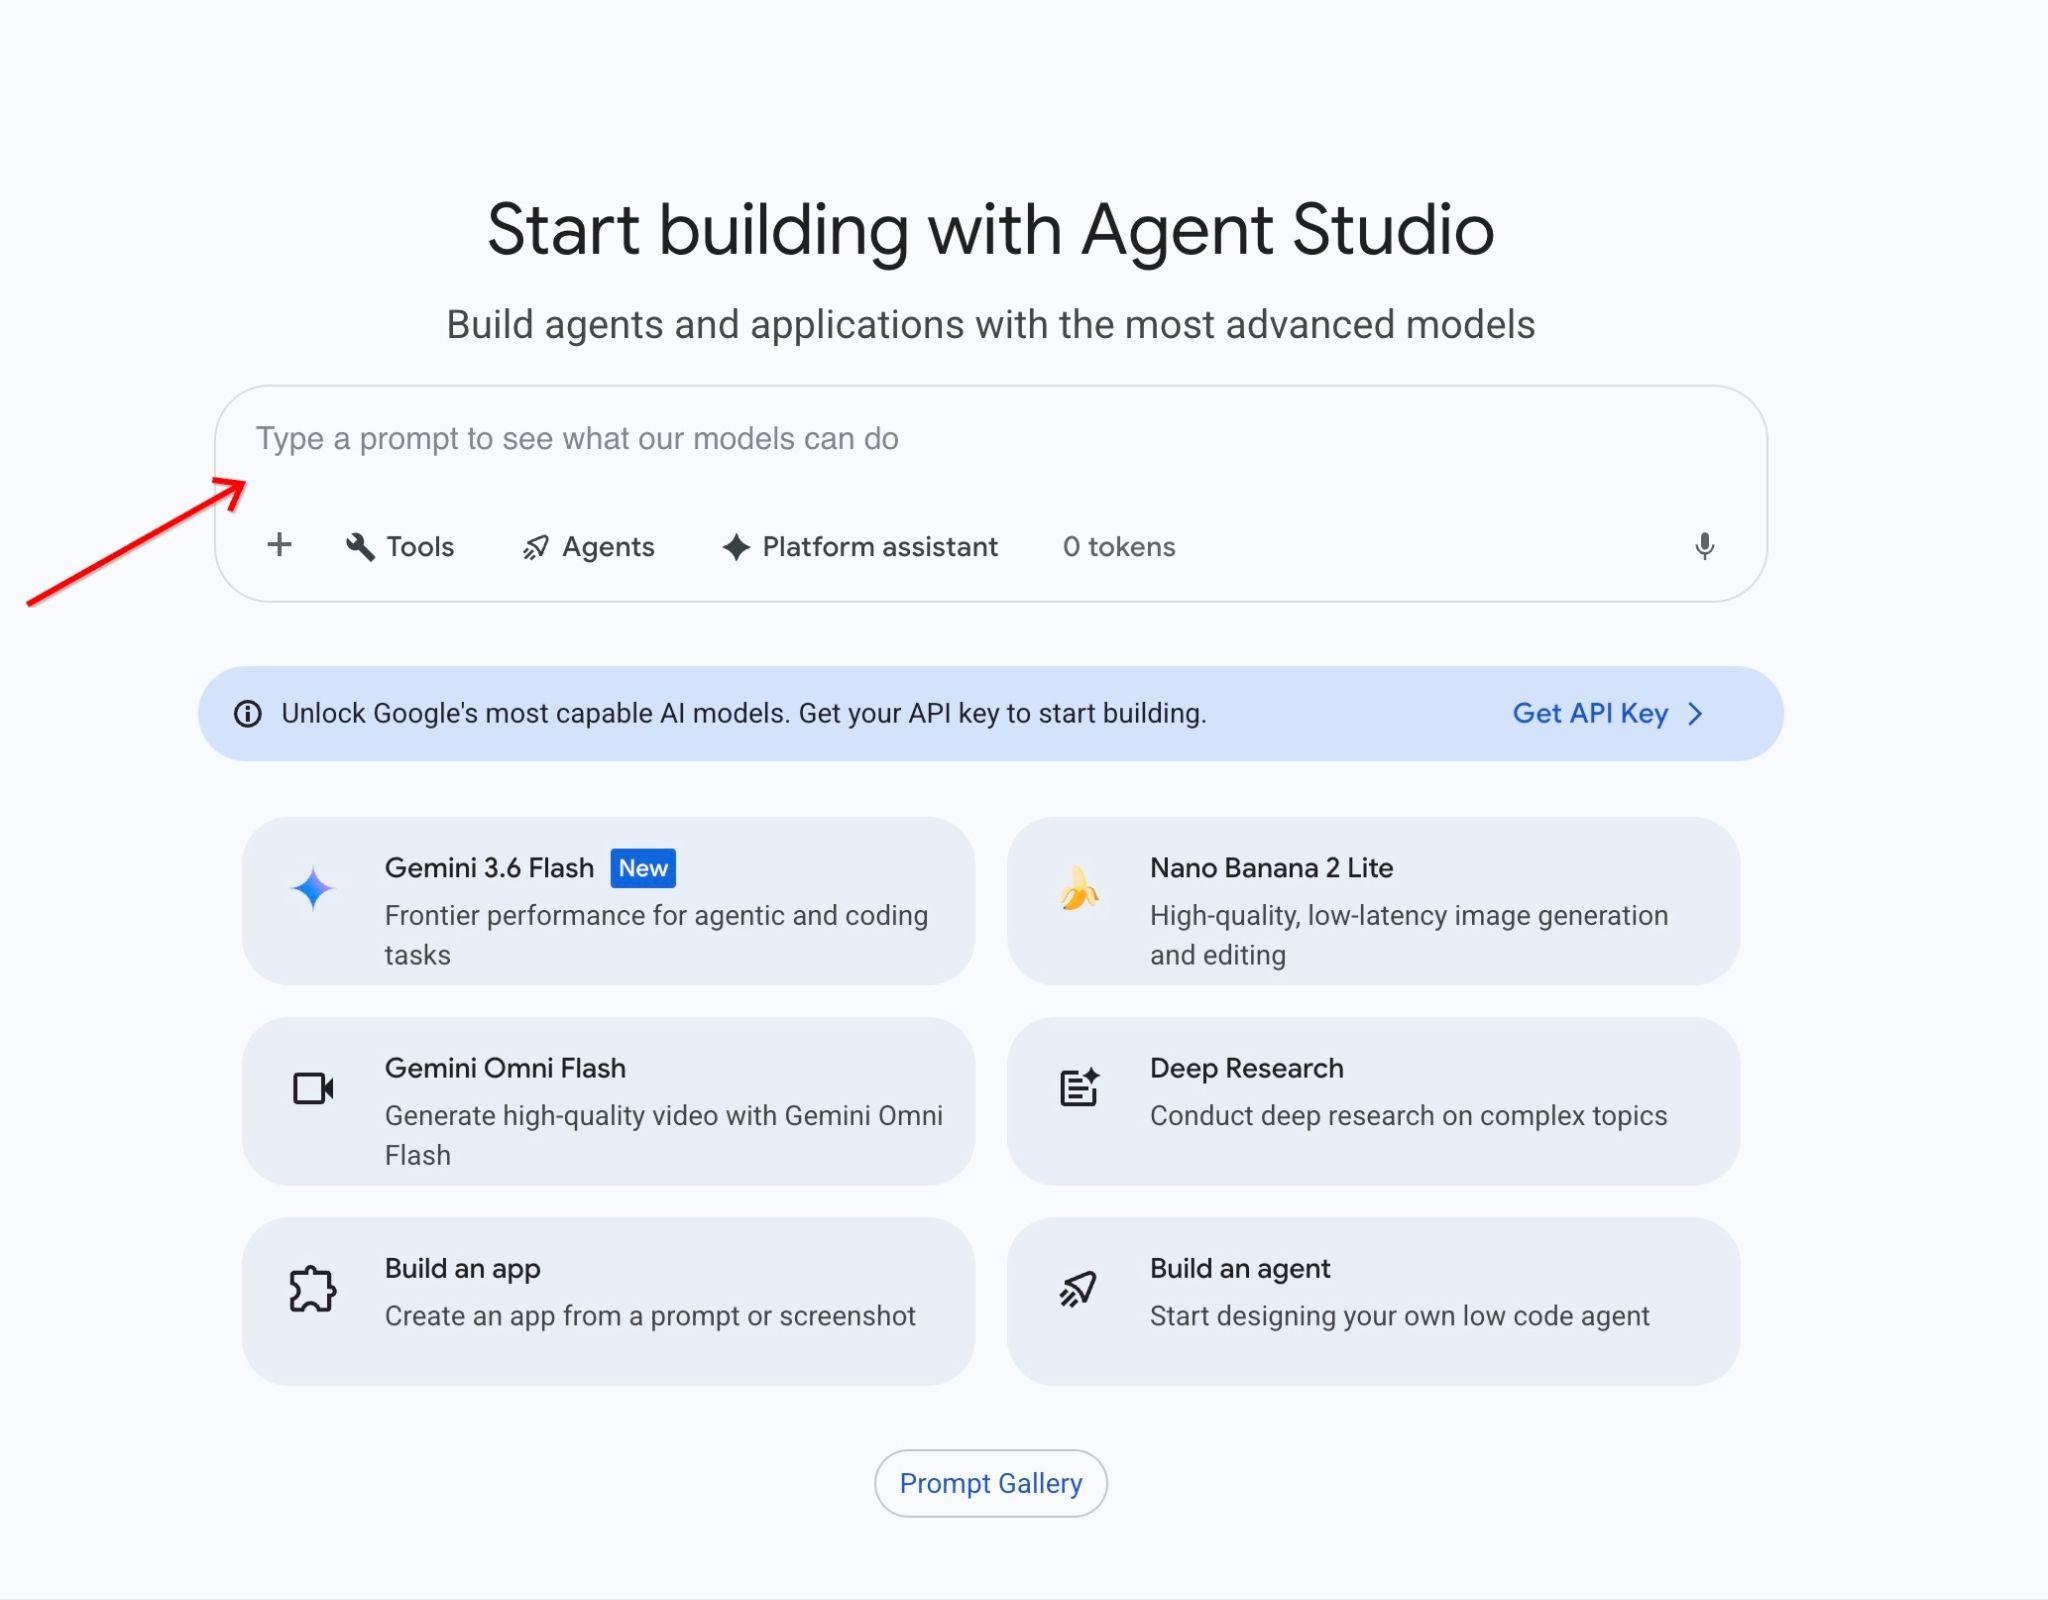
Put the following prompt:
You are a friendly advisor helping to find a product based on the customer's needs.
Based on the client request we have loaded a list of products closely related to search.
The list in JSON format with list of values like {"product_name":"name","description":"some description","sale_price":10,"zip_code": 10234, "produt_id": "02056727942aeb714dc9a2313654e1b0"}
Here is the list of products:
{"product_name":"Cherry Tree","description":"This is a beautiful cherry tree that will produce delicious cherries. It is an d","sale_price":75.00,"zip_code":93230,"product_id":"d536e9e823296a2eba198e52dd23e712"}
The customer asked "What tree is growing the best here?"
You should give information about the product, price and some supplemental information
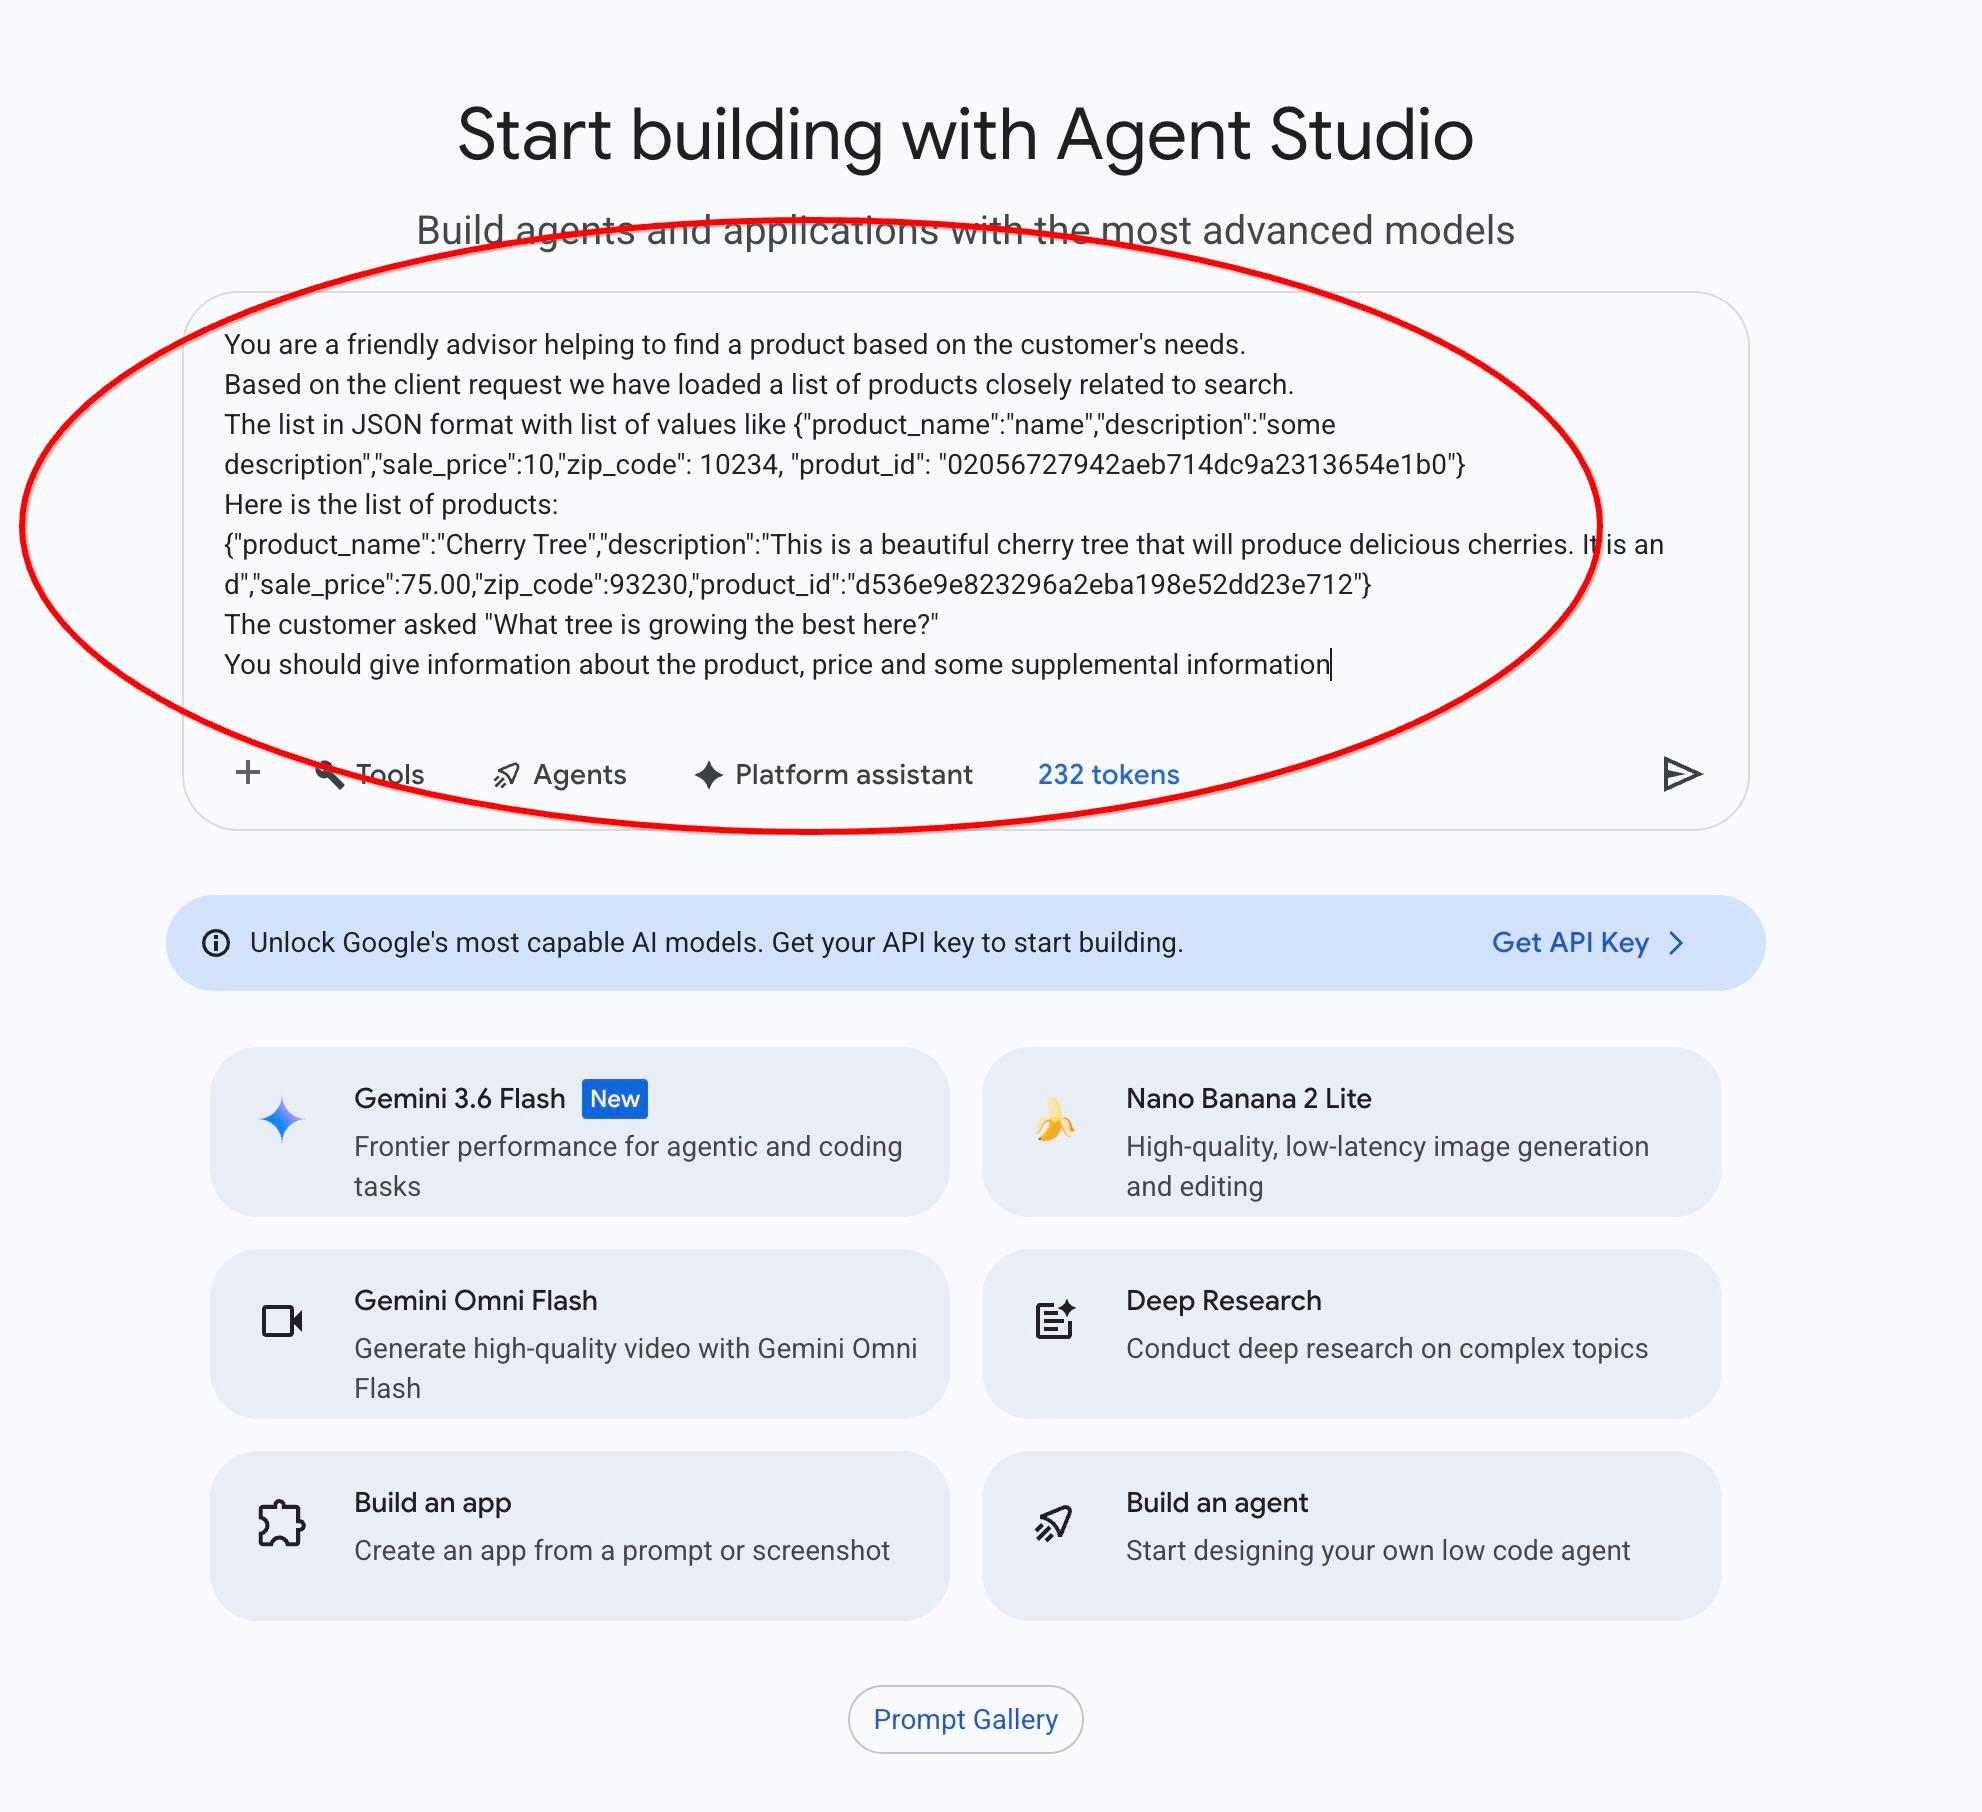
And here is the result when we run the prompt :
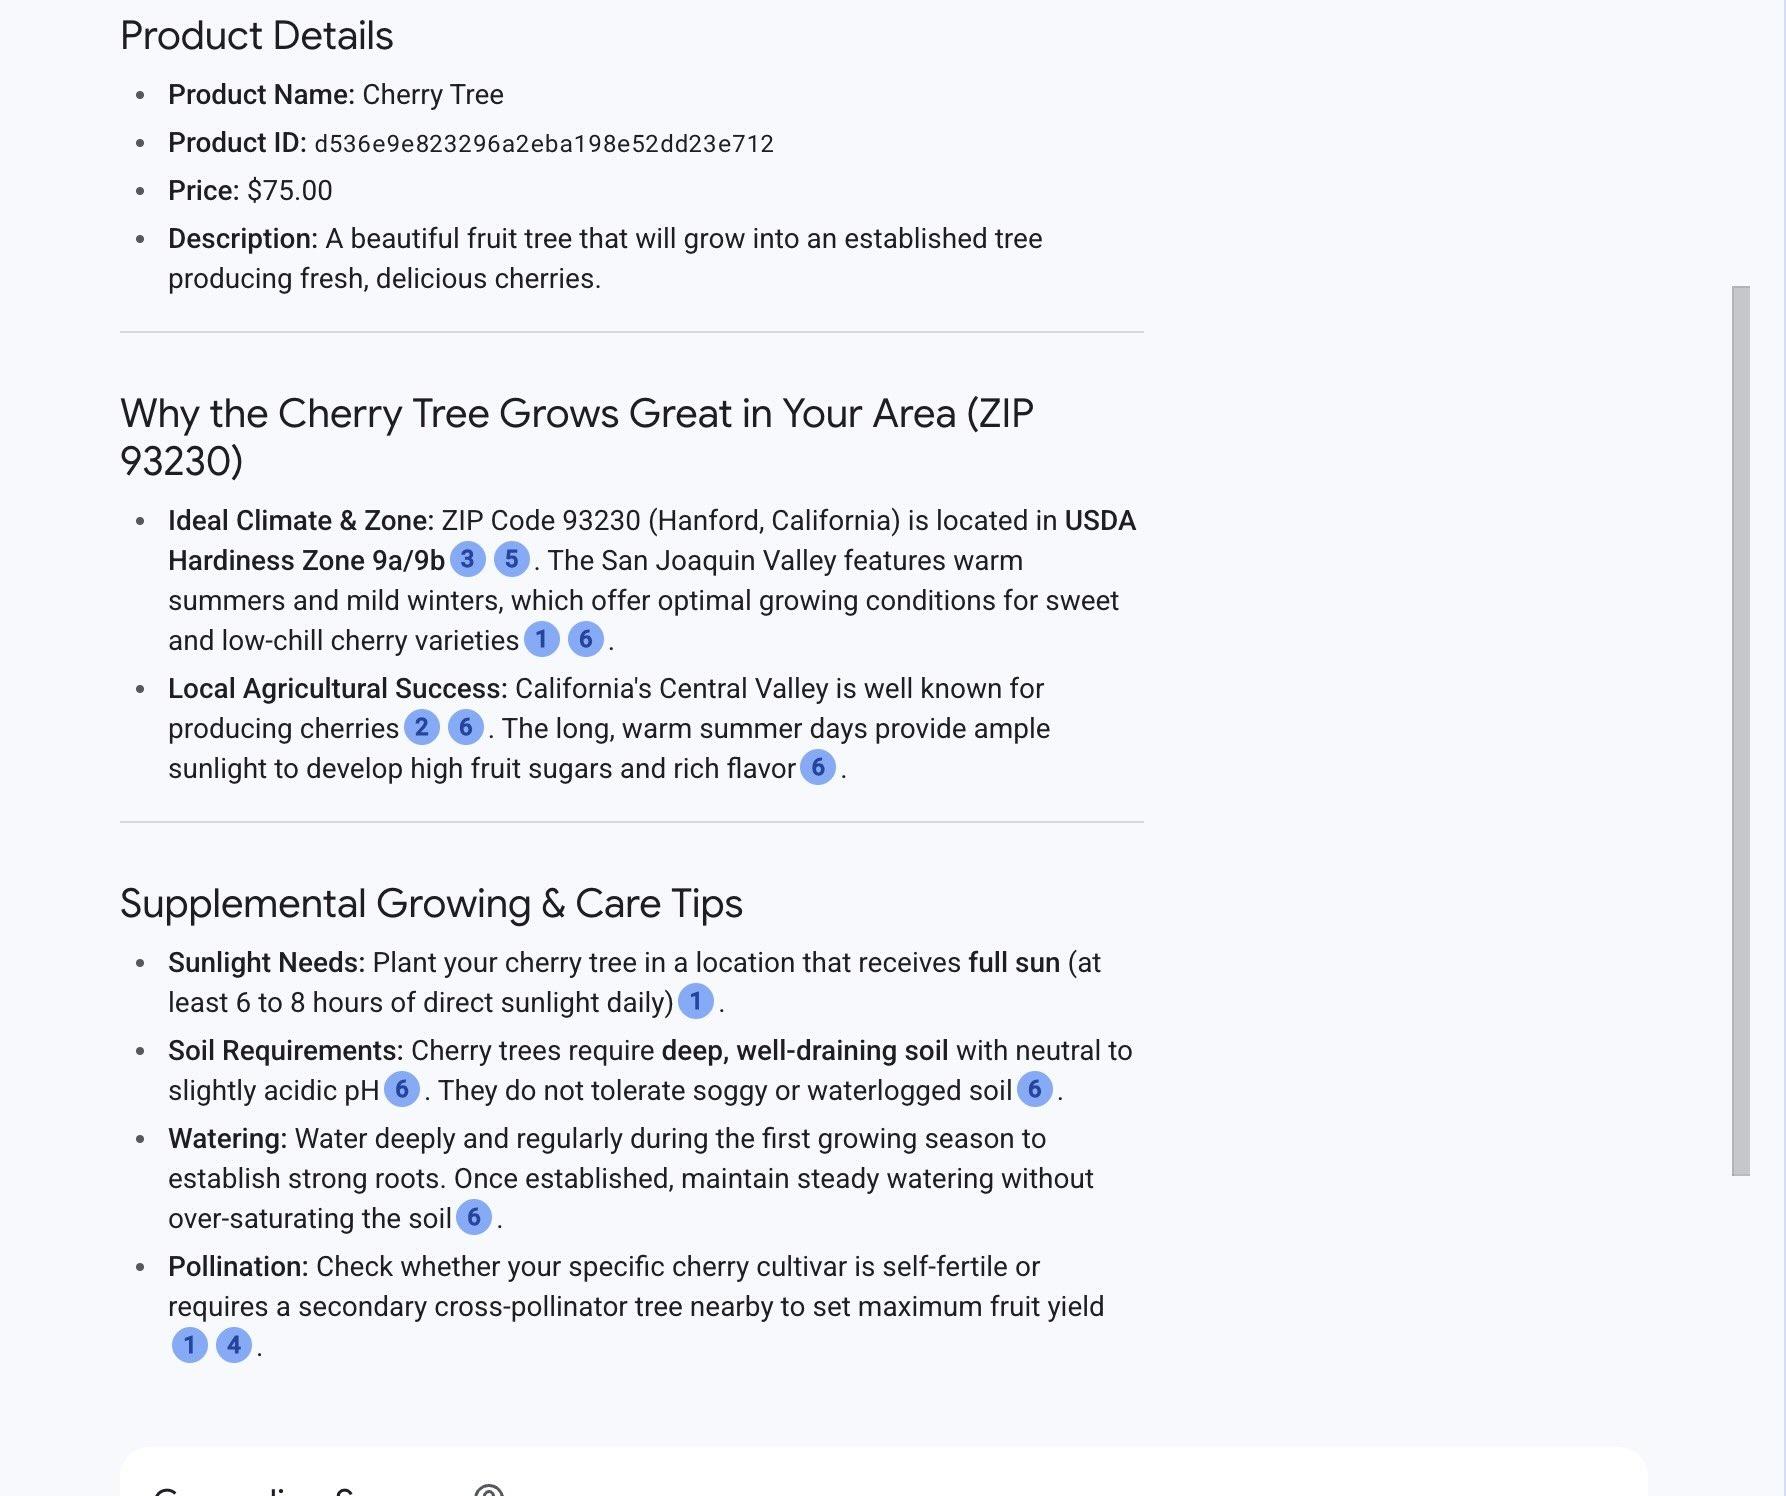
The answer includes price, description and supplemental information the model gets from external sources based on information about the tree and location.
Run the prompt in PSQL
The similar result can be achieved by running Use the AlloyDB AI integration with Gemini Enterprise Agent Platform to get the same response from a generative model using SQL directly in the database. Before you can use the gemini-3.5-flash model, you must register it.
Register gemini-3.5-flash model:
In the AlloyDB Studio run:
CALL google_ml.create_model(
model_id => 'gemini-3.5-flash',
model_request_url => 'https://aiplatform.googleapis.com/v1/projects/PROJECT_ID/locations/global/publishers/google/models/gemini-3.5-flash:generateContent',
model_provider => 'google',
model_type => 'llm'
);
You can always verify the list of registered models by selecting information from the google_ml.model_info_view.
SELECT model_id,model_type FROM google_ml.model_info_view WHERE model_id ILIKE '%flash%';
Here is sample output
quickstart_db=> SELECT model_id,model_type FROM google_ml.model_info_view WHERE model_id ILIKE '%flash%';
       model_id        | model_type
-----------------------+------------
 gemini-3.5-flash      | llm
 gemini-2.0-flash      | llm
 gemini-2.5-flash      | llm
 gemini-2.0-flash-lite | llm
 gemini-2.5-flash-lite | llm
(5 rows)
You can now use the JSON generated in a subquery as part of the prompt for the gemini-3.5-flash model using SQL.
In your psql or AlloyDB Studio session, run the following query:
WITH trees AS (
SELECT
        cp.product_name,
        cp.product_description AS description,
        cp.sale_price,
        cs.zip_code,
        cp.uniq_id AS product_id
FROM
        cymbal_products cp
JOIN cymbal_inventory ci ON
        ci.uniq_id = cp.uniq_id
JOIN cymbal_stores cs ON
        cs.store_id = ci.store_id
        AND ci.inventory>0
        AND cs.store_id = 1583
ORDER BY
        (cp.embedding <=> embedding('text-embedding-005',
        'What kind of fruit trees grow well here?')::vector) ASC
LIMIT 1),
prompt AS (
SELECT
        'You are a friendly advisor helping to find a product based on the customer''s needs.
Based on the client request we have loaded a list of products closely related to search.
The list in JSON format with list of values like {"product_name":"name","product_description":"some description","sale_price":10}
Here is the list of products:' || json_agg(trees) || 'The customer asked "What kind of fruit trees grow well here?"
You should give information about the product, price and some supplemental information' AS prompt_text
FROM
        trees),
response AS (
SELECT
        google_ml.predict_row( model_id =>'gemini-3.5-flash',
        request_body => json_build_object('contents',
        json_build_object('role',
        'user',
        'parts',
        json_build_object('text',
        prompt_text))))->'candidates'->0->'content'->'parts'->0->'text' AS resp
FROM
        prompt)
SELECT
REPLACE(resp::text, '\n', CHR(10))
FROM
        response;
And here is the expected output. The output might be different due to non-deterministic nature of generative AI models:
"Hello there! I'd be delighted to help you pick out a wonderful fruit tree for your space. Based on our local selection, a fantastic option that grows very well is the **Cherry Tree**! Here are the details on this beautiful tree: * **Product:** Cherry Tree * **Price:** $75.00 ### Why it's a great choice: * **Delicious Harvest:** It produces tasty, fresh cherries right in your backyard. * **Size & Benefits:** It's a deciduous tree that grows to about 15 feet tall, making it ideal for providing both lovely shade and a bit of privacy. * **Year-Round Beauty:** It features lush, dark green leaves throughout the summer that transform into a stunning red in the autumn. * **Growing Requirements:** Cherry trees thrive best in cool, moist climates with sandy soil, and are perfectly suited for USDA hardiness zones 4 through 9. Please let me know if you have any questions about planting or if you'd like help adding this to your order!"
10. Create vector index
Because this dataset is small, response times primarily depend on interactions with models on the Gemini Enterprise Agent Platform. However, when you query millions of vectors, the vector search itself can consume a significant portion of the response time and increase the load on your database. To improve search performance, you can build a vector index.
Create ScaNN index
To build a ScaNN index, you must enable an additional extension. The alloydb_scann extension provides an interface for working with Approximate Nearest Neighbor (ANN) vector indexes using the Google ScaNN algorithm.
Run in AlloyDB Studio:
CREATE EXTENSION IF NOT EXISTS alloydb_scann;
The index can be created in MANUAL or AUTO mode. The MANUAL mode is enabled by default and you can create an index and maintain it as any other index. But if you enable AUTO mode then you are able to create the index which doesn't require any maintenance from your side. You can read in detail about all options in the documentation. We don't have enough rows to create the index in AUTO mode - so you will create it as MANUAL.
Run in the AlloyDB Studio:
CREATE INDEX cymbal_products_embeddings_scann ON cymbal_products
  USING scann (embedding cosine)
  WITH (num_leaves=10, max_num_levels = 1);
You can read about tuning index parameters in the documentation.
Expected output:
quickstart_db=> CREATE INDEX cymbal_products_embeddings_scann ON cymbal_products
  USING scann (embedding cosine)
  WITH (num_leaves=10, max_num_levels = 1);
CREATE INDEX
quickstart_db=>
Compare Response
Repeat the query we used to get top value in the semantic search:
WITH trees as (
SELECT
        cp.product_name,
        left(cp.product_description,80) as description,
        cp.sale_price,
        cs.zip_code,
        cp.uniq_id as product_id
FROM
        cymbal_products cp
JOIN cymbal_inventory ci on
        ci.uniq_id=cp.uniq_id
JOIN cymbal_stores cs on
        cs.store_id=ci.store_id
        AND ci.inventory>0
        AND cs.store_id = 1583
ORDER BY
        (cp.embedding <=> embedding('text-embedding-005','What kind of fruit trees grow well here?')::vector) ASC
LIMIT 1)
SELECT json_agg(trees) FROM trees;
Expected output:
[{"product_name":"Cherry Tree","description":"This is a beautiful cherry tree that will produce delicious cherries. It is an d","sale_price":75.00,"zip_code":93230,"product_id":"d536e9e823296a2eba198e52dd23e712"}]
The same "Cherry Tree" in the output.
Verify the index usage:
EXPLAIN (analyze)
WITH trees as (
SELECT
        cp.product_name,
        left(cp.product_description,80) as description,
        cp.sale_price,
        cs.zip_code,
        cp.uniq_id as product_id
FROM
        cymbal_products cp
JOIN cymbal_inventory ci on
        ci.uniq_id=cp.uniq_id
JOIN cymbal_stores cs on
        cs.store_id=ci.store_id
        AND ci.inventory>0
        AND cs.store_id = 1583
ORDER BY
        (cp.embedding <=> embedding('text-embedding-005','What kind of fruit trees grow well here?')::vector) ASC
LIMIT 1)
SELECT json_agg(trees) FROM trees;
Expected output (redacted for clarity):
...
 Aggregate  (cost=27.24..27.25 rows=1 width=32) (actual time=0.964..0.965 rows=1 loops=1)
   ->  Subquery Scan on trees  (cost=18.91..27.23 rows=1 width=142) (actual time=0.953..0.954 rows=1 loops=1)
         ->  Limit  (cost=18.91..27.22 rows=1 width=158) (actual time=0.948..0.949 rows=1 loops=1)
               ->  Nested Loop  (cost=18.91..7126.86 rows=855 width=158) (actual time=0.948..0.948 rows=1 loops=1)
                     ->  Nested Loop  (cost=18.63..7103.59 rows=855 width=907) (actual time=0.931..0.931 rows=1 loops=1)
                           ->  Index Scan using cymbal_products_embeddings_scann on cymbal_products cp  (cost=18.21..343.15 rows=942 width=903) (actual time=0.906..0.908 rows=2 loops=1)
                                 Order By: (embedding <=> '[-0.106554024,0.035774965,-0.027267234,-0.045653425,-0.03286045,0.02124319...
From the output you can see that the query was using "Index Scan using cymbal_products_embeddings_scann on cymbal_products".
The query returns the same Cherry tree that appeared at the top of your search results before you built the index. Because approximate nearest neighbor (ANN) indexes trade absolute accuracy for search speed, index-based queries might occasionally return slightly different top results than an unindexed exact search. However, the vector index provides a significant performance boost while maintaining high accuracy.
To explore further, you can try other vector index types, or find more labs and examples with LangChain integration on the documentation page.
11. Clean up environment
Destroy the AlloyDB instances and cluster when you are done with the lab.
Delete AlloyDB cluster and all instances
The cluster is destroyed with option force which also deletes all the instances belonging to the cluster.
If your terminal disconnected, connect again and define the project and environment variables in Cloud Shell:
gcloud config set project <YOUR_PROJECT_ID>
export REGION=us-central1
export ADBCLUSTER=alloydb-aip-01
export PROJECT_ID=$(gcloud config get-value project)
Delete the cluster:
gcloud alloydb clusters delete $ADBCLUSTER --region=$REGION --force
Expected console output:
student@cloudshell:~ (test-project-001-402417)$ gcloud alloydb clusters delete $ADBCLUSTER --region=$REGION --force
All of the cluster data will be lost when the cluster is deleted.

Do you want to continue (Y/n)?  Y

Operation ID: operation-1697820178429-6082890a0b570-4a72f7e4-4c5df36f
Deleting cluster...done.
Delete AlloyDB Backups
Delete all AlloyDB backups for the cluster:
for i in $(gcloud alloydb backups list \
  --filter="CLUSTER_NAME: projects/$PROJECT_ID/locations/$REGION/clusters/$ADBCLUSTER" \
  --format="value(name)" \
  --sort-by=~createTime) ; do \
  gcloud alloydb backups delete $(basename $i) --region $REGION --quiet; done
Expected console output:
student@cloudshell:~ (test-project-001-402417)$ for i in $(gcloud alloydb backups list --filter="CLUSTER_NAME: projects/$PROJECT_ID/locations/$REGION/clusters/$ADBCLUSTER" --format="value(name)" --sort-by=~createTime) ; do gcloud alloydb backups delete $(basename $i) --region $REGION --quiet; done
Operation ID: operation-1697826266108-60829fb7b5258-7f99dc0b-99f3c35f
Deleting backup...done.
Now we can destroy our VM
Delete GCE VM
In Cloud Shell execute:
export GCEVM=instance-1
export ZONE=us-central1-a
gcloud compute instances delete $GCEVM \
    --zone=$ZONE \
    --quiet
Expected console output:
student@cloudshell:~ (test-project-001-402417)$ export GCEVM=instance-1
export ZONE=us-central1-a
gcloud compute instances delete $GCEVM \
    --zone=$ZONE \
    --quiet
Deleted
12. Congratulations
Congratulations for completing the codelab.
This lab is part of the Production-Ready AI with Google Cloud Learning Path.
- Explore the full curriculum to bridge the gap from prototype to production.
- Share your progress with the hashtag
#ProductionReadyAI.
What we've covered
- How to deploy AlloyDB cluster and primary instance
- How to connect to the AlloyDB from Google Compute Engine VM
- How to create database and enable AlloyDB AI
- How to load data to the database
- How to use AlloyDB Studio
- How to use Gemini Enterprise Agent Platform embedding model in AlloyDB
- How to use Gemini Enterprise Agent Platform Studio
- How to enrich the result using Gemini Enterprise Agent Platform generative model
- How to improve performance using vector index
13. Survey
Output: