

1. परिचय
इस कोडलैब में, आपको वेक्टर सर्च को Vertex AI एम्बेडिंग के साथ जोड़कर, AlloyDB AI का इस्तेमाल करने का तरीका बताया जाएगा. यह लैब, AlloyDB AI की सुविधाओं के लिए उपलब्ध लैब कलेक्शन का हिस्सा है. दस्तावेज़ में, AlloyDB AI पेज पर जाकर इसके बारे में ज़्यादा पढ़ें.
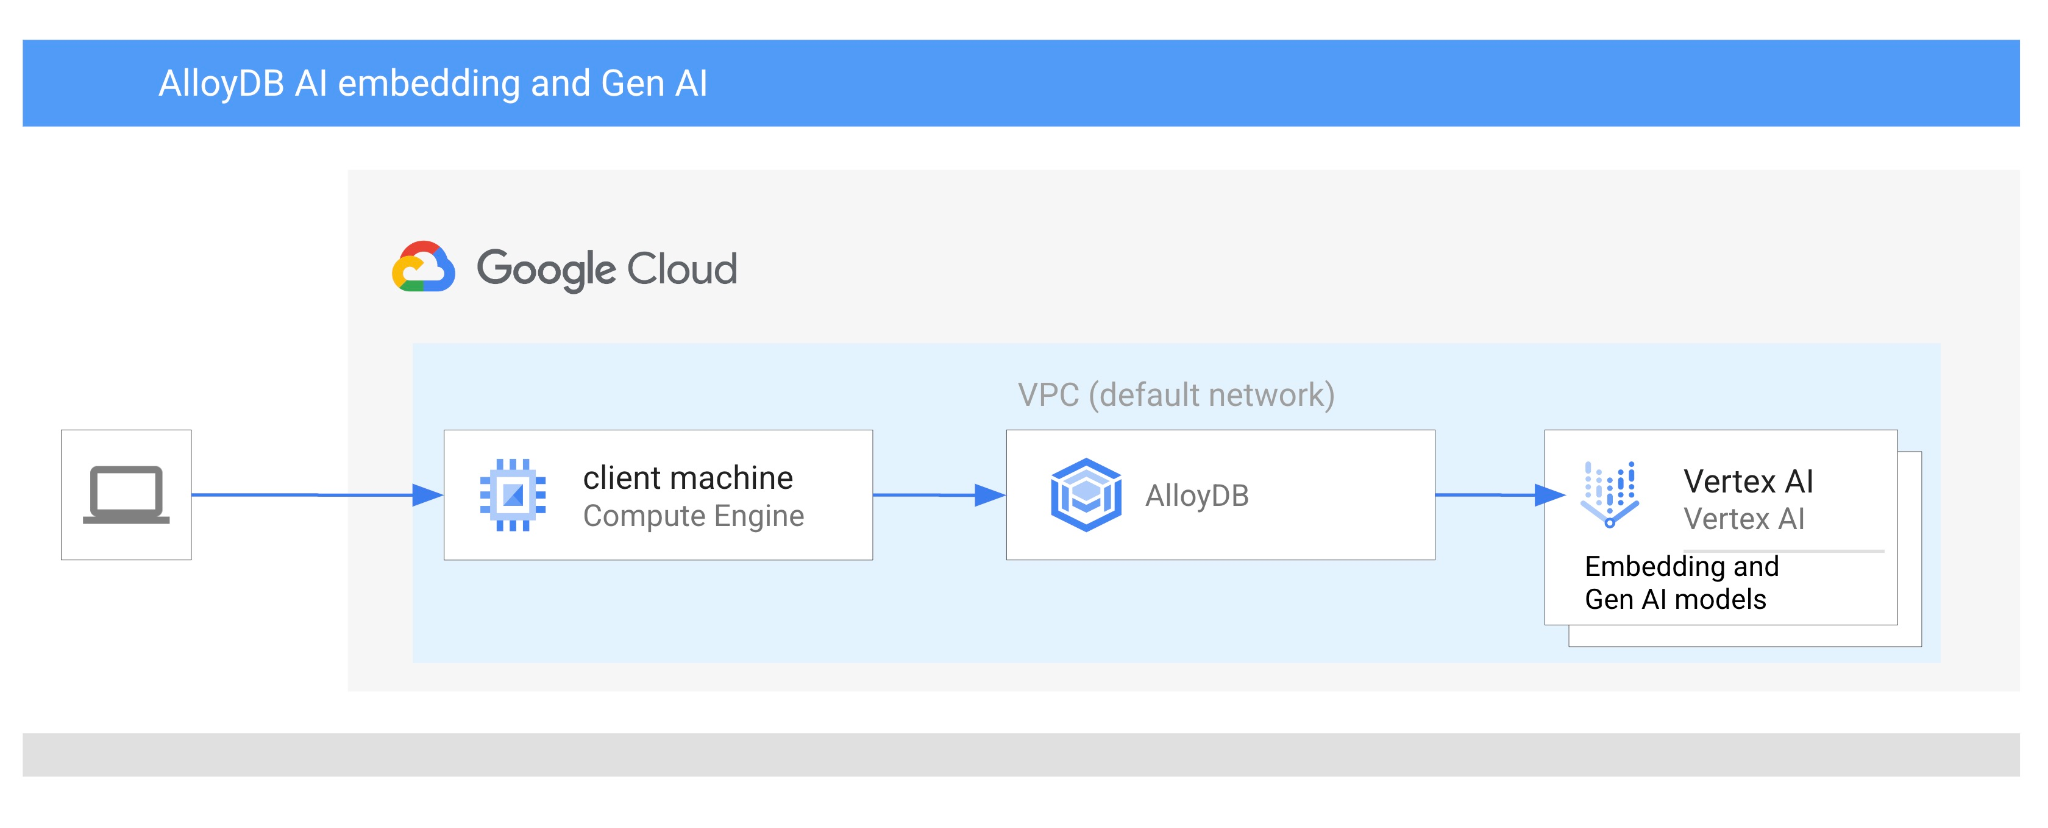
ज़रूरी शर्तें
- Google Cloud और Console की बुनियादी जानकारी
- कमांड-लाइन इंटरफ़ेस और Cloud Shell का इस्तेमाल करने का बुनियादी कौशल
आपको क्या सीखने को मिलेगा
- AlloyDB क्लस्टर और प्राइमरी इंस्टेंस को डिप्लॉय करने का तरीका
- Google Compute Engine VM से AlloyDB से कनेक्ट करने का तरीका
- डेटाबेस बनाने और AlloyDB AI को चालू करने का तरीका
- डेटाबेस में डेटा लोड करने का तरीका
- AlloyDB Studio का इस्तेमाल कैसे करें
- AlloyDB में Gemini Enterprise के एजेंट प्लैटफ़ॉर्म के एम्बेडिंग मॉडल का इस्तेमाल कैसे करें
- Gemini Enterprise Agent Platform Studio का इस्तेमाल कैसे करें
- Gemini Enterprise के एजेंट प्लैटफ़ॉर्म के जनरेटिव मॉडल का इस्तेमाल करके, नतीजे को बेहतर बनाने का तरीका
- वेक्टर इंडेक्स का इस्तेमाल करके परफ़ॉर्मेंस को बेहतर बनाने का तरीका
आपको इन चीज़ों की ज़रूरत होगी
- Google Cloud खाता और Google Cloud प्रोजेक्ट
- कोई वेब ब्राउज़र, जैसे कि Chrome
2. सेटअप और ज़रूरी शर्तें
प्रोजेक्ट सेटअप करना
- Google Cloud Console में साइन इन करें. अगर आपके पास पहले से कोई Gmail या Google Workspace खाता नहीं है, तो आपको एक खाता बनाना होगा.
ऑफ़िस या स्कूल वाले खाते के बजाय, निजी खाते का इस्तेमाल करें.
- कोई नया प्रोजेक्ट बनाएं या किसी मौजूदा प्रोजेक्ट का फिर से इस्तेमाल करें. Google Cloud Console में नया प्रोजेक्ट बनाने के लिए, हेडर में मौजूद 'कोई प्रोजेक्ट चुनें' बटन पर क्लिक करें. इससे एक पॉप-अप विंडो खुलेगी.

'कोई प्रोजेक्ट चुनें' विंडो में, 'नया प्रोजेक्ट' बटन दबाएं. इससे नए प्रोजेक्ट के लिए एक डायलॉग बॉक्स खुलेगा.
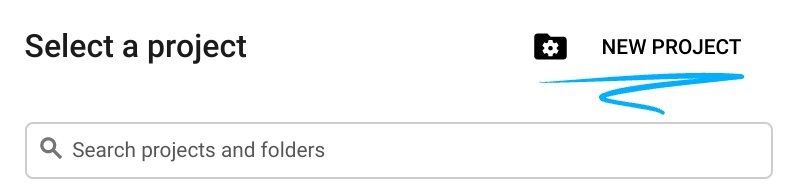
डायलॉग बॉक्स में, प्रोजेक्ट का पसंदीदा नाम डालें और जगह चुनें.
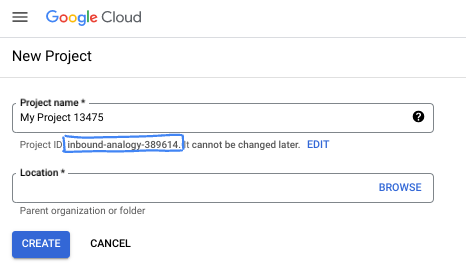
- प्रोजेक्ट का नाम, इस प्रोजेक्ट में हिस्सा लेने वाले लोगों के लिए डिसप्ले नेम होता है. प्रोजेक्ट के नाम का इस्तेमाल Google API नहीं करते हैं. इसे कभी भी बदला जा सकता है.
- प्रोजेक्ट आईडी, सभी Google Cloud प्रोजेक्ट के लिए यूनीक होता है. साथ ही, इसे बदला नहीं जा सकता. Google Cloud Console, अपने-आप एक यूनीक आईडी जनरेट करता है. हालांकि, इसे अपनी पसंद के मुताबिक बनाया जा सकता है. अगर आपको जनरेट किया गया आईडी पसंद नहीं है, तो कोई दूसरा आईडी जनरेट करें. इसके अलावा, अपनी पसंद का आईडी डालकर देखें कि वह उपलब्ध है या नहीं. ज़्यादातर कोडलैब में, आपको अपने प्रोजेक्ट आईडी का रेफ़रंस देना होगा. इसे आम तौर पर, PROJECT_ID प्लेसहोल्डर से पहचाना जाता है.
- आपकी जानकारी के लिए बता दें कि एक तीसरी वैल्यू भी होती है, जिसे प्रोजेक्ट नंबर कहते हैं. इसका इस्तेमाल कुछ एपीआई करते हैं. इन तीनों वैल्यू के बारे में ज़्यादा जानने के लिए, दस्तावेज़ देखें.
बिलिंग चालू करें
निजी बिलिंग खाता सेट अप करना
अगर आपने Google Cloud क्रेडिट का इस्तेमाल करके बिलिंग सेट अप की है, तो इस चरण को छोड़ा जा सकता है.
निजी बिलिंग खाता सेट अप करने के लिए, Cloud Console में बिलिंग की सुविधा चालू करने के लिए यहां जाएं.
ध्यान दें:
- इस लैब को पूरा करने में, क्लाउड संसाधनों पर 3 डॉलर से कम खर्च आना चाहिए.
- ज़्यादा शुल्क से बचने के लिए, संसाधनों को मिटाने का तरीका जानने के लिए, इस लैब के आखिर में दिए गए निर्देशों का पालन करें.
- नए उपयोगकर्ता, 300 डॉलर का क्रेडिट मुफ़्त में आज़मा सकते हैं.
Cloud Shell शुरू करें
Google Cloud को अपने लैपटॉप से रिमोटली ऐक्सेस किया जा सकता है. हालांकि, इस कोडलैब में Google Cloud Shell का इस्तेमाल किया जाएगा. यह क्लाउड में चलने वाला कमांड लाइन एनवायरमेंट है.
Google Cloud Console में, सबसे ऊपर दाएं कोने में मौजूद टूलबार पर, Cloud Shell आइकॉन पर क्लिक करें:

इसके अलावा, G और फिर S दबाकर भी यह सुविधा ऐक्सेस की जा सकती है. इस क्रम से, Cloud Shell चालू हो जाएगा. इसके लिए, आपको Google Cloud Console में होना चाहिए या इस लिंक का इस्तेमाल करना होगा.
इसे चालू करने और एनवायरमेंट से कनेक्ट करने में सिर्फ़ कुछ सेकंड लगते हैं. यह प्रोसेस पूरी होने के बाद, आपको कुछ ऐसा दिखेगा:

इस वर्चुअल मशीन में, डेवलपमेंट के लिए ज़रूरी सभी टूल पहले से मौजूद होते हैं. यह 5 जीबी की होम डायरेक्ट्री उपलब्ध कराता है. साथ ही, Google Cloud पर काम करता है. इससे नेटवर्क की परफ़ॉर्मेंस और पुष्टि करने की प्रोसेस बेहतर होती है. इस कोडलैब में मौजूद सभी टास्क, ब्राउज़र में किए जा सकते हैं. आपको कुछ भी इंस्टॉल करने की ज़रूरत नहीं है.
3. शुरू करने से पहले
एपीआई चालू करना
आउटपुट:
AlloyDB, Compute Engine, नेटवर्किंग सेवाएं, और Gemini Enterprise Agent Platform का इस्तेमाल करने के लिए, आपको अपने Google Cloud प्रोजेक्ट में इनके एपीआई चालू करने होंगे.
एपीआई चालू करना
टर्मिनल में Cloud Shell के अंदर, पक्का करें कि आपका प्रोजेक्ट आईडी सेट अप हो:
gcloud config set project [YOUR-PROJECT-ID]
PROJECT_ID एनवायरमेंट वैरिएबल सेट करें:
PROJECT_ID=$(gcloud config get-value project)
ज़रूरी सभी एपीआई चालू करें:
gcloud services enable alloydb.googleapis.com \
                       compute.googleapis.com \
                       cloudresourcemanager.googleapis.com \
                       servicenetworking.googleapis.com \
                       aiplatform.googleapis.com
अनुमानित आउटपुट
student@cloudshell:~ (test-project-001-402417)$ gcloud config set project test-project-001-402417
Updated property [core/project].
student@cloudshell:~ (test-project-001-402417)$ PROJECT_ID=$(gcloud config get-value project)
Your active configuration is: [cloudshell-14650]
student@cloudshell:~ (test-project-001-402417)$
student@cloudshell:~ (test-project-001-402417)$ gcloud services enable alloydb.googleapis.com \
                       compute.googleapis.com \
                       cloudresourcemanager.googleapis.com \
                       servicenetworking.googleapis.com \
                       aiplatform.googleapis.com
Operation "operations/acat.p2-4470404856-1f44ebd8-894e-4356-bea7-b84165a57442" finished successfully.
चालू किए गए हर एपीआई के बारे में, दस्तावेज़ में पढ़ा जा सकता है.
4. AlloyDB डिप्लॉय करना
AlloyDB क्लस्टर बनाने से पहले, अपने वीपीसी में उपलब्ध निजी आईपी पते की कोई रेंज असाइन करें. इसका इस्तेमाल आने वाले समय में AlloyDB इंस्टेंस करेगा. अगर आपके पास यह नहीं है, तो आपको इसे बनाना होगा. साथ ही, इसे Google की इंटरनल सेवाओं के लिए इस्तेमाल करने की अनुमति देनी होगी. इसके बाद, क्लस्टर और इंस्टेंस बनाया जा सकेगा.
निजी आईपी पतों की रेंज बनाना
आपको AlloyDB के लिए, हमारे वीपीसी में Private Service Access कॉन्फ़िगरेशन कॉन्फ़िगर करना होगा. यहां यह मान लिया गया है कि आपके प्रोजेक्ट में "डिफ़ॉल्ट" वीपीसी नेटवर्क है और इसका इस्तेमाल सभी कार्रवाइयों के लिए किया जाएगा.
निजी आईपी रेंज बनाएं:
gcloud compute addresses create psa-range \
    --global \
    --purpose=VPC_PEERING \
    --prefix-length=24 \
    --description="VPC private service access" \
    --network=default
अलॉट की गई आईपी रेंज का इस्तेमाल करके, निजी कनेक्शन बनाएं:
gcloud services vpc-peerings connect \
    --service=servicenetworking.googleapis.com \
    --ranges=psa-range \
    --network=default
अनुमानित कंसोल आउटपुट:
student@cloudshell:~ (test-project-402417)$ gcloud compute addresses create psa-range \
    --global \
    --purpose=VPC_PEERING \
    --prefix-length=24 \
    --description="VPC private service access" \
    --network=default
Created [https://www.googleapis.com/compute/v1/projects/test-project-402417/global/addresses/psa-range].

student@cloudshell:~ (test-project-402417)$ gcloud services vpc-peerings connect \
    --service=servicenetworking.googleapis.com \
    --ranges=psa-range \
    --network=default
Operation "operations/pssn.p24-4470404856-595e209f-19b7-4669-8a71-cbd45de8ba66" finished successfully.

student@cloudshell:~ (test-project-402417)$
AlloyDB क्लस्टर बनाना
us-central1 क्षेत्र में AlloyDB क्लस्टर बनाएं
postgres उपयोगकर्ता के लिए पासवर्ड तय करें. आपके पास अपना पासवर्ड तय करने या पासवर्ड जनरेट करने के लिए, रैंडम फ़ंक्शन का इस्तेमाल करने का विकल्प होता है
export PGPASSWORD=`openssl rand -hex 16`
अनुमानित कंसोल आउटपुट:
student@cloudshell:~ (test-project-402417)$ export PGPASSWORD=`openssl rand -hex 12`
आने वाले समय में इस्तेमाल करने के लिए, PostgreSQL का पासवर्ड नोट करें:
echo $PGPASSWORD
postgres उपयोगकर्ता के तौर पर इंस्टेंस से कनेक्ट करने के लिए, आपको आने वाले समय में इस पासवर्ड की ज़रूरत होगी. इस पासवर्ड को सेव करें, ताकि इसका इस्तेमाल अगले चरणों में किया जा सके.
अनुमानित कंसोल आउटपुट:
student@cloudshell:~ (test-project-402417)$ echo $PGPASSWORD
bbefbfde7601985b0dee5723 (Note: Yours will be different!)
मुफ़्त में आज़माने के लिए क्लस्टर बनाना
अगर आपने पहले कभी AlloyDB का इस्तेमाल नहीं किया है, तो मुफ़्त में आज़माने के लिए क्लस्टर बनाया जा सकता है:
क्षेत्र और क्लस्टर के नाम के लिए एनवायरमेंट वैरिएबल सेट करें:
export REGION=us-central1
export ADBCLUSTER=alloydb-aip-01
क्लस्टर बनाने के लिए, यह कमांड चलाएं:
gcloud alloydb clusters create $ADBCLUSTER \
    --password=$PGPASSWORD \
    --network=default \
    --region=$REGION \
    --subscription-type=TRIAL
अनुमानित कंसोल आउटपुट:
export REGION=us-central1
export ADBCLUSTER=alloydb-aip-01
gcloud alloydb clusters create $ADBCLUSTER \
    --password=$PGPASSWORD \
    --network=default \
    --region=$REGION \
    --subscription-type=TRIAL
Operation ID: operation-1697655441138-6080235852277-9e7f04f5-2012fce4
Creating cluster...done.
उसी Cloud Shell सेशन में, अपने क्लस्टर के लिए AlloyDB प्राइमरी इंस्टेंस बनाएं. अगर आपका कनेक्शन बंद हो जाता है, तो आपको क्षेत्र और क्लस्टर के नाम वाले एनवायरमेंट वैरिएबल फिर से तय करने होंगे.
gcloud alloydb instances create $ADBCLUSTER-pr \
    --instance-type=PRIMARY \
    --cpu-count=8 \
    --region=$REGION \
    --cluster=$ADBCLUSTER
अनुमानित कंसोल आउटपुट:
student@cloudshell:~ (test-project-402417)$ gcloud alloydb instances create $ADBCLUSTER-pr \
    --instance-type=PRIMARY \
    --cpu-count=8 \
    --region=$REGION \
    --availability-type ZONAL \
    --cluster=$ADBCLUSTER
Operation ID: operation-1697659203545-6080315c6e8ee-391805db-25852721
Creating instance...done.
AlloyDB Standard क्लस्टर बनाना
अगर यह प्रोजेक्ट में आपका पहला AlloyDB क्लस्टर नहीं है, तो स्टैंडर्ड क्लस्टर बनाएं. अगर आपने पहले ही बिना किसी शुल्क के आज़माने वाला क्लस्टर बना लिया है, तो इस चरण को छोड़ दें.
क्षेत्र और क्लस्टर के नाम के लिए एनवायरमेंट वैरिएबल सेट करें:
export REGION=us-central1
export ADBCLUSTER=alloydb-aip-01
क्लस्टर बनाने के लिए, यह कमांड चलाएं:
gcloud alloydb clusters create $ADBCLUSTER \
    --password=$PGPASSWORD \
    --network=default \
    --region=$REGION
अनुमानित कंसोल आउटपुट:
export REGION=us-central1
export ADBCLUSTER=alloydb-aip-01
gcloud alloydb clusters create $ADBCLUSTER \
    --password=$PGPASSWORD \
    --network=default \
    --region=$REGION
Operation ID: operation-1697655441138-6080235852277-9e7f04f5-2012fce4
Creating cluster...done.
उसी Cloud Shell सेशन में, अपने क्लस्टर के लिए AlloyDB प्राइमरी इंस्टेंस बनाएं. अगर आपका कनेक्शन बंद हो जाता है, तो आपको क्षेत्र और क्लस्टर के नाम वाले एनवायरमेंट वैरिएबल फिर से तय करने होंगे.
gcloud alloydb instances create $ADBCLUSTER-pr \
    --instance-type=PRIMARY \
    --cpu-count=2 \
    --region=$REGION \
    --cluster=$ADBCLUSTER
अनुमानित कंसोल आउटपुट:
student@cloudshell:~ (test-project-402417)$ gcloud alloydb instances create $ADBCLUSTER-pr \
    --instance-type=PRIMARY \
    --cpu-count=2 \
    --region=$REGION \
    --availability-type ZONAL \
    --cluster=$ADBCLUSTER
Operation ID: operation-1697659203545-6080315c6e8ee-391805db-25852721
Creating instance...done.
5. AlloyDB से कनेक्ट करना
AlloyDB को सिर्फ़ निजी कनेक्शन का इस्तेमाल करके डिप्लॉय किया जाता है. इसलिए, डेटाबेस के साथ काम करने के लिए, आपको PostgreSQL क्लाइंट इंस्टॉल किए गए Compute Engine वीएम की ज़रूरत होगी.
GCE वीएम डिप्लॉय करना
AlloyDB क्लस्टर के लिए, उसी इलाके और वीपीसी में एक GCE वीएम बनाएं.
Cloud Shell में यह कमांड चलाएं:
export ZONE=us-central1-a
gcloud compute instances create instance-1 \
    --zone=$ZONE \
    --create-disk=auto-delete=yes,boot=yes,image=projects/debian-cloud/global/images/$(gcloud compute images list --filter="family=debian-13 AND family!=debian-13-arm64" --format="value(name)") \
    --scopes=https://www.googleapis.com/auth/cloud-platform
अनुमानित कंसोल आउटपुट:
student@cloudshell:~ (test-project-402417)$ export ZONE=us-central1-a
gcloud compute instances create instance-1 \
    --zone=$ZONE \
    --create-disk=auto-delete=yes,boot=yes,image=projects/debian-cloud/global/images/$(gcloud compute images list --filter="family=debian-13 AND family!=debian-13-arm64" --format="value(name)") \
    --scopes=https://www.googleapis.com/auth/cloud-platform

Created [https://www.googleapis.com/compute/v1/projects/test-project-402417/zones/us-central1-a/instances/instance-1].
NAME: instance-1
ZONE: us-central1-a
MACHINE_TYPE: n1-standard-1
PREEMPTIBLE:
INTERNAL_IP: 10.128.0.2
EXTERNAL_IP: 34.71.192.233
STATUS: RUNNING
Postgres Client इंस्टॉल करना
डिप्लॉय की गई वीएम पर, PostgreSQL क्लाइंट सॉफ़्टवेयर इंस्टॉल करें
वीएम से कनेक्ट करें:
gcloud compute ssh instance-1 --zone=us-central1-a
अनुमानित कंसोल आउटपुट:
student@cloudshell:~ (test-project-402417)$ gcloud compute ssh instance-1 --zone=us-central1-a
Updating project ssh metadata...working..Updated [https://www.googleapis.com/compute/v1/projects/test-project-402417].
Updating project ssh metadata...done.
Waiting for SSH key to propagate.
Warning: Permanently added 'compute.5110295539541121102' (ECDSA) to the list of known hosts.
Linux instance-1 6.12.101+deb13-cloud-amd64 #1 SMP PREEMPT_DYNAMIC Debian 6.12.101-1 (2026-08-05) x86_64

The programs included with the Debian GNU/Linux system are free software;
the exact distribution terms for each program are described in the
individual files in /usr/share/doc/*/copyright.

Debian GNU/Linux comes with ABSOLUTELY NO WARRANTY, to the extent
permitted by applicable law.
student@instance-1:~$
वर्चुअल मशीन में, कमांड चलाने वाला सॉफ़्टवेयर इंस्टॉल करें:
sudo apt-get update
sudo apt-get install --yes postgresql-client
अनुमानित कंसोल आउटपुट:
student@instance-1:~$ sudo apt-get update
sudo apt-get install --yes postgresql-client
Get:1 file:/etc/apt/mirrors/debian.list Mirrorlist [30 B]
Get:2 file:/etc/apt/mirrors/debian-security.list Mirrorlist [39 B]
Hit:3 https://deb.debian.org/debian trixie InRelease
Get:4 https://deb.debian.org/debian trixie-updates InRelease [47.3 kB]
Get:5 https://deb.debian.org/debian trixie-backports InRelease [54.0 kB]
Get:6 https://deb.debian.org/debian-security trixie-security InRelease [43.4 kB]
Hit:10 https://packages.cloud.google.com/apt google-compute-engine-trixie-stable InRelease
...redacted...
update-alternatives: using /usr/share/postgresql/17/man/man1/psql.1.gz to provide /usr/share/man/man1/psql.1.gz (psql.1.gz) in auto mode
Setting up postgresql-client (17+278) ...
Processing triggers for man-db (2.13.1-1) ...
Processing triggers for libc-bin (2.41-12+deb13u3) ...
इंस्टेंस से कनेक्ट करना
psql का इस्तेमाल करके, वीएम से प्राइमरी इंस्टेंस से कनेक्ट करें.
उसी Cloud Shell टैब में, जिसमें आपके instance-1 वीएम के लिए SSH सेशन खुला है.
GCE वीएम से AlloyDB से कनेक्ट करने के लिए, AlloyDB के नोट किए गए पासवर्ड (PGPASSWORD) की वैल्यू और AlloyDB क्लस्टर आईडी का इस्तेमाल करें:
export PGPASSWORD=<Noted password>
export PROJECT_ID=$(gcloud config get-value project)
export REGION=us-central1
export ADBCLUSTER=alloydb-aip-01
export INSTANCE_IP=$(gcloud alloydb instances describe $ADBCLUSTER-pr --cluster=$ADBCLUSTER --region=$REGION --format="value(ipAddress)")
psql "host=$INSTANCE_IP user=postgres sslmode=require"
अनुमानित कंसोल आउटपुट:
student@instance-1:~$ export PGPASSWORD=CQhOi5OygD4ps6ty
student@instance-1:~$ export PROJECT_ID=$(gcloud config get-value project)
export REGION=us-central1
export ADBCLUSTER=alloydb-aip-01
export INSTANCE_IP=$(gcloud alloydb instances describe $ADBCLUSTER-pr --cluster=$ADBCLUSTER --region=$REGION --format="value(ipAddress)")
psql "host=$INSTANCE_IP user=postgres sslmode=require"
psql (17.10 (Debian 17.10-0+deb13u1), server 17.9)
SSL connection (protocol: TLSv1.3, cipher: TLS_AES_256_GCM_SHA384, compression: off, ALPN: postgresql)
Type "help" for help.

postgres=>
psql सेशन बंद करें:
exit
6. डेटाबेस तैयार करना
डेटाबेस बनाएं, Agent Platform AI इंटिग्रेशन चालू करें, डेटाबेस ऑब्जेक्ट बनाएं, और डेटा इंपोर्ट करें.
AlloyDB को ज़रूरी अनुमतियां देना
AlloyDB सेवा एजेंट को Gemini Enterprise Agent Platform की अनुमतियां दें.
सबसे ऊपर मौजूद "+" साइन का इस्तेमाल करके, Cloud Shell का कोई दूसरा टैब खोलें.
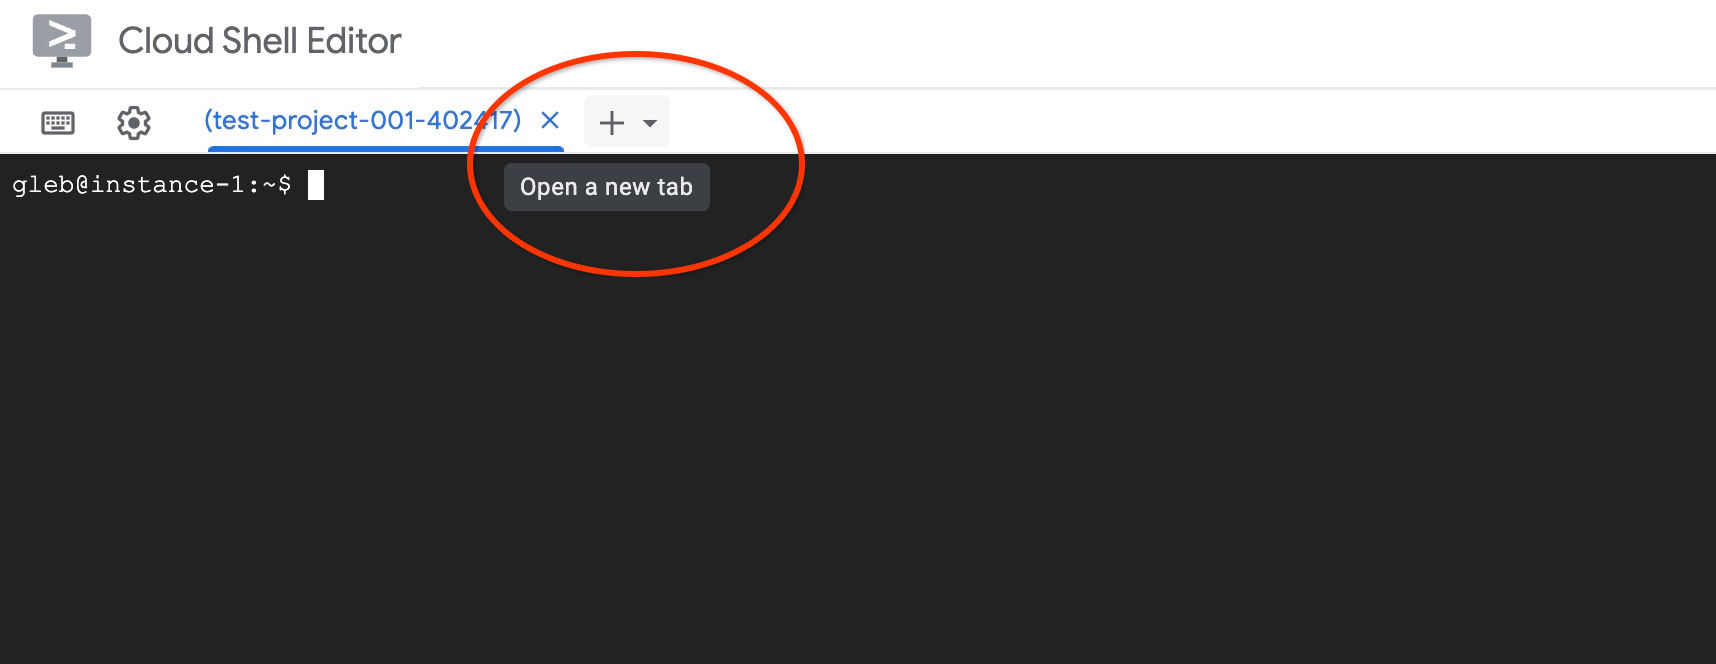
नए क्लाउड शेल टैब में यह कमांड चलाएं:
PROJECT_ID=$(gcloud config get-value project)
gcloud projects add-iam-policy-binding $PROJECT_ID \
  --member="serviceAccount:service-$(gcloud projects describe $PROJECT_ID --format="value(projectNumber)")@gcp-sa-alloydb.iam.gserviceaccount.com" \
  --role="roles/aiplatform.user"
अनुमानित कंसोल आउटपुट:
student@cloudshell:~ (test-project-001-402417)$ PROJECT_ID=$(gcloud config get-value project)
Your active configuration is: [cloudshell-11039]
student@cloudshell:~ (test-project-001-402417)$ gcloud projects add-iam-policy-binding $PROJECT_ID \
  --member="serviceAccount:service-$(gcloud projects describe $PROJECT_ID --format="value(projectNumber)")@gcp-sa-alloydb.iam.gserviceaccount.com" \
  --role="roles/aiplatform.user"
Updated IAM policy for project [test-project-001-402417].
bindings:
- members:
  - serviceAccount:service-4470404856@gcp-sa-alloydb.iam.gserviceaccount.com
  role: roles/aiplatform.user
- members:
...
etag: BwYIEbe_Z3U=
version: 1
टैब में "exit" कमांड डालकर टैब बंद करें:
exit
डेटाबेस बनाएं
डेटाबेस बनाने के बारे में क्विकस्टार्ट गाइड.
GCE वीएम सेशन में यह कमांड चलाएं:
डेटाबेस बनाएं:
psql "host=$INSTANCE_IP user=postgres" -c "CREATE DATABASE quickstart_db"
अनुमानित कंसोल आउटपुट:
student@instance-1:~$ psql "host=$INSTANCE_IP user=postgres" -c "CREATE DATABASE quickstart_db"
CREATE DATABASE
student@instance-1:~$
Vertex AI इंटिग्रेशन चालू करना
डेटाबेस में Vertex AI इंटिग्रेशन और pgvector एक्सटेंशन चालू करें.
GCE वीएम में यह कमांड चलाएं:
psql "host=$INSTANCE_IP user=postgres dbname=quickstart_db" -c "CREATE EXTENSION IF NOT EXISTS google_ml_integration CASCADE"
psql "host=$INSTANCE_IP user=postgres dbname=quickstart_db" -c "CREATE EXTENSION IF NOT EXISTS vector"
अनुमानित कंसोल आउटपुट:
student@instance-1:~$ psql "host=$INSTANCE_IP user=postgres dbname=quickstart_db" -c "CREATE EXTENSION IF NOT EXISTS google_ml_integration CASCADE"
psql "host=$INSTANCE_IP user=postgres dbname=quickstart_db" -c "CREATE EXTENSION IF NOT EXISTS vector"
CREATE EXTENSION
CREATE EXTENSION
student@instance-1:~$
डेटा इंपोर्ट करना
तैयार किए गए डेटा को डाउनलोड करें और उसे नए डेटाबेस में इंपोर्ट करें.
GCE वीएम में यह कमांड चलाएं:
gcloud storage cat gs://cloud-training/gcc/gcc-tech-004/cymbal_demo_schema.sql |psql "host=$INSTANCE_IP user=postgres dbname=quickstart_db"
gcloud storage cat gs://cloud-training/gcc/gcc-tech-004/cymbal_products.csv |psql "host=$INSTANCE_IP user=postgres dbname=quickstart_db" -c "\copy cymbal_products from stdin csv header"
gcloud storage cat gs://cloud-training/gcc/gcc-tech-004/cymbal_inventory.csv |psql "host=$INSTANCE_IP user=postgres dbname=quickstart_db" -c "\copy cymbal_inventory from stdin csv header"
gcloud storage cat gs://cloud-training/gcc/gcc-tech-004/cymbal_stores.csv |psql "host=$INSTANCE_IP user=postgres dbname=quickstart_db" -c "\copy cymbal_stores from stdin csv header"
अनुमानित कंसोल आउटपुट:
student@instance-1:~$ gsutil cat gs://cloud-training/gcc/gcc-tech-004/cymbal_demo_schema.sql |psql "host=$INSTANCE_IP user=postgres dbname=quickstart_db"
SET
SET
SET
SET
SET
 set_config
------------

(1 row)
SET
SET
SET
SET
SET
SET
CREATE TABLE
ALTER TABLE
CREATE TABLE
ALTER TABLE
CREATE TABLE
ALTER TABLE
CREATE TABLE
ALTER TABLE
CREATE SEQUENCE
ALTER TABLE
ALTER SEQUENCE
ALTER TABLE
ALTER TABLE
ALTER TABLE
student@instance-1:~$ gsutil cat gs://cloud-training/gcc/gcc-tech-004/cymbal_products.csv |psql "host=$INSTANCE_IP user=postgres dbname=quickstart_db" -c "\copy cymbal_products from stdin csv header"
COPY 941
student@instance-1:~$ gsutil cat gs://cloud-training/gcc/gcc-tech-004/cymbal_inventory.csv |psql "host=$INSTANCE_IP user=postgres dbname=quickstart_db" -c "\copy cymbal_inventory from stdin csv header"
COPY 263861
student@instance-1:~$ gsutil cat gs://cloud-training/gcc/gcc-tech-004/cymbal_stores.csv |psql "host=$INSTANCE_IP user=postgres dbname=quickstart_db" -c "\copy cymbal_stores from stdin csv header"
COPY 4654
student@instance-1:~$
7. एम्बेडिंग का हिसाब लगाना
डेटा इंपोर्ट करने के बाद, आपके पास cymbal_products टेबल में प्रॉडक्ट डेटा, cymbal_inventory टेबल में हर स्टोर में उपलब्ध प्रॉडक्ट की संख्या दिखाने वाली इन्वेंट्री, और cymbal_stores टेबल में स्टोर की सूची होती है. आपको प्रॉडक्ट के ब्यौरों के आधार पर वेक्टर डेटा का हिसाब लगाना होगा. इसके लिए, google_ml.embedding जैसे फ़ंक्शन का इस्तेमाल किया जा सकता है. इस्तेमाल की गई टेक्नोलॉजी के बारे में ज़्यादा जानने के लिए, दस्तावेज़ पढ़ें.
कुछ लाइनों के लिए एम्बेडिंग जनरेट करना आसान है, लेकिन अगर हमारे पास हज़ारों लाइनें हैं, तो इसे असरदार कैसे बनाया जाए? इस सेक्शन में, बड़ी टेबल के लिए एम्बेड जनरेट करने और उन्हें मैनेज करने का तरीका बताया गया है. अलग-अलग विकल्पों और तकनीकों के बारे में ज़्यादा जानने के लिए, गाइड पढ़ें.
तेज़ी से एम्बेड करने की सुविधा जनरेट करने की सुविधा चालू करें
AlloyDB इंस्टेंस के आईपी और Postgres पासवर्ड का इस्तेमाल करके, अपनी वीएम से psql का इस्तेमाल करके डेटाबेस से कनेक्ट करें:
psql "host=$INSTANCE_IP user=postgres dbname=quickstart_db"
google_ml_integration एक्सटेंशन के वर्शन की पुष्टि करें.
SELECT extversion FROM pg_extension WHERE extname = 'google_ml_integration';
वर्शन 1.5.2 या इसके बाद का होना चाहिए. यहां आउटपुट का उदाहरण दिया गया है:
quickstart_db=> SELECT extversion FROM pg_extension WHERE extname = 'google_ml_integration';
 extversion
------------
 1.6
(1 row)
डिफ़ॉल्ट वर्शन 1.6 या इसके बाद का होना चाहिए. अगर आपके इंस्टेंस में पुराना वर्शन दिख रहा है, तो हो सकता है कि इसे अपडेट करने की ज़रूरत हो. देखें कि इंस्टेंस के लिए रखरखाव की सुविधा बंद तो नहीं की गई है.
पुष्टि करें कि google_ml_integration.enable_faster_embedding_generation डेटाबेस फ़्लैग चालू हो. उसी psql सेशन में, फ़्लैग की वैल्यू देखें:
show google_ml_integration.enable_faster_embedding_generation;
अगर फ़्लैग सही जगह पर है, तो अनुमानित आउटपुट इस तरह दिखेगा:
quickstart_db=> show google_ml_integration.enable_faster_embedding_generation;
 google_ml_integration.enable_faster_embedding_generation
----------------------------------------------------------
 on
(1 row)
अगर फ़्लैग की वैल्यू "off" दिखती है, तो आपको इंस्टेंस अपडेट करना होगा. वेब कंसोल या gcloud कमांड का इस्तेमाल करके ऐसा करें. इसके बारे में दस्तावेज़ में बताया गया है.
psql सेशन से बाहर निकलने के लिए:
exit;
gcloud का इस्तेमाल करके फ़्लैग को अपडेट करने के लिए, यह कमांड चलाएं:
export PROJECT_ID=$(gcloud config get-value project)
export REGION=us-central1
export ADBCLUSTER=alloydb-aip-01
gcloud beta alloydb instances update $ADBCLUSTER-pr \
   --database-flags google_ml_integration.enable_faster_embedding_generation=on \
   --region=$REGION \
   --cluster=$ADBCLUSTER \
   --project=$PROJECT_ID \
   --update-mode=FORCE_APPLY
इसमें कुछ मिनट लग सकते हैं. हालांकि, कुछ समय बाद फ़्लैग की वैल्यू "चालू है" पर सेट हो जाएगी. इसके बाद, अगले चरण पर जाएं.
डेटा को एम्बेड करने के लिए कॉलम बनाना
psql का इस्तेमाल करके डेटाबेस से कनेक्ट करें. साथ ही, cymbal_products टेबल में एंबेडिंग फ़ंक्शन के इस्तेमाल के लिए, वेक्टर डेटा टाइप वाला वर्चुअल कॉलम बनाएं.
psql "host=$INSTANCE_IP user=postgres dbname=quickstart_db"
डेटाबेस से कनेक्ट करने के बाद, psql सेशन में यह कमांड चलाएं:
ALTER TABLE cymbal_products ADD COLUMN embedding vector(768);
इस कमांड से, आने वाले समय में एम्बेड किए जाने वाले डेटा के लिए एक वर्चुअल कॉलम बन जाता है.
अनुमानित कंसोल आउटपुट:
quickstart_db=> ALTER TABLE cymbal_products ADD COLUMN embedding vector(768);
ALTER TABLE
quickstart_db=>
50 लाइनों के बैच में एम्बेडिंग जनरेट करें. उसी psql सेशन में यह कमांड चलाएं:
यह मेज़र करने के लिए कि इसमें कितना समय लगेगा, टाइमिंग की सुविधा चालू करें:
\timing
यह निर्देश चलाएं:
CALL ai.initialize_embeddings(
    model_id => 'text-embedding-005',
    table_name => 'cymbal_products',
    content_column => 'product_description',
    embedding_column => 'embedding',
    batch_size => 50
);
इसके अलावा, एम्बेड करने की सुविधा जनरेट करने के लिए, कंसोल आउटपुट को दो सेकंड से कम समय में दिखाया गया है:
quickstart_db=> CALL ai.initialize_embeddings(
    model_id => 'text-embedding-005',
    table_name => 'cymbal_products',
    content_column => 'product_description',
    embedding_column => 'embedding',
    batch_size => 50
);
NOTICE:  Initialize embedding completed successfully for table cymbal_products
CALL
Time: 1458.704 ms (00:01.459)
quickstart_db=>
अलग-अलग बैच साइज़ का इस्तेमाल करके देखें कि क्या इससे एक्ज़ीक्यूशन में लगने वाला समय बदलता है.
अगर प्रॉडक्ट की जानकारी [product_description] कॉलम अपडेट किया जा रहा है या कोई नई लाइन डाली जा रही है, तो डिफ़ॉल्ट रूप से एम्बेडिंग रीफ़्रेश नहीं होती हैं. हालांकि, पैरामीटर incremental_refresh_mode सेट करके ऐसा किया जा सकता है.
"product_embeddings" कॉलम बनाएं और उसे अपने-आप अपडेट होने के लिए सेट करें:
ALTER TABLE cymbal_products ADD COLUMN product_embedding vector(768);
CALL ai.initialize_embeddings(
    model_id => 'text-embedding-005',
    table_name => 'cymbal_products',
    content_column => 'product_description',
    embedding_column => 'product_embedding',
    batch_size => 50,
    incremental_refresh_mode => 'transactional'
);
टेबल में एक नई लाइन जोड़ें.
INSERT INTO "cymbal_products" ("uniq_id", "crawl_timestamp", "product_url", "product_name", "product_description", "list_price", "sale_price", "brand", "item_number", "gtin", "package_size", "category", "postal_code", "available", "product_embedding", "embedding") VALUES ('fd604542e04b470f9e6348e640cff794', NOW(), 'https://example.com/new_product', 'New Cymbal Product', 'This is a new cymbal product description.', 199.99, 149.99, 'Example Brand', 'EB123', '1234567890', 'Single', 'Cymbals', '12345', TRUE, NULL, NULL);
दो एम्बेडिंग कॉलम की तुलना करने के लिए, टेबल की क्वेरी करें:
SELECT uniq_id,embedding, (product_embedding::real[])[1:5] as product_embedding FROM cymbal_products WHERE uniq_id='fd604542e04b470f9e6348e640cff794';
आउटपुट से पता चलता है कि product_embedding फ़ील्ड में वैल्यू अपने-आप भर जाती है, जबकि embedding फ़ील्ड खाली रहता है:
quickstart_db=> SELECT uniq_id,embedding, (product_embedding::real[])[1:5] as product_embedding  FROM cymbal_products WHERE uniq_id='fd604542e04b470f9e6348e640cff794';
             uniq_id              | embedding |                       product_embedding
----------------------------------+-----------+---------------------------------------------------------------
 fd604542e04b470f9e6348e640cff794 |           | {0.015003494,-0.005349732,-0.059790313,-0.0087091,-0.0271452}
(1 row)

Time: 3.295 ms
8. मिलते-जुलते प्रॉडक्ट खोजने की सुविधा का इस्तेमाल करना
AlloyDB AI का इस्तेमाल करके, जनरेट की गई वेक्टर एंबेडिंग के आधार पर मिलती-जुलती चीज़ें खोजें.
SQL क्वेरी को psql कमांड लाइन इंटरफ़ेस से ही एक्ज़ीक्यूट किया जा सकता है. इसके अलावा, इसे AlloyDB Studio से भी एक्ज़ीक्यूट किया जा सकता है. AlloyDB Studio में, एक से ज़्यादा लाइनों और जटिल आउटपुट को बेहतर तरीके से देखा जा सकता है.
AlloyDB Studio से कनेक्ट करना
AlloyDB Studio खोलने के लिए, यह तरीका अपनाएं:
- Google Cloud Console में, AlloyDB for PostgreSQL के क्लस्टर पेज पर जाएं.
- वेब इंटरफ़ेस खोलने के लिए, अपना प्राइमरी इंस्टेंस चुनें.
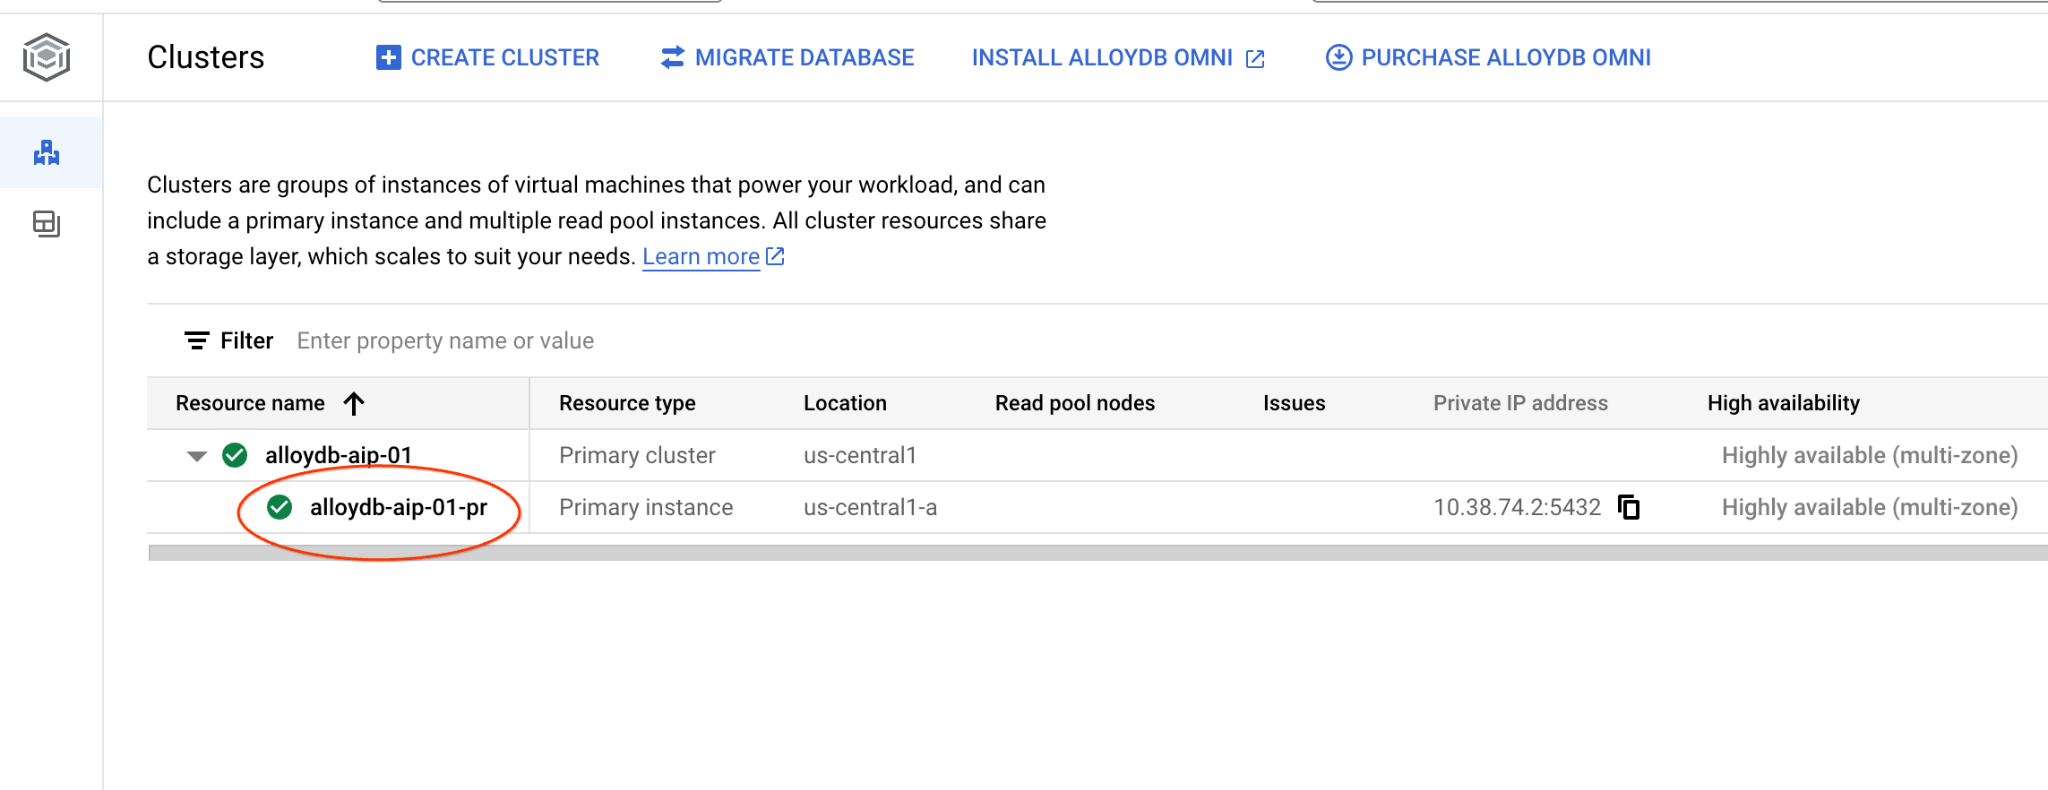 3. इसके बाद, बाईं ओर मौजूद AlloyDB Studio पर क्लिक करें:
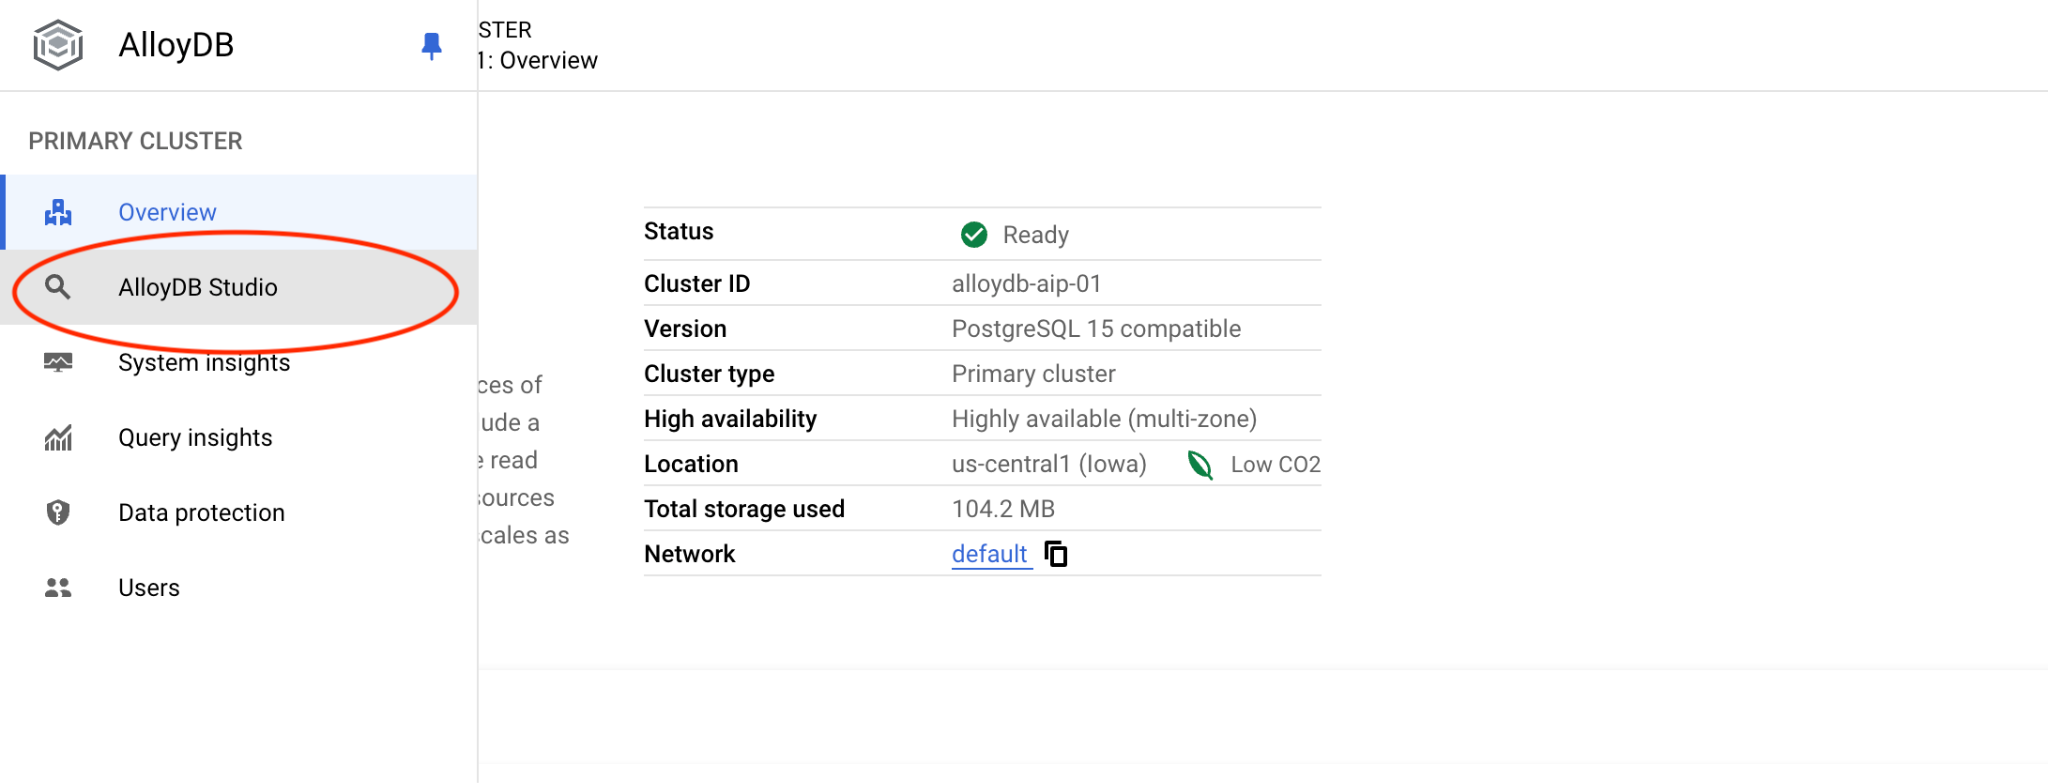
quickstart_dbडेटाबेस और उपयोगकर्ता postgres को चुनें. इसके बाद, नोट किया गया पासवर्ड डालें और पुष्टि करें पर क्लिक करें.
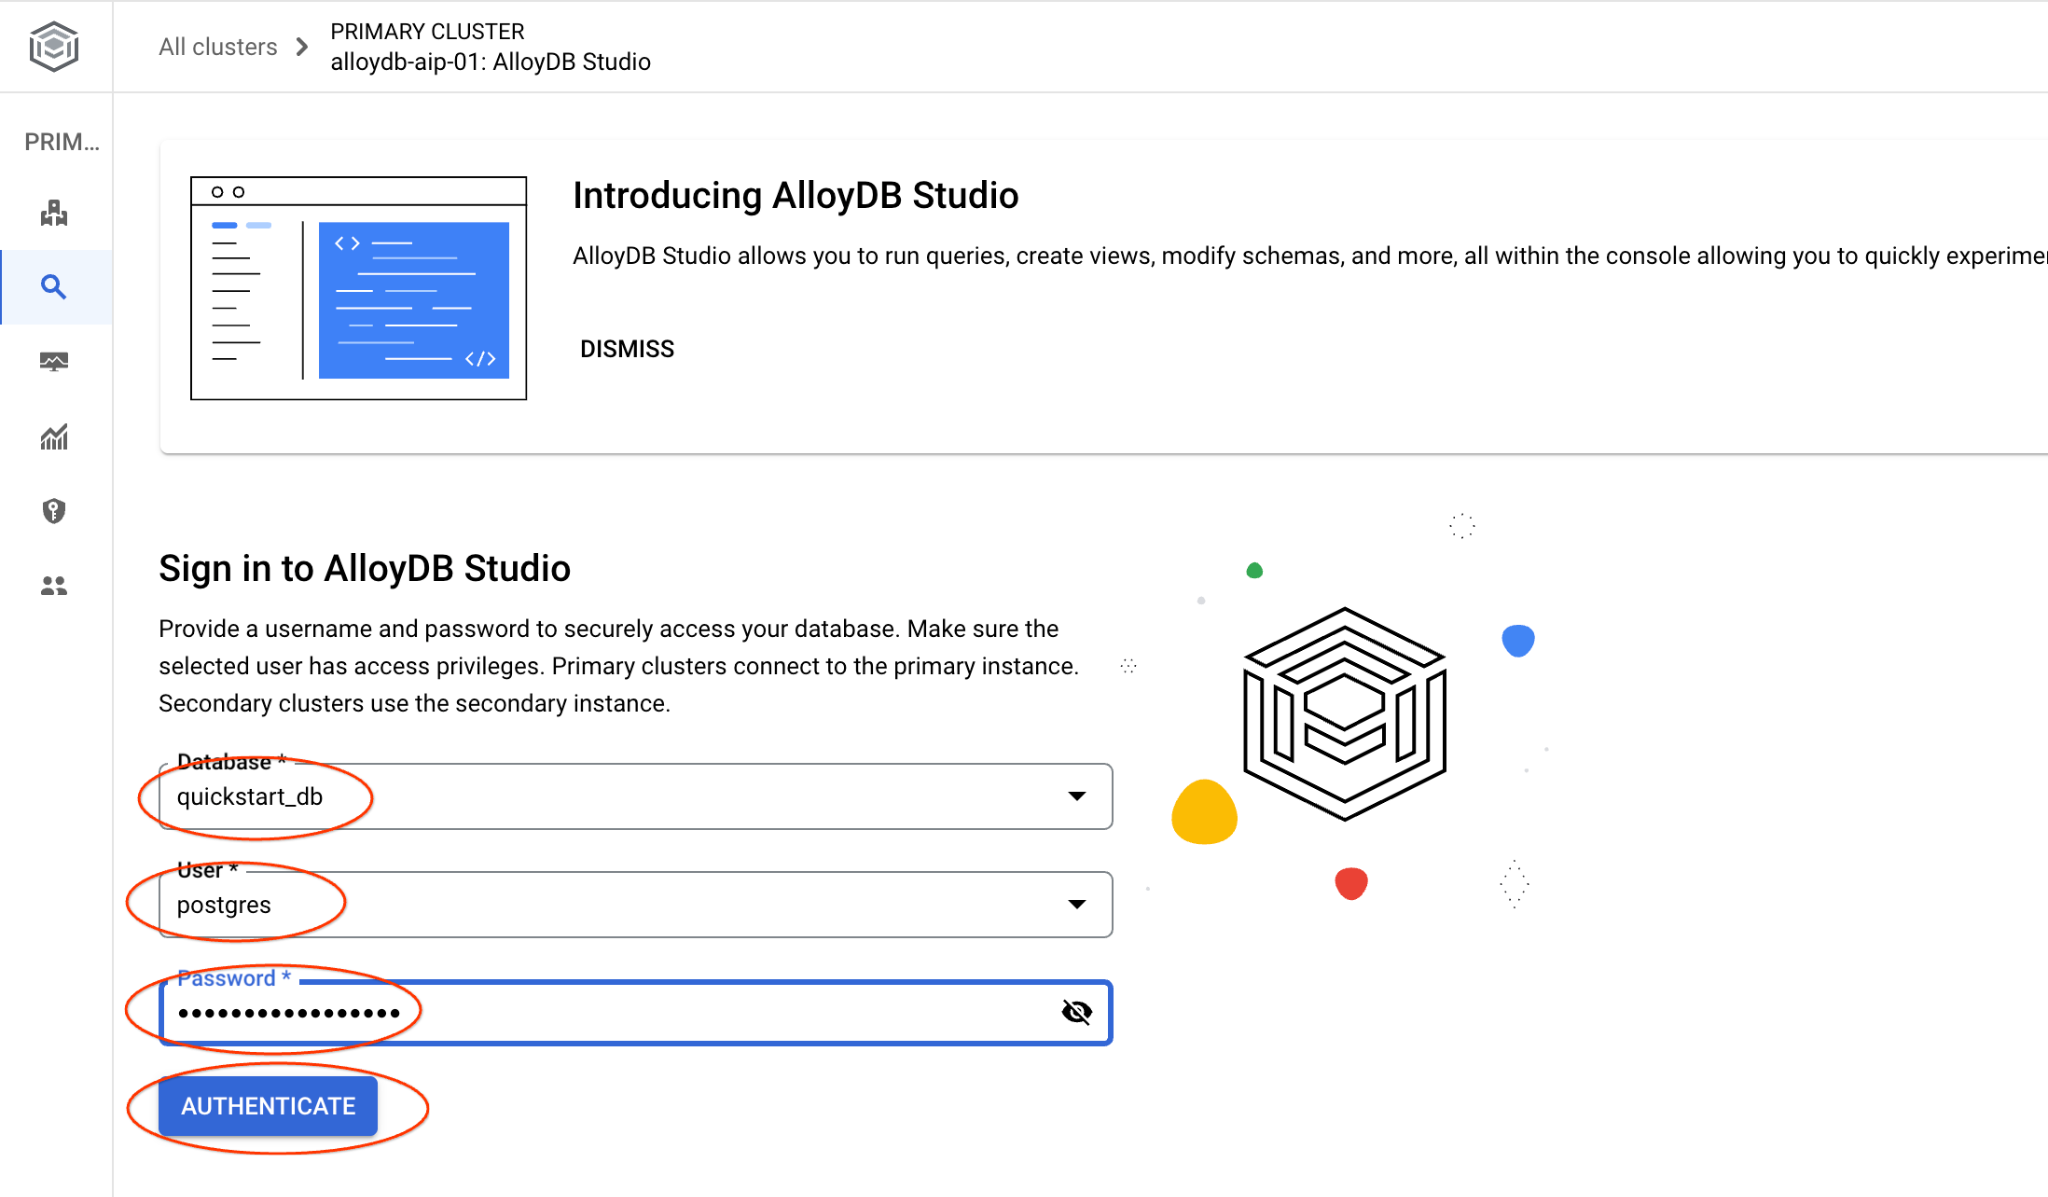
इस कार्रवाई से, AlloyDB Studio का इंटरफ़ेस खुल जाता है.
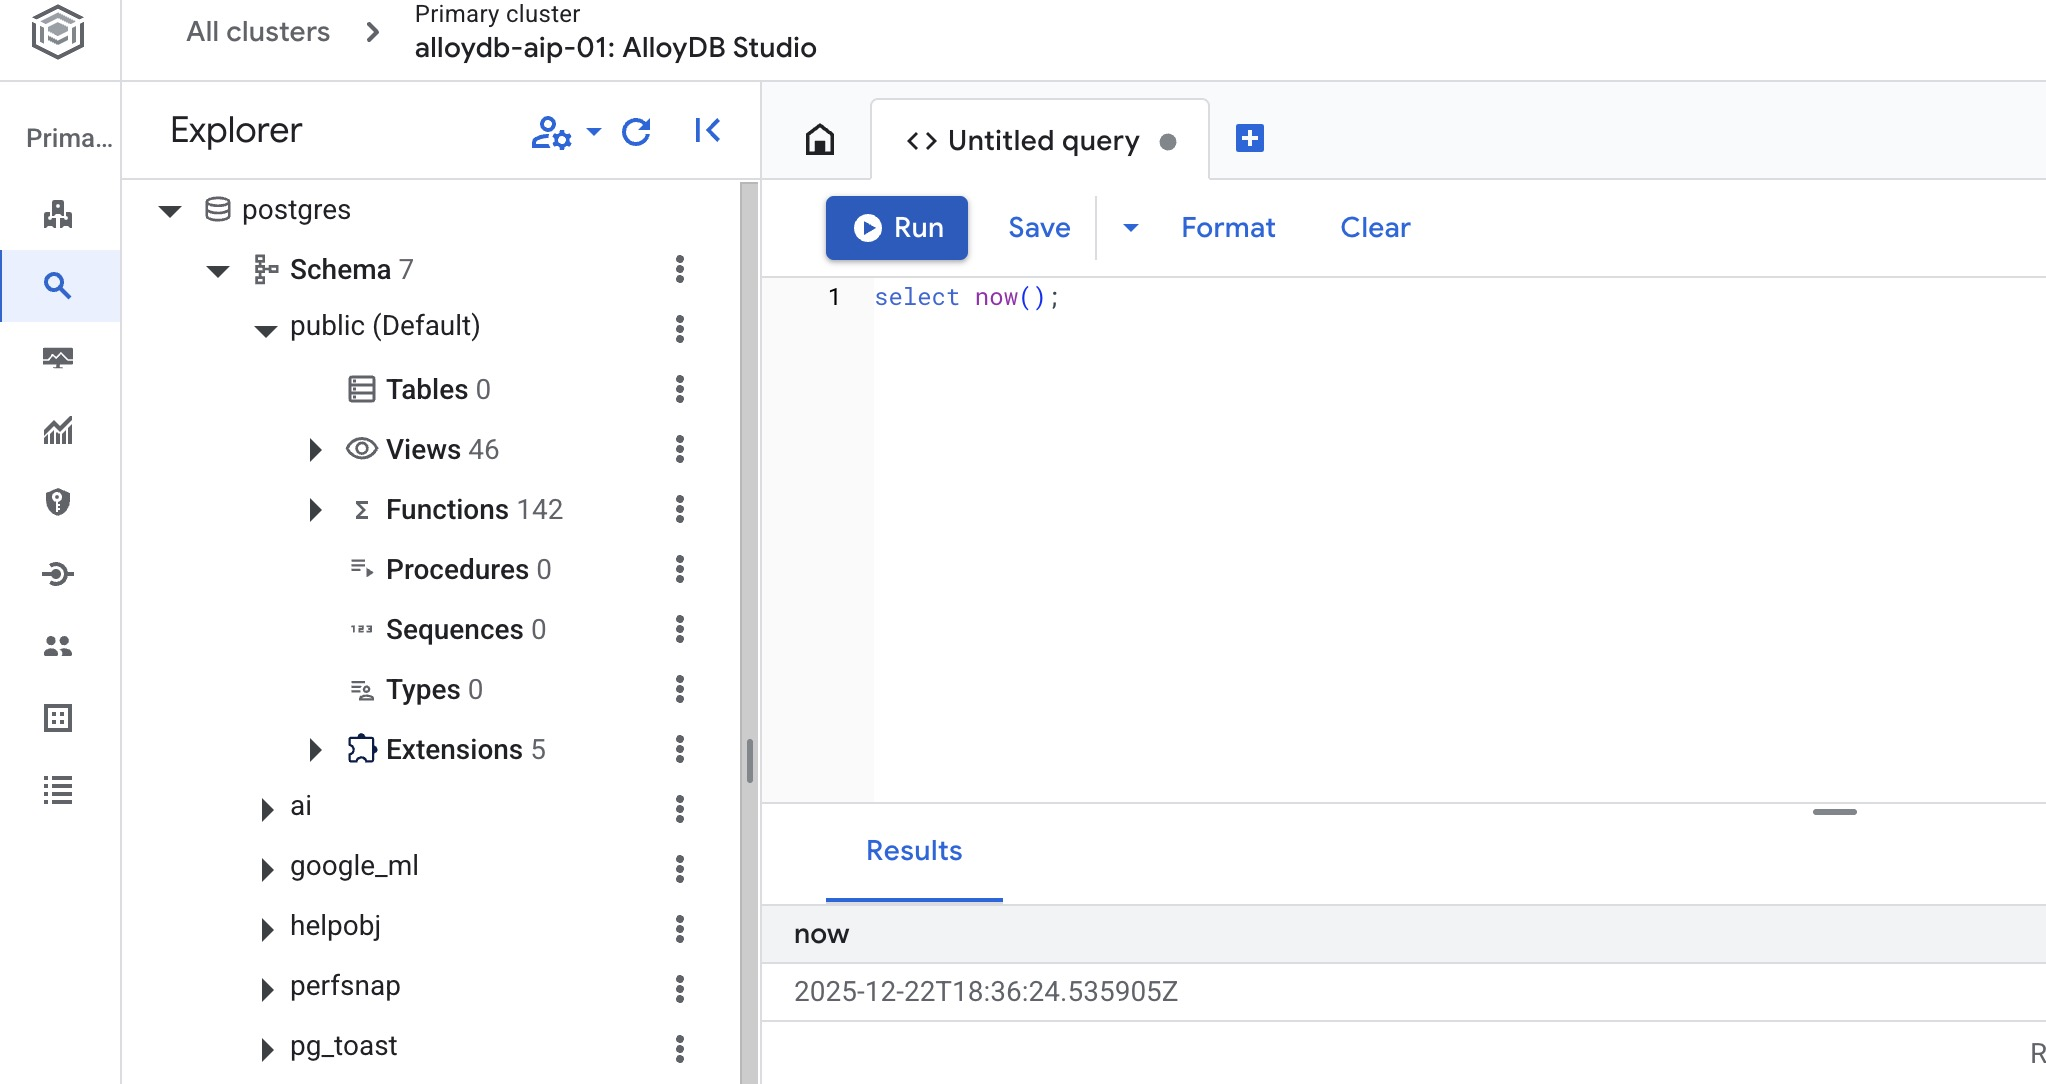
- एसक्यूएल एडिटर खोलने के लिए, Untitled Query टैब चुनें.
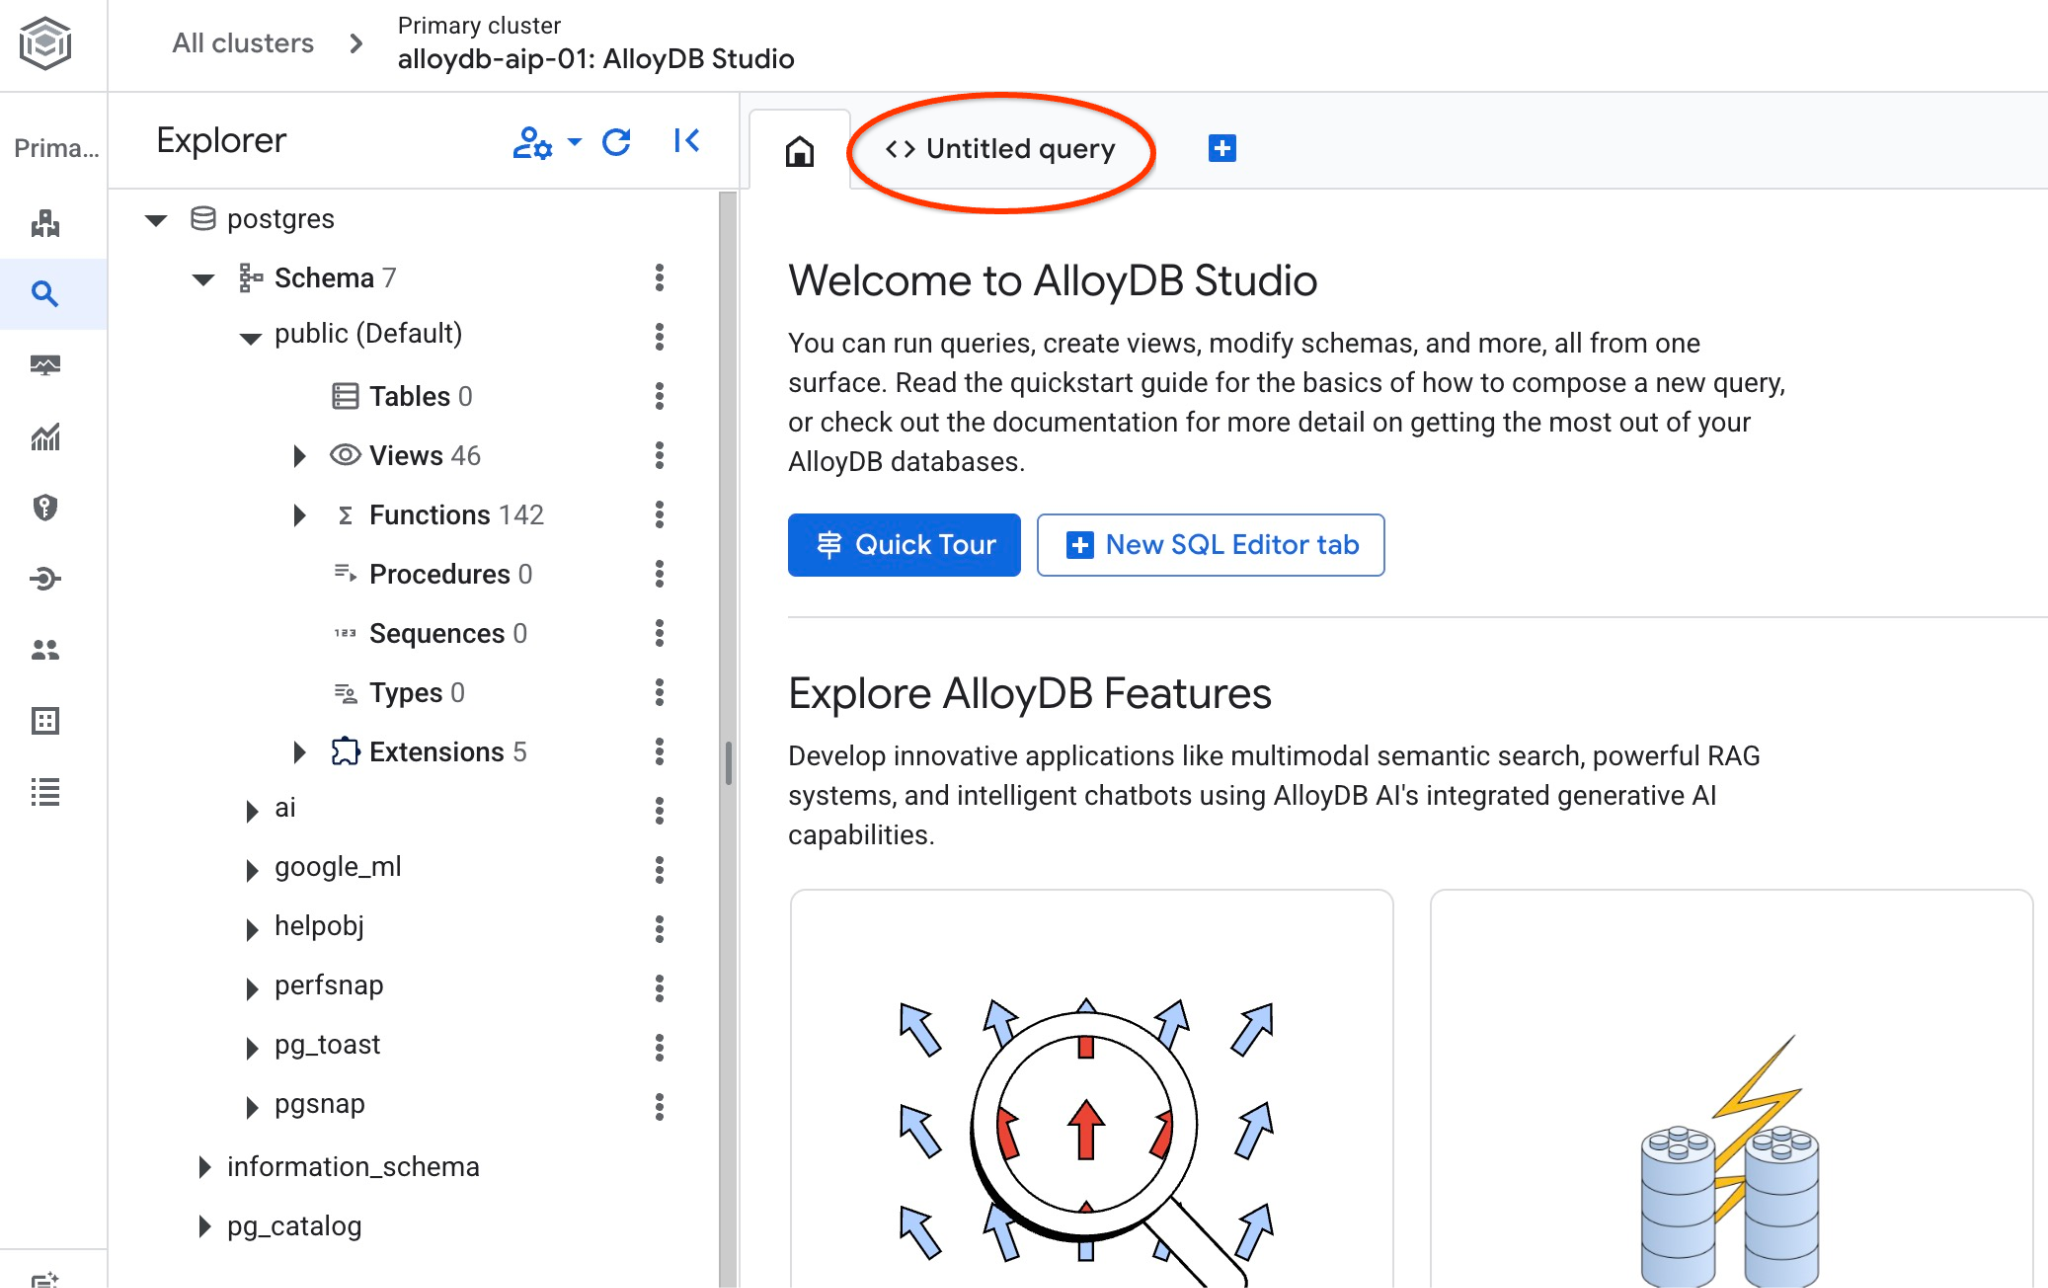
इससे एक एडिटर खुल जाएगा. इसमें एसक्यूएल कमांड चलाई जा सकती हैं. इसे यहां दी गई इमेज में दिखाया गया है:
अगर आपको कमांड लाइन psql का इस्तेमाल करना है, तो दूसरा तरीका अपनाएं. साथ ही, अपने वीएम एसएसएच सेशन से डेटाबेस से कनेक्ट करें. इसके बारे में पिछले अध्यायों में बताया गया है.
मिलते-जुलते प्रॉडक्ट खोजने की सुविधा का इस्तेमाल करना
क्लाइंट के अनुरोध से मिलते-जुलते उपलब्ध प्रॉडक्ट की सूची पाने के लिए, क्वेरी चलाएं. Gemini Enterprise Agent Platform पर एम्बेडिंग मॉडल को पास किया गया खोजा जाने वाला वाक्यांश. इसका इस्तेमाल, हमारे प्रॉडक्ट के लिए एम्बेडिंग जनरेट करने के लिए किया जाता है. इससे "यहाँ किस तरह के फलों के पेड़ अच्छी तरह से उगते हैं?" के लिए वेक्टर वैल्यू मिलती है.
क्वेरी चलाएं:
SELECT
        cp.product_name,
        left(cp.product_description,80) as description,
        cp.sale_price,
        cs.zip_code,
        (cp.embedding <=> embedding('text-embedding-005','What kind of fruit trees grow well here?')::vector) as distance
FROM
        cymbal_products cp
JOIN cymbal_inventory ci on
        ci.uniq_id=cp.uniq_id
JOIN cymbal_stores cs on
        cs.store_id=ci.store_id
        AND ci.inventory>0
        AND cs.store_id = 1583
ORDER BY
        distance ASC
LIMIT 10;
यहां अनुमानित आउटपुट दिया गया है:
quickstart_db=> SELECT
        cp.product_name,
        left(cp.product_description,80) as description,
        cp.sale_price,
        cs.zip_code,
        (cp.embedding <=> embedding('text-embedding-005','What kind of fruit trees grow well here?')::vector) as distance
FROM
        cymbal_products cp
JOIN cymbal_inventory ci on
        ci.uniq_id=cp.uniq_id
JOIN cymbal_stores cs on
        cs.store_id=ci.store_id
        AND ci.inventory>0
        AND cs.store_id = 1583
ORDER BY
        distance ASC
LIMIT 10;
      product_name       |                                   description                                    | sale_price | zip_code |      distance
-------------------------+----------------------------------------------------------------------------------+------------+----------+---------------------
 Cherry Tree             | This is a beautiful cherry tree that will produce delicious cherries. It is an d |      75.00 |    93230 | 0.43922018972266397
 Meyer Lemon Tree        | Meyer Lemon trees are California's favorite lemon tree! Grow your own lemons by  |         34 |    93230 |  0.4685112926118228
 Toyon                   | This is a beautiful toyon tree that can grow to be over 20 feet tall. It is an e |      10.00 |    93230 |  0.4835677149651668
 California Lilac        | This is a beautiful lilac tree that can grow to be over 10 feet tall. It is an d |       5.00 |    93230 |  0.4947204525907498
 California Peppertree   | This is a beautiful peppertree that can grow to be over 30 feet tall. It is an e |      25.00 |    93230 |  0.5054166905547247
 California Black Walnut | This is a beautiful walnut tree that can grow to be over 80 feet tall. It is a d |     100.00 |    93230 |  0.5084219510932597
 California Sycamore     | This is a beautiful sycamore tree that can grow to be over 100 feet tall. It is  |     300.00 |    93230 |  0.5140519790508755
 Coast Live Oak          | This is a beautiful oak tree that can grow to be over 100 feet tall. It is an ev |     500.00 |    93230 |  0.5143126438081371
 Fremont Cottonwood      | This is a beautiful cottonwood tree that can grow to be over 100 feet tall. It i |     200.00 |    93230 |  0.5174774727252058
 Madrone                 | This is a beautiful madrona tree that can grow to be over 80 feet tall. It is an |      50.00 |    93230 |  0.5227400803389093
आपको 10 प्रॉडक्ट मिलते हैं. इनकी जानकारी, खोज के लिए इस्तेमाल किए गए वाक्यांश से मिलती-जुलती होती है. इन्हें इस क्रम में लगाया जाता है कि सबसे मिलते-जुलते प्रॉडक्ट सबसे ऊपर दिखें.
9. जवाब को बेहतर बनाओ
क्लाइंट ऐप्लिकेशन के लिए, क्वेरी के नतीजे का इस्तेमाल करके जवाब को बेहतर बनाया जा सकता है. साथ ही, दिए गए क्वेरी के नतीजों को फ़ाउंडेशन जनरेटिव लैंग्वेज मॉडल के प्रॉम्प्ट में शामिल करके, काम का आउटपुट तैयार किया जा सकता है.
इसके लिए, वेक्टर सर्च से मिले सबसे अच्छे नतीजों का इस्तेमाल करके एक JSON जनरेट करें. इसके बाद, जनरेट किए गए JSON को एजेंट प्लैटफ़ॉर्म में Gen AI मॉडल के प्रॉम्प्ट में जोड़ें, ताकि काम का आउटपुट तैयार किया जा सके. पहले चरण में JSON जनरेट किया जाता है. इसके बाद, इसे Agent Platform Studio में टेस्ट किया जाता है. आखिरी चरण में, सभी को एक एसक्यूएल स्टेटमेंट में शामिल किया जाता है, जिसका इस्तेमाल किसी ऐप्लिकेशन में किया जा सकता है.
JSON फ़ॉर्मैट में आउटपुट जनरेट करना
क्वेरी में बदलाव करके, JSON फ़ॉर्मैट में आउटपुट जनरेट करें. साथ ही, एजेंट प्लैटफ़ॉर्म को सिर्फ़ एक लाइन भेजें
क्वेरी चलाएं:
WITH trees as (
SELECT
        cp.product_name,
        left(cp.product_description,80) as description,
        cp.sale_price,
        cs.zip_code,
        cp.uniq_id as product_id
FROM
        cymbal_products cp
JOIN cymbal_inventory ci on
        ci.uniq_id=cp.uniq_id
JOIN cymbal_stores cs on
        cs.store_id=ci.store_id
        AND ci.inventory>0
        AND cs.store_id = 1583
ORDER BY
        (cp.embedding <=> embedding('text-embedding-005','What kind of fruit trees grow well here?')::vector) ASC
LIMIT 1)
SELECT json_agg(trees) FROM trees;
आउटपुट में मौजूद JSON:
[{"product_name":"Cherry Tree","description":"This is a beautiful cherry tree that will produce delicious cherries. It is an d","sale_price":75.00,"zip_code":93230,"product_id":"d536e9e823296a2eba198e52dd23e712"}]
Vertex AI Studio में प्रॉम्प्ट चलाएं
जनरेट किए गए JSON का इस्तेमाल करके, Vertex AI Studio में जनरेटिव एआई मॉडल को प्रॉम्प्ट के तौर पर जानकारी दें
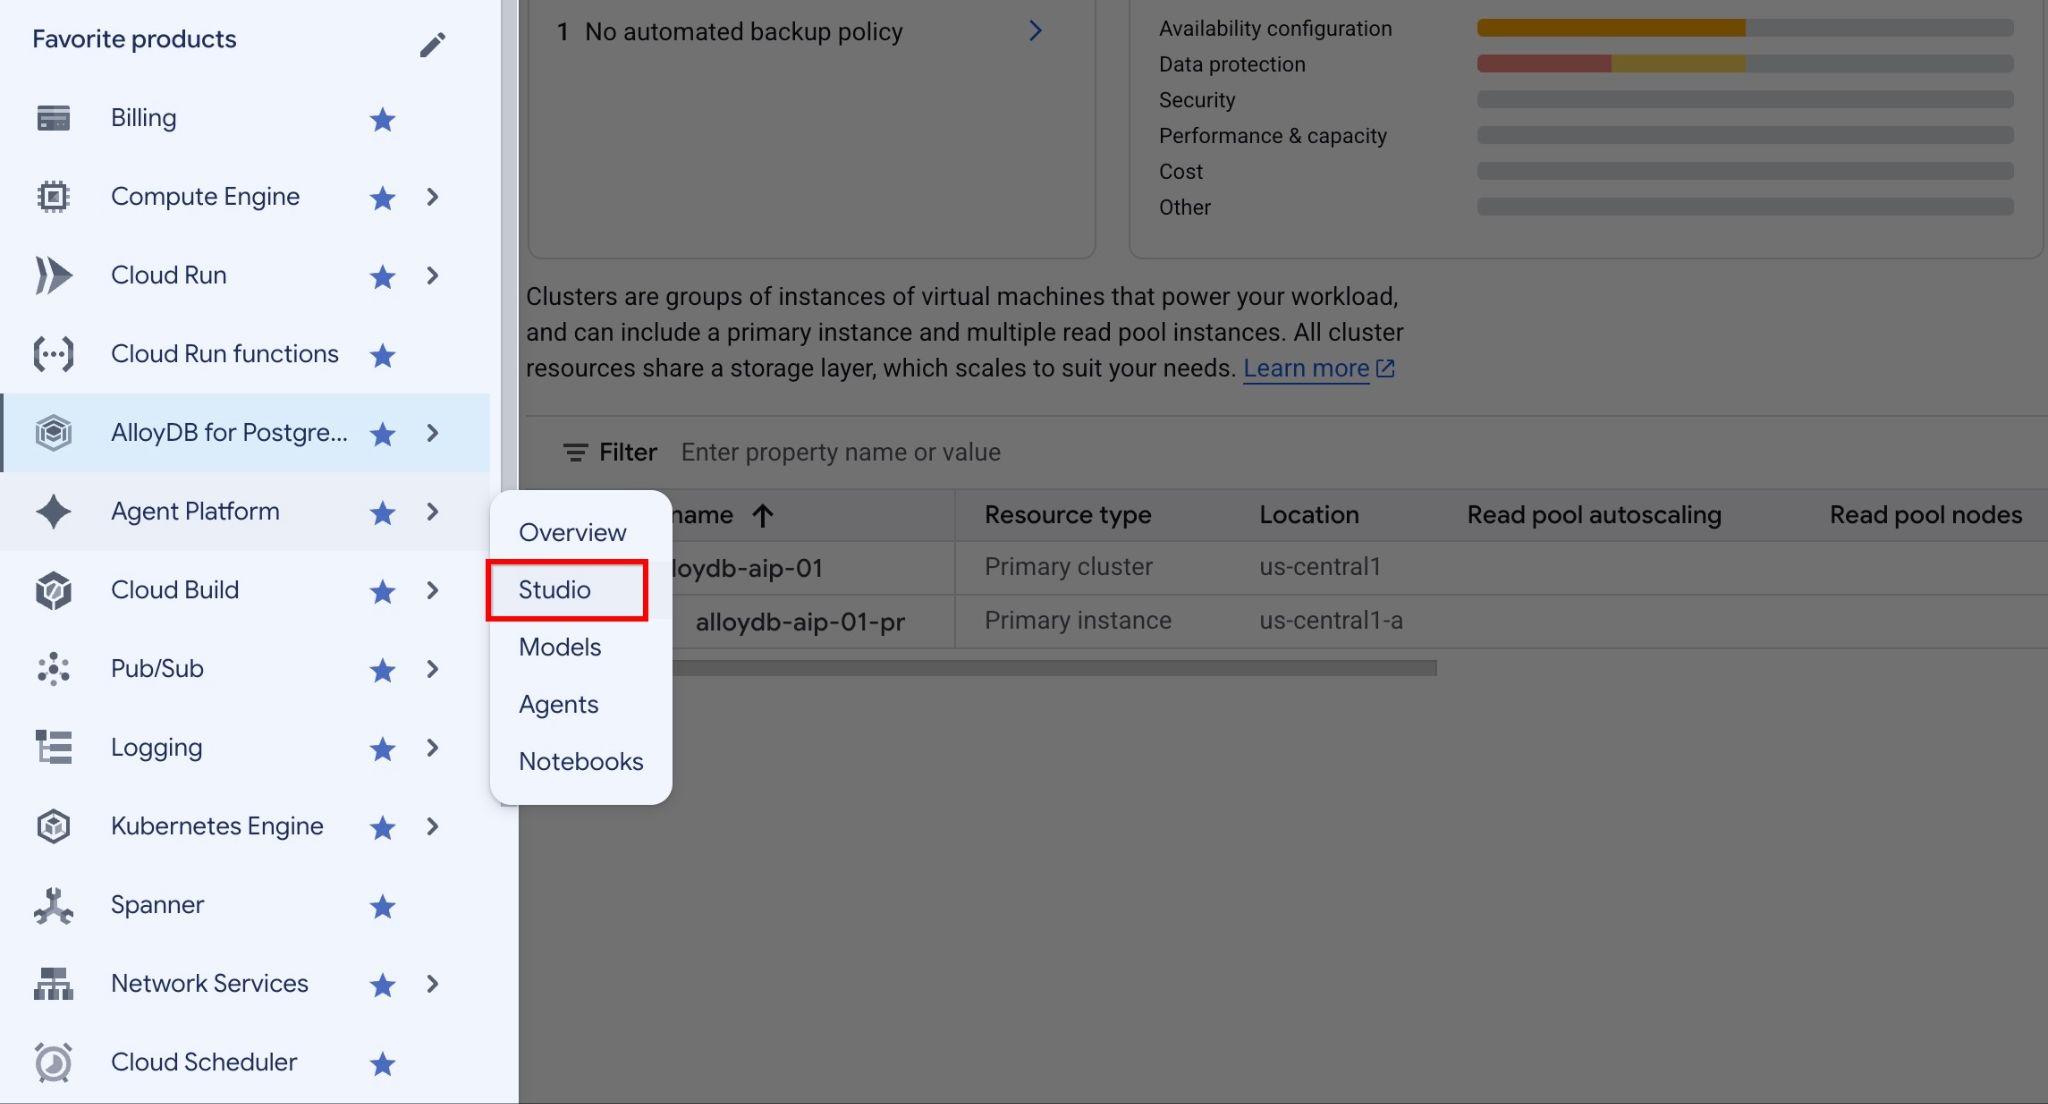
Google Cloud Console में Gemini Enterprise Agent Platform Studio खोलें.
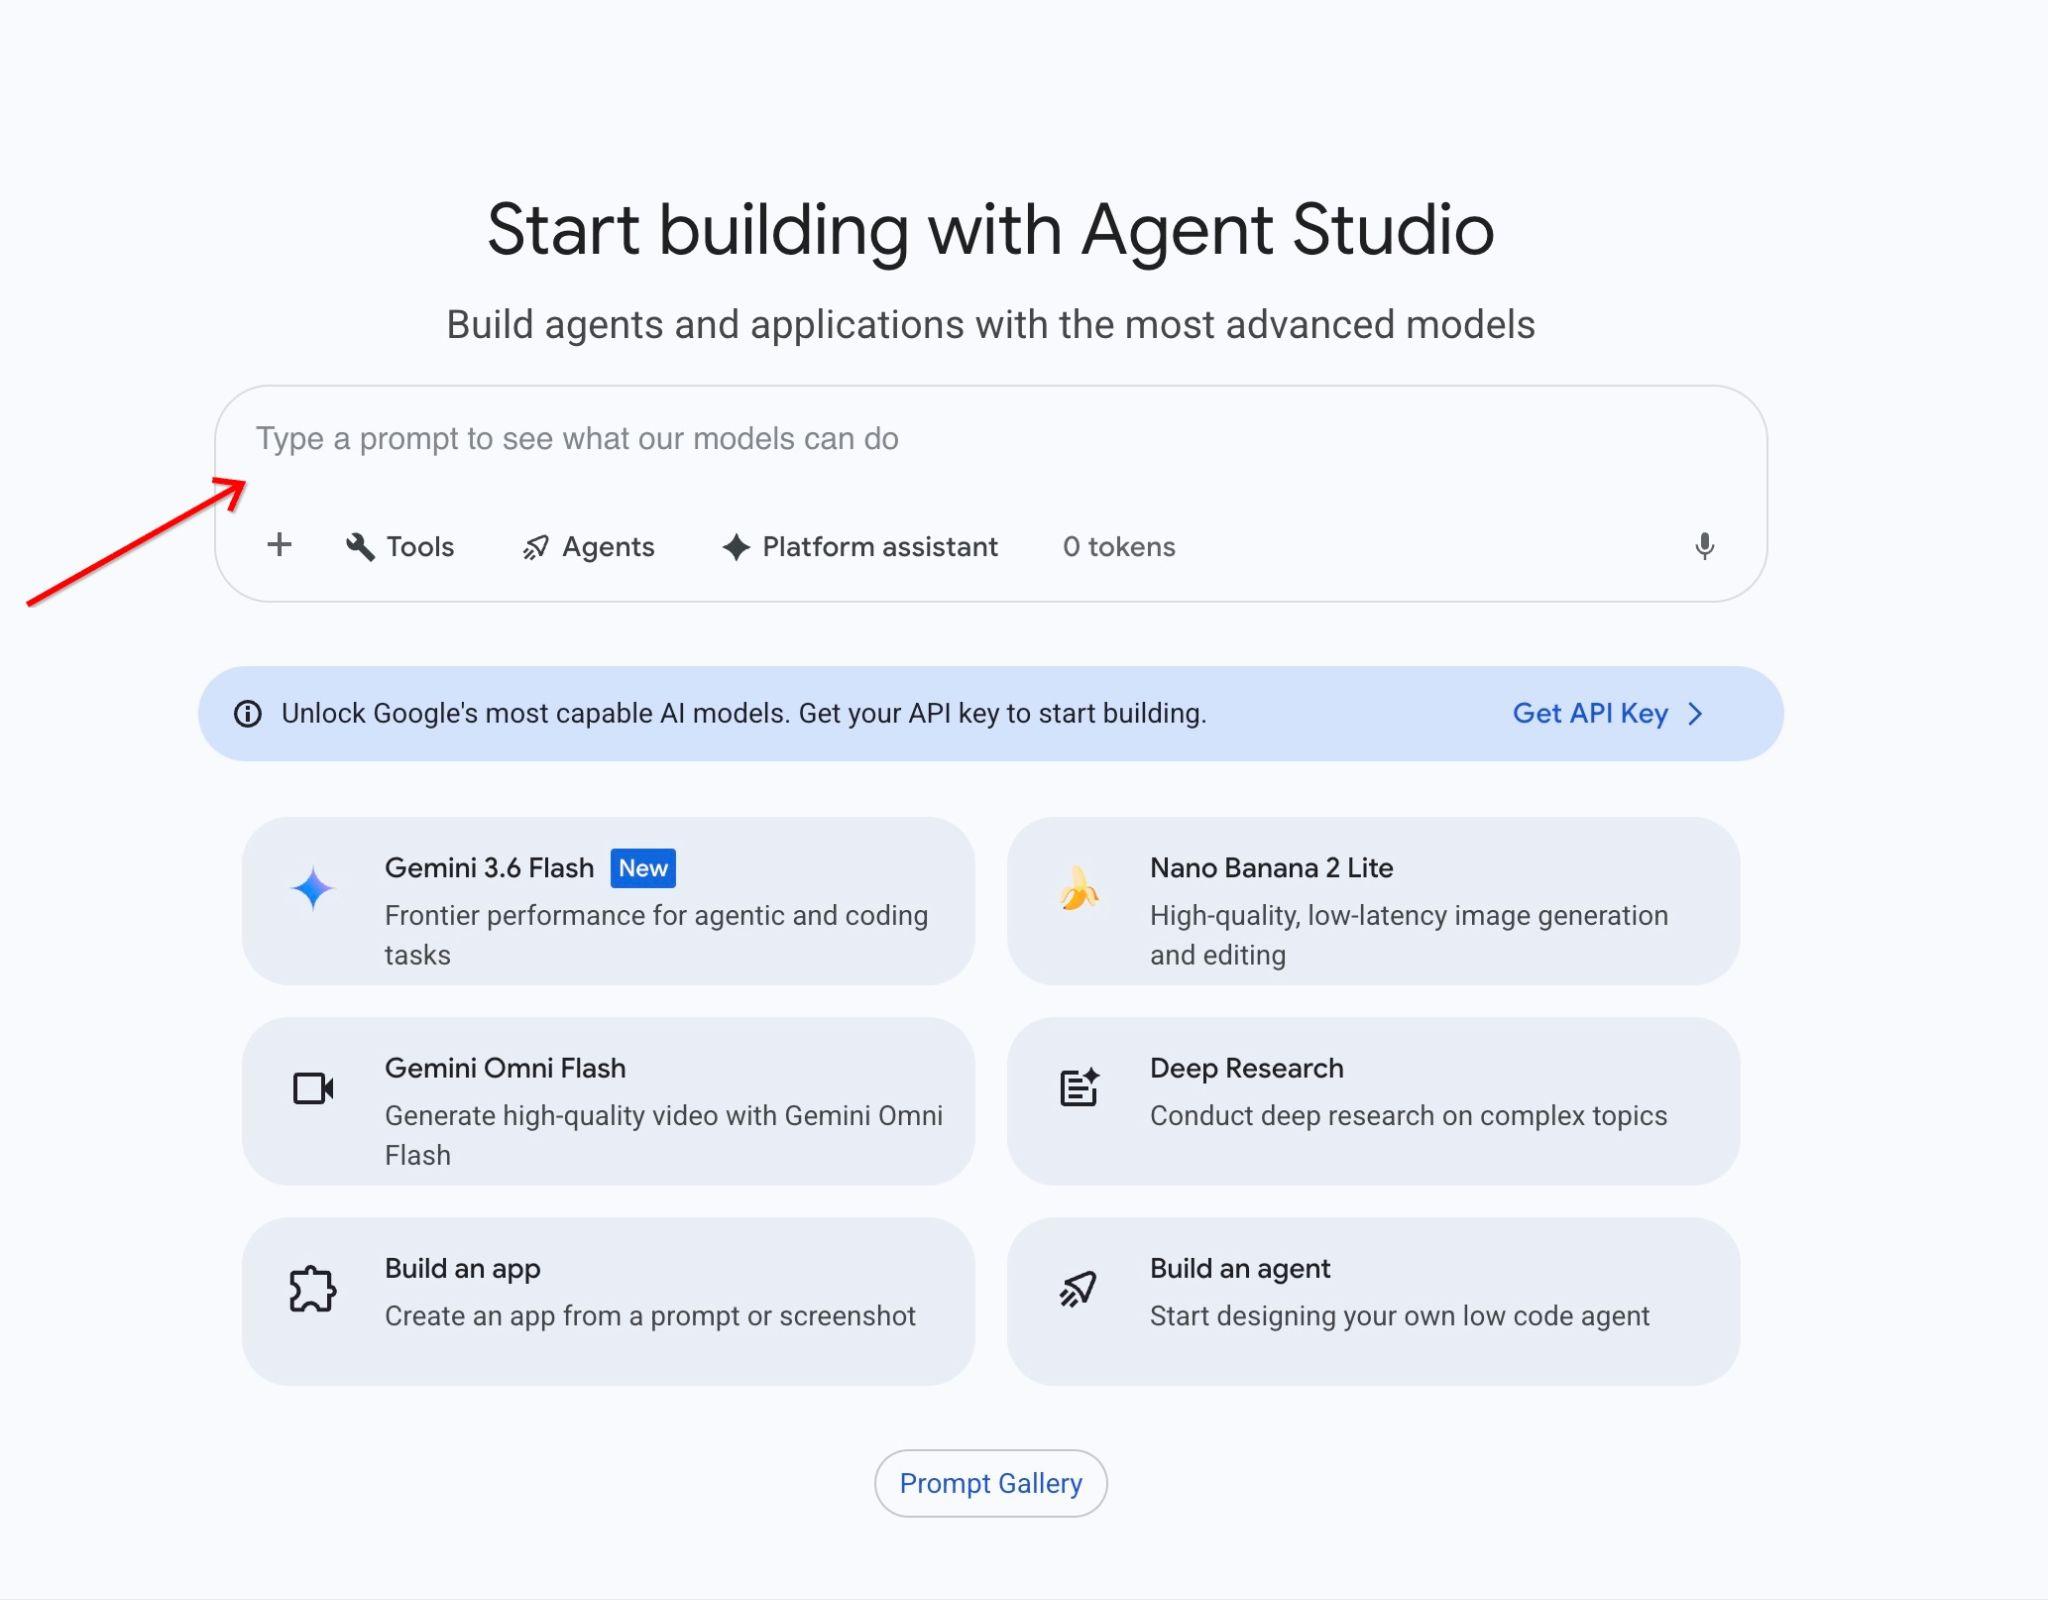
इंटरफ़ेस में अपना प्रॉम्प्ट लिखें:
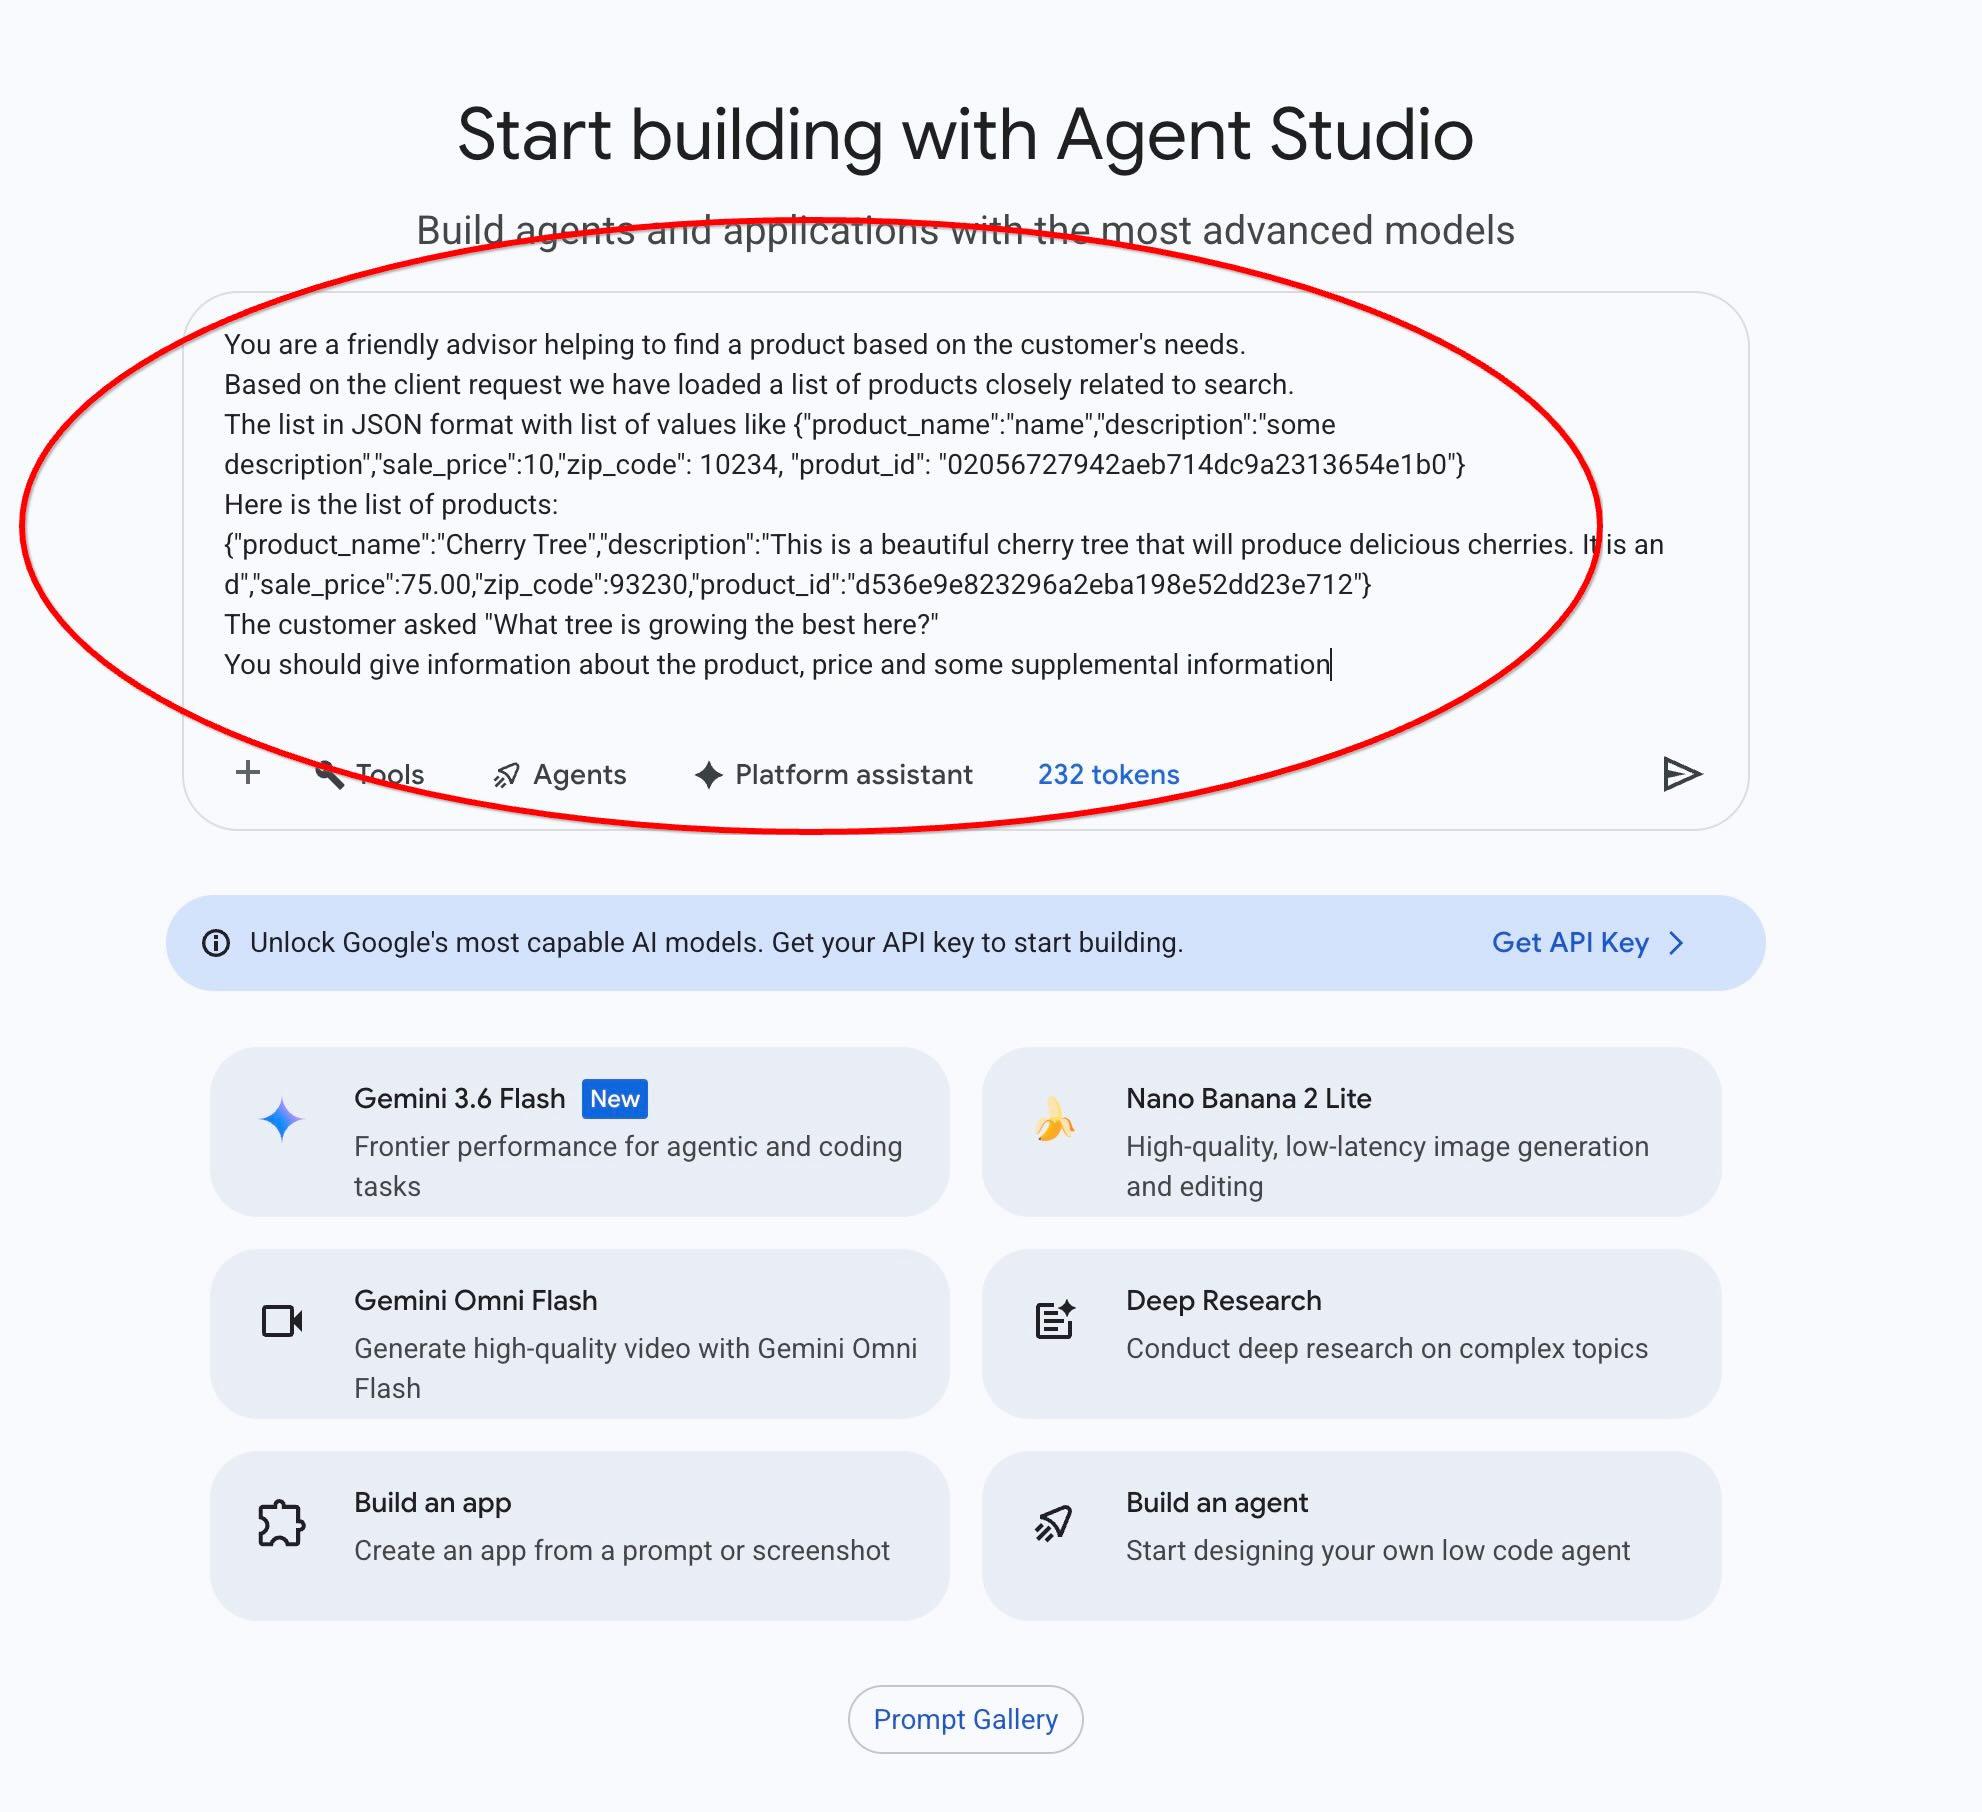
यह प्रॉम्प्ट डालें:
You are a friendly advisor helping to find a product based on the customer's needs.
Based on the client request we have loaded a list of products closely related to search.
The list in JSON format with list of values like {"product_name":"name","description":"some description","sale_price":10,"zip_code": 10234, "produt_id": "02056727942aeb714dc9a2313654e1b0"}
Here is the list of products:
{"product_name":"Cherry Tree","description":"This is a beautiful cherry tree that will produce delicious cherries. It is an d","sale_price":75.00,"zip_code":93230,"product_id":"d536e9e823296a2eba198e52dd23e712"}
The customer asked "What tree is growing the best here?"
You should give information about the product, price and some supplemental information
प्रॉम्प्ट चलाने पर, यह नतीजा मिलता है :
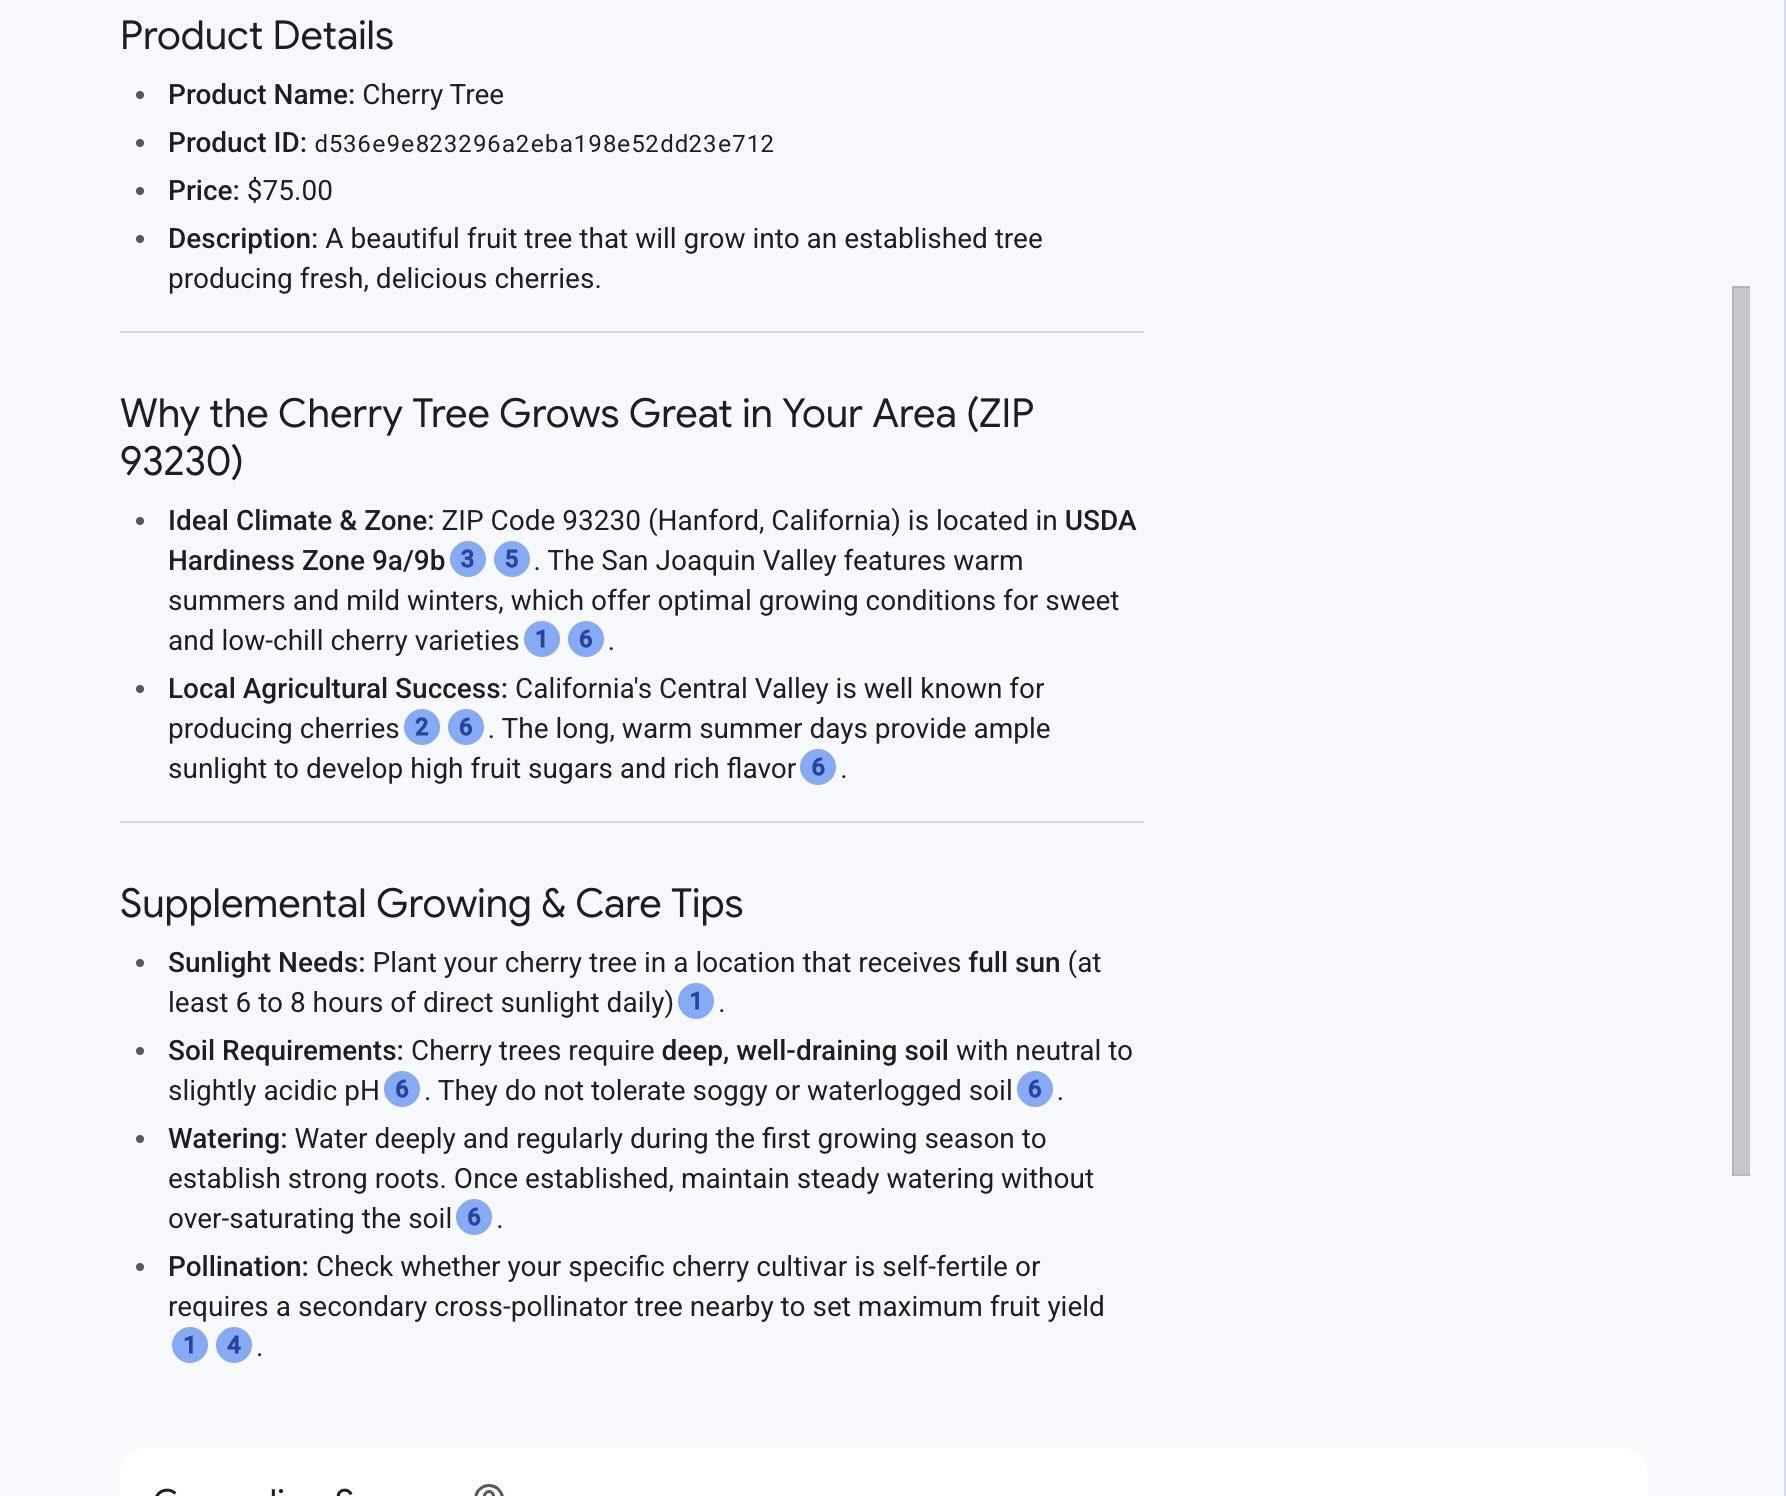
जवाब में कीमत, ब्यौरा, और अतिरिक्त जानकारी शामिल होती है. मॉडल को यह जानकारी, पेड़ और जगह की जानकारी के आधार पर बाहरी सोर्स से मिलती है.
PSQL में प्रॉम्प्ट चलाना
इसी तरह का नतीजा पाने के लिए, Gemini Enterprise Agent Platform के साथ AlloyDB AI इंटिग्रेशन का इस्तेमाल करें. इससे आपको डेटाबेस में सीधे एसक्यूएल का इस्तेमाल करके, जनरेटिव मॉडल से एक जैसा जवाब मिलेगा. gemini-3.6-flash मॉडल का इस्तेमाल करने से पहले, आपको इसे रजिस्टर करना होगा.
gemini-3.6-flash मॉडल रजिस्टर करें:
AlloyDB Studio में रन करें:
CALL google_ml.create_model(
model_id => 'gemini-3.6-flash',
model_request_url => 'https://aiplatform.googleapis.com/v1/projects/PROJECT_ID/locations/global/publishers/google/models/gemini-3.6-flash:generateContent',
model_provider => 'google',
model_type => 'llm'
);
google_ml.model_info_view से जानकारी चुनकर, रजिस्टर किए गए मॉडल की सूची की पुष्टि कभी भी की जा सकती है.
SELECT model_id,model_type FROM google_ml.model_info_view WHERE model_id ILIKE '%flash%';
यहां आउटपुट का सैंपल दिया गया है
quickstart_db=> SELECT model_id,model_type FROM google_ml.model_info_view WHERE model_id ILIKE '%flash%';
       model_id        | model_type
-----------------------+------------
 gemini-3.6-flash      | llm
 gemini-2.0-flash      | llm
 gemini-2.5-flash      | llm
 gemini-2.0-flash-lite | llm
 gemini-2.5-flash-lite | llm
(5 rows)
अब SQL का इस्तेमाल करके, gemini-3.6-flash मॉडल के लिए प्रॉम्प्ट के हिस्से के तौर पर, सबक्वेरी में जनरेट किए गए JSON का इस्तेमाल किया जा सकता है.
अपने psql या AlloyDB Studio सेशन में, यह क्वेरी चलाएं:
WITH trees AS (
SELECT
        cp.product_name,
        cp.product_description AS description,
        cp.sale_price,
        cs.zip_code,
        cp.uniq_id AS product_id
FROM
        cymbal_products cp
JOIN cymbal_inventory ci ON
        ci.uniq_id = cp.uniq_id
JOIN cymbal_stores cs ON
        cs.store_id = ci.store_id
        AND ci.inventory>0
        AND cs.store_id = 1583
ORDER BY
        (cp.embedding <=> embedding('text-embedding-005',
        'What kind of fruit trees grow well here?')::vector) ASC
LIMIT 1),
prompt AS (
SELECT
        'You are a friendly advisor helping to find a product based on the customer''s needs.
Based on the client request we have loaded a list of products closely related to search.
The list in JSON format with list of values like {"product_name":"name","product_description":"some description","sale_price":10}
Here is the list of products:' || json_agg(trees) || 'The customer asked "What kind of fruit trees grow well here?"
You should give information about the product, price and some supplemental information' AS prompt_text
FROM
        trees),
response AS (
SELECT
        google_ml.predict_row( model_id =>'gemini-3.6-flash',
        request_body => json_build_object('contents',
        json_build_object('role',
        'user',
        'parts',
        json_build_object('text',
        prompt_text))))->'candidates'->0->'content'->'parts'->0->'text' AS resp
FROM
        prompt)
SELECT
REPLACE(resp::text, '\n', CHR(10))
FROM
        response;
यहां अनुमानित आउटपुट दिया गया है. जनरेटिव एआई मॉडल के नॉन-डिटरमिनिस्टिक नेचर की वजह से, आउटपुट अलग-अलग हो सकता है:
"Hello there! I'd be delighted to help you pick out a wonderful fruit tree for your space. Based on our local selection, a fantastic option that grows very well is the **Cherry Tree**! Here are the details on this beautiful tree: * **Product:** Cherry Tree * **Price:** $75.00 ### Why it's a great choice: * **Delicious Harvest:** It produces tasty, fresh cherries right in your backyard. * **Size & Benefits:** It's a deciduous tree that grows to about 15 feet tall, making it ideal for providing both lovely shade and a bit of privacy. * **Year-Round Beauty:** It features lush, dark green leaves throughout the summer that transform into a stunning red in the autumn. * **Growing Requirements:** Cherry trees thrive best in cool, moist climates with sandy soil, and are perfectly suited for USDA hardiness zones 4 through 9. Please let me know if you have any questions about planting or if you'd like help adding this to your order!"
10. वेक्टर इंडेक्स बनाना
यह डेटासेट छोटा है. इसलिए, जवाब मिलने में लगने वाला समय मुख्य रूप से, Gemini Enterprise के एजेंट प्लैटफ़ॉर्म पर मौजूद मॉडल के साथ इंटरैक्शन पर निर्भर करता है. हालांकि, लाखों वेक्टर के लिए क्वेरी करने पर, वेक्टर सर्च में ही जवाब देने में लगने वाले समय का ज़्यादातर हिस्सा लग सकता है. साथ ही, इससे आपके डेटाबेस पर लोड बढ़ सकता है. खोज की परफ़ॉर्मेंस को बेहतर बनाने के लिए, वेक्टर इंडेक्स बनाया जा सकता है.
ScaNN इंडेक्स बनाना
ScaNN इंडेक्स बनाने के लिए, आपको एक और एक्सटेंशन चालू करना होगा. alloydb_scann एक्सटेंशन, Google ScaNN एल्गोरिदम का इस्तेमाल करके, अनुमानित सबसे नज़दीकी पड़ोसी (एएनएन) वेक्टर इंडेक्स के साथ काम करने के लिए एक इंटरफ़ेस उपलब्ध कराता है.
AlloyDB Studio में चलाएं:
CREATE EXTENSION IF NOT EXISTS alloydb_scann;
इंडेक्स को मैन्युअल या ऑटो मोड में बनाया जा सकता है. मैन्युअल मोड डिफ़ॉल्ट रूप से चालू होता है. इसमें किसी भी अन्य इंडेक्स की तरह इंडेक्स बनाया और उसे मैनेज किया जा सकता है. हालांकि, AUTO मोड चालू करने पर, ऐसा इंडेक्स बनाया जा सकता है जिसे आपको मैनेज करने की ज़रूरत नहीं होती. दस्तावेज़ में जाकर, सभी विकल्पों के बारे में ज़्यादा जानकारी पाएं. ऑटो मोड में इंडेक्स बनाने के लिए, हमारे पास ज़रूरत के मुताबिक पंक्तियां नहीं हैं. इसलिए, आपको इसे मैन्युअल तरीके से बनाना होगा.
AlloyDB Studio में चलाएं:
CREATE INDEX cymbal_products_embeddings_scann ON cymbal_products
  USING scann (embedding cosine)
  WITH (num_leaves=10, max_num_levels = 1);
दस्तावेज़ में जाकर, इंडेक्स पैरामीटर को ट्यून करने के बारे में पढ़ें.
अनुमानित आउटपुट:
quickstart_db=> CREATE INDEX cymbal_products_embeddings_scann ON cymbal_products
  USING scann (embedding cosine)
  WITH (num_leaves=10, max_num_levels = 1);
CREATE INDEX
quickstart_db=>
जवाब की तुलना करें
सिमैंटिक सर्च में सबसे ज़्यादा वैल्यू पाने के लिए, हमने जिस क्वेरी का इस्तेमाल किया था उसे फिर से दोहराएं:
WITH trees as (
SELECT
        cp.product_name,
        left(cp.product_description,80) as description,
        cp.sale_price,
        cs.zip_code,
        cp.uniq_id as product_id
FROM
        cymbal_products cp
JOIN cymbal_inventory ci on
        ci.uniq_id=cp.uniq_id
JOIN cymbal_stores cs on
        cs.store_id=ci.store_id
        AND ci.inventory>0
        AND cs.store_id = 1583
ORDER BY
        (cp.embedding <=> embedding('text-embedding-005','What kind of fruit trees grow well here?')::vector) ASC
LIMIT 1)
SELECT json_agg(trees) FROM trees;
अनुमानित आउटपुट:
[{"product_name":"Cherry Tree","description":"This is a beautiful cherry tree that will produce delicious cherries. It is an d","sale_price":75.00,"zip_code":93230,"product_id":"d536e9e823296a2eba198e52dd23e712"}]
जवाब में एक ही "चेरी ट्री" की जानकारी दी गई है.
इंडेक्स के इस्तेमाल की पुष्टि करें:
EXPLAIN (analyze)
WITH trees as (
SELECT
        cp.product_name,
        left(cp.product_description,80) as description,
        cp.sale_price,
        cs.zip_code,
        cp.uniq_id as product_id
FROM
        cymbal_products cp
JOIN cymbal_inventory ci on
        ci.uniq_id=cp.uniq_id
JOIN cymbal_stores cs on
        cs.store_id=ci.store_id
        AND ci.inventory>0
        AND cs.store_id = 1583
ORDER BY
        (cp.embedding <=> embedding('text-embedding-005','What kind of fruit trees grow well here?')::vector) ASC
LIMIT 1)
SELECT json_agg(trees) FROM trees;
अनुमानित आउटपुट (ज़्यादा जानकारी के लिए, कुछ हिस्सों को छिपा दिया गया है):
...
 Aggregate  (cost=27.24..27.25 rows=1 width=32) (actual time=0.964..0.965 rows=1 loops=1)
   ->  Subquery Scan on trees  (cost=18.91..27.23 rows=1 width=142) (actual time=0.953..0.954 rows=1 loops=1)
         ->  Limit  (cost=18.91..27.22 rows=1 width=158) (actual time=0.948..0.949 rows=1 loops=1)
               ->  Nested Loop  (cost=18.91..7126.86 rows=855 width=158) (actual time=0.948..0.948 rows=1 loops=1)
                     ->  Nested Loop  (cost=18.63..7103.59 rows=855 width=907) (actual time=0.931..0.931 rows=1 loops=1)
                           ->  Index Scan using cymbal_products_embeddings_scann on cymbal_products cp  (cost=18.21..343.15 rows=942 width=903) (actual time=0.906..0.908 rows=2 loops=1)
                                 Order By: (embedding <=> '[-0.106554024,0.035774965,-0.027267234,-0.045653425,-0.03286045,0.02124319...
आउटपुट से पता चलता है कि क्वेरी में "cymbal_products पर cymbal_products_embeddings_scann का इस्तेमाल करके इंडेक्स स्कैन किया गया".
क्वेरी से वही चेरी का पेड़ दिखता है जो इंडेक्स बनाने से पहले, खोज के नतीजों में सबसे ऊपर दिखता था. सटीक खोज के मुकाबले, एएनएन इंडेक्स में खोज की स्पीड को प्राथमिकता दी जाती है. इसलिए, इंडेक्स पर आधारित क्वेरी के लिए, कभी-कभी सटीक खोज के मुकाबले थोड़े अलग टॉप नतीजे मिल सकते हैं. हालांकि, वेक्टर इंडेक्स से परफ़ॉर्मेंस में काफ़ी सुधार होता है. साथ ही, यह सटीक नतीजे देता है.
ज़्यादा जानने के लिए, वेक्टर इंडेक्स के अन्य टाइप आज़माए जा सकते हैं. इसके अलावा, दस्तावेज़ वाले पेज पर जाकर, LangChain इंटिग्रेशन के साथ ज़्यादा लैब और उदाहरण देखे जा सकते हैं.
11. स्टोरेज में जगह बनाएं
लैब का काम पूरा हो जाने के बाद, AlloyDB इंस्टेंस और क्लस्टर मिटा दें.
AlloyDB क्लस्टर और सभी इंस्टेंस मिटाएं
force विकल्प की मदद से क्लस्टर को बंद कर दिया जाता है. इससे क्लस्टर से जुड़े सभी इंस्टेंस भी मिट जाते हैं.
अगर आपका टर्मिनल डिसकनेक्ट हो गया है, तो फिर से कनेक्ट करें. इसके बाद, Cloud Shell में प्रोजेक्ट और एनवायरमेंट वैरिएबल तय करें:
gcloud config set project <YOUR_PROJECT_ID>
export REGION=us-central1
export ADBCLUSTER=alloydb-aip-01
export PROJECT_ID=$(gcloud config get-value project)
क्लस्टर मिटाने के लिए:
gcloud alloydb clusters delete $ADBCLUSTER --region=$REGION --force
अनुमानित कंसोल आउटपुट:
student@cloudshell:~ (test-project-001-402417)$ gcloud alloydb clusters delete $ADBCLUSTER --region=$REGION --force
All of the cluster data will be lost when the cluster is deleted.

Do you want to continue (Y/n)?  Y

Operation ID: operation-1697820178429-6082890a0b570-4a72f7e4-4c5df36f
Deleting cluster...done.
AlloyDB के बैकअप मिटाना
क्लस्टर के सभी AlloyDB बैकअप मिटाने के लिए:
for i in $(gcloud alloydb backups list \
  --filter="CLUSTER_NAME: projects/$PROJECT_ID/locations/$REGION/clusters/$ADBCLUSTER" \
  --format="value(name)" \
  --sort-by=~createTime) ; do \
  gcloud alloydb backups delete $(basename $i) --region $REGION --quiet; done
अनुमानित कंसोल आउटपुट:
student@cloudshell:~ (test-project-001-402417)$ for i in $(gcloud alloydb backups list --filter="CLUSTER_NAME: projects/$PROJECT_ID/locations/$REGION/clusters/$ADBCLUSTER" --format="value(name)" --sort-by=~createTime) ; do gcloud alloydb backups delete $(basename $i) --region $REGION --quiet; done
Operation ID: operation-1697826266108-60829fb7b5258-7f99dc0b-99f3c35f
Deleting backup...done.
अब हम अपने वीएम को बंद कर सकते हैं
GCE वीएम मिटाएं
Cloud Shell में यह कमांड चलाएं:
export GCEVM=instance-1
export ZONE=us-central1-a
gcloud compute instances delete $GCEVM \
    --zone=$ZONE \
    --quiet
अनुमानित कंसोल आउटपुट:
student@cloudshell:~ (test-project-001-402417)$ export GCEVM=instance-1
export ZONE=us-central1-a
gcloud compute instances delete $GCEVM \
    --zone=$ZONE \
    --quiet
Deleted
12. बधाई हो
कोड लैब पूरा करने के लिए बधाई.
यह लैब, Google Cloud की मदद से प्रोडक्शन के लिए तैयार एआई के लर्निंग पाथ का हिस्सा है.
- प्रोटोटाइप से प्रोडक्शन तक के अंतर को कम करने के लिए, पूरा पाठ्यक्रम देखें.
- अपनी प्रोग्रेस को
#ProductionReadyAIहैशटैग के साथ शेयर करें.
हमने क्या-क्या बताया
- AlloyDB क्लस्टर और प्राइमरी इंस्टेंस को डिप्लॉय करने का तरीका
- Google Compute Engine VM से AlloyDB से कनेक्ट करने का तरीका
- डेटाबेस बनाने और AlloyDB AI को चालू करने का तरीका
- डेटाबेस में डेटा लोड करने का तरीका
- AlloyDB Studio का इस्तेमाल कैसे करें
- AlloyDB में Gemini Enterprise के एजेंट प्लैटफ़ॉर्म के एम्बेडिंग मॉडल का इस्तेमाल कैसे करें
- Gemini Enterprise Agent Platform Studio का इस्तेमाल कैसे करें
- Gemini Enterprise के एजेंट प्लैटफ़ॉर्म के जनरेटिव मॉडल का इस्तेमाल करके, नतीजे को बेहतर बनाने का तरीका
- वेक्टर इंडेक्स का इस्तेमाल करके परफ़ॉर्मेंस को बेहतर बनाने का तरीका
13. सर्वे
आउटपुट: