
1. Introduction
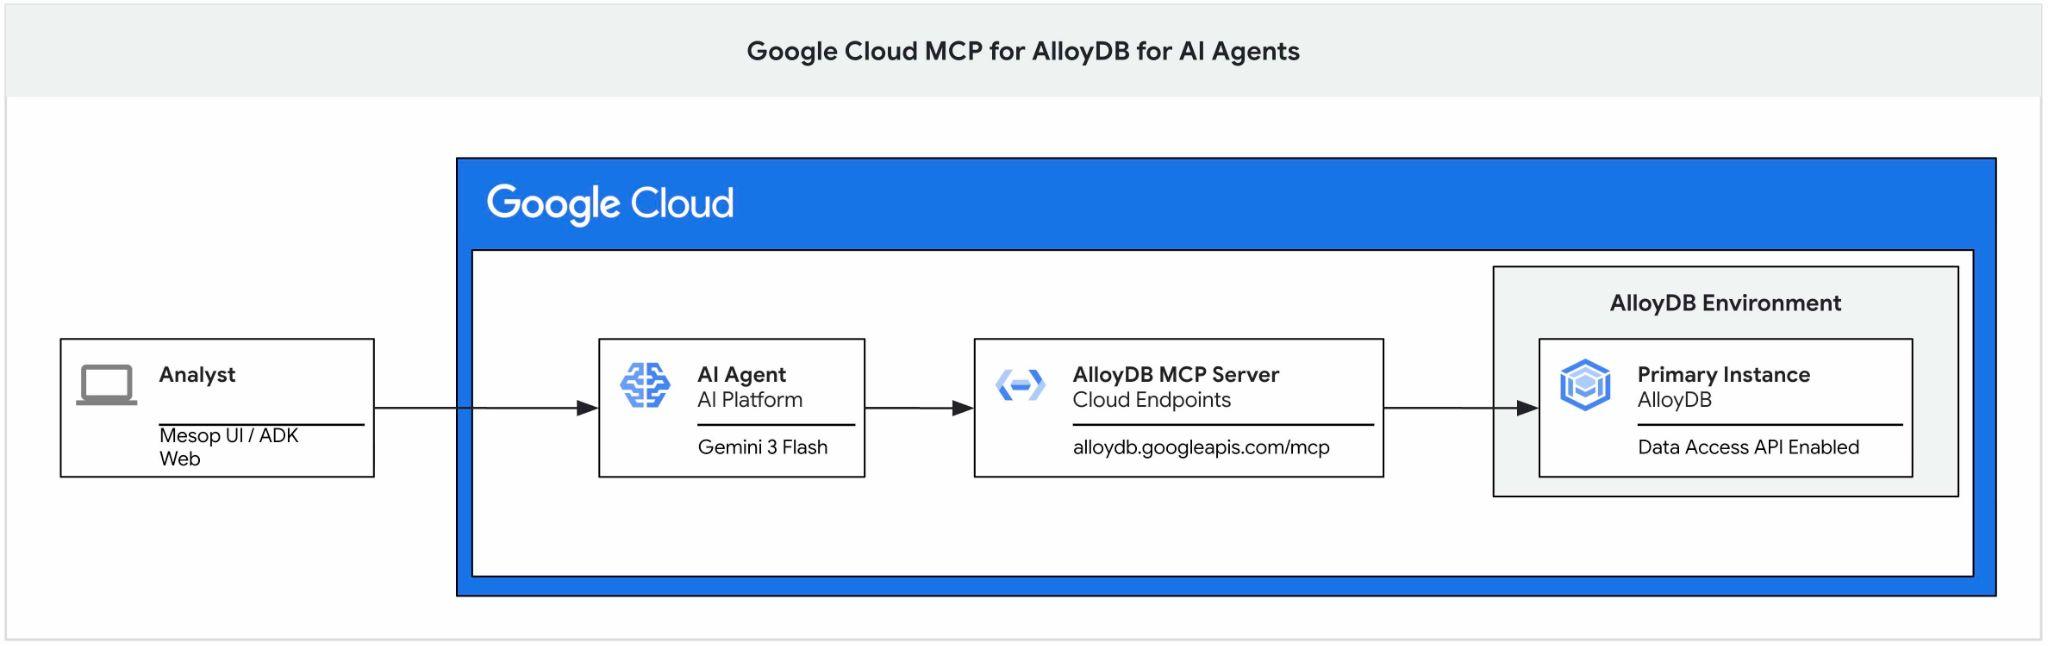
This codelab provides a guide on how to get started with Google Cloud MCP server for AlloyDB and enable it as part of the toolset for an AI agent and use it as a part of application.
Prerequisites
- A basic understanding of Google Cloud, console
- Basic skills in command line interface and Cloud Shell
What you'll learn
- How to create an AlloyDB cluster and import sample data
- How to enable AlloyDB Data access API
- How to enable Google Cloud MCP for AlloyDB NL
- How to add Google Cloud MCP for AlloyDB to your ADK agent
- How to use Google Cloud MCP for AlloyDB in an application
- How to use agents with AlloyDBMCP for analytics
What you'll need
- A Google Cloud Account and Google Cloud Project
- A web browser such as Chrome supporting Google Cloud console and Cloud Shell
2. Setup and Requirements
Project Setup
- Sign-in to the Google Cloud Console. If you don't already have a Gmail or Google Workspace account, you must create one.
Use a personal account instead of a work or school account.
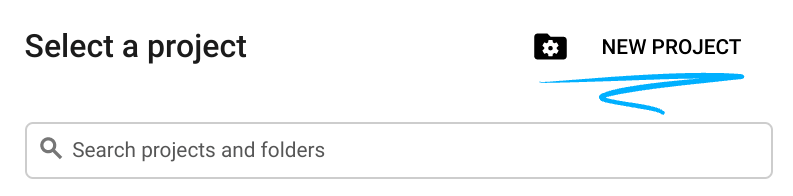
- Create a new project or reuse an existing one. To create a new project in the Google Cloud console, in the header, click the Select a project button which will open a popup window.

In the Select a project window push the button New Project which will open a dialog box for the new project.
In the dialog box put your preferable Project name and choose the location.
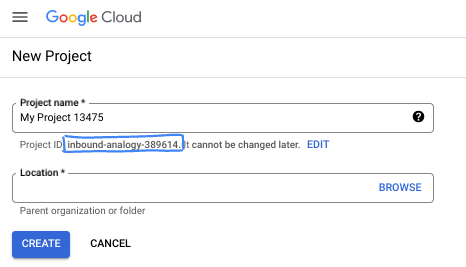
- The Project name is the display name for this project's participants. The project name isn't used by Google APIs, and it can be changed at any time.
- The Project ID is unique across all Google Cloud projects and is immutable (it can't be changed after it has been set). The Google Cloud console automatically generates a unique ID, but you can customize it. If you don't like the generated ID, you can generate another random one or provide your own to check its availability. In most codelabs, you'll need to reference your project ID, which is typically identified with the placeholder PROJECT_ID.
- For your information, there is a third value, a Project Number, which some APIs use. Learn more about all three of these values in the documentation.
Enable Billing
Set up a personal billing account
If you set up billing using Google Cloud credits, you can skip this step.
To set up a personal billing account, go here to enable billing in the Cloud Console.
Some Notes:
- Completing this lab should cost less than $3 USD in Cloud resources.
- You can follow the steps at the end of this lab to delete resources to avoid further charges.
- New users are eligible for the $300 USD Free Trial.
Start Cloud Shell
While Google Cloud can be operated remotely from your laptop, in this codelab you will be using Google Cloud Shell, a command line environment running in the Cloud.
From the Google Cloud Console, click the Cloud Shell icon on the top right toolbar:

Alternatively you can press G then S. This sequence will activate Cloud Shell if you are within the Google Cloud Console or use this link.
It should only take a few moments to provision and connect to the environment. When it is finished, you should see something like this:

This virtual machine is loaded with all the development tools you'll need. It offers a persistent 5GB home directory, and runs on Google Cloud, greatly enhancing network performance and authentication. All of your work in this codelab can be done within a browser. You do not need to install anything.
3. Before you begin
Enable API
To use AlloyDB, Compute Engine, Networking services, and Vertex AI, you need to enable their respective APIs in your Google Cloud project.
Inside Cloud Shell terminal, make sure that your project ID is setup:
gcloud config get-value project
It should return your Google project ID.
Set environment variable PROJECT_ID:
PROJECT_ID=$(gcloud config get-value project)
Enable all necessary services:
gcloud services enable alloydb.googleapis.com \
                       compute.googleapis.com \
                       cloudresourcemanager.googleapis.com \
                       servicenetworking.googleapis.com \
                       aiplatform.googleapis.com \
                       discoveryengine.googleapis.com
Expected output
student@cloudshell:~ (test-project-001-402417)$ gcloud config set project test-project-001-402417
Updated property [core/project].
student@cloudshell:~ (test-project-001-402417)$ PROJECT_ID=$(gcloud config get-value project)
Your active configuration is: [cloudshell-14650]
student@cloudshell:~ (test-project-001-402417)$
student@cloudshell:~ (test-project-001-402417)$ gcloud services enable alloydb.googleapis.com \
                       compute.googleapis.com \
                       cloudresourcemanager.googleapis.com \
                       servicenetworking.googleapis.com \
                       aiplatform.googleapis.com \
                       discoveryengine.googleapis.com
Operation "operations/acat.p2-4470404856-1f44ebd8-894e-4356-bea7-b84165a57442" finished successfully.
4. Deploy AlloyDB
Create AlloyDB cluster and primary instance. You can either deploy it using a prepared script which will deploy all necessary resources or you can do it step-by-step by yourself following documentation.
Deploy AlloyDB Using Automated Script
This approach is using an automated script to deploy the AlloyDB cluster and providing necessary information to start working with the deployed resources.
In the Cloud Shell terminal execute command to clone the deployment script from the repository.
REPO_NAME="codelabs"
REPO_URL="https://github.com/GoogleCloudPlatform/$REPO_NAME"
SOURCE_DIR="alloydb-ai-mcp"

git clone --no-checkout --filter=blob:none --depth=1 $REPO_URL

cd $REPO_NAME
git sparse-checkout set $SOURCE_DIR
git checkout
cd $SOURCE_DIR
Run the deployment script.
./deploy_alloydb.sh
The script will take some time to run - usually about 5-7 minutes. Then as the output it should provide information about your deployed AlloyDB cluster. Please be aware your password will be different - record the password somewhere for future use.
...
<redacted>
...
Creating primary instance: alloydb-aip-01-pr (8 vCPUs for TRIAL cluster)
Operation ID: operation-1765988049916-646282264938a-bddce198-9f248715
Creating instance...done.
----------------------------------------
Deployment Process Completed
Cluster:  alloydb-aip-01 (TRIAL)
Instance: alloydb-aip-01-pr
Region:   us-central1
Initial Password: JBBoDTgixzYwYpkF (if new cluster)
----------------------------------------
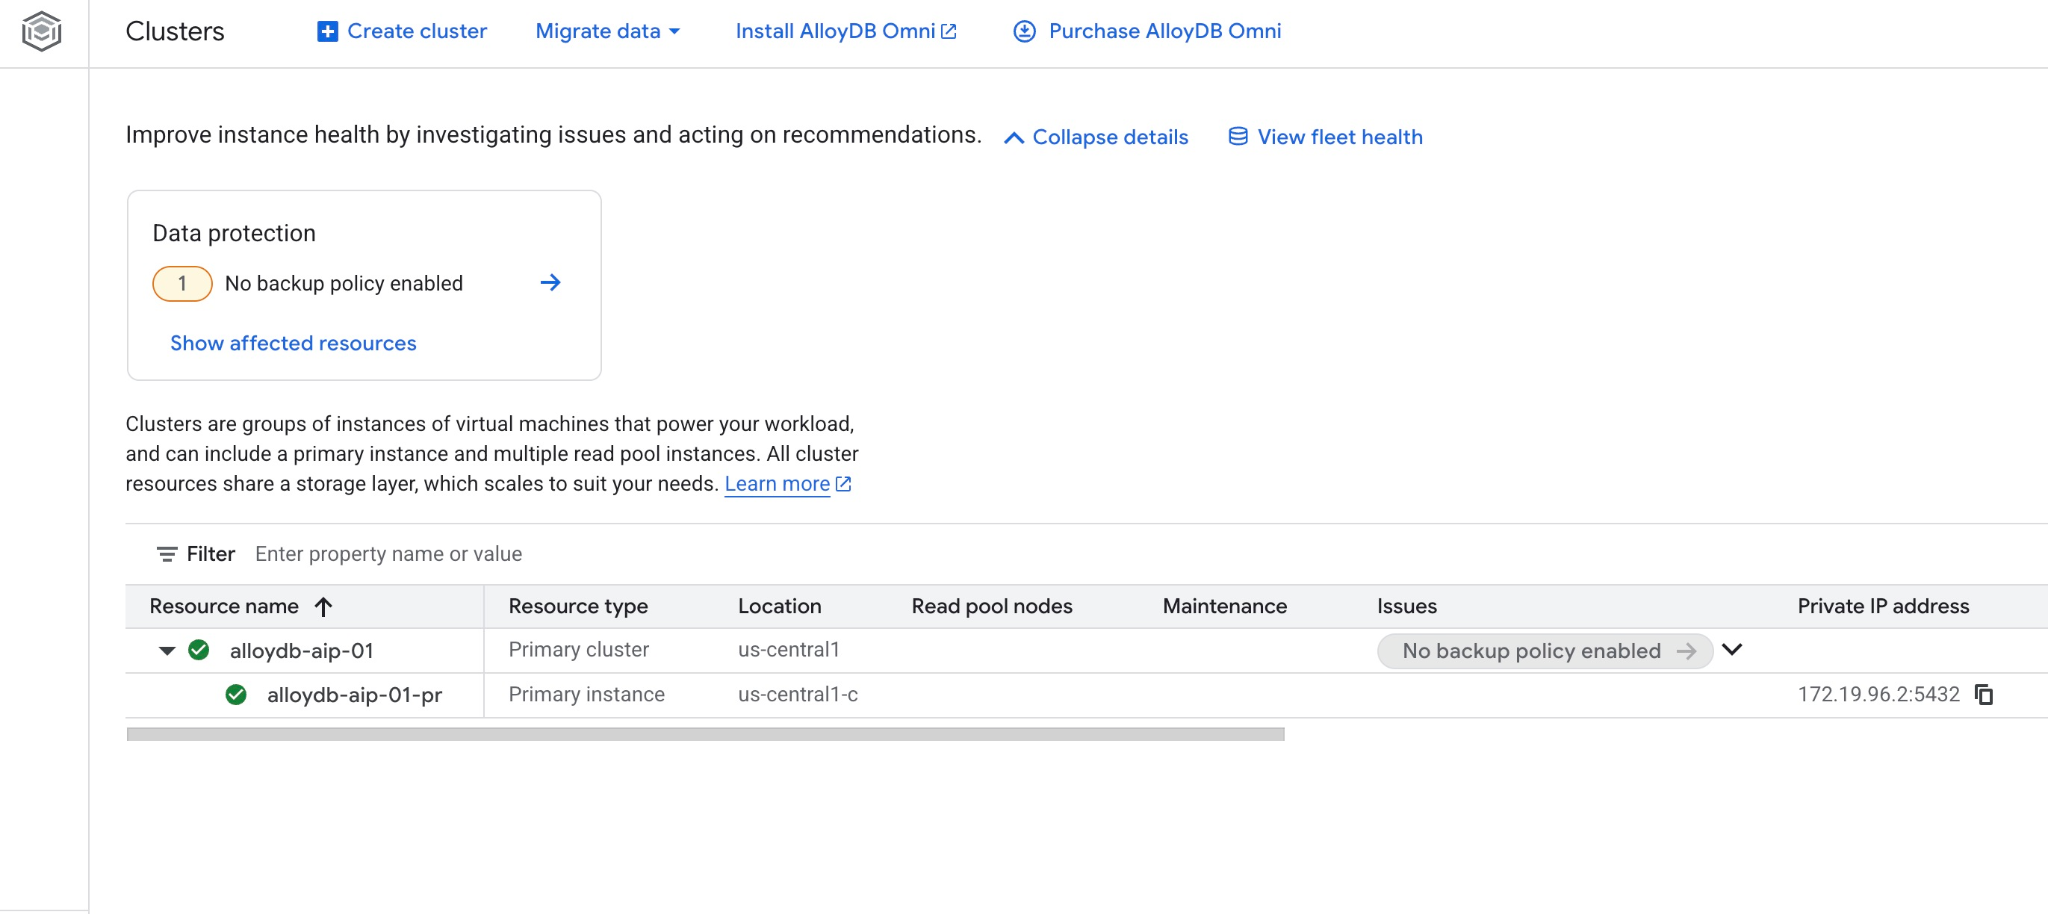
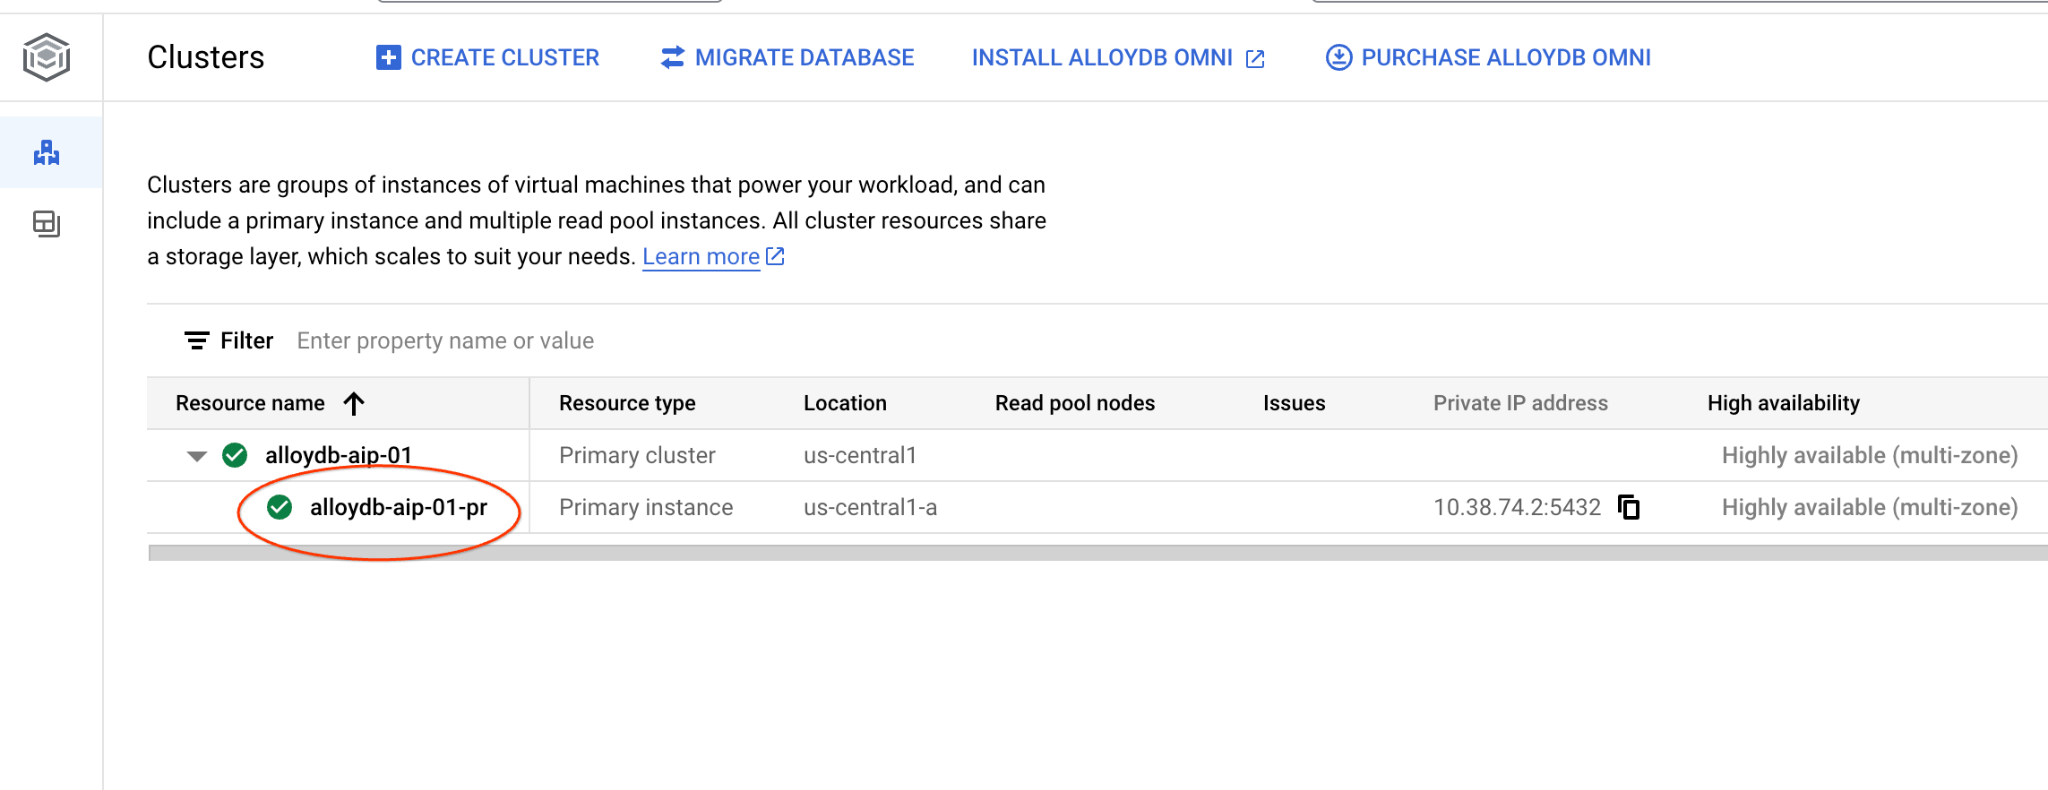
And you can also see the new cluster and the primary instance in the web console
5. Prepare Database
You need to enable Vertex AI integration to use AI functions and operators, enable Data access API and create a database for sample dataset.
Grant Necessary Permissions to AlloyDB
Add Vertex AI permissions to the AlloyDB service agent.
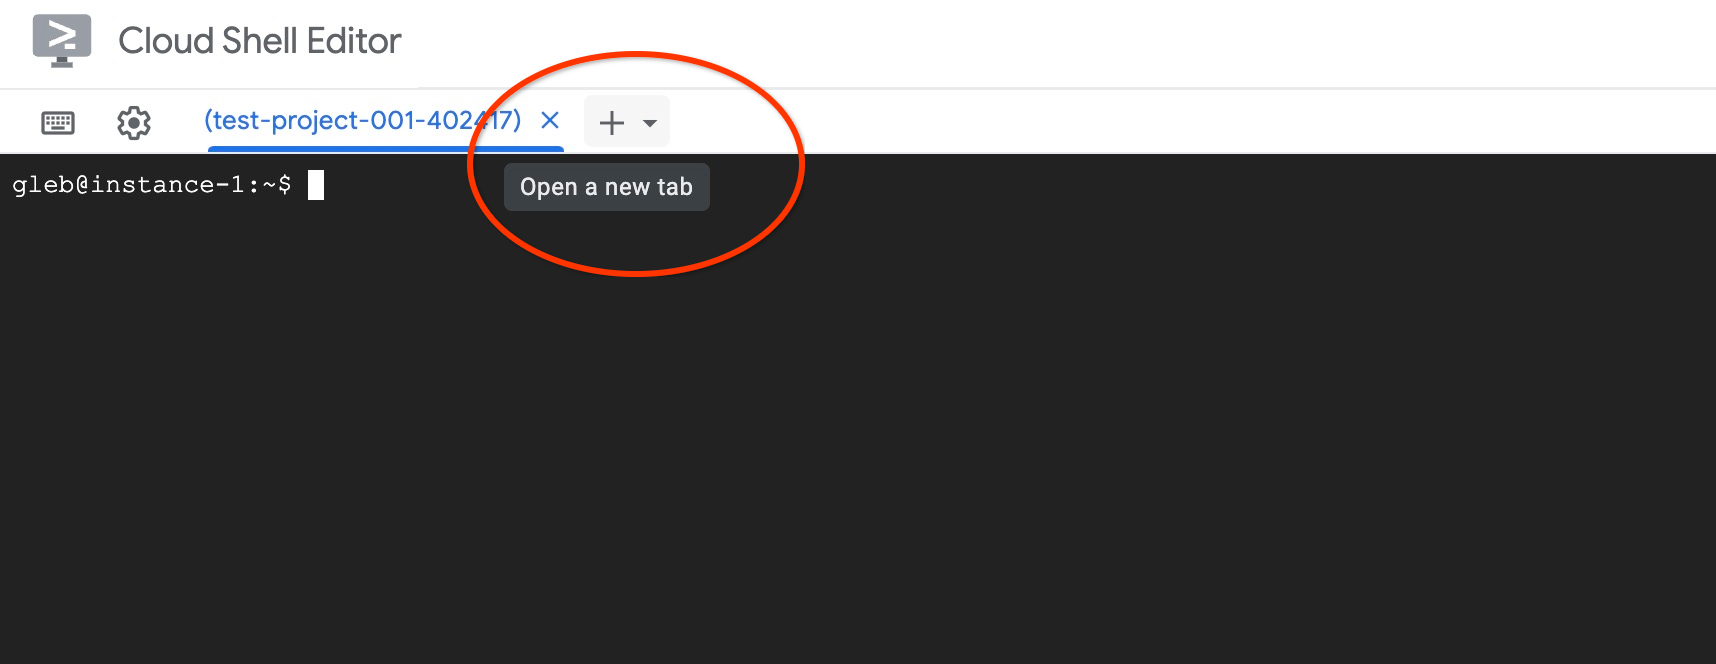
Open another Cloud Shell tab using the sign "+" at the top.
In the new cloud shell tab execute:
PROJECT_ID=$(gcloud config get-value project)
gcloud projects add-iam-policy-binding $PROJECT_ID \
  --member="serviceAccount:service-$(gcloud projects describe $PROJECT_ID --format="value(projectNumber)")@gcp-sa-alloydb.iam.gserviceaccount.com" \
  --role="roles/aiplatform.user"

gcloud projects add-iam-policy-binding $PROJECT_ID \
  --member="serviceAccount:service-$(gcloud projects describe $PROJECT_ID --format="value(projectNumber)")@gcp-sa-alloydb.iam.gserviceaccount.com" \
  --role="roles/discoveryengine.viewer"
Expected console output:
student@cloudshell:~ (test-project-001-402417)$ PROJECT_ID=$(gcloud config get-value project)
Your active configuration is: [cloudshell-11039]
student@cloudshell:~ (test-project-001-402417)$ gcloud projects add-iam-policy-binding $PROJECT_ID \
  --member="serviceAccount:service-$(gcloud projects describe $PROJECT_ID --format="value(projectNumber)")@gcp-sa-alloydb.iam.gserviceaccount.com" \
  --role="roles/aiplatform.user"
Updated IAM policy for project [test-project-001-402417].
bindings:
- members:
  - serviceAccount:service-4470404856@gcp-sa-alloydb.iam.gserviceaccount.com
  role: roles/aiplatform.user
- members:
... < redacted >
etag: BwYIEbe_Z3U=
version: 1
Enable Data Access API
You have to enable the Data Access API on the AlloyDB cluster to be able to use MCP tools like execute_sql.
In the same terminal tab execute.
PROJECT_ID=$(gcloud config get-value project)
REGION=us-central1
ADBCLUSTER=alloydb-aip-01
curl -X PATCH \
 -H "Authorization: Bearer $(gcloud auth print-access-token)" \
 -H "Content-Type: application/json" \
 https://alloydb.googleapis.com/v1alpha/projects/$PROJECT_ID/locations/$REGION/clusters/$ADBCLUSTER/instances/$ADBCLUSTER-pr?updateMask=dataApiAccess \
 -d '{
   "dataApiAccess": "ENABLED",
 }'
Update Instance Flags
To use advanced AI functions in AlloyDB we need to enable some database flags. After enabling the Data Access API it might take a couple of minutes to show the instance to be ready for the next changes. Please see the status of the instance in the console to make sure it has the green checkmark.
In the same terminal tab execute.
PROJECT_ID=$(gcloud config get-value project)
REGION=us-central1
ADBCLUSTER=alloydb-aip-01
gcloud beta alloydb instances update $ADBCLUSTER-pr \
   --database-flags=google_ml_integration.enable_model_support=on,google_ml_integration.enable_ai_query_engine=on,google_ml_integration.enable_preview_ai_functions=on \
   --region=$REGION \
   --cluster=$ADBCLUSTER \
   --project=$PROJECT_ID \
   --update-mode=FORCE_APPLY
Enable MCP
The next step is to enable the Google Cloud MCP server for AlloyDB in your project. By default the MCP is not enabled and it is one of multiple layers of protection including IAM authentication and authorization, data access API and roles inside your cluster.
In the same terminal tab execute.
PROJECT_ID=$(gcloud config get-value project)
gcloud beta services mcp enable alloydb.googleapis.com \
    --project=$PROJECT_ID
Close the tab by either execution command "exit" in the tab:
exit
Connect to AlloyDB Studio
In the following chapters all the SQL commands requiring connection to the database can be executed in the AlloyDB Studio. T
Navigate to the Clusters page in AlloyDB for Postgres.
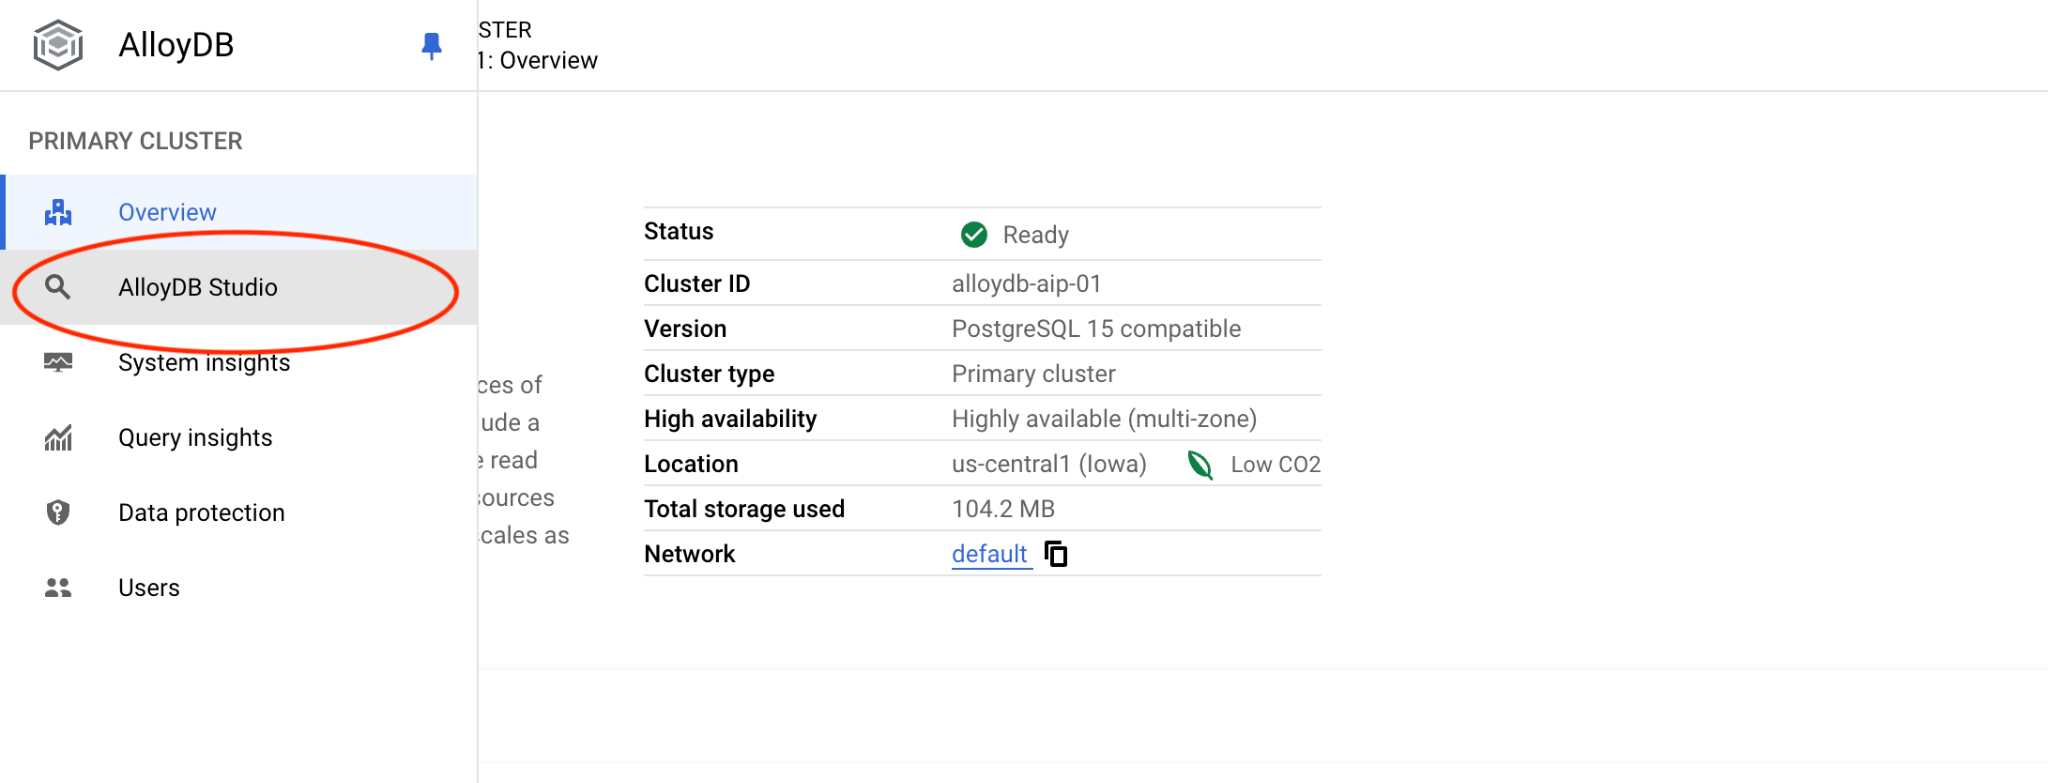
Open the web console interface for your AlloyDB cluster by clicking on the primary instance.
Then click on AlloyDB Studio on the left:
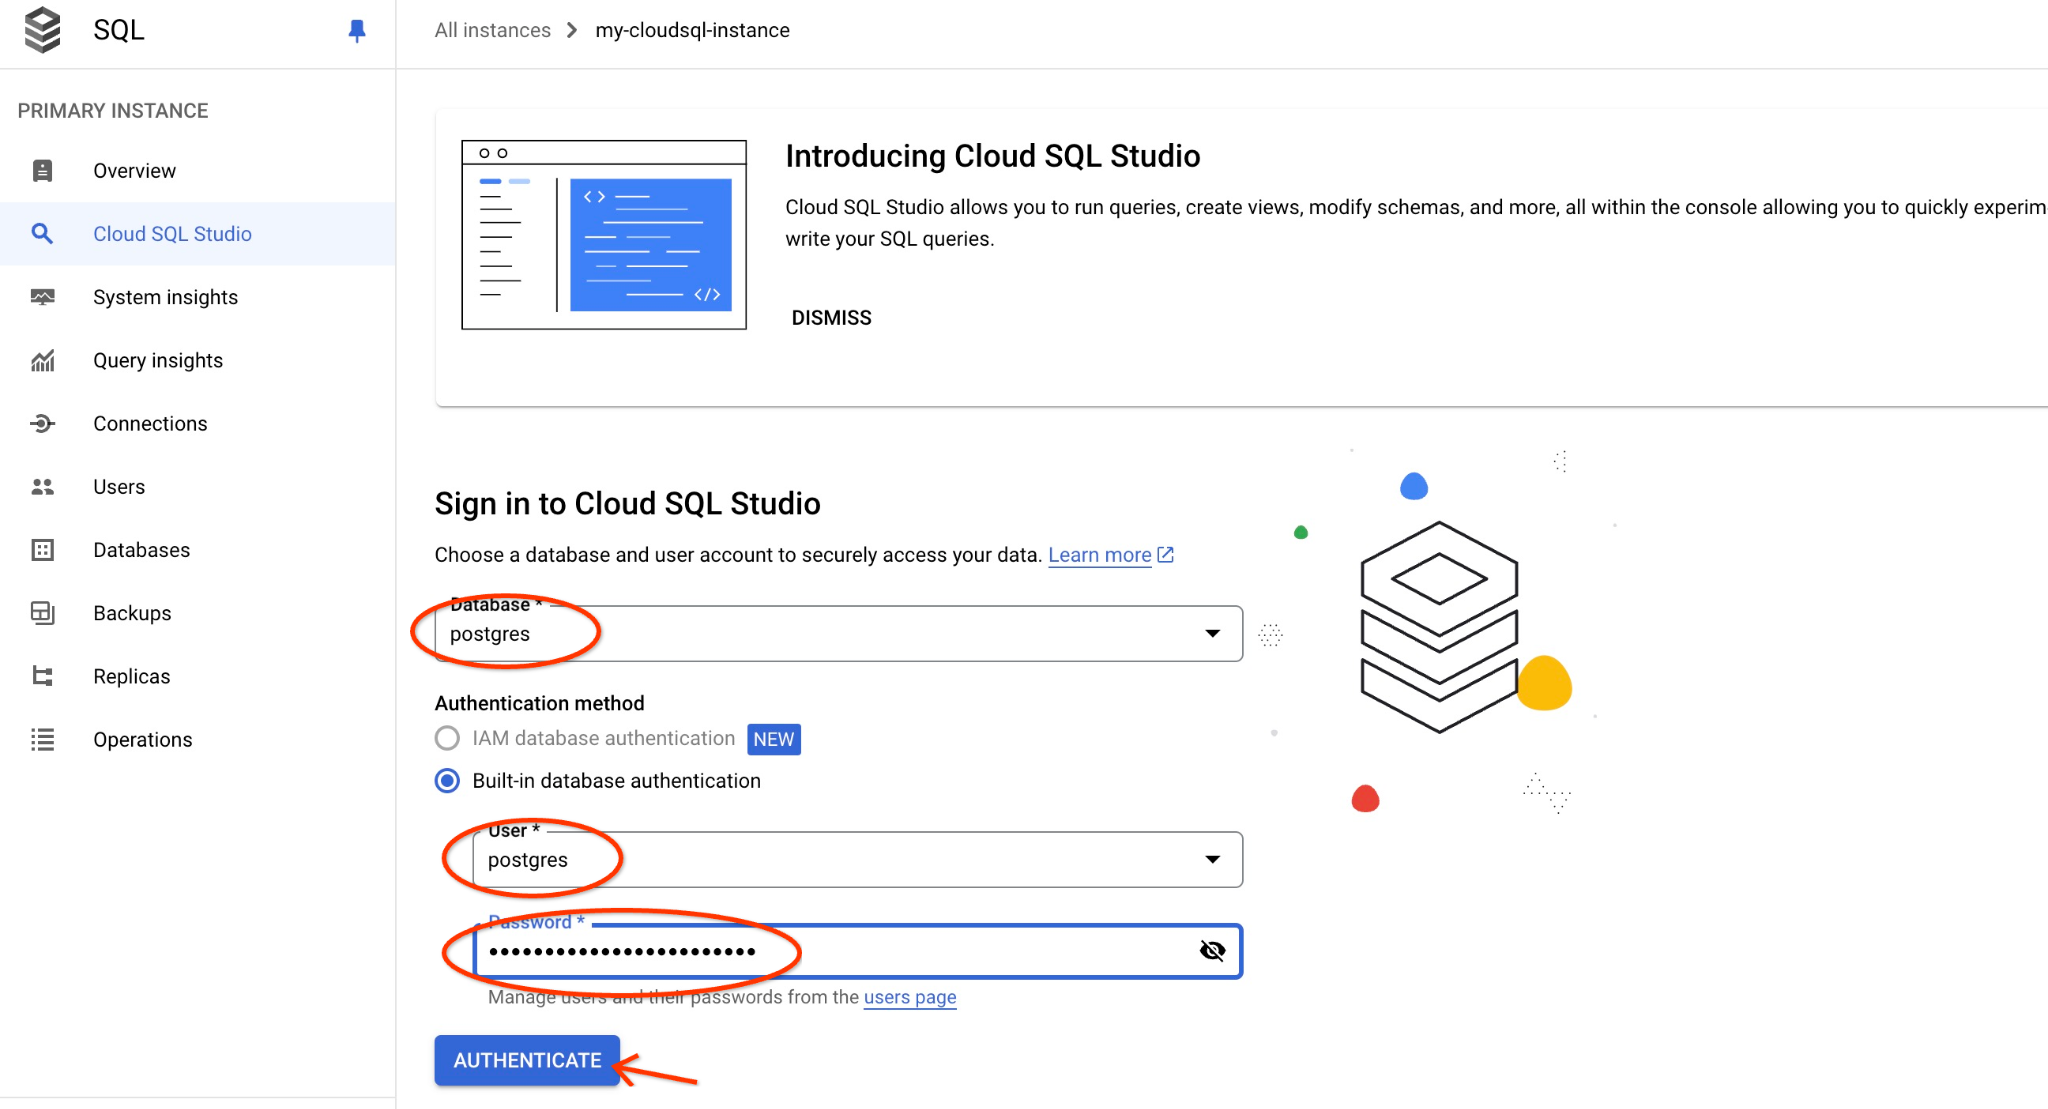
Choose the postgres database, user postgres and provide the password noted when we created the cluster. Then click on the "Authenticate" button.
If the password doesn't work or you forgot to note the password - you can change the password. Check the documentation on how to do that.
It will open the AlloyDB Studio interface. To run the commands in the database you click on the "Untitled Query" tab on the right.
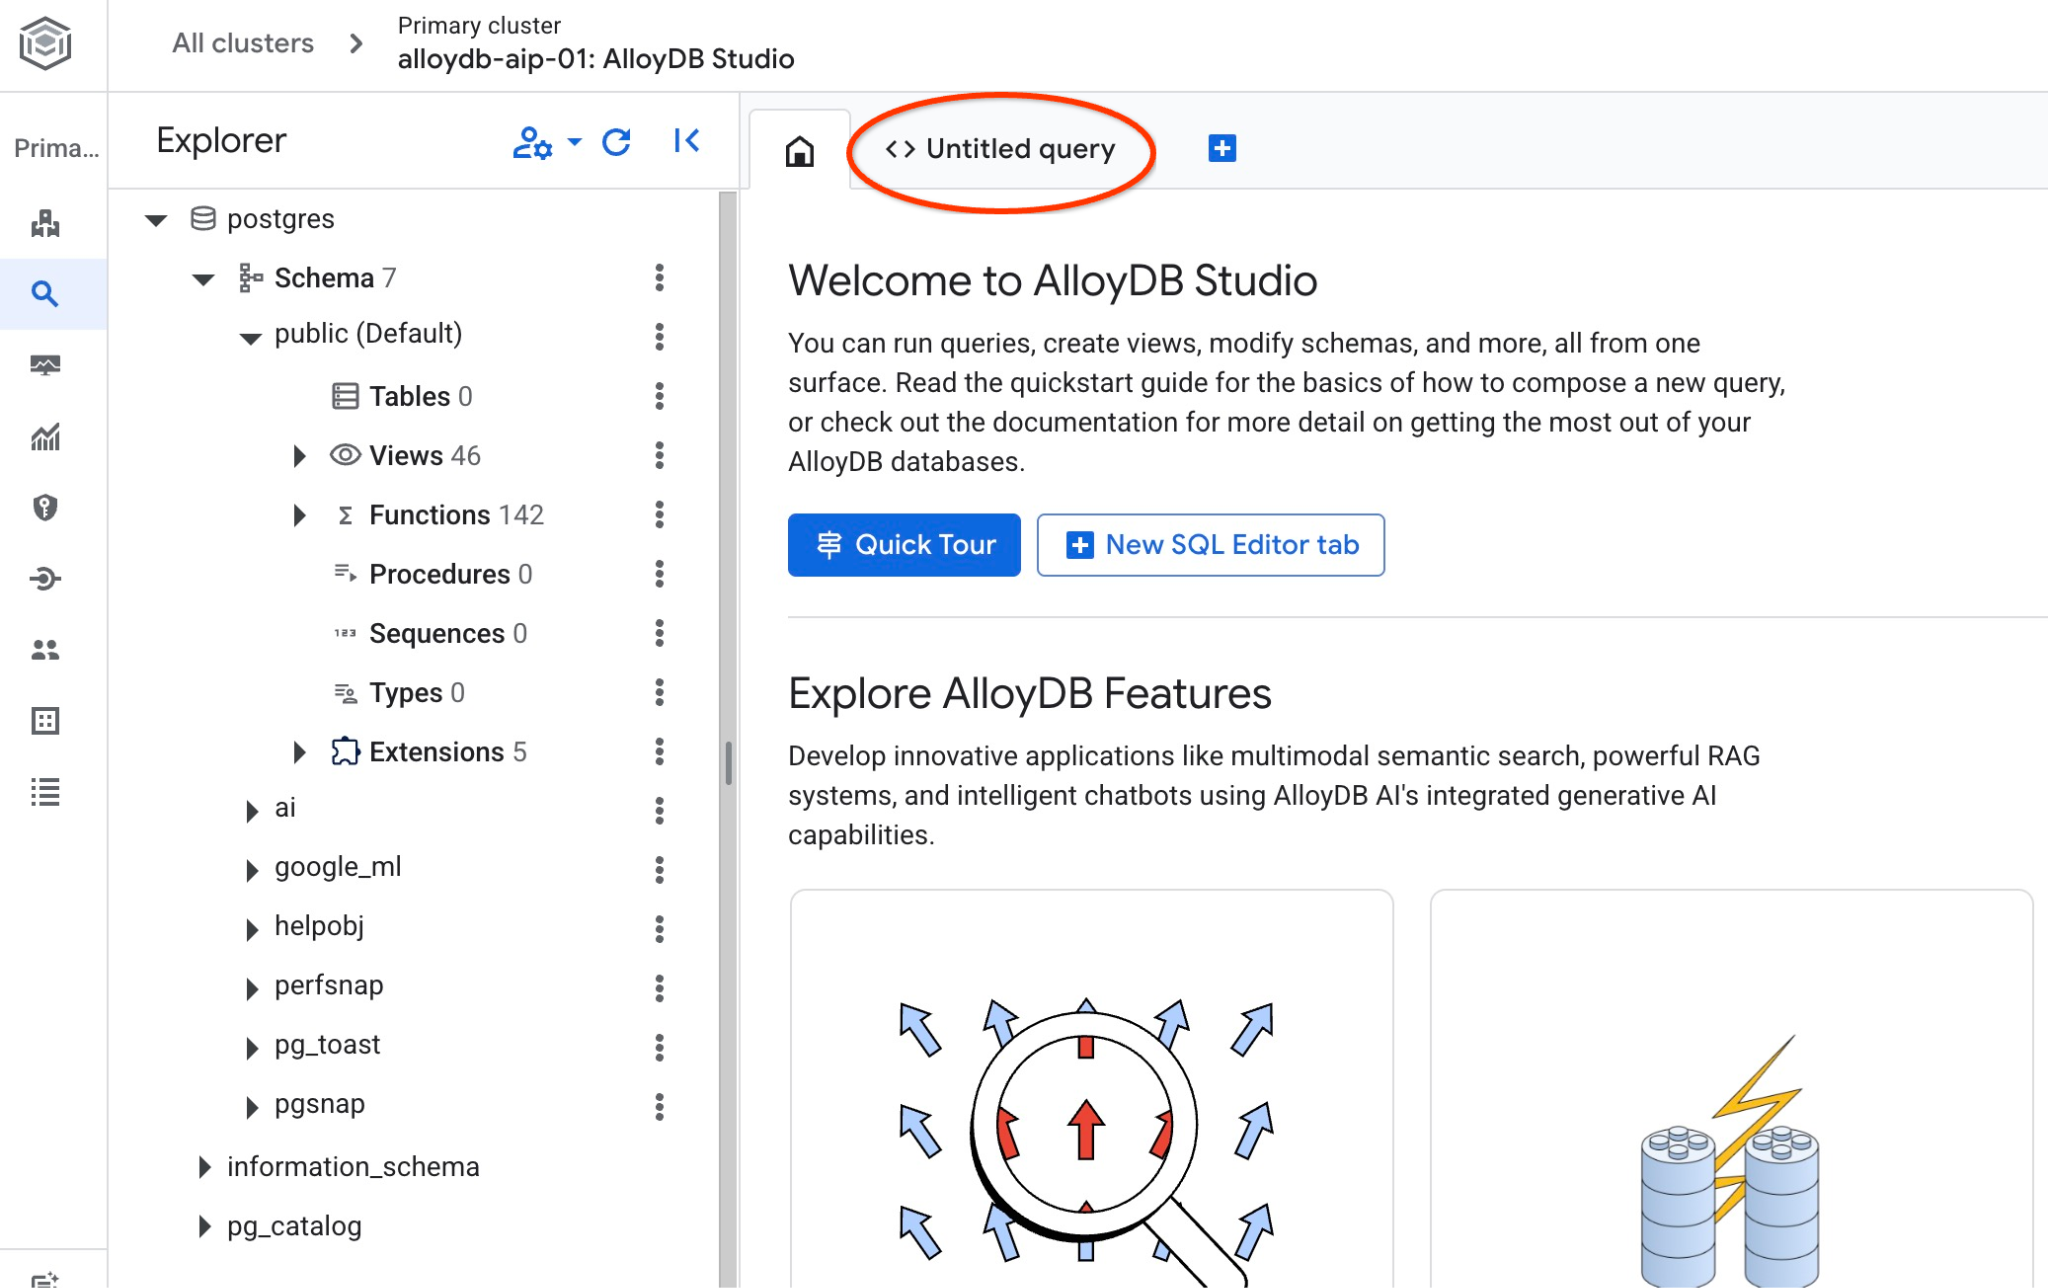
It opens interface where you can run SQL commands
Create Database
Create database quickstart.
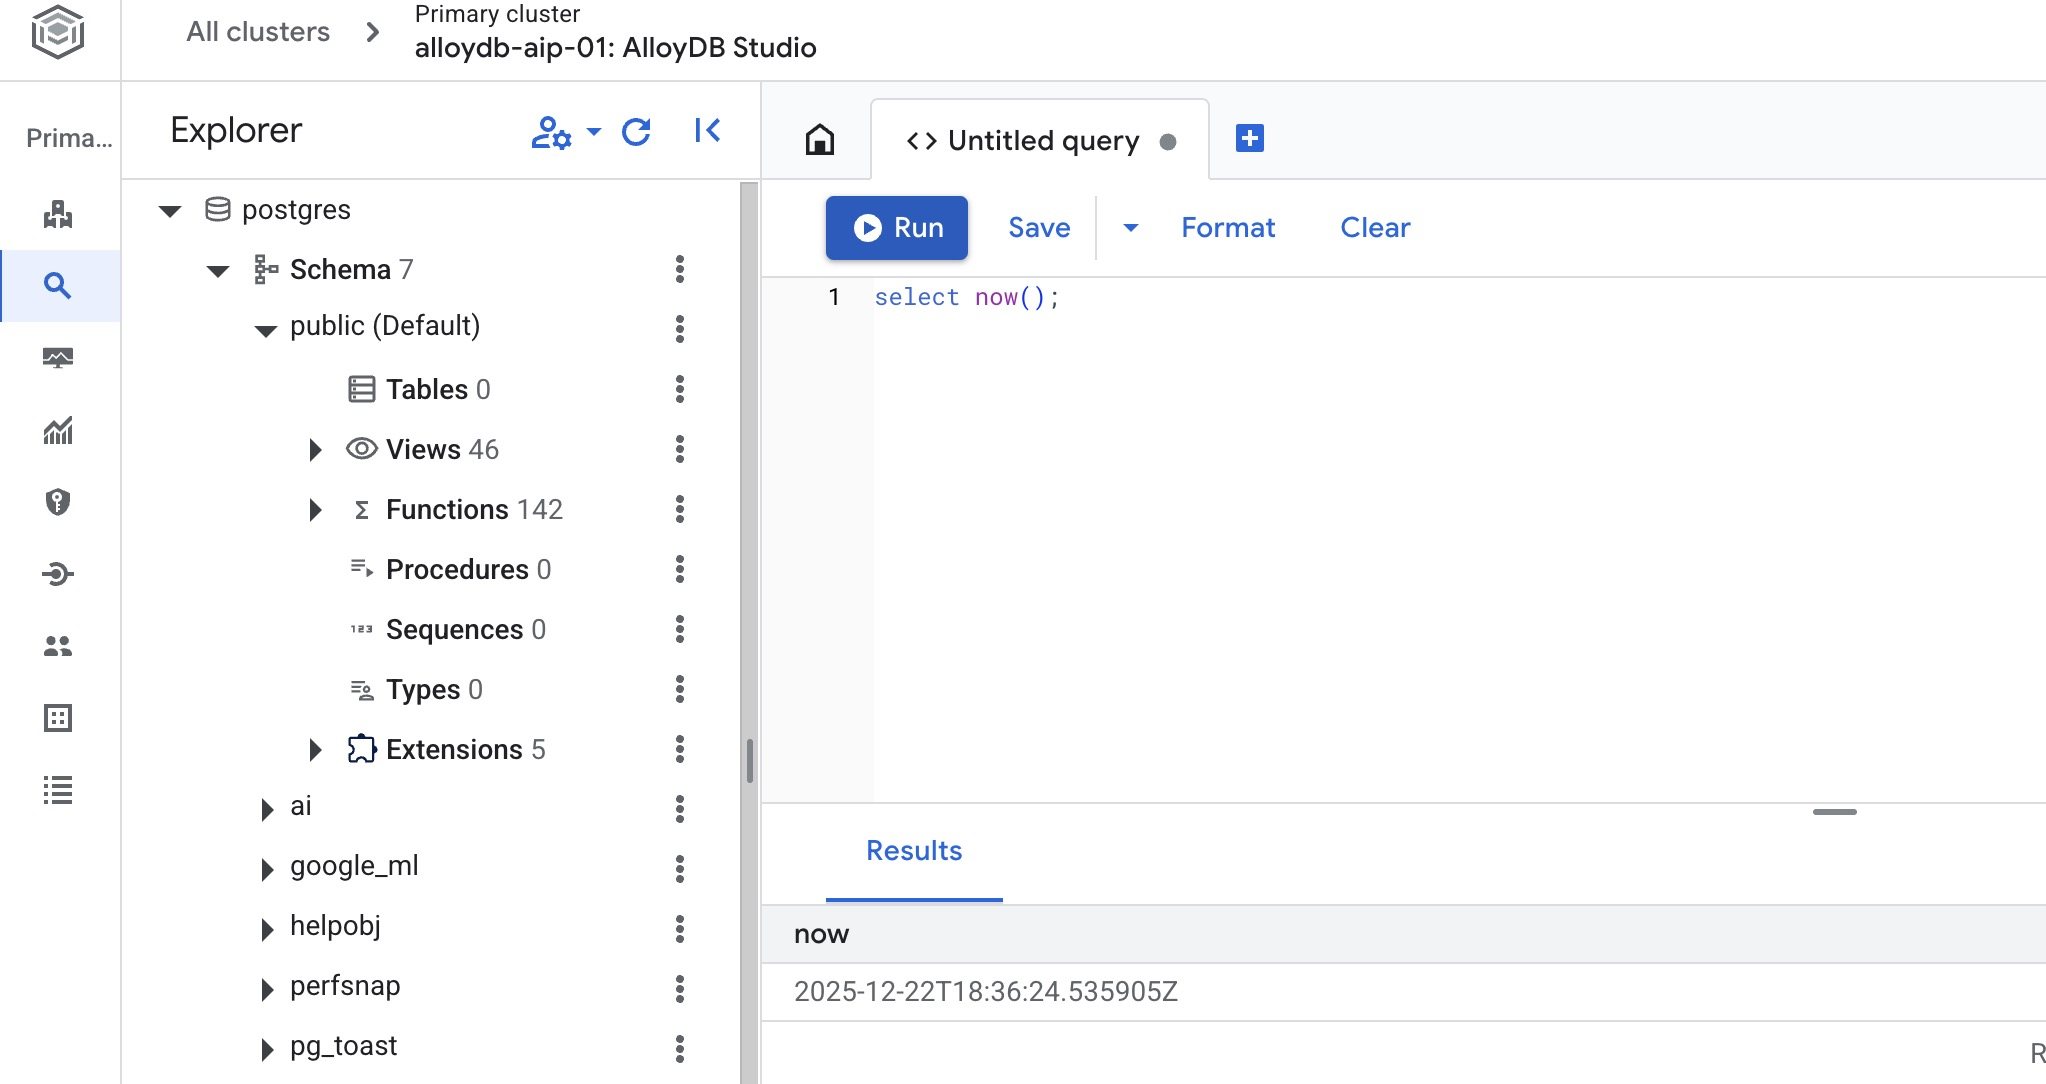
In the AlloyDB Studio Editor execute the following command.
Create database:
CREATE DATABASE quickstart_db
Expected output:
Statement executed successfully
Connect to quickstart_db
Check if your database is created by connecting to it. Reconnect to the studio using the button to switch user/database.

Pick up from the dropdown list the new quickstart_db database and use the same user and password as before.
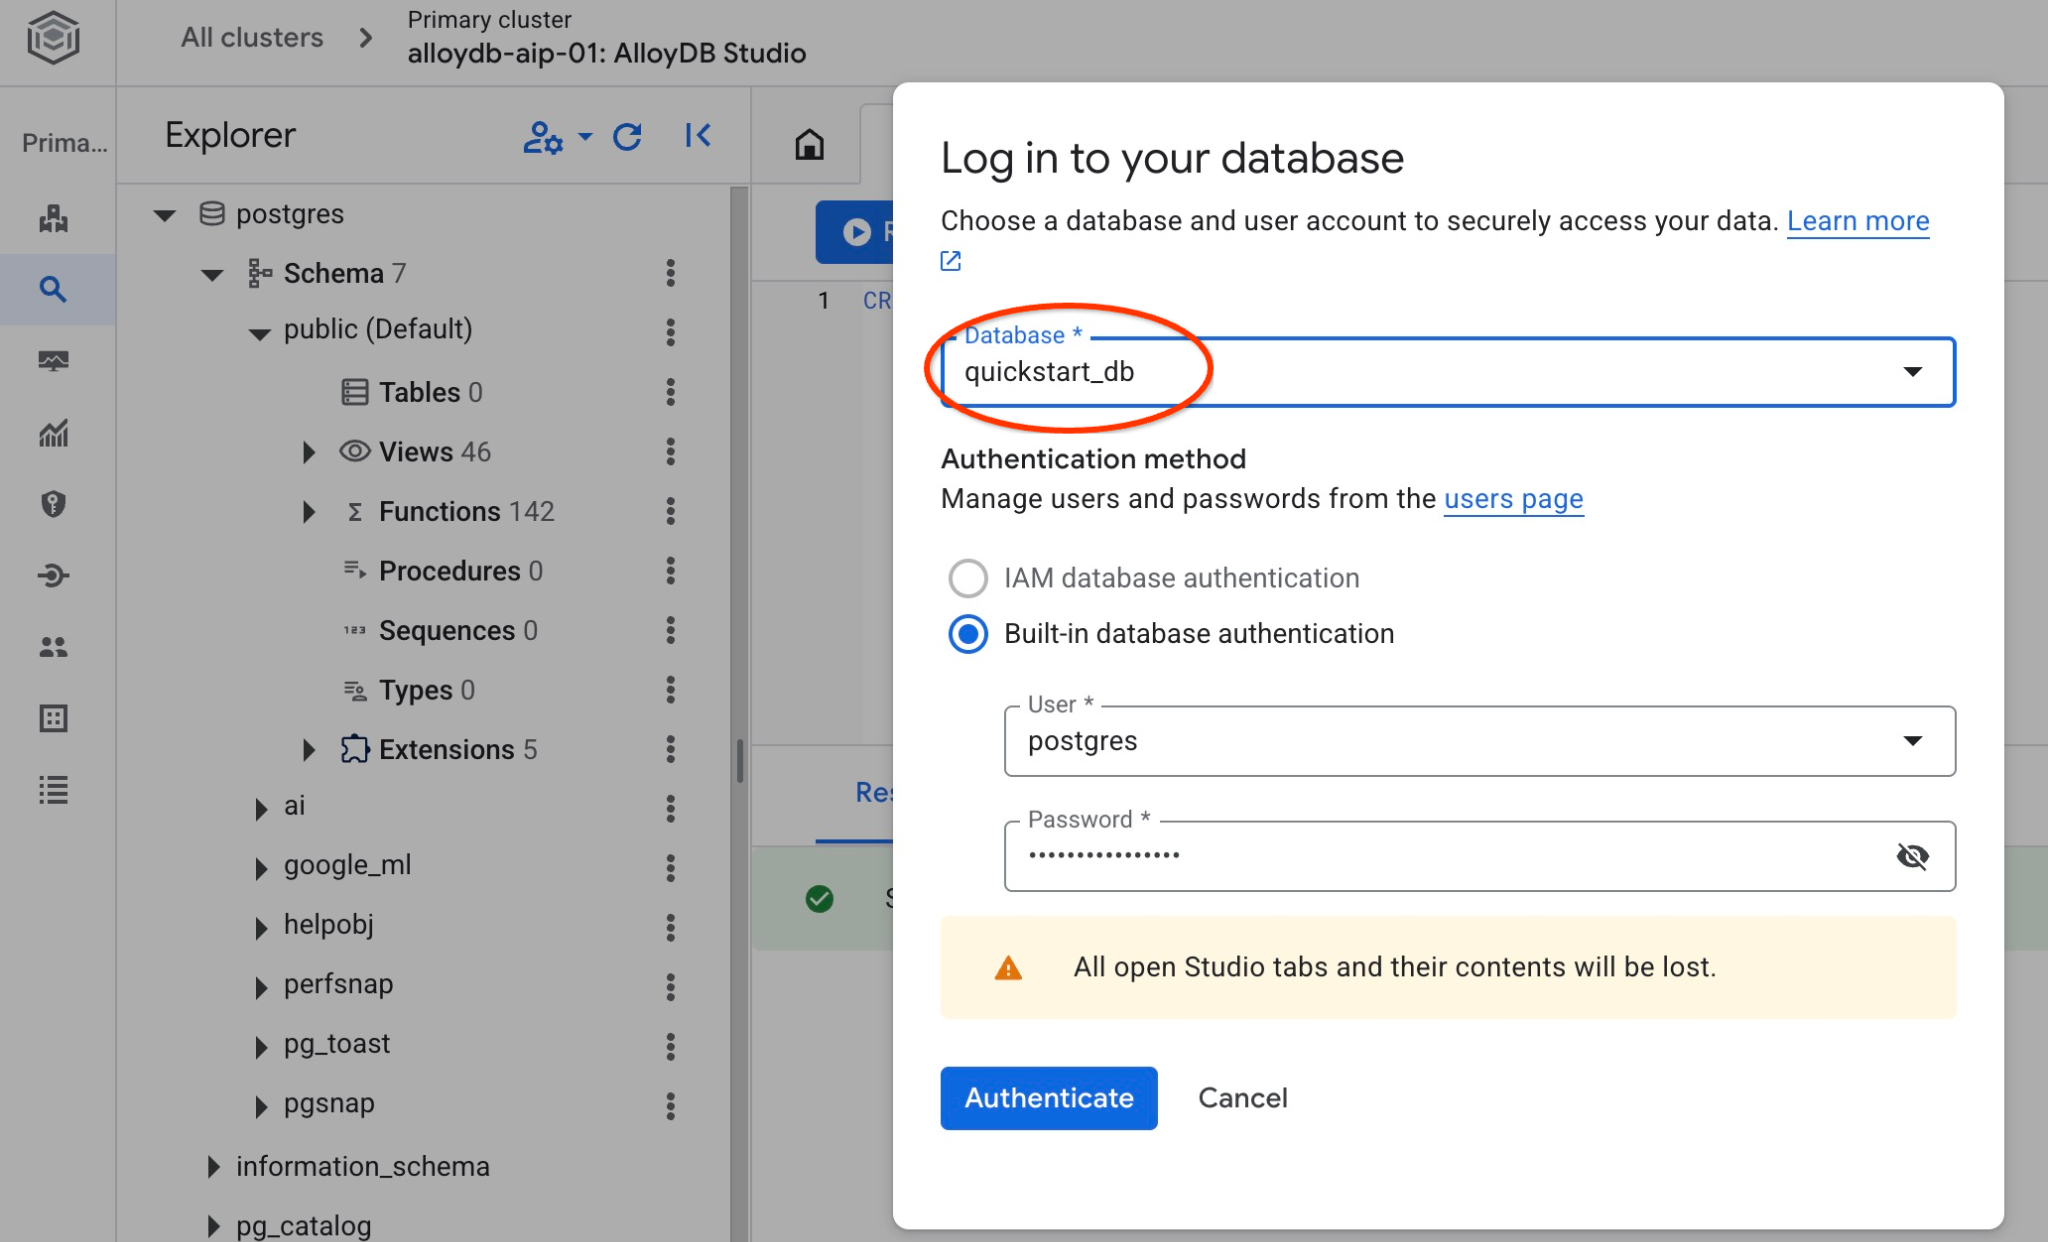
It will open a new connection where you can work with objects from the quickstart_db database. There you will be able to examine your imported schema and data.
6. Sample Data
Now you need to create objects in the database and load data. You are going to use a fictional Cymbal Shipping company dataset. It has fictional data about goods, trucks, requests and truck trips along with fictional drivers.
Create Storage Bucket
You are going to use Google SDK (gcloud) to import data from our cloned repository to the AlloyDB database and need to create a storage bucket for that and grant access to the AlloyDB service account. Alternatively you can always try to do it using the web console as it is described in the documentation.
In the Google Cloud Shell terminal execute:
PROJECT_ID=$(gcloud config get-value project)
REGION=us-central1
gcloud storage buckets create gs://$PROJECT_ID-import --project=$PROJECT_ID --location=$REGION
gcloud storage buckets add-iam-policy-binding gs://$PROJECT_ID-import --member="serviceAccount:service-$(gcloud projects describe $PROJECT_ID --format="value(projectNumber)")@gcp-sa-alloydb.iam.gserviceaccount.com" --role=roles/storage.objectViewer
Load Data
The next step is to load the data. Our SQL dump is located in the cloned repository folder. The following command assumes you've used your home directory as the starting point when you cloned the repository in the previous step while creating AlloyDB cluster.
Copy the compressed SQL dump to the new storage bucket:
REPO_NAME="codelabs"
SOURCE_DIR="alloydb-ai-mcp"
cd ~/$REPO_NAME/$SOURCE_DIR
gcloud storage cp ~/$REPO_NAME/$SOURCE_DIR/postgres_dump.sql.gz  gs://$PROJECT_ID-import
Then load the data to the quickstart_db database:
PROJECT_ID=$(gcloud config get-value project)
CLUSTER_NAME=alloydb-aip-01
REGION=us-central1
gcloud alloydb clusters import $CLUSTER_NAME  --region=us-central1 --database=quickstart_db --gcs-uri=gs://$PROJECT_ID-import/postgres_dump.sql.gz --project=$PROJECT_ID --sql
The command will load the sample dataset to the quickstart_db database. You can verify the tables and records using AlloyDB Studio.
7. Work with Data Agent
Let us start from a sample AI agent created using Google ADK for python and show how to configure it to work with Google Cloud MCP server for AlloyDB.
Check the Agent source code
In the cloned repository review the agent code using Google Cloud Shell editor.
REPO_NAME="codelabs"
SOURCE_DIR="alloydb-ai-mcp"
edit ~/$REPO_NAME/$SOURCE_DIR/cymbal_logistic/data_agent/agent.py
You can see in the agent we have a section for the Google Cloud MCP server for AlloyDB. We provide an endpoint as MCP_SERVER_URL, authentication, project id and adding it to the MCP toolset.
# Google Cloud MCP Server for AlloyDB

MCP_SERVER_URL = "https://alloydb.googleapis.com/mcp"
creds, project_id = default(scopes=["https://www.googleapis.com/auth/cloud-platform"])
if not creds.valid:
    creds.refresh(GoogleAuthRequest())

print(f"Authenticated as project: {project_id}")

# 2. Configure MCP Toolset
# We use StreamableHTTPConnectionParams to pass the auth header
headers = {
    "Authorization": f"Bearer {creds.token}",
    "X-Goog-User-Project": project_id
}

connection_params = StreamableHTTPConnectionParams(
    url=MCP_SERVER_URL,
    headers=headers,
    timeout=300.0,
    sse_read_timeout=600.0
)

mcp_toolset = McpToolset(connection_params=connection_params)
And in the agent code the MCP toolset is included as tools parameter for the agent. Also there are cluster and instance names, the region and the database as variables for the agent prompt.
MODEL_ID = "gemini-3-flash-preview"
cluster_name="alloydb-aip-01"
instance_name="alloydb-aip-01-pr"
location="us-central1"
database_name="quickstart_db"

# Agent configuration

root_agent = Agent(
    model=MODEL_ID,
    name='root_agent',
    description='A helpful assistant for analyst requests.',
    instruction=f"""
    Answer user questions to the best of your knowledge using provided tools.
    Do not try to generate non-existent data but use the grounded data from the database.
    When you answer questions about Cymbal Logistic activity
    use the toolset to run query in the AlloyDB cluster {cluster_name} instance {instance_name} in the location {location}
    in the project {project_id} in the database {database_name}
    Use ai schema to use AI functions and models like gemini-3-flash-preview with the functions from the schema.
    """,
    tools=[mcp_toolset],
)
The Google Cloud MCP service for AlloyDB has a predefined set of tools. If you want to list all available tools you can use the curl command from the Cloud Shell console terminal using the following command. And you always can check the latest reference for the Google Cloud MCP server for alloydb in the documentation.
curl -s -X POST http://alloydb.googleapis.com/mcp \
  -H "Content-Type: application/json" \
  -d @- <<EOF | jq -r '.result.tools[].name'
{
  "id": "my_id_01",
  "jsonrpc": "2.0",
  "method": "tools/list"
}
EOF
Start the Agent
Now you can start the agent in interactive mode using Google ADK web interface. The ADK web interface provides a convenient way to test and troubleshoot agents' workflows.
First let us install all required packages for Python using the uv package manager.
REPO_NAME="codelabs"
SOURCE_DIR="alloydb-ai-mcp"
cd ~/$REPO_NAME/$SOURCE_DIR/cymbal_logistic
uv sync
When all the packages are installed you need to add a .env file to the agent directory to direct it to use Vertex AI for all communications with the AI models.
echo "GOOGLE_GENAI_USE_VERTEXAI=true" > data_agent/.env
echo "GOOGLE_CLOUD_PROJECT=$(gcloud config get-value project -q)" >> data_agent/.env
echo "GOOGLE_CLOUD_LOCATION=global" >> data_agent/.env
Then you can start the agent
uv run adk web --allow_origins 'regex:https://.*\.cloudshell\.dev'
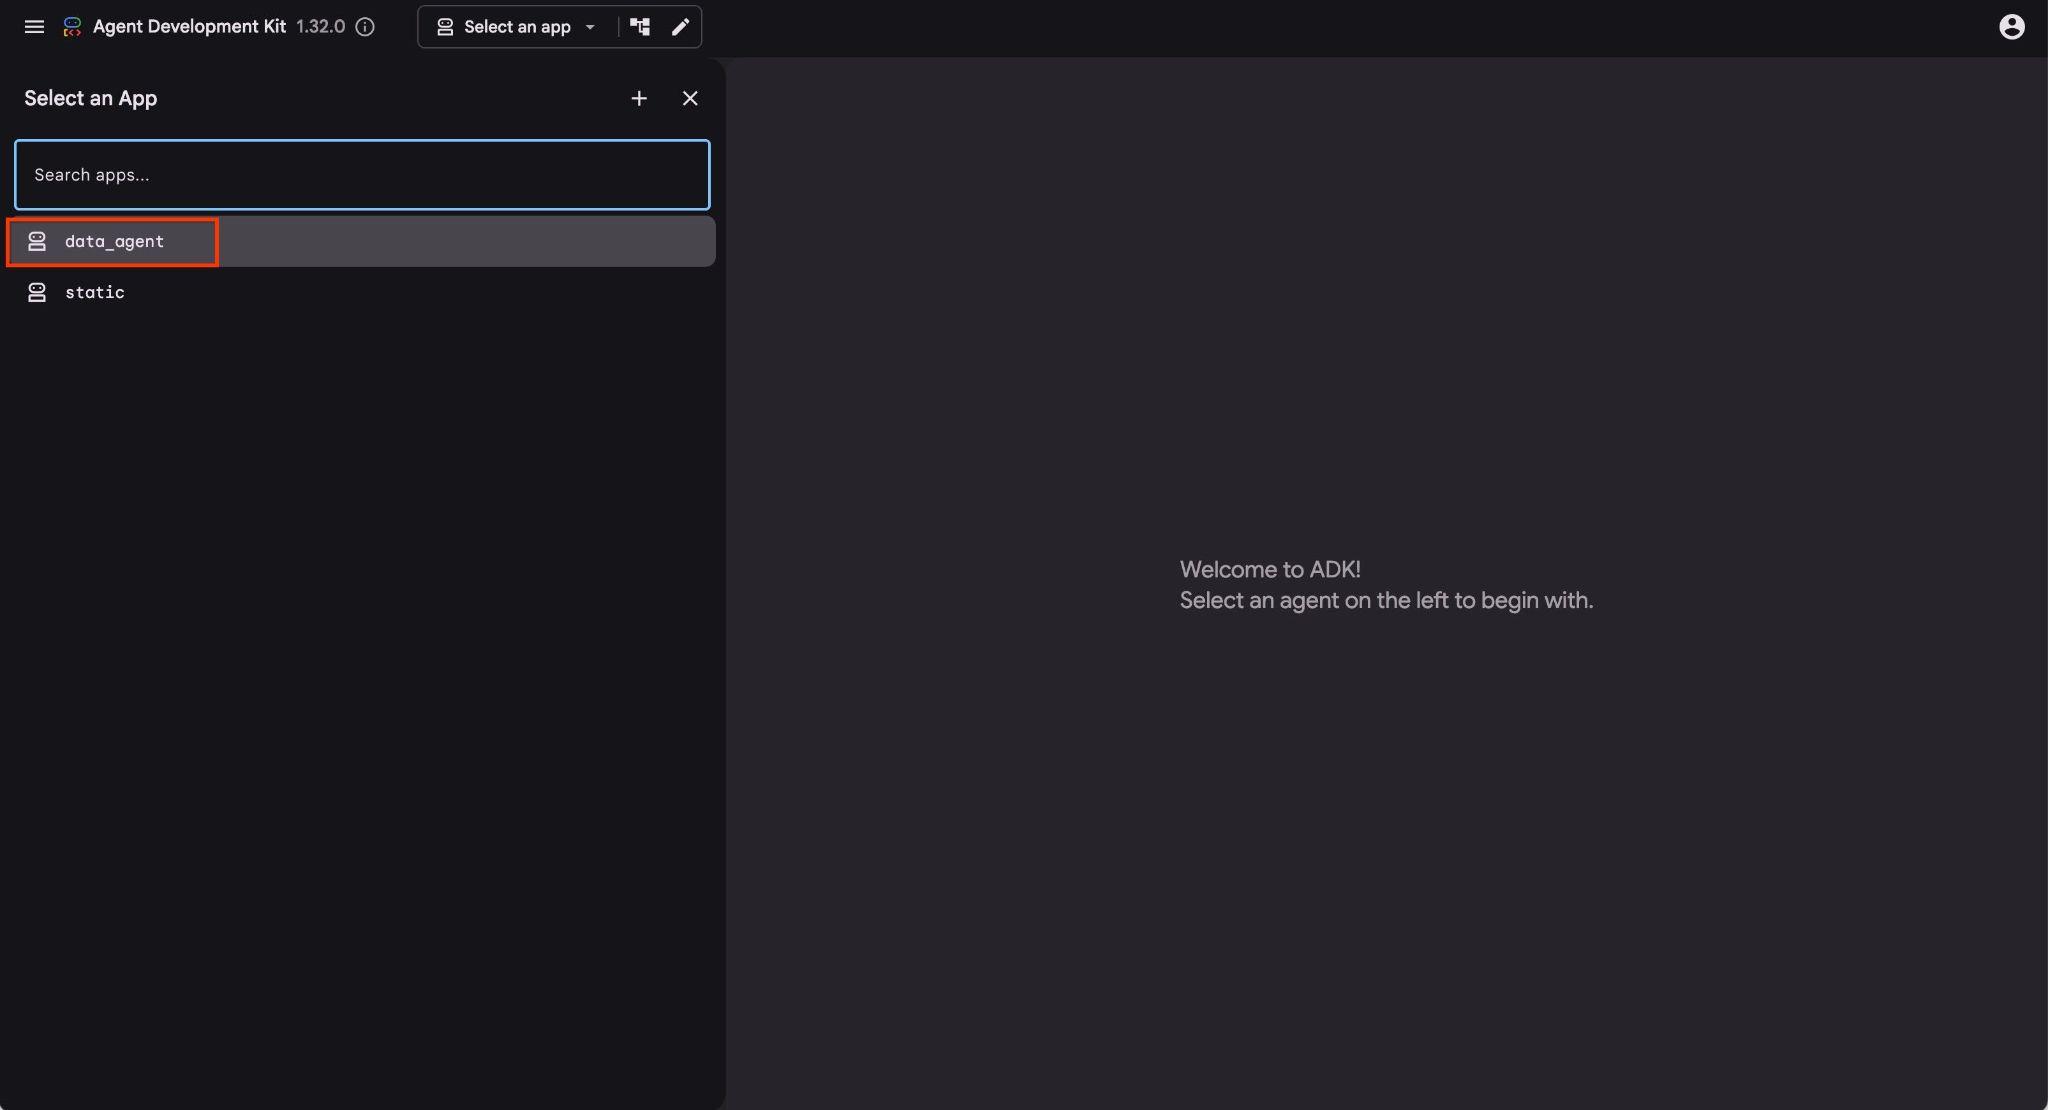
You should see output like the following with the endpoint like http://127.0.0.1:8000 .
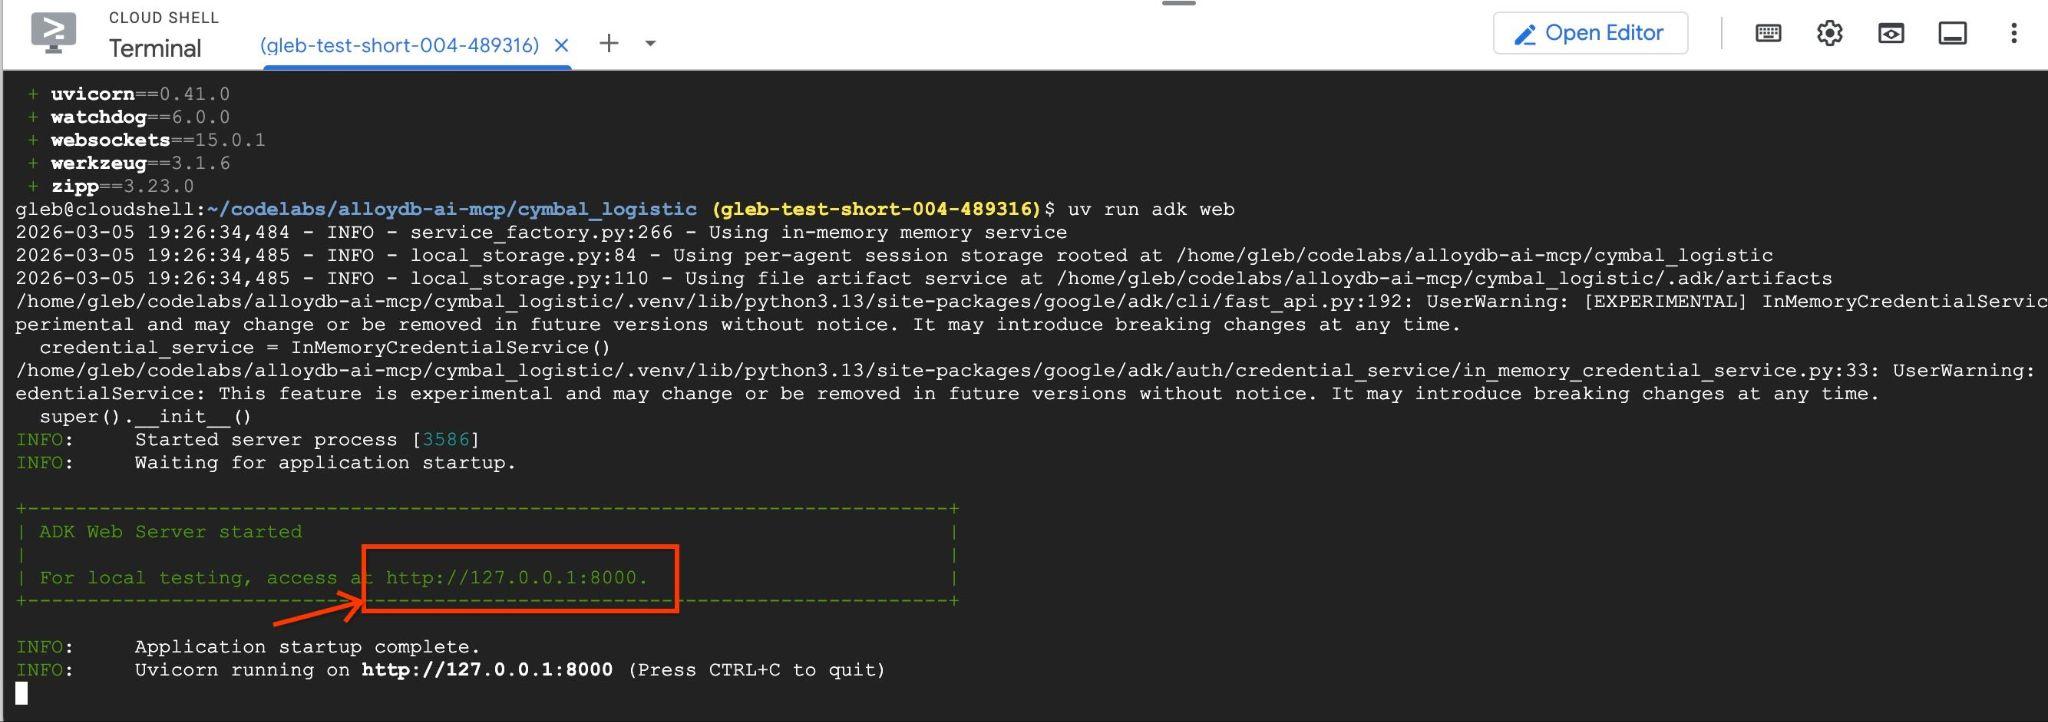
You can click on that URL in the cloud shell and it will open a preview window in a separate browser tab where you choose the data_agent from the drop down list on the left.
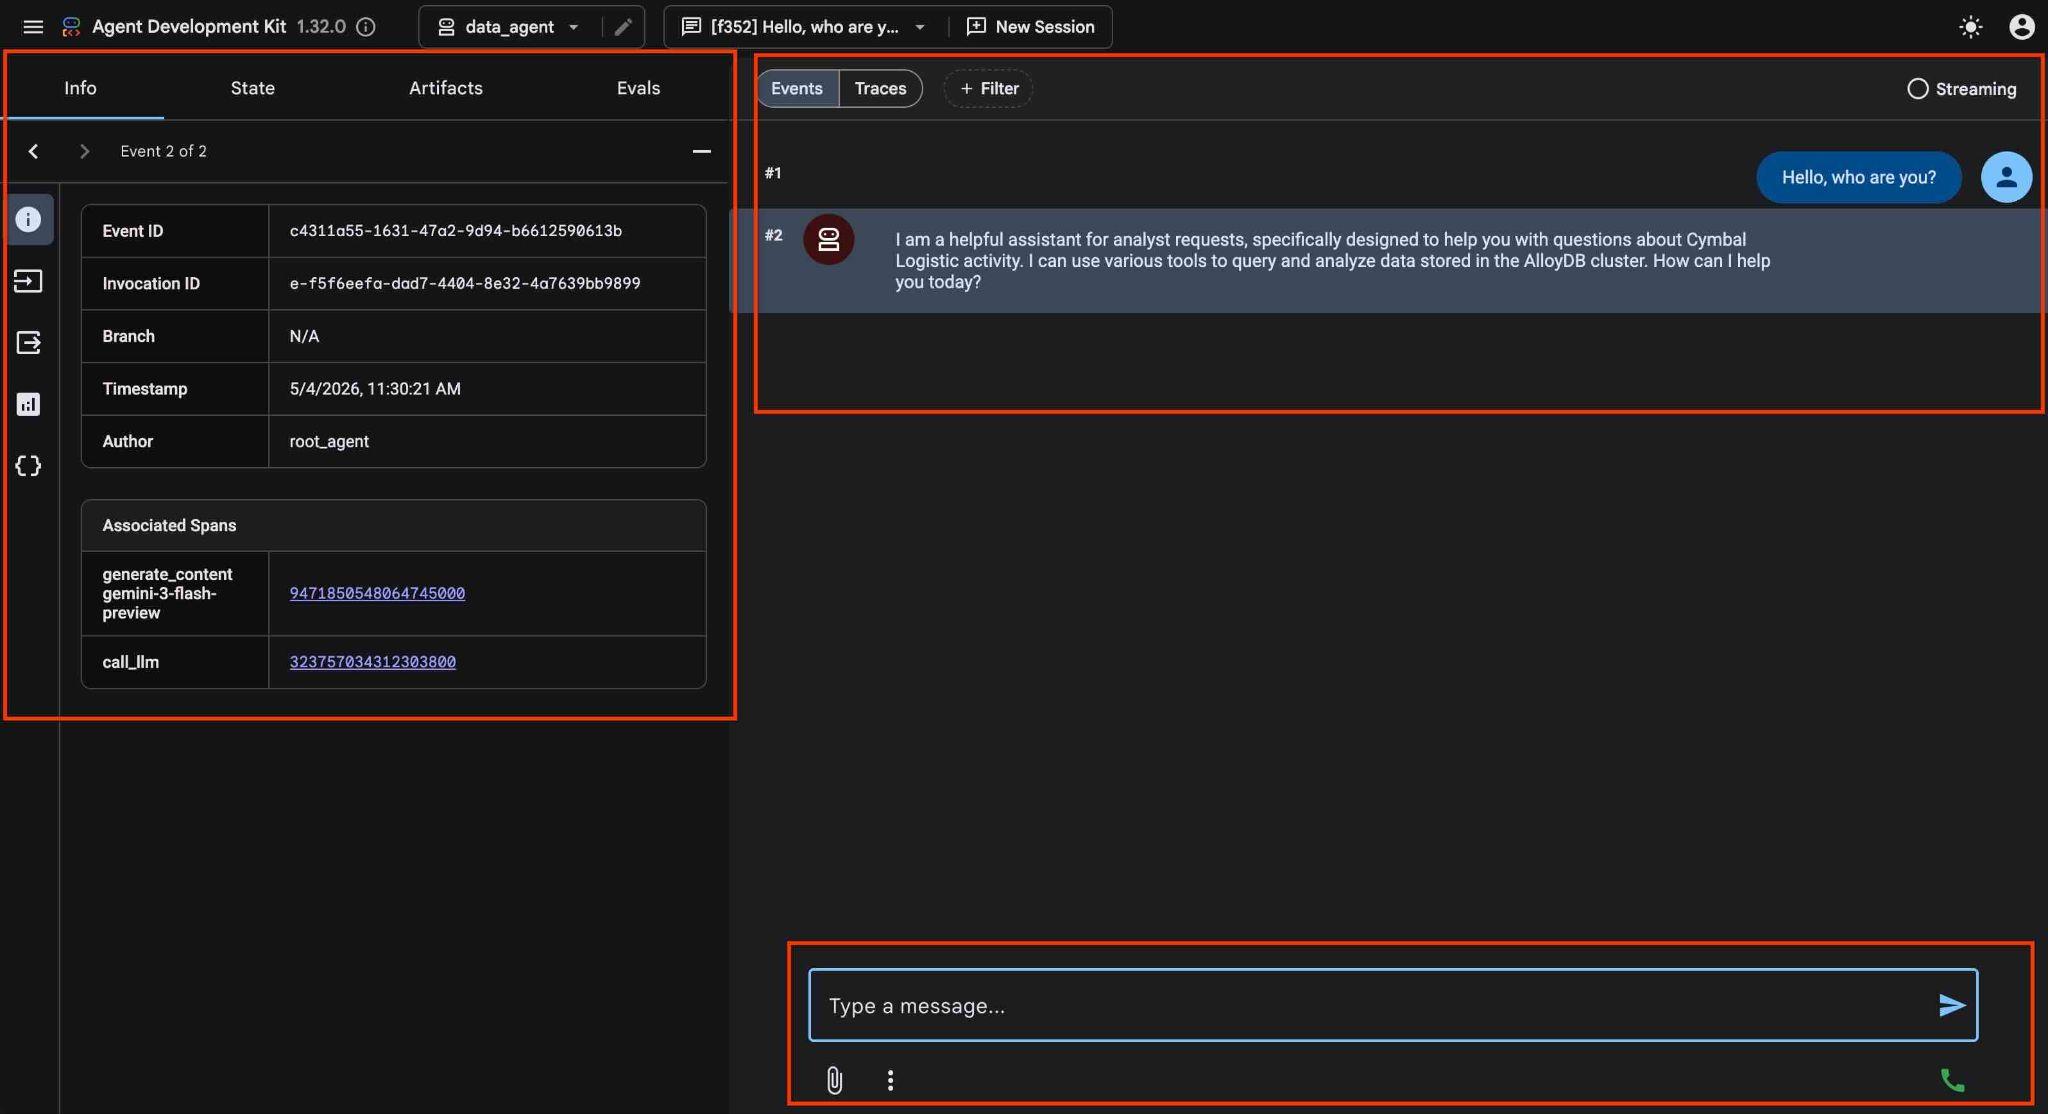
In the ADK web interface you can post your questions in the bottom right and see the full execution flow including the traces for each step on the right side.
8. Test AlloyDB MCP with Agent
The Agent allows you to ask questions in free form using natural language and the agent will use Google Cloud MCP server for AlloyDB as a tool to answer the questions. The questions are posted in the right bottom and the answer with all calls to the tools will appear at the top.
You are working with operational data for a shipping company which has information about shipping requests, trucks, drivers and trips done by drivers. The first question is about the number of trips executed in February 2026.
In the input field on the right bottom type the following and press enter.
Hello, can you tell me how many trips we've done in February this year?
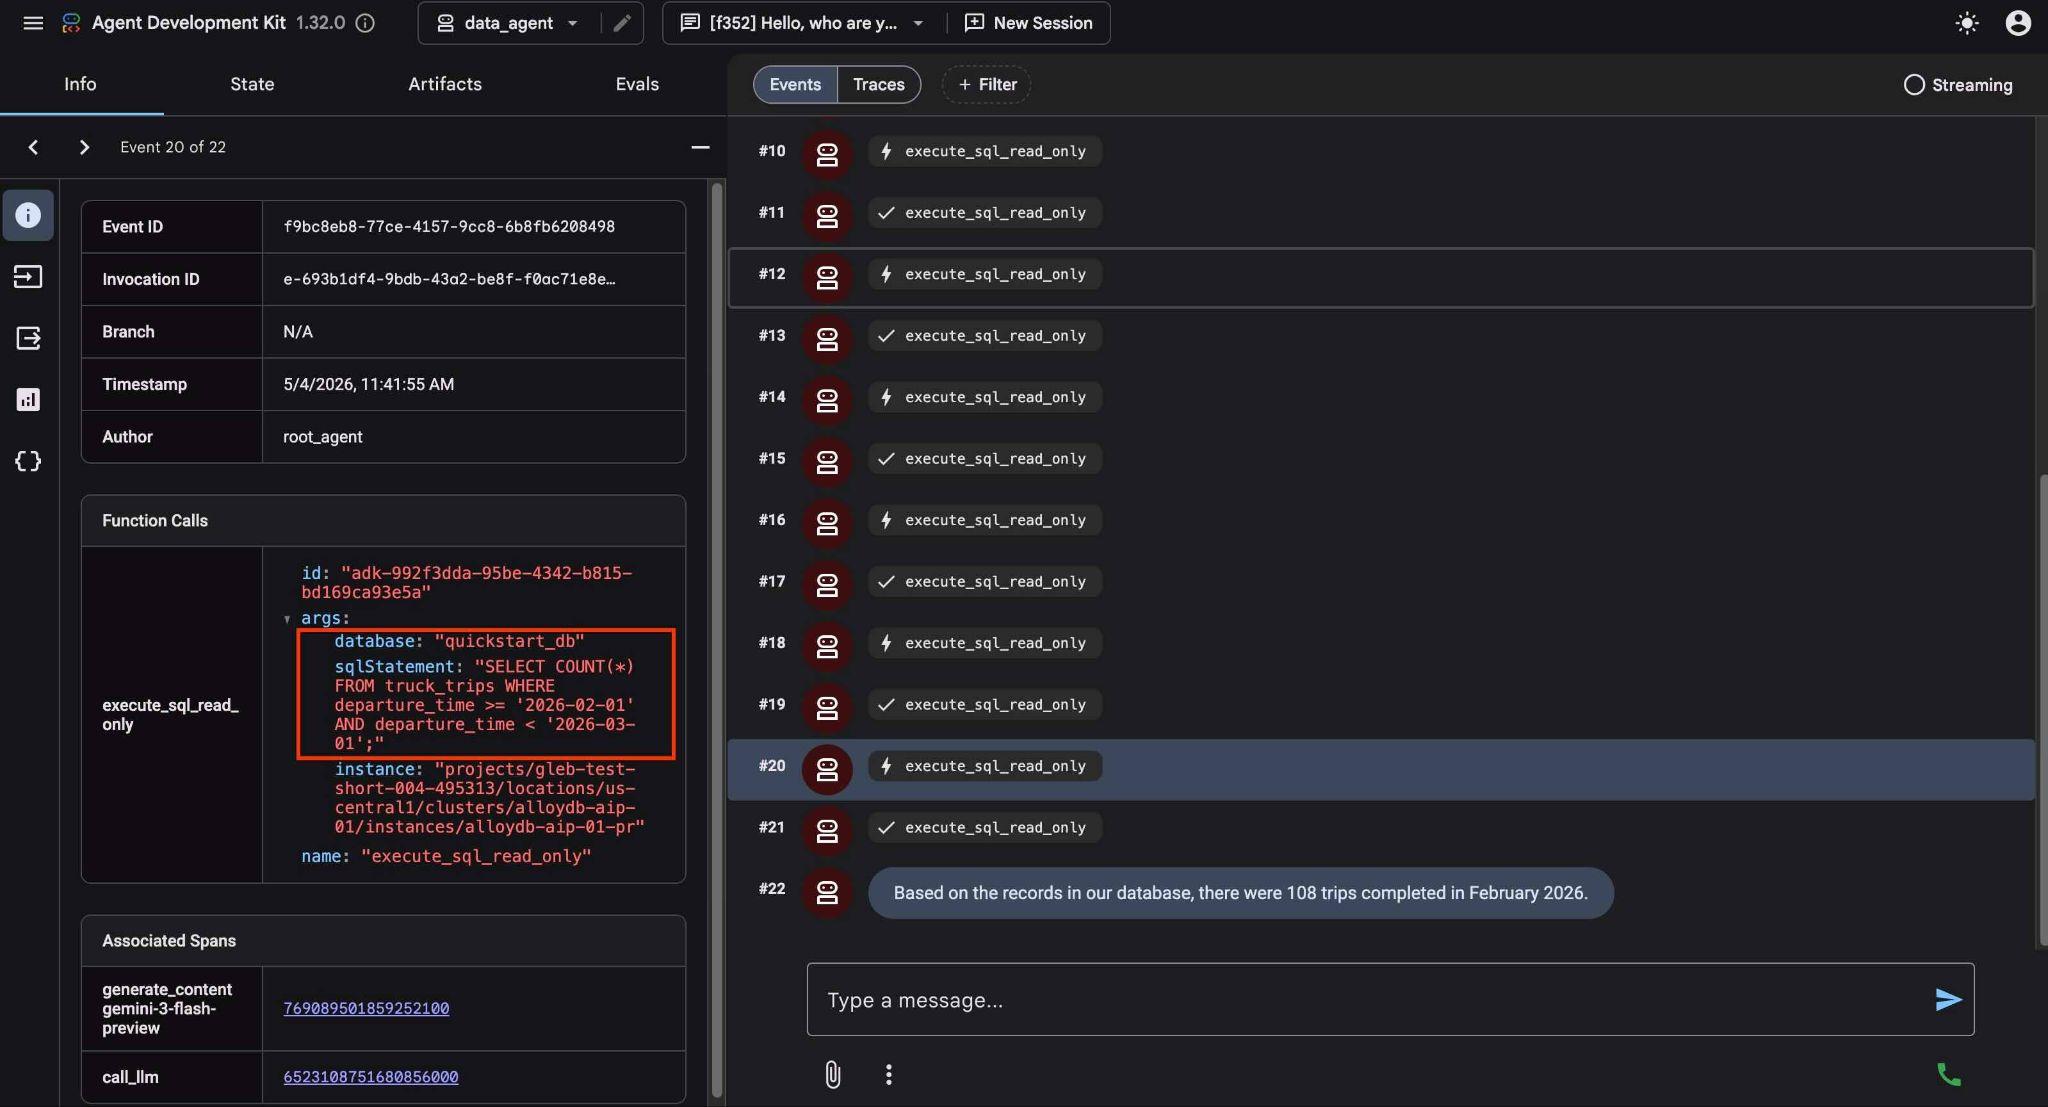
The agent will work executing multiple tools calls to identify the right tables in the schema and the table structure before executing the correct SQL statement to get the right data.
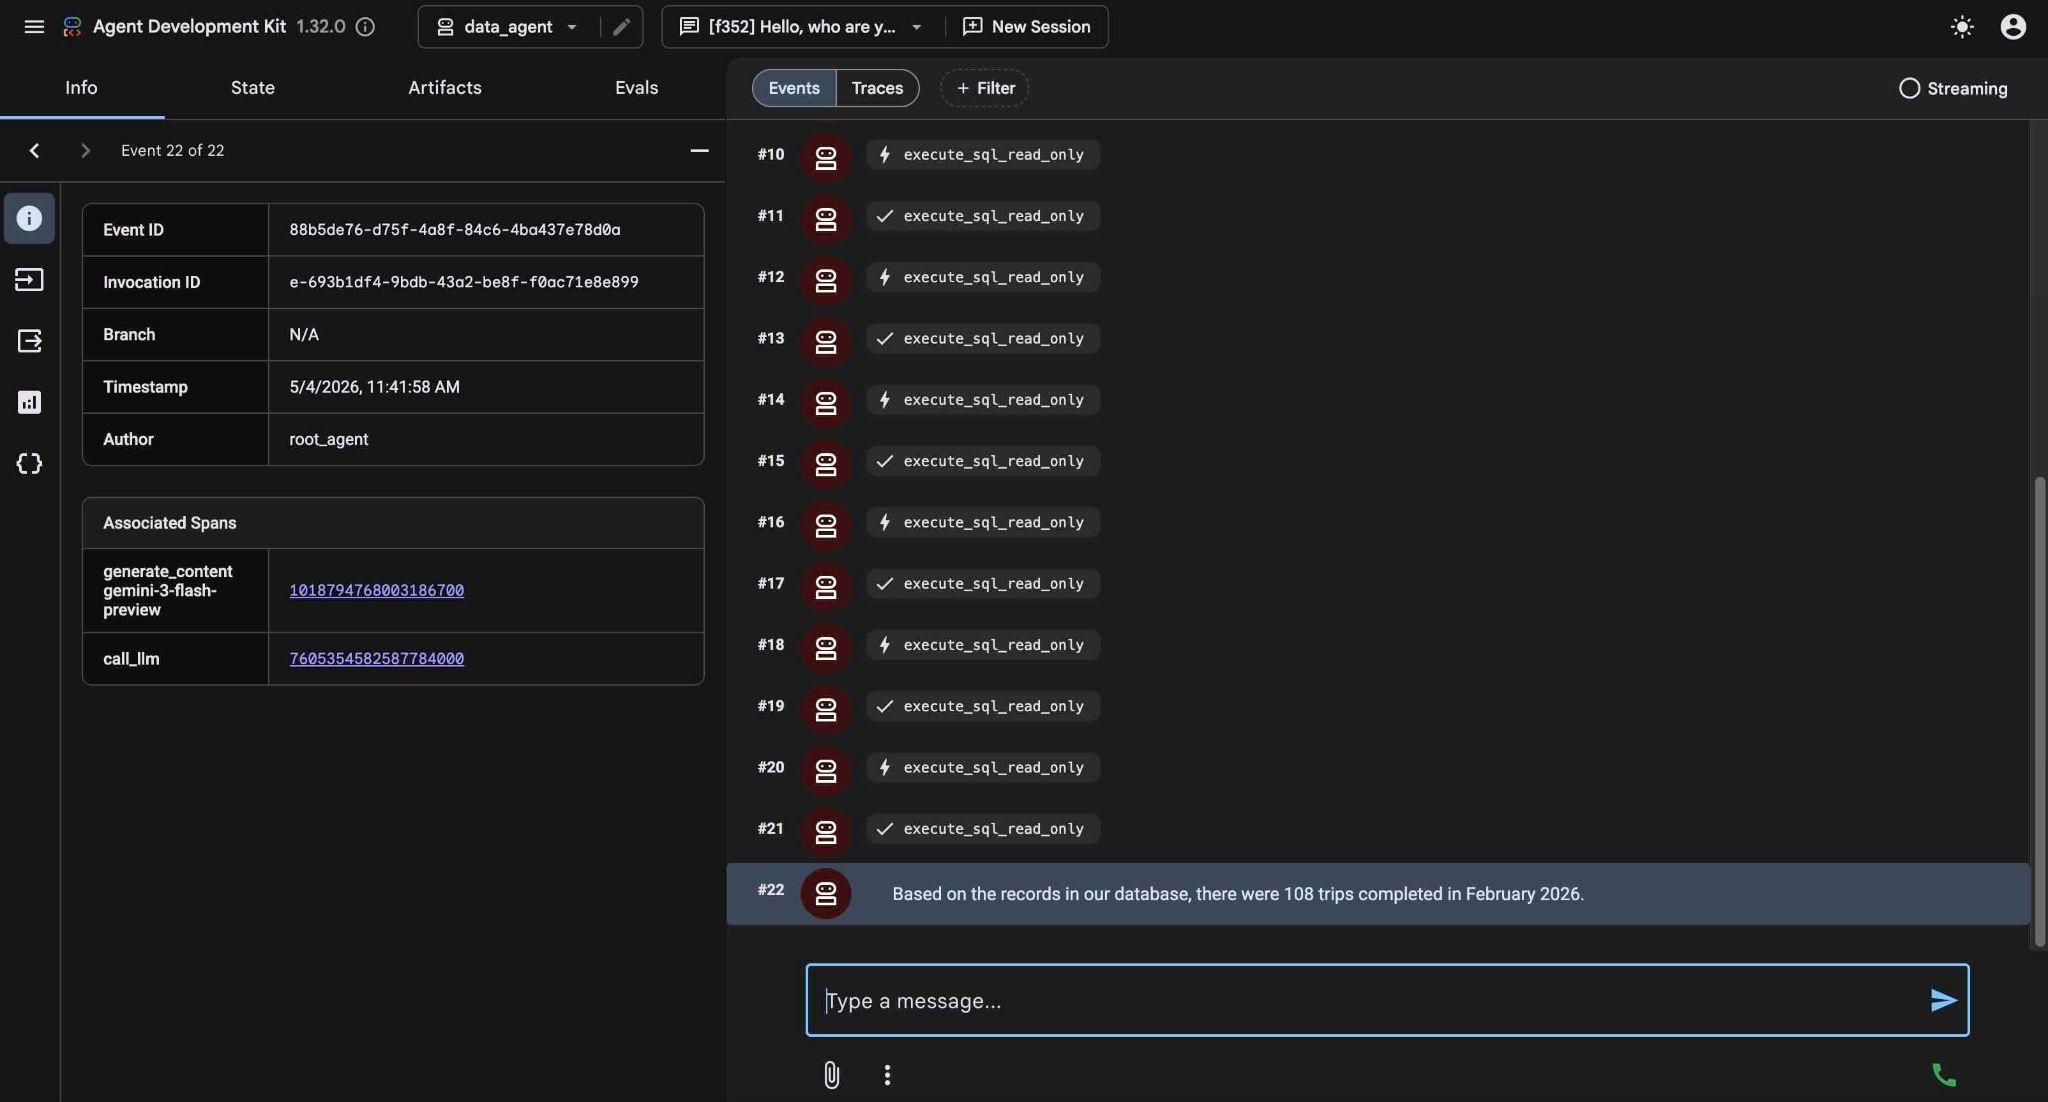
Eventually it will produce the result after building the proper query and executing it on the database.
Based on the records in our database, there were 108 trips completed in February 2026.
You can see what each tool call does by clicking on the tool execution. For example, here is the query executed to get our results.
Now make the request more complicated asking to compare the results with the previous month.
How is it in comparison in numbers and mileage with the January?
It returns the result by executing different queries analyzing results and providing a difference in the number of trips and mileage.
In comparison to January 2026, February saw a slight decrease in both the number of trips and the total mileage:

January 2026: 114 trips with a total mileage of 185,597 km.
February 2026: 108 trips with a total mileage of 177,893 km.
This represents a decrease of 6 trips and 7,704 km in mileage for February compared to January.
Try other simple requests using the ADK web interface and see how it executes different queries to achieve the results.
Stop the agent pressing ctrl+c in the terminal. You can close the browser tab with ADK web interface.
Now you can try a sample application and see how it can be used as a tool for data analysts.
9. Sample Application
In the same cloned repository we have a sample application for our Cymbol Logistic company. The application is using Google Mesop Python framework .
You can analyze the application code by opening the app.py file in the cloud shell editor.
REPO_NAME="codelabs"
SOURCE_DIR="alloydb-ai-mcp"
edit ~/$REPO_NAME/$SOURCE_DIR/cymbal_logistic/app.py
In the code we use a function to pass a new prompt with variables to our data agent. The reason is to be able to configure it in the interface if we decide to call a different database or instance. Here is the function definition and the prompt.
def run_query_sync(request_text, cluster_name, location, instance_name, database_name, project_id, session_id, summary):
    local_runner = FrontendRunner()

    instruction = f"""
    Answer user questions to the best of your knowledge using provided tools.
    Do not try to generate non-existent data but use the grounded data from the database.
    When you answer questions about Cymbal Logistic activity
    use the toolset to run query in the AlloyDB cluster {cluster_name} instance {instance_name} in the location {location}
    in the project {project_id} in the database {database_name}
    Use ai schema to use AI functions and models like gemini-3-flash-preview with the functions from the schema.
    """
    ...
After examining the code press the "terminal" button to start and test our application. The application will start on the port 8080. If you want to change the port - adjust the command changing the port value.
In the cloud shell execute.
REPO_NAME="codelabs"
SOURCE_DIR="alloydb-ai-mcp"
cd ~/$REPO_NAME/$SOURCE_DIR/cymbal_logistic
uv run mesop app.py --port=8080
Then use web preview in the Google Cloud Shell by clicking on http://localhost:8080
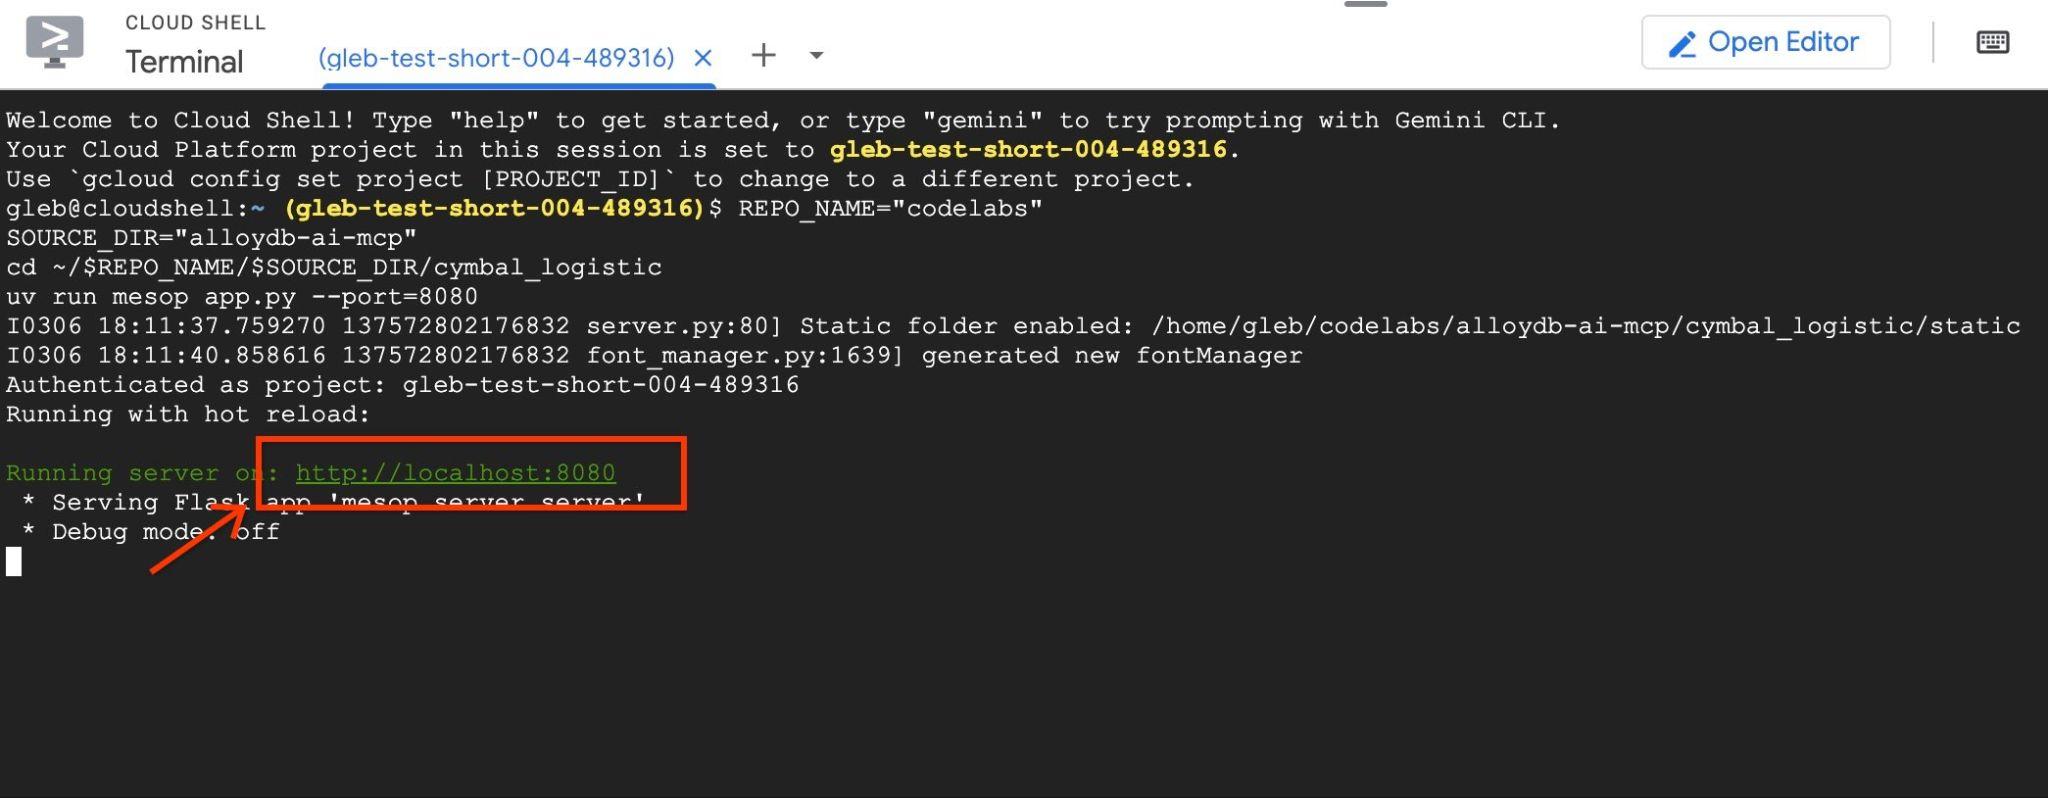
It will open a new tab in the browser with the application interface.
Click on the checkbox "Enable Debug Output" at the top right and type a question like the following.
What was the average speed for each driver last month? List top 5 fasters drivers ranking them by the average speed. Show the name, distance and average speed for each of them.
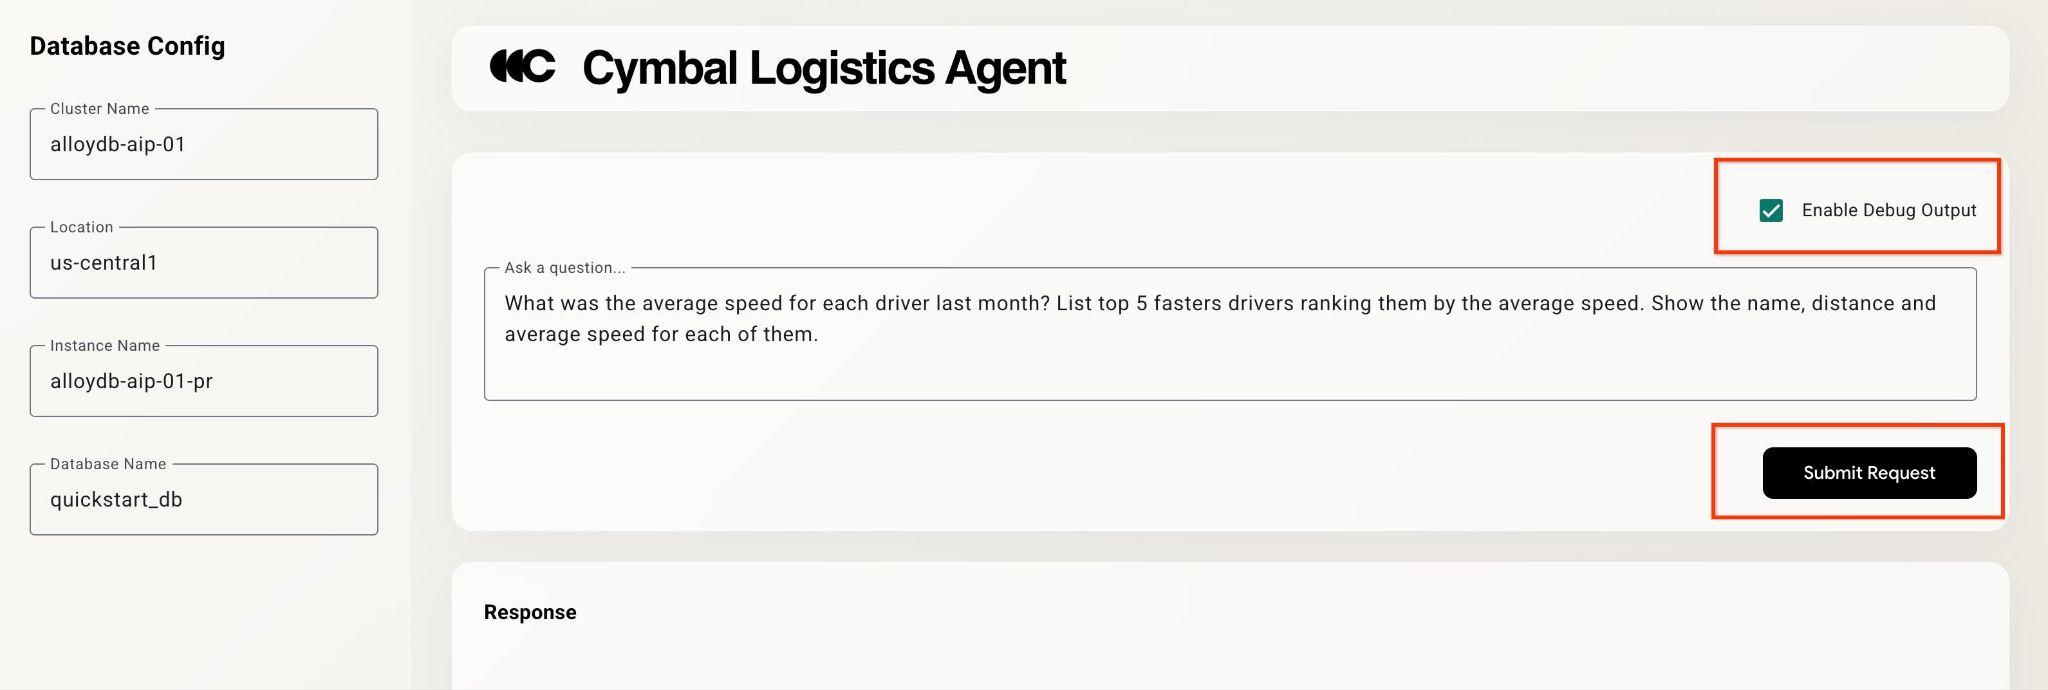
Then push the Submit Request button.
The agent will be working behind the scenes and produce the output and debug information with all the queries executed by our MCP toolset. Check the queries to see the workflow.
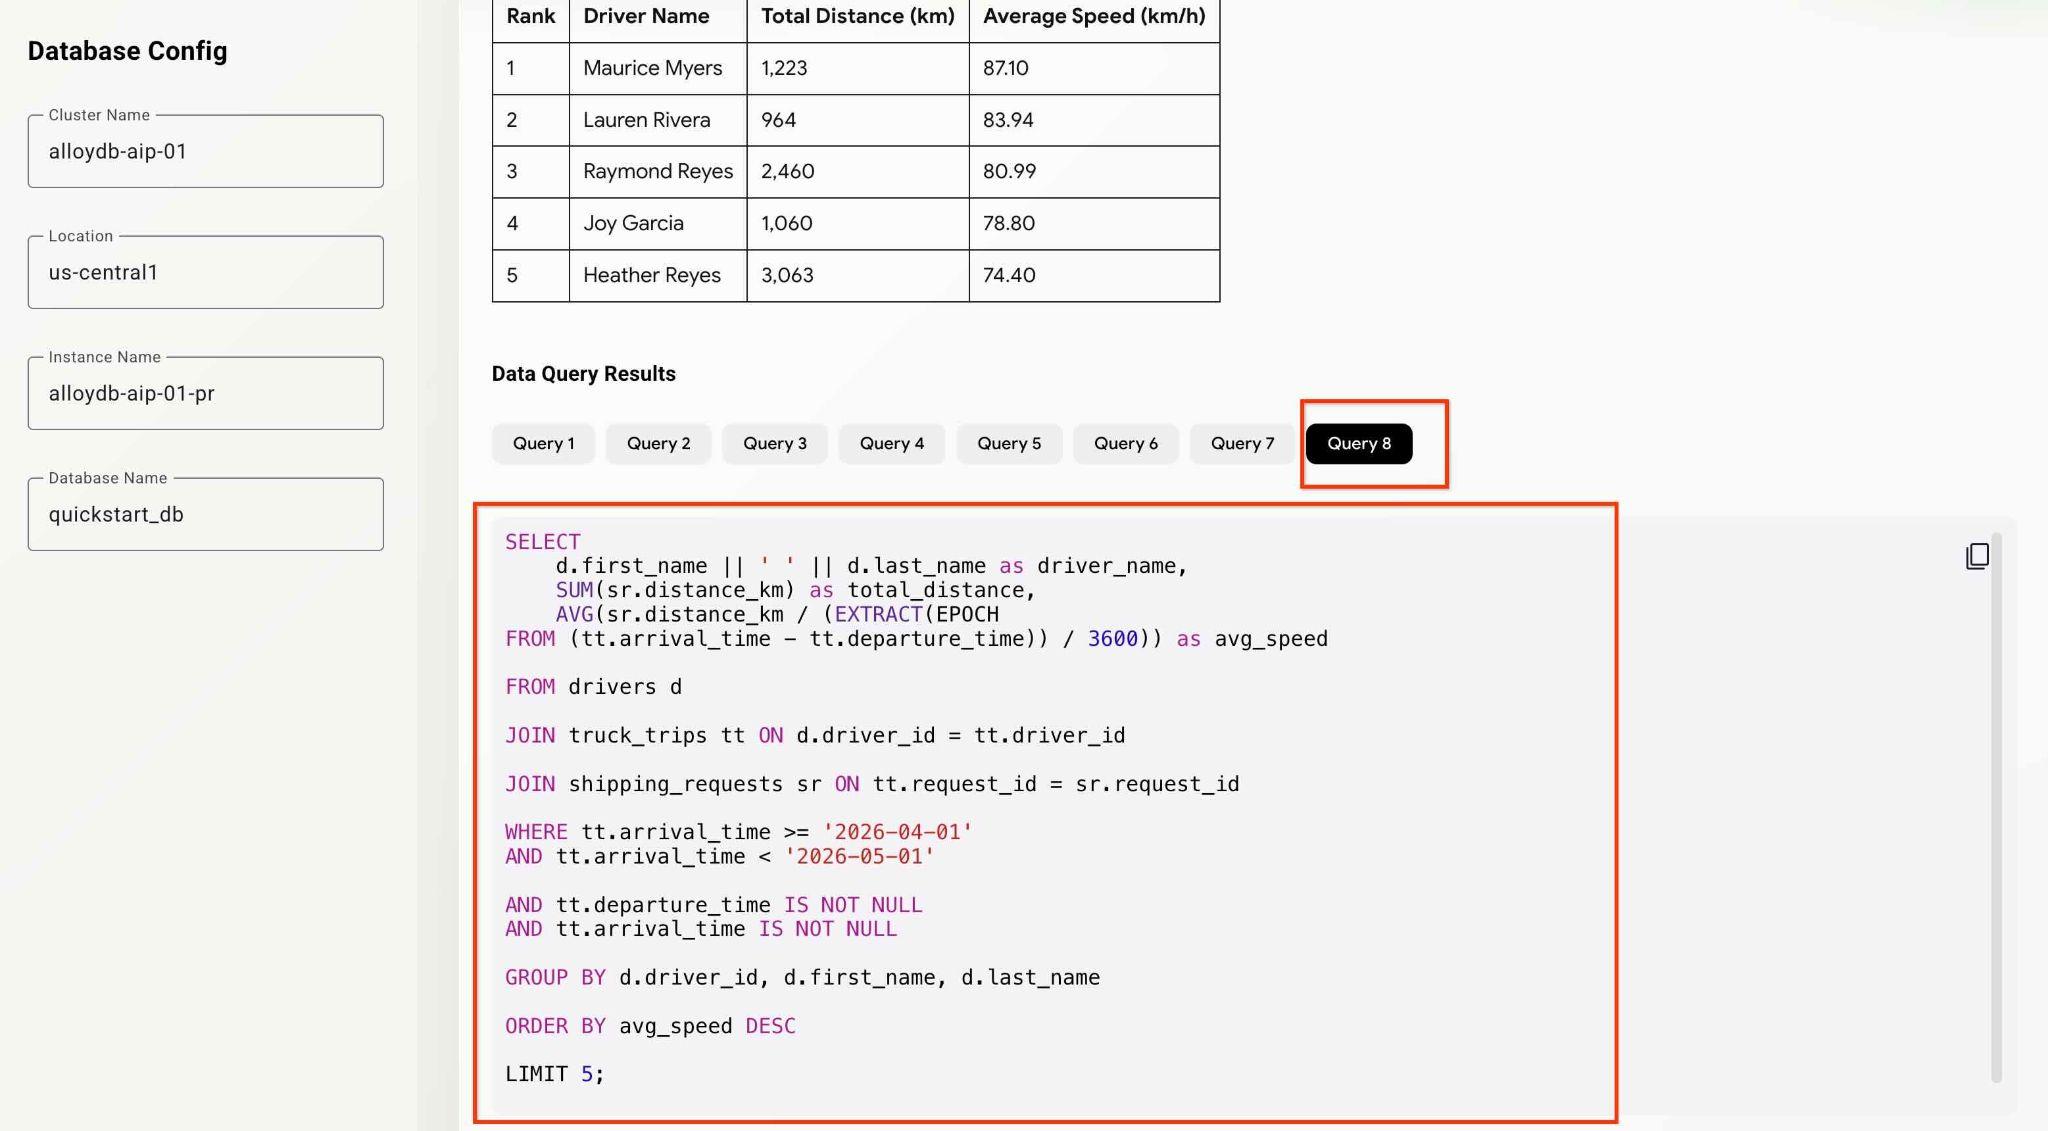
You can test the agents and app capabilities by trying different analytical questions.
So far you were able to do some basic analytics and discovery using the agent with MCP. In the next chapter you will try to use more advanced AlloyDB features.
10. AlloyDB AI Functions
AlloyDB AI functions enable smart filtering and ranking over text and multimodal data (notably, images) and bring the power of Gemini to your queries. In particular, the AlloyDB AI functions AI.IF and AI.RANK can appear in SQL statements along conventional SQL operators (filters, joins, aggregation, etc).
Before using the AI functions we examine a search and aggregations using the "classic" methods. Try the following prompt.
Can you analyze the activity for the last 5 months and evaluate drivers for the most positive customer feedbacks. Give me top 5 drivers listing names, distance and years of experience for each driver.
It is able to find the "rating" column in the table with customer feedback and use it to identify the drivers with the best rating. Then it used the information to get more information about the drivers.
SELECT
    d.first_name || ' ' || d.last_name as driver_name,
    SUM(sr.distance_km) as total_distance,
    d.experience_years,
    COUNT(cf.feedback_id) as positive_feedback_count

FROM drivers d

JOIN truck_trips tt ON d.driver_id = tt.driver_id

JOIN customer_feedback cf ON tt.trip_id = cf.trip_id

JOIN shipping_requests sr ON tt.request_id = sr.request_id

WHERE tt.arrival_time >= '2025-12-01'
AND tt.arrival_time < '2026-05-01'

AND cf.rating >= 4

GROUP BY d.driver_id, d.first_name, d.last_name, d.experience_years

ORDER BY positive_feedback_count DESC, total_distance DESC

LIMIT 5;
But the rating technically may or may not include all the parameters we want to evaluate. For that we can use AlloyDB AI Functions.
AI.RANK operators
The ai.rank() function scores for how well a document answers a given query. It can be used for ranking or re-ranking results of the query. You can read more about operators in the documentation.
Modify the request and ask explicitly to use AI.RANK during the analysis to evaluate drivers based on their performance and professionalism.
Can you find the top 5 fastest drivers in the last month and rank them by the feedback using the AI.RANK function? Give me top drivers names, distance, years of experience and rank for each driver.
The command might take a bit more time since the agent should figure out how to use the AI.RANK function, get the data and apply the AI.RANK to sort the information accordingly. At the end you should get the list of drivers ranked by the model and list of executed queries.
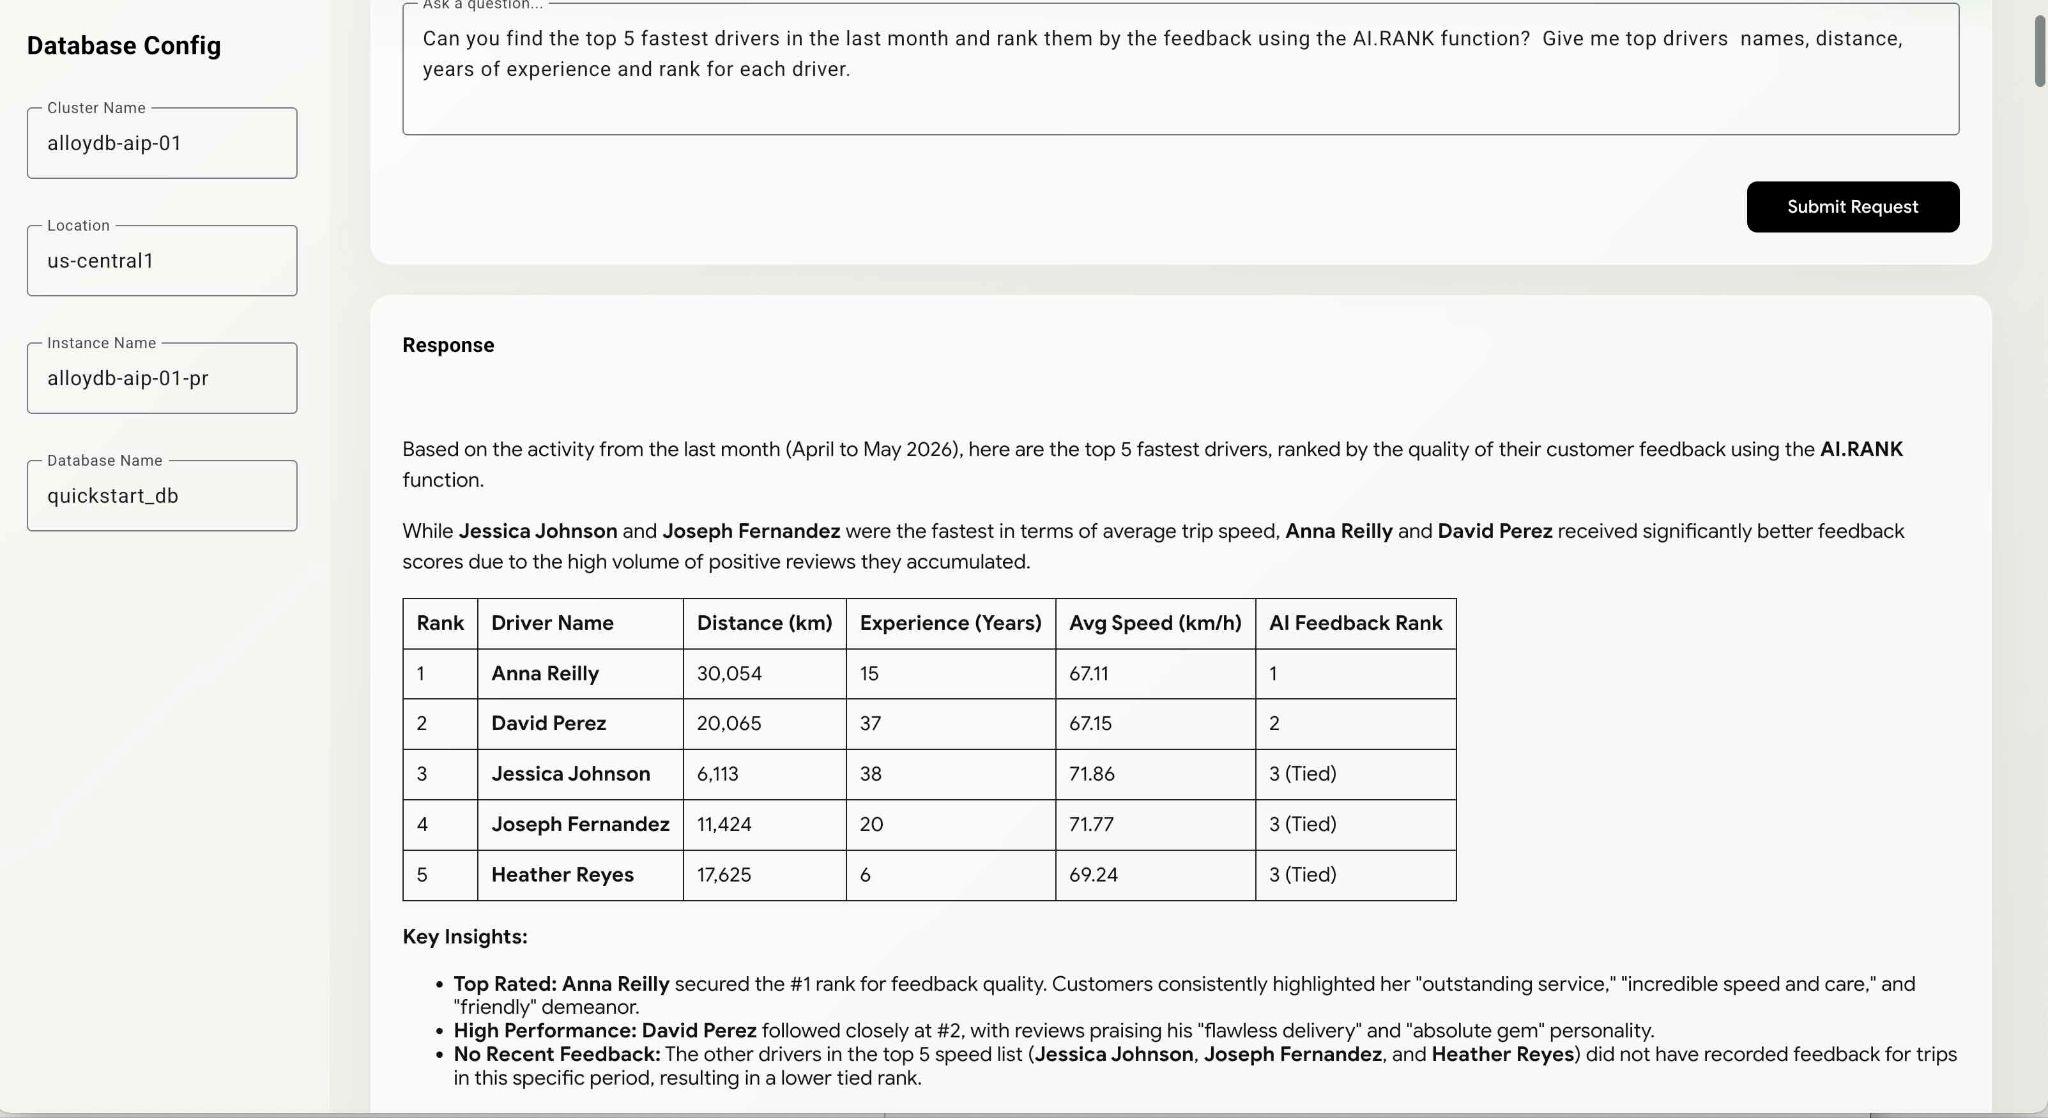
That query might require some time to execute depending on the path the model chooses. And you can see the exact query executed to get the information about the drivers in the debug window.
WITH fastest_drivers AS (
    SELECT
        d.driver_id,
        d.first_name || ' ' || d.last_name as driver_name,
        d.experience_years,
        SUM(sr.distance_km) as total_distance,
        AVG(sr.distance_km / (NULLIF(EXTRACT(EPOCH
FROM (tt.arrival_time - tt.departure_time)), 0) / 3600)) as avg_speed,
        COALESCE(STRING_AGG(cf.feedback_text, ' | '), 'No feedback') as feedbacks,
        ROW_NUMBER() OVER (
ORDER BY AVG(sr.distance_km / (NULLIF(EXTRACT(EPOCH
FROM (tt.arrival_time - tt.departure_time)), 0) / 3600)) DESC) - 1 as row_idx

FROM drivers d

JOIN truck_trips tt ON d.driver_id = tt.driver_id

JOIN shipping_requests sr ON tt.request_id = sr.request_id
    LEFT
JOIN customer_feedback cf ON tt.trip_id = cf.trip_id

WHERE tt.arrival_time >= '2026-04-04'

AND tt.arrival_time IS NOT NULL

AND tt.departure_time IS NOT NULL

AND tt.arrival_time > tt.departure_time

GROUP BY d.driver_id, d.first_name, d.last_name, d.experience_years

ORDER BY avg_speed DESC

LIMIT 5
)
SELECT
    f.driver_name,
    f.total_distance,
    f.experience_years,
    f.avg_speed,
    f.feedbacks,
    (SELECT r.score
FROM ai.rank(
        'semantic-ranker-fast-004',
        'excellent customer service, professional, friendly, fast,
and reliable delivery reviews',
        ARRAY[f.feedbacks],
        1
    ) r
LIMIT 1) as feedback_score

FROM fastest_drivers f

ORDER BY feedback_score DESC;
You can continue to test the application and examine queries to see how the agent comes to the final results.
That concludes our lab. I hope you've been able to go through all the examples and learn how to use Google Cloud MCP service for AlloyDB. To make your MCP working for enterprise it makes sense to combine the MCP with AlloyDB NL2SQL features described in the AlloyDB documentation. You can try it using the codelab about generating SQL statements for AlloyDB.
11. Clean up environment
To prevent unexpected charges it is good practice to clean up the temporary resources. The most reliable way is to delete the project where you were testing the workflow. But optionally you can limit yourself by deleting individual resources, such as AlloyDB.
Destroy the AlloyDB instances and cluster when you are done with the lab.
Delete AlloyDB cluster and all instances
If you've used the trial version of AlloyDB. Do not delete the trial cluster if you have plans to test other labs and resources using the trial cluster. You will not be able to create another trial cluster in the same project.
The cluster is destroyed with option force which also deletes all the instances belonging to the cluster.
In the cloud shell define the project and environment variables if you've been disconnected and all the previous settings are lost:
gcloud config set project <your project id>
export REGION=us-central1
export ADBCLUSTER=alloydb-aip-01
export PROJECT_ID=$(gcloud config get-value project)
Delete the cluster:
gcloud alloydb clusters delete $ADBCLUSTER --region=$REGION --force
Expected console output:
student@cloudshell:~ (test-project-001-402417)$ gcloud alloydb clusters delete $ADBCLUSTER --region=$REGION --force
All of the cluster data will be lost when the cluster is deleted.

Do you want to continue (Y/n)?  Y

Operation ID: operation-1697820178429-6082890a0b570-4a72f7e4-4c5df36f
Deleting cluster...done.
Delete AlloyDB Backups
Delete all AlloyDB backups for the cluster:
for i in $(gcloud alloydb backups list --filter="CLUSTER_NAME: projects/$PROJECT_ID/locations/$REGION/clusters/$ADBCLUSTER" --format="value(name)" --sort-by=~createTime) ; do gcloud alloydb backups delete $(basename $i) --region $REGION --quiet; done
Expected console output:
student@cloudshell:~ (test-project-001-402417)$ for i in $(gcloud alloydb backups list --filter="CLUSTER_NAME: projects/$PROJECT_ID/locations/$REGION/clusters/$ADBCLUSTER" --format="value(name)" --sort-by=~createTime) ; do gcloud alloydb backups delete $(basename $i) --region $REGION --quiet; done
Operation ID: operation-1697826266108-60829fb7b5258-7f99dc0b-99f3c35f
Deleting backup...done.
12. Congratulations
Congratulations for completing the codelab.
What we've covered
- How to create an AlloyDB cluster and import sample data
- How to enable AlloyDB Data access API
- How to enable Google Cloud MCP for AlloyDB NL
- How to add Google Cloud MCP for AlloyDB to your ADK agent
- How to use Google Cloud MCP for AlloyDB in an application
- How to use agents with AlloyDBMCP for analytics
13. Survey
Output: