
1. 簡介
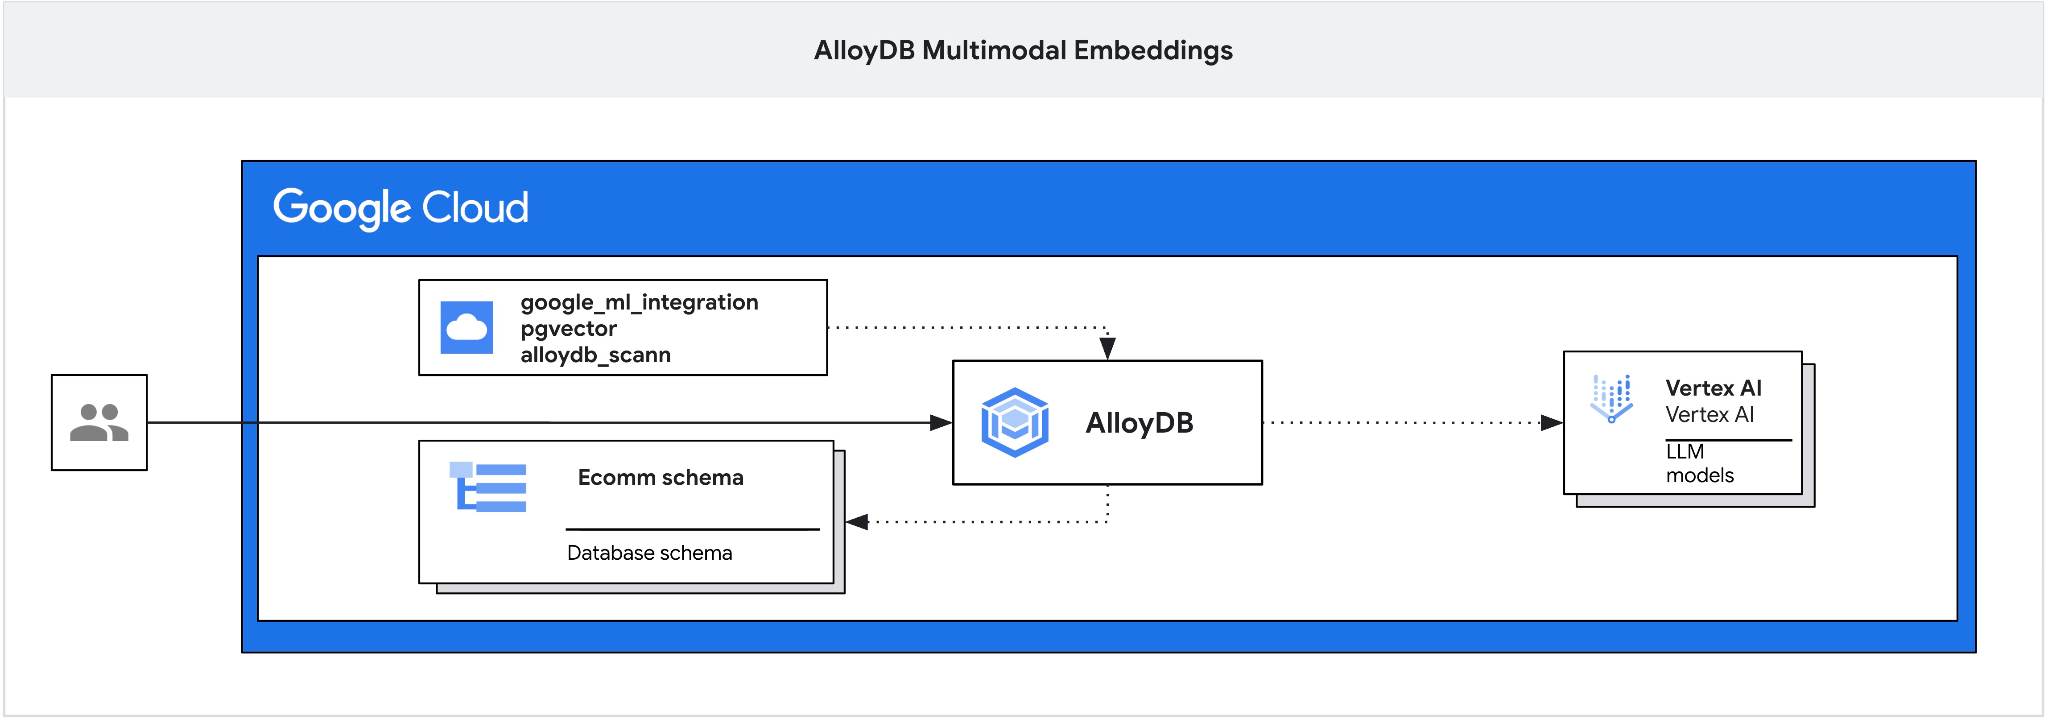
本程式碼研究室提供部署 AlloyDB 的指南,並說明如何運用 AI 整合功能,透過多模態嵌入進行語意搜尋。這個實驗室是 AlloyDB AI 功能專屬實驗室系列的一部分。詳情請參閱說明文件中的 AlloyDB AI 頁面。
必要條件
- 對 Google Cloud 和控制台有基本瞭解
- 指令列介面和 Cloud Shell 的基本技能
課程內容
- 如何部署 Postgres 適用的 AlloyDB
- 如何使用 AlloyDB Studio
- 如何使用多模態向量搜尋
- 如何啟用 AlloyDB AI 運算子
- 如何使用不同的 AlloyDB AI 運算子進行多模態搜尋
- 如何使用 AlloyDB AI 合併文字和圖片搜尋結果
軟硬體需求
- Google Cloud 帳戶和 Google Cloud 專案
- 支援 Google Cloud 控制台和 Cloud Shell 的網路瀏覽器,例如 Chrome
2. 設定和需求條件
專案設定
- 登入 Google Cloud 控制台。如果沒有 Gmail 或 Google Workspace 帳戶,請先建立帳戶。
請改用個人帳戶,而非公司或學校帳戶。
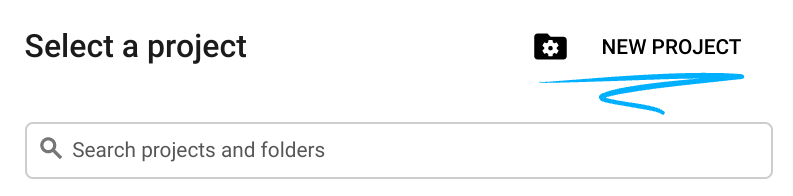
- 建立新專案或重複使用現有專案。如要在 Google Cloud 控制台中建立新專案,請在標題中按一下「選取專案」按鈕,開啟彈出式視窗。

在「選取專案」視窗中,按下「新專案」按鈕,開啟新專案的對話方塊。
在對話方塊中輸入偏好的專案名稱,然後選擇位置。
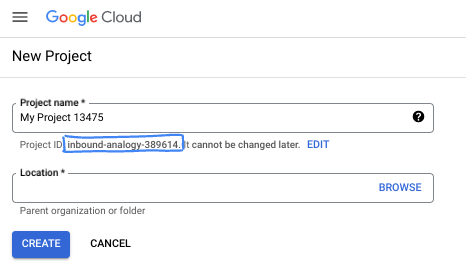
- 「專案名稱」是這個專案參與者的顯示名稱。Google API 不會使用專案名稱,且專案名稱隨時可以變更。
- 專案 ID 在所有 Google Cloud 專案中不得重複,且設定後即無法變更。Google Cloud 控制台會自動產生專屬 ID,但您可以自訂 ID。如果不喜歡系統產生的 ID,可以產生另一個隨機 ID,或提供自己的 ID 來檢查是否可用。在大多數程式碼研究室中,您需要參照專案 ID,通常會以 PROJECT_ID 預留位置識別。
- 請注意,部分 API 會使用第三個值,也就是「專案編號」。如要進一步瞭解這三種值,請參閱說明文件。
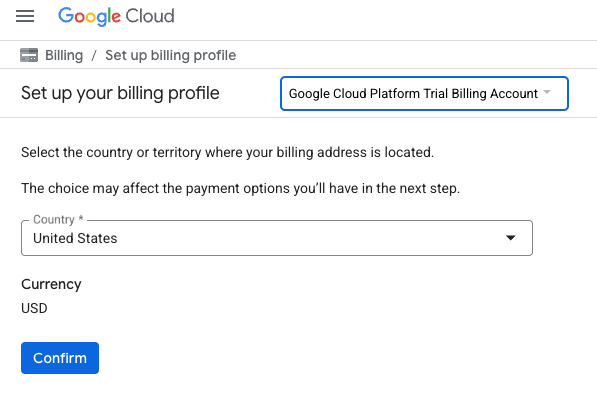
啟用計費功能
如要啟用計費功能,有兩種方法。你可以使用個人帳單帳戶,也可以按照下列步驟兌換抵免額。
兌換 $5 美元的 Google Cloud 抵免額 (選用)
如要參加這個研討會,您需要有具備部分抵免額的帳單帳戶。如果您打算使用自己的帳單,可以略過這個步驟。
- 按一下這個連結,然後登入個人 Google 帳戶。
- 您將看見類似下方的內容:

- 按一下「按這裡存取抵免額」按鈕。系統會將您帶往設定帳單資料的頁面。如果系統顯示免費試用註冊畫面,請按一下「取消」,然後繼續連結帳單資訊。
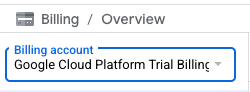
- 按一下「確認」,您現在已連結至 Google Cloud Platform 試用帳單帳戶。
設定個人帳單帳戶
如果使用 Google Cloud 抵免額設定計費,則可略過此步驟。
如要設定個人帳單帳戶,請前往這裡在 Cloud 控制台中啟用帳單功能。
注意事項:
- 完成本實驗室的雲端資源費用應低於 $3 美元。
- 您可以按照本實驗室結尾的步驟刪除資源,避免產生額外費用。
- 新使用者可享有價值 $300 美元的免費試用期。
啟動 Cloud Shell
雖然可以從筆電遠端操作 Google Cloud,但在本程式碼研究室中,您將使用 Google Cloud Shell,這是 Cloud 中執行的指令列環境。
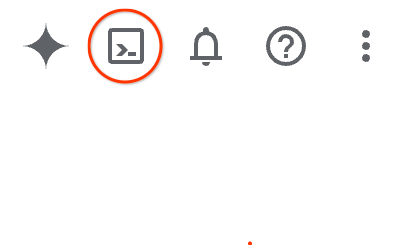
在 Google Cloud 控制台中,點選右上工具列的 Cloud Shell 圖示:
你也可以依序按下 G 鍵和 S 鍵。如果您位於 Google Cloud 控制台中,或使用這個連結,這個序列會啟用 Cloud Shell。
佈建並連線至環境的作業需要一些時間才能完成。完成後,您應該會看到如下的內容:

這部虛擬機器搭載各種您需要的開發工具,提供永久的 5 GB 主目錄,而且在 Google Cloud 中運作,可大幅提升網路效能和驗證。您可以在瀏覽器中完成本程式碼研究室的所有作業。您不需要安裝任何軟體。
3. 事前準備
啟用 API
如要使用 AlloyDB、Compute Engine、網路服務和 Vertex AI,您需要在 Google Cloud 專案中啟用各自的 API。
在終端機的 Cloud Shell 中,確認專案 ID 已設定完畢:
gcloud config set project [YOUR-PROJECT-ID]
設定環境變數 PROJECT_ID:
PROJECT_ID=$(gcloud config get-value project)
啟用所有必要服務:
gcloud services enable alloydb.googleapis.com \
                       compute.googleapis.com \
                       cloudresourcemanager.googleapis.com \
                       servicenetworking.googleapis.com \
                       aiplatform.googleapis.com \
                       discoveryengine.googleapis.com \
                       secretmanager.googleapis.com
預期的輸出內容:
student@cloudshell:~ (test-project-001-402417)$ gcloud config set project test-project-001-402417
Updated property [core/project].
student@cloudshell:~ (test-project-001-402417)$ PROJECT_ID=$(gcloud config get-value project)
Your active configuration is: [cloudshell-14650]
student@cloudshell:~ (test-project-001-402417)$
student@cloudshell:~ (test-project-001-402417)$ gcloud services enable alloydb.googleapis.com \
                       compute.googleapis.com \
                       cloudresourcemanager.googleapis.com \
                       servicenetworking.googleapis.com \
                       aiplatform.googleapis.com
Operation "operations/acat.p2-4470404856-1f44ebd8-894e-4356-bea7-b84165a57442" finished successfully.
API 簡介
- AlloyDB API (
alloydb.googleapis.com) 可讓您建立、管理及擴充 PostgreSQL 適用的 AlloyDB 叢集。這項服務提供與 PostgreSQL 相容的全代管資料庫服務,專為要求嚴苛的企業交易和分析工作負載而設計。 - Compute Engine API (
compute.googleapis.com) 可讓您建立及管理虛擬機器 (VM)、永久磁碟和網路設定。這個服務提供執行工作負載所需的基礎架構即服務 (IaaS) 基礎,並代管許多代管服務的基礎架構。 - Cloud Resource Manager API (
cloudresourcemanager.googleapis.com) 可讓您以程式輔助方式管理 Google Cloud 專案的中繼資料和設定。您可以藉此整理資源、處理 Identity and Access Management (IAM) 政策,以及驗證專案階層中的權限。 - Service Networking API (
servicenetworking.googleapis.com) 可讓您自動設定虛擬私有雲 (VPC) 網路與 Google 代管服務之間的私人連線。您必須建立服務 (例如 AlloyDB) 的私人 IP 存取權,才能與其他資源安全通訊。 - Vertex AI API (
aiplatform.googleapis.com) 可讓應用程式建構、部署及擴充機器學習模型。這個平台提供統一的介面,方便您使用所有 Google Cloud AI 服務,包括存取生成式 AI 模型 (如 Gemini) 和訓練自訂模型。
4. 部署 AlloyDB
建立 AlloyDB 叢集和主要執行個體。下列程序說明如何使用 Google Cloud SDK 建立 AlloyDB 叢集和執行個體。如果您偏好使用控制台,請參閱這份說明文件。
建立 AlloyDB 叢集前,我們需要虛擬私有雲中可用的私人 IP 範圍,供日後的 AlloyDB 執行個體使用。如果沒有,我們就必須建立,並指派給內部 Google 服務使用,之後才能建立叢集和執行個體。
建立私人 IP 範圍
我們需要在虛擬私有雲中為 AlloyDB 設定私人服務存取權。這裡的假設是專案中具有「預設」虛擬私有雲網路,且所有動作都會使用該網路。
建立私人 IP 範圍:
gcloud compute addresses create psa-range \
    --global \
    --purpose=VPC_PEERING \
    --prefix-length=24 \
    --description="VPC private service access" \
    --network=default
使用分配的 IP 範圍建立私人連線:
gcloud services vpc-peerings connect \
    --service=servicenetworking.googleapis.com \
    --ranges=psa-range \
    --network=default
預期的控制台輸出內容:
student@cloudshell:~ (test-project-402417)$ gcloud compute addresses create psa-range \
    --global \
    --purpose=VPC_PEERING \
    --prefix-length=24 \
    --description="VPC private service access" \
    --network=default
Created [https://www.googleapis.com/compute/v1/projects/test-project-402417/global/addresses/psa-range].

student@cloudshell:~ (test-project-402417)$ gcloud services vpc-peerings connect \
    --service=servicenetworking.googleapis.com \
    --ranges=psa-range \
    --network=default
Operation "operations/pssn.p24-4470404856-595e209f-19b7-4669-8a71-cbd45de8ba66" finished successfully.

student@cloudshell:~ (test-project-402417)$
建立 AlloyDB 叢集
在本節中,我們將在 us-central1 區域建立 AlloyDB 叢集。
定義 postgres 使用者的密碼。您可以自行定義密碼,也可以使用隨機函式產生密碼
export PGPASSWORD=`openssl rand -hex 12`
預期的控制台輸出內容:
student@cloudshell:~ (test-project-402417)$ export PGPASSWORD=`openssl rand -hex 12`
請記下 PostgreSQL 密碼,以供日後使用。
echo $PGPASSWORD
日後以 postgres 使用者身分連線至執行個體時,需要使用這個密碼。建議您記下或複製這組代碼,以供日後使用。
預期的控制台輸出內容:
student@cloudshell:~ (test-project-402417)$ echo $PGPASSWORD
bbefbfde7601985b0dee5723 (Note: Yours will be different!)
建立免費試用叢集
如果您從未使用過 AlloyDB,可以建立免費試用叢集:
定義區域和 AlloyDB 叢集名稱。我們將使用 us-central1 地區,並以 alloydb-aip-01 做為叢集名稱:
export REGION=us-central1
export ADBCLUSTER=alloydb-aip-01
執行指令來建立叢集:
gcloud alloydb clusters create $ADBCLUSTER \
    --password=$PGPASSWORD \
    --network=default \
    --region=$REGION \
    --subscription-type=TRIAL
預期的控制台輸出內容:
export REGION=us-central1
export ADBCLUSTER=alloydb-aip-01
gcloud alloydb clusters create $ADBCLUSTER \
    --password=$PGPASSWORD \
    --network=default \
    --region=$REGION \
    --subscription-type=TRIAL
Operation ID: operation-1697655441138-6080235852277-9e7f04f5-2012fce4
Creating cluster...done.
在同一個 Cloud Shell 工作階段中,為叢集建立 AlloyDB 主要執行個體。如果連線中斷,您需要再次定義區域和叢集名稱環境變數。
gcloud alloydb instances create $ADBCLUSTER-pr \
    --instance-type=PRIMARY \
    --cpu-count=8 \
    --region=$REGION \
    --cluster=$ADBCLUSTER
預期的控制台輸出內容:
student@cloudshell:~ (test-project-402417)$ gcloud alloydb instances create $ADBCLUSTER-pr \
    --instance-type=PRIMARY \
    --cpu-count=8 \
    --region=$REGION \
    --availability-type ZONAL \
    --cluster=$ADBCLUSTER
Operation ID: operation-1697659203545-6080315c6e8ee-391805db-25852721
Creating instance...done.
建立 AlloyDB Standard 叢集
如果這不是專案中的第一個 AlloyDB 叢集,請繼續建立標準叢集。如果您已在先前的步驟中建立免費試用叢集,請略過這個步驟。
定義區域和 AlloyDB 叢集名稱。我們將使用 us-central1 地區,並以 alloydb-aip-01 做為叢集名稱:
export REGION=us-central1
export ADBCLUSTER=alloydb-aip-01
執行指令來建立叢集:
gcloud alloydb clusters create $ADBCLUSTER \
    --password=$PGPASSWORD \
    --network=default \
    --region=$REGION
預期的控制台輸出內容:
export REGION=us-central1
export ADBCLUSTER=alloydb-aip-01
gcloud alloydb clusters create $ADBCLUSTER \
    --password=$PGPASSWORD \
    --network=default \
    --region=$REGION
Operation ID: operation-1697655441138-6080235852277-9e7f04f5-2012fce4
Creating cluster...done.
在同一個 Cloud Shell 工作階段中,為叢集建立 AlloyDB 主要執行個體。如果連線中斷,您需要再次定義區域和叢集名稱環境變數。
gcloud alloydb instances create $ADBCLUSTER-pr \
    --instance-type=PRIMARY \
    --cpu-count=2 \
    --region=$REGION \
    --cluster=$ADBCLUSTER
預期的控制台輸出內容:
student@cloudshell:~ (test-project-402417)$ gcloud alloydb instances create $ADBCLUSTER-pr \
    --instance-type=PRIMARY \
    --cpu-count=2 \
    --region=$REGION \
    --availability-type ZONAL \
    --cluster=$ADBCLUSTER
Operation ID: operation-1697659203545-6080315c6e8ee-391805db-25852721
Creating instance...done.
5. 準備資料庫
我們需要建立資料庫、啟用 Vertex AI 整合功能、建立資料庫物件,以及匯入資料。
授予 AlloyDB 必要權限
將 Vertex AI 權限新增至 AlloyDB 服務代理。
使用頂端的「+」符號開啟另一個 Cloud Shell 分頁。

在新的 Cloud Shell 分頁中執行下列指令:
PROJECT_ID=$(gcloud config get-value project)
gcloud projects add-iam-policy-binding $PROJECT_ID \
  --member="serviceAccount:service-$(gcloud projects describe $PROJECT_ID --format="value(projectNumber)")@gcp-sa-alloydb.iam.gserviceaccount.com" \
  --role="roles/aiplatform.user"
預期的控制台輸出內容:
student@cloudshell:~ (test-project-001-402417)$ PROJECT_ID=$(gcloud config get-value project)
Your active configuration is: [cloudshell-11039]
student@cloudshell:~ (test-project-001-402417)$ gcloud projects add-iam-policy-binding $PROJECT_ID \
  --member="serviceAccount:service-$(gcloud projects describe $PROJECT_ID --format="value(projectNumber)")@gcp-sa-alloydb.iam.gserviceaccount.com" \
  --role="roles/aiplatform.user"
Updated IAM policy for project [test-project-001-402417].
bindings:
- members:
  - serviceAccount:service-4470404856@gcp-sa-alloydb.iam.gserviceaccount.com
  role: roles/aiplatform.user
- members:
...
etag: BwYIEbe_Z3U=
version: 1
在分頁中執行「exit」指令,關閉分頁:
exit
連線至 AlloyDB Studio
在接下來的章節中,所有需要連線至資料庫的 SQL 指令,都可以在 AlloyDB Studio 中執行。
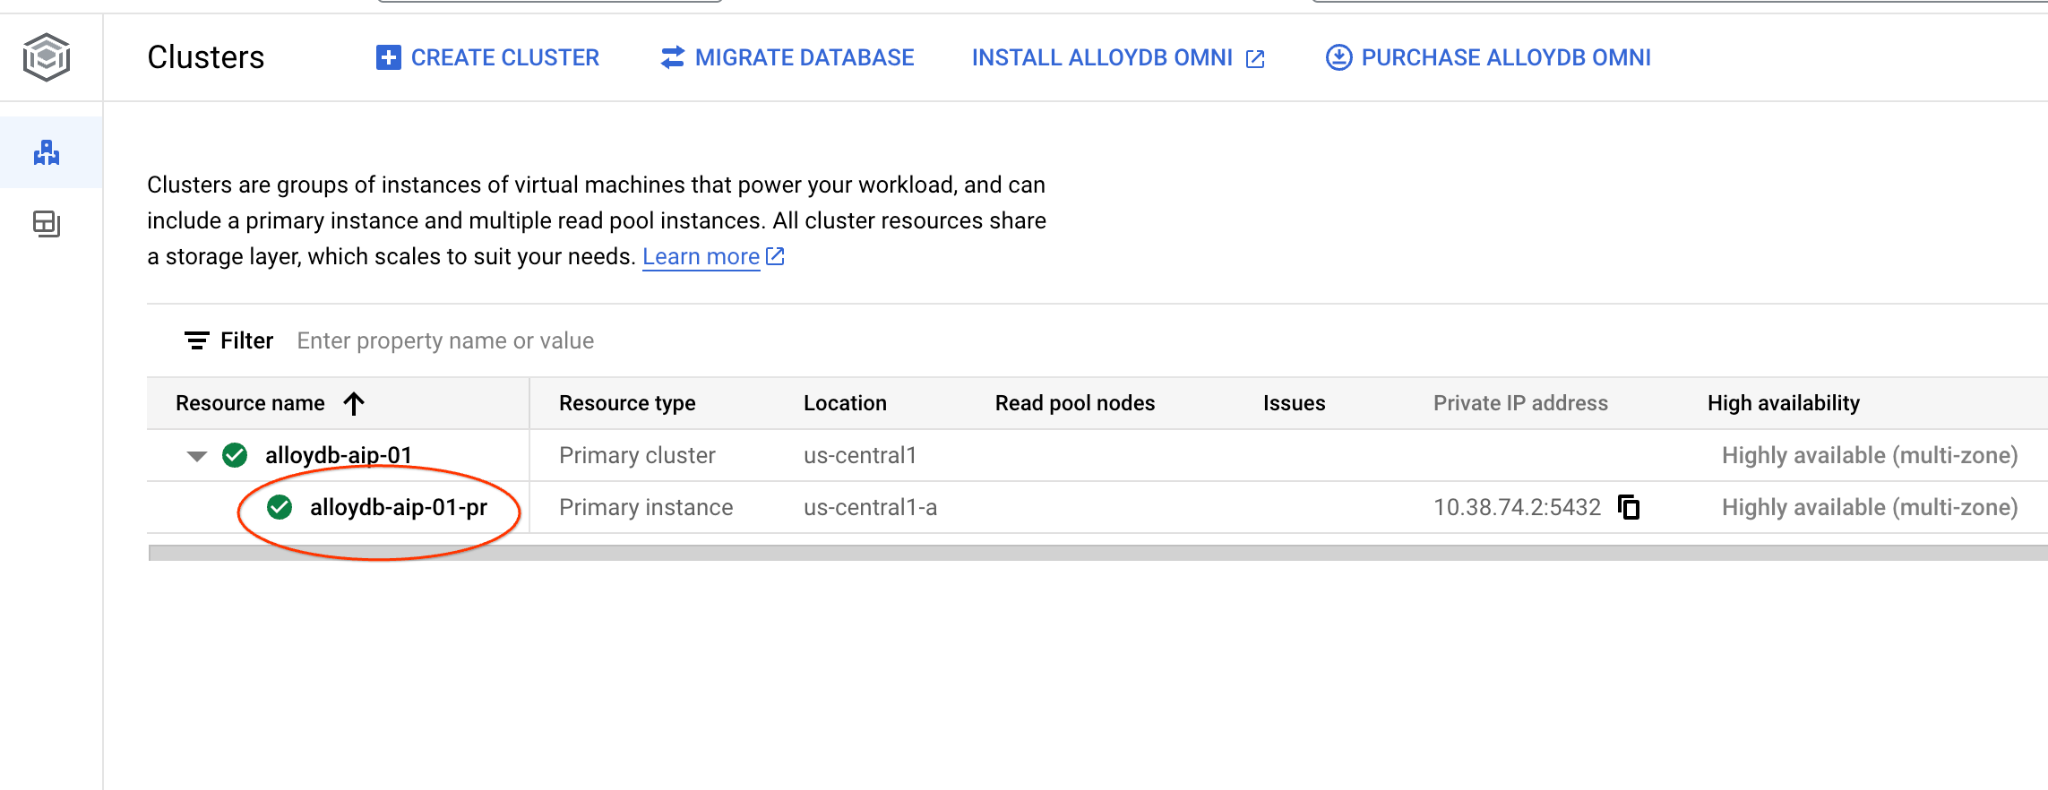
在新分頁中,前往 PostgreSQL 適用的 AlloyDB 的「叢集」頁面。
按一下主要執行個體,開啟 AlloyDB 叢集的網路控制台介面。
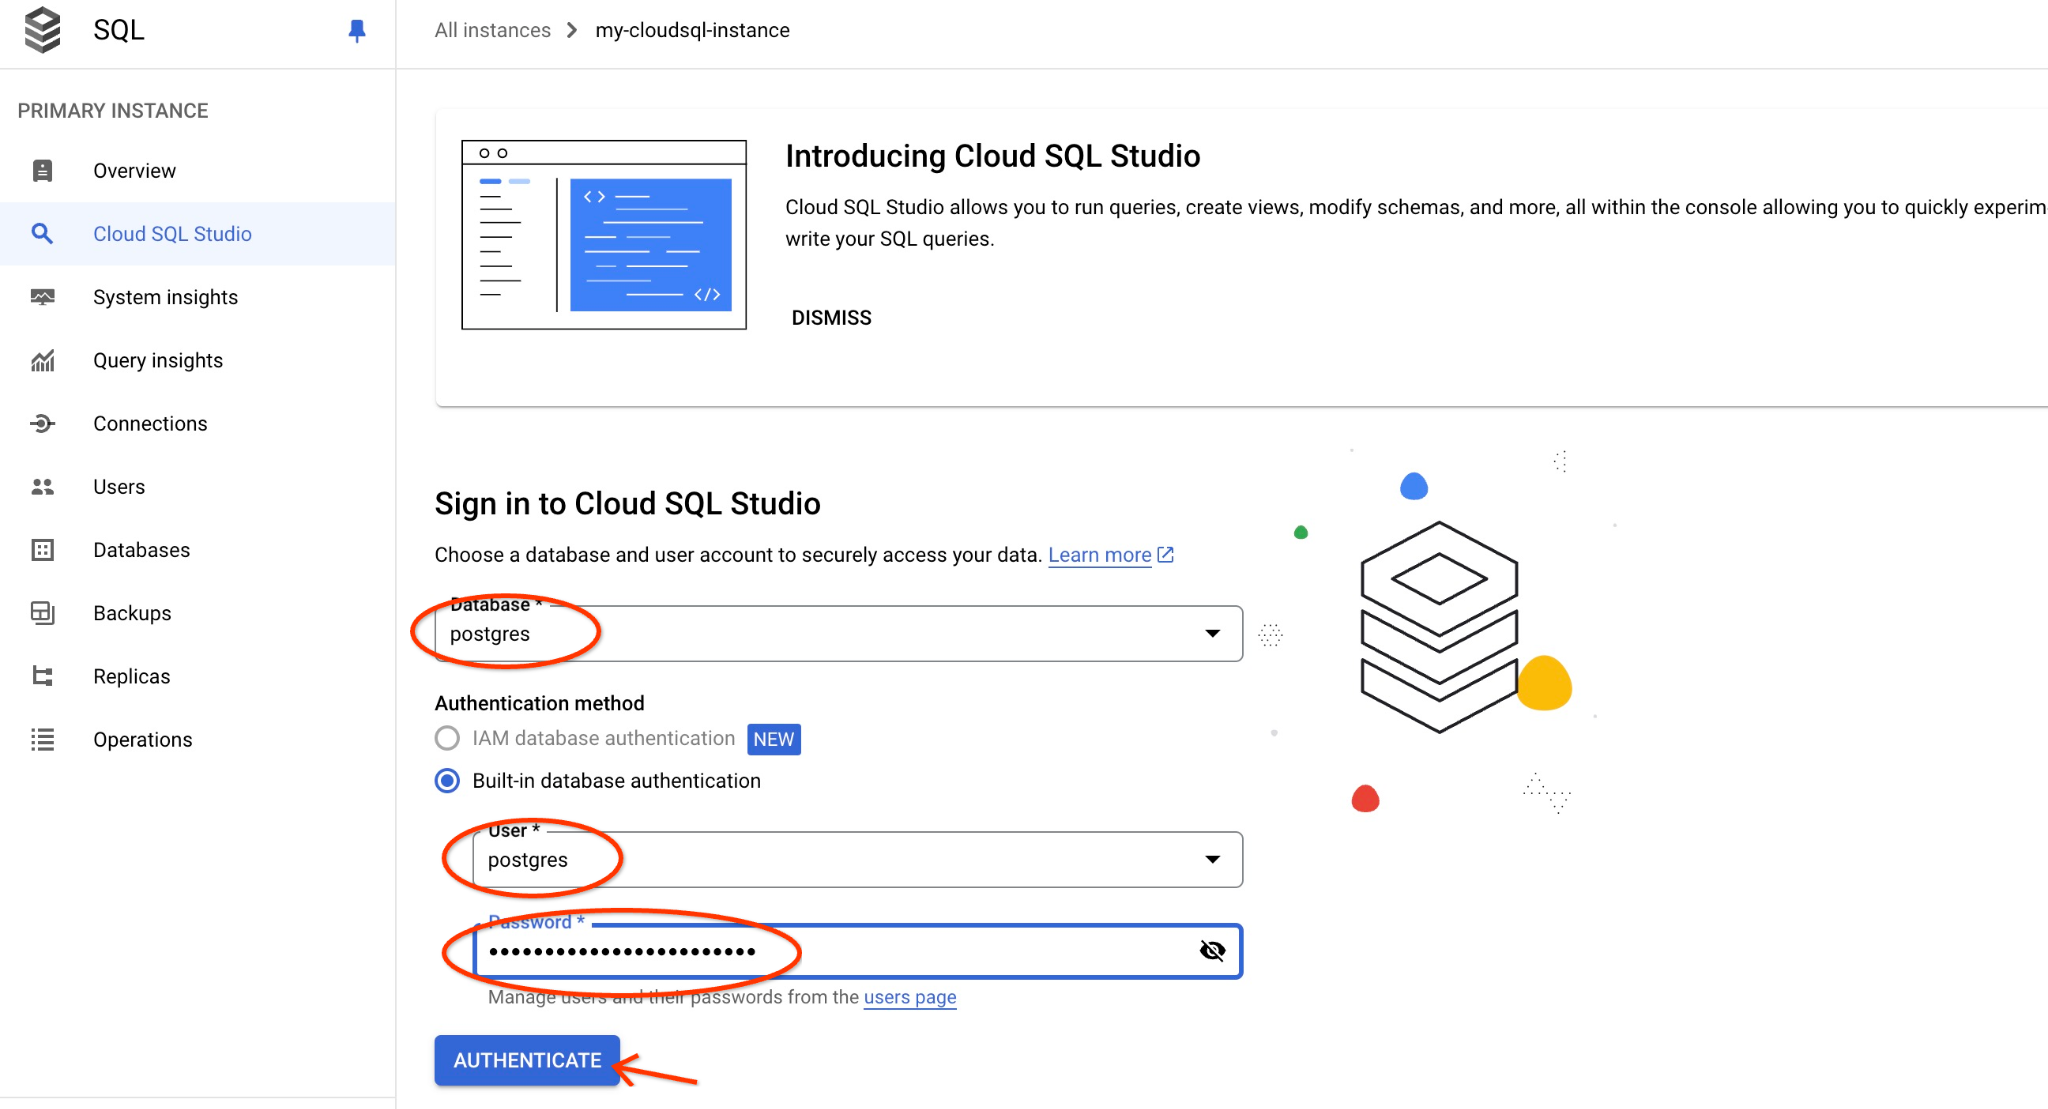
然後按一下左側的 AlloyDB Studio:
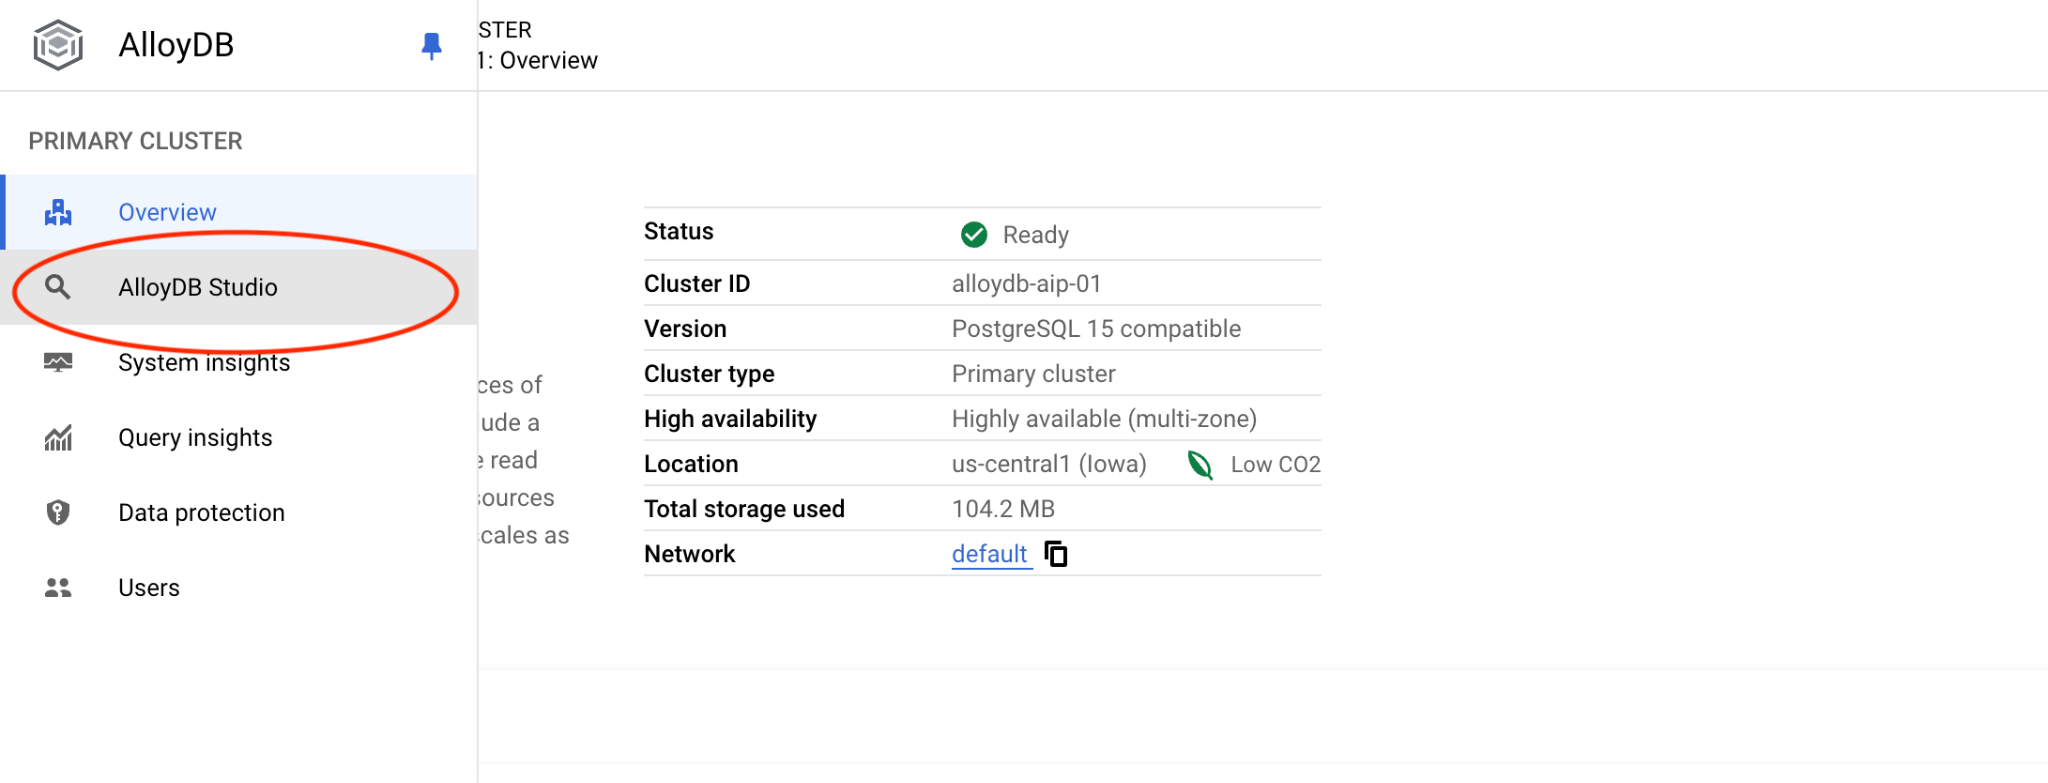
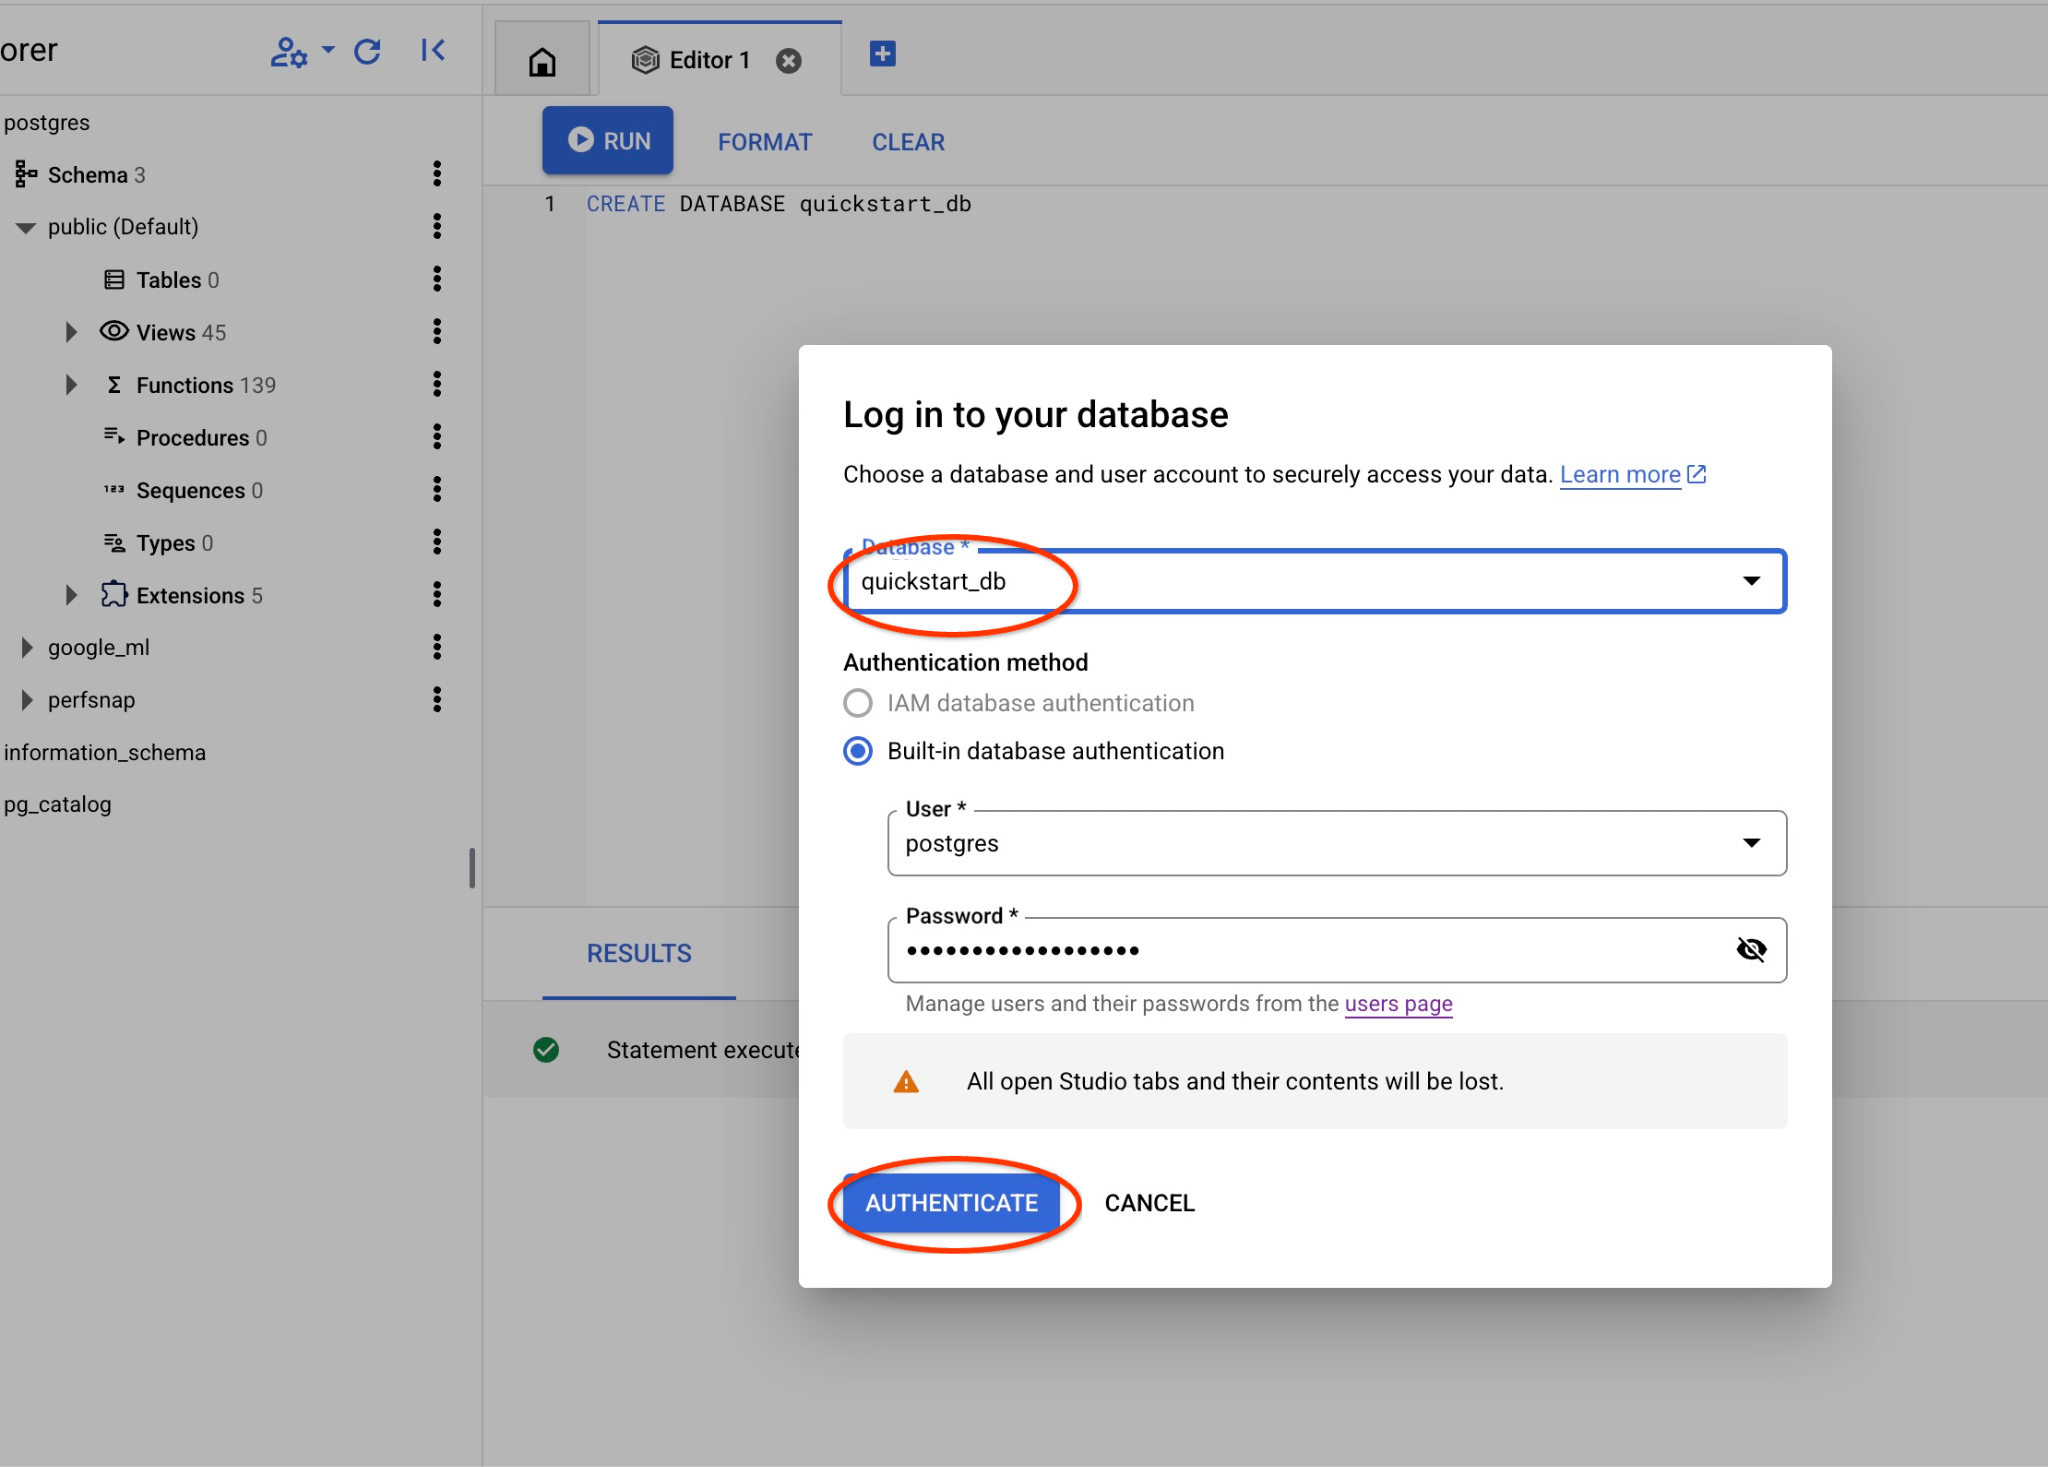
選擇 postgres 資料庫和使用者 postgres,並提供建立叢集時記下的密碼。然後按一下「驗證」按鈕。如果忘記記下密碼,或密碼無法使用,可以變更密碼。如需操作說明,請參閱說明文件。
AlloyDB Studio 介面隨即開啟。如要在資料庫中執行指令,請按一下右側的「Untitled Query」(未命名查詢) 分頁。
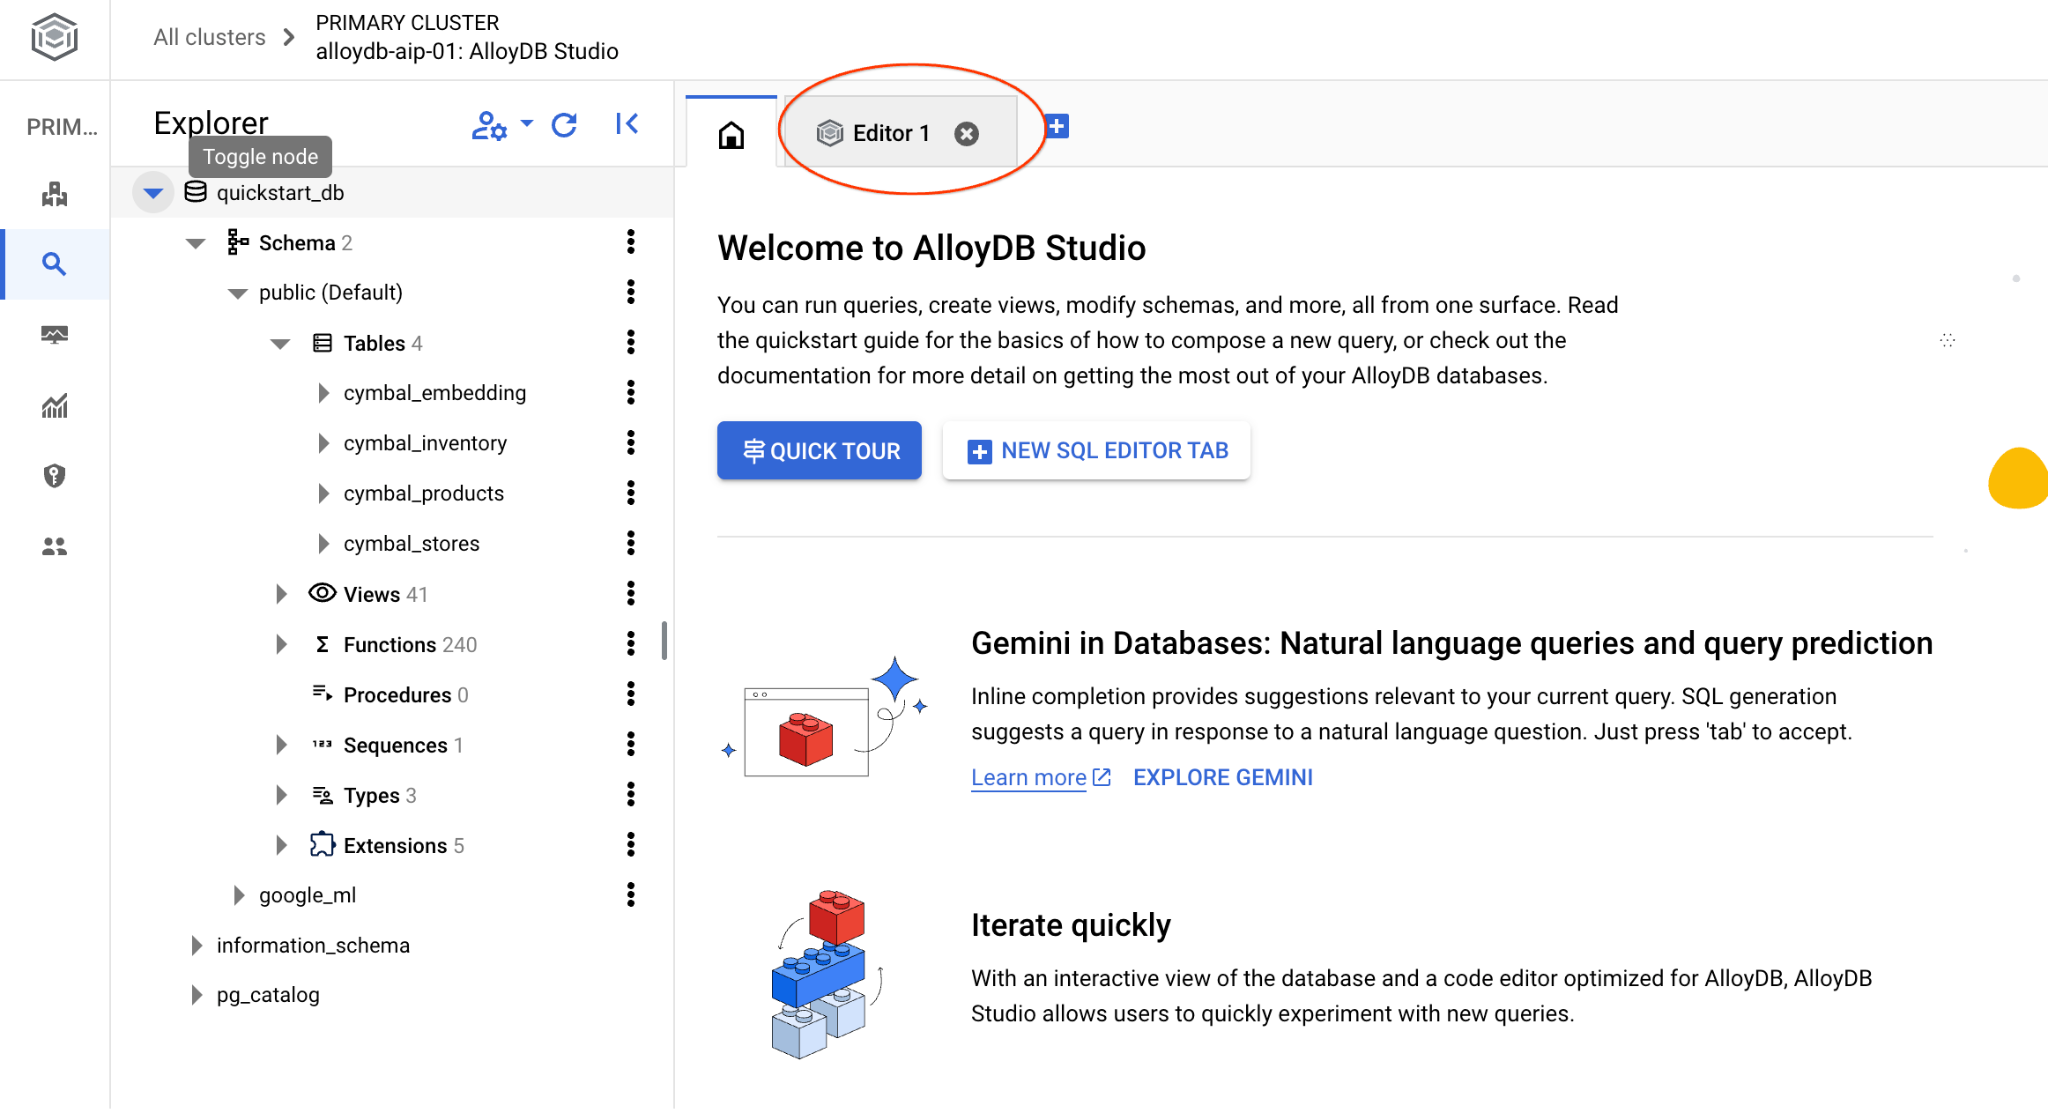
系統會開啟介面,供您執行 SQL 指令
建立資料庫
建立資料庫快速入門。
在 AlloyDB Studio 編輯器中執行下列指令。
建立資料庫:
CREATE DATABASE quickstart_db
預期輸出內容:
Statement executed successfully
連線至 quickstart_db
使用切換使用者/資料庫的按鈕,重新連線至工作室。
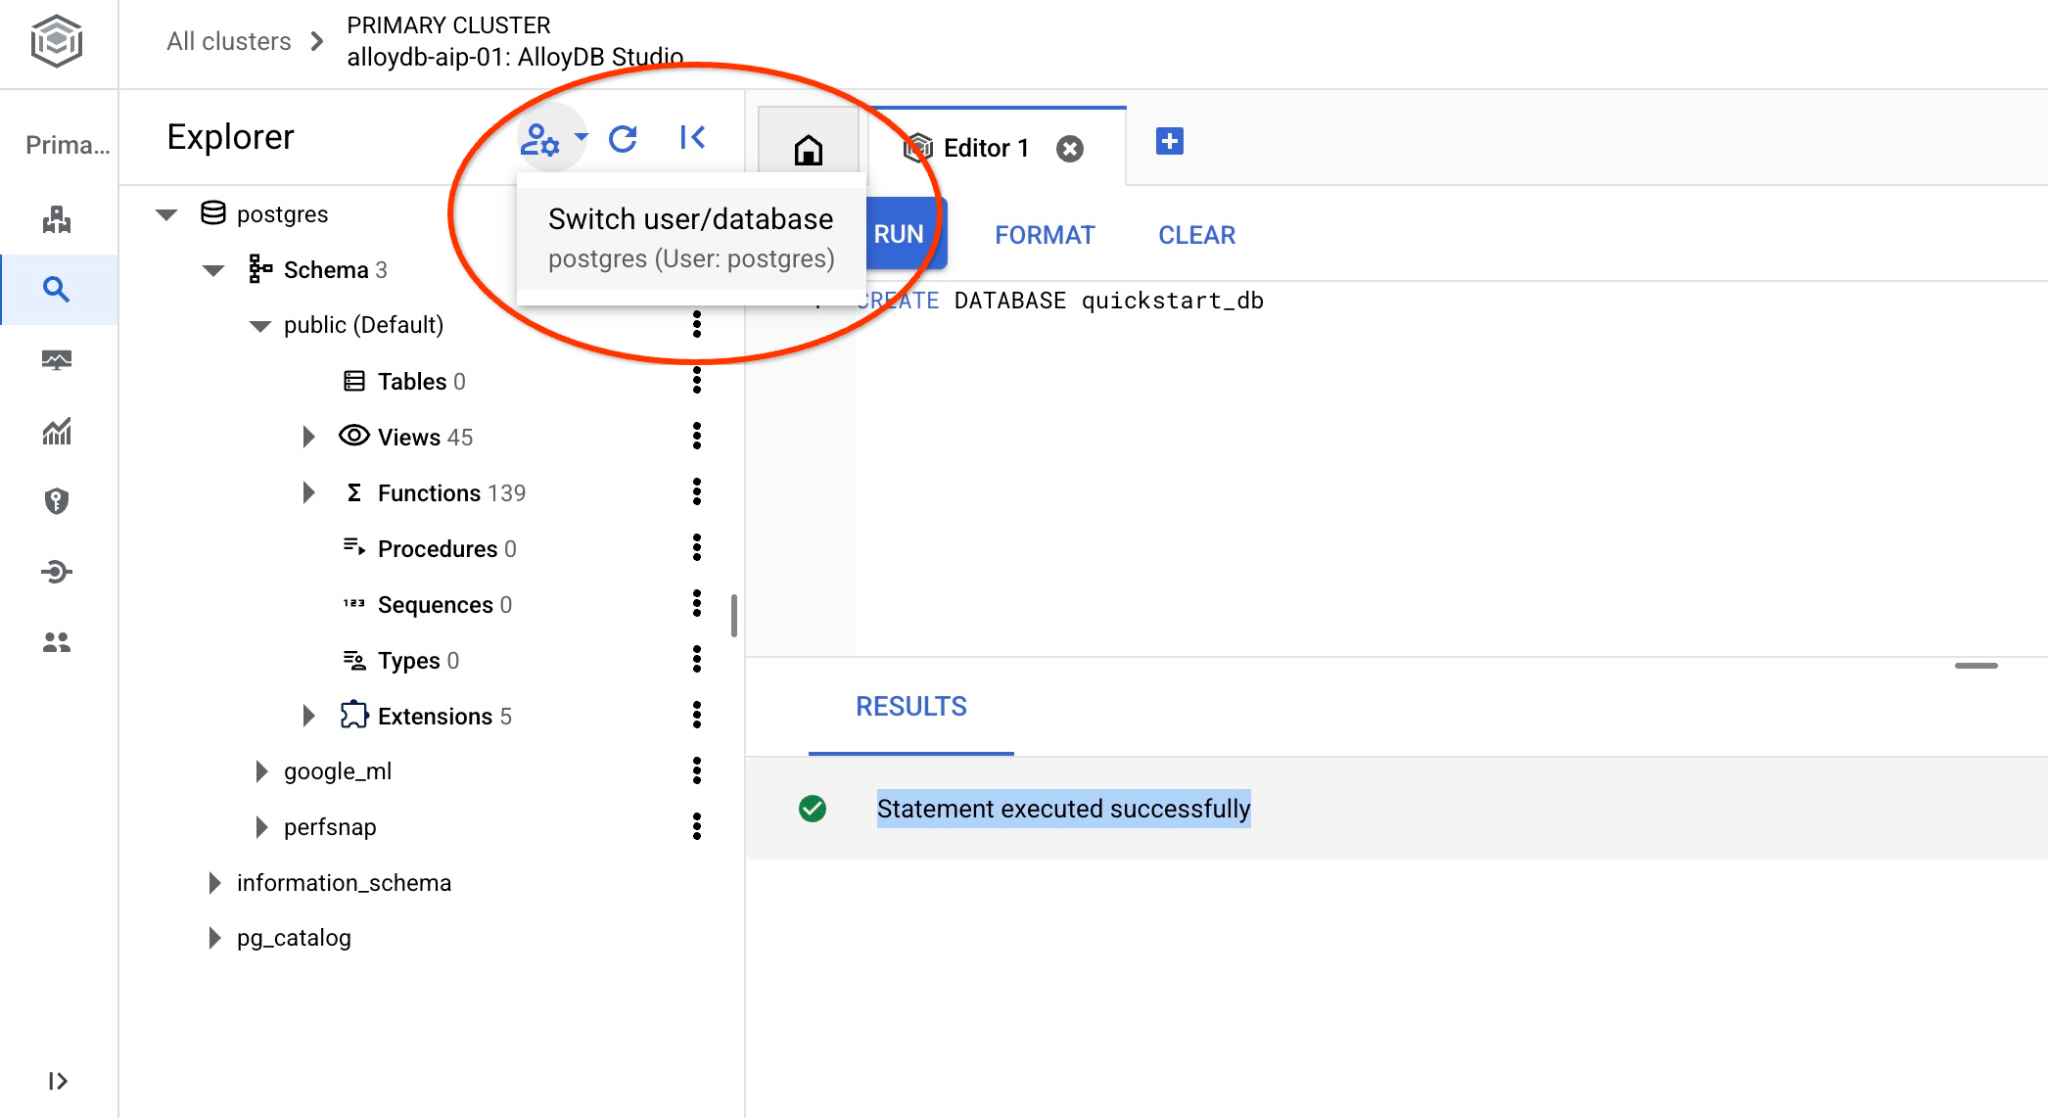
從下拉式清單中選取新的 quickstart_db 資料庫,並使用與先前相同的使用者名稱和密碼。
系統會開啟新連線,您可以在其中使用 quickstart_db 資料庫中的物件。
6. 範例資料
現在我們需要在資料庫中建立物件並載入資料。我們將使用虛構的「Cymbal」商店和虛構資料。
匯入資料前,我們需要啟用支援資料型別和索引的擴充功能。我們需要兩個擴充功能,一個支援向量資料類型,另一個支援 AlloyDB ScaNN 索引。
在連線至 quickstart_db 的 AlloyDB Studio 中執行。
CREATE EXTENSION IF NOT EXISTS vector;
CREATE EXTENSION IF NOT EXISTS alloydb_scann;
資料集會準備好並以 SQL 檔案形式放置,可透過匯入介面載入資料庫。在 Cloud Shell 中執行下列指令:
export REGION=us-central1
export ADBCLUSTER=alloydb-aip-01
gcloud alloydb clusters import $ADBCLUSTER --region=$REGION --database=quickstart_db --gcs-uri='gs://sample-data-and-media/ecomm-retail/ecom_generic_vectors.sql' --user=postgres --sql
這項指令會使用 AlloyDB SDK 建立名為 agentspace_user 的使用者,然後直接從 GCS bucket 將範例資料匯入資料庫,建立所有必要物件並插入資料。
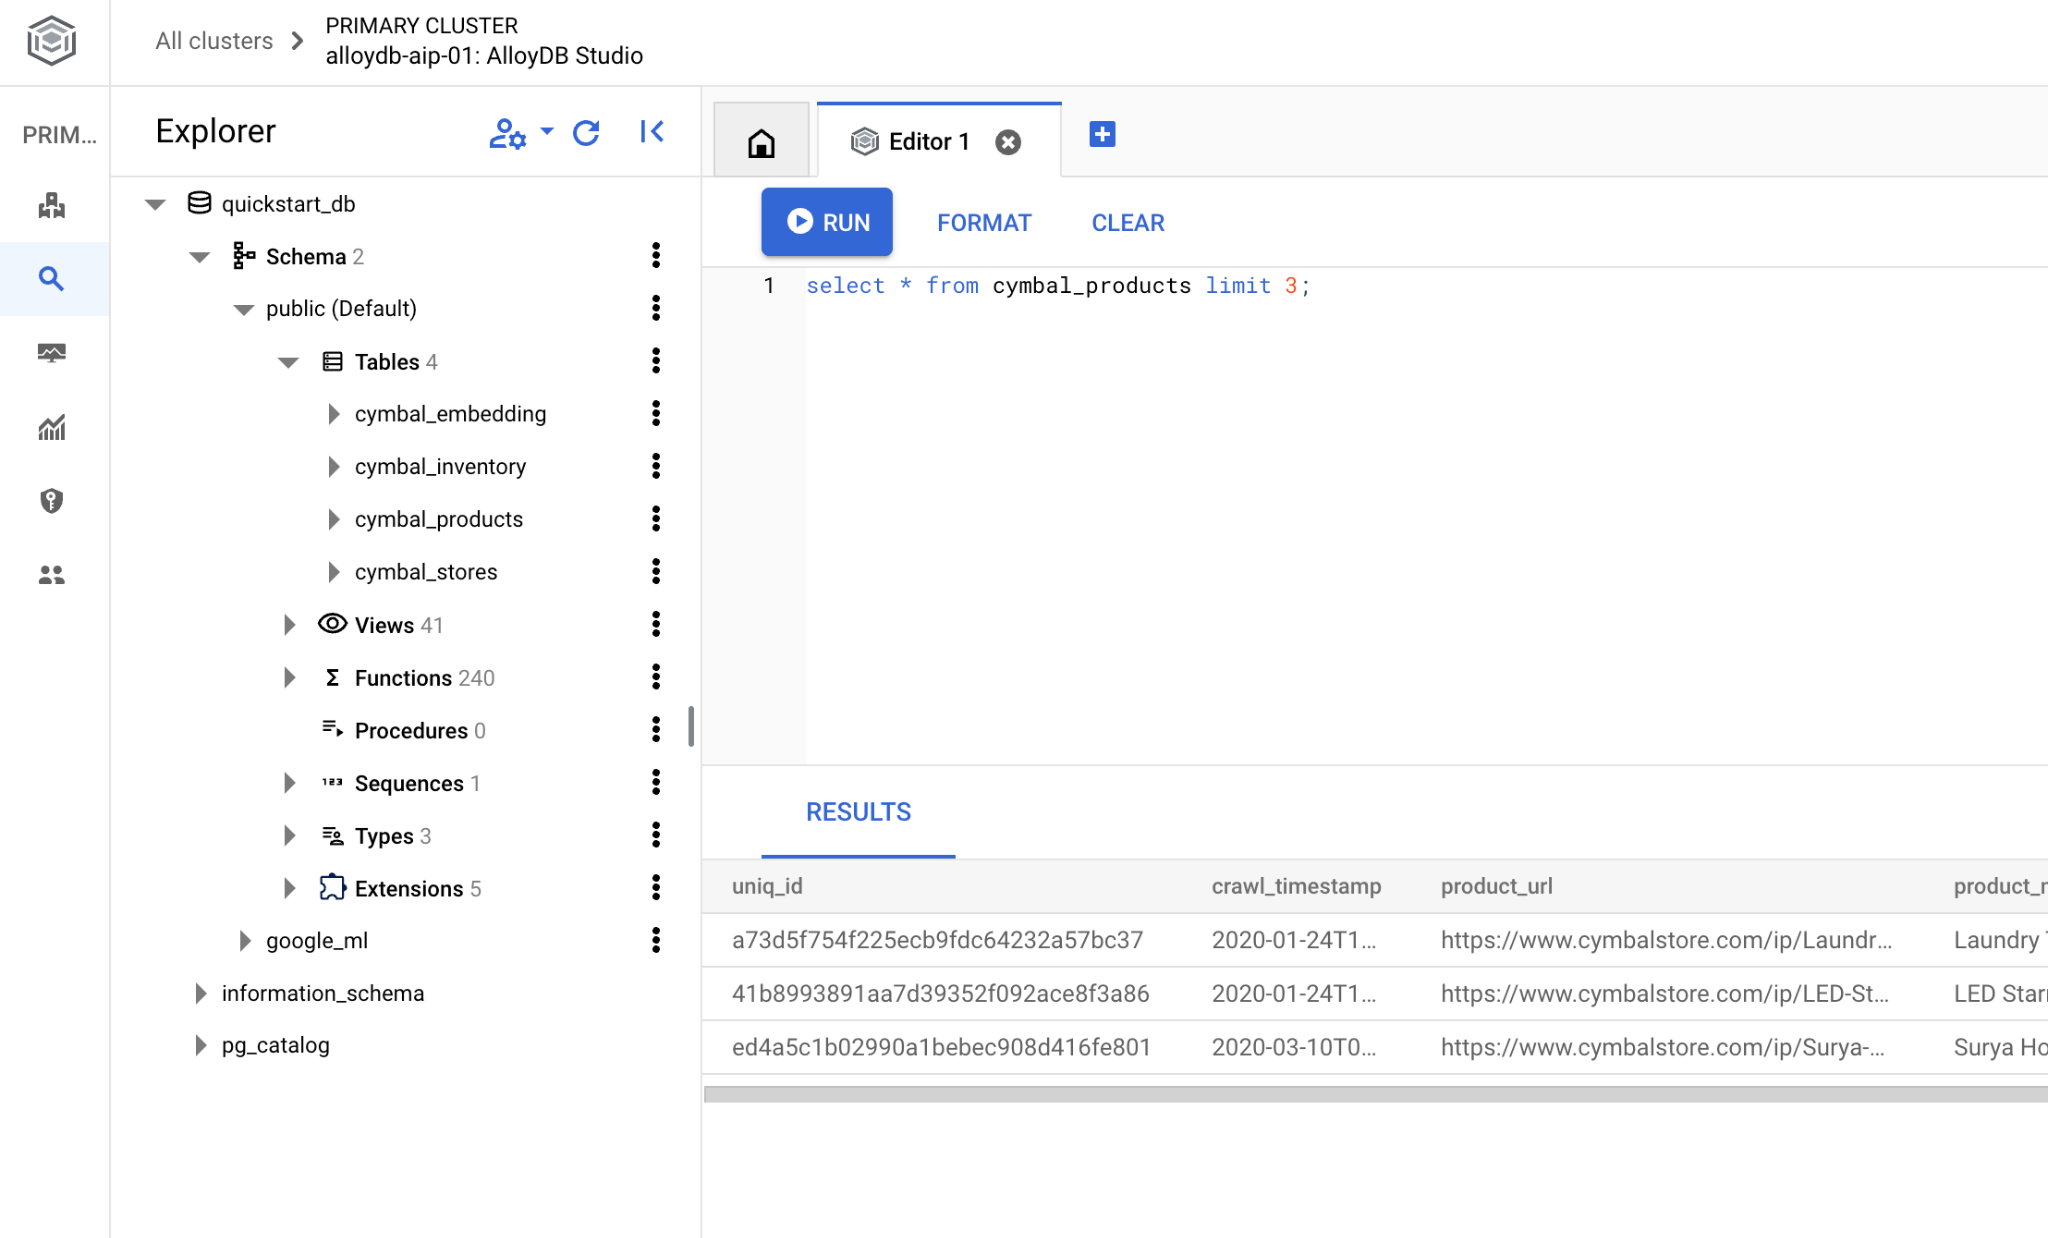
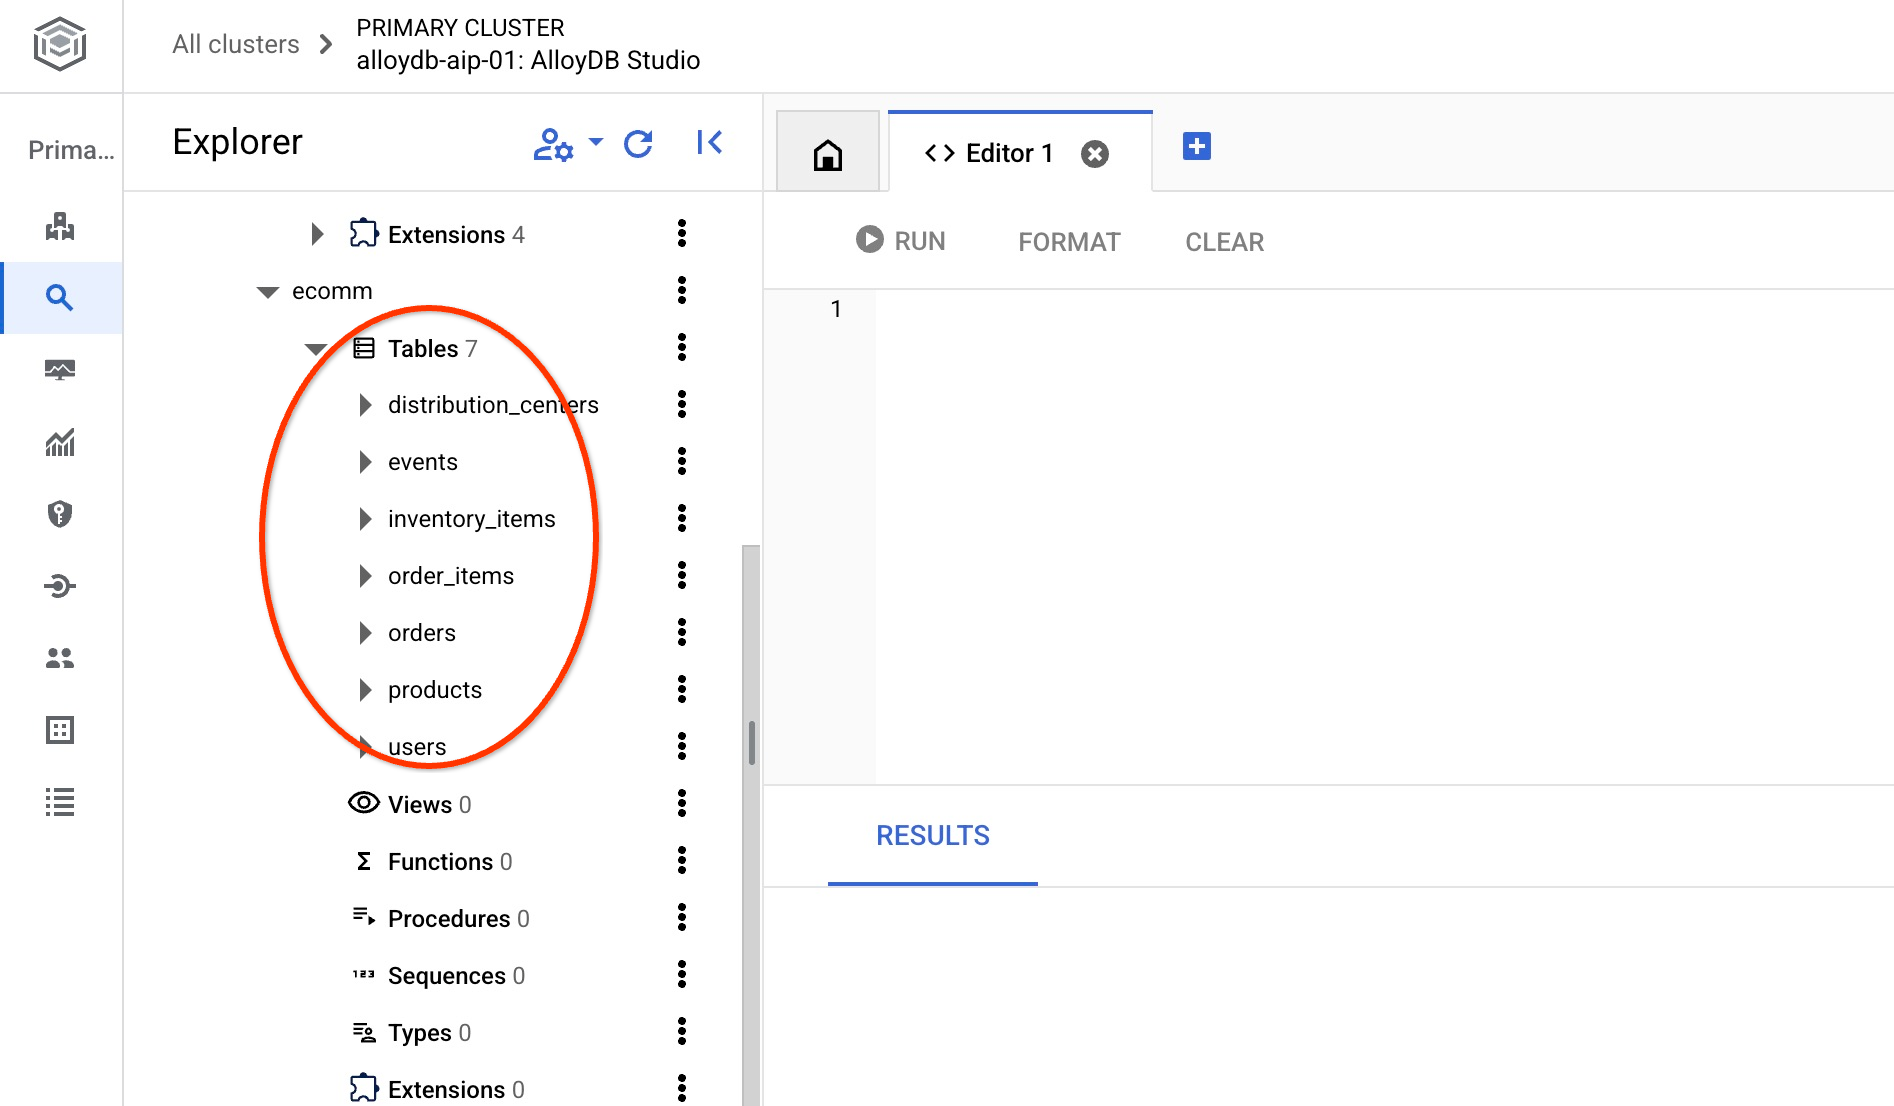
匯入完成後,我們可以在 AlloyDB Studio 中檢查資料表。這些資料表位於 ecomm 結構定義中:
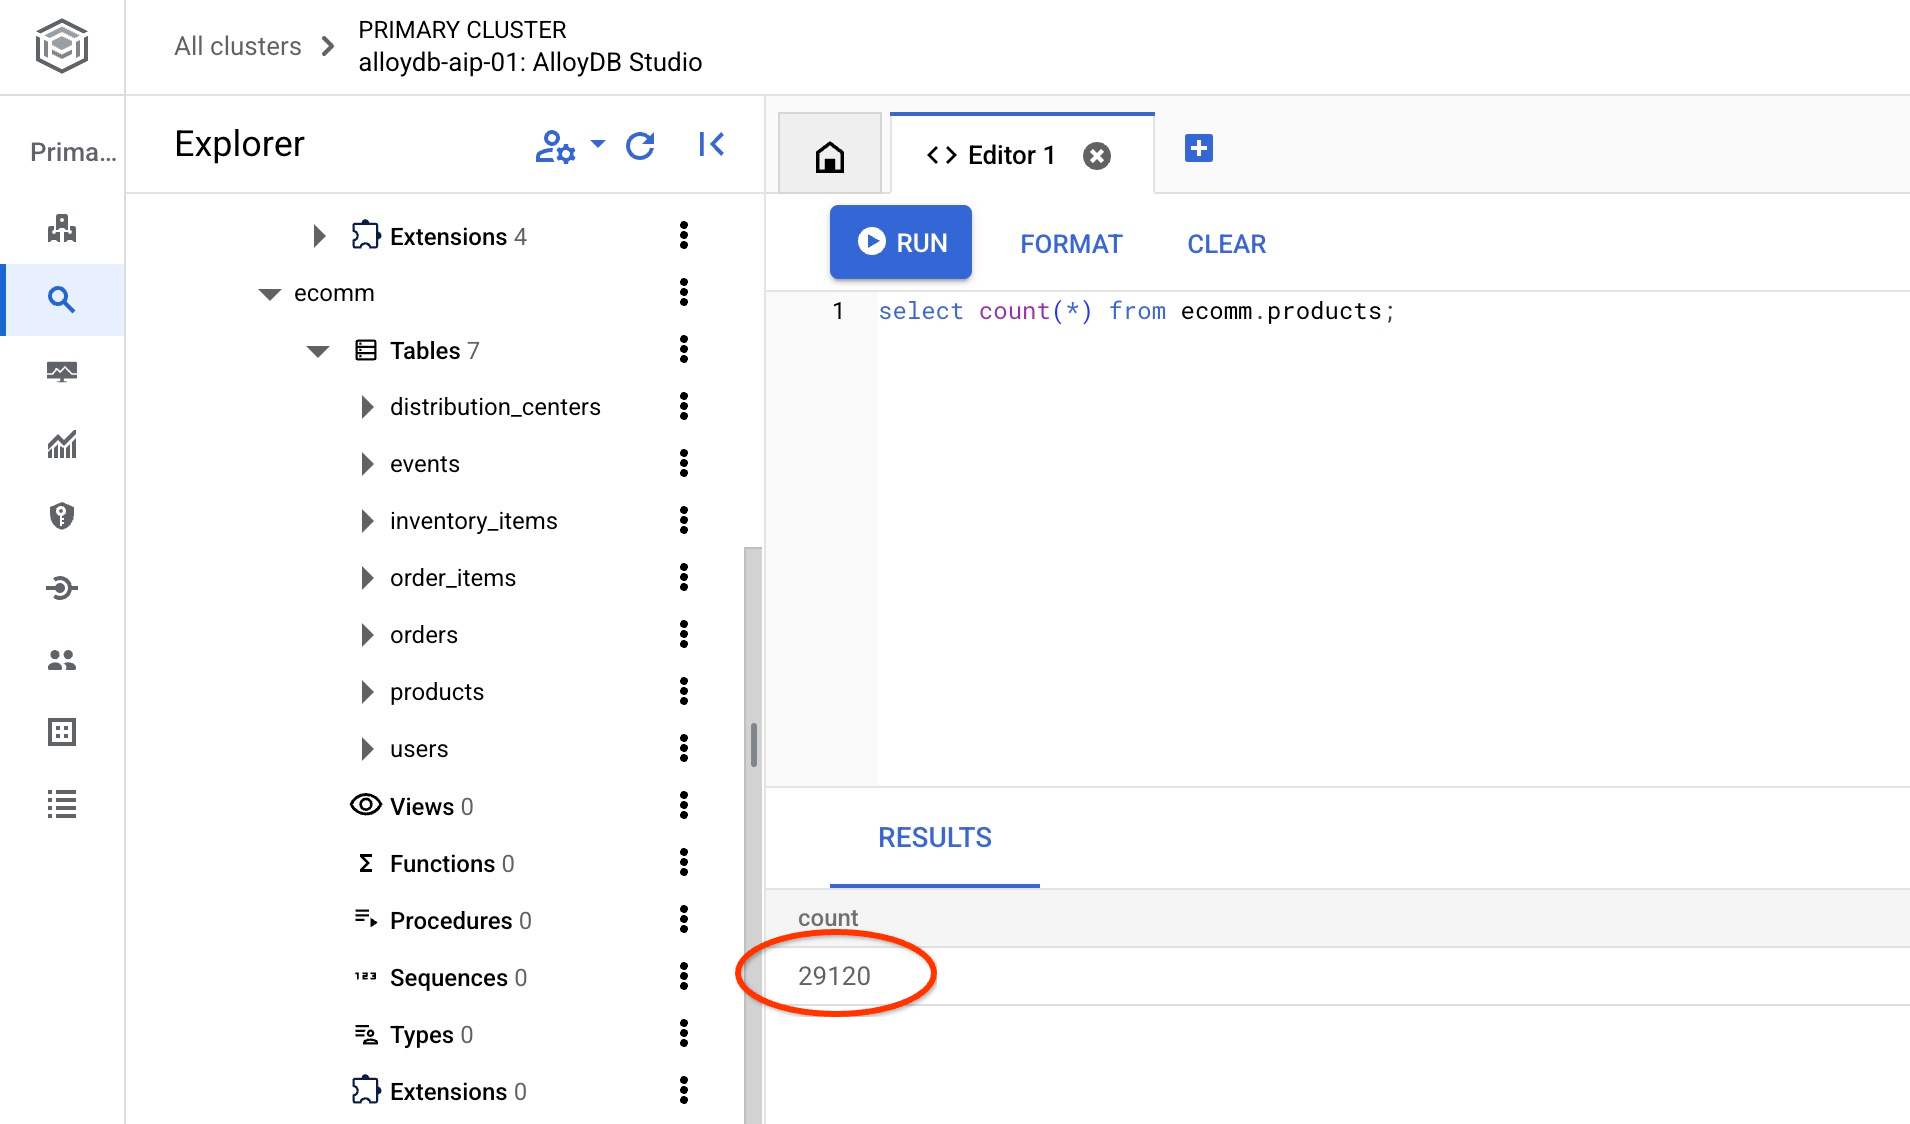
並驗證其中一個資料表中的資料列數。
select count(*) from ecomm.products;
我們已成功匯入範例資料,可以繼續進行後續步驟。
7. 使用文字嵌入進行語意搜尋
在本章中,我們將嘗試使用文字嵌入進行語意搜尋,並與傳統的 Postgres 文字和全文搜尋進行比較。
我們先試試使用標準 PostgreSQL SQL 和 LIKE 運算子的傳統搜尋。
在連線至 quickstart_db 的 AlloyDB Studio 中,嘗試使用下列查詢搜尋雨衣:
SET session.my_search_var='%wet%conditions%jacket%';
SELECT
  name,
  product_description,
  retail_price,   replace(product_image_uri,'gs://','https://storage.googleapis.com/') AS public_url
FROM
  ecomm.products
WHERE
  name ILIKE current_setting('session.my_search_var')
  OR product_description ILIKE current_setting('session.my_search_var')
LIMIT
  10;
由於產品名稱或說明必須包含「濕地」和「外套」等確切字詞,因此查詢不會傳回任何資料列。「潮濕天氣外套」與「雨天外套」並不相同。
我們可以嘗試在搜尋中加入所有可能的變化。請試著只說兩個字,例如:
SELECT
  name,
  product_description,
  retail_price,
   replace(product_image_uri,'gs://','https://storage.googleapis.com/') AS public_url
FROM
  ecomm.products
WHERE
  name ILIKE '%wet%jacket%'
  OR name ILIKE '%jacket%wet%'
  OR name ILIKE '%jacket%'
  OR name ILIKE '%%wet%'
  OR product_description ILIKE '%wet%jacket%'
  OR product_description ILIKE '%jacket%wet%'
  OR product_description ILIKE '%jacket%'
  OR product_description ILIKE '%wet%'
LIMIT
  10;
這樣會傳回多個資料列,但並非所有資料列都完全符合我們對夾克的請求,而且很難依相關性排序。舉例來說,如果我們加入「男性專用」等更多條件,查詢的複雜度就會大幅增加。或者,我們也可以嘗試全文搜尋,但即使這樣,還是會遇到與確切字詞和回覆相關性有關的限制。
現在可以使用嵌入執行類似搜尋。我們已使用不同模型預先計算產品的嵌入。我們將使用 Google 最新的 gemini-embedding-001 模型。我們已將這些資料儲存在 ecomm.products 表格的「product_embedding」欄中。如果我們使用下列查詢,為「男用雨衣」搜尋條件執行查詢:
SELECT
  name,
  product_description,
  retail_price,
   replace(product_image_uri,'gs://','https://storage.googleapis.com/') AS public_url,
  product_embedding <=> embedding ('gemini-embedding-001','wet conditions jacket for men')::vector AS distance
FROM
  ecomm.products
ORDER BY distance
LIMIT
  10;
系統不僅會傳回適合潮濕環境的外套,還會將最相關的結果排序在最上方。
使用嵌入項目的查詢會在 90 到 150 毫秒內傳回結果,其中一部分時間會用於從雲端嵌入模型取得資料。如果查看執行計畫,會發現對模型的請求包含在規劃時間內。查詢中實際執行搜尋的部分相當簡短。使用 AlloyDB ScaNN 索引在 29,000 筆記錄中搜尋,耗時不到 7 毫秒。
以下是執行計畫輸出內容:
Limit (cost=2709.20..2718.82 rows=10 width=490) (actual time=6.966..7.049 rows=10 loops=1)
-> Index Scan using embedding_scann on products (cost=2709.20..30736.40 rows=29120 width=490) (actual time=6.964..7.046 rows=10 loops=1)
Order By: (product_embedding <=> '[-0.0020264734,-0.016582033,0.027258193
...
-0.0051468653,-0.012440448]'::vector)
Limit: 10
規劃時間:136.579 毫秒
執行時間:6.791 毫秒
(6 列)
以上是使用僅含文字的嵌入模型進行文字嵌入搜尋。但我們也有產品圖片,可以搭配搜尋功能使用。下一章將說明多模態模型如何使用圖片進行搜尋。
8. 使用多模態搜尋
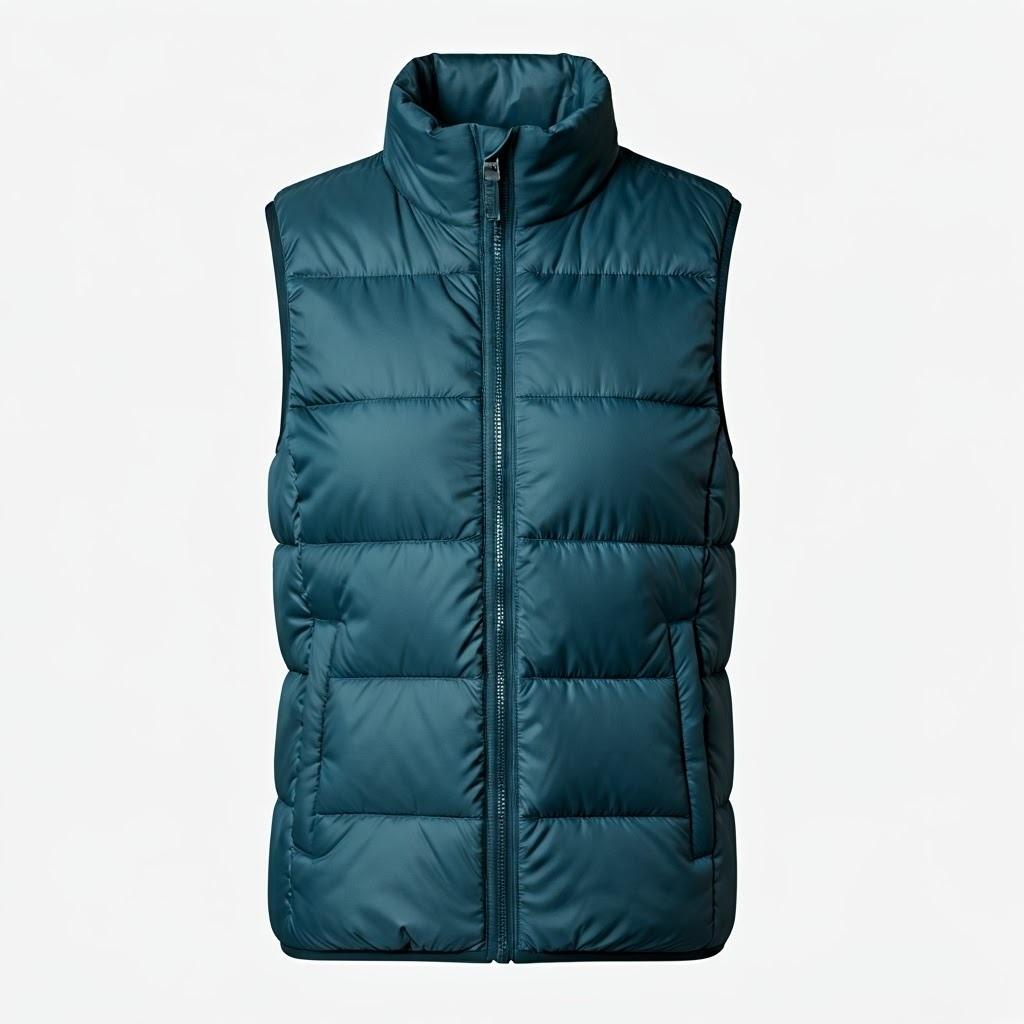
雖然文字語意搜尋很有用,但要描述複雜的細節可能很困難。AlloyDB 的多模態搜尋功能可讓使用者透過圖片輸入探索產品,因此具有優勢。如果視覺呈現方式比單純的文字說明更能清楚表達搜尋意圖,這項功能就特別實用。例如:「尋找與這張圖片中類似的外套」。
讓我們回到外套的例子。如果我有一張與想找的夾克類似的圖片,可以將圖片傳遞至 Google 多模態嵌入模型,並與產品圖片的嵌入資料進行比較。在我們的資料表中,產品圖片的嵌入已在「product_image_embedding」欄中計算完畢,您可以在「product_image_embedding_model」欄中查看使用的模型。
我們可以透過 image_embedding 函式取得圖片的嵌入,並與預先計算的嵌入進行比較,藉此執行搜尋。如要啟用這項功能,請務必使用正確版本的 google_ml_integration 擴充功能。
請確認目前的擴充功能版本。在 AlloyDB Studio 中執行。
SELECT extversion FROM pg_extension WHERE extname = 'google_ml_integration';
如果版本低於 1.5.2,請執行下列程序。
CALL google_ml.upgrade_to_preview_version();
然後重新檢查擴充功能版本。應為 1.5.3。
SELECT extversion FROM pg_extension WHERE extname = 'google_ml_integration';
我們也需要在資料庫中啟用 AI 查詢引擎功能。您可以更新執行個體標記,為執行個體上的所有資料庫啟用這項功能,也可以只為資料庫啟用這項功能。在 AlloyDB Studio 中執行下列指令,為 quickstart_db 資料庫啟用該功能。
ALTER DATABASE quickstart_db SET google_ml_integration.enable_ai_query_engine = 'on';
現在可以透過圖片搜尋。以下是搜尋的範例圖片,但您可以使用任何自訂圖片。您只需要將檔案上傳至 Google 儲存空間或其他公開資源,然後將 URI 放入查詢中即可。

並上傳至 gs://pr-public-demo-data/alloydb-retail-demo/user_photos/4.png
以圖片搜尋圖片
首先,我們嘗試只用圖片搜尋:
SELECT
  name,
  product_description,
  retail_price,
  replace(product_image_uri,'gs://','https://storage.googleapis.com/') AS public_url,
  product_image_embedding <=> google_ml.image_embedding (model_id => 'multimodalembedding@001',image => 'gs://pr-public-demo-data/alloydb-retail-demo/user_photos/4.png', mimetype => 'image/png')::vector AS distance
FROM
  ecomm.products
ORDER BY distance
LIMIT
  4;
我們在商品目錄中找到一些保暖外套。如要查看圖片,請提供 public_url 欄,然後使用可處理圖片的任何工具開啟圖片,即可使用 Cloud SDK (gcloud storage cp) 下載圖片。
|
|
|
|


圖片搜尋會傳回與我們提供的比較圖片相似的項目。如先前所述,你可以嘗試將自己的圖片上傳至公開儲存空間,看看是否能找到不同類型的服飾。
我們使用 Google 的「multimodalembedding@001」模型進行圖片搜尋。我們的 image_embedding 函式會將圖片傳送至 Vertex AI、轉換為向量,然後傳回以與資料庫中儲存的圖片向量進行比較。
我們也可以使用「EXPLAIN ANALYZE」檢查 AlloyDB ScaNN 索引的運作速度。
以下是執行計畫的輸出內容:
Limit (cost=971.70..975.55 rows=4 width=490) (actual time=2.453..2.477 rows=4 loops=1)
-> Index Scan using product_image_embedding_scann on products (cost=971.70..28998.90 rows=29120 width=490) (actual time=2.451..2.475 rows=4 loops=1)
Order By: (product_image_embedding <=> '[0.02119865,0.034206174,0.030682731,
...
,-0.010307034,-0.010053742]'::vector)
Limit: 4
規劃時間:913.322 毫秒
執行時間:2.517 毫秒
(6 列)
同樣地,如上一個範例所示,大部分時間都用於使用雲端端點將圖片轉換為嵌入,向量搜尋本身僅需 2.5 毫秒。
依文字搜尋圖片
使用多模態功能時,我們也可以使用 google_ml.text_embedding 將要搜尋的夾克文字說明傳遞至相同模型,並與圖片嵌入項目進行比較,看看模型會傳回哪些圖片。
SELECT
  name,
  product_description,
  retail_price,
  replace(product_image_uri,'gs://','https://storage.googleapis.com/') AS public_url,
  product_image_embedding <=> google_ml.text_embedding (model_id => 'multimodalembedding@001',content => 'puffy jacket for men, grey or dark colour')::vector AS distance
FROM
  ecomm.products
ORDER BY distance
LIMIT
  4;
我們也獲得了一組灰色或深色的羽絨外套。
|
|
|
|


我們獲得了略有不同的外套組合,但系統根據我們的說明和搜尋圖片嵌入內容,正確挑選了外套。
讓我們試試另一種方式,使用搜尋圖片的嵌入在說明中搜尋。
透過圖片搜尋文字
我們嘗試搜尋圖片,並傳遞圖片的嵌入,然後與產品的預先計算圖片嵌入進行比較。我們也嘗試傳遞文字要求的嵌入,並在產品圖片的相同嵌入中搜尋圖片。現在,我們來試著使用圖片的嵌入,並與產品說明的文字嵌入進行比較。嵌入會儲存在 product_description_embedding 欄中,並使用相同的 multimodalembedding@001 模型。
查詢內容如下:
SELECT
  name,
  product_description,
  retail_price,
  replace(product_image_uri,'gs://','https://storage.googleapis.com/') AS public_url,
  product_description_embedding <=> google_ml.image_embedding (model_id => 'multimodalembedding@001',image => 'gs://pr-public-demo-data/alloydb-retail-demo/user_photos/4.png', mimetype => 'image/png')::vector AS distance

FROM
  ecomm.products
ORDER BY distance
LIMIT
  4;
這裡顯示的夾克組略有不同,顏色為灰色或深色,其中有些與透過不同搜尋方式選取的夾克相同或非常相似。
|
|
|
|


並以略有不同的順序傳回與上述相同的夾克。根據圖片的嵌入,系統可以與文字說明的計算嵌入進行比較,並傳回正確的產品組合。
混合型文字和圖片搜尋
您也可以嘗試結合文字和圖片嵌入,例如使用互惠排名融合。以下是這類查詢的範例,我們合併了兩項搜尋,為每個排名指派分數,並根據合併分數排序結果。
WITH image_search AS (
            SELECT id,
                RANK () OVER (ORDER BY  product_image_embedding <=>google_ml.image_embedding(model_id => 'multimodalembedding@001',image => 'gs://pr-public-demo-data/alloydb-retail-demo/user_photos/4.png', mimetype => 'image/png')::vector) AS rank
                FROM ecomm.products
                ORDER BY product_image_embedding <=>google_ml.image_embedding(model_id => 'multimodalembedding@001',image => 'gs://pr-public-demo-data/alloydb-retail-demo/user_photos/4.png', mimetype => 'image/png')::vector LIMIT 5
        ),
      text_search AS (
            SELECT id,
                RANK () OVER (ORDER BY product_description_embedding <=>google_ml.text_embedding(model_id => 'multimodalembedding@001',content => 'puffy jacket for men, grey or dark colour'
    )::vector) AS rank
            FROM ecomm.products
            ORDER BY product_description_embedding <=>google_ml.text_embedding(model_id => 'multimodalembedding@001',content => 'puffy jacket for men, grey or dark colour'
    )::vector LIMIT 5
        ),
      rrf_score AS (
        SELECT
            COALESCE(image_search.id, text_search.id) AS id,
            COALESCE(1.0 / (60 + image_search.rank), 0.0) + COALESCE(1.0 / (60 + text_search.rank), 0.0) AS rrf_score
        FROM image_search FULL OUTER JOIN text_search ON image_search.id = text_search.id
        ORDER BY rrf_score DESC
      )
      SELECT
        ep.name,
        ep.product_description,
        ep.retail_price,
        replace(ep.product_image_uri,'gs://','https://storage.googleapis.com/') AS public_url
      FROM ecomm.products ep, rrf_score
      WHERE
        ep.id=rrf_score.id
      ORDER by rrf_score DESC
      LIMIT 4;
您可以嘗試在查詢中調整不同參數,看看能否改善搜尋結果。
這樣就完成實驗室了。為避免產生非預期費用,建議您刪除未使用的資源。
此外,您也可以使用其他 AI 運算子,根據說明文件所述,為結果排序。
9. 清除環境
完成實驗室後,請銷毀 AlloyDB 執行個體和叢集。
刪除 AlloyDB 叢集和所有執行個體
如果您使用過 AlloyDB 試用版,如果您打算使用試用叢集測試其他實驗室和資源,請勿刪除試用叢集。您將無法在同一個專案中建立其他試用叢集。
使用 force 選項終止叢集,這也會刪除叢集中的所有執行個體。
如果連線中斷,且所有先前的設定都遺失,請在 Cloud Shell 中定義專案和環境變數:
gcloud config set project <your project id>
export REGION=us-central1
export ADBCLUSTER=alloydb-aip-01
export PROJECT_ID=$(gcloud config get-value project)
刪除叢集:
gcloud alloydb clusters delete $ADBCLUSTER --region=$REGION --force
預期的控制台輸出內容:
student@cloudshell:~ (test-project-001-402417)$ gcloud alloydb clusters delete $ADBCLUSTER --region=$REGION --force
All of the cluster data will be lost when the cluster is deleted.

Do you want to continue (Y/n)?  Y

Operation ID: operation-1697820178429-6082890a0b570-4a72f7e4-4c5df36f
Deleting cluster...done.
刪除 AlloyDB 備份
刪除叢集的所有 AlloyDB 備份:
for i in $(gcloud alloydb backups list --filter="CLUSTER_NAME: projects/$PROJECT_ID/locations/$REGION/clusters/$ADBCLUSTER" --format="value(name)" --sort-by=~createTime) ; do gcloud alloydb backups delete $(basename $i) --region $REGION --quiet; done
預期的控制台輸出內容:
student@cloudshell:~ (test-project-001-402417)$ for i in $(gcloud alloydb backups list --filter="CLUSTER_NAME: projects/$PROJECT_ID/locations/$REGION/clusters/$ADBCLUSTER" --format="value(name)" --sort-by=~createTime) ; do gcloud alloydb backups delete $(basename $i) --region $REGION --quiet; done
Operation ID: operation-1697826266108-60829fb7b5258-7f99dc0b-99f3c35f
Deleting backup...done.
10. 恭喜
恭喜您完成本程式碼研究室。您已學會如何使用文字和圖片的嵌入函式,在 AlloyDB 中執行多模態搜尋。您可以嘗試測試多模態搜尋功能,並使用 AlloyDB AI 運算子的程式碼研究室,透過 google_ml.rank 函式改善這項功能。
Google Cloud 學習路徑
這個實驗室是「打造可用於正式環境的 AI」Google Cloud 學習路徑的一部分。
- 探索完整課程,瞭解如何從設計原型到投入正式環境。
- 使用主題標記
#ProductionReadyAI分享你的進度。
涵蓋內容
- 如何部署 Postgres 適用的 AlloyDB
- 如何使用 AlloyDB Studio
- 如何使用多模態向量搜尋
- 如何啟用 AlloyDB AI 運算子
- 如何使用不同的 AlloyDB AI 運算子進行多模態搜尋
- 如何使用 AlloyDB AI 合併文字和圖片搜尋結果
11. 問卷調查
輸出: