
1. Introduction
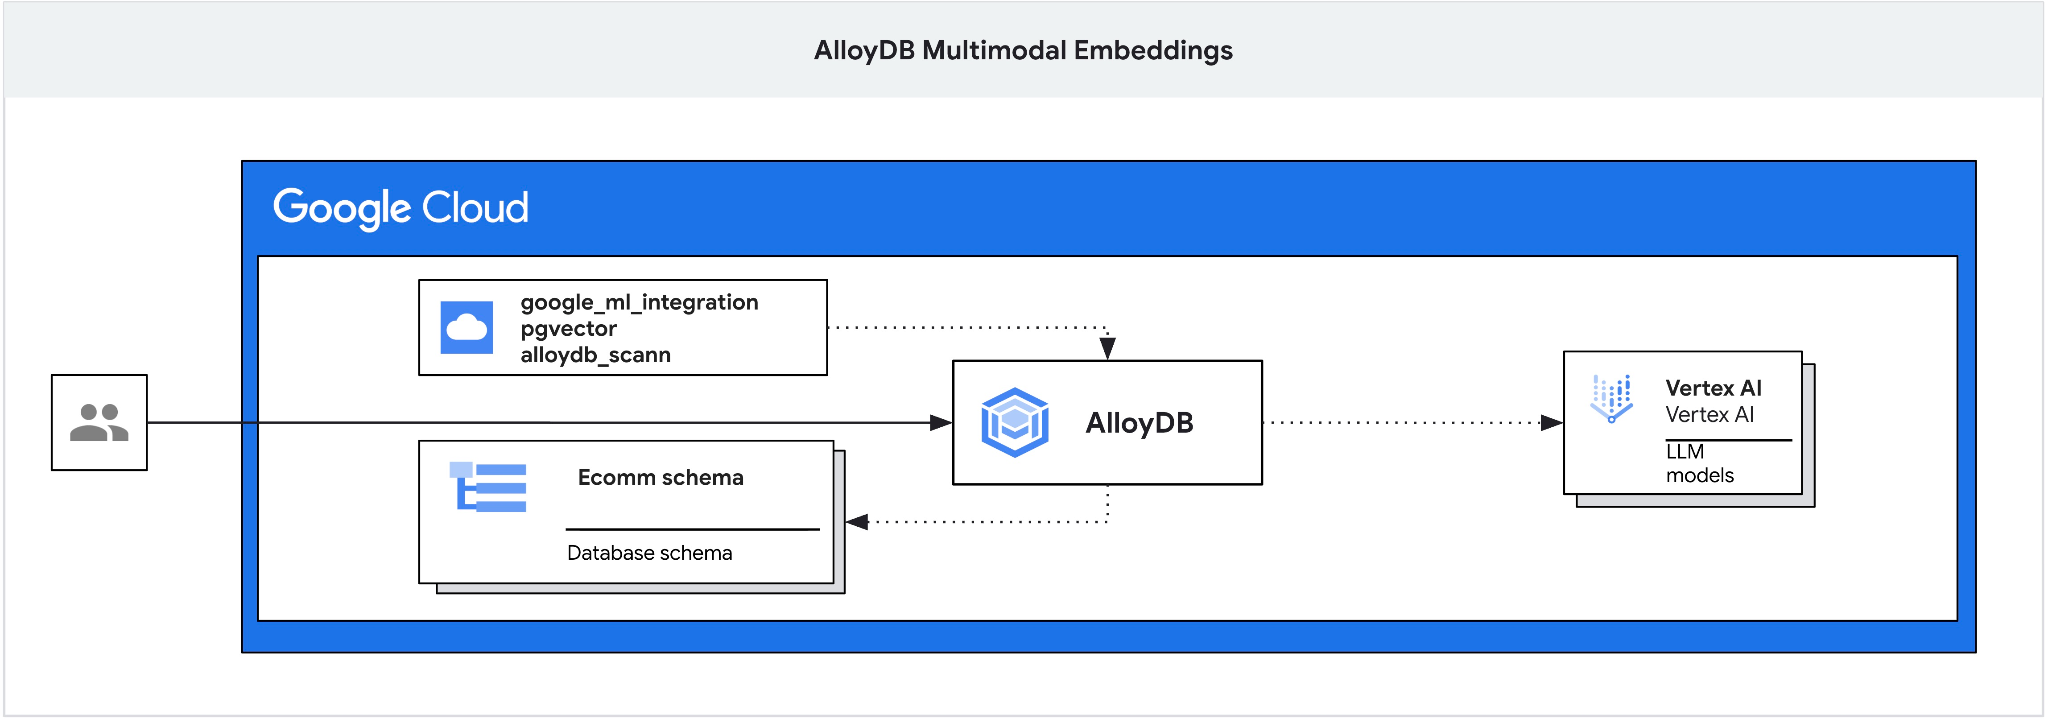
This codelab provides a guide to deploying AlloyDB and leveraging the AI integration for semantic search using multimodal embeddings. This lab is part of a lab collection dedicated to AlloyDB AI features. You can read more on the AlloyDB AI page in documentation.
Prerequisites
- A basic understanding of Google Cloud, console
- Basic skills in command line interface and Cloud Shell
What you'll learn
- How to deploy AlloyDB for Postgres
- How to use AlloyDB Studio
- How to use multimodal vector search
- How to enable AlloyDB AI operators
- How to use different AlloyDB AI operators for multimodal search
- How to use AlloyDB AI to combine text and image search results
What you'll need
- A Google Cloud Account and Google Cloud Project
- A web browser such as Chrome supporting Google Cloud console and Cloud Shell
2. Setup and Requirements
Project Setup
- Sign-in to the Google Cloud Console. If you don't already have a Gmail or Google Workspace account, you must create one.
Use a personal account instead of a work or school account.
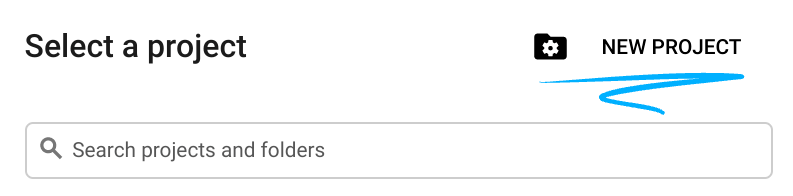
- Create a new project or reuse an existing one. To create a new project in the Google Cloud console, in the header, click the Select a project button which will open a popup window.

In the Select a project window push the button New Project which will open a dialog box for the new project.
In the dialog box put your preferable Project name and choose the location.
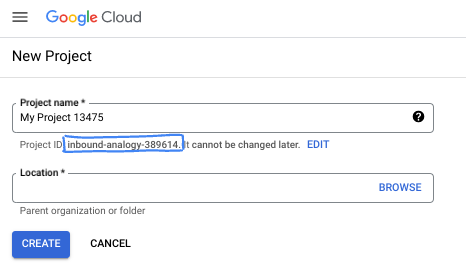
- The Project name is the display name for this project's participants. The project name isn't used by Google APIs, and it can be changed at any time.
- The Project ID is unique across all Google Cloud projects and is immutable (it can't be changed after it has been set). The Google Cloud console automatically generates a unique ID, but you can customize it. If you don't like the generated ID, you can generate another random one or provide your own to check its availability. In most codelabs, you'll need to reference your project ID, which is typically identified with the placeholder PROJECT_ID.
- For your information, there is a third value, a Project Number, which some APIs use. Learn more about all three of these values in the documentation.
Enable Billing
To enable billing, you have two options. You can either use your personal billing account or you can redeem credits with the following steps.
Redeem Google Cloud credits (optional)
To run this workshop, you need a billing account with some credit. Use the credits from the banner at the top of this codelab to get started. If you are already connected to a billing account, you can skip this step.
Set up a personal billing account
If you set up billing using Google Cloud credits, you can skip this step.
To set up a personal billing account, go here to enable billing in the Cloud Console.
Some Notes:
- Completing this lab should cost less than $3 USD in Cloud resources.
- You can follow the steps at the end of this lab to delete resources to avoid further charges.
- New users are eligible for the $300 USD Free Trial.
Start Cloud Shell
While Google Cloud can be operated remotely from your laptop, in this codelab you will be using Google Cloud Shell, a command line environment running in the Cloud.
From the Google Cloud Console, click the Cloud Shell icon on the top right toolbar:

Alternatively you can press G then S. This sequence will activate Cloud Shell if you are within the Google Cloud Console or use this link.
It should only take a few moments to provision and connect to the environment. When it is finished, you should see something like this:

This virtual machine is loaded with all the development tools you'll need. It offers a persistent 5GB home directory, and runs on Google Cloud, greatly enhancing network performance and authentication. All of your work in this codelab can be done within a browser. You do not need to install anything.
3. Before you begin
Enable API
To use AlloyDB, Compute Engine, Networking services, and Vertex AI, you need to enable their respective APIs in your Google Cloud project.
Inside Cloud Shell in the terminal, make sure that your project ID is set up. The project ID should be shown in parentheses in the command prompt like the following:
student@cloudshell:~ (test-project-001-402417)$
If the project ID is not shown there then refresh your browser tab and re-authenticate in the Cloud Shell.
Set environment variable PROJECT_ID:
PROJECT_ID=$(gcloud config get-value project)
Enable all necessary services:
gcloud services enable alloydb.googleapis.com \
                       compute.googleapis.com \
                       cloudresourcemanager.googleapis.com \
                       servicenetworking.googleapis.com \
                       aiplatform.googleapis.com \
                       discoveryengine.googleapis.com \
                       secretmanager.googleapis.com
Expected output
student@cloudshell:~ (test-project-001-402417)$ gcloud config set project test-project-001-402417
Updated property [core/project].
student@cloudshell:~ (test-project-001-402417)$ PROJECT_ID=$(gcloud config get-value project)
Your active configuration is: [cloudshell-14650]
student@cloudshell:~ (test-project-001-402417)$
student@cloudshell:~ (test-project-001-402417)$ gcloud services enable alloydb.googleapis.com \
                       compute.googleapis.com \
                       cloudresourcemanager.googleapis.com \
                       servicenetworking.googleapis.com \
                       aiplatform.googleapis.com \
                       discoveryengine.googleapis.com \
                       secretmanager.googleapis.com
Operation "operations/acat.p2-4470404856-1f44ebd8-894e-4356-bea7-b84165a57442" finished successfully.
4. Deploy AlloyDB
Create AlloyDB cluster and primary instance. The following procedure describes how to create an AlloyDB cluster and instance using Google Cloud SDK. If you prefer the console approach you can follow the documentation here.
Before creating an AlloyDB cluster we need an available private IP range in our VPC to be used by the future AlloyDB instance. If we don't have it then we need to create it, assign it to be used by internal Google services and after that we will be able to create the cluster and instance.
Create private IP range
We need to configure Private Service Access configuration in our VPC for AlloyDB. The assumption here is that we have the "default" VPC network in the project and it is going to be used for all actions.
Create the private IP range:
gcloud compute addresses create psa-range \
    --global \
    --purpose=VPC_PEERING \
    --prefix-length=24 \
    --description="VPC private service access" \
    --network=default
Create private connection using the allocated IP range:
gcloud services vpc-peerings connect \
    --service=servicenetworking.googleapis.com \
    --ranges=psa-range \
    --network=default
Expected console output:
student@cloudshell:~ (test-project-402417)$ gcloud compute addresses create psa-range \
    --global \
    --purpose=VPC_PEERING \
    --prefix-length=24 \
    --description="VPC private service access" \
    --network=default
Created [https://www.googleapis.com/compute/v1/projects/test-project-402417/global/addresses/psa-range].

student@cloudshell:~ (test-project-402417)$ gcloud services vpc-peerings connect \
    --service=servicenetworking.googleapis.com \
    --ranges=psa-range \
    --network=default
Operation "operations/pssn.p24-4470404856-595e209f-19b7-4669-8a71-cbd45de8ba66" finished successfully.

student@cloudshell:~ (test-project-402417)$
Create AlloyDB Cluster
In this section we are creating an AlloyDB cluster in the us-central1 region.
Define password for the postgres user. You can define your own password or use a random function to generate one
export PGPASSWORD=`openssl rand -hex 12`
Expected console output:
student@cloudshell:~ (test-project-402417)$ export PGPASSWORD=`openssl rand -hex 12`
Note the PostgreSQL password for future use.
echo $PGPASSWORD
You will need that password in the future to connect to the instance as the postgres user. I suggest writing it down or copying it somewhere to be able to use later.
Expected console output:
student@cloudshell:~ (test-project-402417)$ echo $PGPASSWORD
bbefbfde7601985b0dee5723 (Note: Yours will be different!)
Create a Free Trial Cluster
If you haven't been using AlloyDB before you can create a free trial cluster:
Define region and AlloyDB cluster name. We are going to use us-central1 region and alloydb-aip-01 as a cluster name:
export REGION=us-central1
export ADBCLUSTER=alloydb-aip-01
Run command to create the cluster:
gcloud alloydb clusters create $ADBCLUSTER \
    --password=$PGPASSWORD \
    --network=default \
    --region=$REGION \
    --subscription-type=TRIAL
Expected console output:
export REGION=us-central1
export ADBCLUSTER=alloydb-aip-01
gcloud alloydb clusters create $ADBCLUSTER \
    --password=$PGPASSWORD \
    --network=default \
    --region=$REGION \
    --subscription-type=TRIAL
Operation ID: operation-1697655441138-6080235852277-9e7f04f5-2012fce4
Creating cluster...done.
Create an AlloyDB primary instance for our cluster in the same cloud shell session. If you are disconnected you will need to define the region and cluster name environment variables again.
gcloud alloydb instances create $ADBCLUSTER-pr \
    --instance-type=PRIMARY \
    --cpu-count=8 \
    --region=$REGION \
    --cluster=$ADBCLUSTER
Expected console output:
student@cloudshell:~ (test-project-402417)$ gcloud alloydb instances create $ADBCLUSTER-pr \
    --instance-type=PRIMARY \
    --cpu-count=8 \
    --region=$REGION \
    --availability-type ZONAL \
    --cluster=$ADBCLUSTER
Operation ID: operation-1697659203545-6080315c6e8ee-391805db-25852721
Creating instance...done.
Create AlloyDB Standard Cluster
If it is not your first AlloyDB cluster in the project proceed with creation of a standard cluster. If you have already created a free trial cluster in the previous step, skip this step.
Define region and AlloyDB cluster name. We are going to use us-central1 region and alloydb-aip-01 as a cluster name:
export REGION=us-central1
export ADBCLUSTER=alloydb-aip-01
Run command to create the cluster:
gcloud alloydb clusters create $ADBCLUSTER \
    --password=$PGPASSWORD \
    --network=default \
    --region=$REGION
Expected console output:
export REGION=us-central1
export ADBCLUSTER=alloydb-aip-01
gcloud alloydb clusters create $ADBCLUSTER \
    --password=$PGPASSWORD \
    --network=default \
    --region=$REGION
Operation ID: operation-1697655441138-6080235852277-9e7f04f5-2012fce4
Creating cluster...done.
Create an AlloyDB primary instance for our cluster in the same cloud shell session. If you are disconnected you will need to define the region and cluster name environment variables again.
gcloud alloydb instances create $ADBCLUSTER-pr \
    --instance-type=PRIMARY \
    --cpu-count=2 \
    --region=$REGION \
    --cluster=$ADBCLUSTER
Expected console output:
student@cloudshell:~ (test-project-402417)$ gcloud alloydb instances create $ADBCLUSTER-pr \
    --instance-type=PRIMARY \
    --cpu-count=2 \
    --region=$REGION \
    --availability-type ZONAL \
    --cluster=$ADBCLUSTER
Operation ID: operation-1697659203545-6080315c6e8ee-391805db-25852721
Creating instance...done.
5. Prepare Database
We need to create a database, enable Vertex AI integration, create database objects and import the data.
Grant Necessary Permissions to AlloyDB
Add Vertex AI permissions to the AlloyDB service agent.
Open another Cloud Shell tab using the sign "+" at the top.
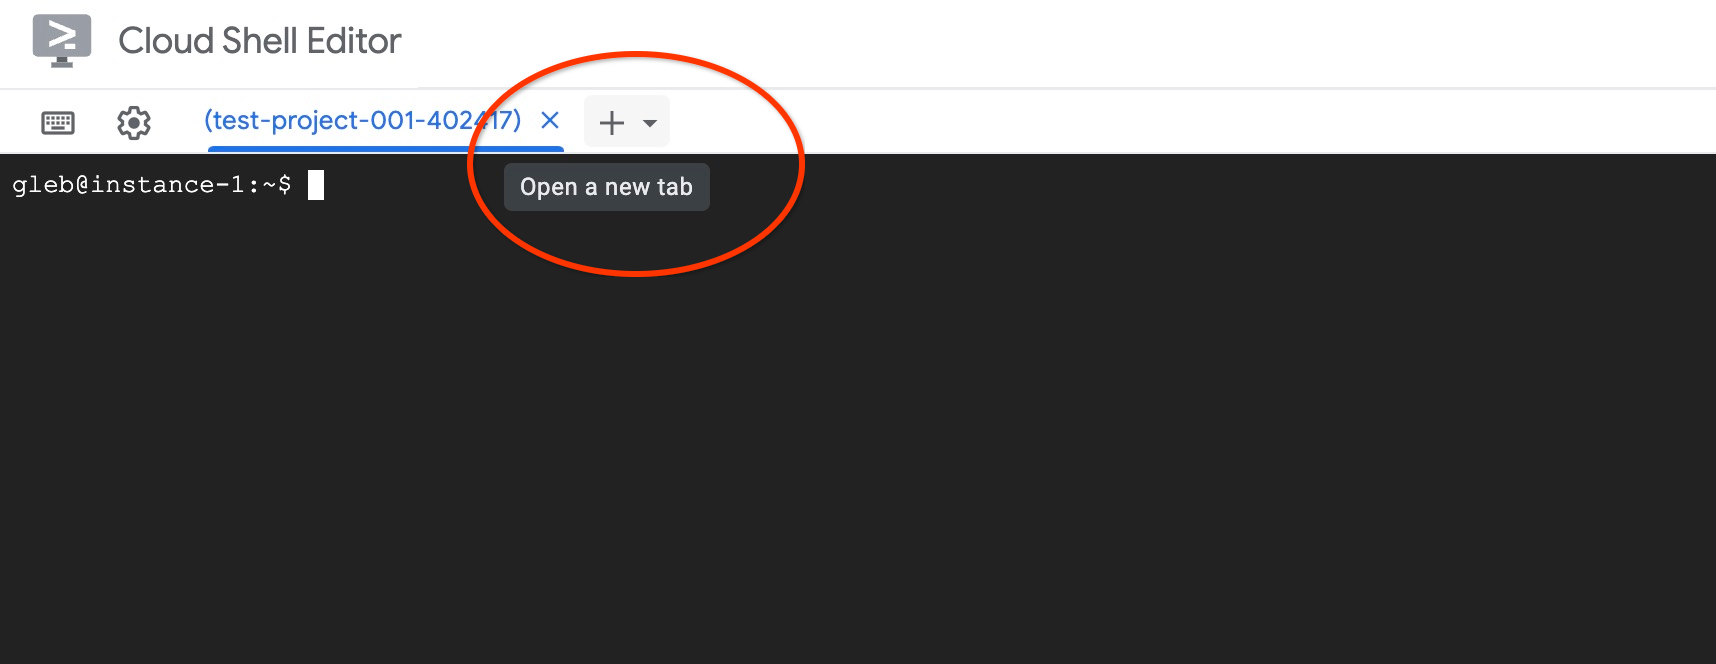
In the new cloud shell tab execute:
PROJECT_ID=$(gcloud config get-value project)
gcloud projects add-iam-policy-binding $PROJECT_ID \
  --member="serviceAccount:service-$(gcloud projects describe $PROJECT_ID --format="value(projectNumber)")@gcp-sa-alloydb.iam.gserviceaccount.com" \
  --role="roles/aiplatform.user"
Expected console output:
student@cloudshell:~ (test-project-001-402417)$ PROJECT_ID=$(gcloud config get-value project)
Your active configuration is: [cloudshell-11039]
student@cloudshell:~ (test-project-001-402417)$ gcloud projects add-iam-policy-binding $PROJECT_ID \
  --member="serviceAccount:service-$(gcloud projects describe $PROJECT_ID --format="value(projectNumber)")@gcp-sa-alloydb.iam.gserviceaccount.com" \
  --role="roles/aiplatform.user"
Updated IAM policy for project [test-project-001-402417].
bindings:
- members:
  - serviceAccount:service-4470404856@gcp-sa-alloydb.iam.gserviceaccount.com
  role: roles/aiplatform.user
- members:
...
etag: BwYIEbe_Z3U=
version: 1
Close the tab by either execution command "exit" in the tab:
exit
Connect to AlloyDB Studio
In the following chapters all the SQL commands requiring connection to the database can be executed in AlloyDB Studio.
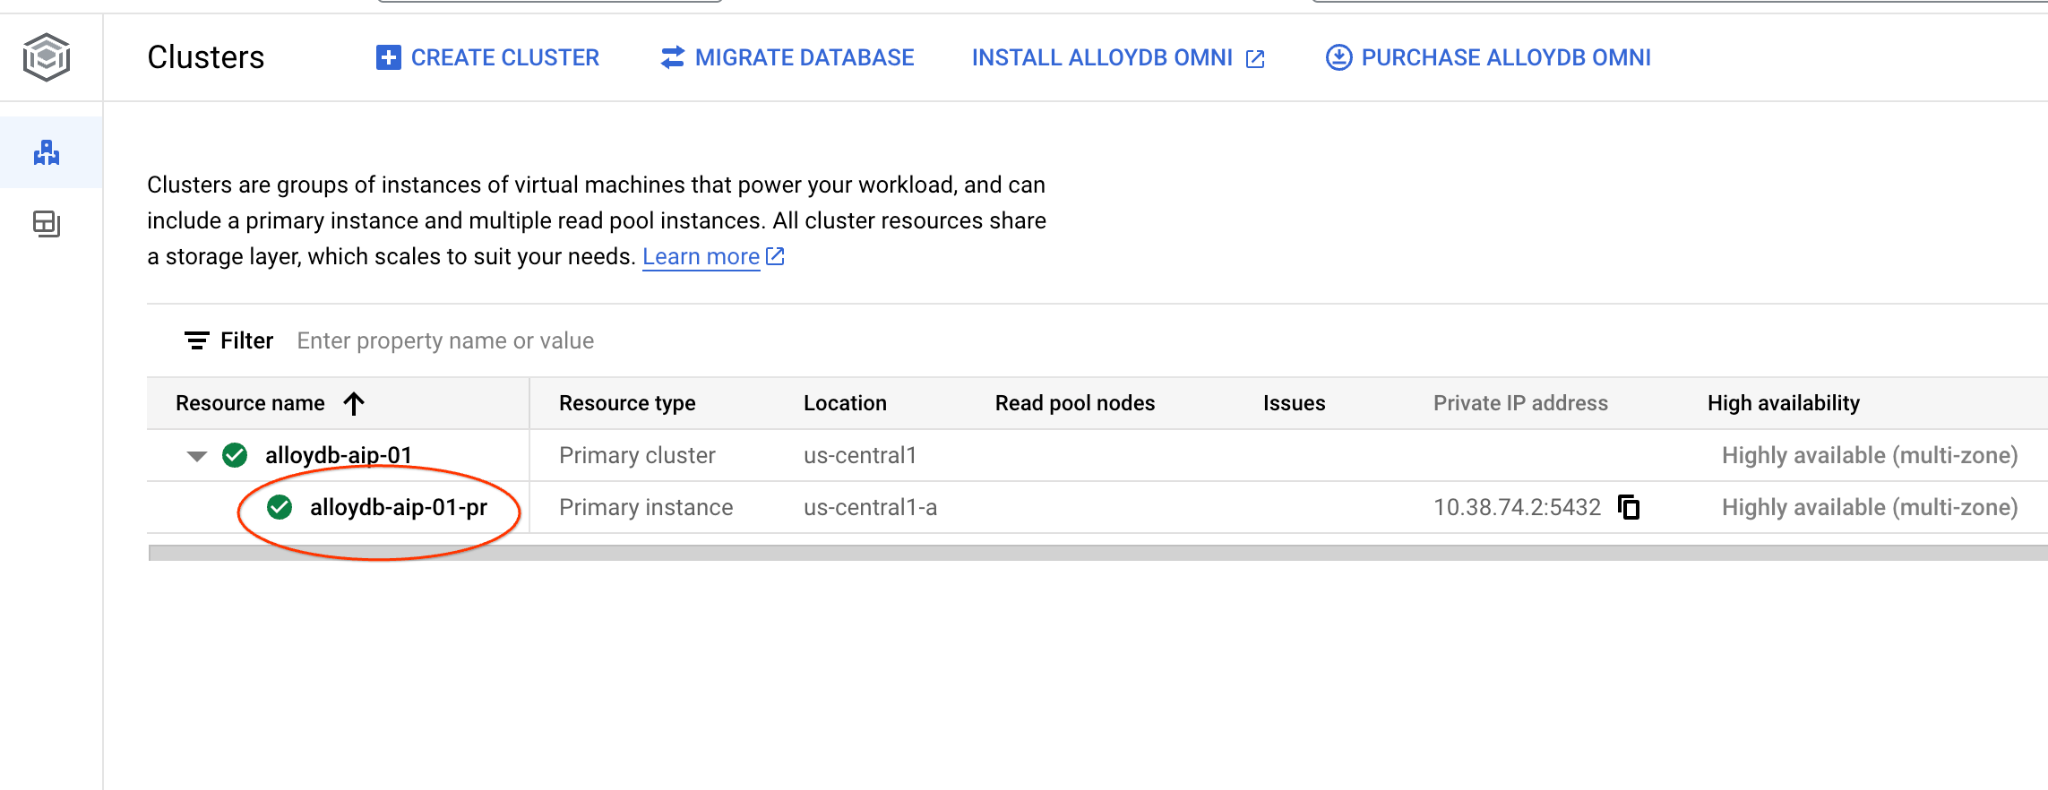
In a new tab, navigate to the Clusters page in AlloyDB for Postgres.
Open the web console interface for your AlloyDB cluster by clicking on the primary instance.
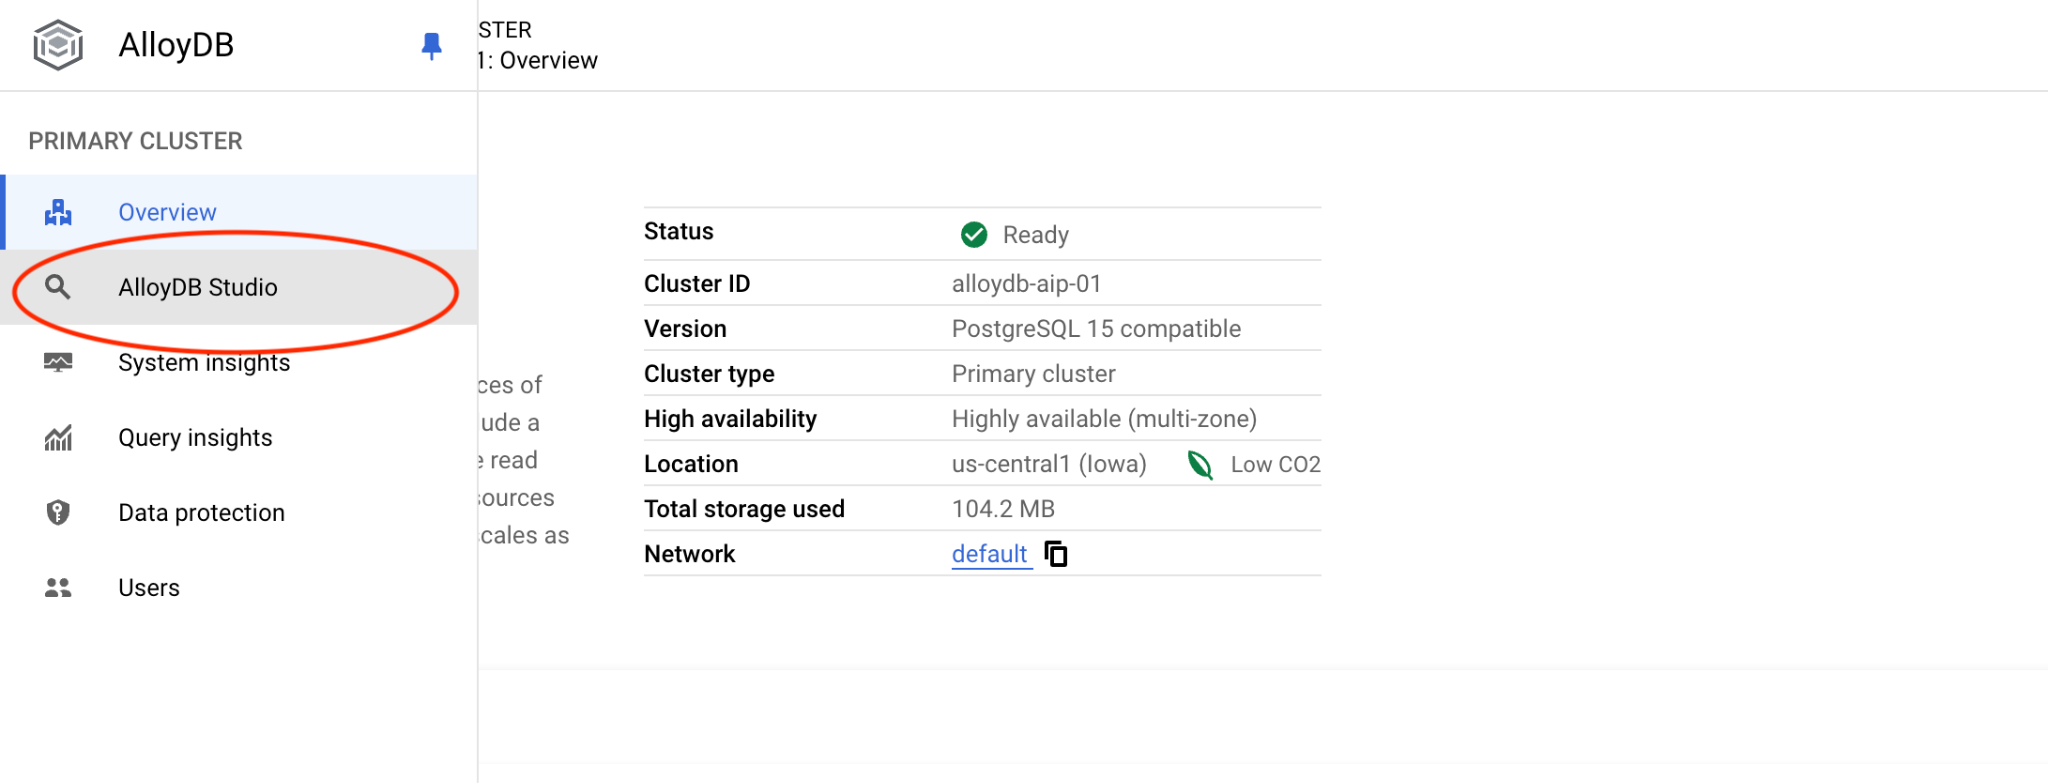
Then click on AlloyDB Studio on the left:
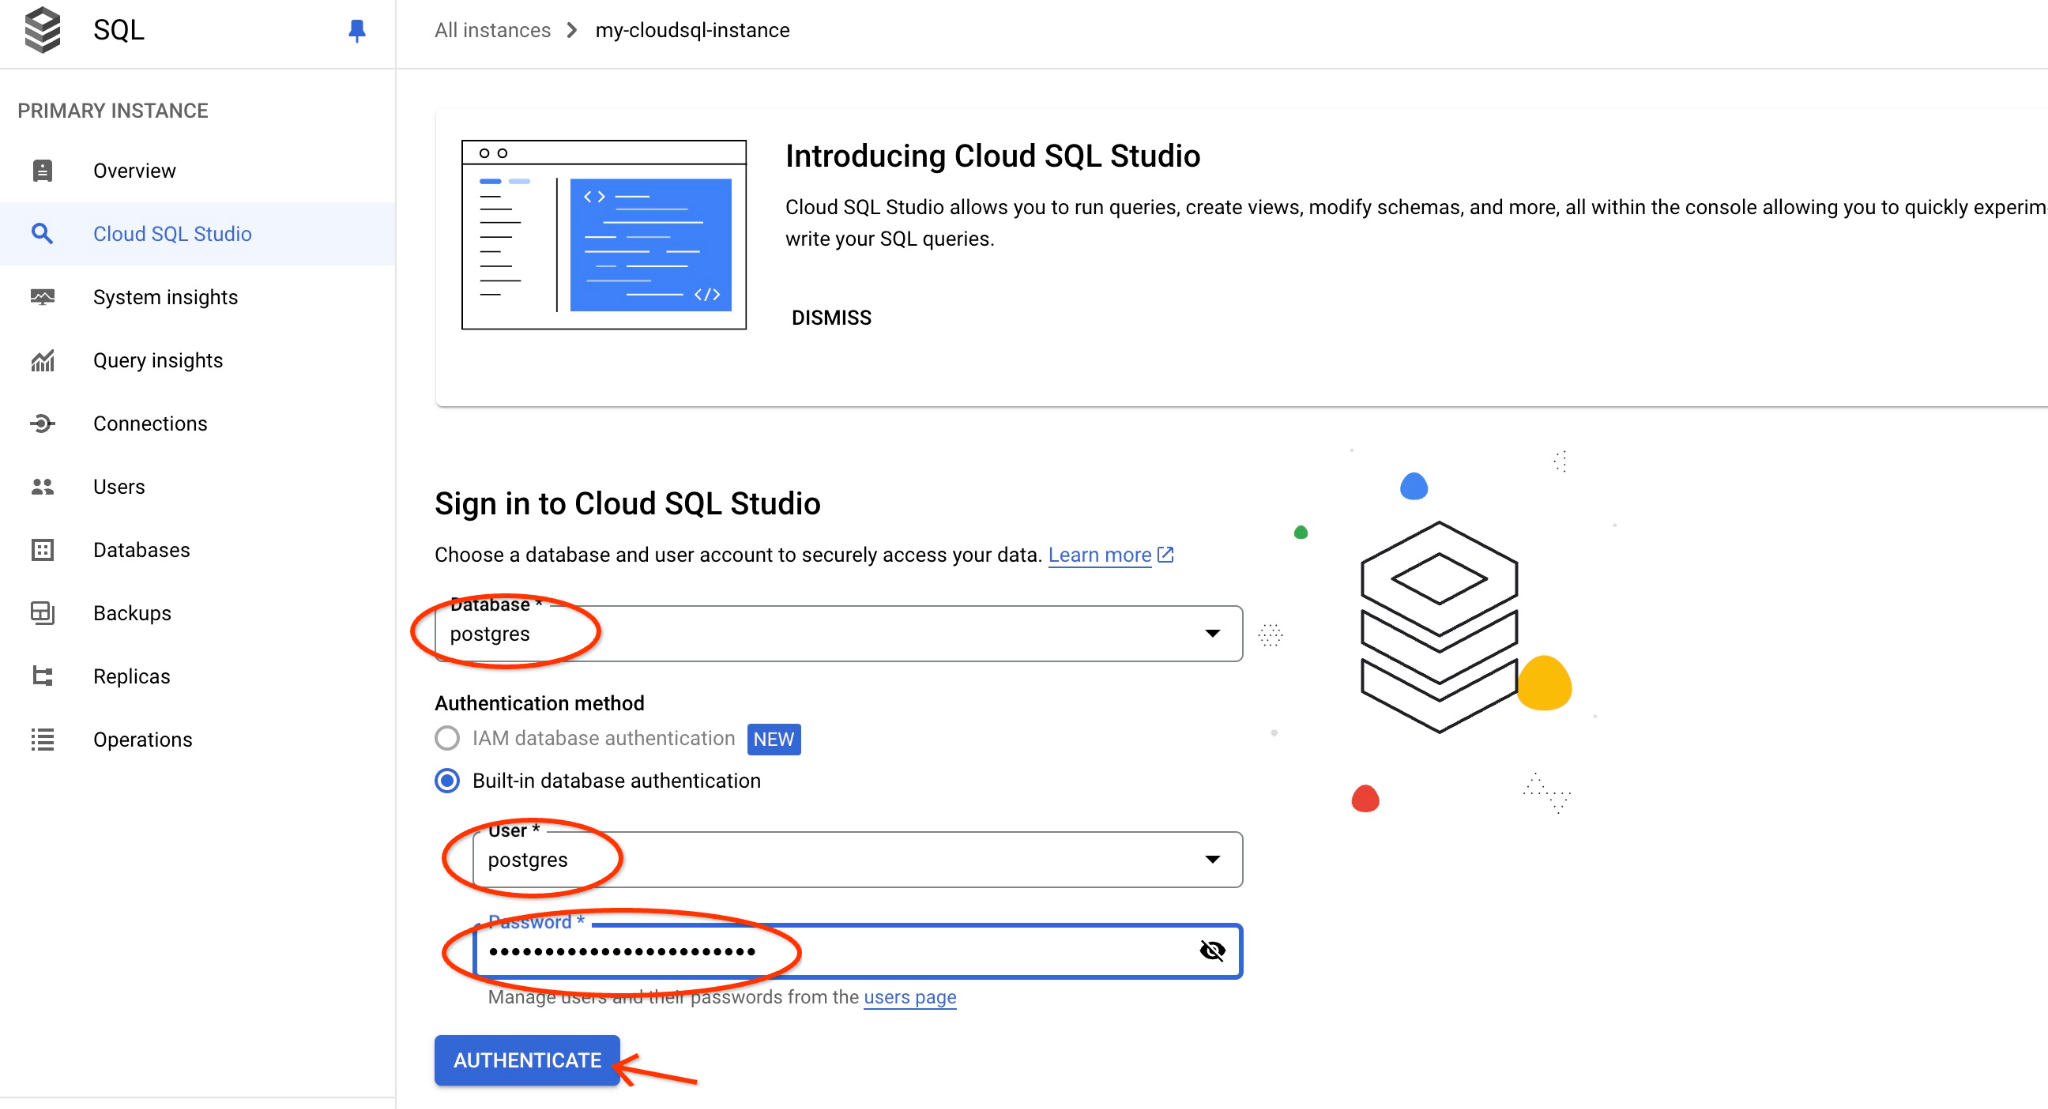
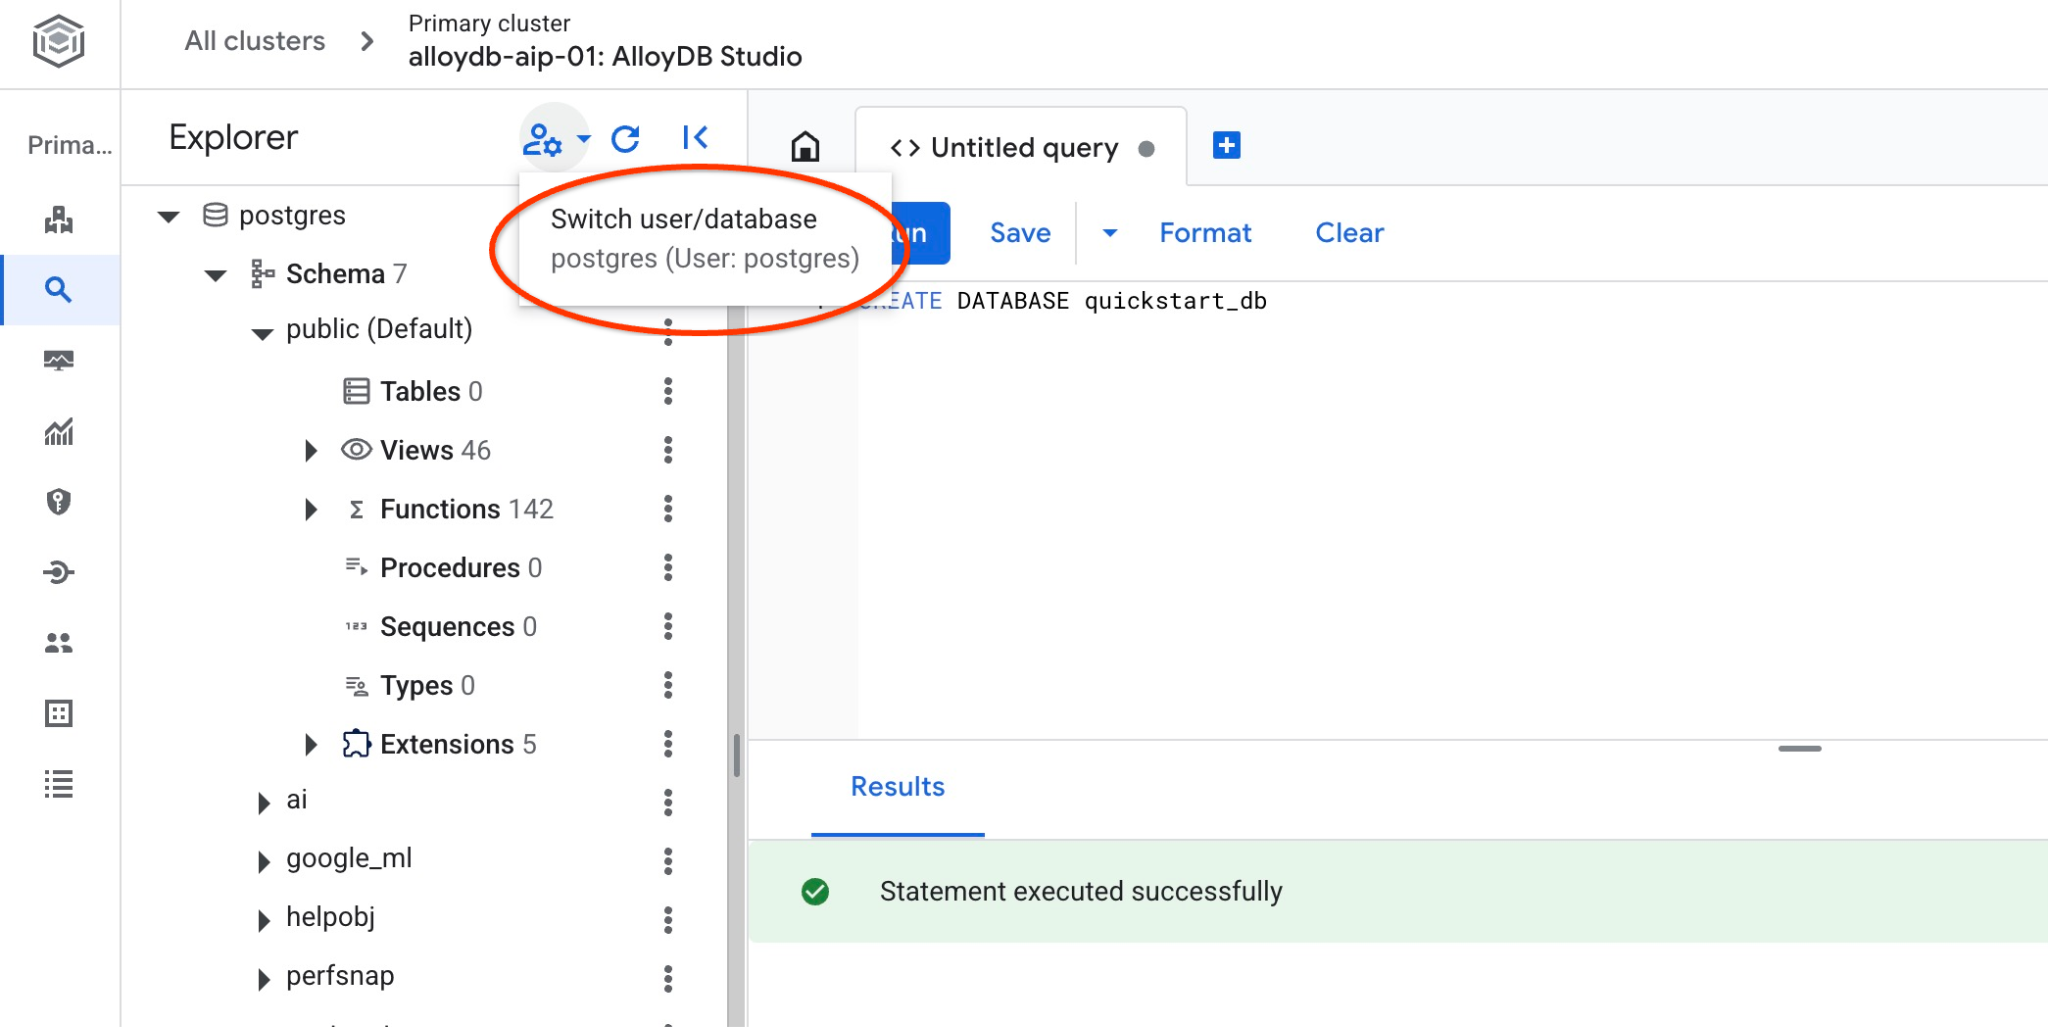
Choose the postgres database, user postgres and provide the password noted when we created the cluster. Then click on the "Authenticate" button. If you forgot to note the password or it doesn't work for you - you can change the password. Check the documentation on how to do that.
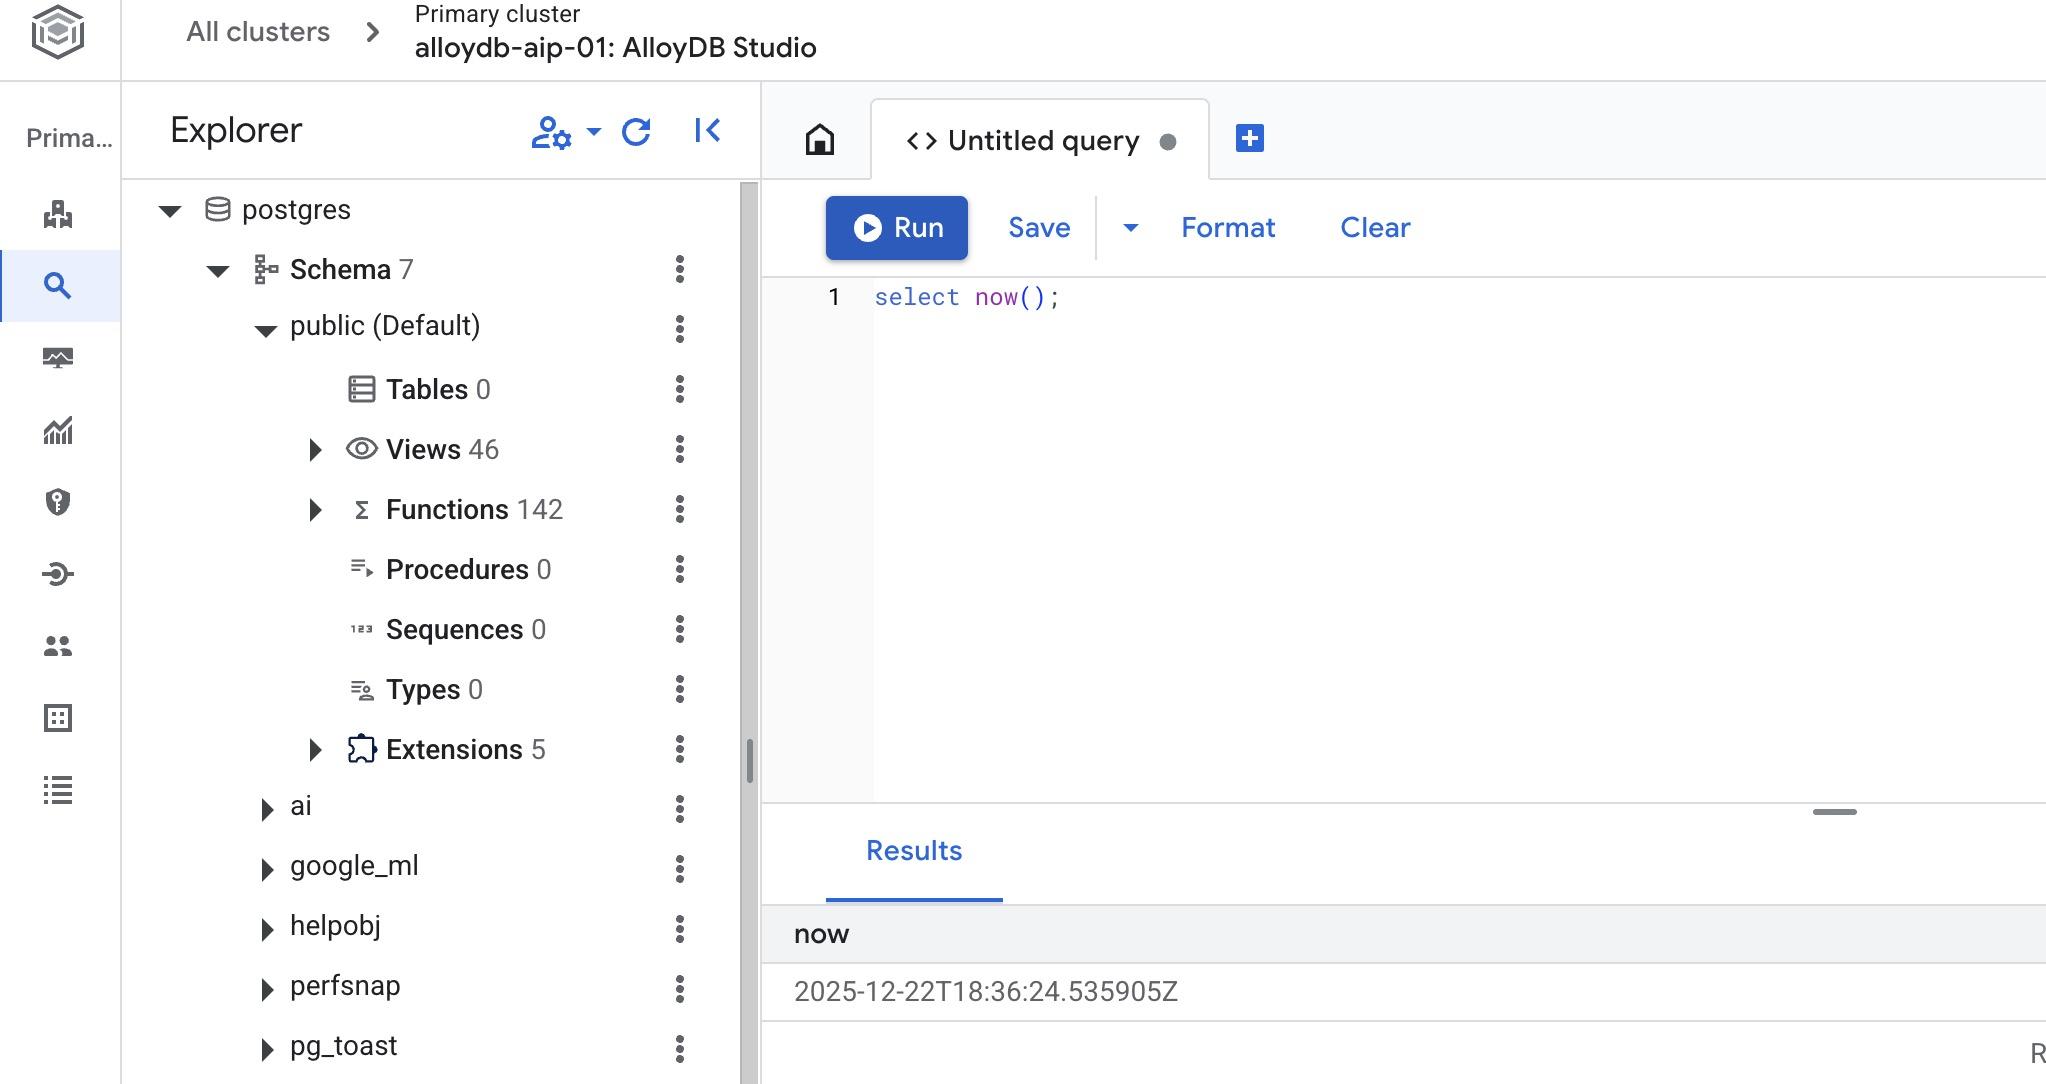
It will open the AlloyDB Studio interface. To run the commands in the database you click on the "Untitled Query" tab on the right.

It opens the interface where you can run SQL commands
Create Database
Create database quickstart.
In the AlloyDB Studio Editor execute the following command.
Create database:
CREATE DATABASE quickstart_db
Expected output:
Statement executed successfully
Connect to quickstart_db
Reconnect to the studio using the button to switch user/database.
Pick the new quickstart_db database from the dropdown list and use the same user and password as before.
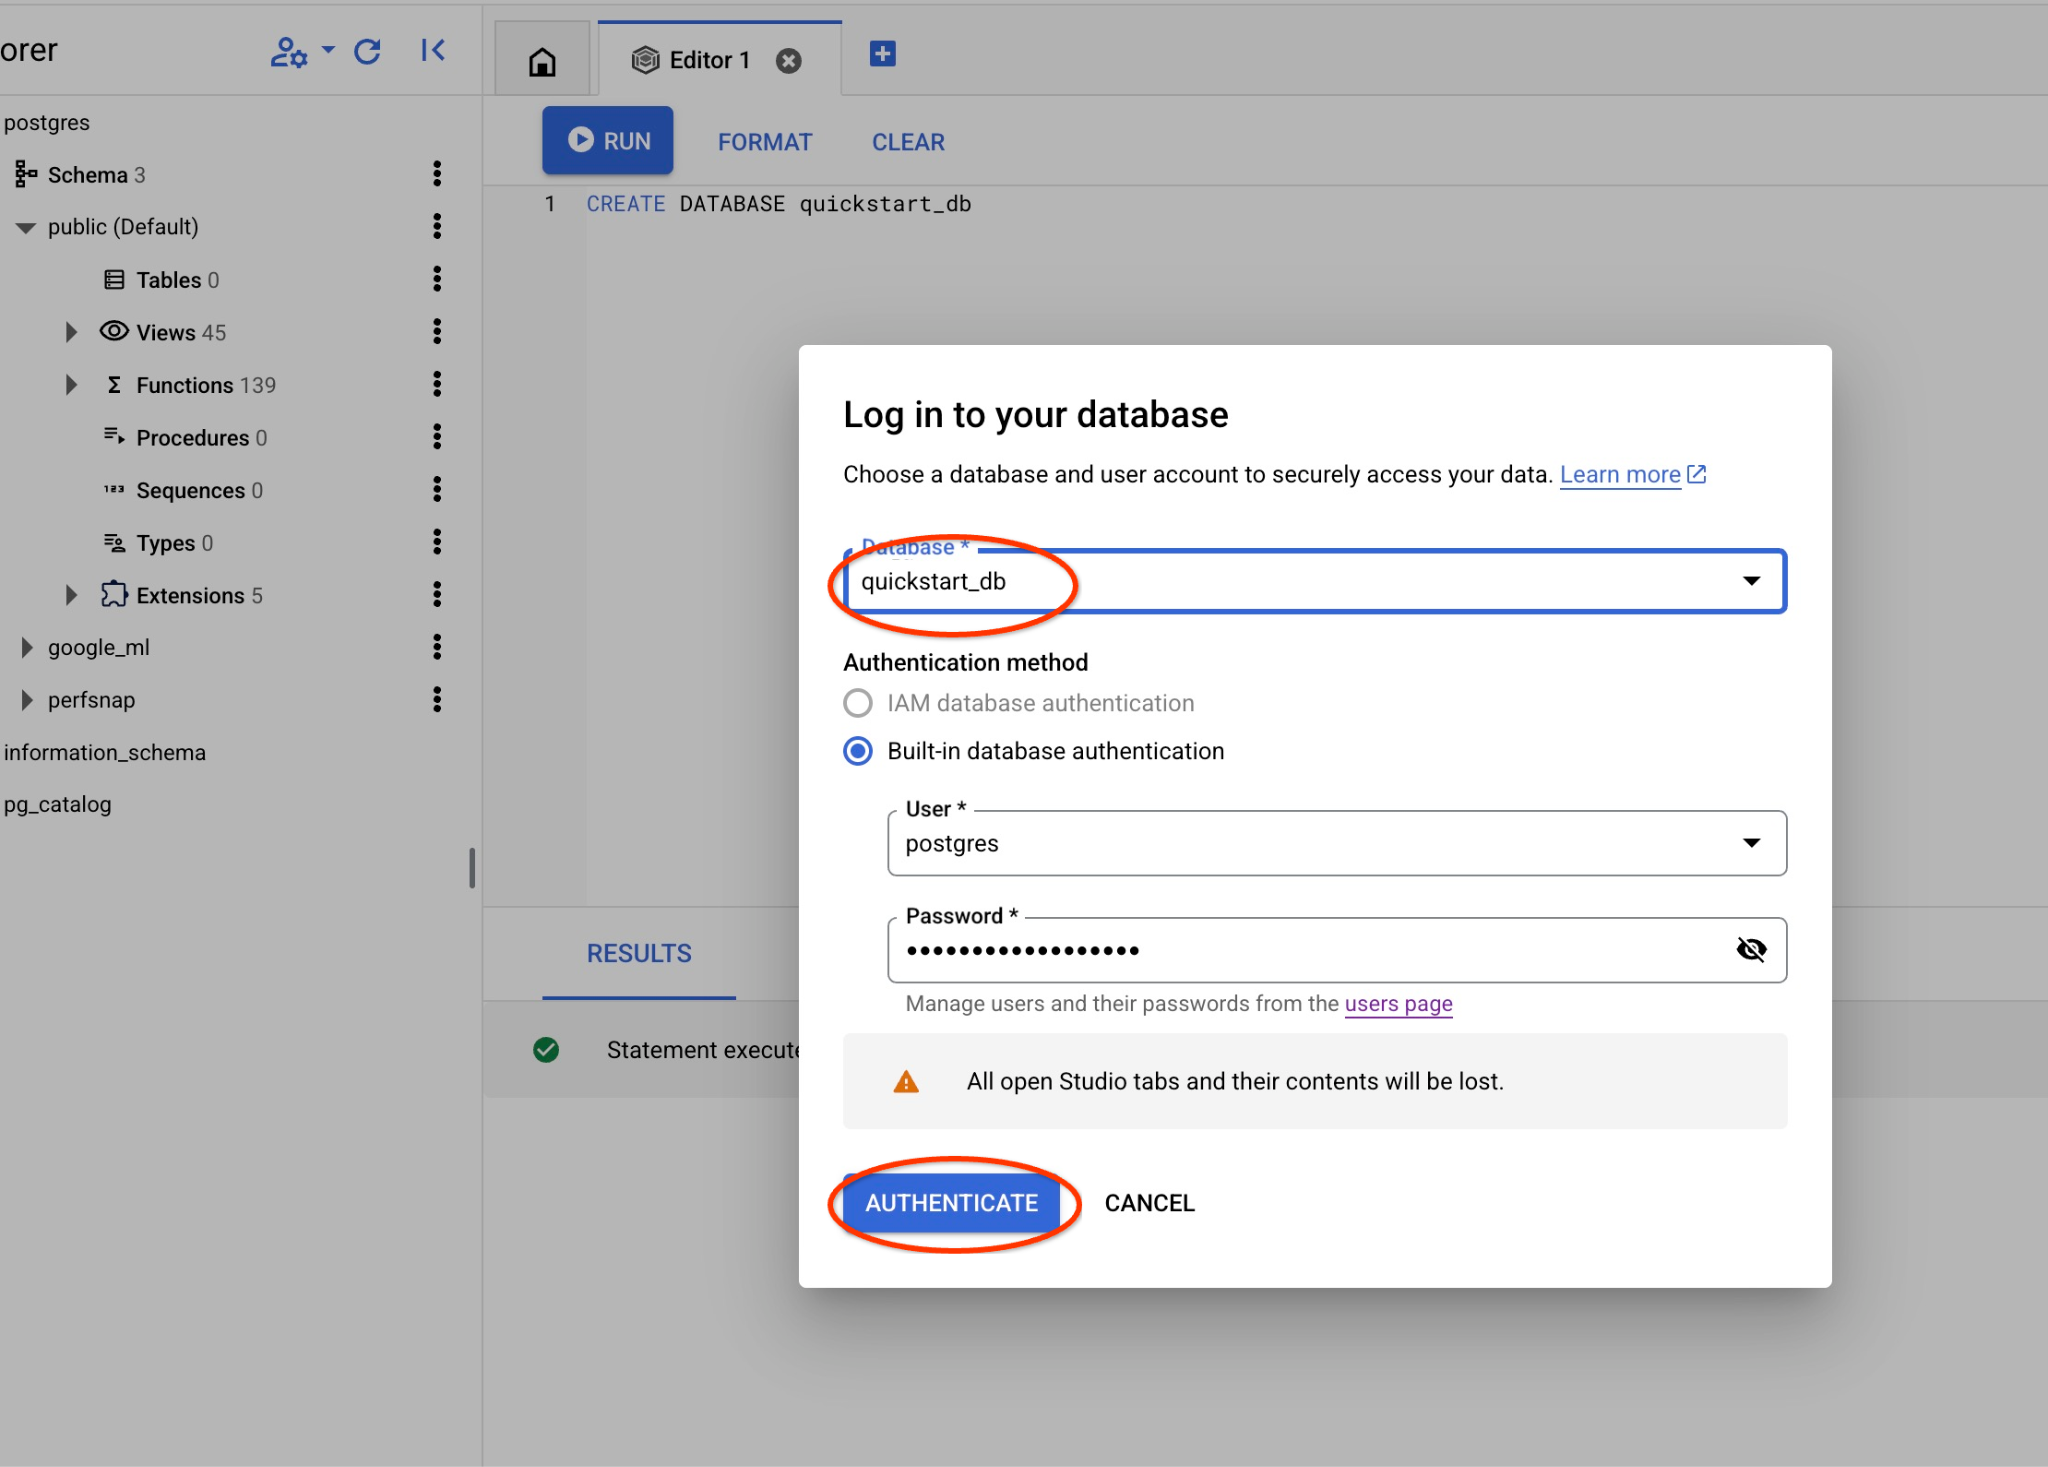
It will open a new connection where you can work with objects from the quickstart_db database.
6. Sample Data
Now we need to create objects in the database and load data. We are going to use a fictional "Cymbal" store with fictional data.
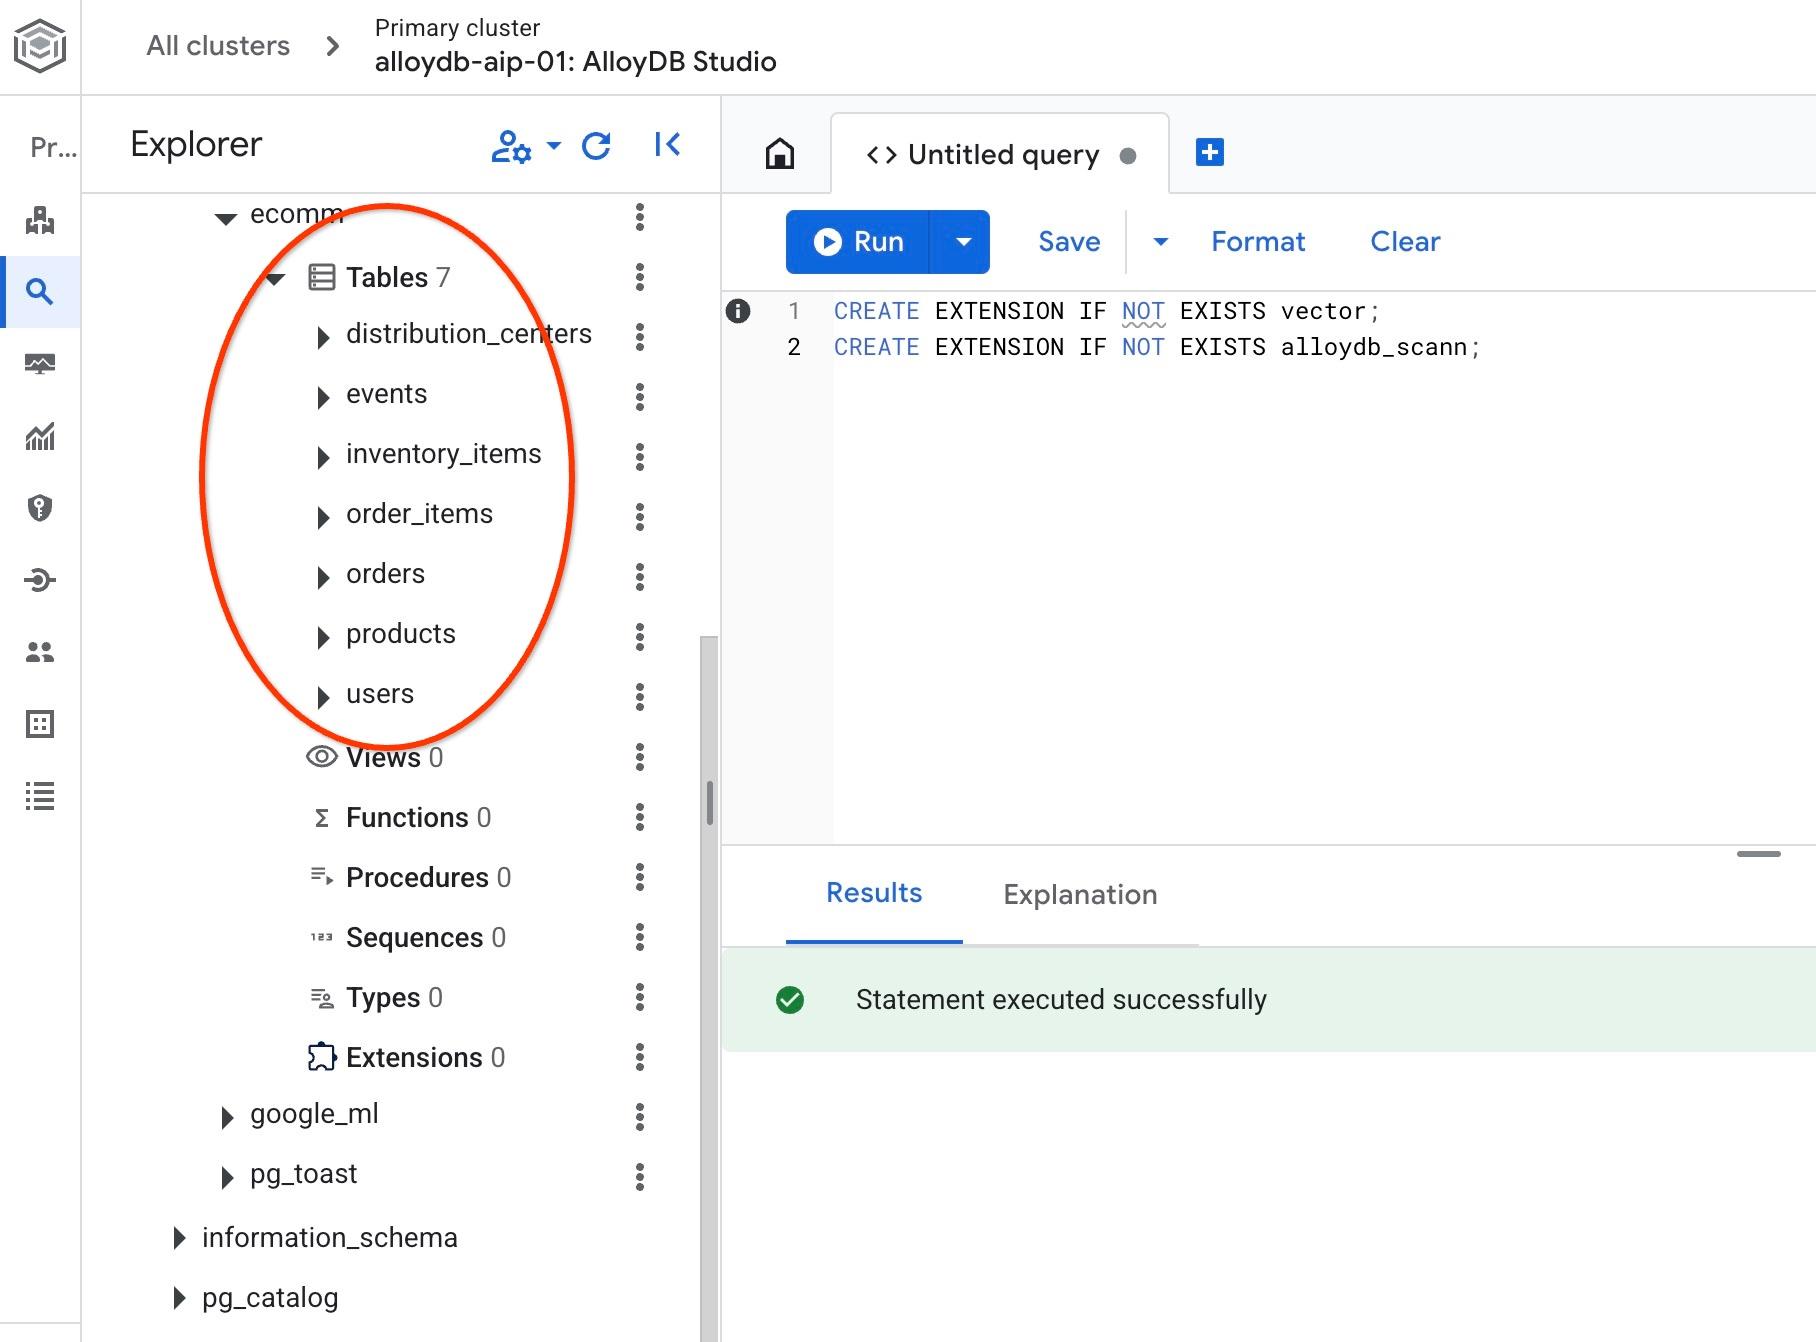
Before importing the data we need to enable extensions supporting datatypes and indexes. We need two extensions: One that supports the vector data type and the other that supports the AlloyDB ScaNN index.
In AlloyDB Studio, connect to the quickstart_db and execute:
CREATE EXTENSION IF NOT EXISTS vector;
CREATE EXTENSION IF NOT EXISTS alloydb_scann;
The dataset is prepared and placed as an SQL file which can be loaded to the database using the import interface. In the cloud Shell execute the following commands:
export REGION=us-central1
export ADBCLUSTER=alloydb-aip-01
gcloud alloydb clusters import $ADBCLUSTER --region=$REGION --database=quickstart_db --gcs-uri='gs://sample-data-and-media/ecomm-retail/ecom_generic_vectors.sql' --user=postgres --sql
The command is using the AlloyDB SDK and creates a user with the name agentspace_user and then imports sample data directly from the GCS bucket to the database creating all necessary objects and inserting data.
After the import we can check the tables in AlloyDB Studio. The tables are in the ecomm schema:
And verify the number of rows in one of the tables.
select count(*) from ecomm.products;
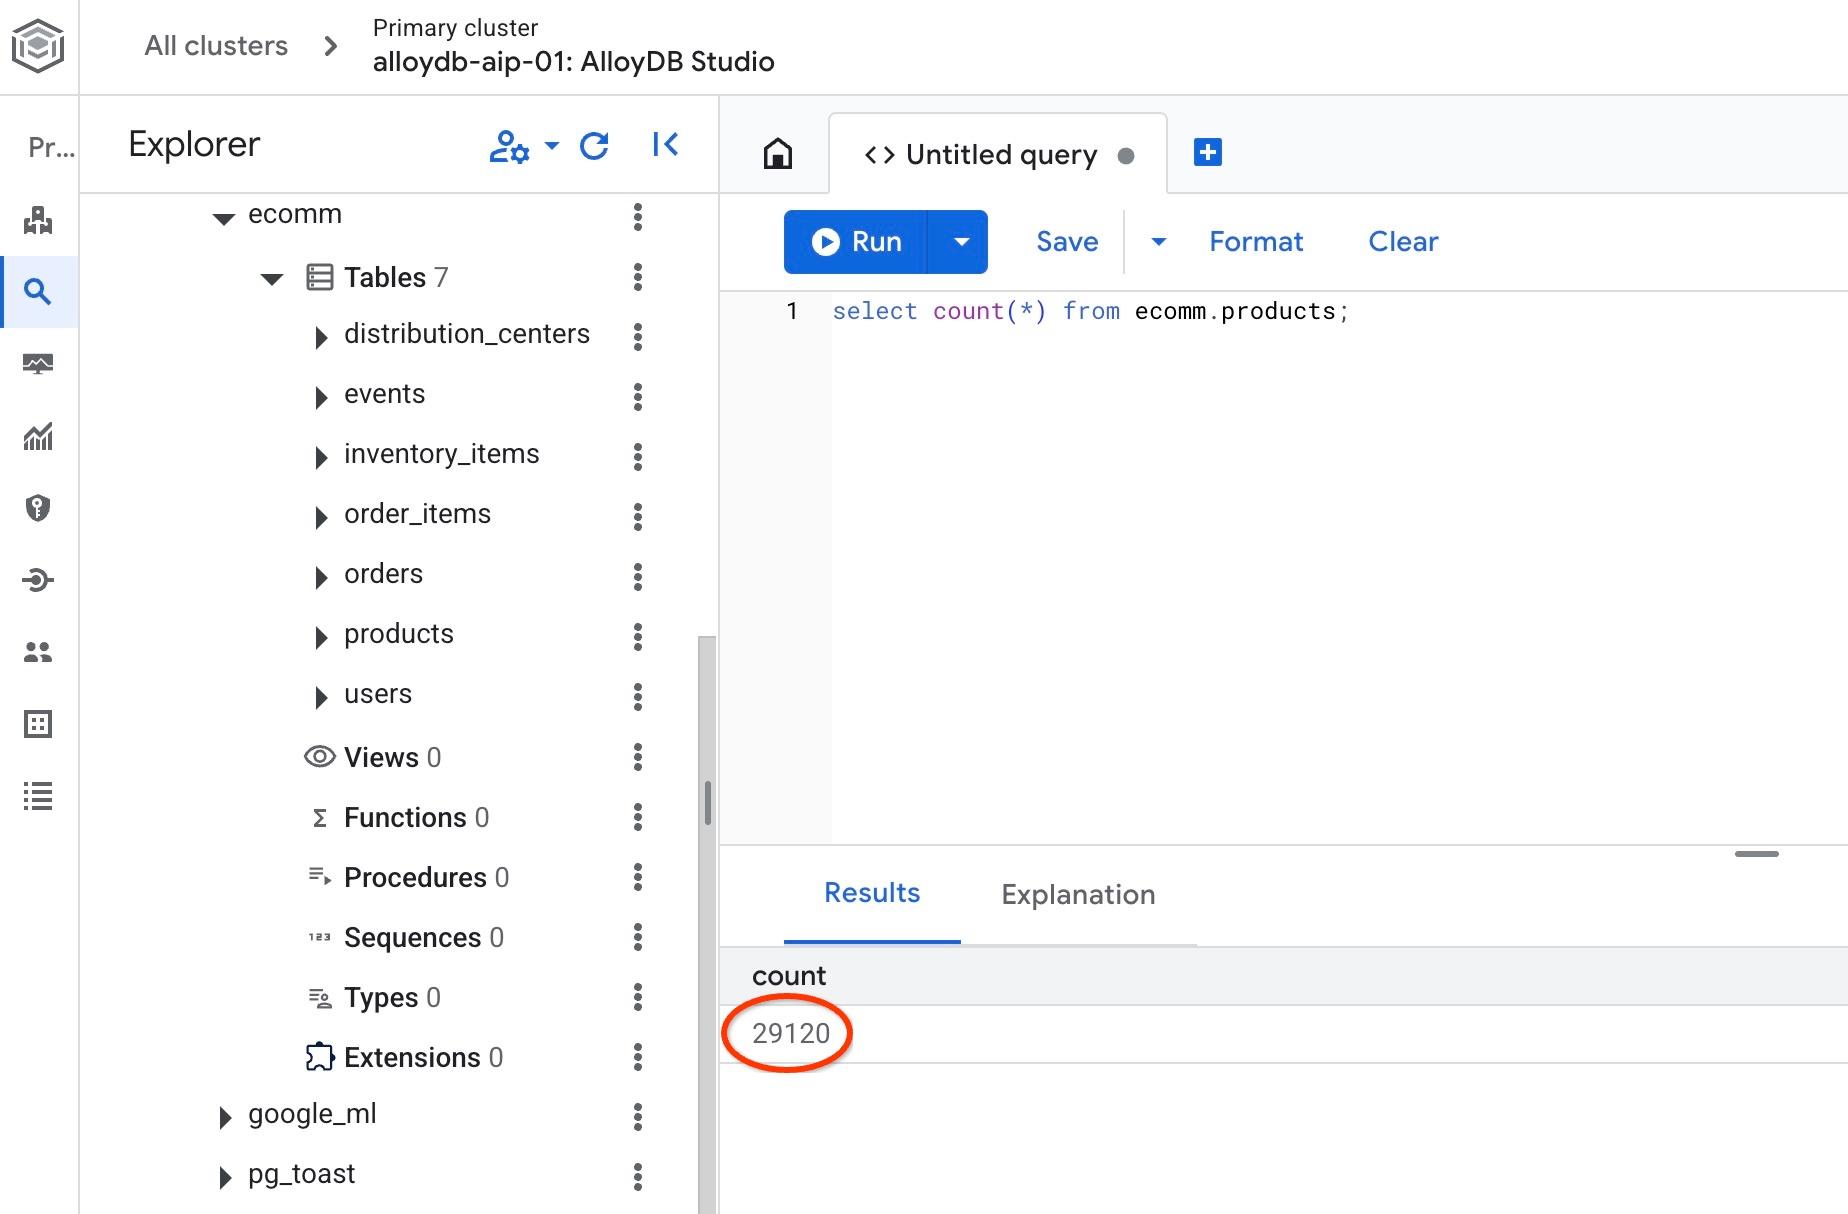
We successfully imported our sample data and can continue with the next steps.
7. Semantic Search Using Text Embeddings
In this chapter we will try to use semantic search using text embeddings and compare it with traditional Postgres text and fulltext search.
Let's try first the classic search using standard PostgreSQL SQL with LIKE operator.
In AlloyDB Studio connect to the quickstart_db, try to search for a rain jacket using the following query:
SET session.my_search_var='%wet%conditions%jacket%';
SELECT
  name,
  product_description,
  retail_price,   replace(product_image_uri,'gs://','https://storage.googleapis.com/') AS public_url
FROM
  ecomm.products
WHERE
  name ILIKE current_setting('session.my_search_var')
  OR product_description ILIKE current_setting('session.my_search_var')
LIMIT
  10;
The query doesn't return any rows since it would need exact words like wet conditions and jacket to be either in product name or the description. And the ‘wet conditions jacket' is not the same as ‘rain conditions jacket'.
We can try to include all possible variations to the search. Let's try to include just two words. For example:
SELECT
  name,
  product_description,
  retail_price,
   replace(product_image_uri,'gs://','https://storage.googleapis.com/') AS public_url
FROM
  ecomm.products
WHERE
  name ILIKE '%wet%jacket%'
  OR name ILIKE '%jacket%wet%'
  OR name ILIKE '%jacket%'
  OR name ILIKE '%%wet%'
  OR product_description ILIKE '%wet%jacket%'
  OR product_description ILIKE '%jacket%wet%'
  OR product_description ILIKE '%jacket%'
  OR product_description ILIKE '%wet%'
LIMIT
  10;
That would return multiple rows but not all of them match perfectly our request for the jackets and it is hard to sort by relevance. And, for example, if we add more conditions like "for men" and others it would significantly increase complexity of the query. Alternatively we can try full text search but even there we hit limitations related to more or less exact words and relevance of the response.
Now we can do a similar search using embeddings. We have already precalculated embeddings for our products using different models. We are going to use the latest Google's gemini-embedding-001 model. We have stored them in the column "product_embedding" of the ecomm.products table. If we run a query for our "rain jacket for men" search condition using the following query:
SELECT
  name,
  product_description,
  retail_price,
   replace(product_image_uri,'gs://','https://storage.googleapis.com/') AS public_url,
  product_embedding <=> embedding ('gemini-embedding-001','wet conditions jacket for men')::vector AS distance
FROM
  ecomm.products
ORDER BY distance
LIMIT
  10;
It will return not only the jackets for wet conditions but also all results are sorted putting the most relevant results on the top.
The query with embeddings returns results in 90-150ms where some portion of the time is spent to get the data from the cloud embedding model. If we look at the execution plan the request to the model is included in the planning time. The portion of the query doing the search itself is quite short. It takes less than 7 ms to do the search in 29k records using the AlloyDB ScaNN index.
Here is the execution plan output:
Limit (cost=2709.20..2718.82 rows=10 width=490) (actual time=6.966..7.049 rows=10 loops=1)
-> Index Scan using embedding_scann on products (cost=2709.20..30736.40 rows=29120 width=490) (actual time=6.964..7.046 rows=10 loops=1)
Order By: (product_embedding <=> '[-0.0020264734,-0.016582033,0.027258193
...
-0.0051468653,-0.012440448]'::vector)
Limit: 10
Planning Time: 136.579 ms
Execution Time: 6.791 ms
(6 rows)
That was the text embedding search using the text only embedding model. But we also have images for our products and we can use it with the search. In the next chapter we will show how the multimodal model uses images for the search.
8. Using Multimodal Search
While text-based semantic search is useful, describing intricate details can be challenging. AlloyDB's multimodal search offers an advantage by enabling product discovery through image input. This is especially helpful when visual representation clarifies search intent more effectively than textual descriptions alone. For example - "find me a coat like this one in the picture".
Let's return to our jacket example. If I have a picture of a jacket similar to what I want to find then I can pass it to the Google multimodal embedding model and compare it with embeddings for images of my products. In our table we already have calculated embeddings for images of our products in the column product_image_embedding and you can see the model used in the column product_image_embedding_model.
For our search we can use the image_embedding function to get embedding for our image and compare it with the precalculated embeddings. To enable the function we need to make sure we are using the right version of the google_ml_integration extension.
Let's verify the current extension version. In AlloyDB Studio execute.
SELECT extversion FROM pg_extension WHERE extname = 'google_ml_integration';
If the version is less than 1.5.2 then run the following procedure.
CALL google_ml.upgrade_to_preview_version();
And recheck the version of the extension. It should be 1.5.3.
SELECT extversion FROM pg_extension WHERE extname = 'google_ml_integration';
We also need to enable the AI query engine features in our database. It can be done either by updating by instance flag for all databases on the instance or by enabling it only for our database. Execute the following command in AlloyDB Studio to enable it for the quickstart_db database.
ALTER DATABASE quickstart_db SET google_ml_integration.enable_ai_query_engine = 'on';
Now we can search by image. Here is my sample image for search but you can use any custom image. You just need to upload it to the Google storage or other publicly available resource and put the URI to the query.

And it is uploaded to gs://pr-public-demo-data/alloydb-retail-demo/user_photos/4.png
Image Search by Images
First, we try to search just by the image:
SELECT
  name,
  product_description,
  retail_price,
  replace(product_image_uri,'gs://','https://storage.googleapis.com/') AS public_url,
  product_image_embedding <=> google_ml.image_embedding (model_id => 'multimodalembedding@001',image => 'gs://pr-public-demo-data/alloydb-retail-demo/user_photos/4.png', mimetype => 'image/png')::vector AS distance
FROM
  ecomm.products
ORDER BY distance
LIMIT
  4;
And we were able to find some warm jackets in the inventory. To see the images you can download them using cloud SDK (gcloud storage cp) by supplying the public_url column and then open it using any tools that work with images.
|
|
|
|


The image search returns items which resemble our image provided for comparison. As I've already mentioned you can try to upload your own images to a public bucket and see if it can find different types of clothes.
We've used Google's ‘multimodalembedding@001' model for our image search. Our image_embedding function sends the image to Vertex AI, converts it to a vector and returns it back to compare with the stored image vectors in our database.
We also can check using "EXPLAIN ANALYZE" for how fast it works with our AlloyDB ScaNN index.
Here is the output for the execution plan:
Limit (cost=971.70..975.55 rows=4 width=490) (actual time=2.453..2.477 rows=4 loops=1)
-> Index Scan using product_image_embedding_scann on products (cost=971.70..28998.90 rows=29120 width=490) (actual time=2.451..2.475 rows=4 loops=1)
Order By: (product_image_embedding <=> '[0.02119865,0.034206174,0.030682731,
...
,-0.010307034,-0.010053742]'::vector)
Limit: 4
Planning Time: 913.322 ms
Execution Time: 2.517 ms
(6 rows)
And again as in the previous example we can see that the most of the time was spent converting our image to embeddings using the cloud endpoint and the vector search itself takes only 2.5 ms.
Image Search by Text
With multimodal we also can pass a text description of the jacket we are trying to search to the model using google_ml.text_embedding for the same model and compare with images embeddings to see what images it returns.
SELECT
  name,
  product_description,
  retail_price,
  replace(product_image_uri,'gs://','https://storage.googleapis.com/') AS public_url,
  product_image_embedding <=> google_ml.text_embedding (model_id => 'multimodalembedding@001',content => 'puffy jacket for men, grey or dark colour')::vector AS distance
FROM
  ecomm.products
ORDER BY distance
LIMIT
  4;
And we got a set of puffy jackets with grey or dark colours.
|
|
|
|


We've gotten a slightly different set of jackets but it correctly picked up jackets based on our description when searching through the image embeddings.
Let's try another way to search among descriptions using our embedding for the search image.
Text Search by Images
We tried to search images passing the embedding for our image and compare with precalculated image embeddings for our products. We also tried to search for images by passing an embedding for our text request and search among the same embedding for the product images. Let's try now to use an embedding for our image and compare it with text embeddings for the product descriptions These embeddings are stored in the product_description_embedding column and use the same multimodalembedding@001 model.
Here is our query:
SELECT
  name,
  product_description,
  retail_price,
  replace(product_image_uri,'gs://','https://storage.googleapis.com/') AS public_url,
  product_description_embedding <=> google_ml.image_embedding (model_id => 'multimodalembedding@001',image => 'gs://pr-public-demo-data/alloydb-retail-demo/user_photos/4.png', mimetype => 'image/png')::vector AS distance

FROM
  ecomm.products
ORDER BY distance
LIMIT
  4;
And here we got a slightly different set of jackets with grey or dark colours where some of them are the same or very close to the ones chosen by the other ways we searched.
|
|
|
|


Based on the embedding for images, it can compare with the calculated embeddings for the text description and return the correct set of products.
Hybrid text and image search
You can also experiment combining both text and image embeddings together using, for example, reciprocal rank fusion. Here is an example of such a query where we have combined two searches assigning a score to each rank and ordering the results based on the combined score.
WITH image_search AS (
            SELECT id,
                RANK () OVER (ORDER BY  product_image_embedding <=>google_ml.image_embedding(model_id => 'multimodalembedding@001',image => 'gs://pr-public-demo-data/alloydb-retail-demo/user_photos/4.png', mimetype => 'image/png')::vector) AS rank
                FROM ecomm.products
                ORDER BY product_image_embedding <=>google_ml.image_embedding(model_id => 'multimodalembedding@001',image => 'gs://pr-public-demo-data/alloydb-retail-demo/user_photos/4.png', mimetype => 'image/png')::vector LIMIT 5
        ),
      text_search AS (
            SELECT id,
                RANK () OVER (ORDER BY product_description_embedding <=>google_ml.text_embedding(model_id => 'multimodalembedding@001',content => 'puffy jacket for men, grey or dark colour'
    )::vector) AS rank
            FROM ecomm.products
            ORDER BY product_description_embedding <=>google_ml.text_embedding(model_id => 'multimodalembedding@001',content => 'puffy jacket for men, grey or dark colour'
    )::vector LIMIT 5
        ),
      rrf_score AS (
        SELECT
            COALESCE(image_search.id, text_search.id) AS id,
            COALESCE(1.0 / (60 + image_search.rank), 0.0) + COALESCE(1.0 / (60 + text_search.rank), 0.0) AS rrf_score
        FROM image_search FULL OUTER JOIN text_search ON image_search.id = text_search.id
        ORDER BY rrf_score DESC
      )
      SELECT
        ep.name,
        ep.product_description,
        ep.retail_price,
        replace(ep.product_image_uri,'gs://','https://storage.googleapis.com/') AS public_url
      FROM ecomm.products ep, rrf_score
      WHERE
        ep.id=rrf_score.id
      ORDER by rrf_score DESC
      LIMIT 4;
You could try to play with different parameters in the query and see if you can improve your search results. In addition, you could also use other AI operators to rank the results as described in the documentation.
This concludes the lab. To prevent unexpected charges it is recommended to delete the unused resources.
9. Clean up environment
Destroy the AlloyDB instances and cluster when you are done with the lab.
Delete AlloyDB cluster and all instances
If you've used the trial version of AlloyDB. Do not delete the trial cluster if you have plans to test other labs and resources using the trial cluster. You will not be able to create another trial cluster in the same project.
The cluster is destroyed with option force which also deletes all the instances belonging to the cluster.
In the cloud shell define the project and environment variables if you've been disconnected and all the previous settings are lost:
gcloud config set project <your project id>
export REGION=us-central1
export ADBCLUSTER=alloydb-aip-01
export PROJECT_ID=$(gcloud config get-value project)
Delete the cluster:
gcloud alloydb clusters delete $ADBCLUSTER --region=$REGION --force
Expected console output:
student@cloudshell:~ (test-project-001-402417)$ gcloud alloydb clusters delete $ADBCLUSTER --region=$REGION --force
All of the cluster data will be lost when the cluster is deleted.

Do you want to continue (Y/n)?  Y

Operation ID: operation-1697820178429-6082890a0b570-4a72f7e4-4c5df36f
Deleting cluster...done.
Delete AlloyDB Backups
Delete all AlloyDB backups for the cluster:
for i in $(gcloud alloydb backups list --filter="CLUSTER_NAME: projects/$PROJECT_ID/locations/$REGION/clusters/$ADBCLUSTER" --format="value(name)" --sort-by=~createTime) ; do gcloud alloydb backups delete $(basename $i) --region $REGION --quiet; done
Expected console output:
student@cloudshell:~ (test-project-001-402417)$ for i in $(gcloud alloydb backups list --filter="CLUSTER_NAME: projects/$PROJECT_ID/locations/$REGION/clusters/$ADBCLUSTER" --format="value(name)" --sort-by=~createTime) ; do gcloud alloydb backups delete $(basename $i) --region $REGION --quiet; done
Operation ID: operation-1697826266108-60829fb7b5258-7f99dc0b-99f3c35f
Deleting backup...done.
10. Congratulations
Congratulations for completing the codelab. You've learned how to use multimodal search in the AlloyDB using embedding functions for texts and images. You can try to test the multimodal search and improve it with google_ml.rank function using codelab for AlloyDB AI operators.
Google Cloud Learning Path
This lab is part of the Production-Ready AI with Google Cloud Learning Path.
- Explore the full curriculum to bridge the gap from prototype to production.
- Share your progress with the hashtag
#ProductionReadyAI.
What we've covered
- How to deploy AlloyDB for Postgres
- How to use AlloyDB Studio
- How to use multimodal vector search
- How to enable AlloyDB AI operators
- How to use different AlloyDB AI operators for multimodal search
- How to use AlloyDB AI to combine text and image search results
11. Survey
Output: