
1. 소개
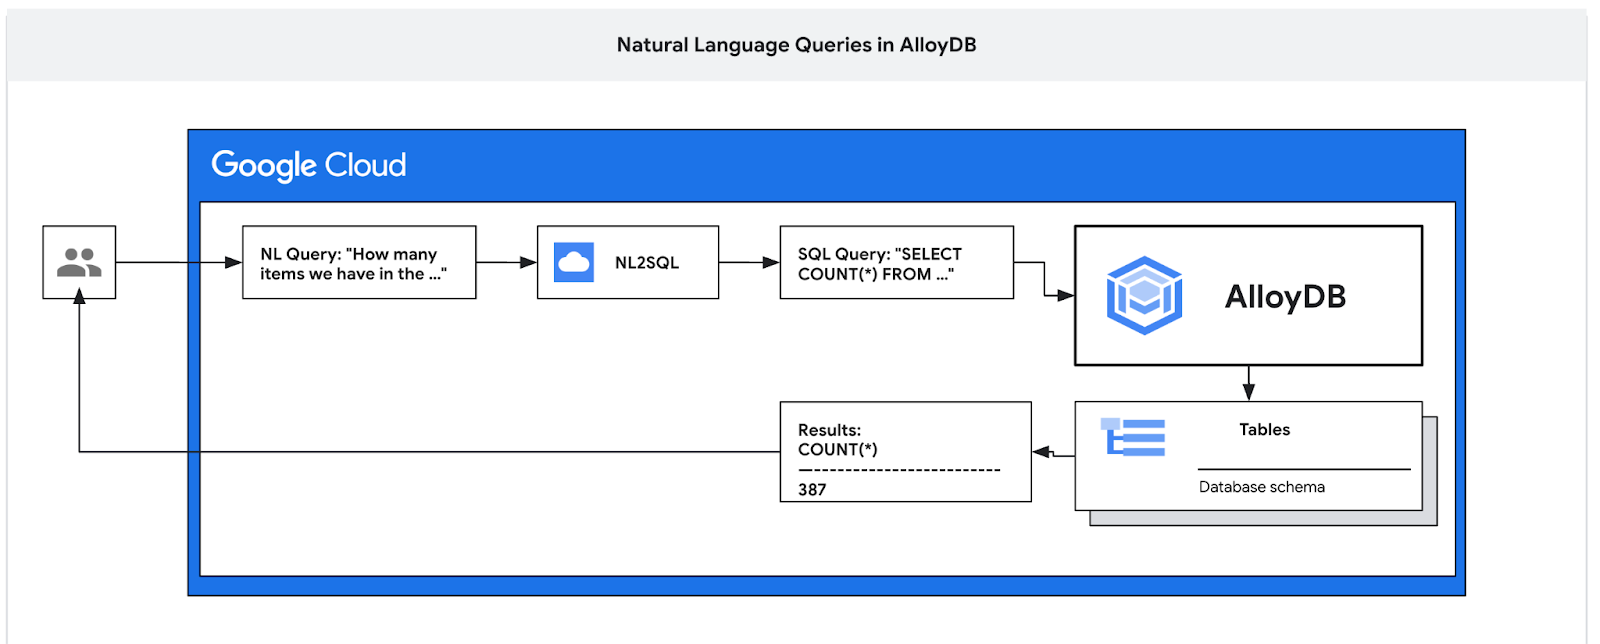
이 Codelab에서는 AlloyDB를 배포하고 AI 자연어를 사용하여 데이터를 쿼리하고 예측 가능하고 효율적인 쿼리를 위해 구성을 조정하는 방법을 알아봅니다. 이 실습은 AlloyDB AI 기능을 위한 실습 모음의 일부입니다. 자세한 내용은 문서의 AlloyDB AI 페이지를 참고하세요.
기본 요건
- Google Cloud, 콘솔에 관한 기본적인 이해
- 명령줄 인터페이스 및 Cloud Shell의 기본 기술
학습할 내용
- Postgres용 AlloyDB를 배포하는 방법
- AlloyDB AI 자연어를 사용 설정하는 방법
- AI 자연어 구성을 만들고 조정하는 방법
- 자연어를 사용하여 SQL 쿼리를 생성하고 결과를 얻는 방법
필요한 항목
- Google Cloud 계정 및 Google Cloud 프로젝트
- Google Cloud 콘솔 및 Cloud Shell을 지원하는 웹브라우저(예: Chrome)
2. 설정 및 요구사항
자습형 환경 설정
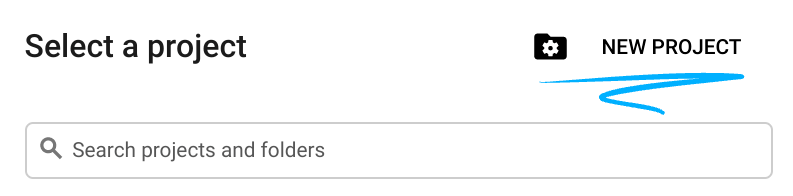
- Google Cloud Console에 로그인하여 새 프로젝트를 만들거나 기존 프로젝트를 재사용합니다. 아직 Gmail이나 Google Workspace 계정이 없는 경우 계정을 만들어야 합니다.

- 프로젝트 이름은 이 프로젝트 참가자의 표시 이름입니다. 이는 Google API에서 사용하지 않는 문자열이며 언제든지 업데이트할 수 있습니다.
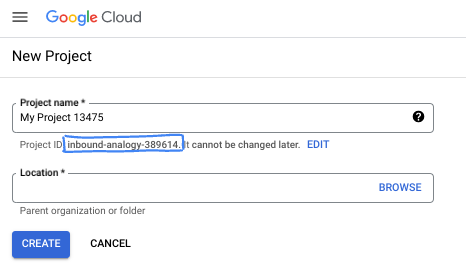
- 프로젝트 ID는 모든 Google Cloud 프로젝트에서 고유하며, 변경할 수 없습니다(설정된 후에는 변경할 수 없음). Cloud 콘솔은 고유한 문자열을 자동으로 생성합니다. 일반적으로는 신경 쓰지 않아도 됩니다. 대부분의 Codelab에서는 프로젝트 ID (일반적으로
PROJECT_ID로 식별됨)를 참조해야 합니다. 생성된 ID가 마음에 들지 않으면 다른 임의 ID를 생성할 수 있습니다. 또는 직접 시도해 보고 사용 가능한지 확인할 수도 있습니다. 이 단계 이후에는 변경할 수 없으며 프로젝트 기간 동안 유지됩니다. - 참고로 세 번째 값은 일부 API에서 사용하는 프로젝트 번호입니다. 이 세 가지 값에 대한 자세한 내용은 문서를 참고하세요.
- 다음으로 Cloud 리소스/API를 사용하려면 Cloud 콘솔에서 결제를 사용 설정해야 합니다. 이 Codelab 실행에는 많은 비용이 들지 않습니다. 이 튜토리얼이 끝난 후에 요금이 청구되지 않도록 리소스를 종료하려면 만든 리소스 또는 프로젝트를 삭제하면 됩니다. Google Cloud 신규 사용자는 300달러(USD) 상당의 무료 체험판 프로그램에 참여할 수 있습니다.
Cloud Shell 시작
Google Cloud를 노트북에서 원격으로 실행할 수 있지만, 이 Codelab에서는 Cloud에서 실행되는 명령줄 환경인 Google Cloud Shell을 사용합니다.
Google Cloud Console의 오른쪽 상단 툴바에 있는 Cloud Shell 아이콘을 클릭합니다.

환경을 프로비저닝하고 연결하는 데 몇 분 정도 소요됩니다. 완료되면 다음과 같이 표시됩니다.

가상 머신에는 필요한 개발 도구가 모두 들어있습니다. 영구적인 5GB 홈 디렉터리를 제공하고 Google Cloud에서 실행되므로 네트워크 성능과 인증이 크게 개선됩니다. 이 Codelab의 모든 작업은 브라우저 내에서 수행할 수 있습니다. 아무것도 설치할 필요가 없습니다.
3. 시작하기 전에
API 사용 설정
Cloud Shell 내에 프로젝트 ID가 설정되어 있는지 확인합니다.
gcloud config set project [YOUR-PROJECT-ID]
환경 변수 PROJECT_ID를 설정합니다.
PROJECT_ID=$(gcloud config get-value project)
필요한 모든 서비스를 사용 설정합니다.
gcloud services enable alloydb.googleapis.com \
                       compute.googleapis.com \
                       cloudresourcemanager.googleapis.com \
                       servicenetworking.googleapis.com \
                       aiplatform.googleapis.com \
                       discoveryengine.googleapis.com \
                       secretmanager.googleapis.com
예상 출력
student@cloudshell:~ (test-project-001-402417)$ gcloud config set project test-project-001-402417
Updated property [core/project].
student@cloudshell:~ (test-project-001-402417)$ PROJECT_ID=$(gcloud config get-value project)
Your active configuration is: [cloudshell-14650]
student@cloudshell:~ (test-project-001-402417)$
student@cloudshell:~ (test-project-001-402417)$ gcloud services enable alloydb.googleapis.com \
                       compute.googleapis.com \
                       cloudresourcemanager.googleapis.com \
                       servicenetworking.googleapis.com \
                       aiplatform.googleapis.com
Operation "operations/acat.p2-4470404856-1f44ebd8-894e-4356-bea7-b84165a57442" finished successfully.
4. AlloyDB 배포
AlloyDB 클러스터 및 기본 인스턴스를 만듭니다. 다음 절차에서는 Google Cloud SDK를 사용하여 AlloyDB 클러스터와 인스턴스를 만드는 방법을 설명합니다. 콘솔 방식을 선호하는 경우 여기에서 문서를 확인하세요.
AlloyDB 클러스터를 만들기 전에 향후 AlloyDB 인스턴스에서 사용할 수 있는 비공개 IP 범위가 VPC에 있어야 합니다. 이 계정이 없으면 계정을 만들어 내부 Google 서비스에서 사용하도록 할당해야 클러스터와 인스턴스를 만들 수 있습니다.
비공개 IP 범위 만들기
VPC에서 AlloyDB용 비공개 서비스 액세스 구성을 설정해야 합니다. 여기서는 프로젝트에 '기본' VPC 네트워크가 있고 이 네트워크가 모든 작업에 사용된다고 가정합니다.
비공개 IP 범위를 만듭니다.
gcloud compute addresses create psa-range \
    --global \
    --purpose=VPC_PEERING \
    --prefix-length=24 \
    --description="VPC private service access" \
    --network=default
할당된 IP 범위를 사용하여 비공개 연결을 만듭니다.
gcloud services vpc-peerings connect \
    --service=servicenetworking.googleapis.com \
    --ranges=psa-range \
    --network=default
예상되는 콘솔 출력:
student@cloudshell:~ (test-project-402417)$ gcloud compute addresses create psa-range \
    --global \
    --purpose=VPC_PEERING \
    --prefix-length=24 \
    --description="VPC private service access" \
    --network=default
Created [https://www.googleapis.com/compute/v1/projects/test-project-402417/global/addresses/psa-range].

student@cloudshell:~ (test-project-402417)$ gcloud services vpc-peerings connect \
    --service=servicenetworking.googleapis.com \
    --ranges=psa-range \
    --network=default
Operation "operations/pssn.p24-4470404856-595e209f-19b7-4669-8a71-cbd45de8ba66" finished successfully.

student@cloudshell:~ (test-project-402417)$
AlloyDB 클러스터 만들기
이 섹션에서는 us-central1 리전에 AlloyDB 클러스터를 만듭니다.
postgres 사용자의 비밀번호를 정의합니다. 비밀번호를 직접 정의하거나 무작위 함수를 사용하여 생성할 수 있습니다.
export PGPASSWORD=`openssl rand -hex 12`
예상되는 콘솔 출력:
student@cloudshell:~ (test-project-402417)$ export PGPASSWORD=`openssl rand -hex 12`
나중에 사용할 수 있도록 PostgreSQL 비밀번호를 기록해 둡니다.
echo $PGPASSWORD
나중에 postgres 사용자로 인스턴스에 연결하려면 이 비밀번호가 필요합니다. 나중에 사용할 수 있도록 적어 두거나 어딘가에 복사해 두는 것이 좋습니다.
예상되는 콘솔 출력:
student@cloudshell:~ (test-project-402417)$ echo $PGPASSWORD
bbefbfde7601985b0dee5723
무료 체험판 클러스터 만들기
이전에 AlloyDB를 사용한 적이 없는 경우 무료 체험판 클러스터를 만들 수 있습니다.
리전과 AlloyDB 클러스터 이름을 정의합니다. us-central1 리전과 alloydb-aip-01을 클러스터 이름으로 사용합니다.
export REGION=us-central1
export ADBCLUSTER=alloydb-aip-01
명령어를 실행하여 클러스터를 만듭니다.
gcloud alloydb clusters create $ADBCLUSTER \
    --password=$PGPASSWORD \
    --network=default \
    --region=$REGION \
    --subscription-type=TRIAL
예상되는 콘솔 출력:
export REGION=us-central1
export ADBCLUSTER=alloydb-aip-01
gcloud alloydb clusters create $ADBCLUSTER \
    --password=$PGPASSWORD \
    --network=default \
    --region=$REGION \
    --subscription-type=TRIAL
Operation ID: operation-1697655441138-6080235852277-9e7f04f5-2012fce4
Creating cluster...done.
동일한 Cloud Shell 세션에서 클러스터의 AlloyDB 기본 인스턴스를 만듭니다. 연결이 해제되면 리전 및 클러스터 이름 환경 변수를 다시 정의해야 합니다.
gcloud alloydb instances create $ADBCLUSTER-pr \
    --instance-type=PRIMARY \
    --cpu-count=8 \
    --region=$REGION \
    --cluster=$ADBCLUSTER
예상되는 콘솔 출력:
student@cloudshell:~ (test-project-402417)$ gcloud alloydb instances create $ADBCLUSTER-pr \
    --instance-type=PRIMARY \
    --cpu-count=8 \
    --region=$REGION \
    --availability-type ZONAL \
    --cluster=$ADBCLUSTER
Operation ID: operation-1697659203545-6080315c6e8ee-391805db-25852721
Creating instance...done.
AlloyDB Standard 클러스터 만들기
프로젝트의 첫 번째 AlloyDB 클러스터가 아닌 경우 표준 클러스터 생성을 진행합니다.
리전과 AlloyDB 클러스터 이름을 정의합니다. us-central1 리전과 alloydb-aip-01을 클러스터 이름으로 사용합니다.
export REGION=us-central1
export ADBCLUSTER=alloydb-aip-01
명령어를 실행하여 클러스터를 만듭니다.
gcloud alloydb clusters create $ADBCLUSTER \
    --password=$PGPASSWORD \
    --network=default \
    --region=$REGION
예상되는 콘솔 출력:
export REGION=us-central1
export ADBCLUSTER=alloydb-aip-01
gcloud alloydb clusters create $ADBCLUSTER \
    --password=$PGPASSWORD \
    --network=default \
    --region=$REGION
Operation ID: operation-1697655441138-6080235852277-9e7f04f5-2012fce4
Creating cluster...done.
동일한 Cloud Shell 세션에서 클러스터의 AlloyDB 기본 인스턴스를 만듭니다. 연결이 해제되면 리전 및 클러스터 이름 환경 변수를 다시 정의해야 합니다.
gcloud alloydb instances create $ADBCLUSTER-pr \
    --instance-type=PRIMARY \
    --cpu-count=2 \
    --region=$REGION \
    --cluster=$ADBCLUSTER
예상되는 콘솔 출력:
student@cloudshell:~ (test-project-402417)$ gcloud alloydb instances create $ADBCLUSTER-pr \
    --instance-type=PRIMARY \
    --cpu-count=2 \
    --region=$REGION \
    --availability-type ZONAL \
    --cluster=$ADBCLUSTER
Operation ID: operation-1697659203545-6080315c6e8ee-391805db-25852721
Creating instance...done.
5. 데이터베이스 준비
데이터베이스를 만들고, Vertex AI 통합을 사용 설정하고, 데이터베이스 객체를 만들고, 데이터를 가져와야 합니다.
AlloyDB에 필요한 권한 부여
AlloyDB 서비스 에이전트에 Vertex AI 권한을 추가합니다.
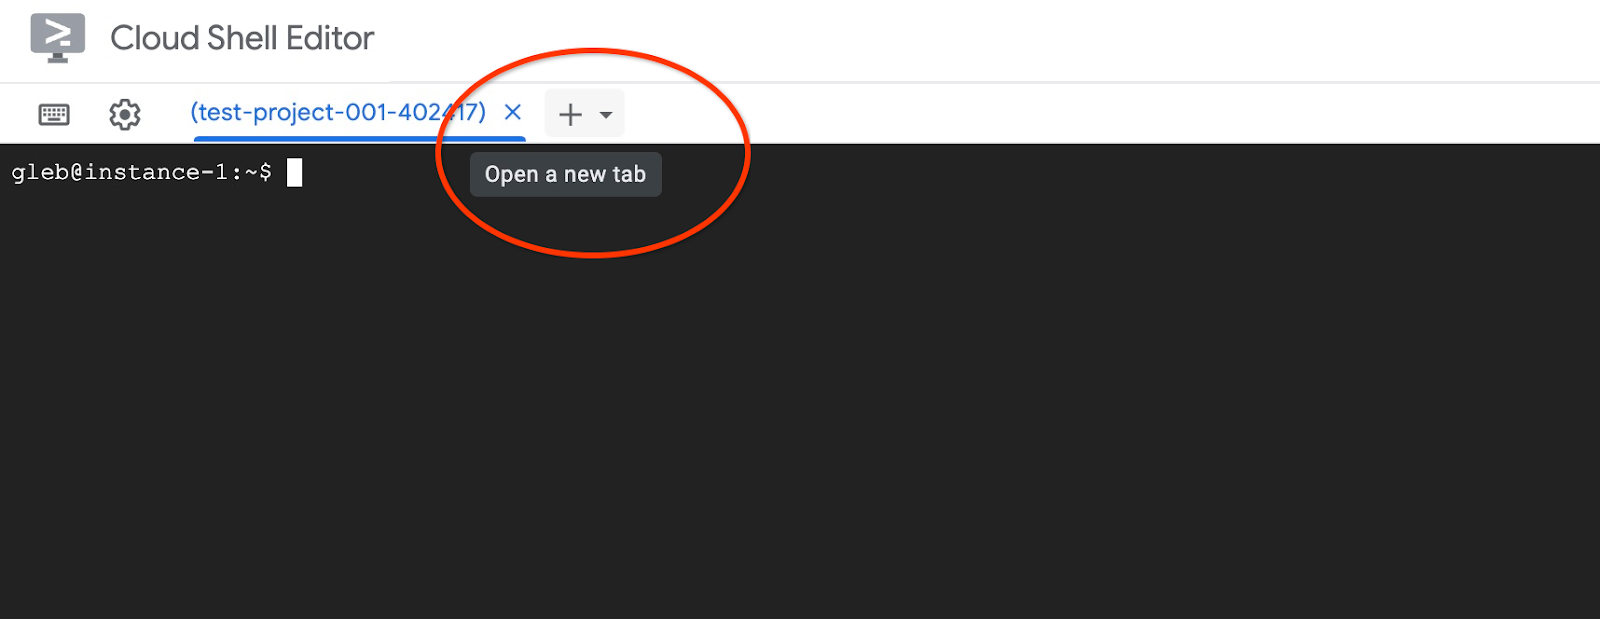
맨 위에 있는 '+' 기호를 사용하여 다른 Cloud Shell 탭을 엽니다.
새 Cloud Shell 탭에서 다음을 실행합니다.
PROJECT_ID=$(gcloud config get-value project)
gcloud projects add-iam-policy-binding $PROJECT_ID \
  --member="serviceAccount:service-$(gcloud projects describe $PROJECT_ID --format="value(projectNumber)")@gcp-sa-alloydb.iam.gserviceaccount.com" \
  --role="roles/aiplatform.user"
예상되는 콘솔 출력:
student@cloudshell:~ (test-project-001-402417)$ PROJECT_ID=$(gcloud config get-value project)
Your active configuration is: [cloudshell-11039]
student@cloudshell:~ (test-project-001-402417)$ gcloud projects add-iam-policy-binding $PROJECT_ID \
  --member="serviceAccount:service-$(gcloud projects describe $PROJECT_ID --format="value(projectNumber)")@gcp-sa-alloydb.iam.gserviceaccount.com" \
  --role="roles/aiplatform.user"
Updated IAM policy for project [test-project-001-402417].
bindings:
- members:
  - serviceAccount:service-4470404856@gcp-sa-alloydb.iam.gserviceaccount.com
  role: roles/aiplatform.user
- members:
...
etag: BwYIEbe_Z3U=
version: 1
탭에서 실행 명령어 'exit' 중 하나를 사용하여 탭을 닫습니다.
exit
AlloyDB Studio에 연결
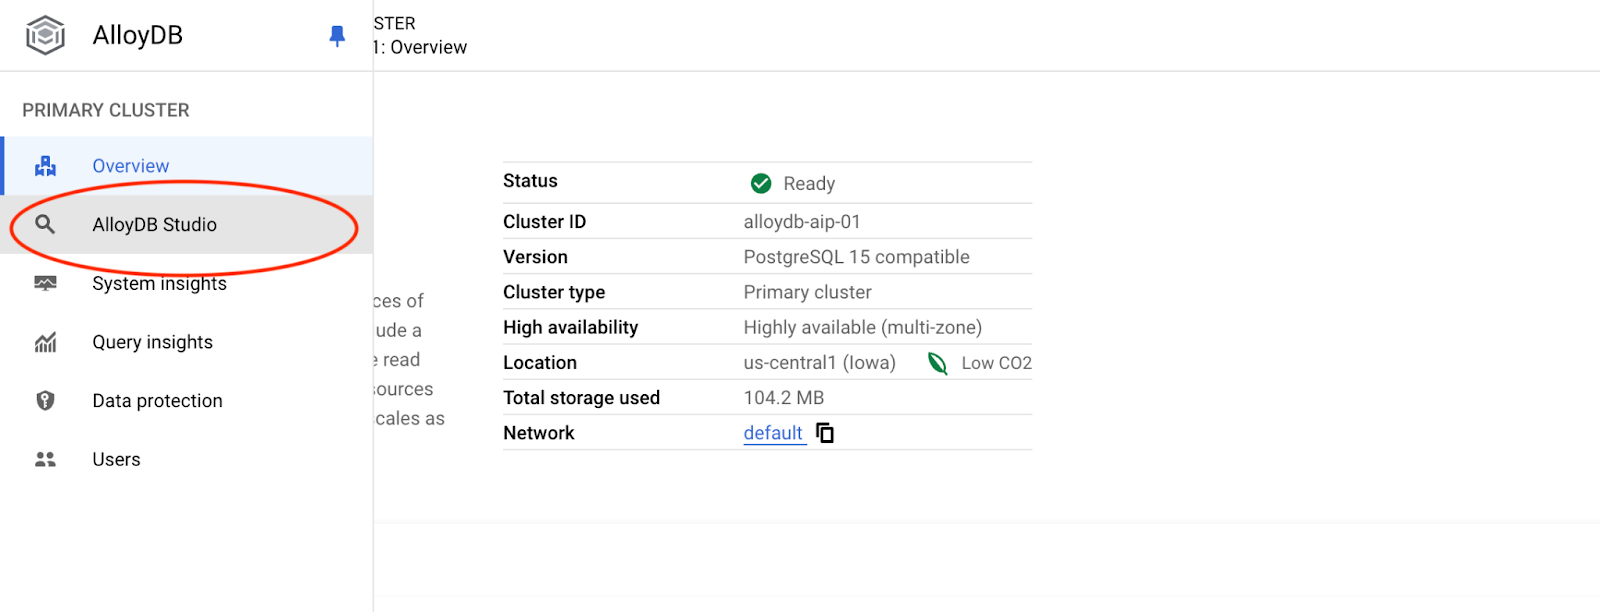
다음 장에서는 데이터베이스에 연결해야 하는 모든 SQL 명령어를 AlloyDB Studio에서 대신 실행할 수 있습니다. 명령어를 실행하려면 기본 인스턴스를 클릭하여 AlloyDB 클러스터의 웹 콘솔 인터페이스를 열어야 합니다.

그런 다음 왼쪽에 있는 AlloyDB Studio를 클릭합니다.
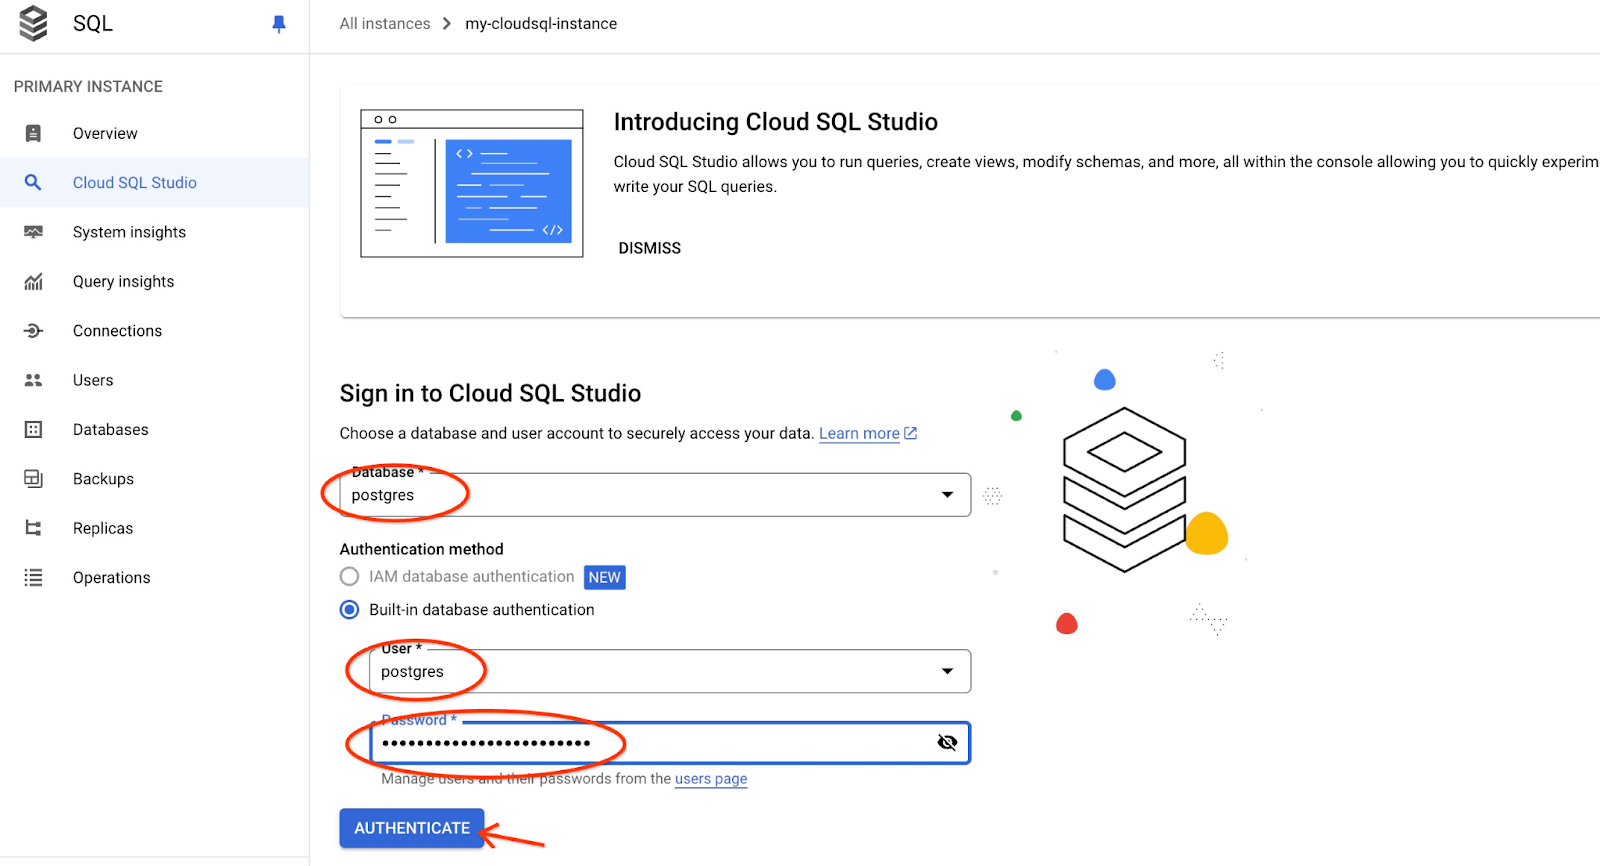
postgres 데이터베이스와 사용자 postgres를 선택하고 클러스터를 만들 때 기록해 둔 비밀번호를 입력합니다. 그런 다음 '인증' 버튼을 클릭합니다.
AlloyDB Studio 인터페이스가 열립니다. 데이터베이스에서 명령어를 실행하려면 오른쪽에 있는 'Editor 1' 탭을 클릭합니다.
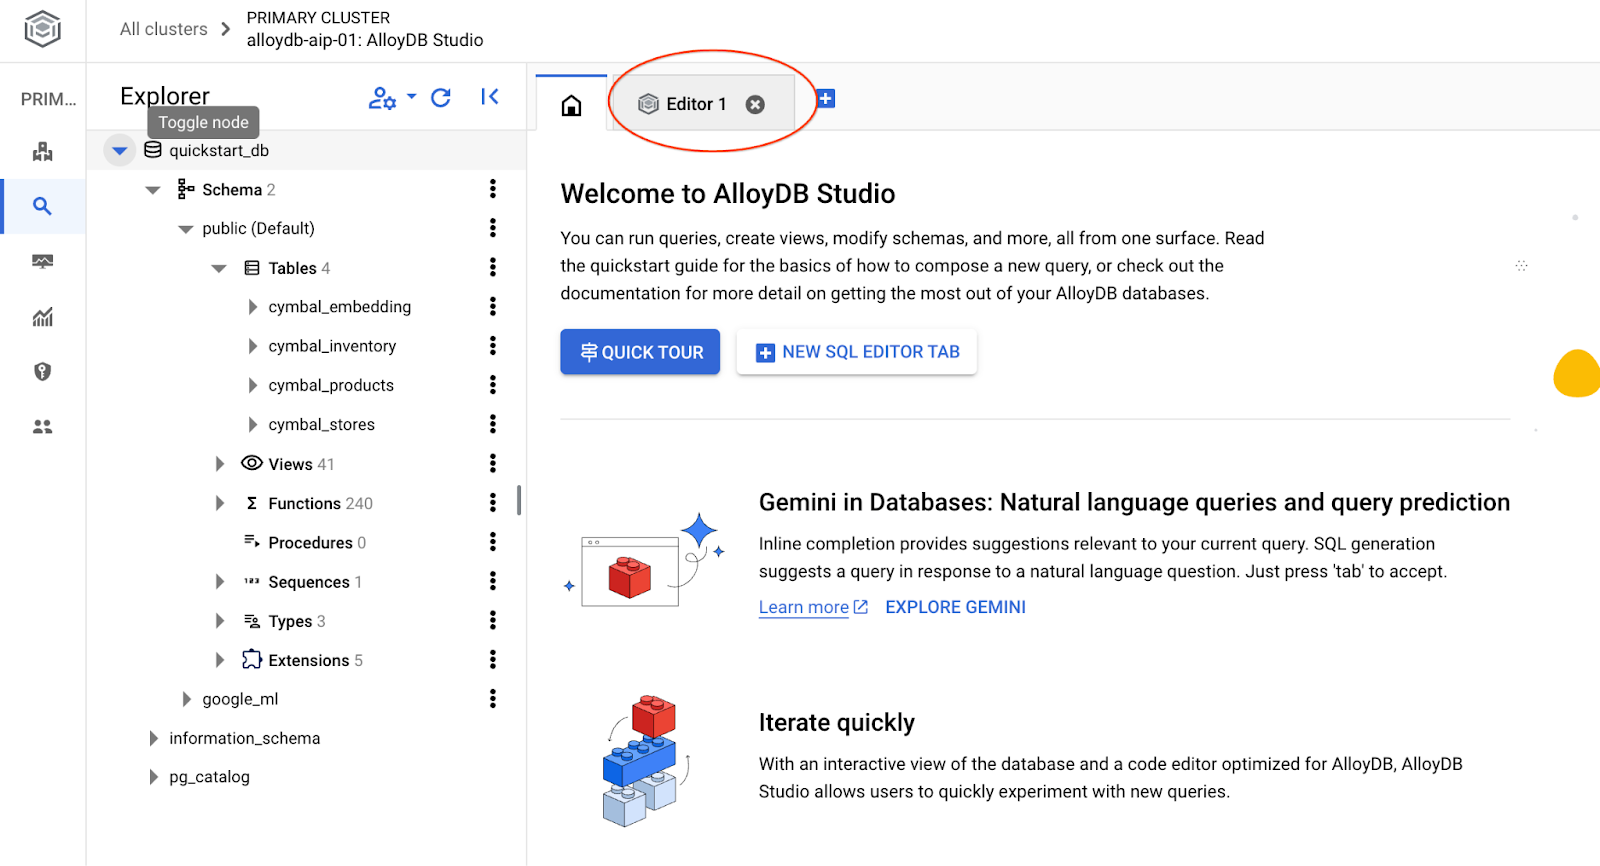
SQL 명령어를 실행할 수 있는 인터페이스가 열립니다.
데이터베이스 만들기
데이터베이스 만들기 빠른 시작
AlloyDB Studio 편집기에서 다음 명령어를 실행합니다.
데이터베이스를 만듭니다.
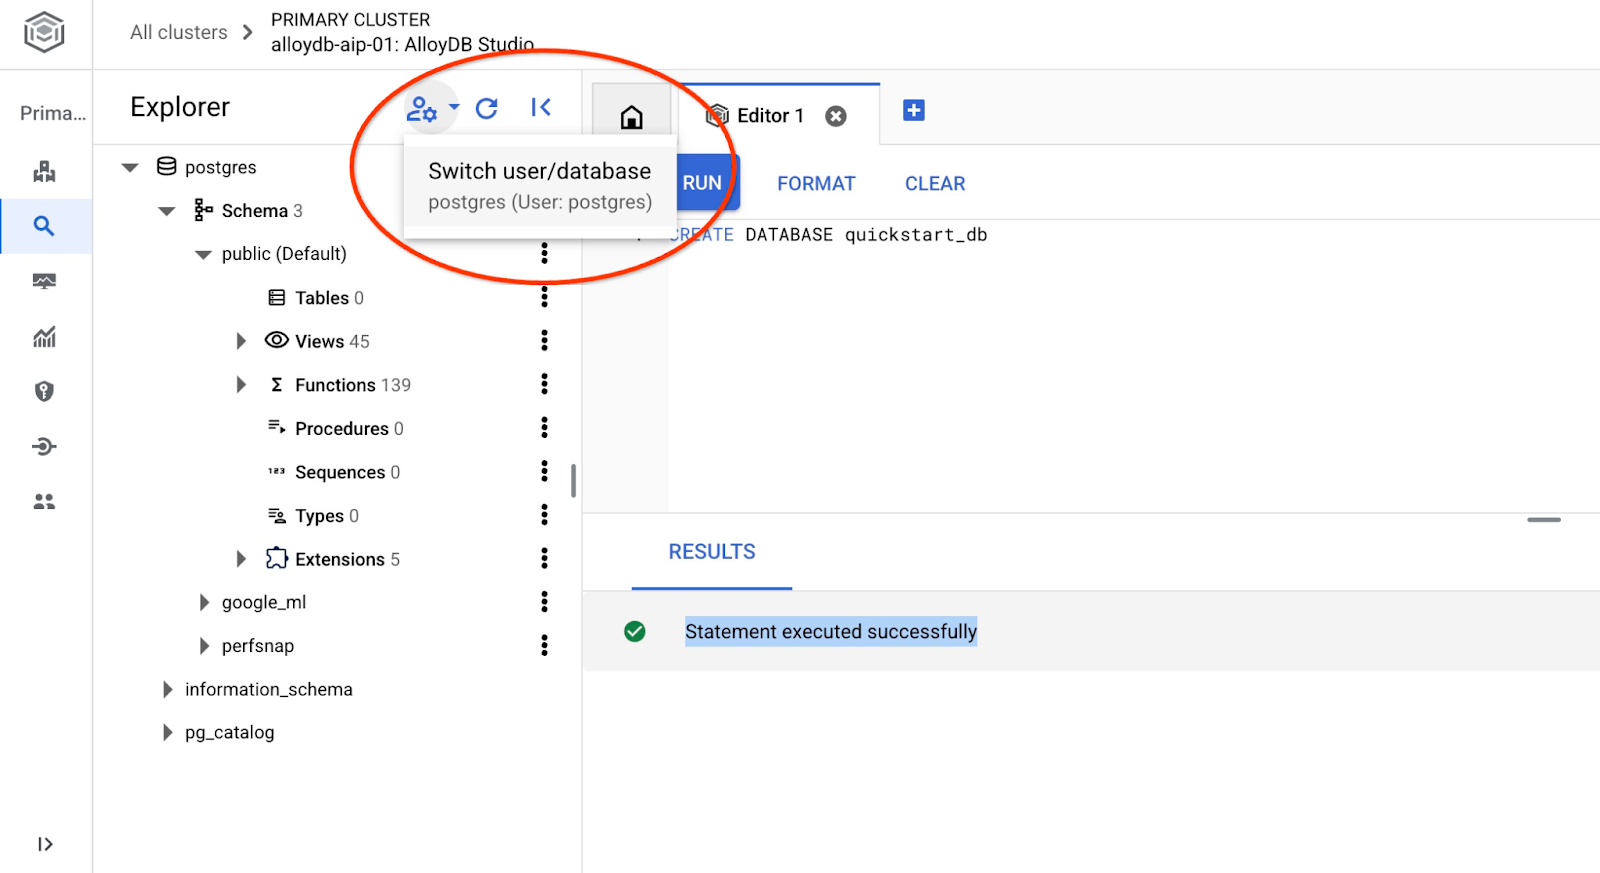
CREATE DATABASE quickstart_db
예상 출력:
Statement executed successfully
quickstart_db에 연결
사용자/데이터베이스 전환 버튼을 사용하여 스튜디오에 다시 연결합니다.
드롭다운 목록에서 새 quickstart_db 데이터베이스를 선택하고 이전과 동일한 사용자 및 비밀번호를 사용합니다.
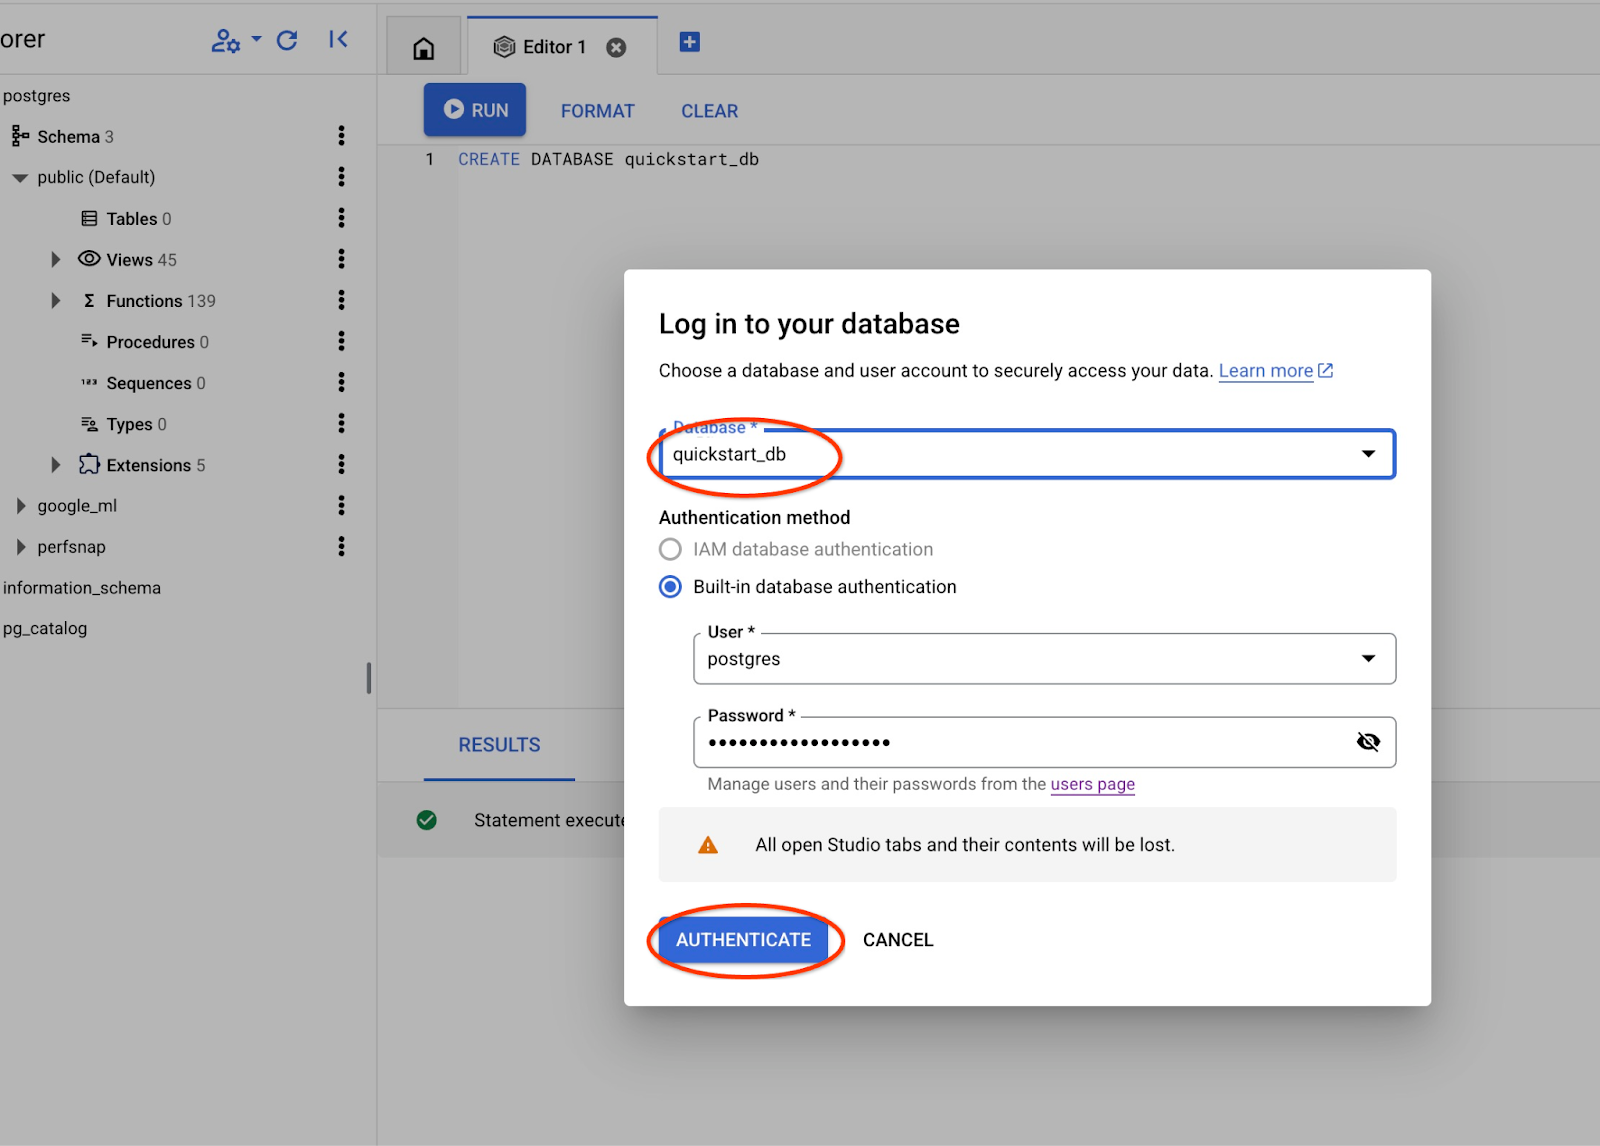
그러면 quickstart_db 데이터베이스의 객체를 사용할 수 있는 새 연결이 열립니다.
6. 샘플 데이터
이제 데이터베이스에서 객체를 만들고 데이터를 로드해야 합니다. 온라인 상점용 테이블 세트가 있는 가상의 'Cymbal ecomm' 상점을 사용합니다. 관계형 데이터베이스 스키마와 유사한 키로 연결된 여러 테이블이 포함되어 있습니다.
데이터 세트가 가져오기 인터페이스를 사용하여 데이터베이스에 로드할 수 있는 SQL 파일로 준비되고 배치됩니다. Cloud Shell에서 다음 명령어를 실행합니다.
export REGION=us-central1
export ADBCLUSTER=alloydb-aip-01
gcloud alloydb clusters import $ADBCLUSTER --region=$REGION --database=quickstart_db --gcs-uri='gs://sample-data-and-media/ecomm-retail/ecom_generic.sql' --user=postgres --sql
이 명령어는 AlloyDB SDK를 사용하며, ecomm 스키마를 만든 다음 GCS 버킷에서 데이터베이스로 직접 샘플 데이터를 가져와 필요한 모든 객체를 만들고 데이터를 삽입합니다.
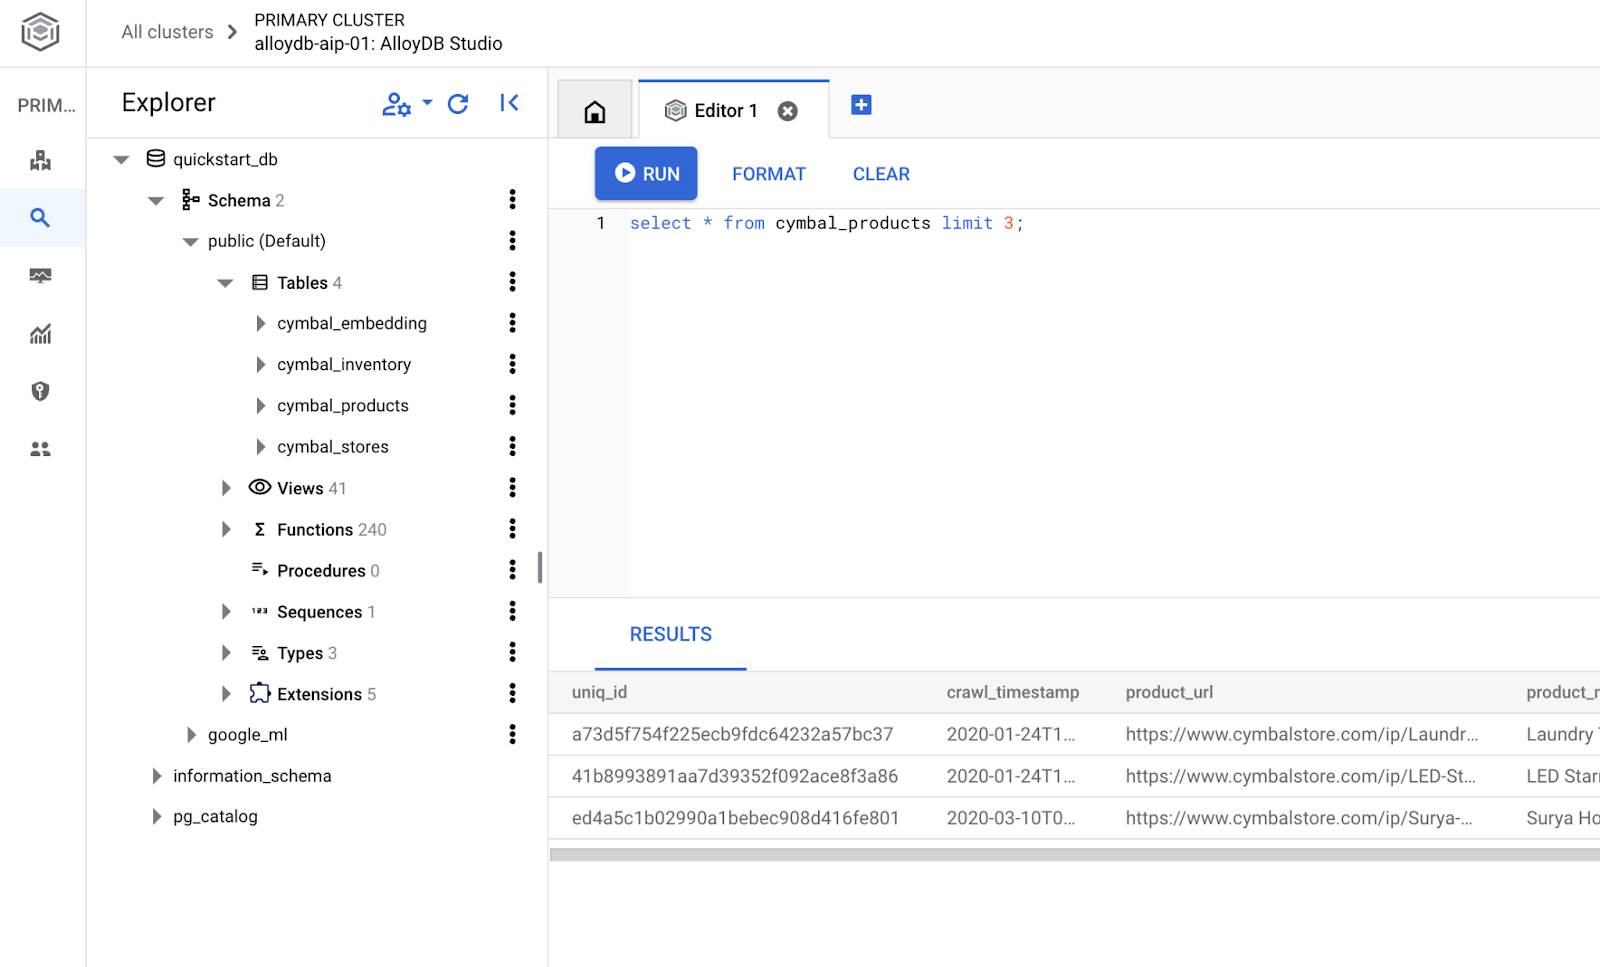
가져오기가 완료되면 AlloyDB Studio에서 테이블을 확인할 수 있습니다.
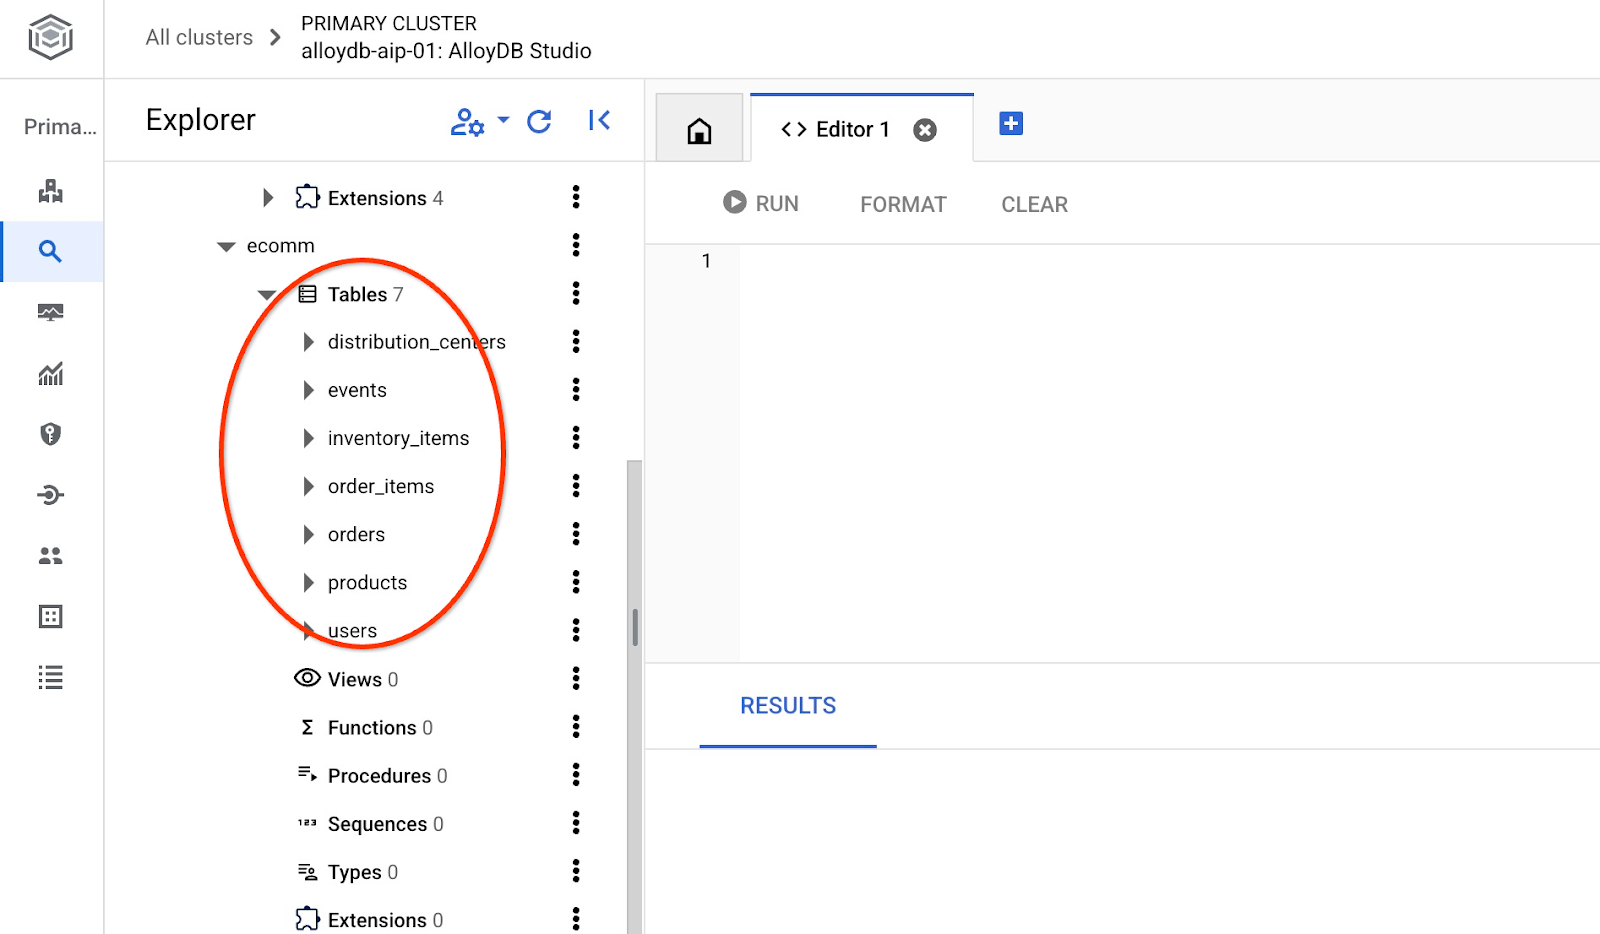
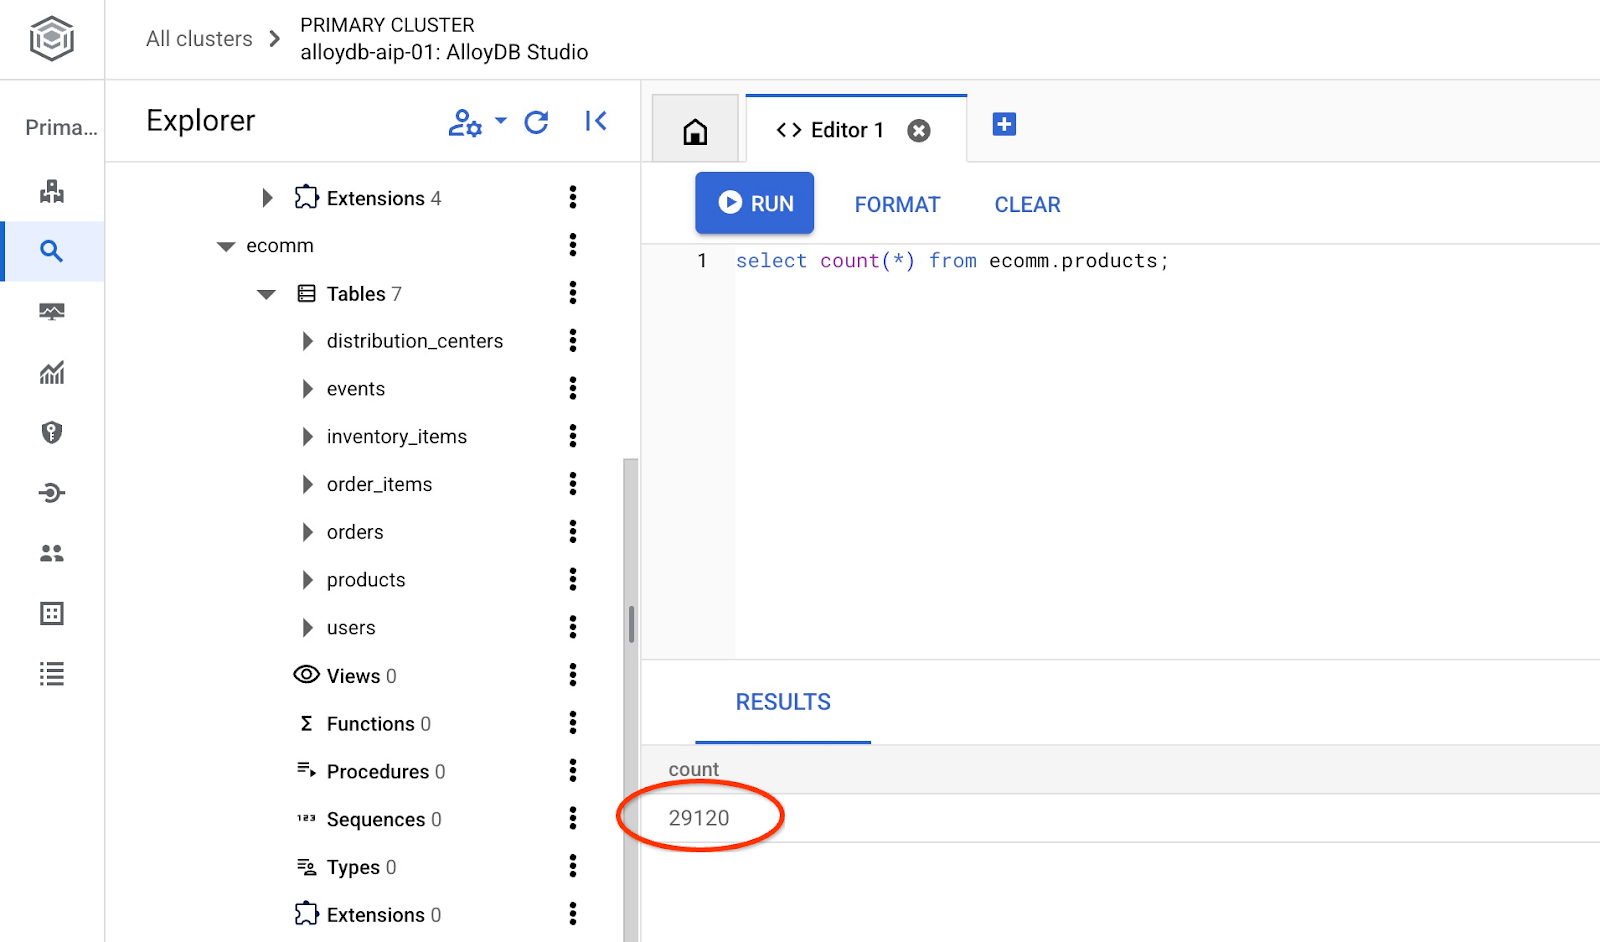
테이블의 행 수를 확인합니다.
7. NL SQL 구성
이 장에서는 샘플 스키마와 함께 작동하도록 NL을 구성합니다.
alloydb_nl_ai 확장 프로그램 설치
데이터베이스에 alloydb_ai_nl 확장 프로그램을 설치해야 합니다. 이렇게 하려면 데이터베이스 플래그 alloydb_ai_nl.enabled를 on으로 설정해야 합니다.
Cloud Shell 세션에서 다음을 실행합니다.
export REGION=us-central1
export ADBCLUSTER=alloydb-aip-01
gcloud alloydb instances update $ADBCLUSTER-pr \
  --cluster=$ADBCLUSTER \
  --region=$REGION \
  --database-flags=alloydb_ai_nl.enabled=on
인스턴스 업데이트가 시작됩니다. 웹 콘솔에서 업데이트 중인 인스턴스의 상태를 확인할 수 있습니다.
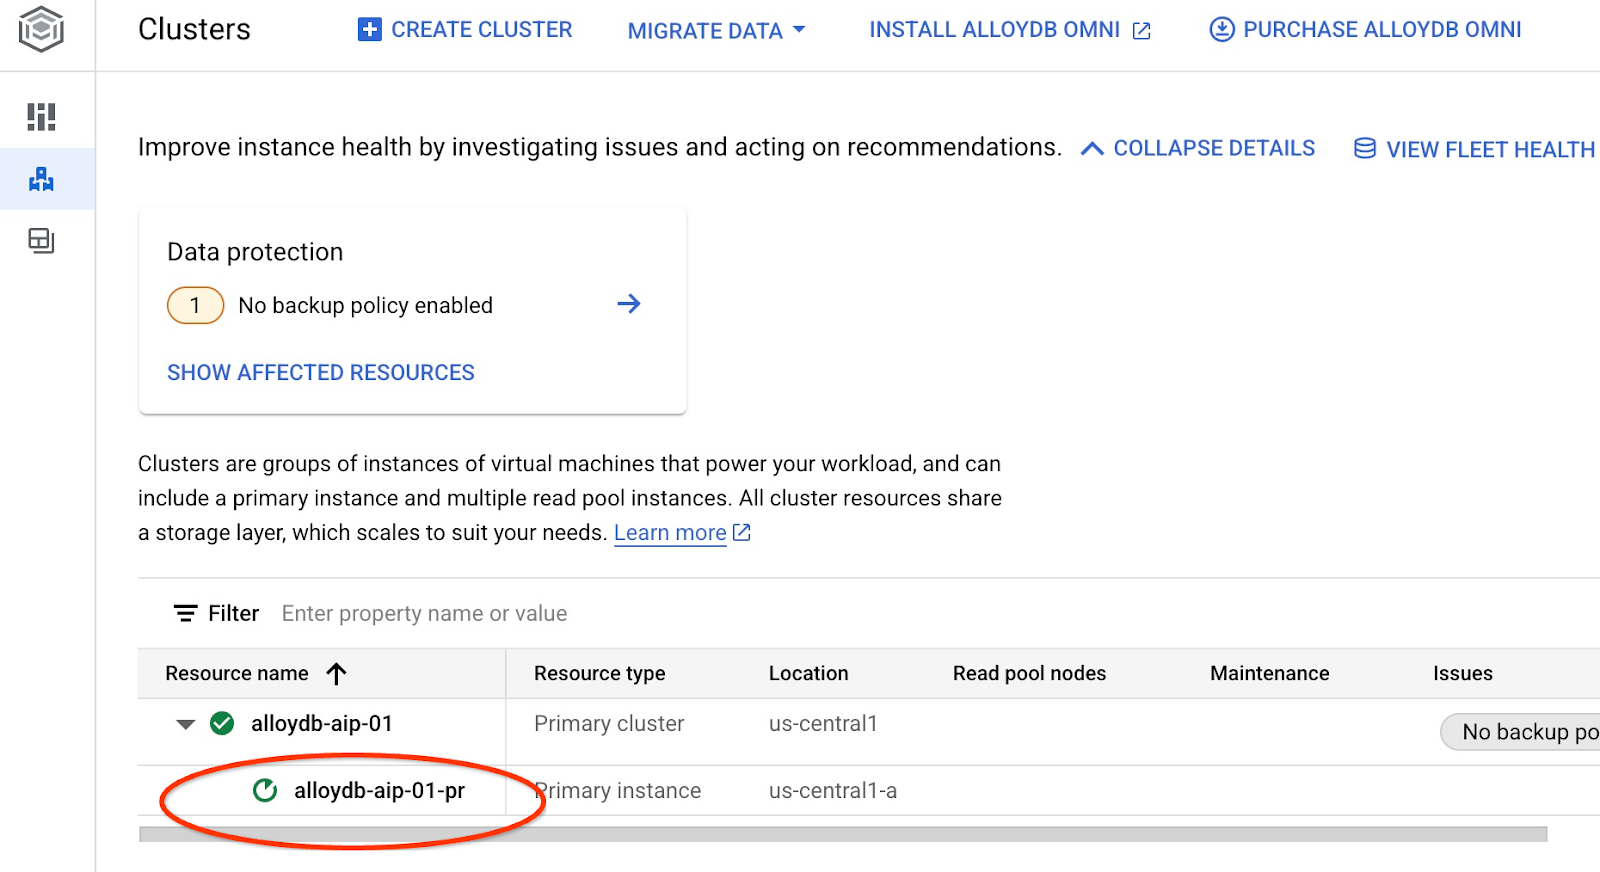
인스턴스가 업데이트되면 (인스턴스 상태가 녹색) alloydb_ai_nl 확장 프로그램을 사용 설정할 수 있습니다.
AlloyDB Studio에서 다음을 실행합니다.
CREATE EXTENSION IF NOT EXISTS google_ml_integration;
CREATE EXTENSION alloydb_ai_nl cascade;
자연어 구성 만들기
확장 프로그램을 사용하려면 구성을 만들어야 합니다. 이 구성은 애플리케이션을 특정 스키마, 쿼리 템플릿, 모델 엔드포인트와 연결하는 데 필요합니다. ID가 cymbal_ecomm_config인 구성을 만들어 보겠습니다.
AlloyDB Studio에서 다음을 실행합니다.
SELECT
  alloydb_ai_nl.g_create_configuration(
    configuration_id => 'cymbal_ecomm_config'
  );
이제 구성에 전자상거래 스키마를 등록할 수 있습니다. ecomm 스키마로 데이터를 가져왔으므로 NL 구성에 해당 스키마를 추가합니다.
SELECT
  alloydb_ai_nl.g_manage_configuration(
    operation => 'register_schema',
    configuration_id_in => 'cymbal_ecomm_config',
    schema_names_in => '{ecomm}'
  );
8. NL SQL에 컨텍스트 추가
일반 컨텍스트 추가
등록된 스키마에 컨텍스트를 추가할 수 있습니다. 컨텍스트는 사용자 요청에 대한 더 나은 결과를 생성하는 데 도움이 됩니다. 예를 들어 명시적으로 정의되지 않은 경우 한 브랜드가 사용자가 선호하는 브랜드라고 말할 수 있습니다. Clades (가상 브랜드)를 기본 브랜드로 설정해 보겠습니다.
AlloyDB Studio에서 다음을 실행합니다.
SELECT
  alloydb_ai_nl.g_manage_configuration(
    operation => 'add_general_context',
    configuration_id_in => 'cymbal_ecomm_config',
    general_context_in => '{"If the user doesn''t clearly define preferred brand then use Clades."}'
  );
일반적인 컨텍스트가 어떻게 작동하는지 확인해 보겠습니다.
AlloyDB Studio에서 다음을 실행합니다.
SELECT
  alloydb_ai_nl.get_sql(
    nl_config_id => 'cymbal_ecomm_config',
    nl_question => 'How many products do we have of our preferred brand?'
  );
생성된 질문은 일반 컨텍스트에서 이전에 정의한 기본 브랜드를 사용합니다.
{"sql": "SELECT count(*) FROM \"ecomm\".\"products\" WHERE \"brand\" = 'Clades'", "method": "default", "prompt": "", "retries": 0, "time(ms)": {"llm": 505.628000, "magic": 424.019000}, "error_msg": "", "nl_question": "How many products do we have of our preferred brand?", "toolbox_used": false}
이를 정리하고 SQL 문만 출력으로 생성할 수 있습니다.
예를 들면 다음과 같습니다.
SELECT
  alloydb_ai_nl.get_sql(
    nl_config_id => 'cymbal_ecomm_config',
    nl_question => 'How many products do we have of our preferred brand?'
  ) ->> 'sql';
출력이 지워짐:
SELECT count(*) FROM "ecomm"."products" WHERE "brand" = 'Clades'
제품 대신 inventory_items 테이블이 자동으로 선택되어 쿼리를 빌드하는 데 사용된 것을 확인했습니다. 일부 경우에는 작동할 수 있지만 스키마에는 작동하지 않습니다. Google의 경우 inventory_items 테이블은 판매를 추적하는 데 사용되므로 내부 정보가 없는 경우 오해를 불러일으킬 수 있습니다. 나중에 쿼리의 정확도를 높이는 방법을 확인하겠습니다.
스키마 컨텍스트
스키마 컨텍스트는 스키마 객체에 정보를 주석으로 저장하는 테이블, 뷰, 개별 열과 같은 스키마 객체를 설명합니다.
다음 쿼리를 사용하여 정의된 구성의 모든 스키마 객체를 자동으로 만들 수 있습니다.
SELECT
  alloydb_ai_nl.generate_schema_context(
    nl_config_id => 'cymbal_ecomm_config',
    overwrite_if_exist => TRUE
  );
'TRUE' 매개변수는 컨텍스트를 재생성하여 덮어쓰도록 안내합니다. 데이터 모델에 따라 실행하는 데 시간이 걸립니다. 관계와 연결이 많을수록 시간이 더 오래 걸릴 수 있습니다.
컨텍스트를 만든 후 다음 쿼리를 사용하여 인벤토리 항목 테이블에 생성된 항목을 확인할 수 있습니다.
SELECT
  object_context
FROM
  alloydb_ai_nl.generated_schema_context_view
WHERE
  schema_object = 'ecomm.inventory_items';
출력이 지워짐:
The `ecomm.inventory_items` table stores information about individual inventory items in an e-commerce system. Each item is uniquely identified by an `id` (primary key). The table tracks the `product_id` (foreign key referencing `ecomm.products`), the timestamp when the item was `created_at`, and the timestamp when it was `sold_at` (which can be null if the item hasn't been sold). The `cost` represents the cost of the item to the business, while `product_retail_price` is the price at which the item is sold. Additional product details include `product_category`, `product_name`, `product_brand`, `product_department`, and `product_sku` (stock keeping unit). The `product_distribution_center_id` (foreign key referencing `ecomm.distribution_centers`) indicates the distribution center where the item is located. The table includes information on both men's and women's apparel across various categories like jeans, tops & tees, activewear, sleep & lounge, intimates, swim, and accessories. The `sold_at` column indicates whether an item has been sold and when.
설명에 inventory_items 테이블이 항목의 이동을 반영하는 주요 부분이 누락된 것 같습니다. 이 키 정보를 ecomm.inventory_items 관계의 컨텍스트에 추가하여 업데이트할 수 있습니다.
SELECT alloydb_ai_nl.update_generated_relation_context(
  relation_name => 'ecomm.inventory_items',
  relation_context => 'The `ecomm.inventory_items` table stores information about moving and sales of inventory items in an e-commerce system. Each movement is uniquely identified by an `id` (primary key) and used in order_items table as `inventory_item_id`. The table tracks sales and movements for the `product_id` (foreign key referencing `ecomm.products`), the timestamp when the movement for the item was `created_at`, and the timestamp when it was `sold_at` (which can be null if the item hasn''t been sold). The `cost` represents the cost of the item to the business, while `product_retail_price` is the price at which the item is sold. Additional product details include `product_category`, `product_name`, `product_brand`, `product_department`, and `product_sku` (stock keeping unit). The `product_distribution_center_id` (foreign key referencing `ecomm.distribution_centers`) indicates the distribution center where the item is located. The table includes information on both men''s and women''s apparel across various categories like jeans, tops & tees, activewear, sleep & lounge, intimates, swim, and accessories. The `sold_at` column indicates whether an item has been sold and when.'
);
제품 표의 설명이 정확한지 확인할 수도 있습니다.
SELECT
  object_context
FROM
  alloydb_ai_nl.generated_schema_context_view
WHERE
  schema_object = 'ecomm.products';
제품 표에 대해 자동으로 생성된 컨텍스트는 매우 정확하며 변경할 필요가 없는 것으로 확인되었습니다.
두 테이블의 각 열에 관한 정보도 확인했는데 올바른 것으로 확인되었습니다.
생성된 ecomm.inventory_items 및 ecomm.products 컨텍스트를 구성에 적용해 보겠습니다.
SELECT alloydb_ai_nl.apply_generated_relation_context(
  relation_name => 'ecomm.inventory_items',
  overwrite_if_exist => TRUE
);

SELECT alloydb_ai_nl.apply_generated_relation_context(
  relation_name => 'ecomm.products',
  overwrite_if_exist => TRUE
);
'선호하는 브랜드의 제품이 몇 개 있나요?'라는 질문에 대한 SQL을 생성하는 쿼리를 기억하시나요? ? 이제 이를 반복하여 출력이 변경되는지 확인할 수 있습니다.
SELECT
  alloydb_ai_nl.get_sql(
    nl_config_id => 'cymbal_ecomm_config',
    nl_question => 'How many products do we have of our preferred brand?'
  ) ->> 'sql';
새 출력은 다음과 같습니다.
SELECT COUNT(*) FROM "ecomm"."products" WHERE "brand" = 'Clades';
이제 더 정확한 ecomm.products를 확인하고 재고 항목이 있는 5,000개의 작업 대신 약 300개의 제품을 반환합니다.
9. 값 색인 작업
값 연결은 값 구문을 사전 등록된 개념 유형 및 열 이름과 연결하여 자연어 쿼리를 풍부하게 만듭니다. 이렇게 하면 결과를 더 예측 가능하게 만들 수 있습니다.
값 색인 구성
제품 테이블의 브랜드 열을 사용하여 쿼리를 만들고 개념 유형을 정의하고 이를 ecomm.products.brand 열과 연결하여 브랜드가 더 안정적인 제품을 검색할 수 있습니다.
이제 개념을 만들고 열과 연결해 보겠습니다.
SELECT alloydb_ai_nl.add_concept_type(
    concept_type_in => 'brand_name',
    match_function_in => 'alloydb_ai_nl.get_concept_and_value_generic_entity_name',
    additional_info_in => '{
      "description": "Concept type for brand name.",
      "examples": "SELECT alloydb_ai_nl.get_concept_and_value_generic_entity_name(''Auto Forge'')" }'::jsonb
);
SELECT alloydb_ai_nl.associate_concept_type(
    column_names_in => 'ecomm.products.brand',
    concept_type_in => 'brand_name',
    nl_config_id_in => 'cymbal_ecomm_config'
);
alloydb_ai_nl.list_concept_types()를 쿼리하여 개념을 확인할 수 있습니다.
SELECT alloydb_ai_nl.list_concept_types();
그런 다음 생성되고 사전 빌드된 모든 연결에 대해 구성에서 색인을 만들 수 있습니다.
SELECT alloydb_ai_nl.create_value_index(
  nl_config_id_in => 'cymbal_ecomm_config'
);
가치 지수 사용
브랜드 이름을 사용하여 SQL을 만드는 쿼리를 실행하지만 브랜드 이름임을 정의하지 않으면 엔티티와 열을 올바르게 식별하는 데 도움이 됩니다. 쿼리는 다음과 같습니다.
SELECT
  alloydb_ai_nl.get_sql(
    nl_config_id => 'cymbal_ecomm_config',
    nl_question => 'How many Clades do we have?'
  ) ->> 'sql';
출력에는 'Clades'라는 단어가 브랜드 이름으로 올바르게 식별되어 있습니다.
SELECT COUNT(*) FROM "ecomm"."products" WHERE "brand" = 'Clades';
10. 쿼리 템플릿 작업
쿼리 템플릿은 비즈니스에 중요한 애플리케이션의 안정적인 쿼리를 정의하여 불확실성을 줄이고 정확도를 높이는 데 도움이 됩니다.
쿼리 템플릿 만들기
여러 테이블을 조인하는 쿼리 템플릿을 만들어 작년에 'Republic Outpost' 제품을 구매한 고객에 관한 정보를 가져와 보겠습니다. 두 테이블 모두 브랜드에 관한 정보가 있으므로 쿼리에서 ecomm.products 테이블을 사용해도 되고 ecomm.inventory_items 테이블을 사용해도 됩니다. 하지만 products 테이블에는 행이 15배 적고 조인을 위한 기본 키에 색인이 있습니다. 제품 표를 사용하는 것이 더 효율적일 수 있습니다. 따라서 쿼리용 템플릿을 만듭니다.
SELECT alloydb_ai_nl.add_template(
    nl_config_id => 'cymbal_ecomm_config',
    intent => 'List the last names and the country of all customers who bought products of `Republic Outpost` in the last year.',
    sql => 'SELECT DISTINCT u."last_name", u."country" FROM "ecomm"."users" AS u INNER JOIN "ecomm"."order_items" AS oi ON u.id = oi."user_id" INNER JOIN "ecomm"."products" AS ep ON oi.product_id = ep.id WHERE ep.brand = ''Republic Outpost'' AND oi.created_at >= DATE_TRUNC(''year'', CURRENT_DATE - INTERVAL ''1 year'') AND oi.created_at < DATE_TRUNC(''year'', CURRENT_DATE)',
    sql_explanation => 'To answer this question, JOIN `ecomm.users` with `ecom.order_items` on having the same `users.id` and `order_items.user_id`, and JOIN the result with ecom.products on having the same `order_items.product_id` and `products.id`. Then filter rows with products.brand = ''Republic Outpost'' and by `order_items.created_at` for the last year. Return the `last_name` and the `country` of the users with matching records.',
    check_intent => TRUE
);
이제 쿼리 생성을 요청할 수 있습니다.
SELECT
  alloydb_ai_nl.get_sql(
    nl_config_id => 'cymbal_ecomm_config',
    nl_question => 'Show me last name and country about customers who bought "Republic Outpost" products last year.'
  ) ->> 'sql';
그리고 원하는 출력을 생성합니다.
SELECT DISTINCT u."last_name", u."country" FROM "ecomm"."users" AS u INNER JOIN "ecomm"."order_items" AS oi ON u.id = oi."user_id" INNER JOIN "ecomm"."products" AS ep ON oi.product_id = ep.id WHERE ep.brand = 'Republic Outpost' AND oi.created_at >= DATE_TRUNC('year', CURRENT_DATE - INTERVAL '1 year') AND oi.created_at < DATE_TRUNC('year', CURRENT_DATE)
또는 다음 쿼리를 사용하여 쿼리를 직접 실행할 수 있습니다.
SELECT
alloydb_ai_nl.execute_nl_query(
    nl_config_id => 'cymbal_ecomm_config',
    nl_question => 'Show me last name and country about customers who bought "Republic Outpost" products last year.'
);
파싱할 수 있는 JSON 형식으로 결과를 반환합니다.
                    execute_nl_query
--------------------------------------------------------
 {"last_name":"Adams","country":"China"}
 {"last_name":"Adams","country":"Germany"}
 {"last_name":"Aguilar","country":"China"}
 {"last_name":"Allen","country":"China"}
11. 환경 정리
실습을 마치면 AlloyDB 인스턴스와 클러스터를 폐기합니다.
AlloyDB 클러스터 및 모든 인스턴스 삭제
AlloyDB 무료 체험판을 사용한 경우 체험 클러스터를 사용하여 다른 실습과 리소스를 테스트할 계획이 있다면 체험 클러스터를 삭제하지 마세요. 동일한 프로젝트에서 다른 체험 클러스터를 만들 수 없습니다.
클러스터는 옵션 강제로 폐기되며, 클러스터에 속한 모든 인스턴스도 삭제됩니다.
연결이 끊어지고 이전 설정이 모두 손실된 경우 Cloud Shell에서 프로젝트와 환경 변수를 정의합니다.
gcloud config set project <your project id>
export REGION=us-central1
export ADBCLUSTER=alloydb-aip-01
export PROJECT_ID=$(gcloud config get-value project)
다음과 같이 클러스터를 삭제합니다.
gcloud alloydb clusters delete $ADBCLUSTER --region=$REGION --force
예상되는 콘솔 출력:
student@cloudshell:~ (test-project-001-402417)$ gcloud alloydb clusters delete $ADBCLUSTER --region=$REGION --force
All of the cluster data will be lost when the cluster is deleted.

Do you want to continue (Y/n)?  Y

Operation ID: operation-1697820178429-6082890a0b570-4a72f7e4-4c5df36f
Deleting cluster...done.
AlloyDB 백업 삭제
클러스터의 모든 AlloyDB 백업을 삭제합니다.
for i in $(gcloud alloydb backups list --filter="CLUSTER_NAME: projects/$PROJECT_ID/locations/$REGION/clusters/$ADBCLUSTER" --format="value(name)" --sort-by=~createTime) ; do gcloud alloydb backups delete $(basename $i) --region $REGION --quiet; done
예상되는 콘솔 출력:
student@cloudshell:~ (test-project-001-402417)$ for i in $(gcloud alloydb backups list --filter="CLUSTER_NAME: projects/$PROJECT_ID/locations/$REGION/clusters/$ADBCLUSTER" --format="value(name)" --sort-by=~createTime) ; do gcloud alloydb backups delete $(basename $i) --region $REGION --quiet; done
Operation ID: operation-1697826266108-60829fb7b5258-7f99dc0b-99f3c35f
Deleting backup...done.
12. 축하합니다
축하합니다. Codelab을 완료했습니다. 이제 AlloyDB의 NL2SQL 기능을 사용하여 자체 솔루션을 구현해 볼 수 있습니다. AlloyDB 및 AlloyDB AI와 관련된 다른 Codelab을 사용해 보는 것이 좋습니다. 이 Codelab에서 AlloyDB의 멀티모달 임베딩 작동 방식을 확인할 수 있습니다.
학습한 내용
- Postgres용 AlloyDB를 배포하는 방법
- AlloyDB AI 자연어를 사용 설정하는 방법
- AI 자연어 구성을 만들고 조정하는 방법
- 자연어를 사용하여 SQL 쿼리를 생성하고 결과를 얻는 방법
13. 설문조사
결과: