
1. บทนำ
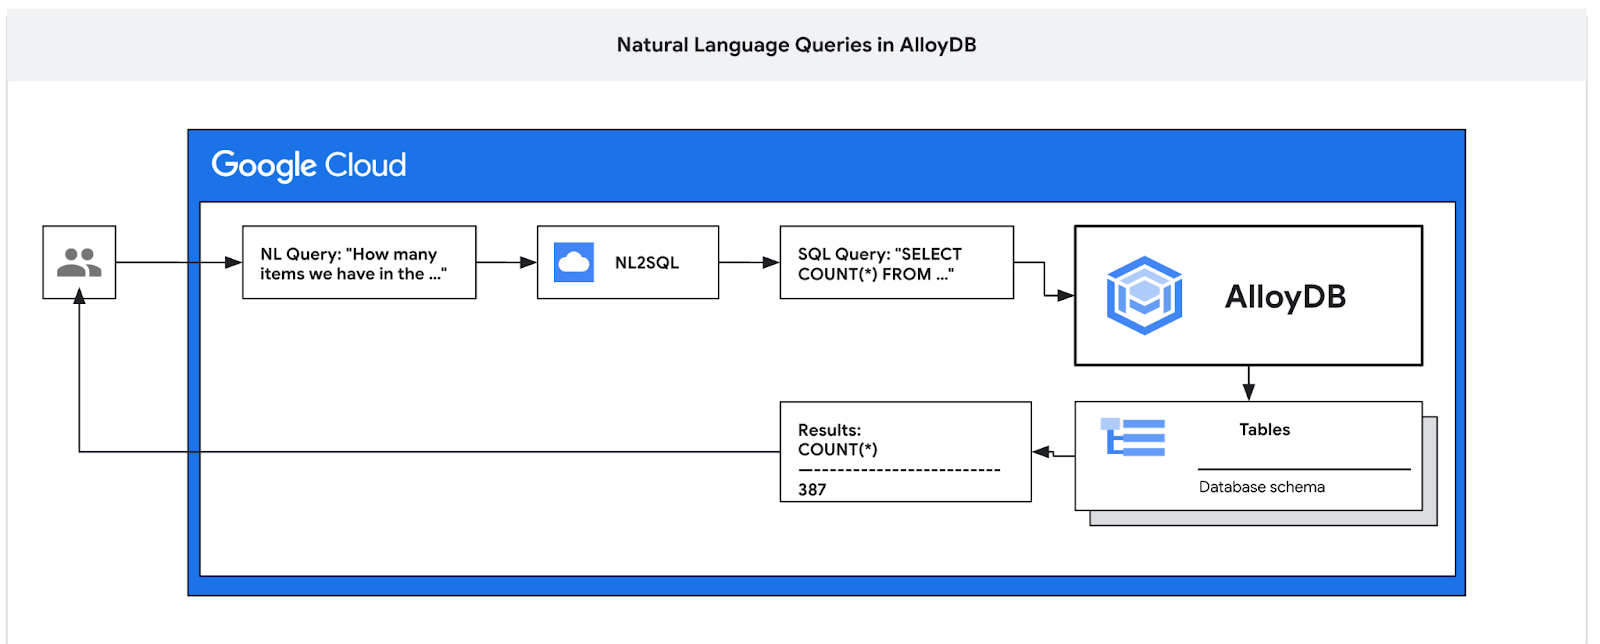
ในโค้ดแล็บนี้ คุณจะได้เรียนรู้วิธีการติดตั้งใช้งาน AlloyDB และใช้ภาษาง่ายๆ ของ AI เพื่อค้นหาข้อมูลและปรับแต่งการกำหนดค่าสำหรับการค้นหาที่มีประสิทธิภาพและคาดการณ์ได้ ห้องทดลองนี้เป็นส่วนหนึ่งของคอลเล็กชันห้องทดลองที่มุ่งเน้นฟีเจอร์ AlloyDB AI ดูข้อมูลเพิ่มเติมได้ที่หน้า AlloyDB AI ในเอกสารประกอบ
ข้อกำหนดเบื้องต้น
- ความเข้าใจพื้นฐานเกี่ยวกับ Google Cloud และคอนโซล
- ทักษะพื้นฐานในอินเทอร์เฟซบรรทัดคำสั่งและ Cloud Shell
สิ่งที่คุณจะได้เรียนรู้
- วิธีติดตั้งใช้งาน AlloyDB for Postgres
- วิธีเปิดใช้ภาษาธรรมชาติของ AlloyDB AI
- วิธีสร้างและปรับแต่งการกำหนดค่าสำหรับภาษาง่ายๆ ของ AI
- วิธีสร้างการค้นหา SQL และรับผลลัพธ์โดยใช้ภาษาธรรมชาติ
สิ่งที่คุณต้องมี
- บัญชี Google Cloud และโปรเจ็กต์ Google Cloud
- เว็บเบราว์เซอร์ เช่น Chrome ที่รองรับ Google Cloud Console และ Cloud Shell
2. การตั้งค่าและข้อกำหนด
การตั้งค่าสภาพแวดล้อมแบบเรียนรู้ด้วยตนเอง
- ลงชื่อเข้าใช้ Google Cloud Console แล้วสร้างโปรเจ็กต์ใหม่หรือใช้โปรเจ็กต์ที่มีอยู่ซ้ำ หากยังไม่มีบัญชี Gmail หรือ Google Workspace คุณต้องสร้างบัญชี

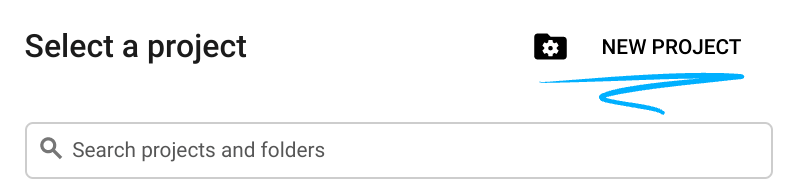
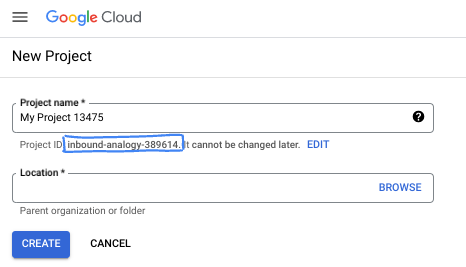
- ชื่อโปรเจ็กต์คือชื่อที่แสดงสำหรับผู้เข้าร่วมโปรเจ็กต์นี้ ซึ่งเป็นสตริงอักขระที่ Google APIs ไม่ได้ใช้ คุณอัปเดตได้ทุกเมื่อ
- รหัสโปรเจ็กต์จะไม่ซ้ำกันในโปรเจ็กต์ Google Cloud ทั้งหมดและเปลี่ยนแปลงไม่ได้ (เปลี่ยนไม่ได้หลังจากตั้งค่าแล้ว) Cloud Console จะสร้างสตริงที่ไม่ซ้ำกันโดยอัตโนมัติ ซึ่งโดยปกติแล้วคุณไม่จำเป็นต้องสนใจว่าสตริงนั้นคืออะไร ใน Codelab ส่วนใหญ่ คุณจะต้องอ้างอิงรหัสโปรเจ็กต์ (โดยทั่วไปจะระบุเป็น
PROJECT_ID) หากไม่ชอบรหัสที่สร้างขึ้น คุณอาจสร้างรหัสแบบสุ่มอีกรหัสหนึ่งได้ หรือคุณอาจลองใช้ชื่อของคุณเองและดูว่ามีชื่อนั้นหรือไม่ คุณจะเปลี่ยนแปลงรหัสนี้หลังจากขั้นตอนนี้ไม่ได้ และรหัสจะคงอยู่ตลอดระยะเวลาของโปรเจ็กต์ - โปรดทราบว่ายังมีค่าที่ 3 ซึ่งคือหมายเลขโปรเจ็กต์ที่ API บางตัวใช้ ดูข้อมูลเพิ่มเติมเกี่ยวกับค่าทั้ง 3 นี้ได้ในเอกสารประกอบ
- จากนั้นคุณจะต้องเปิดใช้การเรียกเก็บเงินใน Cloud Console เพื่อใช้ทรัพยากร/API ของ Cloud การทำตาม Codelab นี้จะไม่มีค่าใช้จ่ายมากนัก หรืออาจไม่มีค่าใช้จ่ายเลย หากต้องการปิดทรัพยากรเพื่อหลีกเลี่ยงการเรียกเก็บเงินนอกเหนือจากบทแนะนำนี้ คุณสามารถลบทรัพยากรที่สร้างขึ้นหรือลบโปรเจ็กต์ได้ ผู้ใช้ Google Cloud รายใหม่มีสิทธิ์เข้าร่วมโปรแกรมช่วงทดลองใช้ฟรีมูลค่า$300 USD
เริ่มต้น Cloud Shell
แม้ว่าคุณจะใช้งาน Google Cloud จากระยะไกลจากแล็ปท็อปได้ แต่ใน Codelab นี้คุณจะใช้ Google Cloud Shell ซึ่งเป็นสภาพแวดล้อมบรรทัดคำสั่งที่ทำงานในระบบคลาวด์
จาก Google Cloud Console ให้คลิกไอคอน Cloud Shell ในแถบเครื่องมือด้านขวาบน

การจัดสรรและเชื่อมต่อกับสภาพแวดล้อมจะใช้เวลาเพียงไม่กี่นาที เมื่อเสร็จแล้ว คุณควรเห็นข้อความคล้ายกับตัวอย่างต่อไปนี้

เครื่องเสมือนนี้มาพร้อมเครื่องมือพัฒนาซอฟต์แวร์ทั้งหมดที่คุณต้องการ โดยมีไดเรกทอรีหลักแบบถาวรขนาด 5 GB และทำงานบน Google Cloud ซึ่งช่วยเพิ่มประสิทธิภาพเครือข่ายและการตรวจสอบสิทธิ์ได้อย่างมาก คุณสามารถทำงานทั้งหมดใน Codelab นี้ได้ภายในเบราว์เซอร์ คุณไม่จำเป็นต้องติดตั้งอะไร
3. ก่อนเริ่มต้น
เปิดใช้ API
ใน Cloud Shell ให้ตรวจสอบว่าได้ตั้งค่ารหัสโปรเจ็กต์แล้ว
gcloud config set project [YOUR-PROJECT-ID]
ตั้งค่าตัวแปรสภาพแวดล้อม PROJECT_ID:
PROJECT_ID=$(gcloud config get-value project)
เปิดใช้บริการที่จำเป็นทั้งหมด
gcloud services enable alloydb.googleapis.com \
                       compute.googleapis.com \
                       cloudresourcemanager.googleapis.com \
                       servicenetworking.googleapis.com \
                       aiplatform.googleapis.com \
                       discoveryengine.googleapis.com \
                       secretmanager.googleapis.com
ผลลัพธ์ที่คาดหวัง
student@cloudshell:~ (test-project-001-402417)$ gcloud config set project test-project-001-402417
Updated property [core/project].
student@cloudshell:~ (test-project-001-402417)$ PROJECT_ID=$(gcloud config get-value project)
Your active configuration is: [cloudshell-14650]
student@cloudshell:~ (test-project-001-402417)$
student@cloudshell:~ (test-project-001-402417)$ gcloud services enable alloydb.googleapis.com \
                       compute.googleapis.com \
                       cloudresourcemanager.googleapis.com \
                       servicenetworking.googleapis.com \
                       aiplatform.googleapis.com
Operation "operations/acat.p2-4470404856-1f44ebd8-894e-4356-bea7-b84165a57442" finished successfully.
4. ติดตั้งใช้งาน AlloyDB
สร้างคลัสเตอร์และอินสแตนซ์หลักของ AlloyDB ขั้นตอนต่อไปนี้จะอธิบายวิธีสร้างคลัสเตอร์และอินสแตนซ์ AlloyDB โดยใช้ Google Cloud SDK หากต้องการใช้แนวทางของคอนโซล คุณสามารถดูเอกสารประกอบได้ที่นี่
ก่อนสร้างคลัสเตอร์ AlloyDB เราต้องมีช่วง IP ส่วนตัวที่พร้อมใช้งานใน VPC เพื่อให้อินสแตนซ์ AlloyDB ในอนาคตใช้ หากเราไม่มี เราจะต้องสร้างขึ้น กำหนดให้ใช้โดยบริการภายในของ Google หลังจากนั้นเราจะสร้างคลัสเตอร์และอินสแตนซ์ได้
สร้างช่วง IP ส่วนตัว
เราต้องกำหนดค่าการเข้าถึงบริการส่วนตัวใน VPC สำหรับ AlloyDB สมมติว่าเรามีเครือข่าย VPC "เริ่มต้น" ในโปรเจ็กต์และจะใช้สำหรับการดำเนินการทั้งหมด
สร้างช่วง IP ส่วนตัว
gcloud compute addresses create psa-range \
    --global \
    --purpose=VPC_PEERING \
    --prefix-length=24 \
    --description="VPC private service access" \
    --network=default
สร้างการเชื่อมต่อส่วนตัวโดยใช้ช่วง IP ที่จัดสรร
gcloud services vpc-peerings connect \
    --service=servicenetworking.googleapis.com \
    --ranges=psa-range \
    --network=default
เอาต์พุตของคอนโซลที่คาดไว้
student@cloudshell:~ (test-project-402417)$ gcloud compute addresses create psa-range \
    --global \
    --purpose=VPC_PEERING \
    --prefix-length=24 \
    --description="VPC private service access" \
    --network=default
Created [https://www.googleapis.com/compute/v1/projects/test-project-402417/global/addresses/psa-range].

student@cloudshell:~ (test-project-402417)$ gcloud services vpc-peerings connect \
    --service=servicenetworking.googleapis.com \
    --ranges=psa-range \
    --network=default
Operation "operations/pssn.p24-4470404856-595e209f-19b7-4669-8a71-cbd45de8ba66" finished successfully.

student@cloudshell:~ (test-project-402417)$
สร้างคลัสเตอร์ AlloyDB
ในส่วนนี้ เราจะสร้างคลัสเตอร์ AlloyDB ในภูมิภาค us-central1
กำหนดรหัสผ่านสำหรับผู้ใช้ postgres คุณกำหนดรหัสผ่านเองหรือใช้ฟังก์ชันแบบสุ่มเพื่อสร้างรหัสผ่านก็ได้
export PGPASSWORD=`openssl rand -hex 12`
เอาต์พุตของคอนโซลที่คาดไว้
student@cloudshell:~ (test-project-402417)$ export PGPASSWORD=`openssl rand -hex 12`
จดรหัสผ่าน PostgreSQL ไว้ใช้ในอนาคต
echo $PGPASSWORD
คุณจะต้องใช้รหัสผ่านดังกล่าวในอนาคตเพื่อเชื่อมต่อกับอินสแตนซ์ในฐานะผู้ใช้ postgres เราขอแนะนำให้คุณจดหรือคัดลอกรหัสนี้ไว้เพื่อใช้ในภายหลัง
เอาต์พุตของคอนโซลที่คาดไว้
student@cloudshell:~ (test-project-402417)$ echo $PGPASSWORD
bbefbfde7601985b0dee5723
สร้างคลัสเตอร์ช่วงทดลองใช้ฟรี
หากยังไม่เคยใช้ AlloyDB มาก่อน คุณสามารถสร้างคลัสเตอร์ทดลองใช้ฟรีได้โดยทำดังนี้
กำหนดชื่อภูมิภาคและคลัสเตอร์ AlloyDB เราจะใช้ภูมิภาค us-central1 และ alloydb-aip-01 เป็นชื่อคลัสเตอร์
export REGION=us-central1
export ADBCLUSTER=alloydb-aip-01
เรียกใช้คำสั่งเพื่อสร้างคลัสเตอร์
gcloud alloydb clusters create $ADBCLUSTER \
    --password=$PGPASSWORD \
    --network=default \
    --region=$REGION \
    --subscription-type=TRIAL
เอาต์พุตของคอนโซลที่คาดไว้
export REGION=us-central1
export ADBCLUSTER=alloydb-aip-01
gcloud alloydb clusters create $ADBCLUSTER \
    --password=$PGPASSWORD \
    --network=default \
    --region=$REGION \
    --subscription-type=TRIAL
Operation ID: operation-1697655441138-6080235852277-9e7f04f5-2012fce4
Creating cluster...done.
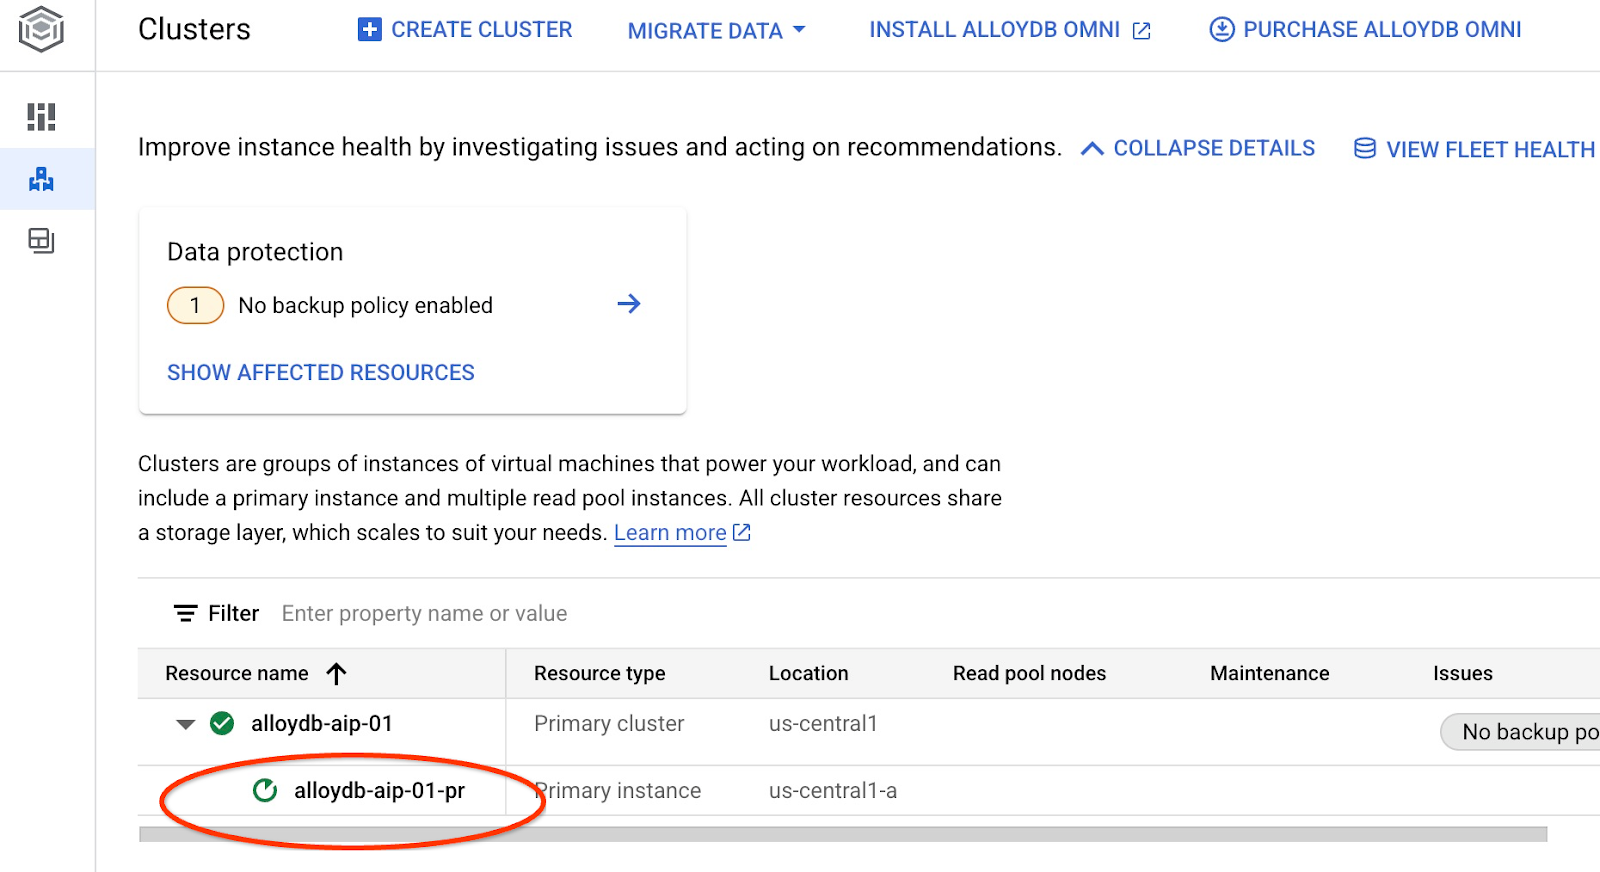
สร้างอินสแตนซ์หลักของ AlloyDB สำหรับคลัสเตอร์ในเซสชัน Cloud Shell เดียวกัน หากการเชื่อมต่อถูกตัด คุณจะต้องกำหนดตัวแปรสภาพแวดล้อมของภูมิภาคและชื่อคลัสเตอร์อีกครั้ง
gcloud alloydb instances create $ADBCLUSTER-pr \
    --instance-type=PRIMARY \
    --cpu-count=8 \
    --region=$REGION \
    --cluster=$ADBCLUSTER
เอาต์พุตของคอนโซลที่คาดไว้
student@cloudshell:~ (test-project-402417)$ gcloud alloydb instances create $ADBCLUSTER-pr \
    --instance-type=PRIMARY \
    --cpu-count=8 \
    --region=$REGION \
    --availability-type ZONAL \
    --cluster=$ADBCLUSTER
Operation ID: operation-1697659203545-6080315c6e8ee-391805db-25852721
Creating instance...done.
สร้างคลัสเตอร์มาตรฐาน AlloyDB
หากไม่ใช่คลัสเตอร์ AlloyDB แรกในโปรเจ็กต์ ให้สร้างคลัสเตอร์มาตรฐานต่อไป
กำหนดชื่อภูมิภาคและคลัสเตอร์ AlloyDB เราจะใช้ภูมิภาค us-central1 และ alloydb-aip-01 เป็นชื่อคลัสเตอร์
export REGION=us-central1
export ADBCLUSTER=alloydb-aip-01
เรียกใช้คำสั่งเพื่อสร้างคลัสเตอร์
gcloud alloydb clusters create $ADBCLUSTER \
    --password=$PGPASSWORD \
    --network=default \
    --region=$REGION
เอาต์พุตของคอนโซลที่คาดไว้
export REGION=us-central1
export ADBCLUSTER=alloydb-aip-01
gcloud alloydb clusters create $ADBCLUSTER \
    --password=$PGPASSWORD \
    --network=default \
    --region=$REGION
Operation ID: operation-1697655441138-6080235852277-9e7f04f5-2012fce4
Creating cluster...done.
สร้างอินสแตนซ์หลักของ AlloyDB สำหรับคลัสเตอร์ในเซสชัน Cloud Shell เดียวกัน หากการเชื่อมต่อถูกตัด คุณจะต้องกำหนดตัวแปรสภาพแวดล้อมของภูมิภาคและชื่อคลัสเตอร์อีกครั้ง
gcloud alloydb instances create $ADBCLUSTER-pr \
    --instance-type=PRIMARY \
    --cpu-count=2 \
    --region=$REGION \
    --cluster=$ADBCLUSTER
เอาต์พุตของคอนโซลที่คาดไว้
student@cloudshell:~ (test-project-402417)$ gcloud alloydb instances create $ADBCLUSTER-pr \
    --instance-type=PRIMARY \
    --cpu-count=2 \
    --region=$REGION \
    --availability-type ZONAL \
    --cluster=$ADBCLUSTER
Operation ID: operation-1697659203545-6080315c6e8ee-391805db-25852721
Creating instance...done.
5. เตรียมฐานข้อมูล
เราต้องสร้างฐานข้อมูล เปิดใช้การผสานรวม Vertex AI สร้างออบเจ็กต์ฐานข้อมูล และนําเข้าข้อมูล
ให้สิทธิ์ที่จำเป็นแก่ AlloyDB
เพิ่มสิทธิ์ Vertex AI ให้กับ Agent บริการ AlloyDB
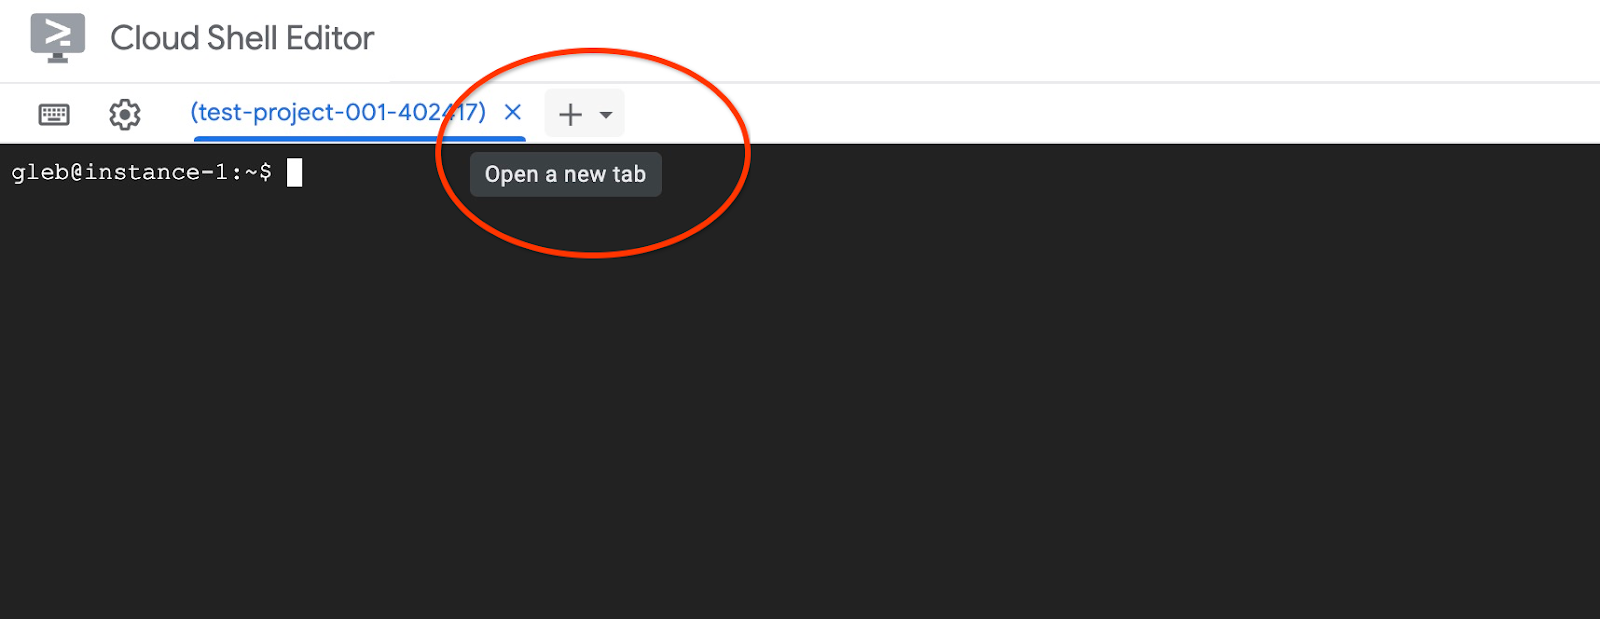
เปิดแท็บ Cloud Shell อีกแท็บโดยใช้เครื่องหมาย "+" ที่ด้านบน
ในแท็บ Cloud Shell ใหม่ ให้เรียกใช้คำสั่งต่อไปนี้
PROJECT_ID=$(gcloud config get-value project)
gcloud projects add-iam-policy-binding $PROJECT_ID \
  --member="serviceAccount:service-$(gcloud projects describe $PROJECT_ID --format="value(projectNumber)")@gcp-sa-alloydb.iam.gserviceaccount.com" \
  --role="roles/aiplatform.user"
เอาต์พุตของคอนโซลที่คาดไว้
student@cloudshell:~ (test-project-001-402417)$ PROJECT_ID=$(gcloud config get-value project)
Your active configuration is: [cloudshell-11039]
student@cloudshell:~ (test-project-001-402417)$ gcloud projects add-iam-policy-binding $PROJECT_ID \
  --member="serviceAccount:service-$(gcloud projects describe $PROJECT_ID --format="value(projectNumber)")@gcp-sa-alloydb.iam.gserviceaccount.com" \
  --role="roles/aiplatform.user"
Updated IAM policy for project [test-project-001-402417].
bindings:
- members:
  - serviceAccount:service-4470404856@gcp-sa-alloydb.iam.gserviceaccount.com
  role: roles/aiplatform.user
- members:
...
etag: BwYIEbe_Z3U=
version: 1
ปิดแท็บโดยใช้คำสั่งดำเนินการ "exit" ในแท็บ
exit
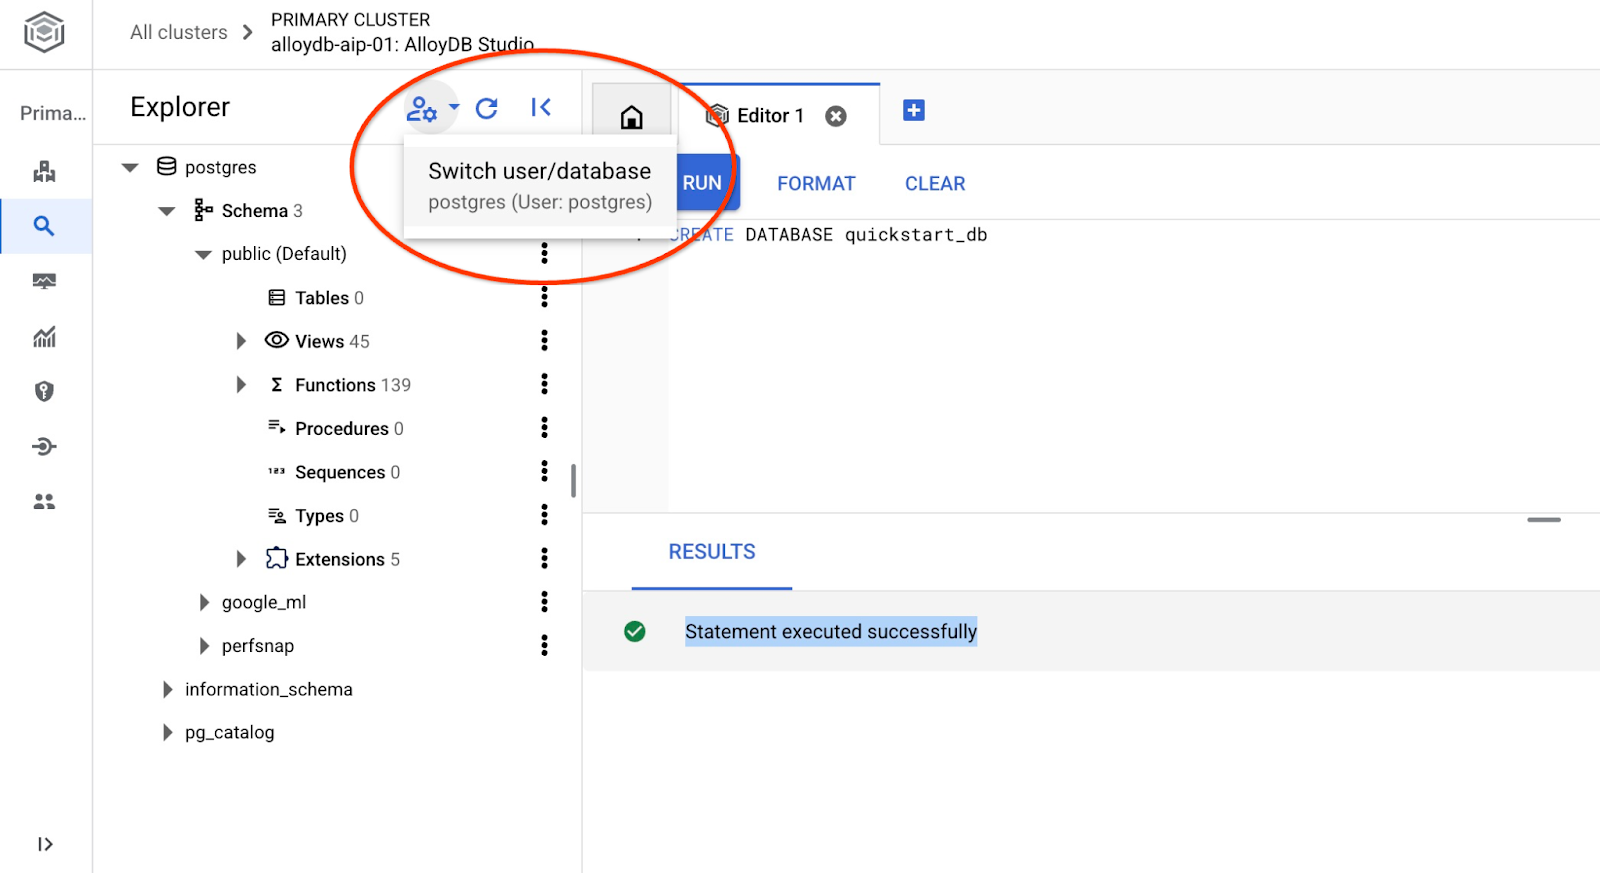
เชื่อมต่อกับ AlloyDB Studio
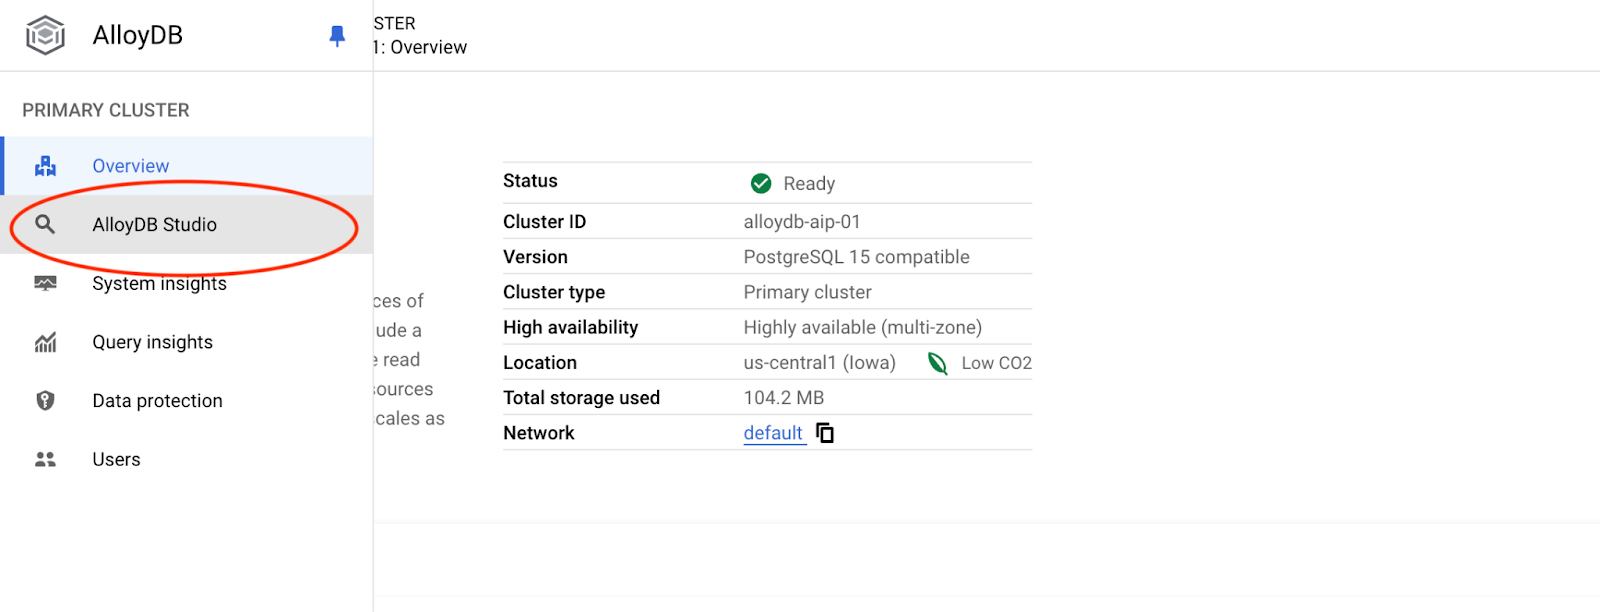
ในบทต่อไปนี้ คุณสามารถเรียกใช้คำสั่ง SQL ทั้งหมดที่ต้องเชื่อมต่อกับฐานข้อมูลใน AlloyDB Studio แทนได้ หากต้องการเรียกใช้คำสั่ง คุณต้องเปิดอินเทอร์เฟซคอนโซลเว็บสำหรับคลัสเตอร์ AlloyDB โดยคลิกอินสแตนซ์หลัก
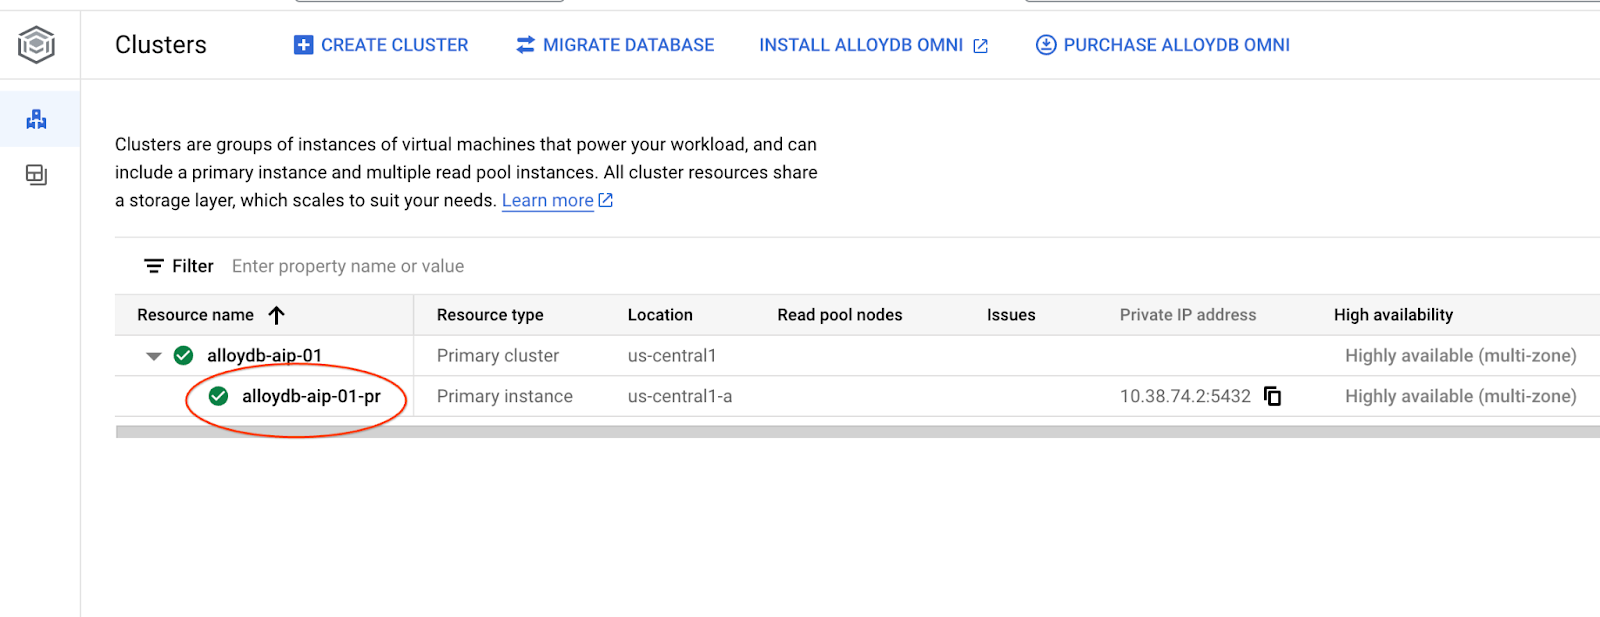
จากนั้นคลิก AlloyDB Studio ทางด้านซ้าย
เลือกฐานข้อมูล Postgres, ผู้ใช้ Postgres และระบุรหัสผ่านที่จดไว้เมื่อเราสร้างคลัสเตอร์ จากนั้นคลิกปุ่ม "ตรวจสอบสิทธิ์"

ซึ่งจะเปิดอินเทอร์เฟซ AlloyDB Studio หากต้องการเรียกใช้คำสั่งในฐานข้อมูล ให้คลิกแท็บ "Editor 1" ทางด้านขวา
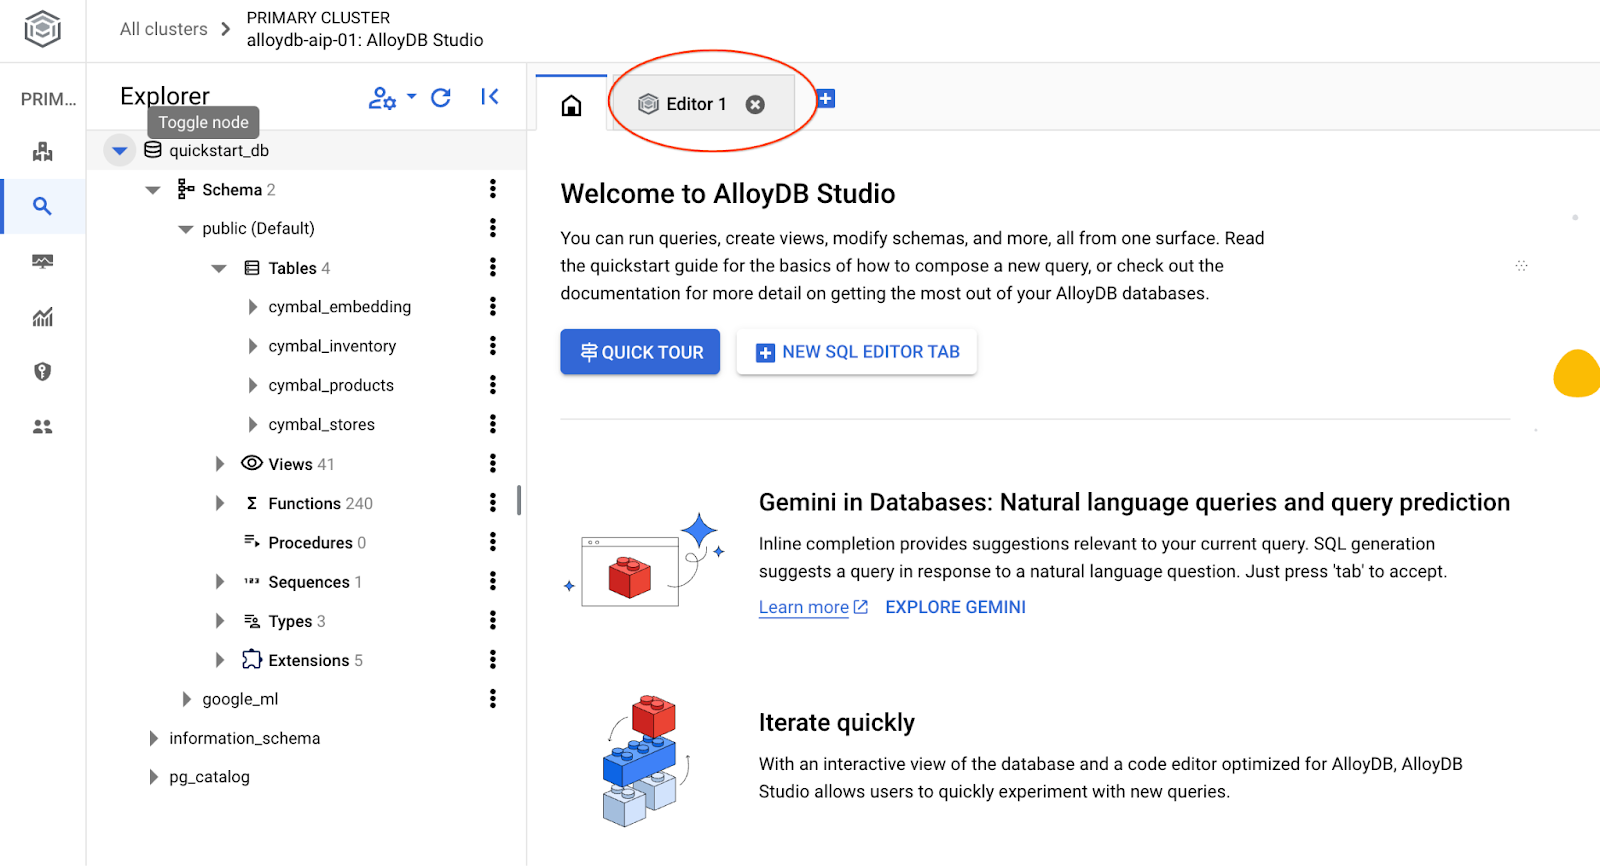
ซึ่งจะเปิดอินเทอร์เฟซที่คุณสามารถเรียกใช้คำสั่ง SQL ได้
สร้างฐานข้อมูล
เริ่มต้นใช้งานฐานข้อมูลอย่างรวดเร็ว
เรียกใช้คำสั่งต่อไปนี้ในโปรแกรมแก้ไข AlloyDB Studio
สร้างฐานข้อมูล
CREATE DATABASE quickstart_db
ผลลัพธ์ที่คาดไว้
Statement executed successfully
เชื่อมต่อกับ quickstart_db
เชื่อมต่อกับสตูดิโออีกครั้งโดยใช้ปุ่มเพื่อเปลี่ยนผู้ใช้/ฐานข้อมูล
เลือกฐานข้อมูล quickstart_db ใหม่จากรายการแบบเลื่อนลง แล้วใช้ผู้ใช้และรหัสผ่านเดิม
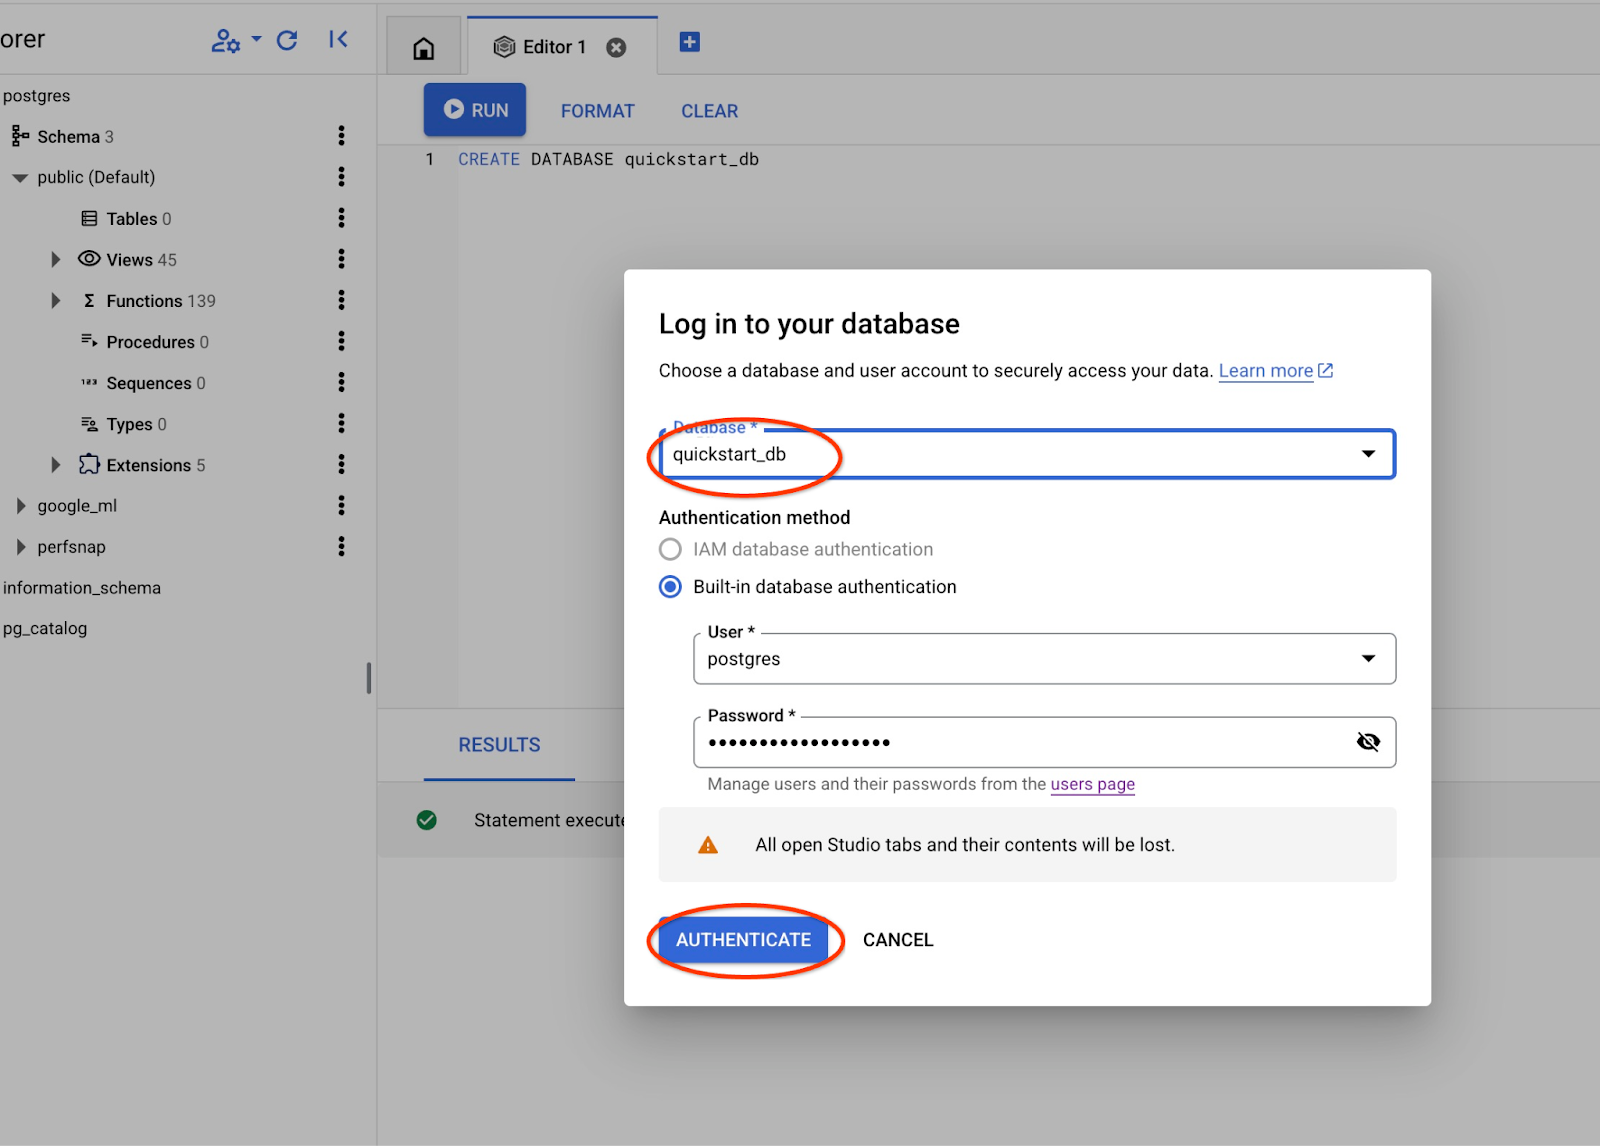
ซึ่งจะเปิดการเชื่อมต่อใหม่ที่คุณสามารถทำงานกับออบเจ็กต์จากฐานข้อมูล quickstart_db ได้
6. ข้อมูลตัวอย่าง
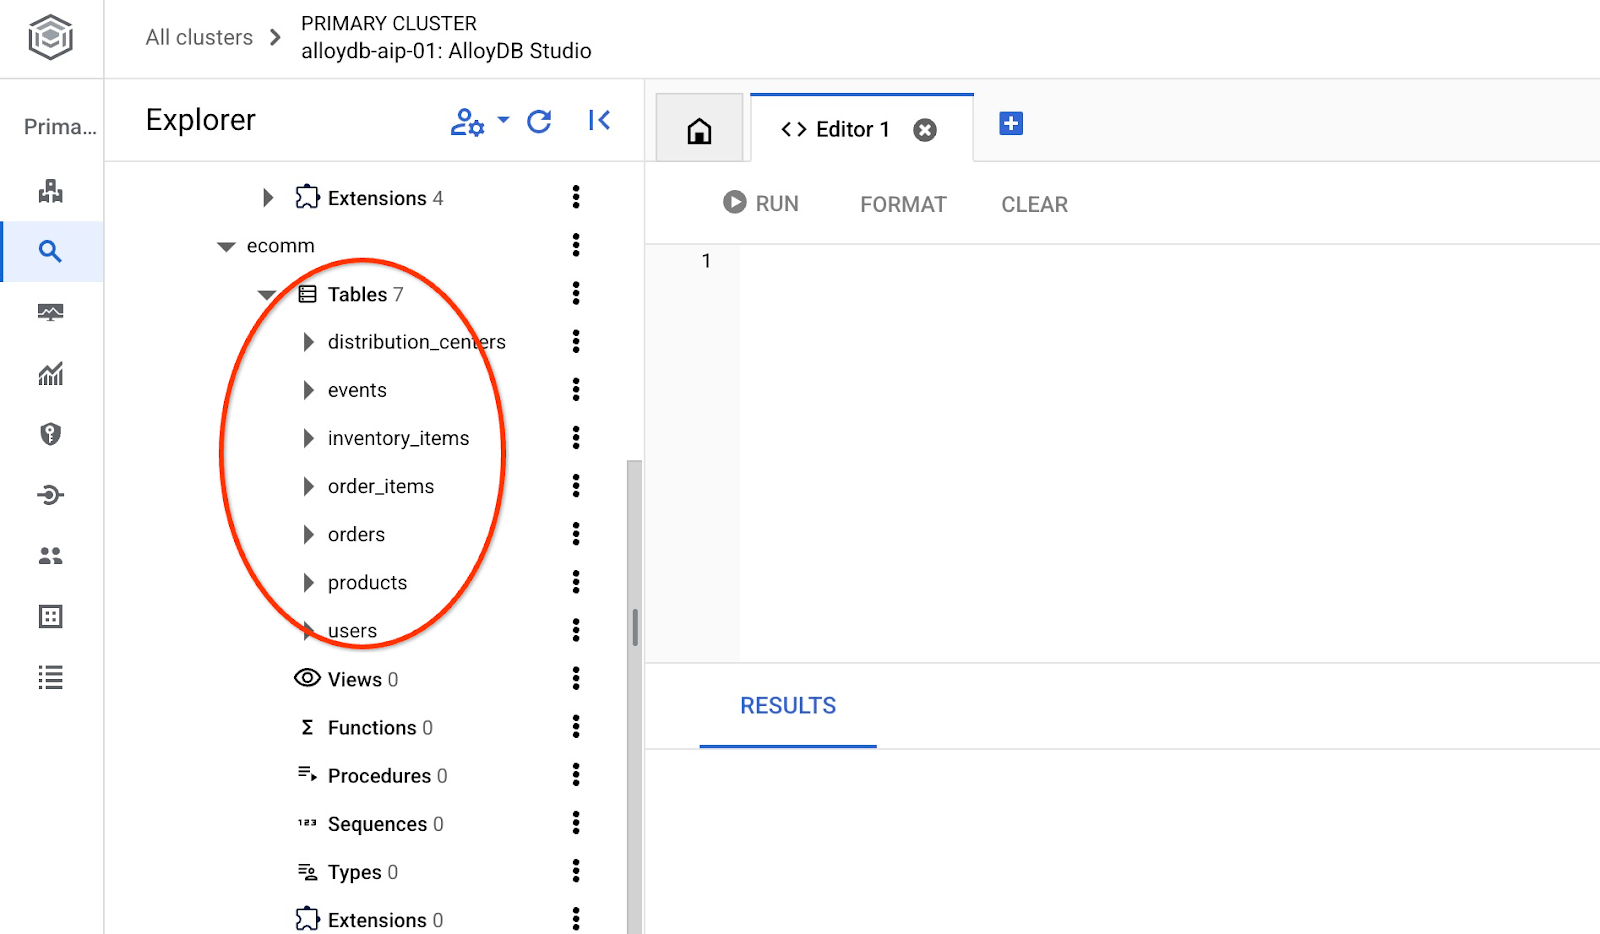
ตอนนี้เราต้องสร้างออบเจ็กต์ในฐานข้อมูลและโหลดข้อมูล เราจะใช้ร้านค้า "Cymbal ecomm" ที่สมมติขึ้นพร้อมชุดตารางสำหรับร้านค้าออนไลน์ โดยมีหลายตารางที่เชื่อมต่อกันด้วยคีย์ซึ่งคล้ายกับสคีมาฐานข้อมูลเชิงสัมพันธ์
ระบบจะจัดเตรียมและวางชุดข้อมูลเป็นไฟล์ SQL ซึ่งโหลดไปยังฐานข้อมูลได้โดยใช้อินเทอร์เฟซการนำเข้า เรียกใช้คำสั่งต่อไปนี้ใน Cloud Shell
export REGION=us-central1
export ADBCLUSTER=alloydb-aip-01
gcloud alloydb clusters import $ADBCLUSTER --region=$REGION --database=quickstart_db --gcs-uri='gs://sample-data-and-media/ecomm-retail/ecom_generic.sql' --user=postgres --sql
คำสั่งนี้ใช้ AlloyDB SDK และสร้างสคีมา ecomm จากนั้นนำเข้าข้อมูลตัวอย่างจากที่เก็บข้อมูล GCS ไปยังฐานข้อมูลโดยตรง ซึ่งจะสร้างออบเจ็กต์ที่จำเป็นทั้งหมดและแทรกข้อมูล
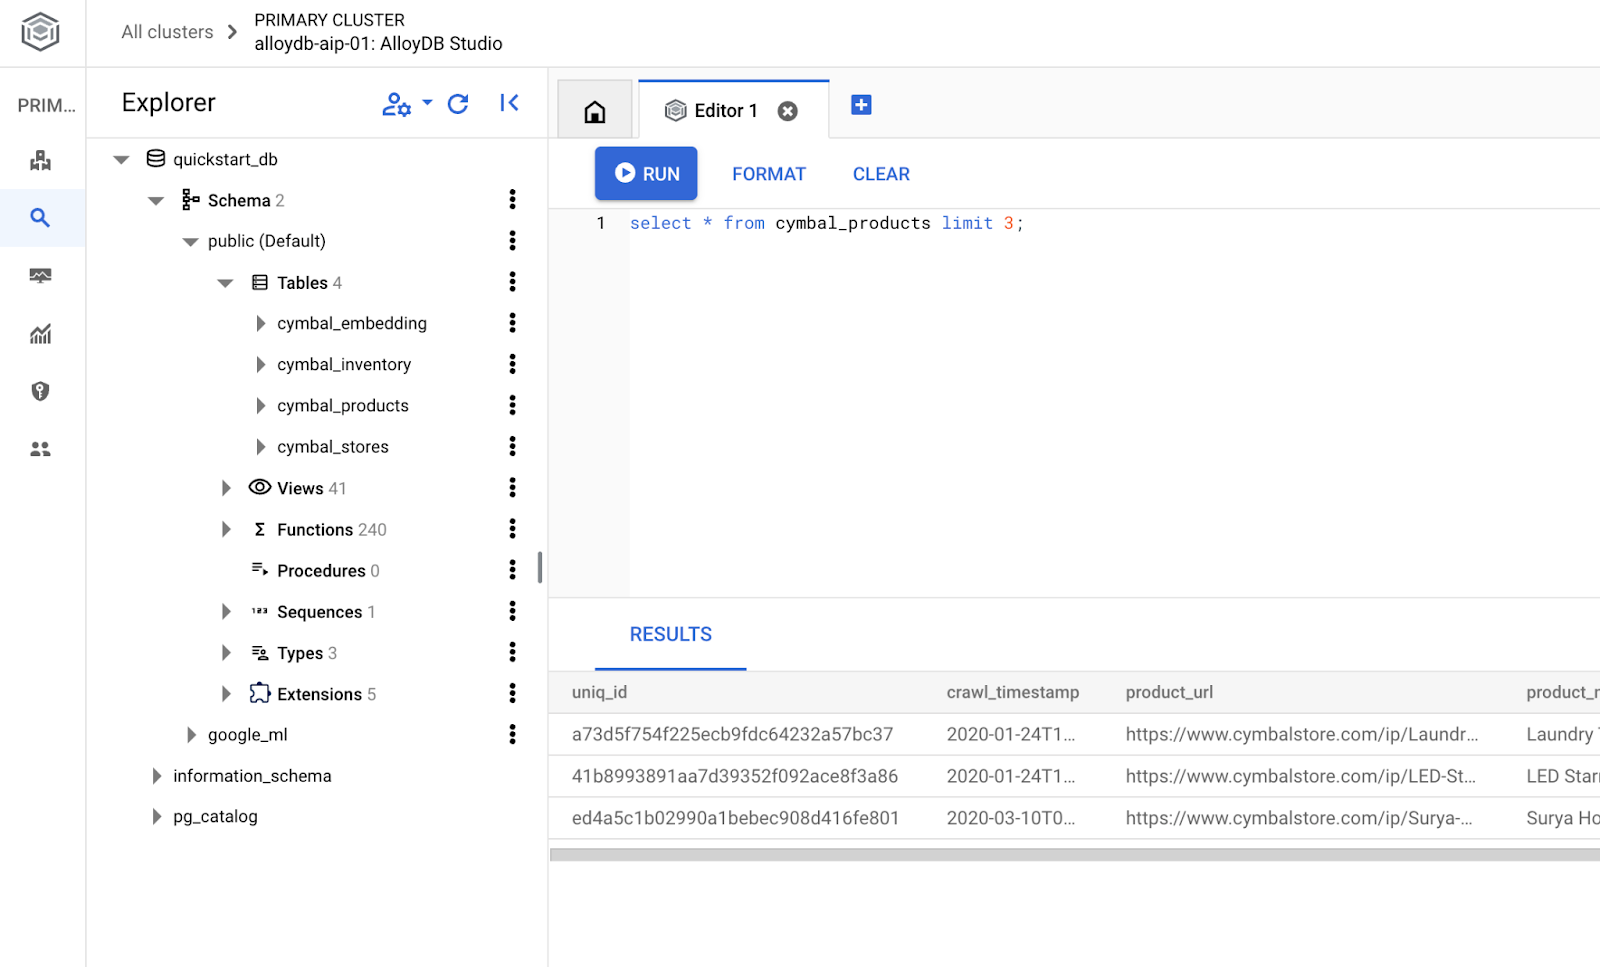
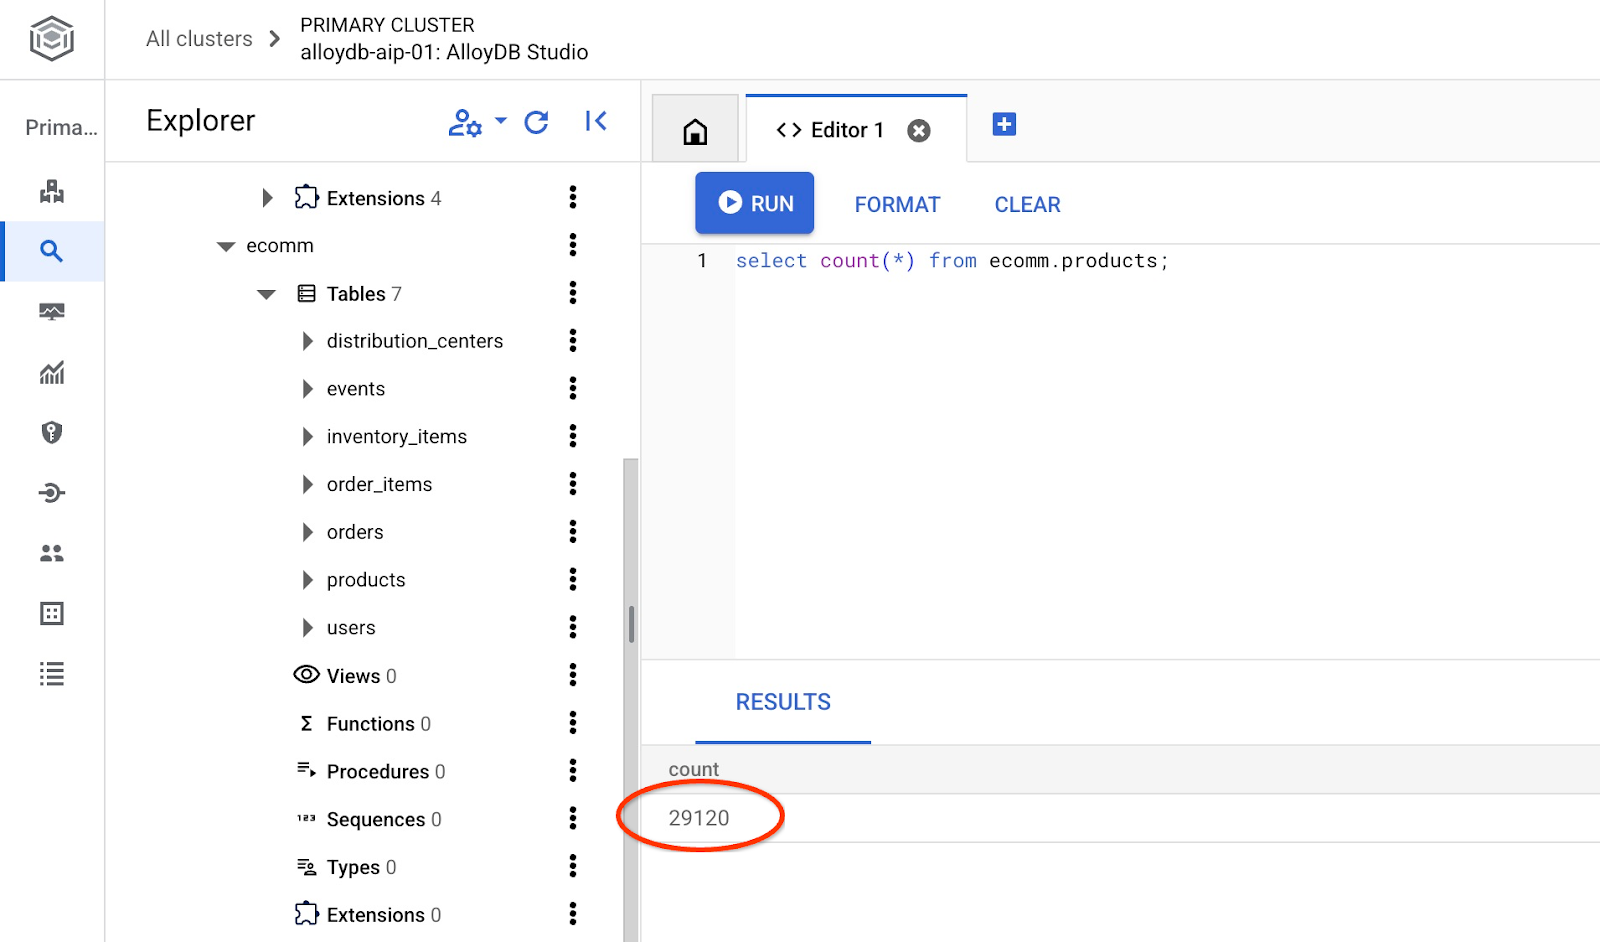
หลังจากนำเข้าแล้ว เราจะตรวจสอบตารางใน AlloyDB Studio ได้
และยืนยันจำนวนแถวในตาราง
7. กำหนดค่า NL SQL
ในบทนี้ เราจะกำหนดค่า NL ให้ทำงานกับสคีมาตัวอย่าง
ติดตั้งส่วนขยาย alloydb_nl_ai
เราต้องติดตั้งส่วนขยาย alloydb_ai_nl ในฐานข้อมูล ก่อนที่จะดำเนินการดังกล่าว เราต้องตั้งค่าสถานะฐานข้อมูล alloydb_ai_nl.enabled เป็นเปิด
ในเซสชัน Cloud Shell ให้เรียกใช้
export REGION=us-central1
export ADBCLUSTER=alloydb-aip-01
gcloud alloydb instances update $ADBCLUSTER-pr \
  --cluster=$ADBCLUSTER \
  --region=$REGION \
  --database-flags=alloydb_ai_nl.enabled=on
ซึ่งจะเริ่มการอัปเดตอินสแตนซ์ คุณดูสถานะของอินสแตนซ์ที่กำลังอัปเดตได้ในเว็บคอนโซล
เมื่ออัปเดตอินสแตนซ์แล้ว (สถานะอินสแตนซ์เป็นสีเขียว) คุณจะเปิดใช้ส่วนขยาย alloydb_ai_nl ได้
ใน AlloyDB Studio ให้ดำเนินการ
CREATE EXTENSION IF NOT EXISTS google_ml_integration;
CREATE EXTENSION alloydb_ai_nl cascade;
สร้างการกำหนดค่าภาษาธรรมชาติ
หากต้องการใช้ส่วนขยาย เราต้องสร้างการกำหนดค่า การกำหนดค่านี้จำเป็นต่อการเชื่อมโยงแอปพลิเคชันกับสคีมา เทมเพลตการค้นหา และปลายทางของโมเดลบางอย่าง มาสร้างการกำหนดค่าที่มีรหัส cymbal_ecomm_config กัน
ใน AlloyDB Studio ให้ดำเนินการ
SELECT
  alloydb_ai_nl.g_create_configuration(
    configuration_id => 'cymbal_ecomm_config'
  );
ตอนนี้เราลงทะเบียนสคีมาอีคอมเมิร์ซในการกำหนดค่าได้แล้ว เราได้นำเข้าข้อมูลไปยังสคีมาอีคอมเมิร์ซแล้ว ดังนั้นเราจะเพิ่มสคีมาดังกล่าวลงในการกำหนดค่า NL
SELECT
  alloydb_ai_nl.g_manage_configuration(
    operation => 'register_schema',
    configuration_id_in => 'cymbal_ecomm_config',
    schema_names_in => '{ecomm}'
  );
8. เพิ่มบริบทให้กับ NL SQL
เพิ่มบริบททั่วไป
เราสามารถเพิ่มบริบทบางอย่างให้กับสคีมาที่ลงทะเบียนไว้ บริบทควรช่วยสร้างผลลัพธ์ที่ดีขึ้นเพื่อตอบสนองคำขอของผู้ใช้ เช่น เราอาจบอกว่าแบรนด์หนึ่งเป็นแบรนด์ที่ผู้ใช้ชื่นชอบเมื่อไม่ได้กำหนดไว้อย่างชัดเจน มาตั้ง Clades (แบรนด์สมมติ) เป็นแบรนด์เริ่มต้นกัน
ใน AlloyDB Studio ให้เรียกใช้คำสั่งต่อไปนี้
SELECT
  alloydb_ai_nl.g_manage_configuration(
    operation => 'add_general_context',
    configuration_id_in => 'cymbal_ecomm_config',
    general_context_in => '{"If the user doesn''t clearly define preferred brand then use Clades."}'
  );
มาตรวจสอบกันว่าบริบททั่วไปทำงานอย่างไร
ใน AlloyDB Studio ให้เรียกใช้คำสั่งต่อไปนี้
SELECT
  alloydb_ai_nl.get_sql(
    nl_config_id => 'cymbal_ecomm_config',
    nl_question => 'How many products do we have of our preferred brand?'
  );
คําค้นหาที่สร้างขึ้นใช้แบรนด์เริ่มต้นของเราที่กําหนดไว้ก่อนหน้านี้ในบริบททั่วไป
{"sql": "SELECT count(*) FROM \"ecomm\".\"products\" WHERE \"brand\" = 'Clades'", "method": "default", "prompt": "", "retries": 0, "time(ms)": {"llm": 505.628000, "magic": 424.019000}, "error_msg": "", "nl_question": "How many products do we have of our preferred brand?", "toolbox_used": false}
เราสามารถล้างข้อมูลและสร้างเฉพาะคำสั่ง SQL เป็นเอาต์พุตได้
เช่น
SELECT
  alloydb_ai_nl.get_sql(
    nl_config_id => 'cymbal_ecomm_config',
    nl_question => 'How many products do we have of our preferred brand?'
  ) ->> 'sql';
เอาต์พุตที่ล้างแล้ว
SELECT count(*) FROM "ecomm"."products" WHERE "brand" = 'Clades'
คุณสังเกตเห็นว่าระบบเลือกตาราง inventory_items โดยอัตโนมัติแทนที่จะเป็นตารางผลิตภัณฑ์ และใช้ตารางดังกล่าวเพื่อสร้างคําค้นหา ซึ่งอาจใช้ได้ในบางกรณี แต่ไม่ใช่สำหรับสคีมาของเรา ในกรณีของเรา ตาราง inventory_items ใช้เพื่อติดตามยอดขาย ซึ่งอาจทำให้เข้าใจผิดได้หากคุณไม่มีข้อมูลวงใน เราจะมาดูวิธีทำให้การค้นหามีความแม่นยำมากขึ้นในภายหลัง
บริบทของสคีมา
บริบทของสคีมาจะอธิบายออบเจ็กต์สคีมา เช่น ตาราง มุมมอง และคอลัมน์แต่ละรายการที่จัดเก็บข้อมูลเป็นความคิดเห็นในออบเจ็กต์สคีมา
เราสามารถสร้างโดยอัตโนมัติสำหรับออบเจ็กต์สคีมาทั้งหมดในการกำหนดค่าที่กำหนดโดยใช้การค้นหาต่อไปนี้
SELECT
  alloydb_ai_nl.generate_schema_context(
    nl_config_id => 'cymbal_ecomm_config',
    overwrite_if_exist => TRUE
  );
พารามิเตอร์ "TRUE" จะสั่งให้เราสร้างบริบทใหม่และเขียนทับ การดำเนินการจะใช้เวลาสักครู่ ทั้งนี้ขึ้นอยู่กับโมเดลข้อมูล ยิ่งมีความสัมพันธ์และการเชื่อมต่อมากเท่าใด ก็อาจใช้เวลานานขึ้นเท่านั้น
หลังจากสร้างบริบทแล้ว เราจะตรวจสอบได้ว่าบริบทได้สร้างอะไรไว้สำหรับตารางสินค้าคงคลังโดยใช้คำค้นหาต่อไปนี้
SELECT
  object_context
FROM
  alloydb_ai_nl.generated_schema_context_view
WHERE
  schema_object = 'ecomm.inventory_items';
เอาต์พุตที่ล้างแล้ว
The `ecomm.inventory_items` table stores information about individual inventory items in an e-commerce system. Each item is uniquely identified by an `id` (primary key). The table tracks the `product_id` (foreign key referencing `ecomm.products`), the timestamp when the item was `created_at`, and the timestamp when it was `sold_at` (which can be null if the item hasn't been sold). The `cost` represents the cost of the item to the business, while `product_retail_price` is the price at which the item is sold. Additional product details include `product_category`, `product_name`, `product_brand`, `product_department`, and `product_sku` (stock keeping unit). The `product_distribution_center_id` (foreign key referencing `ecomm.distribution_centers`) indicates the distribution center where the item is located. The table includes information on both men's and women's apparel across various categories like jeans, tops & tees, activewear, sleep & lounge, intimates, swim, and accessories. The `sold_at` column indicates whether an item has been sold and when.
ดูเหมือนว่าคำอธิบายจะขาดส่วนสำคัญบางส่วนที่ตาราง inventory_items แสดงการเคลื่อนไหวของสินค้า เราสามารถอัปเดตได้โดยเพิ่มข้อมูลสำคัญนี้ลงในบริบทของความสัมพันธ์ ecomm.inventory_items
SELECT alloydb_ai_nl.update_generated_relation_context(
  relation_name => 'ecomm.inventory_items',
  relation_context => 'The `ecomm.inventory_items` table stores information about moving and sales of inventory items in an e-commerce system. Each movement is uniquely identified by an `id` (primary key) and used in order_items table as `inventory_item_id`. The table tracks sales and movements for the `product_id` (foreign key referencing `ecomm.products`), the timestamp when the movement for the item was `created_at`, and the timestamp when it was `sold_at` (which can be null if the item hasn''t been sold). The `cost` represents the cost of the item to the business, while `product_retail_price` is the price at which the item is sold. Additional product details include `product_category`, `product_name`, `product_brand`, `product_department`, and `product_sku` (stock keeping unit). The `product_distribution_center_id` (foreign key referencing `ecomm.distribution_centers`) indicates the distribution center where the item is located. The table includes information on both men''s and women''s apparel across various categories like jeans, tops & tees, activewear, sleep & lounge, intimates, swim, and accessories. The `sold_at` column indicates whether an item has been sold and when.'
);
นอกจากนี้ เรายังยืนยันความถูกต้องของคำอธิบายสำหรับตารางผลิตภัณฑ์ได้ด้วย
SELECT
  object_context
FROM
  alloydb_ai_nl.generated_schema_context_view
WHERE
  schema_object = 'ecomm.products';
ฉันพบว่าบริบทที่สร้างขึ้นโดยอัตโนมัติสำหรับตารางผลิตภัณฑ์ค่อนข้างแม่นยำและไม่จำเป็นต้องเปลี่ยนแปลงใดๆ
นอกจากนี้ ฉันยังตรวจสอบข้อมูลเกี่ยวกับแต่ละคอลัมน์ในทั้ง 2 ตารางและพบว่าข้อมูลถูกต้องเช่นกัน
มาใช้บริบทที่สร้างขึ้นสำหรับ ecomm.inventory_items และ ecomm.products กับการกำหนดค่ากัน
SELECT alloydb_ai_nl.apply_generated_relation_context(
  relation_name => 'ecomm.inventory_items',
  overwrite_if_exist => TRUE
);

SELECT alloydb_ai_nl.apply_generated_relation_context(
  relation_name => 'ecomm.products',
  overwrite_if_exist => TRUE
);
คุณจำคำค้นหาของเราเพื่อสร้าง SQL สำหรับคำถาม "เรามีผลิตภัณฑ์ของแบรนด์ที่ต้องการกี่รายการ" ได้ไหม ? ตอนนี้เราสามารถทำซ้ำและดูว่าเอาต์พุตมีการเปลี่ยนแปลงหรือไม่
SELECT
  alloydb_ai_nl.get_sql(
    nl_config_id => 'cymbal_ecomm_config',
    nl_question => 'How many products do we have of our preferred brand?'
  ) ->> 'sql';
นี่คือเอาต์พุตใหม่
SELECT COUNT(*) FROM "ecomm"."products" WHERE "brand" = 'Clades';
และตอนนี้ระบบกำลังตรวจสอบ ecomm.products ซึ่งมีความแม่นยำมากกว่า และแสดงผลิตภัณฑ์ประมาณ 300 รายการแทนที่จะเป็นการดำเนินการ 5,000 รายการที่มีสินค้าคงคลัง
9. การทำงานกับดัชนีมูลค่า
การลิงก์ค่าจะช่วยเพิ่มประสิทธิภาพการค้นหาด้วยภาษาธรรมชาติโดยการเชื่อมโยงวลีค่ากับประเภทแนวคิดและชื่อคอลัมน์ที่ลงทะเบียนไว้ล่วงหน้า ซึ่งจะช่วยให้คาดการณ์ผลลัพธ์ได้มากขึ้น
กำหนดค่าดัชนีมูลค่า
เราสามารถสร้างการค้นหาโดยใช้คอลัมน์แบรนด์ในตารางผลิตภัณฑ์ และค้นหาผลิตภัณฑ์ที่มีแบรนด์ที่เสถียรมากขึ้นได้โดยการกำหนดประเภทแนวคิดและเชื่อมโยงกับคอลัมน์ ecomm.products.brand
มาสร้างแนวคิดและเชื่อมโยงกับคอลัมน์กัน
SELECT alloydb_ai_nl.add_concept_type(
    concept_type_in => 'brand_name',
    match_function_in => 'alloydb_ai_nl.get_concept_and_value_generic_entity_name',
    additional_info_in => '{
      "description": "Concept type for brand name.",
      "examples": "SELECT alloydb_ai_nl.get_concept_and_value_generic_entity_name(''Auto Forge'')" }'::jsonb
);
SELECT alloydb_ai_nl.associate_concept_type(
    column_names_in => 'ecomm.products.brand',
    concept_type_in => 'brand_name',
    nl_config_id_in => 'cymbal_ecomm_config'
);
คุณยืนยันแนวคิดได้โดยการค้นหา alloydb_ai_nl.list_concept_types()
SELECT alloydb_ai_nl.list_concept_types();
จากนั้นเราจะสร้างดัชนีในการกำหนดค่าสำหรับการเชื่อมโยงที่สร้างขึ้นและที่สร้างไว้ล่วงหน้าทั้งหมดได้
SELECT alloydb_ai_nl.create_value_index(
  nl_config_id_in => 'cymbal_ecomm_config'
);
ใช้ดัชนีมูลค่า
หากคุณเรียกใช้การค้นหาเพื่อสร้าง SQL โดยใช้ชื่อแบรนด์แต่ไม่ได้กำหนดว่าเป็นชื่อแบรนด์ ก็จะช่วยระบุเอนทิตีและคอลัมน์ได้อย่างถูกต้อง โดยคําค้นหาคือ
SELECT
  alloydb_ai_nl.get_sql(
    nl_config_id => 'cymbal_ecomm_config',
    nl_question => 'How many Clades do we have?'
  ) ->> 'sql';
และเอาต์พุตแสดงการระบุคำว่า "Clades" เป็นชื่อแบรนด์อย่างถูกต้อง
SELECT COUNT(*) FROM "ecomm"."products" WHERE "brand" = 'Clades';
10. การทำงานกับเทมเพลตการค้นหา
เทมเพลตการค้นหาช่วยกำหนดการค้นหาที่เสถียรสำหรับแอปพลิเคชันที่สำคัญต่อธุรกิจ ซึ่งจะช่วยลดความไม่แน่นอนและปรับปรุงความแม่นยำ
สร้างเทมเพลตการค้นหา
มาสร้างเทมเพลตการค้นหาที่รวมหลายตารางเพื่อรับข้อมูลเกี่ยวกับลูกค้าที่ซื้อผลิตภัณฑ์ "Republic Outpost" เมื่อปีที่แล้วกัน เราทราบว่าคําค้นหาใช้ตาราง ecomm.products หรือตาราง ecomm.inventory_items ก็ได้ เนื่องจากทั้ง 2 ตารางมีข้อมูลเกี่ยวกับแบรนด์ แต่ตาราง products มีแถวน้อยกว่า 15 เท่าและมีดัชนีในคีย์หลักสำหรับการรวม การใช้ตารางผลิตภัณฑ์อาจมีประสิทธิภาพมากกว่า ดังนั้นเราจึงสร้างเทมเพลตสำหรับคำค้นหา
SELECT alloydb_ai_nl.add_template(
    nl_config_id => 'cymbal_ecomm_config',
    intent => 'List the last names and the country of all customers who bought products of `Republic Outpost` in the last year.',
    sql => 'SELECT DISTINCT u."last_name", u."country" FROM "ecomm"."users" AS u INNER JOIN "ecomm"."order_items" AS oi ON u.id = oi."user_id" INNER JOIN "ecomm"."products" AS ep ON oi.product_id = ep.id WHERE ep.brand = ''Republic Outpost'' AND oi.created_at >= DATE_TRUNC(''year'', CURRENT_DATE - INTERVAL ''1 year'') AND oi.created_at < DATE_TRUNC(''year'', CURRENT_DATE)',
    sql_explanation => 'To answer this question, JOIN `ecomm.users` with `ecom.order_items` on having the same `users.id` and `order_items.user_id`, and JOIN the result with ecom.products on having the same `order_items.product_id` and `products.id`. Then filter rows with products.brand = ''Republic Outpost'' and by `order_items.created_at` for the last year. Return the `last_name` and the `country` of the users with matching records.',
    check_intent => TRUE
);
ตอนนี้เราขอสร้างการค้นหาได้แล้ว
SELECT
  alloydb_ai_nl.get_sql(
    nl_config_id => 'cymbal_ecomm_config',
    nl_question => 'Show me last name and country about customers who bought "Republic Outpost" products last year.'
  ) ->> 'sql';
และสร้างเอาต์พุตที่ต้องการ
SELECT DISTINCT u."last_name", u."country" FROM "ecomm"."users" AS u INNER JOIN "ecomm"."order_items" AS oi ON u.id = oi."user_id" INNER JOIN "ecomm"."products" AS ep ON oi.product_id = ep.id WHERE ep.brand = 'Republic Outpost' AND oi.created_at >= DATE_TRUNC('year', CURRENT_DATE - INTERVAL '1 year') AND oi.created_at < DATE_TRUNC('year', CURRENT_DATE)
หรือจะเรียกใช้การค้นหาโดยตรงโดยใช้การค้นหาต่อไปนี้ก็ได้
SELECT
alloydb_ai_nl.execute_nl_query(
    nl_config_id => 'cymbal_ecomm_config',
    nl_question => 'Show me last name and country about customers who bought "Republic Outpost" products last year.'
);
โดยจะแสดงผลลัพธ์ในรูปแบบ JSON ที่แยกวิเคราะห์ได้
                    execute_nl_query
--------------------------------------------------------
 {"last_name":"Adams","country":"China"}
 {"last_name":"Adams","country":"Germany"}
 {"last_name":"Aguilar","country":"China"}
 {"last_name":"Allen","country":"China"}
11. ล้างข้อมูลในสภาพแวดล้อม
ทำลายอินสแตนซ์และคลัสเตอร์ AlloyDB เมื่อคุณทำแล็บเสร็จแล้ว
ลบคลัสเตอร์ AlloyDB และอินสแตนซ์ทั้งหมด
หากคุณเคยใช้ AlloyDB เวอร์ชันทดลองใช้ อย่าลบคลัสเตอร์ทดลองหากคุณวางแผนที่จะทดสอบห้องทดลองและทรัพยากรอื่นๆ โดยใช้คลัสเตอร์ทดลอง คุณจะสร้างคลัสเตอร์ทดลองอื่นในโปรเจ็กต์เดียวกันไม่ได้
ระบบจะทำลายคลัสเตอร์ด้วยตัวเลือก force ซึ่งจะลบอินสแตนซ์ทั้งหมดที่เป็นของคลัสเตอร์ด้วย
ใน Cloud Shell ให้กำหนดตัวแปรโปรเจ็กต์และตัวแปรสภาพแวดล้อมหากคุณถูกตัดการเชื่อมต่อและสูญเสียการตั้งค่าก่อนหน้านี้ทั้งหมด
gcloud config set project <your project id>
export REGION=us-central1
export ADBCLUSTER=alloydb-aip-01
export PROJECT_ID=$(gcloud config get-value project)
ลบคลัสเตอร์
gcloud alloydb clusters delete $ADBCLUSTER --region=$REGION --force
เอาต์พุตของคอนโซลที่คาดไว้
student@cloudshell:~ (test-project-001-402417)$ gcloud alloydb clusters delete $ADBCLUSTER --region=$REGION --force
All of the cluster data will be lost when the cluster is deleted.

Do you want to continue (Y/n)?  Y

Operation ID: operation-1697820178429-6082890a0b570-4a72f7e4-4c5df36f
Deleting cluster...done.
ลบข้อมูลสำรองของ AlloyDB
ลบข้อมูลสำรอง AlloyDB ทั้งหมดสำหรับคลัสเตอร์
for i in $(gcloud alloydb backups list --filter="CLUSTER_NAME: projects/$PROJECT_ID/locations/$REGION/clusters/$ADBCLUSTER" --format="value(name)" --sort-by=~createTime) ; do gcloud alloydb backups delete $(basename $i) --region $REGION --quiet; done
เอาต์พุตของคอนโซลที่คาดไว้
student@cloudshell:~ (test-project-001-402417)$ for i in $(gcloud alloydb backups list --filter="CLUSTER_NAME: projects/$PROJECT_ID/locations/$REGION/clusters/$ADBCLUSTER" --format="value(name)" --sort-by=~createTime) ; do gcloud alloydb backups delete $(basename $i) --region $REGION --quiet; done
Operation ID: operation-1697826266108-60829fb7b5258-7f99dc0b-99f3c35f
Deleting backup...done.
12. ขอแสดงความยินดี
ขอแสดงความยินดีที่ทำ Codelab เสร็จสมบูรณ์ ตอนนี้คุณลองใช้โซลูชันของคุณเองได้แล้วโดยใช้ฟีเจอร์ NL2SQL ของ AlloyDB เราขอแนะนำให้ลอง Codelab อื่นๆ ที่เกี่ยวข้องกับ AlloyDB และ AlloyDB AI คุณดูวิธีการทำงานของข้อมูลฝังมัลติโมดอลใน AlloyDB ได้ใน Codelab นี้
สิ่งที่เราได้พูดถึง
- วิธีติดตั้งใช้งาน AlloyDB for Postgres
- วิธีเปิดใช้ภาษาธรรมชาติของ AlloyDB AI
- วิธีสร้างและปรับแต่งการกำหนดค่าสำหรับภาษาง่ายๆ ของ AI
- วิธีสร้างการค้นหา SQL และรับผลลัพธ์โดยใช้ภาษาธรรมชาติ
13. แบบสำรวจ
เอาต์พุต: