
1. परिचय
इस कोडलैब में, एआई ऑपरेटर के साथ AlloyDB को डिप्लॉय करने के बारे में जानकारी दी गई है. साथ ही, इसमें सिमेंटिक सर्च, जॉइन, और नतीजों की रैंकिंग जैसे कामों के लिए, एआई ऑपरेटर का इस्तेमाल करने के बारे में भी बताया गया है.
ज़रूरी शर्तें
- Google Cloud और Console की बुनियादी जानकारी
- कमांड लाइन इंटरफ़ेस और Cloud Shell में बुनियादी कौशल
आपको क्या सीखने को मिलेगा
- AlloyDB क्लस्टर और प्राइमरी इंस्टेंस को डिप्लॉय करने का तरीका
- AlloyDB AI ऑपरेटर चालू करने का तरीका
- AlloyDB AI के अलग-अलग ऑपरेटर इस्तेमाल करने का तरीका
- नतीजों को बेहतर बनाने के लिए, AlloyDB AI ऑपरेटर में रीरैंकिंग का इस्तेमाल कैसे करें
आपको इन चीज़ों की ज़रूरत होगी
- Google Cloud खाता और Google Cloud प्रोजेक्ट
- Google Cloud Console और Cloud Shell के साथ काम करने वाला वेब ब्राउज़र, जैसे कि Chrome
2. सेटअप और ज़रूरी शर्तें
प्रोजेक्ट सेटअप करना
- Google Cloud Console में साइन इन करें. अगर आपके पास पहले से कोई Gmail या Google Workspace खाता नहीं है, तो आपको एक खाता बनाना होगा.
ऑफ़िस या स्कूल वाले खाते के बजाय, निजी खाते का इस्तेमाल करें.
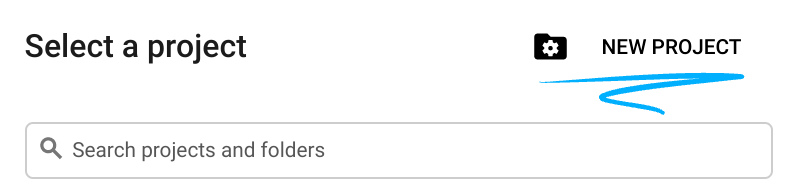
- कोई नया प्रोजेक्ट बनाएं या किसी मौजूदा प्रोजेक्ट का फिर से इस्तेमाल करें. Google Cloud Console में नया प्रोजेक्ट बनाने के लिए, हेडर में मौजूद 'कोई प्रोजेक्ट चुनें' बटन पर क्लिक करें. इससे एक पॉप-अप विंडो खुलेगी.

'कोई प्रोजेक्ट चुनें' विंडो में, 'नया प्रोजेक्ट' बटन दबाएं. इससे नए प्रोजेक्ट के लिए एक डायलॉग बॉक्स खुलेगा.
डायलॉग बॉक्स में, प्रोजेक्ट का पसंदीदा नाम डालें और जगह चुनें.
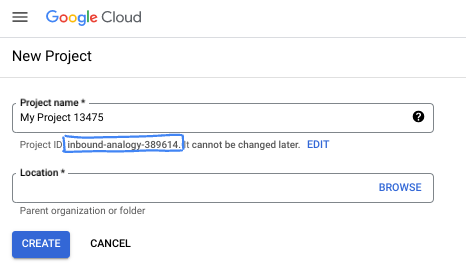
- प्रोजेक्ट का नाम, इस प्रोजेक्ट में हिस्सा लेने वाले लोगों के लिए डिसप्ले नेम होता है. प्रोजेक्ट के नाम का इस्तेमाल Google API नहीं करते हैं. इसे कभी भी बदला जा सकता है.
- प्रोजेक्ट आईडी, सभी Google Cloud प्रोजेक्ट के लिए यूनीक होता है. साथ ही, इसे बदला नहीं जा सकता. Google Cloud Console, अपने-आप एक यूनीक आईडी जनरेट करता है. हालांकि, इसे अपनी पसंद के मुताबिक बनाया जा सकता है. अगर आपको जनरेट किया गया आईडी पसंद नहीं है, तो कोई दूसरा आईडी जनरेट करें. इसके अलावा, अपनी पसंद का आईडी डालकर भी देखा जा सकता है कि वह उपलब्ध है या नहीं. ज़्यादातर कोडलैब में, आपको अपने प्रोजेक्ट आईडी का रेफ़रंस देना होगा. इसे आम तौर पर, PROJECT_ID प्लेसहोल्डर से पहचाना जाता है.
- आपकी जानकारी के लिए बता दें कि एक तीसरी वैल्यू भी होती है, जिसे प्रोजेक्ट नंबर कहते हैं. इसका इस्तेमाल कुछ एपीआई करते हैं. इन तीनों वैल्यू के बारे में ज़्यादा जानने के लिए, दस्तावेज़ देखें.
बिलिंग चालू करें
बिलिंग चालू करने के लिए, आपके पास दो विकल्प हैं. आप अपने निजी बिलिंग खाते का इस्तेमाल कर सकते हैं या यहां दिए गए तरीके से क्रेडिट रिडीम कर सकते हैं.
Google Cloud क्रेडिट रिडीम करना (ज़रूरी नहीं है)
इस वर्कशॉप को चलाने के लिए, आपके पास कुछ क्रेडिट वाला बिलिंग खाता होना चाहिए. शुरू करने के लिए, इस कोडलैब के सबसे ऊपर मौजूद बैनर में दिए गए क्रेडिट का इस्तेमाल करें. अगर आपका खाता पहले से ही किसी बिलिंग खाते से कनेक्ट है, तो इस चरण को छोड़ा जा सकता है.
निजी बिलिंग खाता सेट अप करना
अगर आपने Google Cloud क्रेडिट का इस्तेमाल करके बिलिंग सेट अप की है, तो इस चरण को छोड़ा जा सकता है.
निजी बिलिंग खाता सेट अप करने के लिए, Cloud Console में बिलिंग की सुविधा चालू करने के लिए यहां जाएं.
ध्यान दें:
- इस लैब को पूरा करने में, क्लाउड संसाधनों पर 3 डॉलर से कम खर्च आना चाहिए.
- ज़्यादा शुल्क से बचने के लिए, संसाधनों को मिटाने का तरीका जानने के लिए, इस लैब के आखिर में दिए गए निर्देशों का पालन करें.
- नए उपयोगकर्ता, 300 डॉलर के मुफ़्त क्रेडिट का इस्तेमाल कर सकते हैं.
Cloud Shell शुरू करें
Google Cloud को अपने लैपटॉप से रिमोटली ऐक्सेस किया जा सकता है. हालांकि, इस कोडलैब में Google Cloud Shell का इस्तेमाल किया जाएगा. यह क्लाउड में चलने वाला कमांड लाइन एनवायरमेंट है.
Google Cloud Console में, सबसे ऊपर दाएं कोने में मौजूद टूलबार पर, Cloud Shell आइकॉन पर क्लिक करें:

इसके अलावा, G और फिर S दबाकर भी यह सुविधा ऐक्सेस की जा सकती है. इस क्रम से, Cloud Shell चालू हो जाएगा. इसके लिए, आपको Google Cloud Console में होना चाहिए या इस लिंक का इस्तेमाल करना होगा.
इसे चालू करने और एनवायरमेंट से कनेक्ट करने में सिर्फ़ कुछ सेकंड लगेंगे. यह प्रोसेस पूरी होने के बाद, आपको कुछ ऐसा दिखेगा:

इस वर्चुअल मशीन में, डेवलपमेंट के लिए ज़रूरी सभी टूल पहले से मौजूद हैं. यह 5 जीबी की होम डायरेक्ट्री उपलब्ध कराता है. साथ ही, Google Cloud पर काम करता है. इससे नेटवर्क की परफ़ॉर्मेंस और पुष्टि करने की प्रोसेस बेहतर होती है. इस कोडलैब में मौजूद सभी टास्क, ब्राउज़र में किए जा सकते हैं. आपको कुछ भी इंस्टॉल करने की ज़रूरत नहीं है.
3. शुरू करने से पहले
एपीआई चालू करना
AlloyDB, Compute Engine, नेटवर्किंग सेवाएं, और Vertex AI का इस्तेमाल करने के लिए, आपको अपने Google Cloud प्रोजेक्ट में इनसे जुड़े एपीआई चालू करने होंगे.
Cloud Shell टर्मिनल में, पक्का करें कि आपका प्रोजेक्ट आईडी सेट अप हो:
gcloud config set project [YOUR-PROJECT-ID]
PROJECT_ID एनवायरमेंट वैरिएबल सेट करें:
PROJECT_ID=$(gcloud config get-value project)
ज़रूरी सभी सेवाएं चालू करें:
gcloud services enable alloydb.googleapis.com \
                       compute.googleapis.com \
                       cloudresourcemanager.googleapis.com \
                       servicenetworking.googleapis.com \
                       aiplatform.googleapis.com \
                       discoveryengine.googleapis.com
अनुमानित आउटपुट
student@cloudshell:~ (test-project-001-402417)$ gcloud config set project test-project-001-402417
Updated property [core/project].
student@cloudshell:~ (test-project-001-402417)$ PROJECT_ID=$(gcloud config get-value project)
Your active configuration is: [cloudshell-14650]
student@cloudshell:~ (test-project-001-402417)$
student@cloudshell:~ (test-project-001-402417)$ gcloud services enable alloydb.googleapis.com \
                       compute.googleapis.com \
                       cloudresourcemanager.googleapis.com \
                       servicenetworking.googleapis.com \
                       aiplatform.googleapis.com \
                       discoveryengine.googleapis.com
Operation "operations/acat.p2-4470404856-1f44ebd8-894e-4356-bea7-b84165a57442" finished successfully.
एपीआई के बारे में जानकारी
- AlloyDB API (
alloydb.googleapis.com) की मदद से, AlloyDB for PostgreSQL क्लस्टर बनाए, मैनेज किए, और स्केल किए जा सकते हैं. यह पूरी तरह से मैनेज की गई, PostgreSQL के साथ काम करने वाली डेटाबेस सेवा है. इसे एंटरप्राइज़ के लेन-देन और विश्लेषण से जुड़े कामों के लिए डिज़ाइन किया गया है. - Compute Engine API (
compute.googleapis.com) की मदद से, वर्चुअल मशीनें (वीएम), परसिस्टेंट डिस्क, और नेटवर्क सेटिंग बनाई और मैनेज की जा सकती हैं. यह मुख्य Infrastructure-as-a-Service (IaaS) फ़ाउंडेशन उपलब्ध कराता है. इसकी मदद से, अपने वर्कलोड चलाए जा सकते हैं. साथ ही, मैनेज की जाने वाली कई सेवाओं के लिए बुनियादी इंफ़्रास्ट्रक्चर को होस्ट किया जा सकता है. - Cloud Resource Manager API (
cloudresourcemanager.googleapis.com) की मदद से, Google Cloud प्रोजेक्ट के मेटाडेटा और कॉन्फ़िगरेशन को प्रोग्राम के हिसाब से मैनेज किया जा सकता है. इससे आपको संसाधनों को व्यवस्थित करने, पहचान और ऐक्सेस मैनेजमेंट (IAM) नीतियों को मैनेज करने, और प्रोजेक्ट के क्रम में अनुमतियों की पुष्टि करने में मदद मिलती है. - Service Networking API (
servicenetworking.googleapis.com) की मदद से, वर्चुअल प्राइवेट क्लाउड (वीपीसी) नेटवर्क और Google की मैनेज की गई सेवाओं के बीच, निजी कनेक्टिविटी को अपने-आप सेटअप किया जा सकता है. AlloyDB जैसी सेवाओं के लिए, प्राइवेट आईपी ऐक्सेस सेट अप करना ज़रूरी है. इससे वे आपके अन्य संसाधनों के साथ सुरक्षित तरीके से कम्यूनिकेट कर सकती हैं. - Vertex AI API (
aiplatform.googleapis.com) की मदद से, आपके ऐप्लिकेशन मशीन लर्निंग मॉडल बना सकते हैं, उन्हें डिप्लॉय कर सकते हैं, और बड़े पैमाने पर उपलब्ध करा सकते हैं. यह Google Cloud की सभी एआई सेवाओं के लिए, एक जैसा इंटरफ़ेस उपलब्ध कराता है. इसमें जनरेटिव एआई मॉडल (जैसे, Gemini) का ऐक्सेस और कस्टम मॉडल ट्रेनिंग शामिल है.
4. AlloyDB डिप्लॉय करना
AlloyDB क्लस्टर और प्राइमरी इंस्टेंस बनाएं. इसे तैयार की गई स्क्रिप्ट का इस्तेमाल करके डिप्लॉय किया जा सकता है. इससे सभी ज़रूरी संसाधन डिप्लॉय हो जाएंगे. इसके अलावा, इसे एक-एक करके भी डिप्लॉय किया जा सकता है.
ऑटोमेटेड स्क्रिप्ट का इस्तेमाल करके AlloyDB डिप्लॉय करना
इस तरीके में, AlloyDB क्लस्टर को डिप्लॉय करने के लिए, अपने-आप काम करने वाली स्क्रिप्ट का इस्तेमाल किया जाता है. साथ ही, डिप्लॉय किए गए संसाधनों के साथ काम शुरू करने के लिए ज़रूरी जानकारी दी जाती है.
डिप्लॉयमेंट स्क्रिप्ट को क्लोन करने के लिए, Cloud Shell में execute कमांड को बंद करें.
REPO_NAME="codelabs"
REPO_URL="https://github.com/GoogleCloudPlatform/$REPO_NAME"
SOURCE_DIR="alloydb-ai-operators"

git clone --no-checkout --filter=blob:none --depth=1 $REPO_URL

cd $REPO_NAME
git sparse-checkout set $SOURCE_DIR
git checkout
cd $SOURCE_DIR
डिप्लॉयमेंट स्क्रिप्ट चलाएं.
./deploy_alloydb.sh
स्क्रिप्ट को चलने में कुछ समय लगेगा. आम तौर पर, इसमें 5 से 7 मिनट लगते हैं. इसके बाद, इसे डिप्लॉय किए गए AlloyDB क्लस्टर के बारे में जानकारी देनी चाहिए. कृपया ध्यान दें कि आपका पासवर्ड अलग होगा. इसे कहीं लिख लें, ताकि आने वाले समय में इसका इस्तेमाल किया जा सके.
...
<redacted>
...
Creating primary instance: alloydb-aip-01-pr (8 vCPUs for TRIAL cluster)
Operation ID: operation-1765988049916-646282264938a-bddce198-9f248715
Creating instance...done.
----------------------------------------
Deployment Process Completed
Cluster:  alloydb-aip-01 (TRIAL)
Instance: alloydb-aip-01-pr
Region:   us-central1
Initial Password: JBBoDTgixzYwYpkF (if new cluster)
----------------------------------------
इसे वेब कंसोल में भी देखा जा सकता है
Google Cloud SDK का इस्तेमाल करके, AlloyDB को चरण-दर-चरण डिप्लॉय करना
नीचे दी गई प्रोसेस में, Google Cloud SDK का इस्तेमाल करके AlloyDB क्लस्टर और इंस्टेंस बनाने का तरीका बताया गया है. अगर आपने पिछले चरण में स्क्रिप्ट की मदद से इसे पहले ही डिप्लॉय कर दिया है, तो इसे छोड़ दें और सीधे "डेटाबेस तैयार करें" पर जाएं.
अगर आपको वेब जीयूआई कंसोल का इस्तेमाल करना है, तो यहां दिया गया दस्तावेज़ पढ़ें.
AlloyDB क्लस्टर बनाने से पहले, हमें अपने वीपीसी में एक उपलब्ध निजी आईपी रेंज की ज़रूरत होती है, ताकि आने वाले समय में AlloyDB इंस्टेंस इसका इस्तेमाल कर सके. अगर हमारे पास यह नहीं है, तो हमें इसे बनाना होगा. साथ ही, इसे Google की आंतरिक सेवाओं के लिए इस्तेमाल करने की अनुमति देनी होगी. इसके बाद, हम क्लस्टर और इंस्टेंस बना पाएंगे.
निजी आईपी रेंज बनाना
हमें AlloyDB के लिए, अपने वीपीसी में Private Service Access कॉन्फ़िगरेशन को कॉन्फ़िगर करना होगा. यहां यह मान लिया गया है कि प्रोजेक्ट में "डिफ़ॉल्ट" वीपीसी नेटवर्क है और इसका इस्तेमाल सभी कार्रवाइयों के लिए किया जाएगा.
निजी आईपी रेंज बनाएं:
gcloud compute addresses create psa-range \
    --global \
    --purpose=VPC_PEERING \
    --prefix-length=24 \
    --description="VPC private service access" \
    --network=default
अलॉट की गई आईपी रेंज का इस्तेमाल करके, निजी कनेक्शन बनाएं:
gcloud services vpc-peerings connect \
    --service=servicenetworking.googleapis.com \
    --ranges=psa-range \
    --network=default
अनुमानित कंसोल आउटपुट:
student@cloudshell:~ (test-project-402417)$ gcloud compute addresses create psa-range \
    --global \
    --purpose=VPC_PEERING \
    --prefix-length=24 \
    --description="VPC private service access" \
    --network=default
Created [https://www.googleapis.com/compute/v1/projects/test-project-402417/global/addresses/psa-range].

student@cloudshell:~ (test-project-402417)$ gcloud services vpc-peerings connect \
    --service=servicenetworking.googleapis.com \
    --ranges=psa-range \
    --network=default
Operation "operations/pssn.p24-4470404856-595e209f-19b7-4669-8a71-cbd45de8ba66" finished successfully.

student@cloudshell:~ (test-project-402417)$
AlloyDB क्लस्टर बनाना
इस सेक्शन में, हम us-central1 क्षेत्र में एक AlloyDB क्लस्टर बना रहे हैं.
postgres उपयोगकर्ता के लिए पासवर्ड तय करें. आपके पास अपना पासवर्ड तय करने या पासवर्ड जनरेट करने के लिए, रैंडम फ़ंक्शन का इस्तेमाल करने का विकल्प होता है
export PGPASSWORD=`openssl rand -hex 12`
अनुमानित कंसोल आउटपुट:
student@cloudshell:~ (test-project-402417)$ export PGPASSWORD=`openssl rand -hex 12`
PostgreSQL का पासवर्ड नोट करें, ताकि इसे बाद में इस्तेमाल किया जा सके.
echo $PGPASSWORD
postgres उपयोगकर्ता के तौर पर इंस्टेंस से कनेक्ट करने के लिए, आपको आने वाले समय में इस पासवर्ड की ज़रूरत होगी. हमारा सुझाव है कि इसे लिख लें या कहीं कॉपी कर लें, ताकि बाद में इसका इस्तेमाल किया जा सके.
अनुमानित कंसोल आउटपुट:
student@cloudshell:~ (test-project-402417)$ echo $PGPASSWORD
bbefbfde7601985b0dee5723 (Note: Yours will be different!)
मुफ़्त में आज़माने के लिए क्लस्टर बनाना
अगर आपने पहले कभी AlloyDB का इस्तेमाल नहीं किया है, तो मुफ़्त में आज़माने के लिए क्लस्टर बनाया जा सकता है:
रीजन और AlloyDB क्लस्टर का नाम तय करें. हम us-central1 क्षेत्र और alloydb-aip-01 को क्लस्टर के नाम के तौर पर इस्तेमाल करने जा रहे हैं:
export REGION=us-central1
export ADBCLUSTER=alloydb-aip-01
क्लस्टर बनाने के लिए, यह कमांड चलाएं:
gcloud alloydb clusters create $ADBCLUSTER \
    --password=$PGPASSWORD \
    --network=default \
    --region=$REGION \
    --subscription-type=TRIAL
अनुमानित कंसोल आउटपुट:
export REGION=us-central1
export ADBCLUSTER=alloydb-aip-01
gcloud alloydb clusters create $ADBCLUSTER \
    --password=$PGPASSWORD \
    --network=default \
    --region=$REGION \
    --subscription-type=TRIAL
Operation ID: operation-1697655441138-6080235852277-9e7f04f5-2012fce4
Creating cluster...done.
उसी Cloud Shell सेशन में, हमारे क्लस्टर के लिए AlloyDB प्राइमरी इंस्टेंस बनाएं. अगर आपका कनेक्शन बंद हो जाता है, तो आपको क्षेत्र और क्लस्टर के नाम वाले एनवायरमेंट वैरिएबल फिर से तय करने होंगे.
gcloud alloydb instances create $ADBCLUSTER-pr \
    --instance-type=PRIMARY \
    --cpu-count=8 \
    --region=$REGION \
    --cluster=$ADBCLUSTER
अनुमानित कंसोल आउटपुट:
student@cloudshell:~ (test-project-402417)$ gcloud alloydb instances create $ADBCLUSTER-pr \
    --instance-type=PRIMARY \
    --cpu-count=8 \
    --region=$REGION \
    --availability-type ZONAL \
    --cluster=$ADBCLUSTER
Operation ID: operation-1697659203545-6080315c6e8ee-391805db-25852721
Creating instance...done.
AlloyDB Standard क्लस्टर बनाना
अगर यह प्रोजेक्ट में आपका पहला AlloyDB क्लस्टर नहीं है, तो स्टैंडर्ड क्लस्टर बनाएं. अगर आपने पिछले चरण में, बिना किसी शुल्क के आज़माने की सुविधा वाला क्लस्टर पहले ही बना लिया है, तो इस चरण को छोड़ दें.
रीजन और AlloyDB क्लस्टर का नाम तय करें. हम us-central1 क्षेत्र और alloydb-aip-01 को क्लस्टर के नाम के तौर पर इस्तेमाल करने जा रहे हैं:
export REGION=us-central1
export ADBCLUSTER=alloydb-aip-01
क्लस्टर बनाने के लिए, यह कमांड चलाएं:
gcloud alloydb clusters create $ADBCLUSTER \
    --password=$PGPASSWORD \
    --network=default \
    --region=$REGION
अनुमानित कंसोल आउटपुट:
export REGION=us-central1
export ADBCLUSTER=alloydb-aip-01
gcloud alloydb clusters create $ADBCLUSTER \
    --password=$PGPASSWORD \
    --network=default \
    --region=$REGION
Operation ID: operation-1697655441138-6080235852277-9e7f04f5-2012fce4
Creating cluster...done.
उसी Cloud Shell सेशन में, हमारे क्लस्टर के लिए AlloyDB प्राइमरी इंस्टेंस बनाएं. अगर आपका कनेक्शन बंद हो जाता है, तो आपको क्षेत्र और क्लस्टर के नाम वाले एनवायरमेंट वैरिएबल फिर से तय करने होंगे.
gcloud alloydb instances create $ADBCLUSTER-pr \
    --instance-type=PRIMARY \
    --cpu-count=2 \
    --region=$REGION \
    --cluster=$ADBCLUSTER
अनुमानित कंसोल आउटपुट:
student@cloudshell:~ (test-project-402417)$ gcloud alloydb instances create $ADBCLUSTER-pr \
    --instance-type=PRIMARY \
    --cpu-count=2 \
    --region=$REGION \
    --availability-type ZONAL \
    --cluster=$ADBCLUSTER
Operation ID: operation-1697659203545-6080315c6e8ee-391805db-25852721
Creating instance...done.
5. डेटाबेस तैयार करना
हमें एक डेटाबेस बनाना होगा. साथ ही, Vertex AI इंटिग्रेशन को चालू करना होगा. इसके अलावा, डेटाबेस ऑब्जेक्ट बनाने होंगे और डेटा इंपोर्ट करना होगा.
AlloyDB को ज़रूरी अनुमतियां देना
AlloyDB सेवा एजेंट को Vertex AI की अनुमतियां दें.
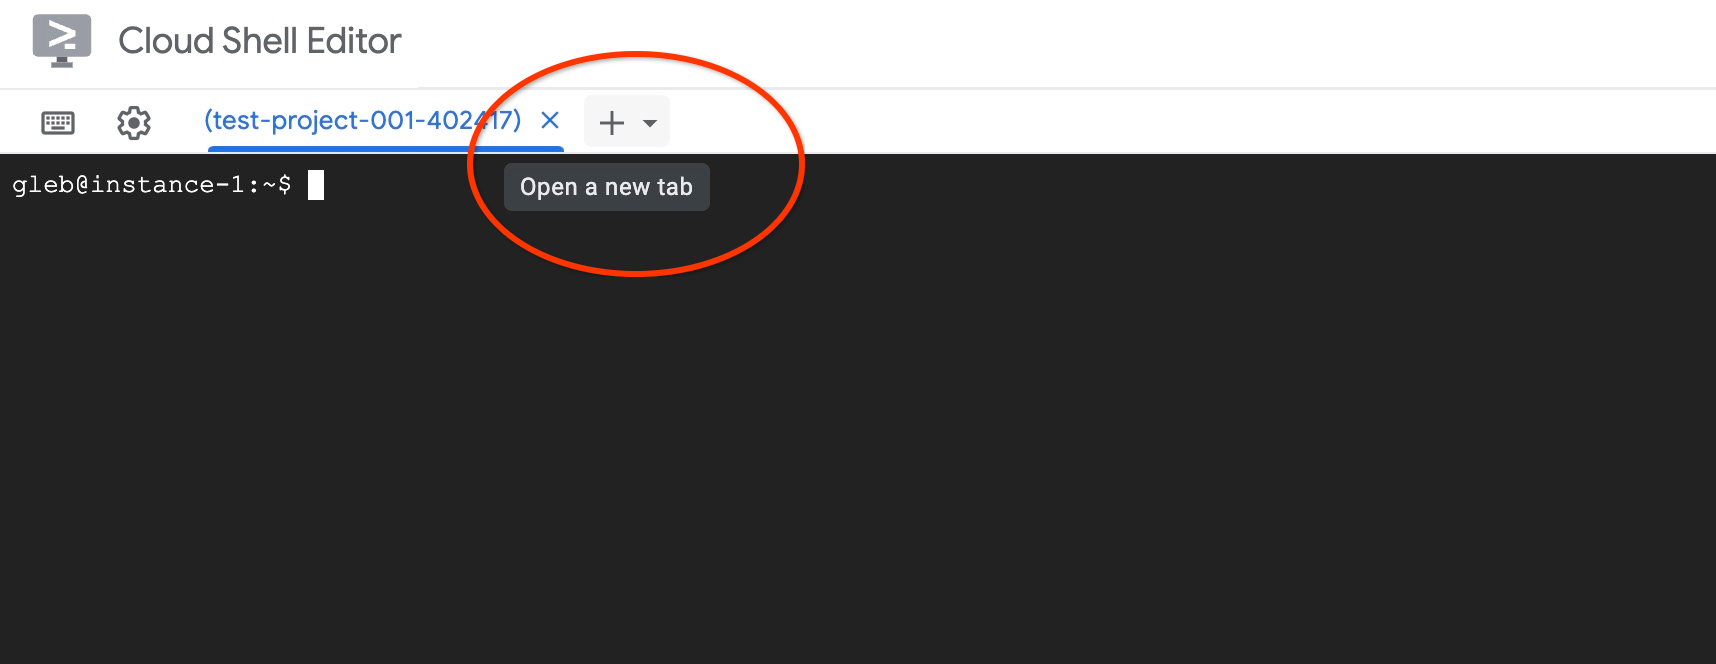
सबसे ऊपर मौजूद "+" साइन का इस्तेमाल करके, Cloud Shell का कोई दूसरा टैब खोलें.
नए Cloud Shell टैब में यह कमांड चलाएं:
PROJECT_ID=$(gcloud config get-value project)
gcloud projects add-iam-policy-binding $PROJECT_ID \
  --member="serviceAccount:service-$(gcloud projects describe $PROJECT_ID --format="value(projectNumber)")@gcp-sa-alloydb.iam.gserviceaccount.com" \
  --role="roles/aiplatform.user"

gcloud projects add-iam-policy-binding $PROJECT_ID \
  --member="serviceAccount:service-$(gcloud projects describe $PROJECT_ID --format="value(projectNumber)")@gcp-sa-alloydb.iam.gserviceaccount.com" \
  --role="roles/discoveryengine.viewer"
अनुमानित कंसोल आउटपुट:
student@cloudshell:~ (test-project-001-402417)$ PROJECT_ID=$(gcloud config get-value project)
Your active configuration is: [cloudshell-11039]
student@cloudshell:~ (test-project-001-402417)$ gcloud projects add-iam-policy-binding $PROJECT_ID \
  --member="serviceAccount:service-$(gcloud projects describe $PROJECT_ID --format="value(projectNumber)")@gcp-sa-alloydb.iam.gserviceaccount.com" \
  --role="roles/aiplatform.user"
Updated IAM policy for project [test-project-001-402417].
bindings:
- members:
  - serviceAccount:service-4470404856@gcp-sa-alloydb.iam.gserviceaccount.com
  role: roles/aiplatform.user
- members:
...
etag: BwYIEbe_Z3U=
version: 1
टैब में "exit" कमांड डालकर टैब बंद करें:
exit
AlloyDB Studio से कनेक्ट करना
यहां दिए गए अध्यायों में, डेटाबेस से कनेक्ट करने के लिए ज़रूरी सभी SQL कमांड, AlloyDB Studio में एक्ज़ीक्यूट की जा सकती हैं. T
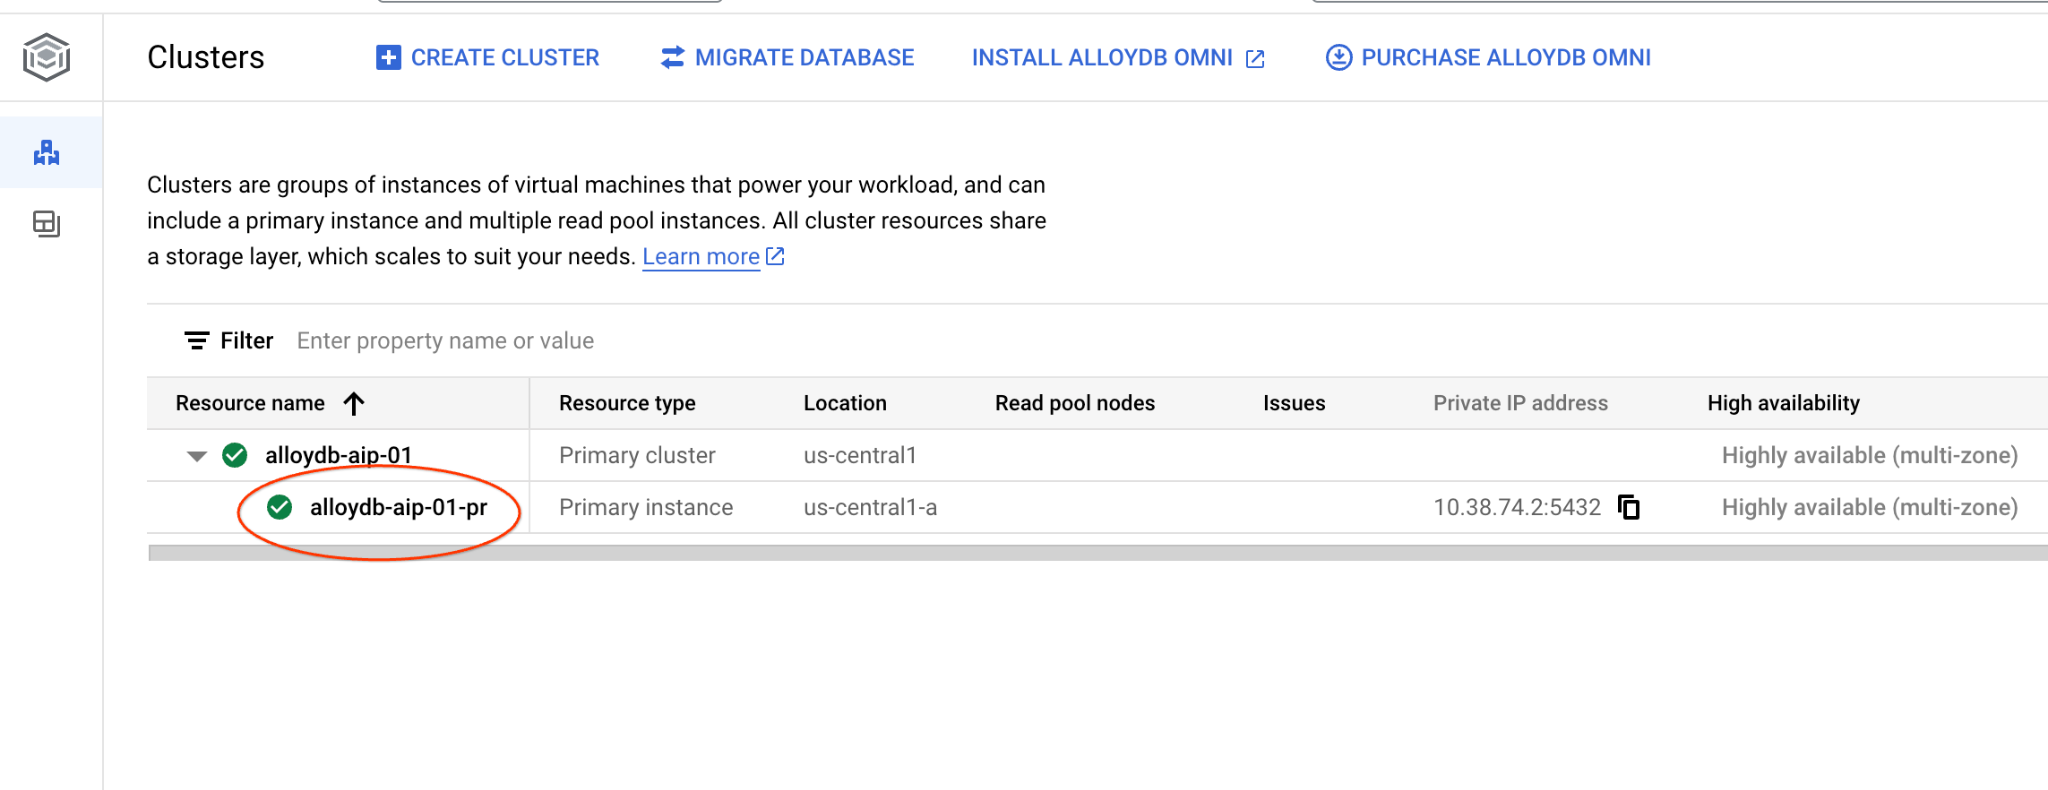
AlloyDB for Postgres में क्लस्टर पेज पर जाएं.
प्राइमरी इंस्टेंस पर क्लिक करके, अपने AlloyDB क्लस्टर के लिए वेब कंसोल इंटरफ़ेस खोलें.
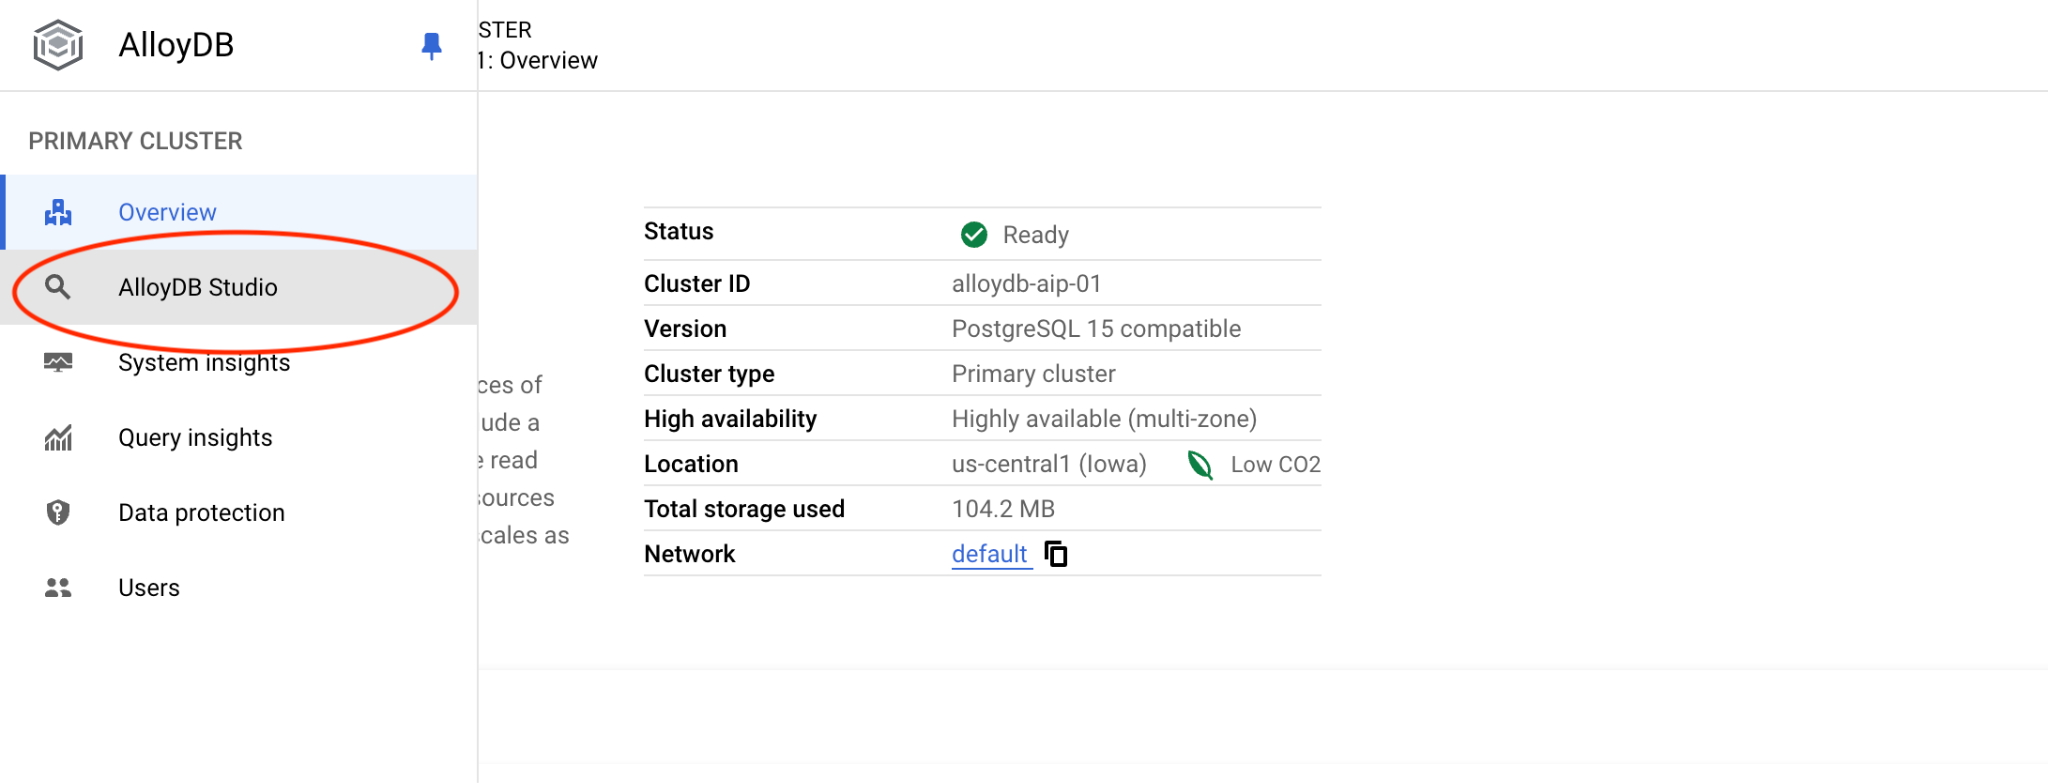
इसके बाद, बाईं ओर मौजूद AlloyDB Studio पर क्लिक करें:
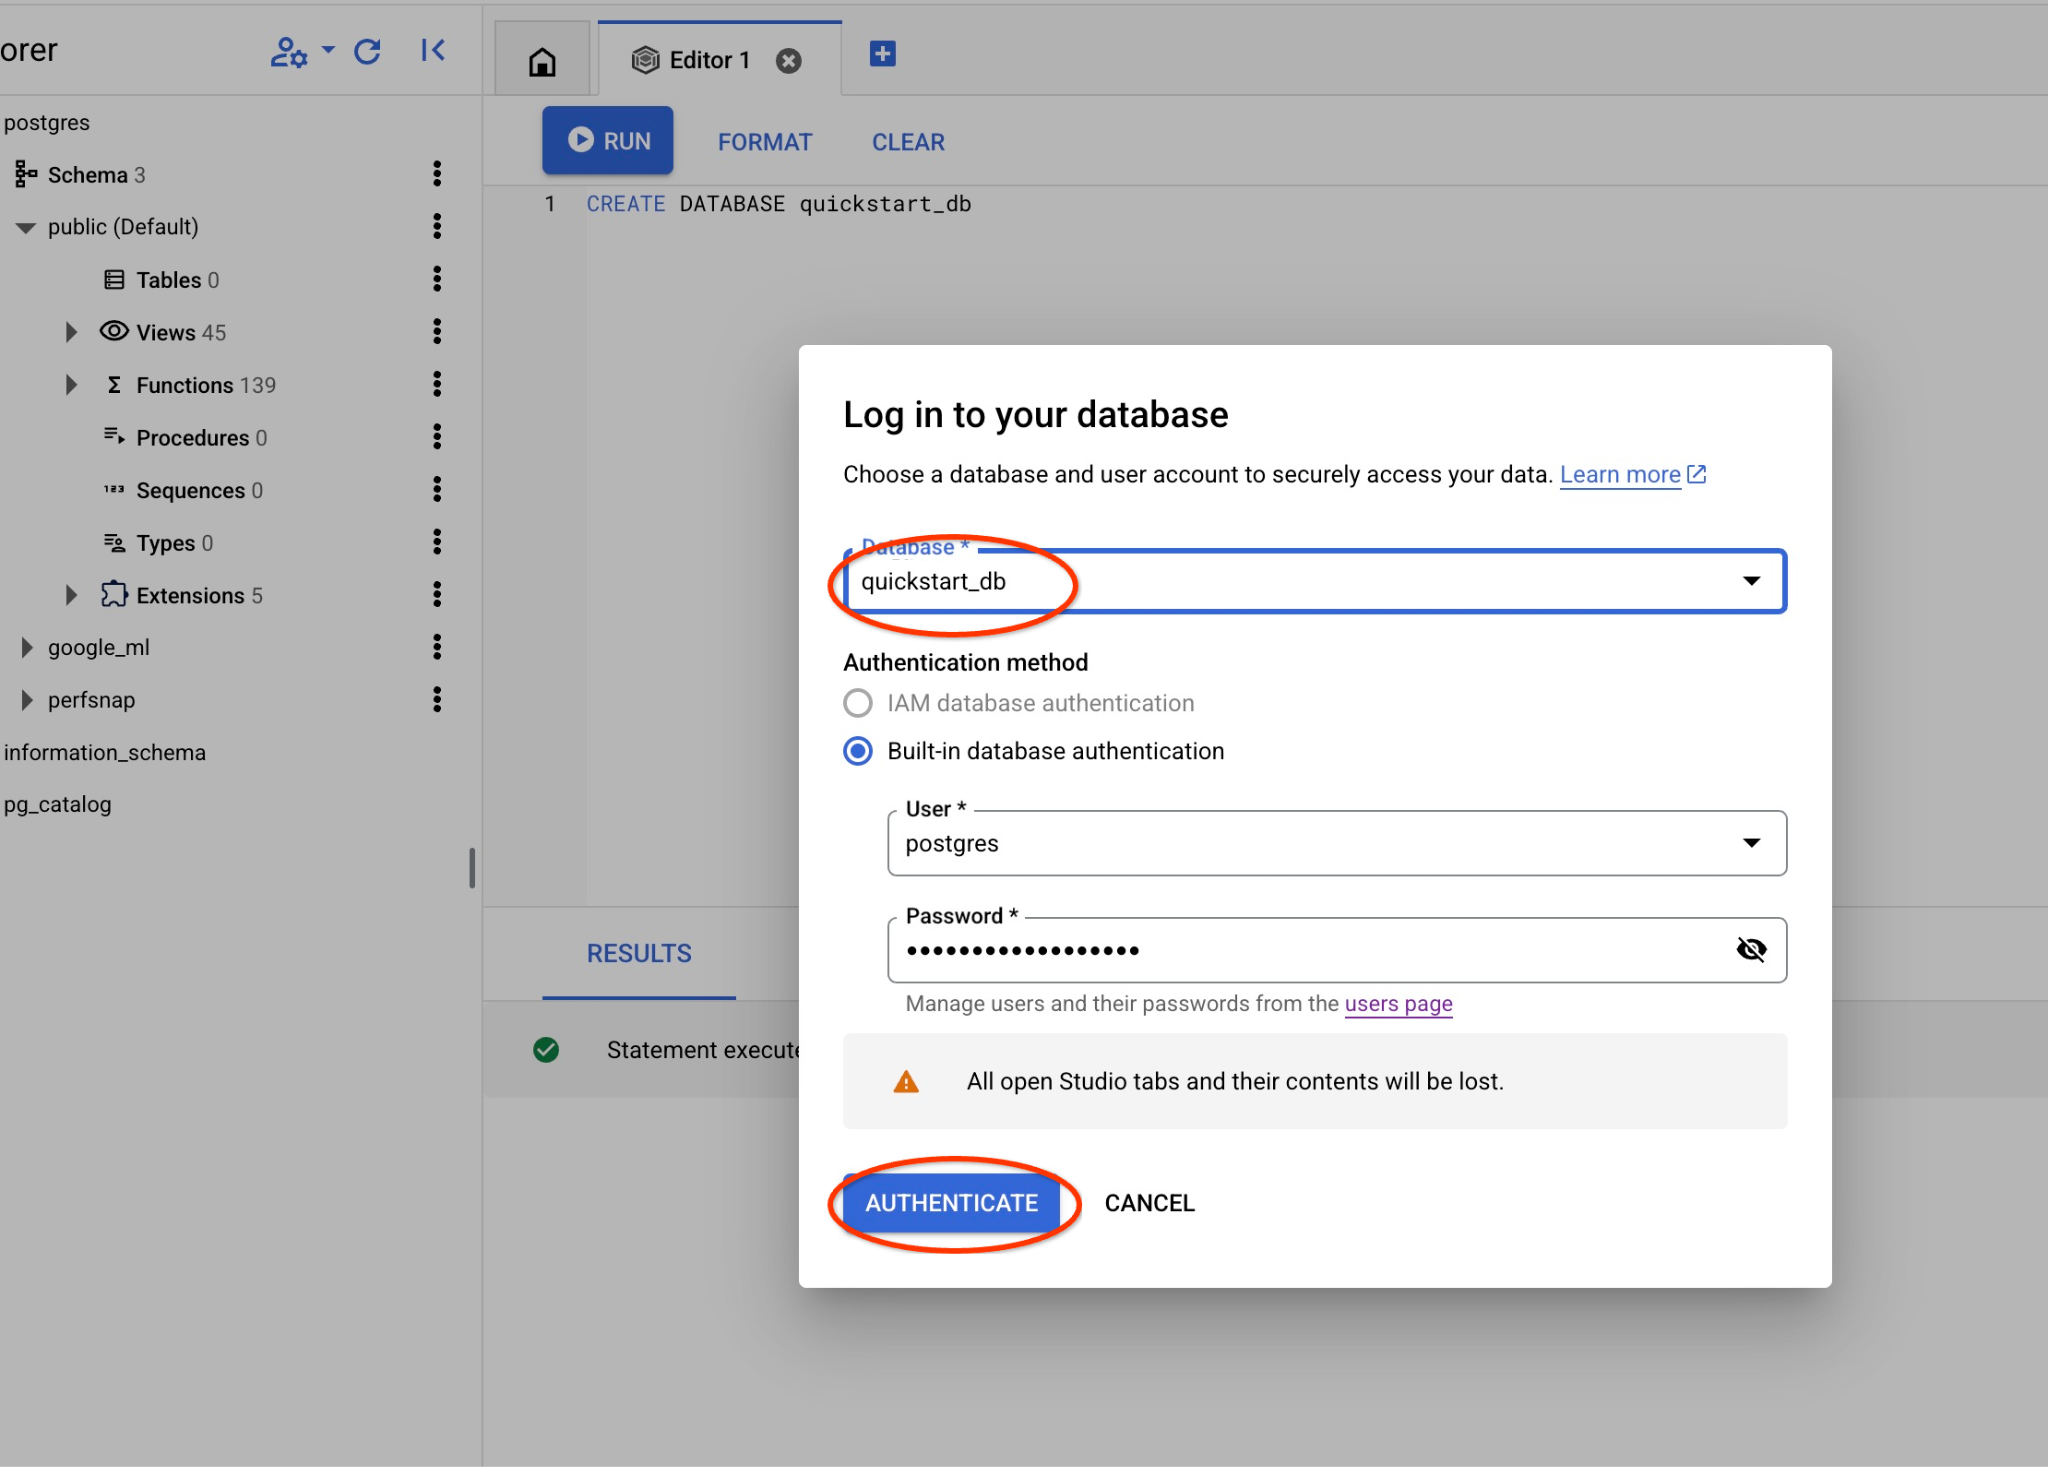
postgres डेटाबेस और postgres उपयोगकर्ता चुनें. साथ ही, क्लस्टर बनाते समय नोट किया गया पासवर्ड डालें. इसके बाद, "Authenticate" बटन पर क्लिक करें.
अगर पासवर्ड काम नहीं करता है या आपने पासवर्ड नोट नहीं किया है, तो पासवर्ड बदला जा सकता है. ऐसा करने का तरीका जानने के लिए, दस्तावेज़ देखें.
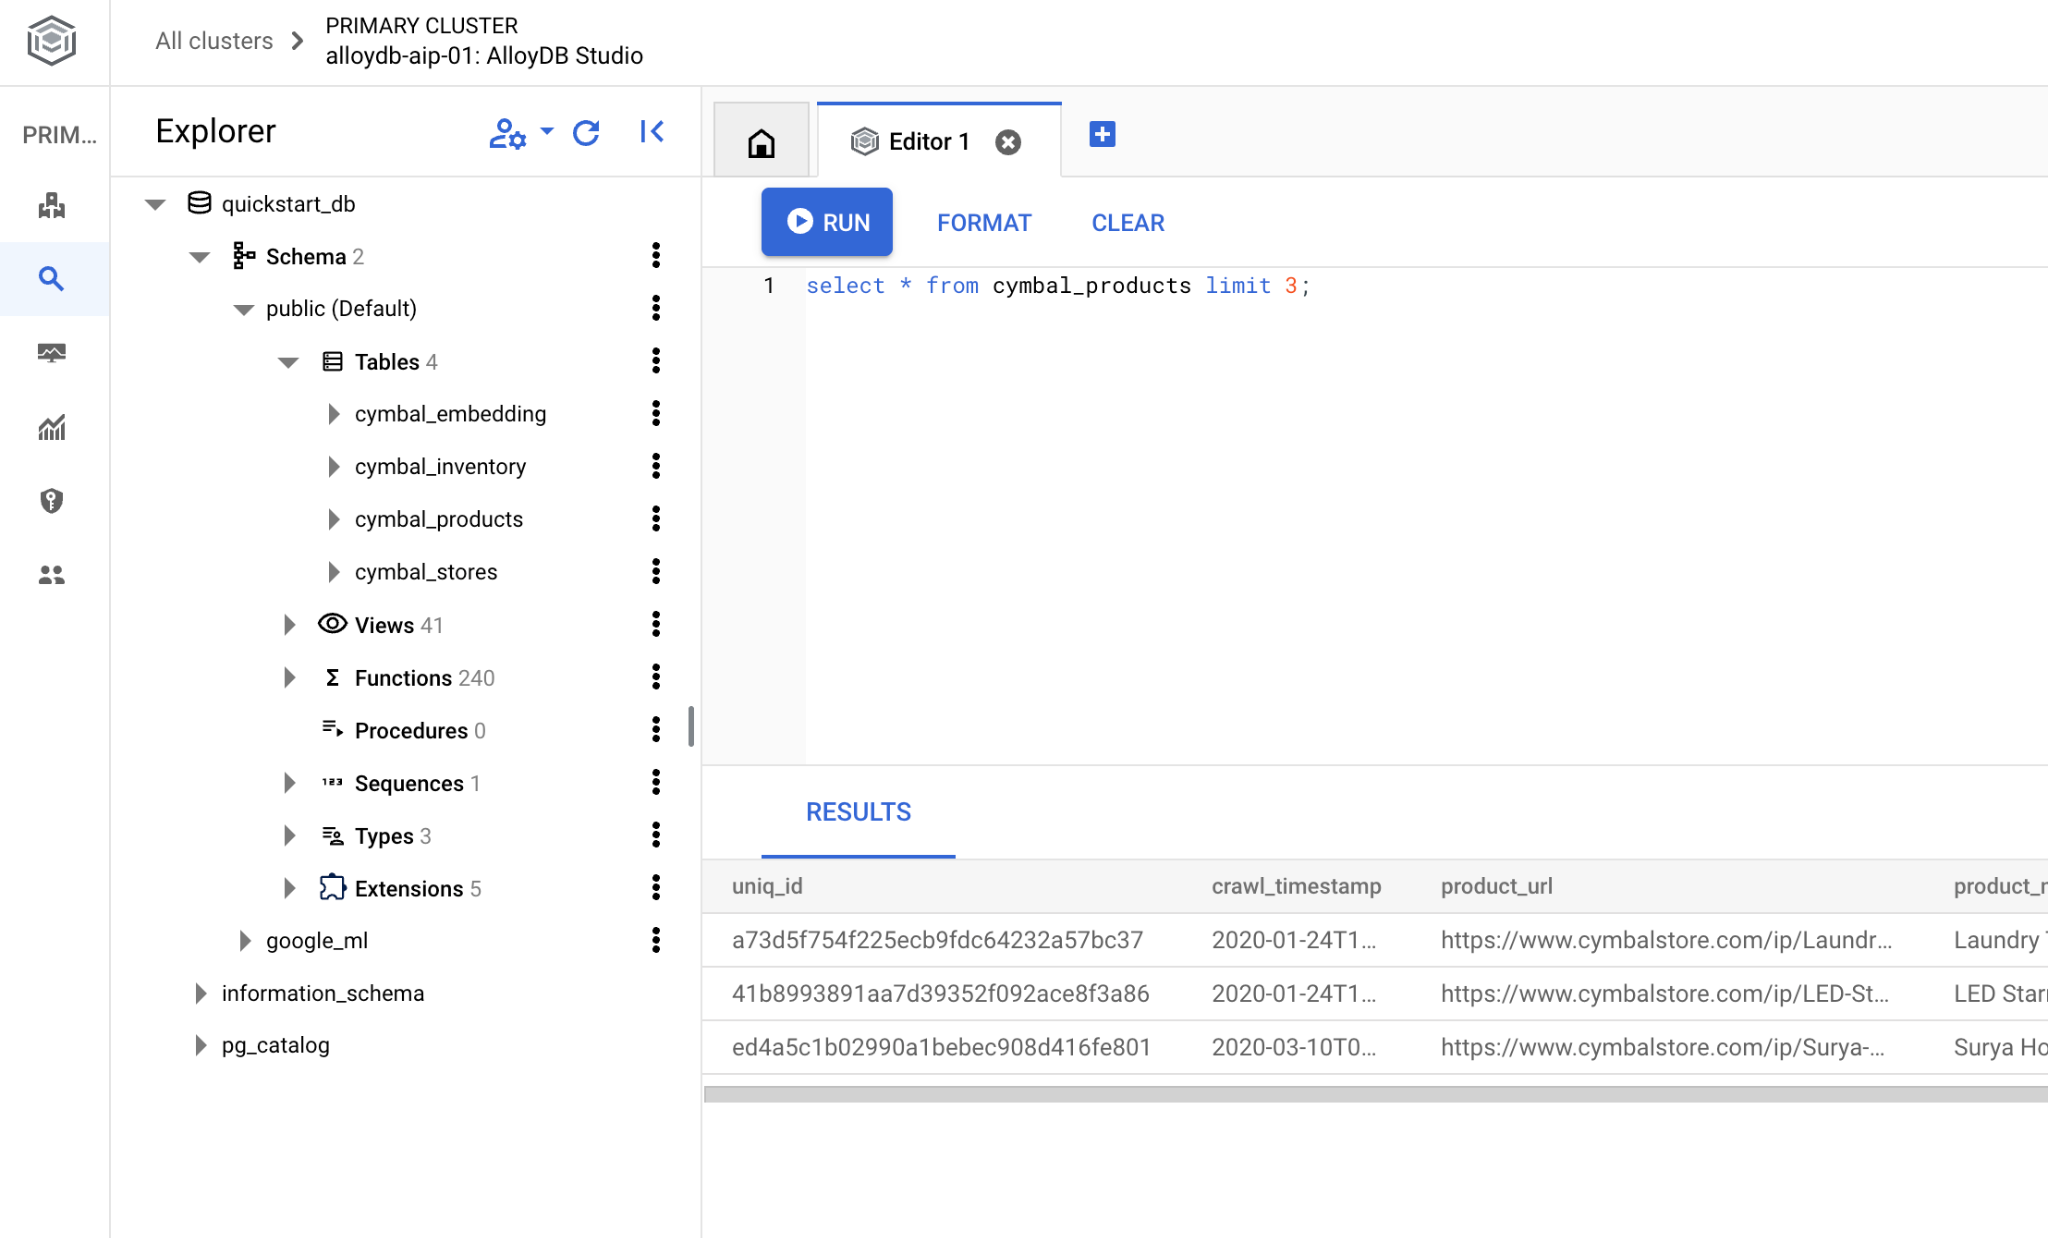
इससे AlloyDB Studio का इंटरफ़ेस खुल जाएगा. डेटाबेस में कमांड चलाने के लिए, दाईं ओर मौजूद "Untitled Query" टैब पर क्लिक करें.
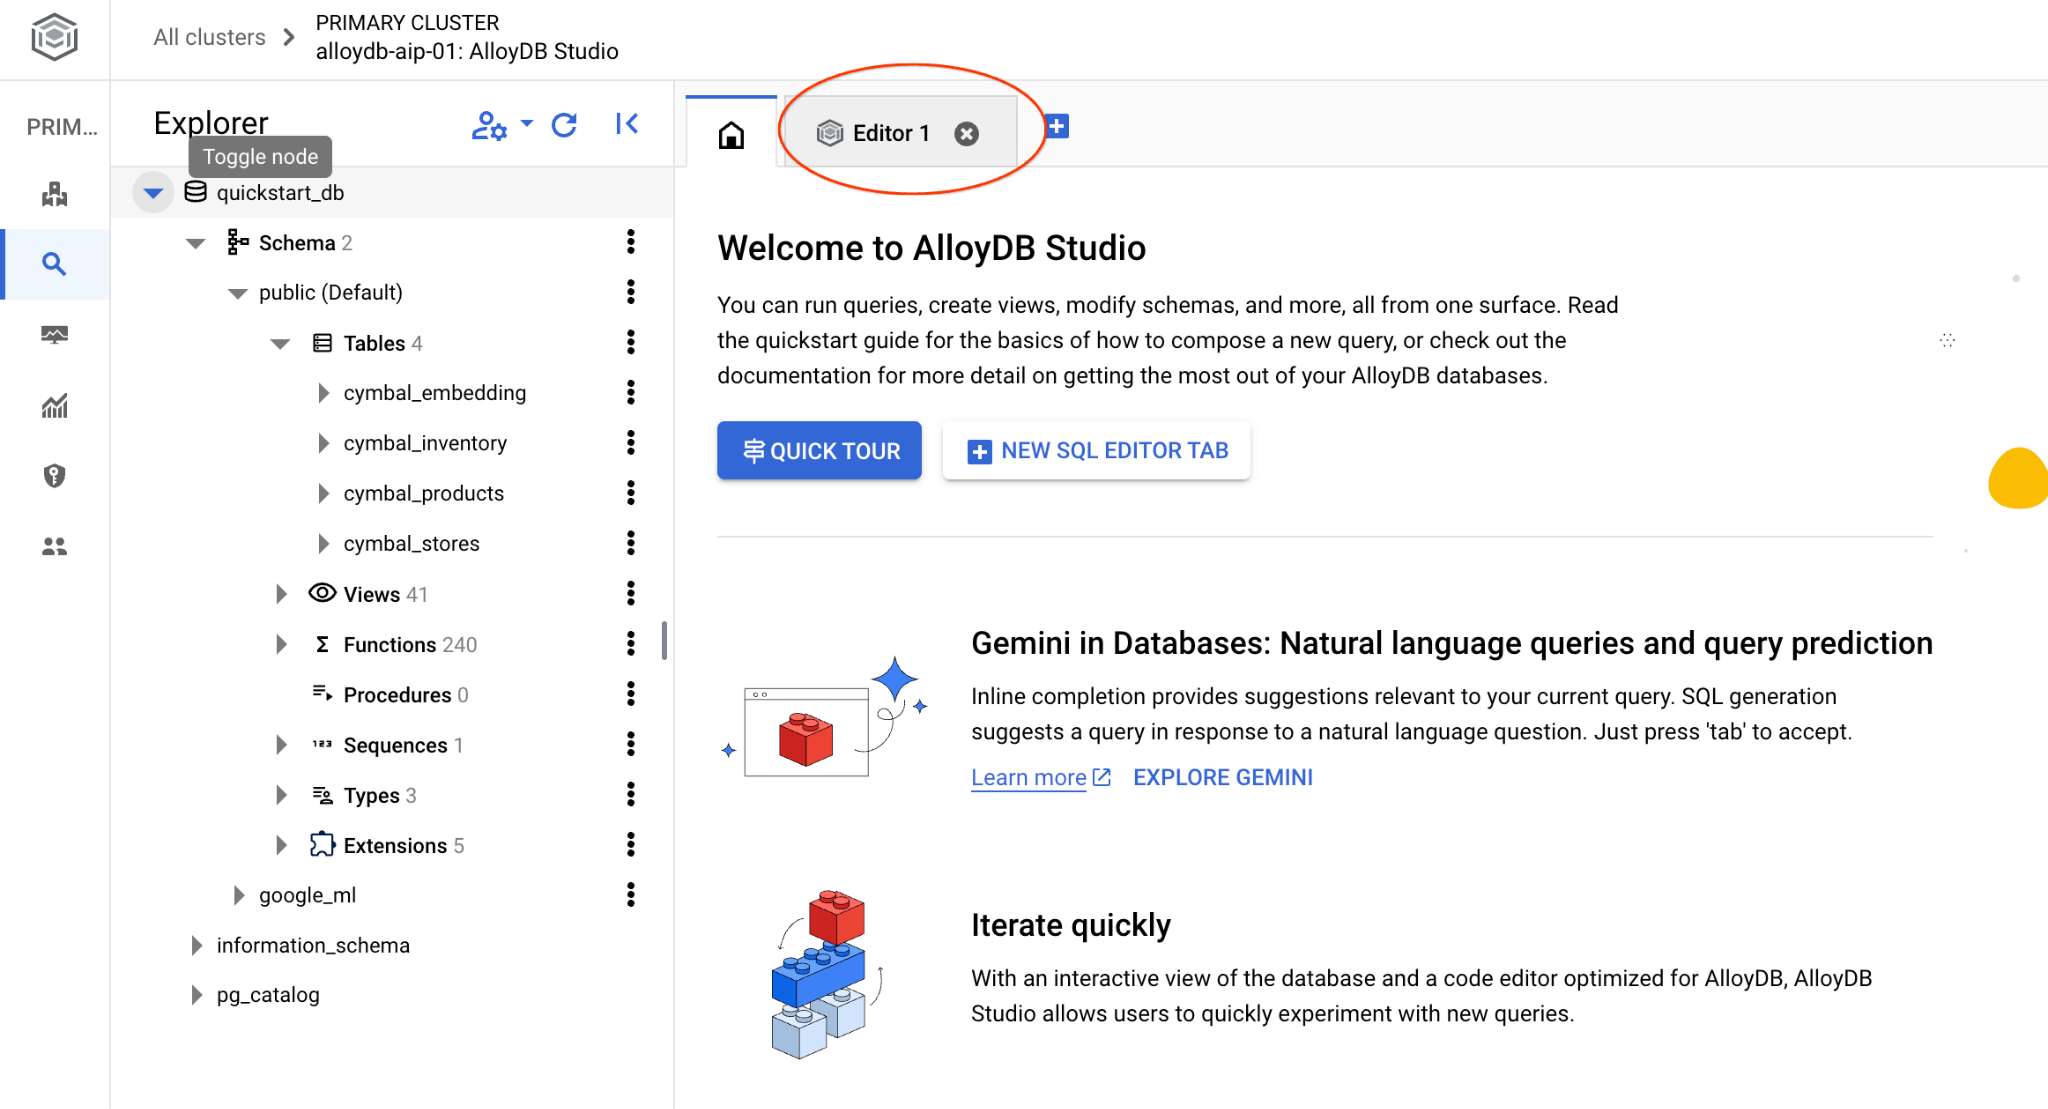
इससे एक इंटरफ़ेस खुलता है, जहां एसक्यूएल कमांड चलाई जा सकती हैं
डेटाबेस बनाएं
डेटाबेस बनाने के बारे में क्विकस्टार्ट गाइड.
AlloyDB Studio Editor में, यह कमांड चलाएं.
डेटाबेस बनाएं:
CREATE DATABASE quickstart_db
अनुमानित आउटपुट:
Statement executed successfully
quickstart_db से कनेक्ट करें
उपयोगकर्ता/डेटाबेस बदलने के बटन का इस्तेमाल करके, स्टूडियो से फिर से कनेक्ट करें.
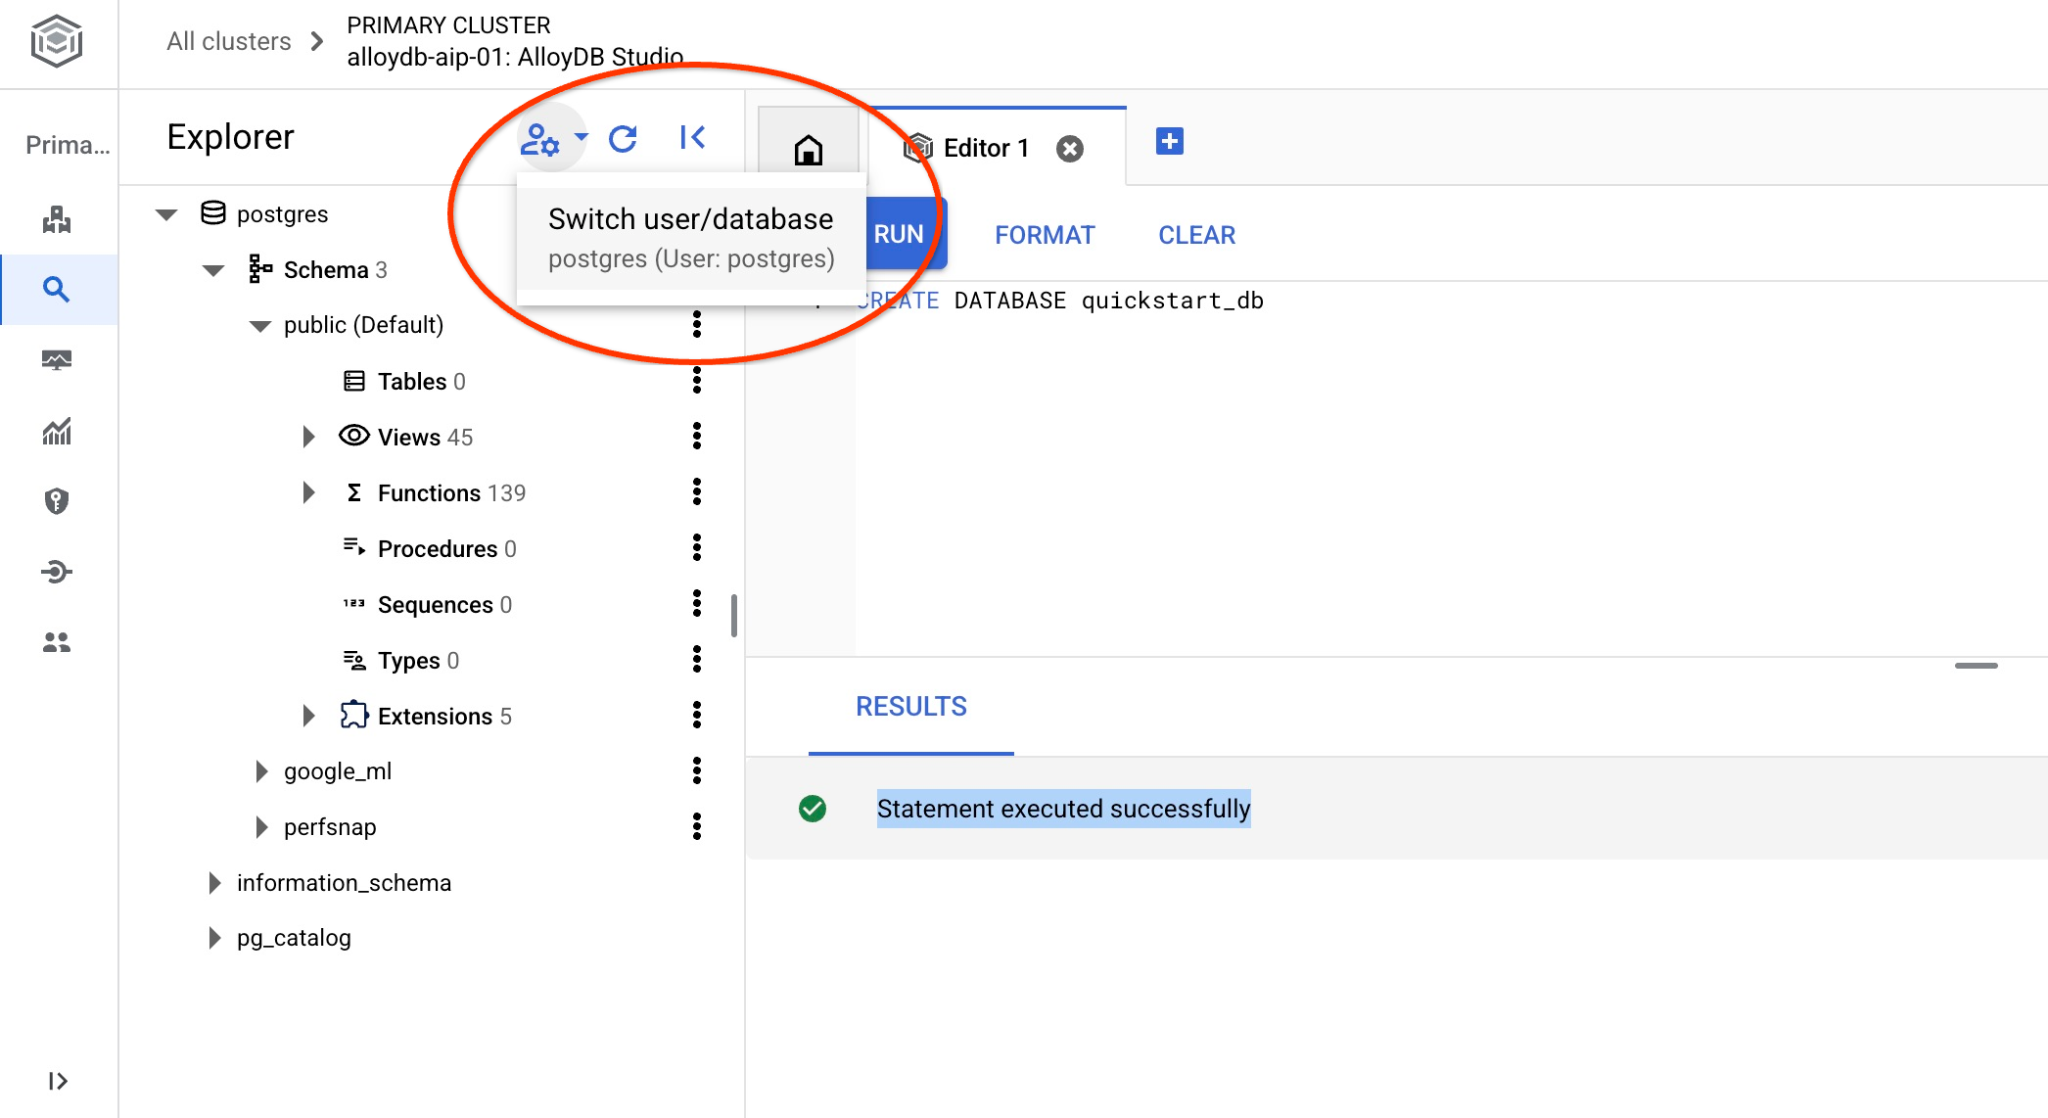
ड्रॉपडाउन सूची से नई quickstart_db डेटाबेस चुनें. साथ ही, पहले की तरह ही उपयोगकर्ता नाम और पासवर्ड का इस्तेमाल करें.
इससे एक नया कनेक्शन खुलेगा. यहां quickstart_db डेटाबेस के ऑब्जेक्ट के साथ काम किया जा सकता है.
google_ml एक्सटेंशन की पुष्टि करना
google_ml एक्सटेंशन का वर्शन देखें. पक्का करें कि यह 1.5.2 या इसके बाद का वर्शन हो, ताकि एआई क्वेरी इंजन का इस्तेमाल किया जा सके.
AlloyDB Studio में, quickstart_db से कनेक्ट होने के दौरान यह कमांड चलाएं:
SELECT extversion FROM pg_extension WHERE extname = 'google_ml_integration';
अनुमानित आउटपुट:
1.5.2
अगर वर्शन, ज़रूरी वर्शन से कम है, तो एक्सटेंशन को अपडेट करें.
AlloyDB Studio में, quickstart_db से कनेक्ट होने के दौरान यह कमांड चलाएं:
CALL google_ml.upgrade_to_preview_version();
अनुमानित आउटपुट:
Statement executed successfully
अपग्रेड हो जाने के बाद, वर्शन की पुष्टि फिर से करें.
AlloyDB Studio में, quickstart_db से कनेक्ट होने के दौरान यह कमांड चलाएं:
SELECT extversion FROM pg_extension WHERE extname = 'google_ml_integration';
अनुमानित आउटपुट:
1.5.2
हमें अपने डेटाबेस में, एआई क्वेरी इंजन की सुविधाएं भी चालू करनी होंगी. इसे दो तरीकों से किया जा सकता है. पहला, इंस्टेंस पर मौजूद सभी डेटाबेस के लिए, इंस्टेंस फ़्लैग को अपडेट करके. दूसरा, सिर्फ़ हमारे डेटाबेस के लिए इसे चालू करके. इसे quickstart_db डेटाबेस के लिए चालू करने के लिए, AlloyDB Studio में यह कमांड चलाएं.
ALTER DATABASE quickstart_db SET google_ml_integration.enable_ai_query_engine = 'on';
6. सैंपल डेटा
अब हमें डेटाबेस में ऑब्जेक्ट बनाने और डेटा लोड करने की ज़रूरत है. हम कुछ लाइनों वाले काल्पनिक मूवी डेटासेट का इस्तेमाल करने जा रहे हैं.
यहां दिए गए स्टेटमेंट को AlloyDB Studio Editor में कॉपी करें और "Run" बटन दबाएं.
-- Drop tables if they exist to prevent errors on re-running the script
DROP TABLE IF EXISTS movie_reviews;
DROP TABLE IF EXISTS movies;

-- Create the 'movies' table
-- This table stores information about each movie.
CREATE TABLE movies (
    id BIGINT PRIMARY KEY,              -- Unique identifier for the movie
    title TEXT NOT NULL,               -- Title of the movie
    description TEXT,                  -- A brief description or synopsis of the movie
    genres TEXT,                       -- Comma-separated list of genres (e.g., "Action, Adventure, Sci-Fi")
    actors TEXT                        -- Comma-separated list of main actors
);

-- Create the 'movie_reviews' table
-- This table stores reviews for the movies.
CREATE TABLE movie_reviews (
    review_id BIGINT PRIMARY KEY,      -- Unique identifier for the review
    movie_id BIGINT NOT NULL,          -- Foreign key referencing the movie being reviewed
    reviewer_name TEXT,                -- Name of the person who wrote the review
    rating INT CHECK (rating >= 1 AND rating <= 5), -- Rating from 1 to 5 stars
    review_text TEXT,                  -- The content of the review
    review_date DATE DEFAULT CURRENT_DATE, -- Date when the review was submitted
    FOREIGN KEY (movie_id) REFERENCES movies(id) ON DELETE CASCADE -- Ensures referential integrity; if a movie is deleted, its reviews are also deleted.
);

-- Insert sample data into the 'movies' table (20 rows)
INSERT INTO movies (id, title, description, genres, actors) VALUES
(1, 'Inception', 'A thief who steals information by entering people''s dreams.', 'Sci-Fi, Thriller, Action', 'Leonardo DiCaprio, Joseph Gordon-Levitt, Elliot Page'),
(2, 'The Matrix', 'A computer hacker learns about the true nature of his reality.', 'Sci-Fi, Action', 'Keanu Reeves, Laurence Fishburne, Carrie-Anne Moss'),
(3, 'Interstellar', 'A team of explorers journey through a cosmic passage beyond our world in an attempt to ensure humanity''s survival.', 'Sci-Fi, Drama, Adventure', 'Matthew McConaughey, Anne Hathaway, Jessica Chastain'), -- Updated description
(4, 'The Dark Knight', 'When the menace known as the Joker wreaks havoc and chaos on the people of Gotham, Batman must accept one of the greatest psychological and physical tests of his ability to fight injustice.', 'Action, Crime, Drama', 'Christian Bale, Heath Ledger, Aaron Eckhart'),
(5, 'Pulp Fiction', 'The lives of two mob hitmen, a boxer, a gangster and his wife, and a pair of diner bandits intertwine in four tales of violence and redemption.', 'Crime, Drama', 'John Travolta, Uma Thurman, Samuel L. Jackson'),
(6, 'Forrest Gump', 'The presidencies of Kennedy and Johnson, the Vietnam War, the Watergate scandal and other historical events unfold from the perspective of an Alabama man with an IQ of 75.', 'Drama, Romance', 'Tom Hanks, Robin Wright, Gary Sinise'),
(7, 'The Shawshank Redemption', 'Two imprisoned men bond over a number of years, finding solace and eventual redemption through acts of common decency.', 'Drama', 'Tim Robbins, Morgan Freeman, Bob Gunton'),
(8, 'Gladiator', 'A former Roman General sets out to exact vengeance against the corrupt emperor who murdered his family and sent him into slavery.', 'Action, Adventure, Drama', 'Russell Crowe, Joaquin Phoenix, Connie Nielsen'),
(9, 'Fight Club', 'An insomniac office worker looking for a way to change his life crosses paths with a devil-may-care soap maker and they form an underground fight club that evolves into something much, much more.', 'Drama', 'Brad Pitt, Edward Norton, Meat Loaf'),
(10, 'The Lord of the Rings: The Return of the King', 'Gandalf and Aragorn lead the World of Men against Sauron''s army to draw his gaze from Frodo and Sam as they approach Mount Doom with the One Ring.', 'Action, Adventure, Drama', 'Elijah Wood, Viggo Mortensen, Ian McKellen'),
(11, 'Spirited Away', 'During her family''s move to the suburbs, a sullen 10-year-old girl wanders into a world ruled by gods, witches, and spirits, and where humans are changed into beasts.', 'Animation, Adventure, Family', 'Daveigh Chase, Suzanne Pleshette, Miyu Irino'),
(12, 'Parasite', 'Greed and class discrimination threaten the newly formed symbiotic relationship between the wealthy Park family and the destitute Kim clan.', 'Comedy, Drama, Thriller', 'Song Kang-ho, Lee Sun-kyun, Cho Yeo-jeong'),
(13, 'The Godfather', 'The aging patriarch of an organized crime dynasty transfers control of his clandestine empire to his reluctant son.', 'Crime, Drama', 'Marlon Brando, Al Pacino, James Caan'),
(14, 'Avengers: Endgame', 'After the devastating events of Avengers: Infinity War, the universe is in ruins. With the help of remaining allies, the Avengers assemble once more in order to reverse Thanos'' actions and restore balance to the universe.', 'Action, Adventure, Drama', 'Robert Downey Jr., Chris Evans, Mark Ruffalo'),
(15, 'Joker', 'In Gotham City, mentally troubled comedian Arthur Fleck is disregarded and mistreated by society. He then embarks on a downward spiral of revolution and bloody crime.', 'Crime, Drama, Thriller', 'Joaquin Phoenix, Robert De Niro, Zazie Beetz'),
(16, 'Mad Max: Fury Road', 'In a post-apocalyptic wasteland, a woman rebels against a tyrannical ruler in search for her homeland with the help of a group of female prisoners, a psychotic worshiper, and a drifter named Max.', 'Action, Adventure, Sci-Fi', 'Tom Hardy, Charlize Theron, Nicholas Hoult'),
(17, 'Coco', 'Aspiring musician Miguel, confronted with his family''s ancestral ban on music, enters the Land of the Dead to find his great-great-grandfather, a legendary singer.', 'Animation, Adventure, Family', 'Anthony Gonzalez, Gael García Bernal, Benjamin Bratt'),
(18, 'Whiplash', 'A promising young drummer enrolls at a cut-throat music conservatory where his dreams of greatness are mentored by an instructor who will stop at nothing to realize a student''s potential.', 'Drama, Music', 'Miles Teller, J.K. Simmons, Paul Reiser'),
(19, 'The Grand Budapest Hotel', 'The adventures of Gustave H, a legendary concierge at a famous hotel from the fictional Republic of Zubrowka between the first and second World Wars, and Zero Moustafa, the lobby boy who becomes his most trusted friend.', 'Adventure, Comedy, Drama', 'Ralph Fiennes, F. Murray Abraham, Mathieu Amalric'),
(20, 'Blade Runner 2049', 'Young Blade Runner K''s discovery of a long-buried secret leads him to track down former Blade Runner Rick Deckard, who''s been missing for thirty years.', 'Action, Drama, Mystery', 'Ryan Gosling, Harrison Ford, Ana de Armas');

-- Insert sample data into the 'movie_reviews' table (30 rows)
-- Reviews are linked to movies via movie_id. Includes a mix of positive and negative reviews.
-- Movie title is prepended to the review text.
INSERT INTO movie_reviews (review_id, movie_id, reviewer_name, rating, review_text) VALUES
(1, 1, 'Alice Wonderland', 5, 'Inception: Absolutely mind-bending! A masterpiece of sci-fi.'),
(2, 1, 'Bob The Critic', 2, 'Inception: Too confusing and pretentious. Didn''t enjoy it.'),
(3, 2, 'Charlie Reviewer', 5, 'The Matrix: Revolutionary visuals and a compelling story.'),
(4, 3, 'Diana Prince', 5, 'Interstellar: Visually stunning and emotionally powerful. A must-see.'),
(5, 3, 'Edward Nigma', 4, 'Interstellar: Long, but worth it for the spectacle and ideas.'),
(6, 4, 'Fiona Glenanne', 5, 'The Dark Knight: Heath Ledger''s Joker is iconic. Dark and thrilling.'),
(7, 5, 'George Costanza', 5, 'Pulp Fiction: Quirky, violent, and endlessly quotable.'),
(8, 5, 'Hannah Montana', 1, 'Pulp Fiction: Way too violent and the timeline was confusing. Hated it.'),
(9, 6, 'Ian Malcolm', 4, 'Forrest Gump: A heartwarming story with a great performance by Hanks.'),
(10, 7, 'Jane Doe', 5, 'The Shawshank Redemption: An uplifting story of hope and friendship. Perfect.'),
(11, 7, 'John Smith', 5, 'The Shawshank Redemption: Morgan Freeman is amazing. Truly a classic.'),
(12, 8, 'Kyle Broflovski', 2, 'Gladiator: Generic plot and boring action scenes. Overrated.'),
(13, 9, 'Laura Palmer', 5, 'Fight Club: Provocative and thought-provoking. Norton and Pitt are fantastic.'),
(14, 10, 'Michael Scott', 5, 'The Lord of the Rings: The Return of the King: A fitting and epic conclusion to a legendary trilogy.'),
(15, 11, 'Nancy Drew', 5, 'Spirited Away: Beautiful animation and a magical story for all ages.'),
(16, 12, 'Oscar Martinez', 5, 'Parasite: A brilliant satire with unexpected twists. Loved it!'),
(17, 12, 'Pam Beesly', 4, 'Parasite: Very intense, but incredibly well-directed and acted.'),
(18, 13, 'Quentin Coldwater', 5, 'The Godfather: A cinematic masterpiece. Brando is unforgettable.'),
(19, 14, 'Rachel Green', 3, 'Avengers: Endgame: It was okay, but felt bloated and had too many characters.'),
(20, 14, 'Steve Rogers', 5, 'Avengers: Endgame: The culmination of a decade of storytelling. Perfect ending.'),
(21, 15, 'Tony Stark', 4, 'Joker: A dark and disturbing character study. Phoenix is mesmerizing.'),
(22, 16, 'Uma Thurman', 5, 'Mad Max: Fury Road: Non-stop action and incredible practical effects. What a ride!'),
(23, 17, 'Victor Frankenstein', 5, 'Coco: A heartwarming and visually stunning celebration of family and culture.'),
(24, 18, 'Walter White', 5, 'Whiplash: Intense and gripping. J.K. Simmons is terrifyingly good.'),
(25, 19, 'Xena Warrior', 2, 'The Grand Budapest Hotel: Too quirky for its own good. Style over substance.'),
(26, 20, 'Ygritte Snow', 5, 'Blade Runner 2049: A worthy sequel that expands on the original in meaningful ways. Visually breathtaking.'),
(27, 1, 'Zack Morris', 4, 'Inception: Kept me on the edge of my seat. Very clever.'),
(28, 4, 'Buffy Summers', 5, 'The Dark Knight: The best superhero movie ever made. Ledger is a legend.'),
(29, 8, 'Clark Kent', 3, 'Gladiator: Decent action, but the story felt predictable and dragged a bit.'),
(30, 15, 'Diana Troy', 3, 'Joker: Hard to watch at times, but a powerful performance. Felt it was a bit one-note though.');
अगर आपके पास अपना सैंपल डेटा है और Cloud Console से उपलब्ध Cloud SQL इंपोर्ट टूल के साथ काम करने वाली CSV फ़ाइलें हैं, तो दिखाई गई प्रोसेस के बजाय इनका इस्तेमाल किया जा सकता है.
7. IF ऑपरेटर का इस्तेमाल करना
आइए, सबसे पहले PostgreSQL के स्टैंडर्ड तरीकों का इस्तेमाल करके क्लासिक सर्च की कोशिश करें.
अगर हमें अंतरिक्ष में एडवेंचर से जुड़ी कोई फ़िल्म खोजनी है, तो हम यह क्वेरी आज़मा सकते हैं
SELECT title,description AS movies_about_space
    FROM movies
    WHERE description like '%space%' OR title like '%space%';
इससे कोई नतीजा नहीं मिला. हालांकि, हमें यकीन है कि हमारे पास कम से कम एक ऐसी फ़िल्म है जो इस कैटगरी में आती है. हम फ़ुल टेक्स्ट सर्च का इस्तेमाल कर सकते हैं.
SELECT title,description
FROM movies
WHERE to_tsvector('english', description) @@ to_tsquery('english', 'space');
ऐसा भी हो सकता है कि हमें कोई नतीजा न मिले. इसलिए, हमें कुछ मुख्य शब्दों या वाक्यांशों के बारे में जानने की ज़रूरत है, ताकि हम PostgreSQL की खोज की "क्लासिक" तकनीकों का इस्तेमाल कर सकें.
अब हम google_ml.if फ़ंक्शन के साथ, एआई की मदद से काम करने वाले सिमैंटिक फ़िल्टरिंग का इस्तेमाल करने की कोशिश कर सकते हैं. यह पर्दे के पीछे एआई का इस्तेमाल करके, हमारे नैचुरल लैंग्वेज के अनुरोध के आधार पर सिमैंटिक फ़िल्टरिंग करेगा.
SELECT title,description AS movies_about_space
    FROM movies
    WHERE
      google_ml.if(
        prompt => 'Here are descriptions of movies, can you return the ones about space adventures:  '||description);
हमें अनुरोध के सिमैंटिक मतलब के आधार पर "इंटरस्टेलर" फ़िल्म मिल रही है. भले ही, इसके टाइटल और ब्यौरे में "स्पेस" शब्द मौजूद न हो. जैसा कि आपने देखा, हमने पहले से कुछ भी नहीं बनाया था. हमने सिर्फ़ पहले से मौजूद ऑटोमेटेड फ़ंक्शन का इस्तेमाल किया था.
8. IF ऑपरेटर के साथ JOIN का इस्तेमाल करना
अगर हमें एआई की मदद से सेमैंटिक फ़िल्टरिंग का इस्तेमाल करके दो टेबल जोड़नी हों, तो क्या करें? उदाहरण के लिए, अगर समीक्षा में किसी मूवी का नाम शामिल है, तो हम उपयोगकर्ताओं की समीक्षाओं को मूवी से मैच करने की कोशिश कर सकते हैं.
इसे AlloyDB Studio के नए एडिटर टैब में चलाएं:
SELECT title, rating, movie_reviews
    FROM movies
    JOIN
    movie_reviews ON
      google_ml.if(
        prompt => 'Does the following reviews talk about a movie mentioned? The review: ' || review_text||' and the movie title is: '||title)
    AND
    title='Interstellar';
हमें दो ऐसी समीक्षाएं मिली हैं जो हमारे अनुरोध से मेल खाती हैं. ये समीक्षाएं, टाइटल में बताई गई फ़िल्म के नाम के आधार पर मिली हैं. हम अनुरोध को और भी आसान बना सकते हैं:
SELECT title, rating, movie_reviews
    FROM movies
    JOIN
    movie_reviews ON
      google_ml.if(
        prompt => 'Do we have the movie in the review?: ' || review_text||' and the movie title is: '||title)
    AND
    title='Interstellar';
9. कॉन्टेंट के आधार पर नतीजों को स्कोर करना
movie_reviews टेबल में, फ़िल्मों की रेटिंग दी गई हैं. हालांकि, अगर हमें अपनी रेटिंग लागू करनी है, तो इसके लिए google_ml.rank फ़ंक्शन का इस्तेमाल किया जा सकता है. हम अपनी समीक्षाओं को नैचुरल लैंग्वेज में तय की गई शर्तों के आधार पर स्कोर कर सकते हैं. उदाहरण के लिए, हम फ़िल्मों के लिए सबसे ज़्यादा रेटिंग वाली पांच समीक्षाएं पा सकते हैं और तुलना करने के लिए ओरिजनल रेटिंग दिखा सकते हैं.
SELECT rating,review_text AS top_five
    FROM movie_reviews
    ORDER BY google_ml.rank('Score of 7 to 10 if the review says the movie was really good, 3 to 6 if the review says it''s alright is and 1 to 2 if the review says it was not worth of time. Review: ' || review_text) DESC
    LIMIT 5;
अगर हमें नई रेटिंग को ओरिजनल रेटिंग के बगल में दिखाना है, तो हम उसे कॉलम की सूची में जोड़ सकते हैं.
SELECT rating,
    google_ml.rank('Score of 7 to 10 if the review says the movie was really good, 3 to 6 if the review says it''s alright is and 1 to 2 if the review says it was not worth of time. Review: ' || review_text) AS ml_rank,
    review_text AS top_five
    FROM movie_reviews
    ORDER BY ml_rank DESC
    LIMIT 5;
यहां सबसे ज़्यादा पसंद की गई पांच समीक्षाएं दी गई हैं.
 rating | ml_rank |                               top_five
--------+---------+-----------------------------------------------------------------------
      5 |       9 | The Dark Knight: Heath Ledger's Joker is iconic. Dark and thrilling.
      5 |       9 | The Matrix: Revolutionary visuals and a compelling story.
      5 |       9 | Interstellar: Visually stunning and emotionally powerful. A must-see.
      5 |       9 | Inception: Absolutely mind-bending! A masterpiece of sci-fi.
      5 |       9 | Pulp Fiction: Quirky, violent, and endlessly quotable.
(5 rows)
5 rows in set (0.13 sec)
सबसे ज़्यादा रेटिंग वाली समीक्षाओं के लिए, चुनी गई रेटिंग 10 में से 9 थी.
दस्तावेज़ में, AlloyDB AI ऑपरेटर के बारे में ज़्यादा पढ़ें.
10. रैंकिंग का इस्तेमाल करके सिमैंटिक सर्च को बेहतर बनाना
ज़्यादा सटीक नतीजे पाने के लिए, हम सिमैंटिक सर्च को रैंकिंग के साथ जोड़ सकते हैं.
रीरैंकिंग मॉडल का ऐक्सेस
रैंकिंग मॉडल का इस्तेमाल करने के लिए, हमें Discovery Engine API चालू करना होगा. साथ ही, AlloyDB सेवा खाते को "discoveryengine.viewer" की भूमिका देनी होगी. एपीआई और भूमिका को हमारे लैब के पहले चरण में चालू कर दिया गया है. ai.rank फ़ंक्शन, Vertex AI पर अपने-आप सबसे नए रीरैंकिंग मॉडल को ढूंढता है और उसका इस्तेमाल करता है.
क्वेरी में रीरैंकिंग मॉडल का इस्तेमाल करना
अब हम क्वेरी में, फिर से रैंक करने वाले मॉडल का इस्तेमाल कर सकते हैं. इससे सिमैंटिक सर्च के नतीजों को बेहतर बनाया जा सकता है. साथ ही, उन्हें ज़्यादा सटीक बनाया जा सकता है और सबसे अच्छे विकल्प चुने जा सकते हैं.
चलो, ऐक्शन फ़िल्में ढूंढते हैं. इसके बाद, "कंप्यूटर और भविष्य" को शर्तों के तौर पर इस्तेमाल करके, उन्हें रैंक करते हैं.
WITH
  action_movies AS (
    SELECT
      title,
      description,
      ROW_NUMBER() OVER (ORDER BY title, description) AS ref_number
    FROM
      movies
    WHERE
      google_ml.if(
        prompt => 'The following movies are action movies. The movie title: ' || title || ' and the description is: ' || description
      )
  ),
  ranked_documents_array AS (
    SELECT
      ARRAY_AGG(description ORDER BY ref_number) AS docs
    FROM
      action_movies
  ),
  reranked_results AS (
    SELECT
      r.index,
      r.score
    FROM
      ranked_documents_array,
      ai.rank(
        model_id => 'semantic-ranker-default',
        search_string => 'Computers and future',
        documents => ranked_documents_array.docs
      ) AS r
  )
SELECT
  am.title,
  left(am.description,80) as description,
  rr.score
FROM
  action_movies am
JOIN
  reranked_results rr ON am.ref_number = rr.index
ORDER BY
  rr.score DESC;
नतीजों में, ऐक्शन फ़िल्में दिखेंगी. साथ ही, उम्मीद है कि इनमें भविष्य और कंप्यूटर से जुड़ी फ़िल्मों को सबसे ऊपर रखा जाएगा.
                     title                     |                                   description                                    | score
-----------------------------------------------+----------------------------------------------------------------------------------+--------
 The Matrix                                    | A computer hacker learns about the true nature of his reality.                   | 0.1197
 Inception                                     | A thief who steals information by entering people's dreams.                      | 0.0646
 Blade Runner 2049                             | Young Blade Runner K's discovery of a long-buried secret leads him to track down |  0.022
 Mad Max: Fury Road                            | In a post-apocalyptic wasteland, a woman rebels against a tyrannical ruler in se | 0.0206
 Gladiator                                     | A former Roman General sets out to exact vengeance against the corrupt emperor w | 0.0189
 Avengers: Endgame                             | After the devastating events of Avengers: Infinity War, the universe is in ruins | 0.0175
 Fight Club                                    | An insomniac office worker looking for a way to change his life crosses paths wi | 0.0162
 The Dark Knight                               | When the menace known as the Joker wreaks havoc and chaos on the people of Gotha | 0.0095
 The Lord of the Rings: The Return of the King | Gandalf and Aragorn lead the World of Men against Sauron's army to draw his gaze | 0.0056
(9 rows)
अलग-अलग शर्तों के साथ इसे आज़माएं और देखें कि रैंकिंग से, आउटपुट के क्रम पर क्या असर पड़ता है.
दस्तावेज़ में, विकल्पों और फिर से रैंक करने के बारे में ज़्यादा पढ़ें.
11. पर्यावरण को साफ़-सुथरा रखना
लैब का काम पूरा हो जाने के बाद, AlloyDB इंस्टेंस और क्लस्टर मिटा दें.
AlloyDB क्लस्टर और सभी इंस्टेंस मिटाना
अगर आपने AlloyDB का मुफ़्त में आज़माने की सुविधा वाला वर्शन इस्तेमाल किया है. अगर आपको ट्रायल क्लस्टर का इस्तेमाल करके अन्य लैब और संसाधनों की जांच करनी है, तो ट्रायल क्लस्टर को न मिटाएं. आपके पास एक ही प्रोजेक्ट में, दूसरा ट्रायल क्लस्टर बनाने का विकल्प नहीं होगा.
फ़ोर्स विकल्प का इस्तेमाल करके क्लस्टर को डिस्ट्रॉय किया जाता है. इससे क्लस्टर से जुड़े सभी इंस्टेंस भी मिट जाते हैं.
अगर आपका कनेक्शन बंद हो गया है और पिछली सभी सेटिंग मिट गई हैं, तो क्लाउड शेल में प्रोजेक्ट और एनवायरमेंट वैरिएबल तय करें:
gcloud config set project <your project id>
export REGION=us-central1
export ADBCLUSTER=alloydb-aip-01
export PROJECT_ID=$(gcloud config get-value project)
क्लस्टर मिटाने के लिए:
gcloud alloydb clusters delete $ADBCLUSTER --region=$REGION --force
अनुमानित कंसोल आउटपुट:
student@cloudshell:~ (test-project-001-402417)$ gcloud alloydb clusters delete $ADBCLUSTER --region=$REGION --force
All of the cluster data will be lost when the cluster is deleted.

Do you want to continue (Y/n)?  Y

Operation ID: operation-1697820178429-6082890a0b570-4a72f7e4-4c5df36f
Deleting cluster...done.
AlloyDB के बैकअप मिटाना
क्लस्टर के सभी AlloyDB बैकअप मिटाने के लिए:
for i in $(gcloud alloydb backups list --filter="CLUSTER_NAME: projects/$PROJECT_ID/locations/$REGION/clusters/$ADBCLUSTER" --format="value(name)" --sort-by=~createTime) ; do gcloud alloydb backups delete $(basename $i) --region $REGION --quiet; done
अनुमानित कंसोल आउटपुट:
student@cloudshell:~ (test-project-001-402417)$ for i in $(gcloud alloydb backups list --filter="CLUSTER_NAME: projects/$PROJECT_ID/locations/$REGION/clusters/$ADBCLUSTER" --format="value(name)" --sort-by=~createTime) ; do gcloud alloydb backups delete $(basename $i) --region $REGION --quiet; done
Operation ID: operation-1697826266108-60829fb7b5258-7f99dc0b-99f3c35f
Deleting backup...done.
12. बधाई हो
कोड लैब पूरा करने के लिए बधाई.
Google Cloud का लर्निंग पाथ
यह लैब, Google Cloud के साथ प्रोडक्शन-रेडी एआई के लर्निंग पाथ का हिस्सा है.
- प्रोटोटाइप से प्रोडक्शन तक के अंतर को कम करने के लिए, पूरा पाठ्यक्रम देखें.
- अपनी प्रोग्रेस को
#ProductionReadyAIहैशटैग के साथ शेयर करें.
हमने क्या-क्या बताया
- AlloyDB क्लस्टर और प्राइमरी इंस्टेंस को डिप्लॉय करने का तरीका
- AlloyDB AI ऑपरेटर चालू करने का तरीका
- AlloyDB AI के अलग-अलग ऑपरेटर इस्तेमाल करने का तरीका
- नतीजों को बेहतर बनाने के लिए, AlloyDB AI ऑपरेटर में रीरैंकिंग का इस्तेमाल कैसे करें
13. सर्वे
आउटपुट: