

1. 简介
在此 Codelab 中,您将学习如何在 Google Kubernetes Engine (GKE) 上部署 AlloyDB Omni,并将其与 EmbeddingGemma 和 Gemma 4 等开放模型搭配使用,以进行嵌入和预测。在同一集群中运行数据库和模型可减少网络延迟时间,并避免对第三方服务的依赖。此外,由于数据绝不会离开您的环境,因此有助于满足合规性和数据驻留要求。
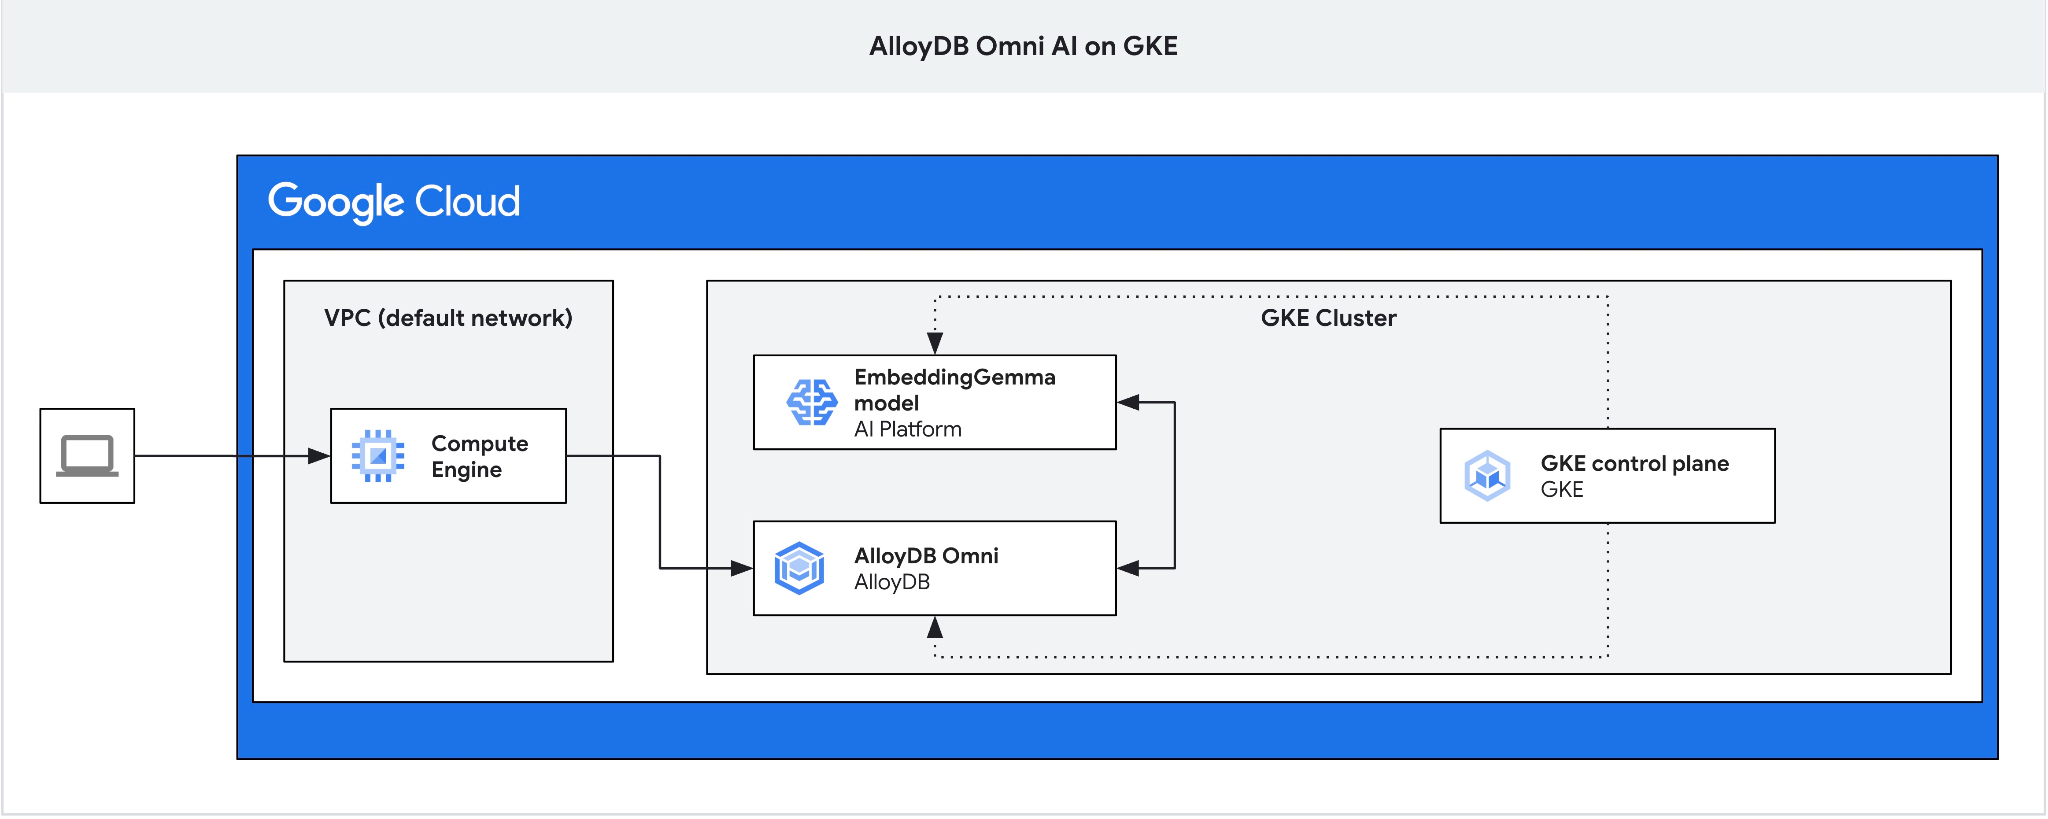
前提条件
- 对 Google Cloud 和 Google Cloud 控制台有基本的了解
- 对 Kubernetes 和 GKE 有基本了解
- 熟悉命令行界面和 Google Cloud Shell
学习内容
- 如何在 GKE 集群上部署 AlloyDB Omni
- 如何连接到 AlloyDB Omni
- 如何将数据加载到 AlloyDB Omni 中
- 如何将 AI 模型(嵌入模型和 LLM)部署到 GKE
- 如何在 AlloyDB Omni 中注册 AI 模型
- 如何生成用于语义搜索的嵌入
- 如何在 AlloyDB Omni 中运行语义搜索查询
- 如何在 AlloyDB Omni 中创建和使用向量索引
所需条件
- Google Cloud 账号和 Google Cloud 项目
- 网络浏览器,例如 Chrome
2. 设置和要求
项目设置
- 登录 Google Cloud 控制台。如果您还没有 Gmail 或 Google Workspace 账号,请创建一个。请改用个人账号,而非工作账号或学校账号。
- 创建新项目或选择现有项目。在 Google Cloud 控制台的标题中,点击选择项目,然后点击新项目。

在选择项目窗口中,点击新建项目以打开项目创建对话框。

在该对话框中,输入项目名称,然后选择您的组织或位置。
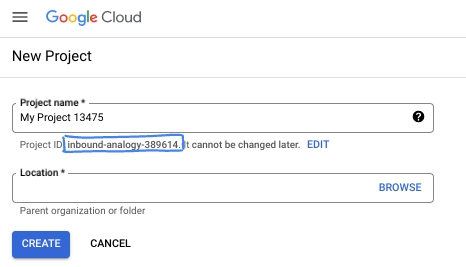
- 项目名称是此项目参与者的显示名称。Google API 不会使用项目名称,您可以随时更改项目名称。
- 项目 ID 在所有 Google Cloud 项目中是唯一的,并且是不可变的(一经设置便无法更改)。Google Cloud 控制台会自动生成一个唯一 ID,您也可以自行提供。在此 Codelab 中,您将使用
- 项目编号是部分 API 使用的第三个标识符。如需了解详情,请参阅 Resource Manager 文档。
启用结算功能
如果您使用 Google Cloud 积分设置了结算,则可以跳过此步骤。
如需设置个人结算账号,请在 Google Cloud 控制台中启用结算功能。
- 完成本实验所需的 Google Cloud 资源费用不到 5 美元。
- 请按照本实验结尾处的清理步骤删除资源,以免产生进一步的费用。
- 新用户符合参与 $300 USD 免费试用计划的条件。
启动 Cloud Shell
在此 Codelab 中,您将使用 Google Cloud Shell,这是一个在云端运行的命令行环境。
在 Google Cloud 控制台中,点击右上角工具栏中的激活 Cloud Shell 图标:

或者,按 G 键再按 S 键,或直接打开 Google Cloud Shell。
连接成功后,Cloud Shell 会显示终端提示:

Cloud Shell 包含永久性存储空间和开发工具。您可以在浏览器中运行此 Codelab 中的所有步骤。
3. 启用 API
如需使用 Google Kubernetes Engine (GKE) 进行 AlloyDB Omni 和模型部署,请在您的 Google Cloud 云项目中启用 Compute Engine 和 GKE API。
在 Cloud Shell 中,验证您的项目 ID 是否已配置:
PROJECT_ID=$(gcloud config get-value project)
echo $PROJECT_ID
如果您的项目 ID 未定义,请进行配置:
export PROJECT_ID=<YOUR_PROJECT_ID>
gcloud config set project $PROJECT_ID
启用必需的 API:
gcloud services enable compute.googleapis.com
gcloud services enable container.googleapis.com
预期输出:
student@cloudshell:~ (test-project-001-402417)$ PROJECT_ID=test-project-001-402417
student@cloudshell:~ (test-project-001-402417)$ gcloud config set project test-project-001-402417
Updated property [core/project].
student@cloudshell:~ (test-project-001-402417)$ gcloud services enable compute.googleapis.com
gcloud services enable container.googleapis.com
Operation "operations/acat.p2-4470404856-1f44ebd8-894e-4356-bea7-b84165a57442" finished successfully.
您可以在文档中了解有关每个已启用 API 的信息。
4. 在 GKE 上部署 AlloyDB Omni
如需在 GKE 上部署 AlloyDB Omni,请按照 AlloyDB Omni 操作器要求准备 Kubernetes 集群。
创建 GKE 集群
部署一个标准 GKE 集群,该集群具有运行 AlloyDB Omni、操作器和监控容器的容量。AlloyDB Omni 至少需要 2 个 CPU 和 8 GB RAM。本教程使用 n2-standard-4 机器类型。
为部署设置环境变量:
export PROJECT_ID=$(gcloud config get-value project)
export LOCATION=us-central1
export CLUSTER_NAME=alloydb-ai-gke
export MACHINE_TYPE=n2-standard-4
创建标准 GKE 集群:
gcloud container clusters create ${CLUSTER_NAME} \
  --project=${PROJECT_ID} \
  --region=${LOCATION} \
  --workload-pool=${PROJECT_ID}.svc.id.goog \
  --release-channel=rapid \
  --machine-type=${MACHINE_TYPE} \
  --num-nodes=1
预期的控制台输出:
student@cloudshell:~ (test-project-001-402417)$ export PROJECT_ID=$(gcloud config get project)
export LOCATION=us-central1
export CLUSTER_NAME=alloydb-ai-gke
export MACHINE_TYPE=n2-standard-4
Your active configuration is: [test-project-001-402417]
student@cloudshell:~ (test-project-001-402417)$ gcloud container clusters create ${CLUSTER_NAME} \
  --project=${PROJECT_ID} \
  --region=${LOCATION} \
  --workload-pool=${PROJECT_ID}.svc.id.goog \
  --release-channel=rapid \
  --machine-type=${MACHINE_TYPE} \
  --num-nodes=1
Note: Your Pod address range (`--cluster-ipv4-cidr`) can accommodate at most 1008 node(s).
Creating cluster alloydb-ai-gke in us-central1... Cluster is being health-checked (Kubernetes Control Plane is healthy)...done.
Created [https://container.googleapis.com/v1/projects/test-project-001-402417/zones/us-central1/clusters/alloydb-ai-gke].
To inspect the contents of your cluster, go to: https://console.cloud.google.com/kubernetes/workload_/gcloud/us-central1/alloydb-ai-gke?project=test-project-001-402417
kubeconfig entry generated for alloydb-ai-gke.
NAME: alloydb-ai-gke
LOCATION: us-central1
MASTER_VERSION: 1.36.3-gke.1640000
MASTER_IP: 34.121.243.65
MACHINE_TYPE: n2-standard-4
NODE_VERSION: 1.36.3-gke.1640000
NUM_NODES: 3
STATUS: RUNNING
STACK_TYPE: IPV4
准备集群
安装所需的组件,例如 cert-manager(Kubernetes 的原生证书控制器)。如需了解详情,请参阅 cert-manager 安装文档。
Cloud Shell 包含 Kubernetes 命令行工具 kubectl。使用 gcloud 获取集群凭据:
gcloud container clusters get-credentials ${CLUSTER_NAME} --region=${LOCATION}
使用 kubectl 安装 cert-manager:
kubectl apply -f https://github.com/cert-manager/cert-manager/releases/download/v1.21.1/cert-manager.yaml
预期的控制台输出(已隐去部分信息):
student@cloudshell:~$ kubectl apply -f https://github.com/cert-manager/cert-manager/releases/download/v1.21.1/cert-manager.yaml
namespace/cert-manager created
customresourcedefinition.apiextensions.k8s.io/certificaterequests.cert-manager.io created
customresourcedefinition.apiextensions.k8s.io/certificates.cert-manager.io created
customresourcedefinition.apiextensions.k8s.io/challenges.acme.cert-manager.io created
customresourcedefinition.apiextensions.k8s.io/clusterissuers.cert-manager.io created
...
validatingwebhookconfiguration.admissionregistration.k8s.io/cert-manager-webhook created
安装 AlloyDB Omni 操作器
使用 Helm 安装 AlloyDB Omni 操作器。
下载并安装 AlloyDB Omni 操作器图表:
helm install alloydbomni-operator oci://gcr.io/alloydb-omni/alloydbomni-operator \
--version 1.8.1 \
--create-namespace \
--namespace alloydb-omni-system \
--atomic \
--timeout 5m
预期的控制台输出(已隐去部分信息):
student@cloudshell:~$ helm install alloydbomni-operator oci://gcr.io/alloydb-omni/alloydbomni-operator \
> --version 1.8.0 \
> --create-namespace \
> --namespace alloydb-omni-system \
> --atomic \
> --timeout 5m
Flag --atomic has been deprecated, use --rollback-on-failure instead
Pulled: gcr.io/alloydb-omni/alloydbomni-operator:1.8.0
Digest: sha256:f2d98fa7a3b08dfc1e83b811582718b94e5c017b81aade700c83e917c59f0395
NAME: alloydbomni-operator
LAST DEPLOYED: Thu Aug 27 17:57:30 2026
NAMESPACE: alloydb-omni-system
STATUS: deployed
REVISION: 1
DESCRIPTION: Install complete
TEST SUITE: None
部署数据库集群。
以下清单配置了一个启用了 googleMLExtension 且具有内部负载平衡器的数据库集群:
cat << 'EOF' > my-omni.yaml
apiVersion: v1
kind: Secret
metadata:
  name: db-pw-my-omni
type: Opaque
data:
  my-omni: "VmVyeVN0cm9uZ1Bhc3N3b3Jk"
---
apiVersion: alloydbomni.dbadmin.goog/v1
kind: DBCluster
metadata:
  name: my-omni
spec:
  databaseVersion: "18.3.0"
  primarySpec:
    adminUser:
      passwordRef:
        name: db-pw-my-omni
    features:
      googleMLExtension:
        enabled: true
    resources:
      cpu: 1
      memory: 8Gi
      disks:
      - name: DataDisk
        size: 20Gi
        storageClass: standard
    dbLoadBalancerOptions:
      annotations:
        networking.gke.io/load-balancer-type: "internal"
  allowExternalIncomingTraffic: true
EOF
密码 Secret 值是 VeryStrongPassword 的 Base64 表示形式。在生产环境中,请使用 Google Secret Manager 管理密码。如需了解详情,请参阅 Secret Manager 文档。
清单已保存为 my-omni.yaml。在 Cloud Shell 中,点击终端窗口右上角的打开编辑器,然后读取该文件。
阅读完 my-omni.yaml 清单后,点击打开终端以返回命令提示符。
应用 my-omni.yaml 清单:
kubectl apply -f my-omni.yaml
预期的控制台输出:
secret/db-pw-my-omni created
dbcluster.alloydbomni.dbadmin.goog/my-omni created
检查 my-omni 集群的状态:
kubectl get dbclusters.alloydbomni.dbadmin.goog my-omni -n default
在部署期间,数据库集群会经历设置阶段,直到达到 DBClusterReady 状态。
预期的控制台输出:
$ kubectl get dbclusters.alloydbomni.dbadmin.goog my-omni -n default
NAME      PRIMARYENDPOINT   PRIMARYPHASE   DBCLUSTERPHASE   HAREADYSTATUS   HAREADYREASON
my-omni   10.131.0.33        Ready          DBClusterReady
您可以选择使用 kubectl log 命令监控集群部署:
kubectl logs -l alloydbomni.internal.dbadmin.goog/dbcluster=my-omni --all-containers -f
连接到 AlloyDB Omni
当集群准备就绪后,使用 PostgreSQL 客户端 (psql) 连接到数据库 pod。密码为 my-omni.yaml 中定义的 VeryStrongPassword:
DB_CLUSTER_NAME=my-omni
DB_CLUSTER_NAMESPACE=default
DBPOD=`kubectl get pod --selector=alloydbomni.internal.dbadmin.goog/dbcluster=$DB_CLUSTER_NAME,alloydbomni.internal.dbadmin.goog/task-type=database -n $DB_CLUSTER_NAMESPACE -o jsonpath='{.items[0].metadata.name}'`
kubectl exec -ti $DBPOD -n $DB_CLUSTER_NAMESPACE -c database -- psql -h localhost -U postgres
控制台输出示例:
DB_CLUSTER_NAME=my-omni
DB_CLUSTER_NAMESPACE=default
DBPOD=`kubectl get pod --selector=alloydbomni.internal.dbadmin.goog/dbcluster=$DB_CLUSTER_NAME,alloydbomni.internal.dbadmin.goog/task-type=database -n $DB_CLUSTER_NAMESPACE -o jsonpath='{.items[0].metadata.name}'`
kubectl exec -ti $DBPOD -n $DB_CLUSTER_NAMESPACE -c database -- psql -h localhost -U postgres
Password for user postgres:
psql (18.3)
SSL connection (protocol: TLSv1.3, cipher: TLS_AES_128_GCM_SHA256, compression: off, ALPN: postgresql)
Type "help" for help.

postgres=#
输入 \q 并按 Enter 键,退出 psql 会话:
postgres=# \q
5. 在 GKE 上部署 EmbeddingGemma 模型
如需测试 AlloyDB Omni AI 与本地模型的集成,请将嵌入模型部署到 GKE 集群。本教程使用 Google 的 EmbeddingGemma 模型。
为模型创建节点池
如需运行模型推理,请准备一个专用节点池。您可以使用仅限 CPU 的节点池或 GPU 加速的节点池(例如 g2-standard-8,搭配 NVIDIA L4 GPU)。本教程使用具有 c3-standard-8 机器类型的基于 CPU 的节点池。
创建单节点 CPU 节点池:
export PROJECT_ID=$(gcloud config get-value project)
export LOCATION=us-central1
export CLUSTER_NAME=alloydb-ai-gke
gcloud container node-pools create cpupool \
  --project=${PROJECT_ID} \
  --location=${LOCATION} \
  --node-locations=${LOCATION}-a \
  --cluster=${CLUSTER_NAME} \
  --machine-type=c3-standard-8 \
  --num-nodes=1
预期输出:
student@cloudshell$ export PROJECT_ID=$(gcloud config get project)
Your active configuration is: [pant]
export LOCATION=us-central1
export CLUSTER_NAME=alloydb-ai-gke
student@cloudshell$ gcloud container node-pools create cpupool \
>   --project=${PROJECT_ID} \
>   --location=${LOCATION} \
>   --node-locations=${LOCATION}-a \
>   --cluster=${CLUSTER_NAME} \
>   --machine-type=c3-standard-8 \
>   --num-nodes=1
Creating node pool cpupool...done.
Created [https://container.googleapis.com/v1/projects/gleb-test-short-003-483115/zones/us-central1/clusters/alloydb-ai-gke/nodePools/cpupool].
NAME     MACHINE_TYPE    DISK_SIZE_GB  NODE_VERSION
cpupool  c3-standard-8  100           1.34.1-gke.3355002
获取 Hugging Face 令牌
本教程将部署 Hugging Face 中的 EmbeddingGemma 模型。如需访问模型权重,请生成 Hugging Face 访问令牌:
- 在 Hugging Face 上登录或创建账号。
- 依次前往您的个人资料 > 访问令牌。
- 点击创建新令牌。
- 输入令牌名称,然后选择读取角色。
- 点击创建令牌,然后复制生成的令牌值。
- 如果您之前未接受过模型条款,请在 EmbeddingGemma 模型页面上接受。
在 Cloud Shell 中创建一个包含您的 Hugging Face 令牌的 Kubernetes Secret(将令牌占位符替换为您的令牌):
export HF_TOKEN=<YOUR_HUGGING_FACE_TOKEN>
kubectl create secret generic hf-secret \
  --from-literal=hf_api_token=$HF_TOKEN \
  --dry-run=client -o yaml | kubectl apply -f -
准备部署清单
如需部署模型,请使用 Hugging Face 的文本嵌入推理 (TEI) 容器软件包。如需了解详情,请参阅 Hugging Face GKE TEI 文档。
从 GitHub 克隆部署代码库:
git clone https://github.com/huggingface/Google-Cloud-Containers
检查并修改 CPU 配置清单:
edit Google-Cloud-Containers/examples/gke/tei-deployment/cpu-config/deployment.yaml
CPU 部署的更新后清单:
apiVersion: apps/v1
kind: Deployment
metadata:
  name: tei-deployment
spec:
  replicas: 1
  selector:
    matchLabels:
      app: tei-server
  template:
    metadata:
      labels:
        app: tei-server
        hf.co/model: Google--embeddinggemma-300m
        hf.co/task: text-embeddings
    spec:
      containers:
        - name: tei-container
          image: ghcr.io/huggingface/text-embeddings-inference:cpu-latest
          resources:
            requests:
              cpu: "6"
              memory: "24Gi"
            limits:
              cpu: "6"
              memory: "24Gi"
          env:
            - name: MODEL_ID
              value: google/embeddinggemma-300m
            - name: NUM_SHARD
              value: "1"
            - name: PORT
              value: "8080"
            - name: HF_TOKEN
              valueFrom:
                secretKeyRef:
                  name: hf-secret
                  key: hf_api_token
          volumeMounts:
            - mountPath: /tmp
              name: tmp
      volumes:
        - name: tmp
          emptyDir: {}
      nodeSelector:
        cloud.google.com/machine-family: "c3"
按 ctrl+s 保存更改,然后切换回终端。
部署模型
应用清单以部署 TEI 服务器:
kubectl apply -f Google-Cloud-Containers/examples/gke/tei-deployment/cpu-config
监控部署,直到其处于就绪状态:
printf "Waiting for model to load..."; until kubectl logs -l app=tei-server --tail=50 2>/dev/null | grep -q "Ready"; do printf "."; sleep 3; done; printf '\n\033[1;32m========================================\n[SUCCESS] Model is loaded and ready!\nYou can now proceed to the next step.\n========================================\033[0m\n'
检查 tei-service Kubernetes 服务:
kubectl get service tei-service
预期输出:
student@cloudshell$ kubectl get service tei-service
NAME          TYPE        CLUSTER-IP      EXTERNAL-IP   PORT(S)    AGE
tei-service   ClusterIP   34.118.233.48   <none>        8080/TCP   10m
服务 CLUSTER-IP 在内部通过 http://34.118.233.48:8080/embed 处理请求。
使用 kubectl port-forward 在本地测试模型端点:
kubectl port-forward service/tei-service 8080:8080
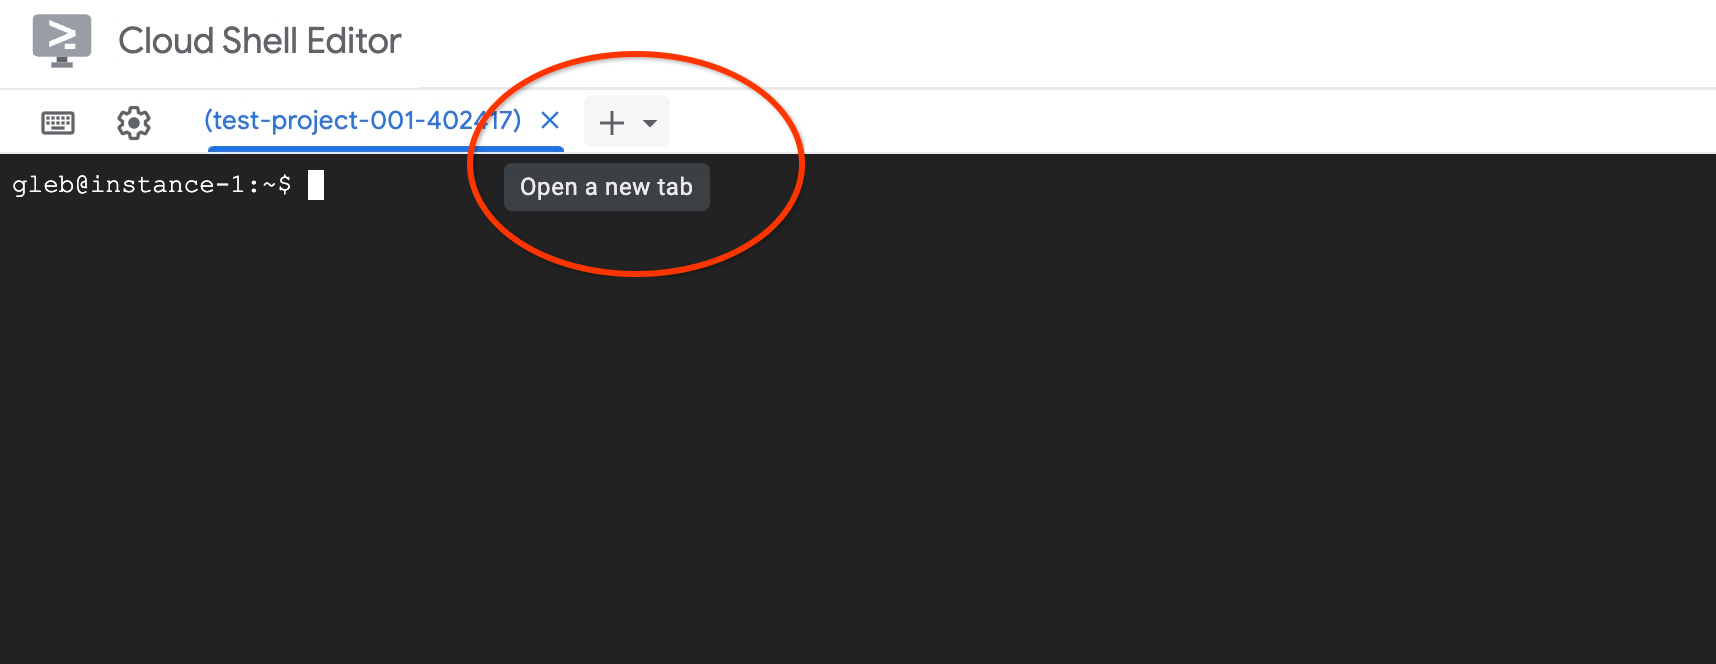
点击终端顶部的 +,打开第二个 Cloud Shell 标签页:
在新标签页中,使用 curl 测试嵌入生成:
curl http://localhost:8080/embed \
  -X POST \
  -d '{"inputs":"Test"}' \
  -H 'Content-Type: application/json'
预期输出(向量数组):
curl http://localhost:8080/embed \
>     -X POST \
>     -d '{"inputs":"Test"}' \
>     -H 'Content-Type: application/json'
[[-0.018975832,0.0071419072,0.06347208,0.022992613,0.014205903
...
-0.03677433,0.01636146,0.06731572]]
按 ctrl+c 停止第一个标签页中的端口转发。
6. 在 AlloyDB Omni 中注册嵌入模型
如需在 AlloyDB Omni 中使用已部署的模型,请创建数据库、定义转换函数并注册模型端点。
创建客户端虚拟机和数据库
在同一 VPC 中创建一个 Compute Engine 虚拟机实例,用作客户端跳板主机:
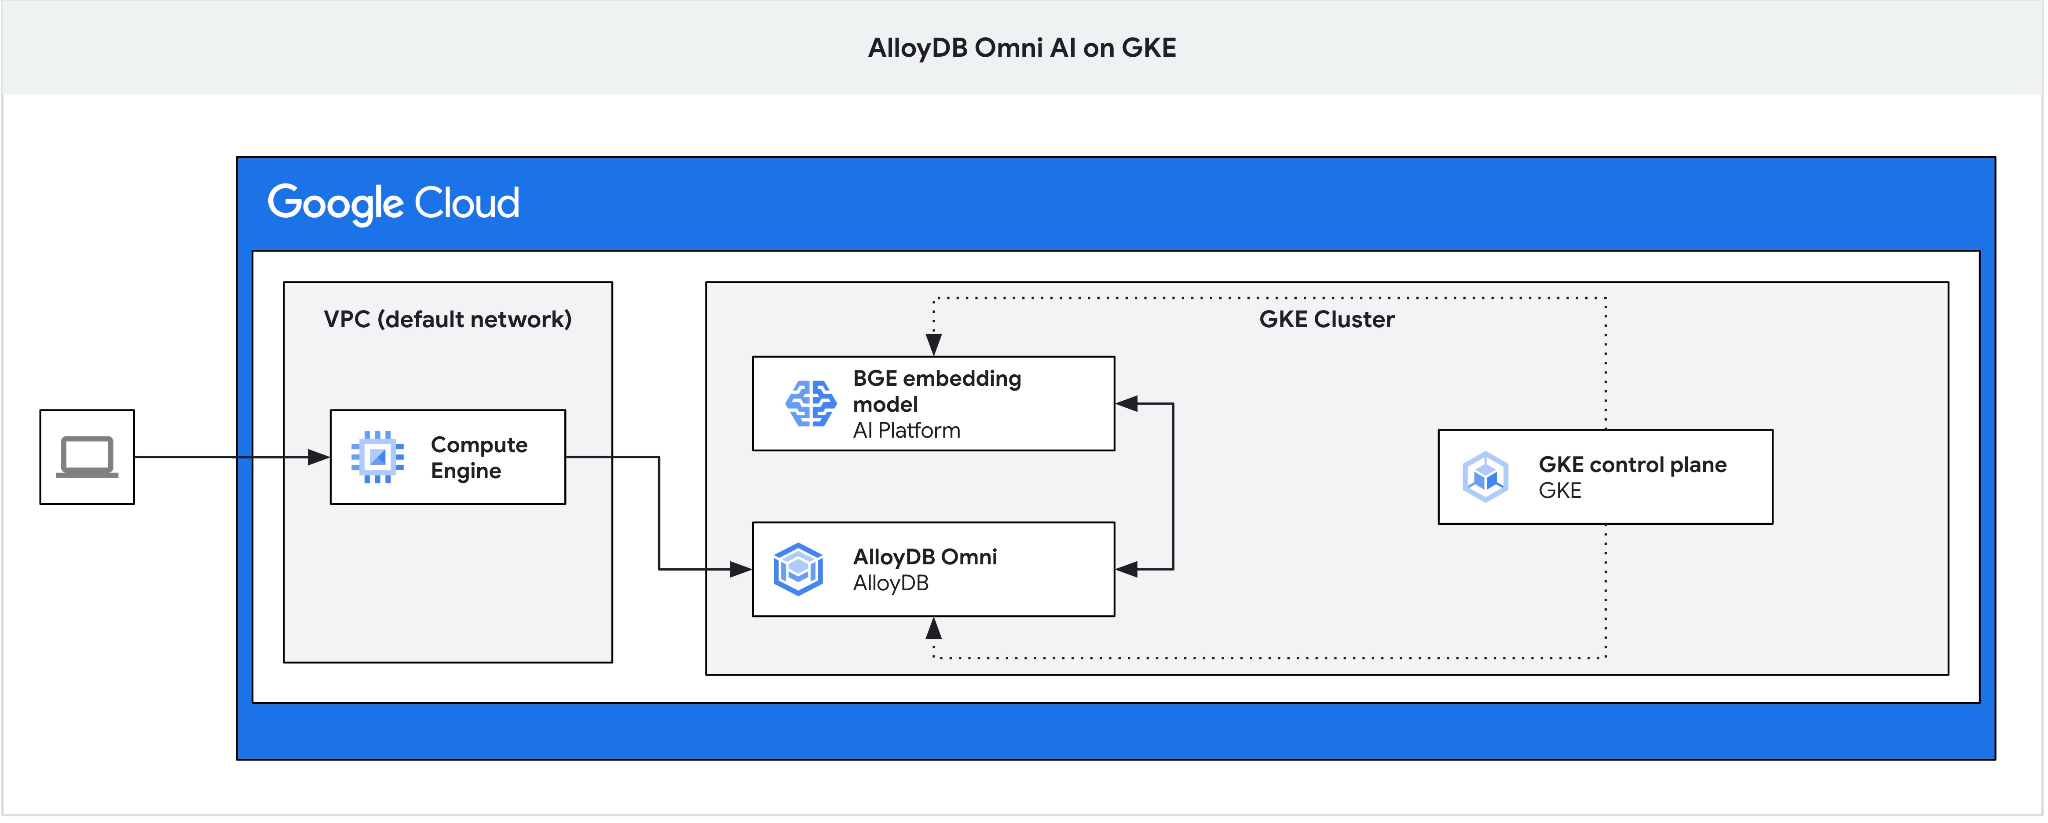
在 Cloud Shell 中,创建客户端虚拟机:
export ZONE=us-central1-a
gcloud compute instances create instance-1 \
  --zone=$ZONE
检索 AlloyDB Omni 端点 IP:
echo "INSTANCE_IP=$(kubectl get dbclusters.alloydbomni.dbadmin.goog my-omni -n default -o jsonpath='{.status.primary.endpoint}')"
预期输出:
INSTANCE_IP=10.128.0.33
INSTANCE_IP 值是 AlloyDB Omni 集群的内部负载平衡器 IP。在此示例中,该网址为 10.131.0.33。
使用 SSH 连接到虚拟机实例:
gcloud compute ssh instance-1 --zone=$ZONE
在 instance-1 的 SSH 会话中,安装 PostgreSQL 客户端:
sudo apt-get update && sudo apt-get install --yes postgresql-client
导出 AlloyDB Omni 负载平衡器 IP(替换为您的 PRIMARYENDPOINT IP):
export INSTANCE_IP=10.131.0.33
使用 psql 连接到 AlloyDB Omni(密码为 VeryStrongPassword):
psql "host=$INSTANCE_IP user=postgres sslmode=require"
在 psql 会话中,创建 demo 数据库:
CREATE DATABASE demo;
切换到 demo 数据库:
\c demo
创建转换函数
自定义嵌入端点需要输入和输出转换函数,以在 AlloyDB Omni 和模型 API 之间调整数据格式。
创建输入转换函数:
CREATE OR REPLACE FUNCTION tei_text_input_transform(model_id VARCHAR(100), input_text TEXT)
RETURNS JSON
LANGUAGE plpgsql
AS $$
DECLARE
  transformed_input JSON;
BEGIN
  SELECT json_build_object('inputs', input_text, 'truncate', true)::JSON INTO transformed_input;
  RETURN transformed_input;
END;
$$;
预期输出:
demo=# CREATE OR REPLACE FUNCTION tei_text_input_transform(model_id VARCHAR(100), input_text TEXT)
RETURNS JSON
LANGUAGE plpgsql
AS $$
DECLARE
  transformed_input JSON;
BEGIN
  SELECT json_build_object('inputs', input_text, 'truncate', true)::JSON INTO transformed_input;
  RETURN transformed_input;
END;
$$;
CREATE FUNCTION
demo=#
创建输出转换函数以解析向量数组响应:
CREATE OR REPLACE FUNCTION tei_text_output_transform(model_id VARCHAR(100), response_json JSON)
RETURNS REAL[]
LANGUAGE plpgsql
AS $$
DECLARE
  transformed_output REAL[];
BEGIN
  SELECT ARRAY(SELECT json_array_elements_text(response_json->0)) INTO transformed_output;
  RETURN transformed_output;
END;
$$;
预期输出:
demo=# CREATE OR REPLACE FUNCTION tei_text_output_transform(model_id VARCHAR(100), response_json JSON)
RETURNS REAL[]
LANGUAGE plpgsql
AS $$
DECLARE
  transformed_output REAL[];
BEGIN
  SELECT ARRAY(SELECT json_array_elements_text(response_json->0)) INTO transformed_output;
  RETURN transformed_output;
END;
$$;
CREATE FUNCTION
demo=#
注册模型
使用 google_ml.create_model 过程在 AlloyDB Omni 中注册模型。将 http://tei-service:8080/embed 指定为 model_request_url,以将请求路由到 Kubernetes 集群服务:
CALL
  google_ml.create_model(
    model_id => 'embeddinggemma',
    model_request_url => 'http://tei-service:8080/embed',
    model_provider => 'custom',
    model_type => 'text_embedding',
    model_in_transform_fn => 'tei_text_input_transform',
    model_out_transform_fn => 'tei_text_output_transform');
预期输出:
demo=# CALL
  google_ml.create_model(
    model_id => 'embeddinggemma',
    model_request_url => 'http://tei-service:8080/embed',
    model_provider => 'custom',
    model_type => 'text_embedding',
    model_in_transform_fn => 'tei_text_input_transform',
    model_out_transform_fn => 'tei_text_output_transform');
CALL
demo=#
使用示例 SQL 查询测试已注册的模型:
SELECT google_ml.embedding('embeddinggemma', 'What is AlloyDB Omni?');
该函数返回由在 GKE 上运行的本地 EmbeddingGemma 模型生成的实数数组表示形式。
按 q 返回到 psql 会话提示。
退出 psql 会话:
\q
7. 使用示例数据测试模型
加载示例数据
本教程使用 Cymbal 零售数据集演示向量相似度搜索。您将使用 Google Cloud SDK 和 PostgreSQL 客户端将数据导入 AlloyDB Omni。
在 instance-1 的 SSH 会话中,连接到演示数据库并启用 vector 扩展程序:
psql "host=$INSTANCE_IP user=postgres sslmode=require dbname=demo"
在 psql 会话中:
CREATE EXTENSION IF NOT EXISTS vector;
退出 psql 会话:
\q
下载并应用架构,以在 demo 数据库中创建表:
gcloud storage cat gs://cloud-training/gcc/gcc-tech-004/cymbal_demo_schema.sql |psql "host=$INSTANCE_IP user=postgres dbname=demo"
预期输出:
student@cloudshell:~$ gcloud storage cat gs://cloud-training/gcc/gcc-tech-004/cymbal_demo_schema.sql |psql "host=$INSTANCE_IP user=postgres dbname=demo"
Password for user postgres:
SET
SET
SET
SET
SET
 set_config
------------

(1 row)

SET
SET
SET
SET
SET
SET
CREATE TABLE
ALTER TABLE
CREATE TABLE
ALTER TABLE
CREATE TABLE
ALTER TABLE
CREATE TABLE
ALTER TABLE
CREATE SEQUENCE
ALTER TABLE
ALTER SEQUENCE
ALTER TABLE
ALTER TABLE
ALTER TABLE
student@cloudshell:~$
验证创建的表:
psql "host=$INSTANCE_IP user=postgres dbname=demo" -c "\dt+"
预期输出:
student@cloudshell:~$ psql "host=$INSTANCE_IP user=postgres dbname=demo" -c "\dt+"
Password for user postgres:
                                           List of relations
 Schema |       Name       | Type  |  Owner   | Persistence | Access method |    Size    | Description
--------+------------------+-------+----------+-------------+---------------+------------+-------------
 public | cymbal_embedding | table | postgres | permanent   | heap          | 8192 bytes |
 public | cymbal_inventory | table | postgres | permanent   | heap          | 8192 bytes |
 public | cymbal_products  | table | postgres | permanent   | heap          | 8192 bytes |
 public | cymbal_stores    | table | postgres | permanent   | heap          | 8192 bytes |
(4 rows)
将数据加载到 cymbal_products 表中:
gcloud storage cat gs://cloud-training/gcc/gcc-tech-004/cymbal_products.csv |psql "host=$INSTANCE_IP user=postgres dbname=demo" -c "\copy cymbal_products from stdin csv header"
预期输出:
student@cloudshell:~$ gcloud storage cat gs://cloud-training/gcc/gcc-tech-004/cymbal_products.csv |psql "host=$INSTANCE_IP user=postgres dbname=demo" -c "\copy cymbal_products from stdin csv header"
COPY 941
student@cloudshell:~$
以下是 cymbal_products 表中的几个示例行。
psql "host=$INSTANCE_IP user=postgres dbname=demo" -c "SELECT uniq_id,left(product_name,30),left(product_description,50),sale_price FROM cymbal_products limit 3"
预期输出:
student@cloudshell:~$ psql "host=$INSTANCE_IP user=postgres dbname=demo" -c "SELECT uniq_id,left(product_name,30),left(product_description,50),sale_price FROM cymbal_products limit 3"
Password for user postgres:
             uniq_id              |              left              |                        left                        | sale_price
----------------------------------+--------------------------------+----------------------------------------------------+------------
 a73d5f754f225ecb9fdc64232a57bc37 | Laundry Tub Strainer Cup       |   Laundry tub strainer cup Chrome For 1-.50, drain |      11.74
 41b8993891aa7d39352f092ace8f3a86 | LED Starry Star Night Light La |  LED Starry Star Night Light Laser Projector 3D Oc |      46.97
 ed4a5c1b02990a1bebec908d416fe801 | Surya Horizon HRZ-1060 Area Ru |  The 100% polypropylene construction of the Surya  |       77.4
(3 rows)
student@cloudshell:~$
将数据加载到 cymbal_inventory 表中:
gcloud storage cat gs://cloud-training/gcc/gcc-tech-004/cymbal_inventory.csv |psql "host=$INSTANCE_IP user=postgres dbname=demo" -c "\copy cymbal_inventory from stdin csv header"
预期输出:
student@cloudshell:~$ gcloud storage cat gs://cloud-training/gcc/gcc-tech-004/cymbal_inventory.csv |psql "host=$INSTANCE_IP user=postgres dbname=demo" -c "\copy cymbal_inventory from stdin csv header"
Password for user postgres:
COPY 263861
student@cloudshell:~$
以下是 cymbal_inventory 表中的几个示例行。
psql "host=$INSTANCE_IP user=postgres dbname=demo" -c "SELECT * FROM cymbal_inventory LIMIT 3"
输出:
student@cloudshell:~$ psql "host=$INSTANCE_IP user=postgres dbname=demo" -c "SELECT * FROM cymbal_inventory LIMIT 3"
Password for user postgres:
 store_id |             uniq_id              | inventory
----------+----------------------------------+-----------
     1583 | adc4964a6138d1148b1d98c557546695 |         5
     1490 | adc4964a6138d1148b1d98c557546695 |         4
     1492 | adc4964a6138d1148b1d98c557546695 |         3
(3 rows)
student@cloudshell:~$
将数据加载到 cymbal_stores 表中:
gcloud storage cat gs://cloud-training/gcc/gcc-tech-004/cymbal_stores.csv |psql "host=$INSTANCE_IP user=postgres dbname=demo" -c "\copy cymbal_stores from stdin csv header"
预期的控制台输出:
student@cloudshell:~$ gcloud storage cat gs://cloud-training/gcc/gcc-tech-004/cymbal_stores.csv |psql "host=$INSTANCE_IP user=postgres dbname=demo" -c "\copy cymbal_stores from stdin csv header"
Password for user postgres:
COPY 4654
student@cloudshell:~$
以下是 cymbal_stores 表中的几个示例行。
psql "host=$INSTANCE_IP user=postgres dbname=demo" -c "SELECT store_id, name, zip_code FROM cymbal_stores limit 3"
输出:
student@cloudshell:~$ psql "host=$INSTANCE_IP user=postgres dbname=demo" -c "SELECT store_id, name, zip_code FROM cymbal_stores limit 3"
Password for user postgres:
 store_id |       name        | zip_code
----------+-------------------+----------
     1990 | Mayaguez Store    |      680
     2267 | Ware Supercenter  |     1082
     4359 | Ponce Supercenter |      780
(3 rows)
student@cloudshell:~$
构建嵌入
使用 psql 连接到演示数据库,并根据 cymbal_products 表中所述的产品说明为这些产品构建嵌入内容。
连接到演示数据库:
psql "host=$INSTANCE_IP user=postgres sslmode=require dbname=demo"
使用 embedding 列(类型为 vector)存储为商品说明生成的文本嵌入。
启用查询计时:
\timing
为每个商品说明生成嵌入,并将其存储在 cymbal_embedding 表中:
INSERT INTO cymbal_embedding (uniq_id, embedding)
SELECT uniq_id, google_ml.embedding('embeddinggemma', product_description)::vector
FROM cymbal_products;
预期输出:
demo=# INSERT INTO cymbal_embedding(uniq_id,embedding)  SELECT uniq_id, google_ml.embedding('embeddinggemma',product_description)::vector FROM cymbal_products;
INSERT 0 941
Time: 497878.136 ms (08:17.878)
demo=#
运行语义搜索查询
在 psql 会话中,使用余弦距离 (<=>) 找到与问题 "What kind of fruit trees grow well here?" 相匹配的前 5 个商品:
SELECT
    cp.product_name,
    left(cp.product_description, 80) AS description,
    cp.sale_price,
    cs.zip_code,
    (ce.embedding <=> google_ml.embedding('embeddinggemma', 'What kind of fruit trees grow well here?')::vector) AS distance
FROM
    cymbal_products cp
JOIN cymbal_embedding ce ON ce.uniq_id = cp.uniq_id
JOIN cymbal_inventory ci ON ci.uniq_id = cp.uniq_id
JOIN cymbal_stores cs ON cs.store_id = ci.store_id
WHERE
    ci.inventory > 0
    AND cs.store_id = 1583
ORDER BY
    distance ASC
LIMIT 5;
预期输出:
demo=# SELECT
        cp.product_name,
        left(cp.product_description,80) as description,
        cp.sale_price,
        cs.zip_code,
        (ce.embedding <=> google_ml.embedding('embeddinggemma','What kind of fruit trees grow well here?')::vector) as distance
FROM
        cymbal_products cp
JOIN cymbal_embedding ce on ce.uniq_id=cp.uniq_id
JOIN cymbal_inventory ci on ci.uniq_id=cp.uniq_id
JOIN cymbal_stores cs on cs.store_id=ci.store_id
WHERE
    ci.inventory > 0
    AND cs.store_id = 1583
ORDER BY
    distance ASC
LIMIT 5;
     product_name      |                                   description                                    | sale_price | zip_code |      distance
-----------------------+----------------------------------------------------------------------------------+------------+----------+--------------------
 Cherry Tree           | This is a beautiful cherry tree that will produce delicious cherries. It is an d |      75.00 |    93230 | 0.5210549378080666
 California Lilac      | This is a beautiful lilac tree that can grow to be over 10 feet tall. It is an d |       5.00 |    93230 | 0.5639421771781971
 Toyon                 | This is a beautiful toyon tree that can grow to be over 20 feet tall. It is an e |      10.00 |    93230 | 0.5670010914504852
 Rose Bush             | This is a beautiful rose bush that will produce fragrant roses. It is a perennia |      50.00 |    93230 | 0.5731542622882957
 California Peppertree | This is a beautiful peppertree that can grow to be over 30 feet tall. It is an e |      25.00 |    93230 | 0.5750934653011995
(5 rows)

Time: 83.610 ms
demo=#
该查询运行了 83 毫秒,并返回了 cymbal_products 表中与请求匹配且在商店 1583 中有库存的树的列表。
构建 ANN 索引
对于小型数据集,可以轻松使用精确搜索扫描所有嵌入内容,但随着数据量的增加,加载时间和响应时间也会增加。为了提高性能,您可以为嵌入数据构建索引。下面是一个示例,展示了如何使用 Google ScaNN 索引处理向量数据。
如果与演示数据库的连接断开,请重新连接:
psql "host=$INSTANCE_IP user=postgres sslmode=require dbname=demo"
启用 alloydb_scann 扩展程序:
CREATE EXTENSION IF NOT EXISTS alloydb_scann;
在 embedding 列上创建 ScaNN 索引:
CREATE INDEX cymbal_products_embeddings_scann ON cymbal_embedding
  USING scann (embedding cosine)
  WITH (num_leaves=10, max_num_levels = 1);
重新运行语义搜索查询,以比较执行性能:
SELECT
    cp.product_name,
    left(cp.product_description, 80) AS description,
    cp.sale_price,
    cs.zip_code,
    (ce.embedding <=> google_ml.embedding('embeddinggemma', 'What kind of fruit trees grow well here?')::vector) AS distance
FROM
    cymbal_products cp
JOIN cymbal_embedding ce ON ce.uniq_id = cp.uniq_id
JOIN cymbal_inventory ci ON ci.uniq_id = cp.uniq_id
JOIN cymbal_stores cs ON cs.store_id = ci.store_id
WHERE
    ci.inventory > 0
    AND cs.store_id = 1583
ORDER BY
    distance ASC
LIMIT 5;
预期输出:
demo=# SELECT
    cp.product_name,
    left(cp.product_description,80) as description,
    cp.sale_price,
    cs.zip_code,
    (ce.embedding <=> google_ml.embedding('embeddinggemma', 'What kind of fruit trees grow well here?')::vector) AS distance
FROM
    cymbal_products cp
JOIN cymbal_embedding ce ON ce.uniq_id = cp.uniq_id
JOIN cymbal_inventory ci ON ci.uniq_id = cp.uniq_id
JOIN cymbal_stores cs ON cs.store_id = ci.store_id
WHERE
    ci.inventory > 0
    AND cs.store_id = 1583
ORDER BY
    distance ASC
LIMIT 5;
     product_name      |                                   description                                    | sale_price | zip_code |      distance
-----------------------+----------------------------------------------------------------------------------+------------+----------+--------------------
 Cherry Tree           | This is a beautiful cherry tree that will produce delicious cherries. It is an d |      75.00 |    93230 | 0.5210549378080666
 California Lilac      | This is a beautiful lilac tree that can grow to be over 10 feet tall. It is an d |       5.00 |    93230 | 0.5639421771781971
 Toyon                 | This is a beautiful toyon tree that can grow to be over 20 feet tall. It is an e |      10.00 |    93230 | 0.5670010914504852
 Rose Bush             | This is a beautiful rose bush that will produce fragrant roses. It is a perennia |      50.00 |    93230 | 0.5731542622882957
 California Peppertree | This is a beautiful peppertree that can grow to be over 30 feet tall. It is an e |      25.00 |    93230 | 0.5750934653011995
(5 rows)

Time: 64.783 ms
查询执行时间略有缩短,在较大数据集上,这种缩短会更加明显。返回的数据应与不使用索引时获得的数据相同或非常相似。
您可以尝试其他查询,并参阅文档详细了解如何优化向量索引。
退出 psql 会话:
\q
断开与 instance-1 SSH 会话的连接,然后按 Ctrl+D 或输入 exit,返回到 Google Cloud Shell。
8. 使用 vLLM 部署 Gemma
为 Gemma 添加节点池
首先,检查您所在区域中可用的节点类型:
export LOCATION=us-central1-a
gcloud compute accelerator-types list --filter="zone:${LOCATION}"
您应该会看到一份可用加速器类型列表,其中包括 nvidia-l4 加速器。现在,创建一个具有 nvidia-l4 加速器类型的节点池:
export PROJECT_ID=$(gcloud config get project)
export LOCATION=us-central1
export CLUSTER_NAME=alloydb-ai-gke
gcloud container node-pools create gpupool \
    --accelerator type=nvidia-l4,count=1,gpu-driver-version=latest \
    --project=${PROJECT_ID} \
    --location=${LOCATION} \
    --node-locations=${LOCATION}-a \
    --cluster=${CLUSTER_NAME} \
    --machine-type=g2-standard-8 \
    --num-nodes=1
使用 vLLM 为 Google Gemini 4 12B 模型创建部署清单:
cat << 'EOF' > gemma-12b-gpu-vllm-deployment.yaml
apiVersion: apps/v1
kind: Deployment
metadata:
  name: gemma-12b-gpu-vllm-deployment
spec:
  replicas: 1
  selector:
    matchLabels:
      app: gemma-12b-gpu-vllm
  template:
    metadata:
      labels:
        app: gemma-12b-gpu-vllm
        ai.gke.io/model: gemma-4-12b-it
        ai.gke.io/inference-server: vllm
        examples.ai.gke.io/source: user-guide
    spec:
      containers:
      - name: inference-server
        image: us-docker.pkg.dev/vertex-ai/vertex-vision-model-garden-dockers/pytorch-vllm-serve:latest
        resources:
          requests:
            cpu: "4"
            memory: "16Gi"
            ephemeral-storage: "30Gi"
            nvidia.com/gpu: "1"
          limits:
            cpu: "8"
            memory: "24Gi"
            ephemeral-storage: "30Gi"
            nvidia.com/gpu: "1"
        command: ["python3", "-m", "vllm.entrypoints.api_server"]
        args:
          - --model=$(MODEL_ID)
          - --host=0.0.0.0
          - --port=8000
          - --tensor-parallel-size=1
          - --enable-log-requests
          - --enable-chunked-prefill
          - --enable-prefix-caching
          - --enable-auto-tool-choice
          - --generation-config=auto
          - --tool-call-parser=gemma4
          - --dtype=bfloat16
          - --max-num-seqs=16
          - --max-model-len=32768
          - --gpu-memory-utilization=0.95
          - --reasoning-parser=gemma4
          - --trust-remote-code
          - --quantization=fp8
        env:
        - name: LD_LIBRARY_PATH
          value: ${LD_LIBRARY_PATH}:/usr/local/nvidia/lib64
        - name: MODEL_ID
          value: google/gemma-4-12b-it
        - name: HF_TOKEN
          valueFrom:
            secretKeyRef:
              name: hf-secret
              key: hf_api_token
        volumeMounts:
        - mountPath: /dev/shm
          name: dshm
      volumes:
      - name: dshm
        emptyDir:
            medium: Memory
      nodeSelector:
        cloud.google.com/gke-accelerator: nvidia-l4
        cloud.google.com/gke-gpu-driver-version: latest
---
apiVersion: v1
kind: Service
metadata:
  name: gemma-12b-gpu-vllm-service
spec:
  selector:
    app: gemma-12b-gpu-vllm
  type: ClusterIP
  ports:
    - protocol: TCP
      port: 8000
      targetPort: 8000
EOF
应用已保存的 gemma-12b-gpu-vllm-deployment.yaml 部署:
kubectl apply -f gemma-12b-gpu-vllm-deployment.yaml
预期输出:
$ kubectl apply -f gemma-12b-gpu-vllm-deployment.yaml
deployment.apps/gemma-12b-gpu-vllm-deployment created
service/gemma-12b-gpu-vllm-service created
等待部署完成并加载模型。这可能需要几分钟时间。
printf "Waiting for model to load..."; until kubectl logs -l app=gemma-12b-gpu-vllm --tail=50 2>/dev/null | grep -q "Application startup complete"; do printf "."; sleep 3; done; printf '\n\033[1;32m========================================\n[SUCCESS] Model is loaded and ready!\nYou can now proceed to the next step.\n========================================\033[0m\n'
预期输出:
Waiting for model to load...
========================================
[SUCCESS] Model is loaded and ready!
You can now proceed to the next step.
========================================
测试模型。启用端口转发以访问模型:
kubectl port-forward svc/gemma-12b-gpu-vllm-service 8090:8000
在另一个终端窗口中,使用 curl 向模型发送提示:
curl http://localhost:8090/v1/chat/completions \
  -H "Content-Type: application/json" \
  -d '{
    "messages": [
      {"role": "system", "content": "You are a helpful assistant running on GKE."},
      {"role": "user", "content": "What is AlloyDB Omni."}
    ],
    "temperature": 0.7
  }' | jq -r '.choices[0].message.content'
预期输出:
  % Total    % Received % Xferd  Average Speed   Time    Time     Time  Current
                                 Dload  Upload   Total   Spent    Left  Speed
100  3957  100  3761  100   196     85      4  0:00:49  0:00:43  0:00:06   830
**AlloyDB Omni** is a fully managed, PostgreSQL-compatible database engine from Google Cloud that can be run **on-premises, in other clouds, or in your own data centers.**

To understand it simply: It allows you to run the high-performance, enterprise-grade capabilities of Google's **AlloyDB** (a cloud-native database) on your own infrastructure.

Here is a breakdown of what makes it significant:

### 1. The "Best of Both Worlds" Architecture
Normally, you have to choose between:
*   **Managed Cloud Databases:** Easy to scale and manage, but you are locked into the cloud provider's infrastructure.
*   **Self-Managed Databases:** You have full control over the hardware/location, but you are responsible for scaling, patching, and high availability.

**AlloyDB Omni** bridges this gap. It provides the advanced features of a cloud-native database (like intelligent indexing, high availability, and massive scalability) while allowing you to run it anywhere.
按 Ctrl+C 停止第一个终端中的端口转发(如果仍在运行)。
9. 在 AlloyDB Omni 中注册 Gemma 4 模型
使用 google_ml.create_model 过程在 AlloyDB Omni 中注册 Gemma 12B 模型。将 http://gemma-12b-gpu-vllm-service:8000/v1/chat/completions 指定为 model_request_url,以将请求路由到 Kubernetes 集群服务:
检索 AlloyDB Omni 端点 IP:
echo "INSTANCE_IP=$(kubectl get dbclusters.alloydbomni.dbadmin.goog my-omni -n default -o jsonpath='{.status.primary.endpoint}')"
使用 SSH 连接到虚拟机实例:
export ZONE=us-central1-a
gcloud compute ssh instance-1 --zone=$ZONE
连接到虚拟机后,导出上一步中的 INSTANCE_IP 变量(以 10.128.0.33 为例,请将其替换为您的 IP):
export INSTANCE_IP=10.128.0.33
导出 AlloyDB 密码:
export PGPASSWORD=VeryStrongPassword
连接到 demo 数据库:
psql "host=$INSTANCE_IP user=postgres sslmode=require dbname=demo"
在 psql 会话中注册模型:
CALL
  google_ml.create_model(
    model_id => 'gemma-12b-gpu',
    model_request_url => 'http://gemma-12b-gpu-vllm-service:8000/v1/chat/completions',
    model_provider => 'custom',
    model_type => 'llm');
使用示例 SQL 查询测试模型:
SELECT google_ml.predict_row(
  model_id => 'gemma-12b-gpu',
  request_body => json_build_object(
    'messages', json_build_array(
      json_build_object('role', 'user', 'content', 'What is AlloyDB Omni?'))))->'choices'->0->'message'->'content';
按 q 从结果窗口退出,返回到 psql 提示
在 AlloyDB Omni 中将向量搜索与 LLM RAG 相结合
将向量搜索与 LLM 请求搭配使用,以演示 LLM 的 RAG(检索增强生成)功能。
在 plsql 中运行 SQL 查询:
WITH trees AS (
SELECT
        cp.product_name,
        cp.product_description AS description,
        cp.sale_price,
        cs.zip_code,
        cp.uniq_id AS product_id
FROM
    cymbal_products cp
JOIN cymbal_embedding ce ON ce.uniq_id = cp.uniq_id
JOIN cymbal_inventory ci ON ci.uniq_id = cp.uniq_id
JOIN cymbal_stores cs ON cs.store_id = ci.store_id
WHERE
        ci.inventory>0
        AND cs.store_id = 1583
ORDER BY
        (ce.embedding <=> embedding('embeddinggemma',
        'What kind of fruit trees grow well here?')::vector) ASC
LIMIT 1),
prompt AS (
SELECT
        'You are a friendly advisor helping to find a product based on the customer''s needs.
Based on the client request we have loaded a list of products closely related to search.
The list in JSON format with list of values like {"product_name":"name","product_description":"some description","sale_price":10}
Here is the list of products:' || json_agg(trees) || 'The customer asked "What kind of fruit trees grow well here?"
You should give information about the product, price and some supplemental information' AS prompt_text
FROM
        trees),
response AS (
SELECT
        google_ml.predict_row(
          model_id =>'gemma-12b-gpu',
          request_body => json_build_object(
            'messages', json_build_array(
              json_build_object('role', 'user', 'content',prompt_text)
            )))->'choices'->0->'message'->'content' AS resp
FROM
        prompt)
SELECT
REPLACE(resp::text, '\n', CHR(10))
FROM
        response;
预期输出:
----------------------------------------------------------------------------------------------------------------------------------------------
 "Hello there! I'd be happy to help you find the perfect tree for your garden.                                                               +
                                                                                                                                             +
 Based on your location, we have a wonderful option that would grow beautifully in your area:                                                +
                                                                                                                                             +
 **Cherry Tree**                                                                                                                             +
 *   **Price:** $75.00                                                                                                                       +
 *   **Description:** This is a stunning deciduous tree that not only provides a beautiful landscape but also produces delicious cherries.   +
 *   **Supplemental Information:**                                                                                                           +
     *   **Growth:** It grows to about 15 feet tall.                                                                                         +
     *   **Appearance:** You can look forward to dark green leaves in the summer that transform into a vibrant red in the fall.              +
     *   **Benefits:** It's a great choice if you're looking for both fruit and extra shade or privacy in your yard.                         +
     *   **Care Tips:** It performs best in a cool, moist climate with sandy soil. Since you are in a suitable zone, it should thrive nicely!+
                                                                                                                                             +
 Would you like more details on how to plant this, or would you like to proceed with an order?"
(1 row)
查询通过向量搜索结果补充了 LLM 的提示。
尝试其他查询,并试验 RAG 模式。所展示架构的优势在于其完全的自给自足能力。数据不会发送到集群外部,并且可以在完全隔离的环境中运行。
退出 psql 会话:
\q
断开与虚拟机的 SSH 会话:
exit
别忘了,AlloyDB Omni 还有更多功能和实验。
10. 清理环境
为避免系统向您的 Google Cloud 账号持续收取费用,请删除在本 Codelab 中创建的资源。
删除 GKE 集群
在 Cloud Shell 中,删除 GKE 集群:
export PROJECT_ID=$(gcloud config get-value project)
export LOCATION=us-central1
export CLUSTER_NAME=alloydb-ai-gke
gcloud container clusters delete ${CLUSTER_NAME} \
  --project=${PROJECT_ID} \
  --region=${LOCATION}
预期输出:
student@cloudshell:~$ gcloud container clusters delete ${CLUSTER_NAME} \
>   --project=${PROJECT_ID} \
>   --region=${LOCATION}
The following clusters will be deleted.
 - [alloydb-ai-gke] in [us-central1]

Do you want to continue (Y/n)?  Y

Deleting cluster alloydb-ai-gke...done.
Deleted
删除客户端虚拟机
在 Cloud Shell 中,删除 Compute Engine 实例:
export PROJECT_ID=$(gcloud config get-value project)
export ZONE=us-central1-a
gcloud compute instances delete instance-1 \
  --project=${PROJECT_ID} \
  --zone=${ZONE}
预期输出:
student@cloudshell:~$ export PROJECT_ID=$(gcloud config get project)
export ZONE=us-central1-a
gcloud compute instances delete instance-1 \
  --project=${PROJECT_ID} \
  --zone=${ZONE}
Your active configuration is: [cloudshell-5399]
The following instances will be deleted. Any attached disks configured to be auto-deleted will be deleted unless they are attached to any other instances or the `--keep-disks` flag is given and specifies them for keeping. Deleting a disk
is irreversible and any data on the disk will be lost.
 - [instance-1] in [us-central1-a]

Do you want to continue (Y/n)?  Y

Deleted
如果您为此 Codelab 创建了一个新项目,可以选择在 Google Cloud Resource Manager 中删除整个项目。
11. 恭喜
恭喜您完成此 Codelab!
所学内容
- 如何在 GKE 集群上部署 AlloyDB Omni
- 如何连接到 AlloyDB Omni
- 如何将数据加载到 AlloyDB Omni 中
- 如何将 AI 模型(嵌入模型和 LLM)部署到 GKE
- 如何在 AlloyDB Omni 中注册 AI 模型
- 如何生成用于语义搜索的嵌入
- 如何在 AlloyDB Omni 中运行语义搜索查询
- 如何在 AlloyDB Omni 中创建和使用向量索引
如需详细了解如何在 AlloyDB Omni 中使用 AI,请参阅文档。
调查问卷
输出: