

1. はじめに
この Codelab では、pgvector と Scalable Nearest Neighbor(ScaNN)インデックスを使用して AlloyDB でハイブリッド検索を実行する方法を学習します。この検索では、Foreign Data Wrapper(FDW)を介して Apache Solr の全文検索機能が組み合わされます。このラボは、AlloyDB AI 機能専用のラボ コレクションの一部です。詳細については、ドキュメントの AlloyDB AI ページをご覧ください。
Apache Solr は、Apache Lucene 上に構築されたオープンソースのエンタープライズ検索プラットフォームです。高速でスケーラブルな高可用性の全文検索機能を備えています。外部データラッパー(FDW)を介して Solr を AlloyDB と統合すると、ユーザーは構造化データベース テーブルとともに PostgreSQL から Solr インデックスを直接クエリできます。詳細については、Apache Solr のドキュメントをご覧ください。
前提条件
- Google Cloud コンソールの基本的な知識
- コマンドライン インターフェースと Google Shell の基本的なスキル
学習内容
- AlloyDB クラスタとプライマリ インスタンスをデプロイする方法
- Google Compute Engine VM から AlloyDB に接続する方法
- データベースを作成して AlloyDB AI を有効にする方法
- データベースにデータを読み込む方法
- AlloyDB Studio の使用方法
- Vertex AI でエンベディングを生成する
- ベクトル検索を高速化する ScaNN ベクトル インデックスの作成方法
- Apache Solr の外部データ ラッパー(FDW)を作成する方法
- AlloyDB のセマンティック検索と Solr の全文検索を組み合わせてハイブリッド検索を実行します。
必要なもの
- Google Cloud アカウントと Google Cloud プロジェクト
- ウェブブラウザ(Chrome など)
2. 設定と要件
プロジェクトのセットアップ
Google Cloud コンソールにログインします。Gmail アカウントも Google Workspace アカウントもまだお持ちでない場合は、アカウントを作成してください。
仕事用または学校用アカウントではなく、個人用アカウントを使用します。
- Google Cloud コンソールのプロジェクト セレクタ ページで、Google Cloud プロジェクトを選択または作成します。
- Cloud プロジェクトに対して課金が有効になっていることを確認します。プロジェクトで課金が有効になっているかどうかを確認する方法をご覧ください。
課金を有効にする
課金を有効にするには、次の 2 つの方法があります。個人用の請求先アカウントを使用するか、次の手順でクレジットを利用できます。
個人用の請求先アカウントを設定する
Google Cloud クレジットを使用して課金を設定した場合は、この手順をスキップできます。
個人用の請求先アカウントを設定するには、Cloud コンソールでこちらに移動して課金を有効にします。
注意事項:
- このラボを完了するのにかかる Cloud リソースの費用は 3 米ドル未満です。
- このラボの最後の手順に沿ってリソースを削除すると、それ以上の料金は発生しません。
- 新規ユーザーは、300 米ドル分の無料トライアルをご利用いただけます。
Cloud Shell の起動
Google Cloud はノートパソコンからリモートで操作できますが、この Codelab では、Google Cloud Shell(Cloud 上で動作するコマンドライン環境)を使用します。
Cloud Shell は、必要なツールがプリロードされた Google Cloud で動作するコマンドライン環境です。
- Google Cloud コンソールの上部にある [Cloud Shell をアクティブにする] をクリックします。
- Cloud Shell に接続したら、認証を確認します。
gcloud auth list - プロジェクトが構成されていることを確認します。
gcloud config get project - プロジェクトが想定どおりに設定されていない場合は、設定します。
export PROJECT_ID=<YOUR_PROJECT_ID>
gcloud config set project $PROJECT_ID
この仮想マシンには、必要な開発ツールがすべて用意されています。永続的なホーム ディレクトリが 5 GB 用意されており、Google Cloud で稼働します。そのため、ネットワークのパフォーマンスと認証機能が大幅に向上しています。この Codelab での作業はすべて、ブラウザ内から実行できます。インストールは不要です。
3. はじめに
API を有効にする
出力:
AlloyDB、Compute Engine、ネットワーキング サービス、Vertex AI を使用するには、Google Cloud プロジェクトでそれぞれの API を有効にする必要があります。
API の有効化
Cloud Shell のターミナルで、プロジェクト ID が設定されていることを確認します。
gcloud config set project [YOUR-PROJECT-ID]
環境変数 PROJECT_ID を設定します。
PROJECT_ID=$(gcloud config get-value project)
必要な API をすべて有効にします。
gcloud services enable alloydb.googleapis.com \
                       compute.googleapis.com \
                       cloudresourcemanager.googleapis.com \
                       servicenetworking.googleapis.com \
                       aiplatform.googleapis.com \
                       secretmanager.googleapis.com
想定される出力
student@cloudshell:~ (alloydb-hybrid-search)$ gcloud config set project alloydb-hybrid-search
[environment: untagged] Read more to tag: g.co/cloud/project-env-tag.
Updated property [core/project].
student@cloudshell:~ (alloydb-hybrid-search)$ PROJECT_ID=$(gcloud config get-value project)
Your active configuration is: [cloudshell-32544]
student@cloudshell:~ (alloydb-hybrid-search)$ gcloud services enable alloydb.googleapis.com \
                       compute.googleapis.com \
                       cloudresourcemanager.googleapis.com \
                       servicenetworking.googleapis.com \
                       aiplatform.googleapis.com \
                       secretmanager.googleapis.com
Operation "operations/acat.p2-350113473377-5ffc2f22-caa9-4857-b2f4-018657d8bf6e" finished successfully.
API の概要
- AlloyDB API(
alloydb.googleapis.com)を使用すると、AlloyDB for PostgreSQL クラスタの作成、管理、スケーリングを行うことができます。要求の厳しいエンタープライズ トランザクション ワークロードと分析ワークロード向けに設計された、PostgreSQL 互換のフルマネージド データベース サービスを提供します。 - Compute Engine API(
compute.googleapis.com)を使用すると、仮想マシン(VM)、永続ディスク、ネットワーク設定を作成して管理できます。これは、ワークロードの実行と、多くのマネージド サービスの基盤となるインフラストラクチャのホストに必要な、Infrastructure-as-a-Service(IaaS)の基盤となるものです。 - Cloud Resource Manager API(
cloudresourcemanager.googleapis.com)を使用すると、Google Cloud プロジェクトのメタデータと構成をプログラムで管理できます。これにより、リソースの整理、Identity and Access Management(IAM)ポリシーの処理、プロジェクト階層全体での権限の検証が可能になります。 - Service Networking API(
servicenetworking.googleapis.com)を使用すると、Virtual Private Cloud(VPC)ネットワークと Google のマネージド サービス間のプライベート接続の設定を自動化できます。AlloyDB などのサービスが他のリソースと安全に通信できるように、プライベート IP アクセスを確立するために必要です。 - Vertex AI API(
aiplatform.googleapis.com)を使用すると、アプリケーションで ML モデルを構築、デプロイ、スケーリングできます。このサービスは、生成 AI モデル(Gemini など)へのアクセスやカスタムモデルのトレーニングなど、Google Cloud のすべての AI サービスに統合インターフェースを提供します。 - Secret Manager API(
secretmanager.googleapis.com)は、API キー、ユーザー名、パスワード、証明書などの機密データを保存して管理できるシークレットおよび認証情報の管理サービスです。
必要に応じて、Vertex AI エンベディング モデルを使用するようにデフォルトのリージョンを構成できます。Vertex AI で使用可能なロケーションの詳細を確認する。この例では、us-central1 リージョンを使用しています。
gcloud config set compute/region us-central1
4. AlloyDB をデプロイする
AlloyDB クラスタを作成する前に、将来の AlloyDB インスタンスで使用する VPC で使用可能なプライベート IP 範囲が必要です。ない場合は、作成して内部の Google サービスで使用するように割り当てる必要があります。その後、クラスタとインスタンスを作成できます。
プライベート IP 範囲を作成する
AlloyDB の VPC でプライベート サービス アクセス構成を構成する必要があります。ここでは、プロジェクトに「デフォルト」の VPC ネットワークがあり、すべてのアクションで使用されることを前提としています。
プライベート IP 範囲を作成します。
gcloud compute addresses create psa-range \
    --global \
    --purpose=VPC_PEERING \
    --prefix-length=24 \
    --description="VPC private service access" \
    --network=default
割り振られた IP 範囲を使用してプライベート接続を作成します。
gcloud services vpc-peerings connect \
    --service=servicenetworking.googleapis.com \
    --ranges=psa-range \
    --network=default
接続したら、ピアリングを更新してカスタムルートをエクスポートします。
gcloud compute networks peerings update servicenetworking-googleapis-com \
    --network=default \
    --export-custom-routes
想定されるコンソール出力:
student@cloudshell:~ (alloydb-hybrid-search)$ gcloud compute addresses create psa-range \
    --global \
    --purpose=VPC_PEERING \
    --prefix-length=24 \
    --description="VPC private service access" \
    --network=default
Created [https://www.googleapis.com/compute/v1/projects/alloydb-hybrid-search/global/addresses/psa-range].

student@cloudshell:~ (alloydb-hybrid-search)$ gcloud services vpc-peerings connect \
    --service=servicenetworking.googleapis.com \
    --ranges=psa-range \
    --network=default
Operation "operations/pssn.p24-350113473377-fadad49e-7e14-472a-8888-26951e40a1f7" finished successfully.

student@cloudshell:~ (alloydb-hybrid-search)$ gcloud compute networks peerings update servicenetworking-googleapis-com \
    --network=default \
    --export-custom-routes
Updated [https://www.googleapis.com/compute/v1/projects/alloydb-hybrid-search/global/networks/default].
AlloyDB クラスタを作成する
このセクションでは、us-central1 リージョンに AlloyDB クラスタを作成します。
postgres ユーザーのパスワードを定義します。独自のパスワードを定義することも、ランダム関数を使用してパスワードを生成することもできます。
export PGPASSWORD=`openssl rand -hex 12`
想定されるコンソール出力:
student@cloudshell:~ (alloydb-hybrid-search)$ export PGPASSWORD=`openssl rand -hex 12`
後で使用できるように PostgreSQL のパスワードをメモしておきます。
echo $PGPASSWORD
このパスワードは、後で postgres ユーザーとしてインスタンスに接続するために必要になります。安全な場所(パスワード マネージャーなど)にコピーすることをおすすめします。
想定されるコンソール出力:
student@cloudshell:~ (alloydb-hybrid-search)$ echo $PGPASSWORD
<generated password>
AlloyDB クラスタを作成する
リージョンと AlloyDB クラスタ名を定義します。ここでは、us-central1 リージョンと alloydb-hybrid-search をクラスタ名として使用します。
export REGION=us-central1
export ADBCLUSTER=alloydb-hybrid-search
コマンドを実行してクラスタを作成します。
gcloud alloydb clusters create $ADBCLUSTER \
    --password=$PGPASSWORD \
    --network=default \
    --region=$REGION \
    --database-version=POSTGRES_17
想定されるコンソール出力:
student@cloudshell:~ (alloydb-hybrid-search)$ export REGION=us-central1
export ADBCLUSTER=alloydb-hybrid-search
student@cloudshell:~ (alloydb-hybrid-search)$ gcloud alloydb clusters create $ADBCLUSTER \
    --password=$PGPASSWORD \
    --network=default \
    --region=$REGION \
    --database-version=POSTGRES_17
Creating cluster...done.
同じ Cloud Shell セッションで、クラスタの AlloyDB プライマリ インスタンスを作成します。切断された場合は、リージョンとクラスタ名の環境変数を再度定義する必要があります。
gcloud alloydb instances create $ADBCLUSTER-pr \
    --instance-type=PRIMARY \
    --cpu-count=2 \
    --region=$REGION \
    --cluster=$ADBCLUSTER
想定されるコンソール出力:
admin_@cloudshell:~ (my-project-93954-gke)$ gcloud alloydb instances create $ADBCLUSTER-pr \
    --instance-type=PRIMARY \
    --cpu-count=2 \
    --region=$REGION \
    --availability-type ZONAL \
    --cluster=$ADBCLUSTER
Operation ID: operation-1784244706986-656c2d7f3c8f2-59a9e52a-1e7b1b01
Creating instance...done.
5. AlloyDB に接続する
AlloyDB はプライベート接続のみを使用してデプロイされるため、データベースを操作するには PostgreSQL クライアントがインストールされた VM が必要です。この VM を使用して Apache Solr インスタンスも実行します。
GCE VM をデプロイする
AlloyDB クラスタと同じリージョンと VPC に GCE VM を作成し、Solr を実行するのに十分な大きさのブートディスクがあることを確認します。ここでは、--create-disk フラグで 20 GB のブートディスクを指定します。
Cloud Shell で、次のコマンドを実行します。
export ZONE=us-central1-a
gcloud compute instances create instance-1 \
    --zone=$ZONE \
    --create-disk=auto-delete=yes,boot=yes,size=20,image=projects/debian-cloud/global/images/$(gcloud compute images list --filter="family=debian-12 AND family!=debian-12-arm64" --format="value(name)") \
    --scopes=https://www.googleapis.com/auth/cloud-platform
想定されるコンソール出力:
student@cloudshell:~ (alloydb-hybrid-search)$ export ZONE=us-central1-a
gcloud compute instances create instance-1 \
    --zone=$ZONE \
    --network=default \
    --create-disk=auto-delete=yes,boot=yes,image=projects/debian-cloud/global/images/$(gcloud compute images list --filter="family=debian-12 AND family!=debian-12-arm64" --format="value(name)") \
    --scopes=https://www.googleapis.com/auth/cloud-platform

Created [https://www.googleapis.com/compute/v1/projects/test-project-402417/zones/us-central1-a/instances/instance-1].
NAME: instance-1
ZONE: us-central1-a
MACHINE_TYPE: n1-standard-1
PREEMPTIBLE:
INTERNAL_IP: X.X.X.X
EXTERNAL_IP: X.X.X.X
STATUS: RUNNING
Postgres クライアントをインストールする
デプロイされた VM に PostgreSQL クライアント ソフトウェアをインストールします。
VM に接続します。
gcloud compute ssh instance-1 --zone=us-central1-a
想定されるコンソール出力:
admin_@cloudshell:~ (my-project-93954-gke)$ gcloud compute ssh instance-1 --zone=us-central1-a
Updating project ssh metadata...working..Updated [https://www.googleapis.com/compute/v1/projects/alloydb-hybrid-search].
Updating project ssh metadata...done.
Waiting for SSH key to propagate.
Warning: Permanently added 'compute.5110295539541121102' (ECDSA) to the list of known hosts.
Linux instance-1.us-central1-a.c.gleb-test-short-001-418811.internal 6.1.0-18-cloud-amd64 #1 SMP PREEMPT_DYNAMIC Debian 6.1.76-1 (2024-02-01) x86_64

The programs included with the Debian GNU/Linux system are free software;
the exact distribution terms for each program are described in the
individual files in /usr/share/doc/*/copyright.

Debian GNU/Linux comes with ABSOLUTELY NO WARRANTY, to the extent
permitted by applicable law.
VM 内でソフトウェア実行コマンドをインストールします。
sudo apt-get update
sudo apt-get install --yes postgresql-client
想定されるコンソール出力:
student@instance-1:~$ sudo apt-get update
sudo apt-get install --yes postgresql-client
Get:1 https://packages.cloud.google.com/apt google-compute-engine-bullseye-stable InRelease [5146 B]
Get:2 https://packages.cloud.google.com/apt cloud-sdk-bullseye InRelease [6406 B]
Hit:3 https://deb.debian.org/debian bullseye InRelease
Get:4 https://deb.debian.org/debian-security bullseye-security InRelease [48.4 kB]
Get:5 https://packages.cloud.google.com/apt google-compute-engine-bullseye-stable/main amd64 Packages [1930 B]
Get:6 https://deb.debian.org/debian bullseye-updates InRelease [44.1 kB]
Get:7 https://deb.debian.org/debian bullseye-backports InRelease [49.0 kB]
...redacted...
Setting up postgresql-client (15+248+deb12u1) ...
Processing triggers for man-db (2.11.2-2) ...
Processing triggers for libc-bin (2.36-9+deb12u14) ...
インスタンスに接続する
psql を使用して VM からプライマリ インスタンスに接続します。
instance-1 VM への SSH セッションが開いている Cloud Shell の同じタブで。
メモした AlloyDB パスワード(PGPASSWORD)の値と AlloyDB クラスタ ID を使用して、GCE VM から AlloyDB に接続します。
export PGPASSWORD=<Noted password>
export PROJECT_ID=$(gcloud config get-value project)
export REGION=us-central1
export ADBCLUSTER=alloydb-hybrid-search
export INSTANCE_IP=$(gcloud alloydb instances describe $ADBCLUSTER-pr --cluster=$ADBCLUSTER --region=$REGION --format="value(ipAddress)")
psql "host=$INSTANCE_IP user=postgres sslmode=require"
想定されるコンソール出力:
student@instance-1:~$ export PROJECT_ID=$(gcloud config get-value project)
export REGION=us-central1
export ADBCLUSTER=alloydb-hybrid-search
export INSTANCE_IP=$(gcloud alloydb instances describe $ADBCLUSTER-pr --cluster=$ADBCLUSTER --region=$REGION --format="value(ipAddress)")
psql "host=$INSTANCE_IP user=postgres sslmode=require"
psql (15.18 (Debian 15.18-0+deb12u1), server 17.9)
WARNING: psql major version 15, server major version 17.
         Some psql features might not work.
SSL connection (protocol: TLSv1.3, cipher: TLS_AES_256_GCM_SHA384, compression: off)
Type "help" for help.

postgres=>
psql セッションを閉じます。
exit
6. データベースの準備
データベースを作成し、Vertex AI インテグレーションを有効にして、データベース オブジェクトを作成し、データをインポートする必要があります。
AlloyDB に必要な権限を付与する
AlloyDB サービス エージェントに Vertex AI 権限を追加します。
上部の「+」記号を選択して、別の Cloud Shell タブを開きます。
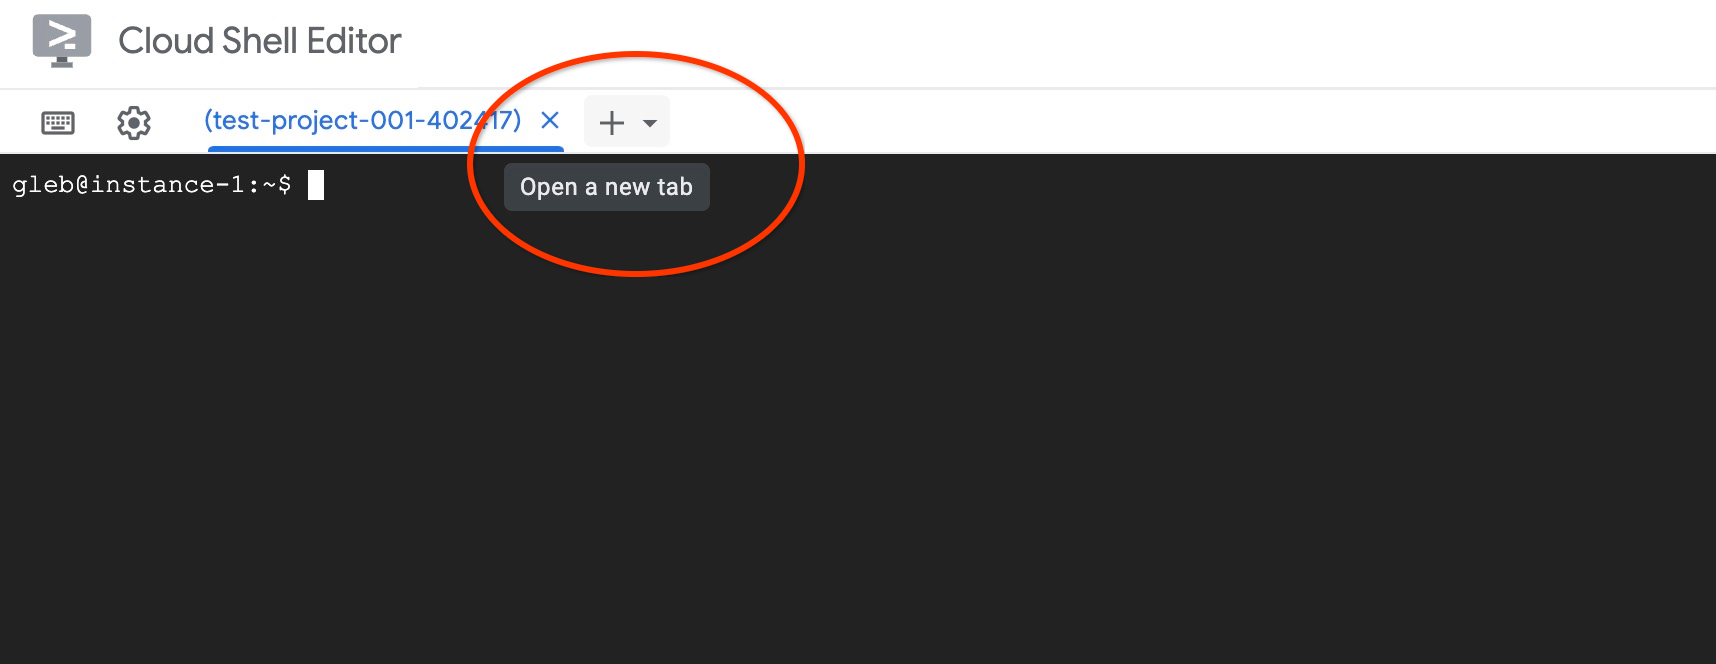
新しい Cloud Shell タブで、次のコマンドを実行します。
PROJECT_ID=$(gcloud config get-value project)
gcloud projects add-iam-policy-binding $PROJECT_ID \
  --member="serviceAccount:service-$(gcloud projects describe $PROJECT_ID --format="value(projectNumber)")@gcp-sa-alloydb.iam.gserviceaccount.com" \
  --role="roles/aiplatform.user"
想定されるコンソール出力:
admin_@cloudshell:~ (my-project-93954-gke)$ PROJECT_ID=$(gcloud config get-value project)
gcloud projects add-iam-policy-binding $PROJECT_ID \
  --member="serviceAccount:service-$(gcloud projects describe $PROJECT_ID --format="value(projectNumber)")@gcp-sa-alloydb.iam.gserviceaccount.com" \
  --role="roles/aiplatform.user"
Your active configuration is: [cloudshell-30137]

Updated IAM policy for project [my-project-93954-gke].
bindings:
- members:
<redacted>
version: 1
[X] をクリックするか、次のコマンドを実行してタブを閉じます。
exit
データベースを作成する
quickstart という名前のデータベースを作成します。
GCE VM セッションで、次のコマンドを実行します。
データベースを作成します。
psql "host=$INSTANCE_IP user=postgres" -c "CREATE DATABASE quickstart_db"
想定されるコンソール出力:
student@instance-1:~$ psql "host=$INSTANCE_IP user=postgres" -c "CREATE DATABASE quickstart_db"
CREATE DATABASE
Vertex AI の統合を有効にする
Vertex AI のインテグレーションとデータベースの pgvector 拡張機能を有効にします。
GCE VM で次のコマンドを実行します。
psql "host=$INSTANCE_IP user=postgres dbname=quickstart_db" -c "CREATE EXTENSION IF NOT EXISTS google_ml_integration CASCADE"
psql "host=$INSTANCE_IP user=postgres dbname=quickstart_db" -c "CREATE EXTENSION IF NOT EXISTS vector"
想定されるコンソール出力:
student@instance-1:~$ psql "host=$INSTANCE_IP user=postgres dbname=quickstart_db" -c "CREATE EXTENSION IF NOT EXISTS google_ml_integration CASCADE"
psql "host=$INSTANCE_IP user=postgres dbname=quickstart_db" -c "CREATE EXTENSION IF NOT EXISTS vector"
NOTICE:  extension "google_ml_integration" already exists, skipping
CREATE EXTENSION
CREATE EXTENSION
データをインポート
準備したデータをダウンロードして、新しいデータベースにインポートします。
GCE VM で次のコマンドを実行します。
gcloud storage cat gs://cloud-training/gcc/gcc-tech-004/cymbal_demo_schema.sql |psql "host=$INSTANCE_IP user=postgres dbname=quickstart_db"
gcloud storage cat gs://cloud-training/gcc/gcc-tech-004/cymbal_products.csv |psql "host=$INSTANCE_IP user=postgres dbname=quickstart_db" -c "\copy cymbal_products from stdin csv header"
gcloud storage cat gs://cloud-training/gcc/gcc-tech-004/cymbal_inventory.csv |psql "host=$INSTANCE_IP user=postgres dbname=quickstart_db" -c "\copy cymbal_inventory from stdin csv header"
gcloud storage cat gs://cloud-training/gcc/gcc-tech-004/cymbal_stores.csv |psql "host=$INSTANCE_IP user=postgres dbname=quickstart_db" -c "\copy cymbal_stores from stdin csv header"
想定されるコンソール出力:
student@instance-1:~$ gcloud storage cat gs://cloud-training/gcc/gcc-tech-004/cymbal_demo_schema.sql |psql "host=$INSTANCE_IP user=postgres dbname=quickstart_db"
gcloud storage cat gs://cloud-training/gcc/gcc-tech-004/cymbal_products.csv |psql "host=$INSTANCE_IP user=postgres dbname=quickstart_db" -c "\copy cymbal_products from stdin csv header"
gcloud storage cat gs://cloud-training/gcc/gcc-tech-004/cymbal_inventory.csv |psql "host=$INSTANCE_IP user=postgres dbname=quickstart_db" -c "\copy cymbal_inventory from stdin csv header"
gcloud storage cat gs://cloud-training/gcc/gcc-tech-004/cymbal_stores.csv |psql "host=$INSTANCE_IP user=postgres dbname=quickstart_db" -c "\copy cymbal_stores from stdin csv header"
SET
SET
SET
SET
SET
 set_config
------------

(1 row)

SET
SET
SET
SET
SET
SET
CREATE TABLE
ALTER TABLE
CREATE TABLE
ALTER TABLE
CREATE TABLE
ALTER TABLE
CREATE TABLE
ALTER TABLE
CREATE SEQUENCE
ALTER TABLE
ALTER SEQUENCE
ALTER TABLE
ALTER TABLE
ALTER TABLE
COPY 941
COPY 263861
COPY 4654
次に、必要なデータベース フラグを設定します。ウェブ コンソールを使用してプライマリ インスタンスでフラグを管理するか、次のように gcloud コマンドを使用できます。
export PROJECT_ID=$(gcloud config get-value project)
export REGION=us-central1
export ADBCLUSTER=alloydb-hybrid-search
gcloud beta alloydb instances update $ADBCLUSTER-pr \
   --database-flags google_ml_integration.enable_faster_embedding_generation=on,scann.enable_preview_features=on,google_ml_integration.enable_preview_ai_functions=on,google_ml_integration.enable_ai_query_engine=on \
   --region=$REGION \
   --cluster=$ADBCLUSTER \
   --project=$PROJECT_ID \
   --update-mode=FORCE_APPLY
想定されるコンソール出力
student@cloudshell:~ (alloydb-hybrid-search)$ export PROJECT_ID=$(gcloud config get-value project)
export REGION=us-central1
export ADBCLUSTER=alloydb-hybrid-search
gcloud beta alloydb instances update $ADBCLUSTER-pr \
   --database-flags google_ml_integration.enable_faster_embedding_generation=on,scann.enable_preview_features=on,google_ml_integration.enable_preview_ai_functions=on,google_ml_integration.enable_ai_query_engine=on \
   --region=$REGION \
   --cluster=$ADBCLUSTER \
   --project=$PROJECT_ID \
   --update-mode=FORCE_APPLY
Your active configuration is: [cloudshell-30137]
Operation ID: operation-1784245853151-656c31c44e12b-6084eb8b-d6611419
データベース フラグを有効にするには、インスタンスの再起動が必要で、数分かかります。完了すると、AlloyDB インスタンスのステータスが [Ready] になります。
7. ベクトル エンベディングを生成する
データをインポートすると、商品に関する情報を格納する cymbal_products、各店舗の商品の在庫を追跡する cymbal_inventory、店舗のリストである cymbal_stores の各テーブルが作成されます。商品に対してセマンティック検索を実行するには、initialize_embeddings 関数を使用して商品説明のベクトル エンベディングを生成する必要があります。Vertex AI のインテグレーションを使用して、商品説明に基づいてベクトル データを計算し、テーブルに追加します。使用されているテクノロジーの詳細については、ドキュメントをご覧ください。
この統合を使用するには、AlloyDB Studio を使用してデータベースに接続するか、AlloyDB インスタンスの IP と postgres パスワードを使用して VM から psql を使用して接続します。
psql "host=$INSTANCE_IP user=postgres dbname=quickstart_db"
google_ml_integration 拡張機能のバージョンを確認します。
SELECT extversion FROM pg_extension WHERE extname = 'google_ml_integration';
バージョンは 1.5.2 以降である必要があります。出力例を次に示します。
quickstart_db=> SELECT extversion FROM pg_extension WHERE extname = 'google_ml_integration';
 extversion
------------
 1.5.9
(1 row)
デフォルトのバージョンは 1.5.2 以降ですが、インスタンスに古いバージョンが表示されている場合は、更新が必要になる可能性があります。インスタンスのメンテナンスが無効になっているかどうかを確認します。
ベクトル拡張機能をインストールし、エンベディングを cymbal_products に保存する新しい列を作成します。
CREATE EXTENSION IF NOT EXISTS vector;
ALTER TABLE cymbal_products ADD COLUMN product_embedding vector(768);
想定されるコンソール出力:
quickstart_db=> CREATE EXTENSION IF NOT EXISTS vector;
ALTER TABLE cymbal_products ADD COLUMN product_embedding vector(768);
NOTICE:  extension "vector" already exists, skipping
CREATE EXTENSION
ALTER TABLE
バッチ エンベディング生成を使用して効率を向上させます。さまざまなエンベディング生成オプションと手法については、ガイドをご覧ください。以前に google_ml_integration.enable_faster_embedding_generation フラグを有効にしました。これにより、エンベディング生成をバッチ処理できます。
最後に、関数呼び出しに incremental_refresh_mode 引数を含めることで、列の値が変更されたときにエンベディングが更新されるようにします。これによりデータベースにオーバーヘッドが発生しますが、エンベディングとコンテンツの同期を自動的に維持するためのトレードオフです。エンベディングを手動で更新する場合は、ドキュメントの手順をご覧ください。
すべてをまとめてエンベディングを生成するには、initialize_embeddings 関数を使用し、バッチ ヒントとして batch_size の 50 を渡し、incremental_refresh_mode を transactional に設定します。
CALL ai.initialize_embeddings(
    model_id => 'text-embedding-005',
    table_name => 'cymbal_products',
    content_column => 'product_description',
    embedding_column => 'product_embedding',
    batch_size => 50,
    incremental_refresh_mode => 'transactional'
);
product_embedding 列に NULL 値を指定してテーブルに新しい行を挿入すると、
INSERT INTO "cymbal_products" ("uniq_id", "crawl_timestamp", "product_url", "product_name", "product_description", "list_price", "sale_price", "brand", "item_number", "gtin", "package_size", "category", "postal_code", "available", "product_embedding") VALUES ('fd604542e04b470f9e6348e640cff794', NOW(), 'https://example.com/new_product', 'New Cymbal Product', 'This is a new cymbal product description.', 199.99, 149.99, 'Example Brand', 'EB123', '1234567890', 'Single', 'Cymbals', '12345', TRUE, NULL);
挿入した行をクエリすると、product_embedding 列が自動的に更新されていることがわかります。
SELECT uniq_id, (product_embedding::real[])[1:5] as product_embedding FROM cymbal_products WHERE uniq_id='fd604542e04b470f9e6348e640cff794';
出力は次のようになります。
quickstart_db=> SELECT uniq_id,(product_embedding::real[])[1:5] as product_embedding  FROM cymbal_products WHERE uniq_id='fd604542e04b470f9e6348e640cff794';
             uniq_id              |                      product_embedding
----------------------------------+---------------------------------------------------------------
 fd604542e04b470f9e6348e640cff794 | {0.015003494,-0.005349732,-0.059790313,-0.0087091,-0.0271452}
(1 row)
8. ベクトル インデックスを作成する
ベクトル検索のパフォーマンスを改善するために、ScaNN インデックスを追加します。
ScaNN インデックスを作成する
SCANN インデックスを構築するには、もう 1 つの拡張機能を有効にする必要があります。拡張機能 alloydb_scann は、Google の ScaNN アルゴリズムを使用して ANN タイプのベクトル インデックスを操作するためのインターフェースを提供します。
CREATE EXTENSION IF NOT EXISTS alloydb_scann;
予想される出力:
quickstart_db=> CREATE EXTENSION IF NOT EXISTS alloydb_scann;
CREATE EXTENSION
インデックスは MANUAL モードまたは AUTO モードで作成できます。MANUAL モードはデフォルトで有効になっており、他のインデックスと同様にインデックスを作成して維持できます。ただし、AUTO モードを有効にすると、ユーザー側でメンテナンスを必要としないインデックスを作成できます。すべてのオプションの詳細については、ドキュメントをご覧ください。この例では、AUTO モードでインデックスを作成するのに十分な行がないため、MANUAL モードで作成し、チューニング パラメータを含めます。インデックス パラメータのチューニングについては、ドキュメントをご覧ください。
CREATE INDEX cymbal_products_embeddings_scann ON cymbal_products
  USING scann (product_embedding cosine)
  WITH (mode='MANUAL', num_leaves=31, max_num_levels = 2);
予想される出力:
quickstart_db=> CREATE INDEX cymbal_products_embeddings_scann ON cymbal_products
  USING scann (product_embedding cosine)
  WITH (num_leaves=31, max_num_levels = 2);
CREATE INDEX
quickstart_db=>
インデックスの使用状況を検査する
これで、EXPLAIN モードでベクトル検索クエリを実行し、インデックスが使用されているかどうかを確認できます。
EXPLAIN (analyze)
WITH trees as (
SELECT
        cp.product_name,
        left(cp.product_description,80) as description,
        cp.sale_price,
        cs.zip_code,
        cp.uniq_id as product_id
FROM
        cymbal_products cp
JOIN cymbal_inventory ci on
        ci.uniq_id=cp.uniq_id
JOIN cymbal_stores cs on
        cs.store_id=ci.store_id
        AND ci.inventory>0
        AND cs.store_id = 1583
ORDER BY
        (cp.product_embedding <=> embedding('text-embedding-005','What kind of fruit trees grow well here?')::vector) ASC
LIMIT 1)
SELECT json_agg(trees) FROM trees;
想定される出力(明確にするために記すと秘匿化済み):
...
Aggregate (cost=16.59..16.60 rows=1 width=32) (actual time=2.875..2.877 rows=1 loops=1)
-> Subquery Scan on trees (cost=8.42..16.59 rows=1 width=142) (actual time=2.860..2.862 rows=1 loops=1)
-> Limit (cost=8.42..16.58 rows=1 width=158) (actual time=2.855..2.856 rows=1 loops=1)
-> Nested Loop (cost=8.42..6489.19 rows=794 width=158) (actual time=2.854..2.855 rows=1 loops=1)
-> Nested Loop (cost=8.13..6466.99 rows=794 width=938) (actual time=2.742..2.743 rows=1 loops=1)
-> Index Scan using cymbal_products_embeddings_scann on cymbal_products cp (cost=7.71..111.99 rows=876 width=934) (actual time=2.724..2.724 rows=1 loops=1)
Order By: (embedding <=> '[0.008864171,0.03693164,-0.024245683,-0.00355923,0.0055611245,0.015985578,...<redacted>...5685,-0.03914233,-0.018452475,0.00826032,-0.07372604]'::vector)
...
出力から、クエリが「cymbal_products の cymbal_products_embeddings_scann を使用したインデックス スキャン」を使用していることが明確にわかります。
9. Solr インスタンスの作成
ハイブリッド検索の全文検索(FTS)部分には Apache Solr を使用します。このステップでは、前に作成した VM にスタンドアロンの Solr インスタンスをデプロイします。
Solr へのアクセスを保護するために、Basic 認証を有効にします。これを行うには、security.json 構成ファイルを提供してマウントし、Solr Docker コンテナを起動します。
VM に SSH 接続して Docker をインストールします。
sudo apt-get update
sudo apt-get install -y ca-certificates curl gnupg
sudo install -m 0755 -d /etc/apt/keyrings
curl -fsSL https://download.docker.com/linux/debian/gpg | sudo gpg --dearmor -o /etc/apt/keyrings/docker.gpg
sudo chmod a+r /etc/apt/keyrings/docker.gpg

echo \
  "deb [arch="$(dpkg --print-architecture)" signed-by=/etc/apt/keyrings/docker.gpg] https://download.docker.com/linux/debian \
  "$(. /etc/os-release && echo "$VERSION_CODENAME")" stable" | \
  sudo tee /etc/apt/sources.list.d/docker.list > /dev/null
sudo apt-get update
sudo apt-get install -y docker-ce docker-ce-cli containerd.io docker-buildx-plugin docker-compose-plugin
これで、ユーザーが実行する docker コマンドを変更できます。
sudo usermod -aG docker $USER
newgrp docker
次に、security.json ファイルを作成して、ユーザー名 solr とパスワード SolrRocks で基本認証を有効にします。
nano security.json
ファイルに次の JSON を貼り付けます。
{
  "authentication": {
    "blockUnknown": true,
    "class": "solr.BasicAuthPlugin",
    "credentials": {
      "solr": "IV0EHq1OnNrj6gvRCwvFwTrZ1+z1oBbnQdiVC3otuq0= Ndd7LKvVBAaZIF0QAVi1ekCfAJXr1GGfLtRUXhgrF8c="
    }
  },
  "authorization": {
    "class": "solr.RuleBasedAuthorizationPlugin",
    "permissions": [
      { "name": "security-edit", "role": "admin" }
    ],
    "user-role": { "solr": "admin" }
  }
}
nano を保存して終了します(Ctrl + O、Enter、Ctrl + X)。
docker run を使用して Solr Docker コンテナを起動し、security.json ファイルをコンテナにマウントします。
docker run -d -p 8983:8983 --name solr --user root -v "$(pwd)/security.json:/var/solr/data/security.json" solr:9 -c -force
コンテナが実行されていることを確認します。
docker ps
予想される出力:
student@instance-1:~$ docker ps
CONTAINER ID   IMAGE     COMMAND                  CREATED         STATUS         PORTS                                         NAMES
90db3c73835e   solr:9    "docker-entrypoint.s..."   7 seconds ago   Up 3 seconds   0.0.0.0:8983->8983/tcp, [::]:8983->8983/tcp   solr
Solr の初期化に数秒かかります。その後、基本認証情報を使用して Solr API を呼び出し、solrindexdemo という名前の新しいコレクションを作成します。
curl --user solr:SolrRocks -X POST "http://localhost:8983/solr/admin/collections?action=CREATE&name=solrindexdemo&numShards=1&replicationFactor=1"
予想される出力:
student@instance-1:~$ curl --user solr:SolrRocks -X POST "http://localhost:8983/solr/admin/collections?action=CREATE&name=solrindexdemo&numShards=1&replicationFactor=1"
{
  "responseHeader":{
    "status":0,
    "QTime":3586
  },
  "success":{
    "172.17.0.2:8983_solr":{
      "responseHeader":{
        "status":0,
        "QTime":2405
      },
      "core":"solrindexdemo_shard1_replica_n1"
    }
  },
  "warning":"Using _default configset. Data driven schema functionality is enabled by default, which is NOT RECOMMENDED for production use. To turn it off: curl http://{host:port}/solr/solrindexdemo/config -d '{\"set-user-property\": {\"update.autoCreateFields\":\"false\"}}'"
次に、Solr インスタンスに商品の説明と名前を入力します。Cloud Storage から VM に商品 CSV をコピーします。
gcloud storage cp gs://cloud-training/gcc/gcc-tech-004/cymbal_products.csv .
次に、CSV を抽出し、一括更新用の JSON リストにデータをフォーマットする Python スクリプトを作成します。
nano convert.py
ファイルに次の内容を貼り付けます。
import csv
import json

# Configuration
input_file = 'cymbal_products.csv'
output_file = 'products.json'

def convert():
    try:
        with open(input_file, mode='r', encoding='utf-8') as f_in, \
             open(output_file, mode='w', encoding='utf-8') as f_out:

            reader = csv.DictReader(f_in)

            products = []
            for row in reader:
                products.append({
                    "id": row['uniq_id'].strip(),
                    "product_name": row['product_name'].strip(),
                    "product_description": row['product_description'].strip()
                })

            json.dump(products, f_out, indent=2)
            print(f"Success: Processed {len(products)} products.")
            print(f"Output saved to: {output_file}")

    except Exception as e:
        print(f"An error occurred: {e}")

if __name__ == "__main__":
    convert()
ファイルを保存して実行します。
python3 convert.py
予想される出力:
admin_gopalbhutada_altostrat_com@instance-1:~$ python3 convert.py
Success: Processed 941 products.
Output saved to: products.json
更新ハンドラを使用して、JSON データを Apache Solr に送信します。
curl --user solr:SolrRocks -X POST -H 'Content-Type: application/json' \
  'http://localhost:8983/solr/solrindexdemo/update?commit=true' \
  --data-binary "@products.json"
予想される出力:
admin_gopalbhutada_altostrat_com@instance-1:~$ curl --user solr:SolrRocks -X POST -H 'Content-Type: application/json' \
  'http://localhost:8983/solr/solrindexdemo/update?commit=true' \
  --data-binary "@products.json"
{
  "responseHeader":{
    "rf":1,
    "status":0,
    "QTime":3220
  }
}
次に、Solr 認証情報を保存するシークレットを Secret Manager に作成する必要があります。AlloyDB は、基本認証に base64 でエンコードされた username:password 値を使用して外部検索 FDW にリンクするため、まず solr:SolrRocks の base64 でエンコードされた文字列を取得します。
echo -n "solr:SolrRocks" | base64
出力:
admin_gopalbhutada_altostrat_com@instance-1:~$ echo -n "solr:SolrRocks" | base64
c29scjpTb2xyUm9ja3M=
この Base64 でエンコードされた認証情報を使用して、Google Secret Manager で Secret を作成します。Cloud Shell で次のコマンドを実行します。
echo -n "c29scjpTb2xyUm9ja3M=" | \
gcloud secrets create solr-credentials \
    --replication-policy="automatic" \
    --data-file=-
10. AlloyDB での外部データ ラッパーの作成
Duration 10:00
AlloyDB から Apache Solr に保存されているデータをクエリするには、Solr 用の外部データ ラッパー(FDW)と外部テーブルを作成する必要があります。以前は、Solr 認証情報を Secret Manager に保存していました。AlloyDB がシークレットにアクセスできるようにするには、サービス アカウントに必要な権限を付与します。
Cloud Shell で、サービス アカウントに solr-credentials シークレットへのアクセス権を付与します。
gcloud secrets add-iam-policy-binding solr-credentials \
    --member="serviceAccount:service-$(gcloud projects describe $(gcloud config get-value project) --format='value(projectNumber)')@gcp-sa-alloydb.iam.gserviceaccount.com" \
    --role="roles/secretmanager.secretAccessor"
予想される出力:
admin_@cloudshell:~ (my-project-93954-gke)$ gcloud secrets add-iam-policy-binding solr-credentials \
    --member="serviceAccount:service-$(gcloud projects describe $(gcloud config get-value project) --format='value(projectNumber)')@gcp-sa-alloydb.iam.gserviceaccount.com" \
    --role="roles/secretmanager.secretAccessor"
Your active configuration is: [cloudshell-13031]
Updated IAM policy for secret [solr-credentials].
bindings:
- members:
  - serviceAccount:service-350113473377@gcp-sa-alloydb.iam.gserviceaccount.com
  role: roles/secretmanager.secretAccessor
etag: BwZWyKlkx6Q=
version: 1
AlloyDB Studio を使用してデータベースに接続します(または、psql を使用して VM から接続します)。postgres ユーザーとして quickstart_db にログインします。
FDW 拡張機能を有効にします。
CREATE EXTENSION IF NOT EXISTS external_search_fdw;
予想される出力:
CREATE EXTENSION
接続パラメータを取得
AlloyDB で外部データサーバーを構成する前に、VM の内部 IP アドレス(Solr が実行されている場所)とシークレット パスが必要です。
VM の内部 IP を出力するには、Cloud Shell で次のコマンドを実行します。
gcloud compute instances describe instance-1 \
    --zone=us-central1-a \
    --format="value(networkInterfaces[0].networkIP)"
予想される出力:
10.X.X.X
Secret Manager でシークレット リソースパスを出力するには、次のコマンドを実行します。
gcloud secrets describe solr-credentials --format="value(name)"
予想される出力:
projects/<project_id>/secrets/solr-credentials
Apache Solr にアクセスするには、外部データサーバーを作成します。次のクエリの /versions/latest を追加してください。
CREATE SERVER solr_demo_server
FOREIGN DATA WRAPPER external_search_fdw
OPTIONS(
    server 'http://<VM_INTERNAL_IP_ADDRESS>:8983',
    search_provider 'solr',
    auth_mode 'secret_manager',
    auth_method 'Basic',
    secret_path '<SECRET_PATH>/versions/latest'
);
予想される出力:
CREATE SERVER
次に、外部テーブルを定義します。メタデータの後に、以前に読み込んだデータと一致する Solr フィールド スキーマ定義を指定します。リモート テーブルで、Solr コレクションの名前を指定します。
CREATE FOREIGN TABLE solrindexdemo (
    metadata external_search_fdw_schema.OpaqueMetadata,
    id TEXT,
    product_name TEXT,
    product_description TEXT
)
SERVER solr_demo_server
OPTIONS(
    remote_table_name 'solrindexdemo'
);
サーバーのユーザー マッピングを作成します。
CREATE USER MAPPING FOR CURRENT_USER SERVER solr_demo_server;
これで、外部テーブルをテストできます。
SELECT id, product_name
FROM solrindexdemo
ORDER BY metadata <@> 'product_description:cherry' DESC
limit 10;
予想される出力:
"id","product_name"
"d536e9e823296a2eba198e52dd23e712","Cherry Tree"
"390cf08feac229e7b752709fd1f943b3","Woven Round Placemat, Set of Twelve, Grass"
"2c9aa7ac98c30abf78dd9c62a68a34e6","48 Scented Wax Melts Wax Cubes: Jelly Belly Jelly Beans Candy Bulk Soy Wax Melts For Candle Warmer, Wax Warmers, Wax Melt Warmers In 8 Pack Set"
11. ハイブリッド検索を使用する
Duration 10:00
これで、ai.hybrid_search() 関数を使用して、ベクトル検索と全文検索を組み合わせることができます。ハイブリッド検索の詳細については、ドキュメントをご覧ください。ハイブリッド検索を使用する場合、デフォルトでは、クエリ結果は Reciprocal Rank Fusion アルゴリズムを使用して、複数のクエリの結果をランク付けします。まず、ベクトル検索とハイブリッド検索を個別に試して、その違いを分析します。
次のクエリは、ベクトル検索を実行して、チェリーに類似した商品を検索します。配列には、実行する検索のリストが用意されています。この場合、ベクトル検索のみを使用しますが、後でベクトルと FTS の両方を提供します。
SELECT id, score, cymbal_products.product_name, cymbal_products.product_description
FROM ai.hybrid_search(
  ARRAY[
      '{
        "data_type": "vector",
        "table_name": "cymbal_products",
        "key_column": "uniq_id",
        "vec_column": "product_embedding",
        "distance_operator": "public.<=>",
        "limit": 3,
        "query_vector": "ai.embedding(''text-embedding-005'', ''cherry'')::vector"
      }'::JSONB
  ]
) JOIN cymbal_products ON id = cymbal_products.uniq_id;
出力では、最初の結果は cherry tree ですが、次の 2 つも果樹であることに注意してください。これは、product_description 列でベクトル検索を使用すると、検索条件に対するセマンティック マッチが見つかるためです。
"id","score","product_name","product_description"
"d536e9e823296a2eba198e52dd23e712","0.01639344262295082","Cherry Tree","This is a beautiful cherry tree that will produce delicious cherries. It is an deciduous tree that grows to be about 15 feet tall. The leaves are dark green in the summer and turn a beautiful red in the fall. Cherry trees are known for their beauty and their ability to provide shade and privacy. Cherry trees prefer a cool, moist climate and sandy soil. They are best suited for USDA zones 4-9."
"b70c44b1a38c0a2329fa583c9109a80f","0.016129032258064516","Peach Tree","This is a beautiful peach tree that will produce delicious peaches. It is an evergreen tree that grows to be about 20 feet tall. The leaves are dark green in the summer and turn a beautiful yellow in the fall. Peach trees are known for their beauty and their ability to provide shade and privacy. Peach trees prefer a cool, moist climate and sandy soil. They are best suited for USDA zones 2-9."
"23e41a71d63d8bbc9bdfa1d118cfddc5","0.015873015873015872","Apple Tree","This is a beautiful apple tree that will produce delicious apples. It is a deciduous tree that grows to be about 30 feet tall. The leaves are dark green in the summer and turn a beautiful red, orange, and yellow in the fall. Apple trees are known for their strength and durability. They are also a popular choice for shade trees. Apple trees prefer a cool, moist climate and loamy soil. They are best suited for USDA zones 4-8."
Apache Solr FDW を使用して全文検索を行うには、次のクエリを実行します。
SELECT id, score, cymbal_products.product_name, cymbal_products.product_description
FROM ai.hybrid_search(
  ARRAY[
      '{
        "limit": 3,
        "data_type": "external_search_fdw",
        "table_name": "solrindexdemo",
        "key_column": "id",
        "query_text_input": "product_description:cherry"
      }'::JSONB
  ]
) JOIN cymbal_products ON id = cymbal_products.uniq_id;
全文検索ではトークン マッチングが使用されるため、結果には商品名に「cherry」という単語が含まれているものが返されます。
"id","score","product_name","product_description"
"d536e9e823296a2eba198e52dd23e712","0.01639344262295082","Cherry Tree","This is a beautiful cherry tree that will produce delicious cherries. It is an deciduous tree that grows to be about 15 feet tall. The leaves are dark green in the summer and turn a beautiful red in the fall. Cherry trees are known for their beauty and their ability to provide shade and privacy. Cherry trees prefer a cool, moist climate and sandy soil. They are best suited for USDA zones 4-9."
"390cf08feac229e7b752709fd1f943b3","0.016129032258064516","Woven Round Placemat, Set of Twelve, Grass","...These placemats are great for special occasions and holidays, but are also perfect to accessorize your everyday place settings.|Measurements. 15-inch round diameter is the perfect size for most table sizes and shapes.|Pop Colors. Choose from 7 pop woven color placemats including: Black, Cherry, Grass, Taupe, Navy, Sun and Graphite."
"2c9aa7ac98c30abf78dd9c62a68a34e6","0.015873015873015872","48 Scented Wax Melts Wax Cubes: Jelly Belly Jelly Beans Candy Bulk Soy Wax Melts For Candle Warmer, Wax Warmers, Wax Melt Warmers In 8 Pack Set","...From These Flavors: Lemon Drop, Mixed Berry Smoothie, Sizzling Cinnamon, Crushed Pineapple, Juicy Pear, Cotton Candy, Toasted Marshmallow, French Vanilla, Watermelon, Red Apple, Very Cherry, Buttered Popcorn..."
セマンティック検索と FTS を組み合わせて、より有意義な結果を取得できるようになりました。たとえば、家よりも高く成長するカリフォルニア産の木を探すとします。クエリを分割して、セマンティック インテントとリテラル マッチングを活用します。ベクトル検索は、「家よりも高く成長する木」という説明部分を処理します。これは、正確なキーワードを必要とせずにスケールの概念を理解しているためです。一方、全文検索では「California」が厳密なフィルタとして処理され、概念的に類似したものではなく、地理的に完全に一致するものが確実に取得されます。
SELECT id, score, cymbal_products.product_name, cymbal_products.product_description
FROM ai.hybrid_search(
  ARRAY[
    '{
        "data_type": "vector",
        "table_name": "cymbal_products",
        "key_column": "uniq_id",
        "vec_column": "product_embedding",
        "distance_operator": "public.<=>",
        "limit": 3,
        "query_vector": "ai.embedding(''text-embedding-005'', ''tree that can grow taller than a house'')::vector"
      }'::JSONB,
      '{
        "limit": 3,
        "data_type": "external_search_fdw",
        "table_name": "solrindexdemo",
        "key_column": "id",
        "query_text_input": "product_description:California"
      }'::JSONB
  ]
) JOIN cymbal_products ON id = cymbal_products.uniq_id;
期待される結果:
"id","score","product_name","product_description"
"a589fd36a8a20fd9472d2403d6ed692a","0.00819672631147241","California Redwood","This is a beautiful redwood tree that can grow to be over 300 feet tall. It is an evergreen tree that grows in the coastal forests of California. Redwoods are known for their beauty and their strength. They are best suited for USDA zones 7-10."
"ef9432802da24041594c2cf368dfb4d2","0.008064521129029258","Madrone","This is a beautiful madrona tree that can grow to be over 80 feet tall. It is an evergreen tree that grows in the coastal forests of California. Madronas are known for their beauty and their bark. They are best suited for USDA zones 7-10."
"1360d8642bc218e4ea28e9c32b2e1721","0.007936512936504936","California Sycamore","This is a beautiful sycamore tree that can grow to be over 100 feet tall. It is an deciduous tree that grows in the valleys and foothills of California. California sycamores are known for their beauty and their shade. They are best suited for USDA zones 7-10."
12. 環境をクリーンアップする
ラボの終了時に AlloyDB インスタンスとクラスタを破棄します。
AlloyDB クラスタとすべてのインスタンスを削除する
AlloyDB のトライアル版を使用した場合。トライアル クラスタを使用して他のラボやリソースをテストする予定がある場合は、トライアル クラスタを削除しないでください。同じプロジェクトに別のトライアル クラスタを作成することはできません。
クラスタは force オプションで破棄され、クラスタに属するすべてのインスタンスも削除されます。
接続が切断され、以前の設定がすべて失われた場合は、Cloud Shell でプロジェクトと環境変数を定義します。
gcloud config set project <your project id>
export REGION=us-central1
export ADBCLUSTER=alloydb-hybrid-search
export PROJECT_ID=$(gcloud config get-value project)
クラスタを削除します。
gcloud alloydb clusters delete $ADBCLUSTER --region=$REGION --force
想定されるコンソール出力:
admin_@cloudshell:~ (my-project-93954-gke)$ gcloud alloydb clusters delete $ADBCLUSTER --region=$REGION --force
All of the cluster data will be lost when the cluster is deleted.

Do you want to continue (Y/n)?  Y

Operation ID: operation-1784270790060-656c8ea9fea06-1b93001f-846543e0
Deleting cluster...done.
AlloyDB バックアップを削除する
クラスタの AlloyDB バックアップをすべて削除します。
for i in $(gcloud alloydb backups list --filter="CLUSTER_NAME: projects/$PROJECT_ID/locations/$REGION/clusters/$ADBCLUSTER" --format="value(name)" --sort-by=~createTime) ; do gcloud alloydb backups delete $(basename $i) --region $REGION --quiet; done
想定されるコンソール出力:
admin_@cloudshell:~ (my-project-93954-gke)$ for i in $(gcloud alloydb backups list --filter="CLUSTER_NAME: projects/$PROJECT_ID/locations/$REGION/clusters/$ADBCLUSTER" --format="value(name)" --sort-by=~createTime) ; do gcloud alloydb backups delete $(basename $i) --region $REGION --quiet; done
Operation ID: operation-1784271231983-656c904f71e05-1389a145-f101ceee
Deleting backup...done.
これで、VM を破棄できます。
GCE VM を削除する
Cloud Shell で、次のコマンドを実行します。
export GCEVM=instance-1
export ZONE=us-central1-a
gcloud compute instances delete $GCEVM \
    --zone=$ZONE \
    --quiet
想定されるコンソール出力:
admin_@cloudshell:~ (my-project-93954-gke)$ export GCEVM=instance-1
export ZONE=us-central1-a
gcloud compute instances delete $GCEVM \
    --zone=$ZONE \
    --quiet
Deleted
13. 完了
以上で、この Codelab は完了です。
学習した内容
- AlloyDB クラスタとプライマリ インスタンスをデプロイする方法
- Google Compute Engine VM から AlloyDB に接続する方法
- データベースを作成して AlloyDB AI を有効にする方法
- データベースにデータを読み込む方法
- AlloyDB Studio の使用方法
- Vertex AI でエンベディングを生成する
- ベクトル検索を高速化する ScaNN ベクトル インデックスの作成方法
- Apache Solr の外部データ ラッパー(FDW)を作成する方法
- AlloyDB のセマンティック検索と Solr の全文検索を組み合わせてハイブリッド検索を実行します。
次のステップ
AlloyDB のその他の Codelab については、公式の Codelab サイトをご覧ください。