
1. Introduction
In this codelab, you back up a high availability (HA) cluster to S3-compatible object storage for AlloyDB Omni using the RPM orchestrator.
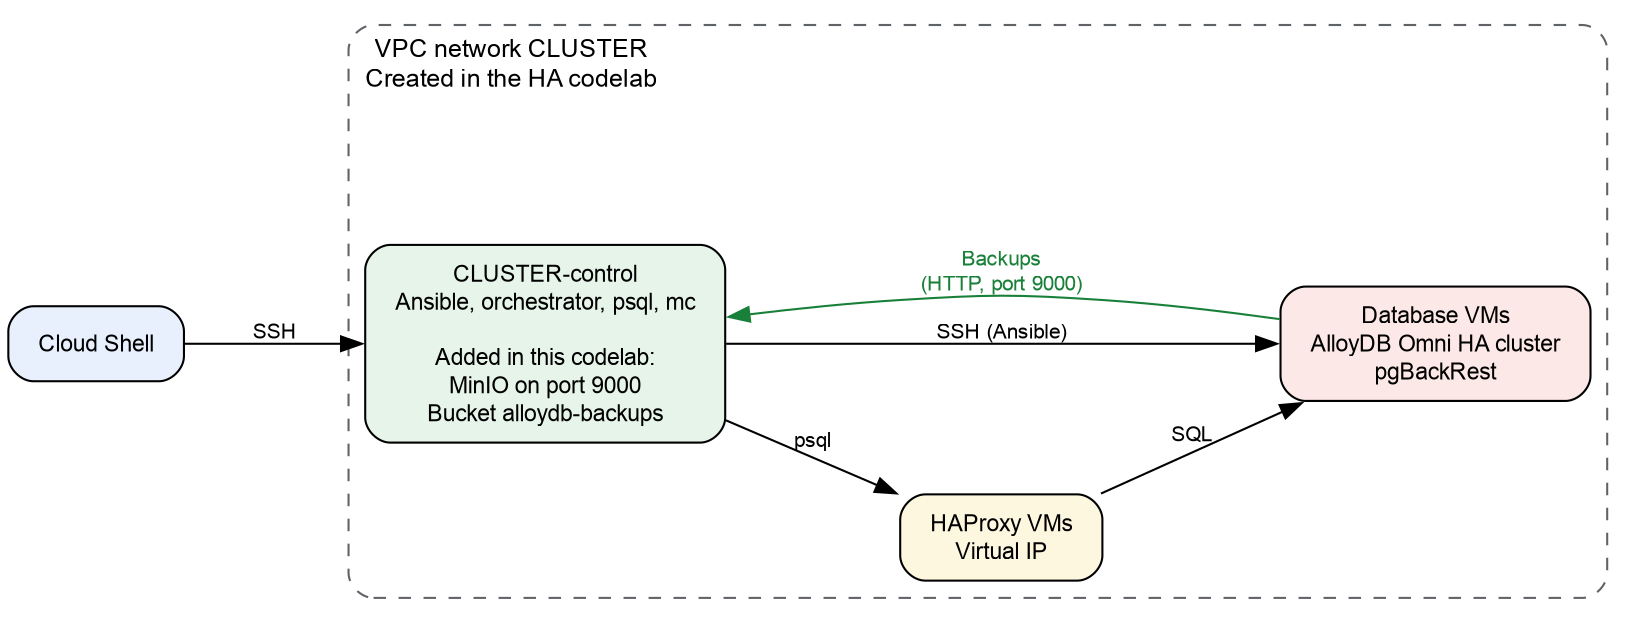
This codelab uses the cluster from the codelab Deploy AlloyDB Omni high availability cluster on GCE VMs using RPM Orchestrator. to create an HA cluster on Compute Engine virtual machines (VM). In this codelab, you add a S3-compatible object storage server on one of the VMs. You use the object storage server for the HA cluster to back up the data to and to restore the cluster from the server.
Prerequisites
- A Google Cloud project with billing enabled.
- The IAM roles that the HA codelab lists.
- Basic knowledge of Linux commands and SQL.
What you'll learn
- How to install and run an S3-compatible object storage server for backups.
- How to create a backup plan that writes backups to S3-compatible storage.
- How to create an on-demand backup.
- How to restore a cluster from a backup and to a point in time.
What you'll need
- The URLs of the AlloyDB Omni software repositories and of the orchestrator Ansible collection. To receive the URLs, complete the AlloyDB Omni sign-up form. For more information, see the AlloyDB Omni using RPM overview. You use the URLs in the HA codelab.
- An AlloyDB Omni HA cluster from the Deploy AlloyDB Omni high availability cluster on GCE VMs using RPM Orchestrator codelab.
- A terminal with access to Google Cloud and a Cloud Shell.
2. Setup and Requirements
- In this step, you create an HA cluster using codelab Deploy AlloyDB Omni high availability cluster on GCE VMs using RPM Orchestrator. Complete the following steps. If you already have a cluster from the codelab, continue with the next step.
- Note: Do not execute the "Clean up Resources" step at this stage. You will perform that step at the end of this codelab.
- Return to this codelab
3. Connect to the cluster and add sample data
In this step, you load the cluster settings on the control VM. Then you connect to the cluster and add a table with sample data.
- If you are not connected to the control VM, connect to it from Cloud Shell:
gcloud compute ssh "$CLUSTER-control" --zone="$ZONE" --project="$PROJECT"CLUSTER,ZONE, andPROJECTvariables come from the Prepare the VMs for the deployment step in the Deploy AlloyDB Omni high availability cluster on GCE VMs using RPM Orchestrator codelab. If Cloud Shell does not have these variables, set them again. - On the control VM, change to your home directory and load the environment variables. Then add the cluster name and the SSH user to the environment file:
cd ~ source /tmp/cluster.conf cat >> ~/.codelab.env <<EOF export CLUSTER="$cluster" export SSH_USER="$service_account" EOF source ~/.codelab.env env | grep -E '^(CLUSTER|SSH_USER|VIRTUAL_IP)='CLUSTER,SSH_USER, andVIRTUAL_IP. Note: If you connect to the control VM again later, runcd ~andsource ~/.codelab.envbefore you continue. - Add the connection settings to the environment file. When the
readcommand asks for the password, enter the password of thepostgresuser. You set this password in the Bootstrap AlloyDB Omni Cluster step in the Deploy AlloyDB Omni high availability cluster on GCE VMs using RPM Orchestrator codelabcat >> ~/.codelab.env <<'EOF' export PATH="/usr/pgsql-18/bin:$PATH" export PGHOST="$VIRTUAL_IP" export PGUSER="postgres" EOF read -rsp "Password of the postgres user: " PGPASSWORD; echo printf 'export PGPASSWORD=%q\n' "$PGPASSWORD" >> ~/.codelab.env source ~/.codelab.env env | grep -E '^(PGHOST|PGUSER|PGPASSWORD)=' - Create a table and add 1,000 rows:
psql <<'SQL' CREATE TABLE public.orders ( id integer PRIMARY KEY, item text NOT NULL, created_at timestamptz NOT NULL DEFAULT pg_catalog.now() ); INSERT INTO public.orders (id, item) SELECT g, 'item-' || g FROM pg_catalog.generate_series(1, 1000) AS g; SQL - Count the rows:
psql -c "SELECT pg_catalog.count(*) FROM public.orders;"1000.
4. Install and run S3-compatible object storage
In this step, you write an Ansible playbook that installs a MinIO server on the control VM. The playbook also creates the bucket and the user for the backups, and makes sure that the database VMs can connect to MinIO. Run all of the commands in this step on the control VM.
- On the control VM, add the storage settings to the environment file. The
opensslcommands make random passwords.MD=http://metadata.google.internal/computeMetadata/v1/instance S3_IP=$(curl -s -H "Metadata-Flavor: Google" "$MD/network-interfaces/0/ip") cat >> ~/.codelab.env <<EOF export S3_IP="$S3_IP" export S3_HOST="$CLUSTER-control" export S3_BUCKET="alloydb-backups" export S3_REGION="us-east-1" export MINIO_ROOT_USER="s3admin" export MINIO_ROOT_PASSWORD="$(openssl rand -hex 16)" export S3_ACCESS_KEY_ID="alloydb-backup" export S3_SECRET_ACCESS_KEY="$(openssl rand -hex 16)" export MINIO_URL="https://github.com/minio/minio/releases/download/RELEASE.2024-05-10T01-41-38Z/minio.linux-amd64.RELEASE.2024-05-10T01-41-38Z" export MC_URL="https://github.com/minio/mc/releases/download/RELEASE.2024-05-09T17-04-24Z/mc.linux-amd64.RELEASE.2024-05-09T17-04-24Z" EOF source ~/.codelab.env echo "$S3_HOST $S3_IP"my-cluster-control 10.1.0.2. The database VMs use this host name and IP address to connect to MinIO. The metadata server of the VM gives the IP address. For more information, see the VM metadata documentation.TheMINIO_URLandMC_URLvalues are the download URLs of the MinIO server and of the MinIO client (mc). - Install the required
community.cryptoAnsible collection on the control VM:ansible-galaxy collection install community.crypto - Create the
s3_server.yamlplaybook:cat > s3_server.yaml <<EOF - name: Install and run MinIO on the control VM hosts: localhost connection: local become: true gather_facts: false tasks: - name: Create MinIO directories ansible.builtin.file: path: "{{ item }}" state: directory mode: "0755" loop: - /var/lib/minio/data - /var/lib/minio/certs - name: Download MinIO server and client ansible.builtin.get_url: url: "{{ item.url }}" dest: "{{ item.dest }}" mode: "0755" loop: - url: "$MINIO_URL" dest: /usr/local/bin/minio - url: "$MC_URL" dest: /usr/local/bin/mc - name: Generate MinIO TLS private key community.crypto.openssl_privatekey: path: /var/lib/minio/certs/private.key size: 2048 mode: "0600" - name: Generate MinIO certificate signing request community.crypto.openssl_csr_pipe: privatekey_path: /var/lib/minio/certs/private.key common_name: "$S3_HOST" subject_alt_name: - "DNS:$S3_HOST" - "DNS:$S3_BUCKET.$S3_HOST" - "DNS:localhost" - "IP:127.0.0.1" - "IP:$S3_IP" register: minio_csr - name: Generate self-signed MinIO TLS certificate community.crypto.x509_certificate: path: /var/lib/minio/certs/public.crt csr_content: "{{ minio_csr.csr }}" privatekey_path: /var/lib/minio/certs/private.key provider: selfsigned selfsigned_not_after: "+365d" mode: "0644" - name: Create MinIO systemd service unit ansible.builtin.copy: dest: /etc/systemd/system/minio.service mode: "0600" content: | [Unit] Description=MinIO Object Storage After=network.target [Service] Environment="MINIO_ROOT_USER=$MINIO_ROOT_USER" Environment="MINIO_ROOT_PASSWORD=$MINIO_ROOT_PASSWORD" Environment="MINIO_DOMAIN=$S3_HOST" ExecStart=/usr/local/bin/minio server /var/lib/minio/data --certs-dir /var/lib/minio/certs Restart=on-failure [Install] WantedBy=multi-user.target - name: Start and enable MinIO service ansible.builtin.systemd_service: name: minio daemon_reload: true state: started enabled: true - name: Add storage host names to /etc/hosts on the control VM ansible.builtin.lineinfile: path: /etc/hosts line: "$S3_IP $S3_HOST $S3_BUCKET.$S3_HOST" state: present - name: Wait for MinIO health endpoint ansible.builtin.uri: url: "https://$S3_HOST:9000/minio/health/live" ca_path: /var/lib/minio/certs/public.crt status_code: 200 register: minio_health until: minio_health.status == 200 retries: 6 delay: 5 - name: Create backup bucket and user in MinIO ansible.builtin.command: argv: "{{ item }}" loop: - - /usr/local/bin/mc - --insecure - alias - set - s3repo - "https://$S3_HOST:9000" - "$MINIO_ROOT_USER" - "$MINIO_ROOT_PASSWORD" - - /usr/local/bin/mc - --insecure - mb - --ignore-existing - "s3repo/$S3_BUCKET" - - /usr/local/bin/mc - --insecure - admin - user - add - s3repo - "$S3_ACCESS_KEY_ID" - "$S3_SECRET_ACCESS_KEY" - - /usr/local/bin/mc - --insecure - admin - policy - attach - s3repo - readwrite - --user - "$S3_ACCESS_KEY_ID" become: false no_log: true - name: Configure database VMs for MinIO hosts: primary_instance_nodes become: true gather_facts: false vars: ansible_user: $SSH_USER ansible_ssh_private_key_file: $HOME/ssh-key-cluster-sa tasks: - name: Set SELinux to permissive mode ansible.builtin.command: cmd: setenforce 0 - name: Add storage host names to /etc/hosts ansible.builtin.lineinfile: path: /etc/hosts line: "$S3_IP $S3_HOST $S3_BUCKET.$S3_HOST" state: present - name: Verify storage host resolution ansible.builtin.getent: database: hosts key: "$S3_BUCKET.$S3_HOST" - name: Verify connection to MinIO ansible.builtin.uri: url: "https://$S3_HOST:9000/minio/health/live" validate_certs: false status_code: 200 EOFMINIO_DOMAINvariable lets MinIO accept virtual-host-style requests. The RPM orchestrator uses thealloydb-backupuser to write the backups. Thereadwritepolicy is a MinIO built-in policy. - Run the playbook:
ansible-playbook s3_server.yaml -i deployment_spec.yamlPLAY RECAPoutput showsfailed=0forlocalhostand for each database VM. - Verify that the bucket exists:
mc --insecure ls s3repoalloydb-backups/bucket.
5. Create a backup plan
A backup plan contains the storage location, the schedule, and the retention period for the backups of a cluster. In this step, you create a backup plan for the MinIO bucket.
- On the control VM, create the backup playbook and the status playbook. You use the backup playbook for the
Secret,BackupPlan, andBackupresources. You use the status playbook to show the status of a resource.cat > backup.yaml <<EOF - name: Manage AlloyDB Omni backups hosts: localhost roles: - role: google.alloydbomni_orchestrator.backup EOF cat > status.yaml <<EOF - name: Get resource status hosts: localhost roles: - role: google.alloydbomni_orchestrator.status EOF - Create a
Secretresource for the S3 credentials. Then apply the resource:S3_KEY_ID_B64=$(printf '%s' "$S3_ACCESS_KEY_ID" | base64 -w 0) S3_KEY_B64=$(printf '%s' "$S3_SECRET_ACCESS_KEY" | base64 -w 0) cat > s3_secret.yaml <<EOF Secret: metadata: name: s3-backup-secret spec: type: Opaque data: access-key-id: "$S3_KEY_ID_B64" access-key: "$S3_KEY_B64" EOF ansible-playbook backup.yaml -i deployment_spec.yaml \ -e resource_spec=s3_secret.yamldatasection must beaccess-key-idandaccess-key. You must apply theSecretresource before you apply theBackupPlanresource. - Create the
BackupPlanresource and then apply the resource:cat > backup_plan.yaml <<EOF BackupPlan: metadata: name: s3-backup-plan spec: dbclusterRef: $CLUSTER backupLocation: type: S3 s3Options: bucket: $S3_BUCKET key: /backups endpoint: https://$S3_HOST:9000 region: $S3_REGION secretRef: name: s3-backup-secret caBundle: - | $(sed 's/^/ /' /var/lib/minio/certs/public.crt) EOF ansible-playbook backup.yaml -i deployment_spec.yaml \ -e resource_spec=backup_plan.yamlkeyvalue is the path for the backups in the bucket. This path must start with a slash (/). ThecaBundlefield contains the PEM-encoded CA certificate that validates the certificate of the S3 storage server. - Verify that the backup plan is ready:
ansible-playbook status.yaml -i deployment_spec.yaml \ -e resource_type=BackupPlan -e resource_name=s3-backup-planphasefield showsReady. If the phase is notReady, wait one minute and run the command again. - When a backup plan is created, the RPM orchestrator starts an initial full backup automatically. Verify that this initial backup completes before you create an on-demand backup:
ansible-playbook status.yaml -i deployment_spec.yaml \
    -e resource_type=Backup
6. Create an on-demand backup
In this step, you create an on-demand backup of the cluster.
- On the control VM, create the
Backupresource. Then apply the resource:cat > create_backup.yaml <<EOF Backup: metadata: name: s3-backup-1 spec: backupPlanRef: s3-backup-plan dbclusterRef: $CLUSTER EOF ansible-playbook backup.yaml -i deployment_spec.yaml \ -e resource_spec=create_backup.yamlbackupPlanReffield is the name of the backup plan. ThedbclusterReffield is the name of the cluster. - Verify that the backup is complete:
ansible-playbook status.yaml -i deployment_spec.yaml \ -e resource_type=Backup -e resource_name=s3-backup-1phasefield showsSucceeded. If the phase is notSucceeded, wait one minute and run the command again. - Verify that the backup files are in the bucket:
mc --insecure tree "s3repo/$S3_BUCKET"backupfolder that contains adbfolder.
7. Restore the cluster from a backup
The RPM orchestrator restores a cluster in place. In this step, you delete a table and restore it from the backup. Then you can optionally restore the cluster to a point in time.
Caution: A restore operation overwrites all of the data in the database cluster.
Restore from a backup
- On the control VM, delete the
orderstable. Then count the rows:psql -c "DROP TABLE public.orders;" psql -c "SELECT pg_catalog.count(*) FROM public.orders;" - Create the restore playbook:
cat > restore.yaml <<EOF - name: Restore AlloyDB Omni cluster hosts: localhost roles: - role: google.alloydbomni_orchestrator.restore EOF - Create a
Restoreresource for thes3-backup-1backup. Then apply the resource:cat > restore_backup.yaml <<EOF Restore: metadata: name: s3-restore-1 spec: sourceDBCluster: $CLUSTER backup: s3-backup-1 EOF ansible-playbook restore.yaml -i deployment_spec.yaml \ -e resource_spec=restore_backup.yaml - Verify that the restore operation is complete:
ansible-playbook status.yaml -i deployment_spec.yaml \ -e resource_type=Restore -e resource_name=s3-restore-1phasefield showsProvisionSucceeded. If the phase is notProvisionSucceeded, wait one minute and run the command again. - Count the rows in the restored table:
psql -c "SELECT pg_catalog.count(*) FROM public.orders;"1000.
(Optional) Restore to a point in time
A point-in-time restore uses a backup and the archived write-ahead log (WAL). You can restore the cluster to any time in the recovery window of the backup plan.
Rules for the target time
You must follow all the rules to choose the value and format for the target time:
- Use the RFC 3339 format in UTC:
YYYY-MM-DDThh:mm:ssZ. For example,2026-06-19T14:30:00Zis 14:30:00 UTC on 19 June 2026. The letterTseparates the date and the time. The letterZshows UTC. - Use a time in the past.
- Use a time after the
beginvalue of therecoveryWindowfield of theBackupPlanCRD.
To show the current time in RFC 3339 format, run this command:
date -u +%Y-%m-%dT%H:%M:%SZ
To change a local time to this format, add the UTC offset of the local time to the date command. For example, the following command changes 16:30:00 on 19 June 2026 at UTC+02:00:
date -u -d "2026-06-19 16:30:00 +0200" +%Y-%m-%dT%H:%M:%SZ
The command returns 2026-06-19T14:30:00Z.
Restore to a recorded time
In this procedure, you add rows to the table and record a time. When you record a time, you bookmark the exact moment when the database is completely intact (having exactly 1,500 rows).Then you delete rows and restore the cluster to the recorded time.
- Add 500 rows to the table:
psql <<'SQL' INSERT INTO public.orders (id, item) SELECT g, 'item-' || g FROM pg_catalog.generate_series(1001, 1500) AS g; SQL - Record the time. The table has 1,500 rows at this time.
sleep 5 PITR_TIME=$(date -u +%Y-%m-%dT%H:%M:%SZ) echo "export PITR_TIME=$PITR_TIME" >> ~/.codelab.env echo "$PITR_TIME" sleep 5YYYY-MM-DDThh:mm:ssZformat, for example2026-10-05T11:16:02Z. - Delete rows from the table to simulate an accidental data deletion. Then start a new WAL file:
psql -c "DELETE FROM public.orders WHERE id > 1000;" psql -c "SELECT pg_catalog.count(*) FROM public.orders;" psql -c "SELECT pg_catalog.pg_switch_wal();"countquery shows1000. Thepg_switch_walfunction makes the server start a new WAL file. Then the server can archive the WAL file that contains your changes. - Verify that the recovery window of the backup plan contains the recorded time:
test -n "$PITR_TIME" || { echo "PITR_TIME is not set. Run step 2 again."; exit 1; } echo "$PITR_TIME" ansible-playbook status.yaml -i deployment_spec.yaml \ -e resource_type=BackupPlan -e resource_name=s3-backup-planPITR_TIMEvalue is after thebeginvalue of therecoveryWindowfield. - Create a
Restoreresource for the recorded time. Then apply the resource:cat > restore_pitr.yaml <<EOF Restore: metadata: name: s3-restore-pitr spec: sourceDBCluster: $CLUSTER pointInTime: "$PITR_TIME" EOF ansible-playbook restore.yaml -i deployment_spec.yaml \ -e resource_spec=restore_pitr.yaml - Verify that the restore operation is complete:
ansible-playbook status.yaml -i deployment_spec.yaml \ -e resource_type=Restore -e resource_name=s3-restore-pitrphasefield showsProvisionSucceeded. If the phase is notProvisionSucceeded, wait one minute and run the command again. - Count the rows:
psql -c "SELECT pg_catalog.count(*) FROM public.orders;"1500.
8. Cleanup
To prevent charges to your Google Cloud account, delete the resources of this codelab and the Deploy AlloyDB Omni high availability cluster on GCE VMs using RPM Orchestrator codelab. First, delete the backup resources, then delete the cluster and the compute environment.
- On the control VM, create the delete playbook:
cat > delete.yaml <<EOF - name: Delete AlloyDB Omni resources hosts: localhost roles: - role: google.alloydbomni_orchestrator.delete EOF - List the backups:
ansible-playbook status.yaml -i deployment_spec.yaml -e resource_type=Backups3-backup-1backup. - Delete the
s3-backup-1backup:ansible-playbook delete.yaml -i deployment_spec.yaml \ -e resource_type=Backup -e resource_name=s3-backup-1 - Delete the backup plan:
ansible-playbook delete.yaml -i deployment_spec.yaml \ -e resource_type=BackupPlan -e resource_name=s3-backup-plan - Delete the cluster and the compute environment using the Clean up Resources step from the Deploy AlloyDB Omni high availability cluster on GCE VMs using RPM Orchestrator codelab. The MinIO server and the backups in it are on the control VM. When you delete the compute environment, you delete both the server and the backups.
9. Congratulations
Congratulations. You backed up a high availability (HA) cluster to S3-compatible object storage for AlloyDB Omni using the RPM orchestrator. Then you restored the cluster from the backups.
What we've covered
- How to install and run MinIO as S3-compatible object storage.
- How to create a backup plan and an on-demand backup.
- How to restore a cluster from a backup and to a point in time.
For more information, see the following pages: