
1. Introduction

Last Updated: 2022-10-18
How do you prepare your game for Google Play Games on PC?
Google Play Games makes it easy to bring your mobile game to Windows PCs. This means that you can grow your player engagement and your audience without having to rearchitect your game or redesign your business model. There are still a few changes that you have to make to give your new PC players the best possible experience.
What you'll learn
This codelab covers the base portions of the requirements checklist to get your game off the ground, and help you prepare your own Unity game for Google Play Games on PC. More in-depth integrations, such as Play Games Sign-On, and the Play Integrity API, are not covered..
- How to build for the x86 architecture from Unity.
- How to test and deploy to the Google Play Games emulator.
- How to modify your user interface to look great on a PC.
- How to detect if you're running in the Google Play Games emulator, and adapt your game accordingly.
What you'll need
- Unity 2020 LTS install (this codelab was built with 2020.3.30f1).
- The Google Play Games emulator.
2. Get set up
Open or create a new project
- Create a new project using the 2D Platformer Microgame, or open up your own project.
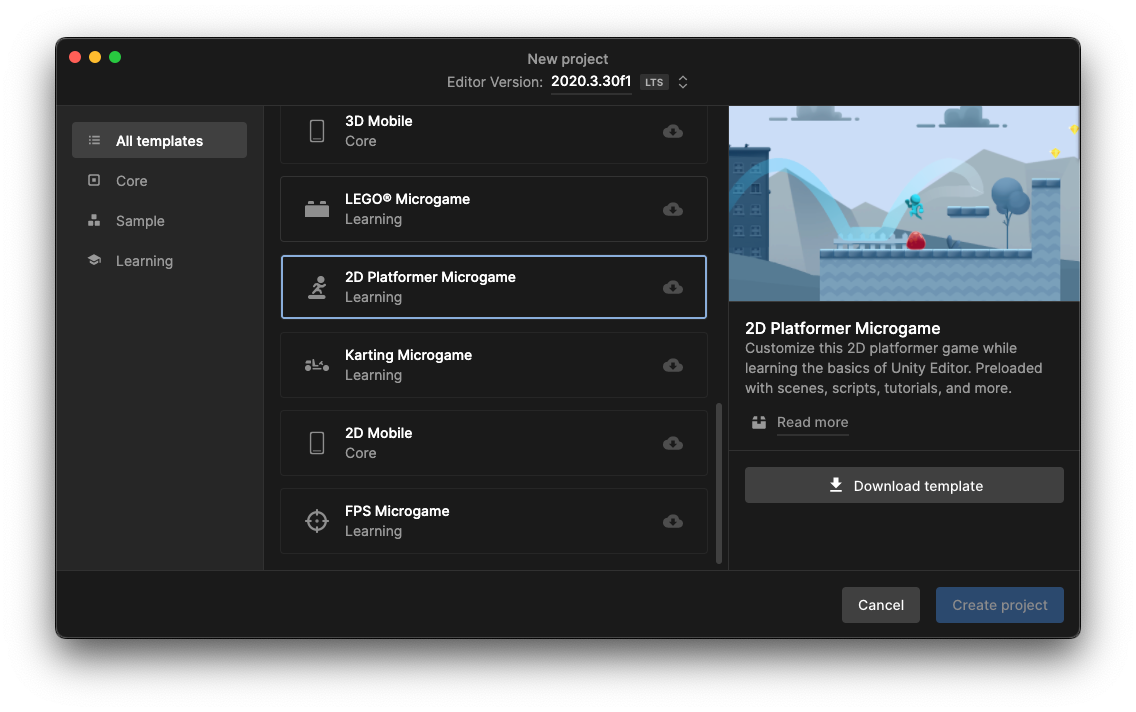
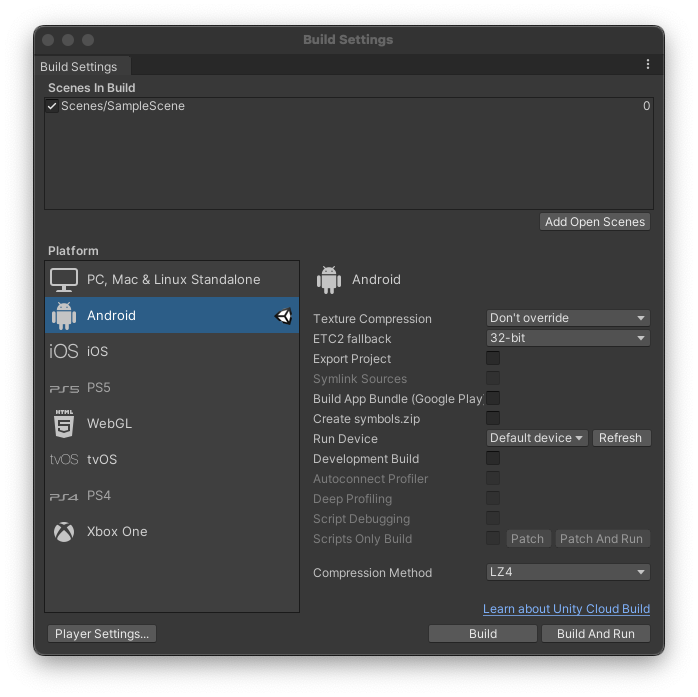
- From the project, select File -> Build Settings and check that you are set up to build for Android.
3. Prepare the Google Play Games emulator
Start by downloading the emulator.
After installing it, you should see an Android desktop in a window:

This is a fully-featured high-performance Android environment suitable for game development. It should show up in Android Debug Bridge (adb) as a device on localhost:
❯ adb devices
List of devices attached
localhost:6520  device
You need a recent version of adb to detect the emulator. The version bundled with Android Studio works, but adb as shipped with Unity may not. A compatible version is bundled with the emulator, and you can find it at C:\Program Files\Google\Play Games Developer Emulator\current\emulator. For the best developer experience, you may want to install Android Studio and use it to manage your Android SDK.
If the emulator disconnects from adb, reconnect it from the command line like this:
adb connect localhost:6520
4. Configure Unity to build and deploy to the emulator directly (Optional)
The version of adb shipped with Unity may not be compatible with the emulator. To make sure, select File -> Build Settings and check the Run Device dialog to see if it's listed.

Depending on your project, build process, and comfort level, you may opt to either configure Unity to deploy to the Google Play Games emulator directly, or build an APK and deploy it manually with adb install. To deploy it manually requires the fewest changes, but may slow down your iteration cycle.
Deploy to the emulator directly with these two steps:
- Configure Unity to use another Unity SDK, ideally the one installed by Android Studio.
- Update the Build Tools version to work around a bug in Unity.
Because the version of the Android SDK shipped with Unity probably won't detect the emulator, you use Android Studio to install a more recent SDK.
- Open Android Studio and select Edit -> Preferences -> External Tools.
- Uncheck
Android SDK Tools Installed with Unity, and provide the path to your Android Studio's installation (usuallyAppData/Local/Android/sdk). Leave theAndroid NDKoption alone.

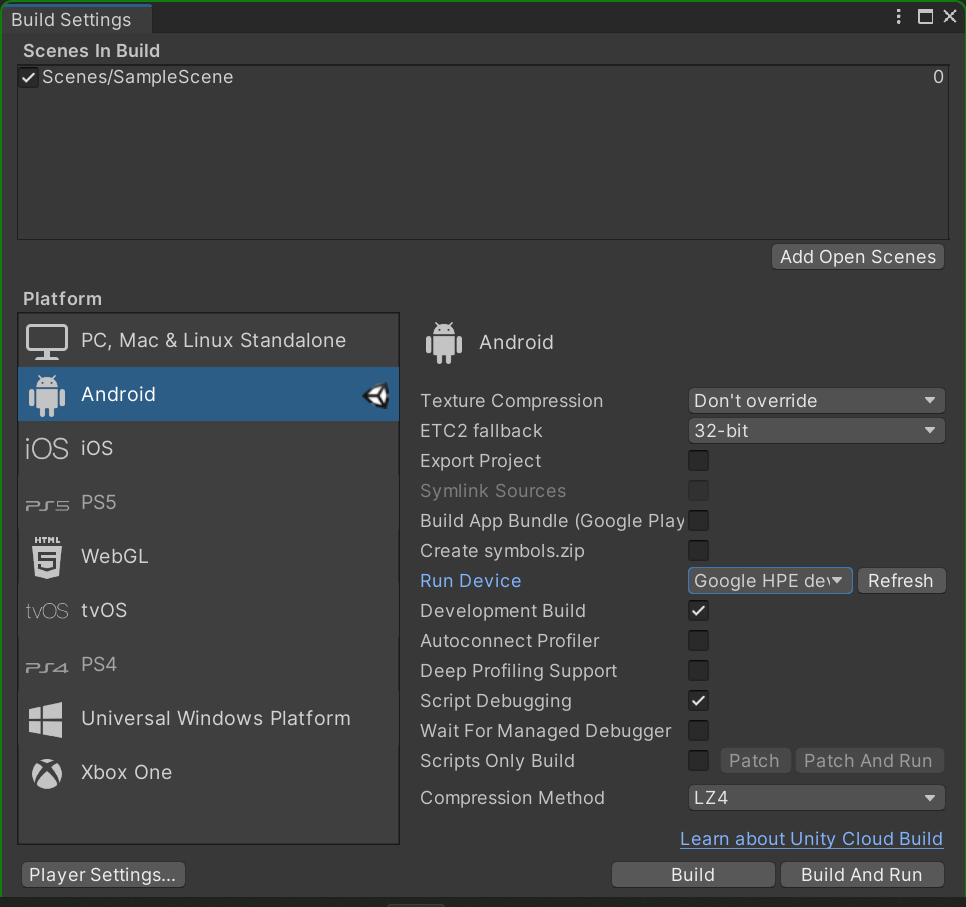
when you refresh the connected devices, you should see Google HPE device (localhost:6520) appear in the build window:
Depending on the state of this bug and your Unity version, you may also need to change your build tools version. To do this, check that you're generating a mainTemplate.gradle and launcherTemplate.gradle.
- Open the Project Settings window to Player Settings and locate the
Publishing Settingssection. - SScroll down to the Build options and check "Custom Main Gradle Template" and "Custom Launcher Gradle Template", which will generate both Gradle files under
Assets\Plugins\Android\.

- Replace any instance of the string
**BUILDTOOLS**with30.0.0. In both files, the section of code should now read:
android {
    compileSdkVersion **APIVERSION**
    buildToolsVersion '30.0.0'
5. Deploy to a Chromebook (optional)
You can start developing games for Google Play Games without access to the Google Play Games emulator by using a ChromeOS device. Much like Google Play Games on PC, Chromebooks have keyboards and mice, have large screens, and are available in x86 configurations. We'll use the Android Logcat Unity plugin with the Chromebook..
- Open the Package Manager and search for
Android LogcatunderUnity Registry.

You also need to configure your Chromebook for Android development. Start by enabling Linux.
- Select Settings -> Developer -> Linux.

Then enable ADB debugging.
- Select Settings -> Developers -> Linux development environment -> Develop Android apps -> Enable ADB debugging.

You'll also want to get your Chromebook's IP address. The easiest way to do this is to
- Click the Network Info icon to get your Chromebook's IP address.


- Select Window -> Analysis -> Android Logcat to open the Android Logcat window.

- Open the device list It may read
No Deviceif nothing is currently connected.

- Click Other connection options and enter your Chromebook's IP address.

- Click Connect. You should see a Success window:

Your Chromebook now appears in Unity's Run Device list (you may have to refresh the screen first):

You can now deploy games to your Chromebook and begin testing and development on PC-like hardware.
6. Deploy a test build
Google Play Games requires that you deploy an x86 version of your game, which is part of how it reaches its performance benchmarks on desktop PCs. All LTS variants of Unity can generate x86 and x86-64 compatible Android builds (labeled "Chrome OS"), and Unity version 2018 and earlier can generate x86 builds. To unlock these architectures, you first need to switch to the IL2CPP scripting backend, which you likely already do in production for arm64 support.
- Select File -> Build Settings to open the Build Settings window, and then click Player Settings.

- Navigate to the Other Settings section and switch your
Scripting BackendtoIL2CPP.

You should also enable x86 or x86-64 support. To ship on the Google Play Games platform you only need to support x86, although we recommend x86-64.

The version of the Frame Pacing library Unity bundles is also incompatible with Google Play Games, and causes your game to crash on launch.
- To disable Frame Pacing from the Player Settings window open the Resolution and Presentation section and uncheck Optimized Frame Pacing.

You're now ready to build!
- Open the Build Settings window again and click Build And Run. Your game appears in the emulator window.

If you're not able to deploy your game, check to see if "Google HPE device (localhost:6520)" shows up in your "Run Device" list. If it's missing, ensure that HPE_Dev is running and you can see the Android home screen. If it's still not appearing in your device list, run adb connect localhost:6520 with the exact adb.exe you're using. If you use the Android Logcat Unity plugin, select Tools -> Open Terminal to open a terminal to the directory with the same adb.exe Unity is using.
Open Terminal" highlighted" style="width: 624.00px" src="img/9101ce3c95fb1aa2.png" srcset="img/9101ce3c95fb1aa2_36.png 36w, img/9101ce3c95fb1aa2_48.png 48w, img/9101ce3c95fb1aa2_72.png 72w, img/9101ce3c95fb1aa2_96.png 96w, img/9101ce3c95fb1aa2_480.png 480w, img/9101ce3c95fb1aa2_720.png 720w, img/9101ce3c95fb1aa2_856.png 856w, img/9101ce3c95fb1aa2_960.png 960w, img/9101ce3c95fb1aa2_1440.png 1440w, img/9101ce3c95fb1aa2_1920.png 1920w, img/9101ce3c95fb1aa2_2880.png 2880w" sizes="(max-width: 840px) 100vw, 856px">
7. Adapt your game for PC
When possible, try to make any changes to your game based on platform-agnostic metrics, or the presence of certain features. For example, a player on Android can hook up a mouse and keyboard or plug in a monitor, so changing your control scheme or HUD elements in reaction to your device configuration lets you leverage Google Play Games on PC work across all your supported platforms.
If it makes sense to change logic based on whether or not the player is in Google Play Games or ChromeOS, this script helps you detect it by checking for the HPE_EXPERIENCE system feature:
using UnityEngine;

public class GoogleDeviceUtilities
{
#if UNITY_ANDROID && !UNITY_EDITOR
    private static AndroidJavaObject PackageManager
    {
        get
        {
            var unityPlayerClass = new AndroidJavaClass("com.unity3d.player.UnityPlayer");
            var currentActivity = unityPlayerClass.GetStatic<AndroidJavaObject>("currentActivity");
            return currentActivity.Call<AndroidJavaObject>("getPackageManager");
        }
    }

    public static bool IsChromeOS => PackageManager.Call<bool>("hasSystemFeature", "org.chromium.arc");

    public static bool IsGooglePlayGames =>
        PackageManager.Call<bool>("hasSystemFeature", "com.google.android.play.feature.HPE_EXPERIENCE");

    public static bool HasKeyboard
    {
        get
        {
            var unityPlayerClass = new AndroidJavaClass("com.unity3d.player.UnityPlayer");
            var currentActivity = unityPlayerClass.GetStatic<AndroidJavaObject>("currentActivity");
            var resources = currentActivity.Call<AndroidJavaObject>("getResources");
            var configuration = resources.Call<AndroidJavaObject>("getConfiguration");
            var keyboard = configuration.Get<int>("keyboard");
            return keyboard == 2; // Configuration.KEYBOARD_QWERTY
        }
    }
#else
    public static bool IsChromeOS => false;
    public static bool IsGooglePlayGames => false;
    public static bool HasKeyboard => true;
#endif
}
PCs have a larger display than the typical Android phone. When possible, we recommend that your HUD takes up no more than 20% of the screen. Since many mobile games use "Scale With Screen Size", changing this to "Constant Physical Size" or "Constant Pixel Size" can be a good first step towards achieving this goal.

You may also want to dynamically set the quality settings using the QualitySettings.SetQualityLevel command at runtime if you detect that you're running in Google Play Games. The Google Play Games emulator uses ANGLE to issue native DirectX or Vulkan commands from the OpenGL Unity emits, so you can likely achieve a higher graphics fidelity than was available on your mobile game builds.
8. Input handling
Games shipping on Google Play Games should be built around mouse and keyboard input. You will need to plan how to interact with your game with a mouse and keyboard, so take the time now to acquire the Input SDK unitypackage. If you don't see a download on that page, make sure that you are signed in with an account in the play-mp-libs group.
For testing purposes, many games build basic mouse and keyboard controls for development in the editor. When possible, you may want to enable these when you're running on a ChromeOS device or in the Google Play Games emulator.
By default, Google Play Games and ChromeOS convert mouse input into a simulated touch. If you use Input.GetTouch and Input.touchCount, your game continues to work as expected. If you rely on multi-touch input, such as dual thumb controls or pinch to zoom, you need to map the action to key presses. You should also map in-game actions to key presses, such as pressing i to open your inventory, escape to close dialog boxes, and enter to send in-game messages.
The 2D Platformer Microgame uses the arrows to move, and space to jump. If you're using your own game, make sure you have your preferred key bindings for the next step.
9. Input SDK integration
Now that you have your mouse and keyboard controls set up, you need to add Input SDK support. This helps players discover your PC inputs with a handy popover:
- After importing the SDK into your project, create a file named
InputMappingProviderBehaviour.csand add these contents:
using System.Collections.Generic;
using Google.Play.InputMapping;
using UnityEngine;
using Input = Google.Play.InputMapping.Input;

public class InputMappingProviderBehaviour : MonoBehaviour
{
    private void Start()
    {
        Input.GetInputMappingClient().RegisterInputMappingProvider(new MyInputMappingProvider());
    }

    private class MyInputMappingProvider : InputMappingProvider
    {
        public InputMap OnProvideInputMap()
        {
            return new InputMap
            {
                InputGroups = new List<InputGroup> { },
                MouseSettings = new MouseSettings
                {
                    InvertMouseMovement = false,
                    AllowMouseSensitivityAdjustment = false
                }
            };
        }
    }

    private enum ActionIds
    {
    }
}
- Now fill
ActionIdswith the list of actions you're using in your game. For the 2D Platformer Microgame, the actions are Left, Right, and Jump:
private enum ActionIds
{
    Left,
    Right,
    Jump
}
- In
OnProvideInputMap, create anInputActionfor each action. For this you need the name of the action, the input, and then the mouse buttons or keycodes that will be bound to it. For the sample game:
var leftAction = new InputAction
{
    ActionLabel = "Walk Left",
    UniqueId = (int)ActionIds.Left,
    InputControls = new InputControls
    {
        AndroidKeycodes = new[]
        {
            AndroidKeyCode.KEYCODE_DPAD_LEFT
        }
    }
};

var rightAction = new InputAction
{
    ActionLabel = "Walk Right",
    UniqueId = (int)ActionIds.Right,
    InputControls = new InputControls
    {
        AndroidKeycodes = new[]
        {
            AndroidKeyCode.KEYCODE_DPAD_RIGHT
        }
    }
};

var jumpAction = new InputAction
{
    ActionLabel = "Jump",
    UniqueId = (int)ActionIds.Jump,
    InputControls = new InputControls
    {
        AndroidKeycodes = new[]
        {
            AndroidKeyCode.KEYCODE_SPACE
        }
    }
};
- Next, put these input actions into groups.
For the microgame we only have one group, but you can create as many as you need to help your players find the actions they need. Add this to the OnProvideInputMap:
var movementInputGroup = new InputGroup
{
    GroupLabel = "Movement",
    InputActions = new List<InputAction>
    {
        leftAction, rightAction, jumpAction
    }
};
- Add all the input groups you've created to the input map. Modify the return statement in
OnProvideInputMapto read:
return new InputMap
{
    InputGroups = new List<InputGroup> { movementInputGroup },
    MouseSettings = new MouseSettings
    {
        InvertMouseMovement = false,
        AllowMouseSensitivityAdjustment = false
    }
};
- Finally, add the script you created into your game:

- When you deploy your game again, press
Shift+Tabto open the in-game overlay.
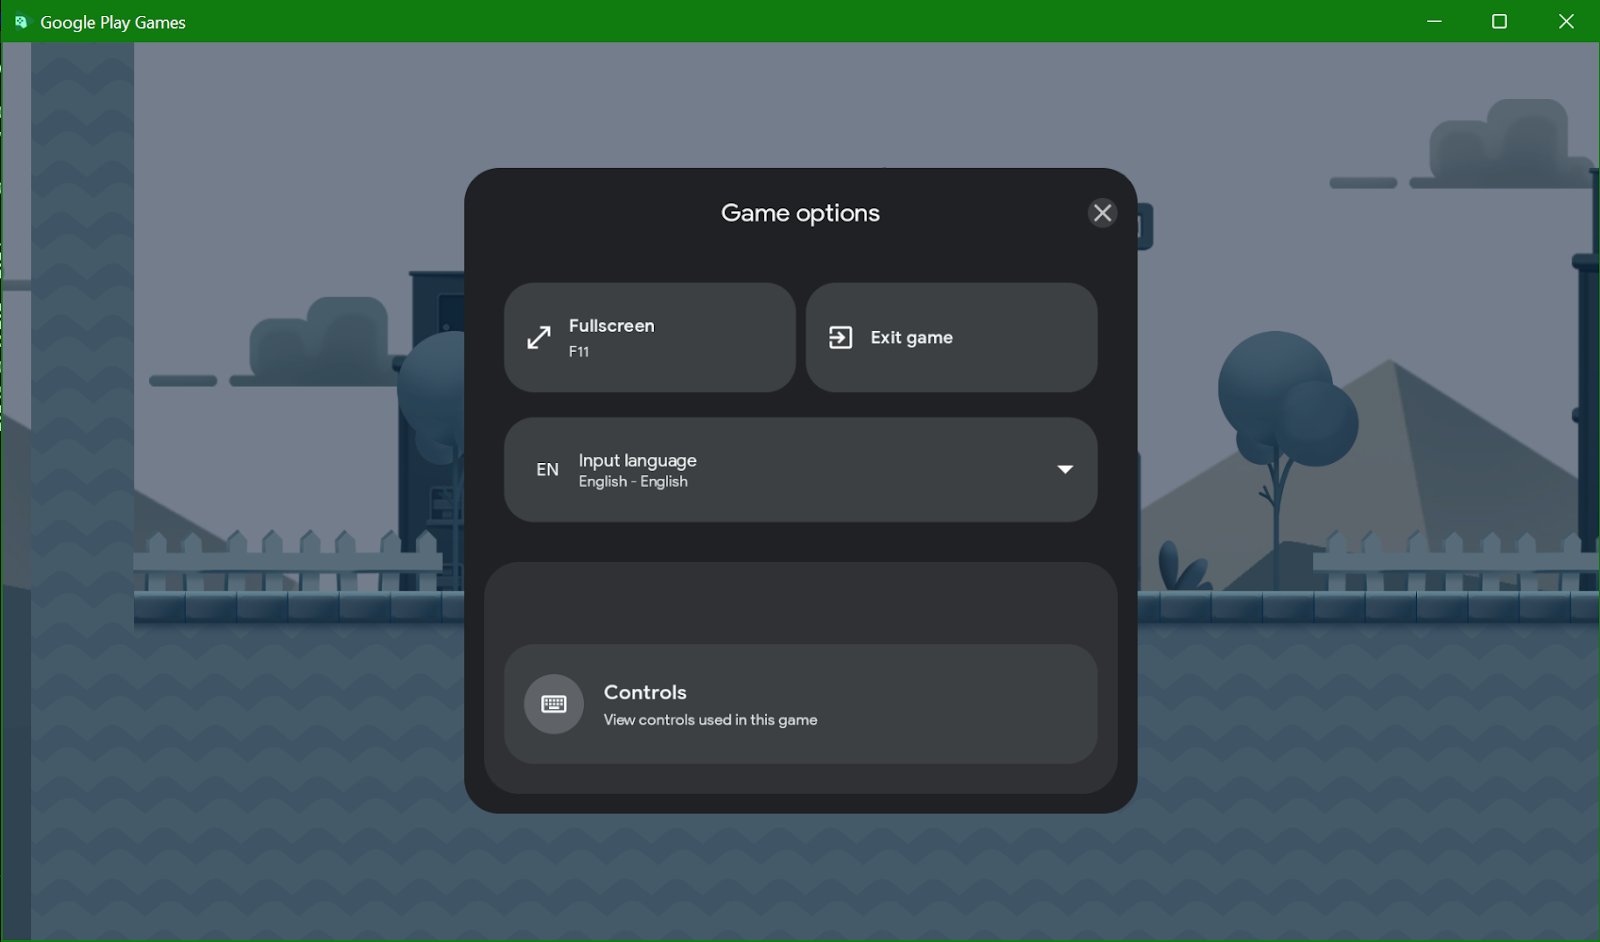
- Click Controls to see the controls you've configured.

10. Remove embedded web views
To give your players a great experience, you should remove embedded web views. It's common to use embedded web views for displaying items like your Privacy Policy or Terms of Service. Although these work in Google Play Games, they show up in an embedded "mobile" browser, rather than the player's preferred desktop browser, and might cause some confusion for PC players. Therefore in Unity, if you're using any extensions to show an embedded browser, fall back to Application.OpenURL(url).
11. Permissions and features
There are a number of Android features and permissions that are unsupported in Google Play Games. A general rule of thumb is that your PC build should never pop up a permissions dialog. A good thing to do, now that you have your build ready, is go through a typical new install and write down any dialogs you see to add to your "todo" list for submitting your game.
Some Unity games request permissions using the Android.Permission API. You should wrap these in if (GoogleDeviceUtilities.IsGooglePlayGames) checks and go directly to your failure logic if applicable.
12. Desktop optimizations
Google Play Games has a few differences when compared to a typical Android phone, and you may want to configure your game accordingly.
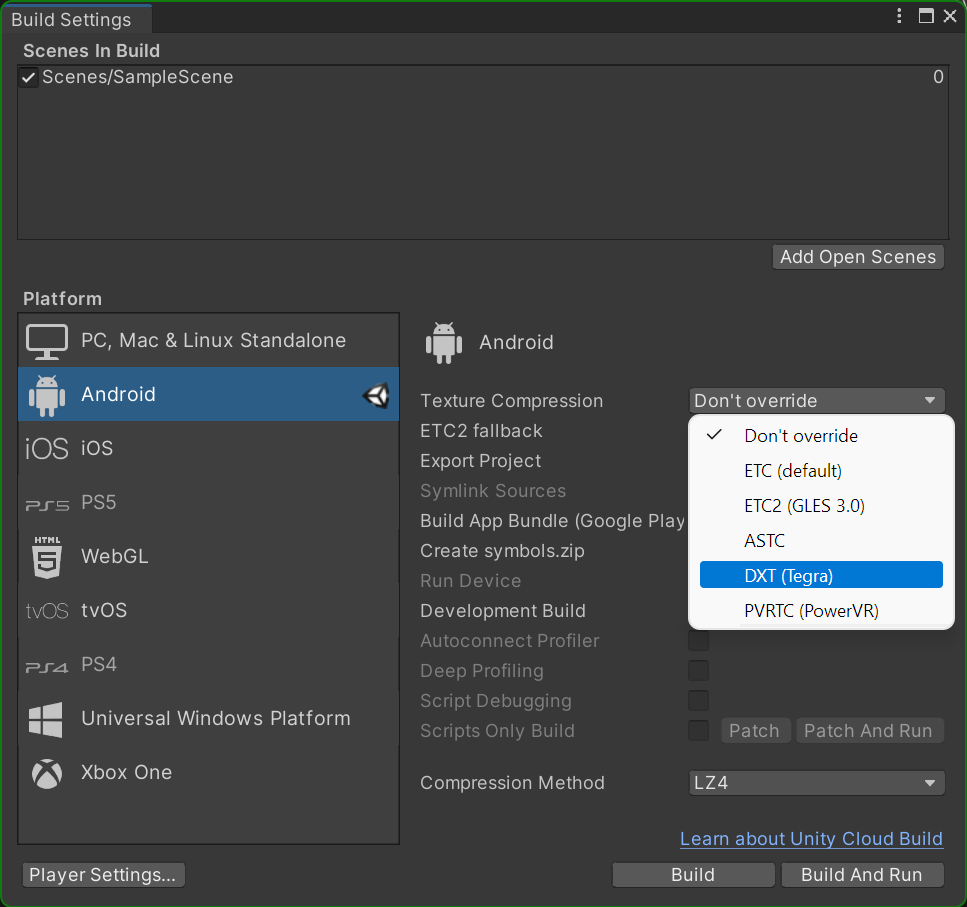
Switch to DXT for texture compression. Common Android texture formats such as ETC are decoded in memory at runtime if they can't be passed through to a player's GPU directly. ASTC gives you the best desktop compatibility, although you need to use a desktop GPU profiling tool in order to verify expected behavior for your game.
Since you're running on a desktop GPU now, you may also want to increase your graphics quality. You can adjust it directly in your Project Settings under Quality

13. Congratulations
You have everything in place to start working on your game for Google Play Games. You can begin testing and iterating on your game. Remember that even though you can keep your same code base, you will want to adapt your game to feel like a native PC game.
What's next?
There is more work to be done to ship a game on Google Play Games:
- Review the Quickstart for the latest information.
- Upgrade to Play Games Services Sign In v2 to automatically log a player in on launch and help satisfy the continuity requirements.
- Implement the Play Integrity API to ensure your PC experience is as secure as your mobile one.
Finally, much of the work you've done to this point for supporting Google Play Games also helps you ship on ChromeOS, and you should consider supporting that platform along with PC.