
1. Introduction
In this codelab, you will learn about Antigravity CLI, a lightweight Terminal User Interface (TUI) surface of Antigravity. It brings the same core agentic capabilities as Antigravity (such as multi-step reasoning, multi-file editing, tool calling, and conversation history) directly to your terminal.
What you'll learn
- Installing and configuring Antigravity CLI
- Understanding basic usage of Antigravity CLI
- Exploring a few use cases with Antigravity CLI
What you'll need
You would need the following:
- Chrome web browser
- A personal Gmail account
This codelab, designed for users and developers of all levels (including beginners). The use cases in the codelab have been categorized into developer and non-developer tasks. The developer use cases demonstrate how to vibe code with Antigravity CLI and work with a GitHub repository to perform common development tasks like code explanation/understanding, generating documentation, fixing issues and more. It is recommended that you complete these use cases in the codelab. There is an optional section at the end that covers several every day tasks that are non-developer focused.
2. Installation
Before you do the setup and run Antigravity CLI, let us create a folder that we will be using as our home folder for all the projects that we create inside of it. This is a starting point for the Antigravity CLI to work with, though it will also reference some other folders on your system and which you will come to later, as needed.
Go ahead and create a sample folder (agy-cli-projects) and navigate to that via the commands shown below. If you prefer to use some other folder name, please do so.
mkdir agy-cli-projects
Let's navigate to that folder:
cd agy-cli-projects
The installation is straightforward and binaries are available across major Operating Systems. I have taken the commands to run in the terminal directly from the installation document:
macOS | Linux
curl -fsSL https://antigravity.google/cli/install.sh | bash
Windows PowerShell
irm https://antigravity.google/cli/install.ps1 | iex
Windows CMD
curl -fsSL https://antigravity.google/cli/install.cmd -o install.cmd && install.cmd && del install.cmd
This should ideally setup and install the Antigravity CLI (agy) in your system and in the Path.
In some cases, if the installer is not able to add the binary ( agy to the PATH), it will say so and will let you know in terms of what you need to do to add it to the PATH.
Just check out the version of Antigravity CLI via the following command:
agy --version
It should show you the version of Antigravity CLI that you have installed. At the time of the last update for this codelab, it was 1.1.27.
When we launch Antigravity CLI for the first time, it will ask you to login. Launch agy and it should show something similar to this:
    ▄▀▀▄
   ▀▀▀▀▀▀
  ▀▀▀▀▀▀▀▀
 ▄▀▀    ▀▀▄
▄▀▀      ▀▀▄

Welcome to the Antigravity CLI. You are currently not signed in.

Select login method:
> 1. Google OAuth
  2. Use a Google Cloud project

[Use arrow keys to navigate, Enter to select]
Use your personal account for now. Choose 1. Google OAuth and press Enter. This will launch a browser and you can login with your Google Account. On successful authentication and authorization, you are asked to copy a code. Please come back into the Antigravity CLI terminal and paste the code.
Once the login is successful, a few things happen:
- First up, it asks you about the color theme that you wish to choose for Antigravity CLI, as shown below. Pick the one that you like.
- Next up, you need to accept a few terms of service. Accept those.
Finally, the most important thing is to give your permission that you trust the folder, as shown below:
Accessing workspace:

/Users/yourusername/agy-cli-projects

Do you trust the contents of this project?

Antigravity CLI requires permission to read, edit, and execute files here.

> Yes, I trust this folder
 No, exit

 ↑/↓ Navigate · enter Confirm
You will see this typically in any new folder that you launch the Antigravity CLI on. We will come to more on this later in the series but for now, go ahead and say Yes, I trust this folder.
Congratulations! You are all set now and Antigravity CLI is waiting for your prompt.
3. Our first interaction with Antigravity CLI
Let's get started with Antigravity CLI and type your first query as shown below:
Give me a famous quote on Artificial Intelligence and who said that?
We get a sample response as shown below:
Identifying a famous AI quote
  │ "Artificial intelligence is the new electricity."
  │
  │ — Andrew Ng, Co-founder of Coursera and Google Brain

  Another iconic, foundational quote:
  │ "A computer would deserve to be called intelligent if it could
  │  deceive a human into believing that it was human."
  │
  │ — Alan Turing, Mathematician and pioneer of modern computer
      science
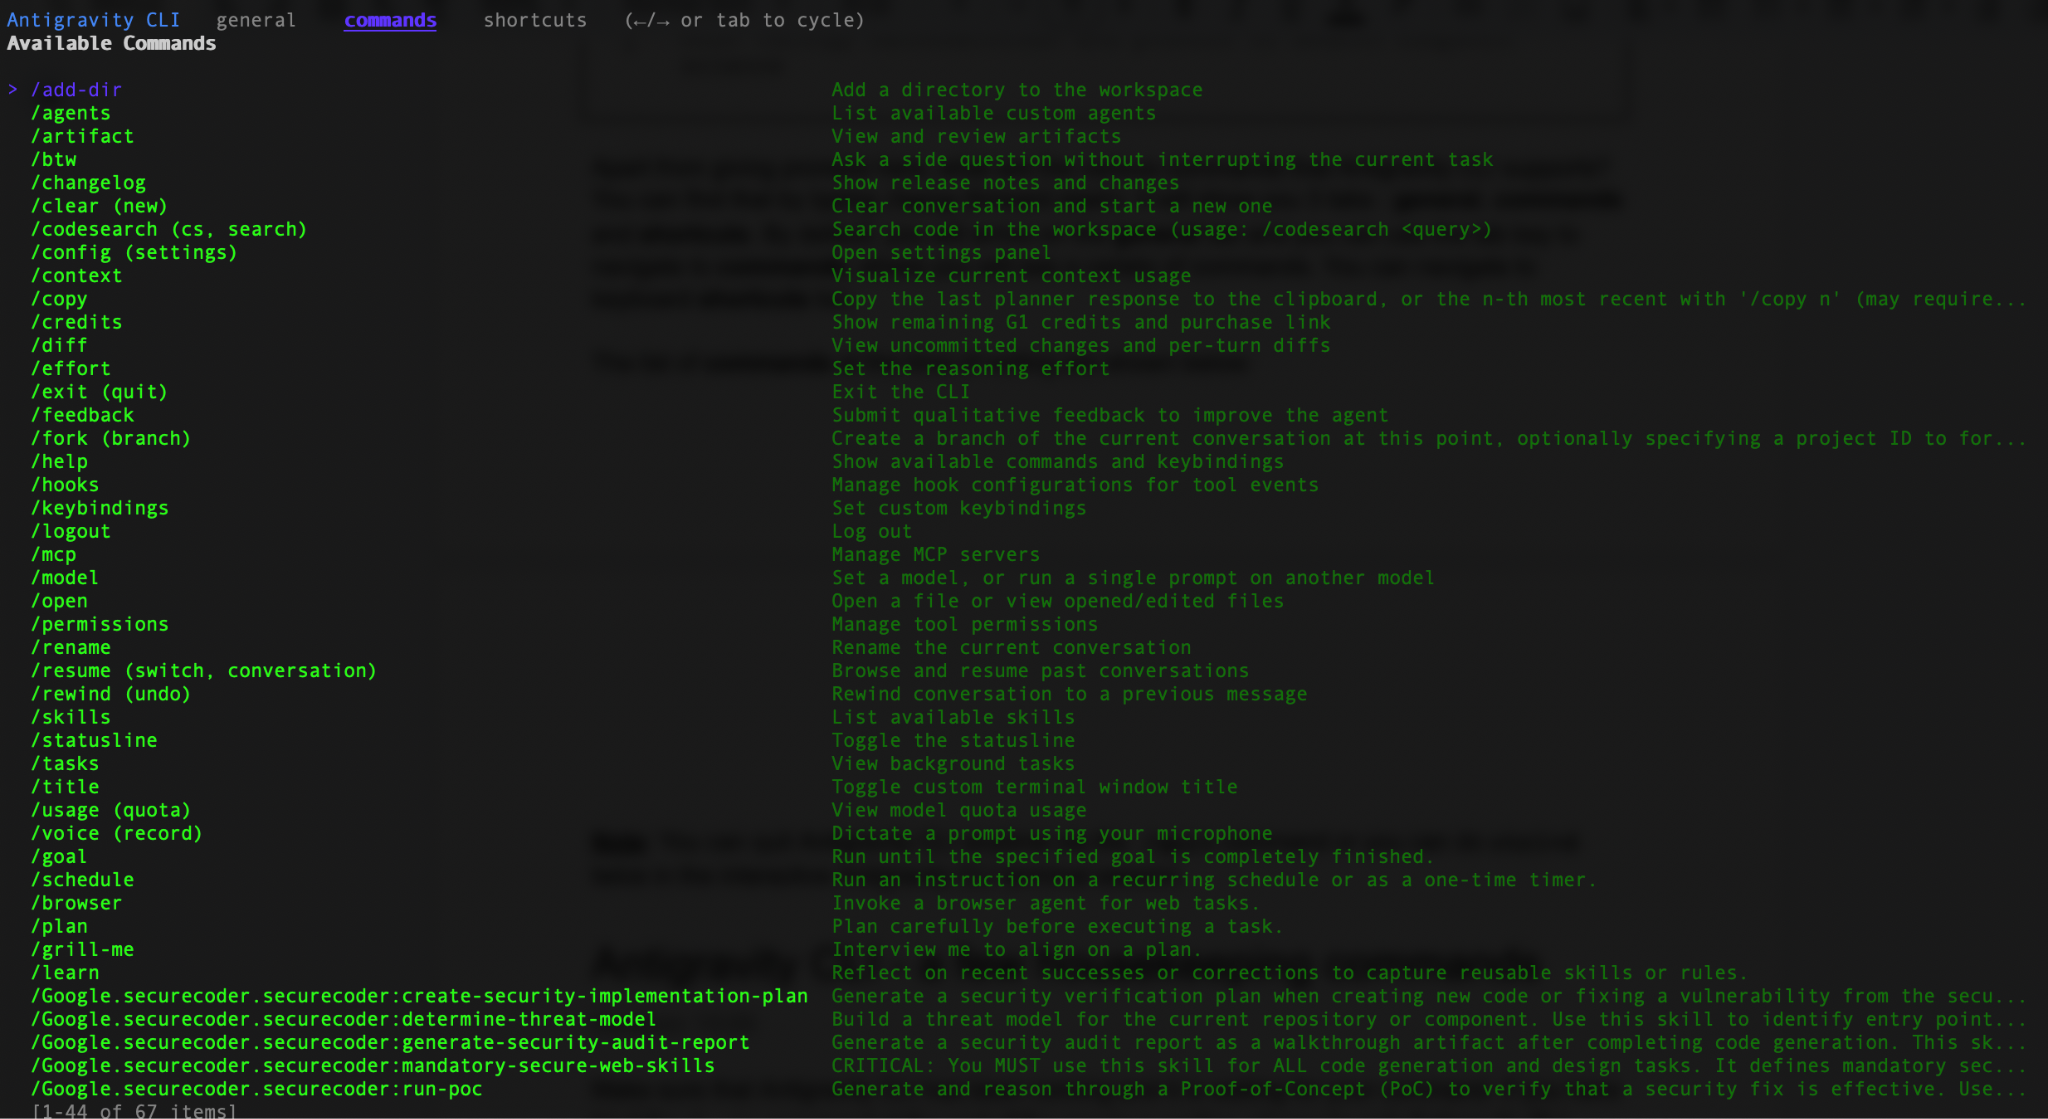
Apart from giving prompts here, what are the various commands that Antigravity CLI supports? You can find that by typing /help (forward slash). It will show you 3 tabs : general, commands and shortcuts. By default, you will arrive on the general tab and you can use the tab key to navigate to commands, where you will see a variety of commands. You can navigate to keyboard shortcuts too.
A sample screenshot for the list of commands is shown below:
Note: You can quit Antigravity CLI anytime via the /quit command or you can do ctrl+d twice in the interactive Antigravity CLI terminal session.
4. Antigravity CLI - a few housekeeping commands
Make sure that Antigravity CLI has been running and it is waiting for your command. If you have tried the /quit command at the end of the previous section, please launch Antigravity CLI again via the agy command.
Notice the model that it is using, the name of which, will be shown in the bottom right. The first thing ideally is to understand that most of the customization and settings that you need to do are available via the /config or /settings command.
Configuration / Settings
Go ahead and invoke the /config command. This will bring up various areas of Antigravity that you can customize based on your preferences. This includes the Color Scheme, Tool permission, telemetry settings and more.
Settings
  Search:
          ────────────────────
> Agent Mode                   default
  Animation Speed              medium
  Artifact Review              asks for review
  Color Scheme                 terminal
  Conversation Picker Grouping none
  Copy on Select               on
  Editor                       auto ($EDITOR)
  Editor Mode                  default
  Enable Telemetry             on
  Non-Workspace Access         off
  Notifications                off
  Rendering Mode               native terminal (inline)
  Sandbox Mode                 off
  Show Active Tasks            on
  Show Feedback Survey         on
  Show Tips                    on
  Tool Permission              request-review
  Use AI Credits               off
  Verbosity                    high
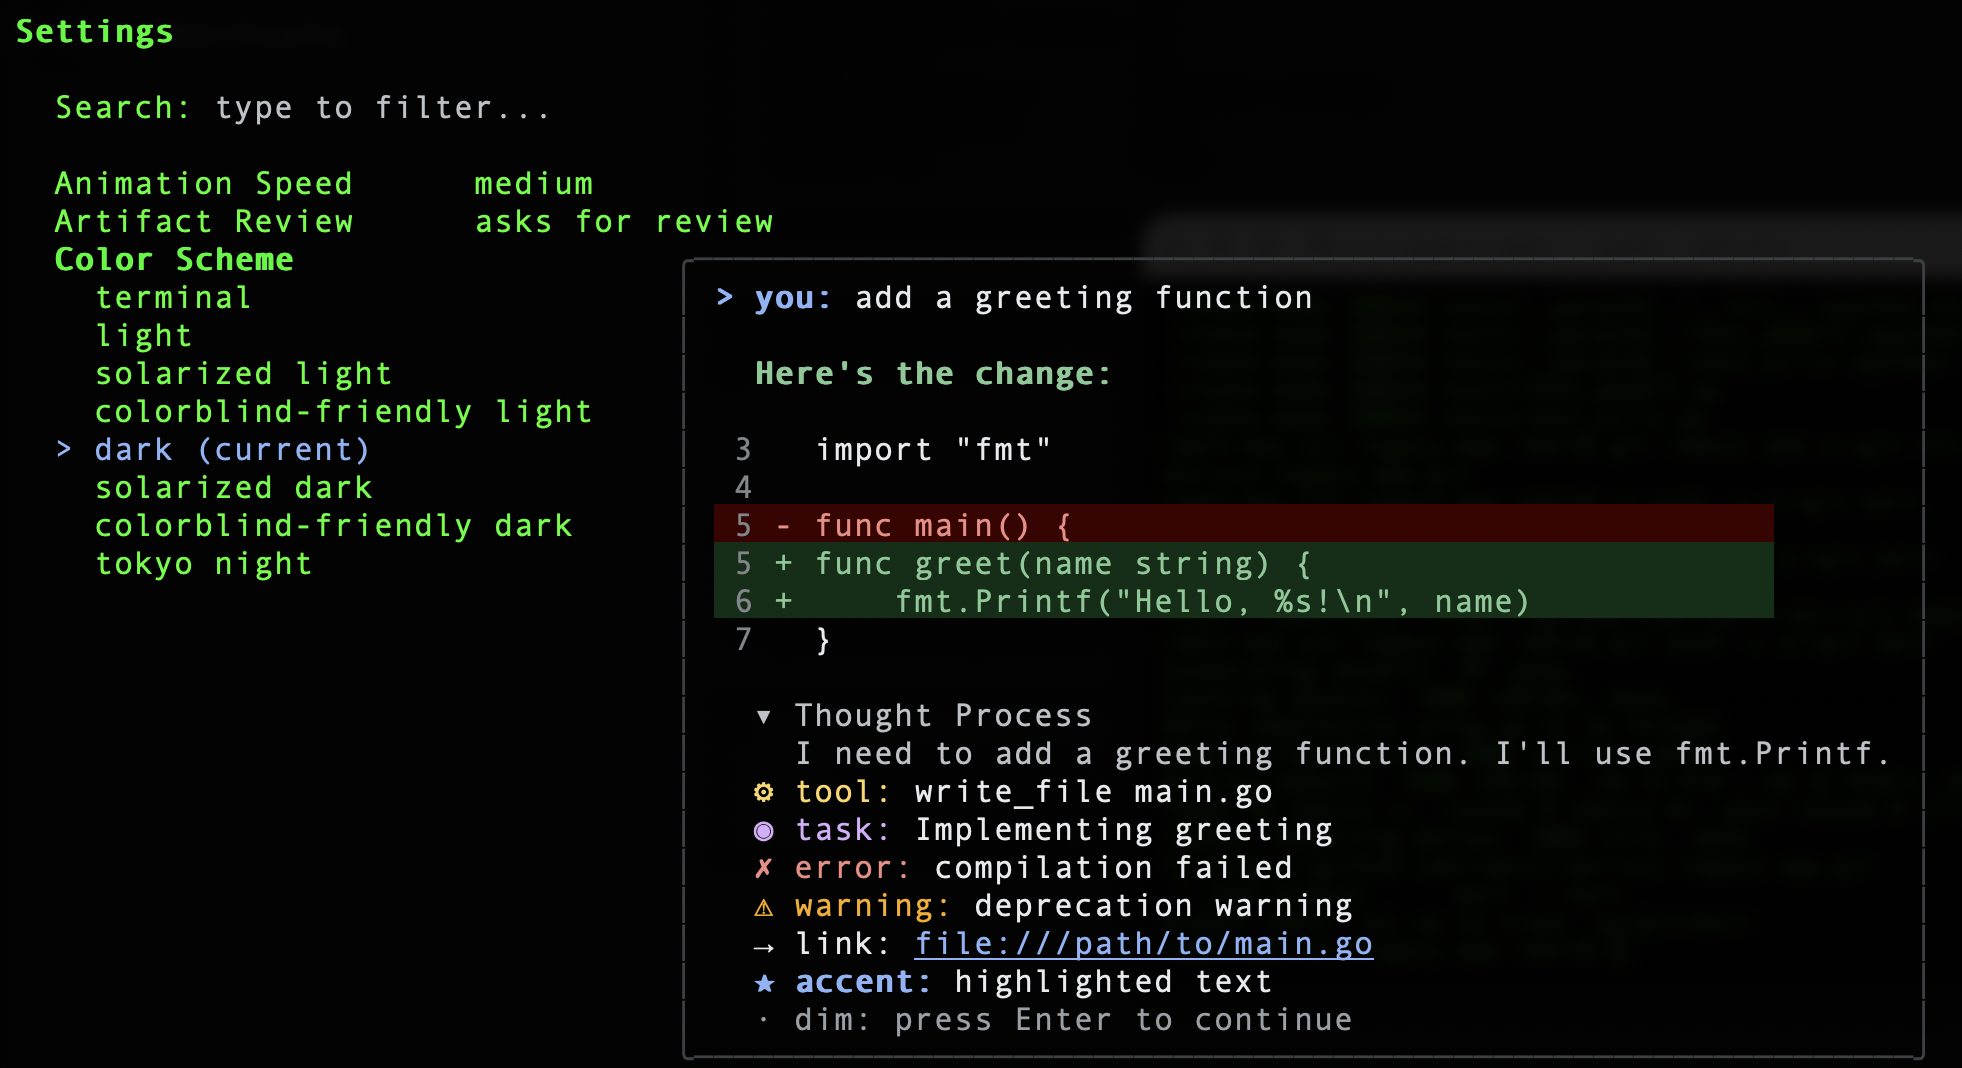
For example, the Color Scheme brings up the following options, from which I can choose my preferred color scheme:
settings.json
The configuration settings need to be stored somewhere right? All of them get stored in ~/.gemini/antigravity-cli/settings.json file. A sample is shown below:
{
      "colorScheme": "dark",
      "model": "Gemini 3.8 Flash (Medium)",
      "statusLine": {
        "type": "",
        "command": "",
        "enabled": true
      },
      "trustedWorkspaces": [
        "/Users/romin/antigravity-cli-projects",
        "/Users/romin/agy-cli-projects"
      ]
    }
You can notice the colorScheme that I have selected, the model and also various folders from where I have started Antigravity CLI and said yes to trusting the folders.
Note: You can modify the settings.json directly too and restart Antigravity CLI as a best practice to see the changes. But be sure of the settings, else it will display an error at startup. If not comfortable with directly modifying the file, it is suggested to use the /settings or /config command in the Antigravity CLI to work with this file.
Tool Permission
An important setting to understand is the Tool Permission. This controls whether terminal commands require your approval before running. You can get to this via the /config command.
 Tool Permission
  > request-review (current)
    proceed-in-sandbox
    always-proceed
    strict
By default, it is set to request-review. Let's understand this in more detail. In Antigravity, Tool Permission settings control the balance between security (guarding your host system against unintended changes) and velocity (how autonomously the agent can work without pausing for your input). Let's review the options:
request-review (Current Default)
In this mode, the agent is treated as a collaborative partner that checks in before performing any action that could affect your system or project files outside of pre-approved bounds. Whenever the agent attempts to run a terminal command, perform a file operation (like writing/deleting), or call an external service where permission hasn't been pre-approved, the execution pauses. The user is prompted to approve or reject the specific action.
proceed-in-sandbox
This mode allows the agent to execute terminal commands automatically, but within a secure, isolated container. The agent can run commands without prompting you, but those commands are executed in a virtualized sandbox (e.g., a lightweight container). They cannot modify your actual host machine's filesystem or access your local network.
always-proceed
This is the fully autonomous mode, giving the agent maximum speed and capability. The agent is granted full permission to run commands and write files directly on your host machine. It will never prompt you for confirmation.
strict
This is a zero-trust, high-security mode. The agent's capabilities are restricted to executing read tools. All non-read tools will require the user to be prompted for action.
5. Antigravity CLI - Command Parameters
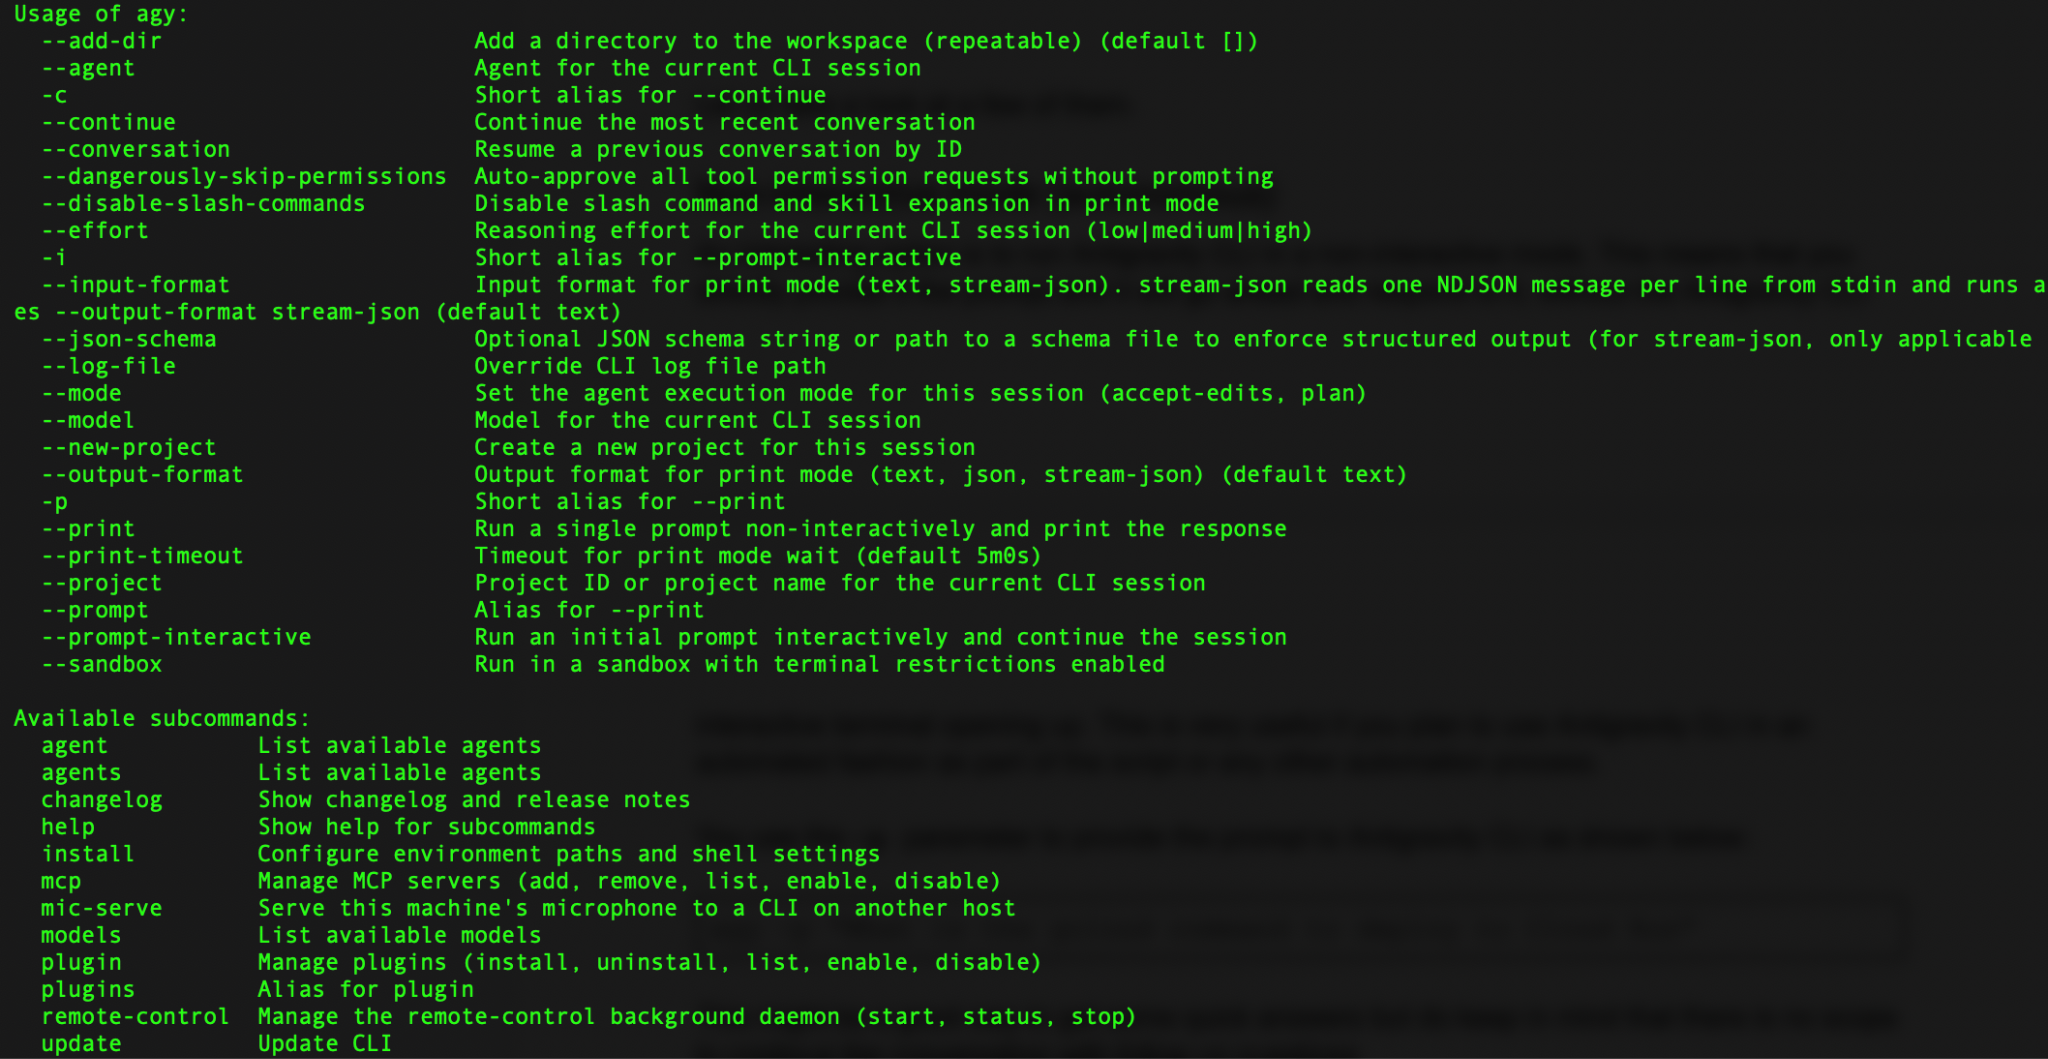
There are a few command line parameters that one can provide when you start Antigravity CLI. To get a full list of options, you can use the --help as shown below.
agy --help
This should show the full range of options available. A sample listing is shown below:
Let us take a look at a few of them.
Non-interactive mode (autonomous)
An interesting option is to run Antigravity CLI in a non-interactive mode. This means that you directly provide it the prompt and it will go ahead and respond to it, without the Antigravity CLI interactive terminal opening up. This is very useful if you plan to use Antigravity CLI in an automated fashion as part of the script or any other automation process.
You use the -p parameter to provide the prompt to Antigravity CLI as shown below:
agy -p "What is the gcloud command to deploy to Cloud Run"
This might be a good way to get some quick answers but do keep in mind that there is no scope to continue the conversation with follow up questions.
Choose a specific model
The first one is to ask Antigravity CLI to use a specific Gemini mode. You can use the --model parameter to tell Antigravity CLI to use a specific model during its session only. This is very useful for the non-interactive mode that we mentioned in the previous section, where you would like to launch several agy sessions and use specific models for specific tasks.
But first, you need to know which models are available for Antigravity CLI. You can do that via the models subcommand as shown below:
agy models
This will list the models that are available for Antigravity CLI.
A sample list is shown below:
- gemini-3.8-flash-high Gemini 3.8 Flash (High)
- gemini-3.8-flash-medium Gemini 3.8 Flash (Medium)
- gemini-3.8-flash-low Gemini 3.8 Flash (Low)
- gemini-3.7-flash-high Gemini 3.7 Flash (High)
- gemini-3.7-flash-medium Gemini 3.7 Flash (Medium)
- gemini-3.7-flash-low Gemini 3.7 Flash (Low)
- gemini-3.6-flash-high Gemini 3.6 Flash (High)
- gemini-3.6-flash-medium Gemini 3.6 Flash (Medium)
- gemini-3.6-flash-low Gemini 3.6 Flash (Low)
- gemini-3.1-pro-high Gemini 3.1 Pro (High)
- gemini-3.1-pro-low Gemini 3.1 Pro (Low)
You can use any of these model names to specify the model to be used for the session. You can do that via the --model command shown below:
agy --model "Gemini 3.7 Flash (Low)"
Once Antigravity CLI launches, you can check either via the /model command about the specific model that you asked it to use or look at the bottom right that shows the model used for the session.
Living dangerously
If you like to live dangerously, then you can look for a very aptly named parameter called --dangerously-skip-permissions. This will auto approve all tool permissions. There will be no prompt asking you for permissions. So use it with care.
Launch Antigravity CLI via the following command:
agy --dangerously-skip-permissions
Then give the following prompt. Check that it did not ask me for any write file permissions.
> get the latest news and write it in a file called news.txt. Then create another file that contains the summary of that file.

  The latest news has been retrieved and written to news.txt, and a concise summary has been saved to summary.txt.
  ### Summary of Created Files
  • **news.txt**: Contains detailed reports covering major global events across:
      • Geopolitics & Conflict: Escalations in the Ukraine conflict and a deadly barracks explosion in Bolivia.
      • Natural Disasters & Science: Severe monsoon and flash flooding in Nepal and Northern India (Bihar), plus ISRO's launch of the EOS-05 satellite.
      • U.S. Economy & Legal: August jobs report exceeding forecasts (+162,000 jobs), surging diesel prices, and a mistrial in the Lindsay Clancy case.
      • Global Initiatives: The UN's endorsement of a revised world map reflecting Africa's true scale and the International Day of Charity observance.
  • **summary.txt**: Provides an executive bullet-point summary highlighting the key points of the full news report.
This mode can be useful in scenarios where things are local and in your control but still be prepared for surprises and hence use it with care.
6. Antigravity CLI - Shell mode
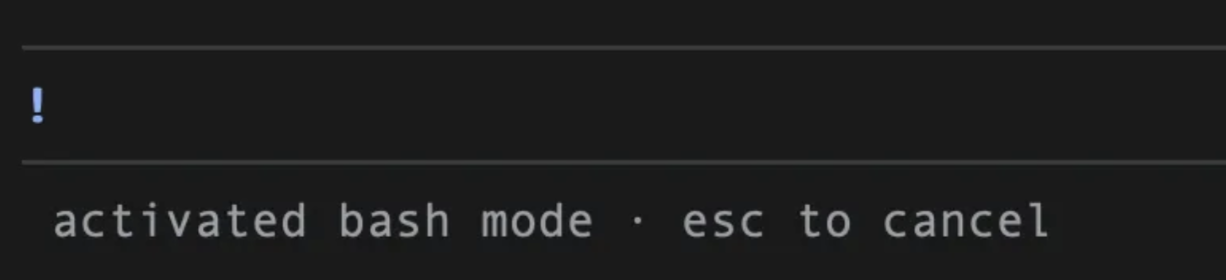
This is a good time to learn how to directly work with the Shell from within Antigravity CLI. You can go into shell mode by pressing ! in the message box. This will toggle to a Shell mode. You can get back by pressing ! again or by hitting the ESC key.
When in shell mode, you will see the ! at the start of the prompt as shown below:
You can directly check using standard commands like pwd and ls. Please note that the commands assume a Linux type OS. If you are on another operating system (Windows), please use equivalent commands like (cd, dir and type).
7. Use cases to try out
Antigravity CLI can be applied to a wide range of use cases that apply to both developers and non-developers alike. Presented here are a few scenarios and depending on your area of interest, you can try any or all of them out.
In each of these cases, the prompt is provided. You are free to try this out in the Antigravity CLI interactive mode to understand better how Antigravity CLI goes about its task.
Vibe coding with Antigravity CLI
Let's use Antigravity CLI to vibe code an application. In this task, you will ask Antigravity CLI to generate an application and then push the initial version to a GitHub repository.
Prerequisite
To perform the tasks in this section, there are a few prerequisites:
- Git
- Antigravity CLI
- Python 3 environment
- Setup
gh( GitHub CLI tool). - Familiarity with Git basics and a bit of programming knowledge
We will assume that you have launched Antigravity CLI in a specific folder of your choice. In our case, we have launched Antigravity CLI from the initial home folder : agy-cli-projects and another folder famous-quotes inside of that.
We are going to ask Antigravity CLI to plan the work first. For this we will use the /plan command and give our initial prompt. Think of it as asking Antigravity CLI to analyze our request and come up with a plan to build out our application. Feel free to modify it as you see fit.
/plan a web application using plain vanilla javascript, html and Python flask to display a random quote from 100 well-known quotes. I should be able to search based on the author of the quote or some categories.
Keep in mind that throughout the session with Antigravity CLI, it will ask you for permissions to create the files, etc. Do give the required permissions.
Antigravity CLI comes back to us with the following:
I have created the detailed implementation plan for the Famous Quotes web application:

 👉 famous_quotes_plan.md

 ### Key Highlights

 • 100 Curated Quotes: Formatted with verified authors and diverse categories (Inspiration, Philosophy, Wisdom, Courage, Life, Humor, etc.).
 • Python Flask Backend: RESTful API endpoints for random quotes, search, category/author aggregation, and security response headers.
 • Pure Vanilla JavaScript & Modern CSS: Safe DOM manipulation (createElement, textContent, replaceChildren), real-time search and filter controls, animated random quote card, and
 copy-to-clipboard interactions.
 • Automated Testing & Security Checks: unittest suite covering API behaviors, edge cases, and security headers.

 Please review the plan and click Proceed or let me know if you would like any changes!

                                                                                                                                                           1 artifact · /artifact to review
You will notice that it says 1 artifact /artifact to review.
Artifacts are files that Antigravity produces and which you can review to understand more. You can list, approve and do things with artifacts. In this scenario, Antigravity has created the famous_quotes_plan.md artifact and we can view it. If you give the /artifact command, it provides the following:
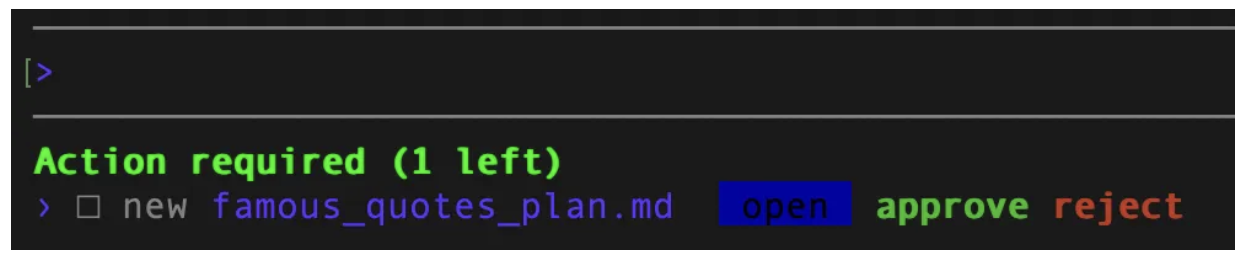
You can now use the arrow / tab keys to either open / approve / reject the file.
If you choose open, you can view the plan in detail, as given below:
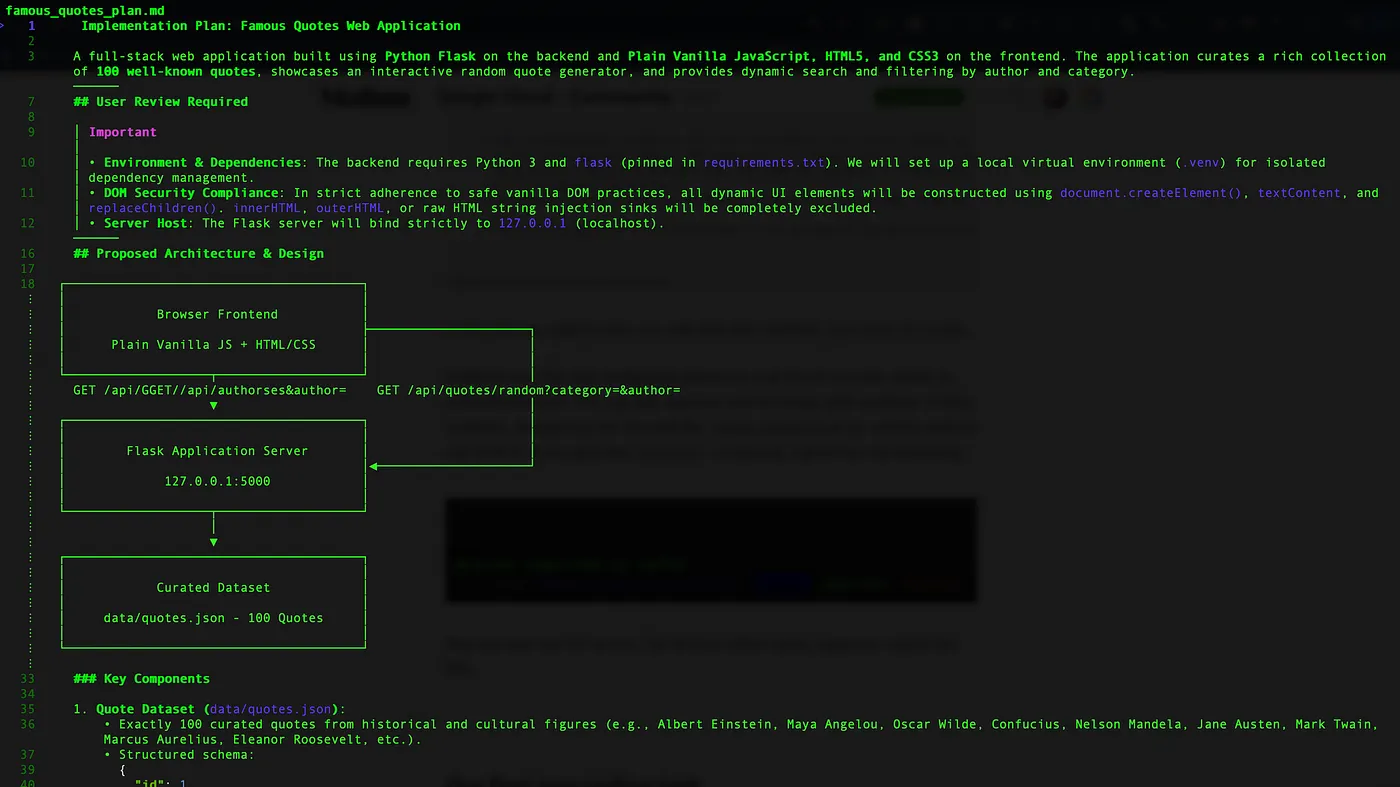
This way you can view the artifact, suggest changes and eventually approve it as needed.
Go ahead and approve it. This gets Antigravity going on the next task in the workflow i.e. generating the application for us.
Once the task is completed, Antigravity provides the following output:
The Famous Quotes web application has been built, tested, and verified.

 ### Summary of What Was Built

 • Curated 100 Quotes Dataset: quotes.json contains exactly 100 famous quotes across 10 categories (Inspiration, Philosophy, Wisdom, Courage, Life, Success, Humor, Science, Leadership,
 Perseverance) and 72 distinct authors.
 • Python Flask Backend: app.py exposes REST API endpoints for fetching random quotes (/api/quotes/random), multi-criteria searching/filtering (/api/quotes), and category/author
 aggregation (/api/categories, /api/authors), with strict security headers (CSP, X-Frame-Options: DENY, X-Content-Type-Options: nosniff).
 • Safe Vanilla JavaScript: app.js implements dynamic DOM updates strictly via safe methods (createElement, textContent, replaceChildren), clipboard copying with non-blocking toast
 notifications, and debounced real-time search.
 • Semantic HTML & Modern CSS: index.html and styles.css deliver a responsive UI with smooth card fade animations and mobile support.
 • Automated Tests: test_app.py contains 15 passing test cases covering dataset integrity, API search/filter parameters, random quote selection, and security headers.

 ### Detailed Walkthrough

 Please see the complete walkthrough and security report in 👉 walkthrough.md.

 ### How to Run

   cd /Users/romin/agy-cli-projects/famous-quotes
   source .venv/bin/activate
   python3 app.py

 Open http://127.0.0.1:5001 in your browser to explore the application.
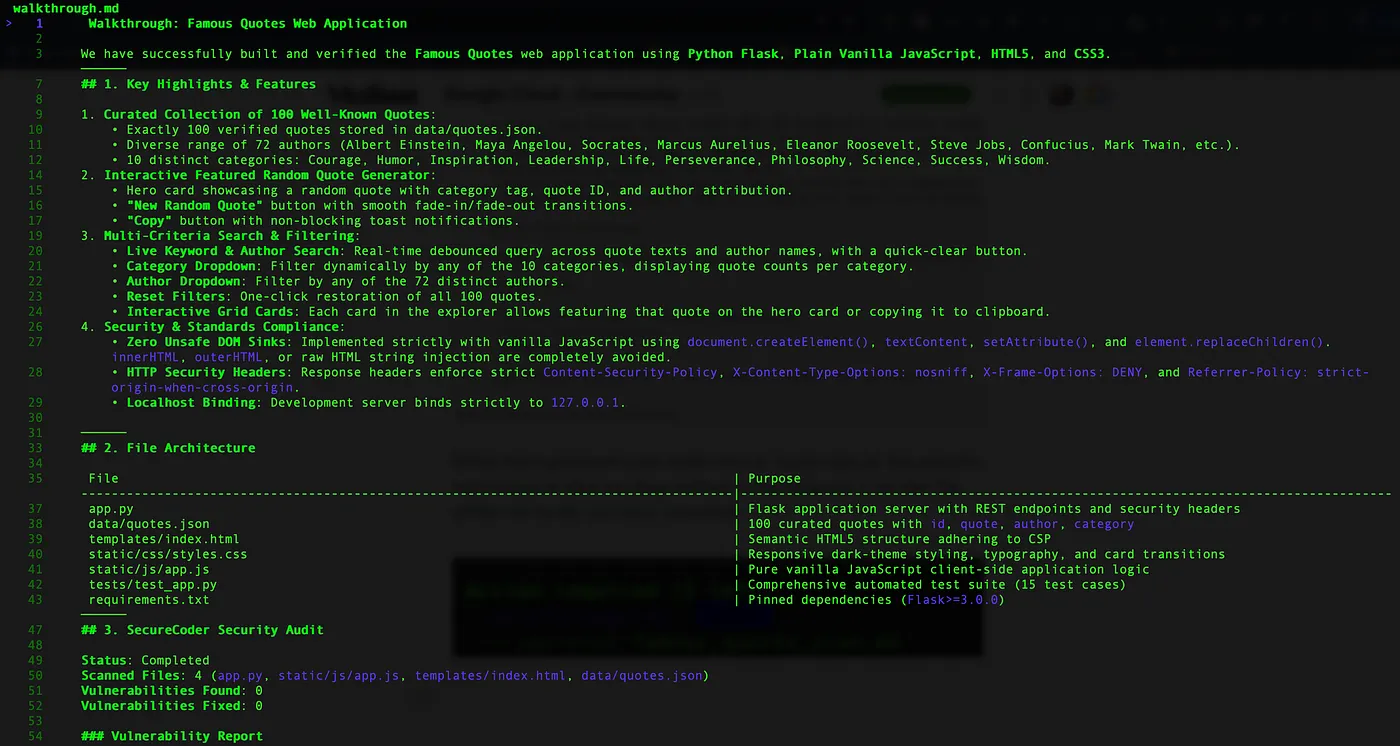
Notice that it generated a new artifact too i.e. walkthrough.md that provides information on what was done and how to test things out. I can view this artifact too via the /artifact command.

Partial output of the walkthrough.md file is shown below:
Here is the final web application:
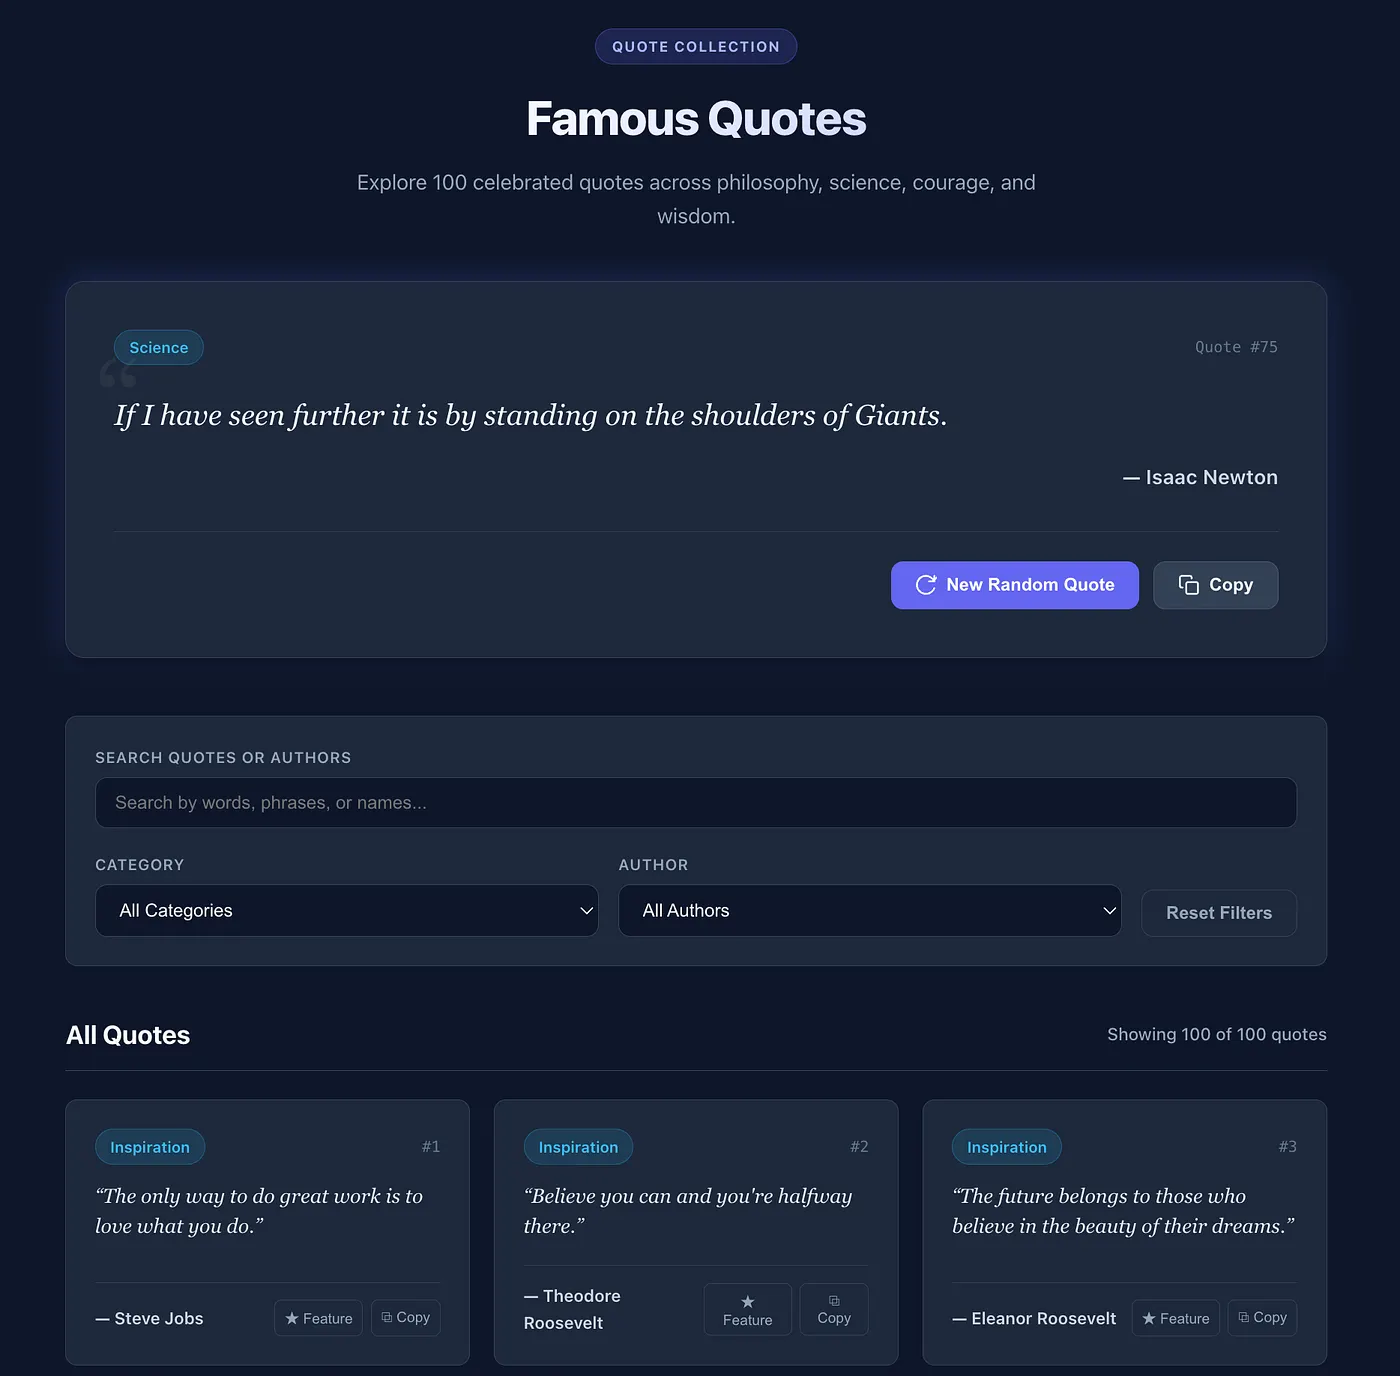
We can stop for now. The idea was to demonstrate and check out what it can do with simple requirements.
(Optional) Push changes to a Github repository
If you do not want to push the event website that we created to Github, you can ignore this section and move on to the next one.
First up, let's create a .gitignore file and you can take the help of Antigravity CLI.
Create a .gitignore file for this project.
The next step for you is to give instructions to Antigravity CLI to push this repository under our GitHub account and this should use the Github helper (gh) that is expected to be available and configured / setup on your machine.
Give a prompt similar to the one below:
Great! I would now like to push all of this to a new repository in my GitHub account. I would like to name this repository <Your-Name>-famous-quotes
It will go through a number of commands here:
- Create the repository.
- It will use multiple Git commands : init, add, commit to manage the local Git repository.
- It will then setup the Git remote and do a push
If all goes well, you should have a GitHub repository in place. You can visit the Github repository page. A sample screenshot is shown below:
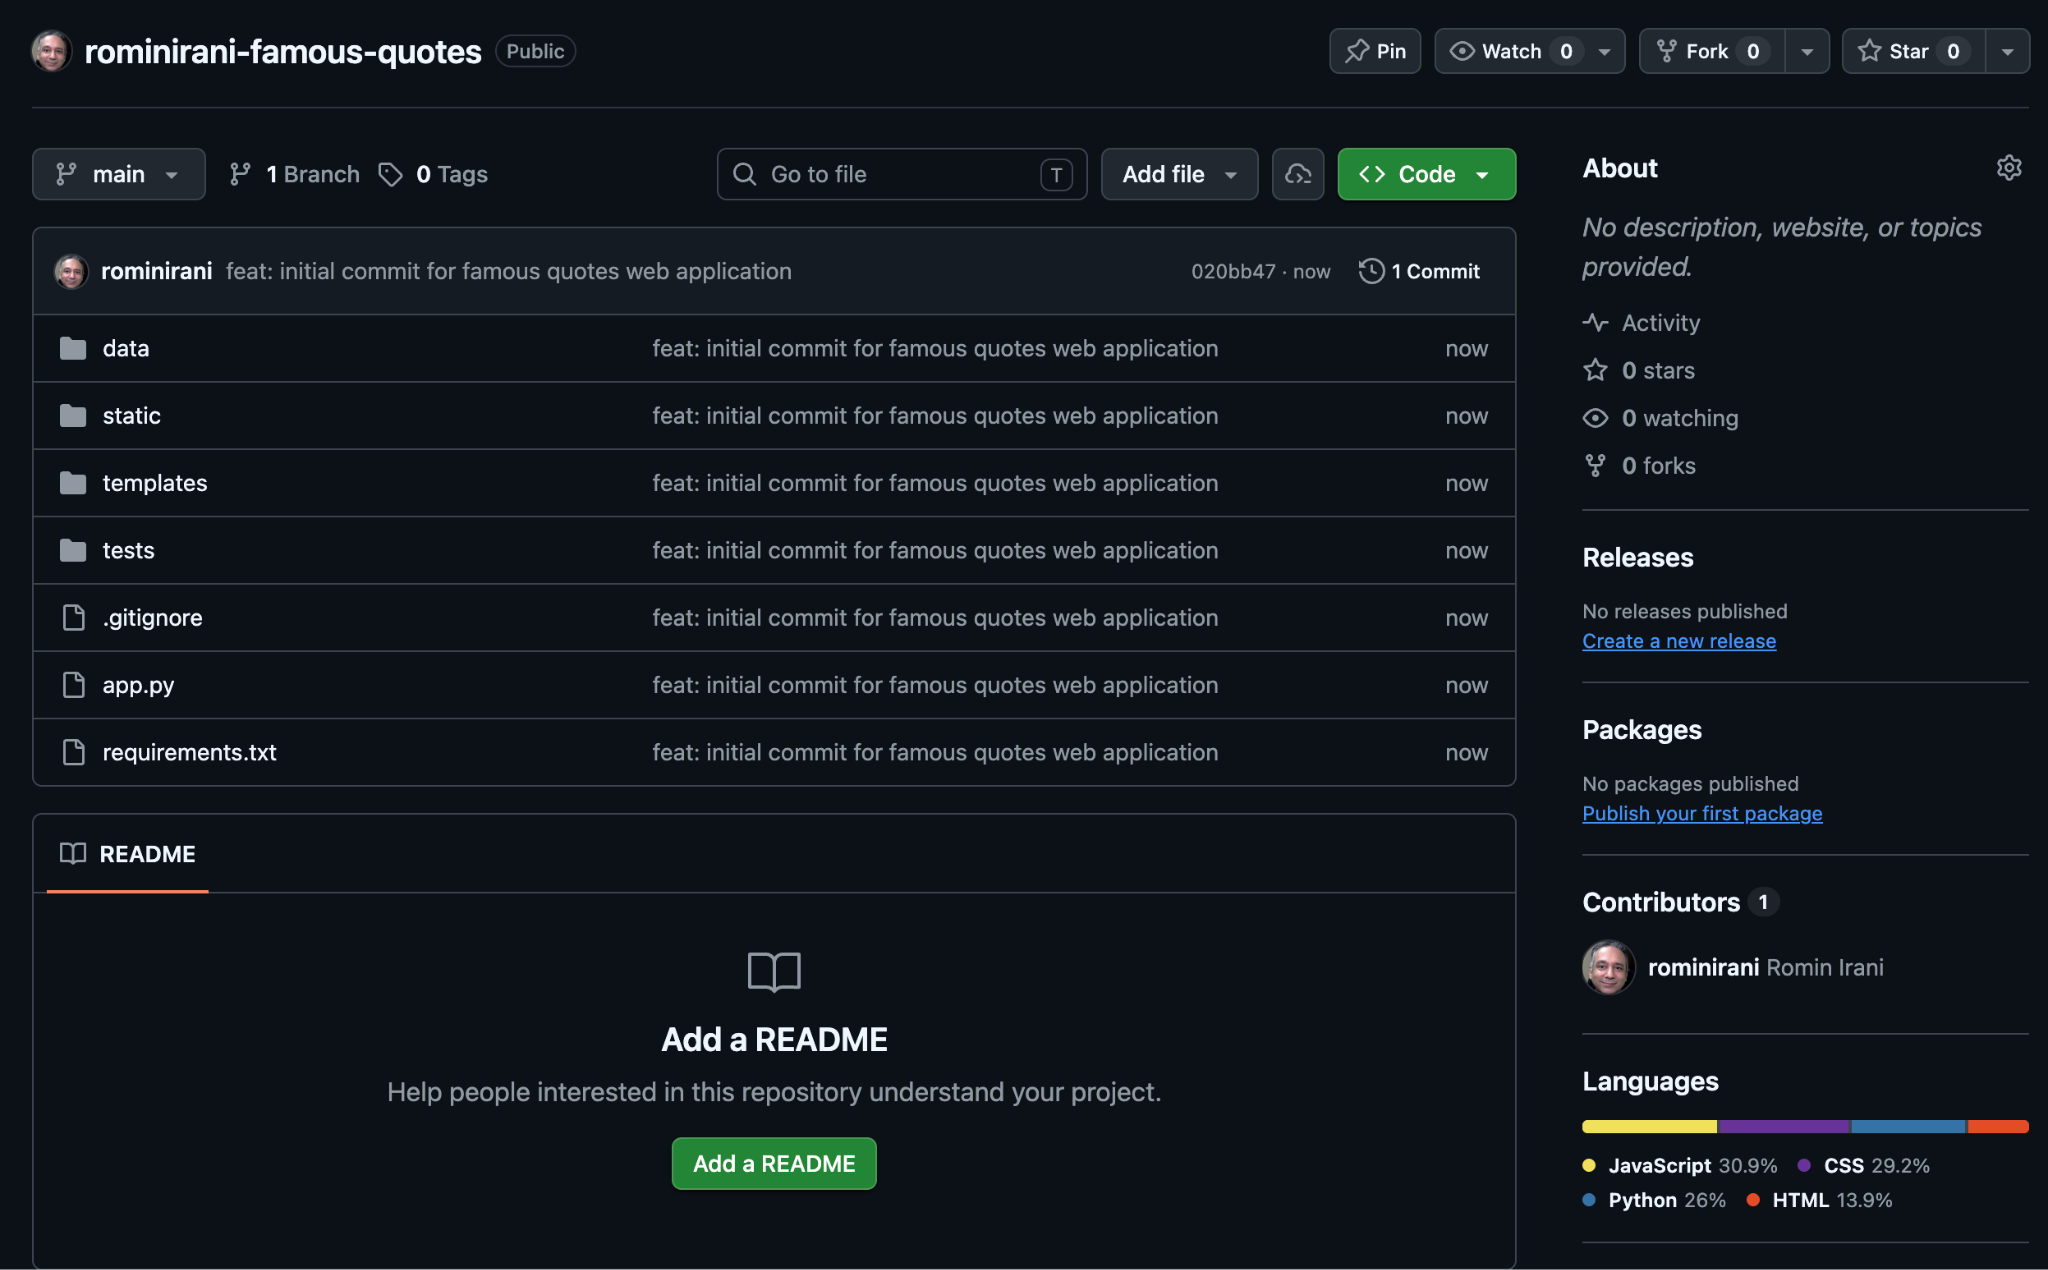
Note that you have not generated a README.md for this project and that is a good exercise for the next section, where we shall now work with this repository that you just created.
Using Antigravity CLI to work with a code repository
In this use case, you shall use Antigravity CLI to work with a code repository. You will perform multiple tasks that include:
- Understanding the code base
- Generating documentation
- Implementing a new feature
This should give you a good foundation to then work with your repositories and use Antigravity CLI as an assistant vis-a-vis these developer specific tasks.
Prerequisite
To perform the tasks in this section, you will need to the following:
- Antigravity CLI
- You should have completed the previous section and have the code that has been generated handy, where we created a Famous Quotes application.
Let's continue to use Antigravity CLI from the folder/directory that you used to generate the Famous Quotes application.
Try out the following prompts as listed below:
Understanding the code base
- I would like to understand this project in detail. Help me understand the main features and then break it down into Server and Client side. Take a sample flow and show me how the request and response works.
Note that it will create a new file (artifact) and you can view all the artifacts or specific artifacts via the
/artifact
command.
- Explain
@app.py
Generating a README file
- Generate a
READMEfile for this project.
Implementing a new feature
- Please implement two simple utility features: a "Copy to Clipboard" button on each quote and an "Export to CSV" button.
- Please implement a simple toggle switch in the header that swaps the page's color scheme from dark to light mode by overriding the CSS root variables.
It should provide you with a plan, which you can approve. On approval, Antigravity CLI will go ahead and make those changes. Do test out your changes and if there are bugs (likely), do ask Antigravity CLI to fix it.
Generate Issues based on suggested features
Let's try something interesting here. You are going to ask Antigravity CLI about how it can improve the user experience of this application.
Try the following prompt:
- I would like you to assess the application from a user experience point of view. Ease of use, responsiveness, helpful messages and more. Please come up with a list of improvements and I would like you to provide them as a list to me.
As a follow up, you can now take one of the issues that was generated earlier and ask Antigravity CLI to work and implement it.
(Optional) Everyday Tasks
The use cases given below are tasks that you might end up doing regularly. These include arranging files into folders, fetching and summarizing content from the web, processing image files and extracting content from them, working with databases and more.
Feel free to explore any of the use cases that you like.
Organizing Files/Folders
You can use Antigravity CLI to organize the files depending on types in various folders as needed. Go to a folder on your machine that has several files .txt, .png, .jpg, .pdf, .mp4 and others. This is likely to be your Desktop or your Downloads folder.
Navigate to that folder and start Antigravity CLI. You are going to ask Antigravity CLI to create some folders first: Images, Documents, Videos and then you will ask Antigravity CLI to organize the files in the folders.
The Antigravity CLI will often prompt you for permission before executing commands, especially those that modify your file system (like writing, moving, or deleting files). Always review these prompts carefully before granting permission. This is your safety net.
Create the following folders "Images","Documents","Videos"
Then give the following prompt:
Go through all the files in this folder and then organize them by moving all the files ending with .jpg, .jpeg, .gif into the "Images" folder. Move all ".txt" files into the "Documents" folder. Move all the ".mp4" files in the "Videos" folder.
An example run on our machine is shown below:
I have completed organizing your files into their respective folders. Here is a summary of the files moved:

  • Images: Moved 95 files ending in  .jpg  or  .jpeg  (no  .gif  files were present).
  • Documents: Moved 1 file ending in  .txt  ( 12March_Live_chat_transcript.txt ).
  • Videos: Moved 26 files ending in  .mp4 .
A few other organizing scenarios (the prompts are given next to each scenario):
- Summarization: For each document in the ‘Documents' folder, create a txt file in the same folder named ‘summary_ORIGINAL_FILENAME.txt' that contains a 3-sentence summary of the document's main points.
- Categorizing by Type: Scan all PDF and DOCX files in this directory. Move all files with "invoice" in their name or content into the ‘Financial/Invoices' folder. Move files with "receipt" into ‘Financial/Receipts'. Any other .docx files go into ‘Reports'.
- Extracting Key Information (and "tagging"): For each PDF file in the ‘Financial/Invoices' folder, read its content. If you find a date, rename the file to include that date in YYYY-MM-DD format, e.g., ‘invoice_2025-07-26_original_name.pdf'.
Summarizing Articles (Local Files or Web)
For each of the scenarios below, feel free to change the url, topic of interest and the local file names as applicable. The filenames provided are sample file names, you can replace them with filenames of files that you have on your system.
Try out any of the following scenarios (the prompts are given next to each scenario):
- Summarize a web article (single URL): Go to https://medium.com/google-cloud/antigravity-cli-tutorial-series-12b46cfe3bf2 and summarize the top 3 key takeaways from this news article.
- Summarize multiple web articles (e.g., from a search): Find the latest news articles about "Antigravity CLI" using Google Search. For the top 5 relevant articles, summarize each in 2-3 sentences and list their URLs.
- Summarize a local text file: Summarize the main points of the article in ‘my_research_paper.txt'. Focus on the methodology and conclusions.
- Summarize a local PDF: Read ‘financial_report_Q2_2025.pdf'. Provide a summary of the financial performance and key challenges mentioned.
Extracting Specific Information (Local Files or Web)
For each of the scenarios below, feel free to change the url, topic of interest and the local file names as applicable. The filenames provided are sample file names, you can replace them with filenames of files that you have on your system.
Try out any of the following scenarios (the prompts are given next to each scenario):
- Extract entities from a local article: From ‘biography.txt', list all named individuals and the significant dates associated with them.
- Extract data from a table in a PDF: In ‘quarterly_sales.pdf', extract the data from the table on page 3 that shows "Product Sales by Region" and present it in a Markdown table format.
- Extract news headlines and sources from a news website: Go to ‘https://news.google.com/' (or a similar news site). Extract the main headlines from the front page and their corresponding news sources. Present them as a bulleted list.
- Find product specifications from an e-commerce page: Browse to ‘https://www.amazon.in/Google-Cloud-Certified-Associate-Engineer/dp/1119871441' (example for a book). Extract the book title, author and other details. Present this in a structured JSON format.
- Extract duration from a video, in a certain format (eg "2h37m42s").
Answering Questions based on Content (RAG-like behavior)
For each of the scenarios below, feel free to change the url, topic of interest and the local file names as applicable. The filenames provided are sample file names, you can replace them with filenames of files that you have on your system.
Try out any of the following scenarios (the prompts are given next to each scenario):
- Q&A on a local document: I'm attaching ‘user_manual.pdf'. What are the steps to troubleshoot network connectivity issues?
- Q&A on a web page: Using the content from ‘https://www.who.int/news-room/fact-sheets/detail/climate-change-and-health', what are the primary health risks associated with climate change according to WHO?
- Compare information across multiple sources: I have two news articles: ‘article1.txt' and ‘article2.txt', both discussing the recent economic policy changes. Compare and contrast their views on the potential impact on small businesses.
Content Generation based on Extracted Information
For each of the scenarios below, feel free to change the url, topic of interest and the local file names as applicable.
Try out any of the following scenarios (the prompts are given next to each scenario):
- Generate a news brief from an article: Read @tech_innovation_article.txt. Write a short, engaging news brief (around 150 words) suitable for a company newsletter, highlighting the new technology and its potential.
- Draft an email summarizing a meeting transcript: Here is a meeting transcript file: @meeting_transcript.txt. Draft an email to the team summarizing the key decisions made and action items assigned, including who is responsible for each.
Antigravity CLI multi-modal support
Antigravity CLI has multi-model support via Gemini and you can ask it to process files of different content formats as per your requirements.
You are going to process a bunch of invoice images with Antigravity CLI and extract key information from them. Follow the steps given below:
- Create a folder on your machine and download some invoices from the following GitHub repository.
- Launch Antigravity CLI from that folder
Give the following prompt to extract out information from the invoices in the form of a table.
The current folder contains a list of invoice files in Image format. Go through all the files in this folder and extract the following invoice information in the form of a table: Invoice No, Invoice Date, Invoice Sent By, Due Date, Due Amount.
You should ideally get an output that looks like this:

Here is another scenario, where you can ask for additional derived columns. Let's say that you want to show a red cross emoji for all the invoice due dates that are in the past. You can give a prompt as follows:
list all files with .png extension in this folder. Extract the invoice information from it by reading them locally and display it in a table format containing the following column headers: : Invoice No, Invoice Date, Invoice Sent By, Due Date, Due Amount. Add a column at the end of the table that shows a red cross emoji in case the due date is in the past.
This produces the following output:

Apply this to any of your own files that are in formats other than text.
Using Antigravity CLI to generate data
You can prompt Antigravity CLI to produce data in various data formats. This could range from content pieces to JSON data, that you might need to mock. Let's focus here on scenarios applicable to developers/testers.
Here are some prompts to try out:
Generate JSON data of sample customer reviews
Generate a JSON array of 3 synthetic customer reviews for a new smartphone. Each review should have 'reviewId' (string, UUID-like), 'productId' (string, e.g., 'SMARTPHONE_X'), 'rating' (integer, 1-5), 'reviewText' (string, 20-50 words), and 'reviewDate' (string, YYYY-MM-DD format).
Generating Mock API Responses (JSON)
Generate a JSON array representing 7 daily sales records for a mock API endpoint. Each record should include 'date' (YYYY-MM-DD, chronologically increasing), 'revenue' (float, between 5000.00 and 20000.00), 'unitsSold' (integer, between 100 and 500), and 'region' (string, either 'North', 'South', 'East', 'West').
Generating Sample Database Insert Statements (SQL)
Generate 5 SQL INSERT statements for a table named 'users' with columns: 'id' (INTEGER, primary key), 'username' (VARCHAR(50), unique), 'email' (VARCHAR(100)), 'password_hash' (VARCHAR(255)), 'created_at' (DATETIME, current timestamp). Ensure the password_hash is a placeholder string like 'hashed_password_X'.
Generating CSV Data for Data Loading/Analysis
Generate 10 lines of CSV data, including a header row, for customer transactions. Columns should be: 'TransactionID' (unique string), 'CustomerID' (integer), 'ItemPurchased' (string, e.g., 'Laptop', 'Monitor', 'Keyboard'), 'Quantity' (integer, 1-3), 'UnitPrice' (float, between 100.00 and 1500.00), 'TransactionDate' (YYYY-MM-DD).
Generate a Configuration file (YAML)
Generate a sample YAML configuration for a 'user_service'. Include sections for 'database' with 'host', 'port', 'username', 'password', 'database_name'. Also include a 'api_keys' section with 'payment_gateway' and 'email_service' placeholders. Use realistic default values.
Generating Test Data for Edge Cases/Validation
Generate a JSON array of 8 email addresses for testing purposes. Include a mix of: 2 valid standard emails, 2 with missing '@', 2 with invalid domains (e.g., '.com1'), and 2 with special characters in the local part that are usually invalid (e.g., spaces or multiple dots).
8. Congratulations
Congratulations, you've successfully explored Antigravity CLI, its capabilities and applied it to a few use cases.