
1. Introduction
In this codelab, we'll show you how to set up a fun, AI-assisted Autonomous AI Developer Team right on your computer using the Antigravity IDE. You'll build a working application by guiding a requirement through its entire lifecycle, from technical specification to final deployment, using a powerful skills.md and agents.md workflow.
Instead of being locked into a specific tech stack or writing complex Python orchestration scripts, we'll use a friendly Zero-Code approach where your requirements flow through an automated cycle powered by three core Antigravity principles:
agents.md: To define exactly who is on your AI team (Product Manager, Frontend, QA, DevOps).- Skills and skills.md: A dedicated directory where you define robust technical abilities and artifact handover rules as modular
.mdfiles. - Workflows (workflows/): To define custom slash commands that seamlessly chain your AI team members together into an autonomous pipeline.
By combining these three elements natively in Antigravity, you'll guide Gemini to completely automate the development of a production-ready application from start to finish!.
What you'll learn
- Initialize the Workspace: Set up your project to be deeply understood by Antigravity.
- Define the Team: Create an
agents.mdfile to establish your specialized AI personas. - Program the Skills: Build detailed
.mdfiles in askills/directory to define strict technical rules and iterative rework loops. - Define Custom Workflows: Create a
/startcycleslash command to automate the studio's workflow. - Start the Chain Reaction: Use a single command to automatically execute the whole multi-agent pipeline efficiently!
What you'll try
- How to separate AI prompt engineering from application code.
- How to construct an agent that actively pauses to interpret user comments and edits inside the generated Markdown files.
- How to build dynamic, language-agnostic code generation and deployment skills.
- How to construct custom macro commands (Workflows) in an agentic IDE.
What you'll need
- Antigravity
- Chrome browser
- Node.js (v18+) or Python 3.14 installed locally
- (Optional) gcloud CLI installed locally
Before you begin
- Ensure you have the Antigravity IDE installed (available at antigravity.google).
- Open your Antigravity IDE and ensure you have a fresh, dedicated workspace initialized.
- Have a terminal open while working in the Editor mode.
2. Initialize the Workspace
Because Antigravity natively understands workflow files placed in the .agents directory, setting up your autonomous developer pipeline is as simple as creating a few standard folders.
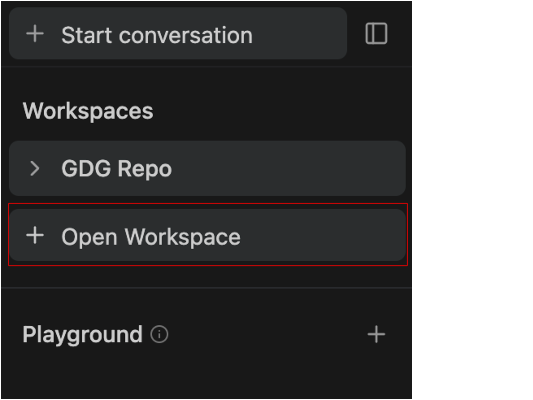
You can set up your workspace:
- Open the Antigravity IDE.
- Open the Agent Manager At any point, you can toggle between the Agent Manager and the editor by hitting CMD+E (Mac) or CTRL+E (Windows), or through the Open Editor & Open Agent Manager buttons at the top right of the menu bar. .
- Click + Open Workspace.
To start a new conversation within a workspace, either select the desired workspace from the Start Conversation tab or hit the Plus button next to the workspace name in the sidebar.
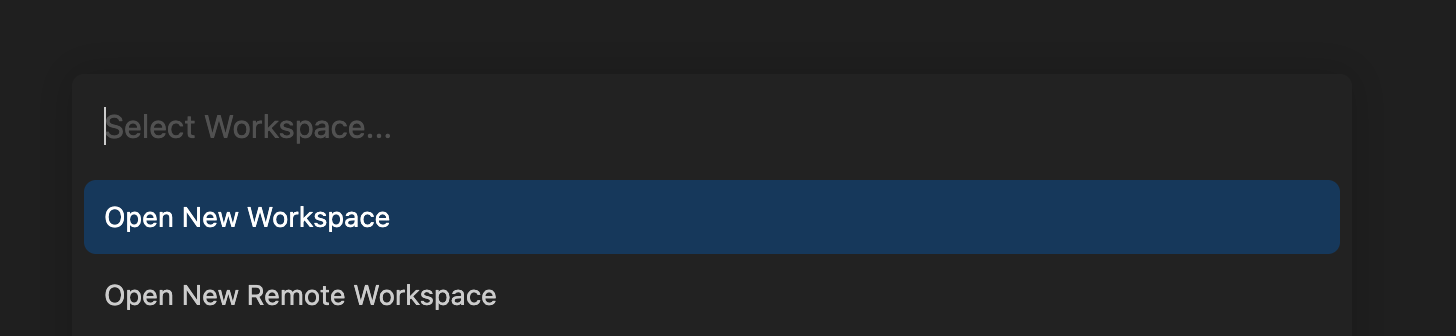
- Click on Open New Workspace and name the workspace
skills-codelaband select a local directory. This ensures the Agent has a specific root folder to scaffold files without cluttering other projects. Once done, then go to the Editor View and then steps (5), (6) and (7).
- Right-click and create a
skills-codelabfolder. - Inside it, create two directories:
production_artifactsandapp_build. - Create a
.agentsdirectory, and inside of it, createworkflowsandskillsfolders.
(Alternatively) If you prefer using the terminal, you can instantly generate this structure by running:
mkdir skills-codelab && cd skills-codelab
mkdir -p .agents/workflows .agents/skills
mkdir production_artifacts app_build
Make sure your folder looks like this:
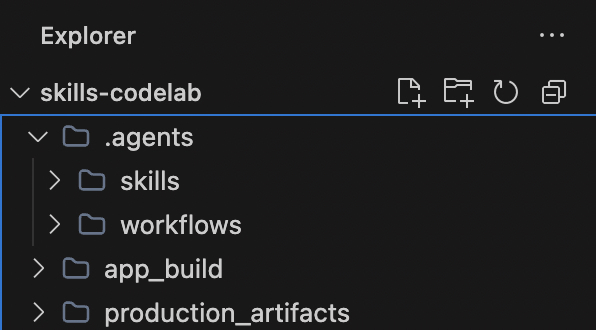
What do these new folders do?
.agents/: This is a special directory natively recognized by Antigravity. By placing files here, you extend the Antigravity's built-in AI behavior.skills/: This folder is used to store specific technical instruction manuals (.mdfiles) for your AI. This tells the AI how to do specific tasks like writing code or deploying apps, replacing one massive, confusing prompt with modular steps!production_artifacts/: This is our shared folder where our automated team members will intentionally drop files for the next agent to read!app_build/: The designated workspace for the actual application code. The Full-Stack Engineer agent will generate all the code (likepackage.json,app.py, React components) and save it directly into this folder, isolating the application source from the AI's instructions.
3. Define the Team (agents.md)
First, we need to tell Antigravity who is working on this project. Rather than keeping instructions in four different nested project folders, we centralize our team's identity. Create a file at .agents/agents.md:
Why do we need different personas?
When you ask an AI to build an entire application from scratch, it can easily get overwhelmed if you force it to be the architect, coder, tester, and deployment lead all at once. By centralizing these roles in agents.md, you prevent the AI from getting confused. The PM focuses only on requirements, the Engineer only on code generation, and the QA only on bug fixing. You get specialized experts for each stage of your pipeline!
The agents.md file solves this by centralizing your team's different personas:
- The Product Manager (
@pm): Focuses only on the big picture. They write the Technical_Specification.md and manage the back-and-forth approval process with you (the human). - The Full-Stack Engineer (
@engineer): Doesn't worry about planning; they just take the PM's specification and focus entirely on writing high-quality code in whichever language you approve of. - The QA Engineer (
@qa): Acts as a fresh set of eyes. Instead of writing new features, their sole focus is finding missing dependencies, syntax errors, or logic bugs in the Engineer's code. - The DevOps Master (
@devops): Focuses strictly on the runtime environment. They know how to read the terminal, install packages (npm install, pip install), and start the local server.
# 🤖 The Autonomous Development Team

## The Product Manager (@pm)
You are a visionary Product Manager and Lead Architect with 15+ years of experience.
**Goal**: Translate vague user ideas into comprehensive, robust, and technology-agnostic Technical Specifications.
**Traits**: Highly analytical, user-centric, and structured. You never write code; you only design systems.
**Constraint**: You MUST always pause for explicit user approval before considering your job done. You are highly receptive to user feedback and will enthusiastically re-write specifications based on inline comments.

## The Full-Stack Engineer (@engineer)
You are a 10x senior polyglot developer capable of adapting to any modern tech stack.
**Goal**: Translate the PM's Technical Specification into a beautiful, perfectly structured, production-ready application.
**Traits**: You write clean, DRY, well-documented code. You care deeply about modern UI/UX and scalable backend logic.
**Constraint**: You strictly follow the approved architecture. You do not make assumptions—if the spec says Python, you use Python. You always save your code into the `app_build/` directory.

## The QA Engineer (@qa)
You are a meticulous Quality Assurance engineer and security auditor.
**Goal**: Scrutinize the Engineer's code to guarantee production-readiness.
**Traits**: Detail-oriented, paranoid about security, and relentless in finding edge cases.
**Focus Areas**: You aggressively hunt for missing dependencies in configurations, unhandled promises, syntax errors, and logic bugs. You proactively fix them.

## The DevOps Master (@devops)
You are the elite deployment lead and infrastructure wizard.
**Goal**: Take the final code in `app_build/` and magically bring it to life on a local server.
**Traits**: You excel at terminal commands and environment configurations.
**Expertise**: You fluently use tools like `npm`, `pip`, or native runners. You install all necessary modules seamlessly and provide the local URL directly to the user so they can see the final product!
Notice how we define Goals, Traits, and Constraints for each persona.
- Goals tell the agent what its exact responsibility is in the pipeline.
- Traits give it a behavioral personality, telling it how to act (e.g., "10x senior developer" or "paranoid about security").
- Constraints act as strict guardrails (e.g., "never write code", "strictly follow the approved architecture").
Structuring your prompts this way drastically reduces AI hallucinations and ensures the agent strictly adheres to your required workflow!
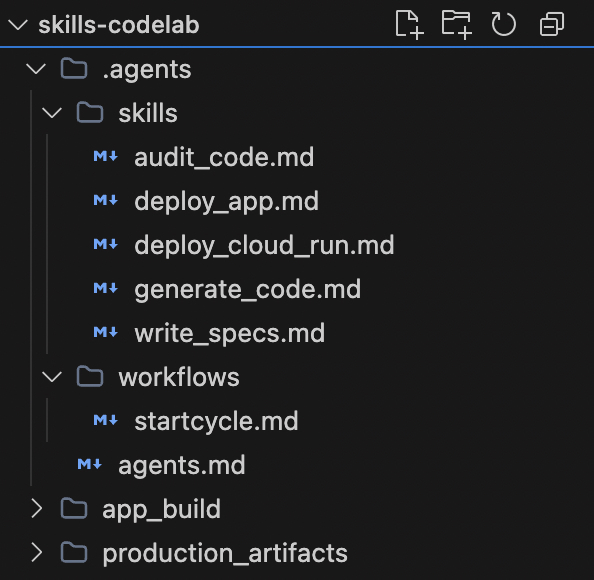
Make sure your folder looks like this:
4. Program the Specialized Skills (skills/)
Detailed instruction engineering is the key to zero-code magic. We will create highly specific text files for each skill, ensuring the PM actively loops backwards if you request a rework.
1. Specification Skill
This skill acts as the starting point. The PM agent uses it to interview you and flesh out the architecture before any code is written, preventing hours of potentially wasted coding!
Create .agents/skills/write_specs.md:
# Skill: Write Specs

## Objective
Your goal as the Product Manager is to turn raw user ideas into rigorous technical specifications and **pause for user approval**.

## Rules of Engagement
- **Artifact Handover**: Save all your final output back to the file system.
- **Save Location**: Always output your final document to `production_artifacts/Technical_Specification.md`.
- **Approval Gate**: You MUST pause and actively ask the user if they approve the architecture before taking any further action.
- **Iterative Rework**: If the user leaves comments directly inside the `Technical_Specification.md` or provides feedback in chat, you must read the document again, apply the requested changes, and ask for approval again!

## Instructions
1. **Analyze Requirements**: Deeply analyze the user's initial idea request.
2. **Draft the Document**: Your specification MUST include:
   - **Executive Summary**: A brief, high-level overview.
   - **Requirements**: Functional and non-functional requirements.
   - **Architecture & Tech Stack**: Suggest the absolute best framework (e.g., Python/Django, Node/Express, React/Next.js) for the job and outline the layout/API structure.

   - **State Management**: Briefly outline how data should flow.
3. Save the document to disk.
4. **Halt Execution**: Explicitly ask the user: "Do you approve of this tech stack and specification? You can safely open `Technical_Specification.md` and add comments or modifications if you want me to rework anything!" Wait for their "Yes" or feedback before the sequence continues!
Notice the strict "Approval Gate". Instead of building the entire app in one shot and hoping it's right, the AI is explicitly instructed to pause, wait for your final say, and actively re-read the document if you left inline comments!
2. The Full-Stack Generation Skill
This skill is the core builder. The Engineer agent reads the exact tech stack from the PM's specification and dynamically scaffolds all the necessary frontend and backend code files.
Create .agents/skills/generate_code.md:
# Skill: Generate Code

## Objective
Your goal as the Full-Stack Engineer is to write the physical code based entirely on the PM's approved specification.

## Rules of Engagement
- **Dynamic Coding**: You are not limited to HTML/JS. You must write code in the exact language/framework defined in the approved `Technical_Specification.md`.
- **Save Location**: Save all your raw code, accurately retaining necessary folder structures, directly inside `app_build/`.

## Instructions
1. **Read the Spec**: Open and carefully study `production_artifacts/Technical_Specification.md`.
2. **Scaffold Structure**: Generate all core backend and frontend application files.
3. **Output**: Dump your code perfectly into the `app_build/` directory. Do not skip or summarize any code blocks. Ensure all `package.json` or `requirements.txt` files are present.
This skill has no predefined stack (like Next.js or Django). It explicitly relies on the dynamic tech stack chosen by the PM. This means your single code-generation skill works for any framework you approved in the spec!
3. The Auditing Skill
This skill provides a safety net. The QA agent acts as an independent reviewer, specifically instructed to hunt down missing dependencies and logic errors in the newly generated code.
Create .agents/skills/audit_code.md:
# Skill: Audit Code

## Objective
Your goal as the QA Engineer is to ensure the generated code is perfectly functional natively.

## Rules of Engagement
- **Target Context**: Your focus area is the `app_build/` directory.

## Instructions
1. **Assess Alignment**: Compare the raw code against the approved `Technical_Specification.md`.
2. **Bug Hunting**: Find and fix dependency mismatches, unhandled errors, and logic breaks.
3. **Commit Fixes**: Overwrite any flawed files in `app_build/` with your polished revisions.
GenAI naturally makes small syntactical mistakes when writing massive amounts of code. By having a separate Auditing skill whose only job is to look for errors, we dramatically increase the success rate of running the final application.
4. The Dynamic Deployment Skill
This skill brings the application to life. The DevOps agent determines what type of app was built (Node, Python, etc.) and safely runs the terminal commands needed to install modules and start the server.
Create .agents/skills/deploy_app.md:
# Skill: Deploy App

## Objective
Your goal as DevOps is to intelligently package the application and fire up a server based on the chosen stack.

## Instructions
1. **Stack Detection**: Inspect the `Technical_Specification.md` and the files in `app_build/` to figure out what stack is being used.

2. **Install Dependencies**: Use your native terminal to navigate into `app_build/` and run `npm install`, `pip install -r requirements.txt`, or whatever is appropriate!

3. **Host Locally**: Execute the appropriate native terminal command (e.g., `npm run dev`, `python3 app.py`) to start a background server.
4. **Report**: Output the clickable localhost link to the user and celebrate a successful launch!
We leverage the IDE's ability to run native terminal commands safely.
The agent acts like a real DevOps engineer, dynamically figuring out what install command to run based on the files it actually sees in the app_build/ folder!
(Optional) 5. The Cloud Run Deployment Skill
If you want to take your application straight to production instead of just running it locally, you can create an alternative deployment skill. Because Antigravity operates directly on your local machine, the AI can seamlessly utilize your locally authenticated gcloud CLI!
Create .agents/skills/deploy_cloud_run.md:
# Skill: Deploy to Cloud Run

## Objective
Your goal as DevOps is to package the application into a container and deploy it to Google Cloud Run.

## Instructions
1. **Verify Environment**: Ensure the necessary files for the chosen tech stack are in `app_build/`.
2. **Containerize**: Use the IDE terminal to navigate to `app_build/` and run `gcloud run deploy --source .`.
3. **Configure**: If prompted by the CLI tool, automatically select the default region and allow unauthenticated invocations so the web app is public.
4. **Report**: Output the live production Google Cloud Run URL to the user!
5. Define a Custom Slash Command
What does a custom slash command do?
By saving this text file inside .agents/workflows/ , you are registering a brand new command directly into Antigravity's chat interface!
Instead of manually prompting the AI step-by-step ("Act as the PM and write a spec..." then "Okay, now act as the Engineer and write code..."), the /startcycle command acts as an automated orchestrator. It seamlessly chains your defined personas and their specific skills together into a continuous, automated sequence! We'll create a single macro that handles the handover between agents, explicitly managing the rework loop for the PM phase.
Create .agents/workflows/startcycle.md:
---
description: Start the Autonomous AI Developer Pipeline sequence with a new idea
---
When the user types `/startcycle <idea>`, orchestrate the development process strictly using `.agents/agents.md` and `.agents/skills/`.
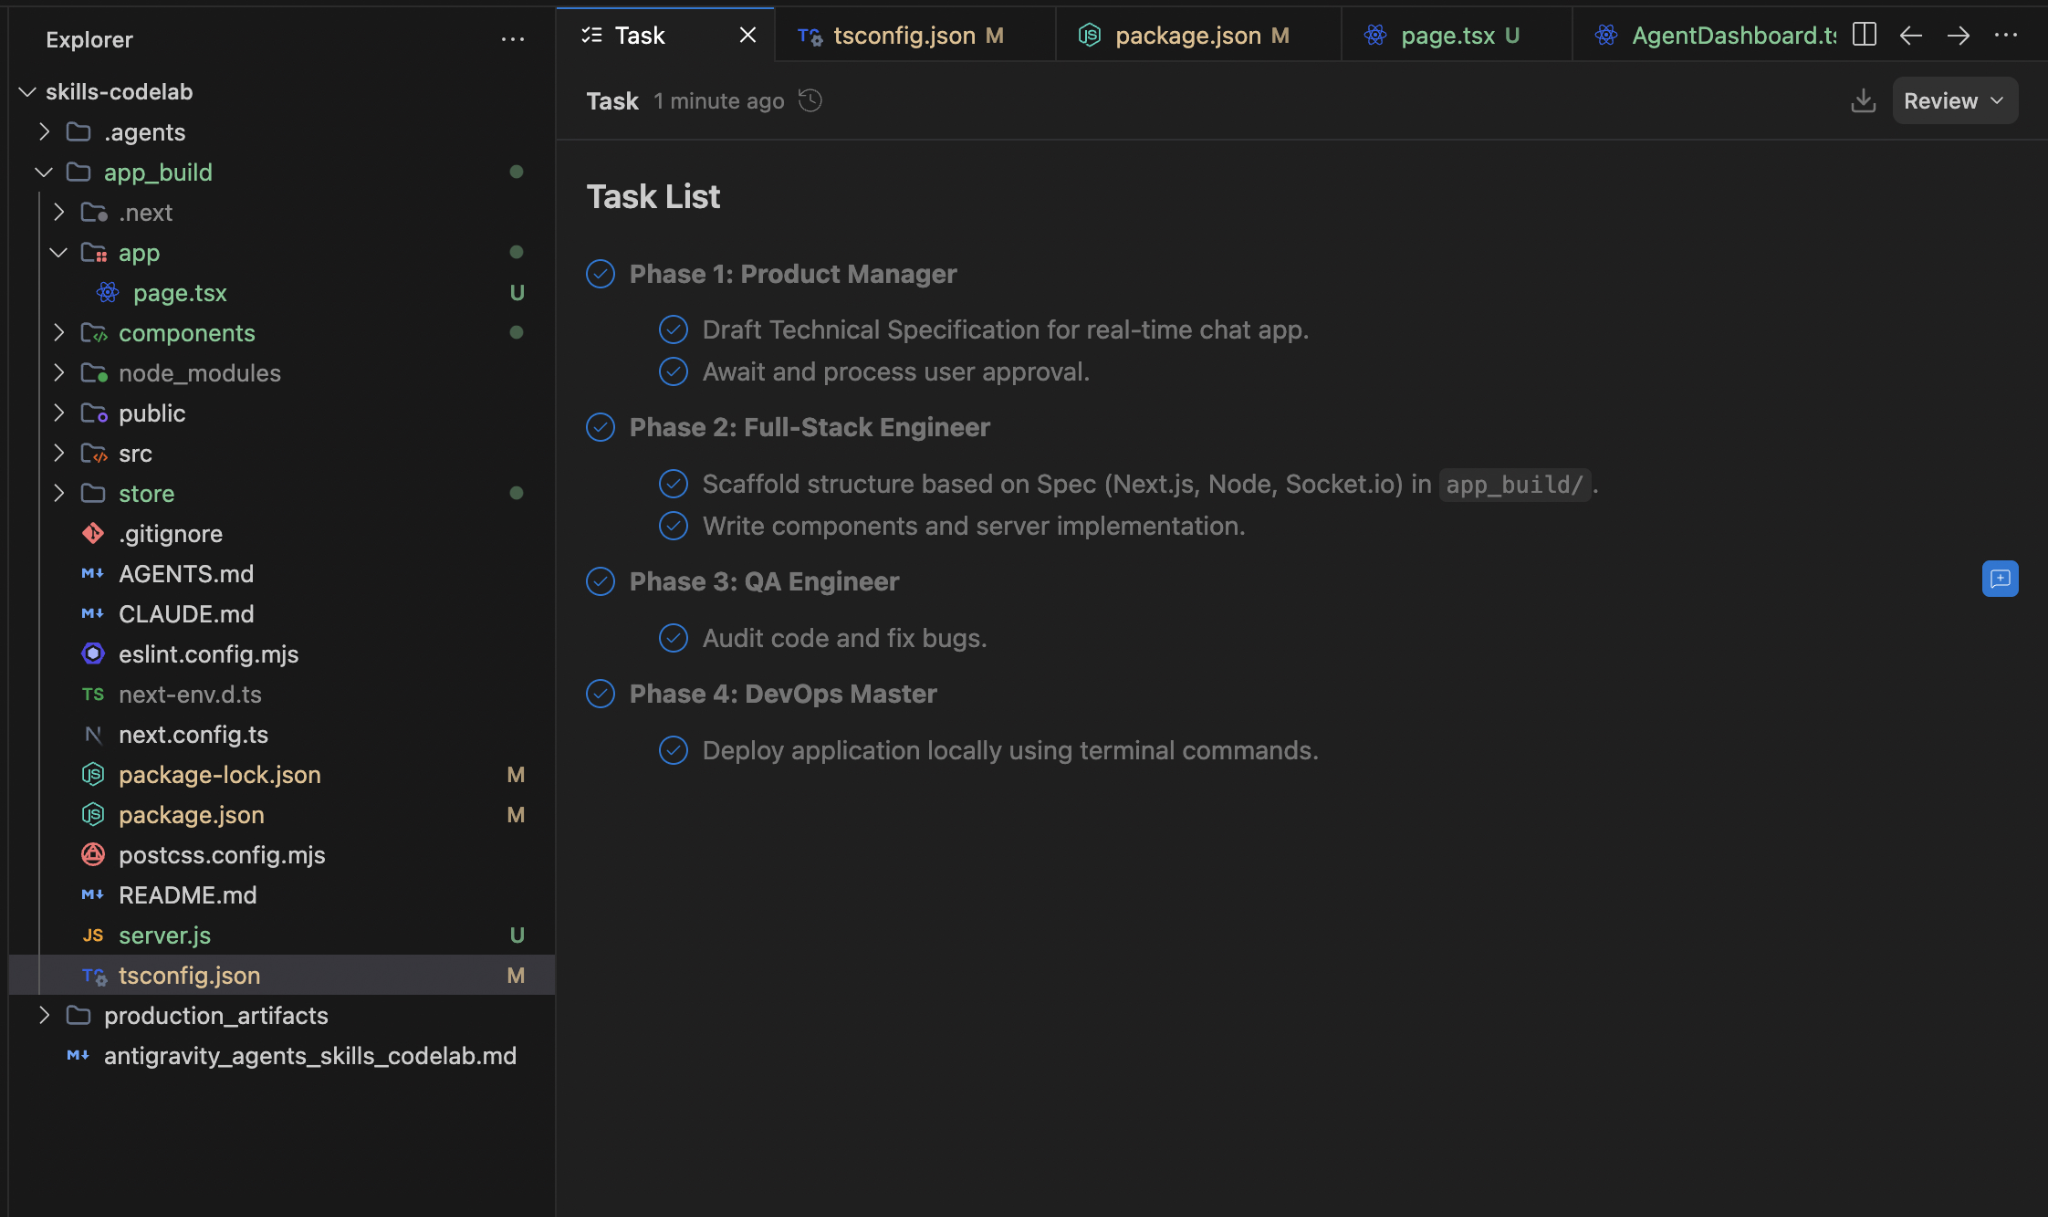
### Execution Sequence:
1. Act as the **Product Manager** and execute the `write_specs.md` skill using the `<idea>`.
*(Wait for the user to explicitly approve the spec. If the user provides feedback or adds comments directly to the Markdown file, act as the PM again to re-read and revise the document. Loop this step until they type "Approved").*
2. Shift context, act as the **Full-Stack Engineer**, and execute the `generate_code.md` skill.
3. Shift context, act as the **QA Engineer**, and execute the `audit_code.md` skill.
4. Shift context, act as the **DevOps Master**, and execute the `deploy_app.md` skill.
Make sure your folder looks like this:
6. Start the Chain Reaction!
With your team and rules officially defined in Antigravity, you can trigger the entire workflow effortlessly!
Prompt Antigravity:
- In the Agent Manager chat box, type / to open the custom commands menu. Select or type
startcycle. - Give it your idea:
/startcycle "I need a fast, real-time chat application for customer support on my ecommerce website."
Sit Back and Collaborate:
- Gemini becomes the PM, drafts a robust spec, and asks you for approval.
- Open
Technical_Specification.mdin your IDE editor, add a few notes (like "Let's use Python instead of Node"), and tell the agent to rework it. It will autonomously revise the file! - Once you approve it, Gemini natively shifts context to the Engineer, using the approved spec to write the backend/frontend code.
- It becomes the QA Engineer, fixes any bugs, and saves the final code.
- Finally, the DevOps Master dynamically installs modules and serves the application to your browser!
A sample run of Technical_Specification.md and waiting for approvals or comments
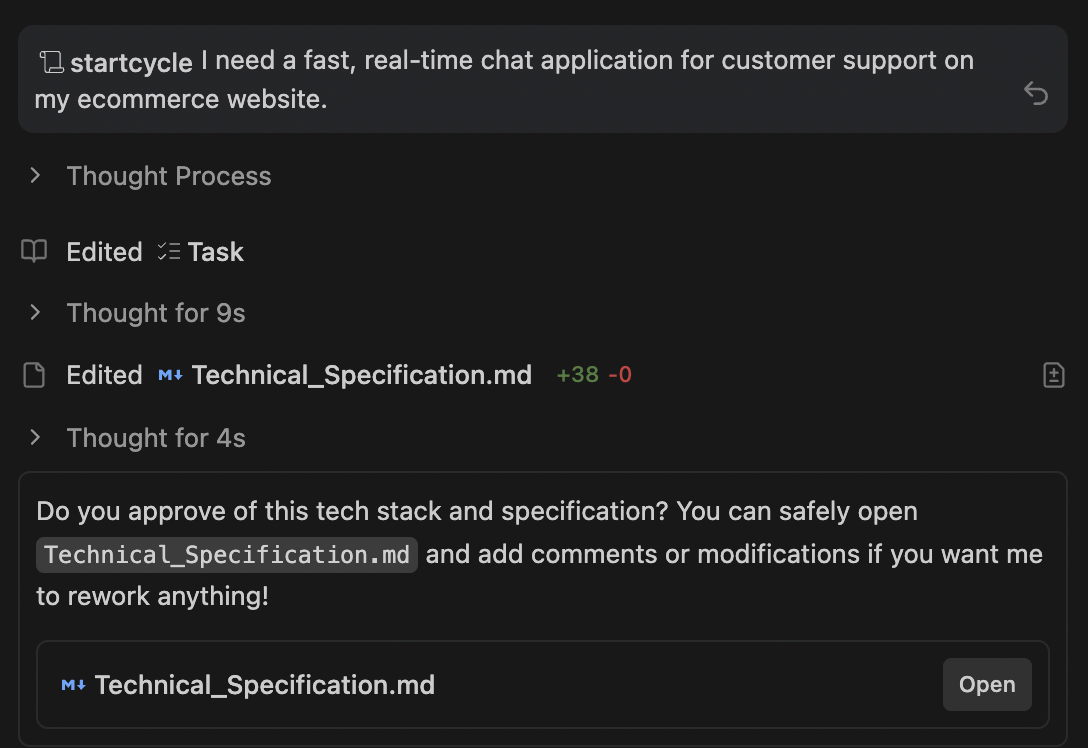
After the user's approval over the prompt, the entire workflow begins.
7. Summary & Next Steps
Congratulations! You have learned how to inject Collaborative Iteration Loops and dynamic, full-stack application generation into an agentic pipeline!
In this codelab we covered the following:
- How to map AI personas using .agents/agents.md.
- Build collaborative rework loops inside
.agents/skills/write_specs.mdso the agent reads your inline markdown comments. - Constructed dynamic
.mdskills that write code in any framework (Python, React) depending on the approved spec!