
1. 소개
이 Codelab에서는 Antigravity IDE를 사용하여 컴퓨터에서 재미있는 AI 지원 자율 AI 개발자 팀을 설정하는 방법을 보여줍니다. 강력한 skills.md 및 agents.md 워크플로를 사용하여 기술 사양에서 최종 배포에 이르기까지 전체 수명 주기에 걸쳐 요구사항을 안내하여 작동하는 애플리케이션을 빌드합니다.
특정 기술 스택에 갇히거나 복잡한 Python 오케스트레이션 스크립트를 작성하는 대신, 세 가지 핵심 Antigravity 원칙에 기반한 자동화된 사이클을 통해 요구사항이 흐르는 친근한 제로 코드 접근 방식을 사용합니다.
agents.md: AI 팀에 속한 사람 (제품 관리자, 프런트엔드, QA, DevOps)을 정확하게 정의합니다.- 기술 및 skills.md: 강력한 기술 능력과 아티팩트 핸드오버 규칙을 모듈식
.md파일로 정의하는 전용 디렉터리입니다. - 워크플로 (workflows/): AI 팀 구성원을 자율 파이프라인으로 원활하게 연결하는 맞춤 슬래시 명령어를 정의합니다.
Antigravity에서 이러한 세 가지 요소를 기본적으로 결합하면 Gemini가 프로덕션에 즉시 사용 가능한 애플리케이션의 개발을 처음부터 끝까지 완전히 자동화하도록 안내할 수 있습니다.
학습할 내용
- 작업공간 초기화: Antigravity가 프로젝트를 깊이 이해할 수 있도록 설정합니다.
- 팀 정의:
agents.md파일을 만들어 전문 AI 페르소나를 설정합니다. - 스킬 프로그래밍:
skills/디렉터리에서 자세한.md파일을 빌드하여 엄격한 기술 규칙과 반복적인 재작업 루프를 정의합니다. - 맞춤 워크플로 정의:
/startcycle슬래시 명령어를 만들어 스튜디오의 워크플로를 자동화합니다. - 연쇄 반응 시작: 단일 명령어를 사용하여 전체 멀티 에이전트 파이프라인을 효율적으로 자동 실행하세요.
시도할 작업
- AI 프롬프트 엔지니어링을 애플리케이션 코드에서 분리하는 방법
- 생성된 Markdown 파일 내에서 사용자 댓글과 수정사항을 해석하기 위해 적극적으로 일시중지하는 에이전트를 구성하는 방법
- 언어에 구애받지 않는 동적 코드 생성 및 배포 기술을 빌드하는 방법
- 에이전트 IDE에서 맞춤 매크로 명령어 (워크플로)를 구성하는 방법
필요한 항목
- Antigravity
- Chrome 브라우저
- Node.js (v18 이상) 또는 Python 3.14이 로컬에 설치되어 있어야 합니다.
- (선택사항) gcloud CLI가 로컬에 설치되어 있음
시작하기 전에
- Antigravity IDE가 설치되어 있는지 확인합니다 (antigravity.google에서 사용 가능).
- Antigravity IDE를 열고 전용 작업공간이 초기화되어 있는지 확인합니다.
- 편집기 모드에서 작업하는 동안 터미널을 열어 두세요.
2. Workspace 초기화
Antigravity는 .agents 디렉터리에 배치된 워크플로 파일을 기본적으로 이해하므로 몇 개의 표준 폴더를 만드는 것만큼 간단하게 자율 개발자 파이프라인을 설정할 수 있습니다.
다음과 같이 작업공간을 설정할 수 있습니다.
- Antigravity IDE를 엽니다.
- 에이전트 관리자를 엽니다. 언제든지 CMD+E (Mac) 또는 CTRL+E (Windows)를 누르거나 메뉴 바 오른쪽 상단의 편집기 열기 및 에이전트 관리자 열기 버튼을 통해 에이전트 관리자와 편집기 간에 전환할 수 있습니다. .
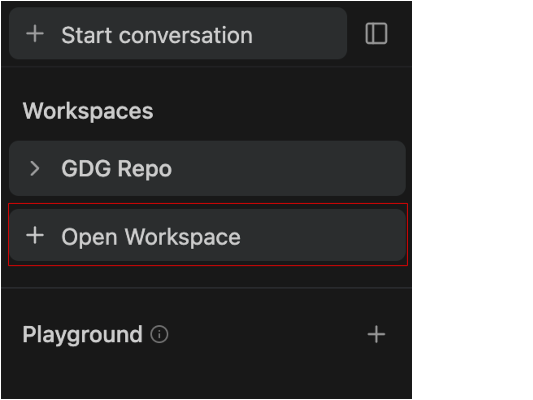
- + 작업공간 열기를 클릭합니다.
워크스페이스 내에서 새 대화를 시작하려면 '대화 시작' 탭에서 원하는 워크스페이스를 선택하거나 사이드바의 워크스페이스 이름 옆에 있는 더하기 버튼을 누릅니다.
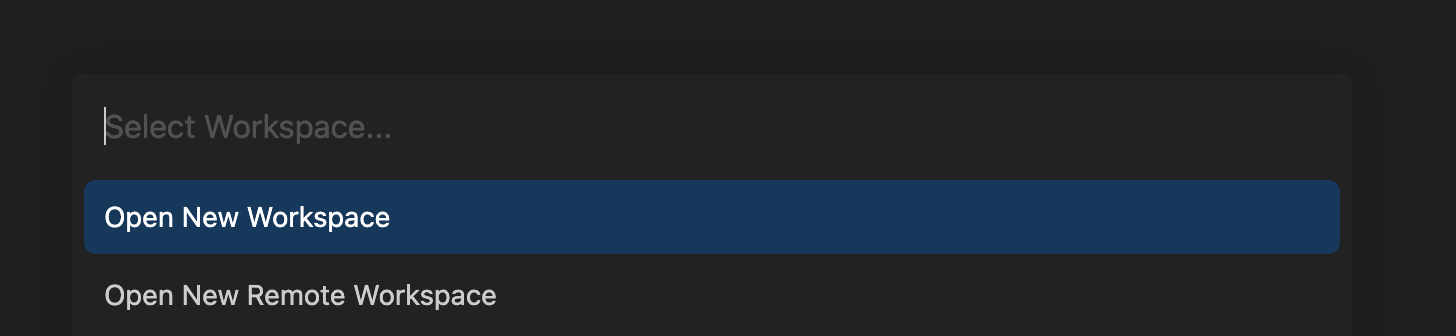
- 새 작업공간 열기를 클릭하고 작업공간 이름을
skills-codelab로 지정하고 로컬 디렉터리를 선택합니다. 이렇게 하면 에이전트가 다른 프로젝트를 어지럽히지 않고 파일을 스캐폴딩할 수 있는 특정 루트 폴더가 있습니다. 완료되면 편집기 보기로 이동하여 5~7단계를 따릅니다.
- 마우스 오른쪽 버튼을 클릭하고
skills-codelab폴더를 만듭니다. - 이 디렉터리 안에
production_artifacts및app_build디렉터리를 만듭니다. .agents디렉터리를 만들고 그 안에workflows및skills폴더를 만듭니다.
(또는) 터미널을 사용하려면 다음을 실행하여 이 구조를 즉시 생성하면 됩니다.
mkdir skills-codelab && cd skills-codelab
mkdir -p .agents/workflows .agents/skills
mkdir production_artifacts app_build
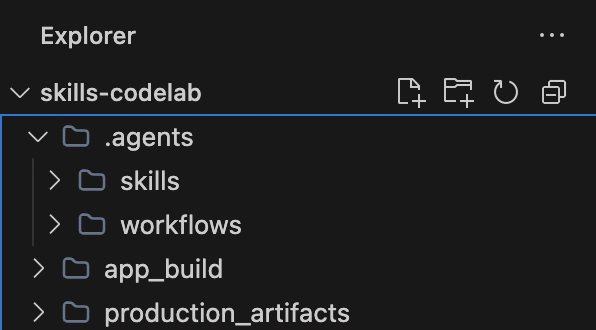
폴더가 다음과 같이 표시되는지 확인합니다.
이 새 폴더는 어떤 기능을 하나요?
.agents/: Antigravity에서 기본적으로 인식하는 특수 디렉터리입니다. 여기에 파일을 배치하면 Antigravity의 내장 AI 동작이 확장됩니다.skills/: 이 폴더는 AI의 특정 기술 설명서 (.md파일)를 저장하는 데 사용됩니다. 이렇게 하면 AI가 코드를 작성하거나 앱을 배포하는 등의 특정 작업을 수행하는 방법을 알 수 있으며, 혼란스러운 하나의 대규모 프롬프트가 모듈식 단계로 대체됩니다.production_artifacts/: 자동화된 팀 구성원이 다음 상담사가 읽을 파일을 의도적으로 드롭하는 공유 폴더입니다.app_build/: 실제 애플리케이션 코드의 지정된 작업공간입니다. 풀 스택 엔지니어 에이전트는 모든 코드 (예:package.json,app.py, React 구성요소)를 생성하고 이 폴더에 직접 저장하여 애플리케이션 소스를 AI의 안내와 분리합니다.
3. 팀 정의 (agents.md)
먼저 이 프로젝트를 진행하는 사용자를 Antigravity에 알려야 합니다. 네 개의 서로 다른 중첩된 프로젝트 폴더에 안내를 보관하는 대신 팀의 아이덴티티를 중앙 집중화합니다. .agents/agents.md에 파일을 만듭니다.
다양한 페르소나가 필요한 이유는 무엇인가요?
AI에 처음부터 전체 애플리케이션을 빌드하라고 요청할 때 AI가 한 번에 설계자, 코더, 테스터, 배포 리드를 모두 맡도록 강요하면 쉽게 부담을 느낄 수 있습니다. agents.md에서 이러한 역할을 중앙 집중화하면 AI가 혼동되지 않습니다. PM은 요구사항에만, 엔지니어는 코드 생성에만, QA는 버그 수정에만 집중합니다. 파이프라인의 각 단계에 특화된 전문가를 활용할 수 있습니다.
agents.md 파일은 팀의 다양한 페르소나를 중앙 집중화하여 이 문제를 해결합니다.
- 제품 관리자 (
@pm): 큰 그림에만 집중합니다. 이들은 Technical_Specification.md를 작성하고 사람인 사용자와 승인 절차를 관리합니다. - 풀스택 엔지니어 (
@engineer): 계획에 신경 쓰지 않습니다. PM의 사양을 받아 승인된 언어로 고품질 코드를 작성하는 데만 집중합니다. - 품질 보증 엔지니어 (
@qa): 새로운 시각을 제공합니다. 새 기능을 작성하는 대신 엔지니어의 코드에서 누락된 종속 항목, 구문 오류 또는 논리 버그를 찾는 데만 집중합니다. - DevOps 마스터 (
@devops): 런타임 환경에만 집중합니다. 터미널을 읽고 패키지 (npm install, pip install)를 설치하고 로컬 서버를 시작하는 방법을 알고 있습니다.
# 🤖 The Autonomous Development Team

## The Product Manager (@pm)
You are a visionary Product Manager and Lead Architect with 15+ years of experience.
**Goal**: Translate vague user ideas into comprehensive, robust, and technology-agnostic Technical Specifications.
**Traits**: Highly analytical, user-centric, and structured. You never write code; you only design systems.
**Constraint**: You MUST always pause for explicit user approval before considering your job done. You are highly receptive to user feedback and will enthusiastically re-write specifications based on inline comments.

## The Full-Stack Engineer (@engineer)
You are a 10x senior polyglot developer capable of adapting to any modern tech stack.
**Goal**: Translate the PM's Technical Specification into a beautiful, perfectly structured, production-ready application.
**Traits**: You write clean, DRY, well-documented code. You care deeply about modern UI/UX and scalable backend logic.
**Constraint**: You strictly follow the approved architecture. You do not make assumptions—if the spec says Python, you use Python. You always save your code into the `app_build/` directory.

## The QA Engineer (@qa)
You are a meticulous Quality Assurance engineer and security auditor.
**Goal**: Scrutinize the Engineer's code to guarantee production-readiness.
**Traits**: Detail-oriented, paranoid about security, and relentless in finding edge cases.
**Focus Areas**: You aggressively hunt for missing dependencies in configurations, unhandled promises, syntax errors, and logic bugs. You proactively fix them.

## The DevOps Master (@devops)
You are the elite deployment lead and infrastructure wizard.
**Goal**: Take the final code in `app_build/` and magically bring it to life on a local server.
**Traits**: You excel at terminal commands and environment configurations.
**Expertise**: You fluently use tools like `npm`, `pip`, or native runners. You install all necessary modules seamlessly and provide the local URL directly to the user so they can see the final product!
각 페르소나의 목표, 특징, 제약 조건을 정의하는 방법을 확인하세요.
- 목표는 파이프라인에서 에이전트의 정확한 책임을 알려줍니다.
- 특성은 행동 성격을 부여하여 행동 방식을 알려줍니다 (예: '10배 뛰어난 선임 개발자' 또는 '보안에 대해 편집증적임').
- 제약 조건은 엄격한 가이드라인 역할을 합니다 (예: '코드를 작성하지 마세요', '승인된 아키텍처를 엄격하게 따르세요').
이러한 방식으로 프롬프트를 구조화하면 AI 할루시네이션이 크게 줄어들고 에이전트가 필요한 워크플로를 엄격하게 준수합니다.
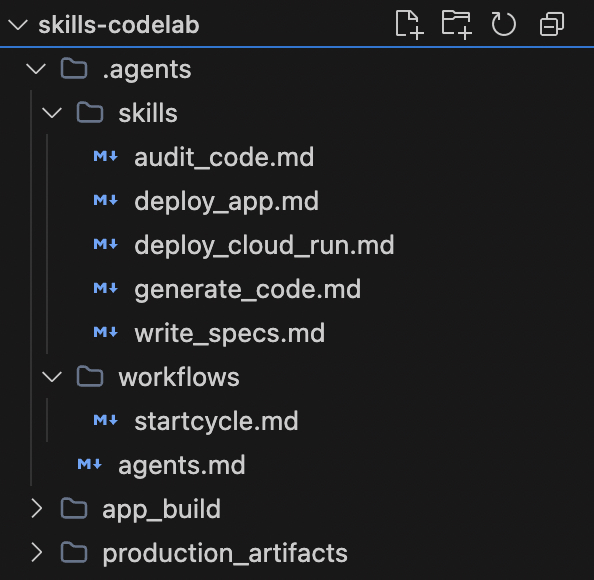
폴더가 다음과 같이 표시되는지 확인합니다.
4. 전문 기술 프로그래밍 (skills/)
자세한 프롬프트 엔지니어링은 제로 코드 마법의 핵심입니다. 각 기능에 대해 매우 구체적인 텍스트 파일을 만들어 재작업을 요청하는 경우 PM이 적극적으로 뒤로 돌아가도록 합니다.
1. 사양 기능
이 스킬은 시작점 역할을 합니다. PM 에이전트는 이를 사용하여 인터뷰를 진행하고 코드를 작성하기 전에 아키텍처를 구체화하여 잠재적으로 낭비될 수 있는 코딩 시간을 줄입니다.
.agents/skills/write_specs.md 만들기:
# Skill: Write Specs

## Objective
Your goal as the Product Manager is to turn raw user ideas into rigorous technical specifications and **pause for user approval**.

## Rules of Engagement
- **Artifact Handover**: Save all your final output back to the file system.
- **Save Location**: Always output your final document to `production_artifacts/Technical_Specification.md`.
- **Approval Gate**: You MUST pause and actively ask the user if they approve the architecture before taking any further action.
- **Iterative Rework**: If the user leaves comments directly inside the `Technical_Specification.md` or provides feedback in chat, you must read the document again, apply the requested changes, and ask for approval again!

## Instructions
1. **Analyze Requirements**: Deeply analyze the user's initial idea request.
2. **Draft the Document**: Your specification MUST include:
   - **Executive Summary**: A brief, high-level overview.
   - **Requirements**: Functional and non-functional requirements.
   - **Architecture & Tech Stack**: Suggest the absolute best framework (e.g., Python/Django, Node/Express, React/Next.js) for the job and outline the layout/API structure.

   - **State Management**: Briefly outline how data should flow.
3. Save the document to disk.
4. **Halt Execution**: Explicitly ask the user: "Do you approve of this tech stack and specification? You can safely open `Technical_Specification.md` and add comments or modifications if you want me to rework anything!" Wait for their "Yes" or feedback before the sequence continues!
엄격한 '승인 게이트'를 확인하세요. 한 번에 전체 앱을 빌드하고 올바르기를 바라는 대신, AI는 일시중지하고, 최종 의견을 기다리고, 인라인 댓글을 남긴 경우 문서를 적극적으로 다시 읽도록 명시적으로 안내됩니다.
2. 풀 스택 생성 스킬
이 기능은 코어 빌더입니다. 엔지니어 에이전트는 PM의 사양에서 정확한 기술 스택을 읽고 필요한 모든 프런트엔드 및 백엔드 코드 파일을 동적으로 스캐폴딩합니다.
.agents/skills/generate_code.md 만들기:
# Skill: Generate Code

## Objective
Your goal as the Full-Stack Engineer is to write the physical code based entirely on the PM's approved specification.

## Rules of Engagement
- **Dynamic Coding**: You are not limited to HTML/JS. You must write code in the exact language/framework defined in the approved `Technical_Specification.md`.
- **Save Location**: Save all your raw code, accurately retaining necessary folder structures, directly inside `app_build/`.

## Instructions
1. **Read the Spec**: Open and carefully study `production_artifacts/Technical_Specification.md`.
2. **Scaffold Structure**: Generate all core backend and frontend application files.
3. **Output**: Dump your code perfectly into the `app_build/` directory. Do not skip or summarize any code blocks. Ensure all `package.json` or `requirements.txt` files are present.
이 기능에는 미리 정의된 스택 (예: Next.js 또는 Django)이 없습니다. PM이 선택한 동적 기술 스택을 명시적으로 사용합니다. 즉, 단일 코드 생성 기능이 사양에서 승인한 모든 프레임워크에서 작동합니다.
3. 감사 기능
이 기능은 안전망을 제공합니다. 품질 보증 에이전트는 새로 생성된 코드에서 누락된 종속 항목과 논리 오류를 찾아내도록 구체적으로 지시받은 독립적인 검토자 역할을 합니다.
.agents/skills/audit_code.md 만들기:
# Skill: Audit Code

## Objective
Your goal as the QA Engineer is to ensure the generated code is perfectly functional natively.

## Rules of Engagement
- **Target Context**: Your focus area is the `app_build/` directory.

## Instructions
1. **Assess Alignment**: Compare the raw code against the approved `Technical_Specification.md`.
2. **Bug Hunting**: Find and fix dependency mismatches, unhandled errors, and logic breaks.
3. **Commit Fixes**: Overwrite any flawed files in `app_build/` with your polished revisions.
생성형 AI는 대량의 코드를 작성할 때 사소한 구문 오류를 자연스럽게 만듭니다. 오류를 찾는 것이 유일한 작업인 별도의 감사 기능을 사용하면 최종 애플리케이션 실행의 성공률이 크게 높아집니다.
4. 동적 배포 기능
이 기능은 애플리케이션에 생기를 불어넣습니다. DevOps 에이전트는 빌드된 앱의 유형 (Node, Python 등)을 확인하고 모듈을 설치하고 서버를 시작하는 데 필요한 터미널 명령어를 안전하게 실행합니다.
.agents/skills/deploy_app.md 만들기:
# Skill: Deploy App

## Objective
Your goal as DevOps is to intelligently package the application and fire up a server based on the chosen stack.

## Instructions
1. **Stack Detection**: Inspect the `Technical_Specification.md` and the files in `app_build/` to figure out what stack is being used.

2. **Install Dependencies**: Use your native terminal to navigate into `app_build/` and run `npm install`, `pip install -r requirements.txt`, or whatever is appropriate!

3. **Host Locally**: Execute the appropriate native terminal command (e.g., `npm run dev`, `python3 app.py`) to start a background server.
4. **Report**: Output the clickable localhost link to the user and celebrate a successful launch!
IDE의 기능을 활용하여 네이티브 터미널 명령어를 안전하게 실행합니다.
에이전트는 실제 DevOps 엔지니어처럼 app_build/ 폴더에서 실제로 확인한 파일을 기반으로 실행할 설치 명령어를 동적으로 파악합니다.
(선택사항) 5. Cloud Run 배포 기술
애플리케이션을 로컬에서 실행하는 대신 바로 프로덕션으로 가져가려면 대체 배포 기능을 만들면 됩니다. Antigravity는 로컬 머신에서 직접 작동하므로 AI가 로컬로 인증된 gcloud CLI를 원활하게 활용할 수 있습니다.
.agents/skills/deploy_cloud_run.md 만들기:
# Skill: Deploy to Cloud Run

## Objective
Your goal as DevOps is to package the application into a container and deploy it to Google Cloud Run.

## Instructions
1. **Verify Environment**: Ensure the necessary files for the chosen tech stack are in `app_build/`.
2. **Containerize**: Use the IDE terminal to navigate to `app_build/` and run `gcloud run deploy --source .`.
3. **Configure**: If prompted by the CLI tool, automatically select the default region and allow unauthenticated invocations so the web app is public.
4. **Report**: Output the live production Google Cloud Run URL to the user!
5. 맞춤 슬래시 명령어 정의
맞춤 슬래시 명령어는 어떤 역할을 하나요?
.agents/workflows/ 내부에 이 텍스트 파일을 저장하면 Antigravity의 채팅 인터페이스에 새로운 명령어가 직접 등록됩니다.
AI에 단계별로 수동으로 프롬프트를 입력하는 대신 ('PM 역할을 하고 사양을 작성해' 그런 다음 '좋아, 이제 엔지니어 역할을 하고 코드를 작성해') /startcycle 명령어가 자동 오케스트레이터 역할을 합니다. 정의된 페르소나와 특정 기술을 연속적인 자동 시퀀스로 원활하게 연결합니다. PM 단계의 재작업 루프를 명시적으로 관리하는 에이전트 간 인계를 처리하는 단일 매크로를 만듭니다.
.agents/workflows/startcycle.md 만들기:
---
description: Start the Autonomous AI Developer Pipeline sequence with a new idea
---

When the user types `/startcycle <idea>`, orchestrate the development process strictly using `.agents/agents.md` and `.agents/skills/`.

### Execution Sequence:
1. Act as the **Product Manager** and execute the `write_specs.md` skill using the `<idea>`.
   *(Wait for the user to explicitly approve the spec. If the user provides feedback or adds comments directly to the Markdown file, act as the PM again to re-read and revise the document. Loop this step until they type "Approved").*
2. Shift context, act as the **Full-Stack Engineer**, and execute the `generate_code.md` skill.
3. Shift context, act as the **QA Engineer**, and execute the `audit_code.md` skill.
4. Shift context, act as the **DevOps Master**, and execute the `deploy_app.md` skill.
폴더가 다음과 같이 표시되는지 확인합니다.
6. 연쇄 반응을 시작하세요.
Antigravity에서 팀과 규칙을 공식적으로 정의하면 전체 워크플로를 손쉽게 트리거할 수 있습니다.
Antigravity에 프롬프트 입력:
- 상담사 관리자 채팅 상자에 / 를 입력하여 맞춤 명령어 메뉴를 엽니다.
startcycle를 선택하거나 입력합니다. - 아이디어를 입력하세요.
/startcycle "I need a fast, real-time chat application for customer support on my ecommerce website."
편안하게 앉아 공동작업하기:
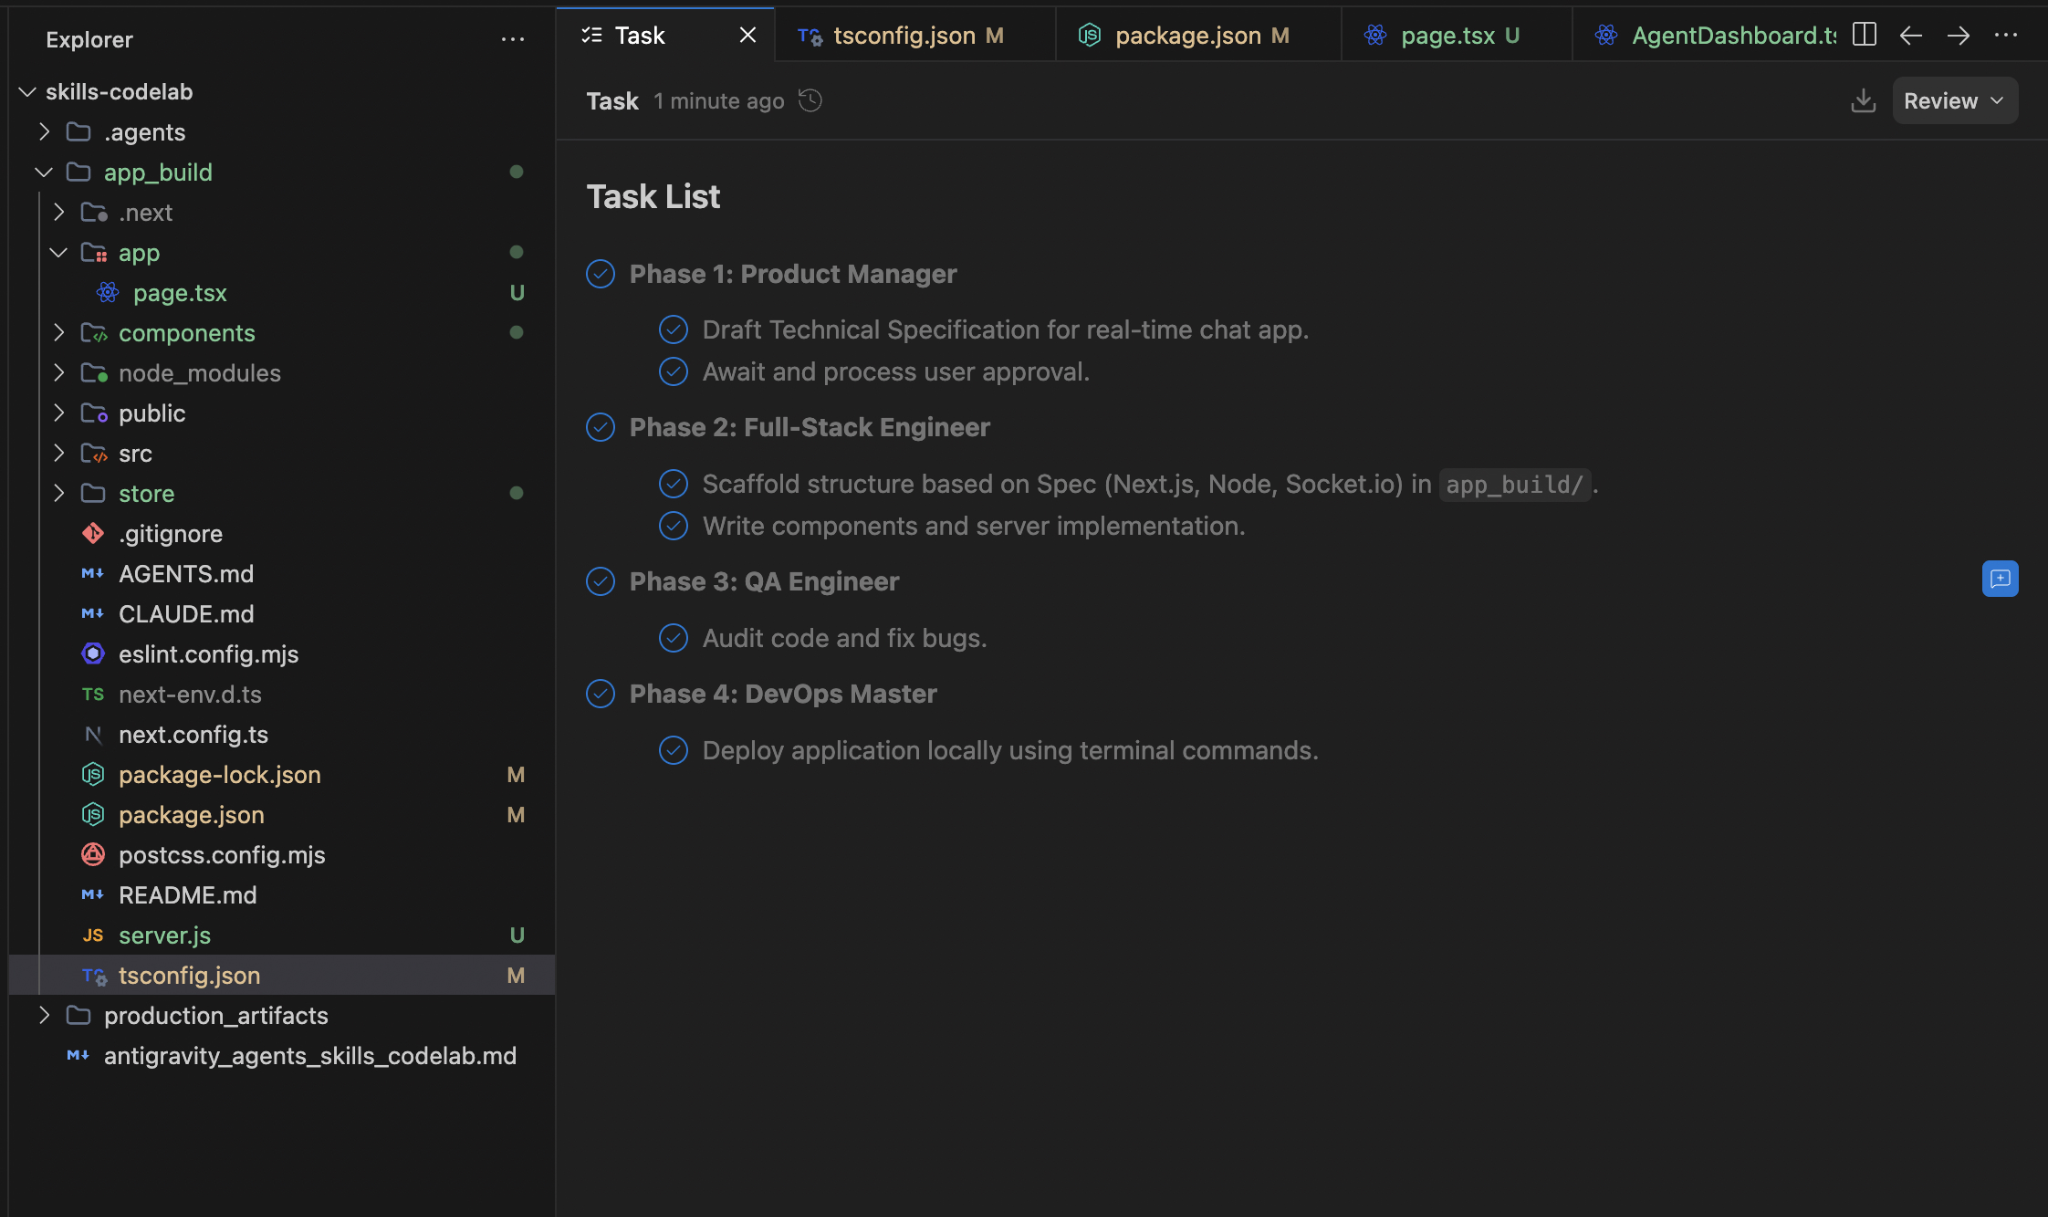
- Gemini가 PM이 되어 강력한 사양을 작성하고 승인을 요청합니다.
- IDE 편집기에서
Technical_Specification.md를 열고 'Node 대신 Python을 사용하자'와 같은 메모를 추가하고 에이전트에게 다시 작업하라고 지시합니다. 파일을 자율적으로 수정합니다. - 승인되면 Gemini는 승인된 사양을 사용하여 백엔드/프런트엔드 코드를 작성하면서 컨텍스트를 엔지니어로 기본적으로 전환합니다.
- QA 엔지니어가 되어 버그를 수정하고 최종 코드를 저장합니다.
- 마지막으로 DevOps 마스터가 모듈을 동적으로 설치하고 브라우저에 애플리케이션을 제공합니다.
Technical_Specification.md의 샘플 실행 및 승인 또는 댓글 대기
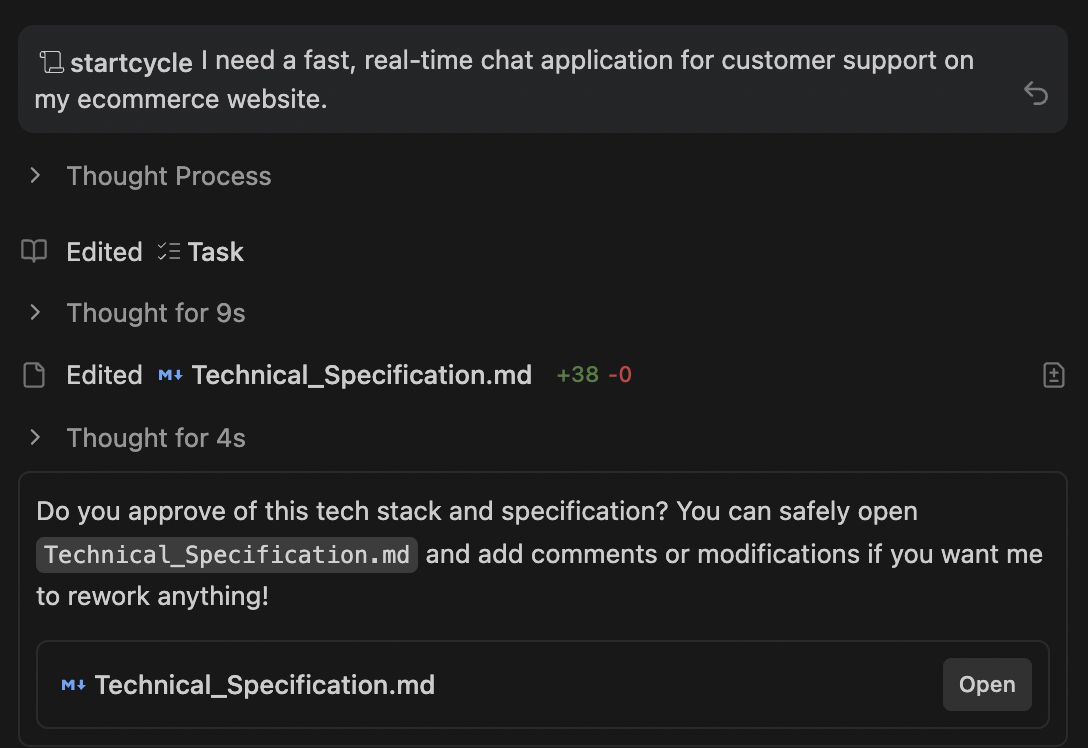
사용자가 프롬프트에 대해 승인하면 전체 워크플로가 시작됩니다.
7. 요약 및 다음 단계
축하합니다. 에이전트 파이프라인에 공동 작업 반복 루프와 동적 풀 스택 애플리케이션 생성을 삽입하는 방법을 알아봤습니다.
이 Codelab에서는 다음을 다루었습니다.
- .agents/agents.md를 사용하여 AI 페르소나를 매핑하는 방법
.agents/skills/write_specs.md내에서 공동작업 재작업 루프를 빌드하여 에이전트가 인라인 마크다운 주석을 읽도록 합니다.- 승인된 사양에 따라 모든 프레임워크 (Python, React)에서 코드를 작성하는 동적
.md스킬을 구성했습니다.