
1. Introduction
In today's fast-paced data landscape, real-time insights are crucial for making informed decisions. This codelab will guide you through building a real-time evaluation pipeline. We'll start by leveraging the Apache Beam framework, which offers a unified programming model for both batch and streaming data. This significantly simplifies pipeline development by abstracting away the complex distributed computing logic you'd otherwise have to build from scratch. Once your pipeline is defined using Beam, you'll then seamlessly run it on Google Cloud Dataflow, a fully managed service that provides unparalleled scale and performance for your data processing needs.
In this codelab, you will learn how to architect a scalable Apache Beam pipeline for machine learning inference, develop a custom ModelHandler to integrate Vertex AI's Gemini model, leverage prompt engineering for intelligent text classification in data streams, and deploy and operate this streaming ML inference pipeline on Google Cloud Dataflow. By the end, you'll gain valuable insights into applying machine learning for real-time data understanding and continuous evaluation in engineering workflows, particularly for maintaining robust and user-centric conversational AI.
Scenario
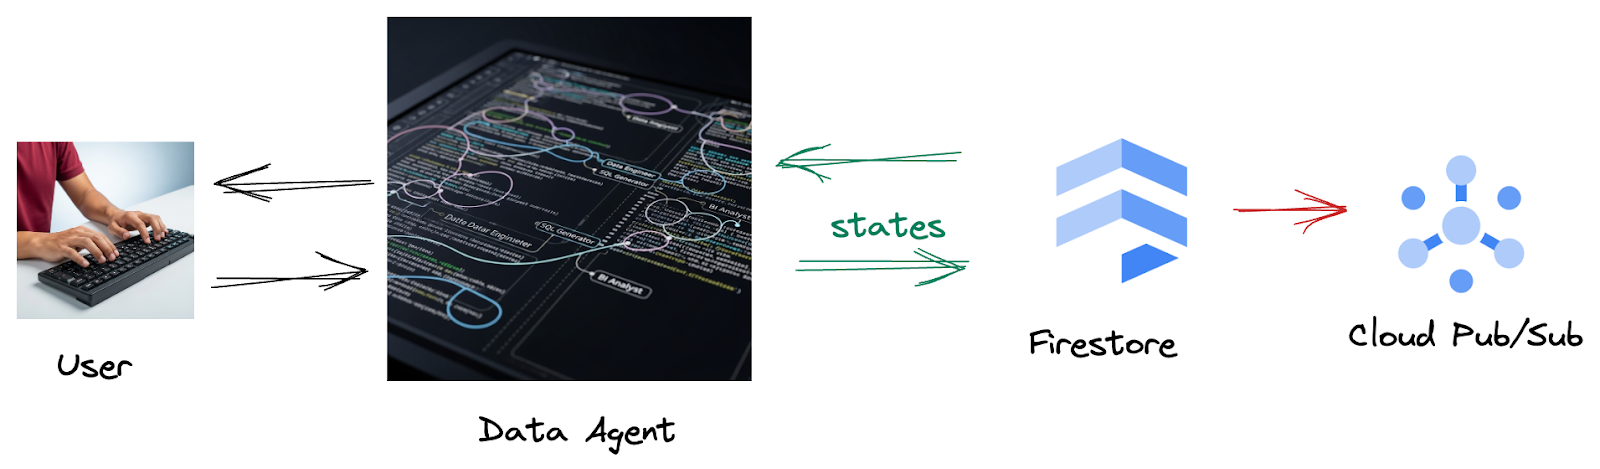
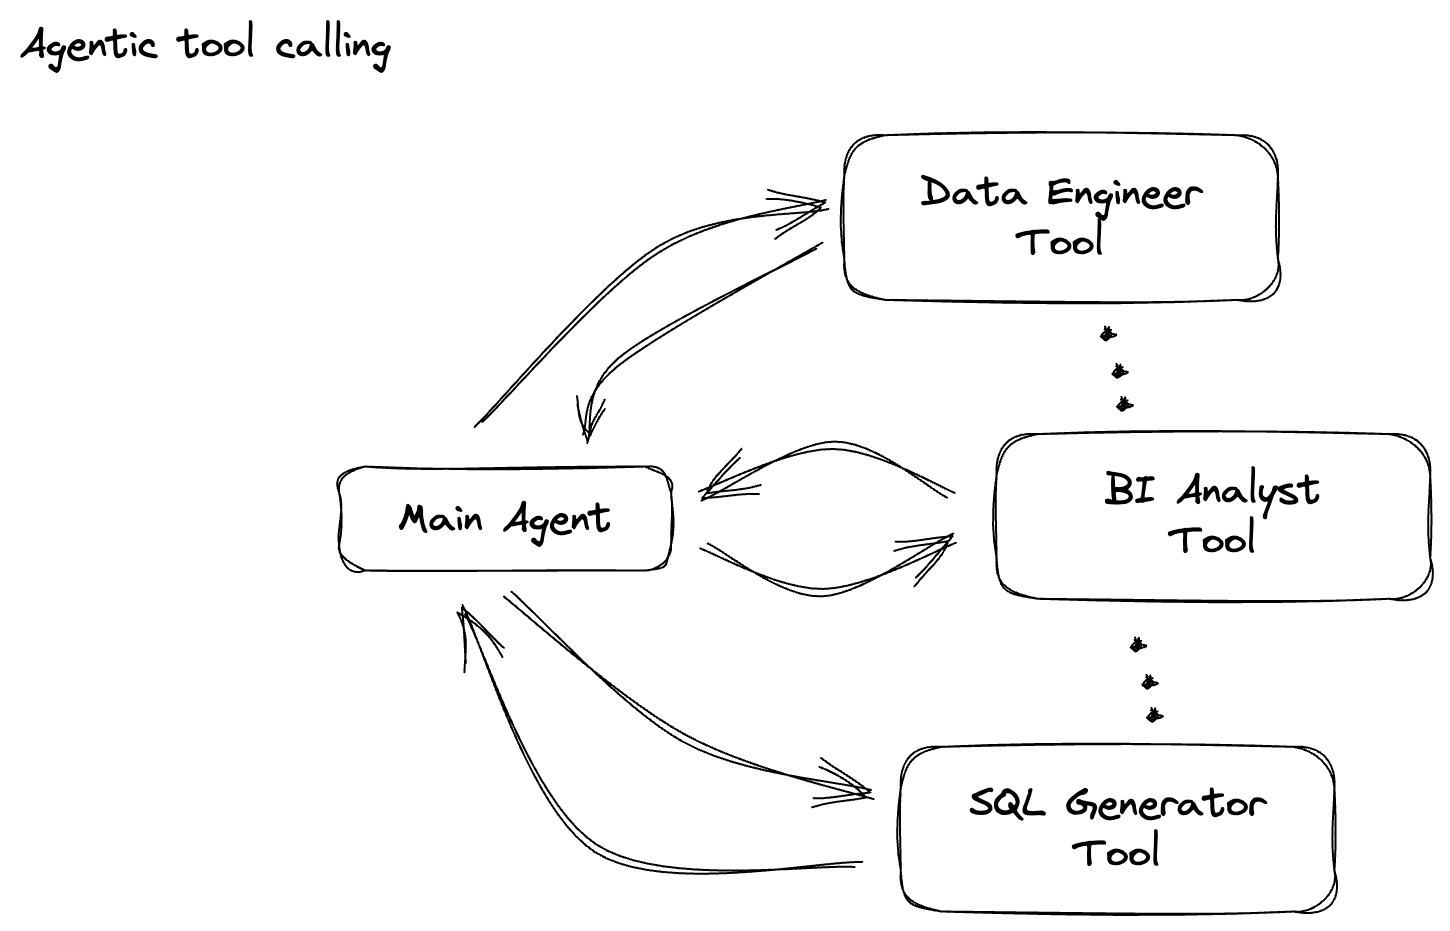
Your company has built a data agent. Your data agent, built with the Agent Development Kit (ADK), is equipped with various specialized capabilities to assist with data-related tasks. Imagine it as a versatile data assistant, ready to handle diverse requests, from acting as a BI Analyst to generate insightful reports, to a Data Engineer helping you build robust data pipelines, or a SQL Generator crafting precise SQL statements, and much more. Every interaction this agent has, every response it generates, is automatically stored in Firestore. But why do we need a pipeline here?
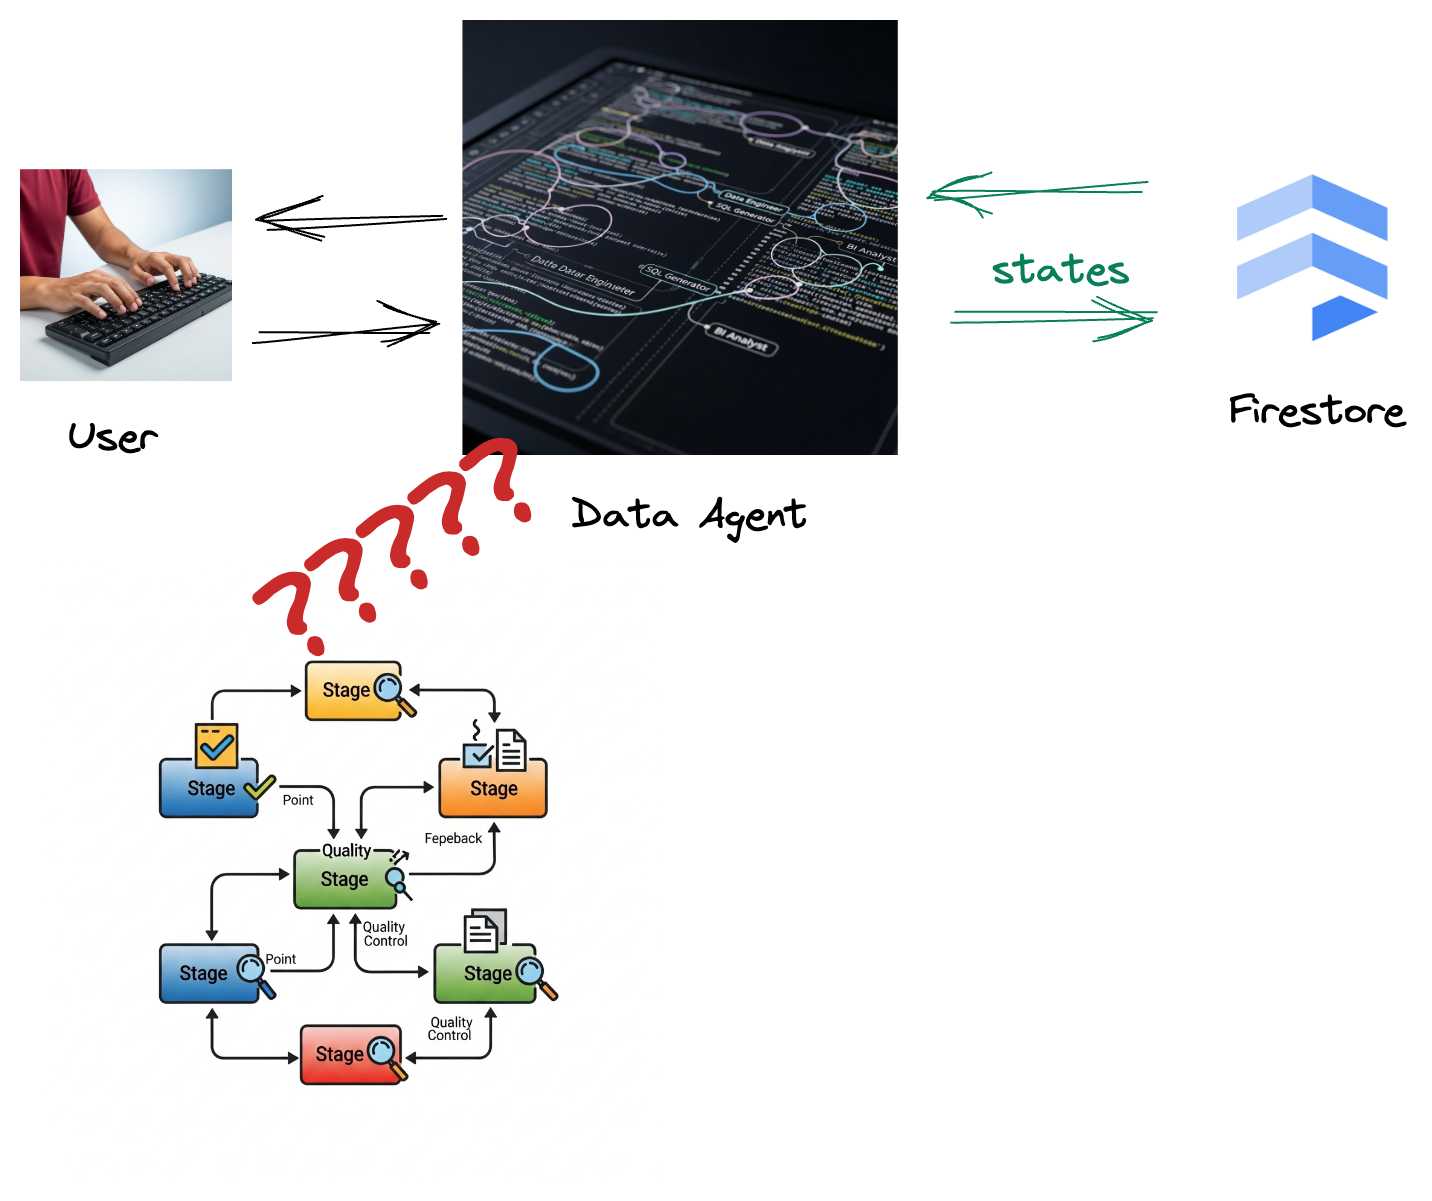
Because from Firestore, a trigger seamlessly sends this interaction data to Pub/Sub, ensuring that we can immediately process and analyze these critical conversations in real-time.
2. Before you begin
Create a project
- In the Google Cloud Console, on the project selector page, select or create a Google Cloud project.
- Make sure that billing is enabled for your Cloud project. Learn how to check if billing is enabled on a project.
- Activate Cloud Shell by clicking this link. You can toggle between Cloud Shell Terminal (for running cloud commands) and Editor (for building projects) by clicking on the corresponding button from Cloud Shell.
- Once connected to Cloud Shell, you check that you're already authenticated and that the project is set to your project ID using the following command:
gcloud auth list
- Run the following command in Cloud Shell to confirm that the gcloud command knows about your project.
gcloud config list project
- If your project is not set, use the following command to set it:
export PROJECT_ID=<YOUR_PROJECT_ID>
gcloud config set project $PROJECT_ID
- Enable the required APIs via the command shown below. This could take a few minutes, so please be patient.
gcloud services enable \
    dataflow.googleapis.com \
    pubsub.googleapis.com \
    aiplatform.googleapis.com \
    compute.googleapis.com
- Make sure to have Python 3.10+
- Install Python Packages
Install the required Python libraries for Apache Beam, Google Cloud Vertex AI, and Google Generative AI in your Cloud Shell environment.
pip install apache-beam[gcp] google-genai
- Clone the github repo and switch to the demo directory.
git clone https://github.com/GoogleCloudPlatform/devrel-demos
cd devrel-demos/data-analytics/beam_as_eval
Refer to the documentation for gcloud commands and usage.
3. How to use the provided Github repository
The GitHub repository associated with this codelab, found at https://github.com/GoogleCloudPlatform/devrel-demos/tree/main/data-analytics/beam_as_eval , is organized to facilitate a guided learning experience. It contains skeleton code that aligns with each distinct part of the codelab, ensuring a clear progression through the material.
Within the repository, you'll discover two primary folders: "complete" and "incomplete." The "complete" folder houses fully functional code for each step, allowing you to run and observe the intended output. Conversely, the "incomplete" folder provides code from preceding steps, leaving specific sections marked between ##### START STEP <NUMBER> ##### and ##### END STEP <NUMBER> ##### for you to complete as part of the exercises. This structure enables you to build upon prior knowledge while actively participating in the coding challenges.

4. Architectural Overview
Our pipeline provides a powerful and scalable pattern for integrating ML inference into data streams. Here's how the pieces fit together:
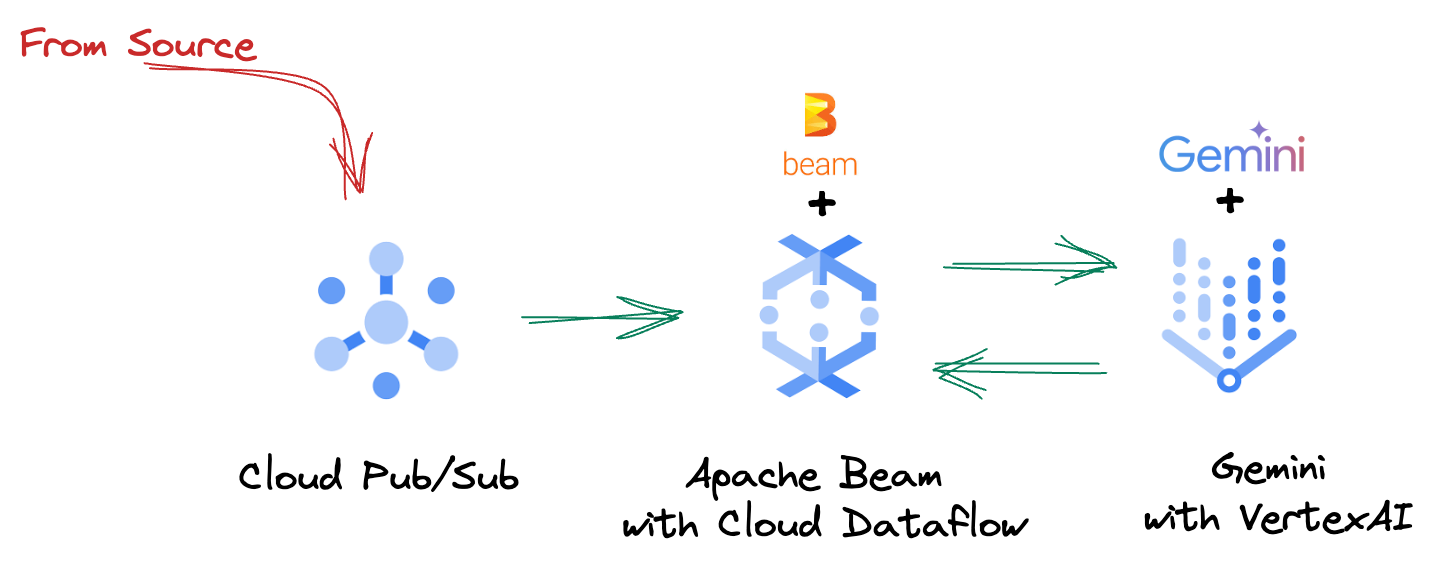
In your Beam pipeline, you will code in multiple inputs conditionally, and then load custom models with the RunInference turnkey transform. Even though you use Gemini with VertexAI in the example, it demonstrates how you would be essentially creating multiple ModelHandlers to fit the number of models you have. Finally, you will use a stateful DoFn to keep track of events and emit them in a controlled manner.
5. Ingesting Data
First, you'll set up your pipeline to ingest data. You'll use Pub/Sub for real-time streaming, but to make development easier, you'll also create a test mode. This test_mode allows you to run the pipeline locally using predefined sample data, so you don't need a live Pub/Sub stream to see if your pipeline works.
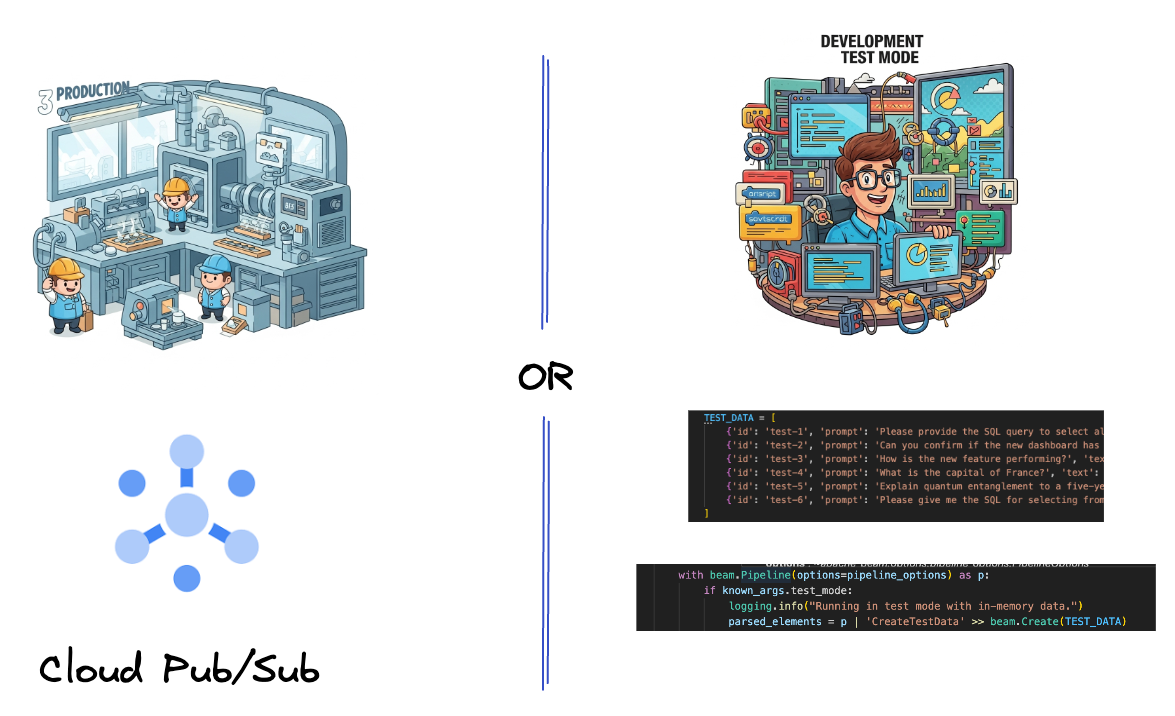
For this section use gemini_beam_pipeline_step1.py.
- Using the provided pipeline object p, code a Pub/Sub input and write out the output as a pCollection.
- Additionally use a flag to determine if TEST_MODE has been set.
- If TEST_MODE was set, then switch to parsing the TEST_DATA array as an input.
This isn't necessary but it helps shorten the process so you don't need to involve Pub/Sub this early.
Here's an example of the code below:
        # Step 1
        # Ingesting Data
        # Write your data ingestion step here.
        ############## BEGIN STEP 1 ##############
        if known_args.test_mode:
            logging.info("Running in test mode with in-memory data.")
            parsed_elements = p | 'CreateTestData' >> beam.Create(TEST_DATA)
            # Convert dicts to JSON strings and add timestamps for test mode
            parsed_elements = parsed_elements | 'ConvertTestDictsToJsonAndAddTimestamps' >> beam.Map(
                lambda x: beam.window.TimestampedValue(json.dumps(x), x['timestamp'])
            )
        else:
            logging.info(f"Reading from Pub/Sub topic: {known_args.input_topic}")
            parsed_elements = (
                p
                | 'ReadFromPubSub' >> beam.io.ReadFromPubSub(
                    topic=known_args.input_topic
                    ).with_output_types(bytes)
                | 'DecodeBytes' >> beam.Map(lambda b: b.decode('utf-8')) # Output is JSON string
                # Extract timestamp from JSON string for Pub/Sub messages
                | 'AddTimestampsFromParsedJson' >> beam.Map(lambda s: beam.window.TimestampedValue(s, json.loads(s)['timestamp']))
            )
        ############## END STEP 1 ##############
Test this code by executing:
python gemini_beam_pipeline_step1.py --project $PROJECT_ID --runner DirectRunner --test_mode
This step should emit all of the records, logging them to stdout.
You should expect an output like the following.
INFO:root:Running in test mode with in-memory data.
INFO:apache_beam.runners.worker.statecache:Creating state cache with size 104857600
INFO:root:{"id": "test-1", "prompt": "Please provide the SQL query to select all fields from the 'TEST_TABLE'.", "text": "Sure here is the SQL: SELECT * FROM TEST_TABLE;", "timestamp": 1751052405.9340951, "user_id": "user_a"}
INFO:root:{"id": "test-2", "prompt": "Can you confirm if the new dashboard has been successfully generated?", "text": "I have gone ahead and generated a new dashboard for you.", "timestamp": 1751052410.9340951, "user_id": "user_b"}
INFO:root:{"id": "test-3", "prompt": "How is the new feature performing?", "text": "It works as expected.", "timestamp": 1751052415.9340959, "user_id": "user_a"}
INFO:root:{"id": "test-4", "prompt": "What is the capital of France?", "text": "The square root of a banana is purple.", "timestamp": 1751052430.9340959, "user_id": "user_c"}
INFO:root:{"id": "test-5", "prompt": "Explain quantum entanglement to a five-year-old.", "text": "A flock of geese wearing tiny hats danced the tango on the moon.", "timestamp": 1751052435.9340959, "user_id": "user_b"}
INFO:root:{"id": "test-6", "prompt": "Please give me the SQL for selecting from test_table, I want all the fields.", "text": "absolutely, here's a picture of a cat", "timestamp": 1751052440.9340959, "user_id": "user_c"}
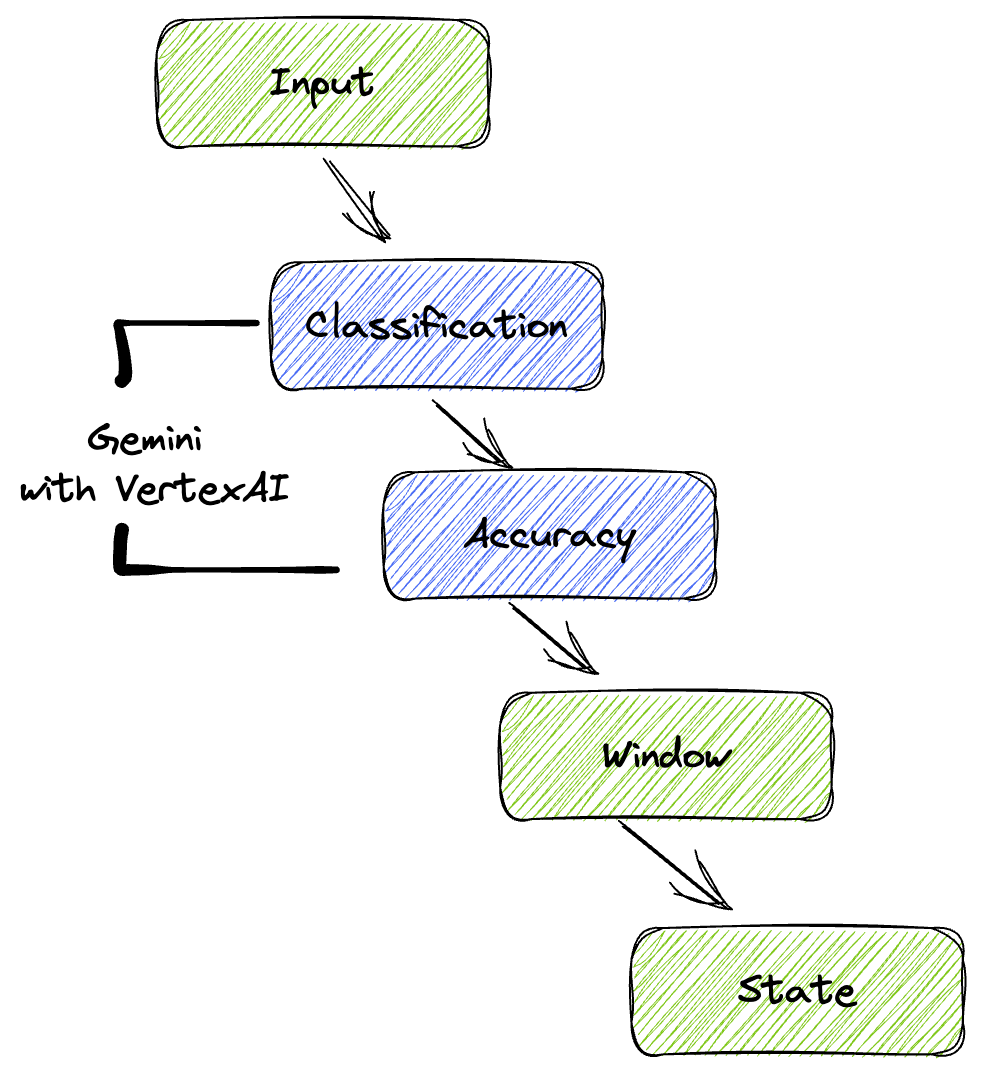
6. Building a PTransform for LLM Prompt Classification
Next, you'll build a PTransform to classify prompts. This involves using Vertex AI's Gemini model to categorize incoming text. You'll define a custom GeminiModelHandler that loads the Gemini model and then instructs the model on how to classify the text into categories like "DATA ENGINEER," "BI ANALYST," or "SQL GENERATOR."
You would use this by comparing to the actual tool calls in the log. This isn't covered in this codelab but you could send it downstream and compare it. There may be some that are ambiguous and this serves as a great additional datapoint to ensure your agent is calling the right tools.
For this section use gemini_beam_pipeline_step2.py.
- Build your custom ModelHandler; however, instead of returning a model object in load_model, return the genai.Client.
- Code you will need to create the run_inference function of the custom ModelHandler. A sample prompt has been provided:
The prompt can be something as follows:
prompt =f"""
            The input is a response from another agent.
            The agent has multiple tools, each having their own responsibilities.
            You are to analyze the input and then classify it into one and only one.
            Use the best one if it seems like it is ambiguous. Choose only one.

            Finally, always provide a paragraph on why you think it is in one of the categories.

            Classify the text into one of these categories:
            DATA ENGINEER
            BI ANALYST
            SQL GENERATOR
            HELPER
            OTHER
            Respond with only the one single classification tag.
            Your response should be in a tuple (classification_tag, reason)

            Text: "{text_to_classify}"
            """
- Yield the results as a pCollection for the next pTransform.
Here's an example of the code below:
    ############## BEGIN STEP 2 ##############
    # load_model is called once per worker process to initialize the LLM client.
    # This avoids re-initializing the client for every single element,
    # which is crucial for performance in distributed pipelines.
    def load_model(self) -> genai.Client:
        """Loads and initializes a model for processing."""
        client = genai.Client(
            vertexai=True,
            project=self._project,
            location=self._location,
        )
        return client

    # run_inference is called for each batch of elements. Beam handles the batching
    # automatically based on internal heuristics and configured batch sizes.
    # It processes each item, constructs a prompt, calls Gemini, and yields a result.
    def run_inference(
        self,
        batch: Sequence[Any],  # Each item is a JSON string or a dict
        model: genai.Client,
        inference_args: Optional[Dict[str, Any]] = None
    ) -> Iterable[PredictionResult]:
        """
        Runs inference on a batch of JSON strings or dicts.
        Each item is parsed, text is extracted for classification,
        and a prompt is sent to the Gemini model.
        """
        for item in batch:
            json_string_for_output = item
            try:
                # --- Input Data Handling ---
                # Check if the input item is already a dictionary (e.g., from TEST_DATA)
                # or a JSON string (e.g., from Pub/Sub).
                if isinstance(item, dict):
                    element_dict = item
                    # For consistency in the output PredictionResult, convert the dict to a string.
                    # This ensures pr.example always contains the original JSON string.
                    json_string_for_output = json.dumps(item)
                else:
                    element_dict = json.loads(item)

                # Extract the 'text' field from the parsed dictionary.
                text_to_classify = element_dict.get('text','')

                if not text_to_classify:
                    logging.warning(f"Input JSON missing 'text' key or text is empty: {json_string_for_output}")
                    yield PredictionResult(example=json_string_for_output, inference="ERROR_NO_TEXT")
                    continue

                prompt =f"""
                The input is a response from another agent.
                The agent has multiple tools, each having their own responsibilites.
                You are to analyze the input and then classify it into one and only one.
                Use the best one if it seems like it is ambigiuous. Choose only one.

                Finally always provide a paragraph on why you think it is in one of the categories.

                Classify the text into one of these categories:
                DATA ENGINEER
                BI ANALYST
                SQL GENERATOR
                HELPER
                OTHER
                Respond with only the one single classification tag.
                Your response should be in a tuple (classification_tag, reason)

                Text: "{text_to_classify}"
                """

                contents = [
                    types.Content( # This is the actual content for the LLM
                    role="user",
                    parts=[
                        types.Part.from_text(text=prompt)
                    ]
                    )
                ]


                gemini_response = model.models.generate_content_stream(
                    model=self._model_name, contents=contents, config=self._model_kwargs
                )
                classification_tag = ""
                for chunk in gemini_response:
                    if chunk.text is not None:
                        classification_tag+=chunk.text

                yield PredictionResult(example=json_string_for_output, inference=classification_tag)

            except json.JSONDecodeError as e:
                logging.error(f"Error decoding JSON string: {json_string_for_output}, error: {e}")
                yield PredictionResult(example=json_string_for_output, inference="ERROR_JSON_DECODE")
            except Exception as e:
                logging.error(f"Error during Gemini inference for input {json_string_for_output}: {e}")
                yield PredictionResult(example=json_string_for_output, inference="ERROR_INFERENCE")
    ############## END STEP 2 ##############
Test this code by executing:
python gemini_beam_pipeline_step2.py --project $PROJECT_ID --runner DirectRunner --test_mode
This step should return an inference from Gemini. It will classify the results as requested by your prompt.
You should expect an output like the following.
INFO:root:PredictionResult(example='{"id": "test-6", "prompt": "Please give me the SQL for selecting from test_table, I want all the fields.", "text": "absolutely, here\'s a picture of a cat", "timestamp": 1751052592.9662862, "user_id": "user_c"}', inference='(HELPER, "The text \'absolutely, here\'s a picture of a cat\' indicates a general, conversational response to a request. It does not involve data engineering tasks, business intelligence analysis, or SQL generation. Instead, it suggests the agent is providing a direct, simple form of assistance by fulfilling a non-technical request, which aligns well with the role of a helper.")', model_id=None)
7. Building an LLM-as-a-Judge
After classifying the prompts, you'll evaluate the accuracy of the model's responses. This involves another call to the Gemini model, but this time, you'll prompt it to score how well the "text" fulfills the original "prompt" on a scale from 0.0 to 1.0. This helps you understand the quality of the AI's output. You'll create a separate GeminiAccuracyModelHandler for this task.

For this section use gemini_beam_pipeline_step3.py.
- Build your custom ModelHandler; however, instead of returning a model object in load_model, return the genai.Client just as you did above.
- Code you will need to create the run_inference function of the custom ModelHandler. A sample prompt has been provided:
            prompt_for_accuracy = f"""
            You are an AI assistant evaluating the accuracy of another AI agent's response to a given prompt.
            Score the accuracy of the 'text' in fulfilling the 'prompt' from 0.0 to 1.0 (float).
            0.0 is very bad, 1.0 is excellent.

            Example of very bad, score of 0:
            prompt: Give me the SQL for test_Table
            text: SUre, here's a picture of a dog

            Example of very good score of 1:
            prompt: generate a sql statement to select all fields from test_table
            text: SELECT * from test_table;

            Your response should be ONLY the float score, followed by a brief explanation of why.
            For example: "0.8 - The response was mostly accurate but missed a minor detail."

            Prompt: "{original_prompt}"
            Text: "{original_text}"
            Score and Explanation:
            """
One thing to note here is you've essentially created two different models in the same pipeline. In this particular example, you are also using a Gemini call with VertexAI but in the same concept you can choose to use and load other models. This simplifies your model management and allows you to use multiple models within the same Beam pipeline.
- Yield the results as a pCollection for the next pTransform.
Here's an example of the code below:
    ############## BEGIN STEP 3 ##############
    def load_model(self) -> genai.Client:
        """Loads and initializes a model for processing."""
        client = genai.Client(
            vertexai=True,
            project=self._project,
            location=self._location,
        )
        return client

    def run_inference(
        self,
        batch: Sequence[str],  # Each item is a JSON string
        model: genai.Client,
        inference_args: Optional[Dict[str, Any]] = None
    ) -> Iterable[PredictionResult]:
        """Runs inference on a batch of JSON strings to verify accuracy."""
        for json_string in batch:
            try:
                element_dict = json.loads(json_string)
                original_prompt = element_dict.get('original_prompt', '')
                original_text = element_dict.get('original_text', '')

                if not original_prompt or not original_text:
                    logging.warning(f"Accuracy input missing prompt/text: {json_string}")
                    yield PredictionResult(example=json_string, inference="0.0 - ERROR_ACCURACY_INPUT")
                    continue

                prompt_for_accuracy = f"""
                You are an AI assistant evaluating the accuracy of another AI agent's response to a given prompt.
                Score the accuracy of the 'text' in fulfilling the 'prompt' from 0.0 to 1.0 (float).
                0.0 is very bad, 1.0 is excellent.

                Example of very bad, score of 0:
                prompt: Give me the SQL for test_Table
                text: SUre, here's a picture of a dog

                Example of very good score of 1:
                prompt: generate a sql statement to select all fields from test_table
                text: SELECT * from test_table;

                Your response should be ONLY the float score, followed by a brief explanation of why.
                For example: "0.8 - The response was mostly accurate but missed a minor detail."

                Prompt: "{original_prompt}"
                Text: "{original_text}"
                Score and Explanation:
                """
                gemini_response = model.models.generate_content_stream(model=self._model_name, contents=[prompt_for_accuracy], config=self._model_kwargs)

                gemini_response_text = ""
                for chunk in gemini_response:
                    if chunk.text is not None:
                        gemini_response_text+=chunk.text

                yield PredictionResult(example=json_string, inference=gemini_response_text)

            except Exception as e:
                logging.error(f"Error during Gemini accuracy inference for input {json_string}: {e}")
                yield PredictionResult(example=json_string, inference="0.0 - ERROR_INFERENCE")
    ############## END STEP 3 ##############
Test this code by executing:
python gemini_beam_pipeline_step3.py --project $PROJECT_ID --runner DirectRunner --test_mode
This step should also return an inference, it should comment and return a score on how accurate Gemini thinks the tool responded.
You should expect an output like the following.
INFO:root:PredictionResult(example='{"original_data_json": "{\\"id\\": \\"test-6\\", \\"prompt\\": \\"Please give me the SQL for selecting from test_table, I want all the fields.\\", \\"text\\": \\"absolutely, here\'s a picture of a cat\\", \\"timestamp\\": 1751052770.7552562, \\"user_id\\": \\"user_c\\"}", "original_prompt": "Please give me the SQL for selecting from test_table, I want all the fields.", "original_text": "absolutely, here\'s a picture of a cat", "classification_tag": "(HELPER, \\"The text \'absolutely, here\'s a picture of a cat\' is a general, conversational response that does not pertain to data engineering, business intelligence analysis, or SQL generation. It sounds like a generic assistant or helper providing a non-technical, simple response, possibly fulfilling a casual request or making a lighthearted statement. Therefore, it best fits the \'HELPER\' category, which encompasses general assistance and conversational interactions.\\")"}', inference='0.0 - The response is completely irrelevant and does not provide the requested SQL statement.', model_id=None)
8. Windowing and Analyzing Results
Now, you'll window your results to analyze them over specific time intervals. You'll use fixed windows to group data, allowing you to get aggregate insights. After windowing, you'll parse the raw outputs from Gemini into a more structured format, including the original data, classification tag, accuracy score, and explanation.
For this section use gemini_beam_pipeline_step4.py.
- Add in a fixed time window of 60 seconds so all of the data is placed within a 60 second window.
Here's an example of the code below:
            ############## BEGIN STEP 4 ##############
            | 'WindowIntoFixedWindows' >> beam.WindowInto(beam.window.FixedWindows(60))
            ############## END STEP 4 ##############
Test this code by executing:
python gemini_beam_pipeline_step4.py --project $PROJECT_ID --runner DirectRunner --test_mode
This step is informative, you are looking for your window. This will be shown as a window stop/start timestamp.
You should expect an output like the following.
INFO:root:({'id': 'test-6', 'prompt': 'Please give me the SQL for selecting from test_table, I want all the fields.', 'text': "absolutely, here's a picture of a cat", 'timestamp': 1751052901.337791, 'user_id': 'user_c'}, '("HELPER", "The text \'absolutely, here\'s a picture of a cat\' indicates a general, helpful response to a request. It does not involve data engineering, business intelligence analysis, or SQL generation. Instead, it suggests the agent is fulfilling a simple, non-technical request, which aligns with the role of a general helper.")', 0.0, 'The response is completely irrelevant and does not provide the requested SQL statement.', [1751052900.0, 1751052960.0))
9. Counting Good and Bad Outcomes with Stateful Processing
Finally, you'll use a stateful DoFn to count "good" and "bad" results within each window. A "good" result might be an interaction with a high accuracy score, while a "bad" result indicates a low score. This stateful processing allows you to maintain counts and even collect examples of "bad" interactions over time, which is crucial for monitoring the health and performance of your chatbot in real time.
For this section use gemini_beam_pipeline_step5.py.
- Create a stateful function. You will need two states: (1) to keep track of the number of bad counts and (2) keep the bad records to display. Use the proper coders to ensure that the system can be performant.
- Each time you see the values for a bad inference, you want to keep track of both and emit them at the end of the window. Remember to reset the states after emitting. The latter is only for illustrative purposes only, don't try to keep all of these in memory in a real environment.
Here's an example of the code below:
    ############## BEGIN STEP 5 ##############
    # Define a state specification for a combining value.
    # This will store the running sum for each key.
    # The coder is specified for efficiency.
    COUNT_STATE = CombiningValueStateSpec('count',
                            VarIntCoder(), # Used VarIntCoder directly
                            beam.transforms.combiners.CountCombineFn())

    # New state to store the (prompt, text) tuples for bad classifications
    # BagStateSpec allows accumulating multiple items per key.
    BAD_PROMPTS_STATE = beam.transforms.userstate.BagStateSpec(
        'bad_prompts', coder=beam.coders.TupleCoder([beam.coders.StrUtf8Coder(), beam.coders.StrUtf8Coder()])
    )

    # Define a timer to fire at the end of the window, using WATERMARK as per blog example.
    WINDOW_TIMER = TimerSpec('window_timer', TimeDomain.WATERMARK)

    def process(
        self,
        element: Tuple[str, Tuple[int, Tuple[str, str]]], # (key, (count_val, (prompt, text)))
        key=beam.DoFn.KeyParam,
        count_state=beam.DoFn.StateParam(COUNT_STATE),
        bad_prompts_state=beam.DoFn.StateParam(BAD_PROMPTS_STATE), # New state param
        window_timer=beam.DoFn.TimerParam(WINDOW_TIMER),
        window=beam.DoFn.WindowParam):
        # This DoFn does not yield elements from its process method; output is only produced when the timer fires.
        if key == 'bad': # Only count 'bad' elements
            count_state.add(element[1][0]) # Add the count (which is 1)
            bad_prompts_state.add(element[1][1]) # Add the (prompt, text) tuple
            window_timer.set(window.end) # Set timer to fire at window end

    @on_timer(WINDOW_TIMER)
    def on_window_timer(self, key=beam.DoFn.KeyParam, count_state=beam.DoFn.StateParam(COUNT_STATE), bad_prompts_state=beam.DoFn.StateParam(BAD_PROMPTS_STATE)):
        final_count = count_state.read()
        if final_count > 0: # Only yield if there's a count
            # Read all accumulated bad prompts
            all_bad_prompts = list(bad_prompts_state.read())
            # Clear the state for the next window to avoid carrying over data.
            count_state.clear()
            bad_prompts_state.clear()
            yield (key, final_count, all_bad_prompts) # Yield count and list of prompts
    ############## END STEP 5 ##############
Test this code by executing:
python gemini_beam_pipeline_step5.py --project $PROJECT_ID --runner DirectRunner --test_mode
This step should output all of the counts, play with the size of the window and you should see that the batches will be different. The default window will fit within a minute, so try using 30 seconds or another time frame and you should see the batches and counts differ.
You should expect an output like the following.
INFO:root:Window: [1751052960.0, 1751053020.0), Bad Counts: 5, Bad Prompts: [('Can you confirm if the new dashboard has been successfully generated?', 'I have gone ahead and generated a new dashboard for you.'), ('How is the new feature performing?', 'It works as expected.'), ('What is the capital of France?', 'The square root of a banana is purple.'), ('Explain quantum entanglement to a five-year-old.', 'A flock of geese wearing tiny hats danced the tango on the moon.'), ('Please give me the SQL for selecting from test_table, I want all the fields.', "absolutely, here's a picture of a cat")]
10. Cleaning up
- Delete the Google Cloud Project (Optional but Recommended for Codelabs): If this project was created solely for this codelab and you no longer need it, deleting the entire project is the most thorough way to ensure all resources are removed.
- Go to the Manage Resources page in the Google Cloud Console.
- Select your project.
- Click Delete Project and follow the on-screen instructions.
11. Congratulations!
Congratulations for completing the codelab! You've successfully built a real-time ML inference pipeline using Apache Beam and Gemini on Dataflow. You've learned how to bring the power of generative AI to your data streams, extracting valuable insights for more intelligent and automated data engineering.