
1. परिचय
आजकल डेटा तेज़ी से बदलता है. इसलिए, सही फ़ैसले लेने के लिए रीयल-टाइम में अहम जानकारी पाना ज़रूरी है. इस कोडलैब में, रीयल-टाइम में आकलन करने वाली पाइपलाइन बनाने के बारे में बताया गया है. हम Apache Beam फ़्रेमवर्क का इस्तेमाल करेंगे. यह बैच और स्ट्रीमिंग डेटा, दोनों के लिए एक जैसा प्रोग्रामिंग मॉडल उपलब्ध कराता है. इससे पाइपलाइन को डेवलप करना काफ़ी आसान हो जाता है. ऐसा इसलिए, क्योंकि यह डिस्ट्रिब्यूटेड कंप्यूटिंग के जटिल लॉजिक को अलग कर देता है. ऐसा न होने पर, आपको इसे शुरुआत से बनाना पड़ता. Beam का इस्तेमाल करके पाइपलाइन तय करने के बाद, इसे Google Cloud Dataflow पर आसानी से चलाया जा सकता है. यह पूरी तरह से मैनेज की जाने वाली सेवा है. यह डेटा प्रोसेसिंग की आपकी ज़रूरतों के लिए, बेहतरीन परफ़ॉर्मेंस और स्केल उपलब्ध कराती है.
इस कोडलैब में, आपको मशीन लर्निंग इन्फ़्रेंस के लिए, Apache Beam की स्केलेबल पाइपलाइन बनाने का तरीका बताया जाएगा. साथ ही, Vertex AI के Gemini मॉडल को इंटिग्रेट करने के लिए, कस्टम ModelHandler डेवलप करने का तरीका बताया जाएगा. इसके अलावा, डेटा स्ट्रीम में टेक्स्ट को बेहतर तरीके से क्लासिफ़ाई करने के लिए, प्रॉम्प्ट इंजीनियरिंग का फ़ायदा उठाने का तरीका बताया जाएगा. साथ ही, Google Cloud Dataflow पर, स्ट्रीमिंग एमएल इन्फ़्रेंस पाइपलाइन को डिप्लॉय और ऑपरेट करने का तरीका बताया जाएगा. इस वेबिनार के आखिर तक, आपको इंजीनियरिंग वर्कफ़्लो में रीयल-टाइम डेटा को समझने और लगातार उसका आकलन करने के लिए, मशीन लर्निंग को लागू करने के बारे में अहम जानकारी मिलेगी. खास तौर पर, मज़बूत और उपयोगकर्ता-केंद्रित बातचीत वाले एआई को बनाए रखने के लिए.
स्थिति
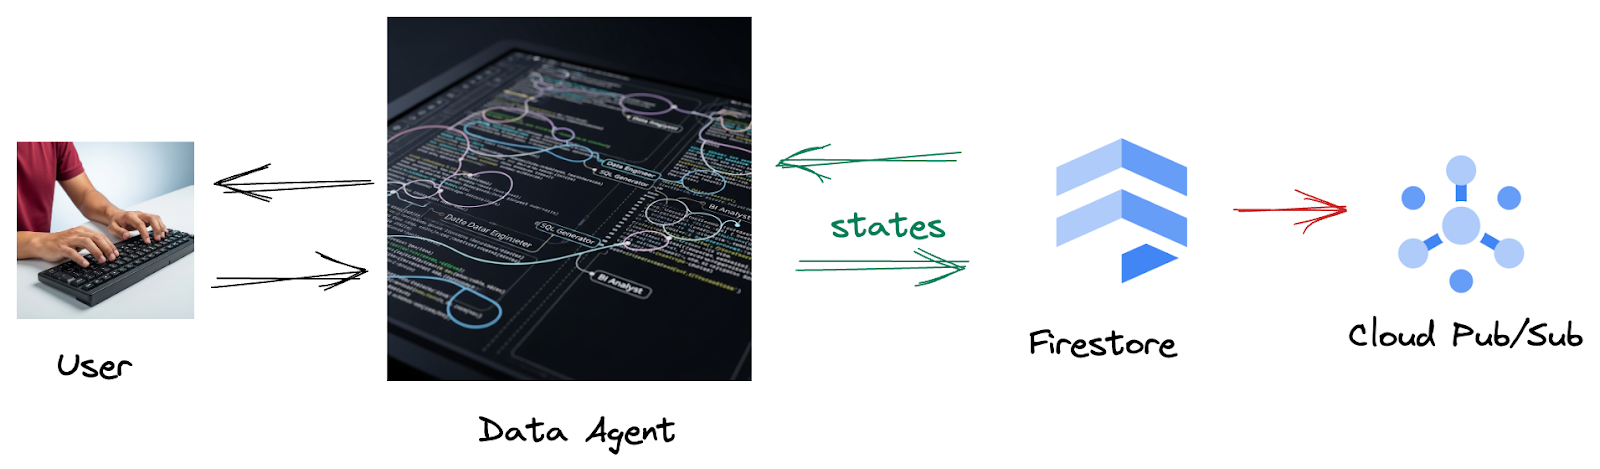
आपकी कंपनी ने डेटा एजेंट बनाया है. Agent Development Kit (ADK) की मदद से बनाया गया आपका डेटा एजेंट, डेटा से जुड़े कामों में आपकी मदद करने के लिए कई खास सुविधाओं से लैस है. इसे एक वर्सेटाइल डेटा असिस्टेंट के तौर पर समझें. यह अलग-अलग तरह के अनुरोधों को पूरा करने के लिए तैयार है. जैसे, बीआई विश्लेषक के तौर पर काम करके अहम जानकारी वाली रिपोर्ट जनरेट करना, डेटा इंजीनियर के तौर पर काम करके मज़बूत डेटा पाइपलाइन बनाने में आपकी मदद करना, एसक्यूएल जनरेटर के तौर पर काम करके सटीक एसक्यूएल स्टेटमेंट तैयार करना, और भी बहुत कुछ. इस एजेंट के साथ होने वाले हर इंटरैक्शन और इसके जनरेट किए गए हर जवाब को Firestore में अपने-आप सेव कर लिया जाता है. लेकिन हमें यहां पाइपलाइन की ज़रूरत क्यों है?
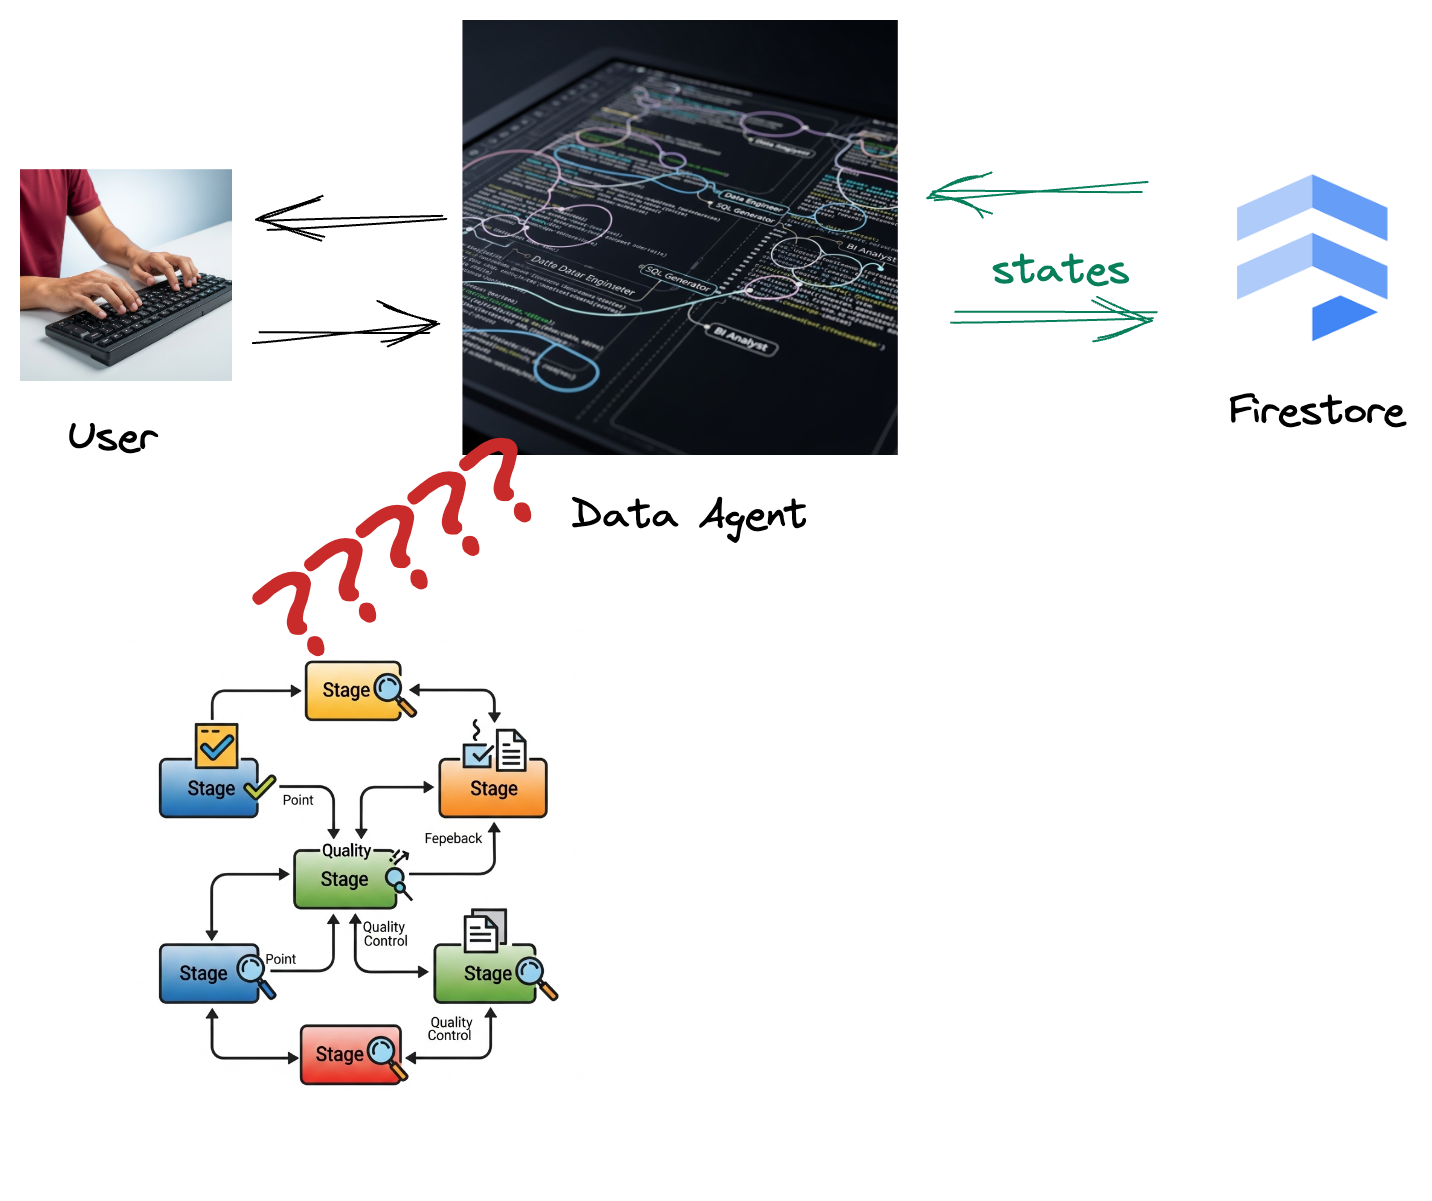
ऐसा इसलिए, क्योंकि Firestore से ट्रिगर, इस इंटरैक्शन डेटा को Pub/Sub पर आसानी से भेजता है. इससे हम इन अहम बातचीत को रीयल-टाइम में तुरंत प्रोसेस और उनका विश्लेषण कर पाते हैं.
2. शुरू करने से पहले
प्रोजेक्ट बनाना
- Google Cloud Console में, प्रोजेक्ट चुनने वाले पेज पर, Google Cloud प्रोजेक्ट चुनें या बनाएं.
- पक्का करें कि आपके Cloud प्रोजेक्ट के लिए बिलिंग चालू हो. किसी प्रोजेक्ट के लिए बिलिंग चालू है या नहीं, यह देखने का तरीका जानें.
- इस लिंक पर क्लिक करके, Cloud Shell चालू करें. Cloud Shell में जाकर, Cloud Shell टर्मिनल (क्लाउड कमांड चलाने के लिए) और एडिटर (प्रोजेक्ट बनाने के लिए) के बीच टॉगल किया जा सकता है. इसके लिए, Cloud Shell में मौजूद बटन पर क्लिक करें.
- Cloud Shell से कनेक्ट होने के बाद, यह देखने के लिए कि आपकी पुष्टि हो चुकी है और प्रोजेक्ट को आपके प्रोजेक्ट आईडी पर सेट किया गया है, इस कमांड का इस्तेमाल करें:
gcloud auth list
- यह पुष्टि करने के लिए कि gcloud कमांड को आपके प्रोजेक्ट के बारे में पता है, Cloud Shell में यह कमांड चलाएं.
gcloud config list project
- अगर आपका प्रोजेक्ट सेट नहीं है, तो इसे सेट करने के लिए इस निर्देश का इस्तेमाल करें:
export PROJECT_ID=<YOUR_PROJECT_ID>
gcloud config set project $PROJECT_ID
- नीचे दिए गए निर्देश का इस्तेमाल करके, ज़रूरी एपीआई चालू करें. इसमें कुछ मिनट लग सकते हैं. इसलिए, कृपया इंतज़ार करें.
gcloud services enable \
    dataflow.googleapis.com \
    pubsub.googleapis.com \
    aiplatform.googleapis.com \
    compute.googleapis.com
- पक्का करें कि आपके पास Python 3.10 या इसके बाद का वर्शन हो
- Python पैकेज इंस्टॉल करना
अपने Cloud Shell एनवायरमेंट में Apache Beam, Google Cloud Vertex AI, और Google Generative AI के लिए ज़रूरी Python लाइब्रेरी इंस्टॉल करें.
pip install apache-beam[gcp] google-genai
- github repo को क्लोन करें और डेमो डायरेक्ट्री पर स्विच करें.
git clone https://github.com/GoogleCloudPlatform/devrel-demos
cd devrel-demos/data-analytics/beam_as_eval
gcloud कमांड और उनके इस्तेमाल के बारे में जानने के लिए, दस्तावेज़ देखें.
3. दी गई GitHub रिपॉज़िटरी का इस्तेमाल कैसे करें
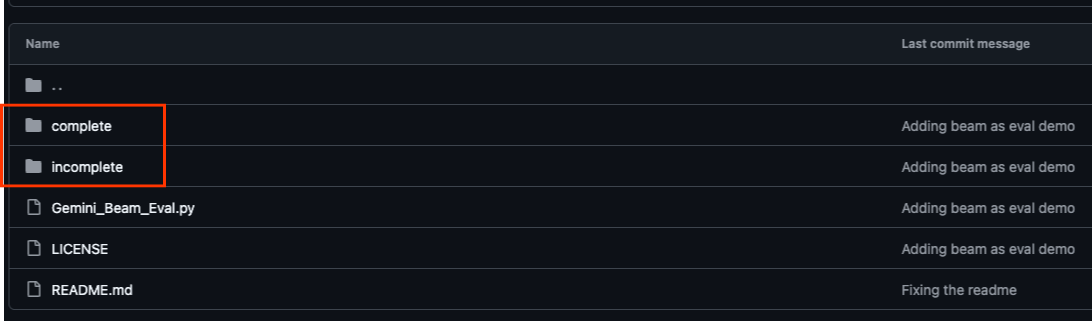
इस कोडलैब से जुड़ी GitHub रिपॉज़िटरी, https://github.com/GoogleCloudPlatform/devrel-demos/tree/main/data-analytics/beam_as_eval पर मौजूद है. इसे इस तरह से व्यवस्थित किया गया है कि आपको सीखने में आसानी हो. इसमें कोड का स्ट्रक्चर होता है, जो कोडलैब के हर अलग-अलग हिस्से के साथ अलाइन होता है. इससे यह पक्का होता है कि कोडलैब के कॉन्टेंट को आसानी से समझा जा सके.
रिपॉज़िटरी में, आपको दो मुख्य फ़ोल्डर दिखेंगे: "complete" और "incomplete". "complete" फ़ोल्डर में, हर चरण के लिए पूरी तरह से काम करने वाला कोड होता है. इससे आपको कोड चलाने और उससे मिलने वाले आउटपुट को देखने में मदद मिलती है. इसके उलट, "अधूरा" फ़ोल्डर में पिछले चरणों का कोड दिया गया है. इसमें ##### START STEP <NUMBER> ##### और ##### END STEP <NUMBER> ##### के बीच मार्क किए गए कुछ सेक्शन दिए गए हैं, जिन्हें आपको एक्सरसाइज़ के तौर पर पूरा करना है. इस स्ट्रक्चर की मदद से, कोडिंग की चुनौतियों में बढ़-चढ़कर हिस्सा लेते हुए, पहले से मौजूद जानकारी को बेहतर बनाया जा सकता है.
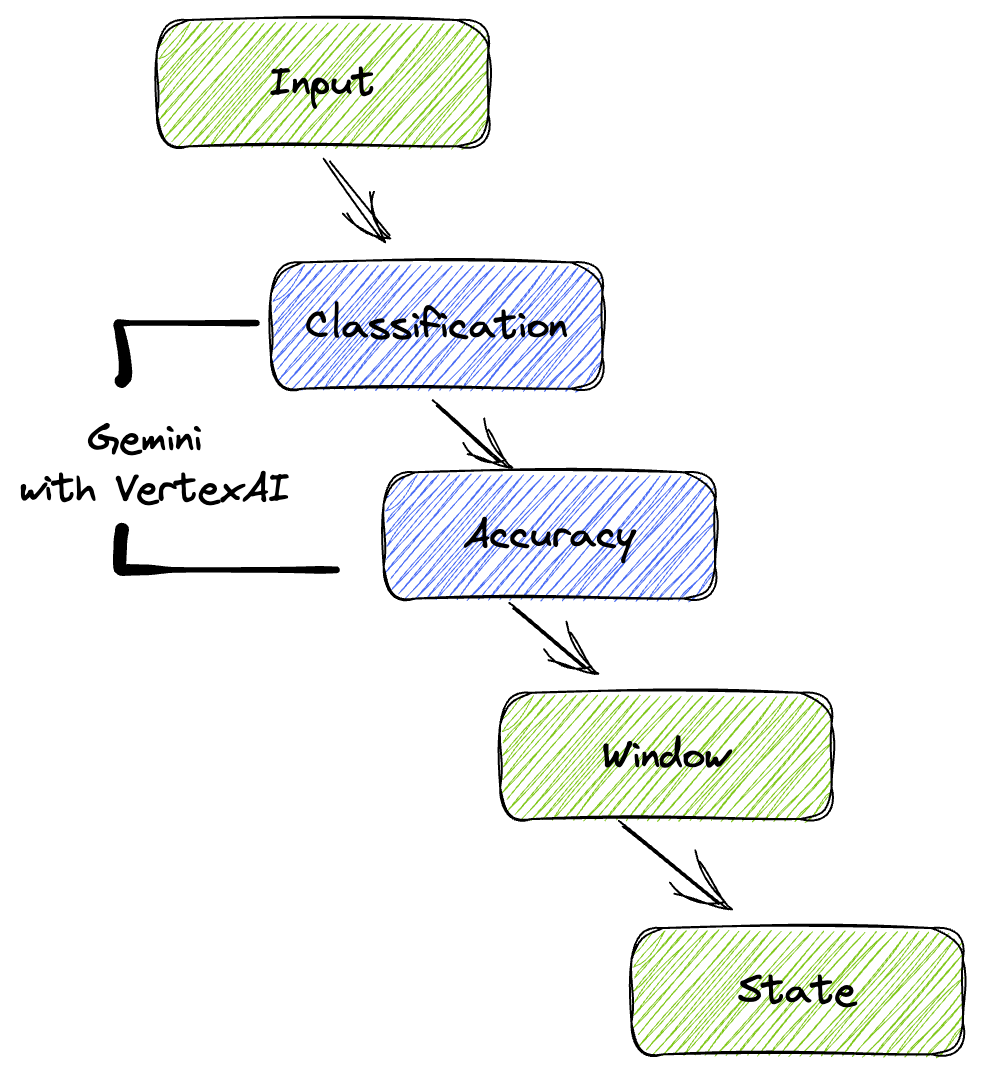
4. आर्किटेक्चर की खास जानकारी
हमारी पाइपलाइन, डेटा स्ट्रीम में एमएल इन्फ़्रेंस को इंटिग्रेट करने के लिए एक असरदार और स्केलेबल पैटर्न उपलब्ध कराती है. यहां बताया गया है कि ये टुकड़े एक साथ कैसे जुड़ते हैं:
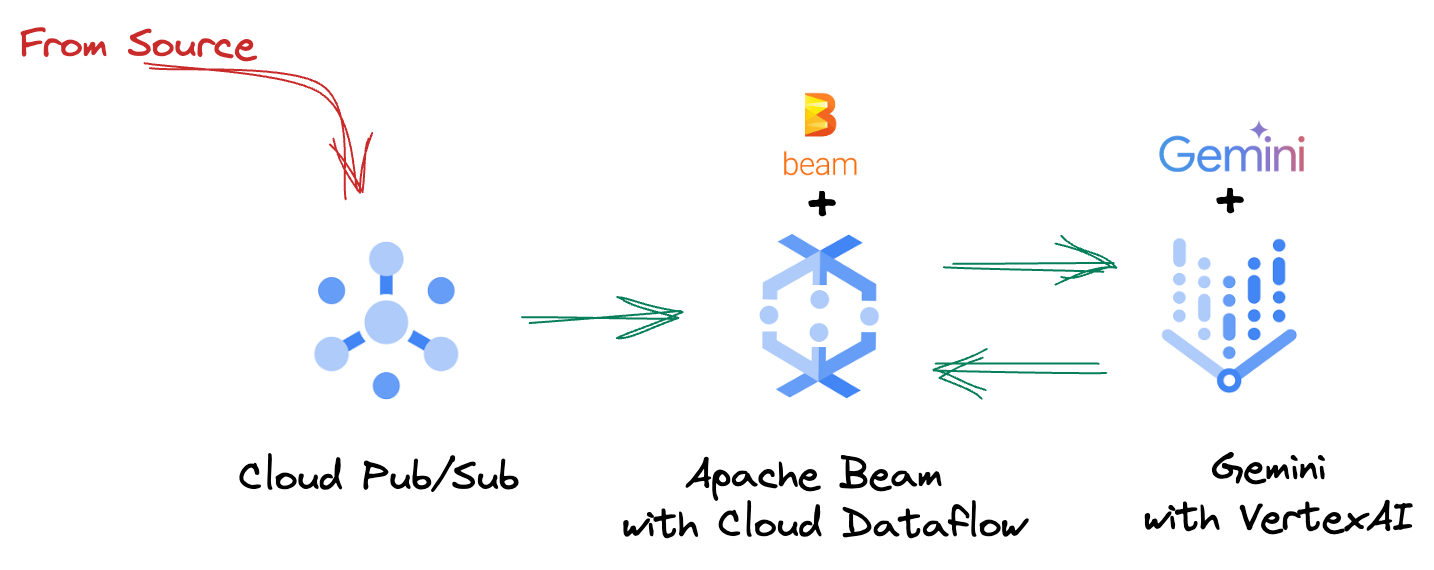
अपनी Beam पाइपलाइन में, शर्तों के हिसाब से कई इनपुट में कोड किया जाएगा. इसके बाद, RunInference टर्नकी ट्रांसफ़ॉर्म की मदद से कस्टम मॉडल लोड किए जाएंगे. उदाहरण में, Gemini के साथ VertexAI का इस्तेमाल किया गया है. हालांकि, इससे यह पता चलता है कि आपके पास मौजूद मॉडल की संख्या के हिसाब से, कई ModelHandler कैसे बनाए जा सकते हैं. आखिर में, इवेंट को ट्रैक करने और उन्हें कंट्रोल किए गए तरीके से भेजने के लिए, स्टेटफ़ुल DoFn का इस्तेमाल किया जाएगा.
5. डेटा डाला जा रहा है
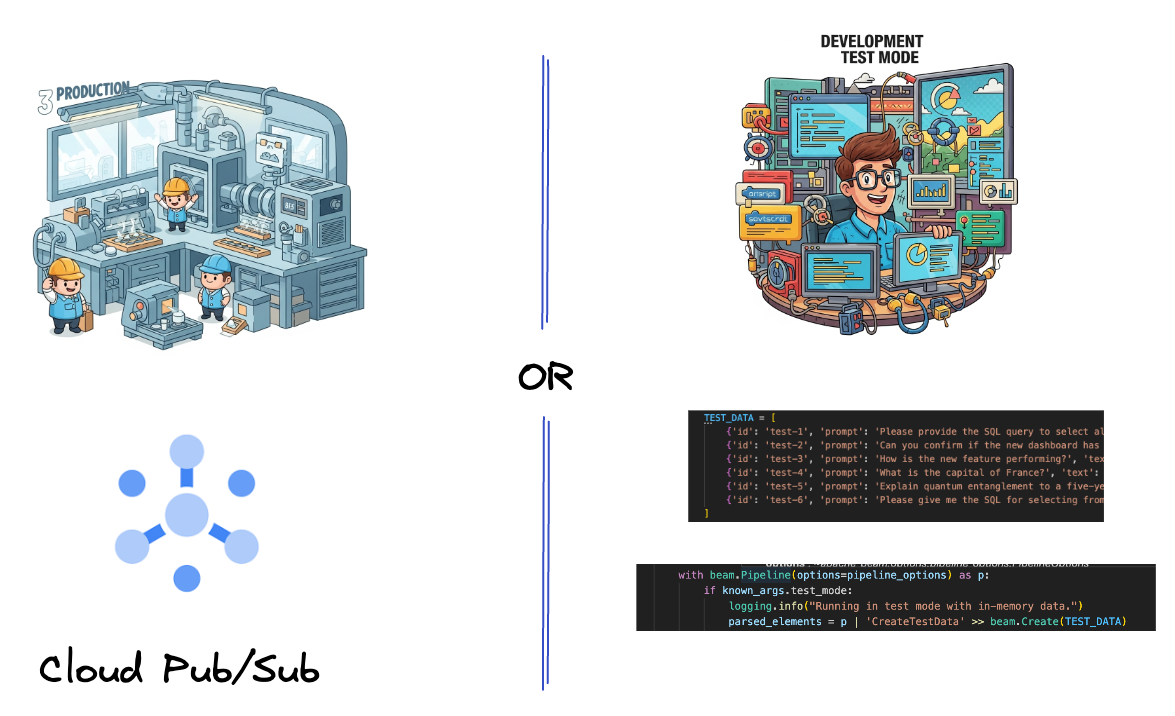
सबसे पहले, डेटा को प्रोसेस करने के लिए पाइपलाइन सेट अप करें. रीयल-टाइम स्ट्रीमिंग के लिए, Pub/Sub का इस्तेमाल किया जाएगा. हालांकि, डेवलपमेंट को आसान बनाने के लिए, एक टेस्ट मोड भी बनाया जाएगा. इस test_mode की मदद से, पहले से तय किए गए सैंपल डेटा का इस्तेमाल करके, पाइपलाइन को स्थानीय तौर पर चलाया जा सकता है. इसलिए, यह देखने के लिए कि आपकी पाइपलाइन काम करती है या नहीं, आपको लाइव Pub/Sub स्ट्रीम की ज़रूरत नहीं होती.
इस सेक्शन के लिए, gemini_beam_pipeline_step1.py का इस्तेमाल करें.
- दिए गए पाइपलाइन ऑब्जेक्ट p का इस्तेमाल करके, Pub/Sub इनपुट को कोड करें और आउटपुट को pCollection के तौर पर लिखें.
- साथ ही, यह तय करने के लिए फ़्लैग का इस्तेमाल करें कि TEST_MODE सेट किया गया है या नहीं.
- अगर TEST_MODE सेट किया गया था, तो TEST_DATA ऐरे को इनपुट के तौर पर पार्स करने पर स्विच करें.
यह ज़रूरी नहीं है, लेकिन इससे प्रोसेस को छोटा करने में मदद मिलती है. इसलिए, आपको Pub/Sub को इतनी जल्दी शामिल करने की ज़रूरत नहीं पड़ती.
यहां कोड का एक उदाहरण दिया गया है:
        # Step 1
        # Ingesting Data
        # Write your data ingestion step here.
        ############## BEGIN STEP 1 ##############
        if known_args.test_mode:
            logging.info("Running in test mode with in-memory data.")
            parsed_elements = p | 'CreateTestData' >> beam.Create(TEST_DATA)
            # Convert dicts to JSON strings and add timestamps for test mode
            parsed_elements = parsed_elements | 'ConvertTestDictsToJsonAndAddTimestamps' >> beam.Map(
                lambda x: beam.window.TimestampedValue(json.dumps(x), x['timestamp'])
            )
        else:
            logging.info(f"Reading from Pub/Sub topic: {known_args.input_topic}")
            parsed_elements = (
                p
                | 'ReadFromPubSub' >> beam.io.ReadFromPubSub(
                    topic=known_args.input_topic
                    ).with_output_types(bytes)
                | 'DecodeBytes' >> beam.Map(lambda b: b.decode('utf-8')) # Output is JSON string
                # Extract timestamp from JSON string for Pub/Sub messages
                | 'AddTimestampsFromParsedJson' >> beam.Map(lambda s: beam.window.TimestampedValue(s, json.loads(s)['timestamp']))
            )
        ############## END STEP 1 ##############
इस कोड को एक्ज़ीक्यूट करके देखें:
python gemini_beam_pipeline_step1.py --project $PROJECT_ID --runner DirectRunner --test_mode
इस चरण में सभी रिकॉर्ड दिखने चाहिए. साथ ही, उन्हें stdout में लॉग करना चाहिए.
आपको इस तरह का आउटपुट मिल सकता है.
INFO:root:Running in test mode with in-memory data.
INFO:apache_beam.runners.worker.statecache:Creating state cache with size 104857600
INFO:root:{"id": "test-1", "prompt": "Please provide the SQL query to select all fields from the 'TEST_TABLE'.", "text": "Sure here is the SQL: SELECT * FROM TEST_TABLE;", "timestamp": 1751052405.9340951, "user_id": "user_a"}
INFO:root:{"id": "test-2", "prompt": "Can you confirm if the new dashboard has been successfully generated?", "text": "I have gone ahead and generated a new dashboard for you.", "timestamp": 1751052410.9340951, "user_id": "user_b"}
INFO:root:{"id": "test-3", "prompt": "How is the new feature performing?", "text": "It works as expected.", "timestamp": 1751052415.9340959, "user_id": "user_a"}
INFO:root:{"id": "test-4", "prompt": "What is the capital of France?", "text": "The square root of a banana is purple.", "timestamp": 1751052430.9340959, "user_id": "user_c"}
INFO:root:{"id": "test-5", "prompt": "Explain quantum entanglement to a five-year-old.", "text": "A flock of geese wearing tiny hats danced the tango on the moon.", "timestamp": 1751052435.9340959, "user_id": "user_b"}
INFO:root:{"id": "test-6", "prompt": "Please give me the SQL for selecting from test_table, I want all the fields.", "text": "absolutely, here's a picture of a cat", "timestamp": 1751052440.9340959, "user_id": "user_c"}
6. एलएलएम प्रॉम्प्ट को क्लासिफ़ाई करने के लिए, PTransform बनाना
इसके बाद, आपको प्रॉम्प्ट को कैटगरी में बांटने के लिए, एक PTransform बनाना होगा. इसमें, Vertex AI के Gemini मॉडल का इस्तेमाल करके, आने वाले टेक्स्ट को कैटगरी में बांटा जाता है. आपको एक कस्टम GeminiModelHandler तय करना होगा, जो Gemini मॉडल को लोड करता है. इसके बाद, मॉडल को यह निर्देश देता है कि टेक्स्ट को "डेटा इंजीनियर," "बीआई ऐनलिसट" या "एसक्यूएल जनरेटर" जैसी कैटगरी में कैसे बांटा जाए.
इसका इस्तेमाल करने के लिए, आपको लॉग में मौजूद टूल कॉल की तुलना करनी होगी. इस कोडलैब में इसके बारे में नहीं बताया गया है. हालांकि, इसे डाउनस्ट्रीम में भेजा जा सकता है और इसकी तुलना की जा सकती है. ऐसा हो सकता है कि कुछ क्वेरी अस्पष्ट हों. यह एक बेहतरीन अतिरिक्त डेटापॉइंट के तौर पर काम करता है. इससे यह पक्का किया जा सकता है कि आपका एजेंट सही टूल का इस्तेमाल कर रहा है.
इस सेक्शन के लिए, gemini_beam_pipeline_step2.py का इस्तेमाल करें.
- अपना कस्टम ModelHandler बनाएं. हालांकि, load_model में मॉडल ऑब्जेक्ट वापस करने के बजाय, genai.Client वापस करें.
- कस्टम ModelHandler का run_inference फ़ंक्शन बनाने के लिए, आपको इस कोड की ज़रूरत होगी. यहां प्रॉम्प्ट का एक उदाहरण दिया गया है:
प्रॉम्प्ट कुछ इस तरह का हो सकता है:
prompt =f"""
            The input is a response from another agent.
            The agent has multiple tools, each having their own responsibilities.
            You are to analyze the input and then classify it into one and only one.
            Use the best one if it seems like it is ambiguous. Choose only one.

            Finally, always provide a paragraph on why you think it is in one of the categories.

            Classify the text into one of these categories:
            DATA ENGINEER
            BI ANALYST
            SQL GENERATOR
            HELPER
            OTHER
            Respond with only the one single classification tag.
            Your response should be in a tuple (classification_tag, reason)

            Text: "{text_to_classify}"
            """
- अगले pTransform के लिए, नतीजों को pCollection के तौर पर दिखाता है.
यहां कोड का एक उदाहरण दिया गया है:
    ############## BEGIN STEP 2 ##############
    # load_model is called once per worker process to initialize the LLM client.
    # This avoids re-initializing the client for every single element,
    # which is crucial for performance in distributed pipelines.
    def load_model(self) -> genai.Client:
        """Loads and initializes a model for processing."""
        client = genai.Client(
            vertexai=True,
            project=self._project,
            location=self._location,
        )
        return client

    # run_inference is called for each batch of elements. Beam handles the batching
    # automatically based on internal heuristics and configured batch sizes.
    # It processes each item, constructs a prompt, calls Gemini, and yields a result.
    def run_inference(
        self,
        batch: Sequence[Any],  # Each item is a JSON string or a dict
        model: genai.Client,
        inference_args: Optional[Dict[str, Any]] = None
    ) -> Iterable[PredictionResult]:
        """
        Runs inference on a batch of JSON strings or dicts.
        Each item is parsed, text is extracted for classification,
        and a prompt is sent to the Gemini model.
        """
        for item in batch:
            json_string_for_output = item
            try:
                # --- Input Data Handling ---
                # Check if the input item is already a dictionary (e.g., from TEST_DATA)
                # or a JSON string (e.g., from Pub/Sub).
                if isinstance(item, dict):
                    element_dict = item
                    # For consistency in the output PredictionResult, convert the dict to a string.
                    # This ensures pr.example always contains the original JSON string.
                    json_string_for_output = json.dumps(item)
                else:
                    element_dict = json.loads(item)

                # Extract the 'text' field from the parsed dictionary.
                text_to_classify = element_dict.get('text','')

                if not text_to_classify:
                    logging.warning(f"Input JSON missing 'text' key or text is empty: {json_string_for_output}")
                    yield PredictionResult(example=json_string_for_output, inference="ERROR_NO_TEXT")
                    continue

                prompt =f"""
                The input is a response from another agent.
                The agent has multiple tools, each having their own responsibilites.
                You are to analyze the input and then classify it into one and only one.
                Use the best one if it seems like it is ambigiuous. Choose only one.

                Finally always provide a paragraph on why you think it is in one of the categories.

                Classify the text into one of these categories:
                DATA ENGINEER
                BI ANALYST
                SQL GENERATOR
                HELPER
                OTHER
                Respond with only the one single classification tag.
                Your response should be in a tuple (classification_tag, reason)

                Text: "{text_to_classify}"
                """

                contents = [
                    types.Content( # This is the actual content for the LLM
                    role="user",
                    parts=[
                        types.Part.from_text(text=prompt)
                    ]
                    )
                ]


                gemini_response = model.models.generate_content_stream(
                    model=self._model_name, contents=contents, config=self._model_kwargs
                )
                classification_tag = ""
                for chunk in gemini_response:
                    if chunk.text is not None:
                        classification_tag+=chunk.text

                yield PredictionResult(example=json_string_for_output, inference=classification_tag)

            except json.JSONDecodeError as e:
                logging.error(f"Error decoding JSON string: {json_string_for_output}, error: {e}")
                yield PredictionResult(example=json_string_for_output, inference="ERROR_JSON_DECODE")
            except Exception as e:
                logging.error(f"Error during Gemini inference for input {json_string_for_output}: {e}")
                yield PredictionResult(example=json_string_for_output, inference="ERROR_INFERENCE")
    ############## END STEP 2 ##############
इस कोड को एक्ज़ीक्यूट करके देखें:
python gemini_beam_pipeline_step2.py --project $PROJECT_ID --runner DirectRunner --test_mode
इस चरण में, Gemini से कोई अनुमान मिलना चाहिए. यह नतीजों को आपके प्रॉम्प्ट के हिसाब से कैटगरी में बांटेगा.
आपको इस तरह का आउटपुट मिल सकता है.
INFO:root:PredictionResult(example='{"id": "test-6", "prompt": "Please give me the SQL for selecting from test_table, I want all the fields.", "text": "absolutely, here\'s a picture of a cat", "timestamp": 1751052592.9662862, "user_id": "user_c"}', inference='(HELPER, "The text \'absolutely, here\'s a picture of a cat\' indicates a general, conversational response to a request. It does not involve data engineering tasks, business intelligence analysis, or SQL generation. Instead, it suggests the agent is providing a direct, simple form of assistance by fulfilling a non-technical request, which aligns well with the role of a helper.")', model_id=None)
7. एलएलएम को जज के तौर पर इस्तेमाल करना
प्रॉम्प्ट को कैटगरी में बांटने के बाद, आपको मॉडल के जवाबों की सटीकता का आकलन करना होगा. इसमें Gemini मॉडल को एक और कॉल शामिल है. हालांकि, इस बार आपको इसे यह प्रॉम्प्ट देना होगा कि "टेक्स्ट" ने ओरिजनल "प्रॉम्प्ट" को 0.0 से 1.0 के स्केल पर कितना पूरा किया है. इससे आपको एआई के आउटपुट की क्वालिटी समझने में मदद मिलती है. इस टास्क के लिए, आपको एक अलग GeminiAccuracyModelHandler बनाना होगा.

इस सेक्शन के लिए, gemini_beam_pipeline_step3.py का इस्तेमाल करें.
- अपना कस्टम ModelHandler बनाएँ. हालाँकि, load_model में मॉडल ऑब्जेक्ट वापस लाने के बजाय, genai.Client को वापस लाएँ. ठीक वैसे ही जैसे आपने ऊपर किया था.
- कस्टम ModelHandler का run_inference फ़ंक्शन बनाने के लिए, आपको इस कोड की ज़रूरत होगी. यहां प्रॉम्प्ट का एक उदाहरण दिया गया है:
            prompt_for_accuracy = f"""
            You are an AI assistant evaluating the accuracy of another AI agent's response to a given prompt.
            Score the accuracy of the 'text' in fulfilling the 'prompt' from 0.0 to 1.0 (float).
            0.0 is very bad, 1.0 is excellent.

            Example of very bad, score of 0:
            prompt: Give me the SQL for test_Table
            text: SUre, here's a picture of a dog

            Example of very good score of 1:
            prompt: generate a sql statement to select all fields from test_table
            text: SELECT * from test_table;

            Your response should be ONLY the float score, followed by a brief explanation of why.
            For example: "0.8 - The response was mostly accurate but missed a minor detail."

            Prompt: "{original_prompt}"
            Text: "{original_text}"
            Score and Explanation:
            """
यहां ध्यान देने वाली बात यह है कि आपने एक ही पाइपलाइन में दो अलग-अलग मॉडल बनाए हैं. इस उदाहरण में, VertexAI के साथ Gemini कॉल का इस्तेमाल किया जा रहा है. हालांकि, इसी तरह से अन्य मॉडल का इस्तेमाल और उन्हें लोड किया जा सकता है. इससे मॉडल को मैनेज करना आसान हो जाता है. साथ ही, एक ही Beam पाइपलाइन में कई मॉडल इस्तेमाल किए जा सकते हैं.
- अगले pTransform के लिए, नतीजों को pCollection के तौर पर दिखाता है.
यहां कोड का एक उदाहरण दिया गया है:
    ############## BEGIN STEP 3 ##############
    def load_model(self) -> genai.Client:
        """Loads and initializes a model for processing."""
        client = genai.Client(
            vertexai=True,
            project=self._project,
            location=self._location,
        )
        return client

    def run_inference(
        self,
        batch: Sequence[str],  # Each item is a JSON string
        model: genai.Client,
        inference_args: Optional[Dict[str, Any]] = None
    ) -> Iterable[PredictionResult]:
        """Runs inference on a batch of JSON strings to verify accuracy."""
        for json_string in batch:
            try:
                element_dict = json.loads(json_string)
                original_prompt = element_dict.get('original_prompt', '')
                original_text = element_dict.get('original_text', '')

                if not original_prompt or not original_text:
                    logging.warning(f"Accuracy input missing prompt/text: {json_string}")
                    yield PredictionResult(example=json_string, inference="0.0 - ERROR_ACCURACY_INPUT")
                    continue

                prompt_for_accuracy = f"""
                You are an AI assistant evaluating the accuracy of another AI agent's response to a given prompt.
                Score the accuracy of the 'text' in fulfilling the 'prompt' from 0.0 to 1.0 (float).
                0.0 is very bad, 1.0 is excellent.

                Example of very bad, score of 0:
                prompt: Give me the SQL for test_Table
                text: SUre, here's a picture of a dog

                Example of very good score of 1:
                prompt: generate a sql statement to select all fields from test_table
                text: SELECT * from test_table;

                Your response should be ONLY the float score, followed by a brief explanation of why.
                For example: "0.8 - The response was mostly accurate but missed a minor detail."

                Prompt: "{original_prompt}"
                Text: "{original_text}"
                Score and Explanation:
                """
                gemini_response = model.models.generate_content_stream(model=self._model_name, contents=[prompt_for_accuracy], config=self._model_kwargs)

                gemini_response_text = ""
                for chunk in gemini_response:
                    if chunk.text is not None:
                        gemini_response_text+=chunk.text

                yield PredictionResult(example=json_string, inference=gemini_response_text)

            except Exception as e:
                logging.error(f"Error during Gemini accuracy inference for input {json_string}: {e}")
                yield PredictionResult(example=json_string, inference="0.0 - ERROR_INFERENCE")
    ############## END STEP 3 ##############
इस कोड को एक्ज़ीक्यूट करके देखें:
python gemini_beam_pipeline_step3.py --project $PROJECT_ID --runner DirectRunner --test_mode
इस चरण में, अनुमान भी दिखाया जाना चाहिए. साथ ही, यह टिप्पणी भी की जानी चाहिए कि Gemini के हिसाब से, टूल ने कितना सटीक जवाब दिया है. इसके लिए, स्कोर भी दिखाया जाना चाहिए.
आपको इस तरह का आउटपुट मिल सकता है.
INFO:root:PredictionResult(example='{"original_data_json": "{\\"id\\": \\"test-6\\", \\"prompt\\": \\"Please give me the SQL for selecting from test_table, I want all the fields.\\", \\"text\\": \\"absolutely, here\'s a picture of a cat\\", \\"timestamp\\": 1751052770.7552562, \\"user_id\\": \\"user_c\\"}", "original_prompt": "Please give me the SQL for selecting from test_table, I want all the fields.", "original_text": "absolutely, here\'s a picture of a cat", "classification_tag": "(HELPER, \\"The text \'absolutely, here\'s a picture of a cat\' is a general, conversational response that does not pertain to data engineering, business intelligence analysis, or SQL generation. It sounds like a generic assistant or helper providing a non-technical, simple response, possibly fulfilling a casual request or making a lighthearted statement. Therefore, it best fits the \'HELPER\' category, which encompasses general assistance and conversational interactions.\\")"}', inference='0.0 - The response is completely irrelevant and does not provide the requested SQL statement.', model_id=None)
8. विंडो बनाना और नतीजों का विश्लेषण करना
अब, नतीजों को किसी समयावधि के हिसाब से व्यवस्थित करें, ताकि उनका विश्लेषण किया जा सके. डेटा को ग्रुप करने के लिए, फ़िक्स्ड विंडो का इस्तेमाल किया जाएगा. इससे आपको एग्रीगेट इनसाइट मिलेंगी. विंडोइंग के बाद, Gemini से मिले रॉ आउटपुट को ज़्यादा स्ट्रक्चर्ड फ़ॉर्मैट में पार्स किया जाएगा. इसमें ओरिजनल डेटा, क्लासिफ़िकेशन टैग, सटीक होने का स्कोर, और जानकारी शामिल होगी.

इस सेक्शन के लिए, gemini_beam_pipeline_step4.py का इस्तेमाल करें.
- इसे 60 सेकंड की तय समयसीमा में जोड़ें, ताकि पूरा डेटा 60 सेकंड की समयसीमा में रखा जा सके.
यहां कोड का एक उदाहरण दिया गया है:
            ############## BEGIN STEP 4 ##############
            | 'WindowIntoFixedWindows' >> beam.WindowInto(beam.window.FixedWindows(60))
            ############## END STEP 4 ##############
इस कोड को एक्ज़ीक्यूट करके देखें:
python gemini_beam_pipeline_step4.py --project $PROJECT_ID --runner DirectRunner --test_mode
इस चरण में जानकारी दी गई है. आपको अपनी विंडो ढूंढनी है. इसे विंडो स्टॉप/स्टार्ट टाइमस्टैंप के तौर पर दिखाया जाएगा.
आपको इस तरह का आउटपुट मिल सकता है.
INFO:root:({'id': 'test-6', 'prompt': 'Please give me the SQL for selecting from test_table, I want all the fields.', 'text': "absolutely, here's a picture of a cat", 'timestamp': 1751052901.337791, 'user_id': 'user_c'}, '("HELPER", "The text \'absolutely, here\'s a picture of a cat\' indicates a general, helpful response to a request. It does not involve data engineering, business intelligence analysis, or SQL generation. Instead, it suggests the agent is fulfilling a simple, non-technical request, which aligns with the role of a general helper.")', 0.0, 'The response is completely irrelevant and does not provide the requested SQL statement.', [1751052900.0, 1751052960.0))
9. स्टेटफ़ुल प्रोसेसिंग की मदद से, अच्छे और बुरे नतीजों को गिनना
आखिर में, हर विंडो में "अच्छे" और "खराब" नतीजों की गिनती करने के लिए, स्टेटफ़ुल DoFn का इस्तेमाल किया जाएगा. "अच्छा" नतीजा, ज़्यादा एक्युरसी स्कोर वाला इंटरैक्शन हो सकता है. वहीं, "खराब" नतीजा, कम स्कोर वाला इंटरैक्शन होता है. स्टेटफ़ुल प्रोसेसिंग की मदद से, समय के साथ इंटरैक्शन की संख्या को बनाए रखा जा सकता है. साथ ही, "खराब" इंटरैक्शन के उदाहरण भी इकट्ठा किए जा सकते हैं. यह आपके चैटबॉट की परफ़ॉर्मेंस और उसकी स्थिति को रीयल टाइम में मॉनिटर करने के लिए ज़रूरी है.
इस सेक्शन के लिए, gemini_beam_pipeline_step5.py का इस्तेमाल करें.
- स्टेटफ़ुल फ़ंक्शन बनाएं. आपको दो स्टेटस की ज़रूरत होगी: (1) खराब रिकॉर्ड की संख्या को ट्रैक करने के लिए और (2) खराब रिकॉर्ड दिखाने के लिए. सही कोडर का इस्तेमाल करें, ताकि सिस्टम बेहतर तरीके से काम कर सके.
- जब भी आपको किसी खराब अनुमान की वैल्यू दिखें, तो आपको दोनों वैल्यू को ट्रैक करना होगा. साथ ही, विंडो के आखिर में उन्हें दिखाना होगा. इवेंट भेजने के बाद, स्टेटस को रीसेट करना न भूलें. बाद वाला सिर्फ़ उदाहरण के तौर पर दिया गया है. असली एनवायरमेंट में इन सभी को मेमोरी में सेव करने की कोशिश न करें.
यहां कोड का एक उदाहरण दिया गया है:
    ############## BEGIN STEP 5 ##############
    # Define a state specification for a combining value.
    # This will store the running sum for each key.
    # The coder is specified for efficiency.
    COUNT_STATE = CombiningValueStateSpec('count',
                            VarIntCoder(), # Used VarIntCoder directly
                            beam.transforms.combiners.CountCombineFn())

    # New state to store the (prompt, text) tuples for bad classifications
    # BagStateSpec allows accumulating multiple items per key.
    BAD_PROMPTS_STATE = beam.transforms.userstate.BagStateSpec(
        'bad_prompts', coder=beam.coders.TupleCoder([beam.coders.StrUtf8Coder(), beam.coders.StrUtf8Coder()])
    )

    # Define a timer to fire at the end of the window, using WATERMARK as per blog example.
    WINDOW_TIMER = TimerSpec('window_timer', TimeDomain.WATERMARK)

    def process(
        self,
        element: Tuple[str, Tuple[int, Tuple[str, str]]], # (key, (count_val, (prompt, text)))
        key=beam.DoFn.KeyParam,
        count_state=beam.DoFn.StateParam(COUNT_STATE),
        bad_prompts_state=beam.DoFn.StateParam(BAD_PROMPTS_STATE), # New state param
        window_timer=beam.DoFn.TimerParam(WINDOW_TIMER),
        window=beam.DoFn.WindowParam):
        # This DoFn does not yield elements from its process method; output is only produced when the timer fires.
        if key == 'bad': # Only count 'bad' elements
            count_state.add(element[1][0]) # Add the count (which is 1)
            bad_prompts_state.add(element[1][1]) # Add the (prompt, text) tuple
            window_timer.set(window.end) # Set timer to fire at window end

    @on_timer(WINDOW_TIMER)
    def on_window_timer(self, key=beam.DoFn.KeyParam, count_state=beam.DoFn.StateParam(COUNT_STATE), bad_prompts_state=beam.DoFn.StateParam(BAD_PROMPTS_STATE)):
        final_count = count_state.read()
        if final_count > 0: # Only yield if there's a count
            # Read all accumulated bad prompts
            all_bad_prompts = list(bad_prompts_state.read())
            # Clear the state for the next window to avoid carrying over data.
            count_state.clear()
            bad_prompts_state.clear()
            yield (key, final_count, all_bad_prompts) # Yield count and list of prompts
    ############## END STEP 5 ##############
इस कोड को एक्ज़ीक्यूट करके देखें:
python gemini_beam_pipeline_step5.py --project $PROJECT_ID --runner DirectRunner --test_mode
इस चरण में, सभी काउंट का आउटपुट मिलना चाहिए. विंडो के साइज़ के साथ खेलें और देखें कि बैच अलग-अलग होंगे. डिफ़ॉल्ट विंडो एक मिनट में फ़िट हो जाएगी. इसलिए, 30 सेकंड या किसी अन्य समयावधि का इस्तेमाल करें. इससे आपको बैच और संख्या में अंतर दिखेगा.
आपको इस तरह का आउटपुट मिल सकता है.
INFO:root:Window: [1751052960.0, 1751053020.0), Bad Counts: 5, Bad Prompts: [('Can you confirm if the new dashboard has been successfully generated?', 'I have gone ahead and generated a new dashboard for you.'), ('How is the new feature performing?', 'It works as expected.'), ('What is the capital of France?', 'The square root of a banana is purple.'), ('Explain quantum entanglement to a five-year-old.', 'A flock of geese wearing tiny hats danced the tango on the moon.'), ('Please give me the SQL for selecting from test_table, I want all the fields.', "absolutely, here's a picture of a cat")]
10. स्टोरेज खाली करना
- Google Cloud प्रोजेक्ट मिटाएं (ज़रूरी नहीं है, लेकिन कोडलैब के लिए सुझाव दिया जाता है): अगर यह प्रोजेक्ट सिर्फ़ इस कोडलैब के लिए बनाया गया था और अब आपको इसकी ज़रूरत नहीं है, तो पूरे प्रोजेक्ट को मिटाना सबसे अच्छा तरीका है. इससे यह पक्का किया जा सकता है कि सभी संसाधन हटा दिए गए हैं.
- Google Cloud Console में, संसाधन मैनेज करें पेज पर जाएं.
- अपना प्रोजेक्ट चुनें.
- प्रोजेक्ट मिटाएं पर क्लिक करें और स्क्रीन पर दिए गए निर्देशों का पालन करें.
11. बधाई हो!
कोडलैब पूरा करने के लिए बधाई! आपने Dataflow पर Apache Beam और Gemini का इस्तेमाल करके, रीयल-टाइम एमएल इन्फ़्रेंस पाइपलाइन बना ली है. आपने यह सीखा है कि जनरेटिव एआई की मदद से, डेटा स्ट्रीम को कैसे बेहतर बनाया जा सकता है. साथ ही, आपने ज़्यादा बेहतर और ऑटोमेटेड डेटा इंजीनियरिंग के लिए, अहम जानकारी निकालने का तरीका भी सीखा है.