
1. Introduzione
In questo codelab imparerai a creare agenti in grado di rispondere a domande sui dati archiviati in BigQuery utilizzando Agent Development Kit (ADK). Valuterai anche questi agenti utilizzando GenAI Evaluation service di Vertex AI:

Attività previste
- Crea un agente di analisi conversazionale in ADK
- Dota questo agente del set di strumenti proprietari di ADK per BigQuery in modo che possa interagire con i dati archiviati in BigQuery
- Crea un framework di valutazione per il tuo agente utilizzando Vertex AI GenAI Evaluation service
- Esegui valutazioni su questo agente rispetto a un insieme di risposte di riferimento
Che cosa ti serve
- Un browser web come Chrome
- Un progetto Google Cloud con la fatturazione abilitata oppure
- Un account Gmail. La sezione successiva ti mostrerà come riscattare un credito senza costi di 5 $per questo codelab e configurare un nuovo progetto.
Questo codelab è rivolto a sviluppatori di tutti i livelli, inclusi i principianti. Utilizzerai l'interfaccia a riga di comando in Google Cloud Shell e il codice Python per lo sviluppo dell'ADK. Non è necessario essere esperti di Python, ma una conoscenza di base della lettura del codice ti aiuterà a comprendere i concetti.
2. Prima di iniziare
Crea un progetto Google Cloud
- Nella console Google Cloud, nella pagina di selezione del progetto, seleziona o crea un progetto Google Cloud.
- Verifica che la fatturazione sia attivata per il tuo progetto Cloud. Scopri come verificare se la fatturazione è abilitata per un progetto.
Avvia Cloud Shell
Cloud Shell è un ambiente a riga di comando in esecuzione in Google Cloud che viene precaricato con gli strumenti necessari.
- Fai clic su Attiva Cloud Shell nella parte superiore della console Google Cloud:

- Una volta connesso a Cloud Shell, esegui questo comando per verificare l'autenticazione in Cloud Shell:
gcloud auth list
- Esegui questo comando per verificare che il progetto sia configurato per l'utilizzo con gcloud:
gcloud config list project
- Utilizza il seguente comando per impostare il progetto:
export PROJECT_ID=<YOUR_PROJECT_ID>
gcloud config set project $PROJECT_ID
Abilita API
- Esegui questo comando per abilitare tutte le API e i servizi richiesti:
gcloud services enable bigquery.googleapis.com \
                       aiplatform.googleapis.com \
                       cloudresourcemanager.googleapis.com
- Se il comando viene eseguito correttamente, dovresti visualizzare un messaggio simile a quello mostrato di seguito:
Operation "operations/..." finished successfully.
3. Crea un set di dati BigQuery
- Esegui il comando seguente in Cloud Shell per creare un nuovo set di dati denominato ecommerce in BigQuery:
bq mk --dataset --location=US ecommerce
Un sottoinsieme statico del set di dati pubblici BigQuery thelook_ecommerce viene salvato come file AVRO in un bucket Google Cloud Storage pubblico.
- Esegui questo comando in Cloud Shell per caricare questi file Avro in BigQuery come tabelle (events, order_items, products, users, orders):
bq load --source_format=AVRO --autodetect \
    ecommerce.events \
  gs://sample-data-and-media/thelook_dataset_snapshot/events/*.avro.gz

bq load --source_format=AVRO --autodetect \
    ecommerce.order_items \
    gs://sample-data-and-media/thelook_dataset_snapshot/order_items/*.avro.gz

bq load --source_format=AVRO --autodetect \
    ecommerce.products \
    gs://sample-data-and-media/thelook_dataset_snapshot/products/*.avro.gz

bq load --source_format=AVRO --autodetect \
    ecommerce.users \
    gs://sample-data-and-media/thelook_dataset_snapshot/users/*.avro.gz

bq load --source_format=AVRO --autodetect \
    ecommerce.orders \
gs://sample-data-and-media/thelook_dataset_snapshot/orders/*.avro.gz
bq load --source_format=AVRO --autodetect \
    ecommerce.inventory_items \
    gs://sample-data-and-media/thelook_dataset_snapshot/inventory_items/*.avro.gz
bq load --source_format=AVRO --autodetect \
    ecommerce.distribution_centers \
    gs://sample-data-and-media/thelook_dataset_snapshot/distribution_centers/*.avro.gz
L'operazione potrebbe richiedere alcuni minuti.
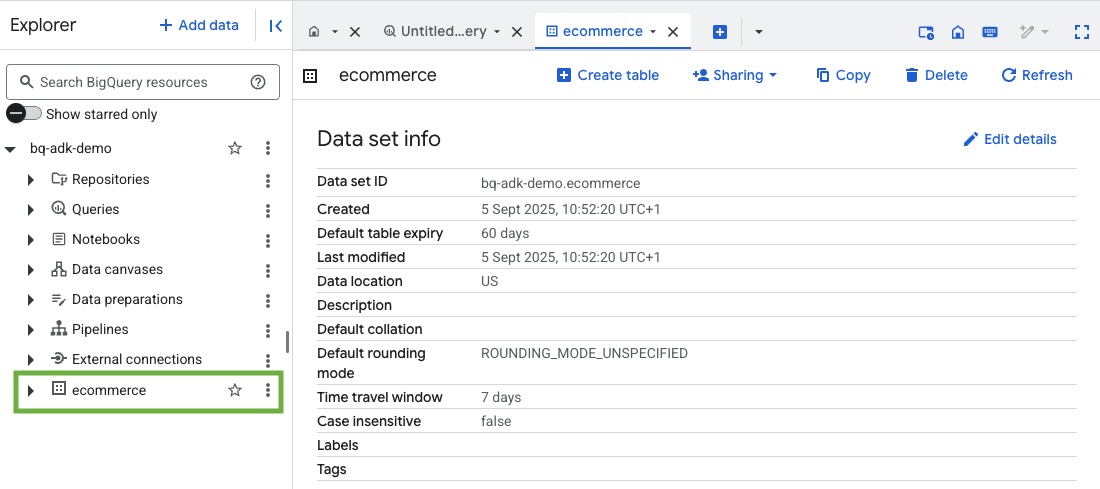
- Verifica che il set di dati e le tabelle siano stati creati visitando la console BigQuery nel tuo progetto Google Cloud:
4. Prepara l'ambiente per gli agenti ADK
Torna a Cloud Shell e assicurati di trovarti nella tua home directory. Creeremo un ambiente Python virtuale e installeremo i pacchetti richiesti.
- Apri una nuova scheda del terminale in Cloud Shell ed esegui questo comando per creare una cartella denominata bigquery-adk-codelab e spostarti al suo interno:
mkdir bigquery-adk-codelab
cd bigquery-adk-codelab
- Crea un ambiente virtuale Python:
python -m venv .venv
- Attiva l'ambiente virtuale:
source .venv/bin/activate
- Installa i pacchetti Python ADK e AI-Platform di Google. Per valutare l'agente bigquery sono necessari la piattaforma AI e il pacchetto pandas:
pip install google-adk google-cloud-aiplatform[evaluation] pandas
5. Crea un'applicazione ADK
Ora creiamo il nostro agente BigQuery. Questo agente sarà progettato per rispondere a domande in linguaggio naturale sui dati archiviati in BigQuery.
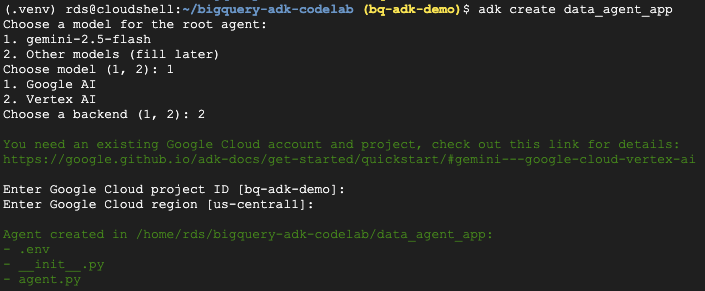
- Esegui il comando dell'utilità adk create per creare una nuova applicazione agente con le cartelle e i file necessari:
adk create data_agent_app
Segui le istruzioni:
- Scegli gemini-2.5-flash per il modello.
- Scegli Vertex AI per il backend.
- Conferma l'ID progetto Google Cloud e la regione predefiniti.
Di seguito è riportato un esempio di interazione:
- Fai clic sul pulsante Apri editor in Cloud Shell per aprire l'editor di Cloud Shell e visualizzare le cartelle e i file appena creati:

Prendi nota dei file generati:
bigquery-adk-codelab/
├── .venv/
└── data_agent_app/
    ├── __init__.py
    ├── agent.py
    └── .env
- init.py::contrassegna la cartella come modulo Python.
- agent.py::contiene la definizione iniziale dell'agente.
- .env: contiene le variabili di ambiente per il tuo progetto (potresti dover fare clic su Visualizza > Attiva/disattiva file nascosti per visualizzare questo file)
Aggiorna le variabili che non sono state impostate correttamente dai prompt:
GOOGLE_GENAI_USE_VERTEXAI=1
GOOGLE_CLOUD_PROJECT=<YOUR_GOOGLE_PROJECT_ID>
GOOGLE_CLOUD_LOCATION=<YOUR_GOOGLE_CLOUD_REGION>
6. Definisci l'agente e assegnagli il set di strumenti BigQuery
Per definire un agente ADK che interagisce con BigQuery utilizzando il set di strumenti BigQuery, sostituisci il contenuto esistente del file agent.py con il seguente codice.
Devi aggiornare l'ID progetto nelle istruzioni dell'agente con il tuo ID progetto effettivo:
from google.adk.agents import Agent
from google.adk.tools.bigquery import BigQueryCredentialsConfig, BigQueryToolset
import google.auth
import dotenv

dotenv.load_dotenv()

credentials, _ = google.auth.default()
credentials_config = BigQueryCredentialsConfig(credentials=credentials)
bigquery_toolset = BigQueryToolset(
  credentials_config=credentials_config
)

root_agent = Agent(
 model="gemini-2.5-flash",
 name="bigquery_agent",
 description="Agent that answers questions about BigQuery data by executing SQL queries.",
 instruction=(
     """
       You are a BigQuery data analysis agent.
       You are able to answer questions on data stored in project-id: '<YOUR_PROJECT_ID>' on the `ecommerce` dataset.
     """
 ),
 tools=[bigquery_toolset]
)

def get_bigquery_agent():
 return root_agent
Il set di strumenti BigQuery fornisce a un agente le funzionalità per recuperare i metadati ed eseguire query SQL sui dati BigQuery. Per utilizzare il set di strumenti, devi autenticarti. Le opzioni più comuni sono le credenziali predefinite dell'applicazione (ADC) per lo sviluppo, OAuth interattivo per quando l'agente deve agire per conto di un utente specifico o le credenziali del service account per l'autenticazione sicura a livello di produzione.
Da qui, puoi chattare con l'agente tornando a Cloud Shell ed eseguendo questo comando:
adk web
Dovresti visualizzare una notifica che indica che il web server è stato avviato:
...
INFO:     Started server process [2735]
INFO:     Waiting for application startup.

+-----------------------------------------------------------------------------+
| ADK Web Server started                                                      |                                                      |
| For local testing, access at http://127.0.0.1:8000.                         |
+-----------------------------------------------------------------------------+

INFO:     Application startup complete.
INFO:     Uvicorn running on http://127.0.0.1:8000
Fai clic sull'URL fornito per avviare l'app web ADK. Puoi porre all'agente alcune domande sul set di dati:
Chiudi adk web e premi Ctrl+C nel terminale per arrestare il server web.
7. Preparare l'agente per la valutazione
Ora che hai definito l'agente BigQuery, devi renderlo eseguibile per la valutazione.
Il codice seguente definisce una funzione, run_conversation, che gestisce il flusso della conversazione creando un agente, eseguendo una sessione ed elaborando gli eventi per recuperare la risposta finale.
- Torna a Cloud Editor e crea un nuovo file denominato
run_agent.pynella directory bigquery-adk-codelab e copia/incolla il codice riportato di seguito:
from data_agent_app.agent import get_bigquery_agent
from google.adk.sessions import InMemorySessionService
from google.adk.runners import Runner
from google.genai import types
import uuid

APP_NAME = "data_agent_app"
USER_ID = "biquery_user_101"


async def run_conversation(prompt: str):
   """Runs a conversation with the BigQuery agent using the ADK Runner."""

   session_service = InMemorySessionService()
   session_id = f"{APP_NAME}-{uuid.uuid4().hex[:8]}"
   root_agent = get_bigquery_agent()

   runner = Runner(
       agent=root_agent, app_name=APP_NAME, session_service=session_service
   )
   session = await session_service.create_session(
       app_name=APP_NAME, user_id=USER_ID, session_id=session_id
   )
   final_response_text = "Unable to retrieve final response."
   tool_calls = []

   try:
       # Run the agent and process the events as they are generated
       async for event in runner.run_async(
           user_id=USER_ID,
           session_id=session_id,
           new_message=types.Content(role="user", parts=[types.Part(text=prompt)]),
       ):

           if (
               event.content
               and event.content.parts
               and event.content.parts[0].function_call
           ):

               func_call = event.content.parts[0].function_call

               tool_call = {
                   "tool_name": func_call.name,
                   "tool_input": dict(func_call.args),
               }
               tool_calls.append(tool_call)

           if event.is_final_response():
               if event.content and event.content.parts:
                   final_response_text = event.content.parts[0].text
               break

   except Exception as e:
       print(f"Error in run_conversation: {e}")
       final_response_text = f"An error occurred during the conversation: {e}"

   return {
       "response": final_response_text,
       "predicted_trajectory": tool_calls
   }
Il codice seguente definisce le funzioni di utilità per chiamare questa funzione eseguibile e restituire il risultato. Include anche funzioni helper che stampano e salvano i risultati della valutazione:
- Crea un nuovo file denominato
utils.pynella directory bigquery-adk-codelab e copia/incolla questo codice nel file utils.py:
import json
import os
import asyncio
import run_agent
import numbers
import math


def get_agent_response(prompt: str) -> dict:
   """Invokes the agent with a prompt and returns its response."""

   try:
       response = asyncio.run(run_agent.run_conversation(prompt))  # Invoke the agent
       return response
   except Exception as e:
       return {"response": "Error: Agent failed to produce a response."}


def save_evaluation_results(eval_result, experiment_run):
   """Processes, saves, and prints the evaluation results for a single run."""

   os.makedirs("eval_results", exist_ok=True)
   output_file_path = os.path.join(
       "eval_results", f"bq_agent_eval_results_{experiment_run}.json"
   )

   # Prepare data for JSON serialization
   eval_result_dict = {
       "summary_metrics": eval_result.summary_metrics,
       "pointwise_metrics": eval_result.metrics_table.to_dict("records"),
   }
   # --- Save the results as a JSON file ---
   with open(output_file_path, "w") as f:
       json.dump(eval_result_dict, f, indent=4)
   print(f"Results for run '{experiment_run}' saved to {output_file_path}")


def print_evaluation_summary(eval_result):
   """Prints a detailed summary of the evaluation results, including summary-level and aggregated pointwise metrics."""

   pointwise_metrics = eval_result.metrics_table
   # Print summary metrics for the current run
   summary_metrics = eval_result.summary_metrics
   if summary_metrics:
       for key, value in summary_metrics.items():
           if isinstance(value, numbers.Real) and not math.isnan(value):
               value = f"{value:.2f}"

           metric_name = key.replace("/mean", "").replace("_", " ").title()
           print(f"- {metric_name}: {key}: {value}")
   else:
       print("No summary metrics found for this run.")
   print("\n" + "=" * 50 + "\n")

   if not pointwise_metrics.empty:
       total_questions = len(pointwise_metrics)
       avg_completeness_score = pointwise_metrics["completeness_metric/score"].mean()
       avg_factual_accuracy_score = pointwise_metrics[
           "factual_accuracy_metric/score"
       ].mean()
       print("\n" + "=" * 50 + "\n")
       print("--- Aggregated Evaluation Summary ---")
       print(f"Total questions in evaluation dataset: {total_questions}")
       print(f"Average Completeness Score: {avg_completeness_score:.2f}")
       print(f"Average Factual Accuracy Score: {avg_factual_accuracy_score:.2f}")
       print("\n" + "=" * 50 + "\n")
   else:
       print("\nNo successful evaluation runs were completed.")
8. Crea un set di dati di valutazione
Per valutare l'agente, devi creare un set di dati di valutazione, definire le metriche di valutazione ed eseguire l'attività di valutazione.
Il set di dati di valutazione contiene un elenco di domande (prompt) e le relative risposte corrette (riferimenti). Il servizio di valutazione utilizzerà queste coppie per confrontare le risposte dell'agente e determinare se sono accurate.
- Crea un nuovo file denominato evaluation_dataset.json nella directory bigquery-adk-codelab e copia/incolla il set di dati di valutazione riportato di seguito:
[
   {
       "prompt": "What tables are available in the dataset `ecommerce`?",
       "reference": "The tables available in the dataset `ecommerce` are: `distribution_centers`, `events`, `inventory_items`, `order_items`, `orders`, `products`, and `users`."
   },
   {
       "prompt": "How many users are there in total?",
       "reference": "There are 100,000 users in total."
   },
   {
       "prompt": "Find the email and age of the user with id 72685.",
       "reference": "The email address of user 72685 is lindseybrennan@example.org and their age is 59."
   },
   {
       "prompt": "How many orders have a status of Complete?",
       "reference": "There are 31,077 orders with a status of 'complete'."
   },
   {
       "prompt": "Which distribution center has the highest latitude, and what is it's latitude?",
       "reference": "Chicago IL is the distribution center with the highest latitude, with a latitude of 41.84."
   },
   {
       "prompt": "Retrieve the order id for all orders with a status of cancelled placed on the 1st June 2023 before 6am.",
       "reference": "The order IDs for all orders with a status of 'cancelled' placed on the 1st June 2023 before 6am are: 26622, 49223"
   },
   {
       "prompt": "What id the full name and user ids of the top 5 users with the most orders.",
       "reference": "The top 5 users with the most orders are: Kristine Pennington (user ID 77359), Anthony Bright (user ID 4137), David Bean (user ID 30740), Michelle Wright (user ID 54563), and Matthew Reynolds (user ID 41136), each with 4 total orders."
   },
   {
       "prompt": "Which distribution center is associated with the highest average retail price of its products, and what is the average retail price?",
       "reference": "The distribution center associated with the highest average retail price of its products is Houston TX, with an average retail price of $69.74."
   },
   {
       "prompt": "How many events were of type 'purchase' in Seoul during May 2024?",
       "reference": "In May 2024, there were 57 'purchase' events recorded in Seoul."
   },
   {
       "prompt": "For orders placed in June 2023, how many took three days or longer to be delivered after they were shipped?",
       "reference": "In June 2023, there were 318 orders with a time difference of of 3 days or more between when they were shipped and delivered."
   },
   {
       "prompt": "What are the names of the products and their respective retail price that have never been sold, but have a retail price greater than $210?",
       "reference": "The products that have never been sold but have a retail price greater than $210 are:\n- Tommy Hilfiger Men's 2 Button Side Vent Windowpane Trim Fit Sport Coat, with a retail price of $249.9\n- MICHAEL Michael Kors Women's Hooded Leather Jacket: $211.11"
   },
   {
       "prompt": "List the id and first name of users between the ages of 70 and 75 who have Facebook were sourced from Facebook and are located in California.",
       "reference": "The users between the ages of 70 and 75 from California with 'Facebook' as their traffic source are:\n- Julie (ID: 25379)\n- Sherry (ID: 85196)\n- Kenneth (ID: 82238)\n- Lindsay (ID: 64079)\n- Matthew (ID: 99612)"
   },
   {
       "prompt": "Identify the full name and user id of users over the age of 67 who live within 3.5 kilometers of any distribution_center.",
       "reference": "The users over the age of 67 who live within 3.5 kilometers of any distribution center are:\n- William Campbell (user ID: 26082)\n- Becky Cantrell (user ID: 39008)"
   },
   {
       "prompt": "What is the median age of users for each gender?",
       "reference": "The median age for female users is 41, and the median age for male users is 41."
   },
   {
       "prompt": "What is the average sale price of complete orders compared to returned orders, and what is the percentage difference (to two decimal places) between them?",
       "reference": "The average sale price for 'Complete' orders was $59.56, while for 'Returned' orders it was $59.76. This represents a percentage difference of 0.34%."
   }
]
9. Definisci le metriche di valutazione
Ora utilizzeremo due metriche personalizzate per valutare la capacità dell'agente di rispondere a domande relative ai tuoi dati BigQuery, entrambe con un punteggio da 1 a 5:
- Metrica di accuratezza fattuale:valuta se tutti i dati e i fatti presentati nella risposta sono precisi e corretti rispetto ai dati empirici reali.
- Metrica di completezza: misura se la risposta include tutte le informazioni chiave richieste dall'utente e presenti nella risposta corretta, senza omissioni critiche.
- Infine, crea un nuovo file denominato
evaluate_agent.pynella directory bigquery-adk-codelab e copia/incolla il codice di definizione della metrica nel file evaluate_agent.py:
import uuid
import pandas as pd
from datetime import datetime
from vertexai.preview.evaluation import EvalTask
from vertexai.preview.evaluation.metrics import (
   PointwiseMetricPromptTemplate,
   PointwiseMetric,
   TrajectorySingleToolUse,
)
from utils import save_evaluation_results, print_evaluation_summary, get_agent_response

factual_accuracy_metric = PointwiseMetric(
   metric="factual_accuracy_metric",
   metric_prompt_template=PointwiseMetricPromptTemplate(
       instruction="""You are an expert evaluator assessing the factual accuracy of an AI's answer to a user's question, given a natural language prompt and a 'reference' (ground truth) answer. Your task is to determine if all factual information in the AI's answer is precise and correct when compared to the reference.""",
       criteria={
           "Accuracy": """The AI's answer must present factual information (numerical values, names, dates, specific values) that are **identical** to or an exact logical derivation from the reference.
          - **Wording may vary, but the core factual information must be the same.**
          - No numerical discrepancies.
          - No incorrect names or identifiers.
          - No fabricated or misleading details.
          - Note: Minor rounding of numerical values that doesn't alter the core meaning or lead to significant misrepresentation is generally acceptable, assuming the prompt doesn't ask for exact precision."""
       },
       rating_rubric={
           "5": "Excellent: The response is entirely factually correct. **All factual information precisely matches the reference.** There are absolutely no inaccuracies or misleading details.",
           "3": "Good: The response is generally accurate, but contains minor, non-critical factual inaccuracies (e.g., a negligible rounding difference or slightly wrong detail) that do not impact the core understanding.",
           "1": "Poor: The response contains significant factual errors, major numerical discrepancies, or fabricated information that makes the answer incorrect or unreliable."
       },
       input_variables=["prompt", "reference", "response"],
   ),
)

completeness_metric = PointwiseMetric(
   metric="completeness_metric",
   metric_prompt_template=PointwiseMetricPromptTemplate(
       instruction="""You are an expert evaluator assessing the completeness of an AI's answer to a user's question, given a natural language prompt and a 'reference' (ground truth) answer. Your task is to determine if the AI's answer provides all the essential information requested by the user and present in the reference.""",
       criteria={
           "Completeness": """The AI's answer must include **all** key pieces of information explicitly or implicitly requested by the prompt and present in the reference.
          - No omissions of critical facts.
          - All requested attributes (e.g., age AND email, not just one) must be present.
          - If the reference provides a multi-part answer, all parts must be covered."""
       },
       rating_rubric={
           "5": "Excellent: The response is perfectly complete. **All key information requested by the prompt and present in the reference is included.** There are absolutely no omissions.",
           "3": "Good: The response is mostly complete. It has only a slight, non-critical omission that does not impact the core understanding or utility of the answer.",
           "1": "Poor: The response is critically incomplete. Essential parts of the requested information are missing, making the answer less useful or unusable for the user's purpose."
       },
       input_variables=["prompt", "reference", "response"],
   ),
)

tool_use_metric = TrajectorySingleToolUse(tool_name="list_table_ids")
Ho incluso anche la metrica TrajectorySingleToolUse per la valutazione della traiettoria. Quando queste metriche sono presenti, le chiamate agli strumenti dell'agente (incluso l'SQL non elaborato che genera ed esegue su BigQuery) verranno incluse nella risposta di valutazione, consentendo un'ispezione dettagliata.
La metrica TrajectorySingleToolUse determina se un agente ha utilizzato un determinato strumento. In questo caso, ho scelto list_table_ids, in quanto prevediamo che questo strumento venga chiamato per ogni domanda nel set di dati di valutazione. A differenza di altre metriche della traiettoria, questa metrica non richiede di specificare tutte le chiamate e gli argomenti degli strumenti previsti per ogni domanda nel set di dati di valutazione.
10. Crea l'attività di valutazione
EvalTask prende il set di dati di valutazione e le metriche personalizzate e configura un nuovo esperimento di valutazione.
Questa funzione, run_eval, è il motore principale per la valutazione. Esegue un ciclo su un EvalTask, eseguendo l'agente su ogni domanda del set di dati. Per ogni domanda, registra la risposta dell'agente e poi utilizza le metriche che hai definito in precedenza per valutarla.
Copia/incolla il seguente codice nella parte inferiore del file evaluate_agent.py:
def run_eval():
   eval_dataset = pd.read_json("evaluation_dataset.json")

   # Generate a unique run name
   current_time = datetime.now().strftime("%Y%m%d-%H%M%S")
   experiment_run_id = f"{current_time}-{uuid.uuid4().hex[:8]}"

   print(f"--- Starting evaluation: ({experiment_run_id}) ---")

   # Define the evaluation task with your dataset and metrics
   eval_task = EvalTask(
       dataset=eval_dataset,
       metrics=[
           factual_accuracy_metric,
           completeness_metric,
           tool_use_metric,
       ],
       experiment="evaluate-bq-data-agent"
   )

   try:
       eval_result = eval_task.evaluate(
           runnable=get_agent_response, experiment_run_name=experiment_run_id
       )
       save_evaluation_results(eval_result, experiment_run_id)
       print_evaluation_summary(eval_result)

   except Exception as e:
       print(f"An error occurred during evaluation run: {e}")


if __name__ == "__main__":
   run_eval()
I risultati vengono riepilogati e salvati in un file JSON.
11. Esegui la valutazione
Ora che hai preparato l'agente, le metriche di valutazione e il set di dati di valutazione, puoi eseguire la valutazione.
Torna a Cloud Shell, assicurati di trovarti nella directory bigquery-adk-codelab ed esegui lo script di valutazione utilizzando questo comando:
python evaluate_agent.py
Man mano che la valutazione procede, vedrai un output simile a questo:
Evaluation Took:11.410560518999773 seconds
Results for run '20250922-130011-300ea89b' saved to eval_results/bq_agent_eval_results_20250922-130011-300ea89b.json
- Row Count: row_count: 15.00
- Factual Accuracy Metric: factual_accuracy_metric/mean: 2.60
- Factual Accuracy Metric/Std: factual_accuracy_metric/std: 1.88
- Completeness Metric: completeness_metric/mean: 2.87
- Completeness Metric/Std: completeness_metric/std: 2.07
- Trajectory Single Tool Use: trajectory_single_tool_use/mean: 0.90
- Trajectory Single Tool Use/Std: trajectory_single_tool_use/std: 0.32
- Latency In Seconds: latency_in_seconds/mean: 9.77
- Latency In Seconds/Std: latency_in_seconds/std: 5.65
- Failure: failure/mean: 0.00
- Failure/Std: failure/std: 0.00
Se si verificano errori come quelli riportati di seguito, significa solo che l'agente non ha chiamato strumenti per una determinata esecuzione. Puoi esaminare ulteriormente il comportamento dell'agente nel passaggio successivo.
Error encountered for metric trajectory_single_tool_use at dataset index 1: Error: 400 List of Field: trajectory_single_tool_use_input.instances[0].predicted_trajectory; Message: Required field is not set.
Interpretazione dei risultati:
Vai alla cartella eval_results nella directory data_agent_app e apri il file dei risultati della valutazione denominato bq_agent_eval_results_*.json:
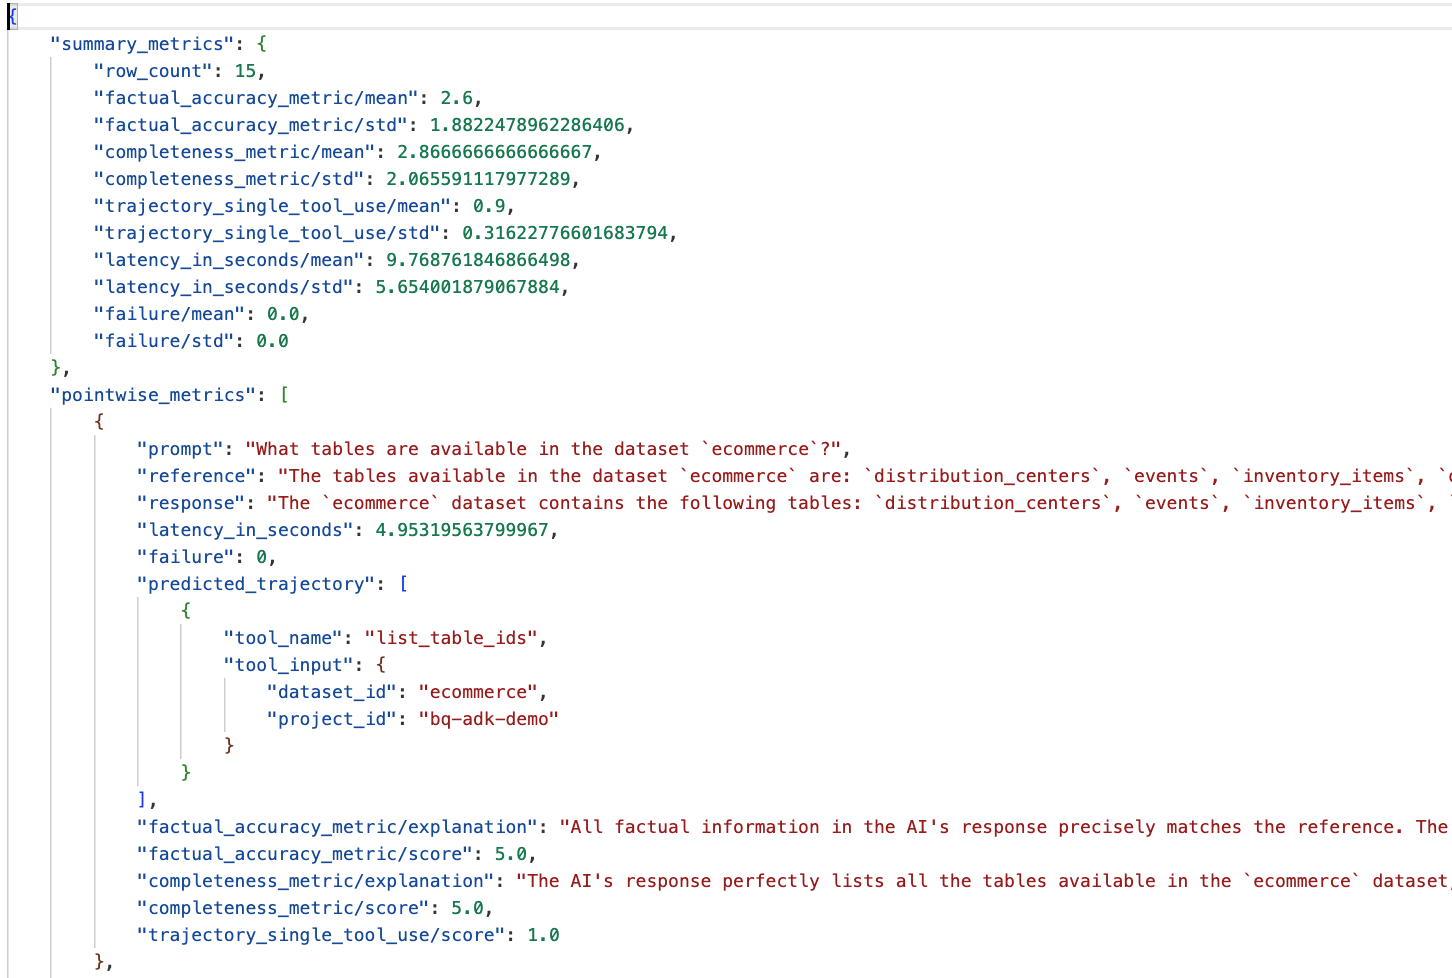
- Metriche riepilogative: forniscono una visualizzazione aggregata del rendimento dell'agente nel set di dati.
- Metriche puntuali di accuratezza e completezza oggettiva:un punteggio più vicino a 5 indica maggiore accuratezza e completezza. Per ogni domanda verrà visualizzato un punteggio, insieme a una spiegazione scritta del motivo per cui è stato assegnato quel punteggio.
- Traiettoria prevista: l'elenco delle chiamate agli strumenti utilizzate dagli agenti per raggiungere la risposta finale. In questo modo potremo visualizzare le query SQL generate dall'agente.
Possiamo vedere che il punteggio medio per la completezza e l'accuratezza fattuale è rispettivamente 2,87 e 2,6.
I risultati non sono molto buoni. Cerchiamo di migliorare la capacità del nostro agente di rispondere alle domande.
12. Migliorare i risultati della valutazione dell'agente
Vai a agent.py nella directory bigquery-adk-codelab e aggiorna il modello e le istruzioni di sistema dell'agente. Ricorda di sostituire <YOUR_PROJECT_ID> con l'ID progetto:
root_agent = Agent(
 model="gemini-2.5-flash",
 name="bigquery_agent",
 description="Agent that answers questions about BigQuery data by executing SQL queries.",
 instruction=(
     """
     You are a data analysis agent with access to several BigQuery tools.
     Use the appropriate tools to fetch relevant BigQuery metadata and execute SQL queries.
     You must use these tools to answer the user's questions.
     Run these queries in the project-id: '<YOUR_PROJECT_ID>' on the `ecommerce` dataset.
    """
 ),
 tools=[bigquery_toolset]
)
Ora torna al terminale ed esegui di nuovo la valutazione:
python evaluate_agent.py
Dovresti notare che i risultati sono ora molto migliori:
==================================================

--- Aggregated Evaluation Summary ---
Total questions in evaluation dataset: 15
Average Completeness Score: 4.73
Average Factual Accuracy Score: 4.20

==================================================
La valutazione dell'agente è un processo iterativo. Per migliorare ulteriormente i risultati della valutazione, puoi modificare le istruzioni di sistema, i parametri del modello o anche i metadati in BigQuery. Consulta questi suggerimenti e trucchi per altre idee.
13. Elimina
Per evitare addebiti continui al tuo account Google Cloud, è importante eliminare le risorse che abbiamo creato durante questo workshop.
Se hai creato set di dati o tabelle BigQuery specifici per questo codelab (ad es. il set di dati e-commerce), potresti volerli eliminare:
bq rm -r $PROJECT_ID:ecommerce
Per rimuovere la directory bigquery-adk-codelab e i relativi contenuti:
cd .. # Go back to your home directory if you are still in bigquery-adk-codelab
rm -rf bigquery-adk-codelab
14. Complimenti
Complimenti! Hai creato e valutato correttamente un agente BigQuery utilizzando Agent Development Kit (ADK). Ora sai come configurare un agente ADK con gli strumenti BigQuery e misurarne le prestazioni utilizzando metriche di valutazione personalizzate.