
1. Giới thiệu
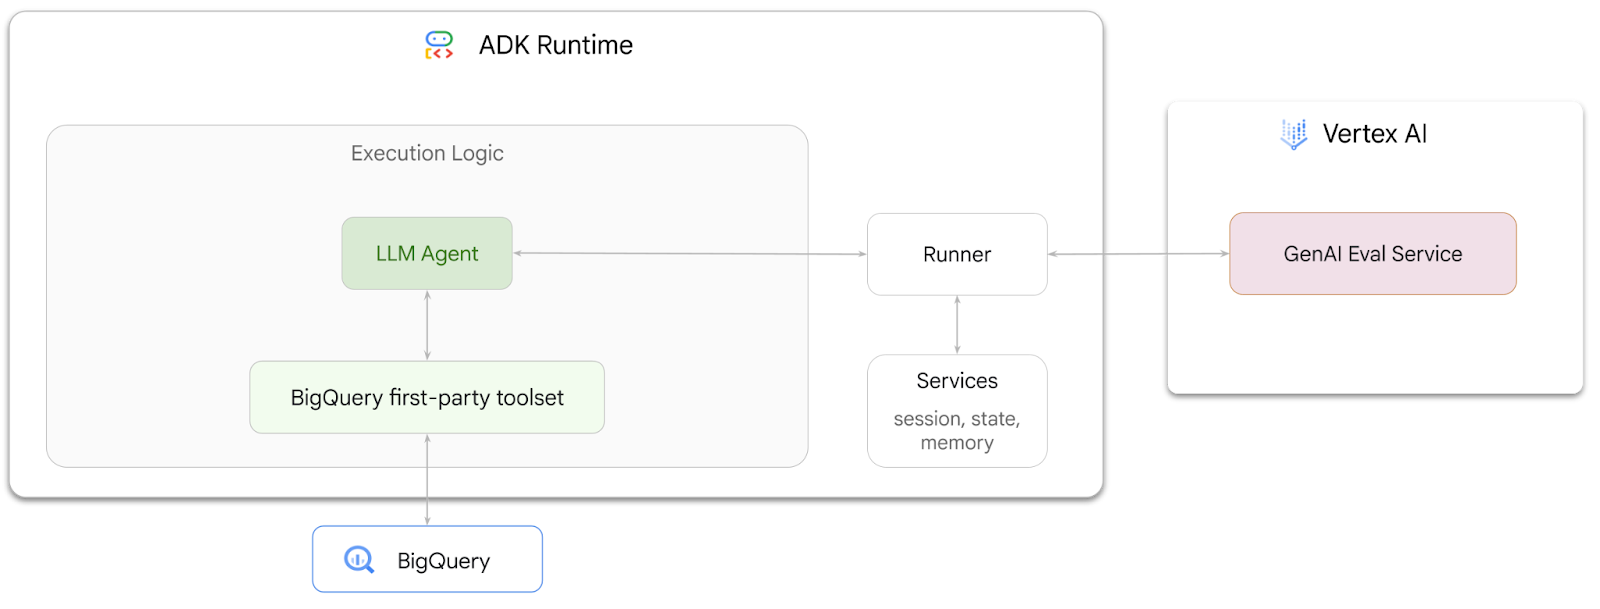
Trong lớp học lập trình này, bạn sẽ tìm hiểu cách xây dựng các tác nhân có thể trả lời câu hỏi về dữ liệu được lưu trữ trong BigQuery bằng Bộ công cụ phát triển tác nhân (ADK). Bạn cũng sẽ đánh giá các tác nhân này bằng dịch vụ Đánh giá AI tạo sinh của Vertex AI:
Bạn sẽ thực hiện
- Tạo một tác nhân phân tích đàm thoại trong ADK
- Trang bị cho tác nhân này bộ công cụ của bên thứ nhất cho BigQuery của ADK để tác nhân có thể tương tác với dữ liệu được lưu trữ trong BigQuery
- Tạo một khung đánh giá cho tác nhân của bạn bằng dịch vụ Đánh giá AI tạo sinh của Vertex AI
- Chạy quy trình đánh giá trên tác nhân này dựa trên một bộ câu trả lời mẫu
Bạn cần có
- Một trình duyệt web như Chrome
- Một dự án trên đám mây của Google Cloud đã bật tính năng thanh toán, hoặc
- Tài khoản Gmail. Phần tiếp theo sẽ hướng dẫn bạn cách sử dụng khoản tín dụng miễn phí trị giá 5 USD cho lớp học lập trình này và thiết lập một dự án mới
Lớp học lập trình này dành cho nhà phát triển ở mọi cấp độ, kể cả người mới bắt đầu. Bạn sẽ sử dụng giao diện dòng lệnh trong Google Cloud Shell và mã Python để phát triển ADK. Bạn không cần phải là chuyên gia về Python, nhưng kiến thức cơ bản về cách đọc mã sẽ giúp bạn hiểu các khái niệm.
2. Trước khi bắt đầu
Tạo một dự án trên Google Cloud
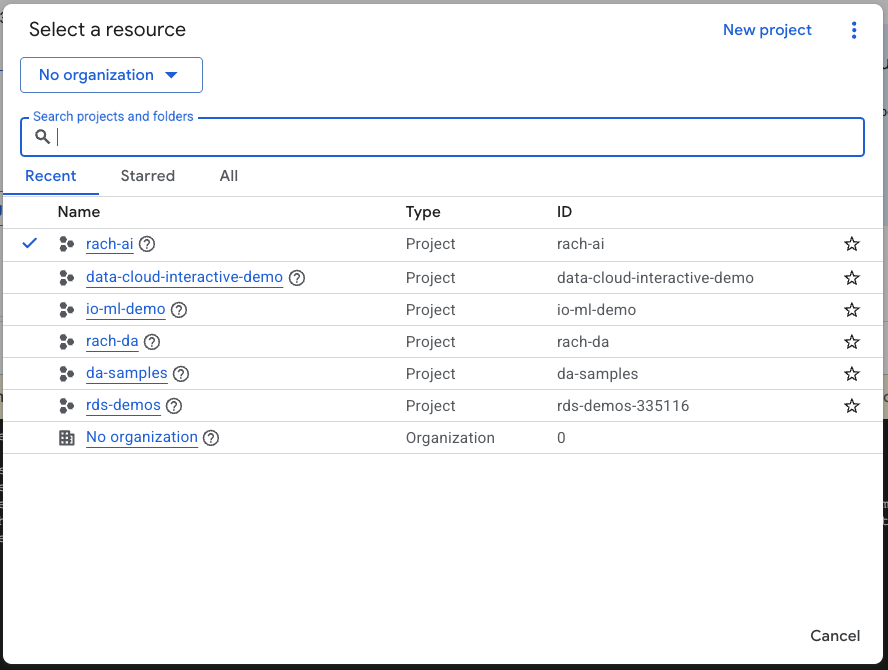
- Trong Google Cloud Console, trên trang chọn dự án, hãy chọn hoặc tạo một dự án trên đám mây của Google Cloud.
- Đảm bảo bạn đã bật tính năng thanh toán cho dự án trên Cloud. Tìm hiểu cách kiểm tra xem tính năng thanh toán có được bật trên một dự án hay không.
Khởi động Cloud Shell
Cloud Shell là một môi trường dòng lệnh chạy trong Google Cloud và được tải sẵn các công cụ cần thiết.
- Nhấp vào Kích hoạt Cloud Shell ở đầu bảng điều khiển Cloud:

- Sau khi kết nối với Cloud Shell, hãy chạy lệnh này để xác minh quá trình xác thực của bạn trong Cloud Shell:
gcloud auth list
- Chạy lệnh sau để xác nhận rằng dự án của bạn đã được định cấu hình để sử dụng với gcloud:
gcloud config list project
- Sử dụng lệnh sau để thiết lập dự án của bạn:
export PROJECT_ID=<YOUR_PROJECT_ID>
gcloud config set project $PROJECT_ID
Bật API
- Chạy lệnh này để bật tất cả các API và dịch vụ bắt buộc:
gcloud services enable bigquery.googleapis.com \
                       aiplatform.googleapis.com \
                       cloudresourcemanager.googleapis.com
- Khi thực thi lệnh thành công, bạn sẽ thấy một thông báo tương tự như thông báo dưới đây:
Operation "operations/..." finished successfully.
3. Tạo tập dữ liệu BigQuery
- Chạy lệnh sau trong Cloud Shell để tạo một tập dữ liệu mới có tên là thương mại điện tử trong BigQuery:
bq mk --dataset --location=US ecommerce
Một tập hợp con tĩnh của tập dữ liệu công khai BigQuery thelook_ecommerce được lưu dưới dạng tệp AVRO trong một vùng chứa công khai của Google Cloud Storage.
- Chạy lệnh này trong Cloud Shell để tải các tệp Avro này vào BigQuery dưới dạng bảng (events, order_items, products, users, orders):
bq load --source_format=AVRO --autodetect \
    ecommerce.events \
  gs://sample-data-and-media/thelook_dataset_snapshot/events/*.avro.gz

bq load --source_format=AVRO --autodetect \
    ecommerce.order_items \
    gs://sample-data-and-media/thelook_dataset_snapshot/order_items/*.avro.gz

bq load --source_format=AVRO --autodetect \
    ecommerce.products \
    gs://sample-data-and-media/thelook_dataset_snapshot/products/*.avro.gz

bq load --source_format=AVRO --autodetect \
    ecommerce.users \
    gs://sample-data-and-media/thelook_dataset_snapshot/users/*.avro.gz

bq load --source_format=AVRO --autodetect \
    ecommerce.orders \
gs://sample-data-and-media/thelook_dataset_snapshot/orders/*.avro.gz
bq load --source_format=AVRO --autodetect \
    ecommerce.inventory_items \
    gs://sample-data-and-media/thelook_dataset_snapshot/inventory_items/*.avro.gz
bq load --source_format=AVRO --autodetect \
    ecommerce.distribution_centers \
    gs://sample-data-and-media/thelook_dataset_snapshot/distribution_centers/*.avro.gz
Quá trình này có thể mất vài phút.
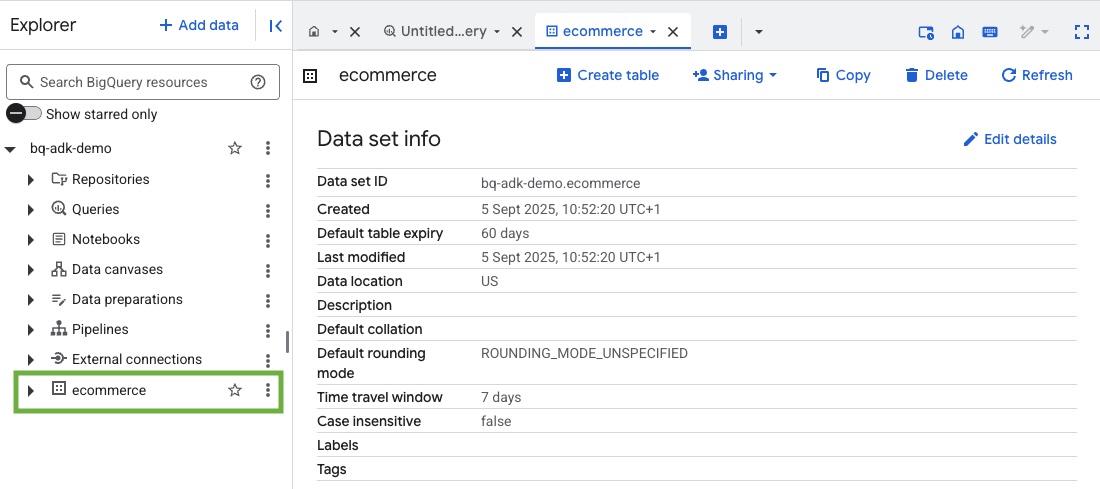
- Xác minh rằng tập dữ liệu và bảng được tạo bằng cách truy cập vào bảng điều khiển BigQuery trong Dự án trên Google Cloud của bạn:
4. Chuẩn bị môi trường cho các tác nhân ADK
Quay lại Cloud Shell và đảm bảo bạn đang ở trong thư mục chính. Chúng ta sẽ tạo một môi trường Python ảo và cài đặt các gói cần thiết.
- Mở một thẻ terminal mới trong Cloud Shell và chạy lệnh này để tạo và chuyển đến một thư mục có tên là bigquery-adk-codelab:
mkdir bigquery-adk-codelab
cd bigquery-adk-codelab
- Tạo môi trường Python ảo:
python -m venv .venv
- Kích hoạt môi trường ảo:
source .venv/bin/activate
- Cài đặt các gói ADK và AI-Platform python của Google. Bạn cần có nền tảng AI và gói pandas để đánh giá tác nhân bigquery:
pip install google-adk google-cloud-aiplatform[evaluation] pandas
5. Tạo ứng dụng ADK
Giờ thì hãy tạo BigQuery Agent. Tác nhân này sẽ được thiết kế để trả lời các câu hỏi bằng ngôn ngữ tự nhiên về dữ liệu được lưu trữ trong BigQuery.
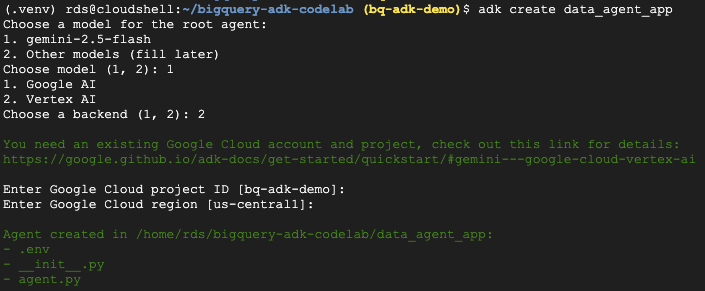
- Chạy lệnh tiện ích adk create để tạo khung cho một ứng dụng tác nhân mới có các thư mục và tệp cần thiết:
adk create data_agent_app
Làm theo lời nhắc:
- Chọn gemini-2.5-flash cho mô hình.
- Chọn Vertex AI cho phần phụ trợ.
- Xác nhận mã dự án và khu vực mặc định trên Google Cloud.
Dưới đây là một ví dụ về lượt tương tác:
- Nhấp vào nút Open Editor (Mở trình chỉnh sửa) trong Cloud Shell để mở Cloud Shell Editor và xem các thư mục cũng như tệp mới tạo:

Lưu ý các tệp được tạo:
bigquery-adk-codelab/
├── .venv/
└── data_agent_app/
    ├── __init__.py
    ├── agent.py
    └── .env
- init.py: Đánh dấu thư mục là một mô-đun Python.
- agent.py: Chứa định nghĩa ban đầu về tác nhân.
- .env: Chứa các biến môi trường cho dự án của bạn (Bạn có thể cần nhấp vào View > Toggle Hidden Files (Xem > Chuyển đổi tệp ẩn) để xem tệp này)
Cập nhật mọi biến chưa được đặt chính xác từ các lời nhắc:
GOOGLE_GENAI_USE_VERTEXAI=1
GOOGLE_CLOUD_PROJECT=<YOUR_GOOGLE_PROJECT_ID>
GOOGLE_CLOUD_LOCATION=<YOUR_GOOGLE_CLOUD_REGION>
6. Xác định tác nhân và chỉ định cho tác nhân đó bộ công cụ BigQuery
Để xác định một ADK Agent tương tác với BigQuery bằng bộ công cụ BigQuery, hãy thay thế nội dung hiện có của tệp agent.py bằng mã sau.
Bạn phải cập nhật mã dự án trong hướng dẫn của tác nhân thành mã dự án thực tế của bạn:
from google.adk.agents import Agent
from google.adk.tools.bigquery import BigQueryCredentialsConfig, BigQueryToolset
import google.auth
import dotenv

dotenv.load_dotenv()

credentials, _ = google.auth.default()
credentials_config = BigQueryCredentialsConfig(credentials=credentials)
bigquery_toolset = BigQueryToolset(
  credentials_config=credentials_config
)

root_agent = Agent(
 model="gemini-2.5-flash",
 name="bigquery_agent",
 description="Agent that answers questions about BigQuery data by executing SQL queries.",
 instruction=(
     """
       You are a BigQuery data analysis agent.
       You are able to answer questions on data stored in project-id: '<YOUR_PROJECT_ID>' on the `ecommerce` dataset.
     """
 ),
 tools=[bigquery_toolset]
)

def get_bigquery_agent():
 return root_agent
Bộ công cụ BigQuery cung cấp cho một tác nhân các khả năng tìm nạp siêu dữ liệu và thực thi các truy vấn SQL trên dữ liệu BigQuery. Để sử dụng bộ công cụ này, bạn phải xác thực bằng các lựa chọn phổ biến nhất là Thông tin xác thực mặc định của ứng dụng (ADC) để phát triển, OAuth tương tác khi tác nhân cần thay mặt cho một người dùng cụ thể hành động hoặc Thông tin đăng nhập tài khoản dịch vụ để xác thực an toàn ở cấp độ sản xuất.
Từ đây, bạn có thể trò chuyện với tác nhân bằng cách quay lại Cloud Shell và chạy lệnh sau:
adk web
Bạn sẽ thấy một thông báo cho biết máy chủ web đã khởi động:
...
INFO:     Started server process [2735]
INFO:     Waiting for application startup.

+-----------------------------------------------------------------------------+
| ADK Web Server started                                                      |                                                      |
| For local testing, access at http://127.0.0.1:8000.                         |
+-----------------------------------------------------------------------------+

INFO:     Application startup complete.
INFO:     Uvicorn running on http://127.0.0.1:8000
Nhấp vào URL được cung cấp để khởi chạy adk web – bạn có thể đặt cho trợ lý một số câu hỏi về tập dữ liệu:
Đóng adk web và nhấn tổ hợp phím Ctrl + C trong cửa sổ dòng lệnh để tắt máy chủ web.
7. Chuẩn bị nhân viên hỗ trợ để đánh giá
Giờ đây, bạn đã xác định được tác nhân BigQuery, bạn cần phải làm cho tác nhân này có thể chạy để đánh giá.
Đoạn mã dưới đây xác định một hàm run_conversation, hàm này xử lý quy trình trò chuyện bằng cách tạo một tác nhân, chạy một phiên và xử lý các sự kiện để truy xuất phản hồi cuối cùng.
- Chuyển về Cloud Editor và tạo một tệp mới có tên là
run_agent.pytrong thư mục bigquery-adk-codelab rồi sao chép/dán mã bên dưới:
from data_agent_app.agent import get_bigquery_agent
from google.adk.sessions import InMemorySessionService
from google.adk.runners import Runner
from google.genai import types
import uuid

APP_NAME = "data_agent_app"
USER_ID = "biquery_user_101"


async def run_conversation(prompt: str):
   """Runs a conversation with the BigQuery agent using the ADK Runner."""

   session_service = InMemorySessionService()
   session_id = f"{APP_NAME}-{uuid.uuid4().hex[:8]}"
   root_agent = get_bigquery_agent()

   runner = Runner(
       agent=root_agent, app_name=APP_NAME, session_service=session_service
   )
   session = await session_service.create_session(
       app_name=APP_NAME, user_id=USER_ID, session_id=session_id
   )
   final_response_text = "Unable to retrieve final response."
   tool_calls = []

   try:
       # Run the agent and process the events as they are generated
       async for event in runner.run_async(
           user_id=USER_ID,
           session_id=session_id,
           new_message=types.Content(role="user", parts=[types.Part(text=prompt)]),
       ):

           if (
               event.content
               and event.content.parts
               and event.content.parts[0].function_call
           ):

               func_call = event.content.parts[0].function_call

               tool_call = {
                   "tool_name": func_call.name,
                   "tool_input": dict(func_call.args),
               }
               tool_calls.append(tool_call)

           if event.is_final_response():
               if event.content and event.content.parts:
                   final_response_text = event.content.parts[0].text
               break

   except Exception as e:
       print(f"Error in run_conversation: {e}")
       final_response_text = f"An error occurred during the conversation: {e}"

   return {
       "response": final_response_text,
       "predicted_trajectory": tool_calls
   }
Đoạn mã bên dưới xác định các hàm tiện ích để gọi hàm có thể thực thi này và trả về kết quả. Thư viện này cũng bao gồm các hàm trợ giúp để in và lưu kết quả đánh giá:
- Tạo một tệp mới có tên
utils.pytrong thư mục bigquery-adk-codelab rồi sao chép/dán mã này vào tệp utils.py:
import json
import os
import asyncio
import run_agent
import numbers
import math


def get_agent_response(prompt: str) -> dict:
   """Invokes the agent with a prompt and returns its response."""

   try:
       response = asyncio.run(run_agent.run_conversation(prompt))  # Invoke the agent
       return response
   except Exception as e:
       return {"response": "Error: Agent failed to produce a response."}


def save_evaluation_results(eval_result, experiment_run):
   """Processes, saves, and prints the evaluation results for a single run."""

   os.makedirs("eval_results", exist_ok=True)
   output_file_path = os.path.join(
       "eval_results", f"bq_agent_eval_results_{experiment_run}.json"
   )

   # Prepare data for JSON serialization
   eval_result_dict = {
       "summary_metrics": eval_result.summary_metrics,
       "pointwise_metrics": eval_result.metrics_table.to_dict("records"),
   }
   # --- Save the results as a JSON file ---
   with open(output_file_path, "w") as f:
       json.dump(eval_result_dict, f, indent=4)
   print(f"Results for run '{experiment_run}' saved to {output_file_path}")


def print_evaluation_summary(eval_result):
   """Prints a detailed summary of the evaluation results, including summary-level and aggregated pointwise metrics."""

   pointwise_metrics = eval_result.metrics_table
   # Print summary metrics for the current run
   summary_metrics = eval_result.summary_metrics
   if summary_metrics:
       for key, value in summary_metrics.items():
           if isinstance(value, numbers.Real) and not math.isnan(value):
               value = f"{value:.2f}"

           metric_name = key.replace("/mean", "").replace("_", " ").title()
           print(f"- {metric_name}: {key}: {value}")
   else:
       print("No summary metrics found for this run.")
   print("\n" + "=" * 50 + "\n")

   if not pointwise_metrics.empty:
       total_questions = len(pointwise_metrics)
       avg_completeness_score = pointwise_metrics["completeness_metric/score"].mean()
       avg_factual_accuracy_score = pointwise_metrics[
           "factual_accuracy_metric/score"
       ].mean()
       print("\n" + "=" * 50 + "\n")
       print("--- Aggregated Evaluation Summary ---")
       print(f"Total questions in evaluation dataset: {total_questions}")
       print(f"Average Completeness Score: {avg_completeness_score:.2f}")
       print(f"Average Factual Accuracy Score: {avg_factual_accuracy_score:.2f}")
       print("\n" + "=" * 50 + "\n")
   else:
       print("\nNo successful evaluation runs were completed.")
8. Tạo một tập dữ liệu đánh giá
Để đánh giá tác nhân, bạn cần tạo một tập dữ liệu đánh giá, xác định các chỉ số đánh giá và chạy tác vụ đánh giá.
Tập dữ liệu đánh giá chứa danh sách các câu hỏi (câu lệnh) và câu trả lời chính xác tương ứng (tài liệu tham khảo). Dịch vụ đánh giá sẽ sử dụng các cặp này để so sánh câu trả lời của trợ lý ảo và xác định xem câu trả lời đó có chính xác hay không.
- Tạo một tệp mới có tên là evaluation_dataset.json trong thư mục bigquery-adk-codelab rồi sao chép/dán tập dữ liệu đánh giá bên dưới:
[
   {
       "prompt": "What tables are available in the dataset `ecommerce`?",
       "reference": "The tables available in the dataset `ecommerce` are: `distribution_centers`, `events`, `inventory_items`, `order_items`, `orders`, `products`, and `users`."
   },
   {
       "prompt": "How many users are there in total?",
       "reference": "There are 100,000 users in total."
   },
   {
       "prompt": "Find the email and age of the user with id 72685.",
       "reference": "The email address of user 72685 is lindseybrennan@example.org and their age is 59."
   },
   {
       "prompt": "How many orders have a status of Complete?",
       "reference": "There are 31,077 orders with a status of 'complete'."
   },
   {
       "prompt": "Which distribution center has the highest latitude, and what is it's latitude?",
       "reference": "Chicago IL is the distribution center with the highest latitude, with a latitude of 41.84."
   },
   {
       "prompt": "Retrieve the order id for all orders with a status of cancelled placed on the 1st June 2023 before 6am.",
       "reference": "The order IDs for all orders with a status of 'cancelled' placed on the 1st June 2023 before 6am are: 26622, 49223"
   },
   {
       "prompt": "What id the full name and user ids of the top 5 users with the most orders.",
       "reference": "The top 5 users with the most orders are: Kristine Pennington (user ID 77359), Anthony Bright (user ID 4137), David Bean (user ID 30740), Michelle Wright (user ID 54563), and Matthew Reynolds (user ID 41136), each with 4 total orders."
   },
   {
       "prompt": "Which distribution center is associated with the highest average retail price of its products, and what is the average retail price?",
       "reference": "The distribution center associated with the highest average retail price of its products is Houston TX, with an average retail price of $69.74."
   },
   {
       "prompt": "How many events were of type 'purchase' in Seoul during May 2024?",
       "reference": "In May 2024, there were 57 'purchase' events recorded in Seoul."
   },
   {
       "prompt": "For orders placed in June 2023, how many took three days or longer to be delivered after they were shipped?",
       "reference": "In June 2023, there were 318 orders with a time difference of of 3 days or more between when they were shipped and delivered."
   },
   {
       "prompt": "What are the names of the products and their respective retail price that have never been sold, but have a retail price greater than $210?",
       "reference": "The products that have never been sold but have a retail price greater than $210 are:\n- Tommy Hilfiger Men's 2 Button Side Vent Windowpane Trim Fit Sport Coat, with a retail price of $249.9\n- MICHAEL Michael Kors Women's Hooded Leather Jacket: $211.11"
   },
   {
       "prompt": "List the id and first name of users between the ages of 70 and 75 who have Facebook were sourced from Facebook and are located in California.",
       "reference": "The users between the ages of 70 and 75 from California with 'Facebook' as their traffic source are:\n- Julie (ID: 25379)\n- Sherry (ID: 85196)\n- Kenneth (ID: 82238)\n- Lindsay (ID: 64079)\n- Matthew (ID: 99612)"
   },
   {
       "prompt": "Identify the full name and user id of users over the age of 67 who live within 3.5 kilometers of any distribution_center.",
       "reference": "The users over the age of 67 who live within 3.5 kilometers of any distribution center are:\n- William Campbell (user ID: 26082)\n- Becky Cantrell (user ID: 39008)"
   },
   {
       "prompt": "What is the median age of users for each gender?",
       "reference": "The median age for female users is 41, and the median age for male users is 41."
   },
   {
       "prompt": "What is the average sale price of complete orders compared to returned orders, and what is the percentage difference (to two decimal places) between them?",
       "reference": "The average sale price for 'Complete' orders was $59.56, while for 'Returned' orders it was $59.76. This represents a percentage difference of 0.34%."
   }
]
9. Xác định các chỉ số đánh giá
Giờ đây, chúng tôi sẽ sử dụng 2 chỉ số tuỳ chỉnh để đánh giá khả năng trả lời các câu hỏi liên quan đến dữ liệu BigQuery của tác nhân, cả hai chỉ số này đều cung cấp điểm số từ 1 đến 5:
- Chỉ số độ chính xác thực tế: Chỉ số này đánh giá xem tất cả dữ liệu và thông tin thực tế được trình bày trong câu trả lời có chính xác và đúng hay không khi so sánh với sự thật.
- Chỉ số về tính đầy đủ: Chỉ số này đo lường xem câu trả lời có bao gồm tất cả thông tin chính mà người dùng yêu cầu và có trong câu trả lời chính xác hay không, mà không bỏ sót bất kỳ thông tin quan trọng nào.
- Cuối cùng, hãy tạo một tệp mới có tên
evaluate_agent.pytrong thư mục bigquery-adk-codelab rồi sao chép/dán mã định nghĩa chỉ số vào tệp evaluate_agent.py:
import uuid
import pandas as pd
from datetime import datetime
from vertexai.preview.evaluation import EvalTask
from vertexai.preview.evaluation.metrics import (
   PointwiseMetricPromptTemplate,
   PointwiseMetric,
   TrajectorySingleToolUse,
)
from utils import save_evaluation_results, print_evaluation_summary, get_agent_response

factual_accuracy_metric = PointwiseMetric(
   metric="factual_accuracy_metric",
   metric_prompt_template=PointwiseMetricPromptTemplate(
       instruction="""You are an expert evaluator assessing the factual accuracy of an AI's answer to a user's question, given a natural language prompt and a 'reference' (ground truth) answer. Your task is to determine if all factual information in the AI's answer is precise and correct when compared to the reference.""",
       criteria={
           "Accuracy": """The AI's answer must present factual information (numerical values, names, dates, specific values) that are **identical** to or an exact logical derivation from the reference.
          - **Wording may vary, but the core factual information must be the same.**
          - No numerical discrepancies.
          - No incorrect names or identifiers.
          - No fabricated or misleading details.
          - Note: Minor rounding of numerical values that doesn't alter the core meaning or lead to significant misrepresentation is generally acceptable, assuming the prompt doesn't ask for exact precision."""
       },
       rating_rubric={
           "5": "Excellent: The response is entirely factually correct. **All factual information precisely matches the reference.** There are absolutely no inaccuracies or misleading details.",
           "3": "Good: The response is generally accurate, but contains minor, non-critical factual inaccuracies (e.g., a negligible rounding difference or slightly wrong detail) that do not impact the core understanding.",
           "1": "Poor: The response contains significant factual errors, major numerical discrepancies, or fabricated information that makes the answer incorrect or unreliable."
       },
       input_variables=["prompt", "reference", "response"],
   ),
)

completeness_metric = PointwiseMetric(
   metric="completeness_metric",
   metric_prompt_template=PointwiseMetricPromptTemplate(
       instruction="""You are an expert evaluator assessing the completeness of an AI's answer to a user's question, given a natural language prompt and a 'reference' (ground truth) answer. Your task is to determine if the AI's answer provides all the essential information requested by the user and present in the reference.""",
       criteria={
           "Completeness": """The AI's answer must include **all** key pieces of information explicitly or implicitly requested by the prompt and present in the reference.
          - No omissions of critical facts.
          - All requested attributes (e.g., age AND email, not just one) must be present.
          - If the reference provides a multi-part answer, all parts must be covered."""
       },
       rating_rubric={
           "5": "Excellent: The response is perfectly complete. **All key information requested by the prompt and present in the reference is included.** There are absolutely no omissions.",
           "3": "Good: The response is mostly complete. It has only a slight, non-critical omission that does not impact the core understanding or utility of the answer.",
           "1": "Poor: The response is critically incomplete. Essential parts of the requested information are missing, making the answer less useful or unusable for the user's purpose."
       },
       input_variables=["prompt", "reference", "response"],
   ),
)

tool_use_metric = TrajectorySingleToolUse(tool_name="list_table_ids")
Tôi cũng đã thêm chỉ số TrajectorySingleToolUse để đánh giá quỹ đạo. Khi các chỉ số này xuất hiện, các lệnh gọi công cụ của tác nhân (bao gồm cả SQL thô mà tác nhân tạo và thực thi dựa trên BigQuery) sẽ được đưa vào phản hồi đánh giá, cho phép kiểm tra chi tiết.
Chỉ số TrajectorySingleToolUse xác định xem một tác nhân có sử dụng một công cụ cụ thể hay không. Trong trường hợp này, tôi đã chọn list_table_ids vì chúng tôi dự kiến công cụ này sẽ được gọi cho mọi câu hỏi trong tập dữ liệu đánh giá. Không giống như các chỉ số về quỹ đạo khác, chỉ số này không yêu cầu bạn chỉ định tất cả các lệnh gọi và đối số dự kiến của công cụ cho từng câu hỏi trong tập dữ liệu đánh giá.
10. Tạo nhiệm vụ đánh giá
EvalTask lấy tập dữ liệu đánh giá và các chỉ số tuỳ chỉnh, đồng thời thiết lập một thử nghiệm đánh giá mới.
Hàm run_eval là công cụ chính để đánh giá. Thao tác này lặp lại thông qua EvalTask, chạy tác nhân của bạn trên từng câu hỏi trong tập dữ liệu. Đối với mỗi câu hỏi, hệ thống sẽ ghi lại câu trả lời của nhân viên hỗ trợ rồi dùng các chỉ số mà bạn đã xác định trước đó để chấm điểm.
Sao chép/dán mã sau đây vào cuối tệp evaluate_agent.py:
def run_eval():
   eval_dataset = pd.read_json("evaluation_dataset.json")

   # Generate a unique run name
   current_time = datetime.now().strftime("%Y%m%d-%H%M%S")
   experiment_run_id = f"{current_time}-{uuid.uuid4().hex[:8]}"

   print(f"--- Starting evaluation: ({experiment_run_id}) ---")

   # Define the evaluation task with your dataset and metrics
   eval_task = EvalTask(
       dataset=eval_dataset,
       metrics=[
           factual_accuracy_metric,
           completeness_metric,
           tool_use_metric,
       ],
       experiment="evaluate-bq-data-agent"
   )

   try:
       eval_result = eval_task.evaluate(
           runnable=get_agent_response, experiment_run_name=experiment_run_id
       )
       save_evaluation_results(eval_result, experiment_run_id)
       print_evaluation_summary(eval_result)

   except Exception as e:
       print(f"An error occurred during evaluation run: {e}")


if __name__ == "__main__":
   run_eval()
Kết quả được tóm tắt và lưu vào một tệp JSON.
11. Chạy quy trình đánh giá
Giờ đây, khi đã chuẩn bị sẵn tác nhân, chỉ số đánh giá và tập dữ liệu đánh giá, bạn có thể chạy quy trình đánh giá.
Quay lại Cloud Shell, đảm bảo bạn đang ở trong thư mục bigquery-adk-codelab và chạy tập lệnh đánh giá bằng lệnh sau:
python evaluate_agent.py
Bạn sẽ thấy kết quả tương tự như sau khi quá trình đánh giá diễn ra:
Evaluation Took:11.410560518999773 seconds
Results for run '20250922-130011-300ea89b' saved to eval_results/bq_agent_eval_results_20250922-130011-300ea89b.json
- Row Count: row_count: 15.00
- Factual Accuracy Metric: factual_accuracy_metric/mean: 2.60
- Factual Accuracy Metric/Std: factual_accuracy_metric/std: 1.88
- Completeness Metric: completeness_metric/mean: 2.87
- Completeness Metric/Std: completeness_metric/std: 2.07
- Trajectory Single Tool Use: trajectory_single_tool_use/mean: 0.90
- Trajectory Single Tool Use/Std: trajectory_single_tool_use/std: 0.32
- Latency In Seconds: latency_in_seconds/mean: 9.77
- Latency In Seconds/Std: latency_in_seconds/std: 5.65
- Failure: failure/mean: 0.00
- Failure/Std: failure/std: 0.00
Nếu gặp phải bất kỳ lỗi nào như bên dưới, điều đó chỉ có nghĩa là tác nhân không gọi bất kỳ công cụ nào cho một lần chạy cụ thể; bạn có thể kiểm tra thêm hành vi của tác nhân ở bước tiếp theo.
Error encountered for metric trajectory_single_tool_use at dataset index 1: Error: 400 List of Field: trajectory_single_tool_use_input.instances[0].predicted_trajectory; Message: Required field is not set.
Diễn giải kết quả:
Chuyển đến thư mục eval_results trong thư mục data_agent_app rồi mở tệp kết quả đánh giá có tên bq_agent_eval_results_*.json:
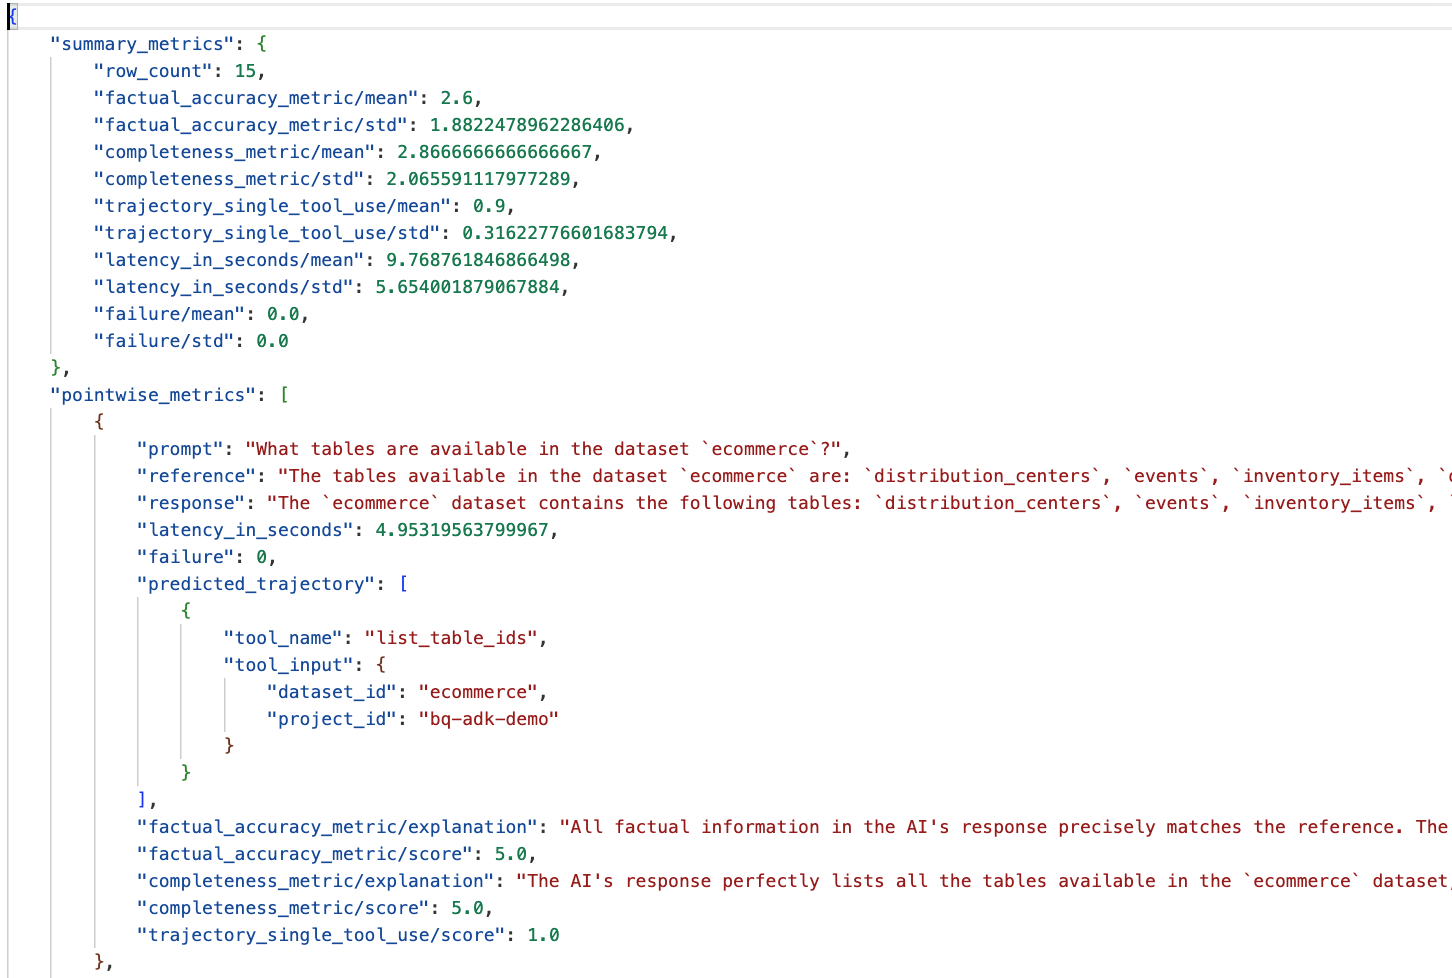
- Chỉ số tóm tắt: Cung cấp thông tin tổng hợp về hiệu suất của tác nhân trên toàn bộ tập dữ liệu.
- Chỉ số theo điểm về độ chính xác và tính đầy đủ của thông tin thực tế: Điểm càng gần 5 thì độ chính xác và tính đầy đủ càng cao. Mỗi câu hỏi sẽ có một điểm số, cùng với giải thích bằng văn bản về lý do câu hỏi đó nhận được điểm số đó.
- Quỹ đạo dự đoán: Đây là danh sách các lệnh gọi công cụ mà các tác nhân dùng để đưa ra phản hồi cuối cùng. Điều này sẽ cho phép chúng ta xem mọi truy vấn SQL do tác nhân tạo.
Chúng ta có thể thấy điểm trung bình cho độ hoàn chỉnh và độ chính xác thực tế lần lượt là 2,87 và 2,6.
Kết quả không được tốt cho lắm! Hãy thử cải thiện khả năng trả lời câu hỏi của trợ lý.
12. Cải thiện kết quả đánh giá của nhân viên hỗ trợ
Chuyển đến agent.py trong thư mục bigquery-adk-codelab rồi cập nhật mô hình và hướng dẫn hệ thống của tác nhân. Đừng quên thay thế <YOUR_PROJECT_ID> bằng mã dự án của bạn:
root_agent = Agent(
 model="gemini-2.5-flash",
 name="bigquery_agent",
 description="Agent that answers questions about BigQuery data by executing SQL queries.",
 instruction=(
     """
     You are a data analysis agent with access to several BigQuery tools.
     Use the appropriate tools to fetch relevant BigQuery metadata and execute SQL queries.
     You must use these tools to answer the user's questions.
     Run these queries in the project-id: '<YOUR_PROJECT_ID>' on the `ecommerce` dataset.
    """
 ),
 tools=[bigquery_toolset]
)
Bây giờ, hãy quay lại cửa sổ dòng lệnh và chạy lại quy trình đánh giá:
python evaluate_agent.py
Bạn sẽ thấy kết quả hiện đã tốt hơn nhiều:
==================================================

--- Aggregated Evaluation Summary ---
Total questions in evaluation dataset: 15
Average Completeness Score: 4.73
Average Factual Accuracy Score: 4.20

==================================================
Đánh giá nhân viên hỗ trợ là một quy trình lặp lại. Để cải thiện hơn nữa kết quả đánh giá, bạn có thể điều chỉnh các chỉ dẫn hệ thống, tham số mô hình hoặc thậm chí cả siêu dữ liệu trong BigQuery – hãy xem những mẹo và thủ thuật này để có thêm ý tưởng.
13. Dọn dẹp
Để tránh bị tính phí liên tục cho tài khoản Google Cloud của bạn, bạn cần xoá các tài nguyên mà chúng ta đã tạo trong hội thảo này.
Nếu đã tạo bất kỳ tập dữ liệu hoặc bảng BigQuery cụ thể nào cho lớp học lập trình này (ví dụ: tập dữ liệu thương mại điện tử), bạn có thể muốn xoá các tập dữ liệu hoặc bảng đó:
bq rm -r $PROJECT_ID:ecommerce
Cách xoá thư mục bigquery-adk-codelab và nội dung trong thư mục này:
cd .. # Go back to your home directory if you are still in bigquery-adk-codelab
rm -rf bigquery-adk-codelab
14. Xin chúc mừng
Xin chúc mừng! Bạn đã xây dựng và đánh giá thành công một tác nhân BigQuery bằng Bộ công cụ phát triển tác nhân (ADK). Giờ đây, bạn đã hiểu cách thiết lập một tác nhân ADK bằng các công cụ BigQuery và đo lường hiệu suất của tác nhân đó bằng các chỉ số đánh giá tuỳ chỉnh.