
1. 简介
借助 BigQuery 的 生成式 AI 函数,您可以使用 SQL 并借助大型语言模型 (LLM) 对数据进行推理。您可以分析数百万行数据的情感、生成摘要和为图片添加说明,而无需移动数据。
但是,如果您的提示需要大量上下文(例如政策、手册或视频)才能获得准确可靠的结果,该怎么办?
Gemini 上下文缓存 通过将大量上下文存储在缓存中来解决此问题。后续提示会引用缓存,而不是每次都处理完整内容,从而降低延迟,并为输入 token 提供高达 90% 的折扣 。
在本 Codelab 中,您将构建一个“细则”退货政策检查器,该检查器使用显式上下文缓存来分析客户退货请求,并对照 BigQuery 中大量静态退货政策文档进行分析。

您将执行的操作
- 创建 BigQuery 数据集,并使用示例客户退货请求填充该数据集。
- 在 Gemini Enterprise Agent Platform(以前称为 Vertex AI)中创建上下文缓存,指向存储在 Cloud Storage 中的退货政策文档。
- 使用引用缓存的
AI.GENERATE运行查询,以高效地逐行评估请求。
所需条件
- 网络浏览器,例如 Chrome
- 启用了结算功能的 Google Cloud 项目
- 能够访问 Google Cloud Shell
本 Codelab 适用于各种水平的开发者,包括新手。
在本 Codelab 中创建的资源费用应低于 2 美元。
预计时长: 完成本 Codelab 大约需要 30 分钟。
2. 准备工作
创建 Google Cloud 项目
- 在 Google Cloud 控制台 的项目选择器页面上,选择或创建一个 Google Cloud 项目。
- 确保您的云项目已启用结算功能。了解如何检查项目是否已启用结算功能。
启动 Cloud Shell
Cloud Shell 是在 Google Cloud 中运行的一个命令行环境,其中预加载了必要的工具。
- 点击 Google Cloud 控制台顶部的激活 Cloud Shell 。

- 连接到 Cloud Shell 后,验证您的身份验证:
gcloud auth list - 确认您的项目已配置:
gcloud config get project - 如果您的项目未按预期设置,请进行设置:
gcloud config set project <YOUR_PROJECT_ID>
设置项目 ID 和位置
运行以下命令以检索有效的 Google Cloud 项目 ID 并将默认位置设置为 环境变量,以便在本 Codelab 中使用:
export PROJECT_ID=$(gcloud config get-value project)
export PROJECT_NUMBER=$(gcloud projects describe $PROJECT_ID --format="value(projectNumber)")
export LOCATION="us-central1"
启用 API
运行此命令以启用所需的 API:
gcloud services enable \
 bigquery.googleapis.com \
 aiplatform.googleapis.com
3. 准备 BigQuery 数据
在测试上下文缓存之前,我们需要一个数据集和一个填充了示例客户退货请求的表,以便针对这些数据运行查询。
1. 创建数据集
在 Cloud Shell 中运行以下命令,以创建名为 caching_demo 的 BigQuery 数据集:
bq mk --dataset $PROJECT_ID:caching_demo
2. 创建并填充表
运行以下命令以创建名为return_requests 的表,并插入示例客户退货请求:
bq query \
  --use_legacy_sql=false \
  "CREATE OR REPLACE TABLE \`caching_demo.return_requests\` AS
SELECT
  10001 AS return_id,
  'P-1001' AS purchase_id,
  'I bought this jacket on Black Friday but it was too small.' AS return_comment,
  DATE('2025-11-28') AS purchase_date,
  DATE('2025-12-05') AS return_date,
  'ApexWear' AS product_brand,
  'Gold' AS customer_tier
UNION ALL
  SELECT
  10002 AS return_id,
  'P-1002' AS purchase_id,
  'The item arrived broken, I want a refund. I don\'t have photos because I threw it away.' AS return_comment,
  DATE('2026-04-01') AS purchase_date,
  DATE('2026-04-02') AS return_date,
  'GenericBrand' AS product_brand,
  'Standard' AS customer_tier
UNION ALL
  SELECT
  10003 AS return_id,
  'P-1003' AS purchase_id,
  'I bought this ApexWear jacket, took the tags off to wear it once, but it doesn\'t fit well.' AS return_comment,
  DATE('2026-02-15') AS purchase_date,
  DATE('2026-02-20') AS return_date,
  'ApexWear' AS product_brand,
  'Standard' AS customer_tier
UNION ALL
  SELECT
  10004 AS return_id,
  'P-1004' AS purchase_id,
  'This was a holiday gift but doesn\'t fit.' AS return_comment,
  DATE('2025-12-20') AS purchase_date,
  DATE('2026-01-28') AS return_date,
  'StyleCorp' AS product_brand,
  'Standard' AS customer_tier
UNION ALL
  SELECT
  10005 AS return_id,
  'P-1005' AS purchase_id,
  'I realized this doesn\'t fit' AS return_comment,
  DATE('2026-02-01') AS purchase_date,
  DATE('2026-03-15') AS return_date,
  'ApexWear' AS product_brand,
  'Gold' AS customer_tier;"
您应该会看到一条成功消息:
Created your-project-id.caching_demo.return_requests
现在,我们已准备好创建缓存!
4. 创建上下文缓存
您将使用对 Gemini Enterprise Agent Platform(以前称为 Vertex AI)模型端点的 REST 调用(使用 curl)创建缓存。
在 Cloud Shell 中运行以下命令以创建新的存储分区 。此存储分区将用于存储我们要缓存的文件:
gcloud storage buckets create gs://${PROJECT_ID}-caching-demo --location=${LOCATION}
接下来,将示例政策文档复制 到新创建的存储分区中:
gcloud storage cp gs://sample-data-and-media/context_caching_demo/return_policy.md gs://${PROJECT_ID}-caching-demo/
现在,运行以下命令以创建引用新暂存政策文档的缓存 (这可能需要一分钟左右才能完成):
curl -X POST \
  -H "Authorization: Bearer $(gcloud auth print-access-token)" \
  -H "Content-Type: application/json" \
  "https://${LOCATION}-aiplatform.googleapis.com/v1/projects/${PROJECT_ID}/locations/${LOCATION}/cachedContents" \
  -d '{
    "model": "projects/'"${PROJECT_ID}"'/locations/'"${LOCATION}"'/publishers/google/models/gemini-2.5-flash",
    "contents": [
      {
        "role": "user",
        "parts": [
          {
            "fileData": {
              "mimeType": "text/markdown",
              "fileUri": "gs://'"${PROJECT_ID}"'-caching-demo/return_policy.md"
            }
          }
        ]
      }
    ],
    "ttl": "3600s"
  }'
请注意响应 JSON 中返回的 name,它将如下所示:projects/PROJECT_NUMBER/locations/LOCATION/cachedContents/CACHE_ID。您需要该 CACHE_ID 才能执行下一步。
{
  "name": "projects/123456789012/locations/us-central1/cachedContents/123456789012345"
}
将 CACHE_ID 保存为 Cloud Shell 中的环境变量 :
export CACHE_ID="<YOUR_CACHE_ID>"
5. 使用缓存的内容运行 AI.GENERATE
首先,我们来验证示例数据是否已正确生成 。前往 BigQuery 控制台,找到 caching_demo 数据集,然后点击 return_requests 表。
在预览 标签页下,您应该会看到我们之前生成的客户退货请求:

现在,缓存已创建并填充完毕,您可以使用 AI.GENERATE 进行查询,只需引用该缓存 ID 即可评估退款请求。
为避免手动查找和替换变量,请在 Cloud Shell 中运行以下命令。这将使用现有环境变量动态构建 SQL 查询 ,并将其输出到屏幕上,以便您轻松复制。
cat << EOF > query.sql
WITH generated_returns AS (
  SELECT
    *,
    -- Call AI.GENERATE with the prompt, schema, and cache ID
    AI.GENERATE(
      -- Construct the prompt referencing the cached policy
      prompt => CONCAT(
        'Analyze this return request using the cached Return Policy. ',
        'Return Comment: "', return_comment, '". ',
        'Purchase Date: ', purchase_date, '. ',
        'Brand: ', product_brand, '. ',
        'Customer Tier: ', customer_tier, '. '
      ),
      -- Define the structured output schema
      output_schema => """
        eligible_for_refund STRING OPTIONS(description = 'True/False whether the request is eligible for a refund based on the policy'),
        refund_type STRING OPTIONS(description = 'Classify as Full, Store Credit, or None'),
        reason_citation STRING OPTIONS(description = 'Quote the specific rule from the policy applied to this decision')
      """,
      -- Construct the endpoint string dynamically using variables
      endpoint => 'gemini-2.5-flash',

      -- Pass the cached content ID using bash interpolation for the literal
      model_params => JSON '{"cachedContent": "projects/$PROJECT_NUMBER/locations/$LOCATION/cachedContents/$CACHE_ID"}'
    ) AS results
  FROM \`caching_demo.return_requests\`
)
SELECT
  *,
  -- Extract token usage metrics from the raw JSON response
  CAST(JSON_EXTRACT_SCALAR(results.full_response, '$.usage_metadata.prompt_token_count') AS INT64) AS prompt_token_count,
  CAST(JSON_EXTRACT_SCALAR(results.full_response, '$.usage_metadata.cached_content_token_count') AS INT64) AS cached_content_token_count,
  CAST(JSON_EXTRACT_SCALAR(results.full_response, '$.usage_metadata.candidates_token_count') AS INT64) AS output_token_count,
  CAST(JSON_EXTRACT_SCALAR(results.full_response, '$.usage_metadata.total_token_count') AS INT64) AS total_token_count,
  CAST(JSON_EXTRACT_SCALAR(results.full_response, '$.usage_metadata.thoughts_token_count') AS INT64) AS thoughts_token_count,
  CAST(JSON_EXTRACT_SCALAR(results.full_response, '$.usage_metadata.billable_prompt_usage.text_count') AS INT64) AS billable_prompt_text_count,
  CAST(JSON_EXTRACT_SCALAR(results.full_response, '$.usage_metadata.billable_cached_content_usage.text_count') AS INT64) AS billable_cached_text_count

FROM generated_returns;
EOF

cat query.sql
现在,复制终端中的 SQL ,在浏览器中前往 BigQuery 控制台,然后在查询编辑器标签页中执行查询 。
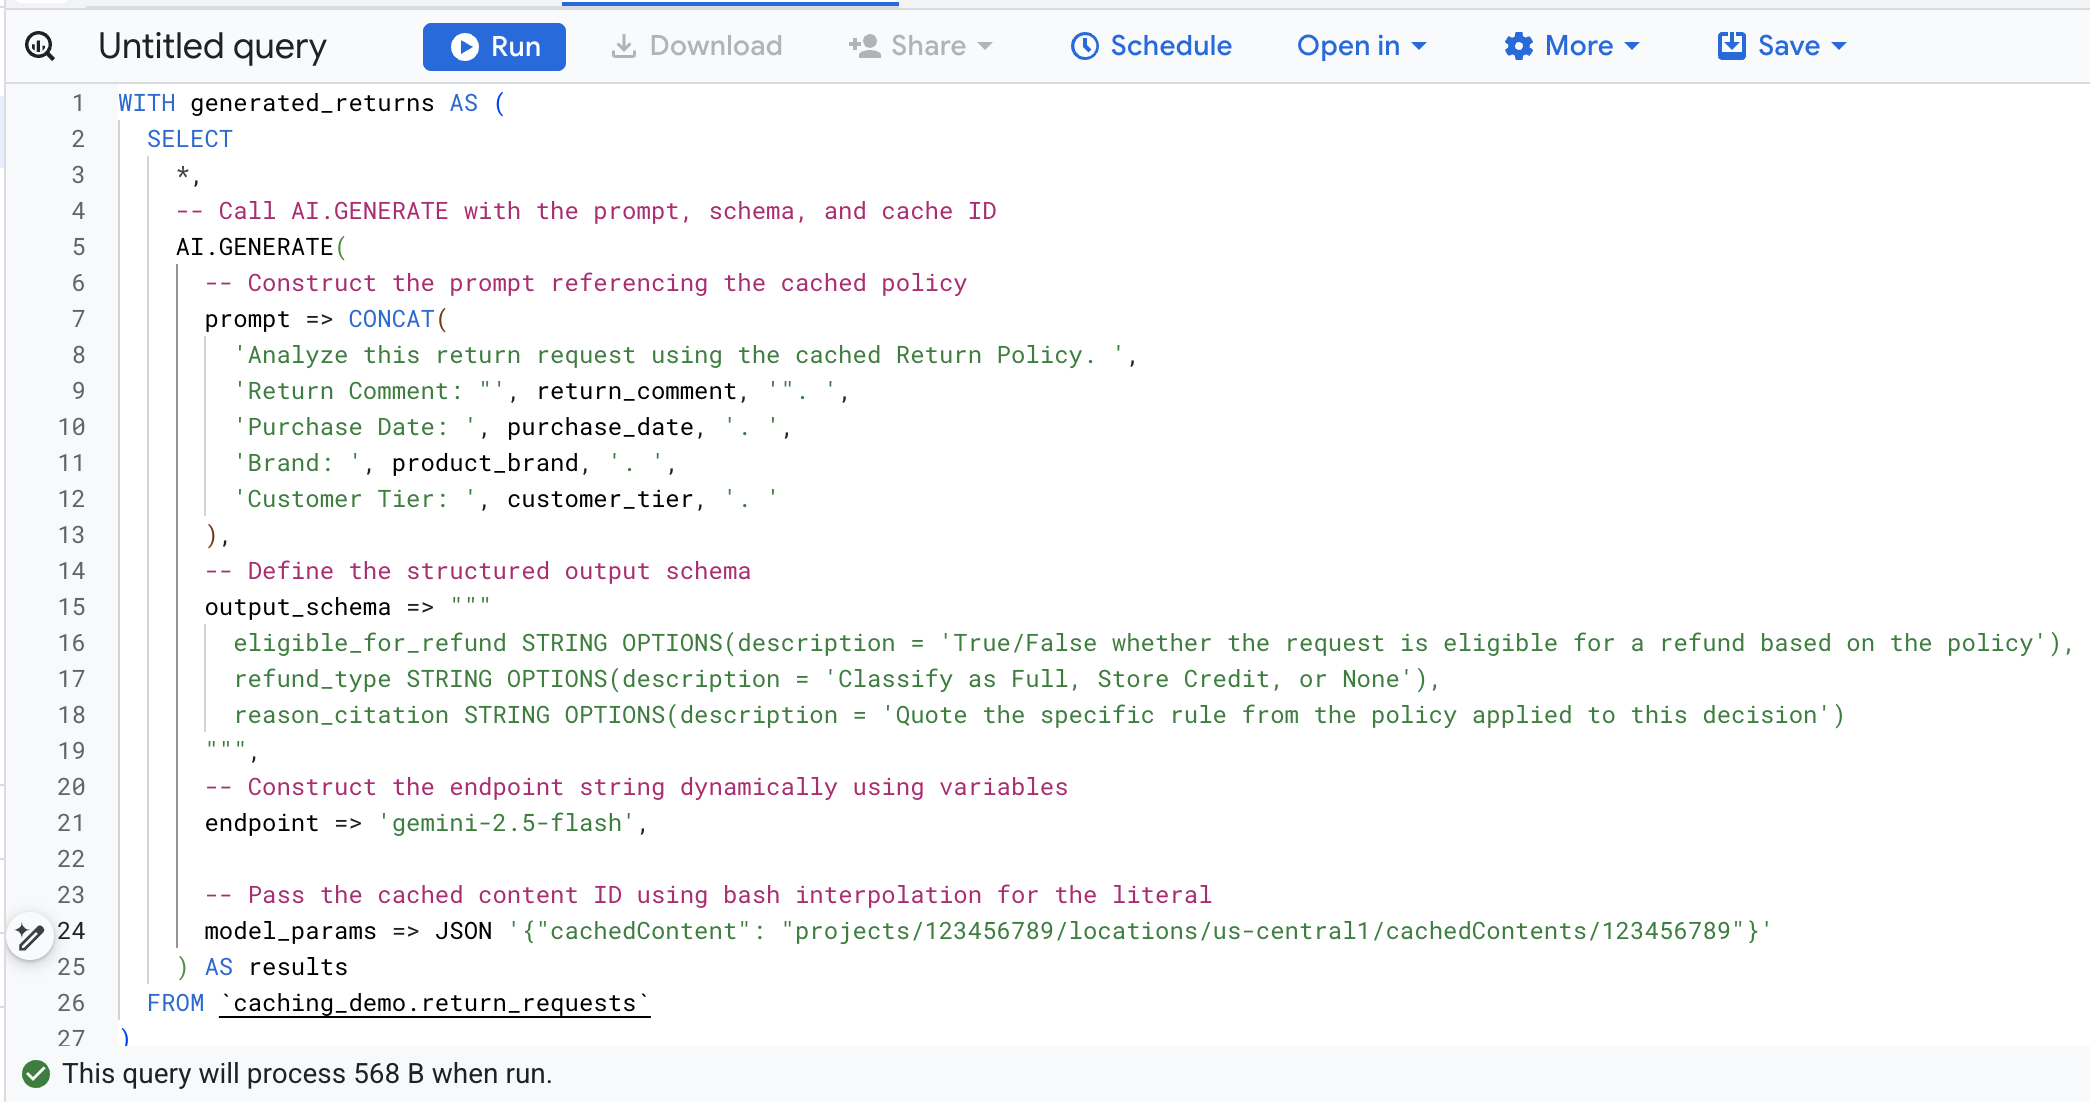
以下是此函数调用中关键参数的细分:
prompt:包含每个客户行的具体信息。此文本实际上会附加到缓存中已存在的大型退货政策文档中。output_schema:定义模型响应的预期 JSON 结构。endpoint:指定用于生成的 Agent Platform AI 模型端点(在本例中为 Gemini 2.5 Flash)。model_params:使用cachedContent字段传递生成的缓存 ID 的关键参数。
您应该会看到根据存储的政策分析每个退货请求的生成结果。向右滚动,查看提取的 token 指标。
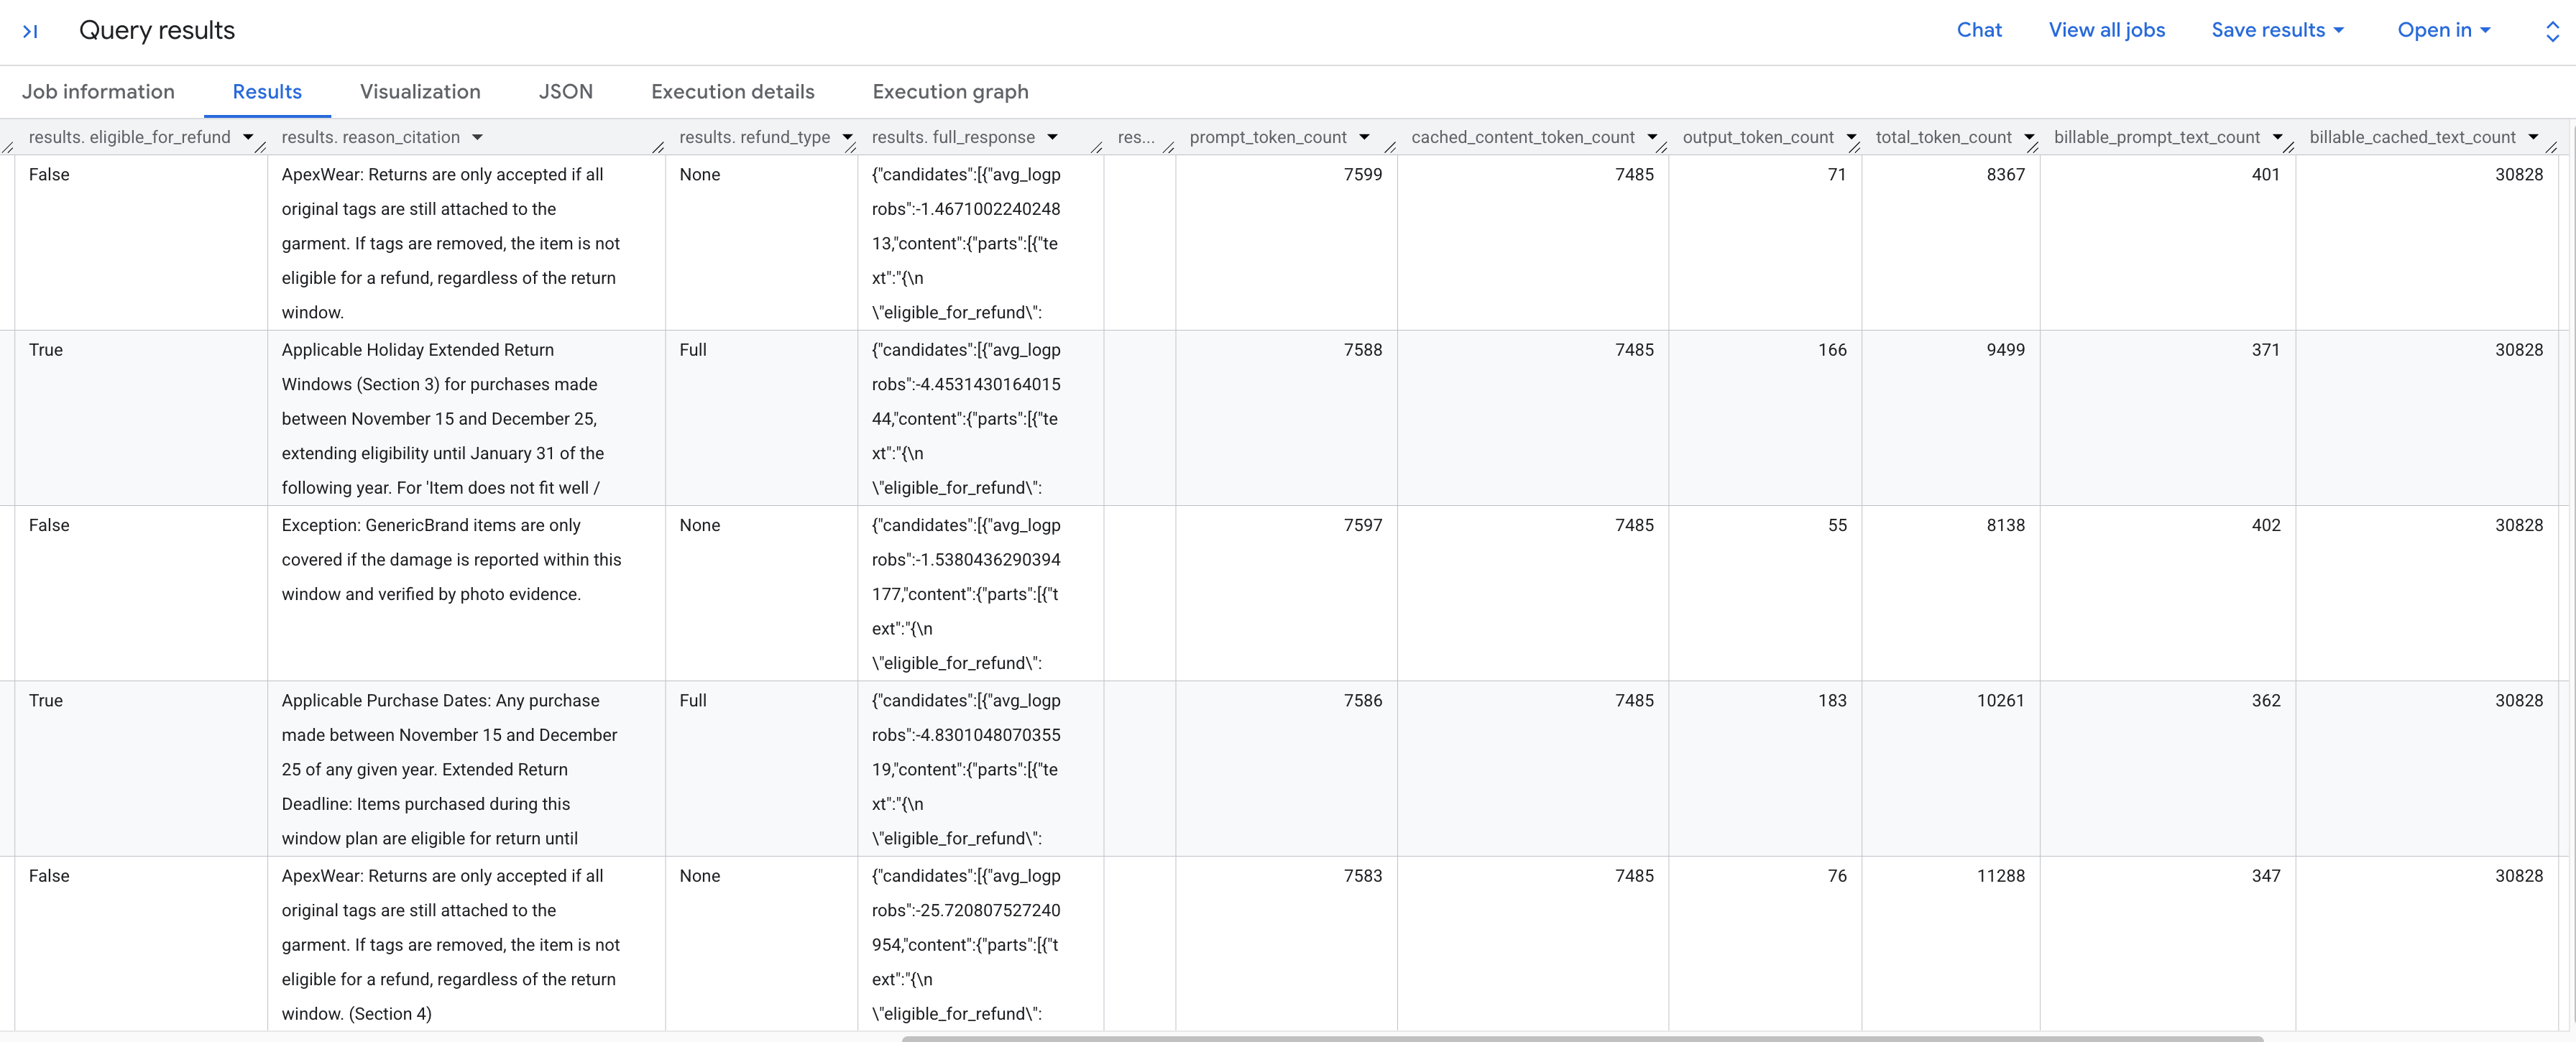
以下是您看到的 token 指标的细分:
prompt_token_count:输入提示中处理的 token 总数(包括缓存的内容)。cached_content_token_count:从缓存提供的 token 数(表示静态退货政策文档)。output_token_count:模型在响应中生成的 token 数。total_token_count:提示 token 和输出 token 的总和。billable_prompt_text_count:提示的非缓存部分中可结算的字符数。billable_cached_text_count:缓存的内容中可结算的字符数。
查看 billable_prompt_text_count 列,它每行仅显示数百个字符,这只是客户的具体请求。与完整退货政策的 billable_cached_text_count (超过 30,000 个字符)形成对比。如果没有上下文缓存,您需要为**每一行** 处理该完整政策文档付费。 通过缓存该文档,您只需为大型文档支付一次费用,后续行只需为较小的、不断变化的提示文本付费。
这可以为批量作业节省大量费用!
6. 清理
为避免 Google Cloud 账号持续产生费用,请删除在本 Codelab 中创建的资源。
在 Cloud Shell 中运行以下命令 以删除 BigQuery 数据集及其表:
bq rm -r -f -d caching_demo
删除 为政策文档创建的暂存存储分区 :
gcloud storage rm --recursive gs://${PROJECT_ID}-caching-demo
最后,删除上下文缓存 ,以避免使用您之前存储的变量产生持续的存储费用:
curl -X DELETE \
  -H "Authorization: Bearer $(gcloud auth print-access-token)" \
  "https://${LOCATION}-aiplatform.googleapis.com/v1/projects/${PROJECT_ID}/locations/${LOCATION}/cachedContents/${CACHE_ID}"
7. 恭喜
恭喜!您已成功在 Agent Platform 中创建上下文缓存,并在 BigQuery AI 函数中引用该缓存,以加快分析速度,同时降低输入 token 处理费用。
您学到的内容
- 如何为退货请求分析设置环境表。
- 如何使用
curl调用 Agent Platform (Vertex AI) API,以显式创建静态文档上下文缓存。 - 如何在
AI.GENERATESQL 查询中使用生成的缓存 ID,以消除有效提示中冗余的输入 token。