
1. Introduction
In this codelab, you will build your very first AI agent step-by-step using Google's Agent Development Kit (ADK) and Gemini. You will create a basic blog-writing agent that plans and writes content, showcasing the core concepts of reasoning and acting.
What you'll do
- Set up your development environment for ADK.
- Create a multi-agent system with a Planner and a Writer.
- Run the agent locally and interact with it via the ADK Web UI.
What you'll need
- A web browser such as Chrome.
- Python 3.10 or higher installed on your machine.
- A Google AI Studio API key.
This codelab is for developers of all levels, including beginners.
Estimated duration: 30 minutes.
2. Visual guide: What are AI Agents?
Before we start building, let's quickly understand what AI agents are and the common patterns they follow.
What is an AI Agent?
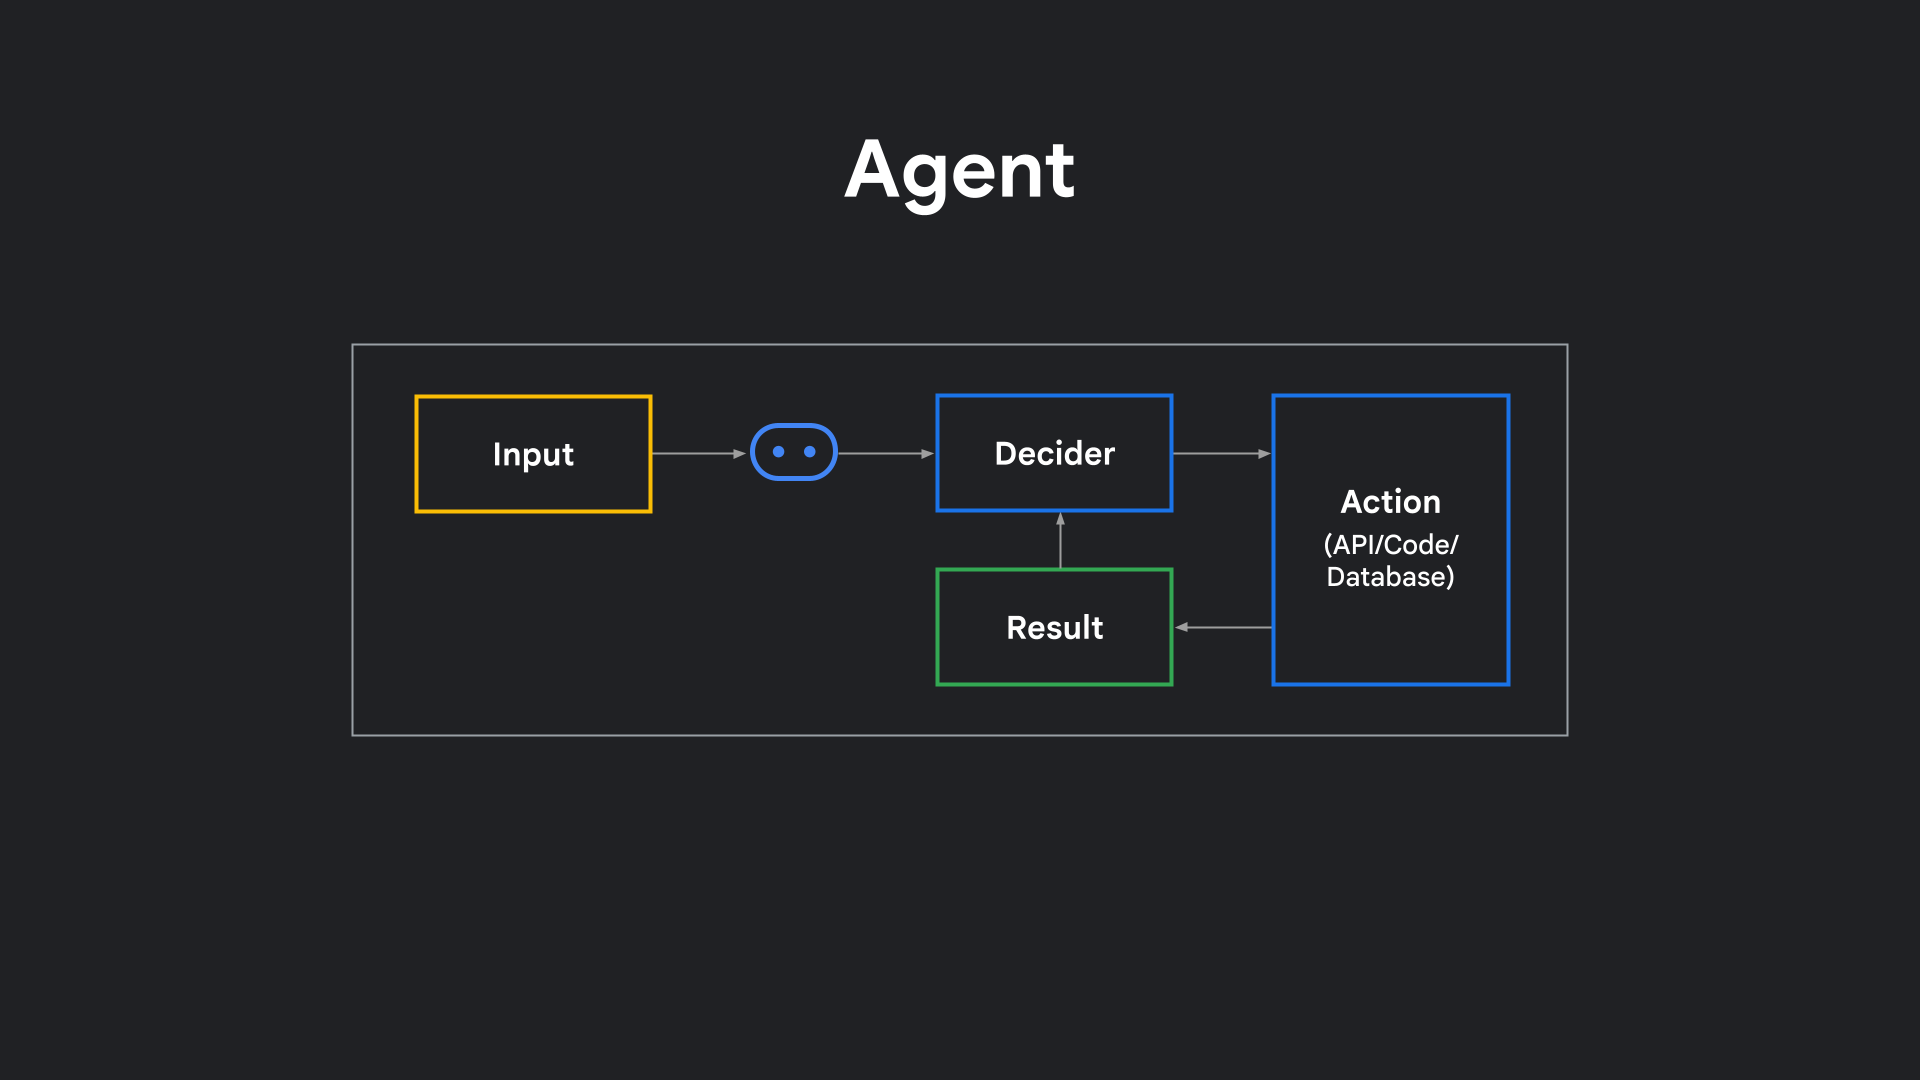
At the simplest level, an agent is software that doesn't just answer — it can decide and take action. Instead of generating a single response like a traditional chatbot, it looks at your request, figures out what steps to take, maybe calls an API, runs code, looks at the result, and then decides what to do next.
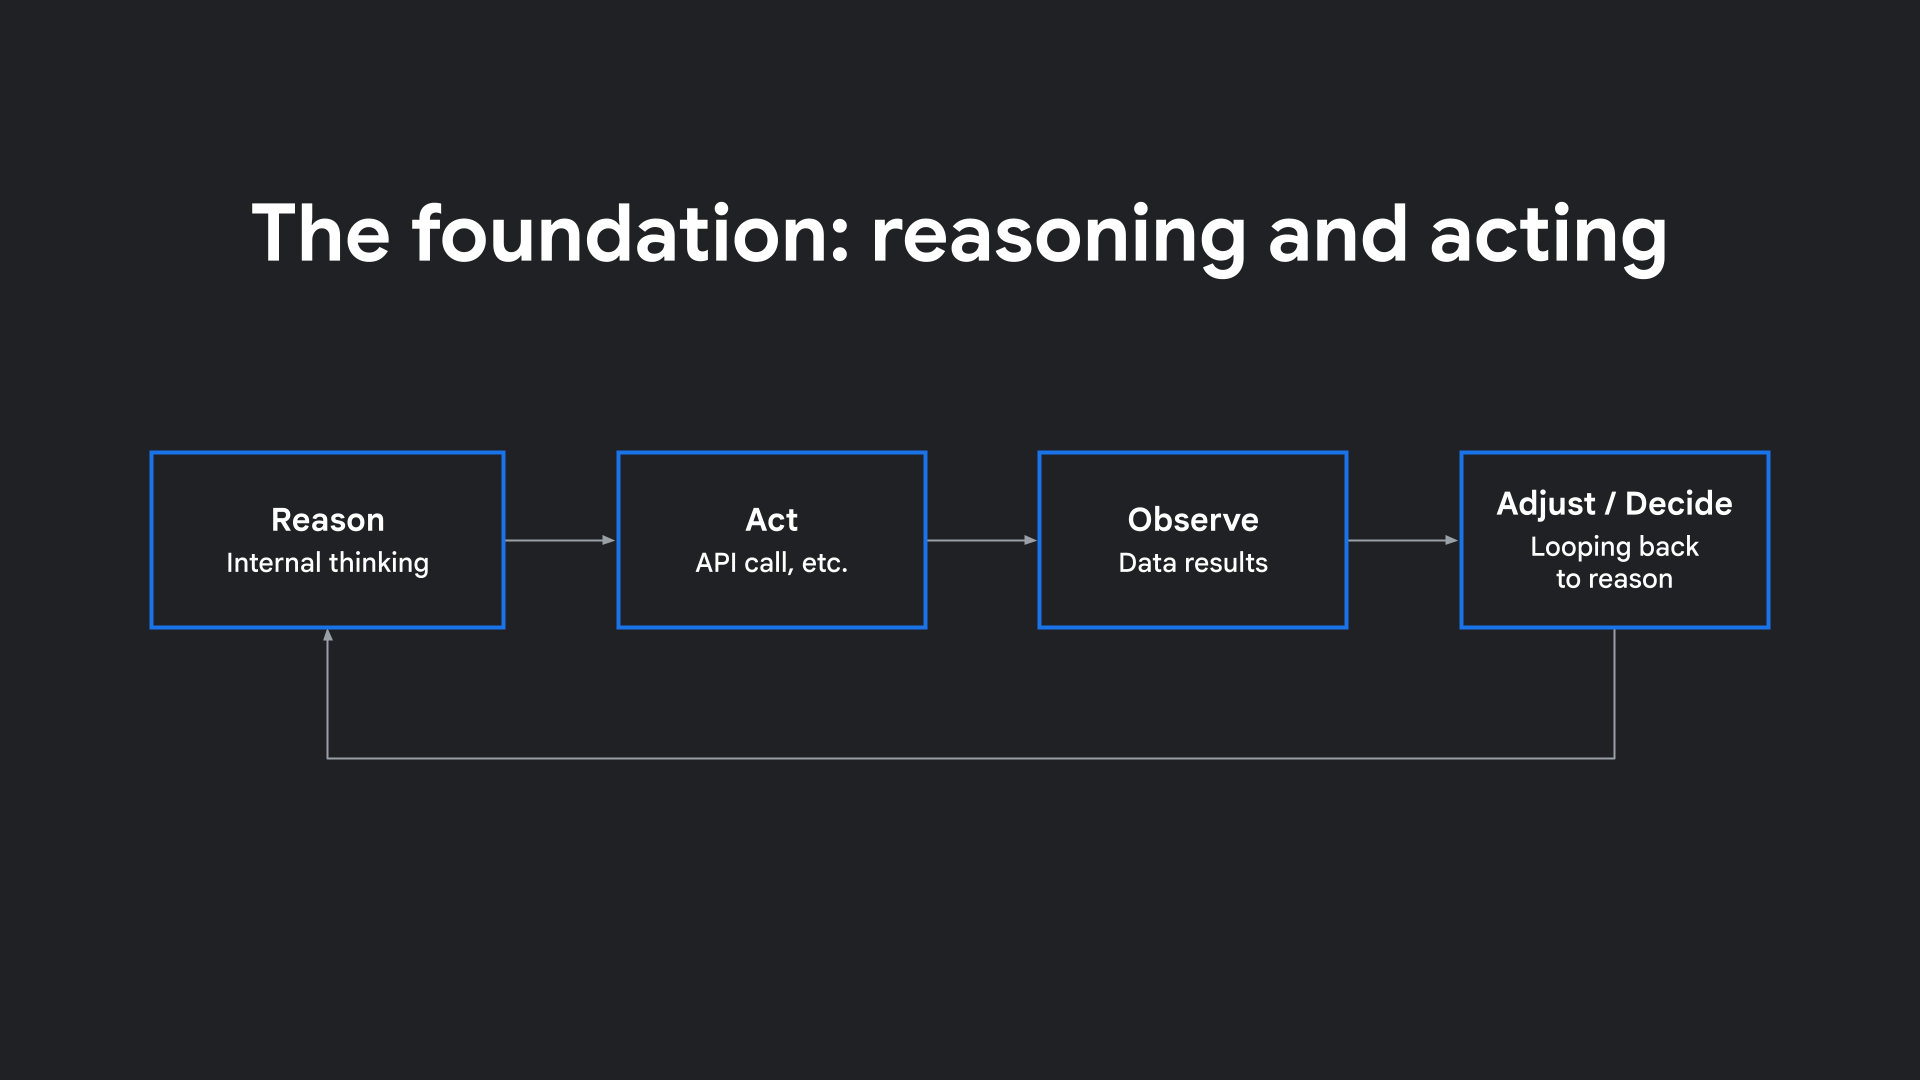
One of the clearest explanations comes from the research paper ReAct: Synergizing Reasoning and Acting in Language Models. The idea in that paper was simple but powerful: language models shouldn't just generate text in one go. They can actually reason step by step, take an action like calling a tool or API, observe the result, and then decide what to do next.
That cycle of reasoning, acting, observing, and adjusting is the foundation of how modern AI agents work. And it lines up with how Google Cloud defines them: systems with reasoning, planning, and memory, with enough autonomy to adapt and make decisions on behalf of the user.
Three Agent Behavior Patterns
Not all agents behave the same way. A useful way to think about them is in three broad patterns:
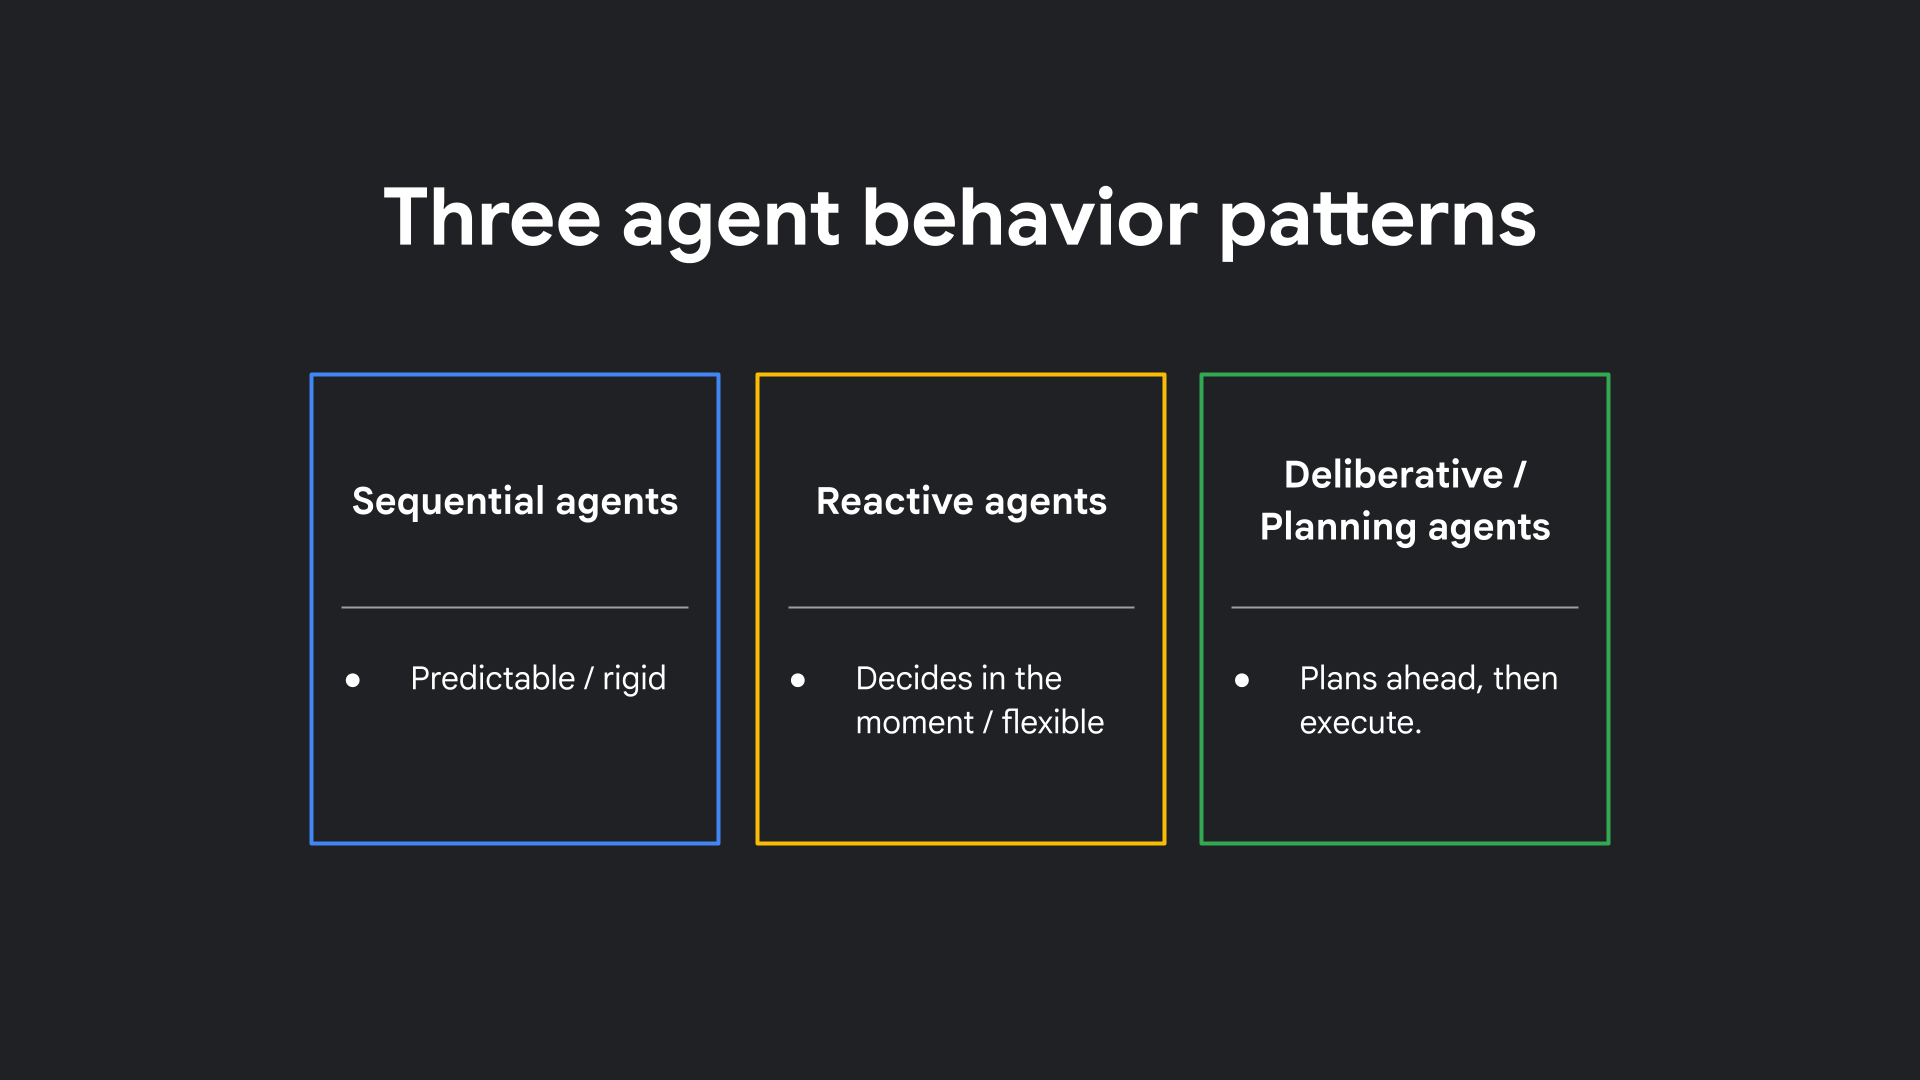
- Sequential agents: These run step by step like an assembly line: Step 1, then Step 2, then Step 3. They're predictable, but rigid.
- Reactive agents: These decide in the moment. They look at the current state and ask, ‘What should I do next?' Maybe Tool A one time, Tool B the next. They're flexible, but don't plan ahead.
- Deliberative, or planning agents: These pause to sketch a plan, then execute. Think about booking travel — you don't just buy a flight randomly, you pick dates, hotels, order the steps, and then follow through.
Which of these is the ‘right' one? It depends on the problem. For simple, predictable flows, sequential is fine. For dynamic tasks, reactive works better. For multi-step goals with dependencies, you want planning agents.
In this lab, we are building a Deliberative/Planning agent that first creates an outline and then writes the blog post!
3. Before you begin
Create a Google Cloud Account and Project
To deploy your agent to Google Cloud Run later in this lab, you need a Google Cloud account and a project with billing enabled.
- Sign-in to the Google Cloud Console. Create a new project or reuse an existing one. If you don't already have a Google Account, you must create one.
- Next, you'll need to enable billing in the Cloud Console to use Cloud resources. Running through this codelab should cost less than a few cents. New Google Cloud users may also be eligible for the $300 USD Free Trial program.
- Note your Project ID (a unique name across all Google Cloud projects). You will need this to configure and deploy the agent.
Get a Google AI Studio API Key
To use Gemini models, you need an API key from Google AI Studio.
- Go to Google AI Studio.
- Click on Get API Key.
- Create a new key or use an existing one. Copy the key for later use.
4. Create the Blog Writer Agent Project Structure
In this step, you will set up the directory and files to house your blog-writing agent's code on your local machine.
1. Create the blog writing agent workspace
Open your terminal and run the following commands to create a dedicated directory for your blog-writer agent and navigate into it:
mkdir bloggeragent
cd bloggeragent
2. Initialize the agent files
The Google ADK framework loads agent workflows directly from your project directory. Create the necessary files directly in the root of bloggeragent:
touch requirements.txt .env __init__.py agent.py
5. Install Dependencies and Setup Environment
In this step, you will set up a Python virtual environment, install the Google ADK framework, and configure environment variables to authenticate your blog agent with the Gemini model.
1. Configure the agent requirements
Open the requirements.txt file in the bloggeragent directory and specify the packages needed for the blog writing agent by adding the following to it:
google-adk==2.2.0
python-dotenv
2. Create a virtual environment for the agent
From the bloggeragent directory, create and activate a Python virtual environment to isolate the agent's packages:
python3 -m venv .venv
source .venv/bin/activate
3. Install the ADK framework
Install the dependencies defined in your requirements.txt to equip your local workspace with the Google ADK:
pip install -r requirements.txt
4. Configure agent API credentials
Open the .env file you created in the project root and add your Gemini API key:
GOOGLE_API_KEY=your_api_key
Replace your_api_key with the key you copied from Google AI Studio.
6. Build the Multi-Agent Blog Writer
In this step, you will implement the core workflow of your blog-writing agent system.
Instead of a simple single-prompt chatbot, you will build a complex multi-agent system that uses self-correcting loops and outline verification to write high-quality technical posts. This follows the Deliberative/Planning pattern we discussed earlier.
Architecture Overview
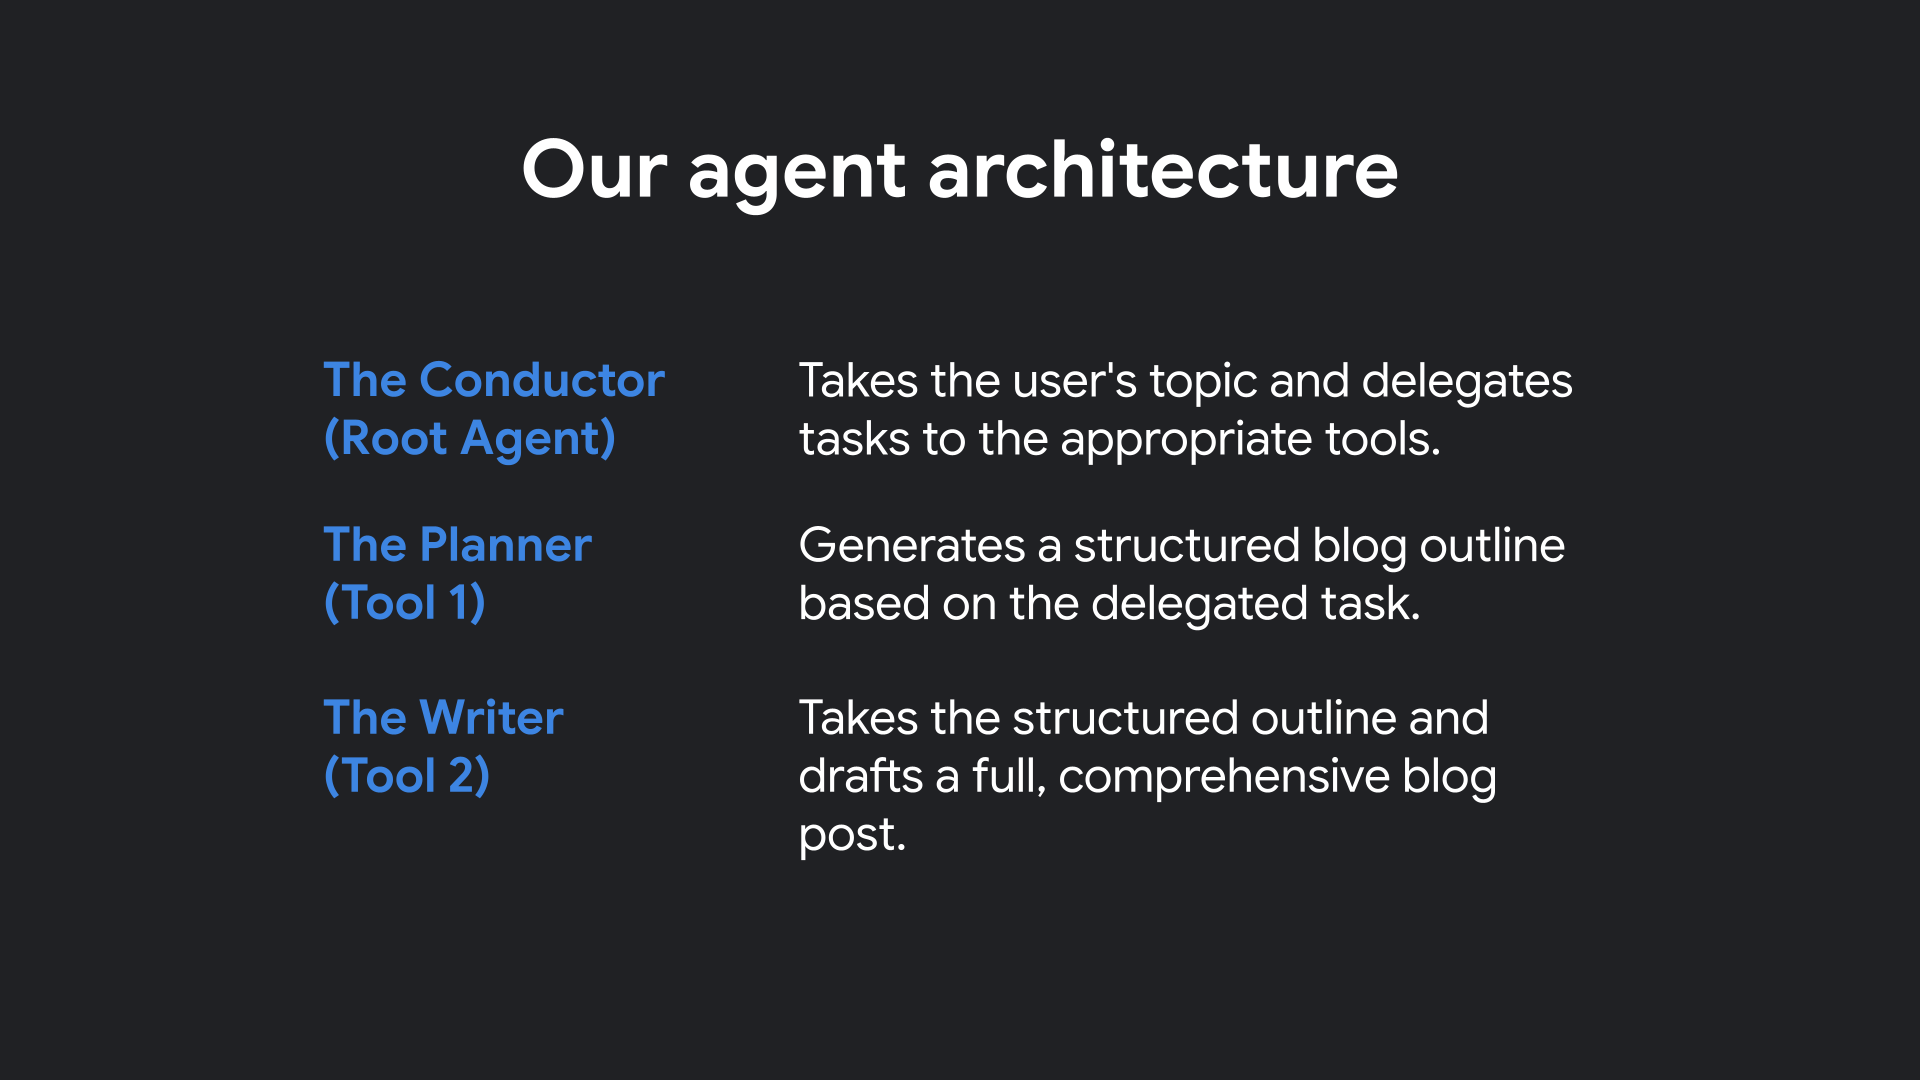
Here is how the specialist agents in your system interact:
Configure init.py
Open __init__.py in your text editor and add the following import to expose the agent workflow to the runner:
from . import agent
Write the blog writing agent workflow
Open agent.py in your code editor and add the following code which defines the Planner, Writer, Validation Checkers, and the main Blogger agent:
import os
import sys
from pathlib import Path
import datetime

from dotenv import load_dotenv
from google.adk.agents import Agent, LoopAgent
from google.adk.tools import agent_tool

# env config
load_dotenv()

MODEL = os.getenv("MODEL", "gemini-flash-latest")

# Sub-Agent: Planner
blog_planner = Agent(
   name="BlogPlanner",
   model=MODEL,
   description="Creates a practical, skimmable outline in Markdown.",
   instruction="""
You are a technical content strategist. Produce a clear Markdown outline with:
- Title
- Short intro
- 4–6 main sections (each with 2–3 bullets)
- Conclusion

If `codebase_context` exists in state, weave in specific sections/snippets.
Return only the outline in Markdown.
""",
   output_key="blog_outline",
)

class OutlineValidationChecker(Agent):
   def __init__(self):
       super().__init__(
           name="OutlineValidationChecker",
           model=MODEL,
           description="Validates that the outline is usable.",
           instruction="""
Check the outline in state `blog_outline`. If it has a title, intro, 4–6 sections, and a conclusion, respond exactly "ok".
Otherwise respond exactly "retry" and list missing pieces.
""",
           output_key="validation_result",
       )

robust_blog_planner = LoopAgent(
   name="RobustBlogPlanner",
   description="Retries planning if validation fails.",
   sub_agents=[blog_planner, OutlineValidationChecker()],
   max_iterations=3,
)

# Sub-Agent: Writer
blog_writer = Agent(
   name="BlogWriter",
   model=MODEL,
   description="Writes a technical blog post from the outline.",
   instruction="""
Write a complete Markdown article from the outline in `blog_outline`.

Guidelines:
- Audience: software engineers; skip basics and focus on practical insight.
- Explain both the 'how' and 'why'.
- Include concise code snippets when helpful.
- Follow the outline's structure (H2/H3).
- Output only the final article in Markdown (no fence around the whole post).
""",
   output_key="blog_post",
)

class BlogPostValidationChecker(Agent):
   def __init__(self):
       super().__init__(
           name="BlogPostValidationChecker",
           model=MODEL,
           description="Validates the final post.",
           instruction="""
Check `blog_post` for: intro, clear sections matching the outline, conclusion, and technical clarity.
If passes, respond "ok". Else respond "retry" with the specific fixes.
""",
           output_key="validation_result",
       )

robust_blog_writer = LoopAgent(
   name="RobustBlogWriter",
   description="Retries writing if validation fails.",
   sub_agents=[blog_writer, BlogPostValidationChecker()],
   max_iterations=3,
)

# Expose planner/writer as tools so the root agent can call them explicitly
planner_tool = agent_tool.AgentTool(agent=robust_blog_planner)
writer_tool  = agent_tool.AgentTool(agent=robust_blog_writer)

# Root Agent: Plan → Write
root_agent = Agent(
   name="Blogger",
   model=MODEL,
   description="Minimal multi-agent blogger that plans and writes.",
   instruction=f"""
If the user gives a topic:
1) Call the planner tool to generate the outline.
2) Call the writer tool to produce the full draft.
3) End with 3 alternate titles and 2 tweet-length hooks.

Date: {datetime.datetime.now().strftime("%Y-%m-%d")}
""",
   tools=[
       planner_tool, # calls RobustBlogPlanner
       writer_tool,  # calls RobustBlogWriter
   ],
)
Understanding the Agent Architecture
Let's break down the main components of the code you just added in agent.py to understand how it implements the multi-agent planning and writing workflow:
1. The BlogPlanner Sub-Agent
The blog_planner agent is responsible for content planning. It takes the topic provided by the user and produces a structured outline in Markdown (with a title, intro, 4-6 sections, and a conclusion). The outline is saved to the shared state dictionary under the key "blog_outline".
2. The OutlineValidationChecker
The OutlineValidationChecker agent acts as a quality gate. It reviews the generated "blog_outline" in state. If the outline is valid, it responds with "ok". Otherwise, it returns "retry" alongside a list of what's missing.
3. The RobustBlogPlanner Loop
To prevent the agent from producing bad outlines, we wrap the planner and the validation checker inside a LoopAgent called robust_blog_planner. If validation fails and returns "retry", the loop automatically runs the planner again, up to 3 times, ensuring self-correction before moving to the next stage.
4. The BlogWriter Sub-Agent
Once the outline is finalized, the blog_writer agent reads "blog_outline" from the state and generates the full technical article in Markdown, matching the structure of the outline and tailoring it for software engineers.
5. The BlogPostValidationChecker & RobustBlogWriter Loop
Just like the outline, the final article is validated by the BlogPostValidationChecker to ensure all key sections are present and clear. The writer and checker are wrapped in the robust_blog_writer loop, allowing it to self-correct up to 3 times if the checker finds issues.
6. Exposing Loops as Tools
We wrap the planner loop (robust_blog_planner) and writer loop (robust_blog_writer) as tools (planner_tool and writer_tool) using AgentTool. This allows other agents to call these complex workflows as if they were simple tools.
7. The Blogger Root Agent
The root_agent (named Blogger) orchestrates the entire workflow. When given a topic, its instructions guide it to:
- Call the
planner_toolto generate the validated outline. - Call the
writer_toolto write the draft based on that outline. - Finish by generating 3 alternate titles and 2 tweet hooks.
This multi-agent loop architecture ensures reliability by catching and correcting LLM formatting or structural mistakes before showing the output to the user!
7. Run and Test the Agent
Now it's time to see your agent in action!
1. Start the ADK Web UI
Make sure you are in the bloggeragent project root directory in your terminal and that your virtual environment is active (source .venv/bin/activate), then start the web interface:
adk web
2. Interact with the Agent
- Open your browser and navigate to
http://127.0.0.1:8000(or the port you specified). - You should see the ADK Web UI with the
Bloggeragent loaded and its visual layout (showing the Blogger root agent pointing to the RobustBlogPlanner and RobustBlogWriter tools):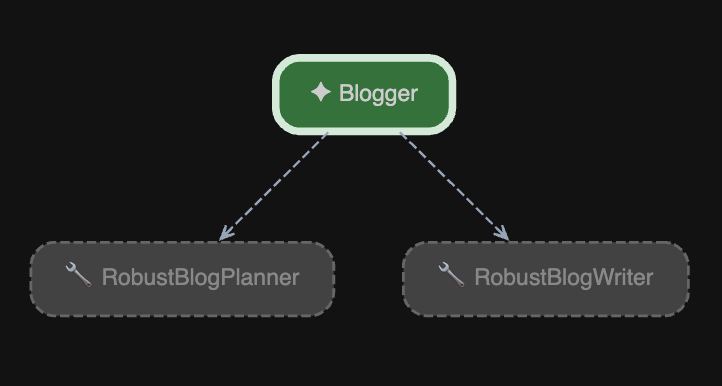
- Type a technical topic in the message box and press Enter. Here are some interesting test prompts you can use to evaluate your agent:
How to build an AI agent using planning loopsExplain the difference between REST and gRPC in microservicesA guide to using Python's asyncio for backend concurrencyWhy developers should use Docker for local database setups
- Watch the execution trace in the UI. You will see the
BlogPlannercreate the outline, theOutlineValidationCheckervalidate it, and theBlogWriterwrite the final draft based on the outline: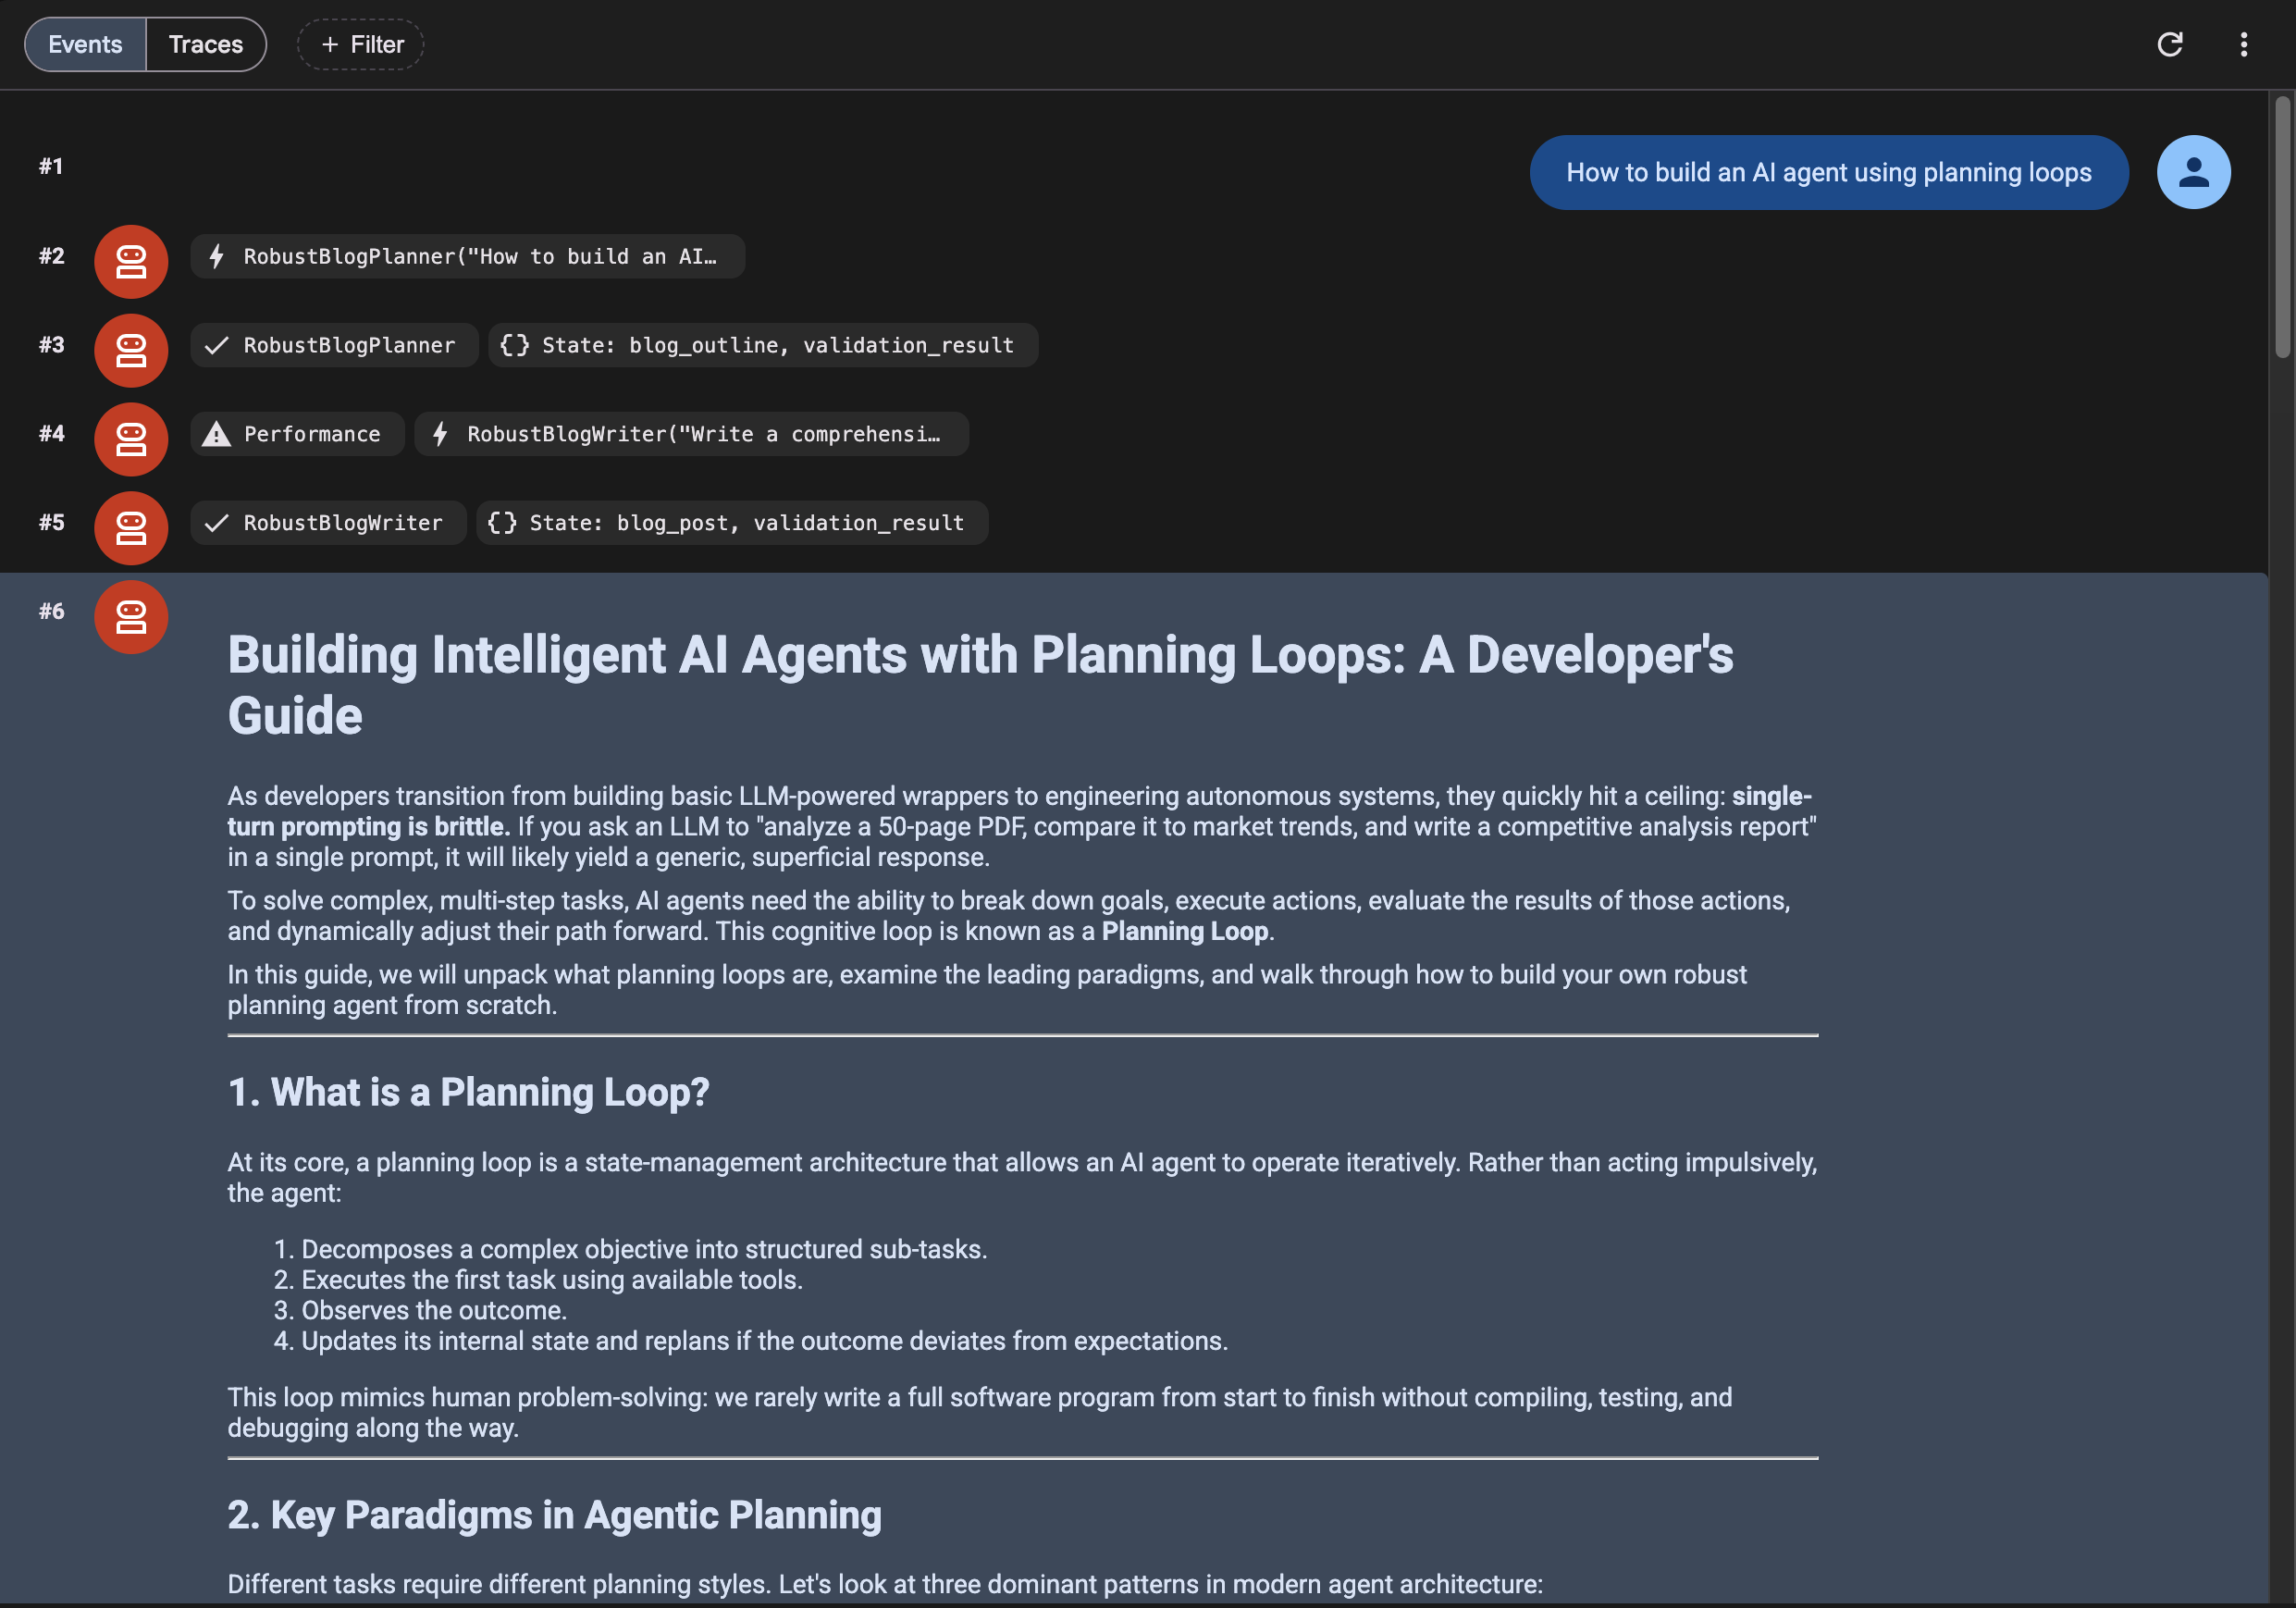
8. Deploy to Cloud Run
Now that you have verified the agent works locally, let's deploy it to Google Cloud Run so others can use it!
Google Cloud Run is a managed compute platform that enables you to run stateless containers that are invocable via web requests or Pub/Sub events.
1. Prerequisites for Deployment
To deploy the blog writing agent to Cloud Run, you will need to install and authenticate the Google Cloud CLI (gcloud) on your local machine:
- Install the Google Cloud CLI: If you don't have it installed, follow the Google Cloud CLI Installation Guide for your operating system (macOS, Windows, or Linux).
- Authenticate your local terminal: Once installed, run the following command in your terminal to log in to your Google Cloud account:
gcloud auth login - Verify authentication: Confirm that your account is successfully logged in and that you can access your Google Cloud resources:
gcloud auth list
2. Setup Google Cloud Project
Set your active project in the terminal:
gcloud config set project <YOUR_PROJECT_ID>
Enable the necessary Google Cloud services required to build and deploy your containerized agent:
gcloud services enable \
  run.googleapis.com \
  artifactregistry.googleapis.com \
  cloudbuild.googleapis.com
Since the ADK deploy command uses Google Cloud Build to automate the build process, you must grant the default compute service account permission to use Cloud Build.
Find your project number by running:
gcloud projects describe <YOUR_PROJECT_ID> --format="value(projectNumber)"
Run the following commands to bind the required IAM roles (replace
- Grant Cloud Build permission to build your container:
gcloud projects add-iam-policy-binding <YOUR_PROJECT_ID> \
  --member="serviceAccount:<PROJECT_NUMBER>-compute@developer.gserviceaccount.com" \
  --role="roles/cloudbuild.builds.builder"
- Grant Gemini Enterprise access permission so the deployed agent can invoke Gemini models without requiring an API key:
gcloud projects add-iam-policy-binding <YOUR_PROJECT_ID> \
  --member="serviceAccount:<PROJECT_NUMBER>-compute@developer.gserviceaccount.com" \
  --role="roles/aiplatform.user"
3. Setup local environment variables
To simplify the deployment command and prevent typos, set your project ID as an environment variable in your terminal session:
export PROJECT_ID="<YOUR_PROJECT_ID>"
4. Deploy using ADK CLI
The ADK CLI provides a streamlined command to deploy your agent to Cloud Run.
Make sure your virtual environment is active and you are in the bloggeragent project directory, then run the deployment command:
# Deploy using ADK
adk deploy cloud_run \
  --project=$PROJECT_ID \
  --region=us-east1 \
  --service_name=bloggeragent \
  --with_ui \
  . \
  -- \
  --set-env-vars GOOGLE_GENAI_USE_VERTEXAI=TRUE,MODEL=gemini-3.5-flash,GOOGLE_CLOUD_LOCATION=global
During the deployment process, you will be prompted with the following two questions in your terminal:
- Confirm repository creation:
Deploying from source requires an Artifact Registry Docker repository to store built containers. A repository named [cloud-run-source-deploy] in region [us-east1] will be created.

Do you want to continue (Y/n)?
Yand press Enter. - Allow unauthenticated access:
Allow unauthenticated invocations to [bloggeragent] (y/N)?
yand press Enter (this allows you to access the ADK Web UI publicly in your browser).
5. Access your Deployed Agent
Once the deployment completes, the command will output a URL. Open that URL in your browser to access your live, publicly accessible ADK Web UI!
9. Clean up
To avoid ongoing charges to your Google Cloud account, delete the resources created during this codelab.
1. Delete Cloud Run Service
Delete the deployed bloggeragent service:
gcloud run services delete bloggeragent --region=us-east1 --quiet
2. Delete the Artifact Registry Repository
Delete the Docker repository created to store the built container images:
gcloud artifacts repositories delete cloud-run-source-deploy --location=us-east1 --quiet
3. Stop the Local Server
To stop the local ADK server, press CTRL+C in the terminal where it is running, and deactivate the virtual environment:
deactivate
10. Congratulations
Congratulations! You've built your first AI agent using Google's ADK and Gemini.
What you've learned
- The core concepts of AI agents (Reasoning and Acting).
- How to use Google ADK to build a multi-agent system.
- How to run and test your agent using the Web UI.
Next steps
- Try adding tools to your agent (like web search or API calls).
- Stay tuned for Video 2, where we will integrate an MCP server!