

১. শুরু করার আগে
আপনি যদি কখনও বন্ধু বা প্রতিবেশীদের সাথে সপ্তাহান্তে দৌড়ের আয়োজন করার চেষ্টা করে থাকেন, তাহলে এর ঝামেলার কথা আপনার জানা আছে: অবিরাম গ্রুপ চ্যাটের ভিড়ে মিলিত হওয়ার জায়গা হারিয়ে যায়, লোকেরা অনবরত জিজ্ঞাসা করে কে কী গতিতে দৌড়াচ্ছে, এবং নতুনরা কখনোই নিশ্চিত হতে পারে না যে কারা আসছে।
এই কোডল্যাবে, আপনি রানিং ক্লাব তৈরি করার মাধ্যমে এই দৈনন্দিন সমস্যার সমাধান করবেন—এটি একটি বন্ধুত্বপূর্ণ ওয়েব অ্যাপ যেখানে স্থানীয় দৌড়বিদরা তাদের পছন্দের রুটগুলো দেখতে, সপ্তাহান্তের সাক্ষাতের সময় নির্ধারণ করতে, এক ক্লিকে অংশগ্রহণ নিশ্চিত করতে এবং সহ-দৌড়বিদদের সাথে চ্যাট করতে পারবেন।
এই অ্যাপটির ডেটাবেস কেন প্রয়োজন?
একটি কমিউনিটি অ্যাপের জন্য একটি নির্ভরযোগ্য স্মৃতিশক্তির প্রয়োজন—যা ডেটাবেস নামে পরিচিত। যখন কোনো দৌড়বিদ একটি নতুন মনোরম রুট যোগ করেন, শনিবার সকালের দৌড়ের জন্য অংশগ্রহণ নিশ্চিত করেন, বা পার্কিং সম্পর্কে জানতে চেয়ে কোনো মন্তব্য পোস্ট করেন, তখন সেই তথ্যগুলো তাদের ফোন বন্ধ করলে বা কম্পিউটার বন্ধ করলে হারিয়ে যেতে পারে না। একটি ডেটাবেস সমস্ত রুট, অংশগ্রহণকারীদের তালিকা এবং সদস্যদের বার্তা নিরাপদে সংরক্ষণ ও সংগঠিত রাখে, যাতে ক্লাবের প্রত্যেকে যখনই অ্যাপটি খোলে, তখনই হালনাগাদ তথ্য দেখতে পায়।
আপনি গুগল এআই স্টুডিও -এর বিল্ড মোড ব্যবহার করে এই অ্যাপটি তৈরি করবেন। আপনাকে নিজে থেকে কোনো জটিল কোড লিখতে বা প্রযুক্তিগত পরিকাঠামো স্থাপন করতে হবে না—আপনি কেবল সহজ ভাষায় বর্ণনা করবেন যে আপনি কী চান। গুগল এআই স্টুডিও অ্যাপটি তৈরি করে, আপনার ডেটা মনে রাখার জন্য একটি আসল ক্লাউড এসকিউএল ফর পোস্টগ্রেসকিউএল (Cloud SQL for PostgreSQL) ডেটাবেসের সাথে সংযোগ স্থাপন করে এবং ক্লাউড রান- এ অ্যাপটি লাইভ প্রকাশ করে, যাতে আপনার কমিউনিটি অবিলম্বে এটি ব্যবহার শুরু করতে পারে।
আপনি যা তৈরি করবেন
আপনি রানিং ক্লাব (Running Club) নামে একটি কমিউনিটি ওয়েব অ্যাপ তৈরি ও চালু করবেন, যেটিতে নিম্নলিখিত বিষয়গুলো অন্তর্ভুক্ত থাকবে:
- গুগল সাইন-ইন : বিদ্যমান গুগল অ্যাকাউন্ট ব্যবহার করে দ্রুত ও সুরক্ষিত লগইন।
- দৌড়বিদের প্রোফাইল : সদস্যদের প্রোফাইল যেখানে দৌড়ানোর পছন্দ এবং লক্ষ্য গতি তুলে ধরা হয়।
- রুট লাইব্রেরি : দূরত্ব, চড়াইয়ের তীব্রতা এবং মিলনস্থল সহ এলাকার প্রিয় রুটগুলোর একটি সংগ্রহ।
- আসন্ন দৌড়ের সময়সূচী : আসন্ন দলগত দৌড়গুলো সংগঠিত করতে এবং সেগুলোকে রুটের সাথে সংযুক্ত করার জন্য একটি ইভেন্ট বোর্ড।
- সহজ RSVP : সদস্যদের জন্য একটি এক-ক্লিক বাটন, যার মাধ্যমে তারা 'আমি যাচ্ছি' জানাতে এবং আর কারা আসছে তা দেখতে পারবেন।
- রান আলোচনা : প্রতিটি রানের বিস্তারিত সমন্বয়, প্রশ্ন জিজ্ঞাসা এবং আপডেট শেয়ার করার জন্য একটি মন্তব্য করার জায়গা থাকবে।
আপনি যা শিখবেন
- সহজ ভাষায় একটিমাত্র প্রম্পট ব্যবহার করে গুগল এআই স্টুডিওতে কীভাবে একটি কার্যকরী ওয়েব অ্যাপ তৈরি করবেন।
- যেভাবে গুগল এআই স্টুডিও স্বয়ংক্রিয়ভাবে গুগল সাইন-ইন সেট আপ করে।
- কীভাবে গুগল এআই স্টুডিও আপনার ডেটা মনে রাখার জন্য একটি আসল ক্লাউড এসকিউএল ফর পোস্টগ্রেসকিউএল (Cloud SQL for PostgreSQL) ডেটাবেস তৈরি ও সংযুক্ত করে।
- এআই-এর সাথে চ্যাট করেই কীভাবে নতুন ফিচার যোগ করবেন এবং আপনার ডেটাবেস প্রসারিত করবেন
- আপনার ক্লাবের ডেটা একাধিক ভিজিট জুড়ে নিরাপদে সংরক্ষিত থাকে কিনা, তা কীভাবে যাচাই করবেন।
- Cloud Run ব্যবহার করে কীভাবে আপনার অ্যাপটি ইন্টারনেটে লাইভ প্রকাশ করবেন।
- গুগল ক্লাউড কনসোলে আপনার লাইভ অ্যাপ এবং ডেটাবেস কীভাবে দেখবেন।
আপনার যা যা লাগবে
- গুগল ক্রোমের মতো একটি আধুনিক ওয়েব ব্রাউজার।
- Google AI Studio- তে সাইন ইন করার জন্য একটি সাধারণ গুগল অ্যাকাউন্ট প্রয়োজন।
ক্লাউড এসকিউএল স্টার্টার এডিশনের যোগ্যতা এবং সীমাবদ্ধতা
নির্মাতাদের জেনারেটিভ অ্যাপ এবং পরিচালিত ডেটাবেস নিয়ে পরীক্ষা-নিরীক্ষা করতে সাহায্য করার জন্য গুগল এআই স্টুডিও গুগল ক্লাউড স্টার্টার টিয়ার অফার করে:
- যোগ্যতা :
- সাধারণ গুগল অ্যাকাউন্ট ব্যবহারকারীরা এটি ব্যবহার করতে পারবেন।
- অযোগ্য অ্যাকাউন্টগুলোর মধ্যে রয়েছে বর্তমান বা অতীতের গুগল ক্লাউড বিলিং অ্যাকাউন্টধারী ব্যবহারকারী, সেইসাথে গুগল ওয়ার্কস্পেস, গুগল ওয়ার্কস্পেস ফর এডুকেশন, বা গুগল ফর ননপ্রফিটস-এর সাথে যুক্ত অ্যাকাউন্টসমূহ।
- আপনার অ্যাকাউন্ট স্টার্টার টিয়ারের জন্য যোগ্য না হলেও , বিলিং চালু আছে এমন একটি বিদ্যমান গুগল ক্লাউড প্রজেক্ট নির্বাচন করে আপনি এই ল্যাবটি সম্পূর্ণ করতে পারবেন। কোনো প্রজেক্টে বিলিং চালু আছে কিনা, তা কীভাবে নিশ্চিত করবেন তা জানুন।
- সম্পদের বিবরণ :
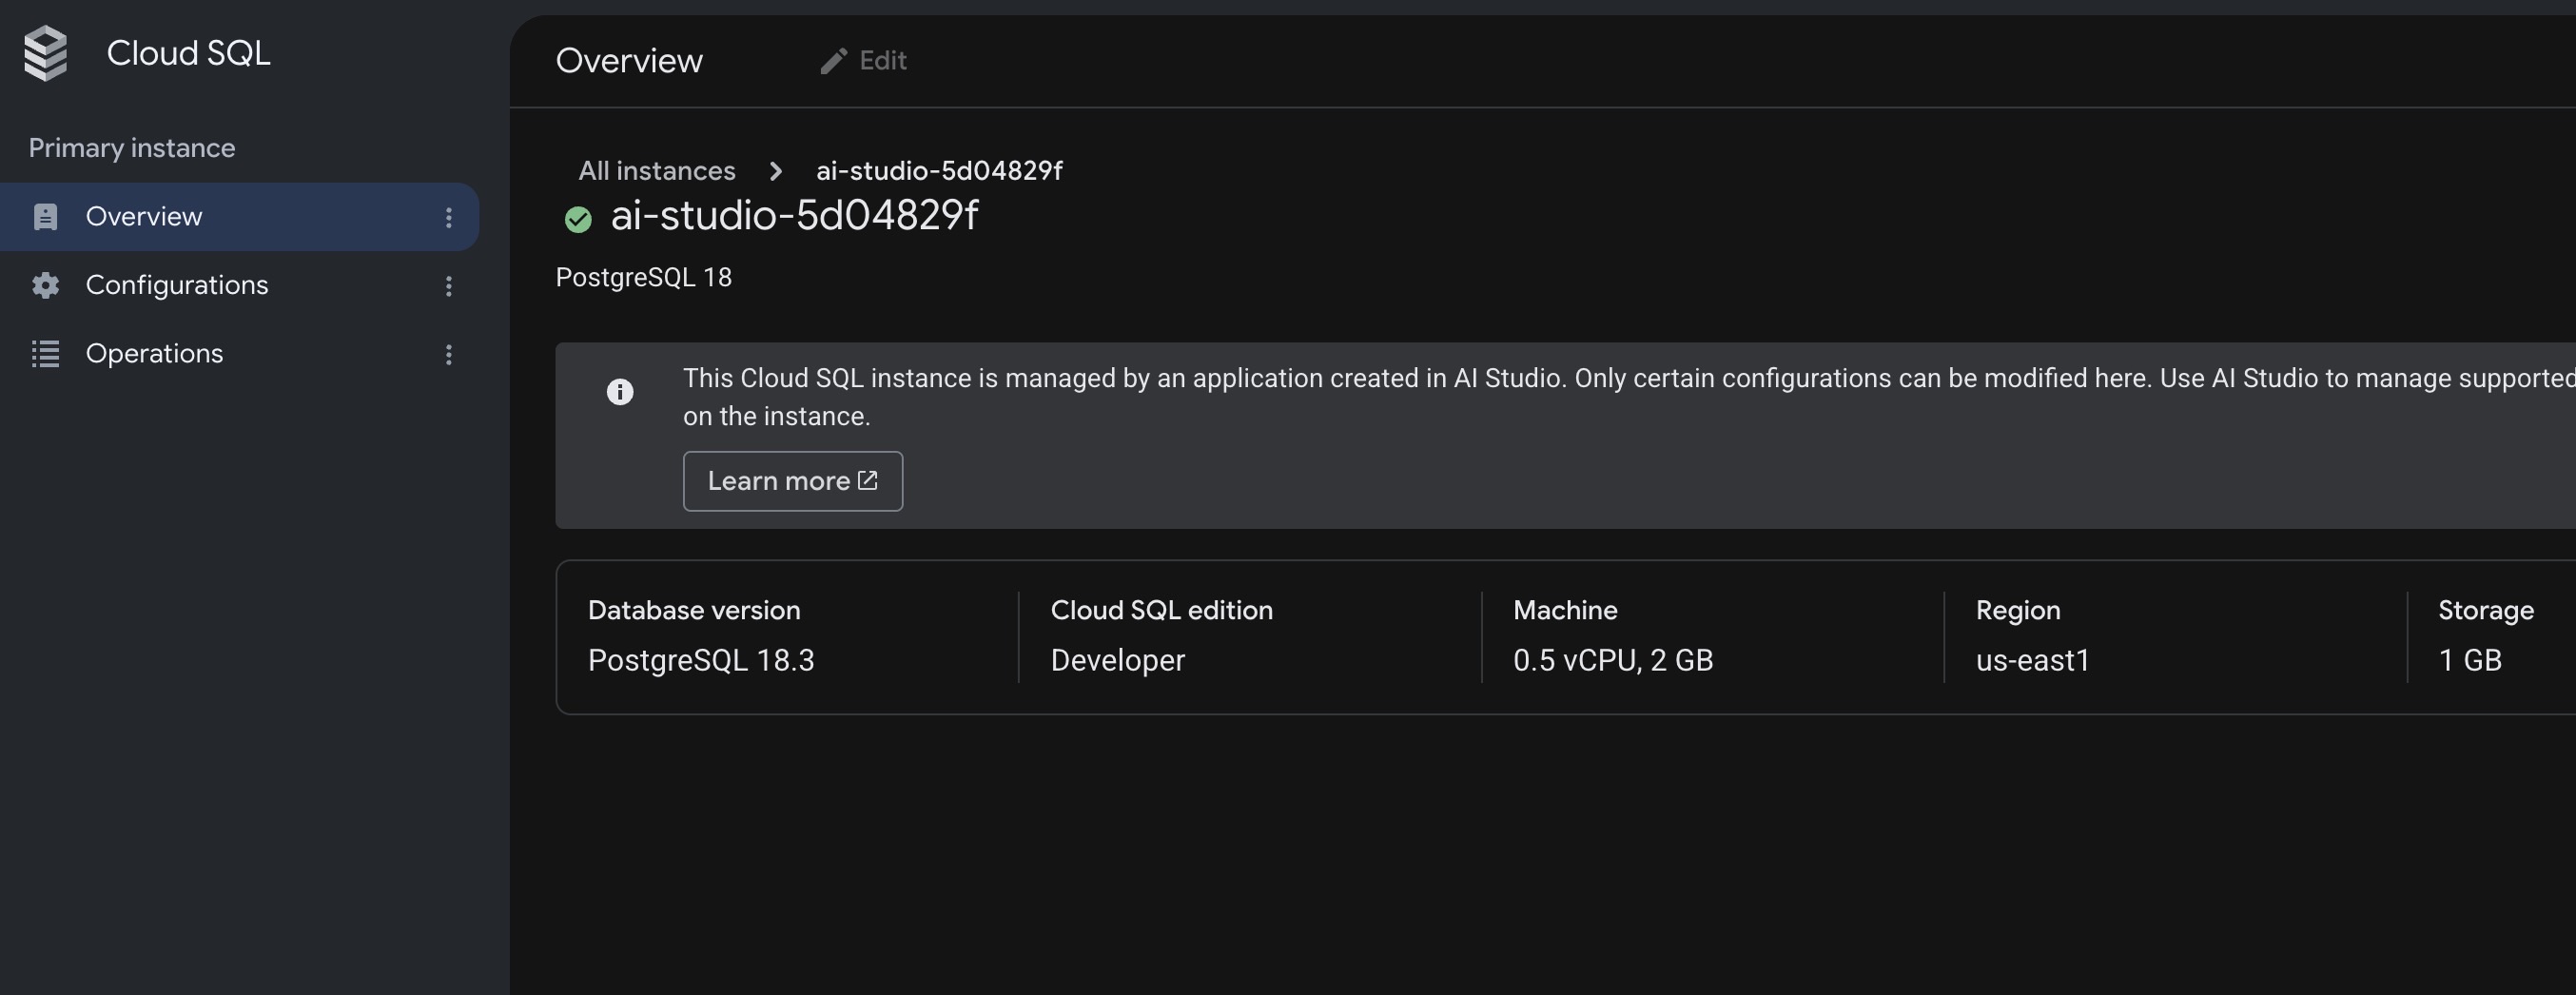
- PostgreSQL 18 চালিত একটি Cloud SQL for PostgreSQL Developer Edition ইনস্ট্যান্স প্রস্তুত করে।
- এতে রয়েছে ০.৫ vCPU, ২ জিবি র্যাম এবং ১ জিবি স্টোরেজ। কার্যকলাপের উপর নির্ভর করে, কয়েক মাস বা তারও বেশি সময় ধরে প্রতিদিন শত শত ভিজিট চালানোর জন্য এটি যথেষ্ট হওয়া উচিত।
- স্কেল টু জিরো সমর্থন করে, যা কোটা সাশ্রয়ের জন্য কোনো সক্রিয় ডাটাবেস সংযোগ না থাকলে স্বয়ংক্রিয়ভাবে কম্পিউটিং কার্যক্রম থামিয়ে দেয়।
- কোটা :
- এর সাথে প্রতি মাসে বিনামূল্যে ৫০টি কম্পিউট ইউনিট এবং ১০ জিবি স্টোরেজ অন্তর্ভুক্ত রয়েছে।
২. গুগল এআই স্টুডিও খুলুন এবং একটি নতুন অ্যাপ শুরু করুন।
শুরু করার জন্য, আপনার ব্রাউজারে গুগল এআই স্টুডিও খুলুন। এটি আপনার অ্যাপ তৈরির কর্মক্ষেত্র, যেখানে আপনি আপনার প্রয়োজন বর্ণনা করে সহজেই অ্যাপ তৈরি ও পরীক্ষা করতে পারবেন।
ধাপ ১: গুগল এআই স্টুডিওতে সাইন ইন করুন।
- আপনার ওয়েব ব্রাউজার (যেমন গুগল ক্রোম) খুলুন এবং aistudio.google.com- এ যান।
- Get started-এ ক্লিক করুন এবং আপনার সাধারণ Google অ্যাকাউন্ট (যেমন আপনার Gmail অ্যাকাউন্ট) দিয়ে লগ ইন করুন।
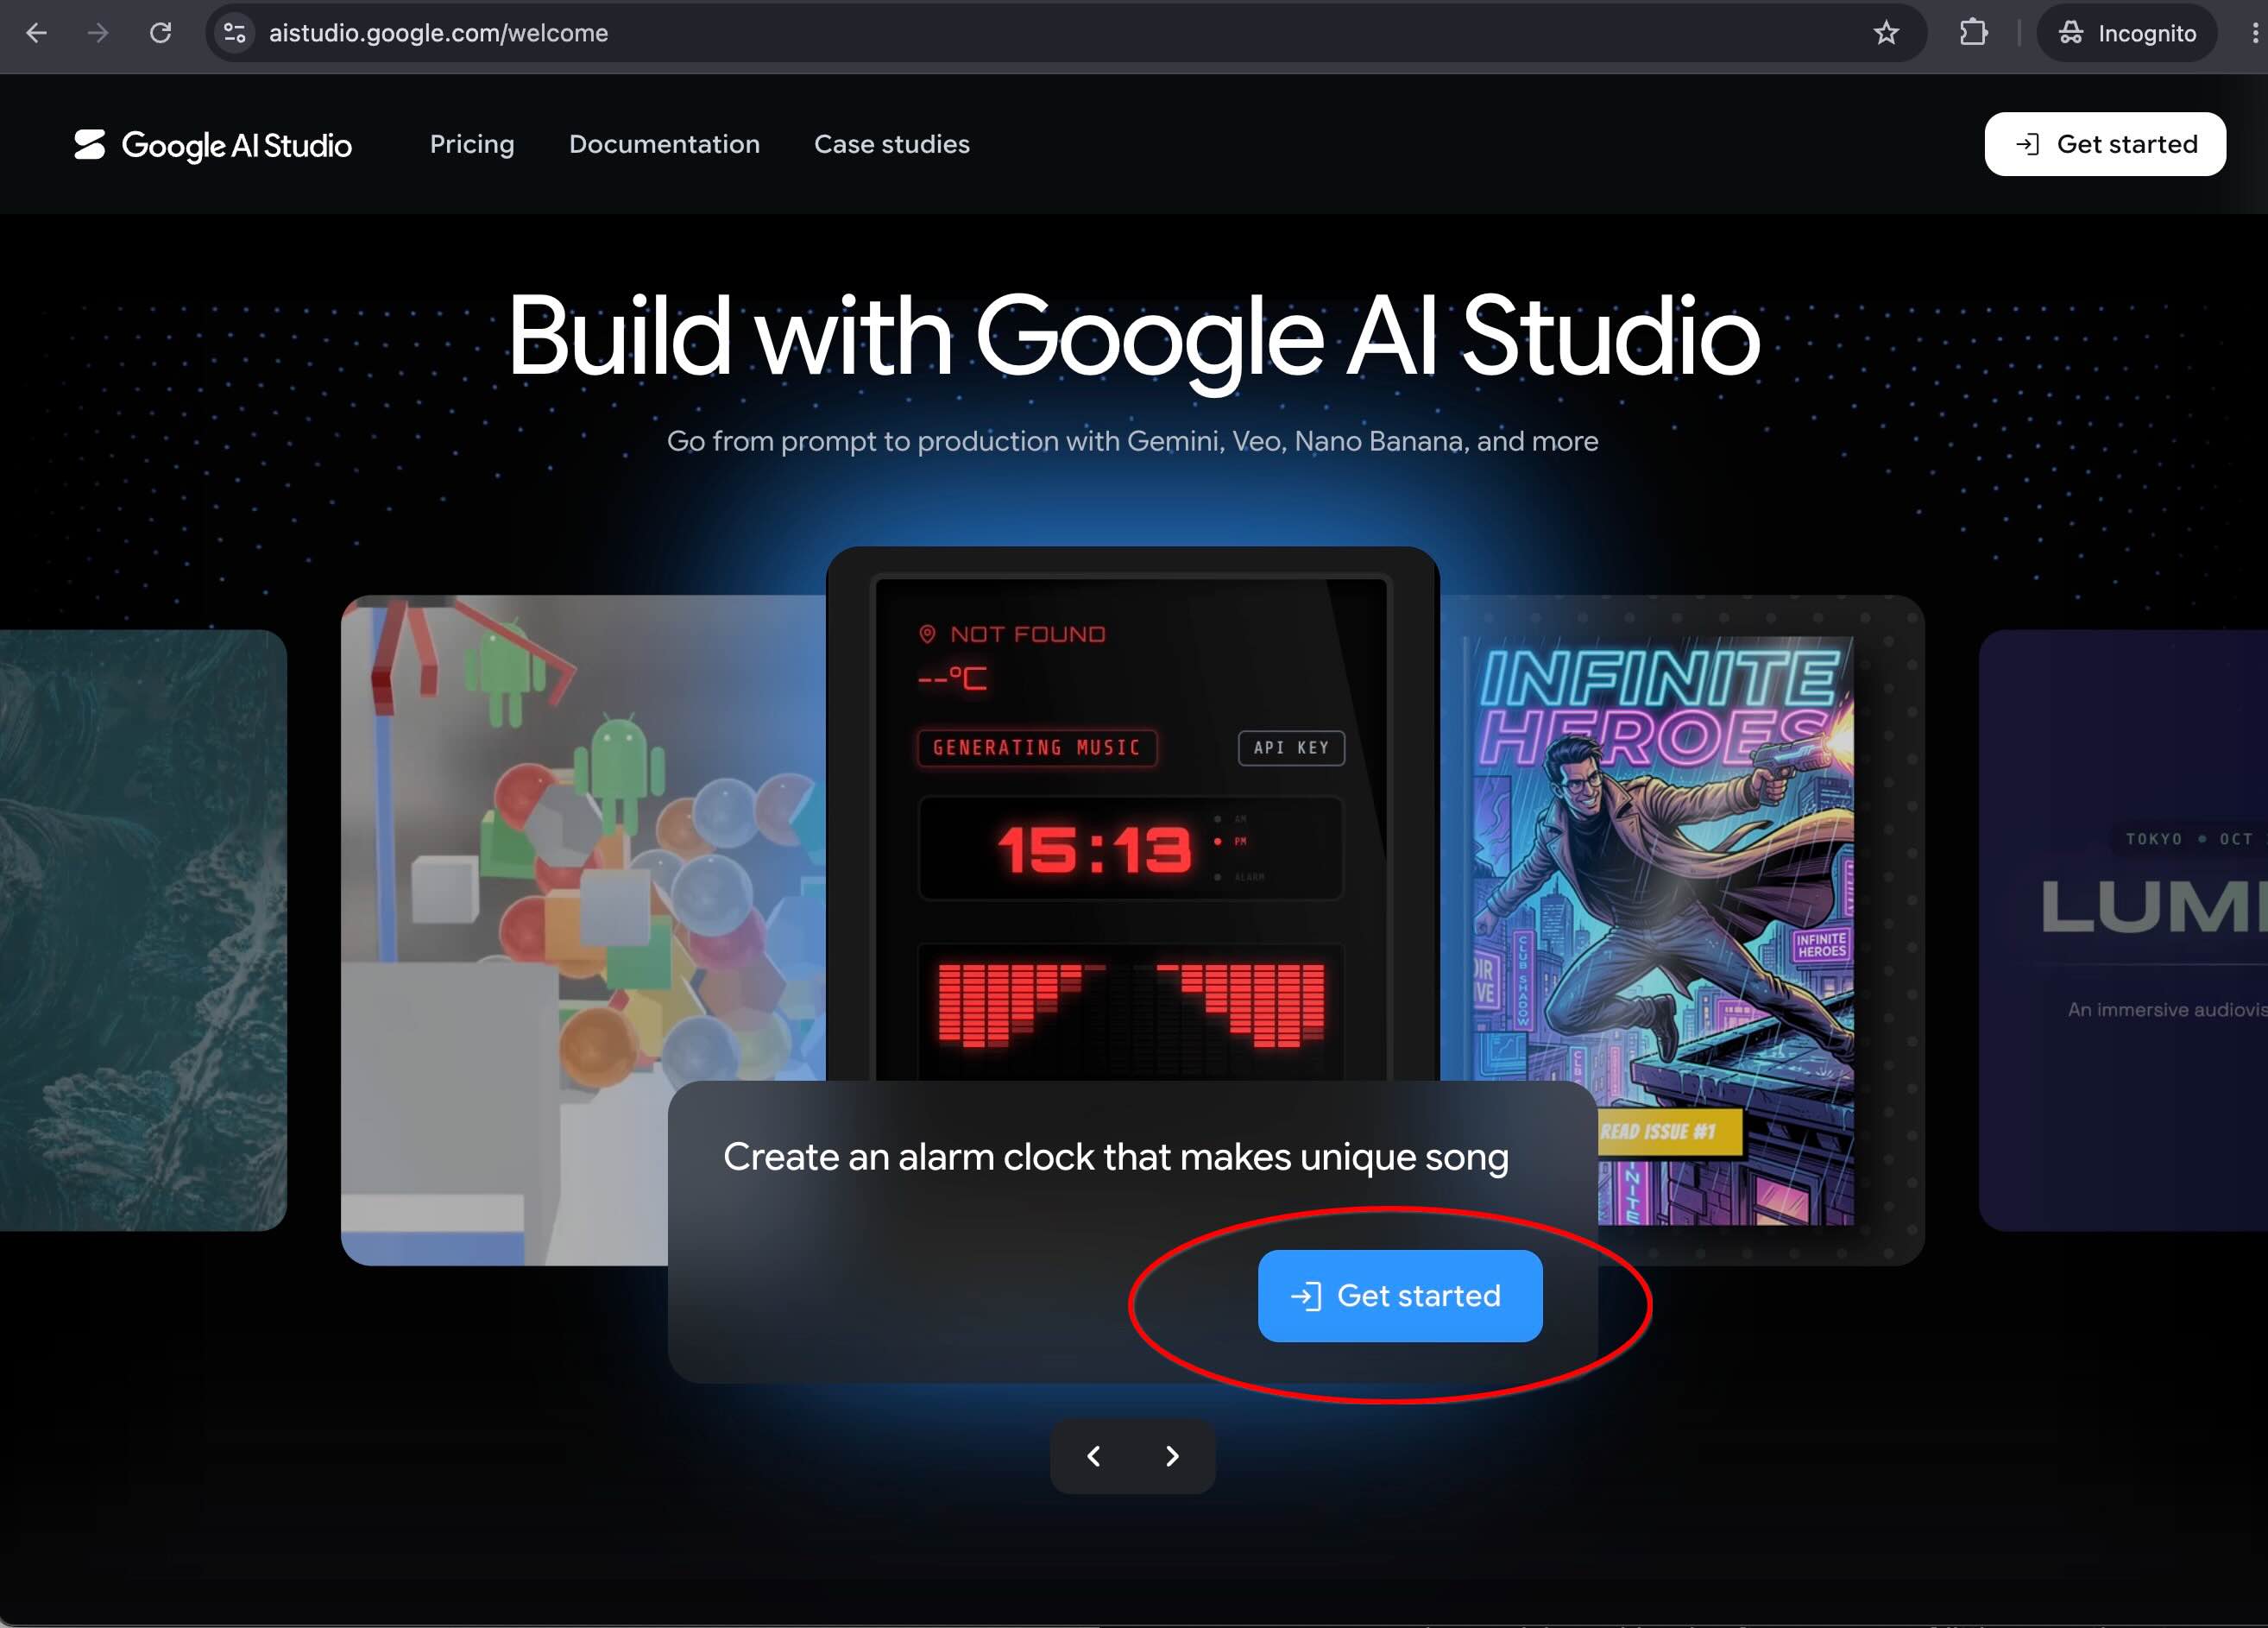
- আপনার প্রথম পরিদর্শনে যদি পরিষেবার শর্তাবলী দেখানো হয়, তবে এগিয়ে যাওয়ার জন্য সেগুলি পর্যালোচনা করুন এবং গ্রহণ করুন।
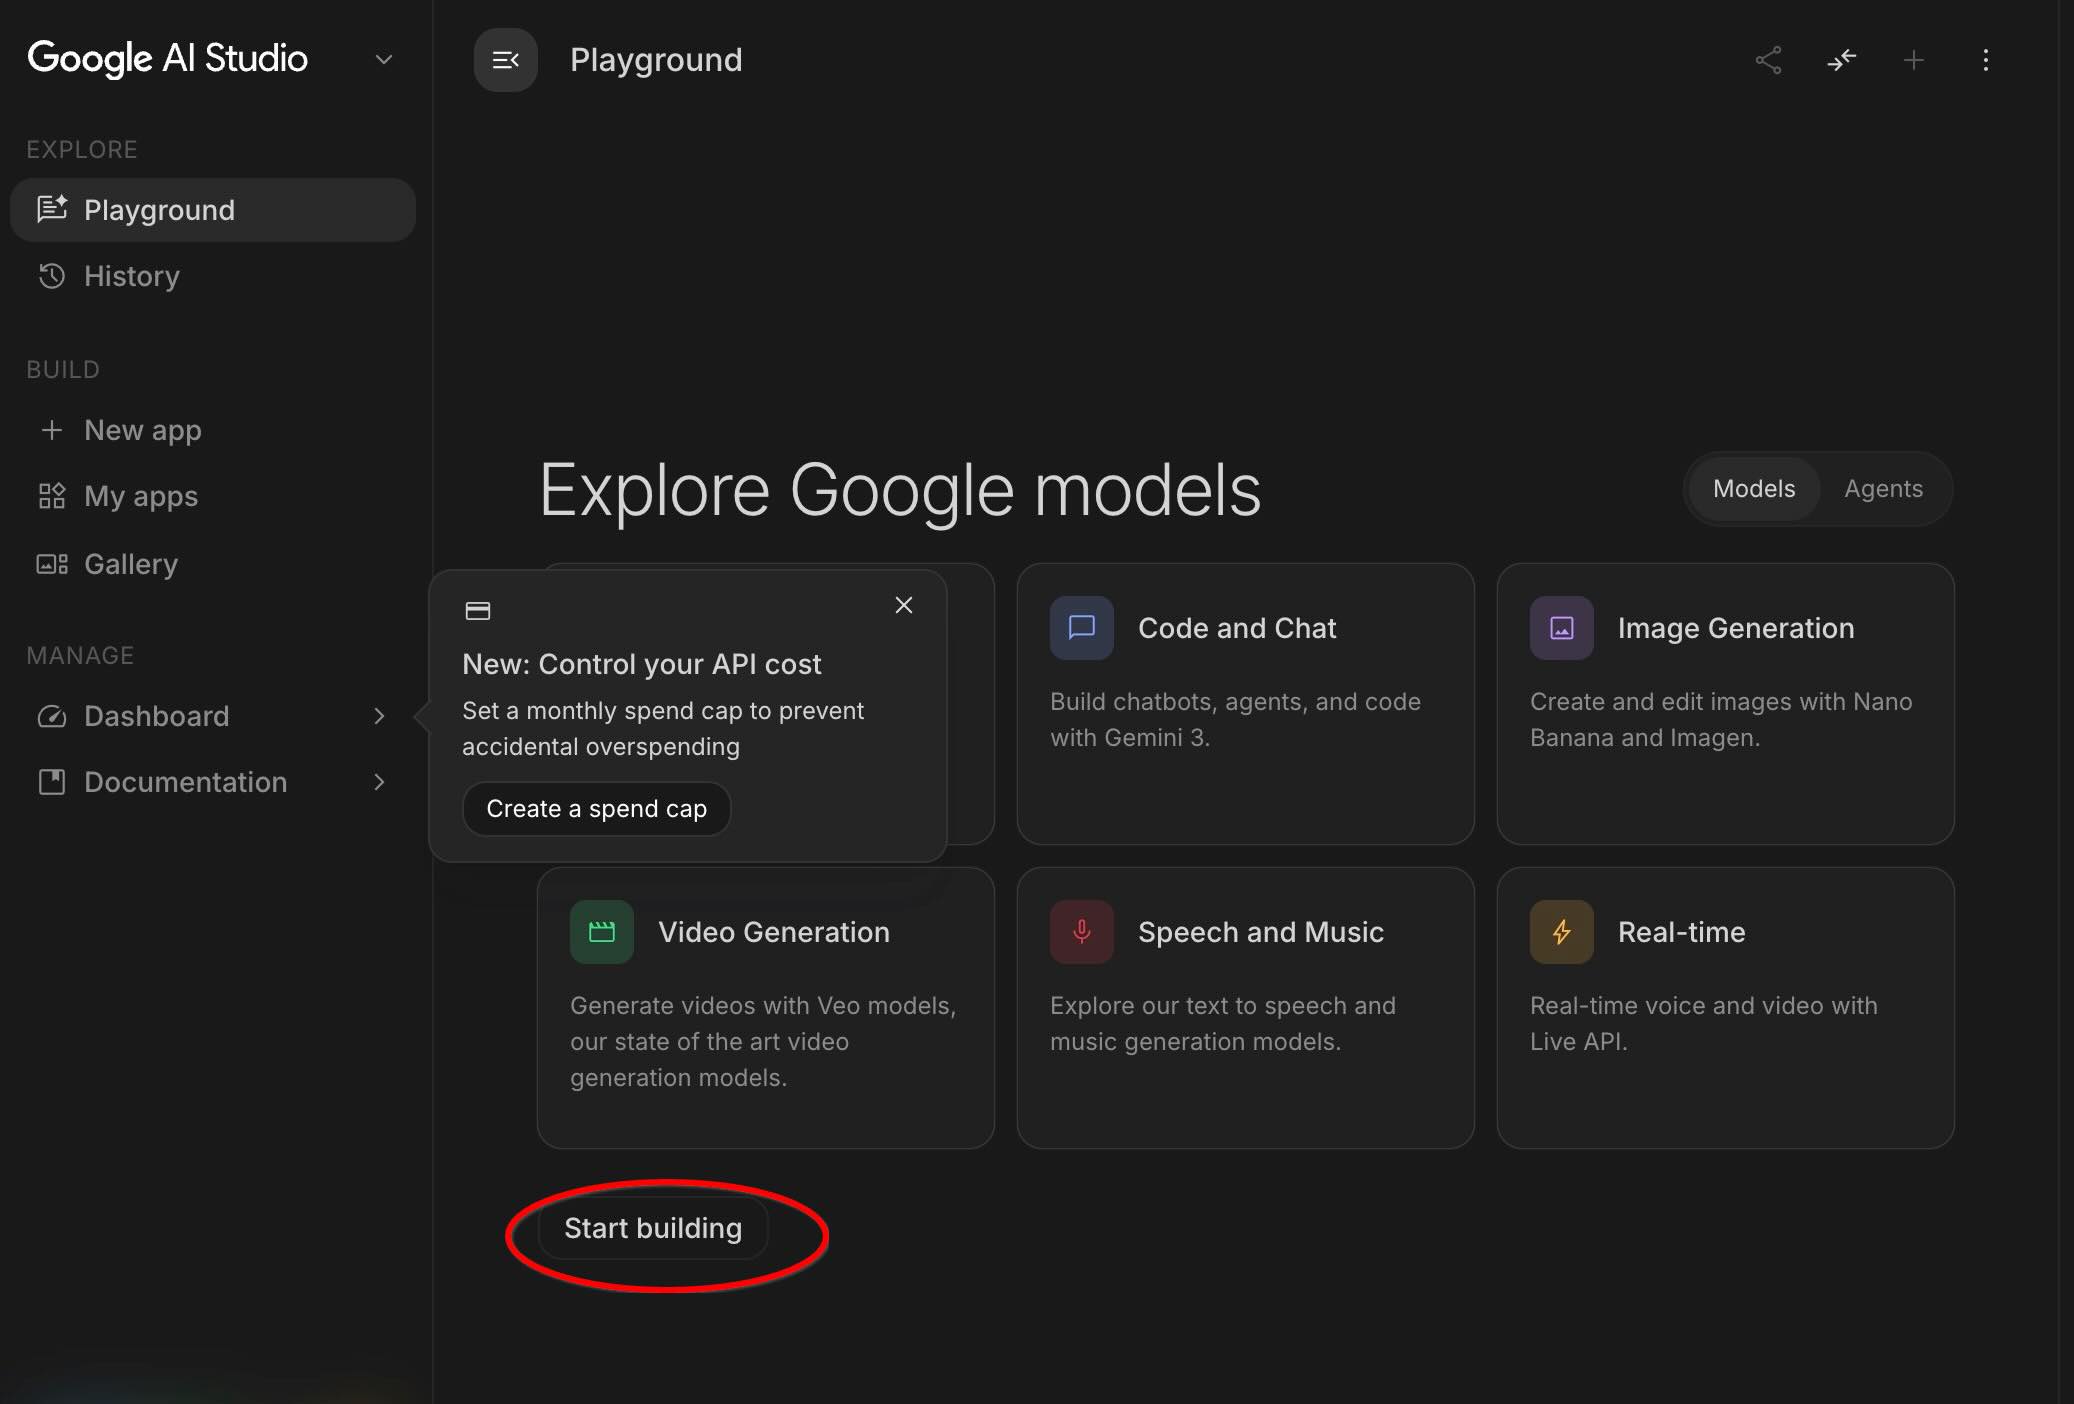
ধাপ ২: একটি নতুন অ্যাপ্লিকেশন শুরু করুন।
- নিচের-মাঝের প্যানেলে, 'Start building'- এ ক্লিক করুন (অথবা ডান প্যানেলে '+New App'- এ ক্লিক করুন)।
৩. একটি সাধারণ প্রম্পট এবং ফায়ারবেস অথেনটিকেশন দিয়ে শুরু করুন
শুরু করার জন্য আপনার জটিল আর্কিটেকচার ডায়াগ্রামের প্রয়োজন নেই। আপনি একটি মাত্র বাক্য দিয়ে আপনার প্রাথমিক অ্যাপ্লিকেশন চালু করতে, গুগল সাইন-ইন কনফিগার করতে এবং আপনার ডাটাবেস সংযুক্ত করতে পারেন।
প্রাথমিক প্রম্পটটি প্রবেশ করান
এআই স্টুডিও বিল্ড মোডের প্রম্পট বক্সে, নিম্নলিখিত প্রম্পটটি লিখুন এবং এন্টার চাপুন:
Build a running club web app with a Cloud SQL database
where members can post upcoming runs.
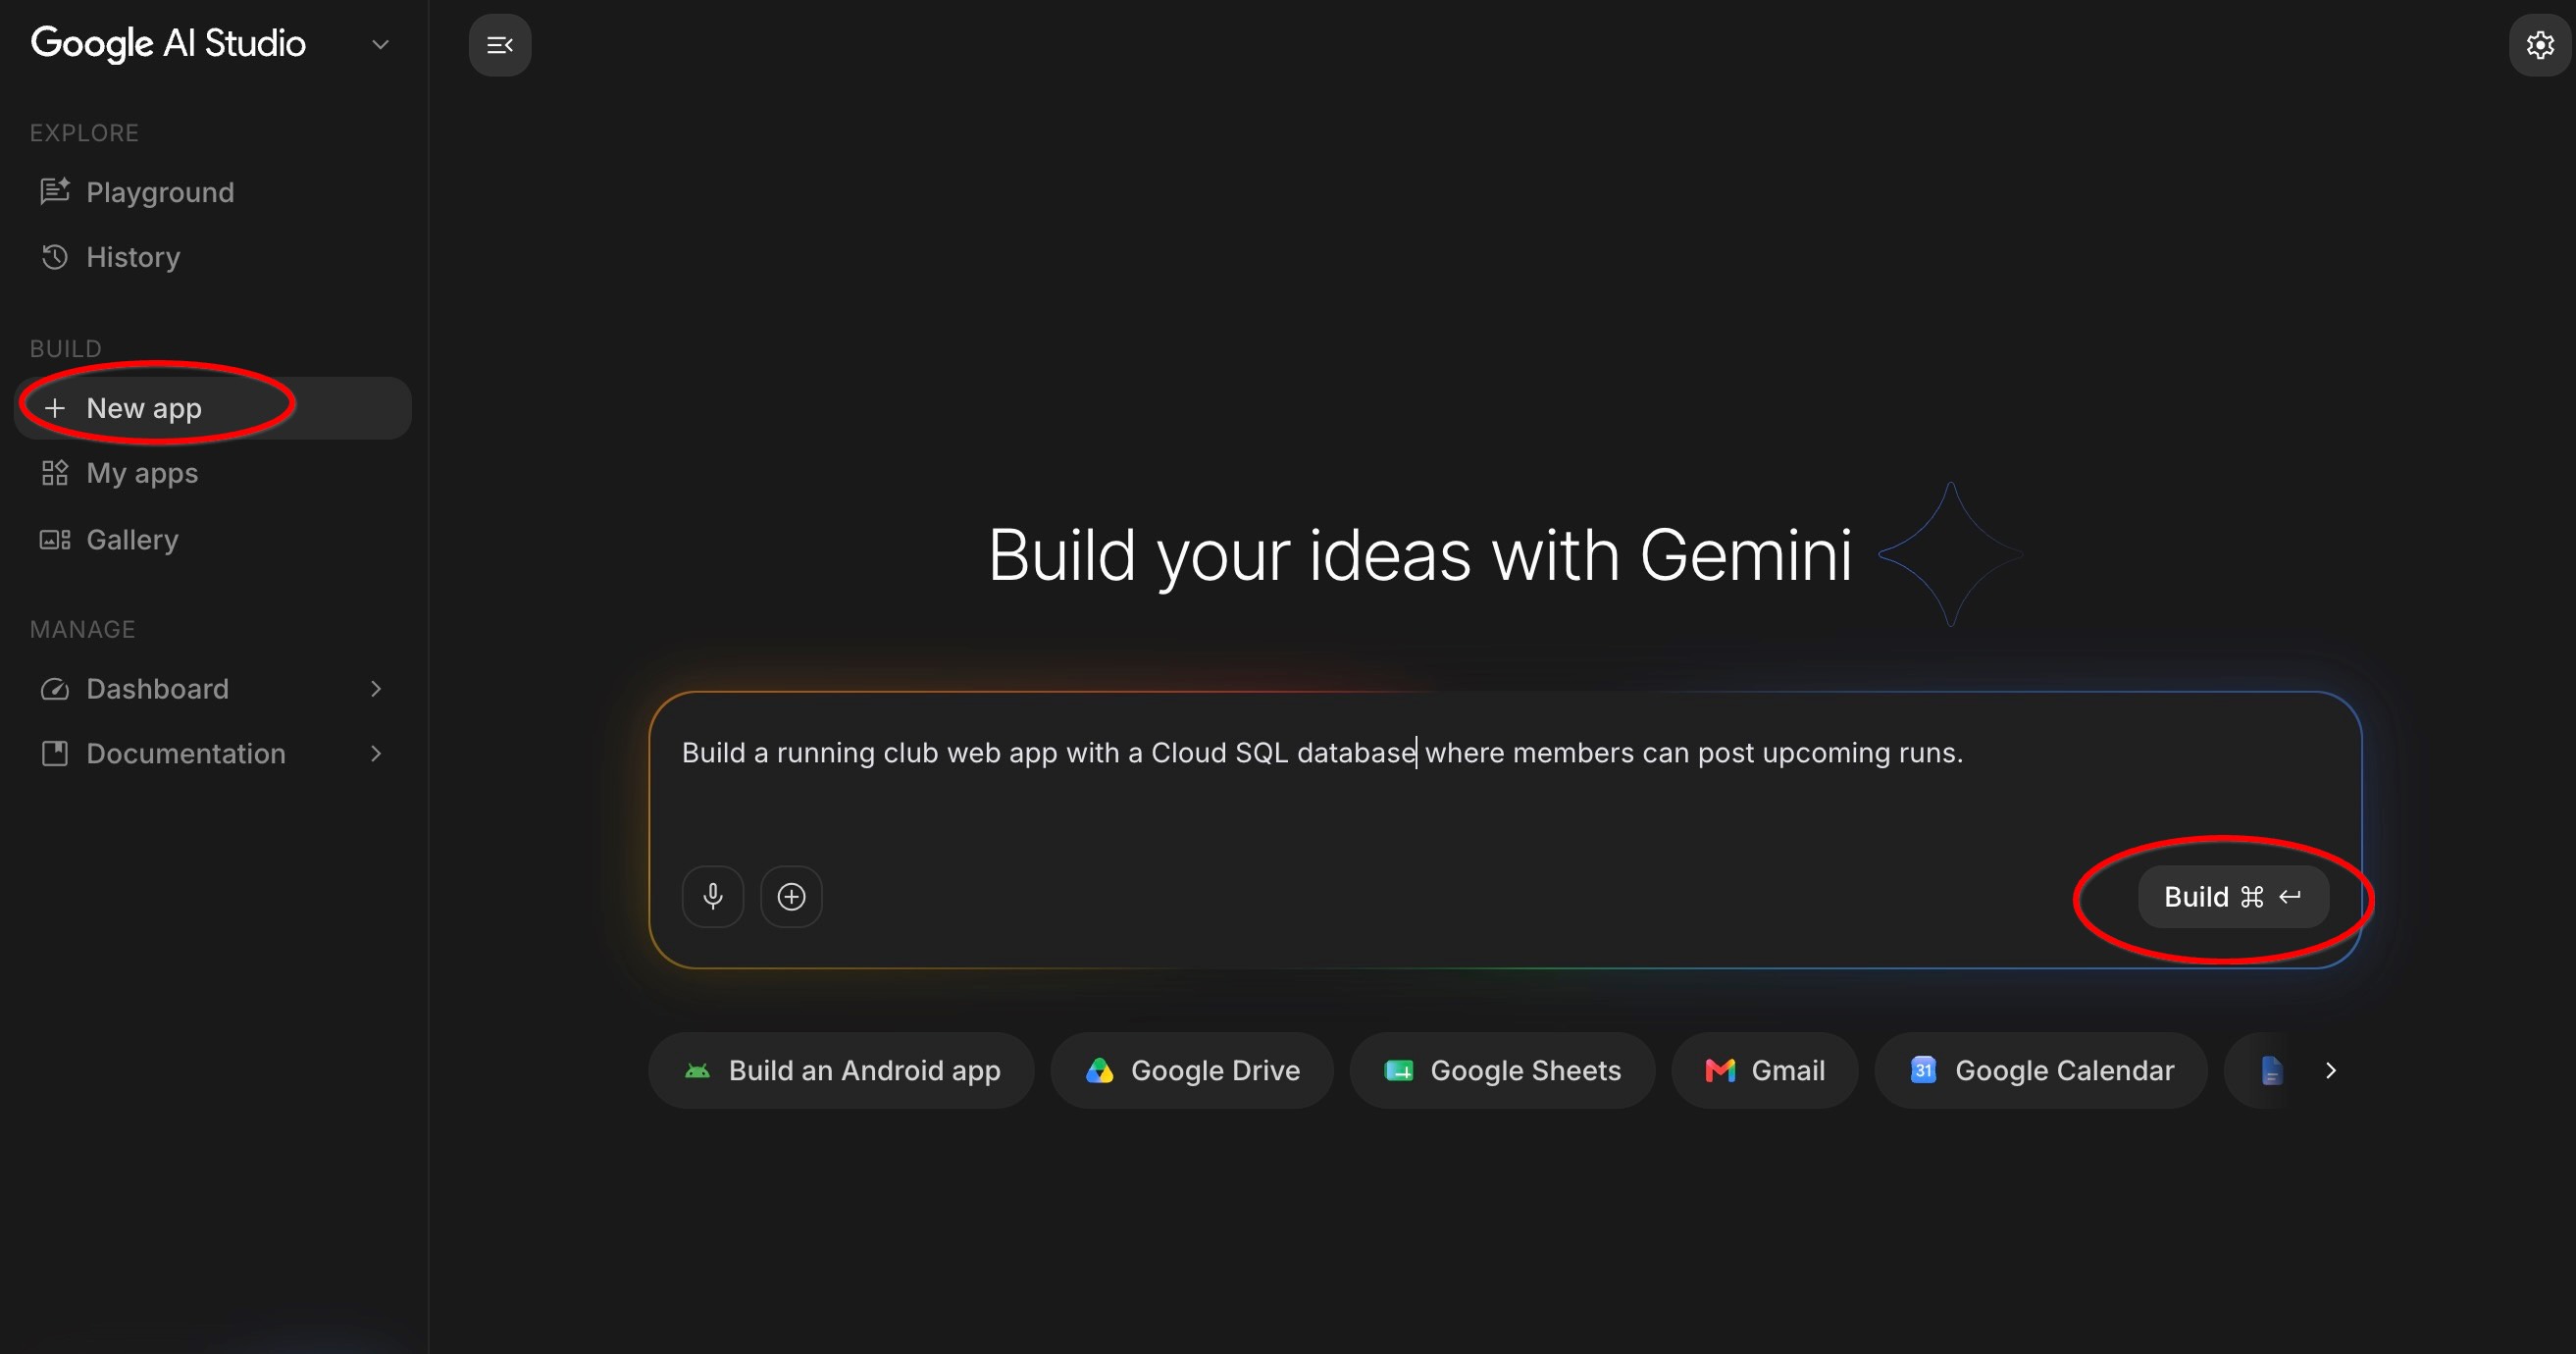
এই লিঙ্কটি আপনার জন্য প্রম্পট বক্সটি স্বয়ংক্রিয়ভাবে পূরণ করে দেবে।
আপনার কর্মক্ষেত্র বুঝুন
আপনি আপনার প্রম্পট জমা দেওয়ার পরে, গুগল এআই স্টুডিও সম্পূর্ণ অ্যাপ্লিকেশন ওয়ার্কস্পেসটি খুলে দেবে। আপনার স্ক্রিনের তিনটি প্রধান অংশের দিকে এক মুহূর্ত তাকিয়ে দেখুন:
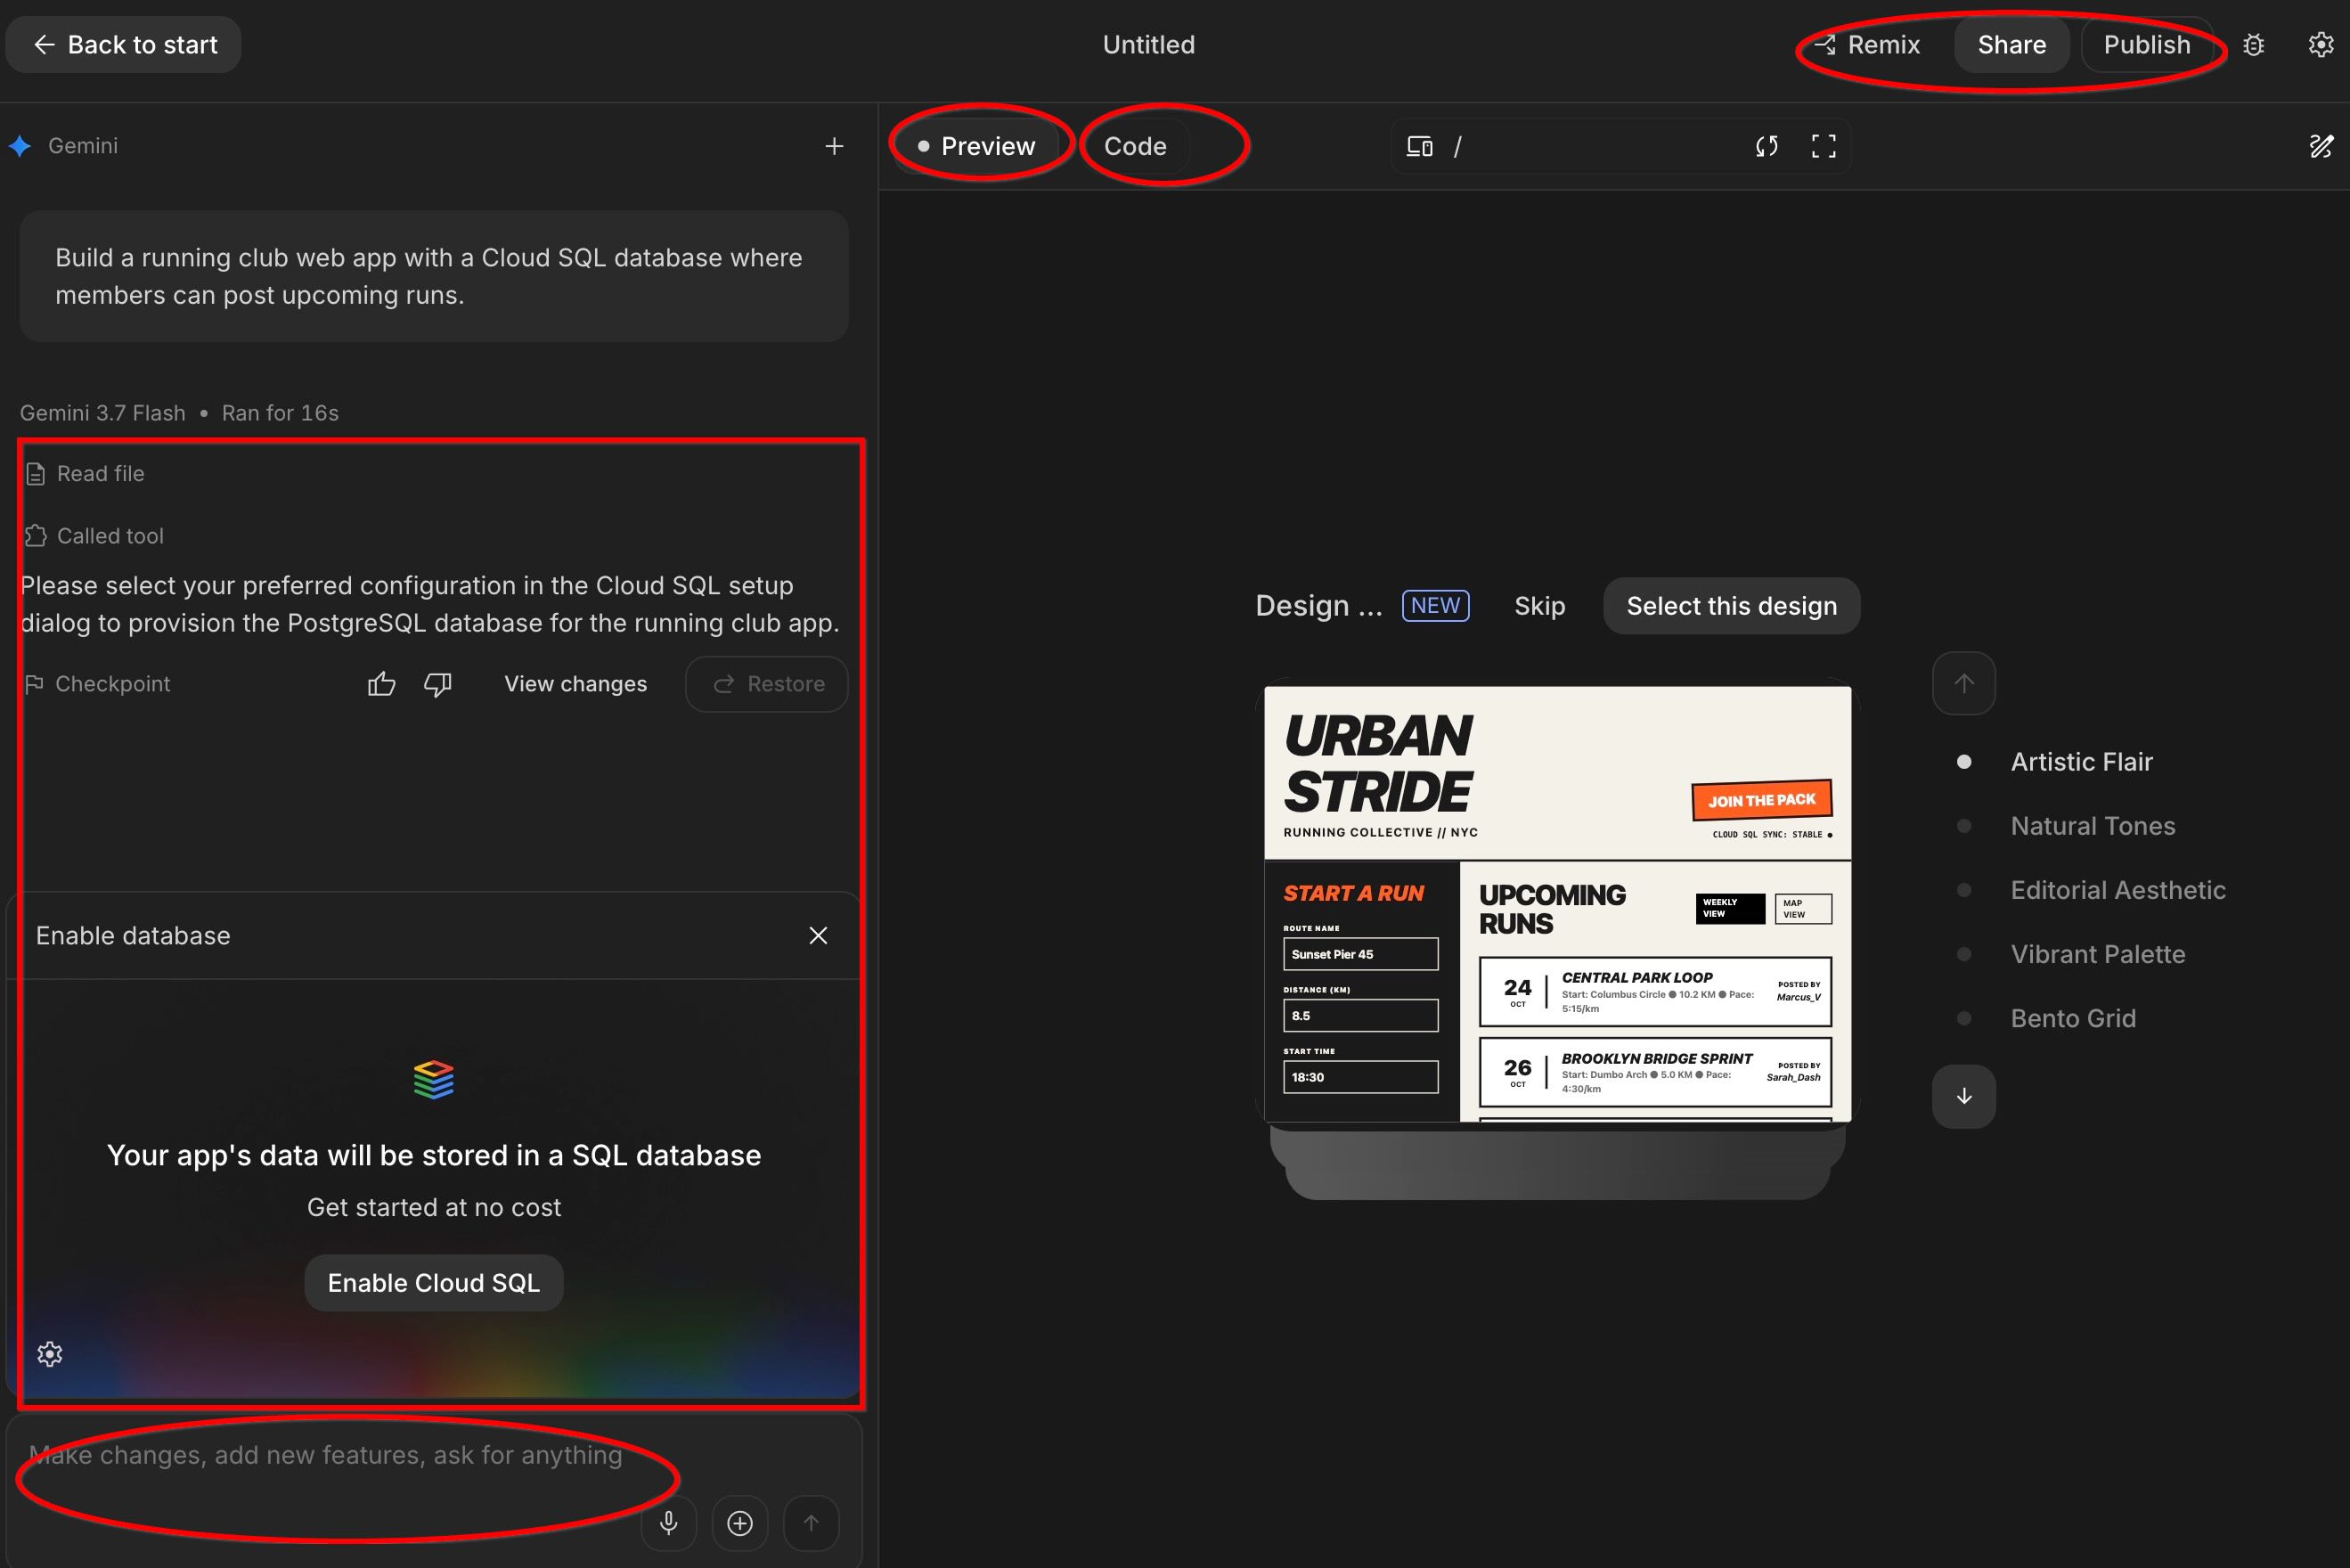
- চ্যাট / প্রম্পট বক্স (নিচে) : এখানে আপনি সাধারণ ভাষায় এআই-এর সাথে চ্যাট চালিয়ে যেতে পারেন, যার মাধ্যমে ফিচার যোগ করা, ডিজাইন পরিবর্তন করা বা প্রশ্ন জিজ্ঞাসা করা যায়।
- ফাইল ও কোড এলাকা (বাম দিকে) : এখানে সেই ফাইলগুলো দেখানো হয় যা এআই নেপথ্যে তৈরি করে। আপনাকে নিজে কোড লিখতে বা সম্পাদনা করতে হবে না, কিন্তু এই প্যানেলটি আপনাকে এআই-কে আপনার অ্যাপের বিভিন্ন অংশ তৈরি করতে দেখার সুযোগ দেয়।
- লাইভ প্রিভিউ উইন্ডো (ডান দিকে) : এটি আপনার আসল কার্যকরী অ্যাপটি রিয়েল টাইমে প্রদর্শন করে। অ্যাপটি তৈরি হওয়ার সাথে সাথেই আপনি এই উইন্ডোতে সরাসরি বাটন ক্লিক করতে, টেক্সট ফিল্ডে টাইপ করতে এবং এটি পরীক্ষা করতে পারবেন।
- কোড এডিটর (ডান দিকে) : এখানে এআই দ্বারা তৈরি আসল কোডটি দেখানো হয়। আপনি চাইলে এটি সম্পাদনা করতে পারেন, তবে তা আবশ্যক নয়।
- স্থাপন ও শেয়ার (উপরের ডানদিকে) : এখান থেকে আপনি আপনার অ্যাপটি ইন্টারনেটে স্থাপন করতে এবং অন্যদের সাথে শেয়ার করতে পারবেন।
গুগল এআই স্টুডিও স্বয়ংক্রিয়ভাবে যা করে
এআই যখন আপনার অনুরোধটি প্রক্রিয়া করবে, তখন আপনি ধাপে ধাপে আপনার অ্যাপটি তৈরি হতে দেখতে পারবেন:
- গুগল সাইন-ইন সেট আপ করে : এআই স্বয়ংক্রিয়ভাবে গুগল সাইন-ইন যুক্ত করে দেয়, ফলে আপনার দৌড়বিদরা তাদের গুগল অ্যাকাউন্ট দিয়ে নিরাপদে লগ ইন করতে পারেন—ব্যবহারকারীর পাসওয়ার্ড বা নিরাপত্তা সেটিংস পরিচালনা করার কোনো প্রয়োজন নেই।
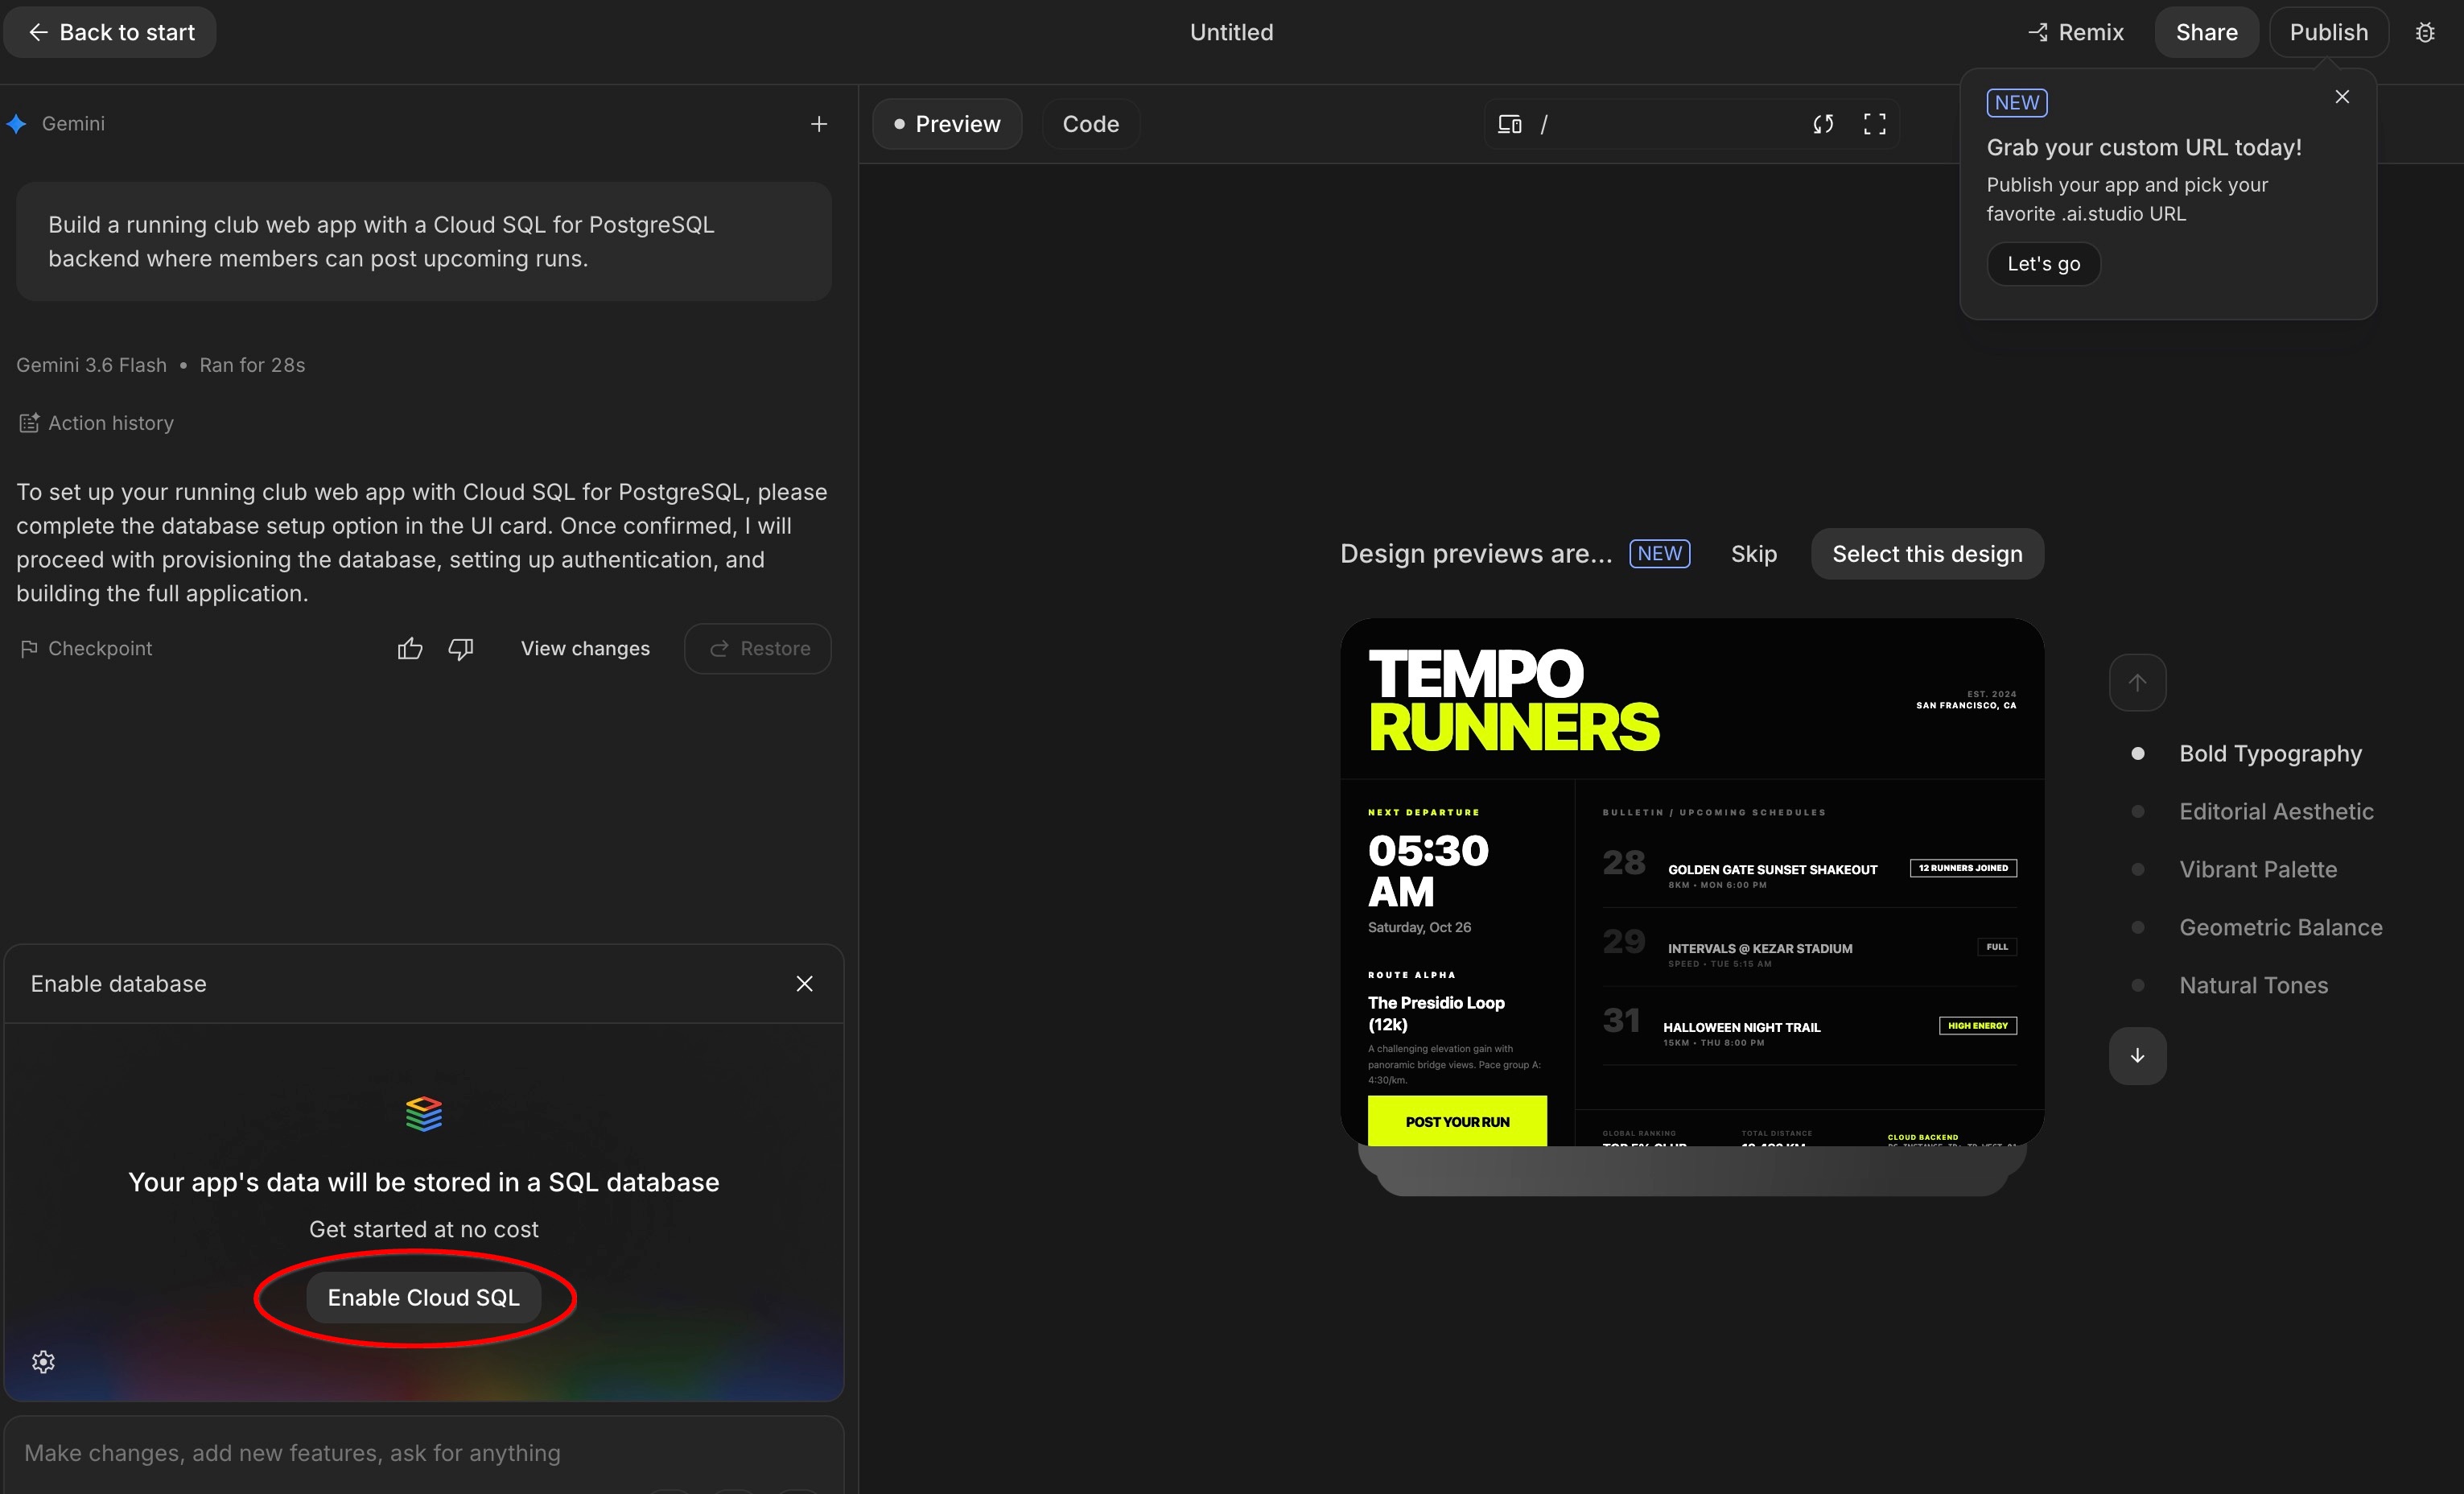
- একটি বাস্তব ডেটাবেস সংযুক্ত করে : এআই আপনার কমিউনিটির ডেটা সংরক্ষণের জন্য একটি পরিচালিত ক্লাউড এসকিউএল (Cloud SQL) ডেটাবেস সেট আপ করে। অনুরোধ করা হলে, আপনার প্রোজেক্টের জন্য ডেটাবেসটি সক্রিয় করতে ক্লিক করুন।
- আপনার ডেটা টেবিল (
schema.ts) সাজিয়ে রাখে: একটি ডাটাবেস স্কিমাকে কয়েকটি গোছানো স্প্রেডশীটের সমষ্টি হিসেবে ভাবুন। এআই স্বয়ংক্রিয়ভাবে আপনার অ্যাপের জন্য স্টোরেজ কাঠামো তৈরি করে:-
usersটেবিল : সদস্যদের প্রোফাইল, নাম, অ্যাভাটার এবং দৌড়ের গতি সংরক্ষণ করে। -
runsটেবিল : নির্ধারিত ইভেন্টগুলোর শিরোনাম, দূরত্ব, লক্ষ্য গতি, অবস্থান এবং তারিখ সংরক্ষণ করে। -
commentsসারণী : প্রতিটি রানের অধীনে অংশগ্রহণকারীদের রেখে যাওয়া বার্তা এবং প্রশ্ন সংরক্ষণ করে।
 (দ্রষ্টব্য: আপনাকে কখনোই এই কোডটি নিজে হাতে লিখতে বা সম্পাদনা করতে হবে না—আপনি যখনই নতুন ফিচারের জন্য অনুরোধ করবেন, এআই (AI) আপনার জন্য এটি আপডেট করে দেবে!)
 -
- ভিজ্যুয়াল ইন্টারফেস তৈরি করে : এআই স্ক্রিনে দেখা ওয়েব পেজগুলো তৈরি করে, যার মধ্যে হেডার, আসন্ন রানের তালিকা, ইভেন্ট তৈরির ফর্ম এবং মন্তব্য বিভাগ অন্তর্ভুক্ত।
প্রমাণীকরণ যাচাই করুন এবং পোস্টিং চালান
জেনারেশন শেষ হলে, প্রিভিউ প্যানে আপনার নতুন অ্যাপটি পরীক্ষা করুন:
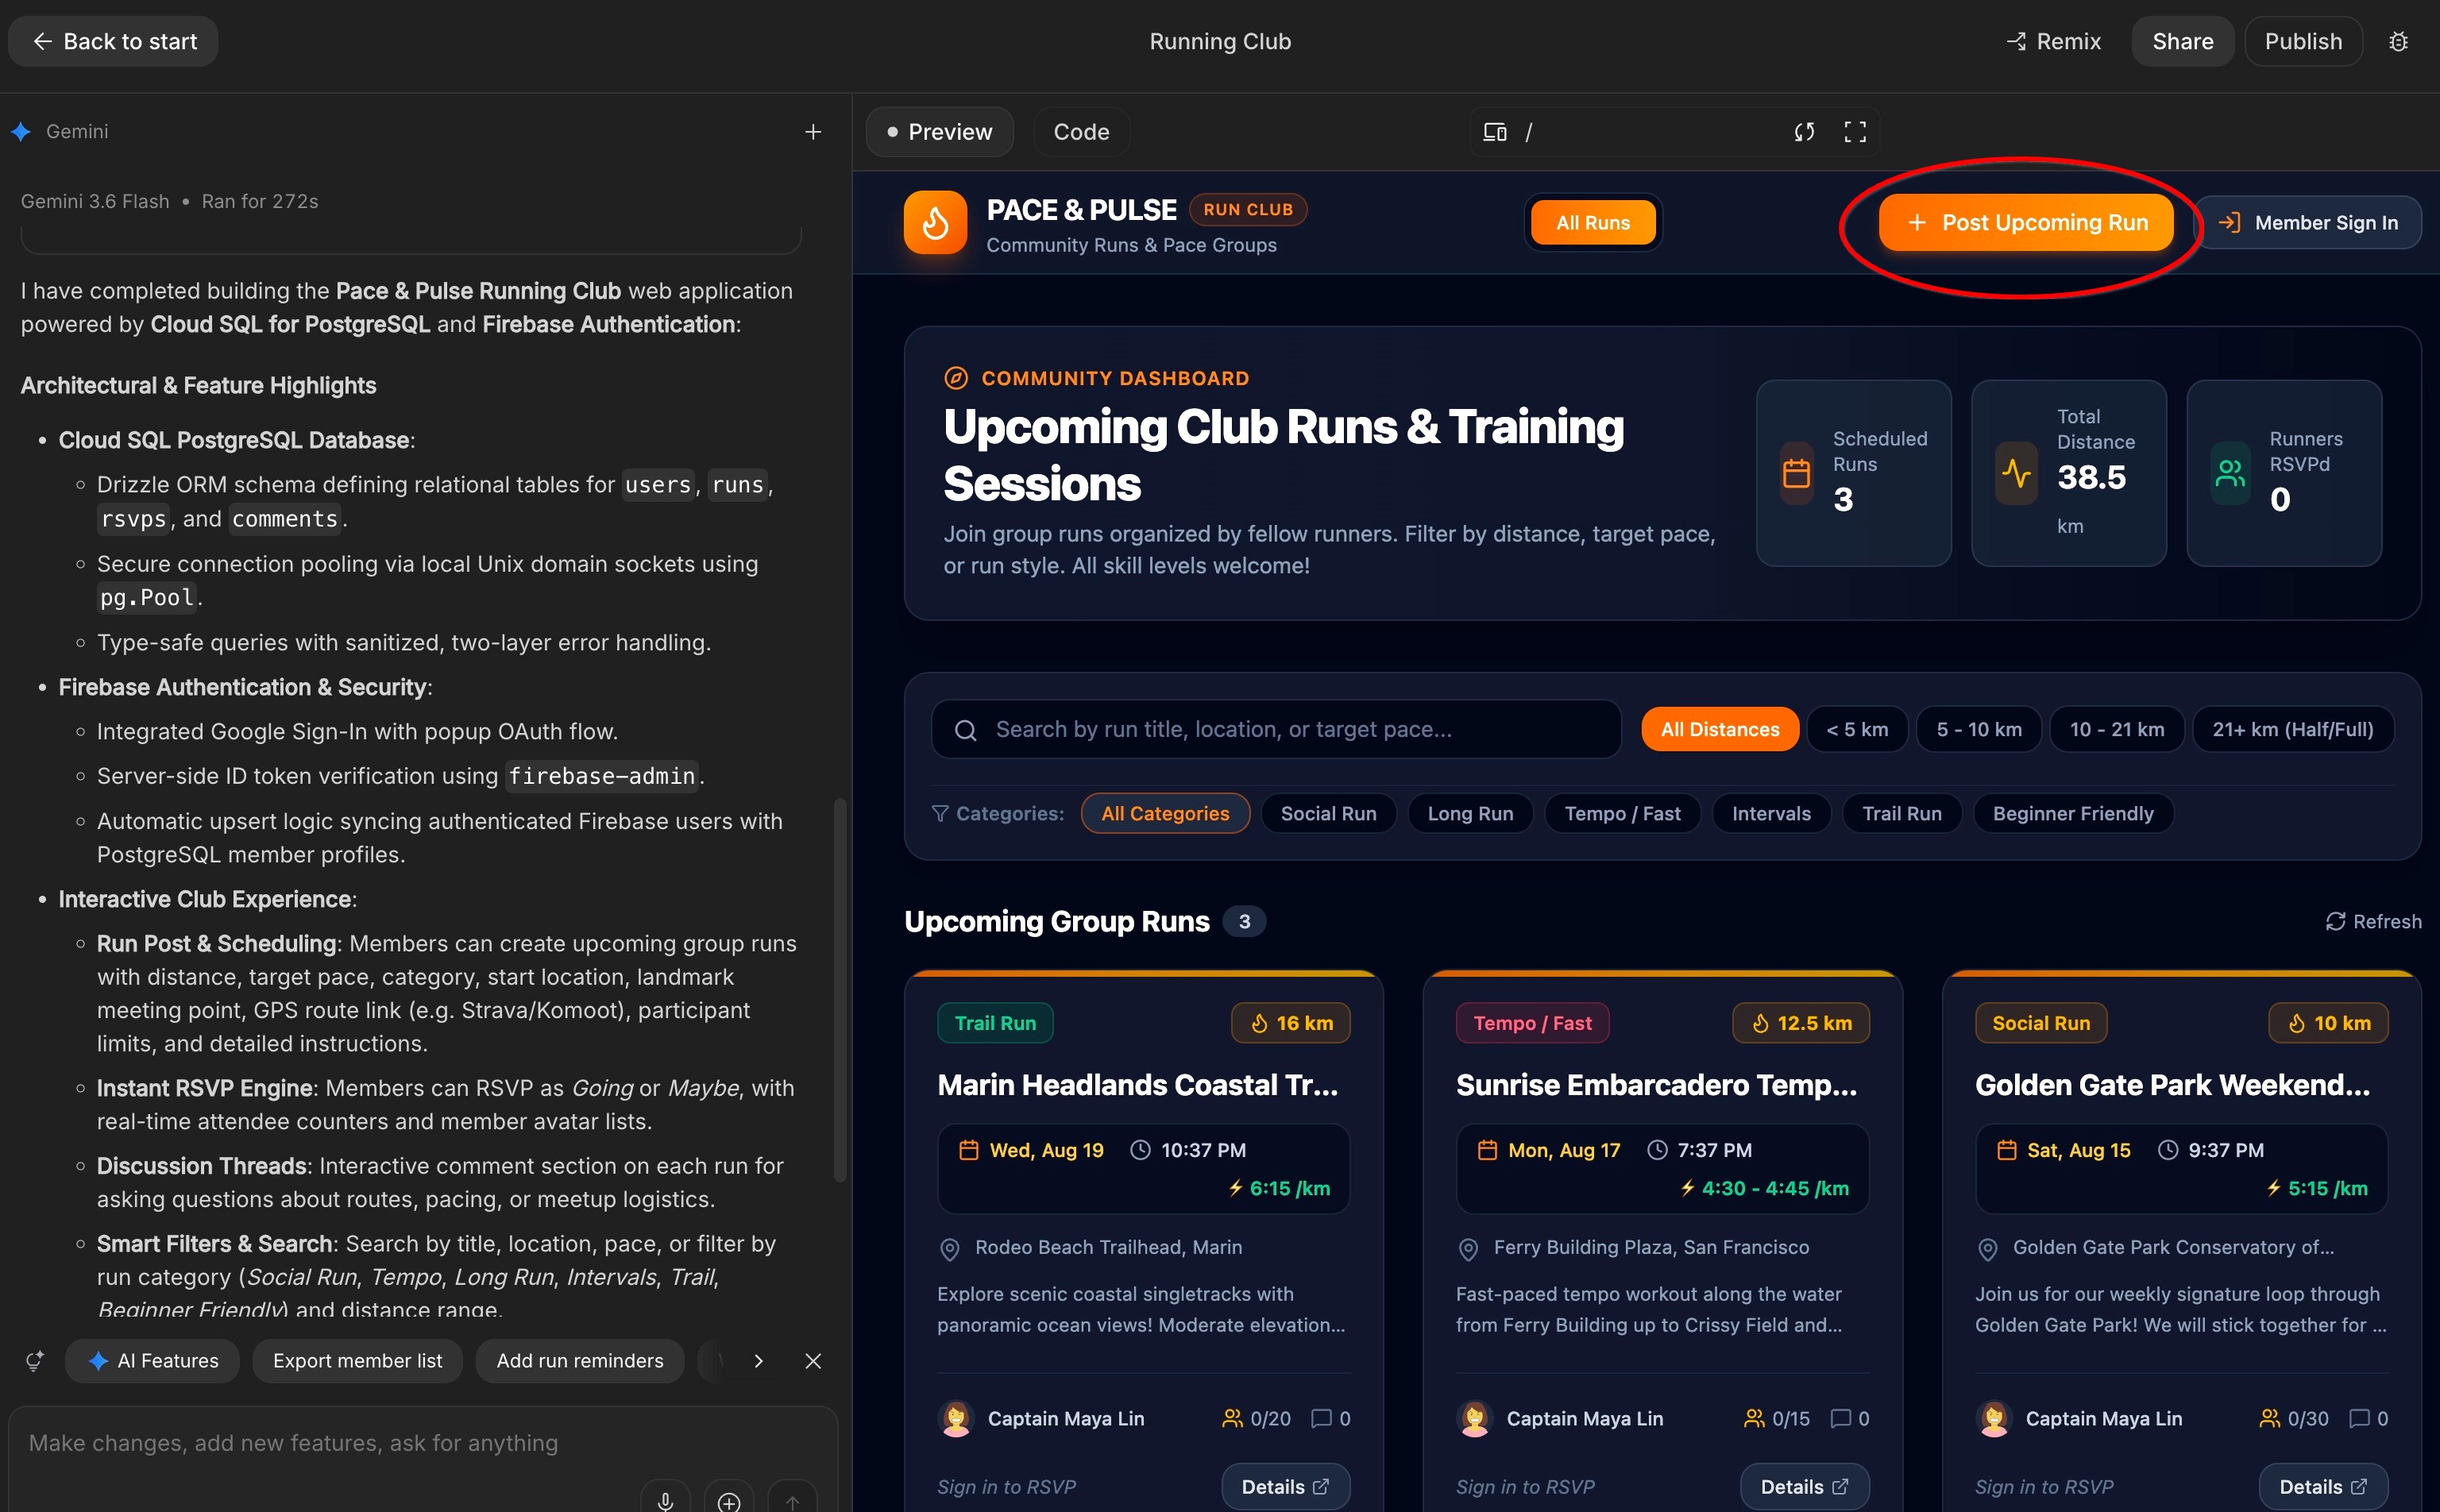
- প্রিভিউ উইন্ডোতে, মেম্বার সাইন ইন-এ ক্লিক করুন (অথবা পোস্ট আপকামিং রান বোতামে ক্লিক করুন, যা প্রমাণীকরণ শুরু করবে)।
- Firebase Auth ডায়ালগ ব্যবহার করে আপনার Google অ্যাকাউন্ট দিয়ে প্রমাণীকরণ করুন।
- একবার সাইন ইন করলে, আপনার গুগল প্রোফাইলের নাম ও অ্যাভাটার নেভিগেশন বারে দেখা যায় এবং আপনার গতির পছন্দগুলো স্বয়ংক্রিয়ভাবে পরিচালিত হয়।
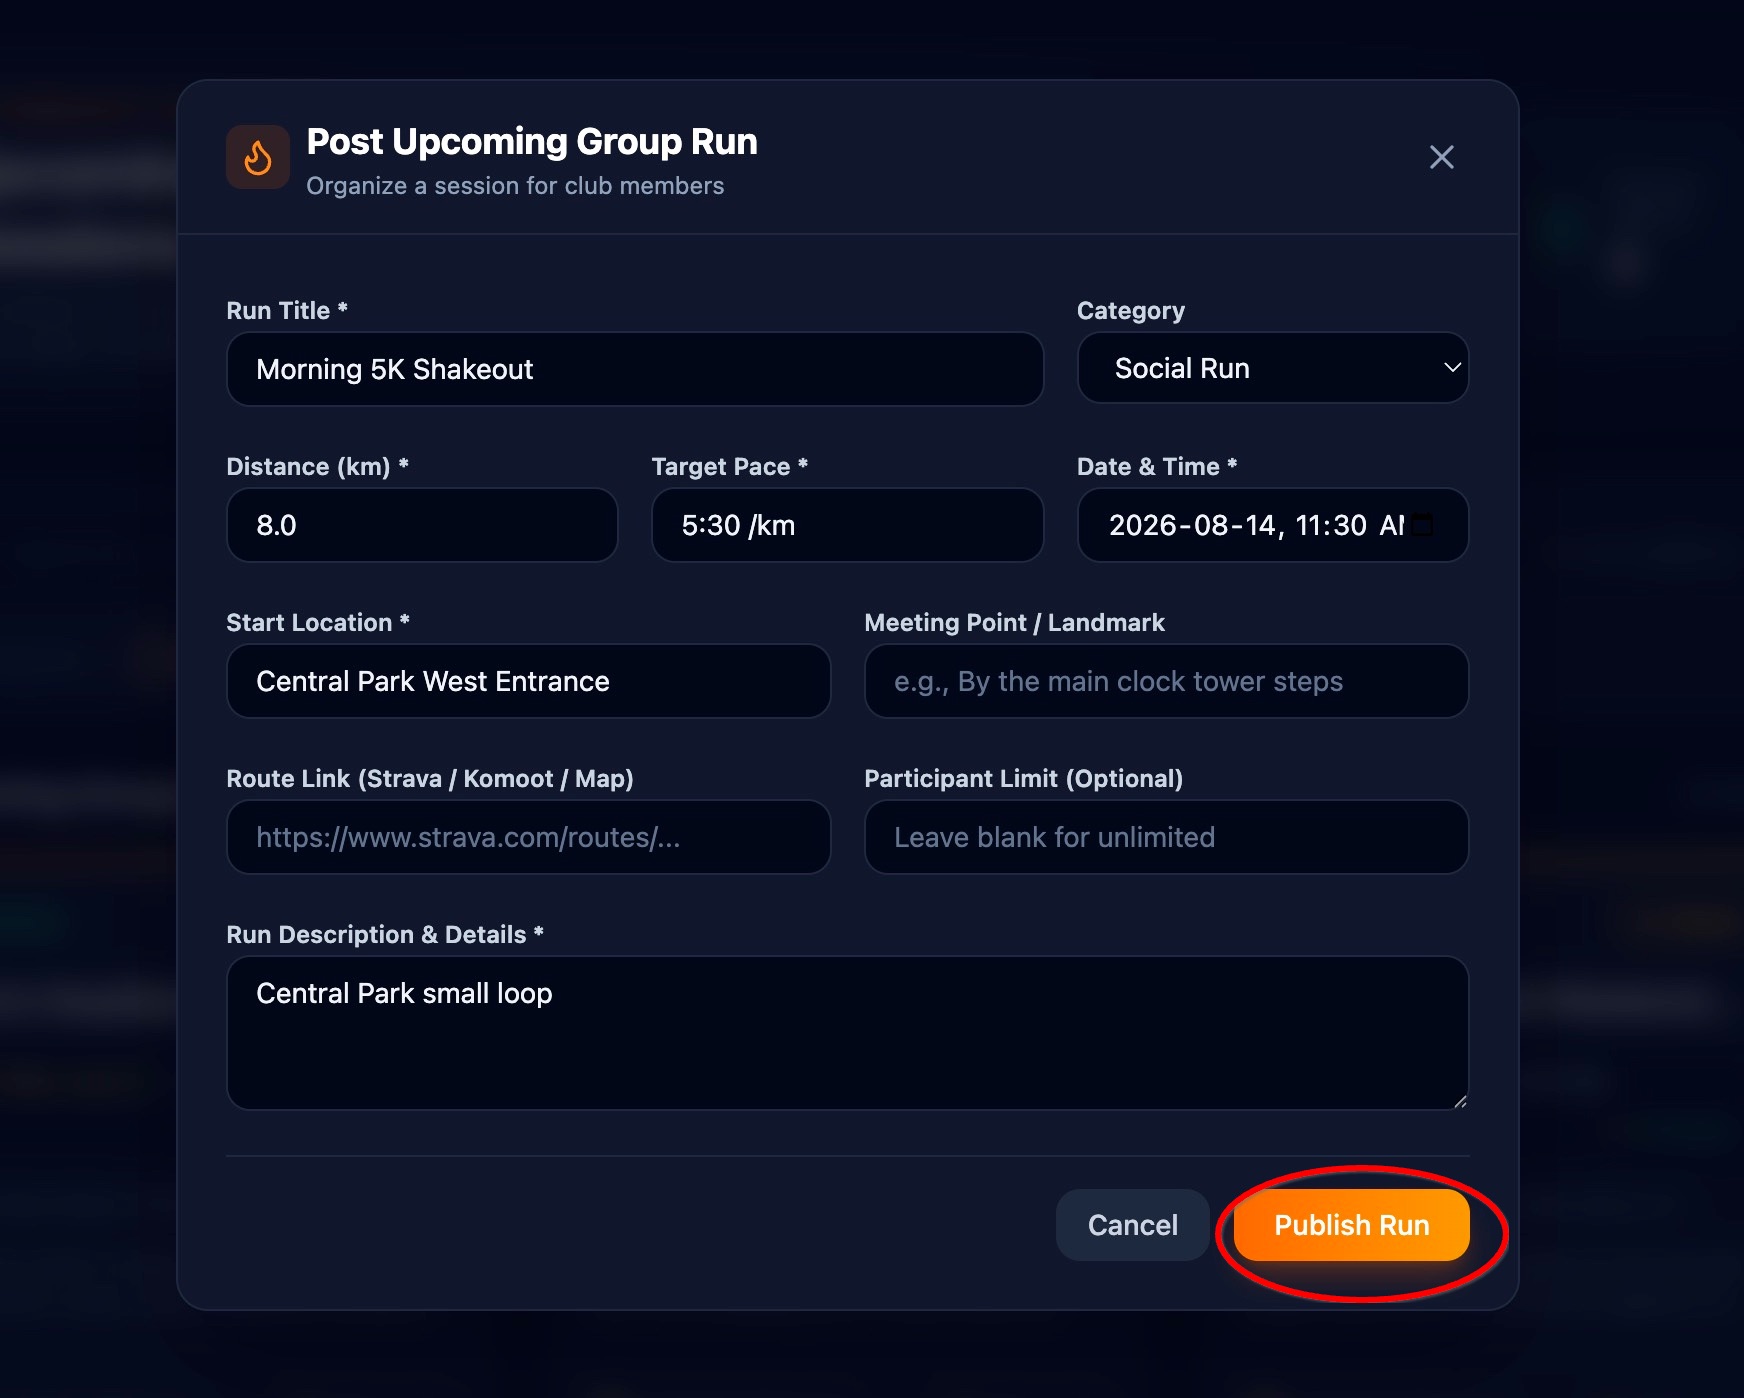
- ‘আসন্ন দৌড়ের পোস্ট’ ফর্মে একটি শিরোনাম লিখুন (যেমন
Morning 5K Shakeout)। - একটি তারিখ ও সময় নির্বাচন করুন এবং একটি সভার স্থান লিখুন (যেমন
Central Park West Entrance)। - PublishRun-এ ক্লিক করুন।
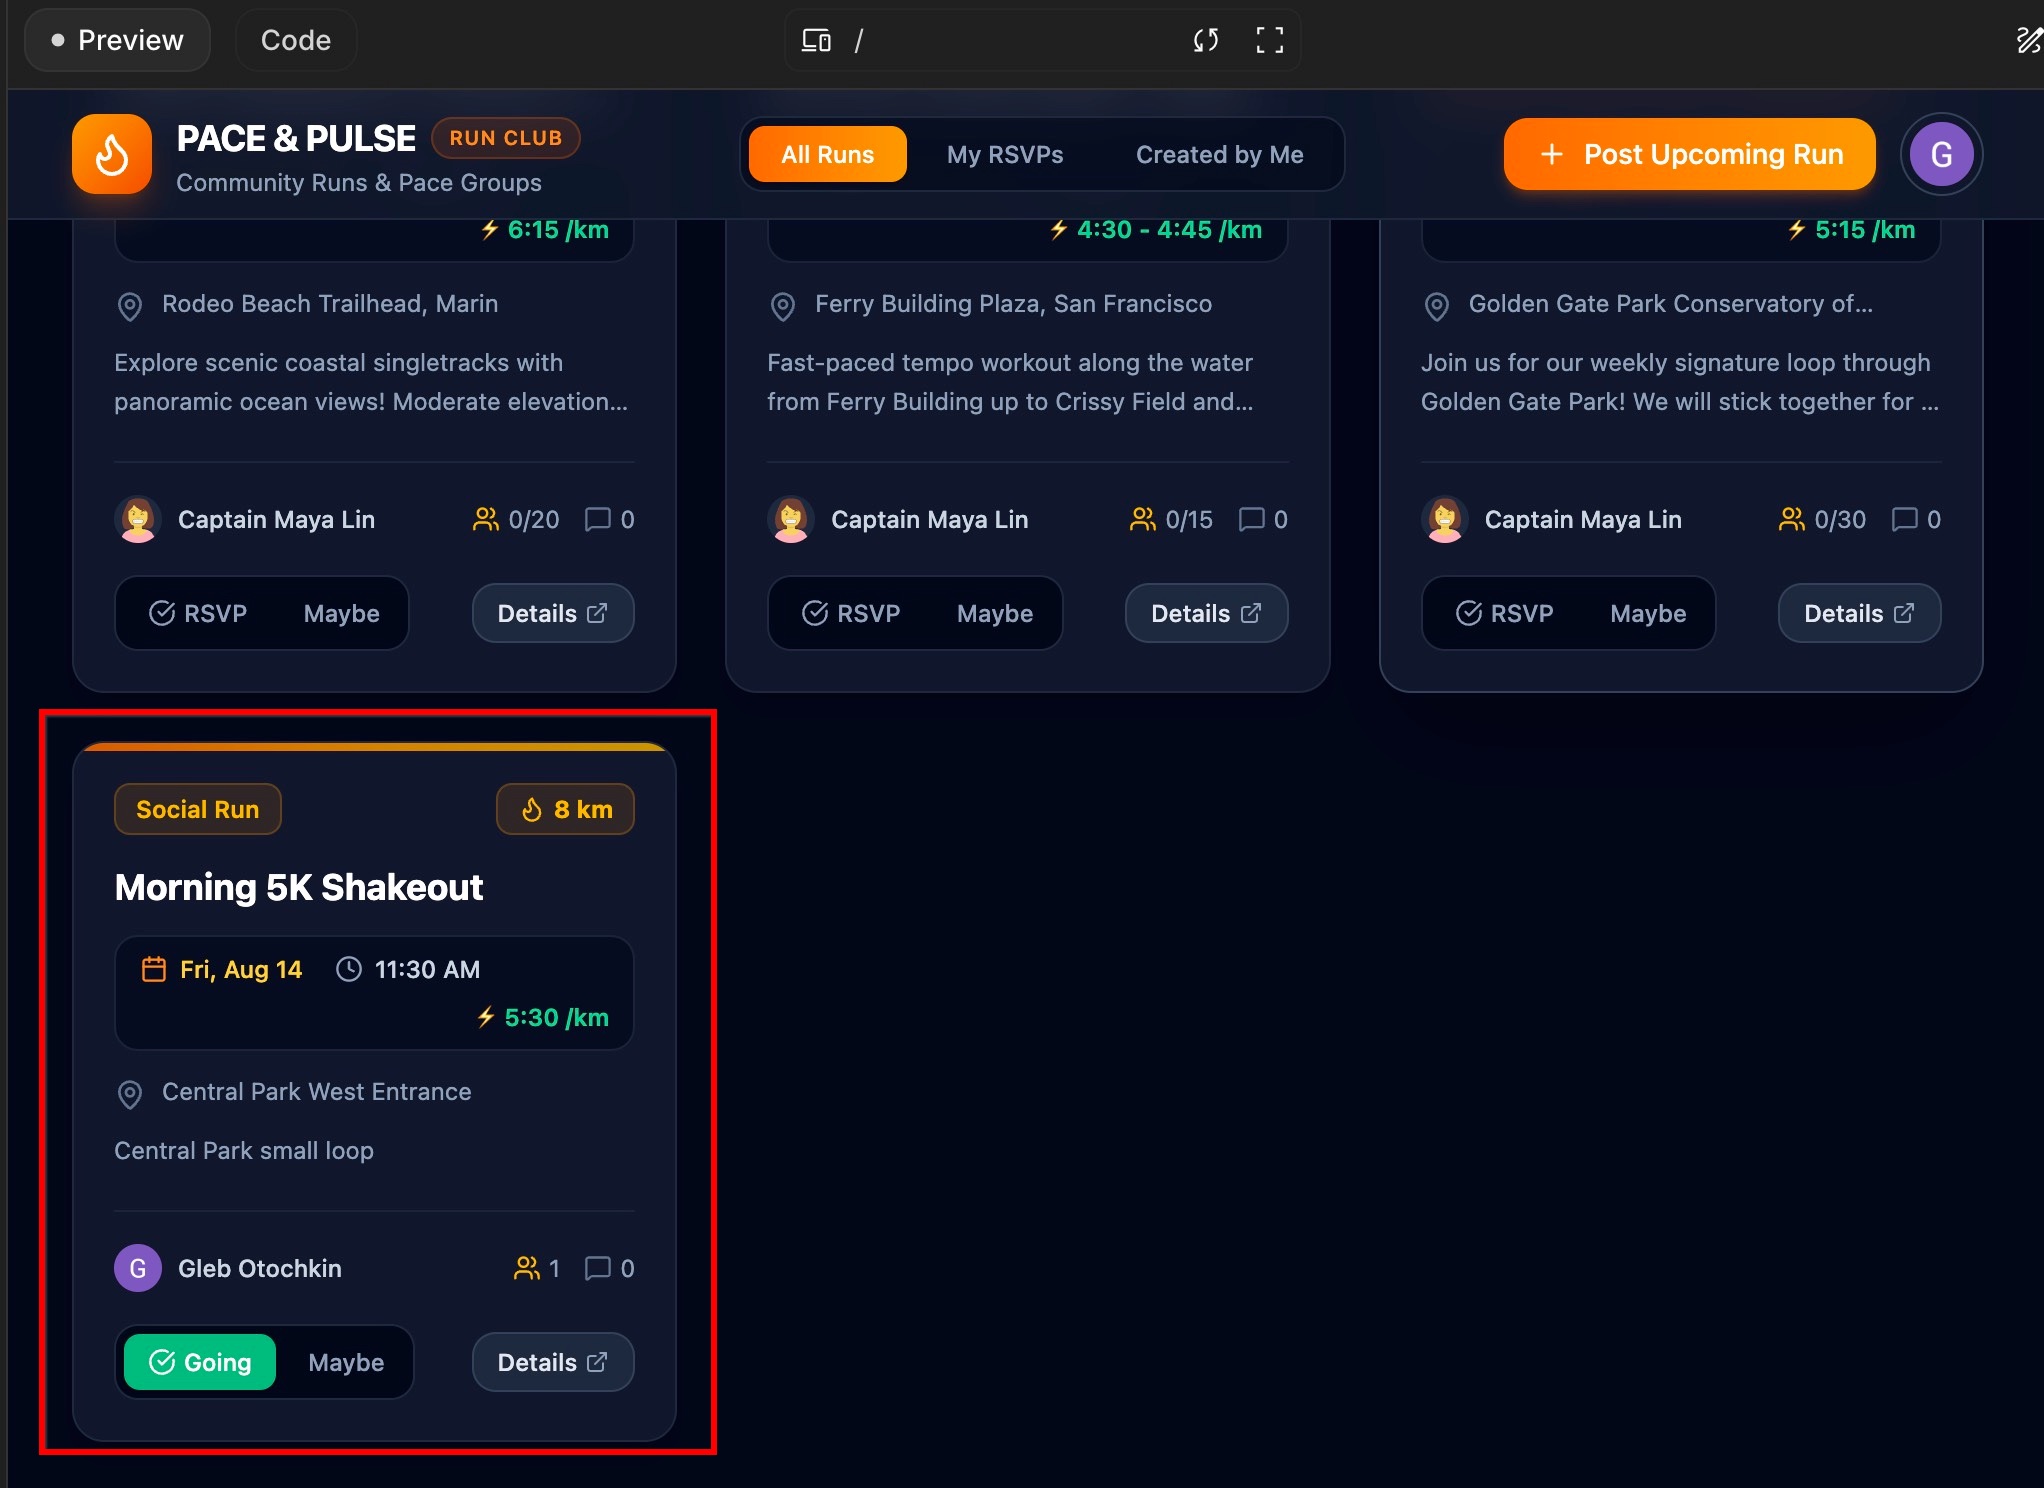
- নিশ্চিত করুন যে নতুন দৌড়টি আসন্ন দৌড়ের ফিডে অবিলম্বে প্রদর্শিত হচ্ছে এবং আয়োজক হিসেবে আপনার প্রমাণীকৃত প্রোফাইলের নাম ও পেস ব্যাজ দেখা যাচ্ছে।
- দৌড়টির আলোচনা বিভাগে একটি সংক্ষিপ্ত বার্তা পোস্ট করুন (যেমন:
Bringing extra water bottles!) এবং যাচাই করুন যে সেটি মন্তব্য বিভাগে দেখা যাচ্ছে।
৪. একটি রুট লাইব্রেরি তৈরি করুন
রানিং ক্লাবগুলো প্রায়শই জনপ্রিয় স্থানীয় রুটগুলো পুনরায় ব্যবহার করে। একই রুটের তথ্য বারবার টাইপ করার পরিবর্তে, আপনি সদস্যদের একটি ক্যাটালগে তাদের পছন্দের রুটগুলো সংরক্ষণ করতে দিতে পারেন এবং যখনই তারা দৌড়ের পরিকল্পনা করবে, তখন সেগুলো সংযুক্ত করার সুযোগ দিতে পারেন।
AI-কে রুট লাইব্রেরি যোগ করতে বলুন
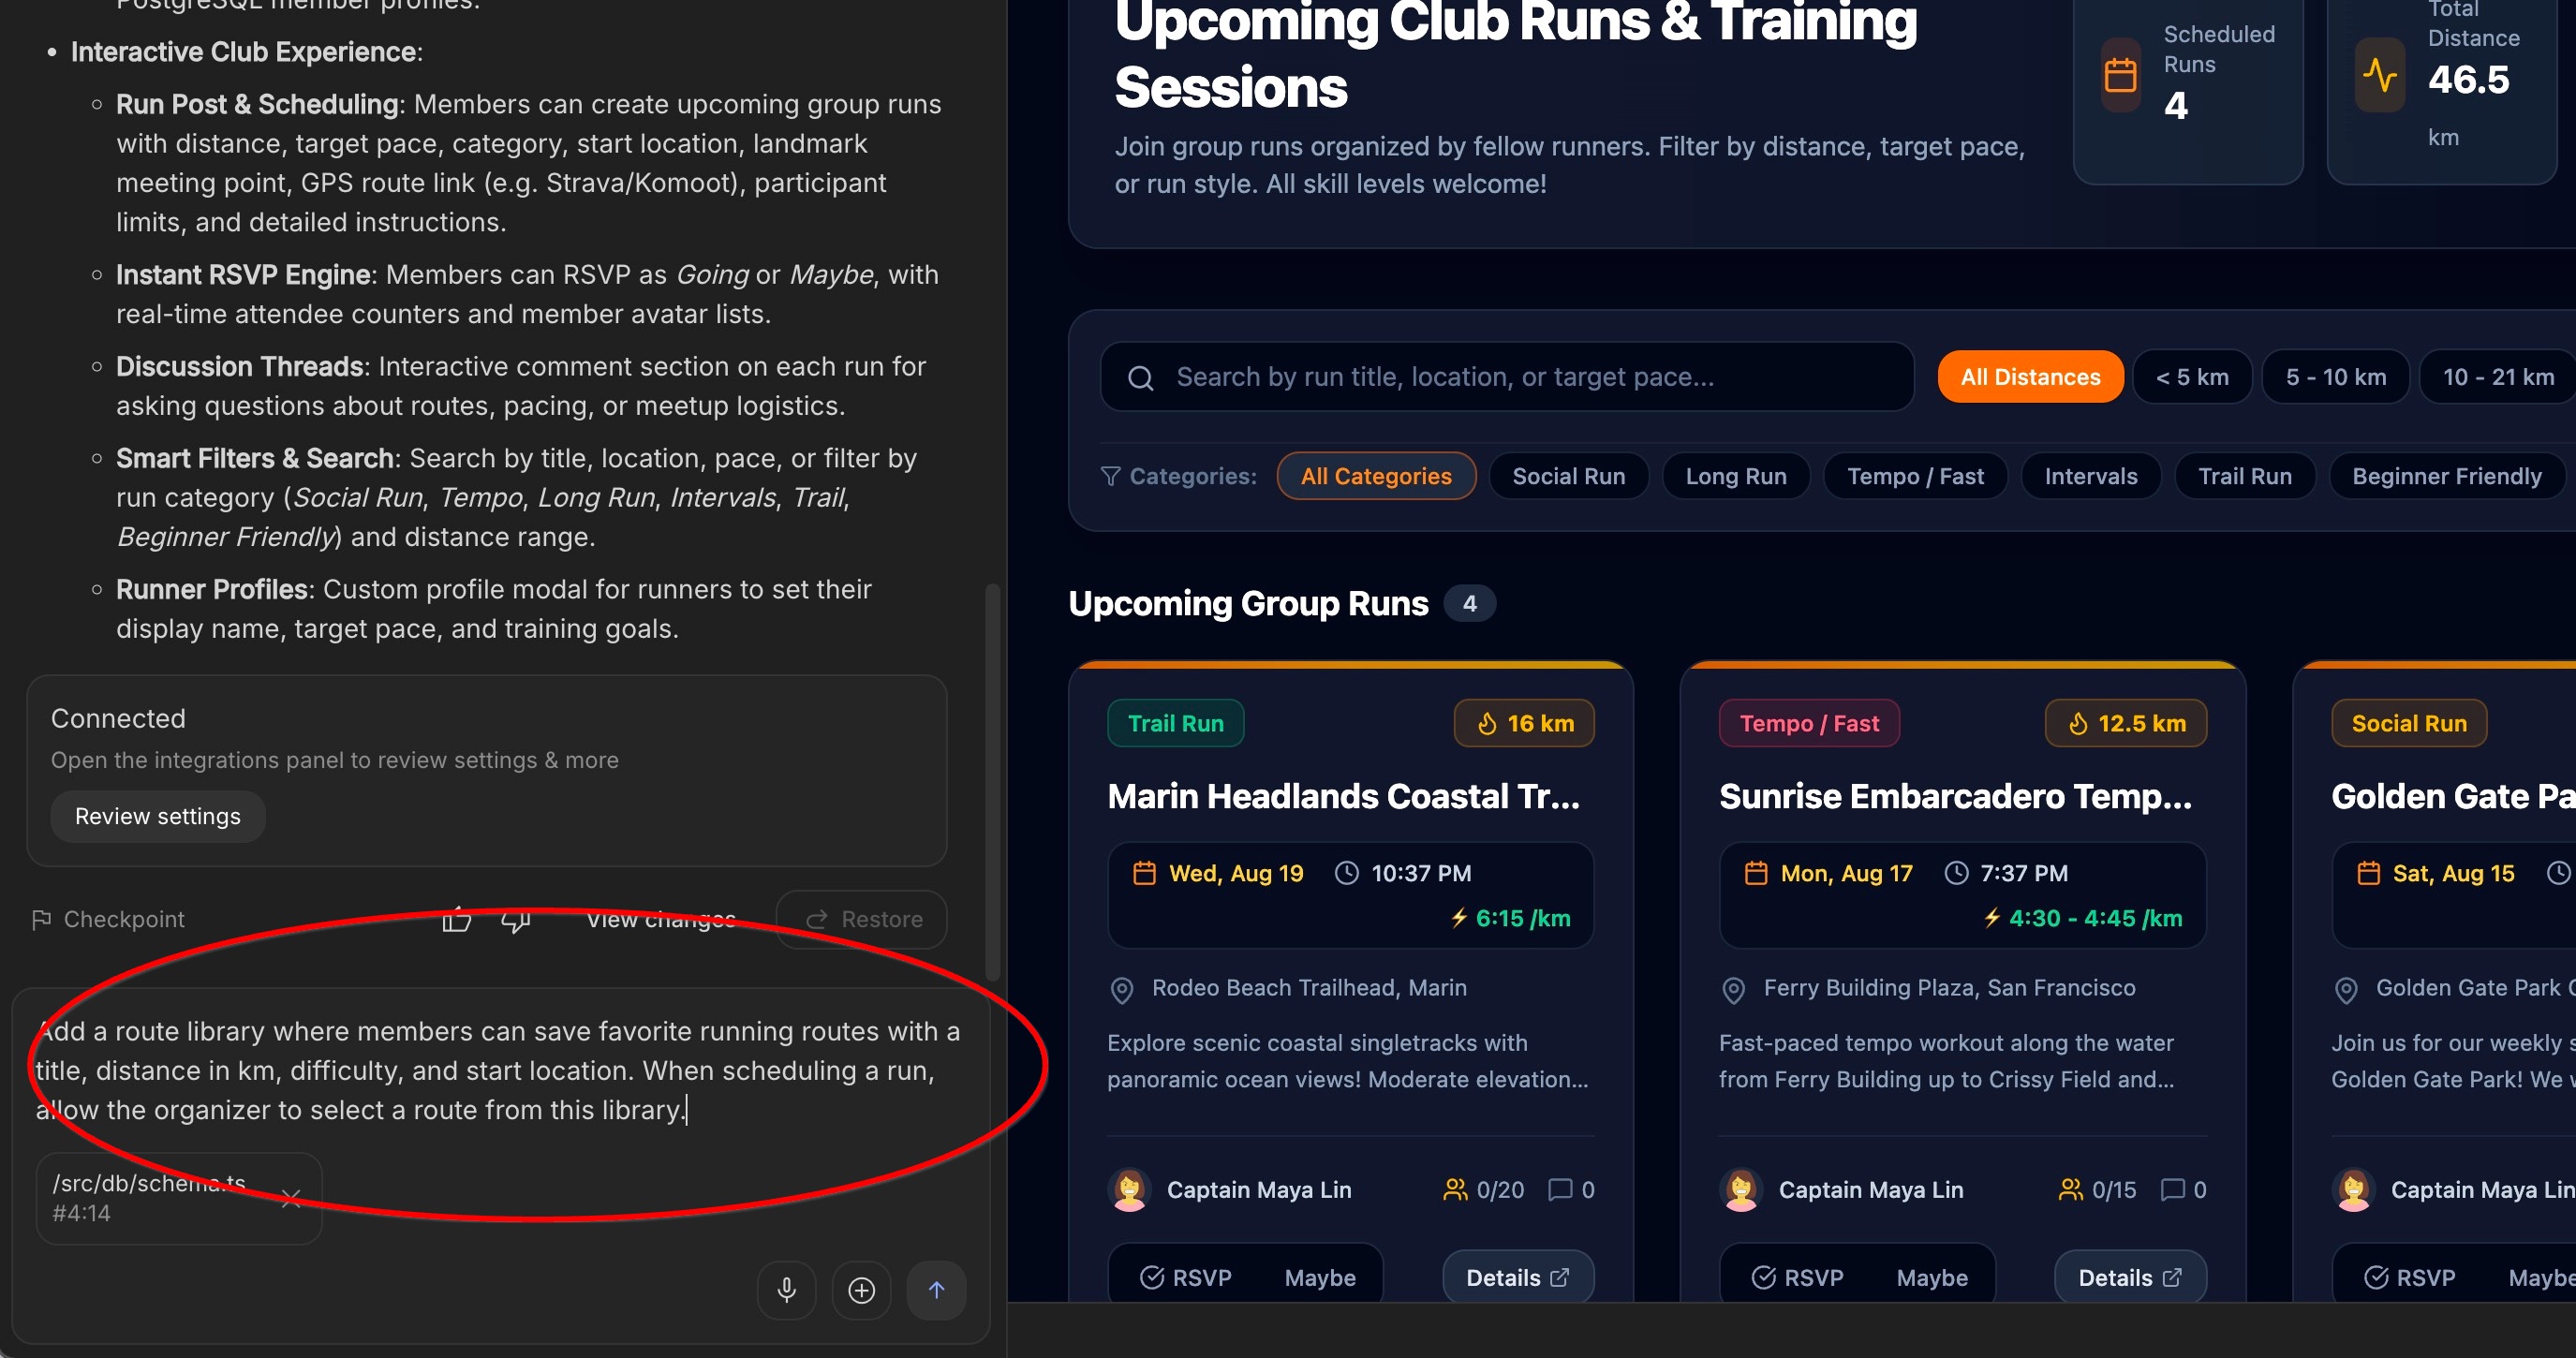
চ্যাট প্রম্পট বক্সে, নিম্নলিখিত অনুরোধটি টাইপ করুন এবং এন্টার চাপুন:
Add a route library where members can save favorite
running routes with atitle, distance in km, difficulty,
and start location. When scheduling a run, allow the
organizer to select a route from this library.
নেপথ্যে এআই কীভাবে রুটগুলোকে রানের সাথে সংযুক্ত করে
এই ব্যবস্থাটি কার্যকর করতে, এআই স্বয়ংক্রিয়ভাবে রুটের জন্য একটি নতুন স্টোরেজ টেবিল তৈরি করে এবং এটিকে সরাসরি রানস টেবিলের সাথে সংযুক্ত করে। এই সংযোগের ফলেই, যখনই কোনো আয়োজক একটি রুট বেছে নেন, আপনার অ্যাপটি স্বয়ংক্রিয়ভাবে দূরত্ব এবং অবস্থানের বিবরণ সংগ্রহ করতে পারে।
(আবারও বলছি, আপনার এই কোডটিতে হাত দেওয়ার কোনো প্রয়োজন নেই—এআই আপনার জন্য ডেটাবেসের কাঠামোটি আপডেট করে দেবে!)
প্রিভিউতে আপনার নতুন রুট লাইব্রেরি পরীক্ষা করুন
এআই আপনার অ্যাপ আপডেট করা শেষ করলে, লাইভ প্রিভিউ উইন্ডোতে নতুন রুট ফিচারটি ব্যবহার করে দেখুন:
- অ্যাপ নেভিগেশনে, রুট লাইব্রেরি ট্যাবে ক্লিক করুন। যদি এমন কোনো ট্যাব না থাকে, তবে লাইভ প্রিভিউয়ের নিচের অংশটি দেখুন - প্রিভিউ রিফ্রেশ করার জন্য এটি আপনাকে সেভ বাটন চাপতে বলতে পারে। অথবা তাতেও কাজ না হলে, চ্যাট উইন্ডোতে AI-এর সাথে কথা বলার চেষ্টা করুন এবং আপনার রুট লাইব্রেরিটি কোথায় আছে তা জিজ্ঞাসা করুন।
- সেভ নিউ রুট (বা অ্যাড রুট ) এ ক্লিক করুন এবং কিছু নমুনা বিবরণ পূরণ করুন:
- পথের শিরোনাম :
Riverfront Trail Loop - দূরত্ব :
8.5 km - কঠিনতা :
Moderate - শুরুর স্থান :
Waterfront Pier 4
- পথের শিরোনাম :
- লাইব্রেরিতে সংরক্ষণ করতে ক্লিক করুন।
- এখন, আপনার নতুন রুট কার্ডে সরাসরি থাকা 'Schedule Run' বোতামে ক্লিক করে এই রুটটি ব্যবহার করে দৌড়ানোর সময় নির্ধারণ করুন।
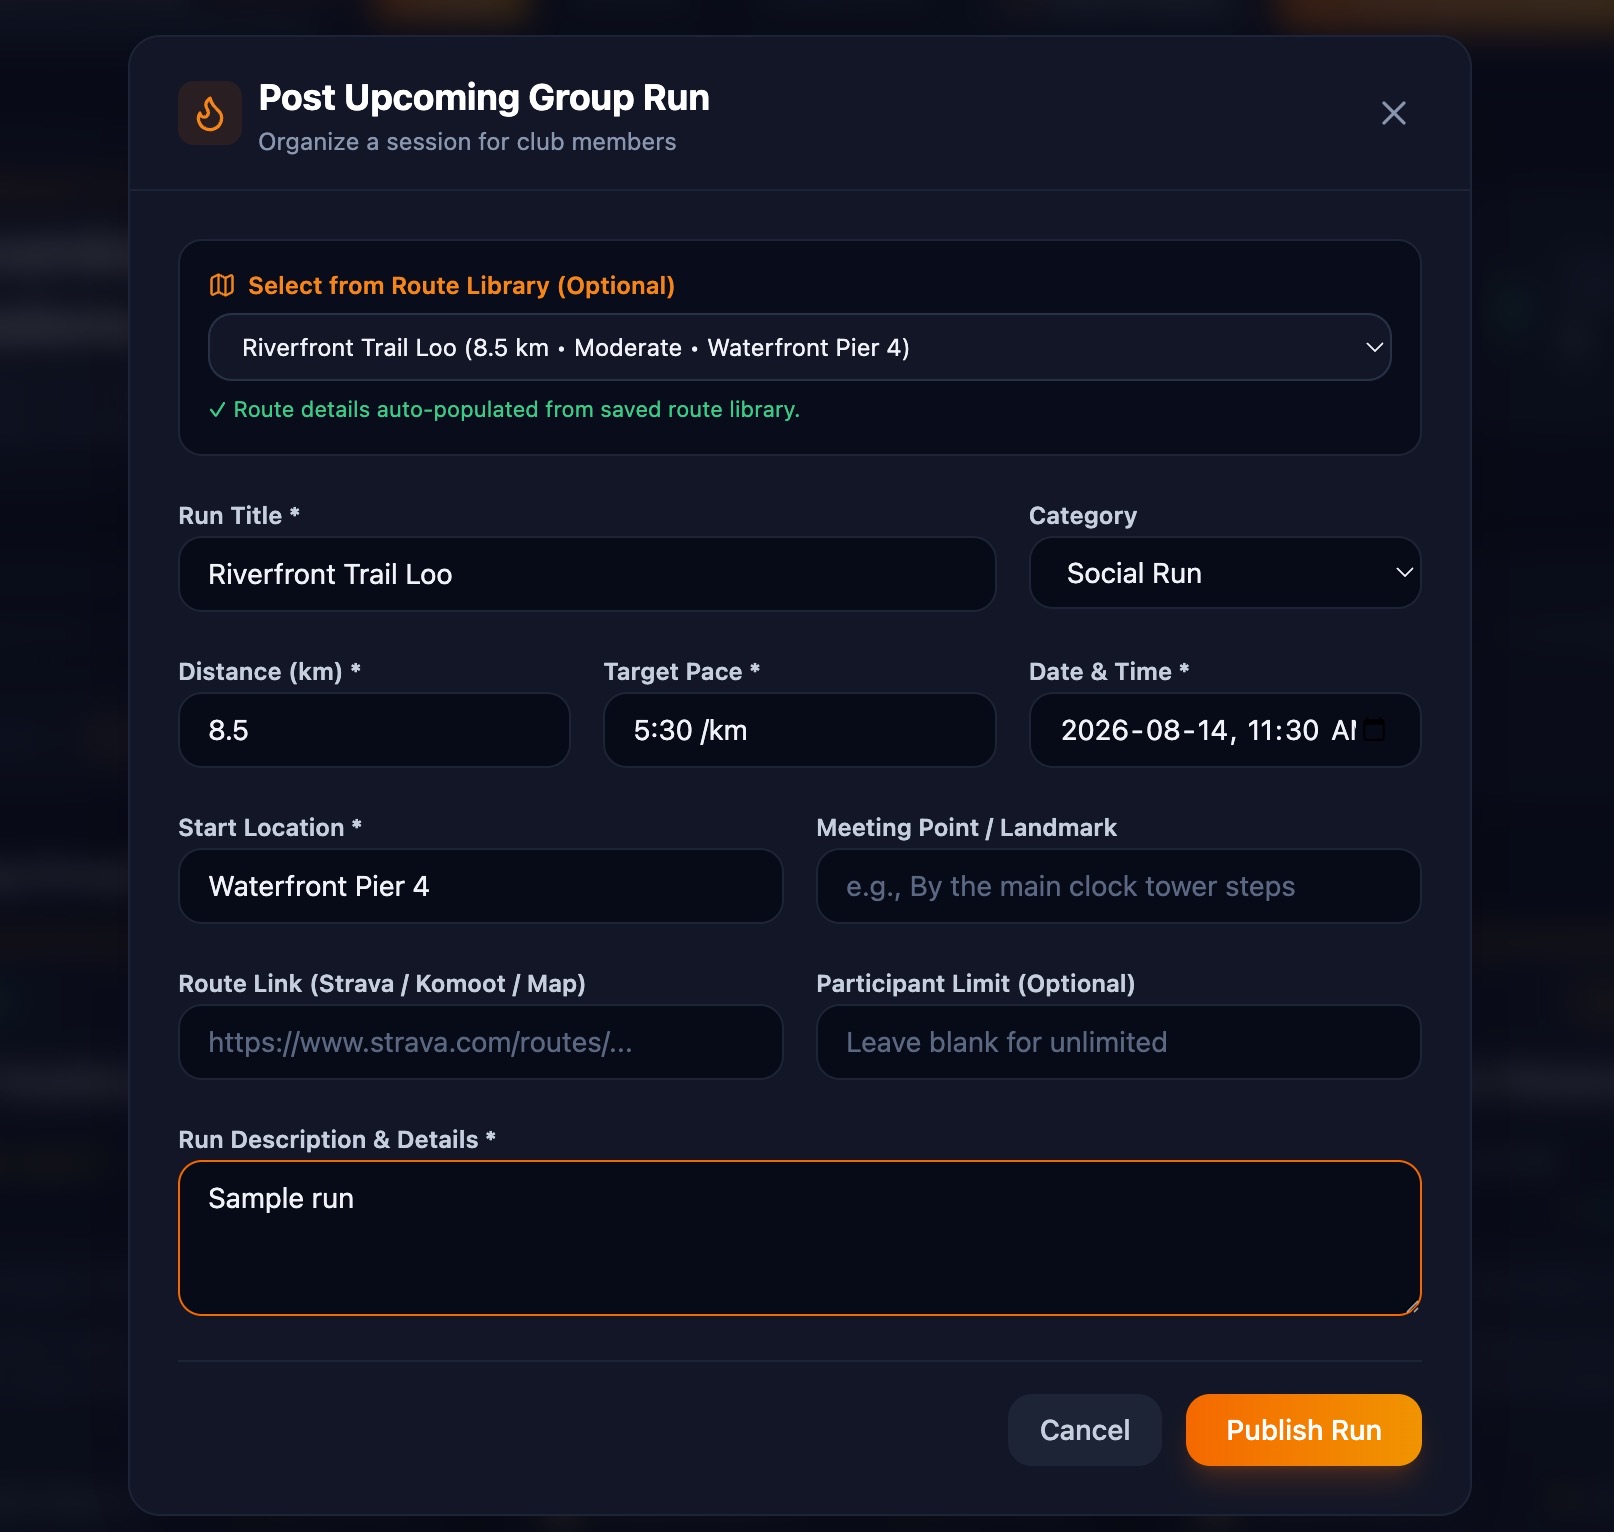
- লক্ষ্য করুন, কীভাবে দূরত্ব, কঠিনতা এবং অবস্থানের বিবরণ আপনার জন্য স্বয়ংক্রিয়ভাবে পূরণ হয়ে যায়!
- 'Publish Run'- এ ক্লিক করুন এবং যাচাই করুন যে আপনার নতুন গ্রুপ রানটি হোম ফিডে দেখা যাচ্ছে।
৫. উপস্থিতির নিশ্চিতকরণ (RSVP) এবং সদস্যদের আমন্ত্রণপত্র বাস্তবায়ন করুন
কমিউনিটি অ্যাপগুলো অংশগ্রহণের মাধ্যমেই সফল হয়! এর মাধ্যমে আপনি দৌড়বিদদের আসন্ন দৌড়ে কারা অংশ নিচ্ছে তা দেখতে দিতে পারেন, এক ক্লিকে সাইন আপ করার সুযোগ দিতে পারেন এবং বন্ধুদের সাথে আমন্ত্রণ লিঙ্ক শেয়ার করতে পারেন।
RSVP এবং আমন্ত্রণ যোগ করতে AI-কে বলুন
চ্যাট প্রম্পট বক্সে, নিম্নলিখিত অনুরোধটি টাইপ করুন এবং এন্টার চাপুন:
Allow registered members to RSVP ("Join Run") to any upcoming run.
Show the list of attending runners on each run card, display an
attendee counter, and add a copyable invite link.
পর্দার আড়ালে এআই কীভাবে অংশগ্রহণকারীদের ট্র্যাক করে
কোন দৌড়বিদ কোন দৌড়ে আসছেন তার হিসাব রাখতে, এআই স্বয়ংক্রিয়ভাবে আপনার ডেটাবেসে একটি rsvps টেবিল তৈরি করে। এটিকে একটি ডিজিটাল সাইন-আপ শিট হিসেবে ভাবুন, যা একজন দৌড়বিদের নামকে একটি নির্দিষ্ট ইভেন্টের সাথে যুক্ত করে।
(আপনার এই কোডটি লেখা বা সম্পাদনা করার প্রয়োজন নেই—এআই আপনার ডেটাবেসে এই সাইন-আপ শিটটি স্বয়ংক্রিয়ভাবে পরিচালনা করে!)
প্রিভিউতে RSVP এবং আমন্ত্রণপত্র পরীক্ষা করুন
এআই আপনার অ্যাপ আপডেট করা শেষ করলে, লাইভ প্রিভিউ উইন্ডোতে নতুন আরএসভিপি ফিচারগুলো পরীক্ষা করে দেখুন:
- প্রিভিউ উইন্ডোতে, আপনার হোম ফিডে আসন্ন কোনো রান খুঁজে নিন।
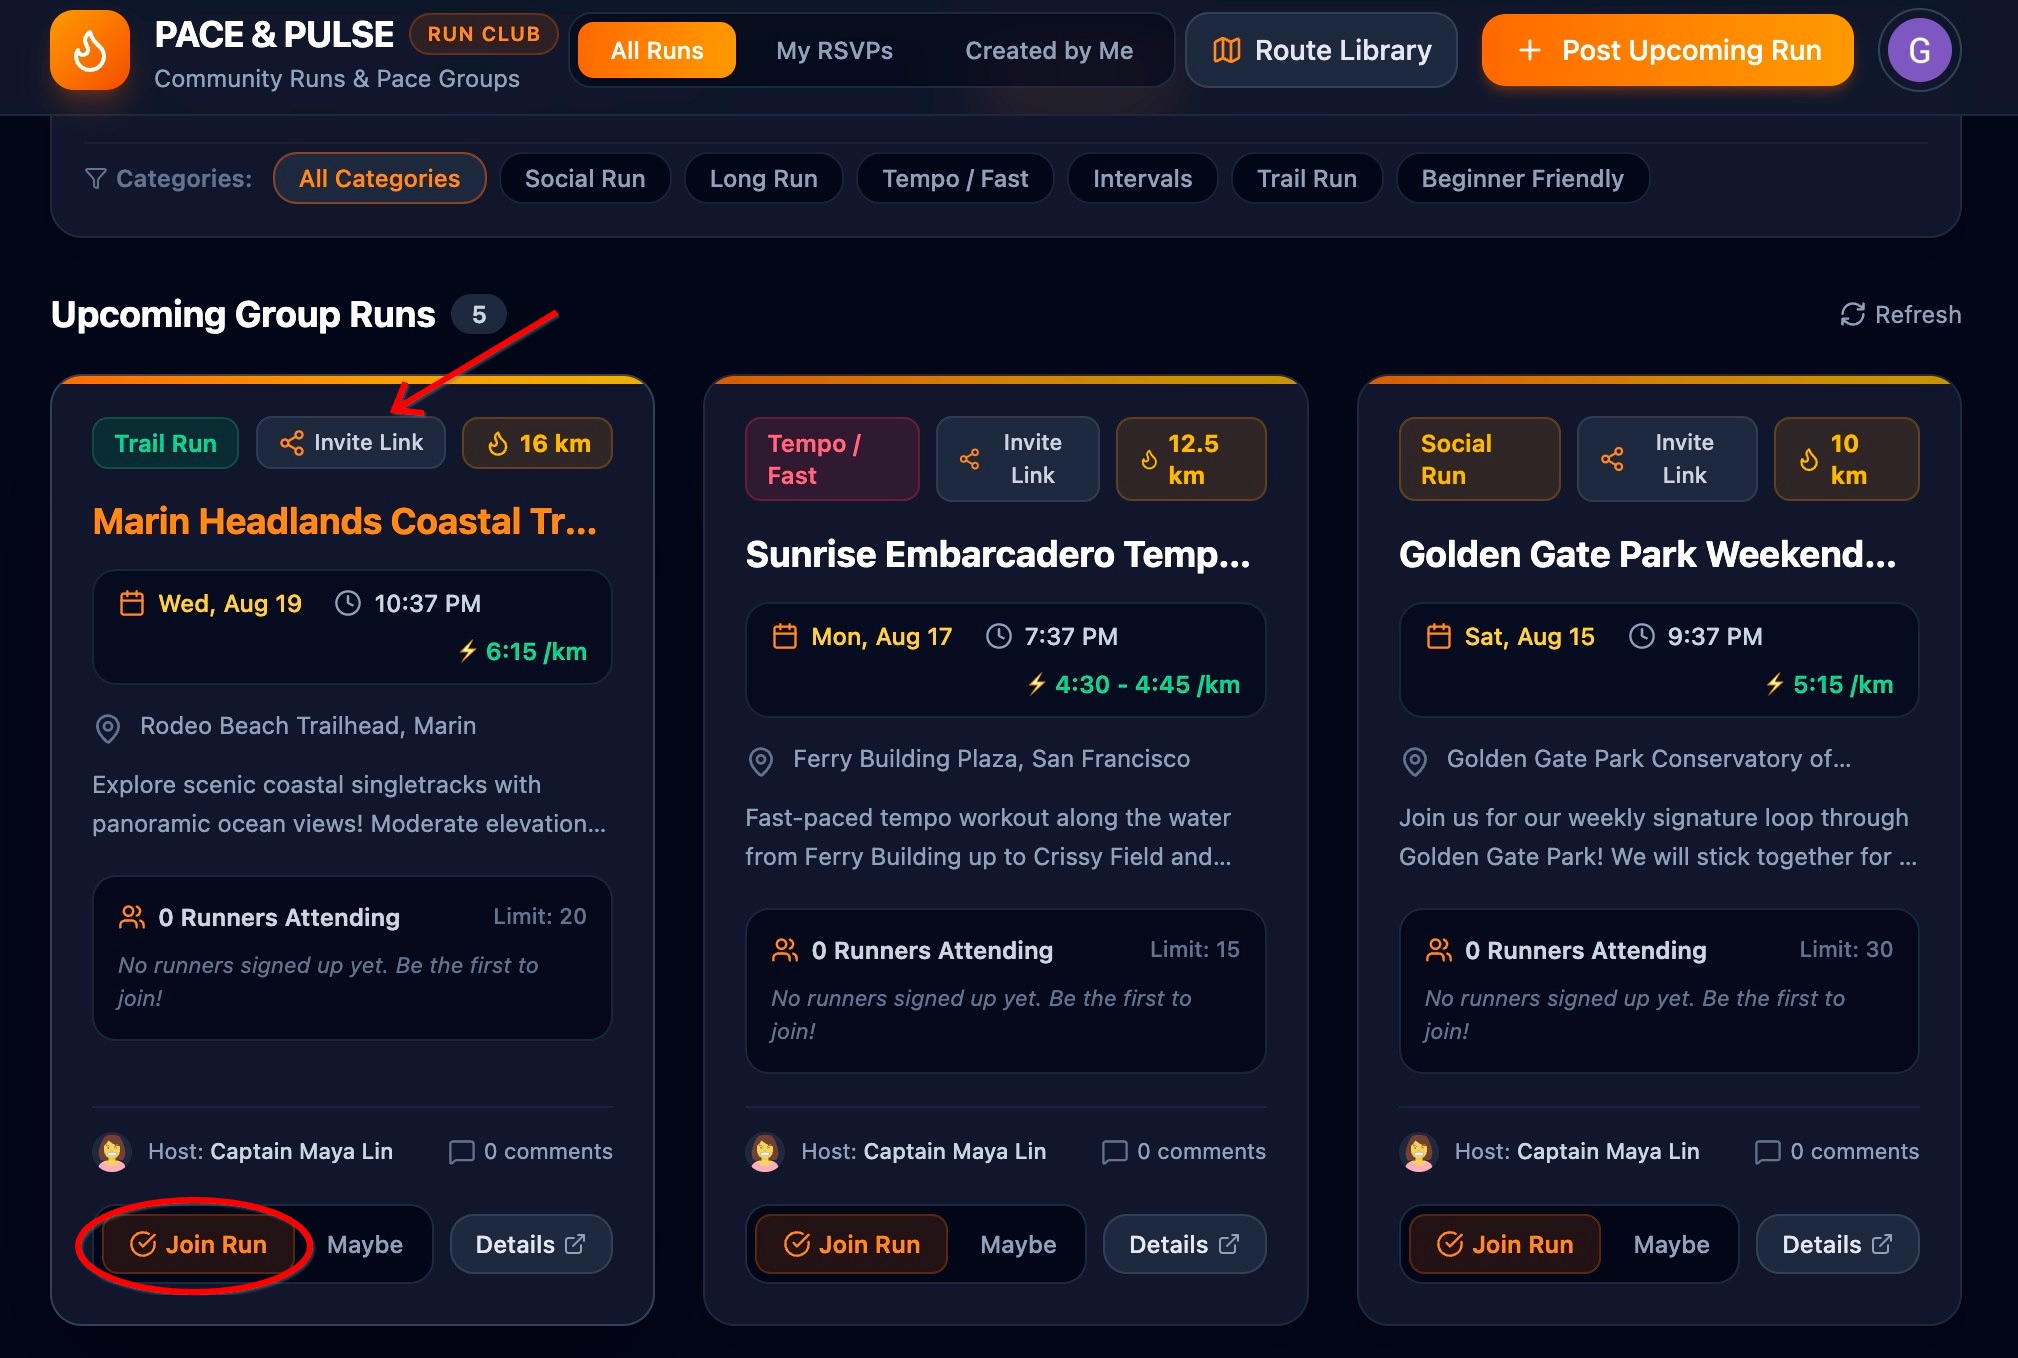
- Join Run (বা RSVP ) বোতামে ক্লিক করুন।
- নিশ্চিত করুন যে আপনার নাম এবং অ্যাভাটার ' উপস্থিত রানার' বিভাগে দেখা যাচ্ছে এবং অংশগ্রহণকারীর সংখ্যা ১ বৃদ্ধি পেয়েছে।
- 'কপি ইনভাইট লিঙ্ক'-এ ক্লিক করুন এবং যাচাই করুন যে একটি শেয়ারযোগ্য লিঙ্ক তৈরি হয়েছে।
৬. ডেটা পার্সিস্টেন্স এবং ক্লাউড এসকিউএল স্কেল-টু-জিরো পরীক্ষা করুন
একটি অ্যাপ তৈরি করার সময় সবচেয়ে গুরুত্বপূর্ণ বিষয় হলো আপনার কমিউনিটির তথ্য সুরক্ষিত আছে কিনা তা নিশ্চিত করা। আপনি যদি আপনার ব্রাউজার রিফ্রেশ করেন, ট্যাব বন্ধ করেন বা কম্পিউটার শাট ডাউন করেন, তাহলে আপনি চাইবেন যে ফিরে আসার পর আপনার সেভ করা সমস্ত রুট, আরএসভিপি এবং আলোচনাগুলো যেন আগের মতোই থাকে।
এই ধাপে, আপনি পরীক্ষা করে দেখবেন যে আপনার ডেটা আপনার ক্লাউড SQL ডেটাবেসে নিরাপদে সংরক্ষিত আছে কিনা এবং আপনার অ্যাপ নিষ্ক্রিয় থাকলে গুগল ক্লাউড কীভাবে শক্তি ও খরচ সাশ্রয় করে, তা শিখবেন।
আপনার অ্যাপ রিফ্রেশ করে পরীক্ষা করুন
- AI Studio প্রিভিউ উইন্ডোর ভিতরে থাকা রিলোড বোতামে ক্লিক করুন (অথবা আপনার ব্রাউজার ট্যাব রিফ্রেশ করুন)।
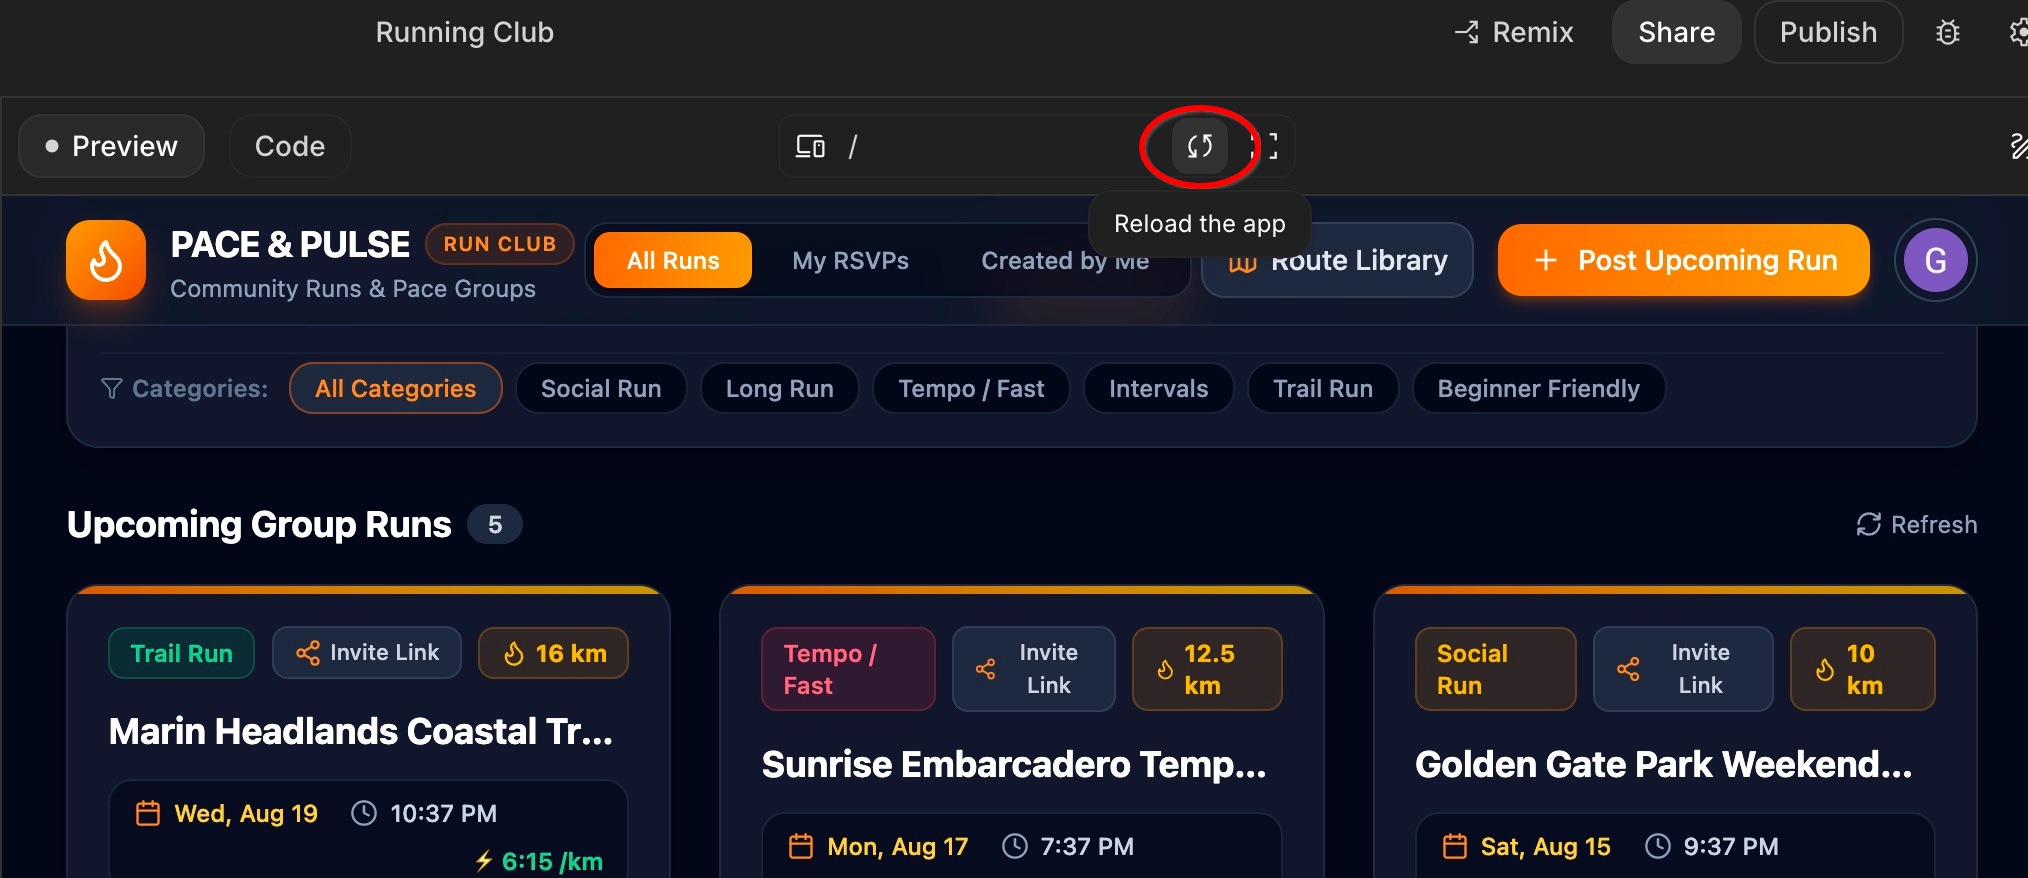
- প্রিভিউতে আপনার অ্যাপটি দেখুন: লক্ষ্য করুন যে আপনার তৈরি করা সবকিছু—আপনার সদস্য প্রোফাইল, সংরক্ষিত রুট, নির্ধারিত দৌড়, অংশগ্রহণের নিশ্চিতকরণ (RSVP), এবং মন্তব্য—এখনও ঠিক সেখানেই আছে যেখানে আপনি রেখেছিলেন!
- আপনার অ্যাপটি শুধু আপনার স্ক্রিনে সাময়িকভাবে তথ্য সংরক্ষণ করেনি; এটি আপনার ক্লাউড এসকিউএল (Cloud SQL) ডেটাবেসে তা নিরাপদে সংরক্ষণ করেছে।
ক্লাউড এসকিউএল কীভাবে শক্তি ও খরচ সাশ্রয় করে ("স্কেল-টু-জিরো")
মাঝরাতে যখন আপনার রানিং ক্লাব অ্যাপটি কেউ ব্যবহার করছে না, তখন কী হয়?
- স্বয়ংক্রিয় স্লিপ ("স্কেল-টু-জিরো") : যখন কেউ অ্যাপটি ভিজিট করে না বা দৌড়ের জন্য সাইন আপ করে না, তখন রিসোর্স সাশ্রয়ের জন্য ডেটাবেস স্বয়ংক্রিয়ভাবে বিরতি নেয়।
- তাৎক্ষণিক সক্রিয়করণ : কোনো দৌড়বিদ অ্যাপটি খোলার সাথে সাথেই বা কোনো আমন্ত্রণ লিঙ্কে ক্লিক করার সাথে সাথেই, আপনার সংরক্ষিত সমস্ত তথ্যসহ ডেটাবেসটি সঙ্গে সঙ্গে সক্রিয় হয়ে ওঠে।
- নিষ্ক্রিয় অবস্থায় কোনো খরচ হয় না : যেহেতু এটি নিষ্ক্রিয় অবস্থায় স্লিপ মোডে থাকে, তাই অ্যাপটি শান্ত থাকলে কোনো কম্পিউটিং রিসোর্স ব্যবহৃত হয় না।
৭. ক্লাউড রানে প্রকাশ ও স্থাপন করুন
এখন যেহেতু আপনার রানিং ক্লাব অ্যাপটি প্রিভিউতে তৈরি ও পরীক্ষা করা হয়ে গেছে, এটি আপনার কমিউনিটির সাথে শেয়ার করার সময় এসেছে! আপনাকে ওয়েব হোস্টিং কিনতে বা সার্ভার কনফিগার করতে হবে না—আপনি এক ক্লিকেই আপনার অ্যাপটি ইন্টারনেটে লাইভ করতে পারবেন।
আপনার অ্যাপটি ওয়েবে লাইভ প্রকাশ করুন।
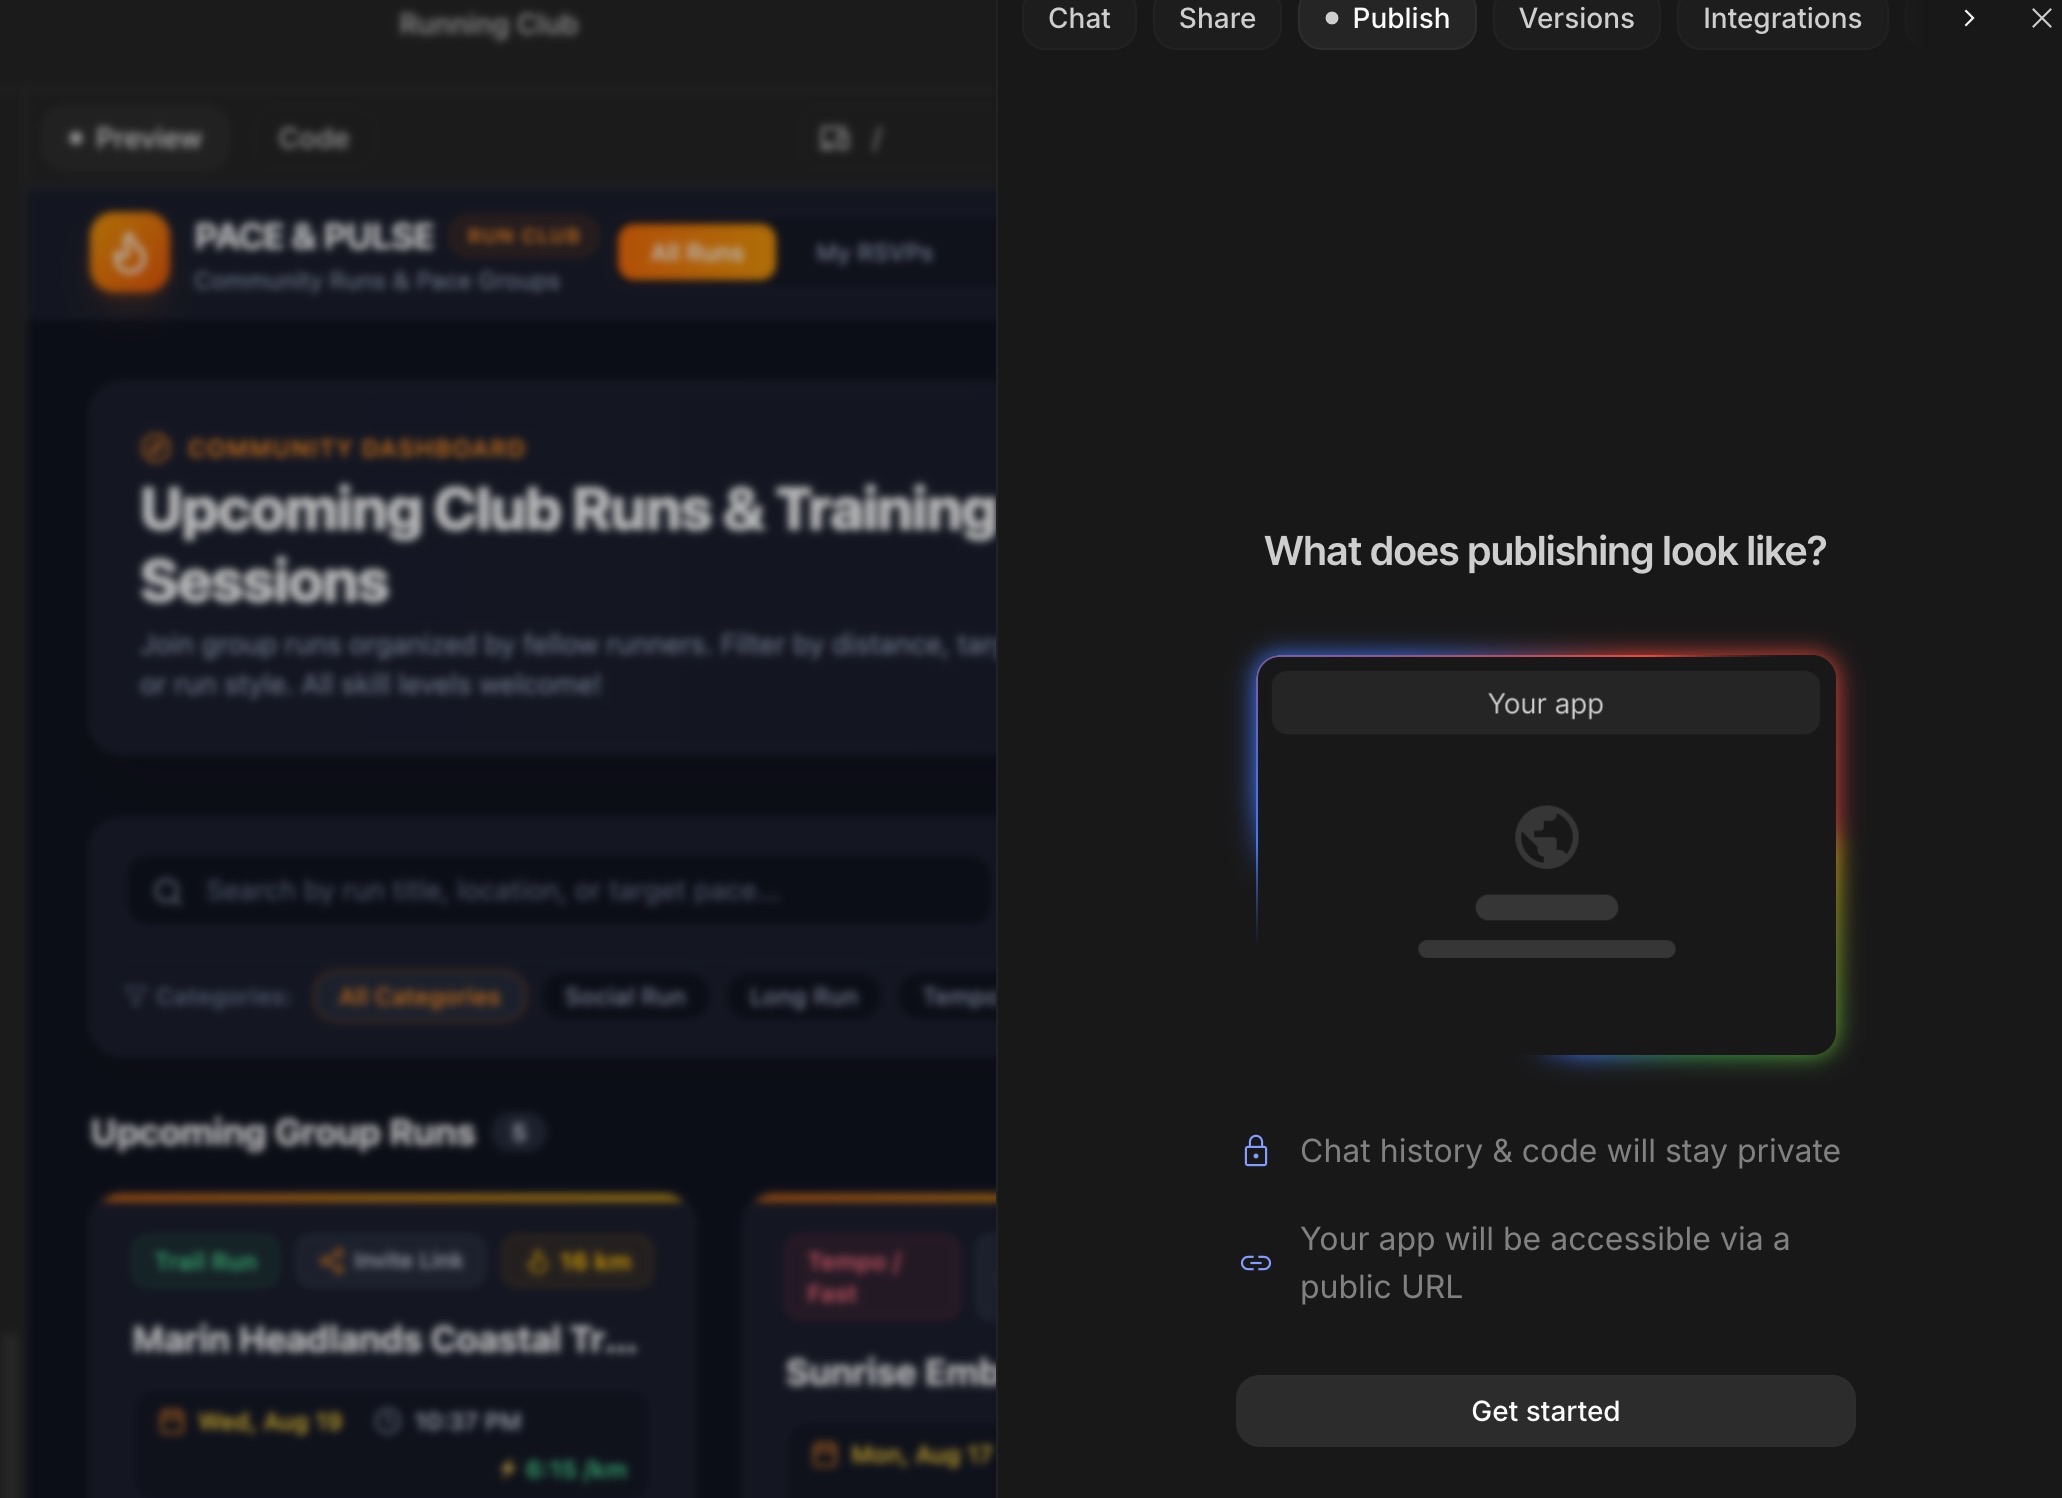
- গুগল এআই স্টুডিও-এর উপরের ডান কোণায় থাকা পাবলিশ বাটনটিতে ক্লিক করুন।
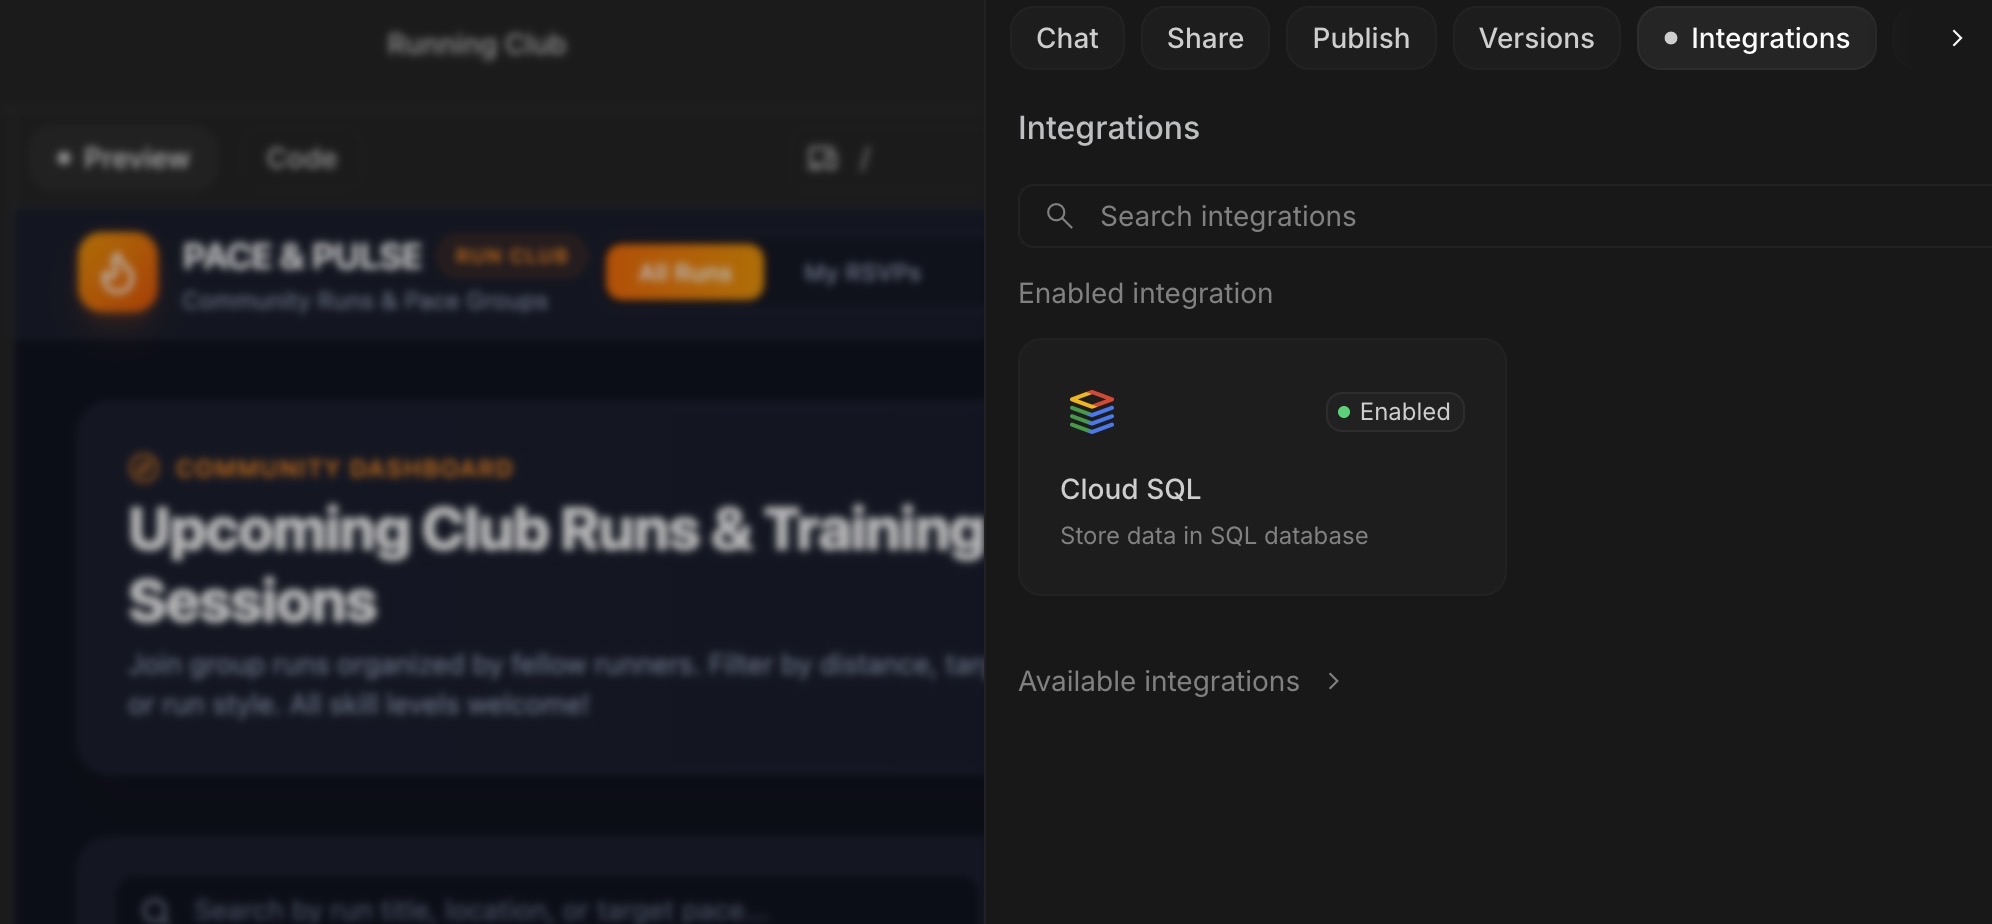
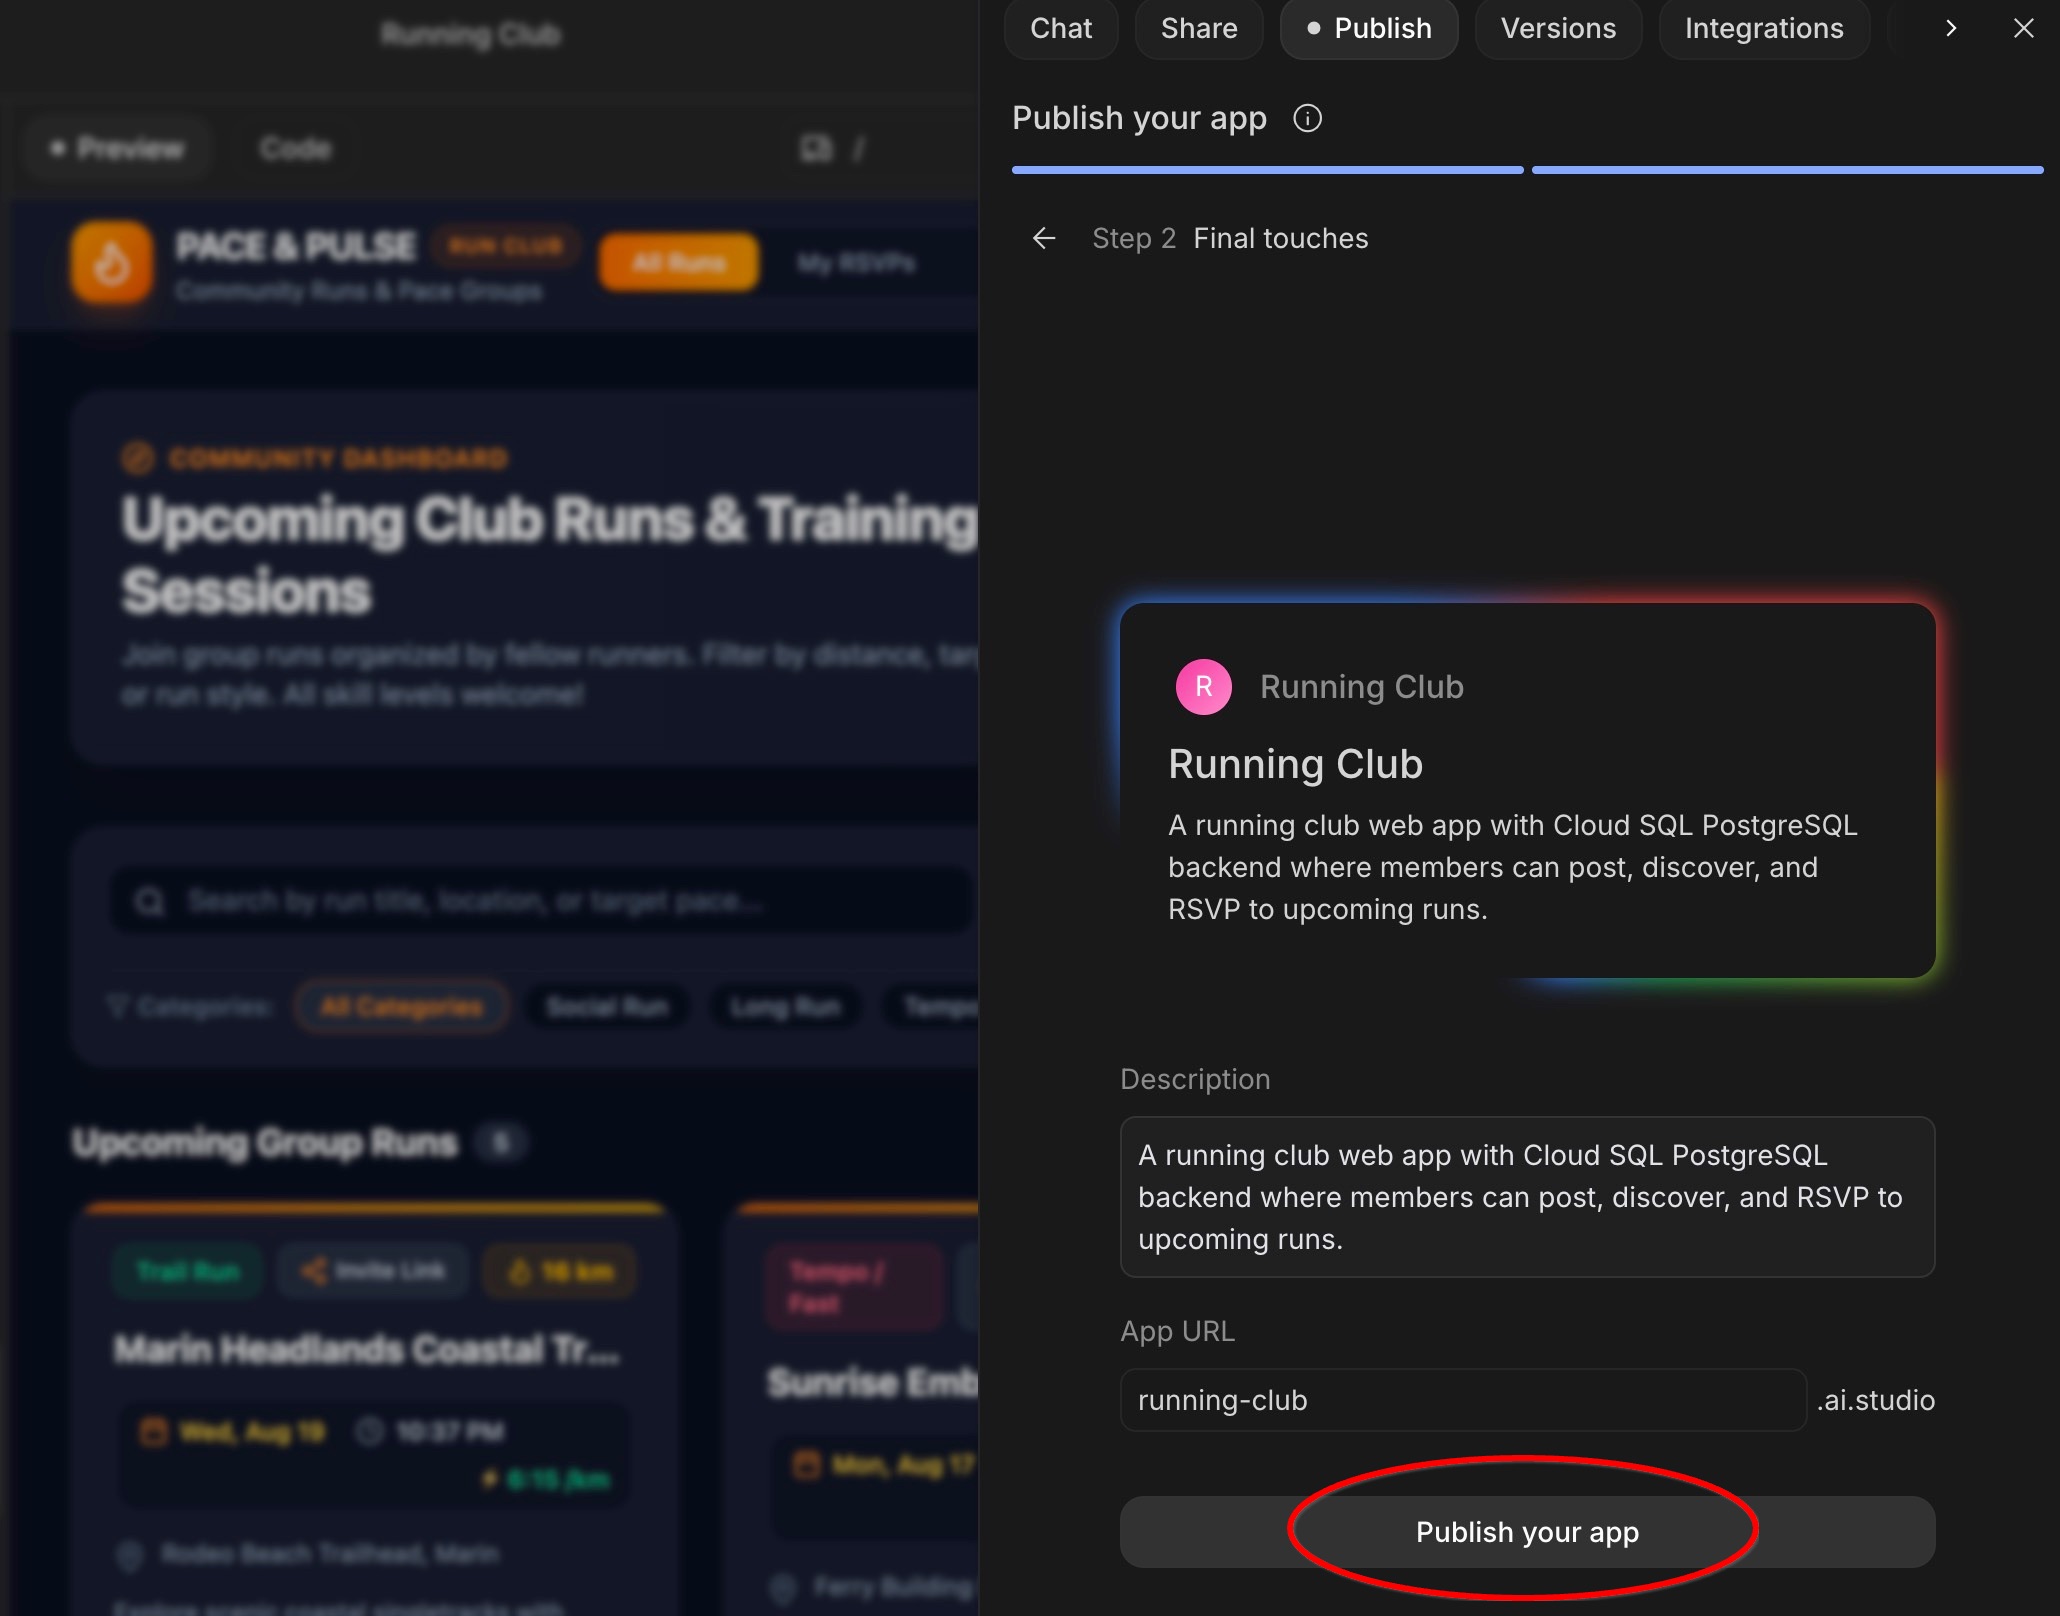
- বিবরণগুলো নিশ্চিত করে একটি সারসংক্ষেপ উইন্ডো প্রদর্শিত হয়:
- হোস্টিং : গুগল ক্লাউড রান-এ হোস্ট ও ডেপ্লয় করা হয়েছে।
- সংযুক্ত পরিষেবাগুলো : গুগল সাইন-ইন এবং আপনার ক্লাউড এসকিউএল ডেটাবেস।
- হোস্টিং : গুগল ক্লাউড রান-এ হোস্ট ও ডেপ্লয় করা হয়েছে।
- আপনার অ্যাপটি চালু করতে পাবলিশ-এ ক্লিক করুন।
আপনার লাইভ অ্যাপটি খুলুন এবং শেয়ার করুন
- প্রকাশনা সম্পন্ন হলে, গুগল এআই স্টুডিও একটি কিউআর কোডসহ আপনার লাইভ ওয়েব ঠিকানা প্রদান করে।
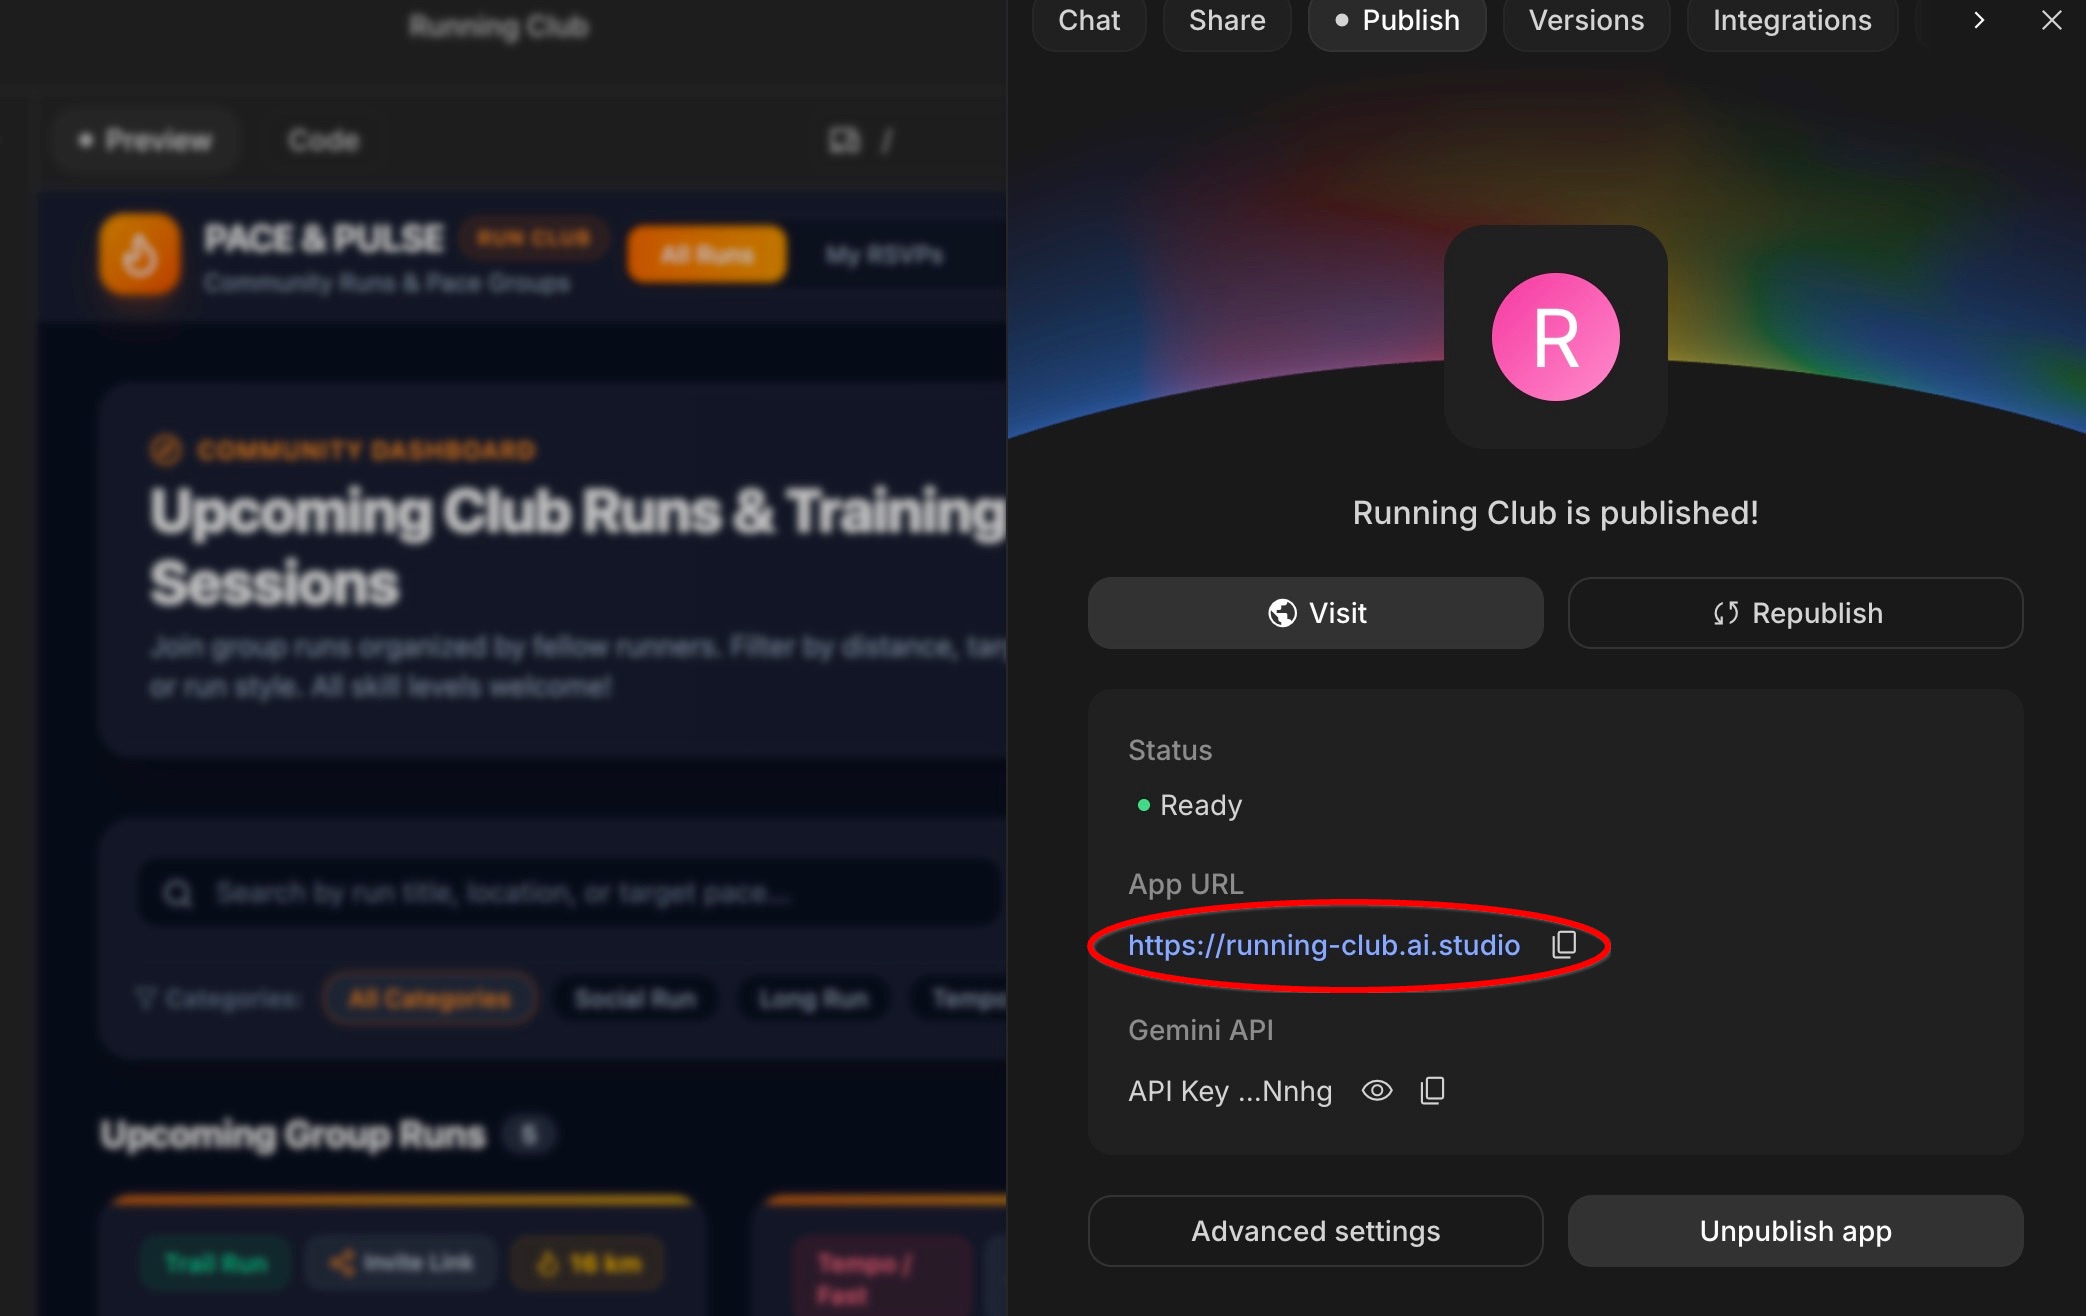
- আপনার লাইভ ওয়েব অ্যাপটি একটি নতুন ব্রাউজার ট্যাবে খুলতে লিঙ্কে ক্লিক করুন, অথবা আপনার ফোনের ক্যামেরা দিয়ে কিউআর কোডটি স্ক্যান করুন।
- আপনার ফোনেই চেষ্টা করুন : আপনার ফোনে সাইন ইন করুন, কম্পিউটারে আগে থেকে শিডিউল করা দৌড়গুলোর একটিতে অংশগ্রহণের বিষয়টি নিশ্চিত করুন, এবং আপনার শেয়ার করা ক্লাউড SQL ডেটাবেসের সৌজন্যে অংশগ্রহণকারীর সংখ্যা রিয়েল টাইমে আপডেট হতে দেখুন!
৮. (বোনাস) গুগল ক্লাউড কনসোলে আপনার রিসোর্সগুলো পরিদর্শন করুন
যখন গুগল এআই স্টুডিও আপনার অ্যাপ বিল্ড এবং ডেপ্লয় করে, তখন এটি সেটিকে কোনো ব্যক্তিগত ব্ল্যাক বক্সের মধ্যে আটকে রাখে না—বরং এটি আপনার হয়ে বাস্তব, প্রোডাকশনের জন্য প্রস্তুত গুগল ক্লাউড পরিষেবা তৈরি করে। গুগল ক্লাউড কনসোলকে নিয়ন্ত্রণ কেন্দ্র হিসেবে ভাবুন, যেখানে আপনি আপনার লাইভ অ্যাপ এবং ডেটাবেস দেখতে পারেন।
ধাপ ১: গুগল ক্লাউড কনসোল খুলুন
- একটি নতুন ব্রাউজার ট্যাবে গুগল ক্লাউড কনসোল খুলুন।
- স্ক্রিনের উপরে, প্রজেক্ট ড্রপ-ডাউন মেনুতে ক্লিক করুন এবং আপনার এআই স্টুডিও অ্যাপের জন্য তৈরি করা প্রজেক্টটি বেছে নিন (এর নামটি সাধারণত
continual-run-দিয়ে শুরু হয়)।
ধাপ ২: দেখুন আপনার ওয়েব অ্যাপটি কোথায় চলছে (ক্লাউড রান)
- উপরের সার্চ বারে
Cloud Runটাইপ করুন এবং ফলাফল থেকে এটি নির্বাচন করুন।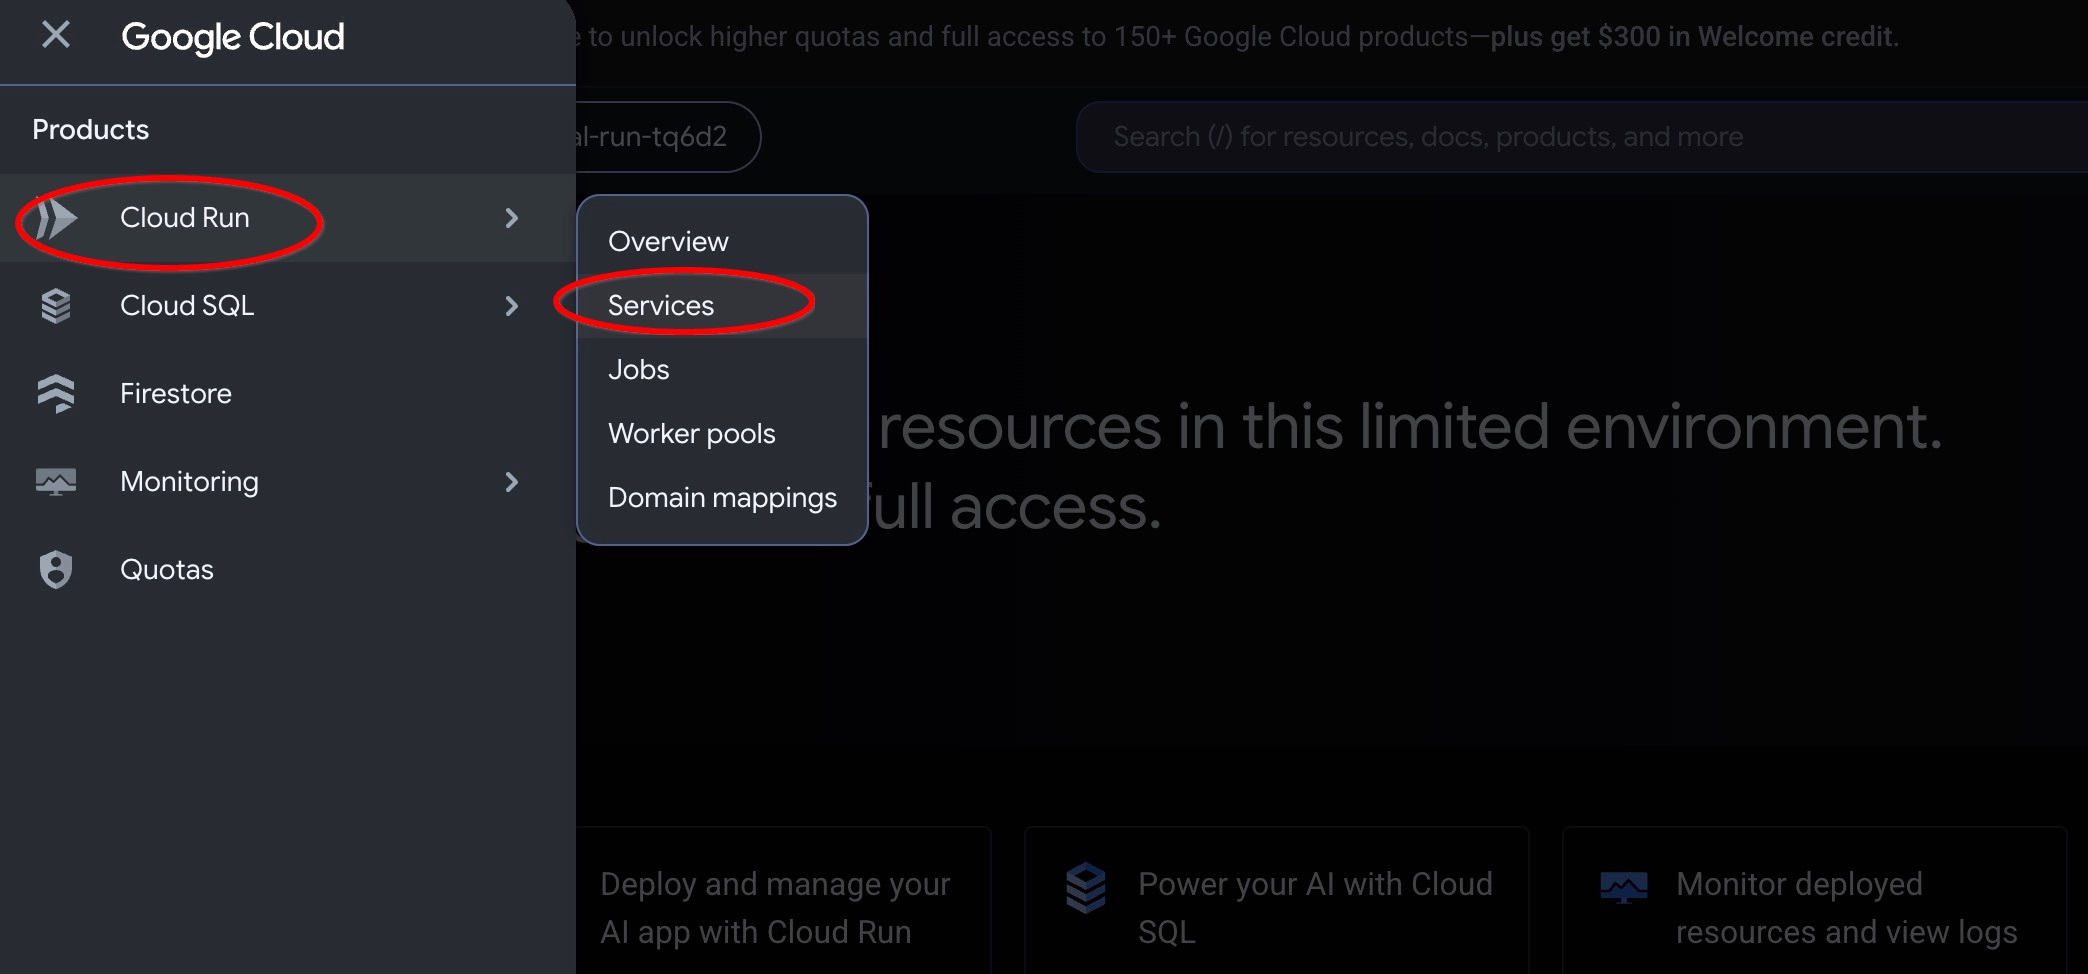
- আপনার অ্যাপের নামে ক্লিক করুন (যেমন
running-club)।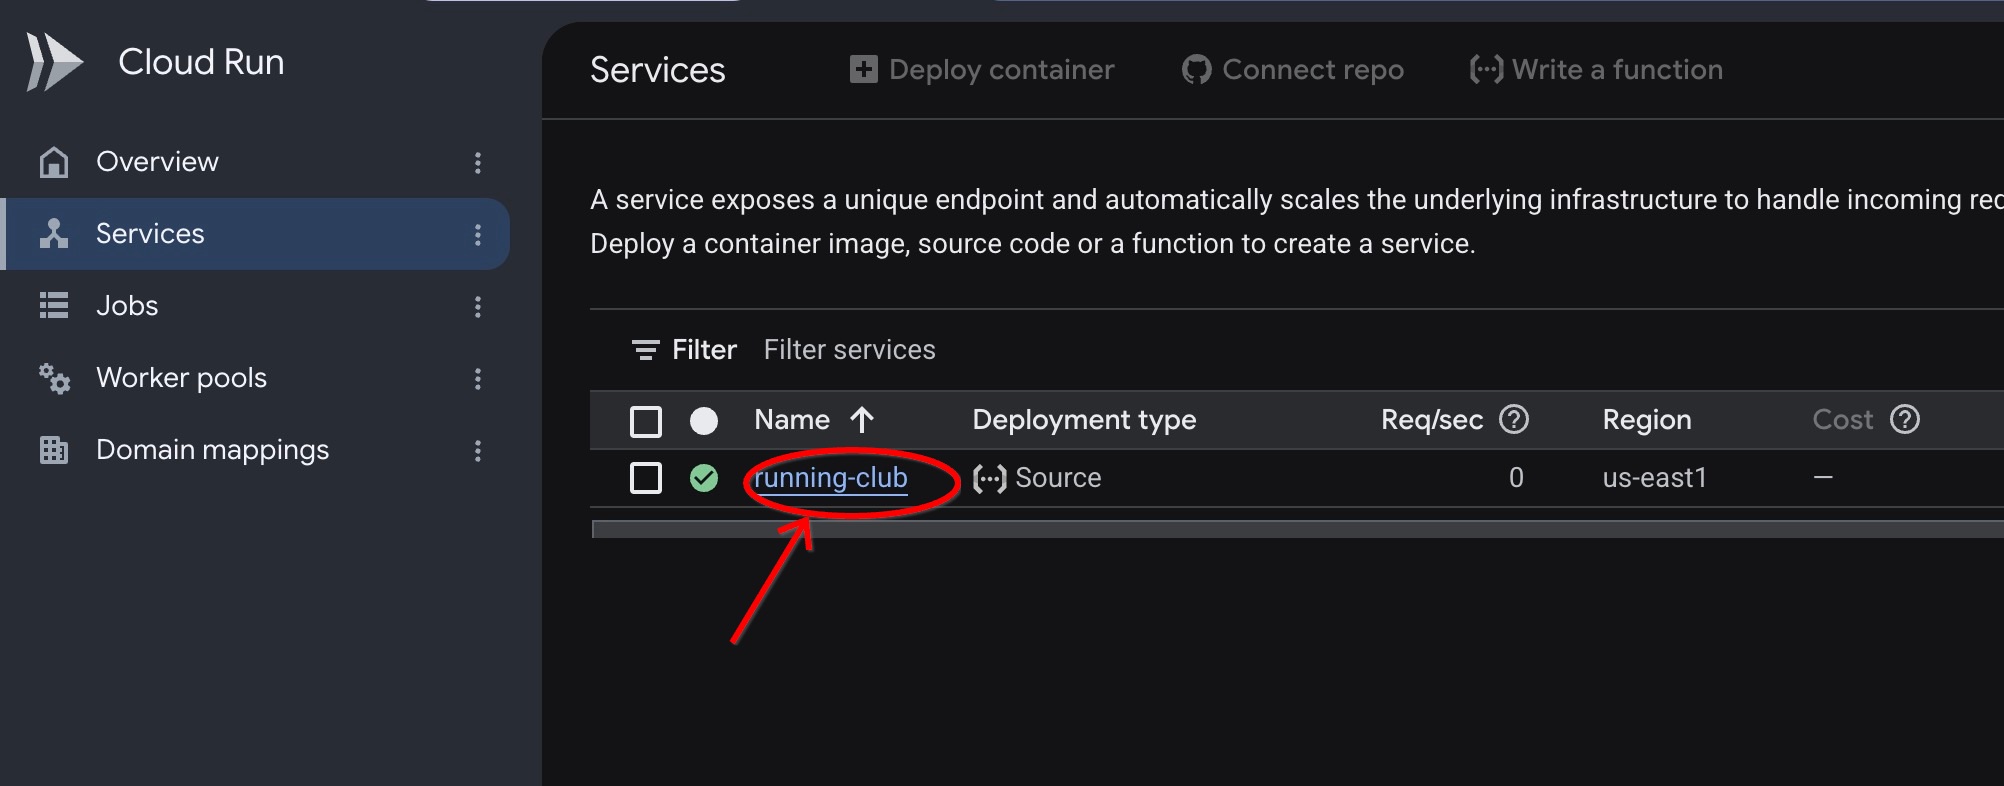
- এখানে আপনি আপনার ওয়েবসাইট হোস্টকারী ইঞ্জিনটি সম্পর্কে জানতে পারবেন:
- মেট্রিক্স : আপনার ওয়েবসাইটে কতজন ভিজিট করছেন তা দেখানোর জন্য সহায়ক গ্রাফ।
- লগ : দর্শকরা যখন আপনার অ্যাপ ব্যবহার করে, তখন কী ঘটে তার একটি সরাসরি রেকর্ড।
ধাপ ৩: আপনার ডাটাবেসটি বাস্তবে কাজ করতে দেখুন (ক্লাউড এসকিউএল)
- উপরের সার্চ বারে
Cloud SQLটাইপ করুন এবং ফলাফল থেকে এটি নির্বাচন করুন। - আপনার PostgreSQL ডাটাবেস ইনস্ট্যান্সটিতে ক্লিক করুন।
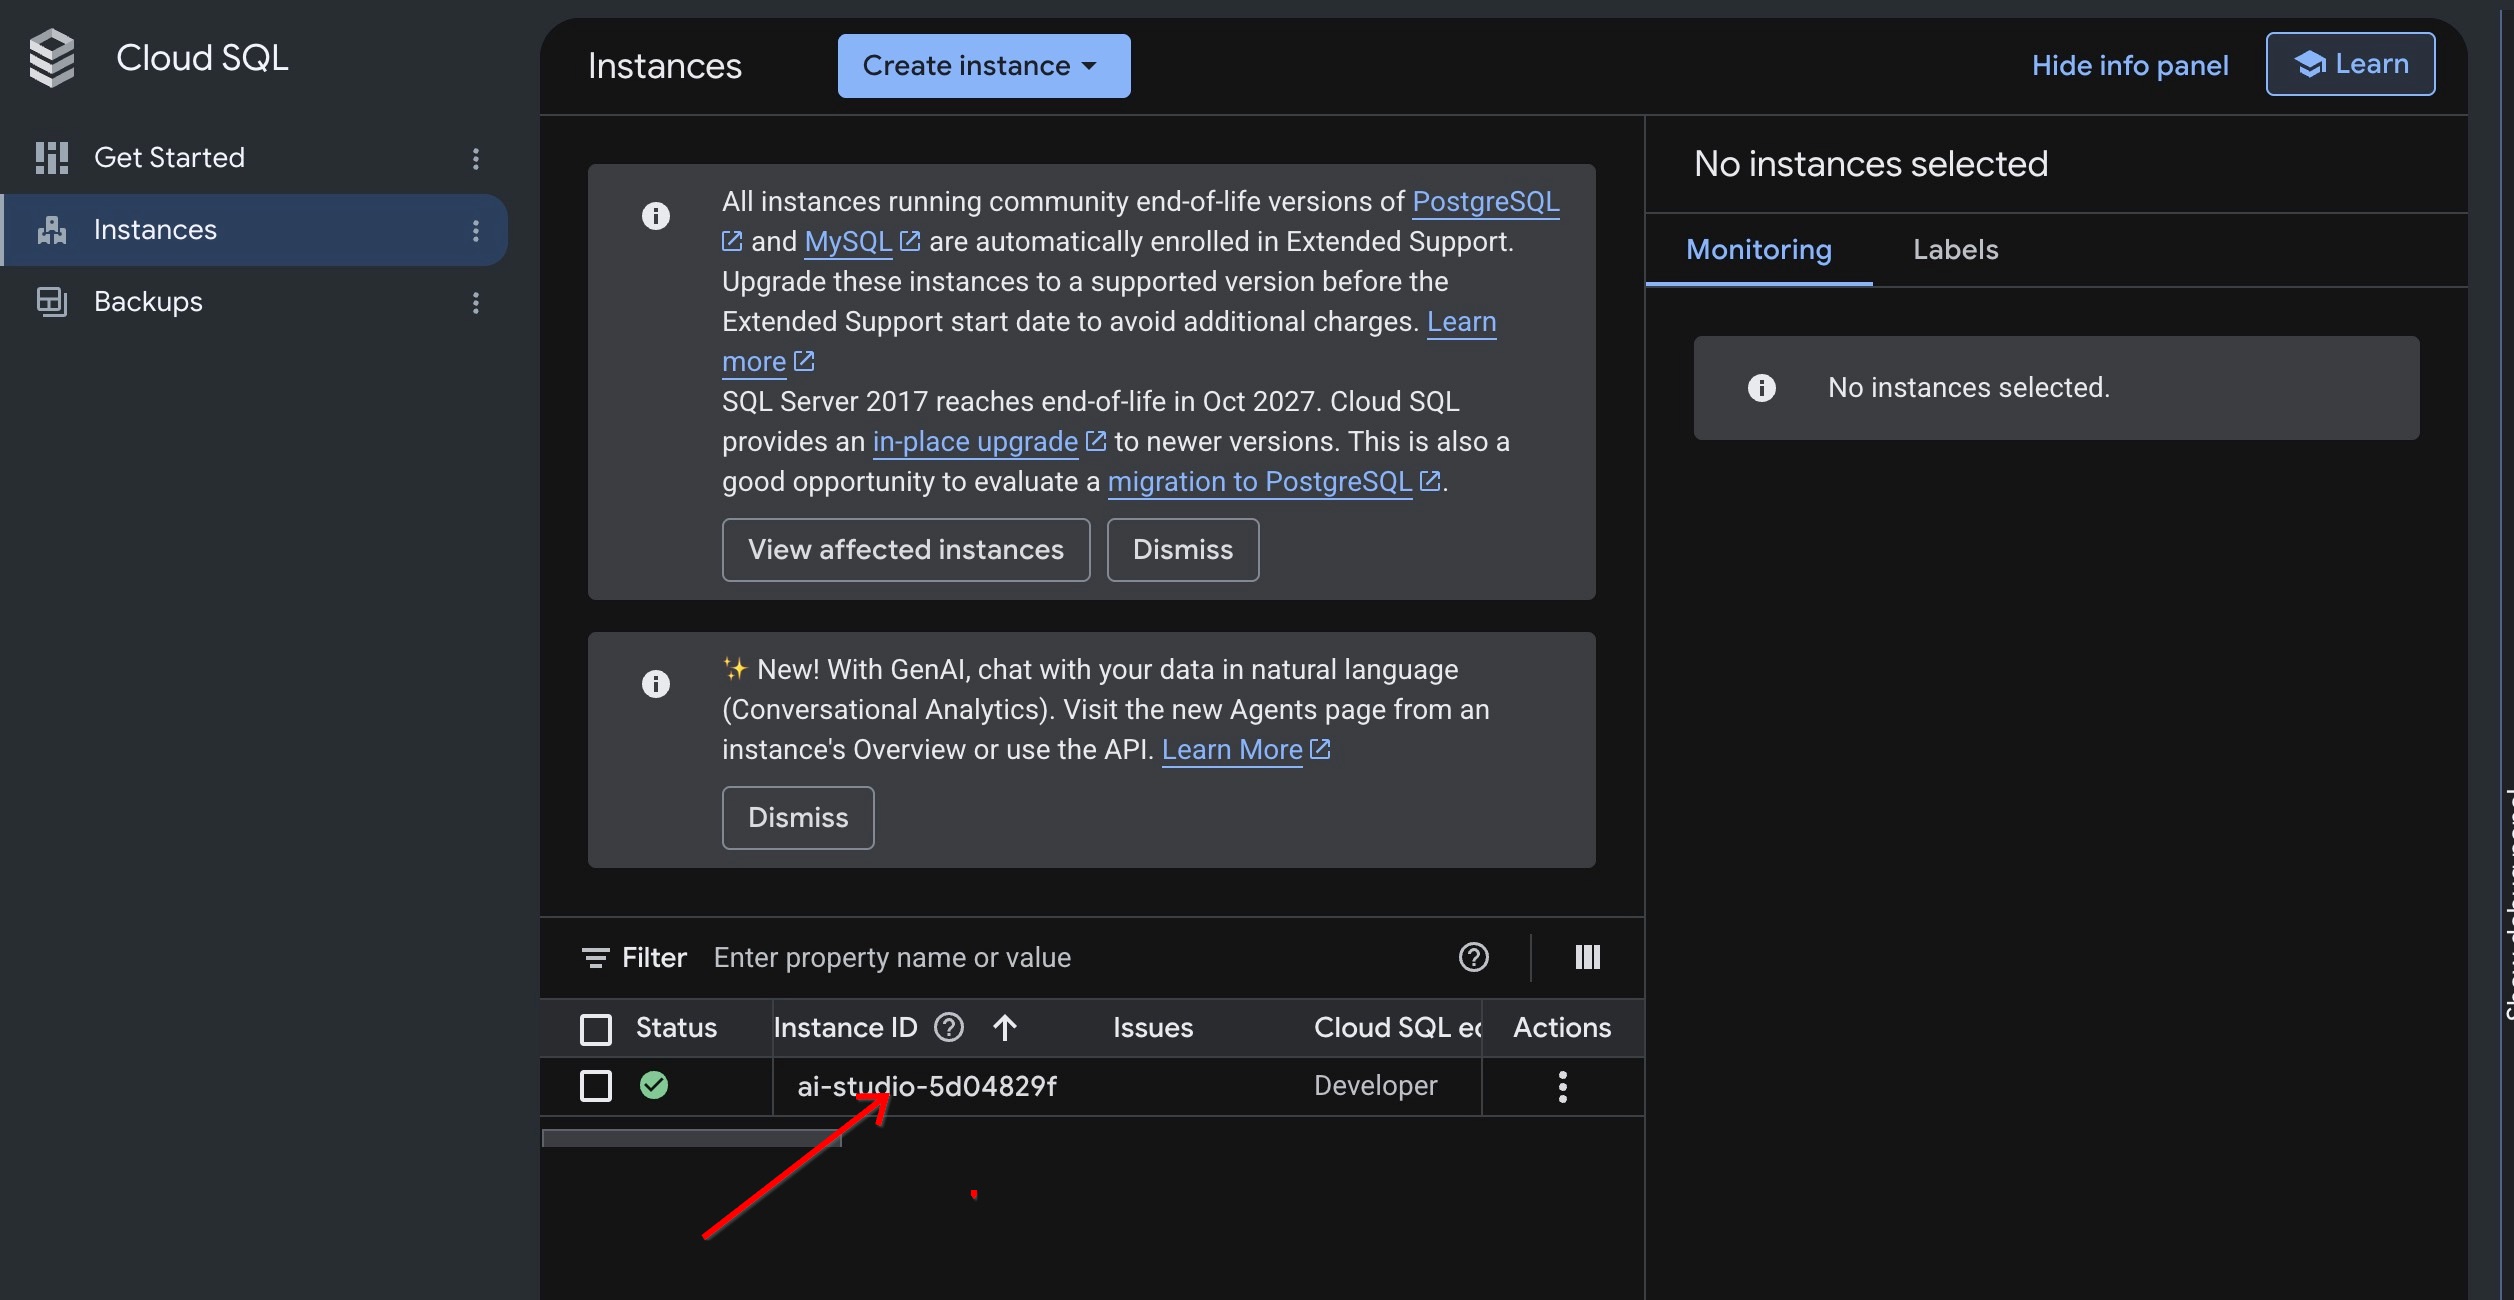
- এখানে আপনি আপনার লাইভ ডেটাবেসের বিবরণ দেখতে পারেন, যা নিশ্চিত করে যে আপনার ডেটাবেসটি সক্রিয় এবং আপনার রানিং ক্লাবের ডেটা সংরক্ষণের জন্য প্রস্তুত।
৯. সম্পদ পরিষ্কার করুন
আপনি যদি এই অ্যাপটি একটি অনুশীলন প্রকল্প হিসাবে তৈরি করে থাকেন, তবে আপনি সহজেই এটি মুছে ফেলতে পারেন। আর যদি আপনার সম্প্রদায়ের সাথে আপনার রানিং ক্লাব অ্যাপটি ব্যবহার করা চালিয়ে যাওয়ার পরিকল্পনা থাকে, তবে আপনি এটি চালু রাখতে পারেন!
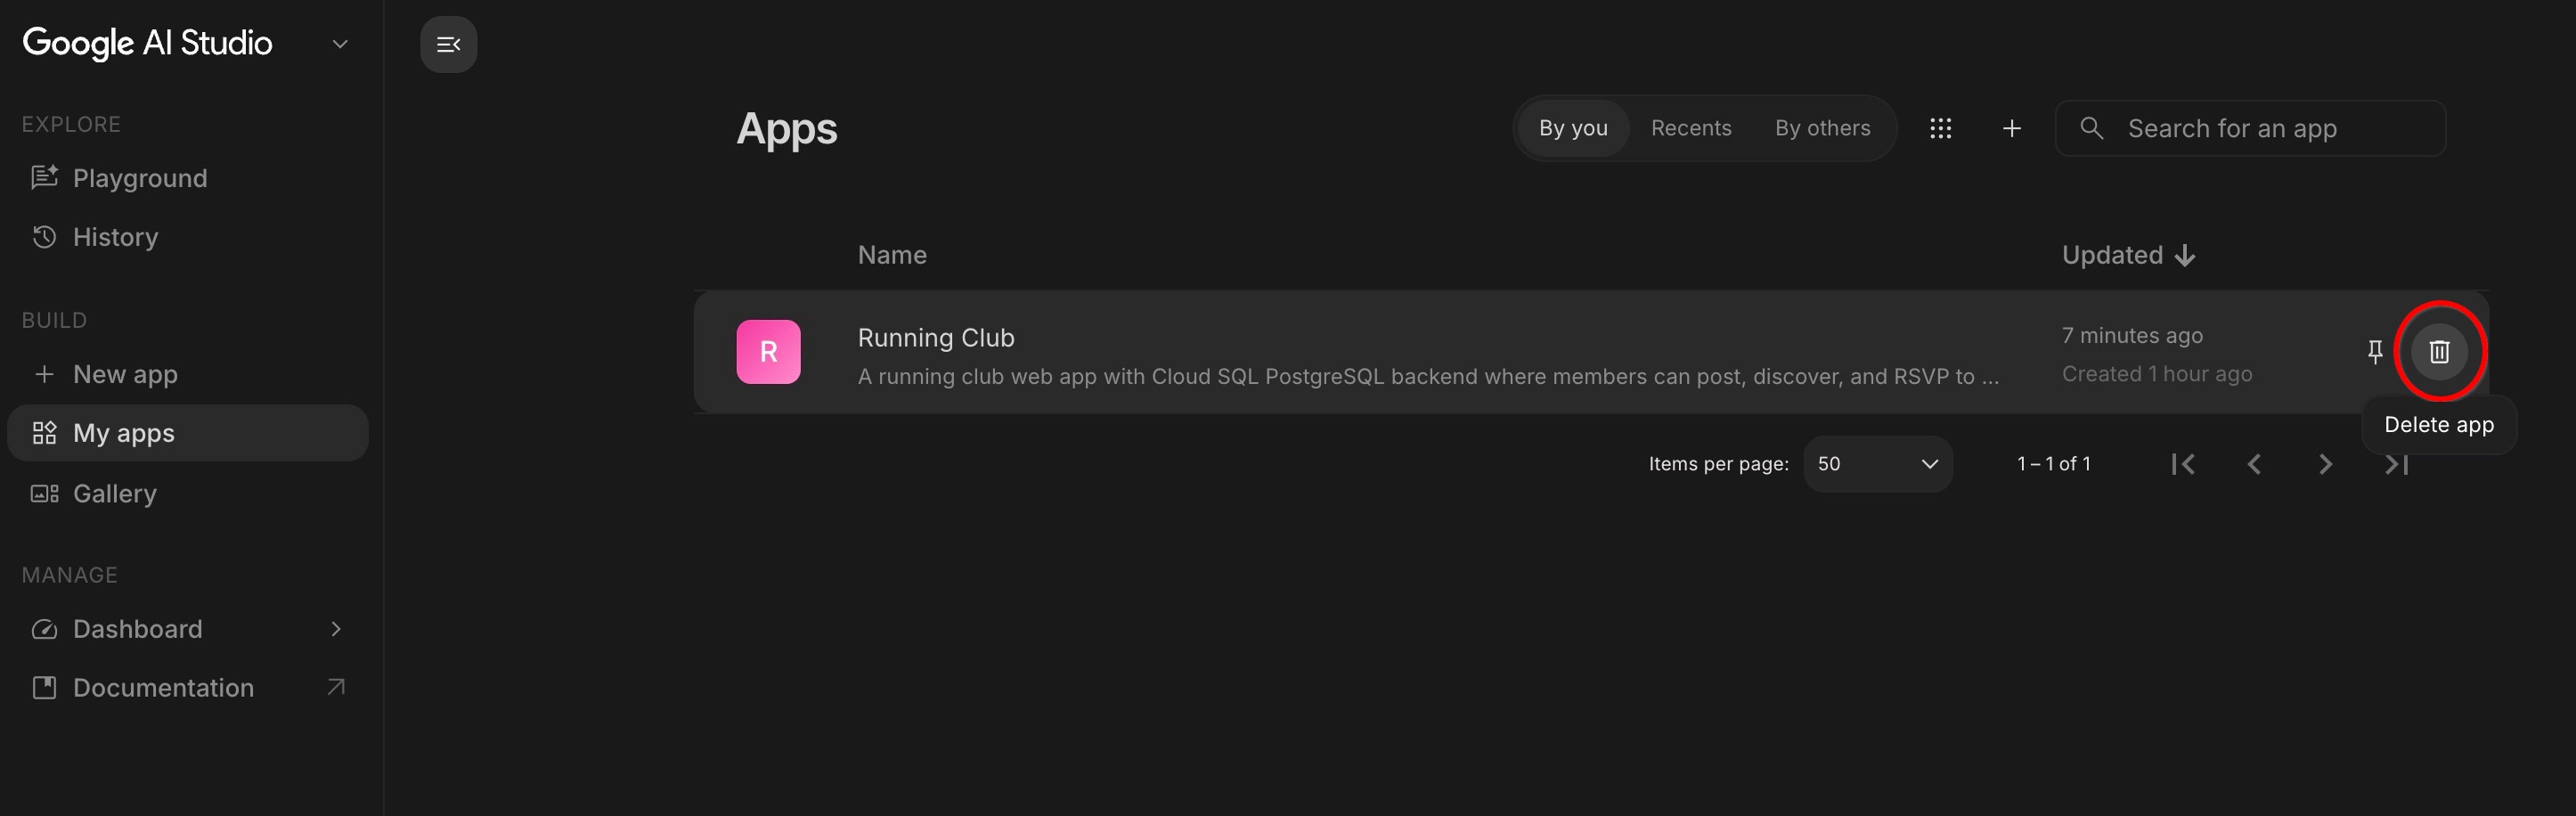
- Google AI Studio- তে, বাম সাইডবারে থাকা My Apps-এ ক্লিক করুন।
- আপনার রানিং ক্লাব অ্যাপটি খুঁজুন।
- ডিলিট অ্যাপ (বা ট্র্যাশ আইকন)-এ ক্লিক করুন। এটি আপনার লাইভ ওয়েব পেজটি বন্ধ করে দেয় এবং এক ধাপেই আপনার জন্য টেস্ট ডেটাবেসটি মুছে ফেলে।
১০. অভিনন্দন
আপনি গুগল এআই স্টুডিও এবং ক্লাউড এসকিউএল ব্যবহার করে আপনার প্রথম ডাটাবেস-ভিত্তিক ওয়েব অ্যাপটি তৈরি, কাস্টমাইজ এবং প্রকাশ করেছেন!
'Completed Builder Journey' ব্যাজটি সংগ্রহ করতে এই লিঙ্কে যান!
আপনার যাত্রা অব্যাহত রাখতে, পরবর্তী ল্যাবের জন্য goo.gle/builders- এ যান।
আপনি যা অর্জন করেছেন
- সহজ ভাষায় অ্যাপ তৈরি করা হয়েছে : সরল নির্দেশাবলী সহ একটি সম্পূর্ণ কমিউনিটি রানিং ক্লাব অ্যাপ তৈরি করা হয়েছে।
- গুগল সাইন-ইন সক্রিয় করা হয়েছে : গুগল অ্যাকাউন্টের মাধ্যমে স্বয়ংক্রিয়ভাবে সুরক্ষিত লগইন সেট আপ করুন।
- একটি প্রকৃত ডেটাবেস সংযুক্ত করা হয়েছে : ক্লাউড এসকিউএল-এ রুট, নির্ধারিত যাত্রা, অংশগ্রহণের নিশ্চিতকরণ (RSVP) এবং আলোচনাসমূহ নিরাপদে সংরক্ষণ করা হয়েছে।
- কথোপকথনের মাধ্যমে নতুন ফিচার যোগ করা হয়েছে : শুধু এআই-এর সাথে চ্যাট করেই একটি রুট লাইব্রেরি এবং আরএসভিপি ট্র্যাকিং তৈরি করা হয়েছে।
- ওয়েবে সরাসরি প্রকাশ করা হয়েছে : এক ক্লিকে আপনার অ্যাপটি ইন্টারনেটে স্থাপন করুন এবং বিভিন্ন ডিভাইসে পরীক্ষা করুন।
- অভ্যন্তরীণ কার্যপ্রণালী পর্যালোচনা: গুগল ক্লাউড কীভাবে আপনার লাইভ ওয়েব অ্যাপ এবং ডেটাবেস হোস্ট করে, তা খতিয়ে দেখা হলো।
এরপর কী?
আপনার অ্যাপে নতুন ফিচার যুক্ত করে সেটিকে আরও উন্নত করতে আপনি Google AI Studio-তে AI-এর সাথে চ্যাট চালিয়ে যেতে পারেন:
- ইন্টারেক্টিভ ম্যাপ : ম্যাপ প্রিভিউ এবং জিপিএস রুট যোগ করতে এআই-কে নির্দেশ দিন।
- দৌড়ের সঙ্গী মেলানো : একই গতির লক্ষ্য রয়েছে এমন দৌড়ের সঙ্গী সাজেস্ট করতে AI-কে নির্দেশ দিন।
- আবহাওয়ার পূর্বাভাস : আসন্ন রান কার্ডগুলিতে সপ্তাহান্তের আবহাওয়ার পূর্বাভাস প্রদর্শন করতে এআই-কে নির্দেশ দিন।
- ছবি শেয়ারিং : দলবদ্ধ দৌড়ের পর দৌড়বিদদের ছবি শেয়ার করার অনুমতি দিতে এআই-কে নির্দেশ দিন।
আরও পড়ুন
১. শুরু করার আগে
আপনি যদি কখনও বন্ধু বা প্রতিবেশীদের সাথে সপ্তাহান্তে দৌড়ের আয়োজন করার চেষ্টা করে থাকেন, তাহলে এর ঝামেলার কথা আপনার জানা আছে: অবিরাম গ্রুপ চ্যাটের ভিড়ে মিলিত হওয়ার জায়গা হারিয়ে যায়, লোকেরা অনবরত জিজ্ঞাসা করে কে কী গতিতে দৌড়াচ্ছে, এবং নতুনরা কখনোই নিশ্চিত হতে পারে না যে কারা আসছে।
এই কোডল্যাবে, আপনি রানিং ক্লাব তৈরি করার মাধ্যমে এই দৈনন্দিন সমস্যার সমাধান করবেন—এটি একটি বন্ধুত্বপূর্ণ ওয়েব অ্যাপ যেখানে স্থানীয় দৌড়বিদরা তাদের পছন্দের রুটগুলো দেখতে, সপ্তাহান্তের সাক্ষাতের সময় নির্ধারণ করতে, এক ক্লিকে অংশগ্রহণ নিশ্চিত করতে এবং সহ-দৌড়বিদদের সাথে চ্যাট করতে পারবেন।
এই অ্যাপটির ডেটাবেস কেন প্রয়োজন?
একটি কমিউনিটি অ্যাপের জন্য একটি নির্ভরযোগ্য স্মৃতিশক্তির প্রয়োজন—যা ডেটাবেস নামে পরিচিত। যখন কোনো দৌড়বিদ একটি নতুন মনোরম রুট যোগ করেন, শনিবার সকালের দৌড়ের জন্য অংশগ্রহণ নিশ্চিত করেন, বা পার্কিং সম্পর্কে জানতে চেয়ে কোনো মন্তব্য পোস্ট করেন, তখন সেই তথ্যগুলো তাদের ফোন বন্ধ করলে বা কম্পিউটার বন্ধ করলে হারিয়ে যেতে পারে না। একটি ডেটাবেস সমস্ত রুট, অংশগ্রহণকারীদের তালিকা এবং সদস্যদের বার্তা নিরাপদে সংরক্ষণ ও সংগঠিত রাখে, যাতে ক্লাবের প্রত্যেকে যখনই অ্যাপটি খোলে, তখনই হালনাগাদ তথ্য দেখতে পায়।
আপনি গুগল এআই স্টুডিও -এর বিল্ড মোড ব্যবহার করে এই অ্যাপটি তৈরি করবেন। আপনাকে নিজে থেকে কোনো জটিল কোড লিখতে বা প্রযুক্তিগত পরিকাঠামো স্থাপন করতে হবে না—আপনি কেবল সহজ ভাষায় বর্ণনা করবেন যে আপনি কী চান। গুগল এআই স্টুডিও অ্যাপটি তৈরি করে, আপনার ডেটা মনে রাখার জন্য একটি আসল ক্লাউড এসকিউএল ফর পোস্টগ্রেসকিউএল (Cloud SQL for PostgreSQL) ডেটাবেসের সাথে সংযোগ স্থাপন করে এবং ক্লাউড রান- এ অ্যাপটি লাইভ প্রকাশ করে, যাতে আপনার কমিউনিটি অবিলম্বে এটি ব্যবহার শুরু করতে পারে।
আপনি যা তৈরি করবেন
আপনি রানিং ক্লাব (Running Club) নামে একটি কমিউনিটি ওয়েব অ্যাপ তৈরি ও চালু করবেন, যেটিতে নিম্নলিখিত বিষয়গুলো অন্তর্ভুক্ত থাকবে:
- গুগল সাইন-ইন : বিদ্যমান গুগল অ্যাকাউন্ট ব্যবহার করে দ্রুত ও সুরক্ষিত লগইন।
- দৌড়বিদের প্রোফাইল : সদস্যদের প্রোফাইল যেখানে দৌড়ানোর পছন্দ এবং লক্ষ্য গতি তুলে ধরা হয়।
- রুট লাইব্রেরি : দূরত্ব, চড়াইয়ের তীব্রতা এবং মিলনস্থল সহ এলাকার প্রিয় রুটগুলোর একটি সংগ্রহ।
- আসন্ন দৌড়ের সময়সূচী : আসন্ন দলগত দৌড়গুলো সংগঠিত করতে এবং সেগুলোকে রুটের সাথে সংযুক্ত করার জন্য একটি ইভেন্ট বোর্ড।
- সহজ RSVP : সদস্যদের জন্য একটি এক-ক্লিক বাটন, যার মাধ্যমে তারা 'আমি যাচ্ছি' জানাতে এবং আর কারা আসছে তা দেখতে পারবেন।
- রান আলোচনা : প্রতিটি রানের বিস্তারিত সমন্বয়, প্রশ্ন জিজ্ঞাসা এবং আপডেট শেয়ার করার জন্য একটি মন্তব্য করার জায়গা থাকবে।
আপনি যা শিখবেন
- সহজ ভাষায় একটিমাত্র প্রম্পট ব্যবহার করে গুগল এআই স্টুডিওতে কীভাবে একটি কার্যকরী ওয়েব অ্যাপ তৈরি করবেন।
- যেভাবে গুগল এআই স্টুডিও স্বয়ংক্রিয়ভাবে গুগল সাইন-ইন সেট আপ করে।
- কীভাবে গুগল এআই স্টুডিও আপনার ডেটা মনে রাখার জন্য একটি আসল ক্লাউড এসকিউএল ফর পোস্টগ্রেসকিউএল (Cloud SQL for PostgreSQL) ডেটাবেস তৈরি ও সংযুক্ত করে।
- এআই-এর সাথে চ্যাট করেই কীভাবে নতুন ফিচার যোগ করবেন এবং আপনার ডেটাবেস প্রসারিত করবেন
- আপনার ক্লাবের ডেটা একাধিক ভিজিট জুড়ে নিরাপদে সংরক্ষিত থাকে কিনা, তা কীভাবে যাচাই করবেন।
- Cloud Run ব্যবহার করে কীভাবে আপনার অ্যাপটি ইন্টারনেটে লাইভ প্রকাশ করবেন।
- গুগল ক্লাউড কনসোলে আপনার লাইভ অ্যাপ এবং ডেটাবেস কীভাবে দেখবেন।
আপনার যা যা লাগবে
- গুগল ক্রোমের মতো একটি আধুনিক ওয়েব ব্রাউজার।
- Google AI Studio- তে সাইন ইন করার জন্য একটি সাধারণ গুগল অ্যাকাউন্ট প্রয়োজন।
ক্লাউড এসকিউএল স্টার্টার এডিশনের যোগ্যতা এবং সীমাবদ্ধতা
নির্মাতাদের জেনারেটিভ অ্যাপ এবং পরিচালিত ডেটাবেস নিয়ে পরীক্ষা-নিরীক্ষা করতে সাহায্য করার জন্য গুগল এআই স্টুডিও গুগল ক্লাউড স্টার্টার টিয়ার অফার করে:
- যোগ্যতা :
- সাধারণ গুগল অ্যাকাউন্ট ব্যবহারকারীরা এটি ব্যবহার করতে পারবেন।
- অযোগ্য অ্যাকাউন্টগুলোর মধ্যে রয়েছে বর্তমান বা অতীতের গুগল ক্লাউড বিলিং অ্যাকাউন্টধারী ব্যবহারকারী, সেইসাথে গুগল ওয়ার্কস্পেস, গুগল ওয়ার্কস্পেস ফর এডুকেশন, বা গুগল ফর ননপ্রফিটস-এর সাথে যুক্ত অ্যাকাউন্টসমূহ।
- আপনার অ্যাকাউন্ট স্টার্টার টিয়ারের জন্য যোগ্য না হলেও , বিলিং চালু আছে এমন একটি বিদ্যমান গুগল ক্লাউড প্রজেক্ট নির্বাচন করে আপনি এই ল্যাবটি সম্পূর্ণ করতে পারবেন। কোনো প্রজেক্টে বিলিং চালু আছে কিনা, তা কীভাবে নিশ্চিত করবেন তা জানুন।
- সম্পদের বিবরণ :
- PostgreSQL 18 চালিত একটি Cloud SQL for PostgreSQL Developer Edition ইনস্ট্যান্স প্রস্তুত করে।
- এতে রয়েছে ০.৫ vCPU, ২ জিবি র্যাম এবং ১ জিবি স্টোরেজ। কার্যকলাপের উপর নির্ভর করে, কয়েক মাস বা তারও বেশি সময় ধরে প্রতিদিন শত শত ভিজিট চালানোর জন্য এটি যথেষ্ট হওয়া উচিত।
- স্কেল টু জিরো সমর্থন করে, যা কোটা সাশ্রয়ের জন্য কোনো সক্রিয় ডাটাবেস সংযোগ না থাকলে স্বয়ংক্রিয়ভাবে কম্পিউটিং কার্যক্রম থামিয়ে দেয়।
- কোটা :
- এর সাথে প্রতি মাসে বিনামূল্যে ৫০টি কম্পিউট ইউনিট এবং ১০ জিবি স্টোরেজ অন্তর্ভুক্ত রয়েছে।
২. গুগল এআই স্টুডিও খুলুন এবং একটি নতুন অ্যাপ শুরু করুন।
শুরু করার জন্য, আপনার ব্রাউজারে গুগল এআই স্টুডিও খুলুন। এটি আপনার অ্যাপ তৈরির কর্মক্ষেত্র, যেখানে আপনি আপনার প্রয়োজন বর্ণনা করে সহজেই অ্যাপ তৈরি ও পরীক্ষা করতে পারবেন।
ধাপ ১: গুগল এআই স্টুডিওতে সাইন ইন করুন।
- আপনার ওয়েব ব্রাউজার (যেমন গুগল ক্রোম) খুলুন এবং aistudio.google.com- এ যান।
- Get started-এ ক্লিক করুন এবং আপনার সাধারণ Google অ্যাকাউন্ট (যেমন আপনার Gmail অ্যাকাউন্ট) দিয়ে লগ ইন করুন।
- আপনার প্রথম পরিদর্শনে যদি পরিষেবার শর্তাবলী দেখানো হয়, তবে এগিয়ে যাওয়ার জন্য সেগুলি পর্যালোচনা করুন এবং গ্রহণ করুন।
ধাপ ২: একটি নতুন অ্যাপ্লিকেশন শুরু করুন।
- নিচের-মাঝের প্যানেলে, 'Start building'- এ ক্লিক করুন (অথবা ডান প্যানেলে '+New App'- এ ক্লিক করুন)।
৩. একটি সাধারণ প্রম্পট এবং ফায়ারবেস অথেনটিকেশন দিয়ে শুরু করুন
শুরু করার জন্য আপনার জটিল আর্কিটেকচার ডায়াগ্রামের প্রয়োজন নেই। আপনি একটি মাত্র বাক্য দিয়ে আপনার প্রাথমিক অ্যাপ্লিকেশন চালু করতে, গুগল সাইন-ইন কনফিগার করতে এবং আপনার ডাটাবেস সংযুক্ত করতে পারেন।
প্রাথমিক প্রম্পটটি প্রবেশ করান
এআই স্টুডিও বিল্ড মোডের প্রম্পট বক্সে, নিম্নলিখিত প্রম্পটটি লিখুন এবং এন্টার চাপুন:
Build a running club web app with a Cloud SQL database
where members can post upcoming runs.
এই লিঙ্কটি আপনার জন্য প্রম্পট বক্সটি স্বয়ংক্রিয়ভাবে পূরণ করে দেবে।
আপনার কর্মক্ষেত্র বুঝুন
আপনি আপনার প্রম্পট জমা দেওয়ার পরে, গুগল এআই স্টুডিও সম্পূর্ণ অ্যাপ্লিকেশন ওয়ার্কস্পেসটি খুলে দেবে। আপনার স্ক্রিনের তিনটি প্রধান অংশের দিকে এক মুহূর্ত তাকিয়ে দেখুন:
- চ্যাট / প্রম্পট বক্স (নিচে) : এখানে আপনি সাধারণ ভাষায় এআই-এর সাথে চ্যাট চালিয়ে যেতে পারেন, যার মাধ্যমে ফিচার যোগ করা, ডিজাইন পরিবর্তন করা বা প্রশ্ন জিজ্ঞাসা করা যায়।
- ফাইল ও কোড এলাকা (বাম দিকে) : এখানে সেই ফাইলগুলো দেখানো হয় যা এআই নেপথ্যে তৈরি করে। আপনাকে নিজে কোড লিখতে বা সম্পাদনা করতে হবে না, কিন্তু এই প্যানেলটি আপনাকে এআই-কে আপনার অ্যাপের বিভিন্ন অংশ তৈরি করতে দেখার সুযোগ দেয়।
- লাইভ প্রিভিউ উইন্ডো (ডান দিকে) : এটি আপনার আসল কার্যকরী অ্যাপটি রিয়েল টাইমে প্রদর্শন করে। অ্যাপটি তৈরি হওয়ার সাথে সাথেই আপনি এই উইন্ডোতে সরাসরি বাটন ক্লিক করতে, টেক্সট ফিল্ডে টাইপ করতে এবং এটি পরীক্ষা করতে পারবেন।
- কোড এডিটর (ডান দিকে) : এখানে এআই দ্বারা তৈরি আসল কোডটি দেখানো হয়। আপনি চাইলে এটি সম্পাদনা করতে পারেন, তবে তা আবশ্যক নয়।
- স্থাপন ও শেয়ার (উপরের ডানদিকে) : এখান থেকে আপনি আপনার অ্যাপটি ইন্টারনেটে স্থাপন করতে এবং অন্যদের সাথে শেয়ার করতে পারবেন।
গুগল এআই স্টুডিও স্বয়ংক্রিয়ভাবে যা করে
এআই যখন আপনার অনুরোধটি প্রক্রিয়া করবে, তখন আপনি ধাপে ধাপে আপনার অ্যাপটি তৈরি হতে দেখতে পারবেন:
- গুগল সাইন-ইন সেট আপ করে : এআই স্বয়ংক্রিয়ভাবে গুগল সাইন-ইন যুক্ত করে দেয়, ফলে আপনার দৌড়বিদরা তাদের গুগল অ্যাকাউন্ট দিয়ে নিরাপদে লগ ইন করতে পারেন—ব্যবহারকারীর পাসওয়ার্ড বা নিরাপত্তা সেটিংস পরিচালনা করার কোনো প্রয়োজন নেই।
- একটি বাস্তব ডেটাবেস সংযুক্ত করে : এআই আপনার কমিউনিটির ডেটা সংরক্ষণের জন্য একটি পরিচালিত ক্লাউড এসকিউএল (Cloud SQL) ডেটাবেস সেট আপ করে। অনুরোধ করা হলে, আপনার প্রোজেক্টের জন্য ডেটাবেসটি সক্রিয় করতে ক্লিক করুন।
- আপনার ডেটা টেবিল (
schema.ts) সাজিয়ে রাখে: একটি ডাটাবেস স্কিমাকে কয়েকটি গোছানো স্প্রেডশীটের সমষ্টি হিসেবে ভাবুন। এআই স্বয়ংক্রিয়ভাবে আপনার অ্যাপের জন্য স্টোরেজ কাঠামো তৈরি করে:-
usersটেবিল : সদস্যদের প্রোফাইল, নাম, অ্যাভাটার এবং দৌড়ের গতি সংরক্ষণ করে। -
runsটেবিল : নির্ধারিত ইভেন্টগুলোর শিরোনাম, দূরত্ব, লক্ষ্য গতি, অবস্থান এবং তারিখ সংরক্ষণ করে। -
commentsসারণী : প্রতিটি রানের অধীনে অংশগ্রহণকারীদের রেখে যাওয়া বার্তা এবং প্রশ্ন সংরক্ষণ করে।
(দ্রষ্টব্য: আপনাকে কখনোই এই কোডটি নিজে হাতে লিখতে বা সম্পাদনা করতে হবে না—আপনি যখনই নতুন ফিচারের জন্য অনুরোধ করবেন, এআই (AI) আপনার জন্য এটি আপডেট করে দেবে!) -
- ভিজ্যুয়াল ইন্টারফেস তৈরি করে : এআই স্ক্রিনে দেখা ওয়েব পেজগুলো তৈরি করে, যার মধ্যে হেডার, আসন্ন রানের তালিকা, ইভেন্ট তৈরির ফর্ম এবং মন্তব্য বিভাগ অন্তর্ভুক্ত।
প্রমাণীকরণ যাচাই করুন এবং পোস্টিং চালান
জেনারেশন শেষ হলে, প্রিভিউ প্যানে আপনার নতুন অ্যাপটি পরীক্ষা করুন:
- প্রিভিউ উইন্ডোতে, মেম্বার সাইন ইন-এ ক্লিক করুন (অথবা পোস্ট আপকামিং রান বোতামে ক্লিক করুন, যা প্রমাণীকরণ শুরু করবে)।
- Firebase Auth ডায়ালগ ব্যবহার করে আপনার Google অ্যাকাউন্ট দিয়ে প্রমাণীকরণ করুন।
- একবার সাইন ইন করলে, আপনার গুগল প্রোফাইলের নাম ও অ্যাভাটার নেভিগেশন বারে দেখা যায় এবং আপনার গতির পছন্দগুলো স্বয়ংক্রিয়ভাবে পরিচালিত হয়।
- ‘আসন্ন দৌড়ের পোস্ট’ ফর্মে একটি শিরোনাম লিখুন (যেমন
Morning 5K Shakeout)। - একটি তারিখ ও সময় নির্বাচন করুন এবং একটি সভার স্থান লিখুন (যেমন
Central Park West Entrance)। - PublishRun-এ ক্লিক করুন।
- নিশ্চিত করুন যে নতুন দৌড়টি আসন্ন দৌড়ের ফিডে অবিলম্বে প্রদর্শিত হচ্ছে এবং আয়োজক হিসেবে আপনার প্রমাণীকৃত প্রোফাইলের নাম ও পেস ব্যাজ দেখা যাচ্ছে।
- দৌড়টির আলোচনা বিভাগে একটি সংক্ষিপ্ত বার্তা পোস্ট করুন (যেমন:
Bringing extra water bottles!) এবং যাচাই করুন যে সেটি মন্তব্য বিভাগে দেখা যাচ্ছে।
৪. একটি রুট লাইব্রেরি তৈরি করুন
রানিং ক্লাবগুলো প্রায়শই জনপ্রিয় স্থানীয় রুটগুলো পুনরায় ব্যবহার করে। একই রুটের তথ্য বারবার টাইপ করার পরিবর্তে, আপনি সদস্যদের একটি ক্যাটালগে তাদের পছন্দের রুটগুলো সংরক্ষণ করতে দিতে পারেন এবং যখনই তারা দৌড়ের পরিকল্পনা করবে, তখন সেগুলো সংযুক্ত করার সুযোগ দিতে পারেন।
AI-কে রুট লাইব্রেরি যোগ করতে বলুন
চ্যাট প্রম্পট বক্সে, নিম্নলিখিত অনুরোধটি টাইপ করুন এবং এন্টার চাপুন:
Add a route library where members can save favorite
running routes with atitle, distance in km, difficulty,
and start location. When scheduling a run, allow the
organizer to select a route from this library.
নেপথ্যে এআই কীভাবে রুটগুলোকে রানের সাথে সংযুক্ত করে
এই ব্যবস্থাটি কার্যকর করতে, এআই স্বয়ংক্রিয়ভাবে রুটের জন্য একটি নতুন স্টোরেজ টেবিল তৈরি করে এবং এটিকে সরাসরি রানস টেবিলের সাথে সংযুক্ত করে। এই সংযোগের ফলেই, যখনই কোনো আয়োজক একটি রুট বেছে নেন, আপনার অ্যাপটি স্বয়ংক্রিয়ভাবে দূরত্ব এবং অবস্থানের বিবরণ সংগ্রহ করতে পারে।
(আবারও বলছি, আপনার এই কোডটিতে হাত দেওয়ার কোনো প্রয়োজন নেই—এআই আপনার জন্য ডেটাবেসের কাঠামোটি আপডেট করে দেবে!)
প্রিভিউতে আপনার নতুন রুট লাইব্রেরি পরীক্ষা করুন
এআই আপনার অ্যাপ আপডেট করা শেষ করলে, লাইভ প্রিভিউ উইন্ডোতে নতুন রুট ফিচারটি ব্যবহার করে দেখুন:
- অ্যাপ নেভিগেশনে, রুট লাইব্রেরি ট্যাবে ক্লিক করুন। যদি এমন কোনো ট্যাব না থাকে, তবে লাইভ প্রিভিউয়ের নিচের অংশটি দেখুন - প্রিভিউ রিফ্রেশ করার জন্য এটি আপনাকে সেভ বাটন চাপতে বলতে পারে। অথবা তাতেও কাজ না হলে, চ্যাট উইন্ডোতে AI-এর সাথে কথা বলার চেষ্টা করুন এবং আপনার রুট লাইব্রেরিটি কোথায় আছে তা জিজ্ঞাসা করুন।
- সেভ নিউ রুট (বা অ্যাড রুট ) এ ক্লিক করুন এবং কিছু নমুনা বিবরণ পূরণ করুন:
- পথের শিরোনাম :
Riverfront Trail Loop - দূরত্ব :
8.5 km - কঠিনতা :
Moderate - শুরুর স্থান :
Waterfront Pier 4
- পথের শিরোনাম :
- লাইব্রেরিতে সংরক্ষণ করতে ক্লিক করুন।
- এখন, আপনার নতুন রুট কার্ডে সরাসরি থাকা 'Schedule Run' বোতামে ক্লিক করে এই রুটটি ব্যবহার করে দৌড়ানোর সময় নির্ধারণ করুন।
- লক্ষ্য করুন, কীভাবে দূরত্ব, কঠিনতা এবং অবস্থানের বিবরণ আপনার জন্য স্বয়ংক্রিয়ভাবে পূরণ হয়ে যায়!
- 'Publish Run'- এ ক্লিক করুন এবং যাচাই করুন যে আপনার নতুন গ্রুপ রানটি হোম ফিডে দেখা যাচ্ছে।
৫. উপস্থিতির নিশ্চিতকরণ (RSVP) এবং সদস্যদের আমন্ত্রণপত্র বাস্তবায়ন করুন
কমিউনিটি অ্যাপগুলো অংশগ্রহণের মাধ্যমেই সফল হয়! এর মাধ্যমে আপনি দৌড়বিদদের আসন্ন দৌড়ে কারা অংশ নিচ্ছে তা দেখতে দিতে পারেন, এক ক্লিকে সাইন আপ করার সুযোগ দিতে পারেন এবং বন্ধুদের সাথে আমন্ত্রণ লিঙ্ক শেয়ার করতে পারেন।
RSVP এবং আমন্ত্রণ যোগ করতে AI-কে বলুন
চ্যাট প্রম্পট বক্সে, নিম্নলিখিত অনুরোধটি টাইপ করুন এবং এন্টার চাপুন:
Allow registered members to RSVP ("Join Run") to any upcoming run.
Show the list of attending runners on each run card, display an
attendee counter, and add a copyable invite link.
পর্দার আড়ালে এআই কীভাবে অংশগ্রহণকারীদের ট্র্যাক করে
কোন দৌড়বিদ কোন দৌড়ে আসছেন তার হিসাব রাখতে, এআই স্বয়ংক্রিয়ভাবে আপনার ডেটাবেসে একটি rsvps টেবিল তৈরি করে। এটিকে একটি ডিজিটাল সাইন-আপ শিট হিসেবে ভাবুন, যা একজন দৌড়বিদের নামকে একটি নির্দিষ্ট ইভেন্টের সাথে যুক্ত করে।
(আপনার এই কোডটি লেখা বা সম্পাদনা করার প্রয়োজন নেই—এআই আপনার ডেটাবেসে এই সাইন-আপ শিটটি স্বয়ংক্রিয়ভাবে পরিচালনা করে!)
প্রিভিউতে RSVP এবং আমন্ত্রণপত্র পরীক্ষা করুন
এআই আপনার অ্যাপ আপডেট করা শেষ করলে, লাইভ প্রিভিউ উইন্ডোতে নতুন আরএসভিপি ফিচারগুলো পরীক্ষা করে দেখুন:
- প্রিভিউ উইন্ডোতে, আপনার হোম ফিডে আসন্ন কোনো রান খুঁজে নিন।
- Join Run (বা RSVP ) বোতামে ক্লিক করুন।
- নিশ্চিত করুন যে আপনার নাম এবং অ্যাভাটার ' উপস্থিত রানার' বিভাগে দেখা যাচ্ছে এবং অংশগ্রহণকারীর সংখ্যা ১ বৃদ্ধি পেয়েছে।
- 'কপি ইনভাইট লিঙ্ক'-এ ক্লিক করুন এবং যাচাই করুন যে একটি শেয়ারযোগ্য লিঙ্ক তৈরি হয়েছে।
৬. ডেটা পার্সিস্টেন্স এবং ক্লাউড এসকিউএল স্কেল-টু-জিরো পরীক্ষা করুন
একটি অ্যাপ তৈরি করার সময় সবচেয়ে গুরুত্বপূর্ণ বিষয় হলো আপনার কমিউনিটির তথ্য সুরক্ষিত আছে কিনা তা নিশ্চিত করা। আপনি যদি আপনার ব্রাউজার রিফ্রেশ করেন, ট্যাব বন্ধ করেন বা কম্পিউটার শাট ডাউন করেন, তাহলে আপনি চাইবেন যে ফিরে আসার পর আপনার সেভ করা সমস্ত রুট, আরএসভিপি এবং আলোচনাগুলো যেন আগের মতোই থাকে।
এই ধাপে, আপনি পরীক্ষা করে দেখবেন যে আপনার ডেটা আপনার ক্লাউড SQL ডেটাবেসে নিরাপদে সংরক্ষিত আছে কিনা এবং আপনার অ্যাপ নিষ্ক্রিয় থাকলে গুগল ক্লাউড কীভাবে শক্তি ও খরচ সাশ্রয় করে, তা শিখবেন।
আপনার অ্যাপ রিফ্রেশ করে পরীক্ষা করুন
- AI Studio প্রিভিউ উইন্ডোর ভিতরে থাকা রিলোড বোতামে ক্লিক করুন (অথবা আপনার ব্রাউজার ট্যাব রিফ্রেশ করুন)।
- প্রিভিউতে আপনার অ্যাপটি দেখুন: লক্ষ্য করুন যে আপনার তৈরি করা সবকিছু—আপনার সদস্য প্রোফাইল, সংরক্ষিত রুট, নির্ধারিত দৌড়, অংশগ্রহণের নিশ্চিতকরণ (RSVP), এবং মন্তব্য—এখনও ঠিক সেখানেই আছে যেখানে আপনি রেখেছিলেন!
- আপনার অ্যাপটি শুধু আপনার স্ক্রিনে সাময়িকভাবে তথ্য সংরক্ষণ করেনি; এটি আপনার ক্লাউড এসকিউএল (Cloud SQL) ডেটাবেসে তা নিরাপদে সংরক্ষণ করেছে।
ক্লাউড এসকিউএল কীভাবে শক্তি ও খরচ সাশ্রয় করে ("স্কেল-টু-জিরো")
মাঝরাতে যখন আপনার রানিং ক্লাব অ্যাপটি কেউ ব্যবহার করছে না, তখন কী হয়?
- স্বয়ংক্রিয় স্লিপ ("স্কেল-টু-জিরো") : যখন কেউ অ্যাপটি ভিজিট করে না বা দৌড়ের জন্য সাইন আপ করে না, তখন রিসোর্স সাশ্রয়ের জন্য ডেটাবেস স্বয়ংক্রিয়ভাবে বিরতি নেয়।
- তাৎক্ষণিক সক্রিয়করণ : কোনো দৌড়বিদ অ্যাপটি খোলার সাথে সাথেই বা কোনো আমন্ত্রণ লিঙ্কে ক্লিক করার সাথে সাথেই, আপনার সংরক্ষিত সমস্ত তথ্যসহ ডেটাবেসটি সঙ্গে সঙ্গে সক্রিয় হয়ে ওঠে।
- নিষ্ক্রিয় অবস্থায় কোনো খরচ হয় না : যেহেতু এটি নিষ্ক্রিয় অবস্থায় স্লিপ মোডে থাকে, তাই অ্যাপটি শান্ত থাকলে কোনো কম্পিউটিং রিসোর্স ব্যবহৃত হয় না।
৭. ক্লাউড রানে প্রকাশ ও স্থাপন করুন
এখন যেহেতু আপনার রানিং ক্লাব অ্যাপটি প্রিভিউতে তৈরি ও পরীক্ষা করা হয়ে গেছে, এটি আপনার কমিউনিটির সাথে শেয়ার করার সময় এসেছে! আপনাকে ওয়েব হোস্টিং কিনতে বা সার্ভার কনফিগার করতে হবে না—আপনি এক ক্লিকেই আপনার অ্যাপটি ইন্টারনেটে লাইভ করতে পারবেন।
Publish your app live to the web
- In the top-right corner of Google AI Studio, click the Publish button.
- A summary window appears confirming the details:
- Hosting : Hosted and deployed on Google Cloud Run.
- Connected services : Google Sign-In and your Cloud SQL database.
- Hosting : Hosted and deployed on Google Cloud Run.
- Click Publish to launch your app.
Open and share your live app
- When publishing is complete, Google AI Studio provides your live web address along with a QR code.
- Click the link to open your live web app in a new browser tab, or scan the QR code with your phone camera.
- Try it on your phone : Sign in on your phone, RSVP to one of the runs you scheduled earlier on your computer, and watch the attendee count update in real time—powered by your shared Cloud SQL database!
8. (Bonus) Inspect Your Resources in the Google Cloud Console
When Google AI Studio builds and deploys your app, it doesn't lock it inside a private black box—it creates real, production-ready Google Cloud services on your behalf. Think of the Google Cloud Console as the control center where you can view your live app and database.
Step 1: Open the Google Cloud Console
- In a new browser tab, open the Google Cloud Console .
- At the top of the screen, click the project drop-down menu and select the project created for your AI Studio app (its name usually starts with
continual-run-).
Step 2: See where your web app runs (Cloud Run)
- In the top search bar, type
Cloud Runand select it from the results. - Click on your app name (such as
running-club). - Here you can explore the engine that hosts your website:
- Metrics : Helpful graphs showing how many people are visiting your website.
- Logs : A live record of activity showing what happens when visitors interact with your app.
Step 3: See your database in action (Cloud SQL)
- In the top search bar, type
Cloud SQLand select it from the results. - Click on your PostgreSQL database instance.
- Here you can see your live database details, confirming that your database is active and ready to store your running club's data.
9. Clean up resources
If you built this app as a practice project, you can easily delete it. If you plan to keep using your Running Club app with your community, you can leave it running!
- In Google AI Studio , click My Apps in the left sidebar.
- Find your Running Club app.
- Click Delete App (or the trash icon). This turns off your live web page and removes the test database for you in one step.
১০. অভিনন্দন
You have built, customized, and published your first database-backed web app using Google AI Studio and Cloud SQL!
'Completed Builder Journey' ব্যাজটি সংগ্রহ করতে এই লিঙ্কে যান!
আপনার যাত্রা অব্যাহত রাখতে, পরবর্তী ল্যাবের জন্য goo.gle/builders- এ যান।
আপনি যা অর্জন করেছেন
- Built an app with plain language : Created a complete community running club app with simple prompts.
- Enabled Google Sign-In : Set up secure login with Google Accounts automatically.
- Connected a real database : Stored routes, scheduled runs, RSVPs, and discussions safely in Cloud SQL.
- Added features conversationally : Built a route library and RSVP tracking simply by chatting with the AI.
- Published live to the web : Deployed your app to the internet with one click and tested it across devices.
- Looked under the hood : Explored how Google Cloud hosts your live web app and database.
এরপর কী?
You can keep chatting with the AI in Google AI Studio to expand your app with new features:
- Interactive Maps : Prompt the AI to add map previews and GPS routes.
- Running Buddy Matching : Prompt the AI to suggest running partners with similar pace goals.
- Weather Forecasts : Prompt the AI to display weekend weather forecasts on upcoming run cards.
- Photo Sharing : Prompt the AI to allow runners to share photos after a group run.
আরও পড়ুন
১. শুরু করার আগে
If you have ever tried organizing a weekend run with friends or neighbors, you know the struggle: meeting locations get lost in endless group chats, people constantly ask what pace everyone is running, and newcomers are never quite sure who is showing up.
In this codelab, you will solve this everyday problem by building Running Club —a welcoming web app where local runners can browse favorite routes, schedule weekend meetups, RSVP with one click, and chat with fellow runners.
Why does this app need a database?
A community app needs a reliable memory—known as a database . When a runner adds a new scenic route, RSVPs for Saturday's morning run, or posts a comment asking about parking, that information cannot disappear when they close their phone or turn off their computer. A database keeps all routes, attendee lists, and member messages safely stored and organized so everyone in the club sees up-to-date information whenever they open the app.
You will build this app using Google AI Studio 's Build mode. You do not need to write complex code or set up technical infrastructure yourself—you simply describe what you want in plain language. Google AI Studio generates the app, connects a real Cloud SQL for PostgreSQL database to remember your data, and publishes the app live on Cloud Run so your community can start using it right away.
আপনি যা তৈরি করবেন
You will build and launch Running Club , a community web app that includes:
- Google Sign-In : Quick and secure login using an existing Google Account.
- Runner profiles : Member profiles that showcase running preferences and target pace.
- Route library : A collection of favorite neighborhood routes with distance, hill difficulty, and meeting points.
- Upcoming run schedule : An event board to organize upcoming group runs and link them to routes.
- Simple RSVPs : A one-click button for members to say "I'm going" and see who else is coming.
- Run discussions : A comment space on each run to coordinate details, ask questions, and share updates.
আপনি যা শিখবেন
- How to create a working web app in Google AI Studio using a single prompt in plain language.
- How Google AI Studio sets up Google Sign-In automatically.
- How Google AI Studio creates and connects a real Cloud SQL for PostgreSQL database to remember your data.
- How to add new features and expand your database simply by chatting with the AI.
- How to verify that your club's data stays safely saved across visits.
- How to publish your app live to the internet with Cloud Run .
- How to view your live app and database in the Google Cloud Console.
আপনার যা যা লাগবে
- A modern web browser such as Google Chrome.
- A standard Google Account to sign in to Google AI Studio .
Cloud SQL Starter Edition eligibility and limits
Google AI Studio offers the Google Cloud Starter Tier to help builders experiment with generative apps and managed databases:
- যোগ্যতা :
- Available to individuals using a standard Google Account.
- Ineligible accounts include users with existing or past Google Cloud billing accounts, as well as accounts associated with Google Workspace, Google Workspace for Education, or Google for Nonprofits.
- If your account is ineligible for the Starter Tier , you can still complete this lab by selecting an existing Google Cloud project with billing enabled. Learn how to confirm billing is enabled on a project .
- Resource specifications :
- Provisions a Cloud SQL for PostgreSQL Developer Edition instance running PostgreSQL 18.
- Includes 0.5 vCPU, 2 GB RAM, and 1 GB storage. That should be enough for you to run hundreds of daily visits for a few months or longer, depending on activity.
- Supports scale to zero , automatically pausing compute when there are no active database connections to conserve quota.
- কোটা :
- Includes a free monthly quota of 50 compute units and 10 GB of storage.
2. Open Google AI Studio and Start a New App
To get started, open Google AI Studio in your browser. This is your creation workspace where you can build and test apps simply by describing what you need.
Step 1: Sign in to Google AI Studio
- Open your web browser (such as Google Chrome) and go to aistudio.google.com .
- Click Get started and log in with your standard Google Account (such as your Gmail account).
- If prompted with terms of service on your first visit, review and accept them to proceed.
Step 2: Start a new application
- In the bottom-center panel, click Start building (or click +New App on the right panel).
3. Start with a Simple Prompt and Firebase Authentication
You do not need complex architecture diagrams to get started. You can launch your initial application, configure Google Sign-In, and connect your database with a single sentence.
Enter the initial prompt
In the prompt box of AI Studio Build mode, enter the following prompt and press Enter :
Build a running club web app with a Cloud SQL database
where members can post upcoming runs.
এই লিঙ্কটি আপনার জন্য প্রম্পট বক্সটি স্বয়ংক্রিয়ভাবে পূরণ করে দেবে।
Understand your workspace
Once you submit your prompt, Google AI Studio opens the full application workspace. Take a moment to look at the three main areas on your screen:
- The Chat / Prompt Box (Bottom) : This is where you continue chatting with the AI in plain language to add features, adjust designs, or ask questions.
- The Files & Code Area (Left side) : This shows the files the AI creates behind the scenes. You do not need to write or edit code yourself, but this panel lets you watch the AI create the pieces of your app.
- The Live Preview Window (Right side) : This displays your actual working app in real time. You can click buttons, type in text fields, and test your app directly in this window as soon as it is generated.
- The code editor (Right side) : This shows the actual code that AI generates. You can edit it if you want to, but it is not required.
- Deployment and sharing (Top right) : This is where you can deploy your app to the internet and share it with others.
What Google AI Studio does automatically
While the AI processes your request, you can watch it build your app step by step:
- Sets up Google Sign-In : The AI automatically integrates Google Sign-In so your runners can log in safely with their Google Accounts—no need to manage user passwords or security settings.
- Connects a real database : The AI sets up a managed Cloud SQL database to store your community's data. If prompted, click to enable the database for your project.
- Organizes your data tables (
schema.ts) : Think of a database schema as a collection of organized spreadsheets. The AI automatically creates the storage structure for your app:-
userstable : Stores member profiles, names, avatars, and running pace. -
runstable : Stores scheduled events with their title, distance, target pace, location, and date. -
commentstable : Stores messages and questions left by runners under each run.
(Note: You never need to write or edit this code manually—the AI updates it for you whenever you ask for new features!) -
- Builds the visual interface : The AI creates the web pages you see on screen, including the header, upcoming runs list, event creation form, and comment section.
Verify authentication and run posting
Once the generation finishes, test your new app in the Preview pane:
- In the preview window, click Member Sign In (or click the Post Upcoming Run button, which will trigger authentication).
- Authenticate with your Google account using the Firebase Auth dialog.
- Once signed in, your Google profile name and avatar appear in the navigation bar, and your pace preferences are automatically managed.
- In the "Post Upcoming Run" form, enter a title (such as
Morning 5K Shakeout). - Select a date and time, and enter a meeting location (such as
Central Park West Entrance). - Click PublishRun .
- Confirm that the new run appears immediately in the upcoming runs feed, displaying your authenticated profile name and pace badge as the organizer.
- Post a quick message in the run's discussion section (such as
Bringing extra water bottles!) and verify that it appears in the comment thread.
4. Build a Route Library
Running clubs often reuse popular local routes. Instead of typing the same route information over and over, you can let members save favorite routes in a catalog and attach them whenever they schedule a run.
Ask the AI to add the Route Library
In the chat prompt box, type the following request and press Enter :
Add a route library where members can save favorite
running routes with atitle, distance in km, difficulty,
and start location. When scheduling a run, allow the
organizer to select a route from this library.
How the AI links routes to runs behind the scenes
To make this work, the AI automatically creates a new storage table for routes and connects it directly to the runs table. This connection is what allows your app to automatically pull in distance and location details whenever an organizer picks a route.
(Again, you do not need to touch this code—the AI updates the database structure for you!)
Test your new Route Library in the Preview
Once the AI finishes updating your app, try out the new route feature in the live preview window:
- In the app navigation, click the Route Library tab. If there is no such tab check the bottom of the live preview - it may ask you to push the Save button to refresh the preview. Or if it doesn't help try to interact with AI in the chat window and ask where your routes library is.
- Click Save New Route (or Add Route ) and fill in some sample details:
- Route Title :
Riverfront Trail Loop - দূরত্ব :
8.5 km - Difficulty :
Moderate - Start Location :
Waterfront Pier 4
- Route Title :
- Click Save to Library .
- Now, schedule a run using this route by clicking the Schedule Run button directly on your new route card.
- Notice how the distance, difficulty, and location details are automatically filled in for you!
- Click Publish Run and verify that your new group run appears on the home feed.
5. Implement RSVPs and Member Invites
Community apps thrive on participation! You can let runners see who is attending an upcoming run, sign up with one click, and share an invite link with friends.
Ask the AI to add RSVPs and invites
In the chat prompt box, type the following request and press Enter :
Allow registered members to RSVP ("Join Run") to any upcoming run.
Show the list of attending runners on each run card, display an
attendee counter, and add a copyable invite link.
How the AI tracks attendees behind the scenes
To keep track of which runners are coming to each run, the AI automatically creates an rsvps table in your database. Think of this like a digital sign-up sheet that links a runner's name to a specific event.
(You don't need to write or edit this code—the AI manages this sign-up sheet in your database automatically!)
Test RSVPs and invites in the Preview
Once the AI finishes updating your app, test the new RSVP features in the live preview window:
- In the preview window, find an upcoming run on your home feed.
- Click the Join Run (or RSVP ) button.
- Confirm that your name and avatar appear in the Attending Runners section, and the attendee counter increases by 1.
- Click Copy Invite Link and verify that a shareable link is generated.
6. Test Data Persistence and Cloud SQL Scale-to-Zero
When building an app, the most important thing is knowing that your community's information is safe. If you refresh your browser, close the tab, or shut down your computer, you want all your saved routes, RSVPs, and discussions to still be there when you return.
In this step, you will test that your data is safely saved in your Cloud SQL database and learn how Google Cloud saves energy and costs when your app is quiet.
Test refreshing your app
- Click the Reload button inside the AI Studio preview window (or refresh your browser tab).
- Look at your app in the preview: notice that everything you created—your member profile, saved routes, scheduled runs, RSVPs, and comments—is still right where you left it!
- Your app didn't just store information temporarily on your screen; it securely stored it in your Cloud SQL database.
How Cloud SQL saves energy and cost ("Scale-to-zero")
What happens when nobody is using your running club app in the middle of the night?
- Automatic sleep ("Scale-to-zero") : When no one is visiting the app or signing up for runs, the database automatically pauses itself to conserve resources.
- Instant wake-up : As soon as a runner opens the app or clicks an invite link, the database wakes up instantly with all your saved information ready to go.
- Zero idle cost : Because it sleeps when inactive, you don't use up compute resources when the app is quiet.
7. Publish and Deploy to Cloud Run
Now that your Running Club app is built and tested in the preview, it's time to share it with your community! You don't need to purchase web hosting or configure servers—you can launch your app live to the internet with a single click.
Publish your app live to the web
- In the top-right corner of Google AI Studio, click the Publish button.
- A summary window appears confirming the details:
- Hosting : Hosted and deployed on Google Cloud Run.
- Connected services : Google Sign-In and your Cloud SQL database.
- Hosting : Hosted and deployed on Google Cloud Run.
- Click Publish to launch your app.
Open and share your live app
- When publishing is complete, Google AI Studio provides your live web address along with a QR code.
- Click the link to open your live web app in a new browser tab, or scan the QR code with your phone camera.
- Try it on your phone : Sign in on your phone, RSVP to one of the runs you scheduled earlier on your computer, and watch the attendee count update in real time—powered by your shared Cloud SQL database!
8. (Bonus) Inspect Your Resources in the Google Cloud Console
When Google AI Studio builds and deploys your app, it doesn't lock it inside a private black box—it creates real, production-ready Google Cloud services on your behalf. Think of the Google Cloud Console as the control center where you can view your live app and database.
Step 1: Open the Google Cloud Console
- In a new browser tab, open the Google Cloud Console .
- At the top of the screen, click the project drop-down menu and select the project created for your AI Studio app (its name usually starts with
continual-run-).
Step 2: See where your web app runs (Cloud Run)
- In the top search bar, type
Cloud Runand select it from the results. - Click on your app name (such as
running-club). - Here you can explore the engine that hosts your website:
- Metrics : Helpful graphs showing how many people are visiting your website.
- Logs : A live record of activity showing what happens when visitors interact with your app.
Step 3: See your database in action (Cloud SQL)
- In the top search bar, type
Cloud SQLand select it from the results. - Click on your PostgreSQL database instance.
- Here you can see your live database details, confirming that your database is active and ready to store your running club's data.
9. Clean up resources
If you built this app as a practice project, you can easily delete it. If you plan to keep using your Running Club app with your community, you can leave it running!
- In Google AI Studio , click My Apps in the left sidebar.
- Find your Running Club app.
- Click Delete App (or the trash icon). This turns off your live web page and removes the test database for you in one step.
১০. অভিনন্দন
You have built, customized, and published your first database-backed web app using Google AI Studio and Cloud SQL!
'Completed Builder Journey' ব্যাজটি সংগ্রহ করতে এই লিঙ্কে যান!
আপনার যাত্রা অব্যাহত রাখতে, পরবর্তী ল্যাবের জন্য goo.gle/builders- এ যান।
আপনি যা অর্জন করেছেন
- Built an app with plain language : Created a complete community running club app with simple prompts.
- Enabled Google Sign-In : Set up secure login with Google Accounts automatically.
- Connected a real database : Stored routes, scheduled runs, RSVPs, and discussions safely in Cloud SQL.
- Added features conversationally : Built a route library and RSVP tracking simply by chatting with the AI.
- Published live to the web : Deployed your app to the internet with one click and tested it across devices.
- Looked under the hood : Explored how Google Cloud hosts your live web app and database.
এরপর কী?
You can keep chatting with the AI in Google AI Studio to expand your app with new features:
- Interactive Maps : Prompt the AI to add map previews and GPS routes.
- Running Buddy Matching : Prompt the AI to suggest running partners with similar pace goals.
- Weather Forecasts : Prompt the AI to display weekend weather forecasts on upcoming run cards.
- Photo Sharing : Prompt the AI to allow runners to share photos after a group run.
আরও পড়ুন
১. শুরু করার আগে
If you have ever tried organizing a weekend run with friends or neighbors, you know the struggle: meeting locations get lost in endless group chats, people constantly ask what pace everyone is running, and newcomers are never quite sure who is showing up.
In this codelab, you will solve this everyday problem by building Running Club —a welcoming web app where local runners can browse favorite routes, schedule weekend meetups, RSVP with one click, and chat with fellow runners.
Why does this app need a database?
A community app needs a reliable memory—known as a database . When a runner adds a new scenic route, RSVPs for Saturday's morning run, or posts a comment asking about parking, that information cannot disappear when they close their phone or turn off their computer. A database keeps all routes, attendee lists, and member messages safely stored and organized so everyone in the club sees up-to-date information whenever they open the app.
You will build this app using Google AI Studio 's Build mode. You do not need to write complex code or set up technical infrastructure yourself—you simply describe what you want in plain language. Google AI Studio generates the app, connects a real Cloud SQL for PostgreSQL database to remember your data, and publishes the app live on Cloud Run so your community can start using it right away.
আপনি যা তৈরি করবেন
You will build and launch Running Club , a community web app that includes:
- Google Sign-In : Quick and secure login using an existing Google Account.
- Runner profiles : Member profiles that showcase running preferences and target pace.
- Route library : A collection of favorite neighborhood routes with distance, hill difficulty, and meeting points.
- Upcoming run schedule : An event board to organize upcoming group runs and link them to routes.
- Simple RSVPs : A one-click button for members to say "I'm going" and see who else is coming.
- Run discussions : A comment space on each run to coordinate details, ask questions, and share updates.
আপনি যা শিখবেন
- How to create a working web app in Google AI Studio using a single prompt in plain language.
- How Google AI Studio sets up Google Sign-In automatically.
- How Google AI Studio creates and connects a real Cloud SQL for PostgreSQL database to remember your data.
- How to add new features and expand your database simply by chatting with the AI.
- How to verify that your club's data stays safely saved across visits.
- How to publish your app live to the internet with Cloud Run .
- How to view your live app and database in the Google Cloud Console.
আপনার যা যা লাগবে
- A modern web browser such as Google Chrome.
- A standard Google Account to sign in to Google AI Studio .
Cloud SQL Starter Edition eligibility and limits
Google AI Studio offers the Google Cloud Starter Tier to help builders experiment with generative apps and managed databases:
- যোগ্যতা :
- Available to individuals using a standard Google Account.
- Ineligible accounts include users with existing or past Google Cloud billing accounts, as well as accounts associated with Google Workspace, Google Workspace for Education, or Google for Nonprofits.
- If your account is ineligible for the Starter Tier , you can still complete this lab by selecting an existing Google Cloud project with billing enabled. Learn how to confirm billing is enabled on a project .
- Resource specifications :
- Provisions a Cloud SQL for PostgreSQL Developer Edition instance running PostgreSQL 18.
- Includes 0.5 vCPU, 2 GB RAM, and 1 GB storage. That should be enough for you to run hundreds of daily visits for a few months or longer, depending on activity.
- Supports scale to zero , automatically pausing compute when there are no active database connections to conserve quota.
- কোটা :
- Includes a free monthly quota of 50 compute units and 10 GB of storage.
2. Open Google AI Studio and Start a New App
To get started, open Google AI Studio in your browser. This is your creation workspace where you can build and test apps simply by describing what you need.
Step 1: Sign in to Google AI Studio
- Open your web browser (such as Google Chrome) and go to aistudio.google.com .
- Click Get started and log in with your standard Google Account (such as your Gmail account).
- If prompted with terms of service on your first visit, review and accept them to proceed.
Step 2: Start a new application
- In the bottom-center panel, click Start building (or click +New App on the right panel).
3. Start with a Simple Prompt and Firebase Authentication
You do not need complex architecture diagrams to get started. You can launch your initial application, configure Google Sign-In, and connect your database with a single sentence.
Enter the initial prompt
In the prompt box of AI Studio Build mode, enter the following prompt and press Enter :
Build a running club web app with a Cloud SQL database
where members can post upcoming runs.
এই লিঙ্কটি আপনার জন্য প্রম্পট বক্সটি স্বয়ংক্রিয়ভাবে পূরণ করে দেবে।
Understand your workspace
Once you submit your prompt, Google AI Studio opens the full application workspace. Take a moment to look at the three main areas on your screen:
- The Chat / Prompt Box (Bottom) : This is where you continue chatting with the AI in plain language to add features, adjust designs, or ask questions.
- The Files & Code Area (Left side) : This shows the files the AI creates behind the scenes. You do not need to write or edit code yourself, but this panel lets you watch the AI create the pieces of your app.
- The Live Preview Window (Right side) : This displays your actual working app in real time. You can click buttons, type in text fields, and test your app directly in this window as soon as it is generated.
- The code editor (Right side) : This shows the actual code that AI generates. You can edit it if you want to, but it is not required.
- Deployment and sharing (Top right) : This is where you can deploy your app to the internet and share it with others.
What Google AI Studio does automatically
While the AI processes your request, you can watch it build your app step by step:
- Sets up Google Sign-In : The AI automatically integrates Google Sign-In so your runners can log in safely with their Google Accounts—no need to manage user passwords or security settings.
- Connects a real database : The AI sets up a managed Cloud SQL database to store your community's data. If prompted, click to enable the database for your project.
- Organizes your data tables (
schema.ts) : Think of a database schema as a collection of organized spreadsheets. The AI automatically creates the storage structure for your app:-
userstable : Stores member profiles, names, avatars, and running pace. -
runstable : Stores scheduled events with their title, distance, target pace, location, and date. -
commentstable : Stores messages and questions left by runners under each run.
(Note: You never need to write or edit this code manually—the AI updates it for you whenever you ask for new features!) -
- Builds the visual interface : The AI creates the web pages you see on screen, including the header, upcoming runs list, event creation form, and comment section.
Verify authentication and run posting
Once the generation finishes, test your new app in the Preview pane:
- In the preview window, click Member Sign In (or click the Post Upcoming Run button, which will trigger authentication).
- Authenticate with your Google account using the Firebase Auth dialog.
- Once signed in, your Google profile name and avatar appear in the navigation bar, and your pace preferences are automatically managed.
- In the "Post Upcoming Run" form, enter a title (such as
Morning 5K Shakeout). - Select a date and time, and enter a meeting location (such as
Central Park West Entrance). - Click PublishRun .
- Confirm that the new run appears immediately in the upcoming runs feed, displaying your authenticated profile name and pace badge as the organizer.
- Post a quick message in the run's discussion section (such as
Bringing extra water bottles!) and verify that it appears in the comment thread.
4. Build a Route Library
Running clubs often reuse popular local routes. Instead of typing the same route information over and over, you can let members save favorite routes in a catalog and attach them whenever they schedule a run.
Ask the AI to add the Route Library
In the chat prompt box, type the following request and press Enter :
Add a route library where members can save favorite
running routes with atitle, distance in km, difficulty,
and start location. When scheduling a run, allow the
organizer to select a route from this library.
How the AI links routes to runs behind the scenes
To make this work, the AI automatically creates a new storage table for routes and connects it directly to the runs table. This connection is what allows your app to automatically pull in distance and location details whenever an organizer picks a route.
(Again, you do not need to touch this code—the AI updates the database structure for you!)
Test your new Route Library in the Preview
Once the AI finishes updating your app, try out the new route feature in the live preview window:
- In the app navigation, click the Route Library tab. If there is no such tab check the bottom of the live preview - it may ask you to push the Save button to refresh the preview. Or if it doesn't help try to interact with AI in the chat window and ask where your routes library is.
- Click Save New Route (or Add Route ) and fill in some sample details:
- Route Title :
Riverfront Trail Loop - দূরত্ব :
8.5 km - Difficulty :
Moderate - Start Location :
Waterfront Pier 4
- Route Title :
- Click Save to Library .
- Now, schedule a run using this route by clicking the Schedule Run button directly on your new route card.
- Notice how the distance, difficulty, and location details are automatically filled in for you!
- Click Publish Run and verify that your new group run appears on the home feed.
5. Implement RSVPs and Member Invites
Community apps thrive on participation! You can let runners see who is attending an upcoming run, sign up with one click, and share an invite link with friends.
Ask the AI to add RSVPs and invites
In the chat prompt box, type the following request and press Enter :
Allow registered members to RSVP ("Join Run") to any upcoming run.
Show the list of attending runners on each run card, display an
attendee counter, and add a copyable invite link.
How the AI tracks attendees behind the scenes
To keep track of which runners are coming to each run, the AI automatically creates an rsvps table in your database. Think of this like a digital sign-up sheet that links a runner's name to a specific event.
(You don't need to write or edit this code—the AI manages this sign-up sheet in your database automatically!)
Test RSVPs and invites in the Preview
Once the AI finishes updating your app, test the new RSVP features in the live preview window:
- In the preview window, find an upcoming run on your home feed.
- Click the Join Run (or RSVP ) button.
- Confirm that your name and avatar appear in the Attending Runners section, and the attendee counter increases by 1.
- Click Copy Invite Link and verify that a shareable link is generated.
6. Test Data Persistence and Cloud SQL Scale-to-Zero
When building an app, the most important thing is knowing that your community's information is safe. If you refresh your browser, close the tab, or shut down your computer, you want all your saved routes, RSVPs, and discussions to still be there when you return.
In this step, you will test that your data is safely saved in your Cloud SQL database and learn how Google Cloud saves energy and costs when your app is quiet.
Test refreshing your app
- Click the Reload button inside the AI Studio preview window (or refresh your browser tab).
- Look at your app in the preview: notice that everything you created—your member profile, saved routes, scheduled runs, RSVPs, and comments—is still right where you left it!
- Your app didn't just store information temporarily on your screen; it securely stored it in your Cloud SQL database.
How Cloud SQL saves energy and cost ("Scale-to-zero")
What happens when nobody is using your running club app in the middle of the night?
- Automatic sleep ("Scale-to-zero") : When no one is visiting the app or signing up for runs, the database automatically pauses itself to conserve resources.
- Instant wake-up : As soon as a runner opens the app or clicks an invite link, the database wakes up instantly with all your saved information ready to go.
- Zero idle cost : Because it sleeps when inactive, you don't use up compute resources when the app is quiet.
7. Publish and Deploy to Cloud Run
Now that your Running Club app is built and tested in the preview, it's time to share it with your community! You don't need to purchase web hosting or configure servers—you can launch your app live to the internet with a single click.
Publish your app live to the web
- In the top-right corner of Google AI Studio, click the Publish button.
- A summary window appears confirming the details:
- Hosting : Hosted and deployed on Google Cloud Run.
- Connected services : Google Sign-In and your Cloud SQL database.
- Hosting : Hosted and deployed on Google Cloud Run.
- Click Publish to launch your app.
Open and share your live app
- When publishing is complete, Google AI Studio provides your live web address along with a QR code.
- Click the link to open your live web app in a new browser tab, or scan the QR code with your phone camera.
- Try it on your phone : Sign in on your phone, RSVP to one of the runs you scheduled earlier on your computer, and watch the attendee count update in real time—powered by your shared Cloud SQL database!
8. (Bonus) Inspect Your Resources in the Google Cloud Console
When Google AI Studio builds and deploys your app, it doesn't lock it inside a private black box—it creates real, production-ready Google Cloud services on your behalf. Think of the Google Cloud Console as the control center where you can view your live app and database.
Step 1: Open the Google Cloud Console
- In a new browser tab, open the Google Cloud Console .
- At the top of the screen, click the project drop-down menu and select the project created for your AI Studio app (its name usually starts with
continual-run-).
Step 2: See where your web app runs (Cloud Run)
- In the top search bar, type
Cloud Runand select it from the results. - Click on your app name (such as
running-club). - Here you can explore the engine that hosts your website:
- Metrics : Helpful graphs showing how many people are visiting your website.
- Logs : A live record of activity showing what happens when visitors interact with your app.
Step 3: See your database in action (Cloud SQL)
- In the top search bar, type
Cloud SQLand select it from the results. - Click on your PostgreSQL database instance.
- Here you can see your live database details, confirming that your database is active and ready to store your running club's data.
9. Clean up resources
If you built this app as a practice project, you can easily delete it. If you plan to keep using your Running Club app with your community, you can leave it running!
- In Google AI Studio , click My Apps in the left sidebar.
- Find your Running Club app.
- Click Delete App (or the trash icon). This turns off your live web page and removes the test database for you in one step.
১০. অভিনন্দন
You have built, customized, and published your first database-backed web app using Google AI Studio and Cloud SQL!
'Completed Builder Journey' ব্যাজটি সংগ্রহ করতে এই লিঙ্কে যান!
আপনার যাত্রা অব্যাহত রাখতে, পরবর্তী ল্যাবের জন্য goo.gle/builders- এ যান।
আপনি যা অর্জন করেছেন
- Built an app with plain language : Created a complete community running club app with simple prompts.
- Enabled Google Sign-In : Set up secure login with Google Accounts automatically.
- Connected a real database : Stored routes, scheduled runs, RSVPs, and discussions safely in Cloud SQL.
- Added features conversationally : Built a route library and RSVP tracking simply by chatting with the AI.
- Published live to the web : Deployed your app to the internet with one click and tested it across devices.
- Looked under the hood : Explored how Google Cloud hosts your live web app and database.
এরপর কী?
You can keep chatting with the AI in Google AI Studio to expand your app with new features:
- Interactive Maps : Prompt the AI to add map previews and GPS routes.
- Running Buddy Matching : Prompt the AI to suggest running partners with similar pace goals.
- Weather Forecasts : Prompt the AI to display weekend weather forecasts on upcoming run cards.
- Photo Sharing : Prompt the AI to allow runners to share photos after a group run.