

۱. قبل از شروع
اگر تا به حال سعی کردهاید یک برنامهی دویدن آخر هفته با دوستان یا همسایهها ترتیب دهید، میدانید که چقدر دردسر دارد: مکانهای ملاقات در چتهای گروهی بیپایان گم میشوند، مردم دائماً میپرسند که هر کس با چه سرعتی میدود، و تازهواردها هیچوقت کاملاً مطمئن نیستند که چه کسی حاضر میشود.
در این آزمایشگاه کد، شما این مشکل روزمره را با ساخت Running Club حل خواهید کرد - یک برنامه وب دلپذیر که در آن دوندگان محلی میتوانند مسیرهای مورد علاقه خود را مرور کنند، قرارهای آخر هفته را برنامهریزی کنند، با یک کلیک RSVP کنند و با دوندگان دیگر گپ بزنند.
چرا این برنامه به پایگاه داده نیاز دارد؟
یک اپلیکیشن اجتماعی به یک حافظه قابل اعتماد نیاز دارد - که به عنوان پایگاه داده شناخته میشود. وقتی یک دونده یک مسیر خوشمنظره جدید اضافه میکند، برای دویدن صبح شنبه اعلام آمادگی میکند، یا نظری در مورد جای پارک مینویسد، این اطلاعات با بستن تلفن یا خاموش کردن رایانه از بین نمیروند. یک پایگاه داده تمام مسیرها، لیست شرکتکنندگان و پیامهای اعضا را با خیال راحت ذخیره و سازماندهی میکند تا همه افراد در باشگاه هر زمان که اپلیکیشن را باز میکنند، اطلاعات بهروز را ببینند.
شما این برنامه را با استفاده از حالت Build در Google AI Studio خواهید ساخت. نیازی نیست خودتان کد پیچیدهای بنویسید یا زیرساخت فنی راهاندازی کنید - شما به سادگی آنچه را که میخواهید به زبان ساده توصیف میکنید. Google AI Studio برنامه را تولید میکند، یک پایگاه داده Cloud SQL واقعی را به PostgreSQL متصل میکند تا دادههای شما را به خاطر بسپارد و برنامه را به صورت زنده در Cloud Run منتشر میکند تا جامعه شما بتواند بلافاصله شروع به استفاده از آن کند.
آنچه خواهید ساخت
شما Running Club ، یک برنامه وب اجتماعی که شامل موارد زیر است را ایجاد و راهاندازی خواهید کرد:
- ورود با گوگل : ورود سریع و امن با استفاده از حساب گوگل موجود.
- پروفایلهای دونده : پروفایلهای اعضا که ترجیحات دویدن و سرعت هدف را نشان میدهند.
- کتابخانه مسیر : مجموعهای از مسیرهای مورد علاقه محلهها به همراه مسافت، سختی تپه و نقاط ملاقات.
- برنامهی دویدنهای آینده : یک تابلوی رویدادها برای سازماندهی دویدنهای گروهی آینده و پیوند دادن آنها به مسیرها.
- RSVP های ساده : یک دکمه با یک کلیک برای اعضا تا بگویند «من میرم» و ببینند چه کسی دیگری میآید.
- اجرای بحثها : در هر اجرا، فضایی برای نظر دادن وجود دارد تا جزئیات را هماهنگ کنید، سوال بپرسید و بهروزرسانیها را به اشتراک بگذارید.
آنچه یاد خواهید گرفت
- نحوه ایجاد یک برنامه وب کارآمد در Google AI Studio با استفاده از یک دستور ساده.
- چگونه Google AI Studio به طور خودکار Google Sign-In را تنظیم میکند.
- چگونه Google AI Studio یک Cloud SQL واقعی برای پایگاه داده PostgreSQL ایجاد و متصل میکند تا دادههای شما را به خاطر بسپارد.
- چگونه میتوان ویژگیهای جدید اضافه کرد و پایگاه داده خود را صرفاً با چت کردن با هوش مصنوعی گسترش داد.
- چگونه مطمئن شوید که دادههای باشگاه شما در طول بازدیدها به طور ایمن ذخیره میشوند.
- چگونه برنامه خود را به صورت زنده با Cloud Run در اینترنت منتشر کنید.
- نحوه مشاهده برنامه و پایگاه داده زنده خود در کنسول Google Cloud.
آنچه نیاز دارید
- یک مرورگر وب مدرن مانند گوگل کروم.
- یک حساب کاربری استاندارد گوگل برای ورود به Google AI Studio .
شرایط و محدودیتهای نسخه آزمایشی Cloud SQL
گوگل هوش مصنوعی استودیو، سطح شروع گوگل کلود را برای کمک به سازندگان در آزمایش برنامههای مولد و پایگاههای داده مدیریتشده ارائه میدهد:
- واجد شرایط بودن :
- برای افرادی که از حساب استاندارد گوگل استفاده میکنند، در دسترس است.
- حسابهای فاقد شرایط لازم شامل کاربرانی میشود که حسابهای پرداخت Google Cloud موجود یا گذشته دارند، و همچنین حسابهای مرتبط با Google Workspace، Google Workspace for Education یا Google for Nonprofits.
- اگر حساب شما واجد شرایط سطح مبتدی نیست ، همچنان میتوانید با انتخاب یک پروژه Google Cloud موجود با قابلیت پرداخت، این آزمایش را تکمیل کنید. یاد بگیرید که چگونه تأیید کنید که پرداخت در یک پروژه فعال است .
- مشخصات منابع :
- یک نمونه Cloud SQL برای نسخه توسعهدهندگان PostgreSQL که PostgreSQL 18 را اجرا میکند، فراهم میکند.
- شامل 0.5 vCPU، 2 گیگابایت رم و 1 گیگابایت فضای ذخیرهسازی است. این مقدار باید برای شما کافی باشد تا صدها بازدید روزانه را برای چند ماه یا بیشتر، بسته به فعالیت، انجام دهید.
- از مقیاسپذیری تا صفر پشتیبانی میکند و در صورت عدم وجود اتصال فعال به پایگاه داده، برای حفظ سهمیه، بهطور خودکار محاسبات را متوقف میکند.
- سهمیه :
- شامل سهمیه ماهانه رایگان ۵۰ واحد محاسباتی و ۱۰ گیگابایت فضای ذخیرهسازی است.
۲. گوگل هوش مصنوعی استودیو را باز کنید و یک برنامه جدید ایجاد کنید
برای شروع، Google AI Studio را در مرورگر خود باز کنید. این فضای کاری شماست که میتوانید در آن، صرفاً با توصیف نیازهایتان، برنامهها را بسازید و آزمایش کنید.
مرحله ۱: وارد استودیوی هوش مصنوعی گوگل شوید
- مرورگر وب خود (مانند گوگل کروم) را باز کنید و به aistudio.google.com بروید.
- روی شروع به کار کلیک کنید و با حساب استاندارد گوگل خود (مانند حساب جیمیل) وارد شوید.
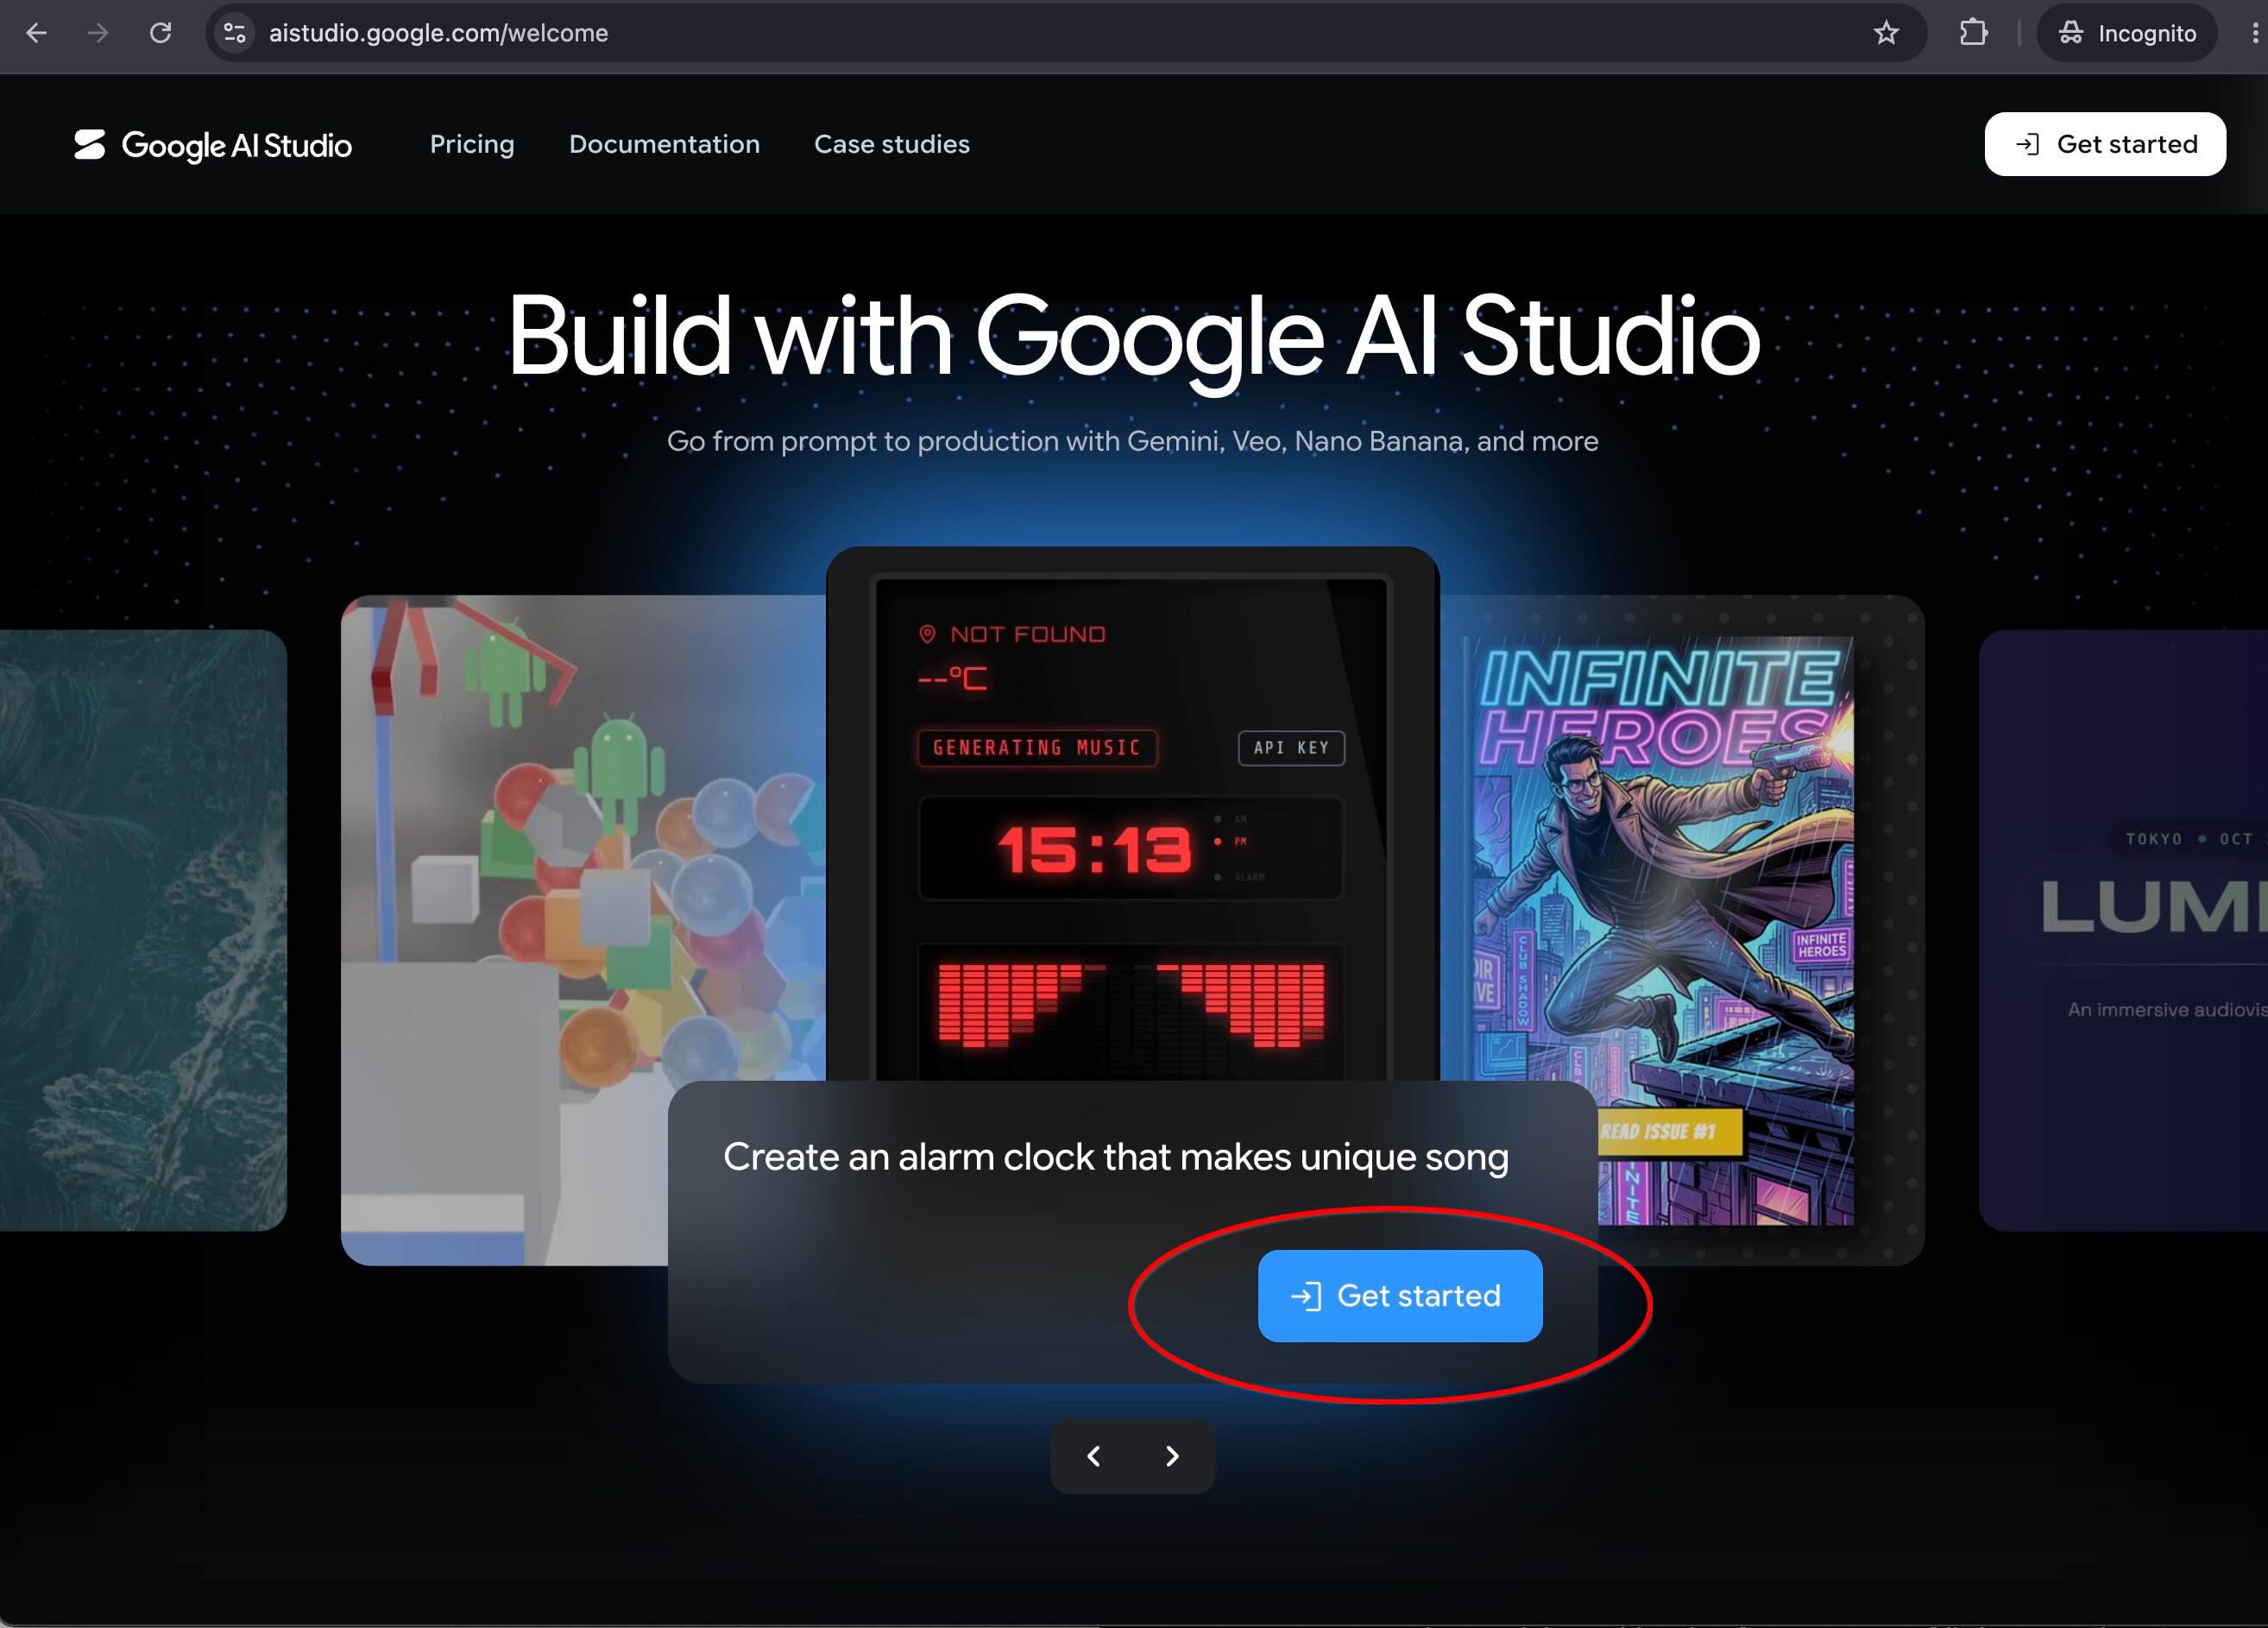
- اگر در اولین بازدید خود از شما شرایط خدمات پرسیده شد، آنها را مرور کرده و برای ادامه، آنها را بپذیرید.
مرحله ۲: شروع یک برنامه جدید
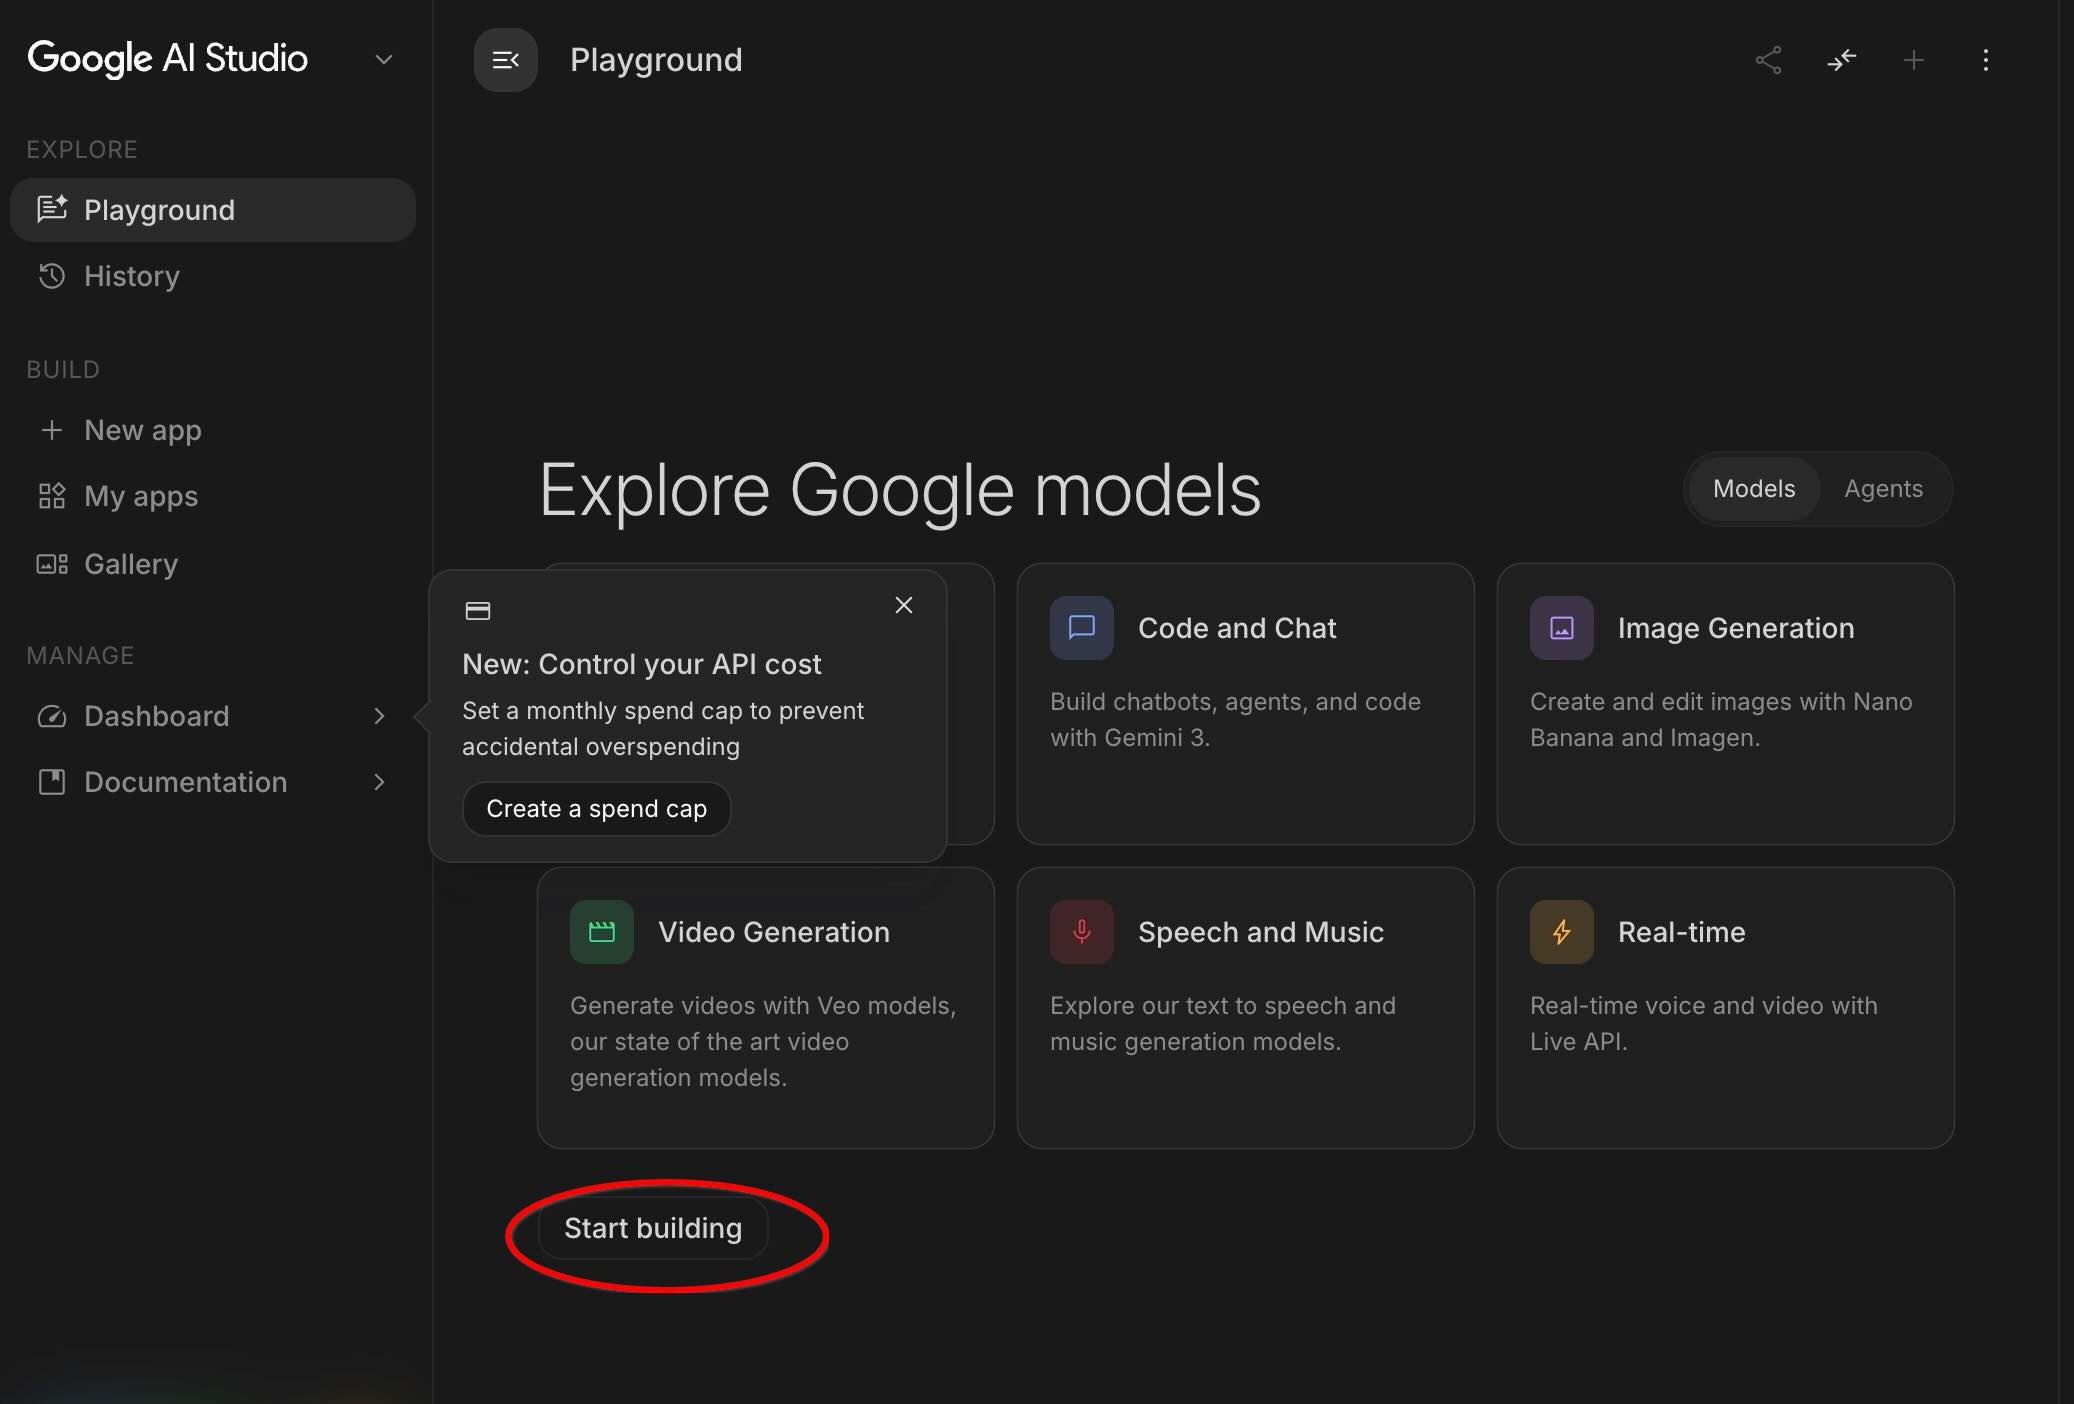
- در پنل پایین-وسط، روی شروع ساخت کلیک کنید (یا روی +برنامه جدید در پنل سمت راست کلیک کنید).
۳. با یک اعلان ساده و احراز هویت Firebase شروع کنید
برای شروع نیازی به نمودارهای معماری پیچیده ندارید. میتوانید برنامه اولیه خود را راهاندازی کنید، ورود به سیستم گوگل را پیکربندی کنید و پایگاه داده خود را با یک جمله واحد متصل کنید.
دستور اولیه را وارد کنید
در کادر اعلان حالت ساخت AI Studio، عبارت زیر را وارد کرده و Enter را بزنید:
Build a running club web app with a Cloud SQL database
where members can post upcoming runs.
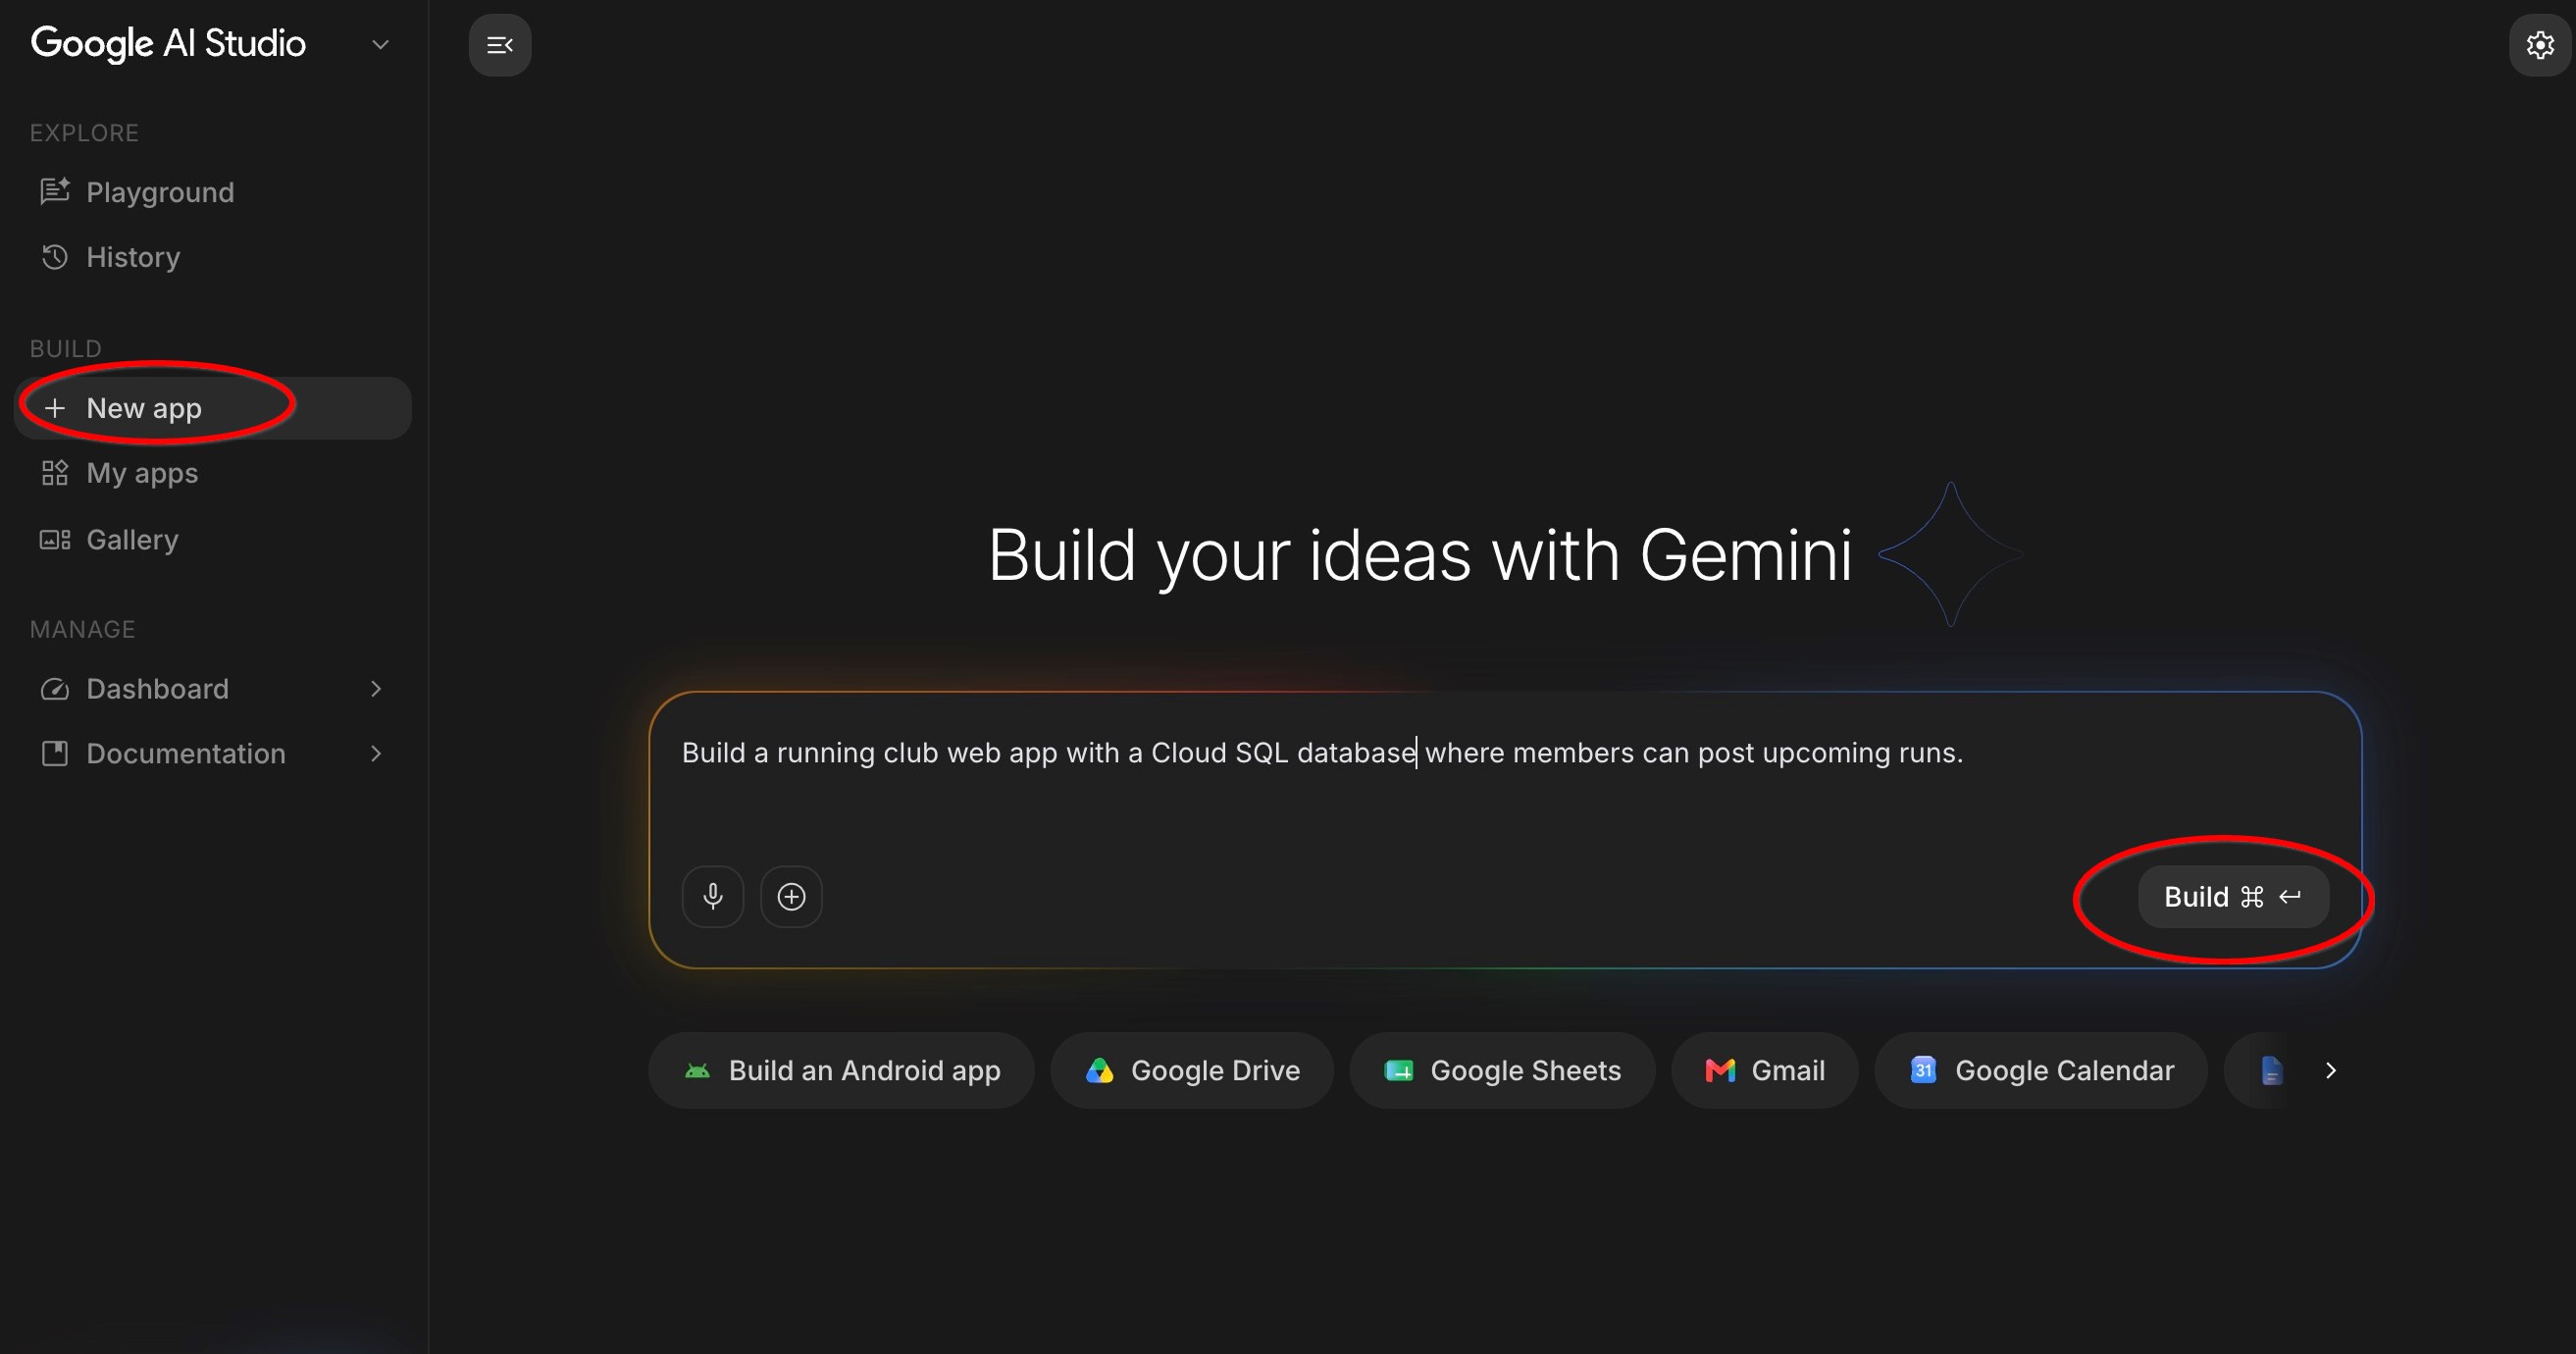
این لینک به طور خودکار کادر درخواست را برای شما پر میکند.
فضای کاری خود را درک کنید
پس از ارسال درخواست، Google AI Studio فضای کاری کامل برنامه را باز میکند. لحظهای به سه قسمت اصلی روی صفحه خود نگاه کنید:
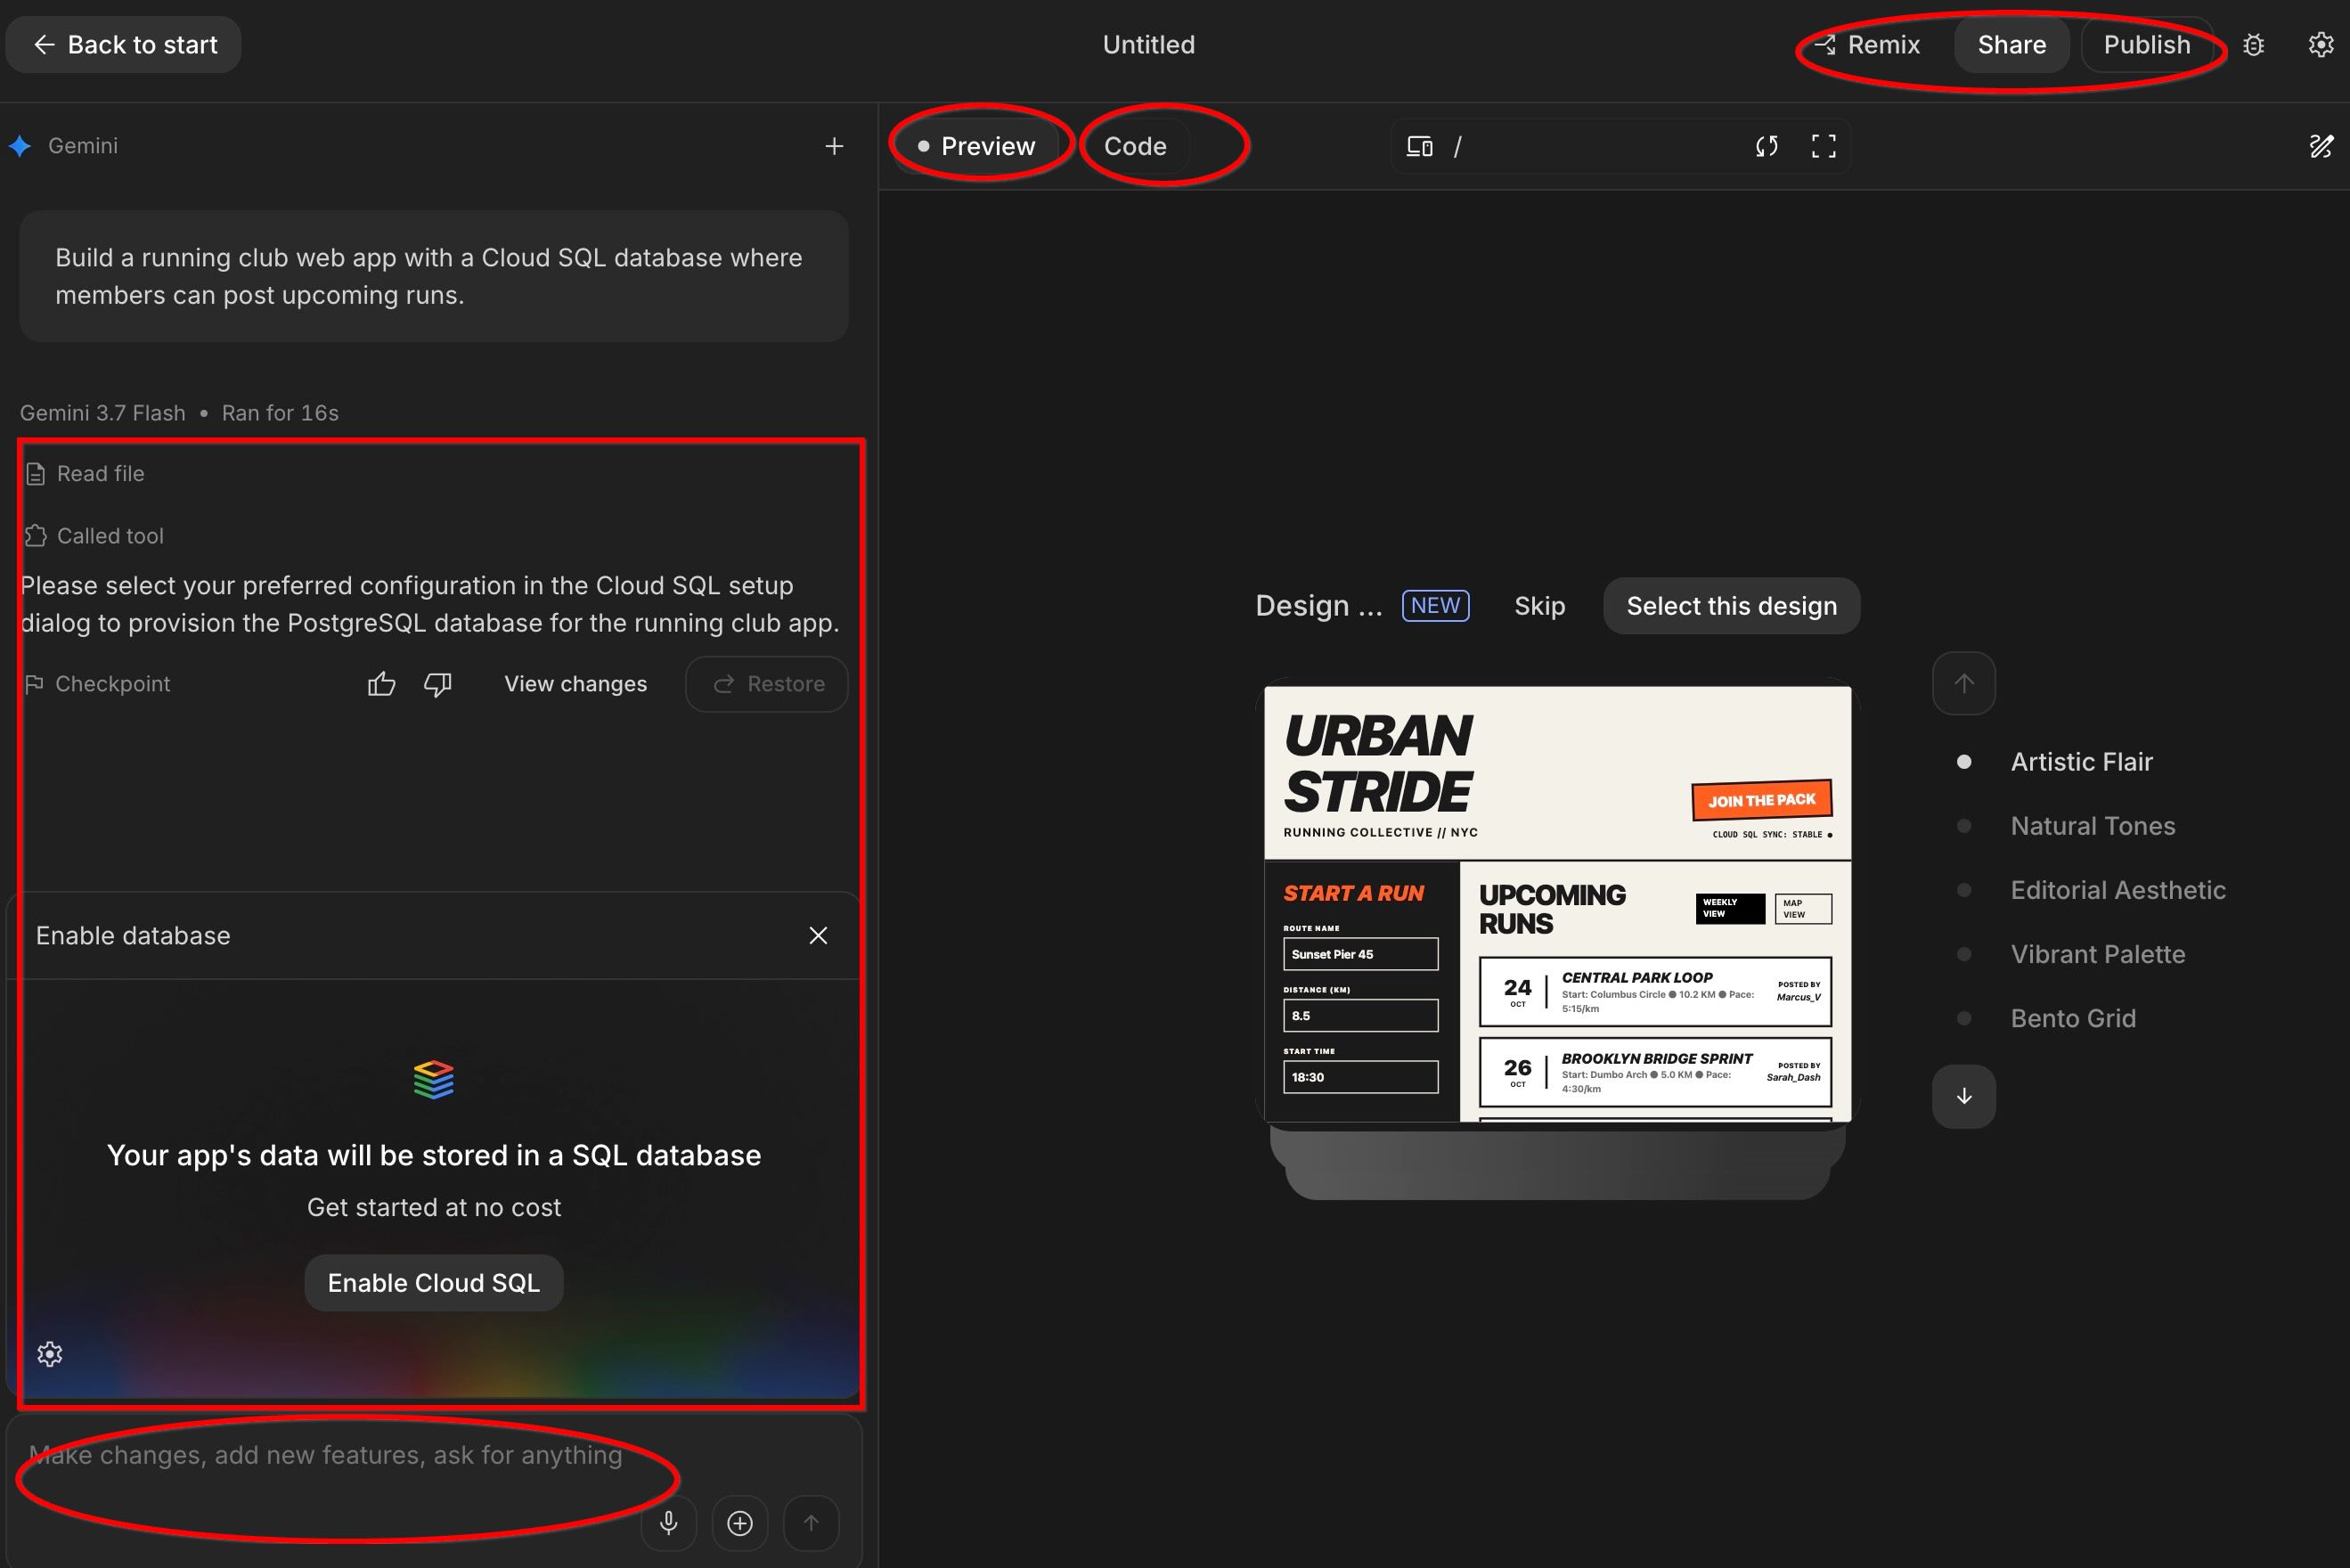
- کادر گفتگو/پیام (پایین) : اینجا جایی است که شما به گفتگو با هوش مصنوعی به زبان ساده ادامه میدهید تا ویژگیها را اضافه کنید، طرحها را تنظیم کنید یا سؤال بپرسید.
- بخش فایلها و کد (سمت چپ) : این بخش، فایلهایی را که هوش مصنوعی در پشت صحنه ایجاد میکند، نشان میدهد. نیازی نیست خودتان کد بنویسید یا ویرایش کنید، اما این پنل به شما امکان میدهد تا مشاهده کنید که هوش مصنوعی چگونه بخشهایی از برنامه شما را ایجاد میکند.
- پنجره پیشنمایش زنده (سمت راست) : این پنجره برنامه در حال کار واقعی شما را به صورت بلادرنگ نمایش میدهد. میتوانید روی دکمهها کلیک کنید، فیلدهای متنی را تایپ کنید و برنامه خود را مستقیماً در این پنجره، به محض تولید، آزمایش کنید.
- ویرایشگر کد (سمت راست) : این قسمت کد واقعی تولید شده توسط هوش مصنوعی را نشان میدهد. در صورت تمایل میتوانید آن را ویرایش کنید، اما این کار الزامی نیست.
- استقرار و اشتراکگذاری (بالا سمت راست) : اینجاست که میتوانید برنامه خود را در اینترنت مستقر کرده و آن را با دیگران به اشتراک بگذارید.
کاری که گوگل هوش مصنوعی استودیو به طور خودکار انجام میدهد
در حالی که هوش مصنوعی درخواست شما را پردازش میکند، میتوانید ساخت برنامه خود را گام به گام تماشا کنید:
- راهاندازی ورود به سیستم گوگل : هوش مصنوعی بهطور خودکار ورود به سیستم گوگل را ادغام میکند تا دوندگان شما بتوانند با خیال راحت با حسابهای گوگل خود وارد سیستم شوند - نیازی به مدیریت رمزهای عبور یا تنظیمات امنیتی نیست.
- اتصال به یک پایگاه داده واقعی : هوش مصنوعی یک پایگاه داده مدیریتشده Cloud SQL را برای ذخیره دادههای جامعه شما راهاندازی میکند. در صورت درخواست، برای فعال کردن پایگاه داده برای پروژه خود کلیک کنید.
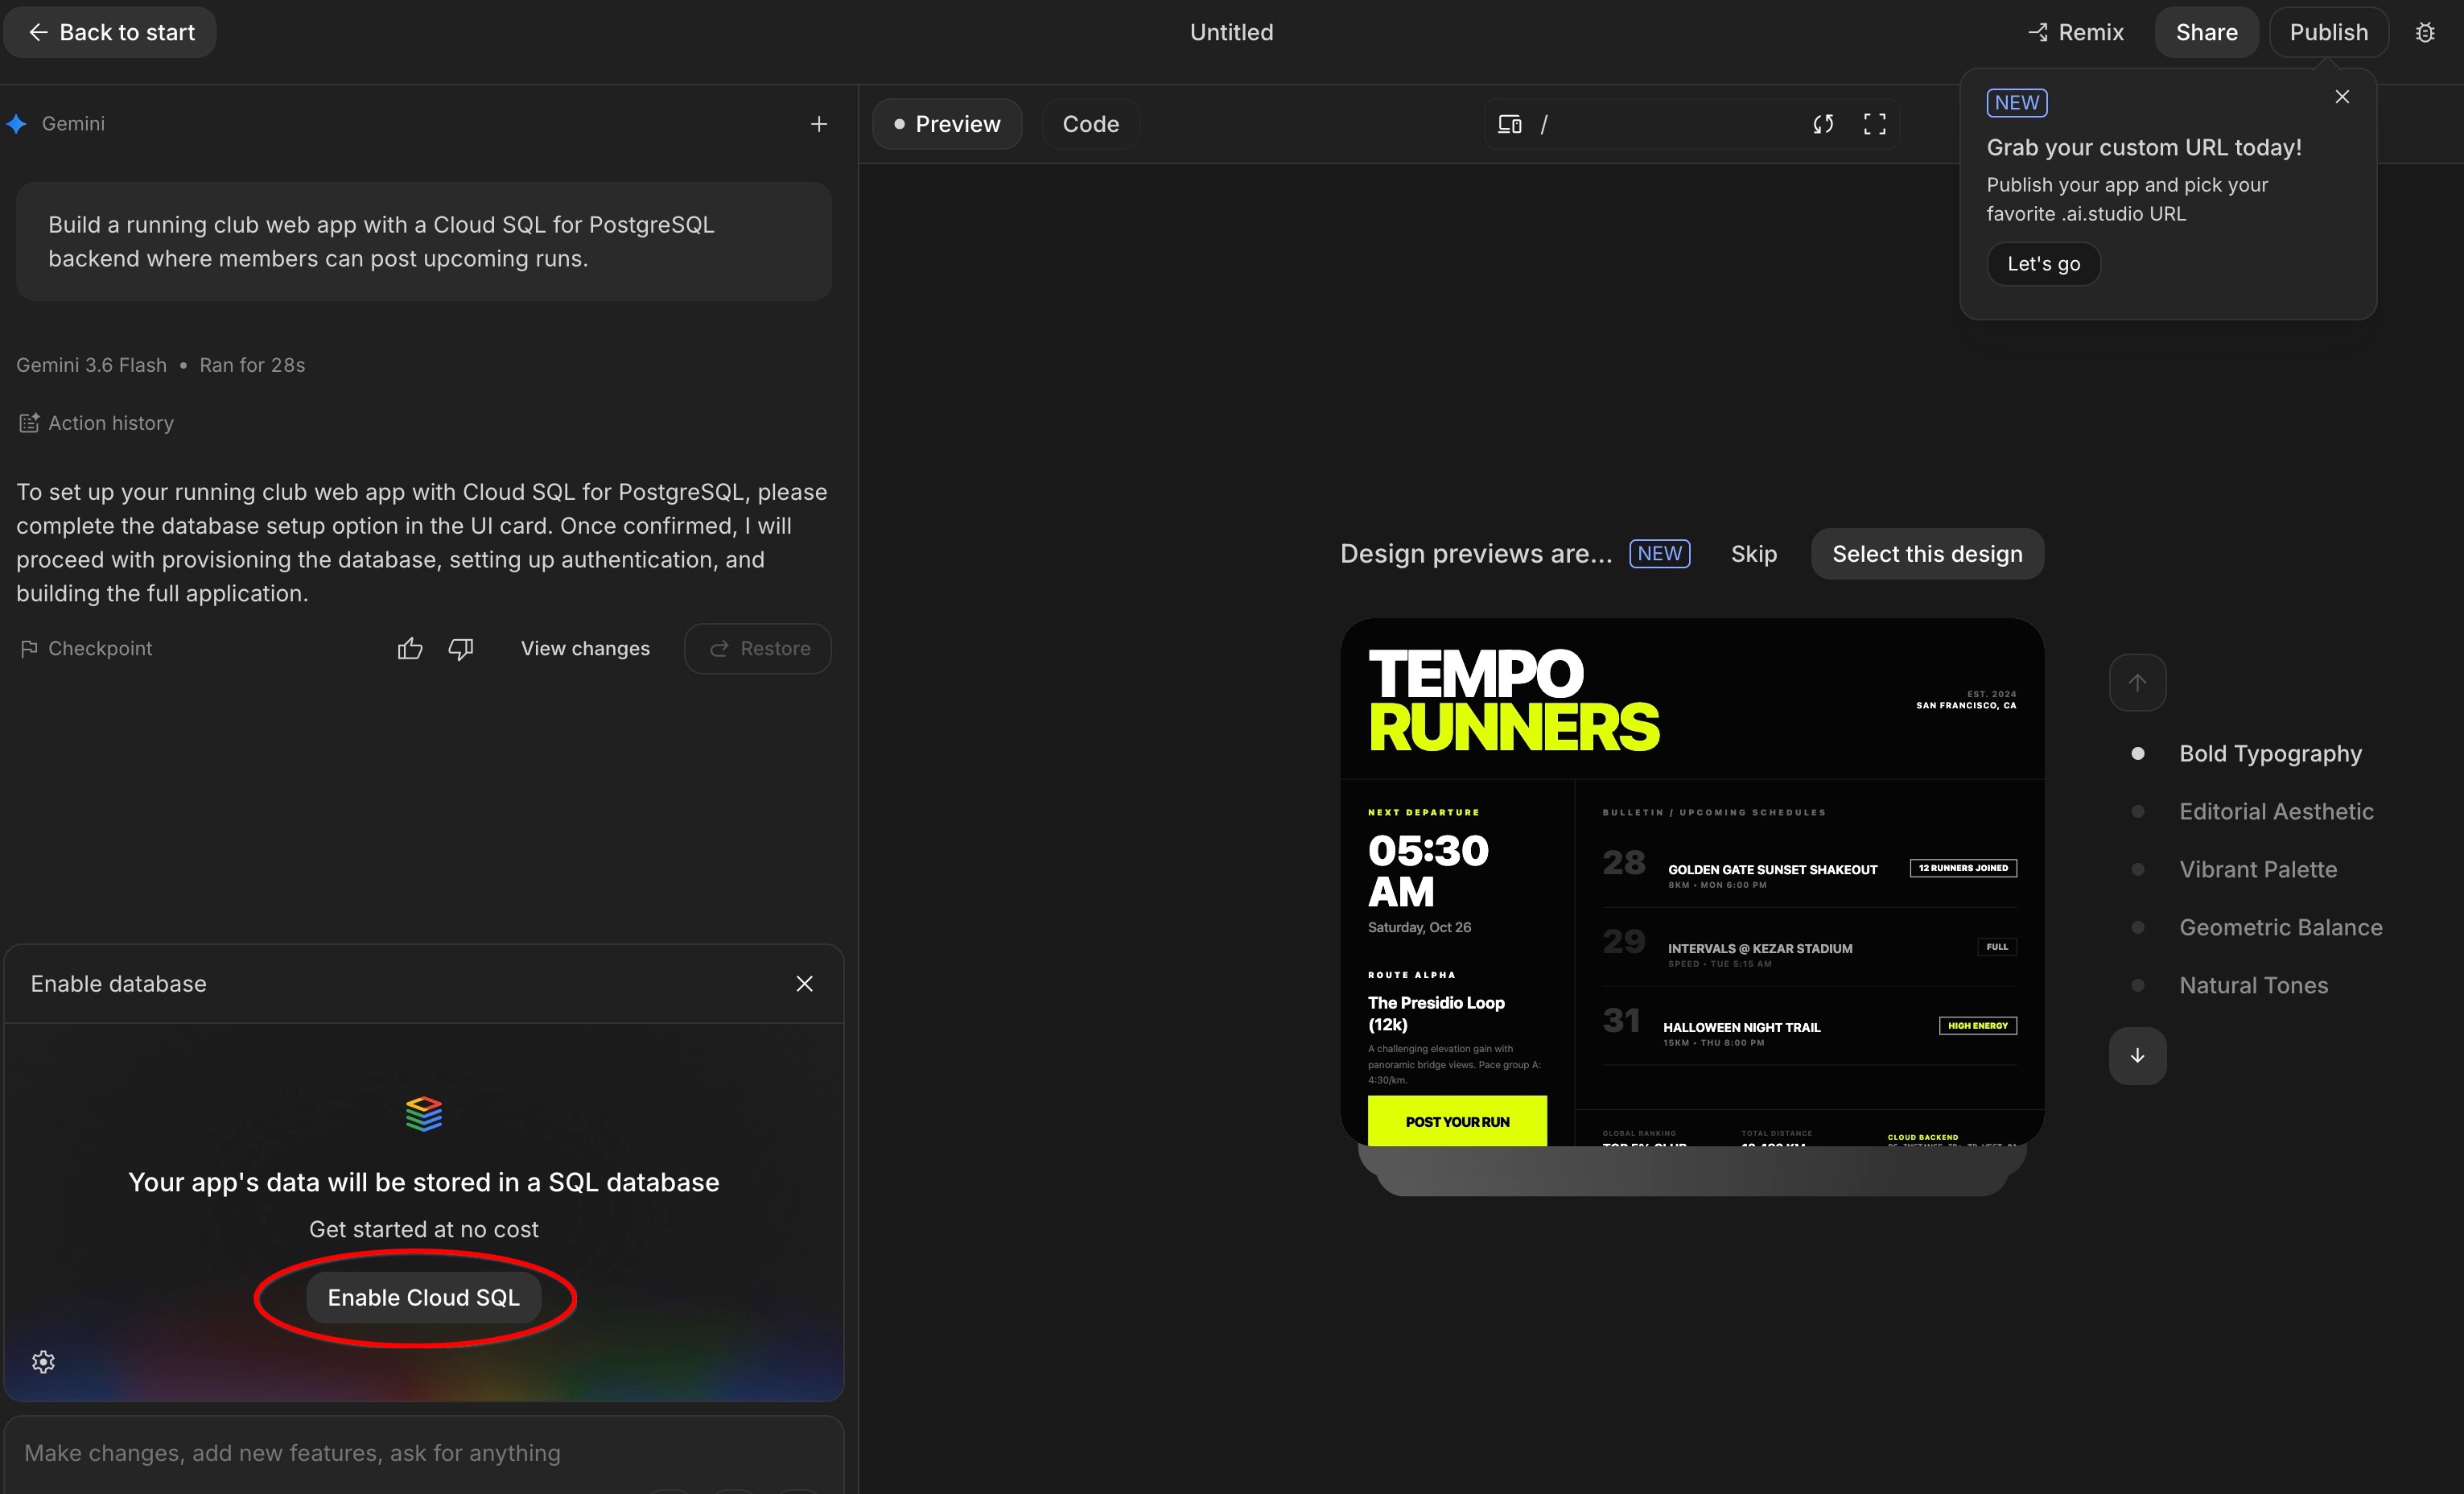
- جداول دادههای شما را سازماندهی میکند (
schema.ts) : یک طرحواره پایگاه داده را به عنوان مجموعهای از صفحات گسترده سازماندهی شده در نظر بگیرید. هوش مصنوعی به طور خودکار ساختار ذخیرهسازی را برای برنامه شما ایجاد میکند:- جدول
users: پروفایل اعضا، نامها، آواتارها و سرعت دویدن آنها را ذخیره میکند. - جدول
runs: رویدادهای زمانبندیشده را به همراه عنوان، مسافت، سرعت هدف، مکان و تاریخ آنها ذخیره میکند. - جدول
comments: پیامها و سوالات مطرحشده توسط دوندگان را در زیر هر مسابقه ذخیره میکند.
 (توجه: شما هرگز نیازی به نوشتن یا ویرایش دستی این کد ندارید - هوش مصنوعی هر زمان که درخواست ویژگیهای جدید کنید، آن را برای شما بهروزرسانی میکند!)
 - جدول
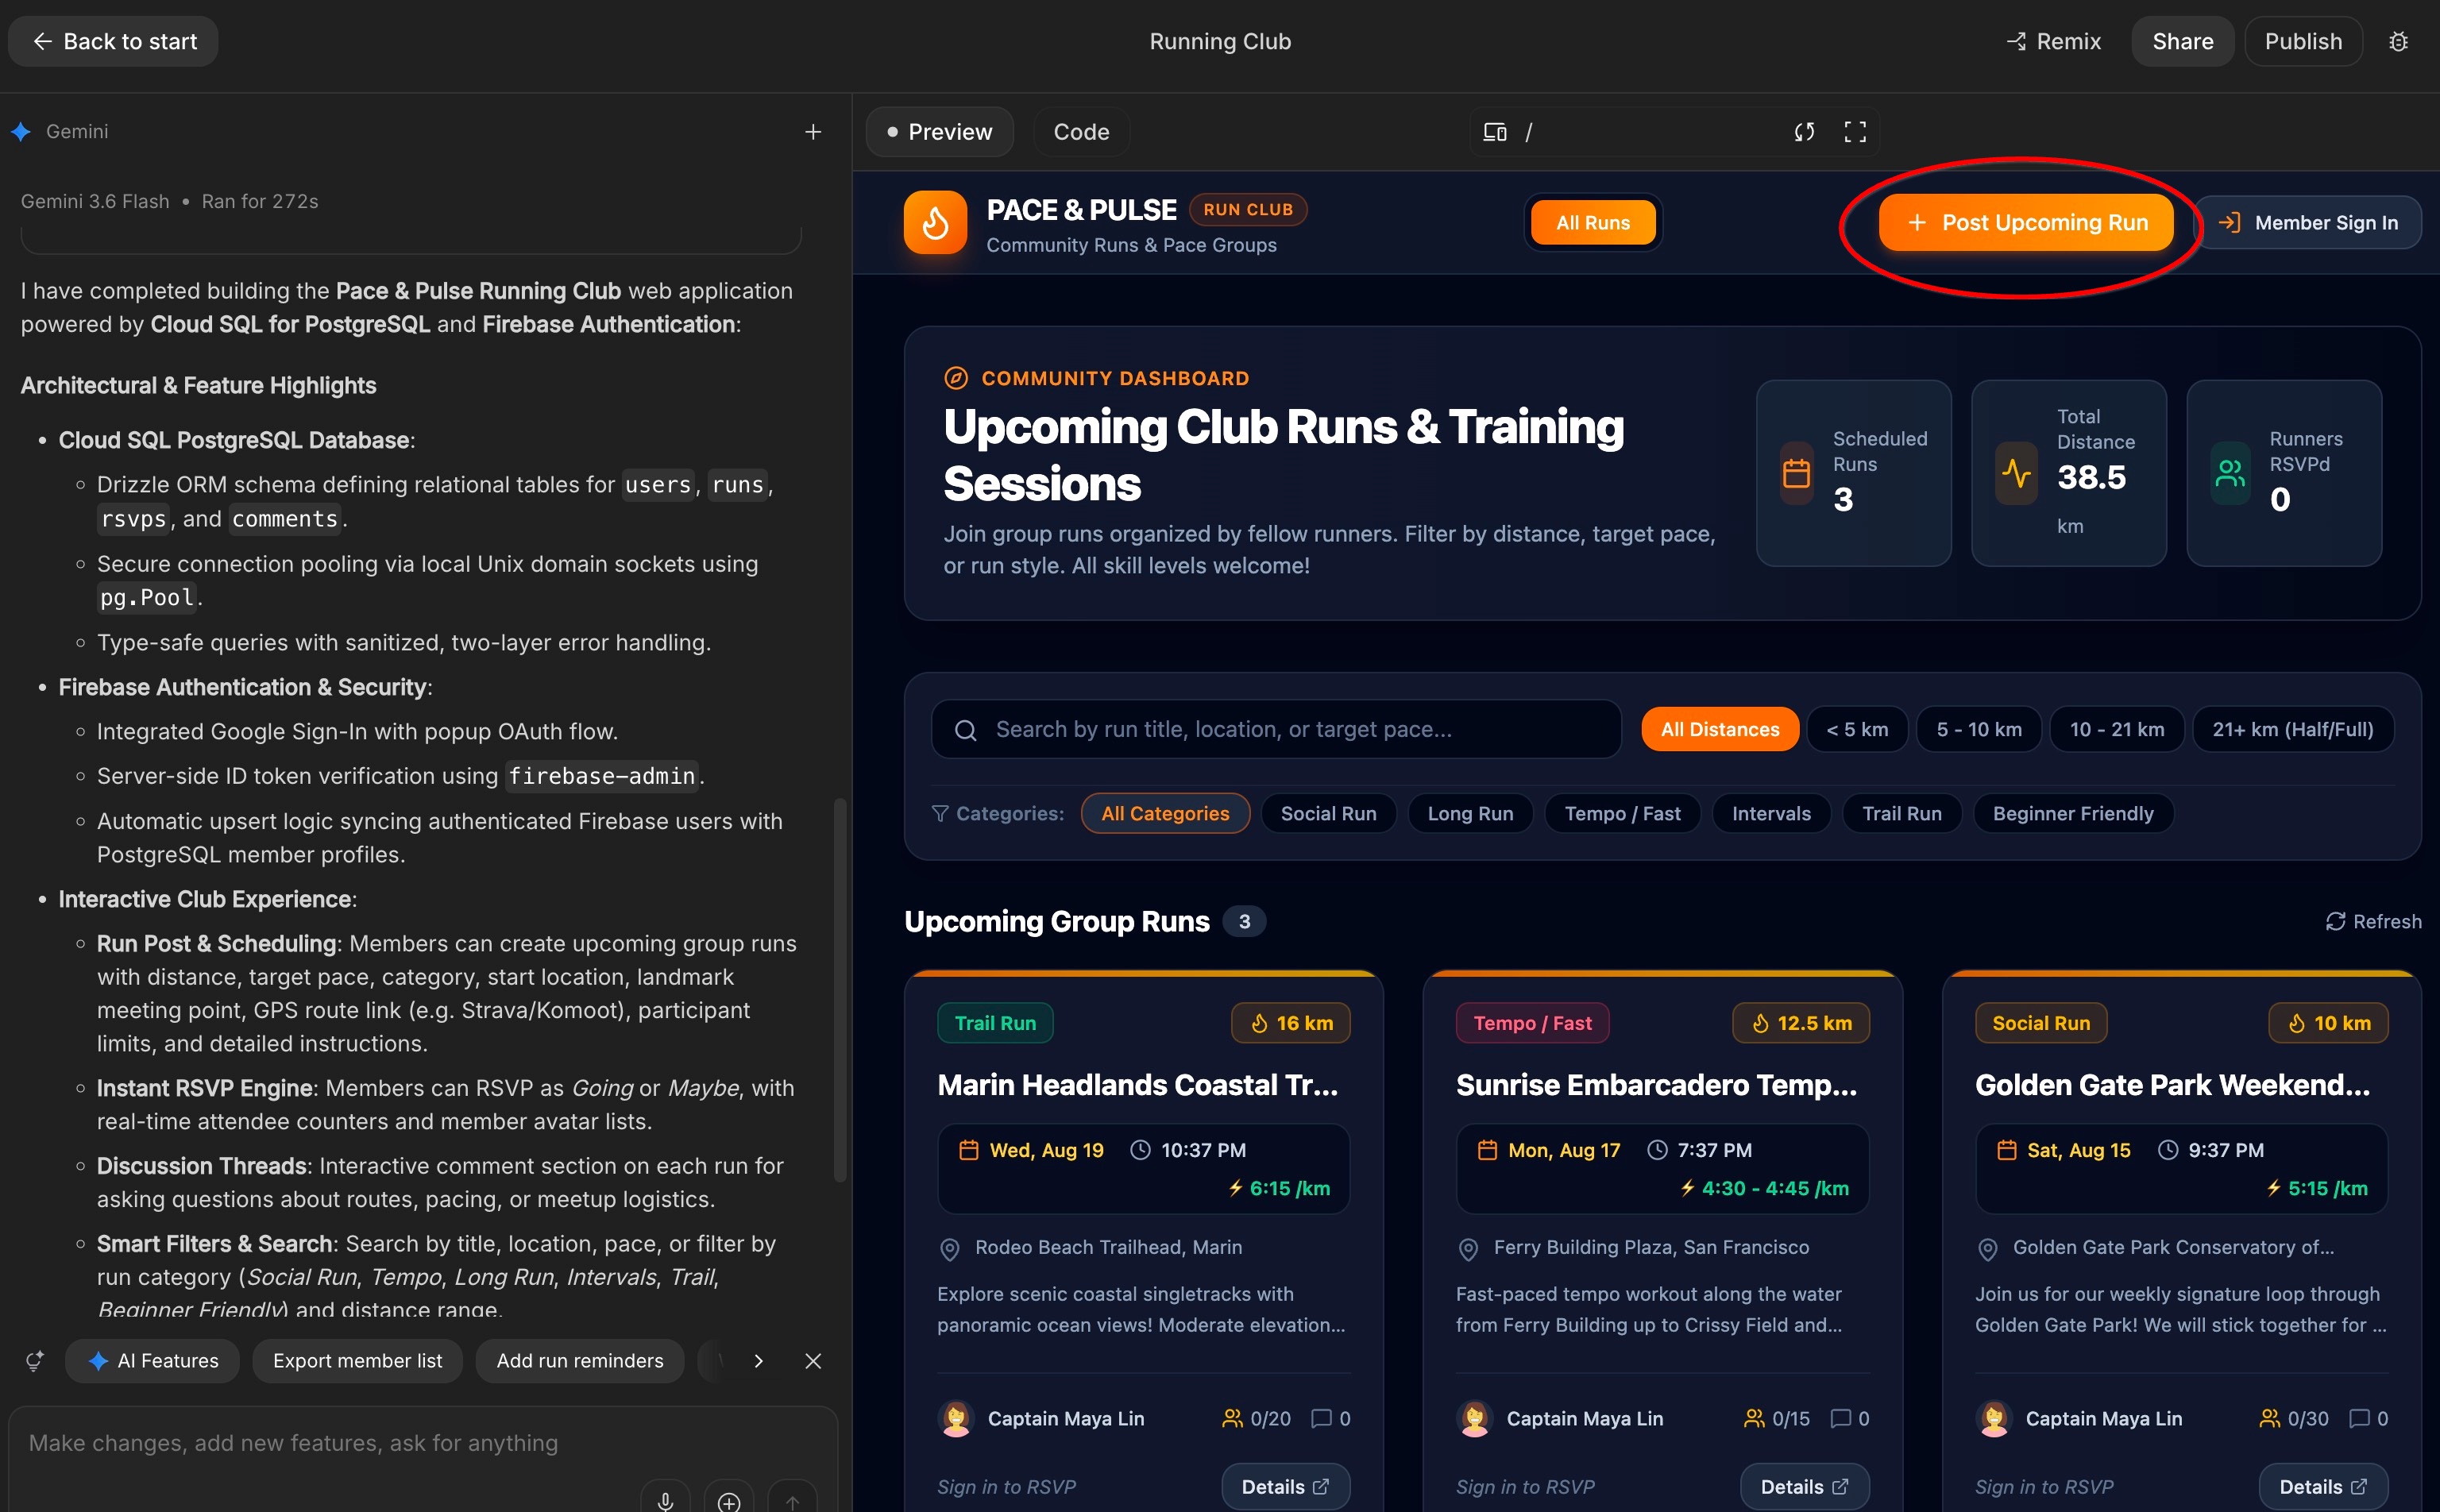
- رابط بصری را میسازد : هوش مصنوعی صفحات وبی را که روی صفحه میبینید، از جمله سربرگ، لیست اجراهای آینده، فرم ایجاد رویداد و بخش نظرات، ایجاد میکند.
تأیید اعتبار و اجرای ارسال پست
پس از اتمام تولید، برنامه جدید خود را در پنل Preview آزمایش کنید:
- در پنجره پیشنمایش، روی ورود اعضا کلیک کنید (یا روی دکمه «اجرای پستهای آینده » کلیک کنید که احراز هویت را فعال میکند).
- با استفاده از کادر محاورهای Firebase Auth، حساب گوگل خود را تأیید کنید.
- پس از ورود به سیستم، نام و آواتار پروفایل گوگل شما در نوار ناوبری ظاهر میشود و تنظیمات سرعت شما به طور خودکار مدیریت میشود.
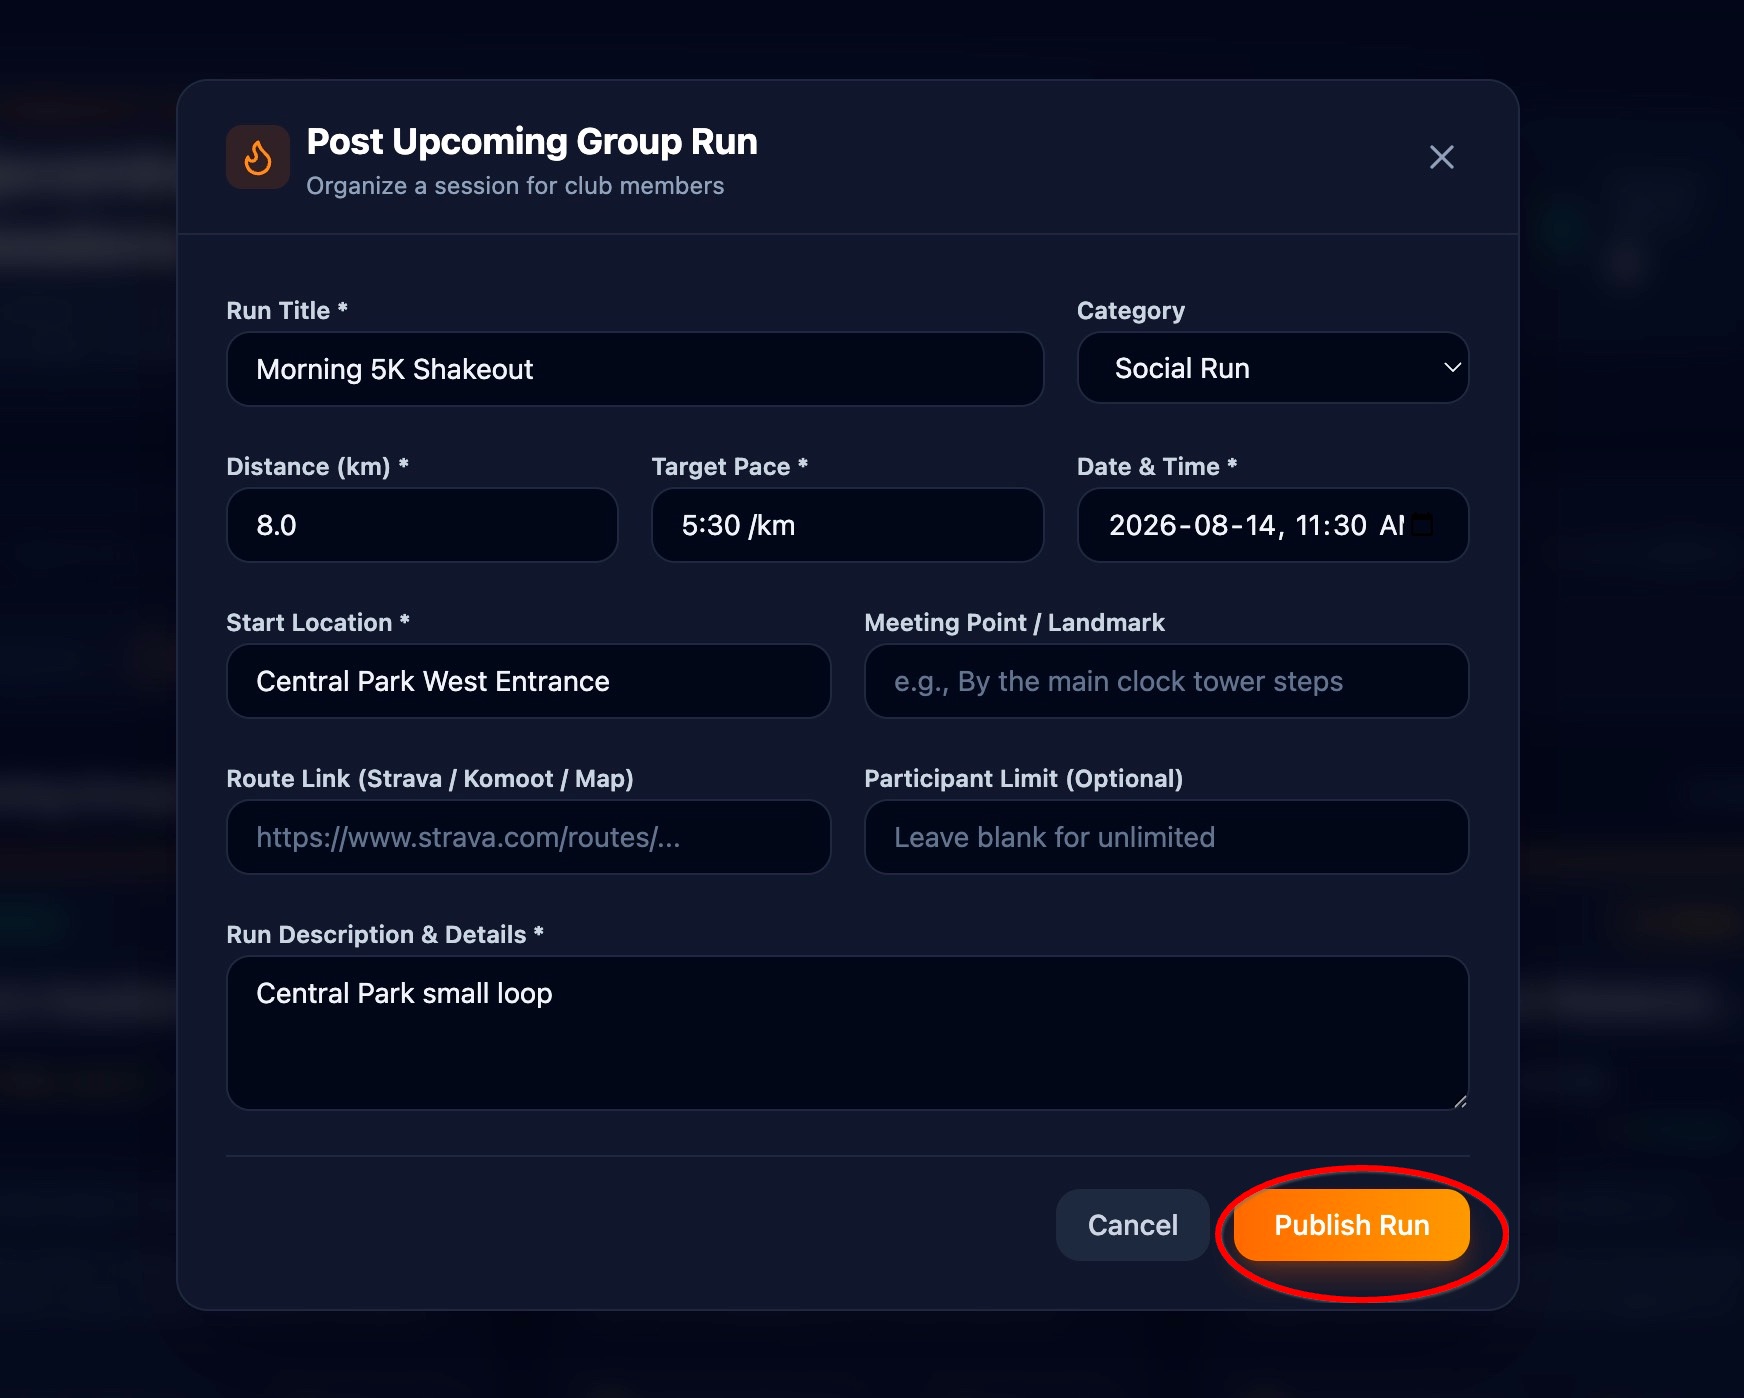
- در فرم «دوی بعدی پس از مسابقه»، عنوانی وارد کنید (مثلاً
Morning 5K Shakeout»). - تاریخ و زمان را انتخاب کنید و مکان جلسه (مانند
Central Park West Entrance) را وارد کنید. - روی PublishRun کلیک کنید.
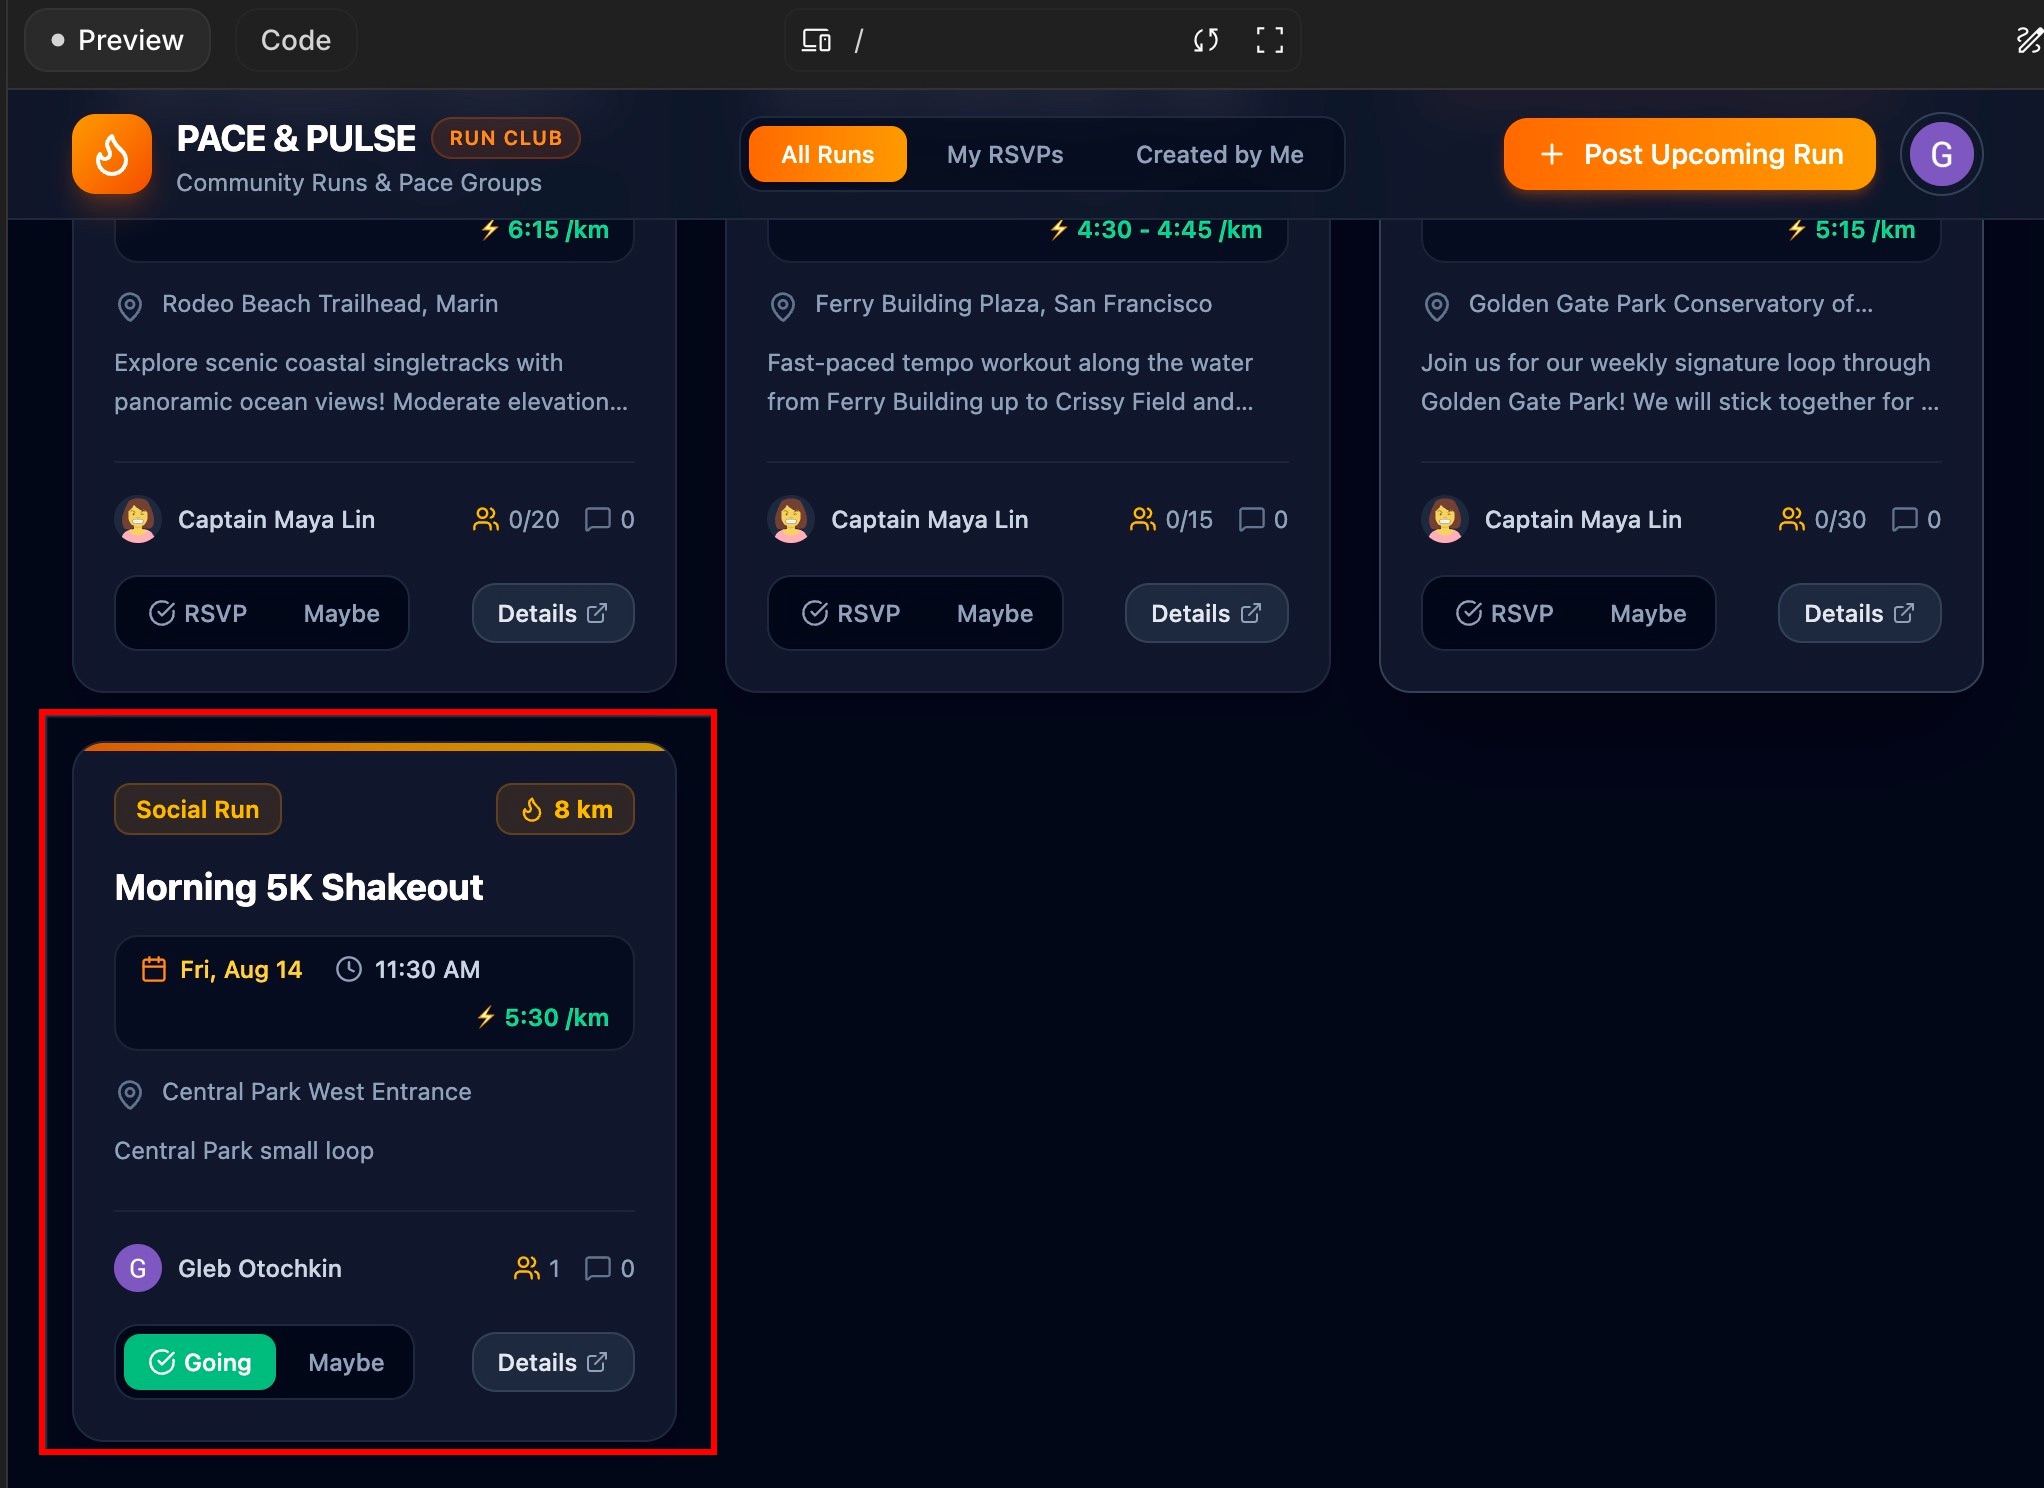
- تأیید کنید که دویدن جدید بلافاصله در فید دویدنهای آینده ظاهر میشود و نام پروفایل تأیید شده و نشان سرعت شما به عنوان برگزارکننده نمایش داده میشود.
- یک پیام کوتاه در بخش بحث اجرا ارسال کنید (مانند
Bringing extra water bottles!») و مطمئن شوید که در بخش نظرات نمایش داده میشود.
۴. یک کتابخانه مسیر بسازید
باشگاههای دویدن اغلب از مسیرهای محلی محبوب دوباره استفاده میکنند. به جای تایپ کردن مکرر اطلاعات یک مسیر، میتوانید به اعضا اجازه دهید مسیرهای مورد علاقه خود را در یک کاتالوگ ذخیره کنند و هر زمان که برنامه دویدن خود را تنظیم کردند، آنها را پیوست کنند.
از هوش مصنوعی بخواهید کتابخانه مسیر را اضافه کند
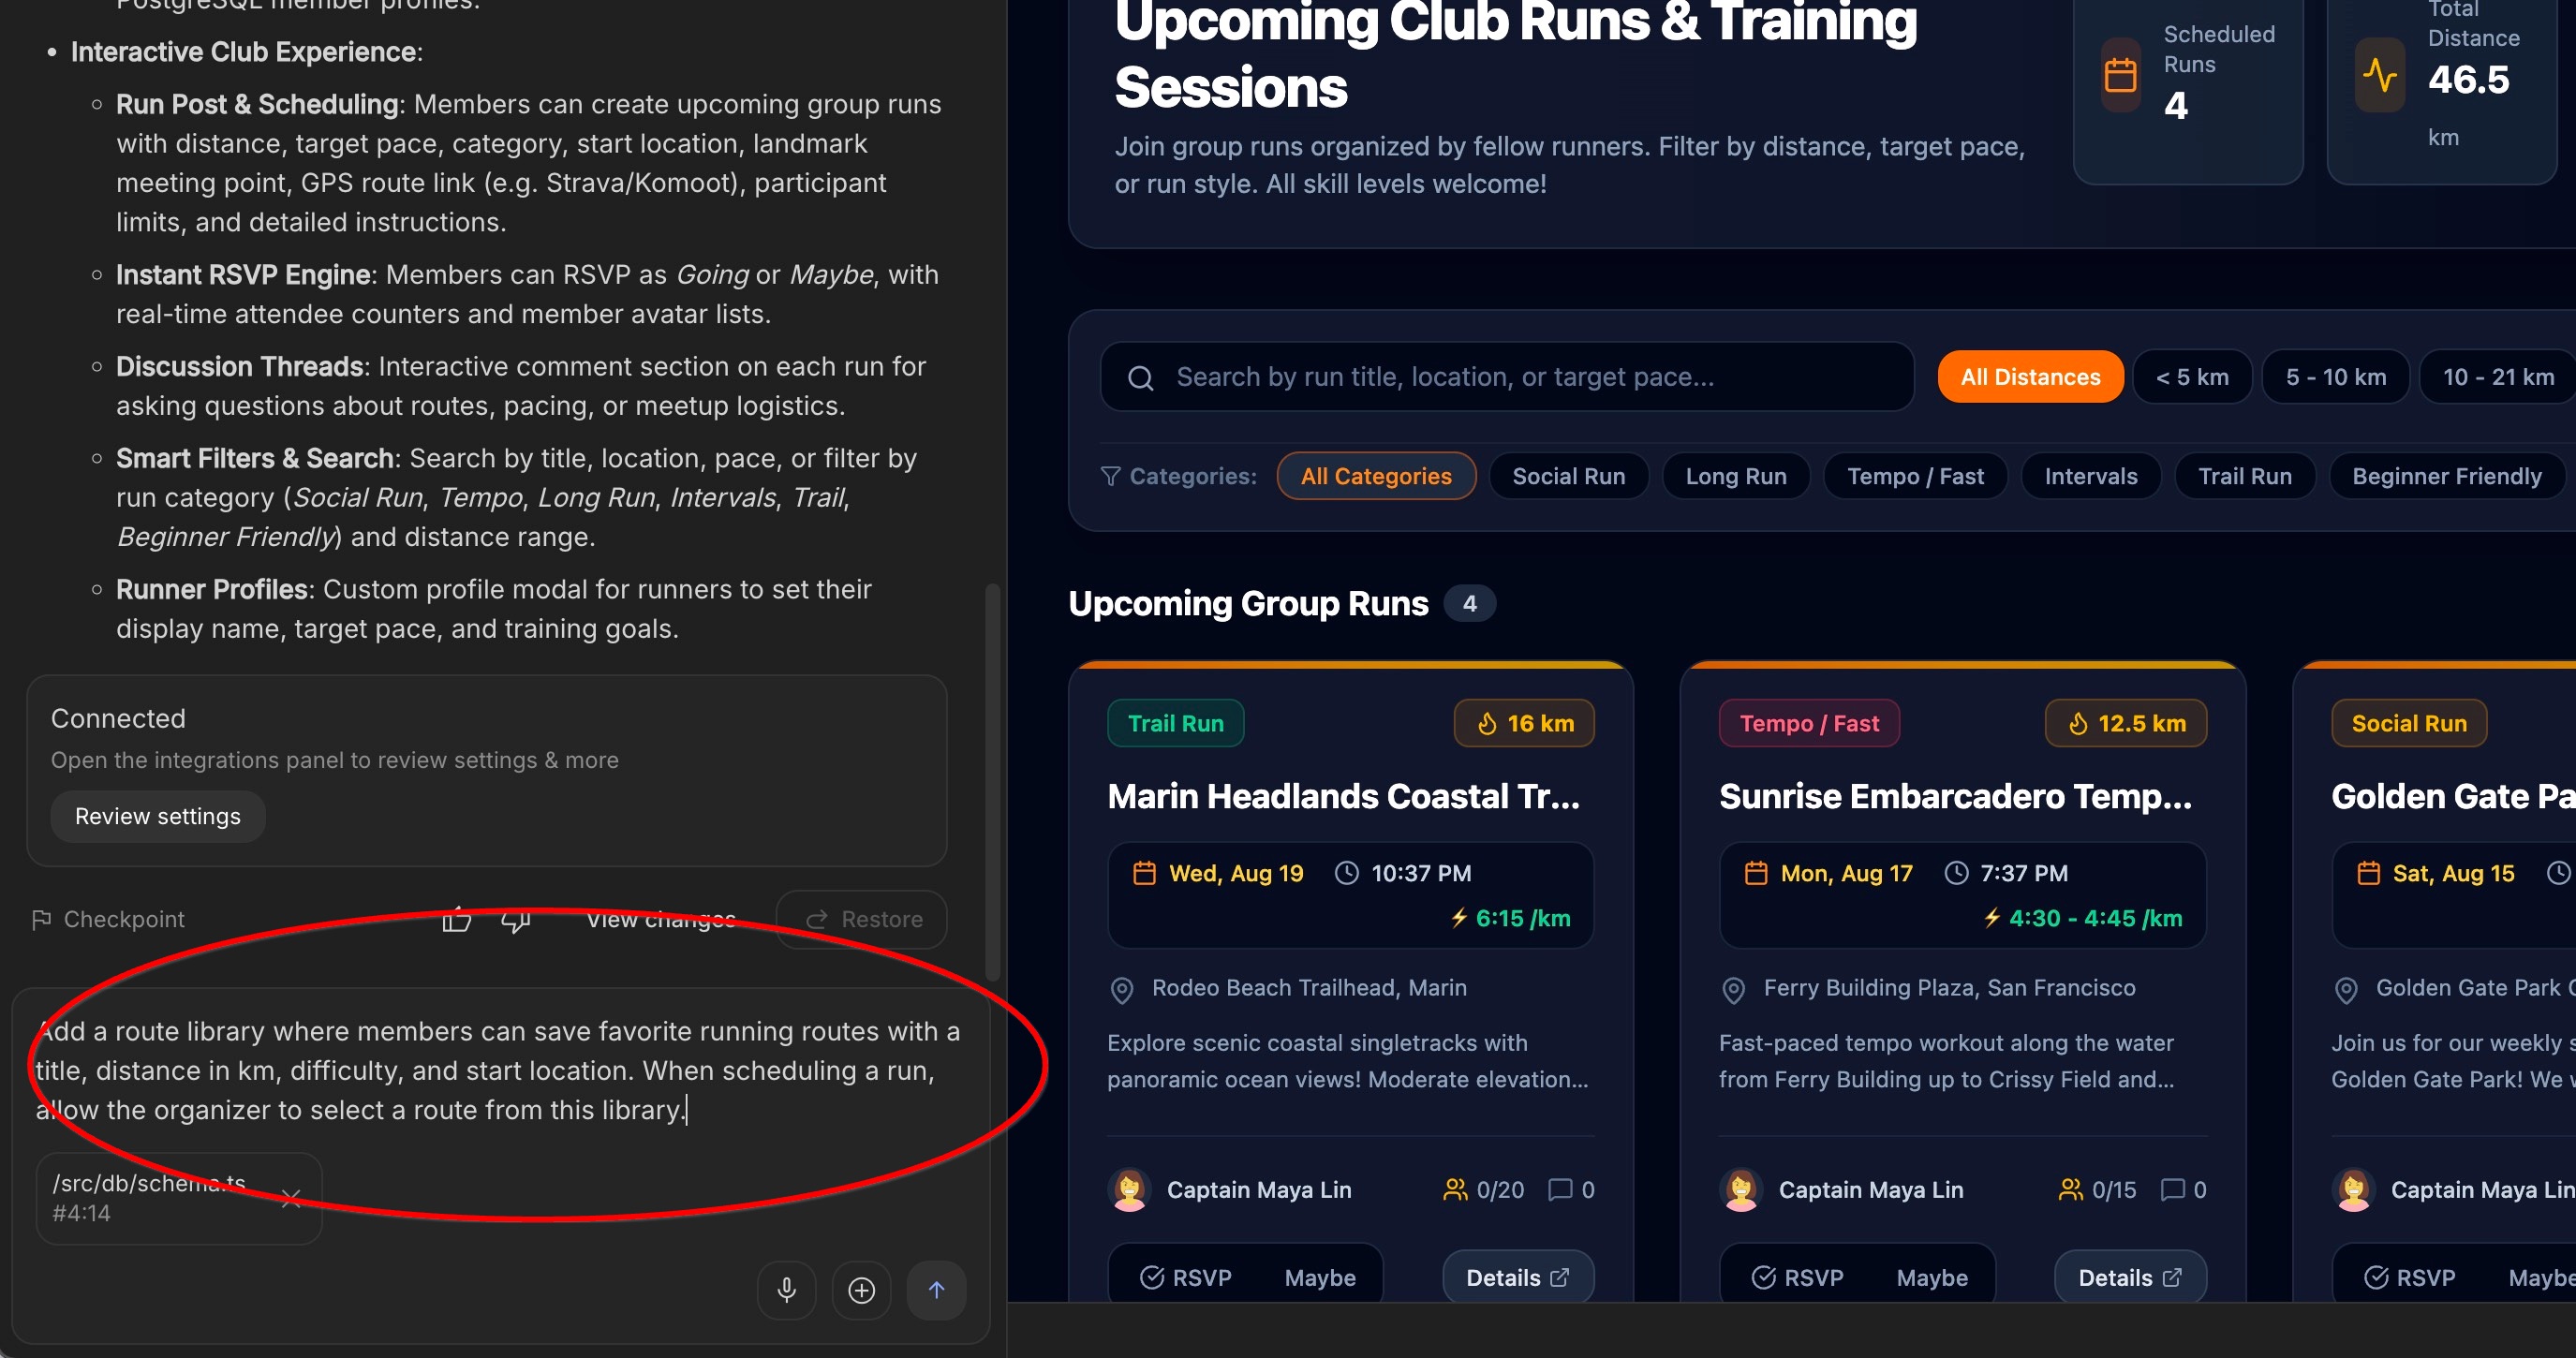
در کادر گفتگوی سریع، درخواست زیر را تایپ کرده و Enter را فشار دهید:
Add a route library where members can save favorite
running routes with atitle, distance in km, difficulty,
and start location. When scheduling a run, allow the
organizer to select a route from this library.
چگونه هوش مصنوعی مسیرها را به دویدن در پشت صحنه پیوند میدهد
برای عملی کردن این قابلیت، هوش مصنوعی به طور خودکار یک جدول ذخیرهسازی جدید برای مسیرها ایجاد میکند و آن را مستقیماً به جدول مسیرها متصل میکند. این اتصال همان چیزی است که به برنامه شما اجازه میدهد هر زمان که یک سازماندهنده مسیری را انتخاب میکند، به طور خودکار جزئیات مسافت و موقعیت مکانی را دریافت کند.
(باز هم، نیازی نیست به این کد دست بزنید - هوش مصنوعی ساختار پایگاه داده را برای شما بهروزرسانی میکند!)
کتابخانه مسیر جدید خود را در پیشنمایش آزمایش کنید
به محض اینکه هوش مصنوعی بهروزرسانی برنامه شما را تمام کرد، ویژگی مسیر جدید را در پنجره پیشنمایش زنده امتحان کنید:
- در نوار ناوبری برنامه، روی برگه «کتابخانه مسیر» کلیک کنید. اگر چنین برگهای وجود ندارد، پایین پیشنمایش زنده را بررسی کنید - ممکن است از شما بخواهد دکمه «ذخیره» را برای بهروزرسانی پیشنمایش فشار دهید. یا اگر کمکی نکرد، سعی کنید در پنجره چت با هوش مصنوعی تعامل داشته باشید و بپرسید که کتابخانه مسیرهای شما کجاست.
- روی ذخیره مسیر جدید (یا افزودن مسیر ) کلیک کنید و برخی از جزئیات نمونه را پر کنید:
- عنوان مسیر :
Riverfront Trail Loop - مسافت :
8.5 km - سختی :
Moderate - مکان شروع :
Waterfront Pier 4
- عنوان مسیر :
- روی ذخیره در کتابخانه کلیک کنید.
- اکنون، با کلیک کردن روی دکمهی «زمانبندی اجرا» مستقیماً روی کارت مسیر جدید خود، یک اجرا را با استفاده از این مسیر برنامهریزی کنید.
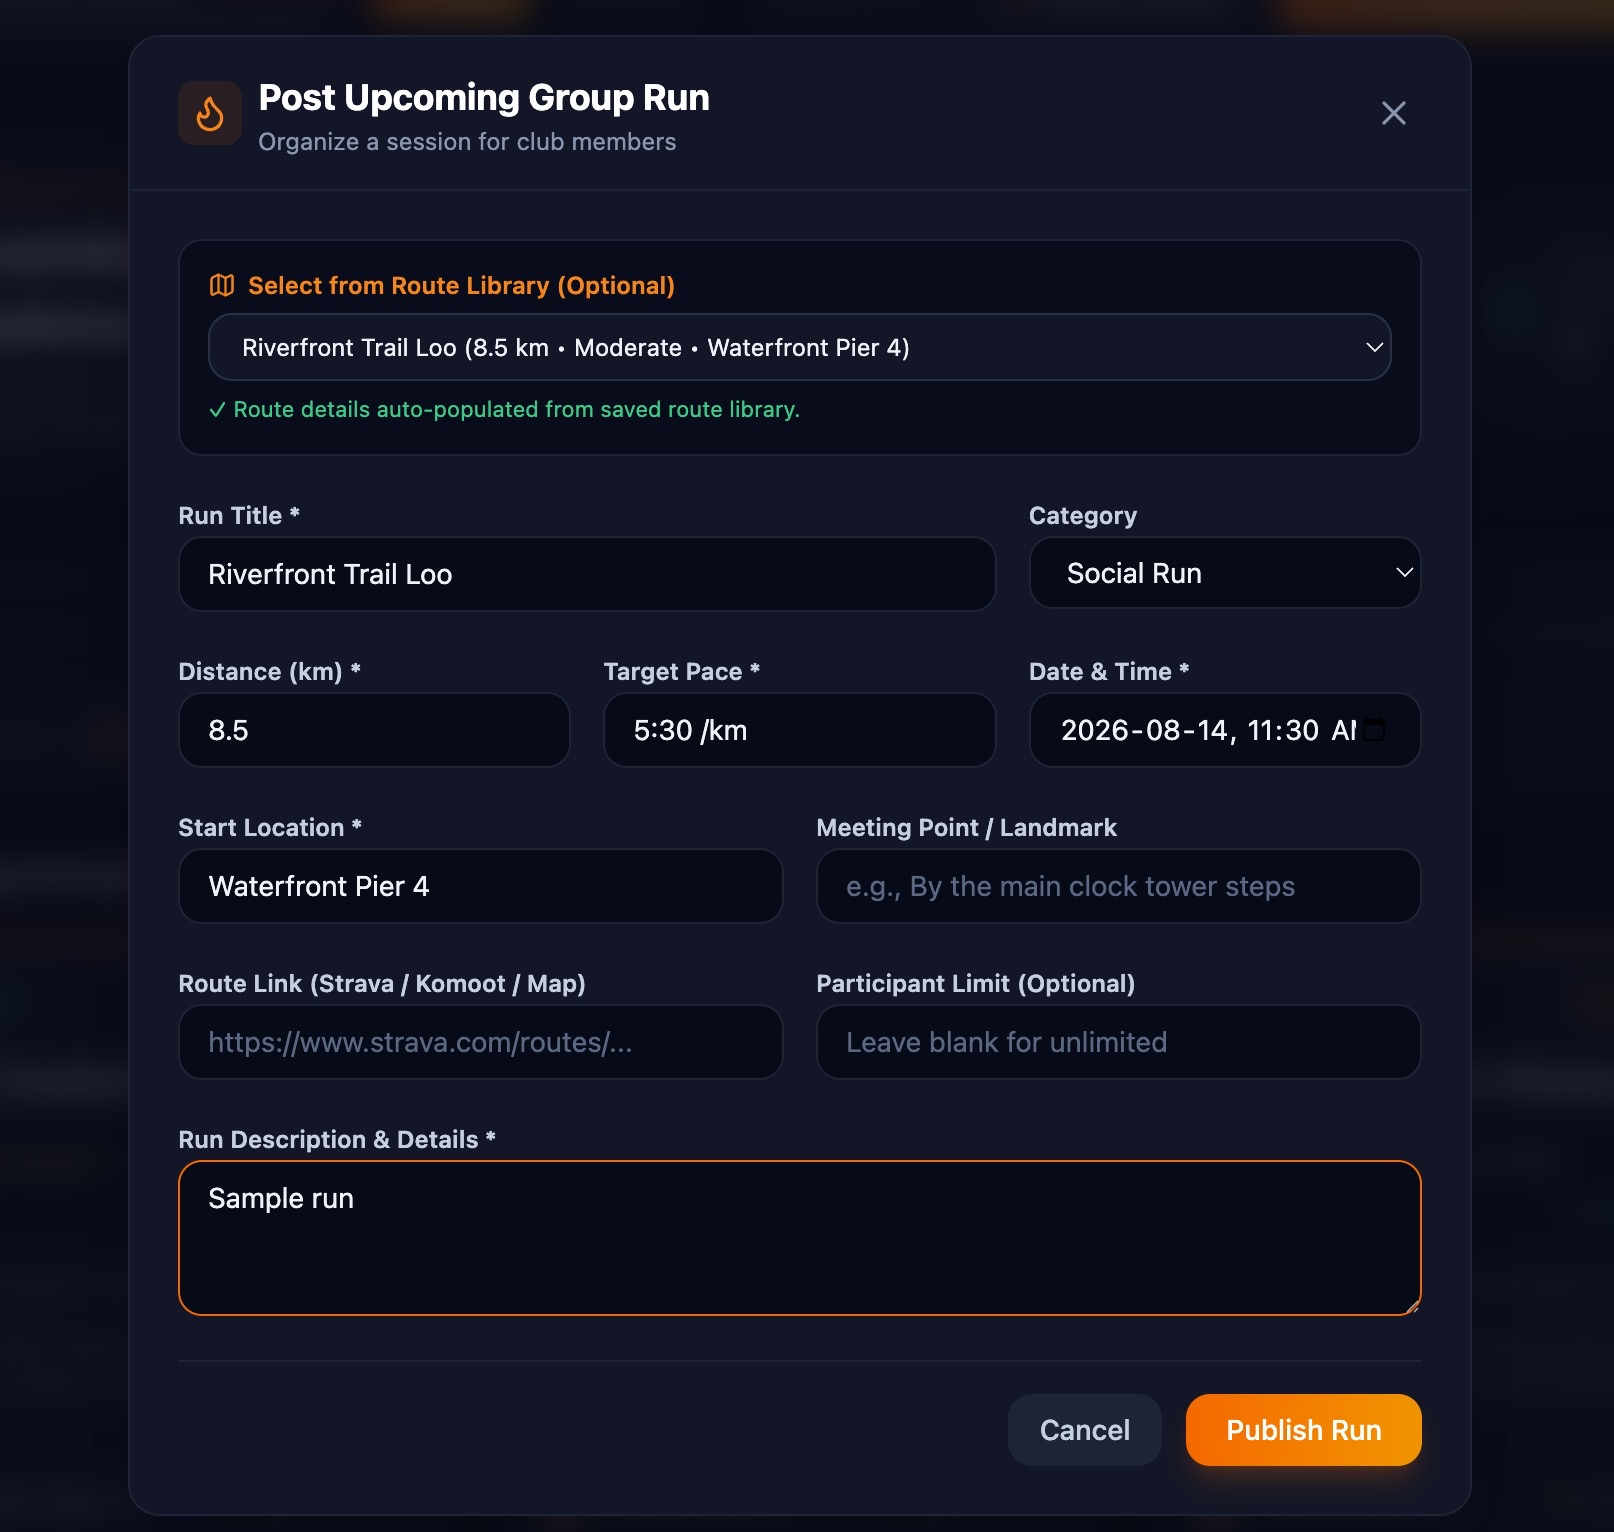
- توجه کنید که چگونه جزئیات مسافت، سختی و مکان به طور خودکار برای شما پر میشوند!
- روی انتشار اجرا کلیک کنید و تأیید کنید که اجرای گروهی جدید شما در فید اصلی ظاهر میشود.
۵. از دعوتنامهها و فراخوانهای اعضا استفاده کنید
اپلیکیشنهای اجتماعی با مشارکت پیشرفت میکنند! میتوانید به دوندگان اجازه دهید ببینند چه کسی در مسابقهی دوی پیش رو شرکت میکند، با یک کلیک ثبتنام کنید و لینک دعوت را با دوستان خود به اشتراک بگذارید.
از هوش مصنوعی بخواهید که RSVP و دعوتنامهها را اضافه کند
در کادر گفتگوی سریع، درخواست زیر را تایپ کرده و Enter را فشار دهید:
Allow registered members to RSVP ("Join Run") to any upcoming run.
Show the list of attending runners on each run card, display an
attendee counter, and add a copyable invite link.
چگونه هوش مصنوعی شرکتکنندگان را در پشت صحنه ردیابی میکند
برای پیگیری اینکه کدام دوندهها در هر مسابقه شرکت میکنند، هوش مصنوعی به طور خودکار یک جدول rsvps در پایگاه داده شما ایجاد میکند. این را مانند یک برگه ثبت نام دیجیتالی در نظر بگیرید که نام یک دونده را به یک رویداد خاص مرتبط میکند.
(نیازی به نوشتن یا ویرایش این کد نیست—هوش مصنوعی این برگه ثبت نام را به طور خودکار در پایگاه داده شما مدیریت میکند!)
RSVP ها و دعوت نامه ها را در پیش نمایش آزمایش کنید
پس از اتمام بهروزرسانی برنامه توسط هوش مصنوعی، ویژگیهای جدید RSVP را در پنجره پیشنمایش زنده آزمایش کنید:
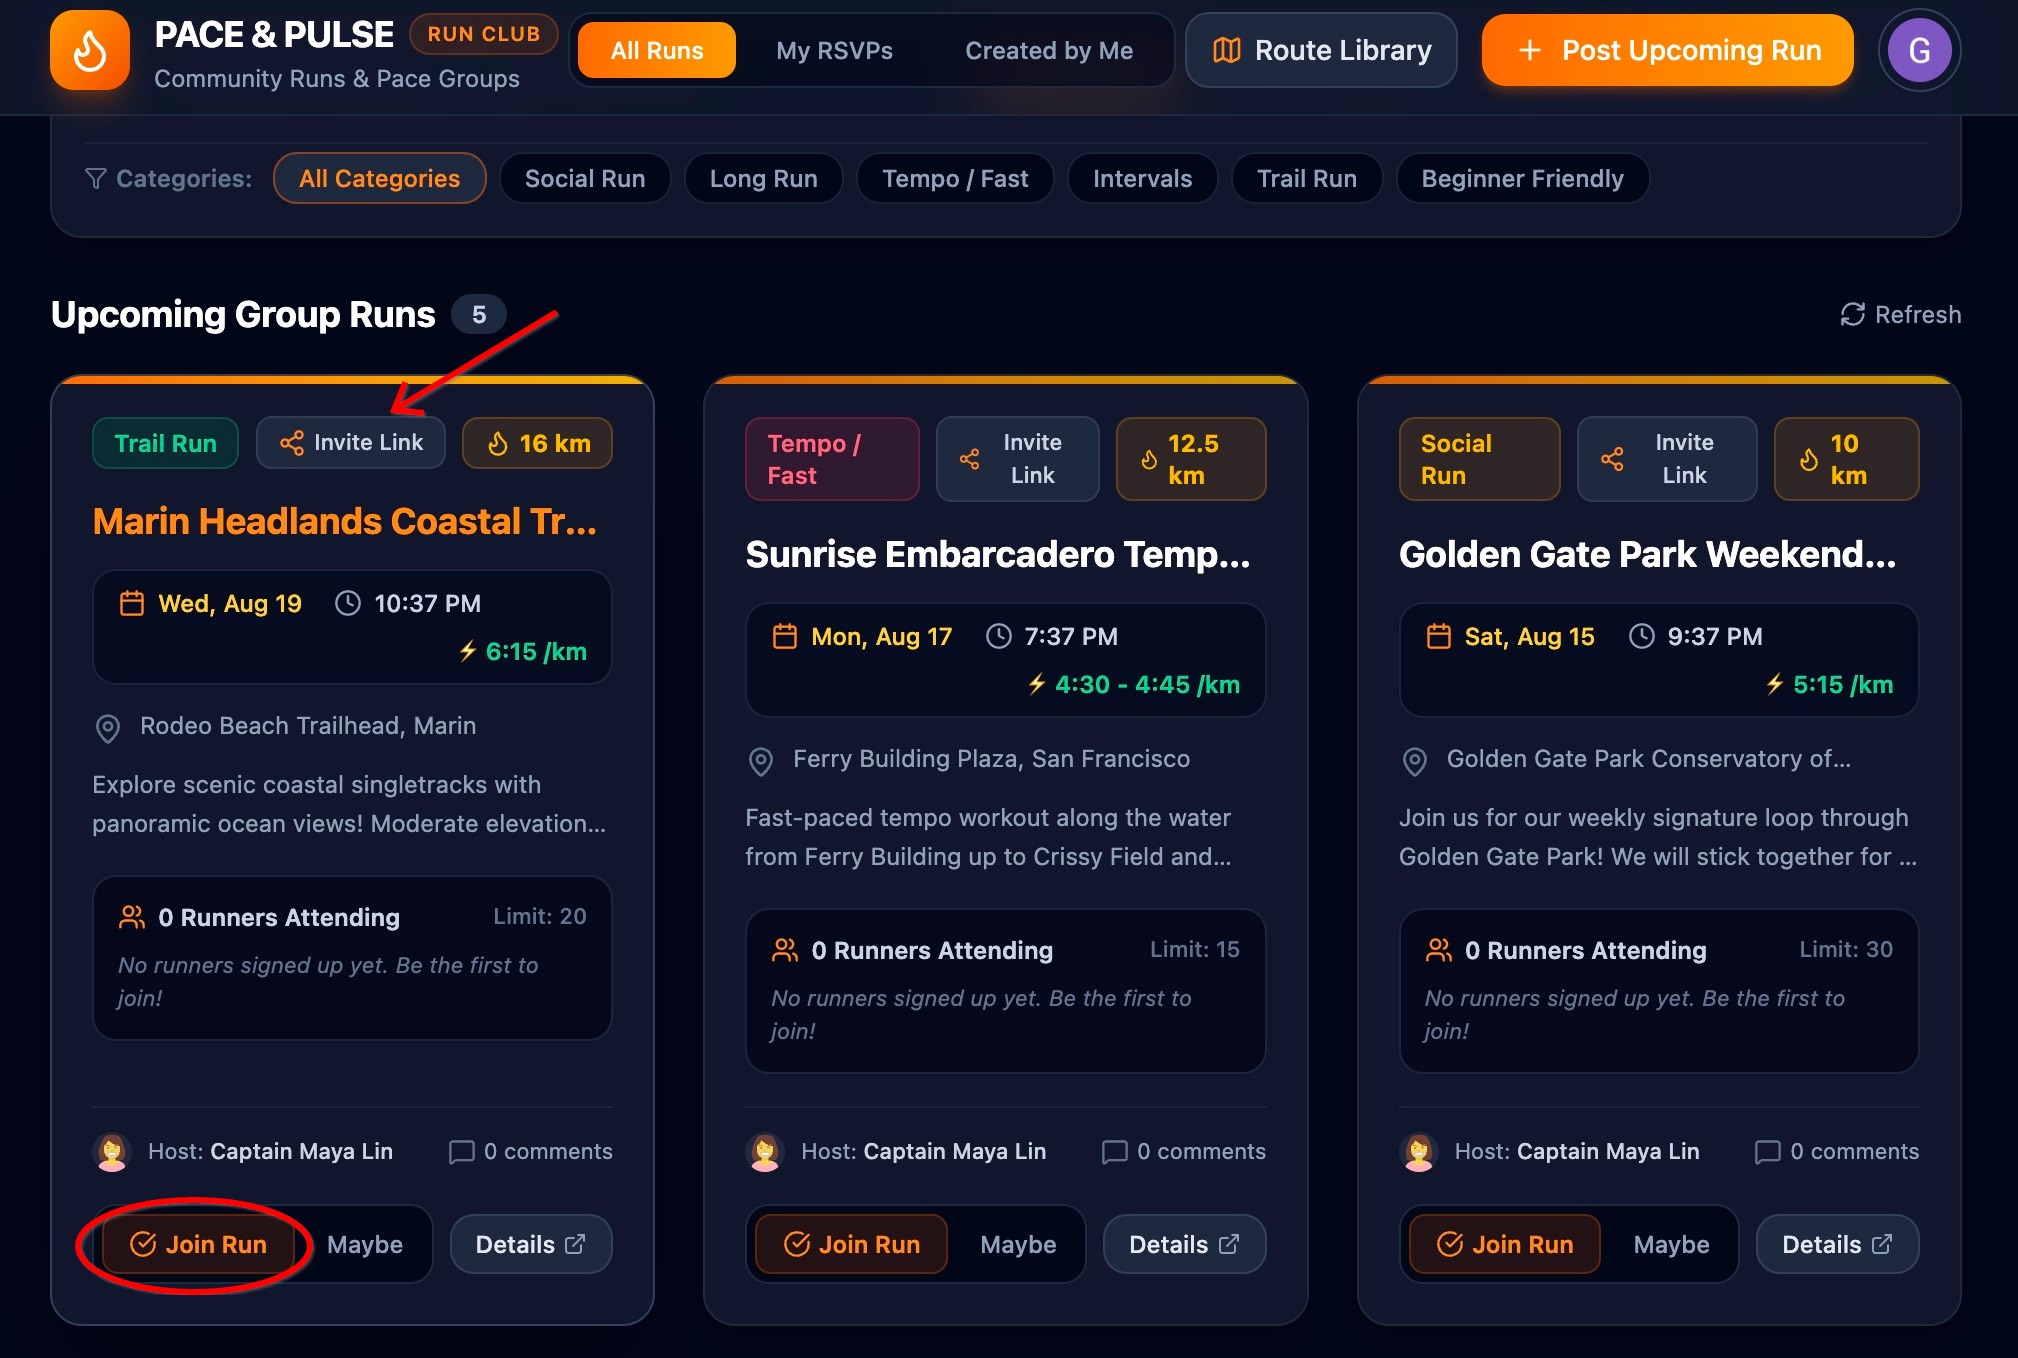
- در پنجره پیشنمایش، پخش آینده را در فید خانگی خود پیدا کنید.
- روی دکمهی «عضویت در مسابقه» (یا «پاسخگویی ») کلیک کنید.
- تأیید کنید که نام و آواتار شما در بخش «شرکتکنندگان» نمایش داده شود و شمارنده شرکتکنندگان ۱ واحد افزایش یابد.
- روی کپی کردن لینک دعوت کلیک کنید و مطمئن شوید که لینک قابل اشتراکگذاری ایجاد شده است.
۶. تست پایداری دادهها و مقیاسپذیری SQL ابری تا صفر
هنگام ساخت یک برنامه، مهمترین چیز این است که بدانید اطلاعات انجمن شما ایمن است. اگر مرورگر خود را رفرش کنید، تب را ببندید یا رایانه خود را خاموش کنید، میخواهید تمام مسیرهای ذخیره شده، پاسخهای مثبت (RSVP) و بحثهای شما هنگام بازگشت همچنان وجود داشته باشند.
در این مرحله، شما بررسی خواهید کرد که دادههای شما به طور ایمن در پایگاه داده Cloud SQL شما ذخیره شدهاند و یاد خواهید گرفت که چگونه Google Cloud در زمانی که برنامه شما بیصدا است، در مصرف انرژی و هزینهها صرفهجویی میکند.
بهروزرسانی برنامه خود را آزمایش کنید
- روی دکمهی Reload در پنجرهی پیشنمایش AI Studio کلیک کنید (یا تب مرورگر خود را رفرش کنید).
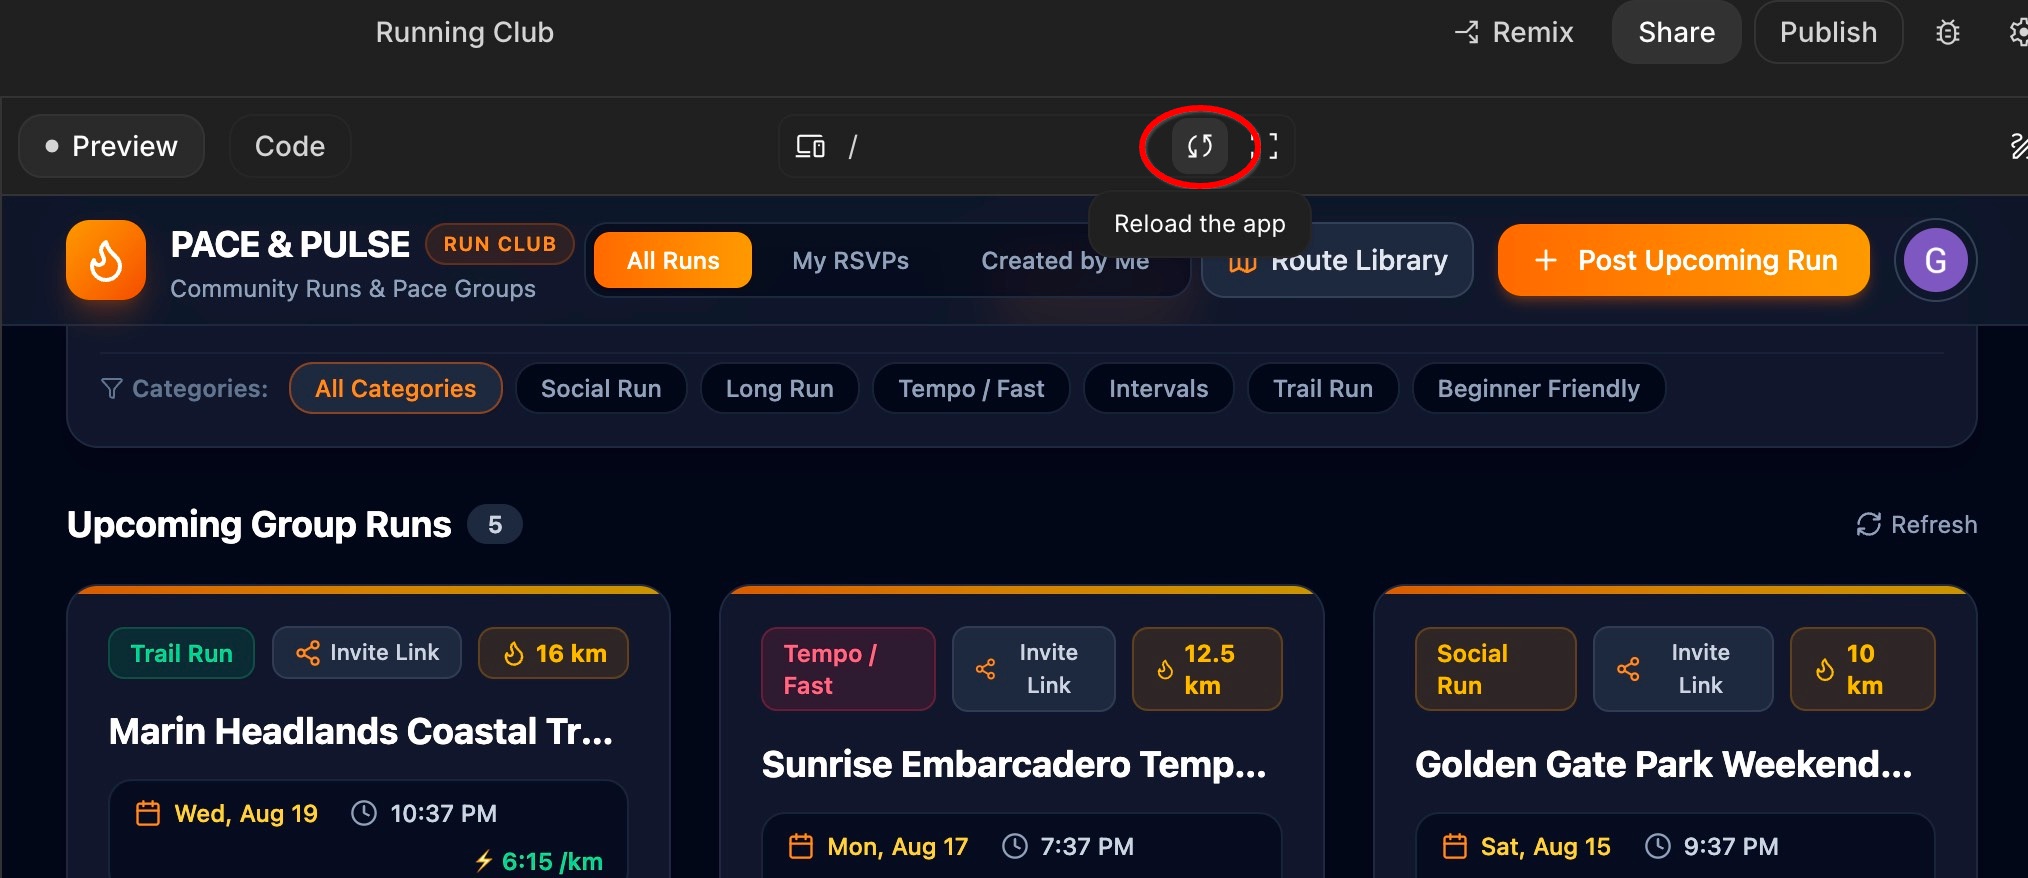
- به برنامه خود در پیشنمایش نگاه کنید: توجه کنید که هر چیزی که ایجاد کردهاید - نمایه عضویت، مسیرهای ذخیره شده، برنامههای زمانبندی شده، RSVPها و نظرات - هنوز در همان جایی که رها کردهاید، قرار دارد!
- برنامه شما فقط اطلاعات را به طور موقت روی صفحه نمایش شما ذخیره نمیکرد؛ بلکه آن را به طور ایمن در پایگاه داده Cloud SQL شما ذخیره میکرد.
چگونه Cloud SQL در مصرف انرژی و هزینه صرفهجویی میکند ("مقیاسپذیری به صفر")
چه اتفاقی میافتد وقتی کسی نیمهشب از اپلیکیشن باشگاه دویدن شما استفاده نمیکند؟
- خواب خودکار ("مقیاس به صفر") : وقتی کسی از برنامه بازدید نمیکند یا برای اجرا ثبتنام نمیکند، پایگاه داده به طور خودکار خود را متوقف میکند تا منابع را حفظ کند.
- بیدارباش فوری : به محض اینکه یک دونده برنامه را باز کند یا روی لینک دعوت کلیک کند، پایگاه داده فوراً با تمام اطلاعات ذخیره شده شما آماده استفاده میشود.
- هزینه بیکاری صفر : از آنجا که در حالت غیرفعال به حالت خواب میرود، وقتی برنامه بیصدا است، از منابع محاسباتی استفاده نمیکنید.
۷. انتشار و استقرار در Cloud Run
حالا که اپلیکیشن Running Club شما ساخته و در پیشنمایش آزمایش شده است، وقت آن رسیده که آن را با جامعه خود به اشتراک بگذارید! نیازی به خرید میزبانی وب یا پیکربندی سرور ندارید—میتوانید اپلیکیشن خود را تنها با یک کلیک به صورت زنده در اینترنت راهاندازی کنید.
برنامه خود را به صورت زنده در وب منتشر کنید
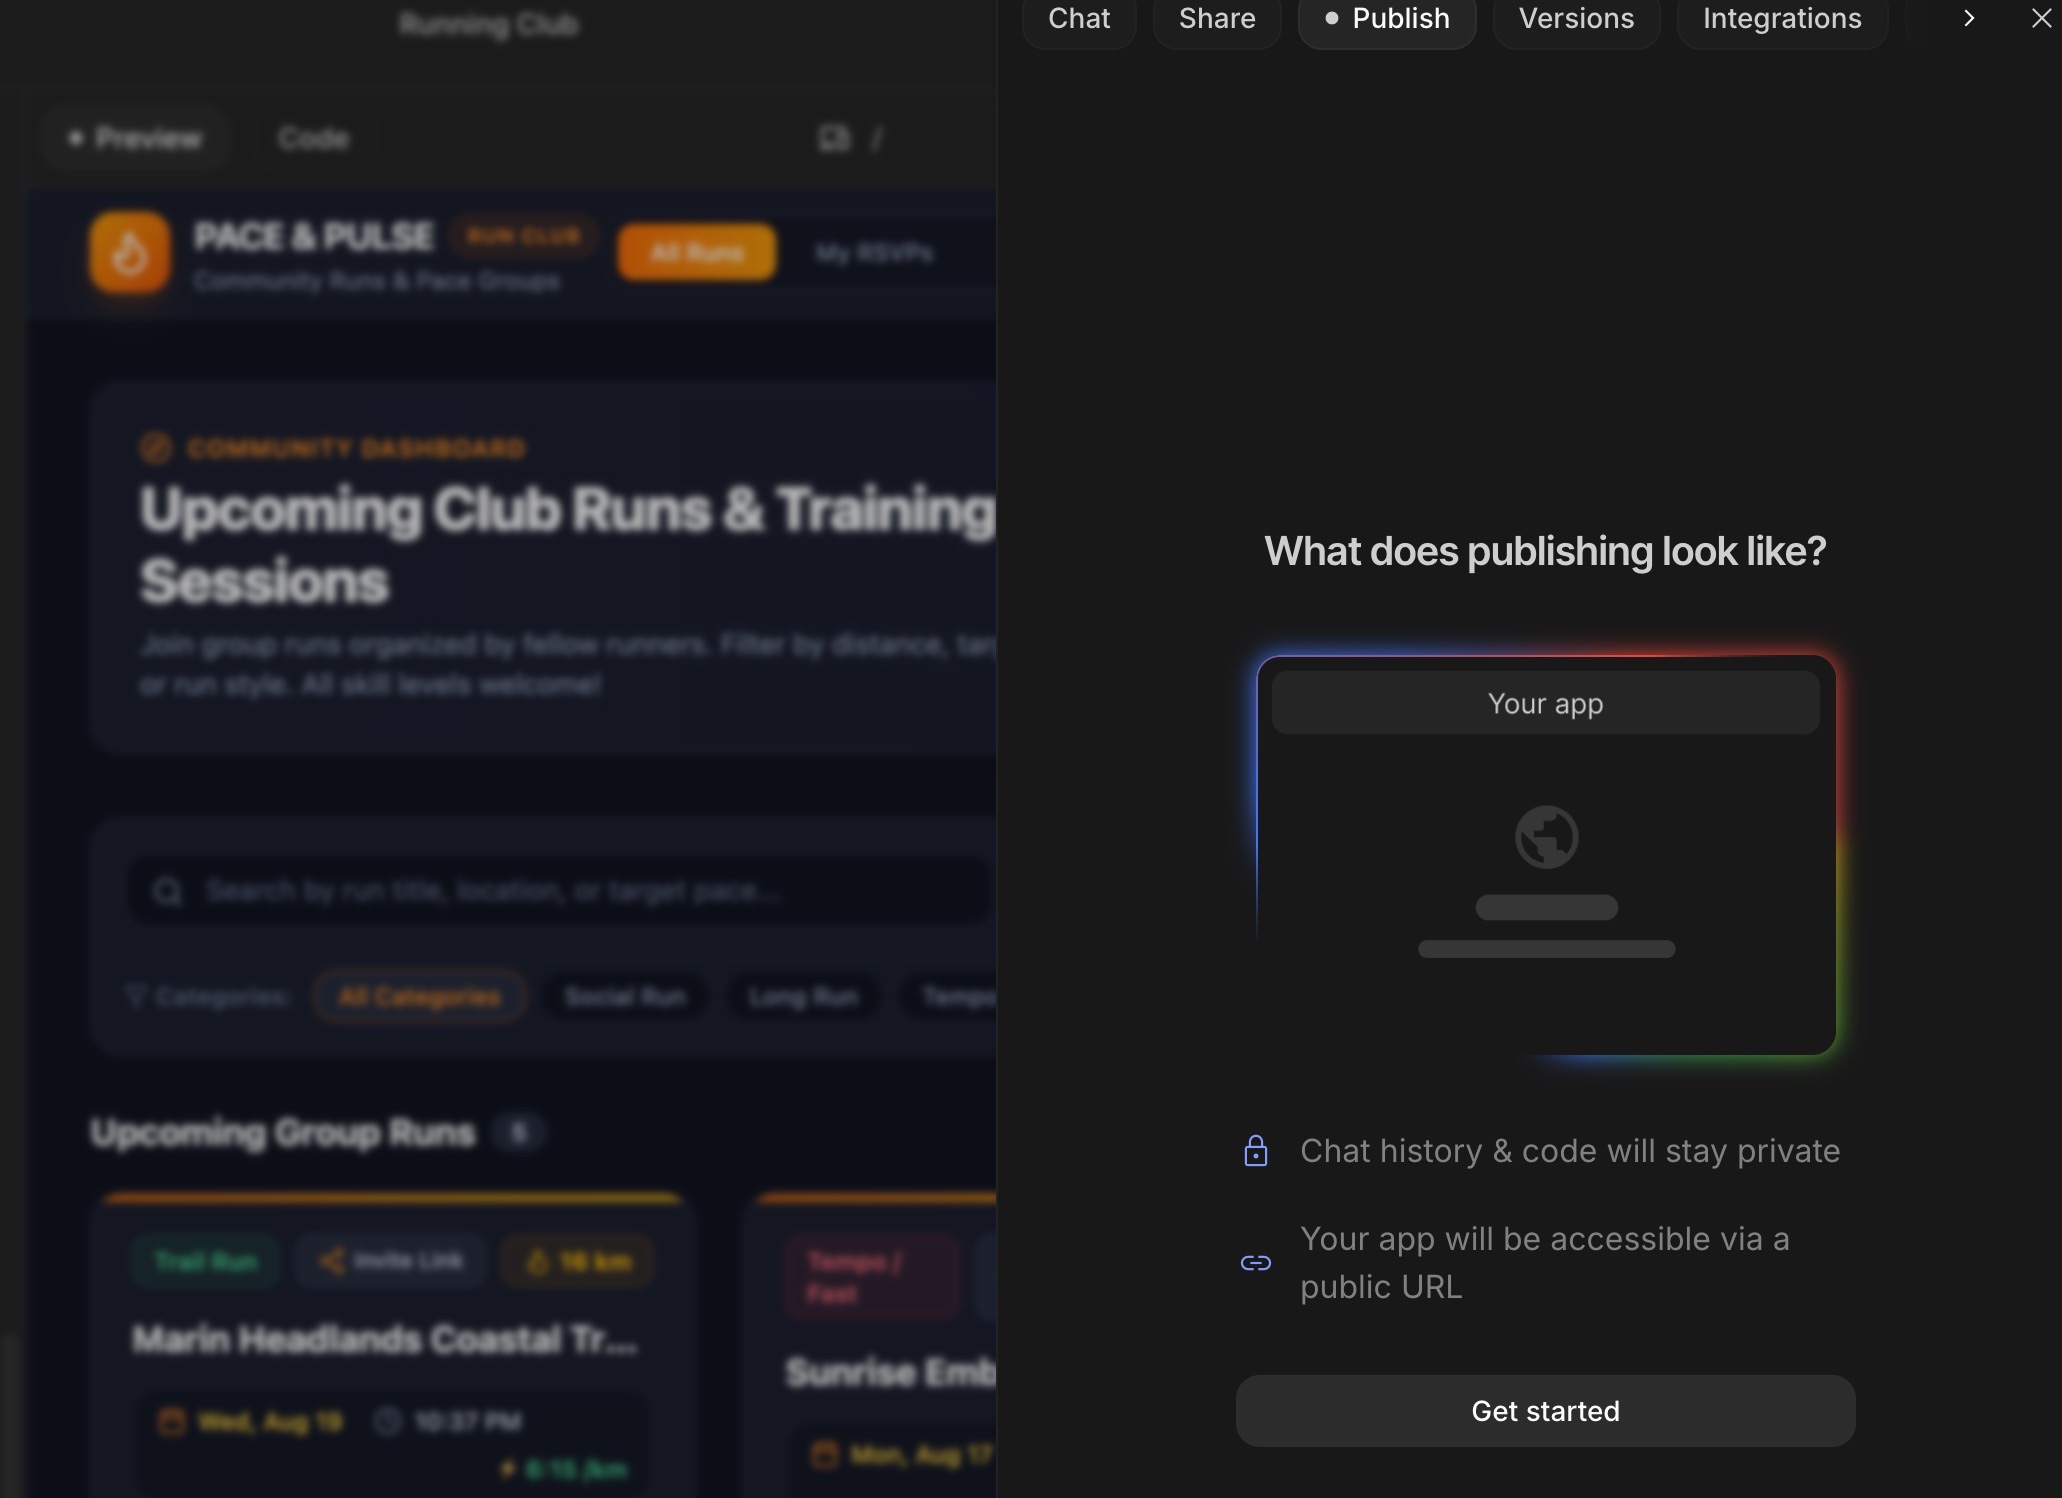
- در گوشه سمت راست بالای Google AI Studio، روی دکمه Publish کلیک کنید.
- یک پنجره خلاصه ظاهر میشود که جزئیات را تأیید میکند:
- میزبانی : میزبانی و استقرار در Google Cloud Run.
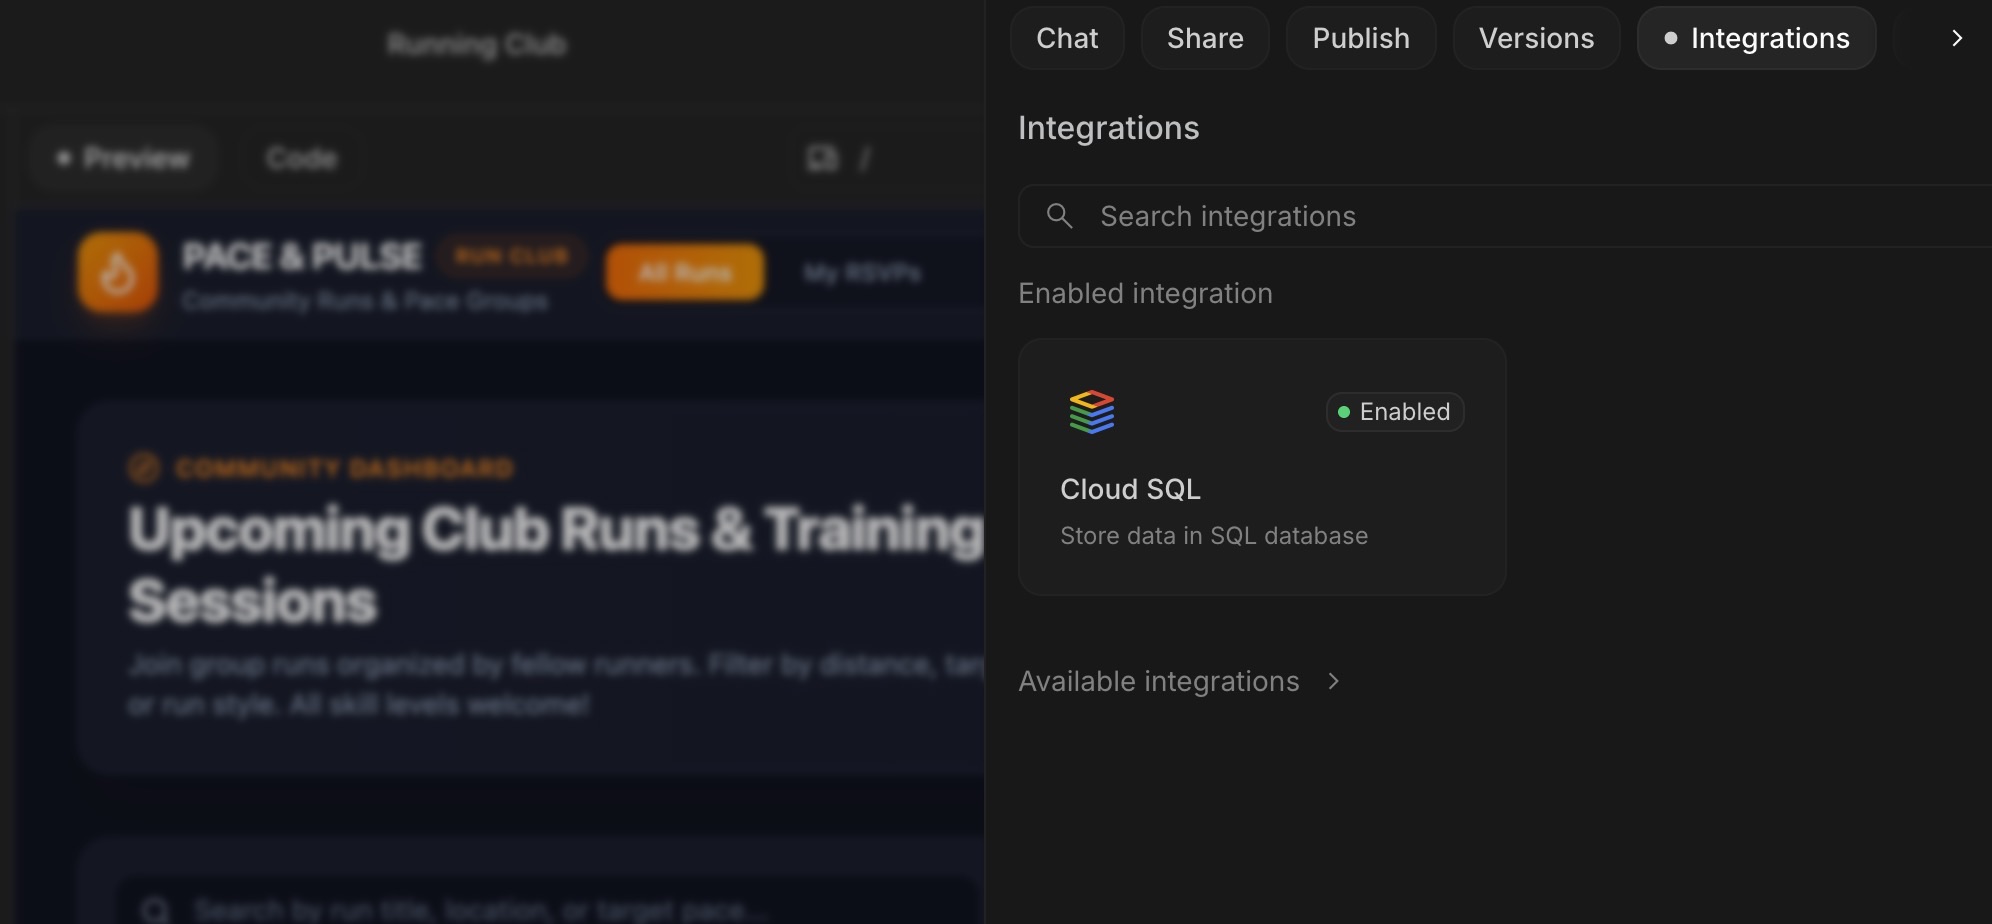
- سرویسهای متصل : ورود به سیستم گوگل و پایگاه داده ابری SQL شما.
- میزبانی : میزبانی و استقرار در Google Cloud Run.
- برای راهاندازی برنامه خود، روی انتشار کلیک کنید.
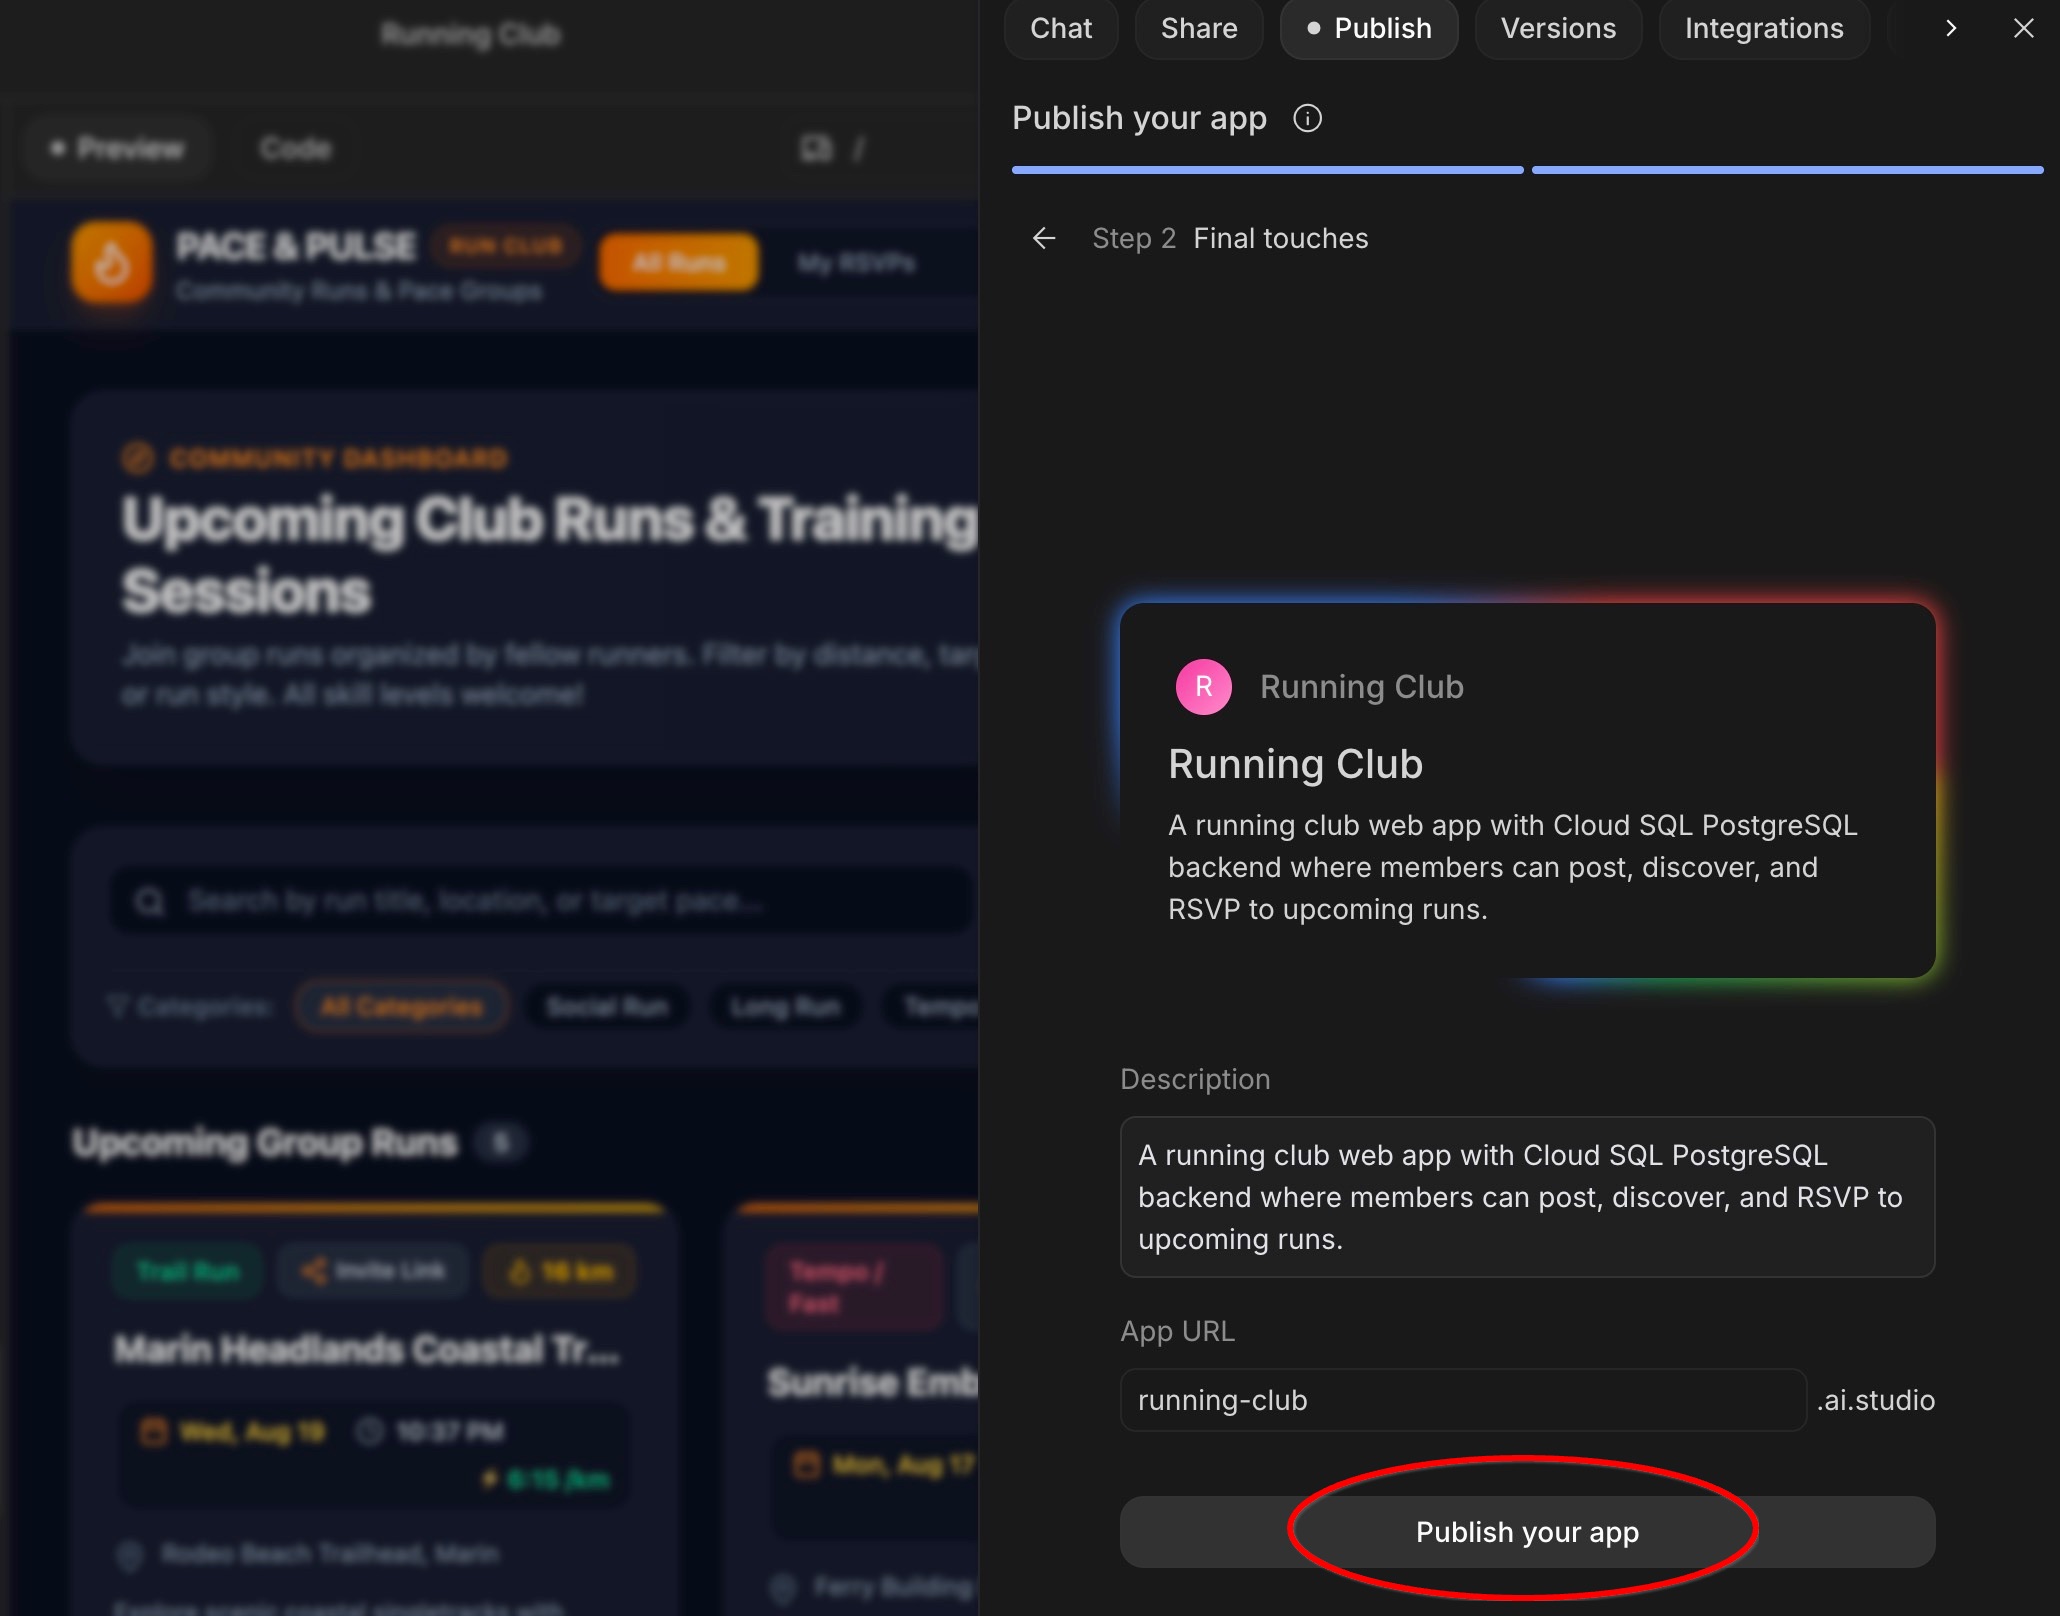
برنامه زنده خود را باز کنید و به اشتراک بگذارید
- وقتی انتشار کامل شد، Google AI Studio آدرس وب زنده شما را به همراه یک کد QR ارائه میدهد.
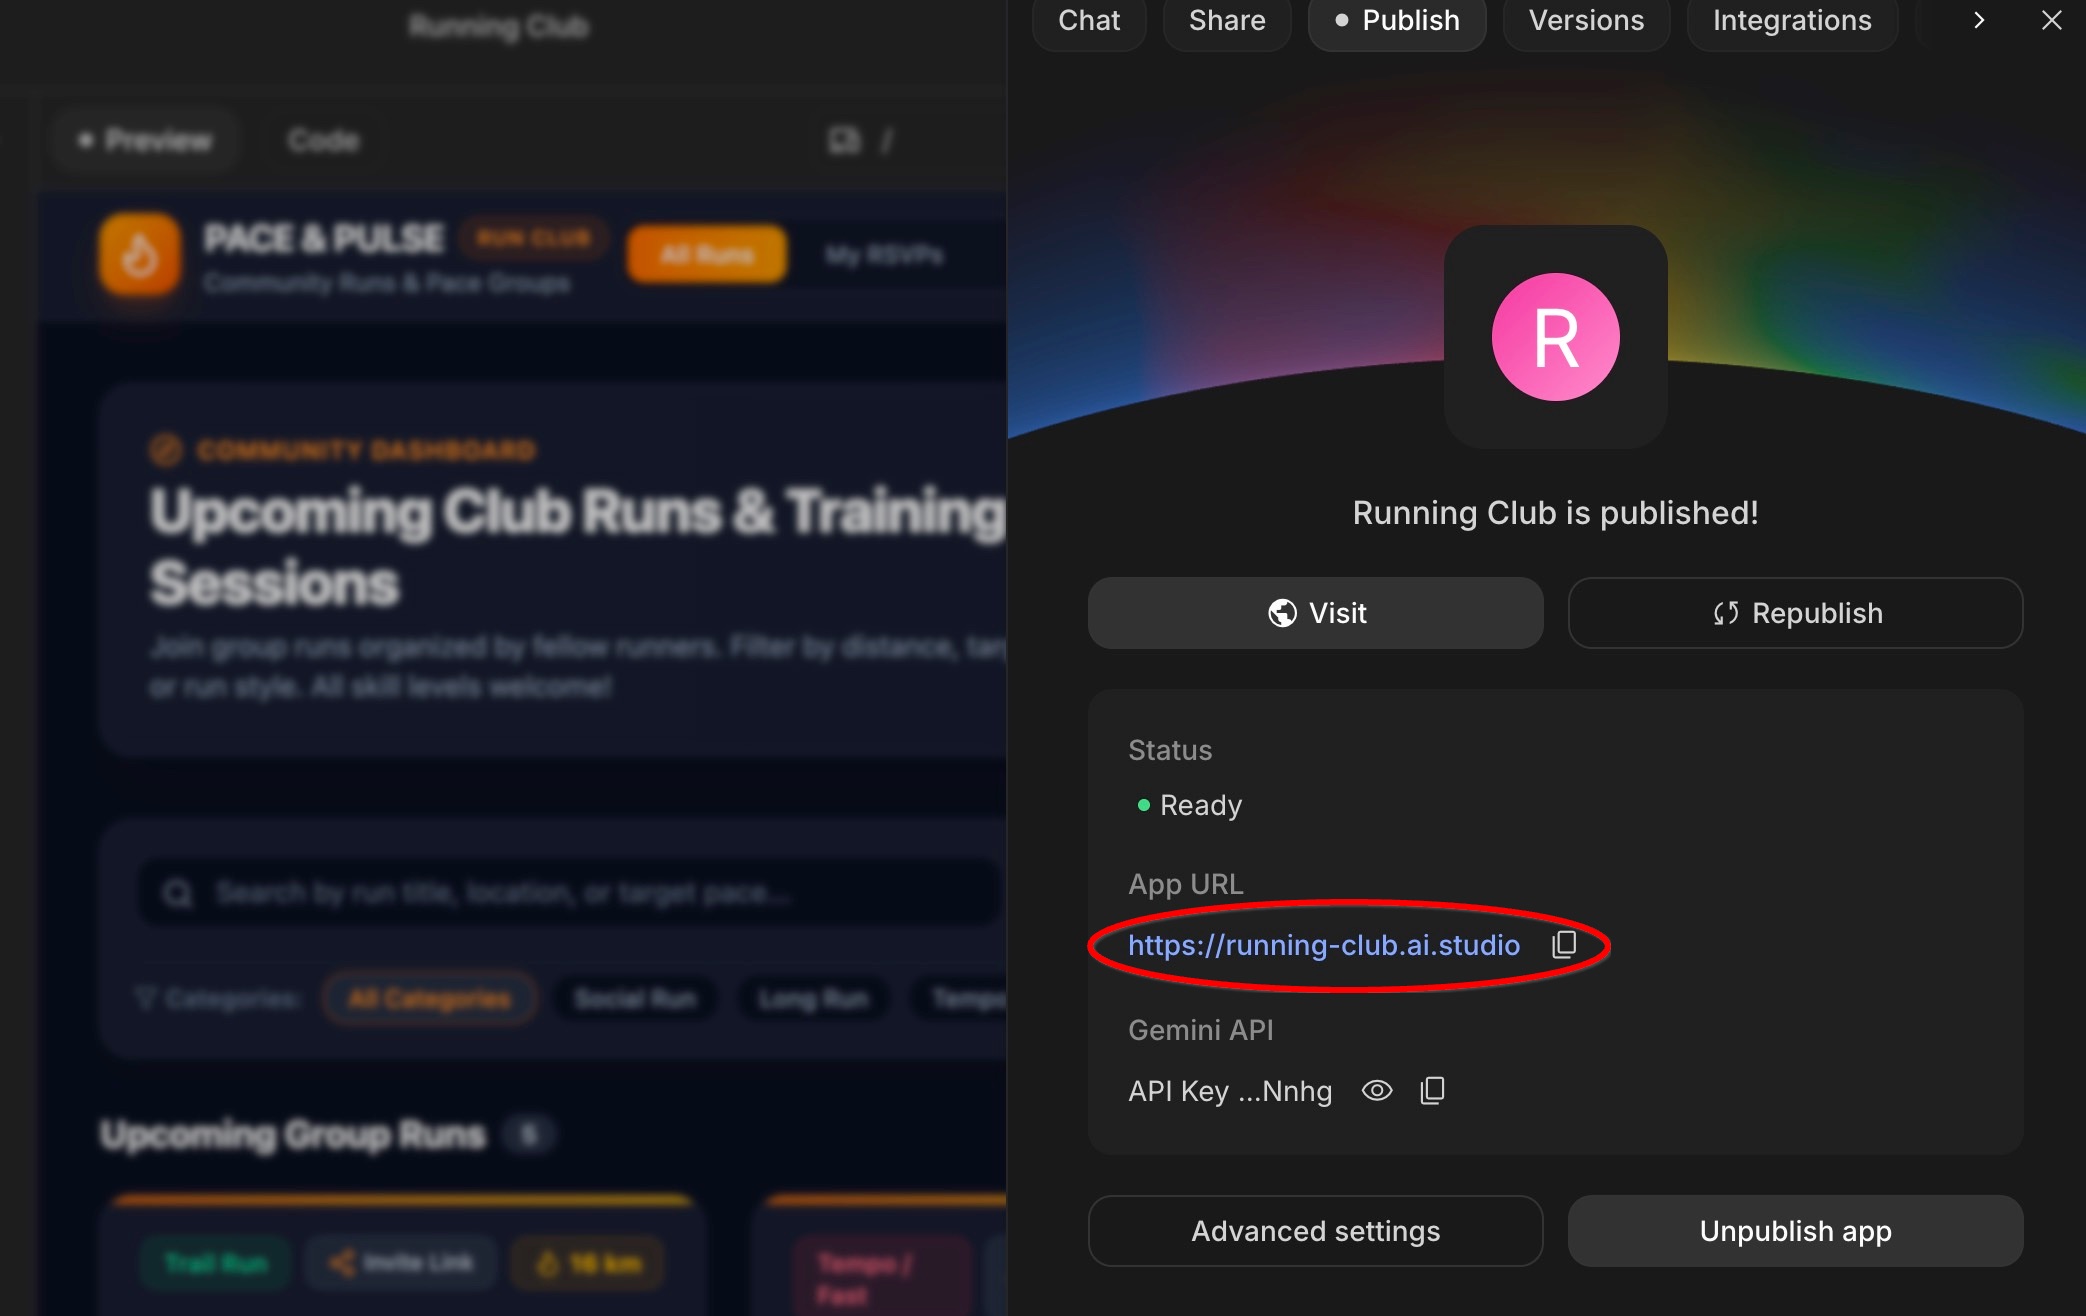
- برای باز کردن برنامه وب زنده خود در یک برگه مرورگر جدید، روی پیوند کلیک کنید یا کد QR را با دوربین تلفن خود اسکن کنید.
- آن را روی تلفن خود امتحان کنید : روی تلفن خود وارد شوید، به یکی از اجراهایی که قبلاً در رایانه خود برنامهریزی کردهاید، پاسخ دهید و بهروزرسانی تعداد شرکتکنندگان را به صورت زنده مشاهده کنید - که توسط پایگاه داده Cloud SQL مشترک شما پشتیبانی میشود!
۸. (امتیاز ویژه) منابع خود را در کنسول ابری گوگل بررسی کنید
وقتی Google AI Studio برنامه شما را میسازد و مستقر میکند، آن را درون یک جعبه سیاه خصوصی قفل نمیکند - بلکه سرویسهای Google Cloud واقعی و آماده برای تولید را از طرف شما ایجاد میکند. کنسول Google Cloud را به عنوان مرکز کنترلی در نظر بگیرید که میتوانید برنامه و پایگاه داده زنده خود را در آن مشاهده کنید.
مرحله ۱: کنسول گوگل کلود را باز کنید
- در یک برگه جدید مرورگر، کنسول Google Cloud را باز کنید.
- در بالای صفحه، روی منوی کشویی پروژه کلیک کنید و پروژه ایجاد شده برای برنامه AI Studio خود را انتخاب کنید (نام آن معمولاً با
continual-run-شروع میشود).
مرحله ۲: ببینید برنامه وب شما کجا اجرا میشود (Cloud Run)
- در نوار جستجوی بالا، عبارت
Cloud Runرا تایپ کنید و آن را از نتایج انتخاب کنید.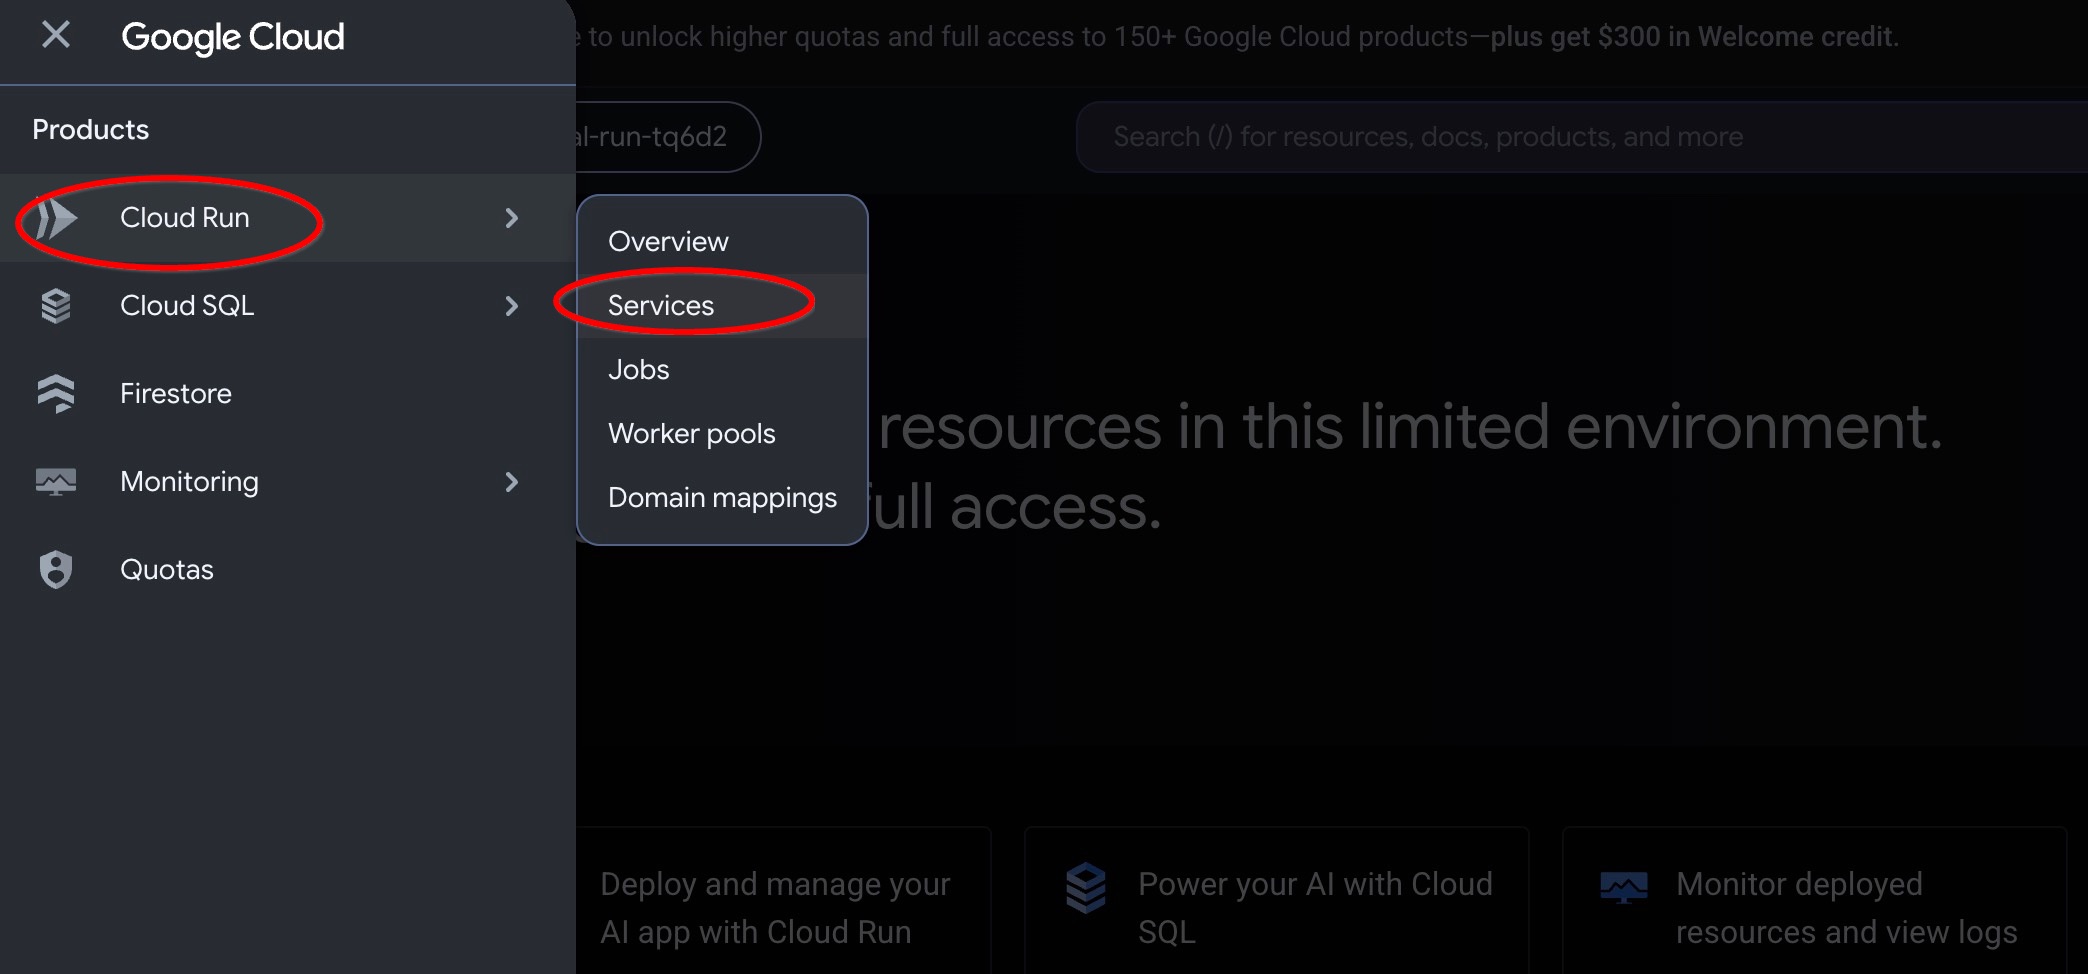
- روی نام برنامه خود (مثلاً
running-club) کلیک کنید.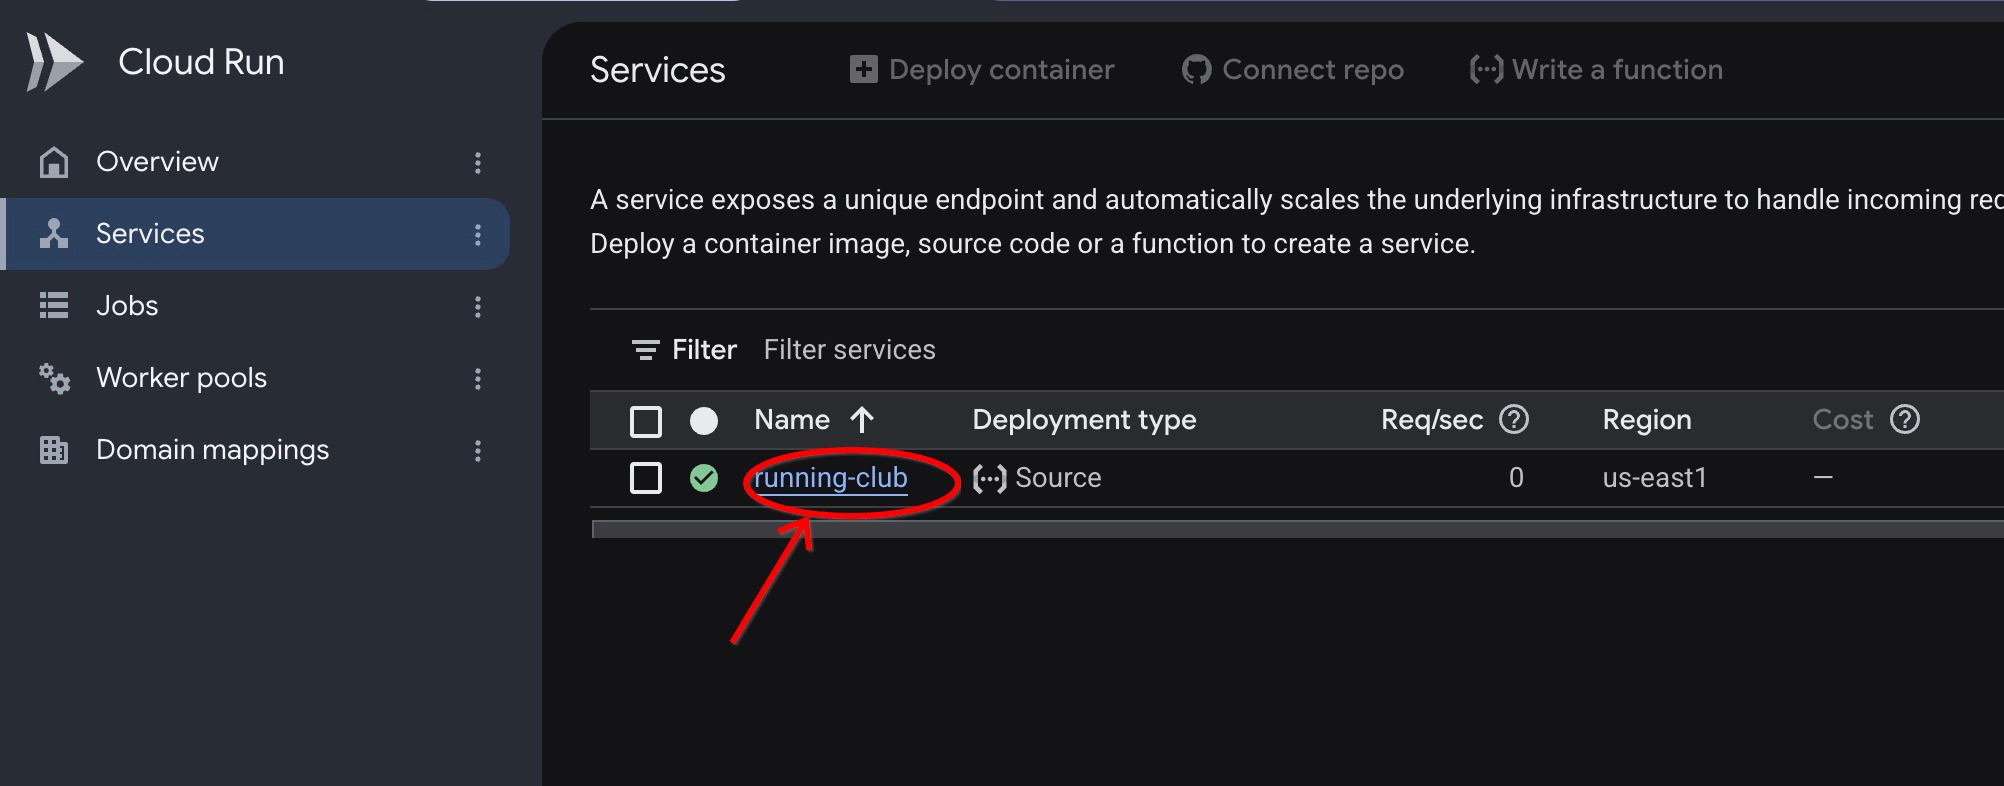
- در اینجا میتوانید موتور میزبانی وبسایت خود را بررسی کنید:
- معیارها : نمودارهای مفیدی که نشان میدهند چند نفر از وبسایت شما بازدید میکنند.
- گزارشها : یک گزارش زنده از فعالیتها که نشان میدهد هنگام تعامل بازدیدکنندگان با برنامه شما چه اتفاقی میافتد.
مرحله ۳: مشاهده پایگاه داده خود در عمل (Cloud SQL)
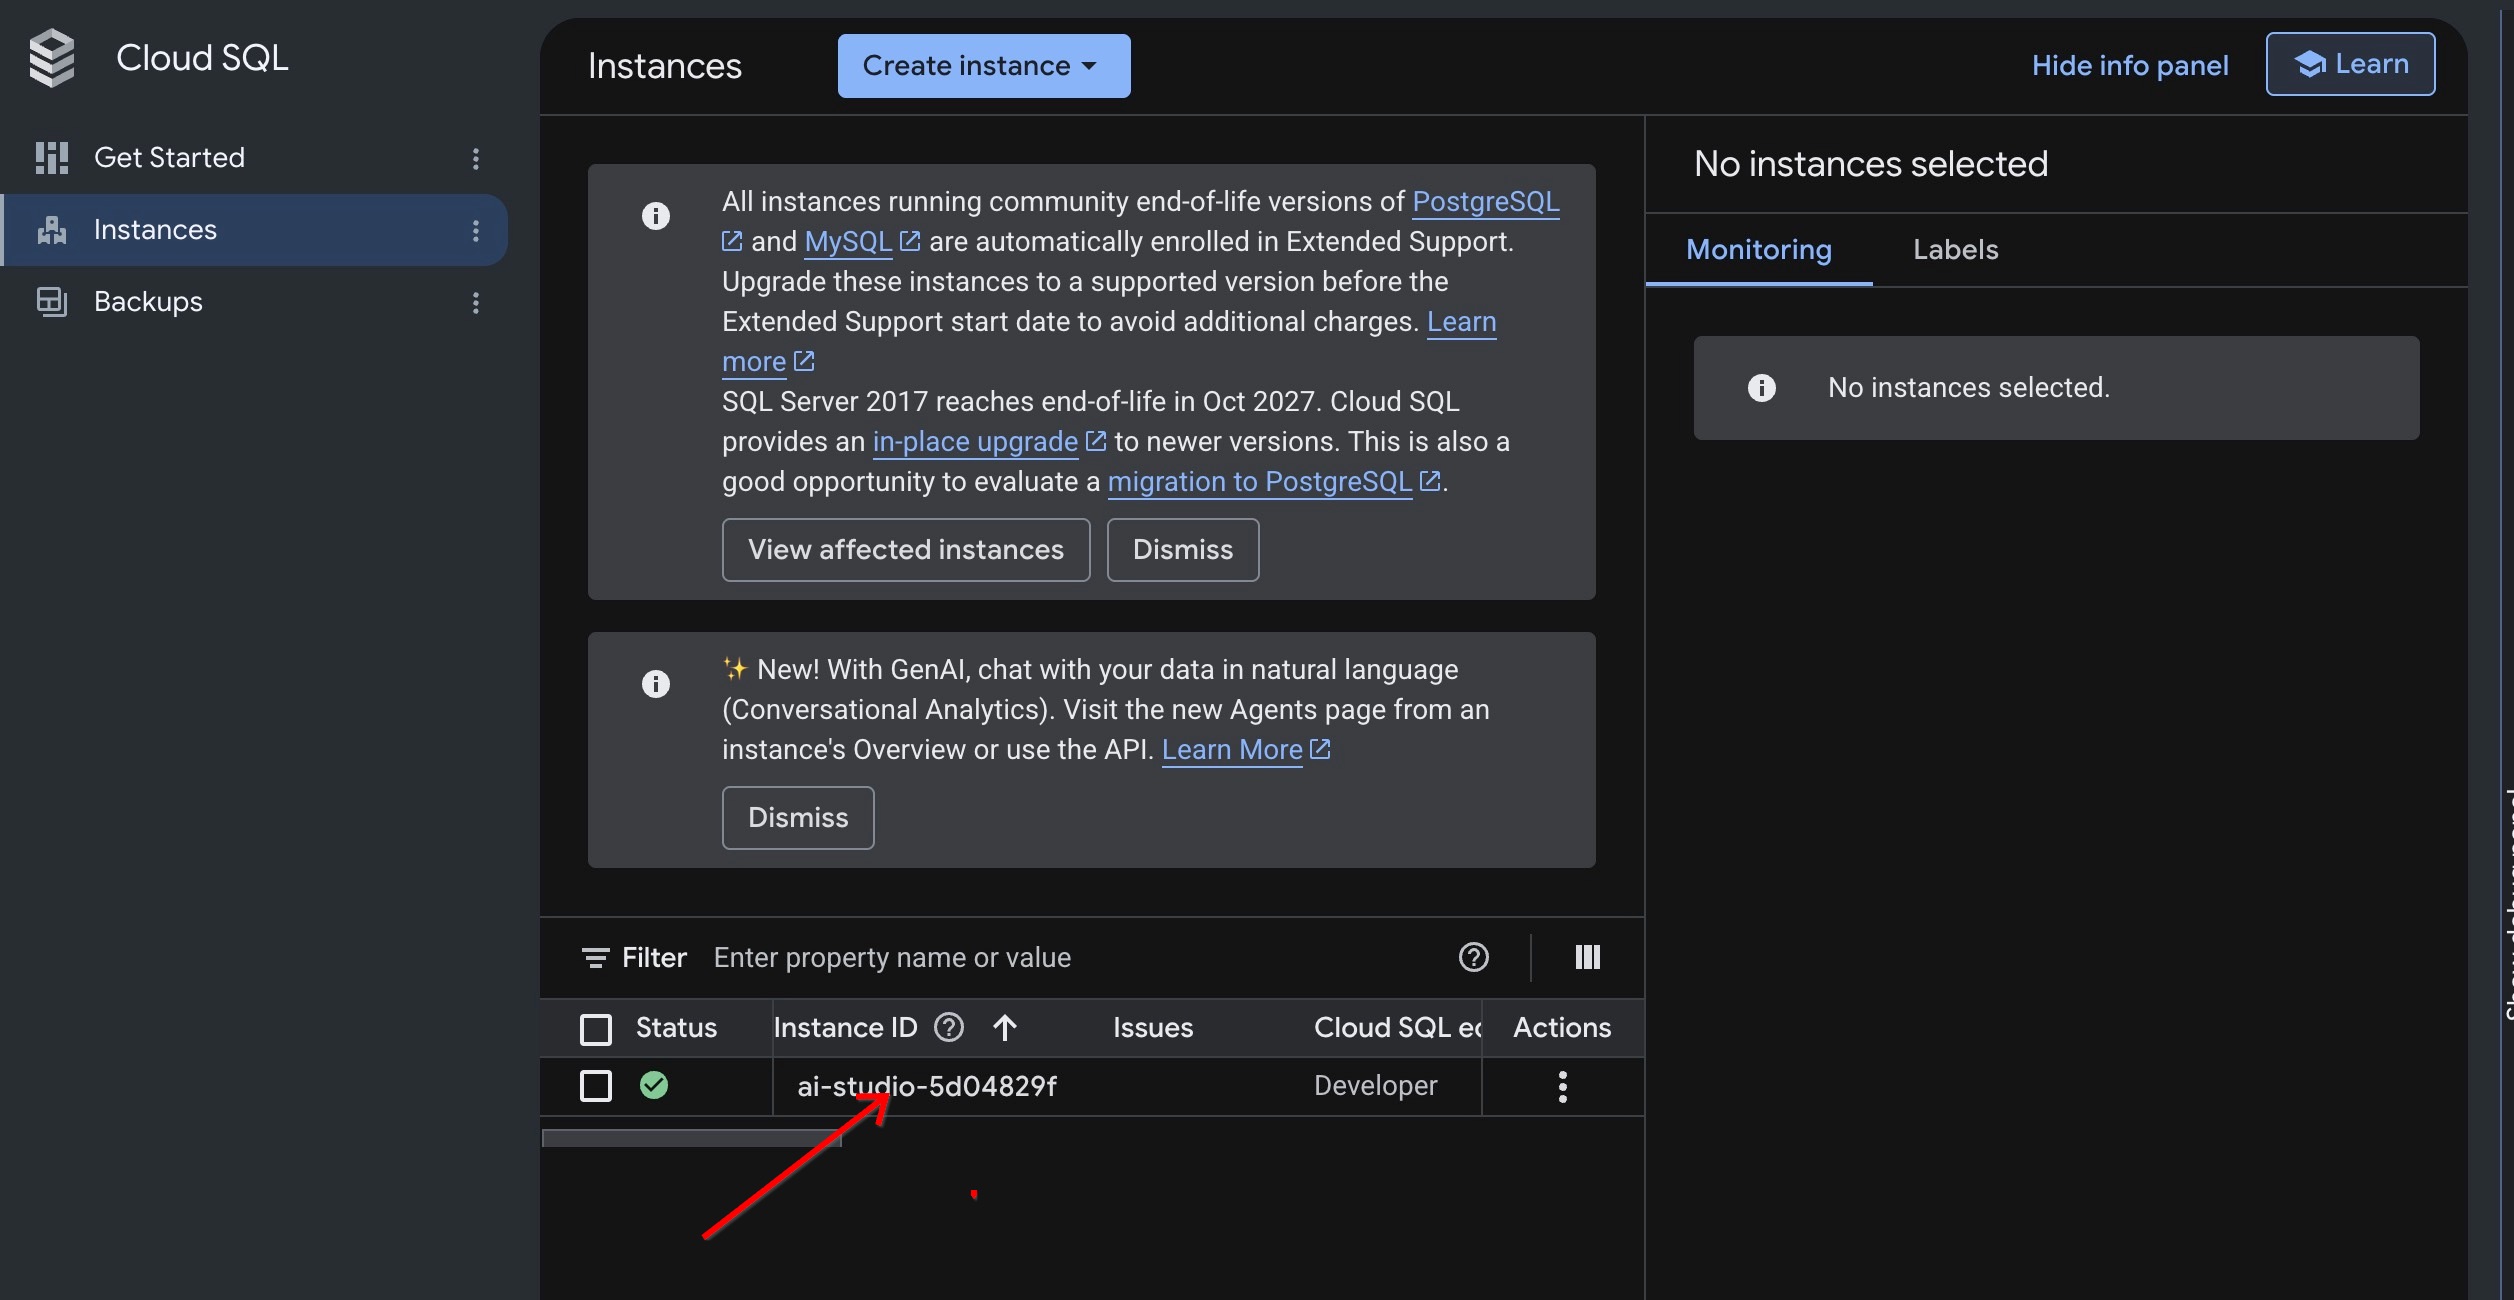
- در نوار جستجوی بالا، عبارت
Cloud SQLرا تایپ کنید و آن را از نتایج انتخاب کنید. - روی نمونه پایگاه داده PostgreSQL خود کلیک کنید.
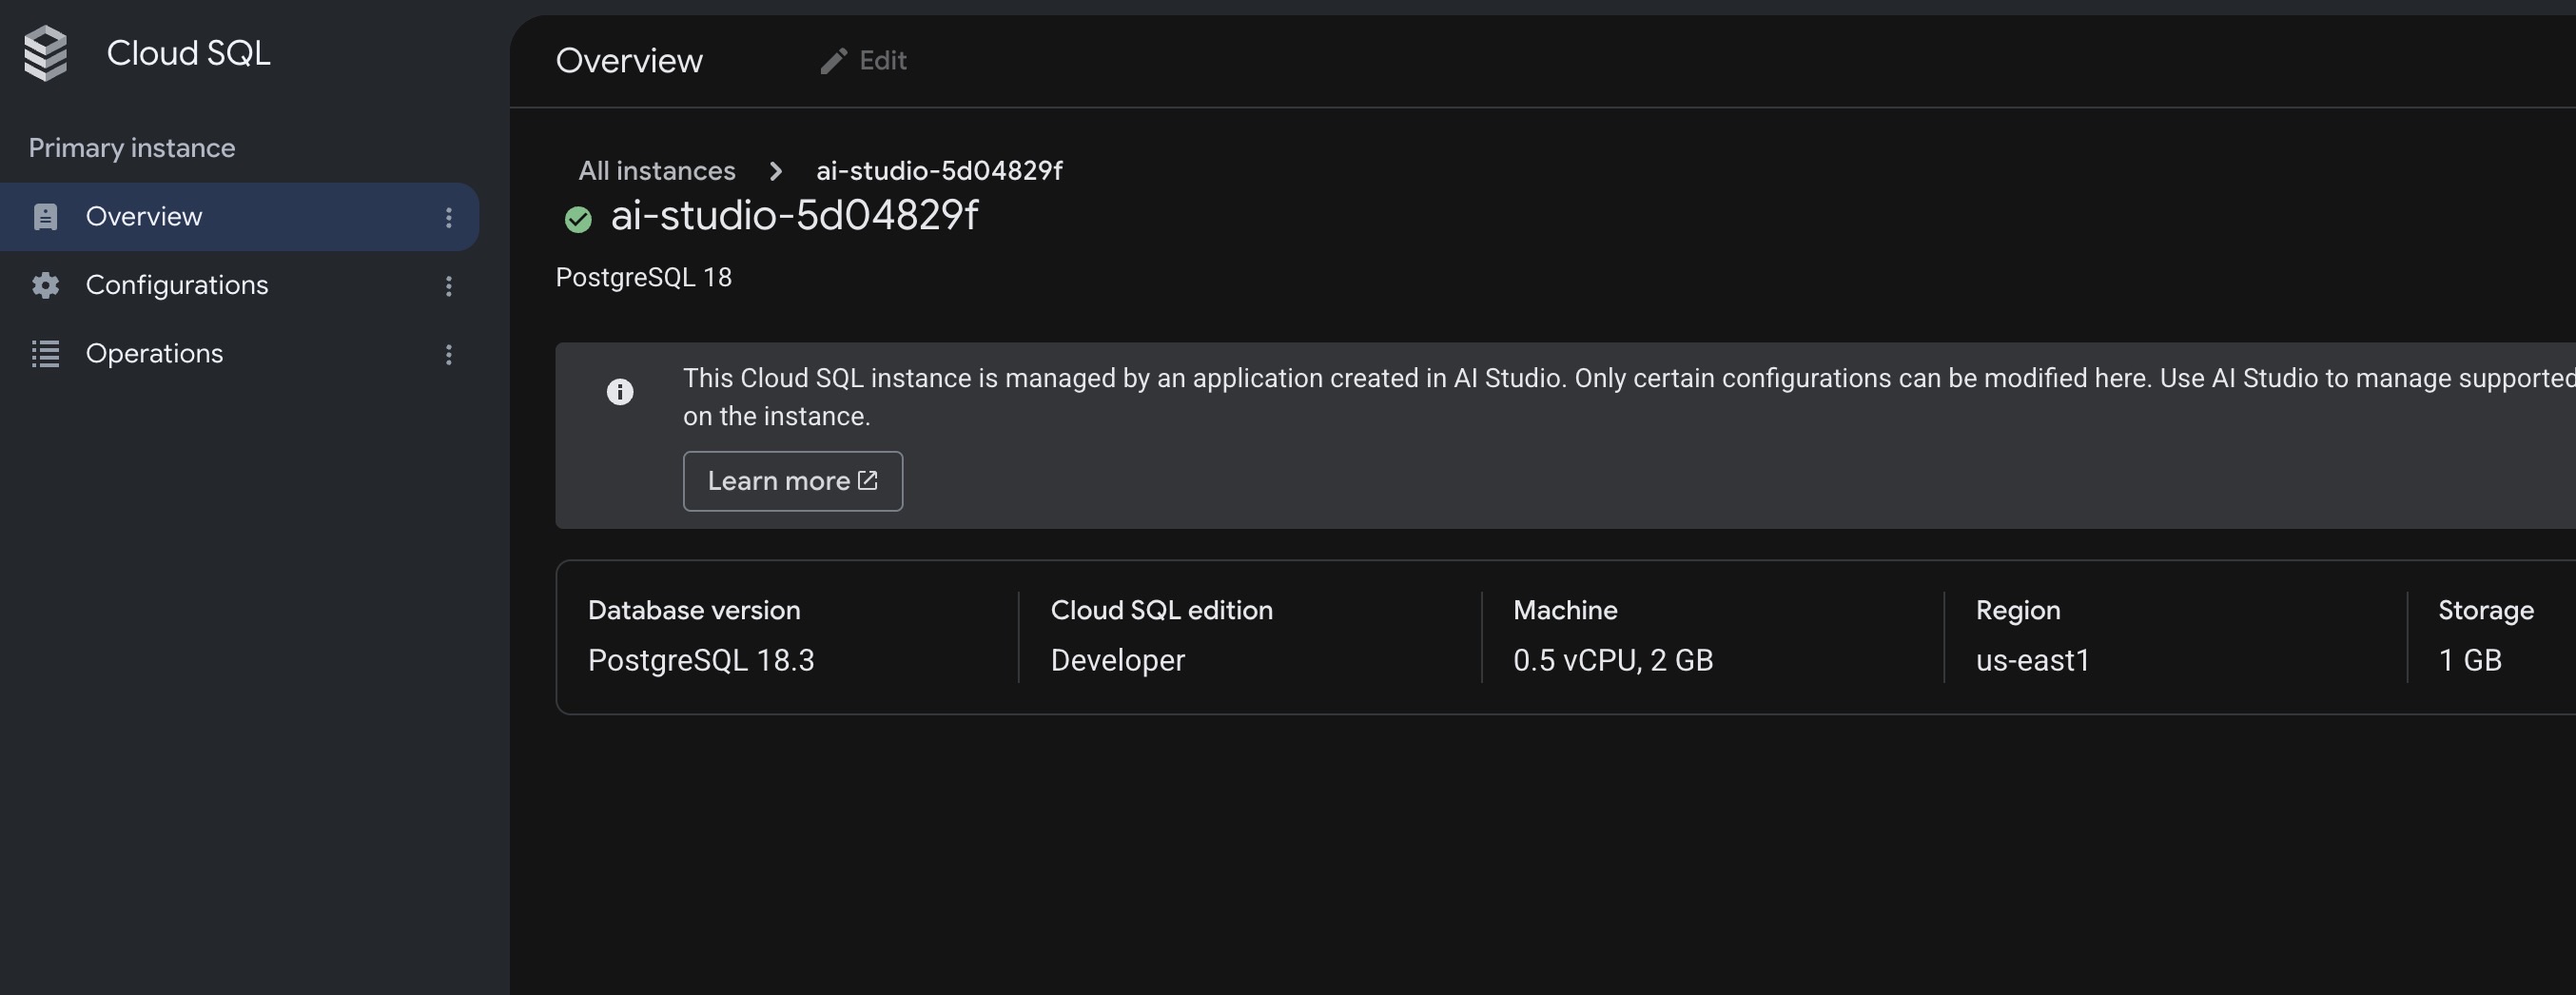
- در اینجا میتوانید جزئیات پایگاه دادهی خود را مشاهده کنید و تأیید کنید که پایگاه دادهی شما فعال و آمادهی ذخیرهی دادههای باشگاه ورزشی شماست.
۹. منابع را پاکسازی کنید
اگر این برنامه را به عنوان یک پروژه تمرینی ساختهاید، میتوانید به راحتی آن را حذف کنید. اگر قصد دارید از برنامه Running Club خود با جامعه خود استفاده کنید، میتوانید آن را در حال اجرا بگذارید!
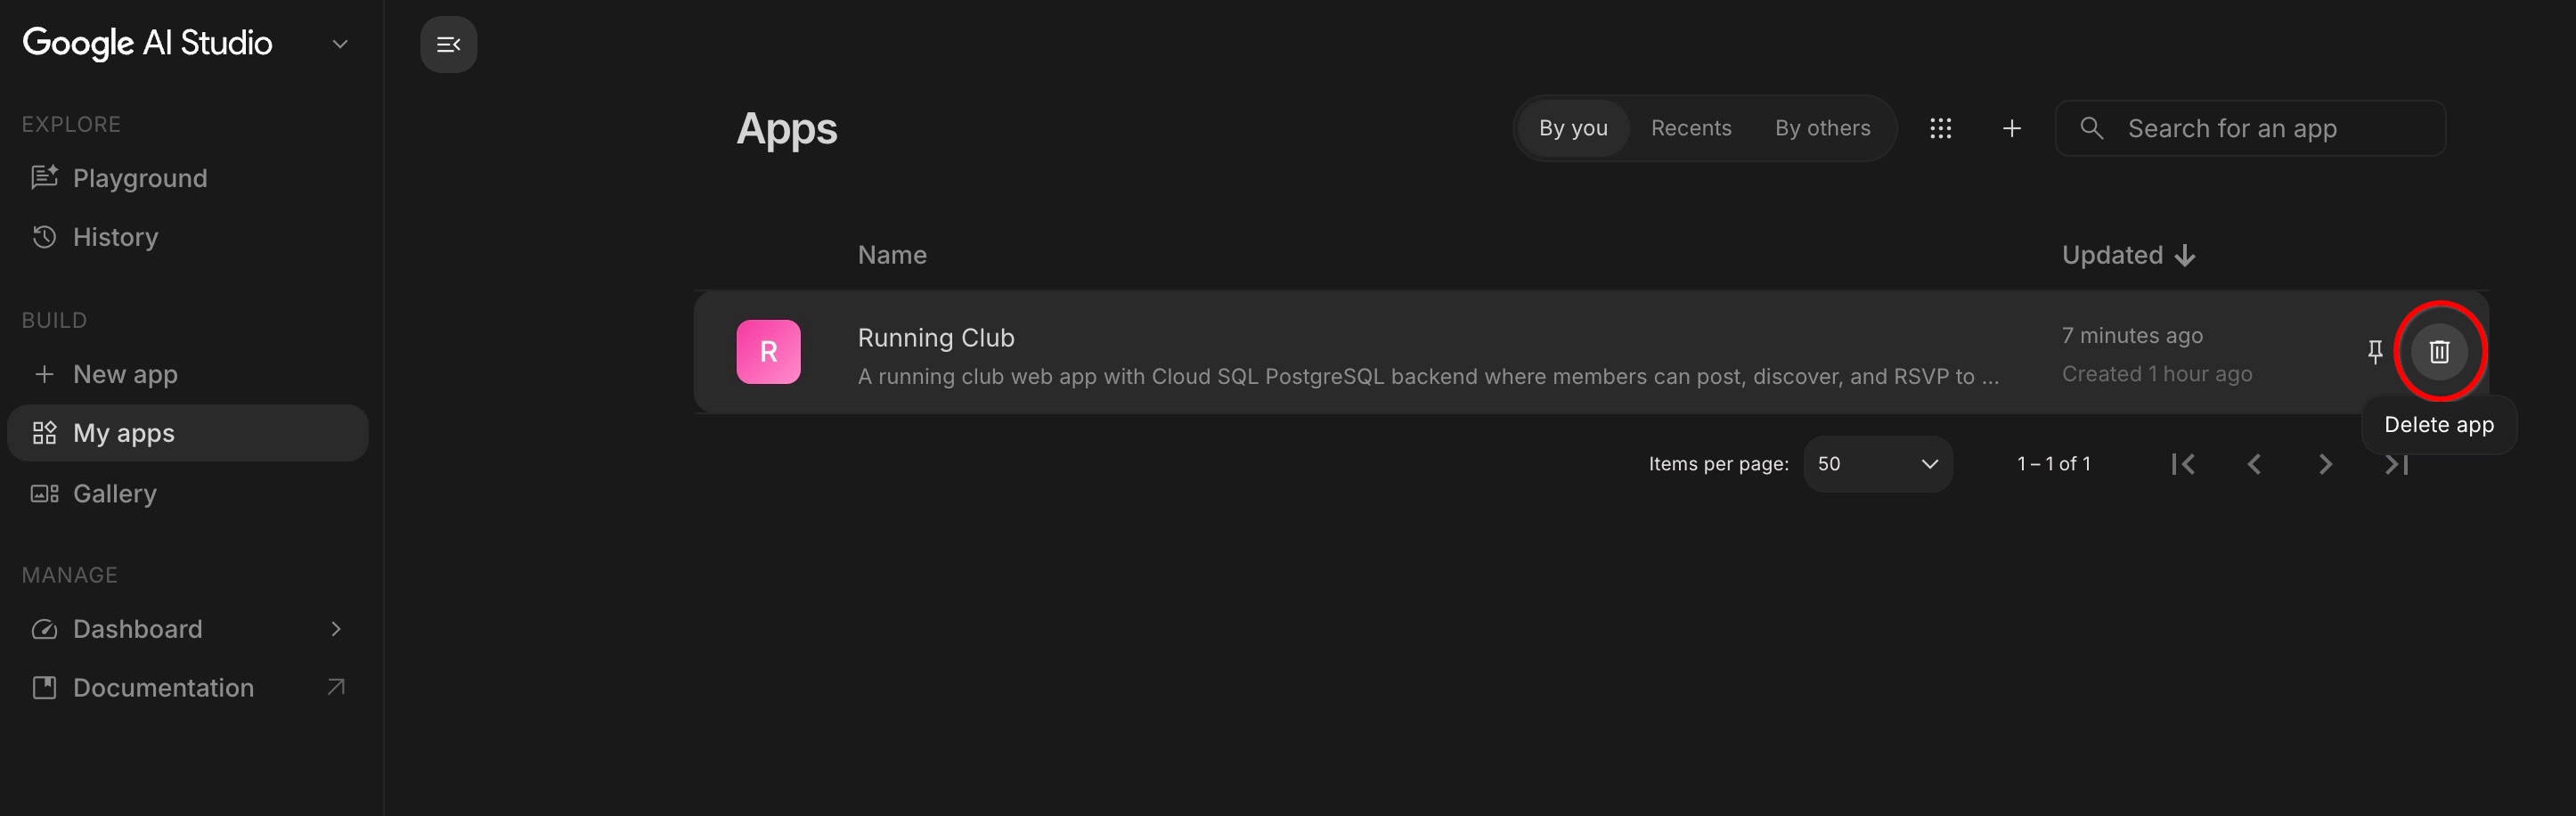
- در Google AI Studio ، روی My Apps در نوار کناری سمت چپ کلیک کنید.
- اپلیکیشن باشگاه دویدن خود را پیدا کنید.
- روی حذف برنامه (یا نماد سطل زباله) کلیک کنید. این صفحه وب زنده شما را خاموش میکند و پایگاه داده آزمایشی را برای شما در یک مرحله حذف میکند.
۱۰. تبریک
شما اولین برنامه وب مبتنی بر پایگاه داده خود را با استفاده از Google AI Studio و Cloud SQL ساخته، سفارشیسازی و منتشر کردهاید!
برای دریافت نشان Completed Builder Journey به این لینک مراجعه کنید!
برای ادامه سفرتان، برای آزمایشگاه بعدی به goo.gle/builders بروید.
کاری که شما انجام دادید
- ساخت یک اپلیکیشن با زبان ساده : یک اپلیکیشن کامل برای باشگاه دو و میدانی عمومی با دستورالعملهای ساده ساختم.
- ورود به سیستم با گوگل فعال شد : ورود ایمن با حسابهای گوگل را بهطور خودکار تنظیم کنید.
- اتصال به یک پایگاه داده واقعی : مسیرهای ذخیره شده، اجراهای زمانبندی شده، RSVPها و بحثها به صورت ایمن در Cloud SQL.
- ویژگیهای اضافه شده به صورت مکالمهای : ساخت کتابخانه مسیر و ردیابی RSVP به سادگی با چت با هوش مصنوعی.
- انتشار زنده در وب : برنامه خود را با یک کلیک در اینترنت مستقر کرده و آن را در دستگاه های مختلف آزمایش کنید.
- نگاهی به جزئیات : بررسی کردیم که چگونه گوگل کلود، برنامه وب زنده و پایگاه داده شما را میزبانی میکند.
قدم بعدی چیست؟
شما میتوانید در Google AI Studio به چت کردن با هوش مصنوعی ادامه دهید تا برنامه خود را با ویژگیهای جدید گسترش دهید:
- نقشههای تعاملی : از هوش مصنوعی بخواهید پیشنمایش نقشه و مسیرهای GPS را اضافه کند.
- تطبیق دوستان در حال دویدن : از هوش مصنوعی بخواهید که همراهانی با اهداف سرعت مشابه پیشنهاد دهد.
- پیشبینی آب و هوا : از هوش مصنوعی بخواهید پیشبینی آب و هوای آخر هفته را روی کارتهای دویدن پیش رو نمایش دهد.
- اشتراکگذاری عکس : از هوش مصنوعی بخواهید که به دوندگان اجازه دهد پس از دویدن گروهی، عکسها را به اشتراک بگذارند.
مطالعه بیشتر
۱. قبل از شروع
اگر تا به حال سعی کردهاید یک برنامهی دویدن آخر هفته با دوستان یا همسایهها ترتیب دهید، میدانید که چقدر دردسر دارد: مکانهای ملاقات در چتهای گروهی بیپایان گم میشوند، مردم دائماً میپرسند که هر کس با چه سرعتی میدود، و تازهواردها هیچوقت کاملاً مطمئن نیستند که چه کسی حاضر میشود.
در این آزمایشگاه کد، شما این مشکل روزمره را با ساخت Running Club حل خواهید کرد - یک برنامه وب دلپذیر که در آن دوندگان محلی میتوانند مسیرهای مورد علاقه خود را مرور کنند، قرارهای آخر هفته را برنامهریزی کنند، با یک کلیک RSVP کنند و با دوندگان دیگر گپ بزنند.
چرا این برنامه به پایگاه داده نیاز دارد؟
یک اپلیکیشن اجتماعی به یک حافظه قابل اعتماد نیاز دارد - که به عنوان پایگاه داده شناخته میشود. وقتی یک دونده یک مسیر خوشمنظره جدید اضافه میکند، برای دویدن صبح شنبه اعلام آمادگی میکند، یا نظری در مورد جای پارک مینویسد، این اطلاعات با بستن تلفن یا خاموش کردن رایانه از بین نمیروند. یک پایگاه داده تمام مسیرها، لیست شرکتکنندگان و پیامهای اعضا را با خیال راحت ذخیره و سازماندهی میکند تا همه افراد در باشگاه هر زمان که اپلیکیشن را باز میکنند، اطلاعات بهروز را ببینند.
شما این برنامه را با استفاده از حالت Build در Google AI Studio خواهید ساخت. نیازی نیست خودتان کد پیچیدهای بنویسید یا زیرساخت فنی راهاندازی کنید - شما به سادگی آنچه را که میخواهید به زبان ساده توصیف میکنید. Google AI Studio برنامه را تولید میکند، یک پایگاه داده Cloud SQL واقعی را به PostgreSQL متصل میکند تا دادههای شما را به خاطر بسپارد و برنامه را به صورت زنده در Cloud Run منتشر میکند تا جامعه شما بتواند بلافاصله شروع به استفاده از آن کند.
آنچه خواهید ساخت
شما Running Club ، یک برنامه وب اجتماعی که شامل موارد زیر است را ایجاد و راهاندازی خواهید کرد:
- ورود با گوگل : ورود سریع و امن با استفاده از حساب گوگل موجود.
- پروفایلهای دونده : پروفایلهای اعضا که ترجیحات دویدن و سرعت هدف را نشان میدهند.
- کتابخانه مسیر : مجموعهای از مسیرهای مورد علاقه محلهها به همراه مسافت، سختی تپه و نقاط ملاقات.
- برنامهی دویدنهای آینده : یک تابلوی رویدادها برای سازماندهی دویدنهای گروهی آینده و پیوند دادن آنها به مسیرها.
- RSVP های ساده : یک دکمه با یک کلیک برای اعضا تا بگویند «من میرم» و ببینند چه کسی دیگری میآید.
- اجرای بحثها : در هر اجرا، فضایی برای نظر دادن وجود دارد تا جزئیات را هماهنگ کنید، سوال بپرسید و بهروزرسانیها را به اشتراک بگذارید.
آنچه یاد خواهید گرفت
- نحوه ایجاد یک برنامه وب کارآمد در Google AI Studio با استفاده از یک دستور ساده.
- چگونه Google AI Studio به طور خودکار Google Sign-In را تنظیم میکند.
- چگونه Google AI Studio یک Cloud SQL واقعی برای پایگاه داده PostgreSQL ایجاد و متصل میکند تا دادههای شما را به خاطر بسپارد.
- چگونه میتوان ویژگیهای جدید اضافه کرد و پایگاه داده خود را صرفاً با چت کردن با هوش مصنوعی گسترش داد.
- چگونه مطمئن شوید که دادههای باشگاه شما در طول بازدیدها به طور ایمن ذخیره میشوند.
- چگونه برنامه خود را به صورت زنده با Cloud Run در اینترنت منتشر کنید.
- نحوه مشاهده برنامه و پایگاه داده زنده خود در کنسول Google Cloud.
آنچه نیاز دارید
- یک مرورگر وب مدرن مانند گوگل کروم.
- یک حساب کاربری استاندارد گوگل برای ورود به Google AI Studio .
شرایط و محدودیتهای نسخه آزمایشی Cloud SQL
گوگل هوش مصنوعی استودیو، سطح شروع گوگل کلود را برای کمک به سازندگان در آزمایش برنامههای مولد و پایگاههای داده مدیریتشده ارائه میدهد:
- واجد شرایط بودن :
- برای افرادی که از حساب استاندارد گوگل استفاده میکنند، در دسترس است.
- حسابهای فاقد شرایط لازم شامل کاربرانی میشود که حسابهای پرداخت Google Cloud موجود یا گذشته دارند، و همچنین حسابهای مرتبط با Google Workspace، Google Workspace for Education یا Google for Nonprofits.
- اگر حساب شما واجد شرایط سطح مبتدی نیست ، همچنان میتوانید با انتخاب یک پروژه Google Cloud موجود با قابلیت پرداخت، این آزمایش را تکمیل کنید. یاد بگیرید که چگونه تأیید کنید که پرداخت در یک پروژه فعال است .
- مشخصات منابع :
- یک نمونه Cloud SQL برای نسخه توسعهدهندگان PostgreSQL که PostgreSQL 18 را اجرا میکند، فراهم میکند.
- شامل 0.5 vCPU، 2 گیگابایت رم و 1 گیگابایت فضای ذخیرهسازی است. این مقدار باید برای شما کافی باشد تا صدها بازدید روزانه را برای چند ماه یا بیشتر، بسته به فعالیت، انجام دهید.
- از مقیاسپذیری تا صفر پشتیبانی میکند و در صورت عدم وجود اتصال فعال به پایگاه داده، برای حفظ سهمیه، بهطور خودکار محاسبات را متوقف میکند.
- سهمیه :
- شامل سهمیه ماهانه رایگان ۵۰ واحد محاسباتی و ۱۰ گیگابایت فضای ذخیرهسازی است.
۲. گوگل هوش مصنوعی استودیو را باز کنید و یک برنامه جدید ایجاد کنید
برای شروع، Google AI Studio را در مرورگر خود باز کنید. این فضای کاری شماست که میتوانید در آن، صرفاً با توصیف نیازهایتان، برنامهها را بسازید و آزمایش کنید.
مرحله ۱: وارد استودیوی هوش مصنوعی گوگل شوید
- مرورگر وب خود (مانند گوگل کروم) را باز کنید و به aistudio.google.com بروید.
- روی شروع به کار کلیک کنید و با حساب استاندارد گوگل خود (مانند حساب جیمیل) وارد شوید.
- اگر در اولین بازدید خود از شما شرایط خدمات پرسیده شد، آنها را مرور کرده و برای ادامه، آنها را بپذیرید.
مرحله ۲: شروع یک برنامه جدید
- در پنل پایین-وسط، روی شروع ساخت کلیک کنید (یا روی +برنامه جدید در پنل سمت راست کلیک کنید).
۳. با یک اعلان ساده و احراز هویت Firebase شروع کنید
برای شروع نیازی به نمودارهای معماری پیچیده ندارید. میتوانید برنامه اولیه خود را راهاندازی کنید، ورود به سیستم گوگل را پیکربندی کنید و پایگاه داده خود را با یک جمله واحد متصل کنید.
دستور اولیه را وارد کنید
در کادر اعلان حالت ساخت AI Studio، عبارت زیر را وارد کرده و Enter را بزنید:
Build a running club web app with a Cloud SQL database
where members can post upcoming runs.
این لینک به طور خودکار کادر درخواست را برای شما پر میکند.
فضای کاری خود را درک کنید
پس از ارسال درخواست، Google AI Studio فضای کاری کامل برنامه را باز میکند. لحظهای به سه قسمت اصلی روی صفحه خود نگاه کنید:
- کادر گفتگو/پیام (پایین) : اینجا جایی است که شما به گفتگو با هوش مصنوعی به زبان ساده ادامه میدهید تا ویژگیها را اضافه کنید، طرحها را تنظیم کنید یا سؤال بپرسید.
- بخش فایلها و کد (سمت چپ) : این بخش، فایلهایی را که هوش مصنوعی در پشت صحنه ایجاد میکند، نشان میدهد. نیازی نیست خودتان کد بنویسید یا ویرایش کنید، اما این پنل به شما امکان میدهد تا مشاهده کنید که هوش مصنوعی چگونه بخشهایی از برنامه شما را ایجاد میکند.
- پنجره پیشنمایش زنده (سمت راست) : این پنجره برنامه در حال کار واقعی شما را به صورت بلادرنگ نمایش میدهد. میتوانید روی دکمهها کلیک کنید، فیلدهای متنی را تایپ کنید و برنامه خود را مستقیماً در این پنجره، به محض تولید، آزمایش کنید.
- ویرایشگر کد (سمت راست) : این قسمت کد واقعی تولید شده توسط هوش مصنوعی را نشان میدهد. در صورت تمایل میتوانید آن را ویرایش کنید، اما این کار الزامی نیست.
- استقرار و اشتراکگذاری (بالا سمت راست) : اینجاست که میتوانید برنامه خود را در اینترنت مستقر کرده و آن را با دیگران به اشتراک بگذارید.
کاری که گوگل هوش مصنوعی استودیو به طور خودکار انجام میدهد
در حالی که هوش مصنوعی درخواست شما را پردازش میکند، میتوانید ساخت برنامه خود را گام به گام تماشا کنید:
- راهاندازی ورود به سیستم گوگل : هوش مصنوعی بهطور خودکار ورود به سیستم گوگل را ادغام میکند تا دوندگان شما بتوانند با خیال راحت با حسابهای گوگل خود وارد سیستم شوند - نیازی به مدیریت رمزهای عبور یا تنظیمات امنیتی نیست.
- اتصال به یک پایگاه داده واقعی : هوش مصنوعی یک پایگاه داده مدیریتشده Cloud SQL را برای ذخیره دادههای جامعه شما راهاندازی میکند. در صورت درخواست، برای فعال کردن پایگاه داده برای پروژه خود کلیک کنید.
- جداول دادههای شما را سازماندهی میکند (
schema.ts) : یک طرحواره پایگاه داده را به عنوان مجموعهای از صفحات گسترده سازماندهی شده در نظر بگیرید. هوش مصنوعی به طور خودکار ساختار ذخیرهسازی را برای برنامه شما ایجاد میکند:- جدول
users: پروفایل اعضا، نامها، آواتارها و سرعت دویدن آنها را ذخیره میکند. - جدول
runs: رویدادهای زمانبندیشده را به همراه عنوان، مسافت، سرعت هدف، مکان و تاریخ آنها ذخیره میکند. - جدول
comments: پیامها و سوالات مطرحشده توسط دوندگان را در زیر هر مسابقه ذخیره میکند.
(توجه: شما هرگز نیازی به نوشتن یا ویرایش دستی این کد ندارید - هوش مصنوعی هر زمان که درخواست ویژگیهای جدید کنید، آن را برای شما بهروزرسانی میکند!) - جدول
- رابط بصری را میسازد : هوش مصنوعی صفحات وبی را که روی صفحه میبینید، از جمله سربرگ، لیست اجراهای آینده، فرم ایجاد رویداد و بخش نظرات، ایجاد میکند.
تأیید اعتبار و اجرای ارسال پست
پس از اتمام تولید، برنامه جدید خود را در پنل Preview آزمایش کنید:
- در پنجره پیشنمایش، روی ورود اعضا کلیک کنید (یا روی دکمه «اجرای پستهای آینده » کلیک کنید که احراز هویت را فعال میکند).
- با استفاده از کادر محاورهای Firebase Auth، حساب گوگل خود را تأیید کنید.
- پس از ورود به سیستم، نام و آواتار پروفایل گوگل شما در نوار ناوبری ظاهر میشود و تنظیمات سرعت شما به طور خودکار مدیریت میشود.
- در فرم «دوی بعدی پس از مسابقه»، عنوانی وارد کنید (مثلاً
Morning 5K Shakeout»). - تاریخ و زمان را انتخاب کنید و مکان جلسه (مانند
Central Park West Entrance) را وارد کنید. - روی PublishRun کلیک کنید.
- تأیید کنید که دویدن جدید بلافاصله در فید دویدنهای آینده ظاهر میشود و نام پروفایل تأیید شده و نشان سرعت شما به عنوان برگزارکننده نمایش داده میشود.
- یک پیام کوتاه در بخش بحث اجرا ارسال کنید (مانند
Bringing extra water bottles!») و مطمئن شوید که در بخش نظرات نمایش داده میشود.
۴. یک کتابخانه مسیر بسازید
باشگاههای دویدن اغلب از مسیرهای محلی محبوب دوباره استفاده میکنند. به جای تایپ کردن مکرر اطلاعات یک مسیر، میتوانید به اعضا اجازه دهید مسیرهای مورد علاقه خود را در یک کاتالوگ ذخیره کنند و هر زمان که برنامه دویدن خود را تنظیم کردند، آنها را پیوست کنند.
از هوش مصنوعی بخواهید کتابخانه مسیر را اضافه کند
در کادر گفتگوی سریع، درخواست زیر را تایپ کرده و Enter را فشار دهید:
Add a route library where members can save favorite
running routes with atitle, distance in km, difficulty,
and start location. When scheduling a run, allow the
organizer to select a route from this library.
چگونه هوش مصنوعی مسیرها را به دویدن در پشت صحنه پیوند میدهد
برای عملی کردن این قابلیت، هوش مصنوعی به طور خودکار یک جدول ذخیرهسازی جدید برای مسیرها ایجاد میکند و آن را مستقیماً به جدول مسیرها متصل میکند. این اتصال همان چیزی است که به برنامه شما اجازه میدهد هر زمان که یک سازماندهنده مسیری را انتخاب میکند، به طور خودکار جزئیات مسافت و موقعیت مکانی را دریافت کند.
(باز هم، نیازی نیست به این کد دست بزنید - هوش مصنوعی ساختار پایگاه داده را برای شما بهروزرسانی میکند!)
کتابخانه مسیر جدید خود را در پیشنمایش آزمایش کنید
به محض اینکه هوش مصنوعی بهروزرسانی برنامه شما را تمام کرد، ویژگی مسیر جدید را در پنجره پیشنمایش زنده امتحان کنید:
- در نوار ناوبری برنامه، روی برگه «کتابخانه مسیر» کلیک کنید. اگر چنین برگهای وجود ندارد، پایین پیشنمایش زنده را بررسی کنید - ممکن است از شما بخواهد دکمه «ذخیره» را برای بهروزرسانی پیشنمایش فشار دهید. یا اگر کمکی نکرد، سعی کنید در پنجره چت با هوش مصنوعی تعامل داشته باشید و بپرسید که کتابخانه مسیرهای شما کجاست.
- روی ذخیره مسیر جدید (یا افزودن مسیر ) کلیک کنید و برخی از جزئیات نمونه را پر کنید:
- عنوان مسیر :
Riverfront Trail Loop - مسافت :
8.5 km - سختی :
Moderate - مکان شروع :
Waterfront Pier 4
- عنوان مسیر :
- روی ذخیره در کتابخانه کلیک کنید.
- اکنون، با کلیک کردن روی دکمهی «زمانبندی اجرا» مستقیماً روی کارت مسیر جدید خود، یک اجرا را با استفاده از این مسیر برنامهریزی کنید.
- توجه کنید که چگونه جزئیات مسافت، سختی و مکان به طور خودکار برای شما پر میشوند!
- روی انتشار اجرا کلیک کنید و تأیید کنید که اجرای گروهی جدید شما در فید اصلی ظاهر میشود.
۵. از دعوتنامهها و فراخوانهای اعضا استفاده کنید
اپلیکیشنهای اجتماعی با مشارکت پیشرفت میکنند! میتوانید به دوندگان اجازه دهید ببینند چه کسی در مسابقهی دوی پیش رو شرکت میکند، با یک کلیک ثبتنام کنید و لینک دعوت را با دوستان خود به اشتراک بگذارید.
از هوش مصنوعی بخواهید که RSVP و دعوتنامهها را اضافه کند
در کادر گفتگوی سریع، درخواست زیر را تایپ کرده و Enter را فشار دهید:
Allow registered members to RSVP ("Join Run") to any upcoming run.
Show the list of attending runners on each run card, display an
attendee counter, and add a copyable invite link.
چگونه هوش مصنوعی شرکتکنندگان را در پشت صحنه ردیابی میکند
برای پیگیری اینکه کدام دوندهها در هر مسابقه شرکت میکنند، هوش مصنوعی به طور خودکار یک جدول rsvps در پایگاه داده شما ایجاد میکند. این را مانند یک برگه ثبت نام دیجیتالی در نظر بگیرید که نام یک دونده را به یک رویداد خاص مرتبط میکند.
(نیازی به نوشتن یا ویرایش این کد نیست—هوش مصنوعی این برگه ثبت نام را به طور خودکار در پایگاه داده شما مدیریت میکند!)
RSVP ها و دعوت نامه ها را در پیش نمایش آزمایش کنید
پس از اتمام بهروزرسانی برنامه توسط هوش مصنوعی، ویژگیهای جدید RSVP را در پنجره پیشنمایش زنده آزمایش کنید:
- در پنجره پیشنمایش، پخش آینده را در فید خانگی خود پیدا کنید.
- روی دکمهی «عضویت در مسابقه» (یا «پاسخگویی ») کلیک کنید.
- تأیید کنید که نام و آواتار شما در بخش «شرکتکنندگان» نمایش داده شود و شمارنده شرکتکنندگان ۱ واحد افزایش یابد.
- روی کپی کردن لینک دعوت کلیک کنید و مطمئن شوید که لینک قابل اشتراکگذاری ایجاد شده است.
۶. تست پایداری دادهها و مقیاسپذیری SQL ابری تا صفر
هنگام ساخت یک برنامه، مهمترین چیز این است که بدانید اطلاعات انجمن شما ایمن است. اگر مرورگر خود را رفرش کنید، تب را ببندید یا رایانه خود را خاموش کنید، میخواهید تمام مسیرهای ذخیره شده، پاسخهای مثبت (RSVP) و بحثهای شما هنگام بازگشت همچنان وجود داشته باشند.
در این مرحله، شما بررسی خواهید کرد که دادههای شما به طور ایمن در پایگاه داده Cloud SQL شما ذخیره شدهاند و یاد خواهید گرفت که چگونه Google Cloud در زمانی که برنامه شما بیصدا است، در مصرف انرژی و هزینهها صرفهجویی میکند.
بهروزرسانی برنامه خود را آزمایش کنید
- روی دکمهی Reload در پنجرهی پیشنمایش AI Studio کلیک کنید (یا تب مرورگر خود را رفرش کنید).
- به برنامه خود در پیشنمایش نگاه کنید: توجه کنید که هر چیزی که ایجاد کردهاید - نمایه عضویت، مسیرهای ذخیره شده، برنامههای زمانبندی شده، RSVPها و نظرات - هنوز در همان جایی که رها کردهاید، قرار دارد!
- برنامه شما فقط اطلاعات را به طور موقت روی صفحه نمایش شما ذخیره نمیکرد؛ بلکه آن را به طور ایمن در پایگاه داده Cloud SQL شما ذخیره میکرد.
چگونه Cloud SQL در مصرف انرژی و هزینه صرفهجویی میکند ("مقیاسپذیری به صفر")
چه اتفاقی میافتد وقتی کسی نیمهشب از اپلیکیشن باشگاه دویدن شما استفاده نمیکند؟
- خواب خودکار ("مقیاس به صفر") : وقتی کسی از برنامه بازدید نمیکند یا برای اجرا ثبتنام نمیکند، پایگاه داده به طور خودکار خود را متوقف میکند تا منابع را حفظ کند.
- بیدارباش فوری : به محض اینکه یک دونده برنامه را باز کند یا روی لینک دعوت کلیک کند، پایگاه داده فوراً با تمام اطلاعات ذخیره شده شما آماده استفاده میشود.
- هزینه بیکاری صفر : از آنجا که در حالت غیرفعال به حالت خواب میرود، وقتی برنامه بیصدا است، از منابع محاسباتی استفاده نمیکنید.
۷. انتشار و استقرار در Cloud Run
Now that your Running Club app is built and tested in the preview, it's time to share it with your community! You don't need to purchase web hosting or configure servers—you can launch your app live to the internet with a single click.
Publish your app live to the web
- In the top-right corner of Google AI Studio, click the Publish button.
- A summary window appears confirming the details:
- Hosting : Hosted and deployed on Google Cloud Run.
- Connected services : Google Sign-In and your Cloud SQL database.
- Hosting : Hosted and deployed on Google Cloud Run.
- Click Publish to launch your app.
Open and share your live app
- When publishing is complete, Google AI Studio provides your live web address along with a QR code.
- Click the link to open your live web app in a new browser tab, or scan the QR code with your phone camera.
- Try it on your phone : Sign in on your phone, RSVP to one of the runs you scheduled earlier on your computer, and watch the attendee count update in real time—powered by your shared Cloud SQL database!
8. (Bonus) Inspect Your Resources in the Google Cloud Console
When Google AI Studio builds and deploys your app, it doesn't lock it inside a private black box—it creates real, production-ready Google Cloud services on your behalf. Think of the Google Cloud Console as the control center where you can view your live app and database.
Step 1: Open the Google Cloud Console
- In a new browser tab, open the Google Cloud Console .
- At the top of the screen, click the project drop-down menu and select the project created for your AI Studio app (its name usually starts with
continual-run-).
Step 2: See where your web app runs (Cloud Run)
- In the top search bar, type
Cloud Runand select it from the results. - Click on your app name (such as
running-club). - Here you can explore the engine that hosts your website:
- Metrics : Helpful graphs showing how many people are visiting your website.
- Logs : A live record of activity showing what happens when visitors interact with your app.
Step 3: See your database in action (Cloud SQL)
- In the top search bar, type
Cloud SQLand select it from the results. - Click on your PostgreSQL database instance.
- Here you can see your live database details, confirming that your database is active and ready to store your running club's data.
9. Clean up resources
If you built this app as a practice project, you can easily delete it. If you plan to keep using your Running Club app with your community, you can leave it running!
- In Google AI Studio , click My Apps in the left sidebar.
- Find your Running Club app.
- Click Delete App (or the trash icon). This turns off your live web page and removes the test database for you in one step.
۱۰. تبریک
You have built, customized, and published your first database-backed web app using Google AI Studio and Cloud SQL!
برای دریافت نشان Completed Builder Journey به این لینک مراجعه کنید!
برای ادامه سفرتان، برای آزمایشگاه بعدی به goo.gle/builders بروید.
کاری که شما انجام دادید
- Built an app with plain language : Created a complete community running club app with simple prompts.
- Enabled Google Sign-In : Set up secure login with Google Accounts automatically.
- Connected a real database : Stored routes, scheduled runs, RSVPs, and discussions safely in Cloud SQL.
- Added features conversationally : Built a route library and RSVP tracking simply by chatting with the AI.
- Published live to the web : Deployed your app to the internet with one click and tested it across devices.
- Looked under the hood : Explored how Google Cloud hosts your live web app and database.
قدم بعدی چیست؟
You can keep chatting with the AI in Google AI Studio to expand your app with new features:
- Interactive Maps : Prompt the AI to add map previews and GPS routes.
- Running Buddy Matching : Prompt the AI to suggest running partners with similar pace goals.
- Weather Forecasts : Prompt the AI to display weekend weather forecasts on upcoming run cards.
- Photo Sharing : Prompt the AI to allow runners to share photos after a group run.
مطالعه بیشتر
۱. قبل از شروع
If you have ever tried organizing a weekend run with friends or neighbors, you know the struggle: meeting locations get lost in endless group chats, people constantly ask what pace everyone is running, and newcomers are never quite sure who is showing up.
In this codelab, you will solve this everyday problem by building Running Club —a welcoming web app where local runners can browse favorite routes, schedule weekend meetups, RSVP with one click, and chat with fellow runners.
Why does this app need a database?
A community app needs a reliable memory—known as a database . When a runner adds a new scenic route, RSVPs for Saturday's morning run, or posts a comment asking about parking, that information cannot disappear when they close their phone or turn off their computer. A database keeps all routes, attendee lists, and member messages safely stored and organized so everyone in the club sees up-to-date information whenever they open the app.
You will build this app using Google AI Studio 's Build mode. You do not need to write complex code or set up technical infrastructure yourself—you simply describe what you want in plain language. Google AI Studio generates the app, connects a real Cloud SQL for PostgreSQL database to remember your data, and publishes the app live on Cloud Run so your community can start using it right away.
آنچه خواهید ساخت
You will build and launch Running Club , a community web app that includes:
- Google Sign-In : Quick and secure login using an existing Google Account.
- Runner profiles : Member profiles that showcase running preferences and target pace.
- Route library : A collection of favorite neighborhood routes with distance, hill difficulty, and meeting points.
- Upcoming run schedule : An event board to organize upcoming group runs and link them to routes.
- Simple RSVPs : A one-click button for members to say "I'm going" and see who else is coming.
- Run discussions : A comment space on each run to coordinate details, ask questions, and share updates.
آنچه یاد خواهید گرفت
- How to create a working web app in Google AI Studio using a single prompt in plain language.
- How Google AI Studio sets up Google Sign-In automatically.
- How Google AI Studio creates and connects a real Cloud SQL for PostgreSQL database to remember your data.
- How to add new features and expand your database simply by chatting with the AI.
- How to verify that your club's data stays safely saved across visits.
- How to publish your app live to the internet with Cloud Run .
- How to view your live app and database in the Google Cloud Console.
آنچه نیاز دارید
- A modern web browser such as Google Chrome.
- A standard Google Account to sign in to Google AI Studio .
Cloud SQL Starter Edition eligibility and limits
Google AI Studio offers the Google Cloud Starter Tier to help builders experiment with generative apps and managed databases:
- Eligibility :
- Available to individuals using a standard Google Account.
- Ineligible accounts include users with existing or past Google Cloud billing accounts, as well as accounts associated with Google Workspace, Google Workspace for Education, or Google for Nonprofits.
- If your account is ineligible for the Starter Tier , you can still complete this lab by selecting an existing Google Cloud project with billing enabled. Learn how to confirm billing is enabled on a project .
- Resource specifications :
- Provisions a Cloud SQL for PostgreSQL Developer Edition instance running PostgreSQL 18.
- Includes 0.5 vCPU, 2 GB RAM, and 1 GB storage. That should be enough for you to run hundreds of daily visits for a few months or longer, depending on activity.
- Supports scale to zero , automatically pausing compute when there are no active database connections to conserve quota.
- Quota :
- Includes a free monthly quota of 50 compute units and 10 GB of storage.
2. Open Google AI Studio and Start a New App
To get started, open Google AI Studio in your browser. This is your creation workspace where you can build and test apps simply by describing what you need.
Step 1: Sign in to Google AI Studio
- Open your web browser (such as Google Chrome) and go to aistudio.google.com .
- Click Get started and log in with your standard Google Account (such as your Gmail account).
- If prompted with terms of service on your first visit, review and accept them to proceed.
Step 2: Start a new application
- In the bottom-center panel, click Start building (or click +New App on the right panel).
3. Start with a Simple Prompt and Firebase Authentication
You do not need complex architecture diagrams to get started. You can launch your initial application, configure Google Sign-In, and connect your database with a single sentence.
Enter the initial prompt
In the prompt box of AI Studio Build mode, enter the following prompt and press Enter :
Build a running club web app with a Cloud SQL database
where members can post upcoming runs.
This link will automatically fill the prompt box for you.
Understand your workspace
Once you submit your prompt, Google AI Studio opens the full application workspace. Take a moment to look at the three main areas on your screen:
- The Chat / Prompt Box (Bottom) : This is where you continue chatting with the AI in plain language to add features, adjust designs, or ask questions.
- The Files & Code Area (Left side) : This shows the files the AI creates behind the scenes. You do not need to write or edit code yourself, but this panel lets you watch the AI create the pieces of your app.
- The Live Preview Window (Right side) : This displays your actual working app in real time. You can click buttons, type in text fields, and test your app directly in this window as soon as it is generated.
- The code editor (Right side) : This shows the actual code that AI generates. You can edit it if you want to, but it is not required.
- Deployment and sharing (Top right) : This is where you can deploy your app to the internet and share it with others.
What Google AI Studio does automatically
While the AI processes your request, you can watch it build your app step by step:
- Sets up Google Sign-In : The AI automatically integrates Google Sign-In so your runners can log in safely with their Google Accounts—no need to manage user passwords or security settings.
- Connects a real database : The AI sets up a managed Cloud SQL database to store your community's data. If prompted, click to enable the database for your project.
- Organizes your data tables (
schema.ts) : Think of a database schema as a collection of organized spreadsheets. The AI automatically creates the storage structure for your app:-
userstable : Stores member profiles, names, avatars, and running pace. -
runstable : Stores scheduled events with their title, distance, target pace, location, and date. -
commentstable : Stores messages and questions left by runners under each run.
(Note: You never need to write or edit this code manually—the AI updates it for you whenever you ask for new features!) -
- Builds the visual interface : The AI creates the web pages you see on screen, including the header, upcoming runs list, event creation form, and comment section.
Verify authentication and run posting
Once the generation finishes, test your new app in the Preview pane:
- In the preview window, click Member Sign In (or click the Post Upcoming Run button, which will trigger authentication).
- Authenticate with your Google account using the Firebase Auth dialog.
- Once signed in, your Google profile name and avatar appear in the navigation bar, and your pace preferences are automatically managed.
- In the "Post Upcoming Run" form, enter a title (such as
Morning 5K Shakeout). - Select a date and time, and enter a meeting location (such as
Central Park West Entrance). - Click PublishRun .
- Confirm that the new run appears immediately in the upcoming runs feed, displaying your authenticated profile name and pace badge as the organizer.
- Post a quick message in the run's discussion section (such as
Bringing extra water bottles!) and verify that it appears in the comment thread.
4. Build a Route Library
Running clubs often reuse popular local routes. Instead of typing the same route information over and over, you can let members save favorite routes in a catalog and attach them whenever they schedule a run.
Ask the AI to add the Route Library
In the chat prompt box, type the following request and press Enter :
Add a route library where members can save favorite
running routes with atitle, distance in km, difficulty,
and start location. When scheduling a run, allow the
organizer to select a route from this library.
How the AI links routes to runs behind the scenes
To make this work, the AI automatically creates a new storage table for routes and connects it directly to the runs table. This connection is what allows your app to automatically pull in distance and location details whenever an organizer picks a route.
(Again, you do not need to touch this code—the AI updates the database structure for you!)
Test your new Route Library in the Preview
Once the AI finishes updating your app, try out the new route feature in the live preview window:
- In the app navigation, click the Route Library tab. If there is no such tab check the bottom of the live preview - it may ask you to push the Save button to refresh the preview. Or if it doesn't help try to interact with AI in the chat window and ask where your routes library is.
- Click Save New Route (or Add Route ) and fill in some sample details:
- Route Title :
Riverfront Trail Loop - Distance :
8.5 km - Difficulty :
Moderate - Start Location :
Waterfront Pier 4
- Route Title :
- Click Save to Library .
- Now, schedule a run using this route by clicking the Schedule Run button directly on your new route card.
- Notice how the distance, difficulty, and location details are automatically filled in for you!
- Click Publish Run and verify that your new group run appears on the home feed.
5. Implement RSVPs and Member Invites
Community apps thrive on participation! You can let runners see who is attending an upcoming run, sign up with one click, and share an invite link with friends.
Ask the AI to add RSVPs and invites
In the chat prompt box, type the following request and press Enter :
Allow registered members to RSVP ("Join Run") to any upcoming run.
Show the list of attending runners on each run card, display an
attendee counter, and add a copyable invite link.
How the AI tracks attendees behind the scenes
To keep track of which runners are coming to each run, the AI automatically creates an rsvps table in your database. Think of this like a digital sign-up sheet that links a runner's name to a specific event.
(You don't need to write or edit this code—the AI manages this sign-up sheet in your database automatically!)
Test RSVPs and invites in the Preview
Once the AI finishes updating your app, test the new RSVP features in the live preview window:
- In the preview window, find an upcoming run on your home feed.
- Click the Join Run (or RSVP ) button.
- Confirm that your name and avatar appear in the Attending Runners section, and the attendee counter increases by 1.
- Click Copy Invite Link and verify that a shareable link is generated.
6. Test Data Persistence and Cloud SQL Scale-to-Zero
When building an app, the most important thing is knowing that your community's information is safe. If you refresh your browser, close the tab, or shut down your computer, you want all your saved routes, RSVPs, and discussions to still be there when you return.
In this step, you will test that your data is safely saved in your Cloud SQL database and learn how Google Cloud saves energy and costs when your app is quiet.
Test refreshing your app
- Click the Reload button inside the AI Studio preview window (or refresh your browser tab).
- Look at your app in the preview: notice that everything you created—your member profile, saved routes, scheduled runs, RSVPs, and comments—is still right where you left it!
- Your app didn't just store information temporarily on your screen; it securely stored it in your Cloud SQL database.
How Cloud SQL saves energy and cost ("Scale-to-zero")
What happens when nobody is using your running club app in the middle of the night?
- Automatic sleep ("Scale-to-zero") : When no one is visiting the app or signing up for runs, the database automatically pauses itself to conserve resources.
- Instant wake-up : As soon as a runner opens the app or clicks an invite link, the database wakes up instantly with all your saved information ready to go.
- Zero idle cost : Because it sleeps when inactive, you don't use up compute resources when the app is quiet.
7. Publish and Deploy to Cloud Run
Now that your Running Club app is built and tested in the preview, it's time to share it with your community! You don't need to purchase web hosting or configure servers—you can launch your app live to the internet with a single click.
Publish your app live to the web
- In the top-right corner of Google AI Studio, click the Publish button.
- A summary window appears confirming the details:
- Hosting : Hosted and deployed on Google Cloud Run.
- Connected services : Google Sign-In and your Cloud SQL database.
- Hosting : Hosted and deployed on Google Cloud Run.
- Click Publish to launch your app.
Open and share your live app
- When publishing is complete, Google AI Studio provides your live web address along with a QR code.
- Click the link to open your live web app in a new browser tab, or scan the QR code with your phone camera.
- Try it on your phone : Sign in on your phone, RSVP to one of the runs you scheduled earlier on your computer, and watch the attendee count update in real time—powered by your shared Cloud SQL database!
8. (Bonus) Inspect Your Resources in the Google Cloud Console
When Google AI Studio builds and deploys your app, it doesn't lock it inside a private black box—it creates real, production-ready Google Cloud services on your behalf. Think of the Google Cloud Console as the control center where you can view your live app and database.
Step 1: Open the Google Cloud Console
- In a new browser tab, open the Google Cloud Console .
- At the top of the screen, click the project drop-down menu and select the project created for your AI Studio app (its name usually starts with
continual-run-).
Step 2: See where your web app runs (Cloud Run)
- In the top search bar, type
Cloud Runand select it from the results. - Click on your app name (such as
running-club). - Here you can explore the engine that hosts your website:
- Metrics : Helpful graphs showing how many people are visiting your website.
- Logs : A live record of activity showing what happens when visitors interact with your app.
Step 3: See your database in action (Cloud SQL)
- In the top search bar, type
Cloud SQLand select it from the results. - Click on your PostgreSQL database instance.
- Here you can see your live database details, confirming that your database is active and ready to store your running club's data.
9. Clean up resources
If you built this app as a practice project, you can easily delete it. If you plan to keep using your Running Club app with your community, you can leave it running!
- In Google AI Studio , click My Apps in the left sidebar.
- Find your Running Club app.
- Click Delete App (or the trash icon). This turns off your live web page and removes the test database for you in one step.
۱۰. تبریک
You have built, customized, and published your first database-backed web app using Google AI Studio and Cloud SQL!
برای دریافت نشان Completed Builder Journey به این لینک مراجعه کنید!
برای ادامه سفرتان، برای آزمایشگاه بعدی به goo.gle/builders بروید.
کاری که شما انجام دادید
- Built an app with plain language : Created a complete community running club app with simple prompts.
- Enabled Google Sign-In : Set up secure login with Google Accounts automatically.
- Connected a real database : Stored routes, scheduled runs, RSVPs, and discussions safely in Cloud SQL.
- Added features conversationally : Built a route library and RSVP tracking simply by chatting with the AI.
- Published live to the web : Deployed your app to the internet with one click and tested it across devices.
- Looked under the hood : Explored how Google Cloud hosts your live web app and database.
قدم بعدی چیست؟
You can keep chatting with the AI in Google AI Studio to expand your app with new features:
- Interactive Maps : Prompt the AI to add map previews and GPS routes.
- Running Buddy Matching : Prompt the AI to suggest running partners with similar pace goals.
- Weather Forecasts : Prompt the AI to display weekend weather forecasts on upcoming run cards.
- Photo Sharing : Prompt the AI to allow runners to share photos after a group run.
مطالعه بیشتر
۱. قبل از شروع
If you have ever tried organizing a weekend run with friends or neighbors, you know the struggle: meeting locations get lost in endless group chats, people constantly ask what pace everyone is running, and newcomers are never quite sure who is showing up.
In this codelab, you will solve this everyday problem by building Running Club —a welcoming web app where local runners can browse favorite routes, schedule weekend meetups, RSVP with one click, and chat with fellow runners.
Why does this app need a database?
A community app needs a reliable memory—known as a database . When a runner adds a new scenic route, RSVPs for Saturday's morning run, or posts a comment asking about parking, that information cannot disappear when they close their phone or turn off their computer. A database keeps all routes, attendee lists, and member messages safely stored and organized so everyone in the club sees up-to-date information whenever they open the app.
You will build this app using Google AI Studio 's Build mode. You do not need to write complex code or set up technical infrastructure yourself—you simply describe what you want in plain language. Google AI Studio generates the app, connects a real Cloud SQL for PostgreSQL database to remember your data, and publishes the app live on Cloud Run so your community can start using it right away.
آنچه خواهید ساخت
You will build and launch Running Club , a community web app that includes:
- Google Sign-In : Quick and secure login using an existing Google Account.
- Runner profiles : Member profiles that showcase running preferences and target pace.
- Route library : A collection of favorite neighborhood routes with distance, hill difficulty, and meeting points.
- Upcoming run schedule : An event board to organize upcoming group runs and link them to routes.
- Simple RSVPs : A one-click button for members to say "I'm going" and see who else is coming.
- Run discussions : A comment space on each run to coordinate details, ask questions, and share updates.
آنچه یاد خواهید گرفت
- How to create a working web app in Google AI Studio using a single prompt in plain language.
- How Google AI Studio sets up Google Sign-In automatically.
- How Google AI Studio creates and connects a real Cloud SQL for PostgreSQL database to remember your data.
- How to add new features and expand your database simply by chatting with the AI.
- How to verify that your club's data stays safely saved across visits.
- How to publish your app live to the internet with Cloud Run .
- How to view your live app and database in the Google Cloud Console.
آنچه نیاز دارید
- A modern web browser such as Google Chrome.
- A standard Google Account to sign in to Google AI Studio .
Cloud SQL Starter Edition eligibility and limits
Google AI Studio offers the Google Cloud Starter Tier to help builders experiment with generative apps and managed databases:
- Eligibility :
- Available to individuals using a standard Google Account.
- Ineligible accounts include users with existing or past Google Cloud billing accounts, as well as accounts associated with Google Workspace, Google Workspace for Education, or Google for Nonprofits.
- If your account is ineligible for the Starter Tier , you can still complete this lab by selecting an existing Google Cloud project with billing enabled. Learn how to confirm billing is enabled on a project .
- Resource specifications :
- Provisions a Cloud SQL for PostgreSQL Developer Edition instance running PostgreSQL 18.
- Includes 0.5 vCPU, 2 GB RAM, and 1 GB storage. That should be enough for you to run hundreds of daily visits for a few months or longer, depending on activity.
- Supports scale to zero , automatically pausing compute when there are no active database connections to conserve quota.
- Quota :
- Includes a free monthly quota of 50 compute units and 10 GB of storage.
2. Open Google AI Studio and Start a New App
To get started, open Google AI Studio in your browser. This is your creation workspace where you can build and test apps simply by describing what you need.
Step 1: Sign in to Google AI Studio
- Open your web browser (such as Google Chrome) and go to aistudio.google.com .
- Click Get started and log in with your standard Google Account (such as your Gmail account).
- If prompted with terms of service on your first visit, review and accept them to proceed.
Step 2: Start a new application
- In the bottom-center panel, click Start building (or click +New App on the right panel).
3. Start with a Simple Prompt and Firebase Authentication
You do not need complex architecture diagrams to get started. You can launch your initial application, configure Google Sign-In, and connect your database with a single sentence.
Enter the initial prompt
In the prompt box of AI Studio Build mode, enter the following prompt and press Enter :
Build a running club web app with a Cloud SQL database
where members can post upcoming runs.
This link will automatically fill the prompt box for you.
Understand your workspace
Once you submit your prompt, Google AI Studio opens the full application workspace. Take a moment to look at the three main areas on your screen:
- The Chat / Prompt Box (Bottom) : This is where you continue chatting with the AI in plain language to add features, adjust designs, or ask questions.
- The Files & Code Area (Left side) : This shows the files the AI creates behind the scenes. You do not need to write or edit code yourself, but this panel lets you watch the AI create the pieces of your app.
- The Live Preview Window (Right side) : This displays your actual working app in real time. You can click buttons, type in text fields, and test your app directly in this window as soon as it is generated.
- The code editor (Right side) : This shows the actual code that AI generates. You can edit it if you want to, but it is not required.
- Deployment and sharing (Top right) : This is where you can deploy your app to the internet and share it with others.
What Google AI Studio does automatically
While the AI processes your request, you can watch it build your app step by step:
- Sets up Google Sign-In : The AI automatically integrates Google Sign-In so your runners can log in safely with their Google Accounts—no need to manage user passwords or security settings.
- Connects a real database : The AI sets up a managed Cloud SQL database to store your community's data. If prompted, click to enable the database for your project.
- Organizes your data tables (
schema.ts) : Think of a database schema as a collection of organized spreadsheets. The AI automatically creates the storage structure for your app:-
userstable : Stores member profiles, names, avatars, and running pace. -
runstable : Stores scheduled events with their title, distance, target pace, location, and date. -
commentstable : Stores messages and questions left by runners under each run.
(Note: You never need to write or edit this code manually—the AI updates it for you whenever you ask for new features!) -
- Builds the visual interface : The AI creates the web pages you see on screen, including the header, upcoming runs list, event creation form, and comment section.
Verify authentication and run posting
Once the generation finishes, test your new app in the Preview pane:
- In the preview window, click Member Sign In (or click the Post Upcoming Run button, which will trigger authentication).
- Authenticate with your Google account using the Firebase Auth dialog.
- Once signed in, your Google profile name and avatar appear in the navigation bar, and your pace preferences are automatically managed.
- In the "Post Upcoming Run" form, enter a title (such as
Morning 5K Shakeout). - Select a date and time, and enter a meeting location (such as
Central Park West Entrance). - Click PublishRun .
- Confirm that the new run appears immediately in the upcoming runs feed, displaying your authenticated profile name and pace badge as the organizer.
- Post a quick message in the run's discussion section (such as
Bringing extra water bottles!) and verify that it appears in the comment thread.
4. Build a Route Library
Running clubs often reuse popular local routes. Instead of typing the same route information over and over, you can let members save favorite routes in a catalog and attach them whenever they schedule a run.
Ask the AI to add the Route Library
In the chat prompt box, type the following request and press Enter :
Add a route library where members can save favorite
running routes with atitle, distance in km, difficulty,
and start location. When scheduling a run, allow the
organizer to select a route from this library.
How the AI links routes to runs behind the scenes
To make this work, the AI automatically creates a new storage table for routes and connects it directly to the runs table. This connection is what allows your app to automatically pull in distance and location details whenever an organizer picks a route.
(Again, you do not need to touch this code—the AI updates the database structure for you!)
Test your new Route Library in the Preview
Once the AI finishes updating your app, try out the new route feature in the live preview window:
- In the app navigation, click the Route Library tab. If there is no such tab check the bottom of the live preview - it may ask you to push the Save button to refresh the preview. Or if it doesn't help try to interact with AI in the chat window and ask where your routes library is.
- Click Save New Route (or Add Route ) and fill in some sample details:
- Route Title :
Riverfront Trail Loop - Distance :
8.5 km - Difficulty :
Moderate - Start Location :
Waterfront Pier 4
- Route Title :
- Click Save to Library .
- Now, schedule a run using this route by clicking the Schedule Run button directly on your new route card.
- Notice how the distance, difficulty, and location details are automatically filled in for you!
- Click Publish Run and verify that your new group run appears on the home feed.
5. Implement RSVPs and Member Invites
Community apps thrive on participation! You can let runners see who is attending an upcoming run, sign up with one click, and share an invite link with friends.
Ask the AI to add RSVPs and invites
In the chat prompt box, type the following request and press Enter :
Allow registered members to RSVP ("Join Run") to any upcoming run.
Show the list of attending runners on each run card, display an
attendee counter, and add a copyable invite link.
How the AI tracks attendees behind the scenes
To keep track of which runners are coming to each run, the AI automatically creates an rsvps table in your database. Think of this like a digital sign-up sheet that links a runner's name to a specific event.
(You don't need to write or edit this code—the AI manages this sign-up sheet in your database automatically!)
Test RSVPs and invites in the Preview
Once the AI finishes updating your app, test the new RSVP features in the live preview window:
- In the preview window, find an upcoming run on your home feed.
- Click the Join Run (or RSVP ) button.
- Confirm that your name and avatar appear in the Attending Runners section, and the attendee counter increases by 1.
- Click Copy Invite Link and verify that a shareable link is generated.
6. Test Data Persistence and Cloud SQL Scale-to-Zero
When building an app, the most important thing is knowing that your community's information is safe. If you refresh your browser, close the tab, or shut down your computer, you want all your saved routes, RSVPs, and discussions to still be there when you return.
In this step, you will test that your data is safely saved in your Cloud SQL database and learn how Google Cloud saves energy and costs when your app is quiet.
Test refreshing your app
- Click the Reload button inside the AI Studio preview window (or refresh your browser tab).
- Look at your app in the preview: notice that everything you created—your member profile, saved routes, scheduled runs, RSVPs, and comments—is still right where you left it!
- Your app didn't just store information temporarily on your screen; it securely stored it in your Cloud SQL database.
How Cloud SQL saves energy and cost ("Scale-to-zero")
What happens when nobody is using your running club app in the middle of the night?
- Automatic sleep ("Scale-to-zero") : When no one is visiting the app or signing up for runs, the database automatically pauses itself to conserve resources.
- Instant wake-up : As soon as a runner opens the app or clicks an invite link, the database wakes up instantly with all your saved information ready to go.
- Zero idle cost : Because it sleeps when inactive, you don't use up compute resources when the app is quiet.
7. Publish and Deploy to Cloud Run
Now that your Running Club app is built and tested in the preview, it's time to share it with your community! You don't need to purchase web hosting or configure servers—you can launch your app live to the internet with a single click.
Publish your app live to the web
- In the top-right corner of Google AI Studio, click the Publish button.
- A summary window appears confirming the details:
- Hosting : Hosted and deployed on Google Cloud Run.
- Connected services : Google Sign-In and your Cloud SQL database.
- Hosting : Hosted and deployed on Google Cloud Run.
- Click Publish to launch your app.
Open and share your live app
- When publishing is complete, Google AI Studio provides your live web address along with a QR code.
- Click the link to open your live web app in a new browser tab, or scan the QR code with your phone camera.
- Try it on your phone : Sign in on your phone, RSVP to one of the runs you scheduled earlier on your computer, and watch the attendee count update in real time—powered by your shared Cloud SQL database!
8. (Bonus) Inspect Your Resources in the Google Cloud Console
When Google AI Studio builds and deploys your app, it doesn't lock it inside a private black box—it creates real, production-ready Google Cloud services on your behalf. Think of the Google Cloud Console as the control center where you can view your live app and database.
Step 1: Open the Google Cloud Console
- In a new browser tab, open the Google Cloud Console .
- At the top of the screen, click the project drop-down menu and select the project created for your AI Studio app (its name usually starts with
continual-run-).
Step 2: See where your web app runs (Cloud Run)
- In the top search bar, type
Cloud Runand select it from the results. - Click on your app name (such as
running-club). - Here you can explore the engine that hosts your website:
- Metrics : Helpful graphs showing how many people are visiting your website.
- Logs : A live record of activity showing what happens when visitors interact with your app.
Step 3: See your database in action (Cloud SQL)
- In the top search bar, type
Cloud SQLand select it from the results. - Click on your PostgreSQL database instance.
- Here you can see your live database details, confirming that your database is active and ready to store your running club's data.
9. Clean up resources
If you built this app as a practice project, you can easily delete it. If you plan to keep using your Running Club app with your community, you can leave it running!
- In Google AI Studio , click My Apps in the left sidebar.
- Find your Running Club app.
- Click Delete App (or the trash icon). This turns off your live web page and removes the test database for you in one step.
۱۰. تبریک
You have built, customized, and published your first database-backed web app using Google AI Studio and Cloud SQL!
برای دریافت نشان Completed Builder Journey به این لینک مراجعه کنید!
برای ادامه سفرتان، برای آزمایشگاه بعدی به goo.gle/builders بروید.
کاری که شما انجام دادید
- Built an app with plain language : Created a complete community running club app with simple prompts.
- Enabled Google Sign-In : Set up secure login with Google Accounts automatically.
- Connected a real database : Stored routes, scheduled runs, RSVPs, and discussions safely in Cloud SQL.
- Added features conversationally : Built a route library and RSVP tracking simply by chatting with the AI.
- Published live to the web : Deployed your app to the internet with one click and tested it across devices.
- Looked under the hood : Explored how Google Cloud hosts your live web app and database.
قدم بعدی چیست؟
You can keep chatting with the AI in Google AI Studio to expand your app with new features:
- Interactive Maps : Prompt the AI to add map previews and GPS routes.
- Running Buddy Matching : Prompt the AI to suggest running partners with similar pace goals.
- Weather Forecasts : Prompt the AI to display weekend weather forecasts on upcoming run cards.
- Photo Sharing : Prompt the AI to allow runners to share photos after a group run.