
1. Introduction
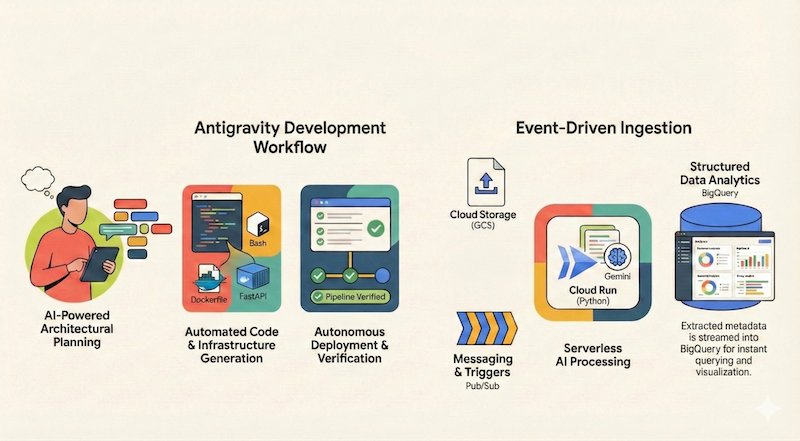
In this codelab, you will learn how to use Google Antigravity to design, build, and deploy a serverless application to Google Cloud. We will build a serverless and event-driven document pipeline that ingests files from Google Cloud Storage (GCS), processes them using Cloud Run and Gemini, and streams their metadata into BigQuery.
What you'll learn
- How to use Antigravity for architectural planning and design.
- Generate infrastructure as code (shell scripts) with an AI agent.
- Build and deploy a Python based Cloud Run service.
- Integrate Gemini on Vertex AI for multimodal document analysis.
- Verify the end-to-end pipeline using Antigravity's Walkthrough artifact.
What you'll need
- Google Antigravity installed.
- A Google Cloud Project with billing enabled.
- gcloud CLI installed and authenticated.
2. Overview of the app
Before we jump into architecting and implementing the application using Antigravity, let's first outline the application we want to build for ourselves.
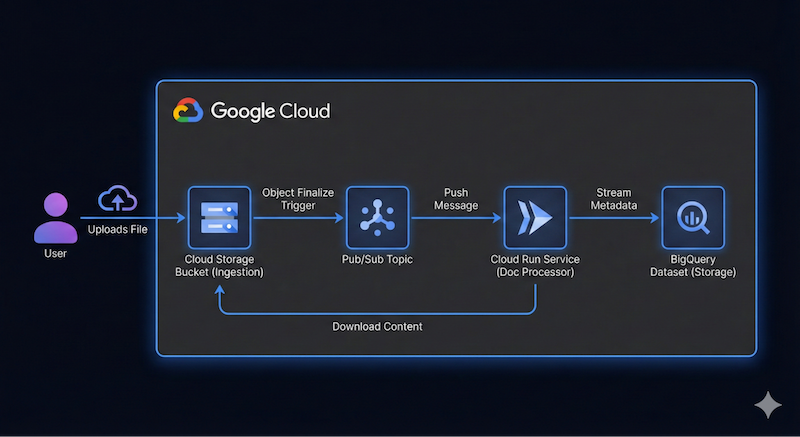
We want to build a serverless and event-driven document pipeline that ingests files from Google Cloud Storage (GCS), processes them using Cloud Run and Gemini, and streams their metadata into BigQuery.
A high level architecture diagram for this application could look like this:
This does not have to be precise. Antigravity can help us to figure out the architecture details as we go along. However, it helps to have an idea on what you want to build. The more detail you can provide, the better results you'll get from Antigravity in terms of architecture and code.
3. Plan the architecture
We are ready to get started planning the architecture details with Antigravity!
Antigravity excels at planning complex systems. Instead of writing code immediately, we can start by defining the high-level architecture and use one of the features to help Antigravity evaluate our request, ask us follow up questions and then proceed in its planning and implementation.
Assuming that you have launched Antigravity, we will be creating a new Project for this codelab.
Click on the new project icon next to the Projects lab and then New Project as shown below:

This will bring up the Add Folder option as shown below:
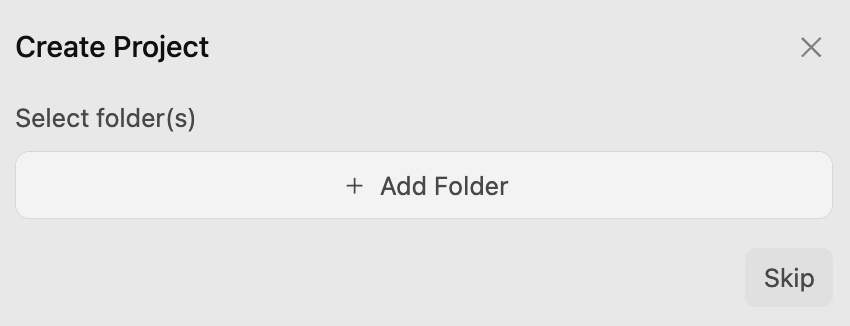
Click on the Add Folder button to add a folder to your project. On my machine I created a google-cloud-serverless-app folder and added that to this project.
This opens up a conversation in the google-cloud-serverless-app workspace.
Click on the main settings icon ⚙️in the left bottom of the screen and go to Project specific settings. Set the Agent Settings / Security Preset to Default and Agent Behaviour / Artifact Review Policy to Always Ask, as shown below:
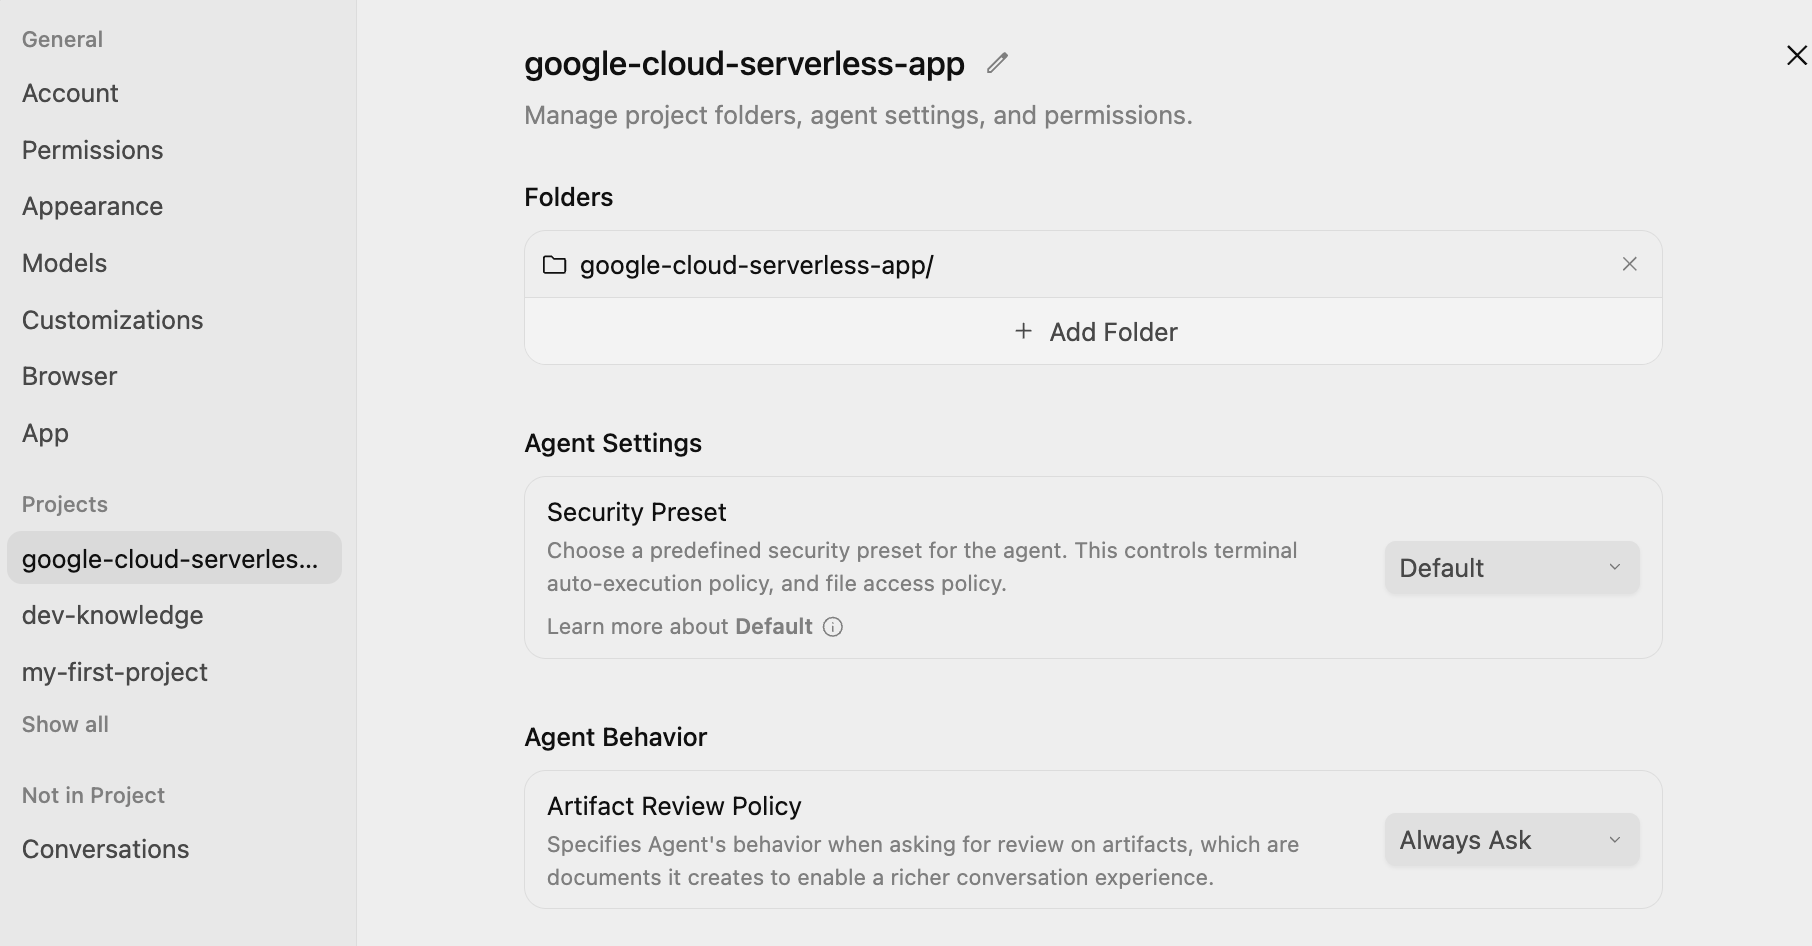
This will ensure that at every step, you will get to review, and approve the plan before the agent executes.
Prompt
Now, we're ready to provide our first prompt to Antigravity. We are going to be using a slash command /grill-me to evaluate our request.
Type /grill-me and then enter the following prompt and click submit button:
/grill-me

I want to build a serverless event-driven document processing pipeline on Google Cloud.
Architecture:
- Ingestion: Users upload files to a Cloud Storage bucket.
- Trigger: File uploads trigger a Pub/Sub message.
- Processor: A Python-based Cloud Run service receives the message, processes the file (simulated OCR), and extracts metadata.
- Storage: Stream the metadata (filename, date, tags, word_count) into a BigQuery dataset.
The /grill-me command asks a number of follow up questions that you can try to answer to the best of your knowledge. It also suggests Recommended Answers and you can go with that if you'd like.
A sample run of my /grill-me command is shown below:
How would you provision and manage the Google Cloud infrastructure resources (Cloud Storage buckets, Pub/Sub topics, BigQuery datasets, Cloud Run service)?
gcloud CLI Setup Script - Shell scripts running gcloud CLI commands to create resources step-by-step

How should the Cloud Storage upload events trigger and reach your Python Cloud Run service?
(Recommended) Native Cloud Storage Pub/Sub Notifications + Pub/Sub Push subscription to Cloud Run (direct, lightweight, standard event-driven approach)

Which Python web framework would you prefer for the Cloud Run processing service?
Flask (with Gunicorn) - Standard, lightweight, and very common for simple Cloud Run services

How should the OCR and metadata extraction logic be implemented in the Cloud Run service?
(Recommended) Full local simulation - If it's a .txt file, read the contents, count words, and extract tags. For other files, generate mock OCR metadata and simulated word count. No external API calls.

Which BigQuery insertion method should the Cloud Run service use to store metadata?
(Recommended) BigQuery table.insert_rows() (Legacy Streaming API) - Extremely simple to code, clean error handling, perfect for simulation and low-to-medium volumes.

How should security/authentication be configured for the Cloud Run service?
Unauthenticated Cloud Run - Allow public requests to the Cloud Run service URL (simpler setup, but insecure for production).


What schema would you like to define for the BigQuery metadata table?
(Recommended) Extended Schema - Include filename, bucket, size, content_type, word_count, tags (as a REPEATED STRING array), ocr_text_preview, and process_timestamp.

How should the Cloud Run service handle processing failures (e.g., file not found, BigQuery write error)?
(Recommended) Fail-Fast with Retry - Log error to standard output (Cloud Logging) and return HTTP 500 to Pub/Sub, so that Pub/Sub automatically retries the message delivery.

What testing tools should we generate to verify the pipeline's functionality?
(Recommended) Both - Include a local test script (sending mock Pub/Sub POST requests to the local Flask server) and a Cloud-integrated test script (uploading a real file to GCS and verifying BigQuery).
Notice that I went with asking Antigravity to go with:
- A simple gcloud CLI script to provision resources
- Native Cloud Storage Pub/Sub Notifications + Pub/Sub Push subscription to Cloud Run
- Use Flask (with Gunicorn) for the framework
- Just use local simulation with a text file for the data instead of live OCR data
- Use BigQuery table.insert_rows() to insert rows into BigQuery
- Unauthenticated Cloud Run deployment
and other recommended options.
Implementation Plan and Task List
Antigravity will now get to work and generate an Implementation Plan. It puts it up for your review by giving you a message similar to the one below:
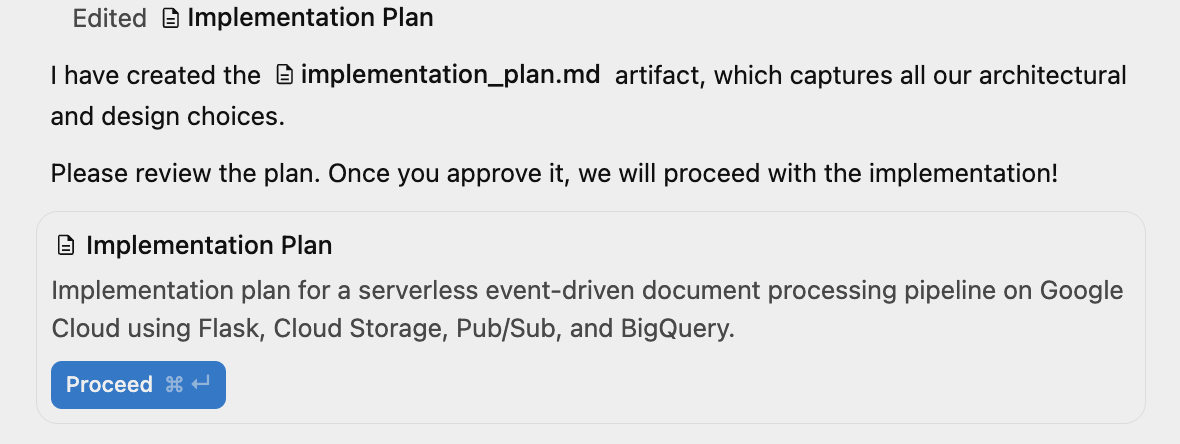
You can click on the Auxiliary Pane toggle in the top right window and view the Artifacts generated, which at this point is just the Implementation Plan.

This plan outlines:
- Infrastructure: GCS Bucket, Pub/Sub Topic, BigQuery Dataset.
- Processor: Python/Flask app, Dockerfile, Requirements.
- Integration: GCS Notifications → Pub/Sub → Cloud Run.
You should see something similar to the following. A partial listing of the implementation plan on our machine is shown below:
Event-Driven Document Processing Pipeline Implementation Plan
This implementation plan describes the components and setup scripts required to build a serverless event-driven document processing pipeline on Google Cloud.

User Review Required

Please review the proposed architecture, components, and default configuration. If you agree, please approve the plan so we can proceed with creating the files and implementation.

IMPORTANT
Security Notice: As requested, the Cloud Run service is configured to allow unauthenticated invocations (--allow-unauthenticated) for simpler testing and development.
Error Handling: The service returns an HTTP 500 error code for failures to trigger Pub/Sub retries.
GCP Configuration: The provisioning scripts will use standard environment variables (e.g., GCP_PROJECT, GCP_REGION) that default to the active configuration of your local gcloud CLI.
Proposed Components and Files

The project will be organized as follows:

google-cloud-serverless-app/
├── src/
│   ├── __init__.py
│   ├── app.py              # Flask app entrypoint and routes
│   ├── processor.py        # Simulated OCR and metadata extraction engine
│   ├── gcs_helper.py       # Helper functions to read files from Cloud Storage
│   └── bq_helper.py        # Helper functions to write metadata to BigQuery
├── requirements.txt         # Python dependencies
├── Dockerfile              # Docker configuration for Cloud Run
├── deploy.sh               # gcloud CLI provisioning and deployment script
├── test_local.sh           # Script to test the Flask app locally with mock Pub/Sub events
├── test_cloud.sh           # Script to upload a real file to GCS and query BigQuery
└── README.md               # Setup and execution guide
Give it a careful read. This is your chance to provide your feedback for the implementation. You can click on any part of the implementation plan and add comments. Once you add some comments, make sure to submit for review any changes that you would like to see, especially around naming, Google Cloud project id, region, etc.
Once it all looks fine, give the agent the permission to proceed with the implementation plan by clicking on the Proceed button.
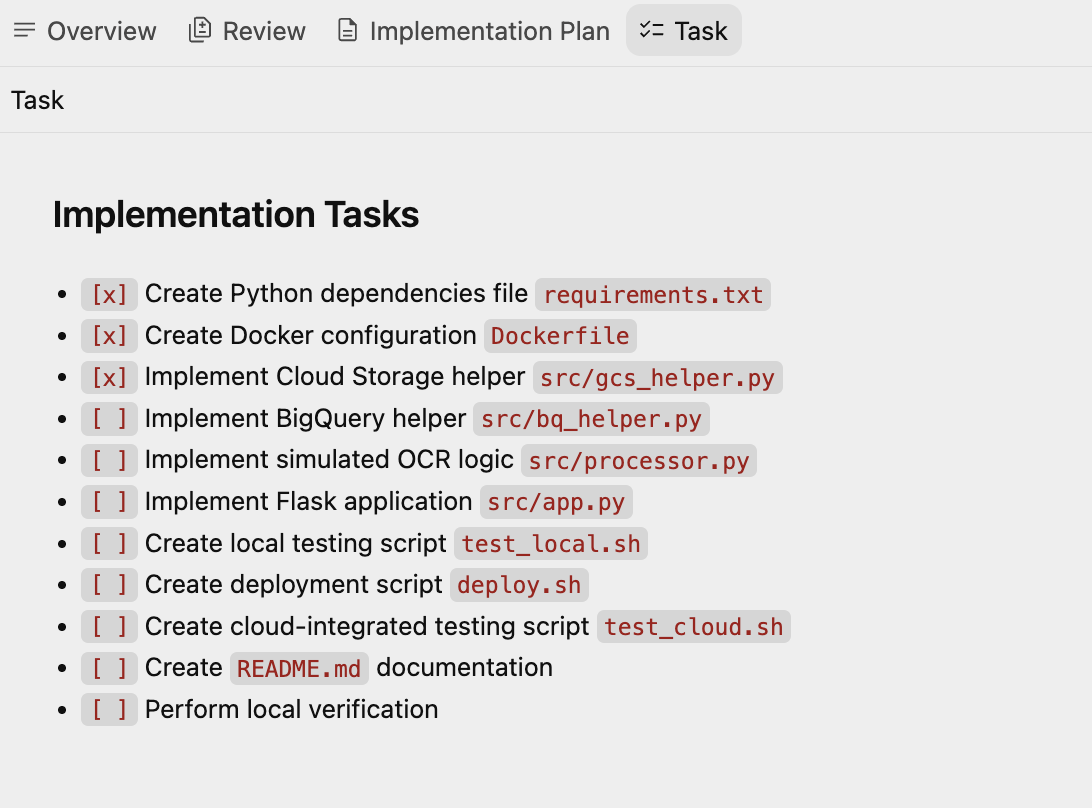
It now goes ahead with creating another artifact Task Plan, that contains a set of tasks that have been created by Antigravity. The agent will go through them one by one and execute them. A sample task list is shown below:
4. Generate the application
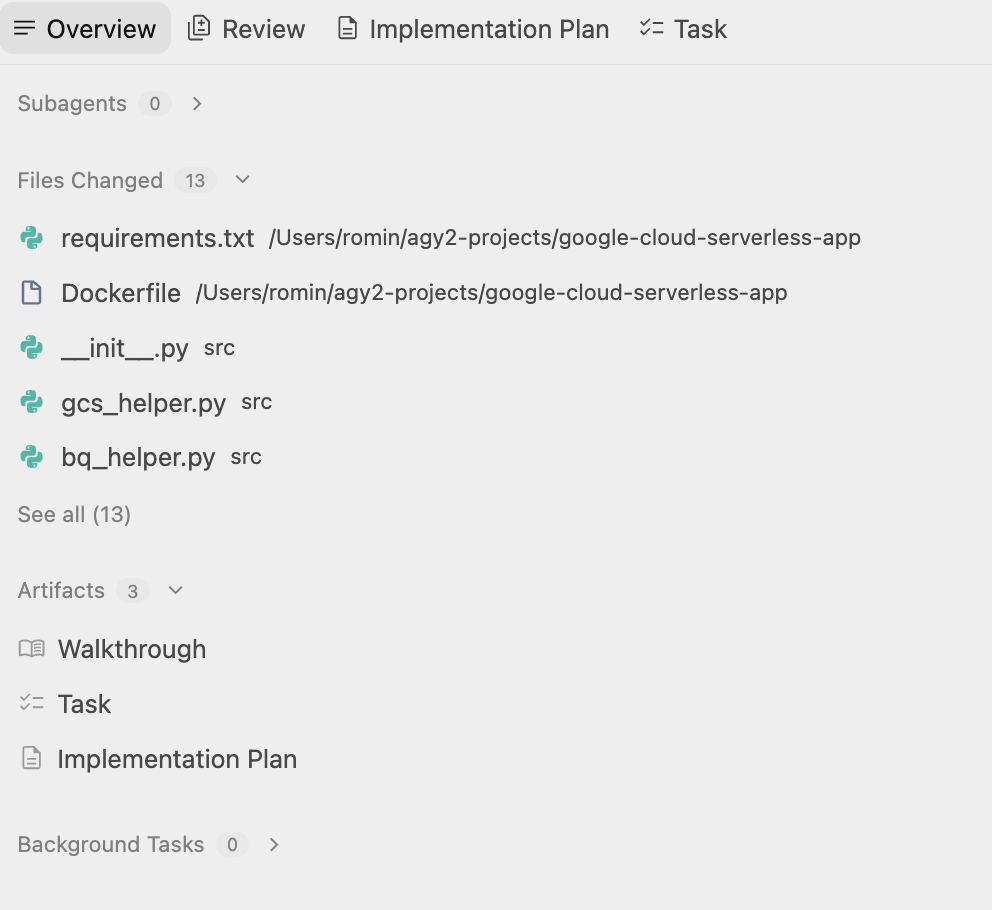
Once the plan is approved, Antigravity starts generating files required for the application, from provisioning scripts to application code.
Antigravity will create a folder and start creating the files necessary for the project. If you check on the Artifacts, you will notice several files (source code, script files, etc) being generated.
Once its completed its work, it will mention that and create a Walkthrough document that you can look at. In that it mentions the next step for the user, a sample is given below:
- Deploy the Pipeline: Ensure you have logged into your GCP CLI and set your target project, then run:
./deploy.sh - Run End-to-End Test: Execute the cloud integration test script to verify that a file upload triggers the Cloud Run processing and streams metadata to BigQuery:
./test_cloud.sh - Clean Up: Once you're done testing, reference the
README.mdclean-up commands to remove the created resources and avoid incurring charges.
You will find a deploy.sh or a similarly named shell script file is generated, which automates the resource creation. It handles:
- Enabling APIs (
run,pubsub,bigquery,storage). - Creating the Google Cloud Storage bucket (
document-processing-ingest-{project-id}). - Creating the BigQuery dataset and table (
document_processing.processed_metadata). - Configuring Pub/Sub topics and notifications.
5. Deploy the application
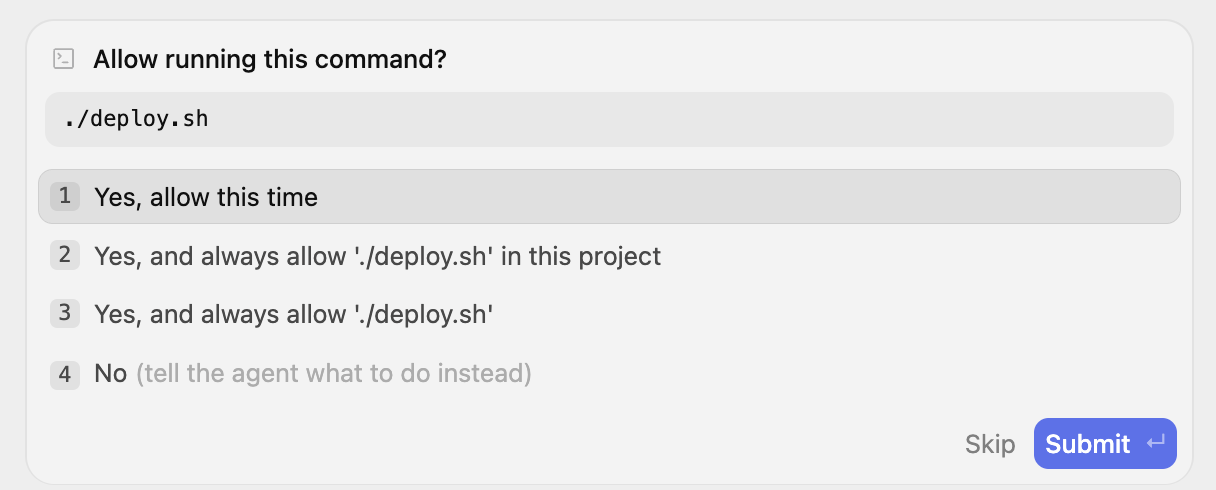
Let's deploy the application as mentioned via the ./ deploy.sh command. We can ask Antigravity to run this for us, but before we do that, ensure that gcloud CLI is present and configured for the Google Cloud Project.
We can give a prompt to Antigravity "Run the deploy.sh for me". This will prompt you for permission. Go ahead and give that.
It starts the process as a background task, as explained by the message below:
I have started the deployment process by running ./deploy.sh in the background. I will monitor the execution logs and let you know as soon as the deployment finishes!
6. Verify the application
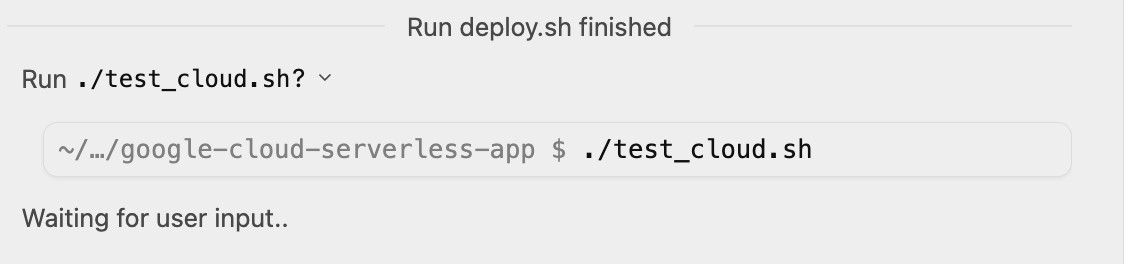
Once the pipeline is deployed, Antigravity goes ahead to verify that the application actually works. It asks us if it can run the test_cloud.sh file. We can go ahead and give it the permission.
It finally tells us the following:
I have successfully run both ./deploy.sh and ./test_cloud.sh.
The pipeline is fully deployed to your GCP project PROJECT_ID and working end-to-end.

Please refer to the walkthrough.md for full verification details and the query output from BigQuery showing the successfully processed document metadata.
We can open up the Walkthrough artifact to view the results:
Cloud Verification Results

The deployment and end-to-end cloud integration test (./test_cloud.sh) succeeded perfectly!
Resources Created:
GCS Bucket: gs://document-processing-ingest-gcp-experiments-349209
Pub/Sub Topic: document-uploads-topic
Pub/Sub Subscription: document-uploads-sub (pushing to Cloud Run)
Cloud Run Service: document-processor (URL: https://document-processor-ido3ocn3pq-uc.a.run.app)
BigQuery Dataset: document_processing
BigQuery Table: processed_metadata
Integration Test Run: A test file cloud_test_sample.txt was uploaded to the bucket. The pipeline processed the file and streamed the metadata record into BigQuery:
🔍 Querying BigQuery to verify metadata insertion...
<BIQUERY DATA HERE>

The pipeline successfully detected the hashtags #gcp and #serverless as tags, correctly counted the 47 words, generated the OCR preview, and wrote the entry to BigQuery under the schema.
Optional: Manual verification
Even though Antigravity already verified the application, you can also manually check in Google Cloud console that all the resources are created, if you wish, by following these steps.
Cloud Storage
Goal: Verify the bucket exists and check for uploaded files.
- Navigate to Cloud Storage > Buckets.
- Locate the bucket named
document-processing-ingest-{project-id}. - Click on the bucket name to browse files.
- Verify: You should see your uploaded files (e.g.,
cloud_test_sample.txt).
Pub/Sub
Goal: Confirm the topic exists and has a push subscription.
- Navigate to Pub/Sub > Topics.
- Find document-uploads-topic.
- Click on the topic ID.
- Scroll down to the Subscriptions tab.
- Verify: Ensure doc-uploads-sub is listed with "Push" delivery type.
Cloud Run
Goal: Check the service status and logs.
- Navigate to Cloud Run.
- Click on the service document-processor.
- Verify:
- Health: Green checkmark indicating the service is active.
- Logs: Click the Logs tab. Look for entries like "Processing file: gs://..." and "Successfully inserted...".
BigQuery
Goal: Validate the data is actually stored.
- Navigate to BigQuery > SQL Workspace.
- In the Explorer pane, expand your project > document_processing dataset.
- Click on the processed_metadata table.
- Click on the Query tab and retrieve all rows from the table via the SELECT * statement.
- Verify: You should see rows containing filename, process_timestamp, tags, and word_count.
7. Explore the application
At this point, you have the basic app provisioned and running. Before diving into extending this application further, take a moment to explore the code. You can view the Artifacts and it should show you the code files generated.
Here's a quick summary of the files you might see:
deploy.sh: The master script that provisions all Google Cloud resources and enables the required APIs.appy.py: The main entry point of the pipeline. This Python app creates a web server that receives Pub/Sub push messages, downloads the file from GCS, "processes" (simulates OCR) it, and streams the metadata to BigQuery.Dockerfile: Defines how to package the app into a container image.requirements.txt: Lists the Python dependencies.
You might also see other scripts and text files needed for testing and verification.
8. Extend the application
Now that you have a working basic application, you can continue iterating and extending the application. Here are some ideas.
Add a frontend
Build a simple web interface to view the processed documents.
Try the following prompt: Create a simple Streamlit or Flask web application that connects to BigQuery. It should display a table of the processed documents (filename, upload_date, tags, word_count) and allow me to filter the results by tag
Integrate with real AI/ML
Instead of simulated OCR processing, use Gemini models to extract, classify and translate.
- Replace the dummy OCR logic. Send the image/PDF to Gemini to extract actual text and data. Analyze the extracted text to classify the document type (invoice, contract, resume) or extract entities (dates, names, locations).
- Automatically detect the language of the document and translate it to English before storing it. You can use any other language too.
Enhance storage & analytics
You can configure lifecycle rules on the bucket to move old files to "Coldline" or "Archive" storage to save costs.
Robustness & Security
You can make the app more robust and secure such as:
- Dead Letter Queues (DLQ): Update the Pub/Sub subscription to handle failures. If the Cloud Run service fails to process a file 5 times, send the message to a separate "Dead Letter" topic/bucket for human inspection.
- Secret Manager: If your app needs API keys or sensitive config, store them in Secret Manager and access them securely from Cloud Run instead of hardcoding strings.
- Eventarc: Upgrade from direct Pub/Sub to Eventarc for more flexible event routing, allowing you to trigger based on complex audit logs or other GCP service events.
Of course, you can come up with your own ideas and use Antigravity to help you to implement them!
9. Conclusion
You have successfully built a scalable, serverless, AI-powered document pipeline in minutes using Google Antigravity. You learned how to:
- Plan architectures with AI.
- Instruct and manage Antigravity as it works through generating the application from code generation to deployment and validation.
- Verify deployments and validation with Walkthroughs.
Reference docs
- Official Site : https://antigravity.google/
- Documentation: https://antigravity.google/docs
- Use cases : https://antigravity.google/use-cases
- Download : https://antigravity.google/download