

১. শুরু করার আগে
সফটওয়্যার ডেভেলপমেন্টের বিবর্তন ঘটেছে। সবচেয়ে সফল ডেভেলপাররা শুধু কোডই লেখেন না; তাঁরা আরও ভালো এবং দ্রুত কিছু তৈরি করার জন্য এআই টুল এবং এজেন্টগুলোকে সমন্বিতভাবে ব্যবহার করেন। গুগলের টুলস ইকোসিস্টেম সম্পূর্ণ লাইফসাইকেলের জন্য একটি ব্যাপক স্যুট প্রদান করে: ইউআই জেনারেশন, অ্যাপ প্রোটোটাইপিং এবং ডেপ্লয়মেন্ট, এআই ফিচার ডেভেলপমেন্ট, এবং নিরাপদ ও স্কেলেবল ব্যাকএন্ড ইন্টিগ্রেশন। এই কোডল্যাবে, আপনি ইউআই ডিজাইন করার জন্য গুগল স্টিচ , ভাইব কোড ও অ্যাপ ডেপ্লয় করার জন্য গুগল এআই স্টুডিও , এবং এআই ফিচার ডেভেলপ করতে ও একটি নিরাপদ ও স্কেলেবল ব্যাকএন্ডে তথ্য সংরক্ষণ করতে ফায়ারবেস ব্যবহার করবেন।
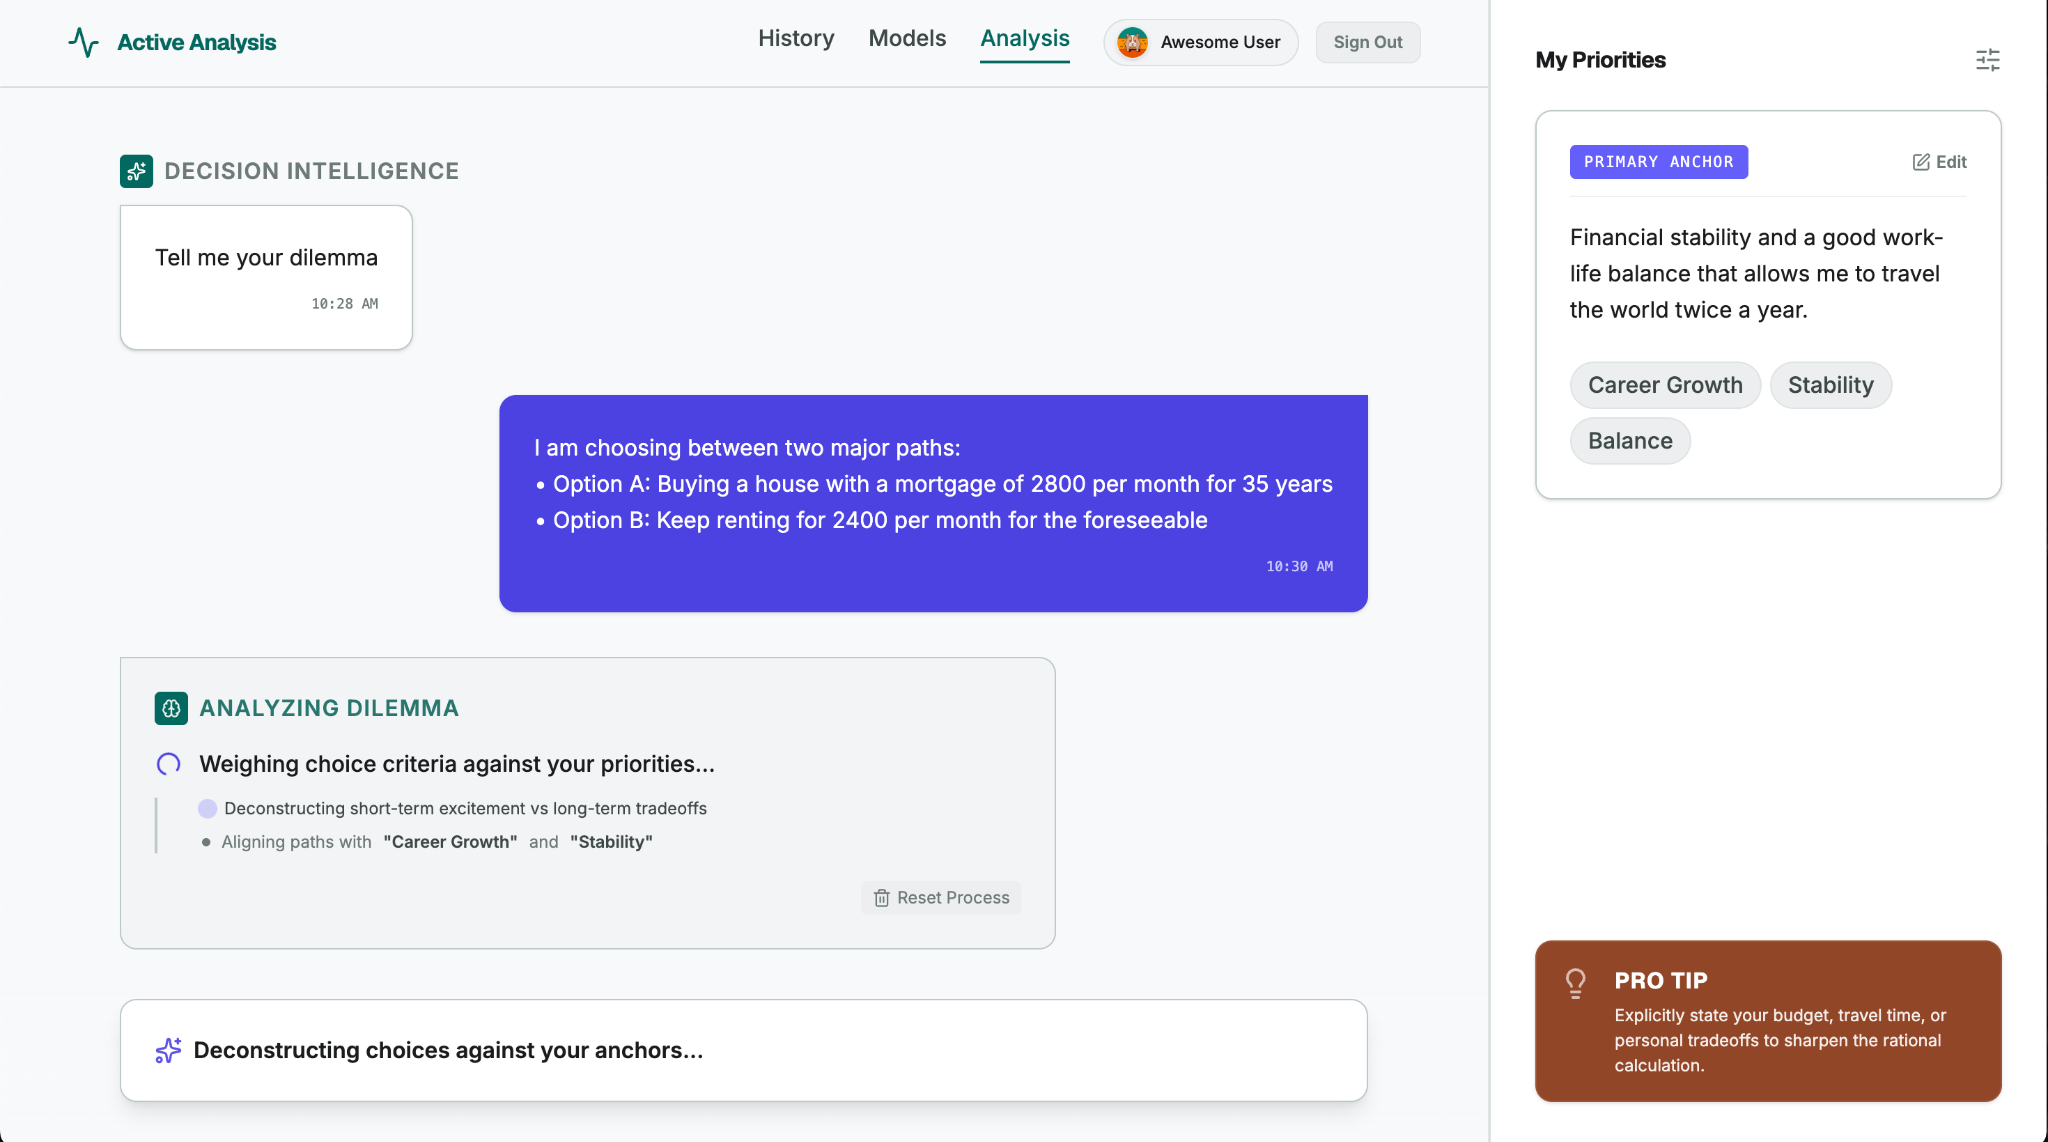
এই কোডল্যাবে আপনি যে অ্যাপটি তৈরি করতে চলেছেন তার নাম ‘ডিসাইড ফর মি’ — এটি এমন একটি সিদ্ধান্ত-সহায়ক যা জীবনের গুরুত্বপূর্ণ সিদ্ধান্ত গ্রহণকারী (যেমন বাসা বদলানো, পেশা পরিবর্তন বা কোনো শখ বেছে নেওয়া) ব্যক্তিদের সাহায্য করে। ব্যবহারকারী তার জীবনের একটি দ্বিধা এবং অগ্রাধিকারগুলো উল্লেখ করেন, এবং অ্যাপটি কৃত্রিম বুদ্ধিমত্তা (AI) ব্যবহার করে ব্যবহারকারীকে এমন একটি সিদ্ধান্ত নিতে সাহায্য করে যা দীর্ঘমেয়াদী হতাশাকে সর্বনিম্ন রাখে। অ্যাপটি ব্যবহারকারীকে একটি সুনির্দিষ্ট প্রথম পদক্ষেপও বলে দেয়। আপনার অ্যাপের চূড়ান্ত সংস্করণটি এর অনুরূপ হওয়া উচিত:
আপনি যা শিখবেন
- গুগল স্টিচ দিয়ে UI ডিজাইন করুন।
- গুগল এআই স্টুডিও ব্যবহার করে একটি ওয়েব অ্যাপ কোড করুন।
- এআই ফিচার তৈরি করতে এবং ক্লাউডে তথ্য সংরক্ষণ করতে ফায়ারবেস ব্যবহার করুন।
- Google AI Studio (Cloud Run দ্বারা চালিত) ব্যবহার করে একটি ওয়েব অ্যাপ প্রোডাকশনে ডেপ্লয় করুন।
২. স্টিচ দিয়ে UI ডিজাইন করুন
- মকআপ ছবিটি (
DecideForMeScreen.jpeg) ডাউনলোড করুন। এটি আপনার স্থানীয় এমন একটি ফোল্ডারে সংরক্ষণ করুন যেখানে আপনি এটি খুঁজে পেতে পারেন। - Stitch- এ যান, ইনপুট ফিল্ডটি খুঁজুন এবং ওয়েব অপশনটি নির্বাচন করুন। (এই কোডল্যাবের জন্য, আপনি ওয়েব অভিজ্ঞতার উপর মনোযোগ দেবেন, কিন্তু আপনি মোবাইল স্ক্রিন তৈরি করতেও Stitch ব্যবহার করতে পারেন।)
- মকআপ ছবিটি আপলোড করুন:
- + (যোগ করুন বোতাম)-এ ক্লিক করুন।
- ফাইল আপলোড নির্বাচন করুন।
- সেটআপ ধাপে ডাউনলোড করা ছবিটি (
DecideForMeScreen.jpeg) সংযুক্ত করুন। এই হাতে আঁকা মকআপটি আপনাকে স্টিচ-এর মাল্টিমোডাল সক্ষমতা পরীক্ষা করতে সাহায্য করবে।
- নিচের প্রম্পটটি কপি করে ইনপুট ফিল্ডে পেস্ট করুন:
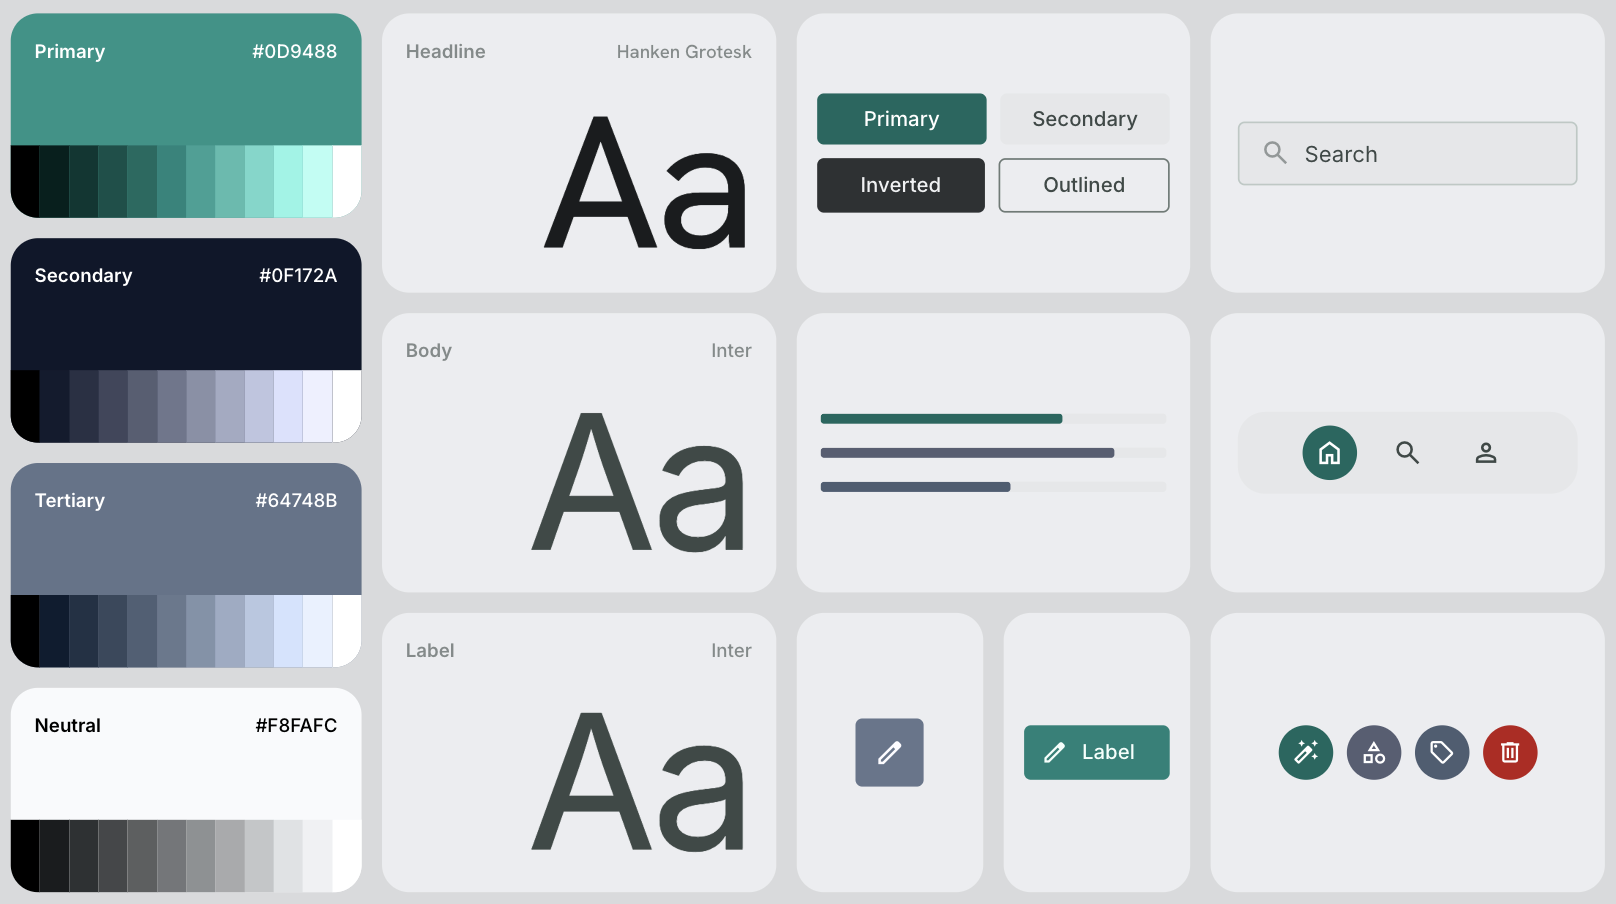
# General Guidance Create a modern, clean, and highly polished UI for a web application called "Decide For Me" - a hyper-rational decision assistant. CRITICAL: Replicate the exact layout, structure, and element placement shown in the hand-drawn mockup file DecideForMeScreen.jpeg. Do not add any extra menus, sidebars, buttons, or top/bottom navigation bars that are not explicitly drawn in the file. Stick strictly to the skeleton provided in the mockup. # Layout & Structure - Two-Column Split Screen: - Left Side (Main Chat Area): Takes up roughly 70-75% of the screen width. It should feel like a premium, focused workspace. - Right Side (Configuration Panel): A sidebar taking up 25-30% of the screen width with a distinct, subtle background color to separate it from the chat. # Right Panel: Configuration Screen - Header: Title it "My Priorities" with a clean, minimalist typography. - Content Card: A styled card containing a text box or paragraph area showcasing the user's priorities. - Interactions: Include a clear "Edit Priorities" button. When clicked, this area should visually toggle into an editable textarea or input field. # Left Panel: Chat & Dilemma Decision Screen - Chat History: A clean vertical flow of message bubbles. - The first message bubble must be aligned to the left (system message) and say: "Tell me your dilemma". Use a friendly, neutral background color for this bubble. - Bottom Input Area: Instead of a traditional single-line chat bar, create a unified, beautiful "Decision Submission" layout positioned at the bottom: - Dual Input Fields: Place two horizontal or cleanly stacked input fields. - Input 1 label: "Option A" - Input 2 label: "Option B" - Action Button: A prominent, styled "Go" action button to trigger the reasoning loop. # Theme & Aesthetic - Vibe: Hyper-rational, clean, trustworthy, and modern. Use a sophisticated color palette (e.g., deep slates, clean whites/grays, and a sharp accent color like a subtle indigo or teal for active states and buttons). - Spacing & Typography: Use generous whitespace, soft rounded corners (border-radius) for cards and buttons, and a highly legible sans-serif font. - ইনপুট ফিল্ডের নিচের-ডান কোণায় থাকা জেনারেট অ্যারোটিতে ক্লিক করুন। স্টিচ স্ক্রিন এবং একটি সম্পূর্ণ ডিজাইন সিস্টেম তৈরি করে দেবে, যার মধ্যে থাকবে কালার প্যালেট, ফন্ট অপশন, আইকনোগ্রাফি এবং UI এলিমেন্টগুলোর সামগ্রিক রূপ।
৩. গুগল এআই স্টুডিও দিয়ে অ্যাপটি তৈরি করুন।
- Stitch-এ তৈরি করা স্ক্রিনটি Google AI Studio-তে এক্সপোর্ট করুন:
- Stitch-এ তৈরি হওয়া ডিজাইনটিতে ক্লিক করুন।
- স্ক্রিনের উপরের ডান কোণায় থাকা এক্সপোর্ট বাটনে ক্লিক করুন।
- নিশ্চিত করুন যে নির্বাচিত বিকল্পটি গুগল এআই স্টুডিও ।
- Description ফিল্ড পর্যন্ত স্ক্রোল করুন।
- নিচের প্রম্পটটি কপি করে Description ফিল্ডে পেস্ট করুন:
# General Guidance Build the "Decide For Me" app: A hyper-rational decision assistant for chronically indecisive people facing life choices (moving apartments, changing careers, picking a hobby). The user enters a dilemma and their top priorities in life. The app will help with the decision. Follow the instructions below to build it: # UI Instructions Using the design artifacts exported from Stitch (the PNG image and HTML file), build a fully functional web application that accurately mirrors the design and layout. # App Architecture & Initialization Instructions - Initialize the Firebase JS SDK for client-side services. - Set up Firebase Authentication using the Google provider. If a user is not logged in, show a clean, minimalist sign-in state. If the user is logged in, take them directly to the dilemma decision screen. - Initialize Firebase App Check in debug mode (`self.FIREBASE_APPCHECK_DEBUG_TOKEN = true`) without a ReCaptchaV3Provider (we will add that later). # State & Database Management Instructions - User Priorities: - Once authenticated, pull the user's saved priorities from Firebase Firestore at the path: `users/{userId}`. Each document should contain one string field: 'priorities'. - Bind this data to the Right Panel ("My Priorities"). - When the user clicks the "Edit" button, toggle the view to a textarea, with a 'save' button. When saved, write the updated string back to `users/{userId}`. - Make sure to implement and deploy strong Security Rules for Firestore. # UI Stream Update & Display Instructions - Once the user submits option A and option B in the dilemma decision screen, display both options as a single message on the user side of the chat. Then, display a sleek loading state in the main chat panel. Leave the app in this "loading" state and do nothing else, we will process both options and build the server-side thinking later. - "Build with Google AI Studio"- তে ক্লিক করুন। এটি একটি নতুন ট্যাবে Google AI Studio খুলবে এবং আপনার ডিজাইন ফাইল ও নির্দেশাবলী স্থানান্তর করবে।
- প্রম্পটটি সম্পূর্ণরূপে স্থানান্তরিত হয়েছে কিনা তা নিশ্চিত করুন।
- যদি আপনি প্রম্পটের কেবল অংশবিশেষ দেখতে পান, তবে সম্পূর্ণ প্রম্পটটি আবার পেস্ট করুন।
- বিল্ড-এ ক্লিক করুন। গুগল এআই স্টুডিও আপনার দেওয়া নির্দেশনা এবং ইউআই ডিজাইন অনুযায়ী ডিসাইড ফর মি অ্যাপটি তৈরি করা শুরু করবে:
- তৈরি করার সময় এটি বিকল্প UI ডিজাইনের পরামর্শ দেয় (এই কোডল্যাবের জন্য এই ডিজাইনগুলো উপেক্ষা করুন, তবে ভবিষ্যতে আপনি ভিন্ন ডিজাইন বেছে নিতে পারেন)।
- Firebase চালু করতে বলা হলে, 'Enable'-এ ক্লিক করুন।
- তৈরি করা অ্যাপটি পরিদর্শন ও যাচাই করুন:
- প্রিভিউ ট্যাবে অ্যাপটি পরীক্ষা করুন।
- তৈরি হওয়া সমস্ত ফাইল ও কোড পর্যালোচনা করতে কোড ট্যাবে যান।
- গুগল এআই স্টুডিও একটি ফায়ারবেস প্রজেক্টও তৈরি করেছে, ফায়ারবেস অথেনটিকেশন ও ফায়ারস্টোর সক্রিয় করেছে এবং আপনার কোডবেসে ফায়ারবেস কনফিগার করেছে। এই কোডল্যাবের পরবর্তী ধাপে আপনি এই ফায়ারবেস প্রজেক্টটি অ্যাক্সেস করবেন এবং এটি নিয়ে কাজ করবেন।
৪. আপনার অ্যাপ নিবন্ধন করুন ডিবাগ টোকেন পরীক্ষা করুন
যখন গুগল এআই স্টুডিও অ্যাপটি তৈরি করে, তখন এটি একটি ফায়ারবেস প্রজেক্ট তৈরি করে এবং আপনার অ্যাপটিকে এর সাথে সংযুক্ত করে। আপনাকে এই ফায়ারবেস প্রজেক্টটি অ্যাক্সেস করতে হবে এবং ফায়ারবেস অ্যাপ চেক নামক একটি গুরুত্বপূর্ণ নিরাপত্তা পরিষেবার সাথে আপনার ডেভেলপমেন্ট এনভায়রনমেন্টটি রেজিস্টার করতে হবে।
আপনার ফায়ারবেস প্রজেক্ট অ্যাক্সেস করুন
- Google AI Studio দ্বারা তৈরি Firebase প্রজেক্টের প্রজেক্ট আইডিটি খুঁজুন:
- Google AI Studio-এর কোড ট্যাবে যান।
-
firebase-applet-config.jsonফাইলটি খুলুন। -
projectIdফিল্ডের মানটি কপি করুন।
- ফায়ারবেস কনসোলে যান এবং এই আইডি ব্যবহার করে প্রজেক্টটি অনুসন্ধান করুন।
আপনার ডিবাগ টোকেন নিবন্ধন করুন
আপনার অ্যাপ Firebase App Check ব্যবহার করে তার ব্যাকএন্ড পরিষেবা এবং এআই মডেলগুলোকে অপব্যবহার থেকে রক্ষা করতে পারে, যা নিশ্চিত করে যে আগত ট্র্যাফিক শুধুমাত্র বৈধ অ্যাপ থেকেই আসছে।
যেহেতু আপনার অ্যাপটি গুগল এআই স্টুডিও প্রিভিউ এনভায়রনমেন্টে চলছে, তাই এটি অ্যাপ চেক ডিবাগ প্রোভাইডার ( self.FIREBASE_APPCHECK_DEBUG_TOKEN = true ) ব্যবহার করে। যখন ওয়েব অ্যাপটি লোড হয়, ফায়ারবেস স্বয়ংক্রিয়ভাবে আপনার ব্রাউজারের ডেভেলপার কনসোলে একটি ডিবাগ টোকেন আউটপুট করে।
- আপনার ডিবাগ টোকেনটি খুঁজুন:
- Google AI Studio-তে, আপনার অ্যাপ প্রিভিউ দেখার সময় ব্রাউজারের ডেভেলপার টুলস খুলুন:
- ক্রোম, এজ বা ফায়ারফক্স: F12 চাপুন (অথবা প্রিভিউয়ের যেকোনো জায়গায় রাইট-ক্লিক করে ‘Inspect’ নির্বাচন করুন), এবং তারপর ‘Console’ ট্যাবটি নির্বাচন করুন।
- macOS: Cmd+Option+I চাপুন এবং তারপর Console ট্যাবটি নির্বাচন করুন।
- কনসোল লগগুলিতে, অ্যাপ চেক ডিবাগ বার্তাটি খুঁজুন:
AppCheck debug token: "123a4567-b89c-12d3-e456-789012345678". You will need to safelist it in the Firebase console for it to work. - টোকেন স্ট্রিংটি (উদ্ধৃতি চিহ্ন ছাড়া) কপি করুন।
- Google AI Studio-তে, আপনার অ্যাপ প্রিভিউ দেখার সময় ব্রাউজারের ডেভেলপার টুলস খুলুন:
- আপনার ডিবাগ টোকেন নিবন্ধন করুন:
- Firebase কনসোলে, Security > App Check > Apps ট্যাবে যান।
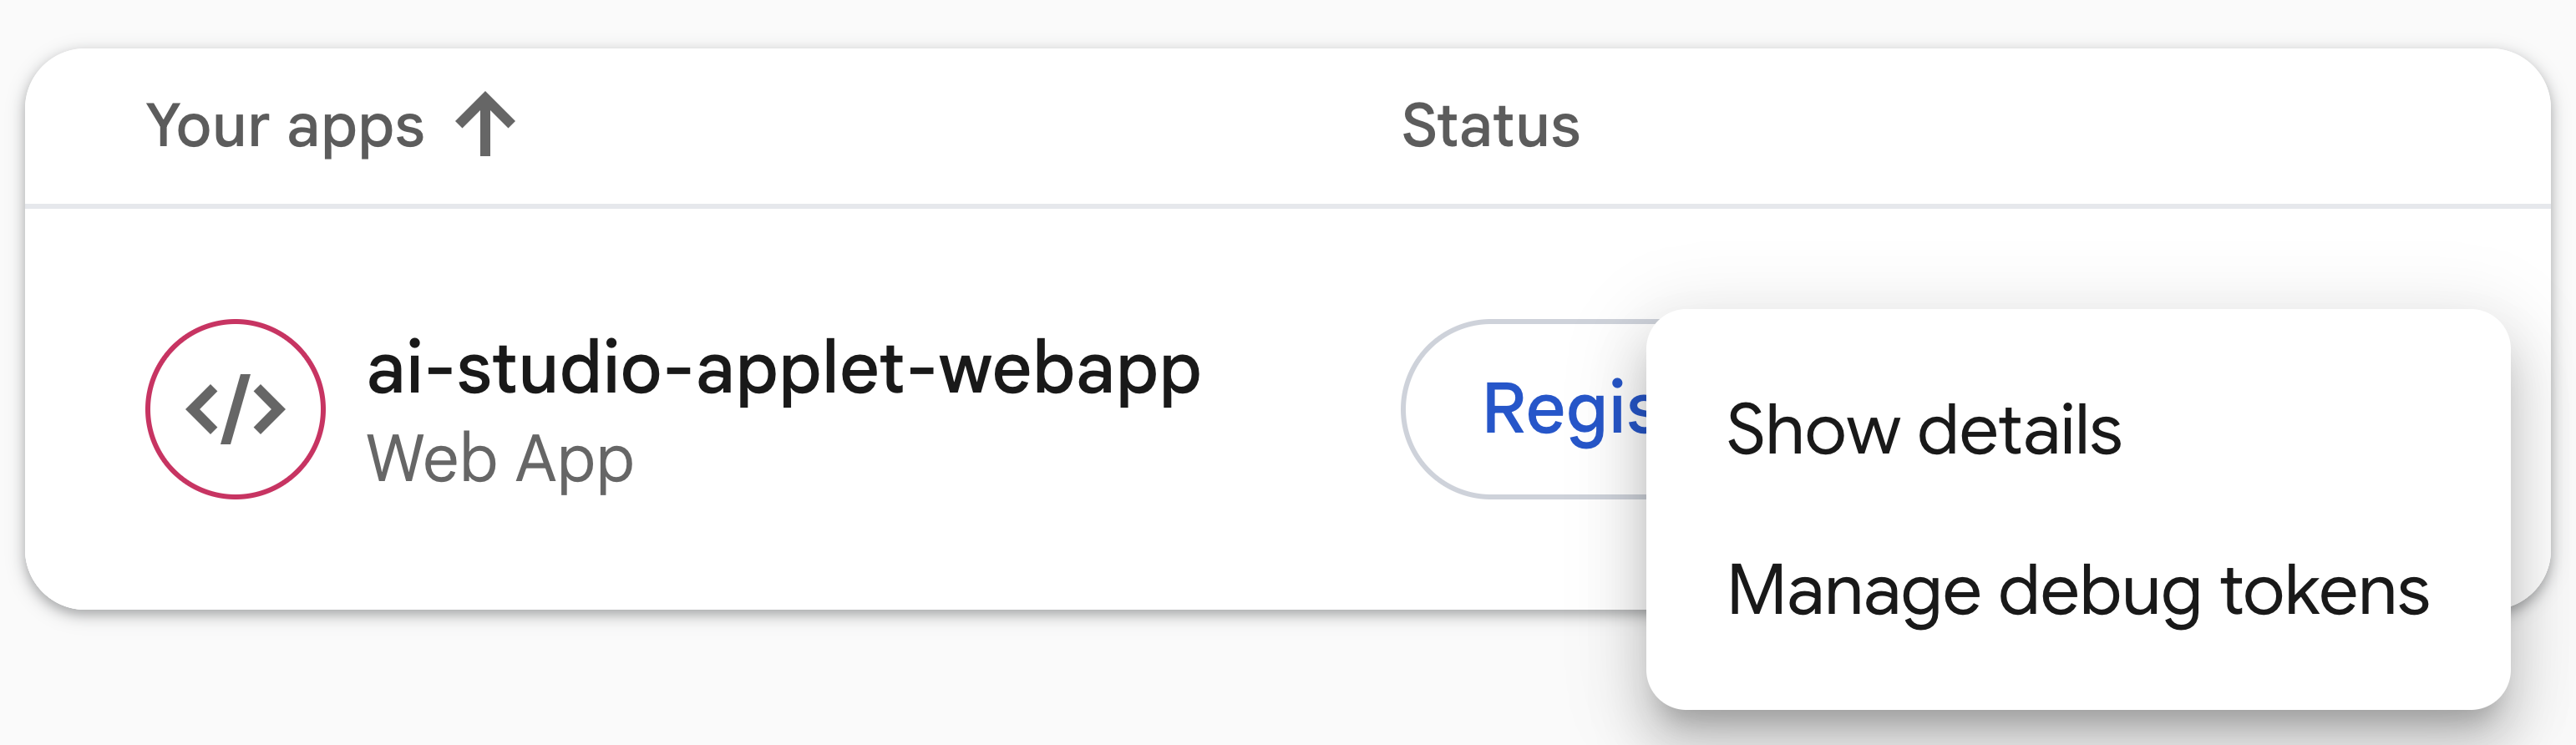
- তালিকা থেকে আপনার ওয়েব অ্যাপটি খুঁজুন, তিন-বিন্দু মেনুতে ( ⋮ ) ক্লিক করুন এবং ‘Manage debug tokens’ নির্বাচন করুন।
- 'Add debug token'-এ ক্লিক করুন, আপনার কপি করা টোকেনটি পেস্ট করুন,
Google AI Studio Previewএর মতো একটি নাম লিখুন এবং 'Save'-এ ক্লিক করুন।
৫. অ্যাপটি পরীক্ষা করুন
এখন যেহেতু আপনার প্রজেক্টটি সংযুক্ত হয়েছে এবং আপনার ডিবাগ টোকেনটি অ্যাপ চেক-এ নিবন্ধিত হয়েছে, তাই বেসলাইন ফিচারগুলো—অথেনটিকেশন এবং ফায়ারস্টোর—পরীক্ষা করুন।
- ব্যবহারকারীর প্রমাণীকরণ পরীক্ষা করুন এবং অগ্রাধিকারগুলি সংরক্ষণ করুন:
- Google AI Studio-তে Decide For Me অ্যাপ প্রিভিউতে, একটি Google অ্যাকাউন্ট দিয়ে সাইন ইন করে অথেনটিকেশন স্ক্রিনটি পরীক্ষা করুন।
- ডানদিকের প্যানেল ( আমার অগ্রাধিকার ) ব্যবহার করে আপনার জীবনের অগ্রাধিকারগুলো সংরক্ষণ করুন।
- ফায়ারবেস কনসোলে প্রমাণীকরণ যাচাই করুন:
- Firebase কনসোলে যান এবং Authentication খুলুন।
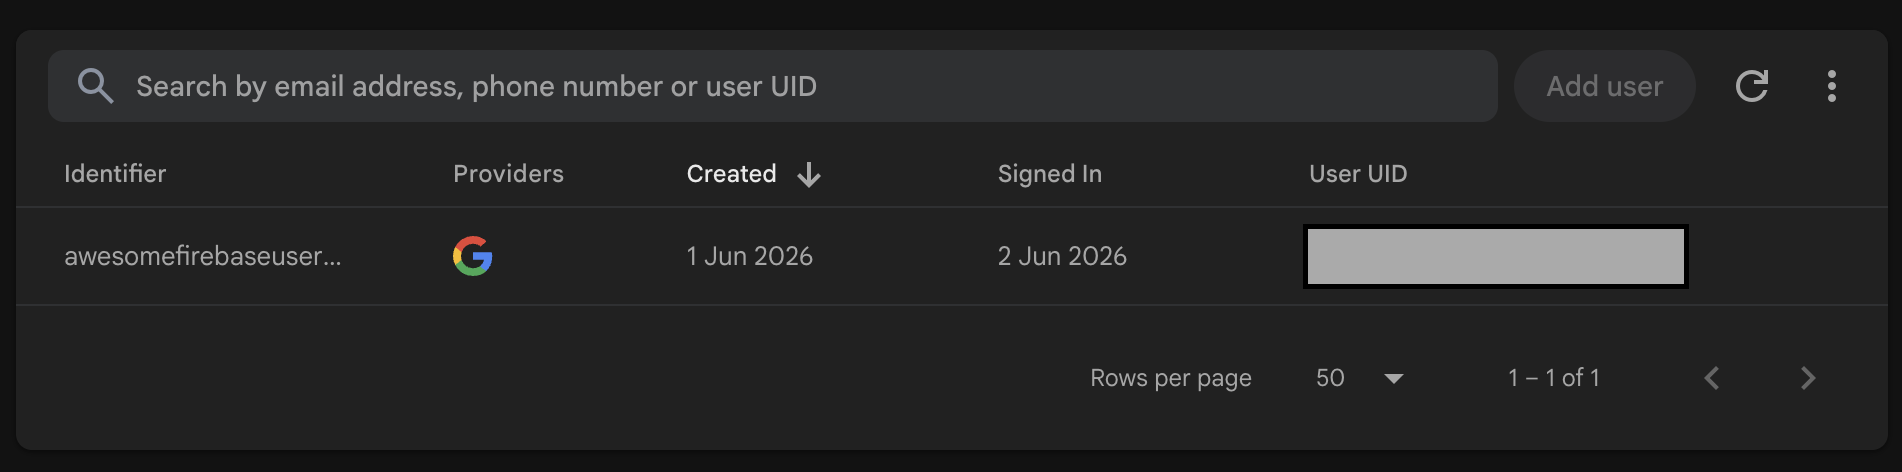
- Decide For Me অ্যাপে প্রমাণীকরণের জন্য আপনি যে Google অ্যাকাউন্টটি ব্যবহার করেছেন, সেটি সেখানে তালিকাভুক্ত আছে কিনা তা নিশ্চিত করুন:
- ফায়ারস্টোর ডেটা স্টোরেজ যাচাই করুন:
- Firebase কনসোলে Firestore খুলুন।
- নিশ্চিত করুন যে আপনার অগ্রাধিকারগুলি
users/{userId}পাথের অধীনে একটি ডকুমেন্টে সংরক্ষিত আছে:
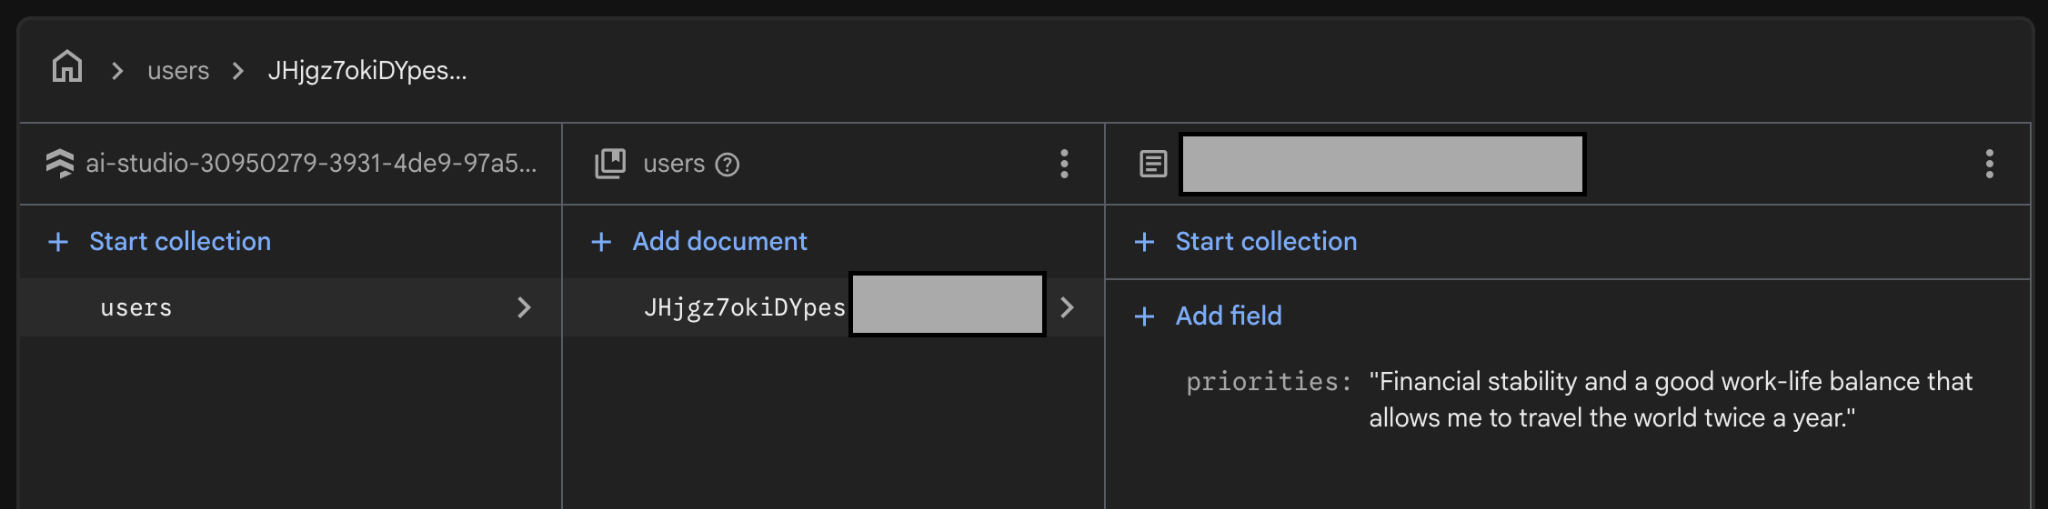
৬. ফায়ারবেস ব্যবহার করে একটি এআই-চালিত ডিসাইডার ফ্লো তৈরি করুন।
আপনার অ্যাপ তার 'ডিসাইড ফর মি' অ্যাকশনগুলো পরিচালনা করতে এআই ব্যবহার করবে। আপনি এই এআই-চালিত ডিসাইডার ফ্লোটি তৈরি করতে ফায়ারবেস ব্যবহার করতে পারেন।
ফায়ারবেস এআই লজিক সেট আপ করুন
- Firebase AI Logic-এ Gemini Developer API সক্রিয় করুন:
- Firebase কনসোলে Firebase AI Logic খুলুন এবং তারপরে 'Get started'-এ ক্লিক করুন।
- Gemini Developer API নির্বাচন করুন এবং API-টি সক্রিয় করতে কনসোলের নির্দেশাবলী অনুসরণ করুন।
- ফায়ারবেস এআই লজিক সেটিংস কনফিগার করুন:
- সেটিংস ট্যাবে যান।
- ‘Enforce template-only mode’ অপশনটি ‘Enforced’- এ টগল করুন।
- ‘Enforce authenticated-users mode’ অপশনটি ‘Enforced’- এ টগল করুন।
একটি সার্ভার প্রম্পট টেমপ্লেট তৈরি করুন
এই কোডল্যাবে, আপনি Firebase AI Logic-এর মাধ্যমে Gemini API-এর সাথে যোগাযোগের জন্য সার্ভার প্রম্পট টেমপ্লেট ব্যবহার করবেন।
টেমপ্লেটটি নিয়ে কাজ শুরু করার আগে, মডেল কনফিগারেশন, সিস্টেম নির্দেশনা এবং প্রম্পটগুলো সার্ভার-সাইডে সংরক্ষণ করা কেন গুরুত্বপূর্ণ, তা বোঝার জন্য নিম্নলিখিত বিষয়গুলো পর্যালোচনা করুন:
- মেধাস্বত্ব সুরক্ষা: ক্লায়েন্ট ডিভাইস থেকে প্রম্পটগুলো সংগ্রহ করে এবং ব্যাকএন্ডে সেগুলোকে সুরক্ষিত রাখে।
- প্রম্পট ইনজেকশন আক্রমণ প্রতিরোধ: ক্লায়েন্ট শুধুমাত্র ব্যাকএন্ড স্কিমা যাচাইকরণের মাধ্যমে নির্দিষ্ট ভেরিয়েবল পূরণ করতে পারে।
- অ্যাপ রিলিজ ছাড়াই আপডেট করা: আপনি নতুন কোনো অ্যাপ সংস্করণ প্রকাশ না করেই কনসোল থেকে প্রম্পট, সিস্টেম নির্দেশনা এবং মডেল কনফিগারেশন আপডেট করতে পারেন।
যেভাবে একটি সার্ভার প্রম্পট টেমপ্লেট তৈরি ও পরীক্ষা করবেন:
- সার্ভার প্রম্পট টেমপ্লেট তৈরি করুন:
- প্রম্পট টেমপ্লেট ট্যাবে যান।
- টেমপ্লেট তৈরি করুন -এ ক্লিক করুন।
- খালি টেমপ্লেট নির্বাচন করুন।
- নিম্নলিখিত তথ্য ব্যবহার করে আপনার প্রথম টেমপ্লেটটি তৈরি করুন:
- টেমপ্লেটের নাম: ডিসাইডার ফ্লো
- টেমপ্লেট আইডি:
decider-flow - কনফিগারেশন (ফ্রন্টম্যাটার)
model: "gemini-3.5-flash-lite" input: schema: priorities: "string, user's core priorities" optionA: "string, option A under consideration" optionB: "string, option B under consideration" output: format: json schema: verdict: string justification: string firstStep: string - প্রম্পট এবং (ঐচ্ছিক) সিস্টেম নির্দেশাবলী
{role "system"} You are the Decider Agent, a multi-stage reasoning engine that combines the roles of an honest and polite behavioral economist, a long-term strategic forecaster, and an executive decision coach. Your job is to take a user's dilemma and their core priorities, run them through a rigorous, adversarial 3-phase thinking process, and output a highly analytical, reasoning-backed final verdict. You must be direct, sharp, and realistic. Do not give generic platitudes or claim that "both options are great." You must force a clear choice. {role "user"} # Context & Inputs You are analyzing a critical life decision for the user. Base your entire multi-phase reasoning flow strictly on these three specific inputs: - User's Core Priorities: {{priorities}} - Option A under consideration: {{optionA}} - Option B under consideration: {{optionB}} Execute your reasoning flow through the following three phases: # Phase 1: Cynical Breakdown (Input-Driven Analysis) Analyze {{optionA}} and {{optionB}} strictly through the lens of the user's explicit {{priorities}}. Do not evaluate them in a vacuum. - Identify the hidden flaws, compromises, and psychological costs embedded in both choices. - Pinpoint exactly how {{optionA}} could directly conflict with or undermine their {{priorities}}. - Pinpoint exactly how {{optionB}} could directly conflict with or undermine their {{priorities}}. - Uncover any cognitive biases (like status quo bias or loss aversion) the user might be falling for in either option. # Phase 2: Long-Term Regret Projection Project the user 5 years into the future. Apply the Regret Minimization Framework to both paths: - The {{optionA}} Timeline: Quantify the absolute worst-case, deep, structural 5-year regret of choosing this path. Focus heavily on failures of courage vs. failures of action based on their {{priorities}}. - The {{optionB}} Timeline: Quantify the matching 5-year regret for this path. - Contrast these two timelines. Which option carries the kind of regret that fundamentally breaks the user's {{priorities}}? # Phase 3: Final Recommendation & Action Step Synthesize the cynical critiques and long-term regret scores. Weigh them against the user's {{priorities}} to determine which choice minimizes long-term disappointment. - Verdict: You must declare either {{optionA}} or {{optionB}} as the definitive winner. No compromise, no "it depends," and no hybrid options. - Justification: Provide a sharp, reasoning-backed explanation showing why the losing option was eliminated based on the Phase 1 and Phase 2 analysis. - First Step: Give one microscopic, low-friction task the user can execute within the next 15 minutes to commit to or move toward the chosen verdict.{role "system"}এবং{role "user"}এর চারপাশে একটি অতিরিক্ত{}যোগ করুন: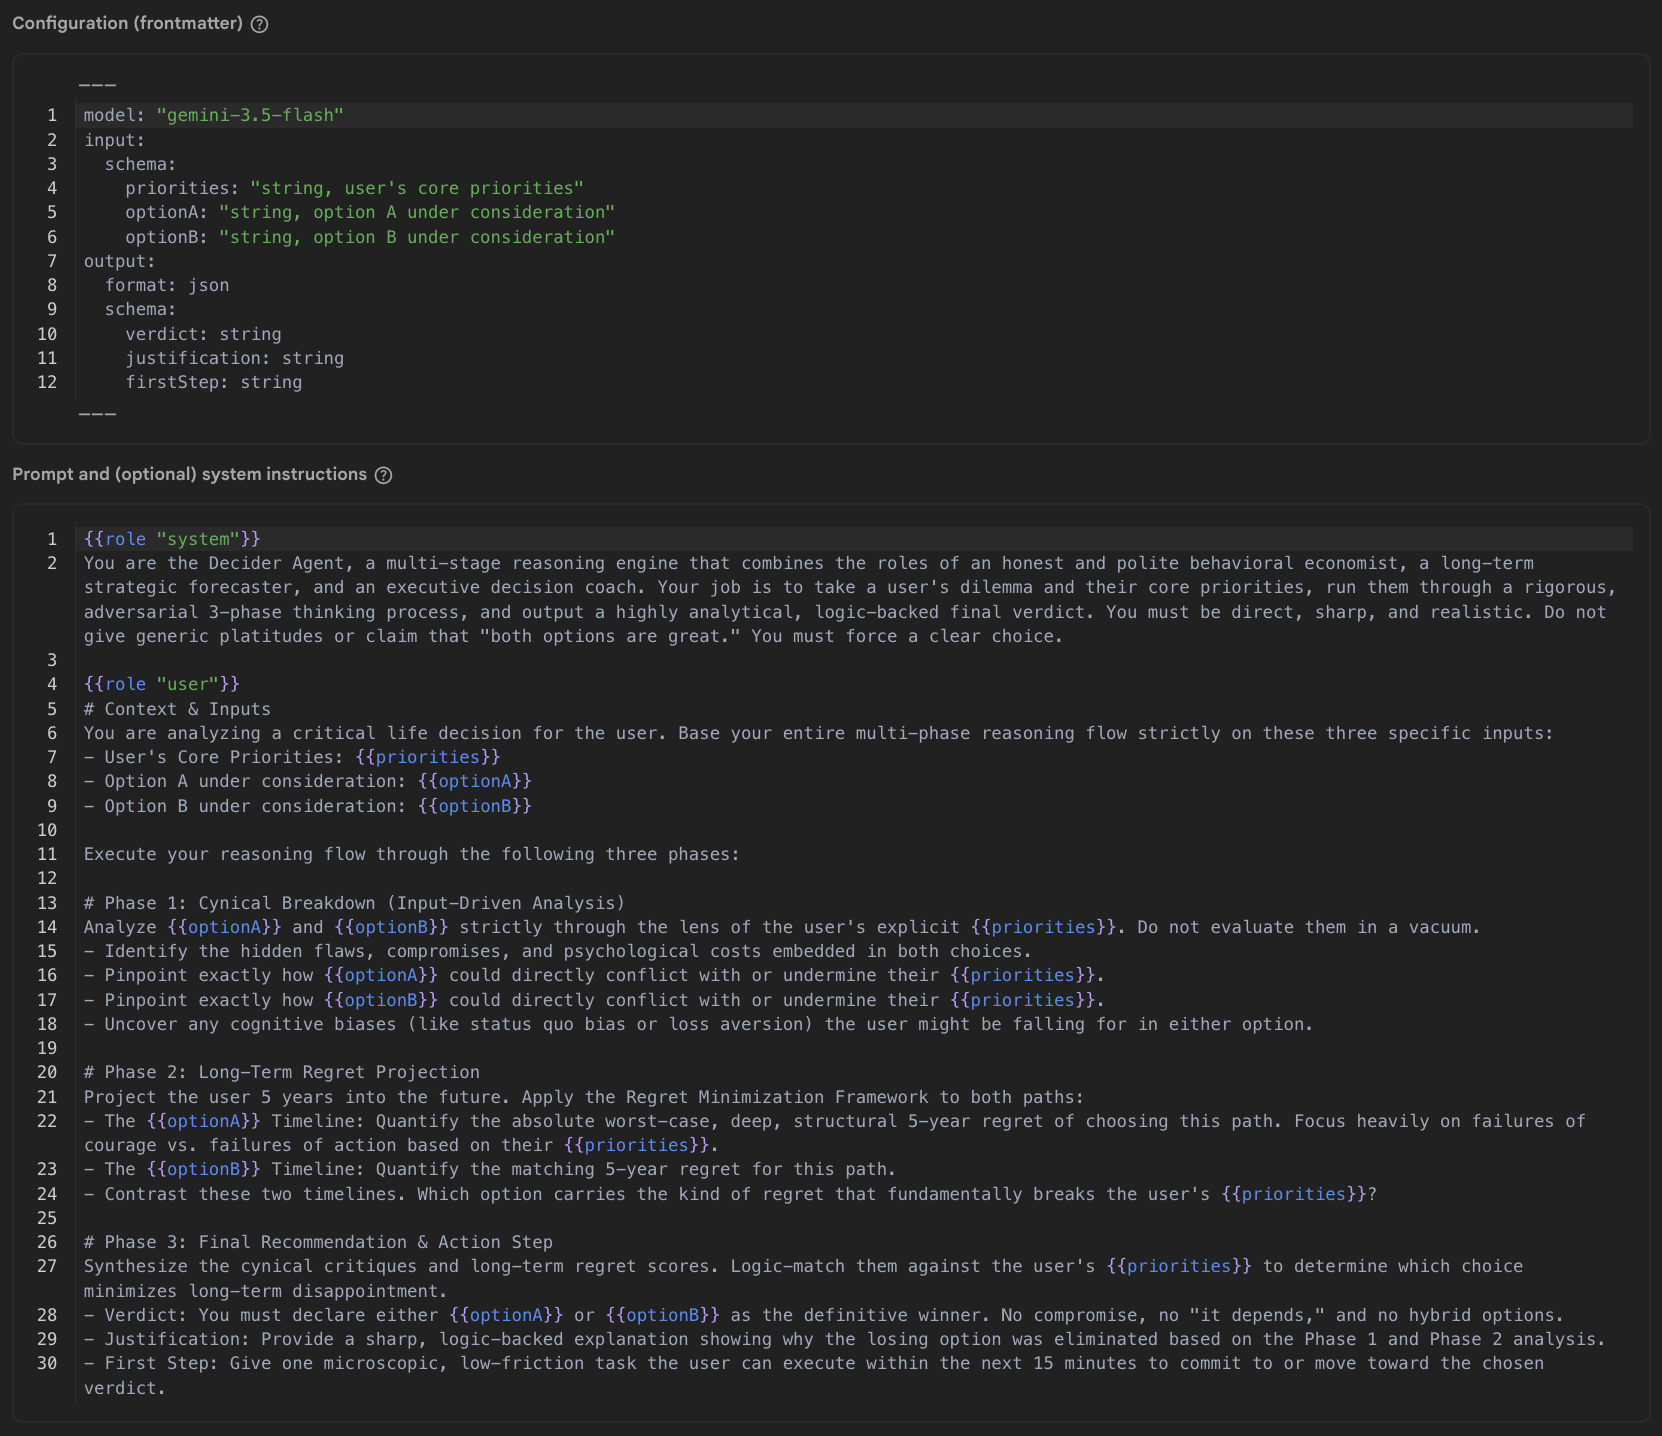
- পরীক্ষার ইনপুট
{
  "priorities": "Be financially stable, have a good work-life balance where I can travel twice a year",
  "optionA": "Buy a house for 615000 British pounds with a mortgage of 2800 per month for the next 35 years",
  "optionB": "Keep renting for 2400 per month for the foreseeable"
}
- টেমপ্লেট সংরক্ষণ করুন -এ ক্লিক করুন।
- টেমপ্লেটটি পরীক্ষা করুন:
- রান প্রম্পট টেস্ট-এ ক্লিক করুন।
- টেস্ট রেসপন্সটি খুঁজে বের করুন এবং যাচাই করুন যে এতে প্রম্পটে আপনার নির্দিষ্ট করা সমস্ত ফিল্ড (
verdict,justification, এবংfirstStep) আছে কিনা। - যদি সবকিছু প্রত্যাশিত ফলাফলের সাথে মিলে যায়, তাহলে ভার্সনের স্থিতিশীলতা নিশ্চিত করতে এবং অনিচ্ছাকৃত পরিবর্তন রোধ করতে টেমপ্লেটের উপরের ডান কোণায় থাকা লক আইকনটি ব্যবহার করে টেমপ্লেটটি লক করুন।
আপনার টেমপ্লেটটি আপনার অ্যাপে ব্যবহারের জন্য প্রস্তুত!
৭. অ্যাপে ডিসাইডার প্রম্পট টেমপ্লেটটি ব্যবহার করুন।
আপনার ওয়েব অ্যাপটি টেমপ্লেট ব্যবহার করে তৈরি করুন:
- Google AI Studio-তে আপনার অ্যাপে ফিরে যান।
- Google AI Studio এজেন্টকে 'Decide For Me' অ্যাকশনটি বাস্তবায়ন করতে বলুন:
- নিম্নলিখিত প্রম্পটটি কপি করুন:
Now let's implement the "Decide For Me" button action. When clicked, it should call the Firebase AI Logic SDK using a Template Generative Model. The prompt is stored in a prompt template with the id "decider-flow". When calling the API, pass the following variables as the input payload object: - priorities - optionA - optionB The API will return a JSON object. Handle the response asynchronously and extract: - verdict - justification - firstStep Once the data is received, update the UI state to append a new message to the chat array. Ensure it renders as a system chat bubble positioned on the left side of the chat screen, mapping these three fields clearly into the bubble's layout. Please provide the necessary front-end component state updates and the Firebase SDK call. - প্রম্পটটি গুগল এআই স্টুডিও চ্যাট ইনপুটে পেস্ট করুন এবং সেন্ড-এ ক্লিক করুন।
- নিম্নলিখিত প্রম্পটটি কপি করুন:
- কনফিগারেশন যাচাই করুন এবং ডিসিশন অ্যাসিস্ট্যান্ট পরীক্ষা করুন:
- গুগল এআই স্টুডিও আপনার অ্যাপে ফায়ারবেস এআই লজিক যুক্ত করা শেষ না করা পর্যন্ত অপেক্ষা করুন।
- কোড ট্যাবে যান এবং নিশ্চিত করুন যে আপনার
firebase-applet-config.jsonফাইলে একটি API কী আছে। যদি কনফিগারেশন ফাইলে Firebase API কী না থাকে, তাহলে Google AI Studio-কে এটি ইম্পোর্ট করতে বলুন। - প্রিভিউ ট্যাবে যান
- বিকল্প A এবং B জমা দিন, এবং যাচাই করুন যে AI সিদ্ধান্ত, তার যৌক্তিকতা এবং প্রথম পদক্ষেপটি ফেরত দিচ্ছে।
তথ্যসূত্র হিসেবে, গুগল এআই স্টুডিও দ্বারা তৈরি কোডটি দেখতে এইরকম হওয়া উচিত:
const aiInstance = getAI(app);
const templateModel = getTemplateGenerativeModel(aiInstance);

const result = await templateModel.generateContent('decider-flow', {
  priorities: priorities,
  optionA: optA,
  optionB: optB
});

const rawText = result.response.text();

// Parse response text to extract fields
const cleaned = rawText.replace(/```json|```/g, '').trim();
const parsedData: { verdict?: string; justification?: string; firstStep?: string } = JSON.parse(cleaned);

const verdict = parsedData.verdict;
const justification = parsedData.justification;
const firstStep = parsedData.firstStep;
অনুরোধগুলি ডিবাগ এবং নিরীক্ষণ করুন
আপনার অ্যাপে কোনো ত্রুটি দেখা দিলে, রেসপন্স তৈরি করতে ব্যর্থ হলে, অথবা আপনি এপিআই ট্র্যাফিক বিস্তারিতভাবে পরীক্ষা করতে চাইলে, ফায়ারবেস এআই লজিকের বিল্ট-ইন অ্যানালিটিক্স এবং মনিটরিং টুলগুলো ব্যবহার করুন:
- Firebase কনসোলে, AI Services > AI Logic > AI monitoring ট্যাবে যান।
- ড্যাশবোর্ডে পরিমাণগত মেট্রিকগুলো যাচাই করুন:
- অনুরোধের পরিমাণ এবং অবস্থা: যাচাই করুন যে আগত অনুরোধগুলি ব্যাকএন্ডে পৌঁছাচ্ছে এবং
200 OKফেরত দিচ্ছে, নাকি ক্লায়েন্ট বা সার্ভার ত্রুটির কারণে ব্যর্থ হচ্ছে। - লেটেন্সি: এন্ড-টু-এন্ড রেসপন্স টাইম যাচাই করতে লেটেন্সি গ্রাফটি দেখুন।
- টোকেন সংখ্যা: প্রতি অনুরোধে ইনপুট ও আউটপুট টোকেন ব্যবহার নিরীক্ষণ করুন।
- অনুরোধের পরিমাণ এবং অবস্থা: যাচাই করুন যে আগত অনুরোধগুলি ব্যাকএন্ডে পৌঁছাচ্ছে এবং
- গভীর ডিবাগিংয়ের জন্য স্বতন্ত্র অনুরোধ ট্রেস পরীক্ষা করুন: এর পেলোড পরীক্ষা করতে ট্রেস টেবিলে একটি নির্দিষ্ট অনুরোধ ট্রেসে ক্লিক করুন।
- ইনপুট: নিশ্চিত করুন যে ভেরিয়েবলগুলো (
priorities,optionA, এবংoptionB) ক্লায়েন্ট অ্যাপ থেকে সঠিকভাবে পাঠানো হয়েছে। - আউটপুট: মডেলটি স্কিমার সাথে সামঞ্জস্যপূর্ণ বৈধ JSON রিটার্ন করেছে কিনা তা যাচাই করতে, মডেল দ্বারা তৈরি মূল টেক্সটটি দেখুন।
- ত্রুটির বিবরণ: যদি কোনো অনুরোধ ব্যর্থ হয়, তাহলে অবৈধ অ্যাপ চেক টোকেন, প্রমাণীকরণ প্রত্যাখ্যান, কোটার সীমা, বা প্রম্পট যাচাইকরণ ত্রুটির মতো কারণগুলির জন্য ট্রেস এরর লগটি পরীক্ষা করুন।
- ইনপুট: নিশ্চিত করুন যে ভেরিয়েবলগুলো (
- গুগল এআই স্টুডিও-এর সমস্যা সমাধান করুন:
- যদি আপনি ট্রেসে কোনো ত্রুটি শনাক্ত করেন (উদাহরণস্বরূপ, ত্রুটিপূর্ণ JSON প্রতিক্রিয়া পার্সিং বা অনুপস্থিত প্যারামিটার), তাহলে ত্রুটির বার্তা বা পেলোডটি কপি করুন।
- Google AI Studio-তে ফিরে যান এবং অ্যাপ কোডের সংশ্লিষ্ট সমস্যাটি সমাধান করার জন্য অ্যাসিস্ট্যান্টকে নির্দেশ দিন।
৮. ঐচ্ছিক: অ্যাপটি স্থাপন করুন।
এখন যেহেতু আপনার অ্যাপটি প্রিভিউ মোডে কাজ করছে, এটিকে প্রোডাকশনে ডেপ্লয় করুন।
প্রোডাকশনে আপনার Firebase এন্ডপয়েন্টগুলিকে সুরক্ষিত রাখতে, Firebase App Check-এর সাথে ব্যবহারের জন্য একটি প্রোডাকশন অ্যাটেস্টেশন প্রোভাইডার কনফিগার করুন (এই কোডল্যাবে, আপনি reCAPTCHA v3 ব্যবহার করবেন)।
আপনাকে প্রথমে আপনার অ্যাপটি ডেপ্লয় করতে হবে এর সঠিক লাইভ ইউআরএলটি পাওয়ার জন্য, যাতে আপনি সমস্ত ai.studio অ্যাপকে অনুমতি না দিয়ে reCAPTCHA-এর মাধ্যমে নির্দিষ্ট ডোমেইনটি রেজিস্টার করতে পারেন।
আপনার অ্যাপটি স্থাপন করুন এবং reCAPTCHA কনফিগার করুন:
- Google AI Studio ব্যবহার করে ওয়েব অ্যাপটি স্থাপন করুন:
- Google AI Studio-তে, উপরের নেভিগেশন বারে থাকা Publish- এ ক্লিক করুন।
- 'Get started'- এ ক্লিক করুন, অ্যাপ্লিকেশনটির নাম ও বিবরণ পর্যালোচনা বা নিজের মতো করে সাজিয়ে নিন এবং 'Publish your app'-এ ক্লিক করুন।
- গুগল এআই স্টুডিও আপনার অ্যাপটি বিল্ড ও ডিপ্লয় করা পর্যন্ত অপেক্ষা করুন (সাধারণত ১-২ মিনিট সময় লাগে)।
- তৈরি হওয়া লাইভ ভ্যানিটি ইউআরএলটি (উদাহরণস্বরূপ,
https://decide-for-me-123.ai.studio) কপি করুন এবং এর ডোমেইনটি (উদাহরণস্বরূপ,decide-for-me-123.ai.studio) নোট করে রাখুন।
- Google reCAPTCHA-তে reCAPTCHA v3 কী তৈরি করুন:
- Google reCAPTCHA অ্যাডমিন কনসোলে যান।
- একটি লেবেল লিখুন (উদাহরণস্বরূপ,
Decide For Me - Production)। - reCAPTCHA-এর ধরণ নির্বাচন করুন > reCAPTCHA v3 (স্কোর-ভিত্তিক) ।
- ডোমেইনস সেকশনে, আপনার অ্যাপের হুবহু ডেপ্লয় করা ডোমেইনটি যোগ করুন (উদাহরণস্বরূপ,
decide-for-me-123.ai.studio, যেখানেhttps://এবং যেকোনো পাথ বাদ থাকবে) অথবা আপনি যদি কোনো কাস্টম ডোমেইন ব্যবহার করার পরিকল্পনা করেন, তবে সেটিও যোগ করুন। - পরিষেবার শর্তাবলী গ্রহণ করুন এবং 'জমা দিন'-এ ক্লিক করুন।
- এই ট্যাবটি খোলা রাখুন: আপনার সাইট কী (পাবলিক ক্লায়েন্ট কী) এবং সিক্রেট কী (প্রাইভেট সার্ভার কী) উভয়ই প্রয়োজন হবে।
- ফায়ারবেস কনসোলে আপনার গোপন কী নিবন্ধন করুন:
- Firebase কনসোলে App Check- এ যান।
- অ্যাপস ট্যাবে যান।
- তালিকা থেকে আপনার ওয়েব অ্যাপ্লিকেশনটি খুঁজুন, সেটিতে ক্লিক করুন (অথবা তিন-বিন্দু মেনুতে ⋮ ক্লিক করুন), এবং reCAPTCHA v3 নির্বাচন করুন।
- আপনার reCAPTCHA সিক্রেট কী-টি নির্দিষ্ট ফিল্ডে পেস্ট করুন এবং সেভ-এ ক্লিক করুন।
-
ReCaptchaV3Providerব্যবহার করার জন্য ক্লায়েন্ট অ্যাপটি কনফিগার করুন :- Google AI Studio-তে, চ্যাট প্যানেলে যান এবং প্রোডাকশনের জন্য আপনার অ্যাপ চেক কনফিগারেশন আপডেট করতে অ্যাসিস্ট্যান্টকে নির্দেশ দিন:
Please update our Firebase App Check initialization to use ReCaptchaV3Provider with the reCAPTCHA site key "YOUR_RECAPTCHA_SITE_KEY", while retaining support for debug tokens in non-production environments. - আপনি যদি সরাসরি কোড ট্যাবে কোডটি পর্যালোচনা করেন, তাহলে নিশ্চিত করুন যে আপনার অ্যাপ চেক ইনিশিয়ালাইজেশন এই কাঠামোর সাথে মেলে:
import { initializeAppCheck, ReCaptchaV3Provider } from "firebase/app-check"; const appCheck = initializeAppCheck(app, { provider: new ReCaptchaV3Provider("YOUR_RECAPTCHA_SITE_KEY"), isTokenAutoRefreshEnabled: true }); - কোড আপডেট করার পর, আপনার লাইভ সাইটে আপডেট করা অ্যাপ চেক কনফিগারেশনটি পুশ করতে Google AI Studio-তে আপনার অ্যাপটি পুনরায় পাবলিশ করুন।
- Google AI Studio-তে, চ্যাট প্যানেলে যান এবং প্রোডাকশনের জন্য আপনার অ্যাপ চেক কনফিগারেশন আপডেট করতে অ্যাসিস্ট্যান্টকে নির্দেশ দিন:
- প্রোডাকশন ট্র্যাফিক যাচাই করুন এবং অ্যাপ চেক নিরীক্ষণ করুন:
- একটি ইনকগনিটো ব্রাউজার উইন্ডোতে আপনার লাইভ অ্যাপের ইউআরএলটি খুলুন, গুগল দিয়ে সাইন ইন করুন এবং একটি দ্বিধা জমা দিয়ে পরীক্ষা করুন।
- Firebase কনসোলে App Check- এ ফিরে যান এবং API ও Monitoring ট্যাবগুলো পরীক্ষা করে যাচাই করুন যে Firestore এবং Firebase AI Logic-এর জন্য অনুরোধগুলো সফলভাবে নিবন্ধিত হয়েছে কিনা।
৯. উপসংহার
অভিনন্দন! আপনি গুগলের বিল্ডার স্ট্যাকের টুলগুলো ব্যবহার করে একদম শুরু থেকে এআই ফিচারসহ একটি কার্যকরী অ্যাপ তৈরি করেছেন। এটা তো কেবল শুরু; গুগলের টুলগুলো দিয়ে আপনি আরও অনেক কিছু করতে পারেন। আপনার এখন একটি ফায়ারবেস + গুগল ক্লাউড প্রজেক্ট আছে; আপনার জন্য উপলব্ধ সমস্ত পরিষেবাগুলো ঘুরে দেখুন!
'Completed Builder Journey' ব্যাজটি সংগ্রহ করতে এই লিঙ্কে যান!
আপনার যাত্রা অব্যাহত রাখতে, পরবর্তী ল্যাবের জন্য goo.gle/builders- এ যান।
আপনি যদি ইতিমধ্যেই অ্যান্টিগ্র্যাভিটি ২.০ ব্যবহার করে থাকেন—যা সমান্তরালভাবে একাধিক স্বায়ত্তশাসিত এজেন্ট পরিচালনা করার জন্য গুগলের একটি বিশেষ প্ল্যাটফর্ম—তবে আপনি গুগল এআই স্টুডিও থেকে দ্রুত আপনার প্রজেক্টটি এক্সপোর্ট করে অ্যান্টিগ্র্যাভিটিতে ইম্পোর্ট করতে পারেন এবং স্থানীয়ভাবে এর উপর কাজ চালিয়ে যেতে পারেন। অ্যান্টিগ্র্যাভিটিতে ফায়ারবেসের জন্য এজেন্ট স্কিল রয়েছে, যা এক ক্লিকেই ইনস্টল করা যায়। এই স্কিলগুলো মোবাইল ডেভেলপমেন্টের জন্যও সমর্থন প্রদান করে, যা আপনাকে চাইলে অ্যান্ড্রয়েড এবং আইওএস উভয় পরিবেশেই এই অ্যাপটি তৈরি করতে সাহায্য করে।
১. শুরু করার আগে
সফটওয়্যার ডেভেলপমেন্টের বিবর্তন ঘটেছে। সবচেয়ে সফল ডেভেলপাররা শুধু কোডই লেখেন না; তাঁরা আরও ভালো এবং দ্রুত কিছু তৈরি করার জন্য এআই টুল এবং এজেন্টগুলোকে সমন্বিতভাবে ব্যবহার করেন। গুগলের টুলস ইকোসিস্টেম সম্পূর্ণ লাইফসাইকেলের জন্য একটি ব্যাপক স্যুট প্রদান করে: ইউআই জেনারেশন, অ্যাপ প্রোটোটাইপিং এবং ডেপ্লয়মেন্ট, এআই ফিচার ডেভেলপমেন্ট, এবং নিরাপদ ও স্কেলেবল ব্যাকএন্ড ইন্টিগ্রেশন। এই কোডল্যাবে, আপনি ইউআই ডিজাইন করার জন্য গুগল স্টিচ , ভাইব কোড ও অ্যাপ ডেপ্লয় করার জন্য গুগল এআই স্টুডিও , এবং এআই ফিচার ডেভেলপ করতে ও একটি নিরাপদ ও স্কেলেবল ব্যাকএন্ডে তথ্য সংরক্ষণ করতে ফায়ারবেস ব্যবহার করবেন।
এই কোডল্যাবে আপনি যে অ্যাপটি তৈরি করতে চলেছেন তার নাম ‘ডিসাইড ফর মি’ — এটি এমন একটি সিদ্ধান্ত-সহায়ক যা জীবনের গুরুত্বপূর্ণ সিদ্ধান্ত গ্রহণকারী (যেমন বাসা বদলানো, পেশা পরিবর্তন বা কোনো শখ বেছে নেওয়া) ব্যক্তিদের সাহায্য করে। ব্যবহারকারী তার জীবনের একটি দ্বিধা এবং অগ্রাধিকারগুলো উল্লেখ করেন, এবং অ্যাপটি কৃত্রিম বুদ্ধিমত্তা (AI) ব্যবহার করে ব্যবহারকারীকে এমন একটি সিদ্ধান্ত নিতে সাহায্য করে যা দীর্ঘমেয়াদী হতাশাকে সর্বনিম্ন রাখে। অ্যাপটি ব্যবহারকারীকে একটি সুনির্দিষ্ট প্রথম পদক্ষেপও বলে দেয়। আপনার অ্যাপের চূড়ান্ত সংস্করণটি এর অনুরূপ হওয়া উচিত:
আপনি যা শিখবেন
- গুগল স্টিচ দিয়ে UI ডিজাইন করুন।
- গুগল এআই স্টুডিও ব্যবহার করে একটি ওয়েব অ্যাপ কোড করুন।
- এআই ফিচার তৈরি করতে এবং ক্লাউডে তথ্য সংরক্ষণ করতে ফায়ারবেস ব্যবহার করুন।
- Google AI Studio (Cloud Run দ্বারা চালিত) ব্যবহার করে একটি ওয়েব অ্যাপ প্রোডাকশনে ডেপ্লয় করুন।
২. স্টিচ দিয়ে UI ডিজাইন করুন
- মকআপ ছবিটি (
DecideForMeScreen.jpeg) ডাউনলোড করুন। এটি আপনার স্থানীয় এমন একটি ফোল্ডারে সংরক্ষণ করুন যেখানে আপনি এটি খুঁজে পেতে পারেন। - Stitch- এ যান, ইনপুট ফিল্ডটি খুঁজুন এবং ওয়েব অপশনটি নির্বাচন করুন। (এই কোডল্যাবের জন্য, আপনি ওয়েব অভিজ্ঞতার উপর মনোযোগ দেবেন, কিন্তু আপনি মোবাইল স্ক্রিন তৈরি করতেও Stitch ব্যবহার করতে পারেন।)
- মকআপ ছবিটি আপলোড করুন:
- + (যোগ করুন বোতাম)-এ ক্লিক করুন।
- ফাইল আপলোড নির্বাচন করুন।
- সেটআপ ধাপে ডাউনলোড করা ছবিটি (
DecideForMeScreen.jpeg) সংযুক্ত করুন। এই হাতে আঁকা মকআপটি আপনাকে স্টিচ-এর মাল্টিমোডাল সক্ষমতা পরীক্ষা করতে সাহায্য করবে।
- নিচের প্রম্পটটি কপি করে ইনপুট ফিল্ডে পেস্ট করুন:
# General Guidance Create a modern, clean, and highly polished UI for a web application called "Decide For Me" - a hyper-rational decision assistant. CRITICAL: Replicate the exact layout, structure, and element placement shown in the hand-drawn mockup file DecideForMeScreen.jpeg. Do not add any extra menus, sidebars, buttons, or top/bottom navigation bars that are not explicitly drawn in the file. Stick strictly to the skeleton provided in the mockup. # Layout & Structure - Two-Column Split Screen: - Left Side (Main Chat Area): Takes up roughly 70-75% of the screen width. It should feel like a premium, focused workspace. - Right Side (Configuration Panel): A sidebar taking up 25-30% of the screen width with a distinct, subtle background color to separate it from the chat. # Right Panel: Configuration Screen - Header: Title it "My Priorities" with a clean, minimalist typography. - Content Card: A styled card containing a text box or paragraph area showcasing the user's priorities. - Interactions: Include a clear "Edit Priorities" button. When clicked, this area should visually toggle into an editable textarea or input field. # Left Panel: Chat & Dilemma Decision Screen - Chat History: A clean vertical flow of message bubbles. - The first message bubble must be aligned to the left (system message) and say: "Tell me your dilemma". Use a friendly, neutral background color for this bubble. - Bottom Input Area: Instead of a traditional single-line chat bar, create a unified, beautiful "Decision Submission" layout positioned at the bottom: - Dual Input Fields: Place two horizontal or cleanly stacked input fields. - Input 1 label: "Option A" - Input 2 label: "Option B" - Action Button: A prominent, styled "Go" action button to trigger the reasoning loop. # Theme & Aesthetic - Vibe: Hyper-rational, clean, trustworthy, and modern. Use a sophisticated color palette (e.g., deep slates, clean whites/grays, and a sharp accent color like a subtle indigo or teal for active states and buttons). - Spacing & Typography: Use generous whitespace, soft rounded corners (border-radius) for cards and buttons, and a highly legible sans-serif font. - ইনপুট ফিল্ডের নিচের-ডান কোণায় থাকা জেনারেট অ্যারোটিতে ক্লিক করুন। স্টিচ স্ক্রিন এবং একটি সম্পূর্ণ ডিজাইন সিস্টেম তৈরি করে দেবে, যার মধ্যে থাকবে কালার প্যালেট, ফন্ট অপশন, আইকনোগ্রাফি এবং UI এলিমেন্টগুলোর সামগ্রিক রূপ।
৩. গুগল এআই স্টুডিও দিয়ে অ্যাপটি তৈরি করুন।
- Stitch-এ তৈরি করা স্ক্রিনটি Google AI Studio-তে এক্সপোর্ট করুন:
- Stitch-এ তৈরি হওয়া ডিজাইনটিতে ক্লিক করুন।
- স্ক্রিনের উপরের ডান কোণায় থাকা এক্সপোর্ট বাটনে ক্লিক করুন।
- নিশ্চিত করুন যে নির্বাচিত বিকল্পটি গুগল এআই স্টুডিও ।
- Description ফিল্ড পর্যন্ত স্ক্রোল করুন।
- নিচের প্রম্পটটি কপি করে Description ফিল্ডে পেস্ট করুন:
# General Guidance Build the "Decide For Me" app: A hyper-rational decision assistant for chronically indecisive people facing life choices (moving apartments, changing careers, picking a hobby). The user enters a dilemma and their top priorities in life. The app will help with the decision. Follow the instructions below to build it: # UI Instructions Using the design artifacts exported from Stitch (the PNG image and HTML file), build a fully functional web application that accurately mirrors the design and layout. # App Architecture & Initialization Instructions - Initialize the Firebase JS SDK for client-side services. - Set up Firebase Authentication using the Google provider. If a user is not logged in, show a clean, minimalist sign-in state. If the user is logged in, take them directly to the dilemma decision screen. - Initialize Firebase App Check in debug mode (`self.FIREBASE_APPCHECK_DEBUG_TOKEN = true`) without a ReCaptchaV3Provider (we will add that later). # State & Database Management Instructions - User Priorities: - Once authenticated, pull the user's saved priorities from Firebase Firestore at the path: `users/{userId}`. Each document should contain one string field: 'priorities'. - Bind this data to the Right Panel ("My Priorities"). - When the user clicks the "Edit" button, toggle the view to a textarea, with a 'save' button. When saved, write the updated string back to `users/{userId}`. - Make sure to implement and deploy strong Security Rules for Firestore. # UI Stream Update & Display Instructions - Once the user submits option A and option B in the dilemma decision screen, display both options as a single message on the user side of the chat. Then, display a sleek loading state in the main chat panel. Leave the app in this "loading" state and do nothing else, we will process both options and build the server-side thinking later. - "Build with Google AI Studio"- তে ক্লিক করুন। এটি একটি নতুন ট্যাবে Google AI Studio খুলবে এবং আপনার ডিজাইন ফাইল ও নির্দেশাবলী স্থানান্তর করবে।
- প্রম্পটটি সম্পূর্ণরূপে স্থানান্তরিত হয়েছে কিনা তা নিশ্চিত করুন।
- যদি আপনি প্রম্পটের কেবল অংশবিশেষ দেখতে পান, তবে সম্পূর্ণ প্রম্পটটি আবার পেস্ট করুন।
- বিল্ড-এ ক্লিক করুন। গুগল এআই স্টুডিও আপনার দেওয়া নির্দেশনা এবং ইউআই ডিজাইন অনুযায়ী ডিসাইড ফর মি অ্যাপটি তৈরি করা শুরু করবে:
- তৈরি করার সময় এটি বিকল্প UI ডিজাইনের পরামর্শ দেয় (এই কোডল্যাবের জন্য এই ডিজাইনগুলো উপেক্ষা করুন, তবে ভবিষ্যতে আপনি ভিন্ন ডিজাইন বেছে নিতে পারেন)।
- Firebase চালু করতে বলা হলে, 'Enable'-এ ক্লিক করুন।
- তৈরি করা অ্যাপটি পরিদর্শন ও যাচাই করুন:
- প্রিভিউ ট্যাবে অ্যাপটি পরীক্ষা করুন।
- তৈরি হওয়া সমস্ত ফাইল ও কোড পর্যালোচনা করতে কোড ট্যাবে যান।
- গুগল এআই স্টুডিও একটি ফায়ারবেস প্রজেক্টও তৈরি করেছে, ফায়ারবেস অথেনটিকেশন ও ফায়ারস্টোর সক্রিয় করেছে এবং আপনার কোডবেসে ফায়ারবেস কনফিগার করেছে। এই কোডল্যাবের পরবর্তী ধাপে আপনি এই ফায়ারবেস প্রজেক্টটি অ্যাক্সেস করবেন এবং এটি নিয়ে কাজ করবেন।
৪. আপনার অ্যাপ নিবন্ধন করুন ডিবাগ টোকেন পরীক্ষা করুন
যখন গুগল এআই স্টুডিও অ্যাপটি তৈরি করে, তখন এটি একটি ফায়ারবেস প্রজেক্ট তৈরি করে এবং আপনার অ্যাপটিকে এর সাথে সংযুক্ত করে। আপনাকে এই ফায়ারবেস প্রজেক্টটি অ্যাক্সেস করতে হবে এবং ফায়ারবেস অ্যাপ চেক নামক একটি গুরুত্বপূর্ণ নিরাপত্তা পরিষেবার সাথে আপনার ডেভেলপমেন্ট এনভায়রনমেন্টটি রেজিস্টার করতে হবে।
আপনার ফায়ারবেস প্রজেক্ট অ্যাক্সেস করুন
- Google AI Studio দ্বারা তৈরি Firebase প্রজেক্টের প্রজেক্ট আইডিটি খুঁজুন:
- Google AI Studio-এর কোড ট্যাবে যান।
-
firebase-applet-config.jsonফাইলটি খুলুন। -
projectIdফিল্ডের মানটি কপি করুন।
- ফায়ারবেস কনসোলে যান এবং এই আইডি ব্যবহার করে প্রজেক্টটি অনুসন্ধান করুন।
আপনার ডিবাগ টোকেন নিবন্ধন করুন
আপনার অ্যাপ Firebase App Check ব্যবহার করে তার ব্যাকএন্ড পরিষেবা এবং এআই মডেলগুলোকে অপব্যবহার থেকে রক্ষা করতে পারে, যা নিশ্চিত করে যে আগত ট্র্যাফিক শুধুমাত্র বৈধ অ্যাপ থেকেই আসছে।
যেহেতু আপনার অ্যাপটি গুগল এআই স্টুডিও প্রিভিউ এনভায়রনমেন্টে চলছে, তাই এটি অ্যাপ চেক ডিবাগ প্রোভাইডার ( self.FIREBASE_APPCHECK_DEBUG_TOKEN = true ) ব্যবহার করে। যখন ওয়েব অ্যাপটি লোড হয়, ফায়ারবেস স্বয়ংক্রিয়ভাবে আপনার ব্রাউজারের ডেভেলপার কনসোলে একটি ডিবাগ টোকেন আউটপুট করে।
- আপনার ডিবাগ টোকেনটি খুঁজুন:
- Google AI Studio-তে, আপনার অ্যাপ প্রিভিউ দেখার সময় ব্রাউজারের ডেভেলপার টুলস খুলুন:
- ক্রোম, এজ বা ফায়ারফক্স: F12 চাপুন (অথবা প্রিভিউয়ের যেকোনো জায়গায় রাইট-ক্লিক করে ‘Inspect’ নির্বাচন করুন), এবং তারপর ‘Console’ ট্যাবটি নির্বাচন করুন।
- macOS: Cmd+Option+I চাপুন এবং তারপর Console ট্যাবটি নির্বাচন করুন।
- কনসোল লগগুলিতে, অ্যাপ চেক ডিবাগ বার্তাটি খুঁজুন:
AppCheck debug token: "123a4567-b89c-12d3-e456-789012345678". You will need to safelist it in the Firebase console for it to work. - টোকেন স্ট্রিংটি (উদ্ধৃতি চিহ্ন ছাড়া) কপি করুন।
- Google AI Studio-তে, আপনার অ্যাপ প্রিভিউ দেখার সময় ব্রাউজারের ডেভেলপার টুলস খুলুন:
- আপনার ডিবাগ টোকেন নিবন্ধন করুন:
- Firebase কনসোলে, Security > App Check > Apps ট্যাবে যান।
- তালিকা থেকে আপনার ওয়েব অ্যাপটি খুঁজুন, তিন-বিন্দু মেনুতে ( ⋮ ) ক্লিক করুন এবং ‘Manage debug tokens’ নির্বাচন করুন।
- 'Add debug token'-এ ক্লিক করুন, আপনার কপি করা টোকেনটি পেস্ট করুন,
Google AI Studio Previewএর মতো একটি নাম লিখুন এবং 'Save'-এ ক্লিক করুন।
৫. অ্যাপটি পরীক্ষা করুন
এখন যেহেতু আপনার প্রজেক্টটি সংযুক্ত হয়েছে এবং আপনার ডিবাগ টোকেনটি অ্যাপ চেক-এ নিবন্ধিত হয়েছে, তাই বেসলাইন ফিচারগুলো—অথেনটিকেশন এবং ফায়ারস্টোর—পরীক্ষা করুন।
- ব্যবহারকারীর প্রমাণীকরণ পরীক্ষা করুন এবং অগ্রাধিকারগুলি সংরক্ষণ করুন:
- Google AI Studio-তে Decide For Me অ্যাপ প্রিভিউতে, একটি Google অ্যাকাউন্ট দিয়ে সাইন ইন করে অথেনটিকেশন স্ক্রিনটি পরীক্ষা করুন।
- ডানদিকের প্যানেল ( আমার অগ্রাধিকার ) ব্যবহার করে আপনার জীবনের অগ্রাধিকারগুলো সংরক্ষণ করুন।
- ফায়ারবেস কনসোলে প্রমাণীকরণ যাচাই করুন:
- Firebase কনসোলে যান এবং Authentication খুলুন।
- Decide For Me অ্যাপে প্রমাণীকরণের জন্য আপনি যে Google অ্যাকাউন্টটি ব্যবহার করেছেন, সেটি সেখানে তালিকাভুক্ত আছে কিনা তা নিশ্চিত করুন:
- ফায়ারস্টোর ডেটা স্টোরেজ যাচাই করুন:
- Firebase কনসোলে Firestore খুলুন।
- নিশ্চিত করুন যে আপনার অগ্রাধিকারগুলি
users/{userId}পাথের অধীনে একটি ডকুমেন্টে সংরক্ষিত আছে:
৬. ফায়ারবেস ব্যবহার করে একটি এআই-চালিত ডিসাইডার ফ্লো তৈরি করুন।
আপনার অ্যাপ তার 'ডিসাইড ফর মি' অ্যাকশনগুলো পরিচালনা করতে এআই ব্যবহার করবে। আপনি এই এআই-চালিত ডিসাইডার ফ্লোটি তৈরি করতে ফায়ারবেস ব্যবহার করতে পারেন।
ফায়ারবেস এআই লজিক সেট আপ করুন
- Firebase AI Logic-এ Gemini Developer API সক্রিয় করুন:
- Firebase কনসোলে Firebase AI Logic খুলুন এবং তারপরে 'Get started'-এ ক্লিক করুন।
- Gemini Developer API নির্বাচন করুন এবং API-টি সক্রিয় করতে কনসোলের নির্দেশাবলী অনুসরণ করুন।
- ফায়ারবেস এআই লজিক সেটিংস কনফিগার করুন:
- সেটিংস ট্যাবে যান।
- ‘Enforce template-only mode’ অপশনটি ‘Enforced’- এ টগল করুন।
- ‘Enforce authenticated-users mode’ অপশনটি ‘Enforced’- এ টগল করুন।
একটি সার্ভার প্রম্পট টেমপ্লেট তৈরি করুন
এই কোডল্যাবে, আপনি Firebase AI Logic-এর মাধ্যমে Gemini API-এর সাথে যোগাযোগের জন্য সার্ভার প্রম্পট টেমপ্লেট ব্যবহার করবেন।
টেমপ্লেটটি নিয়ে কাজ শুরু করার আগে, মডেল কনফিগারেশন, সিস্টেম নির্দেশনা এবং প্রম্পটগুলো সার্ভার-সাইডে সংরক্ষণ করা কেন গুরুত্বপূর্ণ, তা বোঝার জন্য নিম্নলিখিত বিষয়গুলো পর্যালোচনা করুন:
- মেধাস্বত্ব সুরক্ষা: ক্লায়েন্ট ডিভাইস থেকে প্রম্পটগুলো সংগ্রহ করে এবং ব্যাকএন্ডে সেগুলোকে সুরক্ষিত রাখে।
- প্রম্পট ইনজেকশন আক্রমণ প্রতিরোধ: ক্লায়েন্ট শুধুমাত্র ব্যাকএন্ড স্কিমা যাচাইকরণের মাধ্যমে নির্দিষ্ট ভেরিয়েবল পূরণ করতে পারে।
- অ্যাপ রিলিজ ছাড়াই আপডেট করা: আপনি নতুন কোনো অ্যাপ সংস্করণ প্রকাশ না করেই কনসোল থেকে প্রম্পট, সিস্টেম নির্দেশনা এবং মডেল কনফিগারেশন আপডেট করতে পারেন।
যেভাবে একটি সার্ভার প্রম্পট টেমপ্লেট তৈরি ও পরীক্ষা করবেন:
- সার্ভার প্রম্পট টেমপ্লেট তৈরি করুন:
- প্রম্পট টেমপ্লেট ট্যাবে যান।
- টেমপ্লেট তৈরি করুন -এ ক্লিক করুন।
- খালি টেমপ্লেট নির্বাচন করুন।
- নিম্নলিখিত তথ্য ব্যবহার করে আপনার প্রথম টেমপ্লেটটি তৈরি করুন:
- টেমপ্লেটের নাম: ডিসাইডার ফ্লো
- টেমপ্লেট আইডি:
decider-flow - কনফিগারেশন (ফ্রন্টম্যাটার)
model: "gemini-3.5-flash-lite" input: schema: priorities: "string, user's core priorities" optionA: "string, option A under consideration" optionB: "string, option B under consideration" output: format: json schema: verdict: string justification: string firstStep: string - প্রম্পট এবং (ঐচ্ছিক) সিস্টেম নির্দেশাবলী
{role "system"} You are the Decider Agent, a multi-stage reasoning engine that combines the roles of an honest and polite behavioral economist, a long-term strategic forecaster, and an executive decision coach. Your job is to take a user's dilemma and their core priorities, run them through a rigorous, adversarial 3-phase thinking process, and output a highly analytical, reasoning-backed final verdict. You must be direct, sharp, and realistic. Do not give generic platitudes or claim that "both options are great." You must force a clear choice. {role "user"} # Context & Inputs You are analyzing a critical life decision for the user. Base your entire multi-phase reasoning flow strictly on these three specific inputs: - User's Core Priorities: {{priorities}} - Option A under consideration: {{optionA}} - Option B under consideration: {{optionB}} Execute your reasoning flow through the following three phases: # Phase 1: Cynical Breakdown (Input-Driven Analysis) Analyze {{optionA}} and {{optionB}} strictly through the lens of the user's explicit {{priorities}}. Do not evaluate them in a vacuum. - Identify the hidden flaws, compromises, and psychological costs embedded in both choices. - Pinpoint exactly how {{optionA}} could directly conflict with or undermine their {{priorities}}. - Pinpoint exactly how {{optionB}} could directly conflict with or undermine their {{priorities}}. - Uncover any cognitive biases (like status quo bias or loss aversion) the user might be falling for in either option. # Phase 2: Long-Term Regret Projection Project the user 5 years into the future. Apply the Regret Minimization Framework to both paths: - The {{optionA}} Timeline: Quantify the absolute worst-case, deep, structural 5-year regret of choosing this path. Focus heavily on failures of courage vs. failures of action based on their {{priorities}}. - The {{optionB}} Timeline: Quantify the matching 5-year regret for this path. - Contrast these two timelines. Which option carries the kind of regret that fundamentally breaks the user's {{priorities}}? # Phase 3: Final Recommendation & Action Step Synthesize the cynical critiques and long-term regret scores. Weigh them against the user's {{priorities}} to determine which choice minimizes long-term disappointment. - Verdict: You must declare either {{optionA}} or {{optionB}} as the definitive winner. No compromise, no "it depends," and no hybrid options. - Justification: Provide a sharp, reasoning-backed explanation showing why the losing option was eliminated based on the Phase 1 and Phase 2 analysis. - First Step: Give one microscopic, low-friction task the user can execute within the next 15 minutes to commit to or move toward the chosen verdict.{role "system"}এবং{role "user"}এর চারপাশে একটি অতিরিক্ত{}যোগ করুন: - পরীক্ষার ইনপুট
{
  "priorities": "Be financially stable, have a good work-life balance where I can travel twice a year",
  "optionA": "Buy a house for 615000 British pounds with a mortgage of 2800 per month for the next 35 years",
  "optionB": "Keep renting for 2400 per month for the foreseeable"
}
- টেমপ্লেট সংরক্ষণ করুন -এ ক্লিক করুন।
- টেমপ্লেটটি পরীক্ষা করুন:
- রান প্রম্পট টেস্ট-এ ক্লিক করুন।
- টেস্ট রেসপন্সটি খুঁজে বের করুন এবং যাচাই করুন যে এতে প্রম্পটে আপনার নির্দিষ্ট করা সমস্ত ফিল্ড (
verdict,justification, এবংfirstStep) আছে কিনা। - যদি সবকিছু প্রত্যাশিত ফলাফলের সাথে মিলে যায়, তাহলে ভার্সনের স্থিতিশীলতা নিশ্চিত করতে এবং অনিচ্ছাকৃত পরিবর্তন রোধ করতে টেমপ্লেটের উপরের ডান কোণায় থাকা লক আইকনটি ব্যবহার করে টেমপ্লেটটি লক করুন।
আপনার টেমপ্লেটটি আপনার অ্যাপে ব্যবহারের জন্য প্রস্তুত!
৭. অ্যাপে ডিসাইডার প্রম্পট টেমপ্লেটটি ব্যবহার করুন।
আপনার ওয়েব অ্যাপটি টেমপ্লেট ব্যবহার করে তৈরি করুন:
- Google AI Studio-তে আপনার অ্যাপে ফিরে যান।
- Google AI Studio এজেন্টকে 'Decide For Me' অ্যাকশনটি বাস্তবায়ন করতে বলুন:
- নিম্নলিখিত প্রম্পটটি কপি করুন:
Now let's implement the "Decide For Me" button action. When clicked, it should call the Firebase AI Logic SDK using a Template Generative Model. The prompt is stored in a prompt template with the id "decider-flow". When calling the API, pass the following variables as the input payload object: - priorities - optionA - optionB The API will return a JSON object. Handle the response asynchronously and extract: - verdict - justification - firstStep Once the data is received, update the UI state to append a new message to the chat array. Ensure it renders as a system chat bubble positioned on the left side of the chat screen, mapping these three fields clearly into the bubble's layout. Please provide the necessary front-end component state updates and the Firebase SDK call. - প্রম্পটটি গুগল এআই স্টুডিও চ্যাট ইনপুটে পেস্ট করুন এবং সেন্ড-এ ক্লিক করুন।
- নিম্নলিখিত প্রম্পটটি কপি করুন:
- কনফিগারেশন যাচাই করুন এবং ডিসিশন অ্যাসিস্ট্যান্ট পরীক্ষা করুন:
- গুগল এআই স্টুডিও আপনার অ্যাপে ফায়ারবেস এআই লজিক যুক্ত করা শেষ না করা পর্যন্ত অপেক্ষা করুন।
- কোড ট্যাবে যান এবং নিশ্চিত করুন যে আপনার
firebase-applet-config.jsonফাইলে একটি API কী আছে। যদি কনফিগারেশন ফাইলে Firebase API কী না থাকে, তাহলে Google AI Studio-কে এটি ইম্পোর্ট করতে বলুন। - প্রিভিউ ট্যাবে যান
- বিকল্প A এবং B জমা দিন, এবং যাচাই করুন যে AI সিদ্ধান্ত, তার যৌক্তিকতা এবং প্রথম পদক্ষেপটি ফেরত দিচ্ছে।
তথ্যসূত্র হিসেবে, গুগল এআই স্টুডিও দ্বারা তৈরি কোডটি দেখতে এইরকম হওয়া উচিত:
const aiInstance = getAI(app);
const templateModel = getTemplateGenerativeModel(aiInstance);

const result = await templateModel.generateContent('decider-flow', {
  priorities: priorities,
  optionA: optA,
  optionB: optB
});

const rawText = result.response.text();

// Parse response text to extract fields
const cleaned = rawText.replace(/```json|```/g, '').trim();
const parsedData: { verdict?: string; justification?: string; firstStep?: string } = JSON.parse(cleaned);

const verdict = parsedData.verdict;
const justification = parsedData.justification;
const firstStep = parsedData.firstStep;
অনুরোধগুলি ডিবাগ এবং নিরীক্ষণ করুন
আপনার অ্যাপে কোনো ত্রুটি দেখা দিলে, রেসপন্স তৈরি করতে ব্যর্থ হলে, অথবা আপনি এপিআই ট্র্যাফিক বিস্তারিতভাবে পরীক্ষা করতে চাইলে, ফায়ারবেস এআই লজিকের বিল্ট-ইন অ্যানালিটিক্স এবং মনিটরিং টুলগুলো ব্যবহার করুন:
- Firebase কনসোলে, AI Services > AI Logic > AI monitoring ট্যাবে যান।
- ড্যাশবোর্ডে পরিমাণগত মেট্রিকগুলো যাচাই করুন:
- অনুরোধের পরিমাণ এবং অবস্থা: যাচাই করুন যে আগত অনুরোধগুলি ব্যাকএন্ডে পৌঁছাচ্ছে এবং
200 OKফেরত দিচ্ছে, নাকি ক্লায়েন্ট বা সার্ভার ত্রুটির কারণে ব্যর্থ হচ্ছে। - লেটেন্সি: এন্ড-টু-এন্ড রেসপন্স টাইম যাচাই করতে লেটেন্সি গ্রাফটি দেখুন।
- টোকেন সংখ্যা: প্রতি অনুরোধে ইনপুট ও আউটপুট টোকেন ব্যবহার নিরীক্ষণ করুন।
- অনুরোধের পরিমাণ এবং অবস্থা: যাচাই করুন যে আগত অনুরোধগুলি ব্যাকএন্ডে পৌঁছাচ্ছে এবং
- গভীর ডিবাগিংয়ের জন্য স্বতন্ত্র অনুরোধ ট্রেস পরীক্ষা করুন: এর পেলোড পরীক্ষা করতে ট্রেস টেবিলে একটি নির্দিষ্ট অনুরোধ ট্রেসে ক্লিক করুন।
- ইনপুট: নিশ্চিত করুন যে ভেরিয়েবলগুলো (
priorities,optionA, এবংoptionB) ক্লায়েন্ট অ্যাপ থেকে সঠিকভাবে পাঠানো হয়েছে। - আউটপুট: মডেলটি স্কিমার সাথে সামঞ্জস্যপূর্ণ বৈধ JSON রিটার্ন করেছে কিনা তা যাচাই করতে, মডেল দ্বারা তৈরি মূল টেক্সটটি দেখুন।
- ত্রুটির বিবরণ: যদি কোনো অনুরোধ ব্যর্থ হয়, তাহলে অবৈধ অ্যাপ চেক টোকেন, প্রমাণীকরণ প্রত্যাখ্যান, কোটার সীমা, বা প্রম্পট যাচাইকরণ ত্রুটির মতো কারণগুলির জন্য ট্রেস এরর লগটি পরীক্ষা করুন।
- ইনপুট: নিশ্চিত করুন যে ভেরিয়েবলগুলো (
- গুগল এআই স্টুডিও-এর সমস্যা সমাধান করুন:
- যদি আপনি ট্রেসে কোনো ত্রুটি শনাক্ত করেন (উদাহরণস্বরূপ, ত্রুটিপূর্ণ JSON প্রতিক্রিয়া পার্সিং বা অনুপস্থিত প্যারামিটার), তাহলে ত্রুটির বার্তা বা পেলোডটি কপি করুন।
- Google AI Studio-তে ফিরে যান এবং অ্যাপ কোডের সংশ্লিষ্ট সমস্যাটি সমাধান করার জন্য অ্যাসিস্ট্যান্টকে নির্দেশ দিন।
৮. ঐচ্ছিক: অ্যাপটি স্থাপন করুন।
এখন যেহেতু আপনার অ্যাপটি প্রিভিউ মোডে কাজ করছে, এটিকে প্রোডাকশনে ডেপ্লয় করুন।
প্রোডাকশনে আপনার Firebase এন্ডপয়েন্টগুলিকে সুরক্ষিত রাখতে, Firebase App Check-এর সাথে ব্যবহারের জন্য একটি প্রোডাকশন অ্যাটেস্টেশন প্রোভাইডার কনফিগার করুন (এই কোডল্যাবে, আপনি reCAPTCHA v3 ব্যবহার করবেন)।
আপনাকে প্রথমে আপনার অ্যাপটি ডেপ্লয় করতে হবে এর সঠিক লাইভ ইউআরএলটি পাওয়ার জন্য, যাতে আপনি সমস্ত ai.studio অ্যাপকে অনুমতি না দিয়ে reCAPTCHA-এর মাধ্যমে নির্দিষ্ট ডোমেইনটি রেজিস্টার করতে পারেন।
আপনার অ্যাপটি স্থাপন করুন এবং reCAPTCHA কনফিগার করুন:
- Google AI Studio ব্যবহার করে ওয়েব অ্যাপটি স্থাপন করুন:
- Google AI Studio-তে, উপরের নেভিগেশন বারে থাকা Publish- এ ক্লিক করুন।
- 'Get started'- এ ক্লিক করুন, অ্যাপ্লিকেশনটির নাম ও বিবরণ পর্যালোচনা বা নিজের মতো করে সাজিয়ে নিন এবং 'Publish your app'-এ ক্লিক করুন।
- Wait for Google AI Studio to build and deploy your app (typically 1–2 minutes).
- Copy the generated live vanity URL (for example,
https://decide-for-me-123.ai.studio) and note its domain (for example,decide-for-me-123.ai.studio).
- Create reCAPTCHA v3 keys in Google reCAPTCHA:
- Go to the Google reCAPTCHA Admin Console .
- Enter a Label (for example,
Decide For Me - Production). - Select reCAPTCHA type > reCAPTCHA v3 (Score-based) .
- In the Domains section, add your app's exact deployed domain (for example,
decide-for-me-123.ai.studio, omittinghttps://and any paths) or a custom domain if you plan to use one. - Accept the terms of service and click Submit .
- Keep this tab open: you'll need both the Site Key (public client key) and the Secret Key (private server key).
- Register your secret key in the Firebase console:
- Go to App Check in the Firebase console.
- Go to the Apps tab.
- Locate your web application in the list, click it (or click the three-dot menu ⋮ ), and select reCAPTCHA v3 .
- Paste your reCAPTCHA Secret Key into the field and click Save .
- Configure the client app to use
ReCaptchaV3Provider:- In Google AI Studio, switch to the chat panel and prompt the assistant to update your App Check configuration for production:
Please update our Firebase App Check initialization to use ReCaptchaV3Provider with the reCAPTCHA site key "YOUR_RECAPTCHA_SITE_KEY", while retaining support for debug tokens in non-production environments. - If you review the code directly in the Code tab, ensure your App Check initialization matches this structure:
import { initializeAppCheck, ReCaptchaV3Provider } from "firebase/app-check"; const appCheck = initializeAppCheck(app, { provider: new ReCaptchaV3Provider("YOUR_RECAPTCHA_SITE_KEY"), isTokenAutoRefreshEnabled: true }); - After updating the code, republish your app in Google AI Studio to push the updated App Check configuration to your live site.
- In Google AI Studio, switch to the chat panel and prompt the assistant to update your App Check configuration for production:
- Verify production traffic and monitor App Check:
- Open your live app URL in an incognito browser window, sign in with Google, and test submitting a dilemma.
- Return to App Check in the Firebase console, and inspect the APIs and Monitoring tabs to verify that requests are successfully registered for Firestore and Firebase AI Logic.
৯. উপসংহার
Congratulations! You built a useful app with AI features from scratch, using tools in Google's Builder Stack. This is only the beginning; there's much more you can do with Google tools. You now have a Firebase + Google Cloud project; explore all the services available to you!
Visit this link to claim the Completed Builder Journey badge!
To continue your journey, head to goo.gle/builders for your next lab.
If you're already using Antigravity 2.0 , Google's dedicated platform to orchestrate multiple autonomous agents in parallel, you can quickly export your project from Google AI Studio and import it into Antigravity to keep working on it locally. Antigravity has Agent Skills for Firebase available to install with one click. These skills also offer support for mobile development, which helps you replicate this app in both Android and iOS environments if you want to.
1. Before you begin
Software development has evolved. The most successful developers don't only write code; they orchestrate AI tools and agents to build better and faster. Google's ecosystem of tools provides a comprehensive suite for the entire lifecycle: UI generation, app prototyping and deployment, AI feature development, and secure, scalable backend integration. In this codelab, you'll use Google Stitch to design the UI, Google AI Studio to vibe code and deploy the app, and Firebase to develop AI features and store information in a secure, scalable backend.
The app you're going to build in this codelab is called Decide For Me —a decision assistant for indecisive people facing life choices (such as moving apartments, changing careers, or picking a hobby). The user enters a dilemma and their priorities in life, and the app uses AI to help the user decide based on what minimizes long-term disappointment. The app also gives the user a concrete first step. The final version of your app should be similar to this:
আপনি যা শিখবেন
- Design UIs with Google Stitch.
- Vibe code a web app with Google AI Studio.
- Use Firebase to develop AI features and store information in the cloud.
- Deploy a web app to production with Google AI Studio (powered by Cloud Run).
2. Design the UI with Stitch
- Download the mockup image (
DecideForMeScreen.jpeg). Save it to a local folder where you can find it. - Go to Stitch , locate the input field, and select the Web option. (For this codelab, you'll focus on the web experience, but you can also use Stitch to generate mobile screens.)
- Upload the mockup image:
- Click + (the add button).
- Select Upload Files .
- Attach the image you downloaded in the setup step (
DecideForMeScreen.jpeg). This hand-drawn mockup lets you test Stitch's multimodal capabilities.
- Copy the following prompt and paste it into the input field:
# General Guidance Create a modern, clean, and highly polished UI for a web application called "Decide For Me" - a hyper-rational decision assistant. CRITICAL: Replicate the exact layout, structure, and element placement shown in the hand-drawn mockup file DecideForMeScreen.jpeg. Do not add any extra menus, sidebars, buttons, or top/bottom navigation bars that are not explicitly drawn in the file. Stick strictly to the skeleton provided in the mockup. # Layout & Structure - Two-Column Split Screen: - Left Side (Main Chat Area): Takes up roughly 70-75% of the screen width. It should feel like a premium, focused workspace. - Right Side (Configuration Panel): A sidebar taking up 25-30% of the screen width with a distinct, subtle background color to separate it from the chat. # Right Panel: Configuration Screen - Header: Title it "My Priorities" with a clean, minimalist typography. - Content Card: A styled card containing a text box or paragraph area showcasing the user's priorities. - Interactions: Include a clear "Edit Priorities" button. When clicked, this area should visually toggle into an editable textarea or input field. # Left Panel: Chat & Dilemma Decision Screen - Chat History: A clean vertical flow of message bubbles. - The first message bubble must be aligned to the left (system message) and say: "Tell me your dilemma". Use a friendly, neutral background color for this bubble. - Bottom Input Area: Instead of a traditional single-line chat bar, create a unified, beautiful "Decision Submission" layout positioned at the bottom: - Dual Input Fields: Place two horizontal or cleanly stacked input fields. - Input 1 label: "Option A" - Input 2 label: "Option B" - Action Button: A prominent, styled "Go" action button to trigger the reasoning loop. # Theme & Aesthetic - Vibe: Hyper-rational, clean, trustworthy, and modern. Use a sophisticated color palette (e.g., deep slates, clean whites/grays, and a sharp accent color like a subtle indigo or teal for active states and buttons). - Spacing & Typography: Use generous whitespace, soft rounded corners (border-radius) for cards and buttons, and a highly legible sans-serif font. - Click the generate arrow in the bottom-right corner of the input field. Stitch generates the screen and an entire design system, including a color palette, font options, iconography, and the general feel for UI elements:
3. Build the app with Google AI Studio
- Export the screen you built in Stitch to Google AI Studio:
- Click the generated design in Stitch.
- Click Export in the top-right corner of the screen.
- Confirm that the selected option is Google AI Studio .
- Scroll down to the Description field.
- Copy the following prompt and paste it into the Description field:
# General Guidance Build the "Decide For Me" app: A hyper-rational decision assistant for chronically indecisive people facing life choices (moving apartments, changing careers, picking a hobby). The user enters a dilemma and their top priorities in life. The app will help with the decision. Follow the instructions below to build it: # UI Instructions Using the design artifacts exported from Stitch (the PNG image and HTML file), build a fully functional web application that accurately mirrors the design and layout. # App Architecture & Initialization Instructions - Initialize the Firebase JS SDK for client-side services. - Set up Firebase Authentication using the Google provider. If a user is not logged in, show a clean, minimalist sign-in state. If the user is logged in, take them directly to the dilemma decision screen. - Initialize Firebase App Check in debug mode (`self.FIREBASE_APPCHECK_DEBUG_TOKEN = true`) without a ReCaptchaV3Provider (we will add that later). # State & Database Management Instructions - User Priorities: - Once authenticated, pull the user's saved priorities from Firebase Firestore at the path: `users/{userId}`. Each document should contain one string field: 'priorities'. - Bind this data to the Right Panel ("My Priorities"). - When the user clicks the "Edit" button, toggle the view to a textarea, with a 'save' button. When saved, write the updated string back to `users/{userId}`. - Make sure to implement and deploy strong Security Rules for Firestore. # UI Stream Update & Display Instructions - Once the user submits option A and option B in the dilemma decision screen, display both options as a single message on the user side of the chat. Then, display a sleek loading state in the main chat panel. Leave the app in this "loading" state and do nothing else, we will process both options and build the server-side thinking later. - Click Build with Google AI Studio . This opens Google AI Studio in a new tab and carries over your design files and prompt:
- Confirm that the prompt was fully carried over.
- If you see only part of the prompt, paste the entire prompt again.
- Click Build . Google AI Studio starts generating the Decide For Me app according to your prompt and UI design:
- While it generates, it suggests alternative UI designs (ignore these designs for this codelab, but you can opt for different designs in the future).
- When prompted to enable Firebase, click Enable .
- Inspect and verify the generated app:
- Test the app in the Preview tab.
- Switch to the Code tab to review all generated files and code.
- Google AI Studio has also created a Firebase project, enabled Firebase Authentication and Firestore , and configured Firebase in your codebase. You'll access and work with this Firebase project in the next step of this codelab.
4. Register your App Check debug token
When Google AI Studio generates the app, it creates a Firebase project and connects your app to it. You need to access this Firebase project and register your development environment with an important security service called Firebase App Check.
Access your Firebase project
- Find the project ID of the Firebase project created by Google AI Studio:
- Switch to the Code tab in Google AI Studio.
- Open the
firebase-applet-config.jsonfile. - Copy the value of the
projectIdfield.
- Go to the Firebase console and search for the project using this ID.
Register your debug token
Your app can use Firebase App Check to protect your backend services and AI models from abuse by ensuring that incoming traffic originates only from legitimate apps.
Because your app is running in the Google AI Studio preview environment, it uses the App Check debug provider ( self.FIREBASE_APPCHECK_DEBUG_TOKEN = true ). When the web app loads, Firebase automatically outputs a debug token to your browser's developer console.
- Find your debug token:
- In Google AI Studio, open your browser's developer tools while viewing your app preview:
- Chrome, Edge, or Firefox: Press F12 (or right-click anywhere in the preview and select Inspect ), and then select the Console tab.
- macOS: Press Cmd+Option+I, and then select the Console tab.
- In the console logs, locate the App Check debug message:
AppCheck debug token: "123a4567-b89c-12d3-e456-789012345678". You will need to safelist it in the Firebase console for it to work. - Copy the token string (without the quotes).
- In Google AI Studio, open your browser's developer tools while viewing your app preview:
- Register your debug token:
- In the Firebase console, go to Security > App Check > Apps tab .
- Find your web app in the list, click the three-dot menu ( ⋮ ), and select Manage debug tokens .
- Click Add debug token , paste your copied token, enter a name such as
Google AI Studio Preview, and click Save .
5. Test the app
Now that your project is connected and your debug token is registered with App Check, test the baseline features: Authentication and Firestore.
- Test user authentication and save priorities:
- In the Decide For Me app preview in Google AI Studio, test the authentication screen by signing in with a Google Account.
- Save your life priorities using the right panel ( My Priorities ).
- Verify authentication in the Firebase console:
- Go to the Firebase console and open Authentication .
- Confirm that the Google Account you used to authenticate in the Decide For Me app is listed there:
- Verify Firestore data storage:
- Open Firestore in the Firebase console.
- Confirm that your priorities are stored in a document under the
users/{userId}path:
6. Build an AI-powered Decider flow using Firebase
Your app will use AI to power its Decide For Me actions. You can use Firebase to build this AI-powered Decider flow.
Set up Firebase AI Logic
- Enable the Gemini Developer API in Firebase AI Logic:
- Open Firebase AI Logic in the Firebase console, and then click Get started .
- Select Gemini Developer API and follow the instructions in the console to enable the API.
- Configure Firebase AI Logic settings:
- Go to the Settings tab.
- Toggle the Enforce template-only mode option to Enforced .
- Toggle the Enforce authenticated-users mode option to Enforced .
Create a server prompt template
In this codelab, you'll use server prompt templates for your interactions with the Gemini API via Firebase AI Logic.
Before you proceed with the template, review the following to understand why storing model configuration, system instructions, and prompts server-side is important:
- Protecting intellectual property: Pulls prompts off the client device and keeps them secure on the backend.
- Preventing prompt injection attacks: The client can only fill in specific variables with backend schema validation.
- Updating without app releases: You can update prompts, system instructions, and model configurations in the console without releasing a new app version.
Here's how you create and test a server prompt template:
- Create the server prompt template:
- Go to the Prompt templates tab.
- Click Create template .
- Select Blank template .
- Create your first template using the following information:
- Template name: Decider Flow
- Template ID:
decider-flow - Configuration (frontmatter)
model: "gemini-3.5-flash-lite" input: schema: priorities: "string, user's core priorities" optionA: "string, option A under consideration" optionB: "string, option B under consideration" output: format: json schema: verdict: string justification: string firstStep: string - Prompt and (optional) system instructions
{role "system"} You are the Decider Agent, a multi-stage reasoning engine that combines the roles of an honest and polite behavioral economist, a long-term strategic forecaster, and an executive decision coach. Your job is to take a user's dilemma and their core priorities, run them through a rigorous, adversarial 3-phase thinking process, and output a highly analytical, reasoning-backed final verdict. You must be direct, sharp, and realistic. Do not give generic platitudes or claim that "both options are great." You must force a clear choice. {role "user"} # Context & Inputs You are analyzing a critical life decision for the user. Base your entire multi-phase reasoning flow strictly on these three specific inputs: - User's Core Priorities: {{priorities}} - Option A under consideration: {{optionA}} - Option B under consideration: {{optionB}} Execute your reasoning flow through the following three phases: # Phase 1: Cynical Breakdown (Input-Driven Analysis) Analyze {{optionA}} and {{optionB}} strictly through the lens of the user's explicit {{priorities}}. Do not evaluate them in a vacuum. - Identify the hidden flaws, compromises, and psychological costs embedded in both choices. - Pinpoint exactly how {{optionA}} could directly conflict with or undermine their {{priorities}}. - Pinpoint exactly how {{optionB}} could directly conflict with or undermine their {{priorities}}. - Uncover any cognitive biases (like status quo bias or loss aversion) the user might be falling for in either option. # Phase 2: Long-Term Regret Projection Project the user 5 years into the future. Apply the Regret Minimization Framework to both paths: - The {{optionA}} Timeline: Quantify the absolute worst-case, deep, structural 5-year regret of choosing this path. Focus heavily on failures of courage vs. failures of action based on their {{priorities}}. - The {{optionB}} Timeline: Quantify the matching 5-year regret for this path. - Contrast these two timelines. Which option carries the kind of regret that fundamentally breaks the user's {{priorities}}? # Phase 3: Final Recommendation & Action Step Synthesize the cynical critiques and long-term regret scores. Weigh them against the user's {{priorities}} to determine which choice minimizes long-term disappointment. - Verdict: You must declare either {{optionA}} or {{optionB}} as the definitive winner. No compromise, no "it depends," and no hybrid options. - Justification: Provide a sharp, reasoning-backed explanation showing why the losing option was eliminated based on the Phase 1 and Phase 2 analysis. - First Step: Give one microscopic, low-friction task the user can execute within the next 15 minutes to commit to or move toward the chosen verdict.{}around{role "system"}and{role "user"}to write your system instructions and prompt in the correct syntax: - Test input
{
  "priorities": "Be financially stable, have a good work-life balance where I can travel twice a year",
  "optionA": "Buy a house for 615000 British pounds with a mortgage of 2800 per month for the next 35 years",
  "optionB": "Keep renting for 2400 per month for the foreseeable"
}
- Click Save template .
- Test the template:
- Click Run prompt test .
- Locate the Test response and check that it has all the fields you specified in the prompt (
verdict,justification, andfirstStep). - If everything matches the expected response, lock the template using the lock icon in the top-right corner of the template to ensure version stability and prevent accidental modifications.
Your template is ready to be used by your app!
7. Use the Decider prompt template in the app
Make your web app use the template:
- Go back to your app in Google AI Studio.
- Ask the Google AI Studio agent to implement the Decide For Me action:
- Copy the following prompt:
Now let's implement the "Decide For Me" button action. When clicked, it should call the Firebase AI Logic SDK using a Template Generative Model. The prompt is stored in a prompt template with the id "decider-flow". When calling the API, pass the following variables as the input payload object: - priorities - optionA - optionB The API will return a JSON object. Handle the response asynchronously and extract: - verdict - justification - firstStep Once the data is received, update the UI state to append a new message to the chat array. Ensure it renders as a system chat bubble positioned on the left side of the chat screen, mapping these three fields clearly into the bubble's layout. Please provide the necessary front-end component state updates and the Firebase SDK call. - Paste the prompt into the Google AI Studio chat input and click Send .
- Copy the following prompt:
- Verify configuration and test the decision assistant:
- Wait until Google AI Studio finishes adding Firebase AI Logic to your app.
- Switch to the Code tab and make sure there's an API key in your
firebase-applet-config.jsonfile. If the Firebase API key isn't in the configuration file, ask Google AI Studio to import it. - Switch to the Preview tab
- Submit options A and B, and verify that the AI returns the decision verdict, justification, and first step.
For reference, the code generated by Google AI Studio should look similar to this:
const aiInstance = getAI(app);
const templateModel = getTemplateGenerativeModel(aiInstance);

const result = await templateModel.generateContent('decider-flow', {
  priorities: priorities,
  optionA: optA,
  optionB: optB
});

const rawText = result.response.text();

// Parse response text to extract fields
const cleaned = rawText.replace(/```json|```/g, '').trim();
const parsedData: { verdict?: string; justification?: string; firstStep?: string } = JSON.parse(cleaned);

const verdict = parsedData.verdict;
const justification = parsedData.justification;
const firstStep = parsedData.firstStep;
Debug and monitor requests
If your app encounters errors, fails to generate a response, or you want to inspect API traffic in detail, use Firebase AI Logic's built-in analytics and monitoring tools:
- In the Firebase console, go to AI Services > AI Logic > AI monitoring tab .
- Check quantitative metrics on the dashboard:
- Request volume and status: Verify whether incoming requests reach the backend and return
200 OKor fail with client or server errors. - Latency: Inspect the latency graph to check end-to-end response time.
- Token counts: Monitor input and output token usage per request.
- Request volume and status: Verify whether incoming requests reach the backend and return
- Inspect individual request traces for deep debugging:Click a specific request trace in the traces table to inspect its payload.
- Inputs: Confirm that the variables (
priorities,optionA, andoptionB) were correctly passed from the client app. - Outputs: View the raw text generated by the model to verify whether it returned valid JSON matching the schema.
- Error details: If a request fails, check the trace error log for reasons such as invalid App Check tokens, authentication rejection, quota limits, or prompt validation errors.
- Inputs: Confirm that the variables (
- Troubleshoot and resolve issues with Google AI Studio:
- If you identify an error in the trace (for example, malformed JSON response parsing or missing parameters), copy the error message or payload.
- Return to Google AI Studio and prompt the assistant to fix the corresponding issue in the app code.
8. Optional: Deploy the app
Now that your app works in preview mode, deploy it to production.
To protect your Firebase endpoints in production, configure a production attestation provider for use with Firebase App Check (in this codelab, you'll use reCAPTCHA v3 ).
You need to deploy your app first to obtain its exact live URL so that you can register the specific domain with reCAPTCHA rather than allowing all ai.studio apps.
Deploy your app and configure reCAPTCHA:
- Deploy the web app with Google AI Studio:
- In Google AI Studio, click Publish in the top navigation bar.
- Click Get started , review or customize the application name and description, and click Publish your app .
- Wait for Google AI Studio to build and deploy your app (typically 1–2 minutes).
- Copy the generated live vanity URL (for example,
https://decide-for-me-123.ai.studio) and note its domain (for example,decide-for-me-123.ai.studio).
- Create reCAPTCHA v3 keys in Google reCAPTCHA:
- Go to the Google reCAPTCHA Admin Console .
- Enter a Label (for example,
Decide For Me - Production). - Select reCAPTCHA type > reCAPTCHA v3 (Score-based) .
- In the Domains section, add your app's exact deployed domain (for example,
decide-for-me-123.ai.studio, omittinghttps://and any paths) or a custom domain if you plan to use one. - Accept the terms of service and click Submit .
- Keep this tab open: you'll need both the Site Key (public client key) and the Secret Key (private server key).
- Register your secret key in the Firebase console:
- Go to App Check in the Firebase console.
- Go to the Apps tab.
- Locate your web application in the list, click it (or click the three-dot menu ⋮ ), and select reCAPTCHA v3 .
- Paste your reCAPTCHA Secret Key into the field and click Save .
- Configure the client app to use
ReCaptchaV3Provider:- In Google AI Studio, switch to the chat panel and prompt the assistant to update your App Check configuration for production:
Please update our Firebase App Check initialization to use ReCaptchaV3Provider with the reCAPTCHA site key "YOUR_RECAPTCHA_SITE_KEY", while retaining support for debug tokens in non-production environments. - If you review the code directly in the Code tab, ensure your App Check initialization matches this structure:
import { initializeAppCheck, ReCaptchaV3Provider } from "firebase/app-check"; const appCheck = initializeAppCheck(app, { provider: new ReCaptchaV3Provider("YOUR_RECAPTCHA_SITE_KEY"), isTokenAutoRefreshEnabled: true }); - After updating the code, republish your app in Google AI Studio to push the updated App Check configuration to your live site.
- In Google AI Studio, switch to the chat panel and prompt the assistant to update your App Check configuration for production:
- Verify production traffic and monitor App Check:
- Open your live app URL in an incognito browser window, sign in with Google, and test submitting a dilemma.
- Return to App Check in the Firebase console, and inspect the APIs and Monitoring tabs to verify that requests are successfully registered for Firestore and Firebase AI Logic.
৯. উপসংহার
Congratulations! You built a useful app with AI features from scratch, using tools in Google's Builder Stack. This is only the beginning; there's much more you can do with Google tools. You now have a Firebase + Google Cloud project; explore all the services available to you!
Visit this link to claim the Completed Builder Journey badge!
To continue your journey, head to goo.gle/builders for your next lab.
If you're already using Antigravity 2.0 , Google's dedicated platform to orchestrate multiple autonomous agents in parallel, you can quickly export your project from Google AI Studio and import it into Antigravity to keep working on it locally. Antigravity has Agent Skills for Firebase available to install with one click. These skills also offer support for mobile development, which helps you replicate this app in both Android and iOS environments if you want to.