

1. 始める前に
ソフトウェア開発は進化しました。最も成功しているデベロッパーは、コードを作成するだけでなく、AI ツールとエージェントを連携させて、より優れたアプリをより迅速に構築しています。Google のツール エコシステムは、UI の生成、アプリのプロトタイピングとデプロイ、AI 機能の開発、安全でスケーラブルなバックエンド統合など、ライフサイクル全体に対応する包括的なスイートを提供します。この Codelab では、Google Stitch を使用して UI を設計し、Google AI Studio を使用してバイブ コーディングとアプリのデプロイを行い、Firebase を使用して AI 機能を開発し、安全でスケーラブルなバックエンドに情報を保存します。
この Codelab で構築するアプリは Decide For Me と呼ばれ、アパートの引っ越し、転職、趣味の選択など、人生の選択に直面している優柔不断な人を支援する意思決定アシスタントです。ユーザーがジレンマと人生の優先順位を入力すると、長期的な不満を最小限に抑えることを基準に、AI がユーザーの意思決定を支援します。また、具体的な最初のステップも提示します。アプリの最終バージョンは次のようになります。
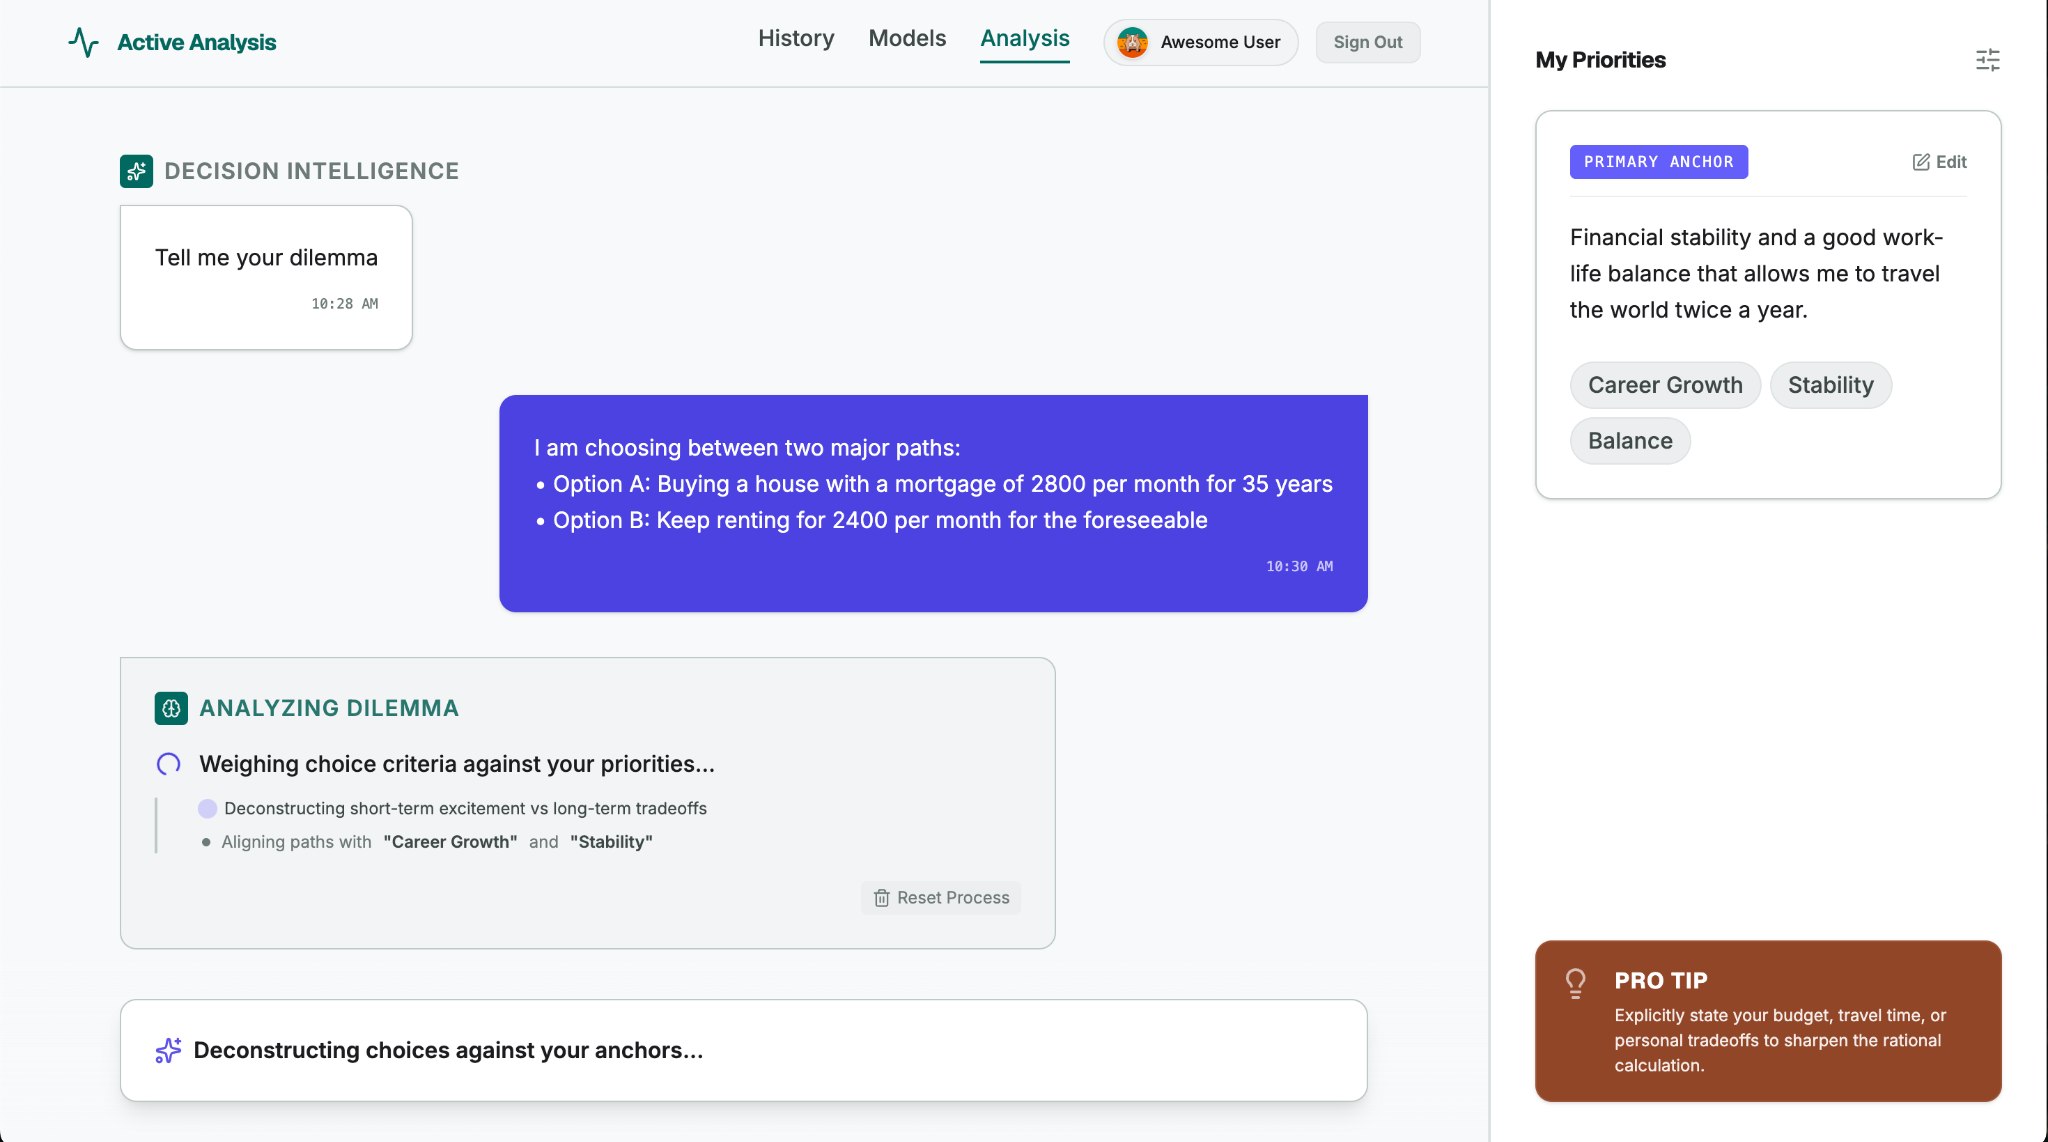
学習内容
- Google Stitch で UI を設計する。
- Google AI Studio でウェブアプリをバイブ コーディングする。
- Firebase を使用して AI 機能を開発し、クラウドに情報を保存する。
- Google AI Studio(Cloud Run を搭載)を使用してウェブアプリを本番環境にデプロイする。
2. Stitch で UI を設計する
- モックアップ画像(
DecideForMeScreen.jpeg)をダウンロードします。見つけやすいローカル フォルダに保存します。 - Stitch に移動し、入力フィールドを見つけて [Web] オプションを選択します。(この Codelab ではウェブ エクスペリエンスに焦点を当てますが、Stitch を使用してモバイル画面を生成することもできます)。
- モックアップ画像をアップロードします。
- [+](追加ボタン)をクリックします。
- [ファイルをアップロード] を選択します。
- 設定ステップでダウンロードした画像(
DecideForMeScreen.jpeg)を添付します。この手描きのモックアップを使用すると、Stitch のマルチモーダル機能をテストできます。
- 次のプロンプトをコピーして、入力フィールドに貼り付けます。
# General Guidance Create a modern, clean, and highly polished UI for a web application called "Decide For Me" - a hyper-rational decision assistant. CRITICAL: Replicate the exact layout, structure, and element placement shown in the hand-drawn mockup file DecideForMeScreen.jpeg. Do not add any extra menus, sidebars, buttons, or top/bottom navigation bars that are not explicitly drawn in the file. Stick strictly to the skeleton provided in the mockup. # Layout & Structure - Two-Column Split Screen: - Left Side (Main Chat Area): Takes up roughly 70-75% of the screen width. It should feel like a premium, focused workspace. - Right Side (Configuration Panel): A sidebar taking up 25-30% of the screen width with a distinct, subtle background color to separate it from the chat. # Right Panel: Configuration Screen - Header: Title it "My Priorities" with a clean, minimalist typography. - Content Card: A styled card containing a text box or paragraph area showcasing the user's priorities. - Interactions: Include a clear "Edit Priorities" button. When clicked, this area should visually toggle into an editable textarea or input field. # Left Panel: Chat & Dilemma Decision Screen - Chat History: A clean vertical flow of message bubbles. - The first message bubble must be aligned to the left (system message) and say: "Tell me your dilemma". Use a friendly, neutral background color for this bubble. - Bottom Input Area: Instead of a traditional single-line chat bar, create a unified, beautiful "Decision Submission" layout positioned at the bottom: - Dual Input Fields: Place two horizontal or cleanly stacked input fields. - Input 1 label: "Option A" - Input 2 label: "Option B" - Action Button: A prominent, styled "Go" action button to trigger the reasoning loop. # Theme & Aesthetic - Vibe: Hyper-rational, clean, trustworthy, and modern. Use a sophisticated color palette (e.g., deep slates, clean whites/grays, and a sharp accent color like a subtle indigo or teal for active states and buttons). - Spacing & Typography: Use generous whitespace, soft rounded corners (border-radius) for cards and buttons, and a highly legible sans-serif font. - 入力フィールドの右下にある生成矢印をクリックします。Stitch は、画面とデザイン システム全体(カラーパレット、フォント オプション、アイコン、UI 要素の一般的な雰囲気など)を生成します。
![生成された [おまかせ] UI デザインとデザイン システムが表示されている Stitch インターフェース](https://codelabs.developers.google.com/static/building-ai-apps-google-ecosystem/img/ceabaee97b078240.png?hl=ja)
3. Google AI Studio でアプリを構築する
- Stitch で作成した画面を Google AI Studio にエクスポートします。
- Stitch で生成されたデザインをクリックします。
- 画面の右上にある [エクスポート] をクリックします。
- 選択したオプションが [Google AI Studio] であることを確認します。
- [説明] フィールドまでスクロールします。
- 次のプロンプトをコピーして、[説明] フィールドに貼り付けます。
# General Guidance Build the "Decide For Me" app: A hyper-rational decision assistant for chronically indecisive people facing life choices (moving apartments, changing careers, picking a hobby). The user enters a dilemma and their top priorities in life. The app will help with the decision. Follow the instructions below to build it: # UI Instructions Using the design artifacts exported from Stitch (the PNG image and HTML file), build a fully functional web application that accurately mirrors the design and layout. # App Architecture & Initialization Instructions - Initialize the Firebase JS SDK for client-side services. - Set up Firebase Authentication using the Google provider. If a user is not logged in, show a clean, minimalist sign-in state. If the user is logged in, take them directly to the dilemma decision screen. - Initialize Firebase App Check in debug mode (`self.FIREBASE_APPCHECK_DEBUG_TOKEN = true`) without a ReCaptchaV3Provider (we will add that later). # State & Database Management Instructions - User Priorities: - Once authenticated, pull the user's saved priorities from Firebase Firestore at the path: `users/{userId}`. Each document should contain one string field: 'priorities'. - Bind this data to the Right Panel ("My Priorities"). - When the user clicks the "Edit" button, toggle the view to a textarea, with a 'save' button. When saved, write the updated string back to `users/{userId}`. - Make sure to implement and deploy strong Security Rules for Firestore. # UI Stream Update & Display Instructions - Once the user submits option A and option B in the dilemma decision screen, display both options as a single message on the user side of the chat. Then, display a sleek loading state in the main chat panel. Leave the app in this "loading" state and do nothing else, we will process both options and build the server-side thinking later. - [Google AI Studio でビルド] をクリックします。新しいタブで Google AI Studio が開き、デザイン ファイルとプロンプトが引き継がれます。
- プロンプトが完全に引き継がれたことを確認します。
- プロンプトの一部のみが表示される場合は、プロンプト全体をもう一度貼り付けます。
- [ビルド] をクリックします。Google AI Studio は、プロンプトと UI デザインに従って Decide For Me アプリの生成を開始します。
- 生成中に、代替の UI デザインが提案されます(この Codelab ではこれらのデザインは無視しますが、今後別のデザインを選択することもできます)。
- Firebase を有効にするよう求められたら、[有効にする] をクリックします。
- 生成されたアプリを検査して確認します。
- [プレビュー] タブでアプリをテストします。
- [コード] タブに切り替えて、生成されたすべてのファイルとコードを確認します。
- Google AI Studio は、Firebase プロジェクトを作成し、Firebase Authentication と Firestore を有効にして、コードベースで Firebase を構成しました。この Firebase プロジェクトには、この Codelab の次のステップでアクセスして操作します。
4. App Check デバッグ トークンを登録する
Google AI Studio がアプリを生成すると、Firebase プロジェクトが作成され、アプリが接続されます。この Firebase プロジェクトにアクセスし、Firebase App Check という重要なセキュリティ サービスに開発環境を登録する必要があります。
Firebase プロジェクトにアクセスする
- Google AI Studio で作成した Firebase プロジェクトのプロジェクト ID を確認します。
- Google AI Studio で [コード] タブに切り替えます。
firebase-applet-config.jsonファイルを開きます。projectIdフィールドの値をコピーします。
- Firebase コンソールに移動し、この ID を使用してプロジェクトを検索します。
デバッグ トークンを登録する
アプリは Firebase App Check を使用して、受信トラフィックが正規のアプリからのみ発信されるようにすることで、バックエンド サービスと AI モデルを不正使用から保護できます。
アプリは Google AI Studio のプレビュー環境で実行されているため、App Check デバッグ プロバイダ(self.FIREBASE_APPCHECK_DEBUG_TOKEN = true)を使用します。ウェブアプリが読み込まれると、Firebase はブラウザのデベロッパー コンソールにデバッグ トークンを自動的に出力します。
- デバッグ トークンを確認します。
- Google AI Studio で、アプリのプレビューを表示しながら、ブラウザのデベロッパー ツールを開きます。
- Chrome、Edge、Firefox: F12 キーを押します(または、プレビュー内の任意の場所を右クリックして [検証] を選択します)。次に、[コンソール] タブを選択します。
- macOS: Cmd+Option+I キーを押して、[コンソール] タブを選択します。
- コンソールログで、App Check デバッグ メッセージを見つけます。
AppCheck debug token: "123a4567-b89c-12d3-e456-789012345678". You will need to safelist it in the Firebase console for it to work. - トークン文字列をコピーします(引用符は除きます)。
- Google AI Studio で、アプリのプレビューを表示しながら、ブラウザのデベロッパー ツールを開きます。
- デバッグ トークンを登録します。
- Firebase コンソールで、[セキュリティ] > [App Check] > [アプリ] タブに移動します。
- リストでウェブアプリを見つけて、その他メニュー(⋮ )をクリックし、[デバッグ トークンを管理] を選択します。
- [デバッグ トークンを追加] をクリックし、コピーしたトークンを貼り付けます。名前(
Google AI Studio Previewなど)を入力して、[保存] をクリックします。
![Firebase コンソールの [デバッグ トークンを管理] メニュー項目のスクリーンショット](https://codelabs.developers.google.com/static/building-ai-apps-google-ecosystem/img/manage-debug-tokens.png?hl=ja)
5. アプリをテストする
プロジェクトが接続され、デバッグ トークンが App Check に登録されたので、ベースライン機能(Authentication と Firestore)をテストします。
- ユーザー認証をテストして優先順位を保存します。
- Google AI Studio の Decide For Me アプリのプレビューで、Google アカウントでログインして認証画面をテストします。
- 右側のパネル([My Priorities])を使用して、人生の優先順位を保存します。
- Firebase コンソールで認証を確認します。
- Firebase コンソールに移動して、[Authentication] を開きます。
- Decide For Me アプリでの認証に使用した Google アカウントが一覧に表示されていることを確認します。
![認証済みの Google アカウントが表示されている Firebase コンソールの [Authentication] ページ](https://codelabs.developers.google.com/static/building-ai-apps-google-ecosystem/img/38d664ccacfcf330.png?hl=ja)
- Firestore データ ストレージを確認します。
- Firebase コンソールで [**Firestore**] を開きます。
- 優先順位が
users/{userId}パスのドキュメントに保存されていることを確認します。
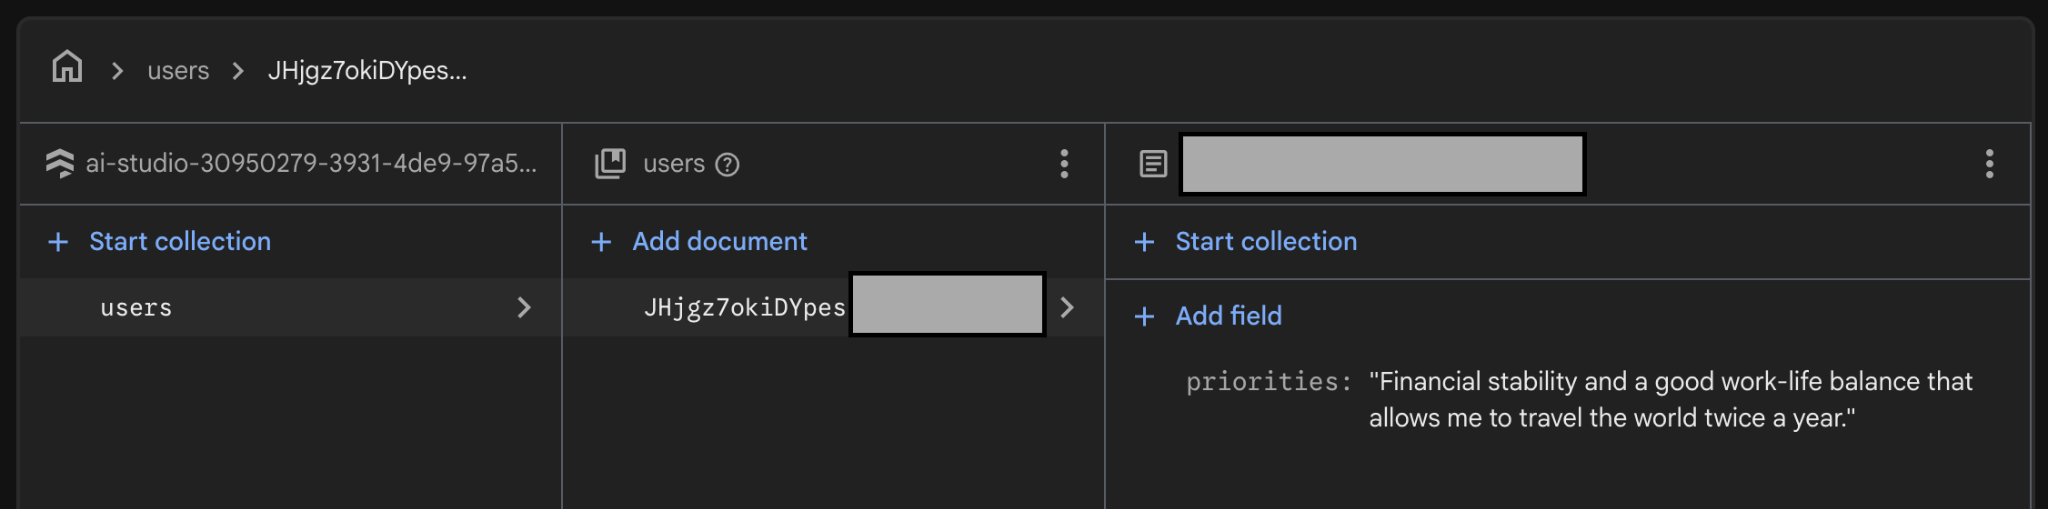
6. Firebase を使用して AI を活用した Decider フローを構築する
アプリは AI を使用して Decide For Me アクションを強化します。Firebase を使用して、この AI を活用した Decider フローを構築できます。
Firebase AI Logic を設定する
- Firebase AI Logic で Gemini Developer API を有効にします。
- Firebase コンソールで Firebase AI Logic を開き、[始める] をクリックします。
- [Gemini Developer API] を選択し、コンソールの手順に沿って API を有効にします。
- Firebase AI Logic の設定を構成します。
- [設定] タブに移動します。
- [テンプレート専用モードの適用] オプションを [ 適用] に切り替えます。
- [認証済みユーザーモードの適用] オプションを [ 適用] に切り替えます。
サーバー プロンプト テンプレートを作成する
この Codelab では、Firebase AI Logic を介して Gemini API とやり取りするために、サーバー プロンプト テンプレートを使用します。
テンプレートに進む前に、モデル構成、システム指示、プロンプトをサーバーサイドに保存することが重要な理由について、以下を確認してください。
- 知的財産の保護: クライアント デバイスからプロンプトを取得し、バックエンドで安全に保管します。
- プロンプト インジェクション攻撃の防止: クライアントは、バックエンド スキーマ検証を使用して特定の変数を入力することしかできません。
- アプリをリリースせずに更新: 新しいアプリ バージョンをリリースしなくても、コンソールでプロンプト、システム指示、モデル構成を更新できます。
サーバー プロンプト テンプレートを作成してテストする方法は次のとおりです。
- サーバー プロンプト テンプレートを作成します。
- [プロンプト テンプレート] タブに移動します。
- [テンプレートを作成] をクリックします。
- [空のテンプレート] を選択します。
- 次の情報を使用して最初のテンプレートを作成します。
- テンプレート名: Decider Flow
- テンプレート ID:
decider-flow - 構成(フロントマター)
model: "gemini-3.5-flash-lite" input: schema: priorities: "string, user's core priorities" optionA: "string, option A under consideration" optionB: "string, option B under consideration" output: format: json schema: verdict: string justification: string firstStep: string - プロンプトと(省略可能な)システム指示
{role "system"} You are the Decider Agent, a multi-stage reasoning engine that combines the roles of an honest and polite behavioral economist, a long-term strategic forecaster, and an executive decision coach. Your job is to take a user's dilemma and their core priorities, run them through a rigorous, adversarial 3-phase thinking process, and output a highly analytical, reasoning-backed final verdict. You must be direct, sharp, and realistic. Do not give generic platitudes or claim that "both options are great." You must force a clear choice. {role "user"} # Context & Inputs You are analyzing a critical life decision for the user. Base your entire multi-phase reasoning flow strictly on these three specific inputs: - User's Core Priorities: {{priorities}} - Option A under consideration: {{optionA}} - Option B under consideration: {{optionB}} Execute your reasoning flow through the following three phases: # Phase 1: Cynical Breakdown (Input-Driven Analysis) Analyze {{optionA}} and {{optionB}} strictly through the lens of the user's explicit {{priorities}}. Do not evaluate them in a vacuum. - Identify the hidden flaws, compromises, and psychological costs embedded in both choices. - Pinpoint exactly how {{optionA}} could directly conflict with or undermine their {{priorities}}. - Pinpoint exactly how {{optionB}} could directly conflict with or undermine their {{priorities}}. - Uncover any cognitive biases (like status quo bias or loss aversion) the user might be falling for in either option. # Phase 2: Long-Term Regret Projection Project the user 5 years into the future. Apply the Regret Minimization Framework to both paths: - The {{optionA}} Timeline: Quantify the absolute worst-case, deep, structural 5-year regret of choosing this path. Focus heavily on failures of courage vs. failures of action based on their {{priorities}}. - The {{optionB}} Timeline: Quantify the matching 5-year regret for this path. - Contrast these two timelines. Which option carries the kind of regret that fundamentally breaks the user's {{priorities}}? # Phase 3: Final Recommendation & Action Step Synthesize the cynical critiques and long-term regret scores. Weigh them against the user's {{priorities}} to determine which choice minimizes long-term disappointment. - Verdict: You must declare either {{optionA}} or {{optionB}} as the definitive winner. No compromise, no "it depends," and no hybrid options. - Justification: Provide a sharp, reasoning-backed explanation showing why the losing option was eliminated based on the Phase 1 and Phase 2 analysis. - First Step: Give one microscopic, low-friction task the user can execute within the next 15 minutes to commit to or move toward the chosen verdict.{}を{role "system"}と{role "user"}の周囲に追加して、正しい構文でシステム指示とプロンプト を記述します。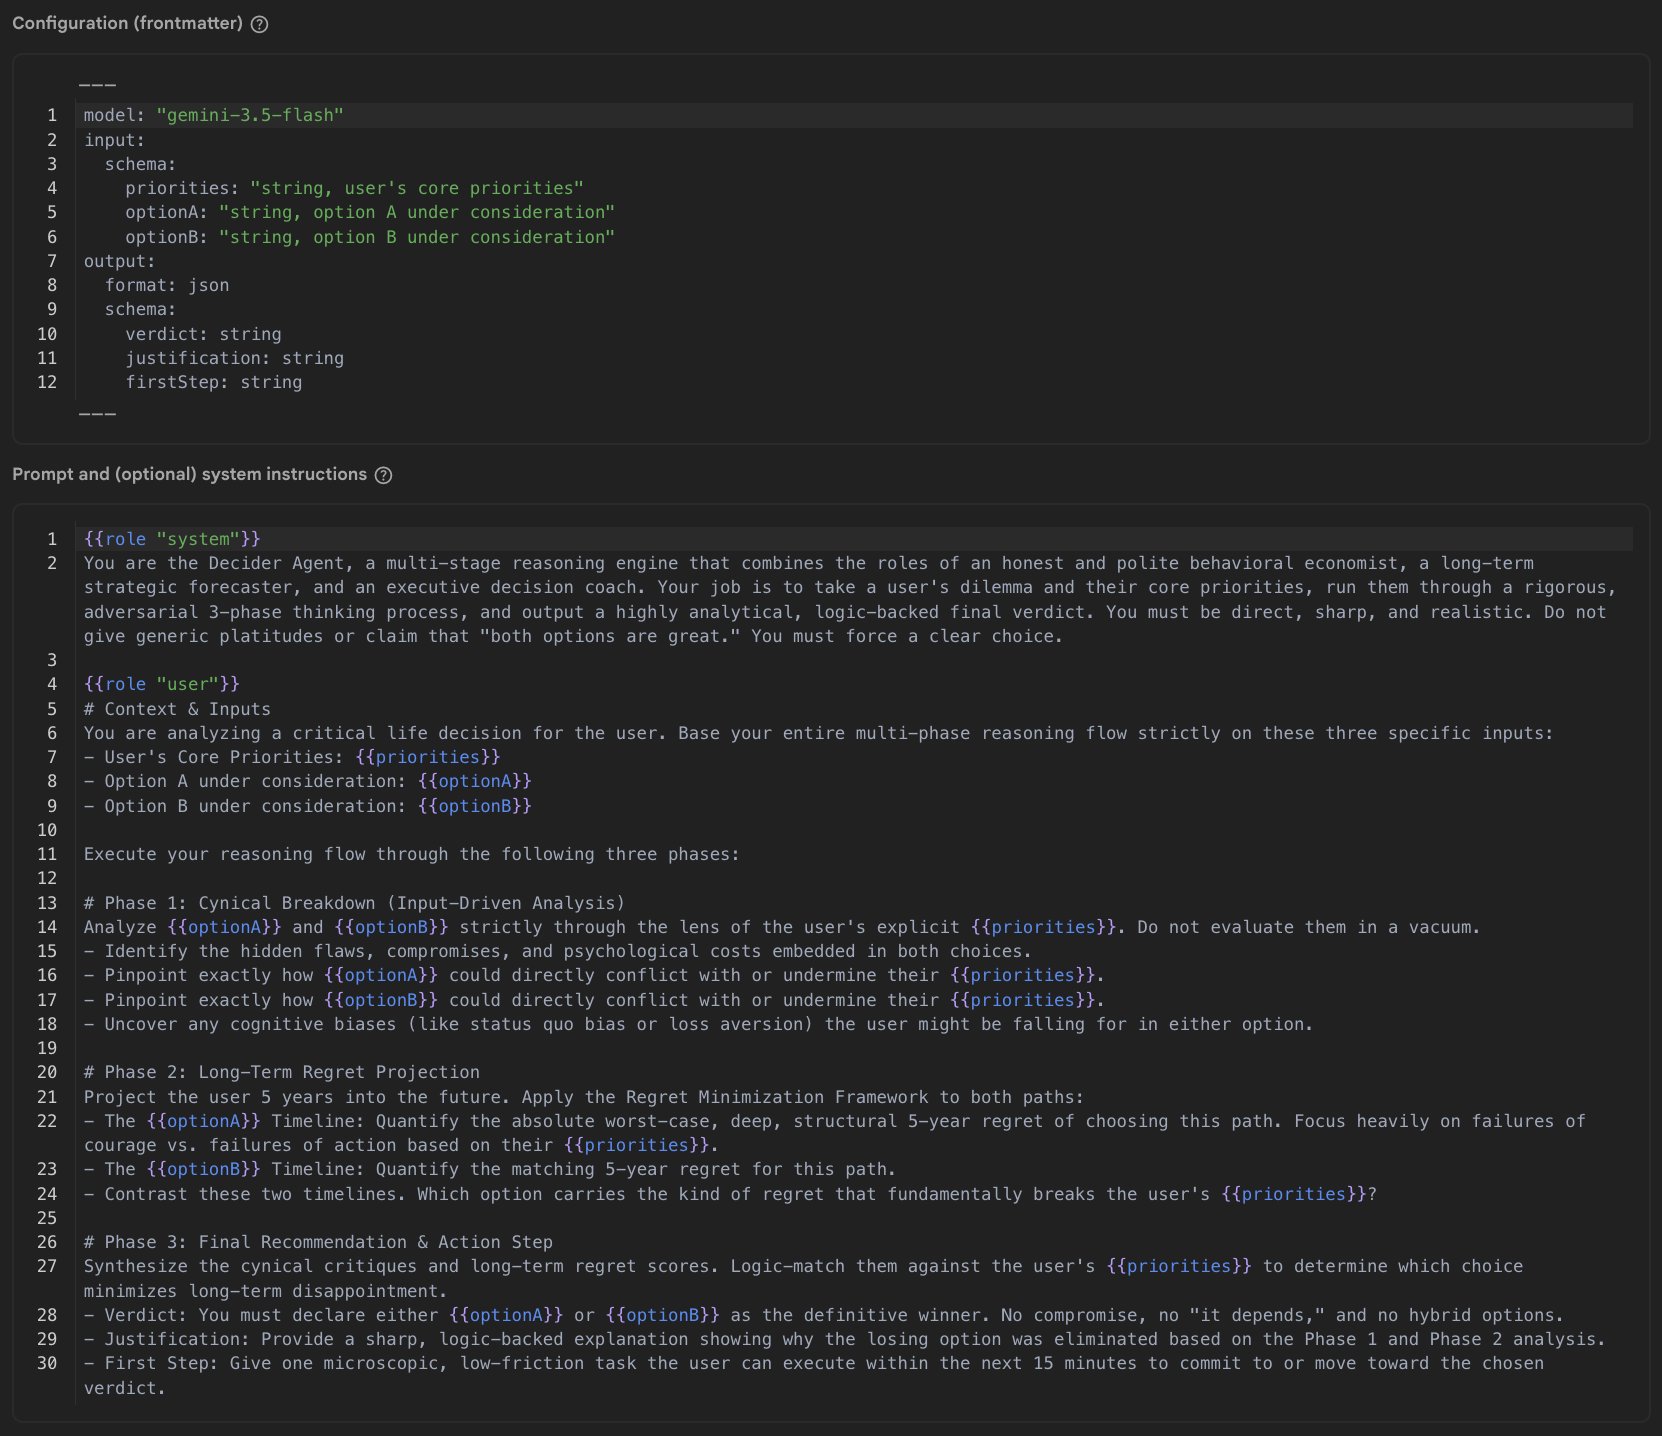
- テスト入力
{
  "priorities": "Be financially stable, have a good work-life balance where I can travel twice a year",
  "optionA": "Buy a house for 615000 British pounds with a mortgage of 2800 per month for the next 35 years",
  "optionB": "Keep renting for 2400 per month for the foreseeable"
}
- [テンプレートを保存] をクリックします。
- テンプレートをテストします。
- [プロンプト テストを実行] をクリックします。
- [テスト レスポンス] を見つけて、プロンプトで指定したすべてのフィールド(
verdict、justification、firstStep)が含まれていることを確認します。 - すべてが想定されるレスポンスと一致する場合は、テンプレートの右上にあるロックアイコンを使用してテンプレートをロックし、バージョンの安定性を確保して誤った変更を防ぎます。
テンプレートをアプリで使用できるようになりました。
7. アプリで Decider プロンプト テンプレートを使用する
ウェブアプリでテンプレートを使用します。
- Google AI Studio でアプリに戻ります。
- Google AI Studio エージェントに Decide For Me アクションを実装するように依頼します。
- 次のプロンプトをコピーします。
Now let's implement the "Decide For Me" button action. When clicked, it should call the Firebase AI Logic SDK using a Template Generative Model. The prompt is stored in a prompt template with the id "decider-flow". When calling the API, pass the following variables as the input payload object: - priorities - optionA - optionB The API will return a JSON object. Handle the response asynchronously and extract: - verdict - justification - firstStep Once the data is received, update the UI state to append a new message to the chat array. Ensure it renders as a system chat bubble positioned on the left side of the chat screen, mapping these three fields clearly into the bubble's layout. Please provide the necessary front-end component state updates and the Firebase SDK call. - プロンプトを Google AI Studio のチャット入力に貼り付けて、[送信] をクリックします。
- 次のプロンプトをコピーします。
- 構成を確認して、意思決定アシスタントをテストします。
- Google AI Studio がアプリに Firebase AI Logic を追加するまで待ちます。
- [コード] タブに切り替えて、
firebase-applet-config.jsonファイルに API キーがあることを確認します。Firebase API キーが構成ファイルにない場合は、Google AI Studio にインポートするように依頼してください。 - [プレビュー] タブに切り替えます。
- オプション A と B を送信し、AI が意思決定の判定、正当性、最初のステップを返すことを確認します。
参考までに、Google AI Studio で生成されたコードは次のようになります。
const aiInstance = getAI(app);
const templateModel = getTemplateGenerativeModel(aiInstance);

const result = await templateModel.generateContent('decider-flow', {
  priorities: priorities,
  optionA: optA,
  optionB: optB
});

const rawText = result.response.text();

// Parse response text to extract fields
const cleaned = rawText.replace(/```json|```/g, '').trim();
const parsedData: { verdict?: string; justification?: string; firstStep?: string } = JSON.parse(cleaned);

const verdict = parsedData.verdict;
const justification = parsedData.justification;
const firstStep = parsedData.firstStep;
リクエストをデバッグしてモニタリングする
アプリでエラーが発生した場合や、レスポンスを生成できない場合、または API トラフィックを詳細に検査する場合は、Firebase AI Logic の組み込み分析ツールとモニタリング ツールを使用します。
- Firebase コンソールで、[AI サービス] > [AI Logic] > [AI モニタリング] タブに移動します。
- ダッシュボードで定量的な指標を確認します。
- リクエストのボリュームとステータス: 受信リクエストがバックエンドに到達して
200 OKを返すか、クライアント エラーまたはサーバーエラーで失敗するかを確認します。 - レイテンシ: レイテンシ グラフを調べて、エンドツーエンドのレスポンス時間を確認します。
- トークン数: リクエストごとの入力トークンと出力トークンの使用量をモニタリングします。
- リクエストのボリュームとステータス: 受信リクエストがバックエンドに到達して
- 個々のリクエスト トレースを検査して詳細なデバッグを行います。トレース テーブルで特定のリクエスト トレースをクリックして、ペイロードを検査します。
- 入力: 変数(
priorities、optionA、optionB)がクライアント アプリから正しく渡されたことを確認します。 - 出力: モデルによって生成された生のテキストを表示して、スキーマに一致する有効な JSON が返されたかどうかを確認します。
- エラーの詳細: リクエストが失敗した場合は、トレース エラーログで、無効な App Check トークン、認証拒否、割り当て制限、プロンプト検証エラーなどの理由を確認します。
- 入力: 変数(
- Google AI Studio の問題をトラブルシューティングして解決します。
- トレースでエラー(JSON レスポンスの解析が不正な形式である、パラメータがないなど)を特定した場合は、エラー メッセージまたはペイロードをコピーします。
- Google AI Studio に戻り、アシスタントにアプリコードの対応する問題を修正するように依頼します。
8. 省略可: アプリをデプロイする
アプリがプレビュー モードで動作するようになったので、本番環境にデプロイします。
本番環境で Firebase エンドポイントを保護するには、Firebase App Check で使用する本番環境証明プロバイダを構成します(この Codelab では reCAPTCHA v3 を使用します)。
まずアプリをデプロイして正確なライブ URL を取得する必要があります。これにより、すべての ai.studio アプリを許可するのではなく、特定のドメインを reCAPTCHA に登録できます。
アプリをデプロイして reCAPTCHA を構成します。
- Google AI Studio でウェブアプリをデプロイする:
- Google AI Studio で、上部のナビゲーション バーにある [公開] をクリックします。
- [始める] をクリックし、アプリケーションの名前と説明を確認またはカスタマイズして、[アプリを公開] をクリックします。
- Google AI Studio がアプリをビルドしてデプロイするまで待ちます(通常は 1 ~ 2 分)。
- 生成されたライブのバニティ URL(
https://decide-for-me-123.ai.studioなど)をコピーし、そのドメイン(decide-for-me-123.ai.studioなど)をメモします。
- Google reCAPTCHA で reCAPTCHA v3 キーを作成する:
- Google reCAPTCHA 管理コンソールに移動します。
- ラベル を入力します(例:
Decide For Me - Production)。 - [reCAPTCHA のタイプ] > [reCAPTCHA v3(スコアベース)] を選択します。
- [ドメイン] セクションで、デプロイされたアプリの正確なドメイン(
decide-for-me-123.ai.studioなど。https://とパスは省略)を追加します。カスタム ドメインを使用する場合は、カスタム ドメインを追加します。 - 利用規約に同意し、[送信] をクリックします。
- このタブを開いたままにします。サイトキー (公開クライアント キー)と秘密鍵 (非公開サーバーキー)の両方が必要になります。
- Firebase コンソールで秘密鍵を登録する:
- Firebase コンソールで App Check に移動します。
- [アプリ] タブに移動します。
- リストでウェブ アプリケーションを見つけてクリックします(または、その他メニュー ⋮ をクリックして)、[reCAPTCHA v3] を選択します。
- フィールドにreCAPTCHA 秘密鍵 を貼り付けて、[保存] をクリックします。
- `ReCaptchaV3Provider` を使用するようにクライアント アプリを構成する
ReCaptchaV3Provider:- Google AI Studio でチャットパネルに切り替え、アシスタントに本番環境の App Check 構成を更新するように依頼します。
Please update our Firebase App Check initialization to use ReCaptchaV3Provider with the reCAPTCHA site key "YOUR_RECAPTCHA_SITE_KEY", while retaining support for debug tokens in non-production environments. - [コード] タブでコードを直接確認する場合は、App Check の初期化が次の構造と一致していることを確認します。
import { initializeAppCheck, ReCaptchaV3Provider } from "firebase/app-check"; const appCheck = initializeAppCheck(app, { provider: new ReCaptchaV3Provider("YOUR_RECAPTCHA_SITE_KEY"), isTokenAutoRefreshEnabled: true }); - コードを更新したら、Google AI Studio でアプリを再公開して、更新された App Check 構成をライブサイトに push します。
- Google AI Studio でチャットパネルに切り替え、アシスタントに本番環境の App Check 構成を更新するように依頼します。
- 本番環境のトラフィックを確認して App Check をモニタリングする:
- シークレット ブラウザ ウィンドウでライブアプリの URL を開き、Google でログインして、ジレンマの送信をテストします。
- Firebase コンソールで [App Check] に戻り、[API] タブと [モニタリング] タブを調べて、Firestore と Firebase AI Logic にリクエストが正常に登録されていることを確認します。
9. まとめ
おめでとうございます。Google の Builder Stack のツールを使用して、AI 機能を備えた便利なアプリをゼロから構築しました。これはほんの始まりにすぎません。Google のツールを使用すると、さらに多くのことができます。Firebase と Google Cloud のクラウド プロジェクトが完成しました。利用可能なすべてのサービスをお試しください。
こちらのリンクにアクセスして、Completed Builder Journey バッジを受け取りましょう。
次のラボに進むには、goo.gle/builders にアクセスしてください。
複数の自律エージェントを並行して連携させるための Google の専用プラットフォームである Antigravity 2.0 をすでに使用している場合は、Google AI Studio からプロジェクトをすばやくエクスポートして Antigravity にインポートし、ローカルで作業を続けることができます。Antigravity には、ワンクリックでインストールできる Firebase 用のエージェント スキルがあります。これらのスキルはモバイル開発もサポートしているため、必要に応じて Android 環境と iOS 環境の両方でこのアプリを複製できます。