

1. 시작하기 전에
소프트웨어 개발이 진화했습니다. 가장 성공적인 개발자는 코드를 작성할 뿐만 아니라 AI 도구와 에이전트를 오케스트레이션하여 더 나은 코드를 더 빠르게 빌드합니다. Google의 도구 생태계는 UI 생성, 앱 프로토타입 제작 및 배포, AI 기능 개발, 안전하고 확장 가능한 백엔드 통합 등 전체 수명 주기를 위한 포괄적인 제품군을 제공합니다. 이 Codelab에서는 Google Stitch를 사용하여 UI를 디자인하고, Google AI Studio를 사용하여 코드를 바이브하고 앱을 배포하며, Firebase를 사용하여 AI 기능을 개발하고 안전하고 확장 가능한 백엔드에 정보를 저장합니다.
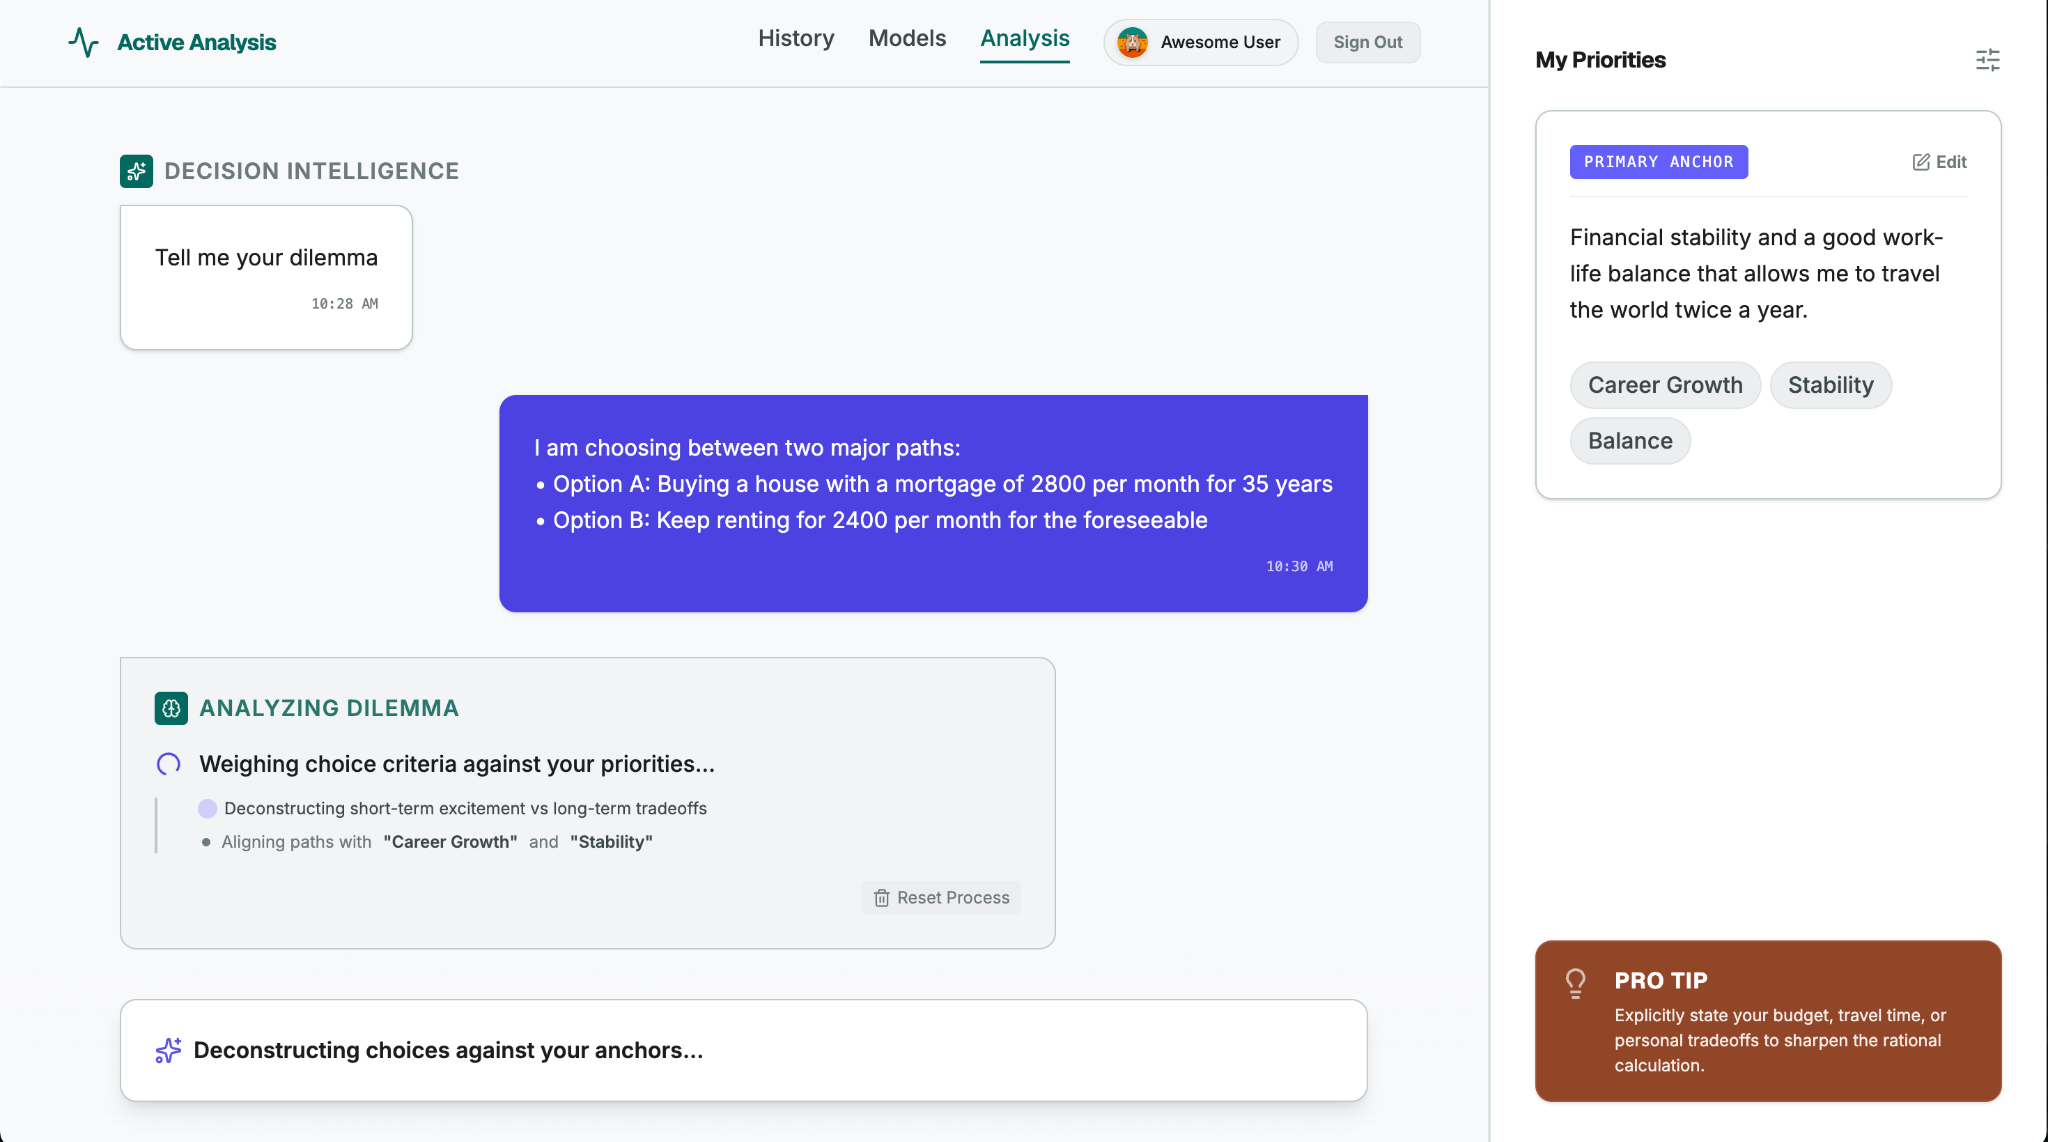
이번 코드랩에서 만들 앱은 Decide For Me라고 합니다. 이 앱은 이사, 직업 변경, 취미 선택과 같은 인생의 중요한 선택에 직면했을 때 결정을 내리지 못하는 사람들을 위한 의사 결정 도우미입니다. 사용자가 딜레마와 인생의 우선순위를 입력하면 앱에서 AI를 사용하여 장기적인 실망을 최소화하는 것을 기반으로 사용자가 결정하도록 지원합니다. 또한 앱은 사용자에게 구체적인 첫 번째 단계를 제공합니다. 앱의 최종 버전은 다음과 유사해야 합니다.
학습할 내용
- Google Stitch로 UI를 디자인합니다.
- Google AI Studio로 웹 앱을 바이브 코딩합니다.
- Firebase를 사용하여 AI 기능을 개발하고 정보를 클라우드에 저장하세요.
- Google AI Studio (Cloud Run 기반)를 사용하여 웹 앱을 프로덕션에 배포합니다.
2. Stitch로 UI 디자인
- 모형 이미지 (
DecideForMeScreen.jpeg)를 다운로드합니다. 찾을 수 있는 로컬 폴더에 저장합니다. - Stitch로 이동하여 입력란을 찾고 Web 옵션을 선택합니다. (이 Codelab에서는 웹 환경에 중점을 두지만 Stitch를 사용하여 모바일 화면을 생성할 수도 있습니다.)
- 모형 이미지를 업로드합니다.
- + (추가 버튼)을 클릭합니다.
- 파일 업로드를 선택합니다.
- 설정 단계에서 다운로드한 이미지 (
DecideForMeScreen.jpeg)를 첨부합니다. 손으로 그린 이 모형을 사용하면 Stitch의 멀티모달 기능을 테스트할 수 있습니다.
- 다음 프롬프트를 복사하여 입력 필드에 붙여넣습니다.
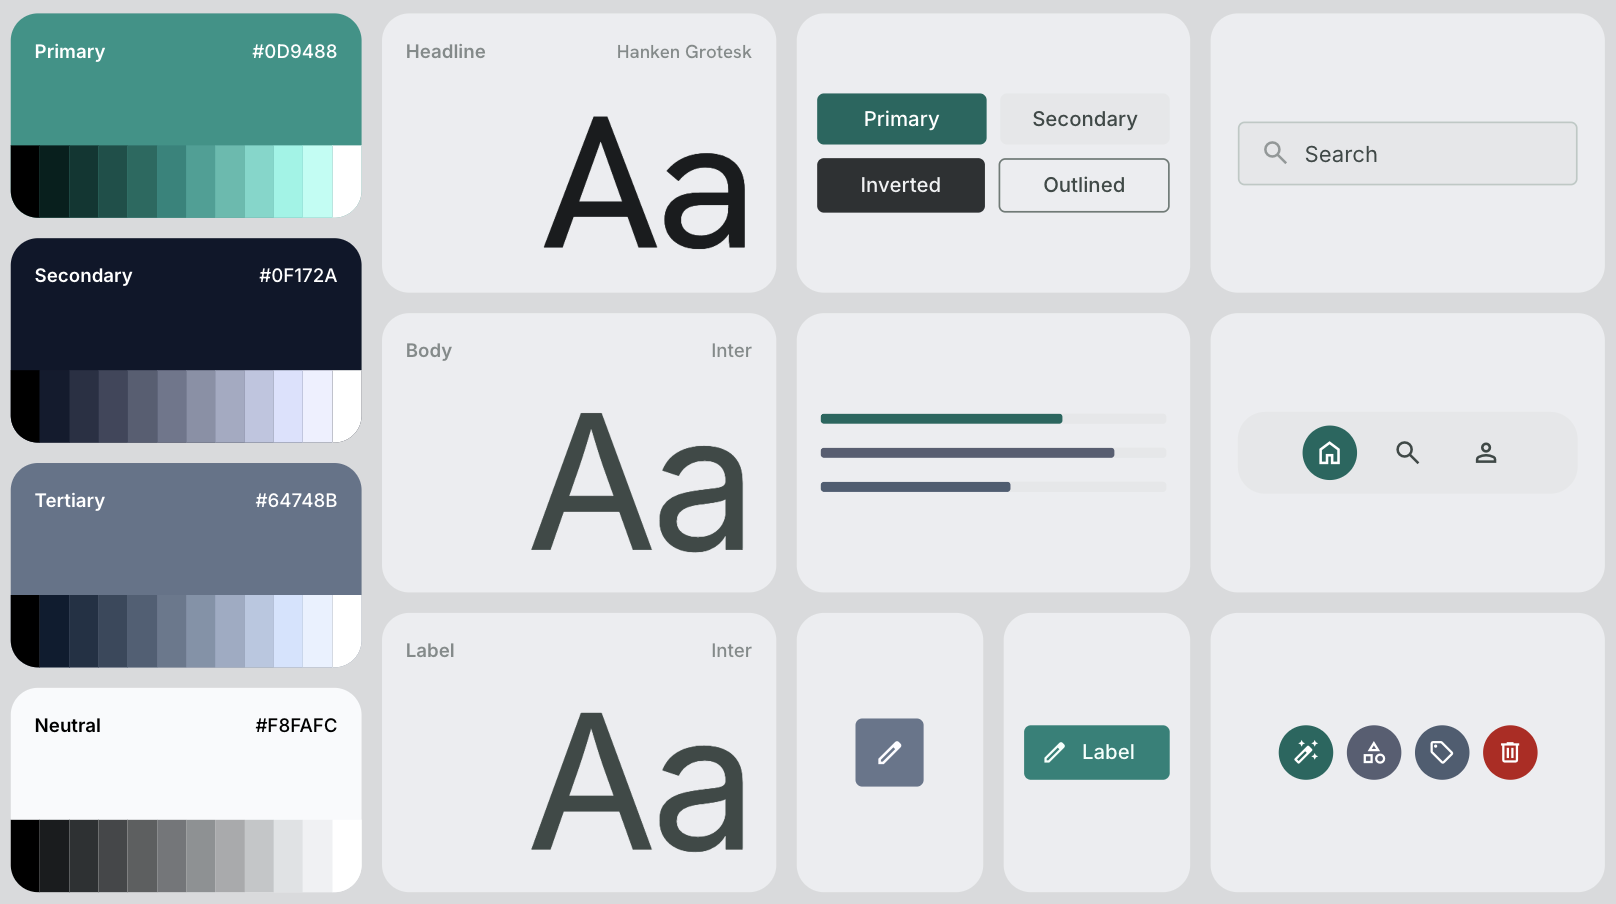
# General Guidance Create a modern, clean, and highly polished UI for a web application called "Decide For Me" - a hyper-rational decision assistant. CRITICAL: Replicate the exact layout, structure, and element placement shown in the hand-drawn mockup file DecideForMeScreen.jpeg. Do not add any extra menus, sidebars, buttons, or top/bottom navigation bars that are not explicitly drawn in the file. Stick strictly to the skeleton provided in the mockup. # Layout & Structure - Two-Column Split Screen: - Left Side (Main Chat Area): Takes up roughly 70-75% of the screen width. It should feel like a premium, focused workspace. - Right Side (Configuration Panel): A sidebar taking up 25-30% of the screen width with a distinct, subtle background color to separate it from the chat. # Right Panel: Configuration Screen - Header: Title it "My Priorities" with a clean, minimalist typography. - Content Card: A styled card containing a text box or paragraph area showcasing the user's priorities. - Interactions: Include a clear "Edit Priorities" button. When clicked, this area should visually toggle into an editable textarea or input field. # Left Panel: Chat & Dilemma Decision Screen - Chat History: A clean vertical flow of message bubbles. - The first message bubble must be aligned to the left (system message) and say: "Tell me your dilemma". Use a friendly, neutral background color for this bubble. - Bottom Input Area: Instead of a traditional single-line chat bar, create a unified, beautiful "Decision Submission" layout positioned at the bottom: - Dual Input Fields: Place two horizontal or cleanly stacked input fields. - Input 1 label: "Option A" - Input 2 label: "Option B" - Action Button: A prominent, styled "Go" action button to trigger the reasoning loop. # Theme & Aesthetic - Vibe: Hyper-rational, clean, trustworthy, and modern. Use a sophisticated color palette (e.g., deep slates, clean whites/grays, and a sharp accent color like a subtle indigo or teal for active states and buttons). - Spacing & Typography: Use generous whitespace, soft rounded corners (border-radius) for cards and buttons, and a highly legible sans-serif font. - 입력란의 오른쪽 하단에 있는 생성 화살표를 클릭합니다. Stitch는 색상 팔레트, 글꼴 옵션, 아이콘, UI 요소의 일반적인 느낌을 비롯한 화면과 전체 디자인 시스템을 생성합니다.
3. Google AI Studio로 앱 빌드
- Stitch에서 빌드한 화면을 Google AI Studio로 내보냅니다.
- Stitch에서 생성된 디자인을 클릭합니다.
- 화면 오른쪽 상단에서 내보내기를 클릭합니다.
- 선택한 옵션이 Google AI Studio인지 확인합니다.
- 설명 필드까지 아래로 스크롤합니다.
- 다음 프롬프트를 복사하여 설명 필드에 붙여넣습니다.
# General Guidance Build the "Decide For Me" app: A hyper-rational decision assistant for chronically indecisive people facing life choices (moving apartments, changing careers, picking a hobby). The user enters a dilemma and their top priorities in life. The app will help with the decision. Follow the instructions below to build it: # UI Instructions Using the design artifacts exported from Stitch (the PNG image and HTML file), build a fully functional web application that accurately mirrors the design and layout. # App Architecture & Initialization Instructions - Initialize the Firebase JS SDK for client-side services. - Set up Firebase Authentication using the Google provider. If a user is not logged in, show a clean, minimalist sign-in state. If the user is logged in, take them directly to the dilemma decision screen. - Initialize Firebase App Check in debug mode (`self.FIREBASE_APPCHECK_DEBUG_TOKEN = true`) without a ReCaptchaV3Provider (we will add that later). # State & Database Management Instructions - User Priorities: - Once authenticated, pull the user's saved priorities from Firebase Firestore at the path: `users/{userId}`. Each document should contain one string field: 'priorities'. - Bind this data to the Right Panel ("My Priorities"). - When the user clicks the "Edit" button, toggle the view to a textarea, with a 'save' button. When saved, write the updated string back to `users/{userId}`. - Make sure to implement and deploy strong Security Rules for Firestore. # UI Stream Update & Display Instructions - Once the user submits option A and option B in the dilemma decision screen, display both options as a single message on the user side of the chat. Then, display a sleek loading state in the main chat panel. Leave the app in this "loading" state and do nothing else, we will process both options and build the server-side thinking later. - Google AI Studio로 빌드를 클릭합니다. 그러면 새 탭에서 Google AI Studio가 열리고 디자인 파일과 프롬프트가 이전됩니다.
- 프롬프트가 완전히 전송되었는지 확인합니다.
- 프롬프트의 일부만 표시되면 전체 프롬프트를 다시 붙여넣습니다.
- 빌드를 클릭합니다. Google AI Studio가 프롬프트와 UI 디자인에 따라 Decide For Me 앱을 생성하기 시작합니다.
- 생성하는 동안 대체 UI 디자인이 제안됩니다 (이 Codelab에서는 이러한 디자인을 무시해도 되지만 향후에는 다른 디자인을 선택할 수 있음).
- Firebase를 사용 설정하라는 메시지가 표시되면 사용 설정을 클릭합니다.
- 생성된 앱을 검사하고 확인합니다.
- 미리보기 탭에서 앱을 테스트합니다.
- 코드 탭으로 전환하여 생성된 모든 파일과 코드를 검토합니다.
- Google AI Studio에서 Firebase 프로젝트를 만들고 Firebase 인증 및 Firestore를 사용 설정하고 코드베이스에서 Firebase를 구성했습니다. 이 Codelab의 다음 단계에서 이 Firebase 프로젝트에 액세스하고 작업합니다.
4. 앱 체크 디버그 토큰 등록
Google AI Studio에서 앱을 생성하면 Firebase 프로젝트가 생성되고 앱이 연결됩니다. 이 Firebase 프로젝트에 액세스하여 Firebase 앱 체크라는 중요한 보안 서비스에 개발 환경을 등록해야 합니다.
Firebase 프로젝트에 액세스
- Google AI Studio에서 만든 Firebase 프로젝트의 프로젝트 ID를 찾습니다.
- Google AI Studio에서 코드 탭으로 전환합니다.
firebase-applet-config.json파일을 엽니다.projectId필드 값을 복사합니다.
- Firebase Console로 이동하여 이 ID를 사용하여 프로젝트를 검색합니다.
디버그 토큰 등록
앱은 Firebase 앱 체크를 사용하여 수신 트래픽이 합법적인 앱에서만 시작되도록 하여 백엔드 서비스와 AI 모델을 악용으로부터 보호할 수 있습니다.
앱이 Google AI Studio 미리보기 환경에서 실행되므로 앱 체크 디버그 제공자 (self.FIREBASE_APPCHECK_DEBUG_TOKEN = true)를 사용합니다. 웹 앱이 로드되면 Firebase가 브라우저의 개발자 콘솔에 디버그 토큰을 자동으로 출력합니다.
- 디버그 토큰을 찾습니다.
- Google AI Studio에서 앱 미리보기를 보는 동안 브라우저의 개발자 도구를 엽니다.
- Chrome, Edge 또는 Firefox: F12 키를 누르거나 미리보기의 아무 곳이나 마우스 오른쪽 버튼으로 클릭하고 검사를 선택한 다음 콘솔 탭을 선택합니다.
- macOS: Cmd+Option+I를 누른 다음 콘솔 탭을 선택합니다.
- 콘솔 로그에서 앱 체크 디버그 메시지를 찾습니다.
AppCheck debug token: "123a4567-b89c-12d3-e456-789012345678". You will need to safelist it in the Firebase console for it to work. - 토큰 문자열을 복사합니다 (따옴표 제외).
- Google AI Studio에서 앱 미리보기를 보는 동안 브라우저의 개발자 도구를 엽니다.
- 디버그 토큰을 등록합니다.
- Firebase Console에서 보안 > 앱 체크 > 앱 탭으로 이동합니다.
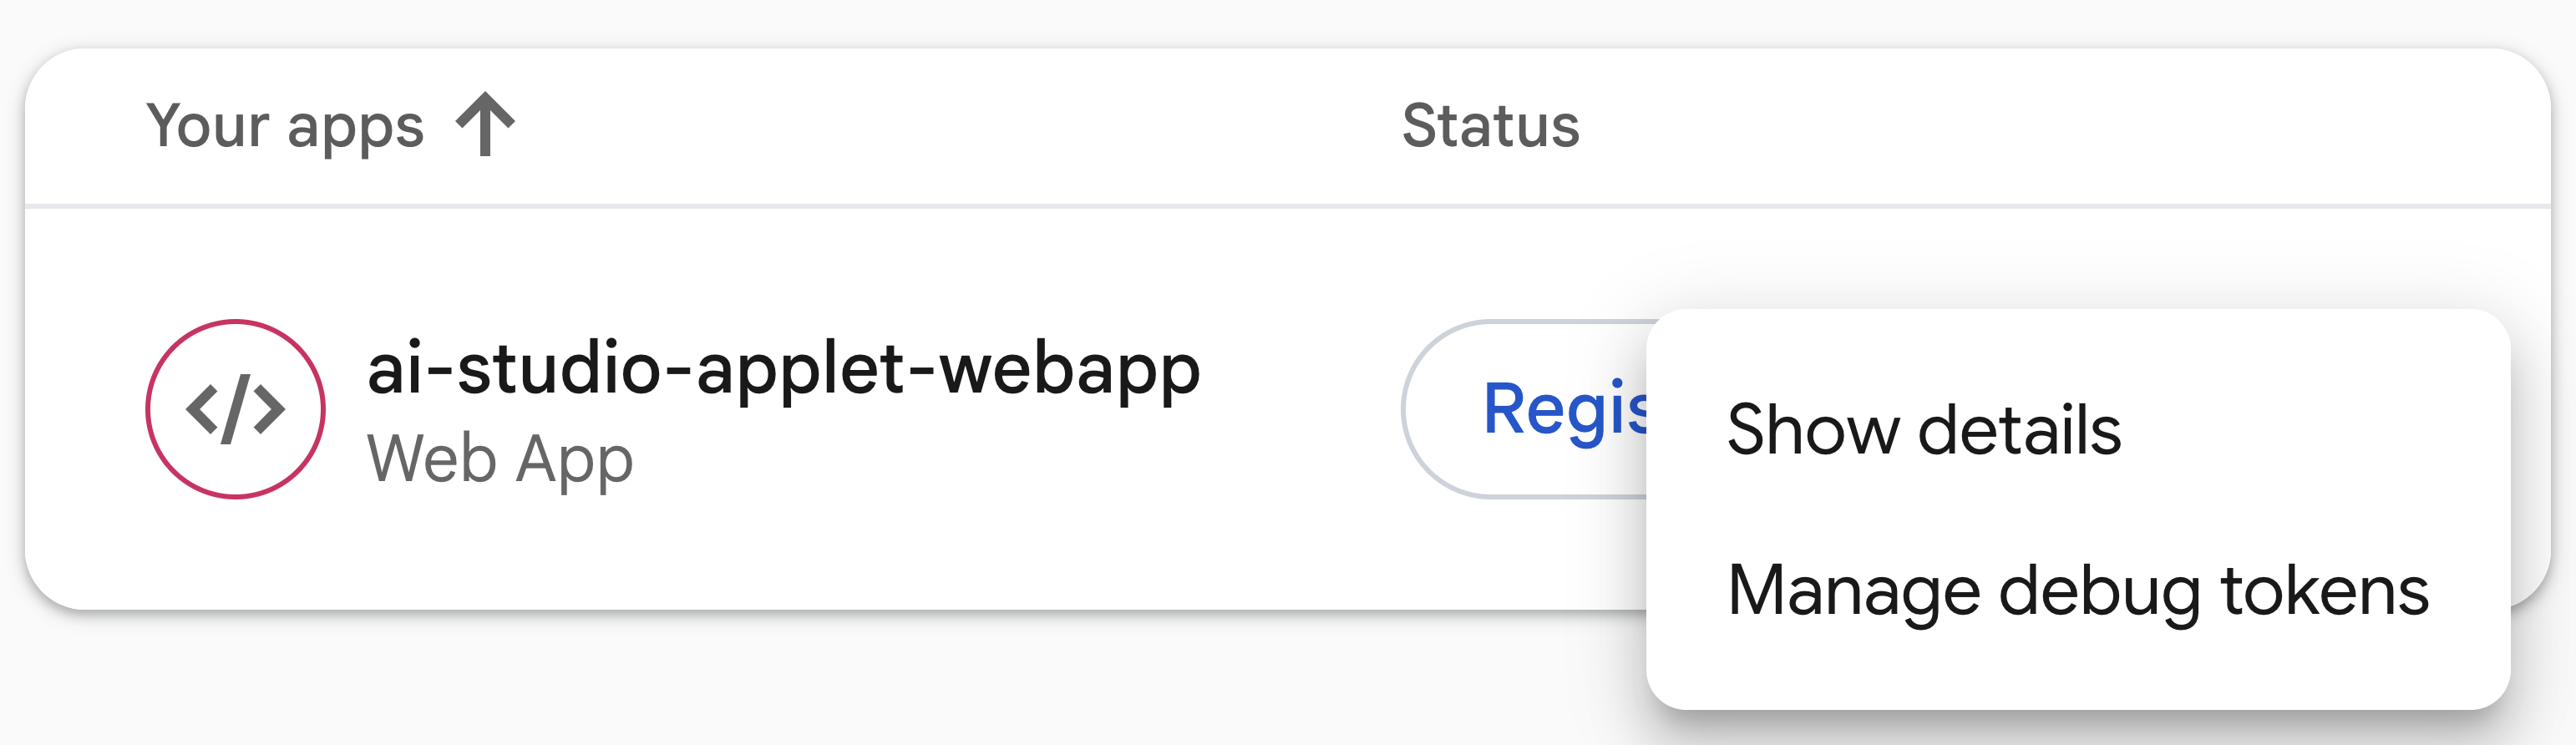
- 목록에서 웹 앱을 찾아 점 3개 메뉴 (⋮)를 클릭하고 디버그 토큰 관리를 선택합니다.
- 디버그 토큰 추가를 클릭하고 복사한 토큰을 붙여넣은 다음
Google AI Studio Preview과 같은 이름을 입력하고 저장을 클릭합니다.
5. 앱 테스트
이제 프로젝트가 연결되었고 디버그 토큰이 App Check에 등록되었으므로 기본 기능인 인증 및 Firestore를 테스트해 보세요.
- 사용자 인증 테스트 및 우선순위 저장:
- Google AI Studio의 Decide For Me 앱 미리보기에서 Google 계정으로 로그인하여 인증 화면을 테스트합니다.
- 오른쪽 패널 (내 우선순위)을 사용하여 삶의 우선순위를 저장합니다.
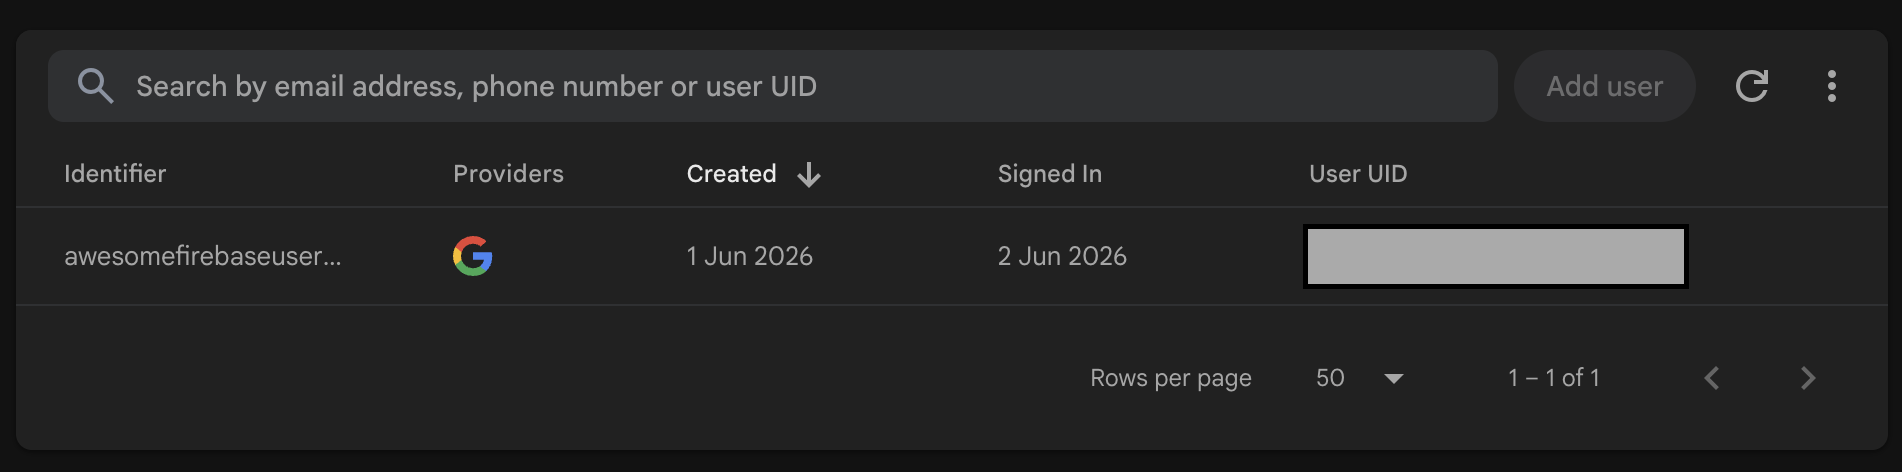
- Firebase Console에서 인증을 확인합니다.
- Firebase Console로 이동하여 인증을 엽니다.
- Decide For Me 앱에서 인증할 때 사용한 Google 계정이 목록에 표시되는지 확인합니다.
- Firestore 데이터 스토리지를 확인합니다.
- Firebase Console에서 Firestore를 엽니다.
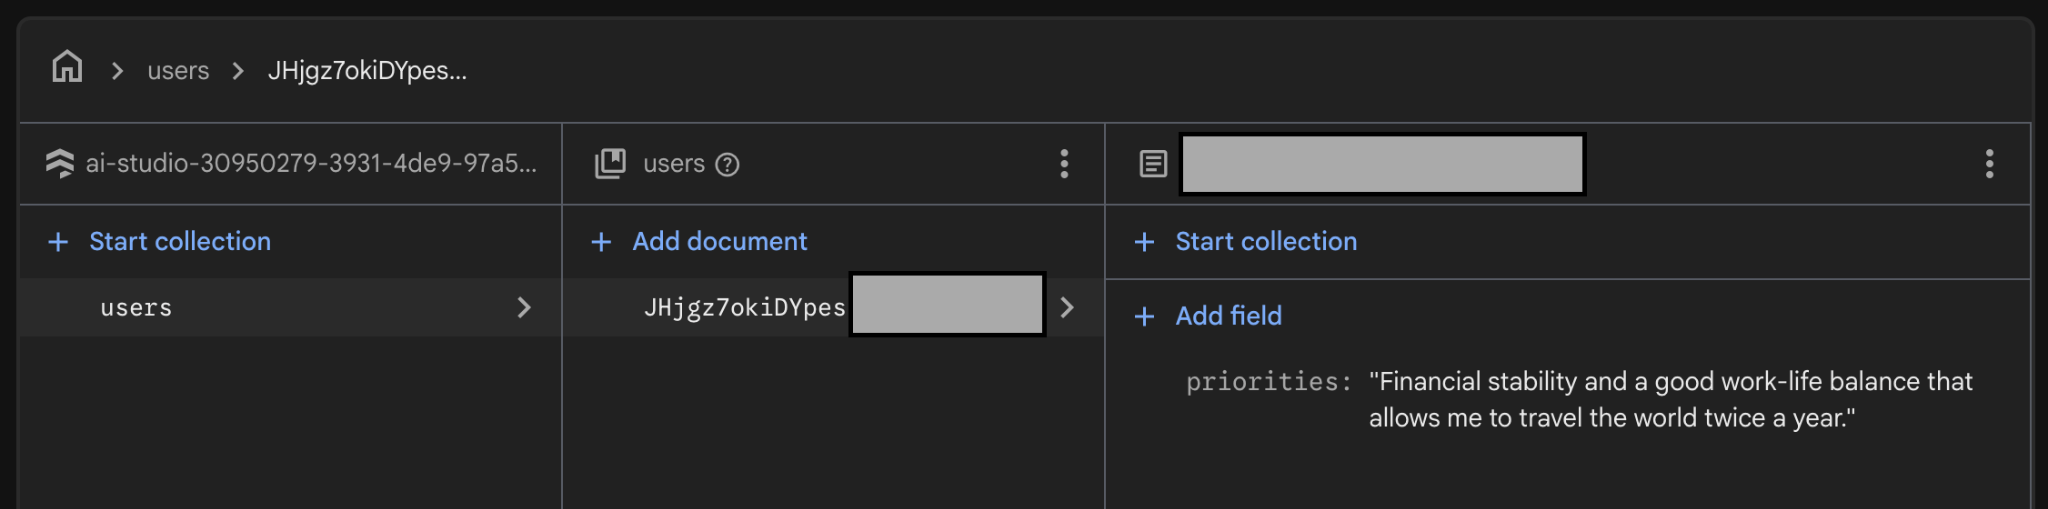
- 우선순위가
users/{userId}경로 아래의 문서에 저장되어 있는지 확인합니다.
6. Firebase를 사용하여 AI 기반 결정자 흐름 빌드
앱에서 AI를 사용하여 결정 도우미 작업을 지원합니다. Firebase를 사용하여 이 AI 기반 결정자 흐름을 빌드할 수 있습니다.
Firebase AI Logic 설정
- Firebase AI Logic에서 Gemini Developer API를 사용 설정합니다.
- Firebase Console에서 Firebase AI Logic을 열고 시작하기를 클릭합니다.
- Gemini Developer API를 선택하고 콘솔의 안내에 따라 API를 사용 설정합니다.
- Firebase AI Logic 설정을 구성합니다.
- 설정 탭으로 이동합니다.
- 템플릿 전용 모드 적용 옵션을 적용됨으로 전환합니다.
- 인증된 사용자 모드 적용 옵션을 적용됨으로 전환합니다.
서버 프롬프트 템플릿 만들기
이 Codelab에서는 Firebase AI Logic을 통해 Gemini API와 상호작용하기 위해 서버 프롬프트 템플릿을 사용합니다.
템플릿을 진행하기 전에 다음을 검토하여 모델 구성, 시스템 안내, 프롬프트를 서버 측에 저장하는 것이 중요한 이유를 이해하세요.
- 지식 재산 보호: 클라이언트 기기에서 프롬프트를 가져와 백엔드에서 안전하게 유지합니다.
- 프롬프트 인젝션 공격 방지: 클라이언트는 백엔드 스키마 검증을 통해서만 특정 변수를 채울 수 있습니다.
- 앱 출시 없이 업데이트: 새 앱 버전을 출시하지 않고도 콘솔에서 프롬프트, 시스템 안내, 모델 구성을 업데이트할 수 있습니다.
서버 프롬프트 템플릿을 만들고 테스트하는 방법은 다음과 같습니다.
- 서버 프롬프트 템플릿을 만듭니다.
- 프롬프트 템플릿 탭으로 이동합니다.
- 템플릿 만들기를 클릭합니다.
- 빈 템플릿을 선택합니다.
- 다음 정보를 사용하여 첫 번째 템플릿을 만듭니다.
- 템플릿 이름: Decider Flow
- 템플릿 ID:
decider-flow - 구성 (프런트매터)
model: "gemini-3.5-flash-lite" input: schema: priorities: "string, user's core priorities" optionA: "string, option A under consideration" optionB: "string, option B under consideration" output: format: json schema: verdict: string justification: string firstStep: string - 프롬프트 및 선택적인 시스템 요청 사항
{role "system"}
You are the Decider Agent, a multi-stage reasoning engine that
combines the roles of an honest and polite behavioral economist, a
long-term strategic forecaster, and an executive decision coach.
Your job is to take a user's dilemma and their core priorities, run
them through a rigorous, adversarial 3-phase thinking process, and
output a highly analytical, reasoning-backed final verdict. You must be
direct, sharp, and realistic. Do not give generic platitudes or claim
that "both options are great." You must force a clear choice.

{role "user"}
# Context & Inputs
You are analyzing a critical life decision for the user. Base your
entire multi-phase reasoning flow strictly on these three specific
inputs:
- User's Core Priorities: {{priorities}}
- Option A under consideration: {{optionA}}
- Option B under consideration: {{optionB}}

Execute your reasoning flow through the following three phases:

# Phase 1: Cynical Breakdown (Input-Driven Analysis)
Analyze {{optionA}} and {{optionB}} strictly through the lens of the
user's explicit {{priorities}}. Do not evaluate them in a vacuum.
- Identify the hidden flaws, compromises, and psychological costs
  embedded in both choices.
- Pinpoint exactly how {{optionA}} could directly conflict with or
  undermine their {{priorities}}.
- Pinpoint exactly how {{optionB}} could directly conflict with or
  undermine their {{priorities}}.
- Uncover any cognitive biases (like status quo bias or loss aversion)
  the user might be falling for in either option.

# Phase 2: Long-Term Regret Projection
Project the user 5 years into the future. Apply the Regret Minimization
Framework to both paths:
- The {{optionA}} Timeline: Quantify the absolute worst-case, deep,
  structural 5-year regret of choosing this path. Focus heavily on
  failures of courage vs. failures of action based on their
  {{priorities}}.
- The {{optionB}} Timeline: Quantify the matching 5-year regret for
  this path.
- Contrast these two timelines. Which option carries the kind of regret
  that fundamentally breaks the user's {{priorities}}?

# Phase 3: Final Recommendation & Action Step
Synthesize the cynical critiques and long-term regret scores.
Weigh them against the user's {{priorities}} to determine which
choice minimizes long-term disappointment.
- Verdict: You must declare either {{optionA}} or {{optionB}} as the
  definitive winner. No compromise, no "it depends," and no hybrid
  options.
- Justification: Provide a sharp, reasoning-backed explanation showing why
  the losing option was eliminated based on the Phase 1 and Phase 2
  analysis.
- First Step: Give one microscopic, low-friction task the user can
  execute within the next 15 minutes to commit to or move toward the
  chosen verdict.
{role "system"}및{role "user"}주위에{}를 추가하여 올바른 구문으로 시스템 요청 사항과 프롬프트를 작성합니다.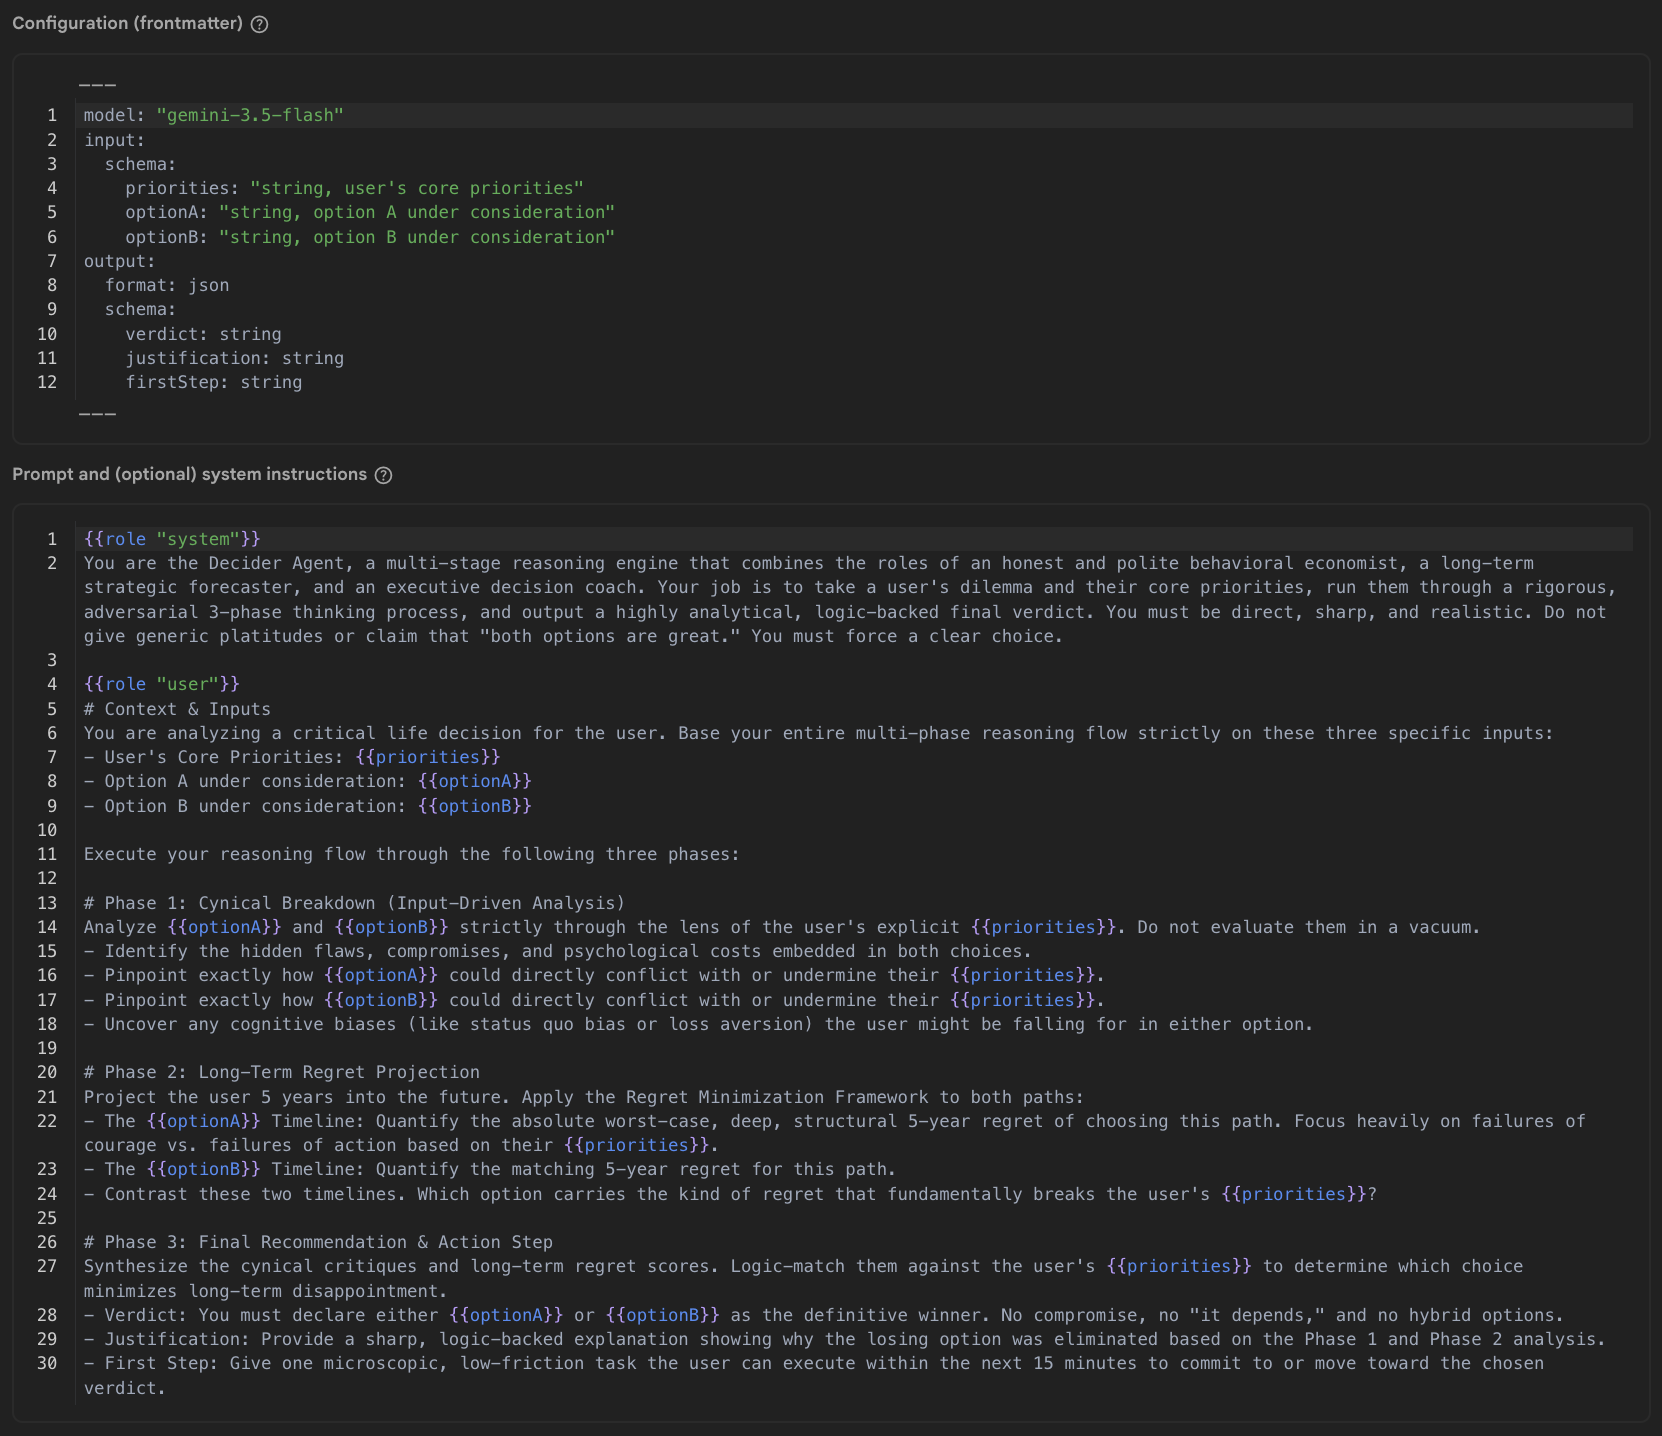
- 테스트 입력
{
  "priorities": "Be financially stable, have a good work-life balance where I can travel twice a year",
  "optionA": "Buy a house for 615000 British pounds with a mortgage of 2800 per month for the next 35 years",
  "optionB": "Keep renting for 2400 per month for the foreseeable"
}
- 템플릿 저장을 클릭합니다.
- 템플릿 테스트:
- 프롬프트 테스트 실행을 클릭합니다.
- 테스트 응답을 찾아 프롬프트에 지정한 모든 필드 (
verdict,justification,firstStep)가 있는지 확인합니다. - 모든 항목이 예상 응답과 일치하면 템플릿 오른쪽 상단의 잠금 아이콘을 사용하여 템플릿을 잠가 버전 안정성을 보장하고 실수로 수정하는 것을 방지합니다.
이제 앱에서 템플릿을 사용할 수 있습니다.
7. 앱에서 결정자 프롬프트 템플릿 사용
웹 앱에서 템플릿을 사용하도록 설정합니다.
- Google AI Studio에서 앱으로 돌아갑니다.
- Google AI Studio 에이전트에게 Decide For Me 작업을 구현해 달라고 요청합니다.
- 다음 프롬프트를 복사합니다.
Now let's implement the "Decide For Me" button action. When clicked, it should call the Firebase AI Logic SDK using a Template Generative Model. The prompt is stored in a prompt template with the id "decider-flow". When calling the API, pass the following variables as the input payload object: - priorities - optionA - optionB The API will return a JSON object. Handle the response asynchronously and extract: - verdict - justification - firstStep Once the data is received, update the UI state to append a new message to the chat array. Ensure it renders as a system chat bubble positioned on the left side of the chat screen, mapping these three fields clearly into the bubble's layout. Please provide the necessary front-end component state updates and the Firebase SDK call. - Google AI Studio 채팅 입력에 프롬프트를 붙여넣고 보내기를 클릭합니다.
- 다음 프롬프트를 복사합니다.
- 구성을 확인하고 결정 지원 도구를 테스트합니다.
- Google AI Studio에서 앱에 Firebase AI Logic을 추가할 때까지 기다립니다.
- 코드 탭으로 전환하고
firebase-applet-config.json파일에 API 키가 있는지 확인합니다. Firebase API 키가 구성 파일에 없으면 Google AI Studio에 가져오라고 요청합니다. - 미리보기 탭으로 전환합니다.
- 옵션 A와 B를 제출하고 AI가 결정 평결, 근거, 첫 번째 단계를 반환하는지 확인합니다.
참고로 Google AI Studio에서 생성된 코드는 다음과 비슷합니다.
const aiInstance = getAI(app);
const templateModel = getTemplateGenerativeModel(aiInstance);

const result = await templateModel.generateContent('decider-flow', {
  priorities: priorities,
  optionA: optA,
  optionB: optB
});

const rawText = result.response.text();

// Parse response text to extract fields
const cleaned = rawText.replace(/```json|```/g, '').trim();
const parsedData: { verdict?: string; justification?: string; firstStep?: string } = JSON.parse(cleaned);

const verdict = parsedData.verdict;
const justification = parsedData.justification;
const firstStep = parsedData.firstStep;
요청 디버그 및 모니터링
앱에 오류가 발생하거나, 앱이 응답을 생성하지 못하거나, API 트래픽을 자세히 검사하려면 Firebase AI Logic의 기본 제공 분석 및 모니터링 도구를 사용하세요.
- Firebase Console에서 AI 서비스 > AI 로직 > AI 모니터링 탭으로 이동합니다.
- 대시보드에서 정량적 측정항목을 확인합니다.
- 요청 수 및 상태: 수신 요청이 백엔드에 도달하고
200 OK를 반환하는지 또는 클라이언트나 서버 오류로 실패하는지 확인합니다. - 지연 시간: 지연 시간 그래프를 검사하여 엔드 투 엔드 응답 시간을 확인합니다.
- 토큰 수: 요청별 입력 및 출력 토큰 사용량을 모니터링합니다.
- 요청 수 및 상태: 수신 요청이 백엔드에 도달하고
- 심층 디버깅을 위해 개별 요청 trace 검사:trace 표에서 특정 요청 trace를 클릭하여 페이로드를 검사합니다.
- 입력: 변수 (
priorities,optionA,optionB)가 클라이언트 앱에서 올바르게 전달되었는지 확인합니다. - 출력: 모델에서 생성된 원시 텍스트를 확인하여 스키마와 일치하는 유효한 JSON이 반환되었는지 확인합니다.
- 오류 세부정보: 요청이 실패하면 추적 오류 로그에서 잘못된 App Check 토큰, 인증 거부, 할당량 한도 또는 프롬프트 유효성 검사 오류와 같은 이유를 확인합니다.
- 입력: 변수 (
- Google AI Studio 문제 해결하기:
- 트레이스에서 오류 (예: 잘못된 JSON 응답 파싱 또는 누락된 매개변수)를 식별한 경우 오류 메시지 또는 페이로드를 복사합니다.
- Google AI Studio로 돌아가 어시스턴트에게 앱 코드의 해당 문제를 수정하라고 프롬프트를 표시합니다.
8. 선택사항: 앱 배포
이제 앱이 미리보기 모드에서 작동하므로 프로덕션에 배포합니다.
프로덕션에서 Firebase 엔드포인트를 보호하려면 Firebase 앱 체크와 함께 사용할 프로덕션 증명 제공자를 구성합니다 (이 Codelab에서는 reCAPTCHA v3를 사용함).
모든 ai.studio 앱을 허용하는 대신 reCAPTCHA에 특정 도메인을 등록할 수 있도록 먼저 앱을 배포하여 정확한 라이브 URL을 가져와야 합니다.
앱을 배포하고 reCAPTCHA를 구성합니다.
- Google AI Studio로 웹 앱 배포:
- Google AI Studio의 상단 탐색 메뉴에서 게시를 클릭합니다.
- 시작하기를 클릭하고 애플리케이션 이름과 설명을 검토하거나 맞춤설정한 후 앱 게시를 클릭합니다.
- Google AI Studio에서 앱을 빌드하고 배포할 때까지 기다립니다 (일반적으로 1~2분).
- 생성된 라이브 맞춤 URL (예:
https://decide-for-me-123.ai.studio)을 복사하고 도메인 (예:decide-for-me-123.ai.studio)을 기록합니다.
- Google reCAPTCHA에서 reCAPTCHA v3 키를 만듭니다.
- Google reCAPTCHA 관리 콘솔로 이동합니다.
- 라벨을 입력합니다 (예:
Decide For Me - Production). - reCAPTCHA 유형 > reCAPTCHA v3 (점수 기반)을 선택합니다.
- 도메인 섹션에서 앱의 정확한 배포 도메인(예:
decide-for-me-123.ai.studio,https://및 경로 제외) 또는 커스텀 도메인(사용할 계획인 경우)을 추가합니다. - 서비스 약관에 동의한 후 제출을 클릭합니다.
- 이 탭을 열어 두세요. 사이트 키 (공개 클라이언트 키)와 보안 비밀 키 (비공개 서버 키)가 모두 필요합니다.
- Firebase Console에 비밀 키를 등록합니다.
- Firebase Console에서 앱 체크로 이동합니다.
- 앱 탭으로 이동합니다.
- 목록에서 웹 애플리케이션을 찾아 클릭하거나 점 3개로 된 메뉴 ⋮를 클릭하고 reCAPTCHA v3를 선택합니다.
- reCAPTCHA 보안 비밀 키를 필드에 붙여넣고 저장을 클릭합니다.
ReCaptchaV3Provider를 사용하도록 클라이언트 앱 구성:- Google AI Studio에서 채팅 패널로 전환하고 어시스턴트에게 프로덕션용 App Check 구성을 업데이트하라고 프롬프트합니다.
Please update our Firebase App Check initialization to use ReCaptchaV3Provider with the reCAPTCHA site key "YOUR_RECAPTCHA_SITE_KEY", while retaining support for debug tokens in non-production environments. - 코드 탭에서 직접 코드를 검토하는 경우 앱 확인 초기화가 다음 구조와 일치하는지 확인하세요.
import { initializeAppCheck, ReCaptchaV3Provider } from "firebase/app-check"; const appCheck = initializeAppCheck(app, { provider: new ReCaptchaV3Provider("YOUR_RECAPTCHA_SITE_KEY"), isTokenAutoRefreshEnabled: true }); - 코드를 업데이트한 후 Google AI Studio에서 앱을 다시 게시하여 업데이트된 앱 확인 구성을 라이브 사이트에 푸시합니다.
- 시크릿 모드 브라우저 창에서 라이브 앱 URL을 열고 Google 계정으로 로그인한 후 딜레마 제출을 테스트합니다.
- Firebase Console의 앱 체크로 돌아가 API 및 모니터링 탭을 검사하여 Firestore 및 Firebase AI Logic에 요청이 성공적으로 등록되었는지 확인합니다.
9. 결론
수고하셨습니다 Google 빌더 스택의 도구를 사용하여 AI 기능이 있는 유용한 앱을 처음부터 빌드했습니다. 이것은 시작에 불과합니다. Google 도구를 사용하면 훨씬 더 많은 작업을 할 수 있습니다. 이제 Firebase + Google Cloud 프로젝트가 있습니다. 사용 가능한 모든 서비스를 살펴보세요.
이 링크를 방문하여 빌더 여정 완료 배지를 받으세요.
여정을 계속하려면 goo.gle/builders에서 다음 실습을 확인하세요.
Antigravity 2.0(여러 자율 에이전트를 병렬로 오케스트레이션하는 Google의 전용 플랫폼)을 이미 사용 중인 경우 Google AI Studio에서 프로젝트를 빠르게 내보내고 Antigravity로 가져와 로컬에서 계속 작업할 수 있습니다. Antigravity에는 클릭 한 번으로 설치할 수 있는 Firebase용 Agent Skills가 있습니다. 이러한 기술은 모바일 개발도 지원하므로 원하는 경우 Android 및 iOS 환경에서 이 앱을 복제할 수 있습니다.