

1. Прежде чем начать
Разработка программного обеспечения эволюционировала. Самые успешные разработчики не просто пишут код; они координируют работу инструментов и агентов искусственного интеллекта, чтобы создавать более качественные и быстрые решения. Экосистема инструментов Google предоставляет полный набор для всего жизненного цикла: генерация пользовательского интерфейса, прототипирование и развертывание приложений, разработка функций ИИ и безопасная, масштабируемая интеграция с бэкэндом. В этом практическом занятии вы будете использовать Google Stitch для проектирования пользовательского интерфейса, Google AI Studio для создания кода и развертывания приложения, а также Firebase для разработки функций ИИ и хранения информации в безопасном, масштабируемом бэкэнде.
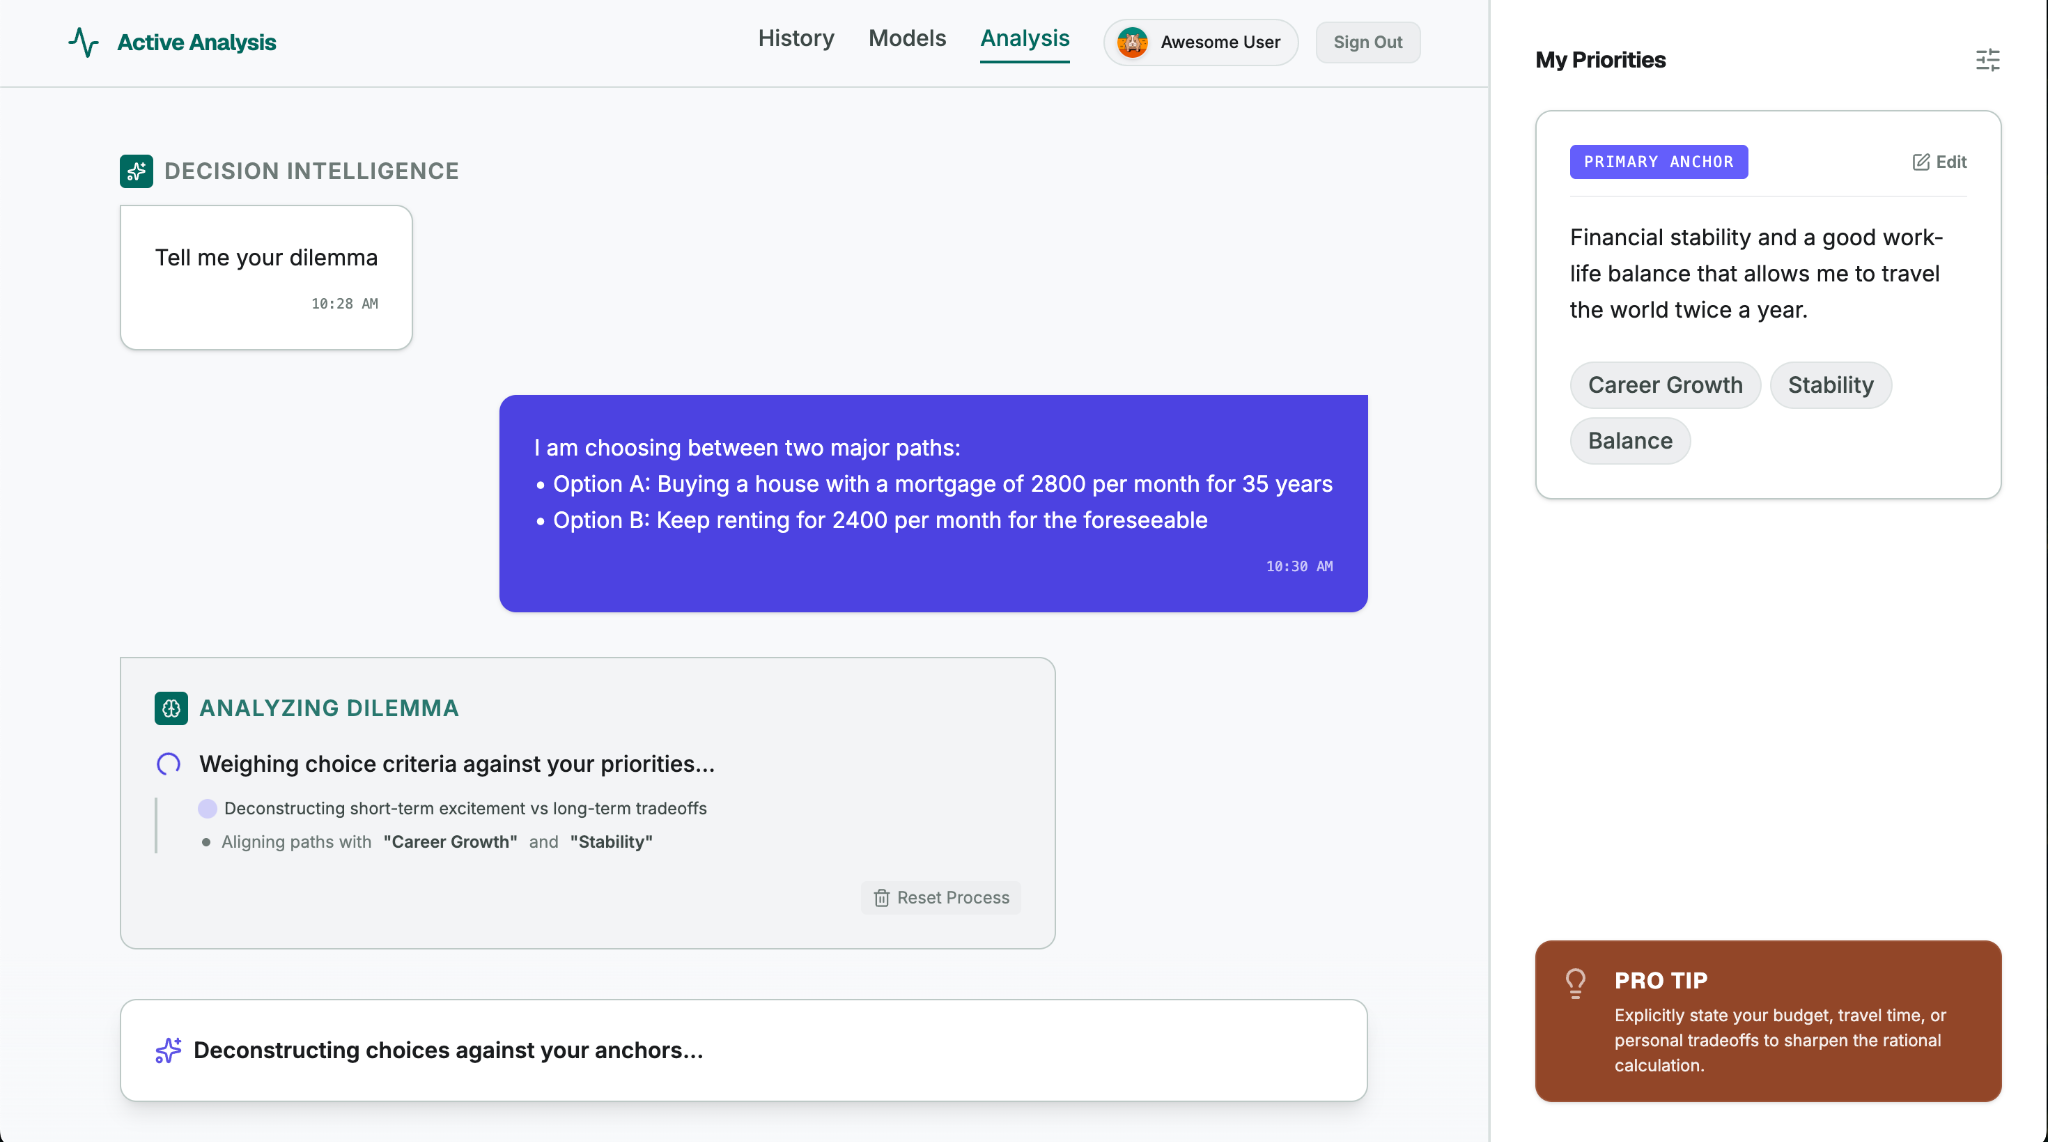
Приложение, которое вы будете создавать в рамках этого практического занятия, называется Decide For Me — это помощник в принятии решений для людей, испытывающих нерешительность при выборе жизненного пути (например, переезд, смена карьеры или хобби). Пользователь вводит дилемму и свои жизненные приоритеты, а приложение использует искусственный интеллект, чтобы помочь пользователю принять решение, минимизируя разочарование в долгосрочной перспективе. Приложение также предоставляет пользователю конкретный первый шаг. Финальная версия вашего приложения должна выглядеть примерно так:
Что вы узнаете
- Создавайте пользовательские интерфейсы с помощью Google Stitch.
- Vibe Code — веб-приложение, созданное с помощью Google AI Studio.
- Используйте Firebase для разработки функций искусственного интеллекта и хранения информации в облаке.
- Разверните веб-приложение в рабочей среде с помощью Google AI Studio (на базе Cloud Run).
2. Разработайте пользовательский интерфейс с помощью Stitch.
- Скачайте макет изображения (
DecideForMeScreen.jpeg). Сохраните его в локальную папку, где вы сможете его найти. - Зайдите в Stitch , найдите поле ввода и выберите опцию «Веб» . (В этом практическом занятии вы сосредоточитесь на веб-версии, но Stitch также можно использовать для создания экранов для мобильных устройств.)
- Загрузите изображение-макет:
- Нажмите + (кнопку добавления).
- Выберите «Загрузить файлы» .
- Прикрепите изображение, которое вы скачали на этапе настройки (
DecideForMeScreen.jpeg). Этот нарисованный от руки макет позволит вам протестировать мультимодальные возможности Stitch.
- Скопируйте следующий текст и вставьте его в поле ввода:
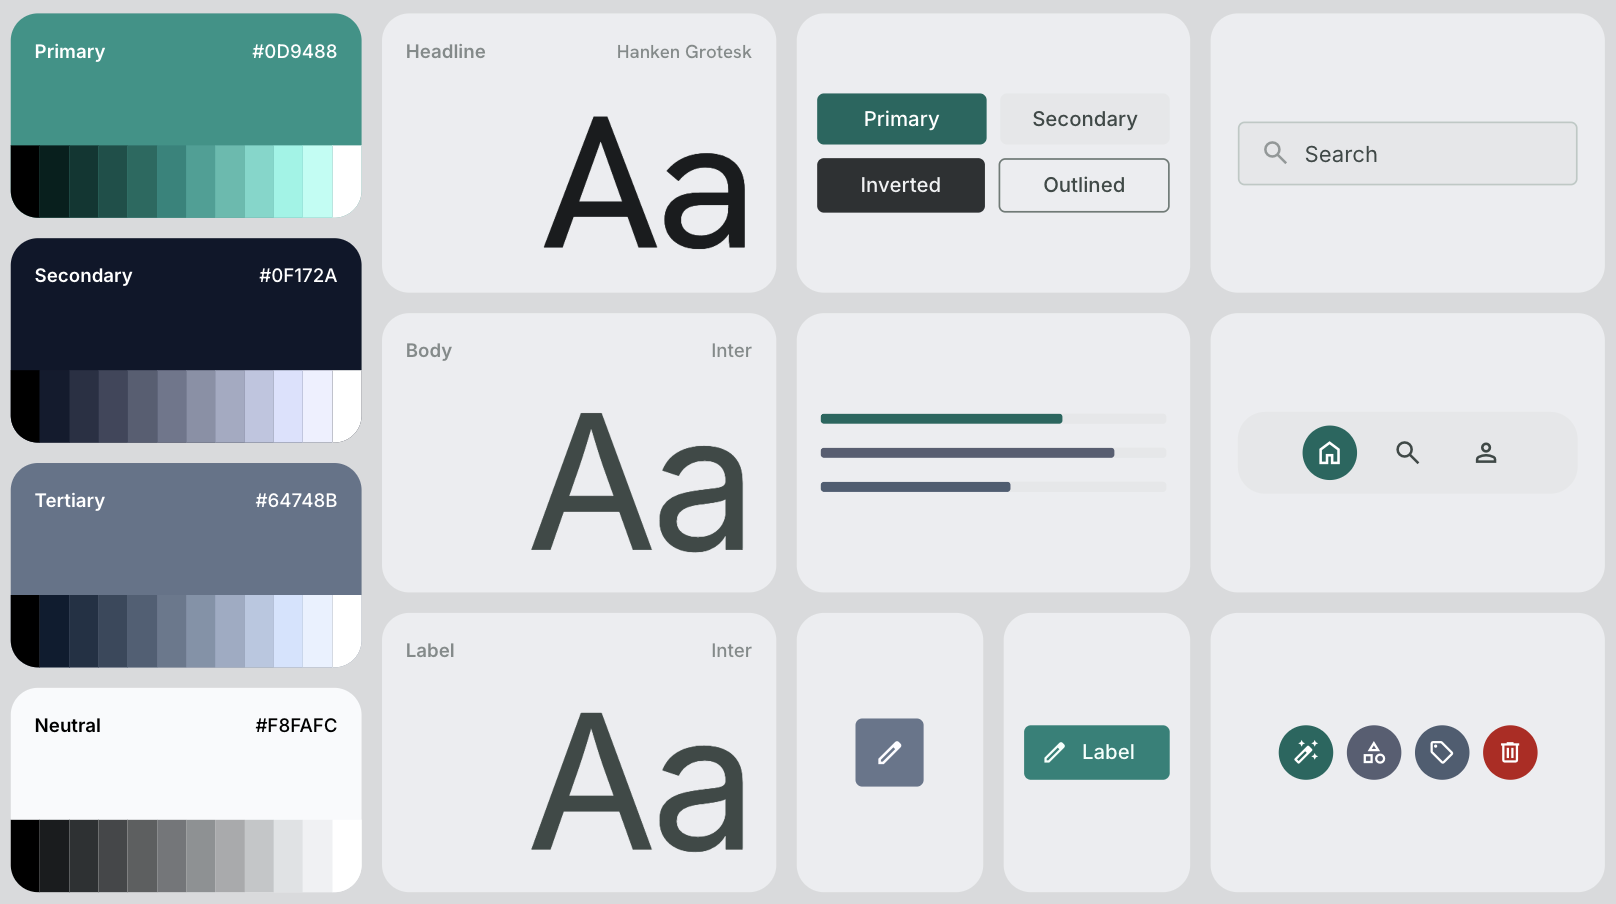
# General Guidance Create a modern, clean, and highly polished UI for a web application called "Decide For Me" - a hyper-rational decision assistant. CRITICAL: Replicate the exact layout, structure, and element placement shown in the hand-drawn mockup file DecideForMeScreen.jpeg. Do not add any extra menus, sidebars, buttons, or top/bottom navigation bars that are not explicitly drawn in the file. Stick strictly to the skeleton provided in the mockup. # Layout & Structure - Two-Column Split Screen: - Left Side (Main Chat Area): Takes up roughly 70-75% of the screen width. It should feel like a premium, focused workspace. - Right Side (Configuration Panel): A sidebar taking up 25-30% of the screen width with a distinct, subtle background color to separate it from the chat. # Right Panel: Configuration Screen - Header: Title it "My Priorities" with a clean, minimalist typography. - Content Card: A styled card containing a text box or paragraph area showcasing the user's priorities. - Interactions: Include a clear "Edit Priorities" button. When clicked, this area should visually toggle into an editable textarea or input field. # Left Panel: Chat & Dilemma Decision Screen - Chat History: A clean vertical flow of message bubbles. - The first message bubble must be aligned to the left (system message) and say: "Tell me your dilemma". Use a friendly, neutral background color for this bubble. - Bottom Input Area: Instead of a traditional single-line chat bar, create a unified, beautiful "Decision Submission" layout positioned at the bottom: - Dual Input Fields: Place two horizontal or cleanly stacked input fields. - Input 1 label: "Option A" - Input 2 label: "Option B" - Action Button: A prominent, styled "Go" action button to trigger the reasoning loop. # Theme & Aesthetic - Vibe: Hyper-rational, clean, trustworthy, and modern. Use a sophisticated color palette (e.g., deep slates, clean whites/grays, and a sharp accent color like a subtle indigo or teal for active states and buttons). - Spacing & Typography: Use generous whitespace, soft rounded corners (border-radius) for cards and buttons, and a highly legible sans-serif font. - Нажмите на стрелку «Сгенерировать» в правом нижнем углу поля ввода. Stitch сгенерирует экран и всю систему дизайна, включая цветовую палитру, параметры шрифтов, иконки и общее представление об элементах пользовательского интерфейса.
3. Создайте приложение с помощью Google AI Studio.
- Экспортируйте созданный в Stitch экран в Google AI Studio:
- Щёлкните по сгенерированному дизайну в Stitch.
- Нажмите кнопку «Экспорт» в правом верхнем углу экрана.
- Убедитесь, что выбран вариант Google AI Studio .
- Прокрутите вниз до поля «Описание» .
- Скопируйте следующий текст и вставьте его в поле «Описание» :
# General Guidance Build the "Decide For Me" app: A hyper-rational decision assistant for chronically indecisive people facing life choices (moving apartments, changing careers, picking a hobby). The user enters a dilemma and their top priorities in life. The app will help with the decision. Follow the instructions below to build it: # UI Instructions Using the design artifacts exported from Stitch (the PNG image and HTML file), build a fully functional web application that accurately mirrors the design and layout. # App Architecture & Initialization Instructions - Initialize the Firebase JS SDK for client-side services. - Set up Firebase Authentication using the Google provider. If a user is not logged in, show a clean, minimalist sign-in state. If the user is logged in, take them directly to the dilemma decision screen. - Initialize Firebase App Check in debug mode (`self.FIREBASE_APPCHECK_DEBUG_TOKEN = true`) without a ReCaptchaV3Provider (we will add that later). # State & Database Management Instructions - User Priorities: - Once authenticated, pull the user's saved priorities from Firebase Firestore at the path: `users/{userId}`. Each document should contain one string field: 'priorities'. - Bind this data to the Right Panel ("My Priorities"). - When the user clicks the "Edit" button, toggle the view to a textarea, with a 'save' button. When saved, write the updated string back to `users/{userId}`. - Make sure to implement and deploy strong Security Rules for Firestore. # UI Stream Update & Display Instructions - Once the user submits option A and option B in the dilemma decision screen, display both options as a single message on the user side of the chat. Then, display a sleek loading state in the main chat panel. Leave the app in this "loading" state and do nothing else, we will process both options and build the server-side thinking later. - Нажмите «Создать с помощью Google AI Studio» . Это откроет Google AI Studio в новой вкладке и перенесет ваши файлы дизайна и подсказку:
- Убедитесь, что подсказка была полностью перенесена.
- Если вы видите только часть подсказки, вставьте её целиком ещё раз.
- Нажмите «Создать» . Google AI Studio начнет генерацию приложения «Решите за меня» в соответствии с вашим запросом и дизайном пользовательского интерфейса:
- В процессе генерации предлагаются альтернативные варианты дизайна пользовательского интерфейса (в рамках данного практического занятия эти варианты можно игнорировать, но в будущем вы сможете выбрать другие).
- Когда появится запрос на включение Firebase, нажмите «Включить» .
- Проверьте и подтвердите работоспособность сгенерированного приложения:
- Протестируйте приложение на вкладке « Предварительный просмотр» .
- Перейдите на вкладку «Код» , чтобы просмотреть все сгенерированные файлы и код.
- Google AI Studio также создала проект Firebase, включила аутентификацию Firebase и Firestore , а также настроила Firebase в вашем коде. Вы получите доступ к этому проекту Firebase и будете работать с ним на следующем шаге этого практического занятия.
4. Зарегистрируйте свое приложение. Проверьте отладочный токен.
Когда Google AI Studio генерирует приложение, она создает проект Firebase и подключает к нему ваше приложение. Вам необходимо получить доступ к этому проекту Firebase и зарегистрировать свою среду разработки в важной службе безопасности под названием Firebase App Check.
Получите доступ к своему проекту Firebase.
- Найдите идентификатор проекта Firebase, созданного с помощью Google AI Studio:
- Перейдите на вкладку «Код» в Google AI Studio.
- Откройте файл
firebase-applet-config.json. - Скопируйте значение поля
projectId.
- Перейдите в консоль Firebase и найдите проект, используя этот ID.
Зарегистрируйте свой отладочный токен
Ваше приложение может использовать Firebase App Check для защиты ваших серверных служб и моделей ИИ от злоупотреблений, гарантируя, что входящий трафик поступает только от легитимных приложений.
Поскольку ваше приложение работает в среде предварительного просмотра Google AI Studio, оно использует отладочный провайдер App Check ( self.FIREBASE_APPCHECK_DEBUG_TOKEN = true ). При загрузке веб-приложения Firebase автоматически выводит отладочный токен в консоль разработчика вашего браузера.
- Найдите свой отладочный токен:
- В Google AI Studio откройте инструменты разработчика в браузере, просматривая предварительный просмотр приложения:
- Chrome, Edge или Firefox: нажмите F12 (или щелкните правой кнопкой мыши в любом месте предварительного просмотра и выберите «Проверить элемент »), а затем выберите вкладку «Консоль» .
- macOS: Нажмите Cmd+Option+I, затем выберите вкладку «Консоль» .
- В журналах консоли найдите отладочное сообщение App Check:
AppCheck debug token: "123a4567-b89c-12d3-e456-789012345678". You will need to safelist it in the Firebase console for it to work. - Скопируйте строку токена (без кавычек).
- В Google AI Studio откройте инструменты разработчика в браузере, просматривая предварительный просмотр приложения:
- Зарегистрируйте свой отладочный токен:
- В консоли Firebase перейдите в раздел Безопасность > Проверка приложений > вкладка Приложения .
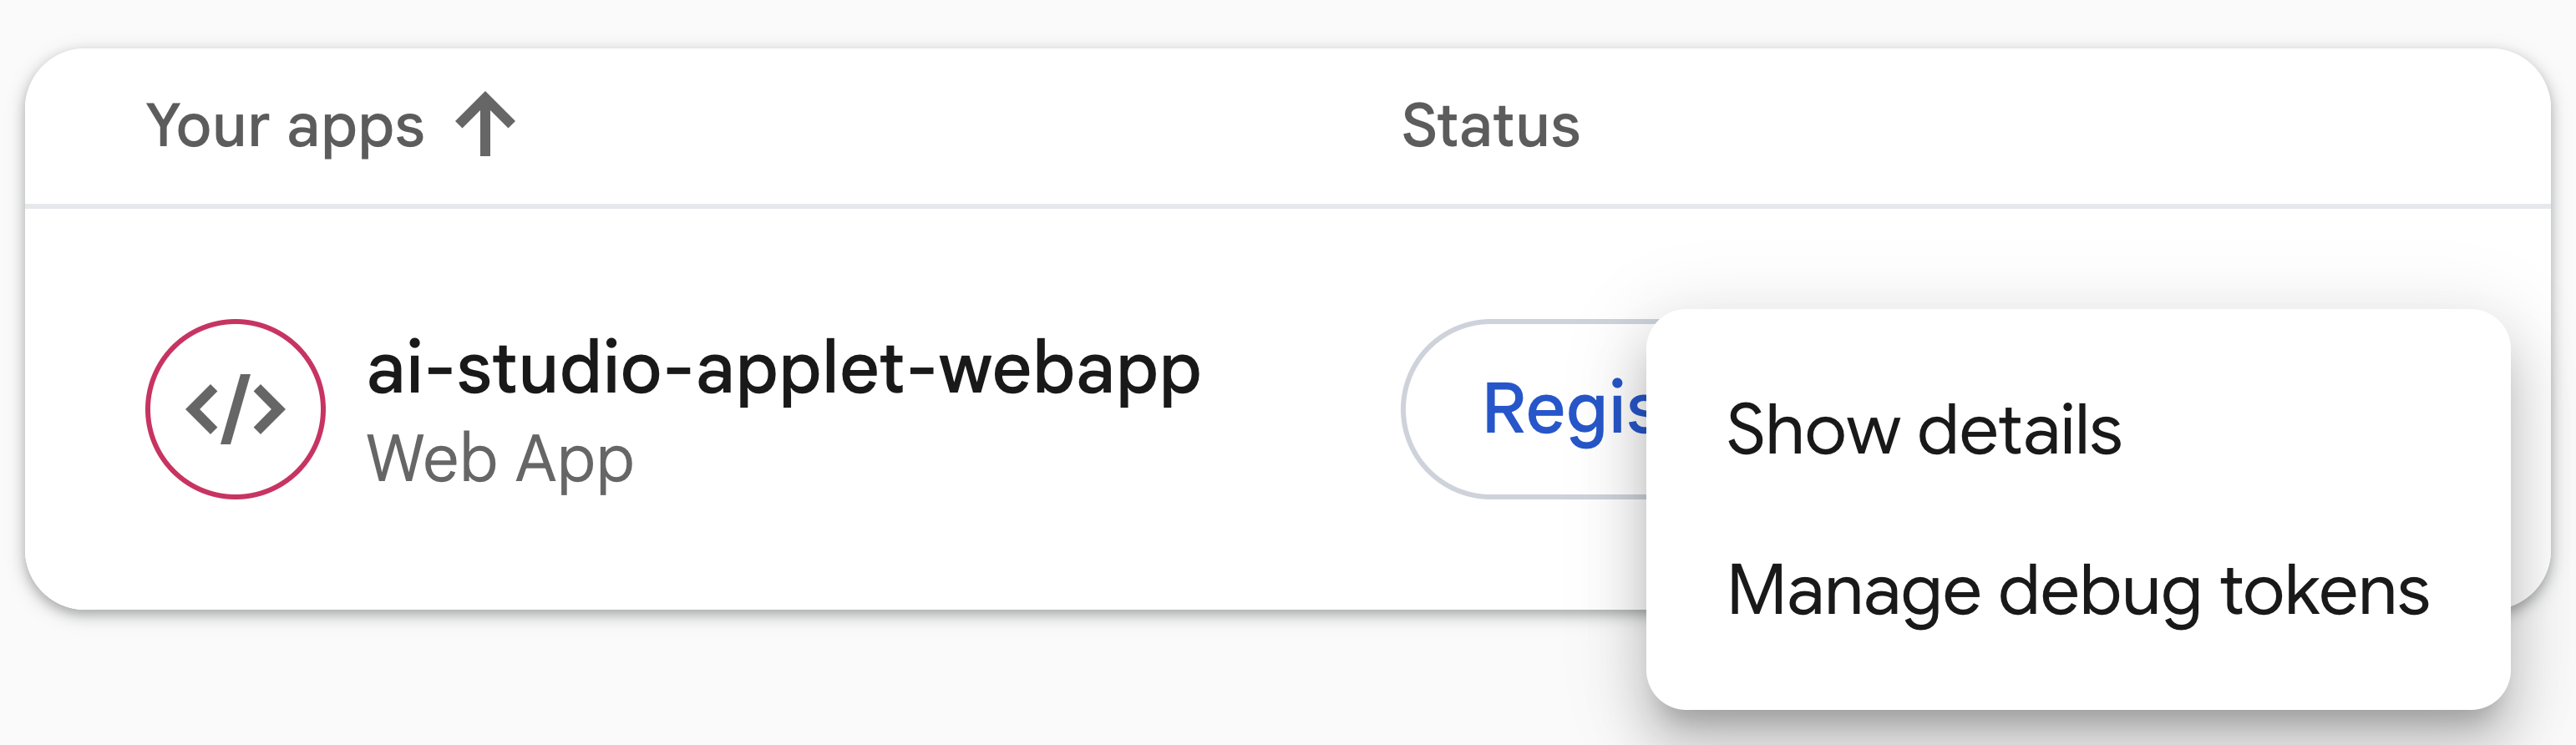
- Найдите свое веб-приложение в списке, нажмите на меню с тремя точками ( ⋮ ) и выберите «Управление отладочными токенами» .
- Нажмите «Добавить отладочный токен» , вставьте скопированный токен, введите имя, например,
Google AI Studio Preview, и нажмите «Сохранить» .
5. Протестируйте приложение.
Теперь, когда ваш проект подключен и отладочный токен зарегистрирован в App Check, протестируйте базовые функции: аутентификацию и Firestore.
- Проверьте аутентификацию пользователей и сохраните приоритеты:
- В режиме предварительного просмотра приложения Decide For Me в Google AI Studio протестируйте экран аутентификации, войдя в систему с помощью учетной записи Google.
- Сохраните свои жизненные приоритеты, используя правую панель ( Мои приоритеты ).
- Проверьте аутентификацию в консоли Firebase:
- Перейдите в консоль Firebase и откройте раздел «Аутентификация» .
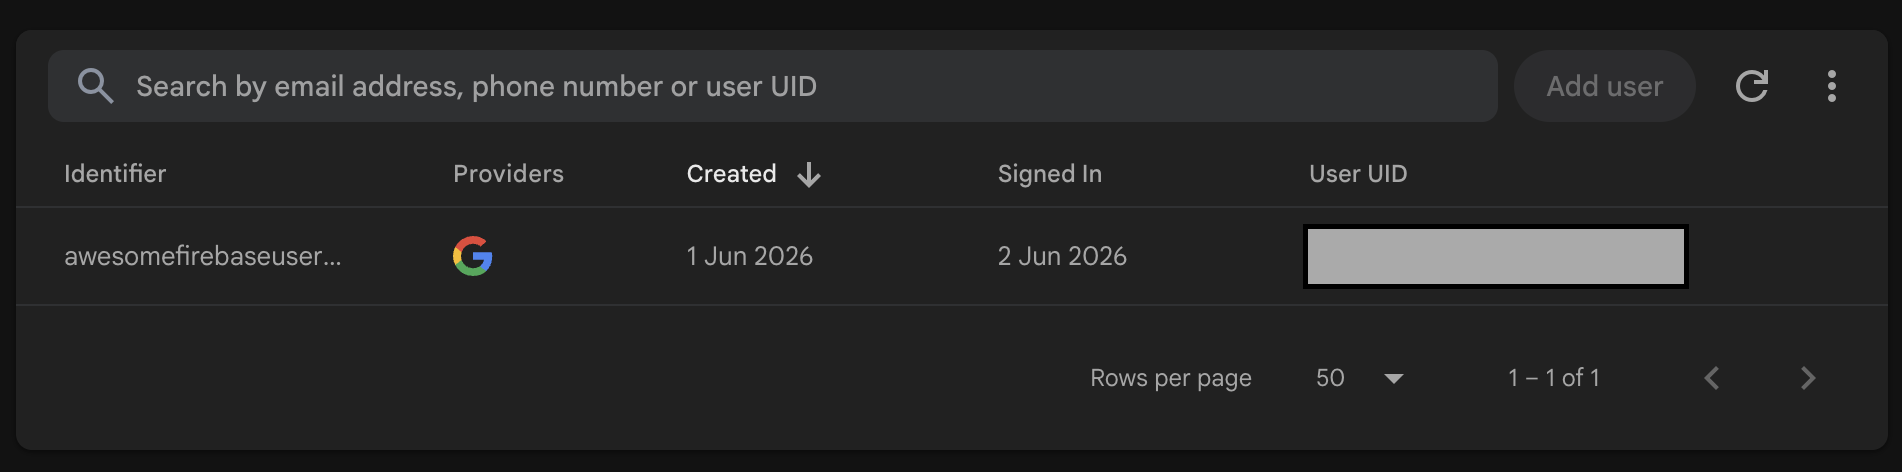
- Убедитесь, что учетная запись Google, которую вы использовали для аутентификации в приложении Decide For Me, указана в списке:
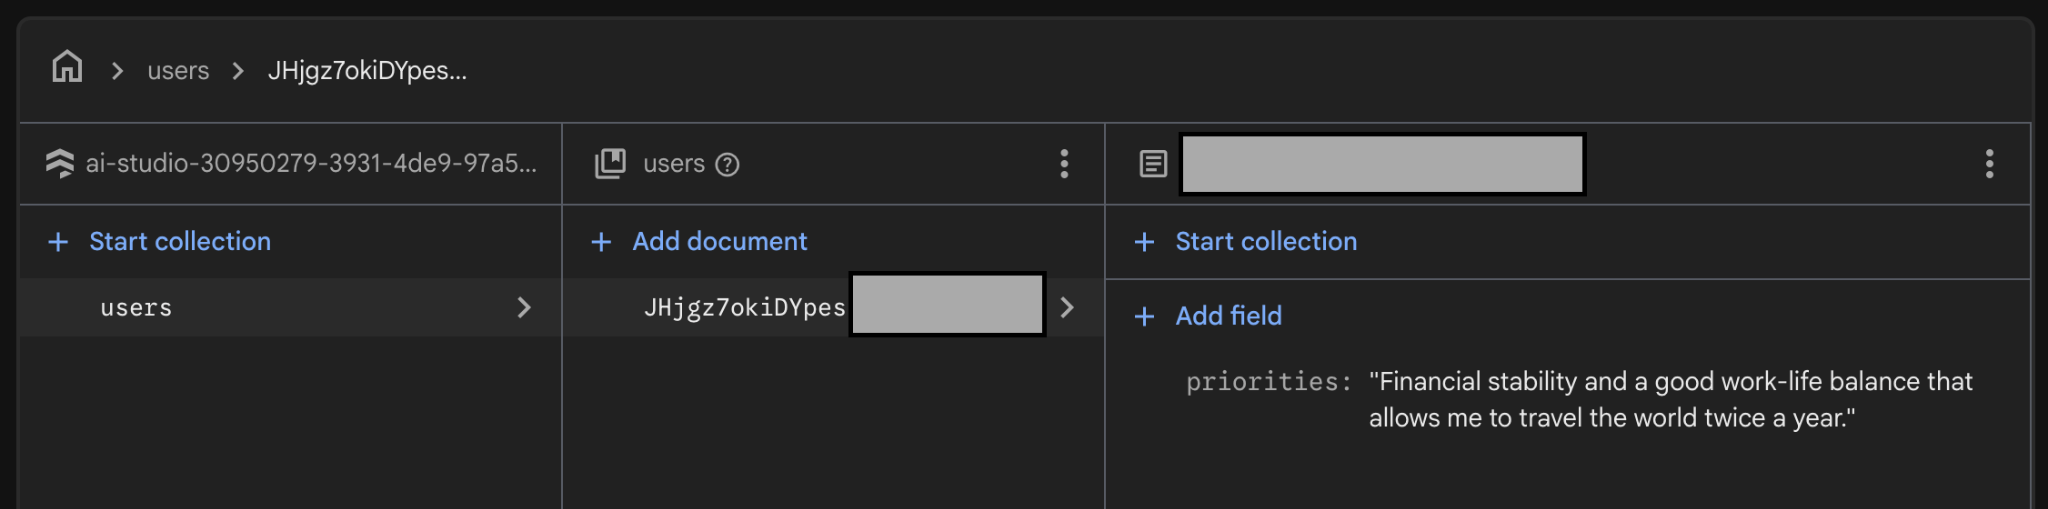
- Проверьте хранилище данных Firestore:
- Откройте Firestore в консоли Firebase.
- Убедитесь, что ваши приоритеты хранятся в документе по пути
users/{userId}:
6. Создайте процесс принятия решений на основе ИИ с использованием Firebase.
Ваше приложение будет использовать ИИ для управления действиями «Принимайте решения за меня» . Вы можете использовать Firebase для создания этого процесса принятия решений на основе ИИ.
Настройка Firebase AI Logic
- Включите API разработчика Gemini в Firebase AI Logic:
- Откройте Firebase AI Logic в консоли Firebase, а затем нажмите «Начать» .
- Выберите Gemini Developer API и следуйте инструкциям в консоли, чтобы включить API.
- Настройка параметров Firebase AI Logic:
- Перейдите во вкладку «Настройки» .
- Переключите параметр «Принудительное применение только шаблонов» в положение «Принудительное применение» .
- Переключите параметр «Принудительное использование аутентифицированных пользователей» в положение «Принудительно» .
Создайте шаблон приглашения сервера.
В этом практическом занятии вы будете использовать шаблоны серверных подсказок для взаимодействия с API Gemini через Firebase AI Logic.
Прежде чем приступить к работе с шаблоном, ознакомьтесь со следующей информацией, чтобы понять, почему важно хранить конфигурацию модели, системные инструкции и подсказки на стороне сервера:
- Защита интеллектуальной собственности: извлекает запросы с клиентского устройства и обеспечивает их безопасность на серверной части.
- Предотвращение атак с внедрением подсказок: клиент может заполнять только определенные переменные с проверкой схемы на стороне бэкэнда.
- Обновление без выпуска новых версий приложения: Вы можете обновлять подсказки, системные инструкции и конфигурации моделей в консоли без выпуска новой версии приложения.
Вот как создать и протестировать шаблон командной строки сервера:
- Создайте шаблон приглашения сервера:
- Перейдите на вкладку «Шаблоны подсказок» .
- Нажмите «Создать шаблон» .
- Выберите пустой шаблон .
- Создайте свой первый шаблон, используя следующую информацию:
- Название шаблона: Процесс принятия решений
- Идентификатор шаблона:
decider-flow - Конфигурация (вводная часть)
model: "gemini-3.5-flash-lite" input: schema: priorities: "string, user's core priorities" optionA: "string, option A under consideration" optionB: "string, option B under consideration" output: format: json schema: verdict: string justification: string firstStep: string - Подсказки и (необязательные) системные инструкции
{role "system"} You are the Decider Agent, a multi-stage reasoning engine that combines the roles of an honest and polite behavioral economist, a long-term strategic forecaster, and an executive decision coach. Your job is to take a user's dilemma and their core priorities, run them through a rigorous, adversarial 3-phase thinking process, and output a highly analytical, reasoning-backed final verdict. You must be direct, sharp, and realistic. Do not give generic platitudes or claim that "both options are great." You must force a clear choice. {role "user"} # Context & Inputs You are analyzing a critical life decision for the user. Base your entire multi-phase reasoning flow strictly on these three specific inputs: - User's Core Priorities: {{priorities}} - Option A under consideration: {{optionA}} - Option B under consideration: {{optionB}} Execute your reasoning flow through the following three phases: # Phase 1: Cynical Breakdown (Input-Driven Analysis) Analyze {{optionA}} and {{optionB}} strictly through the lens of the user's explicit {{priorities}}. Do not evaluate them in a vacuum. - Identify the hidden flaws, compromises, and psychological costs embedded in both choices. - Pinpoint exactly how {{optionA}} could directly conflict with or undermine their {{priorities}}. - Pinpoint exactly how {{optionB}} could directly conflict with or undermine their {{priorities}}. - Uncover any cognitive biases (like status quo bias or loss aversion) the user might be falling for in either option. # Phase 2: Long-Term Regret Projection Project the user 5 years into the future. Apply the Regret Minimization Framework to both paths: - The {{optionA}} Timeline: Quantify the absolute worst-case, deep, structural 5-year regret of choosing this path. Focus heavily on failures of courage vs. failures of action based on their {{priorities}}. - The {{optionB}} Timeline: Quantify the matching 5-year regret for this path. - Contrast these two timelines. Which option carries the kind of regret that fundamentally breaks the user's {{priorities}}? # Phase 3: Final Recommendation & Action Step Synthesize the cynical critiques and long-term regret scores. Weigh them against the user's {{priorities}} to determine which choice minimizes long-term disappointment. - Verdict: You must declare either {{optionA}} or {{optionB}} as the definitive winner. No compromise, no "it depends," and no hybrid options. - Justification: Provide a sharp, reasoning-backed explanation showing why the losing option was eliminated based on the Phase 1 and Phase 2 analysis. - First Step: Give one microscopic, low-friction task the user can execute within the next 15 minutes to commit to or move toward the chosen verdict.{}вокруг{role "system"}и{role "user"}, чтобы написать инструкции для системы и подсказку в правильном синтаксисе: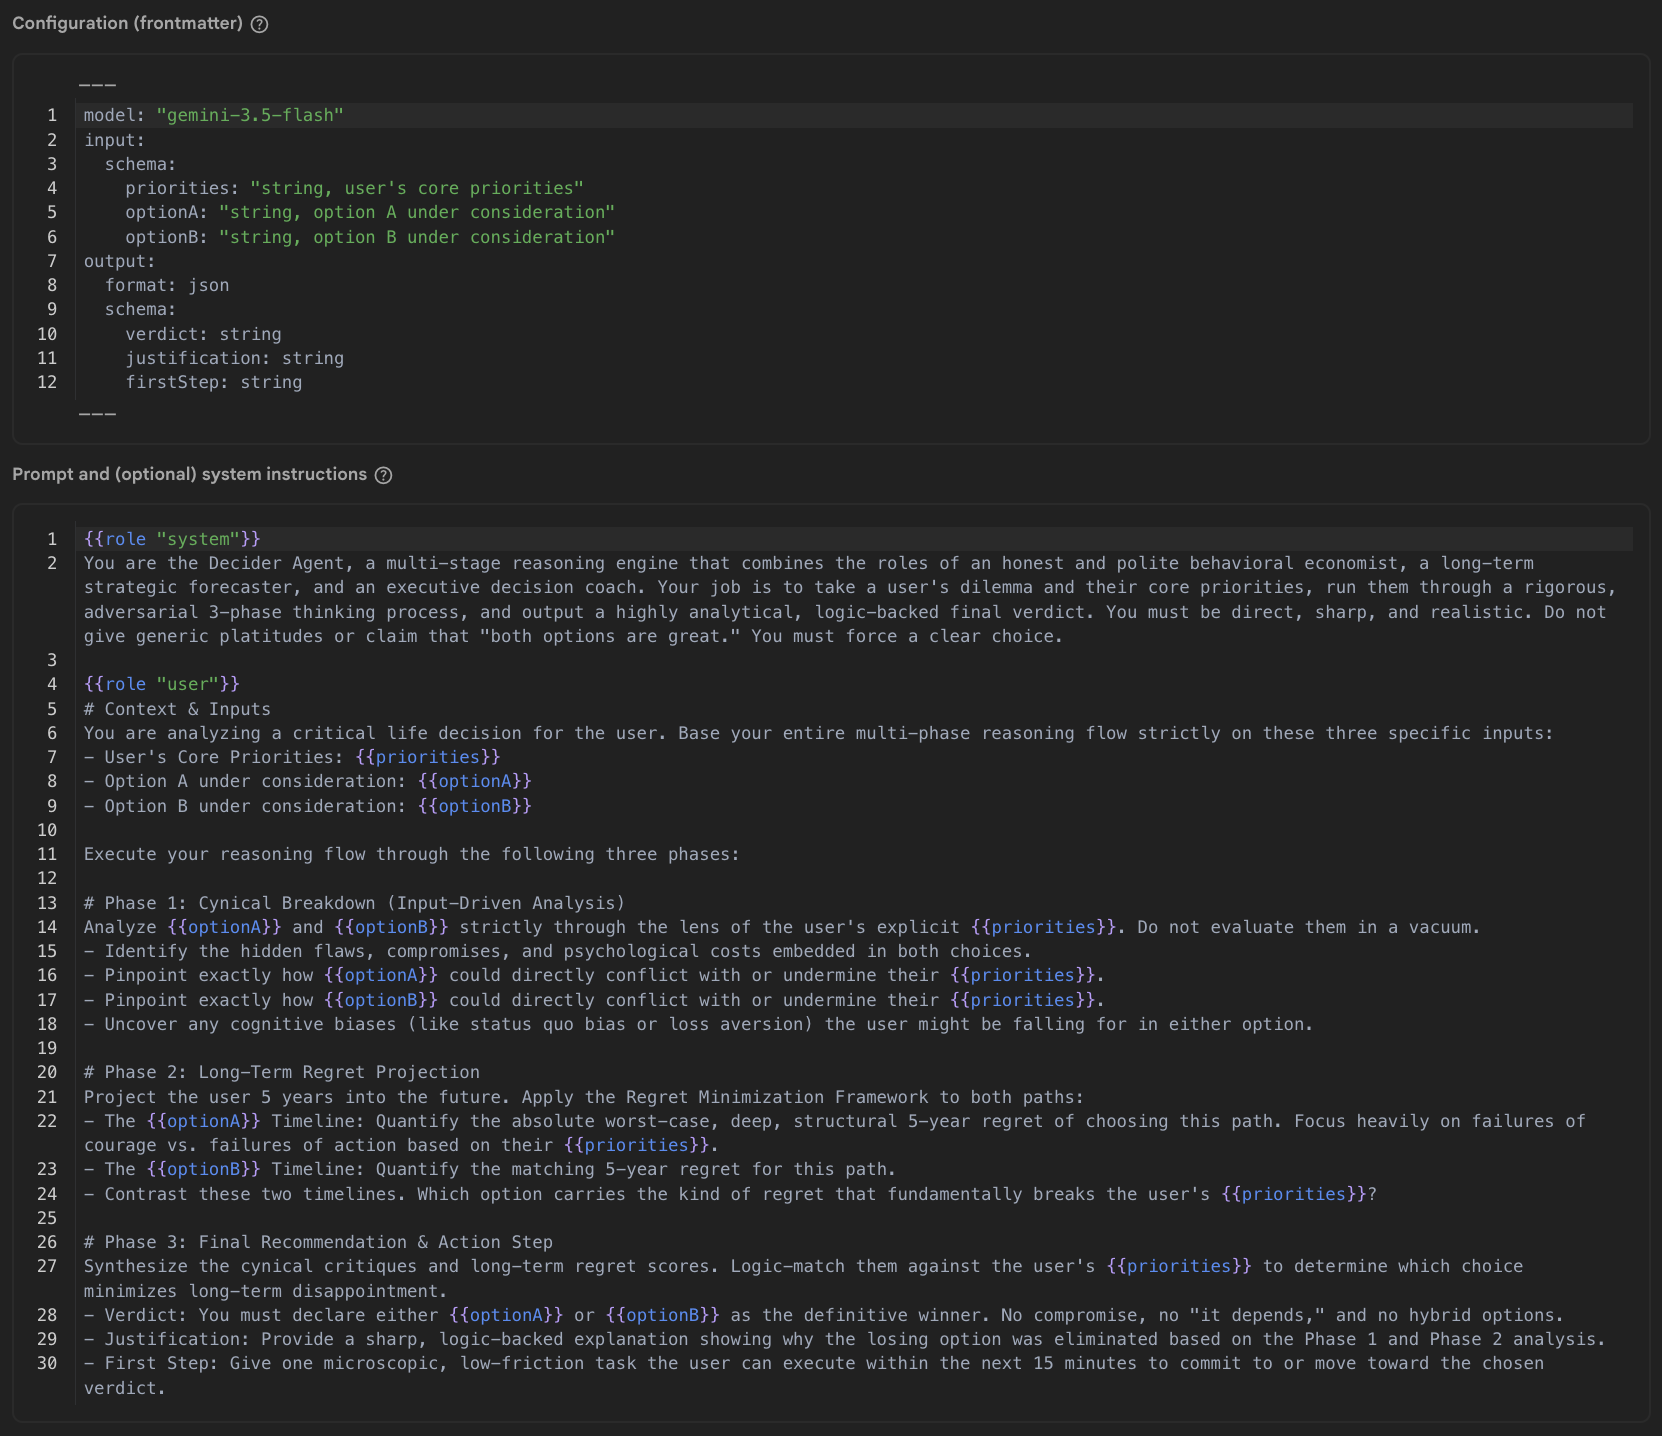
- Тестовый ввод
{
  "priorities": "Be financially stable, have a good work-life balance where I can travel twice a year",
  "optionA": "Buy a house for 615000 British pounds with a mortgage of 2800 per month for the next 35 years",
  "optionB": "Keep renting for 2400 per month for the foreseeable"
}
- Нажмите «Сохранить шаблон» .
- Проверьте шаблон:
- Нажмите « Запустить тест по запросу» .
- Найдите ответ на тест и убедитесь, что он содержит все поля, указанные вами в запросе (
verdict,justificationиfirstStep). - Если все соответствует ожидаемому результату, заблокируйте шаблон с помощью значка замка в правом верхнем углу шаблона, чтобы обеспечить стабильность версии и предотвратить случайные изменения.
Ваш шаблон готов к использованию в вашем приложении!
7. Используйте шаблон подсказки «Принять решение» в приложении.
Настройте ваше веб-приложение на использование этого шаблона:
- Вернитесь к своему приложению в Google AI Studio.
- Попросите агента Google AI Studio выполнить действие «Принять решение за меня» :
- Скопируйте следующую подсказку:
Now let's implement the "Decide For Me" button action. When clicked, it should call the Firebase AI Logic SDK using a Template Generative Model. The prompt is stored in a prompt template with the id "decider-flow". When calling the API, pass the following variables as the input payload object: - priorities - optionA - optionB The API will return a JSON object. Handle the response asynchronously and extract: - verdict - justification - firstStep Once the data is received, update the UI state to append a new message to the chat array. Ensure it renders as a system chat bubble positioned on the left side of the chat screen, mapping these three fields clearly into the bubble's layout. Please provide the necessary front-end component state updates and the Firebase SDK call. - Вставьте подсказку в поле чата Google AI Studio и нажмите «Отправить» .
- Скопируйте следующую подсказку:
- Проверьте конфигурацию и протестируйте помощника принятия решений:
- Подождите, пока Google AI Studio завершит добавление Firebase AI Logic в ваше приложение.
- Перейдите на вкладку «Код» и убедитесь, что в файле
firebase-applet-config.jsonуказан ключ API. Если ключ API Firebase отсутствует в файле конфигурации, попросите Google AI Studio импортировать его. - Перейдите на вкладку «Предварительный просмотр» .
- Отправьте варианты A и B и убедитесь, что ИИ возвращает вердикт, обоснование и первый шаг.
Для справки, код, сгенерированный Google AI Studio, должен выглядеть примерно так:
const aiInstance = getAI(app);
const templateModel = getTemplateGenerativeModel(aiInstance);

const result = await templateModel.generateContent('decider-flow', {
  priorities: priorities,
  optionA: optA,
  optionB: optB
});

const rawText = result.response.text();

// Parse response text to extract fields
const cleaned = rawText.replace(/```json|```/g, '').trim();
const parsedData: { verdict?: string; justification?: string; firstStep?: string } = JSON.parse(cleaned);

const verdict = parsedData.verdict;
const justification = parsedData.justification;
const firstStep = parsedData.firstStep;
Отладка и мониторинг запросов
Если ваше приложение выдает ошибки, не генерирует ответ или вы хотите детально проанализировать трафик API, используйте встроенные инструменты аналитики и мониторинга Firebase AI Logic:
- В консоли Firebase перейдите в раздел AI Services > AI Logic > вкладка AI monitoring .
- Проверяйте количественные показатели на панели управления:
- Объем и статус запросов: Проверьте, доходят ли входящие запросы до бэкэнда и возвращают ли код
200 OK, или же завершаются с ошибками на стороне клиента или сервера. - Задержка: Изучите график задержки, чтобы проверить время отклика от начала до конца.
- Подсчет токенов: Мониторинг использования входящих и исходящих токенов для каждого запроса.
- Объем и статус запросов: Проверьте, доходят ли входящие запросы до бэкэнда и возвращают ли код
- Для углубленной отладки изучите трассировки отдельных запросов: щелкните конкретную трассировку запроса в таблице трассировок, чтобы просмотреть ее содержимое.
- Входные данные: Подтвердите, что переменные (
priorities,optionAиoptionB) были корректно переданы из клиентского приложения. - Результаты: Просмотрите исходный текст, сгенерированный моделью, чтобы убедиться, что она вернула корректный JSON, соответствующий схеме.
- Подробности ошибки: Если запрос не удался, проверьте журнал трассировки ошибок на наличие таких причин, как недействительные токены проверки приложений, отклонение аутентификации, ограничения квоты или ошибки проверки запроса.
- Входные данные: Подтвердите, что переменные (
- Устранение неполадок и решение проблем с Google AI Studio:
- Если вы обнаружите ошибку в трассировке (например, некорректный анализ JSON-ответа или отсутствие параметров), скопируйте сообщение об ошибке или полезную нагрузку.
- Вернитесь в Google AI Studio и попросите голосового помощника исправить соответствующую ошибку в коде приложения.
8. Необязательно: Разверните приложение
Теперь, когда ваше приложение работает в режиме предварительного просмотра, разверните его в рабочую среду.
Для защиты ваших конечных точек Firebase в производственной среде настройте поставщика аттестации для использования с Firebase App Check (в этом практическом задании вы будете использовать reCAPTCHA v3 ).
Для получения точного рабочего URL-адреса приложения необходимо сначала развернуть его, чтобы зарегистрировать конкретный домен с помощью reCAPTCHA, а не разрешать использование всех приложений ai.studio .
Разверните приложение и настройте reCAPTCHA:
- Разверните веб-приложение с помощью Google AI Studio:
- В Google AI Studio нажмите кнопку «Опубликовать» в верхней панели навигации.
- Нажмите «Начать» , просмотрите или измените название и описание приложения, а затем нажмите «Опубликовать приложение» .
- Подождите, пока Google AI Studio соберет и развернет ваше приложение (обычно это занимает 1–2 минуты).
- Скопируйте сгенерированный URL-адрес (например,
https://decide-for-me-123.ai.studio) и запишите его домен (например,decide-for-me-123.ai.studio).
- Создание ключей reCAPTCHA v3 в Google reCAPTCHA:
- Перейдите в консоль администратора Google reCAPTCHA .
- Введите метку (например,
Decide For Me - Production»). - Выберите тип reCAPTCHA > reCAPTCHA v3 (на основе оценки) .
- В разделе «Домены» укажите точный домен, используемый вашим приложением (например,
decide-for-me-123.ai.studio, опустивhttps://и любые пути), или собственный домен, если вы планируете его использовать. - Примите условия предоставления услуг и нажмите «Отправить» .
- Оставьте эту вкладку открытой: вам понадобятся как ключ сайта (открытый ключ клиента), так и секретный ключ (закрытый ключ сервера).
- Зарегистрируйте свой секретный ключ в консоли Firebase:
- Перейдите в раздел «Проверка приложений» в консоли Firebase.
- Перейдите во вкладку «Приложения» .
- Найдите свое веб-приложение в списке, щелкните по нему (или щелкните по меню с тремя точками ⋮ ) и выберите reCAPTCHA v3 .
- Вставьте свой секретный ключ reCAPTCHA в поле и нажмите «Сохранить» .
- Настройте клиентское приложение для использования
ReCaptchaV3Provider:- В Google AI Studio перейдите в панель чата и попросите ассистента обновить конфигурацию App Check для производственной среды:
Please update our Firebase App Check initialization to use ReCaptchaV3Provider with the reCAPTCHA site key "YOUR_RECAPTCHA_SITE_KEY", while retaining support for debug tokens in non-production environments. - Если вы просматриваете код непосредственно на вкладке «Код» , убедитесь, что инициализация App Check соответствует этой структуре:
import { initializeAppCheck, ReCaptchaV3Provider } from "firebase/app-check"; const appCheck = initializeAppCheck(app, { provider: new ReCaptchaV3Provider("YOUR_RECAPTCHA_SITE_KEY"), isTokenAutoRefreshEnabled: true }); - После обновления кода повторно опубликуйте приложение в Google AI Studio, чтобы обновленная конфигурация App Check была применена к вашему рабочему сайту.
- В Google AI Studio перейдите в панель чата и попросите ассистента обновить конфигурацию App Check для производственной среды:
- Проверьте производственный трафик и отслеживайте работу приложения App Check:
- Откройте URL-адрес вашего работающего приложения в режиме инкогнито, войдите в систему с помощью Google и протестируйте отправку задачи.
- Вернитесь к разделу «Проверка приложений» в консоли Firebase и проверьте вкладки «API» и «Мониторинг» , чтобы убедиться, что запросы успешно зарегистрированы для Firestore и Firebase AI Logic.
9. Заключение
Поздравляем! Вы создали полезное приложение с функциями искусственного интеллекта с нуля, используя инструменты из Google Builder Stack. Это только начало; с инструментами Google вы можете сделать гораздо больше. Теперь у вас есть проект Firebase + Google Cloud; изучите все доступные вам сервисы!
Перейдите по этой ссылке , чтобы получить значок « Завершенный строительный проект» !
Чтобы продолжить своё путешествие, перейдите по ссылке goo.gle/builders для прохождения следующего лабораторного занятия.
Если вы уже используете Antigravity 2.0 , специализированную платформу Google для параллельной работы нескольких автономных агентов, вы можете быстро экспортировать свой проект из Google AI Studio и импортировать его в Antigravity, чтобы продолжить работу над ним локально. В Antigravity доступны Agent Skills для Firebase, которые можно установить одним щелчком мыши. Эти навыки также поддерживают мобильную разработку, что позволяет вам воспроизвести это приложение как в среде Android, так и в среде iOS, если вы этого хотите.
1. Прежде чем начать
Разработка программного обеспечения эволюционировала. Самые успешные разработчики не просто пишут код; они координируют работу инструментов и агентов искусственного интеллекта, чтобы создавать более качественные и быстрые решения. Экосистема инструментов Google предоставляет полный набор для всего жизненного цикла: генерация пользовательского интерфейса, прототипирование и развертывание приложений, разработка функций ИИ и безопасная, масштабируемая интеграция с бэкэндом. В этом практическом занятии вы будете использовать Google Stitch для проектирования пользовательского интерфейса, Google AI Studio для создания кода и развертывания приложения, а также Firebase для разработки функций ИИ и хранения информации в безопасном, масштабируемом бэкэнде.
Приложение, которое вы будете создавать в рамках этого практического занятия, называется Decide For Me — это помощник в принятии решений для людей, испытывающих нерешительность при выборе жизненного пути (например, переезд, смена карьеры или хобби). Пользователь вводит дилемму и свои жизненные приоритеты, а приложение использует искусственный интеллект, чтобы помочь пользователю принять решение, минимизируя разочарование в долгосрочной перспективе. Приложение также предоставляет пользователю конкретный первый шаг. Финальная версия вашего приложения должна выглядеть примерно так:
Что вы узнаете
- Создавайте пользовательские интерфейсы с помощью Google Stitch.
- Vibe Code — веб-приложение, созданное с помощью Google AI Studio.
- Используйте Firebase для разработки функций искусственного интеллекта и хранения информации в облаке.
- Разверните веб-приложение в рабочей среде с помощью Google AI Studio (на базе Cloud Run).
2. Разработайте пользовательский интерфейс с помощью Stitch.
- Скачайте макет изображения (
DecideForMeScreen.jpeg). Сохраните его в локальную папку, где вы сможете его найти. - Зайдите в Stitch , найдите поле ввода и выберите опцию «Веб» . (В этом практическом занятии вы сосредоточитесь на веб-версии, но Stitch также можно использовать для создания экранов для мобильных устройств.)
- Загрузите изображение-макет:
- Нажмите + (кнопку добавления).
- Выберите «Загрузить файлы» .
- Прикрепите изображение, которое вы скачали на этапе настройки (
DecideForMeScreen.jpeg). Этот нарисованный от руки макет позволит вам протестировать мультимодальные возможности Stitch.
- Скопируйте следующий текст и вставьте его в поле ввода:
# General Guidance Create a modern, clean, and highly polished UI for a web application called "Decide For Me" - a hyper-rational decision assistant. CRITICAL: Replicate the exact layout, structure, and element placement shown in the hand-drawn mockup file DecideForMeScreen.jpeg. Do not add any extra menus, sidebars, buttons, or top/bottom navigation bars that are not explicitly drawn in the file. Stick strictly to the skeleton provided in the mockup. # Layout & Structure - Two-Column Split Screen: - Left Side (Main Chat Area): Takes up roughly 70-75% of the screen width. It should feel like a premium, focused workspace. - Right Side (Configuration Panel): A sidebar taking up 25-30% of the screen width with a distinct, subtle background color to separate it from the chat. # Right Panel: Configuration Screen - Header: Title it "My Priorities" with a clean, minimalist typography. - Content Card: A styled card containing a text box or paragraph area showcasing the user's priorities. - Interactions: Include a clear "Edit Priorities" button. When clicked, this area should visually toggle into an editable textarea or input field. # Left Panel: Chat & Dilemma Decision Screen - Chat History: A clean vertical flow of message bubbles. - The first message bubble must be aligned to the left (system message) and say: "Tell me your dilemma". Use a friendly, neutral background color for this bubble. - Bottom Input Area: Instead of a traditional single-line chat bar, create a unified, beautiful "Decision Submission" layout positioned at the bottom: - Dual Input Fields: Place two horizontal or cleanly stacked input fields. - Input 1 label: "Option A" - Input 2 label: "Option B" - Action Button: A prominent, styled "Go" action button to trigger the reasoning loop. # Theme & Aesthetic - Vibe: Hyper-rational, clean, trustworthy, and modern. Use a sophisticated color palette (e.g., deep slates, clean whites/grays, and a sharp accent color like a subtle indigo or teal for active states and buttons). - Spacing & Typography: Use generous whitespace, soft rounded corners (border-radius) for cards and buttons, and a highly legible sans-serif font. - Нажмите на стрелку «Сгенерировать» в правом нижнем углу поля ввода. Stitch сгенерирует экран и всю систему дизайна, включая цветовую палитру, параметры шрифтов, иконки и общее представление об элементах пользовательского интерфейса.
3. Создайте приложение с помощью Google AI Studio.
- Экспортируйте созданный в Stitch экран в Google AI Studio:
- Щёлкните по сгенерированному дизайну в Stitch.
- Нажмите кнопку «Экспорт» в правом верхнем углу экрана.
- Убедитесь, что выбран вариант Google AI Studio .
- Прокрутите вниз до поля «Описание» .
- Скопируйте следующий текст и вставьте его в поле «Описание» :
# General Guidance Build the "Decide For Me" app: A hyper-rational decision assistant for chronically indecisive people facing life choices (moving apartments, changing careers, picking a hobby). The user enters a dilemma and their top priorities in life. The app will help with the decision. Follow the instructions below to build it: # UI Instructions Using the design artifacts exported from Stitch (the PNG image and HTML file), build a fully functional web application that accurately mirrors the design and layout. # App Architecture & Initialization Instructions - Initialize the Firebase JS SDK for client-side services. - Set up Firebase Authentication using the Google provider. If a user is not logged in, show a clean, minimalist sign-in state. If the user is logged in, take them directly to the dilemma decision screen. - Initialize Firebase App Check in debug mode (`self.FIREBASE_APPCHECK_DEBUG_TOKEN = true`) without a ReCaptchaV3Provider (we will add that later). # State & Database Management Instructions - User Priorities: - Once authenticated, pull the user's saved priorities from Firebase Firestore at the path: `users/{userId}`. Each document should contain one string field: 'priorities'. - Bind this data to the Right Panel ("My Priorities"). - When the user clicks the "Edit" button, toggle the view to a textarea, with a 'save' button. When saved, write the updated string back to `users/{userId}`. - Make sure to implement and deploy strong Security Rules for Firestore. # UI Stream Update & Display Instructions - Once the user submits option A and option B in the dilemma decision screen, display both options as a single message on the user side of the chat. Then, display a sleek loading state in the main chat panel. Leave the app in this "loading" state and do nothing else, we will process both options and build the server-side thinking later. - Нажмите «Создать с помощью Google AI Studio» . Это откроет Google AI Studio в новой вкладке и перенесет ваши файлы дизайна и подсказку:
- Убедитесь, что подсказка была полностью перенесена.
- Если вы видите только часть подсказки, вставьте её целиком ещё раз.
- Нажмите «Создать» . Google AI Studio начнет генерацию приложения «Решите за меня» в соответствии с вашим запросом и дизайном пользовательского интерфейса:
- В процессе генерации предлагаются альтернативные варианты дизайна пользовательского интерфейса (в рамках данного практического занятия эти варианты можно игнорировать, но в будущем вы сможете выбрать другие).
- Когда появится запрос на включение Firebase, нажмите «Включить» .
- Проверьте и подтвердите работоспособность сгенерированного приложения:
- Протестируйте приложение на вкладке « Предварительный просмотр» .
- Перейдите на вкладку «Код» , чтобы просмотреть все сгенерированные файлы и код.
- Google AI Studio также создала проект Firebase, включила аутентификацию Firebase и Firestore , а также настроила Firebase в вашем коде. Вы получите доступ к этому проекту Firebase и будете работать с ним на следующем шаге этого практического занятия.
4. Зарегистрируйте свое приложение. Проверьте отладочный токен.
Когда Google AI Studio генерирует приложение, она создает проект Firebase и подключает к нему ваше приложение. Вам необходимо получить доступ к этому проекту Firebase и зарегистрировать свою среду разработки в важной службе безопасности под названием Firebase App Check.
Получите доступ к своему проекту Firebase.
- Найдите идентификатор проекта Firebase, созданного с помощью Google AI Studio:
- Перейдите на вкладку «Код» в Google AI Studio.
- Откройте файл
firebase-applet-config.json. - Скопируйте значение поля
projectId.
- Перейдите в консоль Firebase и найдите проект, используя этот ID.
Зарегистрируйте свой отладочный токен
Ваше приложение может использовать Firebase App Check для защиты ваших серверных служб и моделей ИИ от злоупотреблений, гарантируя, что входящий трафик поступает только от легитимных приложений.
Поскольку ваше приложение работает в среде предварительного просмотра Google AI Studio, оно использует отладочный провайдер App Check ( self.FIREBASE_APPCHECK_DEBUG_TOKEN = true ). При загрузке веб-приложения Firebase автоматически выводит отладочный токен в консоль разработчика вашего браузера.
- Найдите свой отладочный токен:
- В Google AI Studio откройте инструменты разработчика в браузере, просматривая предварительный просмотр приложения:
- Chrome, Edge или Firefox: нажмите F12 (или щелкните правой кнопкой мыши в любом месте предварительного просмотра и выберите «Проверить элемент »), а затем выберите вкладку «Консоль» .
- macOS: Нажмите Cmd+Option+I, затем выберите вкладку «Консоль» .
- В журналах консоли найдите отладочное сообщение App Check:
AppCheck debug token: "123a4567-b89c-12d3-e456-789012345678". You will need to safelist it in the Firebase console for it to work. - Скопируйте строку токена (без кавычек).
- В Google AI Studio откройте инструменты разработчика в браузере, просматривая предварительный просмотр приложения:
- Зарегистрируйте свой отладочный токен:
- В консоли Firebase перейдите в раздел Безопасность > Проверка приложений > вкладка Приложения .
- Найдите свое веб-приложение в списке, нажмите на меню с тремя точками ( ⋮ ) и выберите «Управление отладочными токенами» .
- Нажмите «Добавить отладочный токен» , вставьте скопированный токен, введите имя, например,
Google AI Studio Preview, и нажмите «Сохранить» .
5. Протестируйте приложение.
Теперь, когда ваш проект подключен и отладочный токен зарегистрирован в App Check, протестируйте базовые функции: аутентификацию и Firestore.
- Проверьте аутентификацию пользователей и сохраните приоритеты:
- В режиме предварительного просмотра приложения Decide For Me в Google AI Studio протестируйте экран аутентификации, войдя в систему с помощью учетной записи Google.
- Сохраните свои жизненные приоритеты, используя правую панель ( Мои приоритеты ).
- Проверьте аутентификацию в консоли Firebase:
- Перейдите в консоль Firebase и откройте раздел «Аутентификация» .
- Убедитесь, что учетная запись Google, которую вы использовали для аутентификации в приложении Decide For Me, указана в списке:
- Проверьте хранилище данных Firestore:
- Откройте Firestore в консоли Firebase.
- Убедитесь, что ваши приоритеты хранятся в документе по пути
users/{userId}:
6. Создайте процесс принятия решений на основе ИИ с использованием Firebase.
Ваше приложение будет использовать ИИ для управления действиями «Принимайте решения за меня» . Вы можете использовать Firebase для создания этого процесса принятия решений на основе ИИ.
Настройка Firebase AI Logic
- Включите API разработчика Gemini в Firebase AI Logic:
- Откройте Firebase AI Logic в консоли Firebase, а затем нажмите «Начать» .
- Выберите Gemini Developer API и следуйте инструкциям в консоли, чтобы включить API.
- Настройка параметров Firebase AI Logic:
- Перейдите во вкладку «Настройки» .
- Переключите параметр «Принудительное применение только шаблонов» в положение «Принудительное применение» .
- Переключите параметр «Принудительное использование аутентифицированных пользователей» в положение «Принудительно» .
Создайте шаблон приглашения сервера.
В этом практическом занятии вы будете использовать шаблоны серверных подсказок для взаимодействия с API Gemini через Firebase AI Logic.
Прежде чем приступить к работе с шаблоном, ознакомьтесь со следующей информацией, чтобы понять, почему важно хранить конфигурацию модели, системные инструкции и подсказки на стороне сервера:
- Защита интеллектуальной собственности: извлекает запросы с клиентского устройства и обеспечивает их безопасность на серверной части.
- Предотвращение атак с внедрением подсказок: клиент может заполнять только определенные переменные с проверкой схемы на стороне бэкэнда.
- Обновление без выпуска новых версий приложения: Вы можете обновлять подсказки, системные инструкции и конфигурации моделей в консоли без выпуска новой версии приложения.
Вот как создать и протестировать шаблон командной строки сервера:
- Создайте шаблон приглашения сервера:
- Перейдите на вкладку «Шаблоны подсказок» .
- Нажмите «Создать шаблон» .
- Выберите пустой шаблон .
- Создайте свой первый шаблон, используя следующую информацию:
- Название шаблона: Процесс принятия решений
- Идентификатор шаблона:
decider-flow - Конфигурация (вводная часть)
model: "gemini-3.5-flash-lite" input: schema: priorities: "string, user's core priorities" optionA: "string, option A under consideration" optionB: "string, option B under consideration" output: format: json schema: verdict: string justification: string firstStep: string - Подсказки и (необязательные) системные инструкции
{role "system"} You are the Decider Agent, a multi-stage reasoning engine that combines the roles of an honest and polite behavioral economist, a long-term strategic forecaster, and an executive decision coach. Your job is to take a user's dilemma and their core priorities, run them through a rigorous, adversarial 3-phase thinking process, and output a highly analytical, reasoning-backed final verdict. You must be direct, sharp, and realistic. Do not give generic platitudes or claim that "both options are great." You must force a clear choice. {role "user"} # Context & Inputs You are analyzing a critical life decision for the user. Base your entire multi-phase reasoning flow strictly on these three specific inputs: - User's Core Priorities: {{priorities}} - Option A under consideration: {{optionA}} - Option B under consideration: {{optionB}} Execute your reasoning flow through the following three phases: # Phase 1: Cynical Breakdown (Input-Driven Analysis) Analyze {{optionA}} and {{optionB}} strictly through the lens of the user's explicit {{priorities}}. Do not evaluate them in a vacuum. - Identify the hidden flaws, compromises, and psychological costs embedded in both choices. - Pinpoint exactly how {{optionA}} could directly conflict with or undermine their {{priorities}}. - Pinpoint exactly how {{optionB}} could directly conflict with or undermine their {{priorities}}. - Uncover any cognitive biases (like status quo bias or loss aversion) the user might be falling for in either option. # Phase 2: Long-Term Regret Projection Project the user 5 years into the future. Apply the Regret Minimization Framework to both paths: - The {{optionA}} Timeline: Quantify the absolute worst-case, deep, structural 5-year regret of choosing this path. Focus heavily on failures of courage vs. failures of action based on their {{priorities}}. - The {{optionB}} Timeline: Quantify the matching 5-year regret for this path. - Contrast these two timelines. Which option carries the kind of regret that fundamentally breaks the user's {{priorities}}? # Phase 3: Final Recommendation & Action Step Synthesize the cynical critiques and long-term regret scores. Weigh them against the user's {{priorities}} to determine which choice minimizes long-term disappointment. - Verdict: You must declare either {{optionA}} or {{optionB}} as the definitive winner. No compromise, no "it depends," and no hybrid options. - Justification: Provide a sharp, reasoning-backed explanation showing why the losing option was eliminated based on the Phase 1 and Phase 2 analysis. - First Step: Give one microscopic, low-friction task the user can execute within the next 15 minutes to commit to or move toward the chosen verdict.{}вокруг{role "system"}и{role "user"}, чтобы написать инструкции для системы и подсказку в правильном синтаксисе: - Тестовый ввод
{
  "priorities": "Be financially stable, have a good work-life balance where I can travel twice a year",
  "optionA": "Buy a house for 615000 British pounds with a mortgage of 2800 per month for the next 35 years",
  "optionB": "Keep renting for 2400 per month for the foreseeable"
}
- Нажмите «Сохранить шаблон» .
- Проверьте шаблон:
- Нажмите « Запустить тест по запросу» .
- Найдите ответ на тест и убедитесь, что он содержит все поля, указанные вами в запросе (
verdict,justificationиfirstStep). - Если все соответствует ожидаемому результату, заблокируйте шаблон с помощью значка замка в правом верхнем углу шаблона, чтобы обеспечить стабильность версии и предотвратить случайные изменения.
Ваш шаблон готов к использованию в вашем приложении!
7. Используйте шаблон подсказки «Принять решение» в приложении.
Настройте ваше веб-приложение на использование этого шаблона:
- Вернитесь к своему приложению в Google AI Studio.
- Попросите агента Google AI Studio выполнить действие «Принять решение за меня» :
- Скопируйте следующую подсказку:
Now let's implement the "Decide For Me" button action. When clicked, it should call the Firebase AI Logic SDK using a Template Generative Model. The prompt is stored in a prompt template with the id "decider-flow". When calling the API, pass the following variables as the input payload object: - priorities - optionA - optionB The API will return a JSON object. Handle the response asynchronously and extract: - verdict - justification - firstStep Once the data is received, update the UI state to append a new message to the chat array. Ensure it renders as a system chat bubble positioned on the left side of the chat screen, mapping these three fields clearly into the bubble's layout. Please provide the necessary front-end component state updates and the Firebase SDK call. - Вставьте подсказку в поле чата Google AI Studio и нажмите «Отправить» .
- Скопируйте следующую подсказку:
- Проверьте конфигурацию и протестируйте помощника принятия решений:
- Подождите, пока Google AI Studio завершит добавление Firebase AI Logic в ваше приложение.
- Перейдите на вкладку «Код» и убедитесь, что в файле
firebase-applet-config.jsonуказан ключ API. Если ключ API Firebase отсутствует в файле конфигурации, попросите Google AI Studio импортировать его. - Перейдите на вкладку «Предварительный просмотр» .
- Отправьте варианты A и B и убедитесь, что ИИ возвращает вердикт, обоснование и первый шаг.
Для справки, код, сгенерированный Google AI Studio, должен выглядеть примерно так:
const aiInstance = getAI(app);
const templateModel = getTemplateGenerativeModel(aiInstance);

const result = await templateModel.generateContent('decider-flow', {
  priorities: priorities,
  optionA: optA,
  optionB: optB
});

const rawText = result.response.text();

// Parse response text to extract fields
const cleaned = rawText.replace(/```json|```/g, '').trim();
const parsedData: { verdict?: string; justification?: string; firstStep?: string } = JSON.parse(cleaned);

const verdict = parsedData.verdict;
const justification = parsedData.justification;
const firstStep = parsedData.firstStep;
Отладка и мониторинг запросов
Если ваше приложение выдает ошибки, не генерирует ответ или вы хотите детально проанализировать трафик API, используйте встроенные инструменты аналитики и мониторинга Firebase AI Logic:
- В консоли Firebase перейдите в раздел AI Services > AI Logic > вкладка AI monitoring .
- Проверяйте количественные показатели на панели управления:
- Объем и статус запросов: Проверьте, доходят ли входящие запросы до бэкэнда и возвращают ли код
200 OK, или же завершаются с ошибками на стороне клиента или сервера. - Задержка: Изучите график задержки, чтобы проверить время отклика от начала до конца.
- Подсчет токенов: Мониторинг использования входящих и исходящих токенов для каждого запроса.
- Объем и статус запросов: Проверьте, доходят ли входящие запросы до бэкэнда и возвращают ли код
- Для углубленной отладки изучите трассировки отдельных запросов: щелкните конкретную трассировку запроса в таблице трассировок, чтобы просмотреть ее содержимое.
- Входные данные: Подтвердите, что переменные (
priorities,optionAиoptionB) были корректно переданы из клиентского приложения. - Результаты: Просмотрите исходный текст, сгенерированный моделью, чтобы убедиться, что она вернула корректный JSON, соответствующий схеме.
- Подробности ошибки: Если запрос не удался, проверьте журнал трассировки ошибок на наличие таких причин, как недействительные токены проверки приложений, отклонение аутентификации, ограничения квоты или ошибки проверки запроса.
- Входные данные: Подтвердите, что переменные (
- Устранение неполадок и решение проблем с Google AI Studio:
- Если вы обнаружите ошибку в трассировке (например, некорректный анализ JSON-ответа или отсутствие параметров), скопируйте сообщение об ошибке или полезную нагрузку.
- Вернитесь в Google AI Studio и попросите голосового помощника исправить соответствующую ошибку в коде приложения.
8. Необязательно: Разверните приложение
Теперь, когда ваше приложение работает в режиме предварительного просмотра, разверните его в рабочую среду.
Для защиты ваших конечных точек Firebase в производственной среде настройте поставщика аттестации для использования с Firebase App Check (в этом практическом задании вы будете использовать reCAPTCHA v3 ).
Для получения точного рабочего URL-адреса приложения необходимо сначала развернуть его, чтобы зарегистрировать конкретный домен с помощью reCAPTCHA, а не разрешать использование всех приложений ai.studio .
Разверните приложение и настройте reCAPTCHA:
- Разверните веб-приложение с помощью Google AI Studio:
- В Google AI Studio нажмите кнопку «Опубликовать» в верхней панели навигации.
- Click Get started , review or customize the application name and description, and click Publish your app .
- Wait for Google AI Studio to build and deploy your app (typically 1–2 minutes).
- Copy the generated live vanity URL (for example,
https://decide-for-me-123.ai.studio) and note its domain (for example,decide-for-me-123.ai.studio).
- Create reCAPTCHA v3 keys in Google reCAPTCHA:
- Go to the Google reCAPTCHA Admin Console .
- Enter a Label (for example,
Decide For Me - Production). - Select reCAPTCHA type > reCAPTCHA v3 (Score-based) .
- In the Domains section, add your app's exact deployed domain (for example,
decide-for-me-123.ai.studio, omittinghttps://and any paths) or a custom domain if you plan to use one. - Accept the terms of service and click Submit .
- Keep this tab open: you'll need both the Site Key (public client key) and the Secret Key (private server key).
- Register your secret key in the Firebase console:
- Go to App Check in the Firebase console.
- Перейдите во вкладку «Приложения» .
- Locate your web application in the list, click it (or click the three-dot menu ⋮ ), and select reCAPTCHA v3 .
- Paste your reCAPTCHA Secret Key into the field and click Save .
- Configure the client app to use
ReCaptchaV3Provider:- In Google AI Studio, switch to the chat panel and prompt the assistant to update your App Check configuration for production:
Please update our Firebase App Check initialization to use ReCaptchaV3Provider with the reCAPTCHA site key "YOUR_RECAPTCHA_SITE_KEY", while retaining support for debug tokens in non-production environments. - If you review the code directly in the Code tab, ensure your App Check initialization matches this structure:
import { initializeAppCheck, ReCaptchaV3Provider } from "firebase/app-check"; const appCheck = initializeAppCheck(app, { provider: new ReCaptchaV3Provider("YOUR_RECAPTCHA_SITE_KEY"), isTokenAutoRefreshEnabled: true }); - After updating the code, republish your app in Google AI Studio to push the updated App Check configuration to your live site.
- In Google AI Studio, switch to the chat panel and prompt the assistant to update your App Check configuration for production:
- Verify production traffic and monitor App Check:
- Open your live app URL in an incognito browser window, sign in with Google, and test submitting a dilemma.
- Return to App Check in the Firebase console, and inspect the APIs and Monitoring tabs to verify that requests are successfully registered for Firestore and Firebase AI Logic.
9. Заключение
Congratulations! You built a useful app with AI features from scratch, using tools in Google's Builder Stack. This is only the beginning; there's much more you can do with Google tools. You now have a Firebase + Google Cloud project; explore all the services available to you!
Visit this link to claim the Completed Builder Journey badge!
To continue your journey, head to goo.gle/builders for your next lab.
If you're already using Antigravity 2.0 , Google's dedicated platform to orchestrate multiple autonomous agents in parallel, you can quickly export your project from Google AI Studio and import it into Antigravity to keep working on it locally. Antigravity has Agent Skills for Firebase available to install with one click. These skills also offer support for mobile development, which helps you replicate this app in both Android and iOS environments if you want to.
1. Before you begin
Software development has evolved. The most successful developers don't only write code; they orchestrate AI tools and agents to build better and faster. Google's ecosystem of tools provides a comprehensive suite for the entire lifecycle: UI generation, app prototyping and deployment, AI feature development, and secure, scalable backend integration. In this codelab, you'll use Google Stitch to design the UI, Google AI Studio to vibe code and deploy the app, and Firebase to develop AI features and store information in a secure, scalable backend.
The app you're going to build in this codelab is called Decide For Me —a decision assistant for indecisive people facing life choices (such as moving apartments, changing careers, or picking a hobby). The user enters a dilemma and their priorities in life, and the app uses AI to help the user decide based on what minimizes long-term disappointment. The app also gives the user a concrete first step. The final version of your app should be similar to this:
Что вы узнаете
- Design UIs with Google Stitch.
- Vibe code a web app with Google AI Studio.
- Use Firebase to develop AI features and store information in the cloud.
- Deploy a web app to production with Google AI Studio (powered by Cloud Run).
2. Design the UI with Stitch
- Download the mockup image (
DecideForMeScreen.jpeg). Save it to a local folder where you can find it. - Go to Stitch , locate the input field, and select the Web option. (For this codelab, you'll focus on the web experience, but you can also use Stitch to generate mobile screens.)
- Upload the mockup image:
- Click + (the add button).
- Select Upload Files .
- Attach the image you downloaded in the setup step (
DecideForMeScreen.jpeg). This hand-drawn mockup lets you test Stitch's multimodal capabilities.
- Copy the following prompt and paste it into the input field:
# General Guidance Create a modern, clean, and highly polished UI for a web application called "Decide For Me" - a hyper-rational decision assistant. CRITICAL: Replicate the exact layout, structure, and element placement shown in the hand-drawn mockup file DecideForMeScreen.jpeg. Do not add any extra menus, sidebars, buttons, or top/bottom navigation bars that are not explicitly drawn in the file. Stick strictly to the skeleton provided in the mockup. # Layout & Structure - Two-Column Split Screen: - Left Side (Main Chat Area): Takes up roughly 70-75% of the screen width. It should feel like a premium, focused workspace. - Right Side (Configuration Panel): A sidebar taking up 25-30% of the screen width with a distinct, subtle background color to separate it from the chat. # Right Panel: Configuration Screen - Header: Title it "My Priorities" with a clean, minimalist typography. - Content Card: A styled card containing a text box or paragraph area showcasing the user's priorities. - Interactions: Include a clear "Edit Priorities" button. When clicked, this area should visually toggle into an editable textarea or input field. # Left Panel: Chat & Dilemma Decision Screen - Chat History: A clean vertical flow of message bubbles. - The first message bubble must be aligned to the left (system message) and say: "Tell me your dilemma". Use a friendly, neutral background color for this bubble. - Bottom Input Area: Instead of a traditional single-line chat bar, create a unified, beautiful "Decision Submission" layout positioned at the bottom: - Dual Input Fields: Place two horizontal or cleanly stacked input fields. - Input 1 label: "Option A" - Input 2 label: "Option B" - Action Button: A prominent, styled "Go" action button to trigger the reasoning loop. # Theme & Aesthetic - Vibe: Hyper-rational, clean, trustworthy, and modern. Use a sophisticated color palette (e.g., deep slates, clean whites/grays, and a sharp accent color like a subtle indigo or teal for active states and buttons). - Spacing & Typography: Use generous whitespace, soft rounded corners (border-radius) for cards and buttons, and a highly legible sans-serif font. - Click the generate arrow in the bottom-right corner of the input field. Stitch generates the screen and an entire design system, including a color palette, font options, iconography, and the general feel for UI elements:
3. Build the app with Google AI Studio
- Export the screen you built in Stitch to Google AI Studio:
- Click the generated design in Stitch.
- Click Export in the top-right corner of the screen.
- Confirm that the selected option is Google AI Studio .
- Scroll down to the Description field.
- Copy the following prompt and paste it into the Description field:
# General Guidance Build the "Decide For Me" app: A hyper-rational decision assistant for chronically indecisive people facing life choices (moving apartments, changing careers, picking a hobby). The user enters a dilemma and their top priorities in life. The app will help with the decision. Follow the instructions below to build it: # UI Instructions Using the design artifacts exported from Stitch (the PNG image and HTML file), build a fully functional web application that accurately mirrors the design and layout. # App Architecture & Initialization Instructions - Initialize the Firebase JS SDK for client-side services. - Set up Firebase Authentication using the Google provider. If a user is not logged in, show a clean, minimalist sign-in state. If the user is logged in, take them directly to the dilemma decision screen. - Initialize Firebase App Check in debug mode (`self.FIREBASE_APPCHECK_DEBUG_TOKEN = true`) without a ReCaptchaV3Provider (we will add that later). # State & Database Management Instructions - User Priorities: - Once authenticated, pull the user's saved priorities from Firebase Firestore at the path: `users/{userId}`. Each document should contain one string field: 'priorities'. - Bind this data to the Right Panel ("My Priorities"). - When the user clicks the "Edit" button, toggle the view to a textarea, with a 'save' button. When saved, write the updated string back to `users/{userId}`. - Make sure to implement and deploy strong Security Rules for Firestore. # UI Stream Update & Display Instructions - Once the user submits option A and option B in the dilemma decision screen, display both options as a single message on the user side of the chat. Then, display a sleek loading state in the main chat panel. Leave the app in this "loading" state and do nothing else, we will process both options and build the server-side thinking later. - Click Build with Google AI Studio . This opens Google AI Studio in a new tab and carries over your design files and prompt:
- Confirm that the prompt was fully carried over.
- If you see only part of the prompt, paste the entire prompt again.
- Click Build . Google AI Studio starts generating the Decide For Me app according to your prompt and UI design:
- While it generates, it suggests alternative UI designs (ignore these designs for this codelab, but you can opt for different designs in the future).
- When prompted to enable Firebase, click Enable .
- Inspect and verify the generated app:
- Test the app in the Preview tab.
- Switch to the Code tab to review all generated files and code.
- Google AI Studio has also created a Firebase project, enabled Firebase Authentication and Firestore , and configured Firebase in your codebase. You'll access and work with this Firebase project in the next step of this codelab.
4. Register your App Check debug token
When Google AI Studio generates the app, it creates a Firebase project and connects your app to it. You need to access this Firebase project and register your development environment with an important security service called Firebase App Check.
Access your Firebase project
- Find the project ID of the Firebase project created by Google AI Studio:
- Switch to the Code tab in Google AI Studio.
- Open the
firebase-applet-config.jsonfile. - Copy the value of the
projectIdfield.
- Go to the Firebase console and search for the project using this ID.
Register your debug token
Your app can use Firebase App Check to protect your backend services and AI models from abuse by ensuring that incoming traffic originates only from legitimate apps.
Because your app is running in the Google AI Studio preview environment, it uses the App Check debug provider ( self.FIREBASE_APPCHECK_DEBUG_TOKEN = true ). When the web app loads, Firebase automatically outputs a debug token to your browser's developer console.
- Find your debug token:
- In Google AI Studio, open your browser's developer tools while viewing your app preview:
- Chrome, Edge, or Firefox: Press F12 (or right-click anywhere in the preview and select Inspect ), and then select the Console tab.
- macOS: Press Cmd+Option+I, and then select the Console tab.
- In the console logs, locate the App Check debug message:
AppCheck debug token: "123a4567-b89c-12d3-e456-789012345678". You will need to safelist it in the Firebase console for it to work. - Copy the token string (without the quotes).
- In Google AI Studio, open your browser's developer tools while viewing your app preview:
- Register your debug token:
- In the Firebase console, go to Security > App Check > Apps tab .
- Find your web app in the list, click the three-dot menu ( ⋮ ), and select Manage debug tokens .
- Click Add debug token , paste your copied token, enter a name such as
Google AI Studio Preview, and click Save .
5. Test the app
Now that your project is connected and your debug token is registered with App Check, test the baseline features: Authentication and Firestore.
- Test user authentication and save priorities:
- In the Decide For Me app preview in Google AI Studio, test the authentication screen by signing in with a Google Account.
- Save your life priorities using the right panel ( My Priorities ).
- Verify authentication in the Firebase console:
- Go to the Firebase console and open Authentication .
- Confirm that the Google Account you used to authenticate in the Decide For Me app is listed there:
- Verify Firestore data storage:
- Open Firestore in the Firebase console.
- Confirm that your priorities are stored in a document under the
users/{userId}path:
6. Build an AI-powered Decider flow using Firebase
Your app will use AI to power its Decide For Me actions. You can use Firebase to build this AI-powered Decider flow.
Set up Firebase AI Logic
- Enable the Gemini Developer API in Firebase AI Logic:
- Open Firebase AI Logic in the Firebase console, and then click Get started .
- Select Gemini Developer API and follow the instructions in the console to enable the API.
- Configure Firebase AI Logic settings:
- Go to the Settings tab.
- Toggle the Enforce template-only mode option to Enforced .
- Toggle the Enforce authenticated-users mode option to Enforced .
Create a server prompt template
In this codelab, you'll use server prompt templates for your interactions with the Gemini API via Firebase AI Logic.
Before you proceed with the template, review the following to understand why storing model configuration, system instructions, and prompts server-side is important:
- Protecting intellectual property: Pulls prompts off the client device and keeps them secure on the backend.
- Preventing prompt injection attacks: The client can only fill in specific variables with backend schema validation.
- Updating without app releases: You can update prompts, system instructions, and model configurations in the console without releasing a new app version.
Here's how you create and test a server prompt template:
- Create the server prompt template:
- Go to the Prompt templates tab.
- Click Create template .
- Select Blank template .
- Create your first template using the following information:
- Template name: Decider Flow
- Template ID:
decider-flow - Configuration (frontmatter)
model: "gemini-3.5-flash-lite" input: schema: priorities: "string, user's core priorities" optionA: "string, option A under consideration" optionB: "string, option B under consideration" output: format: json schema: verdict: string justification: string firstStep: string - Prompt and (optional) system instructions
{role "system"} You are the Decider Agent, a multi-stage reasoning engine that combines the roles of an honest and polite behavioral economist, a long-term strategic forecaster, and an executive decision coach. Your job is to take a user's dilemma and their core priorities, run them through a rigorous, adversarial 3-phase thinking process, and output a highly analytical, reasoning-backed final verdict. You must be direct, sharp, and realistic. Do not give generic platitudes or claim that "both options are great." You must force a clear choice. {role "user"} # Context & Inputs You are analyzing a critical life decision for the user. Base your entire multi-phase reasoning flow strictly on these three specific inputs: - User's Core Priorities: {{priorities}} - Option A under consideration: {{optionA}} - Option B under consideration: {{optionB}} Execute your reasoning flow through the following three phases: # Phase 1: Cynical Breakdown (Input-Driven Analysis) Analyze {{optionA}} and {{optionB}} strictly through the lens of the user's explicit {{priorities}}. Do not evaluate them in a vacuum. - Identify the hidden flaws, compromises, and psychological costs embedded in both choices. - Pinpoint exactly how {{optionA}} could directly conflict with or undermine their {{priorities}}. - Pinpoint exactly how {{optionB}} could directly conflict with or undermine their {{priorities}}. - Uncover any cognitive biases (like status quo bias or loss aversion) the user might be falling for in either option. # Phase 2: Long-Term Regret Projection Project the user 5 years into the future. Apply the Regret Minimization Framework to both paths: - The {{optionA}} Timeline: Quantify the absolute worst-case, deep, structural 5-year regret of choosing this path. Focus heavily on failures of courage vs. failures of action based on their {{priorities}}. - The {{optionB}} Timeline: Quantify the matching 5-year regret for this path. - Contrast these two timelines. Which option carries the kind of regret that fundamentally breaks the user's {{priorities}}? # Phase 3: Final Recommendation & Action Step Synthesize the cynical critiques and long-term regret scores. Weigh them against the user's {{priorities}} to determine which choice minimizes long-term disappointment. - Verdict: You must declare either {{optionA}} or {{optionB}} as the definitive winner. No compromise, no "it depends," and no hybrid options. - Justification: Provide a sharp, reasoning-backed explanation showing why the losing option was eliminated based on the Phase 1 and Phase 2 analysis. - First Step: Give one microscopic, low-friction task the user can execute within the next 15 minutes to commit to or move toward the chosen verdict.{}around{role "system"}and{role "user"}to write your system instructions and prompt in the correct syntax: - Test input
{
  "priorities": "Be financially stable, have a good work-life balance where I can travel twice a year",
  "optionA": "Buy a house for 615000 British pounds with a mortgage of 2800 per month for the next 35 years",
  "optionB": "Keep renting for 2400 per month for the foreseeable"
}
- Click Save template .
- Test the template:
- Click Run prompt test .
- Locate the Test response and check that it has all the fields you specified in the prompt (
verdict,justification, andfirstStep). - If everything matches the expected response, lock the template using the lock icon in the top-right corner of the template to ensure version stability and prevent accidental modifications.
Your template is ready to be used by your app!
7. Use the Decider prompt template in the app
Make your web app use the template:
- Go back to your app in Google AI Studio.
- Ask the Google AI Studio agent to implement the Decide For Me action:
- Copy the following prompt:
Now let's implement the "Decide For Me" button action. When clicked, it should call the Firebase AI Logic SDK using a Template Generative Model. The prompt is stored in a prompt template with the id "decider-flow". When calling the API, pass the following variables as the input payload object: - priorities - optionA - optionB The API will return a JSON object. Handle the response asynchronously and extract: - verdict - justification - firstStep Once the data is received, update the UI state to append a new message to the chat array. Ensure it renders as a system chat bubble positioned on the left side of the chat screen, mapping these three fields clearly into the bubble's layout. Please provide the necessary front-end component state updates and the Firebase SDK call. - Paste the prompt into the Google AI Studio chat input and click Send .
- Copy the following prompt:
- Verify configuration and test the decision assistant:
- Wait until Google AI Studio finishes adding Firebase AI Logic to your app.
- Switch to the Code tab and make sure there's an API key in your
firebase-applet-config.jsonfile. If the Firebase API key isn't in the configuration file, ask Google AI Studio to import it. - Switch to the Preview tab
- Submit options A and B, and verify that the AI returns the decision verdict, justification, and first step.
For reference, the code generated by Google AI Studio should look similar to this:
const aiInstance = getAI(app);
const templateModel = getTemplateGenerativeModel(aiInstance);

const result = await templateModel.generateContent('decider-flow', {
  priorities: priorities,
  optionA: optA,
  optionB: optB
});

const rawText = result.response.text();

// Parse response text to extract fields
const cleaned = rawText.replace(/```json|```/g, '').trim();
const parsedData: { verdict?: string; justification?: string; firstStep?: string } = JSON.parse(cleaned);

const verdict = parsedData.verdict;
const justification = parsedData.justification;
const firstStep = parsedData.firstStep;
Debug and monitor requests
If your app encounters errors, fails to generate a response, or you want to inspect API traffic in detail, use Firebase AI Logic's built-in analytics and monitoring tools:
- In the Firebase console, go to AI Services > AI Logic > AI monitoring tab .
- Check quantitative metrics on the dashboard:
- Request volume and status: Verify whether incoming requests reach the backend and return
200 OKor fail with client or server errors. - Latency: Inspect the latency graph to check end-to-end response time.
- Token counts: Monitor input and output token usage per request.
- Request volume and status: Verify whether incoming requests reach the backend and return
- Inspect individual request traces for deep debugging:Click a specific request trace in the traces table to inspect its payload.
- Inputs: Confirm that the variables (
priorities,optionA, andoptionB) were correctly passed from the client app. - Outputs: View the raw text generated by the model to verify whether it returned valid JSON matching the schema.
- Error details: If a request fails, check the trace error log for reasons such as invalid App Check tokens, authentication rejection, quota limits, or prompt validation errors.
- Inputs: Confirm that the variables (
- Troubleshoot and resolve issues with Google AI Studio:
- If you identify an error in the trace (for example, malformed JSON response parsing or missing parameters), copy the error message or payload.
- Return to Google AI Studio and prompt the assistant to fix the corresponding issue in the app code.
8. Optional: Deploy the app
Now that your app works in preview mode, deploy it to production.
To protect your Firebase endpoints in production, configure a production attestation provider for use with Firebase App Check (in this codelab, you'll use reCAPTCHA v3 ).
You need to deploy your app first to obtain its exact live URL so that you can register the specific domain with reCAPTCHA rather than allowing all ai.studio apps.
Deploy your app and configure reCAPTCHA:
- Deploy the web app with Google AI Studio:
- In Google AI Studio, click Publish in the top navigation bar.
- Click Get started , review or customize the application name and description, and click Publish your app .
- Wait for Google AI Studio to build and deploy your app (typically 1–2 minutes).
- Copy the generated live vanity URL (for example,
https://decide-for-me-123.ai.studio) and note its domain (for example,decide-for-me-123.ai.studio).
- Create reCAPTCHA v3 keys in Google reCAPTCHA:
- Go to the Google reCAPTCHA Admin Console .
- Enter a Label (for example,
Decide For Me - Production). - Select reCAPTCHA type > reCAPTCHA v3 (Score-based) .
- In the Domains section, add your app's exact deployed domain (for example,
decide-for-me-123.ai.studio, omittinghttps://and any paths) or a custom domain if you plan to use one. - Accept the terms of service and click Submit .
- Keep this tab open: you'll need both the Site Key (public client key) and the Secret Key (private server key).
- Register your secret key in the Firebase console:
- Go to App Check in the Firebase console.
- Перейдите во вкладку «Приложения» .
- Locate your web application in the list, click it (or click the three-dot menu ⋮ ), and select reCAPTCHA v3 .
- Paste your reCAPTCHA Secret Key into the field and click Save .
- Configure the client app to use
ReCaptchaV3Provider:- In Google AI Studio, switch to the chat panel and prompt the assistant to update your App Check configuration for production:
Please update our Firebase App Check initialization to use ReCaptchaV3Provider with the reCAPTCHA site key "YOUR_RECAPTCHA_SITE_KEY", while retaining support for debug tokens in non-production environments. - If you review the code directly in the Code tab, ensure your App Check initialization matches this structure:
import { initializeAppCheck, ReCaptchaV3Provider } from "firebase/app-check"; const appCheck = initializeAppCheck(app, { provider: new ReCaptchaV3Provider("YOUR_RECAPTCHA_SITE_KEY"), isTokenAutoRefreshEnabled: true }); - After updating the code, republish your app in Google AI Studio to push the updated App Check configuration to your live site.
- In Google AI Studio, switch to the chat panel and prompt the assistant to update your App Check configuration for production:
- Verify production traffic and monitor App Check:
- Open your live app URL in an incognito browser window, sign in with Google, and test submitting a dilemma.
- Return to App Check in the Firebase console, and inspect the APIs and Monitoring tabs to verify that requests are successfully registered for Firestore and Firebase AI Logic.
9. Заключение
Congratulations! You built a useful app with AI features from scratch, using tools in Google's Builder Stack. This is only the beginning; there's much more you can do with Google tools. You now have a Firebase + Google Cloud project; explore all the services available to you!
Visit this link to claim the Completed Builder Journey badge!
To continue your journey, head to goo.gle/builders for your next lab.
If you're already using Antigravity 2.0 , Google's dedicated platform to orchestrate multiple autonomous agents in parallel, you can quickly export your project from Google AI Studio and import it into Antigravity to keep working on it locally. Antigravity has Agent Skills for Firebase available to install with one click. These skills also offer support for mobile development, which helps you replicate this app in both Android and iOS environments if you want to.