

1. ก่อนเริ่มต้น
การพัฒนาซอฟต์แวร์มีการพัฒนาไปมาก นักพัฒนาแอปที่ประสบความสำเร็จมากที่สุดไม่ได้เขียนโค้ดเพียงอย่างเดียว แต่ยังประสานงานเครื่องมือและเอเจนต์ AI เพื่อสร้างแอปได้ดีขึ้นและเร็วขึ้นด้วย ระบบนิเวศของเครื่องมือของ Google มีชุดโปรแกรมที่ครอบคลุมตลอดวงจรทั้งหมด ได้แก่ การสร้าง UI การสร้างต้นแบบและการติดตั้งใช้งานแอป การพัฒนาฟีเจอร์ AI และการผสานรวมแบ็กเอนด์ที่ปลอดภัยและปรับขนาดได้ ใน Codelab นี้ คุณจะได้ใช้ Google Stitch เพื่อออกแบบ UI, Google AI Studio เพื่อเขียนโค้ดและติดตั้งใช้งานแอป และ Firebase เพื่อพัฒนาฟีเจอร์ AI และจัดเก็บข้อมูลในแบ็กเอนด์ที่ปลอดภัยและปรับขนาดได้
แอปที่คุณจะสร้างในโค้ดแล็บนี้ชื่อ Decide For Me ซึ่งเป็นผู้ช่วยในการตัดสินใจสำหรับผู้ที่ตัดสินใจไม่เก่งเมื่อต้องเลือกเรื่องต่างๆ ในชีวิต (เช่น การย้ายอพาร์ตเมนต์ การเปลี่ยนอาชีพ หรือการเลือกงานอดิเรก) ผู้ใช้จะป้อนภาวะกลืนไม่เข้าคายไม่ออกและลำดับความสำคัญในชีวิต จากนั้นแอปจะใช้ AI เพื่อช่วยผู้ใช้ตัดสินใจโดยอิงตามสิ่งที่ลดความผิดหวังในระยะยาวได้มากที่สุด นอกจากนี้ แอปยังให้ขั้นตอนแรกที่ชัดเจนแก่ผู้ใช้ด้วย แอปเวอร์ชันสุดท้ายควรมีลักษณะคล้ายกับตัวอย่างต่อไปนี้
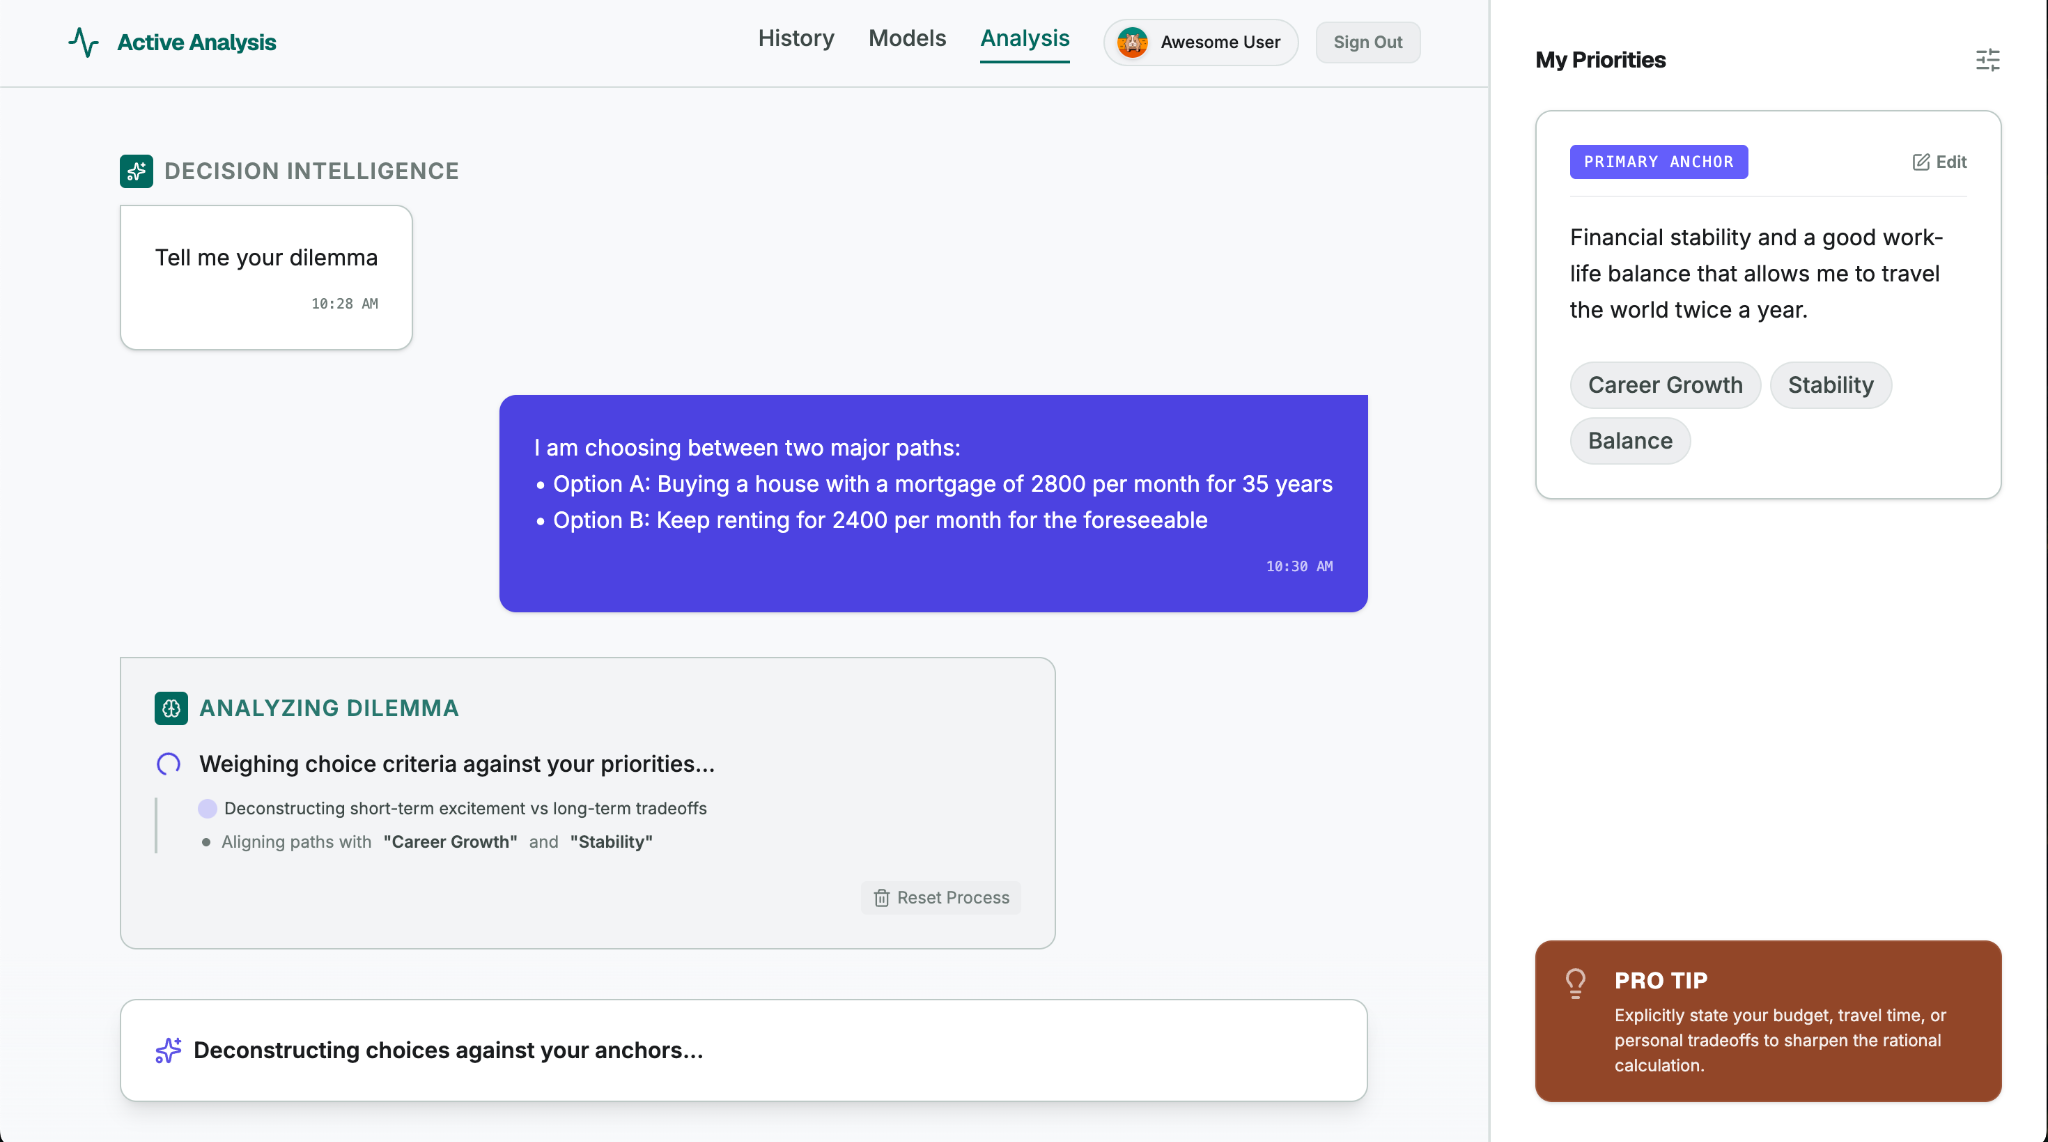
สิ่งที่คุณจะได้เรียนรู้
- ออกแบบ UI ด้วย Google Stitch
- Vibe Code เว็บแอปด้วย Google AI Studio
- ใช้ Firebase เพื่อพัฒนาฟีเจอร์ AI และจัดเก็บข้อมูลในระบบคลาวด์
- ติดตั้งใช้งานเว็บแอปกับเวอร์ชันที่ใช้งานจริงด้วย Google AI Studio (ขับเคลื่อนโดย Cloud Run)
2. ออกแบบ UI ด้วย Stitch
- ดาวน์โหลดรูปภาพจำลอง (
DecideForMeScreen.jpeg) บันทึกลงในโฟลเดอร์ในเครื่องที่คุณค้นหาได้ - ไปที่ Stitch หาช่องป้อนข้อมูล แล้วเลือกตัวเลือก Web (สำหรับ Codelab นี้ คุณจะมุ่งเน้นที่ประสบการณ์การใช้งานบนเว็บ แต่คุณยังใช้ Stitch เพื่อสร้างหน้าจออุปกรณ์เคลื่อนที่ได้ด้วย)
- อัปโหลดรูปภาพจำลองโดยทำดังนี้
- คลิก + (ปุ่มเพิ่ม)
- เลือกอัปโหลดไฟล์
- แนบรูปภาพที่ดาวน์โหลดในขั้นตอนการตั้งค่า (
DecideForMeScreen.jpeg) ม็อกอัปที่วาดด้วยมือนี้ช่วยให้คุณทดสอบความสามารถแบบหลายรูปแบบของ Stitch ได้
- คัดลอกพรอมต์ต่อไปนี้แล้ววางลงในช่องป้อนข้อมูล
# General Guidance Create a modern, clean, and highly polished UI for a web application called "Decide For Me" - a hyper-rational decision assistant. CRITICAL: Replicate the exact layout, structure, and element placement shown in the hand-drawn mockup file DecideForMeScreen.jpeg. Do not add any extra menus, sidebars, buttons, or top/bottom navigation bars that are not explicitly drawn in the file. Stick strictly to the skeleton provided in the mockup. # Layout & Structure - Two-Column Split Screen: - Left Side (Main Chat Area): Takes up roughly 70-75% of the screen width. It should feel like a premium, focused workspace. - Right Side (Configuration Panel): A sidebar taking up 25-30% of the screen width with a distinct, subtle background color to separate it from the chat. # Right Panel: Configuration Screen - Header: Title it "My Priorities" with a clean, minimalist typography. - Content Card: A styled card containing a text box or paragraph area showcasing the user's priorities. - Interactions: Include a clear "Edit Priorities" button. When clicked, this area should visually toggle into an editable textarea or input field. # Left Panel: Chat & Dilemma Decision Screen - Chat History: A clean vertical flow of message bubbles. - The first message bubble must be aligned to the left (system message) and say: "Tell me your dilemma". Use a friendly, neutral background color for this bubble. - Bottom Input Area: Instead of a traditional single-line chat bar, create a unified, beautiful "Decision Submission" layout positioned at the bottom: - Dual Input Fields: Place two horizontal or cleanly stacked input fields. - Input 1 label: "Option A" - Input 2 label: "Option B" - Action Button: A prominent, styled "Go" action button to trigger the reasoning loop. # Theme & Aesthetic - Vibe: Hyper-rational, clean, trustworthy, and modern. Use a sophisticated color palette (e.g., deep slates, clean whites/grays, and a sharp accent color like a subtle indigo or teal for active states and buttons). - Spacing & Typography: Use generous whitespace, soft rounded corners (border-radius) for cards and buttons, and a highly legible sans-serif font. - คลิกลูกศรสร้างที่มุมขวาล่างของช่องป้อนข้อมูล Stitch จะสร้างหน้าจอและระบบการออกแบบทั้งหมด รวมถึงชุดสี ตัวเลือกแบบอักษร ไอคอน และความรู้สึกทั่วไปสำหรับองค์ประกอบ UI ดังนี้
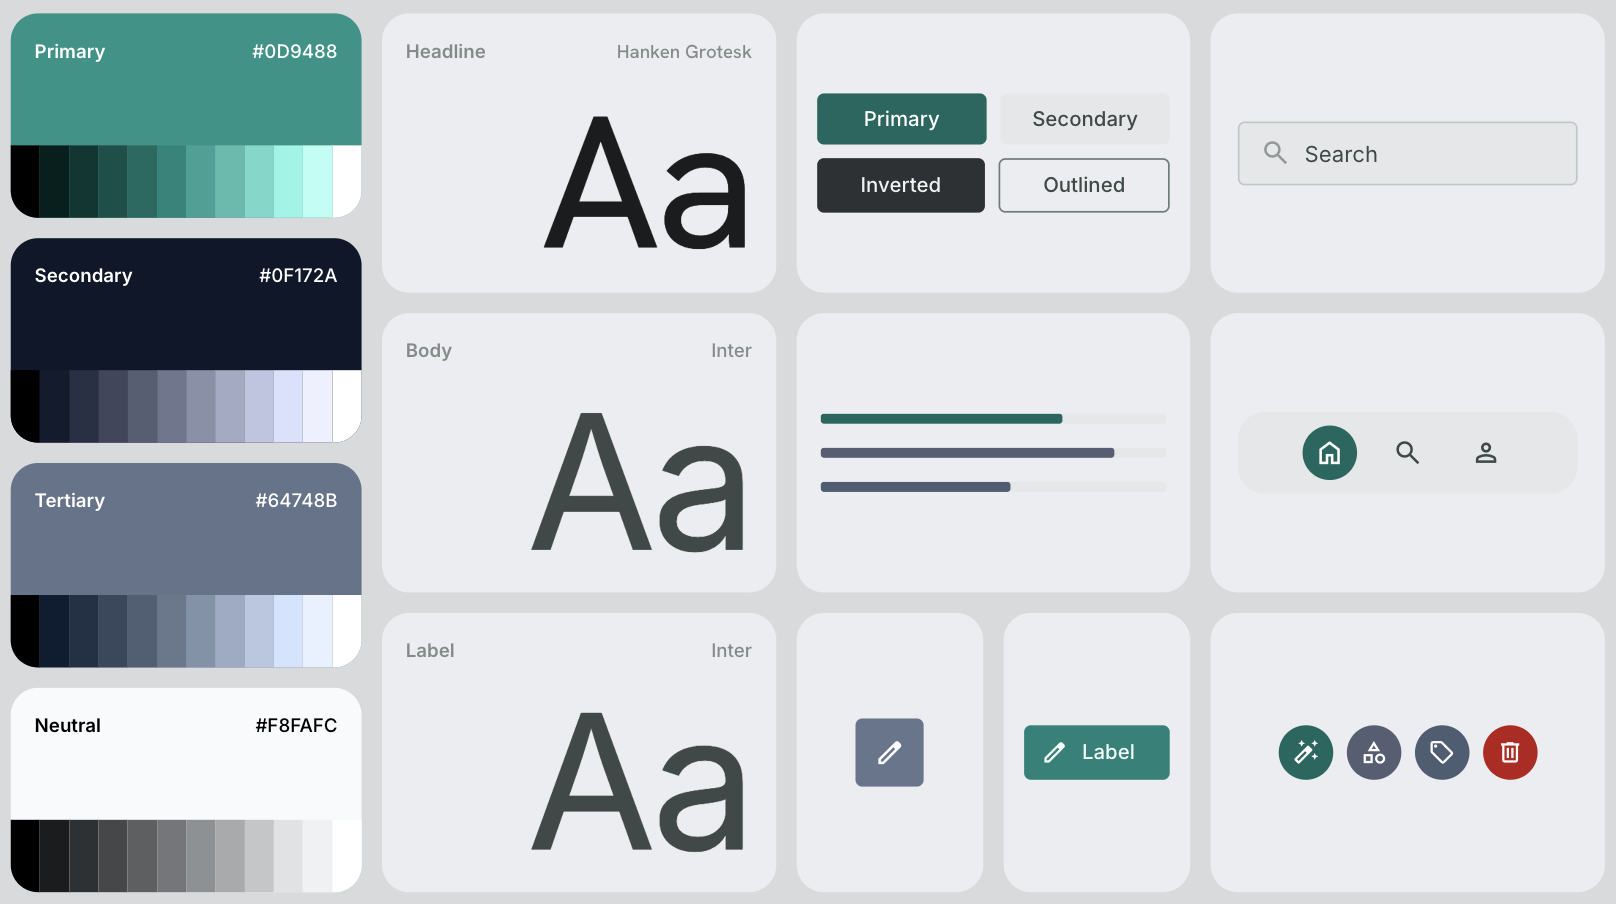
3. สร้างแอปด้วย Google AI Studio
- ส่งออกหน้าจอที่คุณสร้างใน Stitch ไปยัง Google AI Studio โดยทำดังนี้
- คลิกที่ดีไซน์ที่สร้างขึ้นใน Stitch
- คลิกส่งออกที่มุมขวาบนของหน้าจอ
- ยืนยันว่าตัวเลือกที่เลือกคือ Google AI Studio
- เลื่อนลงไปที่ช่องคำอธิบาย
- คัดลอกพรอมต์ต่อไปนี้แล้ววางลงในช่องคำอธิบาย
# General Guidance Build the "Decide For Me" app: A hyper-rational decision assistant for chronically indecisive people facing life choices (moving apartments, changing careers, picking a hobby). The user enters a dilemma and their top priorities in life. The app will help with the decision. Follow the instructions below to build it: # UI Instructions Using the design artifacts exported from Stitch (the PNG image and HTML file), build a fully functional web application that accurately mirrors the design and layout. # App Architecture & Initialization Instructions - Initialize the Firebase JS SDK for client-side services. - Set up Firebase Authentication using the Google provider. If a user is not logged in, show a clean, minimalist sign-in state. If the user is logged in, take them directly to the dilemma decision screen. - Initialize Firebase App Check in debug mode (`self.FIREBASE_APPCHECK_DEBUG_TOKEN = true`) without a ReCaptchaV3Provider (we will add that later). # State & Database Management Instructions - User Priorities: - Once authenticated, pull the user's saved priorities from Firebase Firestore at the path: `users/{userId}`. Each document should contain one string field: 'priorities'. - Bind this data to the Right Panel ("My Priorities"). - When the user clicks the "Edit" button, toggle the view to a textarea, with a 'save' button. When saved, write the updated string back to `users/{userId}`. - Make sure to implement and deploy strong Security Rules for Firestore. # UI Stream Update & Display Instructions - Once the user submits option A and option B in the dilemma decision screen, display both options as a single message on the user side of the chat. Then, display a sleek loading state in the main chat panel. Leave the app in this "loading" state and do nothing else, we will process both options and build the server-side thinking later. - คลิกสร้างด้วย Google AI Studio ซึ่งจะเปิด Google AI Studio ในแท็บใหม่และนำไฟล์ดีไซน์และพรอมต์ของคุณไปใช้
- ยืนยันว่าระบบได้โอนพรอมต์มาทั้งหมดแล้ว
- หากเห็นข้อความแจ้งเพียงบางส่วน ให้วางข้อความแจ้งทั้งหมดอีกครั้ง
- คลิกสร้าง Google AI Studio จะเริ่มสร้างแอป Decide For Me ตามพรอมต์และการออกแบบ UI ของคุณ
- ขณะที่สร้าง UI จะแนะนำการออกแบบ UI ทางเลือก (ไม่ต้องสนใจการออกแบบเหล่านี้สำหรับ Codelab นี้ แต่คุณเลือกการออกแบบอื่นๆ ได้ในอนาคต)
- เมื่อได้รับข้อความแจ้งให้เปิดใช้ Firebase ให้คลิกเปิดใช้
- ตรวจสอบและยืนยันแอปที่สร้างขึ้น
- ทดสอบแอปในแท็บแสดงตัวอย่าง
- เปลี่ยนไปที่แท็บโค้ดเพื่อตรวจสอบไฟล์และโค้ดทั้งหมดที่สร้างขึ้น
- นอกจากนี้ Google AI Studio ยังได้สร้างโปรเจ็กต์ Firebase เปิดใช้ การตรวจสอบสิทธิ์ Firebase และ Firestore รวมถึงกําหนดค่า Firebase ในฐานของโค้ดของคุณด้วย คุณจะเข้าถึงและทำงานกับโปรเจ็กต์ Firebase นี้ได้ในขั้นตอนถัดไปของโค้ดแล็บนี้
4. ลงทะเบียนโทเค็นการแก้ไขข้อบกพร่องของ App Check
เมื่อ Google AI Studio สร้างแอป ระบบจะสร้างโปรเจ็กต์ Firebase และเชื่อมต่อแอปของคุณกับโปรเจ็กต์ดังกล่าว คุณต้องเข้าถึงโปรเจ็กต์ Firebase นี้และลงทะเบียนสภาพแวดล้อมในการพัฒนาซอฟต์แวร์ด้วยบริการด้านความปลอดภัยที่สำคัญที่ชื่อว่า Firebase App Check
เข้าถึงโปรเจ็กต์ Firebase
- ค้นหารหัสโปรเจ็กต์ของโปรเจ็กต์ Firebase ที่สร้างโดย Google AI Studio
- เปลี่ยนไปที่แท็บโค้ดใน Google AI Studio
- เปิดไฟล์
firebase-applet-config.json - คัดลอกค่าของช่อง
projectId
- ไปที่คอนโซล Firebase แล้วค้นหาโปรเจ็กต์โดยใช้รหัสนี้
ลงทะเบียนโทเค็นการแก้ไขข้อบกพร่อง
แอปของคุณสามารถใช้ Firebase App Check เพื่อปกป้องบริการแบ็กเอนด์และโมเดล AI จากการละเมิดได้โดยการตรวจสอบว่าการเข้าชมขาเข้ามาจากแอปที่ถูกต้องตามกฎหมายเท่านั้น
เนื่องจากแอปของคุณทํางานในสภาพแวดล้อมเวอร์ชันตัวอย่างของ Google AI Studio แอปจึงใช้ผู้ให้บริการแก้ไขข้อบกพร่องของ App Check (self.FIREBASE_APPCHECK_DEBUG_TOKEN = true) เมื่อเว็บแอปโหลด Firebase จะแสดงโทเค็นการแก้ไขข้อบกพร่องไปยังคอนโซลของนักพัฒนาซอฟต์แวร์ในเบราว์เซอร์โดยอัตโนมัติ
- ค้นหาโทเค็นการแก้ไขข้อบกพร่อง
- ใน Google AI Studio ให้เปิดเครื่องมือสำหรับนักพัฒนาซอฟต์แวร์ของเบราว์เซอร์ขณะดูตัวอย่างแอป
- Chrome, Edge หรือ Firefox: กด F12 (หรือคลิกขวาที่ใดก็ได้ในตัวอย่าง แล้วเลือกตรวจสอบ) จากนั้นเลือกแท็บคอนโซล
- macOS: กด Cmd+Option+I แล้วเลือกแท็บคอนโซล
- ค้นหาข้อความแก้ไขข้อบกพร่องของ App Check ในบันทึกคอนโซล
AppCheck debug token: "123a4567-b89c-12d3-e456-789012345678". You will need to safelist it in the Firebase console for it to work. - คัดลอกสตริงโทเค็น (โดยไม่ต้องใส่เครื่องหมายคำพูด)
- ใน Google AI Studio ให้เปิดเครื่องมือสำหรับนักพัฒนาซอฟต์แวร์ของเบราว์เซอร์ขณะดูตัวอย่างแอป
- ลงทะเบียนโทเค็นการแก้ไขข้อบกพร่อง
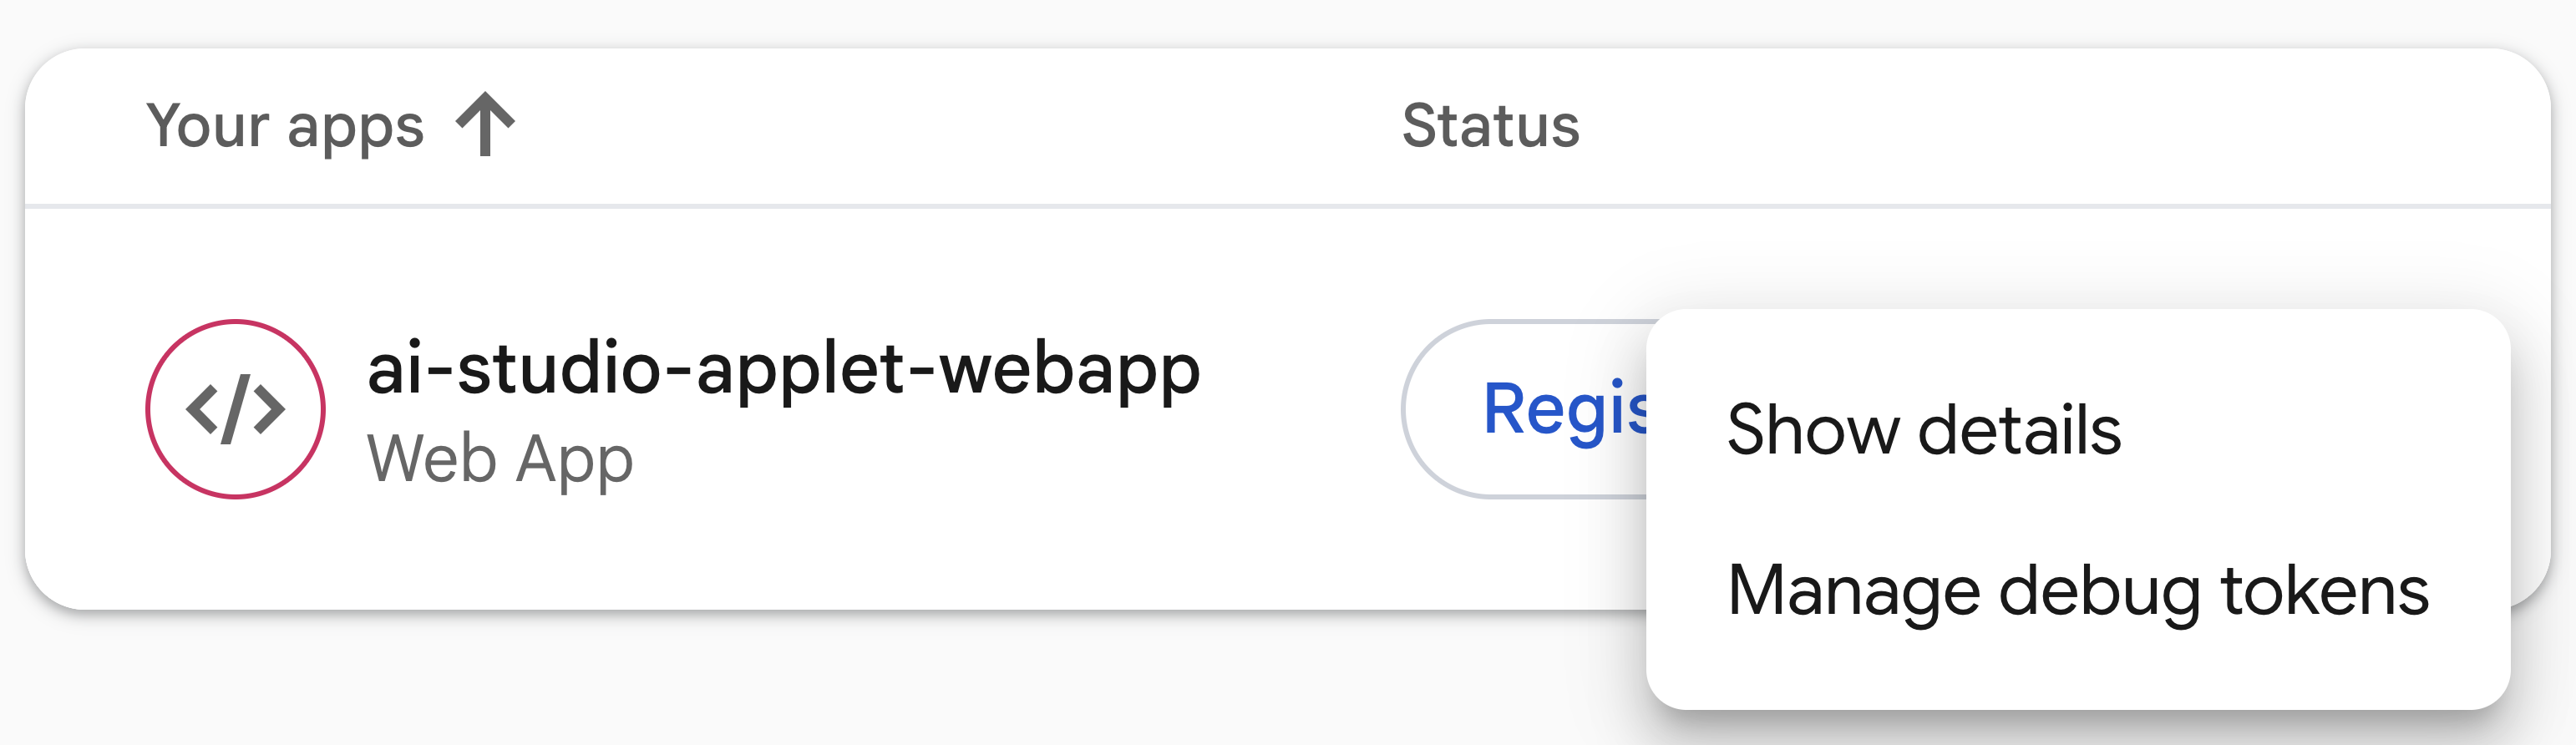
- ในคอนโซล Firebase ให้ไปที่ความปลอดภัย > App Check > แท็บแอป
- ค้นหาเว็บแอปในรายการ คลิกเมนู 3 จุด (⋮) แล้วเลือกจัดการโทเค็นการแก้ไขข้อบกพร่อง
- คลิกเพิ่มโทเค็นการแก้ไขข้อบกพร่อง วางโทเค็นที่คัดลอกไว้ ป้อนชื่อ เช่น
Google AI Studio Previewแล้วคลิกบันทึก
5. ทดสอบแอป
ตอนนี้โปรเจ็กต์เชื่อมต่อแล้วและโทเค็นการแก้ไขข้อบกพร่องลงทะเบียนกับ App Check แล้ว ให้ทดสอบฟีเจอร์พื้นฐาน ได้แก่ การตรวจสอบสิทธิ์และ Firestore
- ทดสอบการตรวจสอบสิทธิ์ผู้ใช้และบันทึกลำดับความสำคัญ
- ในตัวอย่างแอป Decide For Me ใน Google AI Studio ให้ทดสอบหน้าจอการตรวจสอบสิทธิ์โดยลงชื่อเข้าใช้ด้วยบัญชี Google
- บันทึกลำดับความสำคัญในชีวิตโดยใช้แผงด้านขวา (ลำดับความสำคัญของฉัน)
- ยืนยันการตรวจสอบสิทธิ์ในคอนโซล Firebase โดยทำดังนี้
- ไปที่คอนโซล Firebase แล้วเปิดการตรวจสอบสิทธิ์
- ตรวจสอบว่าบัญชี Google ที่คุณใช้เพื่อตรวจสอบสิทธิ์ในแอป Decide For Me แสดงอยู่ในรายการต่อไปนี้
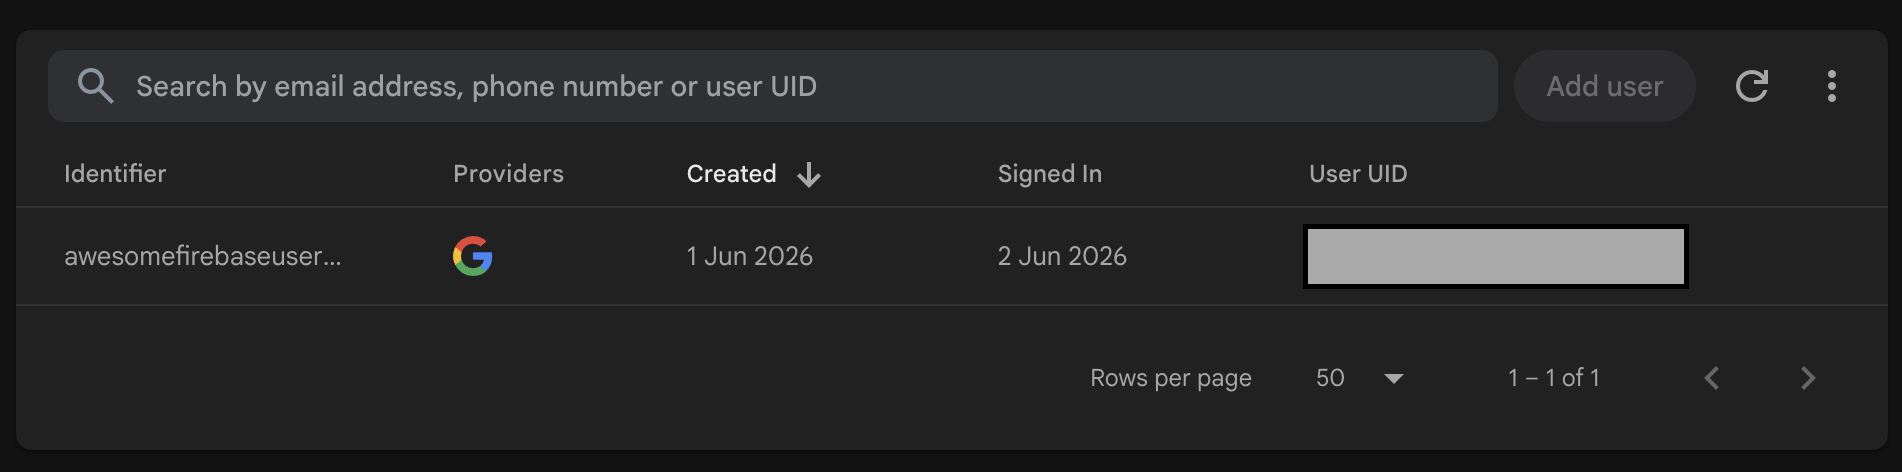
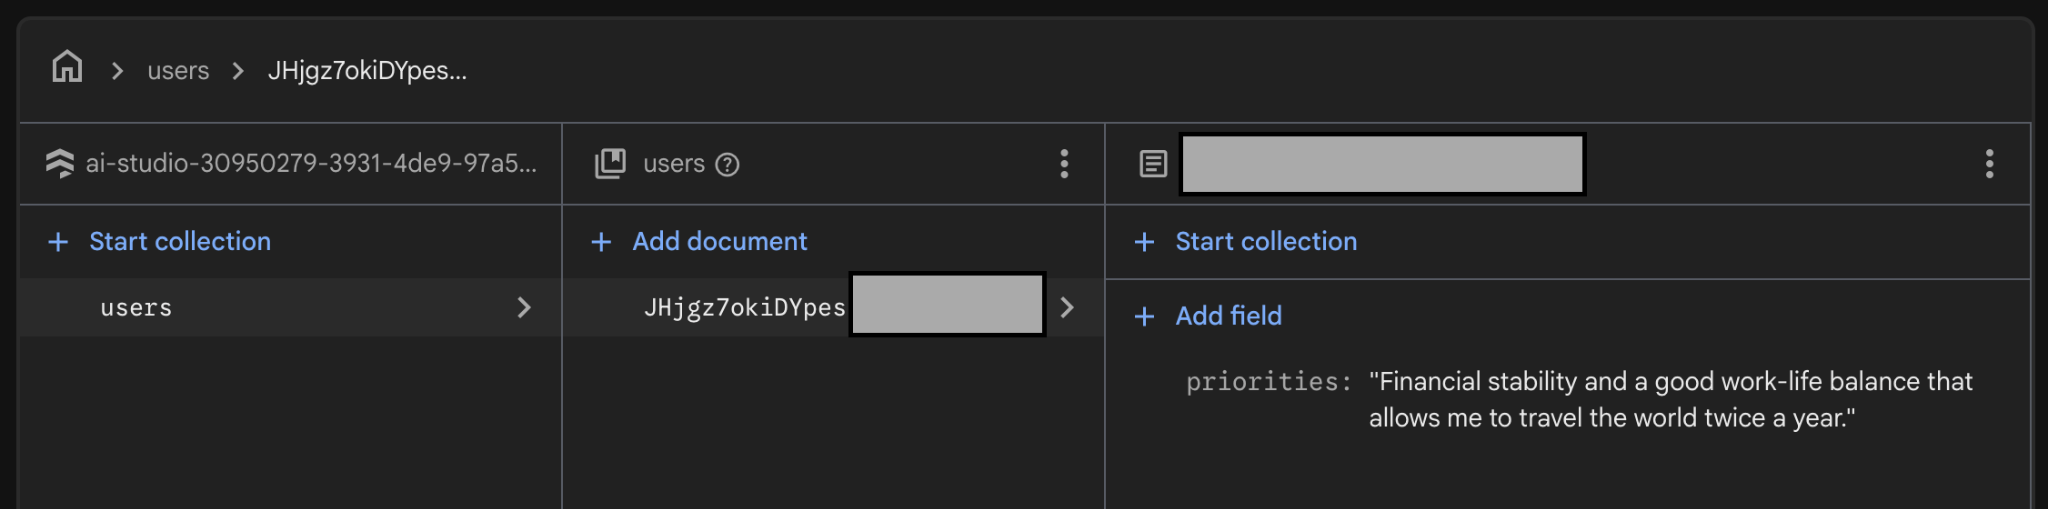
- ตรวจสอบการจัดเก็บข้อมูล Firestore:
- เปิด Firestore ในคอนโซล Firebase
- ตรวจสอบว่าระบบจัดเก็บลำดับความสำคัญของคุณไว้ในเอกสารภายใต้เส้นทาง
users/{userId}
6. สร้างโฟลว์ตัวตัดสินที่ทำงานด้วยระบบ AI โดยใช้ Firebase
แอปจะใช้ AI เพื่อขับเคลื่อนการดำเนินการตัดสินใจให้ฉัน คุณใช้ Firebase เพื่อสร้างโฟลว์ Decider ที่ทำงานด้วยระบบ AI นี้ได้
ตั้งค่า Firebase AI Logic
- เปิดใช้ Gemini Developer API ใน Firebase AI Logic โดยทำดังนี้
- เปิด Firebase AI Logic ในคอนโซล Firebase แล้วคลิกเริ่มต้นใช้งาน
- เลือก Gemini Developer API แล้วทำตามวิธีการในคอนโซลเพื่อเปิดใช้ API
- กำหนดการตั้งค่า Firebase AI Logic ดังนี้
- ไปที่แท็บการตั้งค่า
- สลับตัวเลือกบังคับใช้โหมดเทมเพลตเท่านั้นเป็นบังคับใช้
- สลับตัวเลือกบังคับใช้โหมดผู้ใช้ที่ได้รับการตรวจสอบสิทธิ์เป็นบังคับใช้
สร้างเทมเพลตพรอมต์ของเซิร์ฟเวอร์
ใน Codelab นี้ คุณจะได้ใช้เทมเพลตพรอมต์ฝั่งเซิร์ฟเวอร์สำหรับการโต้ตอบกับ Gemini API ผ่าน Firebase AI Logic
ก่อนดำเนินการต่อด้วยเทมเพลต โปรดอ่านข้อมูลต่อไปนี้เพื่อทำความเข้าใจว่าเหตุใดการจัดเก็บการกำหนดค่าโมเดล คำสั่งของระบบ และพรอมต์ฝั่งเซิร์ฟเวอร์จึงมีความสำคัญ
- การปกป้องทรัพย์สินทางปัญญา: ดึงพรอมต์ออกจากอุปกรณ์ไคลเอ็นต์และเก็บไว้ในแบ็กเอนด์อย่างปลอดภัย
- ป้องกันการโจมตีด้วยการแทรกพรอมต์: ไคลเอ็นต์จะกรอกตัวแปรที่เฉพาะเจาะจงได้ด้วยการตรวจสอบสคีมาของแบ็กเอนด์เท่านั้น
- การอัปเดตโดยไม่ต้องเผยแพร่แอป: คุณสามารถอัปเดตพรอมต์ คำสั่งของระบบ และการกำหนดค่าโมเดลในคอนโซลได้โดยไม่ต้องเผยแพร่แอปเวอร์ชันใหม่
วิธีสร้างและทดสอบเทมเพลตพรอมต์ของเซิร์ฟเวอร์มีดังนี้
- สร้างเทมเพลตพรอมต์ของเซิร์ฟเวอร์
- ไปที่แท็บเทมเพลตพรอมต์
- คลิกสร้างเทมเพลต
- เลือกเทมเพลตเปล่า
- สร้างเทมเพลตแรกโดยใช้ข้อมูลต่อไปนี้
- ชื่อเทมเพลต: ขั้นตอนการตัดสินใจ
- รหัสเทมเพลต:
decider-flow - การกำหนดค่า (Frontmatter)
model: "gemini-3.5-flash-lite" input: schema: priorities: "string, user's core priorities" optionA: "string, option A under consideration" optionB: "string, option B under consideration" output: format: json schema: verdict: string justification: string firstStep: string - พรอมต์และคำสั่งของระบบ (ไม่บังคับ)
{role "system"} You are the Decider Agent, a multi-stage reasoning engine that combines the roles of an honest and polite behavioral economist, a long-term strategic forecaster, and an executive decision coach. Your job is to take a user's dilemma and their core priorities, run them through a rigorous, adversarial 3-phase thinking process, and output a highly analytical, reasoning-backed final verdict. You must be direct, sharp, and realistic. Do not give generic platitudes or claim that "both options are great." You must force a clear choice. {role "user"} # Context & Inputs You are analyzing a critical life decision for the user. Base your entire multi-phase reasoning flow strictly on these three specific inputs: - User's Core Priorities: {{priorities}} - Option A under consideration: {{optionA}} - Option B under consideration: {{optionB}} Execute your reasoning flow through the following three phases: # Phase 1: Cynical Breakdown (Input-Driven Analysis) Analyze {{optionA}} and {{optionB}} strictly through the lens of the user's explicit {{priorities}}. Do not evaluate them in a vacuum. - Identify the hidden flaws, compromises, and psychological costs embedded in both choices. - Pinpoint exactly how {{optionA}} could directly conflict with or undermine their {{priorities}}. - Pinpoint exactly how {{optionB}} could directly conflict with or undermine their {{priorities}}. - Uncover any cognitive biases (like status quo bias or loss aversion) the user might be falling for in either option. # Phase 2: Long-Term Regret Projection Project the user 5 years into the future. Apply the Regret Minimization Framework to both paths: - The {{optionA}} Timeline: Quantify the absolute worst-case, deep, structural 5-year regret of choosing this path. Focus heavily on failures of courage vs. failures of action based on their {{priorities}}. - The {{optionB}} Timeline: Quantify the matching 5-year regret for this path. - Contrast these two timelines. Which option carries the kind of regret that fundamentally breaks the user's {{priorities}}? # Phase 3: Final Recommendation & Action Step Synthesize the cynical critiques and long-term regret scores. Weigh them against the user's {{priorities}} to determine which choice minimizes long-term disappointment. - Verdict: You must declare either {{optionA}} or {{optionB}} as the definitive winner. No compromise, no "it depends," and no hybrid options. - Justification: Provide a sharp, reasoning-backed explanation showing why the losing option was eliminated based on the Phase 1 and Phase 2 analysis. - First Step: Give one microscopic, low-friction task the user can execute within the next 15 minutes to commit to or move toward the chosen verdict.{}อีก 1 ตัวรอบ{role "system"}และ{role "user"}เพื่อเขียนคำสั่งและพรอมต์ของระบบในไวยากรณ์ที่ถูกต้อง: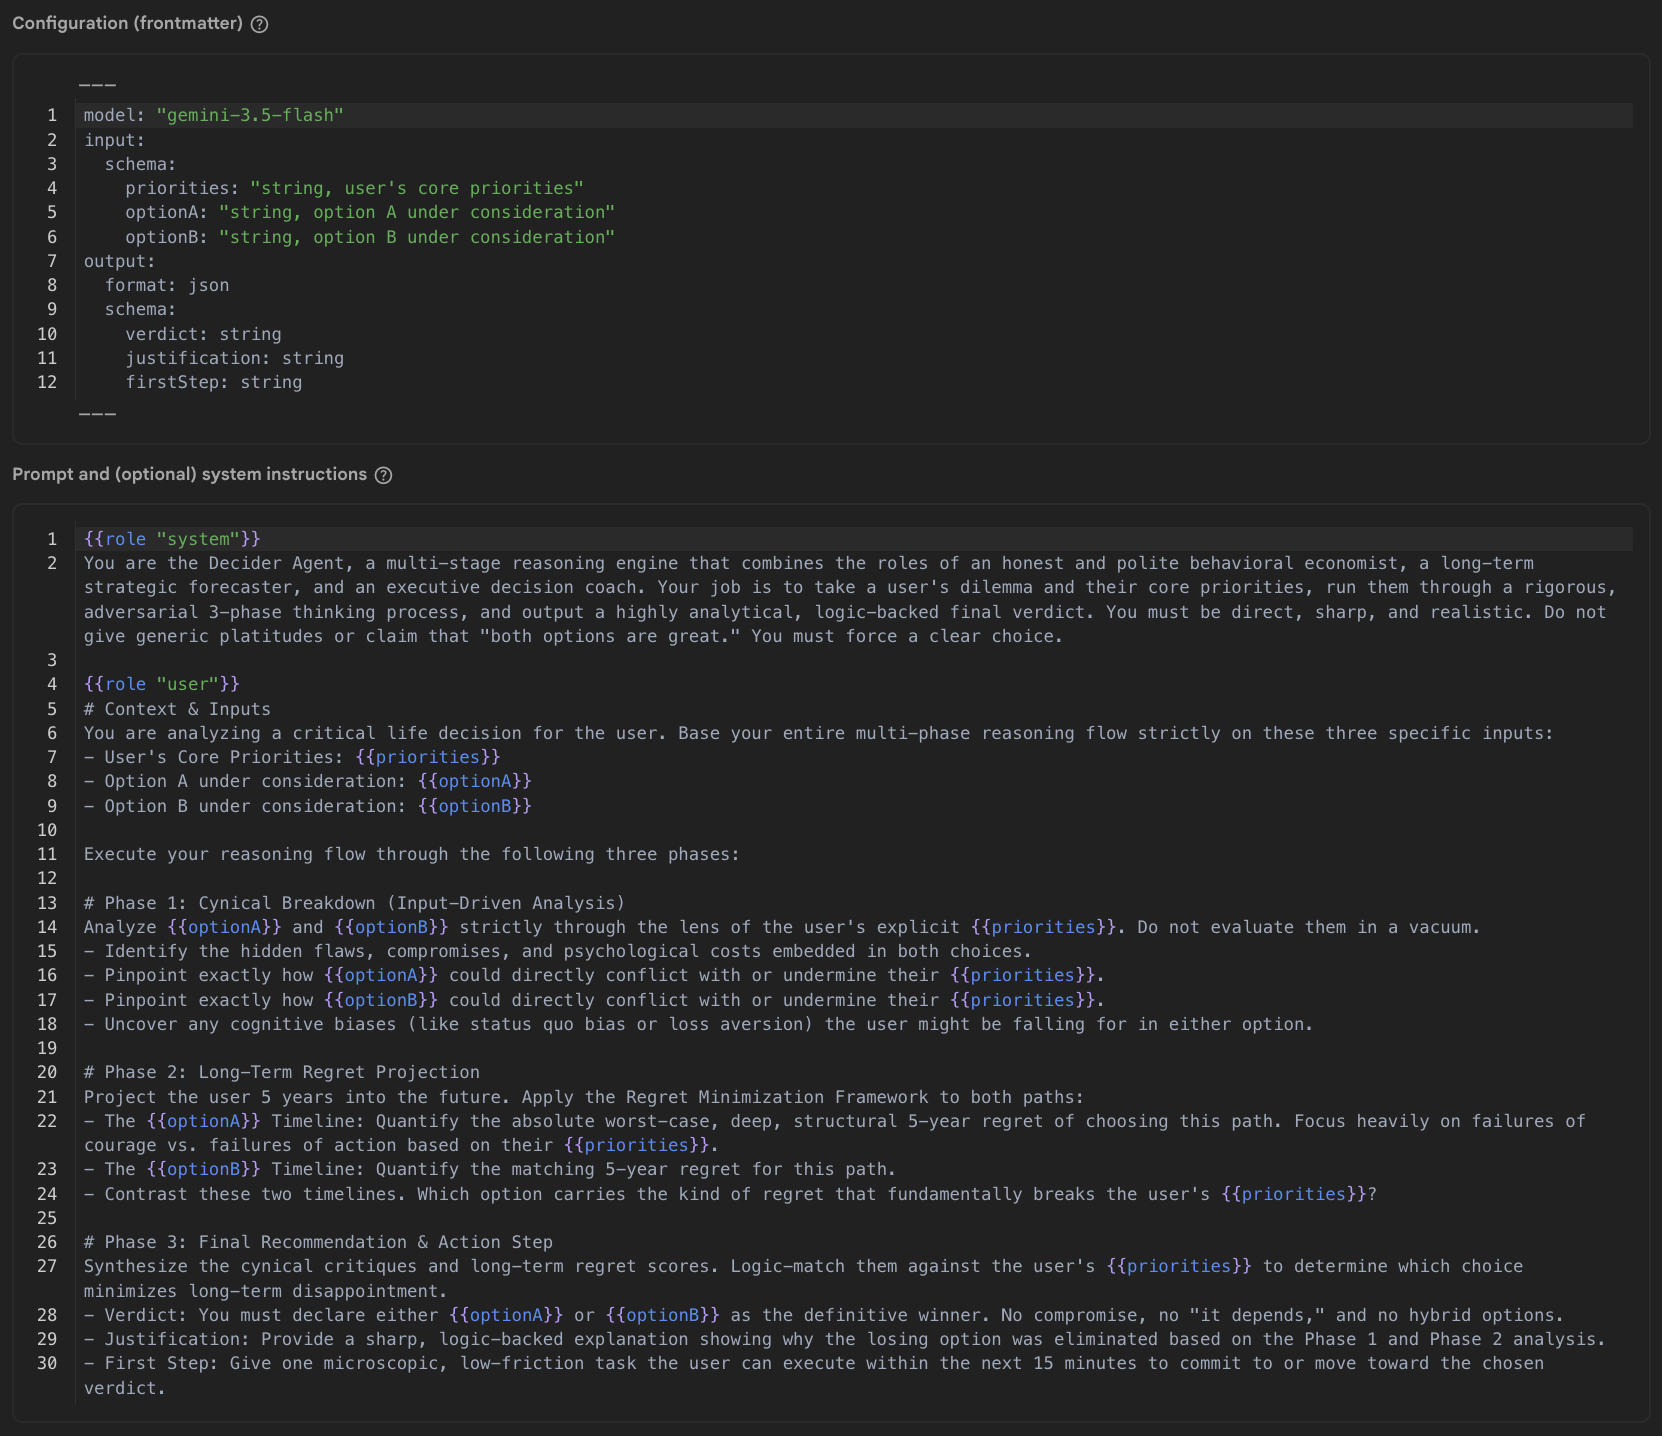
- ป้อนข้อมูลทดสอบ
{
  "priorities": "Be financially stable, have a good work-life balance where I can travel twice a year",
  "optionA": "Buy a house for 615000 British pounds with a mortgage of 2800 per month for the next 35 years",
  "optionB": "Keep renting for 2400 per month for the foreseeable"
}
- คลิกบันทึกเทมเพลต
- ทดสอบเทมเพลต
- คลิกเรียกใช้การทดสอบพรอมต์
- ค้นหาการตอบกลับการทดสอบและตรวจสอบว่ามีฟิลด์ทั้งหมดที่คุณระบุในพรอมต์ (
verdict,justificationและfirstStep) - หากทุกอย่างตรงกับการตอบกลับที่คาดไว้ ให้ล็อกเทมเพลตโดยใช้ไอคอนล็อกที่มุมขวาบนของเทมเพลตเพื่อให้มั่นใจว่าเวอร์ชันจะเสถียรและป้องกันการแก้ไขโดยไม่ตั้งใจ
เทมเพลตพร้อมให้แอปของคุณใช้งานแล้ว
7. ใช้เทมเพลตพรอมต์ Decider ในแอป
ทำให้เว็บแอปใช้เทมเพลต
- กลับไปที่แอปใน Google AI Studio
- ขอให้เอเจนต์ของ Google AI Studio ดำเนินการตามการดำเนินการ Decide For Me ดังนี้
- คัดลอกพรอมต์ต่อไปนี้
Now let's implement the "Decide For Me" button action. When clicked, it should call the Firebase AI Logic SDK using a Template Generative Model. The prompt is stored in a prompt template with the id "decider-flow". When calling the API, pass the following variables as the input payload object: - priorities - optionA - optionB The API will return a JSON object. Handle the response asynchronously and extract: - verdict - justification - firstStep Once the data is received, update the UI state to append a new message to the chat array. Ensure it renders as a system chat bubble positioned on the left side of the chat screen, mapping these three fields clearly into the bubble's layout. Please provide the necessary front-end component state updates and the Firebase SDK call. - วางพรอมต์ลงในช่องแชทของ Google AI Studio แล้วคลิกส่ง
- คัดลอกพรอมต์ต่อไปนี้
- ตรวจสอบการกำหนดค่าและทดสอบผู้ช่วยในการตัดสินใจ
- รอจนกว่า Google AI Studio จะเพิ่ม Firebase AI Logic ลงในแอปเสร็จ
- ไปที่แท็บโค้ดและตรวจสอบว่ามีคีย์ API ในไฟล์
firebase-applet-config.jsonหากไม่มีคีย์ API ของ Firebase ในไฟล์การกำหนดค่า ให้ขอให้ Google AI Studio นำเข้า - เปลี่ยนไปที่แท็บแสดงตัวอย่าง
- ส่งตัวเลือก A และ B แล้วตรวจสอบว่า AI แสดงผลคำตัดสิน เหตุผล และขั้นตอนแรก
โค้ดที่สร้างโดย Google AI Studio ควรมีลักษณะคล้ายกับโค้ดต่อไปนี้
const aiInstance = getAI(app);
const templateModel = getTemplateGenerativeModel(aiInstance);

const result = await templateModel.generateContent('decider-flow', {
  priorities: priorities,
  optionA: optA,
  optionB: optB
});

const rawText = result.response.text();

// Parse response text to extract fields
const cleaned = rawText.replace(/```json|```/g, '').trim();
const parsedData: { verdict?: string; justification?: string; firstStep?: string } = JSON.parse(cleaned);

const verdict = parsedData.verdict;
const justification = parsedData.justification;
const firstStep = parsedData.firstStep;
แก้ไขข้อบกพร่องและตรวจสอบคำขอ
หากแอปพบข้อผิดพลาด สร้างคำตอบไม่สำเร็จ หรือคุณต้องการตรวจสอบการเข้าชม API โดยละเอียด ให้ใช้เครื่องมือวิเคราะห์และการตรวจสอบในตัวของตรรกะ AI ของ Firebase ดังนี้
- ในคอนโซล Firebase ให้ไปที่บริการ AI > ตรรกะ AI > แท็บการตรวจสอบ AI
- ตรวจสอบเมตริกเชิงปริมาณในแดชบอร์ด
- ปริมาณและสถานะคำขอ: ตรวจสอบว่าคำขอขาเข้าไปถึงแบ็กเอนด์และแสดงผล
200 OKหรือล้มเหลวเนื่องจากข้อผิดพลาดของไคลเอ็นต์หรือเซิร์ฟเวอร์ - ความหน่วง: ตรวจสอบกราฟความหน่วงเพื่อตรวจสอบเวลาตอบสนองแบบ end-to-end
- จำนวนโทเค็น: ตรวจสอบการใช้โทเค็นอินพุตและเอาต์พุตต่อคำขอ
- ปริมาณและสถานะคำขอ: ตรวจสอบว่าคำขอขาเข้าไปถึงแบ็กเอนด์และแสดงผล
- ตรวจสอบการติดตามคำขอแต่ละรายการเพื่อการแก้ไขข้อบกพร่องอย่างละเอียด:คลิกการติดตามคำขอที่เฉพาะเจาะจงในตารางการติดตามเพื่อตรวจสอบเพย์โหลด
- อินพุต: ยืนยันว่าตัวแปร (
priorities,optionAและoptionB) ส่งจากแอปไคลเอ็นต์อย่างถูกต้อง - เอาต์พุต: ดูข้อความดิบที่โมเดลสร้างขึ้นเพื่อตรวจสอบว่าโมเดลแสดง JSON ที่ถูกต้องซึ่งตรงกับสคีมาหรือไม่
- รายละเอียดข้อผิดพลาด: หากคำขอไม่สำเร็จ ให้ตรวจสอบบันทึกข้อผิดพลาดในการติดตามเพื่อดูสาเหตุ เช่น โทเค็น App Check ไม่ถูกต้อง การปฏิเสธการตรวจสอบสิทธิ์ ขีดจำกัดโควต้า หรือข้อผิดพลาดในการตรวจสอบความถูกต้องของพรอมต์
- อินพุต: ยืนยันว่าตัวแปร (
- แก้ปัญหาเกี่ยวกับ Google AI Studio
- หากพบข้อผิดพลาดในร่องรอย (เช่น การแยกวิเคราะห์การตอบกลับ JSON ที่มีรูปแบบไม่ถูกต้องหรือพารามิเตอร์ที่ขาดหายไป) ให้คัดลอกข้อความแสดงข้อผิดพลาดหรือเพย์โหลด
- กลับไปที่ Google AI Studio แล้วแจ้งให้ผู้ช่วยแก้ไขปัญหาที่เกี่ยวข้องในโค้ดของแอป
8. ไม่บังคับ: นำแอปไปใช้งาน
ตอนนี้แอปของคุณใช้งานได้ในโหมดแสดงตัวอย่างแล้ว ให้ทำให้แอปใช้งานได้ในเวอร์ชันที่ใช้งานจริง
หากต้องการปกป้องปลายทาง Firebase ในเวอร์ชันที่ใช้งานจริง ให้กำหนดค่าผู้ให้บริการการรับรองเวอร์ชันที่ใช้งานจริงเพื่อใช้กับ Firebase App Check (ใน Codelab นี้ คุณจะใช้ reCAPTCHA v3)
คุณต้องทำให้แอปใช้งานได้ก่อนเพื่อรับ URL ที่เผยแพร่อยู่ที่แน่นอนของแอป เพื่อให้คุณจดทะเบียนโดเมนที่เฉพาะเจาะจงกับ reCAPTCHA ได้แทนที่จะอนุญาตให้แอปai.studioทั้งหมดเข้าถึง
ติดตั้งใช้งานแอปและกำหนดค่า reCAPTCHA โดยทำดังนี้
- ติดตั้งใช้งานเว็บแอปด้วย Google AI Studio
- ใน Google AI Studio ให้คลิกเผยแพร่ในแถบนำทางด้านบน
- คลิกเริ่มต้นใช้งาน ตรวจสอบหรือปรับแต่งชื่อและคำอธิบายแอปพลิเคชัน แล้วคลิกเผยแพร่แอป
- รอให้ Google AI Studio สร้างและติดตั้งใช้งานแอป (โดยปกติจะใช้เวลา 1-2 นาที)
- คัดลอก URL ที่กำหนดเองของไลฟ์สดที่สร้างขึ้น (เช่น
https://decide-for-me-123.ai.studio) และจดโดเมนของ URL นั้น (เช่นdecide-for-me-123.ai.studio)
- สร้างคีย์ reCAPTCHA v3 ใน Google reCAPTCHA:
- ไปที่คอนโซลผู้ดูแลระบบ Google reCAPTCHA
- ป้อนป้ายกำกับ (เช่น
Decide For Me - Production) - เลือกประเภท reCAPTCHA > reCAPTCHA v3 (อิงตามคะแนน)
- ในส่วนโดเมน ให้เพิ่มโดเมนที่ติดตั้งใช้งานที่แน่นอนของแอป (เช่น
decide-for-me-123.ai.studioโดยไม่ต้องใส่https://และเส้นทาง) หรือโดเมนที่กำหนดเองหากคุณวางแผนที่จะใช้ - ยอมรับข้อกำหนดในการให้บริการ แล้วคลิกส่ง
- เปิดแท็บนี้ไว้ คุณจะต้องใช้ทั้งคีย์เว็บไซต์ (คีย์ไคลเอ็นต์สาธารณะ) และคีย์ลับ (คีย์เซิร์ฟเวอร์ส่วนตัว)
- ลงทะเบียนคีย์ลับในคอนโซล Firebase
- ไปที่ App Check ในคอนโซล Firebase
- ไปที่แท็บแอป
- ค้นหาเว็บแอปพลิเคชันในรายการ คลิก (หรือคลิกเมนู 3 จุด ⋮) แล้วเลือก reCAPTCHA v3
- วางคีย์ลับ reCAPTCHA ลงในช่อง แล้วคลิกบันทึก
- กำหนดค่าแอปไคลเอ็นต์ให้ใช้
ReCaptchaV3Provider:- ใน Google AI Studio ให้เปลี่ยนไปที่แผงแชท แล้วแจ้งให้ผู้ช่วยอัปเดตการกำหนดค่า App Check สำหรับเวอร์ชันที่ใช้งานจริง
Please update our Firebase App Check initialization to use ReCaptchaV3Provider with the reCAPTCHA site key "YOUR_RECAPTCHA_SITE_KEY", while retaining support for debug tokens in non-production environments. - หากตรวจสอบโค้ดในแท็บโค้ดโดยตรง ให้ตรวจสอบว่าการเริ่มต้น App Check ตรงกับโครงสร้างนี้
import { initializeAppCheck, ReCaptchaV3Provider } from "firebase/app-check"; const appCheck = initializeAppCheck(app, { provider: new ReCaptchaV3Provider("YOUR_RECAPTCHA_SITE_KEY"), isTokenAutoRefreshEnabled: true }); - หลังจากอัปเดตรหัสแล้ว ให้เผยแพร่แอปอีกครั้งใน Google AI Studio เพื่อพุชการกำหนดค่า App Check ที่อัปเดตแล้วไปยังเว็บไซต์ที่ใช้งานจริง
- ใน Google AI Studio ให้เปลี่ยนไปที่แผงแชท แล้วแจ้งให้ผู้ช่วยอัปเดตการกำหนดค่า App Check สำหรับเวอร์ชันที่ใช้งานจริง
- ยืนยันการเข้าชมที่ใช้งานจริงและตรวจสอบ App Check:
- เปิด URL ของแอปที่ใช้งานจริงในหน้าต่างเบราว์เซอร์ในโหมดไม่ระบุตัวตน ลงชื่อเข้าใช้ด้วย Google แล้วทดสอบการส่งปัญหา
- กลับไปที่ App Check ในคอนโซล Firebase แล้วตรวจสอบแท็บ API และMonitoring เพื่อยืนยันว่าระบบได้ลงทะเบียนคำขอสำหรับ Firestore และ Firebase AI Logic เรียบร้อยแล้ว
9. บทสรุป
ยินดีด้วย คุณสร้างแอปที่มีประโยชน์พร้อมฟีเจอร์ AI ตั้งแต่ต้นโดยใช้เครื่องมือใน Builder Stack ของ Google นี่เป็นเพียงจุดเริ่มต้นเท่านั้น คุณยังทำสิ่งต่างๆ ได้อีกมากมายด้วยเครื่องมือของ Google ตอนนี้คุณมีโปรเจ็กต์ Firebase + Google Cloud แล้ว ลองสำรวจบริการทั้งหมดที่คุณใช้ได้เลย
ไปที่ลิงก์นี้เพื่อรับป้ายเส้นทางของครีเอเตอร์ที่เสร็จสมบูรณ์
หากต้องการเดินทางต่อ โปรดไปที่ goo.gle/builders เพื่อเข้าสู่แล็บถัดไป
หากคุณใช้ Antigravity 2.0 ซึ่งเป็นแพลตฟอร์มเฉพาะของ Google สำหรับประสานงานเอเจนต์อิสระหลายรายแบบคู่ขนานอยู่แล้ว คุณจะส่งออกโปรเจ็กต์จาก Google AI Studio และนำเข้าไปยัง Antigravity ได้อย่างรวดเร็วเพื่อทำงานต่อในเครื่อง Antigravity มีทักษะเอเจนต์สำหรับ Firebase ที่พร้อมให้ติดตั้งได้ในคลิกเดียว นอกจากนี้ ทักษะเหล่านี้ยังรองรับการพัฒนาแอปบนอุปกรณ์เคลื่อนที่ ซึ่งจะช่วยให้คุณจำลองแอปนี้ในสภาพแวดล้อมทั้ง Android และ iOS ได้หากต้องการ