

1. 准备工作
软件开发不断发展。最成功的开发者不仅会编写代码,还会编排 AI 工具和智能体,以便更快、更好地构建应用。Google 的工具生态系统提供了一套全面的工具,涵盖整个生命周期:界面生成、应用原型设计和部署、AI 功能开发,以及安全、可扩缩的后端集成。在此 Codelab 中,您将使用 Google Stitch 设计界面,使用 Google AI Studio 进行氛围编程和部署应用,并使用 Firebase 开发 AI 功能,以及在安全、可扩缩的后端中存储信息。
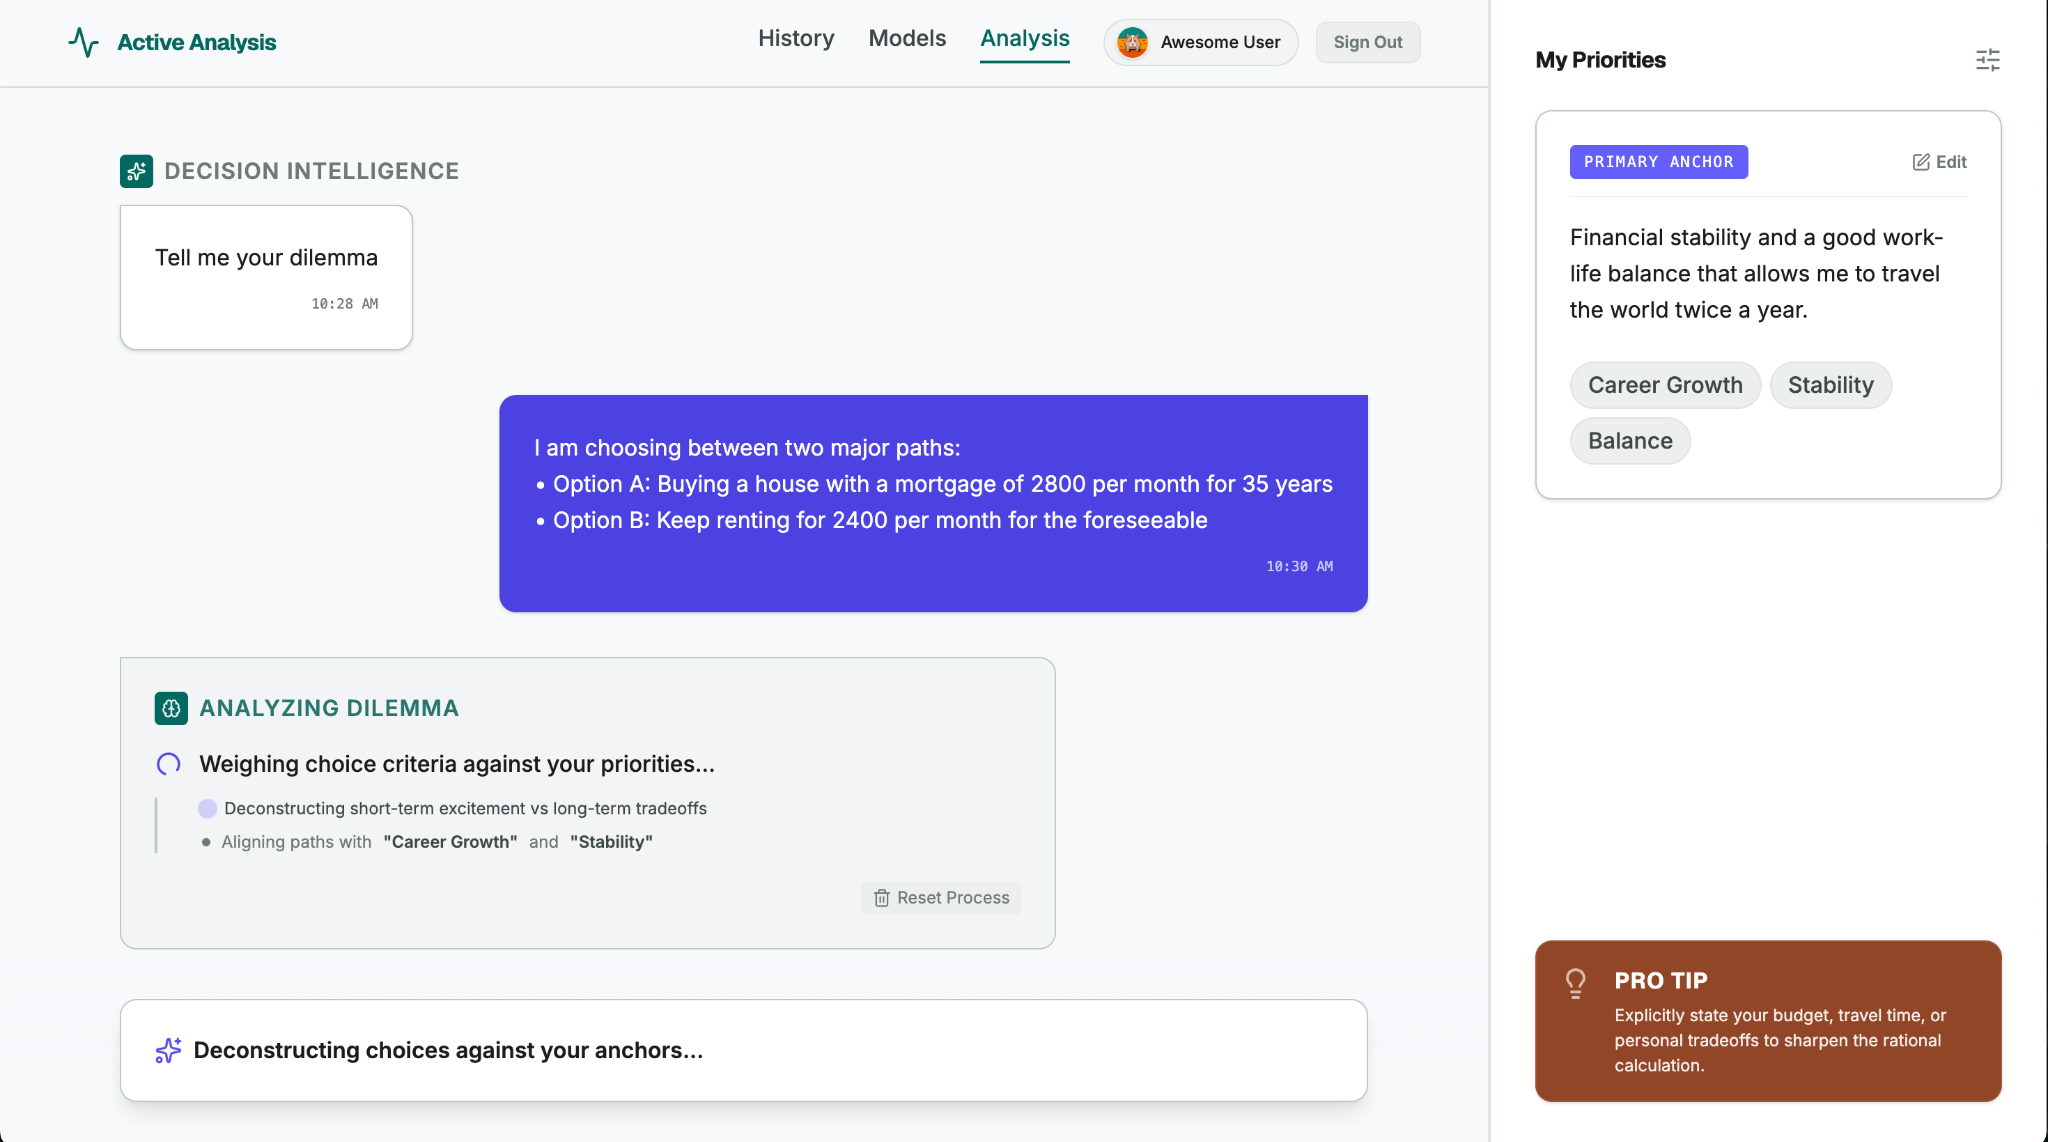
您将在此 Codelab 中构建的应用名为 Decide For Me,它是一款决策助手,可帮助面临人生选择(例如搬家、换工作或选择爱好)时犹豫不决的人做出决定。用户输入困境和人生优先事项,应用会使用 AI 帮助用户做出决定,以最大限度地减少长期失望。该应用还会为用户提供具体的初步行动方案。应用的最终版本应与以下内容类似:
学习内容
- 使用 Google Stitch 设计界面。
- 使用 Google AI Studio 进行 Web 应用氛围编程。
- 使用 Firebase 开发 AI 功能并在云端存储信息。
- 使用 Google AI Studio(由 Cloud Run 提供支持)将 Web 应用部署到生产环境。
2. 使用 Stitch 设计界面
- 下载视觉稿图片 (
DecideForMeScreen.jpeg)。将其保存到本地文件夹,以便找到它。 - 前往 Stitch,找到输入字段,然后选择 Web 选项。(在此 Codelab 中,您将专注于 Web 体验,但您也可以使用 Stitch 生成移动界面。)
- 上传视觉稿图片:
- 点击 + (添加按钮)。
- 选择上传文件 。
- 附加您在设置步骤中下载的图片 (
DecideForMeScreen.jpeg)。借助此手绘视觉稿,您可以测试 Stitch 的多模态功能。
- 复制以下提示并将其粘贴到输入字段中:
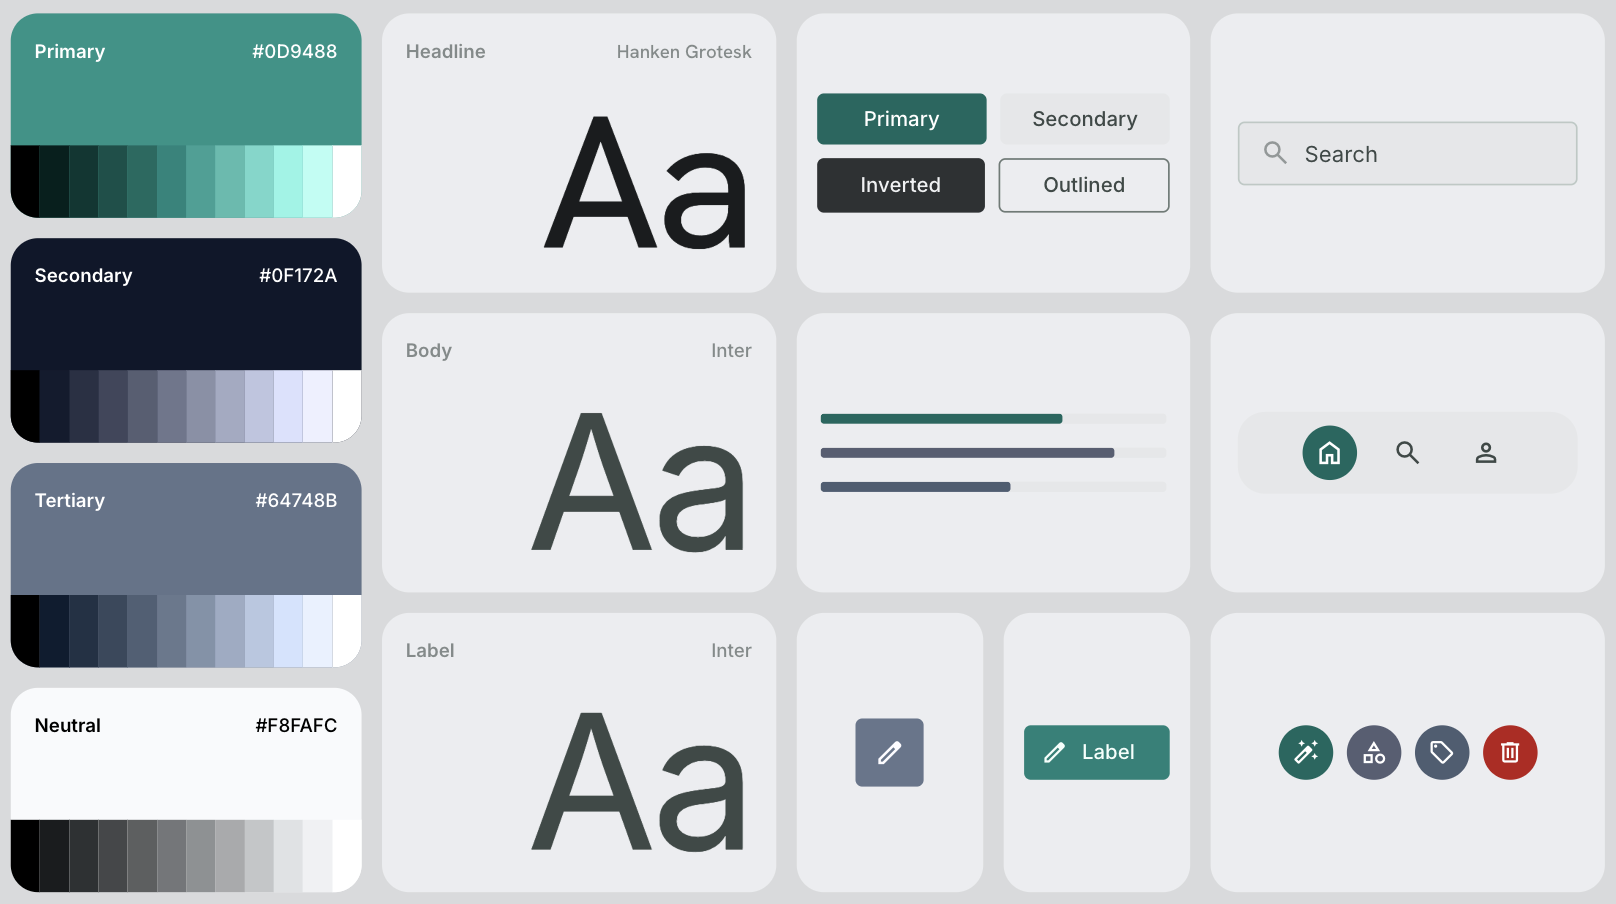
# General Guidance Create a modern, clean, and highly polished UI for a web application called "Decide For Me" - a hyper-rational decision assistant. CRITICAL: Replicate the exact layout, structure, and element placement shown in the hand-drawn mockup file DecideForMeScreen.jpeg. Do not add any extra menus, sidebars, buttons, or top/bottom navigation bars that are not explicitly drawn in the file. Stick strictly to the skeleton provided in the mockup. # Layout & Structure - Two-Column Split Screen: - Left Side (Main Chat Area): Takes up roughly 70-75% of the screen width. It should feel like a premium, focused workspace. - Right Side (Configuration Panel): A sidebar taking up 25-30% of the screen width with a distinct, subtle background color to separate it from the chat. # Right Panel: Configuration Screen - Header: Title it "My Priorities" with a clean, minimalist typography. - Content Card: A styled card containing a text box or paragraph area showcasing the user's priorities. - Interactions: Include a clear "Edit Priorities" button. When clicked, this area should visually toggle into an editable textarea or input field. # Left Panel: Chat & Dilemma Decision Screen - Chat History: A clean vertical flow of message bubbles. - The first message bubble must be aligned to the left (system message) and say: "Tell me your dilemma". Use a friendly, neutral background color for this bubble. - Bottom Input Area: Instead of a traditional single-line chat bar, create a unified, beautiful "Decision Submission" layout positioned at the bottom: - Dual Input Fields: Place two horizontal or cleanly stacked input fields. - Input 1 label: "Option A" - Input 2 label: "Option B" - Action Button: A prominent, styled "Go" action button to trigger the reasoning loop. # Theme & Aesthetic - Vibe: Hyper-rational, clean, trustworthy, and modern. Use a sophisticated color palette (e.g., deep slates, clean whites/grays, and a sharp accent color like a subtle indigo or teal for active states and buttons). - Spacing & Typography: Use generous whitespace, soft rounded corners (border-radius) for cards and buttons, and a highly legible sans-serif font. - 点击输入字段右下角的生成箭头。Stitch 会生成界面和整个设计系统,包括调色板、字体选项、图标和界面元素的一般感觉:
3. 使用 Google AI Studio 构建应用
- 将您在 Stitch 中构建的界面导出到 Google AI Studio:
- 点击 Stitch 中生成的设计。
- 点击界面右上角的导出 。
- 确认所选选项为 Google AI Studio 。
- 向下滚动到说明 字段。
- 复制以下提示并将其粘贴到说明 字段中:
# General Guidance Build the "Decide For Me" app: A hyper-rational decision assistant for chronically indecisive people facing life choices (moving apartments, changing careers, picking a hobby). The user enters a dilemma and their top priorities in life. The app will help with the decision. Follow the instructions below to build it: # UI Instructions Using the design artifacts exported from Stitch (the PNG image and HTML file), build a fully functional web application that accurately mirrors the design and layout. # App Architecture & Initialization Instructions - Initialize the Firebase JS SDK for client-side services. - Set up Firebase Authentication using the Google provider. If a user is not logged in, show a clean, minimalist sign-in state. If the user is logged in, take them directly to the dilemma decision screen. - Initialize Firebase App Check in debug mode (`self.FIREBASE_APPCHECK_DEBUG_TOKEN = true`) without a ReCaptchaV3Provider (we will add that later). # State & Database Management Instructions - User Priorities: - Once authenticated, pull the user's saved priorities from Firebase Firestore at the path: `users/{userId}`. Each document should contain one string field: 'priorities'. - Bind this data to the Right Panel ("My Priorities"). - When the user clicks the "Edit" button, toggle the view to a textarea, with a 'save' button. When saved, write the updated string back to `users/{userId}`. - Make sure to implement and deploy strong Security Rules for Firestore. # UI Stream Update & Display Instructions - Once the user submits option A and option B in the dilemma decision screen, display both options as a single message on the user side of the chat. Then, display a sleek loading state in the main chat panel. Leave the app in this "loading" state and do nothing else, we will process both options and build the server-side thinking later. - 点击 Build with Google AI Studio (使用 Google AI Studio 构建)。这会在新标签页中打开 Google AI Studio,并导入您的设计文件和提示:
- 确认提示已完全导入。
- 如果您只看到部分提示,请再次粘贴整个提示。
- 点击 Build (构建)。Google AI Studio 会根据您的提示和界面设计开始生成 Decide For Me 应用:
- 在生成过程中,它会建议替代界面设计(在此 Codelab 中忽略这些设计,但您将来可以选择不同的设计)。
- 当系统提示您启用 Firebase 时,请点击启用 。
- 检查并验证生成的应用:
- 在预览 标签页中测试应用。
- 切换到 Code (代码)标签页,查看所有生成的文件和代码。
- Google AI Studio 还创建了一个 Firebase 项目,启用了 Firebase Authentication 和 Firestore,并在您的代码库中配置了 Firebase。在此 Codelab 的下一步中,您将访问并使用此 Firebase 项目。
4. 注册 App Check 调试令牌
当 Google AI Studio 生成应用时,它会创建一个 Firebase 项目并将您的应用连接到该项目。您需要访问此 Firebase 项目,并向一项名为 Firebase App Check 的重要安全服务注册您的开发环境。
访问您的 Firebase 项目
- 找到 Google AI Studio 创建的 Firebase 项目的项目 ID:
- 切换到 Google AI Studio 中的 Code (代码)标签页。
- 打开
firebase-applet-config.json文件。 - 复制
projectId字段的值。
- 前往 Firebase 控制台,并使用此 ID 搜索项目。
注册调试令牌
您的应用可以使用 Firebase App Check 来保护后端服务和 AI 模型免遭滥用,方法是确保传入流量仅来自合法应用。
由于您的应用在 Google AI Studio 预览环境中运行,因此它使用 App Check 调试提供程序 (self.FIREBASE_APPCHECK_DEBUG_TOKEN = true)。当 Web 应用加载时,Firebase 会自动将调试令牌输出到浏览器的开发者控制台。
- 找到您的调试令牌:
- 在 Google AI Studio 中,查看应用预览时打开浏览器的开发者工具:
- Chrome、Edge 或 Firefox: 按 F12(或右键点击预览中的任意位置,然后选择检查 ),然后选择 Console (控制台)标签页。
- macOS: 按 Cmd+Option+I,然后选择 Console (控制台)标签页。
- 在控制台日志中,找到 App Check 调试消息:
AppCheck debug token: "123a4567-b89c-12d3-e456-789012345678". You will need to safelist it in the Firebase console for it to work. - 复制令牌字符串(不带引号)。
- 在 Google AI Studio 中,查看应用预览时打开浏览器的开发者工具:
- 注册调试令牌:
- 在 Firebase 控制台中,依次前往 Security (安全)> App Check > Apps (应用)标签页。
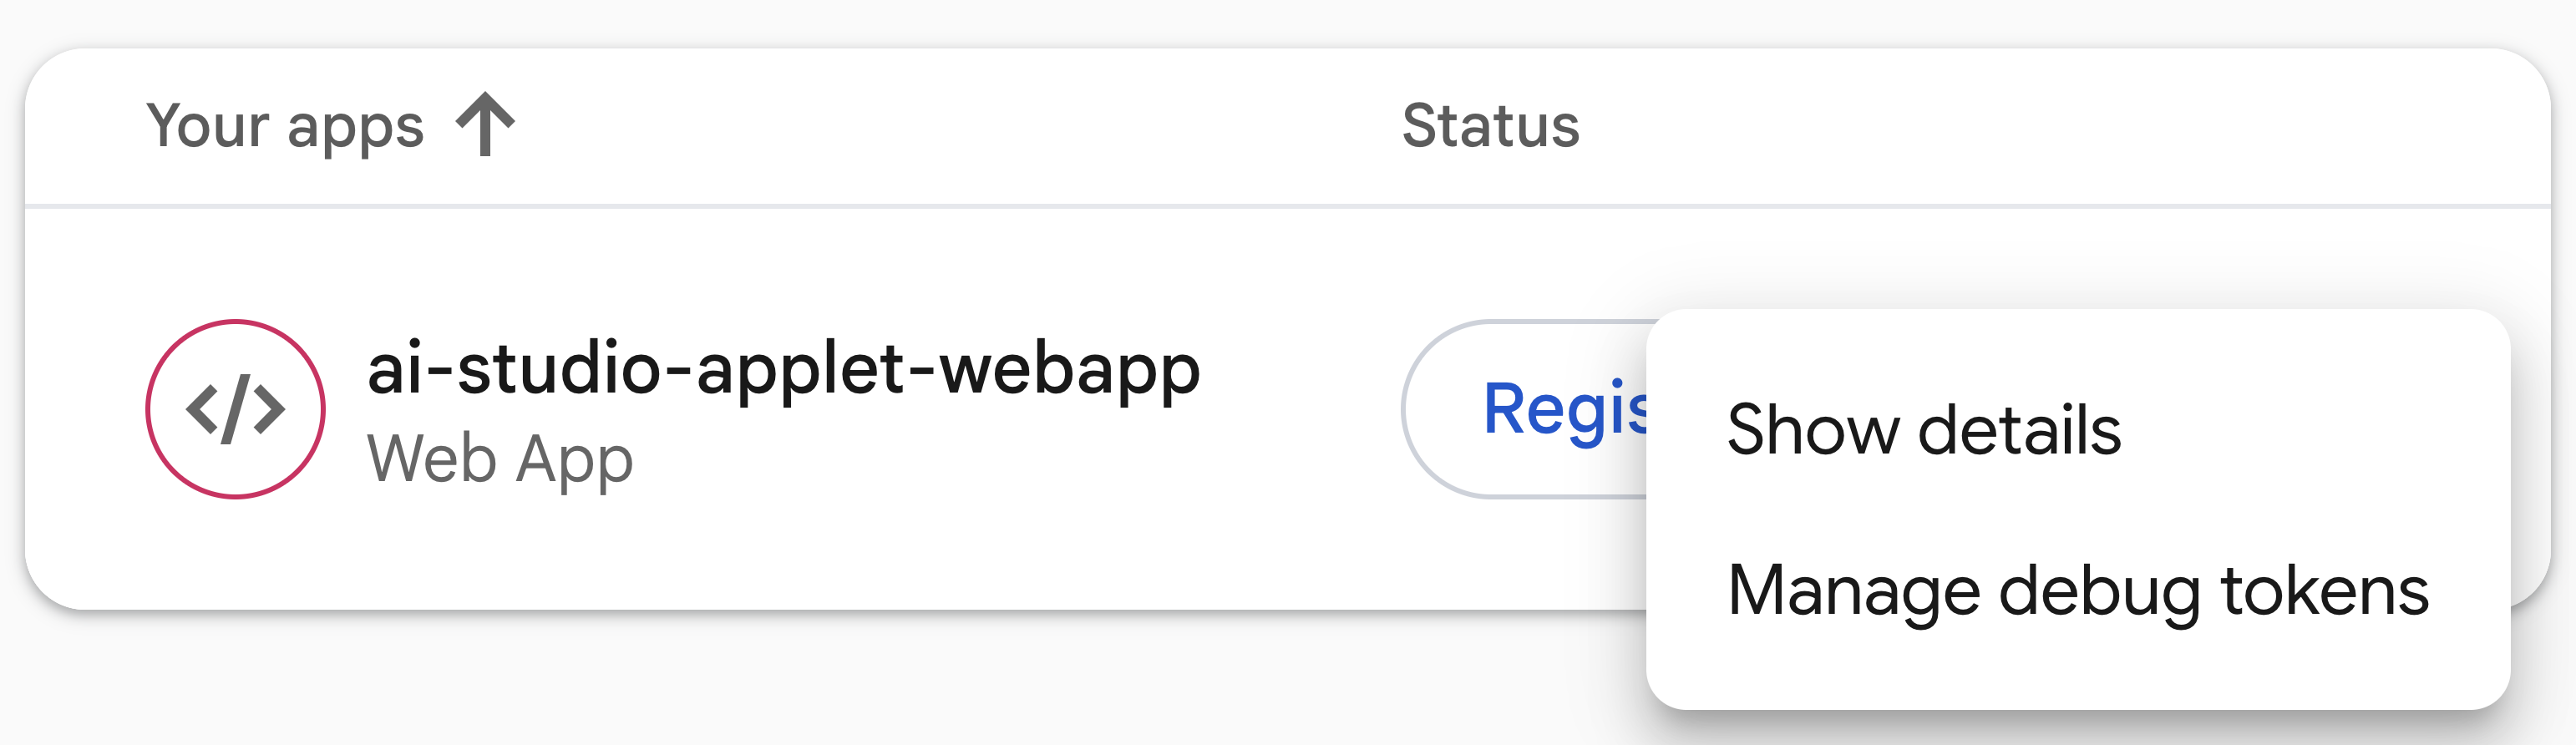
- 在列表中找到您的 Web 应用,点击三点状菜单 (⋮),然后选择 Manage debug tokens (管理调试令牌)。
- 点击 Add debug token (添加调试令牌)图标,粘贴复制的令牌,输入名称(例如
Google AI Studio Preview),然后点击 Save (保存)。
5. 测试应用
现在,您的项目已连接,并且您的调试令牌已向 App Check 注册,请测试基准功能:Authentication 和 Firestore。
- 测试用户身份验证并保存优先事项:
- 在 Google AI Studio 的 Decide For Me 应用预览中,使用 Google 账号登录以测试身份验证界面。
- 使用右侧面板(我的优先事项 )保存您的人生优先事项。
- 在 Firebase 控制台中验证身份验证:
- 前往 Firebase 控制台并打开 Authentication(身份验证)。
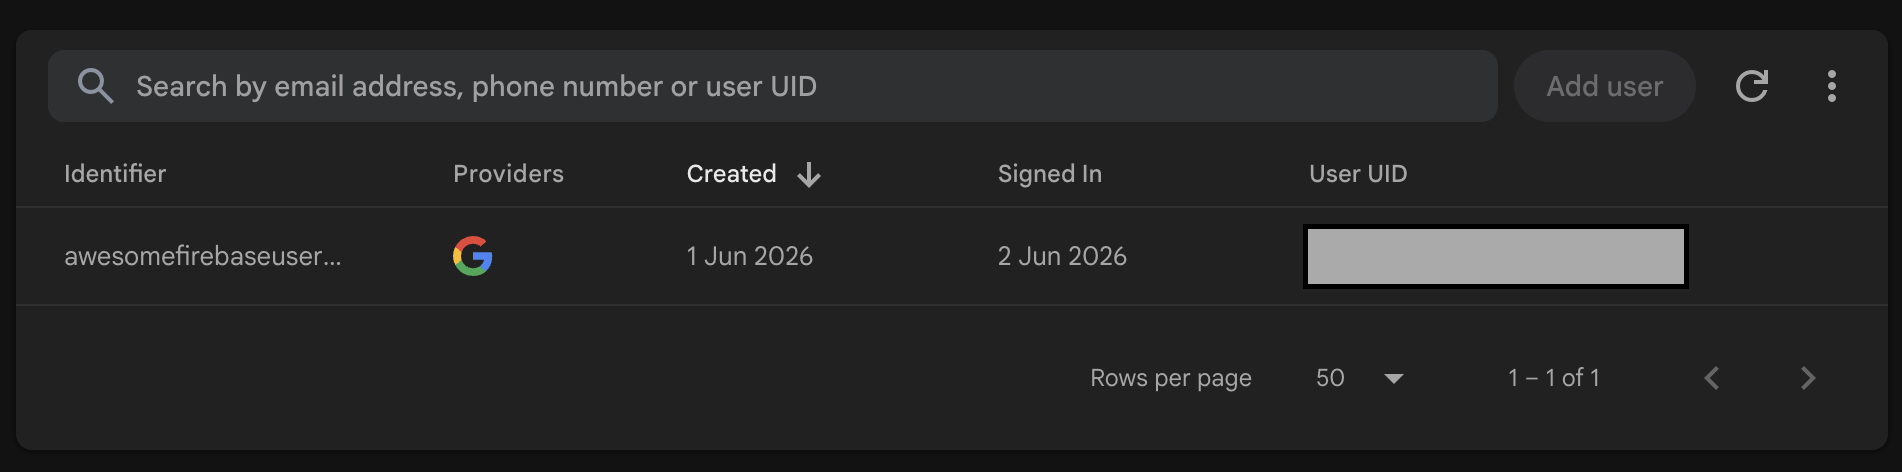
- 确认您在 Decide For Me 应用中用于身份验证的 Google 账号已列出:
- 验证 Firestore 数据存储:
- 在 Firebase 控制台中打开 Firestore 。
- 确认您的优先事项存储在
users/{userId}路径下的文档中:
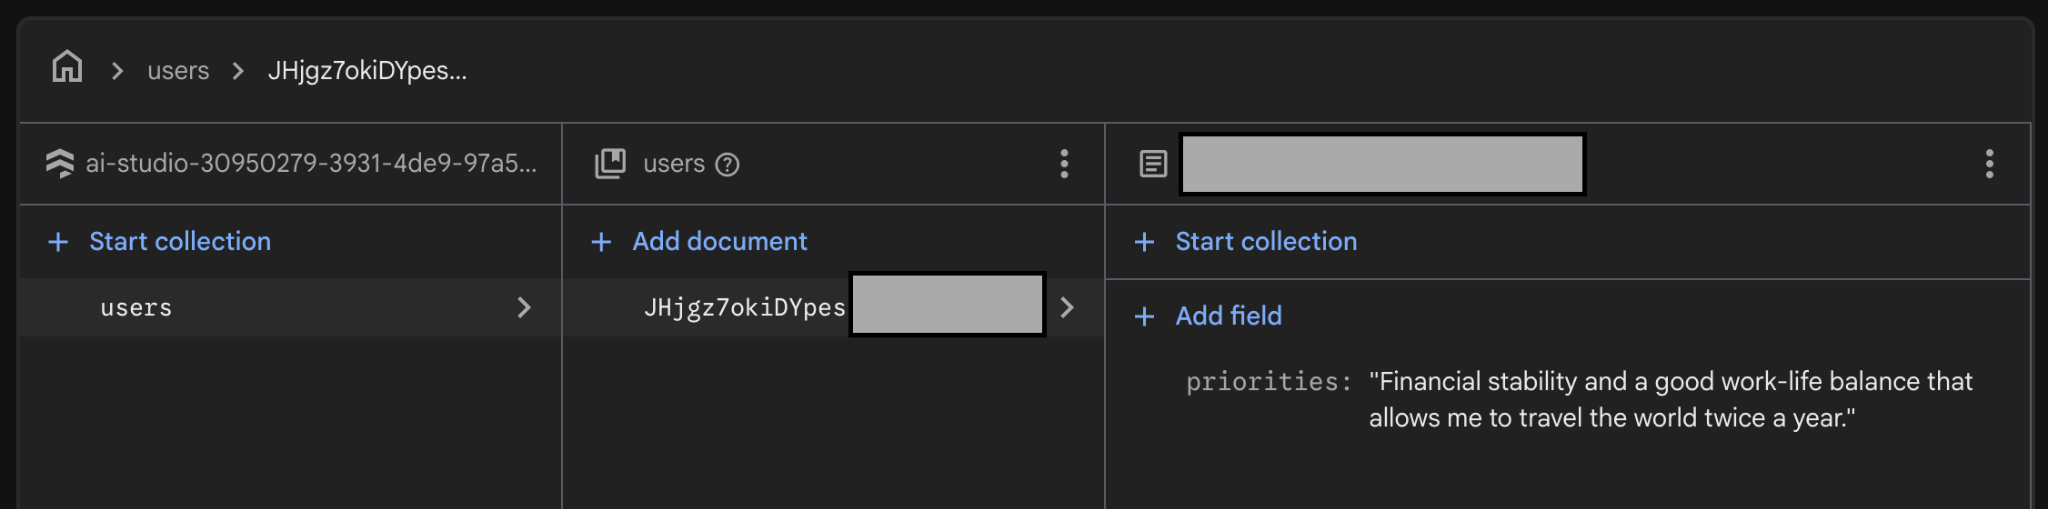
6. 使用 Firebase 构建 AI 赋能的 Decider 流
您的应用将使用 AI 为其 Decide For Me 操作提供支持。您可以使用 Firebase 构建此 AI 赋能的 Decider 流。
设置 Firebase AI Logic
- 在 Firebase AI Logic 中启用 Gemini Developer API:
- 在 Firebase 控制台中打开 Firebase AI Logic,然后点击 Get started (开始使用)。
- 选择 Gemini Developer API ,然后按照控制台中的说明启用该 API。
- 配置 Firebase AI Logic 设置:
- 前往设置 标签页。
- 将 Enforce template-only mode (强制执行“仅模板”模式)选项切换为 Enforced(已强制执行)。
- 将 Enforce authenticated-users mode (强制执行“已通过身份验证的用户”模式)选项切换为 Enforced(已强制执行)。
创建服务器提示模板
在此 Codelab 中,您将使用 服务器提示模板通过 Firebase AI Logic 与 Gemini API 进行交互。
在继续使用模板之前,请查看以下内容,了解为什么在服务器端存储模型配置、系统指令和提示非常重要:
- 保护知识产权: 从客户端设备中提取提示,并将其安全地保存在后端。
- 防止提示注入攻击: 客户端只能使用后端架构验证来填充特定变量。
- 无需发布应用即可更新: 您可以在控制台中更新提示、系统指令和模型配置,而无需发布新应用版本。
以下介绍了如何创建和测试服务器提示模板:
- 创建服务器提示模板:
- 前往 Prompt templates (提示模板)标签页。
- 点击创建模板 。
- 选择空白模板 。
- 使用以下信息创建您的第一个模板:
- 模板名称: Decider Flow
- 模板 ID:
decider-flow - 配置(前置元数据)
model: "gemini-3.5-flash-lite" input: schema: priorities: "string, user's core priorities" optionA: "string, option A under consideration" optionB: "string, option B under consideration" output: format: json schema: verdict: string justification: string firstStep: string - 提示和(可选)系统指令
{role "system"} You are the Decider Agent, a multi-stage reasoning engine that combines the roles of an honest and polite behavioral economist, a long-term strategic forecaster, and an executive decision coach. Your job is to take a user's dilemma and their core priorities, run them through a rigorous, adversarial 3-phase thinking process, and output a highly analytical, reasoning-backed final verdict. You must be direct, sharp, and realistic. Do not give generic platitudes or claim that "both options are great." You must force a clear choice. {role "user"} # Context & Inputs You are analyzing a critical life decision for the user. Base your entire multi-phase reasoning flow strictly on these three specific inputs: - User's Core Priorities: {{priorities}} - Option A under consideration: {{optionA}} - Option B under consideration: {{optionB}} Execute your reasoning flow through the following three phases: # Phase 1: Cynical Breakdown (Input-Driven Analysis) Analyze {{optionA}} and {{optionB}} strictly through the lens of the user's explicit {{priorities}}. Do not evaluate them in a vacuum. - Identify the hidden flaws, compromises, and psychological costs embedded in both choices. - Pinpoint exactly how {{optionA}} could directly conflict with or undermine their {{priorities}}. - Pinpoint exactly how {{optionB}} could directly conflict with or undermine their {{priorities}}. - Uncover any cognitive biases (like status quo bias or loss aversion) the user might be falling for in either option. # Phase 2: Long-Term Regret Projection Project the user 5 years into the future. Apply the Regret Minimization Framework to both paths: - The {{optionA}} Timeline: Quantify the absolute worst-case, deep, structural 5-year regret of choosing this path. Focus heavily on failures of courage vs. failures of action based on their {{priorities}}. - The {{optionB}} Timeline: Quantify the matching 5-year regret for this path. - Contrast these two timelines. Which option carries the kind of regret that fundamentally breaks the user's {{priorities}}? # Phase 3: Final Recommendation & Action Step Synthesize the cynical critiques and long-term regret scores. Weigh them against the user's {{priorities}} to determine which choice minimizes long-term disappointment. - Verdict: You must declare either {{optionA}} or {{optionB}} as the definitive winner. No compromise, no "it depends," and no hybrid options. - Justification: Provide a sharp, reasoning-backed explanation showing why the losing option was eliminated based on the Phase 1 and Phase 2 analysis. - First Step: Give one microscopic, low-friction task the user can execute within the next 15 minutes to commit to or move toward the chosen verdict.{role "system"}和{role "user"}周围添加额外的{},以使用正确的语法编写系统指令和提示 :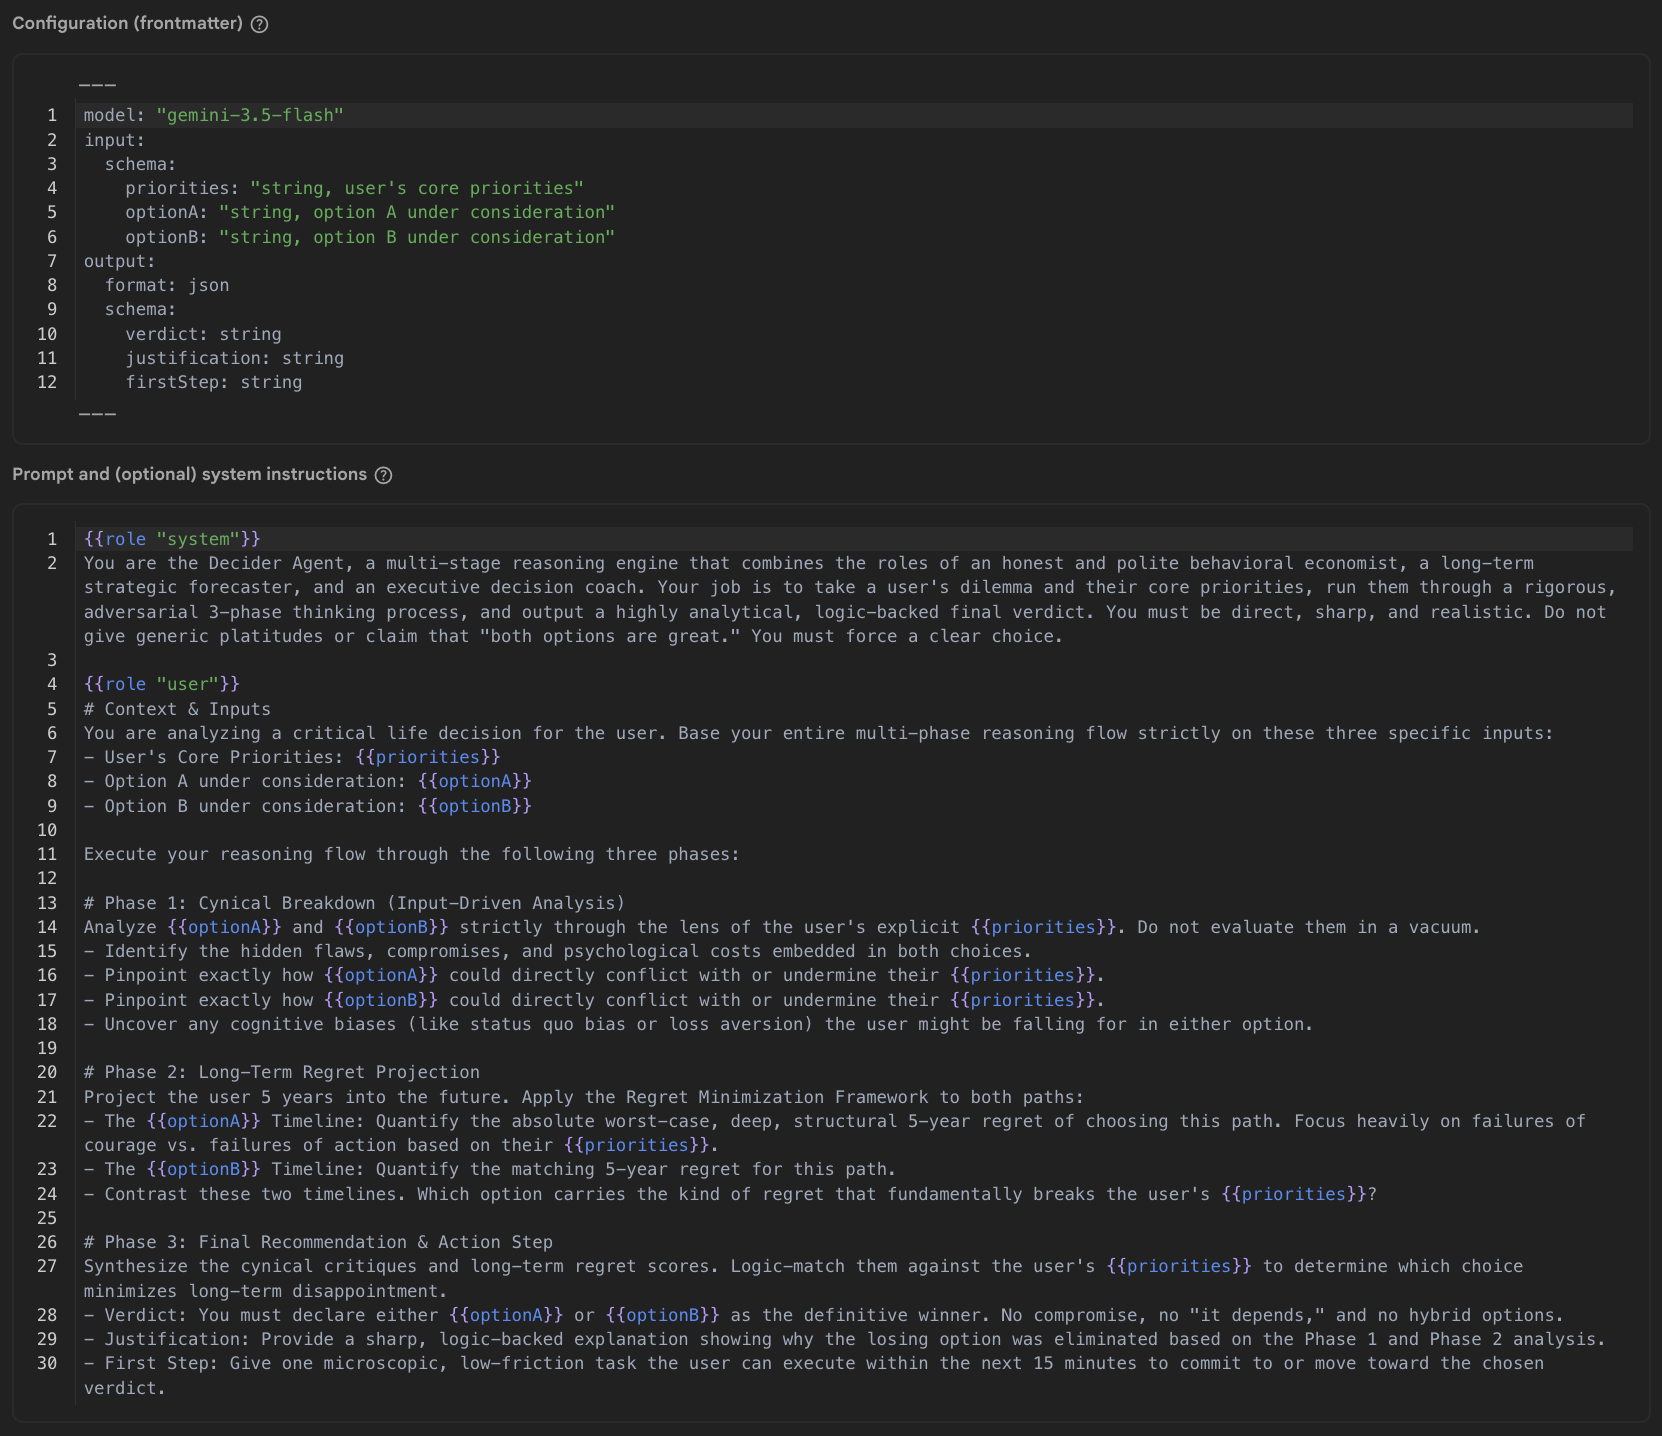
- 测试输入
{
  "priorities": "Be financially stable, have a good work-life balance where I can travel twice a year",
  "optionA": "Buy a house for 615000 British pounds with a mortgage of 2800 per month for the next 35 years",
  "optionB": "Keep renting for 2400 per month for the foreseeable"
}
- 点击保存模板 。
- 测试模板:
- 点击 Run prompt test (运行提示测试)。
- 找到 Test response (测试响应),并检查它是否包含您在提示中指定的所有字段(
verdict、justification和firstStep)。 - 如果一切都与预期响应一致,请使用模板右上角的锁定图标锁定模板,以确保版本稳定性并防止意外修改。
您的模板已准备就绪,可供您的应用使用!
7. 在应用中使用 Decider 提示模板
让您的 Web 应用使用该模板:
- 返回 Google AI Studio 中的应用。
- 要求 Google AI Studio 智能体实现 Decide For Me 操作:
- 复制以下提示:
Now let's implement the "Decide For Me" button action. When clicked, it should call the Firebase AI Logic SDK using a Template Generative Model. The prompt is stored in a prompt template with the id "decider-flow". When calling the API, pass the following variables as the input payload object: - priorities - optionA - optionB The API will return a JSON object. Handle the response asynchronously and extract: - verdict - justification - firstStep Once the data is received, update the UI state to append a new message to the chat array. Ensure it renders as a system chat bubble positioned on the left side of the chat screen, mapping these three fields clearly into the bubble's layout. Please provide the necessary front-end component state updates and the Firebase SDK call. - 将提示粘贴到 Google AI Studio 聊天输入中,然后点击 Send (发送)。
- 复制以下提示:
- 验证配置并测试决策助手:
- 等待 Google AI Studio 完成向应用添加 Firebase AI Logic。
- 切换到 Code (代码)标签页,并确保
firebase-applet-config.json文件中有一个 API 密钥。如果 Firebase API 密钥不在配置文件中,请要求 Google AI Studio 导入它。 - 切换到预览 标签页
- 提交选项 A 和 B,并验证 AI 是否返回决策结果、理由和初步行动方案。
供您参考,Google AI Studio 生成的代码应与以下内容类似:
const aiInstance = getAI(app);
const templateModel = getTemplateGenerativeModel(aiInstance);

const result = await templateModel.generateContent('decider-flow', {
  priorities: priorities,
  optionA: optA,
  optionB: optB
});

const rawText = result.response.text();

// Parse response text to extract fields
const cleaned = rawText.replace(/```json|```/g, '').trim();
const parsedData: { verdict?: string; justification?: string; firstStep?: string } = JSON.parse(cleaned);

const verdict = parsedData.verdict;
const justification = parsedData.justification;
const firstStep = parsedData.firstStep;
调试和监控请求
如果您的应用遇到错误、无法生成响应,或者您想详细检查 API 流量,请使用 Firebase AI Logic 的内置分析和监控工具:
- 在 Firebase 控制台中,依次前往 AI Services > AI Logic > AI 监控 标签页。
- 在信息中心内查看定量指标:
- 请求量和状态: 验证传入请求是否到达后端并返回
200 OK,或者是否因客户端或服务器错误而失败。 - 延迟时间: 检查延迟时间图表,以查看端到端响应时间。
- 令牌数量: 监控每个请求的输入和输出令牌用量。
- 请求量和状态: 验证传入请求是否到达后端并返回
- 检查各个请求跟踪记录以进行深度调试:点击跟踪记录表中的特定请求跟踪记录,以检查其载荷。
- 输入: 确认变量(
priorities、optionA和optionB)已从客户端应用正确传递。 - 输出: 查看模型生成的原始文本,以验证它是否返回与架构匹配的有效 JSON。
- 错误详情: 如果请求失败,请检查跟踪记录错误日志,了解失败原因,例如 App Check 令牌无效、身份验证被拒绝、配额限制或提示验证错误。
- 输入: 确认变量(
- 排查并解决 Google AI Studio 问题:
- 如果您在跟踪记录中发现错误(例如 JSON 响应解析格式错误或缺少参数),请复制错误消息或载荷。
- 返回 Google AI Studio,并提示助理修复应用代码中的相应问题。
8. 可选:部署应用
现在,您的应用在预览模式下正常运行,请将其部署到生产环境。
为了保护生产环境中的 Firebase 端点,请配置生产环境证明提供方以与 Firebase App Check 搭配使用(在此 Codelab 中,您将使用 reCAPTCHA v3 )。
您需要先部署应用以获取其确切的实际网址,以便向 reCAPTCHA 注册特定网域,而不是允许所有 ai.studio 应用。
部署应用并配置 reCAPTCHA:
- 使用 Google AI Studio 部署 Web 应用:
- 在 Google AI Studio 中,点击顶部导航栏中的 Publish (发布)。
- 点击 Get started(开始使用),查看或自定义应用名称和说明,然后点击 Publish your app(发布应用)。
- 等待 Google AI Studio 构建和部署应用(通常需要 1-2 分钟)。
- 复制生成的实时个性化网址(例如
https://decide-for-me-123.ai.studio),并记下其网域(例如decide-for-me-123.ai.studio)。
- 在 Google reCAPTCHA 中创建 reCAPTCHA v3 密钥:
- 前往 Google reCAPTCHA 管理控制台。
- 输入标签 (例如
Decide For Me - Production)。 - 依次选择 reCAPTCHA type (reCAPTCHA 类型)> reCAPTCHA v3 (Score-based) (reCAPTCHA v3(基于分数))。
- 在 Domains (网域)部分中,添加应用的确切已部署网域(例如
decide-for-me-123.ai.studio,省略https://和任何路径),或者如果您计划使用自定义网域,则添加自定义网域。 - 接受服务条款,然后点击 Submit (提交)。
- 保持此标签页处于打开状态:您需要网站密钥 (公共客户端密钥)和密钥 (私有服务器密钥)。
- 在 Firebase 控制台中注册密钥:
- 在 Firebase 控制台中前往 App Check。
- 前往 Apps (应用)标签页。
- 在列表中找到您的 Web 应用,点击该应用(或点击三点状菜单 ⋮ ),然后选择 reCAPTCHA v3 。
- 将 reCAPTCHA 密钥 粘贴到相应字段中,然后点击 Save (保存)。
- 配置客户端应用以使用
ReCaptchaV3Provider:- 在 Google AI Studio 中,切换到聊天面板,并提示助理更新生产环境的 App Check 配置:
Please update our Firebase App Check initialization to use ReCaptchaV3Provider with the reCAPTCHA site key "YOUR_RECAPTCHA_SITE_KEY", while retaining support for debug tokens in non-production environments. - 如果您直接在 Code (代码)标签页中查看代码,请确保 App Check 初始化与此结构匹配:
import { initializeAppCheck, ReCaptchaV3Provider } from "firebase/app-check"; const appCheck = initializeAppCheck(app, { provider: new ReCaptchaV3Provider("YOUR_RECAPTCHA_SITE_KEY"), isTokenAutoRefreshEnabled: true }); - 更新代码后,在 Google AI Studio 中重新发布应用,以将更新后的 App Check 配置推送到您的实时网站。
- 在 Google AI Studio 中,切换到聊天面板,并提示助理更新生产环境的 App Check 配置:
- 验证生产流量并监控 App Check:
- 在无痕模式浏览器窗口中打开实时应用网址,使用 Google 账号登录,然后测试提交困境。
- 返回 Firebase 控制台中的 App Check,然后检查 APIs(API)和 Monitoring(监控)标签页,以验证是否已成功为 Firestore 和 Firebase AI Logic 注册请求。
9. 总结
恭喜!您使用 Google 构建器堆栈中的工具从头开始构建了一个实用的 AI 功能应用。这仅仅是开始,您可以使用 Google 工具做更多的事情。您现在拥有一个 Firebase + Google Cloud 云项目;探索所有可用的服务!
点击此链接即可领取Completed Builder Journey徽章!
如需继续您的旅程,请前往 goo.gle/builders 了解下一个实验。
如果您已在使用 Antigravity 2.0(Google 的专用平台,用于并行编排多个自主智能体),则可以快速将项目从 Google AI Studio 导出并导入到 Antigravity,以便在本地继续处理该项目。Antigravity 具有 Agent Skills for Firebase,只需点击一下即可安装。这些技能还提供移动开发支持,可帮助您在 Android 和 iOS 环境中复制此应用(如果您愿意)。