

1. 事前準備
軟體開發作業不斷演進,最成功的開發人員不僅會編寫程式碼,還會協調 AI 工具和代理程式,以更快速度打造更優質的產品。Google 的工具生態系統提供全方位的套件,可支援整個生命週期:UI 生成、應用程式原型設計與部署、AI 功能開發,以及安全且可擴充的後端整合。在本程式碼研究室中,您將使用 Google Stitch 設計 UI、使用 Google AI Studio 進行直覺式程式開發及部署應用程式,並使用 Firebase 開發 AI 功能,以及在安全無虞且可擴充的後端儲存資訊。
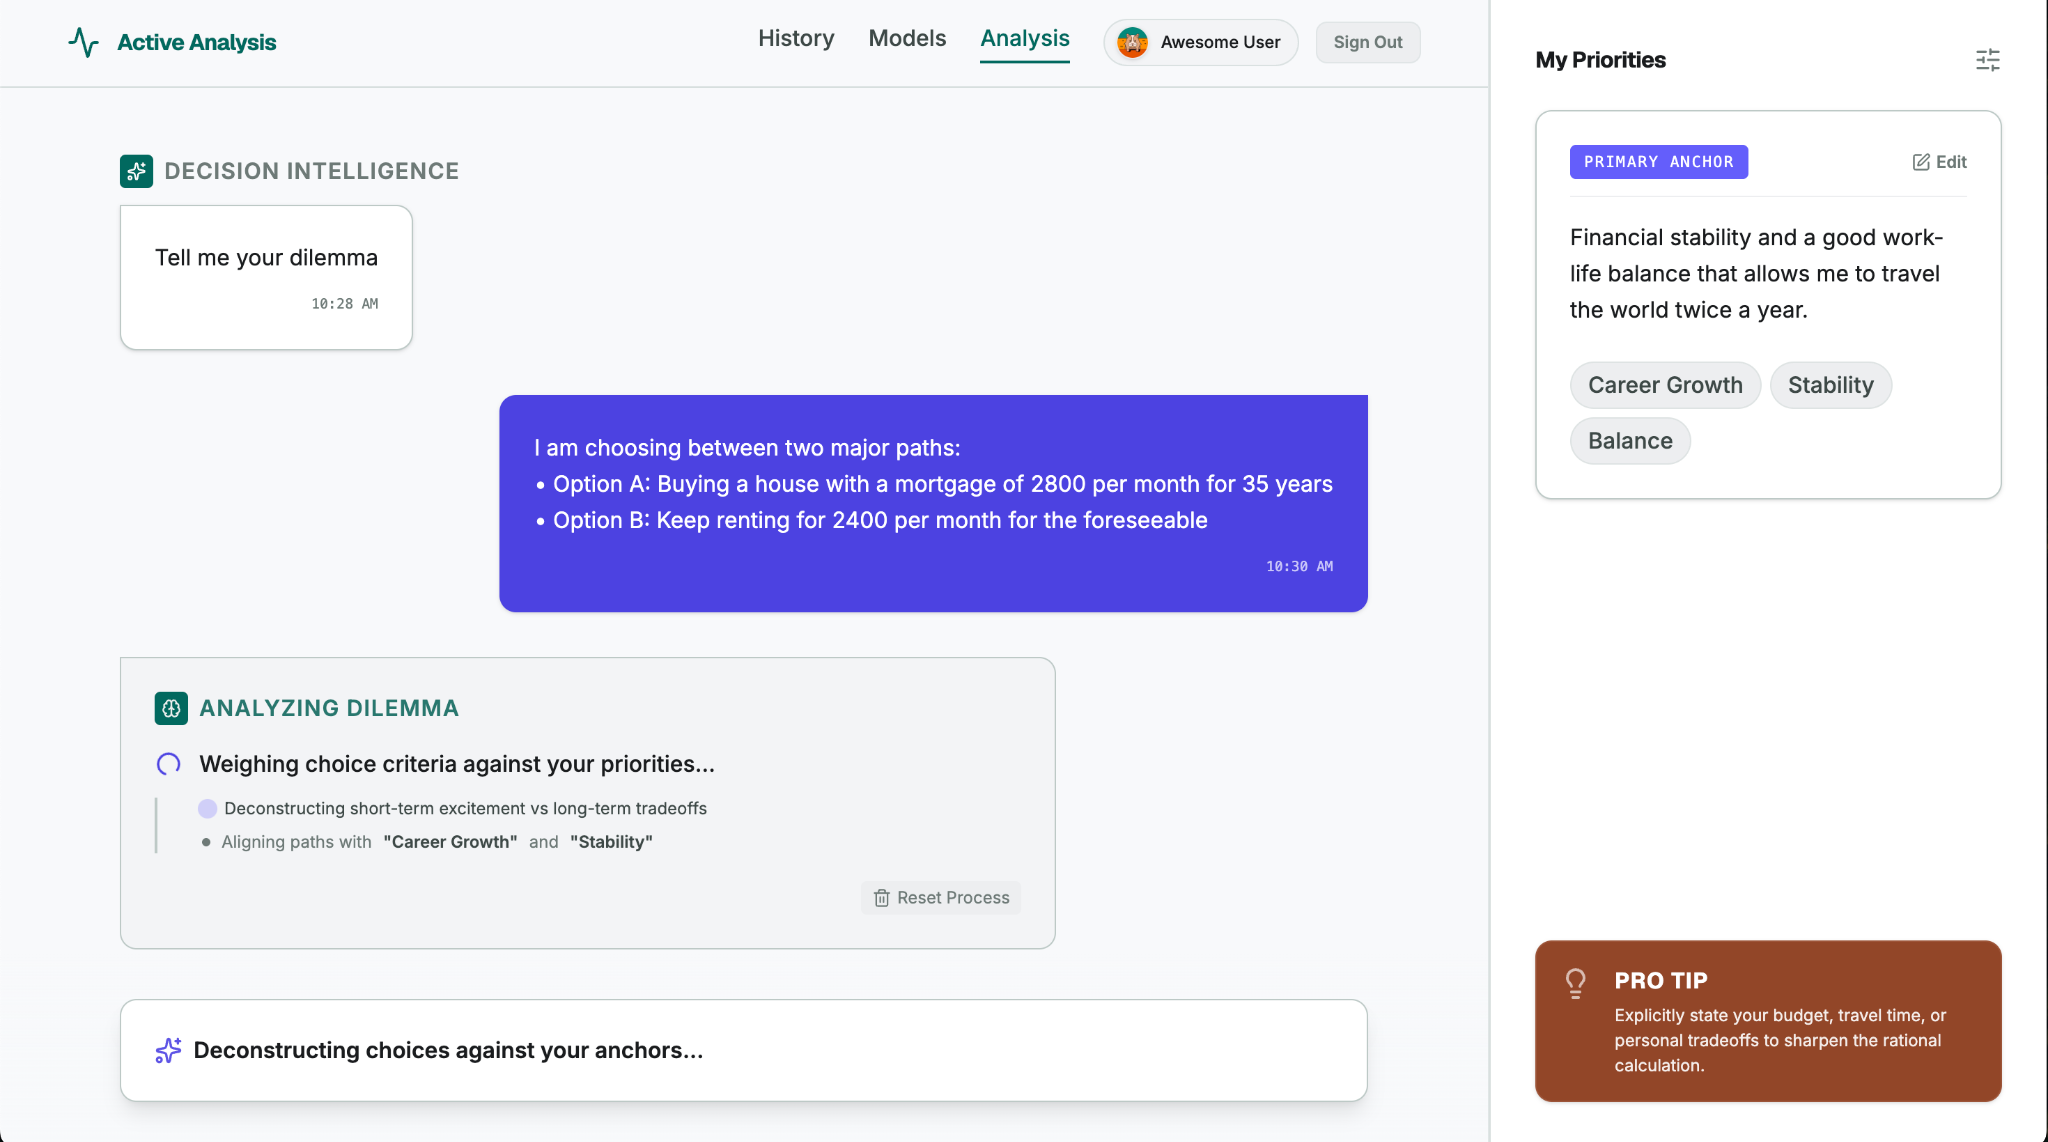
在本程式碼研究室中,您將建構名為「Decide For Me」的應用程式,這款應用程式可做為決策輔助工具,協助猶豫不決的人做出人生選擇 (例如搬家、轉職或選擇嗜好)。使用者輸入兩難的處境和生活中的優先事項,應用程式就會運用 AI 技術,根據可將長期失望感降到最低的選項,協助使用者做出決定。應用程式也會提供具體的入門步驟。應用程式的最終版本應如下所示:
課程內容
- 使用 Google Stitch 設計 UI。
- 使用 Google AI Studio,以直覺方式開發網頁應用程式。
- 使用 Firebase 開發 AI 功能,並將資訊儲存在雲端。
- 使用 Google AI Studio (由 Cloud Run 提供技術支援) 將網頁應用程式部署至正式環境。
2. 使用 Stitch 設計 UI
- 下載模擬圖片 (
DecideForMeScreen.jpeg),並儲存到本機資料夾,方便您日後尋找。 - 前往 Stitch,找到輸入欄位,然後選取「網頁」選項。(在本程式碼研究室中,您將著重於網頁體驗,但您也可以使用 Stitch 生成行動裝置畫面)。
- 上傳模型圖:
- 按一下「+」 (新增按鈕)。
- 選取「上傳檔案」。
- 附加您在設定步驟中下載的圖片 (
DecideForMeScreen.jpeg)。這張手繪模擬圖可讓您測試 Stitch 的多模態功能。
- 複製下列提示詞,並貼到輸入欄位:
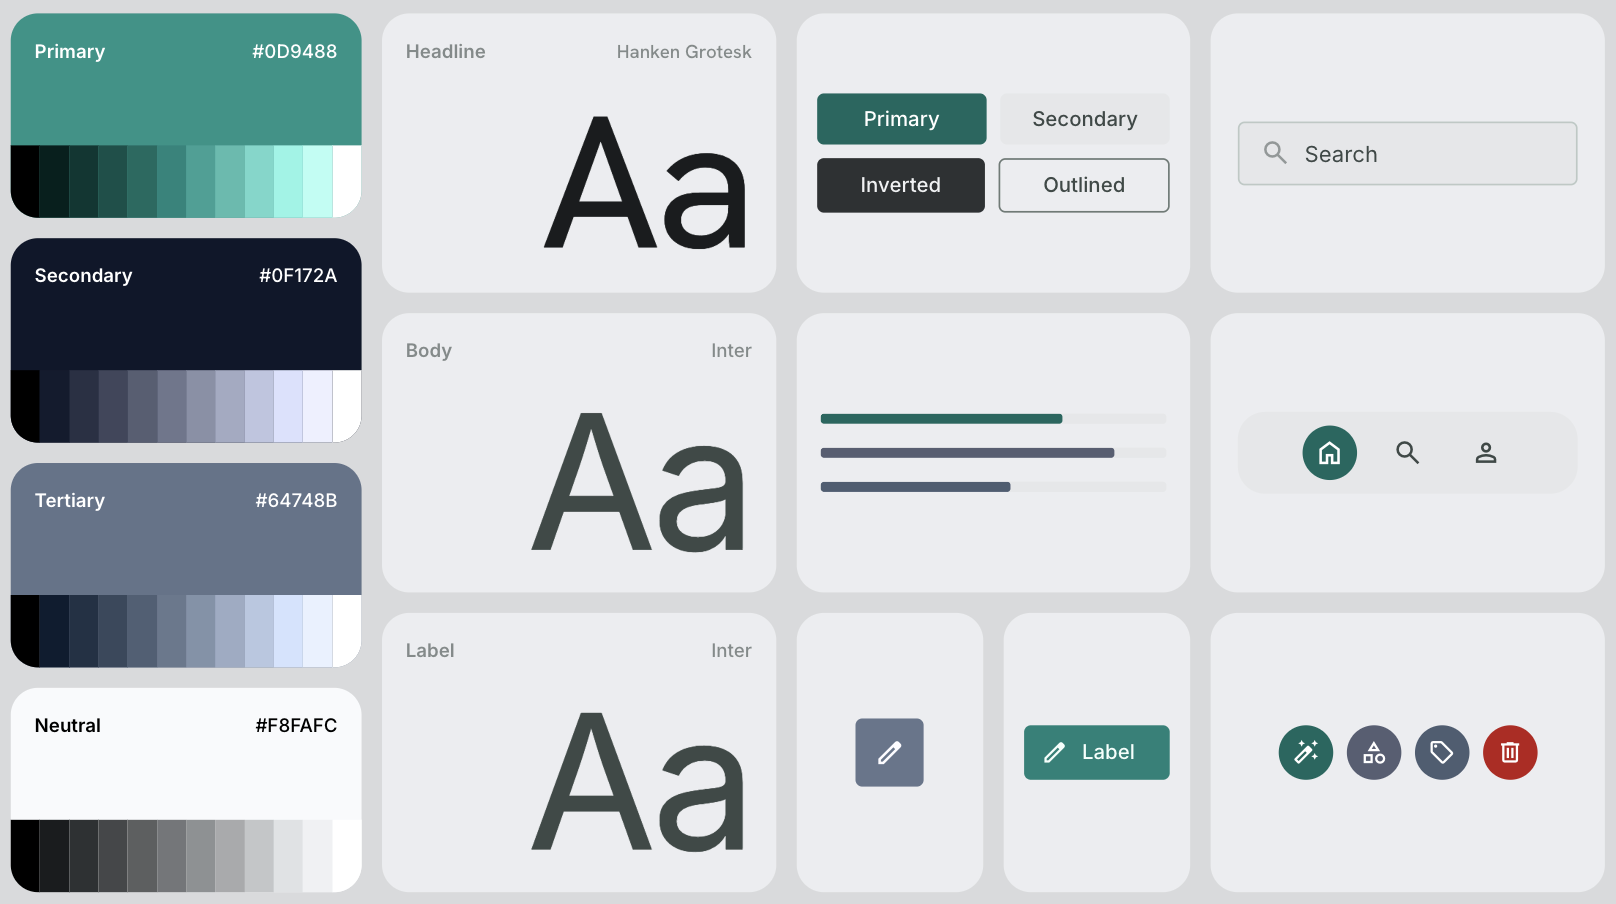
# General Guidance Create a modern, clean, and highly polished UI for a web application called "Decide For Me" - a hyper-rational decision assistant. CRITICAL: Replicate the exact layout, structure, and element placement shown in the hand-drawn mockup file DecideForMeScreen.jpeg. Do not add any extra menus, sidebars, buttons, or top/bottom navigation bars that are not explicitly drawn in the file. Stick strictly to the skeleton provided in the mockup. # Layout & Structure - Two-Column Split Screen: - Left Side (Main Chat Area): Takes up roughly 70-75% of the screen width. It should feel like a premium, focused workspace. - Right Side (Configuration Panel): A sidebar taking up 25-30% of the screen width with a distinct, subtle background color to separate it from the chat. # Right Panel: Configuration Screen - Header: Title it "My Priorities" with a clean, minimalist typography. - Content Card: A styled card containing a text box or paragraph area showcasing the user's priorities. - Interactions: Include a clear "Edit Priorities" button. When clicked, this area should visually toggle into an editable textarea or input field. # Left Panel: Chat & Dilemma Decision Screen - Chat History: A clean vertical flow of message bubbles. - The first message bubble must be aligned to the left (system message) and say: "Tell me your dilemma". Use a friendly, neutral background color for this bubble. - Bottom Input Area: Instead of a traditional single-line chat bar, create a unified, beautiful "Decision Submission" layout positioned at the bottom: - Dual Input Fields: Place two horizontal or cleanly stacked input fields. - Input 1 label: "Option A" - Input 2 label: "Option B" - Action Button: A prominent, styled "Go" action button to trigger the reasoning loop. # Theme & Aesthetic - Vibe: Hyper-rational, clean, trustworthy, and modern. Use a sophisticated color palette (e.g., deep slates, clean whites/grays, and a sharp accent color like a subtle indigo or teal for active states and buttons). - Spacing & Typography: Use generous whitespace, soft rounded corners (border-radius) for cards and buttons, and a highly legible sans-serif font. - 按一下輸入欄位右下角的生成箭頭。Stitch 會生成畫面和整個設計系統,包括調色盤、字型選項、圖像,以及 UI 元素的整體感覺:
3. 使用 Google AI Studio 建構應用程式
- 將在 Stitch 中建構的畫面匯出至 Google AI Studio:
- 按一下 Stitch 中生成的設計。
- 按一下畫面右上角的「匯出」。
- 確認選取的選項是「Google AI Studio」。
- 向下捲動至「說明」欄位。
- 複製下列提示詞並貼到「說明」欄位:
# General Guidance Build the "Decide For Me" app: A hyper-rational decision assistant for chronically indecisive people facing life choices (moving apartments, changing careers, picking a hobby). The user enters a dilemma and their top priorities in life. The app will help with the decision. Follow the instructions below to build it: # UI Instructions Using the design artifacts exported from Stitch (the PNG image and HTML file), build a fully functional web application that accurately mirrors the design and layout. # App Architecture & Initialization Instructions - Initialize the Firebase JS SDK for client-side services. - Set up Firebase Authentication using the Google provider. If a user is not logged in, show a clean, minimalist sign-in state. If the user is logged in, take them directly to the dilemma decision screen. - Initialize Firebase App Check in debug mode (`self.FIREBASE_APPCHECK_DEBUG_TOKEN = true`) without a ReCaptchaV3Provider (we will add that later). # State & Database Management Instructions - User Priorities: - Once authenticated, pull the user's saved priorities from Firebase Firestore at the path: `users/{userId}`. Each document should contain one string field: 'priorities'. - Bind this data to the Right Panel ("My Priorities"). - When the user clicks the "Edit" button, toggle the view to a textarea, with a 'save' button. When saved, write the updated string back to `users/{userId}`. - Make sure to implement and deploy strong Security Rules for Firestore. # UI Stream Update & Display Instructions - Once the user submits option A and option B in the dilemma decision screen, display both options as a single message on the user side of the chat. Then, display a sleek loading state in the main chat panel. Leave the app in this "loading" state and do nothing else, we will process both options and build the server-side thinking later. - 按一下「使用 Google AI Studio 建構」。這會在新的分頁中開啟 Google AI Studio,並帶入設計檔案和提示:
- 確認提示已完整轉移。
- 如果只看到部分提示,請再次貼上完整提示。
- 按一下「Build」。Google AI Studio 會根據提示和 UI 設計,開始生成「幫我決定」應用程式:
- 生成期間,系統會建議其他 UI 設計 (請忽略這些設計,但日後可以選擇其他設計)。
- 系統提示啟用 Firebase 時,請按一下「啟用」。
- 檢查並驗證生成的應用程式:
- 在「預覽」分頁標籤中測試應用程式。
- 切換至「程式碼」分頁,即可查看所有生成的檔案和程式碼。
- Google AI Studio 也建立了 Firebase 專案、啟用 Firebase 驗證和 Firestore,並在程式碼集設定 Firebase。在本程式碼研究室的下一個步驟中,您將存取及使用這個 Firebase 專案。
4. 註冊 App Check 偵錯權杖
Google AI Studio 生成應用程式時,會建立 Firebase 專案並連結應用程式。您必須存取這個 Firebase 專案,並透過名為 Firebase App Check 的重要安全服務註冊開發環境。
存取 Firebase 專案
- 找出 Google AI Studio 建立的 Firebase 專案 ID:
- 在 Google AI Studio 中切換至「程式碼」分頁。
- 開啟
firebase-applet-config.json檔案。 - 複製
projectId欄位的值。
- 前往 Firebase 控制台,使用這個 ID 搜尋專案。
註冊偵錯權杖
您的應用程式可以使用 Firebase App Check,確保傳入流量只來自正當應用程式,避免後端服務和 AI 模型遭到濫用。
由於應用程式是在 Google AI Studio 搶先版環境中執行,因此會使用 App Check 偵錯供應器 (self.FIREBASE_APPCHECK_DEBUG_TOKEN = true)。網頁應用程式載入時,Firebase 會自動將偵錯權杖輸出至瀏覽器的開發人員控制台。
- 找出偵錯權杖:
- 在 Google AI Studio 中,查看應用程式預覽畫面時,開啟瀏覽器的開發人員工具:
- Chrome、Edge 或 Firefox:按下 F12 鍵 (或在預覽畫面中按一下滑鼠右鍵,然後選取「檢查」),然後選取「控制台」分頁。
- macOS:按下 Cmd+Option+I,然後選取「控制台」分頁。
- 在控制台記錄中,找出 App Check 偵錯訊息:
AppCheck debug token: "123a4567-b89c-12d3-e456-789012345678". You will need to safelist it in the Firebase console for it to work. - 複製權杖字串 (不含引號)。
- 在 Google AI Studio 中,查看應用程式預覽畫面時,開啟瀏覽器的開發人員工具:
- 註冊偵錯權杖:
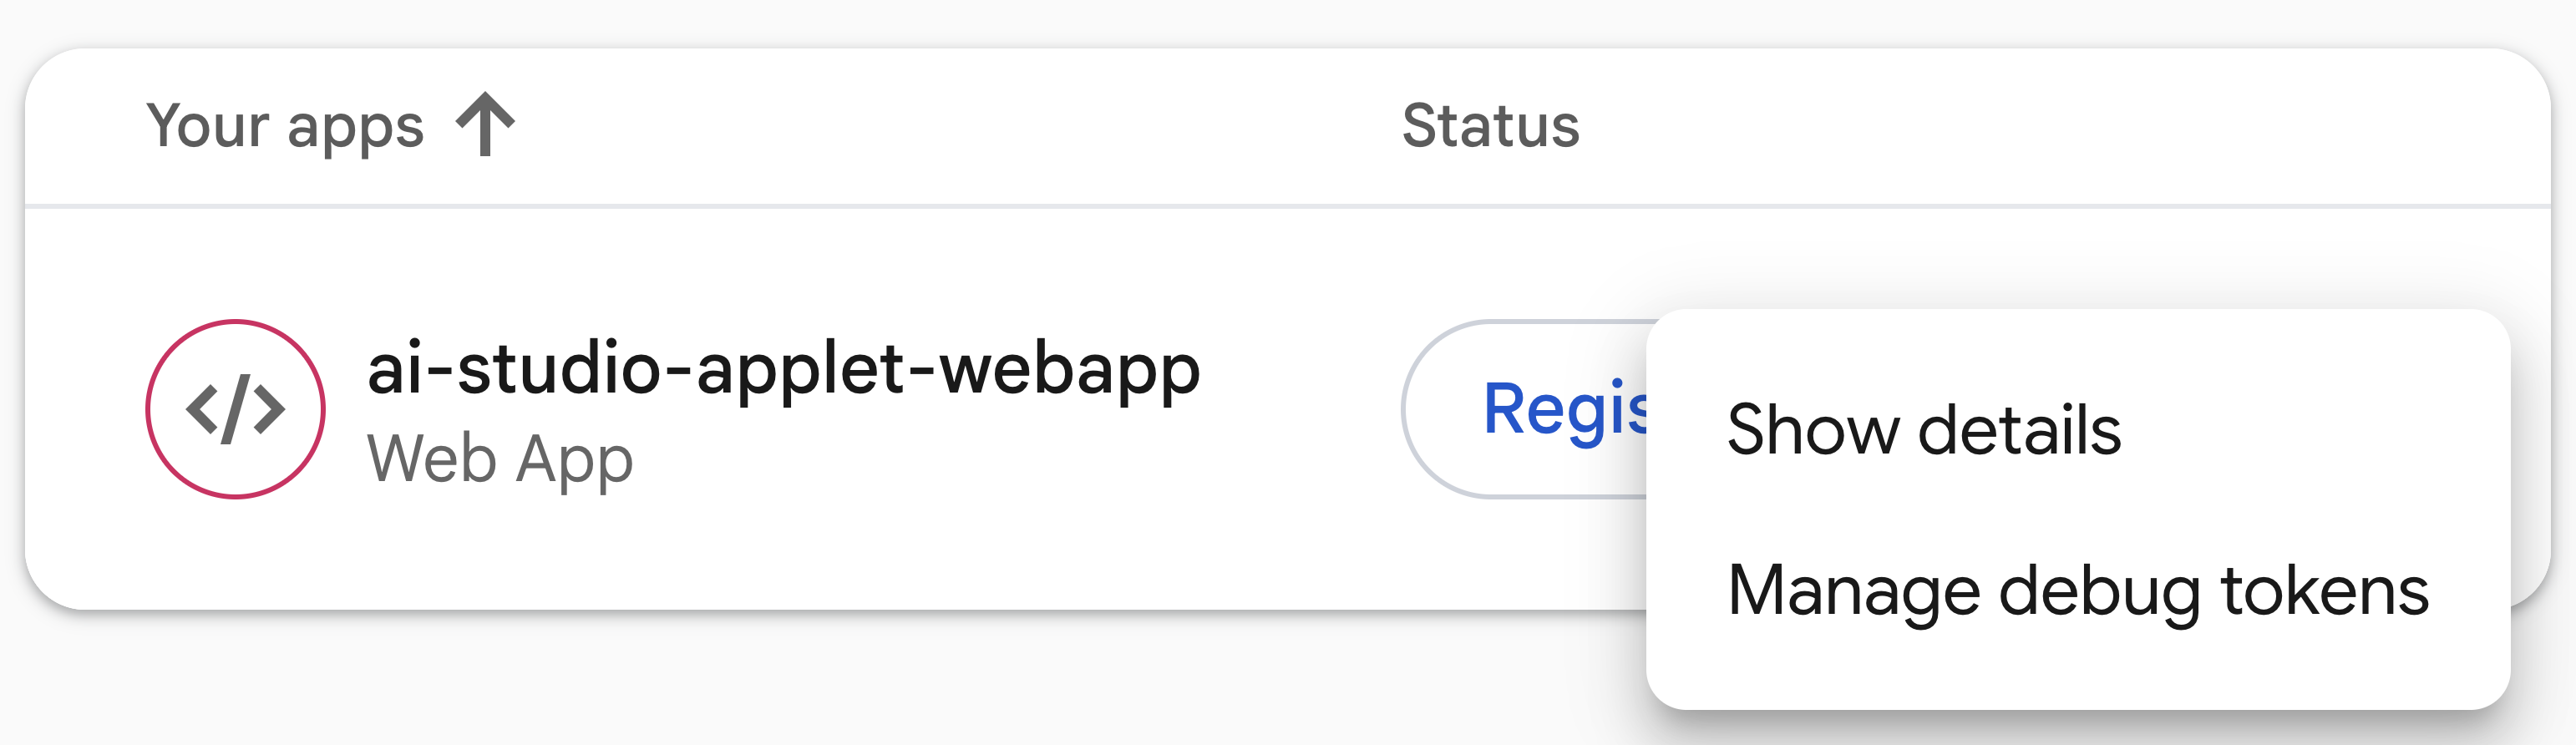
- 在 Firebase 控制台中,依序前往「安全性」 >「App Check」 >「應用程式」分頁標籤。
- 在清單中找出您的網頁應用程式,按一下三點選單 (⋮),然後選取「管理偵錯權杖」。
- 按一下「新增偵錯權杖」,貼上複製的權杖,輸入名稱 (例如
Google AI Studio Preview),然後按一下「儲存」。
5. 測試應用程式
專案連結完成,且偵錯權杖已向 App Check 註冊後,請測試基準功能:驗證和 Firestore。
- 測試使用者驗證並儲存優先順序:
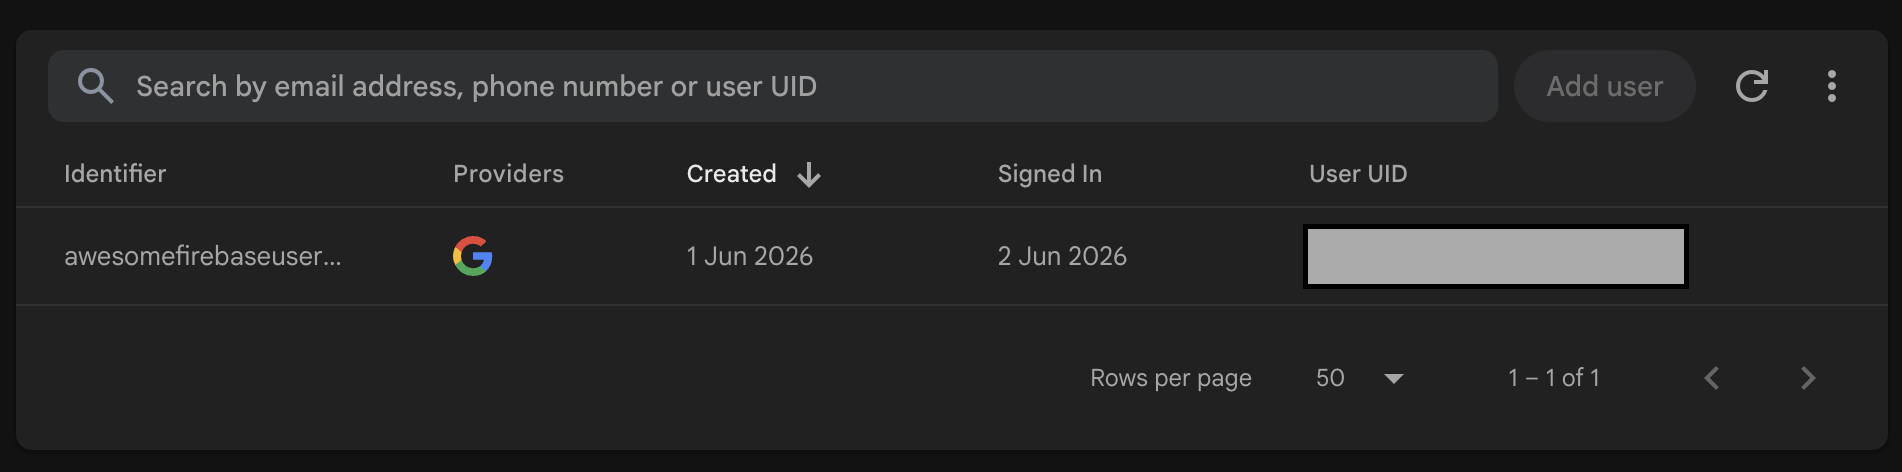
- 在 Google AI Studio 的「Decide For Me」應用程式預覽畫面中,使用 Google 帳戶登入,測試驗證畫面。
- 使用右側面板「我的優先事項」儲存生活優先事項。
- 在 Firebase 控制台中驗證驗證:
- 驗證 Firestore 資料儲存空間:
- 在 Firebase 控制台中開啟 Firestore。
- 確認優先順序儲存在
users/{userId}路徑下的文件中:
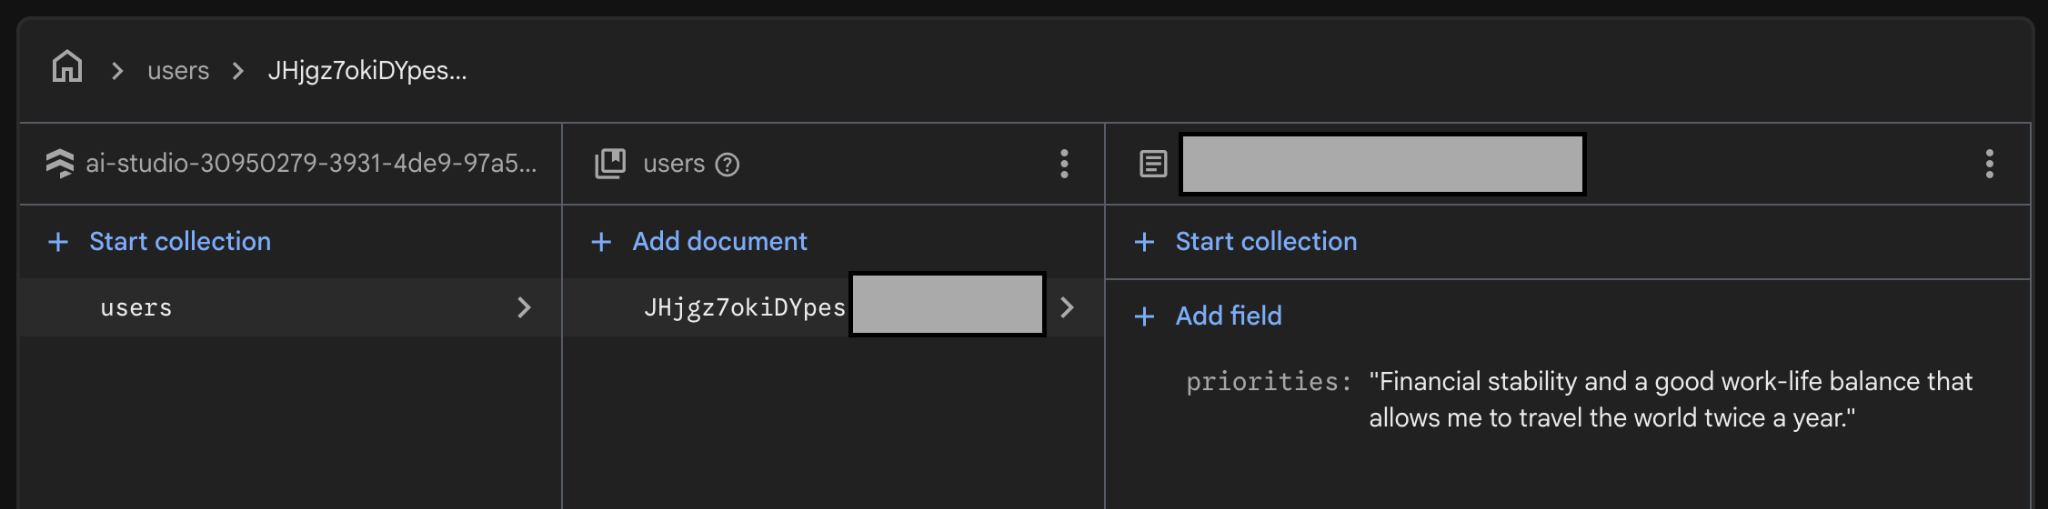
6. 使用 Firebase 建構 AI 輔助的決策流程
應用程式會使用 AI 執行「幫我決定」動作。您可以使用 Firebase 建構這項 AI 輔助的決策流程。
設定 Firebase AI Logic
- 在 Firebase AI Logic 中啟用 Gemini Developer API:
- 在 Firebase 控制台中開啟 Firebase AI Logic,然後按一下「開始使用」。
- 選取「Gemini Developer API」,然後按照控制台中的操作說明啟用 API。
- 設定 Firebase AI Logic 設定:
- 前往「設定」分頁。
- 將「強制執行僅限範本模式」選項切換為「強制執行」。
- 將「強制啟用『僅限通過驗證的使用者』模式」選項切換為「強制啟用」。
建立伺服器提示詞範本
在本程式碼研究室中,您將透過 Firebase AI Logic,使用伺服器提示詞範本與 Gemini API 互動。
使用範本前,請先詳閱下列內容,瞭解在伺服器端儲存模型設定、系統指令和提示的重要性:
- 保護智慧財產:從用戶端裝置提取提示,並在後端確保提示安全無虞。
- 防範提示詞注入攻擊:用戶端只能透過後端結構定義驗證,填入特定變數。
- 無須發布新版應用程式即可更新:您可以在控制台中更新提示、系統指令和模型設定,不必發布新版應用程式。
以下說明如何建立及測試伺服器提示詞範本:
- 建立伺服器提示詞範本:
- 前往「提示範本」分頁。
- 點選「Create template」(建立範本)。
- 選取「空白範本」。
- 使用下列資訊建立第一個範本:
- 範本名稱:Decider Flow
- 範本 ID:
decider-flow - 設定 (前言)
model: "gemini-3.5-flash-lite" input: schema: priorities: "string, user's core priorities" optionA: "string, option A under consideration" optionB: "string, option B under consideration" output: format: json schema: verdict: string justification: string firstStep: string - 提示詞和系統指令 (後者可視需求使用)
{role "system"} You are the Decider Agent, a multi-stage reasoning engine that combines the roles of an honest and polite behavioral economist, a long-term strategic forecaster, and an executive decision coach. Your job is to take a user's dilemma and their core priorities, run them through a rigorous, adversarial 3-phase thinking process, and output a highly analytical, reasoning-backed final verdict. You must be direct, sharp, and realistic. Do not give generic platitudes or claim that "both options are great." You must force a clear choice. {role "user"} # Context & Inputs You are analyzing a critical life decision for the user. Base your entire multi-phase reasoning flow strictly on these three specific inputs: - User's Core Priorities: {{priorities}} - Option A under consideration: {{optionA}} - Option B under consideration: {{optionB}} Execute your reasoning flow through the following three phases: # Phase 1: Cynical Breakdown (Input-Driven Analysis) Analyze {{optionA}} and {{optionB}} strictly through the lens of the user's explicit {{priorities}}. Do not evaluate them in a vacuum. - Identify the hidden flaws, compromises, and psychological costs embedded in both choices. - Pinpoint exactly how {{optionA}} could directly conflict with or undermine their {{priorities}}. - Pinpoint exactly how {{optionB}} could directly conflict with or undermine their {{priorities}}. - Uncover any cognitive biases (like status quo bias or loss aversion) the user might be falling for in either option. # Phase 2: Long-Term Regret Projection Project the user 5 years into the future. Apply the Regret Minimization Framework to both paths: - The {{optionA}} Timeline: Quantify the absolute worst-case, deep, structural 5-year regret of choosing this path. Focus heavily on failures of courage vs. failures of action based on their {{priorities}}. - The {{optionB}} Timeline: Quantify the matching 5-year regret for this path. - Contrast these two timelines. Which option carries the kind of regret that fundamentally breaks the user's {{priorities}}? # Phase 3: Final Recommendation & Action Step Synthesize the cynical critiques and long-term regret scores. Weigh them against the user's {{priorities}} to determine which choice minimizes long-term disappointment. - Verdict: You must declare either {{optionA}} or {{optionB}} as the definitive winner. No compromise, no "it depends," and no hybrid options. - Justification: Provide a sharp, reasoning-backed explanation showing why the losing option was eliminated based on the Phase 1 and Phase 2 analysis. - First Step: Give one microscopic, low-friction task the user can execute within the next 15 minutes to commit to or move toward the chosen verdict.{role "system"}和{role "user"}周圍加上額外的{},以正確語法撰寫系統指令和提示: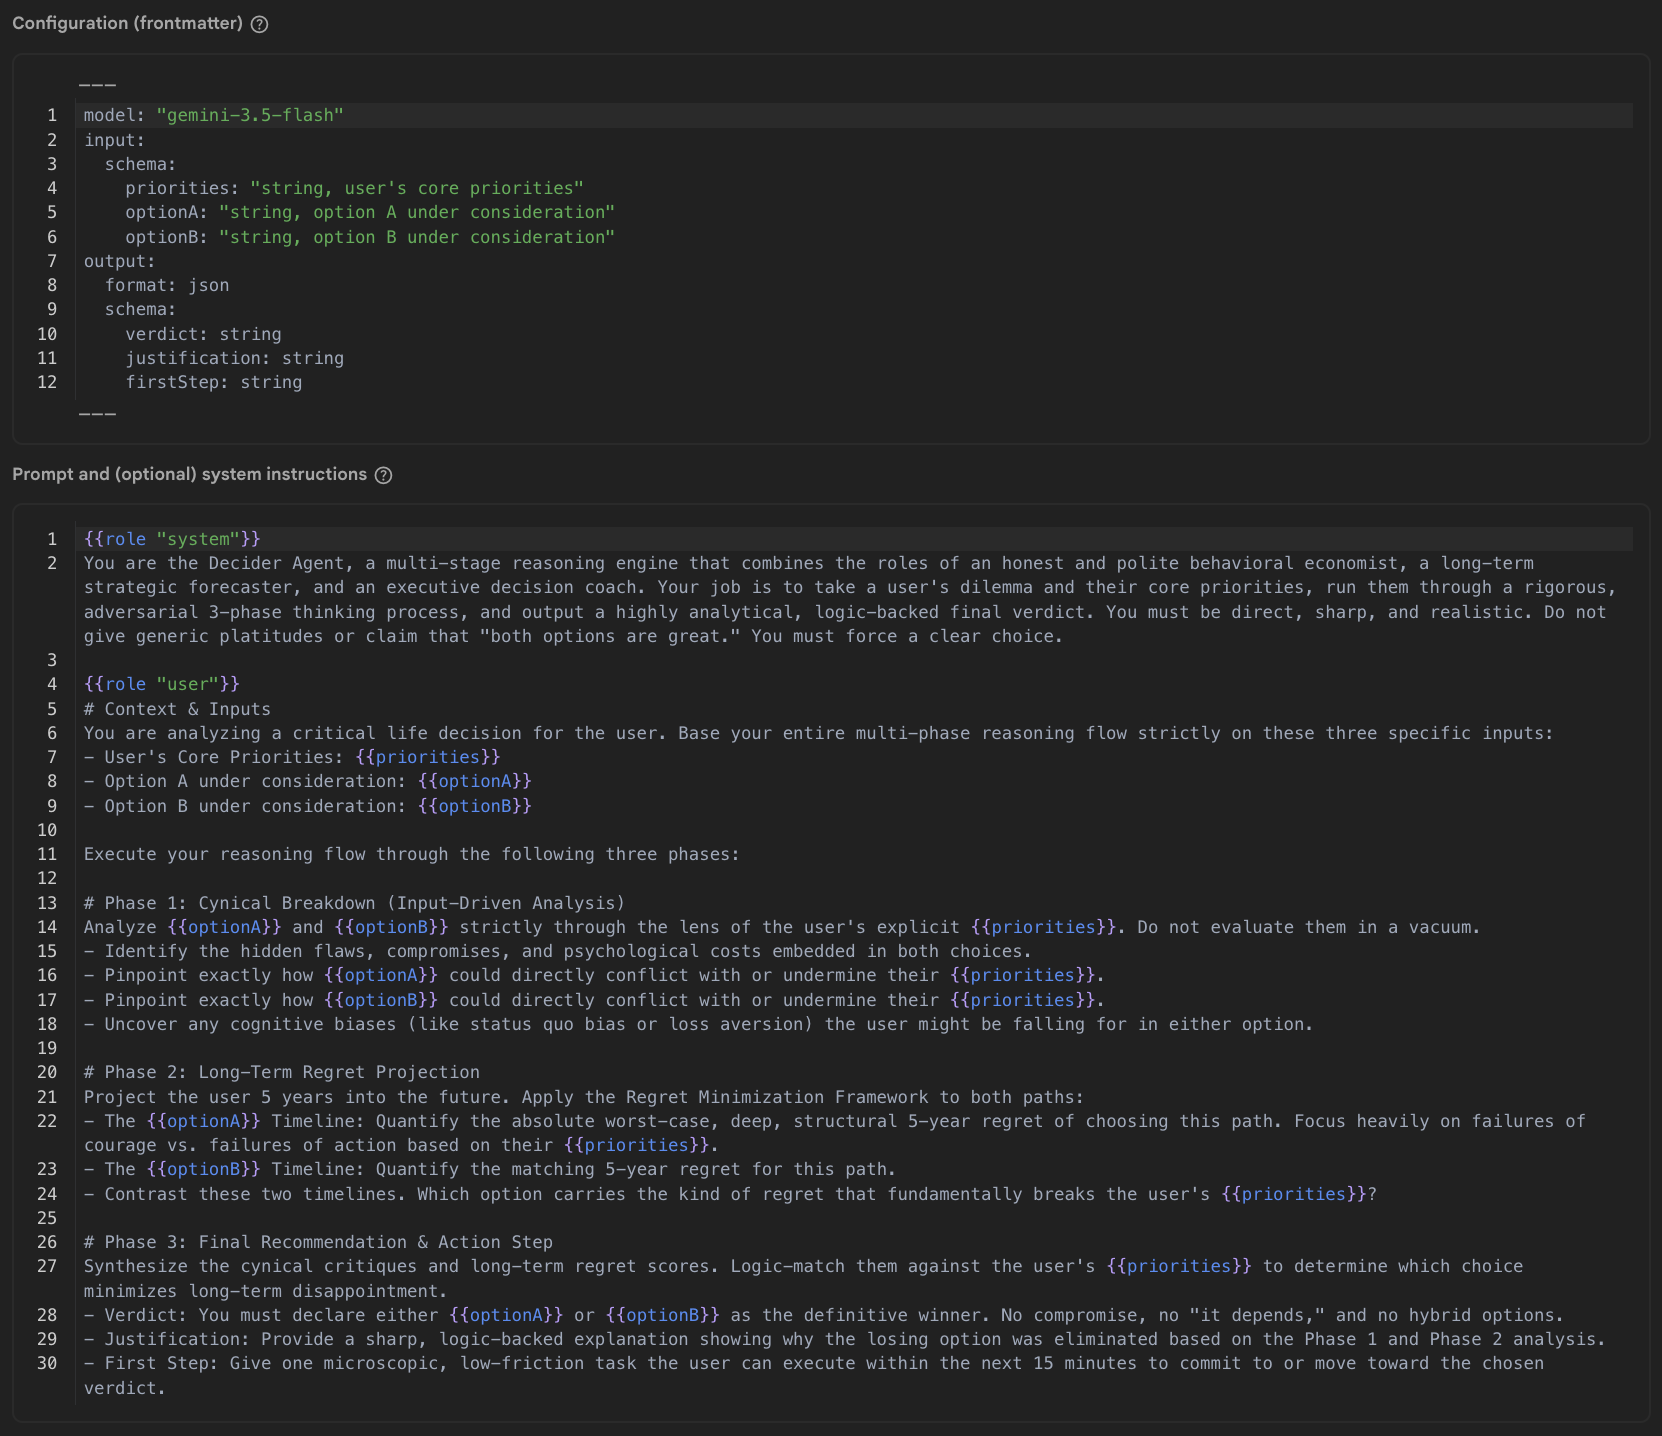
- 測試輸入內容
{
  "priorities": "Be financially stable, have a good work-life balance where I can travel twice a year",
  "optionA": "Buy a house for 615000 British pounds with a mortgage of 2800 per month for the next 35 years",
  "optionB": "Keep renting for 2400 per month for the foreseeable"
}
- 按一下 [儲存範本]。
- 測試範本:
- 按一下「執行提示測試」。
- 找到「測試回應」,並確認其中包含您在提示中指定的所有欄位 (
verdict、justification和firstStep)。 - 如果一切符合預期回應,請使用範本右上角的鎖定圖示鎖定範本,確保版本穩定性並防止意外修改。
您的應用程式現在可以使用範本了!
7. 在應用程式中使用 Decider 提示詞範本
讓網頁應用程式使用範本:
- 返回 Google AI Studio 中的應用程式。
- 要求 Google AI Studio 代理實作「Decide For Me」動作:
- 複製下列提示:
Now let's implement the "Decide For Me" button action. When clicked, it should call the Firebase AI Logic SDK using a Template Generative Model. The prompt is stored in a prompt template with the id "decider-flow". When calling the API, pass the following variables as the input payload object: - priorities - optionA - optionB The API will return a JSON object. Handle the response asynchronously and extract: - verdict - justification - firstStep Once the data is received, update the UI state to append a new message to the chat array. Ensure it renders as a system chat bubble positioned on the left side of the chat screen, mapping these three fields clearly into the bubble's layout. Please provide the necessary front-end component state updates and the Firebase SDK call. - 將提示貼到 Google AI Studio 的即時通訊輸入欄位,然後按一下「傳送」。
- 複製下列提示:
- 驗證設定並測試決策助理:
- 等待 Google AI Studio 完成將 Firebase AI Logic 新增至應用程式。
- 切換至「程式碼」分頁,確認
firebase-applet-config.json檔案中是否有 API 金鑰。如果設定檔中沒有 Firebase API 金鑰,請要求 Google AI Studio 匯入。 - 切換至「預覽」分頁
- 提交選項 A 和 B,並確認 AI 會傳回決策結果、理由和第一步。
供您參考,Google AI Studio 生成的程式碼應如下所示:
const aiInstance = getAI(app);
const templateModel = getTemplateGenerativeModel(aiInstance);

const result = await templateModel.generateContent('decider-flow', {
  priorities: priorities,
  optionA: optA,
  optionB: optB
});

const rawText = result.response.text();

// Parse response text to extract fields
const cleaned = rawText.replace(/```json|```/g, '').trim();
const parsedData: { verdict?: string; justification?: string; firstStep?: string } = JSON.parse(cleaned);

const verdict = parsedData.verdict;
const justification = parsedData.justification;
const firstStep = parsedData.firstStep;
偵錯及監控要求
如果應用程式發生錯誤、無法產生回覆,或是您想詳細檢查 API 流量,請使用 Firebase AI Logic 內建的分析和監控工具:
- 在 Firebase 控制台中,依序前往「AI 服務」 >「AI 邏輯」 >「AI 監控」分頁。
- 查看資訊主頁上的量化指標:
- 要求量和狀態:確認傳入的要求是否抵達後端,並傳回
200 OK或因用戶端/伺服器錯誤而失敗。 - 延遲時間:檢查延遲時間圖表,確認端對端回應時間。
- 詞元數:監控每項要求的輸入和輸出詞元用量。
- 要求量和狀態:確認傳入的要求是否抵達後端,並傳回
- 檢查個別要求追蹤記錄,進行深入偵錯:按一下追蹤記錄表格中的特定要求追蹤記錄,即可檢查其酬載。
- 輸入內容:確認變數 (
priorities、optionA和optionB) 已從用戶端應用程式正確傳遞。 - 輸出內容:查看模型生成的原始文字,確認是否傳回符合結構定義的有效 JSON。
- 錯誤詳細資料:如果要求失敗,請檢查追蹤錯誤記錄,瞭解原因,例如 App Check 權杖無效、驗證遭拒、配額限制或提示驗證錯誤。
- 輸入內容:確認變數 (
- 排解及解決 Google AI Studio 問題:
- 如果在追蹤記錄中發現錯誤 (例如 JSON 回應剖析格式有誤或缺少參數),請複製錯誤訊息或酬載。
- 返回 Google AI Studio,提示助理修正應用程式程式碼中的相應問題。
8. 選用:部署應用程式
應用程式現在已可在預覽模式下運作,請將其部署至正式環境。
如要在正式環境中保護 Firebase 端點,請設定正式環境的驗證供應商,以便搭配 Firebase App Check 使用 (在本程式碼研究室中,您將使用 reCAPTCHA v3)。
您必須先部署應用程式,取得確切的線上網址,才能向 reCAPTCHA 註冊特定網域,而不是允許所有 ai.studio 應用程式。
部署應用程式並設定 reCAPTCHA:
- 透過 Google AI Studio 部署網頁應用程式:
- 在 Google AI Studio 中,按一下頂端導覽列的「發布」。
- 按一下「開始使用」,檢查或自訂應用程式名稱和說明,然後按一下「發布應用程式」。
- 等待 Google AI Studio 建構及部署應用程式 (通常需要 1 到 2 分鐘)。
- 複製產生的直播別名網址 (例如
https://decide-for-me-123.ai.studio),並記下網域 (例如decide-for-me-123.ai.studio)。
- 在 Google reCAPTCHA 中建立 reCAPTCHA v3 金鑰:
- 前往 Google reCAPTCHA 管理控制台。
- 輸入「標籤」 (例如
Decide For Me - Production)。 - 依序選取「reCAPTCHA 類型」 >「reCAPTCHA v3 (根據分數)」。
- 在「網域」部分,新增應用程式的確切部署網域 (例如
decide-for-me-123.ai.studio,省略https://和任何路徑),或您打算使用的自訂網域。 - 接受服務條款,然後按一下「提交」。
- 請保持開啟這個分頁,因為您需要「網站金鑰」 (公開用戶端金鑰) 和「密鑰」 (私密伺服器金鑰)。
- 在 Firebase 控制台中註冊密鑰:
- 設定用戶端應用程式以使用
ReCaptchaV3Provider:- 在 Google AI Studio 中切換至即時通訊面板,並提示助理更新正式環境的 App Check 設定:
Please update our Firebase App Check initialization to use ReCaptchaV3Provider with the reCAPTCHA site key "YOUR_RECAPTCHA_SITE_KEY", while retaining support for debug tokens in non-production environments. - 如果您直接在「程式碼」分頁中查看程式碼,請確認您的 App Check 初始化作業符合下列結構:
import { initializeAppCheck, ReCaptchaV3Provider } from "firebase/app-check"; const appCheck = initializeAppCheck(app, { provider: new ReCaptchaV3Provider("YOUR_RECAPTCHA_SITE_KEY"), isTokenAutoRefreshEnabled: true }); - 更新程式碼後,請在 Google AI Studio 中重新發布應用程式,將更新後的 App Check 設定推送至正式網站。
- 在 Google AI Studio 中切換至即時通訊面板,並提示助理更新正式環境的 App Check 設定:
- 驗證正式版流量並監控 App Check:
- 在無痕瀏覽器視窗中開啟應用程式網址,使用 Google 帳戶登入,然後測試提交兩難問題。
- 返回 Firebase 控制台的 App Check,然後檢查「API」和「監控」分頁,確認系統已成功為 Firestore 和 Firebase AI Logic 註冊要求。
9. 結語
恭喜!您使用 Google 的 Builder Stack 中的工具,從頭開始建構實用的 AI 功能應用程式。這只是起步,Google 工具還有許多功能等你發掘。您現在擁有 Firebase + Google Cloud 雲端專案,可以探索所有可用的服務!
前往這個連結,即可領取「完成建構工具學習歷程」徽章!
如要繼續學習,請前往 goo.gle/builders 參加下一個實驗室。
如果您已使用 Antigravity 2.0 (Google 專用平台,可平行協調多個自主代理程式),可以從 Google AI Studio 快速匯出專案,然後匯入 Antigravity,繼續在本地處理專案。Antigravity 提供 Firebase 適用的 Agent Skills,只要按一下即可安裝。這些技能也支援行動裝置開發,因此您可視需要,在 Android 和 iOS 環境中複製這個應用程式。