
1. מבוא
בשיעור ה-codelab הזה תלמדו איך להשתמש ב-Python SDK של Conversational Analytics (CA) API עם מקור נתונים של BigQuery. תלמדו איך ליצור סוכן חדש, איך להשתמש בניהול מצב השיחה ואיך לשלוח תשובות מה-API ולהזרים אותן.
דרישות מוקדמות
- הבנה בסיסית של Google Cloud ומסוף Google Cloud
- מיומנויות בסיסיות בממשק שורת הפקודה וב-Cloud Shell
- מיומנות בסיסית בתכנות ב-Python
מה תלמדו
- איך משתמשים ב-Python SDK של Conversational Analytics API עם מקור נתונים של BigQuery
- איך יוצרים סוכן חדש באמצעות CA API
- איך משתמשים בניהול מצב השיחה
- איך שולחים ומזרמים תגובות מה-API
מה תצטרכו
- חשבון Google Cloud ופרויקט בענן של Google Cloud
- דפדפן אינטרנט כמו Chrome
2. הגדרה ודרישות
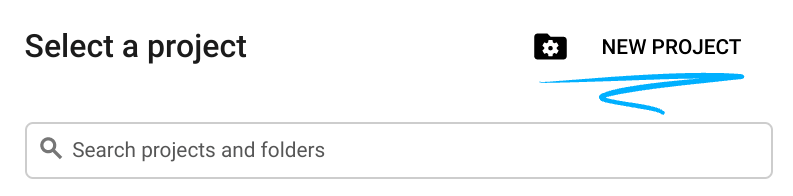
בחירת פרויקט
- נכנסים ל-מסוף Google Cloud ויוצרים פרויקט חדש או משתמשים בפרויקט קיים. אם עדיין אין לכם חשבון Gmail או Google Workspace, אתם צריכים ליצור חשבון.

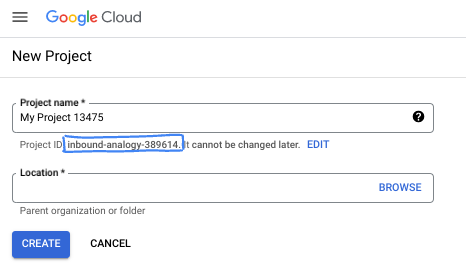
- שם הפרויקט הוא השם המוצג של הפרויקט הזה למשתתפים. זו מחרוזת תווים שלא נמצאת בשימוש ב-Google APIs. תמיד אפשר לעדכן את המיקום.
- מזהה הפרויקט הוא ייחודי לכל הפרויקטים ב-Google Cloud ואי אפשר לשנות אותו אחרי שהוא מוגדר. מסוף Cloud יוצר באופן אוטומטי מחרוזת ייחודית, ובדרך כלל לא צריך לדעת מה היא. ברוב ה-Codelabs, תצטרכו להפנות למזהה הפרויקט (בדרך כלל מסומן כ-
PROJECT_ID). אם אתם לא אוהבים את המזהה שנוצר, אתם יכולים ליצור מזהה אקראי אחר. אפשר גם לנסות שם משתמש משלכם ולבדוק אם הוא זמין. אי אפשר לשנות את ההגדרה הזו אחרי השלב הזה, והיא תישאר לאורך הפרויקט. - לידיעתכם, יש ערך שלישי, מספר פרויקט, שחלק מממשקי ה-API משתמשים בו. במאמרי העזרה מפורט מידע נוסף על שלושת הערכים האלה.
- בשלב הבא, תצטרכו להפעיל את החיוב במסוף Cloud כדי להשתמש במשאבי Cloud או בממשקי API של Cloud. השלמת ה-codelab הזה לא תעלה לכם הרבה, אם בכלל. כדי להשבית את המשאבים ולמנוע חיובים נוספים אחרי שתסיימו את המדריך הזה, תוכלו למחוק את המשאבים שיצרתם או למחוק את הפרויקט. משתמשים חדשים ב-Google Cloud זכאים לתוכנית תקופת ניסיון בחינם בשווי 300$.
מפעילים את Cloud Shell
אפשר להפעיל את Google Cloud מרחוק מהמחשב הנייד, אבל ב-codelab הזה תשתמשו ב-Google Cloud Shell, סביבת שורת פקודה שפועלת בענן.
ב-מסוף Google Cloud, לוחצים על סמל Cloud Shell בסרגל הכלים שבפינה הימנית העליונה:

יחלפו כמה רגעים עד שההקצאה והחיבור לסביבת העבודה יושלמו. בסיום התהליך, אמור להופיע משהו כזה:

המכונה הווירטואלית הזו כוללת את כל הכלים שדרושים למפתחים. יש בה ספריית בית בנפח מתמיד של 5GB והיא פועלת ב-Google Cloud, מה שמשפר מאוד את הביצועים והאימות ברשת. אפשר לבצע את כל העבודה ב-codelab הזה בדפדפן. לא צריך להתקין שום דבר.
3. לפני שמתחילים
הפעלת ממשקי ה-API הנדרשים
כדי להשתמש בשירותי Google Cloud, צריך קודם להפעיל את ממשקי ה-API המתאימים לפרויקט. ב-codelab הזה תשתמשו בשירותים הבאים של Google Cloud:
- Data Analytics API עם Gemini
- Gemini ל-Google Cloud
- BigQuery API
כדי להפעיל את השירותים האלה, מריצים את הפקודות הבאות בטרמינל של Cloud Shell:
gcloud services enable geminidataanalytics.googleapis.com
gcloud services enable cloudaicompanion.googleapis.com
gcloud services enable bigquery.googleapis.com
התקנת חבילות Python
לפני שמתחילים פרויקט Python, מומלץ ליצור סביבה וירטואלית. כך מבודדים את התלויות של הפרויקט ומונעים התנגשויות עם פרויקטים אחרים או עם חבילות Python גלובליות של המערכת. בקטע הזה נתקין את uv מ-pip, כי pip כבר זמין ב-Cloud Shell.
התקנת חבילת uv
pip install uv
בדיקה אם uv מותקן בצורה נכונה
uv --version
הפלט הצפוי
אם מופיעה שורת פלט עם uv, אפשר להמשיך לשלב הבא. שימו לב: מספר הגרסה עשוי להשתנות:

יצירת סביבה וירטואלית והתקנת חבילות
uv init ca-api-codelab
cd ca-api-codelab
uv venv --python 3.12
uv add google-cloud-geminidataanalytics pandas altair
uv pip list | grep -E 'altair|pandas|google-cloud-geminidataanalytics'
הפלט הצפוי
אם מופיעים בפלט שורות עם שלושת החבילות, אפשר להמשיך לשלב הבא. שימו לב שמספרי הגרסאות עשויים להיות שונים:

התחלת השימוש ב-Python
uv run python
המסך אמור להיראות כך:

4. יצירת סוכן
עכשיו, אחרי שהגדרתם את סביבת הפיתוח, הגיע הזמן להניח את היסודות ל-Gemini Data Analytics API. ה-SDK מפשט את התהליך הזה, ונדרשות רק כמה הגדרות חיוניות כדי ליצור את הסוכן.
הגדרת משתנים
מייבאים את חבילת geminidataanalytics ומגדירים את משתני הסביבה:
import os
from google.cloud import geminidataanalytics

data_agent_client = geminidataanalytics.DataAgentServiceClient()

location = "global"
billing_project = os.environ.get('DEVSHELL_PROJECT_ID')
data_agent_id = "google_trends_analytics_agent"
הגדרת הוראות מערכת לסוכן
ה-API של CA קורא מטא-נתונים של BigQuery כדי לקבל יותר הקשר לגבי הטבלאות והעמודות שמפנים אליהן. מכיוון שלקבוצת הנתונים הציבורית הזו אין תיאורים של עמודות, אפשר לספק הקשר נוסף לנציג כמחרוזת בפורמט YAML. אפשר לעיין במאמרי העזרה כדי לקבל מידע על שיטות מומלצות ועל תבנית לשימוש:
system_instruction = """
system_instruction:
  - You are a data analyst specializing in the Google Trends dataset.
  - When querying, always use the 'week' column for date-based filtering. This needs to be a Sunday. If you are doing week over week comparison, make sure you specify a date that is a Sunday.
  - The following columns should be ignored in all queries 'dma_id', 'refresh_date'
  - The 'dma_name' column represents the city and state for about 210 metro areas in the USA.
tables:
  top_terms:
    description: "Represents the 25 most popular search terms by weekly search volume in a given US metro area (DMA)."
    fields:
      term: "The search query string."
      week: "The start date of the week (Sunday) for which the ranking is valid."
      rank: "The term's popularity rank from 1 (most popular) to 25."
      score: "Relative search interest, where 100 is the peak popularity for the term in that week."
      dma_name: "The name of the US metro area, e.g., 'New York NY'."
  top_rising_terms:
    description: "Represents the 25 fastest-growing ('breakout') search terms by momentum in a given US metro area (DMA)."
    fields:
      term: "The surging search query string."
      week: "The start date of the week (Sunday) for which the ranking is valid."
      rank: "The term's breakout rank from 1 (top rising) to 25."
      percent_gain: "The percentage growth in search volume compared to the previous period."
      dma_name: "The name of the US metro area, e.g., 'Los Angeles CA'."
      score: "Relative search interest, where 100 is the peak popularity for the term in that week."
join_instructions:
  goal: "Find terms that are simultaneously popular and rising in the same week and metro area."
  method: "INNER JOIN the two tables on their common keys."
  keys:
    - "term"
    - "week"
    - "dma_name"
golden_queries:
  - natural_language_query: "Find all terms in the 'New York NY' area that were in both the top 25 and top 25 rising lists for the week of July 6th, 2025, and show their ranks and percent gain."
    sql_query: |
      SELECT
          top.term,
          top.rank AS top_25_rank,
          rising.rank AS rising_25_rank,
          rising.percent_gain
      FROM
          `bigquery-public-data.google_trends.top_terms` AS top
      INNER JOIN
          `bigquery-public-data.google_trends.top_rising_terms` AS rising
      ON
          top.term = rising.term
          AND top.week = rising.week
          AND top.dma_name = rising.dma_name
      WHERE
          top.week = '2025-07-06'
          AND top.dma_name = 'New York NY'
      ORDER BY
          top.rank;
"""
הגדרת מקורות נתונים של טבלאות BigQuery
עכשיו אפשר להגדיר את מקורות הנתונים של טבלה ב-BigQuery. CA API מקבל טבלאות BigQuery במערך:
# BigQuery table data sources
bq_top = geminidataanalytics.BigQueryTableReference(
    project_id="bigquery-public-data", dataset_id="google_trends", table_id="top_terms"
)
bq_rising = geminidataanalytics.BigQueryTableReference(
    project_id="bigquery-public-data", dataset_id="google_trends", table_id="top_rising_terms"
)
datasource_references = geminidataanalytics.DatasourceReferences(
    bq=geminidataanalytics.BigQueryTableReferences(table_references=[bq_top, bq_rising]))
הגדרת הקשר לצ'אט עם שמירת מצב
אתם יכולים ליצור את הסוכן החדש עם ההקשר שפורסם, שכולל את הוראות המערכת, הפניות למקורות נתונים ואפשרויות אחרות.
שימו לב: יש לכם אפשרות ליצור stagingContext כדי לבדוק ולאמת את השינויים לפני הפרסום. כך מפתח יכול להוסיף ניהול גרסאות לסוכן נתונים על ידי ציון contextVersion בבקשה לצ'אט. ב-Codelab הזה, פשוט מפרסמים ישירות:
# Context setup for stateful chat
published_context = geminidataanalytics.Context(
    system_instruction=system_instruction,
    datasource_references=datasource_references,
    options=geminidataanalytics.ConversationOptions(
        analysis=geminidataanalytics.AnalysisOptions(
            python=geminidataanalytics.AnalysisOptions.Python(
                enabled=False
            )
        )
    ),
)

data_agent = geminidataanalytics.DataAgent(
    data_analytics_agent=geminidataanalytics.DataAnalyticsAgent(
        published_context=published_context
    ),
)

# Create the agent
data_agent_client.create_data_agent(request=geminidataanalytics.CreateDataAgentRequest(
    parent=f"projects/{billing_project}/locations/{location}",
    data_agent_id=data_agent_id,
    data_agent=data_agent,
))
אחרי שיוצרים את הסוכן, הפלט אמור להיראות כך:

קבלת הנציג
כדאי לבדוק את הנציג כדי לוודא שהוא נוצר:
# Test the agent
request = geminidataanalytics.GetDataAgentRequest(
    name=data_agent_client.data_agent_path(
        billing_project, location, data_agent_id)
)
response = data_agent_client.get_data_agent(request=request)
print(response)
הנתונים האלה אמורים להופיע בסוכן החדש. המידע הזה יכלול פרטים כמו שעת היצירה והקשר של הסוכן בהוראות המערכת ובמקורות הנתונים.
5. יצירת שיחה
עכשיו אתם מוכנים ליצור את השיחה הראשונה שלכם. ב-codelab הזה, תשתמשו בהפניה לשיחה כדי לנהל צ'אט עם הסוכן שלכם שכולל שמירת מצב.
לשם השוואה, ב-CA API יש דרכים שונות לנהל שיחות עם אפשרויות שונות לניהול מצב וסוכנים. הנה סיכום קצר של 3 הגישות:
מדינה | היסטוריית השיחות | Agent | Code | תיאור | |
שיחה באמצעות חומרי עזר | עם שמירת מצב | מנוהל על ידי API | כן | המשך שיחה עם שמירת מצב על ידי שליחת הודעה בצ'אט שמפנה לשיחה קיימת ולהקשר הנציג שמשויך אליה. בשיחות מרובות תפניות, Google Cloud מאחסנת ומנהלת את היסטוריית השיחות. | |
צ'אט באמצעות הפניה לסוכן נתונים | בלי שמירת מצב | בניהול המשתמשים | כן | שליחת הודעה בצ'אט בלי שמירת מצב, עם הפניה לסוכן נתונים שנשמר כדי לספק הקשר. בשיחות מרובות תורות, האפליקציה צריכה לנהל את היסטוריית השיחה ולספק אותה בכל בקשה. | |
שיחה באמצעות הקשר מוטבע | בלי שמירת מצב | בניהול המשתמשים | לא | שליחת הודעת צ'אט בלי שמירת מצב על ידי ציון כל ההקשר ישירות בבקשה, בלי להשתמש בסוכן נתונים שמור. בשיחות מרובות תורות, האפליקציה צריכה לנהל את היסטוריית השיחה ולספק אותה בכל בקשה. |
תצטרכו ליצור פונקציה כדי להגדיר את השיחה ולספק מזהה ייחודי לשיחה:
def setup_conversation(conversation_id: str):
    data_chat_client = geminidataanalytics.DataChatServiceClient()
    conversation = geminidataanalytics.Conversation(
        agents=[data_chat_client.data_agent_path(
            billing_project, location, data_agent_id)],
    )
    request = geminidataanalytics.CreateConversationRequest(
        parent=f"projects/{billing_project}/locations/{location}",
        conversation_id=conversation_id,
        conversation=conversation,
    )
    try:
        data_chat_client.get_conversation(name=data_chat_client.conversation_path(
            billing_project, location, conversation_id))
        print(f"Conversation '{conversation_id}' already exists.")
    except Exception:
        response = data_chat_client.create_conversation(request=request)
        print("Conversation created successfully:")
        print(response)


conversation_id = "my_first_conversation"
setup_conversation(conversation_id=conversation_id)
תופיע הודעה שהשיחה נוצרה בהצלחה.
6. הוספת פונקציות בסיסיות
כמעט סיימתם את ההכנות לשיחה עם הנציג. לפני שנעשה את זה, נוסיף כמה פונקציות בסיסיות שיעזרו לנו לעצב את ההודעות כדי שיהיה קל יותר לקרוא אותן, וגם כדי לרנדר את ההדמיות. ממשק ה-API של רשות האישורים ישלח מפרט vega שאפשר לשרטט באמצעות חבילת altair:
# Utility functions for streaming and formatting responses
import altair as alt
import http.server
import pandas as pd
import proto
import socketserver
import threading

_server_thread = None
_httpd = None


# Prints a formatted section title
def display_section_title(text):
    print(f"\n--- {text.upper()} ---")


# Handles and displays data responses
def handle_data_response(resp):
    if "query" in resp:
        query = resp.query
        display_section_title("Retrieval query")
        print(f"Query name: {query.name}")
        print(f"Question: {query.question}")
        print("Data sources:")
        for datasource in query.datasources:
            display_datasource(datasource)
    elif "generated_sql" in resp:
        display_section_title("SQL generated")
        print(resp.generated_sql)
    elif "result" in resp:
        display_section_title("Data retrieved")
        fields = [field.name for field in resp.result.schema.fields]
        d = {field: [] for field in fields}
        for el in resp.result.data:
            for field in fields:
                d[field].append(el[field])
        print(pd.DataFrame(d))


# Starts a local web server to preview charts
def preview_in_browser(port: int = 8080):
    """Starts a web server in a background thread and waits for user to stop it."""
    global _server_thread, _httpd
    if _server_thread and _server_thread.is_alive():
        print(
            f"\n--> A new chart was generated. Refresh your browser at http://localhost:{port}")
        return
    Handler = http.server.SimpleHTTPRequestHandler
    socketserver.TCPServer.allow_reuse_address = True
    try:
        _httpd = socketserver.TCPServer(("", port), Handler)
    except OSError as e:
        print(f"❌ Could not start server on port {port}: {e}")
        return
    _server_thread = threading.Thread(target=_httpd.serve_forever)
    _server_thread.daemon = False
    _server_thread.start()
    print("\n" + "=" * 60)
    print(" 📈 CHART READY - PREVIEW IN BROWSER ".center(60))
    print("=" * 60)
    print(
        f"1. In the Cloud Shell toolbar, click 'Web Preview' and select port {port}.")
    print(f"2. Or, open your local browser to http://localhost:{port}")
    print("=" * 60)
    try:
        input(
            "\n--> Press Enter here after viewing all charts to shut down the server...\n\n")
    finally:
        print("Shutting down server...")
        _httpd.shutdown()
        _server_thread.join()
        _httpd, _server_thread = None, None
        print("Server stopped.")


# Handles chart responses
def handle_chart_response(resp, chart_generated_flag: list):
    def _value_to_dict(v):
        if isinstance(v, proto.marshal.collections.maps.MapComposite):
            return {k: _value_to_dict(v[k]) for k in v}
        elif isinstance(v, proto.marshal.collections.RepeatedComposite):
            return [_value_to_dict(el) for el in v]
        return v
    if "query" in resp:
        print(resp.query.instructions)
    elif "result" in resp:
        vega_config_dict = _value_to_dict(resp.result.vega_config)
        chart = alt.Chart.from_dict(vega_config_dict)
        chart_filename = "index.html"
        chart.save(chart_filename)
        if chart_generated_flag:
            chart_generated_flag[0] = True


# Displays the schema of a data source
def display_schema(data):
    fields = getattr(data, "fields")
    df = pd.DataFrame({
        "Column": [f.name for f in fields],
        "Type": [f.type for f in fields],
        "Description": [getattr(f, "description", "-") for f in fields],
        "Mode": [f.mode for f in fields],
    })
    print(df)


# Displays information about a BigQuery data source
def display_datasource(datasource):
    table_ref = datasource.bigquery_table_reference
    source_name = f"{table_ref.project_id}.{table_ref.dataset_id}.{table_ref.table_id}"
    print(source_name)
    display_schema(datasource.schema)


# Handles and displays schema resolution responses
def handle_schema_response(resp):
    if "query" in resp:
        print(resp.query.question)
    elif "result" in resp:
        display_section_title("Schema resolved")
        print("Data sources:")
        for datasource in resp.result.datasources:
            display_datasource(datasource)


# Handles and prints simple text responses
def handle_text_response(resp):
    parts = resp.parts
    print("".join(parts))


# Processes and displays different types of system messages
def show_message(msg, chart_generated_flag: list):
    m = msg.system_message
    if "text" in m:
        handle_text_response(getattr(m, "text"))
    elif "schema" in m:
        handle_schema_response(getattr(m, "schema"))
    elif "data" in m:
        handle_data_response(getattr(m, "data"))
    elif "chart" in m:
        handle_chart_response(getattr(m, "chart"), chart_generated_flag)
    print("\n")
7. יצירת פונקציית צ'אט
השלב האחרון הוא ליצור פונקציית צ'אט שאפשר לעשות בה שימוש חוזר, ולקרוא לפונקציה show_message לכל מקטע בזרם התגובה:
def stream_chat_response(question: str):
    """
    Sends a chat request, processes the streaming response, and if a chart
    was generated, starts the preview server and waits for it to be closed.
    """
    data_chat_client = geminidataanalytics.DataChatServiceClient()
    chart_generated_flag = [False]
    messages = [
        geminidataanalytics.Message(
            user_message=geminidataanalytics.UserMessage(text=question)
        )
    ]
    conversation_reference = geminidataanalytics.ConversationReference(
        conversation=data_chat_client.conversation_path(
            billing_project, location, conversation_id
        ),
        data_agent_context=geminidataanalytics.DataAgentContext(
            data_agent=data_chat_client.data_agent_path(
                billing_project, location, data_agent_id
            ),
        ),
    )
    request = geminidataanalytics.ChatRequest(
        parent=f"projects/{billing_project}/locations/{location}",
        messages=messages,
        conversation_reference=conversation_reference,
    )
    stream = data_chat_client.chat(request=request)
    for response in stream:
        show_message(response, chart_generated_flag)
    if chart_generated_flag[0]:
        preview_in_browser()
הפונקציה stream_chat_response מוגדרת ומוכנה לשימוש בהנחיות.
8. התחלת צ'אט
שאלה 1
עכשיו אפשר להתחיל לשאול שאלות. בואו נראה מה הסוכן הזה יכול לעשות:
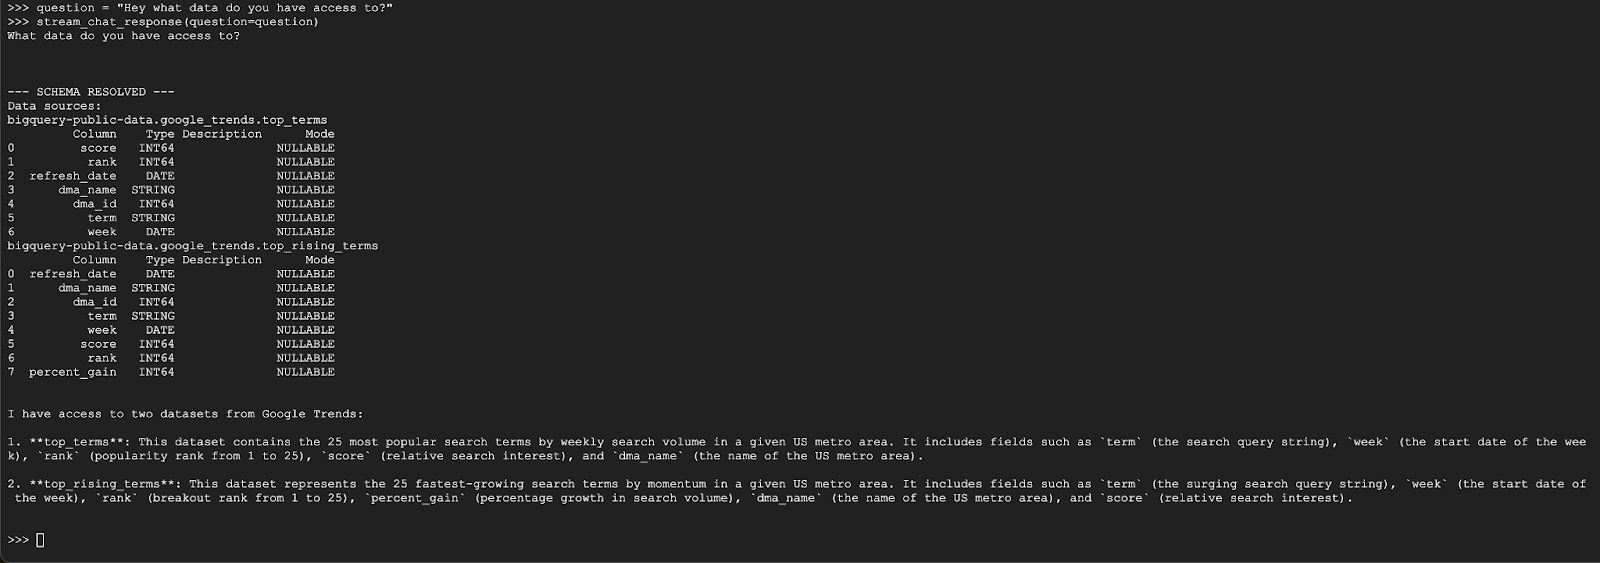
question = "Hey what data do you have access to?"
stream_chat_response(question=question)
הסוכן צריך להשיב עם משהו דומה למה שמופיע בהמשך:
שאלה 2
מעולה, בוא ננסה למצוא מידע נוסף על מונחי החיפוש הפופולריים האחרונים:
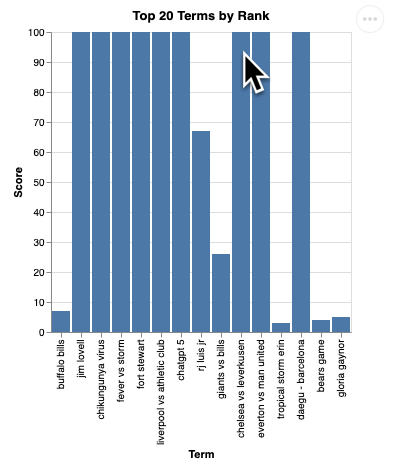
question = "What are the top 20 most popular search terms last week in NYC based on rank? Display each term and score as a column chart"
stream_chat_response(question=question)
הפעולה הזו תימשך כמה רגעים. אפשר לראות את הסוכן מבצע שלבים שונים ומעדכן אתכם בזמן אמת, החל מאחזור הסכימה והמטא-נתונים, כתיבת שאילתת ה-SQL, קבלת התוצאות, ציון הוראות להצגת התוצאות בצורה ויזואלית וסיכום התוצאות.
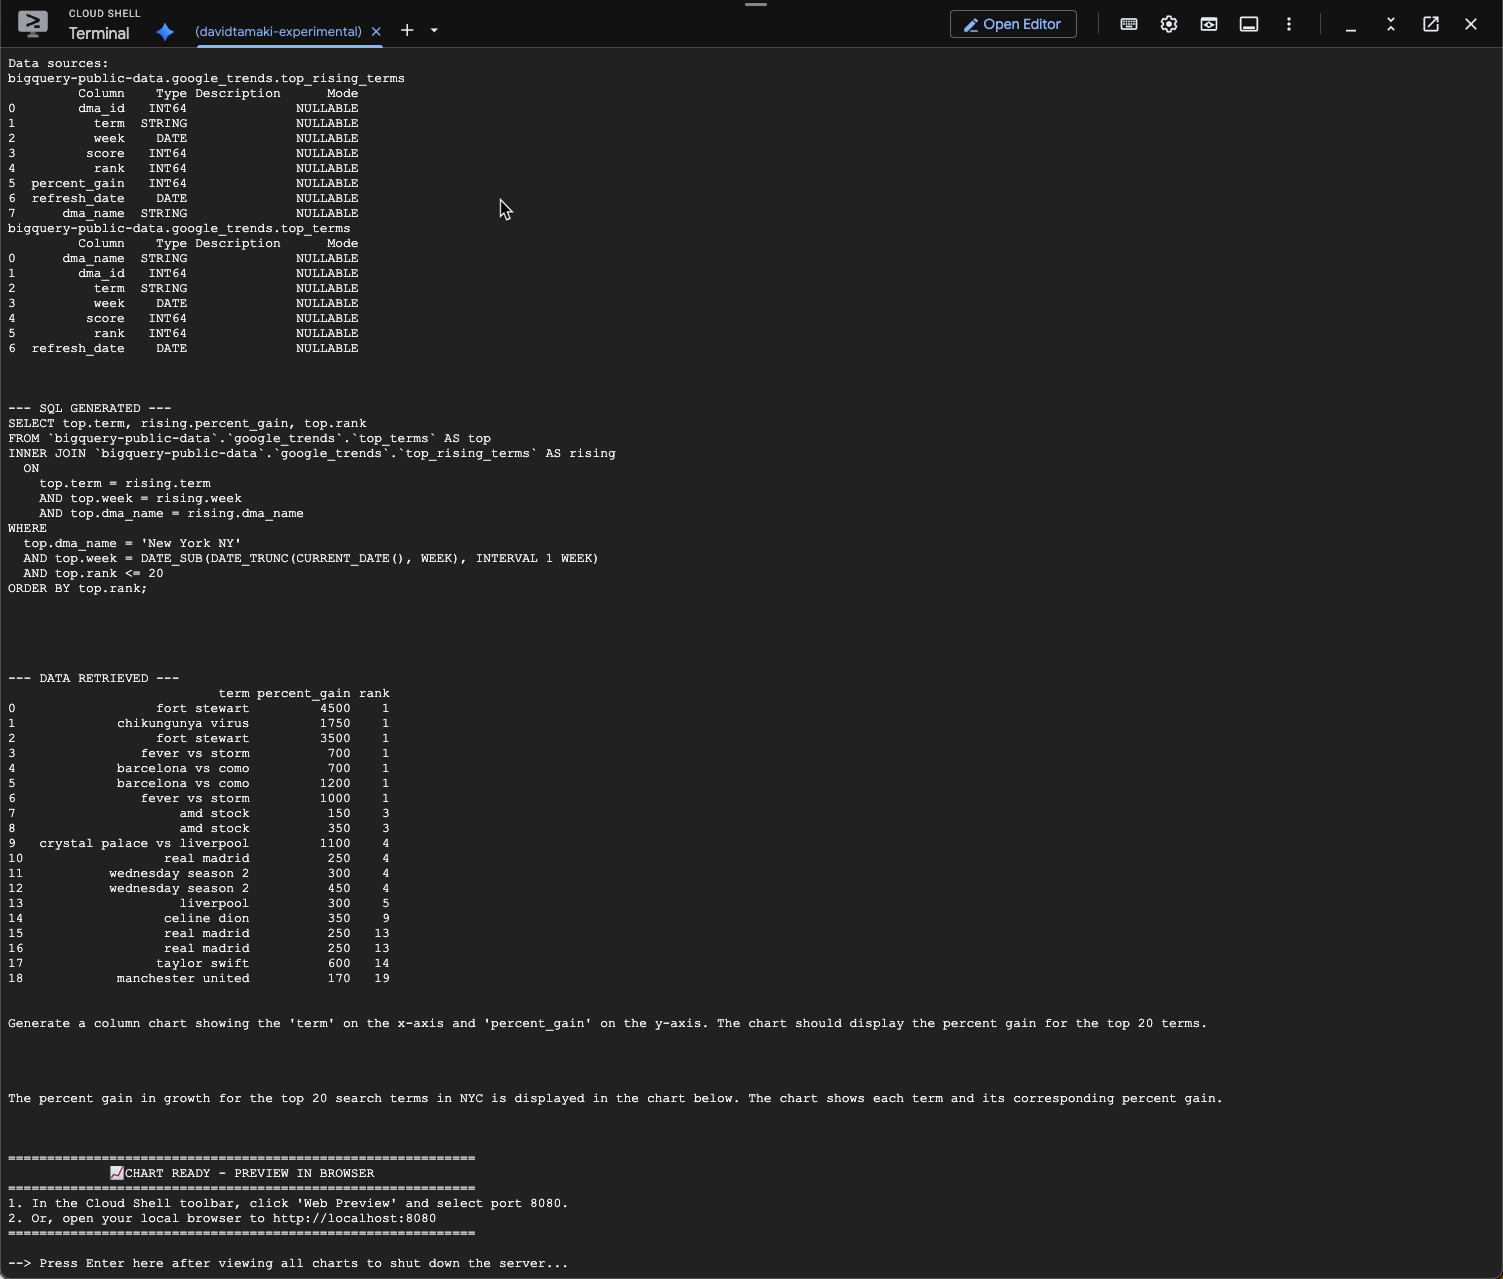
כדי לראות את התרשים, עוברים לסרגל הכלים של Cloud Shell, לוחצים על 'תצוגה מקדימה באינטרנט' ובוחרים ביציאה 8080:
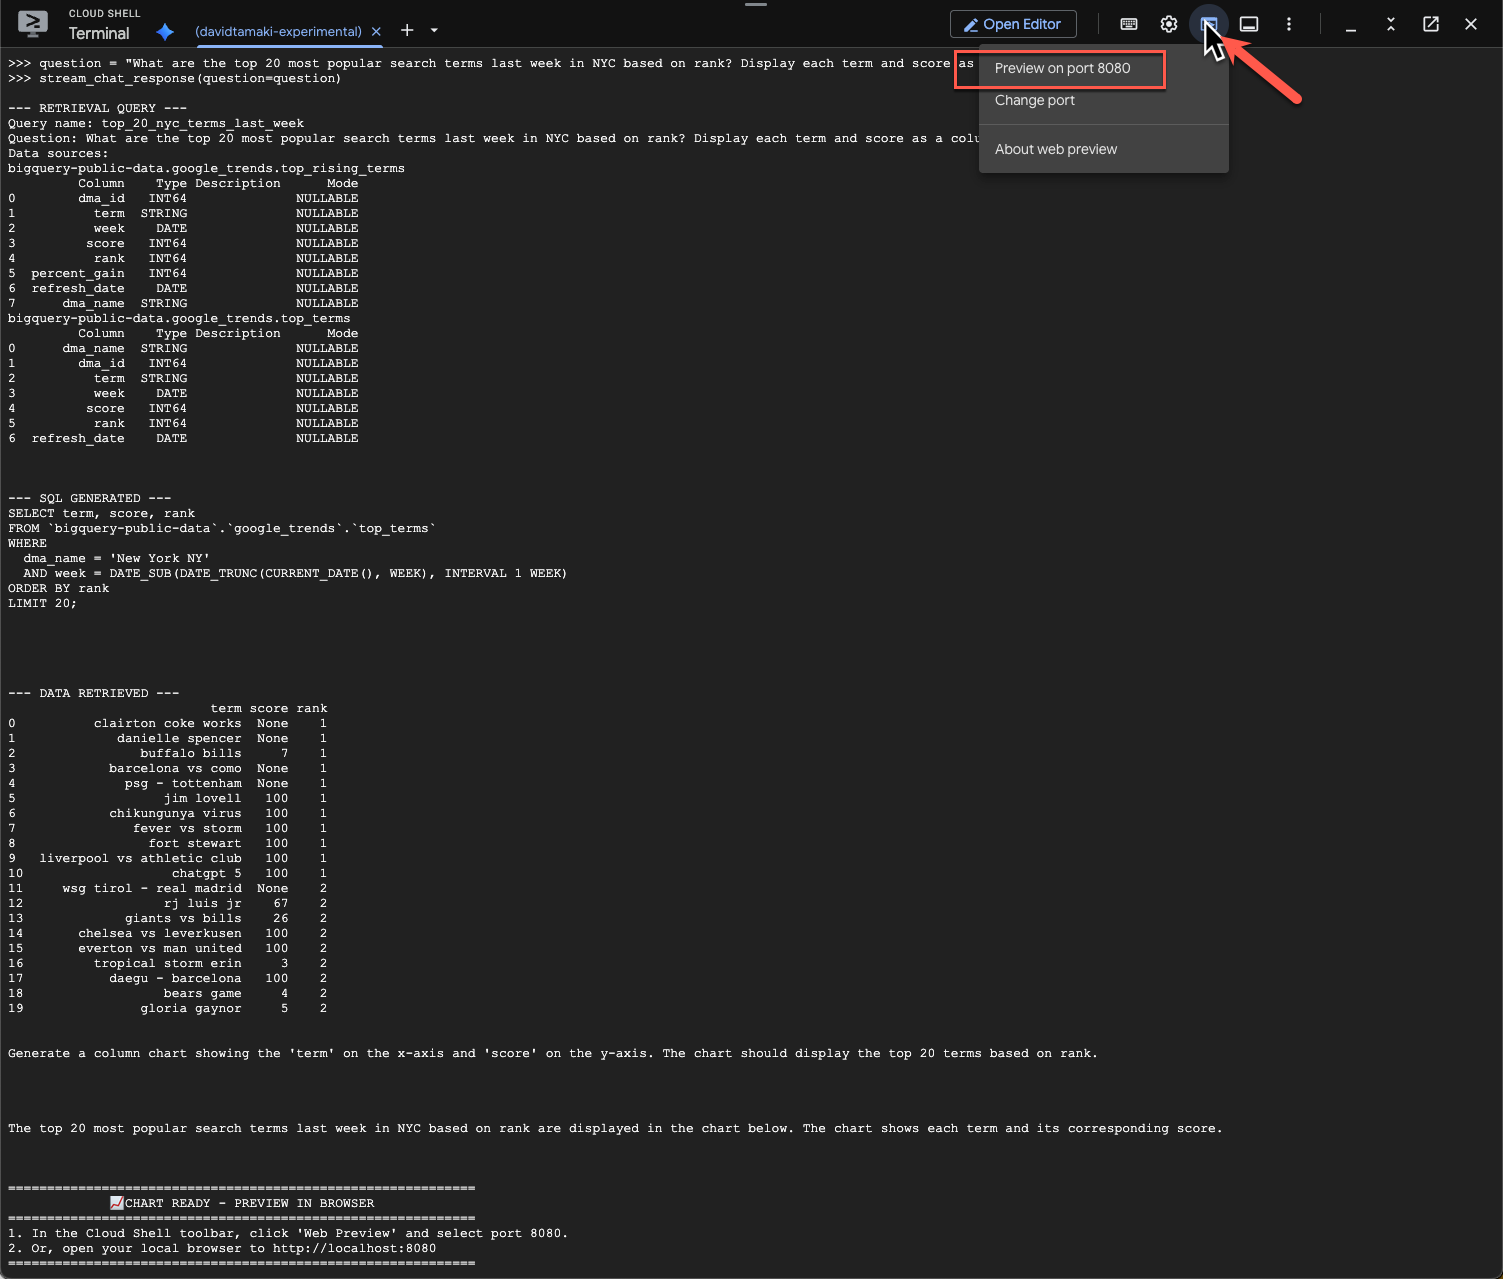
ההדמיה אמורה להיראות כך:
מקישים על Enter כדי לכבות את השרת ולהמשיך.
שאלה 3
ננסה לשאול שאלת המשך כדי להתעמק בתוצאות האלה:
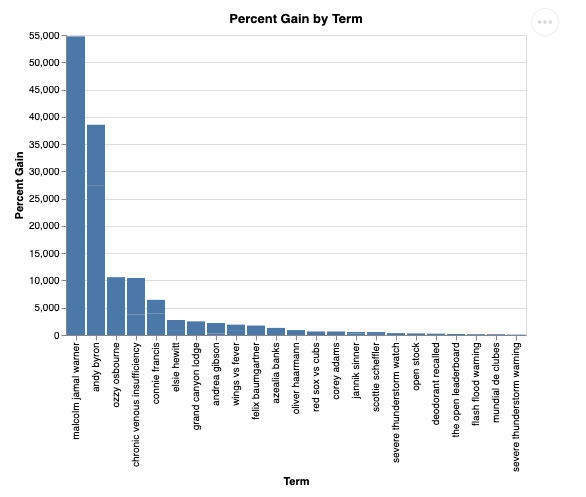
question = "What was the percent gain in growth for these search terms from the week before?"
stream_chat_response(question=question)
התוצאה אמורה להיות דומה לתוצאה שמוצגת למטה. במקרה הזה, הסוכן יצר שאילתה לצירוף 2 הטבלאות כדי למצוא את אחוז העלייה. שימו לב: יכול להיות שהשאילתה שלכם תיראה קצת שונה:
הדוח ייראה כך:
9. הסרת המשאבים
ב-codelab הזה לא נעשה שימוש במוצרים שפועלים לאורך זמן, ולכן מספיק להפסיק את סשן Python הפעיל על ידי הזנת exit() במסוף.
מחיקת תיקיות וקבצים של פרויקט
אם רוצים להסיר את הקוד מסביבת Cloud Shell, משתמשים בפקודות הבאות:
cd ~
rm -rf ca-api-codelab
השבתת ממשקי API
כדי להשבית את ממשקי ה-API שהופעלו קודם, מריצים את הפקודה הזו
gcloud services disable geminidataanalytics.googleapis.com
gcloud services disable cloudaicompanion.googleapis.com
gcloud services disable bigquery.googleapis.com
10. סיכום
יצרתם בהצלחה סוכן פשוט לניתוח נתוני שיחות באמצעות ה-SDK של CA. מידע נוסף זמין בחומרי העזר.