
1. परिचय
इस कोडलैब में, आपको BigQuery डेटा सोर्स के साथ Conversational Analytics (CA) API के Python SDK का इस्तेमाल करने का तरीका बताया जाएगा. आपको नया एजेंट बनाने, बातचीत की स्थिति को मैनेज करने, और एपीआई से जवाब भेजने और स्ट्रीम करने का तरीका बताया जाएगा.
ज़रूरी शर्तें
- Google Cloud और Google Cloud Console की बुनियादी जानकारी
- कमांड लाइन इंटरफ़ेस और Cloud Shell में बुनियादी कौशल
- Python प्रोग्रामिंग की बुनियादी जानकारी
आपको क्या सीखने को मिलेगा
- BigQuery डेटा सोर्स के साथ Conversational Analytics API Python SDK का इस्तेमाल करने का तरीका
- CA API का इस्तेमाल करके नया एजेंट बनाने का तरीका
- बातचीत की स्थिति को मैनेज करने की सुविधा का इस्तेमाल कैसे करें
- एपीआई से जवाब भेजने और स्ट्रीम करने का तरीका
आपको इन चीज़ों की ज़रूरत होगी
- Google Cloud खाता और Google Cloud प्रोजेक्ट
- कोई वेब ब्राउज़र, जैसे कि Chrome
2. सेटअप और ज़रूरी शर्तें
कोई प्रोजेक्ट चुनें
- Google Cloud Console में साइन इन करें और नया प्रोजेक्ट बनाएं या किसी मौजूदा प्रोजेक्ट का फिर से इस्तेमाल करें. अगर आपके पास पहले से कोई Gmail या Google Workspace खाता नहीं है, तो आपको एक खाता बनाना होगा.

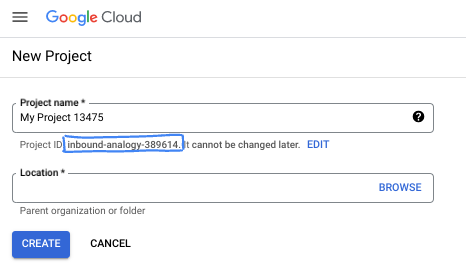
- प्रोजेक्ट का नाम, इस प्रोजेक्ट में हिस्सा लेने वाले लोगों के लिए डिसप्ले नेम होता है. यह एक वर्ण स्ट्रिंग है, जिसका इस्तेमाल Google API नहीं करते. इसे कभी भी अपडेट किया जा सकता है.
- प्रोजेक्ट आईडी, सभी Google Cloud प्रोजेक्ट के लिए यूनीक होता है. साथ ही, इसे बदला नहीं जा सकता. Cloud Console, यूनीक स्ट्रिंग को अपने-आप जनरेट करता है. आम तौर पर, आपको इससे कोई फ़र्क़ नहीं पड़ता कि यह क्या है. ज़्यादातर कोडलैब में, आपको अपने प्रोजेक्ट आईडी (आम तौर पर
PROJECT_IDके तौर पर पहचाना जाता है) का रेफ़रंस देना होगा. अगर आपको जनरेट किया गया आईडी पसंद नहीं है, तो कोई दूसरा रैंडम आईडी जनरेट किया जा सकता है. इसके अलावा, आपके पास अपना नाम आज़माने का विकल्प भी है. इससे आपको पता चलेगा कि वह नाम उपलब्ध है या नहीं. इस चरण के बाद, इसे बदला नहीं जा सकता. यह प्रोजेक्ट की अवधि तक बना रहता है. - आपकी जानकारी के लिए बता दें कि एक तीसरी वैल्यू भी होती है, जिसे प्रोजेक्ट नंबर कहते हैं. इसका इस्तेमाल कुछ एपीआई करते हैं. इन तीनों वैल्यू के बारे में ज़्यादा जानने के लिए, दस्तावेज़ देखें.
- इसके बाद, आपको Cloud Console में बिलिंग चालू करनी होगी, ताकि Cloud संसाधनों/एपीआई का इस्तेमाल किया जा सके. इस कोडलैब को पूरा करने में ज़्यादा समय नहीं लगेगा. इस ट्यूटोरियल के बाद बिलिंग से बचने के लिए, संसाधनों को बंद किया जा सकता है. इसके लिए, बनाए गए संसाधनों को मिटाएं या प्रोजेक्ट को मिटाएं. Google Cloud के नए उपयोगकर्ताओं को, 300 डॉलर का क्रेडिट मिलेगा. वे इसे मुफ़्त में आज़मा सकते हैं.
Cloud Shell शुरू करें
Google Cloud को अपने लैपटॉप से रिमोटली ऐक्सेस किया जा सकता है. हालांकि, इस कोडलैब में Google Cloud Shell का इस्तेमाल किया जाएगा. यह क्लाउड में चलने वाला कमांड लाइन एनवायरमेंट है.
Google Cloud Console में, सबसे ऊपर दाएं कोने में मौजूद टूलबार पर, Cloud Shell आइकॉन पर क्लिक करें:

इसे चालू करने और एनवायरमेंट से कनेक्ट करने में सिर्फ़ कुछ सेकंड लगेंगे. यह प्रोसेस पूरी होने के बाद, आपको कुछ ऐसा दिखेगा:

इस वर्चुअल मशीन में, डेवलपमेंट के लिए ज़रूरी सभी टूल पहले से मौजूद हैं. यह 5 जीबी की होम डायरेक्ट्री उपलब्ध कराता है. साथ ही, यह Google Cloud पर काम करता है. इससे नेटवर्क की परफ़ॉर्मेंस और पुष्टि करने की प्रोसेस बेहतर होती है. इस कोडलैब में मौजूद सभी टास्क, ब्राउज़र में किए जा सकते हैं. आपको कुछ भी इंस्टॉल करने की ज़रूरत नहीं है.
3. शुरू करने से पहले
ज़रूरी एपीआई चालू करना
Google Cloud की सेवाओं का इस्तेमाल करने के लिए, आपको सबसे पहले अपने प्रोजेक्ट के लिए उनसे जुड़े एपीआई चालू करने होंगे. इस कोडलैब में, Google Cloud की इन सेवाओं का इस्तेमाल किया जाएगा:
- Gemini के साथ Data Analytics API
- Google Cloud के लिए Gemini
- BigQuery API
इन सेवाओं को चालू करने के लिए, Cloud Shell टर्मिनल में ये कमांड चलाएं:
gcloud services enable geminidataanalytics.googleapis.com
gcloud services enable cloudaicompanion.googleapis.com
gcloud services enable bigquery.googleapis.com
Python पैकेज इंस्टॉल करना
किसी भी Python प्रोजेक्ट को शुरू करने से पहले, वर्चुअल एनवायरमेंट बनाना एक अच्छा तरीका है. इससे प्रोजेक्ट की डिपेंडेंसी अलग हो जाती हैं. इससे अन्य प्रोजेक्ट या सिस्टम के ग्लोबल Python पैकेज के साथ होने वाले टकराव को रोका जा सकता है. इस सेक्शन में, pip से uv इंस्टॉल किया जाएगा. ऐसा इसलिए, क्योंकि Cloud Shell में pip पहले से उपलब्ध है.
uv पैकेज इंस्टॉल करना
pip install uv
पुष्टि करें कि uv सही तरीके से इंस्टॉल किया गया है या नहीं
uv --version
अनुमानित आउटपुट
अगर आपको uv वाली आउटपुट लाइन दिखती है, तो अगले चरण पर जाएं. ध्यान दें कि वर्शन नंबर अलग-अलग हो सकता है:

वर्चुअल एनवायरमेंट बनाना और पैकेज इंस्टॉल करना
uv init ca-api-codelab
cd ca-api-codelab
uv venv --python 3.12
uv add google-cloud-geminidataanalytics pandas altair
uv pip list | grep -E 'altair|pandas|google-cloud-geminidataanalytics'
अनुमानित आउटपुट
अगर आपको तीन पैकेज के साथ आउटपुट लाइनें दिखती हैं, तो अगले चरण पर जाएं. ध्यान दें कि वर्शन नंबर अलग-अलग हो सकते हैं:

Python का इस्तेमाल शुरू करें
uv run python
आपकी स्क्रीन ऐसी दिखनी चाहिए:

4. कोई एजेंट बनाएं
अब आपका डेवलपमेंट एनवायरमेंट सेट अप हो गया है और इस्तेमाल के लिए तैयार है. इसलिए, अब Gemini Data Analytics API के लिए बुनियादी सेटअप करने का समय आ गया है. एसडीके इस प्रोसेस को आसान बनाता है. इससे एजेंट बनाने के लिए, सिर्फ़ कुछ ज़रूरी कॉन्फ़िगरेशन करने होते हैं.
वैरिएबल सेट करना
geminidataanalytics पैकेज इंपोर्ट करें और हमारे एनवायरमेंट वैरिएबल सेट करें:
import os
from google.cloud import geminidataanalytics

data_agent_client = geminidataanalytics.DataAgentServiceClient()

location = "global"
billing_project = os.environ.get('DEVSHELL_PROJECT_ID')
data_agent_id = "google_trends_analytics_agent"
एजेंट के लिए सिस्टम के निर्देश सेट करना
CA API, BigQuery के मेटाडेटा को पढ़ता है, ताकि उन टेबल और कॉलम के बारे में ज़्यादा जानकारी मिल सके जिनका रेफ़रंस दिया जा रहा है. इस सार्वजनिक डेटासेट में कॉलम के बारे में कोई जानकारी नहीं दी गई है. इसलिए, एजेंट को YAML फ़ॉर्मैट वाली स्ट्रिंग के तौर पर ज़्यादा जानकारी दी जा सकती है. सबसे सही तरीके और इस्तेमाल करने के लिए टेंप्लेट देखने के लिए, दस्तावेज़ देखें:
system_instruction = """
system_instruction:
  - You are a data analyst specializing in the Google Trends dataset.
  - When querying, always use the 'week' column for date-based filtering. This needs to be a Sunday. If you are doing week over week comparison, make sure you specify a date that is a Sunday.
  - The following columns should be ignored in all queries 'dma_id', 'refresh_date'
  - The 'dma_name' column represents the city and state for about 210 metro areas in the USA.
tables:
  top_terms:
    description: "Represents the 25 most popular search terms by weekly search volume in a given US metro area (DMA)."
    fields:
      term: "The search query string."
      week: "The start date of the week (Sunday) for which the ranking is valid."
      rank: "The term's popularity rank from 1 (most popular) to 25."
      score: "Relative search interest, where 100 is the peak popularity for the term in that week."
      dma_name: "The name of the US metro area, e.g., 'New York NY'."
  top_rising_terms:
    description: "Represents the 25 fastest-growing ('breakout') search terms by momentum in a given US metro area (DMA)."
    fields:
      term: "The surging search query string."
      week: "The start date of the week (Sunday) for which the ranking is valid."
      rank: "The term's breakout rank from 1 (top rising) to 25."
      percent_gain: "The percentage growth in search volume compared to the previous period."
      dma_name: "The name of the US metro area, e.g., 'Los Angeles CA'."
      score: "Relative search interest, where 100 is the peak popularity for the term in that week."
join_instructions:
  goal: "Find terms that are simultaneously popular and rising in the same week and metro area."
  method: "INNER JOIN the two tables on their common keys."
  keys:
    - "term"
    - "week"
    - "dma_name"
golden_queries:
  - natural_language_query: "Find all terms in the 'New York NY' area that were in both the top 25 and top 25 rising lists for the week of July 6th, 2025, and show their ranks and percent gain."
    sql_query: |
      SELECT
          top.term,
          top.rank AS top_25_rank,
          rising.rank AS rising_25_rank,
          rising.percent_gain
      FROM
          `bigquery-public-data.google_trends.top_terms` AS top
      INNER JOIN
          `bigquery-public-data.google_trends.top_rising_terms` AS rising
      ON
          top.term = rising.term
          AND top.week = rising.week
          AND top.dma_name = rising.dma_name
      WHERE
          top.week = '2025-07-06'
          AND top.dma_name = 'New York NY'
      ORDER BY
          top.rank;
"""
BigQuery टेबल डेटा सोर्स सेट अप करना
अब BigQuery टेबल डेटा सोर्स सेट किए जा सकते हैं. CA API, BigQuery टेबल को एक ऐरे में स्वीकार करता है:
# BigQuery table data sources
bq_top = geminidataanalytics.BigQueryTableReference(
    project_id="bigquery-public-data", dataset_id="google_trends", table_id="top_terms"
)
bq_rising = geminidataanalytics.BigQueryTableReference(
    project_id="bigquery-public-data", dataset_id="google_trends", table_id="top_rising_terms"
)
datasource_references = geminidataanalytics.DatasourceReferences(
    bq=geminidataanalytics.BigQueryTableReferences(table_references=[bq_top, bq_rising]))
स्टेटफ़ुल चैट के लिए कॉन्टेक्स्ट सेट करना
पब्लिश किए गए कॉन्टेक्स्ट का इस्तेमाल करके, नया एजेंट बनाया जा सकता है. इस कॉन्टेक्स्ट में सिस्टम के निर्देश, डेटा सोर्स के रेफ़रंस, और अन्य विकल्प शामिल होते हैं.
ध्यान दें कि आपके पास पब्लिश करने से पहले, बदलावों को टेस्ट करने और उनकी पुष्टि करने के लिए stagingContext बनाने की सुविधा है. इससे डेवलपर, चैट के अनुरोध में contextVersion तय करके, डेटा एजेंट में वर्शनिंग की सुविधा जोड़ सकता है. इस कोडलैब के लिए, आपको सीधे तौर पर पब्लिश करना होगा:
# Context setup for stateful chat
published_context = geminidataanalytics.Context(
    system_instruction=system_instruction,
    datasource_references=datasource_references,
    options=geminidataanalytics.ConversationOptions(
        analysis=geminidataanalytics.AnalysisOptions(
            python=geminidataanalytics.AnalysisOptions.Python(
                enabled=False
            )
        )
    ),
)

data_agent = geminidataanalytics.DataAgent(
    data_analytics_agent=geminidataanalytics.DataAnalyticsAgent(
        published_context=published_context
    ),
)

# Create the agent
data_agent_client.create_data_agent(request=geminidataanalytics.CreateDataAgentRequest(
    parent=f"projects/{billing_project}/locations/{location}",
    data_agent_id=data_agent_id,
    data_agent=data_agent,
))
एजेंट बनाने के बाद, आपको इससे मिलता-जुलता आउटपुट दिखेगा:

एजेंट पाना
आइए, एजेंट को टेस्ट करके देखते हैं कि वह बन गया है या नहीं:
# Test the agent
request = geminidataanalytics.GetDataAgentRequest(
    name=data_agent_client.data_agent_path(
        billing_project, location, data_agent_id)
)
response = data_agent_client.get_data_agent(request=request)
print(response)
आपको अपने नए एजेंट पर मेटाडेटा दिखेगा. इसमें सिस्टम के निर्देशों और डेटा सोर्स पर, बनाए जाने का समय और एजेंट के संदर्भ जैसी जानकारी शामिल होगी.
5. बातचीत शुरू करें
अब आप अपनी पहली बातचीत शुरू करने के लिए तैयार हैं! इस कोडलैब के लिए, आपको अपने एजेंट के साथ स्टेटफ़ुल चैट के लिए बातचीत का रेफ़रंस इस्तेमाल करना होगा.
जानकारी के लिए बता दें कि CA API में, अलग-अलग राज्यों और एजेंट को मैनेज करने के विकल्पों के साथ चैट करने के कई तरीके उपलब्ध हैं. यहां तीन तरीकों के बारे में खास जानकारी दी गई है:
राज्य | बातचीत का इतिहास | Agent | कोड | विवरण | |
बातचीत के रेफ़रंस का इस्तेमाल करके चैट करना | स्टेटफ़ुल ग्रुप | एपीआई से मैनेज किया गया | हां | यह कुकी, स्टेटफ़ुल बातचीत को जारी रखती है. इसके लिए, यह एक चैट मैसेज भेजती है. इस मैसेज में, मौजूदा बातचीत और उससे जुड़े एजेंट के कॉन्टेक्स्ट का रेफ़रंस होता है. एक से ज़्यादा बार की जाने वाली बातचीत के लिए, Google Cloud बातचीत के इतिहास को सेव और मैनेज करता है. | |
डेटा एजेंट के रेफ़रंस का इस्तेमाल करके चैट करना | स्टेटलेस | उपयोगकर्ता के ज़रिए मैनेज किया गया | हां | यह कुकी, बिना किसी स्टेटस वाला चैट मैसेज भेजती है. इसमें कॉन्टेक्स्ट के लिए, सेव किए गए डेटा एजेंट का रेफ़रंस होता है. एक से ज़्यादा बार बातचीत करने की सुविधा के लिए, आपके ऐप्लिकेशन को हर अनुरोध के साथ बातचीत का इतिहास मैनेज करना और उपलब्ध कराना होगा. | |
इनलाइन कॉन्टेक्स्ट का इस्तेमाल करके चैट करना | स्टेटलेस | उपयोगकर्ता के ज़रिए मैनेज किया गया | नहीं | यह कुकी, बिना किसी सेव किए गए डेटा एजेंट का इस्तेमाल किए, अनुरोध में सीधे तौर पर पूरा कॉन्टेक्स्ट देकर, स्टेटलेस चैट मैसेज भेजती है. एक से ज़्यादा बार बातचीत करने की सुविधा के लिए, आपके ऐप्लिकेशन को हर अनुरोध के साथ बातचीत का इतिहास मैनेज करना और उपलब्ध कराना होगा. |
आपको बातचीत सेट अप करने के लिए एक फ़ंक्शन बनाना होगा. साथ ही, बातचीत के लिए एक यूनीक आईडी देना होगा:
def setup_conversation(conversation_id: str):
    data_chat_client = geminidataanalytics.DataChatServiceClient()
    conversation = geminidataanalytics.Conversation(
        agents=[data_chat_client.data_agent_path(
            billing_project, location, data_agent_id)],
    )
    request = geminidataanalytics.CreateConversationRequest(
        parent=f"projects/{billing_project}/locations/{location}",
        conversation_id=conversation_id,
        conversation=conversation,
    )
    try:
        data_chat_client.get_conversation(name=data_chat_client.conversation_path(
            billing_project, location, conversation_id))
        print(f"Conversation '{conversation_id}' already exists.")
    except Exception:
        response = data_chat_client.create_conversation(request=request)
        print("Conversation created successfully:")
        print(response)


conversation_id = "my_first_conversation"
setup_conversation(conversation_id=conversation_id)
आपको एक मैसेज दिखेगा, जिसमें बताया जाएगा कि बातचीत शुरू हो गई है.
6. उपयोगिता फ़ंक्शन जोड़ना
आप एजेंट से चैट करने के लिए लगभग तैयार हैं. इससे पहले, कुछ यूटिलिटी फ़ंक्शन जोड़ते हैं. इससे मैसेज को फ़ॉर्मैट करने में मदद मिलेगी, ताकि उन्हें आसानी से पढ़ा जा सके. साथ ही, विज़ुअलाइज़ेशन को रेंडर किया जा सके. CA API, vega स्पेसिफ़िकेशन भेजेगा. इसे altair पैकेज का इस्तेमाल करके प्लॉट किया जा सकता है:
# Utility functions for streaming and formatting responses
import altair as alt
import http.server
import pandas as pd
import proto
import socketserver
import threading

_server_thread = None
_httpd = None


# Prints a formatted section title
def display_section_title(text):
    print(f"\n--- {text.upper()} ---")


# Handles and displays data responses
def handle_data_response(resp):
    if "query" in resp:
        query = resp.query
        display_section_title("Retrieval query")
        print(f"Query name: {query.name}")
        print(f"Question: {query.question}")
        print("Data sources:")
        for datasource in query.datasources:
            display_datasource(datasource)
    elif "generated_sql" in resp:
        display_section_title("SQL generated")
        print(resp.generated_sql)
    elif "result" in resp:
        display_section_title("Data retrieved")
        fields = [field.name for field in resp.result.schema.fields]
        d = {field: [] for field in fields}
        for el in resp.result.data:
            for field in fields:
                d[field].append(el[field])
        print(pd.DataFrame(d))


# Starts a local web server to preview charts
def preview_in_browser(port: int = 8080):
    """Starts a web server in a background thread and waits for user to stop it."""
    global _server_thread, _httpd
    if _server_thread and _server_thread.is_alive():
        print(
            f"\n--> A new chart was generated. Refresh your browser at http://localhost:{port}")
        return
    Handler = http.server.SimpleHTTPRequestHandler
    socketserver.TCPServer.allow_reuse_address = True
    try:
        _httpd = socketserver.TCPServer(("", port), Handler)
    except OSError as e:
        print(f"❌ Could not start server on port {port}: {e}")
        return
    _server_thread = threading.Thread(target=_httpd.serve_forever)
    _server_thread.daemon = False
    _server_thread.start()
    print("\n" + "=" * 60)
    print(" 📈 CHART READY - PREVIEW IN BROWSER ".center(60))
    print("=" * 60)
    print(
        f"1. In the Cloud Shell toolbar, click 'Web Preview' and select port {port}.")
    print(f"2. Or, open your local browser to http://localhost:{port}")
    print("=" * 60)
    try:
        input(
            "\n--> Press Enter here after viewing all charts to shut down the server...\n\n")
    finally:
        print("Shutting down server...")
        _httpd.shutdown()
        _server_thread.join()
        _httpd, _server_thread = None, None
        print("Server stopped.")


# Handles chart responses
def handle_chart_response(resp, chart_generated_flag: list):
    def _value_to_dict(v):
        if isinstance(v, proto.marshal.collections.maps.MapComposite):
            return {k: _value_to_dict(v[k]) for k in v}
        elif isinstance(v, proto.marshal.collections.RepeatedComposite):
            return [_value_to_dict(el) for el in v]
        return v
    if "query" in resp:
        print(resp.query.instructions)
    elif "result" in resp:
        vega_config_dict = _value_to_dict(resp.result.vega_config)
        chart = alt.Chart.from_dict(vega_config_dict)
        chart_filename = "index.html"
        chart.save(chart_filename)
        if chart_generated_flag:
            chart_generated_flag[0] = True


# Displays the schema of a data source
def display_schema(data):
    fields = getattr(data, "fields")
    df = pd.DataFrame({
        "Column": [f.name for f in fields],
        "Type": [f.type for f in fields],
        "Description": [getattr(f, "description", "-") for f in fields],
        "Mode": [f.mode for f in fields],
    })
    print(df)


# Displays information about a BigQuery data source
def display_datasource(datasource):
    table_ref = datasource.bigquery_table_reference
    source_name = f"{table_ref.project_id}.{table_ref.dataset_id}.{table_ref.table_id}"
    print(source_name)
    display_schema(datasource.schema)


# Handles and displays schema resolution responses
def handle_schema_response(resp):
    if "query" in resp:
        print(resp.query.question)
    elif "result" in resp:
        display_section_title("Schema resolved")
        print("Data sources:")
        for datasource in resp.result.datasources:
            display_datasource(datasource)


# Handles and prints simple text responses
def handle_text_response(resp):
    parts = resp.parts
    print("".join(parts))


# Processes and displays different types of system messages
def show_message(msg, chart_generated_flag: list):
    m = msg.system_message
    if "text" in m:
        handle_text_response(getattr(m, "text"))
    elif "schema" in m:
        handle_schema_response(getattr(m, "schema"))
    elif "data" in m:
        handle_data_response(getattr(m, "data"))
    elif "chart" in m:
        handle_chart_response(getattr(m, "chart"), chart_generated_flag)
    print("\n")
7. चैट फ़ंक्शन बनाना
आखिरी चरण में, एक चैट फ़ंक्शन बनाएं. इसका दोबारा इस्तेमाल किया जा सकता है. साथ ही, जवाब की स्ट्रीम में मौजूद हर चंक के लिए, show_message फ़ंक्शन को कॉल किया जा सकता है:
def stream_chat_response(question: str):
    """
    Sends a chat request, processes the streaming response, and if a chart
    was generated, starts the preview server and waits for it to be closed.
    """
    data_chat_client = geminidataanalytics.DataChatServiceClient()
    chart_generated_flag = [False]
    messages = [
        geminidataanalytics.Message(
            user_message=geminidataanalytics.UserMessage(text=question)
        )
    ]
    conversation_reference = geminidataanalytics.ConversationReference(
        conversation=data_chat_client.conversation_path(
            billing_project, location, conversation_id
        ),
        data_agent_context=geminidataanalytics.DataAgentContext(
            data_agent=data_chat_client.data_agent_path(
                billing_project, location, data_agent_id
            ),
        ),
    )
    request = geminidataanalytics.ChatRequest(
        parent=f"projects/{billing_project}/locations/{location}",
        messages=messages,
        conversation_reference=conversation_reference,
    )
    stream = data_chat_client.chat(request=request)
    for response in stream:
        show_message(response, chart_generated_flag)
    if chart_generated_flag[0]:
        preview_in_browser()
stream_chat_response फ़ंक्शन अब तय हो गया है और इसे अपने प्रॉम्प्ट के साथ इस्तेमाल किया जा सकता है.
8. चैट करना शुरू करें
पहला सवाल
अब सवाल पूछने की सुविधा का इस्तेमाल किया जा सकता है! आइए, देखते हैं कि यह एजेंट शुरुआत में क्या-क्या कर सकता है:
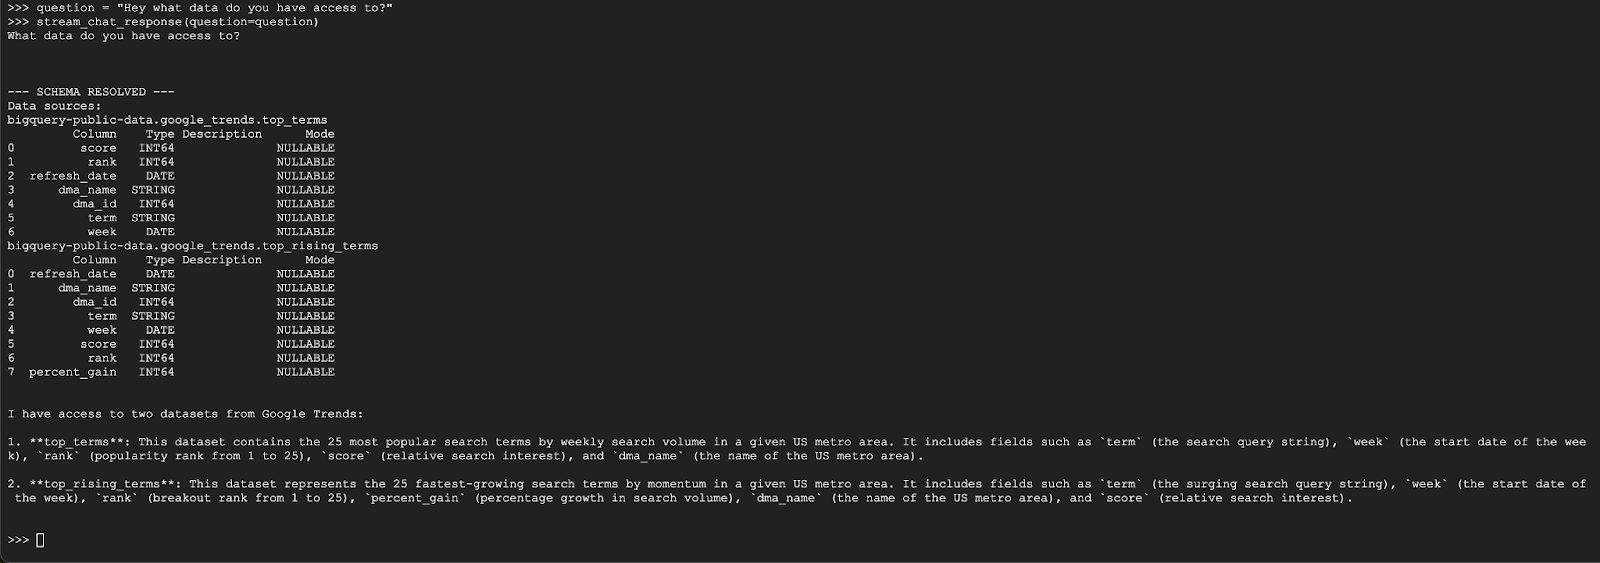
question = "Hey what data do you have access to?"
stream_chat_response(question=question)
एजेंट को कुछ इस तरह जवाब देना चाहिए:
दूसरा सवाल
बहुत बढ़िया, अब हम सबसे ज़्यादा खोजे जाने वाले नए शब्दों के बारे में ज़्यादा जानकारी ढूंढने की कोशिश करते हैं:
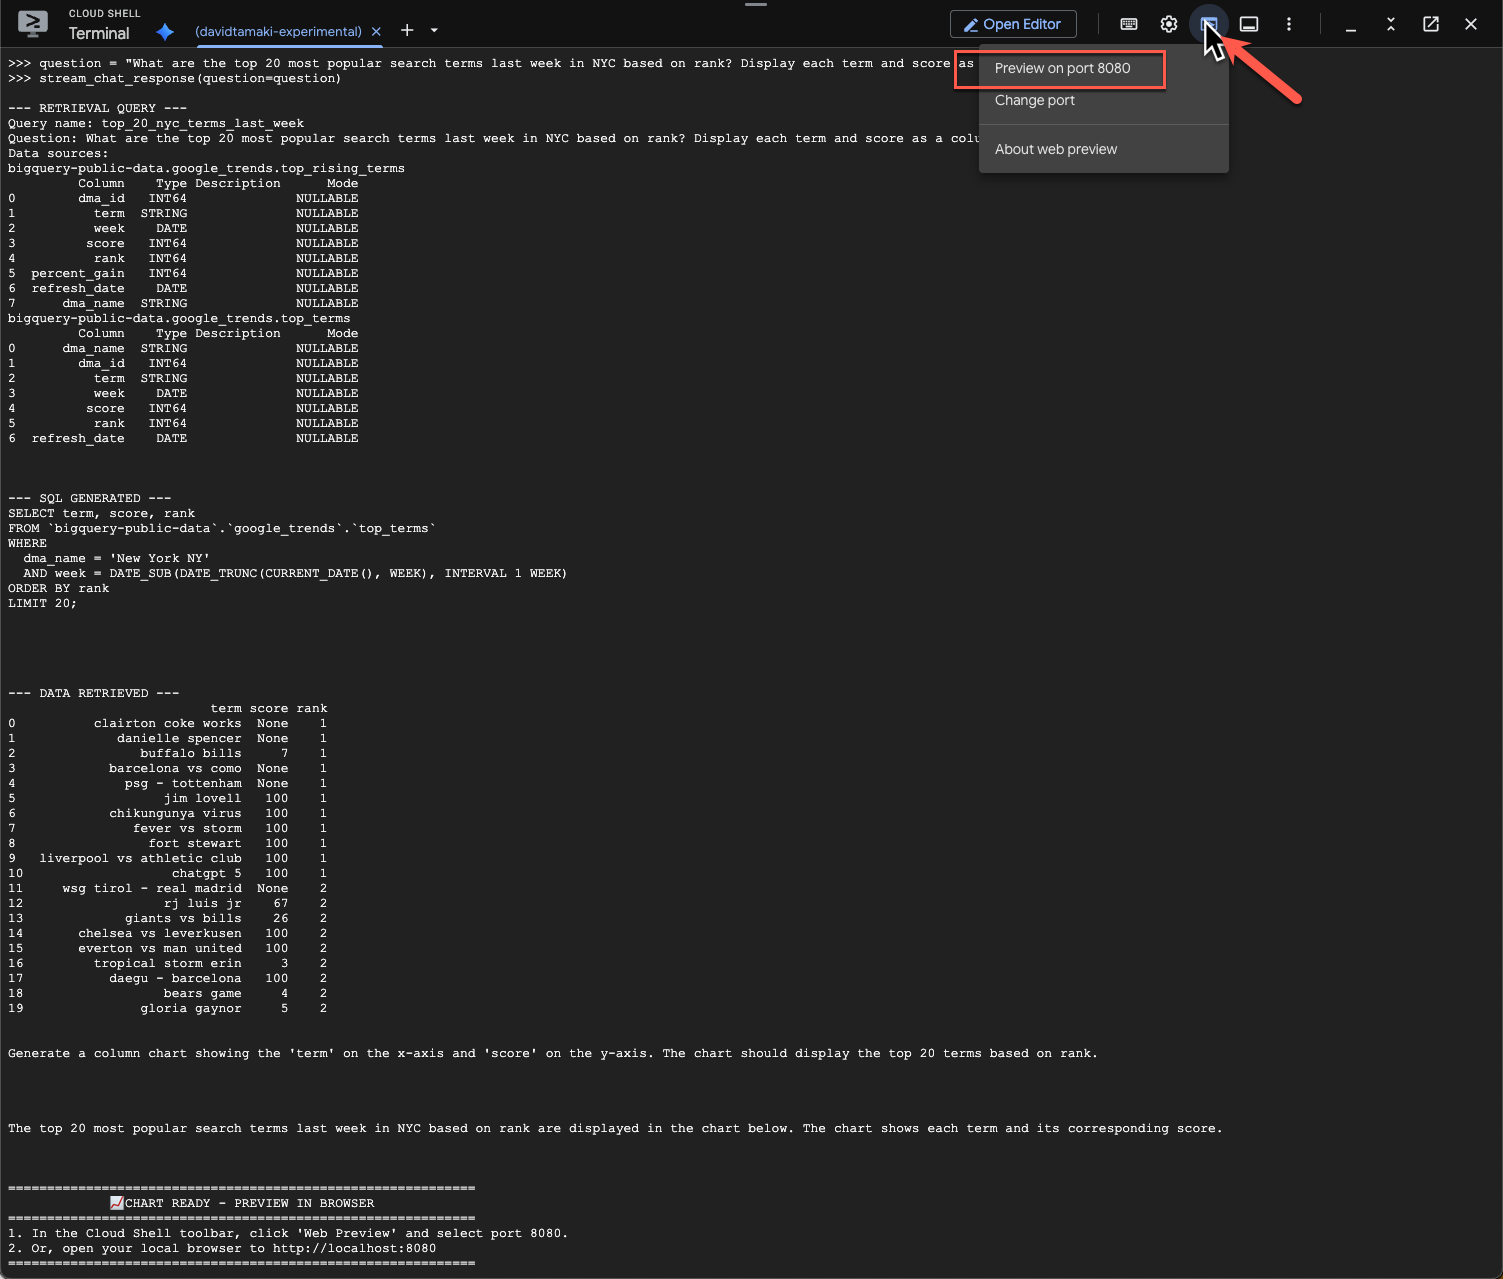
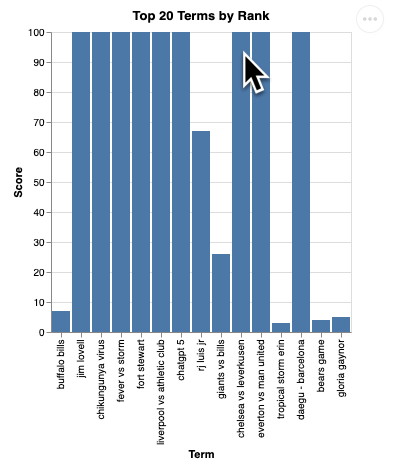
question = "What are the top 20 most popular search terms last week in NYC based on rank? Display each term and score as a column chart"
stream_chat_response(question=question)
इसे पूरा होने में कुछ समय लगेगा. आपको दिखेगा कि एजेंट, अलग-अलग चरणों को पूरा कर रहा है और अपडेट स्ट्रीम कर रहा है. जैसे, स्कीमा और मेटाडेटा वापस पाना, एसक्यूएल क्वेरी लिखना, नतीजे पाना, विज़ुअलाइज़ेशन के निर्देश देना, और नतीजों की खास जानकारी देना.
चार्ट देखने के लिए, Cloud Shell टूलबार पर जाएं. इसके बाद, ‘वेब प्रीव्यू' पर क्लिक करें और पोर्ट 8080 चुनें:
आपको विज़ुअलाइज़ेशन की रेंडरिंग इस तरह दिखेगी:
सर्वर बंद करने और जारी रखने के लिए, Enter दबाएं.
तीसरा सवाल
आइए, फ़ॉलो अप वाला सवाल पूछकर इन नतीजों के बारे में ज़्यादा जानें:
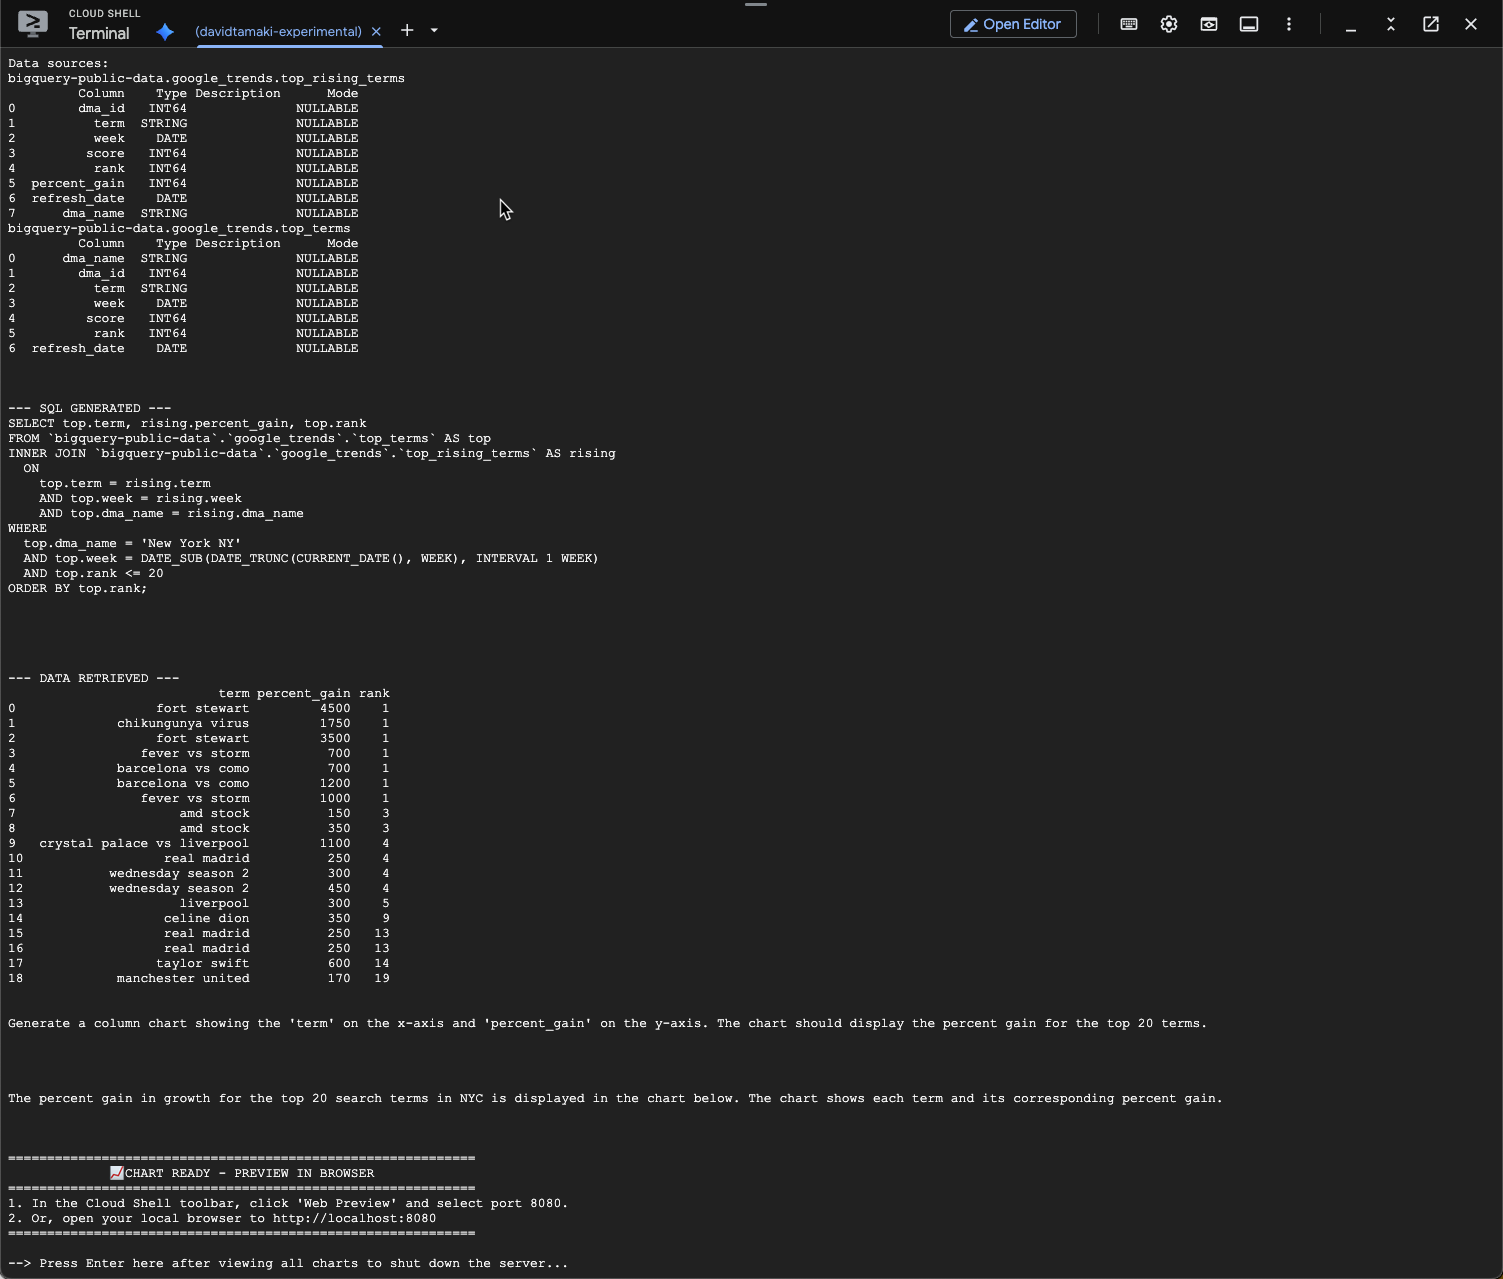
question = "What was the percent gain in growth for these search terms from the week before?"
stream_chat_response(question=question)
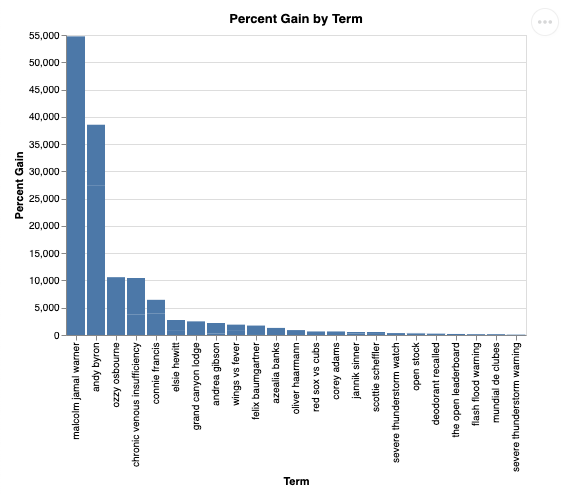
आपको नीचे दिए गए जैसा कुछ दिखेगा. इस मामले में, एजेंट ने दो टेबल को जोड़ने के लिए एक क्वेरी जनरेट की है, ताकि प्रतिशत में हुई बढ़ोतरी का पता लगाया जा सके. ध्यान दें कि आपकी क्वेरी थोड़ी अलग दिख सकती है:
विज़ुअलाइज़ करने पर, यह इस तरह दिखेगा:
9. साफ़-सफ़ाई सेवा
इस कोडलैब में, लंबे समय तक चलने वाले किसी भी प्रॉडक्ट का इस्तेमाल नहीं किया गया है. इसलिए, टर्मिनल में exit() डालकर, अपनी चालू Python सेशन को बंद करना काफ़ी है.
प्रोजेक्ट फ़ोल्डर और फ़ाइलें मिटाना
अगर आपको अपने Cloud Shell एनवायरमेंट से कोड हटाना है, तो इन कमांड का इस्तेमाल करें:
cd ~
rm -rf ca-api-codelab
एपीआई बंद करना
पहले से चालू किए गए एपीआई बंद करने के लिए, यह निर्देश चलाएं
gcloud services disable geminidataanalytics.googleapis.com
gcloud services disable cloudaicompanion.googleapis.com
gcloud services disable bigquery.googleapis.com
10. नतीजा
बधाई हो, आपने CA SDK का इस्तेमाल करके, कन्वर्सेशनल ऐनालिटिक्स एजेंट बना लिया है. ज़्यादा जानने के लिए, रेफ़रंस के लिए उपलब्ध दस्तावेज़ देखें!