
1. บทนำ
ใน Codelab นี้ คุณจะได้เรียนรู้วิธีใช้ Python SDK ของ Conversational Analytics (CA) API กับแหล่งข้อมูล BigQuery คุณจะได้เรียนรู้วิธีสร้างเอเจนต์ใหม่ วิธีใช้ประโยชน์จากการจัดการสถานะการสนทนา และวิธีส่งและสตรีมการตอบกลับจาก API
ข้อกำหนดเบื้องต้น
- ความเข้าใจพื้นฐานเกี่ยวกับ Google Cloud และ Google Cloud Console
- ทักษะพื้นฐานในอินเทอร์เฟซบรรทัดคำสั่งและ Cloud Shell
- มีความเชี่ยวชาญพื้นฐานในการเขียนโปรแกรม Python
สิ่งที่คุณจะได้เรียนรู้
- วิธีใช้ Conversational Analytics API Python SDK กับแหล่งข้อมูล BigQuery
- วิธีสร้างตัวแทนใหม่โดยใช้ CA API
- วิธีใช้ประโยชน์จากการจัดการสถานะการสนทนา
- วิธีส่งและสตรีมการตอบกลับจาก API
สิ่งที่คุณต้องมี
- บัญชี Google Cloud และโปรเจ็กต์ Google Cloud
- เว็บเบราว์เซอร์ เช่น Chrome
2. การตั้งค่าและข้อกำหนด
เลือกโปรเจ็กต์
- ลงชื่อเข้าใช้ Google Cloud Console แล้วสร้างโปรเจ็กต์ใหม่หรือใช้โปรเจ็กต์ที่มีอยู่ซ้ำ หากยังไม่มีบัญชี Gmail หรือ Google Workspace คุณต้องสร้างบัญชี

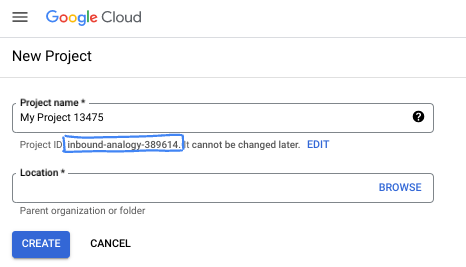
- ชื่อโปรเจ็กต์คือชื่อที่แสดงสำหรับผู้เข้าร่วมโปรเจ็กต์นี้ ซึ่งเป็นสตริงอักขระที่ Google APIs ไม่ได้ใช้ คุณอัปเดตได้ทุกเมื่อ
- รหัสโปรเจ็กต์จะไม่ซ้ำกันในโปรเจ็กต์ Google Cloud ทั้งหมดและเปลี่ยนแปลงไม่ได้ (เปลี่ยนไม่ได้หลังจากตั้งค่าแล้ว) Cloud Console จะสร้างสตริงที่ไม่ซ้ำกันโดยอัตโนมัติ ซึ่งโดยปกติแล้วคุณไม่จำเป็นต้องสนใจว่าสตริงนั้นคืออะไร ใน Codelab ส่วนใหญ่ คุณจะต้องอ้างอิงรหัสโปรเจ็กต์ (โดยทั่วไปจะระบุเป็น
PROJECT_ID) หากไม่ชอบรหัสที่สร้างขึ้น คุณอาจสร้างรหัสแบบสุ่มอีกรหัสหนึ่งได้ หรือคุณอาจลองใช้ชื่อของคุณเองและดูว่ามีชื่อนั้นหรือไม่ คุณจะเปลี่ยนแปลงรหัสนี้หลังจากขั้นตอนนี้ไม่ได้ และรหัสจะคงอยู่ตลอดระยะเวลาของโปรเจ็กต์ - โปรดทราบว่ายังมีค่าที่ 3 ซึ่งคือหมายเลขโปรเจ็กต์ที่ API บางตัวใช้ ดูข้อมูลเพิ่มเติมเกี่ยวกับค่าทั้ง 3 นี้ได้ในเอกสารประกอบ
- จากนั้นคุณจะต้องเปิดใช้การเรียกเก็บเงินใน Cloud Console เพื่อใช้ทรัพยากร/API ของ Cloud การทำตาม Codelab นี้จะไม่มีค่าใช้จ่ายมากนัก หรืออาจไม่มีค่าใช้จ่ายเลย หากต้องการปิดทรัพยากรเพื่อหลีกเลี่ยงการเรียกเก็บเงินนอกเหนือจากบทแนะนำนี้ คุณสามารถลบทรัพยากรที่สร้างขึ้นหรือลบโปรเจ็กต์ได้ ผู้ใช้ Google Cloud รายใหม่มีสิทธิ์เข้าร่วมโปรแกรมช่วงทดลองใช้ฟรีมูลค่า$300 USD
เริ่มต้น Cloud Shell
แม้ว่าคุณจะใช้งาน Google Cloud จากระยะไกลจากแล็ปท็อปได้ แต่ใน Codelab นี้คุณจะใช้ Google Cloud Shell ซึ่งเป็นสภาพแวดล้อมบรรทัดคำสั่งที่ทำงานในระบบคลาวด์
จาก Google Cloud Console ให้คลิกไอคอน Cloud Shell ในแถบเครื่องมือด้านขวาบน

การจัดสรรและเชื่อมต่อกับสภาพแวดล้อมจะใช้เวลาเพียงไม่กี่นาที เมื่อเสร็จแล้ว คุณควรเห็นข้อความคล้ายกับตัวอย่างต่อไปนี้

เครื่องเสมือนนี้มาพร้อมเครื่องมือพัฒนาซอฟต์แวร์ทั้งหมดที่คุณต้องการ โดยมีไดเรกทอรีหลักแบบถาวรขนาด 5 GB และทำงานบน Google Cloud ซึ่งช่วยเพิ่มประสิทธิภาพเครือข่ายและการตรวจสอบสิทธิ์ได้อย่างมาก คุณสามารถทำงานทั้งหมดใน Codelab นี้ได้ภายในเบราว์เซอร์ คุณไม่จำเป็นต้องติดตั้งอะไร
3. ก่อนเริ่มต้น
เปิดใช้ API ที่จำเป็น
หากต้องการใช้บริการของ Google Cloud คุณต้องเปิดใช้งาน API ที่เกี่ยวข้องสำหรับโปรเจ็กต์ก่อน คุณจะใช้บริการ Google Cloud ต่อไปนี้ใน Codelab นี้
- Data Analytics API ด้วย Gemini
- Gemini สำหรับ Google Cloud
- BigQuery API
หากต้องการเปิดใช้บริการเหล่านี้ ให้เรียกใช้คำสั่งต่อไปนี้ในเทอร์มินัล Cloud Shell
gcloud services enable geminidataanalytics.googleapis.com
gcloud services enable cloudaicompanion.googleapis.com
gcloud services enable bigquery.googleapis.com
ติดตั้งแพ็กเกจ Python
ก่อนเริ่มโปรเจ็กต์ Python ใดๆ คุณควรสร้างสภาพแวดล้อมเสมือน ซึ่งจะแยกการอ้างอิงของโปรเจ็กต์เพื่อป้องกันไม่ให้เกิดความขัดแย้งกับโปรเจ็กต์อื่นๆ หรือแพ็กเกจ Python ทั่วโลกของระบบ ในส่วนนี้ คุณจะติดตั้ง uv จาก pip เนื่องจาก Cloud Shell มี pip อยู่แล้ว
ติดตั้งแพ็กเกจ uv
pip install uv
ตรวจสอบว่าติดตั้ง uv อย่างถูกต้องหรือไม่
uv --version
ผลลัพธ์ที่คาดไว้
หากเห็นบรรทัดเอาต์พุตที่มี uv แสดงว่าคุณพร้อมที่จะไปยังขั้นตอนถัดไป โปรดทราบว่าหมายเลขเวอร์ชันอาจแตกต่างกันไป

สร้างสภาพแวดล้อมเสมือนและติดตั้งแพ็กเกจ
uv init ca-api-codelab
cd ca-api-codelab
uv venv --python 3.12
uv add google-cloud-geminidataanalytics pandas altair
uv pip list | grep -E 'altair|pandas|google-cloud-geminidataanalytics'
ผลลัพธ์ที่คาดไว้
หากเห็นบรรทัดเอาต์พุตที่มีแพ็กเกจทั้ง 3 รายการ แสดงว่าคุณพร้อมที่จะไปยังขั้นตอนถัดไป โปรดทราบว่าหมายเลขเวอร์ชันอาจแตกต่างกันไป

เริ่มใช้ Python
uv run python
หน้าจอของคุณควรมีลักษณะดังนี้

4. สร้างเอเจนต์
เมื่อตั้งค่าและเตรียมสภาพแวดล้อมในการพัฒนาเรียบร้อยแล้ว ก็ถึงเวลาวางรากฐานสำหรับ Gemini Data Analytics API SDK ช่วยให้กระบวนการนี้ง่ายขึ้น โดยกำหนดให้มีการกำหนดค่าที่จำเป็นเพียงไม่กี่อย่างเพื่อสร้างเอเจนต์
ตั้งค่าตัวแปร
นำเข้าแพ็กเกจ geminidataanalytics และตั้งค่าตัวแปรสภาพแวดล้อม
import os
from google.cloud import geminidataanalytics

data_agent_client = geminidataanalytics.DataAgentServiceClient()

location = "global"
billing_project = os.environ.get('DEVSHELL_PROJECT_ID')
data_agent_id = "google_trends_analytics_agent"
ตั้งค่าคำสั่งของระบบสำหรับ Agent
CA API จะอ่านข้อมูลเมตาของ BigQuery เพื่อให้ได้บริบทเพิ่มเติมเกี่ยวกับตารางและคอลัมน์ที่อ้างอิง เนื่องจากชุดข้อมูลสาธารณะนี้ไม่มีคำอธิบายคอลัมน์ คุณจึงระบุบริบทเพิ่มเติมให้กับตัวแทนเป็นสตริงในรูปแบบ YAML ได้ ดูแนวทางปฏิบัติแนะนำและเทมเพลตที่จะใช้ได้ในเอกสารประกอบ
system_instruction = """
system_instruction:
  - You are a data analyst specializing in the Google Trends dataset.
  - When querying, always use the 'week' column for date-based filtering. This needs to be a Sunday. If you are doing week over week comparison, make sure you specify a date that is a Sunday.
  - The following columns should be ignored in all queries 'dma_id', 'refresh_date'
  - The 'dma_name' column represents the city and state for about 210 metro areas in the USA.
tables:
  top_terms:
    description: "Represents the 25 most popular search terms by weekly search volume in a given US metro area (DMA)."
    fields:
      term: "The search query string."
      week: "The start date of the week (Sunday) for which the ranking is valid."
      rank: "The term's popularity rank from 1 (most popular) to 25."
      score: "Relative search interest, where 100 is the peak popularity for the term in that week."
      dma_name: "The name of the US metro area, e.g., 'New York NY'."
  top_rising_terms:
    description: "Represents the 25 fastest-growing ('breakout') search terms by momentum in a given US metro area (DMA)."
    fields:
      term: "The surging search query string."
      week: "The start date of the week (Sunday) for which the ranking is valid."
      rank: "The term's breakout rank from 1 (top rising) to 25."
      percent_gain: "The percentage growth in search volume compared to the previous period."
      dma_name: "The name of the US metro area, e.g., 'Los Angeles CA'."
      score: "Relative search interest, where 100 is the peak popularity for the term in that week."
join_instructions:
  goal: "Find terms that are simultaneously popular and rising in the same week and metro area."
  method: "INNER JOIN the two tables on their common keys."
  keys:
    - "term"
    - "week"
    - "dma_name"
golden_queries:
  - natural_language_query: "Find all terms in the 'New York NY' area that were in both the top 25 and top 25 rising lists for the week of July 6th, 2025, and show their ranks and percent gain."
    sql_query: |
      SELECT
          top.term,
          top.rank AS top_25_rank,
          rising.rank AS rising_25_rank,
          rising.percent_gain
      FROM
          `bigquery-public-data.google_trends.top_terms` AS top
      INNER JOIN
          `bigquery-public-data.google_trends.top_rising_terms` AS rising
      ON
          top.term = rising.term
          AND top.week = rising.week
          AND top.dma_name = rising.dma_name
      WHERE
          top.week = '2025-07-06'
          AND top.dma_name = 'New York NY'
      ORDER BY
          top.rank;
"""
ตั้งค่าแหล่งข้อมูลตาราง BigQuery
ตอนนี้คุณตั้งค่าแหล่งข้อมูลตาราง BigQuery ได้แล้ว CA API ยอมรับตาราง BigQuery ในอาร์เรย์
# BigQuery table data sources
bq_top = geminidataanalytics.BigQueryTableReference(
    project_id="bigquery-public-data", dataset_id="google_trends", table_id="top_terms"
)
bq_rising = geminidataanalytics.BigQueryTableReference(
    project_id="bigquery-public-data", dataset_id="google_trends", table_id="top_rising_terms"
)
datasource_references = geminidataanalytics.DatasourceReferences(
    bq=geminidataanalytics.BigQueryTableReferences(table_references=[bq_top, bq_rising]))
ตั้งค่าบริบทสำหรับการแชทแบบมีสถานะ
คุณสามารถสร้างเอเจนต์ใหม่ด้วยบริบทที่เผยแพร่แล้ว ซึ่งจะรวมคำสั่งของระบบ การอ้างอิงแหล่งข้อมูล และตัวเลือกอื่นๆ
โปรดทราบว่าคุณมีฟังก์ชันในการสร้าง stagingContext เพื่อทดสอบและตรวจสอบการเปลี่ยนแปลงก่อนเผยแพร่ ซึ่งช่วยให้นักพัฒนาแอปเพิ่มการควบคุมเวอร์ชันลงใน Data Agent ได้โดยการระบุ contextVersion ในคำขอแชท สำหรับ Codelab นี้ คุณจะเผยแพร่โดยตรงเท่านั้น
# Context setup for stateful chat
published_context = geminidataanalytics.Context(
    system_instruction=system_instruction,
    datasource_references=datasource_references,
    options=geminidataanalytics.ConversationOptions(
        analysis=geminidataanalytics.AnalysisOptions(
            python=geminidataanalytics.AnalysisOptions.Python(
                enabled=False
            )
        )
    ),
)

data_agent = geminidataanalytics.DataAgent(
    data_analytics_agent=geminidataanalytics.DataAnalyticsAgent(
        published_context=published_context
    ),
)

# Create the agent
data_agent_client.create_data_agent(request=geminidataanalytics.CreateDataAgentRequest(
    parent=f"projects/{billing_project}/locations/{location}",
    data_agent_id=data_agent_id,
    data_agent=data_agent,
))
คุณควรเห็นเอาต์พุตคล้ายกับด้านล่างนี้หลังจากสร้างเอเจนต์

รับ Agent
มาทดสอบ Agent เพื่อให้แน่ใจว่าสร้างแล้ว
# Test the agent
request = geminidataanalytics.GetDataAgentRequest(
    name=data_agent_client.data_agent_path(
        billing_project, location, data_agent_id)
)
response = data_agent_client.get_data_agent(request=request)
print(response)
คุณควรเห็นข้อมูลเมตาในเอเจนต์ใหม่ ซึ่งรวมถึงข้อมูลต่างๆ เช่น เวลาที่สร้างและบริบทของตัวแทนในคำสั่งของระบบและแหล่งข้อมูล
5. สร้างการสนทนา
ตอนนี้คุณพร้อมที่จะสร้างการสนทนาแรกแล้ว สำหรับ Codelab นี้ คุณจะใช้การอ้างอิงการสนทนาสำหรับแชทแบบมีสถานะกับ Agent
เพื่อเป็นข้อมูลอ้างอิง CA API มีวิธีต่างๆ ในการแชทพร้อมตัวเลือกการจัดการสถานะและตัวแทนที่แตกต่างกัน สรุปสั้นๆ เกี่ยวกับแนวทางทั้ง 3 มีดังนี้
สถานะ | ประวัติการสนทนา | Agent | รหัส | คำอธิบาย | |
แชทโดยใช้การอ้างอิงการสนทนา | เก็บสถานะ | จัดการ API | ใช่ | ดำเนินการสนทนาแบบมีสถานะต่อโดยการส่งข้อความแชทที่อ้างอิงการสนทนาที่มีอยู่และบริบทของตัวแทนที่เชื่อมโยง สำหรับการสนทนาแบบหลายรอบ Google Cloud จะจัดเก็บและจัดการประวัติการสนทนา | |
แชทโดยใช้การอ้างอิงตัวแทนข้อมูล | ไม่เก็บสถานะ | จัดการโดยผู้ใช้ | ใช่ | ส่งข้อความแชทแบบไม่เก็บสถานะซึ่งอ้างอิงถึงตัวแทนข้อมูลที่บันทึกไว้เพื่อบริบท สำหรับการสนทนาแบบหลายรอบ แอปพลิเคชันของคุณต้องจัดการและระบุประวัติการสนทนาพร้อมกับคำขอแต่ละรายการ | |
แชทโดยใช้บริบทในบรรทัด | ไม่เก็บสถานะ | จัดการโดยผู้ใช้ | ไม่ | ส่งข้อความแชทแบบไม่เก็บสถานะโดยระบุบริบททั้งหมดในคำขอโดยตรงโดยไม่ต้องใช้ Agent ข้อมูลที่บันทึกไว้ สำหรับการสนทนาแบบหลายรอบ แอปพลิเคชันของคุณต้องจัดการและระบุประวัติการสนทนาพร้อมกับคำขอแต่ละรายการ |
คุณจะสร้างฟังก์ชันเพื่อตั้งค่าการสนทนาและระบุรหัสที่ไม่ซ้ำกันสำหรับการสนทนา
def setup_conversation(conversation_id: str):
    data_chat_client = geminidataanalytics.DataChatServiceClient()
    conversation = geminidataanalytics.Conversation(
        agents=[data_chat_client.data_agent_path(
            billing_project, location, data_agent_id)],
    )
    request = geminidataanalytics.CreateConversationRequest(
        parent=f"projects/{billing_project}/locations/{location}",
        conversation_id=conversation_id,
        conversation=conversation,
    )
    try:
        data_chat_client.get_conversation(name=data_chat_client.conversation_path(
            billing_project, location, conversation_id))
        print(f"Conversation '{conversation_id}' already exists.")
    except Exception:
        response = data_chat_client.create_conversation(request=request)
        print("Conversation created successfully:")
        print(response)


conversation_id = "my_first_conversation"
setup_conversation(conversation_id=conversation_id)
คุณควรเห็นข้อความที่ระบุว่าสร้างการสนทนาเรียบร้อยแล้ว
6. เพิ่มฟังก์ชันยูทิลิตี
คุณใกล้จะเริ่มแชทกับตัวแทนได้แล้ว ก่อนอื่นมาเพิ่มฟังก์ชันยูทิลิตีเพื่อช่วยจัดรูปแบบข้อความเพื่อให้ง่ายต่อการอ่านและแสดงภาพกัน CA API จะส่งข้อกำหนด vega ที่คุณสามารถพล็อตได้โดยใช้แพ็กเกจ altair
# Utility functions for streaming and formatting responses
import altair as alt
import http.server
import pandas as pd
import proto
import socketserver
import threading

_server_thread = None
_httpd = None


# Prints a formatted section title
def display_section_title(text):
    print(f"\n--- {text.upper()} ---")


# Handles and displays data responses
def handle_data_response(resp):
    if "query" in resp:
        query = resp.query
        display_section_title("Retrieval query")
        print(f"Query name: {query.name}")
        print(f"Question: {query.question}")
        print("Data sources:")
        for datasource in query.datasources:
            display_datasource(datasource)
    elif "generated_sql" in resp:
        display_section_title("SQL generated")
        print(resp.generated_sql)
    elif "result" in resp:
        display_section_title("Data retrieved")
        fields = [field.name for field in resp.result.schema.fields]
        d = {field: [] for field in fields}
        for el in resp.result.data:
            for field in fields:
                d[field].append(el[field])
        print(pd.DataFrame(d))


# Starts a local web server to preview charts
def preview_in_browser(port: int = 8080):
    """Starts a web server in a background thread and waits for user to stop it."""
    global _server_thread, _httpd
    if _server_thread and _server_thread.is_alive():
        print(
            f"\n--> A new chart was generated. Refresh your browser at http://localhost:{port}")
        return
    Handler = http.server.SimpleHTTPRequestHandler
    socketserver.TCPServer.allow_reuse_address = True
    try:
        _httpd = socketserver.TCPServer(("", port), Handler)
    except OSError as e:
        print(f"❌ Could not start server on port {port}: {e}")
        return
    _server_thread = threading.Thread(target=_httpd.serve_forever)
    _server_thread.daemon = False
    _server_thread.start()
    print("\n" + "=" * 60)
    print(" 📈 CHART READY - PREVIEW IN BROWSER ".center(60))
    print("=" * 60)
    print(
        f"1. In the Cloud Shell toolbar, click 'Web Preview' and select port {port}.")
    print(f"2. Or, open your local browser to http://localhost:{port}")
    print("=" * 60)
    try:
        input(
            "\n--> Press Enter here after viewing all charts to shut down the server...\n\n")
    finally:
        print("Shutting down server...")
        _httpd.shutdown()
        _server_thread.join()
        _httpd, _server_thread = None, None
        print("Server stopped.")


# Handles chart responses
def handle_chart_response(resp, chart_generated_flag: list):
    def _value_to_dict(v):
        if isinstance(v, proto.marshal.collections.maps.MapComposite):
            return {k: _value_to_dict(v[k]) for k in v}
        elif isinstance(v, proto.marshal.collections.RepeatedComposite):
            return [_value_to_dict(el) for el in v]
        return v
    if "query" in resp:
        print(resp.query.instructions)
    elif "result" in resp:
        vega_config_dict = _value_to_dict(resp.result.vega_config)
        chart = alt.Chart.from_dict(vega_config_dict)
        chart_filename = "index.html"
        chart.save(chart_filename)
        if chart_generated_flag:
            chart_generated_flag[0] = True


# Displays the schema of a data source
def display_schema(data):
    fields = getattr(data, "fields")
    df = pd.DataFrame({
        "Column": [f.name for f in fields],
        "Type": [f.type for f in fields],
        "Description": [getattr(f, "description", "-") for f in fields],
        "Mode": [f.mode for f in fields],
    })
    print(df)


# Displays information about a BigQuery data source
def display_datasource(datasource):
    table_ref = datasource.bigquery_table_reference
    source_name = f"{table_ref.project_id}.{table_ref.dataset_id}.{table_ref.table_id}"
    print(source_name)
    display_schema(datasource.schema)


# Handles and displays schema resolution responses
def handle_schema_response(resp):
    if "query" in resp:
        print(resp.query.question)
    elif "result" in resp:
        display_section_title("Schema resolved")
        print("Data sources:")
        for datasource in resp.result.datasources:
            display_datasource(datasource)


# Handles and prints simple text responses
def handle_text_response(resp):
    parts = resp.parts
    print("".join(parts))


# Processes and displays different types of system messages
def show_message(msg, chart_generated_flag: list):
    m = msg.system_message
    if "text" in m:
        handle_text_response(getattr(m, "text"))
    elif "schema" in m:
        handle_schema_response(getattr(m, "schema"))
    elif "data" in m:
        handle_data_response(getattr(m, "data"))
    elif "chart" in m:
        handle_chart_response(getattr(m, "chart"), chart_generated_flag)
    print("\n")
7. สร้างฟังก์ชันแชท
ขั้นตอนสุดท้ายคือการสร้างฟังก์ชันแชทที่คุณนำกลับมาใช้ใหม่ได้ และเรียกใช้ฟังก์ชัน show_message สำหรับแต่ละก้อนในสตรีมการตอบกลับ
def stream_chat_response(question: str):
    """
    Sends a chat request, processes the streaming response, and if a chart
    was generated, starts the preview server and waits for it to be closed.
    """
    data_chat_client = geminidataanalytics.DataChatServiceClient()
    chart_generated_flag = [False]
    messages = [
        geminidataanalytics.Message(
            user_message=geminidataanalytics.UserMessage(text=question)
        )
    ]
    conversation_reference = geminidataanalytics.ConversationReference(
        conversation=data_chat_client.conversation_path(
            billing_project, location, conversation_id
        ),
        data_agent_context=geminidataanalytics.DataAgentContext(
            data_agent=data_chat_client.data_agent_path(
                billing_project, location, data_agent_id
            ),
        ),
    )
    request = geminidataanalytics.ChatRequest(
        parent=f"projects/{billing_project}/locations/{location}",
        messages=messages,
        conversation_reference=conversation_reference,
    )
    stream = data_chat_client.chat(request=request)
    for response in stream:
        show_message(response, chart_generated_flag)
    if chart_generated_flag[0]:
        preview_in_browser()
ตอนนี้ฟังก์ชัน stream_chat_response ได้รับการกำหนดและพร้อมใช้งานกับพรอมต์ของคุณแล้ว
8. เริ่มแชท
คำถามที่ 1
ตอนนี้คุณก็พร้อมเริ่มถามคำถามแล้ว มาดูกันว่าเอเจนต์นี้ทำอะไรได้บ้างในเบื้องต้น
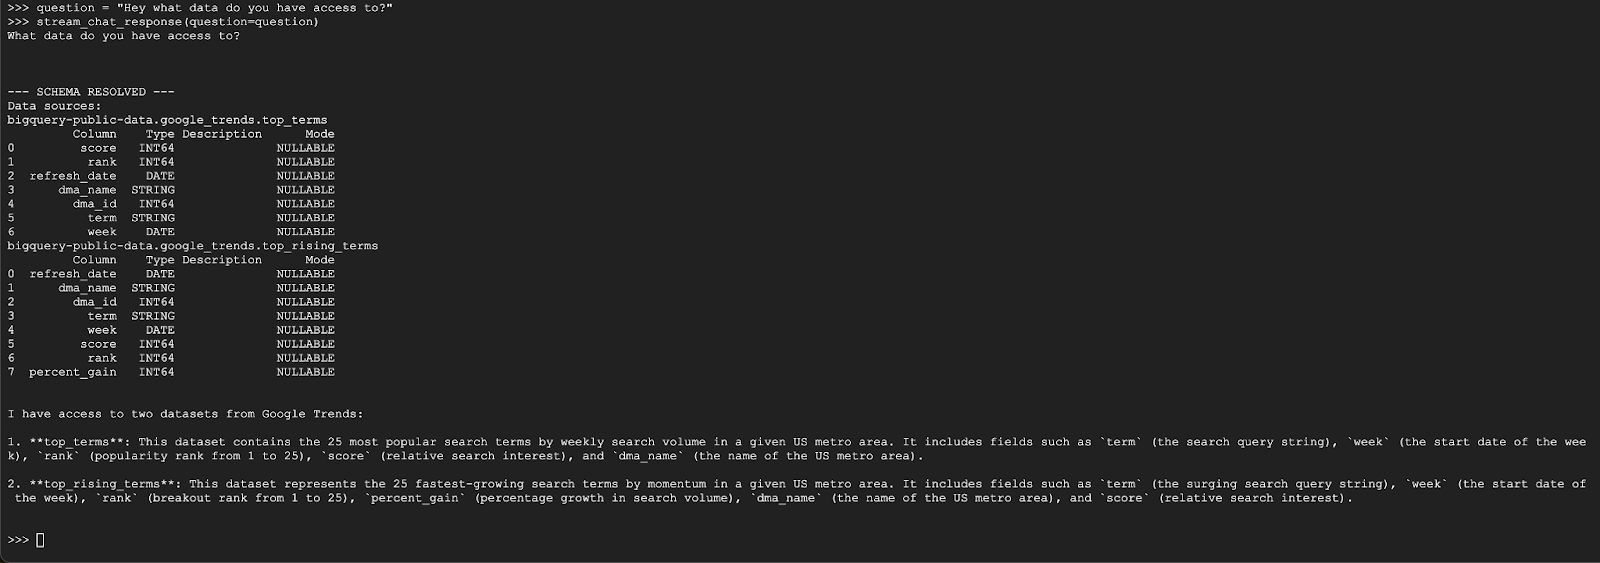
question = "Hey what data do you have access to?"
stream_chat_response(question=question)
ตัวแทนควรตอบกลับด้วยข้อความที่คล้ายกับข้อความด้านล่าง
คำถามที่ 2
ยอดเยี่ยม เรามาลองค้นหาข้อมูลเพิ่มเติมเกี่ยวกับข้อความค้นหายอดนิยมล่าสุดกัน
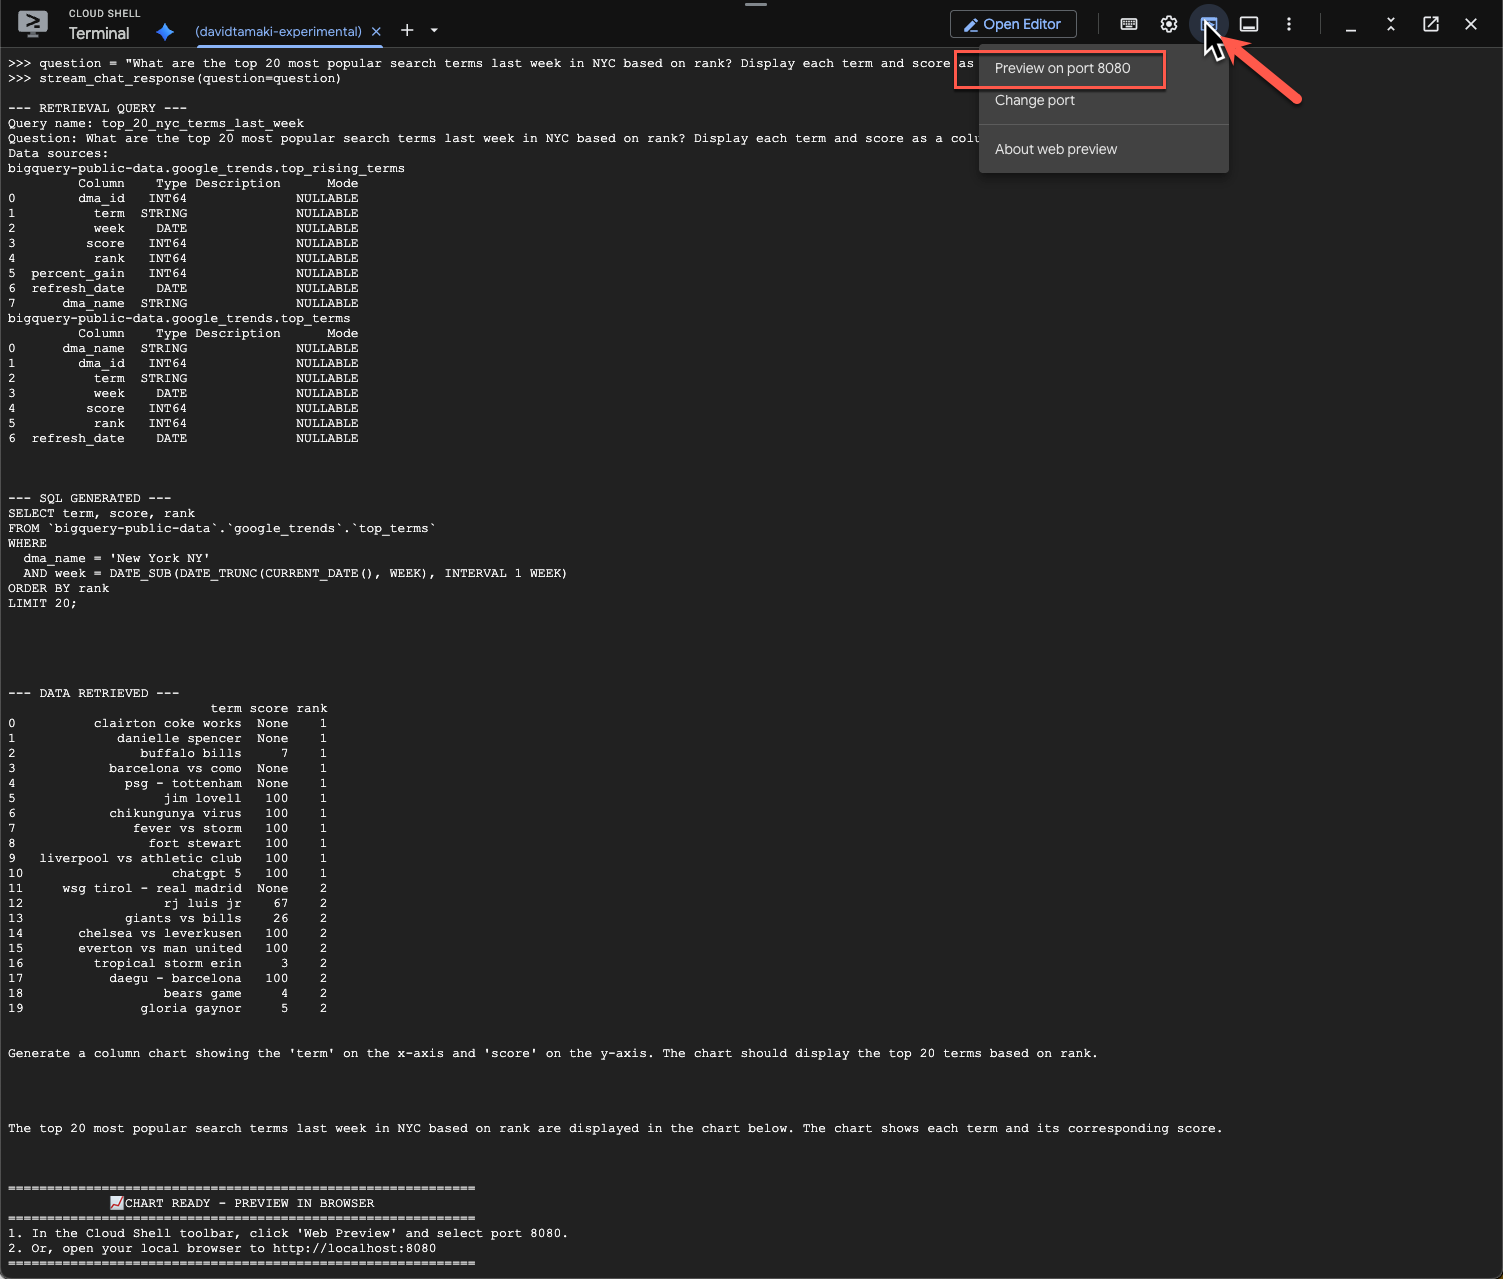
question = "What are the top 20 most popular search terms last week in NYC based on rank? Display each term and score as a column chart"
stream_chat_response(question=question)
การดำเนินการนี้จะใช้เวลาสักครู่ คุณควรเห็นเอเจนต์ดำเนินการตามขั้นตอนต่างๆ และสตรีมการอัปเดต ตั้งแต่การดึงข้อมูลสคีมาและข้อมูลเมตา การเขียนคำค้นหา SQL การรับผลลัพธ์ การระบุวิธีการแสดงภาพ และการสรุปผลลัพธ์
หากต้องการดูแผนภูมิ ให้ไปที่แถบเครื่องมือ Cloud Shell คลิก "ตัวอย่างเว็บ" แล้วเลือกพอร์ต 8080
คุณควรเห็นการแสดงผลภาพข้อมูลดังนี้
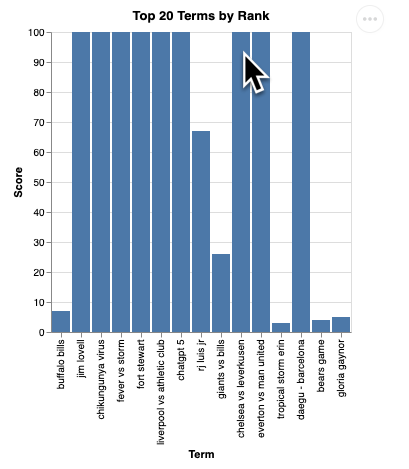
กด Enter เพื่อปิดเซิร์ฟเวอร์และดำเนินการต่อ
คำถามที่ 3
มาลองถามคำถามต่อเนื่องและเจาะลึกผลลัพธ์เหล่านี้กัน
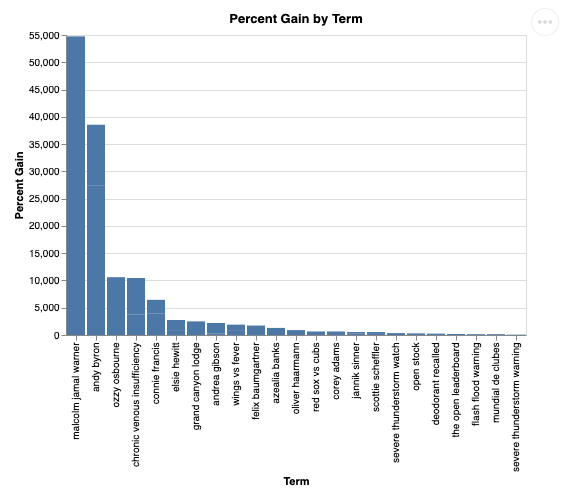
question = "What was the percent gain in growth for these search terms from the week before?"
stream_chat_response(question=question)
คุณควรเห็นข้อมูลที่มีลักษณะคล้ายด้านล่าง ในกรณีนี้ เอเจนต์ได้สร้างคำค้นหาเพื่อรวม 2 ตารางเข้าด้วยกันเพื่อหาเปอร์เซ็นต์การเพิ่มขึ้น โปรดทราบว่าคำค้นหาของคุณอาจมีลักษณะแตกต่างกันเล็กน้อย
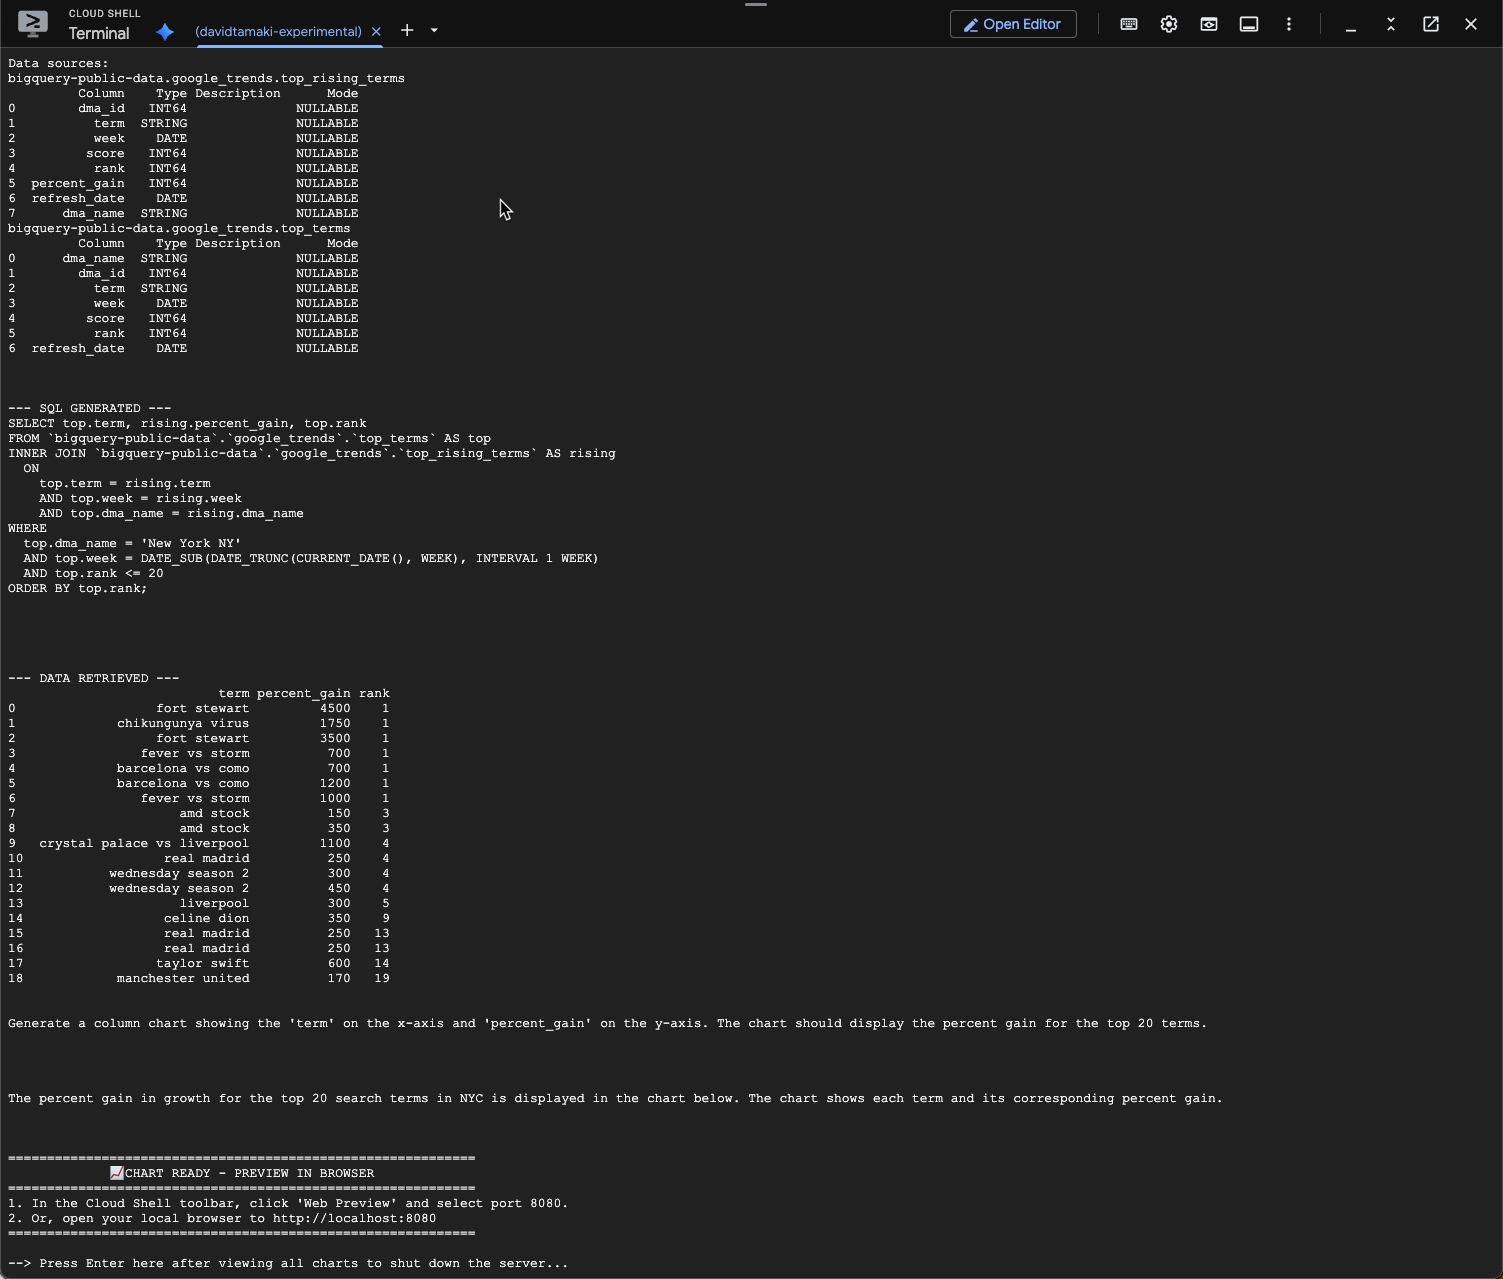
และเมื่อแสดงภาพแล้วจะมีลักษณะดังนี้
9. ล้างข้อมูล
เนื่องจาก Codelab นี้ไม่ได้เกี่ยวข้องกับผลิตภัณฑ์ที่ทำงานเป็นเวลานาน การหยุดเซสชัน Python ที่ใช้งานอยู่โดยป้อน exit() ในเทอร์มินัลก็เพียงพอแล้ว
ลบโฟลเดอร์และไฟล์โปรเจ็กต์
หากต้องการนำโค้ดออกจากสภาพแวดล้อม Cloud Shell ให้ใช้คำสั่งต่อไปนี้
cd ~
rm -rf ca-api-codelab
ปิดใช้ API
หากต้องการปิดใช้ API ที่เปิดใช้ก่อนหน้านี้ ให้เรียกใช้คำสั่งนี้
gcloud services disable geminidataanalytics.googleapis.com
gcloud services disable cloudaicompanion.googleapis.com
gcloud services disable bigquery.googleapis.com
10. บทสรุป
ขอแสดงความยินดี คุณสร้างเอเจนต์วิเคราะห์เชิงสนทนาอย่างง่ายโดยใช้ CA SDK ได้สำเร็จแล้ว ดูข้อมูลอ้างอิงเพื่อดูข้อมูลเพิ่มเติม