
1. Introduction to CFT 101
Last Updated: 2022-02-11
What is the Cloud Foundation Toolkit?
In essence, CFT provides best-practice templates to quickly get started in Google Cloud Platform. In this tutorial, you will learn how to contribute to the Cloud Foundation Toolkit.
What you'll need
- A GitHub account.
- Docker installed on your machine or use Cloud Shell ( Mac install, Windows installl)
- Code Editor for editing code (Example: Visual Studio Code)
- Basic familiarity with Git and GitHub
- Some experience with Terraform and infrastructure as code
- Permission to grant the Project Creator role to a Service Account
- A Google Cloud Organization, a test folder, and a billing account
What you'll build
In this codelab, you're going to learn how to contribute to the Cloud Foundation Toolkit (CFT).
You will:
- Setup a dev environment for contributing to CFT
- Add a feature to a CFT module
- Add tests for the added feature
- Execute integration tests in CFT
- Execute lint tests
- Commit code to GitHub and submit a Pull Request (PR)
You'll execute all the above steps by adding a new feature to the Google Cloud Storage CFT module. You will be adding a label called the "silly_label" which will be automatically added to all the buckets created through the GCS CFT module. You will also get to write tests to validate your feature and ensure end to end integration.
2. Setup Dev Environment
If you want, you can utilize the Cloud Shell for your development purposes. If you don't want to use Cloud Shell for contributing to CFT, you can set up your dev environment on your machine.
Set up Git
GitHub is based on an open source version control system (VCS) called Git. Git is responsible for everything GitHub-related that happens locally on your machine or your Cloud Shell.
- When you use the Cloud Shell, you don't need to install git as it comes pre-installed.
$ git --version
# This will display the git version on the Cloud Shell.
If you are setting up your dev environment on your machine you need to install Git.
Setting your username and email in Git
Git uses a username to associate commits with an identity. The Git username is not the same as your GitHub username.
You can change the name that is associated with your Git commits using the git config command. Changing the name associated with your Git commits using git config will only affect future commits and will not change the name used for past commits.
You have set up Git successfully and you should be able to fork, create and clone branches. We will be using Git extensively in this Codelab.
3. Fork CFT's GCS Repository
Fork a CFT repository
You set up Git on your local machine or your Cloud Shell in the earlier step. Now you need to fork the Google Cloud Storage CFT repo to start contributing.
A fork is a copy of a repository. Forking a repository allows you to freely experiment with changes without affecting the original project.
Most commonly, forks are used to either propose changes to someone else's project or to use someone else's project as a starting point for your own idea.
For example, you can use forks to propose changes related to fixing a bug. To fix a bug, you can:
- Fork the repository.
- Make the fix.
- Submit a pull request to the project owner.
Steps for forking a CFT repo:
- Open your web browser and navigate to terraform-google-modules/terraform-google-cloud-storage repository. We will be using this repo for the entire Codelab.
- In the top-right corner of the page, click Fork.

- You will be presented with an option of where you want to have the fork, choose your profile and the repo will be forked.
Clone your fork locally
The fork you created is a copy of the GCS module repository. You will now clone this repository to your local environment to add your new feature.
Steps to clone your fork:
- Open your web browser and navigate to your fork on terraform-google-modules/terraform-google-cloud-storage.
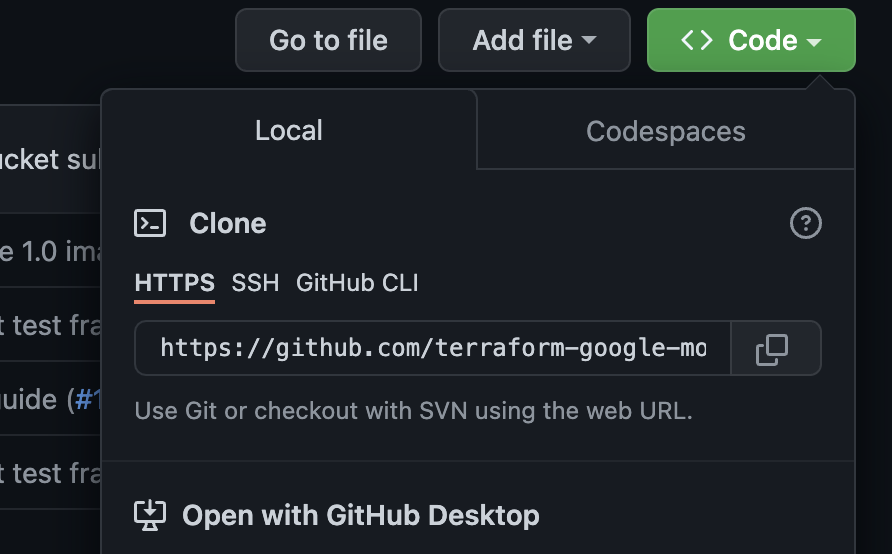
- In the top-right corner you will find the "Code" button, click on it.

- After you have clicked on the "Code" button, click on the "Copy" icon to copy the URL of the fork. You will use this URL to clone your fork to your local environment.
- Go to a terminal in your VSCode or your machine and clone the fork.
$ git clone <url>
# This command will clone your fork locally.
# Paste the copied URL from the previous step.
- Now that you have cloned your fork locally, you should go into your repo, create a new branch off the fork and make code changes to the temporary branch.
By convention, you can name your branch as follows:
- For feature requests:
feature/feature-name - For internal updates,
internal/change-name - For bug fixes:
bugfix/issue-name
Since you are adding a new feature, you can call your temporary branch feature/silly_label
$ cd terraform-google-cloud-storage
# This command takes you into the cloned directory on your local machine.

$ git branch
# This command tells your current branch
# When you run this for the first time after you have cloned, your
# output should say "master", that is your fork.

$ git checkout -b feature/silly_label
# This command creates a new branch on your fork and switches your
# branch to the newly created branch.

$ git branch
# This command will confirm your current branch to be "feature/silly_label"
You are now all setup for starting work on the Cloud Foundation Toolkit!
4. Create a test environment
The standard CFT development process is based around using an isolated test project for testing. This step will guide you through creating the test project (based on a standard configuration) via a service account.
0. Install Docker Engine
If you are using your machine for development purposes, you need to install Docker Engine.
1. Install Google Cloud SDK
You don't need to install Google Cloud SDK if you are using GCP Cloud Shell.
Go to Google Cloud SDK and download the interactive installer for your platform.
2. Set configuration
In order to create a test environment, you will need a Google Cloud Organization, a test folder, and a billing account. These values need to be set via environment variables:
export TF_VAR_org_id="your_org_id"
export TF_VAR_folder_id="your_folder_id"
export TF_VAR_billing_account="your_billing_account_id"
3. Set up your Service Account
Before creating a test environment, you need to download a service account key to your test environment. This service account will need Project Creator, Billing Account User, and Organization Viewer roles. These steps help you create a new service account, but you could also reuse an existing account.
3.1 Create or Select Seed GCP Project
Before creating your service account, you need to select a project to host it in. You can also create a new project.
gcloud config set core/project YOUR_PROJECT_ID
3.2 Enable Google Cloud APIs
Enable the following Google Cloud APIs on your seed project:
gcloud services enable cloudresourcemanager.googleapis.com
gcloud services enable iam.googleapis.com
gcloud services enable cloudbilling.googleapis.com
3.3 Create Service Account
Create a new service account to manage the test environment:
# Creating a service account for CFT.
gcloud iam service-accounts create cft-onboarding \
  --description="CFT Onboarding Terraform Service Account" \
  --display-name="CFT Onboarding"

# Assign SERVICE_ACCOUNT environment variable for later steps
export SERVICE_ACCOUNT=cft-onboarding@$(gcloud config get-value core/project).iam.gserviceaccount.com
Verify your service account is created:
gcloud iam service-accounts list --filter="EMAIL=${SERVICE_ACCOUNT}"
3.4 Grant Project Creator, Billing Account User, and Organization Viewer roles to the Service Account:
gcloud resource-manager folders add-iam-policy-binding ${TF_VAR_folder_id} \
  --member="serviceAccount:${SERVICE_ACCOUNT}" \
  --role="roles/resourcemanager.projectCreator"
gcloud organizations add-iam-policy-binding ${TF_VAR_org_id} \
  --member="serviceAccount:${SERVICE_ACCOUNT}" \
  --role="roles/billing.user"
gcloud beta billing accounts add-iam-policy-binding ${TF_VAR_billing_account} \
  --member="serviceAccount:${SERVICE_ACCOUNT}" \
  --role="roles/billing.user"
gcloud organizations add-iam-policy-binding ${TF_VAR_org_id} \
  --member="serviceAccount:${SERVICE_ACCOUNT}" \
  --role="roles/resourcemanager.organizationViewer"
Now you have a Service Account which can be used for managing the test environment.
4. Prepare Terraform Credential
In order to create the test environment, you need to download the service account key into your shell.
4.1 Service Account Key
Create and download a service account key for Terraform
gcloud iam service-accounts keys create cft.json --iam-account=${SERVICE_ACCOUNT}
4.2 Setup Terraform Credential
Supply the key to Terraform using the environment variable SERVICE_ACCOUNT_JSON, setting the value to the contents of your service account key.
export SERVICE_ACCOUNT_JSON=$(< cft.json)
After storing the credential information in the environment variable, remove the keyfile. You can recreate a key later if needed using the same command above.
rm -rf cft.json
5. Create test project for Terraform deployments
Now that everything is prepared, you can create the test project with a single command. Run this command from the terraform-google-cloud-storage directory root:
make docker_test_prepare
You will see the below output when you run make docker_test_prepare , at the end you will receive the test project_id that has been created where you will deploy and test your Cloud Storage module with your new feature. If you encounter issues with linking a billing account, refer to troubleshooting steps.
macbookpro3:terraform-google-cloud-storage user$ make docker_test_prepare
docker run --rm -it \
                -e SERVICE_ACCOUNT_JSON \
                -e TF_VAR_org_id \
                -e TF_VAR_folder_id \
                -e TF_VAR_billing_account \
                -v /Users/cft/terraform-google-cloud-storage:/workspace \
                gcr.io/cloud-foundation-cicd/cft/developer-tools:0.8.0 \
                /usr/local/bin/execute_with_credentials.sh prepare_environment
Activated service account credentials for: [cft-onboarding@<project_id>.iam.gserviceaccount.com]
Activated service account credentials for: [cft-onboarding@<project_id>.iam.gserviceaccount.com]
Initializing modules...

Initializing the backend...

Initializing provider plugins...

The following providers do not have any version constraints in configuration,
so the latest version was installed.

To prevent automatic upgrades to new major versions that may contain breaking
changes, it is recommended to add version = "..." constraints to the
corresponding provider blocks in configuration, with the constraint strings
suggested below.

* provider.google-beta: version = "~> 3.9"
* provider.null: version = "~> 2.1"
* provider.random: version = "~> 2.2"

Terraform has been successfully initialized!

You may now begin working with Terraform. Try running "terraform plan" to see
any changes that are required for your infrastructure. All Terraform commands
should now work.

If you ever set or change modules or backend configuration for Terraform,
rerun this command to reinitialize your working directory. If you forget, other
commands will detect it and remind you to do so if necessary.
module.project.module.project-factory.null_resource.preconditions: Refreshing state... [id=8723188031607443970]
module.project.module.project-factory.null_resource.shared_vpc_subnet_invalid_name[0]: Refreshing state... [id=5109975723938185892]
module.project.module.gsuite_group.data.google_organization.org[0]: Refreshing state...
module.project.module.project-factory.random_id.random_project_id_suffix: Refreshing state... [id=rnk]
module.project.module.project-factory.google_project.main: Refreshing state... [id=<project-id>]
module.project.module.project-factory.google_project_service.project_services[0]: Refreshing state... [id=<project-id>/storage-api.googleapis.com]
module.project.module.project-factory.google_project_service.project_services[1]: Refreshing state... [id=<project-id>/cloudresourcemanager.googleapis.com]
module.project.module.project-factory.google_project_service.project_services[2]: Refreshing state... [id=<project-id>/compute.googleapis.com]
module.project.module.project-factory.data.null_data_source.default_service_account: Refreshing state...
module.project.module.project-factory.google_service_account.default_service_account: Refreshing state... [id=projects/ci-cloud-storage-ae79/serviceAccounts/project-service-account@<project-id>.iam.gserv
iceaccount.com]
module.project.module.project-factory.google_project_service.project_services[3]: Refreshing state... [id=<project-id>/serviceusage.googleapis.com]
module.project.module.project-factory.null_resource.delete_default_compute_service_account[0]: Refreshing state... [id=3576396874950891283]
google_service_account.int_test: Refreshing state... [id=projects/<project-id>/serviceAccounts/cft-onboarding@<project-id>.iam.gserviceaccount.com]
google_service_account_key.int_test: Refreshing state... [id=projects/<project-id>/serviceAccounts/cft-onboarding@<project-id>.iam.gserviceaccount.com/keys/351009a1e011e88049ab2097994d1c627a61
6961]
google_project_iam_member.int_test[1]: Refreshing state... [id=<project-id>/roles/iam.serviceAccountUser/serviceaccount:cft-onboarding@<project-id>.iam.gserviceaccount.com]
google_project_iam_member.int_test[0]: Refreshing state... [id=<project-id>/roles/storage.admin/serviceaccount:cft-onboarding@<project-id>.iam.gserviceaccount.com]

Apply complete! Resources: 0 added, 0 changed, 0 destroyed.

Outputs:

project_id = <test-project-id>
sa_key = <sensitive>
Found test/setup/make_source.sh. Using it for additional explicit environment configuration.
You have now created a test project which is referenced by project_id as you can see on the console output. Your development and test environment is setup.
5. Add a new feature to CFT module
Now your development and test environment are setup, let's start adding your "silly_label" feature to the google-cloud-storage CFT module.
Make sure you are in the terraform-google-cloud-storage and open the main.tf file as you see below in the folder structure.
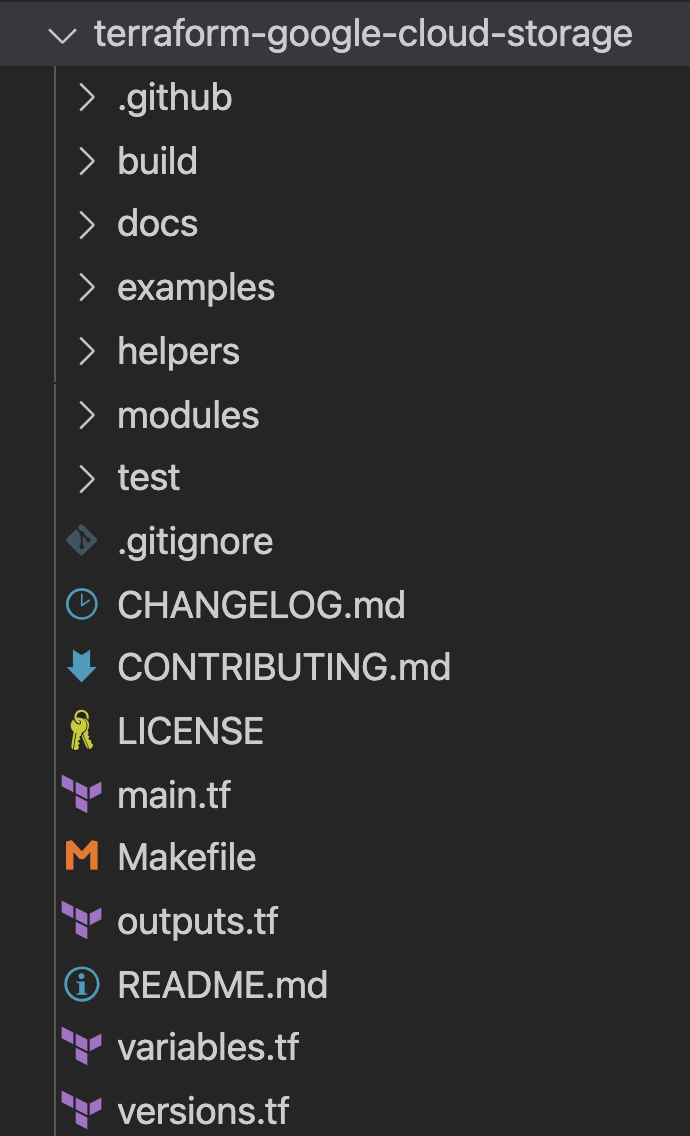
Since "silly_label" is a label, you will add the feature in line 27 in the variable "labels" in main.tf, as you see below:
terraform-google-cloud-storage/main.tf
resource "google_storage_bucket" "buckets" {
 <...>
 storage_class = var.storage_class
 // CODELAB:Add silly label in labels variable
 labels        = merge(var.labels, { name = replace("${local.prefix}${lower(each.value)}", ".", "-") }, { "silly" = var.silly_label })
 force_destroy = lookup(
 <...>
}
Now, you will add the silly_label variable in the variables.tf that you see in the above folder structure.
Copy paste the below code and add it to line 31 in variables.tf and ensure you have a new line character above and below the variable block you add.
terraform-google-cloud-storage/variables.tf
variable "names" {
 description = "Bucket name suffixes."
 type        = list(string)
}

// CODELAB: Add "silly_label" variable to variables.tf between "names" and "location"
variable "silly_label" {
 description = "Sample label for bucket."
 type        = string
}

variable "location" {
 description = "Bucket location."
 default     = "EU"
}
6. Add a new feature to example of storage bucket
You have added your feature to the main.tf of the module and now you will test your added feature through an example.
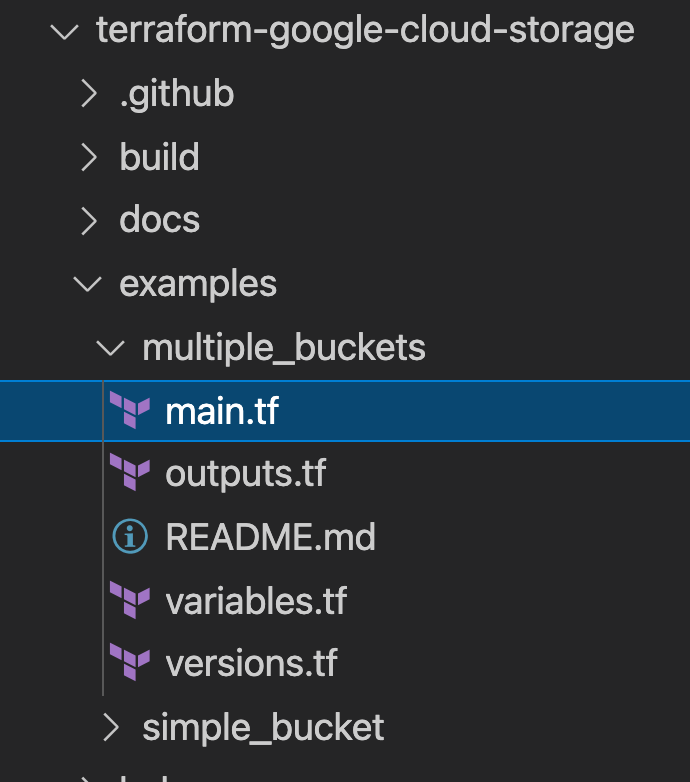
The "silly_label" will need to be added to the examples/multiple-buckets/main.tf
This example will be used in the next step to perform integration tests.
Copy paste the below variable silly_label line to line 27 in main.tf at terraform-google-cloud-storage/examples/multiple-buckets/ as seen in the folder structure:
terraform-google-cloud-storage/examples/multiple-buckets/main.tf
module "cloud_storage" {
 <...>
 // CODELAB: Add "silly_label" as an example to main.tf.
 silly_label        = "awesome"

 <..>
}
7. Update blueprint test to check feature
You have added your feature to the main.tf of the module and then added the feature to multiple_buckets example. Now, you need to test your feature via a blueprint integration test written in Golang.
You will add your new tests in multiple_buckets_test.go file found in the below folder structure:
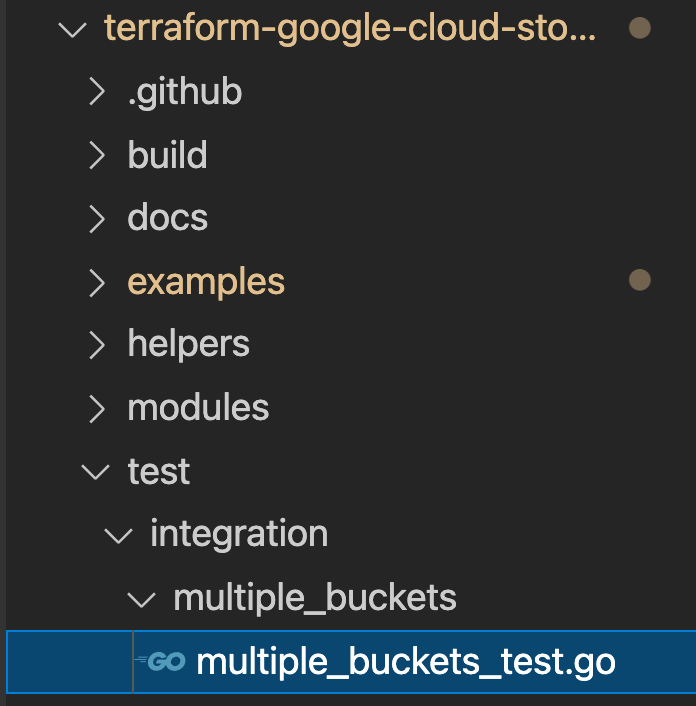
You added the "silly_label" on all the buckets being created through the multiple_buckets module and now you need to write tests to test out the new feature.
In the below code, you are getting the label of each bucket through the gcloud alpha storage command and then you check the returned output from the command.
test/integration/multiple_buckets/multiple_buckets_test.go
func TestMultipleBuckets(t *testing.T) {
 <..>
op := gcloud.Run(t, fmt.Sprintf("alpha storage ls --buckets gs://%s", bucketName), gcloudArgs).Array()[0]

// verify silly label on each bucket
assert.Equal("awesome", op.Get("metadata.labels.silly").String(), "should have silly label set to awesome")

// verify lifecycle rules
...
}
8. Execute integration tests in CFT
Integration Testing
Integration tests are used to verify the behavior of the root module, submodules, and examples. Additions, changes, and fixes should be accompanied with tests.
The integration tests are written using the blueprint test framework and run using the CFT CLI. These tools are packaged within a Docker image for convenience.
The general strategy for these tests is to verify the behavior of the example modules, thus ensuring that the root module, submodules, and example modules are all functionally correct.
In interactive execution, you execute each step via multiple commands.
- Run
make docker_runto start the testing Docker container in interactive mode.
Make is a build automation tool that automatically builds executable programs and libraries from source code by reading files called Makefiles which specify how to derive the target program. When you make file changes the docker container must be updated automatically.
When you run make docker_run, you create a workspace in your docker container and activate the credentials for your service account. The workspace will be used in the next steps to run tests.
You will see the below output in your terminal:
Activated service account credentials for: [cft@<PROJECT_ID>.iam.gserviceaccount.com]
- Run
module-swapper -registry-prefix=terraform-google-modulesto adjust the examplemain.tffiles to import the modules from your local files instead of the published modules.
You should see output like the following in your terminal:
[root@<CONTAINER_ID> workspace]# module-swapper -registry-prefix=terraform-google-modules
2025/08/04 19:26:29 Module name set from remote to cloud-storage
2025/08/04 19:26:29 Modifications made to file /workspace/examples/multiple_buckets/main.tf
2025/08/04 19:26:29 --- Original
+++ Modified
@@ -21,7 +21,7 @@
 }

 module "cloud_storage" {
-  source = "terraform-google-modules/cloud-storage/google"
+  source = "../.."
   # [restore-marker]   version = "~> 10.0"

   project_id = var.project_id
- Run
cft test listto list all the blueprints tests in your workspace.
You will see the below output in your terminal:
[root@CONTAINER_ID workspace]# cft test list
 NAME                           | CONFIG                    | LOCATION
--------------------------------+---------------------------+------------------------------------------------------------
 TestAll/examples/simple_bucket | examples/simple_bucket    | test/integration/discover_test.go
 TestMultipleBuckets            | examples/multiple_buckets | test/integration/multiple_buckets/multiple_buckets_test.go
- Run
cft test run <EXAMPLE_NAME> --stage initto initialize the example. In this case to initializeTestMultipleBucketstest run,cft test run TestMultipleBuckets --stage init. You can additionally use the--verboseflag to get additional info when running tests.
This init stage initializes the Terraform example.
You will see the below output in your terminal.
[root@<CONTAINER_ID> workspace]# cft test run TestMultipleBuckets --stage init --verbose
INFO[02-09|08:24:31] using test-dir: test/integration
...
TestMultipleBuckets 2022-02-09T08:24:35Z command.go:179: Terraform has been successfully initialized!
...
TestMultipleBuckets 2022-02-09T08:24:35Z command.go:100: Running command terraform with args [validate]
TestMultipleBuckets 2022-02-09T08:24:36Z command.go:179: Success! The configuration is valid.
...
--- PASS: TestMultipleBuckets (4.05s)
- Run
cft test run <EXAMPLE_NAME> --stage applyto apply the example module.
This step applies the example initialized in the previous stage to the GCP project created earlier in the Codelab.
You will see the below output in your terminal.
[root@<CONTAINER_ID> workspace]# cft test run TestMultipleBuckets --stage apply --verbose
INFO[02-09|08:28:11] using test-dir: test/integration
...
TestMultipleBuckets 2022-02-09T08:28:19Z command.go:179: Apply complete! Resources: 6 added, 0 changed, 0 destroyed.
TestMultipleBuckets 2022-02-09T08:28:19Z command.go:179:
TestMultipleBuckets 2022-02-09T08:28:19Z command.go:179: Outputs:
TestMultipleBuckets 2022-02-09T08:28:19Z command.go:179:
TestMultipleBuckets 2022-02-09T08:28:19Z command.go:179: names = {
TestMultipleBuckets 2022-02-09T08:28:19Z command.go:179:   "one" = "multiple-buckets-erp1-eu-one"
...
--- PASS: TestMultipleBuckets (6.51s)
PASS
ok      github.com/terraform-google-modules/terraform-google-cloud-storage/test/integration/multiple_buckets    6.548s
- Run
cft test run <EXAMPLE_NAME> --stage verifyto verify that the example created expected infrastructure.
This step will run the verify function in TestMultipleBuckets. Usually verification is done via executing a gcloud command to retrieve JSON output for the current state of a resource and asserting that the current state is as declared in the example.
If you get any errors, you will see what was expected and what was received by the command for the test.
You will see the below output in your terminal.
[root@<CONTAINER_ID> workspace]# cft test run TestMultipleBuckets --stage verify --verbose
INFO[02-09|08:30:19] using test-dir: test/integration
...
TestMultipleBuckets 2022-02-09T08:30:27Z command.go:100: Running command terraform with args [output -no-color -json names_list]
TestMultipleBuckets 2022-02-09T08:30:27Z command.go:179: ["multiple-buckets-erp1-eu-one","multiple-buckets-erp1-eu-two"]
TestMultipleBuckets 2022-02-09T08:30:27Z command.go:100: Running command gcloud with args [alpha storage ls --buckets gs://multiple-buckets-erp1-eu-one --project ci-cloud-storage-8ce9 --json]
TestMultipleBuckets 2022-02-09T08:30:28Z command.go:179: [
TestMultipleBuckets 2022-02-09T08:30:28Z command.go:179: {
TestMultipleBuckets 2022-02-09T08:30:28Z command.go:179:   "url": "gs://multiple-buckets-erp1-eu-one/",
...
TestMultipleBuckets 2022-02-09T08:30:33Z command.go:179: ]
2022/02/09 08:30:33 RUN_STAGE env var set to verify
2022/02/09 08:30:33 Skipping stage teardown
--- PASS: TestMultipleBuckets (12.32s)
PASS
ok      github.com/terraform-google-modules/terraform-google-cloud-storage/test/integration/multiple_buckets    12.359s
- Run
cft test run <EXAMPLE_NAME> --stage teardownto teardown the example.
This step destroys the infrastructure that you created in the above steps. This step will also destroy the GCS buckets that were created in the project along with the label that you added to the GCS module.
You can view the below output in your terminal.
[root@<CONTAINER_ID> workspace]# cft test run TestMultipleBuckets --stage teardown --verbose
INFO[02-09|08:36:02] using test-dir: test/integration
...
TestMultipleBuckets 2022-02-09T08:36:06Z command.go:100: Running command terraform with args [destroy -auto-approve -input=false -lock=false]
TestMultipleBuckets 2022-02-09T08:36:07Z command.go:179: module.cloud_storage.random_id.bucket_suffix: Refreshing state... [id=mNA]
TestMultipleBuckets 2022-02-09T08:36:07Z command.go:179: random_string.prefix: Refreshing state... [id=erp1]
TestMultipleBuckets 2022-02-09T08:36:08Z command.go:179: module.cloud_storage.google_storage_bucket.buckets["two"]: Refreshing state... [id=multiple-buckets-erp1-eu-two]
...
TestMultipleBuckets 2022-02-09T08:36:10Z command.go:179: Destroy complete! Resources: 6 destroyed.
TestMultipleBuckets 2022-02-09T08:36:10Z command.go:179:
--- PASS: TestMultipleBuckets (6.62s)
PASS
ok      github.com/terraform-google-modules/terraform-google-cloud-storage/test/integration/multiple_buckets    6.654s
- Run
module-swapper -registry-prefix=terraform-google-modules -restoreto undo the adjustments to the examplemain.tffiles from the last time you ranmodule-swapper.
[root@<CONTAINER_ID> workspace]# module-swapper -registry-prefix=terraform-google-modules -restore
2025/08/04 19:30:41 Module name set from remote to cloud-storage
2025/08/04 19:36:32 Modifications made to file /workspace/examples/multiple_buckets/main.tf
2025/08/04 19:36:32 --- Original
+++ Modified
@@ -21,8 +21,8 @@
 }

 module "cloud_storage" {
-  source = "../.."
-   version = "~> 10.0"
+  source  = "terraform-google-modules/cloud-storage/google"
+  version = "~> 10.0"

   project_id = var.project_id
- Run
exitto exit the test container.
9. Generating Documentation for Inputs and Outputs
The Inputs and Outputs tables in the READMEs of the root module, submodules, and example modules are automatically generated based on the variables and outputs of the respective modules. These tables must be refreshed if the module interfaces are changed.
Run:
make generate_docs
# This will generate new Inputs and Outputs tables
10. Execute lint tests in CFT
A linter is a tool that analyzes source code to flag programming errors, bugs, stylistic errors, and suspicious constructs.
Many of the files in the repository can be linted or formatted to maintain a standard of quality. To ensure quality in CFT, you will use a lint test.
Run:
make docker_test_lint
# This will run all lint tests on your repo
11. Submitting a Pull Request on Github
Now that you have changed your code locally and tested it through the integration tests you would want to publish this code to the master repo.
To make your code available on the master repo, you will need to commit code changes to your branch and push it to the master repository. For your code to be added to the main repo that you forked at the start of the Codelab, you will raise a Pull Request (PR) on the master repo after committing code to your repo.
When you raise a PR, the repo admin will be notified to review the proposed code changes. Additionally, you can also add other users as reviewers to get feedback on your code changes. The PR will trigger a Cloud Build which will run tests on the repo.
Based on your code changes, code reviewers will provide comments on your code and ask for modifications if something needs to be changed based on best practices and documentation. The admin will review your code changes, ensure that your code is compliant with the repo and might again request you to make some changes before merging your code into the master repo.
Execute the following steps to commit code to your forked branch and push code to your forked branch:
- First step is to add changed files into the local repo.
$ git add main.tf
$ git add README.md
$ git add variables.tf
$ git add examples/multiple-buckets/main.tf
$ git add test/integration/multiple_buckets/multiple_buckets_test.go
# The ‘git add' command adds the file in the local repository and
# stages the file for commit. To unstage a file, use git reset HEAD YOUR-FILE
- Your files are now staged, next you will commit the changes.
$ git commit -m "First CFT commit"
# This will commit the staged changes and prepares them to be pushed
# to a remote repository. To remove this commit and modify the file,
# use 'git reset --soft HEAD~1' and commit and add the file again.
- Push the committed changes in your local repository to GitHub for creating a Pull Request (PR).
$ git push -u origin feature/silly_label
# Pushes the changes in your local repository up to the remote
# repository you specified as the origin
Your code changes are now ready for a Pull Request!
Execute the following steps to create a PR to the terraform-google-modules/terraform-google-cloud-storage repo:
- In your web browser, navigate to the main page of the repo.
- You will see a suggestion via banner to open a PR from your fork. Click on "Compare and pull request".

- Enter a title and description for your pull request to describe your code changes. Be as specific as possible while being concise.
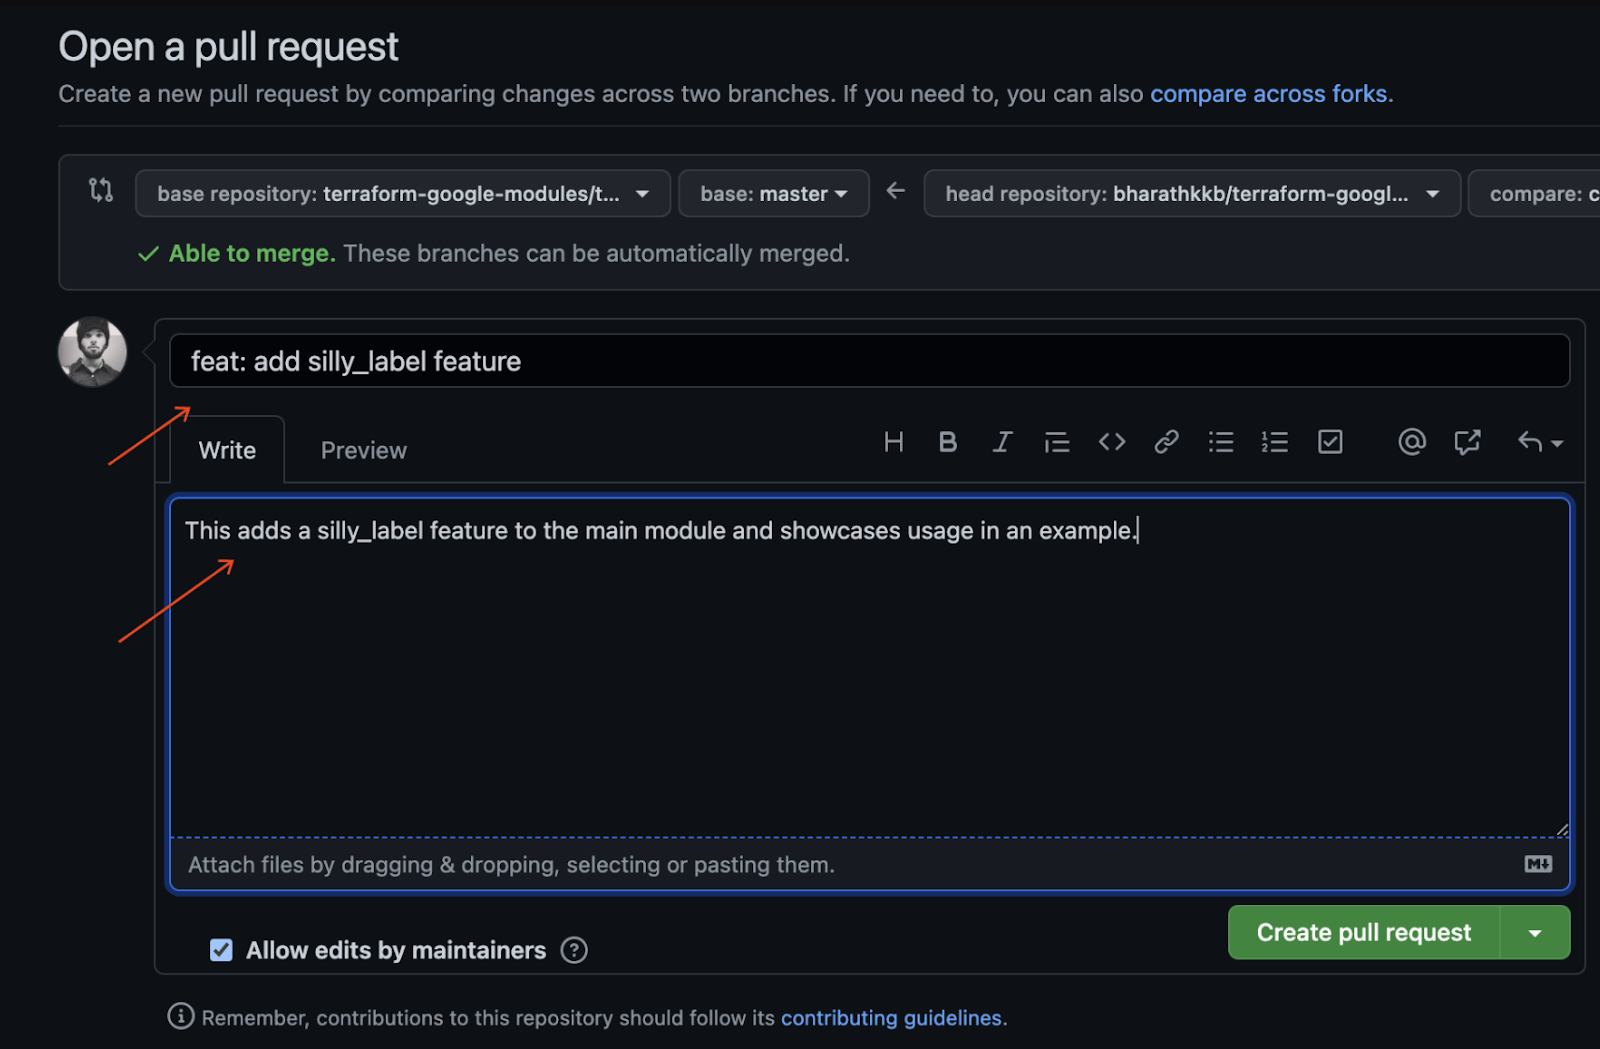
- To create a pull request that is ready for review, click "Create Pull Request".
- You will see Cloud Build Triggers running which are triggered due to the PR.
- Refer to official GitHub docs on opening pull requests from forks if you encounter any issues.
You have successfully pushed your first code change to your forked branch and raised your first CFT PR against the master branch!
12. Congratulations
Congratulations, you've successfully added a feature to a CFT module and submitted a PR for review!
You added a feature to a CFT module, tested it locally through an example, and performed tests before committing your code to GitHub. Finally, you raised a PR for review and final merge into CFT.
You now know the important steps to get started with the Cloud Foundation Toolkit.