
1. सीएफ़टी 101 के बारे में जानकारी

पिछले अपडेट की तारीख: 11-02-2022
Cloud Foundation Toolkit क्या है?
CFT, Google Cloud Platform में तेज़ी से काम शुरू करने के लिए, सबसे सही तरीके से काम करने वाले टेंप्लेट उपलब्ध कराता है. इस ट्यूटोरियल में, आपको Cloud Foundation Toolkit में योगदान करने का तरीका बताया जाएगा.
आपको इन चीज़ों की ज़रूरत होगी
- एक GitHub खाता.
- आपके कंप्यूटर पर Docker इंस्टॉल होना चाहिए या Cloud Shell ( Mac पर इंस्टॉल करें, Windows पर इंस्टॉल करें) का इस्तेमाल करें
- कोड में बदलाव करने के लिए कोड एडिटर (उदाहरण: Visual Studio Code)
- Git और GitHub के बारे में बुनियादी जानकारी
- Terraform और इंफ़्रास्ट्रक्चर ऐज़ कोड का कुछ अनुभव हो
- किसी सेवा खाते को प्रोजेक्ट क्रिएटर की भूमिका असाइन करने की अनुमति
- Google Cloud संगठन, टेस्ट फ़ोल्डर, और बिलिंग खाता
आपको क्या बनाने को मिलेगा
इस कोडलैब में, आपको Cloud Foundation Toolkit (CFT) में योगदान देने का तरीका बताया जाएगा.
आपको:
- CFT में योगदान देने के लिए, डेवलपमेंट एनवायरमेंट सेट अप करना
- सीएफ़टी मॉड्यूल में कोई सुविधा जोड़ना
- जोड़ी गई सुविधा के लिए टेस्ट जोड़ना
- CFT में इंटिग्रेशन टेस्ट चलाना
- लिंट टेस्ट चलाना
- GitHub पर कोड कमिट करना और पुल का अनुरोध (पीआर) सबमिट करना
ऊपर दिए गए सभी चरणों को पूरा करने के लिए, आपको Google Cloud Storage CFT मॉड्यूल में नई सुविधा जोड़नी होगी. आपको "silly_label" नाम का एक लेबल जोड़ना होगा. यह GCS CFT मॉड्यूल से बनाए गए सभी बकेट में अपने-आप जुड़ जाएगा. आपको अपनी सुविधा की पुष्टि करने और एंड-टू-एंड इंटिग्रेशन पक्का करने के लिए, टेस्ट लिखने का विकल्प भी मिलेगा.
2. डेवलपमेंट एनवायरमेंट सेटअप करना
अगर आपको डेवलपमेंट के लिए Cloud Shell का इस्तेमाल करना है, तो ऐसा किया जा सकता है. अगर आपको CFT में योगदान देने के लिए Cloud Shell का इस्तेमाल नहीं करना है, तो अपनी मशीन पर डेवलपमेंट एनवायरमेंट सेट अप करें.
Git सेट अप करना
GitHub, Git नाम के ओपन सोर्स वर्शन कंट्रोल सिस्टम (वीसीएस) पर आधारित है. Git, GitHub से जुड़ी उन सभी गतिविधियों के लिए ज़िम्मेदार है जो आपकी मशीन या Cloud Shell पर होती हैं.
- Cloud Shell का इस्तेमाल करते समय, आपको git इंस्टॉल करने की ज़रूरत नहीं होती, क्योंकि यह पहले से इंस्टॉल होता है.
$ git --version
# This will display the git version on the Cloud Shell.
अगर आपको अपनी मशीन पर डेवलपमेंट एनवायरमेंट सेट अप करना है, तो आपको Git इंस्टॉल करना होगा.
Git में अपना उपयोगकर्ता नाम और ईमेल पता सेट करना
Git, कमिट को किसी पहचान से जोड़ने के लिए उपयोगकर्ता नाम का इस्तेमाल करता है. Git का उपयोगकर्ता नाम और GitHub का उपयोगकर्ता नाम एक जैसा नहीं है.
git config कमांड का इस्तेमाल करके, Git कमिट से जुड़ा नाम बदला जा सकता है. git config का इस्तेमाल करके, Git कमिट से जुड़ा नाम बदलने पर, सिर्फ़ आने वाले समय में की जाने वाली कमिट पर असर पड़ेगा. इससे पिछली कमिट के लिए इस्तेमाल किया गया नाम नहीं बदलेगा.
आपने Git को सही तरीके से सेट अप कर लिया है. साथ ही, आपके पास फ़ोर्क करने, ब्रांच बनाने, और क्लोन करने का विकल्प होना चाहिए. इस कोडलैब में, हम Git का बड़े पैमाने पर इस्तेमाल करेंगे.
3. फ़ोर्क सीएफ़टी की जीसीएस रिपॉज़िटरी
CFT रिपॉज़िटरी को फ़ोर्क करना
आपने पिछले चरण में, अपने कंप्यूटर या Cloud Shell पर Git सेट अप किया हो. अब आपको योगदान देने के लिए, Google Cloud Storage CFT repo को फ़ोर्क करना होगा.
फ़ोर्क, किसी रिपॉज़िटरी की कॉपी होती है. किसी रिपॉज़िटरी को फ़ोर्क करने से, आपको मूल प्रोजेक्ट पर असर डाले बिना बदलावों को आज़माने की सुविधा मिलती है.
आम तौर पर, फ़ोर्क का इस्तेमाल किसी दूसरे व्यक्ति के प्रोजेक्ट में बदलाव करने का सुझाव देने या किसी दूसरे व्यक्ति के प्रोजेक्ट को अपने आइडिया के लिए शुरुआती बिंदु के तौर पर इस्तेमाल करने के लिए किया जाता है.
उदाहरण के लिए, किसी गड़बड़ी को ठीक करने से जुड़े बदलावों का सुझाव देने के लिए, फ़ोर्क का इस्तेमाल किया जा सकता है. किसी बग को ठीक करने के लिए, ये काम किए जा सकते हैं:
- रिपॉज़िटरी को फ़ोर्क करें.
- समस्या ठीक करें.
- प्रोजेक्ट के मालिक को पुल अनुरोध सबमिट करें.
CFT रेपो को फ़ोर्क करने का तरीका:
- अपना वेब ब्राउज़र खोलें और terraform-google-modules/terraform-google-cloud-storage रिपॉज़िटरी पर जाएं. हम इस रिपो का इस्तेमाल पूरे कोडलैब के लिए करेंगे.
- पेज के सबसे ऊपर दाएं कोने में, Fork पर क्लिक करें.

- आपको एक विकल्प दिखेगा कि आपको फ़ोर्क कहां करना है. अपनी प्रोफ़ाइल चुनें और रिपो फ़ोर्क हो जाएगी.
अपने फ़ोर्क को स्थानीय तौर पर क्लोन करना
आपने जो फ़ोर्क बनाया है वह GCS मॉड्यूल रिपॉज़िटरी की कॉपी है. अब आपको इस रिपॉज़िटरी को अपने लोकल एनवायरमेंट में क्लोन करना होगा, ताकि नई सुविधा जोड़ी जा सके.
अपने फ़ोर्क को क्लोन करने का तरीका:
- अपना वेब ब्राउज़र खोलें और terraform-google-modules/terraform-google-cloud-storage पर अपने फ़ोर्क पर जाएं.
- सबसे ऊपर दाएं कोने में, आपको "Code" बटन दिखेगा. इस पर क्लिक करें.

- "कोड" बटन पर क्लिक करने के बाद, फ़ोर्क किए गए यूआरएल को कॉपी करने के लिए, "कॉपी करें" आइकॉन पर क्लिक करें. इस यूआरएल का इस्तेमाल करके, अपने फ़ोर्क को लोकल एनवायरमेंट में क्लोन किया जा सकता है.

- VSCode या अपनी मशीन में किसी टर्मिनल पर जाएं और फ़ोर्क को क्लोन करें.
$ git clone <url>
# This command will clone your fork locally.
# Paste the copied URL from the previous step.
- अब आपने अपने फ़ोर्क को स्थानीय तौर पर क्लोन कर लिया है. इसके बाद, आपको अपनी रेपो में जाना चाहिए. साथ ही, फ़ोर्क से एक नई ब्रांच बनानी चाहिए और अस्थायी ब्रांच में कोड में बदलाव करने चाहिए.
परंपरा के मुताबिक, अपनी ब्रांच को इस तरह नाम दिया जा सकता है:
- सुविधा के अनुरोधों के लिए:
feature/feature-name - इंटरनल अपडेट के लिए,
internal/change-name - गड़बड़ियां ठीक करने के लिए:
bugfix/issue-name
नई सुविधा जोड़ी जा रही है, इसलिए अपनी अस्थायी ब्रांच को feature/silly_label कहा जा सकता है
$ cd terraform-google-cloud-storage
# This command takes you into the cloned directory on your local machine.

$ git branch
# This command tells your current branch
# When you run this for the first time after you have cloned, your
# output should say "master", that is your fork.

$ git checkout -b feature/silly_label
# This command creates a new branch on your fork and switches your
# branch to the newly created branch.

$ git branch
# This command will confirm your current branch to be "feature/silly_label"
अब Cloud Foundation Toolkit पर काम शुरू करने के लिए, आपका सेटअप पूरा हो गया है!
4. टेस्ट एनवायरमेंट बनाना
CFT को डेवलप करने की स्टैंडर्ड प्रोसेस में, टेस्टिंग के लिए आइसोलेट किए गए टेस्ट प्रोजेक्ट का इस्तेमाल किया जाता है. इस चरण में, सेवा खाते के ज़रिए टेस्ट प्रोजेक्ट (स्टैंडर्ड कॉन्फ़िगरेशन के आधार पर) बनाने का तरीका बताया गया है.
0. Docker Engine इंस्टॉल करना
अगर आपको डेवलपमेंट के लिए अपनी मशीन का इस्तेमाल करना है, तो आपको Docker Engine इंस्टॉल करना होगा.
1. Google Cloud SDK इंस्टॉल करना
अगर GCP Cloud Shell का इस्तेमाल किया जा रहा है, तो आपको Google Cloud SDK इंस्टॉल करने की ज़रूरत नहीं है.
Google Cloud SDK पर जाएं और अपने प्लैटफ़ॉर्म के लिए इंटरैक्टिव इंस्टॉलर डाउनलोड करें.
2. कॉन्फ़िगरेशन सेट करना
टेस्ट एनवायरमेंट बनाने के लिए, आपके पास Google Cloud संगठन, टेस्ट फ़ोल्डर, और बिलिंग खाता होना चाहिए. इन वैल्यू को एनवायरमेंट वैरिएबल के ज़रिए सेट करना होगा:
export TF_VAR_org_id="your_org_id"
export TF_VAR_folder_id="your_folder_id"
export TF_VAR_billing_account="your_billing_account_id"
3. अपना सेवा खाता सेट अप करना
टेस्ट एनवायरमेंट बनाने से पहले, आपको अपने टेस्ट एनवायरमेंट में सेवा खाते की कुंजी डाउनलोड करनी होगी. इस सेवा खाते के लिए, प्रोजेक्ट क्रिएटर, बिलिंग खाते का उपयोगकर्ता, और संगठन के व्यूअर की भूमिकाएं ज़रूरी होंगी. इन चरणों से, नया सेवा खाता बनाने में मदद मिलती है. हालांकि, किसी मौजूदा खाते का फिर से इस्तेमाल भी किया जा सकता है.
3.1 सीड GCP प्रोजेक्ट बनाना या चुनना
अपना सेवा खाता बनाने से पहले, आपको उसे होस्ट करने के लिए कोई प्रोजेक्ट चुनना होगा. आपके पास नया प्रोजेक्ट बनाने का भी विकल्प है.
gcloud config set core/project YOUR_PROJECT_ID
3.2 Google Cloud API चालू करना
अपने सीड प्रोजेक्ट पर, Google Cloud के इन एपीआई को चालू करें:
gcloud services enable cloudresourcemanager.googleapis.com
gcloud services enable iam.googleapis.com
gcloud services enable cloudbilling.googleapis.com
3.3 सेवा खाता बनाना
टेस्ट एनवायरमेंट को मैनेज करने के लिए, नया सेवा खाता बनाएं:
# Creating a service account for CFT.
gcloud iam service-accounts create cft-onboarding \
  --description="CFT Onboarding Terraform Service Account" \
  --display-name="CFT Onboarding"

# Assign SERVICE_ACCOUNT environment variable for later steps
export SERVICE_ACCOUNT=cft-onboarding@$(gcloud config get-value core/project).iam.gserviceaccount.com
पुष्टि करें कि आपका सेवा खाता बन गया है:
gcloud iam service-accounts list --filter="EMAIL=${SERVICE_ACCOUNT}"
3.4 सेवा खाते को प्रोजेक्ट क्रिएटर, बिलिंग खाते का उपयोगकर्ता, और संगठन के व्यूअर की भूमिकाएं असाइन करें:
gcloud resource-manager folders add-iam-policy-binding ${TF_VAR_folder_id} \
  --member="serviceAccount:${SERVICE_ACCOUNT}" \
  --role="roles/resourcemanager.projectCreator"
gcloud organizations add-iam-policy-binding ${TF_VAR_org_id} \
  --member="serviceAccount:${SERVICE_ACCOUNT}" \
  --role="roles/billing.user"
gcloud beta billing accounts add-iam-policy-binding ${TF_VAR_billing_account} \
  --member="serviceAccount:${SERVICE_ACCOUNT}" \
  --role="roles/billing.user"
gcloud organizations add-iam-policy-binding ${TF_VAR_org_id} \
  --member="serviceAccount:${SERVICE_ACCOUNT}" \
  --role="roles/resourcemanager.organizationViewer"
अब आपके पास एक सेवा खाता है. इसका इस्तेमाल, टेस्ट एनवायरमेंट को मैनेज करने के लिए किया जा सकता है.
4. Terraform क्रेडेंशियल तैयार करना
टेस्ट एनवायरमेंट बनाने के लिए, आपको सेवा खाते की कुंजी को अपने शेल में डाउनलोड करना होगा.
4.1 सेवा खाते की कुंजी
Terraform के लिए सेवा खाता कुंजी बनाना और डाउनलोड करना
gcloud iam service-accounts keys create cft.json --iam-account=${SERVICE_ACCOUNT}
4.2 Terraform क्रेडेंशियल सेट अप करना
एनवायरमेंट वैरिएबल SERVICE_ACCOUNT_JSON का इस्तेमाल करके, Terraform को कुंजी दें. साथ ही, वैल्यू को अपने सेवा खाते की कुंजी के कॉन्टेंट पर सेट करें.
export SERVICE_ACCOUNT_JSON=$(< cft.json)
क्रेडेंशियल की जानकारी को एनवायरमेंट वैरिएबल में सेव करने के बाद, keyfile को हटा दें. ज़रूरत पड़ने पर, ऊपर दिए गए कमांड का इस्तेमाल करके, बाद में कोई नई कुंजी बनाई जा सकती है.
rm -rf cft.json
5. Terraform डिप्लॉयमेंट के लिए टेस्ट प्रोजेक्ट बनाना
अब जब सब कुछ तैयार है, तो एक ही कमांड से टेस्ट प्रोजेक्ट बनाया जा सकता है. terraform-google-cloud-storage डायरेक्ट्री के रूट से यह कमांड चलाएं:
make docker_test_prepare
make docker_test_prepare चलाने पर, आपको नीचे दिया गया आउटपुट दिखेगा. आखिर में, आपको बनाया गया टेस्ट project_id मिलेगा. यहां आपको अपनी नई सुविधा के साथ Cloud Storage मॉड्यूल को डिप्लॉय और टेस्ट करना होगा. अगर आपको बिलिंग खाते को लिंक करने में समस्याएं आ रही हैं, तो समस्या हल करने के तरीके देखें.
macbookpro3:terraform-google-cloud-storage user$ make docker_test_prepare
docker run --rm -it \
                -e SERVICE_ACCOUNT_JSON \
                -e TF_VAR_org_id \
                -e TF_VAR_folder_id \
                -e TF_VAR_billing_account \
                -v /Users/cft/terraform-google-cloud-storage:/workspace \
                gcr.io/cloud-foundation-cicd/cft/developer-tools:0.8.0 \
                /usr/local/bin/execute_with_credentials.sh prepare_environment
Activated service account credentials for: [cft-onboarding@<project_id>.iam.gserviceaccount.com]
Activated service account credentials for: [cft-onboarding@<project_id>.iam.gserviceaccount.com]
Initializing modules...

Initializing the backend...

Initializing provider plugins...

The following providers do not have any version constraints in configuration,
so the latest version was installed.

To prevent automatic upgrades to new major versions that may contain breaking
changes, it is recommended to add version = "..." constraints to the
corresponding provider blocks in configuration, with the constraint strings
suggested below.

* provider.google-beta: version = "~> 3.9"
* provider.null: version = "~> 2.1"
* provider.random: version = "~> 2.2"

Terraform has been successfully initialized!

You may now begin working with Terraform. Try running "terraform plan" to see
any changes that are required for your infrastructure. All Terraform commands
should now work.

If you ever set or change modules or backend configuration for Terraform,
rerun this command to reinitialize your working directory. If you forget, other
commands will detect it and remind you to do so if necessary.
module.project.module.project-factory.null_resource.preconditions: Refreshing state... [id=8723188031607443970]
module.project.module.project-factory.null_resource.shared_vpc_subnet_invalid_name[0]: Refreshing state... [id=5109975723938185892]
module.project.module.gsuite_group.data.google_organization.org[0]: Refreshing state...
module.project.module.project-factory.random_id.random_project_id_suffix: Refreshing state... [id=rnk]
module.project.module.project-factory.google_project.main: Refreshing state... [id=<project-id>]
module.project.module.project-factory.google_project_service.project_services[0]: Refreshing state... [id=<project-id>/storage-api.googleapis.com]
module.project.module.project-factory.google_project_service.project_services[1]: Refreshing state... [id=<project-id>/cloudresourcemanager.googleapis.com]
module.project.module.project-factory.google_project_service.project_services[2]: Refreshing state... [id=<project-id>/compute.googleapis.com]
module.project.module.project-factory.data.null_data_source.default_service_account: Refreshing state...
module.project.module.project-factory.google_service_account.default_service_account: Refreshing state... [id=projects/ci-cloud-storage-ae79/serviceAccounts/project-service-account@<project-id>.iam.gserv
iceaccount.com]
module.project.module.project-factory.google_project_service.project_services[3]: Refreshing state... [id=<project-id>/serviceusage.googleapis.com]
module.project.module.project-factory.null_resource.delete_default_compute_service_account[0]: Refreshing state... [id=3576396874950891283]
google_service_account.int_test: Refreshing state... [id=projects/<project-id>/serviceAccounts/cft-onboarding@<project-id>.iam.gserviceaccount.com]
google_service_account_key.int_test: Refreshing state... [id=projects/<project-id>/serviceAccounts/cft-onboarding@<project-id>.iam.gserviceaccount.com/keys/351009a1e011e88049ab2097994d1c627a61
6961]
google_project_iam_member.int_test[1]: Refreshing state... [id=<project-id>/roles/iam.serviceAccountUser/serviceaccount:cft-onboarding@<project-id>.iam.gserviceaccount.com]
google_project_iam_member.int_test[0]: Refreshing state... [id=<project-id>/roles/storage.admin/serviceaccount:cft-onboarding@<project-id>.iam.gserviceaccount.com]

Apply complete! Resources: 0 added, 0 changed, 0 destroyed.

Outputs:

project_id = <test-project-id>
sa_key = <sensitive>
Found test/setup/make_source.sh. Using it for additional explicit environment configuration.
आपने अब एक टेस्ट प्रोजेक्ट बना लिया है. इसे project_id से रेफ़र किया जाता है. इसे कंसोल आउटपुट में देखा जा सकता है. आपका डेवलपमेंट और टेस्ट एनवायरमेंट सेट अप हो गया है.
5. सीएफ़टी मॉड्यूल में नई सुविधा जोड़ना
अब आपका डेवलपमेंट और टेस्ट एनवायरमेंट सेटअप हो गया है. आइए, google-cloud-storage CFT मॉड्यूल में "silly_label" सुविधा जोड़ना शुरू करें.
पक्का करें कि आप terraform-google-cloud-storage में हों और आपने main.tf फ़ाइल खोली हो. यह फ़ाइल, फ़ोल्डर स्ट्रक्चर में यहां दिखाई गई है.

"silly_label" एक लेबल है. इसलिए, आपको main.tf में मौजूद "labels" वैरिएबल की 27वीं लाइन में यह सुविधा जोड़नी होगी. जैसा कि यहां दिखाया गया है:
terraform-google-cloud-storage/main.tf
resource "google_storage_bucket" "buckets" {
 <...>
 storage_class = var.storage_class
 // CODELAB:Add silly label in labels variable
 labels        = merge(var.labels, { name = replace("${local.prefix}${lower(each.value)}", ".", "-") }, { "silly" = var.silly_label })
 force_destroy = lookup(
 <...>
}
अब आपको ऊपर दिए गए फ़ोल्डर स्ट्रक्चर में दिख रहे variables.tf में silly_label वैरिएबल जोड़ना होगा.
यहां दिए गए कोड को कॉपी करके चिपकाएं. इसके बाद, इसे variables.tf फ़ाइल में 31वीं लाइन पर जोड़ें. साथ ही, यह पक्का करें कि आपने जिस वैरिएबल ब्लॉक को जोड़ा है उसके ऊपर और नीचे एक नया लाइन कैरेक्टर हो.
terraform-google-cloud-storage/variables.tf
variable "names" {
 description = "Bucket name suffixes."
 type        = list(string)
}

// CODELAB: Add "silly_label" variable to variables.tf between "names" and "location"
variable "silly_label" {
 description = "Sample label for bucket."
 type        = string
}

variable "location" {
 description = "Bucket location."
 default     = "EU"
}
6. स्टोरेज बकेट के उदाहरण में नई सुविधा जोड़ना
आपने मॉड्यूल के main.tf में अपनी सुविधा जोड़ दी है. अब आपको एक उदाहरण की मदद से, जोड़ी गई सुविधा को टेस्ट करना होगा.
"silly_label" को examples/multiple-buckets/main.tf में जोड़ना होगा
इस उदाहरण का इस्तेमाल अगले चरण में इंटिग्रेशन टेस्ट करने के लिए किया जाएगा.
नीचे दिए गए silly_label वैरिएबल की लाइन को कॉपी करके, terraform-google-cloud-storage/examples/multiple-buckets/ में मौजूद main.tf फ़ाइल की 27वीं लाइन पर चिपकाएं. इसे फ़ोल्डर स्ट्रक्चर में देखा जा सकता है:

terraform-google-cloud-storage/examples/multiple-buckets/main.tf
module "cloud_storage" {
 <...>
 // CODELAB: Add "silly_label" as an example to main.tf.
 silly_label        = "awesome"

 <..>
}
7. सुविधा की जांच करने के लिए, ब्लूप्रिंट टेस्ट को अपडेट करना
आपने अपनी सुविधा को मॉड्यूल के main.tf में जोड़ा है. इसके बाद, आपने सुविधा को multiple_buckets उदाहरण में जोड़ा है. अब आपको Golang में लिखे गए ब्लूप्रिंट इंटिग्रेशन टेस्ट के ज़रिए, अपनी सुविधा की जांच करनी होगी.
आपको अपनी नई जांचें, नीचे दिए गए फ़ोल्डर स्ट्रक्चर में मौजूद multiple_buckets_test.go फ़ाइल में जोड़नी होंगी:

आपने multiple_buckets मॉड्यूल के ज़रिए बनाए जा रहे सभी बकेट पर "silly_label" जोड़ा है. अब आपको नई सुविधा की जांच करने के लिए टेस्ट लिखने हैं.
नीचे दिए गए कोड में, gcloud alpha storage कमांड का इस्तेमाल करके हर बकेट का लेबल पाया जा रहा है. इसके बाद, कमांड से मिले आउटपुट की जांच की जा रही है.
test/integration/multiple_buckets/multiple_buckets_test.go
func TestMultipleBuckets(t *testing.T) {
 <..>
op := gcloud.Run(t, fmt.Sprintf("alpha storage ls --buckets gs://%s", bucketName), gcloudArgs).Array()[0]

// verify silly label on each bucket
assert.Equal("awesome", op.Get("metadata.labels.silly").String(), "should have silly label set to awesome")

// verify lifecycle rules
...
}
8. CFT में इंटिग्रेशन टेस्ट चलाना
इंटिग्रेशन टेस्टिंग
इंटिग्रेशन टेस्ट का इस्तेमाल, रूट मॉड्यूल, सबमॉड्यूल, और उदाहरणों के व्यवहार की पुष्टि करने के लिए किया जाता है. जोड़े गए, बदले गए, और ठीक किए गए कोड के साथ टेस्ट भी शामिल होने चाहिए.
इंटिग्रेशन टेस्ट, ब्लूप्रिंट टेस्ट फ़्रेमवर्क का इस्तेमाल करके लिखे जाते हैं. इन्हें CFT CLI का इस्तेमाल करके चलाया जाता है. ये टूल, इस्तेमाल में आसानी के लिए Docker इमेज में पैकेज किए गए हैं.
इन टेस्ट के लिए सामान्य रणनीति यह है कि उदाहरण मॉड्यूल के व्यवहार की पुष्टि की जाए. इससे यह पक्का किया जा सकता है कि रूट मॉड्यूल, सबमॉड्यूल, और उदाहरण मॉड्यूल, सभी सही तरीके से काम कर रहे हैं.
इंटरैक्टिव एक्ज़ीक्यूशन में, एक से ज़्यादा कमांड का इस्तेमाल करके हर चरण को पूरा किया जाता है.
- इंटरैक्टिव मोड में टेस्टिंग Docker कंटेनर शुरू करने के लिए,
make docker_runचलाएं.
Make, एक बिल्ड ऑटोमेशन टूल है. यह Makefiles नाम की फ़ाइलों को पढ़कर, सोर्स कोड से अपने-आप एक्ज़ीक्यूटेबल प्रोग्राम और लाइब्रेरी बनाता है. इन फ़ाइलों में यह जानकारी होती है कि टारगेट प्रोग्राम को कैसे हासिल किया जाए. फ़ाइल में बदलाव करने पर, डॉकर कंटेनर अपने-आप अपडेट होना चाहिए.
make docker_run चलाने पर, आपके Docker कंटेनर में एक वर्कस्पेस बनता है. साथ ही, आपके सेवा खाते के क्रेडेंशियल चालू हो जाते हैं. इस वर्कस्पेस का इस्तेमाल, अगले चरणों में टेस्ट चलाने के लिए किया जाएगा.
आपको अपने टर्मिनल में यह आउटपुट दिखेगा:
Activated service account credentials for: [cft@<PROJECT_ID>.iam.gserviceaccount.com]
module-swapper -registry-prefix=terraform-google-modulesचलाएं, ताकि उदाहरणmain.tfफ़ाइलों में बदलाव करके, पब्लिश किए गए मॉड्यूल के बजाय अपनी लोकल फ़ाइलों से मॉड्यूल इंपोर्ट किए जा सकें.
आपको अपने टर्मिनल में, इस तरह का आउटपुट दिखेगा:
[root@<CONTAINER_ID> workspace]# module-swapper -registry-prefix=terraform-google-modules
2025/08/04 19:26:29 Module name set from remote to cloud-storage
2025/08/04 19:26:29 Modifications made to file /workspace/examples/multiple_buckets/main.tf
2025/08/04 19:26:29 --- Original
+++ Modified
@@ -21,7 +21,7 @@
 }

 module "cloud_storage" {
-  source = "terraform-google-modules/cloud-storage/google"
+  source = "../.."
   # [restore-marker]   version = "~> 10.0"

   project_id = var.project_id
- अपने फ़ाइल फ़ोल्डर में मौजूद सभी ब्लूप्रिंट टेस्ट की सूची देखने के लिए,
cft test listचलाएं.
आपको अपने टर्मिनल में यह आउटपुट दिखेगा:
[root@CONTAINER_ID workspace]# cft test list
 NAME                           | CONFIG                    | LOCATION
--------------------------------+---------------------------+------------------------------------------------------------
 TestAll/examples/simple_bucket | examples/simple_bucket    | test/integration/discover_test.go
 TestMultipleBuckets            | examples/multiple_buckets | test/integration/multiple_buckets/multiple_buckets_test.go
- उदाहरण को चालू करने के लिए,
cft test run <EXAMPLE_NAME> --stage initचलाएँ. इस मामले में,TestMultipleBucketsटेस्ट रन शुरू करने के लिए,cft test run TestMultipleBuckets --stage init. जांच करते समय ज़्यादा जानकारी पाने के लिए,--verboseफ़्लैग का इस्तेमाल किया जा सकता है.
यह init स्टेज, Terraform के उदाहरण को शुरू करता है.
आपको अपने टर्मिनल में यह आउटपुट दिखेगा.
[root@<CONTAINER_ID> workspace]# cft test run TestMultipleBuckets --stage init --verbose
INFO[02-09|08:24:31] using test-dir: test/integration
...
TestMultipleBuckets 2022-02-09T08:24:35Z command.go:179: Terraform has been successfully initialized!
...
TestMultipleBuckets 2022-02-09T08:24:35Z command.go:100: Running command terraform with args [validate]
TestMultipleBuckets 2022-02-09T08:24:36Z command.go:179: Success! The configuration is valid.
...
--- PASS: TestMultipleBuckets (4.05s)
- उदाहरण के तौर पर दिए गए मॉड्यूल को लागू करने के लिए,
cft test run <EXAMPLE_NAME> --stage applyचलाएं.
इस चरण में, पिछले चरण में शुरू किए गए उदाहरण को, कोडलैब में पहले बनाए गए GCP प्रोजेक्ट पर लागू किया जाता है.
आपको अपने टर्मिनल में यह आउटपुट दिखेगा.
[root@<CONTAINER_ID> workspace]# cft test run TestMultipleBuckets --stage apply --verbose
INFO[02-09|08:28:11] using test-dir: test/integration
...
TestMultipleBuckets 2022-02-09T08:28:19Z command.go:179: Apply complete! Resources: 6 added, 0 changed, 0 destroyed.
TestMultipleBuckets 2022-02-09T08:28:19Z command.go:179:
TestMultipleBuckets 2022-02-09T08:28:19Z command.go:179: Outputs:
TestMultipleBuckets 2022-02-09T08:28:19Z command.go:179:
TestMultipleBuckets 2022-02-09T08:28:19Z command.go:179: names = {
TestMultipleBuckets 2022-02-09T08:28:19Z command.go:179:   "one" = "multiple-buckets-erp1-eu-one"
...
--- PASS: TestMultipleBuckets (6.51s)
PASS
ok      github.com/terraform-google-modules/terraform-google-cloud-storage/test/integration/multiple_buckets    6.548s
cft test run <EXAMPLE_NAME> --stage verifyचलाकर पुष्टि करें कि बनाए गए उदाहरण में, उम्मीद के मुताबिक इंफ़्रास्ट्रक्चर है.
इस चरण में, TestMultipleBuckets में पुष्टि करने वाला फ़ंक्शन चलेगा. आम तौर पर, पुष्टि करने के लिए gcloud कमांड को एक्ज़ीक्यूट किया जाता है. इससे संसाधन की मौजूदा स्थिति के लिए JSON आउटपुट मिलता है. साथ ही, यह पुष्टि की जाती है कि मौजूदा स्थिति, उदाहरण में बताई गई स्थिति के मुताबिक है.
अगर आपको कोई गड़बड़ी मिलती है, तो आपको दिखेगा कि टेस्ट के लिए क्या उम्मीद की गई थी और कमांड से क्या मिला.
आपको अपने टर्मिनल में यह आउटपुट दिखेगा.
[root@<CONTAINER_ID> workspace]# cft test run TestMultipleBuckets --stage verify --verbose
INFO[02-09|08:30:19] using test-dir: test/integration
...
TestMultipleBuckets 2022-02-09T08:30:27Z command.go:100: Running command terraform with args [output -no-color -json names_list]
TestMultipleBuckets 2022-02-09T08:30:27Z command.go:179: ["multiple-buckets-erp1-eu-one","multiple-buckets-erp1-eu-two"]
TestMultipleBuckets 2022-02-09T08:30:27Z command.go:100: Running command gcloud with args [alpha storage ls --buckets gs://multiple-buckets-erp1-eu-one --project ci-cloud-storage-8ce9 --json]
TestMultipleBuckets 2022-02-09T08:30:28Z command.go:179: [
TestMultipleBuckets 2022-02-09T08:30:28Z command.go:179: {
TestMultipleBuckets 2022-02-09T08:30:28Z command.go:179:   "url": "gs://multiple-buckets-erp1-eu-one/",
...
TestMultipleBuckets 2022-02-09T08:30:33Z command.go:179: ]
2022/02/09 08:30:33 RUN_STAGE env var set to verify
2022/02/09 08:30:33 Skipping stage teardown
--- PASS: TestMultipleBuckets (12.32s)
PASS
ok      github.com/terraform-google-modules/terraform-google-cloud-storage/test/integration/multiple_buckets    12.359s
- उदाहरण को हटाने के लिए,
cft test run <EXAMPLE_NAME> --stage teardownचलाएं.
इस चरण में, ऊपर दिए गए चरणों में बनाया गया इन्फ़्रास्ट्रक्चर मिट जाता है. इस चरण में, प्रोजेक्ट में बनाए गए GCS बकेट भी मिट जाएंगे. साथ ही, GCS मॉड्यूल में जोड़ा गया लेबल भी मिट जाएगा.
टर्मिनल में यहां दिया गया आउटपुट देखा जा सकता है.
[root@<CONTAINER_ID> workspace]# cft test run TestMultipleBuckets --stage teardown --verbose
INFO[02-09|08:36:02] using test-dir: test/integration
...
TestMultipleBuckets 2022-02-09T08:36:06Z command.go:100: Running command terraform with args [destroy -auto-approve -input=false -lock=false]
TestMultipleBuckets 2022-02-09T08:36:07Z command.go:179: module.cloud_storage.random_id.bucket_suffix: Refreshing state... [id=mNA]
TestMultipleBuckets 2022-02-09T08:36:07Z command.go:179: random_string.prefix: Refreshing state... [id=erp1]
TestMultipleBuckets 2022-02-09T08:36:08Z command.go:179: module.cloud_storage.google_storage_bucket.buckets["two"]: Refreshing state... [id=multiple-buckets-erp1-eu-two]
...
TestMultipleBuckets 2022-02-09T08:36:10Z command.go:179: Destroy complete! Resources: 6 destroyed.
TestMultipleBuckets 2022-02-09T08:36:10Z command.go:179:
--- PASS: TestMultipleBuckets (6.62s)
PASS
ok      github.com/terraform-google-modules/terraform-google-cloud-storage/test/integration/multiple_buckets    6.654s
module-swapperको पिछली बार चलाने पर, उदाहरण के तौर पर दी गईmain.tfफ़ाइलों में किए गए बदलावों को वापस लाने के लिए,module-swapper -registry-prefix=terraform-google-modules -restoreचलाएं.
[root@<CONTAINER_ID> workspace]# module-swapper -registry-prefix=terraform-google-modules -restore
2025/08/04 19:30:41 Module name set from remote to cloud-storage
2025/08/04 19:36:32 Modifications made to file /workspace/examples/multiple_buckets/main.tf
2025/08/04 19:36:32 --- Original
+++ Modified
@@ -21,8 +21,8 @@
 }

 module "cloud_storage" {
-  source = "../.."
-   version = "~> 10.0"
+  source  = "terraform-google-modules/cloud-storage/google"
+  version = "~> 10.0"

   project_id = var.project_id
- टेस्ट कंटेनर से बाहर निकलने के लिए,
exitचलाएं.
9. इनपुट और आउटपुट के लिए दस्तावेज़ जनरेट करना
रूट मॉड्यूल, सबमॉड्यूल, और उदाहरण मॉड्यूल के README में मौजूद इनपुट और आउटपुट टेबल, अपने-आप जनरेट होती हैं. ये टेबल, संबंधित मॉड्यूल के variables और outputs के आधार पर जनरेट होती हैं. अगर मॉड्यूल इंटरफ़ेस में बदलाव किया जाता है, तो इन टेबल को रीफ़्रेश करना ज़रूरी है.
रन:
make generate_docs
# This will generate new Inputs and Outputs tables
10. CFT में लिंट टेस्ट चलाना
लिंटर एक ऐसा टूल है जो सोर्स कोड का विश्लेषण करता है. इससे प्रोग्रामिंग से जुड़ी गड़बड़ियों, बग, स्टाइल से जुड़ी गड़बड़ियों, और संदिग्ध कंस्ट्रक्ट का पता चलता है.
डेटा स्टोर करने की जगह में मौजूद कई फ़ाइलों को, क्वालिटी के स्टैंडर्ड को बनाए रखने के लिए, लिंट किया जा सकता है या फ़ॉर्मैट किया जा सकता है. सीएफ़टी में क्वालिटी पक्का करने के लिए, आपको लिंट टेस्ट का इस्तेमाल करना होगा.
रन:
make docker_test_lint
# This will run all lint tests on your repo
11. GitHub पर पुल अनुरोध सबमिट करना
आपने कोड को स्थानीय तौर पर बदल दिया है और इंटिग्रेशन टेस्ट के ज़रिए उसकी जांच कर ली है. अब आपको इस कोड को मास्टर रेपो में पब्लिश करना होगा.
अपने कोड को मास्टर रेपो पर उपलब्ध कराने के लिए, आपको अपनी ब्रांच में कोड में किए गए बदलावों को कमिट करना होगा. इसके बाद, इसे मास्टर रिपॉज़िटरी पर पुश करना होगा. आपके कोड को उस मुख्य रेपो में जोड़ा जाएगा जिसे आपने कोडलैब की शुरुआत में फ़ोर्क किया था. इसके लिए, आपको अपनी रेपो में कोड सबमिट करने के बाद, मास्टर रेपो पर पुल अनुरोध (पीआर) करना होगा.
पीआर सबमिट करने पर, रिपॉज़िटरी के एडमिन को इसकी सूचना दी जाएगी, ताकि वह कोड में किए गए बदलावों की समीक्षा कर सके. इसके अलावा, कोड में किए गए बदलावों पर सुझाव/राय पाने के लिए, अन्य उपयोगकर्ताओं को समीक्षक के तौर पर भी जोड़ा जा सकता है. पीआर, Cloud Build को ट्रिगर करेगा. इससे रिपॉज़िटरी पर टेस्ट किए जाएंगे.
कोड में किए गए बदलावों के आधार पर, कोड की समीक्षा करने वाले लोग आपके कोड पर टिप्पणियां करेंगे. साथ ही, अगर सबसे सही तरीकों और दस्तावेज़ के आधार पर किसी चीज़ में बदलाव करने की ज़रूरत होगी, तो वे आपसे बदलाव करने के लिए कहेंगे. एडमिन, कोड में किए गए बदलावों की समीक्षा करेगा. साथ ही, यह पक्का करेगा कि आपका कोड, रेपो के मुताबिक है. इसके अलावा, वह आपके कोड को मास्टर रेपो में मर्ज करने से पहले, आपसे कुछ बदलाव करने के लिए फिर से कह सकता है.
फ़ोर्क की गई ब्रांच में कोड को कमिट करने और फ़ोर्क की गई ब्रांच में कोड को पुश करने के लिए, यह तरीका अपनाएं:
- पहला चरण, बदली गई फ़ाइलों को लोकल रेपो में जोड़ना है.
$ git add main.tf
$ git add README.md
$ git add variables.tf
$ git add examples/multiple-buckets/main.tf
$ git add test/integration/multiple_buckets/multiple_buckets_test.go
# The ‘git add' command adds the file in the local repository and
# stages the file for commit. To unstage a file, use git reset HEAD YOUR-FILE
- आपकी फ़ाइलें अब स्टेज हो गई हैं. इसके बाद, आपको बदलावों को कमिट करना होगा.
$ git commit -m "First CFT commit"
# This will commit the staged changes and prepares them to be pushed
# to a remote repository. To remove this commit and modify the file,
# use 'git reset --soft HEAD~1' and commit and add the file again.
- पुल अनुरोध (पीआर) बनाने के लिए, अपनी लोकल रिपॉज़िटरी में किए गए बदलावों को GitHub पर पुश करें.
$ git push -u origin feature/silly_label
# Pushes the changes in your local repository up to the remote
# repository you specified as the origin
आपके कोड में किए गए बदलावों को अब पुल अनुरोध के लिए तैयार किया जा सकता है!
terraform-google-modules/terraform-google-cloud-storage repo में पीआर बनाने के लिए, यह तरीका अपनाएं:
- अपने वेब ब्राउज़र में, repo के मुख्य पेज पर जाएं.
- आपको बैनर के ज़रिए, अपने फ़ोर्क से पीआर खोलने का सुझाव दिखेगा. "तुलना करें और पुल का अनुरोध करें" पर क्लिक करें.

- अपने कोड में किए गए बदलावों के बारे में बताने के लिए, पुल अनुरोध का टाइटल और ब्यौरा डालें. कम शब्दों में ज़्यादा से ज़्यादा सटीक जानकारी दें.
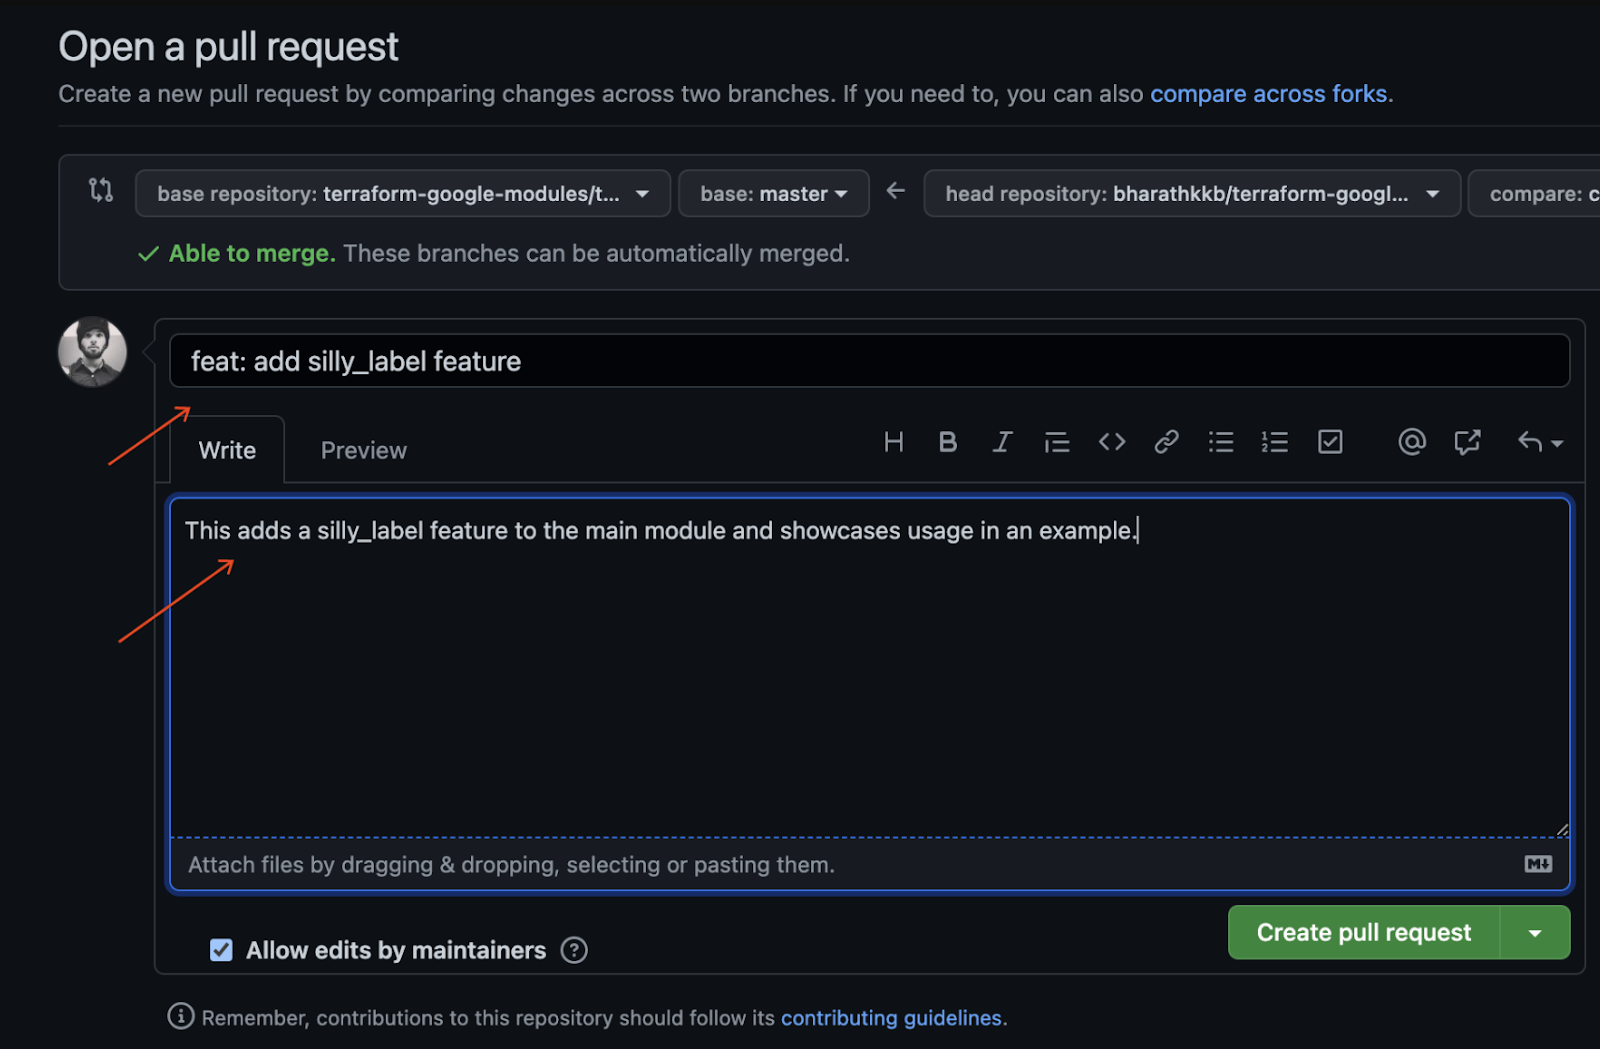
- समीक्षा के लिए तैयार पुल का अनुरोध बनाने के लिए, "पुल का अनुरोध करें" पर क्लिक करें.
- आपको Cloud Build ट्रिगर चालू दिखेंगे, जो पीआर की वजह से ट्रिगर हुए हैं.
- अगर आपको कोई समस्या आती है, तो फ़ोर्क से पुल के अनुरोध खोलने के बारे में GitHub के आधिकारिक दस्तावेज़ देखें.
आपने फ़ोर्क की गई ब्रांच में कोड में किए गए पहले बदलाव को पुश कर दिया है. साथ ही, मास्टर ब्रांच के ख़िलाफ़ पहला सीएफ़टी पीआर सबमिट कर दिया है!
12. बधाई हो
बधाई हो, आपने सीएफ़टी मॉड्यूल में एक सुविधा जोड़ दी है और समीक्षा के लिए पीआर सबमिट कर दिया है!
आपने सीएफ़टी मॉड्यूल में कोई सुविधा जोड़ी है. आपने उदाहरण के ज़रिए, स्थानीय तौर पर उसकी जांच की है. साथ ही, GitHub पर अपना कोड सबमिट करने से पहले, आपने उसकी जांच की है. आखिर में, आपने समीक्षा के लिए पीआर सबमिट किया और उसे सीएफ़टी में मर्ज कर दिया.
अब आपको Cloud Foundation Toolkit का इस्तेमाल शुरू करने के लिए ज़रूरी चरणों के बारे में पता चल गया है.