
1. 始める前に
AI 対応の Google Chat アプリとは
AI 対応の Google Chat アプリでは、次のことができます。
- サービスやリソースを Google Chat に取り入れることができるため、ユーザーは会話から離れることなくすばやく情報を取得したり、対処したりできます。
- 生成 AI モデルと統合して、テキストや画像などのデータを作成、検索、編集できます。
- 会話型 AI のコンセプトを適用して、より実用的で自然で洗練された便利なインタラクションを実現し、エージェント エクスペリエンスをサポートします。
Google Chat アプリを AI と統合する理由
一般的なユースケースは、次のカテゴリに分類されます。
- コンテンツの作成と編集。マーケティング コピーの作成、ソーシャル メディア投稿の作成、リアルな画像の作成、音楽の制作、動画コンテンツの作成を支援します。
- データ検索と分析。高い精度と速度で、非構造化ナレッジベースから重要な分析情報を抽出したり、長いテキストを要約したり、コンテンツを分類したり、言語を翻訳したりできます。
- 会話。アシスタントと会話するように、自然で有益かつ効率的な会話を行います。
- タスクの自動化。新しいカレンダーの予定の作成、ドキュメントの送信、外部システムでのチケットの管理など、ユーザーに代わってアクションを実行します。
Google Chat の使い慣れたインターフェースにこうした機能を直接統合できるため、ユーザーのエクスペリエンスと生産性を向上させたいと考えている企業にとって大きなチャンスとなります。
前提条件
- Google Cloud と Node.js に関する基本的な知識。
- Google Chat アプリに関する基本的な知識(メッセージ、カード、認証、API、HTTP エンドポイントなど)。
作成するアプリの概要
この Codelab では、基本的な AI のコンセプトを統合した 8 つのミニマリスト Google Chat アプリを作成し、それらを実際のアプリケーションに適用する方法を示します。これらはすべて Google Workspace アドオンとして構築され、HTTP アーキテクチャに依存しています。
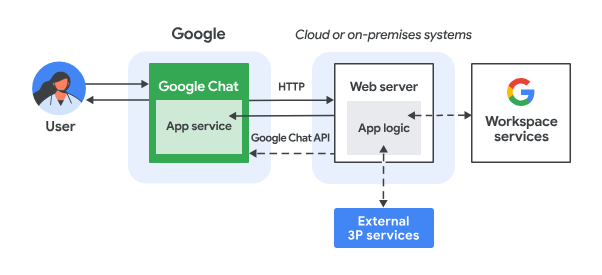
機能は次のとおりです。
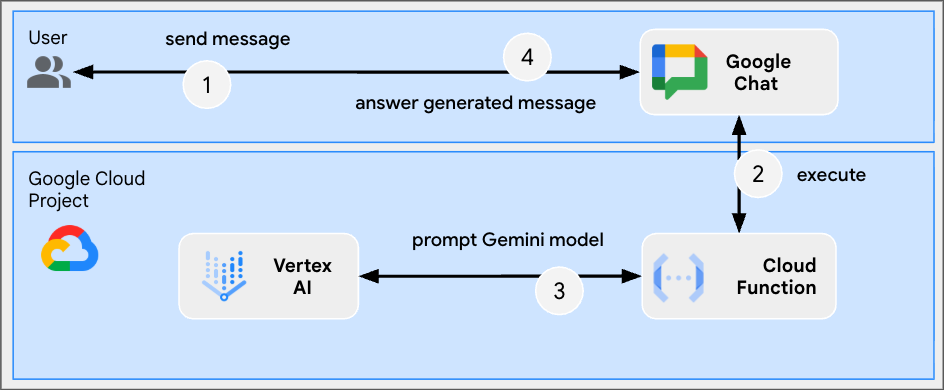
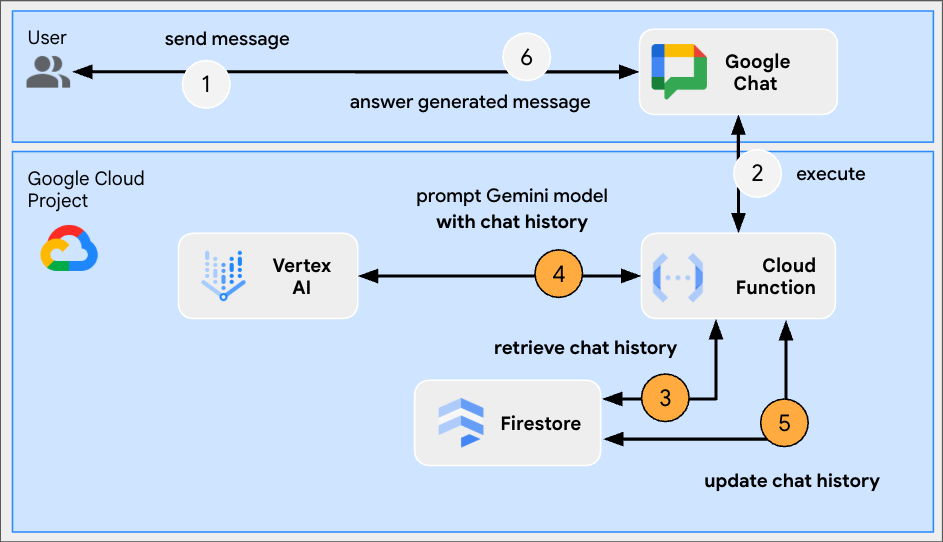
- ユーザーが Google Chat で Chat アプリにメッセージを送信します。ダイレクト メッセージまたは Chat スペースで送信できます。
- HTTP リクエストは、Chat 用アプリのロジックを含む Node.js Google Cloud Run 関数として実行されているウェブサーバーに送信されます。
- 必要に応じて、Chat 用アプリのロジックを Google Workspace サービス(カレンダーやスプレッドシートなど)、他の Google サービス(マップ、YouTube、Vertex AI など)、または他のウェブ サービス(プロジェクト管理システムやチケット発行ツールなど)と統合できます。
- ウェブサーバーは、HTTP レスポンスを Chat の Chat 用アプリ サービスに返します。
- レスポンスがユーザーに返されます。
- 必要に応じて、Chat 用アプリは Chat API を呼び出して、メッセージを非同期で投稿したり、他のオペレーションを実行したりできます。
各 Google Chat アプリの Node.js Google Cloud Run 関数には、上記のステップ 3 とステップ 6 で必要なアクションを実行するための、次のソースファイルの独自のバージョンが含まれています。
package.json: Node.js プロジェクトのブループリントとして機能する中央マニフェスト。メタデータ、依存関係、スクリプトの定義に使用されます。env.js: 実行に必要な定数を設定するスクリプト。環境と構成に基づいて編集する必要があります。index.js:: Google Chat のインタラクション イベントのロジックを処理するメイン スクリプト。この Codelab ではメッセージ イベントタイプのみが実装されていますが、実際のアプリケーションでは通常、カードクリック、スラッシュ コマンド、ダイアログなどの他のタイプも含まれます。
プロンプト アプリ
このアプリは、Gemini モデルを使用して、簡潔で平易なテキストの回答でユーザーと自然言語で会話します。
Format アプリ
このアプリは、特定の Google Chat メッセージのテキスト形式に準拠したリッチテキストの回答のサポートを追加することで、Prompt app を基盤として構築されています。
Ground アプリ
このアプリは、Format app をベースに、Google 検索ツールのサポートを追加し、回答メッセージでカードとともにソースを返します。
MCP アプリ
このアプリは、Format app に Google Workspace Developer Assist Model Context Protocol(MCP)のサポートを追加することで構築されています。
マルチターン アプリ
このアプリは、Format app をベースに、Google Cloud Firestore データベースを使用して会話メモリのサポートを追加しています。
カスタム ツールアプリ
このアプリは、ユーザーが提供した情報に基づいて Google Workspace Calendar API を呼び出す関数呼び出しカスタムツールのサポートを追加することで、Multi-turn app をベースに構築されています。
ストリーミング アプリ
このアプリは、Gemini モデルを使用して、ユーザーが提供したテーマに基づいて短編小説を生成します。Google Chat API は、進行状況に応じてメッセージで結果とステータスを送信するために使用されます。
マルチモーダル アプリ
このアプリは、Gemini モデルを使用して、ユーザーからのテキストによる指示に基づいて画像を編集します。Google Chat API は、画像をメッセージの添付ファイルとしてダウンロードおよびアップロードするために使用されます。
学習内容
- 基本的な AI のコンセプトは、Google Chat 用アプリとそれらの適用方法に関連しています。
- Google Gen AI SDK を使用して Vertex AI にアクセスする。
- Google Workspace API を使用して、魅力的で強力な機能を開発する。
- Cloud Run を活用して、スケーラブルな Google Chat 用アプリを構築する。
必要なもの
- Node.js を使用して「HTTP Google Chat アプリを作成する」クイックスタートを完了していること。この Codelab では、作成された Google Cloud プロジェクト、Google Chat 用アプリ、Google Cloud Run 関数を基に作業します。
2. セットアップする
リソースを初期化してアクセスする
このセクションでは、お使いのウェブブラウザから次のリソースにアクセスして構成します。
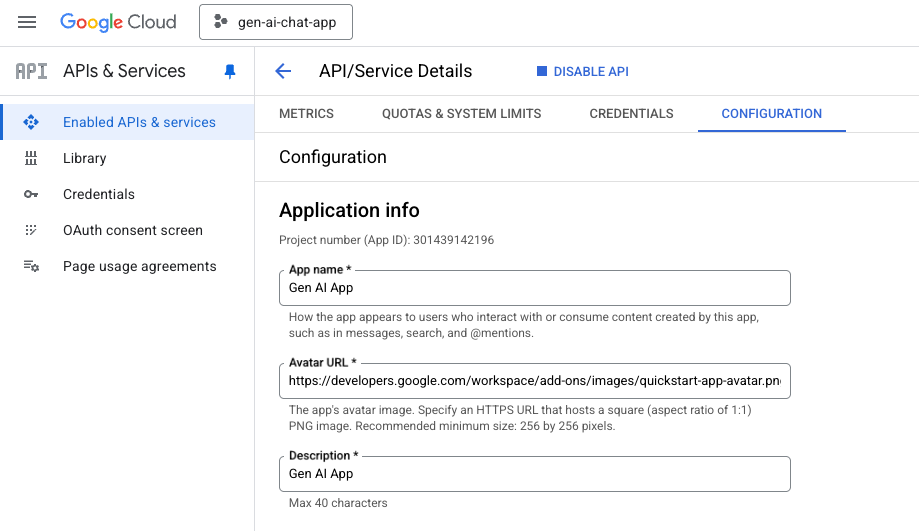
Google Chat API の構成
新しいタブで Google Cloud コンソールを開き、次の操作を行います。
- プロジェクトを選択します。
- Google Cloud の検索フィールドで「Google Chat API」を検索し、[Google Chat API]、[管理]、[構成] の順にクリックします。
- [アプリ名] と [説明] を
Gen AI Appに設定します。 - [保存] をクリックします。
Google Chat スペース
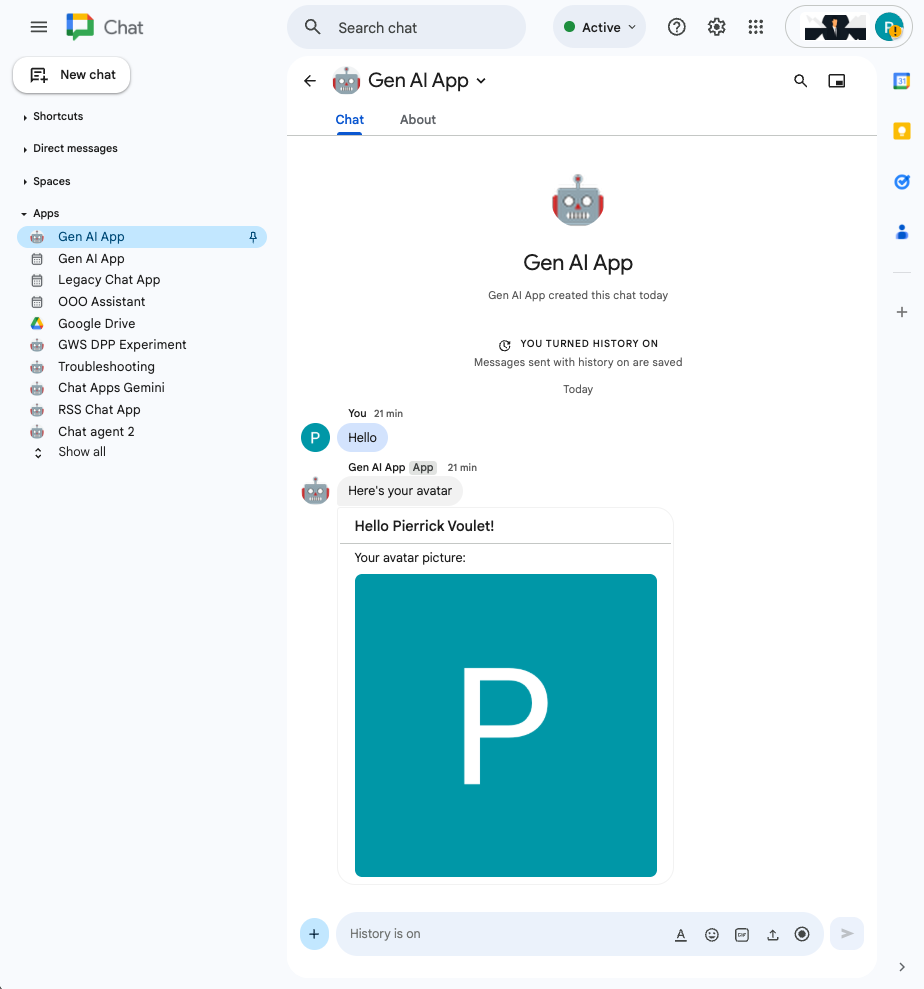
新しいタブで Google Chat を開き、次の手順を行います。
- まだ行っていない場合は、Chat 用アプリとのダイレクト メッセージ スペースを開きます。
- 「
Hello」と入力してenterを押すと、Chat 用アプリが名前とアバター画像で返信します。
Google Cloud Run 関数サービス
新しいタブで Google Cloud コンソールを開き、次の操作を行います。
- プロジェクトを選択します。
- メニュー アイコン ☰ > [Cloud Run] > [サービス] をクリックします。
- サービスのリストで [addonchatapp] をクリックし、[ソース] タブを開きます。

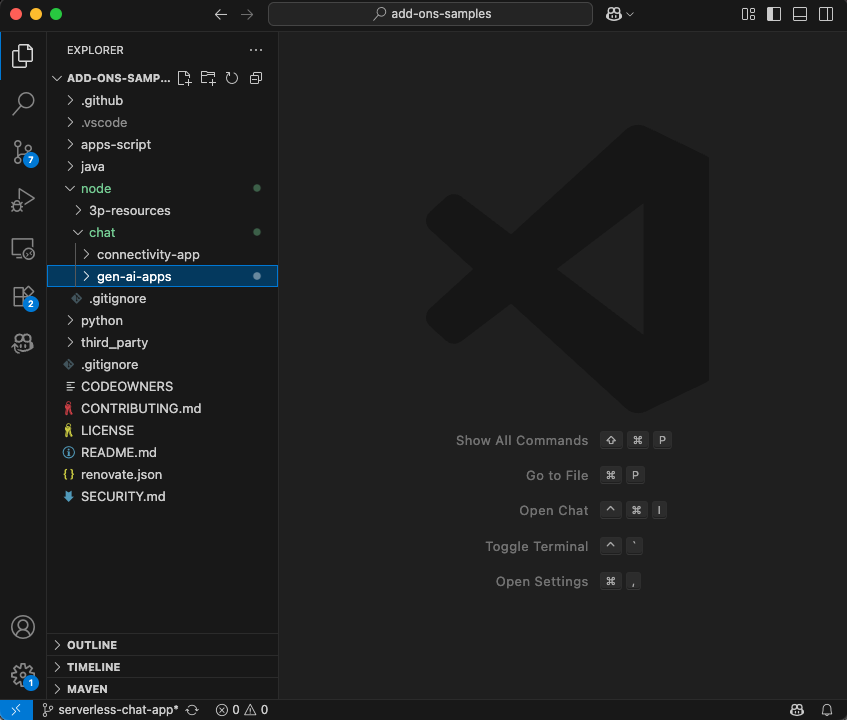
ソースコードとリソースをローカルにダウンロードする
- この GitHub リポジトリをダウンロードします。
- 任意のローカル開発環境で、
node/chat/gen-ai-appsディレクトリを開きます。
3. プロンプト アプリ
このアプリは、Vertex AI の Gemini にプロンプトを送信し、簡潔で平易なテキストの回答を使用して、ユーザーと自然言語で会話します。この実装は、Google Gen AI SDK for Node.js に依存しています。
コンセプトを確認する
自然言語
人工言語やコンピュータ ベースの言語とは対照的に、日常的なコミュニケーションのために人間が話したり書いたりする言語。
Cloud Run functions
Cloud Run functions は、サーバーレス バックエンドの構築、リアルタイムのデータ処理、インテリジェント アプリの作成に最適です。プロビジョニング、管理、パッチ適用、アップデートを行うサーバーはありません。自動スケーリングし、高可用性とフォールト トレランスを備えています。
プロンプト
プロンプトとは、生成 AI モデルが目的の出力を生成するように導くための入力(プロンプト)を作成する手法のことです。通常、モデルから具体的で関連性の高い回答を得るために、質問の言い回しを慎重に検討したり、コンテキストを提供したり、指示を与えたり、例を示したりします。
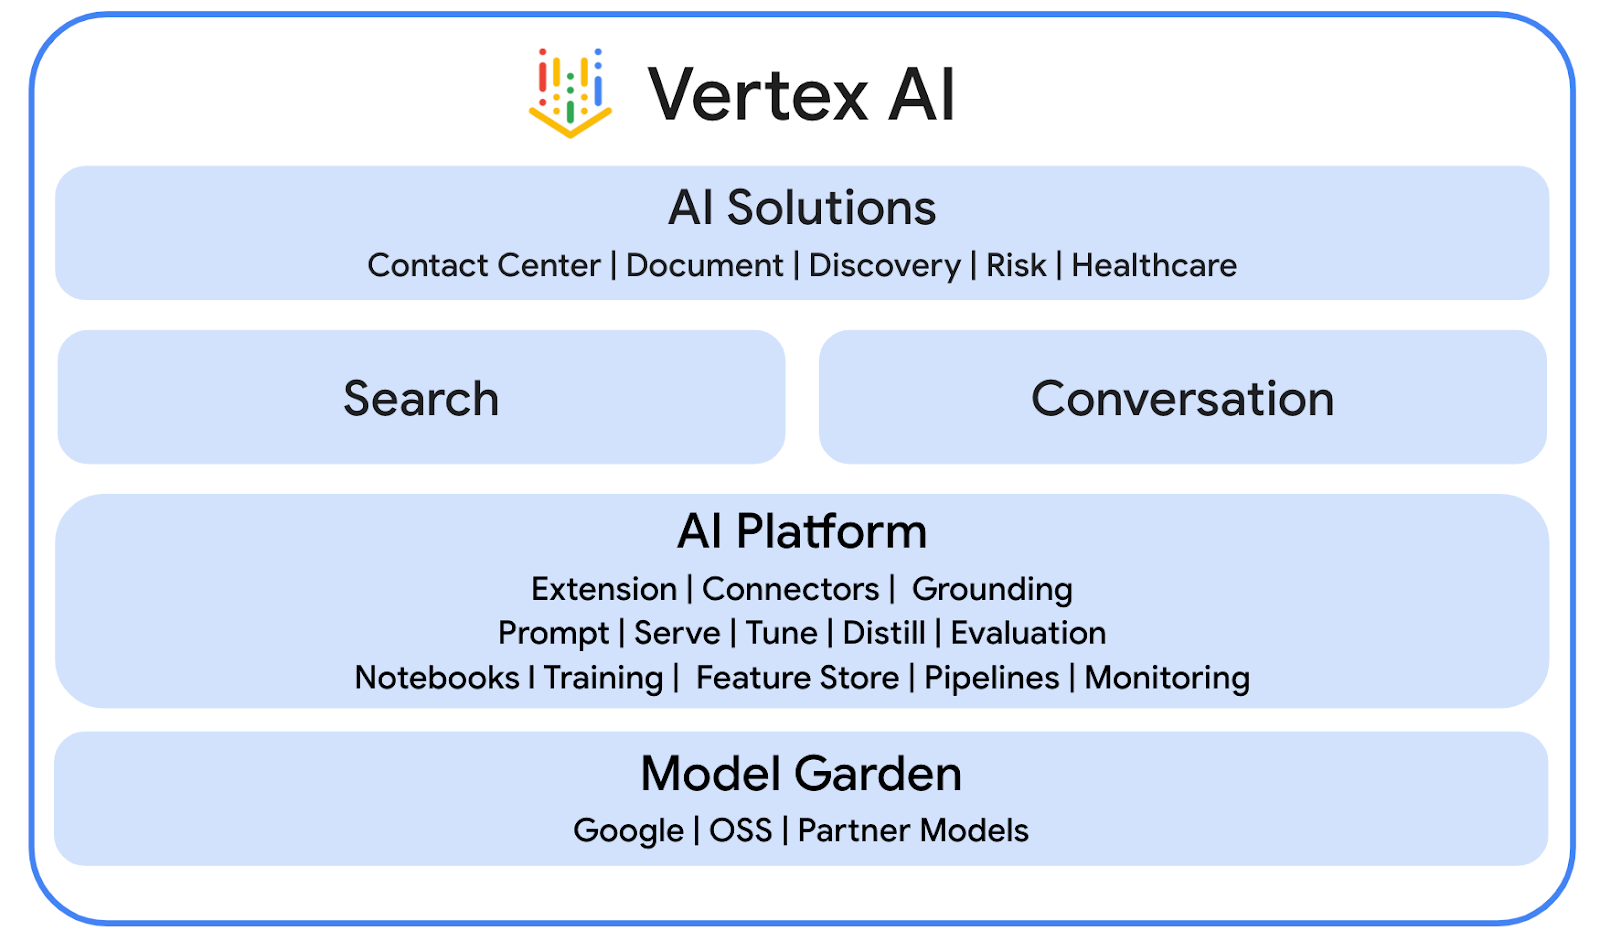
Vertex AI
Vertex AI は、AI ソリューション、検索と会話、130 を超える基盤モデル、統合 AI プラットフォームなど、生成 AI を構築して使用するために必要なすべてを提供します。
Gemini
Gemini は、Vertex AI からアクセスできる Google のマルチモーダル LLM です。人々が、人間の可能性を解き放ち、想像力を高め、好奇心を刺激し、生産性を高めるお手伝いをします。
Google Gen AI SDK
Google Gen AI SDK は、デベロッパーが Gemini を活用したアプリケーションを構築するために設計されています。Gemini Developer API と Vertex AI の両方と互換性のある統合インターフェースを提供します。Python、Go、Node.js、Java のクライアント ライブラリが付属しています。
審査フロー
ソースコードを確認する
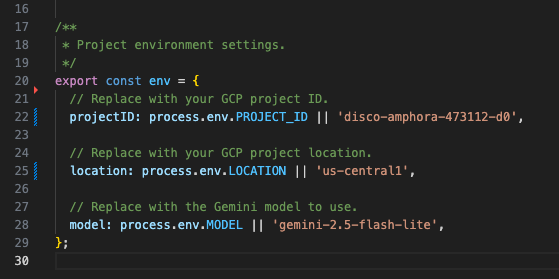
env.js
...
// Replace with your GCP project ID.
projectID: process.env.PROJECT_ID || 'your-google-cloud-project-id',

// Replace with your GCP project location.
location: process.env.LOCATION || 'your-google-cloud-project-location',

// Replace with the Gemini model to use.
model: process.env.MODEL || 'gemini-2.5-flash-lite',
...
index.js
// Import the Google Gen AI SDK.
import { GoogleGenAI } from '@google/genai';
...
// Use Vertex AI.
const genAI = new GoogleGenAI({vertexai: true, project: env.projectID, location: env.location});

http('gen-ai-app', async (req, res) => {
 // Send a new Chat message with the generated answer
 return res.send({ hostAppDataAction: { chatDataAction: { createMessageAction: { message: {
   text: await generateAnswer(req.body.chat.messagePayload.message.text)
 }}}}});
});

async function generateAnswer(message) {
 // The prompt is made of the user's message and specific instructions for the model.
 const prompt = 'In a consice and with plain text only (no formatting), '
                 + 'answer the following message in the same language: ' + message;
 const aiResponse = await genAI.models.generateContent({model: env.model, contents: prompt});
 return aiResponse.candidates[0].content.parts[0].text;
};
...
package.json
...
"main": "index.js",
"type": "module",
"scripts": {
  "start": "node index.js"
},
"dependencies": {
  "@google-cloud/functions-framework": "^4.0.0",
  "@google/genai": "1.15.0"
},
...
Vertex AI API を有効にする
- Google Cloud コンソールで、Vertex AI API を有効にします。
- メニュー アイコン ☰ > [API とサービス] > [有効な API とサービス] をクリックし、Vertex AI API がリストに含まれていることを確認します。
Google Cloud Run Node.js 関数を更新する
- ローカル開発環境で、現在のディレクトリを
node/chat/gen-ai-apps/1-promptに変更します。ソースコードとリソースがすべて含まれています。 - エディタで
env.jsを開き、次の設定を行います。 - projectID: Google Cloud プロジェクトの ID。これは、Google Cloud コンソールの [ようこそ] ページで取得できます。
- location: Google Cloud Run 関数サービスのリージョン。これは、Google Cloud Run 関数のサービスの詳細ページから取得できます。
- model: 使用するモデル。利用可能なすべてのモデルは、Vertex AI のドキュメントで確認できます。デフォルトで設定されているモデルは、高速かつ安価な実行のための Flash です。
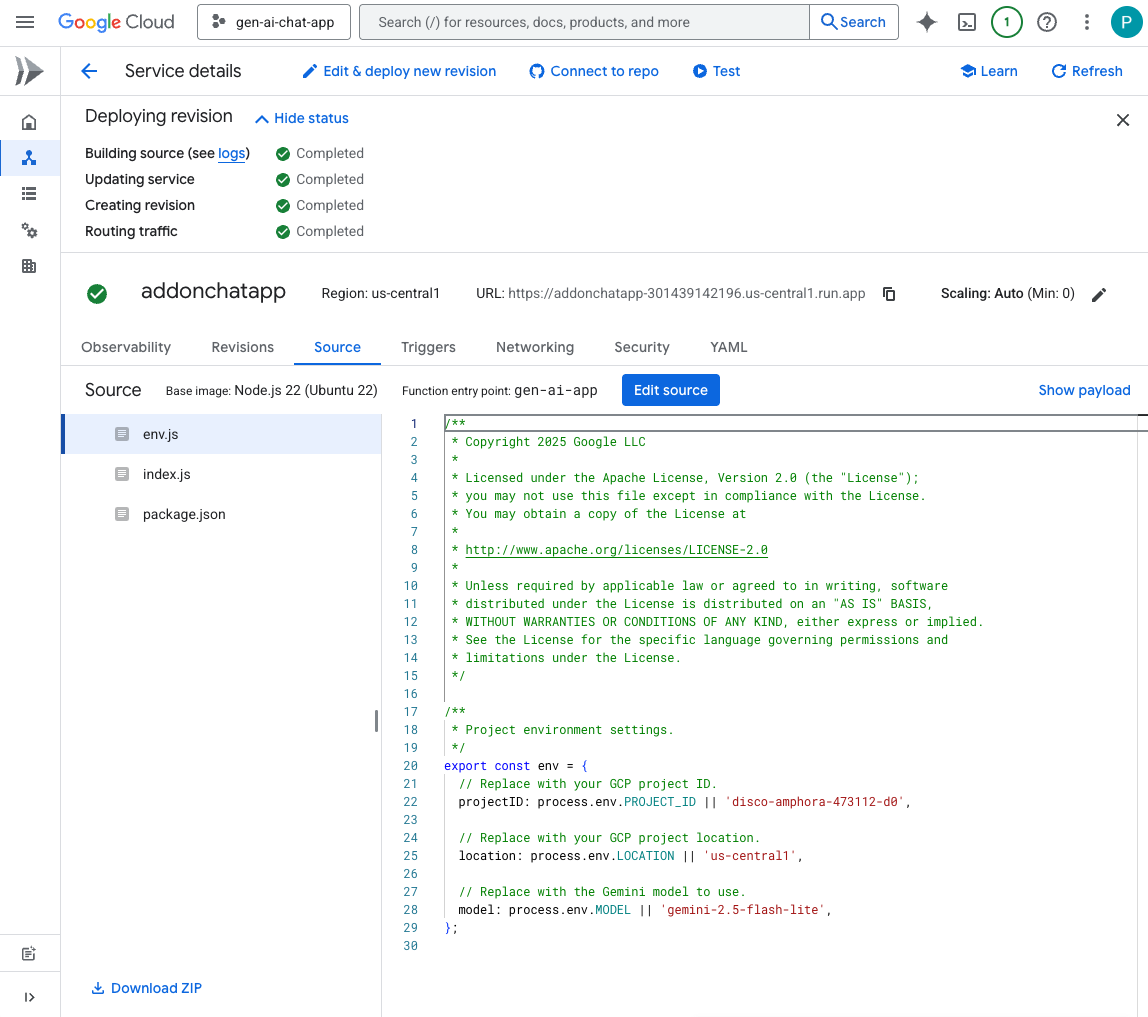
- Google Cloud Run 関数サービスの詳細ページの [ソース] タブに移動します。
- [ソースを編集] をクリックします。
- [関数のエントリ ポイント] を
gen-ai-appに設定します。 - [➕] をクリックし、「
env.js」と入力して、✔️ をクリックし、不足しているソースファイルを作成します。 index.js、env.js、package.jsonファイルの内容全体を、ローカル開発環境の内容に置き換えます。- [保存して再デプロイ] をクリックします。
- リビジョンのデプロイが正常に完了するまで待ちます。
試してみる
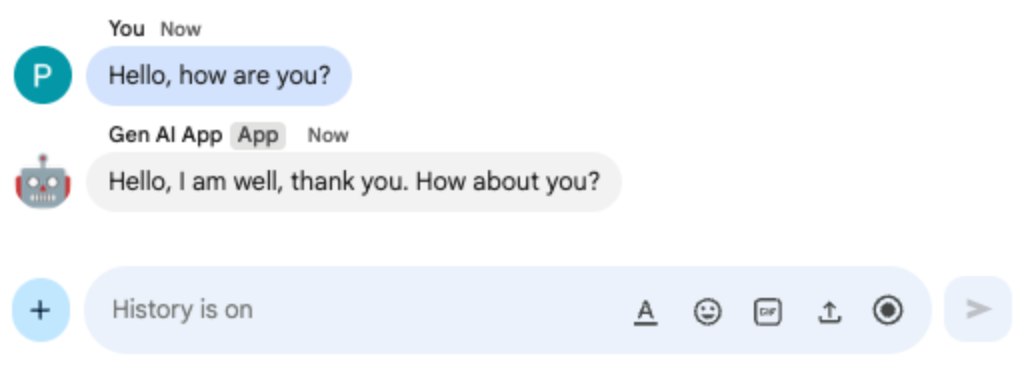
- Google Chat の Chat 用アプリとのダイレクト メッセージ スペースで、「
Hello, how are you?」と入力してenterを押します。アプリは、プロンプトの指示に従って、プレーン テキストで簡潔に回答する必要があります。
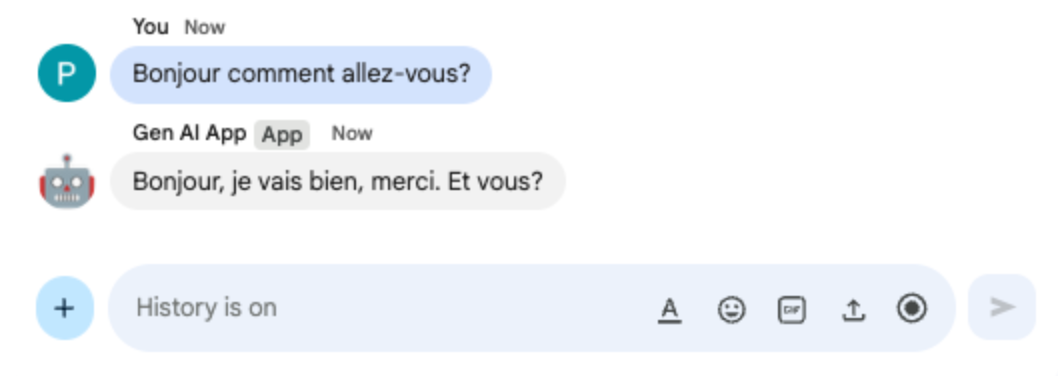
- Google Chat の Chat 用アプリとのダイレクト メッセージ スペースで、「
Bonjour comment allez-vous?」と入力してenterを押します。プロンプトの指示に従って、アプリがフランス語で回答する。
4. アプリをフォーマットする
このアプリは Prompt app をベースに、Google Chat のテキスト メッセージ形式に準拠したリッチテキストの回答をサポートしています。プロンプトの指示が更新され、モデルで使用できるさまざまなオプションの詳細な説明が追加されます。
コンセプトを確認する
Google Chat のテキスト メッセージ
Google Chat のテキスト メッセージでは、さまざまな書式設定オプションがサポートされており、Google Chat のインターフェース内で直接、より明確で表現力豊かなメッセージを作成できます。これらは、太字、斜体、取り消し線、ハイパーリンクの作成などを適用するための特定のマークダウン ルールに基づいています。
審査フロー
ソースコードを確認する
index.js
...
async function generateAnswer(message) {
 // Specify formatting options that are compatible with Google Chat messages
 // https://developers.google.com/workspace/chat/format-messages#format-texts
 const prompt = `Use simple text for concise answers. The only formatting options you can use is to
(1) surround some text with a single star for bold such as *text* for strong emphasis
(2) surround some text with a single underscore for italic such as _text_ for gentle emphasis
(3) surround some text with a single tild for strikethrough such as ~text~ for removal
(4) use a less than before followed by a URL followed by a pipe followed by a link text followed
    by a more than for a hyperlink such as <https://example.com|link text> for resource referencing
(5) use a backslash followed by the letter n for a new line such as \n for readibility
(6) surround some text with a single backquote such as \`text\` for quoting code
(7) surround an entire paragraph with three backquotes in dedicated lines such as
    \`\`\`\nparagraph\n\`\`\` for quoting code
(8) prepend lines with list items with a single star or hyphen followed by a single space
    such as * list item or - list item for bulleting ;
DO NOT USE ANY OTHER FORMATTING OTHER THAN THOSE.
Answer the following message in the same language: ${message}`;
...
};
...
Google Cloud Run Node.js 関数を更新する
- ローカル開発環境で、現在のディレクトリを
node/chat/gen-ai-apps/2-formatに変更します。ソースコードとリソースがすべて含まれています。 - Google Cloud Run 関数サービスの詳細ページの [ソース] タブに移動します。
- [ソースを編集] をクリックします。
index.jsファイルのコンテンツ全体を、ローカル開発環境のコンテンツに置き換えます。- [保存して再デプロイ] をクリックします。
- リビジョンのデプロイが正常に完了するまで待ちます。
試してみる
- Google Chat の Chat 用アプリとのダイレクト メッセージ スペースで、「
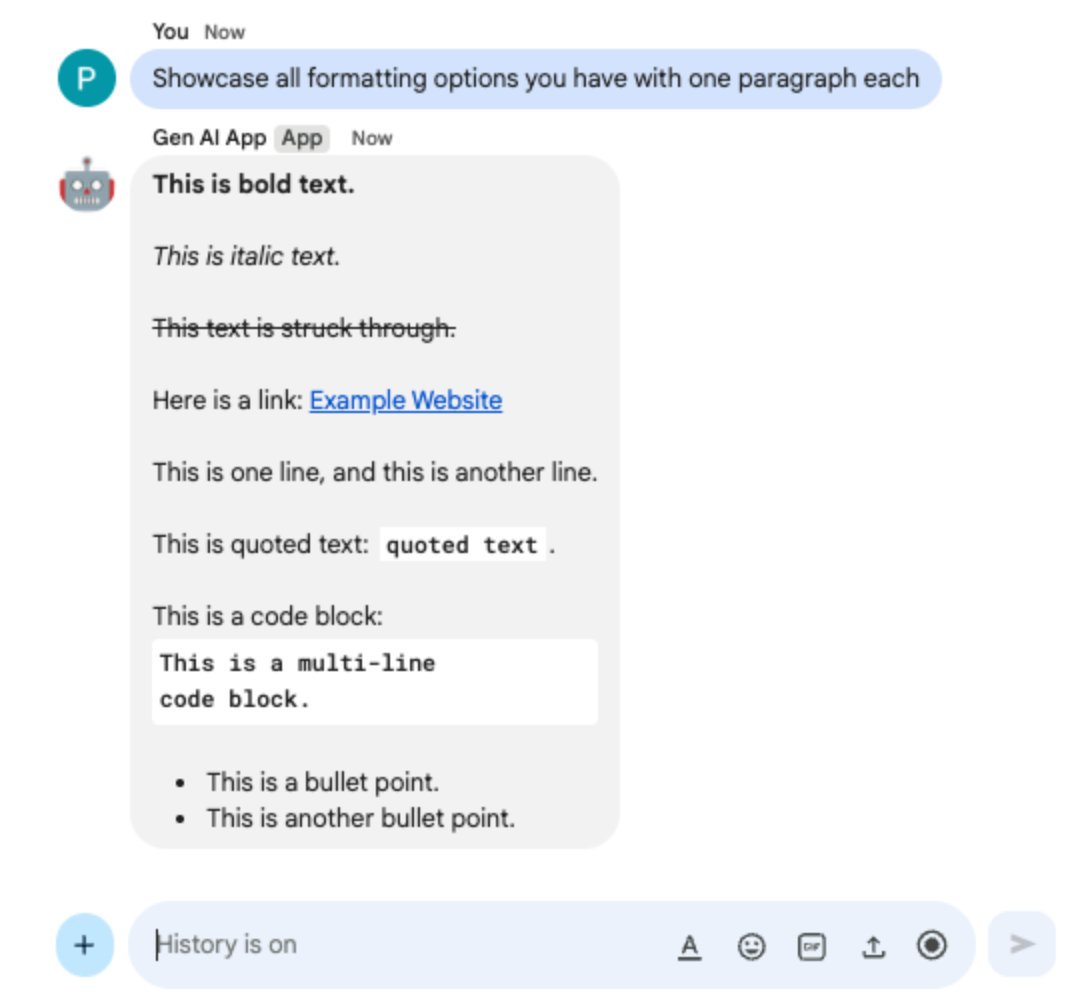
Showcase all formatting options you have with one paragraph each」と入力してenterを押します。アプリは、プロンプトの指示に基づいて、書式設定のサンプルを回答する必要があります。
- Google Chat の Chat 用アプリとのダイレクト メッセージ スペースで、「
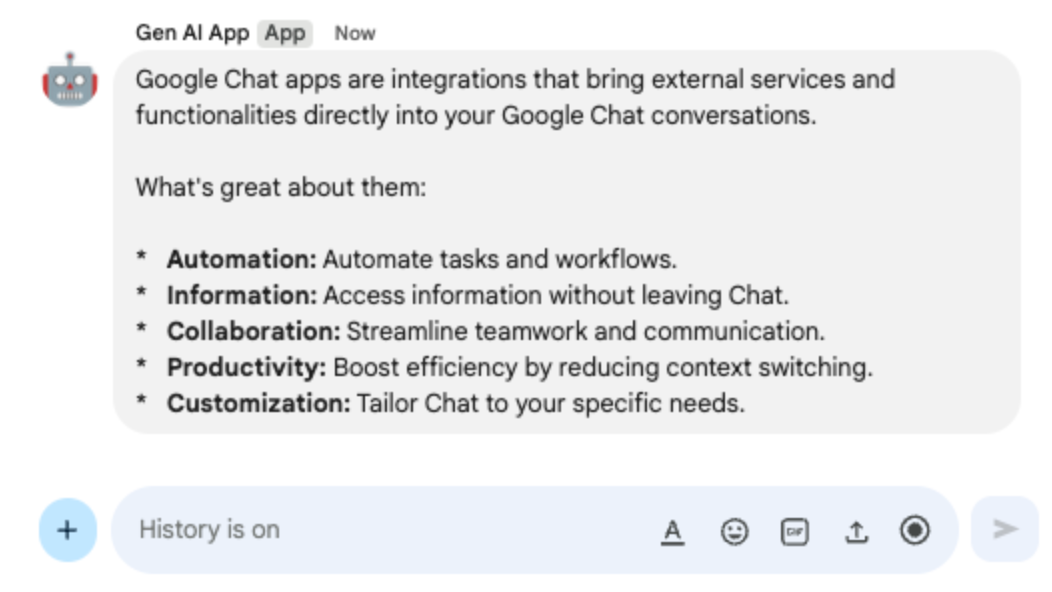
What are Google Chat apps? What's great about them?」と入力してenterを押します。アプリは、有用な場合は書式設定を使用して回答する必要があります。
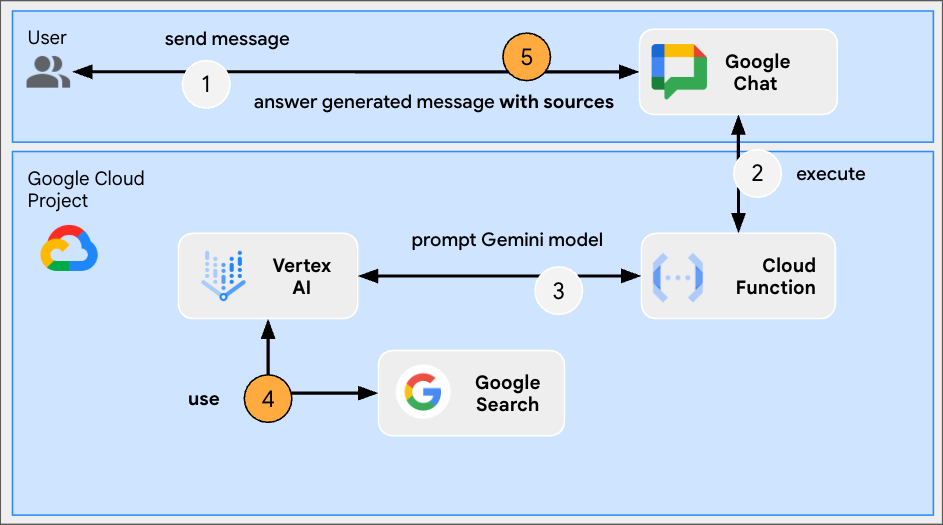
5. グラウンド アプリ
このアプリは、Format app をベースに、グラウンディングとソースの返信のサポートを追加しています。Google 検索ツールを実行し、回答へのリンクを含むカードを添付します。
コンセプトを確認する
グラウンディング
グラウンディングは、モデルを情報源に接続する手法です。実用的なアプリケーションでよく使用され、実世界のデータを参照することで生成されたコンテンツの精度と関連性を高め、モデルがハルシネーションを起こしたり、事実と異なる情報を生成したりするのを防ぎます。
Google 検索ツール
Google 検索ツールを使用すると、モデルがウェブでリアルタイムの情報を検索できるようになり、回答の精度と最新性が確保されるため、グラウンディングが強化されます。
Google Workspace カード フレームワーク
Google Workspace のカード フレームワークを使用すると、デベロッパーはリッチでインタラクティブなユーザー インターフェースを作成できます。テキスト、画像、ボタンなどのウィジェットを含めることができる、整理された視覚的に魅力的なカードを構築できます。これらのカードは、構造化された情報を提供し、会話内で直接クイック アクションを実行できるようにすることで、ユーザー エクスペリエンスを向上させます。
レビュー フロー
ソースコードを確認する
index.js
...
const aiResponse = await genAI.models.generateContent({
 model: env.model,
 contents: prompt,
 // Google Search tool is enabled
 config: { tools: [{ googleSearch: {}}]}
});

let groundingCardsV2 = undefined;
const grounding = aiResponse.candidates[0].groundingMetadata;
// Go through the grounding metadata if any
if (grounding && grounding.groundingChunks && grounding.groundingChunks.length > 0) {
 let linkButtons = [];
 grounding.groundingChunks.forEach(groundingChunk => {
   if (groundingChunk.web) {
     // Create one link button per web URL returned
     linkButtons.push({
       text: groundingChunk.web.domain,
       onClick: { openLink: { url: groundingChunk.web.uri}}
     });
   }
 });
 // Create a card with link buttons
 groundingCardsV2 = [{
   cardId: "sourcesCard",
   card: { sections: [{
     header: "Sources",
     widgets: [{ buttonList: { buttons: linkButtons}}]
   }]}
 }];
}

// Send a Chat message with the generated answer
return res.send({ hostAppDataAction: { chatDataAction: { createMessageAction: { message: {
 text: aiResponse.candidates[0].content.parts[0].text,
 // The sources are referenced in the card
 cardsV2: groundingCardsV2
}}}}});
...
Google Cloud Run Node.js 関数を更新する
- ローカル開発環境で、現在のディレクトリを
node/chat/gen-ai-apps/3-groundに変更します。ソースコードとリソースがすべて含まれています。 - Google Cloud Run 関数サービスの詳細ページの [ソース] タブに移動します。
- [ソースを編集] をクリックします。
index.jsファイルのコンテンツ全体を、ローカル開発環境のコンテンツに置き換えます。- [保存して再デプロイ] をクリックします。
- リビジョンのデプロイが正常に完了するまで待ちます。
試してみる
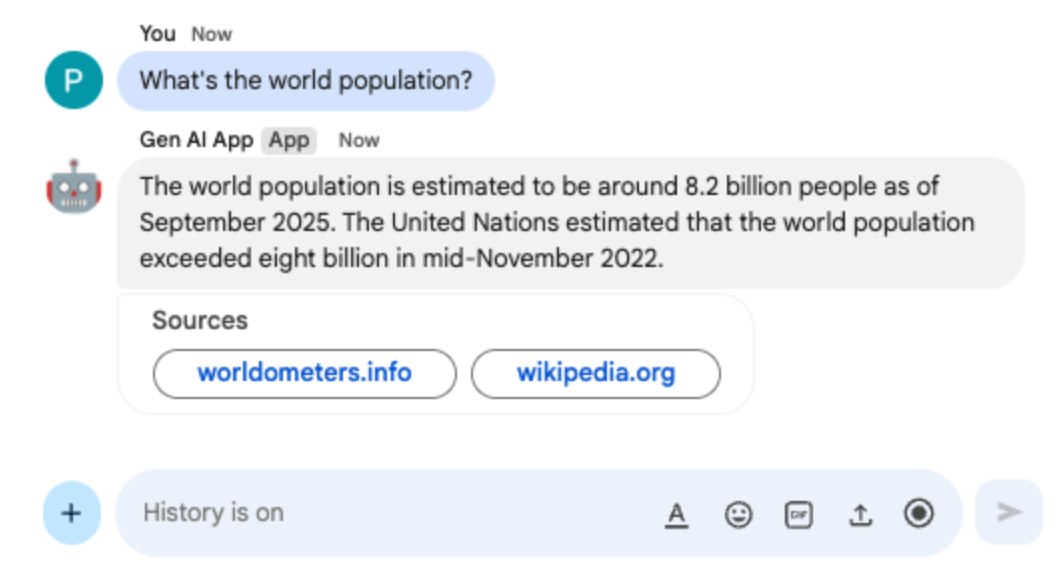
Google Chat の Chat 用アプリとのダイレクト メッセージ スペースで、「What's the world population?」と入力して enter を押します。アプリは、カードにソースリンクを添付して回答します。
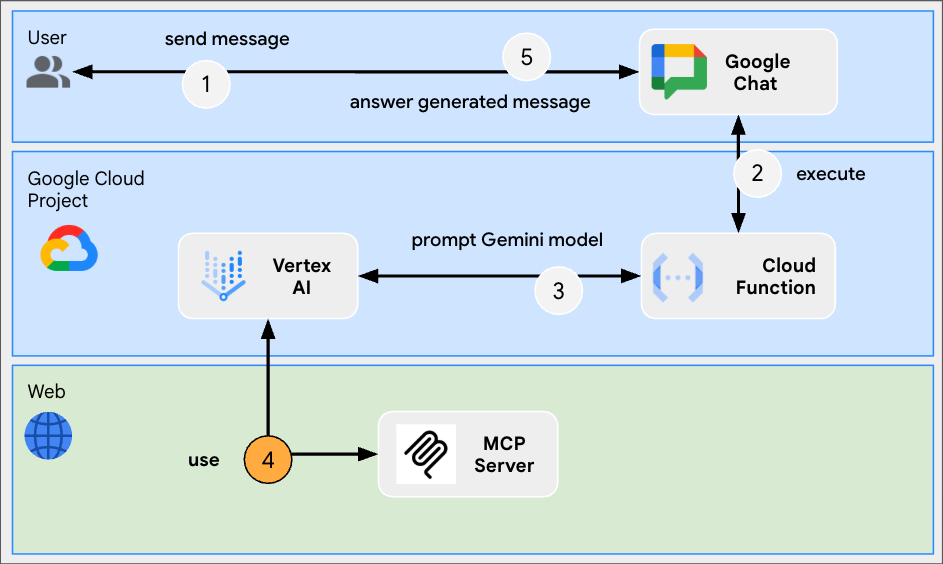
6. MCP アプリ
このアプリは、リモートでホストされている Model Context Protocol(MCP)サーバーが提供するツールのサポートを追加することで、Format app をベースに構築されています。Google Workspace デベロッパー ドキュメントにアクセスして検索するためのツールを提供する Google Workspace Developer Assist MCP に接続します。
コンセプトを確認する
Model Context Protocol(MCP)
Model Context Protocol は、モデルを標準化された方法で外部サービスと統合するオープンソース フレームワークです。モデルは、さまざまなツールをプログラムで検出、理解し、やり取りすることで、機能を拡張し、現実世界のアクションを実行し、更新された情報にアクセスできます。
MCP TypeScript SDK
TypeScript SDK は MCP 仕様全体を実装しており、任意の MCP サーバーに接続する MCP クライアントの作成を簡素化します。また、リソース、プロンプト、ツールへのアクセスを提供する MCP サーバーの開発も可能にします。
審査フロー
ソースコードを確認する
index.js
// Import the MCP TypeScript SDK.
import { Client } from "@modelcontextprotocol/sdk/client/index.js";
import { StreamableHTTPClientTransport } from "@modelcontextprotocol/sdk/client/streamableHttp.js";
import { SSEClientTransport } from "@modelcontextprotocol/sdk/client/sse.js";
...
// Create and connect the MCP client from the URL.
const mcpServerUrl = new URL("https://workspace-developer.goog/mcp");
const client = new Client({ name: "gen-ai-app-mcp", version: "1.0.0" });
// Try Streamable HTTP first (new) and SSE (old) as fallback for transport
try {
 await client.connect(new StreamableHTTPClientTransport(mcpServerUrl));
} catch (error) {
 await client.connect(new SSEClientTransport(mcpServerUrl));
}

http('gen-ai-app', async (req, res) => {
 ...
 const aiResponse = await genAI.models.generateContent({
   model: env.model,
   contents: prompt,
   // MCP tools are enabled
   config: { tools: [mcpToTool(client)]}
 });
 ...
}
...
package.json
...
"dependencies": {
  ...
  "@modelcontextprotocol/sdk": "^1.18.1"
},
...
Google Cloud Run Node.js 関数を更新する
- ローカル開発環境で、現在のディレクトリを
node/chat/gen-ai-apps/4-mcpに変更します。ソースコードとリソースがすべて含まれています。 - Google Cloud Run 関数サービスの詳細ページの [ソース] タブに移動します。
- [ソースを編集] をクリックします。
index.jsファイルとpackage.jsonファイルの内容全体を、ローカル開発環境の内容に置き換えます。- [保存して再デプロイ] をクリックします。
- リビジョンのデプロイが正常に完了するまで待ちます。
試してみる
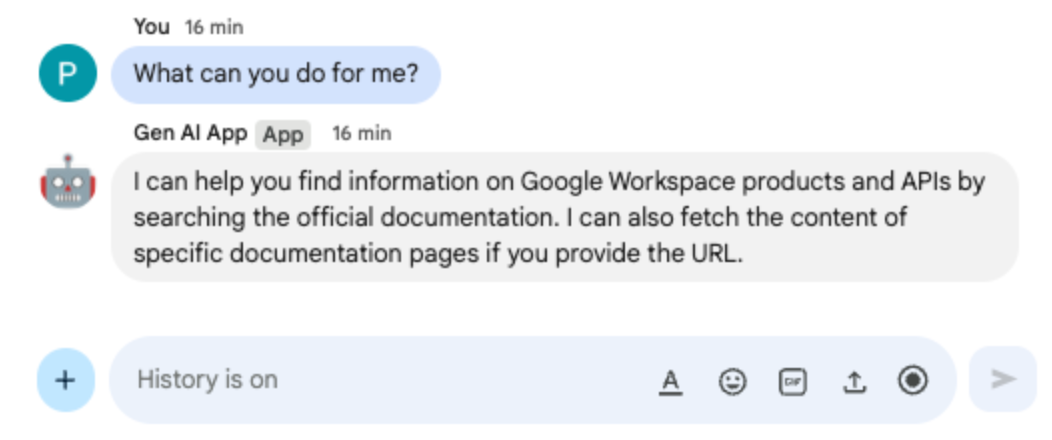
- Google Chat の Chat 用アプリとのダイレクト メッセージ スペースで、「
What can you do for me?」と入力してenterを押します。アプリは、実行できること(MCP ツール)を説明する必要があります。
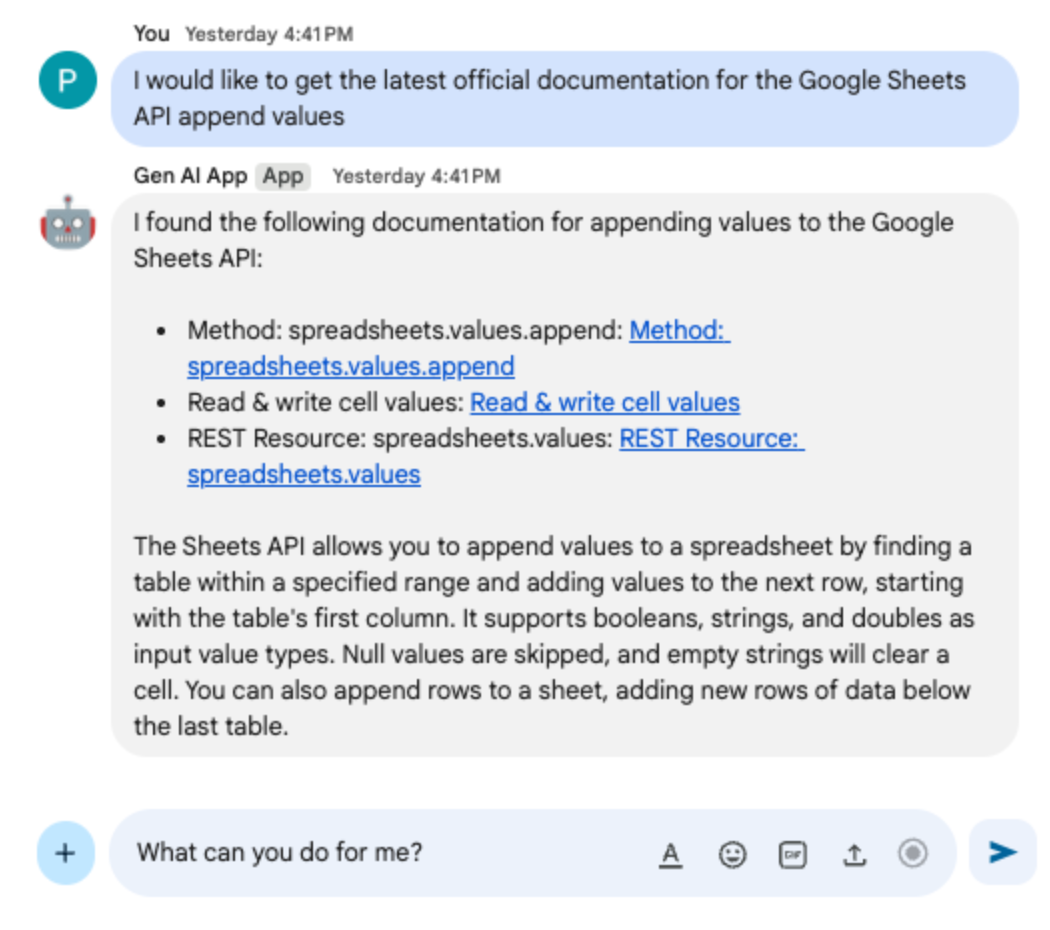
- Google Chat の Chat 用アプリとのダイレクト メッセージ スペースで、「
I would like to get the latest official documentation for the Google Sheets API append values」と入力してenterを押します。アプリは、リクエストされたドキュメントを(MCP ツールを使用して)返します。
7. マルチターン アプリ
このアプリは、チャット インタラクションの履歴を追跡することで会話メモリのサポートを追加し、Format app をベースに構築されています。これにより、より自然でインテリジェントな、パーソナライズされたエクスペリエンスが実現します。アプリは、Google Cloud プロジェクトに関連付けられたデフォルトの Google Cloud Firestore データベースをストレージに使用します。
コンセプトを確認する
マルチターン
マルチターンのコンセプトは、モデルが複数のやり取りや会話でコンテキストと継続性を維持する能力を指します。複雑な会話、高度な AI 駆動型機能、自然なユーザー エクスペリエンスをサポートするうえで、この機能は不可欠です。
Google Cloud Firestore
Google Cloud Firestore は、モバイル、ウェブ、サーバーの開発に対応した、柔軟でスケーラブルな NoSQL クラウド データベースです。データはドキュメントに格納され、ドキュメントはコレクションにまとめられます。リアルタイム同期とオフライン サポートが可能です。
審査フロー
ソースコードを確認する
index.js
// Import the Google Cloud Firestore client library.
import { Firestore } from '@google-cloud/firestore';
...
// Configure DB
const USERS_PREFIX = 'users/';
const CHATS_COLLECTION = 'chats';
const db = new Firestore();
...
// Create or update data for a given user
async function createOrUpdateChatHistory(userId, data) {
 await db.collection(CHATS_COLLECTION).doc(userId.replace(USERS_PREFIX, '')).set(data);
};

// Retrieve data snapshot for a given user
async function getChatHistory(userId) {
 return await db.collection(CHATS_COLLECTION).doc(userId.replace(USERS_PREFIX, '')).get();
};
...
...
http('gen-ai-app', async (req, res) => {
 // Retrieve the chat history of the user
 const chatHistory = await getChatHistory(userId);
 const chat = genAI.chats.create({
   model: env.model,
   // Initiate the model with chat history for context
   history: chatHistory.exists ? chatHistory.data().contents : []
 });
 // If no history, send a first message to the model with instructions on how to behave
 if(!chatHistory.exists) {
   const preambule = 'The only formatting options you can use is to '
                   + ...
                   + 'DO NOT USE ANY OTHER FORMATTING OTHER THAN THOSE. '
                   + 'Answer in the same language that I use.';
   // The answer to this message is ignored
   await chat.sendMessage({message: preambule});
 }

 // Send the user's message to the model to generate the answer
 const aiResponse = await chat.sendMessage({message: userMessage});

 // Persist the updated chat history of the user
 await createOrUpdateChatHistory(userId, {contents: chat.getHistory({curated: true})});

 // Send a Chat message with the generated answer
 return res.send({ hostAppDataAction: { chatDataAction: { createMessageAction: { message: {
   text: aiResponse.candidates[0].content.parts[0].text
 }}}}});
});
...
package.json
...
"dependencies": {
  ...
  "@google-cloud/firestore": "^7.11.5"
},
...
Google Cloud Firestore API を有効にする
- Google Cloud コンソールで、Google Cloud Firestore API を有効にします。
- メニュー アイコン ☰ > [API とサービス] > [有効な API とサービス] をクリックし、Cloud Firestore API がリストに含まれていることを確認します。
Cloud Firestore データベースを作成する
- Google Cloud コンソールで、メニュー アイコン ☰ > [Firestore] をクリックします。
- [Firestore データベースを作成] をクリックします。
- デフォルトの構成のままにして、[データベースを作成] をクリックします。
Google Cloud Run Node.js 関数を更新する
- ローカル開発環境で、現在のディレクトリを
node/chat/gen-ai-apps/5-multi-turnに変更します。ソースコードとリソースがすべて含まれています。 - Google Cloud Run 関数サービスの詳細ページの [ソース] タブに移動します。
- [ソースを編集] をクリックします。
index.jsファイルとpackage.jsonファイルの内容全体を、ローカル開発環境の内容に置き換えます。- [保存して再デプロイ] をクリックします。
- リビジョンのデプロイが正常に完了するまで待ちます。
試してみる
- Google Chat の Chat 用アプリとのダイレクト メッセージ スペースで、「
Can you speak with the English from the 80's for now on?」と入力してenterを押します。アプリは肯定的な応答を返すはずです。
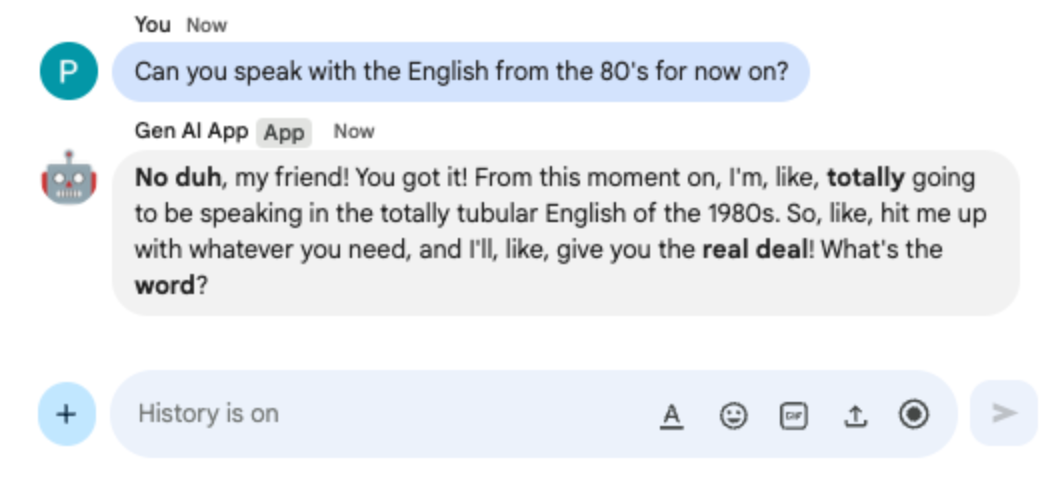
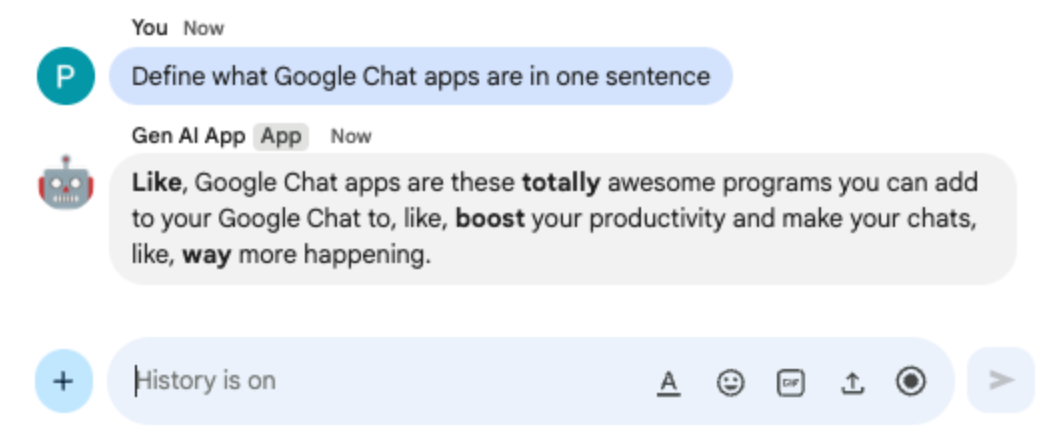
- Google Chat の Chat 用アプリとのダイレクト メッセージ スペースで、「
Define what Google Chat apps are in one sentence」と入力してenterを押します。アプリは 1980 年代の英語で応答を続けます。
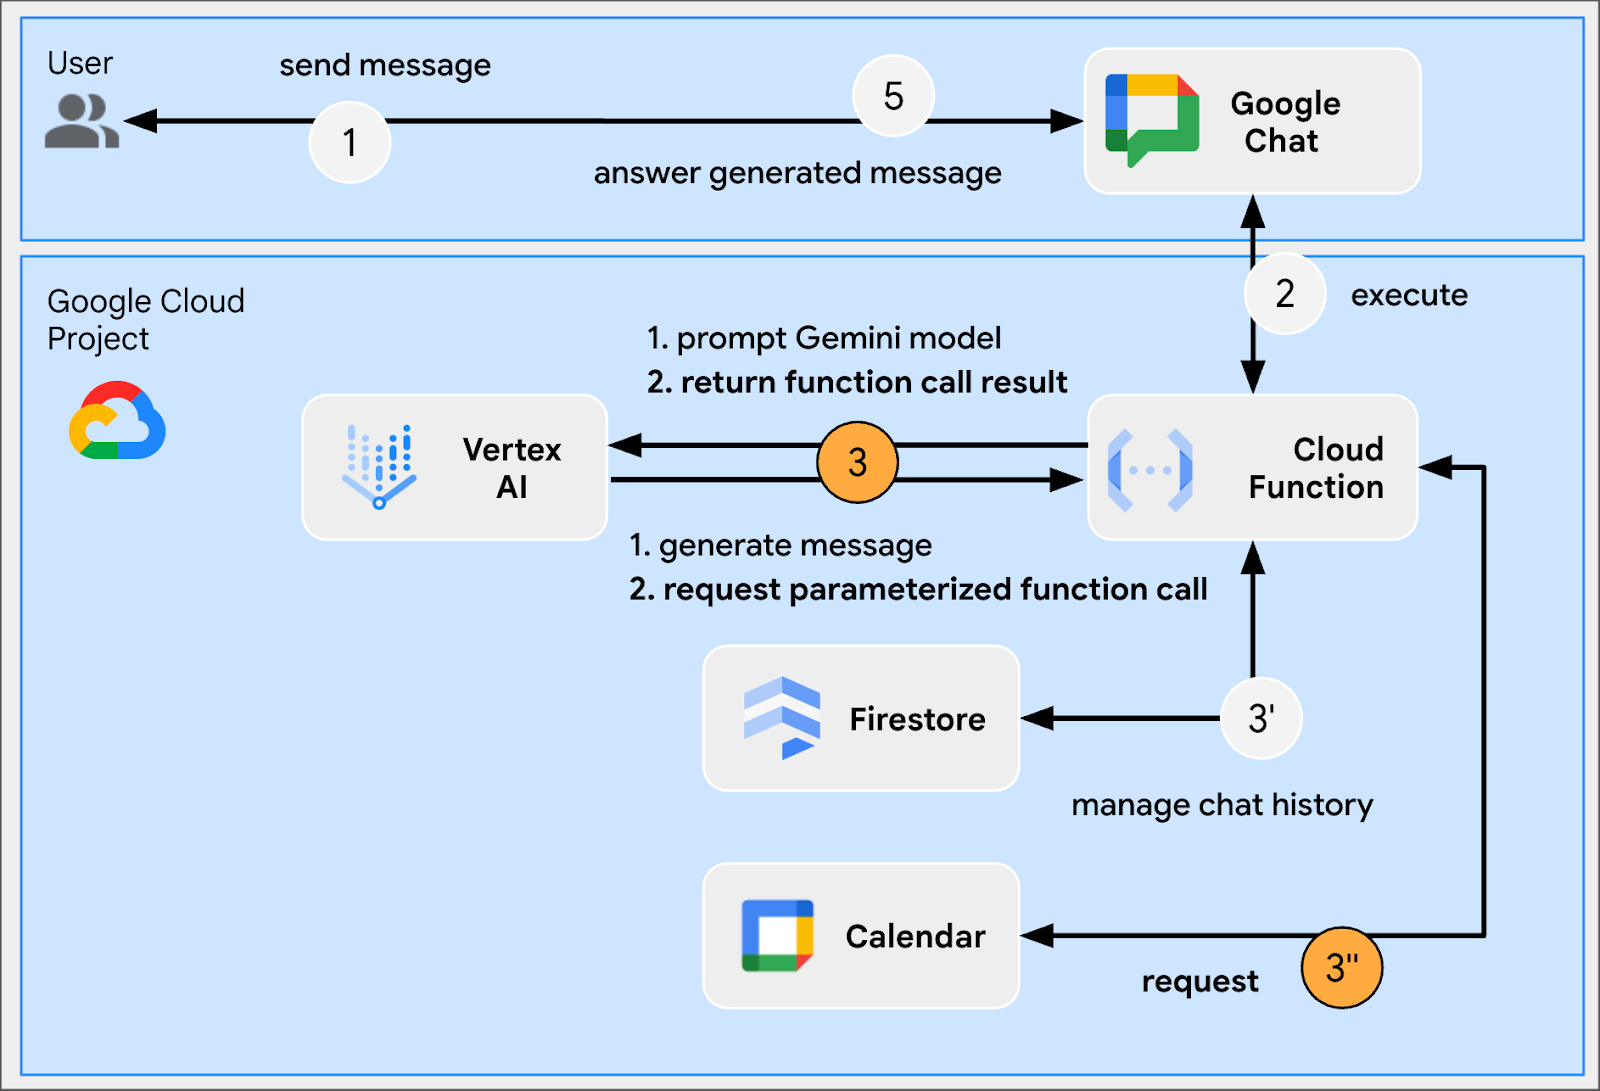
8. カスタムツールアプリ
このアプリは、Multi-turn app をベースに、Google Workspace Calendar API を使用して公開カレンダーから次の予定を取得する関数呼び出しカスタムツールのサポートを追加しています。モデルは、入力の受信やツールからの出力の配信など、すべてのユーザー操作を管理します。ただし、必要な API 呼び出しを実行し、リクエストに応じてモデルに結果を提供する責任はアプリケーションにあります。アプリは Google API キーを使用します。これは、公開カレンダー データを取得するためにユーザー認証情報を必要としないためです。
コンセプトを確認する
関数呼び出し
関数呼び出しにより、モデルはユーザーのリクエストを外部ツールまたは API で満たせるかどうかを検出できます。モデルは、そのツールを呼び出すために必要なパラメータを提供し、外部機能をレスポンスに統合します。
Google Workspace API
Google Workspace API を使用すると、デベロッパーはアプリケーションをさまざまな Google Workspace サービスと統合できます。これらの API を使用すると、Gmail、Chat、カレンダー、ドライブ、ドキュメント、スプレッドシートなどのプロダクトの機能にプログラムでアクセスして、自動化、データ同期、カスタム ワークフローの作成を行うことができます。
審査フロー
ソースコードを確認する
env.js
...
// Replace with your Google API key.
googleApiKey: process.env.GOOGLE_API_KEY || 'your-google-api-key',
...
index.js
// Import parameter type definitions from Google Gen AI SDK.
import { GoogleGenAI, Type } from '@google/genai';
// Import Google APIs that include the Google Calendar API.
import { google } from 'googleapis';
...
// Create a Google Calendar API client using a Google API key.
const calendar = google.calendar({version: 'v3', auth: env.googleApiKey});
...
// Define the tool used for function calling
const getNextPublicCalendarEventTitleFunctionDeclaration = {
 name: 'getNextPublicCalendarEventTitle',
 parameters: {
   type: Type.OBJECT,
   description: 'Get the title of the next event of a public calendar.',
   properties: {
     calendarId: {
       type: Type.STRING,
       description: 'ID of the public calendar to get the next event title.',
     }
   },
   required: ['calendarId']
 }
};

// The function referenced in the tool definition
async function getNextPublicCalendarEventTitle(calendarId) {
 // Use Calendar API to retrieve the next event in the given calendar
 const response = await calendar.events.list({
   calendarId: calendarId,
   timeMin: new Date().toISOString(),
   maxResults: 1,
   singleEvents: true,
   orderBy: 'startTime',
 });
 const events = response.data.items;
 if (!events || events.length === 0) {
   return null;
 }
 return `${events[0].summary}`;
};
...
...
http('gen-ai-app', async (req, res) => {
 ...
 // Send the user's message to the model to generate the answer
 let aiResponse = await chat.sendMessage({
   message: userMessage,
   // The tool used for function calling is enabled
   config: { tools: [{ functionDeclarations: [getNextPublicCalendarEventTitleFunctionDeclaration]}]}
 });

 // Handle the function calling turn with the model if any
 const functionCall = aiResponse.candidates[0].content.parts[0].functionCall;
 if (functionCall) {
   let functionResult = null;
   switch(functionCall.name) {
     case 'getNextPublicCalendarEventTitle':
       // Make the function call as per model request
       functionResult = await getNextPublicCalendarEventTitle(functionCall.args['calendarId']);
       break;
     default:
   }
   // Finish the function calling turn by sending the execution result to the model
   aiResponse = await chat.sendMessage({ message: { functionResponse: {
     name: functionCall.name,
     response: { output: functionResult }
   }}});
 }
 ...
 // Send a Chat message with the generated answer
 return res.send({ hostAppDataAction: { chatDataAction: { createMessageAction: { message: {
   text: aiResponse.candidates[0].content.parts[0].text
 }}}}});
});
...
package.json
...
"dependencies": {
  ...
   "googleapis": "^160.0.0"
},
...
Calendar API を有効にする
- Google Cloud コンソールで、Google Calendar API を有効にします。
- メニュー アイコン ☰ > [API とサービス] > [有効な API とサービス] をクリックし、Google カレンダー API がリストに含まれていることを確認します。
Google API キーを作成する
Google Cloud コンソールで、次の手順を行います。
- メニュー ☰ > [API とサービス] > [認証情報] をクリックします。
- [認証情報を作成] をクリックして [API キー] を選択します。
- オペレーションが完了するまで待ちます。
- 確認ダイアログで、[Your API Key] テキスト フィールドを見つけて、[Copy to clipboard] をクリックします。
Google Cloud Run Node.js 関数を更新する
- ローカル開発環境で、現在のディレクトリを
node/chat/gen-ai-apps/6-custom-toolに変更します。ソースコードとリソースがすべて含まれています。 - Google Cloud Run 関数サービスの詳細ページの [ソース] タブに移動します。
- [ソースを編集] をクリックします。
index.jsファイルとpackage.jsonファイルの内容全体を、ローカル開発環境の内容に置き換えます。env.jsファイルを開き、次の操作を行います。- エクスポートされたフィールドに googleApiKey を追加
export const env = {
 ...
 googleApiKey: 'your-google-api-key',
};
your-google-api-keyは、前の手順でコピーした Google API キーに置き換えます。この値は、Google Cloud の認証情報ページで [キーを表示] をクリックして取得できます。
- [保存して再デプロイ] をクリックします。
- リビジョンのデプロイが正常に完了するまで待ちます。
試してみる
- Google カレンダーで次の手順を行います。
- [他のカレンダー] で [+] をクリックし、[新しいカレンダーを作成] をクリックします。
- [名前] を
My Public Calendarに設定します - [カレンダーを作成] をクリックします。
- オペレーションが完了するまで待ちます。
- [マイカレンダーの設定] で、新しく作成したカレンダー [My Public Calendar] を選択します。
- [予定のアクセス権限] で [一般公開して誰でも利用できるようにする] を選択し、[警告] ダイアログで [OK] をクリックします。
- [予定のアクセス権限] で、[一般公開して誰でも利用できるようにする] オプションの横にあるプルダウン メニューから [予定の表示(すべての予定の詳細)] を選択します。
- [カレンダーの統合] で、[カレンダー ID] フィールドの値をクリップボードにコピーします。
- 左上にある左矢印をクリックして、[設定] を終了します。
- カレンダーをクリックして明日の新しい予定を作成し、「
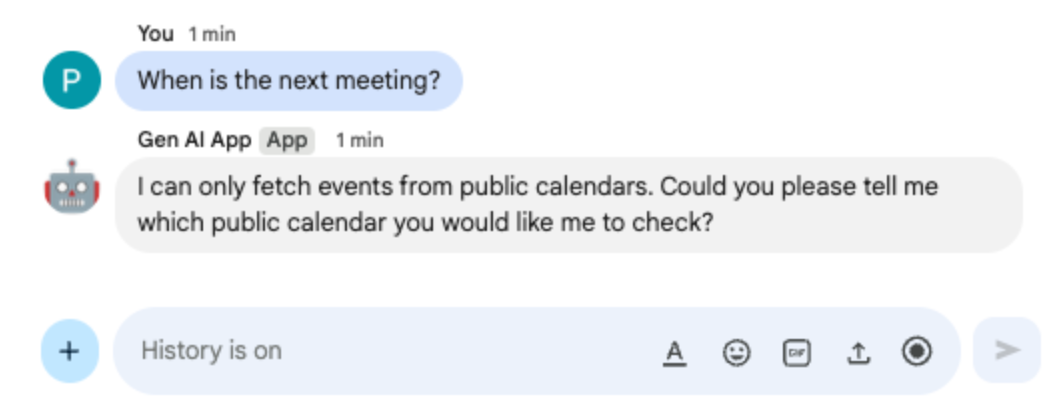
Important meeting」と入力して、プルダウンから [一般公開カレンダー] を選択し、[保存] をクリックします。 - Google Chat の Chat 用アプリとのダイレクト メッセージ スペースで、「
When is the next meeting?」と入力してenterを押します。参照されているカレンダーが不明なため、アプリは精度をリクエストする必要があります。
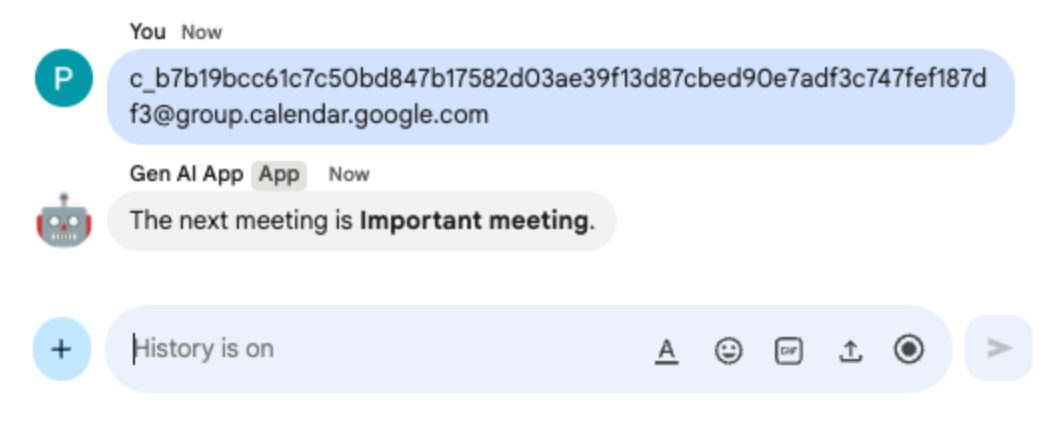
- Google Chat の Chat 用アプリとのダイレクト メッセージ スペースで、先ほどクリップボードにコピーしたカレンダー ID を貼り付け、
enterを押します。アプリは、以前に作成されたイベントの詳細を返します。
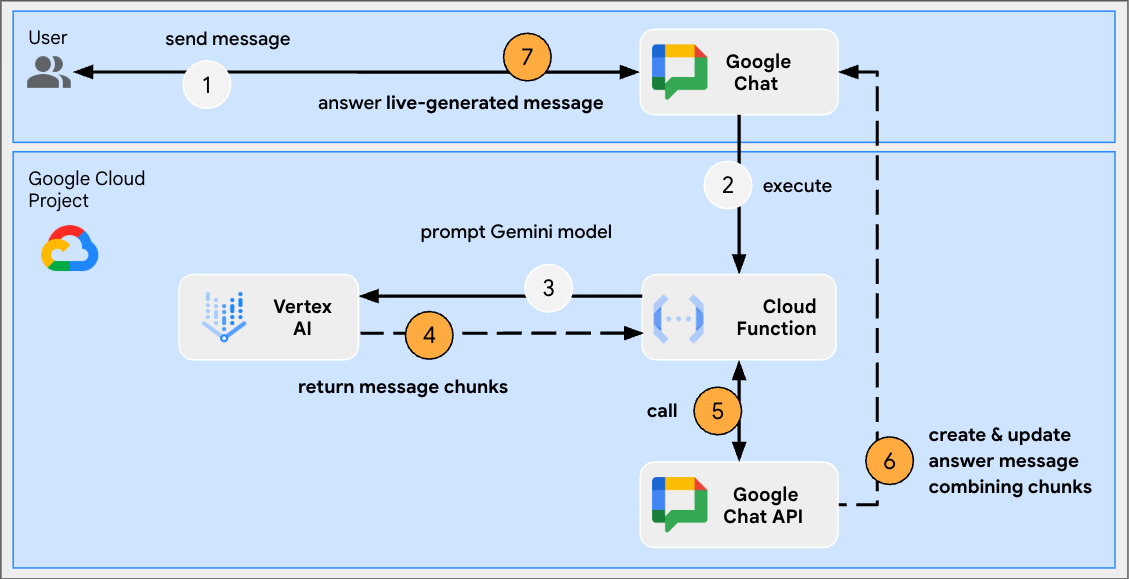
9. ストリーム アプリ
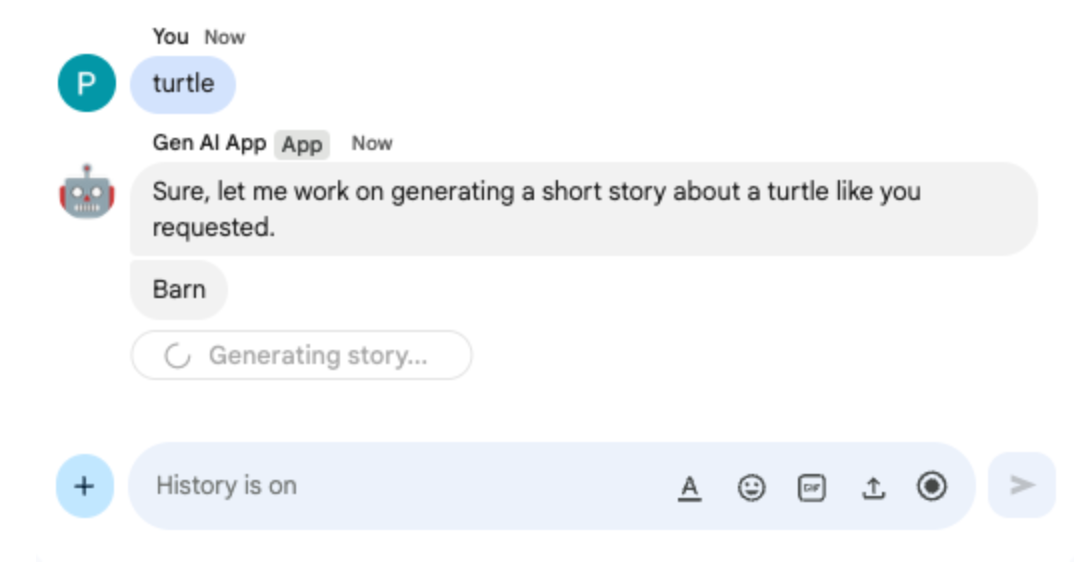
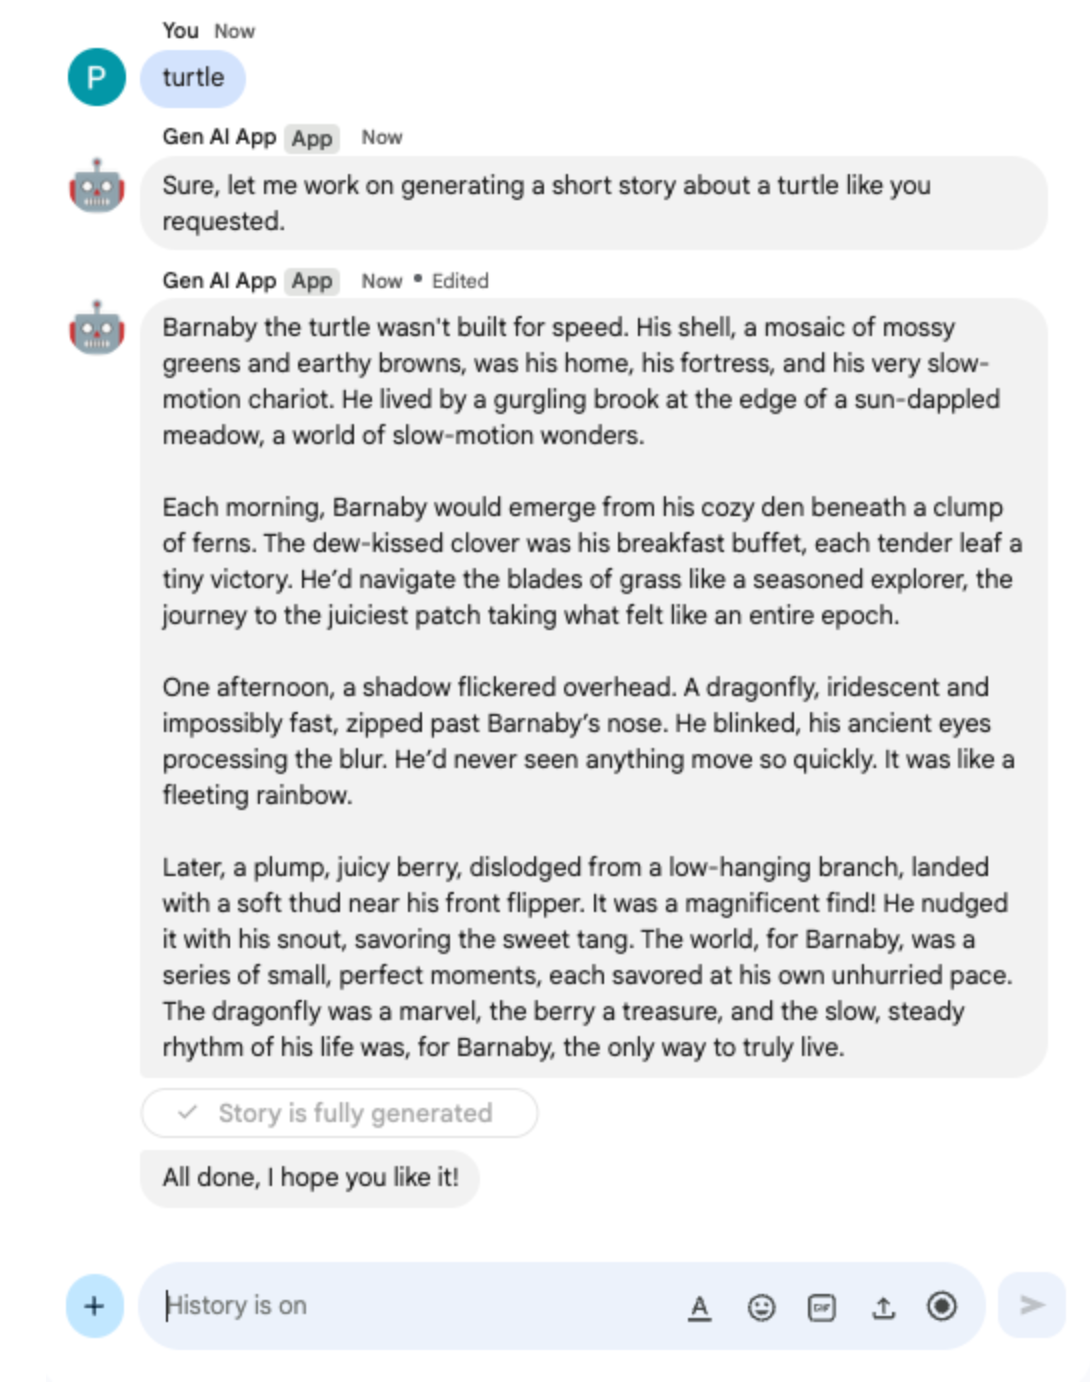
このアプリは、Gemini モデルを使用して、ユーザーが提供したテーマに基づいて 2 分間の物語を生成します。完全な回答を生成するには時間がかかるため、アプリはストリーミング モードでモデルを呼び出し、Google Chat API を使用して、進行状況に応じてメッセージのコンテンツとステータスを送信します。
コンセプトを確認する
Google Chat API
Google Chat API を使用すると、デベロッパーは Google Chat をプログラムで操作できます。メッセージの送信、スペースの作成、メンバーの管理などを行い、カスタム統合やボットを構築できます。
ストリーミング
ストリーミングとは、レスポンス全体が生成されるのを待つのではなく、データを継続的なフローで受信するプロセスを指します。AI モデルの呼び出しに関して、ストリーミングを使用すると、アプリケーションは部分的な結果が利用可能になった時点でユーザーに表示できるため、特に長い生成タスクで認識されるパフォーマンスとユーザー エクスペリエンスが向上します。これは、完全な出力を生成するのにかなりの時間を要する可能性がある生成 AI モデルに特に当てはまります。
審査フロー
ソースコードを確認する
index.js
// Import Google Auth library used to create Google Chat API client
import { GoogleAuth } from 'google-auth-library';
...
http('gen-ai-app', async (req, res) => {
 // Use app authentication.
 // Application Default Credentials (ADC) will use the Cloud Run function's
 // default service account, we just need to specify the Chat API app auth scopes.
 const auth = new GoogleAuth({
   // Chat API app authentication scopes
   scopes: ['https://www.googleapis.com/auth/chat.bot']
 });

 // Create Chat service client with application credentials
 const chatClient = google.chat({
   version: 'v1',
   auth: await auth.getClient()
 });

 // Send a server streaming request to generate the answer
 const aiResponse = await genAI.models.generateContentStream({
   model: env.model,
   contents: `Generate a story about a ${userMessage}. `
               + `It should take 2 minutes to read it out loud.`
 });

 // Send a first Chat message to summarize what will be done
 await chatClient.spaces.messages.create({
   parent: spaceName,
   requestBody: { text: `Sure, let me work on generating a short story `
                           + `about a ${userMessage} like you requested.`}
 });

 // Go through the response chunks received from the stream
 let messageName = undefined;
 let answer = "";
 for await (const chunk of aiResponse) {
   const text = chunk.text;
   if (text) {
     // Update the answer by concatenating the response chunks
     answer += text;
     // The Chat message request body is the same for message creation and update
     const responseBody = {
       text: answer,
       accessoryWidgets: [getStatusAccessoryWidget('Generating story...', 'progress_activity')]
     }
     if (!messageName) {
       // Create a Chat message dedicated to the generated content
       const messageResponse = await chatClient.spaces.messages.create({
         parent: spaceName,
         requestBody: responseBody
       });
       messageName = messageResponse.data.name;
     } else {
       // Update the Chat message dedicated to the generated content
       await chatClient.spaces.messages.patch({
         name: messageName,
         updateMask: 'text,accessory_widgets',
         requestBody: responseBody
       });
     }
   }
 }

 // Update the accessory widget with final progress status
 await chatClient.spaces.messages.patch({
   name: messageName,
   updateMask: 'accessory_widgets',
   requestBody: {
     accessoryWidgets: [getStatusAccessoryWidget('Story is fully generated', 'check')]
   }
 });

 // Send a last Chat message to confirm it's done
 return res.send({ hostAppDataAction: { chatDataAction: { createMessageAction: { message: {
   text: 'All done, I hope you like it!'
 }}}}});
});

// Create an accessory widget with progress status
function getStatusAccessoryWidget(text, icon) {
 return { buttonList: { buttons: [{
   text: text,
   icon: { materialIcon: { name: icon}},
   // This is a workaround to have the icon shown, it's not clickable
   onClick: { openLink: { url: "https://google.com"}},
   disabled: true
 }]}};
}
package.json
...
"dependencies": {
  ...
   "google-auth-library": "^10.3.0"
},
...
Google Cloud Run Node.js 関数を更新する
- ローカル開発環境で、現在のディレクトリを
node/chat/gen-ai-apps/7-streamに変更します。ソースコードとリソースがすべて含まれています。 - Google Cloud Run 関数サービスの詳細ページの [ソース] タブに移動します。
- [ソースを編集] をクリックします。
index.jsファイルとpackage.jsonファイルの内容全体を、ローカル開発環境の内容に置き換えます。- [保存して再デプロイ] をクリックします。
- リビジョンのデプロイが正常に完了するまで待ちます。
試してみる
Google Chat の Chat 用アプリとのダイレクト メッセージ スペースで、「turtle」と入力して enter を押します。アプリは、確認メッセージ、進行状況に応じてステータスが更新される生成されたストーリー、完了確認メッセージで応答する必要があります。
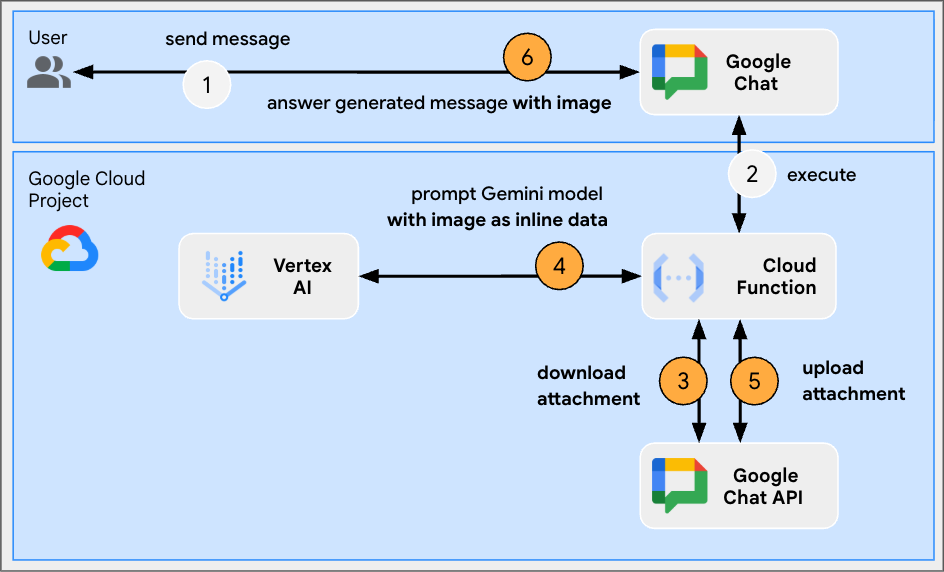
10. マルチモーダル アプリ
このアプリは、ユーザーからのテキストによる指示に基づいて画像を編集するモデルに依存しています。ユーザーとアプリの両方が、Google Chat メッセージの添付ファイルとして画像を追加して交換します。このアプリは、Google Chat API を使用して画像をプログラムでダウンロードおよびアップロードします。
コンセプトを確認する
Google Chat メッセージの添付ファイル
Google Chat メッセージの添付ファイルは、Google Chat メッセージにアップロードされた画像や動画などのファイルです。これらの添付ファイルはプログラムで管理できるため、アプリケーションは会話内でリッチメディアを直接操作できます。
ドメイン全体の委任(DWD)
ドメイン全体の委任(DWD)を使用すると、サービス アカウントは Google Workspace ドメイン内のユーザーになりすますことができます。これにより、アプリケーションは直接承認なしでユーザーに代わってアクションを実行できます。これは、ユーザーがアクティブに存在していない場合でも、ユーザーのコンテキストでユーザーデータにアクセスしたり、アクション(Google Chat への添付ファイルのアップロードなど)を実行したりする必要があるアプリに役立ちます。サービス アカウントにドメイン全体への広範なアクセス権を付与することで、このようなアプリのニーズに対応できます。
審査フロー
ソースコードを確認する
env.js
...
// Replace with the Gemini model to use.
model: process.env.MODEL || 'gemini-2.0-flash-preview-image-generation',
...
index.js
...
// Import byte stream management libraries.
import { Buffer } from 'buffer';
import { Readable } from 'stream';
...
// Download a Google Chat attachment as base 64 string.
async function downloadFile(appChatClient, attachmentName) {
 const response = await appChatClient.media.download({
     resourceName: attachmentName,
     alt: 'media'
   }, {
     responseType: 'stream'
 });
 const chunks = [];
 return new Promise((resolve) => {
   response.data.on('data', (chunk) => {
     chunks.push(chunk);
   });
   response.data.on('end', () => {
     const fileBuffer = Buffer.concat(chunks);
     const base64String = fileBuffer.toString('base64');
     resolve(base64String);
   });
 });
}

// Upload a base 64 string as Google Chat attachment of a space.
async function uploadFile(useChatClient, spaceName, data) {
 const filename = 'generated_image.png';
 return await userChatClient.media.upload({
   parent: spaceName,
   requestBody: { filename: filename },
   media: {
     mimeType: 'image/png',
     body: Readable.from(Buffer.from(data, 'base64'))
   }
 });
}
...
...
http('gen-ai-app', async (req, res) => {
 const userEmail = req.body.chat.user.email;
 const spaceName = req.body.chat.messagePayload.space.name;
 const userMessage = req.body.chat.messagePayload.message.text;
 const attachmentName = req.body.chat.messagePayload.message.attachment[0].attachmentDataRef.resourceName;
 const attachmentContentType = req.body.chat.messagePayload.message.attachment[0].contentType;

 // Set up app authentication used to download the attachment input
 // Application Default Credentials (ADC) will use the Cloud Run function's
 // default service account.
 const appAuth = new GoogleAuth({
   // Specify the Chat API app authentication scopes
   scopes: ['https://www.googleapis.com/auth/chat.bot']
 });
 // Create Chat service client with application credentials
 const appChatClient = google.chat({
   version: 'v1',
   auth: await appAuth.getClient()
 });

 // Send a request to generate the answer with both text and image contents
 const aiResponse = await genAI.models.generateContent({
   model: env.model,
   contents: [{
     role: 'USER',
     parts: [
       // The text content of the message
       { text: userMessage },
       // The attachment of the message is downloaded and added inline
       { inlineData: {
         data: await downloadFile(appChatClient, attachmentName),
         mimeType: attachmentContentType
       }}
     ]
   }],
   config: { responseModalities: ['TEXT', 'IMAGE']}
 });

 // Set up user impersonation authentication used to upload the attachment output
 // and send the response.
 const impersonatedUserAuth = new GoogleAuth({
   // Specify the Chat API user authentication scopes
   scopes: ['https://www.googleapis.com/auth/chat.messages'],
   keyFile: './credentials.json',
   clientOptions: {
     // Impersonate the user who sent the original message
     subject: userEmail
   }
 });
 // Create Chat service client with impersonated user credentials
 const userChatClient = google.chat({
   version: 'v1',
   auth: await impersonatedUserAuth.getClient()
 });

 let responseText = undefined;
 let responseAttachment = undefined;
 // Go through the response parts received
 for (const part of aiResponse.candidates[0].content.parts) {
   if (part.inlineData) {
     // The resulting image is retrieved inline and uploaded
     const mediaResponse = await uploadFile(userChatClient, spaceName, part.inlineData.data);
     responseAttachment = mediaResponse.data;
   } else {
     responseText = part.text;
   }
 }

 // Create a Chat message dedicated to the generated content
 await userChatClient.spaces.messages.create({
   parent: spaceName,
   requestBody: {
     text: responseText ? responseText : 'Here it is!',
     // The uploaded image is referenced as attachment
     attachment: responseAttachment ? [responseAttachment] : undefined
   }
 });

 // Send a last Chat message to confirm it's done
 return res.send({ hostAppDataAction: { chatDataAction: { createMessageAction: { message: {
   text: 'Done, feel free to let me know if you need anything else!'
 }}}}});
});
...
サービス アカウントを構成して秘密鍵をエクスポートする
- Cloud Run のデフォルト サービス アカウントを委任して、ユーザーの Google Chat メッセージを管理します。スコープ https://www.googleapis.com/auth/chat.messages を使用して、手順に沿って操作します。Cloud Run のデフォルトのサービス アカウントのクライアント ID を取得する手順は次のとおりです。
- メニュー アイコン ☰ > [IAM と管理] > [サービス アカウント] をクリックします。
- [デフォルトのコンピューティング サービス アカウント] という名前のサービス アカウントをクリックします。
- [詳細設定] セクションを開きます。
- [Client ID] をクリップボードにコピーします。
- Cloud Run のデフォルト サービス アカウントの新しい秘密鍵を作成してダウンロードする
- メニュー アイコン ☰ > [IAM と管理] > [サービス アカウント] をクリックします。
- [デフォルトのコンピューティング サービス アカウント] という名前のサービス アカウントをクリックします。
- [鍵] タブを選択し、[鍵を追加]、[新しい鍵を作成] の順にクリックします。
- [JSON] を選択し、[作成] をクリックします。
- 新しい公開鍵と秘密鍵のペアが生成され、新しいファイルとしてパソコンにダウンロードされます。ダウンロードした JSON ファイルを保存し、その内容をクリップボードにコピーします。このファイルはこの鍵の唯一のコピーです。キーを安全に保存する方法については、サービス アカウント キーの管理をご覧ください。
Google Cloud Run Node.js 関数を更新する
- ローカル開発環境で、現在のディレクトリを
node/chat/gen-ai-apps/8-multimodalに変更します。ソースコードとリソースがすべて含まれています。 - Google Cloud Run 関数サービスの詳細ページの [ソース] タブに移動します。
- [ソースを編集] をクリックします。
- [➕] をクリックし、
credentials.jsonと入力して、✔️ をクリックし、不足しているリソース ファイルを作成します。 - 前の手順でダウンロードした JSON ファイルの内容を、新しく作成した
credentials.jsonファイルに貼り付けます。 index.jsファイルの内容全体を、ローカル開発環境の内容に置き換えます。env.jsファイルを開き、model の値をgemini-2.0-flash-preview-image-generationに設定します。
...
model: 'gemini-2.0-flash-preview-image-generation',
...
- [保存して再デプロイ] をクリックします。
- リビジョンのデプロイが正常に完了するまで待ちます。
試してみる
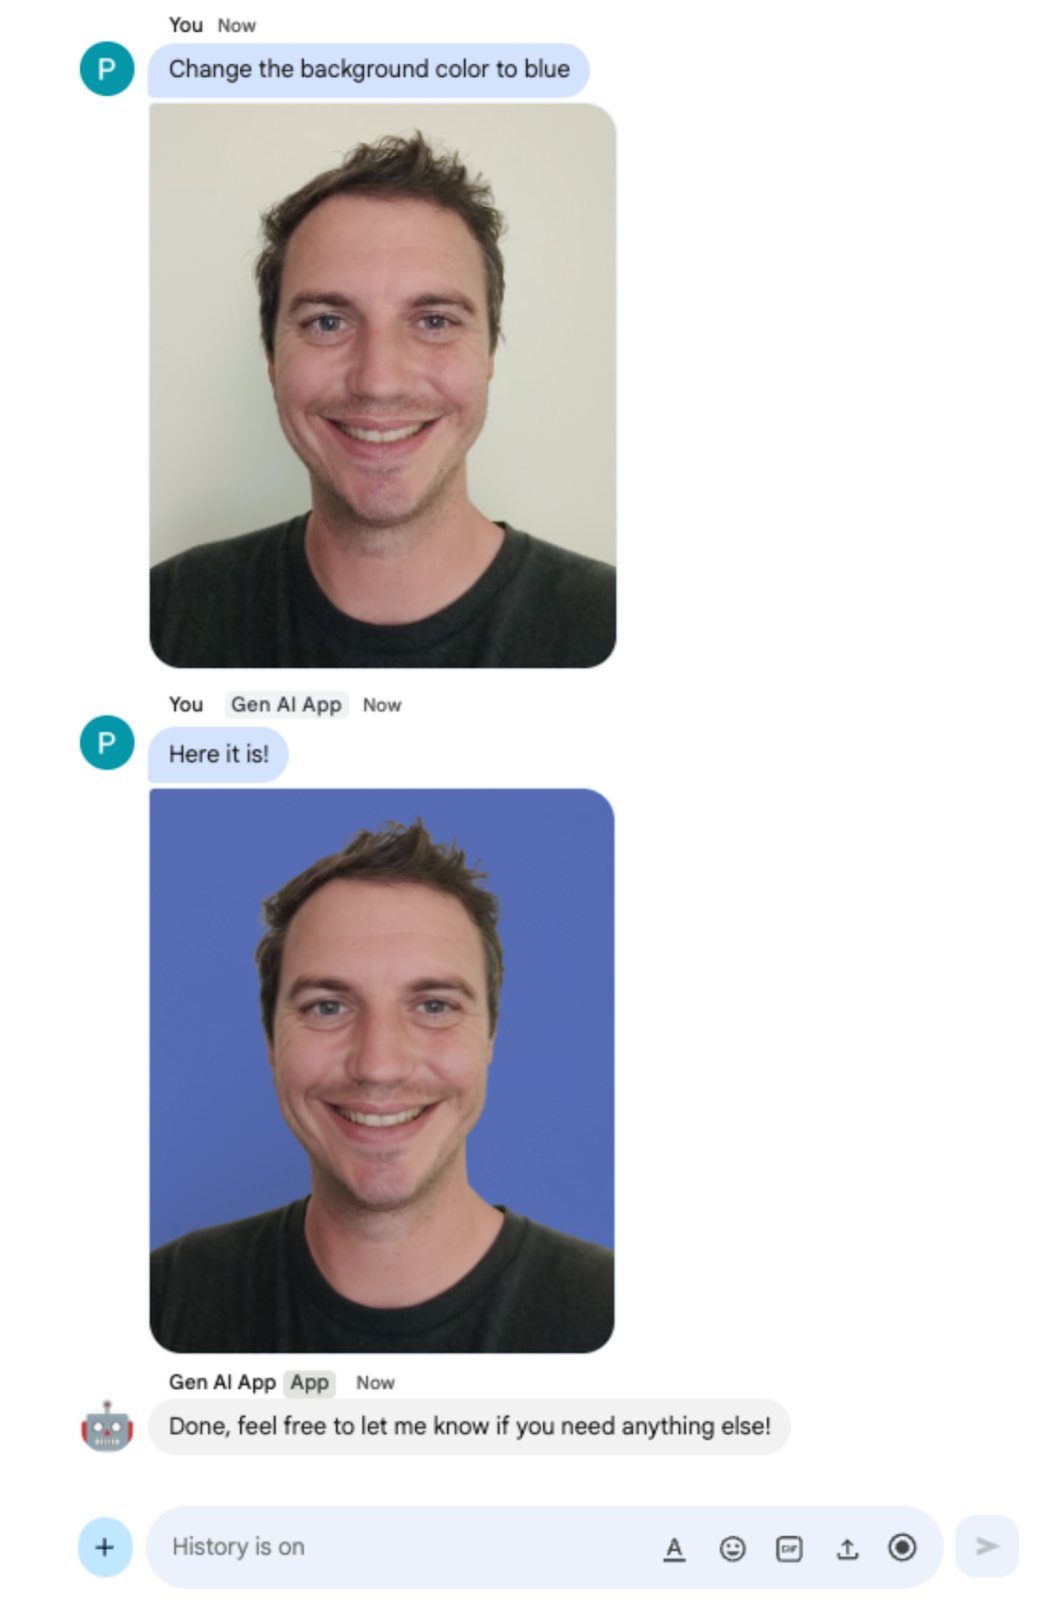
Google Chat の Chat 用アプリとのダイレクト メッセージ スペースで、自分のポートレート写真を PNG 形式でアップロードし、「Change the background color to blue」と入力して enter を押します。アプリは、青い背景の画像のバージョンと完了確認メッセージで応答します。
11. クリーンアップ
Google Cloud プロジェクトを削除する
この Codelab で使用したリソースに対して Google Cloud アカウントで課金されないようにするには、Google Cloud プロジェクトを削除することをおすすめします。
Google Cloud コンソールで、次の手順を行います。
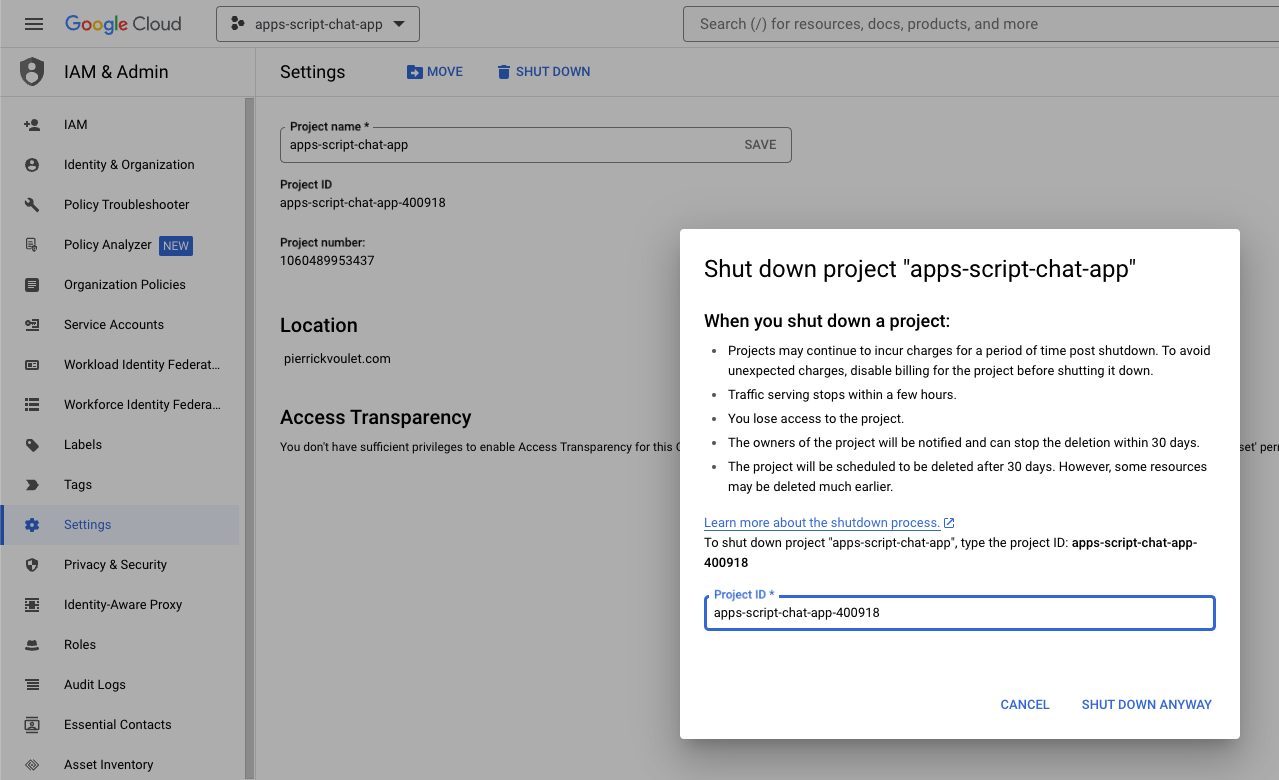
- メニュー アイコン ☰ > [IAM と管理] > [設定] をクリックします。
- [シャットダウン] をクリックします。
- プロジェクト ID を入力します。
- [このままシャットダウン] をクリックします。
12. 完了
おめでとうございます!基本的な AI のコンセプトを統合した Google Chat アプリを Google Workspace アドオンとして構築しました。
次のステップ
この Codelab では最小限のユースケースのみを紹介しましたが、Google Chat アプリはさまざまな形で拡張して使用できます。たとえば次のような例があります。
- 音声や動画など、他の種類のメディアをサポートします。
- Vertex AI などの専用プラットフォームでホストされているカスタムを含む他の AI モデルと統合します。
- Agentspace や Dialogflow CX などの専用プラットフォームでホストされているカスタム エージェントを含むエージェントと統合します。
- フィードバック ループと分類を利用して、パフォーマンスをモニタリングし、改善します。
- マーケットプレイスで公開して、チーム、組織、一般ユーザーを支援します。
その他の情報
YouTube 動画、ドキュメント ウェブサイト、コードサンプル、チュートリアルなど、さまざまなデベロッパー向けリソースがあります。