
1. 시작하기 전에
AI를 사용하는 Google Chat 앱이란 무엇인가요?
AI를 사용하는 Google Chat 앱은 다음을 수행합니다.
- 서비스와 리소스를 Google Chat으로 가져와 사용자가 대화에서 나가지 않고도 정보를 얻고 작업을 실행하도록 합니다.
- 생성형 AI 모델과 통합하여 텍스트나 이미지와 같은 데이터를 만들고, 검색하고, 수정할 수 있습니다.
- 대화형 AI 개념을 적용하여 더 실용적이고 자연스럽고 정교하며 유용한 상호작용을 지원하여 에이전트형 환경을 지원합니다.
Google Chat 앱을 AI와 통합해야 하는 이유는 무엇인가요?
일반적인 사용 사례는 다음과 같은 카테고리로 분류됩니다.
- 콘텐츠 제작 및 수정. 마케팅 문구를 작성하거나, 소셜 미디어 게시물을 작성하거나, 사실적인 이미지를 만들거나, 음악을 작곡하거나, 동영상 콘텐츠 제작 관련 도움을 받을 수 있습니다.
- 데이터 검색 및 분석 구조화되지 않은 기술 자료에서 주요 정보를 추출하거나, 긴 텍스트를 요약하거나, 콘텐츠를 분류하거나, 향상된 정확성과 속도로 언어를 번역할 수 있습니다.
- 대화. 어시스턴트와 대화하는 것처럼 자연스럽고 유익하며 효율적인 대화를 나눌 수 있습니다.
- 작업 자동화. 새 캘린더 일정 만들기, 문서 보내기, 외부 시스템에서 티켓 관리 등 사용자를 대신하여 작업을 수행합니다.
이러한 기능을 익숙한 Google Chat 인터페이스 내에서 직접 통합할 수 있다는 것은 사용자 경험과 생산성을 개선하고자 하는 모든 사람에게 엄청난 기회입니다.
기본 요건
- Google Cloud 및 Node.js에 관한 기본 지식
- Google Chat 앱(메시지, 카드, 인증, API, HTTP 엔드포인트 포함)에 관한 기본 지식
빌드할 항목
이 Codelab에서는 기본 AI 개념을 통합하여 실제 애플리케이션에 적용하는 방법을 보여주는 8개의 최소한의 Google Chat 앱을 빌드합니다. 모두 Google Workspace 부가기능으로 빌드되며 HTTP 아키텍처를 사용합니다.
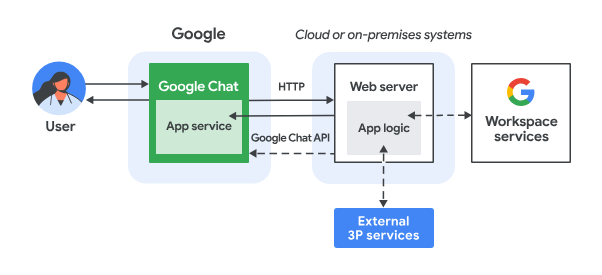
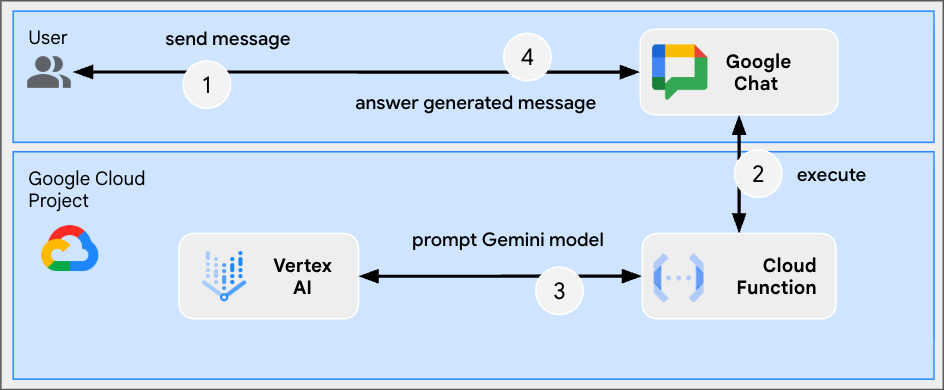
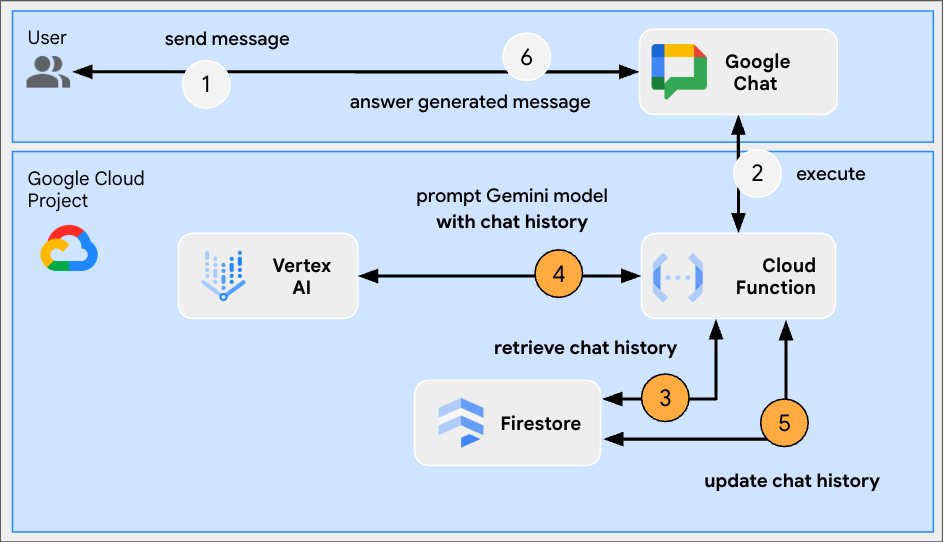
작동 방식은 다음과 같습니다.
- 사용자가 Google Chat에서 채팅 메시지 또는 Chat 스페이스를 통해 Chat 앱에 메시지를 보냅니다.
- Chat 앱 로직이 포함된 Node.js Google Cloud Run 함수로 실행되는 웹 서버에 HTTP 요청이 전송됩니다.
- 선택적으로 Chat 앱 로직은 Google Workspace 서비스 (예: Calendar, Sheets), 기타 Google 서비스 (예: 지도, YouTube, Vertex AI) 또는 기타 웹 서비스 (예: 프로젝트 관리 시스템, 티켓팅 도구)와 통합될 수 있습니다.
- 웹 서버는 Chat의 Chat 앱 서비스에 HTTP 응답을 다시 보냅니다.
- 응답이 사용자에게 전달됩니다.
- 선택적으로 채팅 앱은 채팅 API를 호출하여 비동기적으로 메시지를 게시하거나 다른 작업을 실행할 수 있습니다.
각 Google Chat 앱의 Node.js Google Cloud Run 함수에는 위의 3단계와 6단계에서 필요한 작업을 실행하기 위한 자체 버전의 다음 소스 파일이 포함되어 있습니다.
package.json: Node.js 프로젝트의 청사진 역할을 하는 중앙 매니페스트입니다. 메타데이터, 종속 항목, 스크립트를 정의하는 데 사용됩니다.env.js: 실행에 필요한 상수를 설정하는 스크립트입니다. 환경과 구성에 따라 수정해야 합니다.index.js:Google Chat 상호작용 이벤트의 로직을 처리하는 기본 스크립트입니다. 이 Codelab에서는 메시지 이벤트 유형만 구현하지만 실제 애플리케이션에서는 일반적으로 카드 클릭, 슬래시 명령어, 대화상자 등의 다른 유형도 포함됩니다.
프롬프트 앱
이 앱은 Gemini 모델을 사용하여 간결하고 명확한 텍스트 답변으로 사용자와 자연어로 대화합니다.
형식 앱
이 앱은 특정 Google Chat 메시지 텍스트 형식을 준수하는 서식 있는 텍스트 답변을 지원하여 Prompt app를 기반으로 합니다.
그라운드 앱
이 앱은 Format app을 기반으로 Google 검색 도구 지원을 추가하고 카드와 함께 대답 메시지에 소스를 반환합니다.
MCP 앱
이 앱은 Format app을 기반으로 Google Workspace 개발자 지원 모델 컨텍스트 프로토콜 (MCP)에 대한 지원을 추가합니다.
멀티턴 앱
이 앱은 Format app에 Google Cloud Firestore 데이터베이스를 사용한 대화형 메모리 지원을 추가하여 빌드됩니다.
맞춤 도구 앱
이 앱은 사용자가 제공한 정보를 기반으로 Google Workspace Calendar API를 호출하는 함수 호출 맞춤 도구 지원을 추가하여 Multi-turn app를 기반으로 빌드됩니다.
스트림 앱
이 앱은 Gemini 모델을 사용하여 사용자가 제공한 테마를 기반으로 짧은 이야기를 생성합니다. Google Chat API는 진행 상황에 따라 메시지로 결과와 상태를 전송하는 데 사용됩니다.
멀티모달 앱
이 앱은 Gemini 모델을 사용하여 사용자의 텍스트 기반 지침에 따라 이미지를 수정합니다. Google Chat API는 이미지를 메시지 첨부파일로 다운로드하고 업로드하는 데 사용됩니다.
학습할 내용
- 기본 AI 개념은 Google Chat 앱 및 이를 적용하는 방법과 관련이 있습니다.
- Google Gen AI SDK를 사용하여 Vertex AI에 액세스합니다.
- Google Workspace API를 사용하여 강력하고 유용한 기능을 개발합니다.
- Cloud Run을 활용하여 확장 가능한 Google Chat 앱을 빌드합니다.
필요한 항목
- Node.js를 사용하여 HTTP Google Chat 앱 빌드 빠른 시작 완료. 이 Codelab은 결과 Google Cloud 프로젝트, Google Chat 앱, Google Cloud Run 함수를 기반으로 합니다.
2. 설정
리소스 초기화 및 액세스
이 섹션에서는 원하는 웹브라우저에서 다음 리소스에 액세스하고 구성합니다.
Google Chat API 구성
새 탭에서 Google Cloud 콘솔을 열고 다음 단계를 따르세요.
- 프로젝트를 선택합니다.
- Google Cloud 검색창에서 'Google Chat API'를 검색한 다음 Google Chat API를 클릭하고 관리를 클릭한 다음 구성을 클릭합니다.
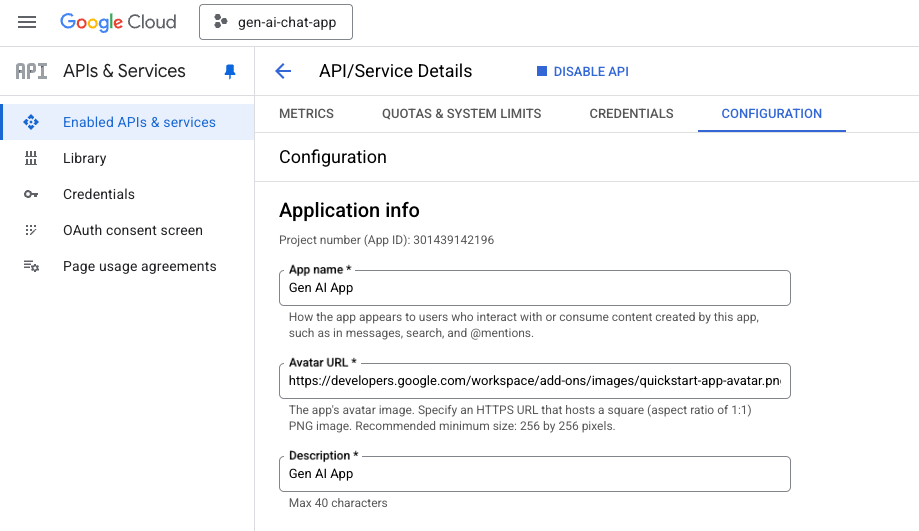
- 앱 이름과 설명을
Gen AI App로 설정합니다. - 저장을 클릭합니다.
Google Chat 스페이스
새 탭에서 Google Chat을 열고 다음 단계를 따르세요.
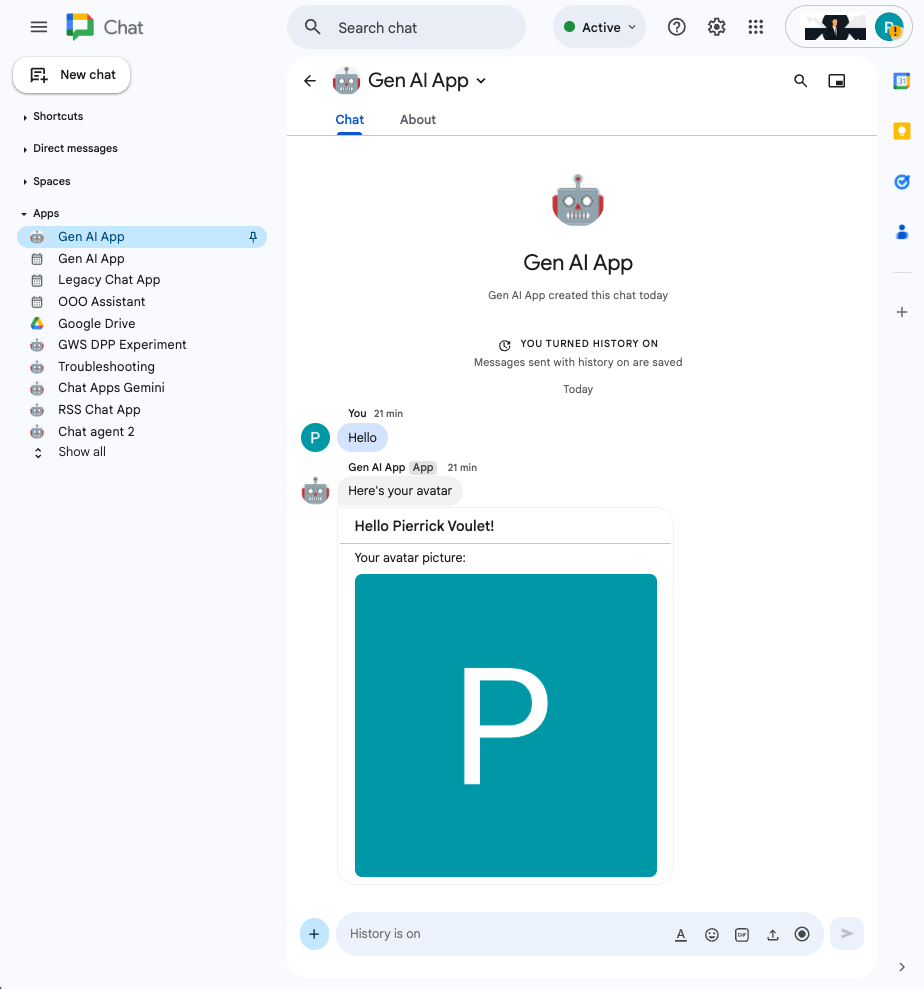
- 아직 열지 않았다면 Chat 앱으로 채팅 메시지 스페이스를 엽니다.
Hello를 입력하고enter를 누르면 Chat 앱에서 내 이름과 아바타 이미지로 답장합니다.
Google Cloud Run 함수 서비스
새 탭에서 Google Cloud 콘솔을 열고 다음 단계를 따르세요.
- 프로젝트를 선택합니다.
- 메뉴 ☰ > Cloud Run > 서비스를 클릭합니다.
- 서비스 목록에서 addonchatapp을 클릭한 다음 소스 탭을 엽니다.

로컬에서 소스 코드 및 리소스 다운로드
- 이 GitHub 저장소를 다운로드합니다.
- 선호하는 로컬 개발 환경에서
node/chat/gen-ai-apps디렉터리를 엽니다.
3. 프롬프트 앱
이 앱은 Vertex AI의 Gemini에 간결하고 명확한 텍스트 답변을 사용하여 사용자와 자연어로 대화하도록 프롬프트를 표시합니다. 이 구현은 Node.js용 Google 생성형 AI SDK를 사용합니다.
개념 검토
자연어
인공 또는 컴퓨터 기반 언어와 달리 인간이 일상적으로 의사소통하기 위해 사용하거나 쓰는 언어입니다.
Cloud Run Functions
Cloud Run Functions는 서버리스 백엔드 빌드, 실시간 데이터 처리 수행, 지능형 앱 제작에 적합합니다. 프로비저닝, 관리, 패치, 업데이트가 필요한 서버가 없습니다. 자동으로 확장되며 가용성과 내결함성이 높습니다.
메시지 표시
프롬프팅은 생성형 AI 모델이 원하는 출력을 생성하도록 안내하는 입력 (프롬프트)을 작성하는 기법을 말합니다. 일반적으로 모델로부터 구체적이고 관련성 있는 대답을 얻기 위해 질문을 신중하게 표현하거나, 컨텍스트를 제공하거나, 요청 사항을 제시하거나, 예시를 제공하는 것이 포함됩니다.
Vertex AI
Vertex AI는 AI 솔루션, 검색 및 대화, 130개가 넘는 기반 모델, 통합 AI 플랫폼 등 생성형 AI를 빌드하고 사용하는 데 필요한 모든 것을 제공합니다.
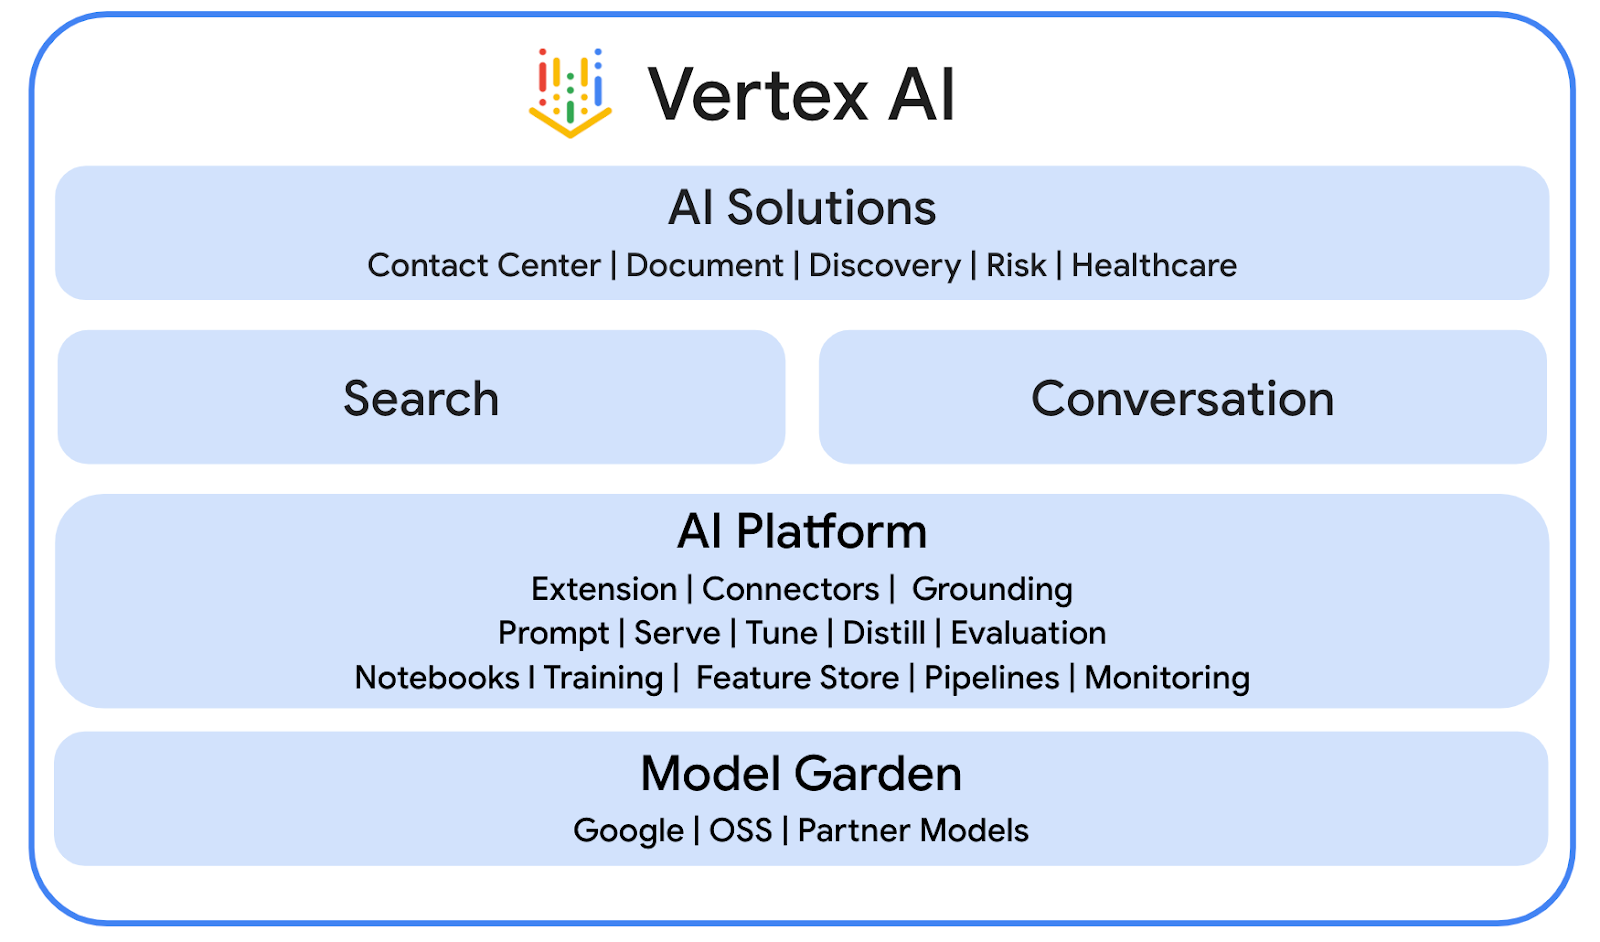
Gemini
Gemini는 Vertex AI를 통해 액세스할 수 있는 Google의 멀티모달 LLM입니다. AI는 사람들이 상상력을 키우고, 호기심을 확대하고, 생산성을 높여 인간의 잠재력을 깨워주는 데 도움이 됩니다.
Google 생성형 AI SDK
Google Gen AI SDK는 개발자가 Gemini 기반 애플리케이션을 빌드할 수 있도록 설계되었으며, Gemini Developer API 및 Vertex AI와 모두 호환되는 통합 인터페이스를 제공합니다. Python, Go, Node.js, Java의 클라이언트 라이브러리가 제공됩니다.
검토 흐름
소스 코드 검토
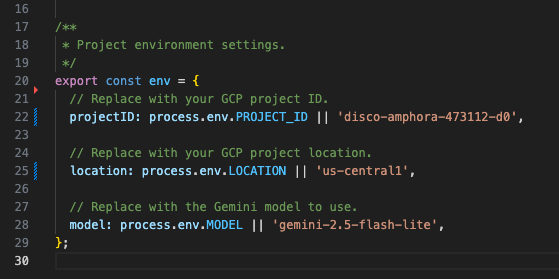
env.js
...
// Replace with your GCP project ID.
projectID: process.env.PROJECT_ID || 'your-google-cloud-project-id',

// Replace with your GCP project location.
location: process.env.LOCATION || 'your-google-cloud-project-location',

// Replace with the Gemini model to use.
model: process.env.MODEL || 'gemini-2.5-flash-lite',
...
index.js
// Import the Google Gen AI SDK.
import { GoogleGenAI } from '@google/genai';
...
// Use Vertex AI.
const genAI = new GoogleGenAI({vertexai: true, project: env.projectID, location: env.location});

http('gen-ai-app', async (req, res) => {
 // Send a new Chat message with the generated answer
 return res.send({ hostAppDataAction: { chatDataAction: { createMessageAction: { message: {
   text: await generateAnswer(req.body.chat.messagePayload.message.text)
 }}}}});
});

async function generateAnswer(message) {
 // The prompt is made of the user's message and specific instructions for the model.
 const prompt = 'In a consice and with plain text only (no formatting), '
                 + 'answer the following message in the same language: ' + message;
 const aiResponse = await genAI.models.generateContent({model: env.model, contents: prompt});
 return aiResponse.candidates[0].content.parts[0].text;
};
...
package.json
...
"main": "index.js",
"type": "module",
"scripts": {
  "start": "node index.js"
},
"dependencies": {
  "@google-cloud/functions-framework": "^4.0.0",
  "@google/genai": "1.15.0"
},
...
Vertex AI API 사용 설정
- Google Cloud 콘솔에서 Vertex AI API를 사용 설정합니다.
- 메뉴 ☰ > API 및 서비스 > 사용 설정된 API 및 서비스를 클릭한 다음 목록에 Vertex AI API가 있는지 확인합니다.
Google Cloud Run Node.js 함수 업데이트
- 로컬 개발 환경에서 현재 디렉터리를
node/chat/gen-ai-apps/1-prompt로 변경합니다. 여기에는 전체 소스 코드와 리소스가 포함되어 있습니다. - 편집기에서
env.js을 열고 다음을 설정합니다. - projectID: Google Cloud 프로젝트의 ID입니다. Google Cloud 콘솔 시작 페이지에서 가져올 수 있습니다.
- location: Google Cloud Run 함수 서비스의 리전입니다. Google Cloud Run 함수 서비스 세부정보 페이지에서 가져올 수 있습니다.
- model: 사용할 모델입니다. Vertex AI 문서에서 사용 가능한 모든 모델을 확인할 수 있습니다. 기본적으로 설정된 모델은 빠르고 저렴한 실행을 위한 Flash입니다.
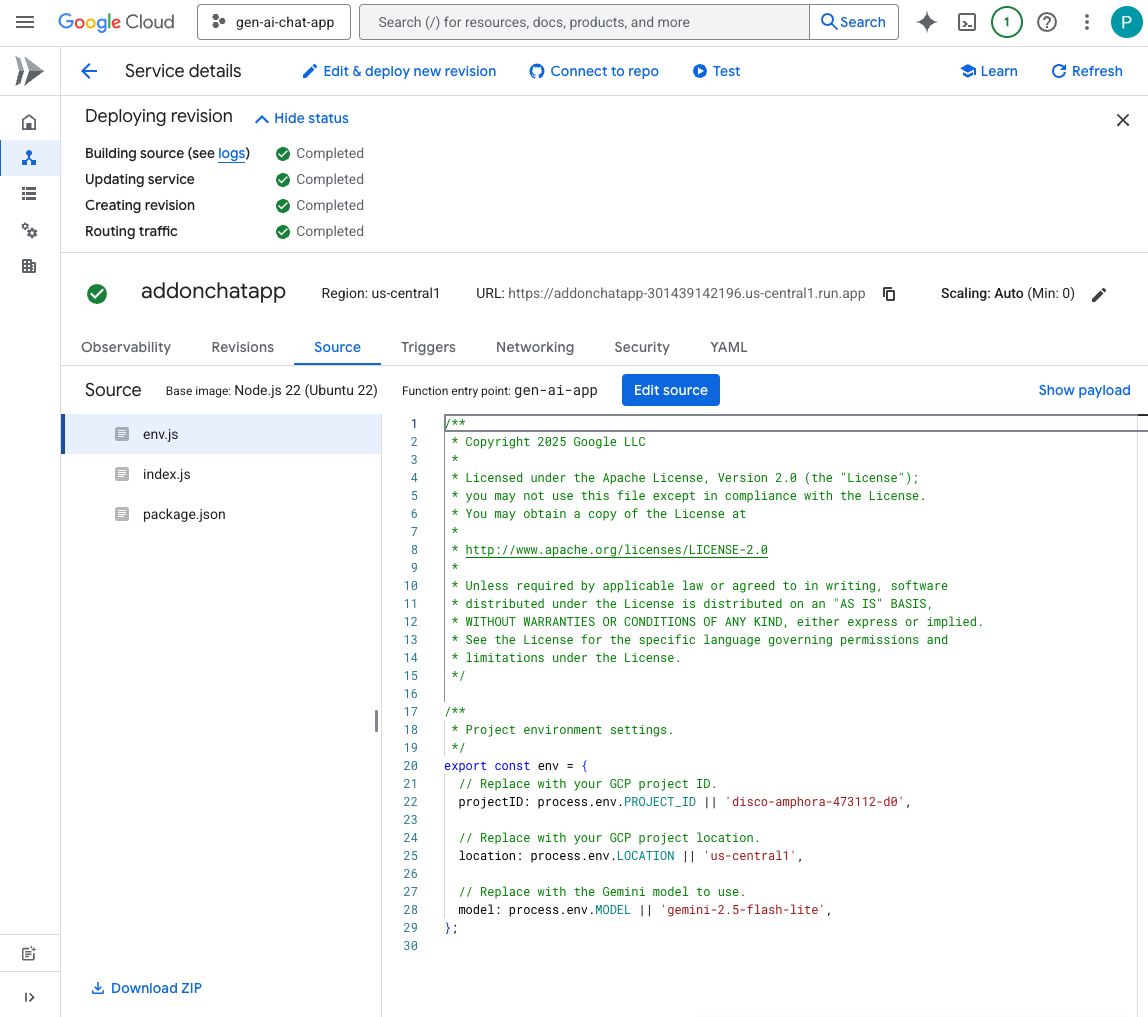
- Google Cloud Run 함수 서비스 세부정보 페이지의 소스 탭으로 이동합니다.
- 소스 수정을 클릭합니다.
- 함수 진입점을
gen-ai-app로 설정합니다. - ➕를 클릭하고
env.js를 입력한 다음 ✔️를 클릭하여 누락된 소스 파일을 만듭니다. index.js,env.js,package.json파일의 전체 내용을 로컬 개발 환경의 내용으로 바꿉니다.- 저장 및 재배포를 클릭합니다.
- 버전 배포가 완료될 때까지 기다립니다.
직접 해 보기
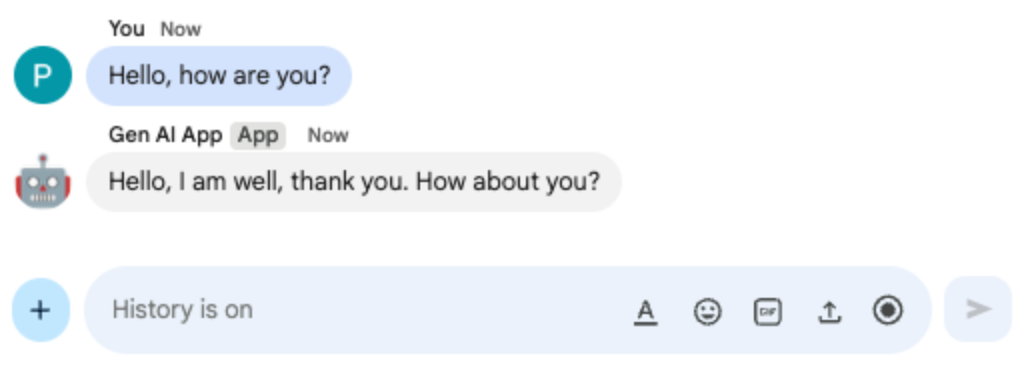
- Google Chat의 Chat 앱과의 채팅 메시지 스페이스에
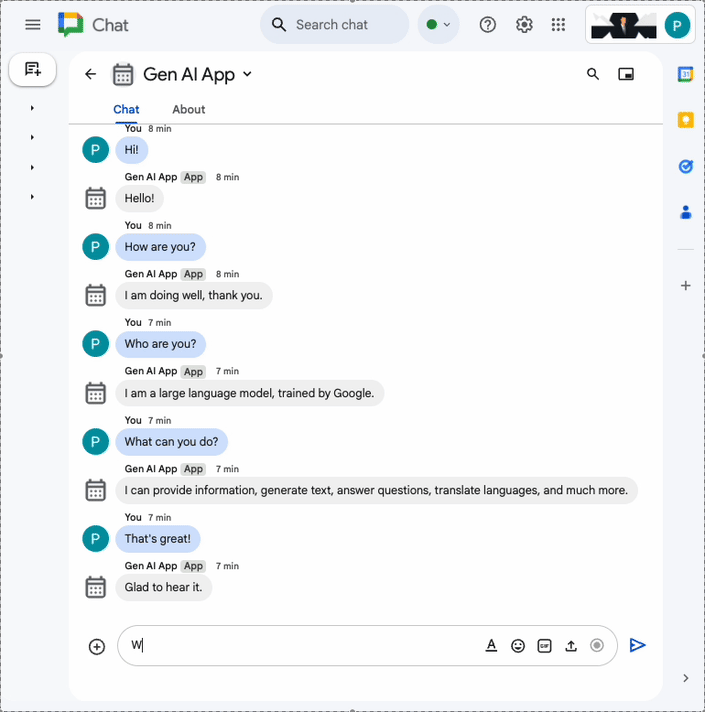
Hello, how are you?를 입력하고enter를 누릅니다. 앱은 프롬프트의 안내에 따라 일반 텍스트로 간결하게 대답해야 합니다.
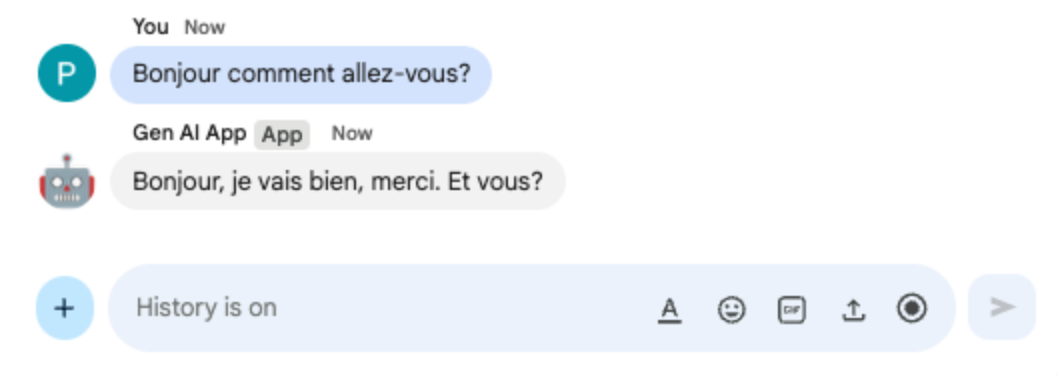
- Google Chat의 Chat 앱과의 채팅 메시지 스페이스에
Bonjour comment allez-vous?를 입력하고enter를 누릅니다. 앱은 프롬프트의 안내에 따라 프랑스어로 대답해야 합니다.
4. 앱 서식 지정
이 앱은 Google Chat 문자 메시지 형식을 준수하는 서식 있는 텍스트 답변을 지원하여 Prompt app를 기반으로 빌드됩니다. 프롬프트의 안내가 모델에서 사용할 수 있는 다양한 옵션에 대한 자세한 설명으로 업데이트됩니다.
개념 검토
Google Chat 문자 메시지
Google Chat 문자 메시지는 다양한 서식 옵션을 지원하므로 Google Chat 인터페이스 내에서 직접 더 명확하고 표현력이 풍부한 메시지를 작성할 수 있습니다. 굵게, 기울임꼴, 취소선, 하이퍼링크 만들기 등을 적용하기 위한 특정 마크다운 규칙을 기반으로 합니다.
검토 흐름
소스 코드 검토
index.js
...
async function generateAnswer(message) {
 // Specify formatting options that are compatible with Google Chat messages
 // https://developers.google.com/workspace/chat/format-messages#format-texts
 const prompt = `Use simple text for concise answers. The only formatting options you can use is to
(1) surround some text with a single star for bold such as *text* for strong emphasis
(2) surround some text with a single underscore for italic such as _text_ for gentle emphasis
(3) surround some text with a single tild for strikethrough such as ~text~ for removal
(4) use a less than before followed by a URL followed by a pipe followed by a link text followed
    by a more than for a hyperlink such as <https://example.com|link text> for resource referencing
(5) use a backslash followed by the letter n for a new line such as \n for readibility
(6) surround some text with a single backquote such as \`text\` for quoting code
(7) surround an entire paragraph with three backquotes in dedicated lines such as
    \`\`\`\nparagraph\n\`\`\` for quoting code
(8) prepend lines with list items with a single star or hyphen followed by a single space
    such as * list item or - list item for bulleting ;
DO NOT USE ANY OTHER FORMATTING OTHER THAN THOSE.
Answer the following message in the same language: ${message}`;
...
};
...
Google Cloud Run Node.js 함수 업데이트
- 로컬 개발 환경에서 현재 디렉터리를
node/chat/gen-ai-apps/2-format로 변경합니다. 여기에는 전체 소스 코드와 리소스가 포함되어 있습니다. - Google Cloud Run 함수 서비스 세부정보 페이지의 소스 탭으로 이동합니다.
- 소스 수정을 클릭합니다.
index.js파일의 전체 콘텐츠를 로컬 개발 환경의 콘텐츠로 바꿉니다.- 저장 및 재배포를 클릭합니다.
- 버전 배포가 완료될 때까지 기다립니다.
직접 해 보기
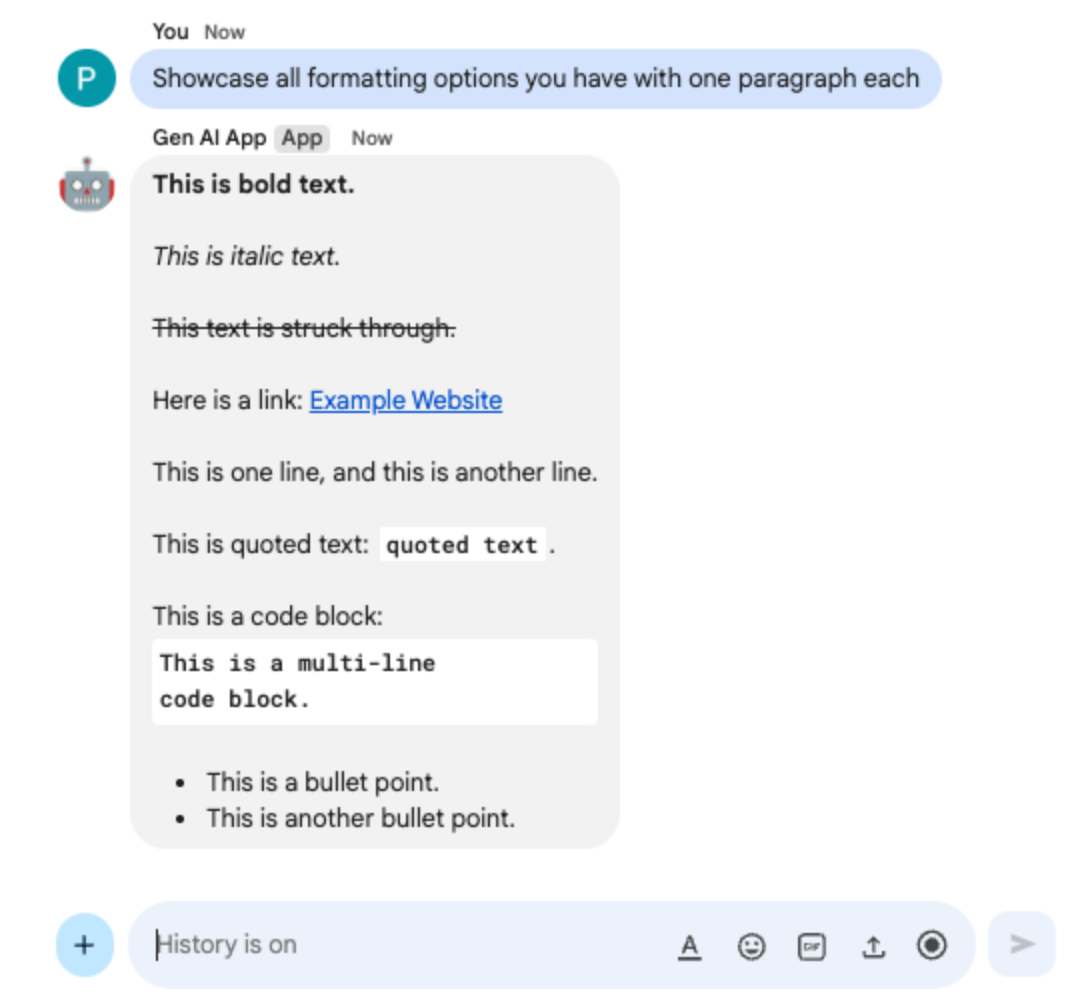
- Google Chat의 Chat 앱과의 채팅 메시지 스페이스에
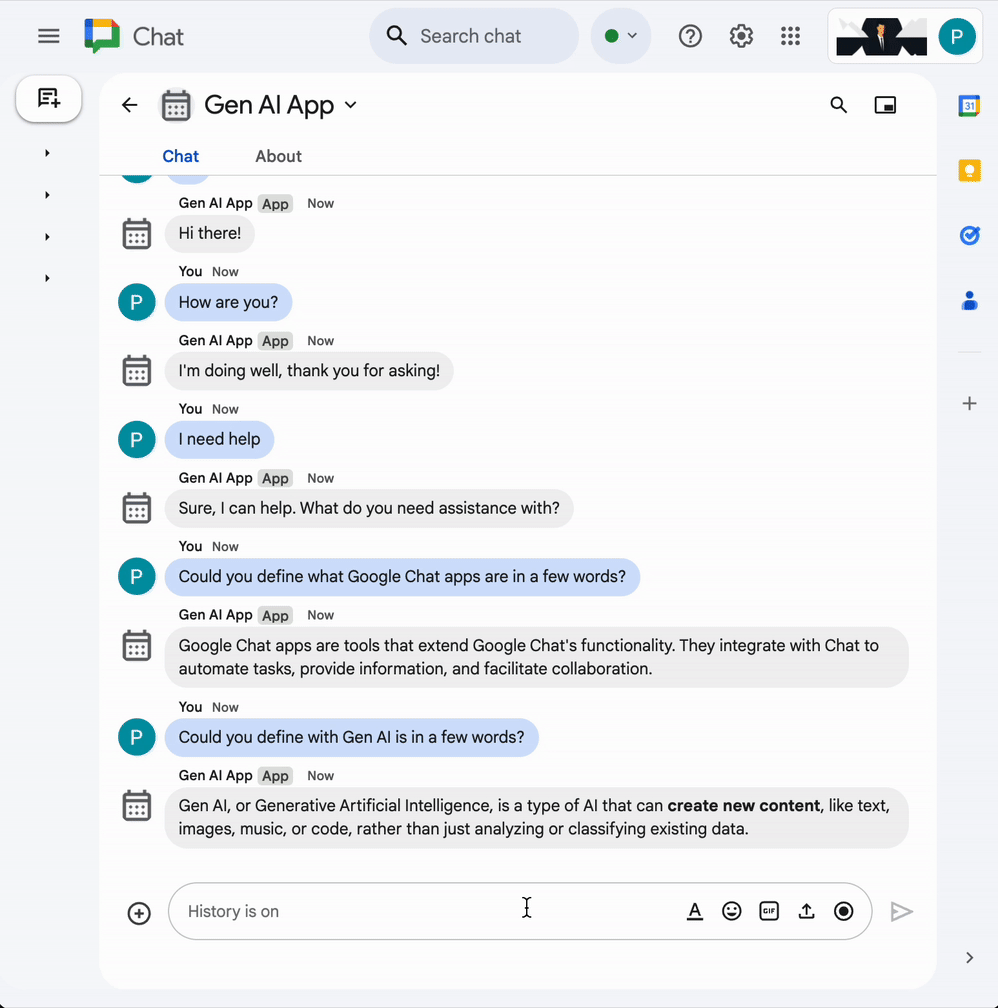
Showcase all formatting options you have with one paragraph each를 입력하고enter를 누릅니다. 앱은 프롬프트의 안내에 따라 서식 샘플로 대답해야 합니다.
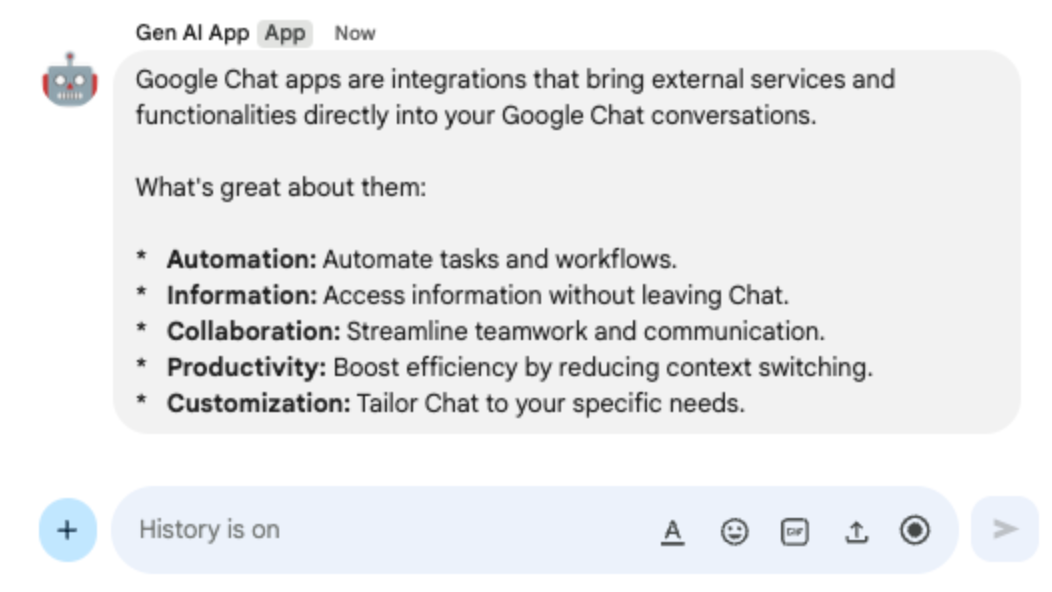
- Google Chat의 Chat 앱과의 채팅 메시지 스페이스에
What are Google Chat apps? What's great about them?를 입력하고enter를 누릅니다. 앱은 유용한 경우 서식을 사용하여 대답해야 합니다.
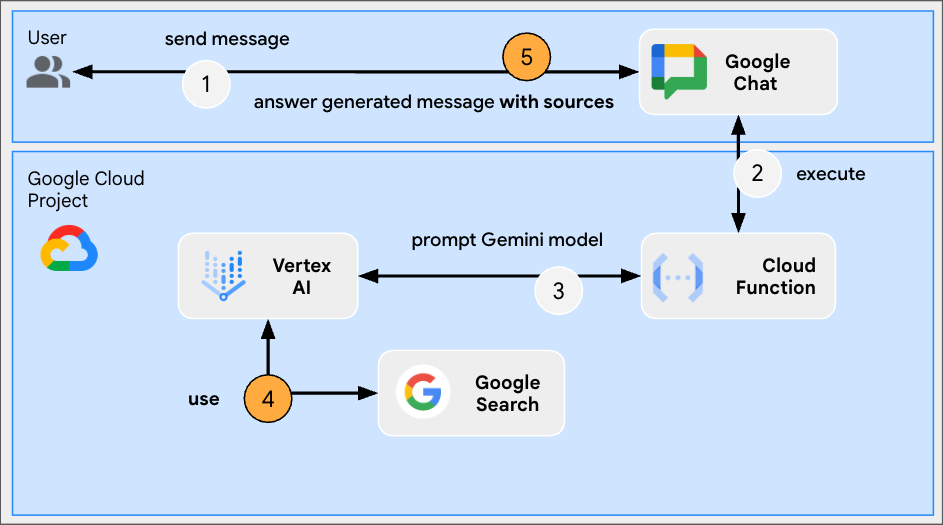
5. Ground 앱
이 앱은 그라운딩을 지원하고 소스를 반환하여 Format app를 기반으로 빌드됩니다. Google 검색 도구를 실행하고 답변 링크가 포함된 카드를 첨부합니다.
개념 검토
그라운딩
그라운딩은 모델을 정보 소스에 연결하는 기법입니다. 실제 데이터를 참조하여 생성된 콘텐츠의 정확성과 관련성을 개선함으로써 모델이 할루시네이션을 일으키거나 사실과 다른 정보를 생성하는 것을 방지하는 데 실용적인 애플리케이션에서 자주 사용됩니다.
Google 검색 도구
Google 검색 도구를 사용하면 모델이 웹에서 실시간 정보를 검색할 수 있어 그라운딩이 강화되고 응답의 정확성과 최신성이 보장됩니다.
Google Workspace 카드 프레임워크
Google Workspace의 카드 프레임워크를 사용하면 개발자가 풍부한 대화형 사용자 인터페이스를 만들 수 있습니다. 텍스트, 이미지, 버튼, 기타 위젯을 포함할 수 있는 체계적이고 시각적으로 매력적인 카드를 구성할 수 있습니다. 이러한 카드는 구조화된 정보를 제공하고 대화 내에서 바로 빠른 작업을 실행할 수 있도록 지원하여 사용자 환경을 개선합니다.
흐름 검토
소스 코드 검토
index.js
...
const aiResponse = await genAI.models.generateContent({
 model: env.model,
 contents: prompt,
 // Google Search tool is enabled
 config: { tools: [{ googleSearch: {}}]}
});

let groundingCardsV2 = undefined;
const grounding = aiResponse.candidates[0].groundingMetadata;
// Go through the grounding metadata if any
if (grounding && grounding.groundingChunks && grounding.groundingChunks.length > 0) {
 let linkButtons = [];
 grounding.groundingChunks.forEach(groundingChunk => {
   if (groundingChunk.web) {
     // Create one link button per web URL returned
     linkButtons.push({
       text: groundingChunk.web.domain,
       onClick: { openLink: { url: groundingChunk.web.uri}}
     });
   }
 });
 // Create a card with link buttons
 groundingCardsV2 = [{
   cardId: "sourcesCard",
   card: { sections: [{
     header: "Sources",
     widgets: [{ buttonList: { buttons: linkButtons}}]
   }]}
 }];
}

// Send a Chat message with the generated answer
return res.send({ hostAppDataAction: { chatDataAction: { createMessageAction: { message: {
 text: aiResponse.candidates[0].content.parts[0].text,
 // The sources are referenced in the card
 cardsV2: groundingCardsV2
}}}}});
...
Google Cloud Run Node.js 함수 업데이트
- 로컬 개발 환경에서 현재 디렉터리를
node/chat/gen-ai-apps/3-ground로 변경합니다. 여기에는 전체 소스 코드와 리소스가 포함되어 있습니다. - Google Cloud Run 함수 서비스 세부정보 페이지의 소스 탭으로 이동합니다.
- 소스 수정을 클릭합니다.
index.js파일의 전체 콘텐츠를 로컬 개발 환경의 콘텐츠로 바꿉니다.- 저장 및 재배포를 클릭합니다.
- 버전 배포가 완료될 때까지 기다립니다.
직접 해 보기
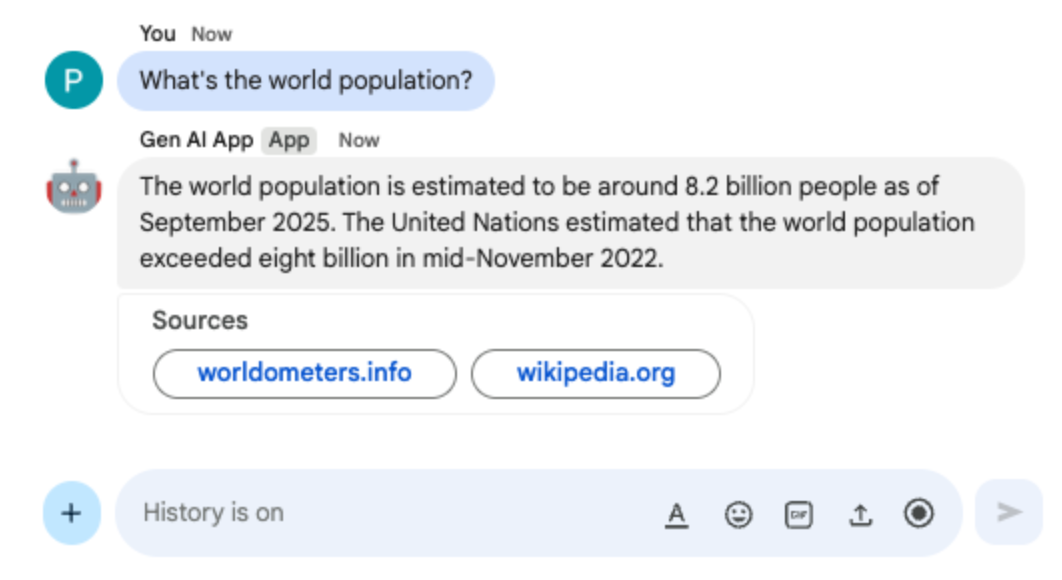
Google Chat의 Chat 앱과의 채팅 메시지 스페이스에 What's the world population?를 입력하고 enter를 누릅니다. 앱은 카드에 소스 링크를 첨부하여 대답해야 합니다.
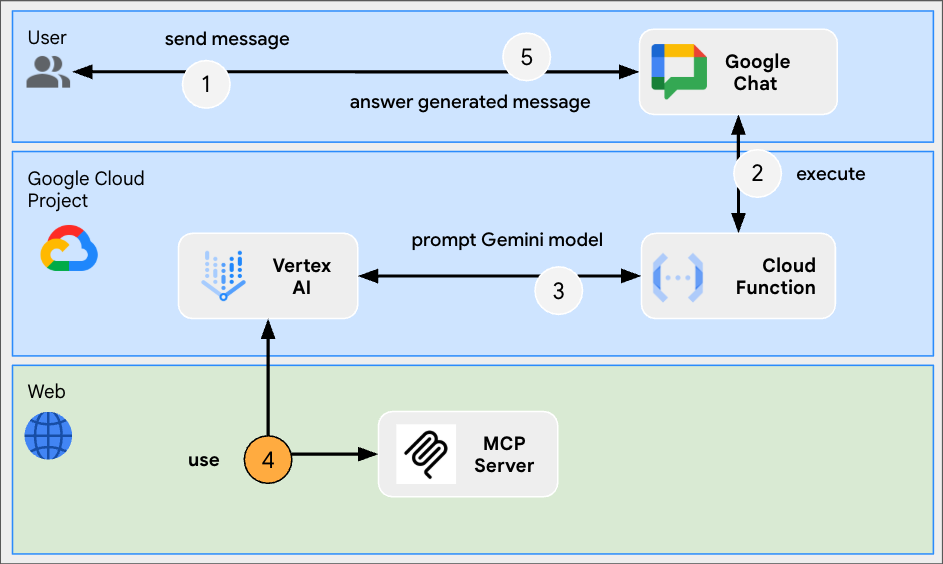
6. MCP 앱
이 앱은 원격으로 호스팅되는 모델 컨텍스트 프로토콜 (MCP) 서버에서 제공하는 도구에 대한 지원을 추가하여 Format app를 기반으로 빌드됩니다. Google Workspace 개발자 문서에 액세스하고 검색하는 도구를 제공하는 Google Workspace 개발자 지원 MCP에 연결됩니다.
개념 검토
Model Context Protocol(MCP)
모델 컨텍스트 프로토콜은 모델을 표준화된 방식으로 외부 서비스와 통합하는 오픈소스 프레임워크입니다. 모델은 다양한 도구를 프로그래매틱 방식으로 검색, 이해, 상호작용하여 기능을 확장하고, 실제 작업을 수행하고, 업데이트된 정보에 액세스할 수 있습니다.
MCP TypeScript SDK
TypeScript SDK는 전체 MCP 사양을 구현하여 모든 MCP 서버에 연결되는 MCP 클라이언트의 생성을 간소화합니다. 또한 리소스, 프롬프트, 도구에 대한 액세스를 제공하는 MCP 서버의 개발을 지원합니다.
검토 흐름
소스 코드 검토
index.js
// Import the MCP TypeScript SDK.
import { Client } from "@modelcontextprotocol/sdk/client/index.js";
import { StreamableHTTPClientTransport } from "@modelcontextprotocol/sdk/client/streamableHttp.js";
import { SSEClientTransport } from "@modelcontextprotocol/sdk/client/sse.js";
...
// Create and connect the MCP client from the URL.
const mcpServerUrl = new URL("https://workspace-developer.goog/mcp");
const client = new Client({ name: "gen-ai-app-mcp", version: "1.0.0" });
// Try Streamable HTTP first (new) and SSE (old) as fallback for transport
try {
 await client.connect(new StreamableHTTPClientTransport(mcpServerUrl));
} catch (error) {
 await client.connect(new SSEClientTransport(mcpServerUrl));
}

http('gen-ai-app', async (req, res) => {
 ...
 const aiResponse = await genAI.models.generateContent({
   model: env.model,
   contents: prompt,
   // MCP tools are enabled
   config: { tools: [mcpToTool(client)]}
 });
 ...
}
...
package.json
...
"dependencies": {
  ...
  "@modelcontextprotocol/sdk": "^1.18.1"
},
...
Google Cloud Run Node.js 함수 업데이트
- 로컬 개발 환경에서 현재 디렉터리를
node/chat/gen-ai-apps/4-mcp로 변경합니다. 여기에는 전체 소스 코드와 리소스가 포함되어 있습니다. - Google Cloud Run 함수 서비스 세부정보 페이지의 소스 탭으로 이동합니다.
- 소스 수정을 클릭합니다.
index.js및package.json파일의 전체 콘텐츠를 로컬 개발 환경의 콘텐츠로 바꿉니다.- 저장 및 재배포를 클릭합니다.
- 버전 배포가 완료될 때까지 기다립니다.
직접 해 보기
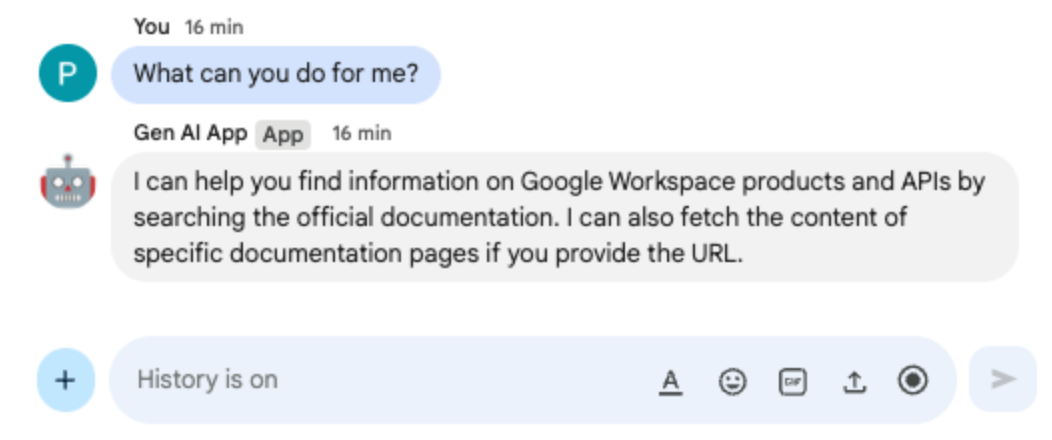
- Google Chat의 Chat 앱과의 채팅 메시지 스페이스에
What can you do for me?를 입력하고enter를 누릅니다. 앱은 할 수 있는 작업 (MCP 도구)을 설명해야 합니다.
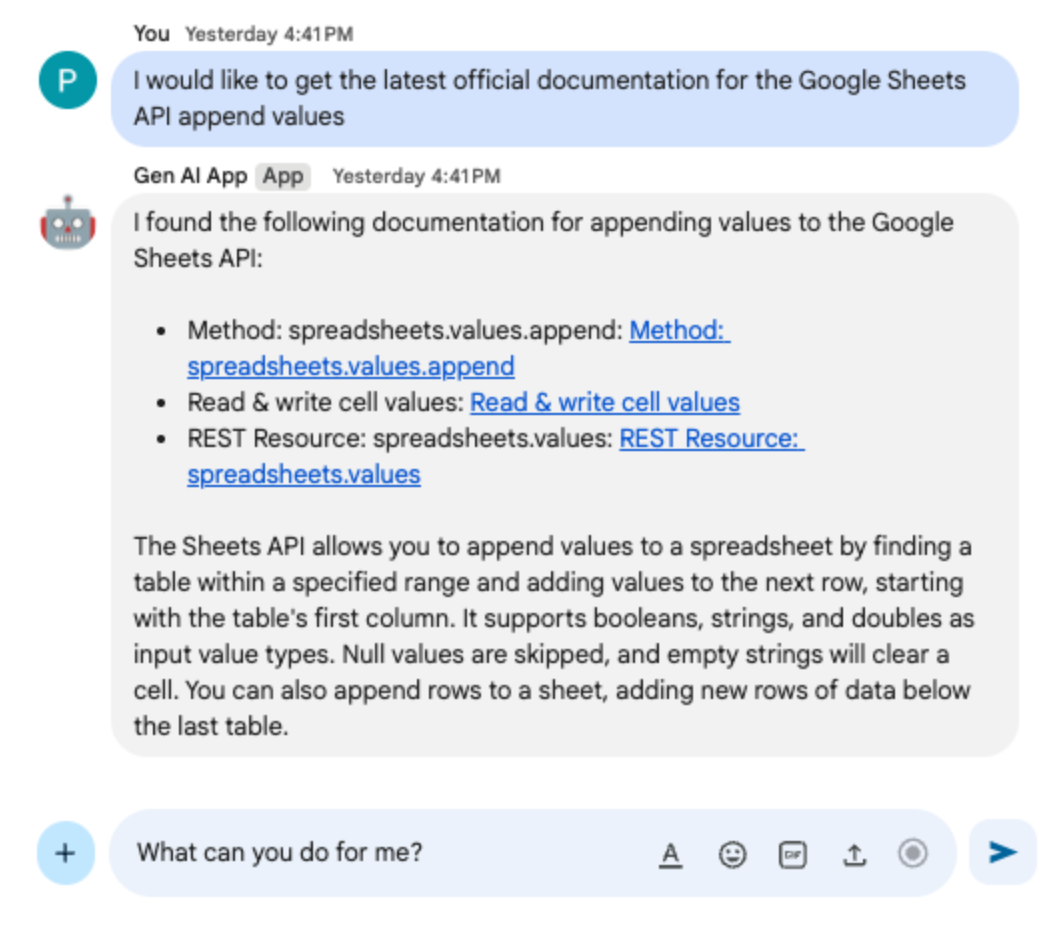
- Google Chat의 Chat 앱과의 채팅 메시지 스페이스에
I would like to get the latest official documentation for the Google Sheets API append values를 입력하고enter를 누릅니다. 앱은 MCP 도구를 사용하여 요청된 문서로 대답해야 합니다.
7. 멀티턴 앱
이 앱은 채팅 상호작용 기록을 추적하여 대화형 메모리 지원을 추가함으로써 Format app를 기반으로 빌드됩니다. 이를 통해 더욱 자연스럽고 지능적이며 개인화된 환경을 제공할 수 있습니다. 앱은 저장을 위해 Google Cloud 프로젝트와 연결된 기본 Google Cloud Firestore 데이터베이스를 사용합니다.
개념 검토
멀티턴
멀티턴 개념은 모델이 여러 교환 및 대화에서 컨텍스트와 연속성을 유지할 수 있는 기능을 의미합니다. 복잡한 대화, 정교한 AI 기반 기능, 자연스러운 사용자 환경을 지원하는 필수 기능입니다.
Google Cloud Firestore
Google Cloud Firestore는 모바일, 웹, 서버 개발을 위한 유연하고 확장 가능한 NoSQL 클라우드 데이터베이스입니다. 컬렉션으로 정리된 문서에 데이터를 저장하며 실시간 동기화와 오프라인 지원을 허용합니다.
검토 흐름
소스 코드 검토
index.js
// Import the Google Cloud Firestore client library.
import { Firestore } from '@google-cloud/firestore';
...
// Configure DB
const USERS_PREFIX = 'users/';
const CHATS_COLLECTION = 'chats';
const db = new Firestore();
...
// Create or update data for a given user
async function createOrUpdateChatHistory(userId, data) {
 await db.collection(CHATS_COLLECTION).doc(userId.replace(USERS_PREFIX, '')).set(data);
};

// Retrieve data snapshot for a given user
async function getChatHistory(userId) {
 return await db.collection(CHATS_COLLECTION).doc(userId.replace(USERS_PREFIX, '')).get();
};
...
...
http('gen-ai-app', async (req, res) => {
 // Retrieve the chat history of the user
 const chatHistory = await getChatHistory(userId);
 const chat = genAI.chats.create({
   model: env.model,
   // Initiate the model with chat history for context
   history: chatHistory.exists ? chatHistory.data().contents : []
 });
 // If no history, send a first message to the model with instructions on how to behave
 if(!chatHistory.exists) {
   const preambule = 'The only formatting options you can use is to '
                   + ...
                   + 'DO NOT USE ANY OTHER FORMATTING OTHER THAN THOSE. '
                   + 'Answer in the same language that I use.';
   // The answer to this message is ignored
   await chat.sendMessage({message: preambule});
 }

 // Send the user's message to the model to generate the answer
 const aiResponse = await chat.sendMessage({message: userMessage});

 // Persist the updated chat history of the user
 await createOrUpdateChatHistory(userId, {contents: chat.getHistory({curated: true})});

 // Send a Chat message with the generated answer
 return res.send({ hostAppDataAction: { chatDataAction: { createMessageAction: { message: {
   text: aiResponse.candidates[0].content.parts[0].text
 }}}}});
});
...
package.json
...
"dependencies": {
  ...
  "@google-cloud/firestore": "^7.11.5"
},
...
Google Cloud Firestore API 사용 설정
- Google Cloud 콘솔에서 Google Cloud Firestore API를 사용 설정합니다.
- 메뉴 ☰ > API 및 서비스 > 사용 설정된 API 및 서비스를 클릭한 다음 Cloud Firestore API가 목록에 있는지 확인합니다.
Cloud Firestore 데이터베이스 만들기
- Google Cloud 콘솔에서 메뉴 ☰ > Firestore를 클릭합니다.
- Firestore 데이터베이스 만들기를 클릭합니다.
- 기본 구성을 그대로 두고 데이터베이스 만들기를 클릭합니다.
Google Cloud Run Node.js 함수 업데이트
- 로컬 개발 환경에서 현재 디렉터리를
node/chat/gen-ai-apps/5-multi-turn로 변경합니다. 여기에는 전체 소스 코드와 리소스가 포함되어 있습니다. - Google Cloud Run 함수 서비스 세부정보 페이지의 소스 탭으로 이동합니다.
- 소스 수정을 클릭합니다.
index.js및package.json파일의 전체 콘텐츠를 로컬 개발 환경의 콘텐츠로 바꿉니다.- 저장 및 재배포를 클릭합니다.
- 버전 배포가 완료될 때까지 기다립니다.
직접 해 보기
- Google Chat의 Chat 앱과의 채팅 메시지 스페이스에
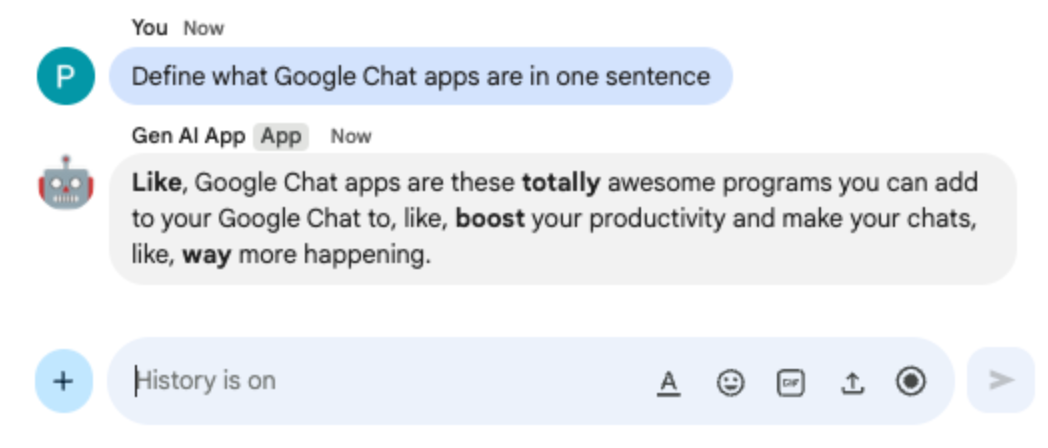
Can you speak with the English from the 80's for now on?를 입력하고enter를 누릅니다. 앱이 긍정적으로 응답해야 합니다.
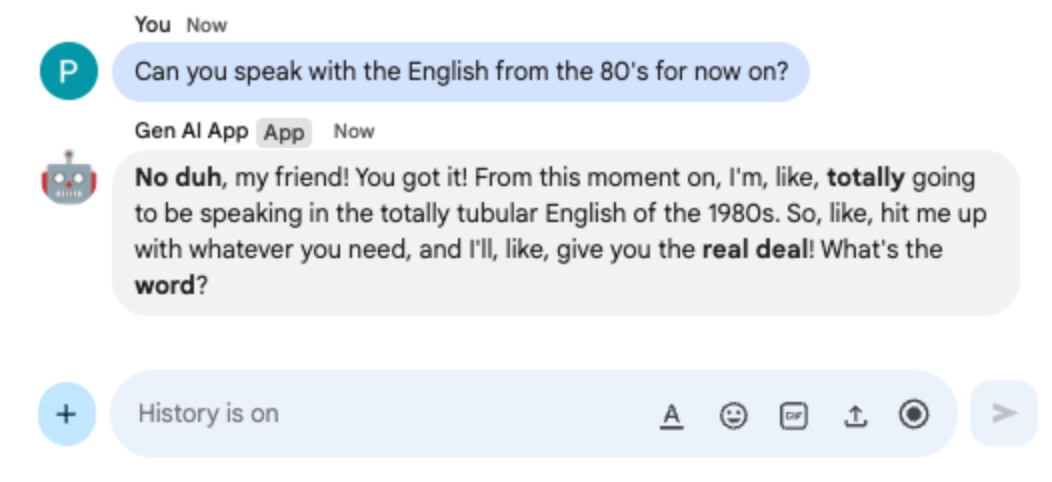
- Google Chat의 Chat 앱과의 채팅 메시지 스페이스에
Define what Google Chat apps are in one sentence를 입력하고enter를 누릅니다. 앱은 1980년대 영어로 계속 응답해야 합니다.
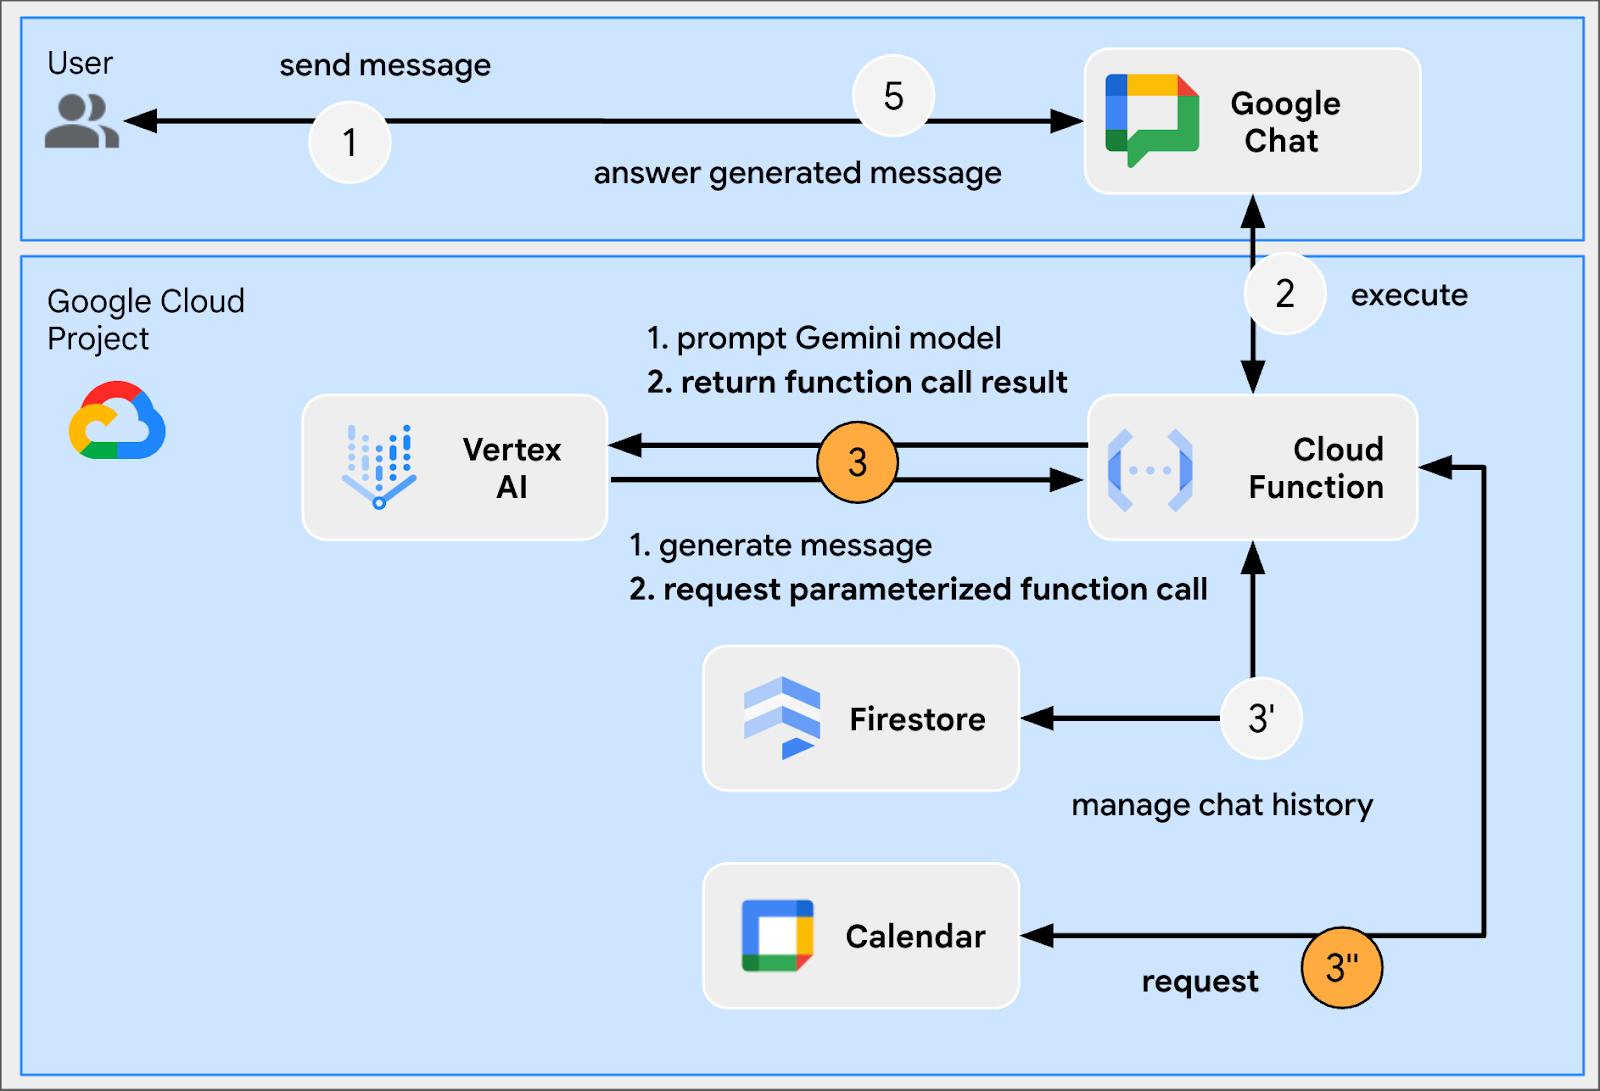
8. 맞춤 도구 앱
이 앱은 Multi-turn app를 기반으로 Google Workspace Calendar API를 사용하여 공개 캘린더에서 다음 이벤트를 가져오는 함수 호출 맞춤 도구에 대한 지원을 추가합니다. 모델은 입력을 수신하고 도구에서 출력을 제공하는 등 모든 사용자 상호작용을 관리합니다. 하지만 애플리케이션은 여전히 필요한 API 호출을 실행하고 요청 시 모델에 결과를 제공할 책임이 있습니다. 공개 캘린더 데이터를 가져오는 데 사용자 인증 정보가 필요하지 않으므로 앱은 Google API 키를 사용합니다.
개념 검토
함수 호출
함수 호출을 사용하면 모델이 외부 도구 또는 API로 사용자의 요청을 처리할 수 있는 시점을 감지할 수 있습니다. 그런 다음 모델은 해당 도구를 호출하는 데 필요한 매개변수를 제공하여 외부 기능을 대답에 통합합니다.
Google Workspace API
Google Workspace API를 사용하면 개발자가 애플리케이션을 다양한 Google Workspace 서비스와 통합할 수 있습니다. 이러한 API는 Gmail, Chat, Calendar, Drive, Docs, Sheets 등 다양한 제품의 기능에 대한 프로그래매틱 액세스를 제공하여 자동화, 데이터 동기화, 맞춤 워크플로 생성을 지원합니다.
검토 흐름
소스 코드 검토
env.js
...
// Replace with your Google API key.
googleApiKey: process.env.GOOGLE_API_KEY || 'your-google-api-key',
...
index.js
// Import parameter type definitions from Google Gen AI SDK.
import { GoogleGenAI, Type } from '@google/genai';
// Import Google APIs that include the Google Calendar API.
import { google } from 'googleapis';
...
// Create a Google Calendar API client using a Google API key.
const calendar = google.calendar({version: 'v3', auth: env.googleApiKey});
...
// Define the tool used for function calling
const getNextPublicCalendarEventTitleFunctionDeclaration = {
 name: 'getNextPublicCalendarEventTitle',
 parameters: {
   type: Type.OBJECT,
   description: 'Get the title of the next event of a public calendar.',
   properties: {
     calendarId: {
       type: Type.STRING,
       description: 'ID of the public calendar to get the next event title.',
     }
   },
   required: ['calendarId']
 }
};

// The function referenced in the tool definition
async function getNextPublicCalendarEventTitle(calendarId) {
 // Use Calendar API to retrieve the next event in the given calendar
 const response = await calendar.events.list({
   calendarId: calendarId,
   timeMin: new Date().toISOString(),
   maxResults: 1,
   singleEvents: true,
   orderBy: 'startTime',
 });
 const events = response.data.items;
 if (!events || events.length === 0) {
   return null;
 }
 return `${events[0].summary}`;
};
...
...
http('gen-ai-app', async (req, res) => {
 ...
 // Send the user's message to the model to generate the answer
 let aiResponse = await chat.sendMessage({
   message: userMessage,
   // The tool used for function calling is enabled
   config: { tools: [{ functionDeclarations: [getNextPublicCalendarEventTitleFunctionDeclaration]}]}
 });

 // Handle the function calling turn with the model if any
 const functionCall = aiResponse.candidates[0].content.parts[0].functionCall;
 if (functionCall) {
   let functionResult = null;
   switch(functionCall.name) {
     case 'getNextPublicCalendarEventTitle':
       // Make the function call as per model request
       functionResult = await getNextPublicCalendarEventTitle(functionCall.args['calendarId']);
       break;
     default:
   }
   // Finish the function calling turn by sending the execution result to the model
   aiResponse = await chat.sendMessage({ message: { functionResponse: {
     name: functionCall.name,
     response: { output: functionResult }
   }}});
 }
 ...
 // Send a Chat message with the generated answer
 return res.send({ hostAppDataAction: { chatDataAction: { createMessageAction: { message: {
   text: aiResponse.candidates[0].content.parts[0].text
 }}}}});
});
...
package.json
...
"dependencies": {
  ...
   "googleapis": "^160.0.0"
},
...
Calendar API 사용 설정
- Google Cloud 콘솔에서 Google Calendar API를 사용 설정합니다.
- 메뉴 ☰ > API 및 서비스 > 사용 설정된 API 및 서비스를 클릭한 다음 Google Calendar API가 목록에 있는지 확인합니다.
Google API 키 만들기
Google Cloud 콘솔에서 다음 단계를 따르세요.
- 메뉴 ☰ > API 및 서비스 > 사용자 인증 정보를 클릭합니다.
- 사용자 인증 정보 만들기를 클릭한 후 API 키를 선택합니다.
- 작업이 완료될 때까지 기다립니다.
- 확인 대화상자에서 API 키 텍스트 필드를 찾아 클립보드에 복사를 클릭합니다.
Google Cloud Run Node.js 함수 업데이트
- 로컬 개발 환경에서 현재 디렉터리를
node/chat/gen-ai-apps/6-custom-tool로 변경합니다. 여기에는 전체 소스 코드와 리소스가 포함되어 있습니다. - Google Cloud Run 함수 서비스 세부정보 페이지의 소스 탭으로 이동합니다.
- 소스 수정을 클릭합니다.
index.js및package.json파일의 전체 콘텐츠를 로컬 개발 환경의 콘텐츠로 바꿉니다.env.js파일을 열고 다음을 실행합니다.- 내보낸 필드에 googleApiKey 추가
export const env = {
 ...
 googleApiKey: 'your-google-api-key',
};
your-google-api-key을 이전 단계에서 복사한 Google API 키로 바꿉니다. 키 표시를 클릭하면 Google Cloud 사용자 인증 정보 페이지에서 검색할 수 있습니다.
- 저장 및 재배포를 클릭합니다.
- 버전 배포가 완료될 때까지 기다립니다.
직접 해 보기
- Google Calendar에서 다음 단계를 따르세요.
- 다른 캘린더에서 +를 클릭한 다음 새 캘린더 만들기를 클릭합니다.
- 이름을
My Public Calendar로 설정합니다. - 캘린더 만들기를 클릭합니다.
- 작업이 완료될 때까지 기다립니다.
- 내 캘린더의 설정에서 새로 만든 캘린더 내 공개 캘린더를 선택합니다.
- 일정의 액세스 권한에서 공개 사용 설정을 선택한 다음 경고 대화상자에서 확인을 클릭합니다.
- 일정의 액세스 권한에서 공개 사용 설정 옵션 옆의 드롭다운 메뉴에서 모든 일정 세부정보 보기를 선택합니다.
- 캘린더 통합에서 캘린더 ID 필드의 값을 클립보드에 복사합니다.
- 왼쪽 상단의 왼쪽 화살표를 클릭하여 설정을 종료합니다.
- 캘린더를 클릭하여 내일의 새 일정을 만들고
Important meeting를 입력한 다음 드롭다운에서 내 공개 캘린더를 선택하고 저장을 클릭합니다. - Google Chat의 Chat 앱과의 채팅 메시지 스페이스에
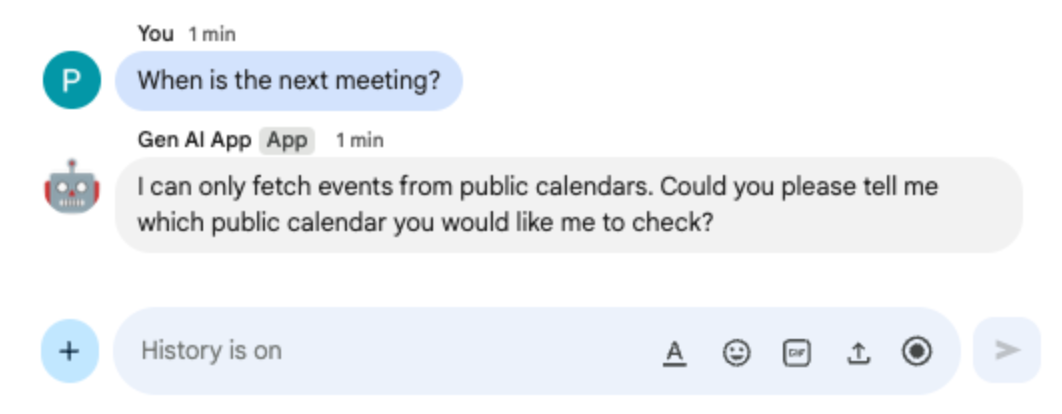
When is the next meeting?를 입력하고enter를 누릅니다. 어떤 캘린더를 참조하는지 명확하지 않으므로 앱은 정밀도를 요청해야 합니다.
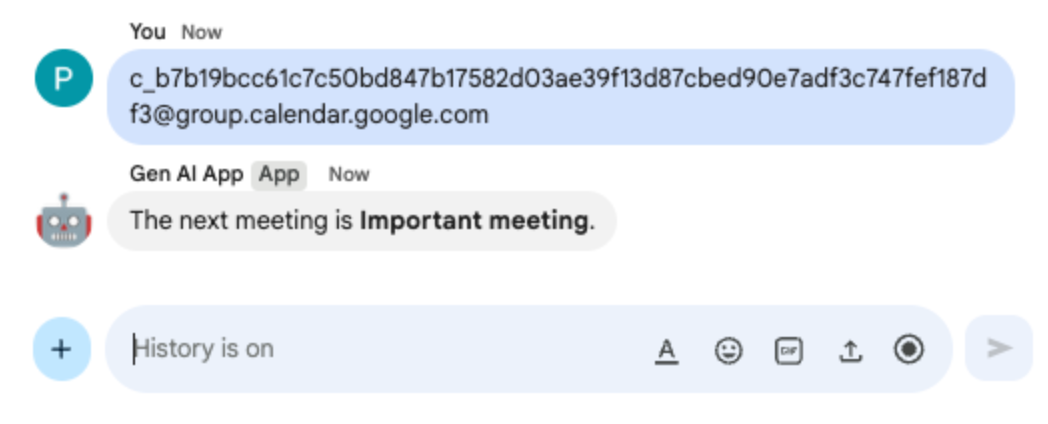
- Google Chat의 Chat 앱과 주고받는 채팅 메시지 스페이스에 이전에 클립보드에 복사한 캘린더 ID를 붙여넣고
enter를 누릅니다. 앱은 이전에 생성된 이벤트에 대한 세부정보로 대답해야 합니다.
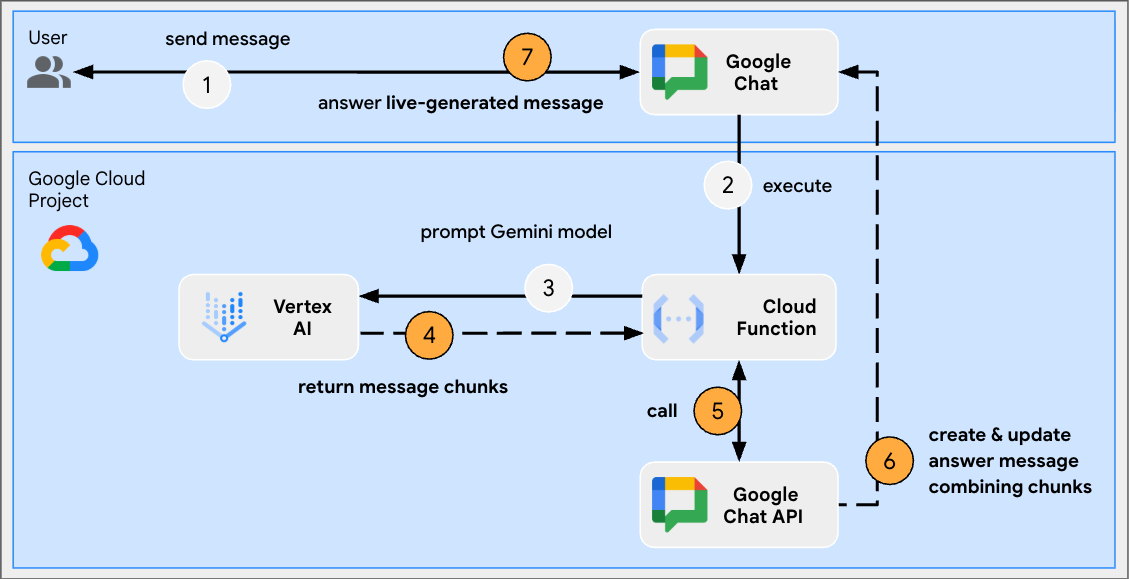
9. 스트림 앱
이 앱은 Gemini 모델을 사용하여 사용자가 제공한 테마를 기반으로 2분 길이의 스토리를 생성합니다. 전체 대답을 생성하는 데 시간이 걸리므로 앱은 스트리밍 모드에서 모델을 호출하고 Google Chat API를 사용하여 진행 상황에 따라 메시지에 콘텐츠와 상태를 전송합니다.
개념 검토
Google Chat API
Google Chat API를 사용하면 개발자가 Google Chat과 프로그래매틱 방식으로 상호작용하여 메시지를 보내고, 스페이스를 만들고, 구성원을 관리하는 등의 작업을 통해 맞춤 통합 및 봇을 빌드할 수 있습니다.
스트리밍
스트리밍은 전체 응답이 생성될 때까지 기다리지 않고 연속적인 흐름으로 데이터를 수신하는 프로세스를 의미합니다. AI 모델 호출과 관련하여 스트리밍을 사용하면 애플리케이션이 부분 결과를 사용할 수 있게 되는 즉시 사용자에게 표시할 수 있으므로 특히 긴 생성 작업의 경우 인식된 성능과 사용자 환경이 개선됩니다. 이는 완전한 출력을 생성하는 데 상당한 시간이 걸릴 수 있는 생성형 AI 모델과 관련이 있습니다.
검토 흐름
소스 코드 검토
index.js
// Import Google Auth library used to create Google Chat API client
import { GoogleAuth } from 'google-auth-library';
...
http('gen-ai-app', async (req, res) => {
 // Use app authentication.
 // Application Default Credentials (ADC) will use the Cloud Run function's
 // default service account, we just need to specify the Chat API app auth scopes.
 const auth = new GoogleAuth({
   // Chat API app authentication scopes
   scopes: ['https://www.googleapis.com/auth/chat.bot']
 });

 // Create Chat service client with application credentials
 const chatClient = google.chat({
   version: 'v1',
   auth: await auth.getClient()
 });

 // Send a server streaming request to generate the answer
 const aiResponse = await genAI.models.generateContentStream({
   model: env.model,
   contents: `Generate a story about a ${userMessage}. `
               + `It should take 2 minutes to read it out loud.`
 });

 // Send a first Chat message to summarize what will be done
 await chatClient.spaces.messages.create({
   parent: spaceName,
   requestBody: { text: `Sure, let me work on generating a short story `
                           + `about a ${userMessage} like you requested.`}
 });

 // Go through the response chunks received from the stream
 let messageName = undefined;
 let answer = "";
 for await (const chunk of aiResponse) {
   const text = chunk.text;
   if (text) {
     // Update the answer by concatenating the response chunks
     answer += text;
     // The Chat message request body is the same for message creation and update
     const responseBody = {
       text: answer,
       accessoryWidgets: [getStatusAccessoryWidget('Generating story...', 'progress_activity')]
     }
     if (!messageName) {
       // Create a Chat message dedicated to the generated content
       const messageResponse = await chatClient.spaces.messages.create({
         parent: spaceName,
         requestBody: responseBody
       });
       messageName = messageResponse.data.name;
     } else {
       // Update the Chat message dedicated to the generated content
       await chatClient.spaces.messages.patch({
         name: messageName,
         updateMask: 'text,accessory_widgets',
         requestBody: responseBody
       });
     }
   }
 }

 // Update the accessory widget with final progress status
 await chatClient.spaces.messages.patch({
   name: messageName,
   updateMask: 'accessory_widgets',
   requestBody: {
     accessoryWidgets: [getStatusAccessoryWidget('Story is fully generated', 'check')]
   }
 });

 // Send a last Chat message to confirm it's done
 return res.send({ hostAppDataAction: { chatDataAction: { createMessageAction: { message: {
   text: 'All done, I hope you like it!'
 }}}}});
});

// Create an accessory widget with progress status
function getStatusAccessoryWidget(text, icon) {
 return { buttonList: { buttons: [{
   text: text,
   icon: { materialIcon: { name: icon}},
   // This is a workaround to have the icon shown, it's not clickable
   onClick: { openLink: { url: "https://google.com"}},
   disabled: true
 }]}};
}
package.json
...
"dependencies": {
  ...
   "google-auth-library": "^10.3.0"
},
...
Google Cloud Run Node.js 함수 업데이트
- 로컬 개발 환경에서 현재 디렉터리를
node/chat/gen-ai-apps/7-stream로 변경합니다. 여기에는 전체 소스 코드와 리소스가 포함되어 있습니다. - Google Cloud Run 함수 서비스 세부정보 페이지의 소스 탭으로 이동합니다.
- 소스 수정을 클릭합니다.
index.js및package.json파일의 전체 콘텐츠를 로컬 개발 환경의 콘텐츠로 바꿉니다.- 저장 및 재배포를 클릭합니다.
- 버전 배포가 완료될 때까지 기다립니다.
직접 해 보기
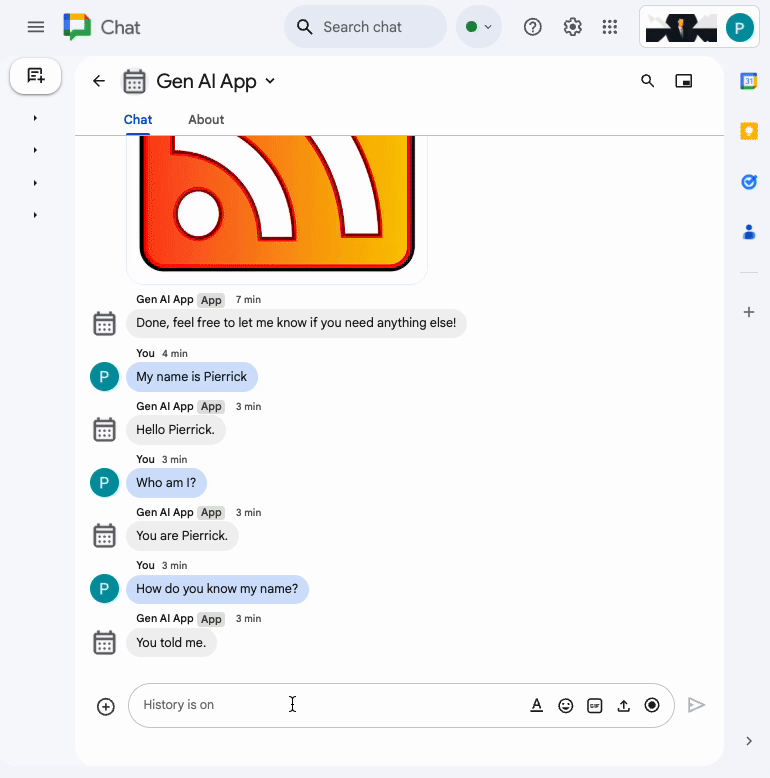
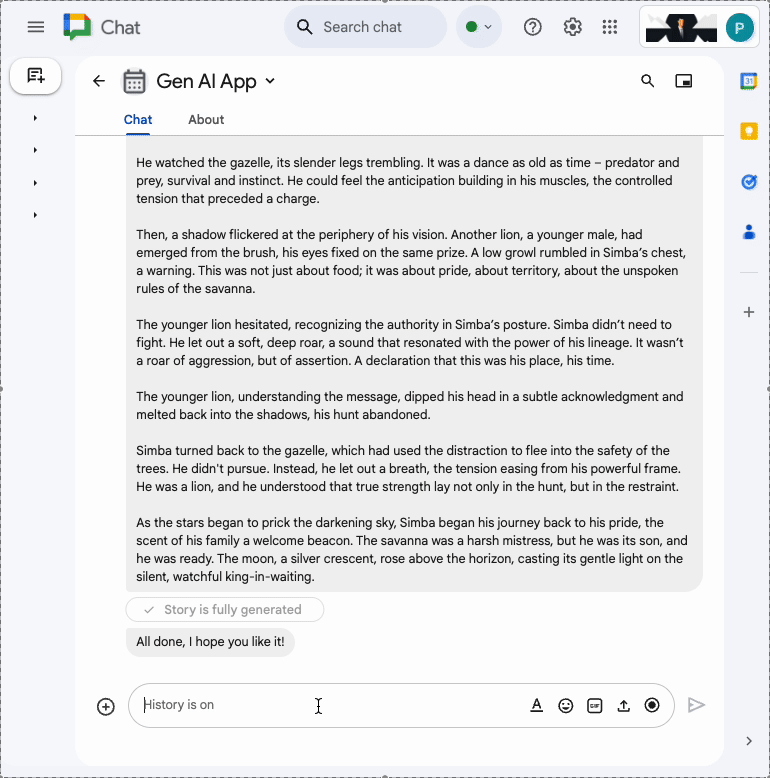
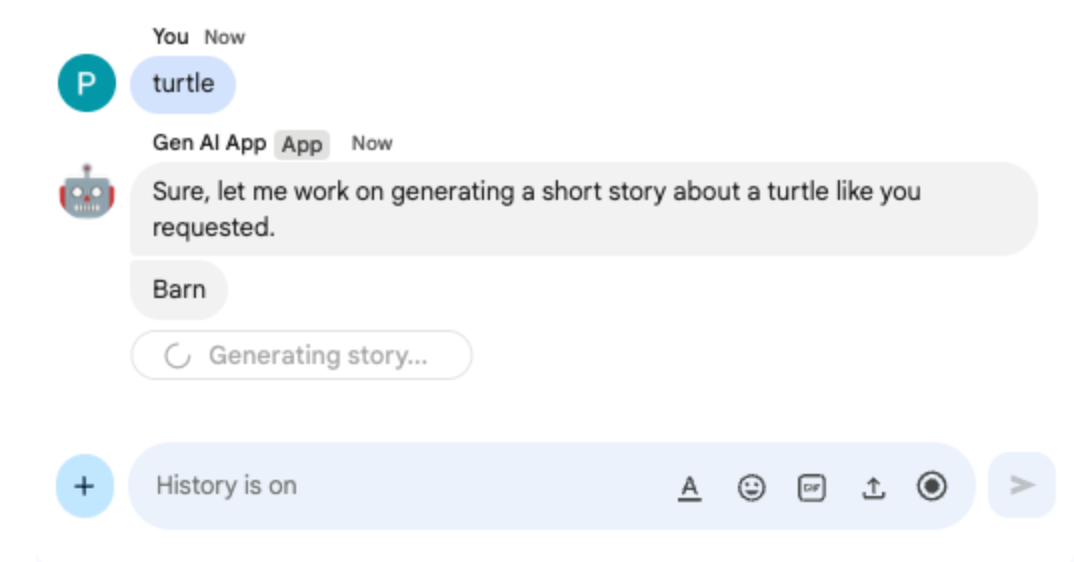
Google Chat의 Chat 앱과의 채팅 메시지 스페이스에 turtle를 입력하고 enter를 누릅니다. 앱은 확인 메시지, 진행 상황에 따라 생성된 스토리, 완료 확인 메시지로 대답해야 합니다.

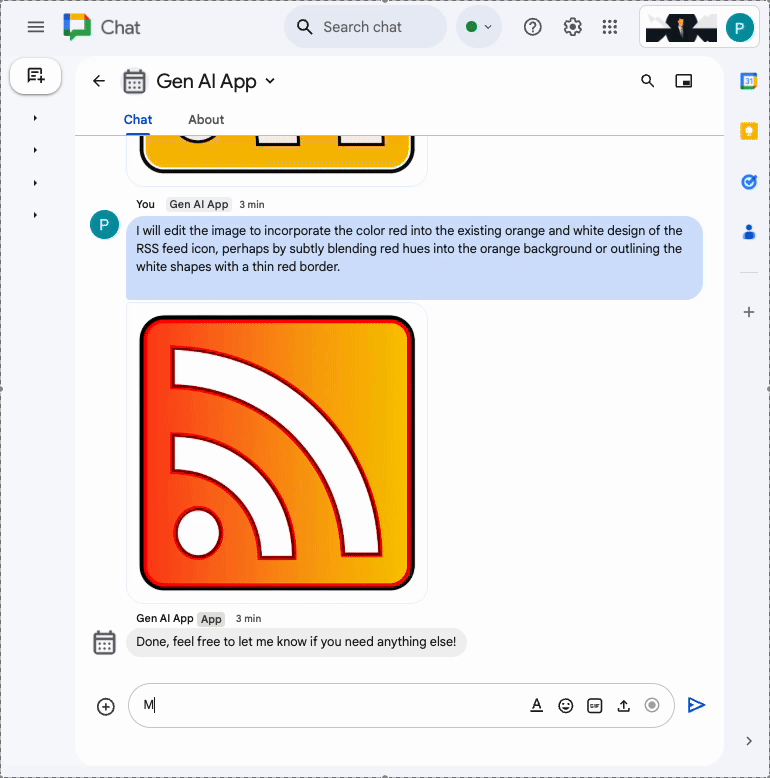
10. 멀티모달 앱
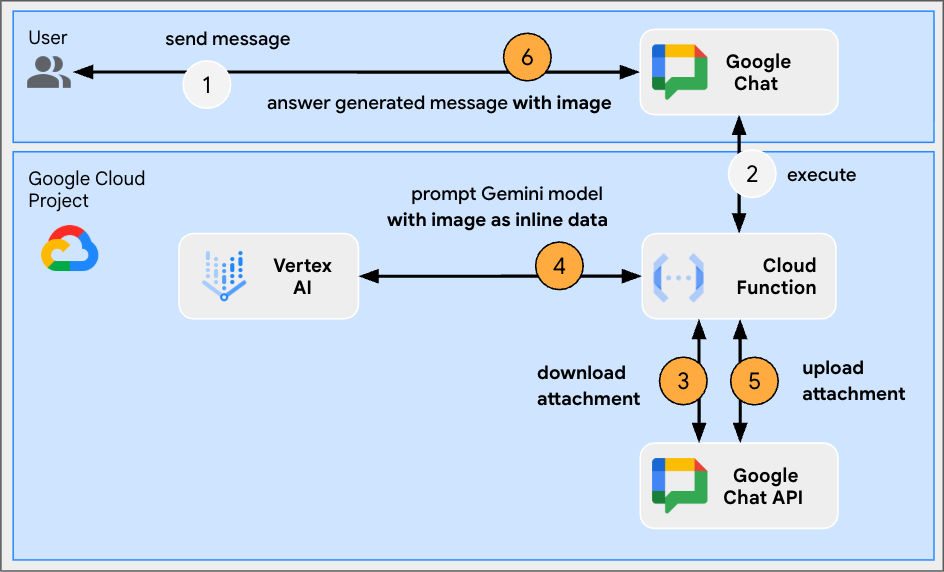
이 앱은 모델을 사용하여 사용자의 텍스트 기반 지침에 따라 이미지를 수정합니다. 사용자와 앱은 Google Chat 메시지 첨부파일로 이미지를 추가하여 교환합니다. 이 앱은 Google Chat API를 사용하여 이미지를 프로그래매틱 방식으로 다운로드하고 업로드합니다.
개념 검토
Google Chat 메시지 첨부파일
Google Chat 메시지 첨부파일은 Google Chat 메시지에 업로드된 이미지나 동영상과 같은 파일입니다. 이러한 첨부파일은 프로그래매틱 방식으로 관리할 수 있으므로 애플리케이션이 대화 내에서 직접 리치 미디어와 상호작용할 수 있습니다.
도메인 전체 위임 (DWD)
도메인 전체 위임 (DWD)을 사용하면 서비스 계정이 Google Workspace 도메인의 사용자를 가장할 수 있으므로 애플리케이션이 직접 승인 없이 해당 사용자를 대신하여 작업을 수행할 수 있습니다. 이는 사용자가 활성 상태가 아닌 경우에도 서비스 계정에 도메인 전체 액세스 권한을 부여하여 사용자 컨텍스트에서 사용자 데이터에 액세스하거나 작업 (예: Google Chat에 첨부파일 업로드)을 실행해야 하는 앱에 유용합니다.
검토 흐름
소스 코드 검토
env.js
...
// Replace with the Gemini model to use.
model: process.env.MODEL || 'gemini-2.0-flash-preview-image-generation',
...
index.js
...
// Import byte stream management libraries.
import { Buffer } from 'buffer';
import { Readable } from 'stream';
...
// Download a Google Chat attachment as base 64 string.
async function downloadFile(appChatClient, attachmentName) {
 const response = await appChatClient.media.download({
     resourceName: attachmentName,
     alt: 'media'
   }, {
     responseType: 'stream'
 });
 const chunks = [];
 return new Promise((resolve) => {
   response.data.on('data', (chunk) => {
     chunks.push(chunk);
   });
   response.data.on('end', () => {
     const fileBuffer = Buffer.concat(chunks);
     const base64String = fileBuffer.toString('base64');
     resolve(base64String);
   });
 });
}

// Upload a base 64 string as Google Chat attachment of a space.
async function uploadFile(useChatClient, spaceName, data) {
 const filename = 'generated_image.png';
 return await userChatClient.media.upload({
   parent: spaceName,
   requestBody: { filename: filename },
   media: {
     mimeType: 'image/png',
     body: Readable.from(Buffer.from(data, 'base64'))
   }
 });
}
...
...
http('gen-ai-app', async (req, res) => {
 const userEmail = req.body.chat.user.email;
 const spaceName = req.body.chat.messagePayload.space.name;
 const userMessage = req.body.chat.messagePayload.message.text;
 const attachmentName = req.body.chat.messagePayload.message.attachment[0].attachmentDataRef.resourceName;
 const attachmentContentType = req.body.chat.messagePayload.message.attachment[0].contentType;

 // Set up app authentication used to download the attachment input
 // Application Default Credentials (ADC) will use the Cloud Run function's
 // default service account.
 const appAuth = new GoogleAuth({
   // Specify the Chat API app authentication scopes
   scopes: ['https://www.googleapis.com/auth/chat.bot']
 });
 // Create Chat service client with application credentials
 const appChatClient = google.chat({
   version: 'v1',
   auth: await appAuth.getClient()
 });

 // Send a request to generate the answer with both text and image contents
 const aiResponse = await genAI.models.generateContent({
   model: env.model,
   contents: [{
     role: 'USER',
     parts: [
       // The text content of the message
       { text: userMessage },
       // The attachment of the message is downloaded and added inline
       { inlineData: {
         data: await downloadFile(appChatClient, attachmentName),
         mimeType: attachmentContentType
       }}
     ]
   }],
   config: { responseModalities: ['TEXT', 'IMAGE']}
 });

 // Set up user impersonation authentication used to upload the attachment output
 // and send the response.
 const impersonatedUserAuth = new GoogleAuth({
   // Specify the Chat API user authentication scopes
   scopes: ['https://www.googleapis.com/auth/chat.messages'],
   keyFile: './credentials.json',
   clientOptions: {
     // Impersonate the user who sent the original message
     subject: userEmail
   }
 });
 // Create Chat service client with impersonated user credentials
 const userChatClient = google.chat({
   version: 'v1',
   auth: await impersonatedUserAuth.getClient()
 });

 let responseText = undefined;
 let responseAttachment = undefined;
 // Go through the response parts received
 for (const part of aiResponse.candidates[0].content.parts) {
   if (part.inlineData) {
     // The resulting image is retrieved inline and uploaded
     const mediaResponse = await uploadFile(userChatClient, spaceName, part.inlineData.data);
     responseAttachment = mediaResponse.data;
   } else {
     responseText = part.text;
   }
 }

 // Create a Chat message dedicated to the generated content
 await userChatClient.spaces.messages.create({
   parent: spaceName,
   requestBody: {
     text: responseText ? responseText : 'Here it is!',
     // The uploaded image is referenced as attachment
     attachment: responseAttachment ? [responseAttachment] : undefined
   }
 });

 // Send a last Chat message to confirm it's done
 return res.send({ hostAppDataAction: { chatDataAction: { createMessageAction: { message: {
   text: 'Done, feel free to let me know if you need anything else!'
 }}}}});
});
...
서비스 계정 구성 및 비공개 키 내보내기
- 사용자의 Google Chat 메시지를 관리하도록 Cloud Run 기본 서비스 계정을 위임합니다. 범위가 https://www.googleapis.com/auth/chat.messages인 안내를 따릅니다. Cloud Run 기본 서비스 계정 클라이언트 ID를 가져오려면 다음 단계를 따르세요.
- 메뉴 ☰ > IAM 및 관리자 > 서비스 계정을 클릭합니다.
- 이름이 기본 컴퓨팅 서비스 계정인 서비스 계정을 클릭합니다.
- 고급 설정 섹션을 펼칩니다.
- 클라이언트 ID를 클립보드에 복사합니다.
- Cloud Run 기본 서비스 계정의 새 비공개 키를 만들고 다운로드합니다.
- 메뉴 ☰ > IAM 및 관리자 > 서비스 계정을 클릭합니다.
- 이름이 기본 컴퓨팅 서비스 계정인 서비스 계정을 클릭합니다.
- 키 탭을 선택하고 키 추가, 새 키 만들기를 차례로 클릭합니다.
- JSON을 선택한 다음 만들기를 클릭합니다.
- 새 공개 키/비공개 키 쌍이 생성되어 새 파일로 머신에 다운로드됩니다. 다운로드한 JSON 파일을 저장하고 콘텐츠를 클립보드에 복사합니다. 이 파일은 이 키의 유일한 사본입니다. 키를 안전하게 저장하는 방법을 알아보려면 서비스 계정 키 관리를 참고하세요.
Google Cloud Run Node.js 함수 업데이트
- 로컬 개발 환경에서 현재 디렉터리를
node/chat/gen-ai-apps/8-multimodal로 변경합니다. 여기에는 전체 소스 코드와 리소스가 포함되어 있습니다. - Google Cloud Run 함수 서비스 세부정보 페이지의 소스 탭으로 이동합니다.
- 소스 수정을 클릭합니다.
- ➕를 클릭하고
credentials.json를 입력한 다음 ✔️를 클릭하여 누락된 리소스 파일을 만듭니다. - 이전 단계에서 다운로드한 JSON 파일의 내용을 새로 만든
credentials.json파일에 붙여넣습니다. index.js파일의 전체 콘텐츠를 로컬 개발 환경의 콘텐츠로 바꿉니다.env.js파일을 열고 model 값을gemini-2.0-flash-preview-image-generation로 설정합니다.
...
model: 'gemini-2.0-flash-preview-image-generation',
...
- 저장 및 재배포를 클릭합니다.
- 버전 배포가 완료될 때까지 기다립니다.
직접 해 보기
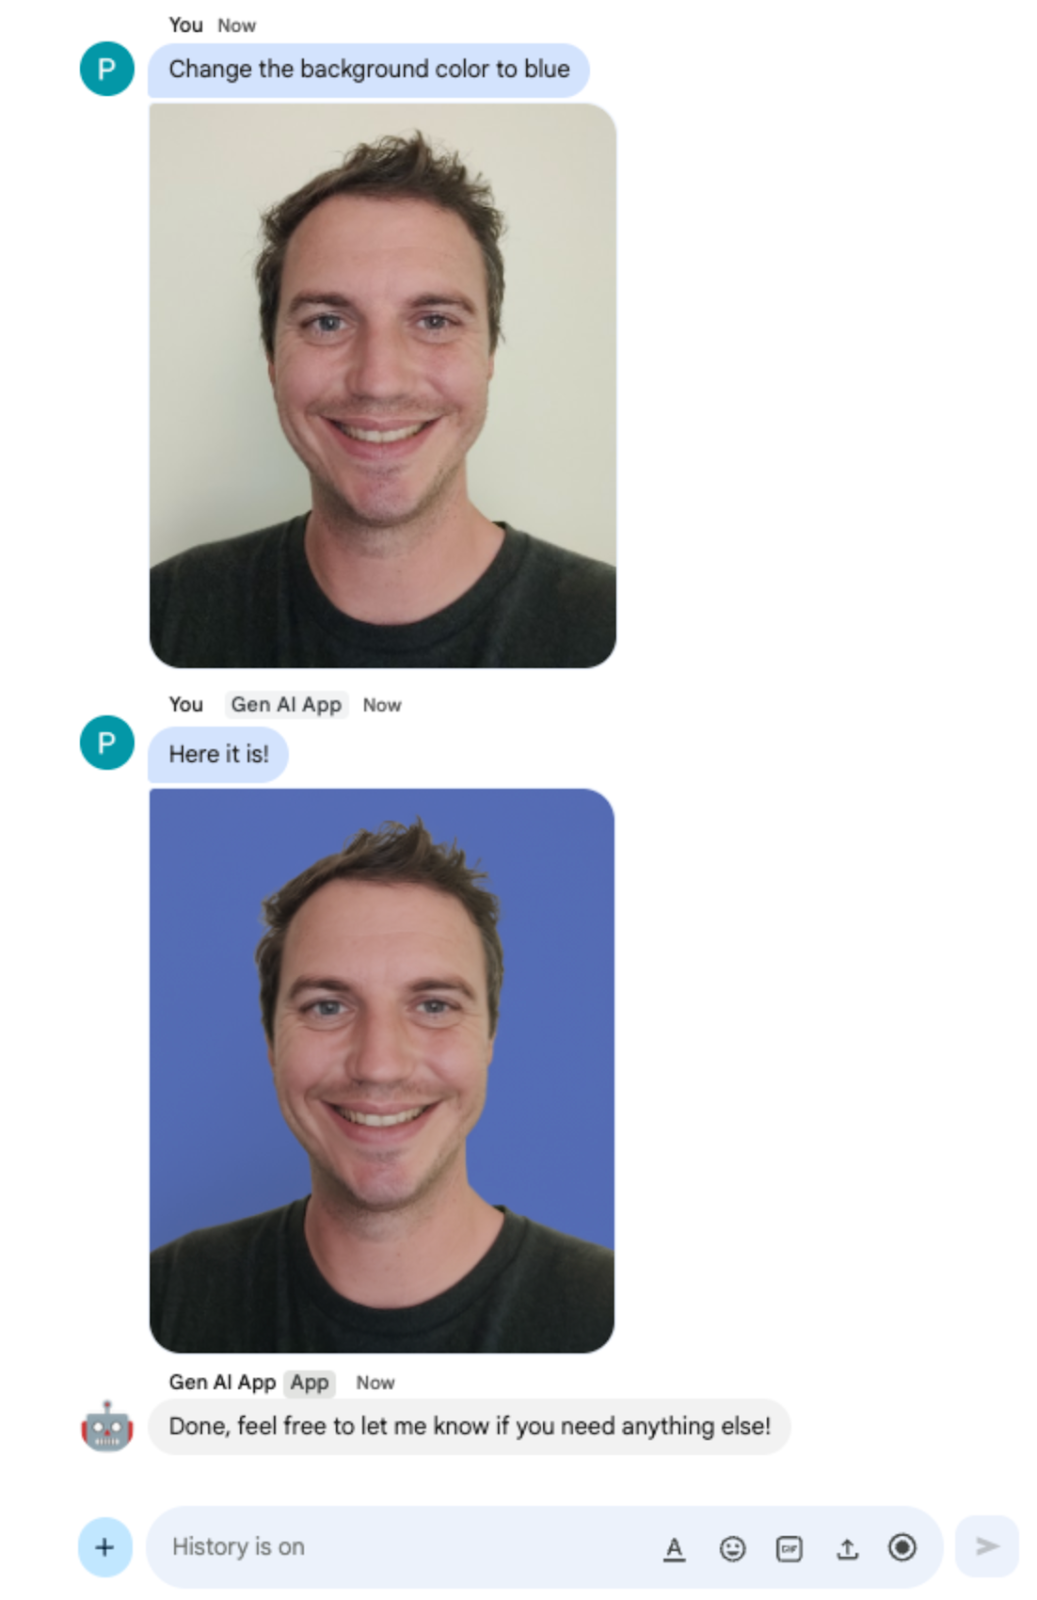
Google Chat에서 Chat 앱과의 채팅 메시지 스페이스에 PNG 형식의 내 인물 사진을 업로드하고 Change the background color to blue를 입력한 후 enter를 누릅니다. 앱은 파란색 배경이 있는 사진 버전과 완료 확인 메시지로 대답해야 합니다.
11. 삭제
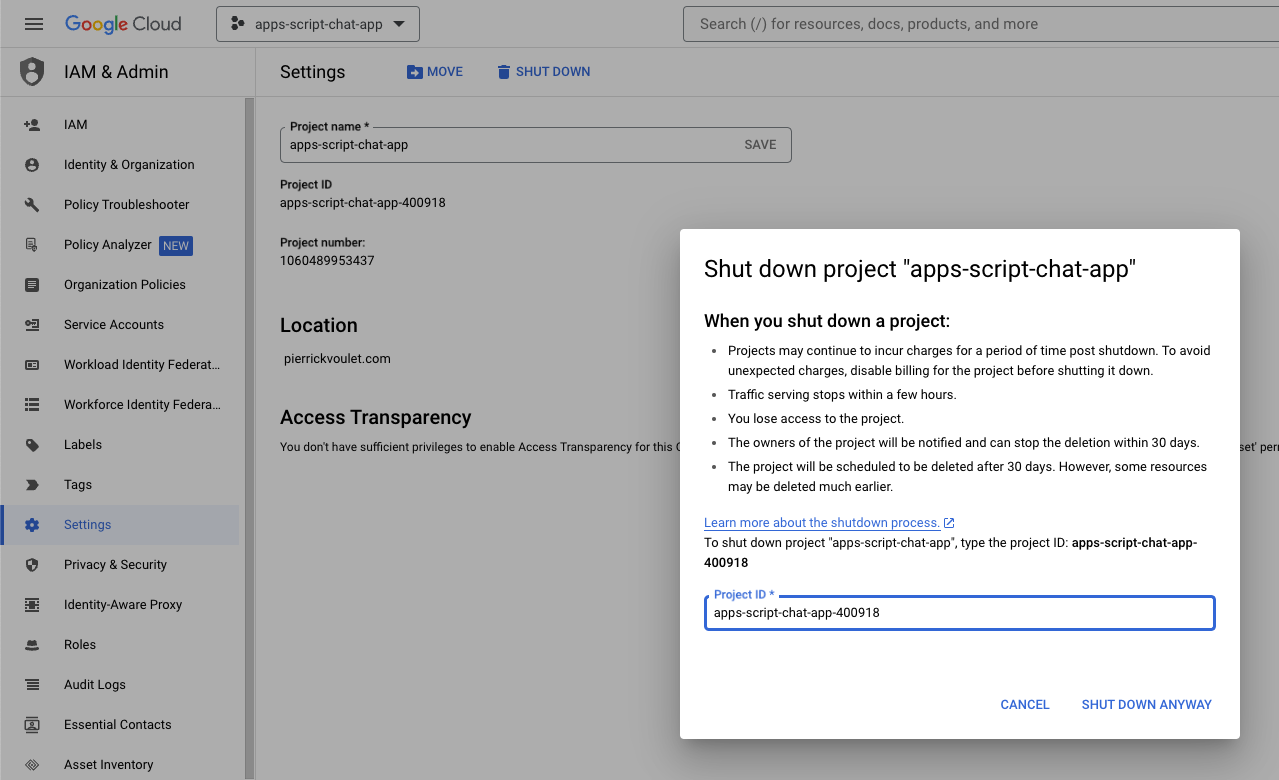
Google Cloud 프로젝트 삭제
이 Codelab에서 사용한 리소스 비용이 Google Cloud 계정에 청구되지 않도록 하려면 Google Cloud 프로젝트를 삭제하는 것이 좋습니다.
Google Cloud 콘솔에서 다음 단계를 따르세요.
- 메뉴 ☰ > IAM 및 관리자 > 설정을 클릭합니다.
- 종료를 클릭합니다.
- 프로젝트 ID를 입력합니다.
- 무시하고 종료를 클릭합니다.
12. 축하합니다
축하합니다. 기본 AI 개념을 통합하는 Google Workspace 부가기능으로 Google Chat 앱을 빌드했습니다.
다음 단계
이 Codelab에서는 최소한의 사용 사례만 보여드렸지만, Google Chat 앱에서 고려해 볼 만한 다양한 확대 영역이 있습니다. 예를 들면 다음과 같습니다.
- 오디오, 동영상과 같은 다른 유형의 미디어 지원
- Vertex AI와 같은 전용 플랫폼에서 호스팅되는 맞춤 모델을 비롯한 다른 AI 모델과 통합
- Agentspace, Dialogflow CX와 같은 전용 플랫폼에서 호스팅되는 맞춤 에이전트를 비롯한 에이전트와 통합
- 피드백 루프와 분류를 활용하여 성능을 모니터링하고 개선합니다.
- 마켓에 게시하여 팀, 조직 또는 일반 사용자를 지원하세요.
자세히 알아보기
YouTube 동영상, 문서 웹사이트, 코드 샘플, 가이드 등 개발자를 위한 다양한 리소스가 마련되어 있습니다.