
1. 事前準備
什麼是 Google Chat AI 應用程式?
搭載 AI 的 Google Chat 應用程式可執行下列操作:
- 將服務和資源整合到 Google Chat,讓使用者不必離開對話就能取得資訊及採取行動。
- 整合生成式 AI 模型,建立、搜尋及編輯文字或圖片等資料。
- 運用對話式 AI 概念,打造更實用、自然、精緻且有幫助的互動,支援代理服務體驗。
為什麼要將 Google Chat 應用程式與 AI 整合?
常見用途包括:
- 內容創作和編輯。生成行銷文案、製作社群媒體貼文、建立逼真圖片、創作音樂,或協助製作影片內容。
- 資料搜尋和分析:從非結構化知識庫擷取重要洞察資料、摘要長篇文字、分類內容,或以更高的準確度和速度翻譯語言。
- 對話。與 Gemini 進行自然、實用且有效率的對話,就像與助理交談一樣。
- 工作自動化。代表使用者執行動作,例如建立新的日曆活動、傳送文件,或管理外部系統中的票證。
直接在 Google Chat 的熟悉介面中整合這些功能,對於想提升使用者體驗和工作效率的人來說,是絕佳的機會。
必要條件
- Google Cloud 和 Node.js 的基本知識。
- Google Chat 應用程式的基本知識,包括訊息、資訊卡、驗證、API 和 HTTP 端點。
建構目標
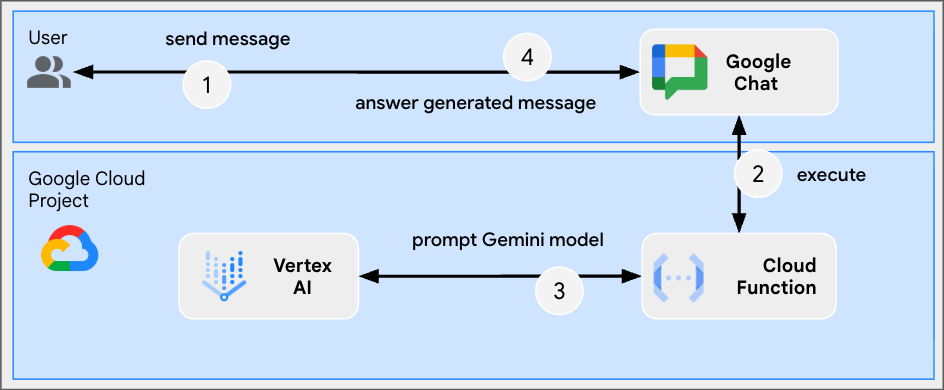
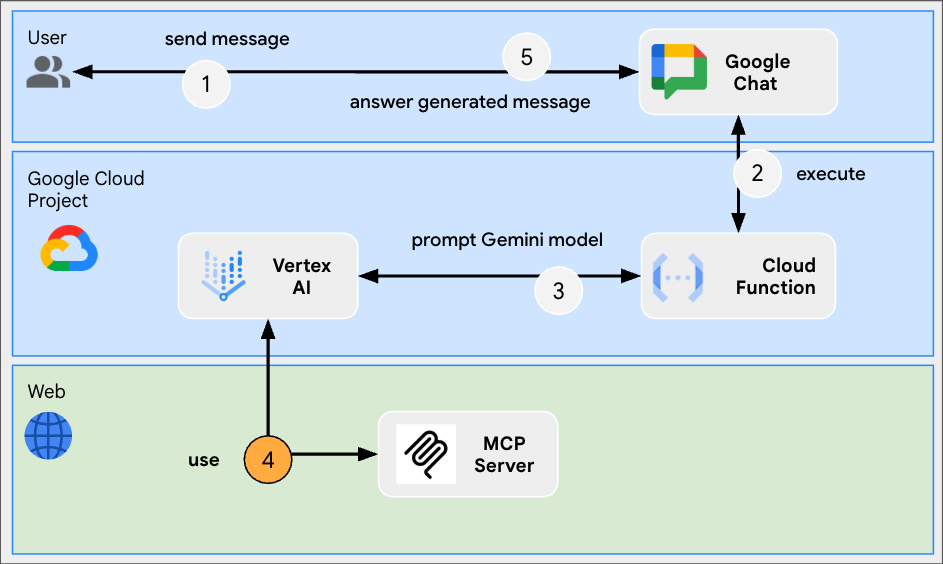
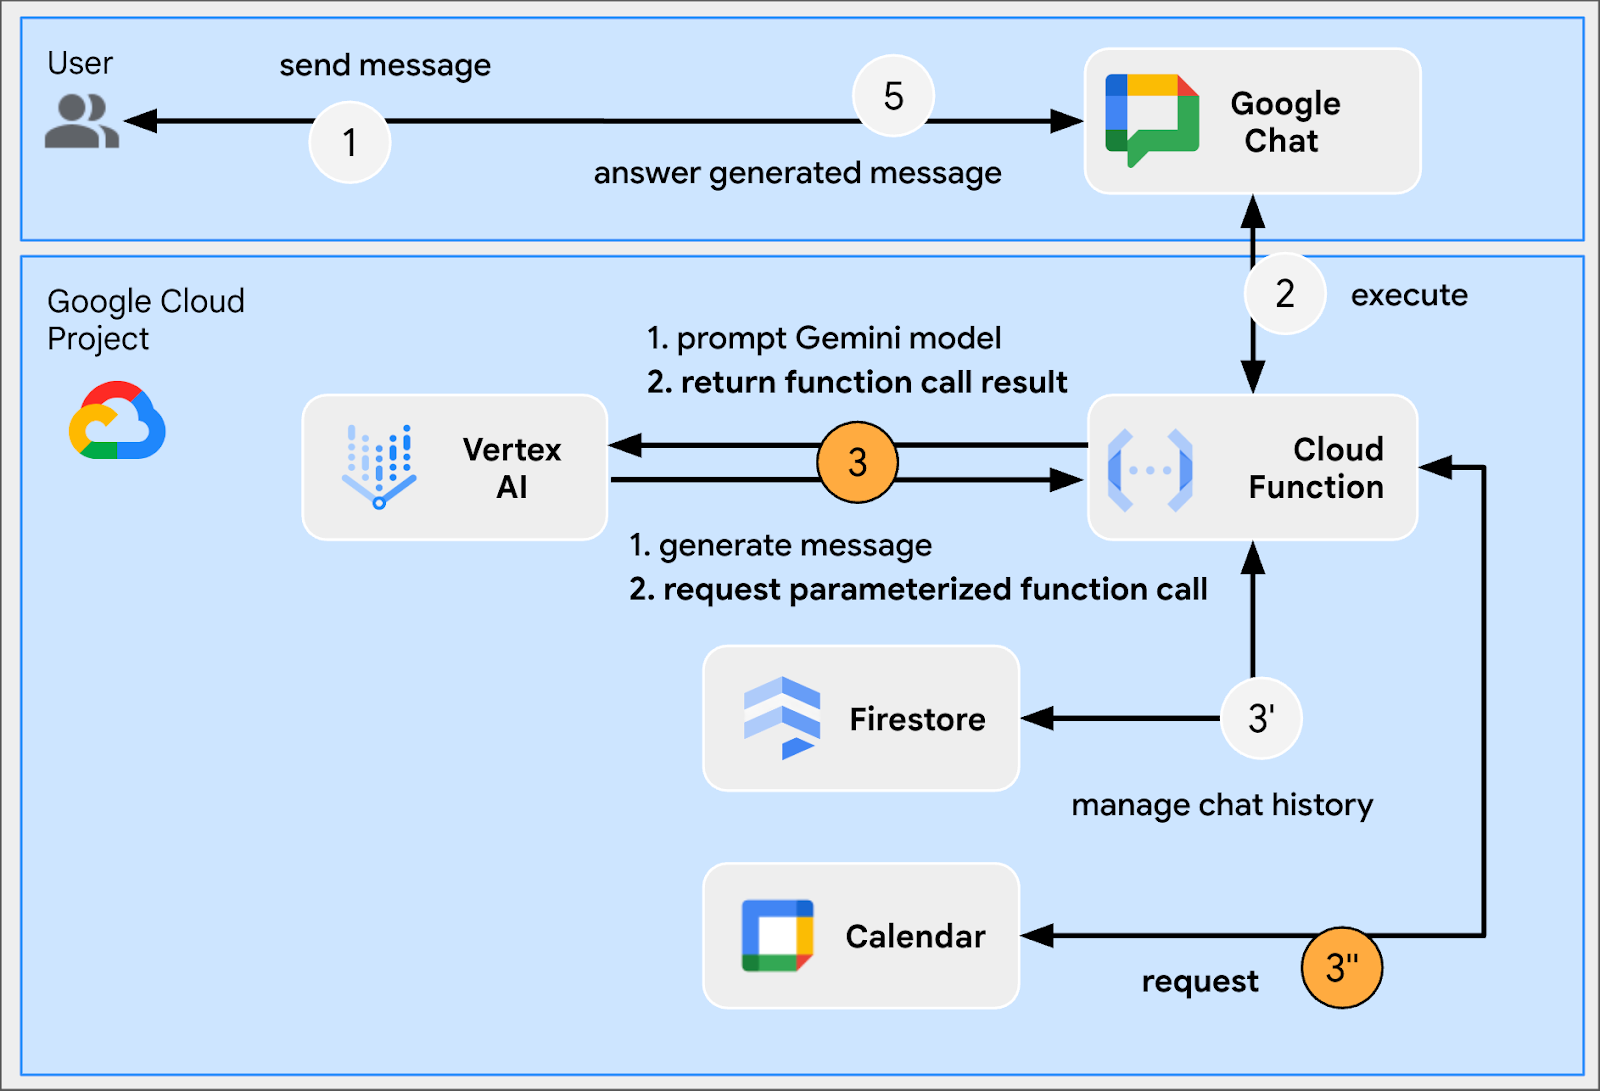
在本程式碼研究室中,您將建構八個極簡的 Google Chat 應用程式,整合 AI 基本概念,瞭解如何將這些概念應用於實際應用程式。這些外掛程式都是以 Google Workspace 外掛程式的形式建構,並採用 HTTP 架構:
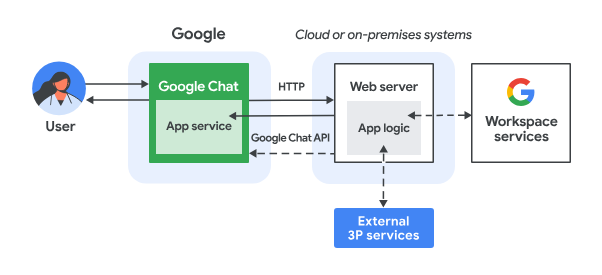
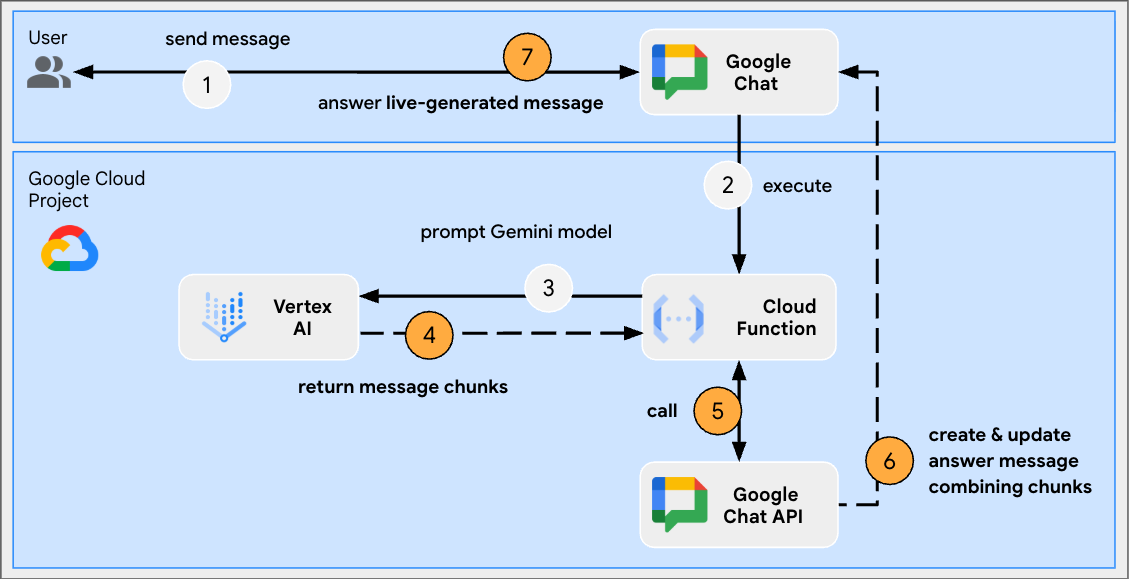
運作方式如下:
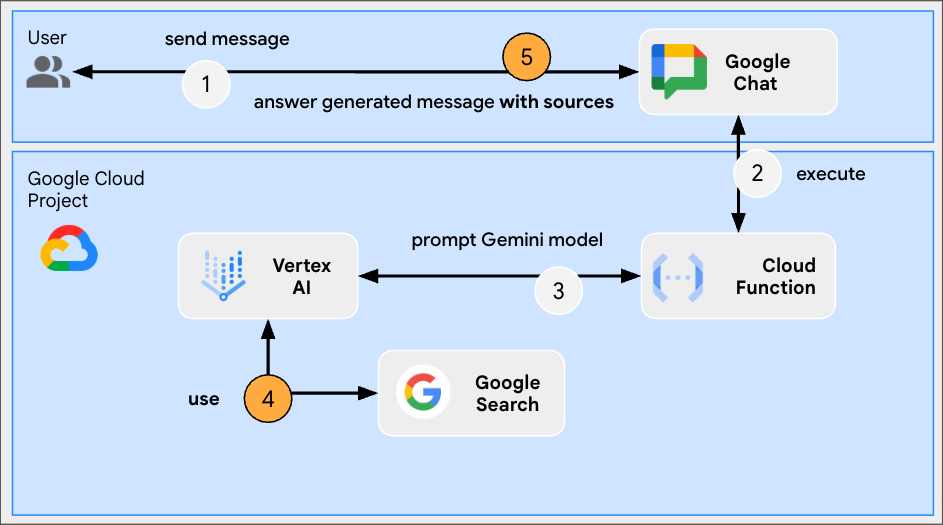
- 使用者在 Google Chat 中傳送訊息給 Chat 應用程式,可以是即時訊息或 Chat 聊天室訊息。
- 系統會將 HTTP 要求傳送至以 Node.js Google Cloud Run 函式執行的網路伺服器,其中包含 Chat 應用程式邏輯。
- 視需要,Chat 應用程式邏輯可與 Google Workspace 服務 (例如日曆和試算表)、其他 Google 服務 (例如地圖、YouTube 和 Vertex AI) 或其他網路服務 (例如專案管理系統或票證工具) 整合。
- 網路伺服器會將 HTTP 回應傳回給 Chat 應用程式服務。
- 系統會將回應傳送給使用者。
- Chat 應用程式也可以視需要呼叫 Chat API,以非同步方式發布訊息或執行其他作業。
每個 Google Chat 應用程式的 Node.js Google Cloud Run 函式都包含下列來源檔案的專屬版本,以便在上述步驟 3 和 6 中採取必要行動:
package.json:做為 Node.js 專案藍圖的中央資訊清單。用於定義中繼資料、依附元件和指令碼。env.js:設定執行作業所需常數的指令碼。請根據環境和設定進行編輯。index.js:主要指令碼,用於處理 Google Chat 互動事件的邏輯。本程式碼研究室只實作訊息事件類型,但實際應用程式通常會包含其他類型,例如點選資訊卡、斜線指令和對話方塊。
提示應用程式
這個應用程式會使用 Gemini 模型,以簡潔易懂的文字回覆,用自然語言與使用者對話。
格式化應用程式
這個應用程式以 Prompt app 為基礎,新增了對複合式文字答案的支援,這些答案符合Google Chat 訊息的特定文字格式。
Ground 應用程式
這個應用程式以 Format app 為基礎,新增 Google 搜尋工具支援功能,並在回覆訊息中以資訊卡形式提供來源。
MCP 應用程式
這個應用程式以 Format app 為基礎,新增了對 Google Workspace Developer Assist Model Context Protocol (MCP) 的支援。
多輪對話應用程式
這個應用程式以 Format app 為基礎,新增了對話記憶體支援功能,並使用 Google Cloud Firestore 資料庫。
自訂工具應用程式
這個應用程式以 Multi-turn app 為基礎,新增了支援函式呼叫自訂工具的功能,可根據使用者提供的資訊呼叫 Google Workspace Calendar API。
Stream 應用程式
這個應用程式會根據使用者提供的主題,透過 Gemini 模型生成短篇故事。Google Chat API 會在處理過程中傳送訊息,說明進度和結果。
多模態應用程式
這個應用程式會根據使用者的文字指令,透過 Gemini 模型編輯圖片。Google Chat API 用於下載及上傳圖片做為訊息附件。
學習目標
- 瞭解與 Google Chat 應用程式相關的 AI 基本概念,以及如何套用這些概念。
- 使用 Google Gen AI SDK 存取 Vertex AI。
- 使用 Google Workspace API 開發實用強大的功能。
- 運用 Cloud Run 建構可擴充的 Google Chat 應用程式。
需要準備的事項
- 完成 使用 Node.js 建構 HTTP Google Chat 應用程式快速入門導覽課程。這個程式碼實驗室會以產生的 Google Cloud 專案、Google Chat 應用程式和 Google Cloud Run 函式為基礎。
2. 做好準備
初始化及存取資源
在本節中,您將透過偏好的網路瀏覽器存取及設定下列資源。
Google Chat API 設定
在新分頁中開啟 Google Cloud 控制台,然後按照下列步驟操作:
- 選取專案。
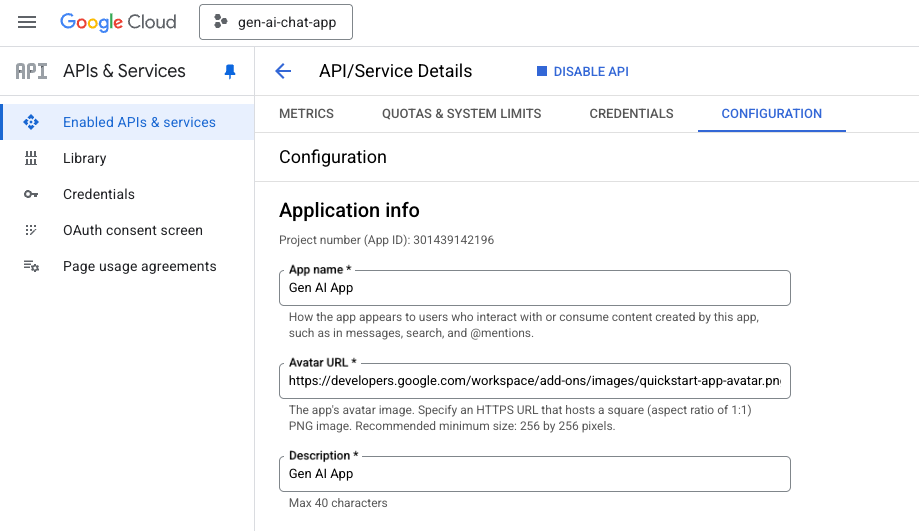
- 在 Google Cloud 搜尋欄位中搜尋「Google Chat API」,然後依序點選「Google Chat API」、「管理」和「設定」。
- 將「應用程式名稱」和「說明」設為
Gen AI App。 - 按一下 [儲存]。
Google Chat 聊天室
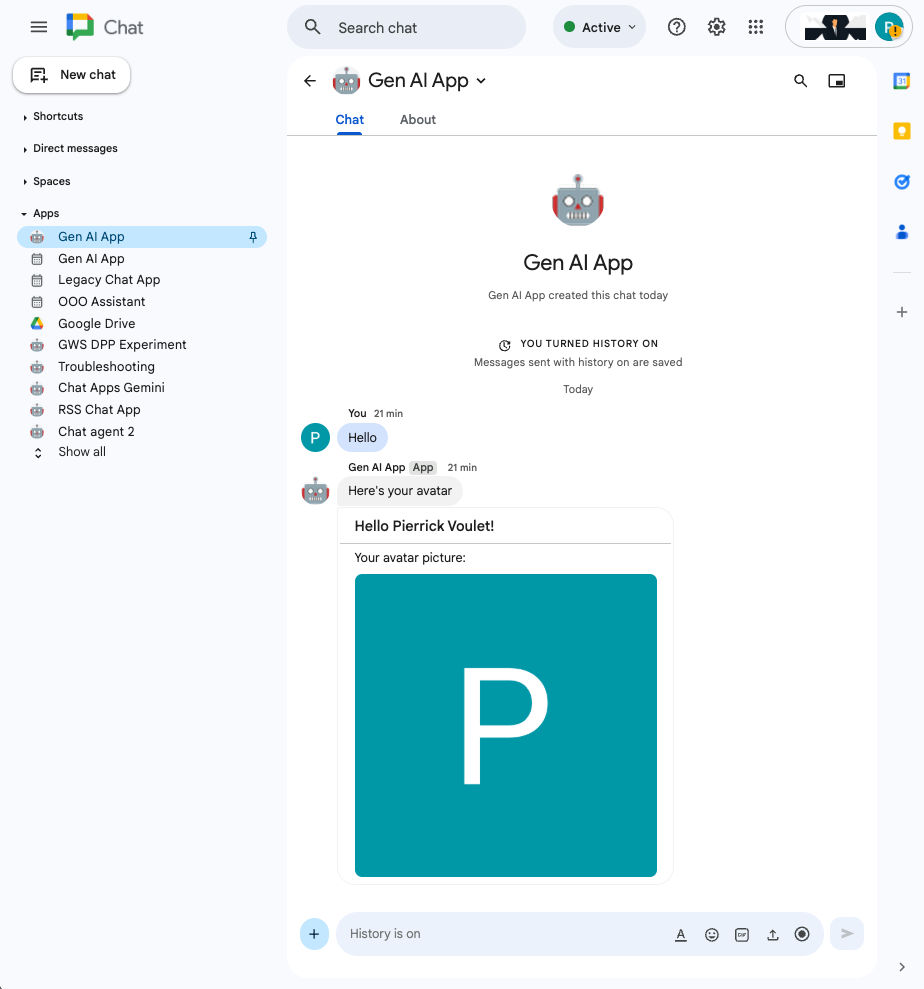
在新分頁中開啟 Google Chat,然後按照下列步驟操作:
- 如果尚未開啟,請開啟與 Chat 應用程式互傳的即時訊息聊天室。
- 輸入
Hello並按下enter鍵,Chat 應用程式應會回覆你的名稱和個人資料相片。
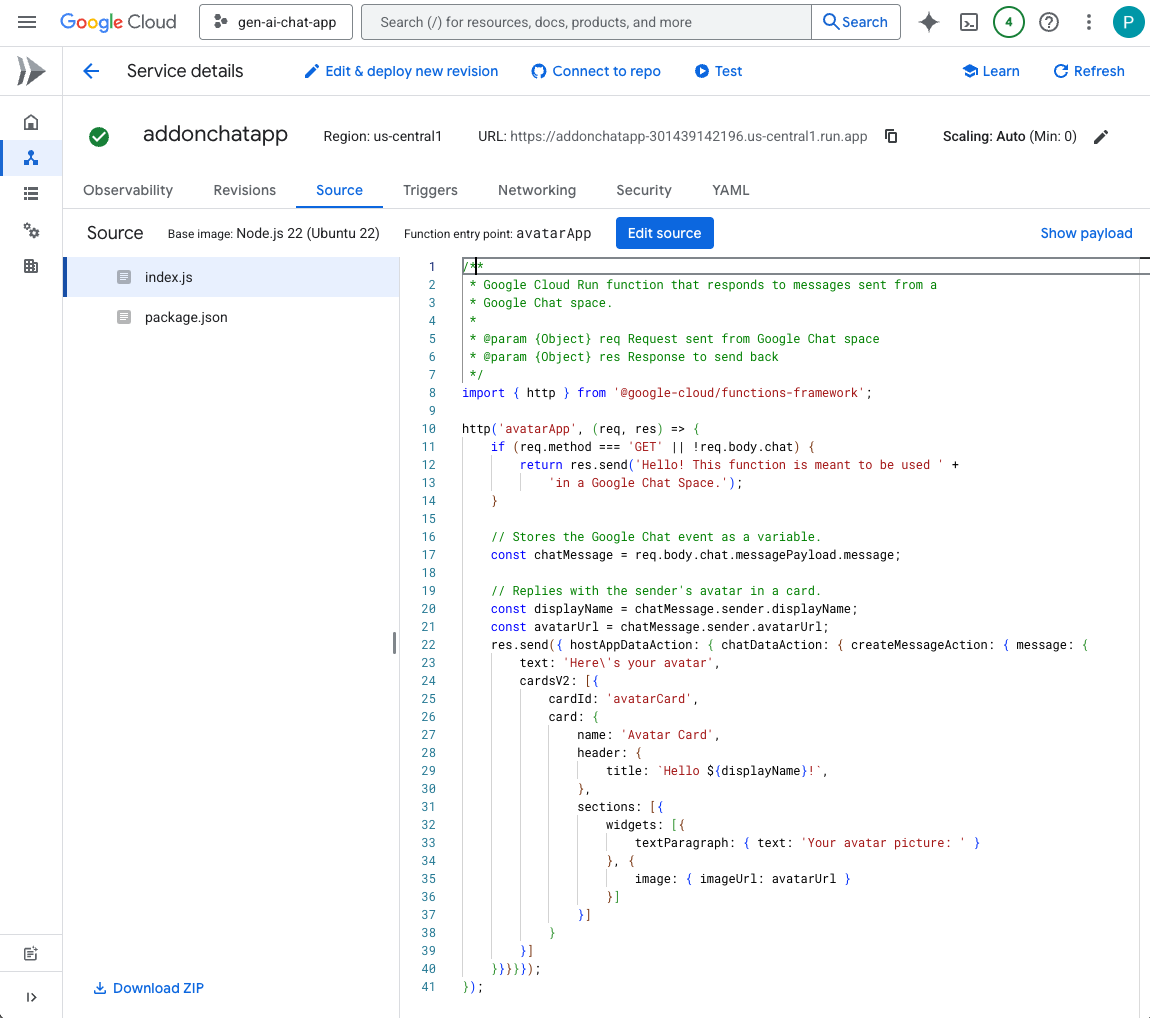
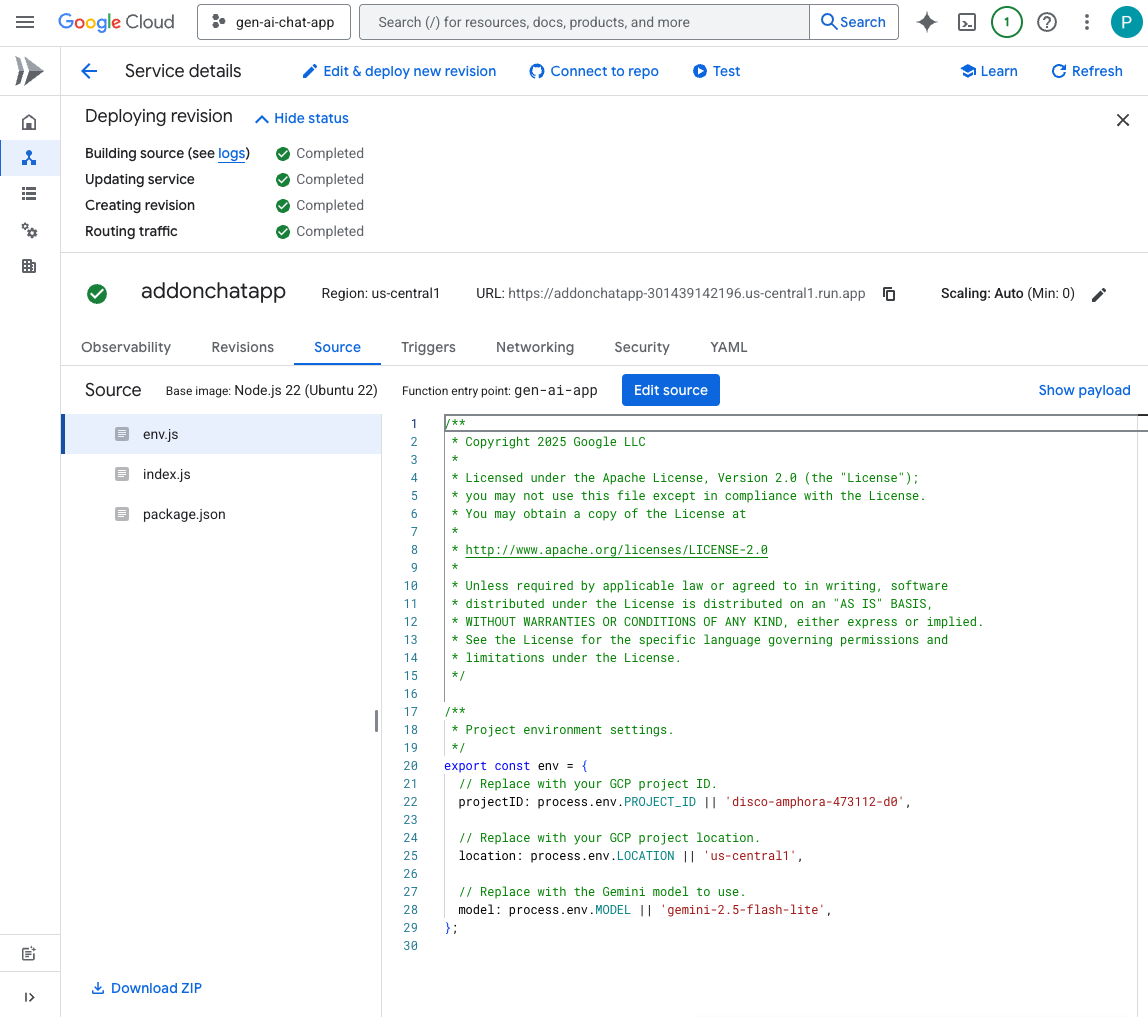
Google Cloud Run 函式服務
在新分頁中開啟 Google Cloud 控制台,然後按照下列步驟操作:
- 選取專案。
- 依序點選「選單」圖示 ☰ >「Cloud Run」>「服務」。
- 在服務清單中點選「addonchatapp」,然後開啟「來源」分頁。
在本地下載原始碼和資源
- 在偏好的本機開發環境中,開啟
node/chat/gen-ai-apps目錄。
3. 提示應用程式
這個應用程式會提示 Vertex AI 上的 Gemini,以簡潔明瞭的文字回覆,用自然語言與使用者對話。實作項目會使用 Node.js 適用的 Google Gen AI SDK。
查看概念
自然語言
相對於人工或電腦語言,人類在日常溝通時使用的口語或書寫語言。
Cloud Run functions
Cloud Run functions 非常適合建構無伺服器後端、執行即時資料處理作業,以及建立智慧型應用程式。無需佈建、管理、修補或更新伺服器。可自動調整資源配置、可容錯,並具備高可用性。
提示
提示是指設計輸入內容 (提示) 的技巧,用來引導生成式 AI 模型產生想要的輸出內容。通常需要仔細措辭問題、提供脈絡資訊、給予指示或範例,才能從模型獲得特定且相關的回覆。
Vertex AI
Vertex AI 提供建構及使用生成式 AI 所需的一切資源,包括 AI 解決方案、搜尋和對話、超過 130 個基礎模型,以及整合式 AI 平台。

Gemini
Gemini 是 Google 的多模態 LLM,可透過 Vertex AI 存取。這項技術可協助使用者發揮潛能,激發想像力、拓展好奇心,以及提升工作效率。
Google Gen AI SDK
Google Gen AI SDK 專為開發人員打造,可建構由 Gemini 驅動的應用程式,並提供與 Gemini Developer API 和 Vertex AI 相容的統一介面。並提供 Python、Go、Node.js 和 Java 的用戶端程式庫。
審查流程
查看原始碼
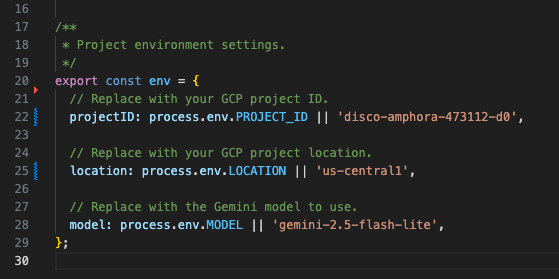
env.js
...
// Replace with your GCP project ID.
projectID: process.env.PROJECT_ID || 'your-google-cloud-project-id',

// Replace with your GCP project location.
location: process.env.LOCATION || 'your-google-cloud-project-location',

// Replace with the Gemini model to use.
model: process.env.MODEL || 'gemini-2.5-flash-lite',
...
index.js
// Import the Google Gen AI SDK.
import { GoogleGenAI } from '@google/genai';
...
// Use Vertex AI.
const genAI = new GoogleGenAI({vertexai: true, project: env.projectID, location: env.location});

http('gen-ai-app', async (req, res) => {
 // Send a new Chat message with the generated answer
 return res.send({ hostAppDataAction: { chatDataAction: { createMessageAction: { message: {
   text: await generateAnswer(req.body.chat.messagePayload.message.text)
 }}}}});
});

async function generateAnswer(message) {
 // The prompt is made of the user's message and specific instructions for the model.
 const prompt = 'In a consice and with plain text only (no formatting), '
                 + 'answer the following message in the same language: ' + message;
 const aiResponse = await genAI.models.generateContent({model: env.model, contents: prompt});
 return aiResponse.candidates[0].content.parts[0].text;
};
...
package.json
...
"main": "index.js",
"type": "module",
"scripts": {
  "start": "node index.js"
},
"dependencies": {
  "@google-cloud/functions-framework": "^4.0.0",
  "@google/genai": "1.15.0"
},
...
啟用 Vertex AI API
- 在 Google Cloud 控制台中,啟用 Vertex AI API:
- 依序點選「選單 ☰」>「API 和服務」>「已啟用的 API 和服務」,然後確認清單中是否列出「Vertex AI API」。
更新 Google Cloud Run Node.js 函式
- 在本機開發環境中,將目前目錄變更為
node/chat/gen-ai-apps/1-prompt。其中包含完整的原始碼和資源。 - 在編輯器中開啟
env.js,然後設定下列項目: - projectID:Google Cloud 專案的 ID。您可以從 Google Cloud 控制台歡迎頁面擷取這個值。
- location:Google Cloud Run 函式服務的區域。您可以從 Google Cloud Run 函式服務詳細資料頁面擷取。
- model:要使用的模型。如要查看所有可用模型,請參閱 Vertex AI 說明文件。預設模型為 Flash,可快速執行作業並降低成本。
- 前往 Google Cloud Run 函式服務詳細資料頁面的「來源」分頁。
- 按一下「編輯來源」。
- 將「函式進入點」設為
gen-ai-app。 - 按一下「➕」,輸入
env.js,然後按一下「✔️」,即可建立缺少的來源檔案。 - 將
index.js、env.js和package.json檔案的全部內容,替換為本機開發環境中的內容。 - 按一下「儲存並重新部署」。
- 等待修訂版本部署作業順利完成。
試試看
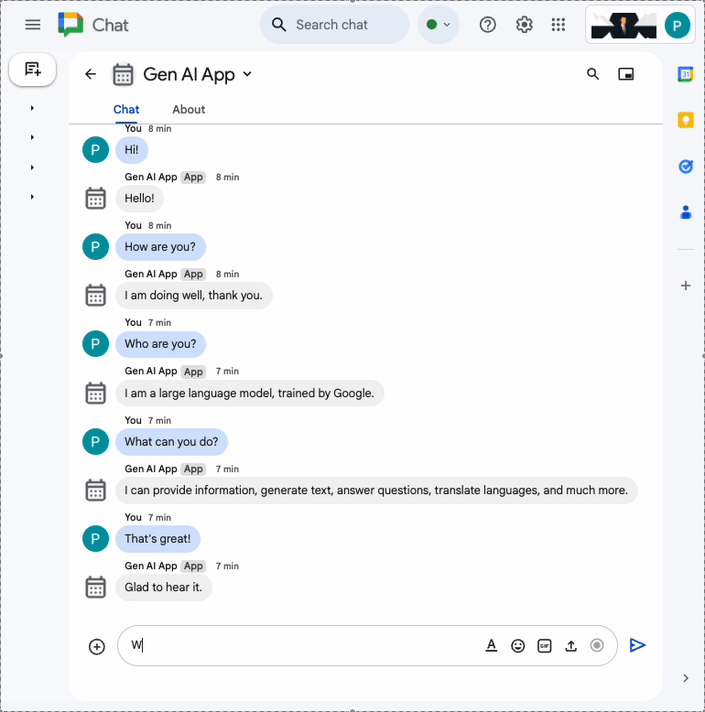
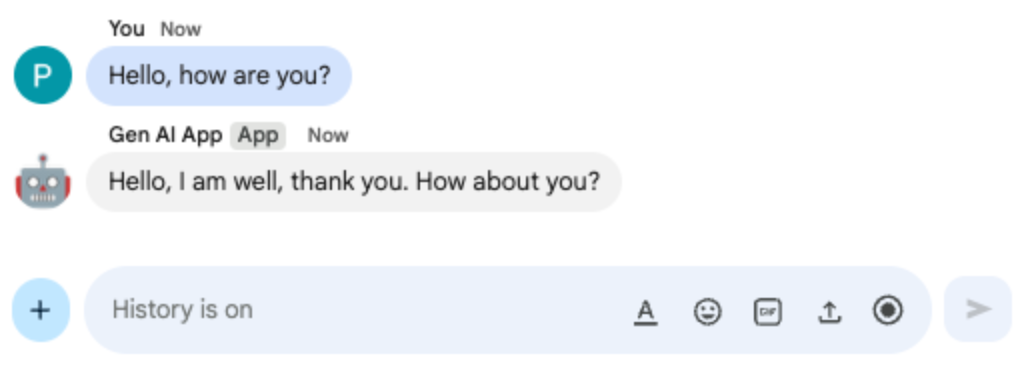
- 在 Google Chat 中,與 Chat 應用程式互傳即時訊息時,請輸入
Hello, how are you?並按下enter。應用程式應根據提示中的指示,以純文字簡潔地回覆。
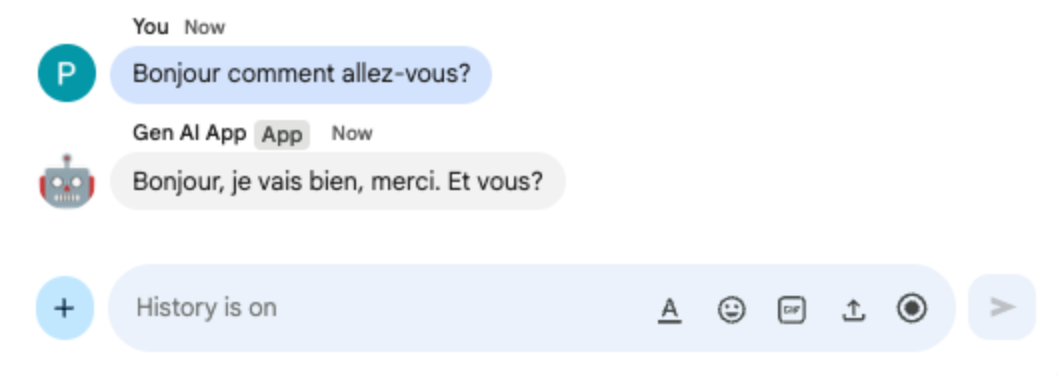
- 在 Google Chat 中,與 Chat 應用程式互傳即時訊息時,請輸入
Bonjour comment allez-vous?並按下enter。應用程式應按照提示中的指示,以法文回覆。
4. 格式化應用程式
這個應用程式以 Prompt app 為基礎,新增了符合 Google Chat 簡訊格式的 RTF 回覆支援。提示中的指令會更新,詳盡說明模型可使用的不同選項。
查看概念
Google Chat 訊息
Google Chat 訊息支援多種格式選項,讓您直接在 Google Chat 介面中傳送更清楚、更生動的訊息。這些規則會根據特定 Markdown 規則套用粗體、斜體、刪除線,以及建立超連結等。
審查流程
檢查原始碼
index.js
...
async function generateAnswer(message) {
 // Specify formatting options that are compatible with Google Chat messages
 // https://developers.google.com/workspace/chat/format-messages#format-texts
 const prompt = `Use simple text for concise answers. The only formatting options you can use is to
(1) surround some text with a single star for bold such as *text* for strong emphasis
(2) surround some text with a single underscore for italic such as _text_ for gentle emphasis
(3) surround some text with a single tild for strikethrough such as ~text~ for removal
(4) use a less than before followed by a URL followed by a pipe followed by a link text followed
    by a more than for a hyperlink such as <https://example.com|link text> for resource referencing
(5) use a backslash followed by the letter n for a new line such as \n for readibility
(6) surround some text with a single backquote such as \`text\` for quoting code
(7) surround an entire paragraph with three backquotes in dedicated lines such as
    \`\`\`\nparagraph\n\`\`\` for quoting code
(8) prepend lines with list items with a single star or hyphen followed by a single space
    such as * list item or - list item for bulleting ;
DO NOT USE ANY OTHER FORMATTING OTHER THAN THOSE.
Answer the following message in the same language: ${message}`;
...
};
...
更新 Google Cloud Run Node.js 函式
- 在本機開發環境中,將目前目錄變更為
node/chat/gen-ai-apps/2-format。其中包含完整的原始碼和資源。 - 前往 Google Cloud Run 函式服務詳細資料頁面的「來源」分頁。
- 按一下「編輯來源」。
- 將
index.js檔案的完整內容,替換為本機開發環境中的內容。 - 按一下「儲存並重新部署」。
- 等待修訂版本部署作業順利完成。
試試看
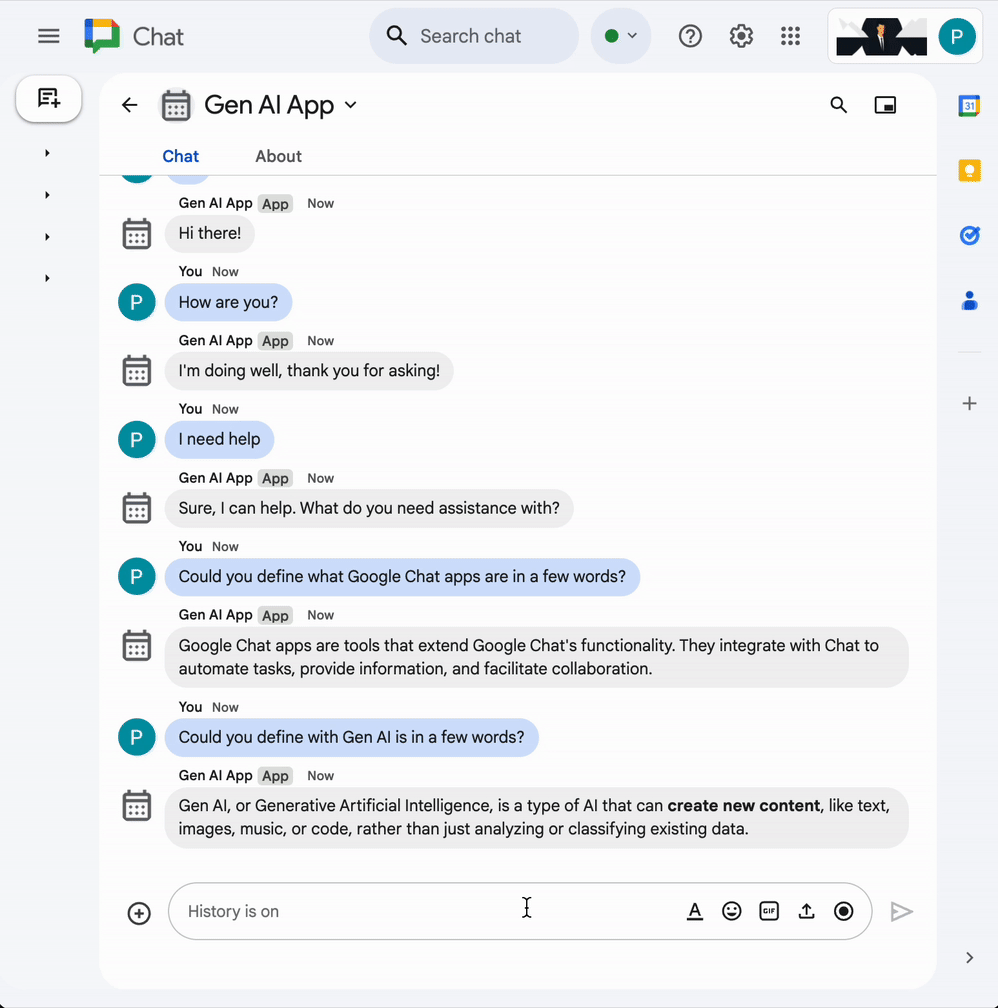
- 在 Google Chat 中,與 Chat 應用程式互傳即時訊息時,請輸入
Showcase all formatting options you have with one paragraph each並按下enter。應用程式應根據提示中的指示,提供格式化範例。

- 在 Google Chat 中,與 Chat 應用程式互傳即時訊息時,請輸入
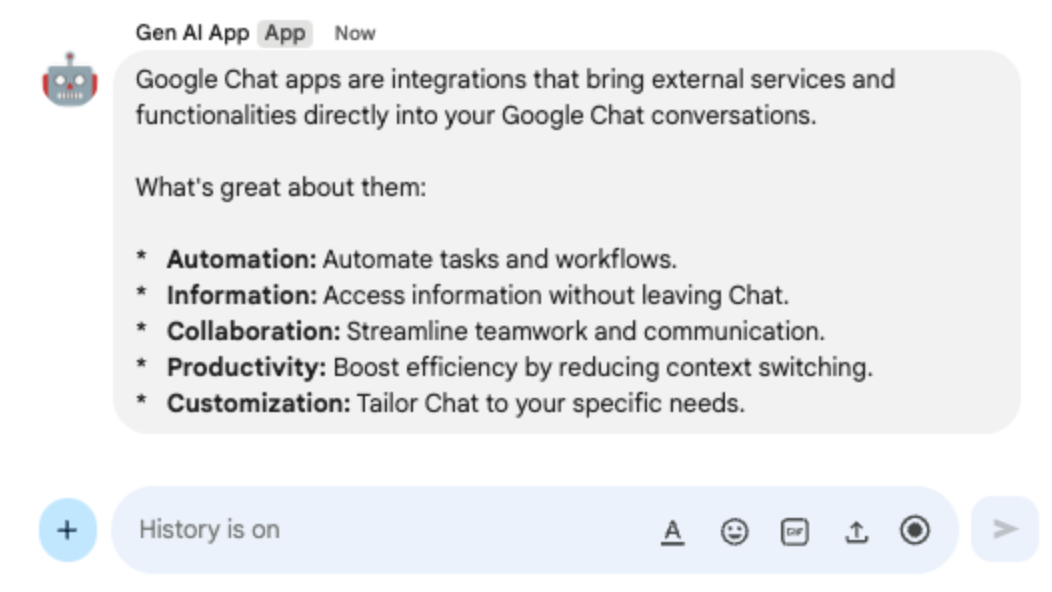
What are Google Chat apps? What's great about them?並按下enter。應用程式應在適當情況下提供格式化答案。
5. Ground 應用程式
這個應用程式以 Format app 為基礎,並新增了來源根據和傳回來源的支援功能。並執行 Google 搜尋工具,附上含有答案連結的資訊卡。
複習概念
建立基準
建立基準是指將模型連結至資訊來源的技術。這項技術通常用於實際應用,可參照真實世界的資料,提高生成內容的準確度和關聯性,避免模型產生幻覺或不實資訊。
Google 搜尋工具
Google 搜尋工具可讓模型在網路上搜尋即時資訊,確保回覆內容準確且符合現況,進而提升基準建立效果。
Google Workspace 資訊卡架構
Google Workspace 的資訊卡架構可讓開發人員建立豐富的互動式使用者介面。可建構有條理且美觀的卡片,當中可包含文字、圖片、按鈕和其他小工具。這些資訊卡提供結構化資訊,並支援在對話中直接執行快速動作,提升使用者體驗。
查看流程
檢查原始碼
index.js
...
const aiResponse = await genAI.models.generateContent({
 model: env.model,
 contents: prompt,
 // Google Search tool is enabled
 config: { tools: [{ googleSearch: {}}]}
});

let groundingCardsV2 = undefined;
const grounding = aiResponse.candidates[0].groundingMetadata;
// Go through the grounding metadata if any
if (grounding && grounding.groundingChunks && grounding.groundingChunks.length > 0) {
 let linkButtons = [];
 grounding.groundingChunks.forEach(groundingChunk => {
   if (groundingChunk.web) {
     // Create one link button per web URL returned
     linkButtons.push({
       text: groundingChunk.web.domain,
       onClick: { openLink: { url: groundingChunk.web.uri}}
     });
   }
 });
 // Create a card with link buttons
 groundingCardsV2 = [{
   cardId: "sourcesCard",
   card: { sections: [{
     header: "Sources",
     widgets: [{ buttonList: { buttons: linkButtons}}]
   }]}
 }];
}

// Send a Chat message with the generated answer
return res.send({ hostAppDataAction: { chatDataAction: { createMessageAction: { message: {
 text: aiResponse.candidates[0].content.parts[0].text,
 // The sources are referenced in the card
 cardsV2: groundingCardsV2
}}}}});
...
更新 Google Cloud Run Node.js 函式
- 在本機開發環境中,將目前目錄變更為
node/chat/gen-ai-apps/3-ground。其中包含完整的原始碼和資源。 - 前往 Google Cloud Run 函式服務詳細資料頁面的「來源」分頁。
- 按一下「編輯來源」。
- 將
index.js檔案的完整內容,替換為本機開發環境中的內容。 - 按一下「儲存並重新部署」。
- 等待修訂版本部署作業順利完成。
試試看
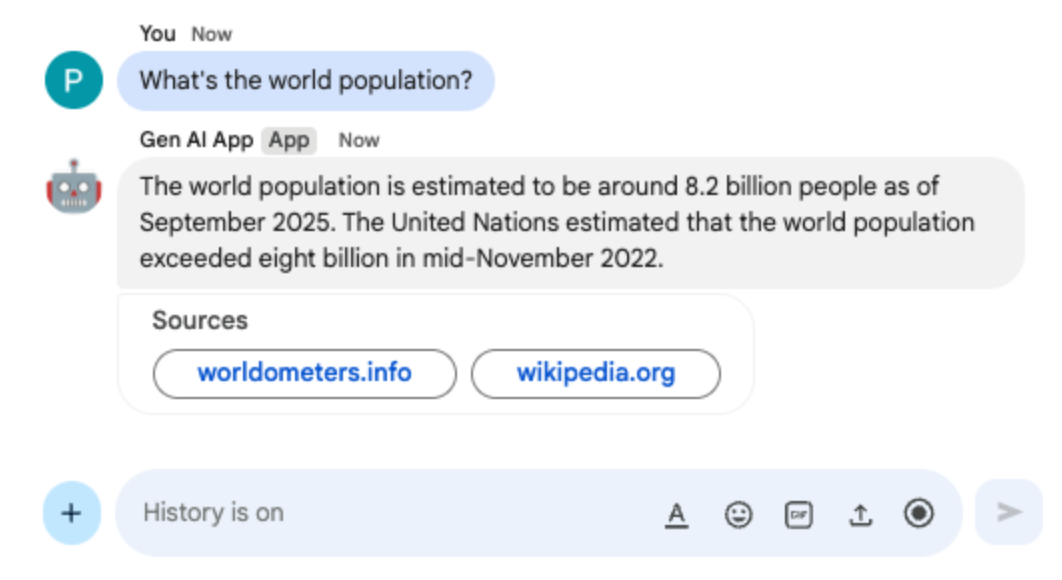
在 Google Chat 中,與 Chat 應用程式互傳即時訊息時,請輸入 What's the world population? 並按下 enter。應用程式應在資訊卡中附上來源連結,藉此提供回覆。
6. MCP 應用程式
這個應用程式以 Format app 為基礎,新增對遠端代管 Model Context Protocol (MCP) 伺服器所提供工具的支援。這項服務會連線至 Google Workspace Developer Assist MCP,提供存取及搜尋 Google Workspace 開發人員說明文件的工具。
查看概念
Model Context Protocol (MCP)
Model Context Protocol 是一種開放原始碼架構,可將模型與外部服務整合,並標準化整合方式。模型可以透過程式設計探索、瞭解及使用各種工具,擴展自身能力、執行實際行動,並存取最新資訊。
MCP TypeScript SDK
TypeScript SDK 實作了完整的 MCP 規格,可簡化 MCP 用戶端的建立作業,並連線至任何 MCP 伺服器。此外,您也可以開發 MCP 伺服器,提供資源、提示和工具的存取權。
審查流程
檢查原始碼
index.js
// Import the MCP TypeScript SDK.
import { Client } from "@modelcontextprotocol/sdk/client/index.js";
import { StreamableHTTPClientTransport } from "@modelcontextprotocol/sdk/client/streamableHttp.js";
import { SSEClientTransport } from "@modelcontextprotocol/sdk/client/sse.js";
...
// Create and connect the MCP client from the URL.
const mcpServerUrl = new URL("https://workspace-developer.goog/mcp");
const client = new Client({ name: "gen-ai-app-mcp", version: "1.0.0" });
// Try Streamable HTTP first (new) and SSE (old) as fallback for transport
try {
 await client.connect(new StreamableHTTPClientTransport(mcpServerUrl));
} catch (error) {
 await client.connect(new SSEClientTransport(mcpServerUrl));
}

http('gen-ai-app', async (req, res) => {
 ...
 const aiResponse = await genAI.models.generateContent({
   model: env.model,
   contents: prompt,
   // MCP tools are enabled
   config: { tools: [mcpToTool(client)]}
 });
 ...
}
...
package.json
...
"dependencies": {
  ...
  "@modelcontextprotocol/sdk": "^1.18.1"
},
...
更新 Google Cloud Run Node.js 函式
- 在本機開發環境中,將目前目錄變更為
node/chat/gen-ai-apps/4-mcp。其中包含完整的原始碼和資源。 - 前往 Google Cloud Run 函式服務詳細資料頁面的「來源」分頁。
- 按一下「編輯來源」。
- 將
index.js和package.json檔案的全部內容,替換為本機開發環境中的內容。 - 按一下「儲存並重新部署」。
- 等待修訂版本部署作業順利完成。
試試看
- 在 Google Chat 中,與 Chat 應用程式互傳即時訊息時,請輸入
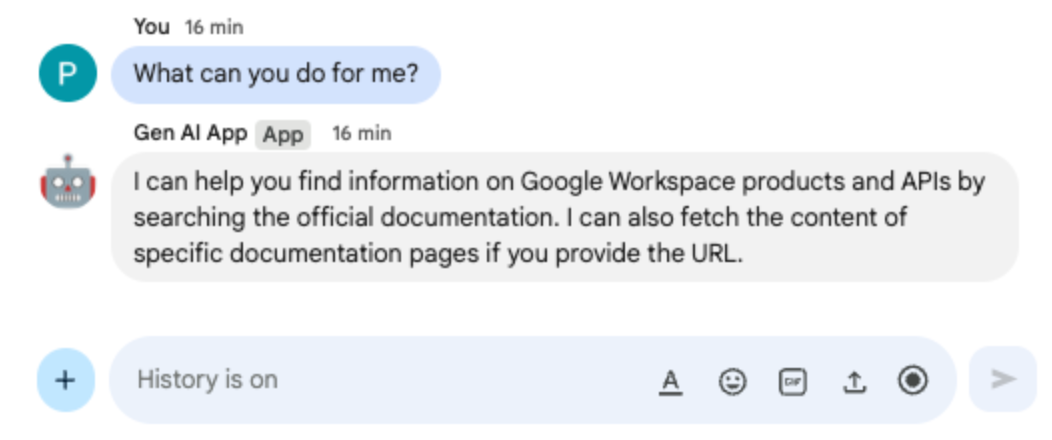
What can you do for me?並按下enter。應用程式應說明可執行的操作 (MCP 工具)。
- 在 Google Chat 中,與 Chat 應用程式互傳即時訊息時,請輸入
I would like to get the latest official documentation for the Google Sheets API append values並按下enter。應用程式應使用 MCP 工具,回覆要求的文件。

7. 多輪對話應用程式
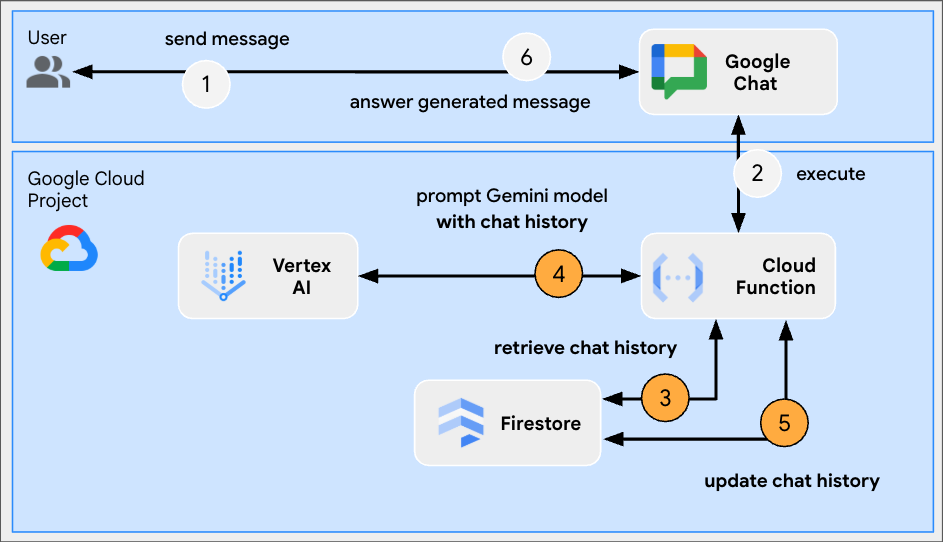
這個應用程式以 Format app 為基礎,追蹤即時通訊互動記錄,支援對話記憶功能。提供更自然、智慧且個人化的體驗。應用程式會使用與 Google Cloud 專案相關聯的預設 Google Cloud Firestore 資料庫進行儲存。
複習概念
多輪對話
多輪概念是指模型在多輪對話中,維持背景資訊和連貫性的能力。這項功能是支援複雜對話、進階 AI 輔助功能和自然使用者體驗的必要條件。
Google Cloud Firestore
Google Cloud Firestore 是一種充滿彈性且可擴充的 NoSQL 雲端資料庫,適用於行動技術、網頁與伺服器開發。這項服務會將資料儲存至文件中,並整理成集合,同時支援即時同步處理和離線使用。
審查流程
檢查原始碼
index.js
// Import the Google Cloud Firestore client library.
import { Firestore } from '@google-cloud/firestore';
...
// Configure DB
const USERS_PREFIX = 'users/';
const CHATS_COLLECTION = 'chats';
const db = new Firestore();
...
// Create or update data for a given user
async function createOrUpdateChatHistory(userId, data) {
 await db.collection(CHATS_COLLECTION).doc(userId.replace(USERS_PREFIX, '')).set(data);
};

// Retrieve data snapshot for a given user
async function getChatHistory(userId) {
 return await db.collection(CHATS_COLLECTION).doc(userId.replace(USERS_PREFIX, '')).get();
};
...
...
http('gen-ai-app', async (req, res) => {
 // Retrieve the chat history of the user
 const chatHistory = await getChatHistory(userId);
 const chat = genAI.chats.create({
   model: env.model,
   // Initiate the model with chat history for context
   history: chatHistory.exists ? chatHistory.data().contents : []
 });
 // If no history, send a first message to the model with instructions on how to behave
 if(!chatHistory.exists) {
   const preambule = 'The only formatting options you can use is to '
                   + ...
                   + 'DO NOT USE ANY OTHER FORMATTING OTHER THAN THOSE. '
                   + 'Answer in the same language that I use.';
   // The answer to this message is ignored
   await chat.sendMessage({message: preambule});
 }

 // Send the user's message to the model to generate the answer
 const aiResponse = await chat.sendMessage({message: userMessage});

 // Persist the updated chat history of the user
 await createOrUpdateChatHistory(userId, {contents: chat.getHistory({curated: true})});

 // Send a Chat message with the generated answer
 return res.send({ hostAppDataAction: { chatDataAction: { createMessageAction: { message: {
   text: aiResponse.candidates[0].content.parts[0].text
 }}}}});
});
...
package.json
...
"dependencies": {
  ...
  "@google-cloud/firestore": "^7.11.5"
},
...
啟用 Google Cloud Firestore API
- 依序點選「選單 ☰」>「API 和服務」>「已啟用的 API 和服務」,然後確認清單中是否列出 Cloud Firestore API。
建立 Cloud Firestore 資料庫
- 在 Google Cloud 控制台中,依序點選「選單 ☰」>「Firestore」。
- 點選「建立 Firestore 資料庫」
- 保留預設設定,然後點選「建立資料庫」。
更新 Google Cloud Run Node.js 函式
- 在本機開發環境中,將目前目錄變更為
node/chat/gen-ai-apps/5-multi-turn。其中包含完整的原始碼和資源。 - 前往 Google Cloud Run 函式服務詳細資料頁面的「來源」分頁。
- 按一下「編輯來源」。
- 將
index.js和package.json檔案的全部內容,替換為本機開發環境中的內容。 - 按一下「儲存並重新部署」。
- 等待修訂版本部署作業順利完成。
試試看
- 在 Google Chat 中,與 Chat 應用程式互傳即時訊息時,請輸入
Can you speak with the English from the 80's for now on?並按下enter。應用程式應會回覆正面訊息。
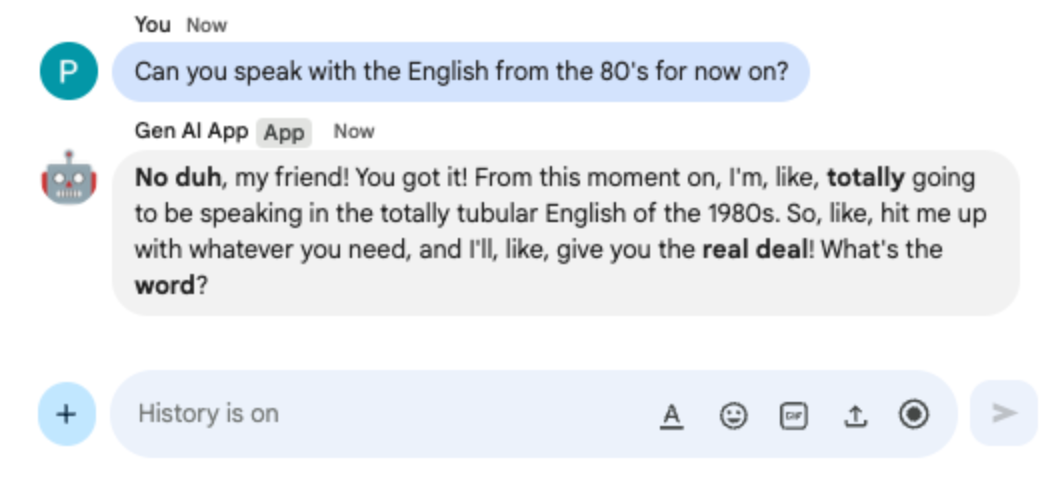
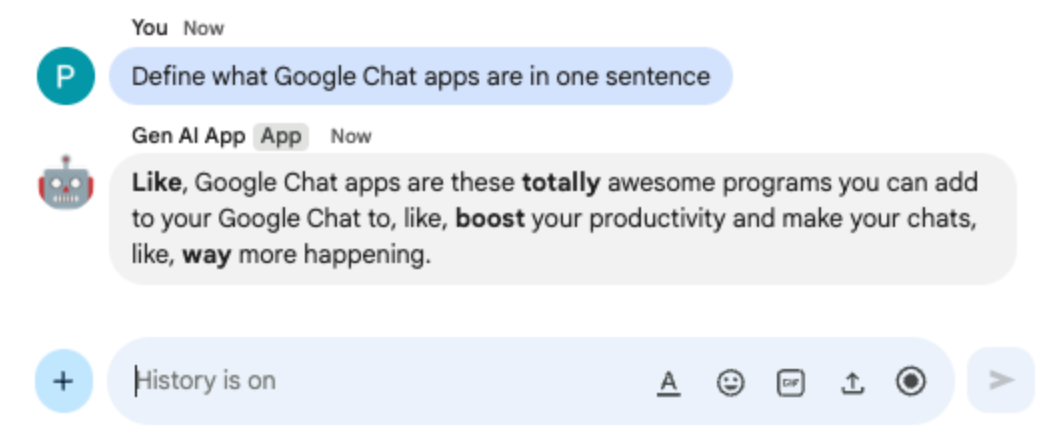
- 在 Google Chat 中,與 Chat 應用程式互傳即時訊息時,請輸入
Define what Google Chat apps are in one sentence並按下enter。應用程式應繼續以 1980 年代的英文回覆。
8. 自訂工具應用程式
這個應用程式以 Multi-turn app 為基礎,新增對函式呼叫自訂工具的支援,該工具會依賴 Google Workspace Calendar API 從公開日曆擷取下一個活動。模型會管理所有使用者互動,包括接收輸入內容,以及提供工具的輸出內容。不過,應用程式仍須負責執行必要的 API 呼叫,並在收到要求時向模型提供結果。應用程式使用 Google API 金鑰,因為擷取公開日曆資料時不需要使用者憑證。
查看概念
函式呼叫
函式呼叫功能可讓模型偵測使用者要求是否能透過外部工具或 API 達成。接著,模型會提供呼叫該工具所需的參數,將外部功能整合至回覆中。
Google Workspace API
開發人員可透過 Google Workspace API,將應用程式與各種 Google Workspace 服務整合。這些 API 可透過程式輔助方式存取 Gmail、Chat、日曆、雲端硬碟、文件、試算表等產品的功能,實現自動化、資料同步,以及建立自訂工作流程。
審查流程
檢查原始碼
env.js
...
// Replace with your Google API key.
googleApiKey: process.env.GOOGLE_API_KEY || 'your-google-api-key',
...
index.js
// Import parameter type definitions from Google Gen AI SDK.
import { GoogleGenAI, Type } from '@google/genai';
// Import Google APIs that include the Google Calendar API.
import { google } from 'googleapis';
...
// Create a Google Calendar API client using a Google API key.
const calendar = google.calendar({version: 'v3', auth: env.googleApiKey});
...
// Define the tool used for function calling
const getNextPublicCalendarEventTitleFunctionDeclaration = {
 name: 'getNextPublicCalendarEventTitle',
 parameters: {
   type: Type.OBJECT,
   description: 'Get the title of the next event of a public calendar.',
   properties: {
     calendarId: {
       type: Type.STRING,
       description: 'ID of the public calendar to get the next event title.',
     }
   },
   required: ['calendarId']
 }
};

// The function referenced in the tool definition
async function getNextPublicCalendarEventTitle(calendarId) {
 // Use Calendar API to retrieve the next event in the given calendar
 const response = await calendar.events.list({
   calendarId: calendarId,
   timeMin: new Date().toISOString(),
   maxResults: 1,
   singleEvents: true,
   orderBy: 'startTime',
 });
 const events = response.data.items;
 if (!events || events.length === 0) {
   return null;
 }
 return `${events[0].summary}`;
};
...
...
http('gen-ai-app', async (req, res) => {
 ...
 // Send the user's message to the model to generate the answer
 let aiResponse = await chat.sendMessage({
   message: userMessage,
   // The tool used for function calling is enabled
   config: { tools: [{ functionDeclarations: [getNextPublicCalendarEventTitleFunctionDeclaration]}]}
 });

 // Handle the function calling turn with the model if any
 const functionCall = aiResponse.candidates[0].content.parts[0].functionCall;
 if (functionCall) {
   let functionResult = null;
   switch(functionCall.name) {
     case 'getNextPublicCalendarEventTitle':
       // Make the function call as per model request
       functionResult = await getNextPublicCalendarEventTitle(functionCall.args['calendarId']);
       break;
     default:
   }
   // Finish the function calling turn by sending the execution result to the model
   aiResponse = await chat.sendMessage({ message: { functionResponse: {
     name: functionCall.name,
     response: { output: functionResult }
   }}});
 }
 ...
 // Send a Chat message with the generated answer
 return res.send({ hostAppDataAction: { chatDataAction: { createMessageAction: { message: {
   text: aiResponse.candidates[0].content.parts[0].text
 }}}}});
});
...
package.json
...
"dependencies": {
  ...
   "googleapis": "^160.0.0"
},
...
啟用 Calendar API
- 依序點選「選單 ☰」>「API 和服務」>「已啟用的 API 和服務」,然後確認清單中是否列出「Google Calendar API」。
建立 Google API 金鑰
在 Google Cloud 控制台中,按照下列步驟操作:
- 依序點選「選單 ☰」>「API 和服務」>「憑證」。
- 按一下「+ 建立憑證」,然後選取「API 金鑰」。
- 等待作業完成。
- 在確認對話方塊中,找出「Your API Key」(您的 API 金鑰) 文字欄位,然後按一下「Copy to clipboard」(複製到剪貼簿)。
更新 Google Cloud Run Node.js 函式
- 在本機開發環境中,將目前目錄變更為
node/chat/gen-ai-apps/6-custom-tool。其中包含完整的原始碼和資源。 - 前往 Google Cloud Run 函式服務詳細資料頁面的「來源」分頁。
- 按一下「編輯來源」。
- 將
index.js和package.json檔案的全部內容,替換為本機開發環境中的內容。 - 開啟
env.js檔案,然後執行下列操作: - 將 googleApiKey 新增至匯出的欄位
export const env = {
 ...
 googleApiKey: 'your-google-api-key',
};
- 將
your-google-api-key替換成您在上一個步驟複製的 Google API 金鑰。按一下 Google Cloud 憑證頁面中的「顯示金鑰」即可擷取。
- 按一下「儲存並重新部署」。
- 等待修訂版本部署作業順利完成。
試試看
- 在 Google 日曆中,按照下列步驟操作:
- 在「其他日曆」下方,依序按一下「+」和「建立新日曆」。
- 將「Name」(名稱) 設定為
My Public Calendar。 - 按一下「建立日曆」
- 等待作業完成。
- 在「我的日曆的設定」下方,選取新建立的日曆「我的公開日曆」。
- 在「活動的存取權限」下方,選取「公開這個日曆」,然後在「警告」對話方塊中按一下「確定」。
- 在「活動的存取權限」下方,選取「公開這個日曆」選項旁的下拉式選單,然後選取「查看所有活動的詳細資料」
- 在「整合日曆」下方,將「日曆 ID」欄位的值複製到剪貼簿
- 按一下左上角的向左箭頭,離開「設定」。
- 按一下日曆,為明天建立新活動,輸入
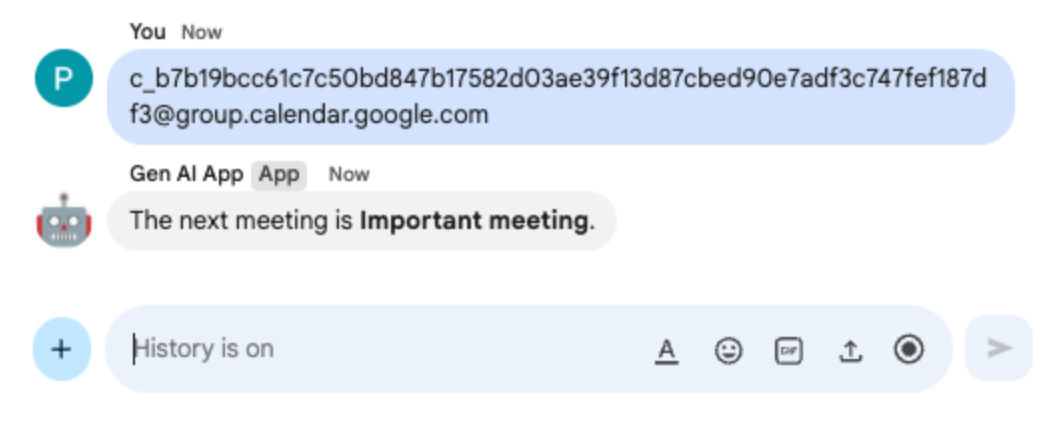
Important meeting,從下拉式選單中選取「我的公開日曆」,然後按一下「儲存」。 - 在 Google Chat 中,與 Chat 應用程式互傳即時訊息時,請輸入
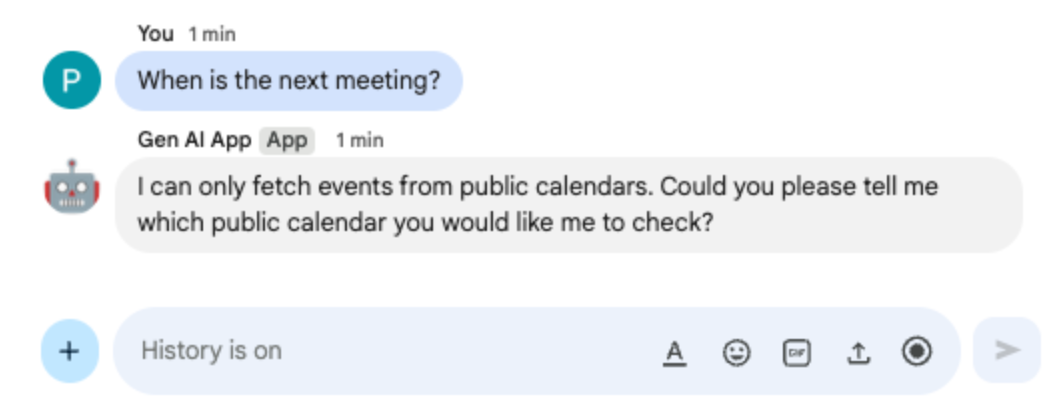
When is the next meeting?並按下enter。應用程式應要求精確度,因為系統不清楚要參照哪個日曆。
- 在 Google Chat 中,開啟與 Chat 應用程式的即時訊息空間,貼上先前複製到剪貼簿的日曆 ID,然後按下
enter。應用程式應會提供先前建立的活動詳細資料。
9. 串流應用程式
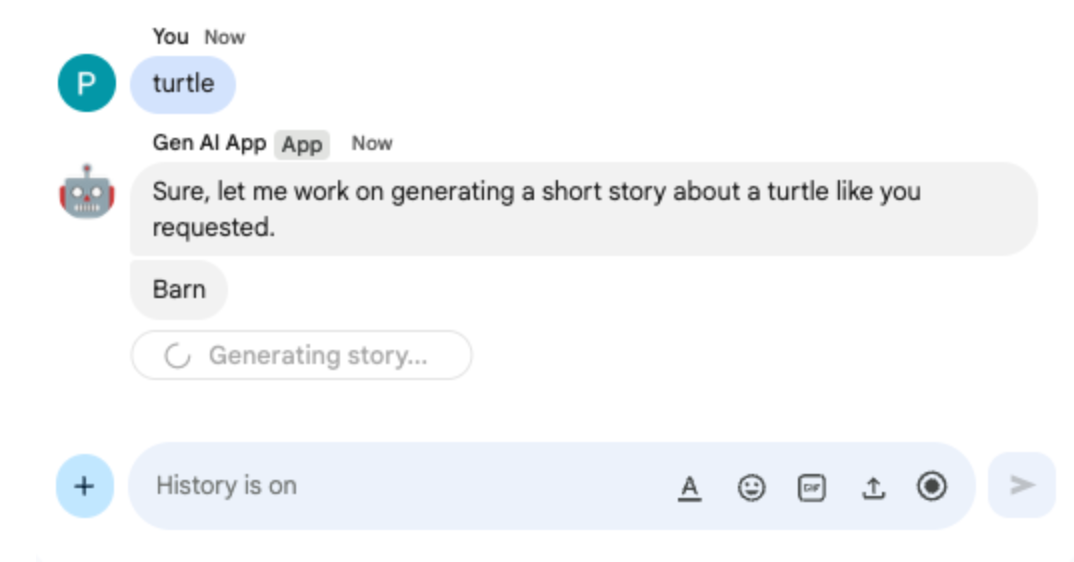
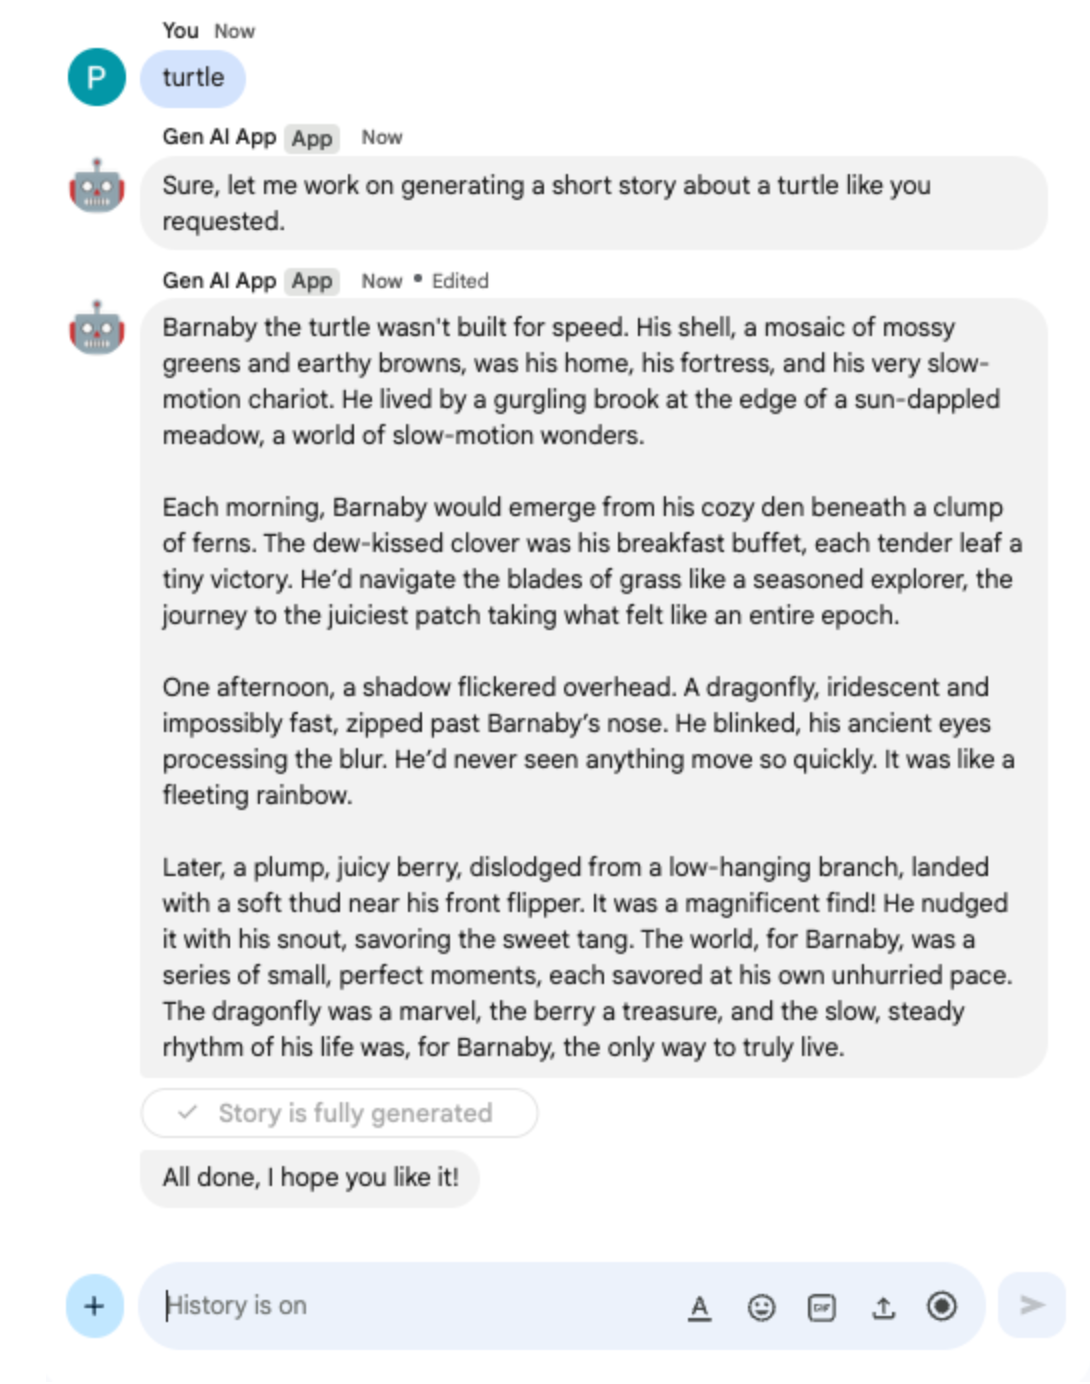
這個應用程式會根據使用者提供的主題,透過 Gemini 模型生成 2 分鐘的故事。由於生成完整答案需要時間,因此應用程式會以串流模式呼叫模型,並透過 Google Chat API 在訊息中傳送內容和狀態,顯示進度。
查看概念
Google Chat API
開發人員可透過 Google Chat API 以程式輔助方式與 Google Chat 互動,傳送訊息、建立聊天室、管理成員等,進而建構自訂整合功能和機器人。
串流
串流是指持續接收資料的程序,不必等待系統生成完整的回覆。在 AI 模型呼叫方面,串流功能可讓應用程式在部分結果可用時立即向使用者顯示,進而提升感知效能和使用者體驗,尤其是在生成時間較長的工作方面。如果生成式 AI 模型可能需要大量時間才能產生完整輸出內容,這項功能就特別實用。
審查流程
查看原始碼
index.js
// Import Google Auth library used to create Google Chat API client
import { GoogleAuth } from 'google-auth-library';
...
http('gen-ai-app', async (req, res) => {
 // Use app authentication.
 // Application Default Credentials (ADC) will use the Cloud Run function's
 // default service account, we just need to specify the Chat API app auth scopes.
 const auth = new GoogleAuth({
   // Chat API app authentication scopes
   scopes: ['https://www.googleapis.com/auth/chat.bot']
 });

 // Create Chat service client with application credentials
 const chatClient = google.chat({
   version: 'v1',
   auth: await auth.getClient()
 });

 // Send a server streaming request to generate the answer
 const aiResponse = await genAI.models.generateContentStream({
   model: env.model,
   contents: `Generate a story about a ${userMessage}. `
               + `It should take 2 minutes to read it out loud.`
 });

 // Send a first Chat message to summarize what will be done
 await chatClient.spaces.messages.create({
   parent: spaceName,
   requestBody: { text: `Sure, let me work on generating a short story `
                           + `about a ${userMessage} like you requested.`}
 });

 // Go through the response chunks received from the stream
 let messageName = undefined;
 let answer = "";
 for await (const chunk of aiResponse) {
   const text = chunk.text;
   if (text) {
     // Update the answer by concatenating the response chunks
     answer += text;
     // The Chat message request body is the same for message creation and update
     const responseBody = {
       text: answer,
       accessoryWidgets: [getStatusAccessoryWidget('Generating story...', 'progress_activity')]
     }
     if (!messageName) {
       // Create a Chat message dedicated to the generated content
       const messageResponse = await chatClient.spaces.messages.create({
         parent: spaceName,
         requestBody: responseBody
       });
       messageName = messageResponse.data.name;
     } else {
       // Update the Chat message dedicated to the generated content
       await chatClient.spaces.messages.patch({
         name: messageName,
         updateMask: 'text,accessory_widgets',
         requestBody: responseBody
       });
     }
   }
 }

 // Update the accessory widget with final progress status
 await chatClient.spaces.messages.patch({
   name: messageName,
   updateMask: 'accessory_widgets',
   requestBody: {
     accessoryWidgets: [getStatusAccessoryWidget('Story is fully generated', 'check')]
   }
 });

 // Send a last Chat message to confirm it's done
 return res.send({ hostAppDataAction: { chatDataAction: { createMessageAction: { message: {
   text: 'All done, I hope you like it!'
 }}}}});
});

// Create an accessory widget with progress status
function getStatusAccessoryWidget(text, icon) {
 return { buttonList: { buttons: [{
   text: text,
   icon: { materialIcon: { name: icon}},
   // This is a workaround to have the icon shown, it's not clickable
   onClick: { openLink: { url: "https://google.com"}},
   disabled: true
 }]}};
}
package.json
...
"dependencies": {
  ...
   "google-auth-library": "^10.3.0"
},
...
更新 Google Cloud Run Node.js 函式
- 在本機開發環境中,將目前目錄變更為
node/chat/gen-ai-apps/7-stream。其中包含完整的原始碼和資源。 - 前往 Google Cloud Run 函式服務詳細資料頁面的「來源」分頁。
- 按一下「編輯來源」。
- 將
index.js和package.json檔案的全部內容,替換為本機開發環境中的內容。 - 按一下「儲存並重新部署」。
- 等待修訂版本部署作業順利完成。
試試看
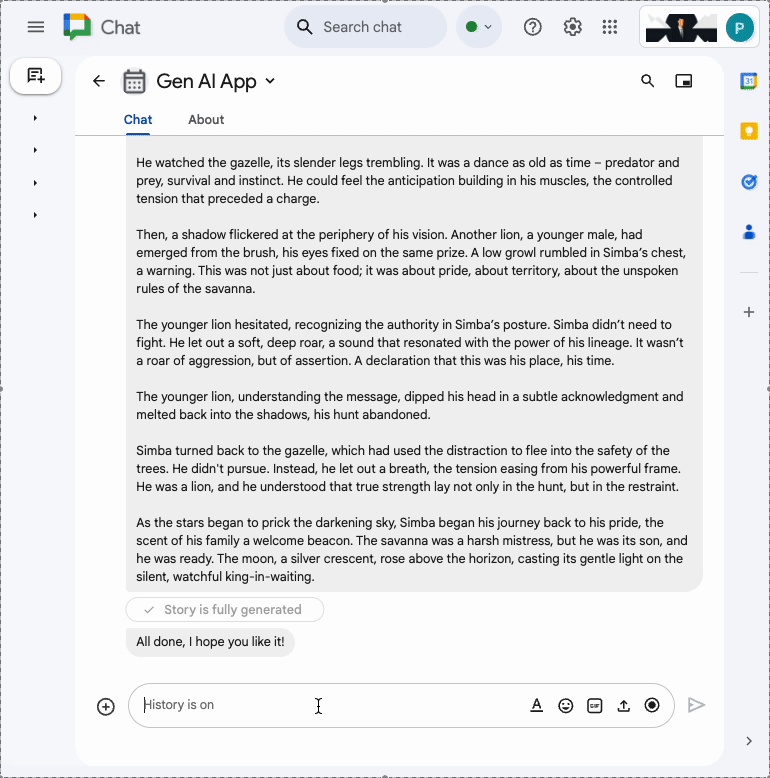
在 Google Chat 中,與 Chat 應用程式互傳即時訊息時,請輸入 turtle 並按下 enter。應用程式應回覆確認訊息、在生成故事時顯示進度,並在完成時傳送確認訊息。
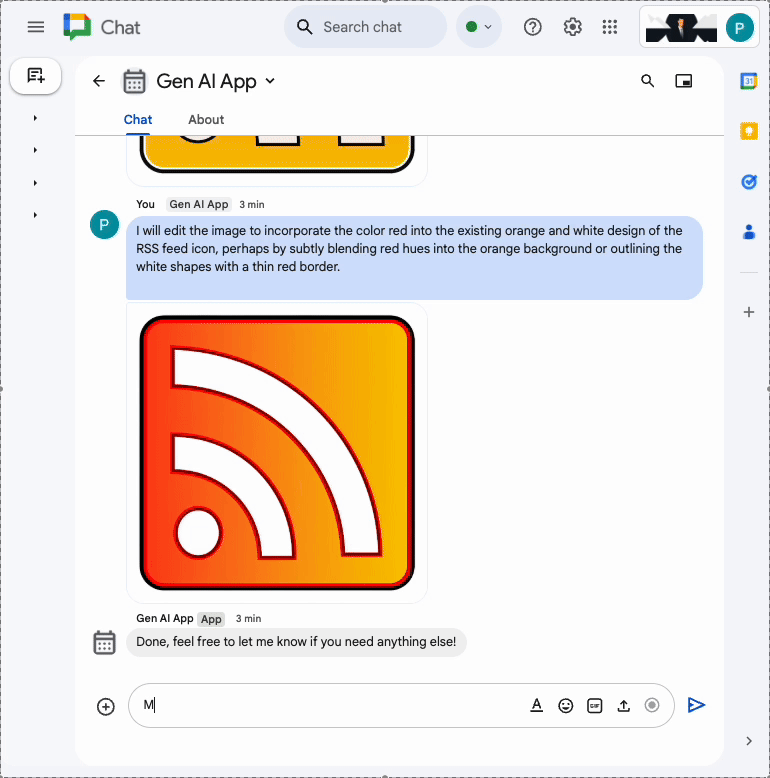
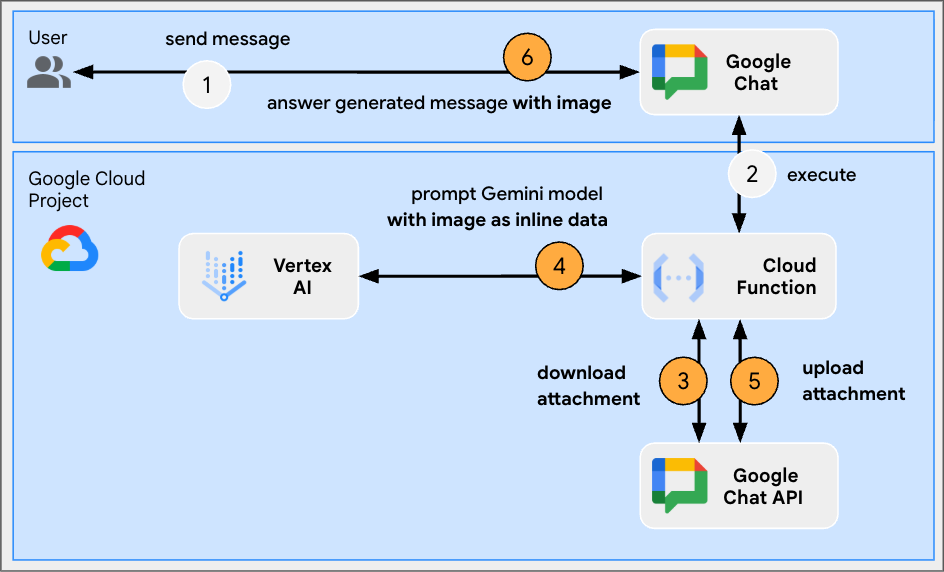
10. 多模態應用程式
這款應用程式會根據使用者的文字指令,透過模型編輯圖片。使用者和應用程式都會將圖片新增為 Google Chat 訊息附件,以便交換。應用程式會透過 Google Chat API,以程式輔助方式下載及上傳圖片。
查看概念
Google Chat 訊息附件
Google Chat 訊息附件是指上傳至 Google Chat 訊息的檔案,例如圖片或影片。這些附件可透過程式輔助方式管理,讓應用程式直接在對話中與多媒體互動。
網域範圍委派 (DWD)
全網域委派 (DWD) 可讓服務帳戶模擬 Google Workspace 網域中的使用者,讓應用程式代表這些使用者執行動作,而不需直接授權。如果應用程式需要在使用者環境中存取使用者資料或執行動作 (例如將附件上傳至 Google Chat),即使使用者不在場,只要授予服務帳戶網域的廣泛存取權,就能達成目的。
審查流程
檢查原始碼
env.js
...
// Replace with the Gemini model to use.
model: process.env.MODEL || 'gemini-2.0-flash-preview-image-generation',
...
index.js
...
// Import byte stream management libraries.
import { Buffer } from 'buffer';
import { Readable } from 'stream';
...
// Download a Google Chat attachment as base 64 string.
async function downloadFile(appChatClient, attachmentName) {
 const response = await appChatClient.media.download({
     resourceName: attachmentName,
     alt: 'media'
   }, {
     responseType: 'stream'
 });
 const chunks = [];
 return new Promise((resolve) => {
   response.data.on('data', (chunk) => {
     chunks.push(chunk);
   });
   response.data.on('end', () => {
     const fileBuffer = Buffer.concat(chunks);
     const base64String = fileBuffer.toString('base64');
     resolve(base64String);
   });
 });
}

// Upload a base 64 string as Google Chat attachment of a space.
async function uploadFile(useChatClient, spaceName, data) {
 const filename = 'generated_image.png';
 return await userChatClient.media.upload({
   parent: spaceName,
   requestBody: { filename: filename },
   media: {
     mimeType: 'image/png',
     body: Readable.from(Buffer.from(data, 'base64'))
   }
 });
}
...
...
http('gen-ai-app', async (req, res) => {
 const userEmail = req.body.chat.user.email;
 const spaceName = req.body.chat.messagePayload.space.name;
 const userMessage = req.body.chat.messagePayload.message.text;
 const attachmentName = req.body.chat.messagePayload.message.attachment[0].attachmentDataRef.resourceName;
 const attachmentContentType = req.body.chat.messagePayload.message.attachment[0].contentType;

 // Set up app authentication used to download the attachment input
 // Application Default Credentials (ADC) will use the Cloud Run function's
 // default service account.
 const appAuth = new GoogleAuth({
   // Specify the Chat API app authentication scopes
   scopes: ['https://www.googleapis.com/auth/chat.bot']
 });
 // Create Chat service client with application credentials
 const appChatClient = google.chat({
   version: 'v1',
   auth: await appAuth.getClient()
 });

 // Send a request to generate the answer with both text and image contents
 const aiResponse = await genAI.models.generateContent({
   model: env.model,
   contents: [{
     role: 'USER',
     parts: [
       // The text content of the message
       { text: userMessage },
       // The attachment of the message is downloaded and added inline
       { inlineData: {
         data: await downloadFile(appChatClient, attachmentName),
         mimeType: attachmentContentType
       }}
     ]
   }],
   config: { responseModalities: ['TEXT', 'IMAGE']}
 });

 // Set up user impersonation authentication used to upload the attachment output
 // and send the response.
 const impersonatedUserAuth = new GoogleAuth({
   // Specify the Chat API user authentication scopes
   scopes: ['https://www.googleapis.com/auth/chat.messages'],
   keyFile: './credentials.json',
   clientOptions: {
     // Impersonate the user who sent the original message
     subject: userEmail
   }
 });
 // Create Chat service client with impersonated user credentials
 const userChatClient = google.chat({
   version: 'v1',
   auth: await impersonatedUserAuth.getClient()
 });

 let responseText = undefined;
 let responseAttachment = undefined;
 // Go through the response parts received
 for (const part of aiResponse.candidates[0].content.parts) {
   if (part.inlineData) {
     // The resulting image is retrieved inline and uploaded
     const mediaResponse = await uploadFile(userChatClient, spaceName, part.inlineData.data);
     responseAttachment = mediaResponse.data;
   } else {
     responseText = part.text;
   }
 }

 // Create a Chat message dedicated to the generated content
 await userChatClient.spaces.messages.create({
   parent: spaceName,
   requestBody: {
     text: responseText ? responseText : 'Here it is!',
     // The uploaded image is referenced as attachment
     attachment: responseAttachment ? [responseAttachment] : undefined
   }
 });

 // Send a last Chat message to confirm it's done
 return res.send({ hostAppDataAction: { chatDataAction: { createMessageAction: { message: {
   text: 'Done, feel free to let me know if you need anything else!'
 }}}}});
});
...
設定服務帳戶並匯出私密金鑰
- 將 Cloud Run 預設服務帳戶委派給使用者,讓該帳戶管理 Google Chat 訊息。按照說明操作,並使用 https://www.googleapis.com/auth/chat.messages 範圍。如要擷取 Cloud Run 預設服務帳戶的用戶端 ID,請按照下列步驟操作:
- 依序點選「選單 ☰」>「IAM 與管理」>「服務帳戶」
- 按一下名稱為「Default compute service account」(預設運算服務帳戶) 的服務帳戶。
- 展開「進階設定」部分
- 將「用戶端 ID」複製到剪貼簿。
- 為 Cloud Run 預設服務帳戶建立並下載新的私密金鑰
- 依序點選「選單 ☰」>「IAM 與管理」>「服務帳戶」
- 按一下名稱為「Default compute service account」(預設運算服務帳戶) 的服務帳戶。
- 選取「金鑰」分頁,依序點選「新增金鑰」和「建立新的金鑰」。
- 選取「JSON」,然後按一下「建立」。
- 接著,系統就會為您產生一對新的公開/私密金鑰,並下載至您的電腦中做為新檔案。儲存下載的 JSON 檔案,並將內容複製到剪貼簿。這個檔案是這組金鑰的唯一副本,如要瞭解如何安全儲存金鑰,請參閱「管理服務帳戶金鑰」。
更新 Google Cloud Run Node.js 函式
- 在本機開發環境中,將目前目錄變更為
node/chat/gen-ai-apps/8-multimodal。其中包含完整的原始碼和資源。 - 前往 Google Cloud Run 函式服務詳細資料頁面的「來源」分頁。
- 按一下「編輯來源」。
- 按一下「➕」,輸入
credentials.json,然後按一下「✔️」,即可建立缺少的資源檔案。 - 將上一步下載的 JSON 檔案內容,貼到新建立的
credentials.json檔案中。 - 將
index.js檔案的完整內容,替換為本機開發環境中的內容。 - 開啟
env.js檔案,並將 model 的值設為gemini-2.0-flash-preview-image-generation。
...
model: 'gemini-2.0-flash-preview-image-generation',
...
- 按一下「儲存並重新部署」。
- 等待修訂版本部署作業順利完成。
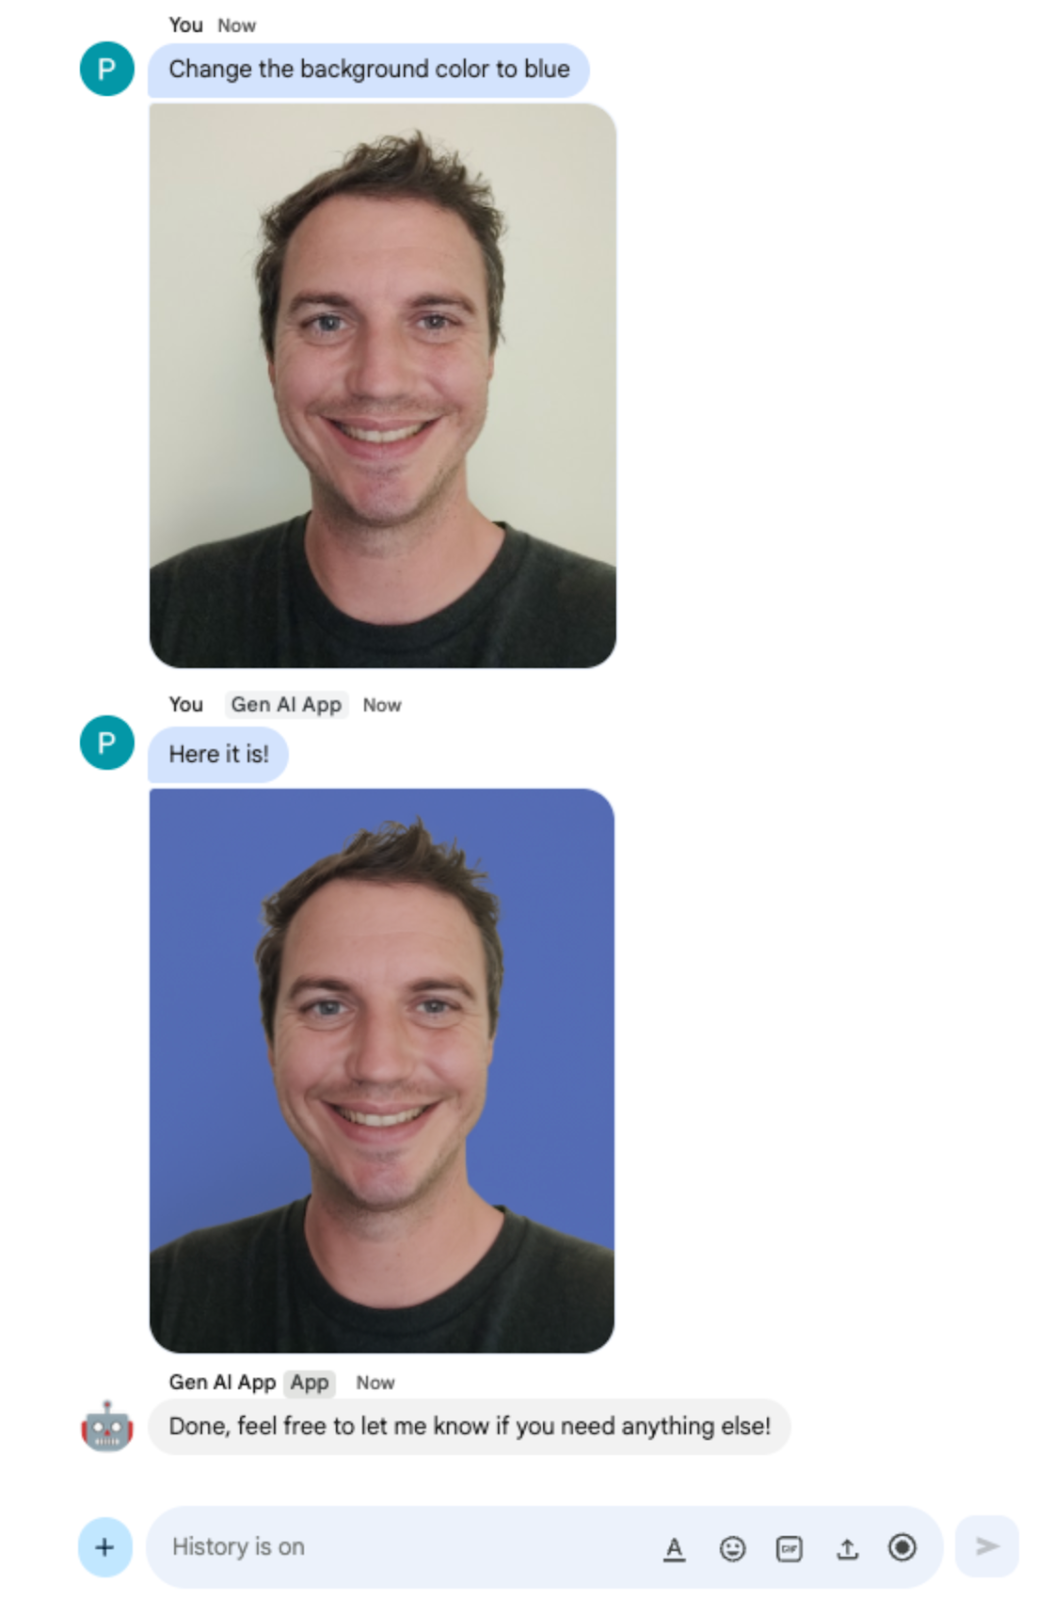
立即體驗
在 Google Chat 中,與 Chat 應用程式的即時訊息空間中,上傳 PNG 格式的個人直向相片,然後輸入 Change the background color to blue 並按下 enter。應用程式應回覆藍色背景的圖片版本,以及完成確認訊息。
11. 清理
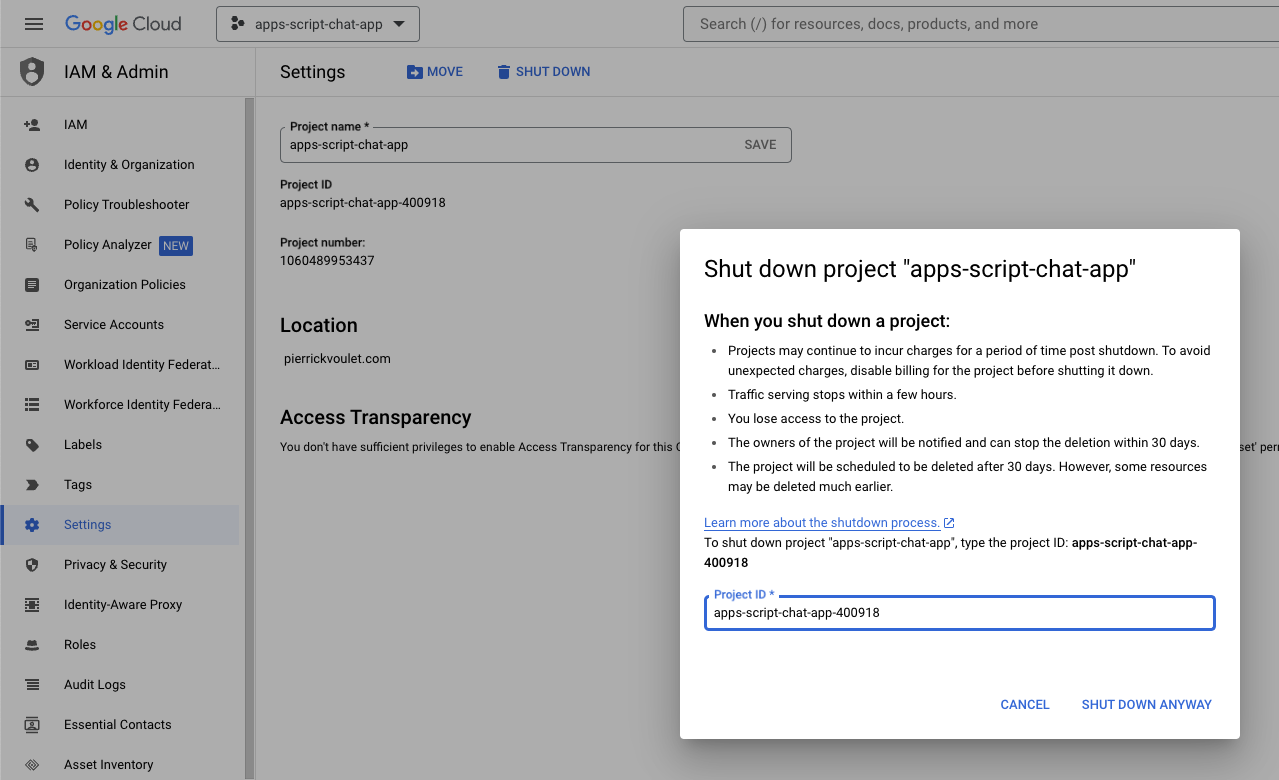
刪除 Google Cloud 專案
如要避免系統向您的 Google Cloud 帳戶收取本程式碼研究室所用資源的費用,建議您刪除 Google Cloud 專案。
在 Google Cloud 控制台中,按照下列步驟操作:
- 依序點選「選單」圖示 ☰ >「IAM 與管理」>「設定」。
- 按一下「Shut down」(關閉)。
- 輸入專案 ID。
- 按一下「仍要關閉」。
12. 恭喜
恭喜!您已將 Google Chat 應用程式建構為 Google Workspace 外掛程式,並整合了 AI 基本概念!
後續步驟
本程式碼研究室僅展示最簡單的使用案例,但您可能想在 Google Chat 應用程式中考慮許多擴充領域,例如:
- 支援其他類型的媒體,例如音訊和影片。
- 與其他 AI 模型整合,包括託管於 Vertex AI 等專屬平台的自訂模型。
- 與代理程式整合,包括在 Agentspace 和 Dialogflow CX 等專用平台中代管的自訂代理程式。
- 運用意見回饋迴圈和分類,監控及提升成效。
- 在 Marketplace 上發布,讓團隊、機構或一般使用者都能使用。
瞭解詳情
開發人員可參考許多資源,例如 YouTube 影片、說明文件網站、程式碼範例和教學課程: