
1. Introduction
In this codelab, you are going to learn how to build a sophisticated AI agent using the Google Agent Development Kit (ADK). We will follow a natural evolutionary path, starting from a foundational conversational agent and progressively layering on specialized capabilities.
The agent we are building is an executive assistant, designed to help you with daily tasks like managing your calendar, reminding you of tasks, doing research and compiling notes, all built from scratch using ADK, Gemini and Vertex AI.
At the end of this lab you will have a fully working agent and the knowledge required to extend it to your own needs.
Prerequisites
- Basic knowledge of the Python programming language
- Basic knowledge of the Google Cloud console to manage cloud resources
What you'll learn
- Provisioning Google Cloud infrastructure for AI Agents.
- Implementing persistent long-term memory utilizing Vertex AI Memory Bank.
- Constructing a hierarchy of specialized sub-agents.
- Integrating external databases and the Google Workspace ecosystem.
What you'll need
This workshop can be done entirely within the Google Cloud Shell, which comes with all the necessary dependencies (gcloud CLI, code editor, Go, Gemini CLI) pre-installed.
Alternatively, if you prefer to work on your own machine, you will need the following:
- Python (version 3.12 or higher)
- A code editor or IDE (such as VS Code or
vim). - A terminal to execute Python and
gcloudcommands. - Recommended: a coding agent like Gemini CLI or Antigravity
Key Technologies
Here you can find more information about the technologies we will be utilizing:
2. Environment Setup
Choose one of the following options: Self-paced environment setup if you want to run this codelab on your own machine, or; Start Cloud Shell if you want to run this codelab entirely in the cloud.
Self-paced environment setup
- Sign-in to the Google Cloud Console and create a new project or reuse an existing one. If you don't already have a Gmail or Google Workspace account, you must create one.

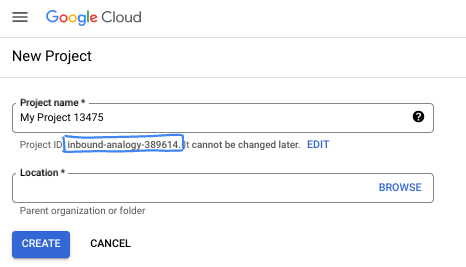
- The Project name is the display name for this project's participants. It is a character string not used by Google APIs. You can always update it.
- The Project ID is unique across all Google Cloud projects and is immutable (cannot be changed after it has been set). The Cloud Console auto-generates a unique string; usually you don't care what it is. In most codelabs, you'll need to reference your Project ID (typically identified as
PROJECT_ID). If you don't like the generated ID, you might generate another random one. Alternatively, you can try your own, and see if it's available. It can't be changed after this step and remains for the duration of the project. - For your information, there is a third value, a Project Number, which some APIs use. Learn more about all three of these values in the documentation.
- Next, you'll need to enable billing in the Cloud Console to use Cloud resources/APIs. Running through this codelab won't cost much, if anything at all. To shut down resources to avoid incurring billing beyond this tutorial, you can delete the resources you created or delete the project. New Google Cloud users are eligible for the $300 USD Free Trial program.
Start Cloud Shell
While Google Cloud can be operated remotely from your laptop, in this codelab you will be using Google Cloud Shell, a command line environment running in the Cloud.
From the Google Cloud Console, click the Cloud Shell icon on the top right toolbar:

It should only take a few moments to provision and connect to the environment. When it is finished, you should see something like this:

This virtual machine is loaded with all the development tools you'll need. It offers a persistent 5GB home directory, and runs on Google Cloud, greatly enhancing network performance and authentication. All of your work in this codelab can be done within a browser. You do not need to install anything.
3. Project Setup
Before writing code, we must provision the necessary infrastructure and permissions in Google Cloud.
Set Environment Variables
Open the terminal and set the following environment variables:
export PROJECT_ID=`gcloud config get project`
export LOCATION=us-central1
Enable Required APIs
Your agent requires access to several Google Cloud services. Run the following command to enable them:
gcloud services enable \
    aiplatform.googleapis.com \
    calendar-json.googleapis.com \
    sqladmin.googleapis.com
Authenticate with Application Default Credentials
We need to authenticate with Application Default Credentials (ADC) to communicate with the Google Cloud services from your environment.
Run the following command to ensure your Application Default Credentials are active and up to date:
gcloud auth application-default login
4. Create the base agent
Now, we need to initialize the directory where we are going to store the project source code:
# setup project directory
mkdir -p adk_ea_codelab && cd adk_ea_codelab
# prepare virtual environment
uv init
# install dependencies
uv add google-adk google-api-python-client tzlocal python-dotenv
uv add cloud-sql-python-connector[pg8000] sqlalchemy
We begin by establishing the agent's identity and basic conversational capabilities. In the ADK, the Agent class defines the agent persona and their instructions.
This is the time you might want to think about an agent name. I like my agents to have proper names like Aida or Sharon, as I think it helps to give them some "personality", but you can also simply call the agent by what it does, like "executive_assistant", "travel_agent" or "code_executor".
Run the adk create command to spin up a boilerplate agent:
# replace with your desired agent name
uv run adk create executive_assistant
Please choose gemini-2.5-flash as the model, and Vertex AI as the backend. Double check the suggested project ID is the one you created for this lab and hit enter to confirm. For Google Cloud region, you can accept the default (us-central1). Your terminal will look similar to this:
daniela_petruzalek@cloudshell:~/adk_ea_codelab (your-project-id)$ uv run adk create executive_assistant
Choose a model for the root agent:
1. gemini-2.5-flash
2. Other models (fill later)
Choose model (1, 2): 1
1. Google AI
2. Vertex AI
Choose a backend (1, 2): 2

You need an existing Google Cloud account and project, check out this link for details:
https://google.github.io/adk-docs/get-started/quickstart/#gemini---google-cloud-vertex-ai

Enter Google Cloud project ID [your-project-id]:
Enter Google Cloud region [us-central1]:

Agent created in /home/daniela_petruzalek/adk_ea_codelab/executive_assistant:
- .env
- __init__.py
- agent.py

daniela_petruzalek@cloudshell:~/adk_ea_codelab (your-project-id)$
Once finished, the previous command will create a folder with the agent name (e.g. executive_assistant) with a few files on it, including an agent.py file with the basic agent definition:
from google.adk.agents.llm_agent import Agent

root_agent = Agent(
    model='gemini-2.5-flash',
    name='root_agent',
    description='A helpful assistant for user questions.',
    instruction='Answer user questions to the best of your knowledge',
)
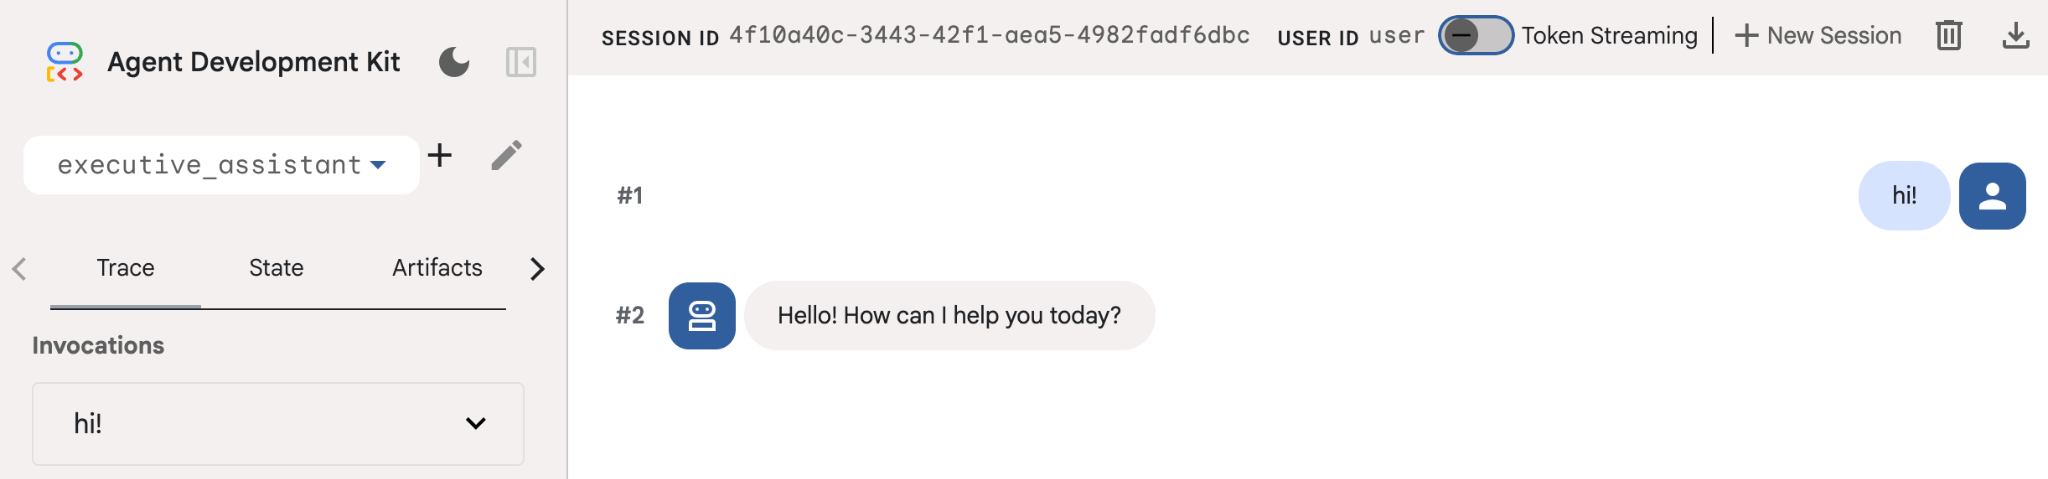
If you want to interact with this agent you can do so by running uv run adk web on the command line and opening the development UI on your browser. You will see something like this:
$ uv run adk web
...
INFO:     Started server process [1244]
INFO:     Waiting for application startup.

+-----------------------------------------------------------------------------+
| ADK Web Server started                                                      |
|                                                                             |
| For local testing, access at http://127.0.0.1:8000.                         |
+-----------------------------------------------------------------------------+

INFO:     Application startup complete.
INFO:     Uvicorn running on http://127.0.0.1:8000 (Press CTRL+C to quit)
Even if this agent is pretty basic, it is useful to do this at least once to ensure the setup is working properly before we start editing the agent. The screenshot below shows a simple interaction using the development UI:
Now, let's modify the agent definition with our executive assistant persona. Copy the code below and replace the contents of agent.py. Adapt the agent name and persona to your preferences.
from google.adk.agents.llm_agent import Agent

root_agent = Agent(
    model='gemini-2.5-flash',
    name='executive_assistant',
    description='A professional AI Executive Assistant',
    instruction='''
    You are an elite, warm, and highly efficient AI partner.
    Your primary goal is to help the user manage their tasks, schedule, and research.
    Always be direct, concise, and high-signal.
    ''',
)
Please note that the name property defines the agent's internal name, while in the instructions you can also give it a friendlier name as part of their persona for the interactions with the end user. The internal name is used mostly for observability and hand-overs in multi-agent systems using the transfer_to_agent tool. You won't be dealing with this tool yourself, ADK automatically registers it when you declare one or more sub-agents.
To run the agent we just created, use adk web:
uv run adk web
Open the ADK UI on the browser and say hi to your new assistant!
5. Add persistent memory with Vertex AI Memory Bank
A true assistant must remember preferences and past interactions to provide a seamless, personalized experience. In this step, we will integrate Vertex AI Agent Engine Memory Bank, a Vertex AI feature that dynamically generates long-term memories based on user conversations.
Memory Bank allows your agent to create personalized information accessible across multiple sessions, establishing cross-session continuity. Behind the scenes, it manages the chronological sequence of messages in a session and can use similarity search retrieval to provide the agent with the most relevant memories for the current context.
Initialize Memory Service
The ADK uses Vertex AI to store and retrieve long-term memories. You must initialize a "Memory Engine" in your project. This is essentially a Reasoning Engine instance configured to act as a Memory Bank.
Create the following script as setup_memory.py:
setup_memory.py
import vertexai
import os

PROJECT_ID=os.getenv("PROJECT_ID")
LOCATION=os.getenv("LOCATION")

client = vertexai.Client(project=PROJECT_ID, location=LOCATION)

# Create Reasoning Engine for Memory Bank
agent_engine = client.agent_engines.create()

# You will need this resource name to give it to ADK
print(agent_engine.api_resource.name)
Now run setup_memory.py to provision the reasoning engine for the memory bank:
uv run python setup_memory.py
Your output should look similar to this:
$ uv run python setup.py
projects/1234567890/locations/us-central1/reasoningEngines/1234567890
Save the engine resource name in an environment variable:
export ENGINE_ID="<insert the resource name above>"
Now we need to update the code to use the persistent memory. Replace the content of agent.py with the following:
agent.py
from google.adk.agents.llm_agent import Agent
from google.adk.tools.preload_memory_tool import PreloadMemoryTool
from google.adk.tools.load_memory_tool import load_memory_tool

async def auto_save_session_to_memory_callback(callback_context):
    await callback_context._invocation_context.memory_service.add_session_to_memory(
        callback_context._invocation_context.session)

# Update root_agent with memory tools and callback
root_agent = Agent(
    model='gemini-2.5-flash',
    name='executive_assistant',
    description='Executive Assistant with Persistent Memory',
    instruction='''
    You are an elite AI partner with long-term memory.
    Use load_memory to find context about the user when needed.
    Always be direct, concise, and high-signal.
    ''',
    tools=[PreloadMemoryTool(), load_memory_tool],
    after_agent_callback=auto_save_session_to_memory_callback,
)
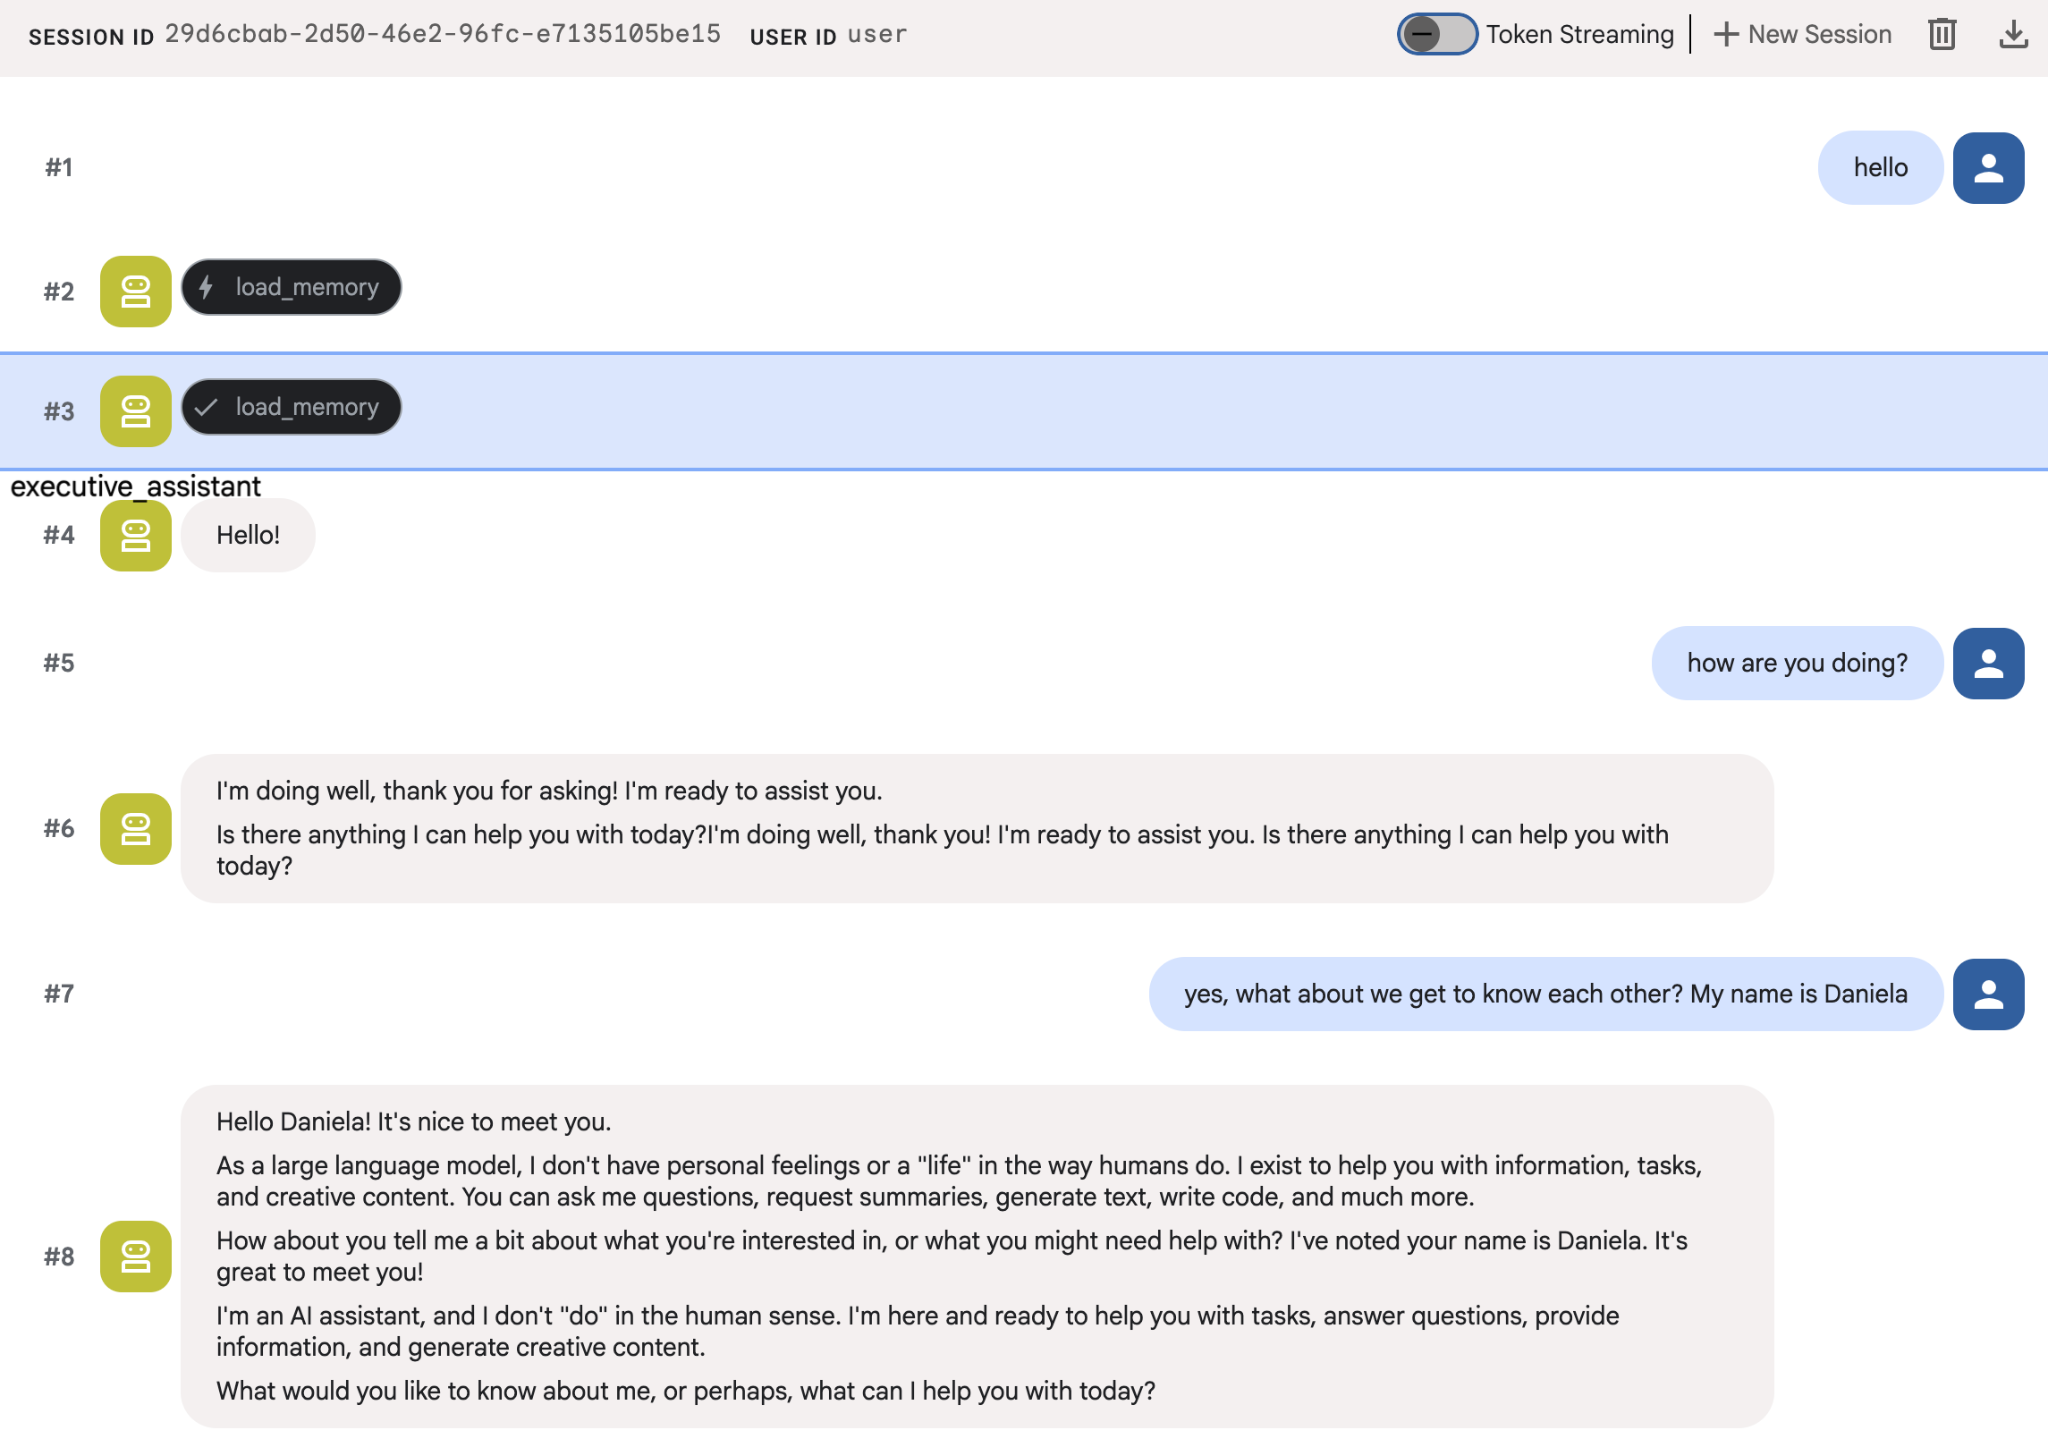
The PreloadMemoryTool automatically injects relevant context from past conversations into each request (using similarity search retrieval), while load_memory_tool allows the model to explicitly query Memory Bank for facts when needed. This combination gives your agent deep, persistent context!
Now to launch your agent with memory support you need to pass it the memory_service_uri when running adk web:
uv run adk web --memory_service_uri="agentengine://$ENGINE_ID"
Try giving the agents a few facts about yourself, and then come back with a different session to ask about them. For example, tell it your name:
You can inspect the memories the agent is saving on the cloud console. Go to the product page for "Agent Engine" (use the search bar)

Then click on your agent engine name (make sure you select the right region):
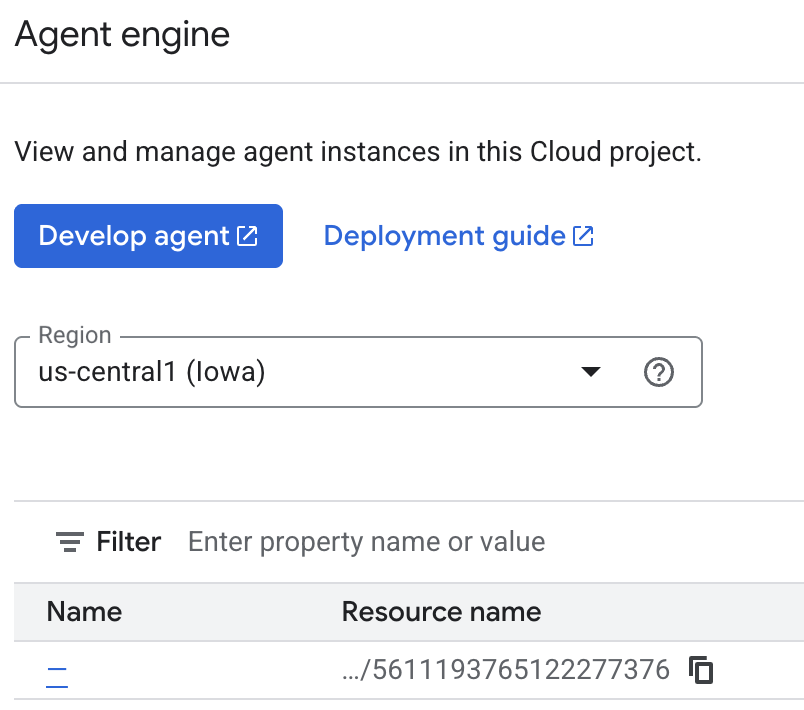
And then go to the memories tab:
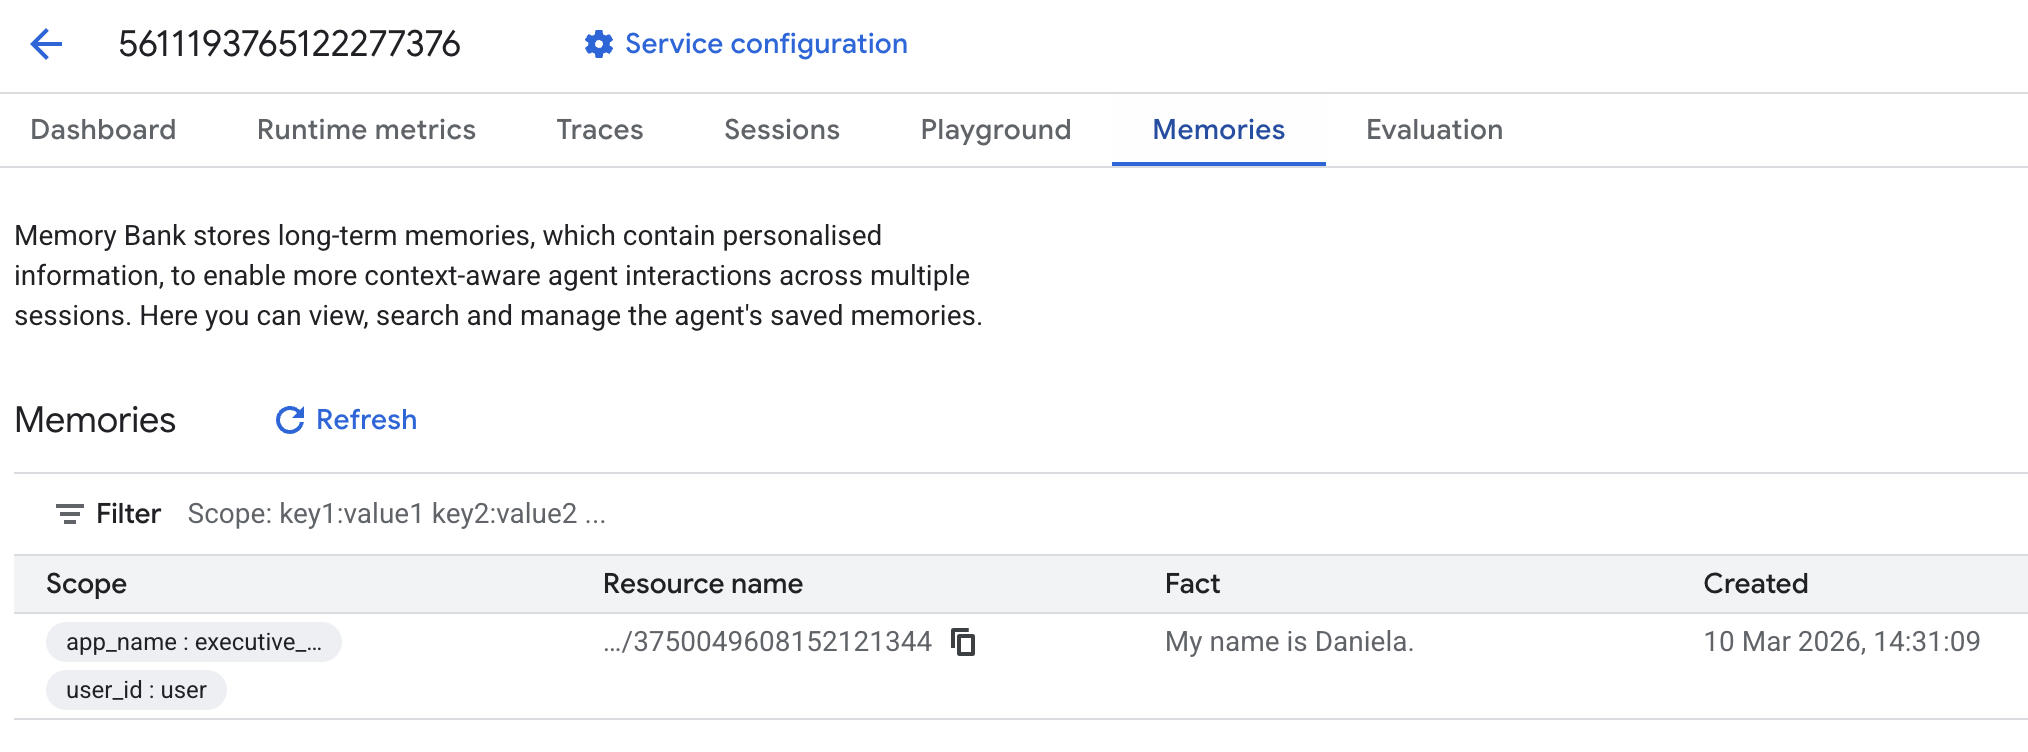
You should see some memories added.
6. Add web research capabilities
To provide high-quality information, our agent must perform deep investigations that go beyond a single search query. By delegating research to a specialized sub-agent, we maintain the main persona's responsiveness while the researcher handles complex data gathering in the background.
In this step, we implement a LoopAgent to achieve "research depth"—allowing the agent to iteratively search, evaluate findings, and refine its queries until it has a complete picture. We also enforce technical rigor by requiring inline citations for all findings, ensuring every claim is backed by a source link.
Create the Research Specialist (research.py)
Here we define a base Agent equipped with the Google Search tool and wrap it in a LoopAgent. The max_iterations parameter acts as a governor, ensuring the agent iterates on the search up to 3 times if gaps in its understanding remain.
research.py
from google.adk.agents.llm_agent import Agent
from google.adk.agents.loop_agent import LoopAgent
from google.adk.tools.google_search_tool import GoogleSearchTool
from google.adk.tools.tool_context import ToolContext

def exit_loop(tool_context: ToolContext):
    """Call this function ONLY when no further research is needed, signaling the iterative process should end."""
    print(f"  [Tool Call] exit_loop triggered by {tool_context.agent_name}")
    tool_context.actions.escalate = True
    # Return empty dict as tools should typically return JSON-serializable output
    return {}

# --- RESEARCH LOGIC ---
_research_worker = Agent(
    model='gemini-2.5-flash',
    name='research_worker',
    description='Worker agent that performs a single research step.',
    instruction='''
    Use google_search to find facts and synthesize them for the user.
    Critically evaluate your findings. If the data is incomplete or you need more context, prepare to search again in the next iteration.
    You must include the links you found as references in your response, formatting them like citations in a research paper (e.g., [1], [2]).
    Use the exit_loop tool to terminate the research early if no further research is needed.
    If you need to ask the user for clarifications, call the exit_loop function early to interrupt the research cycle.
    ''',
    tools=[GoogleSearchTool(bypass_multi_tools_limit=True), exit_loop],
)

# The LoopAgent iterates the worker up to 3 times for deeper research
research_agent = LoopAgent(
    name='research_specialist',
    description='Deep web research specialist.',
    sub_agents=[_research_worker],
    max_iterations=3,
)
Update the Root Agent (agent.py)
Import the research_agent and add it as a tool to Sharon:
agent.py
from google.adk.agents.llm_agent import Agent
from google.adk.tools.preload_memory_tool import PreloadMemoryTool
from google.adk.tools.load_memory_tool import load_memory_tool

# Import our new sub agent
from .research import research_agent

async def auto_save_session_to_memory_callback(callback_context):
    await callback_context._invocation_context.memory_service.add_session_to_memory(
        callback_context._invocation_context.session)

# Update root_agent with memory tools and callback
root_agent = Agent(
    model='gemini-2.5-flash',
    name='executive_assistant',
    description='Executive Assistant with persistent memory and research capabilities',
    instruction='''
    You are an elite AI partner with long-term memory.
    1. Use load_memory to recall facts.
    2. Delegate research tasks to the research_specialist.
    Always be direct, concise, and high-signal.
    ''',
    tools=[PreloadMemoryTool(), load_memory_tool],
    sub_agents=[research_agent],
    after_agent_callback=auto_save_session_to_memory_callback,
)
Launch adk web again to test the research agent.
uv run adk web --memory_service_uri="agentengine://$ENGINE_ID"
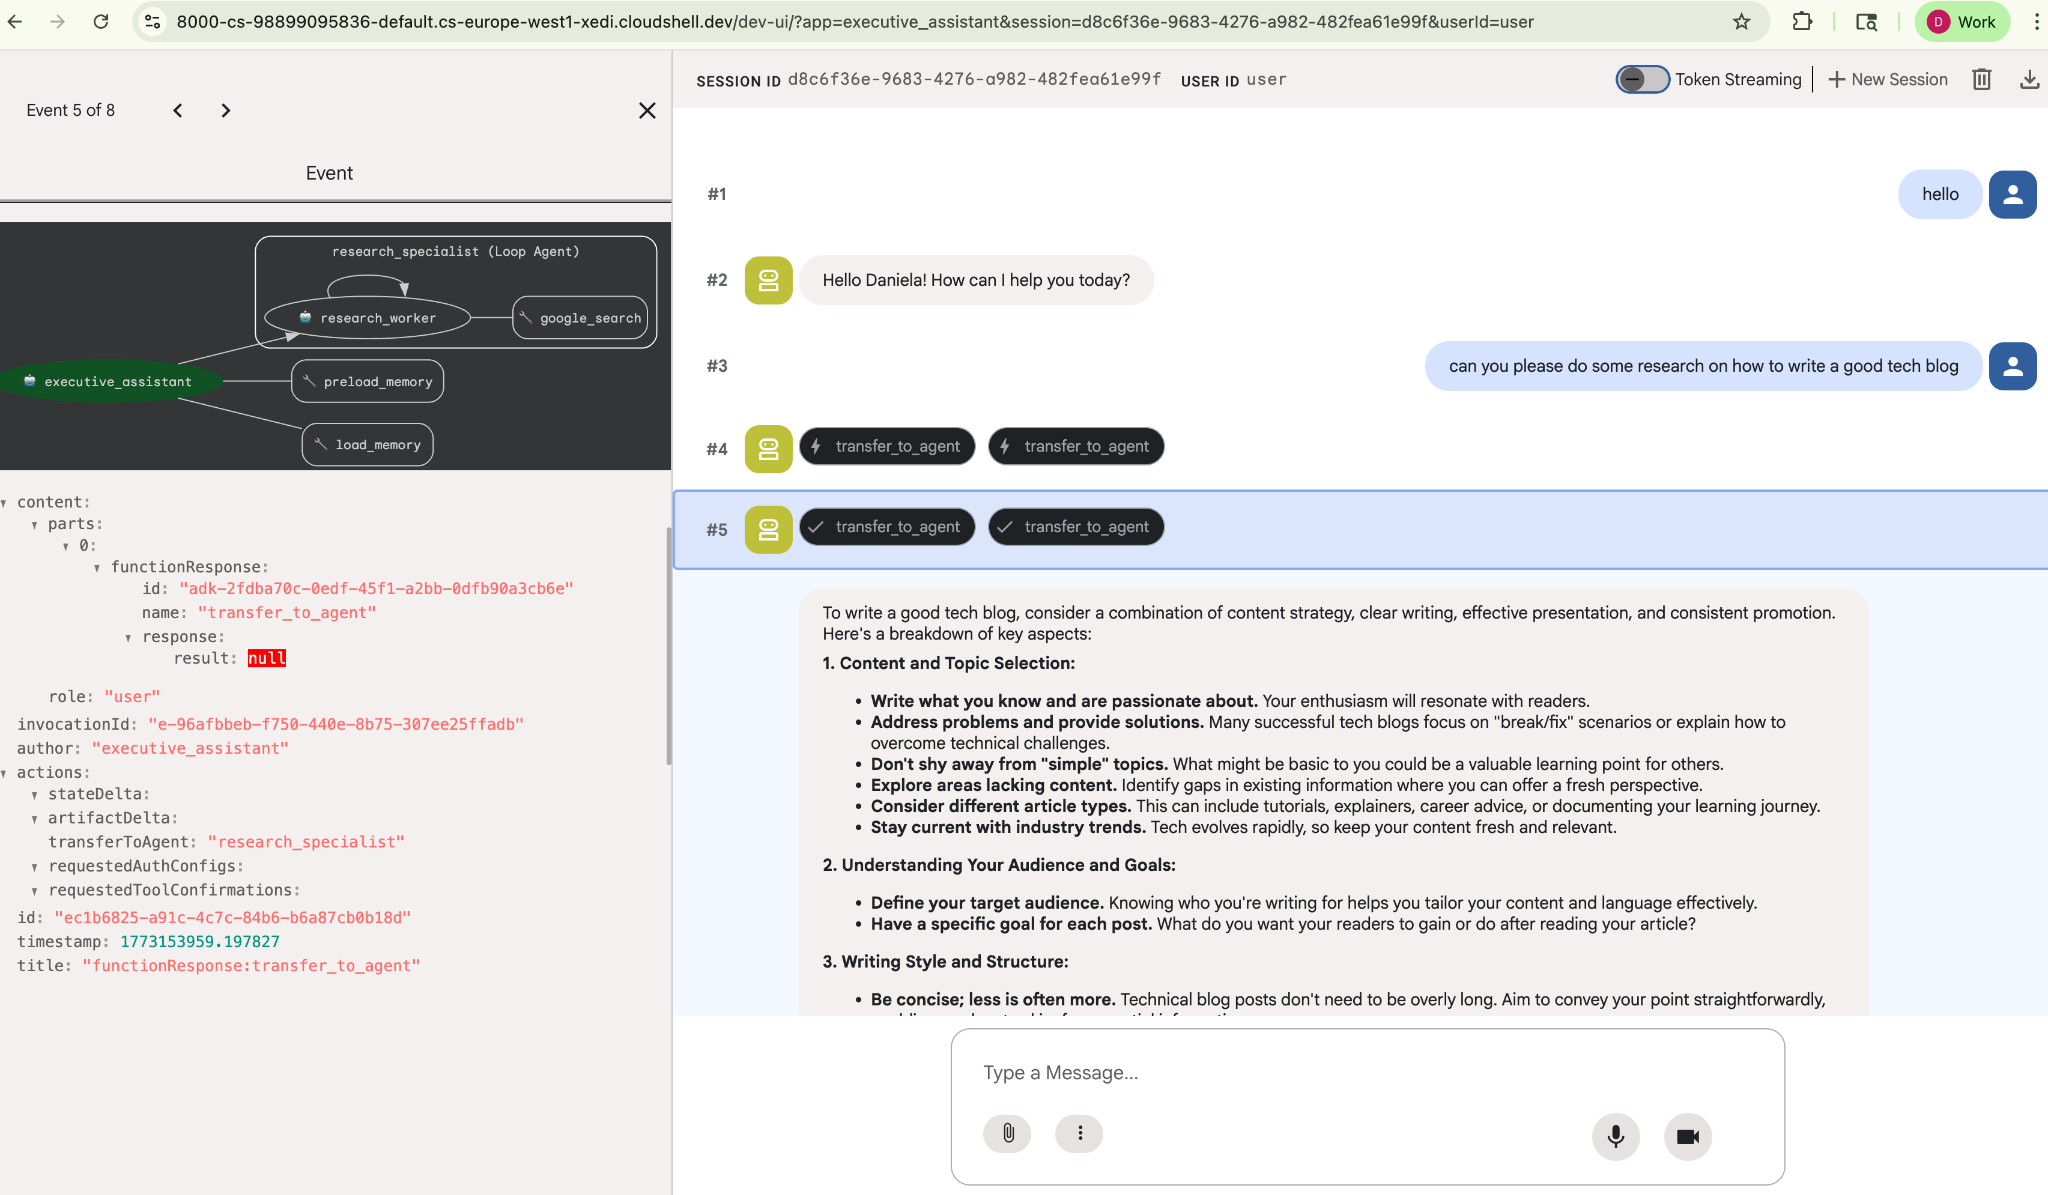
Give it a simple research task, for example, "how to write a good tech blog?"
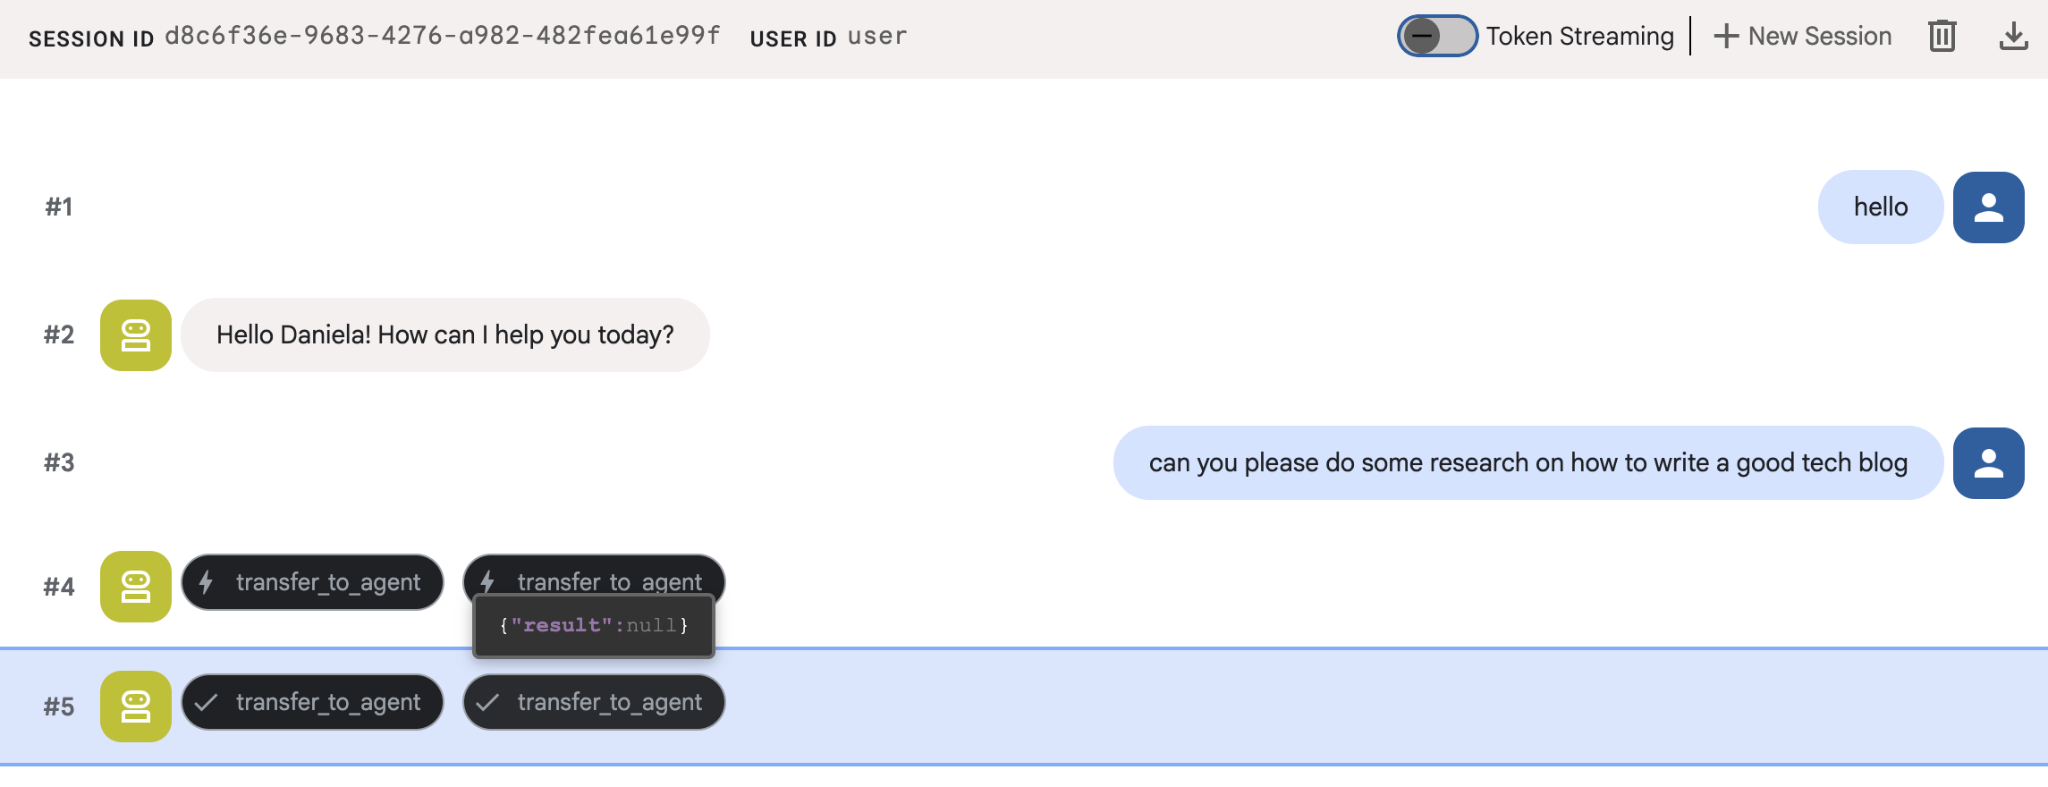
You might have noticed that the agent remembered my name even though this is a new session. Please also take note of the "transfer_to_agent" tool call: this is the tool that hands over the task to our new research agent.
Now, let's get on with task management.
7. Add task management with Cloud SQL
While the agent has long-term memory, it's not suitable for granular, structured data like a To-Do list. For tasks, we use a traditional relational database. We are going to use SQLAlchemy and a Google Cloud SQL (PostgreSQL) database. Before we can write the code, we must provision the infrastructure.
Provision the infrastructure
Run these commands to create your database. Note: Instance creation takes about 5–10 minutes. You can proceed to the next step while this runs in the background.
# 1. Define instance variables
export INSTANCE_NAME="assistant-db"
export USER_EMAIL=$(gcloud config get-value account)

# 2. Create the Cloud SQL instance
gcloud sql instances create $INSTANCE_NAME \
    --database-version=POSTGRES_18 \
    --tier=db-f1-micro \
    --region=us-central1 \
    --edition=ENTERPRISE

# 3. Create the database for our tasks
gcloud sql databases create tasks --instance=$INSTANCE_NAME
The database instance provisioning will take a few minutes. This might be a good time to take a cup of coffee or tea, or update the code while you wait for it to finish, just don't forget to come back and finish the access control!
Configure access control
Now we need to configure your user account to have access to the database. Run the following commands on the terminal:
# change this to your favorite password
export DB_PASS="correct-horse-battery-staple"

# Create a regular database user
gcloud sql users create assistant_user \
    --instance=$INSTANCE_NAME \
    --password=$DB_PASS
Update environment configuration
The ADK loads configuration from a .env file at runtime. Update your agent's environment with the database connection details.
# Retrieve the unique connection name
export DB_CONN=$(gcloud sql instances describe $INSTANCE_NAME --format='value(connectionName)')

# Append configuration to your .env file
cat <<EOF >> executive_assistant/.env
DB_CONNECTION_NAME=$DB_CONN
DB_USER=assistant_user
DB_PASSWORD=$DB_PASS
DB_NAME=tasks
EOF
Now let's proceed to make the code changes.
Create the Todo Specialist (todo.py)
Similar to the research agent, let's create our to-do specialist in its own file. Create todo.py:
todo.py
import os
import uuid
import sqlalchemy
from datetime import datetime
from typing import Optional, List

from sqlalchemy import (
    Column,
    String,
    DateTime,
    Enum,
    select,
    delete,
    update,
)
from sqlalchemy.orm import declarative_base, Session
from google.cloud.sql.connector import Connector
from google.adk.agents.llm_agent import Agent

# --- DATABASE LOGIC ---
Base = declarative_base()
connector = Connector()

def getconn():
    db_connection_name = os.environ.get("DB_CONNECTION_NAME")
    db_user = os.environ.get("DB_USER")
    db_password = os.environ.get("DB_PASSWORD")
    db_name = os.environ.get("DB_NAME", "tasks")

    return connector.connect(
        db_connection_name,
        "pg8000",
        user=db_user,
        password=db_password,
        db=db_name,
    )

engine = sqlalchemy.create_engine(
    "postgresql+pg8000://",
    creator=getconn,
)

class Todo(Base):
    __tablename__ = "todos"
    id = Column(String(36), primary_key=True, default=lambda: str(uuid.uuid4()))
    title = Column(String(255), nullable=False)
    priority = Column(
        Enum("high", "medium", "low", name="priority_levels"), nullable=False, default="medium"
    )
    due_date = Column(DateTime, nullable=True)
    status = Column(Enum("pending", "done", name="status_levels"), default="pending")
    created_at = Column(DateTime, default=datetime.utcnow)

def init_db():
    """Builds the table if it's missing."""
    Base.metadata.create_all(bind=engine)

def add_todo(
    title: str, priority: str = "medium", due_date: Optional[str] = None
) -> dict:
    """
    Adds a new task to the list.

    Args:
        title (str): The description of the task.
        priority (str): The urgency level. Must be one of: 'high', 'medium', 'low'.
        due_date (str, optional): The due date in ISO format (YYYY-MM-DD or YYYY-MM-DDTHH:MM:SS).

    Returns:
        dict: A dictionary containing the new task's ID and a status message.
    """
    init_db()
    with Session(engine) as session:
        due = datetime.fromisoformat(due_date) if due_date else None
        item = Todo(
            title=title,
            priority=priority.lower(),
            due_date=due,
        )
        session.add(item)
        session.commit()
        return {"id": item.id, "status": f"Task added ✅"}

def list_todos(status: str = "pending") -> list:
    """
    Lists tasks from the database, optionally filtering by status.

    Args:
        status (str, optional): The status to filter by. 'pending', 'done', or 'all'.
    """
    init_db()
    with Session(engine) as session:
        query = select(Todo)

        s_lower = status.lower()
        if s_lower != "all":
            query = query.where(Todo.status == s_lower)

        query = query.order_by(Todo.priority, Todo.created_at)

        results = session.execute(query).scalars().all()
        return [
            {
                "id": t.id,
                "task": t.title,
                "priority": t.priority,
                "status": t.status,
            }
            for t in results
        ]

def complete_todo(task_id: str) -> str:
    """Marks a specific task as 'done'."""
    init_db()
    with Session(engine) as session:
        session.execute(update(Todo).where(Todo.id == task_id).values(status="done"))
        session.commit()
        return f"Task {task_id} marked as done."

def delete_todo(task_id: str) -> str:
    """Permanently removes a task from the database."""
    init_db()
    with Session(engine) as session:
        session.execute(delete(Todo).where(Todo.id == task_id))
        session.commit()
        return f"Task {task_id} deleted."

# --- TODO SPECIALIST AGENT ---
todo_agent = Agent(
    model='gemini-2.5-flash',
    name='todo_specialist',
    description='A specialist agent that manages a structured SQL task list.',
    instruction='''
    You manage the user's task list using a PostgreSQL database.
    - Use add_todo when the user wants to remember something. If no priority is mentioned, mark it as 'medium'.
    - Use list_todos to show tasks.
    - Use complete_todo to mark a task as finished.
    - Use delete_todo to remove a task entirely.

    When marking a task as complete or deleting it, if the user doesn't provide the ID,
    use list_todos first to find the correct ID for the task they described.
    ''',
    tools=[add_todo, list_todos, complete_todo, delete_todo],
)
The code above is responsible for two main things: connecting with the Cloud SQL database and providing a list of tools for all common to-do list operations, including adding, removing and marking them complete.
Because this logic is very specific to the to-do agent, and we don't necessarily care about this granular management from the executive assistant (root agent) point of view, we will package this agent as an "AgentTool" instead of a sub agent.
To decide between using an AgentTool or sub-agent, consider whether they need to share context or not:
- use an AgentTool when your agent doesn't need to share context with the root agent
- use a sub agent when you want your agent to share context with the root agent
In the case of the research agent, sharing context can be useful, but for a simple to-do agent there isn't much benefit in doing so.
Let's implement the AgentTool in agent.py.
Update the Root Agent (agent.py)
Now, import the todo_agent into your main file and attach it as a tool:
agent.py
import os
from datetime import datetime
from google.adk.agents.llm_agent import Agent
from google.adk.tools.agent_tool import AgentTool
from google.adk.tools.preload_memory_tool import PreloadMemoryTool
from google.adk.tools.load_memory_tool import load_memory_tool

# Import our specialized sub-agents
from .research import research_agent
from .todo import todo_agent

# Callback for persistent memory storage
async def auto_save_session_to_memory_callback(callback_context):
    await callback_context._invocation_context.memory_service.add_session_to_memory(
        callback_context._invocation_context.session)

# --- ROOT AGENT DEFINITION ---
root_agent = Agent(
    model='gemini-2.5-flash',
    name='executive_assistant',
    description='A professional AI Executive Assistant with memory and specialized tools.',
    instruction='''
    You are an elite, high-signal AI Executive Assistant.
    Your goal is to help the user manage their knowledge, tasks, and research.

    ## Your Capabilities:
    1. Memory: Use load_memory to recall personal facts or past context about the user.
    2. Research: Delegate complex web-based investigations to the research_specialist.
    3. Tasks: Delegate all to-do list management (adding, listing, or completing tasks) to the todo_specialist.

    Always be direct and professional. If a task is successful, provide a brief confirmation.
    ''',
    tools=[
        PreloadMemoryTool(),
        load_memory_tool,
        AgentTool(todo_agent) # Exposes the Todo Specialist as a tool
    ],
    sub_agents=[research_agent], # Exposes the Research Specialist for direct handover
    after_agent_callback=auto_save_session_to_memory_callback,
)
Run adk web again to test the new feature:
uv run adk web --memory_service_uri="agentengine://$ENGINE_ID"
And try creating a to do:
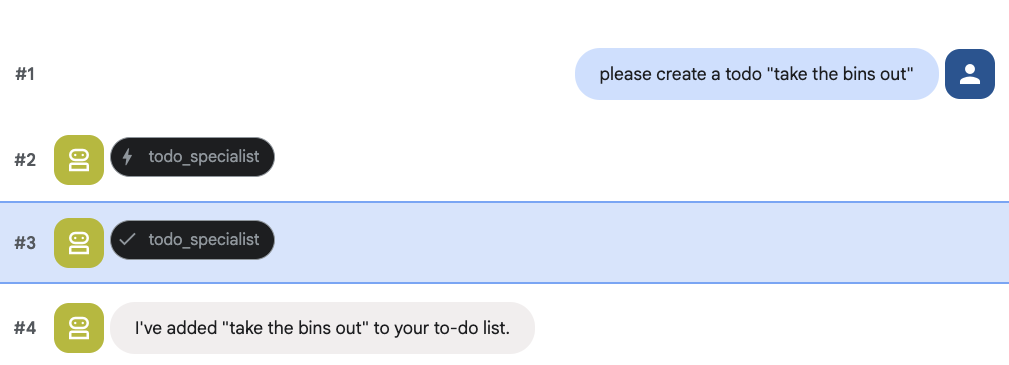
8. Add calendar management
Finally, we will integrate with Google Calendar so that the agent can manage appointments. For the sake of this codelab, instead of giving the agent access to your personal calendar, which could be potentially dangerous if not done in the right way, we are going to create an independent calendar for the agent to manage.
First, we will create a dedicated Service Account to act as the agent's identity. Then, we will programmatically create the agent's calendar using the service account.
Provision the service account
Open your terminal and run these commands to create the identity and grant your personal account permission to impersonate it:
export SA_NAME="ea-agent"
export SA_EMAIL="${SA_NAME}@${PROJECT_ID}.iam.gserviceaccount.com"

# Create the service account
gcloud iam service-accounts create $SA_NAME \
    --display-name="Executive Assistant Agent"

# Allow your local user to impersonate it
gcloud iam service-accounts add-iam-policy-binding $SA_EMAIL \
    --member="user:$(gcloud config get-value account)" \
    --role="roles/iam.serviceAccountTokenCreator"

# Save it to the agent's environment
echo "SERVICE_ACCOUNT_EMAIL=$SA_EMAIL" >> executive_assistant/.env
Create the calendar programmatically
Let's write a script to tell the Service Account to create the calendar. Create a new file named setup_calendar.py in the root of your project (alongside setup_memory.py):
setup_calendar.py
import os
import google.auth
from googleapiclient.discovery import build
from google.auth.transport.requests import Request
from google.auth import impersonated_credentials
from dotenv import load_dotenv

load_dotenv('executive_assistant/.env')
SA_EMAIL = os.environ.get("SERVICE_ACCOUNT_EMAIL")

def setup_sa_calendar():
    print(f"Authenticating to impersonate {SA_EMAIL}...")

    # 1. Base credentials
    creds, _ = google.auth.default(scopes=["https://www.googleapis.com/auth/cloud-platform"])
    creds.refresh(Request())

    # 2. Impersonate the Service Account
    impersonated = impersonated_credentials.Credentials(
        source_credentials=creds,
        target_principal=SA_EMAIL,
        target_scopes=["https://www.googleapis.com/auth/calendar"],
    )
    service = build("calendar", "v3", credentials=impersonated)

    # 3. Create the calendar
    print("Creating independent Service Account calendar...")
    calendar = service.calendars().insert(body={
        "summary": "AI Assistant (SA Owned)",
        "description": "An independent calendar managed purely by the AI."
    }).execute()

    calendar_id = calendar['id']

    # 4. Save the ID
    with open("executive_assistant/.env", "a") as f:
        f.write(f"\nCALENDAR_ID={calendar_id}\n")
    print(f"Setup complete! CALENDAR_ID {calendar_id} added to .env")

if __name__ == "__main__":
    setup_sa_calendar()
Run the script from your terminal:
uv run python setup_calendar.py
Create the Calendar Specialist (calendar.py)
Now let's focus on the calendar specialist. We will equip this agent with a full suite of calendar tools: listing, creating, updating, deleting, and even a "quick add" feature that understands natural language.
Copy the code below to calendar.py.
calendar.py
import os
from datetime import datetime, timedelta, timezone

import google.auth
from googleapiclient.discovery import build
from googleapiclient.errors import HttpError
from google.adk.agents.llm_agent import Agent

def _get_calendar_service():
    """Build the Google Calendar API service using Service Account Impersonation."""
    from google.auth.transport.requests import Request
    from google.auth import impersonated_credentials

    target_principal = os.environ.get("SERVICE_ACCOUNT_EMAIL")
    if not target_principal:
        raise ValueError("SERVICE_ACCOUNT_EMAIL environment variable is missing.")

    base_scopes = ["https://www.googleapis.com/auth/cloud-platform"]
    creds, _ = google.auth.default(scopes=base_scopes)
    creds.refresh(Request())

    target_scopes = ["https://www.googleapis.com/auth/calendar"]
    impersonated = impersonated_credentials.Credentials(
        source_credentials=creds,
        target_principal=target_principal,
        target_scopes=target_scopes,
    )

    return build("calendar", "v3", credentials=impersonated)

def _format_event(event: dict) -> dict:
    """Format a raw Calendar API event into a clean dict for the LLM."""
    start = event.get("start", {})
    end = event.get("end", {})
    return {
        "id": event.get("id"),
        "title": event.get("summary", "(No title)"),
        "start": start.get("dateTime", start.get("date")),
        "end": end.get("dateTime", end.get("date")),
        "location": event.get("location", ""),
        "description": event.get("description", ""),
        "attendees": [
            {"email": a["email"], "status": a.get("responseStatus", "unknown")}
            for a in event.get("attendees", [])
        ],
        "link": event.get("htmlLink", ""),
        "conference_link": (
            event.get("conferenceData", {}).get("entryPoints", [{}])[0].get("uri", "")
            if event.get("conferenceData")
            else ""
        ),
        "status": event.get("status", ""),
    }

def list_events(days_ahead: int = 7) -> dict:
    """List upcoming calendar events."""
    calendar_id = os.environ.get("CALENDAR_ID")
    try:
        service = _get_calendar_service()
        now = datetime.now(timezone.utc).isoformat()
        end = (datetime.now(timezone.utc) + timedelta(days=days_ahead)).isoformat()

        events_result = service.events().list(
            calendarId=calendar_id, timeMin=now, timeMax=end,
            maxResults=50, singleEvents=True, orderBy="startTime"
        ).execute()

        events = events_result.get("items", [])
        if not events:
            return {"status": "success", "count": 0, "events": []}

        return {"status": "success", "count": len(events), "events": [_format_event(e) for e in events]}
    except HttpError as e:
        return {"status": "error", "message": f"Calendar API error: {e}"}

def create_event(title: str, start_time: str, end_time: str, description: str = "", location: str = "", attendees: str = "", add_google_meet: bool = False) -> dict:
    """Create a new calendar event."""
    calendar_id = os.environ.get("CALENDAR_ID")
    try:
        service = _get_calendar_service()
        event_body = {
            "summary": title,
            "start": {"dateTime": start_time},
            "end": {"dateTime": end_time},
        }
        if description: event_body["description"] = description
        if location: event_body["location"] = location
        if attendees:
            email_list = [e.strip() for e in attendees.split(",") if e.strip()]
            event_body["attendees"] = [{"email": e} for e in email_list]

        conference_version = 0
        if add_google_meet:
            event_body["conferenceData"] = {
                "createRequest": {"requestId": f"event-{datetime.now().strftime('%Y%m%d%H%M%S')}", "conferenceSolutionKey": {"type": "hangoutsMeet"}}
            }
            conference_version = 1

        event = service.events().insert(calendarId=calendar_id, body=event_body, conferenceDataVersion=conference_version).execute()
        return {"status": "success", "message": f"Event created ✅", "event": _format_event(event)}
    except HttpError as e:
        return {"status": "error", "message": f"Calendar API error: {e}"}

def update_event(event_id: str, title: str = "", start_time: str = "", end_time: str = "", description: str = "") -> dict:
    """Update an existing calendar event."""
    calendar_id = os.environ.get("CALENDAR_ID")
    try:
        service = _get_calendar_service()
        patch_body = {}
        if title: patch_body["summary"] = title
        if start_time: patch_body["start"] = {"dateTime": start_time}
        if end_time: patch_body["end"] = {"dateTime": end_time}
        if description: patch_body["description"] = description
        if not patch_body: return {"status": "error", "message": "No fields to update."}

        event = service.events().patch(calendarId=calendar_id, eventId=event_id, body=patch_body).execute()
        return {"status": "success", "message": "Event updated ✅", "event": _format_event(event)}
    except HttpError as e:
        return {"status": "error", "message": f"Calendar API error: {e}"}

def delete_event(event_id: str) -> dict:
    """Delete a calendar event by its ID."""
    calendar_id = os.environ.get("CALENDAR_ID")
    try:
        service = _get_calendar_service()
        service.events().delete(calendarId=calendar_id, eventId=event_id).execute()
        return {"status": "success", "message": f"Event '{event_id}' deleted ✅"}
    except HttpError as e:
        return {"status": "error", "message": f"Calendar API error: {e}"}

def quick_add_event(text: str) -> dict:
    """Create an event using natural language (e.g. 'Lunch with Sarah next Monday noon')."""
    calendar_id = os.environ.get("CALENDAR_ID")
    try:
        service = _get_calendar_service()
        event = service.events().quickAdd(calendarId=calendar_id, text=text).execute()
        return {"status": "success", "message": "Event created from text ✅", "event": _format_event(event)}
    except HttpError as e:
        return {"status": "error", "message": f"Calendar API error: {e}"}

calendar_agent = Agent(
    model='gemini-2.5-flash',
    name='calendar_specialist',
    description='Manages the user schedule and calendar events.',
    instruction='''
    You manage the user's Google Calendar.
    - Use list_events to check the schedule.
    - Use quick_add_event for simple, conversational scheduling requests (e.g., "Lunch tomorrow at noon").
    - Use create_event for complex meetings that require attendees, specific durations, or Google Meet links.
    - Use update_event to change details of an existing event.
    - Use delete_event to cancel or remove an event.

    CRITICAL: For update_event and delete_event, you must provide the exact `event_id`.
    If the user does not provide the ID, you MUST call list_events first to find the correct `event_id` before attempting the update or deletion.

    Always use the current date/time context provided by the root agent to resolve relative dates like "tomorrow".
    ''',
    tools=[list_events, create_event, update_event, delete_event, quick_add_event],
)
Finalize the Root Agent (agent.py)
Update your agent.py file with the code below:
agent.py
import os
from datetime import datetime
from zoneinfo import ZoneInfo
from google.adk.agents.llm_agent import Agent
from google.adk.tools.agent_tool import AgentTool
from google.adk.tools.preload_memory_tool import PreloadMemoryTool
from google.adk.tools.load_memory_tool import load_memory_tool

# Import all our specialized sub-agents
from .research import research_agent
from .todo import todo_agent
from .calendar import calendar_agent
import tzlocal

# Automatically detect the local system timezone
TIMEZONE = tzlocal.get_localzone_name()

# Callback for persistent memory storage
async def auto_save_session_to_memory_callback(callback_context):
    await callback_context._invocation_context.memory_service.add_session_to_memory(
        callback_context._invocation_context.session)

# Callback to inject the current time into the prompt
async def setup_agent_context(callback_context, **kwargs):
    now = datetime.now(ZoneInfo(TIMEZONE))
    callback_context.state["current_time"] = now.strftime("%A, %Y-%m-%d %I:%M %p")
    callback_context.state["timezone"] = TIMEZONE

# --- ROOT AGENT DEFINITION ---
root_agent = Agent(
    model='gemini-2.5-flash',
    name='executive_assistant',
    description='A professional AI Executive Assistant with memory and specialized tools.',
    instruction='''
    You are an elite, high-signal AI Executive Assistant.
    Your goal is to help the user manage their knowledge, tasks, research, and schedule.

    ## Your Capabilities:
    1. Memory: Use load_memory to recall personal facts.
    2. Research: Delegate complex web investigations to the research_specialist.
    3. Tasks: Delegate all to-do list management to the todo_specialist.
    4. Scheduling: Delegate all calendar queries to the calendar_specialist.

    ## 🕒 Current State
    - Time: {current_time?}
    - Timezone: {timezone?}

    Always be direct and professional.
    ''',
    tools=[
        PreloadMemoryTool(),
        load_memory_tool,
        AgentTool(todo_agent),
        AgentTool(calendar_agent)
    ],
    sub_agents=[research_agent],
    before_agent_callback=[setup_agent_context],
    after_agent_callback=[auto_save_session_to_memory_callback],
)
Please note that, besides the calendar tool, we also added a new before agent callback function: setup_agent_context. This function gives the agent awareness of the current date, time and timezone so it can use the calendar more efficiently. It works by setting session state variables, a different kind of agent memory designed for short term persistence.
Run adk web one last time to test the complete agent!
uv run adk web --memory_service_uri="agentengine://$ENGINE_ID"
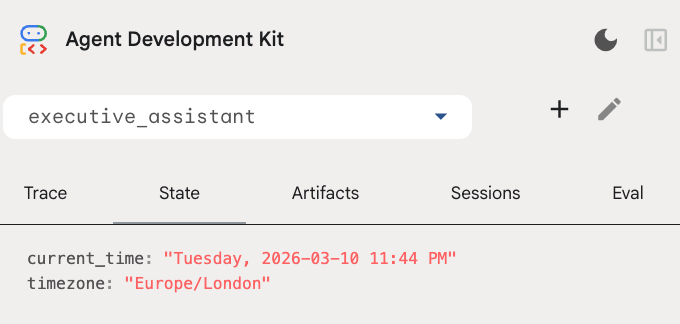
You can inspect the session state in the state tab in the developer UI:
You now have an agent that can keep track of calendar events, to-do lists, do research and has long term memory!
Cleaning up after the lab
9. Conclusion
Congratulations! You have successfully architected a multi-functional AI executive assistant through 5 evolutionary stages.
What we covered
- Provisioning infrastructure for AI Agents.
- Implementing persistent memory and specialized sub-agents using ADK built-ins.
- Integrating external databases and productivity APIs.
Next Steps
You can continue your learning journey by exploring other codelabs in this platform, or making improvements to the executive assistant on your own.
If you need some ideas for improvements, you could try:
- Implement event compaction to optimize performance for long conversations.
- Add an artifact service to allow the agent to take notes for you and save as files
- Deploy your agent as a backend service using Google Cloud Run.
Once you are done testing, remember to clean up the environment to not incur unexpected charges to your billing account.
Happy coding!