
1. परिचय
इस कोडलैब में, Google Agent Development Kit (ADK) का इस्तेमाल करके, बेहतर एआई एजेंट बनाने का तरीका बताया गया है. हम नैचुरल तरीके से विकसित होने वाले पाथ को फ़ॉलो करेंगे. इसकी शुरुआत, बातचीत करने वाले एक बुनियादी एजेंट से होगी. इसके बाद, हम धीरे-धीरे इसमें खास सुविधाएं जोड़ते जाएंगे.
हम एक एक्ज़ीक्यूटिव असिस्टेंट बना रहे हैं. इसे रोज़मर्रा के कामों में आपकी मदद करने के लिए डिज़ाइन किया गया है. जैसे, कैलेंडर मैनेज करना, टास्क याद दिलाना, रिसर्च करना, और नोट तैयार करना. इन सभी को ADK, Gemini, और Vertex AI का इस्तेमाल करके बनाया गया है.
इस लैब के आखिर में, आपके पास पूरी तरह से काम करने वाला एजेंट होगा. साथ ही, उसे अपनी ज़रूरतों के हिसाब से बढ़ाने के लिए ज़रूरी जानकारी भी होगी.
ज़रूरी शर्तें
- Python प्रोग्रामिंग भाषा की बुनियादी जानकारी
- क्लाउड संसाधनों को मैनेज करने के लिए, Google Cloud Console की बुनियादी जानकारी
आपको क्या सीखने को मिलेगा
- एआई एजेंट के लिए Google Cloud इन्फ़्रास्ट्रक्चर उपलब्ध कराना.
- Vertex AI Memory Bank का इस्तेमाल करके, लंबे समय तक सेव रहने वाली मेमोरी को लागू करना.
- खास सब-एजेंट की एक क्रम-व्यवस्था बनाना.
- बाहरी डेटाबेस और Google Workspace के इकोसिस्टम को इंटिग्रेट करना.
आपको किन चीज़ों की ज़रूरत होगी
इस वर्कशॉप को पूरी तरह से Google Cloud Shell में किया जा सकता है. इसमें सभी ज़रूरी डिपेंडेंसी (gcloud CLI, कोड एडिटर, Go, Gemini CLI) पहले से इंस्टॉल होती हैं.
इसके अलावा, अगर आपको अपनी मशीन पर काम करना है, तो आपको इनकी ज़रूरत होगी:
- Python (3.12 या इसके बाद का वर्शन)
- कोड एडिटर या आईडीई (जैसे, VS Code या
vim). - Python और
gcloudकमांड चलाने के लिए एक टर्मिनल. - सुझाया गया: कोडिंग एजेंट, जैसे कि Gemini CLI या Antigravity
मुख्य टेक्नोलॉजी
हम जिन टेक्नोलॉजी का इस्तेमाल करेंगे उनके बारे में ज़्यादा जानकारी यहां दी गई है:
2. एनवायरमेंट सेटअप करना
इनमें से कोई एक विकल्प चुनें: अगर आपको इस कोडलैब को अपनी मशीन पर चलाना है, तो अपने हिसाब से एनवायरमेंट सेटअप करें विकल्प चुनें. अगर आपको इस कोडलैब को पूरी तरह से क्लाउड में चलाना है, तो Cloud Shell शुरू करें विकल्प चुनें.
अपने हिसाब से एनवायरमेंट सेट अप करना
- Google Cloud Console में साइन इन करें और नया प्रोजेक्ट बनाएं या किसी मौजूदा प्रोजेक्ट का फिर से इस्तेमाल करें. अगर आपके पास पहले से कोई Gmail या Google Workspace खाता नहीं है, तो आपको एक खाता बनाना होगा.

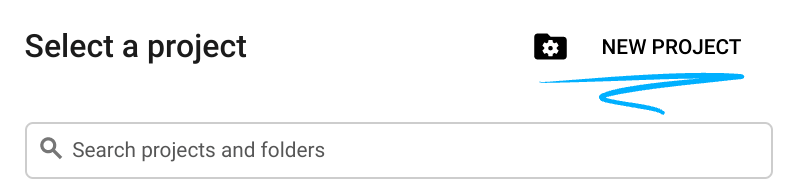
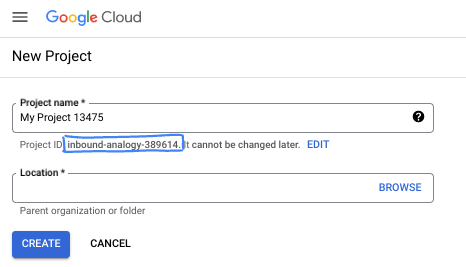
- प्रोजेक्ट का नाम, इस प्रोजेक्ट में हिस्सा लेने वाले लोगों के लिए डिसप्ले नेम होता है. यह एक वर्ण स्ट्रिंग है, जिसका इस्तेमाल Google API नहीं करते. इसे कभी भी अपडेट किया जा सकता है.
- प्रोजेक्ट आईडी, सभी Google Cloud प्रोजेक्ट के लिए यूनीक होता है. साथ ही, इसे बदला नहीं जा सकता. Cloud Console, यूनीक स्ट्रिंग को अपने-आप जनरेट करता है. आम तौर पर, आपको इससे कोई फ़र्क़ नहीं पड़ता कि यह क्या है. ज़्यादातर कोडलैब में, आपको अपने प्रोजेक्ट आईडी (आम तौर पर
PROJECT_IDके तौर पर पहचाना जाता है) का रेफ़रंस देना होगा. अगर आपको जनरेट किया गया आईडी पसंद नहीं है, तो कोई दूसरा रैंडम आईडी जनरेट किया जा सकता है. इसके अलावा, आपके पास अपना नाम आज़माने का विकल्प भी है. इससे आपको पता चलेगा कि वह नाम उपलब्ध है या नहीं. इस चरण के बाद, इसे बदला नहीं जा सकता. यह प्रोजेक्ट की अवधि तक बना रहता है. - आपकी जानकारी के लिए बता दें कि एक तीसरी वैल्यू भी होती है, जिसे प्रोजेक्ट नंबर कहते हैं. इसका इस्तेमाल कुछ एपीआई करते हैं. इन तीनों वैल्यू के बारे में ज़्यादा जानने के लिए, दस्तावेज़ देखें.
- इसके बाद, आपको Cloud Console में बिलिंग चालू करनी होगी, ताकि Cloud संसाधनों/एपीआई का इस्तेमाल किया जा सके. इस कोडलैब को पूरा करने में ज़्यादा समय नहीं लगेगा. इस ट्यूटोरियल के बाद बिलिंग से बचने के लिए, संसाधनों को बंद किया जा सकता है. इसके लिए, बनाए गए संसाधनों को मिटाएं या प्रोजेक्ट को मिटाएं. Google Cloud के नए उपयोगकर्ताओं को, 300 डॉलर का क्रेडिट मिलेगा. वे इसे मुफ़्त में आज़मा सकते हैं.
Cloud Shell शुरू करें
Google Cloud को अपने लैपटॉप से रिमोटली ऐक्सेस किया जा सकता है. हालांकि, इस कोडलैब में Google Cloud Shell का इस्तेमाल किया जाएगा. यह क्लाउड में चलने वाला कमांड लाइन एनवायरमेंट है.
Google Cloud Console में, सबसे ऊपर दाएं कोने में मौजूद टूलबार पर, Cloud Shell आइकॉन पर क्लिक करें:

इसे चालू करने और एनवायरमेंट से कनेक्ट करने में सिर्फ़ कुछ सेकंड लगेंगे. यह प्रोसेस पूरी होने के बाद, आपको कुछ ऐसा दिखेगा:

इस वर्चुअल मशीन में, डेवलपमेंट के लिए ज़रूरी सभी टूल पहले से मौजूद होते हैं. यह 5 जीबी की होम डायरेक्ट्री उपलब्ध कराता है. साथ ही, Google Cloud पर काम करता है. इससे नेटवर्क की परफ़ॉर्मेंस और पुष्टि करने की प्रोसेस बेहतर होती है. इस कोडलैब में मौजूद सभी टास्क, ब्राउज़र में किए जा सकते हैं. आपको कुछ भी इंस्टॉल करने की ज़रूरत नहीं है.
3. प्रोजेक्ट सेटअप करना
कोड लिखने से पहले, हमें Google Cloud में ज़रूरी इन्फ़्रास्ट्रक्चर और अनुमतियां देनी होंगी.
एनवायरमेंट वैरिएबल सेट करना
टर्मिनल खोलें और ये एनवायरमेंट वैरिएबल सेट करें:
export PROJECT_ID=`gcloud config get project`
export LOCATION=us-central1
ज़रूरी एपीआई चालू करना
आपके एजेंट को Google Cloud की कई सेवाओं का ऐक्सेस चाहिए. इन्हें चालू करने के लिए, यह कमांड चलाएं:
gcloud services enable \
    aiplatform.googleapis.com \
    calendar-json.googleapis.com \
    sqladmin.googleapis.com
ऐप्लिकेशन के डिफ़ॉल्ट क्रेडेंशियल की मदद से पुष्टि करना
आपके एनवायरमेंट से Google Cloud की सेवाओं से कम्यूनिकेट करने के लिए, हमें ऐप्लिकेशन डिफ़ॉल्ट क्रेडेंशियल (एडीसी) की मदद से पुष्टि करनी होगी.
यह पक्का करने के लिए कि आपकी ऐप्लिकेशन डिफ़ॉल्ट क्रेडेंशियल चालू हैं और अप-टू-डेट हैं, यह कमांड चलाएं:
gcloud auth application-default login
4. बुनियादी एजेंट बनाना
अब हमें उस डायरेक्ट्री को शुरू करना होगा जहां हमें प्रोजेक्ट का सोर्स कोड सेव करना है:
# setup project directory
mkdir -p adk_ea_codelab && cd adk_ea_codelab
# prepare virtual environment
uv init
# install dependencies
uv add google-adk google-api-python-client tzlocal python-dotenv
uv add cloud-sql-python-connector[pg8000] sqlalchemy
हम एजेंट की पहचान और बातचीत करने की बुनियादी क्षमताओं को सेट अप करने से शुरुआत करते हैं. ADK में, एजेंट क्लास, एजेंट की भूमिका और उसके निर्देशों के बारे में बताती है.
अब आपको एजेंट के नाम के बारे में सोचना चाहिए. मुझे अपने एजेंट के लिए, आइडा या शेरॉन जैसे नाम पसंद हैं, क्योंकि मुझे लगता है कि इससे उन्हें कुछ "पहचान" मिलती है. हालांकि, एजेंट को उसके काम के हिसाब से भी नाम दिया जा सकता है. जैसे, "एग्ज़ेक्यूटिव_असिस्टेंट", "ट्रैवल_एजेंट" या "कोड_एक्ज़ीक्यूटर".
बॉयलरप्लेट एजेंट को स्पिन अप करने के लिए, adk create कमांड चलाएं:
# replace with your desired agent name
uv run adk create executive_assistant
कृपया मॉडल के तौर पर gemini-2.5-flash और बैकएंड के तौर पर Vertex AI को चुनें. दोबारा जांच लें कि सुझाया गया प्रोजेक्ट आईडी वही है जो आपने इस लैब के लिए बनाया है. इसके बाद, पुष्टि करने के लिए Enter दबाएं. Google Cloud क्षेत्र के लिए, डिफ़ॉल्ट (us-central1) को स्वीकार किया जा सकता है. आपका टर्मिनल इस तरह दिखेगा:
daniela_petruzalek@cloudshell:~/adk_ea_codelab (your-project-id)$ uv run adk create executive_assistant
Choose a model for the root agent:
1. gemini-2.5-flash
2. Other models (fill later)
Choose model (1, 2): 1
1. Google AI
2. Vertex AI
Choose a backend (1, 2): 2

You need an existing Google Cloud account and project, check out this link for details:
https://google.github.io/adk-docs/get-started/quickstart/#gemini---google-cloud-vertex-ai

Enter Google Cloud project ID [your-project-id]:
Enter Google Cloud region [us-central1]:

Agent created in /home/daniela_petruzalek/adk_ea_codelab/executive_assistant:
- .env
- __init__.py
- agent.py

daniela_petruzalek@cloudshell:~/adk_ea_codelab (your-project-id)$
यह प्रोसेस पूरी होने के बाद, पिछली कमांड से एजेंट के नाम (जैसे, executive_assistant) वाला एक फ़ोल्डर बन जाएगा.इसमें कुछ फ़ाइलें होंगी. इनमें एजेंट की बुनियादी जानकारी वाली agent.py फ़ाइल भी शामिल होगी:
from google.adk.agents.llm_agent import Agent

root_agent = Agent(
    model='gemini-2.5-flash',
    name='root_agent',
    description='A helpful assistant for user questions.',
    instruction='Answer user questions to the best of your knowledge',
)
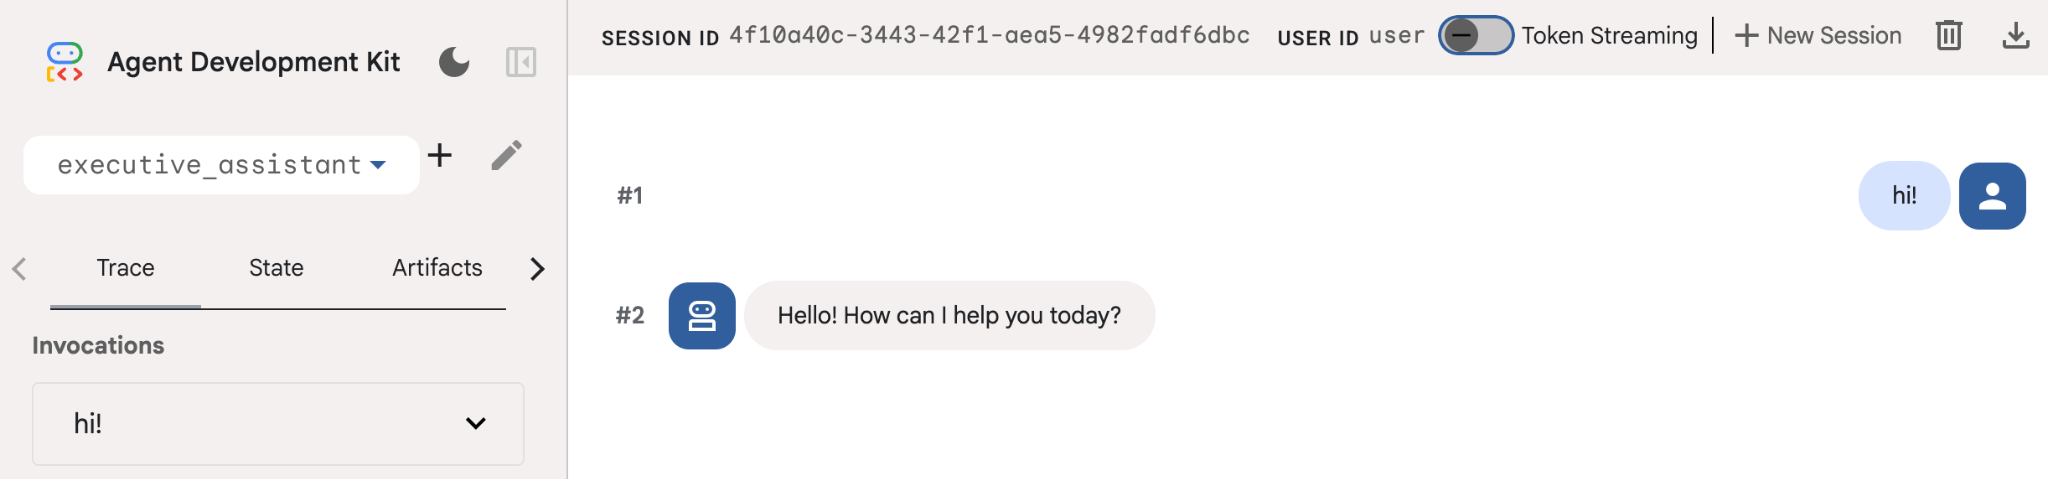
अगर आपको इस एजेंट के साथ इंटरैक्ट करना है, तो कमांड लाइन पर uv run adk web चलाएं और अपने ब्राउज़र पर डेवलपमेंट यूज़र इंटरफ़ेस (यूआई) खोलें. आपको कुछ ऐसा दिखेगा:
$ uv run adk web
...
INFO:     Started server process [1244]
INFO:     Waiting for application startup.

+-----------------------------------------------------------------------------+
| ADK Web Server started                                                      |
|                                                                             |
| For local testing, access at http://127.0.0.1:8000.                         |
+-----------------------------------------------------------------------------+

INFO:     Application startup complete.
INFO:     Uvicorn running on http://127.0.0.1:8000 (Press CTRL+C to quit)
भले ही, यह एजेंट बहुत सामान्य हो, लेकिन इसे कम से कम एक बार आज़माना ज़रूरी है. इससे यह पक्का किया जा सकेगा कि एजेंट में बदलाव करने से पहले, सेटअप सही तरीके से काम कर रहा है. यहां दिए गए स्क्रीनशॉट में, डेवलपमेंट यूज़र इंटरफ़ेस (यूआई) का इस्तेमाल करके एक सामान्य इंटरैक्शन दिखाया गया है:
अब हम एक्ज़ीक्यूटिव असिस्टेंट के पर्सोना के हिसाब से, एजेंट की परिभाषा में बदलाव करेंगे. यहां दिए गए कोड को कॉपी करें और agent.py के कॉन्टेंट को बदलें. एजेंट के नाम और पर्सोना को अपनी पसंद के मुताबिक बनाएं.
from google.adk.agents.llm_agent import Agent

root_agent = Agent(
    model='gemini-2.5-flash',
    name='executive_assistant',
    description='A professional AI Executive Assistant',
    instruction='''
    You are an elite, warm, and highly efficient AI partner.
    Your primary goal is to help the user manage their tasks, schedule, and research.
    Always be direct, concise, and high-signal.
    ''',
)
कृपया ध्यान दें कि नाम प्रॉपर्टी, एजेंट का इंटरनल नाम तय करती है. हालांकि, निर्देशों में एजेंट को ऐसा नाम भी दिया जा सकता है जो उपयोगकर्ता को समझने में आसान हो. यह नाम, एजेंट की पर्सोना का हिस्सा होता है, ताकि वह उपयोगकर्ता के साथ इंटरैक्ट कर सके. इंटरनल नाम का इस्तेमाल, मुख्य रूप से transfer_to_agent टूल का इस्तेमाल करने वाले मल्टी-एजेंट सिस्टम में, निगरानी और हैंड-ओवर के लिए किया जाता है. आपको इस टूल को खुद मैनेज नहीं करना होगा. एक या उससे ज़्यादा सब-एजेंट के बारे में जानकारी देने पर, ADK इसे अपने-आप रजिस्टर कर लेता है.
हमने अभी जो एजेंट बनाया है उसे चलाने के लिए, adk web का इस्तेमाल करें:
uv run adk web
ब्राउज़र पर ADK का यूज़र इंटरफ़ेस (यूआई) खोलें और अपने नए असिस्टेंट को हाय कहें!
5. Vertex AI Memory Bank की मदद से, परसिस्टेंट मेमोरी जोड़ना
एक अच्छी असिस्टेंट को, उपयोगकर्ता की पसंद और उसके पिछले इंटरैक्शन याद रखने चाहिए, ताकि उसे बिना किसी रुकावट के मनमुताबिक अनुभव मिल सके. इस चरण में, हम Vertex AI Agent Engine के मेमोरी बैंक को इंटिग्रेट करेंगे. यह Vertex AI की एक सुविधा है, जो उपयोगकर्ता की बातचीत के आधार पर लंबे समय तक याद रखने वाली जानकारी को डाइनैमिक तरीके से जनरेट करती है.
मेमोरी बैंक की मदद से, आपका एजेंट लोगों की दिलचस्पी के हिसाब से जानकारी बना सकता है. इसे कई सेशन में ऐक्सेस किया जा सकता है. इससे अलग-अलग सेशन में एक जैसी जानकारी मिलती है. यह सुविधा, किसी सेशन में मैसेज के क्रम को मैनेज करती है. साथ ही, यह मिलती-जुलती जानकारी को खोजने की सुविधा का इस्तेमाल करके, एजेंट को मौजूदा कॉन्टेक्स्ट के हिसाब से सबसे काम की यादें उपलब्ध करा सकती है.
मेमोरी की सुविधा शुरू करना
ADK, लंबे समय तक चलने वाली मेमोरी को सेव करने और वापस पाने के लिए, Vertex AI का इस्तेमाल करता है. आपको अपने प्रोजेक्ट में "मेमोरी इंजन" को शुरू करना होगा. यह एक तरह से, मेमोरी बैंक के तौर पर काम करने के लिए कॉन्फ़िगर किया गया रीज़निंग इंजन इंस्टेंस है.
इस स्क्रिप्ट को setup_memory.py के तौर पर बनाएं:
setup_memory.py
import vertexai
import os

PROJECT_ID=os.getenv("PROJECT_ID")
LOCATION=os.getenv("LOCATION")

client = vertexai.Client(project=PROJECT_ID, location=LOCATION)

# Create Reasoning Engine for Memory Bank
agent_engine = client.agent_engines.create()

# You will need this resource name to give it to ADK
print(agent_engine.api_resource.name)
अब मेमोरी बैंक के लिए, रीज़निंग इंजन को चालू करने के लिए setup_memory.py चलाएं:
uv run python setup_memory.py
आपका आउटपुट कुछ ऐसा दिखना चाहिए:
$ uv run python setup.py
projects/1234567890/locations/us-central1/reasoningEngines/1234567890
इंजन के संसाधन का नाम, एनवायरमेंट वैरिएबल में सेव करें:
export ENGINE_ID="<insert the resource name above>"
अब हमें परसिस्टेंट मेमोरी का इस्तेमाल करने के लिए, कोड को अपडेट करना होगा. agent.py के कॉन्टेंट को इससे बदलें:
agent.py
from google.adk.agents.llm_agent import Agent
from google.adk.tools.preload_memory_tool import PreloadMemoryTool
from google.adk.tools.load_memory_tool import load_memory_tool

async def auto_save_session_to_memory_callback(callback_context):
    await callback_context._invocation_context.memory_service.add_session_to_memory(
        callback_context._invocation_context.session)

# Update root_agent with memory tools and callback
root_agent = Agent(
    model='gemini-2.5-flash',
    name='executive_assistant',
    description='Executive Assistant with Persistent Memory',
    instruction='''
    You are an elite AI partner with long-term memory.
    Use load_memory to find context about the user when needed.
    Always be direct, concise, and high-signal.
    ''',
    tools=[PreloadMemoryTool(), load_memory_tool],
    after_agent_callback=auto_save_session_to_memory_callback,
)
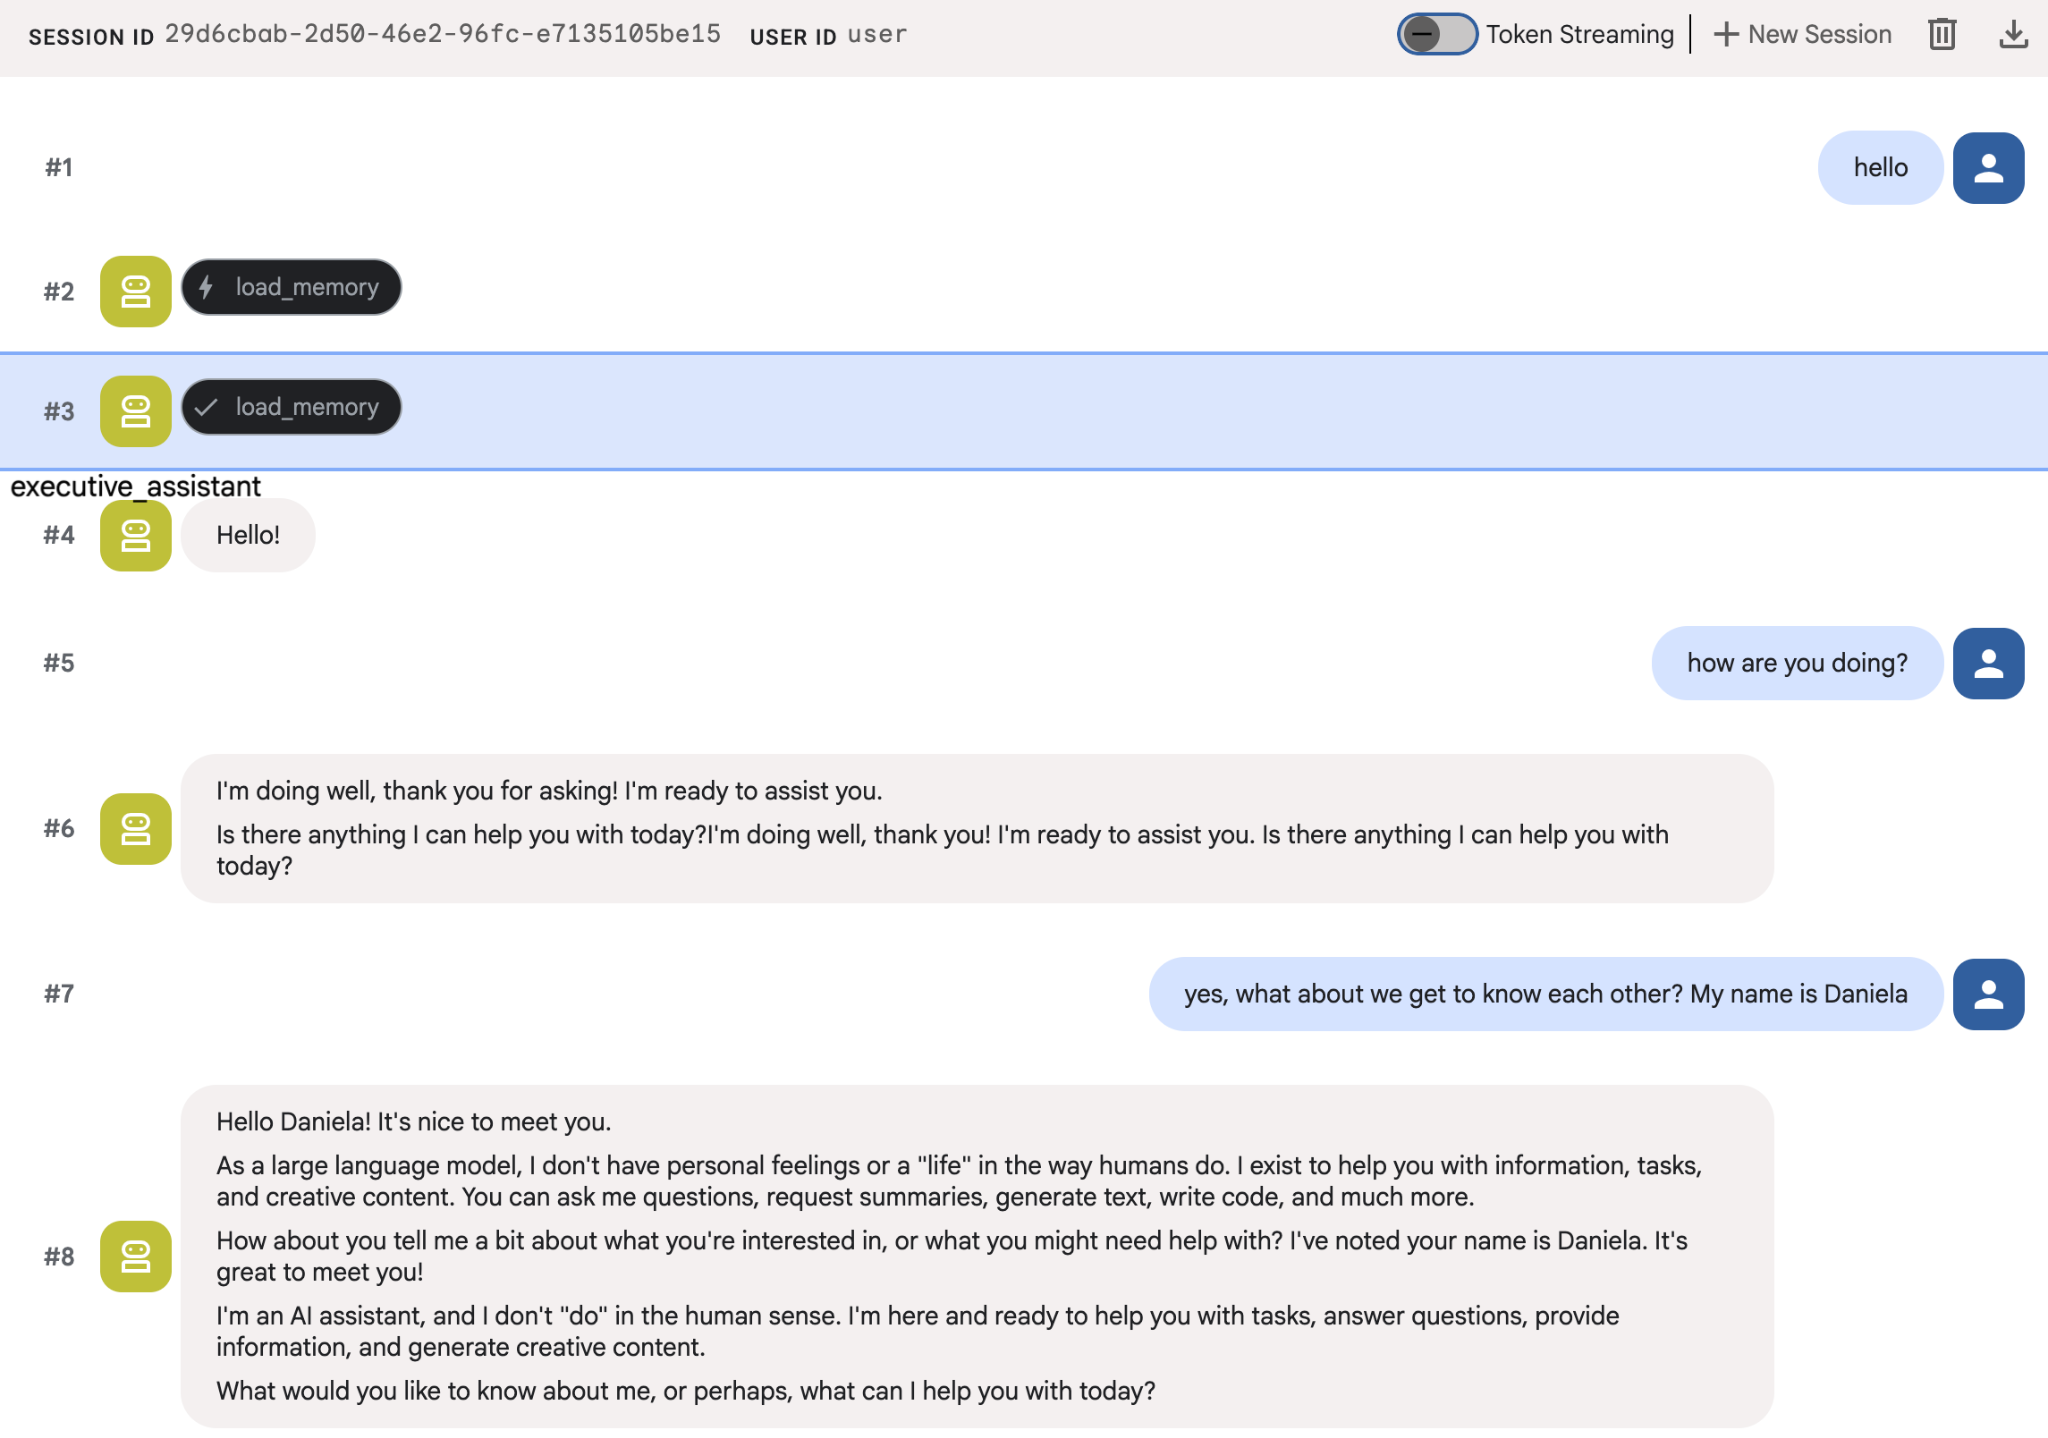
PreloadMemoryTool, पिछली बातचीत से मिले काम के कॉन्टेक्स्ट को हर अनुरोध में अपने-आप जोड़ देता है. इसके लिए, यह समानता के आधार पर खोज करने की सुविधा का इस्तेमाल करता है. वहीं, load_memory_tool की मदद से मॉडल, ज़रूरत पड़ने पर तथ्यों के लिए मेमोरी बैंक से साफ़ तौर पर क्वेरी कर सकता है. इन दोनों को मिलाकर, आपके एजेंट को ज़्यादा और लगातार कॉन्टेक्स्ट मिलता है!
अब मेमोरी की सुविधा के साथ एजेंट को लॉन्च करने के लिए, आपको adk web चलाते समय memory_service_uri को पास करना होगा:
uv run adk web --memory_service_uri="agentengine://$ENGINE_ID"
एजेंट को अपने बारे में कुछ जानकारी दें. इसके बाद, किसी दूसरे सेशन में जाकर उसके बारे में सवाल पूछें. उदाहरण के लिए, उसे अपना नाम बताएं:
आपके पास उन यादों की जांच करने का विकल्प होता है जिन्हें एजेंट, Cloud Console पर सेव कर रहा है. "Agent Engine" के प्रॉडक्ट पेज पर जाएं (खोज बार का इस्तेमाल करें)

इसके बाद, अपने एजेंट इंजन के नाम पर क्लिक करें. पक्का करें कि आपने सही क्षेत्र चुना हो:
इसके बाद, यादें टैब पर जाएं:
आपको कुछ यादें दिखेंगी.
6. वेब रिसर्च की सुविधाएं जोड़ना
अच्छी क्वालिटी की जानकारी देने के लिए, हमारे एजेंट को गहरी जांच करनी होगी. यह जांच, सिर्फ़ एक सर्च क्वेरी से आगे की होनी चाहिए. शोध को किसी खास सब-एजेंट को सौंपकर, हम मुख्य पर्सोना की जवाब देने की क्षमता को बनाए रखते हैं. वहीं, रिसर्चर बैकग्राउंड में जटिल डेटा इकट्ठा करता है.
इस चरण में, हम "रिसर्च की गहराई" को हासिल करने के लिए, LoopAgent को लागू करते हैं. इससे एजेंट को बार-बार खोजने, नतीजों का आकलन करने, और अपनी क्वेरी को तब तक बेहतर बनाने की अनुमति मिलती है, जब तक उसे पूरी जानकारी न मिल जाए. हम तकनीकी तौर पर भी सख्ती बरतते हैं. इसके लिए, हम सभी नतीजों के लिए इनलाइन उद्धरण (टेक्स्ट में ही उद्धरण देना) ज़रूरी करते हैं. इससे यह पक्का होता है कि हर दावे के साथ, स्रोत का लिंक दिया गया हो.
रिसर्च स्पेशलिस्ट (research.py) बनाएं
यहां हमने Google Search टूल से लैस एक बुनियादी एजेंट को परिभाषित किया है और उसे LoopAgent में रैप किया है. max_iterations पैरामीटर, एक तरह से कंट्रोलर के तौर पर काम करता है. यह पक्का करता है कि अगर एजेंट को जानकारी समझने में कोई समस्या आ रही है, तो वह खोज को तीन बार तक दोहराए.
research.py
from google.adk.agents.llm_agent import Agent
from google.adk.agents.loop_agent import LoopAgent
from google.adk.tools.google_search_tool import GoogleSearchTool
from google.adk.tools.tool_context import ToolContext

def exit_loop(tool_context: ToolContext):
    """Call this function ONLY when no further research is needed, signaling the iterative process should end."""
    print(f"  [Tool Call] exit_loop triggered by {tool_context.agent_name}")
    tool_context.actions.escalate = True
    # Return empty dict as tools should typically return JSON-serializable output
    return {}

# --- RESEARCH LOGIC ---
_research_worker = Agent(
    model='gemini-2.5-flash',
    name='research_worker',
    description='Worker agent that performs a single research step.',
    instruction='''
    Use google_search to find facts and synthesize them for the user.
    Critically evaluate your findings. If the data is incomplete or you need more context, prepare to search again in the next iteration.
    You must include the links you found as references in your response, formatting them like citations in a research paper (e.g., [1], [2]).
    Use the exit_loop tool to terminate the research early if no further research is needed.
    If you need to ask the user for clarifications, call the exit_loop function early to interrupt the research cycle.
    ''',
    tools=[GoogleSearchTool(bypass_multi_tools_limit=True), exit_loop],
)

# The LoopAgent iterates the worker up to 3 times for deeper research
research_agent = LoopAgent(
    name='research_specialist',
    description='Deep web research specialist.',
    sub_agents=[_research_worker],
    max_iterations=3,
)
रूट एजेंट (agent.py) को अपडेट करें
research_agent को इंपोर्ट करें और उसे Sharon के लिए टूल के तौर पर जोड़ें:
agent.py
from google.adk.agents.llm_agent import Agent
from google.adk.tools.preload_memory_tool import PreloadMemoryTool
from google.adk.tools.load_memory_tool import load_memory_tool

# Import our new sub agent
from .research import research_agent

async def auto_save_session_to_memory_callback(callback_context):
    await callback_context._invocation_context.memory_service.add_session_to_memory(
        callback_context._invocation_context.session)

# Update root_agent with memory tools and callback
root_agent = Agent(
    model='gemini-2.5-flash',
    name='executive_assistant',
    description='Executive Assistant with persistent memory and research capabilities',
    instruction='''
    You are an elite AI partner with long-term memory.
    1. Use load_memory to recall facts.
    2. Delegate research tasks to the research_specialist.
    Always be direct, concise, and high-signal.
    ''',
    tools=[PreloadMemoryTool(), load_memory_tool],
    sub_agents=[research_agent],
    after_agent_callback=auto_save_session_to_memory_callback,
)
रिसर्च एजेंट की जांच करने के लिए, adk वेब को फिर से लॉन्च करें.
uv run adk web --memory_service_uri="agentengine://$ENGINE_ID"
इसे रिसर्च से जुड़ा कोई आसान टास्क दें. उदाहरण के लिए, "अच्छा टेक ब्लॉग कैसे लिखें?"
आपने देखा होगा कि एजेंट को मेरा नाम याद था, जबकि यह एक नया सेशन है. कृपया "transfer_to_agent" टूल कॉल पर भी ध्यान दें: यह वह टूल है जो टास्क को हमारे नए रिसर्च एजेंट को सौंपता है.
अब, टास्क मैनेजमेंट के बारे में बात करते हैं.
7. Cloud SQL की मदद से टास्क मैनेजमेंट की सुविधा जोड़ना
एजेंट के पास लंबे समय तक जानकारी सेव रखने की सुविधा होती है. हालांकि, यह सुविधा, स्ट्रक्चर्ड डेटा के लिए सही नहीं है. जैसे, काम की सूची. टास्क के लिए, हम पारंपरिक रिलेशनल डेटाबेस का इस्तेमाल करते हैं. हम SQLAlchemy और Google Cloud SQL (PostgreSQL) डेटाबेस का इस्तेमाल करेंगे. कोड लिखने से पहले, हमें बुनियादी ढांचा तैयार करना होगा.
इंफ़्रास्ट्रक्चर उपलब्ध कराना
अपना डेटाबेस बनाने के लिए, ये कमांड चलाएं. ध्यान दें: इंस्टेंस बनाने में करीब 5 से 10 मिनट लगते हैं. बैकग्राउंड में यह प्रोसेस जारी रहने के दौरान, अगले चरण पर जाया जा सकता है.
# 1. Define instance variables
export INSTANCE_NAME="assistant-db"
export USER_EMAIL=$(gcloud config get-value account)

# 2. Create the Cloud SQL instance
gcloud sql instances create $INSTANCE_NAME \
    --database-version=POSTGRES_18 \
    --tier=db-f1-micro \
    --region=us-central1 \
    --edition=ENTERPRISE

# 3. Create the database for our tasks
gcloud sql databases create tasks --instance=$INSTANCE_NAME
डेटाबेस इंस्टेंस को चालू होने में कुछ मिनट लगेंगे. इस दौरान, चाय या कॉफ़ी का आनंद लें या कोड को अपडेट करें. हालांकि, वापस आकर ऐक्सेस कंट्रोल को पूरा करना न भूलें!
ऐक्सेस कंट्रोल कॉन्फ़िगर करना
अब हमें आपके उपयोगकर्ता खाते को कॉन्फ़िगर करना होगा, ताकि आपके पास डेटाबेस का ऐक्सेस हो. टर्मिनल पर ये कमांड चलाएं:
# change this to your favorite password
export DB_PASS="correct-horse-battery-staple"

# Create a regular database user
gcloud sql users create assistant_user \
    --instance=$INSTANCE_NAME \
    --password=$DB_PASS
एनवायरमेंट का कॉन्फ़िगरेशन अपडेट करना
ADK, रनटाइम के दौरान .env फ़ाइल से कॉन्फ़िगरेशन लोड करता है. डेटाबेस कनेक्शन की जानकारी के साथ, अपने एजेंट के एनवायरमेंट को अपडेट करें.
# Retrieve the unique connection name
export DB_CONN=$(gcloud sql instances describe $INSTANCE_NAME --format='value(connectionName)')

# Append configuration to your .env file
cat <<EOF >> executive_assistant/.env
DB_CONNECTION_NAME=$DB_CONN
DB_USER=assistant_user
DB_PASSWORD=$DB_PASS
DB_NAME=tasks
EOF
अब कोड में बदलाव करने का तरीका जानें.
Todo Specialist (todo.py) बनाएं
रिसर्च एजेंट की तरह ही, हम 'क्या-क्या करना है' की सूची बनाने वाले एजेंट को उसकी फ़ाइल में बनाते हैं. todo.py बनाएं:
todo.py
import os
import uuid
import sqlalchemy
from datetime import datetime
from typing import Optional, List

from sqlalchemy import (
    Column,
    String,
    DateTime,
    Enum,
    select,
    delete,
    update,
)
from sqlalchemy.orm import declarative_base, Session
from google.cloud.sql.connector import Connector
from google.adk.agents.llm_agent import Agent

# --- DATABASE LOGIC ---
Base = declarative_base()
connector = Connector()

def getconn():
    db_connection_name = os.environ.get("DB_CONNECTION_NAME")
    db_user = os.environ.get("DB_USER")
    db_password = os.environ.get("DB_PASSWORD")
    db_name = os.environ.get("DB_NAME", "tasks")

    return connector.connect(
        db_connection_name,
        "pg8000",
        user=db_user,
        password=db_password,
        db=db_name,
    )

engine = sqlalchemy.create_engine(
    "postgresql+pg8000://",
    creator=getconn,
)

class Todo(Base):
    __tablename__ = "todos"
    id = Column(String(36), primary_key=True, default=lambda: str(uuid.uuid4()))
    title = Column(String(255), nullable=False)
    priority = Column(
        Enum("high", "medium", "low", name="priority_levels"), nullable=False, default="medium"
    )
    due_date = Column(DateTime, nullable=True)
    status = Column(Enum("pending", "done", name="status_levels"), default="pending")
    created_at = Column(DateTime, default=datetime.utcnow)

def init_db():
    """Builds the table if it's missing."""
    Base.metadata.create_all(bind=engine)

def add_todo(
    title: str, priority: str = "medium", due_date: Optional[str] = None
) -> dict:
    """
    Adds a new task to the list.

    Args:
        title (str): The description of the task.
        priority (str): The urgency level. Must be one of: 'high', 'medium', 'low'.
        due_date (str, optional): The due date in ISO format (YYYY-MM-DD or YYYY-MM-DDTHH:MM:SS).

    Returns:
        dict: A dictionary containing the new task's ID and a status message.
    """
    init_db()
    with Session(engine) as session:
        due = datetime.fromisoformat(due_date) if due_date else None
        item = Todo(
            title=title,
            priority=priority.lower(),
            due_date=due,
        )
        session.add(item)
        session.commit()
        return {"id": item.id, "status": f"Task added ✅"}

def list_todos(status: str = "pending") -> list:
    """
    Lists tasks from the database, optionally filtering by status.

    Args:
        status (str, optional): The status to filter by. 'pending', 'done', or 'all'.
    """
    init_db()
    with Session(engine) as session:
        query = select(Todo)

        s_lower = status.lower()
        if s_lower != "all":
            query = query.where(Todo.status == s_lower)

        query = query.order_by(Todo.priority, Todo.created_at)

        results = session.execute(query).scalars().all()
        return [
            {
                "id": t.id,
                "task": t.title,
                "priority": t.priority,
                "status": t.status,
            }
            for t in results
        ]

def complete_todo(task_id: str) -> str:
    """Marks a specific task as 'done'."""
    init_db()
    with Session(engine) as session:
        session.execute(update(Todo).where(Todo.id == task_id).values(status="done"))
        session.commit()
        return f"Task {task_id} marked as done."

def delete_todo(task_id: str) -> str:
    """Permanently removes a task from the database."""
    init_db()
    with Session(engine) as session:
        session.execute(delete(Todo).where(Todo.id == task_id))
        session.commit()
        return f"Task {task_id} deleted."

# --- TODO SPECIALIST AGENT ---
todo_agent = Agent(
    model='gemini-2.5-flash',
    name='todo_specialist',
    description='A specialist agent that manages a structured SQL task list.',
    instruction='''
    You manage the user's task list using a PostgreSQL database.
    - Use add_todo when the user wants to remember something. If no priority is mentioned, mark it as 'medium'.
    - Use list_todos to show tasks.
    - Use complete_todo to mark a task as finished.
    - Use delete_todo to remove a task entirely.

    When marking a task as complete or deleting it, if the user doesn't provide the ID,
    use list_todos first to find the correct ID for the task they described.
    ''',
    tools=[add_todo, list_todos, complete_todo, delete_todo],
)
ऊपर दिया गया कोड, दो मुख्य काम करता है: Cloud SQL डेटाबेस से कनेक्ट करना और 'करने के लिए काम' की सूची से जुड़ी सभी सामान्य कार्रवाइयों के लिए टूल की सूची उपलब्ध कराना. इनमें, आइटम जोड़ना, हटाना, और उन्हें पूरा होने के तौर पर मार्क करना शामिल है.
यह लॉजिक, 'क्या-क्या करना है' एजेंट के लिए बहुत खास है. साथ ही, हमें एक्ज़ीक्यूटिव असिस्टेंट (रूट एजेंट) के नज़रिए से इस बारीक मैनेजमेंट की ज़रूरत नहीं है. इसलिए, हम इस एजेंट को सब-एजेंट के बजाय "AgentTool" के तौर पर पैकेज करेंगे.
AgentTool या सब-एजेंट का इस्तेमाल करने का फ़ैसला लेते समय, यह देखें कि उन्हें कॉन्टेक्स्ट शेयर करने की ज़रूरत है या नहीं:
- जब आपके एजेंट को रूट एजेंट के साथ कॉन्टेक्स्ट शेयर करने की ज़रूरत न हो, तब AgentTool का इस्तेमाल करें
- जब आपको अपने एजेंट को रूट एजेंट के साथ कॉन्टेक्स्ट शेयर करना हो, तब सब-एजेंट का इस्तेमाल करें
रिसर्च एजेंट के मामले में, कॉन्टेक्स्ट शेयर करना फ़ायदेमंद हो सकता है. हालांकि, सामान्य कामों को पूरा करने वाले एजेंट के लिए, ऐसा करने से ज़्यादा फ़ायदा नहीं मिलता.
आइए, agent.py में AgentTool को लागू करें.
रूट एजेंट (agent.py) को अपडेट करें
अब todo_agent को अपनी मुख्य फ़ाइल में इंपोर्ट करें और इसे टूल के तौर पर अटैच करें:
agent.py
import os
from datetime import datetime
from google.adk.agents.llm_agent import Agent
from google.adk.tools.agent_tool import AgentTool
from google.adk.tools.preload_memory_tool import PreloadMemoryTool
from google.adk.tools.load_memory_tool import load_memory_tool

# Import our specialized sub-agents
from .research import research_agent
from .todo import todo_agent

# Callback for persistent memory storage
async def auto_save_session_to_memory_callback(callback_context):
    await callback_context._invocation_context.memory_service.add_session_to_memory(
        callback_context._invocation_context.session)

# --- ROOT AGENT DEFINITION ---
root_agent = Agent(
    model='gemini-2.5-flash',
    name='executive_assistant',
    description='A professional AI Executive Assistant with memory and specialized tools.',
    instruction='''
    You are an elite, high-signal AI Executive Assistant.
    Your goal is to help the user manage their knowledge, tasks, and research.

    ## Your Capabilities:
    1. Memory: Use load_memory to recall personal facts or past context about the user.
    2. Research: Delegate complex web-based investigations to the research_specialist.
    3. Tasks: Delegate all to-do list management (adding, listing, or completing tasks) to the todo_specialist.

    Always be direct and professional. If a task is successful, provide a brief confirmation.
    ''',
    tools=[
        PreloadMemoryTool(),
        load_memory_tool,
        AgentTool(todo_agent) # Exposes the Todo Specialist as a tool
    ],
    sub_agents=[research_agent], # Exposes the Research Specialist for direct handover
    after_agent_callback=auto_save_session_to_memory_callback,
)
नई सुविधा को आज़माने के लिए, adk web को फिर से चलाएं:
uv run adk web --memory_service_uri="agentengine://$ENGINE_ID"
इसके अलावा, कोई काम करने की सूची बनाने के लिए:
8. कैलेंडर मैनेज करने की सुविधा जोड़ना
आखिर में, हम इसे Google Calendar के साथ इंटिग्रेट करेंगे, ताकि एजेंट अपॉइंटमेंट मैनेज कर सके. इस कोडलैब के लिए, हम एजेंट को आपके निजी कैलेंडर का ऐक्सेस देने के बजाय, एक अलग कैलेंडर बनाएँगे, ताकि एजेंट उसे मैनेज कर सके. अगर एजेंट को आपके निजी कैलेंडर का ऐक्सेस दिया जाता है, तो यह खतरनाक हो सकता है.
सबसे पहले, हम एक खास सेवा खाता बनाएंगे, ताकि एजेंट की पहचान की जा सके. इसके बाद, हम सेवा खाते का इस्तेमाल करके प्रोग्राम के हिसाब से एजेंट का कैलेंडर बनाएंगे.
सेवा खाता उपलब्ध कराना
अपनी पहचान बनाने के लिए, टर्मिनल खोलें और ये कमांड चलाएं. साथ ही, अपने निजी खाते को इसकी पहचान के तौर पर इस्तेमाल करने की अनुमति दें:
export SA_NAME="ea-agent"
export SA_EMAIL="${SA_NAME}@${PROJECT_ID}.iam.gserviceaccount.com"

# Create the service account
gcloud iam service-accounts create $SA_NAME \
    --display-name="Executive Assistant Agent"

# Allow your local user to impersonate it
gcloud iam service-accounts add-iam-policy-binding $SA_EMAIL \
    --member="user:$(gcloud config get-value account)" \
    --role="roles/iam.serviceAccountTokenCreator"

# Save it to the agent's environment
echo "SERVICE_ACCOUNT_EMAIL=$SA_EMAIL" >> executive_assistant/.env
प्रोग्राम के हिसाब से कैलेंडर बनाना
आइए, एक स्क्रिप्ट लिखते हैं, ताकि सेवा खाते को कैलेंडर बनाने के लिए कहा जा सके. अपने प्रोजेक्ट के रूट में setup_calendar.py नाम की एक नई फ़ाइल बनाएं. यह फ़ाइल setup_memory.py के साथ होनी चाहिए:
setup_calendar.py
import os
import google.auth
from googleapiclient.discovery import build
from google.auth.transport.requests import Request
from google.auth import impersonated_credentials
from dotenv import load_dotenv

load_dotenv('executive_assistant/.env')
SA_EMAIL = os.environ.get("SERVICE_ACCOUNT_EMAIL")

def setup_sa_calendar():
    print(f"Authenticating to impersonate {SA_EMAIL}...")

    # 1. Base credentials
    creds, _ = google.auth.default(scopes=["https://www.googleapis.com/auth/cloud-platform"])
    creds.refresh(Request())

    # 2. Impersonate the Service Account
    impersonated = impersonated_credentials.Credentials(
        source_credentials=creds,
        target_principal=SA_EMAIL,
        target_scopes=["https://www.googleapis.com/auth/calendar"],
    )
    service = build("calendar", "v3", credentials=impersonated)

    # 3. Create the calendar
    print("Creating independent Service Account calendar...")
    calendar = service.calendars().insert(body={
        "summary": "AI Assistant (SA Owned)",
        "description": "An independent calendar managed purely by the AI."
    }).execute()

    calendar_id = calendar['id']

    # 4. Save the ID
    with open("executive_assistant/.env", "a") as f:
        f.write(f"\nCALENDAR_ID={calendar_id}\n")
    print(f"Setup complete! CALENDAR_ID {calendar_id} added to .env")

if __name__ == "__main__":
    setup_sa_calendar()
टर्मिनल से स्क्रिप्ट चलाएं:
uv run python setup_calendar.py
कैलेंडर स्पेशलिस्ट (calendar.py) बनाएं
अब कैलेंडर स्पेशलिस्ट के बारे में बात करते हैं. हम इस एजेंट को कैलेंडर के सभी टूल उपलब्ध कराएंगे. जैसे, इवेंट की सूची बनाना, इवेंट बनाना, इवेंट अपडेट करना, इवेंट मिटाना. साथ ही, इसमें "जल्दी जोड़ें" सुविधा भी होगी, जो सामान्य भाषा को समझती है.
यहां दिए गए कोड को कॉपी करके, calendar.py में चिपकाएं.
calendar.py
import os
from datetime import datetime, timedelta, timezone

import google.auth
from googleapiclient.discovery import build
from googleapiclient.errors import HttpError
from google.adk.agents.llm_agent import Agent

def _get_calendar_service():
    """Build the Google Calendar API service using Service Account Impersonation."""
    from google.auth.transport.requests import Request
    from google.auth import impersonated_credentials

    target_principal = os.environ.get("SERVICE_ACCOUNT_EMAIL")
    if not target_principal:
        raise ValueError("SERVICE_ACCOUNT_EMAIL environment variable is missing.")

    base_scopes = ["https://www.googleapis.com/auth/cloud-platform"]
    creds, _ = google.auth.default(scopes=base_scopes)
    creds.refresh(Request())

    target_scopes = ["https://www.googleapis.com/auth/calendar"]
    impersonated = impersonated_credentials.Credentials(
        source_credentials=creds,
        target_principal=target_principal,
        target_scopes=target_scopes,
    )

    return build("calendar", "v3", credentials=impersonated)

def _format_event(event: dict) -> dict:
    """Format a raw Calendar API event into a clean dict for the LLM."""
    start = event.get("start", {})
    end = event.get("end", {})
    return {
        "id": event.get("id"),
        "title": event.get("summary", "(No title)"),
        "start": start.get("dateTime", start.get("date")),
        "end": end.get("dateTime", end.get("date")),
        "location": event.get("location", ""),
        "description": event.get("description", ""),
        "attendees": [
            {"email": a["email"], "status": a.get("responseStatus", "unknown")}
            for a in event.get("attendees", [])
        ],
        "link": event.get("htmlLink", ""),
        "conference_link": (
            event.get("conferenceData", {}).get("entryPoints", [{}])[0].get("uri", "")
            if event.get("conferenceData")
            else ""
        ),
        "status": event.get("status", ""),
    }

def list_events(days_ahead: int = 7) -> dict:
    """List upcoming calendar events."""
    calendar_id = os.environ.get("CALENDAR_ID")
    try:
        service = _get_calendar_service()
        now = datetime.now(timezone.utc).isoformat()
        end = (datetime.now(timezone.utc) + timedelta(days=days_ahead)).isoformat()

        events_result = service.events().list(
            calendarId=calendar_id, timeMin=now, timeMax=end,
            maxResults=50, singleEvents=True, orderBy="startTime"
        ).execute()

        events = events_result.get("items", [])
        if not events:
            return {"status": "success", "count": 0, "events": []}

        return {"status": "success", "count": len(events), "events": [_format_event(e) for e in events]}
    except HttpError as e:
        return {"status": "error", "message": f"Calendar API error: {e}"}

def create_event(title: str, start_time: str, end_time: str, description: str = "", location: str = "", attendees: str = "", add_google_meet: bool = False) -> dict:
    """Create a new calendar event."""
    calendar_id = os.environ.get("CALENDAR_ID")
    try:
        service = _get_calendar_service()
        event_body = {
            "summary": title,
            "start": {"dateTime": start_time},
            "end": {"dateTime": end_time},
        }
        if description: event_body["description"] = description
        if location: event_body["location"] = location
        if attendees:
            email_list = [e.strip() for e in attendees.split(",") if e.strip()]
            event_body["attendees"] = [{"email": e} for e in email_list]

        conference_version = 0
        if add_google_meet:
            event_body["conferenceData"] = {
                "createRequest": {"requestId": f"event-{datetime.now().strftime('%Y%m%d%H%M%S')}", "conferenceSolutionKey": {"type": "hangoutsMeet"}}
            }
            conference_version = 1

        event = service.events().insert(calendarId=calendar_id, body=event_body, conferenceDataVersion=conference_version).execute()
        return {"status": "success", "message": f"Event created ✅", "event": _format_event(event)}
    except HttpError as e:
        return {"status": "error", "message": f"Calendar API error: {e}"}

def update_event(event_id: str, title: str = "", start_time: str = "", end_time: str = "", description: str = "") -> dict:
    """Update an existing calendar event."""
    calendar_id = os.environ.get("CALENDAR_ID")
    try:
        service = _get_calendar_service()
        patch_body = {}
        if title: patch_body["summary"] = title
        if start_time: patch_body["start"] = {"dateTime": start_time}
        if end_time: patch_body["end"] = {"dateTime": end_time}
        if description: patch_body["description"] = description
        if not patch_body: return {"status": "error", "message": "No fields to update."}

        event = service.events().patch(calendarId=calendar_id, eventId=event_id, body=patch_body).execute()
        return {"status": "success", "message": "Event updated ✅", "event": _format_event(event)}
    except HttpError as e:
        return {"status": "error", "message": f"Calendar API error: {e}"}

def delete_event(event_id: str) -> dict:
    """Delete a calendar event by its ID."""
    calendar_id = os.environ.get("CALENDAR_ID")
    try:
        service = _get_calendar_service()
        service.events().delete(calendarId=calendar_id, eventId=event_id).execute()
        return {"status": "success", "message": f"Event '{event_id}' deleted ✅"}
    except HttpError as e:
        return {"status": "error", "message": f"Calendar API error: {e}"}

def quick_add_event(text: str) -> dict:
    """Create an event using natural language (e.g. 'Lunch with Sarah next Monday noon')."""
    calendar_id = os.environ.get("CALENDAR_ID")
    try:
        service = _get_calendar_service()
        event = service.events().quickAdd(calendarId=calendar_id, text=text).execute()
        return {"status": "success", "message": "Event created from text ✅", "event": _format_event(event)}
    except HttpError as e:
        return {"status": "error", "message": f"Calendar API error: {e}"}

calendar_agent = Agent(
    model='gemini-2.5-flash',
    name='calendar_specialist',
    description='Manages the user schedule and calendar events.',
    instruction='''
    You manage the user's Google Calendar.
    - Use list_events to check the schedule.
    - Use quick_add_event for simple, conversational scheduling requests (e.g., "Lunch tomorrow at noon").
    - Use create_event for complex meetings that require attendees, specific durations, or Google Meet links.
    - Use update_event to change details of an existing event.
    - Use delete_event to cancel or remove an event.

    CRITICAL: For update_event and delete_event, you must provide the exact `event_id`.
    If the user does not provide the ID, you MUST call list_events first to find the correct `event_id` before attempting the update or deletion.

    Always use the current date/time context provided by the root agent to resolve relative dates like "tomorrow".
    ''',
    tools=[list_events, create_event, update_event, delete_event, quick_add_event],
)
रूट एजेंट (agent.py) को फ़ाइनल करें
नीचे दिए गए कोड का इस्तेमाल करके, अपनी agent.py फ़ाइल अपडेट करें:
agent.py
import os
from datetime import datetime
from zoneinfo import ZoneInfo
from google.adk.agents.llm_agent import Agent
from google.adk.tools.agent_tool import AgentTool
from google.adk.tools.preload_memory_tool import PreloadMemoryTool
from google.adk.tools.load_memory_tool import load_memory_tool

# Import all our specialized sub-agents
from .research import research_agent
from .todo import todo_agent
from .calendar import calendar_agent
import tzlocal

# Automatically detect the local system timezone
TIMEZONE = tzlocal.get_localzone_name()

# Callback for persistent memory storage
async def auto_save_session_to_memory_callback(callback_context):
    await callback_context._invocation_context.memory_service.add_session_to_memory(
        callback_context._invocation_context.session)

# Callback to inject the current time into the prompt
async def setup_agent_context(callback_context, **kwargs):
    now = datetime.now(ZoneInfo(TIMEZONE))
    callback_context.state["current_time"] = now.strftime("%A, %Y-%m-%d %I:%M %p")
    callback_context.state["timezone"] = TIMEZONE

# --- ROOT AGENT DEFINITION ---
root_agent = Agent(
    model='gemini-2.5-flash',
    name='executive_assistant',
    description='A professional AI Executive Assistant with memory and specialized tools.',
    instruction='''
    You are an elite, high-signal AI Executive Assistant.
    Your goal is to help the user manage their knowledge, tasks, research, and schedule.

    ## Your Capabilities:
    1. Memory: Use load_memory to recall personal facts.
    2. Research: Delegate complex web investigations to the research_specialist.
    3. Tasks: Delegate all to-do list management to the todo_specialist.
    4. Scheduling: Delegate all calendar queries to the calendar_specialist.

    ## 🕒 Current State
    - Time: {current_time?}
    - Timezone: {timezone?}

    Always be direct and professional.
    ''',
    tools=[
        PreloadMemoryTool(),
        load_memory_tool,
        AgentTool(todo_agent),
        AgentTool(calendar_agent)
    ],
    sub_agents=[research_agent],
    before_agent_callback=[setup_agent_context],
    after_agent_callback=[auto_save_session_to_memory_callback],
)
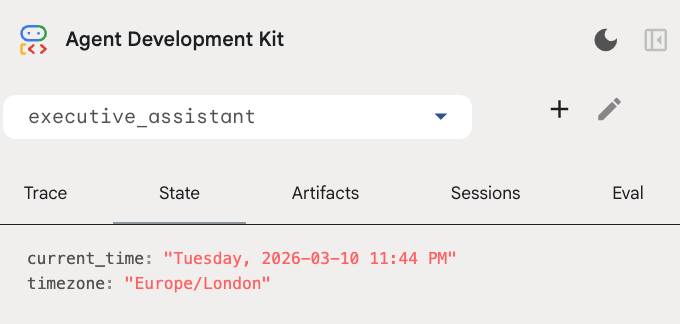
कृपया ध्यान दें कि कैलेंडर टूल के अलावा, हमने एक नया एजेंट से पहले कॉलबैक फ़ंक्शन भी जोड़ा है: setup_agent_context. इस फ़ंक्शन से एजेंट को मौजूदा तारीख, समय, और टाइमज़ोन के बारे में जानकारी मिलती है, ताकि वह कैलेंडर का ज़्यादा असरदार तरीके से इस्तेमाल कर सके. यह सेशन की स्थिति वाले वैरिएबल सेट करके काम करता है. यह एजेंट की मेमोरी का एक अलग टाइप है, जिसे कम समय के लिए डिज़ाइन किया गया है.
एजेंट की पूरी तरह से जांच करने के लिए, adk web को एक बार फिर से चलाएं!
uv run adk web --memory_service_uri="agentengine://$ENGINE_ID"
डेवलपर यूज़र इंटरफ़ेस (यूआई) में, स्थिति टैब में जाकर सेशन की स्थिति की जांच की जा सकती है:
अब आपके पास एक ऐसा एजेंट है जो कैलेंडर इवेंट और कामों की सूचियों को ट्रैक कर सकता है, रिसर्च कर सकता है, और जिसमें लंबे समय तक जानकारी सेव रखने की सुविधा है!
लैब के बाद क्लीनअप करना
9. नतीजा
बधाई हो! आपने पांच चरणों में, कई फ़ंक्शन वाला एआई एक्ज़ीक्यूटिव असिस्टेंट तैयार कर लिया है.
हमने क्या-क्या कवर किया
- एआई एजेंट के लिए इन्फ़्रास्ट्रक्चर उपलब्ध कराना.
- ADK में पहले से मौजूद सुविधाओं का इस्तेमाल करके, परसिस्टेंट मेमोरी और खास सब-एजेंट लागू करना.
- बाहरी डेटाबेस और प्रॉडक्टिविटी एपीआई को इंटिग्रेट करना.
अगले चरण
इस प्लैटफ़ॉर्म पर मौजूद अन्य कोडलैब आज़माकर, अपनी सीखने की यात्रा जारी रखी जा सकती है. इसके अलावा, अपने हिसाब से एक्ज़ीक्यूटिव असिस्टेंट को बेहतर बनाया जा सकता है.
अगर आपको बेहतर बनाने से जुड़े कुछ आइडिया चाहिए, तो ये तरीके आज़माएं:
- लंबी बातचीत के लिए परफ़ॉर्मेंस को ऑप्टिमाइज़ करने के लिए, इवेंट कंपैक्शन लागू करें.
- आर्टफ़ैक्ट सेवा जोड़ें, ताकि एजेंट आपके लिए नोट ले सके और उन्हें फ़ाइलों के तौर पर सेव कर सके
- Google Cloud Run का इस्तेमाल करके, अपने एजेंट को बैकएंड सेवा के तौर पर डिप्लॉय करें.
जांच पूरी होने के बाद, एनवायरमेंट को क्लीन अप करना न भूलें. ऐसा न करने पर, आपके बिलिंग खाते पर अनचाहे शुल्क लग सकते हैं.
कोडिंग करते रहें!