
1. บทนำ
ใน Codelab นี้ คุณจะได้เรียนรู้วิธีสร้าง AI Agent ที่ซับซ้อนโดยใช้ Google Agent Development Kit (ADK) เราจะทำตามเส้นทางการพัฒนาตามธรรมชาติ โดยเริ่มจากเอเจนต์การสนทนาพื้นฐานและค่อยๆ เพิ่มความสามารถเฉพาะทาง
Agent ที่เรากำลังสร้างคือผู้ช่วยผู้บริหาร ซึ่งออกแบบมาเพื่อช่วยคุณในงานประจำวัน เช่น การจัดการปฏิทิน การเตือนงาน การค้นคว้า และการรวบรวมโน้ต โดยสร้างขึ้นใหม่ทั้งหมดโดยใช้ ADK, Gemini และ Vertex AI
เมื่อสิ้นสุดแล็บนี้ คุณจะมีเอเจนต์ที่ทำงานได้อย่างเต็มรูปแบบและความรู้ที่จำเป็นในการขยายเอเจนต์ให้ตรงกับความต้องการของคุณเอง
ข้อกำหนดเบื้องต้น
- มีความรู้พื้นฐานเกี่ยวกับภาษาโปรแกรม Python
- ความรู้พื้นฐานเกี่ยวกับคอนโซล Google Cloud เพื่อจัดการทรัพยากรระบบคลาวด์
สิ่งที่คุณจะได้เรียนรู้
- การจัดสรรโครงสร้างพื้นฐานของระบบคลาวด์สำหรับ AI Agent
- การใช้หน่วยความจำระยะยาวแบบถาวรโดยใช้ Vertex AI Memory Bank
- สร้างลำดับชั้นของเอเจนต์ย่อยเฉพาะทาง
- การผสานรวมฐานข้อมูลภายนอกและระบบนิเวศของ Google Workspace
สิ่งที่คุณต้องมี
คุณสามารถทำเวิร์กช็อปนี้ได้ทั้งหมดภายใน Google Cloud Shell ซึ่งมาพร้อมกับทรัพยากร Dependency ที่จำเป็นทั้งหมด (gcloud CLI, ตัวแก้ไขโค้ด, Go, Gemini CLI) ที่ติดตั้งไว้ล่วงหน้า
หรือหากต้องการทำงานในเครื่องของคุณเอง คุณจะต้องมีสิ่งต่อไปนี้
- Python (เวอร์ชัน 3.12 ขึ้นไป)
- ตัวแก้ไขโค้ดหรือ IDE (เช่น VS Code หรือ
vim) - เทอร์มินัลเพื่อเรียกใช้คำสั่ง Python และ
gcloud - แนะนำ: เอเจนต์การเขียนโค้ด เช่น Gemini CLI หรือ Antigravity
เทคโนโลยีหลัก
ดูข้อมูลเพิ่มเติมเกี่ยวกับเทคโนโลยีที่เราจะใช้ได้ที่นี่
2. การตั้งค่าสภาพแวดล้อม
เลือกตัวเลือกใดตัวเลือกหนึ่งต่อไปนี้ การตั้งค่าสภาพแวดล้อมแบบเรียนรู้ด้วยตนเอง หากต้องการเรียกใช้ Codelab นี้ในเครื่องของคุณเอง หรือเริ่ม Cloud Shell หากต้องการเรียกใช้ Codelab นี้ในระบบคลาวด์ทั้งหมด
การตั้งค่าสภาพแวดล้อมแบบเรียนรู้ด้วยตนเอง
- ลงชื่อเข้าใช้ คอนโซล Google Cloud แล้วสร้างโปรเจ็กต์ใหม่หรือใช้โปรเจ็กต์ที่มีอยู่ซ้ำ หากยังไม่มีบัญชี Gmail หรือ Google Workspace คุณต้องสร้างบัญชี


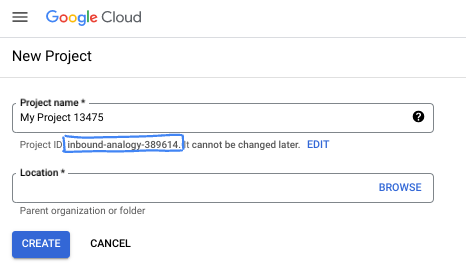
- ชื่อโปรเจ็กต์คือชื่อที่แสดงสำหรับผู้เข้าร่วมโปรเจ็กต์นี้ ซึ่งเป็นสตริงอักขระที่ Google APIs ไม่ได้ใช้ คุณอัปเดตได้ทุกเมื่อ
- รหัสโปรเจ็กต์จะไม่ซ้ำกันในโปรเจ็กต์ Google Cloud ทั้งหมดและเปลี่ยนแปลงไม่ได้ (เปลี่ยนไม่ได้หลังจากตั้งค่าแล้ว) Cloud Console จะสร้างสตริงที่ไม่ซ้ำกันโดยอัตโนมัติ ซึ่งโดยปกติแล้วคุณไม่จำเป็นต้องสนใจว่าสตริงนั้นคืออะไร ใน Codelab ส่วนใหญ่ คุณจะต้องอ้างอิงรหัสโปรเจ็กต์ (โดยทั่วไปจะระบุเป็น
PROJECT_ID) หากไม่ชอบรหัสที่สร้างขึ้น คุณอาจสร้างรหัสแบบสุ่มอีกรหัสหนึ่งได้ หรือคุณอาจลองใช้ชื่อของคุณเองและดูว่ามีชื่อนั้นหรือไม่ คุณจะเปลี่ยนแปลงรหัสนี้หลังจากขั้นตอนนี้ไม่ได้ และรหัสจะคงอยู่ตลอดระยะเวลาของโปรเจ็กต์ - โปรดทราบว่ายังมีค่าที่ 3 ซึ่งคือหมายเลขโปรเจ็กต์ที่ API บางตัวใช้ ดูข้อมูลเพิ่มเติมเกี่ยวกับค่าทั้ง 3 นี้ได้ในเอกสารประกอบ
- จากนั้นคุณจะต้องเปิดใช้การเรียกเก็บเงินใน Cloud Console เพื่อใช้ทรัพยากร/API ของ Cloud การทำตาม Codelab นี้จะไม่เสียค่าใช้จ่ายมากนัก หรืออาจไม่เสียเลย หากต้องการปิดทรัพยากรเพื่อหลีกเลี่ยงการเรียกเก็บเงินนอกเหนือจากบทแนะนำนี้ คุณสามารถลบทรัพยากรที่สร้างขึ้นหรือลบโปรเจ็กต์ได้ ผู้ใช้ Google Cloud รายใหม่มีสิทธิ์เข้าร่วมโปรแกรมช่วงทดลองใช้ฟรีมูลค่า$300 USD
เริ่มต้น Cloud Shell
แม้ว่าคุณจะใช้งาน Google Cloud จากระยะไกลจากแล็ปท็อปได้ แต่ใน Codelab นี้คุณจะใช้ Google Cloud Shell ซึ่งเป็นสภาพแวดล้อมบรรทัดคำสั่งที่ทำงานในระบบคลาวด์
จาก คอนโซล Google Cloud ให้คลิกไอคอน Cloud Shell ในแถบเครื่องมือด้านขวาบน

การจัดสรรและเชื่อมต่อกับสภาพแวดล้อมจะใช้เวลาเพียงไม่กี่นาที เมื่อเสร็จแล้ว คุณควรเห็นข้อความคล้ายกับตัวอย่างต่อไปนี้

เครื่องเสมือนนี้มาพร้อมเครื่องมือพัฒนาซอฟต์แวร์ทั้งหมดที่คุณต้องการ โดยมีไดเรกทอรีหลักแบบถาวรขนาด 5 GB และทำงานบน Google Cloud ซึ่งช่วยเพิ่มประสิทธิภาพเครือข่ายและการตรวจสอบสิทธิ์ได้อย่างมาก คุณสามารถทำงานทั้งหมดใน Codelab นี้ได้ภายในเบราว์เซอร์ คุณไม่จำเป็นต้องติดตั้งอะไร
3. การตั้งค่าโปรเจ็กต์
ก่อนเขียนโค้ด เราต้องจัดสรรโครงสร้างพื้นฐานและสิทธิ์ที่จำเป็นใน Google Cloud
ตั้งค่าตัวแปรสภาพแวดล้อม
เปิดเทอร์มินัลและตั้งค่าตัวแปรสภาพแวดล้อมต่อไปนี้
export PROJECT_ID=`gcloud config get project`
export LOCATION=us-central1
เปิดใช้ API ที่จำเป็น
เอเจนต์ของคุณต้องมีสิทธิ์เข้าถึงบริการต่างๆ ของ Google Cloud เรียกใช้คำสั่งต่อไปนี้เพื่อเปิดใช้
gcloud services enable \
    aiplatform.googleapis.com \
    calendar-json.googleapis.com \
    sqladmin.googleapis.com
ตรวจสอบสิทธิ์ด้วยข้อมูลรับรองเริ่มต้นของแอปพลิเคชัน
เราต้องตรวจสอบสิทธิ์ด้วยข้อมูลรับรองเริ่มต้นของแอปพลิเคชัน (ADC) เพื่อสื่อสารกับบริการ Google Cloud จากสภาพแวดล้อมของคุณ
เรียกใช้คำสั่งต่อไปนี้เพื่อให้มั่นใจว่าข้อมูลรับรองเริ่มต้นของแอปพลิเคชันของคุณใช้งานได้และเป็นเวอร์ชันล่าสุด
gcloud auth application-default login
4. สร้างเอเจนต์พื้นฐาน
ตอนนี้เราต้องเริ่มต้นไดเรกทอรีที่เราจะจัดเก็บซอร์สโค้ดของโปรเจ็กต์
# setup project directory
mkdir -p adk_ea_codelab && cd adk_ea_codelab
# prepare virtual environment
uv init
# install dependencies
uv add google-adk google-api-python-client tzlocal python-dotenv
uv add cloud-sql-python-connector[pg8000] sqlalchemy
เราเริ่มต้นด้วยการสร้างตัวตนของเอเจนต์และความสามารถในการสนทนาขั้นพื้นฐาน ใน ADK คลาส Agent จะกำหนดลักษณะตัวตนของ Agent และวิธีการของ Agent
ตอนนี้คุณอาจต้องคิดถึงชื่อตัวแทน ฉันชอบให้เอเจนต์มีชื่อที่เหมาะสม เช่น Aida หรือ Sharon เพราะคิดว่าช่วยให้เอเจนต์มี "บุคลิก" บางอย่าง แต่คุณจะเรียกเอเจนต์ตามสิ่งที่เอเจนต์ทำก็ได้ เช่น "executive_assistant" "travel_agent" หรือ "code_executor"
เรียกใช้adk createเพื่อสร้าง Agent เทมเพลต
# replace with your desired agent name
uv run adk create executive_assistant
โปรดเลือก gemini-2.5-flash เป็นโมเดลและ Vertex AI เป็นแบ็กเอนด์ ตรวจสอบอีกครั้งว่ารหัสโปรเจ็กต์ที่แนะนำคือรหัสที่คุณสร้างขึ้นสำหรับแล็บนี้ แล้วกด Enter เพื่อยืนยัน สำหรับภูมิภาค Google Cloud คุณสามารถยอมรับค่าเริ่มต้น (us-central1) เทอร์มินัลจะมีลักษณะคล้ายกับตัวอย่างนี้
daniela_petruzalek@cloudshell:~/adk_ea_codelab (your-project-id)$ uv run adk create executive_assistant
Choose a model for the root agent:
1. gemini-2.5-flash
2. Other models (fill later)
Choose model (1, 2): 1
1. Google AI
2. Vertex AI
Choose a backend (1, 2): 2

You need an existing Google Cloud account and project, check out this link for details:
https://google.github.io/adk-docs/get-started/quickstart/#gemini---google-cloud-vertex-ai

Enter Google Cloud project ID [your-project-id]:
Enter Google Cloud region [us-central1]:

Agent created in /home/daniela_petruzalek/adk_ea_codelab/executive_assistant:
- .env
- __init__.py
- agent.py

daniela_petruzalek@cloudshell:~/adk_ea_codelab (your-project-id)$
เมื่อเสร็จแล้ว คำสั่งก่อนหน้าจะสร้างโฟลเดอร์ที่มีชื่อเอเจนต์ (เช่น executive_assistant) พร้อมไฟล์ 2-3 ไฟล์ ซึ่งรวมถึงไฟล์ agent.py ที่มีคำจำกัดความเอเจนต์พื้นฐาน
from google.adk.agents.llm_agent import Agent

root_agent = Agent(
    model='gemini-2.5-flash',
    name='root_agent',
    description='A helpful assistant for user questions.',
    instruction='Answer user questions to the best of your knowledge',
)
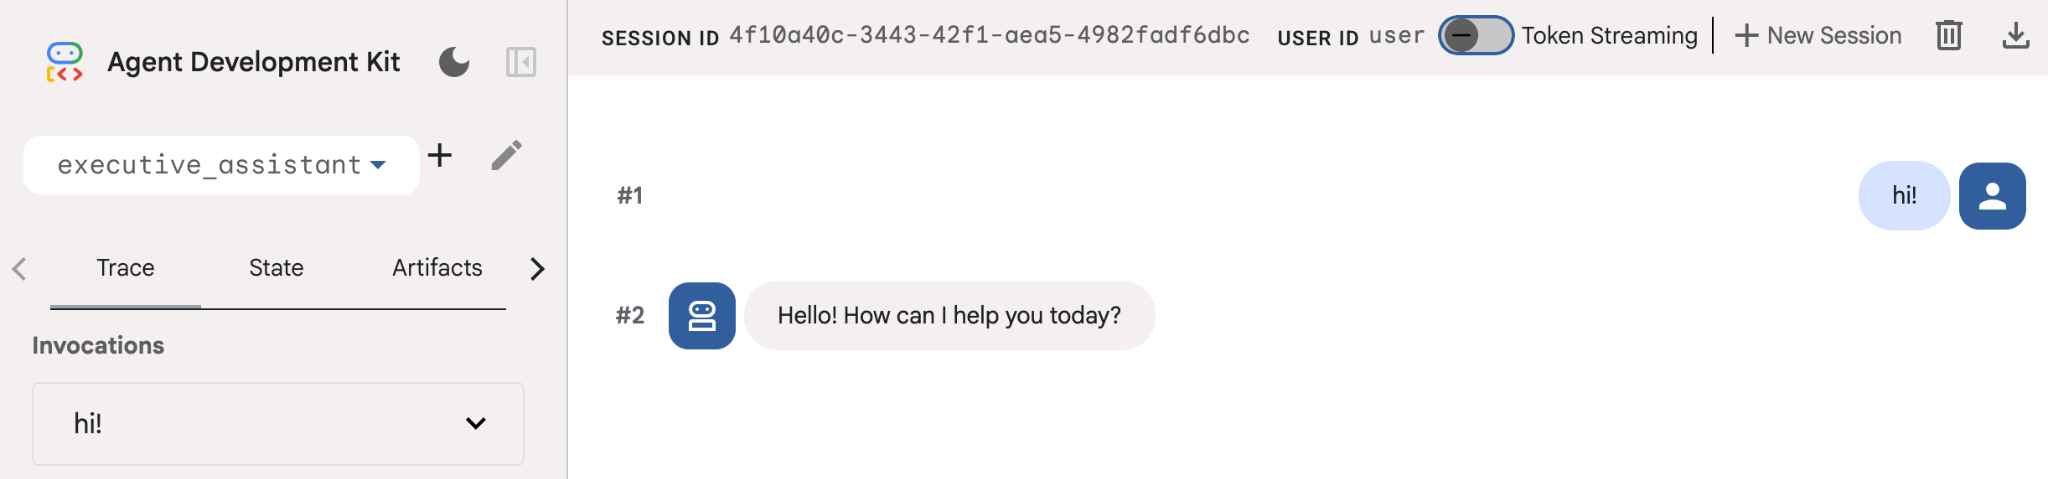
หากต้องการโต้ตอบกับเอเจนต์นี้ ให้เรียกใช้ uv run adk web ในบรรทัดคำสั่งและเปิด UI การพัฒนาในเบราว์เซอร์ คุณจะเห็นข้อความคล้ายกับข้อความต่อไปนี้
$ uv run adk web
...
INFO:     Started server process [1244]
INFO:     Waiting for application startup.

+-----------------------------------------------------------------------------+
| ADK Web Server started                                                      |
|                                                                             |
| For local testing, access at http://127.0.0.1:8000.                         |
+-----------------------------------------------------------------------------+

INFO:     Application startup complete.
INFO:     Uvicorn running on http://127.0.0.1:8000 (Press CTRL+C to quit)
แม้ว่าเอเจนต์นี้จะค่อนข้างพื้นฐาน แต่การดำเนินการนี้อย่างน้อย 1 ครั้งก็มีประโยชน์เพื่อให้แน่ใจว่าการตั้งค่าทำงานได้อย่างถูกต้องก่อนที่เราจะเริ่มแก้ไขเอเจนต์ ภาพหน้าจอด้านล่างแสดงการโต้ตอบอย่างง่ายโดยใช้ UI สำหรับการพัฒนา
ตอนนี้มาแก้ไขคำจำกัดความของ Agent ด้วยลักษณะตัวตนของผู้ช่วยผู้บริหารกัน คัดลอกโค้ดด้านล่างและแทนที่เนื้อหาของ agent.py ปรับชื่อและลักษณะตัวตนของเอเจนต์ตามค่ากำหนดของคุณ
from google.adk.agents.llm_agent import Agent

root_agent = Agent(
    model='gemini-2.5-flash',
    name='executive_assistant',
    description='A professional AI Executive Assistant',
    instruction='''
    You are an elite, warm, and highly efficient AI partner.
    Your primary goal is to help the user manage their tasks, schedule, and research.
    Always be direct, concise, and high-signal.
    ''',
)
โปรดทราบว่าพร็อพเพอร์ตี้ชื่อจะกำหนดชื่อภายในของเอเจนต์ ในขณะที่ในวิธีการ คุณยังตั้งชื่อที่เข้าใจง่ายขึ้นเป็นส่วนหนึ่งของลักษณะตัวตนสำหรับการโต้ตอบกับผู้ใช้ปลายทางได้ด้วย ชื่อภายในส่วนใหญ่ใช้เพื่อความสามารถในการสังเกตการณ์และการส่งต่อในระบบแบบหลายเอเจนต์ที่ใช้เครื่องมือ transfer_to_agent คุณไม่ต้องจัดการเครื่องมือนี้ด้วยตนเอง ADK จะลงทะเบียนเครื่องมือนี้โดยอัตโนมัติเมื่อคุณประกาศตัวแทนย่อยอย่างน้อย 1 ราย
หากต้องการเรียกใช้เอเจนต์ที่เราเพิ่งสร้าง ให้ใช้ adk web ดังนี้
uv run adk web
เปิด UI ของ ADK ในเบราว์เซอร์ แล้วทักทายผู้ช่วยคนใหม่ของคุณ
5. เพิ่มหน่วยความจำแบบถาวรด้วย Vertex AI Memory Bank
ผู้ช่วยที่แท้จริงต้องจดจำค่ากำหนดและการโต้ตอบที่ผ่านมาเพื่อมอบประสบการณ์ที่ราบรื่นและปรับเปลี่ยนในแบบของคุณ ในขั้นตอนนี้ เราจะผสานรวม Vertex AI Agent Engine Memory Bank ซึ่งเป็นฟีเจอร์ของ Vertex AI ที่สร้างความทรงจำระยะยาวแบบไดนามิกตามการสนทนาของผู้ใช้
Memory Bank ช่วยให้เอเจนต์สร้างข้อมูลเฉพาะบุคคลที่เข้าถึงได้ในหลายเซสชัน ซึ่งจะช่วยให้เซสชันต่างๆ ต่อเนื่องกัน เบื้องหลังการทำงานคือการจัดการลำดับข้อความตามลำดับเวลาในเซสชัน และใช้การดึงข้อมูลการค้นหาความคล้ายคลึงเพื่อมอบความทรงจำที่เกี่ยวข้องมากที่สุดสำหรับบริบทปัจจุบันให้แก่ตัวแทน
เริ่มต้นบริการความทรงจำ
ADK ใช้ Vertex AI เพื่อจัดเก็บและเรียกคืนความทรงจำระยะยาว คุณต้องเริ่มต้น "Memory Engine" ในโปรเจ็กต์ ซึ่งโดยพื้นฐานแล้วเป็นอินสแตนซ์ของ Reasoning Engine ที่กำหนดค่าให้ทำหน้าที่เป็น Memory Bank
สร้างสคริปต์ต่อไปนี้เป็น setup_memory.py
setup_memory.py
import vertexai
import os

PROJECT_ID=os.getenv("PROJECT_ID")
LOCATION=os.getenv("LOCATION")

client = vertexai.Client(project=PROJECT_ID, location=LOCATION)

# Create Reasoning Engine for Memory Bank
agent_engine = client.agent_engines.create()

# You will need this resource name to give it to ADK
print(agent_engine.api_resource.name)
ตอนนี้ให้เรียกใช้ setup_memory.py เพื่อจัดสรรเครื่องมืออนุมานสำหรับธนาคารความทรงจำ
uv run python setup_memory.py
เอาต์พุตควรมีลักษณะคล้ายกับข้อมูลต่อไปนี้
$ uv run python setup.py
projects/1234567890/locations/us-central1/reasoningEngines/1234567890
บันทึกชื่อทรัพยากรของเครื่องมือในตัวแปรสภาพแวดล้อม
export ENGINE_ID="<insert the resource name above>"
ตอนนี้เราต้องอัปเดตโค้ดเพื่อใช้หน่วยความจำแบบถาวร แทนที่เนื้อหาของ agent.py ด้วยเนื้อหาต่อไปนี้
agent.py
from google.adk.agents.llm_agent import Agent
from google.adk.tools.preload_memory_tool import PreloadMemoryTool
from google.adk.tools.load_memory_tool import load_memory_tool

async def auto_save_session_to_memory_callback(callback_context):
    await callback_context._invocation_context.memory_service.add_session_to_memory(
        callback_context._invocation_context.session)

# Update root_agent with memory tools and callback
root_agent = Agent(
    model='gemini-2.5-flash',
    name='executive_assistant',
    description='Executive Assistant with Persistent Memory',
    instruction='''
    You are an elite AI partner with long-term memory.
    Use load_memory to find context about the user when needed.
    Always be direct, concise, and high-signal.
    ''',
    tools=[PreloadMemoryTool(), load_memory_tool],
    after_agent_callback=auto_save_session_to_memory_callback,
)
PreloadMemoryTool จะแทรกบริบทที่เกี่ยวข้องจากการสนทนาก่อนหน้าลงในคำขอแต่ละรายการโดยอัตโนมัติ (ใช้การดึงข้อมูลการค้นหาความคล้ายคลึงกัน) ขณะที่ load_memory_tool จะช่วยให้โมเดลสามารถค้นหาข้อเท็จจริงในธนาคารความทรงจำได้อย่างชัดเจนเมื่อจำเป็น การผสมผสานนี้จะช่วยให้ Agent มีบริบทที่ลึกซึ้งและคงอยู่
ตอนนี้หากต้องการเปิดตัวเอเจนต์ที่รองรับหน่วยความจำ คุณต้องส่ง memory_service_uri เมื่อเรียกใช้ adk web
uv run adk web --memory_service_uri="agentengine://$ENGINE_ID"
ลองบอกข้อเท็จจริงเกี่ยวกับตัวคุณให้ตัวแทนทราบ แล้วกลับมาในเซสชันอื่นเพื่อถามเกี่ยวกับข้อเท็จจริงเหล่านั้น เช่น บอกชื่อของคุณ
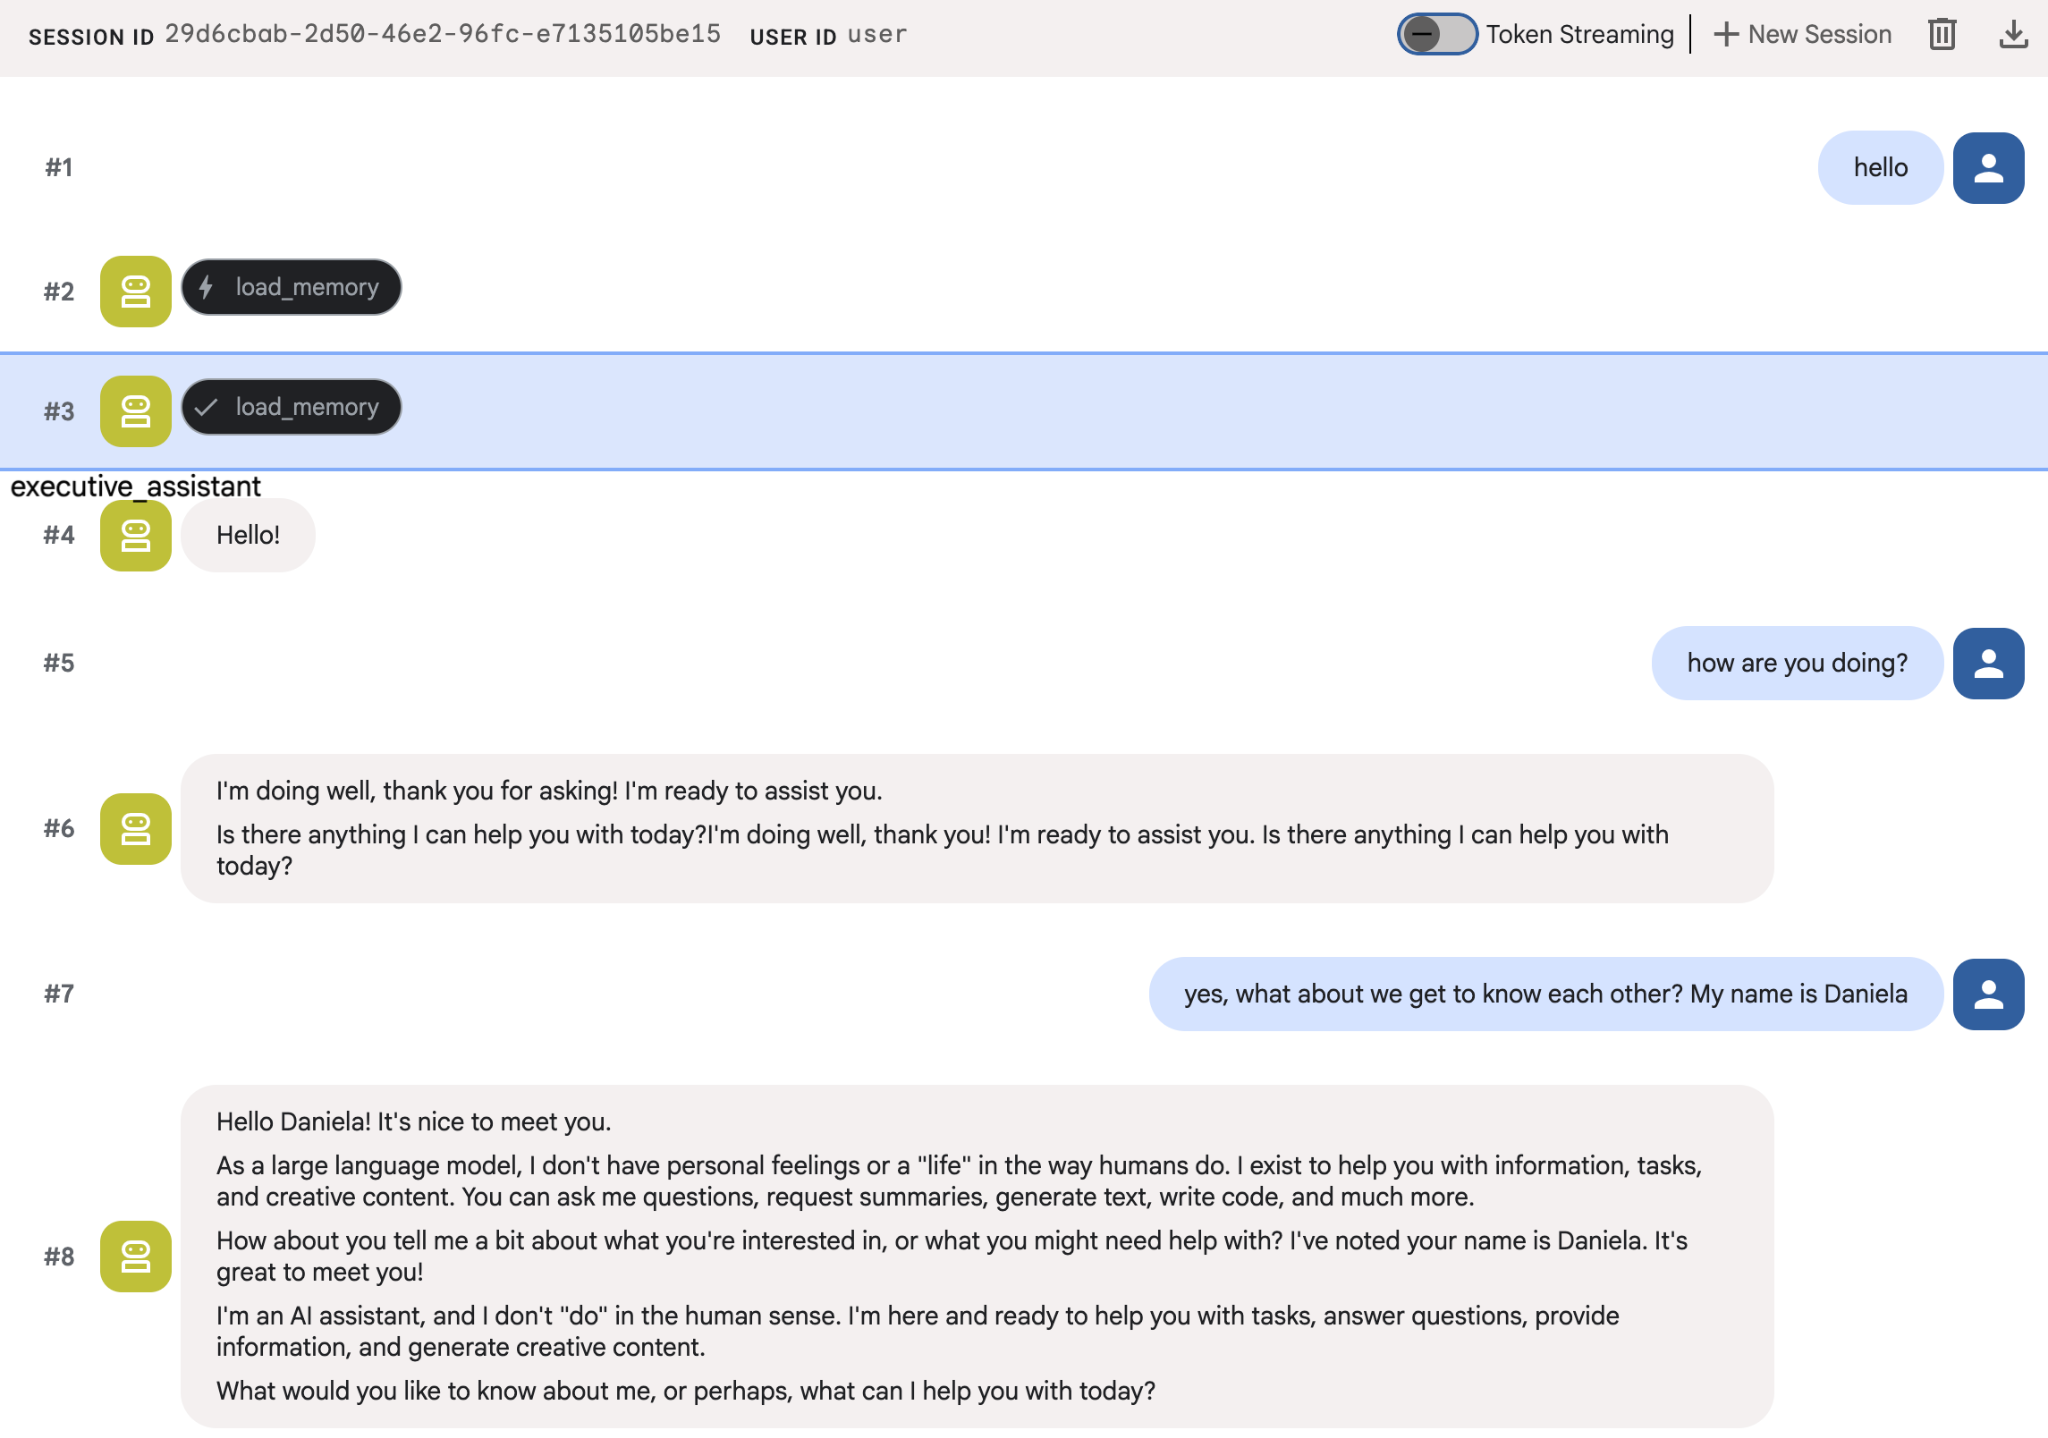
คุณสามารถตรวจสอบความทรงจำที่เอเจนต์บันทึกไว้ในคอนโซลระบบคลาวด์ได้ ไปที่หน้าสินค้าสำหรับ "Agent Engine" (ใช้แถบค้นหา)

จากนั้นคลิกชื่อเครื่องมือของเอเจนต์ (ตรวจสอบว่าคุณเลือกภูมิภาคที่ถูกต้อง)

จากนั้นไปที่แท็บความทรงจำโดยทำดังนี้
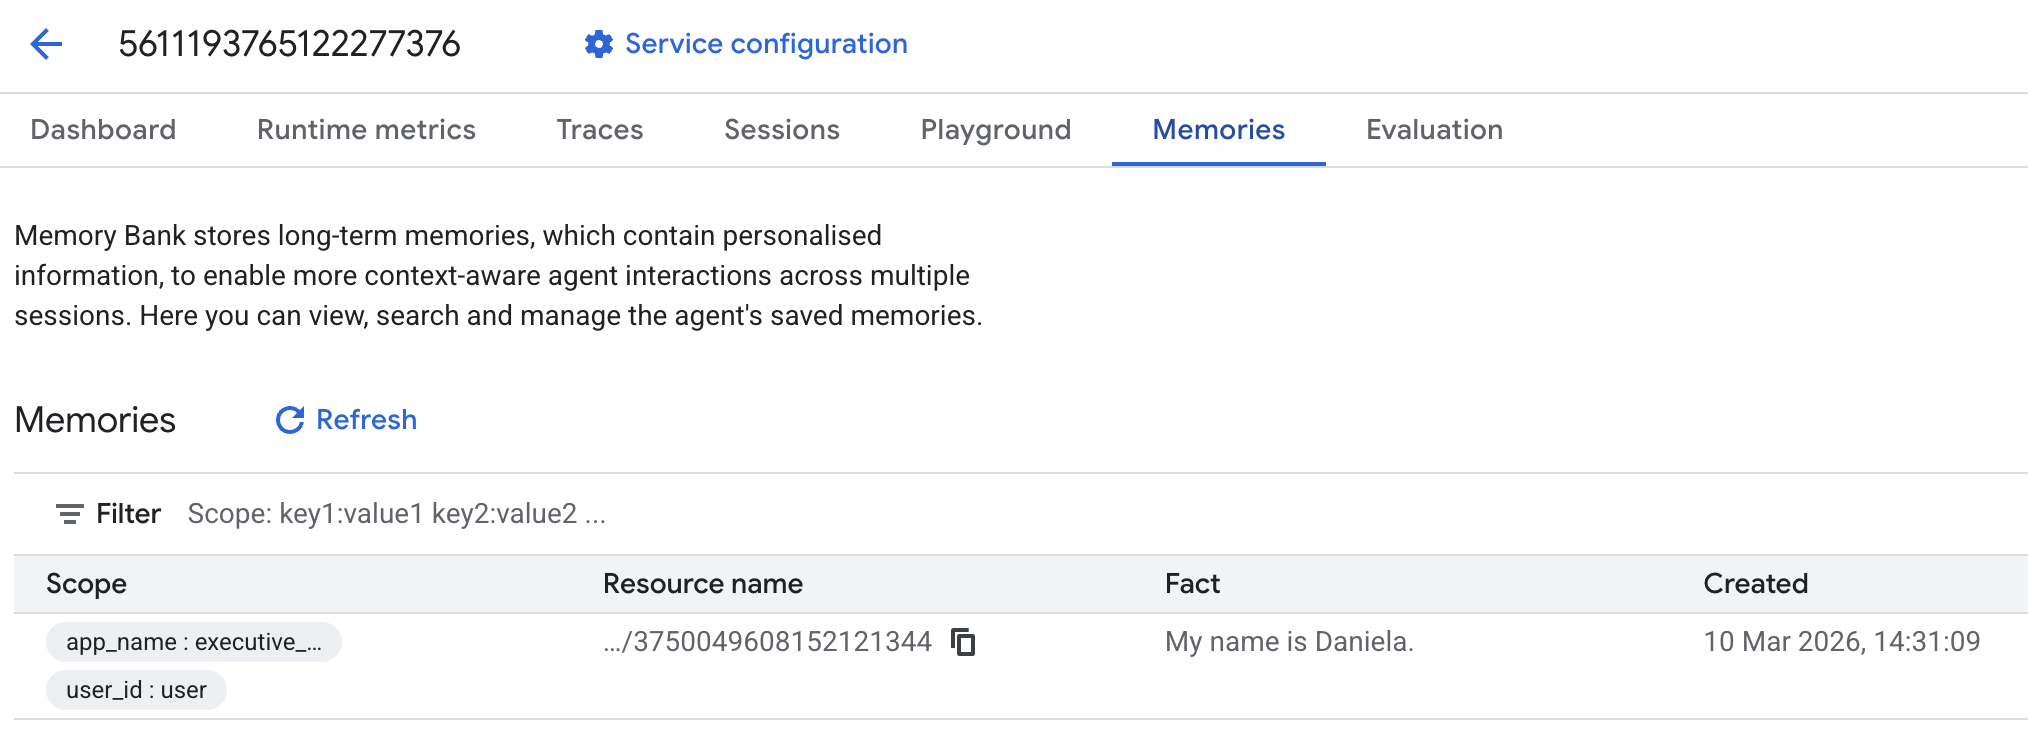
คุณควรเห็นความทรงจำบางส่วนที่เพิ่มเข้ามา
6. เพิ่มความสามารถในการค้นคว้าบนเว็บ
เอเจนต์ของเราต้องทำการตรวจสอบอย่างละเอียดซึ่งครอบคลุมมากกว่าคำค้นหาเดียวเพื่อให้ข้อมูลที่มีคุณภาพสูง การมอบหมายงานวิจัยให้กับ Agent ย่อย ที่เชี่ยวชาญจะช่วยให้เราคงความสามารถในการตอบสนองของตัวตนหลักไว้ได้ในขณะที่นักวิจัยจัดการการรวบรวมข้อมูลที่ซับซ้อนในเบื้องหลัง
ในขั้นตอนนี้ เราจะใช้ LoopAgent เพื่อให้ได้ "ความลึกของการวิจัย" ซึ่งจะช่วยให้ Agent ค้นหา ประเมินผลการค้นหา และปรับแต่งคำค้นหาซ้ำๆ จนกว่าจะได้ภาพรวมที่สมบูรณ์ นอกจากนี้ เรายังบังคับใช้ความเข้มงวดด้านเทคนิคโดยกำหนดให้มีการอ้างอิงในบรรทัดสำหรับผลการค้นหาทั้งหมด เพื่อให้มั่นใจว่าการกล่าวอ้างทุกครั้งมีลิงก์แหล่งที่มาสนับสนุน
สร้างผู้เชี่ยวชาญด้านการค้นคว้าข้อมูล (research.py)
ในที่นี้ เราจะกำหนด Agent พื้นฐานที่ติดตั้งเครื่องมือ Google Search และห่อหุ้มด้วย LoopAgent พารามิเตอร์ max_iterations จะทำหน้าที่เป็นตัวควบคุมเพื่อให้มั่นใจว่าเอเจนต์จะวนซ้ำในการค้นหาสูงสุด 3 ครั้งหากยังคงมีช่องว่างในความเข้าใจ
research.py
from google.adk.agents.llm_agent import Agent
from google.adk.agents.loop_agent import LoopAgent
from google.adk.tools.google_search_tool import GoogleSearchTool
from google.adk.tools.tool_context import ToolContext

def exit_loop(tool_context: ToolContext):
    """Call this function ONLY when no further research is needed, signaling the iterative process should end."""
    print(f"  [Tool Call] exit_loop triggered by {tool_context.agent_name}")
    tool_context.actions.escalate = True
    # Return empty dict as tools should typically return JSON-serializable output
    return {}

# --- RESEARCH LOGIC ---
_research_worker = Agent(
    model='gemini-2.5-flash',
    name='research_worker',
    description='Worker agent that performs a single research step.',
    instruction='''
    Use google_search to find facts and synthesize them for the user.
    Critically evaluate your findings. If the data is incomplete or you need more context, prepare to search again in the next iteration.
    You must include the links you found as references in your response, formatting them like citations in a research paper (e.g., [1], [2]).
    Use the exit_loop tool to terminate the research early if no further research is needed.
    If you need to ask the user for clarifications, call the exit_loop function early to interrupt the research cycle.
    ''',
    tools=[GoogleSearchTool(bypass_multi_tools_limit=True), exit_loop],
)

# The LoopAgent iterates the worker up to 3 times for deeper research
research_agent = LoopAgent(
    name='research_specialist',
    description='Deep web research specialist.',
    sub_agents=[_research_worker],
    max_iterations=3,
)
อัปเดต Root Agent (agent.py)
นำเข้า research_agent แล้วเพิ่มเป็นเครื่องมือให้กับ Sharon
agent.py
from google.adk.agents.llm_agent import Agent
from google.adk.tools.preload_memory_tool import PreloadMemoryTool
from google.adk.tools.load_memory_tool import load_memory_tool

# Import our new sub agent
from .research import research_agent

async def auto_save_session_to_memory_callback(callback_context):
    await callback_context._invocation_context.memory_service.add_session_to_memory(
        callback_context._invocation_context.session)

# Update root_agent with memory tools and callback
root_agent = Agent(
    model='gemini-2.5-flash',
    name='executive_assistant',
    description='Executive Assistant with persistent memory and research capabilities',
    instruction='''
    You are an elite AI partner with long-term memory.
    1. Use load_memory to recall facts.
    2. Delegate research tasks to the research_specialist.
    Always be direct, concise, and high-signal.
    ''',
    tools=[PreloadMemoryTool(), load_memory_tool],
    sub_agents=[research_agent],
    after_agent_callback=auto_save_session_to_memory_callback,
)
เปิดใช้เว็บ adk อีกครั้งเพื่อทดสอบเอเจนต์การค้นคว้าข้อมูล
uv run adk web --memory_service_uri="agentengine://$ENGINE_ID"
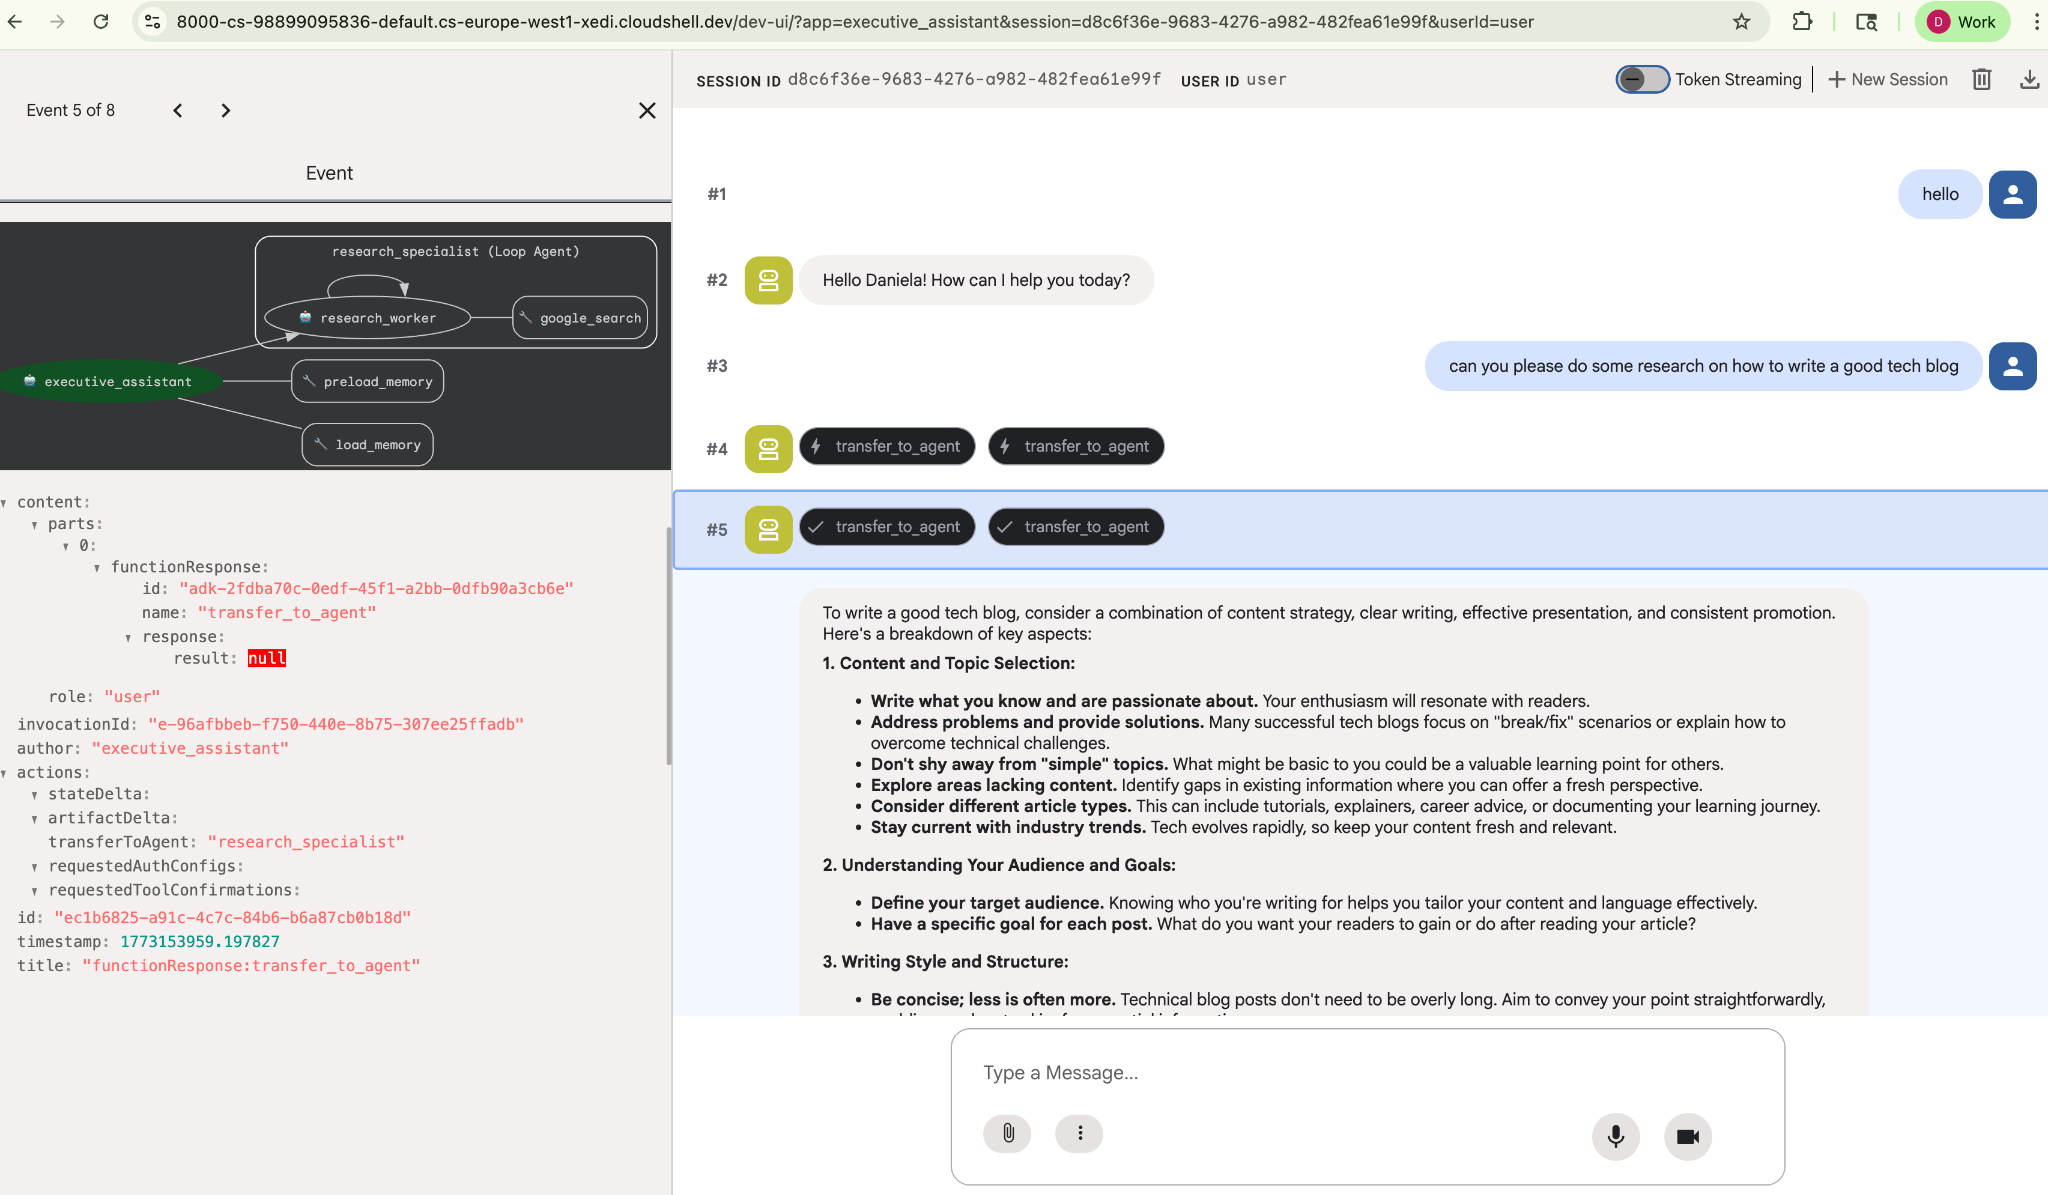
มอบหมายงานวิจัยง่ายๆ ให้ เช่น "วิธีเขียนบล็อกเทคโนโลยีที่ดี"
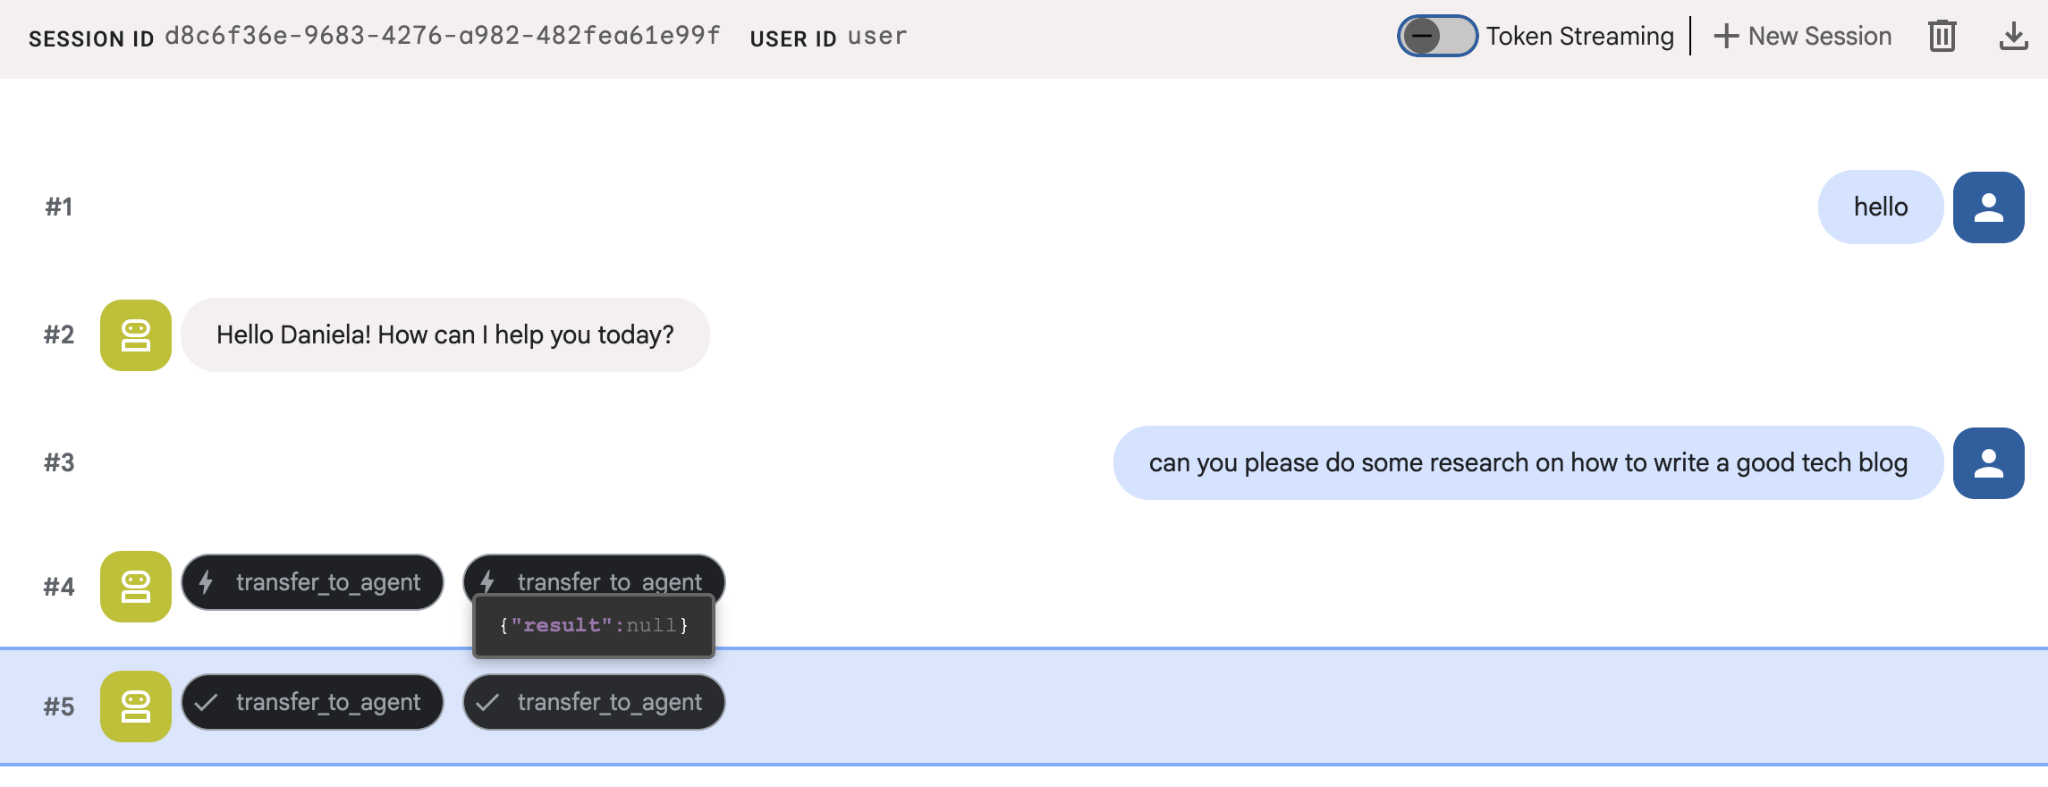
คุณอาจสังเกตเห็นว่าตัวแทนจำชื่อของฉันได้แม้ว่านี่จะเป็นเซสชันใหม่ก็ตาม โปรดสังเกตการเรียกใช้เครื่องมือ "transfer_to_agent" ด้วย ซึ่งเป็นเครื่องมือที่ส่งต่อภารกิจไปยังตัวแทนการวิจัยคนใหม่ของเรา
มาเริ่มจัดการงานกันเลย
7. เพิ่มการจัดการงานด้วย Cloud SQL
แม้ว่าเอเจนต์จะมีหน่วยความจำระยะยาว แต่ก็ไม่เหมาะกับข้อมูลที่มีโครงสร้างแบบละเอียด เช่น รายการสิ่งที่ต้องทำ สำหรับงาน เราใช้ฐานข้อมูลเชิงสัมพันธ์แบบเดิม เราจะใช้ SQLAlchemy และฐานข้อมูล Google Cloud SQL (PostgreSQL) ก่อนที่จะเขียนโค้ดได้ เราต้องจัดสรรโครงสร้างพื้นฐานก่อน
จัดสรรโครงสร้างพื้นฐาน
เรียกใช้คำสั่งต่อไปนี้เพื่อสร้างฐานข้อมูล หมายเหตุ: การสร้างอินสแตนซ์ใช้เวลาประมาณ 5-10 นาที คุณดำเนินการในขั้นตอนถัดไปได้เลยขณะที่ระบบดำเนินการในเบื้องหลัง
# 1. Define instance variables
export INSTANCE_NAME="assistant-db"
export USER_EMAIL=$(gcloud config get-value account)

# 2. Create the Cloud SQL instance
gcloud sql instances create $INSTANCE_NAME \
    --database-version=POSTGRES_18 \
    --tier=db-f1-micro \
    --region=us-central1 \
    --edition=ENTERPRISE

# 3. Create the database for our tasks
gcloud sql databases create tasks --instance=$INSTANCE_NAME
การจัดสรรอินสแตนซ์ฐานข้อมูลจะใช้เวลาสักครู่ ช่วงนี้อาจเป็นโอกาสดีที่จะจิบกาแฟหรือชา หรืออัปเดตรหัสขณะรอให้การดำเนินการเสร็จสิ้น แต่อย่าลืมกลับมาและเสร็จสิ้นการควบคุมการเข้าถึง
กำหนดค่าการควบคุมการเข้าถึง
ตอนนี้เราต้องกำหนดค่าบัญชีผู้ใช้ให้มีสิทธิ์เข้าถึงฐานข้อมูล เรียกใช้คำสั่งต่อไปนี้ในเทอร์มินัล
# change this to your favorite password
export DB_PASS="correct-horse-battery-staple"

# Create a regular database user
gcloud sql users create assistant_user \
    --instance=$INSTANCE_NAME \
    --password=$DB_PASS
อัปเดตการกำหนดค่าสภาพแวดล้อม
ADK จะโหลดการกำหนดค่าจากไฟล์ .env ที่รันไทม์ อัปเดตสภาพแวดล้อมของตัวแทนด้วยรายละเอียดการเชื่อมต่อฐานข้อมูล
# Retrieve the unique connection name
export DB_CONN=$(gcloud sql instances describe $INSTANCE_NAME --format='value(connectionName)')

# Append configuration to your .env file
cat <<EOF >> executive_assistant/.env
DB_CONNECTION_NAME=$DB_CONN
DB_USER=assistant_user
DB_PASSWORD=$DB_PASS
DB_NAME=tasks
EOF
ตอนนี้เรามาทำการเปลี่ยนแปลงโค้ดกัน
สร้างผู้เชี่ยวชาญด้านสิ่งที่ต้องทำ (todo.py)
เราจะสร้างผู้เชี่ยวชาญด้านสิ่งที่ต้องทำในไฟล์ของตัวเองเช่นเดียวกับเอเจนต์การวิจัย สร้าง todo.py:
todo.py
import os
import uuid
import sqlalchemy
from datetime import datetime
from typing import Optional, List

from sqlalchemy import (
    Column,
    String,
    DateTime,
    Enum,
    select,
    delete,
    update,
)
from sqlalchemy.orm import declarative_base, Session
from google.cloud.sql.connector import Connector
from google.adk.agents.llm_agent import Agent

# --- DATABASE LOGIC ---
Base = declarative_base()
connector = Connector()

def getconn():
    db_connection_name = os.environ.get("DB_CONNECTION_NAME")
    db_user = os.environ.get("DB_USER")
    db_password = os.environ.get("DB_PASSWORD")
    db_name = os.environ.get("DB_NAME", "tasks")

    return connector.connect(
        db_connection_name,
        "pg8000",
        user=db_user,
        password=db_password,
        db=db_name,
    )

engine = sqlalchemy.create_engine(
    "postgresql+pg8000://",
    creator=getconn,
)

class Todo(Base):
    __tablename__ = "todos"
    id = Column(String(36), primary_key=True, default=lambda: str(uuid.uuid4()))
    title = Column(String(255), nullable=False)
    priority = Column(
        Enum("high", "medium", "low", name="priority_levels"), nullable=False, default="medium"
    )
    due_date = Column(DateTime, nullable=True)
    status = Column(Enum("pending", "done", name="status_levels"), default="pending")
    created_at = Column(DateTime, default=datetime.utcnow)

def init_db():
    """Builds the table if it's missing."""
    Base.metadata.create_all(bind=engine)

def add_todo(
    title: str, priority: str = "medium", due_date: Optional[str] = None
) -> dict:
    """
    Adds a new task to the list.

    Args:
        title (str): The description of the task.
        priority (str): The urgency level. Must be one of: 'high', 'medium', 'low'.
        due_date (str, optional): The due date in ISO format (YYYY-MM-DD or YYYY-MM-DDTHH:MM:SS).

    Returns:
        dict: A dictionary containing the new task's ID and a status message.
    """
    init_db()
    with Session(engine) as session:
        due = datetime.fromisoformat(due_date) if due_date else None
        item = Todo(
            title=title,
            priority=priority.lower(),
            due_date=due,
        )
        session.add(item)
        session.commit()
        return {"id": item.id, "status": f"Task added ✅"}

def list_todos(status: str = "pending") -> list:
    """
    Lists tasks from the database, optionally filtering by status.

    Args:
        status (str, optional): The status to filter by. 'pending', 'done', or 'all'.
    """
    init_db()
    with Session(engine) as session:
        query = select(Todo)

        s_lower = status.lower()
        if s_lower != "all":
            query = query.where(Todo.status == s_lower)

        query = query.order_by(Todo.priority, Todo.created_at)

        results = session.execute(query).scalars().all()
        return [
            {
                "id": t.id,
                "task": t.title,
                "priority": t.priority,
                "status": t.status,
            }
            for t in results
        ]

def complete_todo(task_id: str) -> str:
    """Marks a specific task as 'done'."""
    init_db()
    with Session(engine) as session:
        session.execute(update(Todo).where(Todo.id == task_id).values(status="done"))
        session.commit()
        return f"Task {task_id} marked as done."

def delete_todo(task_id: str) -> str:
    """Permanently removes a task from the database."""
    init_db()
    with Session(engine) as session:
        session.execute(delete(Todo).where(Todo.id == task_id))
        session.commit()
        return f"Task {task_id} deleted."

# --- TODO SPECIALIST AGENT ---
todo_agent = Agent(
    model='gemini-2.5-flash',
    name='todo_specialist',
    description='A specialist agent that manages a structured SQL task list.',
    instruction='''
    You manage the user's task list using a PostgreSQL database.
    - Use add_todo when the user wants to remember something. If no priority is mentioned, mark it as 'medium'.
    - Use list_todos to show tasks.
    - Use complete_todo to mark a task as finished.
    - Use delete_todo to remove a task entirely.

    When marking a task as complete or deleting it, if the user doesn't provide the ID,
    use list_todos first to find the correct ID for the task they described.
    ''',
    tools=[add_todo, list_todos, complete_todo, delete_todo],
)
โค้ดด้านบนมีหน้าที่หลัก 2 อย่าง ได้แก่ การเชื่อมต่อกับฐานข้อมูล Cloud SQL และการแสดงรายการเครื่องมือสำหรับการดำเนินการในรายการสิ่งที่ต้องทำทั่วไปทั้งหมด ซึ่งรวมถึงการเพิ่ม การนำออก และการทำเครื่องหมายว่าเสร็จสมบูรณ์
เนื่องจากตรรกะนี้มีความเฉพาะเจาะจงมากสำหรับเอเจนต์สิ่งที่ต้องทำ และเราไม่จำเป็นต้องสนใจการจัดการแบบละเอียดนี้จากมุมมองของผู้ช่วยผู้บริหาร (เอเจนต์รูท) เราจึงจะจัดแพ็กเกจเอเจนต์นี้เป็น "AgentTool" แทนที่จะเป็นเอเจนต์ย่อย
หากต้องการเลือกระหว่างการใช้ AgentTool หรือ Agent ย่อย ให้พิจารณาว่าจำเป็นต้องแชร์บริบทหรือไม่
- ใช้ AgentTool เมื่อตัวแทนไม่จำเป็นต้องแชร์บริบทกับตัวแทนรูท
- ใช้ Agent ย่อยเมื่อต้องการให้ Agent แชร์บริบทกับ Agent รูท
ในกรณีของเอเจนต์วิจัย การแชร์บริบทอาจมีประโยชน์ แต่สำหรับเอเจนต์รายการสิ่งที่ต้องทำแบบง่ายๆ การแชร์บริบทอาจไม่ค่อยมีประโยชน์
มาใช้ AgentTool ใน agent.py กัน
อัปเดต Root Agent (agent.py)
ตอนนี้ให้นำเข้า todo_agent ไปยังไฟล์หลักและแนบเป็นเครื่องมือ
agent.py
import os
from datetime import datetime
from google.adk.agents.llm_agent import Agent
from google.adk.tools.agent_tool import AgentTool
from google.adk.tools.preload_memory_tool import PreloadMemoryTool
from google.adk.tools.load_memory_tool import load_memory_tool

# Import our specialized sub-agents
from .research import research_agent
from .todo import todo_agent

# Callback for persistent memory storage
async def auto_save_session_to_memory_callback(callback_context):
    await callback_context._invocation_context.memory_service.add_session_to_memory(
        callback_context._invocation_context.session)

# --- ROOT AGENT DEFINITION ---
root_agent = Agent(
    model='gemini-2.5-flash',
    name='executive_assistant',
    description='A professional AI Executive Assistant with memory and specialized tools.',
    instruction='''
    You are an elite, high-signal AI Executive Assistant.
    Your goal is to help the user manage their knowledge, tasks, and research.

    ## Your Capabilities:
    1. Memory: Use load_memory to recall personal facts or past context about the user.
    2. Research: Delegate complex web-based investigations to the research_specialist.
    3. Tasks: Delegate all to-do list management (adding, listing, or completing tasks) to the todo_specialist.

    Always be direct and professional. If a task is successful, provide a brief confirmation.
    ''',
    tools=[
        PreloadMemoryTool(),
        load_memory_tool,
        AgentTool(todo_agent) # Exposes the Todo Specialist as a tool
    ],
    sub_agents=[research_agent], # Exposes the Research Specialist for direct handover
    after_agent_callback=auto_save_session_to_memory_callback,
)
เรียกใช้ adk web อีกครั้งเพื่อทดสอบฟีเจอร์ใหม่
uv run adk web --memory_service_uri="agentengine://$ENGINE_ID"
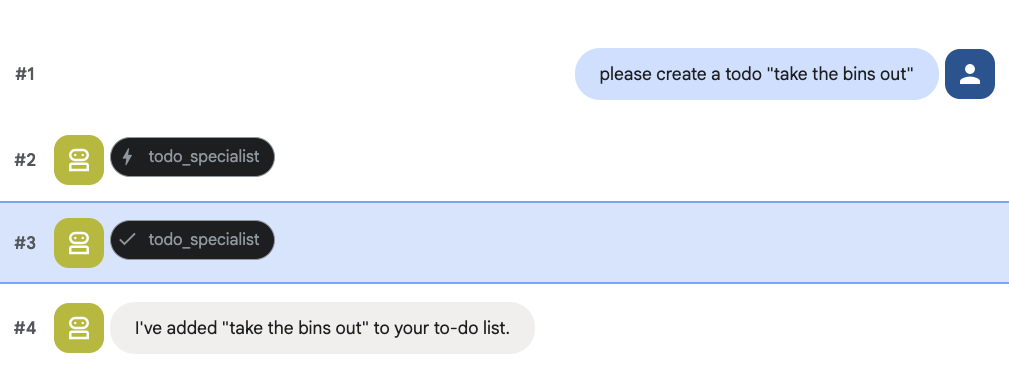
และลองสร้างสิ่งที่ต้องทำโดยทำดังนี้
8. เพิ่มการจัดการปฏิทิน
และสุดท้าย เราจะผสานรวมกับ Google ปฏิทินเพื่อให้ตัวแทนจัดการการนัดหมายได้ เพื่อประโยชน์ของ Codelab นี้ เราจะสร้างปฏิทินแยกต่างหากให้ Agent จัดการแทนที่จะให้สิทธิ์เข้าถึงปฏิทินส่วนตัวของคุณ ซึ่งอาจเป็นอันตรายได้หากดำเนินการไม่ถูกต้อง
ก่อนอื่น เราจะสร้างบัญชีบริการเฉพาะเพื่อทำหน้าที่เป็นข้อมูลประจำตัวของตัวแทน จากนั้นเราจะสร้างปฏิทินของตัวแทนโดยอัตโนมัติโดยใช้บัญชีบริการ
จัดสรรบัญชีบริการ
เปิดเทอร์มินัลแล้วเรียกใช้คำสั่งต่อไปนี้เพื่อสร้างข้อมูลประจำตัวและให้สิทธิ์บัญชีส่วนตัวของคุณในการแอบอ้างเป็นข้อมูลประจำตัวนั้น
export SA_NAME="ea-agent"
export SA_EMAIL="${SA_NAME}@${PROJECT_ID}.iam.gserviceaccount.com"

# Create the service account
gcloud iam service-accounts create $SA_NAME \
    --display-name="Executive Assistant Agent"

# Allow your local user to impersonate it
gcloud iam service-accounts add-iam-policy-binding $SA_EMAIL \
    --member="user:$(gcloud config get-value account)" \
    --role="roles/iam.serviceAccountTokenCreator"

# Save it to the agent's environment
echo "SERVICE_ACCOUNT_EMAIL=$SA_EMAIL" >> executive_assistant/.env
สร้างปฏิทินแบบเป็นโปรแกรม
มาเขียนสคริปต์เพื่อบอกให้บัญชีบริการสร้างปฏิทินกัน สร้างไฟล์ใหม่ชื่อ setup_calendar.py ในรูทของโปรเจ็กต์ (ข้าง setup_memory.py) ดังนี้
setup_calendar.py
import os
import google.auth
from googleapiclient.discovery import build
from google.auth.transport.requests import Request
from google.auth import impersonated_credentials
from dotenv import load_dotenv

load_dotenv('executive_assistant/.env')
SA_EMAIL = os.environ.get("SERVICE_ACCOUNT_EMAIL")

def setup_sa_calendar():
    print(f"Authenticating to impersonate {SA_EMAIL}...")

    # 1. Base credentials
    creds, _ = google.auth.default(scopes=["https://www.googleapis.com/auth/cloud-platform"])
    creds.refresh(Request())

    # 2. Impersonate the Service Account
    impersonated = impersonated_credentials.Credentials(
        source_credentials=creds,
        target_principal=SA_EMAIL,
        target_scopes=["https://www.googleapis.com/auth/calendar"],
    )
    service = build("calendar", "v3", credentials=impersonated)

    # 3. Create the calendar
    print("Creating independent Service Account calendar...")
    calendar = service.calendars().insert(body={
        "summary": "AI Assistant (SA Owned)",
        "description": "An independent calendar managed purely by the AI."
    }).execute()

    calendar_id = calendar['id']

    # 4. Save the ID
    with open("executive_assistant/.env", "a") as f:
        f.write(f"\nCALENDAR_ID={calendar_id}\n")
    print(f"Setup complete! CALENDAR_ID {calendar_id} added to .env")

if __name__ == "__main__":
    setup_sa_calendar()
เรียกใช้สคริปต์จากเทอร์มินัลด้วยคำสั่งนี้
uv run python setup_calendar.py
สร้าง Calendar Specialist (calendar.py)
ตอนนี้เรามาโฟกัสที่ผู้เชี่ยวชาญด้านปฏิทินกัน เราจะติดตั้งเครื่องมือปฏิทินครบชุดให้กับเอเจนต์นี้ ได้แก่ การแสดงรายการ การสร้าง การอัปเดต การลบ และแม้แต่ฟีเจอร์ "เพิ่มด่วน" ที่เข้าใจภาษาที่เป็นธรรมชาติ
คัดลอกโค้ดด้านล่างไปยัง calendar.py
calendar.py
import os
from datetime import datetime, timedelta, timezone

import google.auth
from googleapiclient.discovery import build
from googleapiclient.errors import HttpError
from google.adk.agents.llm_agent import Agent

def _get_calendar_service():
    """Build the Google Calendar API service using Service Account Impersonation."""
    from google.auth.transport.requests import Request
    from google.auth import impersonated_credentials

    target_principal = os.environ.get("SERVICE_ACCOUNT_EMAIL")
    if not target_principal:
        raise ValueError("SERVICE_ACCOUNT_EMAIL environment variable is missing.")

    base_scopes = ["https://www.googleapis.com/auth/cloud-platform"]
    creds, _ = google.auth.default(scopes=base_scopes)
    creds.refresh(Request())

    target_scopes = ["https://www.googleapis.com/auth/calendar"]
    impersonated = impersonated_credentials.Credentials(
        source_credentials=creds,
        target_principal=target_principal,
        target_scopes=target_scopes,
    )

    return build("calendar", "v3", credentials=impersonated)

def _format_event(event: dict) -> dict:
    """Format a raw Calendar API event into a clean dict for the LLM."""
    start = event.get("start", {})
    end = event.get("end", {})
    return {
        "id": event.get("id"),
        "title": event.get("summary", "(No title)"),
        "start": start.get("dateTime", start.get("date")),
        "end": end.get("dateTime", end.get("date")),
        "location": event.get("location", ""),
        "description": event.get("description", ""),
        "attendees": [
            {"email": a["email"], "status": a.get("responseStatus", "unknown")}
            for a in event.get("attendees", [])
        ],
        "link": event.get("htmlLink", ""),
        "conference_link": (
            event.get("conferenceData", {}).get("entryPoints", [{}])[0].get("uri", "")
            if event.get("conferenceData")
            else ""
        ),
        "status": event.get("status", ""),
    }

def list_events(days_ahead: int = 7) -> dict:
    """List upcoming calendar events."""
    calendar_id = os.environ.get("CALENDAR_ID")
    try:
        service = _get_calendar_service()
        now = datetime.now(timezone.utc).isoformat()
        end = (datetime.now(timezone.utc) + timedelta(days=days_ahead)).isoformat()

        events_result = service.events().list(
            calendarId=calendar_id, timeMin=now, timeMax=end,
            maxResults=50, singleEvents=True, orderBy="startTime"
        ).execute()

        events = events_result.get("items", [])
        if not events:
            return {"status": "success", "count": 0, "events": []}

        return {"status": "success", "count": len(events), "events": [_format_event(e) for e in events]}
    except HttpError as e:
        return {"status": "error", "message": f"Calendar API error: {e}"}

def create_event(title: str, start_time: str, end_time: str, description: str = "", location: str = "", attendees: str = "", add_google_meet: bool = False) -> dict:
    """Create a new calendar event."""
    calendar_id = os.environ.get("CALENDAR_ID")
    try:
        service = _get_calendar_service()
        event_body = {
            "summary": title,
            "start": {"dateTime": start_time},
            "end": {"dateTime": end_time},
        }
        if description: event_body["description"] = description
        if location: event_body["location"] = location
        if attendees:
            email_list = [e.strip() for e in attendees.split(",") if e.strip()]
            event_body["attendees"] = [{"email": e} for e in email_list]

        conference_version = 0
        if add_google_meet:
            event_body["conferenceData"] = {
                "createRequest": {"requestId": f"event-{datetime.now().strftime('%Y%m%d%H%M%S')}", "conferenceSolutionKey": {"type": "hangoutsMeet"}}
            }
            conference_version = 1

        event = service.events().insert(calendarId=calendar_id, body=event_body, conferenceDataVersion=conference_version).execute()
        return {"status": "success", "message": f"Event created ✅", "event": _format_event(event)}
    except HttpError as e:
        return {"status": "error", "message": f"Calendar API error: {e}"}

def update_event(event_id: str, title: str = "", start_time: str = "", end_time: str = "", description: str = "") -> dict:
    """Update an existing calendar event."""
    calendar_id = os.environ.get("CALENDAR_ID")
    try:
        service = _get_calendar_service()
        patch_body = {}
        if title: patch_body["summary"] = title
        if start_time: patch_body["start"] = {"dateTime": start_time}
        if end_time: patch_body["end"] = {"dateTime": end_time}
        if description: patch_body["description"] = description
        if not patch_body: return {"status": "error", "message": "No fields to update."}

        event = service.events().patch(calendarId=calendar_id, eventId=event_id, body=patch_body).execute()
        return {"status": "success", "message": "Event updated ✅", "event": _format_event(event)}
    except HttpError as e:
        return {"status": "error", "message": f"Calendar API error: {e}"}

def delete_event(event_id: str) -> dict:
    """Delete a calendar event by its ID."""
    calendar_id = os.environ.get("CALENDAR_ID")
    try:
        service = _get_calendar_service()
        service.events().delete(calendarId=calendar_id, eventId=event_id).execute()
        return {"status": "success", "message": f"Event '{event_id}' deleted ✅"}
    except HttpError as e:
        return {"status": "error", "message": f"Calendar API error: {e}"}

def quick_add_event(text: str) -> dict:
    """Create an event using natural language (e.g. 'Lunch with Sarah next Monday noon')."""
    calendar_id = os.environ.get("CALENDAR_ID")
    try:
        service = _get_calendar_service()
        event = service.events().quickAdd(calendarId=calendar_id, text=text).execute()
        return {"status": "success", "message": "Event created from text ✅", "event": _format_event(event)}
    except HttpError as e:
        return {"status": "error", "message": f"Calendar API error: {e}"}

calendar_agent = Agent(
    model='gemini-2.5-flash',
    name='calendar_specialist',
    description='Manages the user schedule and calendar events.',
    instruction='''
    You manage the user's Google Calendar.
    - Use list_events to check the schedule.
    - Use quick_add_event for simple, conversational scheduling requests (e.g., "Lunch tomorrow at noon").
    - Use create_event for complex meetings that require attendees, specific durations, or Google Meet links.
    - Use update_event to change details of an existing event.
    - Use delete_event to cancel or remove an event.

    CRITICAL: For update_event and delete_event, you must provide the exact `event_id`.
    If the user does not provide the ID, you MUST call list_events first to find the correct `event_id` before attempting the update or deletion.

    Always use the current date/time context provided by the root agent to resolve relative dates like "tomorrow".
    ''',
    tools=[list_events, create_event, update_event, delete_event, quick_add_event],
)
สร้าง Root Agent (agent.py) ให้เสร็จสมบูรณ์
อัปเดตไฟล์ agent.py ด้วยโค้ดด้านล่าง
agent.py
import os
from datetime import datetime
from zoneinfo import ZoneInfo
from google.adk.agents.llm_agent import Agent
from google.adk.tools.agent_tool import AgentTool
from google.adk.tools.preload_memory_tool import PreloadMemoryTool
from google.adk.tools.load_memory_tool import load_memory_tool

# Import all our specialized sub-agents
from .research import research_agent
from .todo import todo_agent
from .calendar import calendar_agent
import tzlocal

# Automatically detect the local system timezone
TIMEZONE = tzlocal.get_localzone_name()

# Callback for persistent memory storage
async def auto_save_session_to_memory_callback(callback_context):
    await callback_context._invocation_context.memory_service.add_session_to_memory(
        callback_context._invocation_context.session)

# Callback to inject the current time into the prompt
async def setup_agent_context(callback_context, **kwargs):
    now = datetime.now(ZoneInfo(TIMEZONE))
    callback_context.state["current_time"] = now.strftime("%A, %Y-%m-%d %I:%M %p")
    callback_context.state["timezone"] = TIMEZONE

# --- ROOT AGENT DEFINITION ---
root_agent = Agent(
    model='gemini-2.5-flash',
    name='executive_assistant',
    description='A professional AI Executive Assistant with memory and specialized tools.',
    instruction='''
    You are an elite, high-signal AI Executive Assistant.
    Your goal is to help the user manage their knowledge, tasks, research, and schedule.

    ## Your Capabilities:
    1. Memory: Use load_memory to recall personal facts.
    2. Research: Delegate complex web investigations to the research_specialist.
    3. Tasks: Delegate all to-do list management to the todo_specialist.
    4. Scheduling: Delegate all calendar queries to the calendar_specialist.

    ## 🕒 Current State
    - Time: {current_time?}
    - Timezone: {timezone?}

    Always be direct and professional.
    ''',
    tools=[
        PreloadMemoryTool(),
        load_memory_tool,
        AgentTool(todo_agent),
        AgentTool(calendar_agent)
    ],
    sub_agents=[research_agent],
    before_agent_callback=[setup_agent_context],
    after_agent_callback=[auto_save_session_to_memory_callback],
)
โปรดทราบว่านอกเหนือจากเครื่องมือปฏิทินแล้ว เรายังได้เพิ่มฟังก์ชันก่อนการโทรกลับของตัวแทนใหม่ด้วย ซึ่งก็คือ setup_agent_context ฟังก์ชันนี้ช่วยให้ตัวแทนทราบวันที่ เวลา และเขตเวลาปัจจุบัน เพื่อให้ใช้ปฏิทินได้อย่างมีประสิทธิภาพมากขึ้น โดยจะทำงานด้วยการตั้งค่าตัวแปรสถานะเซสชัน ซึ่งเป็นหน่วยความจำของเอเจนต์อีกประเภทหนึ่งที่ออกแบบมาเพื่อการคงอยู่ระยะสั้น
เรียกใช้ adk web เป็นครั้งสุดท้ายเพื่อทดสอบ Agent ที่สมบูรณ์
uv run adk web --memory_service_uri="agentengine://$ENGINE_ID"
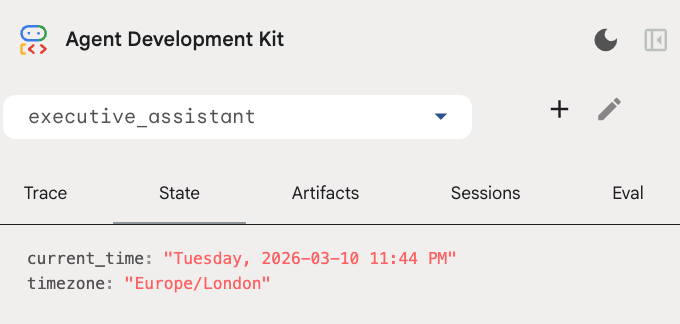
คุณตรวจสอบสถานะเซสชันได้ในแท็บสถานะใน UI สำหรับนักพัฒนาซอฟต์แวร์ โดยทำดังนี้
ตอนนี้คุณมีเอเจนต์ที่สามารถติดตามกิจกรรมในปฏิทิน รายการสิ่งที่ต้องทำ ทำการค้นคว้า และมีหน่วยความจำระยะยาวแล้ว
การทำความสะอาดหลังห้องทดลอง
9. บทสรุป
ยินดีด้วย คุณได้ออกแบบผู้ช่วยผู้บริหาร AI แบบมัลติฟังก์ชันผ่าน 5 ขั้นตอนการพัฒนาเรียบร้อยแล้ว
สิ่งที่เราพูดถึง
- การจัดสรรโครงสร้างพื้นฐานสำหรับ AI Agent
- การใช้หน่วยความจำแบบถาวรและ Agent ย่อยเฉพาะทางโดยใช้ ADK ในตัว
- การผสานรวมฐานข้อมูลภายนอกและ API เพื่อเพิ่มประสิทธิภาพการทำงาน
ขั้นตอนถัดไป
คุณสามารถเรียนรู้ต่อไปได้โดยสำรวจ Codelab อื่นๆ ในแพลตฟอร์มนี้ หรือปรับปรุงผู้ช่วยผู้บริหารด้วยตนเอง
หากต้องการไอเดียในการปรับปรุง คุณอาจลองทำสิ่งต่อไปนี้
- ใช้การบีบอัดเหตุการณ์เพื่อเพิ่มประสิทธิภาพสำหรับการสนทนาที่ยาวนาน
- เพิ่มบริการอาร์ติแฟกต์เพื่อให้ Agent จดบันทึกแทนคุณและบันทึกเป็นไฟล์ได้
- ติดตั้งใช้งานเอเจนต์เป็นบริการแบ็กเอนด์โดยใช้ Google Cloud Run
เมื่อทดสอบเสร็จแล้ว อย่าลืมล้างข้อมูลในสภาพแวดล้อมเพื่อไม่ให้มีการเรียกเก็บเงินที่ไม่คาดคิดในบัญชีสำหรับการเรียกเก็บเงิน
ขอให้สนุกกับการเขียนโค้ด