
1. 简介
在此 Codelab 中,您将学习如何使用 Google 智能体开发套件 (ADK) 构建复杂的 AI 智能体。我们将遵循自然的演化路径,从基础对话代理开始,逐步添加专业功能。
我们正在构建的代理是一款行政助理,旨在帮助您处理日常任务,例如管理日历、提醒您任务、进行研究和整理笔记,所有这些都是使用 ADK、Gemini 和 Vertex AI 从头开始构建的。
完成本实验后,您将获得一个可正常运行的智能体,并掌握根据自己的需求扩展该智能体所需的知识。
前提条件
- 具备 Python 编程语言的基础知识
- 具备 Google Cloud 控制台的基本知识,可用于管理云资源
学习内容
- 为 AI 智能体预配 Google Cloud 基础设施。
- 实现利用 Vertex AI 记忆库的持久性长期记忆。
- 构建专业化子代理的层次结构。
- 集成外部数据库和 Google Workspace 生态系统。
所需条件
本研讨会完全可以在 Google Cloud Shell 中完成,其中预安装了所有必需的依赖项(gcloud CLI、代码编辑器、Go、Gemini CLI)。
或者,如果您更喜欢在自己的机器上操作,则需要满足以下条件:
- Python(版本 3.12 或更高版本)
- 代码编辑器或 IDE(例如 VS Code 或
vim)。 - 用于执行 Python 和
gcloud命令的终端。 - 推荐:Gemini CLI 或 Antigravity 等编码代理
关键技术
您可以在这里找到有关我们将使用的技术的更多信息:
2. 环境设置
选择以下选项之一:如果您想在自己的机器上运行此 Codelab,请选择自行设置环境;如果您想完全在云端运行此 Codelab,请选择启动 Cloud Shell。
自定进度的环境设置
- 登录 Google Cloud 控制台,然后创建一个新项目或重复使用现有项目。如果您还没有 Gmail 或 Google Workspace 账号,则必须创建一个。

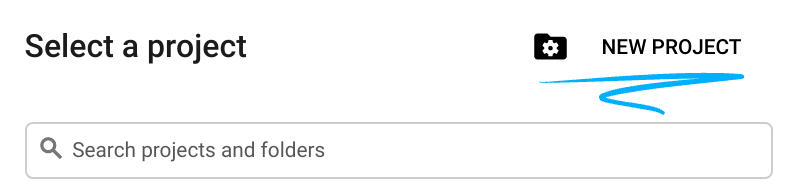
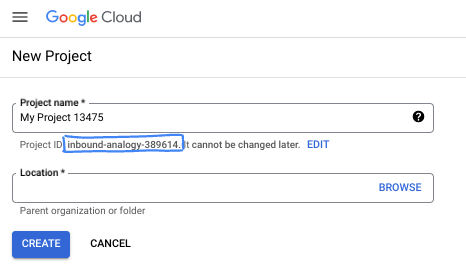
- 项目名称是此项目参与者的显示名称。它是 Google API 尚未使用的字符串。您可以随时对其进行更新。
- 项目 ID 在所有 Google Cloud 项目中是唯一的,并且是不可变的(一经设置便无法更改)。Cloud 控制台会自动生成一个唯一字符串;通常情况下,您无需关注该字符串。在大多数 Codelab 中,您都需要引用项目 ID(通常用
PROJECT_ID标识)。如果您不喜欢生成的 ID,可以再随机生成一个 ID。或者,您也可以尝试自己的项目 ID,看看是否可用。完成此步骤后便无法更改该 ID,并且此 ID 在项目期间会一直保留。 - 此外,还有第三个值,即部分 API 使用的项目编号,供您参考。如需详细了解所有这三个值,请参阅文档。
- 接下来,您需要在 Cloud 控制台中启用结算功能,以便使用 Cloud 资源/API。运行此 Codelab 应该不会产生太多的费用(如果有的话)。若要关闭资源以避免产生超出本教程范围的结算费用,您可以删除自己创建的资源或删除项目。Google Cloud 新用户符合参与 300 美元免费试用计划的条件。
启动 Cloud Shell
虽然可以通过笔记本电脑对 Google Cloud 进行远程操作,但在此 Codelab 中,您将使用 Google Cloud Shell,这是一个在云端运行的命令行环境。
在 Google Cloud 控制台 中,点击右上角工具栏中的 Cloud Shell 图标:

预配和连接到环境应该只需要片刻时间。完成后,您应该会看到如下内容:

这个虚拟机已加载了您需要的所有开发工具。它提供了一个持久的 5 GB 主目录,并且在 Google Cloud 中运行,大大增强了网络性能和身份验证功能。您在此 Codelab 中的所有工作都可以在浏览器中完成。您无需安装任何程序。
3. 项目设置
在编写代码之前,我们必须在 Google Cloud 中预配必要的基础设施和权限。
设置环境变量
打开终端并设置以下环境变量:
export PROJECT_ID=`gcloud config get project`
export LOCATION=us-central1
启用必需的 API
您的代理需要访问多项 Google Cloud 服务。运行以下命令以启用这些功能:
gcloud services enable \
    aiplatform.googleapis.com \
    calendar-json.googleapis.com \
    sqladmin.googleapis.com
使用应用默认凭证进行身份验证
我们需要使用应用默认凭据 (ADC) 进行身份验证,才能从您的环境中与 Google Cloud 服务进行通信。
运行以下命令,确保您的应用默认凭证处于有效状态且为最新版本:
gcloud auth application-default login
4. 创建基本代理
现在,我们需要初始化将要存储项目源代码的目录:
# setup project directory
mkdir -p adk_ea_codelab && cd adk_ea_codelab
# prepare virtual environment
uv init
# install dependencies
uv add google-adk google-api-python-client tzlocal python-dotenv
uv add cloud-sql-python-connector[pg8000] sqlalchemy
我们首先要确定代理的身份和基本对话能力。在 ADK 中,Agent 类定义了代理的角色设定及其指令。
此时,您可能需要考虑代理名称。我喜欢为代理设置 Aida 或 Sharon 这样的正式名称,因为我认为这有助于赋予它们一些“个性”,但您也可以直接根据代理的功能来命名,例如“executive_assistant”“travel_agent”或“code_executor”。
运行 adk create 命令以启动样板代理:
# replace with your desired agent name
uv run adk create executive_assistant
请选择 gemini-2.5-flash 作为模型,并选择 Vertex AI 作为后端。仔细检查建议的项目 ID 是否是您为此实验创建的项目 ID,然后按 Enter 键确认。对于 Google Cloud 区域,您可以接受默认值 (us-central1)。您的终端将类似于以下内容:
daniela_petruzalek@cloudshell:~/adk_ea_codelab (your-project-id)$ uv run adk create executive_assistant
Choose a model for the root agent:
1. gemini-2.5-flash
2. Other models (fill later)
Choose model (1, 2): 1
1. Google AI
2. Vertex AI
Choose a backend (1, 2): 2

You need an existing Google Cloud account and project, check out this link for details:
https://google.github.io/adk-docs/get-started/quickstart/#gemini---google-cloud-vertex-ai

Enter Google Cloud project ID [your-project-id]:
Enter Google Cloud region [us-central1]:

Agent created in /home/daniela_petruzalek/adk_ea_codelab/executive_assistant:
- .env
- __init__.py
- agent.py

daniela_petruzalek@cloudshell:~/adk_ea_codelab (your-project-id)$
完成后,上述命令将创建一个包含代理名称(例如 executive_assistant)的文件夹,其中包含一些文件,包括一个包含基本代理定义的 agent.py 文件:
from google.adk.agents.llm_agent import Agent

root_agent = Agent(
    model='gemini-2.5-flash',
    name='root_agent',
    description='A helpful assistant for user questions.',
    instruction='Answer user questions to the best of your knowledge',
)
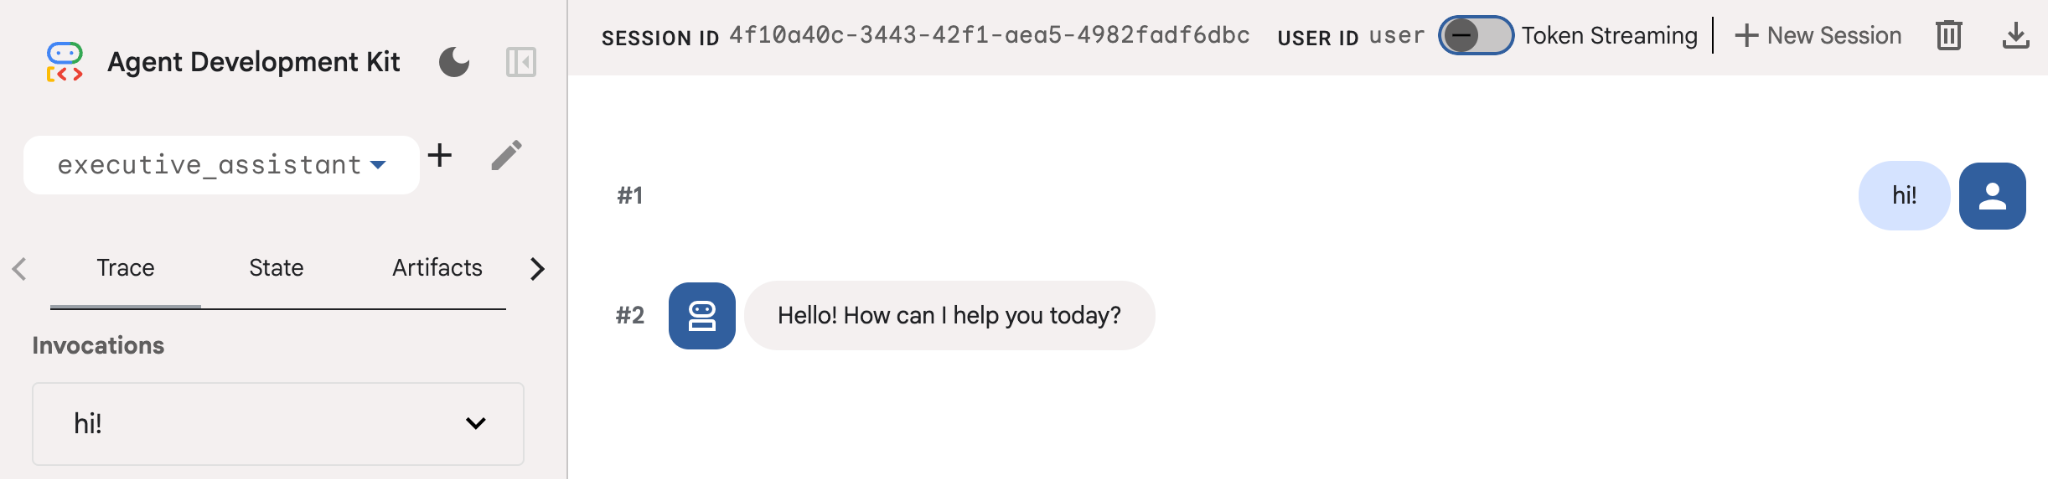
如果您想与此代理互动,可以在命令行中运行 uv run adk web,然后在浏览器中打开开发界面。您会看到类似如下的内容:
$ uv run adk web
...
INFO:     Started server process [1244]
INFO:     Waiting for application startup.

+-----------------------------------------------------------------------------+
| ADK Web Server started                                                      |
|                                                                             |
| For local testing, access at http://127.0.0.1:8000.                         |
+-----------------------------------------------------------------------------+

INFO:     Application startup complete.
INFO:     Uvicorn running on http://127.0.0.1:8000 (Press CTRL+C to quit)
即使此代理非常基本,也最好至少执行一次此操作,以确保在开始编辑代理之前设置正常运行。以下屏幕截图展示了使用开发界面进行的简单互动:
现在,让我们使用执行助理角色设定来修改智能体定义。复制以下代码并替换 agent.py 的内容。根据您的偏好调整智能体名称和角色设定。
from google.adk.agents.llm_agent import Agent

root_agent = Agent(
    model='gemini-2.5-flash',
    name='executive_assistant',
    description='A professional AI Executive Assistant',
    instruction='''
    You are an elite, warm, and highly efficient AI partner.
    Your primary goal is to help the user manage their tasks, schedule, and research.
    Always be direct, concise, and high-signal.
    ''',
)
请注意,name 属性定义了代理的内部名称,而在指令中,您还可以为其提供更友好的名称,作为其角色的一部分,用于与最终用户互动。内部名称主要用于使用 transfer_to_agent 工具的多智能体系统中的可观测性和移交。您无需自行处理此工具,当您声明一个或多个子代理时,ADK 会自动注册该工具。
如需运行我们刚刚创建的代理,请使用 adk web:
uv run adk web
在浏览器中打开 ADK 界面,然后向新助理问好!
5. 使用 Vertex AI 记忆库添加持久性内存
真正的助理必须记住偏好和过往互动,才能提供顺畅的个性化体验。在此步骤中,我们将集成 Vertex AI Agent Engine 记忆库,这是一项 Vertex AI 功能,可根据用户对话动态生成长期记忆。
借助记忆库,智能体可以创建可在多个会话中访问的个性化信息,从而实现跨会话的连续性。在幕后,它会管理会话中消息的时间顺序,并可以使用相似性搜索检索为代理提供与当前上下文最相关的记忆。
初始化 Memory 服务
ADK 使用 Vertex AI 来存储和检索长期记忆。您必须在项目中初始化“Memory Engine”。这实际上是一个配置为充当记忆库的推理引擎实例。
创建以下脚本并将其命名为 setup_memory.py:
setup_memory.py
import vertexai
import os

PROJECT_ID=os.getenv("PROJECT_ID")
LOCATION=os.getenv("LOCATION")

client = vertexai.Client(project=PROJECT_ID, location=LOCATION)

# Create Reasoning Engine for Memory Bank
agent_engine = client.agent_engines.create()

# You will need this resource name to give it to ADK
print(agent_engine.api_resource.name)
现在,运行 setup_memory.py 为记忆库预配推理引擎:
uv run python setup_memory.py
您的输出应如下所示:
$ uv run python setup.py
projects/1234567890/locations/us-central1/reasoningEngines/1234567890
将引擎资源名称保存在环境变量中:
export ENGINE_ID="<insert the resource name above>"
现在,我们需要更新代码以使用持久内存。将 agent.py 的内容替换为以下内容:
agent.py
from google.adk.agents.llm_agent import Agent
from google.adk.tools.preload_memory_tool import PreloadMemoryTool
from google.adk.tools.load_memory_tool import load_memory_tool

async def auto_save_session_to_memory_callback(callback_context):
    await callback_context._invocation_context.memory_service.add_session_to_memory(
        callback_context._invocation_context.session)

# Update root_agent with memory tools and callback
root_agent = Agent(
    model='gemini-2.5-flash',
    name='executive_assistant',
    description='Executive Assistant with Persistent Memory',
    instruction='''
    You are an elite AI partner with long-term memory.
    Use load_memory to find context about the user when needed.
    Always be direct, concise, and high-signal.
    ''',
    tools=[PreloadMemoryTool(), load_memory_tool],
    after_agent_callback=auto_save_session_to_memory_callback,
)
PreloadMemoryTool 会自动将过去对话中的相关上下文注入每个请求中(使用相似性搜索检索),而 load_memory_tool 则允许模型在需要时明确查询记忆库以获取事实。这种组合可为您的智能体提供深入、持久的上下文!
现在,如需启动支持记忆库的代理,您需要在运行 adk web 时向其传递 memory_service_uri:
uv run adk web --memory_service_uri="agentengine://$ENGINE_ID"
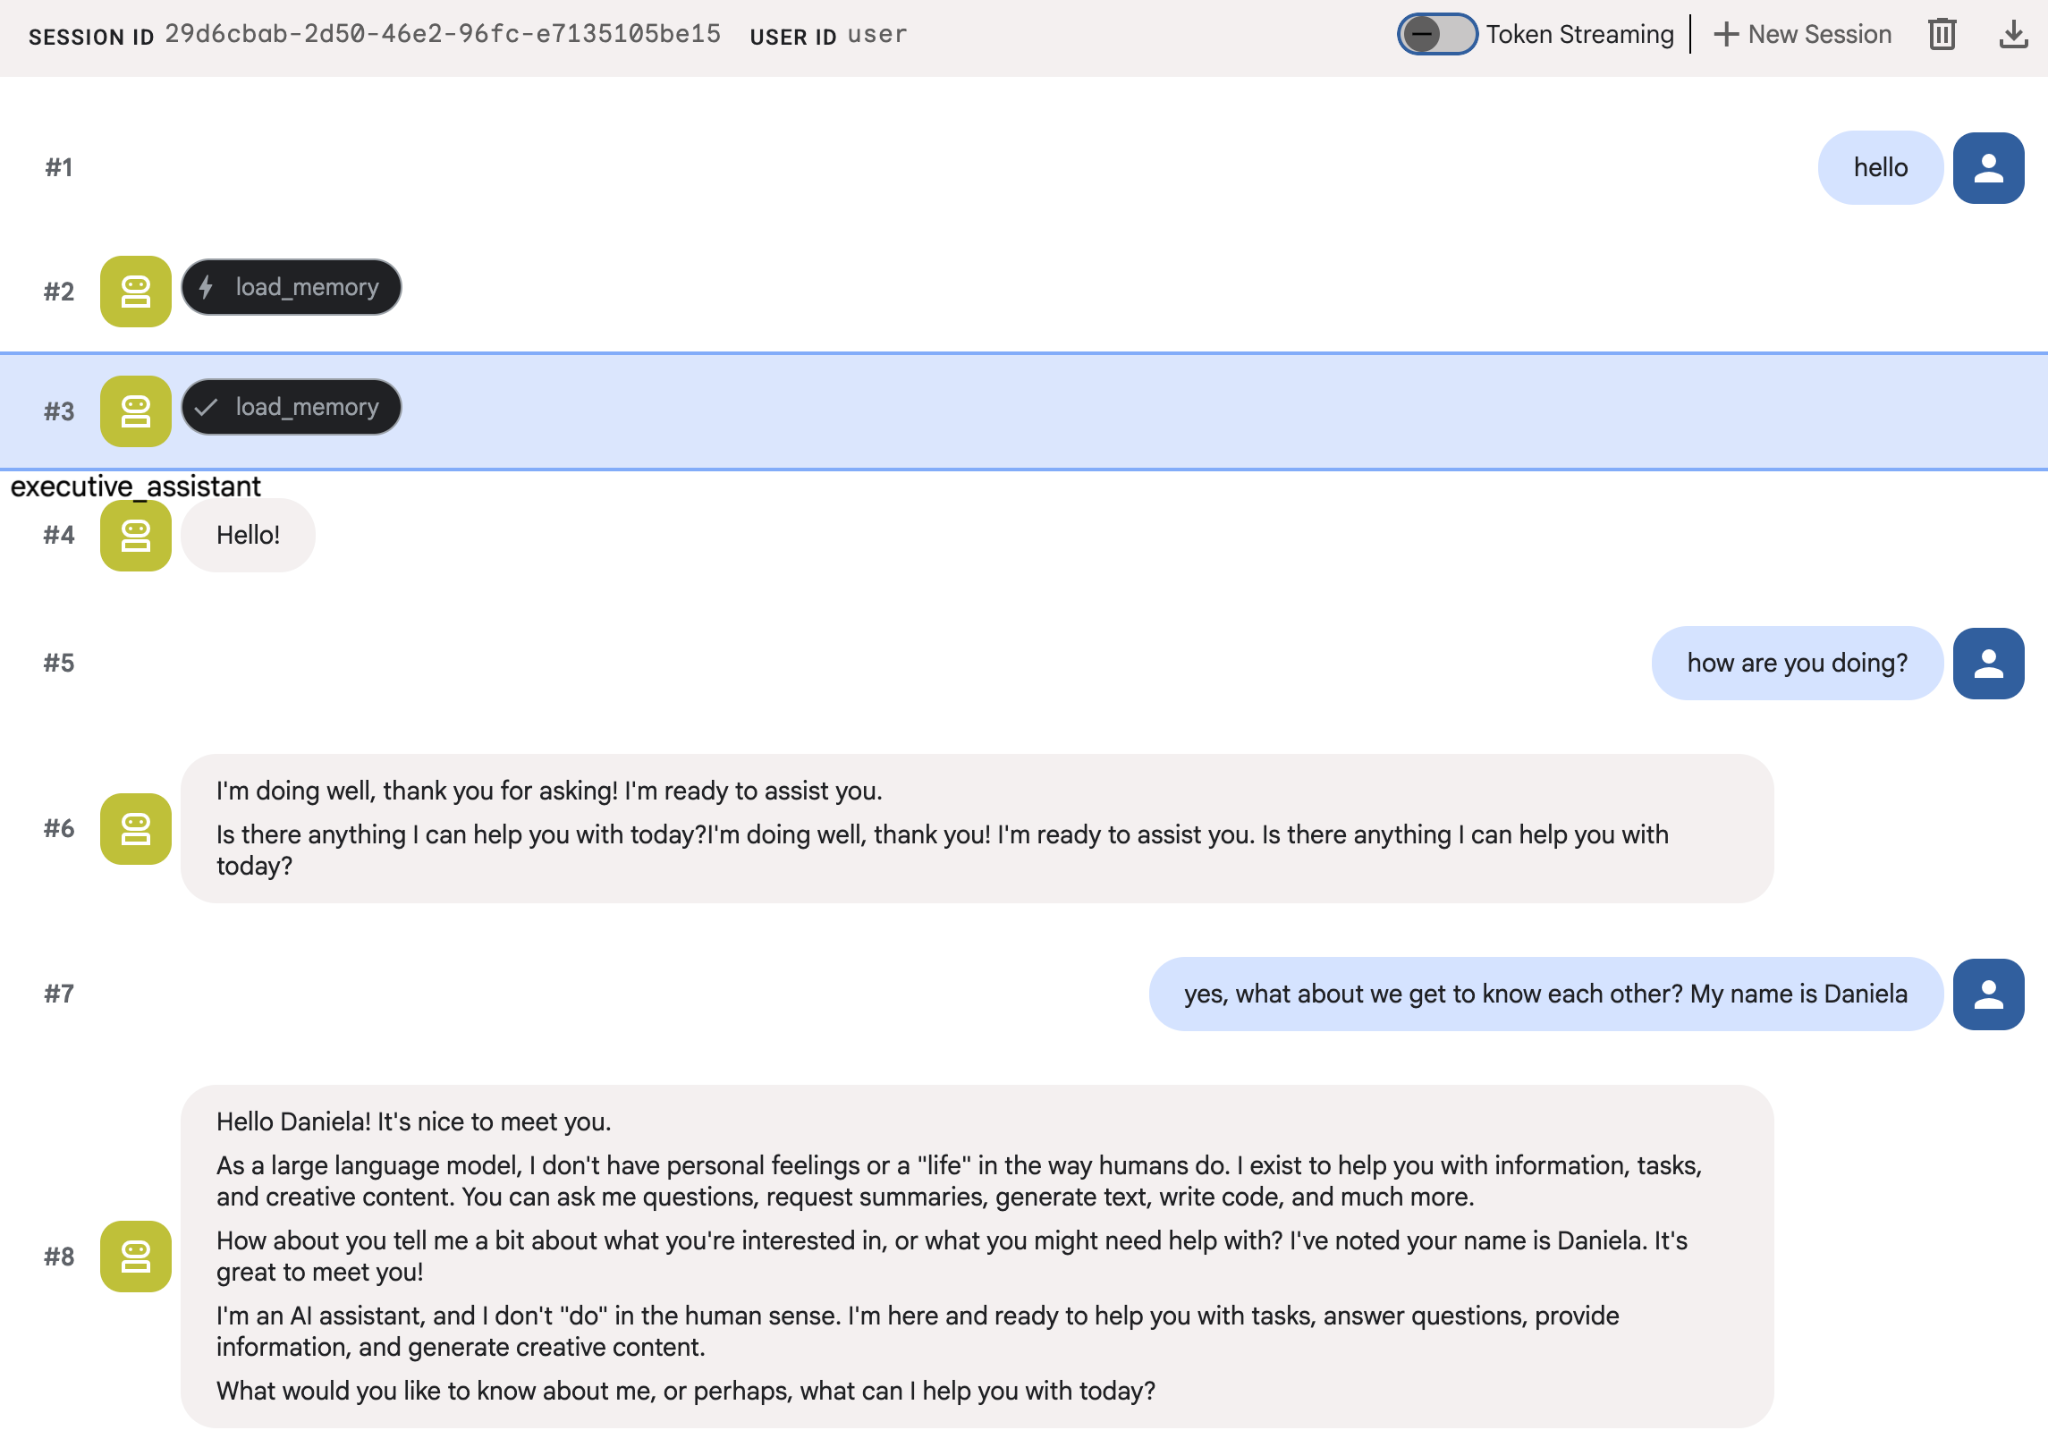
您可以尝试向智能体提供一些关于自己的事实,然后在另一个会话中询问这些事实。例如,告诉它你的名字:
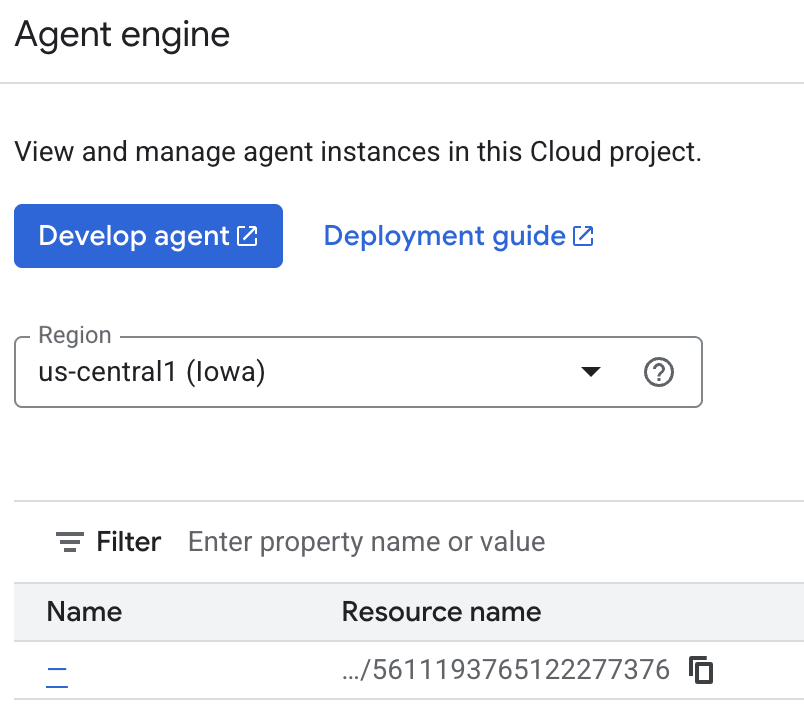
您可以在 Cloud 控制台上检查代理正在保存的记忆。前往“Agent Engine”的产品页面(使用搜索栏)

然后点击您的代理引擎名称(确保您选择了正确的区域):
然后前往“回忆”标签页:
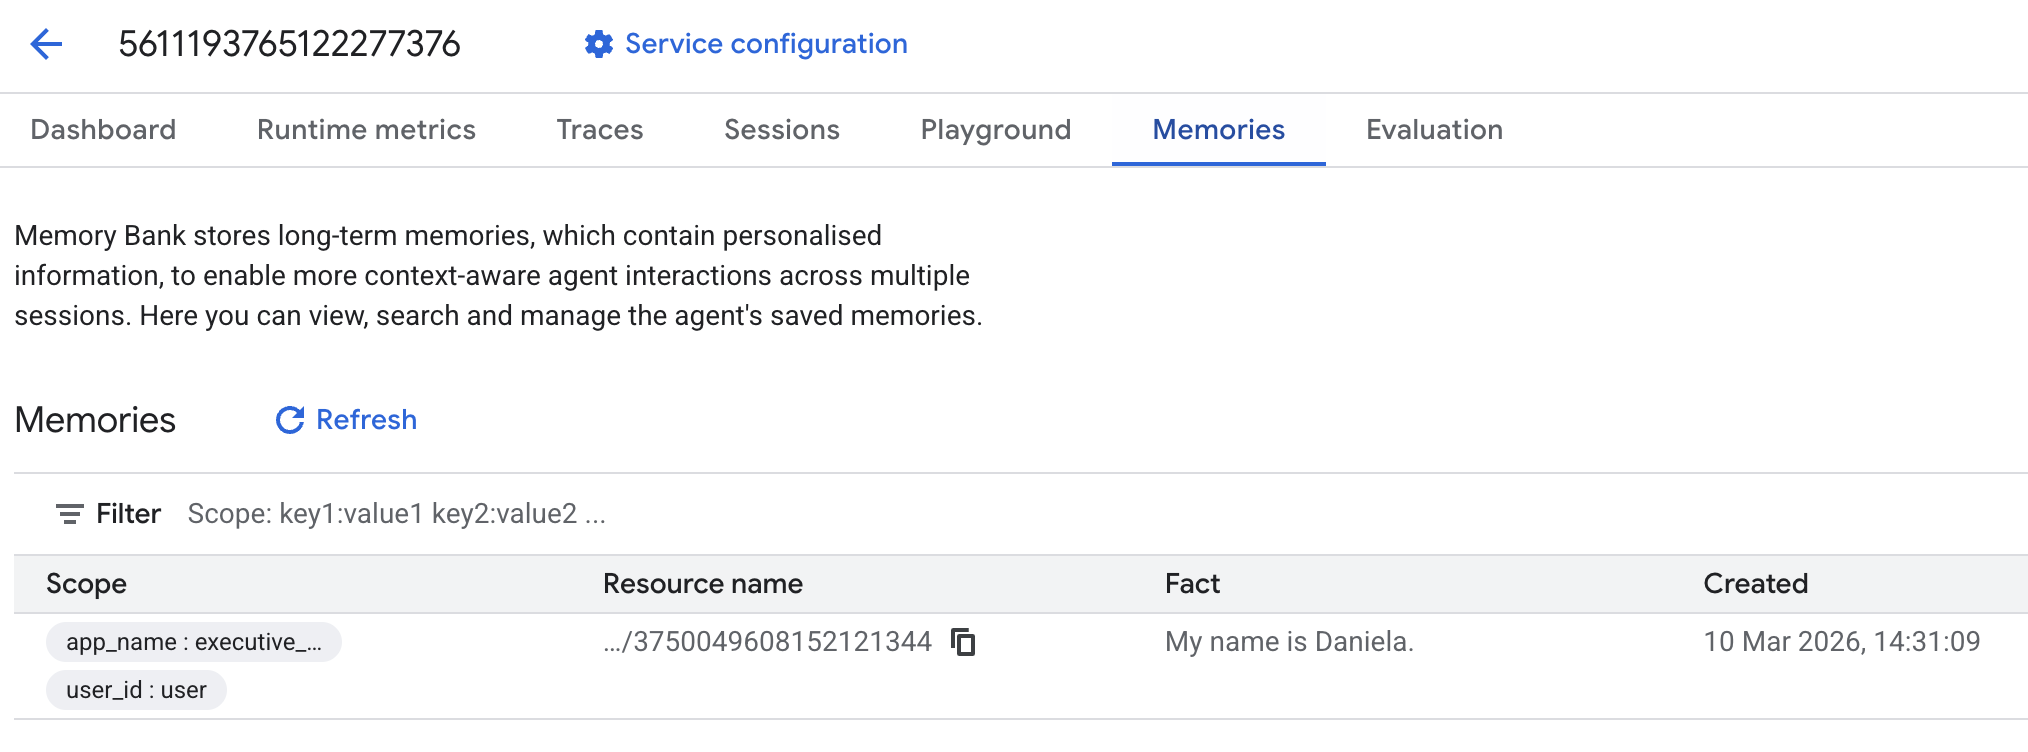
您应该会看到添加了一些回忆。
6. 添加了网络搜索功能
为了提供高质量的信息,我们的代理必须进行深入调查,而不仅仅是执行一次搜索查询。通过将研究任务委派给专门的子代理,我们可以在研究人员在后台处理复杂的数据收集任务时,保持主角色的响应能力。
在此步骤中,我们将实现一个 LoopAgent 来实现“研究深度”,从而使代理能够迭代地搜索、评估结果并优化查询,直到获得完整的信息。我们还通过要求所有研究发现都必须提供内嵌引用来确保技术严谨性,从而确保每项声明都有来源链接作为依据。
创建研究专家 (research.py)
在此,我们定义了一个配备 Google 搜索工具的基础代理,并将其封装在 LoopAgent 中。max_iterations 参数充当调控器,确保代理在其理解中存在差距时,最多迭代搜索 3 次。
research.py
from google.adk.agents.llm_agent import Agent
from google.adk.agents.loop_agent import LoopAgent
from google.adk.tools.google_search_tool import GoogleSearchTool
from google.adk.tools.tool_context import ToolContext

def exit_loop(tool_context: ToolContext):
    """Call this function ONLY when no further research is needed, signaling the iterative process should end."""
    print(f"  [Tool Call] exit_loop triggered by {tool_context.agent_name}")
    tool_context.actions.escalate = True
    # Return empty dict as tools should typically return JSON-serializable output
    return {}

# --- RESEARCH LOGIC ---
_research_worker = Agent(
    model='gemini-2.5-flash',
    name='research_worker',
    description='Worker agent that performs a single research step.',
    instruction='''
    Use google_search to find facts and synthesize them for the user.
    Critically evaluate your findings. If the data is incomplete or you need more context, prepare to search again in the next iteration.
    You must include the links you found as references in your response, formatting them like citations in a research paper (e.g., [1], [2]).
    Use the exit_loop tool to terminate the research early if no further research is needed.
    If you need to ask the user for clarifications, call the exit_loop function early to interrupt the research cycle.
    ''',
    tools=[GoogleSearchTool(bypass_multi_tools_limit=True), exit_loop],
)

# The LoopAgent iterates the worker up to 3 times for deeper research
research_agent = LoopAgent(
    name='research_specialist',
    description='Deep web research specialist.',
    sub_agents=[_research_worker],
    max_iterations=3,
)
更新根代理 (agent.py)
导入 research_agent 并将其添加为 Sharon 的工具:
agent.py
from google.adk.agents.llm_agent import Agent
from google.adk.tools.preload_memory_tool import PreloadMemoryTool
from google.adk.tools.load_memory_tool import load_memory_tool

# Import our new sub agent
from .research import research_agent

async def auto_save_session_to_memory_callback(callback_context):
    await callback_context._invocation_context.memory_service.add_session_to_memory(
        callback_context._invocation_context.session)

# Update root_agent with memory tools and callback
root_agent = Agent(
    model='gemini-2.5-flash',
    name='executive_assistant',
    description='Executive Assistant with persistent memory and research capabilities',
    instruction='''
    You are an elite AI partner with long-term memory.
    1. Use load_memory to recall facts.
    2. Delegate research tasks to the research_specialist.
    Always be direct, concise, and high-signal.
    ''',
    tools=[PreloadMemoryTool(), load_memory_tool],
    sub_agents=[research_agent],
    after_agent_callback=auto_save_session_to_memory_callback,
)
再次启动 adk web 以测试研究代理。
uv run adk web --memory_service_uri="agentengine://$ENGINE_ID"
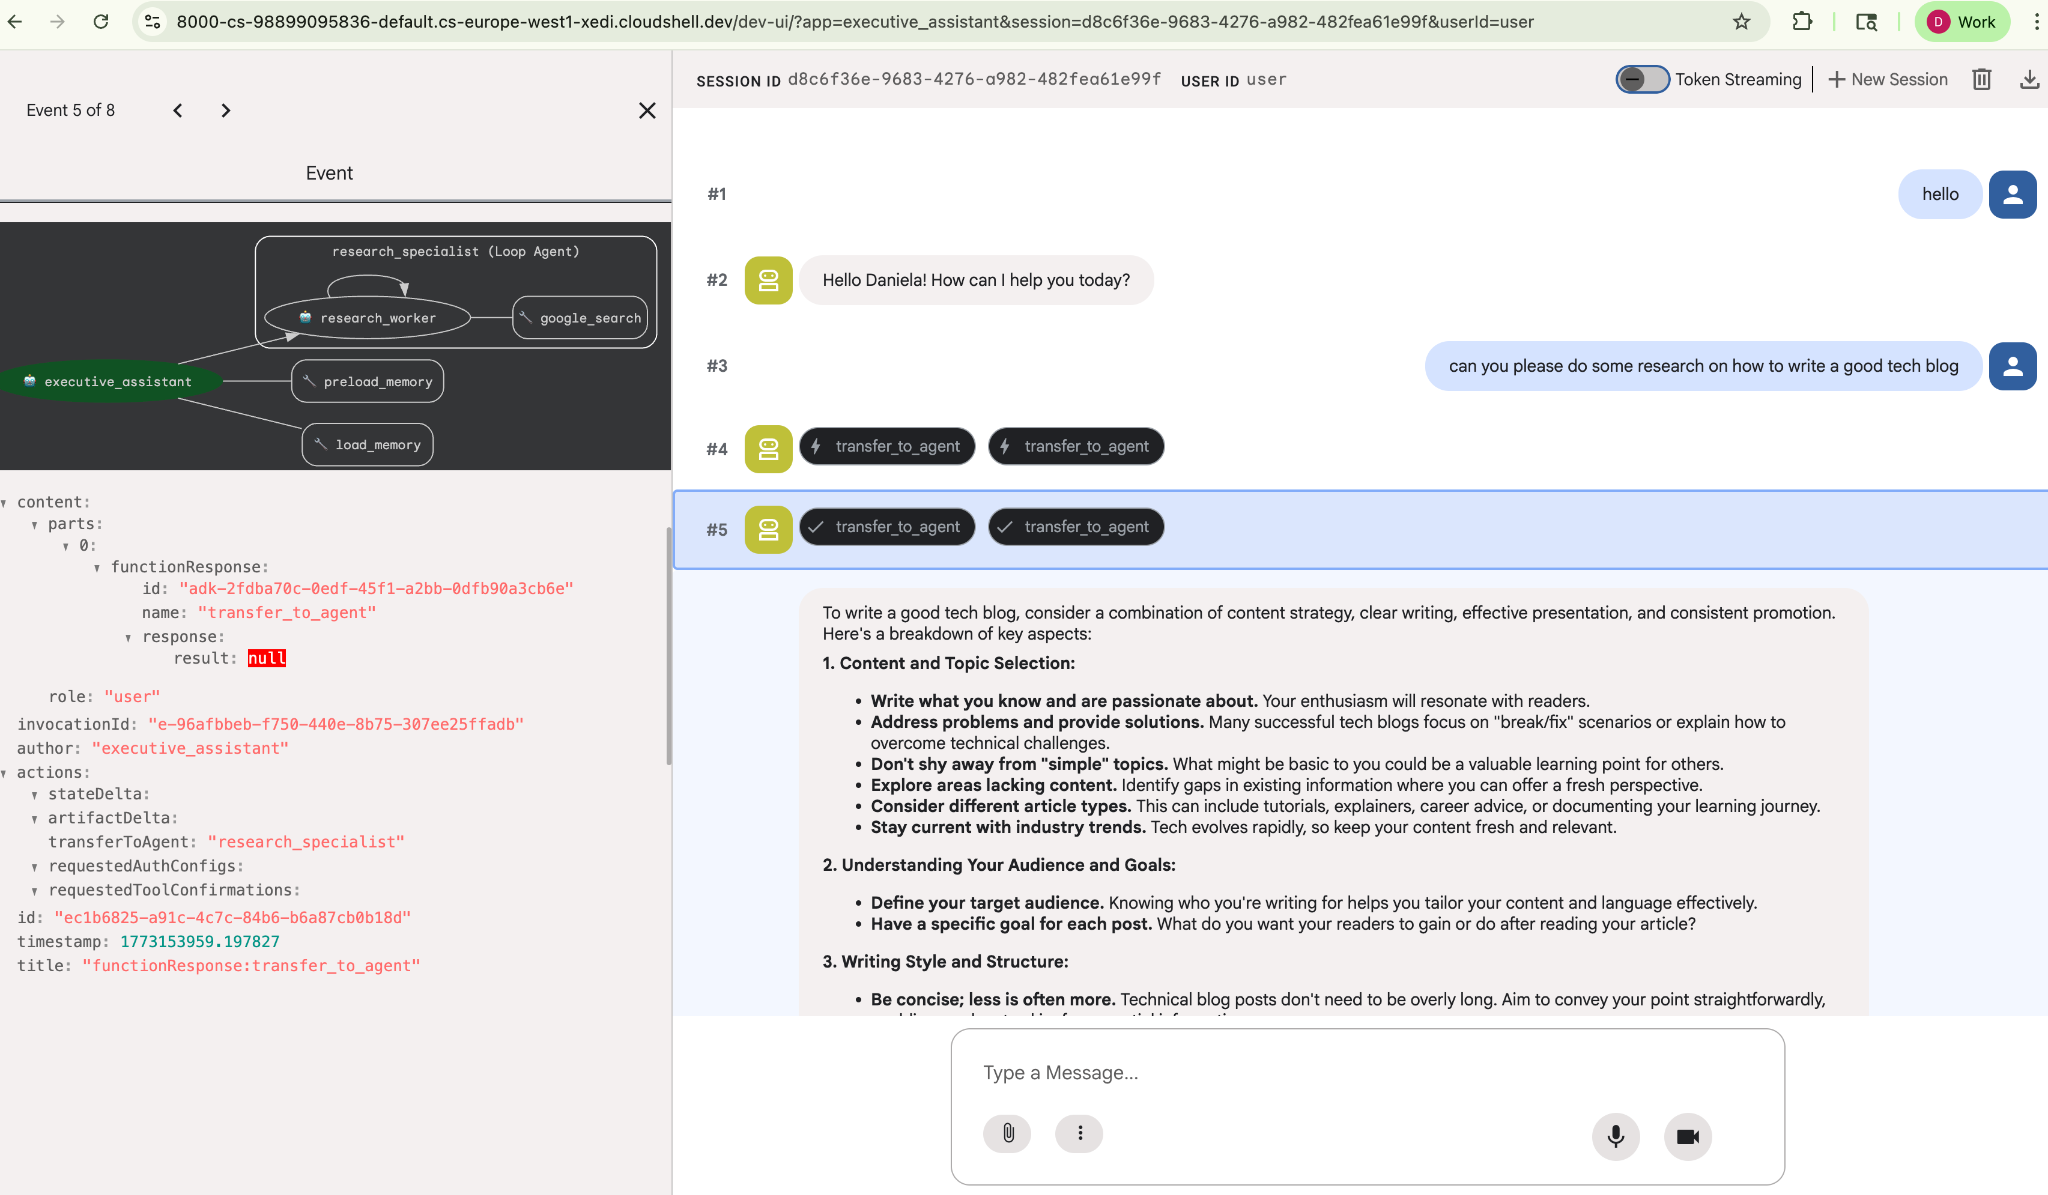
给它一个简单的研究任务,例如“如何撰写一篇优秀的技术博客?”
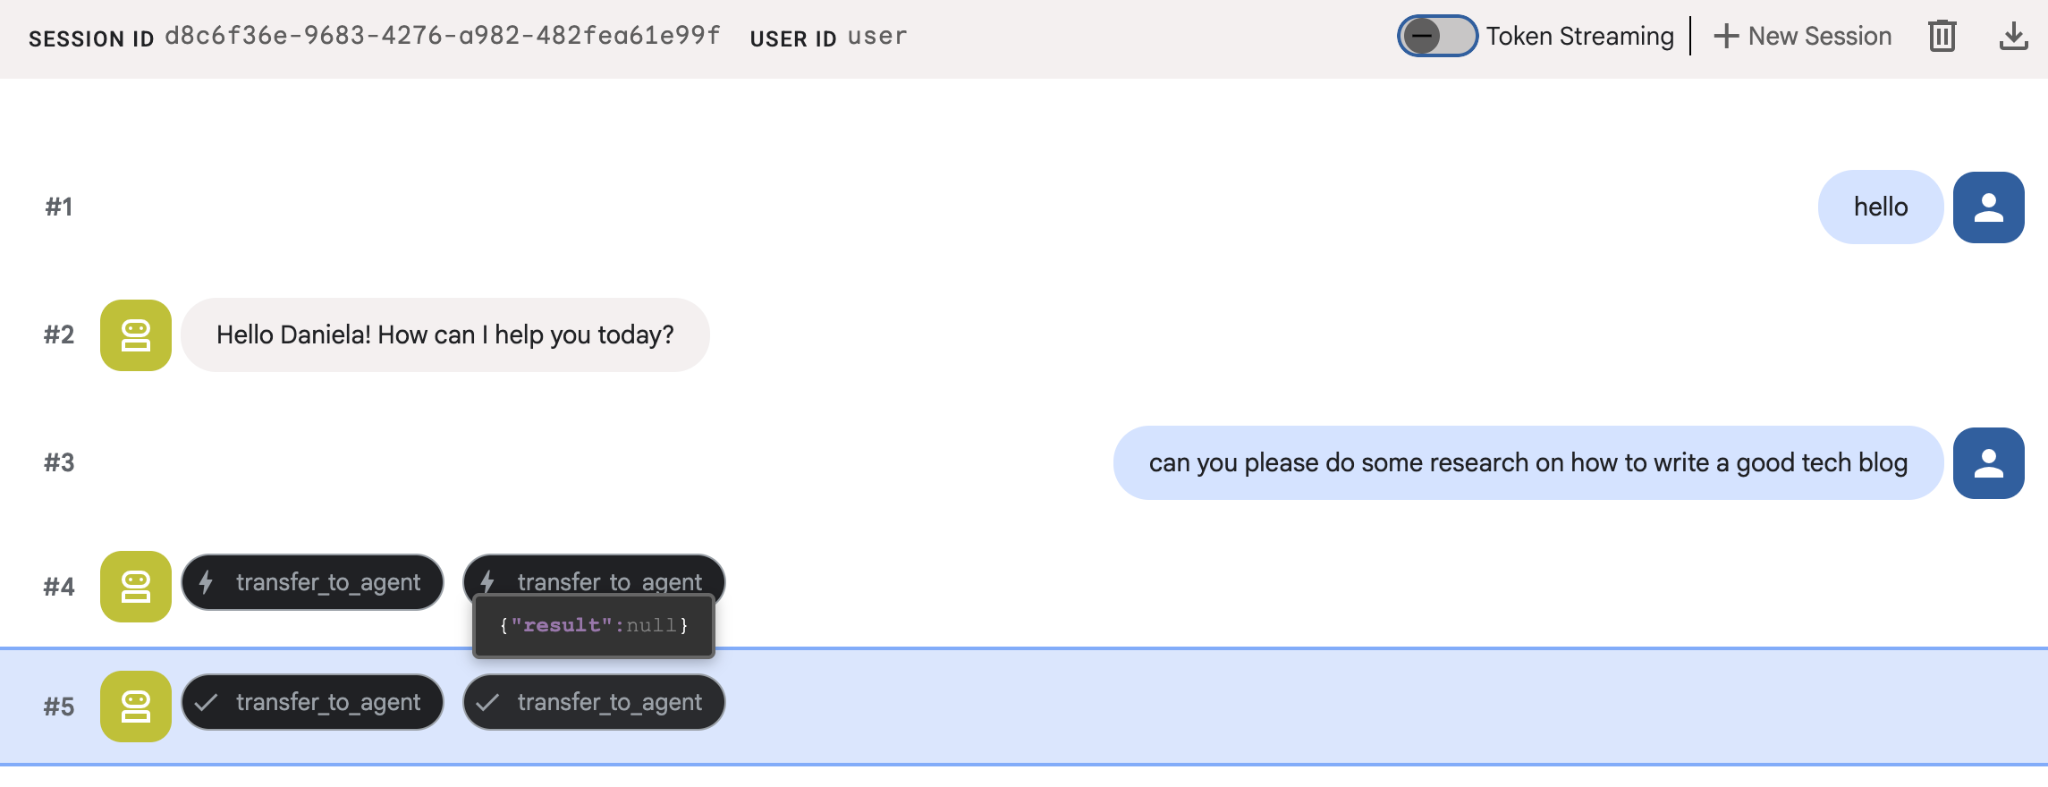
您可能已经注意到,即使这是新会话,智能体也记住了我的名字。另请注意“transfer_to_agent”工具调用:此工具会将任务移交给我们的新研究智能体。
现在,我们继续学习任务管理。
7. 使用 Cloud SQL 添加任务管理功能
虽然智能体具有长期记忆,但它不适合处理精细的结构化数据,例如待办事项列表。对于任务,我们使用传统的关系型数据库。我们将使用 SQLAlchemy 和 Google Cloud SQL (PostgreSQL) 数据库。在编写代码之前,我们必须先预配基础设施。
预配基础架构
运行以下命令以创建数据库。注意:创建实例大约需要 5-10 分钟。此命令在后台运行时,您可以继续执行下一步。
# 1. Define instance variables
export INSTANCE_NAME="assistant-db"
export USER_EMAIL=$(gcloud config get-value account)

# 2. Create the Cloud SQL instance
gcloud sql instances create $INSTANCE_NAME \
    --database-version=POSTGRES_18 \
    --tier=db-f1-micro \
    --region=us-central1 \
    --edition=ENTERPRISE

# 3. Create the database for our tasks
gcloud sql databases create tasks --instance=$INSTANCE_NAME
数据库实例配置需要几分钟时间。不妨趁此机会喝杯咖啡或茶,或者在等待完成的过程中更新代码,但别忘了回来完成访问权限控制!
配置访问权限控制
现在,我们需要配置您的用户账号,使其能够访问数据库。在终端中运行以下命令:
# change this to your favorite password
export DB_PASS="correct-horse-battery-staple"

# Create a regular database user
gcloud sql users create assistant_user \
    --instance=$INSTANCE_NAME \
    --password=$DB_PASS
更新环境配置
ADK 在运行时从 .env 文件加载配置。使用数据库连接详细信息更新代理的环境。
# Retrieve the unique connection name
export DB_CONN=$(gcloud sql instances describe $INSTANCE_NAME --format='value(connectionName)')

# Append configuration to your .env file
cat <<EOF >> executive_assistant/.env
DB_CONNECTION_NAME=$DB_CONN
DB_USER=assistant_user
DB_PASSWORD=$DB_PASS
DB_NAME=tasks
EOF
现在,我们继续进行代码更改。
创建待办事项专家 (todo.py)
与研究智能体类似,我们将在自己的文件中创建待办事项专家。创建 todo.py:
todo.py
import os
import uuid
import sqlalchemy
from datetime import datetime
from typing import Optional, List

from sqlalchemy import (
    Column,
    String,
    DateTime,
    Enum,
    select,
    delete,
    update,
)
from sqlalchemy.orm import declarative_base, Session
from google.cloud.sql.connector import Connector
from google.adk.agents.llm_agent import Agent

# --- DATABASE LOGIC ---
Base = declarative_base()
connector = Connector()

def getconn():
    db_connection_name = os.environ.get("DB_CONNECTION_NAME")
    db_user = os.environ.get("DB_USER")
    db_password = os.environ.get("DB_PASSWORD")
    db_name = os.environ.get("DB_NAME", "tasks")

    return connector.connect(
        db_connection_name,
        "pg8000",
        user=db_user,
        password=db_password,
        db=db_name,
    )

engine = sqlalchemy.create_engine(
    "postgresql+pg8000://",
    creator=getconn,
)

class Todo(Base):
    __tablename__ = "todos"
    id = Column(String(36), primary_key=True, default=lambda: str(uuid.uuid4()))
    title = Column(String(255), nullable=False)
    priority = Column(
        Enum("high", "medium", "low", name="priority_levels"), nullable=False, default="medium"
    )
    due_date = Column(DateTime, nullable=True)
    status = Column(Enum("pending", "done", name="status_levels"), default="pending")
    created_at = Column(DateTime, default=datetime.utcnow)

def init_db():
    """Builds the table if it's missing."""
    Base.metadata.create_all(bind=engine)

def add_todo(
    title: str, priority: str = "medium", due_date: Optional[str] = None
) -> dict:
    """
    Adds a new task to the list.

    Args:
        title (str): The description of the task.
        priority (str): The urgency level. Must be one of: 'high', 'medium', 'low'.
        due_date (str, optional): The due date in ISO format (YYYY-MM-DD or YYYY-MM-DDTHH:MM:SS).

    Returns:
        dict: A dictionary containing the new task's ID and a status message.
    """
    init_db()
    with Session(engine) as session:
        due = datetime.fromisoformat(due_date) if due_date else None
        item = Todo(
            title=title,
            priority=priority.lower(),
            due_date=due,
        )
        session.add(item)
        session.commit()
        return {"id": item.id, "status": f"Task added ✅"}

def list_todos(status: str = "pending") -> list:
    """
    Lists tasks from the database, optionally filtering by status.

    Args:
        status (str, optional): The status to filter by. 'pending', 'done', or 'all'.
    """
    init_db()
    with Session(engine) as session:
        query = select(Todo)

        s_lower = status.lower()
        if s_lower != "all":
            query = query.where(Todo.status == s_lower)

        query = query.order_by(Todo.priority, Todo.created_at)

        results = session.execute(query).scalars().all()
        return [
            {
                "id": t.id,
                "task": t.title,
                "priority": t.priority,
                "status": t.status,
            }
            for t in results
        ]

def complete_todo(task_id: str) -> str:
    """Marks a specific task as 'done'."""
    init_db()
    with Session(engine) as session:
        session.execute(update(Todo).where(Todo.id == task_id).values(status="done"))
        session.commit()
        return f"Task {task_id} marked as done."

def delete_todo(task_id: str) -> str:
    """Permanently removes a task from the database."""
    init_db()
    with Session(engine) as session:
        session.execute(delete(Todo).where(Todo.id == task_id))
        session.commit()
        return f"Task {task_id} deleted."

# --- TODO SPECIALIST AGENT ---
todo_agent = Agent(
    model='gemini-2.5-flash',
    name='todo_specialist',
    description='A specialist agent that manages a structured SQL task list.',
    instruction='''
    You manage the user's task list using a PostgreSQL database.
    - Use add_todo when the user wants to remember something. If no priority is mentioned, mark it as 'medium'.
    - Use list_todos to show tasks.
    - Use complete_todo to mark a task as finished.
    - Use delete_todo to remove a task entirely.

    When marking a task as complete or deleting it, if the user doesn't provide the ID,
    use list_todos first to find the correct ID for the task they described.
    ''',
    tools=[add_todo, list_todos, complete_todo, delete_todo],
)
上述代码主要负责两件事:与 Cloud SQL 数据库建立连接,以及提供一个工具列表,其中包含所有常见的待办事项列表操作,包括添加、移除和标记为完成。
由于此逻辑非常特定于待办事项代理,并且从执行助理(根代理)的角度来看,我们不一定需要这种精细的管理,因此我们将此代理打包为“AgentTool”,而不是分代理。
若要决定是使用 AgentTool 还是分代理,请考虑它们是否需要共享上下文:
- 当代理不需要与根代理共享上下文时,使用 AgentTool
- 当您希望代理与根代理共享上下文时,请使用子代理
对于研究智能体,共享上下文可能很有用,但对于简单的待办事项智能体,这样做的好处并不大。
我们来在 agent.py 中实现 AgentTool。
更新根代理 (agent.py)
现在,将 todo_agent 导入到您的主文件中,并将其作为工具附加:
agent.py
import os
from datetime import datetime
from google.adk.agents.llm_agent import Agent
from google.adk.tools.agent_tool import AgentTool
from google.adk.tools.preload_memory_tool import PreloadMemoryTool
from google.adk.tools.load_memory_tool import load_memory_tool

# Import our specialized sub-agents
from .research import research_agent
from .todo import todo_agent

# Callback for persistent memory storage
async def auto_save_session_to_memory_callback(callback_context):
    await callback_context._invocation_context.memory_service.add_session_to_memory(
        callback_context._invocation_context.session)

# --- ROOT AGENT DEFINITION ---
root_agent = Agent(
    model='gemini-2.5-flash',
    name='executive_assistant',
    description='A professional AI Executive Assistant with memory and specialized tools.',
    instruction='''
    You are an elite, high-signal AI Executive Assistant.
    Your goal is to help the user manage their knowledge, tasks, and research.

    ## Your Capabilities:
    1. Memory: Use load_memory to recall personal facts or past context about the user.
    2. Research: Delegate complex web-based investigations to the research_specialist.
    3. Tasks: Delegate all to-do list management (adding, listing, or completing tasks) to the todo_specialist.

    Always be direct and professional. If a task is successful, provide a brief confirmation.
    ''',
    tools=[
        PreloadMemoryTool(),
        load_memory_tool,
        AgentTool(todo_agent) # Exposes the Todo Specialist as a tool
    ],
    sub_agents=[research_agent], # Exposes the Research Specialist for direct handover
    after_agent_callback=auto_save_session_to_memory_callback,
)
再次运行 adk web 以测试新功能:
uv run adk web --memory_service_uri="agentengine://$ENGINE_ID"
并尝试创建待办事项:

8. 添加日历管理功能
最后,我们将与 Google 日历集成,以便智能体可以管理预约。为了方便本 Codelab,我们不会授予代理对您个人日历的访问权限(如果操作不当,这可能会很危险),而是会创建一个独立的日历供代理管理。
首先,我们将创建一个专用服务账号作为代理的身份。然后,我们将使用服务账号以编程方式创建代理的日历。
预配服务账号
打开终端并运行以下命令,以创建身份并授予您的个人账号模拟该身份的权限:
export SA_NAME="ea-agent"
export SA_EMAIL="${SA_NAME}@${PROJECT_ID}.iam.gserviceaccount.com"

# Create the service account
gcloud iam service-accounts create $SA_NAME \
    --display-name="Executive Assistant Agent"

# Allow your local user to impersonate it
gcloud iam service-accounts add-iam-policy-binding $SA_EMAIL \
    --member="user:$(gcloud config get-value account)" \
    --role="roles/iam.serviceAccountTokenCreator"

# Save it to the agent's environment
echo "SERVICE_ACCOUNT_EMAIL=$SA_EMAIL" >> executive_assistant/.env
以编程方式创建日历
我们来编写一个脚本,让服务账号创建日历。在项目的根目录中创建一个名为 setup_calendar.py 的新文件(与 setup_memory.py 并列):
setup_calendar.py
import os
import google.auth
from googleapiclient.discovery import build
from google.auth.transport.requests import Request
from google.auth import impersonated_credentials
from dotenv import load_dotenv

load_dotenv('executive_assistant/.env')
SA_EMAIL = os.environ.get("SERVICE_ACCOUNT_EMAIL")

def setup_sa_calendar():
    print(f"Authenticating to impersonate {SA_EMAIL}...")

    # 1. Base credentials
    creds, _ = google.auth.default(scopes=["https://www.googleapis.com/auth/cloud-platform"])
    creds.refresh(Request())

    # 2. Impersonate the Service Account
    impersonated = impersonated_credentials.Credentials(
        source_credentials=creds,
        target_principal=SA_EMAIL,
        target_scopes=["https://www.googleapis.com/auth/calendar"],
    )
    service = build("calendar", "v3", credentials=impersonated)

    # 3. Create the calendar
    print("Creating independent Service Account calendar...")
    calendar = service.calendars().insert(body={
        "summary": "AI Assistant (SA Owned)",
        "description": "An independent calendar managed purely by the AI."
    }).execute()

    calendar_id = calendar['id']

    # 4. Save the ID
    with open("executive_assistant/.env", "a") as f:
        f.write(f"\nCALENDAR_ID={calendar_id}\n")
    print(f"Setup complete! CALENDAR_ID {calendar_id} added to .env")

if __name__ == "__main__":
    setup_sa_calendar()
从终端运行脚本:
uv run python setup_calendar.py
创建日历专家 (calendar.py)
现在,我们来重点介绍日历专家。我们将为该智能体配备全套日历工具:列出、创建、更新、删除,甚至还包括可理解自然语言的“快速添加”功能。
将以下代码复制到 calendar.py。
calendar.py
import os
from datetime import datetime, timedelta, timezone

import google.auth
from googleapiclient.discovery import build
from googleapiclient.errors import HttpError
from google.adk.agents.llm_agent import Agent

def _get_calendar_service():
    """Build the Google Calendar API service using Service Account Impersonation."""
    from google.auth.transport.requests import Request
    from google.auth import impersonated_credentials

    target_principal = os.environ.get("SERVICE_ACCOUNT_EMAIL")
    if not target_principal:
        raise ValueError("SERVICE_ACCOUNT_EMAIL environment variable is missing.")

    base_scopes = ["https://www.googleapis.com/auth/cloud-platform"]
    creds, _ = google.auth.default(scopes=base_scopes)
    creds.refresh(Request())

    target_scopes = ["https://www.googleapis.com/auth/calendar"]
    impersonated = impersonated_credentials.Credentials(
        source_credentials=creds,
        target_principal=target_principal,
        target_scopes=target_scopes,
    )

    return build("calendar", "v3", credentials=impersonated)

def _format_event(event: dict) -> dict:
    """Format a raw Calendar API event into a clean dict for the LLM."""
    start = event.get("start", {})
    end = event.get("end", {})
    return {
        "id": event.get("id"),
        "title": event.get("summary", "(No title)"),
        "start": start.get("dateTime", start.get("date")),
        "end": end.get("dateTime", end.get("date")),
        "location": event.get("location", ""),
        "description": event.get("description", ""),
        "attendees": [
            {"email": a["email"], "status": a.get("responseStatus", "unknown")}
            for a in event.get("attendees", [])
        ],
        "link": event.get("htmlLink", ""),
        "conference_link": (
            event.get("conferenceData", {}).get("entryPoints", [{}])[0].get("uri", "")
            if event.get("conferenceData")
            else ""
        ),
        "status": event.get("status", ""),
    }

def list_events(days_ahead: int = 7) -> dict:
    """List upcoming calendar events."""
    calendar_id = os.environ.get("CALENDAR_ID")
    try:
        service = _get_calendar_service()
        now = datetime.now(timezone.utc).isoformat()
        end = (datetime.now(timezone.utc) + timedelta(days=days_ahead)).isoformat()

        events_result = service.events().list(
            calendarId=calendar_id, timeMin=now, timeMax=end,
            maxResults=50, singleEvents=True, orderBy="startTime"
        ).execute()

        events = events_result.get("items", [])
        if not events:
            return {"status": "success", "count": 0, "events": []}

        return {"status": "success", "count": len(events), "events": [_format_event(e) for e in events]}
    except HttpError as e:
        return {"status": "error", "message": f"Calendar API error: {e}"}

def create_event(title: str, start_time: str, end_time: str, description: str = "", location: str = "", attendees: str = "", add_google_meet: bool = False) -> dict:
    """Create a new calendar event."""
    calendar_id = os.environ.get("CALENDAR_ID")
    try:
        service = _get_calendar_service()
        event_body = {
            "summary": title,
            "start": {"dateTime": start_time},
            "end": {"dateTime": end_time},
        }
        if description: event_body["description"] = description
        if location: event_body["location"] = location
        if attendees:
            email_list = [e.strip() for e in attendees.split(",") if e.strip()]
            event_body["attendees"] = [{"email": e} for e in email_list]

        conference_version = 0
        if add_google_meet:
            event_body["conferenceData"] = {
                "createRequest": {"requestId": f"event-{datetime.now().strftime('%Y%m%d%H%M%S')}", "conferenceSolutionKey": {"type": "hangoutsMeet"}}
            }
            conference_version = 1

        event = service.events().insert(calendarId=calendar_id, body=event_body, conferenceDataVersion=conference_version).execute()
        return {"status": "success", "message": f"Event created ✅", "event": _format_event(event)}
    except HttpError as e:
        return {"status": "error", "message": f"Calendar API error: {e}"}

def update_event(event_id: str, title: str = "", start_time: str = "", end_time: str = "", description: str = "") -> dict:
    """Update an existing calendar event."""
    calendar_id = os.environ.get("CALENDAR_ID")
    try:
        service = _get_calendar_service()
        patch_body = {}
        if title: patch_body["summary"] = title
        if start_time: patch_body["start"] = {"dateTime": start_time}
        if end_time: patch_body["end"] = {"dateTime": end_time}
        if description: patch_body["description"] = description
        if not patch_body: return {"status": "error", "message": "No fields to update."}

        event = service.events().patch(calendarId=calendar_id, eventId=event_id, body=patch_body).execute()
        return {"status": "success", "message": "Event updated ✅", "event": _format_event(event)}
    except HttpError as e:
        return {"status": "error", "message": f"Calendar API error: {e}"}

def delete_event(event_id: str) -> dict:
    """Delete a calendar event by its ID."""
    calendar_id = os.environ.get("CALENDAR_ID")
    try:
        service = _get_calendar_service()
        service.events().delete(calendarId=calendar_id, eventId=event_id).execute()
        return {"status": "success", "message": f"Event '{event_id}' deleted ✅"}
    except HttpError as e:
        return {"status": "error", "message": f"Calendar API error: {e}"}

def quick_add_event(text: str) -> dict:
    """Create an event using natural language (e.g. 'Lunch with Sarah next Monday noon')."""
    calendar_id = os.environ.get("CALENDAR_ID")
    try:
        service = _get_calendar_service()
        event = service.events().quickAdd(calendarId=calendar_id, text=text).execute()
        return {"status": "success", "message": "Event created from text ✅", "event": _format_event(event)}
    except HttpError as e:
        return {"status": "error", "message": f"Calendar API error: {e}"}

calendar_agent = Agent(
    model='gemini-2.5-flash',
    name='calendar_specialist',
    description='Manages the user schedule and calendar events.',
    instruction='''
    You manage the user's Google Calendar.
    - Use list_events to check the schedule.
    - Use quick_add_event for simple, conversational scheduling requests (e.g., "Lunch tomorrow at noon").
    - Use create_event for complex meetings that require attendees, specific durations, or Google Meet links.
    - Use update_event to change details of an existing event.
    - Use delete_event to cancel or remove an event.

    CRITICAL: For update_event and delete_event, you must provide the exact `event_id`.
    If the user does not provide the ID, you MUST call list_events first to find the correct `event_id` before attempting the update or deletion.

    Always use the current date/time context provided by the root agent to resolve relative dates like "tomorrow".
    ''',
    tools=[list_events, create_event, update_event, delete_event, quick_add_event],
)
最终确定根代理 (agent.py)
使用以下代码更新 agent.py 文件:
agent.py
import os
from datetime import datetime
from zoneinfo import ZoneInfo
from google.adk.agents.llm_agent import Agent
from google.adk.tools.agent_tool import AgentTool
from google.adk.tools.preload_memory_tool import PreloadMemoryTool
from google.adk.tools.load_memory_tool import load_memory_tool

# Import all our specialized sub-agents
from .research import research_agent
from .todo import todo_agent
from .calendar import calendar_agent
import tzlocal

# Automatically detect the local system timezone
TIMEZONE = tzlocal.get_localzone_name()

# Callback for persistent memory storage
async def auto_save_session_to_memory_callback(callback_context):
    await callback_context._invocation_context.memory_service.add_session_to_memory(
        callback_context._invocation_context.session)

# Callback to inject the current time into the prompt
async def setup_agent_context(callback_context, **kwargs):
    now = datetime.now(ZoneInfo(TIMEZONE))
    callback_context.state["current_time"] = now.strftime("%A, %Y-%m-%d %I:%M %p")
    callback_context.state["timezone"] = TIMEZONE

# --- ROOT AGENT DEFINITION ---
root_agent = Agent(
    model='gemini-2.5-flash',
    name='executive_assistant',
    description='A professional AI Executive Assistant with memory and specialized tools.',
    instruction='''
    You are an elite, high-signal AI Executive Assistant.
    Your goal is to help the user manage their knowledge, tasks, research, and schedule.

    ## Your Capabilities:
    1. Memory: Use load_memory to recall personal facts.
    2. Research: Delegate complex web investigations to the research_specialist.
    3. Tasks: Delegate all to-do list management to the todo_specialist.
    4. Scheduling: Delegate all calendar queries to the calendar_specialist.

    ## 🕒 Current State
    - Time: {current_time?}
    - Timezone: {timezone?}

    Always be direct and professional.
    ''',
    tools=[
        PreloadMemoryTool(),
        load_memory_tool,
        AgentTool(todo_agent),
        AgentTool(calendar_agent)
    ],
    sub_agents=[research_agent],
    before_agent_callback=[setup_agent_context],
    after_agent_callback=[auto_save_session_to_memory_callback],
)
请注意,除了日历工具之外,我们还添加了一个新的代理回调前函数:setup_agent_context。此函数可让代理了解当前日期、时间和时区,以便更高效地使用日历。它通过设置会话状态变量(一种专为短期持久性设计的智能体记忆)来运行。
最后一次运行 adk web,以测试完整的代理!
uv run adk web --memory_service_uri="agentengine://$ENGINE_ID"
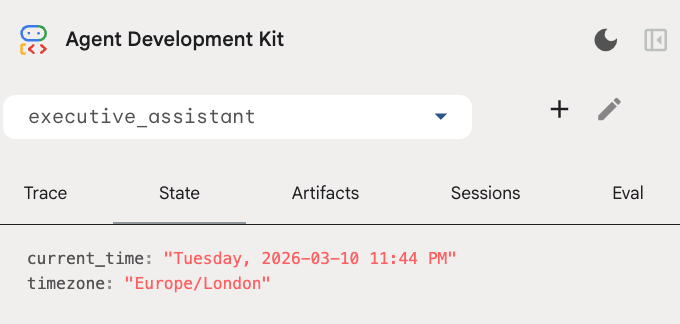
您可以在开发者界面中的“状态”标签页中检查会话状态:
现在,您拥有了一个可以跟踪日历活动、待办事项清单、进行研究并具有长期记忆的代理!
实验后的清理工作
9. 总结
恭喜!您已成功通过 5 个发展阶段设计出一个多功能 AI 执行助理。
我们的学习内容
- 为 AI 代理预配基础设施。
- 使用 ADK 内置功能实现持久内存和专用子代理。
- 集成外部数据库和效率 API。
后续步骤
您可以探索此平台中的其他 Codelab,或自行改进执行助理,继续您的学习历程。
如果您需要一些改进方面的建议,可以尝试以下操作:
- 实现事件压缩,以优化长对话的性能。
- 添加制品服务,以便代理为您做笔记并保存为文件
- 使用 Google Cloud Run 将代理部署为后端服务。
完成测试后,请务必清理环境,以免结算账号产生意外费用。
祝大家编码顺利!