
1. 簡介
在本程式碼研究室中,您將瞭解如何使用 Google Agent Development Kit (ADK) 建構精密的 AI 代理。我們會遵循自然演進路徑,從基礎對話式代理開始,逐步加入專業功能。
我們建構的代理程式是執行助理,可協助您處理日常工作,例如管理日曆、提醒您工作、進行研究及彙整筆記,這些都是使用 ADK、Gemini 和 Vertex AI 從頭建構。
完成本實驗室後,您將擁有可正常運作的代理程式,並具備根據自身需求擴充代理程式的知識。
必要條件
- 具備 Python 程式設計語言的基本知識
- 具備 Google Cloud 控制台的基本知識,可管理雲端資源
課程內容
- 為 AI 代理佈建 Google Cloud 雲端基礎架構。
- 運用 Vertex AI Memory Bank 實作長期記憶體。
- 建構專業子代理的階層。
- 整合外部資料庫和 Google Workspace 生態系統。
軟硬體需求
本研討會可完全在 Google Cloud Shell 中進行,該環境已預先安裝所有必要依附元件 (gcloud CLI、程式碼編輯器、Go、Gemini CLI)。
或者,如果您偏好使用自己的電腦,則需要下列項目:
- Python (3.12 以上版本)
- 程式碼編輯器或 IDE (例如 VS Code 或
vim)。 - 用於執行 Python 和
gcloud指令的終端機。 - 建議:使用程式設計代理,例如 Gemini CLI 或 Antigravity
主要技術
請參閱下列資源,進一步瞭解我們會用到的技術:
2. 環境設定
請選擇下列其中一個選項:如要在自己的電腦上執行本程式碼研究室,請選取「自行設定環境」;如要完全在雲端執行本程式碼研究室,請選取「啟動 Cloud Shell」。
自修實驗室環境設定
- 登入 Google Cloud 控制台,然後建立新專案或重複使用現有專案。如果沒有 Gmail 或 Google Workspace 帳戶,請先建立帳戶。

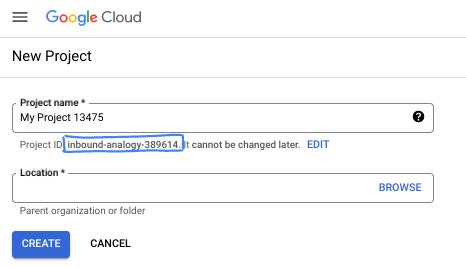
- 專案名稱是這個專案參與者的顯示名稱。這是 Google API 未使用的字元字串。你隨時可以更新。
- 專案 ID 在所有 Google Cloud 專案中都是不重複的,而且設定後即無法變更。Cloud 控制台會自動產生專屬字串,通常您不需要在意該字串為何。在大多數程式碼研究室中,您需要參照專案 ID (通常標示為
PROJECT_ID)。如果您不喜歡產生的 ID,可以產生另一個隨機 ID。你也可以嘗試使用自己的名稱,看看是否可用。完成這個步驟後就無法變更,且專案期間會維持不變。 - 請注意,有些 API 會使用第三個值,也就是「專案編號」。如要進一步瞭解這三種值,請參閱說明文件。
- 接著,您需要在 Cloud 控制台中啟用帳單,才能使用 Cloud 資源/API。完成本程式碼研究室的費用不高,甚至可能完全免費。如要關閉資源,避免在本教學課程結束後繼續產生費用,請刪除您建立的資源或專案。Google Cloud 新使用者可參加價值$300 美元的免費試用計畫。
啟動 Cloud Shell
雖然可以透過筆電遠端操作 Google Cloud,但在本程式碼研究室中,您將使用 Google Cloud Shell,這是可在雲端執行的指令列環境。
在 Google Cloud 控制台中,點選右上工具列的 Cloud Shell 圖示:

佈建並連線至環境的作業需要一些時間才能完成。完成後,您應該會看到如下的內容:

這部虛擬機器搭載各種您需要的開發工具,並提供永久的 5GB 主目錄,而且可在 Google Cloud 運作,大幅提升網路效能並強化驗證功能。您可以在瀏覽器中完成本程式碼研究室的所有作業。您不需要安裝任何軟體。
3. 專案設定
編寫程式碼之前,我們必須在 Google Cloud 中佈建必要的基礎架構和權限。
設定環境變數
開啟終端機並設定下列環境變數:
export PROJECT_ID=`gcloud config get project`
export LOCATION=us-central1
啟用必要的 API
您的代理程式需要存取多項 Google Cloud 服務。執行下列指令即可啟用:
gcloud services enable \
    aiplatform.googleapis.com \
    calendar-json.googleapis.com \
    sqladmin.googleapis.com
使用應用程式預設憑證進行驗證
我們需要使用應用程式預設憑證 (ADC) 進行驗證,才能從您的環境與 Google Cloud 服務通訊。
執行下列指令,確保應用程式預設憑證有效且為最新版本:
gcloud auth application-default login
4. 建立基礎代理程式
現在,我們需要初始化要儲存專案原始碼的目錄:
# setup project directory
mkdir -p adk_ea_codelab && cd adk_ea_codelab
# prepare virtual environment
uv init
# install dependencies
uv add google-adk google-api-python-client tzlocal python-dotenv
uv add cloud-sql-python-connector[pg8000] sqlalchemy
首先,我們會建立代理程式的身分和基本對話功能。在 ADK 中,Agent 類別會定義代理角色和指令。
此時您可能需要考慮代理程式名稱。我希望代理人有適當的名稱,例如 Aida 或 Sharon,因為我覺得這樣可以賦予代理人一些「個性」,但你也可以直接依代理人的功能命名,例如「executive_assistant」、「travel_agent」或「code_executor」。
執行 adk create 指令,啟動樣板代理程式:
# replace with your desired agent name
uv run adk create executive_assistant
請選擇 gemini-2.5-flash 做為模型,並選擇 Vertex AI 做為後端。請仔細檢查建議的專案 ID 是否為您為這個實驗室建立的專案 ID,然後按下 Enter 鍵確認。如果是 Google Cloud 區域,您可以接受預設值 (us-central1)。終端機畫面會類似於以下內容:
daniela_petruzalek@cloudshell:~/adk_ea_codelab (your-project-id)$ uv run adk create executive_assistant
Choose a model for the root agent:
1. gemini-2.5-flash
2. Other models (fill later)
Choose model (1, 2): 1
1. Google AI
2. Vertex AI
Choose a backend (1, 2): 2

You need an existing Google Cloud account and project, check out this link for details:
https://google.github.io/adk-docs/get-started/quickstart/#gemini---google-cloud-vertex-ai

Enter Google Cloud project ID [your-project-id]:
Enter Google Cloud region [us-central1]:

Agent created in /home/daniela_petruzalek/adk_ea_codelab/executive_assistant:
- .env
- __init__.py
- agent.py

daniela_petruzalek@cloudshell:~/adk_ea_codelab (your-project-id)$
完成後,上一個指令會建立以代理程式名稱命名的資料夾 (例如 executive_assistant),內含幾個檔案,包括含有基本代理程式定義的 agent.py 檔案:
from google.adk.agents.llm_agent import Agent

root_agent = Agent(
    model='gemini-2.5-flash',
    name='root_agent',
    description='A helpful assistant for user questions.',
    instruction='Answer user questions to the best of your knowledge',
)
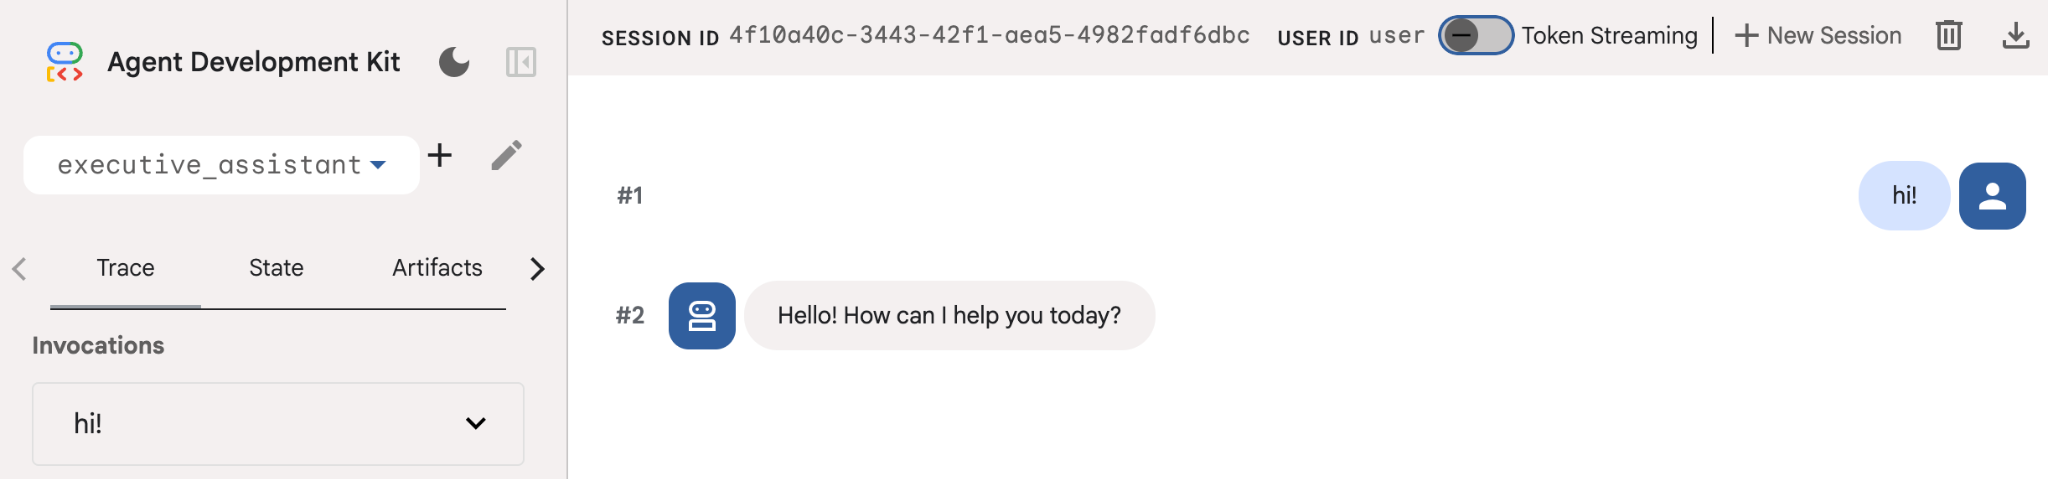
如要與這個代理互動,請在指令列中執行 uv run adk web,並在瀏覽器中開啟開發 UI。您將看見類似下方的內容:
$ uv run adk web
...
INFO:     Started server process [1244]
INFO:     Waiting for application startup.

+-----------------------------------------------------------------------------+
| ADK Web Server started                                                      |
|                                                                             |
| For local testing, access at http://127.0.0.1:8000.                         |
+-----------------------------------------------------------------------------+

INFO:     Application startup complete.
INFO:     Uvicorn running on http://127.0.0.1:8000 (Press CTRL+C to quit)
即使這個代理程式相當基本,但至少執行一次這項操作,有助於確保設定正常運作,再開始編輯代理程式。下方的螢幕截圖顯示使用開發 UI 的簡單互動:
現在,我們來修改代理程式定義,加入行政助理角色。複製下列程式碼,並取代 agent.py 的內容。根據偏好調整代理程式名稱和角色。
from google.adk.agents.llm_agent import Agent

root_agent = Agent(
    model='gemini-2.5-flash',
    name='executive_assistant',
    description='A professional AI Executive Assistant',
    instruction='''
    You are an elite, warm, and highly efficient AI partner.
    Your primary goal is to help the user manage their tasks, schedule, and research.
    Always be direct, concise, and high-signal.
    ''',
)
請注意,名稱屬性會定義代理的內部名稱,而在指令中,您也可以為代理提供更友善的名稱,做為與使用者互動時的角色名稱。內部名稱主要用於可觀測性,以及使用 transfer_to_agent 工具的多代理系統中的交接。您不必自行處理這項工具,ADK 會在您宣告一或多個子代理程式時自動註冊。
如要執行剛才建立的代理程式,請使用 adk web:
uv run adk web
在瀏覽器上開啟 ADK UI,向新助理打聲招呼!
5. 使用 Vertex AI Memory Bank 新增持續性記憶體
真正的助理必須記住偏好設定和過往互動,才能提供流暢的個人化體驗。在這個步驟中,我們將整合 Vertex AI Agent Engine Memory Bank。這項 Vertex AI 功能會根據使用者對話動態生成長期記憶。
Memory Bank 可讓您的代理建立個人化資訊,並在多個工作階段中存取,建立跨工作階段的連續性。在幕後,這項功能會管理工作階段中的訊息時間順序,並使用相似度搜尋擷取功能,為代理程式提供目前情境中最相關的記憶。
初始化記憶體服務
ADK 會使用 Vertex AI 儲存及擷取長期記憶。您必須在專案中初始化「記憶體引擎」。這基本上是設定為 Memory Bank 的 Reasoning Engine 執行個體。
建立下列指令碼並命名為 setup_memory.py:
setup_memory.py
import vertexai
import os

PROJECT_ID=os.getenv("PROJECT_ID")
LOCATION=os.getenv("LOCATION")

client = vertexai.Client(project=PROJECT_ID, location=LOCATION)

# Create Reasoning Engine for Memory Bank
agent_engine = client.agent_engines.create()

# You will need this resource name to give it to ADK
print(agent_engine.api_resource.name)
現在執行 setup_memory.py,為記憶體庫佈建推理引擎:
uv run python setup_memory.py
輸出內容應與以下所示相似:
$ uv run python setup.py
projects/1234567890/locations/us-central1/reasoningEngines/1234567890
將引擎資源名稱儲存在環境變數中:
export ENGINE_ID="<insert the resource name above>"
現在我們需要更新程式碼,才能使用持續性記憶體。將 agent.py 的內容替換為下列內容:
agent.py
from google.adk.agents.llm_agent import Agent
from google.adk.tools.preload_memory_tool import PreloadMemoryTool
from google.adk.tools.load_memory_tool import load_memory_tool

async def auto_save_session_to_memory_callback(callback_context):
    await callback_context._invocation_context.memory_service.add_session_to_memory(
        callback_context._invocation_context.session)

# Update root_agent with memory tools and callback
root_agent = Agent(
    model='gemini-2.5-flash',
    name='executive_assistant',
    description='Executive Assistant with Persistent Memory',
    instruction='''
    You are an elite AI partner with long-term memory.
    Use load_memory to find context about the user when needed.
    Always be direct, concise, and high-signal.
    ''',
    tools=[PreloadMemoryTool(), load_memory_tool],
    after_agent_callback=auto_save_session_to_memory_callback,
)
PreloadMemoryTool 會自動將過去對話中的相關脈絡資訊注入每個要求 (使用相似性搜尋擷取),而 load_memory_tool 則允許模型在需要時明確查詢 Memory Bank 中的事實。這個組合可為代理提供深入且持續的脈絡情境!
現在,如要啟動支援記憶體的代理,您需要在執行 adk web 時傳遞 memory_service_uri:
uv run adk web --memory_service_uri="agentengine://$ENGINE_ID"
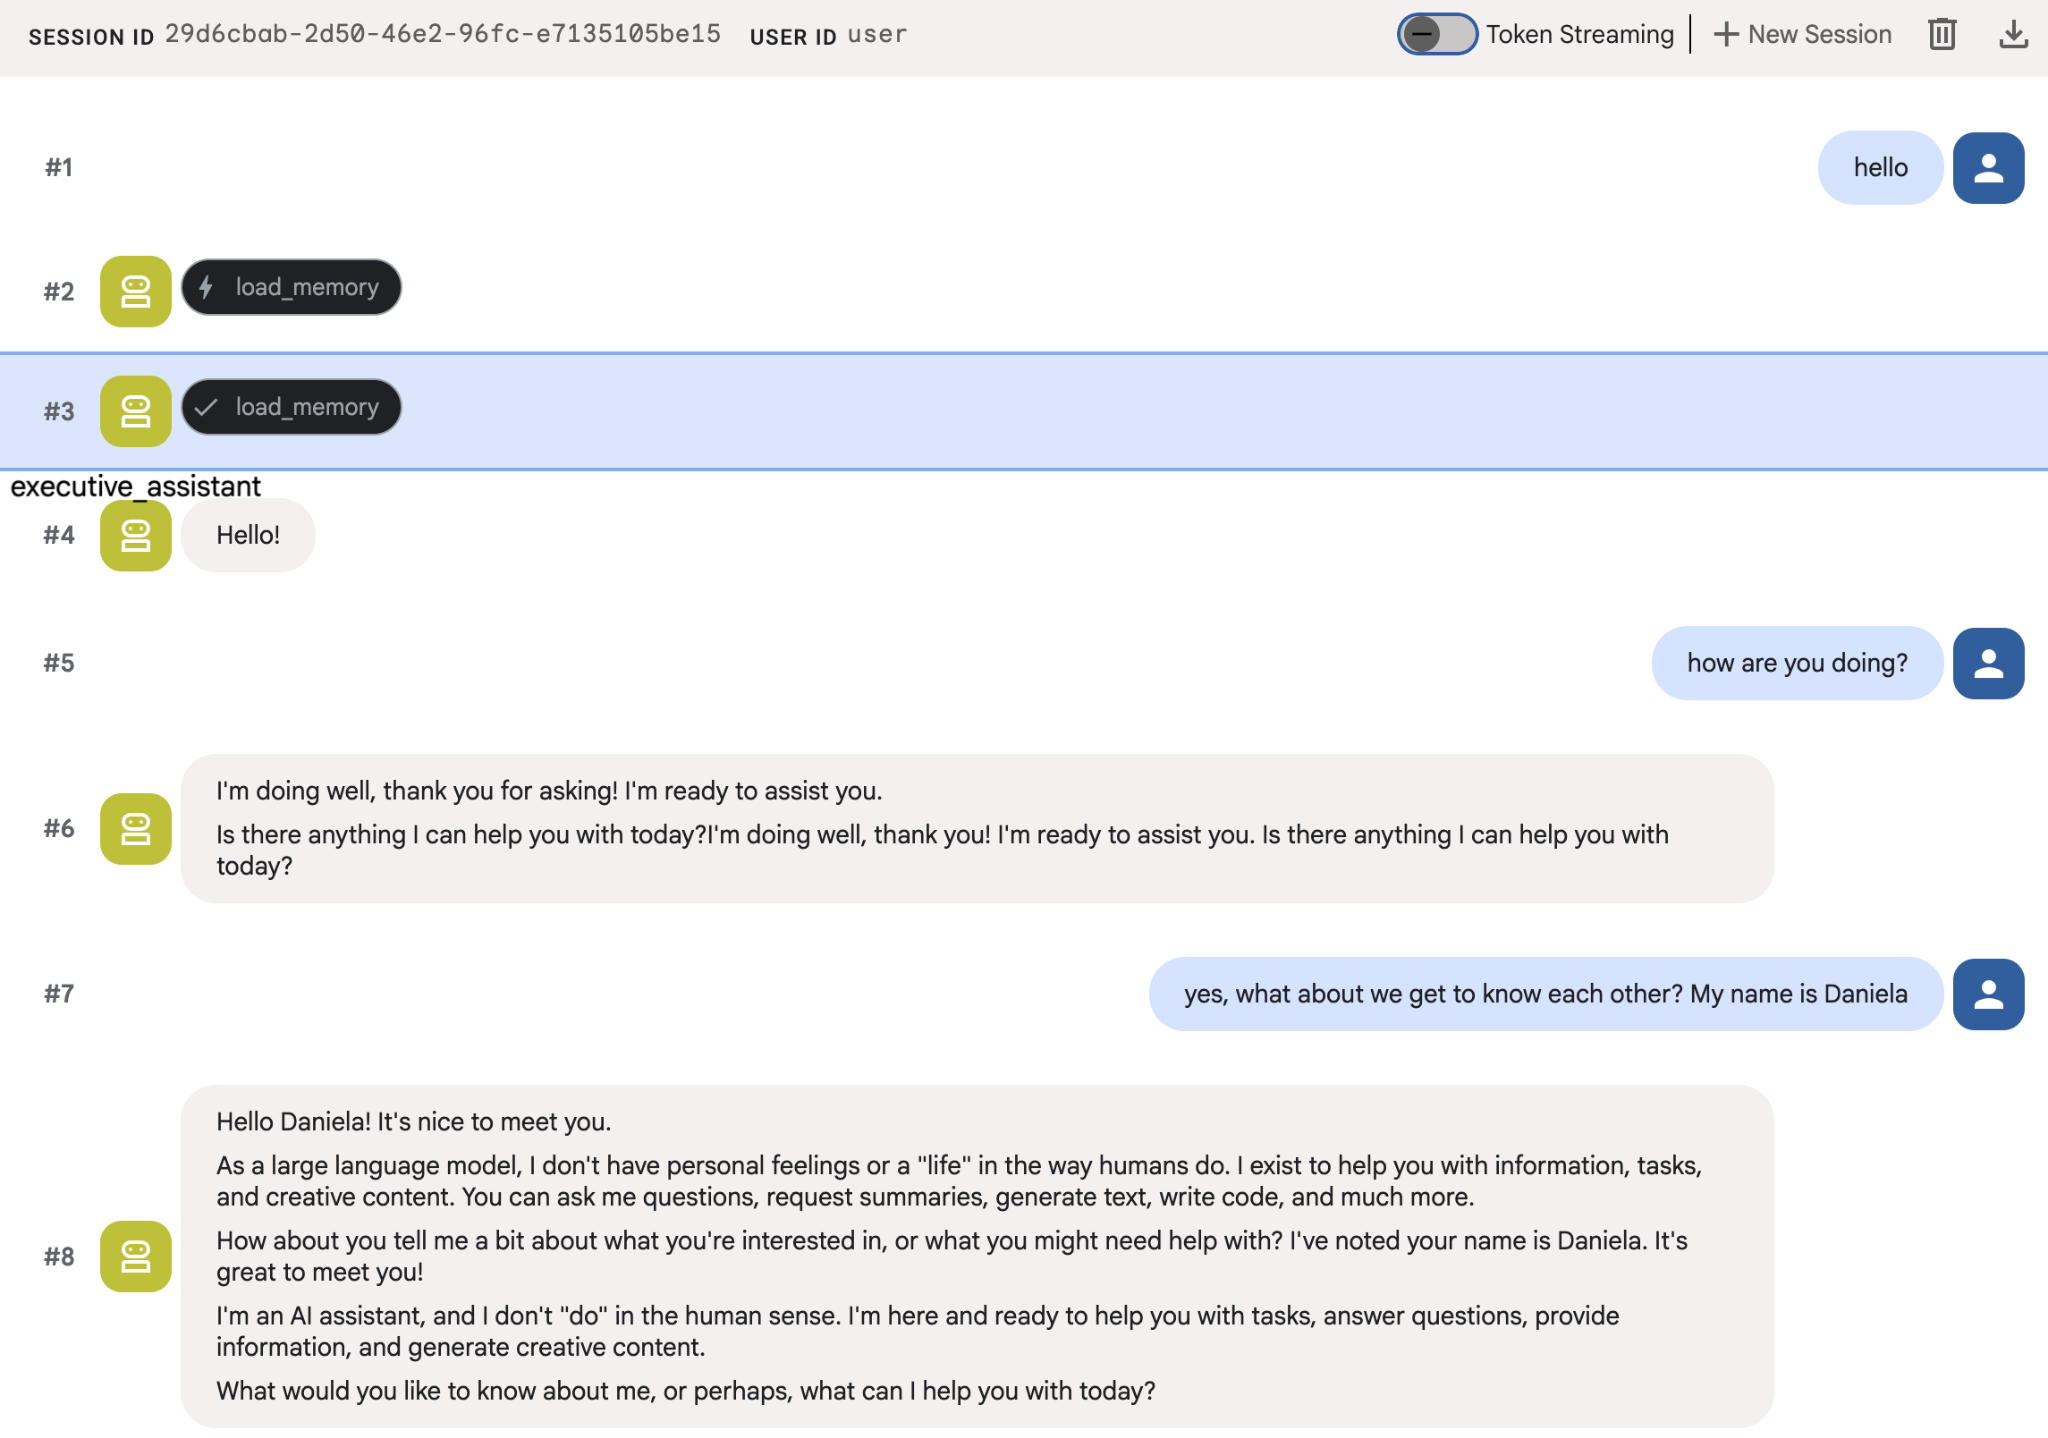
你可以先提供幾項個人資訊給代理,然後在另一個工作階段中詢問相關問題。例如,告訴它你的名字:
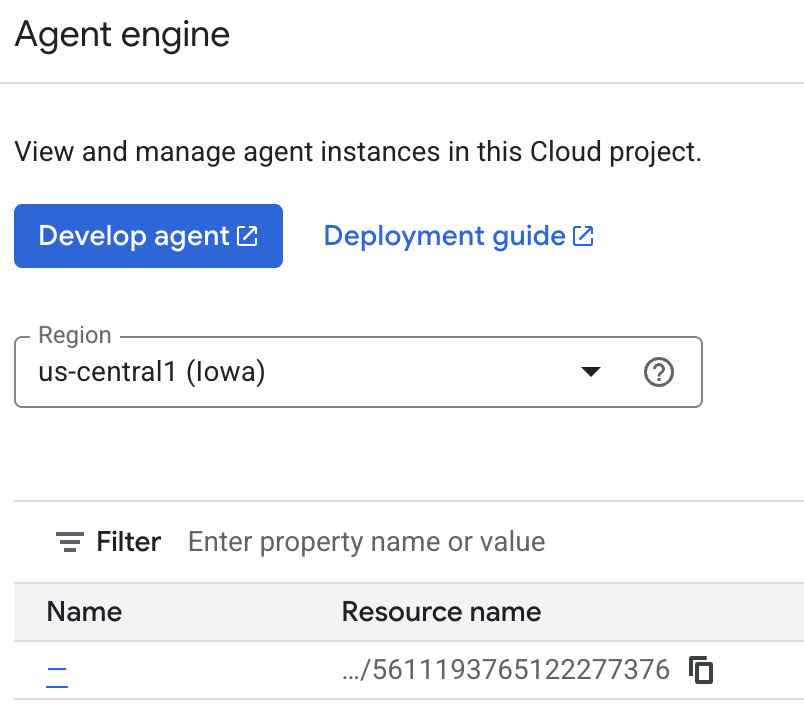
您可以在雲端控制台檢查代理儲存的記憶。前往「Agent Engine」的產品頁面 (使用搜尋列)

然後按一下代理程式引擎名稱 (請務必選取正確的區域):
然後前往「回憶集錦」分頁:
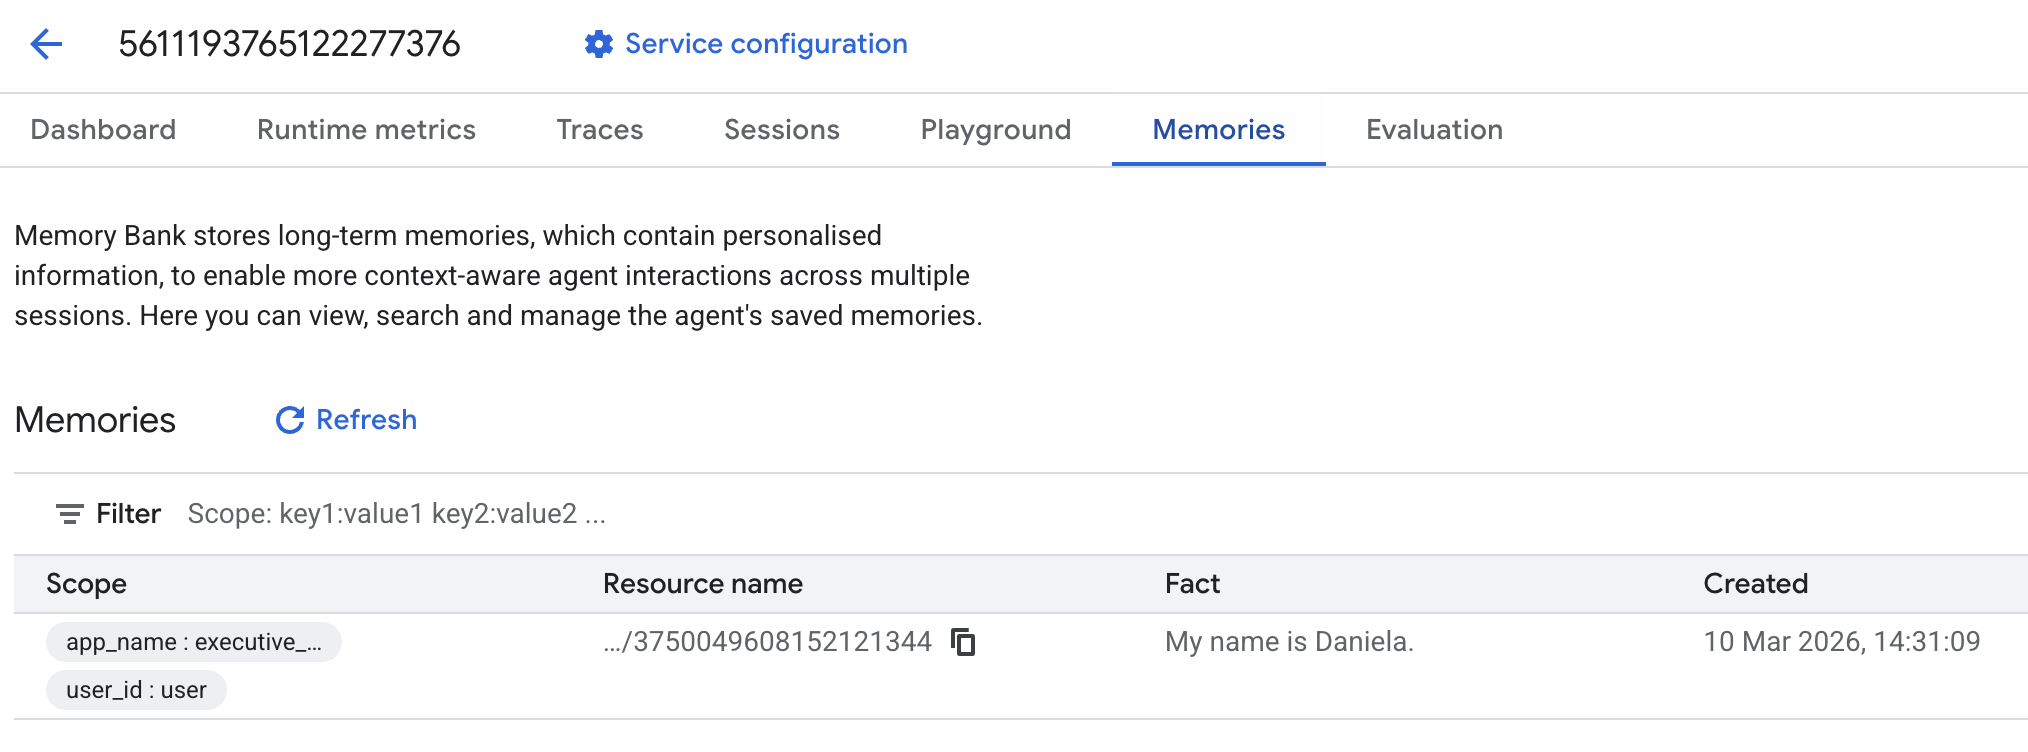
畫面上應該會顯示新增的回憶集錦。
6. 新增網路研究功能
為了提供優質資訊,我們的服務專員必須進行深入調查,而不只是單一搜尋查詢。將研究工作委派給專用子代理,可確保主要角色維持回應能力,同時讓研究人員在背景處理複雜的資料收集作業。
在這個步驟中,我們將實作 LoopAgent,以達到「研究深度」,讓代理程式反覆搜尋、評估結果,並修正查詢,直到獲得完整資訊為止。我們也要求所有發現都附上內嵌引用出處,確保每項聲明都有來源連結佐證,藉此落實嚴謹的技術要求。
建立研究專員 (research.py)
我們在這裡定義配備 Google 搜尋工具的基礎代理,並將其包裝在 LoopAgent 中。max_iterations 參數可做為調控器,確保代理程式在理解仍有落差時,最多會重複搜尋 3 次。
research.py
from google.adk.agents.llm_agent import Agent
from google.adk.agents.loop_agent import LoopAgent
from google.adk.tools.google_search_tool import GoogleSearchTool
from google.adk.tools.tool_context import ToolContext

def exit_loop(tool_context: ToolContext):
    """Call this function ONLY when no further research is needed, signaling the iterative process should end."""
    print(f"  [Tool Call] exit_loop triggered by {tool_context.agent_name}")
    tool_context.actions.escalate = True
    # Return empty dict as tools should typically return JSON-serializable output
    return {}

# --- RESEARCH LOGIC ---
_research_worker = Agent(
    model='gemini-2.5-flash',
    name='research_worker',
    description='Worker agent that performs a single research step.',
    instruction='''
    Use google_search to find facts and synthesize them for the user.
    Critically evaluate your findings. If the data is incomplete or you need more context, prepare to search again in the next iteration.
    You must include the links you found as references in your response, formatting them like citations in a research paper (e.g., [1], [2]).
    Use the exit_loop tool to terminate the research early if no further research is needed.
    If you need to ask the user for clarifications, call the exit_loop function early to interrupt the research cycle.
    ''',
    tools=[GoogleSearchTool(bypass_multi_tools_limit=True), exit_loop],
)

# The LoopAgent iterates the worker up to 3 times for deeper research
research_agent = LoopAgent(
    name='research_specialist',
    description='Deep web research specialist.',
    sub_agents=[_research_worker],
    max_iterations=3,
)
更新根代理程式 (agent.py)
匯入 research_agent,並將其新增為 Sharon 的工具:
agent.py
from google.adk.agents.llm_agent import Agent
from google.adk.tools.preload_memory_tool import PreloadMemoryTool
from google.adk.tools.load_memory_tool import load_memory_tool

# Import our new sub agent
from .research import research_agent

async def auto_save_session_to_memory_callback(callback_context):
    await callback_context._invocation_context.memory_service.add_session_to_memory(
        callback_context._invocation_context.session)

# Update root_agent with memory tools and callback
root_agent = Agent(
    model='gemini-2.5-flash',
    name='executive_assistant',
    description='Executive Assistant with persistent memory and research capabilities',
    instruction='''
    You are an elite AI partner with long-term memory.
    1. Use load_memory to recall facts.
    2. Delegate research tasks to the research_specialist.
    Always be direct, concise, and high-signal.
    ''',
    tools=[PreloadMemoryTool(), load_memory_tool],
    sub_agents=[research_agent],
    after_agent_callback=auto_save_session_to_memory_callback,
)
再次啟動 adk web,測試研究代理程式。
uv run adk web --memory_service_uri="agentengine://$ENGINE_ID"
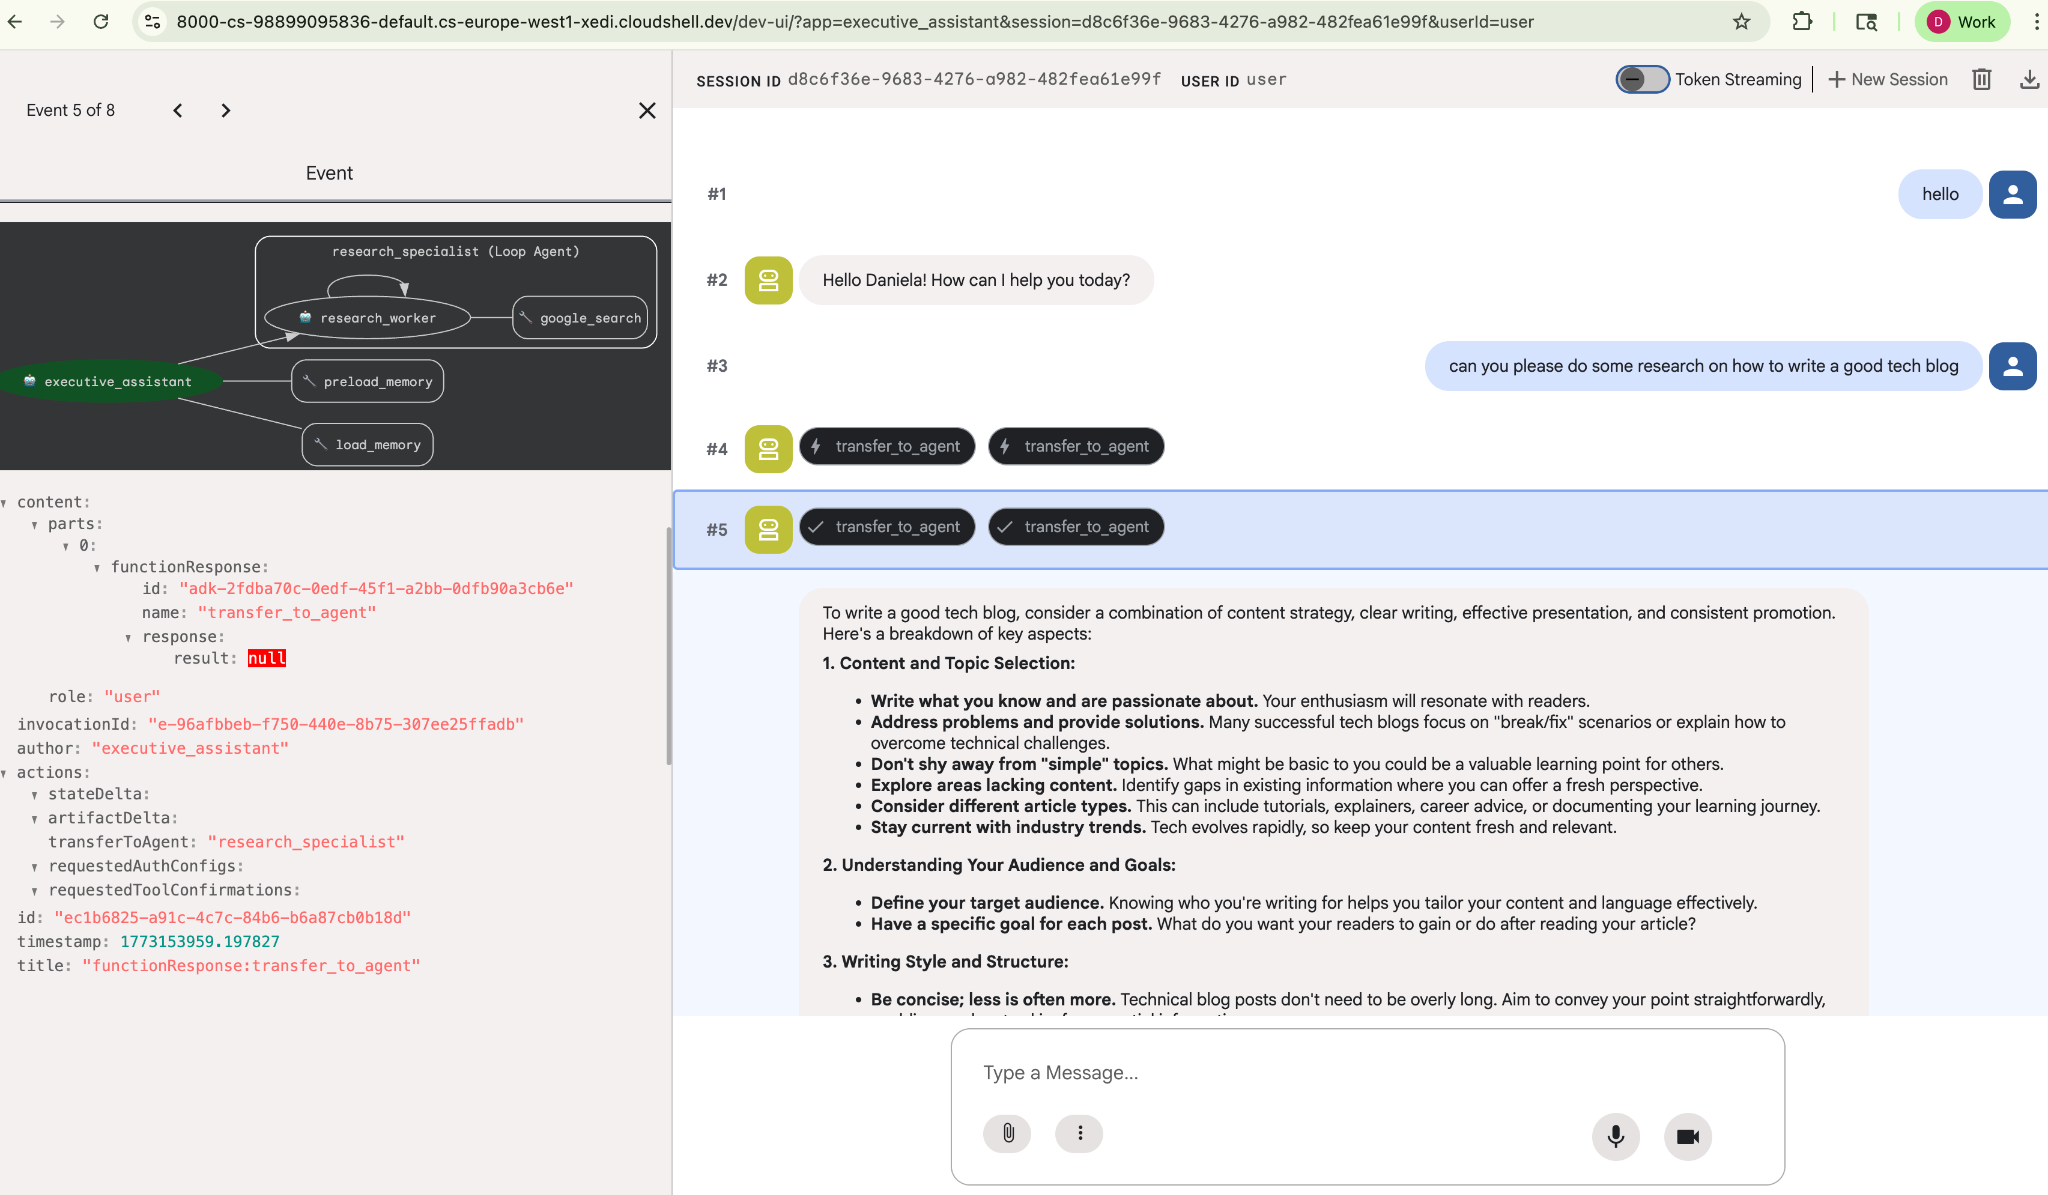
給予簡單的研究工作,例如「如何撰寫優質的科技部落格?」
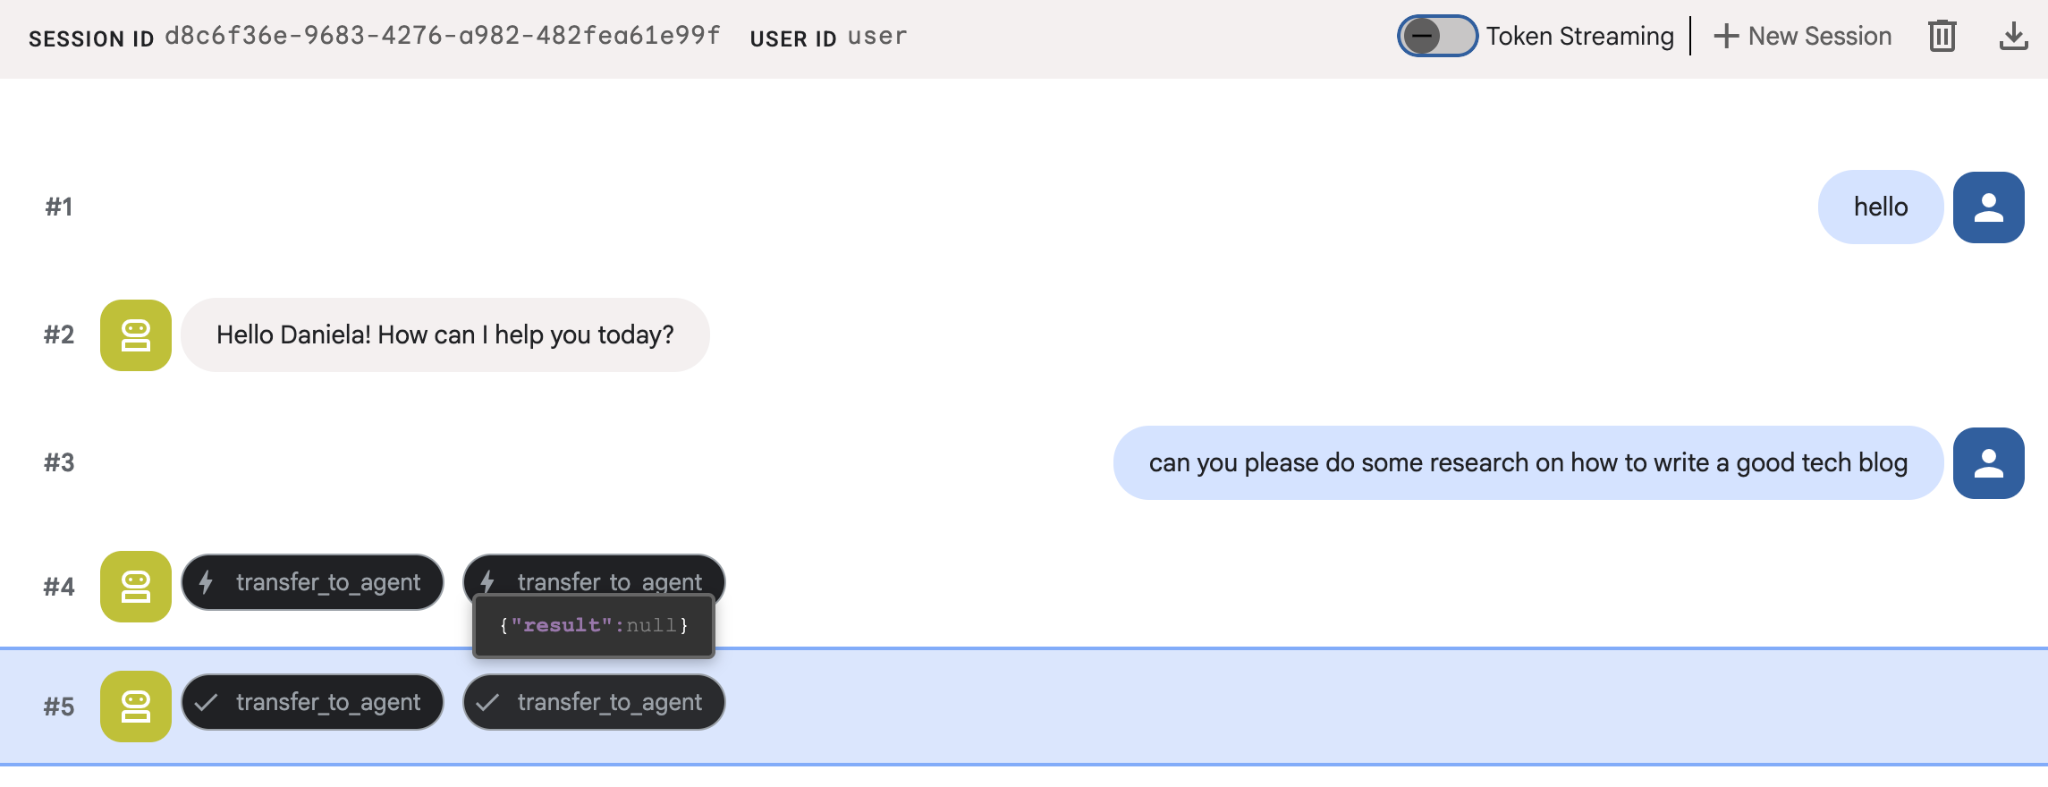
您可能注意到,即使這是新的工作階段,代理程式仍記得我的名字。請注意「transfer_to_agent」工具呼叫:這個工具會將任務交給新的研究代理。
現在我們來瞭解如何管理工作。
7. 使用 Cloud SQL 新增工作管理功能
雖然代理程式有長期記憶功能,但不適合用於待辦事項清單等精細的結構化資料。我們使用傳統的關聯式資料庫處理工作。我們將使用 SQLAlchemy 和 Google Cloud SQL (PostgreSQL) 資料庫。編寫程式碼前,我們必須先佈建基礎架構。
佈建基礎架構
執行下列指令來建立資料庫。注意:建立執行個體約需 5 到 10 分鐘。這項作業會在背景執行,您可以繼續下一個步驟。
# 1. Define instance variables
export INSTANCE_NAME="assistant-db"
export USER_EMAIL=$(gcloud config get-value account)

# 2. Create the Cloud SQL instance
gcloud sql instances create $INSTANCE_NAME \
    --database-version=POSTGRES_18 \
    --tier=db-f1-micro \
    --region=us-central1 \
    --edition=ENTERPRISE

# 3. Create the database for our tasks
gcloud sql databases create tasks --instance=$INSTANCE_NAME
資料庫執行個體佈建作業需要幾分鐘才能完成。不妨趁這段時間喝杯咖啡或茶,或更新程式碼,但別忘了回來完成存取控管!
設定存取控管機制
現在我們需要設定使用者帳戶,才能存取資料庫。在終端機中執行下列指令:
# change this to your favorite password
export DB_PASS="correct-horse-battery-staple"

# Create a regular database user
gcloud sql users create assistant_user \
    --instance=$INSTANCE_NAME \
    --password=$DB_PASS
更新環境設定
ADK 會在執行階段從 .env 檔案載入設定。使用資料庫連線詳細資料更新代理程式的環境。
# Retrieve the unique connection name
export DB_CONN=$(gcloud sql instances describe $INSTANCE_NAME --format='value(connectionName)')

# Append configuration to your .env file
cat <<EOF >> executive_assistant/.env
DB_CONNECTION_NAME=$DB_CONN
DB_USER=assistant_user
DB_PASSWORD=$DB_PASS
DB_NAME=tasks
EOF
現在繼續進行程式碼變更。
建立待辦事項專員 (todo.py)
與研究代理程式類似,我們會在專屬檔案中建立待辦事項專家。建立 todo.py:
todo.py
import os
import uuid
import sqlalchemy
from datetime import datetime
from typing import Optional, List

from sqlalchemy import (
    Column,
    String,
    DateTime,
    Enum,
    select,
    delete,
    update,
)
from sqlalchemy.orm import declarative_base, Session
from google.cloud.sql.connector import Connector
from google.adk.agents.llm_agent import Agent

# --- DATABASE LOGIC ---
Base = declarative_base()
connector = Connector()

def getconn():
    db_connection_name = os.environ.get("DB_CONNECTION_NAME")
    db_user = os.environ.get("DB_USER")
    db_password = os.environ.get("DB_PASSWORD")
    db_name = os.environ.get("DB_NAME", "tasks")

    return connector.connect(
        db_connection_name,
        "pg8000",
        user=db_user,
        password=db_password,
        db=db_name,
    )

engine = sqlalchemy.create_engine(
    "postgresql+pg8000://",
    creator=getconn,
)

class Todo(Base):
    __tablename__ = "todos"
    id = Column(String(36), primary_key=True, default=lambda: str(uuid.uuid4()))
    title = Column(String(255), nullable=False)
    priority = Column(
        Enum("high", "medium", "low", name="priority_levels"), nullable=False, default="medium"
    )
    due_date = Column(DateTime, nullable=True)
    status = Column(Enum("pending", "done", name="status_levels"), default="pending")
    created_at = Column(DateTime, default=datetime.utcnow)

def init_db():
    """Builds the table if it's missing."""
    Base.metadata.create_all(bind=engine)

def add_todo(
    title: str, priority: str = "medium", due_date: Optional[str] = None
) -> dict:
    """
    Adds a new task to the list.

    Args:
        title (str): The description of the task.
        priority (str): The urgency level. Must be one of: 'high', 'medium', 'low'.
        due_date (str, optional): The due date in ISO format (YYYY-MM-DD or YYYY-MM-DDTHH:MM:SS).

    Returns:
        dict: A dictionary containing the new task's ID and a status message.
    """
    init_db()
    with Session(engine) as session:
        due = datetime.fromisoformat(due_date) if due_date else None
        item = Todo(
            title=title,
            priority=priority.lower(),
            due_date=due,
        )
        session.add(item)
        session.commit()
        return {"id": item.id, "status": f"Task added ✅"}

def list_todos(status: str = "pending") -> list:
    """
    Lists tasks from the database, optionally filtering by status.

    Args:
        status (str, optional): The status to filter by. 'pending', 'done', or 'all'.
    """
    init_db()
    with Session(engine) as session:
        query = select(Todo)

        s_lower = status.lower()
        if s_lower != "all":
            query = query.where(Todo.status == s_lower)

        query = query.order_by(Todo.priority, Todo.created_at)

        results = session.execute(query).scalars().all()
        return [
            {
                "id": t.id,
                "task": t.title,
                "priority": t.priority,
                "status": t.status,
            }
            for t in results
        ]

def complete_todo(task_id: str) -> str:
    """Marks a specific task as 'done'."""
    init_db()
    with Session(engine) as session:
        session.execute(update(Todo).where(Todo.id == task_id).values(status="done"))
        session.commit()
        return f"Task {task_id} marked as done."

def delete_todo(task_id: str) -> str:
    """Permanently removes a task from the database."""
    init_db()
    with Session(engine) as session:
        session.execute(delete(Todo).where(Todo.id == task_id))
        session.commit()
        return f"Task {task_id} deleted."

# --- TODO SPECIALIST AGENT ---
todo_agent = Agent(
    model='gemini-2.5-flash',
    name='todo_specialist',
    description='A specialist agent that manages a structured SQL task list.',
    instruction='''
    You manage the user's task list using a PostgreSQL database.
    - Use add_todo when the user wants to remember something. If no priority is mentioned, mark it as 'medium'.
    - Use list_todos to show tasks.
    - Use complete_todo to mark a task as finished.
    - Use delete_todo to remove a task entirely.

    When marking a task as complete or deleting it, if the user doesn't provide the ID,
    use list_todos first to find the correct ID for the task they described.
    ''',
    tools=[add_todo, list_todos, complete_todo, delete_todo],
)
上述程式碼主要負責兩件事:連線至 Cloud SQL 資料庫,以及提供所有常見待辦事項清單作業的工具清單,包括新增、移除及標示為完成。
因為這項邏輯非常具體,專屬於待辦事項代理程式,而且從執行助理 (根代理程式) 的角度來看,我們不一定會關心這項精細的管理作業,因此我們會將這個代理程式封裝為「AgentTool」,而不是子代理程式。
如要決定使用 AgentTool 或子代理程式,請考量是否需要共用內容:
- 在代理程式不需要與根代理程式共用內容時使用 AgentTool
- 如要讓代理程式與根代理程式共用脈絡,請使用子代理程式
以研究代理為例,分享脈絡資料可能很有用,但對於簡單的待辦事項代理來說,這麼做的好處並不多。
我們來在 agent.py 中實作 AgentTool。
更新根代理程式 (agent.py)
現在,請將 todo_agent 匯入主要檔案,並附加為工具:
agent.py
import os
from datetime import datetime
from google.adk.agents.llm_agent import Agent
from google.adk.tools.agent_tool import AgentTool
from google.adk.tools.preload_memory_tool import PreloadMemoryTool
from google.adk.tools.load_memory_tool import load_memory_tool

# Import our specialized sub-agents
from .research import research_agent
from .todo import todo_agent

# Callback for persistent memory storage
async def auto_save_session_to_memory_callback(callback_context):
    await callback_context._invocation_context.memory_service.add_session_to_memory(
        callback_context._invocation_context.session)

# --- ROOT AGENT DEFINITION ---
root_agent = Agent(
    model='gemini-2.5-flash',
    name='executive_assistant',
    description='A professional AI Executive Assistant with memory and specialized tools.',
    instruction='''
    You are an elite, high-signal AI Executive Assistant.
    Your goal is to help the user manage their knowledge, tasks, and research.

    ## Your Capabilities:
    1. Memory: Use load_memory to recall personal facts or past context about the user.
    2. Research: Delegate complex web-based investigations to the research_specialist.
    3. Tasks: Delegate all to-do list management (adding, listing, or completing tasks) to the todo_specialist.

    Always be direct and professional. If a task is successful, provide a brief confirmation.
    ''',
    tools=[
        PreloadMemoryTool(),
        load_memory_tool,
        AgentTool(todo_agent) # Exposes the Todo Specialist as a tool
    ],
    sub_agents=[research_agent], # Exposes the Research Specialist for direct handover
    after_agent_callback=auto_save_session_to_memory_callback,
)
再次執行 adk web,測試新功能:
uv run adk web --memory_service_uri="agentengine://$ENGINE_ID"
然後嘗試建立待辦事項:
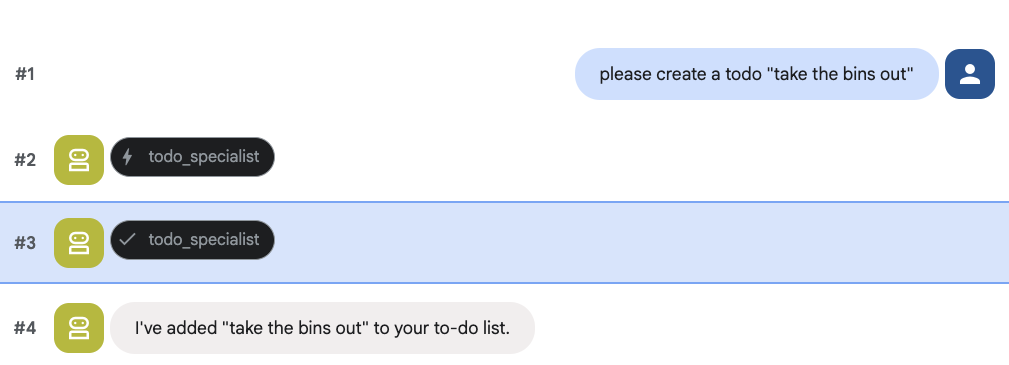
8. 新增日曆管理員
最後,我們會與 Google 日曆整合,讓代理程式管理預約。為了進行本程式碼研究室,我們不會讓代理程式存取您的個人日曆 (如果做法不當,可能會很危險),而是要建立獨立日曆供代理程式管理。
首先,我們會建立專用的服務帳戶,做為代理程式的身分。接著,我們會使用服務帳戶,以程式輔助方式建立代理程式的日曆。
佈建服務帳戶
開啟終端機並執行下列指令,建立身分並授予個人帳戶模擬該身分的權限:
export SA_NAME="ea-agent"
export SA_EMAIL="${SA_NAME}@${PROJECT_ID}.iam.gserviceaccount.com"

# Create the service account
gcloud iam service-accounts create $SA_NAME \
    --display-name="Executive Assistant Agent"

# Allow your local user to impersonate it
gcloud iam service-accounts add-iam-policy-binding $SA_EMAIL \
    --member="user:$(gcloud config get-value account)" \
    --role="roles/iam.serviceAccountTokenCreator"

# Save it to the agent's environment
echo "SERVICE_ACCOUNT_EMAIL=$SA_EMAIL" >> executive_assistant/.env
透過程式建立日曆
我們來編寫指令碼,指示服務帳戶建立日曆。在專案的根目錄中 (與 setup_memory.py 位於同一層),建立名為 setup_calendar.py 的新檔案:
setup_calendar.py
import os
import google.auth
from googleapiclient.discovery import build
from google.auth.transport.requests import Request
from google.auth import impersonated_credentials
from dotenv import load_dotenv

load_dotenv('executive_assistant/.env')
SA_EMAIL = os.environ.get("SERVICE_ACCOUNT_EMAIL")

def setup_sa_calendar():
    print(f"Authenticating to impersonate {SA_EMAIL}...")

    # 1. Base credentials
    creds, _ = google.auth.default(scopes=["https://www.googleapis.com/auth/cloud-platform"])
    creds.refresh(Request())

    # 2. Impersonate the Service Account
    impersonated = impersonated_credentials.Credentials(
        source_credentials=creds,
        target_principal=SA_EMAIL,
        target_scopes=["https://www.googleapis.com/auth/calendar"],
    )
    service = build("calendar", "v3", credentials=impersonated)

    # 3. Create the calendar
    print("Creating independent Service Account calendar...")
    calendar = service.calendars().insert(body={
        "summary": "AI Assistant (SA Owned)",
        "description": "An independent calendar managed purely by the AI."
    }).execute()

    calendar_id = calendar['id']

    # 4. Save the ID
    with open("executive_assistant/.env", "a") as f:
        f.write(f"\nCALENDAR_ID={calendar_id}\n")
    print(f"Setup complete! CALENDAR_ID {calendar_id} added to .env")

if __name__ == "__main__":
    setup_sa_calendar()
從終端機執行指令碼:
uv run python setup_calendar.py
建立 Calendar 專家 (calendar.py)
現在我們來看看日曆專員。我們會為這個代理程式配備完整套件的日曆工具,包括列出、建立、更新、刪除,甚至是可理解自然語言的「快速新增」功能。
將下列程式碼複製到 calendar.py。
calendar.py
import os
from datetime import datetime, timedelta, timezone

import google.auth
from googleapiclient.discovery import build
from googleapiclient.errors import HttpError
from google.adk.agents.llm_agent import Agent

def _get_calendar_service():
    """Build the Google Calendar API service using Service Account Impersonation."""
    from google.auth.transport.requests import Request
    from google.auth import impersonated_credentials

    target_principal = os.environ.get("SERVICE_ACCOUNT_EMAIL")
    if not target_principal:
        raise ValueError("SERVICE_ACCOUNT_EMAIL environment variable is missing.")

    base_scopes = ["https://www.googleapis.com/auth/cloud-platform"]
    creds, _ = google.auth.default(scopes=base_scopes)
    creds.refresh(Request())

    target_scopes = ["https://www.googleapis.com/auth/calendar"]
    impersonated = impersonated_credentials.Credentials(
        source_credentials=creds,
        target_principal=target_principal,
        target_scopes=target_scopes,
    )

    return build("calendar", "v3", credentials=impersonated)

def _format_event(event: dict) -> dict:
    """Format a raw Calendar API event into a clean dict for the LLM."""
    start = event.get("start", {})
    end = event.get("end", {})
    return {
        "id": event.get("id"),
        "title": event.get("summary", "(No title)"),
        "start": start.get("dateTime", start.get("date")),
        "end": end.get("dateTime", end.get("date")),
        "location": event.get("location", ""),
        "description": event.get("description", ""),
        "attendees": [
            {"email": a["email"], "status": a.get("responseStatus", "unknown")}
            for a in event.get("attendees", [])
        ],
        "link": event.get("htmlLink", ""),
        "conference_link": (
            event.get("conferenceData", {}).get("entryPoints", [{}])[0].get("uri", "")
            if event.get("conferenceData")
            else ""
        ),
        "status": event.get("status", ""),
    }

def list_events(days_ahead: int = 7) -> dict:
    """List upcoming calendar events."""
    calendar_id = os.environ.get("CALENDAR_ID")
    try:
        service = _get_calendar_service()
        now = datetime.now(timezone.utc).isoformat()
        end = (datetime.now(timezone.utc) + timedelta(days=days_ahead)).isoformat()

        events_result = service.events().list(
            calendarId=calendar_id, timeMin=now, timeMax=end,
            maxResults=50, singleEvents=True, orderBy="startTime"
        ).execute()

        events = events_result.get("items", [])
        if not events:
            return {"status": "success", "count": 0, "events": []}

        return {"status": "success", "count": len(events), "events": [_format_event(e) for e in events]}
    except HttpError as e:
        return {"status": "error", "message": f"Calendar API error: {e}"}

def create_event(title: str, start_time: str, end_time: str, description: str = "", location: str = "", attendees: str = "", add_google_meet: bool = False) -> dict:
    """Create a new calendar event."""
    calendar_id = os.environ.get("CALENDAR_ID")
    try:
        service = _get_calendar_service()
        event_body = {
            "summary": title,
            "start": {"dateTime": start_time},
            "end": {"dateTime": end_time},
        }
        if description: event_body["description"] = description
        if location: event_body["location"] = location
        if attendees:
            email_list = [e.strip() for e in attendees.split(",") if e.strip()]
            event_body["attendees"] = [{"email": e} for e in email_list]

        conference_version = 0
        if add_google_meet:
            event_body["conferenceData"] = {
                "createRequest": {"requestId": f"event-{datetime.now().strftime('%Y%m%d%H%M%S')}", "conferenceSolutionKey": {"type": "hangoutsMeet"}}
            }
            conference_version = 1

        event = service.events().insert(calendarId=calendar_id, body=event_body, conferenceDataVersion=conference_version).execute()
        return {"status": "success", "message": f"Event created ✅", "event": _format_event(event)}
    except HttpError as e:
        return {"status": "error", "message": f"Calendar API error: {e}"}

def update_event(event_id: str, title: str = "", start_time: str = "", end_time: str = "", description: str = "") -> dict:
    """Update an existing calendar event."""
    calendar_id = os.environ.get("CALENDAR_ID")
    try:
        service = _get_calendar_service()
        patch_body = {}
        if title: patch_body["summary"] = title
        if start_time: patch_body["start"] = {"dateTime": start_time}
        if end_time: patch_body["end"] = {"dateTime": end_time}
        if description: patch_body["description"] = description
        if not patch_body: return {"status": "error", "message": "No fields to update."}

        event = service.events().patch(calendarId=calendar_id, eventId=event_id, body=patch_body).execute()
        return {"status": "success", "message": "Event updated ✅", "event": _format_event(event)}
    except HttpError as e:
        return {"status": "error", "message": f"Calendar API error: {e}"}

def delete_event(event_id: str) -> dict:
    """Delete a calendar event by its ID."""
    calendar_id = os.environ.get("CALENDAR_ID")
    try:
        service = _get_calendar_service()
        service.events().delete(calendarId=calendar_id, eventId=event_id).execute()
        return {"status": "success", "message": f"Event '{event_id}' deleted ✅"}
    except HttpError as e:
        return {"status": "error", "message": f"Calendar API error: {e}"}

def quick_add_event(text: str) -> dict:
    """Create an event using natural language (e.g. 'Lunch with Sarah next Monday noon')."""
    calendar_id = os.environ.get("CALENDAR_ID")
    try:
        service = _get_calendar_service()
        event = service.events().quickAdd(calendarId=calendar_id, text=text).execute()
        return {"status": "success", "message": "Event created from text ✅", "event": _format_event(event)}
    except HttpError as e:
        return {"status": "error", "message": f"Calendar API error: {e}"}

calendar_agent = Agent(
    model='gemini-2.5-flash',
    name='calendar_specialist',
    description='Manages the user schedule and calendar events.',
    instruction='''
    You manage the user's Google Calendar.
    - Use list_events to check the schedule.
    - Use quick_add_event for simple, conversational scheduling requests (e.g., "Lunch tomorrow at noon").
    - Use create_event for complex meetings that require attendees, specific durations, or Google Meet links.
    - Use update_event to change details of an existing event.
    - Use delete_event to cancel or remove an event.

    CRITICAL: For update_event and delete_event, you must provide the exact `event_id`.
    If the user does not provide the ID, you MUST call list_events first to find the correct `event_id` before attempting the update or deletion.

    Always use the current date/time context provided by the root agent to resolve relative dates like "tomorrow".
    ''',
    tools=[list_events, create_event, update_event, delete_event, quick_add_event],
)
完成根代理程式 (agent.py)
使用下列程式碼更新 agent.py 檔案:
agent.py
import os
from datetime import datetime
from zoneinfo import ZoneInfo
from google.adk.agents.llm_agent import Agent
from google.adk.tools.agent_tool import AgentTool
from google.adk.tools.preload_memory_tool import PreloadMemoryTool
from google.adk.tools.load_memory_tool import load_memory_tool

# Import all our specialized sub-agents
from .research import research_agent
from .todo import todo_agent
from .calendar import calendar_agent
import tzlocal

# Automatically detect the local system timezone
TIMEZONE = tzlocal.get_localzone_name()

# Callback for persistent memory storage
async def auto_save_session_to_memory_callback(callback_context):
    await callback_context._invocation_context.memory_service.add_session_to_memory(
        callback_context._invocation_context.session)

# Callback to inject the current time into the prompt
async def setup_agent_context(callback_context, **kwargs):
    now = datetime.now(ZoneInfo(TIMEZONE))
    callback_context.state["current_time"] = now.strftime("%A, %Y-%m-%d %I:%M %p")
    callback_context.state["timezone"] = TIMEZONE

# --- ROOT AGENT DEFINITION ---
root_agent = Agent(
    model='gemini-2.5-flash',
    name='executive_assistant',
    description='A professional AI Executive Assistant with memory and specialized tools.',
    instruction='''
    You are an elite, high-signal AI Executive Assistant.
    Your goal is to help the user manage their knowledge, tasks, research, and schedule.

    ## Your Capabilities:
    1. Memory: Use load_memory to recall personal facts.
    2. Research: Delegate complex web investigations to the research_specialist.
    3. Tasks: Delegate all to-do list management to the todo_specialist.
    4. Scheduling: Delegate all calendar queries to the calendar_specialist.

    ## 🕒 Current State
    - Time: {current_time?}
    - Timezone: {timezone?}

    Always be direct and professional.
    ''',
    tools=[
        PreloadMemoryTool(),
        load_memory_tool,
        AgentTool(todo_agent),
        AgentTool(calendar_agent)
    ],
    sub_agents=[research_agent],
    before_agent_callback=[setup_agent_context],
    after_agent_callback=[auto_save_session_to_memory_callback],
)
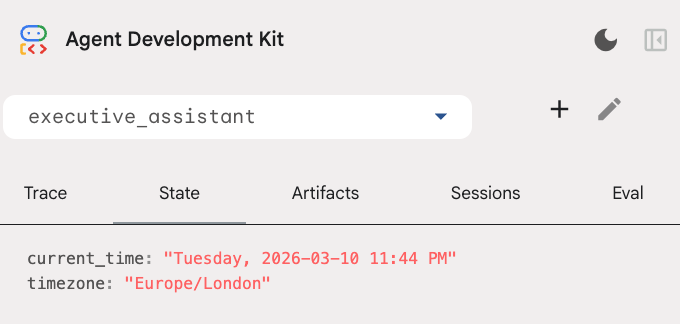
請注意,除了日曆工具,我們也新增了「before agent callback」函式:setup_agent_context。這項函式可讓代理程式瞭解目前的日期、時間和時區,以便更有效率地使用日曆。這項功能會設定工作階段狀態變數,這是一種專為短期保存而設計的代理程式記憶體。
最後一次執行 adk web,測試完整的代理程式!
uv run adk web --memory_service_uri="agentengine://$ENGINE_ID"
您可以在開發人員 UI 的「狀態」分頁中檢查工作階段狀態:
現在,代理程式可以追蹤日曆活動、待辦事項清單、進行研究,並擁有長期記憶!
實驗室結束後清除所用資源
9. 結語
恭喜!您已成功透過 5 個演進階段,設計出多功能 AI 執行助理。
涵蓋內容
- 為 AI 代理佈建基礎架構。
- 使用 ADK 內建功能實作持續性記憶和專用子代理。
- 整合外部資料庫和生產力 API。
後續步驟
您可以探索這個平台上的其他程式碼研究室,繼續學習歷程,也可以自行改良執行助理。
如需改善建議,不妨試試:
- 導入事件壓縮功能,針對長時間對話最佳化效能。
- 新增構件服務,讓代理為你做筆記並儲存為檔案
- 使用 Google Cloud Run 將代理程式部署為後端服務。
測試完成後,請務必清理環境,以免帳單帳戶產生非預期費用。
祝您編寫程式一切順利!