
1. Introduction
In this codelab, you'll learn how to build and deploy a Model Context Protocol (MCP) server to extend the capabilities of Gemini CLI. You will be building godoctor, a Go-based server that provides custom tools for Go development, transforming Gemini CLI from a general-purpose coding assistant into a specialized Go development expert.
This codelab uses a "prompt-driven" approach. You will act as a tech lead, providing prompts to your AI assistant (Gemini CLI). Your goal is to learn how to translate project requirements into effective prompts and let the AI handle the implementation details.
At the heart of this project is the Model Context Protocol (MCP). MCP is an open-source protocol that standardizes how large language models (LLMs) like Gemini communicate with external tools and services. It acts as a bridge, allowing the AI to access real-world information and perform actions beyond its built-in knowledge. By building an MCP server and connecting it to Gemini CLI, you are extending its capabilities with specialized tooling.
What you'll learn
- How to install and configure Gemini CLI
- How to formulate effective prompts to guide an AI assistant in software development
- How to provide context and guidelines to an AI assistant
- How to create and configure an MCP server to augment Gemini CLI capabilities
- How to containerize and deploy a Go application to Google Cloud Run
What you'll need
This workshop can be done entirely within the Google Cloud Shell, which comes with all the necessary dependencies (gcloud CLI, Go, Docker, Gemini CLI) pre-installed.
Alternatively, if you prefer to work on your own machine, you will need the following:
- Node.js 20 or later
- The Google Cloud SDK (gcloud CLI) installed and initialized
- Go 1.24 or later installed on your system
- Docker installed on your system
Key Technologies
Here you can find more information about the technologies we will be utilizing:
- Gemini CLI: The AI-powered command-line interface that we will be extending
- Model Context Protocol (MCP): The open protocol that allows Gemini CLI to communicate with our custom tool
- Go SDK for MCP: The Go library we will use to implement our MCP server
Tips for a Successful Codelab
Working with an AI assistant is a new way of developing software. Here are some tips to make your experience smooth and successful:
- Don't be afraid to hit ESC. The AI will sometimes propose actions or code that you don't agree with. Use the ESC key to cancel its proposed action and provide a new prompt to guide it in the right direction. You are the pilot.
- Encourage tool use. If the AI seems lost or is making up information, encourage it to use its available tools. Prompts like "Can you use Google Search to verify that?" or "Use the read_file tool to understand the current code before making changes" can be very effective.
- Resist manual changes. Try to have the AI perform all the work. This is the core skill you are practicing. However, if you must make a manual change, tell the AI about it afterward. A prompt like "I have manually updated the README.md file. Please read it again to refresh your knowledge" will ensure the AI stays in sync with your project.
- Have you tried turning it off and on again? In the rare case that the AI is trying to force a given path against your command, it might be due to context degradation (sometimes also called "context rot"). In this case you can use the Gemini CLI command "/compress" to reduce the context noise or, in extreme cases, you can use the "/clear" command to clean the entire session history.
2. Environment Setup
Choose one of the following options: Self-paced environment setup if you want to run this codelab on your own machine, or; Start Cloud Shell if you want to run this codelab entirely in the cloud.
Self-paced environment setup
- Sign-in to the Google Cloud Console and create a new project or reuse an existing one. If you don't already have a Gmail or Google Workspace account, you must create one.

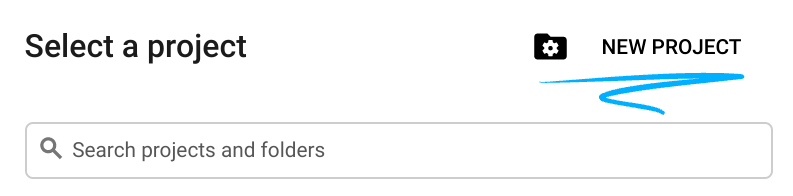
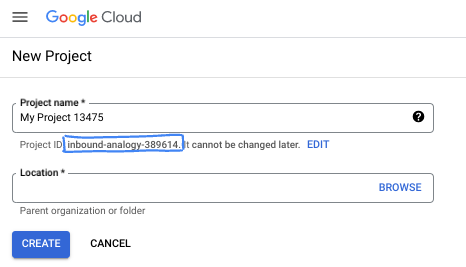
- The Project name is the display name for this project's participants. It is a character string not used by Google APIs. You can always update it.
- The Project ID is unique across all Google Cloud projects and is immutable (cannot be changed after it has been set). The Cloud Console auto-generates a unique string; usually you don't care what it is. In most codelabs, you'll need to reference your Project ID (typically identified as
PROJECT_ID). If you don't like the generated ID, you might generate another random one. Alternatively, you can try your own, and see if it's available. It can't be changed after this step and remains for the duration of the project. - For your information, there is a third value, a Project Number, which some APIs use. Learn more about all three of these values in the documentation.
- Next, you'll need to enable billing in the Cloud Console to use Cloud resources/APIs. Running through this codelab won't cost much, if anything at all. To shut down resources to avoid incurring billing beyond this tutorial, you can delete the resources you created or delete the project. New Google Cloud users are eligible for the $300 USD Free Trial program.
Start Cloud Shell
While Google Cloud can be operated remotely from your laptop, in this codelab you will be using Google Cloud Shell, a command line environment running in the Cloud.
From the Google Cloud Console, click the Cloud Shell icon on the top right toolbar:

It should only take a few moments to provision and connect to the environment. When it is finished, you should see something like this:

This virtual machine is loaded with all the development tools you'll need. It offers a persistent 5GB home directory, and runs on Google Cloud, greatly enhancing network performance and authentication. All of your work in this codelab can be done within a browser. You do not need to install anything.
3. Getting Started with Gemini CLI
In this section you will learn about Gemini CLI, including how to install and configure it for your environment.
What is Gemini CLI?
The Gemini CLI is an AI-powered command-line interface that can help you with a wide range of development tasks. It can understand your project's context, answer questions, generate code, and use external tools to extend its capabilities.
Installation
Install Gemini CLI globally using npm.
npm install -g @google/gemini-cli
You can confirm the CLI is installed by running:
gemini --version
Configuration
The Gemini CLI's behavior is controlled by configuration files and environment variables. There are two key files:
GEMINI.md: This file provides guidelines and context to the AI. The CLI reads this file to understand your project's coding standards and conventions..gemini/settings.json: This file controls the configuration of the CLI including how to connect to external tools. We are going to use this file later on to configure the CLI to use the MCP server we are building in this lab.
We will first set up the environment and then proceed to create the GEMINI.md file. The settings.json file will be configured at a later step.
- Create and initialize a project directory:
mkdir godoctor && cd godoctor
go mod init godoctor
- Authenticate with the Google Cloud application default credentials:
We need to login to an account that has access to the GCP project you are going to use for this codelab:
- Make sure you have the Google Cloud SDK installed and initialized.
- Run the following command to set up Application Default Credentials:
gcloud auth application-default login
4. Context File (GEMINI.md)
Context files, which use the default name GEMINI.md, are used for providing instructional context to the Gemini model. You can use these files to give project-specific instructions, define a persona, or provide coding style guides to make the AI's responses more accurate and tailored to your needs.
To ensure the AI assistant generates high-quality, idiomatic Go code, we are going to write a GEMINI.md file with some common best practices for Go developers.
Goal: Create a GEMINI.md file that will serve as the set of rules for the AI assistant during this project.
Open your IDE to create the GEMINI.md file with the content below. If you are using Cloud Shell, you can open an editor using the command below:
cloudshell edit .
Task: Create a file named GEMINI.md in the root of your godoctor directory and paste the following content into it.
# Go Development Guidelines
All code contributed to this project must adhere to the following principles.

## 1. Formatting
All Go code **must** be formatted with `gofmt` before being submitted.

## 2. Naming Conventions
- **Packages:** Use short, concise, all-lowercase names.
- **Variables, Functions, and Methods:** Use `camelCase` for unexported identifiers and `PascalCase` for exported identifiers.
- **Interfaces:** Name interfaces for what they do (e.g., `io.Reader`), not with a prefix like `I`.

## 3. Error Handling
- Errors are values. Do not discard them.
- Handle errors explicitly using the `if err != nil` pattern.
- Provide context to errors using `fmt.Errorf("context: %w", err)`.

## 4. Simplicity and Clarity
- "Clear is better than clever." Write code that is easy to understand.
- Avoid unnecessary complexity and abstractions.
- Prefer returning concrete types, not interfaces.

## 5. Documentation
- All exported identifiers (`PascalCase`) **must** have a doc comment.
- Comments should explain the *why*, not the *what*.

## 6. Project structure
- cmd/ contains source code for target binaries (e.g. server, client)
- internal/ contains source code for packages not meant to be exported (e.g. internal/tools/hello)
- bin/ contains the compiled binaries
- At the root place README.md, go.mod and go.sum
Now your development environment is fully set up.
5. The Initial Build: A Documentation Server
Your first goal is to create the initial version of the godoctor server. This version should be a minimal application that provides a single tool called read_docs that provides the ability to look up Go documentation.
Goal: Create a production-ready MCP server that exposes the go doc command, allowing an LLM to query Go documentation.
Run Gemini CLI command on the shell:
gemini
When you run the CLI for the first time it will ask you to choose an authentication mode and a theme.
If you are running this codelab in Cloud Shell, choose the Use Cloud Shell user credentials option. If not, you can use login with Google to login with a personal Google account so you can benefit from Gemini CLI's generous free tier. The authentication selection screen will look similar to this:
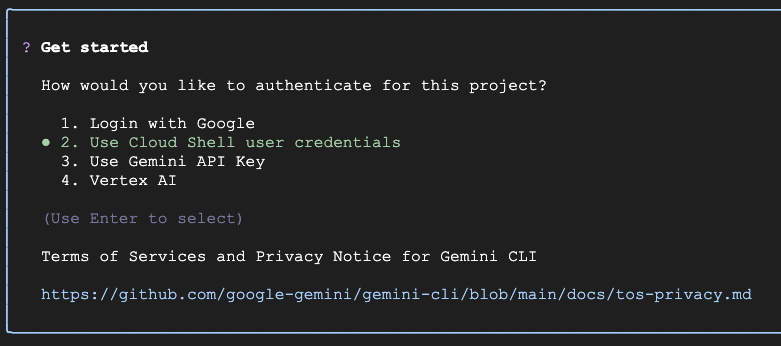
In case you need to change your selection, you can type /auth and hit enter to open this menu again.
Next you will be prompted to pick up a theme:
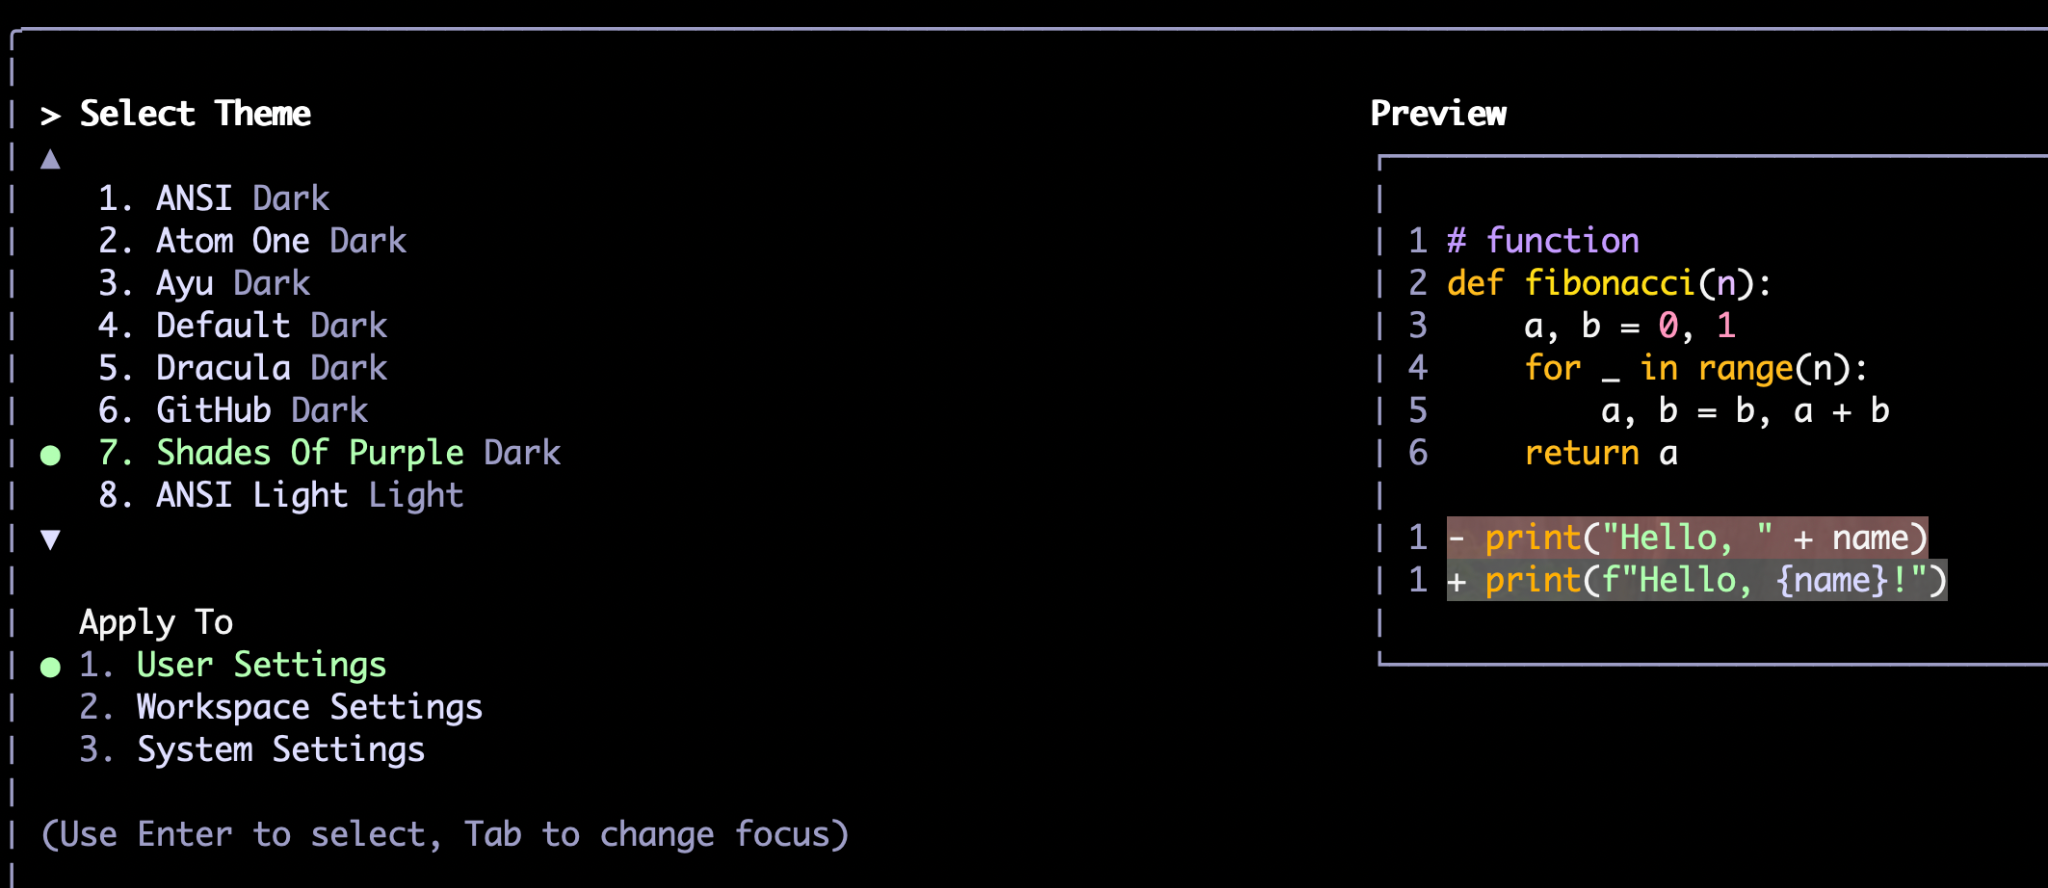
Similar to /auth, you can also change the theme later with the /theme command.
After choosing the authentication method and your preferred theme you will be taken to the command prompt. Here you can type your commands, for example:
Write a hello world application in Go
The CLI uses a combination of its own reasoning (via a Gemini model like Gemini Flash or Gemini Pro) and tools to perform the tasks. It uses tools whenever it needs to interact with the filesystem or external services, like APIs, databases, etc. Examples of the tools that come out of the box, or "internal tools", are read_file, write_file, web_fetch and google_search. The MCP server that we are building will also become a tool available to the CLI.
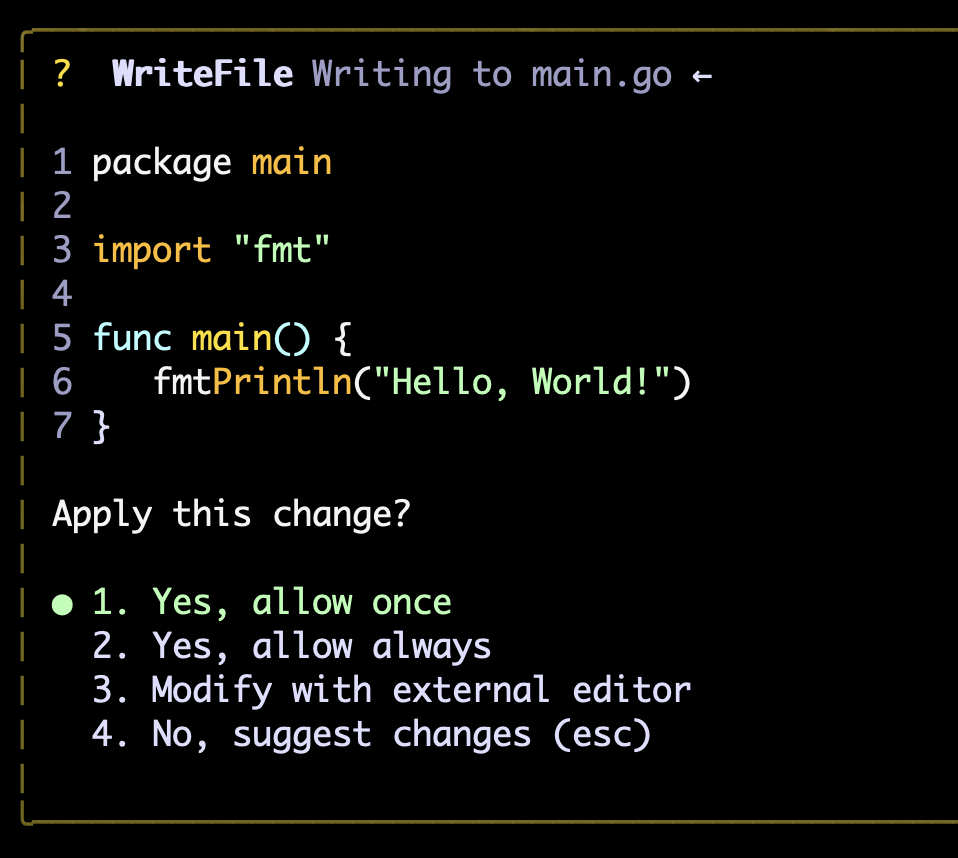
The first time it runs a tool it will ask for your permission. You can give it a one off permission (allow once), a blanket approval for the rest of the session (allow always), or deny its request. If it is a file editing operation you will also find the option to edit the file using an external editor, just in case you want to make some adjustments. For example, this is the output of the prompt above, to create a hello world program:
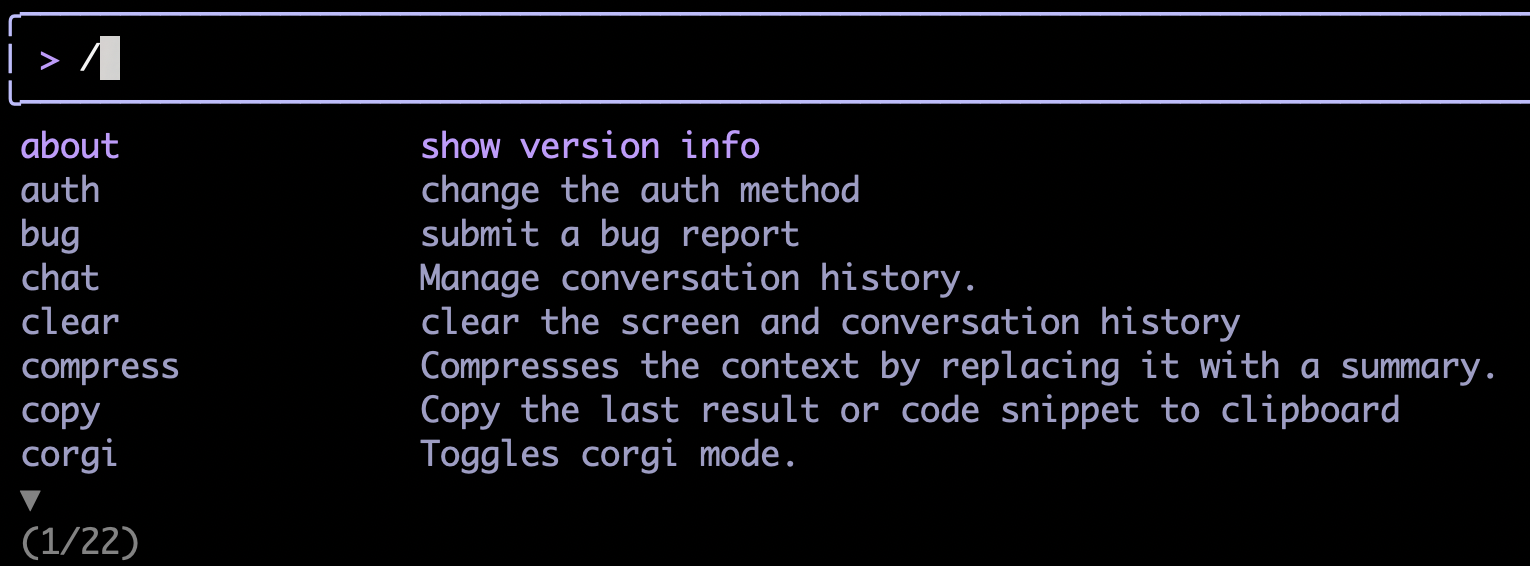
Besides prompts, you can also use slash commands. If you type "/", the CLI will automatically show you the autocomplete options. You can continue to type the full command or select one from the options. The /auth and /theme commands mentioned above are a couple of such commands.
Once you are familiar with the interface, you can start the main task of this section, which is to ask the CLI to write the MCP server for us.
Creating a Hello World MCP server
One of the best ways to ensure the model will build things more consistently is to break down complex tasks into incremental steps. While the model might be able to figure out a complex task on its own, without the right setup it will take a long time to discover the right implementation.
For a more consistent approach, we are going to first instruct it to build a "Hello World" MCP server before implementing the functionality we want (reading go documentation).
An example prompt is shown below:
Create a Model Context Protocol (MCP) server that exposes a "hello_world" tool. This tool, when called, should return the message "Hello, MCP world!"

For the MCP implementation, you should use the official Go SDK for MCP (github.com/modelcontextprotocol/go-sdk/mcp) and use the stdio transport.

TODO:
- Download the dependency: `go get github.com/modelcontextprotocol/go-sdk/mcp`
- Inspect the documentation of the SDK: `go doc github.com/modelcontextprotocol/go-sdk/mcp`
- Build a `server` command that supports stdio transport only
- Build a `client` command that connects to the server over command transport to test the server

Acceptance Criteria:
- `./bin/client --list-tools` returns the list of server tools including "hello_world"
- `./bin/client --call-tool` "hello_world" returns the output "Hello, MCP world!"
Note that the prompt above is composed by three main segments:
- The problem specification, including what we want to build and the constraints (e.g. use the official SDK instead of any SDK, stdio transport instead of http)
- Break down of the tasks to perform (TODOs)
- Acceptance criteria for the task, which works as a test procedure so the agent knows when it's done
Having these three components will help the model to achieve the desired results in a more consistent manner.
The read_docs tool implementation
Once you have a working implementation, we can move to implement the real "read_docs" tool:
Add a new tool to our MCP server called "read_docs" that invokes the "go doc" shell command. The tool will take a mandatory "package" argument and an optional "symbol" argument.

TODO:
- create a package `./internal/tools/docs`
- register the tool with the MCP server
- update the client to support the "read_docs" tool by providing arguments to the tool call

Acceptance Criteria:
- `./bin/client --list-tools` show both hello_world and read_docs
- `./bin/client --call-tool read_docs fmt` returns the documentation for the `fmt` package
- `./bin/client --call-tool read_docs fmt.Println` returns the documentation for the `fmt.Println` function
- `./bin/client --call-tool read_docs github.com/modelcontextprotocol/go-sdk/mcp` returns documentation for the `mcp` package
Note: feel free to experiment with this prompt or try to come up with your own.
Useful Tips
Given that MCP is still a novel concept and that the Go SDK for MCP is a new library, in this step Gemini might take a long time to discover the right implementation on its own. In order to help the model come up with the right solution, you might want to try the following:
- If the model skipped reading the documentation at any step, hit ESC and remind it to do so. If you are not familiar with go, running "go doc" plus the name of the package "go doc github.com/modelcontextprotocol/go-sdk/mcp" will return the right documentation.
- The top level module " github.com/modelcontextprotocol/go-sdk" does not have any documentation (because it has no Go code), you need to tell the model to look for the complete path
- Conversely, if the model hallucinates a package that doesn't exist, e.g., "go doc github.com/modelcontextprotocol/go-sdk/mcp/server", just steer it towards the top level package.
6. Configuring godoctor as an MCP Server for Gemini CLI
After the AI assistant has generated the code for both the client and the server, you can instruct it to run a few manual tests. For example:
retrieve the documentation for the package net/http
Make sure you also test it with an external dependency (not in the standard library):
retrieve the documentation for the github.com/modelcontextprotocol/go-sdk/mcp package
Once you are satisfied with the results, instruct it to write a README.md with instructions on how to use and develop this project.
Now write a detailed README.md file explaining both from a user and a developer perspective how to use and to build this project.
Now we are going to configure the server so that Gemini CLI can use it during the next phase of development.
- Ask the CLI to update GEMINI.md to use
read_docsas the preferred method to read documentation:
update the GEMINI.md file to include instructions to always use the read_docs tool to retrieve documentation about Go packages or symbols. This should be done whenever seeing an import for the first time in a session or after a new dependency is installed to the project (e.g. via `go get`)
- Now we need to restart Gemini CLI to configure the MCP server. First, let's save the chat session so you can resume from where you stopped once it is restarted.
/chat save godoctor-workshop
- Exit the CLI by pressing Ctrl+D twice or typing the
/quitcommand. - In the previous steps the agent should have compiled a server binary for you, but we are compiling the server again with a different name so it is not affected when we modify its source code:
mkdir -p bin && go build -o ./bin/godoctor ./cmd/server
- Configure Gemini CLI for the local tool: Create a
.gemini/settings.jsonfile in your project root and add anmcpServerssection to tell Gemini CLI how to run your compiled server.
mkdir -p .gemini && touch .gemini/settings.json
- Now, add the following content to the new file using either the cloudshell editor or your favorite IDE.
{
  "mcpServers": {
    "godoctor": {
      "command": "./bin/godoctor"
    }
  }
}
- Launch Gemini CLI with the
geminicommand - You should be able to see that the tool is loaded by typing the
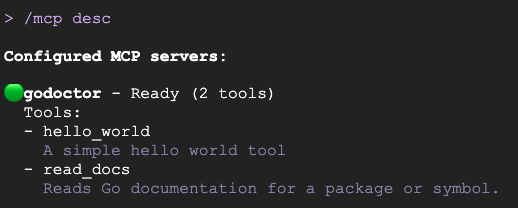
/mcpcommand. You can also show the full description of the tools by using/mcp desc:
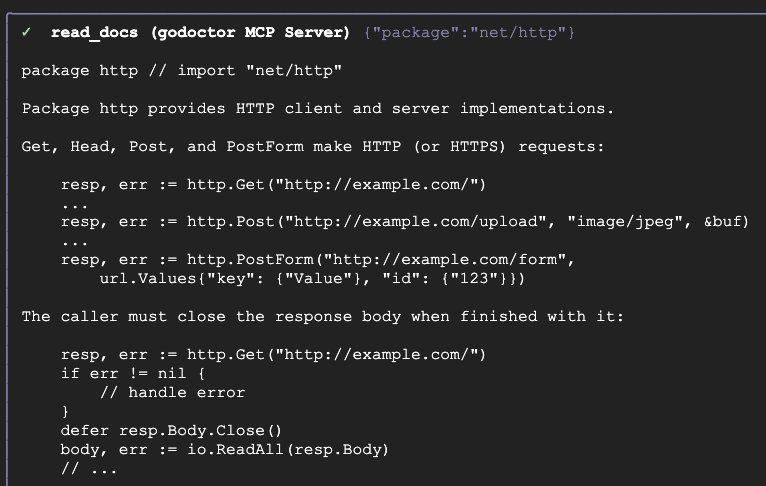
- Test the integration by asking Gemini CLI to use your tool with a prompt like "Show me the documentation for the package net/http"
You should see something like this:
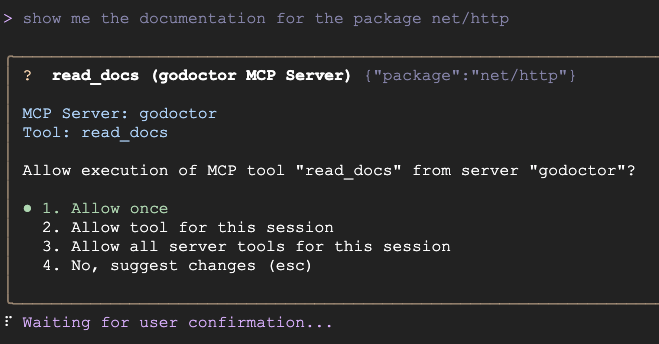
If the tool is working correctly you should see the documentation retrieved through the tool call:
Congratulations, you have made an MCP tool! But this is not the end, we still can make this server a bit more useful.
7. Adding an AI-Powered Code Reviewer
Let's add a more sophisticated, AI-powered feature: a code reviewer that uses the Gemini API.
You can now restore the previous chat session with the command /chat resume godoctor-workshop. This will load the session context up to the point where we finished developing read_docs, so the model will have the knowledge required to build the new tool.
This tool will need access to Vertex AI, so we need to enable the API first. You can run shell commands without leaving the Gemini CLI by typing an exclamation mark (!) in an empty prompt. This will change the Gemini CLI to shell mode.
Run the following command in shell mode to enable the Vertex AI API:
gcloud services enable aiplatform.googleapis.com
Once the command is done, you can switch back to prompt mode by typing the escape key (Esc).
Goal: Add a new tool named code_review to the existing project. This tool will use the Gemini API to analyze Go code and provide feedback.
Example Prompt:
Add a new tool to my project called code_review. This tool should use the Gemini API on Vertex AI (with model id gemini-2.5-pro) to analyze Go code and provide a list of improvements according to the best practices accepted by the Go community.

The tool should take the Go code content and an optional hint as input. The hint will be used to provide additional guidance for the AI reviewer, like "focus on security" or "help me simplify this code".

The tool output should be text in Markdown format.

TODO:
- add the genai SDK dependency with `go get import google.golang.org/genai`
- create the tool code in ./internal/tools/code/review.go
- create a code review prompt to be used by the tool
- use go-genai with Vertex AI authentication to call gemini-2.5-pro
- register the tool with the server
- add a flag to the server to set the Google Cloud Project ID: --project
- add a flag to the server to set the Google Cloud Location: --location
- add support to the review tool in the client CLI

NOT TO DO:
- DO NOT use the package github.com/google/generative-ai-go/genai as it is DEPRECATED
- DO NOT use the package cloud.google.com/go/vertexai/genai as it has been superseded by google.golang.org/genai

Acceptance Criteria:
- `./bin/client --list-tools` show all tools including `code_review`
- `./bin/client --call-tool code_review internal/tools/code/review.go` returns the code review for the "review.go" file
Useful Tips
- Once the model starts working on it you might automatically see it requesting to call the
read_docstool to browse the documentation for thegenaipackage. If it doesn't, you can always interrupt the process with the escape key and remind it that now it has theread_docstool at its disposal. - If you see it trying to use the wrong GenAI SDK (even though there is a clear "not allowed" list in the prompt), steer it back to the right one.
Testing the Code Reviewer
- Save the chat session with
/chat save godoctor-workshopand then exit the CLI by pressing Ctrl+D twice. - Re-compile the server with the new tool definition:.
go build -o ./bin/godoctor ./cmd/server
- Using your IDE, update the
.gemini/settings.jsonfile to include the environment configuration for Vertex AI:
{
  "mcpServers": {
    "godoctor": {
      "command": "./bin/godoctor",
      "env": {
        "GOOGLE_CLOUD_USE_VERTEXAI": "true",
        "GOOGLE_CLOUD_PROJECT": "<your-project-id>",
        "GOOGLE_CLOUD_LOCATION": "<your-preferred-region>"
      }
    }
  }
}
- Launch Gemini CLI again. Restore the chat session with
/chat resume godoctor-workshop - Confirm that the tool is enabled by typing the command
/mcp. You should see something like this:

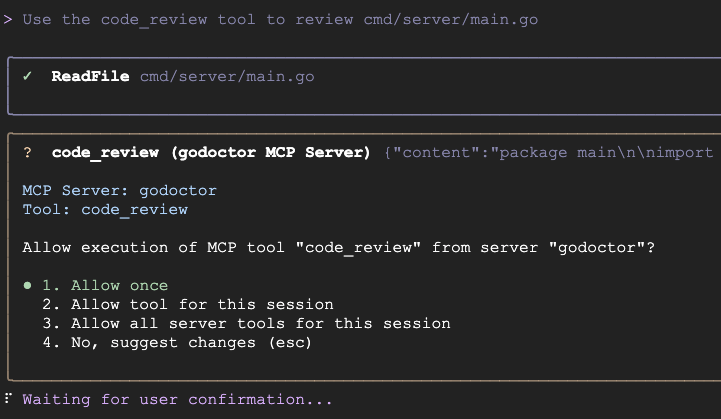
- Now let's test the
code_reviewtool by reviewing one of the tool's source files:
Use the code_review tool to review cmd/server/main.go
You should see something like this:
With the code review tool working, now you can suggest the model to apply some of the improvements it found, for a full "self-improving" workflow!
You have now confirmed that the code-review tool works. In the next section you will work on deploying it to the cloud. Save your current session with /chat save godoctor-workshop and exit the CLI.
8. Prepare your server for the cloud
The MCP server we have developed so far only runs in the local machine, which is fine if you are developing tools for your own use, but often in enterprise environments we need to deploy tools for wider usage of hundreds or even thousands of developers.
In order to scale our MCP server, we need to convert it from a server that only speaks standard I/O to a server that can talk HTTP, and deploy it somewhere where it can be accessible by different developers. For this objective we are going to use a transport mode defined in the MCP specification as streamable HTTP, and use Cloud Run as our deployment target.
Goal: Refactor the godoctor server to use the streamable HTTP transport.
Example Prompt:
The godoctor server is currently using the stdio transport. I want to prepare it to be deployed to Cloud Run, so we need to add support to use the Streamable HTTP transport.

TODO:
- Update server to enable Streamable HTTP via the -http flag.
- An optional -listen flag can be specified to set the port to listen
- If no -http flag is specified, the server defaults to stdio transport and -listen is ignored
- Update client to use Streamable HTTP via the -addr flag
- If no flag is specified, the client defaults to command transport
- Create a shell script test_server.sh to support testing

NOT TO DO:
- DO NOT use the HTTP+SSE protocol as it has been deprecated by the MCP specification

Acceptance Criteria
- Create a shell script that:
  - Runs the server in the background;
  - Runs the client connecting over HTTP and call list tools
  - Kills the background process
- The shell script should run without failures
Useful Tips
- The model might try to use HTTP+SSE instead, which has been deprecated. If you see it going through this path, steer it back towards streamable HTTP.
- The current version of Gemini CLI (0.26.0) doesn't support running processes in the background (any process launched with
run_shell_commandis killed once the tool call returns), so we are asking Gemini to automate the test process using a script. This feature is planned and will be added in the near future, which can simplify the testing process.
Optional: Testing the MCP Server using HTTP
If you want to configure Gemini CLI to use the server via HTTP:
- Save your session and exit the CLI
- Edit your
.gemini/settings.jsonfile and change the configuration to point to your local running server.
"mcpServers": {
  "godoctor": {
    "httpUrl": "http://localhost:8080"
  }
}
- In a second terminal, run the HTTP enabled server locally:
go build -o ./bin/godoctor ./cmd/server && ./bin/godoctor -listen=:8080
- Restart Gemini CLI and give it a prompt to test the connection, e.g., "Use the godoctor tool to get the documentation for fmt.Println."
- Stop the server with Ctrl+C when you are done testing.
9. Containerizing the Application with Docker
Now that our server is using the correct transport protocol, we can containerize it for deployment.
Goal: Create a Dockerfile to package the godoctor server into a portable, production-ready container image.
Example Prompt:
Please create a multi-stage Dockerfile that compiles the Go binary and copies it into a minimal golang image like golang:1.25.6-alpine. The image should support the following environment variables:
- GOOGLE_CLOUD_USE_VERTEXAI
- GOOGLE_CLOUD_PROJECT
- GOOGLE_CLOUD_LOCATION

Acceptance Criteria:
- The image builds successfully
- Create a script test_docker.sh to launch the docker image in background and test the connectivity with the client:
    - Call list_tools on the client pointing to the server running on Docker
    - Call read_docs for fmt.Println
    - Stop the server
- The script should run without failures
Optional: Manually Testing the Docker Image
After the Dockerfile is created, build the image and run it to ensure it works correctly.
- Build the container:
docker build -t godoctor:latest .
- Run the container locally:
docker run -p 8080:8080 -e PORT=8080 godoctor:latest
- Test the running container: In another terminal, start Gemini CLI and ask it to fetch documentation.
- Stop the server with Ctrl+C when you are done testing.
10. Deploying to Cloud Run
Now it's time to deploy our container to the cloud.
Goal: Deploy the containerized godoctor server to Google Cloud Run.
Example Prompt:
Now please deploy this image to Cloud Run and return me an URL I can use to call the MCP tool. Configure Cloud Run to use the following environment variables:
- GOOGLE_CLOUD_USE_VERTEXAI: true,
- GOOGLE_CLOUD_PROJECT: <your-project-id>
- GOOGLE_CLOUD_LOCATION: <your-preferred-region>

TODO:
- Run `docker build -t gcr.io/daniela-genai-sandbox/godoctor .`
- Run `gcloud run deploy godoctor --image` with the image created above

Acceptance Criteria:
- Call list-tools with the client pointing to the CloudRun endpoint
Once the deployment is finished we will configure Gemini CLI to use the tool you just deployed.
Update your .gemini/settings.json file to change the MCP tool configuration to point to your deployed service, or ask Gemini CLI to do it for you:
now update the .gemini/settings.json file to use this URL for the godoctor server
The final mcpServers section should look like this (remember to replace the placeholder with your actual Cloud Run app URL):
"mcpServers": {
  "godoctor": {
    "httpUrl": "https://<your-cloud-run-id>.us-central1.run.app"
  }
}
Testing the Cloud Run Deployment
You are now ready for the final, end-to-end test.
Restart Gemini CLI one last time (using /chat save and /chat resume if you want to preserve your context). Now the CLI should be able to call the remote MCP server. Try asking for documentation for any packages.
You can also test the code review tool:
Use the godoctor tool to review the cmd/godoctor/main.go file
Cleaning Up
Once you are done testing, remember to clean up the environment. You can tell Gemini to either delete your project or to just remove the Cloud Run deployment. Example prompt:
I'm done with my tests on the CloudRun server, please delete this deployment for me and revert my .gemini/settings.json to use the local version.
11. Congratulations!
You have successfully guided an AI assistant to build, containerize, and deploy a sophisticated, AI-powered tool. More importantly, you've practiced the essential skill of modern software development: translating requirements into effective prompts. You have successfully extended Gemini CLI with a custom MCP tool, making it a more powerful and specialized Go development assistant.