
1. 简介
在此 Codelab 中,您将学习如何构建和部署 Model Context Protocol (MCP) 服务器,以扩展 Gemini CLI 的功能。您将构建 godoctor。这是一个基于 Go 的服务器,可为 Go 开发提供自定义工具,让 Gemini CLI 从通用编码助理变身为专业的 Go 开发专家。
本 Codelab 采用“提示驱动”方法。您将化身技术主管,为 AI 助理 (Gemini CLI) 提供提示。您的目标是学习如何将项目要求转化为有效的提示,并让 AI 处理实现细节。
该项目的核心是 Model Context Protocol (MCP)。MCP 是一种开源协议,可规范 Gemini 等大语言模型 (LLM) 与外部工具和服务之间的通信方式。它充当桥梁,使 AI 能够访问现实世界的信息并执行超出其自身知识范围的操作。通过构建 MCP 服务器并将其连接到 Gemini CLI,您可以利用专用工具扩展其功能。
学习内容
- 如何安装和配置 Gemini CLI
- 如何编写有效的提示,指导 AI 助理进行软件开发
- 如何为 AI 助理提供上下文信息和指南
- 如何创建和配置 MCP 服务器以增强 Gemini CLI 的功能
- 如何将 Go 应用容器化并部署到 Google Cloud Run
所需条件
本研讨会完全可以在 Google Cloud Shell 中完成,其中预安装了所有必需的依赖项(gcloud CLI、Go、Docker、Gemini CLI)。
或者,如果您希望在自己的机器上操作,则需要满足以下条件:
- Node.js 20 或更高版本
- 已安装并初始化 Google Cloud SDK (gcloud CLI)
- 系统上安装了 Go 1.24 或更高版本
- 您的系统上安装了 Docker
关键技术
您可以在这里找到有关我们将使用的技术的更多信息:
- Gemini CLI:我们将扩展的 AI 赋能的命令行界面
- Model Context Protocol (MCP):一种开放协议,可让 Gemini CLI 与我们的自定义工具进行通信
- MCP 的 Go SDK:我们将使用该 Go 库来实现 MCP 服务器
成功完成 Codelab 的技巧
使用 AI 助理是一种全新的软件开发方式。下面的建议可帮助您顺利完成开发:
- 不要害怕按 ESC 键。有时候,AI 提议的操作或给出的代码并不符合要求。这种情况下,您可以使用 ESC 键取消其建议的操作,并提供新的提示,引导它给出正确的结果。您才是真正的主导者。
- 提醒 AI 使用工具。如果发现 AI 似乎迷失了方向或在编造信息,可以在提示中要求它使用工具。例如可以在提示中输入“Can you use Google Search to verify that?”(使用 Google 搜索验证一下。)或“Use the read_file tool to understand the current code before making changes”(在进行更改之前,请使用 read_file 工具了解当前代码)。
- 避免手动更改。尽量让 AI 完成所有工作。这才是您真正要练习的核心技能。不过,如果必须手动更改,请在更改之后告知 AI。为了确保 AI 与您的项目保持同步,可以使用类似下面的提示:“I have manually updated the README.md file. Please read it again to refresh your knowledge"(我手动更新了 README.md 文件,请再次阅读,更新你的知识库)。
- 是否尝试过关闭并重启?在极少数情况下,如果 AI 试图违背您的指令,执意按照特定的路径执行,可能是因为上下文降级(有时也称为“上下文腐烂”)。在这种情况下,您可以使用 Gemini CLI 命令“/compress”来减少上下文噪声。在极端情况下,也可以使用“/clear”命令来清除整个会话历史记录。
2. 环境设置
选择以下选项之一:如果您想在自己的机器上运行此 Codelab,请选择自行设置环境;如果您想完全在云端运行此 Codelab,请选择启动 Cloud Shell。
自定进度的环境设置
- 登录 Google Cloud 控制台,然后创建一个新项目或重复使用现有项目。如果您还没有 Gmail 或 Google Workspace 账号,则必须创建一个。


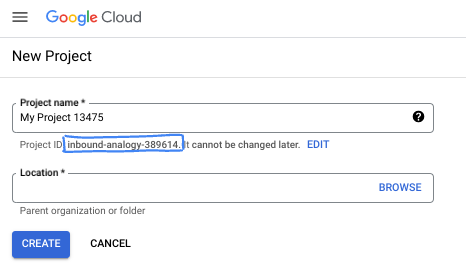
- 项目名称是此项目参与者的显示名称。它是 Google API 尚未使用的字符串。您可以随时对其进行更新。
- 项目 ID 在所有 Google Cloud 项目中是唯一的,并且是不可变的(一经设置便无法更改)。Cloud 控制台会自动生成一个唯一字符串;通常情况下,您无需关注该字符串。在大多数 Codelab 中,您都需要引用项目 ID(通常用
PROJECT_ID标识)。如果您不喜欢生成的 ID,可以再随机生成一个 ID。或者,您也可以尝试自己的项目 ID,看看是否可用。完成此步骤后便无法更改该 ID,并且此 ID 在项目期间会一直保留。 - 此外,还有第三个值,即部分 API 使用的项目编号,供您参考。如需详细了解所有这三个值,请参阅文档。
- 接下来,您需要在 Cloud 控制台中启用结算功能,以便使用 Cloud 资源/API。运行此 Codelab 应该不会产生太多的费用(如果有的话)。若要关闭资源以避免产生超出本教程范围的结算费用,您可以删除自己创建的资源或删除项目。Google Cloud 新用户符合参与 300 美元免费试用计划的条件。
启动 Cloud Shell
虽然可以通过笔记本电脑对 Google Cloud 进行远程操作,但在此 Codelab 中,您将使用 Google Cloud Shell,这是一个在云端运行的命令行环境。
在 Google Cloud 控制台 中,点击右上角工具栏中的 Cloud Shell 图标:

预配和连接到环境应该只需要片刻时间。完成后,您应该会看到如下内容:

这个虚拟机已加载了您需要的所有开发工具。它提供了一个持久的 5 GB 主目录,并且在 Google Cloud 中运行,大大增强了网络性能和身份验证功能。您在此 Codelab 中的所有工作都可以在浏览器中完成。您无需安装任何程序。
3. Gemini CLI 使用入门
在本部分中,您将了解 Gemini CLI,包括如何安装和配置环境。
什么是 Gemini CLI?
Gemini CLI 是一个 AI 赋能的命令行界面,可帮助您完成各种开发任务。它可以理解项目的上下文,回答问题,生成代码,还可以使用外部工具来扩展其功能。
安装
使用 npm 全局安装 Gemini CLI。
npm install -g @google/gemini-cli
您可以运行以下命令来确认 CLI 是否已安装:
gemini --version
配置
Gemini CLI 的行为由配置文件和环境变量控制。有两个关键文件:
GEMINI.md:此文件为 AI 提供指南和上下文。CLI 会读取此文件,以了解项目的编码标准和惯例。.gemini/settings.json:此文件决定了 CLI 的配置,包括如何连接到外部工具。我们稍后将使用此文件来配置 CLI,以便使用我们在本实验中构建的 MCP 服务器。
我们将首先设置环境,然后创建 GEMINI.md 文件。settings.json 文件将在后续步骤中进行配置。
- 创建并初始化项目目录:
mkdir godoctor && cd godoctor
go mod init godoctor
- 使用 Google Cloud 应用默认凭据进行身份验证:
我们需要登录有权访问您将在此 Codelab 中使用的 GCP 项目的账号:
- 确保您已安装并初始化 Google Cloud SDK。
- 运行以下命令以设置应用默认凭证:
gcloud auth application-default login
4. 上下文文件 (GEMINI.md)
上下文文件(使用默认名称 GEMINI.md)用于向 Gemini 模型提供指导性上下文。您可以使用这些文件提供项目专属的指令、定义角色或提供编码风格指南,让 AI 的回答更准确,也更贴合您的需求。
为了确保 AI 助理能生成高质量、规范的 Go 代码,我们将编写一个 GEMINI.md 文件,其中包含一些针对 Go 开发者的常见最佳实践。
目标:创建一个 GEMINI.md 文件,用于在此项目中为 AI 助理提供一组规则。
打开 IDE,创建包含以下内容的 GEMINI.md 文件。如果您使用的是 Cloud Shell,可以使用以下命令打开编辑器:
cloudshell edit .
任务:在 godoctor 目录的根目录下创建一个名为 GEMINI.md 的文件,并将以下内容粘贴到其中。
# Go Development Guidelines
All code contributed to this project must adhere to the following principles.

## 1. Formatting
All Go code **must** be formatted with `gofmt` before being submitted.

## 2. Naming Conventions
- **Packages:** Use short, concise, all-lowercase names.
- **Variables, Functions, and Methods:** Use `camelCase` for unexported identifiers and `PascalCase` for exported identifiers.
- **Interfaces:** Name interfaces for what they do (e.g., `io.Reader`), not with a prefix like `I`.

## 3. Error Handling
- Errors are values. Do not discard them.
- Handle errors explicitly using the `if err != nil` pattern.
- Provide context to errors using `fmt.Errorf("context: %w", err)`.

## 4. Simplicity and Clarity
- "Clear is better than clever." Write code that is easy to understand.
- Avoid unnecessary complexity and abstractions.
- Prefer returning concrete types, not interfaces.

## 5. Documentation
- All exported identifiers (`PascalCase`) **must** have a doc comment.
- Comments should explain the *why*, not the *what*.

## 6. Project structure
- cmd/ contains source code for target binaries (e.g. server, client)
- internal/ contains source code for packages not meant to be exported (e.g. internal/tools/hello)
- bin/ contains the compiled binaries
- At the root place README.md, go.mod and go.sum
现在,您的开发环境已完全设置完毕。
5. 初始 build:文档服务器
您的首要目标是创建 godoctor 服务器的初始版本。此版本应是一个极简应用,其中提供了一个名为 read_docs 的工具,用于查找 Go 文档。
目标:创建一个可用于生产用途的 MCP 服务器,以公开 go doc 命令,允许 LLM 查询 Go 文档。
在 shell 上运行 Gemini CLI 命令:
gemini
首次运行该 CLI 时,系统会要求您选择身份验证模式和主题。
如果您在 Cloud Shell 中运行此 Codelab,请选择使用 Cloud Shell 用户凭据选项。如果不是,您可以使用 login with Google(使用 Google 账号登录)来登录个人 Google 账号,以便享受 Gemini CLI 的宽裕的免费层级。身份验证选择界面将如下所示:
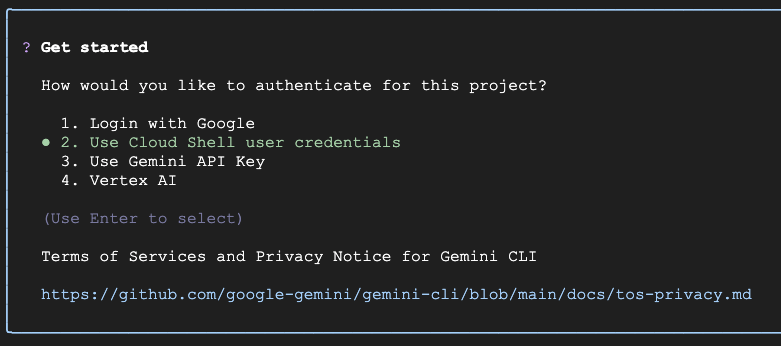
如果您需要更改所做选择,可以输入 /auth 并按 Enter 键再次打开此菜单。
接下来,系统会提示您选择主题:
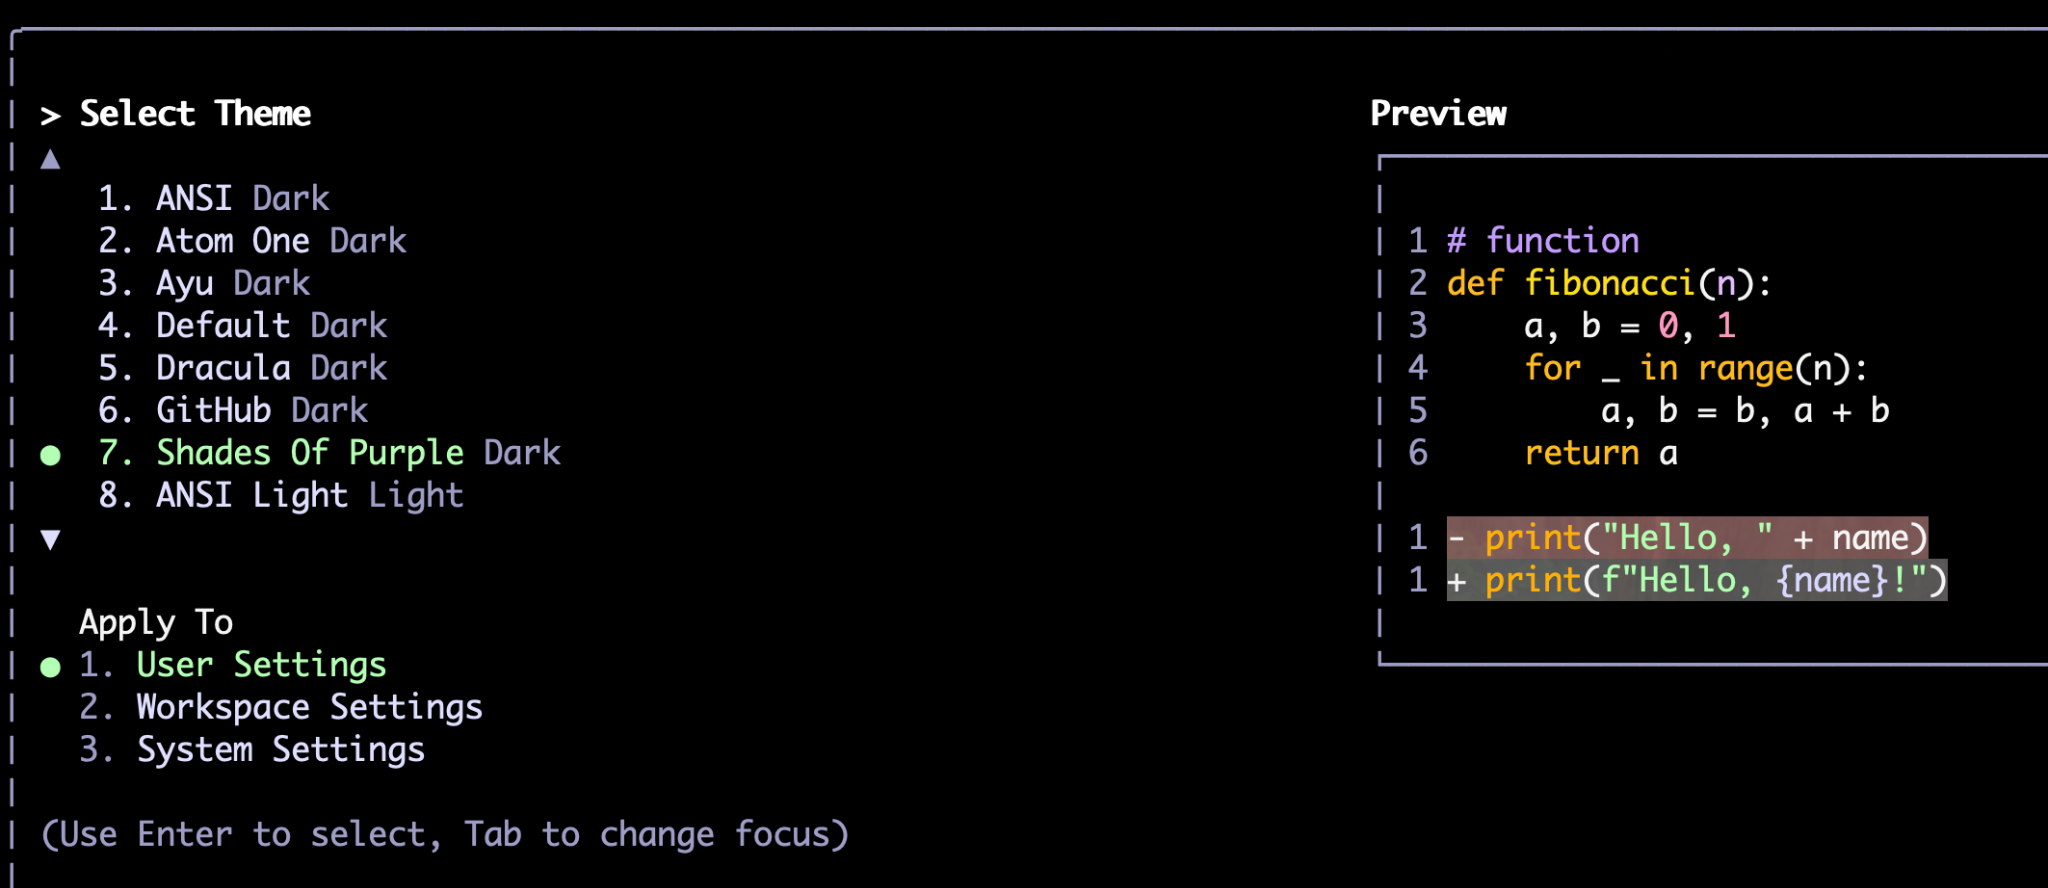
与 /auth 类似,您也可以稍后使用 /theme 命令更改主题。
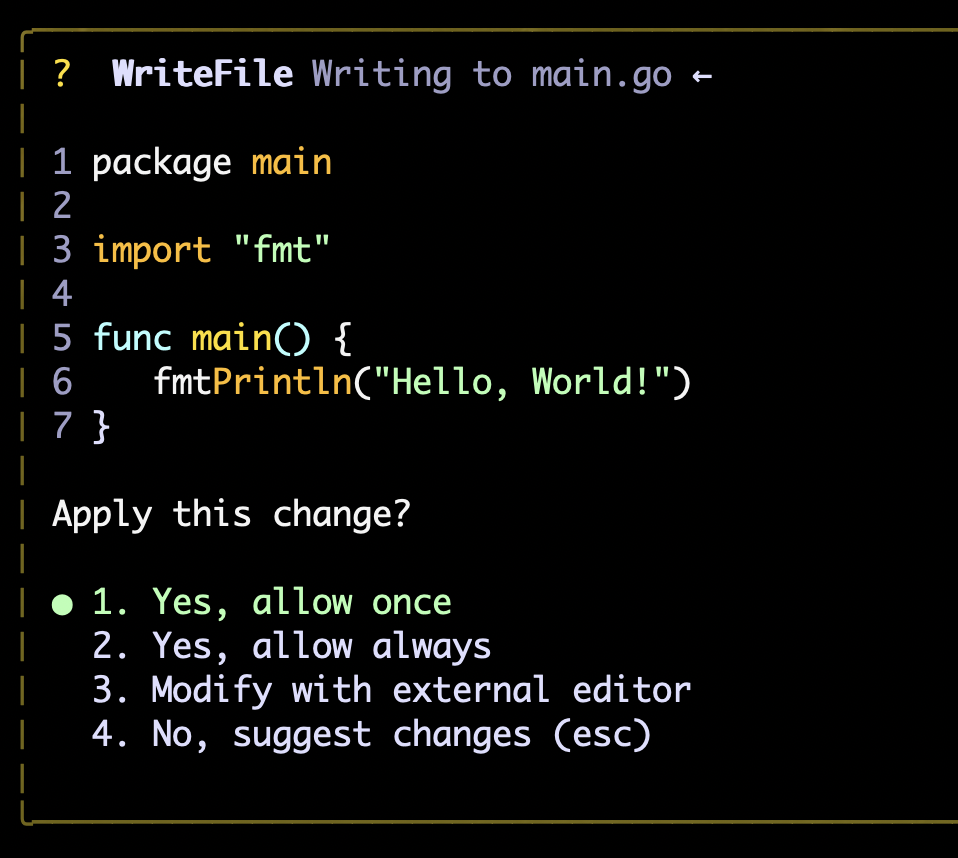
选择身份验证方法和首选主题后,系统会显示命令提示符。您可以在这里输入命令,例如:
Write a hello world application in Go
CLI 会结合使用自己的推理(通过 Gemini Flash 或 Gemini Pro 等 Gemini 模型)和工具来执行任务。每当需要与文件系统或外部服务(如 API、数据库等)交互时,它都会使用工具。开箱即用的工具或“内部工具”包括 read_file、write_file、web_fetch 和 google_search。我们构建的 MCP 服务器也将成为可供 CLI 使用的工具。
首次运行工具时,它会请求您的许可。您可以授予一次性权限(仅允许一次)、批准其在本次会话的剩余时间使用(始终允许),也可以拒绝其请求。如果需要调整,例如要编辑文件,您还可以找到使用外部编辑器编辑文件的选项。例如,以下是上述提示的输出,用于创建 Hello World 程序:
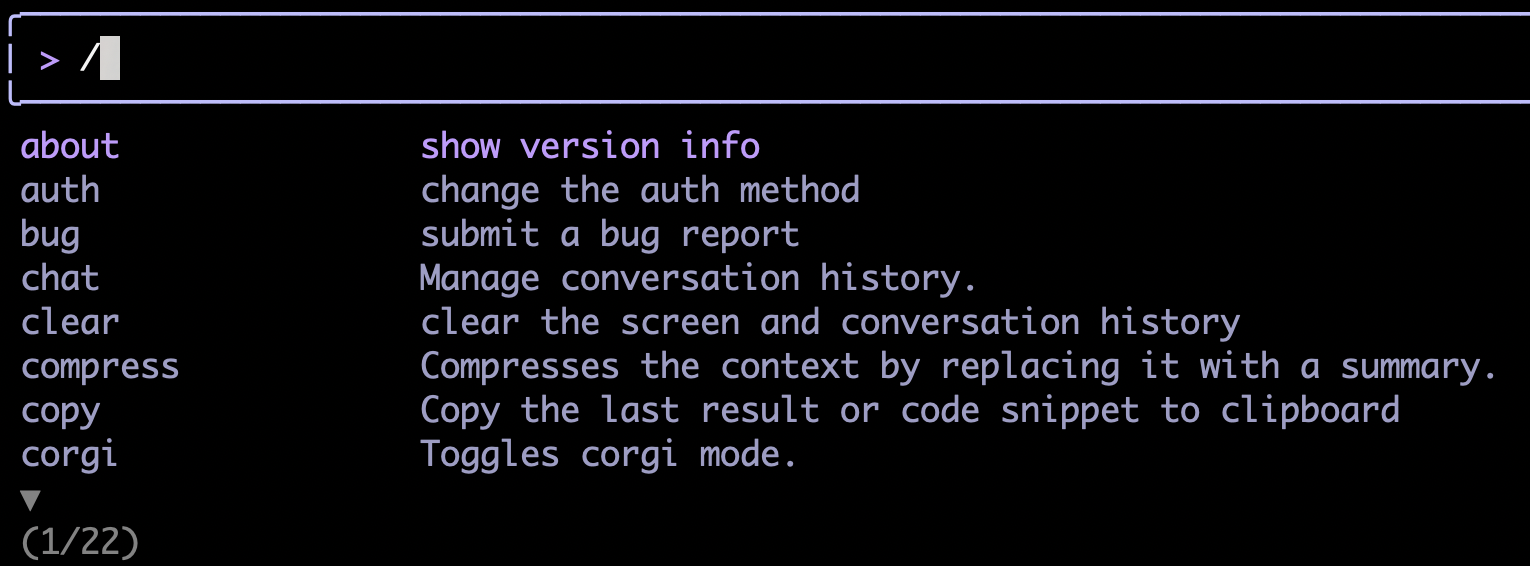
除了提示,您还可以使用斜杠命令。如果您输入“/”,CLI 会自动显示自动补全选项。您可以继续输入完整命令,也可以从选项中选择一个。上面提到的 /auth 和 /theme 命令就是此类命令。
熟悉界面后,您就可以开始本部分的主要任务,即让 CLI 为我们编写 MCP 服务器。
创建 Hello World MCP 服务器
为了确保模型更一致地构建内容,将复杂任务逐步拆解是一种很好的方式。虽然模型可能能够自行完成复杂的任务,但如果没有正确的设置,它需要很长时间才能找到正确的实现方式。
为了让它能够以更一致的方式实现,我们将首先指示它构建一个“Hello World”MCP 服务器,然后再实现我们想要的功能(读取 Go 文档)。
以下是一个提示示例:
Create a Model Context Protocol (MCP) server that exposes a "hello_world" tool. This tool, when called, should return the message "Hello, MCP world!"

For the MCP implementation, you should use the official Go SDK for MCP (github.com/modelcontextprotocol/go-sdk/mcp) and use the stdio transport.

TODO:
- Download the dependency: `go get github.com/modelcontextprotocol/go-sdk/mcp`
- Inspect the documentation of the SDK: `go doc github.com/modelcontextprotocol/go-sdk/mcp`
- Build a `server` command that supports stdio transport only
- Build a `client` command that connects to the server over command transport to test the server

Acceptance Criteria:
- `./bin/client --list-tools` returns the list of server tools including "hello_world"
- `./bin/client --call-tool` "hello_world" returns the output "Hello, MCP world!"
请注意,上述提示由三个主要部分组成:
- 问题规范,包括我们想要构建的对象和限制条件(例如,使用官方 SDK 而不是随意选择一个 SDK,使用 stdio 传输而不是 http)
- 要执行的任务(待办事项)细分
- 任务的验收标准,作为测试程序,以便代理知道何时完成任务
有了这三个组成部分,模型就能以更一致的方式实现所需的结果。
read_docs 工具实现
实现正常运行后,我们就可以开始实现真正的“read_docs”工具了:
Add a new tool to our MCP server called "read_docs" that invokes the "go doc" shell command. The tool will take a mandatory "package" argument and an optional "symbol" argument.

TODO:
- create a package `./internal/tools/docs`
- register the tool with the MCP server
- update the client to support the "read_docs" tool by providing arguments to the tool call

Acceptance Criteria:
- `./bin/client --list-tools` show both hello_world and read_docs
- `./bin/client --call-tool read_docs fmt` returns the documentation for the `fmt` package
- `./bin/client --call-tool read_docs fmt.Println` returns the documentation for the `fmt.Println` function
- `./bin/client --call-tool read_docs github.com/modelcontextprotocol/go-sdk/mcp` returns documentation for the `mcp` package
注意:您可以直接使用此提示,也可以尝试自行编写提示。
实用提示
鉴于 MCP 仍然是一个新概念,且 MCP 的 Go SDK 是一个新库,在此步骤中,Gemini 可能需要很长时间才能自行发现正确的实现。为了帮助模型找到正确的解决方案,您可能需要尝试以下操作:
- 如果模型在任何步骤中跳过了阅读文档,请按 Esc 键并提醒它阅读文档。如果您不熟悉 Go,请运行“go doc”加上软件包名称“go doc github.com/modelcontextprotocol/go-sdk/mcp”,系统会返回正确的文档。
- 顶级模块“github.com/modelcontextprotocol/go-sdk”没有任何文档(因为它没有 Go 代码),您需要告知模型查找完整路径
- 反之,如果模型虚构了一个不存在的软件包,例如“go doc github.com/modelcontextprotocol/go-sdk/mcp/server”,只需将其引导至顶级软件包即可。
6. 将 godoctor 配置为 Gemini CLI 的 MCP 服务器
在 AI 助理生成客户端和服务器的代码后,您可以指示它运行一些手动测试。例如:
retrieve the documentation for the package net/http
请务必使用外部依赖项(不在标准库中)对其进行测试:
retrieve the documentation for the github.com/modelcontextprotocol/go-sdk/mcp package
得到满意的结果后,指示 Gemini 编写一个 README.md 文件,其中包含有关如何使用和开发此项目的说明。
Now write a detailed README.md file explaining both from a user and a developer perspective how to use and to build this project.
现在,我们将配置服务器,以便 Gemini CLI 在下一开发阶段可以使用它。
- 让 CLI 将 GEMINI.md 更新为使用
read_docs作为阅读文档的首选方法:
update the GEMINI.md file to include instructions to always use the read_docs tool to retrieve documentation about Go packages or symbols. This should be done whenever seeing an import for the first time in a session or after a new dependency is installed to the project (e.g. via `go get`)
- 现在,我们需要重启 Gemini CLI 以配置 MCP 服务器。首先,我们来保存聊天会话,以便您在重启后从上次停止的地方继续。
/chat save godoctor-workshop
- 按两次 Ctrl+D 或输入
/quit命令,退出 CLI。 - 在之前的步骤中,代理应该已经为您编译了一个服务器二进制文件,但我们现在要使用其他名称重新编译服务器,这样在修改其源代码时就不会受到影响:
mkdir -p bin && go build -o ./bin/godoctor ./cmd/server
- 为本地工具配置 Gemini CLI:在项目根目录中创建
.gemini/settings.json文件,并添加mcpServers部分,告知 Gemini CLI 如何运行已编译的服务器。
mkdir -p .gemini && touch .gemini/settings.json
- 现在,使用 Cloud Shell 编辑器或您喜爱的 IDE 将以下内容添加到新文件中。
{
  "mcpServers": {
    "godoctor": {
      "command": "./bin/godoctor"
    }
  }
}
- 使用
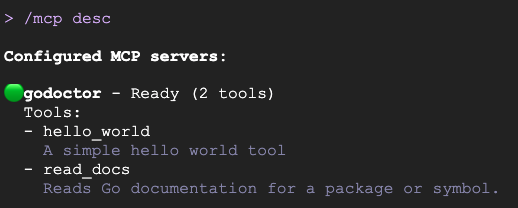
gemini命令启动 Gemini CLI - 您应该能够通过输入
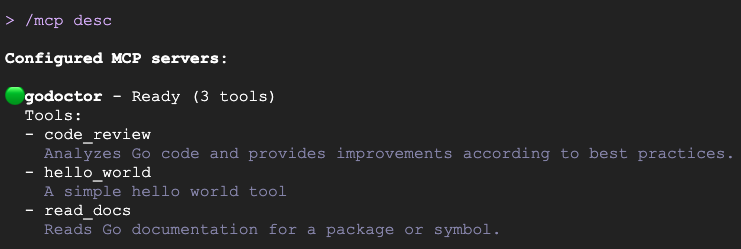
/mcp命令来查看该工具是否已加载。您还可以使用/mcp desc显示工具的完整说明:
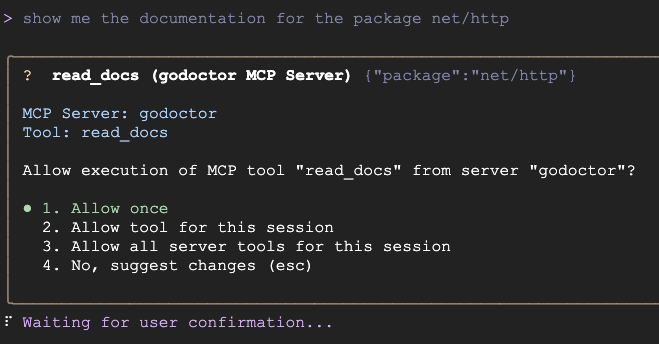
- 通过向 Gemini CLI 发出“Show me the documentation for the package net/http”之类的提示,要求其使用您的工具,从而测试集成情况
您应会看到类似下图的界面:
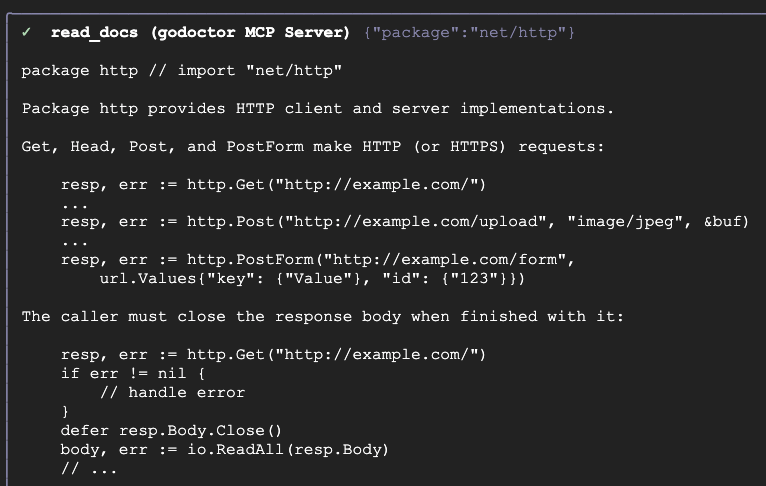
如果该工具正常运行,您应该会看到通过工具调用检索到的文档:
恭喜,您已经制作了一个 MCP 工具!但这并不是最终结果,我们仍然可以使此服务器变得更有用。
7. 添加 AI 赋能的代码审核员
我们来添加一项更先进的 AI 赋能功能:使用 Gemini API 的代码审核器。
现在,您可以使用 /chat resume godoctor-workshop. 命令恢复之前的聊天会话。这会加载会话上下文,直到我们完成 read_docs 的开发,这样模型就会具备构建新工具所需的知识。
此工具需要访问 Vertex AI,因此我们需要先启用该 API。您可以在空白提示中输入感叹号 (!),在不离开 Gemini CLI 的情况下运行 shell 命令。这会将 Gemini CLI 更改为 shell 模式。
在 shell 模式下运行以下命令,以启用 Vertex AI API:
gcloud services enable aiplatform.googleapis.com
命令完成后,您可以按 Esc 键切换回提示模式。
目标:向现有项目添加一个名为 code_review 的新工具。此工具将使用 Gemini API 分析 Go 代码并提供反馈。
提示示例:
Add a new tool to my project called code_review. This tool should use the Gemini API on Vertex AI (with model id gemini-2.5-pro) to analyze Go code and provide a list of improvements according to the best practices accepted by the Go community.

The tool should take the Go code content and an optional hint as input. The hint will be used to provide additional guidance for the AI reviewer, like "focus on security" or "help me simplify this code".

The tool output should be text in Markdown format.

TODO:
- add the genai SDK dependency with `go get import google.golang.org/genai`
- create the tool code in ./internal/tools/code/review.go
- create a code review prompt to be used by the tool
- use go-genai with Vertex AI authentication to call gemini-2.5-pro
- register the tool with the server
- add a flag to the server to set the Google Cloud Project ID: --project
- add a flag to the server to set the Google Cloud Location: --location
- add support to the review tool in the client CLI

NOT TO DO:
- DO NOT use the package github.com/google/generative-ai-go/genai as it is DEPRECATED
- DO NOT use the package cloud.google.com/go/vertexai/genai as it has been superseded by google.golang.org/genai

Acceptance Criteria:
- `./bin/client --list-tools` show all tools including `code_review`
- `./bin/client --call-tool code_review internal/tools/code/review.go` returns the code review for the "review.go" file
实用提示
- 模型开始处理该问题后,您可能会自动看到它请求调用
read_docs工具来浏览genai软件包的文档。如果它没有这样做,您可以随时使用 Esc 键中断该流程,并提醒它现在可以使用read_docs工具。 - 如果您看到它尝试使用错误的 GenAI SDK(即使提示中明确列出了“不允许”使用的 SDK),请引导它回到正确的 SDK。
测试代码审核器
- 使用
/chat save godoctor-workshop保存聊天会话,然后按两次 Ctrl+D 退出 CLI。 - 使用新的工具定义重新编译服务器。
go build -o ./bin/godoctor ./cmd/server
- 使用 IDE 更新
.gemini/settings.json文件,以纳入 Vertex AI 的环境配置:
{
  "mcpServers": {
    "godoctor": {
      "command": "./bin/godoctor",
      "env": {
        "GOOGLE_CLOUD_USE_VERTEXAI": "true",
        "GOOGLE_CLOUD_PROJECT": "<your-project-id>",
        "GOOGLE_CLOUD_LOCATION": "<your-preferred-region>"
      }
    }
  }
}
- 再次启动 Gemini CLI。恢复与
/chat resume godoctor-workshop的聊天会话 - 输入命令
/mcp,确认该工具已启用。您应会看到类似下图的界面:
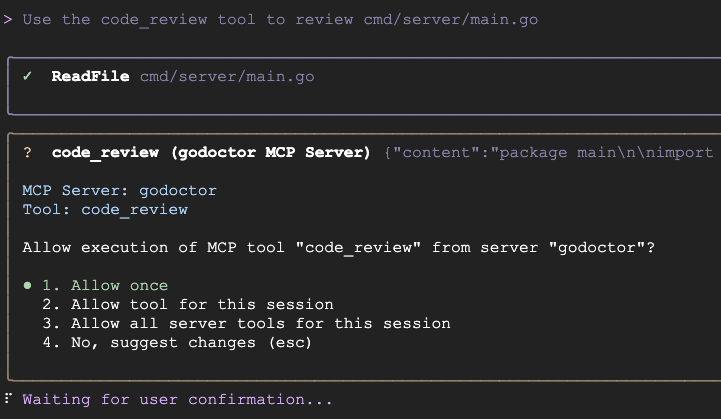
- 现在,我们来测试一下
code_review工具,方法是查看该工具的其中一个源文件:
Use the code_review tool to review cmd/server/main.go
You should see something like this:
在代码审核工具正常运行后,您现在可以建议模型应用其发现的一些改进,从而实现完整的“自我改进”工作流程!
您现在已确认 code-review 工具可以正常运行。在下一部分中,您将学习如何将其部署到云端。使用 /chat save godoctor-workshop 保存当前会话并退出 CLI。
8. 为将服务器部署到云端做准备
到目前为止,我们开发的 MCP 服务器只能在本地机器上运行,如果您开发的工具只是供自己使用,这没有问题。不过,在企业环境中,我们通常需要部署工具,供数百甚至数千名开发者使用。
为了扩缩 MCP 服务器,我们需要将其从仅使用标准 I/O 的服务器转换为可以使用 HTTP 的服务器,并将其部署到不同开发者可以访问的位置。为了实现此目标,我们将使用 MCP 规范中定义为可流式传输的 HTTP 的传输模式,并使用 Cloud Run 作为部署目标。
目标:重构 godoctor 服务器,以使用可流式传输的 HTTP 传输。
提示示例:
The godoctor server is currently using the stdio transport. I want to prepare it to be deployed to Cloud Run, so we need to add support to use the Streamable HTTP transport.

TODO:
- Update server to enable Streamable HTTP via the -http flag.
- An optional -listen flag can be specified to set the port to listen
- If no -http flag is specified, the server defaults to stdio transport and -listen is ignored
- Update client to use Streamable HTTP via the -addr flag
- If no flag is specified, the client defaults to command transport
- Create a shell script test_server.sh to support testing

NOT TO DO:
- DO NOT use the HTTP+SSE protocol as it has been deprecated by the MCP specification

Acceptance Criteria
- Create a shell script that:
  - Runs the server in the background;
  - Runs the client connecting over HTTP and call list tools
  - Kills the background process
- The shell script should run without failures
实用提示
- 该模型可能会尝试使用已弃用的 HTTP+SSE。如果发现它有这种倾向,可以引导它回到可流式传输的 HTTP。
- 当前版本的 Gemini CLI (0.26.0) 不支持在后台运行进程(使用
run_shell_command启动的任何进程在工具调用返回后都会被终止),因此我们要求 Gemini 使用脚本自动执行测试流程。我们计划在不久的将来添加此功能,以简化测试流程。
可选:使用 HTTP 测试 MCP 服务器
如果您想配置 Gemini CLI 以通过 HTTP 使用服务器,请执行以下操作:
- 保存会话并退出 CLI
- 修改
.gemini/settings.json文件,并将配置更改为指向本地运行的服务器。
"mcpServers": {
  "godoctor": {
    "httpUrl": "http://localhost:8080"
  }
}
- 在第二个终端中,在本地运行启用 HTTP 的服务器:
go build -o ./bin/godoctor ./cmd/server && ./bin/godoctor -listen=:8080
- 重启 Gemini CLI,并向其发出提示以测试连接,例如“Use the godoctor tool to get the documentation for fmt.Println.”。
- 测试完成后,按 Ctrl+C 停止服务器。
9. 使用 Docker 将应用容器化
现在,我们的服务器已经在使用正确的传输协议,我们可以将其容器化以进行部署。
目标:创建一个 Dockerfile,用于将 godoctor 服务器打包到可移植的、可用于生产用途的容器映像中。
提示示例:
Please create a multi-stage Dockerfile that compiles the Go binary and copies it into a minimal golang image like golang:1.25.6-alpine. The image should support the following environment variables:
- GOOGLE_CLOUD_USE_VERTEXAI
- GOOGLE_CLOUD_PROJECT
- GOOGLE_CLOUD_LOCATION

Acceptance Criteria:
- The image builds successfully
- Create a script test_docker.sh to launch the docker image in background and test the connectivity with the client:
    - Call list_tools on the client pointing to the server running on Docker
    - Call read_docs for fmt.Println
    - Stop the server
- The script should run without failures
可选:手动测试 Docker 映像
创建 Dockerfile 后,构建映像并运行它,以确保其正常工作。
- 构建容器:
docker build -t godoctor:latest .
- 在本地运行容器:
docker run -p 8080:8080 -e PORT=8080 godoctor:latest
- 测试正在运行的容器:在另一个终端中,启动 Gemini CLI 并让其获取文档。
- 测试完成后,按 Ctrl+C 停止服务器。
10. 部署到 Cloud Run
现在,我们可以将容器部署到云端了。
目标:将容器化的 godoctor 服务器部署到 Google Cloud Run。
提示示例:
Now please deploy this image to Cloud Run and return me an URL I can use to call the MCP tool. Configure Cloud Run to use the following environment variables:
- GOOGLE_CLOUD_USE_VERTEXAI: true,
- GOOGLE_CLOUD_PROJECT: <your-project-id>
- GOOGLE_CLOUD_LOCATION: <your-preferred-region>

TODO:
- Run `docker build -t gcr.io/daniela-genai-sandbox/godoctor .`
- Run `gcloud run deploy godoctor --image` with the image created above

Acceptance Criteria:
- Call list-tools with the client pointing to the CloudRun endpoint
部署完成后,我们将配置 Gemini CLI 以使用刚刚部署的工具。
更新 .gemini/settings.json 文件,将 MCP 工具配置更改为指向已部署的服务,或者让 Gemini CLI 为您执行此操作:
now update the .gemini/settings.json file to use this URL for the godoctor server
最终的 mcpServers 部分应如下所示(请记得将占位符替换为实际的 Cloud Run 应用网址):
"mcpServers": {
  "godoctor": {
    "httpUrl": "https://<your-cloud-run-id>.us-central1.run.app"
  }
}
测试 Cloud Run 部署
现在,您可以进行最终的端到端测试了。
最后一次重启 Gemini CLI(如果您想保留上下文,请使用 /chat save 和 /chat resume)。现在,CLI 应该能够调用远程 MCP 服务器了。可以试试让它查找软件包的文档。
您还可以测试代码审核工具:
Use the godoctor tool to review the cmd/godoctor/main.go file
清理
测试完成后,请记得清理环境。您可以让 Gemini 删除项目,也可以让 Gemini 仅移除 Cloud Run 部署。提示示例:
I'm done with my tests on the CloudRun server, please delete this deployment for me and revert my .gemini/settings.json to use the local version.
11. 恭喜!
您已成功引导 AI 助理完成了一个复杂 AI 赋能工具的构建、容器化和部署操作。更重要的是,您已经掌握了现代软件开发的一项基本技能:将要求转化为有效的提示。您已成功使用自定义 MCP 工具扩展了 Gemini CLI,使其成为更强大、更专业的 Go 开发助理。