
1. 簡介
在本程式碼研究室中,您將瞭解如何建構及部署 Model Context Protocol (MCP) 伺服器,用來擴充 Gemini CLI 的功能。您將建構 godoctor,這是一個以 Go 為基礎、提供 Go 開發專用工具的伺服器,能讓 Gemini CLI 從一般用途的程式設計助理轉變為專業的 Go 開發專家。
本程式碼研究室採用「提示詞導向」做法,您將扮演技術主管,向 AI 助理 (Gemini CLI) 輸入提示詞。您的目標是學習將專案需求轉化為有效的提示詞,並交由 AI 處理實作細節。
這項專案的核心是 Model Context Protocol (MCP)。MCP 是一種開放原始碼通訊協定,規範了 Gemini 等大型語言模型 (LLM) 與外部工具和服務的標準通訊方式。這項技術就像一座橋梁,能讓 AI 存取現實世界的資訊,並執行固有知識以外的動作。建構 MCP 伺服器並連結至 Gemini CLI,即可使用專門工具擴充功能。
課程內容
- 如何安裝及設定 Gemini CLI
- 如何設計有效提示詞,引導 AI 助理進行軟體開發
- 如何為 AI 助理提供背景資訊和指引
- 如何建立及設定 MCP 伺服器,擴展 Gemini CLI 的功能
- 如何將 Go 應用程式容器化並部署至 Google Cloud Run
軟硬體需求
本研討會可完全在 Google Cloud Shell 中進行,該環境已預先安裝所有必要依附元件 (gcloud CLI、Go、Docker、Gemini CLI)。
或者,如果您偏好使用自己的電腦,則需要下列項目:
- Node.js 20 以上版本
- 已安裝並初始化 Google Cloud SDK (gcloud CLI)
- 系統上安裝 Go 1.24 以上版本
- 系統上已安裝 Docker
主要技術
請參閱下列資源,進一步瞭解我們會用到的技術:
- Gemini CLI:我們將擴充的 AI 輔助指令列介面
- Model Context Protocol (MCP):開放通訊協定,可讓 Gemini CLI 與自訂工具通訊
- 適用於 MCP 的 Go SDK:用於實作 MCP 伺服器的 Go 程式庫
成功完成程式碼實驗室的訣竅
與 AI 助理協作是一種全新的軟體開發方式。以下提供幾項訣竅,助您順利完成本實驗室中的任務:
- 別害怕按下 ESC 鍵。有時您可能會不同意 AI 建議的動作或程式碼,這時請按下 ESC 鍵取消建議動作,並輸入新的提示詞,引導 Gemini 朝正確方向回覆,畢竟控制權在您手上!
- 鼓勵 AI 使用工具。如果 AI 似乎遺漏內容或編造資訊,請提醒它運用可用的工具。舉例來說,「請使用 Google 搜尋驗證回覆」或「請使用 read_file 工具理解目前的程式碼,然後才進行變更」等提示詞,都能發揮很好的效果。
- 避免人為介入。盡量讓 AI 完成所有工作,因為這是您正在練習的核心技能。不過如果必須手動變更,請在變更後告知 AI,例如「我手動更新了 README.md 檔案。請重新讀取以更新知識庫」,確保 AI 在專案過程中與您保持同步。
- 試過關掉重開嗎?在極少數情況下,AI 可能會偏離您的指令,執意朝著特定方向回覆,這可能是因為脈絡退化 (有時也稱「脈絡腐化」) 的關係。這時,您可以使用 Gemini CLI 指令「/compress」去除會分散 AI 注意力的脈絡。在極端情況下,也可以使用「/clear」指令清除整個對話記錄。
2. 環境設定
請選擇下列其中一個選項:如要在自己的電腦上執行本程式碼研究室,請選取「自行設定環境」;如要完全在雲端執行本程式碼研究室,請選取「啟動 Cloud Shell」。
自修實驗室環境設定
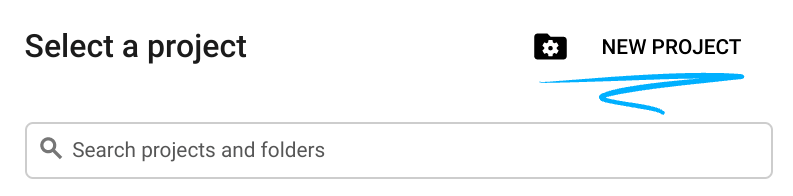
- 登入 Google Cloud 控制台,然後建立新專案或重複使用現有專案。如果沒有 Gmail 或 Google Workspace 帳戶,請先建立帳戶。

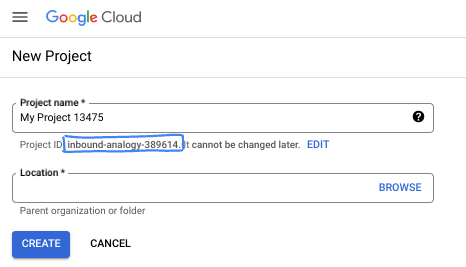
- 專案名稱是這個專案參與者的顯示名稱。這是 Google API 未使用的字元字串。你隨時可以更新。
- 專案 ID 在所有 Google Cloud 專案中都是不重複的,而且設定後即無法變更。Cloud 控制台會自動產生專屬字串,通常您不需要在意該字串為何。在大多數程式碼研究室中,您需要參照專案 ID (通常標示為
PROJECT_ID)。如果您不喜歡產生的 ID,可以產生另一個隨機 ID。你也可以嘗試使用自己的名稱,看看是否可用。完成這個步驟後就無法變更,且專案期間會維持不變。 - 請注意,有些 API 會使用第三個值,也就是「專案編號」。如要進一步瞭解這三種值,請參閱說明文件。
- 接著,您需要在 Cloud 控制台中啟用帳單,才能使用 Cloud 資源/API。完成這個程式碼研究室的費用不高,甚至可能完全免費。如要關閉資源,避免在本教學課程結束後繼續產生費用,請刪除您建立的資源或專案。Google Cloud 新使用者可參加價值$300 美元的免費試用計畫。
啟動 Cloud Shell
雖然可以透過筆電遠端操作 Google Cloud,但在本程式碼研究室中,您將使用 Google Cloud Shell,這是可在雲端執行的指令列環境。
在 Google Cloud 控制台中,點選右上角工具列的 Cloud Shell 圖示:

佈建並連線至環境的作業需要一些時間才能完成。完成後,您應該會看到如下的內容:

這部虛擬機器搭載各種您需要的開發工具,並提供永久的 5GB 主目錄,而且可在 Google Cloud 運作,大幅提升網路效能並強化驗證功能。您可以在瀏覽器中完成本程式碼研究室的所有作業。您不需要安裝任何軟體。
3. 開始使用 Gemini CLI
在本節中,您將瞭解 Gemini CLI,包括如何安裝及設定環境。
什麼是 Gemini CLI?
Gemini CLI 是 AI 輔助的指令列介面,可協助您處理各種開發工作。Gemini 能理解專案脈絡、回答問題、生成程式碼,還能使用外部工具擴充自身功能。
安裝
使用 npm 全域安裝 Gemini CLI。
npm install -g @google/gemini-cli
執行下列指令,確認 CLI 是否已安裝:
gemini --version
設定
Gemini CLI 的行為由設定檔和環境變數控制,主要由以下兩個檔案設定:
GEMINI.md:這個檔案會為 AI 提供指引和背景資訊。CLI 會讀取此檔案,瞭解專案的程式設計標準和慣例。.gemini/settings.json:這個檔案會控管 CLI 的設定,包括如何連線至外部工具。稍後我們會使用這個檔案,設定 CLI 在本實驗室中使用 MCP 伺服器。
我們會先設定環境,然後建立 GEMINI.md 檔案。settings.json 檔案會在後續步驟中設定。
- 建立並初始化專案目錄:
mkdir godoctor && cd godoctor
go mod init godoctor
- 使用 Google Cloud 應用程式預設憑證進行驗證:
我們需要登入可存取您要用於本程式碼研究室的 GCP 專案的帳戶:
- 確認您已安裝並初始化 Google Cloud SDK。
- 執行下列指令來設定應用程式預設憑證:
gcloud auth application-default login
4. 脈絡檔案 (GEMINI.md)
脈絡檔案 (預設名稱為 GEMINI.md) 用於為 Gemini 模型提供指令脈絡。您可以透過這些檔案提供專案專屬指示、定義角色或提供程式設計樣式指南,確保 AI 的回覆更準確,也更符合需求。
為確保 AI 助理生成高品質、符合 Go 慣例的程式碼,我們將編寫 GEMINI.md 檔案,其中包含 Go 開發人員常用的最佳做法。
目標:建立 GEMINI.md 檔案,做為 AI 助理在本專案中的規則集。
開啟 IDE,建立 GEMINI.md 檔案並填入下列內容。如果您使用 Cloud Shell,可以執行下列指令開啟編輯器:
cloudshell edit .
工作:在 godoctor 目錄的根目錄中建立名為 GEMINI.md 的檔案,然後將下列內容貼到檔案中。
# Go Development Guidelines
All code contributed to this project must adhere to the following principles.

## 1. Formatting
All Go code **must** be formatted with `gofmt` before being submitted.

## 2. Naming Conventions
- **Packages:** Use short, concise, all-lowercase names.
- **Variables, Functions, and Methods:** Use `camelCase` for unexported identifiers and `PascalCase` for exported identifiers.
- **Interfaces:** Name interfaces for what they do (e.g., `io.Reader`), not with a prefix like `I`.

## 3. Error Handling
- Errors are values. Do not discard them.
- Handle errors explicitly using the `if err != nil` pattern.
- Provide context to errors using `fmt.Errorf("context: %w", err)`.

## 4. Simplicity and Clarity
- "Clear is better than clever." Write code that is easy to understand.
- Avoid unnecessary complexity and abstractions.
- Prefer returning concrete types, not interfaces.

## 5. Documentation
- All exported identifiers (`PascalCase`) **must** have a doc comment.
- Comments should explain the *why*, not the *what*.

## 6. Project structure
- cmd/ contains source code for target binaries (e.g. server, client)
- internal/ contains source code for packages not meant to be exported (e.g. internal/tools/hello)
- bin/ contains the compiled binaries
- At the root place README.md, go.mod and go.sum
現在開發環境已全部設定完畢。
5. 初始版本:文件伺服器
您的首要目標是建立 godoctor 伺服器的初始版本。這是精簡版應用程式,提供可查詢 Go 文件的單一工具 read_docs。
目標:建立可用於正式環境的 MCP 伺服器,公開 go doc 指令,允許 LLM 查詢 Go 文件。
在殼層執行 Gemini CLI 指令:
gemini
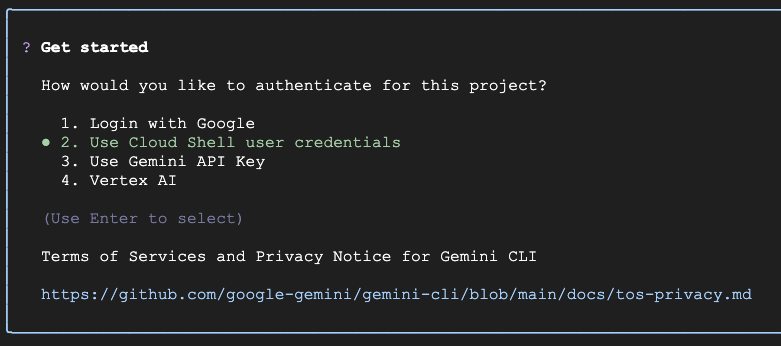
首次執行 CLI 時,系統會要求您選擇驗證模式和主題。
如果您在 Cloud Shell 中執行本程式碼研究室,請選擇「Use Cloud Shell user credentials」(使用 Cloud Shell 使用者憑證) 選項。如果沒有,請使用透過 Google 登入,並使用個人 Google 帳戶登入,即可享有 Gemini CLI 的慷慨免費方案。驗證選擇畫面如下所示:
如需變更選擇,請輸入 /auth 並按下 Enter 鍵,再次開啟該選單。
接著,系統會提示你選擇主題:
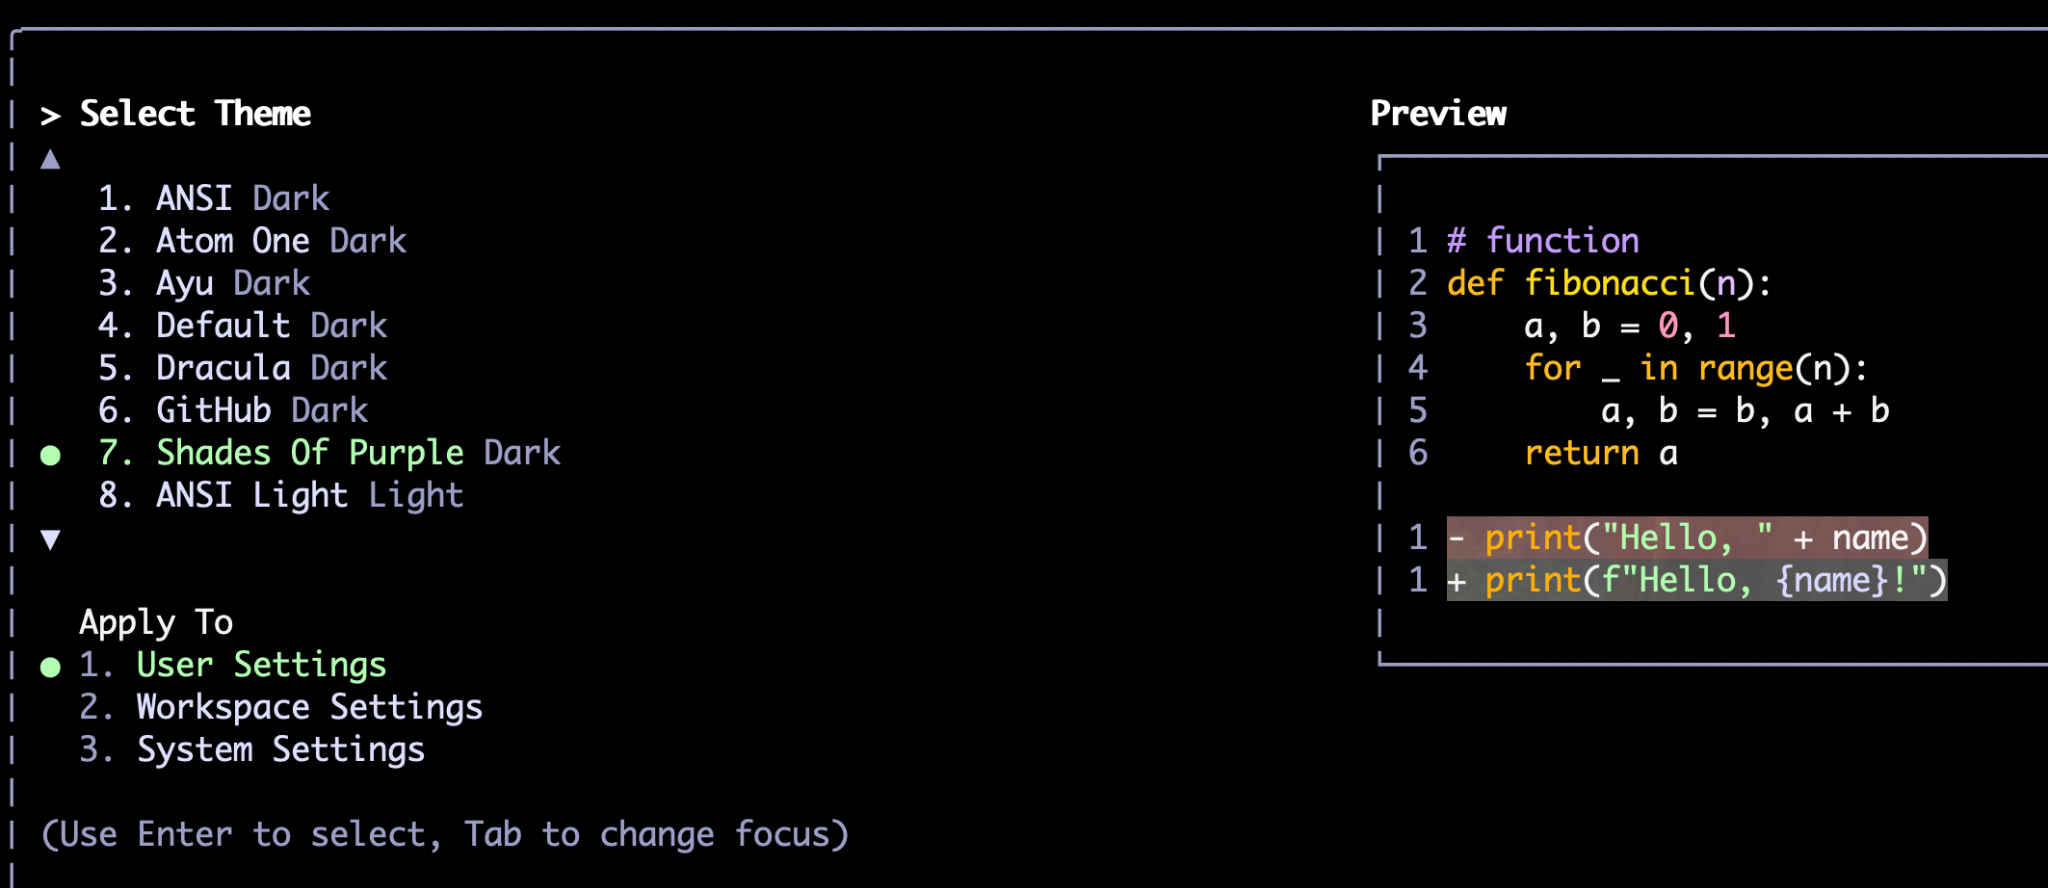
如同 /auth 指令,您稍後也可以使用 /theme 指令變更主題。
選擇驗證方式和偏好的主題後,系統會帶您前往命令提示字元,您可以在這裡輸入指令,例如:
Write a hello world application in Go
CLI 在執行作業時,會結合自身的推理能力 (由 Gemini Flash 或 Gemini Pro 等 Gemini 模型支援) 和工具。每當需要與檔案系統或外部服務 (例如 API、資料庫等) 互動時,就會使用工具。相關的內建工具包括 read_file、write_file、web_fetch 和 google_search。我們建構的 MCP 伺服器也會供 CLI 使用。
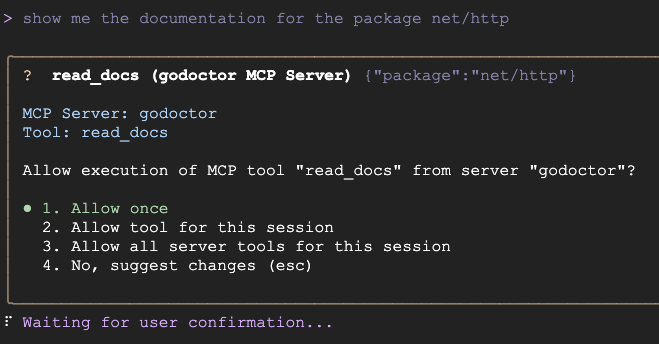
首次執行工具時,系統會要求您授予權限。您可以選擇單次授權 (僅允許一次)、在本次工作階段中一律核准 (一律允許),或是拒絕要求。如果是檔案編輯作業,您也可以選擇使用外部編輯器編輯檔案,以防需要進行調整。舉例來說,這是上述提示的輸出內容,用於建立 Hello World 程式:

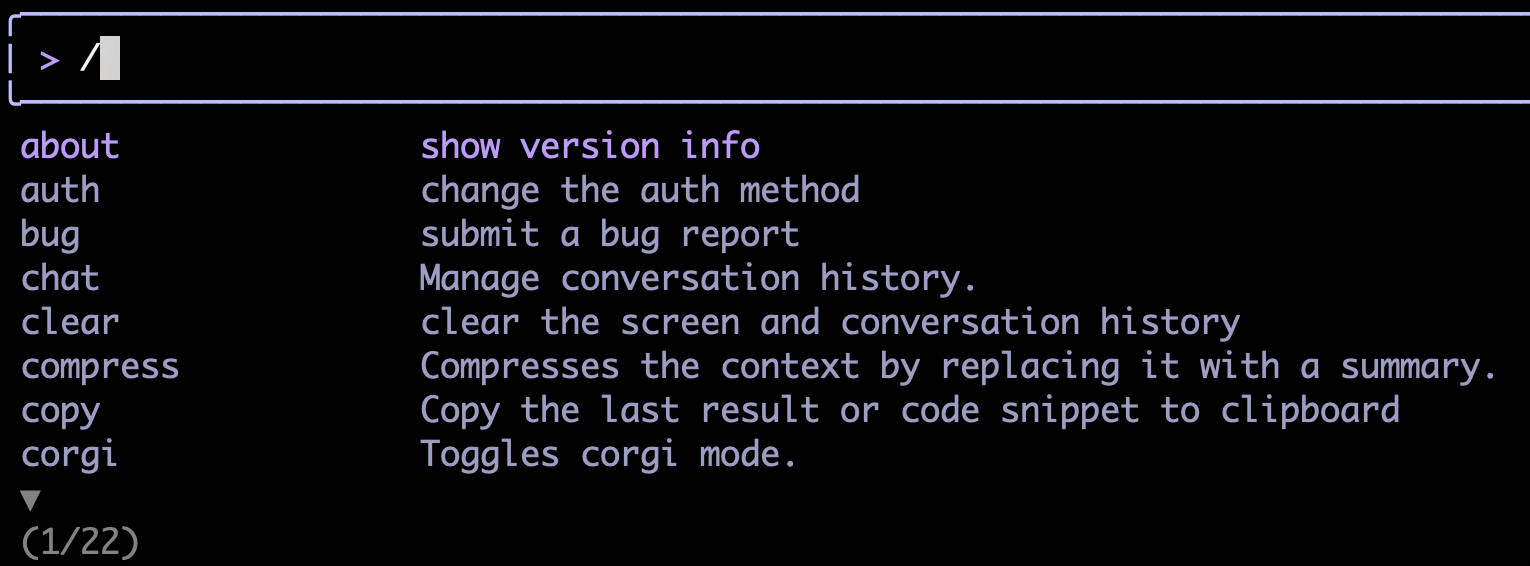
除了提示詞,您也可以使用斜線指令。輸入「/」時,CLI 會隨即顯示自動完成選項。您可以繼續輸入完整指令,或從選項中選取。上述的 /auth 和 /theme 指令就是這類指令。
熟悉介面後,即可開始本節的主要工作,也就是要求 CLI 為我們編寫 MCP 伺服器。
建立 Hello World MCP 伺服器
確保模型穩定完成工作的最佳做法之一,就是將複雜任務拆解為多個步驟。雖然模型或許能自行處理複雜的任務,但如果沒有正確設定,可能需要很長的時間才能找到合適的實作方式。
為了確保做法一致,我們會先指示 Gemini 建立「Hello World」MCP 伺服器,接著實作所需功能,也就是讀取 Go 文件。
提示範例如下所示:
Create a Model Context Protocol (MCP) server that exposes a "hello_world" tool. This tool, when called, should return the message "Hello, MCP world!"

For the MCP implementation, you should use the official Go SDK for MCP (github.com/modelcontextprotocol/go-sdk/mcp) and use the stdio transport.

TODO:
- Download the dependency: `go get github.com/modelcontextprotocol/go-sdk/mcp`
- Inspect the documentation of the SDK: `go doc github.com/modelcontextprotocol/go-sdk/mcp`
- Build a `server` command that supports stdio transport only
- Build a `client` command that connects to the server over command transport to test the server

Acceptance Criteria:
- `./bin/client --list-tools` returns the list of server tools including "hello_world"
- `./bin/client --call-tool` "hello_world" returns the output "Hello, MCP world!"
請注意,上述提示詞由三個主要部分組成:
- 問題規格,包括我們想建構的內容和限制,例如規定使用官方 SDK,而非任意 SDK、使用 stdio 傳輸,而非 http
- 要執行的工作細目 (待辦事項)
- 任務的驗收標準,做為測試程序,讓專員知道何時完成任務
有了這三個要素,模型就能更穩定地達成預期結果。
read_docs 工具實作
實作項目可正常運作後,即可開始打造真正的「read_docs」工具:
Add a new tool to our MCP server called "read_docs" that invokes the "go doc" shell command. The tool will take a mandatory "package" argument and an optional "symbol" argument.

TODO:
- create a package `./internal/tools/docs`
- register the tool with the MCP server
- update the client to support the "read_docs" tool by providing arguments to the tool call

Acceptance Criteria:
- `./bin/client --list-tools` show both hello_world and read_docs
- `./bin/client --call-tool read_docs fmt` returns the documentation for the `fmt` package
- `./bin/client --call-tool read_docs fmt.Println` returns the documentation for the `fmt.Println` function
- `./bin/client --call-tool read_docs github.com/modelcontextprotocol/go-sdk/mcp` returns documentation for the `mcp` package
注意:您可以直接用上方的提示詞進行實驗,或自行撰寫提示詞。
實用提示
由於 MCP 仍屬於新穎的概念,且 MCP 適用的 Go SDK 亦為新程式庫,在這個步驟中,Gemini 可能需要很長的時間才能自行找出合適的實作方式。為了協助模型找出正確的解決方案,建議您嘗試下列做法:
- 如果模型在任何步驟略過閱讀說明文件,請按下 Esc 鍵,提醒模型閱讀。如果您不熟悉 Go,請執行「go doc」加上套件名稱「go doc github.com/modelcontextprotocol/go-sdk/mcp」,系統就會傳回正確的說明文件。
- 頂層模組「github.com/modelcontextprotocol/go-sdk」沒有任何文件 (因為沒有 Go 程式碼),您需要告知模型尋找完整路徑
- 反之,如果模型產生不存在的套件 (例如「go doc github.com/modelcontextprotocol/go-sdk/mcp/server」),請將模型導向頂層套件。
6. 將 godoctor 設定為 Gemini CLI 的 MCP 伺服器
AI 助理生成用戶端和伺服器的程式碼後,您可以指示助理執行幾項手動測試。例如:
retrieve the documentation for the package net/http
另外,請輸入下列提示詞,確保 AI 助理使用外部依附元件進行測試,而非使用標準程式庫中的依附元件:
retrieve the documentation for the github.com/modelcontextprotocol/go-sdk/mcp package
滿意 AI 助理的回覆後,請指示 Gemini 編寫 README.md,說明此專案的使用及開發方式。
Now write a detailed README.md file explaining both from a user and a developer perspective how to use and to build this project.
現在我們要設定伺服器,供 Gemini CLI 在下一個開發階段使用。
- 提示 CLI 更新 GEMINI.md,預設採用
read_docs中的方式來閱讀文件:
update the GEMINI.md file to include instructions to always use the read_docs tool to retrieve documentation about Go packages or symbols. This should be done whenever seeing an import for the first time in a session or after a new dependency is installed to the project (e.g. via `go get`)
- 現在我們需要重新啟動 Gemini CLI,設定 MCP 伺服器。首先,請保存即時通訊工作階段,以便在重新啟動後從中斷處繼續。
/chat save godoctor-workshop
- 按兩下 Ctrl+D 鍵或輸入
/quit指令,即可退出 CLI。 - 在先前的步驟中,代理程式應該已為您編譯伺服器二進位檔,但我們會再次編譯伺服器,並使用不同名稱,這樣修改來源程式碼時就不會受到影響:
mkdir -p bin && go build -o ./bin/godoctor ./cmd/server
- 為本機工具設定 Gemini CLI:在專案根目錄中建立
.gemini/settings.json檔案,並加入mcpServers部分,告訴 Gemini CLI 如何執行編譯後的伺服器。
mkdir -p .gemini && touch .gemini/settings.json
- 現在,請使用 Cloud Shell 編輯器或慣用的 IDE,將下列內容新增至新檔案。
{
  "mcpServers": {
    "godoctor": {
      "command": "./bin/godoctor"
    }
  }
}
- 使用
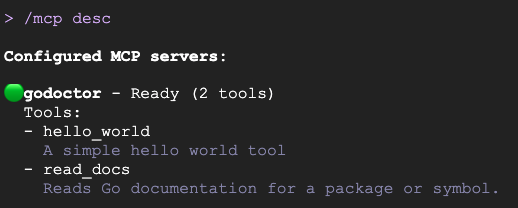
gemini指令啟動 Gemini CLI - 輸入
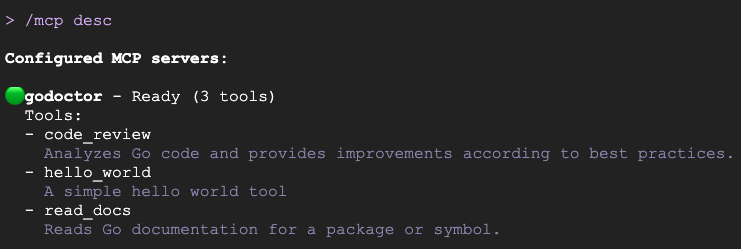
/mcp指令後,您應該會看到工具已載入。您也可以使用/mcp desc顯示工具的完整說明:
- 輸入「Show me the documentation for the package net/http」等提示詞,要求 Gemini CLI 使用您的工具,測試整合功能。
畫面應如下所示:
如果工具正常運作,您應該會看到經由呼叫工具所擷取的文件:
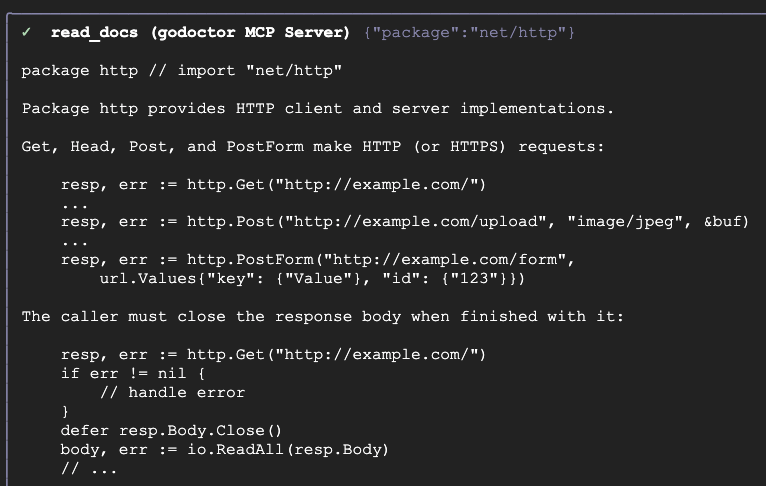
恭喜,您已成功建立 MCP 工具!不過這樣還不夠,我們還能進一步提升伺服器的實用度。
7. 新增 AI 程式碼審查員
現在要加入更精密的 AI 輔助功能:使用 Gemini API 的程式碼審查員。
現在可以使用 /chat resume godoctor-workshop. 指令還原先前的即時通訊工作階段。這會載入工作階段內容,直到我們完成開發 read_docs 為止,因此模型會具備建構新工具所需的知識。
這項工具需要存取 Vertex AI,因此請先啟用 API。在空白提示中輸入驚嘆號 (!),即可執行殼層指令,不必離開 Gemini CLI。這會將 Gemini CLI 切換為殼層模式。
在 Shell 模式下執行下列指令,啟用 Vertex AI API:
gcloud services enable aiplatform.googleapis.com
指令執行完畢後,輸入 Esc 鍵即可切換回提示模式。
目標:在現有專案中新增名為 code_review 的工具。這項工具會使用 Gemini API 分析 Go 程式碼並提供意見回饋。
提示範例:
Add a new tool to my project called code_review. This tool should use the Gemini API on Vertex AI (with model id gemini-2.5-pro) to analyze Go code and provide a list of improvements according to the best practices accepted by the Go community.

The tool should take the Go code content and an optional hint as input. The hint will be used to provide additional guidance for the AI reviewer, like "focus on security" or "help me simplify this code".

The tool output should be text in Markdown format.

TODO:
- add the genai SDK dependency with `go get import google.golang.org/genai`
- create the tool code in ./internal/tools/code/review.go
- create a code review prompt to be used by the tool
- use go-genai with Vertex AI authentication to call gemini-2.5-pro
- register the tool with the server
- add a flag to the server to set the Google Cloud Project ID: --project
- add a flag to the server to set the Google Cloud Location: --location
- add support to the review tool in the client CLI

NOT TO DO:
- DO NOT use the package github.com/google/generative-ai-go/genai as it is DEPRECATED
- DO NOT use the package cloud.google.com/go/vertexai/genai as it has been superseded by google.golang.org/genai

Acceptance Criteria:
- `./bin/client --list-tools` show all tools including `code_review`
- `./bin/client --call-tool code_review internal/tools/code/review.go` returns the code review for the "review.go" file
實用提示
- 模型開始運作後,您可能會自動看到模型要求呼叫
read_docs工具,以瀏覽genai套件的文件。如果沒有,你隨時可以按下 Esc 鍵中斷程序,並提醒模型現在可以使用read_docs工具。 - 如果系統嘗試使用錯誤的 GenAI SDK (即使提示中明確列出「不允許」的項目),請引導系統使用正確的 SDK。
測試程式碼審查員
- 儲存與
/chat save godoctor-workshop的即時通訊工作階段,然後按兩次 Ctrl+D 退出 CLI。 - 使用新的工具定義重新編譯伺服器:
go build -o ./bin/godoctor ./cmd/server
- 使用 IDE 更新
.gemini/settings.json檔案,加入 Vertex AI 的環境設定:
{
  "mcpServers": {
    "godoctor": {
      "command": "./bin/godoctor",
      "env": {
        "GOOGLE_CLOUD_USE_VERTEXAI": "true",
        "GOOGLE_CLOUD_PROJECT": "<your-project-id>",
        "GOOGLE_CLOUD_LOCATION": "<your-preferred-region>"
      }
    }
  }
}
- 再次啟動 Gemini CLI。還原與「
/chat resume godoctor-workshop」的即時通訊工作階段 - 輸入
/mcp指令,確認工具已啟用。畫面應如下所示:
- 現在來測試
code_review工具,方法是查看其中一個工具的來源檔案:
Use the code_review tool to review cmd/server/main.go
You should see something like this:
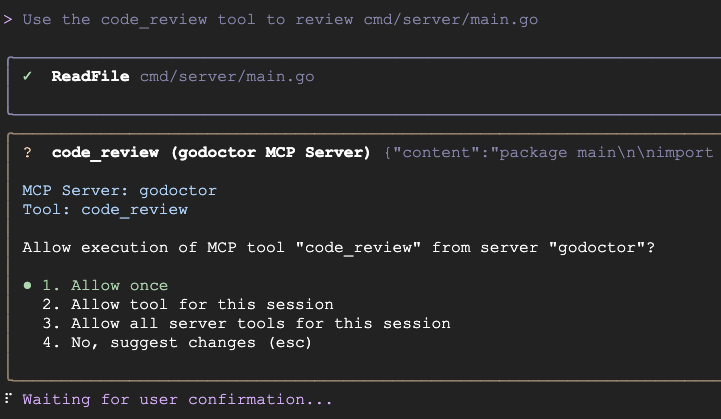
程式碼審查工具運作後,您現在可以建議模型套用發現的改善項目,完成「自我改善」工作流程!
您現在已確認 code-review 工具可正常運作。在下一節中,您將把這個應用程式部署到雲端。使用 /chat save godoctor-workshop 儲存目前的工作階段,然後結束 CLI。
8. 準備可用於雲端環境的伺服器
目前為止,我們開發的 MCP 伺服器只能在本機執行,對於自用工具來說這確實已足夠。不過在企業環境中,我們通常需要部署工具給數百甚至數千名開發人員使用。
為擴充 MCP 伺服器,我們需要將只能使用標準 I/O 的伺服器,轉換為可透過 HTTP 通訊的伺服器,並部署在所有開發人員都能存取的位置。為此,我們將使用 MCP 規格中定義的傳輸模式 (串流 HTTP),以便最終部署至 Cloud Run。
目標:重構 godoctor 伺服器,改用串流 HTTP 傳輸模式。
提示範例:
The godoctor server is currently using the stdio transport. I want to prepare it to be deployed to Cloud Run, so we need to add support to use the Streamable HTTP transport.

TODO:
- Update server to enable Streamable HTTP via the -http flag.
- An optional -listen flag can be specified to set the port to listen
- If no -http flag is specified, the server defaults to stdio transport and -listen is ignored
- Update client to use Streamable HTTP via the -addr flag
- If no flag is specified, the client defaults to command transport
- Create a shell script test_server.sh to support testing

NOT TO DO:
- DO NOT use the HTTP+SSE protocol as it has been deprecated by the MCP specification

Acceptance Criteria
- Create a shell script that:
  - Runs the server in the background;
  - Runs the client connecting over HTTP and call list tools
  - Kills the background process
- The shell script should run without failures
實用提示
- 模型可能會嘗試使用已淘汰的 HTTP+SSE 方法。如果發現有此跡象,請將模型引導回串流 HTTP 模式。
- 目前版本的 Gemini CLI (0.26.0) 不支援在背景執行程序 (工具呼叫傳回後,以
run_shell_command啟動的任何程序都會終止),因此我們要求 Gemini 使用指令碼自動執行測試程序。我們預計在不久的將來新增這項功能,簡化測試程序。
選用:使用 HTTP 測試 MCP 伺服器
如要設定 Gemini CLI,透過 HTTP 使用伺服器,請按照下列步驟操作:
- 儲存工作階段並退出 CLI
- 編輯
.gemini/settings.json檔案,並變更設定以指向本機執行的伺服器。
"mcpServers": {
  "godoctor": {
    "httpUrl": "http://localhost:8080"
  }
}
- 在第二個終端機中,在本機執行已啟用 HTTP 的伺服器:
go build -o ./bin/godoctor ./cmd/server && ./bin/godoctor -listen=:8080
- 重新啟動 Gemini CLI,並提示測試連線,例如「使用 godoctor 工具取得 fmt.Println 的文件」。
- 測試完成後,請按下 Ctrl+C 停止伺服器。
9. 使用 Docker 將應用程式容器化
為伺服器設定正確的傳輸通訊協定後,即可將其容器化並部署。
目標:建立 Dockerfile,將 godoctor 伺服器封裝成可攜式、可用於正式環境的容器映像檔。
提示範例:
Please create a multi-stage Dockerfile that compiles the Go binary and copies it into a minimal golang image like golang:1.25.6-alpine. The image should support the following environment variables:
- GOOGLE_CLOUD_USE_VERTEXAI
- GOOGLE_CLOUD_PROJECT
- GOOGLE_CLOUD_LOCATION

Acceptance Criteria:
- The image builds successfully
- Create a script test_docker.sh to launch the docker image in background and test the connectivity with the client:
    - Call list_tools on the client pointing to the server running on Docker
    - Call read_docs for fmt.Println
    - Stop the server
- The script should run without failures
選用:手動測試 Docker 映像檔
建立 Dockerfile 後,請建構並運作執行映像檔,確認是否正常運作。
- 建構容器:
docker build -t godoctor:latest .
- 在本機執行容器:
docker run -p 8080:8080 -e PORT=8080 godoctor:latest
- 測試執行中的容器:在另一個終端機中啟動 Gemini CLI,並要求擷取說明文件。
- 測試完成後,請按下 Ctrl+C 停止伺服器。
10. 部署至 Cloud Run
現在可以將容器部署至雲端了。
目標:將容器化的 godoctor 伺服器部署至 Google Cloud Run。
提示範例:
Now please deploy this image to Cloud Run and return me an URL I can use to call the MCP tool. Configure Cloud Run to use the following environment variables:
- GOOGLE_CLOUD_USE_VERTEXAI: true,
- GOOGLE_CLOUD_PROJECT: <your-project-id>
- GOOGLE_CLOUD_LOCATION: <your-preferred-region>

TODO:
- Run `docker build -t gcr.io/daniela-genai-sandbox/godoctor .`
- Run `gcloud run deploy godoctor --image` with the image created above

Acceptance Criteria:
- Call list-tools with the client pointing to the CloudRun endpoint
部署完畢後,請設定 Gemini CLI 使用剛部署的工具。
更新 .gemini/settings.json 檔案,將 MCP 工具設定變更為指向已部署的服務,或請 Gemini CLI 為您執行這項操作:
now update the .gemini/settings.json file to use this URL for the godoctor server
最終的 mcpServers 區段應如下所示 (請記得將預留位置替換為實際的 Cloud Run 應用程式網址):
"mcpServers": {
  "godoctor": {
    "httpUrl": "https://<your-cloud-run-id>.us-central1.run.app"
  }
}
測試 Cloud Run 部署作業
現在可以進行最後的端對端測試了。
最後一次重新啟動 Gemini CLI (如要保留對話脈絡,請使用 /chat save 和 /chat resume)。現在 CLI 應該可以呼叫遠端 MCP 伺服器,您可以試著要求任何套件的文件。
您也可以測試程式碼審查工具:
Use the godoctor tool to review the cmd/godoctor/main.go file
清除
測試完成後,請記得清理環境。您可以要求 Gemini 刪除專案,或只移除 Cloud Run 部署作業。範例提示詞:
I'm done with my tests on the CloudRun server, please delete this deployment for me and revert my .gemini/settings.json to use the local version.
11. 恭喜!
您已成功引導 AI 助理建構精密的 AI 輔助工具,將其容器化後進行部署。更重要的是,您練習了現代軟體開發的必備技能:將要求轉化為有效的提示詞。您已成功使用自訂 MCP 工具擴充 Gemini CLI 的功能,使其成為更強大專業的 Go 開發助理。